

Page 1
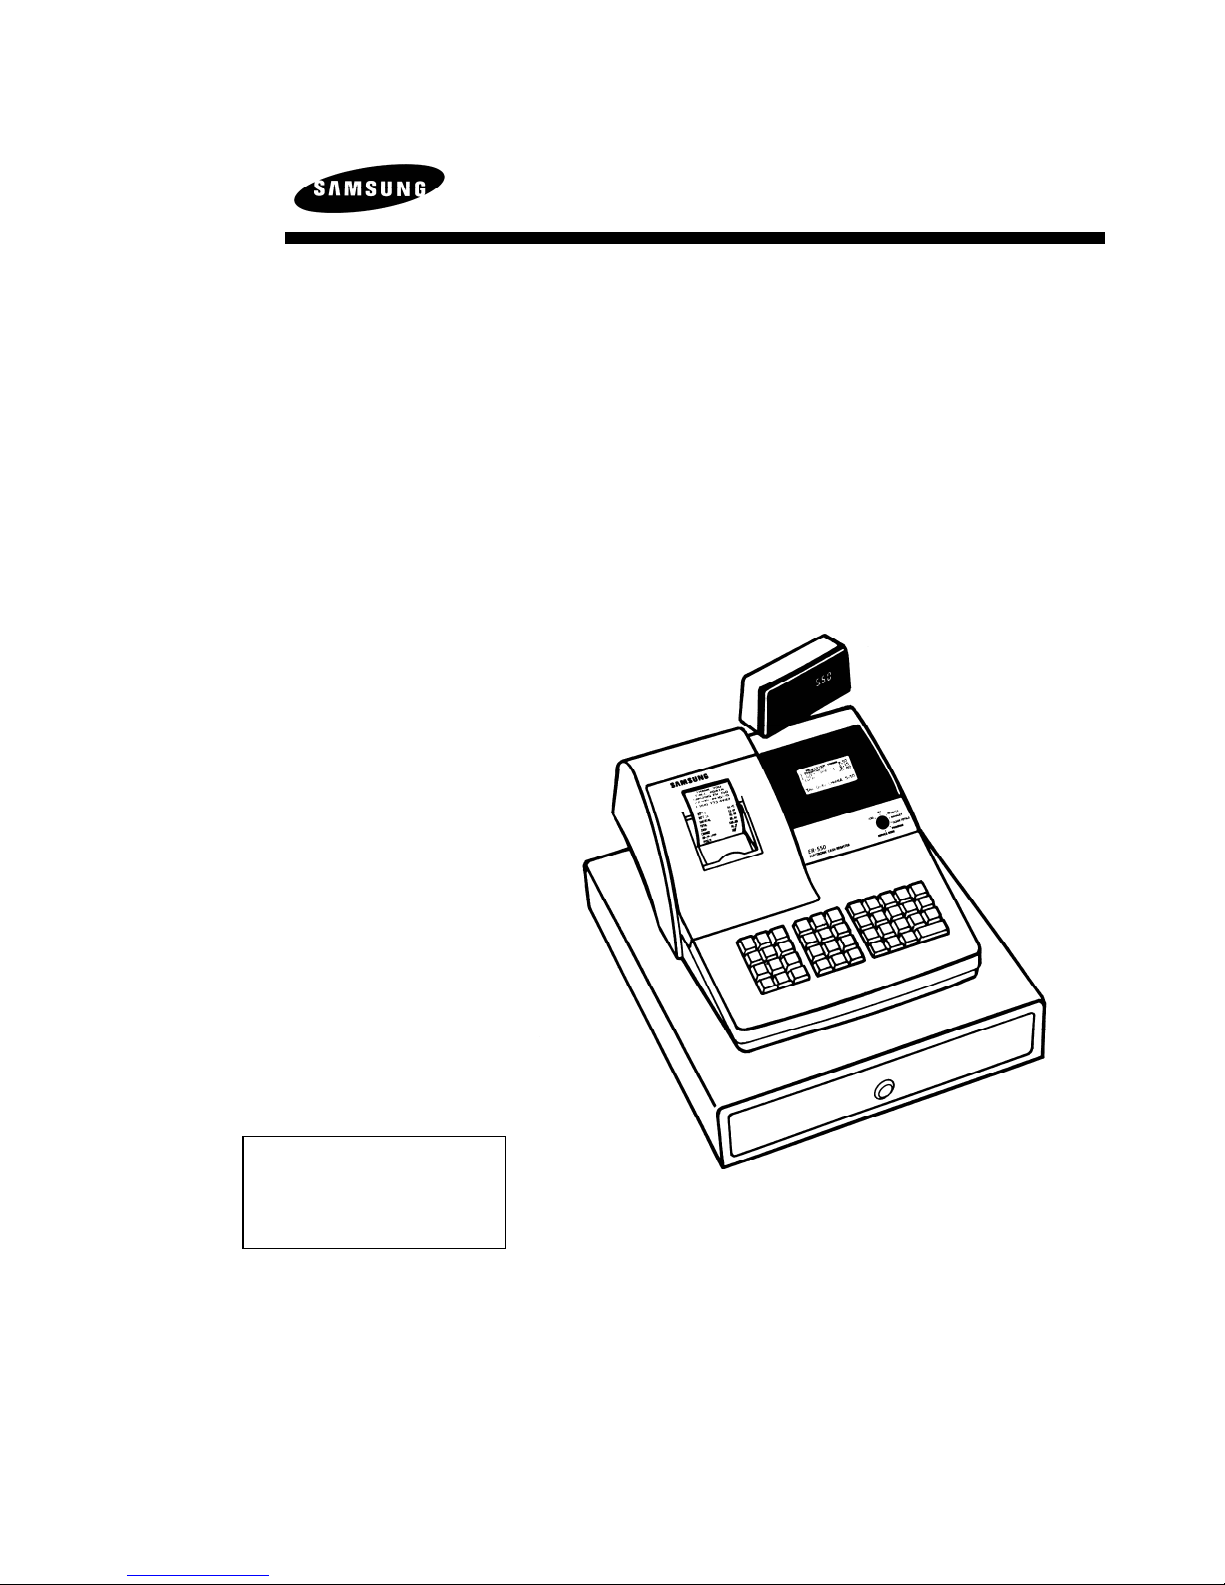
Samsung ER-550 Electronic Cash Register
Operator's and
Programming Manual
For Fast Startup,
See "Getting
Started" on page 17
All specifications are subject to change without notice 1997, Cash Register Sales, Inc.
CRS, Inc.
Page 2

CRS, INC.
LIMITED WARRANTY AND DISCLAIMERS OF WARRANTY
This limited warranty has application only to buyers which buy directly from CRS, Inc.
CRS MAKES NO REPRESENTATIONS OR WARRANTIES TO BUYERS WHICH BUY THE GOODS FROM CRS DEALERS OR OTHER
PARTIES. BUYERS WHICH BUY FROM CRS DEALERS OR OTHER PARTIES SHOULD CONTACT THEM DIRECTLY FOR
INFORMATION REGARDING REPRESENTATIONS OR WARRANTIES, IF ANY.
LIMITED WARRANTY AND DISCLAIMERS
A. Cash Register Sales, Inc., (CRS) warrants the goods sold hereunder, if properly installed, maintained, and operated under normal conditions
with competent supervision, to be free from any defects in material, operation, and workmanship for a period of ninety (90) days from the
date of the invoice evidencing the sale of the goods to the buyer. The obligations of CRS, and the buyer's SOLE AND EXCLUSIVE
REMEDY hereunder shall be limited to one of the following, at CRS's option:
(I) The replacement or repair of any goods which are returned to CRS's plant, transportation charges prepaid, and there determined by
CRS to be at variance with the warranty contained herein, or
(II) In the event the goods are determined by CRS to be so defective as to preclude the correction of warranted defects by repair or
replacement, the buyer shall be entitled to a refund of the purchase price.
B. Notwithstanding any of the foregoing, CRS shall have no obligation hereunder in the event the goods become defective in whole or in part
as a result of improper installation, maintenance, or repairs not made by CRS, unauthorized modification, or as a result of removal, improper
use, abnormal operation by the buyer, or any other misuse or mistreatment of the goods.
EXCLUSIVITY OF WARRANTY
THE WARRANTY CONTAINED HEREIN IS EXPRESSLY IN LIEU OF ANY OTHER EXPRESSED OR IMPLIED WARRANTY,
INCLUDING ANY IMPLIED WARRANTY OF MERCHANTABILITY OR FITNESS FOR A PARTICULAR PURPOSE, OR ANY OTHER
OBLIGATION ON THE PART OF CRS. ANY MODELS, DRAWINGS, PLANS, AFFIRMATIONS OF FACT, PROMISES, OR OTHER
COMMUNICATIONS BY ANY PARTY WITH REFERENCE TO THE PERFORMANCE OF THE GOODS SHALL NOT IN ANY WAY
MODIFY THE DISCLAIMERS OR EXPRESSED OR IMPLIED WARRANTY AS SET FORTH HEREIN. THE BUYER ACKNOWLEDGES
IT IS PURCHASING THE GOODS SOLELY ON THE BASIS OF THE COMMITMENTS OF CRS AS EXPRESSLY SET FORTH HEREIN.
NO AGENT OR OTHER PARTY IS AUTHORIZED TO MAKE ANY WARRANTIES ON BEHALF OF CRS OR TO ASSUME FOR CRS
ANY OTHER LIABILITY IN CONNECTION WITH PERFORMANCE OF THE GOODS HEREUNDER.
LIMITATION OF ACTIONS AND APPLICABLE LAW
Any action resulting from any breach on the part of CRS as to the goods hereunder must be commenced within one (1) year after the cause of
action is accrued. In no event shall CRS's total liability for any or all breaches of any warranty or duty exceed the purchase price of the goods to
which the breaches relate. The rights and duties of CRS and the buyer shall be determined by the laws of the State of Minnesota, and the terms
and conditions of this warranty shall be construed and considered to have been made and perform e d in the State of Minnesota.
WARNING - U.S.
THIS EQUIPMENT HAS BEEN TESTED AND FOUND TO COMPLY WITH THE LIMITS FOR A CLASS A DIGITAL DEVICE,
PURSUANT TO PART 15 OF THE FCC RULES. THESE LIMITS ARE DESIGNED TO PROVIDE REASONABLE PROTECTION
AGAINST HARMFUL INTERFERENCE WHEN THE EQUIPMENT IS OPERATED IN A COMMERCIAL ENVIRONMENT. THIS
EQUIPMENT GENERATES, USES, AND CAN RADIATE RADIO FREQUENCY ENERGY AND, IF NOT INSTALLED AND USED IN
ACCORDANCE WITH THE INSTRUCTION MANUAL, MAY CAUSE HARMFUL INTERFERENCT TO RADIO COMMUNICATIONS.
OPERATIONS OF THE EQUIPMENT IN A RESIDENTIAL AREA IS LIKELY TO CAUSE INTERFERENCE IN WHICH CASE THE
USER WILL BE REQUIRED TO CORRECT THE INTERFERENCE AT HIS OWN EXPENSE.
NOTICE - CANADA
THIS APPARATUS COMPLIES WITH THE CLASS "A" LIMITS FOR RADIO INTERFERENCE AS SPECIFIED IN THE CANADIAN
DEPARTMENT OF COMMUNICATIONS RADIO INTERFERENCE REGULATIONS.
CET APPAREIL EST CONFORME AUX NoRMES CLASS "A" D'INTERFERENCE RADIO TEL QUE SPECIFIER PAR LE MINISTRE
CANADIEN DES COMMUNICATIONS DANS LES REGLEMENTS D'INTERFERENCE RADIO.
ATTENTION
The product that you have purchased may contain a rechargeable nickel-cadmium battery. This battery is recyclable. At the end of its useful life,
under various state and local laws, it may be illegal to dispose of this battery into the municipal waste system.
Check with you local solid waste officials for details concerning recycling options or proper disposal.
Cash Register Sales, Inc.
1997
Page 3

Contents
Introduction 5
About the Samsung ER-550 ....................................................................................................... 5
Using This Manual .................................................................................................................... 5
Basic Features and Functions .................................................................................................... 7
Using Flowcharts ......................................................................................................... 6
Keyboard ..................................................................................................................... 8
Control Lock ............................................................................................................. 11
Printer ........................................................................................................................ 12
Sample Receipt .......................................................................................................... 12
Front Display ............................................................................................................. 13
Rear Display .............................................................................................................. 15
Getting Started 17
Unpacking ................................................................................................................................ 17
Installing the Paper .................................................................................................................. 17
Installing the Ribbon Cartridge ............................................................................................... 20
Clearing Memory ..................................................................................................................... 21
Basic Programming ................................................................................................................. 22
Setting the Time & Date ............................................................................................ 22
Programming Tax ...................................................................................................... 24
How to Enter Descriptors in Program Mode ............................................................. 26
Operating Instructions 29
Operator Display Screen .......................................................................................................... 29
Operator Display Example ........................................................................................ 30
Clerk Operations ...................................................................................................................... 31
Clerk Sign On Instructions ........................................................................................ 32
Clerk Sign Off Instructions ....................................................................................... 32
Clerk Time Keeping .................................................................................................. 33
Department Registrations ........................................................................................................ 35
Open Department ...................................................................................................... 35
Preset Price Department ............................................................................................ 35
Department Repeat Entry .......................................................................................... 36
Multiplication ............................................................................................................ 36
Department Multiplication with Decimal Point ........................................................ 37
Split Pricing ............................................................................................................... 37
Single Item Department ............................................................................................. 38
PLU (Price Look Up) Registrations ........................................................................................ 39
Open PLU .................................................................................................................. 39
Preset Price PLU ....................................................................................................... 39
Looking up a PLU Number ....................................................................................... 40
PLU Multiplication .................................................................................................... 40
PLU Multiplication with Decimal Point .................................................................... 41
Samsung ER-550 Electronic Cash Register 1
Page 4

Split Pricing PLU ...................................................................................................... 41
Shifting or Exempting Tax ...................................................................................................... 42
Shifting Tax ............................................................................................................... 42
Exempting Tax .......................................................................................................... 43
Percent Key Operations ........................................................................................................... 44
Preset Percent Discount on a Department or PLU ..................................................... 44
Enter a Percent on a Department or PLU .................................................................. 45
Percent on Sale Total ................................................................................................. 46
Coupon on Sale (Vendor Coupon) ............................................................................ 47
Coupon on Item (Store Coupon) ............................................................................... 48
Return Merchandise Registrations ........................................................................................... 49
Voids and Corrections ............................................................................................................. 50
Void Last Item (Error Correction) ............................................................................. 50
Void Previous Item .................................................................................................... 50
Cancel ........................................................................................................................ 51
Void Position Operations .......................................................................................... 51
No Sale Operations .................................................................................................................. 52
Open Drawer ............................................................................................................. 52
Non Add Number ...................................................................................................... 52
Received On Account Operations ............................................................................................ 53
Paid Out Operations ................................................................................................................. 54
Totaling and Tendering ............................................................................................................ 55
Subtotaling a Sale ...................................................................................................... 55
Totaling a Cash Sale .................................................................................................. 55
Totaling a Check Sale ................................................................................................ 55
Tendering a Cash Sale ............................................................................................... 56
Tendering a Check Sale ............................................................................................. 56
Totaling a Miscellaneous Tender Sale (Charge or Credit Card) ............................... 57
Tendering a Miscellaneous Tender Sale (Charge or Credit Card) ............................ 58
Check Cashing ........................................................................................................... 59
Split Tender ............................................................................................................... 60
Post Tender ................................................................................................................ 61
Currency Conversion ................................................................................................. 62
Receipt On/Off and Receipt on Request .................................................................... 63
Scale Operations ...................................................................................................................... 64
Direct Scale Entry ...................................................................................................... 64
Automatic Scale Entry ............................................................................................... 65
Tare Weight Entry ..................................................................................................... 66
Manual Weight Entry ................................................................................................ 67
Manager Functions 69
Overview.................................................................................................................................. 69
Generating Reports .................................................................................................................. 70
Print or Display Reports ............................................................................................ 71
Reset Reports ............................................................................................................. 74
Cash Declaration ...................................................................................................................... 76
Receipt & Printing Control ...................................................................................................... 78
Training Mode ......................................................................................................................... 80
Programming Instructions 83
Program Mode ......................................................................................................................... 83
Programming Menu - Reference Information ........................................................... 84
Department Programming ........................................................................................................ 85
2 Samsung ER-550 Electronic Cash Register
Page 5

Department Options - Reference Information ........................................................... 87
PLU Programming ................................................................................................................... 89
PLU Options - Reference Information ...................................................................... 91
Sales Tax Programming ........................................................................................................... 93
Programming an Add-On Tax Rate Percentage ........................................................ 94
Programming a Tax Table ......................................................................................... 95
Programming a VAT (Value Added Tax) ................................................................. 99
Programming a Canadian GST ................................................................................ 100
System Option Programming ................................................................................................. 101
System Options - Reference Information ................................................................ 104
Print Option Programming .................................................................................................... 107
Print Options - Reference Information .................................................................... 110
Function Key Programming .................................................................................................. 112
Function Key Programming - Reference Information ............................................. 113
Clerk Programming ............................................................................................................... 118
Clerk Programming - Reference Information .......................................................... 118
Logo Descriptor Programming .............................................................................................. 119
Group Descriptor Programming ............................................................................................ 120
Tare Weight Programming .................................................................................................... 121
More Menu Programs ............................................................................................................ 122
Clerk In/Out Programming ...................................................................................... 122
Inventory Level Programming ................................................................................ 123
Program Scans ......................................................................................................... 124
Program Scan Samples ............................................................................................ 125
Report Samples 135
Financial Report .................................................................................................................... 135
Time Report ........................................................................................................................... 139
PLU Report ............................................................................................................................ 140
Clerk Report .......................................................................................................................... 141
Groups Report ....................................................................................................................... 144
PLU & Department Stock Reports ........................................................................................ 145
Cash/Check Totals ................................................................................................................. 146
Clerk Time Report ................................................................................................................. 147
Electronic Journal .................................................................................................................. 148
System Balancing .................................................................................................................. 149
Department Sales Total ........................................................................................... 149
Net Total .................................................................................................................. 149
Gross Total .............................................................................................................. 149
Grand Total ............................................................................................................. 150
Drawer Total ........................................................................................................... 150
Service Mode Functions 151
Overview ............................................................................................................................... 151
Hardware Tests ...................................................................................................................... 152
Clear Totals ............................................................................................................................ 153
Reading Program Information ............................................................................................... 154
Glossary of Terms 155
Index 159
Samsung ER-550 Electronic Cash Register 3
Page 6

Page 7

Introduction
About the Samsung ER-550
Congratulations! You have selected a very flexible electronic cash register designed for years of
reliable service. Samsung ER-550 will fit many retail stores, shops and restaurants, providing fast
transaction processing, security, and detailed sales information.
The Samsung ER-550 is equipped with a unique operator screen. The operator screen allows you to
view itemized transaction information, and it provides on screen programming that is simple and
easy to use.
Using This Manual
To Get Started turn to "Getting Started" on page 17. This section covers unpacking, memory
clearing, and a few simple program procedures. After reading this section, you can start using
your Samsung ER-550. All of the functions of the register operate immediately, without
additional programming steps.
For detailed operations sequences, see "Operating Instructions" on page 29.
To generate reports and perform other manager functions see "Manager Functions" on page 69.
For detailed programming instructions, see “Programming Instructions” on page 83. In this
section you will find detailed information about many additional features that will help you solve
the special calculation problems or security issues that you might face.
To view samples of reports and balance the register see "Report Samples" on page 135.
To perform service functions, such as testing hardware and clearing totals, see "Service Mode
Functions" on page 151.
Samsung ER-550 Electronic Cash Register Introduction 5
Page 8

Using Flowcharts
Flowcharts are used to supplement step by step instructions throughout this manual. For example,
the following flowchart describes how to register $1.00 into department 1:
1 0 0
1/13
This flowchart means:
1. Press numeric key 1.
2. Press numeric key 0.
3. Press numeric key 0.
4. Press department 1/13.
Follow the flowchart from left to right, pressing the keys in the order they are shown. Numeric
keypad entries are shown as square keys. Department and function keys are shown as rectangular
keys.
6 Introduction Samsung ER-550 Electronic Cash Register
Page 9

Basic Features and Functions
26 column receipt or journal printer.
Sturdy Metal Cash Drawer with removable 5 Bill/5 Coin insert.
7-position control lock.
24-hour real-time clock with automatic day and date change.
Four tax rates with value added tax (VAT) capability. Each tax rate is programmable for tax table
look-ups and/or straight percentage tax programming. Tax rate 4 can be programmed to accommodate
Canadian goods and services tax (GST).
12 Department keys with Department Shift for a total of 24 Department totals.
Operation for up to 20 clerks with separate report totals.
Employee time keeping functions for the 20 clerks.
A minimum of 70 Price Look Ups (PLUs) for open or preset item registration. (The total number of
PLUs available varies. Ask your Samsung dealer for more information.)
10 Group totals to accumulate totals of individual departments that are assigned to each group.
Check, Cash, and up to four miscellaneous tender keys for tracking charge and/or credit card sales.
Currency conversion capability for calculating sale totals in foreign currency.
Management reports, with the capability to view most reports on the register display.
Electronic Journal capability, where transaction information can be captured in register memory for
printing at a later time.
Interface for optional load cell scale, with up to 5 preprogrammed tare weights.
Interface for optional kitchen printer.
Samsung ER-550 Electronic Cash Register Introduction 7
Page 10
v
r
f
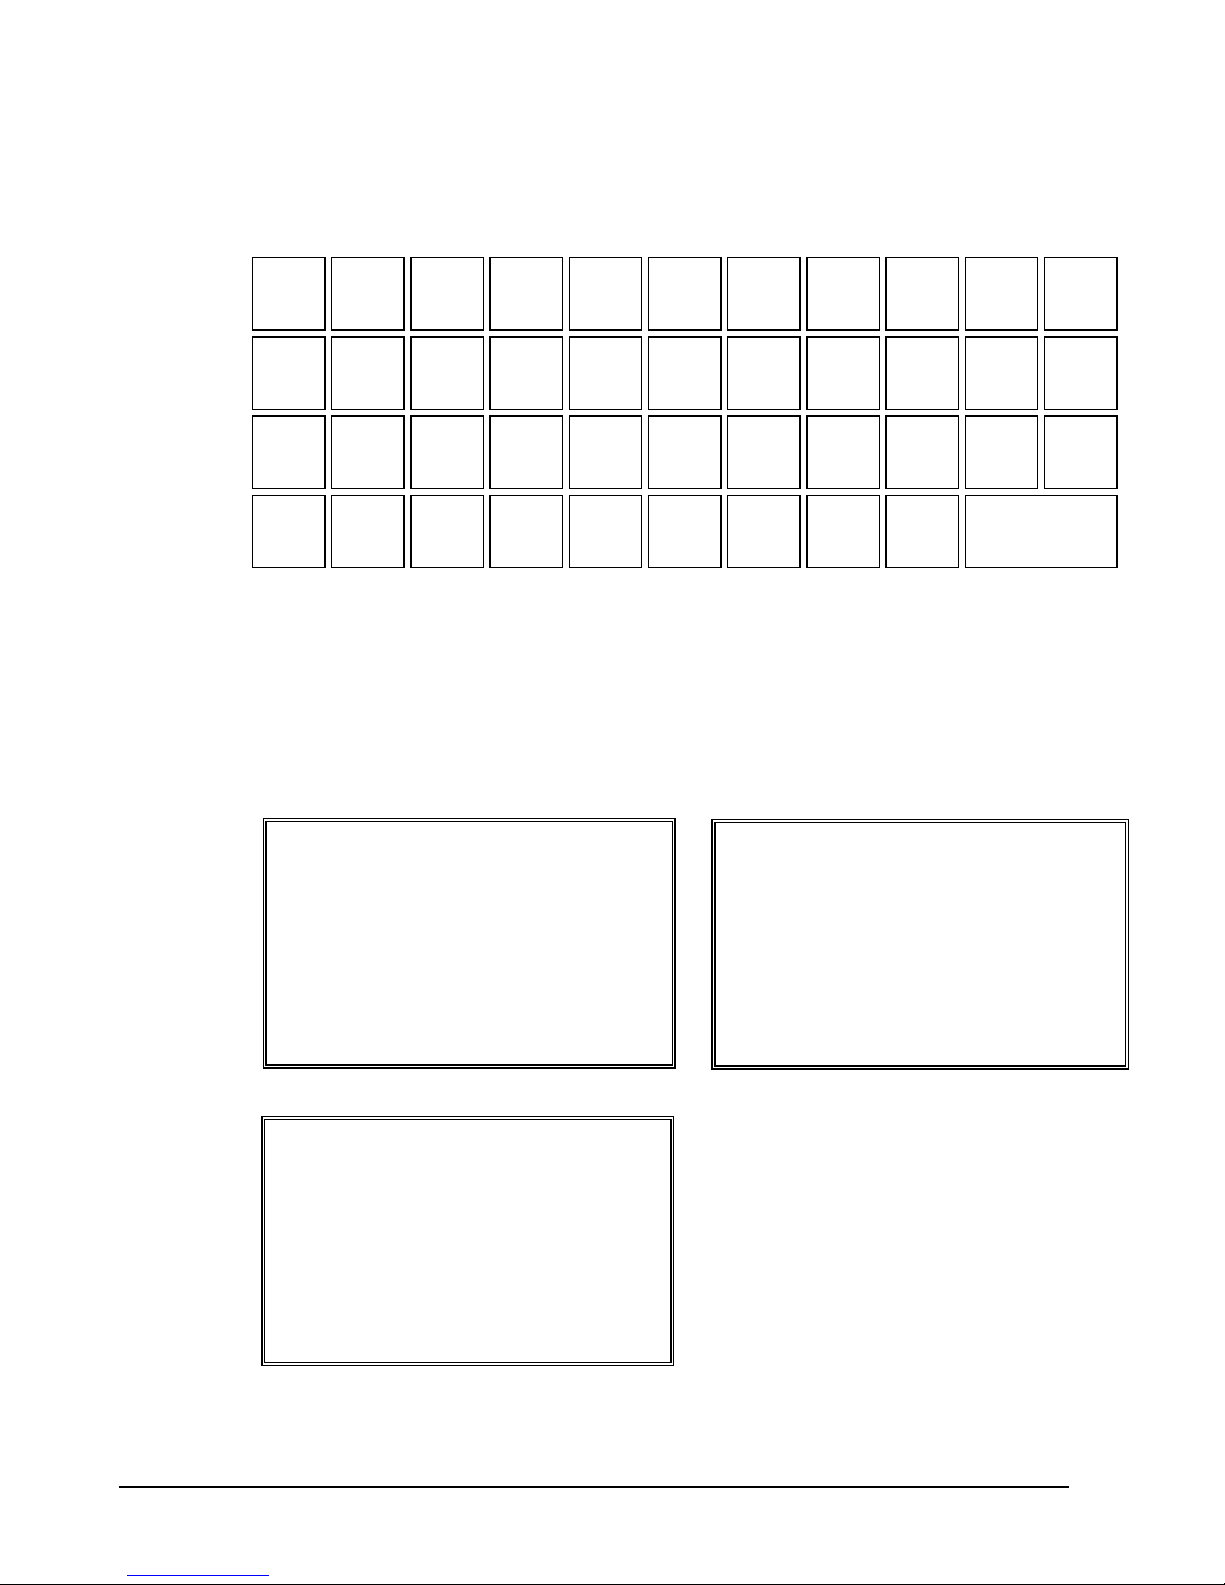
Keyboard
PAPER
FEED
#/
NO SALE
TAX
SHIFT
MORE
KEYS
HELP
SCREEN
CANCEL
%
CLERK
#
PLU
VOID
ITEM
@/FOR
PRT
SCREEN
CLEAR
Esc
7
4
1
othe
0
caps
pqrs
ghi
8
5
2
abc
00
double
9
tu
wxyz
4/16
8/20
12/24
6
jkl
mno
3/15
11/237/19
3
de
2/14
6/18
10/22
.
space
1/13
5/17
DEPT
SHIFT
YES/NO
SBTL
MORE
TENDERS
CASH/TEND
9/21
More Keys and More Tenders Menu Keys
The MORE KEYS and SBTL (MORE TENDERS) keys provide additional keyboard functions by
displaying menus. Press the MORE KEYS key to select from a list of eight additional functions.
Press the key a second time to access two additional functions. Press the SBTL (MORE
TENDERS) key once to display the sale subtotal. Press again to select from a list of alternative
payment methods.
MORE KEYS MENUS
1. %1
2. %2
3. %3
4. %4
5. REC ON ACCT.
6. PAID OUT
7. RETURN
8. TIME IN/OUT
MORE TENDER MENU
1. MISCTND 1
2. MISCTND 2
3. MISCTND 3
4. MISCTND 4
5. CONV 1
6. CONV 2
7. CONV 3
8. CONV 4
PAGE
UP
PAGE
DOWN
CHECK
TEND
ENTER
9. SCALE
00. TARE#
.
8 Introduction Samsung ER-550 Electronic Cash Register
Page 11
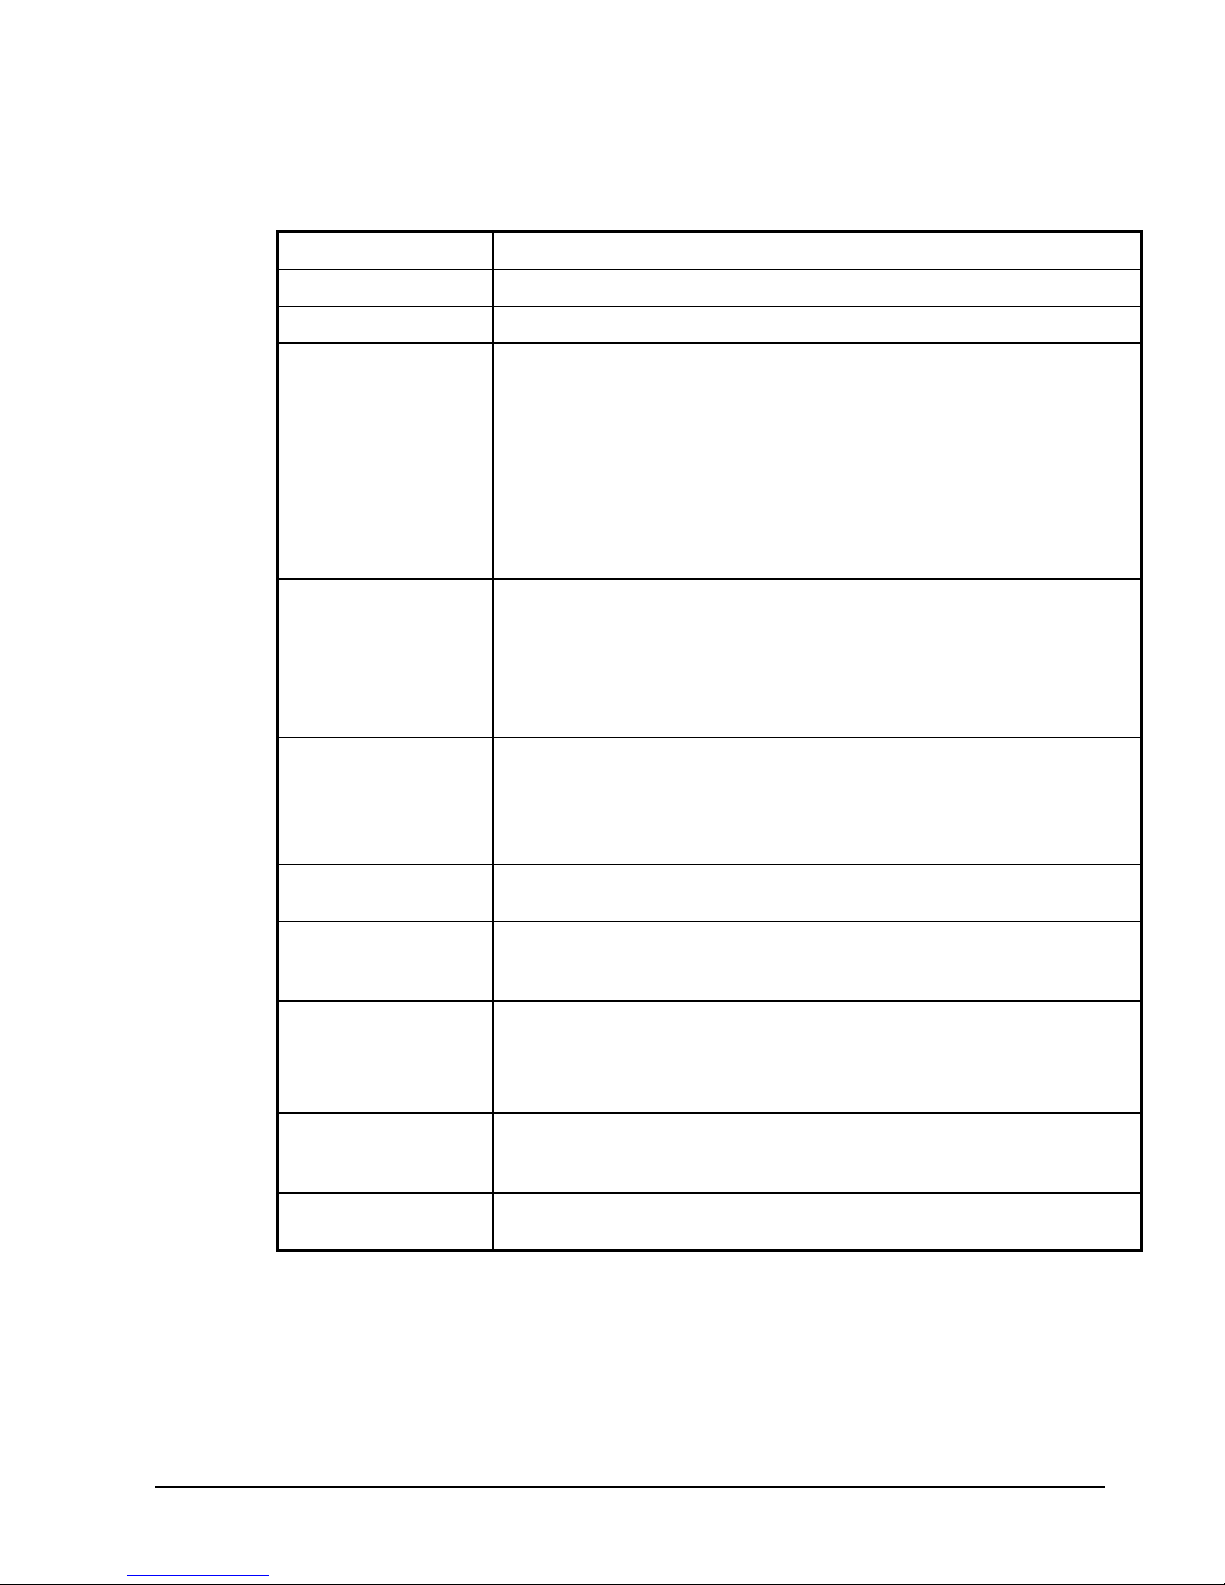
Key Descriptions
Key Description
PAPER FEED
HELP SCREEN
Numeric Keypad:
0-9, 00, and
Decimal
CLEAR
(ESC)
Department Keys
DEPT SHIFT
#/NS
@/FOR
(PRT SCREEN)
VOID ITEM
CANCEL
Press to advance the printer paper.
Press to display help information.
Use the numeric keypad to enter amounts, other numeric values.
Like a telephone keypad, each numeric key is also assigned alpha
characters, i.e. numeric '2' is assigned 'abc'. These keys are also used to
program alpha numeric descriptors for departments, PLUs, function keys
groups and printed messages.
The decimal key is used for decimal multiplication, when setting or
entering fractional percentage discounts, or when programming fractional
tax rates. Do not use the decimal key when making amount entries into
departments or PLUs.
Press to clear numeric errors made on keyboard prior to pressing the
registration key. Also press to stop the error alarm when incorrect entries
are made.
The CLEAR key doubles as an ESC (Escape) key. When you are
performing manager functions, or programming, use the ESC key to back
up, or return to the previous screen.
There are twelve department keys on the keyboard to register different
types of merchandise. (Twelve additional department classifications are
available by using the DEPT. SHIFT key, for a total of 24 department
classifications.) Departments can be used to accept open priced entries, or
can be programmed to register preset prices.
Press the DEPT. SHIFT key before pressing a department to access
departments 13 to 24.
Press to open the cash drawer when you have not already started a
transaction. Also, can be used to print any non-adding number (up to 8
digits) on the printer paper.
Enter a quantity, then press the @/FOR key to enter multiple items. Also
use to enter “split pricing” items, such as 1 item at 3 for $.89.
When pressed directly, the @/FOR key will cause the information
displayed on the screen to be printed.
Press to void (or erase) the last item entered. You can also void an item
previously entered within a transaction by pressing CLEAR, then VOID
then re-entering the item you wish to correct.
Press CANCEL to void (or erase) all items entered thus far in any
transaction.
Samsung ER-550 Electronic Cash Register Introduction 9
Page 12
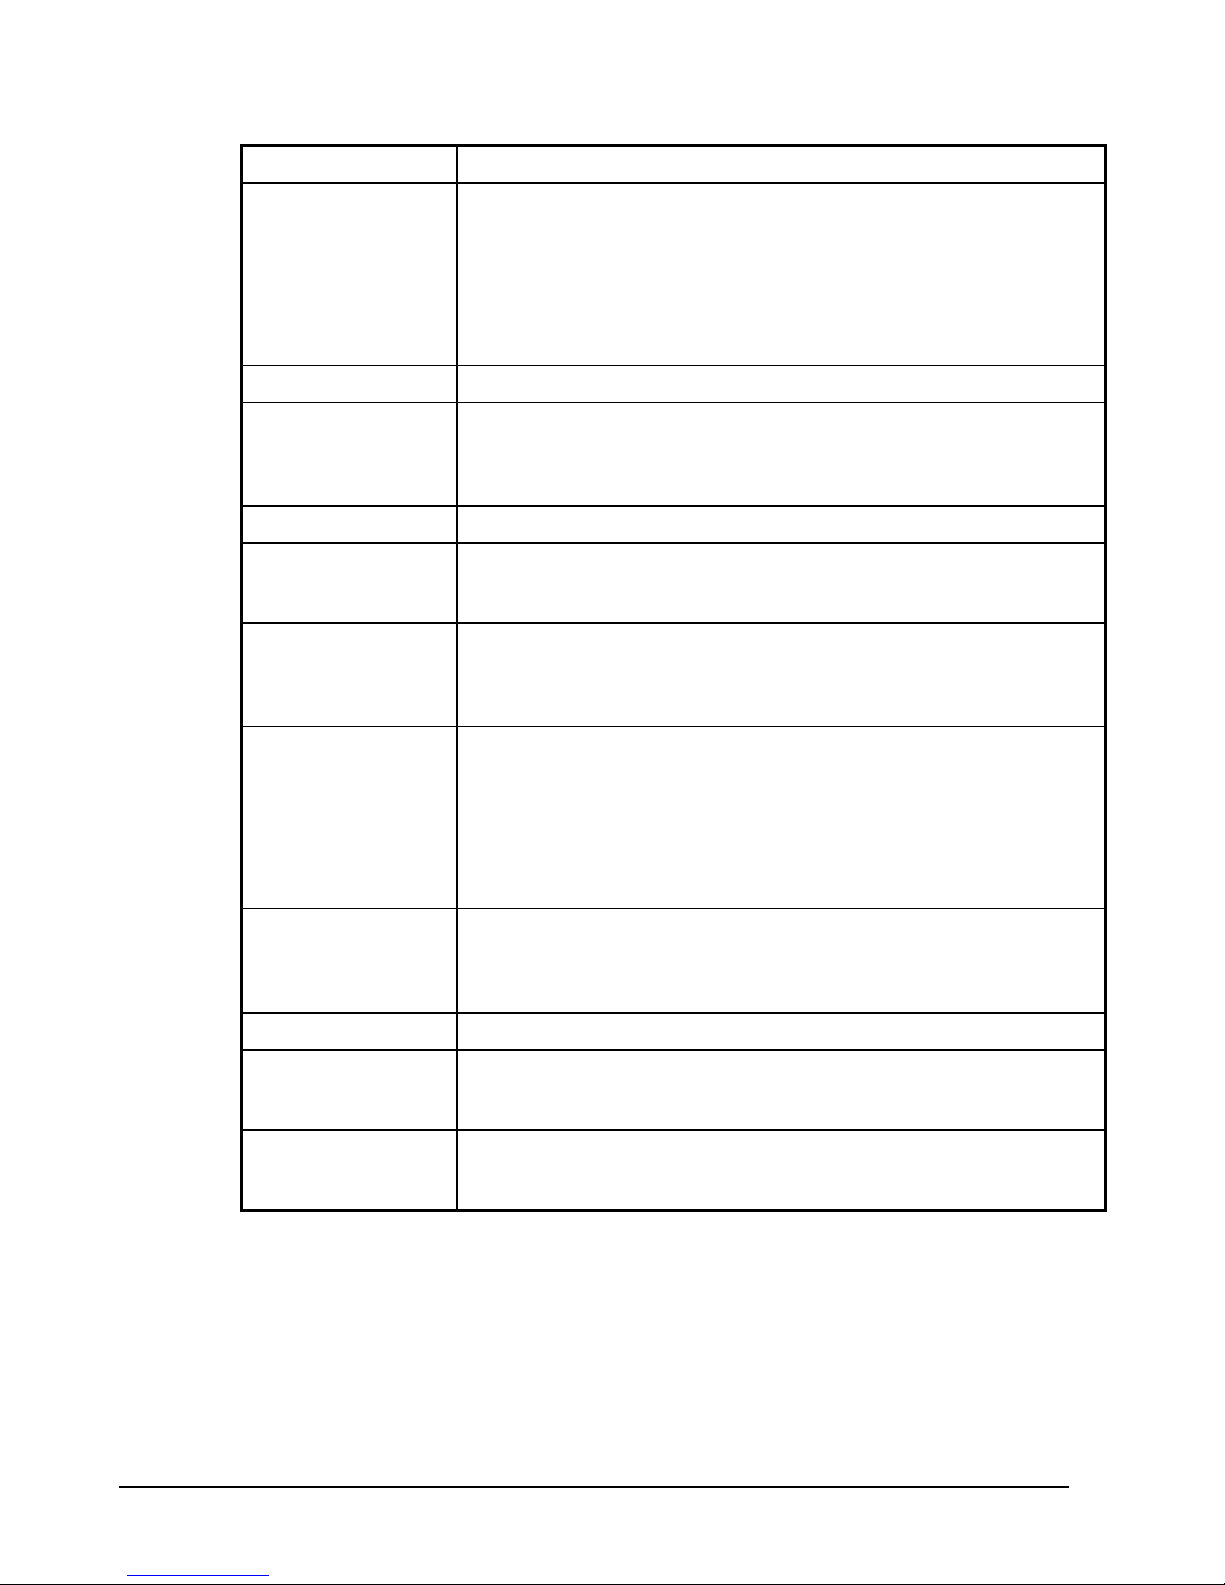
Key Description
%
PLU
TAX SHIFT
CLERK #
SBTL
(MORE TENDERS)
CHECK TEND
CASH/TEND
(ENTER)
MORE KEYS
YES/NO
The % key is set with a specific function, such as item discount or
surcharge; or sale discount or surcharge. The percent rate can be entered or
preprogrammed; or the percent keys can be programmed with a negative
open or preset price, thus acting as coupon keys.
A total of four % functions are available. %1 is accessed through this key;
or the %1 function and the remaining % functions can be accessed through
the MORE KEYS key.
Use to register a Price Look Up (PLU).
Press to reverse the programmed tax status of a department or PLU. For
example, by entering the appropriate tax number (four taxes are available)
and pressing the TAX SHIFT key prior to registering a taxable item, the
item will be sold without sales tax added.
Use to sign on or sign off a clerk. See "Clerk Operations" on page 31.
Press once to display the sale subtotal. Press again to select from a list of
alternative payment methods. The screen displays a menu of four
miscellaneous tender options and four currency conversion options.
Press to total a transaction paid by check. Also if the check amount is over
the amount purchased, enter the amount of the check, then press the
CHECK TEND key. The drawer will open and the cash change will be
computed.
Press to total a transaction paid by cash. Also if the cash amount tendered
is over the amount purchased, enter the amount of the tender, then press the
CASH/TEND key. The drawer will open and the cash change will be
computed.
The CASH/TEND key doubles as an ENTER key. When you are
performing manager functions, or programming, use the ENTER key to
advance to the next item or screen.
Press this key to select from a list of eight additional functions. Four %
key functions, REC ON ACCT. (received on account), PAID OUT,
RETURN, and TIME IN/OUT functions are accessed by pressing this
key. Press the key a second time to access SCALE and TARE functions.
Press to toggle from Y (yes) to N (no) when selecting program options.
PAGE UP
PAGE DOWN
10 Introduction Samsung ER-550 Electronic Cash Register
When transactions contain more items than can be displayed on the screen
at one time, press the PAGE UP key to view items at the beginning of the
transactions.
When transactions contain more items than can be displayed on the screen
at one time, press the PAGE DOWN key to view items at the end of the
transactions.
Page 13

V
Control Lock
OID
OFF
SERVICE MODE
REGISTER
MANAGER
CLEAR TOTALS
PROGRAM
VOID
OFF
REGISTER
MANAGER
CLEAR
TOTALS
PROGRAM
SERVICE
MODE
Use to void (correct) items outside of a sale.
The register is inoperable.
Use for normal registrations.
Use to read register reports and perform other
manager functions.
Use to read register reports and reset totals to
zero.
Use to program the register.
Use for tests and special settings.
The Samsung ER-550 includes two sets of keys that can be used to access the following key lock
positions.
Key
VOID
X
Z
PGM
Positions Accessible
VOID, OFF, REGISTER, MANAGER
OFF, REGISTER, MANAGER
OFF, REGISTER, MANAGER, CLEAR TOTALS
VOID, OFF, REGISTER, MANAGER,
CLEAR TOTALS, PROGRAM
C
ALL POSITIONS
Note: Keys can be removed from the key lock in the OFF or REG positions.
Samsung ER-550 Electronic Cash Register Introduction 11
Page 14

Printer
Model:
Features:
Sample Receipt
Samsung ERP-200N
Receipt or Journal Printer.
Print speed: 3.1 lines per second, bi-directional print
Columns: 26
Character Size: 9 x 7 dots.
Paper size: 57.5 mm width.
Tear off for receipt.
THANK-YOU
CALL AGAIN
DATE 08/15/1999 SUN
2/3FOR @2.99
PLU3 T1 $1.99
TAX1 AMT $0.12
TOTAL $2.11
CASH $2.11
ANNIE NO. 000001
TIME 11:27AM 01
12 Introduction Samsung ER-550 Electronic Cash Register
Page 15

Front Display
The front display is a liquid crystal screen, allowing you to view up to 8 lines of information with up
to 20 characters per line. The display is backlit to provide excellent visibility, regardless of lighting
conditions.
When the control lock in the OFF position, the message OFF MODE is displayed and the register
can not be operated. When the control lock in the REGISTER or VOID positions the appropriate
message, VOID MODE or REGISTER MODE is displayed and the register is ready for operation.
When the control lock is in the MANAGER, CLEAR TOTALS, PROGRAM or SERVICE
MODE positions, the appropriate menu is displayed.
The initial display for each control lock position is shown below:
OFF
OFF MODE
REGISTER
VOID
REGISTER MODE
VOID MODE
Samsung ER-550 Electronic Cash Register Introduction 13
Page 16

MANAGER
MANAGER MODE
0.PRINT REPORTS
1.DISPLAY REPORTS
2.PERFORM DECLARA.
3.REG. PRINT FORMAT
4.STOP REG PRINTING
5.TRAINING MODE
CLEAR TOTALS
RESET REPORTS MODE
1.DAILY REPORTS
2.PERIOD REPORT
3.RESET E.J.
PROGRAM
PROGRAM MODE
0.DEPARTMENT
1.PLU
2.SALES TAX
3.SYSTEM OPTION
4.PRINT OPTION
5.FUNCTION KEYS
6.CLERK
Press PAGE DOWN to view the remainder of the PROGRAM MODE menu:
PROGRAM MODE
7.LOGO DESC.
8.GROUP DESC
9.TARE WEIGHT
00.MORE
Press PAGE UP to return to the first page of the PROGRAM MODE menu:
14 Introduction Samsung ER-550 Electronic Cash Register
Page 17

SERVICE MODE
Rear Display
The rear display is a 10 digit florescent display that allows your customer to monitor the tran saction
and view the sale total. The rear display can be lifted and turned for easy customer viewing.
Rear Display Information
SERVICE MODE
0. HW TEST
1. CLEAR ALL TOTALS
2. CLEAR GRAND TOTAL
3. EPROM INFO.
Department
Number
Item Count
Amount
The department number of the registration (up to 2 digits) is
displayed in the leftmost display positions.
The number of times an item has been repeated is displayed
next to the department number.
The amount of the item, subtotal or total is displayed in the
rightmost portion of the display.
Rear Display Messages
C
Sub
=
Change Due
Negative entry
Subtotal of the sale
Total of the sale
Samsung ER-550 Electronic Cash Register Introduction 15
Page 18

16 Introduction Samsung ER-550 Electronic Cash Register
Page 19
Getting Started
Unpacking
1. Unpack and Unwrap the cash register.
2. Located in the packing are the following items:
1 roll of paper
1 ribbon cartridge
1 rewind spindle
1 set of control keys
Operator's and Programming manual
3. Remove the cardboard protectors from the cash drawer.
4. Plug the register into a grounded outlet (three prong), insert a control key and turn the key to the
REGISTER control lock position.
Installing the Paper
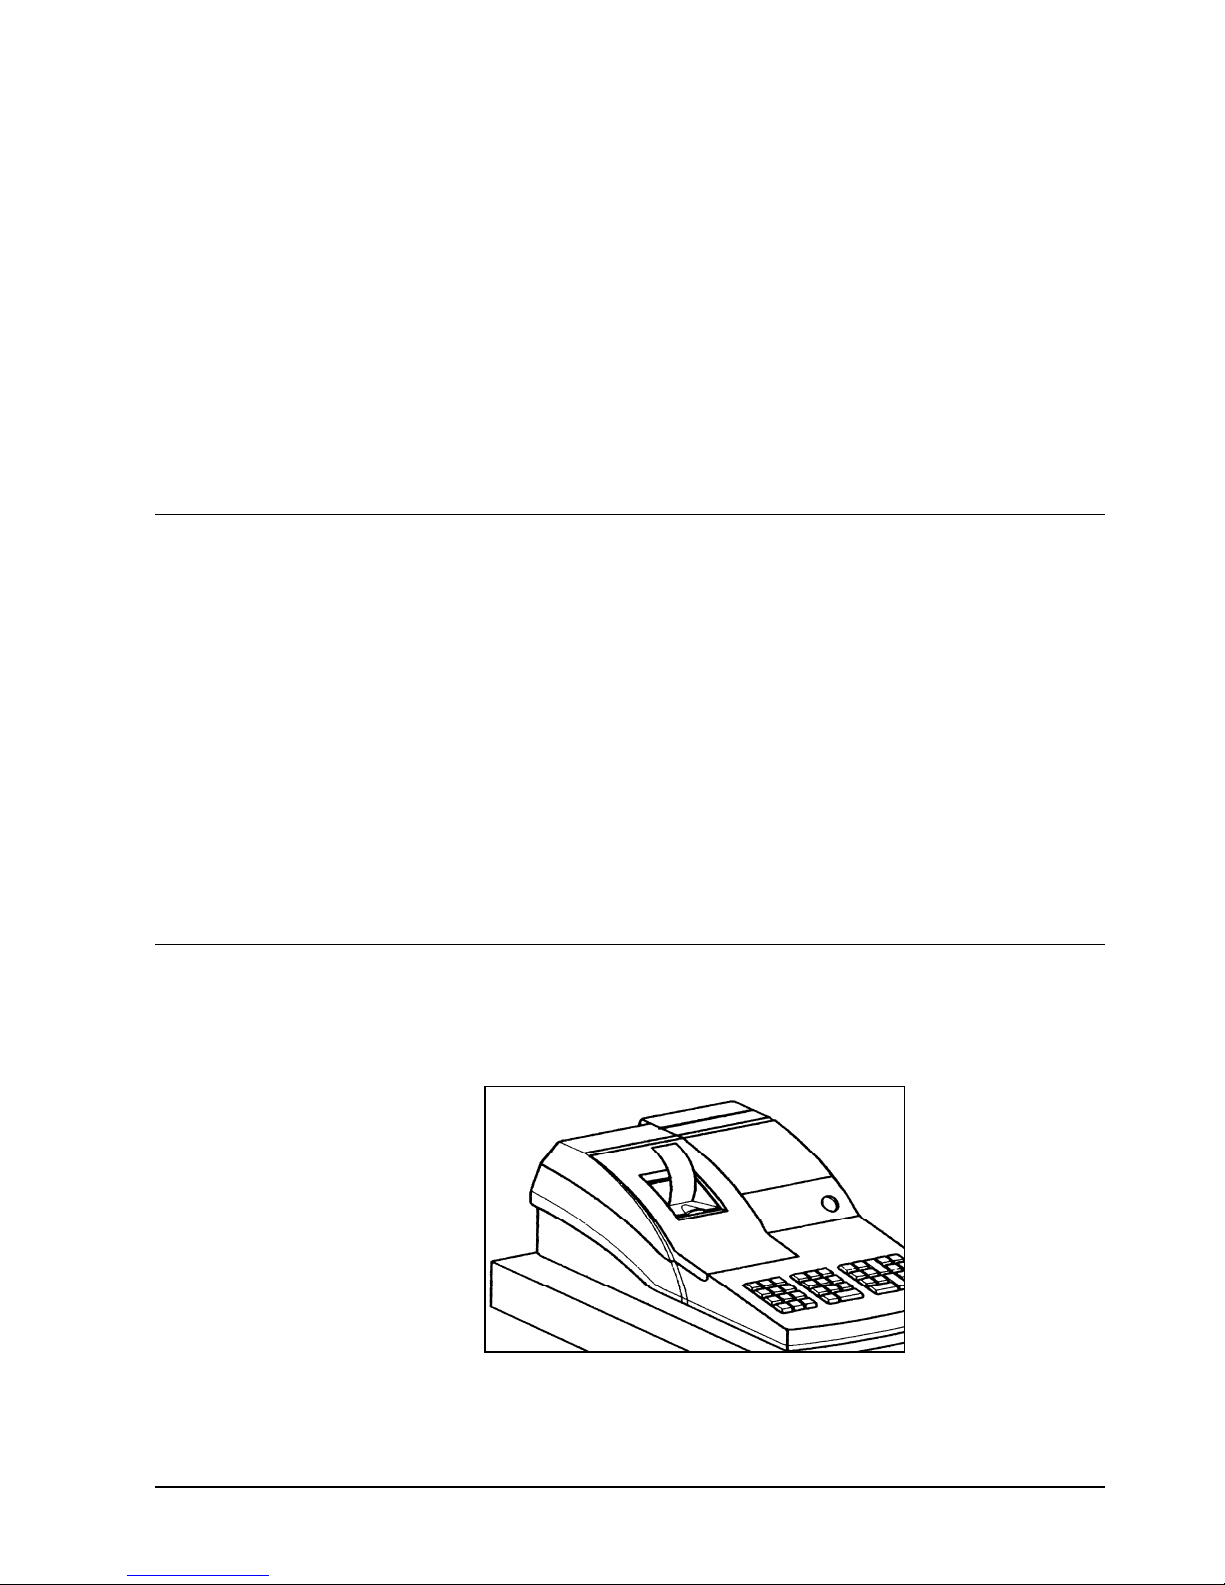
1. Remove the printer cover.
Samsung ER-550 Electronic Cash Register Getting Started 17
Page 20
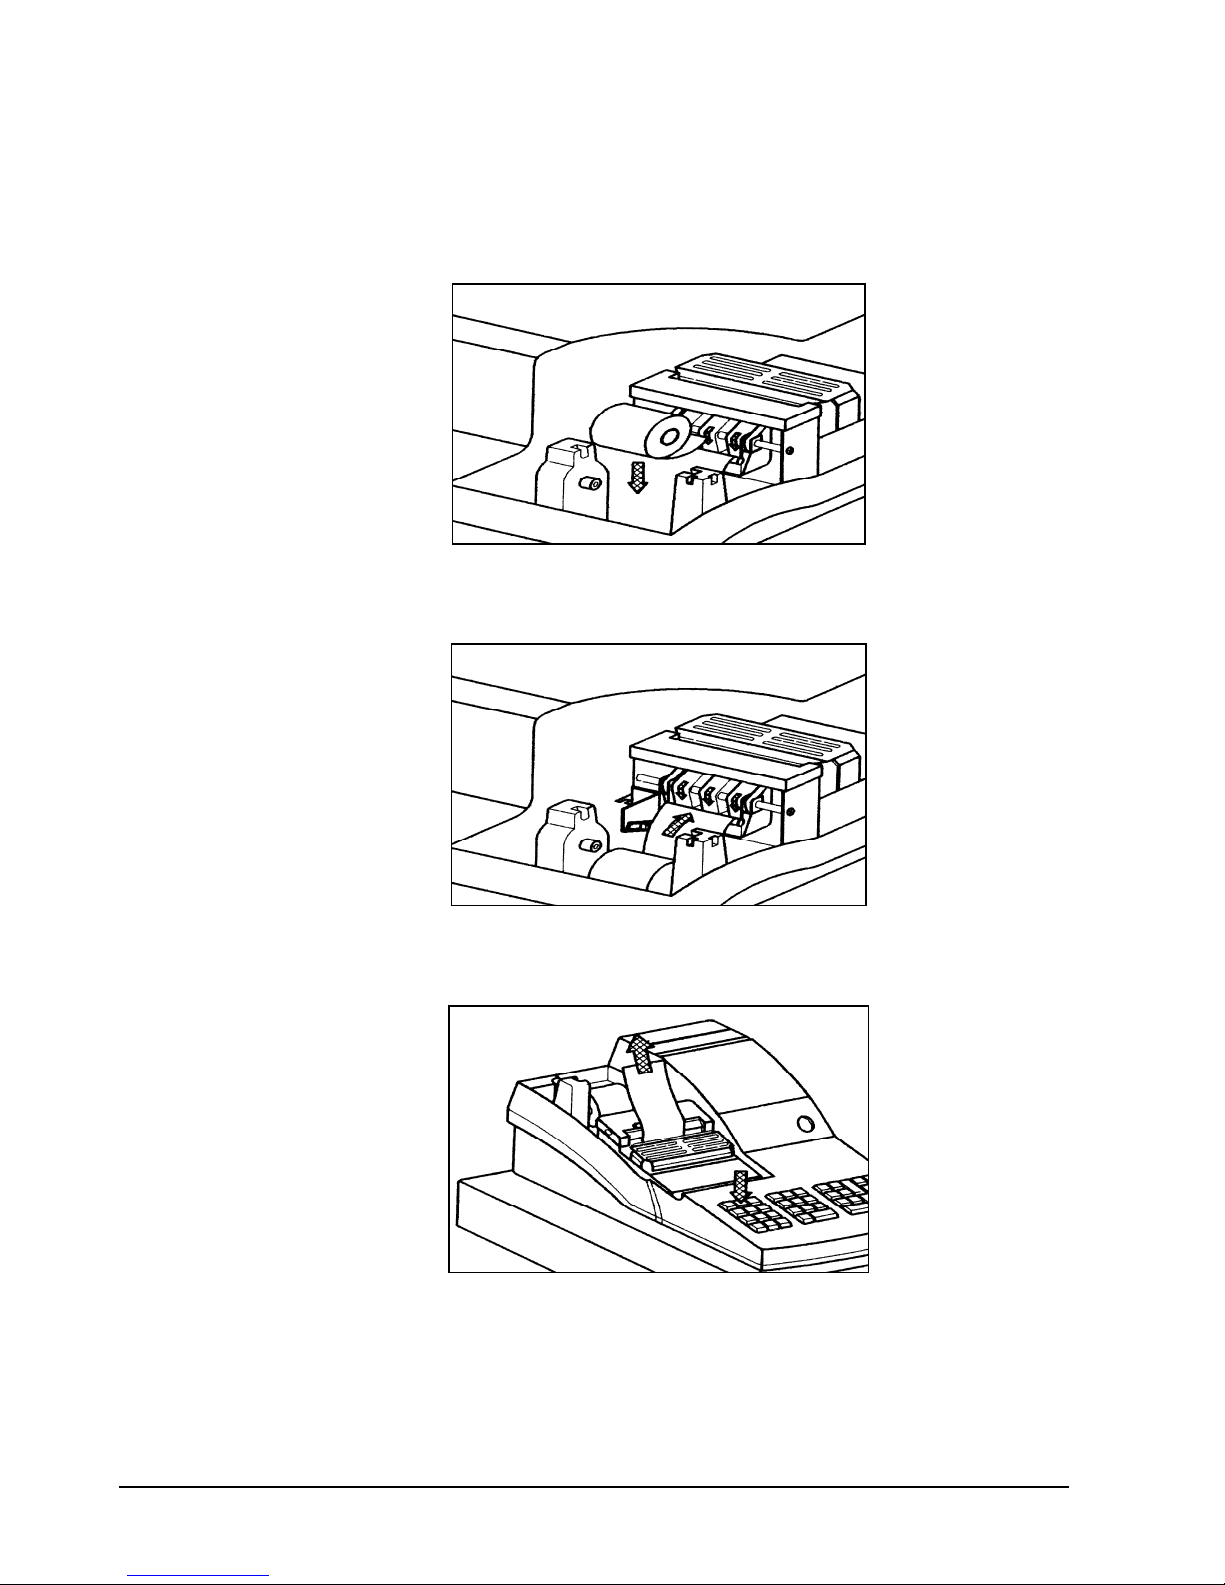
2. For proper feeding through the print head, cut or tear a straight even edge on the end of the
paper roll. (Be sure to remove any paper with glue residue.) Place the paper roll in the paper
holder so that the paper will feed from the bottom of the roll.
3. Insert the end of the paper into the paper slot.
4. Press the PAPER FEED key until the paper comes out about 8 inches.
18 Getting Started Samsung ER-550 Electronic Cash Register
Page 21
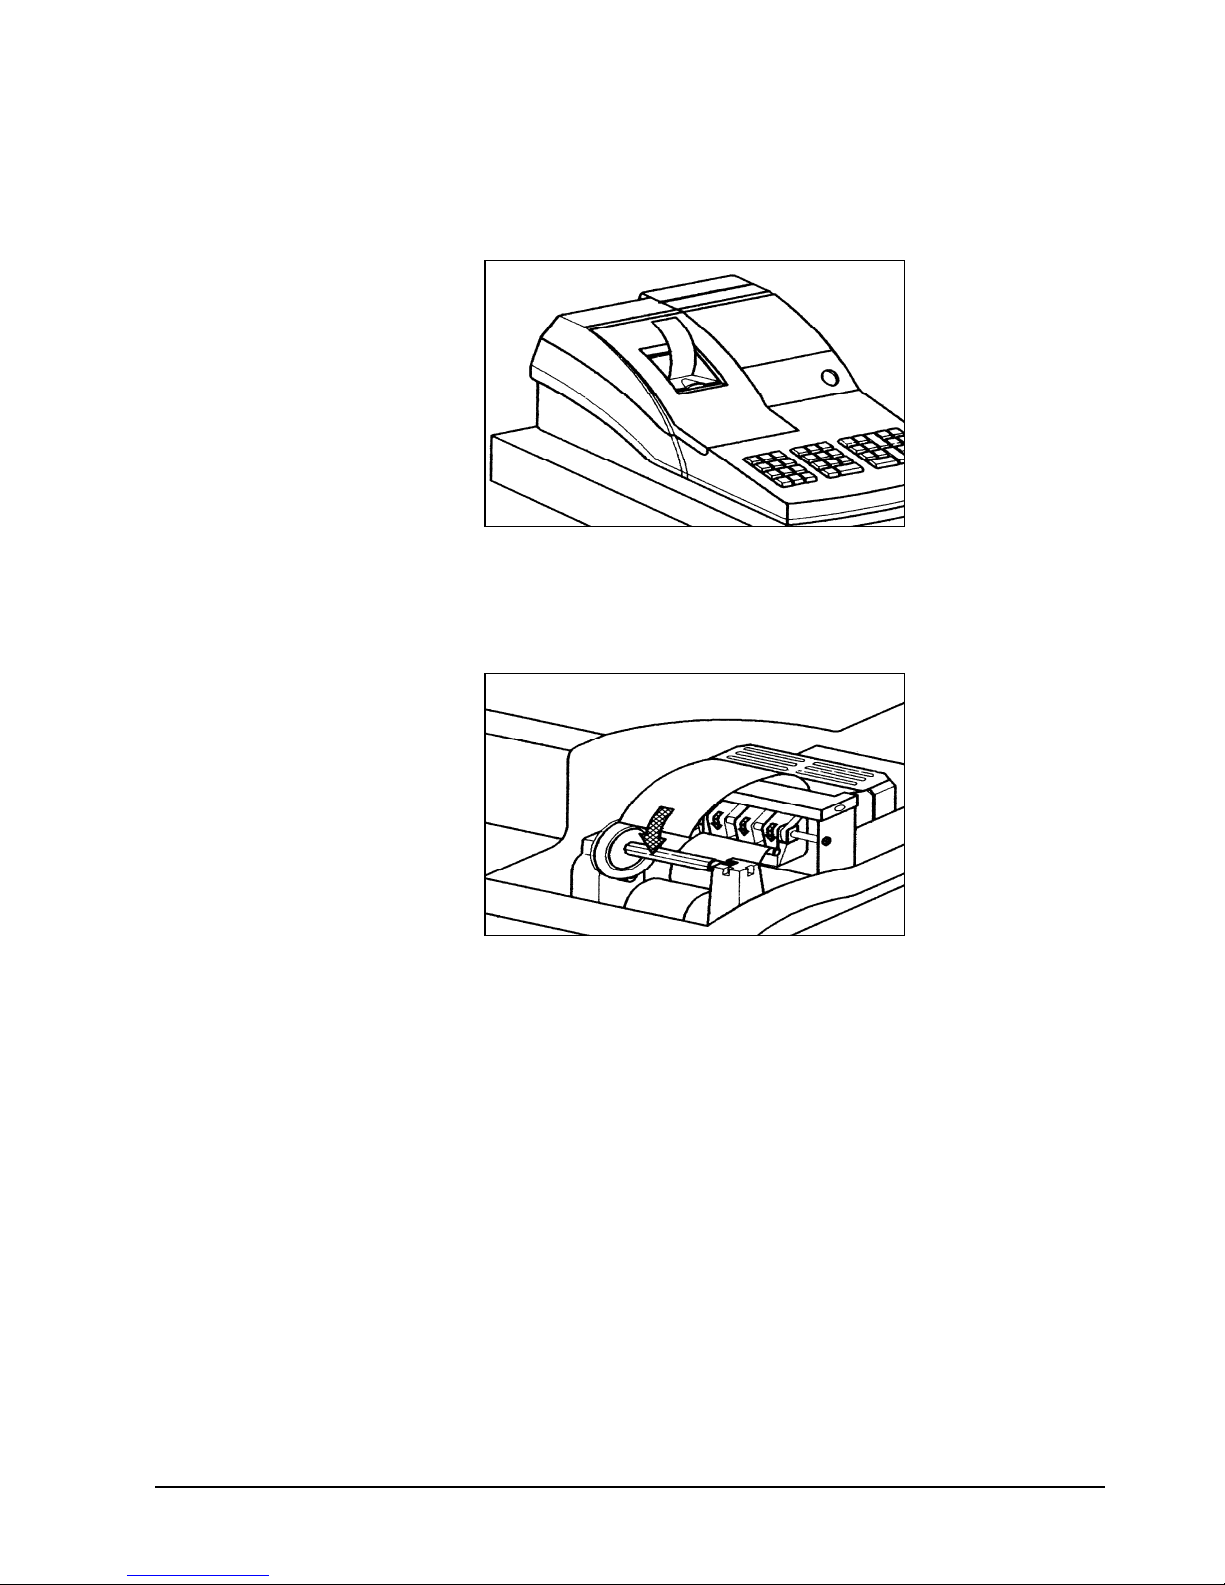
5. If you wish to use the printer to print customer receipts, pass the paper through the window of
the printer cover and replace the printer cover.
6. If you wish to use the printer to print a sales journal, insert the paper into the paper take-up
spool. Also see "Setting Receipt or Journal Printing" on page78. Wind the paper two or three
turns around the spool shaft and install the spool in the mount.
Samsung ER-550 Electronic Cash Register Getting Started 19
Page 22
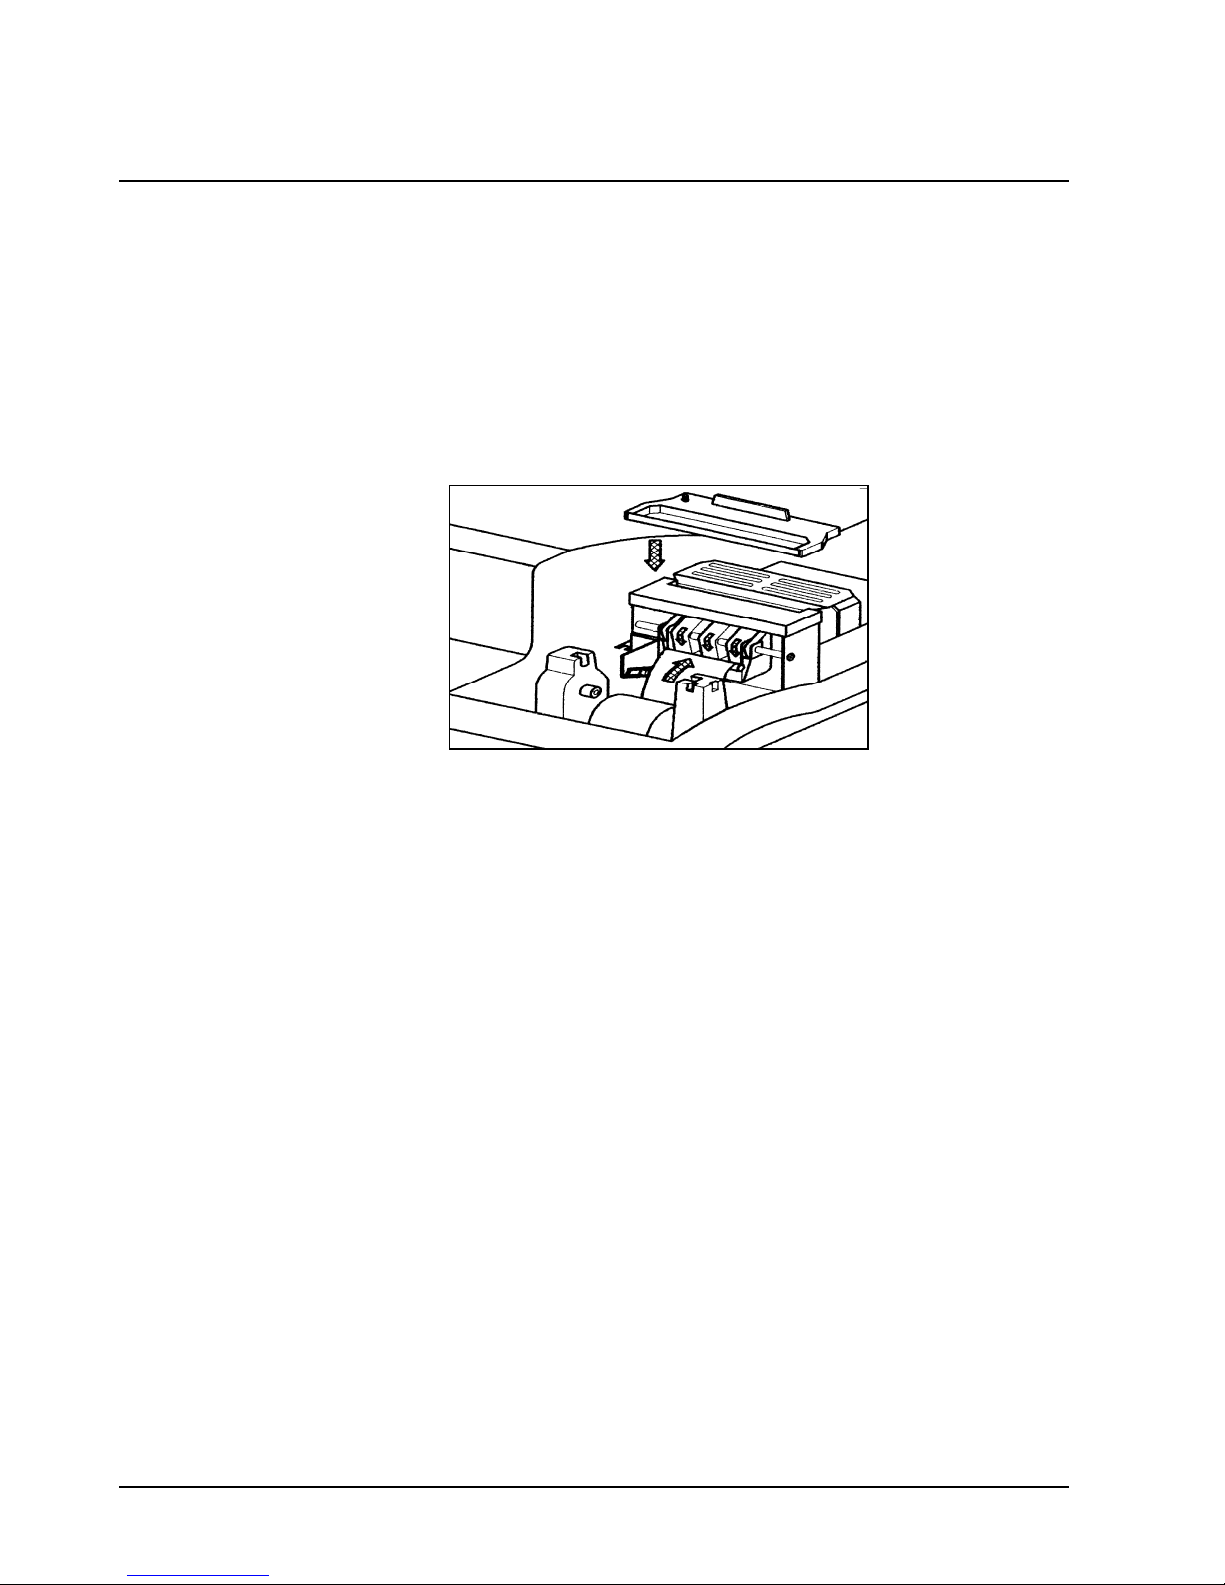
Installing the Ribbon Cartridge
1. Remove the printer cover.
2. If you are replacing a worn ribbon, lift up to remove the old cartridge. You must install the first
cartridge on a new cash register.
3. Insert the new ribbon cartridge firmly into place.
4. Turn the post on the ribbon cartridge to tighten the ribbon.
5. Replace the printer cover
20 Getting Started Samsung ER-550 Electronic Cash Register
Page 23

Clearing Memory
This step insures that the cash register is cleared of any totals or programming. After this procedure,
the cash register is ready for programming and operation.
WARNING: This is a one time procedure. Do not repeat this procedure after
the cash register is programmed, it causes all programs and totals to be erased.
1. Unplug the register.
2. Turn the control lock to SERVICE MODE position.
3. Press and hold the 00 key (double zero key) while connecting the AC plug into a power outlet.
Continue to hold the 00 key for about 5 seconds, until the printing has completed.
OO
4. When memory is cleared, the register prints a message including the EPROM information and
the message "RAM ALL CLEAR!".
**************************
V1.01 FEB.06 1997
CHECK SUM : 6F4B
PLU/EJ : 70/1370
RAM ALL CLEAR !
--------------------------
POWER
UP
Samsung ER-550 Electronic Cash Register Getting Started 21
Page 24

Basic Programming
This section covers the basic programming necessary to get your cash register running quickly. See
“Programming Instructions” on page 83 for if you wish to program options that are not included in
this section.
PROGRAMMING NOTES:
To select an option from the menu displayed on the screen, press the number
next to the option you wish to program.
If you need help, press the HELP SCREEN key. Press ESC (CLEAR) to exit
a help screen and return to the original screen.
Be sure to press ENTER (CASH/TEND) after changing a selection. If you do
not press ENTER (CASH/TEND), the change will not be accepted.
Setting the Time & Date
1. Turn the control lock to the PROGRAM position. The first page of the PROGRAM MODE
menu displays.
PROGRAM MODE
0.DEPARTMENT
1.PLU
2.SALES TAX
3.SYSTEM OPTION
4.PRINT OPTION
5.FUNCTION KEYS
6.CLERK
2. Press PAGE DOWN to view the remainder of the PROGRAM MODE menu:
PROGRAM MODE
7.LOGO DEC.
8.GROUP DESC
9.TARE WEIGHT
00.MORE
22 Getting Started Samsung ER-550 Electronic Cash Register
Page 25

3. Press 00 (double zero) to view additional programming options on the PROGRAM MODE
page 2 menu.
PROGRAM MODE page2
0.CLERK I/O
1.INVENTORY(PLU)
2.INVENTORY(DEPT)
3.TIME & DATE
4.PROGRAM SCAN
5.ALL PGM SCAN
4. Press 3 to program view the SET TIME & DATE screen.
SET TIME & DATE
SET TIME : HH:MM
(MILITARY) 11:27
SET DATE : MM.DD.YY
08.15.99
5. When the arrow is pointed at the time, enter the time in military time format.
6. Press ENTER (CASH/TEND) to move the arrow to the date field.
7. Enter the date in month/day/year format. Press ENTER (CASH/TEND) to return to the
PROGRAM MODE screen. (Note: You can change the date format from MM/DD/YY to
DD/MM/YY or YY/MM/DD. See "Programming Instructions" on page 83. You must always
enter the date in MM/DD/YY format.)
Samsung ER-550 Electronic Cash Register Getting Started 23
Page 26

Programming Tax
Most sales taxes can be programmed by entering an add-on tax rate percentage. You will find
instructions for programming an add-on tax rate percentage here. In some cases you can find that tax
that is entered as a percentage does not follow exactly the tax chart that applies in your area. If this
is the case, you must enter your tax using tax table programming. This method will match tax
collection exactly to the break points of your tax table. See "Programming a Tax Table" on page 95.
Important Note: After you have entered your tax program, test for accuracy
by entering several transactions of different dollar amounts. Carefully check
to make sure the tax charged by the cash register matches the tax amounts on
the printed tax chart for your area. As a merchant, you are responsible for
accurate tax collection. If the cash register is not calculating tax accurately, or
if you cannot program your tax properly from the information in this manual,
contact your Samsung Dealer for assistance.
Programming an Add-On Tax Rate Percentage
1. Turn the control lock to the PROGRAM position.
2. From the PROGRAM MODE menu, press 2 to view the TAX PROG. screen.
TAX PROG.
TAX NUMBER (1-4) 1
TAX TYPE (0-2) 0
0 : ADD-ON
1 : TAX TABLE
2 : VAT
3. When the arrow is pointed at the TAX NUMBER field, enter the number of the tax you wish to
program. (There are four taxes available, enter 1, 2, 3, or 4.) The arrow will move to the TAX
TYPE field.
24 Getting Started Samsung ER-550 Electronic Cash Register
Page 27

4. Enter 0 for an ADD-ON tax with a straight percentage rate. (See "Sales Tax Programming" on
page 93 to program the other selections, TAX TABLE or VAT.) The appropriate TAX #
PROGRAMMING screen displays.
TAX #1 PROGRAMMING
TAX RATE 0.000
5. When the arrow is pointed at the TAX RATE field, enter the percentage rate for the sales tax.
For example if the tax is 6 percent, enter 6.000 or 6.0. If the tax is 7.5 percent, enter 7.500 or
7.5. If the tax is 10 percent, enter 10.000 or 10.0. Be sure to enter the decimal. Press the
ENTER (CASH/TEND) to set the rate.
6. The TAX PROG. screen will return prompting you to enter the next tax, if necessary. Continue
to program additional taxes or press CLEAR to return to the PROGRAM MODE screen.
Samsung ER-550 Electronic Cash Register Getting Started 25
Page 28

j
o
v
r
f
How to Enter Descriptors in Program Mode
The ER-550 allows you to program unique descriptors for:
Departments and PLUs
Function keys
Clerks
Groups
The Logo Message
Descriptors are programmed using the numeric keys. Each numeric key on the amount key pad has
letters or another function printed under the numeral. The 1 key is labeled with "other", 0 with
"caps", 00 with "double"; and the decimal key is labeled with "space".
7
4
1
othe
0
caps
pqrs
ghi
8
5
2
abc
00
double
9
tu
wxyz
6
kl
mn
3
de
.
space
26 Getting Started Samsung ER-550 Electronic Cash Register
Page 29

To Program Descriptors
1. See "Programming Instructions" on page 83 and follow the appropriate instructions to access the
screen for programming departments, PLUs, function keys, groups, or the logo descriptor.
2. Press the appropriate number key the correct number of times to assign the character you want.
Refer the table below:
KEY
ONE
TIME
TWO
TIMES
THREE
TIMES
FOUR
TIMES
FIVE
TIMES
2
3
4
5
6
7
8
9
3. Press the ENTER (CASH TEND) key to assign the character you selected. Repeat for each
character of the descriptor or message. Press the decimal key to add a space.
A B C 2
D E F 3
G H I 4
J K L 5
M N O 6
P Q R S 7
T U V 8
W X Y Z 9
Note: If you make a mistake, press ENTER (CASH TEND), then press PAGE
UP to return to the first field on the screen.
To Program Lower Case Descriptors
Press the 00 key once to lock in lower case descriptors. Press the 00 key again to return to upper
case descriptors
To Program Double Size Characters
Press the 0 key once to lock in double size characters. Each double size character takes two
standard size character positions. Press the 0 key again to return to standard size characters.
Samsung ER-550 Electronic Cash Register Getting Started 27
Page 30

To Program Other Characters
1. Press the 1 key to display the first page of the OTHER ALPHA MENU:
OTHER ALPHA MENU
1. 0 7. % 13. -
2. 1 8. ^ 14. _
3. ! 9. & 15. +
4. @ 10. * 16. =
5. # 11. ( 17.
6. $ 12. ) 18. [
0
2. If necessary, press PAGE DOWN to display the second page of the OTHER ALPHA MENU:
OTHER ALPHA MENU
19. ] 24. ' 29. ?
20. \ 25. < 30. /
21. : 26. ,
22. ; 27. >
23. " 28. .
0
3. Enter the number that represents the character you wish (for example, enter 10 for an asterisk
"*"), press the ENTER (CASH TEND) key to select the character.
4. Press the ENTER (CASH TEND) again to move advance to the next character position.
Descriptor Programming Example
Program the descriptor "SODA" for department 2.
1. Turn the control lock to the PROGRAM position.
2. From the PROGRAM MODE menu, press 0 for Department.
3. Press Department 2/14 to go to the DEPT #2 PROGRAMMING screen.
4. Press the numeric 4 key four times for S; press ENTER (CASH TEND).
5. Press the numeric 6 key three times for O; press ENTER (CASH TEND).
6. Press the numeric 3 key one time for D; press ENTER (CASH TEND).
7. Press the numeric 2 key one time for A; press ENTER (CASH TEND).
8. Press ENTER (CASH TEND) to advance to the PRESET field of the DEPT #2
PROGRAMMING screen.
9. Press CLEAR to exit the DEPT #2 PROGRAMMING screen.
28 Getting Started Samsung ER-550 Electronic Cash Register
Page 31

Operating Instructions
Operator Display Screen
The Samsung ER-550 Electronic Cash Register has a liquid crystal display screen, providing up to 8
lines of information with up to 20 characters per line. The display is backlit to provide excellent
visibility, regardless of lighting conditions.
The multiple line screen lets you keep track of each item, as it is registered. For example:
When you are operating the register (in the REGISTER or VOID control lock positions), you can
view a list of items that have been registered, as well continuous tax and sale subtotals.
If an item is multiplied, or repeated, the display lists the quantity of the item sold. (Note: Only
single numbers up to 9 are displayed in the quantity field.)
Up to five items can be displayed simultaneously. When the more than five items are registered,
the display lists the last five items sold.
You can scroll through long transactions with the PAGE UP and PAGE DOWN keys. When
more than five items have been registered, you can press the PAGE UP key to view items
registered earlier in the sale. Press the PAGE DOWN key to return to a view of the items
registered later in the transaction.
If you make an error, the screen specifies the type of error.
OPERATING NOTE: If you need help, press the HELP SCREEN key. Press
ESC (CLEAR) to exit a help screen and return to the original screen.
Samsung ER-550 Electronic Cash Register Operating Instructions 29
Page 32
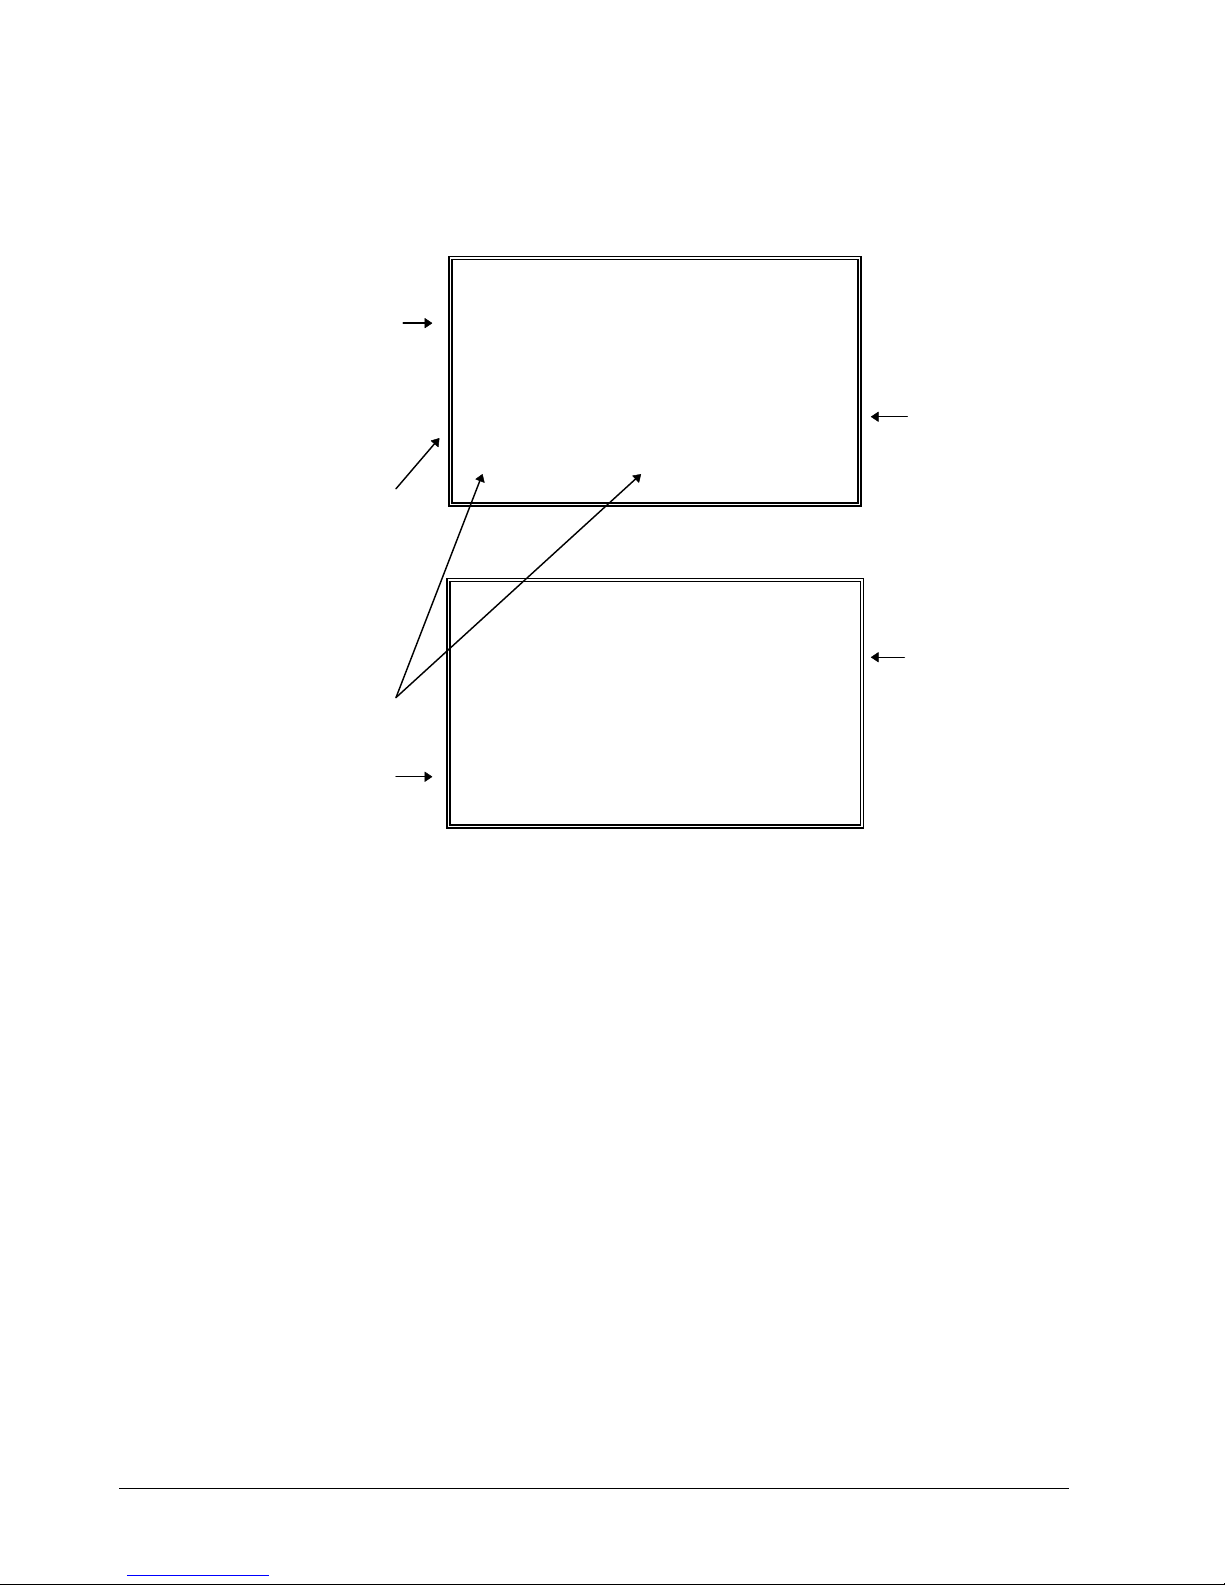
Operator Display Example
Up to five items
can be displayed
simultaneously.
If an item is
multiplied, or
repeated, the
display lists the
quantity of items
here.
Tax and sale
subt otals are
updated with
each new item
entered
REGISTER MODE
1 DEPT.1 T1 1.00
1 DEPT.2 2.00
1 DEPT.3 3.00
.
1 DEPT.4 4.00
3 DEPT.5 15.00
TAX 0.06 SBTL 25.06
1 DEPT.3 3.00
1 DEPT.4 4.00
1 DEPT.5 15.00
1 DEPT.6 6.00
1 DEPT.7 7.00
When more
than five items
have been
regi s tered , you
can press the
PAGE UP
to view the
items registered
earlier in the
sale.
When th e more
than five items
are regi stered ,
the display lists
the last five
items sold.
key
1 DEPT.8 8.00
TAX 0.06 SBTL 46.06
30 Operating Instructions Samsung ER-550 Electronic Cash Register
Page 33

Clerk Operations
The ER-550 can track sales for up to 20 clerks.
You can choose a push button or code entry clerk system:
The simplest clerk system is the push button system. This is also the default system; the register
will operate this way unless it is programmed otherwise. You simply press the CLERK # key to
sign on or sign off the clerk. You can operate only one clerk when you choose this method.
You can provide maximum security in a multiple clerk system with the code entry system. Press
the CLERK # key, enter the clerk secret code, then press the CLERK # key, or enter the clerk
secret code, then press the CLERK # key to sign on the register.
You can also select stay down or pop-up mode for clerk operation:
Stay down means that once a clerk is signed on, the same clerk will remain signed on until a
different clerk signs on or the original clerk signs off. A stay down clerk system might be used
when only one operator uses the register at a time, and a different operator begins when a work
shift is changed.
Pop-up means that the clerk is automatically signed off an the end of each transaction. Therefore,
to begin a transaction, you must first sign a clerk on. A pop-up clerk system might be used in a
department store, where several clerks might use the register during the same shift and clerk sales
information is required.
See "Clerk Programming" on page 118 to set clerk options.
Samsung ER-550 Electronic Cash Register Operating Instructions 31
Page 34
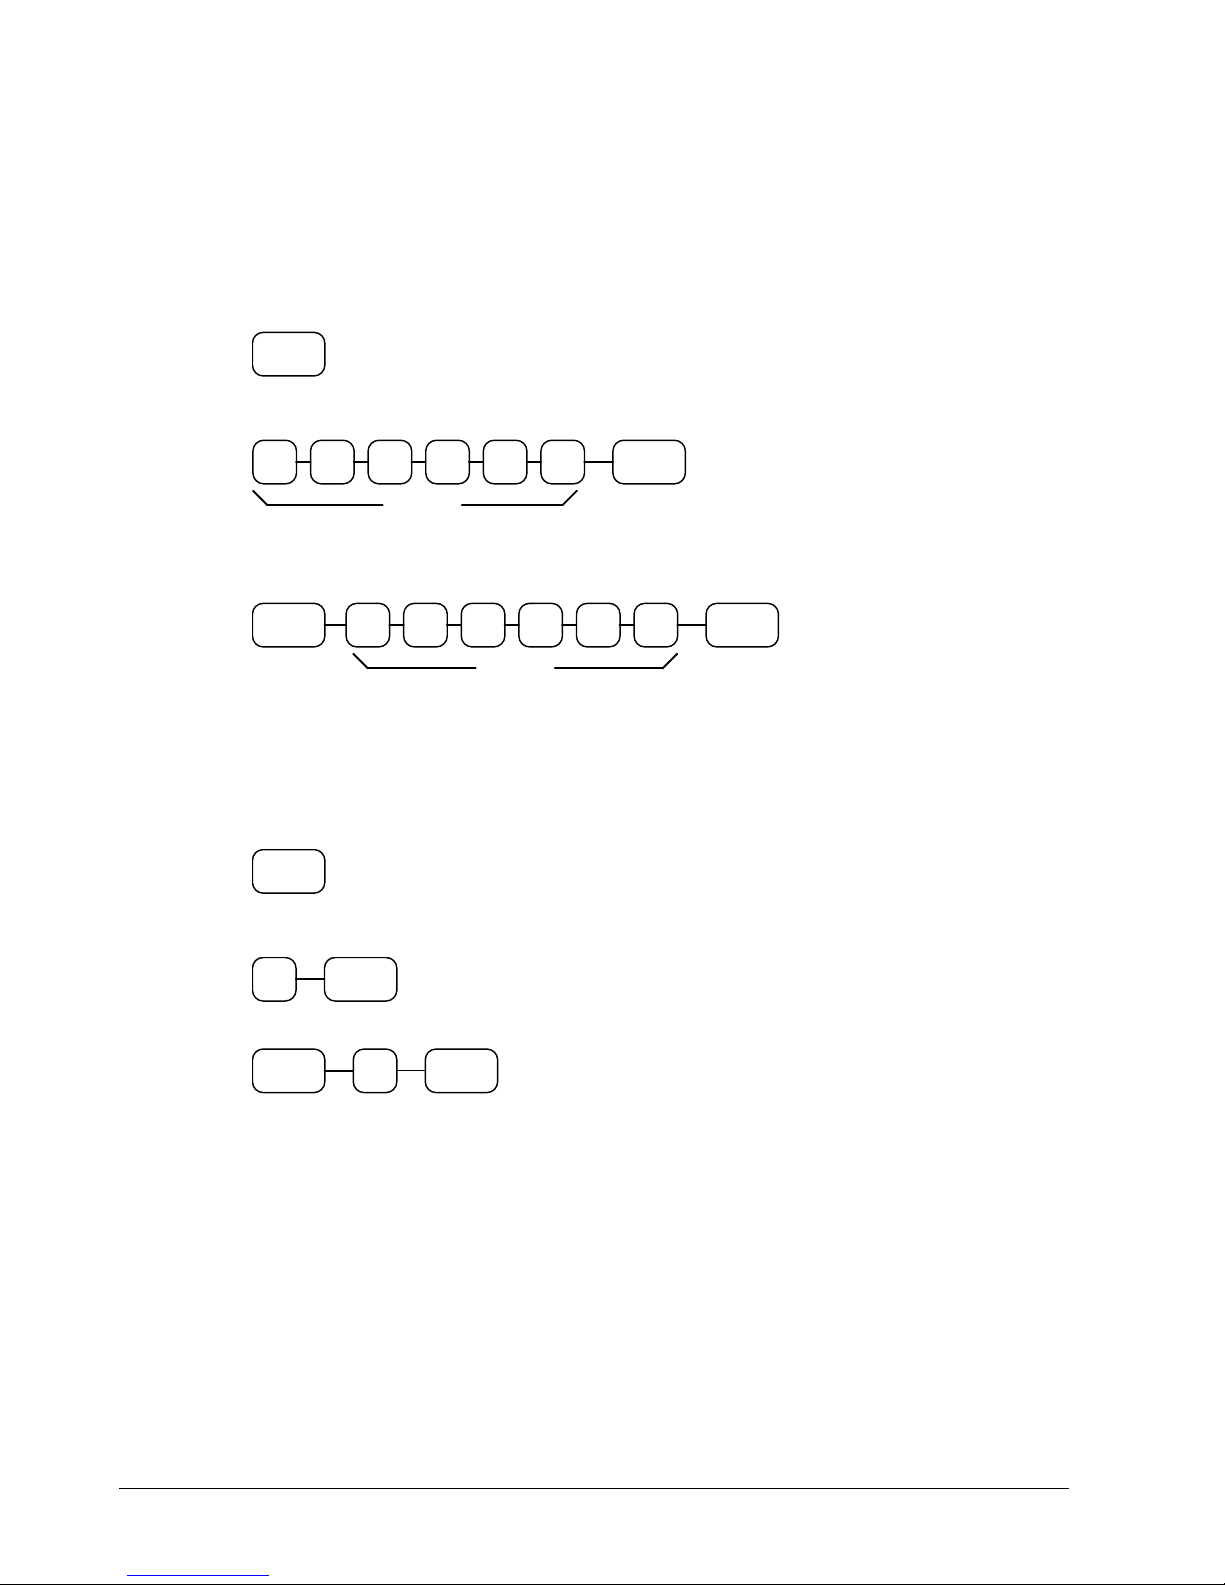
Clerk Sign On Instructions
When a clerk is not signed on, the message "Closed" is shown on the display. The current clerk
must be signed off before a new clerk can be signed on.
Push Button
CLERK #
Code Entry
Secret
clerk #
or,
CLERK #
Clerk Sign Off Instructions
Push Button
CLERK #
Secret
clerk #
CLERK #
CLERK #
Code Entry
CLERK #0
or,
32 Operating Instructions Samsung ER-550 Electronic Cash Register
CLERK #0CLERK #
Page 35

Clerk Time Keeping
Clerk time keeping is a standard feature of the ER-550. Clerks can clock in and clock out at any
time, regardless of whether they are signed on to operate the register. (Clocking in and clocking out
are separate functions from signing on or signing off to operate the register.) You must assign secret
clerk codes to clock in or clock out. See "System Option Programming" on page 101 to set up your
clerk system and see "Clerk Programming" on page 118 to assign a secret clerk code.
In addition:
If a clerk forgets to sign in or sign out, or if sign in or out records need to be modified, these
corrections can be made by the appropriate authority in the program mode.
Clerk times can be read in the MANAGER control lock position or reset in the CLEAR
TOTALS control lock position.
To Clock In/Out:
1. Turn the control lock to the REGISTER position.
2. Any current transaction must be finalized before clocking in or out.
3. Press the MORE KEYS menu key.
4. From the MORE KEYS menu, press 8 for TIME IN/OUT. The TIME CLOCK IN/OUT
screen displays. (Shortcut note: you can press 8, then press MORE KEYS to access the TIME
CLOCK IN/OUT screen.)
TIME CLOCK IN/OUT
ENTER SECRET CODE
AND PRESS CASH
Samsung ER-550 Electronic Cash Register Operating Instructions 33
Page 36

5. Enter the secret code of the clerk that is to clock in, press ENTER (CASH/TEND). The display
will show the 3 most recent in and out records for the clerk, and the total time worked.
TIME CLOCK IN/OUT
I 01/15/1999 08:00AM
O 01/15/1999 05:00PM
I 00:00AM
O 00:00AM
I 00:00AM
O 00:00AM
TIME WORKED : 9:00
6. Repeat the procedure from step 1 to clock out.
7. The printer will print Time In and Time Out records as in the examples below:
THANK-YOU
CALL AGAIN
DATE 08/15/1999 SUN
CLERK TIME IN
ANNIE #01
CLERK IN TIME : 8:00AM
ANNIE NO. 000001
TIME 11:27AM 01
THANK-YOU
CALL AGAIN
DATE 08/15/1999 SUN
CLERK TIME OUT
ANNIE #01
CLERK OUT TIME: 5:00PM
TIME WORKED : 9:00
ANNIE NO. 000001
TIME 11:27AM 01
34 Operating Instructions Samsung ER-550 Electronic Cash Register
Page 37
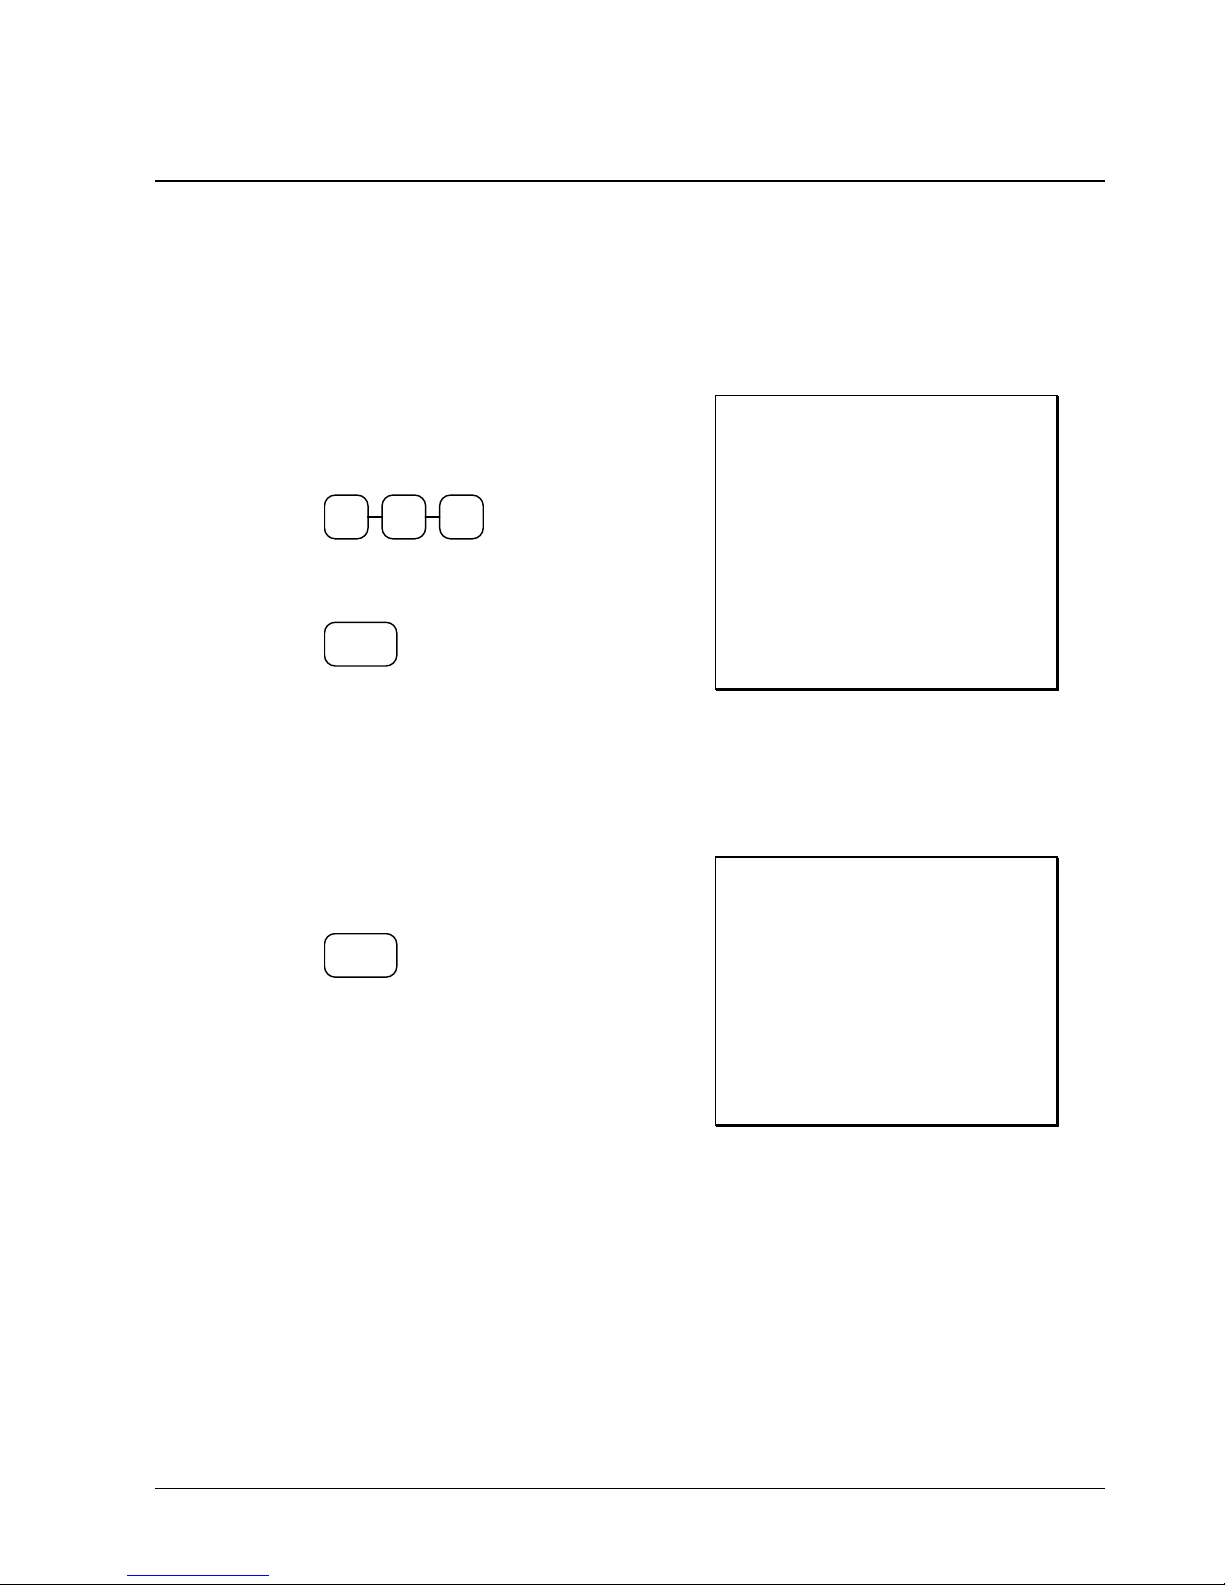
Department Registrations
As you make department registrations, you can follow your entries by viewing the display.
Remember that the sale and tax totals are updated automatically with each entry.
Open Department
1. Enter an amount on the ten key pad. Do
not use the decimal key. For example, for
$2.99, enter:
2 9 9
2. Press a department key. For example, press
department 1/13:
1/13
Preset Price Department
A preset department registers the price that was previously programmed. See "Department
Programming" on page 85 to program preset prices.
1. Press a preset department key. For
example, press department 5/17:
5/17
THANK-YOU
CALL AGAIN
DATE 08/15/1999 SUN
DEPT.1 T1 $2.99
TAX1 AMT $0.18
TOTAL 3.17
CASH 3.17
ANNIE NO. 000001
TIME 11:27AM 01
THANK-YOU
CALL AGAIN
DATE 08/15/1999 SUN
DEPT.5 $1.29
TOTAL $1.29
CASH $1.29
ANNIE NO. 000001
TIME 11:27AM 01
Samsung ER-550 Electronic Cash Register Operating Instructions 35
Page 38
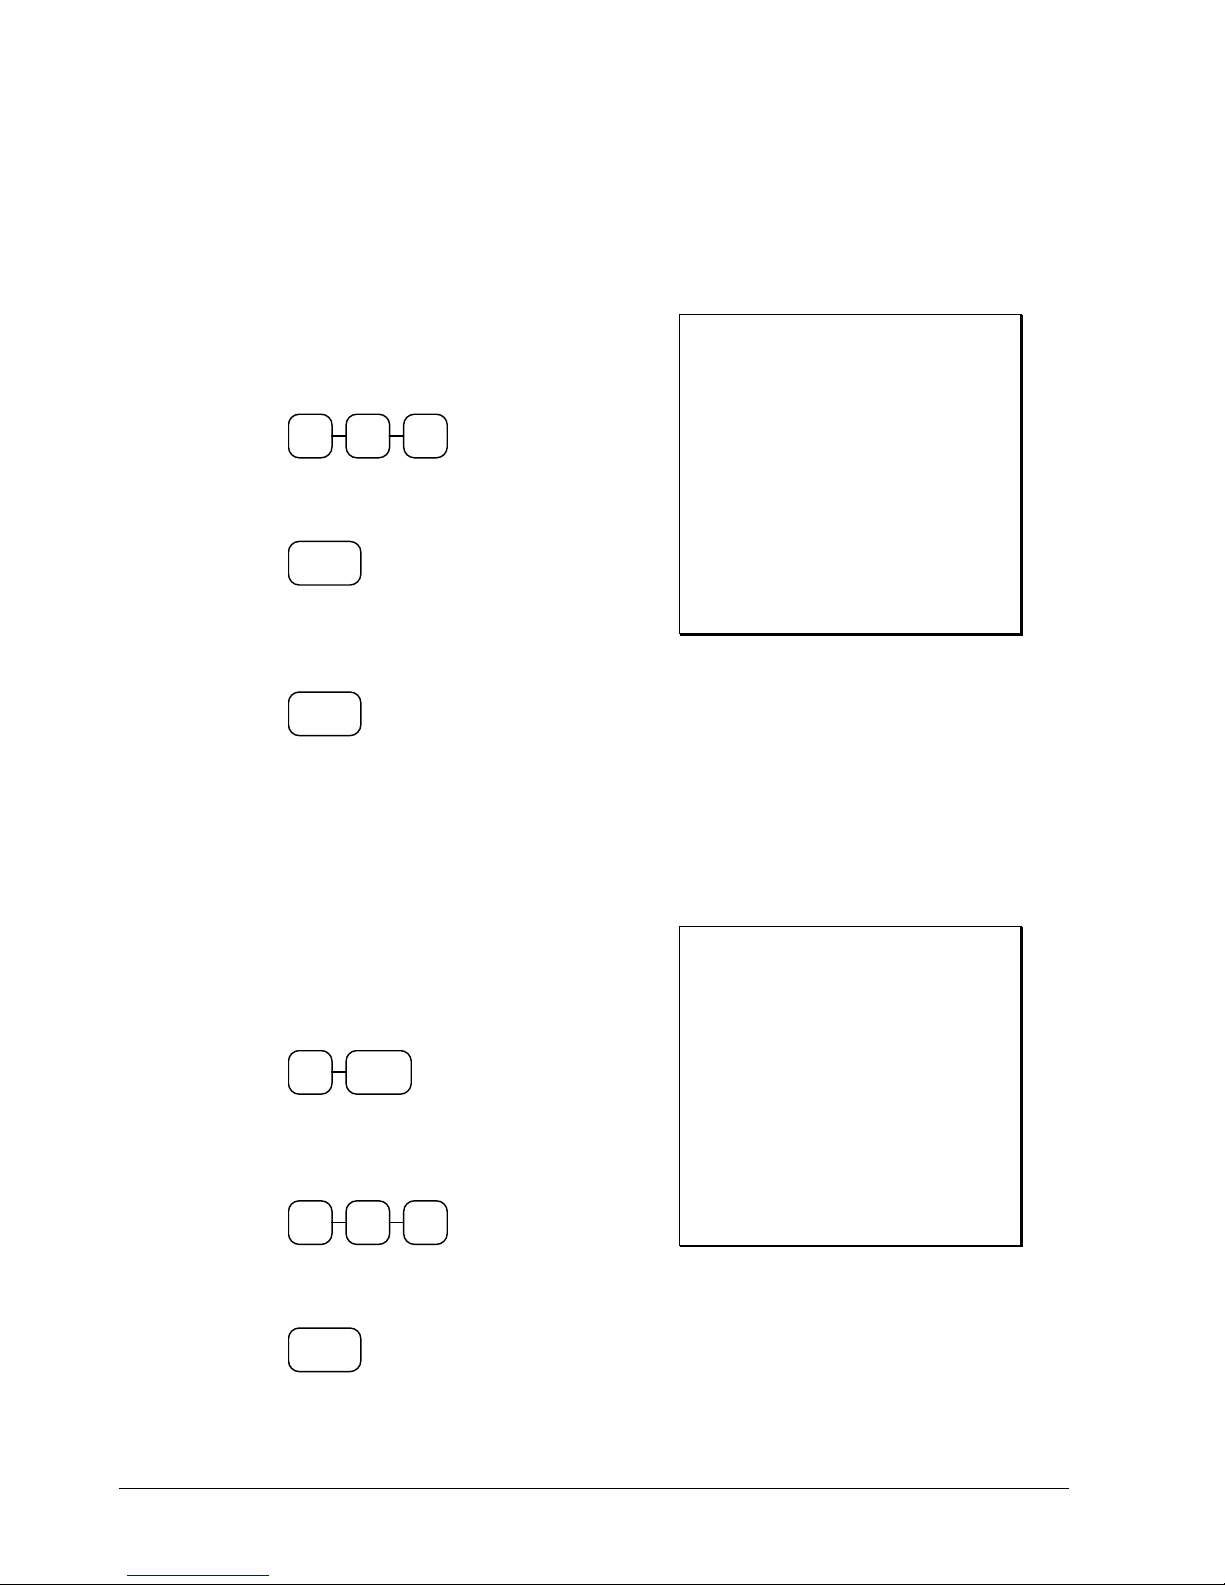
Department Repeat Entry
Open or preset price departments can be repeated as many times as necessary by pressing the same
department again. The number of times the item is repeated is shown on the display.
1. Enter an amount on the ten key pad. Do
not use the decimal key. For example, for
$2.99, enter:
2. Press a department key. For example, press
department 1/13:
3. To register a second item exactly as the
first, press the department key a second
time. For example, press department 1/13:
Multiplication
When several of the same items are to be entered into the same Department, you can use
multiplication. You can enter a quantity (1 to 999.999) using the @/FOR key. You can multiply
open or preset departments.
2 9 9
1/13
1/13
THANK-YOU
CALL AGAIN
DATE 08/15/1999 SUN
DEPT.1 T1 $2.99
DEPT.1 T1 $2.99
TAX1 AMT $0.36
TOTAL $6.34
CASH $6.34
ANNIE NO. 000001
TIME 11:27AM 01
1. Enter the quantity of items being
purchased, press the @/FOR key. For
example, enter 4 on the numeric key pad
and press the @/FOR key:
4
@/
FOR
2. Enter an amount on the ten key pad. Do
not use the decimal key. For example, for
$1.99, enter:
1 9 9
THANK-YOU
CALL AGAIN
DATE 08/15/1999 SUN
4X @1.99
DEPT.1 T1 $7.96
TAX1 AMT $0.48
TOTAL $8.44
CASH $8.44
ANNIE NO. 000001
TIME 11:27AM 01
Press a department key. For example, press
department 1/13:
1/13
36 Operating Instructions Samsung ER-550 Electronic Cash Register
Page 39
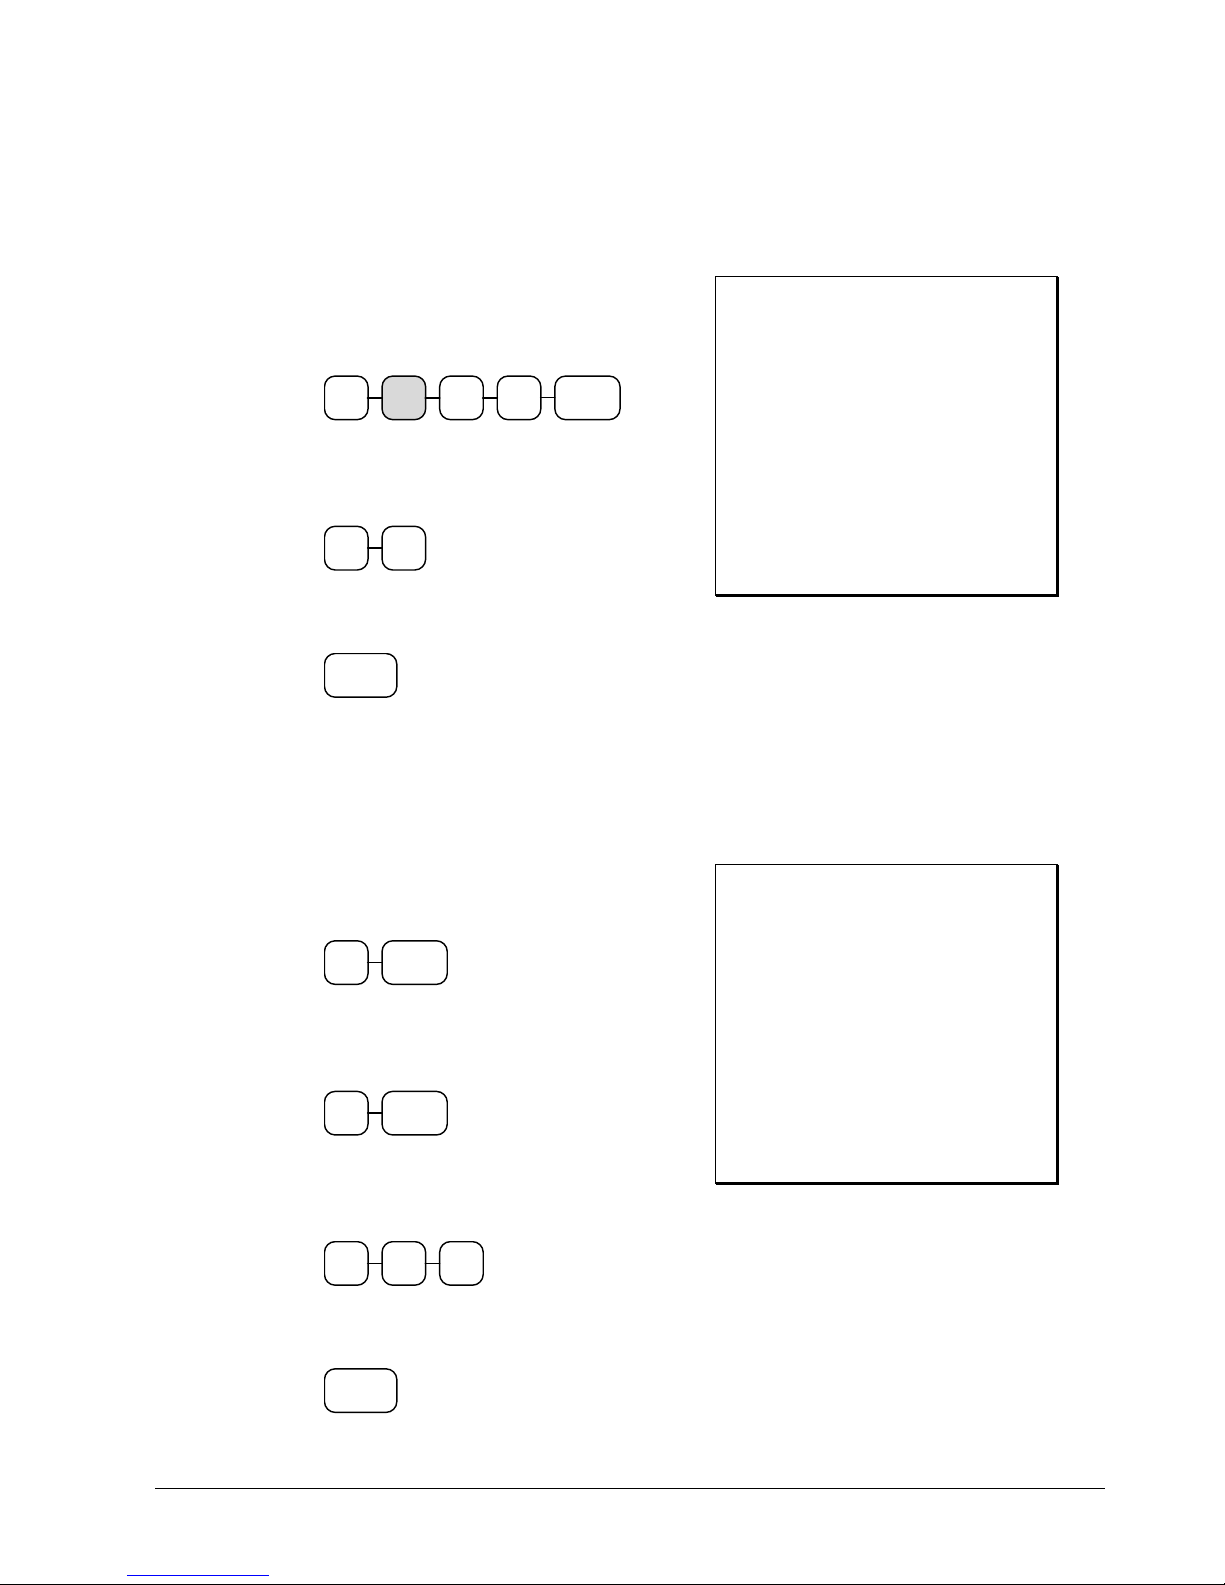
Department Multiplication with Decimal Point
If you are selling items by weight, or if you are selling yard goods, you can multiply a fraction of a
unit.
1. Enter the with the decimal point, press the
2. Enter an amount on the ten key pad. Do
Press a department key. For example, press
Split Pricing
When items are priced in groups, i.e. 3 for $1.00, you can enter the quantity purchased and let the
register calculate the correct price.
@/FOR key. For example, for 3 pounds
of produce, enter:
3 . 7
5
@/
FOR
not use the decimal key. For example, if
the price is $.99 per pound, enter:
9 9
department 1/13:
1/13
THANK-YOU
CALL AGAIN
DATE 08/15/1999 SUN
3.75X @0.99
DEPT.1 T1 $3.71
TAX1 AMT $0.22
TOTAL $3.93
CASH $3.93
ANNIE NO. 000001
TIME 11:27AM 01
1. Enter the quantity purchased, press the
@/FOR key. For example, enter:
2
@/
FOR
2. Enter the quantity of the group price, press
the @/FOR key. For example, if the items
are priced 3 for $1.00, enter:
3
@/
FOR
3. Enter an amount on the ten key pad. For
example, if the items are priced 3 for
$1.00, enter:
1 0 0
4. Press a department key. For example, press
department 1/13:
1/13
THANK-YOU
CALL AGAIN
DATE 08/15/1999 SUN
2/3FOR @1.00
DEPT.1 T1 $0.67
TAX1 AMT $0.04
TOTAL $0.71
CASH $0.71
ANNIE NO. 000001
TIME 11:27AM 01
Samsung ER-550 Electronic Cash Register Operating Instructions 37
Page 40

Single Item Department
Single item departments automatically total as a cash sale immediately after registration. Use single
item departments for speedy one item sales. For example if you are selling admission tickets, and all
ticket sales are one item sales, you can assign open or preset department single item department for
ticket sales. After each registration, the drawer will immediately open, and a separate transaction is
printed. See "Department Programming" on page 85 to program a single item department.
1. Press a single item preset department key.
(or enter a price and press a single item
open department key.) For example, press
department 6/18:
6/18
THANK-YOU
CALL AGAIN
DATE 08/15/1999 SUN
DEPT.6 $1.29
TOTAL $1.29
CASH $1.29
ANNIE NO. 000001
TIME 11:27AM 01
38 Operating Instructions Samsung ER-550 Electronic Cash Register
Page 41
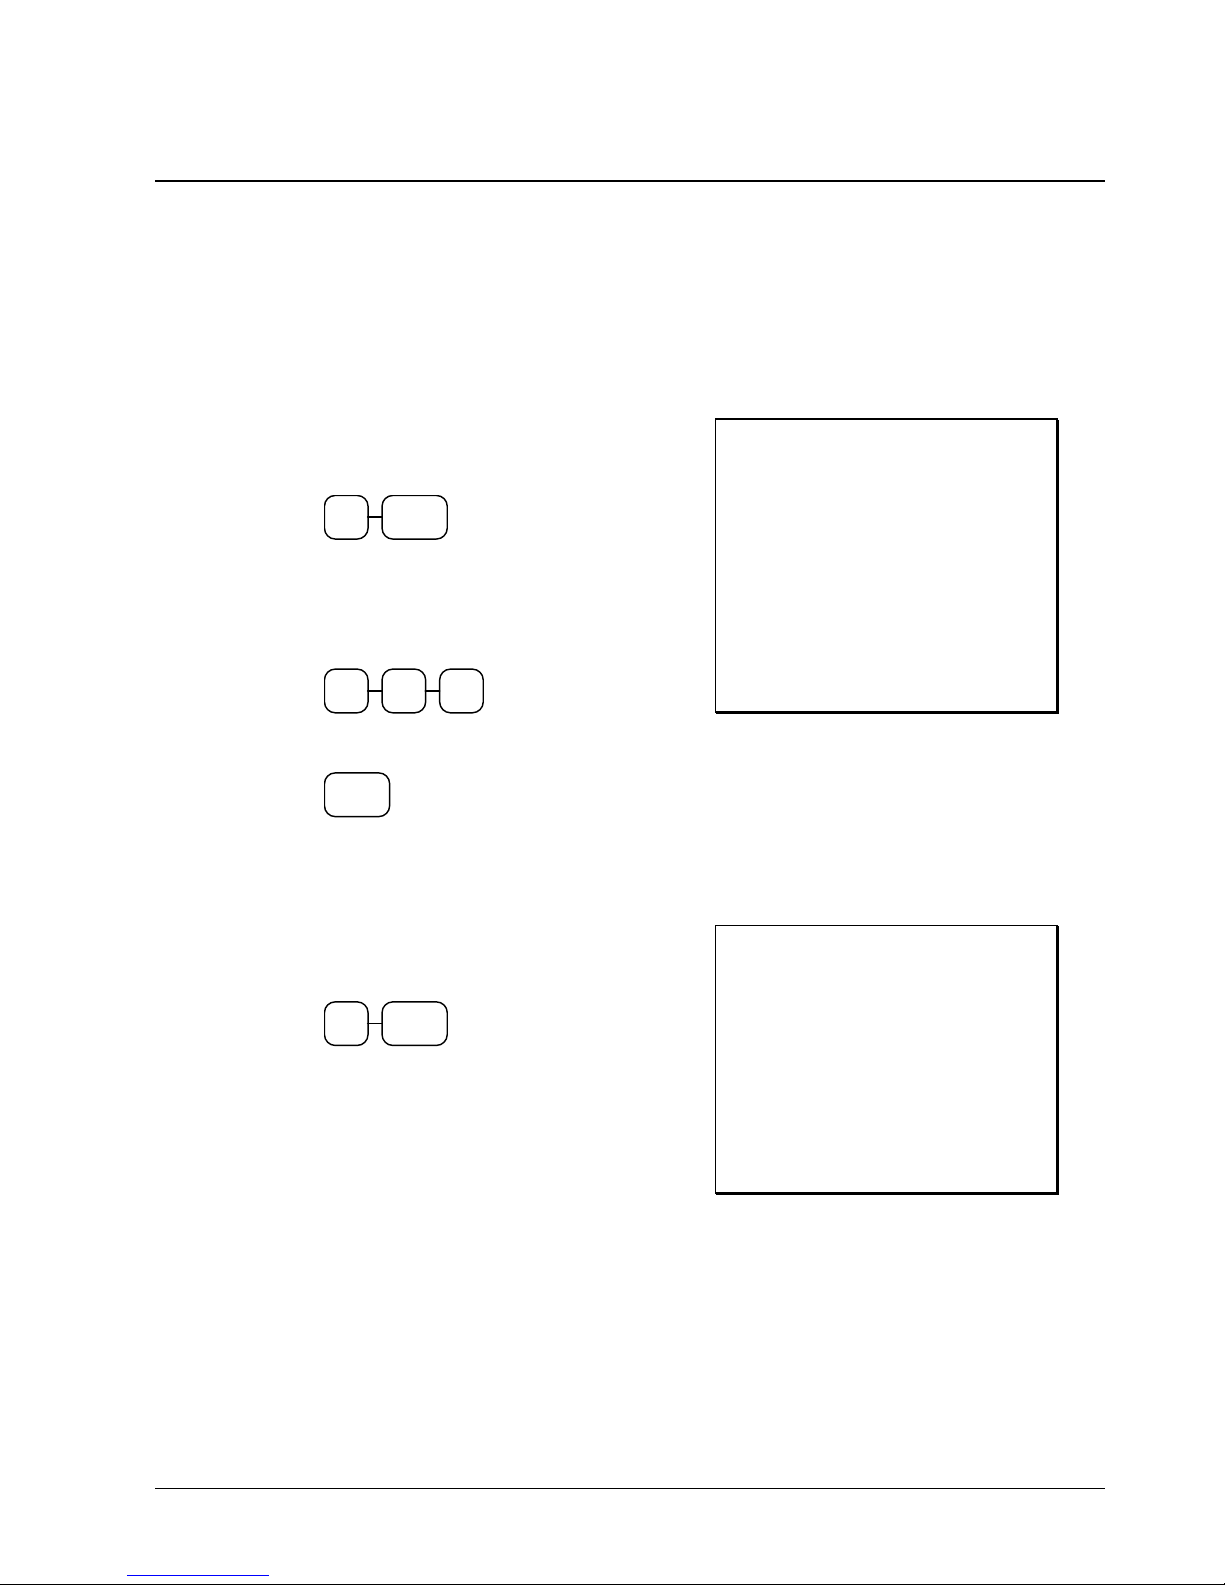
PLU (Price Look Up) Registrations
Without otherwise programming them, PLUs operate with open, non-taxable status. PLUs may
require further programming. See "PLU Programming" on page 89 to program PLU descriptors and
options.
Open PLU
1. Enter the PLU number, press the PLU key.
For example, enter:
2 PLU
2. The display will prompt "ENTER PRICE".
Enter an amount on the ten key pad. Do
not use the decimal key. For example, for
$2.99, enter:
2 9 9
3. Press the PLU key again.
PLU
Preset Price PLU
1. Enter the PLU number, press the PLU key.
For example, enter:
1 PLU
2.
THANK-YOU
CALL AGAIN
DATE 08/15/1999 SUN
PLU2 T1 $2.99
TAX1 AMT $0.18
TOTAL 3.17
CASH 3.17
ANNIE NO. 000001
TIME 11:27AM 01
THANK-YOU
CALL AGAIN
DATE 08/15/1999 SUN
PLU1 $1.29
TOTAL $1.29
CASH $1.29
ANNIE NO. 000001
TIME 11:27AM 01
Samsung ER-550 Electronic Cash Register Operating Instructions 39
Page 42
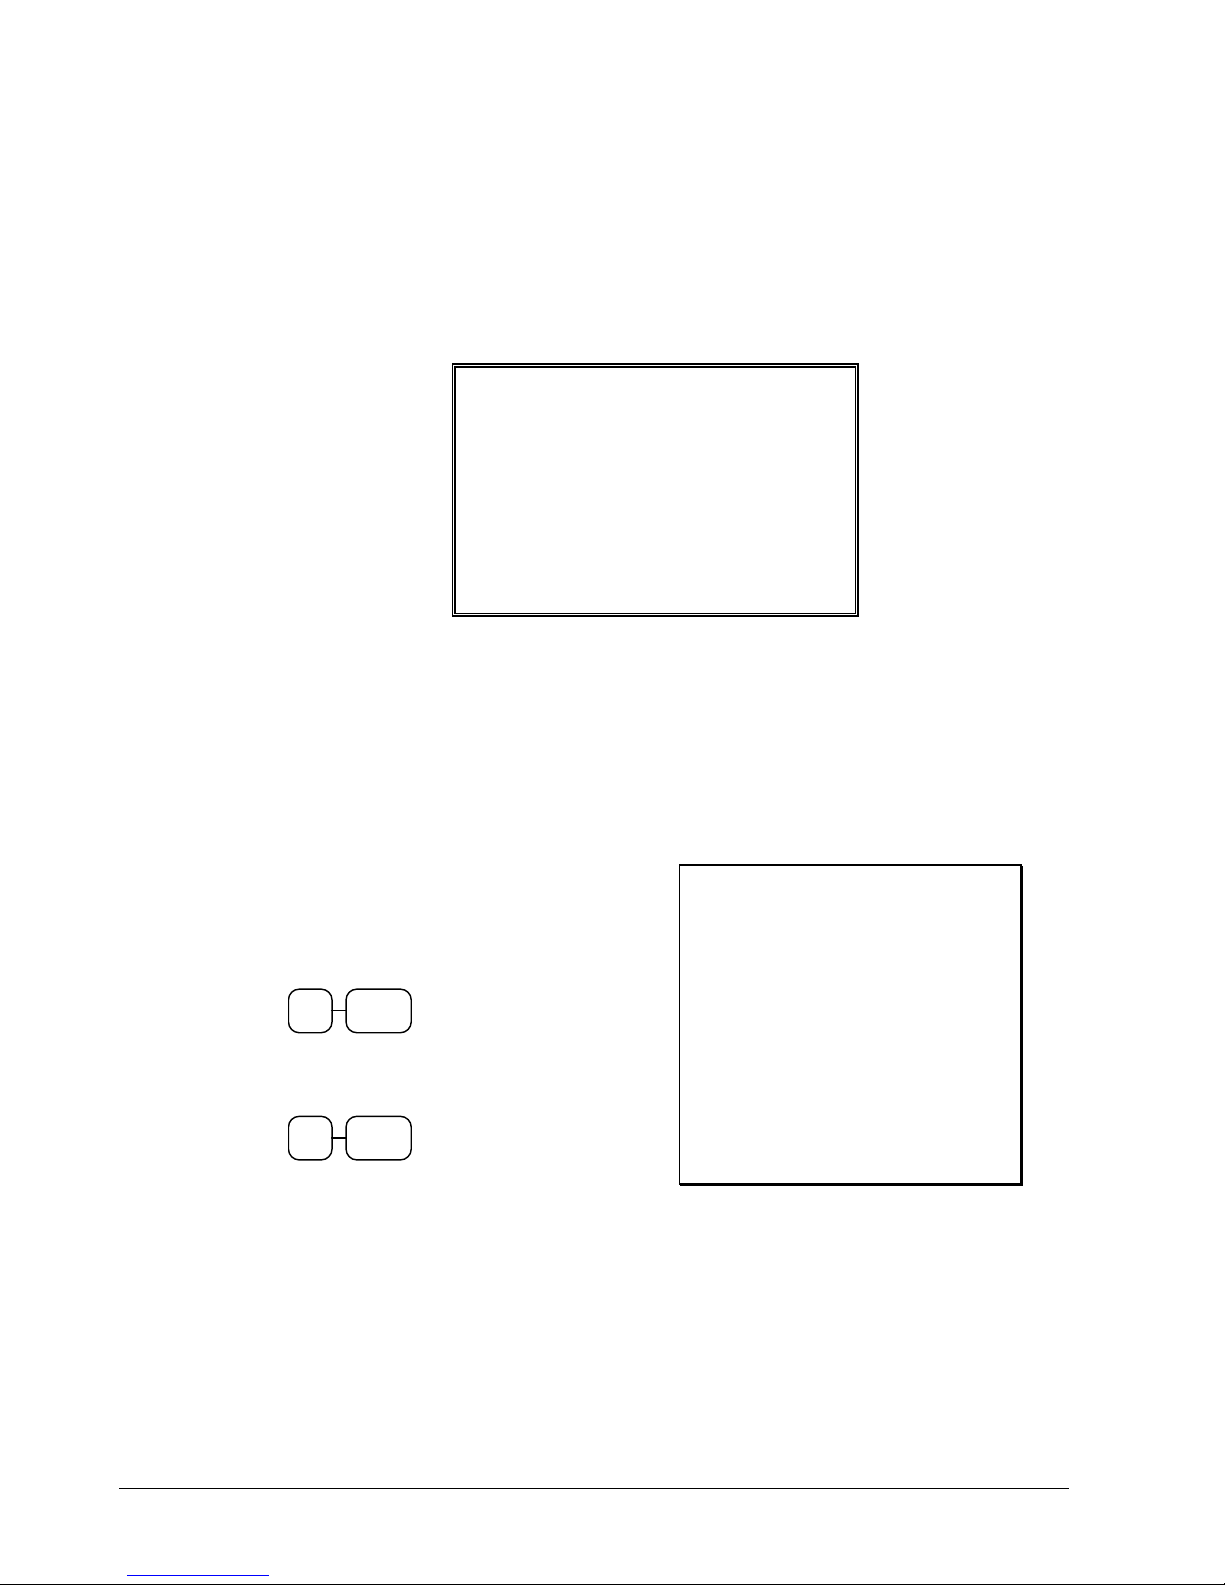
Looking up a PLU Number
If you do not know a PLU number, you can find the PLU number by viewing it on the screen.
1. Press the PLU key to display the beginning of the PLU list. The first seven PLUs will display
with their descriptor and price. Press PAGE DOWN to view the next seven PLUs, press PAGE
UP to view the previous seven PLUs. (The first 70 PLUs can be viewed in this method.)
01 PLU 1 1.29
02 PLU 2 0.00
03 PLU 3 2.99
04 PLU 4 0.00
05 PLU 5 0.00
06 PLU 6 0.00
07 PLU 7 0.00
2. When you have found the appropriate PLU number, register it as you would any open or preset
PLU.
PLU Multiplication
When several of the same items are to be entered into the same PLU, you can use multiplication.
You can enter a quantity (1 to 999.999) using the @/FOR key. You can multiply open or preset
PLUs.
1. Enter the quantity of items being
purchased, press the @/FOR key. For
example, enter 4 on the numeric key pad
and press the @/FOR key:
4
FOR
2. Enter the PLU number, press the PLU key.
For example, enter:
1 PLU
@/
THANK-YOU
CALL AGAIN
DATE 08/15/1999 SUN
4X @1.99
PLU1 T1 $7.96
TAX1 AMT $0.48
TOTAL $8.44
CASH $8.44
ANNIE NO. 000001
TIME 11:27AM 01
40 Operating Instructions Samsung ER-550 Electronic Cash Register
Page 43
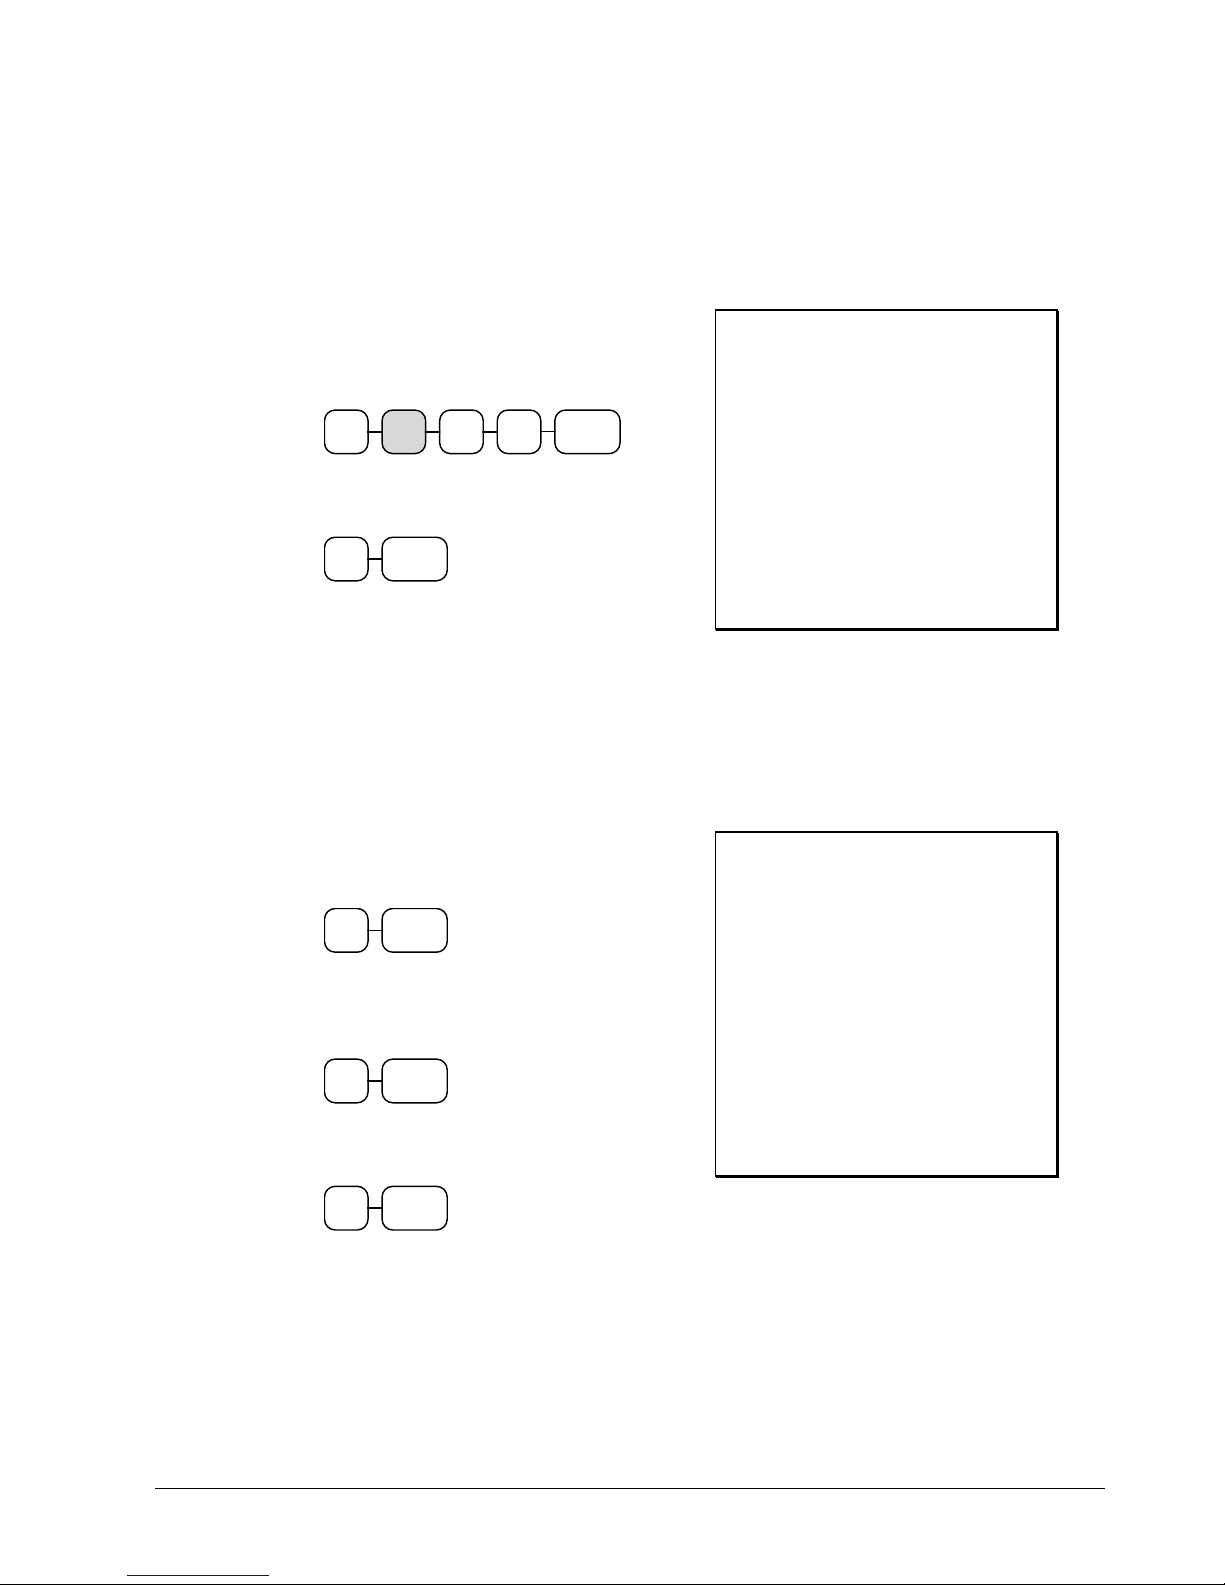
PLU Multiplication with Decimal Point
If you are selling items by weight, or if you are selling yard goods, you can multiply a fraction of a
unit.
1. Enter the quantity with the decimal point,
press the @/FOR key. For example, for 3
pounds of produce, enter:
3 . 7
2. Enter the PLU number, press the PLU key.
For example, enter:
3 PLU
Split Pricing PLU
When items are priced in groups, i.e. 3 for $1.00, you can enter the quantity purchased and let the
register calculate the correct price.
1. Enter the quantity purchased, press the
@/FOR key. For example, enter:
2
2. Enter the quantity of the group price, press
the @/FOR key. For example, if the items
are priced 3 for $1.00, enter:
3
3. Enter the PLU number, press the PLU key.
For example, enter:
3 PLU
@/
FOR
@/
FOR
THANK-YOU
CALL AGAIN
DATE 08/15/1999 SUN
5
@/
FOR
3.75X @2.99
PLU3 T1 $11.21
TAX1 AMT $0.67
TOTAL $11.88
CASH $11.88
ANNIE NO. 000001
TIME 11:27AM 01
THANK-YOU
CALL AGAIN
DATE 08/15/1999 SUN
2/3FOR @2.99
PLU3 T1 $1.99
TAX1 AMT $0.12
TOTAL $2.11
CASH $2.11
ANNIE NO. 000001
TIME 11:27AM 01
Samsung ER-550 Electronic Cash Register Operating Instructions 41
Page 44
Shifting or Exempting Tax
Shifting Tax
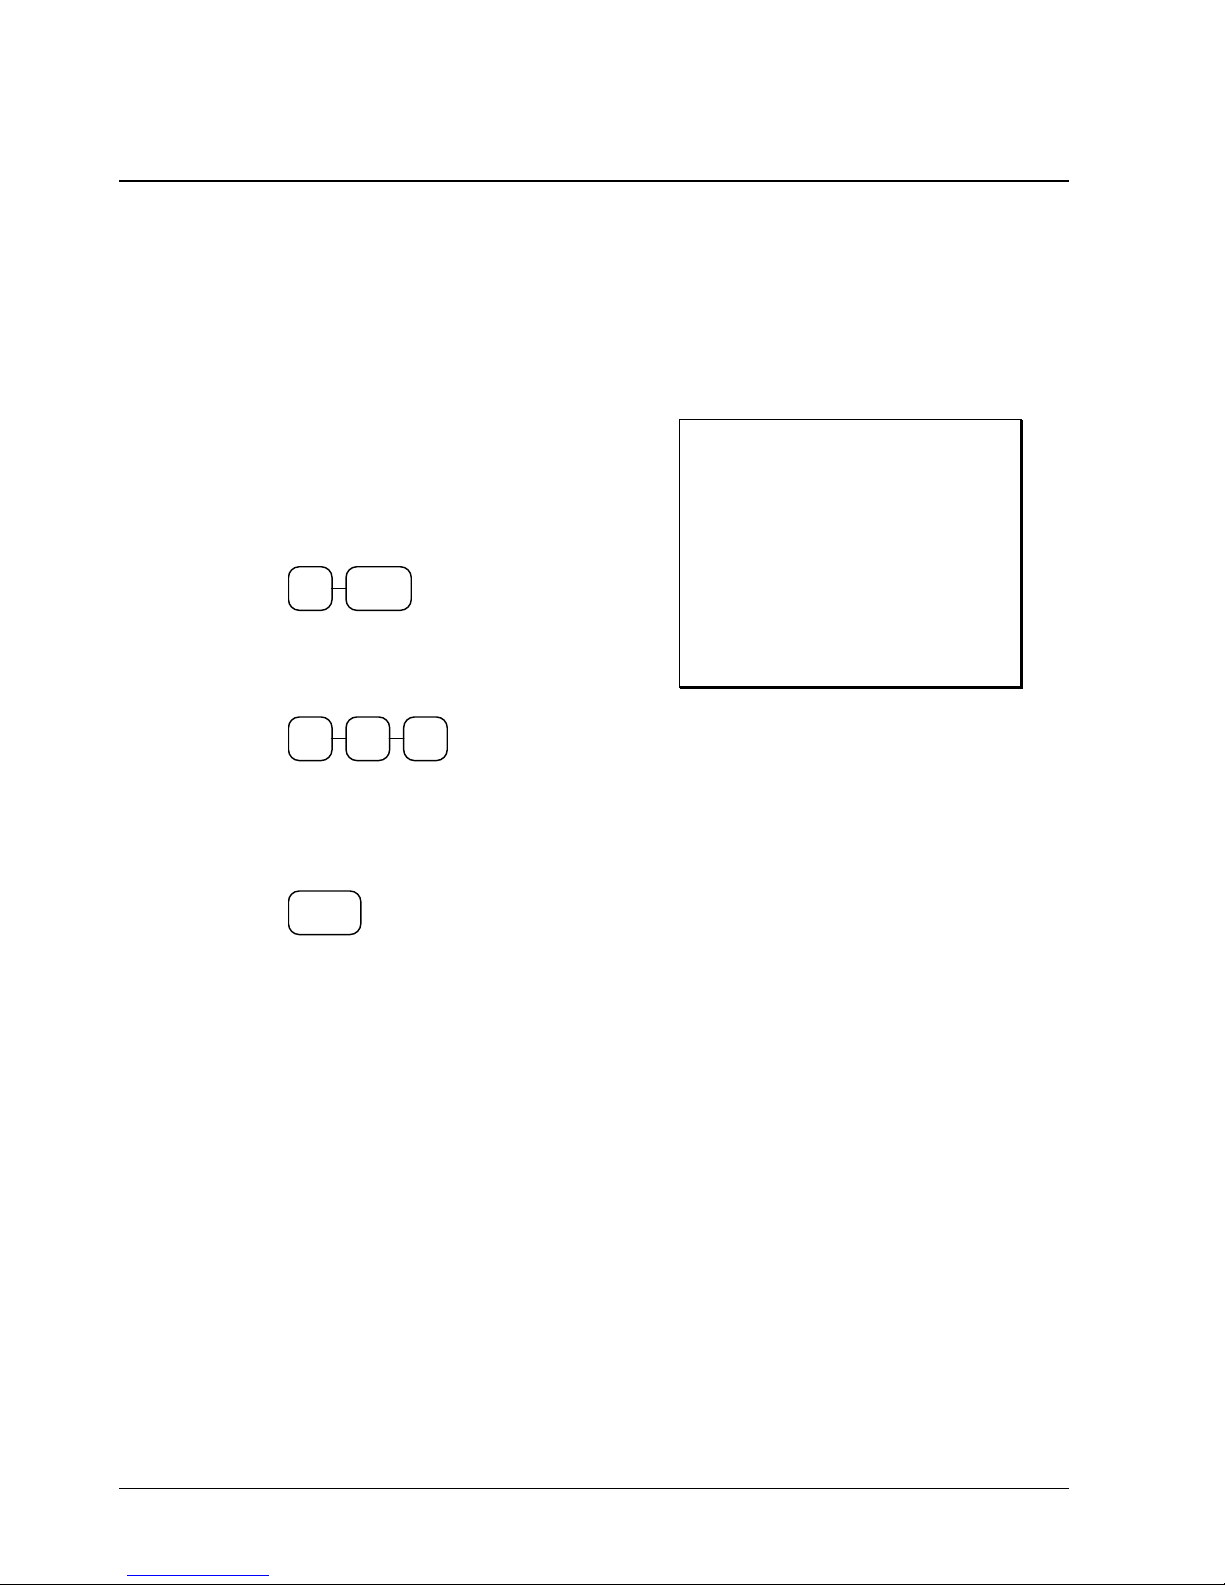
Taxable Departments and PLUs can be programmed to automatically add the appropriate tax or
taxes. Occasionally, you may need to sell a normally taxable item without tax, or a normally taxable
item with tax. You can perform this tax shifting with the TAX SHIFT key.
1. Enter the number for the tax you wish to
shift. Press 1 to shift tax 1, press 2 to shift
tax 2, press 3 to shift tax 3, or press 4 to
shift tax 4. Press the TAX SHIFT key.
For example, shift tax 1:
TAX
1
SHIFT
2. Enter an amount on the ten key pad. Do
not use the decimal key. For example, for
$2.99, enter:
2 9 9
3. Press a department key. For example, press
department 1/13. If department 1/13 is
normally taxable by tax 1, the registration
will be non-taxable.
1/13
THANK-YOU
CALL AGAIN
DATE 08/15/1999 SUN
DEPT.1 $2.99
TOTAL $2.99
CASH $2.99
ANNIE NO. 000001
TIME 11:27AM 01
42 Operating Instructions Samsung ER-550 Electronic Cash Register
Page 45
Exempting Tax
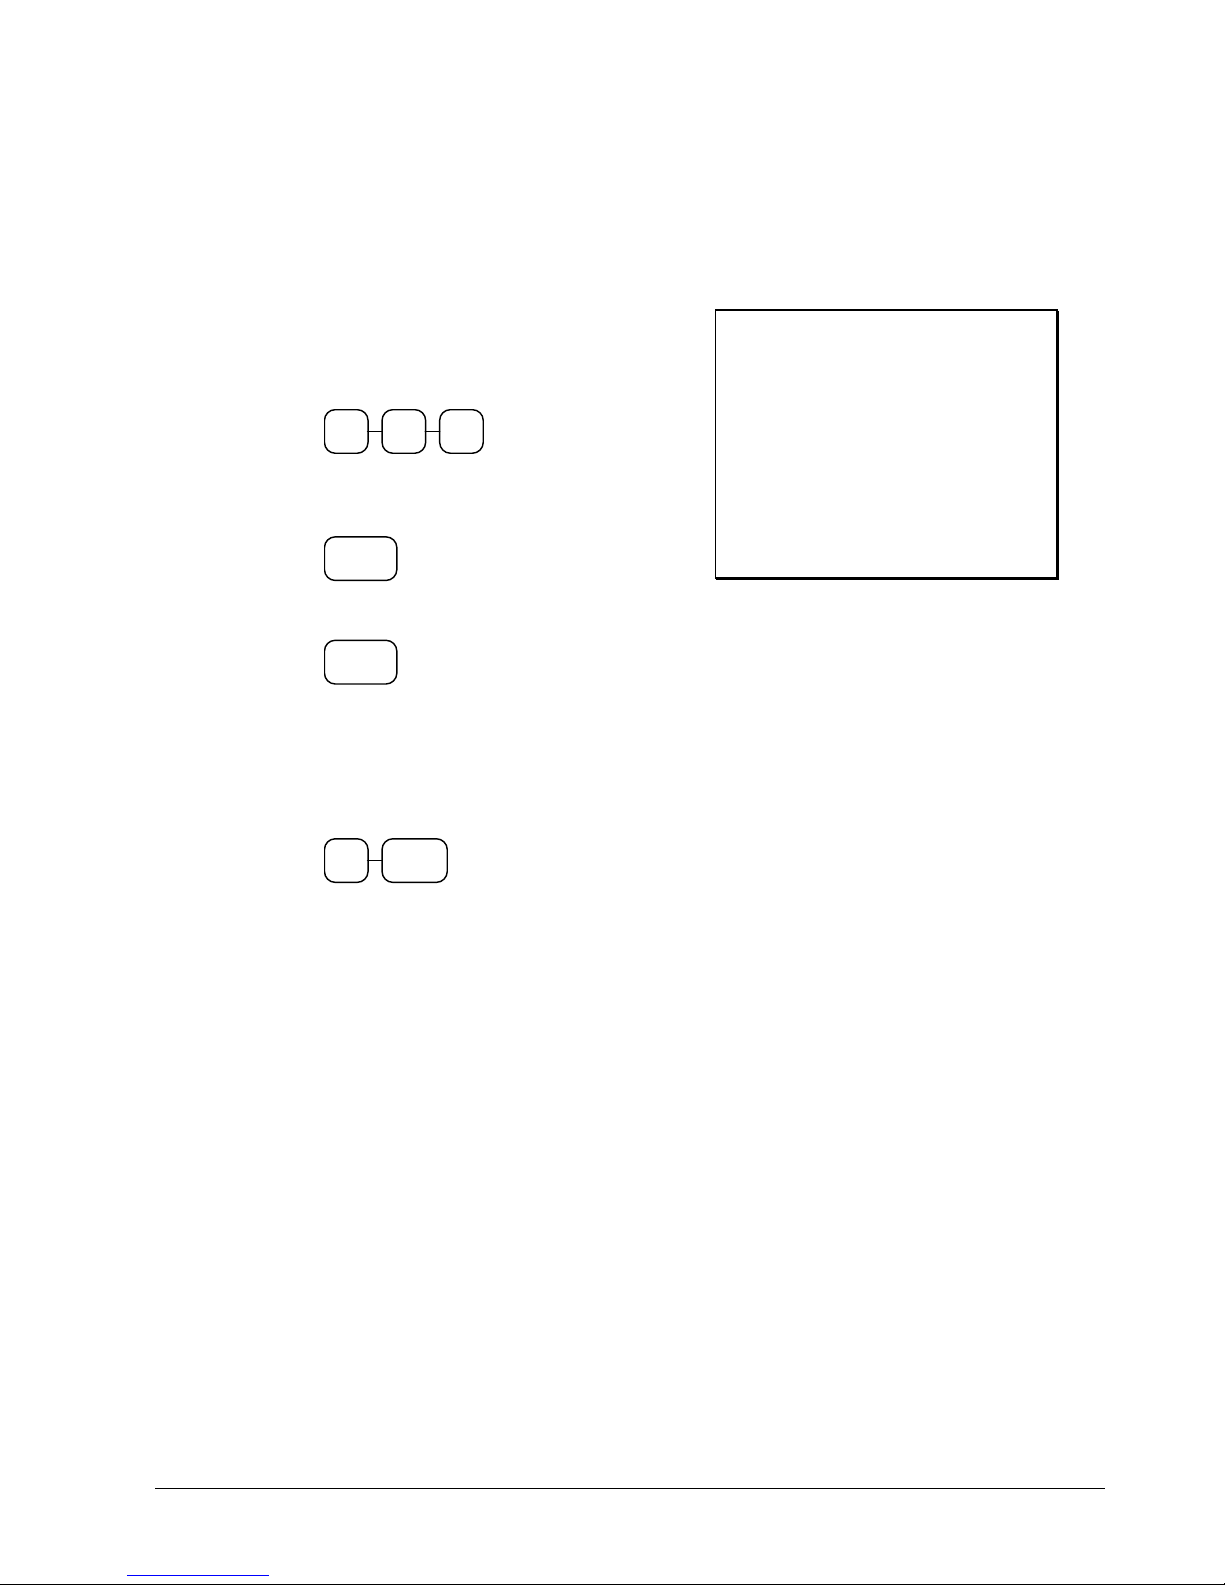
Occasionally, you may need to exempt tax from an entire sale. For example, you might remove all
state and local taxes when you sell to a church or charitable in stitution.
1. Enter an amount on the ten key pad. Do
not use the decimal key. For example, for
$2.99, enter:
2 9 9
2. Press a taxable department key. For
example, press department 1/13:
1/13
3. Press Subtotal:
SUB
TOTAL
4. Enter the number for the tax you wish to
exempt. Press 1 to exempt tax 1, press 2 to
exempt tax , press 3 to exempt tax 3, or
press 4 to exempt tax 4. Press the TAX
SHIFT key. For example, exempt tax 1:
TAX
1
SHIFT
5. Total the sale with CASH/TEND,
CHECK TEND, or a miscellaneous
tender. The sale will not include tax 1.
THANK-YOU
CALL AGAIN
DATE 08/15/1999 SUN
DEPT.1 T1 $2.99
TOTAL $2.99
CASH $2.99
ANNIE NO. 000001
TIME 11:27AM 01
Samsung ER-550 Electronic Cash Register Operating Instructions 43
Page 46
Percent Key Operations
A total of four % functions are available. %1 is accessed through the keyboard key; or the %1
function and the remaining % functions can be accessed through the MORE KEYS key. Each
function is individually programmable to add or subtract, from an individual item or from a sale
total, amounts (coupons) or percentages. You can also program the percentage key taxable or nontaxable, so that sales taxes are calculated on the net, or the gross amount of the item or sale. You can
also program preset prices or percentages.
The operation examples in this section show the percentage key in a variety of configurations. See
"%1, %2, %3, %4 Function Options" on page 114 to assign a specific function to each percentage
key.
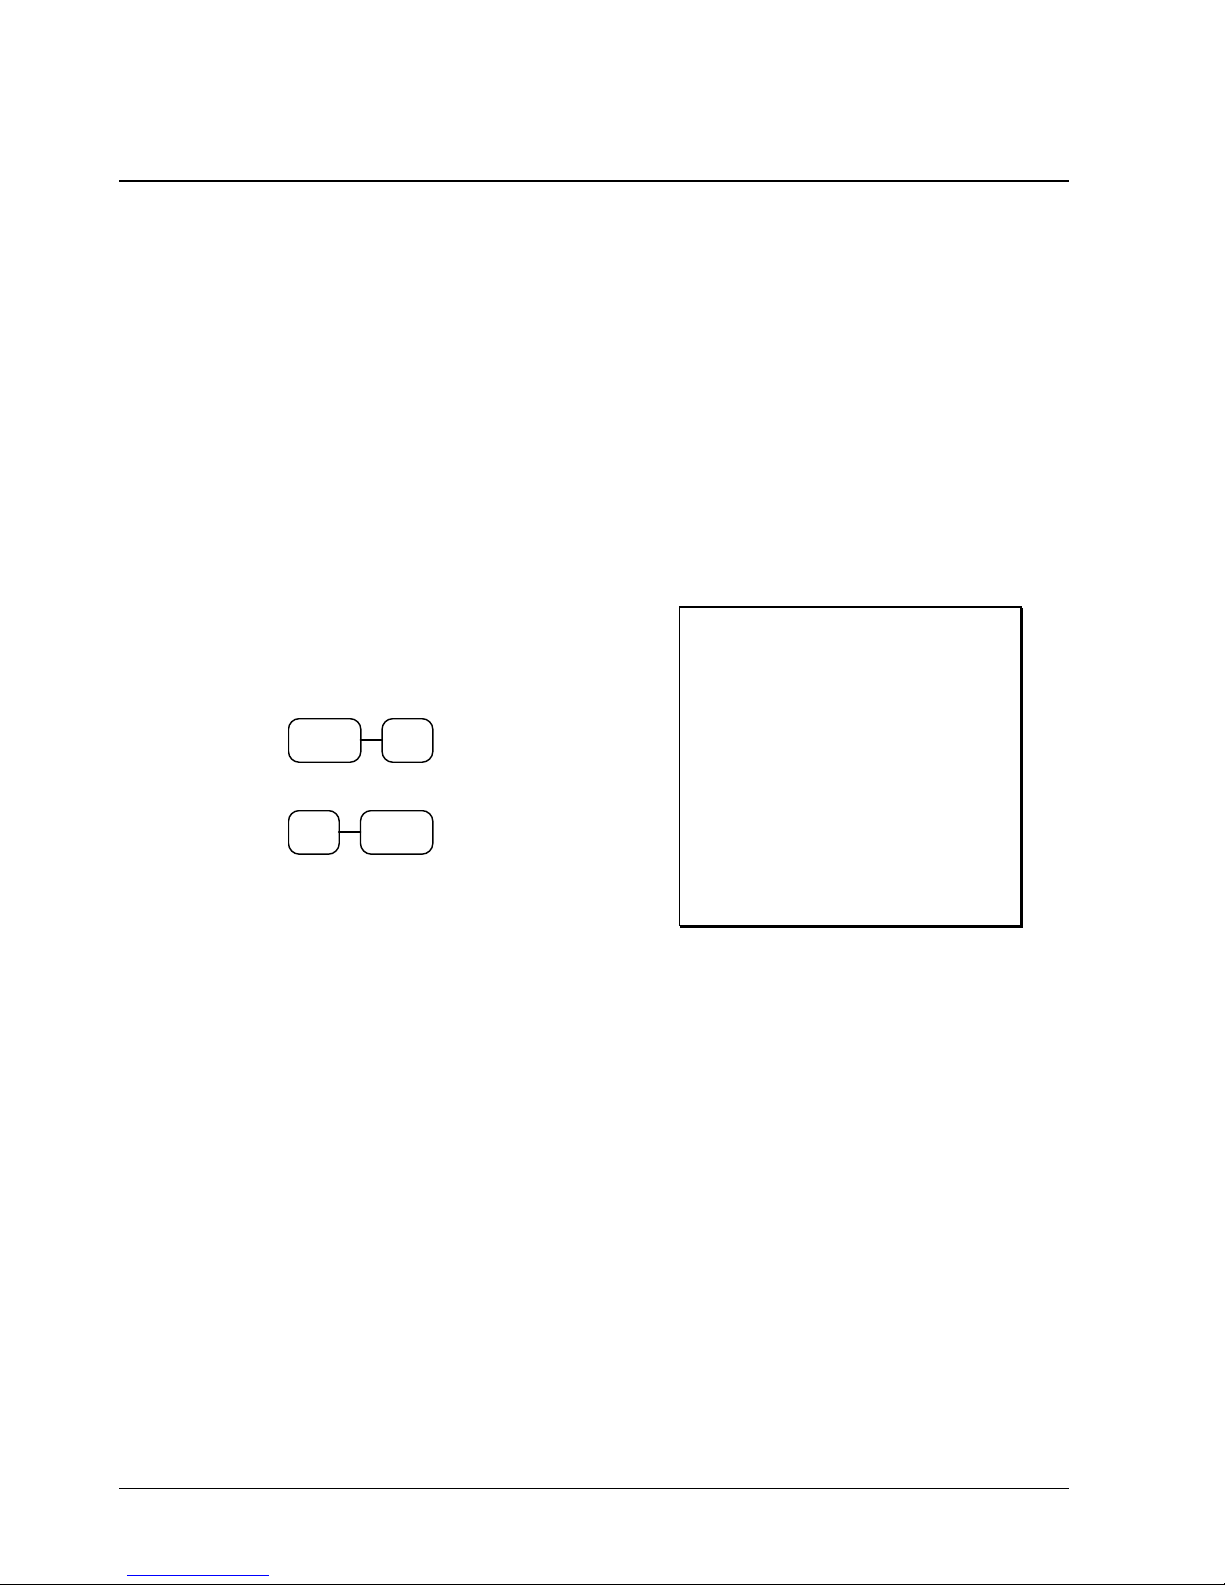
Preset Percent Discount on a Department or PLU
In this example the-%1 function is preset with a rate of 10 %.
1. Register the item.
2. Press the MORE KEYS key. From the
menu, press 1 to select the %1 function:
MORE
KEYS
or, press 1 then press MORE KEYS:
1
3. The discount is automatically subtracted.
1
MORE
KEYS
THANK-YOU
CALL AGAIN
DATE 08/15/1999 SUN
DEPT.2 $10.00
% 1 -10.000%
AMOUNT -1.00
TOTAL $9.00
CASH $9.00
ANNIE NO. 000001
TIME 11:27AM 01
44 Operating Instructions Samsung ER-550 Electronic Cash Register
Page 47
Enter a Percent on a Department or PLU
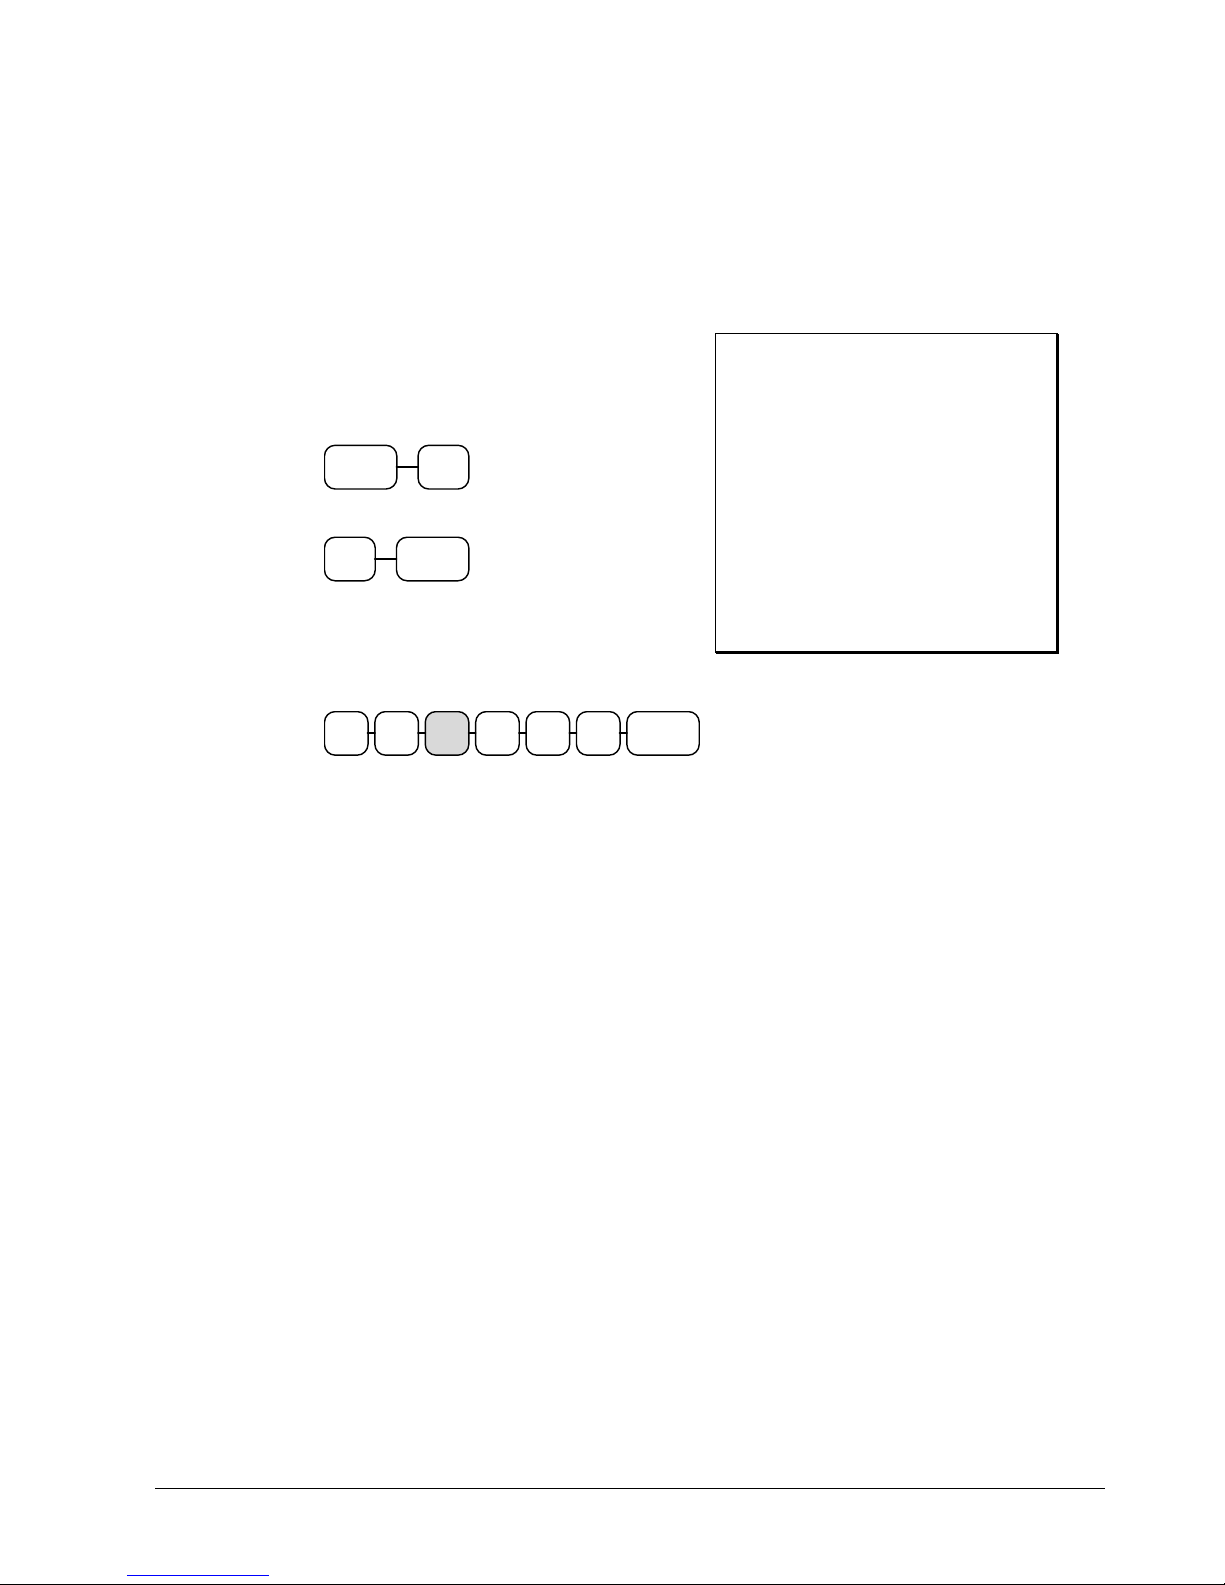
You can also operate the percentage functions by entering the percentage of the discount or
surcharge. If necessary, you can enter a fractional percentage up two 3 digits beyond the decimal
(i.e. 99.999%).
1. Register the discounted item.
2. Press the MORE KEYS key. From the
menu, press 1 to select the %1 function:
MORE
KEYS
1
or, press 1 then press MORE KEYS:
1
MORE
KEYS
3. Enter the percentage, press the ENTER
(CASH TEND) key. If you are entering a
fraction of a percent, you must use the
decimal key. For example, for off enter:
3 . 33 3 3
CASH/
TEND
4. The discount is automatically subtracted.
THANK-YOU
CALL AGAIN
DATE 08/15/1999 SUN
DEPT.2 $10.00
% 1 -33.333%
AMOUNT -3.33
TOTAL $6.67
CASH $6.67
ANNIE NO. 000001
TIME 11:27AM 01
Samsung ER-550 Electronic Cash Register Operating Instructions 45
Page 48
Percent on Sale Total
In this example a surcharge of 15% is applied.
1. Register the items you wish to sell.
2. Press SBTL/MORE TENDERS:
SBTL
MORE
TENDERS
3. Press the MORE KEYS key. From the
menu, press 1 to select the %1 function:
MORE
KEYS
1
or, press 1 then press MORE KEYS:
1
MORE
KEYS
4. Enter the percentage, press the ENTER
(CASH TEND) key. For example, for
15% enter:
CASH/
51
TEND
5. The surcharge is automatically added.
THANK-YOU
CALL AGAIN
DATE 08/15/1999 SUN
DEPT.2 $10.00
% 1 15.000%
AMOUNT $1.50
TOTAL $11.50
CASH $11.50
ANNIE NO. 000001
TIME 11:27AM 01
46 Operating Instructions Samsung ER-550 Electronic Cash Register
Page 49
Coupon on Sale (Vendor Coupon)
1. Register the items you wish to sell.
2. Press SBTL/MORE TENDERS:
SBTL
MORE
TENDERS
3. Press the MORE KEYS key. From the
menu, press 1 to select the %1 function:
MORE
KEYS
1
or, press 1 then press MORE KEYS:
1
MORE
KEYS
4. Enter the amount of the coupon, press the
ENTER (CASH TEND) key. For
example:
02 0
CASH/
TEND
5. The coupon is subtracted.
THANK-YOU
CALL AGAIN
DATE 08/15/1999 SUN
DEPT.2 $10.00
%1 -2.00
TOTAL $8.00
CASH $8.00
ANNIE NO. 000001
TIME 11:27AM 01
Samsung ER-550 Electronic Cash Register Operating Instructions 47
Page 50
Coupon on Item (Store Coupon)
1. Register the items you wish to sell.
2. Press SBTL/MORE TENDERS:
SBTL
MORE
TENDERS
3. Press the MORE KEYS key. From the
menu, press 1 to select the %1 function:
MORE
KEYS
1
or, press 1 then press MORE KEYS:
1
MORE
KEYS
4. Enter the amount of the coupon, press the
ENTER (CASH TEND) key. For
example:
02 0
CASH/
TEND
5. Press the department you wish the coupon
amount to be subtracted from.
THANK-YOU
CALL AGAIN
DATE 08/15/1999 SUN
DEPT.1 $10.00
DEPT.1 C -2.00
TOTAL $8.00
CASH $8.00
ANNIE NO. 000001
TIME 11:27AM 01
1/13
6. The coupon is automatically subtracted.
48 Operating Instructions Samsung ER-550 Electronic Cash Register
Page 51
Return Merchandise Registrations
If you wish to return or refund an item, select RETURN MERCHANDISE from the MORE KEYS
menu key, then re-enter any item. You can return merchandise as part of a sale, or you can return
merchandise as a separate transaction and return cash to the customer.
1. Press the MORE KEYS key. From the
menu, press 7 to select the RETURN
function:
MORE
KEYS
7
or, press 7 then press MORE KEYS:
7
MORE
KEYS
2. Enter the price of the item you wish to
return, then press the department key where
it was registered originally.
9 92
2/14
3. Total the sale with CASH/TEND,
CHECK TEND, or a miscellaneous tender
function.
THANK-YOU
CALL AGAIN
DATE 08/15/1999 SUN
RETURN *******************
DEPT.2 T1 -2.99
TAX1 AMT -0.18
TOTAL -3.17
CASH -3.17
ANNIE NO. 000001
TIME 11:27AM 01
Samsung ER-550 Electronic Cash Register Operating Instructions 49
Page 52
Voids and Corrections
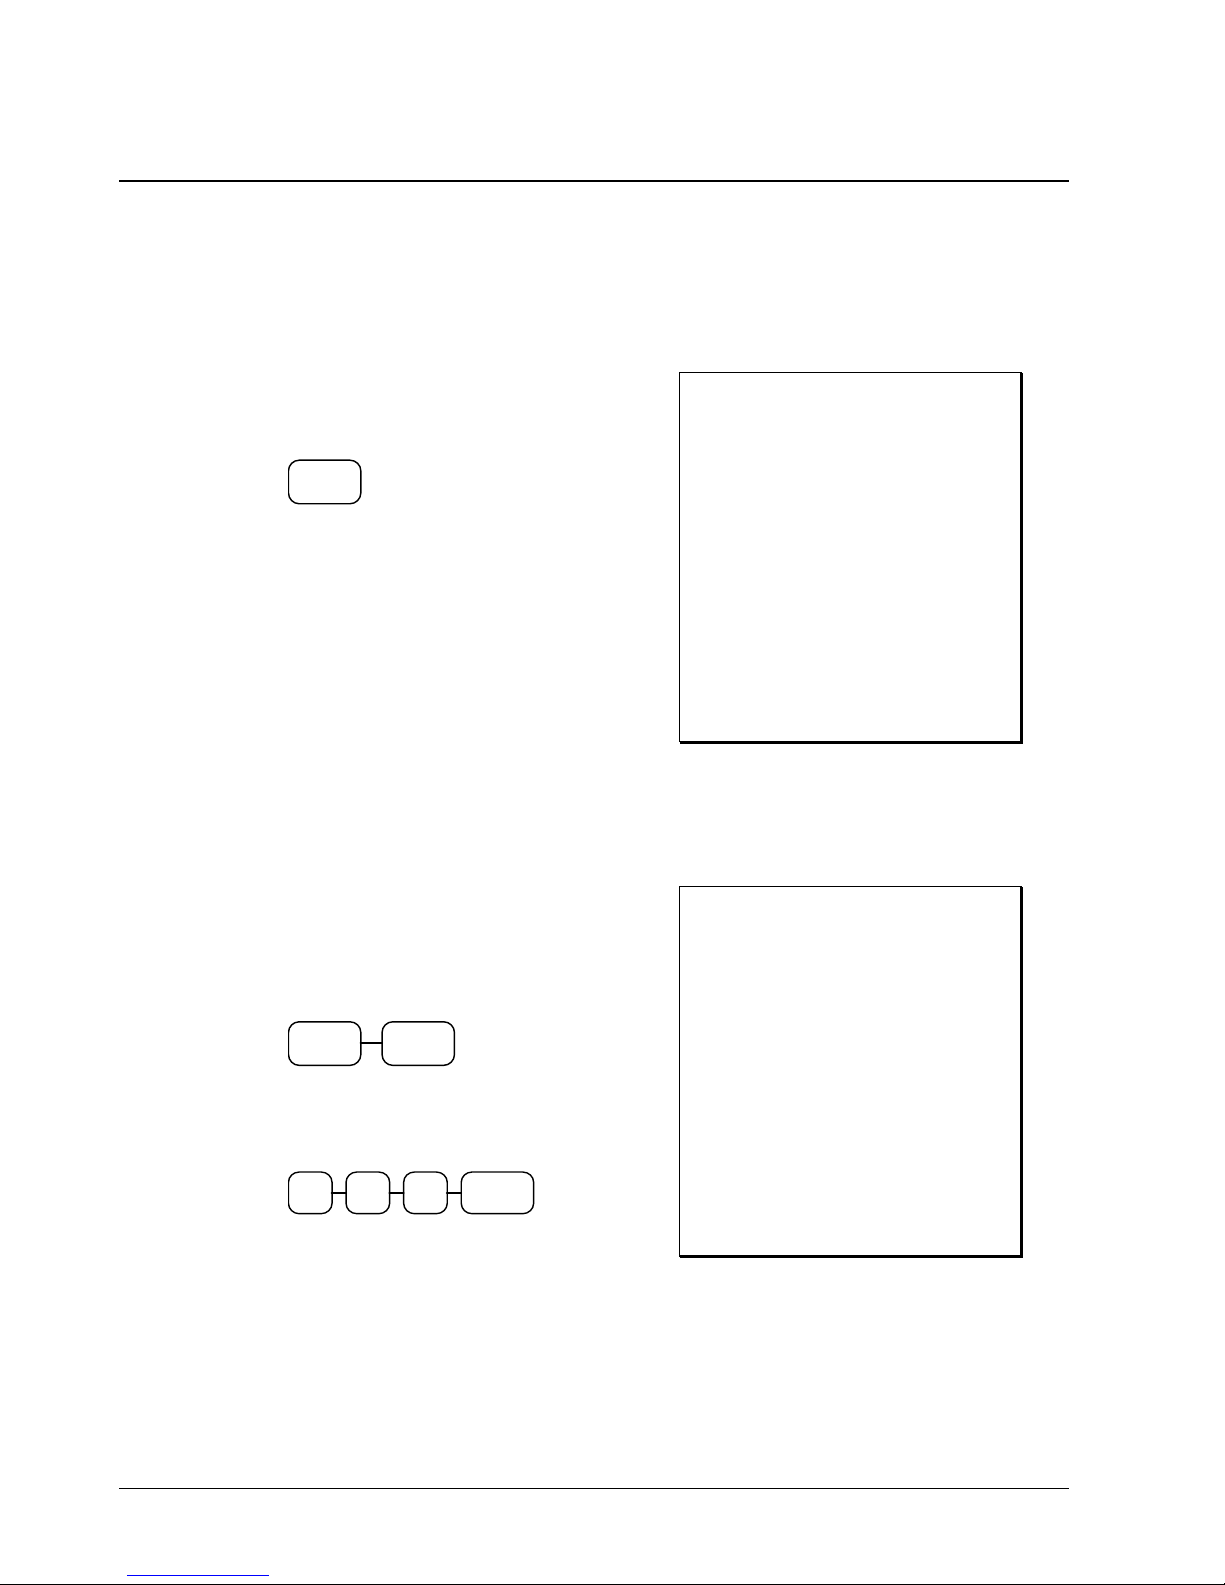
Void Last Item (Error Correction)
This function corrects the last item entered.
1. Register the item you wish to sell.
2. Press the VOID ITEM key.
VOID
ITEM
Void Previous Item
This function allows you to correct an item registered previously in a transaction.
1. Register an item. Then register a second
item.
2. To correct the first item, press CLEAR,
then press VOID ITEM:
CLEAR
3. Enter the price of the first item, then press
the department key where it was registered
originally.
2 91
VOID
ITEM
THANK-YOU
CALL AGAIN
DATE 08/15/1999 SUN
DEPT.1 T1 $2 29
DEPT.2 $1.29
ERR CORR ----------------DEPT.2 -1.29
TAX1 AMT $0.14
TOTAL $2.43
CASH $2.43
ANNIE NO. 000001
TIME 11:27AM 01
THANK-YOU
CALL AGAIN
DATE 08/15/1999 SUN
DEPT.2 $1.29
DEPT.1 T1 $2.29
VOID --------------------DEPT.2 -1.29
TAX1 AMT $0.14
TOTAL $2.43
CASH $2.43
2/14
ANNIE NO. 000001
TIME 11:27AM 01
50 Operating Instructions Samsung ER-550 Electronic Cash Register
Page 53

Cancel
The CANCEL key allows you to stop any transaction. Anything registered within the transaction
before the CANCEL key is pressed is automatically corrected.
1. Register the items you wish to sell.
2. Press the CANCEL key.
CANCEL
Void Position Operations
You can use the VOID control lock position to correct any complete transaction. To correct any
transaction:
1. Turn the control lock to the VOID position.
2. Enter the transaction you wish to correct
exactly as it was entered originally in the
REGISTER control lock position. You
can enter discounts, voids, returns, tax
exemptions or any other function.
3. All totals and counters are corrected as if
the original transaction did not take place.
THANK-YOU
CALL AGAIN
DATE 08/15/1999 SUN
DEPT.1 T1 $2.29
DEPT.2 -0.50
CANCEL *******************
ANNIE NO. 000001
TIME 11:27AM 01
THANK-YOU
CALL AGAIN
DATE 08/15/1999 SUN
VOID MODE ****************
DEPT.1 T1 -2.29
DEPT.2 -1.00
TAX1 AMT -0.14
TOTAL -3.43
CASH -3.43
ANNIE NO. 000001
TIME 11:27AM 01
Samsung ER-550 Electronic Cash Register Operating Instructions 51
Page 54
No Sale Operations
Open Drawer
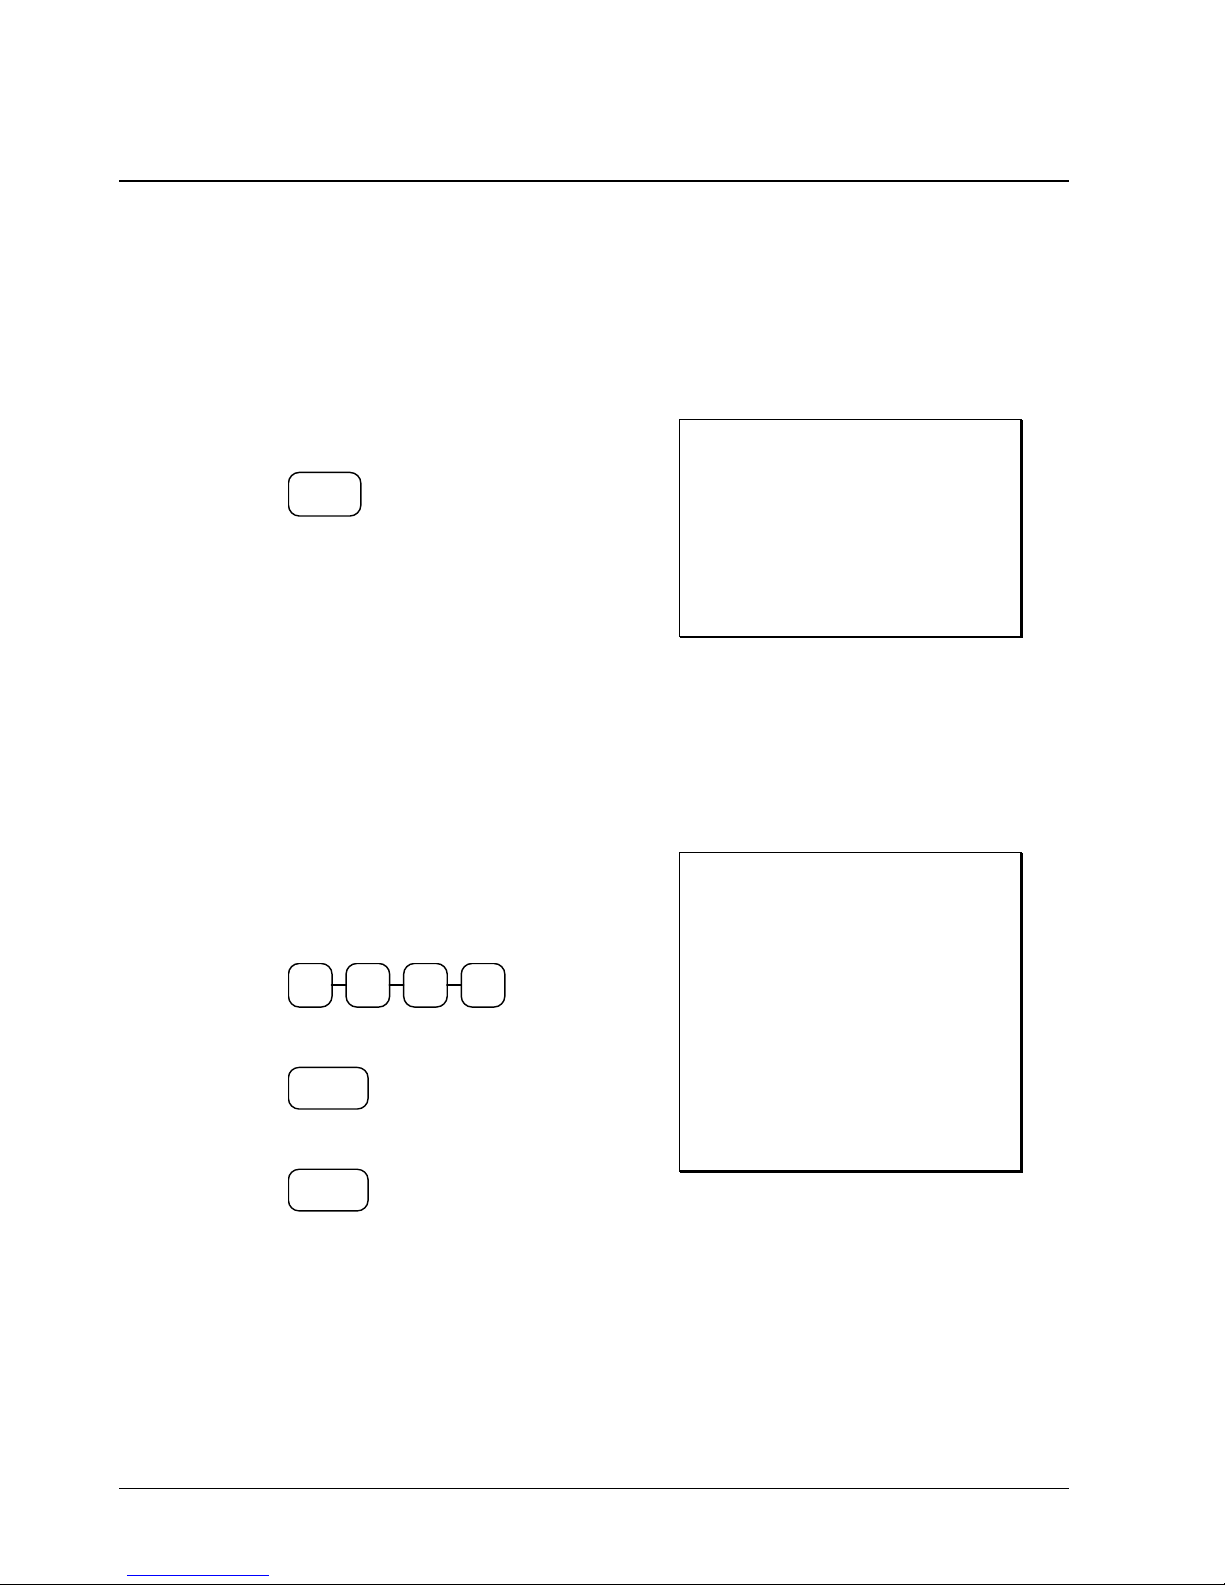
The #/NO SALE key will open the cash drawer when you have not already started a transaction.
The no sale function can be disabled through programming, see "Function Key Programming" on
page 112.
1. Press #/NO SALE:
#/NO
SALE
2. The drawer will open and the receipt will
print as in the example on the right.
Non Add Number
You can also use the #/NO SALE key to print any number (up to 8 digits) on the printer paper. You
can enter the number any time during a transaction. For example, if you wish to record a checking
account number, enter the number and press the #/NO SALE key before totaling the sale with the
CHECK TEND key.
1. Register the items you wish to sell.
2. Enter the number you wish to record, for
example enter:
3. Press #/NO SALE:
#/NO
SALE
4. Press CHECK TEND:
CHECK
TEND
THANK-YOU
CALL AGAIN
DATE 08/15/1999 SUN
NO SALE -------------ANNIE NO. 000001
TIME 11:27AM 01
THANK-YOU
CALL AGAIN
DATE 08/15/1999 SUN
2 3 41
DEPT.1 T1 $2.99
NON-ADD# 1234
TAX1 AMT $0.18
TOTAL $3.17
CHECK $3.17
ANNIE NO. 000001
TIME 11:27AM 01
52 Operating Instructions Samsung ER-550 Electronic Cash Register
Page 55
S
/
S
/
Received On Account Operations
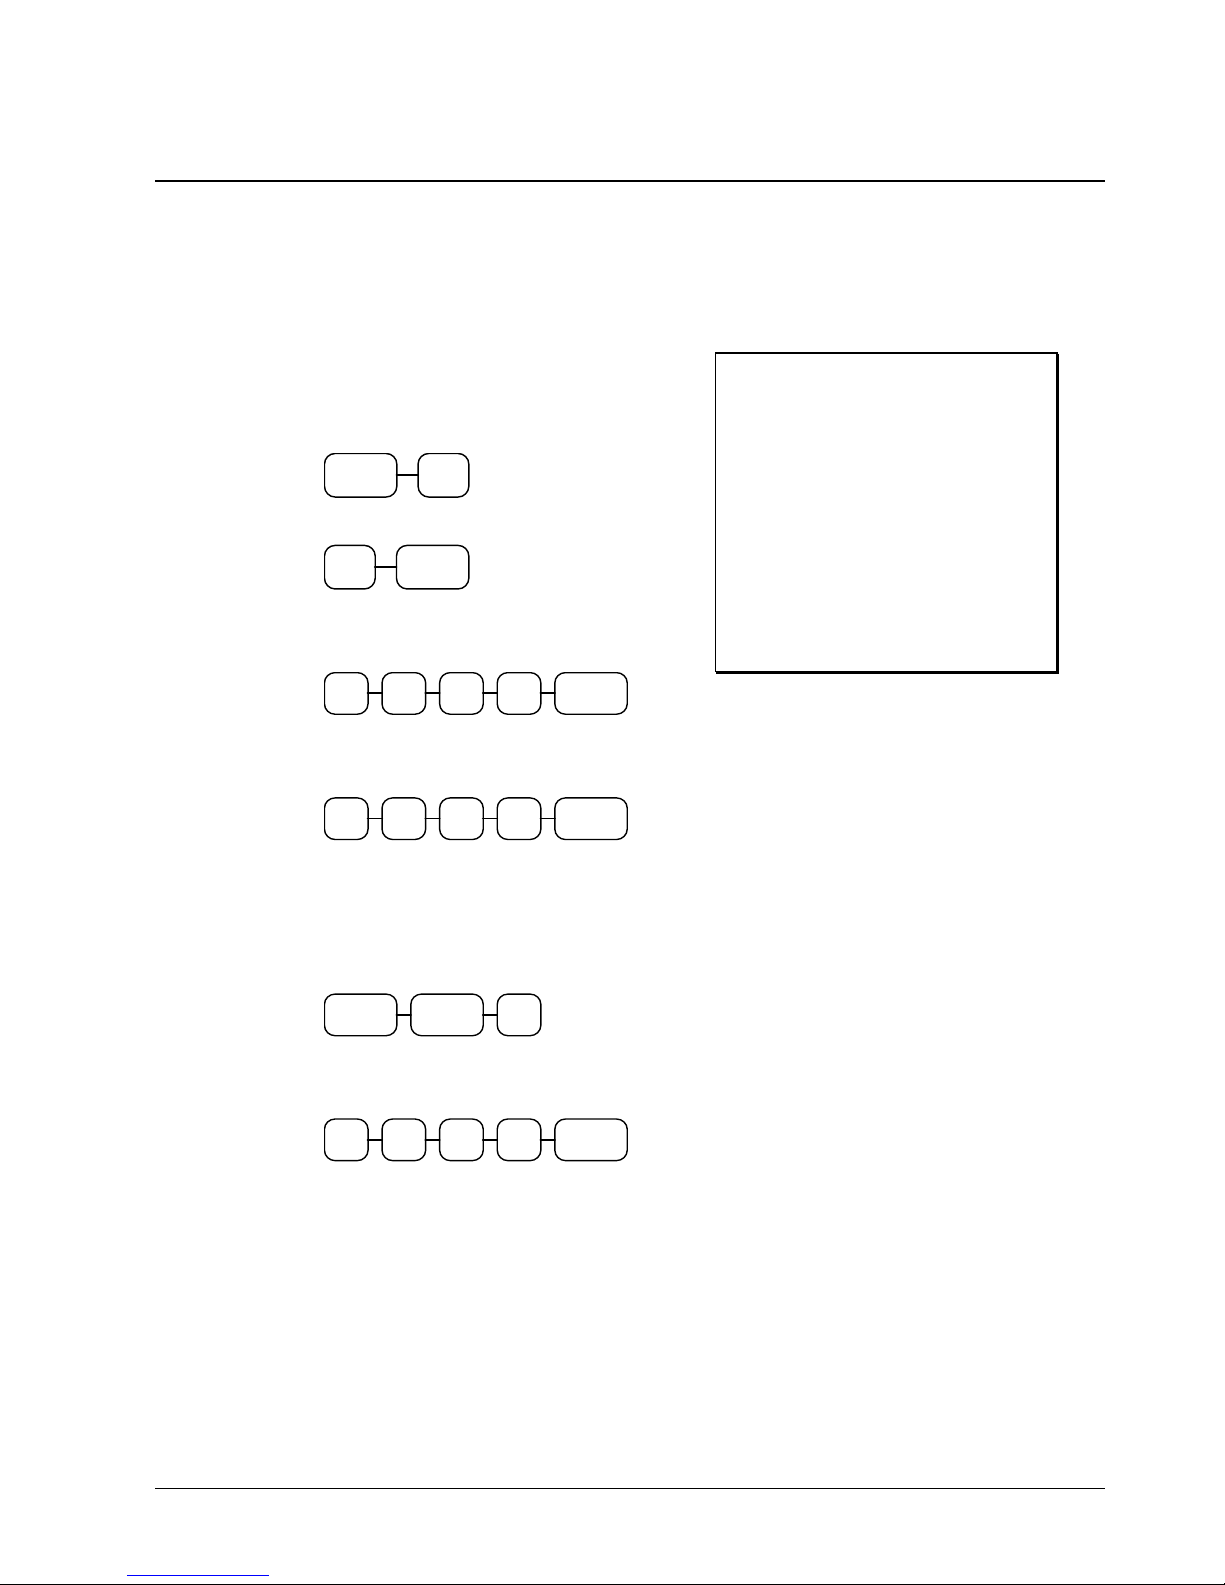
You can use the REC ON ACCT. (received on account) function to accept cash into the cash
drawer when you are not actually selling merchandise. For example, use REC ON ACCT. to accept
payments for previously sold merchandise, or record loans to the cash drawer.
1. Press the MORE KEYS key. From the
menu, press 5 to select the REC ON
ACCT. function:
MORE
KEYS
5
or, press 5 then press MORE KEYS:
5
MORE
KEYS
2. Enter the amount of cash received, Press
CASH/TEND.
0 001
CASH/
TEND
3. Enter the check amount received, Press
CHECK TEND.
0 001
CHECK
TEND
4. Press the SBTL/MORE TENDERS key
once to display the subtotal, press the
SBTL/MORE TENDERS key again to
display the more tenders menu. Press 1 to
select MISCTND 1.
BTL
MORE
TENDERS
BTL
MORE
TENDERS
1
5. Enter the miscellaneous tender amount
received.
0 001
CASH/
TEND
6. You can continue to itemize receipts, or
you can finalize by pressing CASH TEND.
THANK-YOU
CALL AGAIN
DATE 08/15/1999 SUN
RECD ON ACCT.
CASH $10.00
CHECK $10.00
MISCTND 1 $10.00
RECD ON ACCT. $30.00
ANNIE NO. 000001
TIME 11:27AM 01
Samsung ER-550 Electronic Cash Register Operating Instructions 53
Page 56
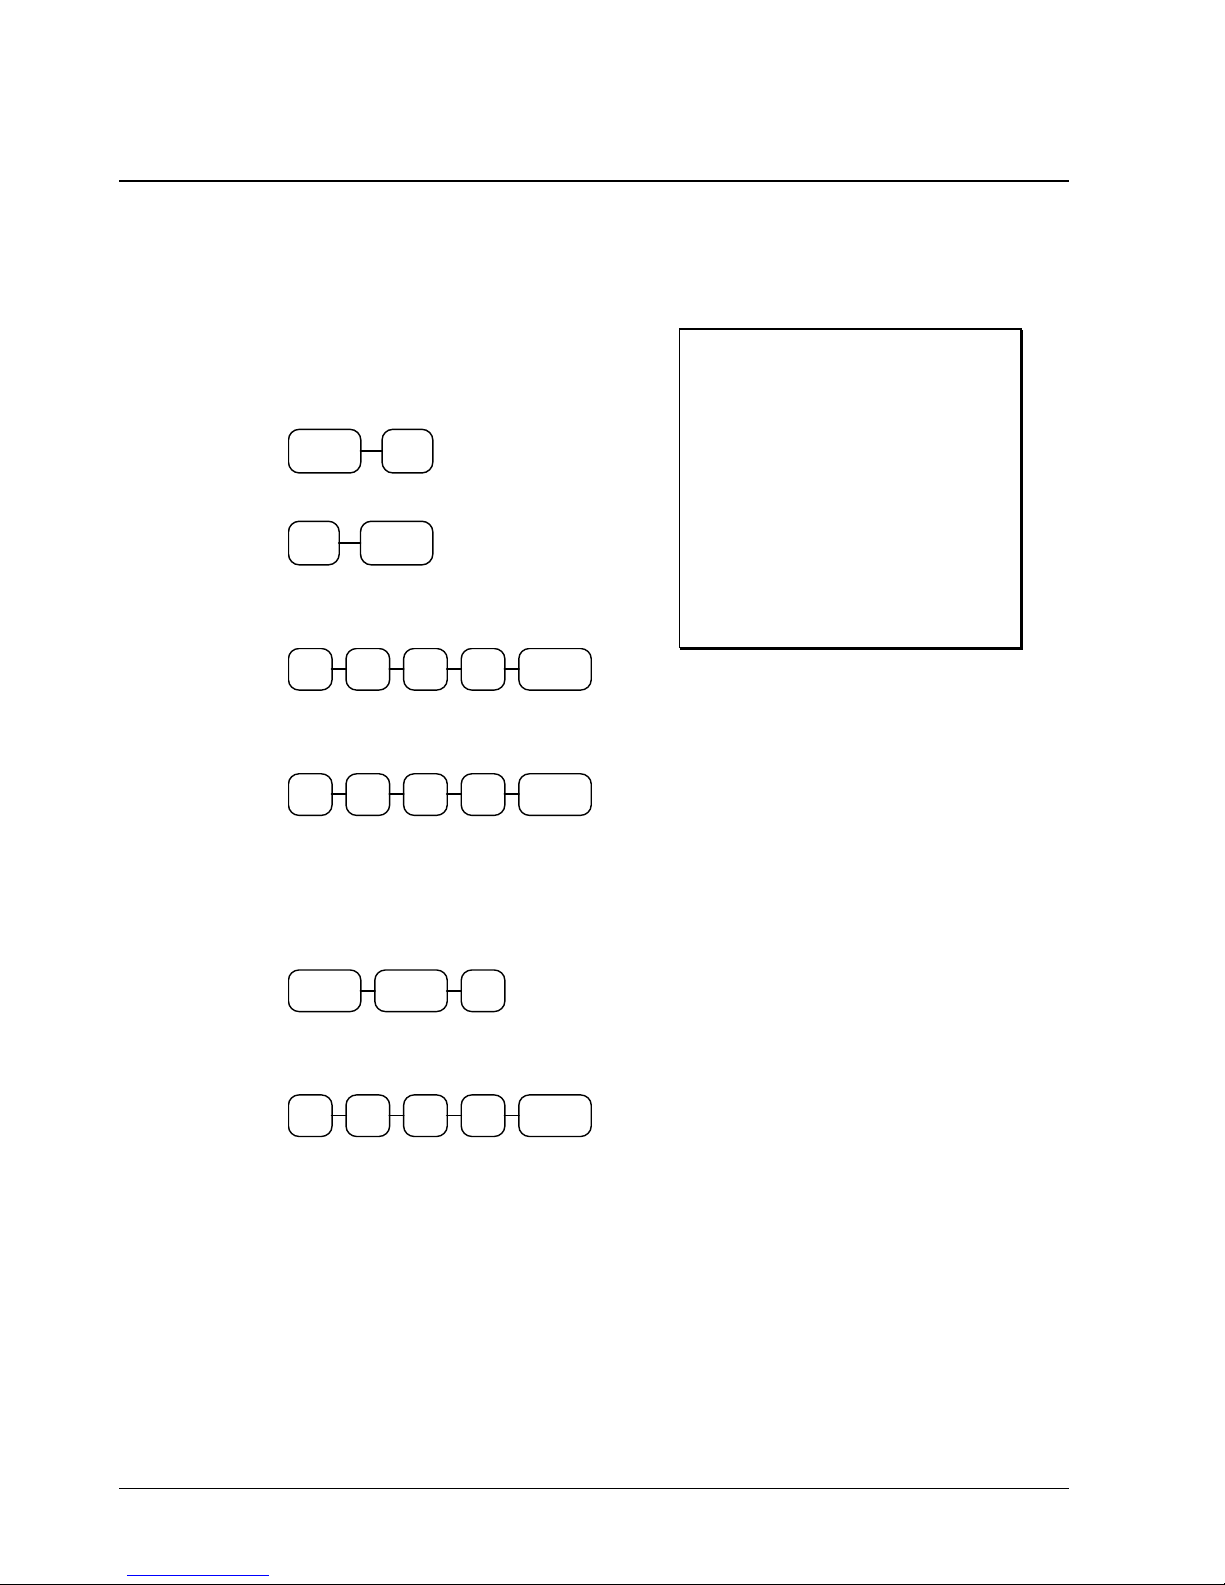
S
/
S
/
Paid Out Operations
You can use the PAID OUT function to track cash paid out for merchandise or to record loans from
the cash drawer.
1. Press the MORE KEYS key. From the
menu, press 6 to select the PAID OUT
function:
MORE
KEYS
6
or, press 6 then press MORE KEYS:
6
MORE
KEYS
2. Enter the amount of cash paid out, Press
CASH/TEND.
0 001
CASH/
TEND
3. Enter the check amount paid out, Press
CHECK TEND.
0 001
CHECK
TEND
4. Press the SBTL/MORE TENDERS key
once to display the subtotal, press the
SBTL/MORE TENDERS key again to
display the more tenders menu. Press 1 to
select MISCTND 1.
BTL
MORE
TENDERS
BTL
MORE
TENDERS
1
5. Enter the miscellaneous tender amount
received.
0 001
CASH/
TEND
6. You can continue to itemize paid outs, or
you can finalize by pressing CASH/TEND.
THANK-YOU
CALL AGAIN
DATE 08/15/1999 SUN
PAID OUT
CASH -10.00
CHECK -10.00
MISCTND 1 -10.00
PAID OUT -30.00
ANNIE NO. 000001
TIME 11:27AM 01
54 Operating Instructions Samsung ER-550 Electronic Cash Register
Page 57

S
/
Totaling and Tendering
There are six tenders available to categorize sales. CASH/TEND and CHECK TEND are
individual keys on the keyboard. The SBTL/MORE TENDERS key provides a menu from which
you can select four additional miscellaneous tender functions. You can use the miscellaneous tender
functions to track charge or credit card sales.
Subtotaling a Sale
1. Register the items you wish to sell.
2. Press SBTL/MORE TENDERS. The
subtotal will display with the message
"Sub" indicated on the rear display.
BTL
MORE
TENDERS
3. The subtotal can be printed if the system
option is set. See "System Option
Programming" on page 101.
Totaling a Cash Sale
1. Register the items you wish to sell.
2. To total a cash sale, press CASH/TEND:
CASH/
TEND
3. The display will indicate the total amount
of the cash sale.
Totaling a Check Sale
1. Register the items you wish to sell.
2. To total a cash sale, press CHECK:
CHECK
TEND
3. The display will indicate the total amount
of the cash sale.
THANK-YOU
CALL AGAIN
DATE 08/15/1999 SUN
DEPT.2 $7.96
TOTAL $7.96
CASH $7.96
ANNIE NO. 000001
TIME 11:27AM 01
THANK-YOU
CALL AGAIN
DATE 08/15/1999 SUN
DEPT.2 $7.96
TOTAL $7.96
CHECK $7.96
ANNIE NO. 000001
TIME 11:27AM 01
Samsung ER-550 Electronic Cash Register Operating Instructions 55
Page 58
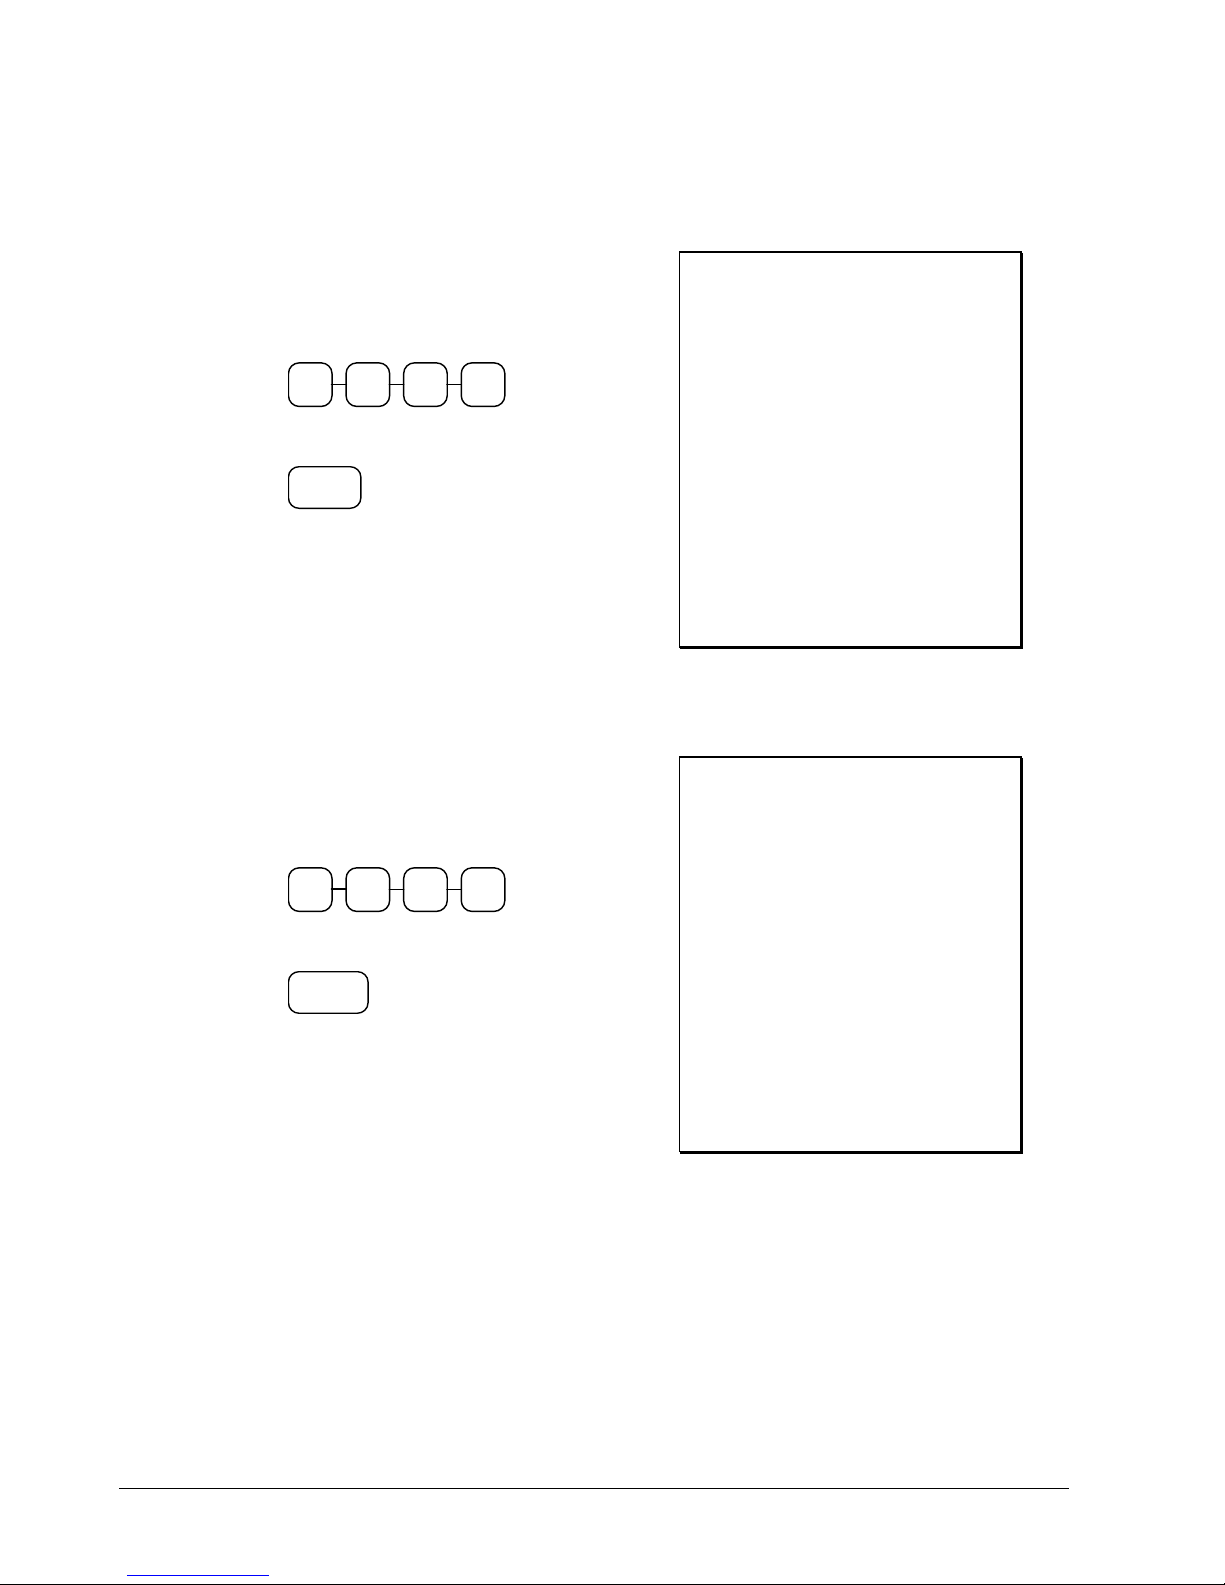
Tendering a Cash Sale
1. Register the items you wish to sell.
2. Enter the amount tendered by the customer.
For example, for $20.00 enter:
0 0 02
3. Press CASH/TEND:
CASH/
TEND
4. The display will indicate the total amount
of the cash tendered and the change due, if
any.
Tendering a Check Sale
1. Register the items you wish to sell.
2. Enter the amount tendered by the customer.
For example, for $20.00 enter:
0 0 02
3. Press CHECK TEND:
CHECK
TEND
4. The display will indicate the total amount
of the check tendered and the change due,
if any.
THANK-YOU
CALL AGAIN
DATE 08/15/1999 SUN
DEPT.1 T1 $2.99
DEPT.1 T1 $2.99
4 X @1.99
DEPT.2 $7.96
TAX1 AMT $0.36
TOTAL $14.30
CASH $20.00
CHANGE $5.70
ANNIE NO. 000001
TIME 11:27AM 01
THANK-YOU
CALL AGAIN
DATE 08/15/1999 SUN
DEPT.1 T1 $2.99
DEPT.1 T1 $2.99
4 X @1.99
DEPT.2 $7.96
TAX1 AMT $0.36
TOTAL $14.30
CHECK $20.00
CHANGE $5.70
ANNIE NO. 000001
TIME 11:27AM 01
56 Operating Instructions Samsung ER-550 Electronic Cash Register
Page 59
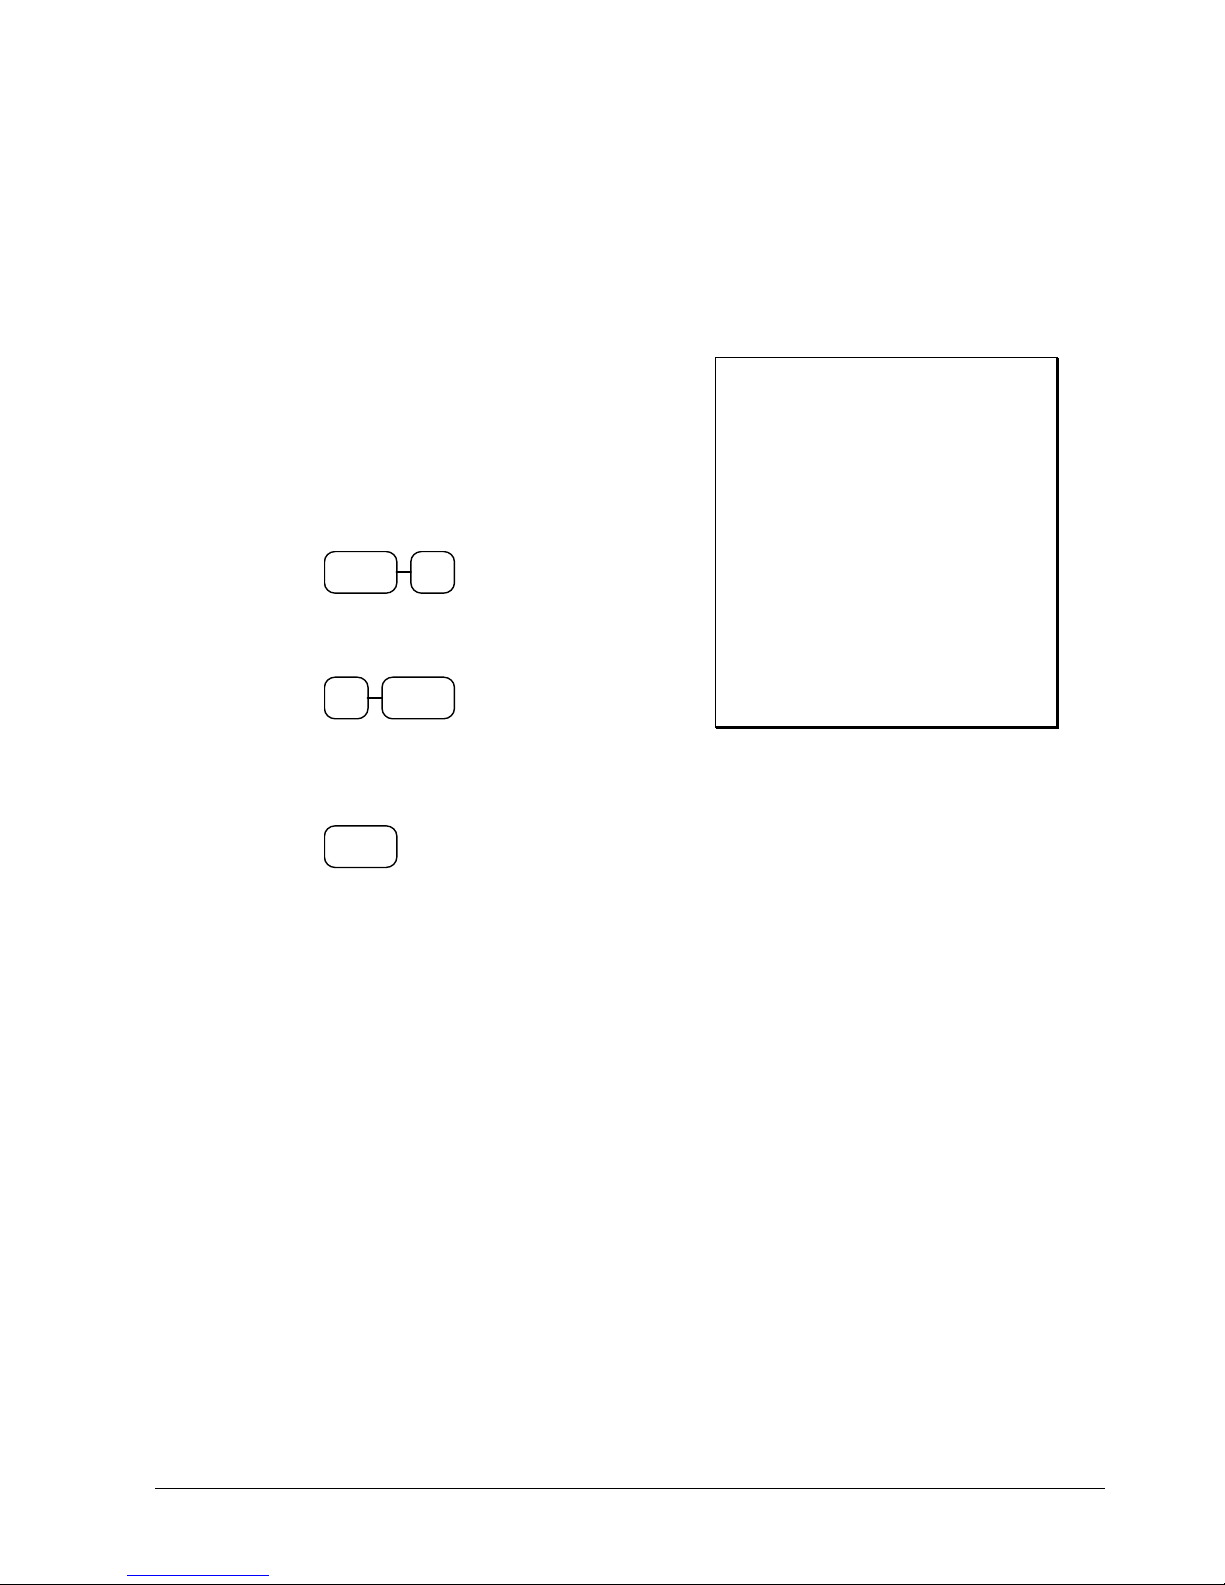
S
/
S
/
Totaling a Miscellaneous Tender Sale (Charge or Credit Card)
Use miscellaneous tenders to track charge or credit card sales. See “Function Key Programming" on
page 112 to change the descriptors for the miscellaneous tender functions. For example, you can use
MISCTND1 to track Visa card sales. The descriptor "VISA" will display on the MORE TENDERS
menu and print on the printer.
1. Register the items you wish to sell.
2. Press the SBTL/MORE TENDERS key
once to display the subtotal.
Press the SBTL/MORE TENDERS key
again to display the MORE TENDERS
menu, then press 1 to select MISCTND 1.
BTL
MORE
TENDERS
1
or, press 1 then press SBTL/MORE
TENDERS :
1
BTL
MORE
TENDERS
3. The display will indicate MISCTND 1.
Press the ENTER (CASH/TEND) key to
finalize the sale as MISCTND 1.
CASH/
TEND
THANK-YOU
CALL AGAIN
DATE 08/15/1999 SUN
DEPT.1 T1 $2.99
DEPT.1 T1 $2.99
4 X @1.99
DEPT.2 $7.96
TAX1 AMT $0.36
TOTAL $14.30
MISCTND 1 $14.30
ANNIE NO. 000001
TIME 11:27AM 01
Samsung ER-550 Electronic Cash Register Operating Instructions 57
Page 60
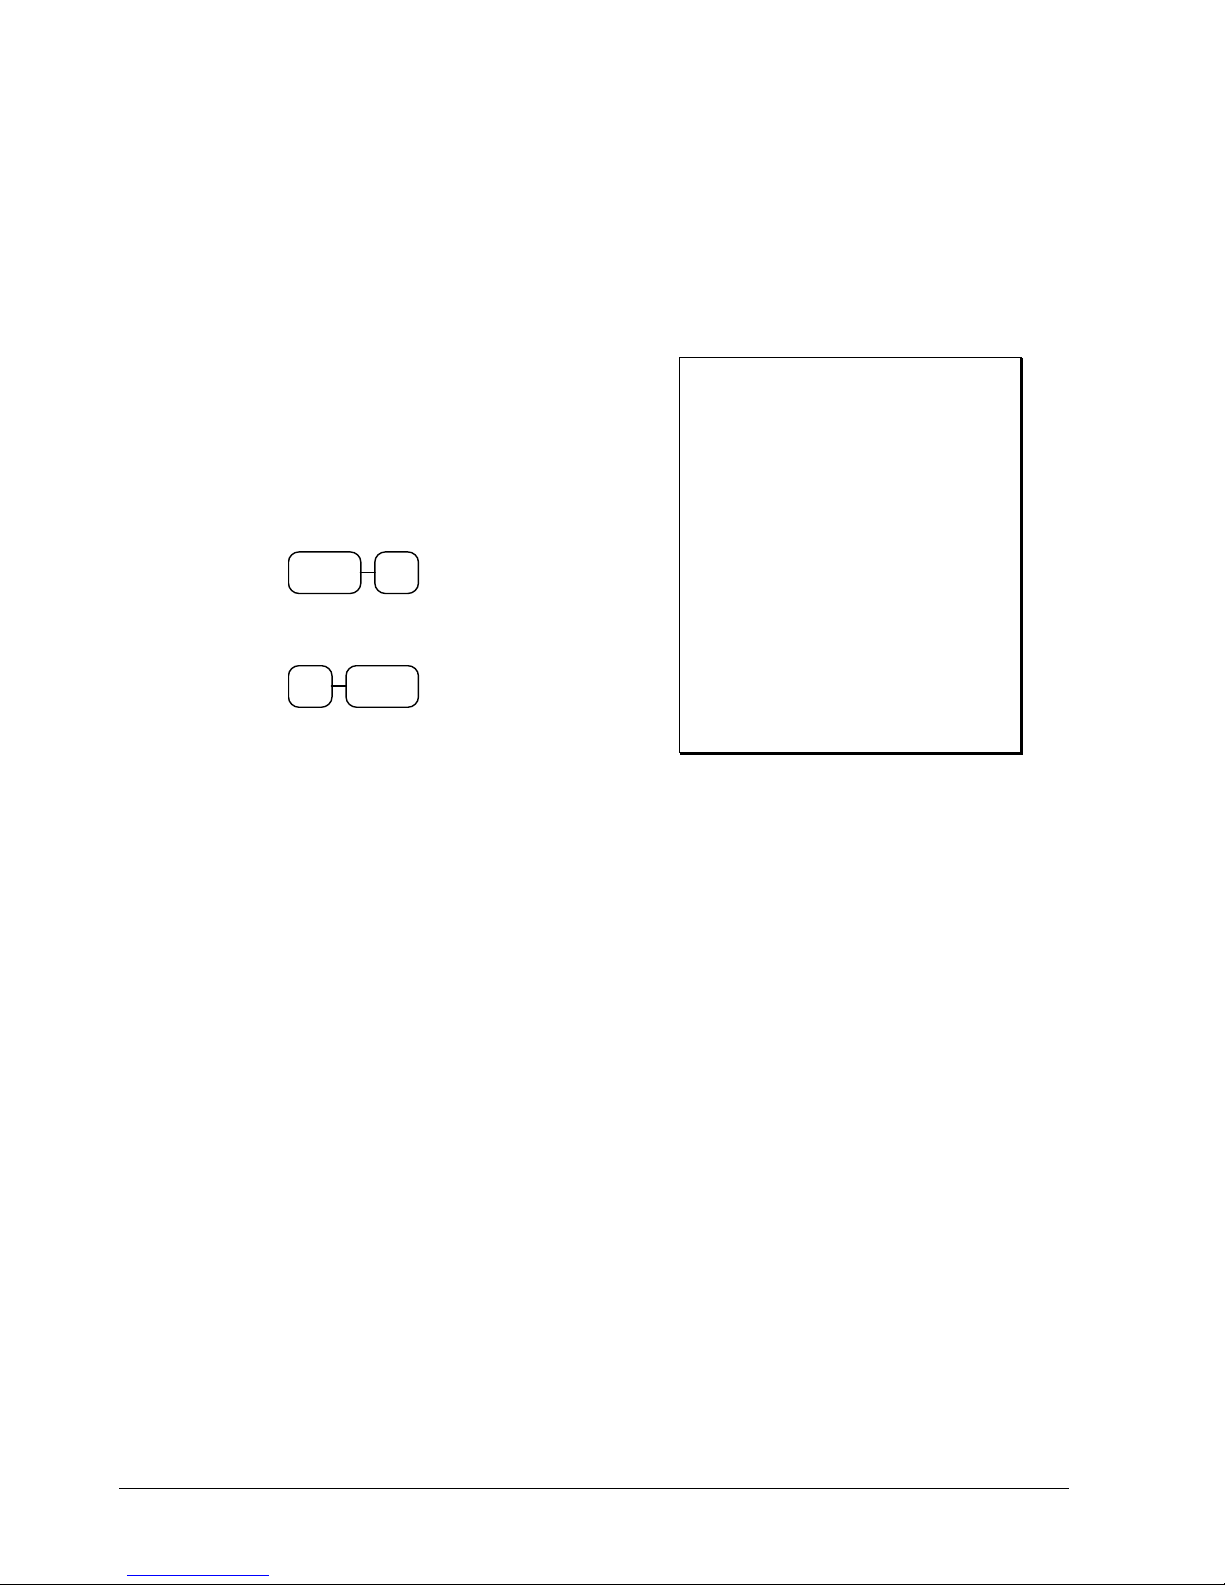
S
/
S
/
Tendering a Miscellaneous Tender Sale (Charge or Credit Card)
Use miscellaneous tenders to track charge or credit card sales. See “Function Key Programming" on
page 112 to change the descriptors for the miscellaneous tender functions. For example, you can
use MISCTND1 to track Visa card sales. The descriptor "VISA" will display on the MORE
TENDERS menu and print on the printer.
1. Register the items you wish to sell.
2. Press the SBTL/MORE TENDERS key
once to display the subtotal.
Press the SBTL/MORE TENDERS key
again to display the MORE TENDERS
menu, then press 1 to select MISCTND 1.
BTL
MORE
TENDERS
1
or, press 1 then press SBTL/MORE
TENDERS :
1
BTL
MORE
TENDERS
3. The display will indicate MISCTND 1.
Enter the amount of the tender, press the
ENTER (CASH/TEND) key to finalize
the sale as MISCTND 1.
THANK-YOU
CALL AGAIN
DATE 08/15/1999 SUN
DEPT.1 T1 $2.99
DEPT.1 T1 $2.99
4 X @1.99
DEPT.2 $7.96
TAX1 AMT $0.36
TOTAL $14.30
MISCTND 1 $20.00
CHANGE $5.70
ANNIE NO. 000001
TIME 11:27AM 01
58 Operating Instructions Samsung ER-550 Electronic Cash Register
Page 61
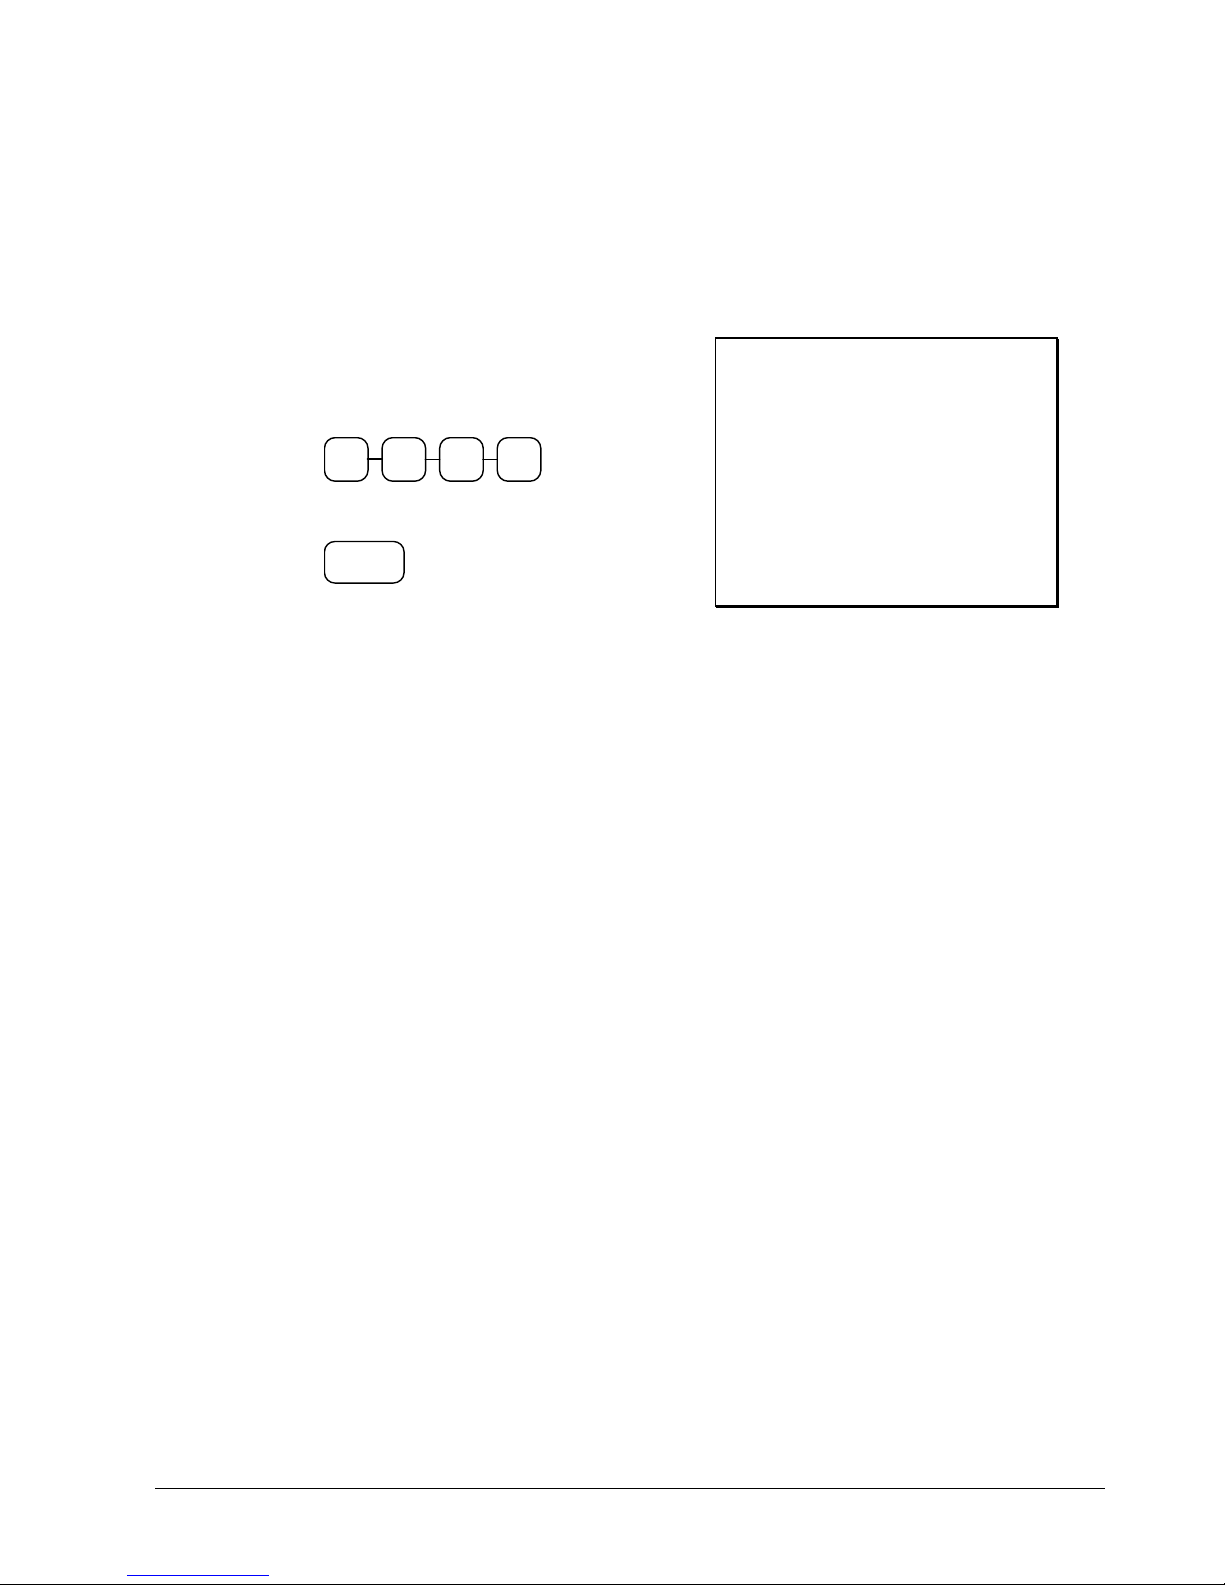
Check Cashing
Check cashing means exchanging cash for a check. Normally, this function is allowed. If you wish
to disallow check cashing, you must set the appropriate system option. See "“Function Key
Programming" on page 112.
1. Enter the amount of the check tendered by
the customer. For example, for $20.00
enter:
0 0 02
2. Press CHECK TEND:
CHECK
TEND
3. The display will indicate the amount of the
check and the cash change.
THANK-YOU
CALL AGAIN
DATE 08/15/1999 SUN
CHECK $20.00
CASH -20.00
CHANGE $20.00
ANNIE NO. 000001
TIME 11:27AM 01
Samsung ER-550 Electronic Cash Register Operating Instructions 59
Page 62
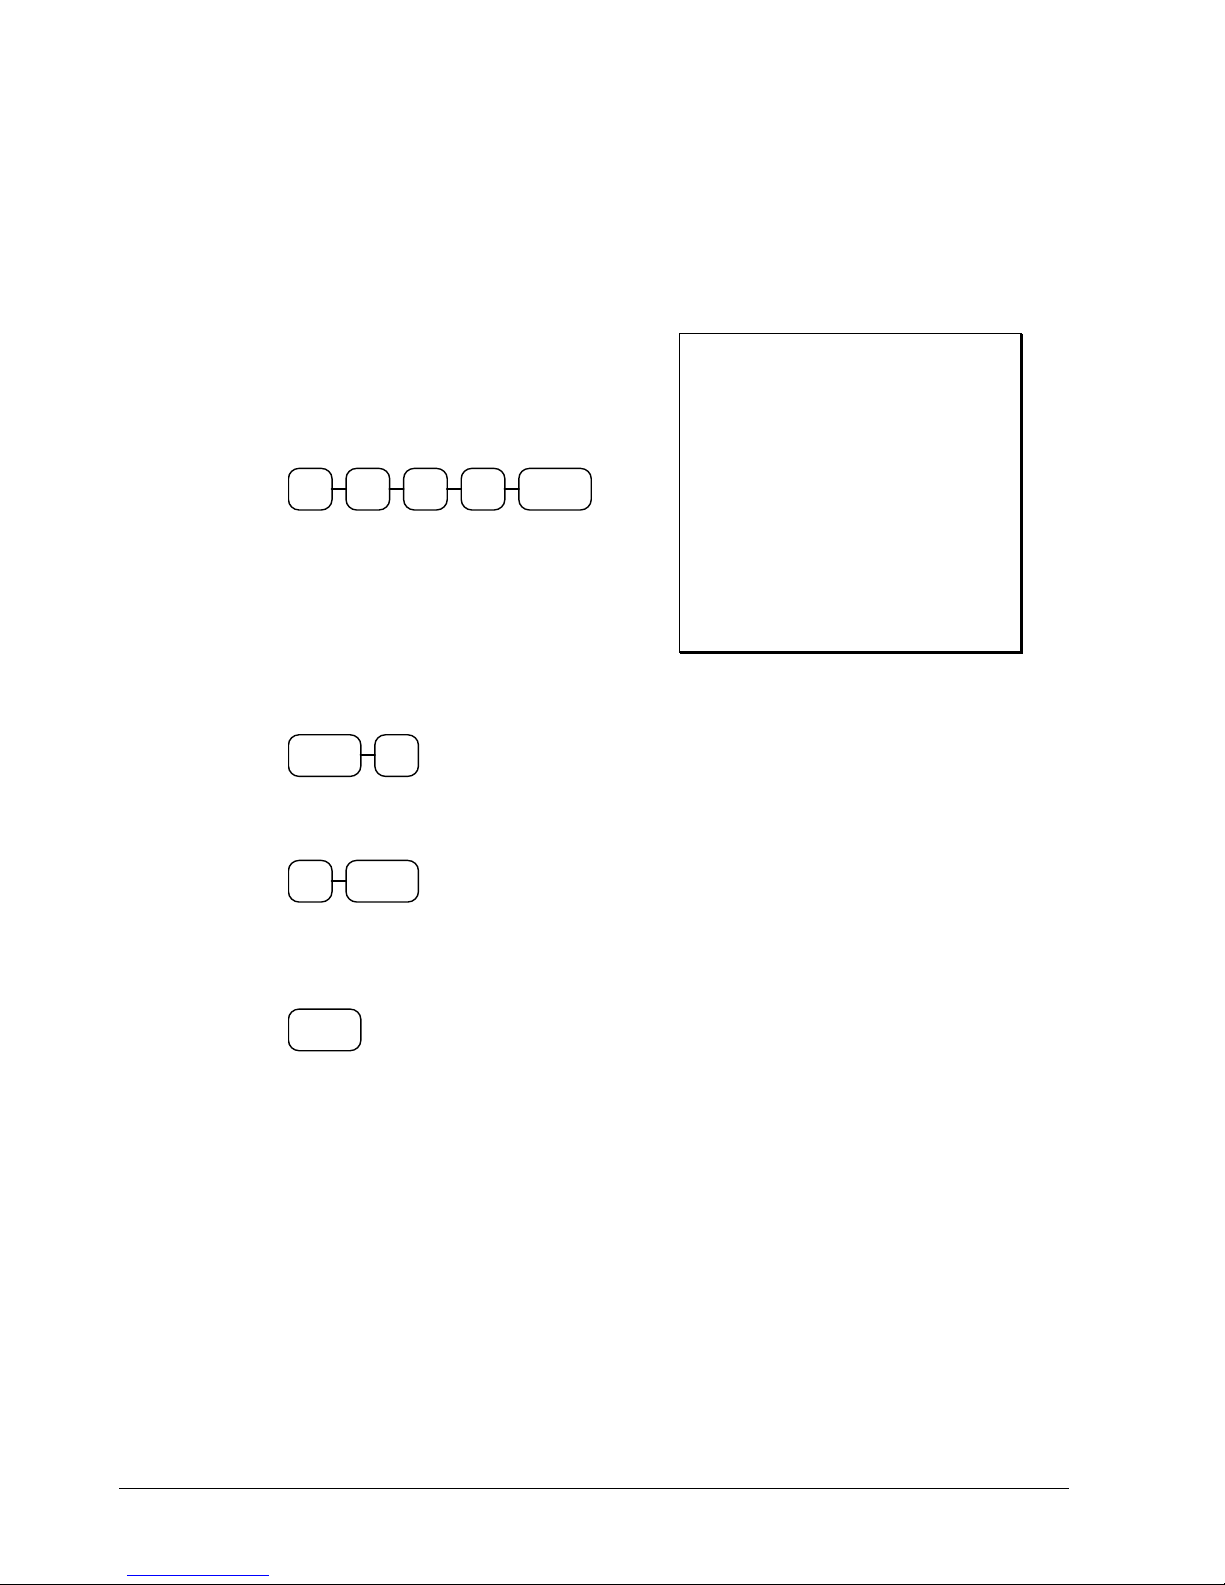
S
/
S
/
Split Tender
Split tendering means paying for one sale by different payment methods. For example, a $20.00 sale
could be split so $10.00 is paid in cash, and the remaining $10.00 is paid by a miscellaneous tender.
If necessary, you can make several different payments.
1. Register the items you wish to sell.
2. Enter the amount of cash tendered by the
customer. For example, enter $10.00 and
press CASH/TEND:
0 01 0
CASH/
TEND
3. The display will indicate the $10.00 cash
tender and the $10.00 total still due.
4. Press the SBTL/MORE TENDERS key
once to display the subtotal.
Press the SBTL/MORE TENDERS key
again to display the MORE TENDERS
menu, then press 1 to select MISCTND 1.
BTL
MORE
TENDERS
1
or, press 1 then press SBTL/MORE
TENDERS :
1
BTL
MORE
TENDERS
5. The display will indicate MISCTND 1.
Press the ENTER (CASH/TEND) key to
finalize the sale as MISCTND 1.
CASH/
TEND
THANK-YOU
CALL AGAIN
DATE 08/15/1999 SUN
DEPT.2 $20 00
TOTAL $20.00
CASH $10.00
TOTAL $10.00
MISCTND 1 $10.00
ANNIE NO. 000001
TIME 11:27AM 01
60 Operating Instructions Samsung ER-550 Electronic Cash Register
Page 63
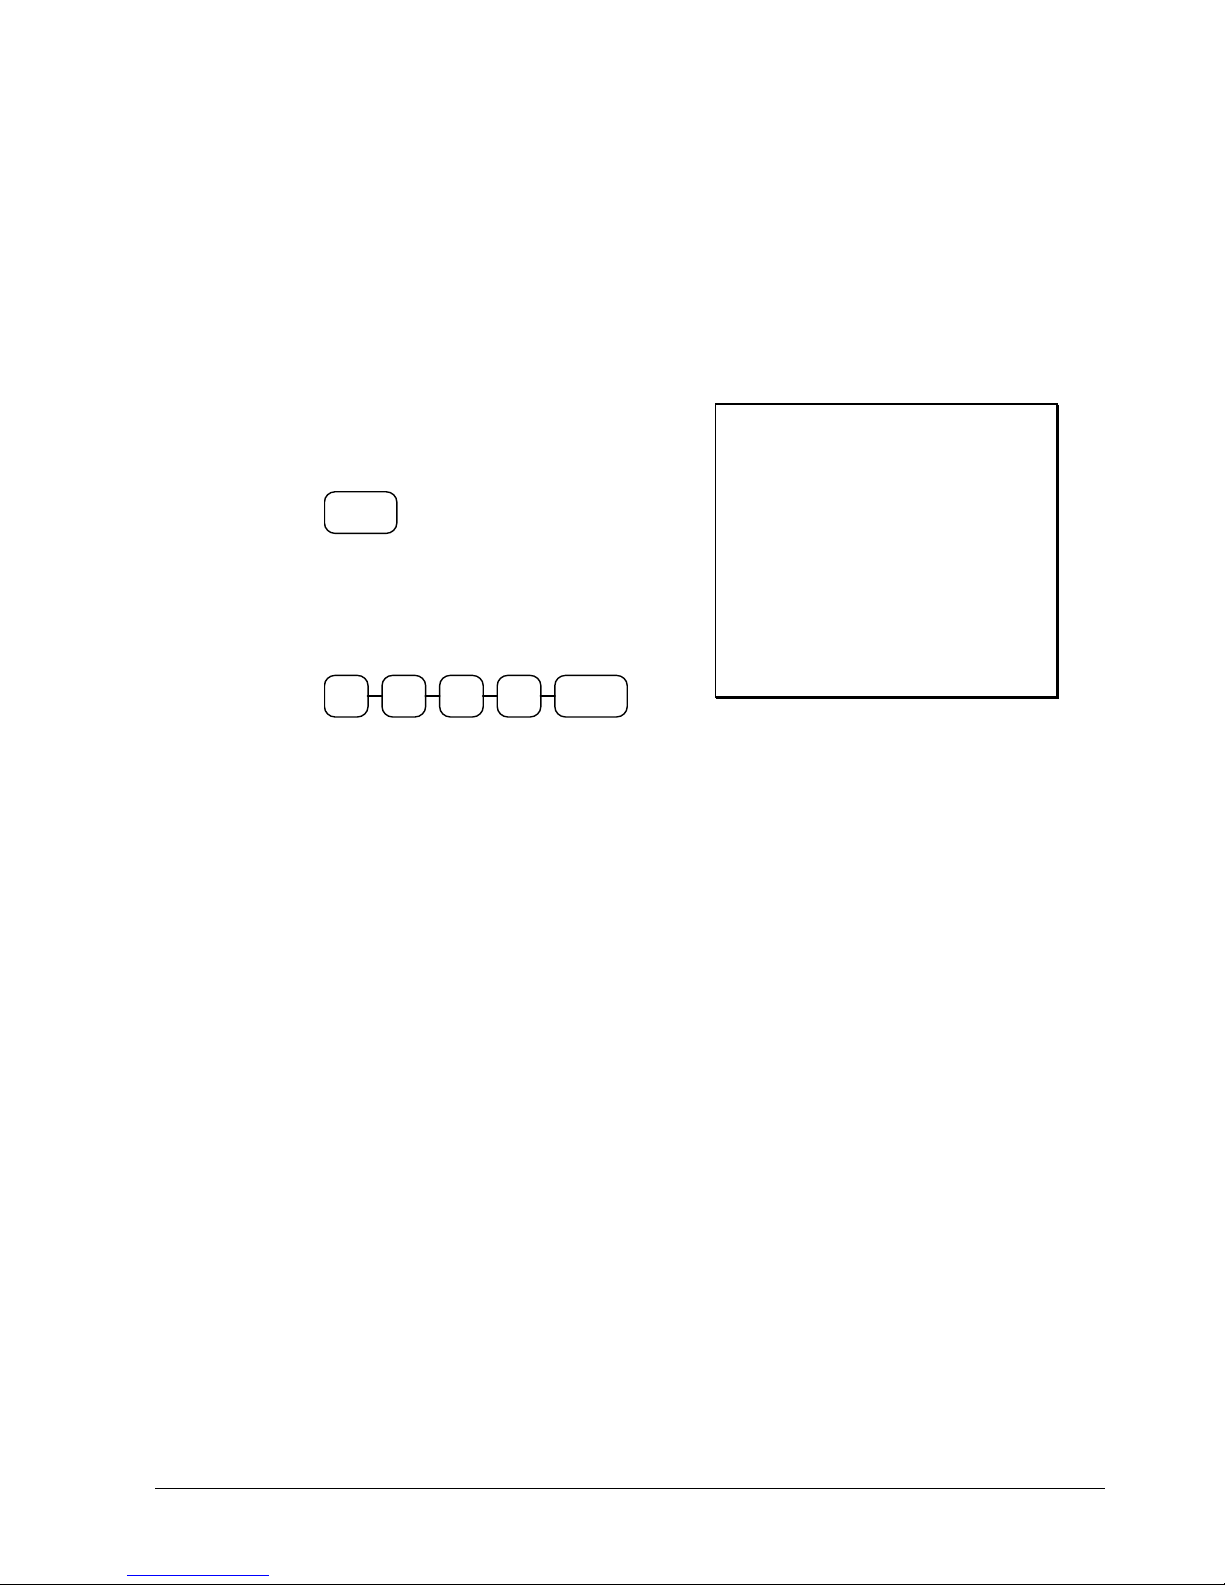
Post Tender
Post tendering means computing change after the sale has been totaled and the drawer is open. This
feature is useful when a customer changes the amount of the tender or when a "quick change artist"
confuses a clerk. Normally, this function is not allowed. If you wish to allow post tendering, you
must set the appropriate system option.
(A separate system options determines whether the drawer opens on the post tender.)
1. Register the items you wish to sell.
2. Press CASH/TEND:
CASH/
TEND
3. The display will indicate the total of the
cash sale.
4. Enter the amount of the new tender, Press
CASH/TEND:
0 02 0
CASH/
TEND
5. The display will indicate the change due.
THANK-YOU
CALL AGAIN
DATE 08/15/1999 SUN
DEPT.1 T1 $2.00
SUBTOTAL $2.12
TAX1 AMT $0.12
CASH $2.12
ANNIE NO. 000001
TIME 11:27AM 01
Samsung ER-550 Electronic Cash Register Operating Instructions 61
Page 64
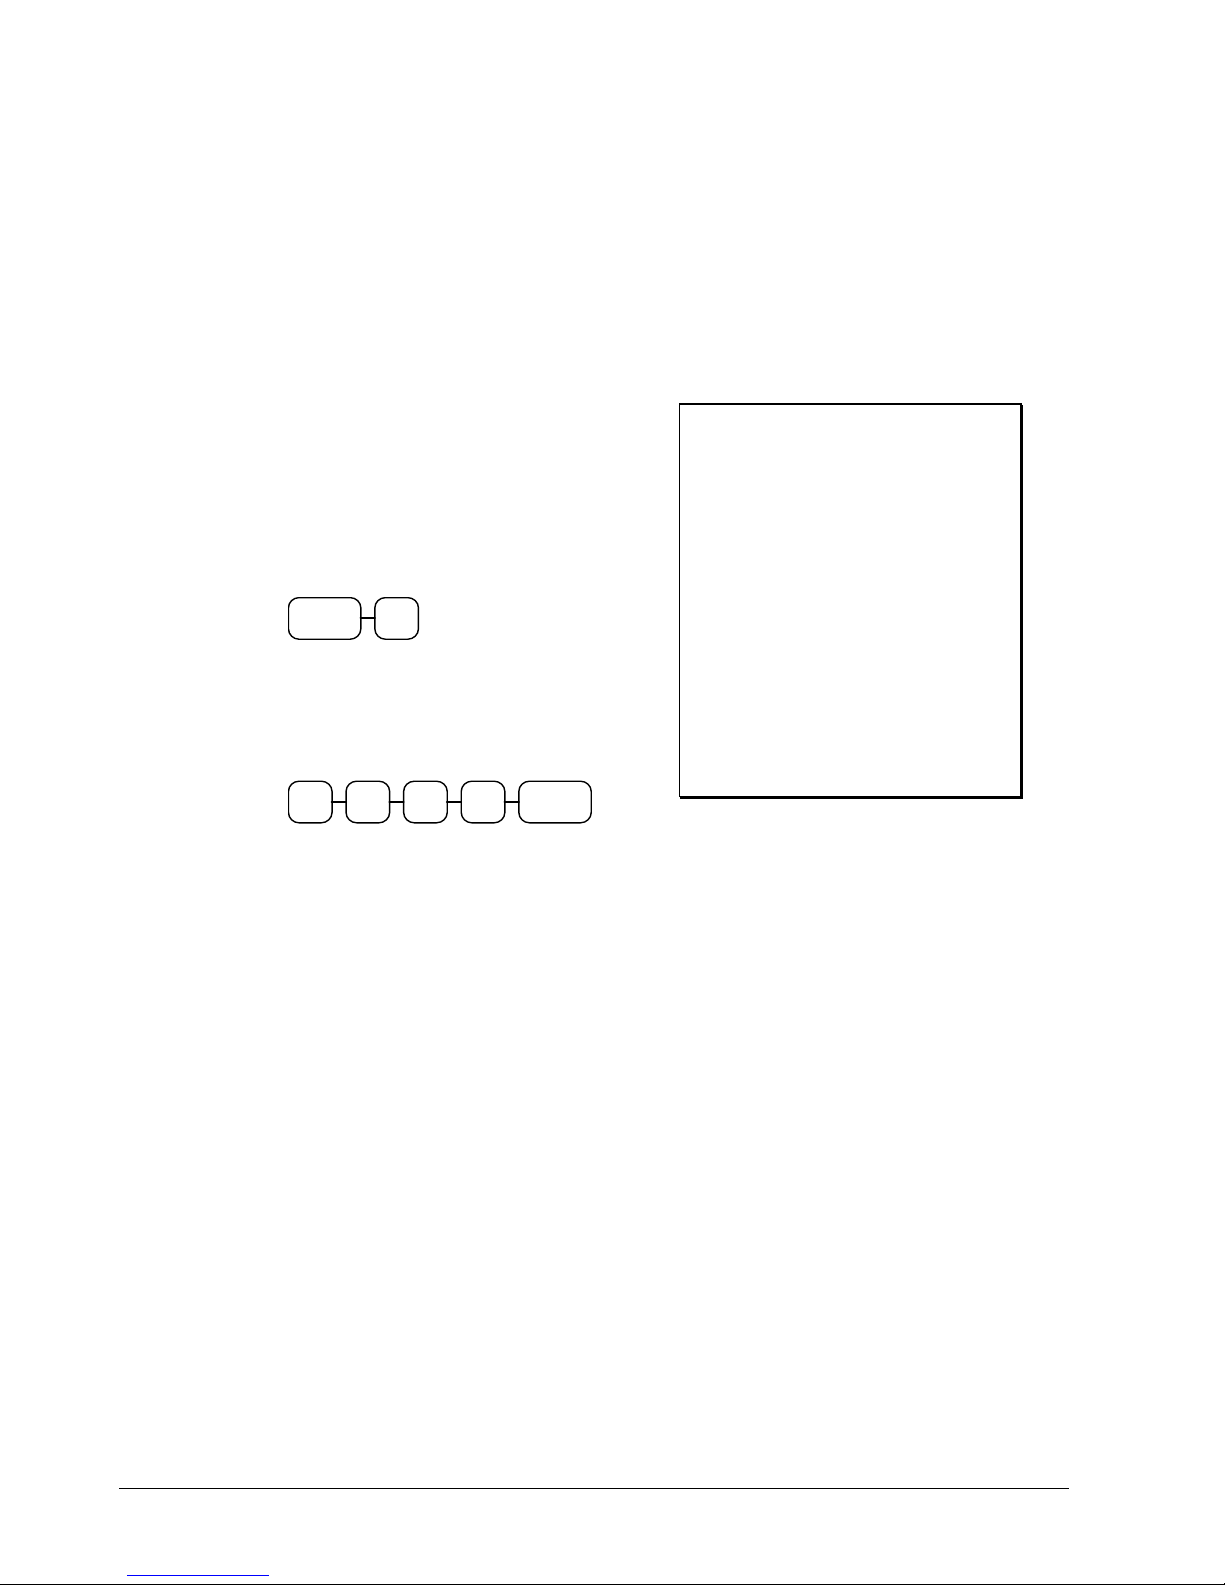
S
/
Currency Conversion
If you normally accept currency from a neighboring nations, you can program the Samsung ER-550
to convert the subtotal of a sale to the equivalent cost in the foreign currency. You can set up four
separate conversion functions for different foreign currencies. To do this, you need to program the
conversion factor. For example, if the US dollar (home currency) is worth 1.3720 Canadian dollars
(foreign currency), the conversion factor is 1.3720. See "CURRENCY CONV.#1-4 Function
Options" on page 116 to set a conversion factor.
1. Register the items you wish to sell.
2. Press the SBTL/MORE TENDERS key
once to display the subtotal.
3. Press the SBTL/MORE TENDERS key
again to display the ` menu, then press 5 to
select CONV 1.
BTL
MORE
TENDERS
5
4. The amount due in foreign currency is
displayed.
5. Enter the amount of the foreign currency
tender, Press CASH/TEND:
0 01 0
CASH/
TEND
6. The display will indicate the amount of
foreign currency tendered and display
$5.17 change due. The change due is
computed in home currency!
THANK-YOU
CALL AGAIN
DATE 08/15/1999 SUN
DEPT.1 T1 $2.00
TAX1 AMT $0.12
TOTAL $2.12
CONV 1
10.00
CHANGE RATE #1.372
HOME AMT. $7.29
CHANGE $5.17
ANNIE NO. 000001
TIME 11:27AM 01
62 Operating Instructions Samsung ER-550 Electronic Cash Register
Page 65

Receipt On/Off and Receipt on Request
When a receipt is not normally issued, you can turn the receipt function off.
If the receipt is off, you can still issue a receipt after the sale has been completed. You must set the
system option "ALLOW MULTIPLE RECEIPT" to Yes.
Printing a Receipt after the Sale
After the sale has been totaled, but before the next transaction is started, press CASH/TEND:
CASH/
TEND
Note: Because receipt memory is limited, when a sale has more than 50 items,
the receipt issued after the sale will only include the total of the sale and any
tenders.
Samsung ER-550 Electronic Cash Register Operating Instructions 63
Page 66
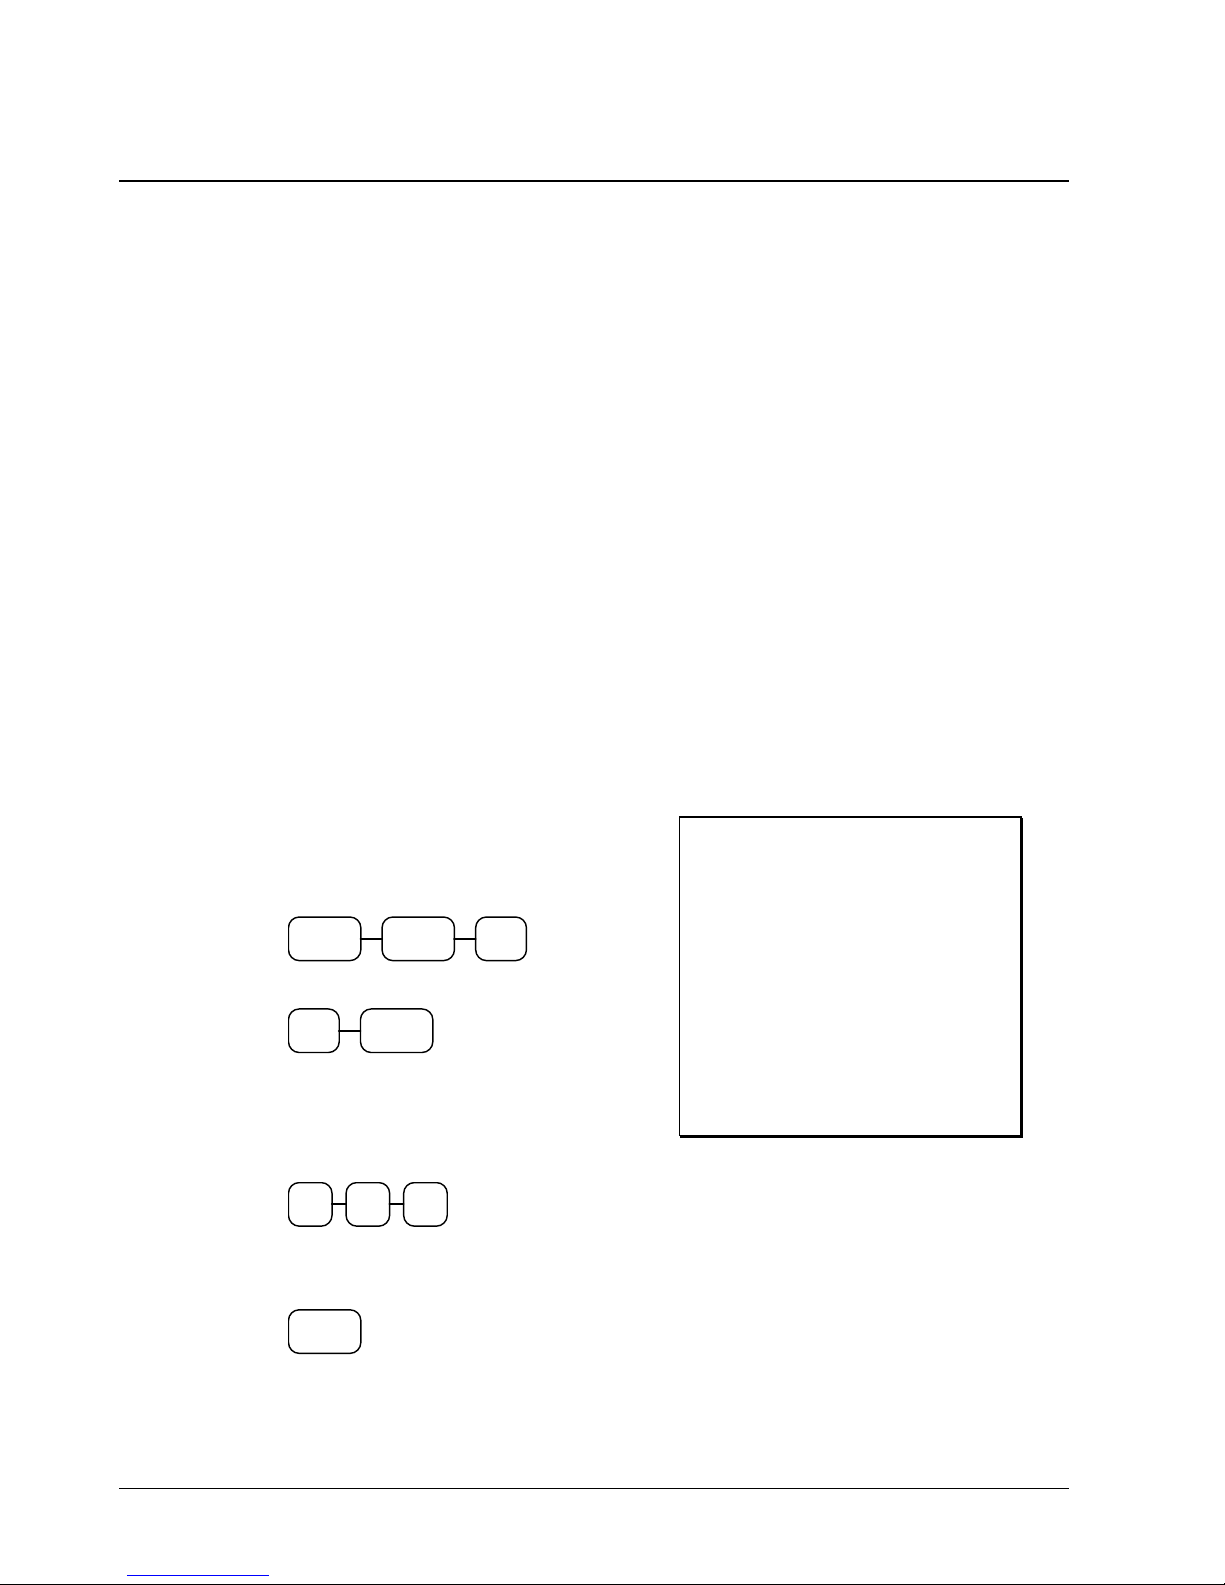
Scale Operations
The Samsung ER-550 can be interfaced to an optional load-cell scale. The scale interface allows
direct entry of an item's weight using the SCALE function. You can also choose "manual entry"
scale operation if you are working with a standalone scale that is not interfaced the scale to the cash
register. See "Function Key Programming" on page112.
Departments and PLUs must be set to "scaleable" status to allow scale multiplication. In most cases,
if you attempt an entry into a Department or PLU that has been programmed "scaleable", an error
tone will sound and the operator will be prompted to make a scale entry. See "Department
Programming" on page 85 or "PLU Programming" on page 89 to set "scaleable" status.
Departments and PLUs can be set to "auto scale" status to speed up scale entries by automatically
retrieving the weight on the scale and multiplying it times the amount entered. . See "Department
Programming" on page 85 or "PLU Programming" on page 89 to set "auto scale" status.
A tare is the amount of weight accounted for by the container or packaging. By entering a tare
weight (as required by law in some areas) the weight of the container is subtracted and only the true
weight of the product is measured on the scale. By entering the tare number (1-5) the operator can
automatically subtract the predetermined container weight when a product is on the scale. See "Tare
Weight Programming" on page 121.
Direct Scale Entry
Place a product on the scale and access the SCALE function to display the weight on the cash
register. Then make the appropriate Department or PLU entry.
1. Press the MORE KEYS key twice. From
the menu, press 9 to select the SCALE
function:
MORE
KEYS
or, press 9 then press MORE KEYS:
9
2. Note that the weight is displayed on the
screen. Enter the price per pound on the
ten key pad. Do not use the decimal key.
For example, for $3.00, enter:
3 0 0
Press a department key. For example, press
department 1/13:
MORE
KEYS
MORE
KEYS
THANK-YOU
CALL AGAIN
DATE 08/15/1999 SUN
9
1.50 lb @3.00
DEPT.1 $4.50
TAX1 AMT $0.27
TOTAL $4.77
CASH $4.77
ANNIE NO. 000001
TIME 11:27AM 01
1/13
64 Operating Instructions Samsung ER-550 Electronic Cash Register
Page 67
Automatic Scale Entry
Place a product on the scale and make the appropriate Department or PLU entry. The department or
PLU must be set with "auto scale status". . See "Department Programming" on page 85 or "PLU
Programming" on page 89.
1. Enter the price per pound on the ten key
pad. Do not use the decimal key. For
example, for $3.00, enter:
3 0 0
2. Press a department key. For example, press
department 1/13:
1/13
THANK-YOU
CALL AGAIN
DATE 08/15/1999 SUN
1.50 lb @3.00
DEPT.1 $4.50
TAX1 AMT $0.27
TOTAL $4.77
CASH $4.77
ANNIE NO. 000001
TIME 11:27AM 01
Samsung ER-550 Electronic Cash Register Operating Instructions 65
Page 68
Tare Weight Entry
1. Press the MORE KEYS key twice. From
the menu, press 00 to select the TARE
function:
MORE
KEYS
MORE
KEYS
00
or, press 00 then press MORE KEYS:
00
MORE
KEYS
2. Enter the preprogrammed tare number.
Press the CASH/TEND (ENTER) key.
CASH/
1
TEND
3. Press the MORE KEYS key twice. From
the menu, press 9 to select the SCALE
function:
MORE
KEYS
MORE
KEYS
9
or, press 9 then press MORE KEYS:
9
MORE
KEYS
4. Note that the weight, less the tare weight, is
displayed on the screen. Enter the price per
pound on the ten key pad. Do not use the
decimal key. For example, for $3.00, enter:
3 0 0
Press a department key. For example, press
department 1/13:
THANK-YOU
CALL AGAIN
DATE 08/15/1999 SUN
1.50 lb @3.00
DEPT.1 $4.50
TAX1 AMT $0.27
TOTAL $4.77
CASH $4.77
ANNIE NO. 000001
TIME 11:27AM 01
1/13
66 Operating Instructions Samsung ER-550 Electronic Cash Register
Page 69
Manual Weight Entry
Operators can make manual weight entries if the item has been programmed to accept them. You
must use the decimal key to enter fractional manual weights.
1. Press the MORE KEYS key twice. From
the menu, press 9 to select the SCALE
function:
MORE
KEYS
MORE
KEYS
9
or, press 9 then press MORE KEYS:
9
MORE
KEYS
2. Enter the weight using the decimal key for
fractional weights. Press the
CASH/TEND (ENTER) key.
1 . 5
CASH/
TEND
3. Enter the price per pound on the ten key
pad. Do not use the decimal key. For
example, for $3.00, enter:
3 0 0
Press a department key. For example, press
department 1/13:
THANK-YOU
CALL AGAIN
DATE 08/15/1999 SUN
1.50 lb @3.00
DEPT.1 $4.50
TAX1 AMT $0.27
TOTAL $4.77
CASH $4.77
ANNIE NO. 000001
TIME 11:27AM 01
1/13
Samsung ER-550 Electronic Cash Register Operating Instructions 67
Page 70

68 Samsung ER-550 Electronic Cash Register
Page 71

Manager Functions
Overview
In this chapter you will find:
Instructions for printing and displaying reports from the MANAGER control lock position and
instructions for clearing totals from the CLEAR TOTALS control lock position. Samples of
each report and balancing formulas can be found in "Report Samples" on page 135.
Instructions for performing the other functions available from the MANAGER MODE menu,
including:
"Cash Declaration" on page 76
"Receipt & Printing Control" on page 78
"Training Mode" on page 80
OPERATING NOTE: If you need help, press the HELP SCREEN key. Press
ESC (CLEAR) to exit a help screen and return to the original screen.
Samsung ER-550 Electronic Cash Register Manager Functions 69
Page 72
Generating Reports
Reports can be read-only reports taken in the MANAGER control lock position or read and reset
reports taken in the CLEAR TOTALS control lock position. Read-only reports can be displayed on
the screen or printed on the printer; read and reset reports must be printed.
The Financial report is available in two levels:
daily reports, that can be read or reset, and
period reports, which represent a summary of daily reports, that can also be read or reset.
The period report is updated each time the daily report is reset.
If you are using the electronic journal, the contents of the journal can also be read or reset.
The following table summaries the reports available on the Samsung ER-550:
Report Contents Type Control Lock Position
FINANCIAL Department Sales totals,
Function key totals and
Balancing Information
TIME Sales by hour summary
totals
PLU Sales totals for PLUs Daily
ALL CLERKS Sales totals for all clerks Daily
INDIVIDUAL CLERK Sales totals for a
designated clerk
GROUPS Sales totals for each
group.
STOCK (PLU) Current inventory level
for each PLU designated
as an inventory item
STOCK (DEPT) Current inventory level
for each Department
designated as an
inventory item
CASH/CHECK TOTALS Cash and Check in
drawer totals
CLERK TIME REPORT Clock in and Clock out
times for each clerk
ELECTRONIC
JOURNAL
Line by line contents of
the electronic journal, if
used.
Daily or Period
Daily
Daily
Daily
Daily
Daily
Daily
Daily
Daily
MANAGER or CLEAR
TOTALS
MANAGER or CLEAR
TOTALS
MANAGER or CLEAR
TOTALS
MANAGER or CLEAR
TOTALS
MANAGER or CLEAR
TOTALS
MANAGER or CLEAR
TOTALS
MANAGER or CLEAR
TOTALS
MANAGER or CLEAR
TOTALS
MANAGER
MANAGER
MANAGER or CLEAR
TOTALS
70 Manager Functions Samsung ER-550 Electronic Cash Register
Page 73

Print or Display Reports
1. Turn the Control lock to the MANAGER position. The MANAGER MODE menu displays:
2. Press 0 to print reports or press 1 to display reports. The PRINT REPORT or DISPLAY
REPORT menu displays.
MANAGER MODE
0.PRINT REPORTS
1.DISPLAY REPORTS
2.PERFORM DECLARA.
3.REG. PRINT FORMAT
4.STOP REG PRINTING
5.TRAINING MODE
PRINT REPORT page1
0.DAILY REPORTS
1.PERIOD REPORT
2.ELECTRONIC JOURNAL
DISPLAY REPORT page1
0.DAILY REPORTS
1.PERIOD REPORT
Samsung ER-550 Electronic Cash Register Manager Functions 71
Page 74

3. Press 0 for DAILY REPORTS, 1 for PERIOD REPORT, or 2 for ELECTRONIC
JOURNAL (you cannot display the electronic journal).
If you selected 0 for DAILY REPORTS, page 2 of the menu will display:
PRINT REPORT page2
0.FINANCIAL
1.TIME
2.PLU
3.ALL CLERKS
4.INDIVIDUAL CLERK
5.GROUP
6.STOCK (PLU)
Enter the digit that represents the report you wish to take, or p ress PAGE DOWN to view
the remainder of the menu:
PRINT REPORT page2
7.STOCK (DEPT)
8.CLERK TIME REPORT
9.CASH/CHECK TOTALS
If you selected 1 for PERIOD REPORT, page 2 of the menu will display:
PRINT REPORT page2
0.FINANCIAL
Enter the 0 to take a period FINANCIAL report.
72 Manager Functions Samsung ER-550 Electronic Cash Register
Page 75

If you select 2 for ELECTRONIC JOURNAL, the ELECTRONIC JOURNAL menu
will display.
ELECTRONIC JOURNAL
0.PRT ALL EJ
1.PRT ONLY CASH
2.PRT ONLY CHECK
3.PRT ONLY MISC/T
4.PRINT ONLY %
5.PRINT ONLY RA/PO
6.PRT ONLY RETURN
Enter 0 to print the entire electronic journal, or enter the digit that represents the specific
information from the electronic journal report you wish to see, or press PAGE DOWN to
view the remainder of the menu:
ELECTRONIC JOURNAL
7.PRT ONLY EC/VOID
8.PRT ONLY #/NS
9.PRT ONLY CANCEL
Samsung ER-550 Electronic Cash Register Manager Functions 73
Page 76
Reset Reports
1. Turn the Control lock to the CLEAR TOTALS position. The RESET REPORTS menu
displays:
2. Press 0 for DAILY REPORTS, 1 for PERIOD REPORT, or 2 for RESET E.J. (electronic
journal).
RESET REPORTS page1
0.DAILY REPORTS
1.PERIOD REPORT
2.RESET E.J.
3.PC COMMUNICATION
If you selected 0 for DAILY REPORT, page 2 of the menu will display:
RESET REPORTS page2
0.FINANCIAL
1.TIME
2.PLU
3.ALL CLERKS
4.INDIVIDUAL CLERK
5.GROUP
6.STOCK (PLU)
Enter the digit that represents the report you wish to take, or p ress PAGE DOWN to view
the remainder of the menu:
RESET REPORTS page2
7.STOCK (DEPT)
74 Manager Functions Samsung ER-550 Electronic Cash Register
Page 77

If you selected 1 for PERIOD REPORT, page 2 of the menu will display:
RESET REPORTS page2
0.FINANCIAL
Enter the 0 to take a period FINANCIAL report.
If you selected 2 for RESET E.J., the report will reset without printing.
Samsung ER-550 Electronic Cash Register Manager Functions 75
Page 78

Cash Declaration
Cash-In-Drawer Declaration is an optional feature that forces you to count the drawer and declare
the drawer count before a report can be run. By forcing the operator to declare, without knowledge
of the expected drawer totals, you are assured that all cash will be depo sited. The register will
compare your declaration with the expected cash and check in drawer totals and display and print the
difference. The cash and check declarations will also appear on the financial report with the over or
short amounts.
The appropriate system option must be set to enforce cash declaration. See page 4 of "System
Option Programming" on page 101.
1. Turn the Control lock to the MANAGER position. The MANAGER MODE menu displays:
MANAGER MODE
0.PRINT REPORTS
1.DISPLAY REPORTS
2.PERFORM DECLARA.
3.REG. PRINT FORMAT
4.STOP REG PRINTING
5.TRAINING MODE
2. Press 2 to display the DECLARATION SCREEN.
DECLARATION SCREEN
CASH 0.00
CHECK 0.00
TOTAL 0.00
3. You can enter the cash drawer total in one step, or to facilitate the counting of the cash drawer,
you can enter each type of bill/coin and checks separately and let the register add the totals.
Enter cash by entering the cash amount on the ten key pad, then pressing the CASH/TEND key.
Repeat, if necessary, for each cash/coin denomination. If desired, you can use the @/FOR key
to multiply denominations as the are counted. For example enter 15, press @/FOR, enter 500,
then press CASH/TEND to declare fifteen five dollar bills.
Enter checks by entering the check amount on the ten key pad, then press the CHECK TEND
key. Repeat, if necessary, for each check.
76 Manager Functions Samsung ER-550 Electronic Cash Register
Page 79

4. Press CASH/TEND to total your declaration. The declaration will display and print on the
printer.
Declaration Screen Example:
DECLARATION SCREEN
INPUT AMT 7.25
DRAWER TTL 7.15
DIFFERENCE 0.10
Declaration Print Example:
THANK-YOU
CALL AGAIN
DATE 08/15/1999 SUN
CASH 7.25
TOTAL AMT 7.25
INPUT AMT 7.25
DRAWER TTL 7.15
DIFFERENCE 0.10
ANNIE NO. 000001
TIME 11:27AM 01
Samsung ER-550 Electronic Cash Register Manager Functions 77
Page 80

Receipt & Printing Control
Two print control options are available from the MANAGER MODE screen.
You can designate the printer to print a sales journal or print a receipt.
You can turn the print on or off. Note that the print is automatically turned on when
reports are to be printed. Also, you can generate a receipt on request if the system option
"ALLOW MULTIPLE RECEIPT" is set to yes (see "System Option Programming" on
page 101.) by pressing the CASH/TEND key.
Setting Receipt or Journal Printing
1. Turn the Control lock to the MANAGER position. The MANAGER MODE menu displays:
MANAGER MODE
0.PRINT REPORTS
1.DISPLAY REPORTS
2.PERFORM DECLARA.
3.REG. PRINT FORMAT
4.STOP REG PRINTING
5.TRAINING MODE
2. Press 3 to change the print format from receipt to journal or journal to receipt. The REG.
PRINTING FORMAT screen displays. Press the YES/NO key, then press the ENTER
(CASH/TEND) to change the function from its' current setting.
REG. PRINTING FORMAT
REGISTER PRINTING IS
CURRENTLY RECEIPT
TO SET TO JOURNAL
PRESS YES AND ENTER
78 Manager Functions Samsung ER-550 Electronic Cash Register
Page 81

Setting the Printer On or Off
1. Turn the Control lock to the MANAGER position. The MANAGER MODE menu displays:
MANAGER MODE
0.PRINT REPORTS
1.DISPLAY REPORTS
2.PERFORM DECLARA.
3.REG. PRINT FORMAT
4.STOP REG PRINTING
5.TRAINING MODE
2. Press 4 to set the print on or off. The REG. PRINTING ON/OFF screen displays. Press the
YES/NO key, then press the ENTER (CASH/TEND) to change the function from its' current
setting.
REG. PRINTING ON/OFF
REGISTER PRINTING
IS CURRENTLY ON
TO TURN OFF
PRESS YES AND ENTER
Samsung ER-550 Electronic Cash Register Manager Functions 79
Page 82

Training Mode
A training mode is available so that you can operate the cash register without updating totals and
counters. Note the following conditions:
The message "TRAINING MODE" prints on each receipt printed while training mode is
active.
For security, you can set a 4 digit password that is required to enter or exit training mode.
See page 5 of "System Option Programming" on page 101 to set this password.
The total and counter on the financial report labeled "TRAIN TTL" is updated with the
net amount of each training transaction.
To Enter Training Mode
1. Turn the Control lock to the MANAGER position. The MANAGER MODE menu displays:
MANAGER MODE
0.PRINT REPORTS
1.DISPLAY REPORTS
2.PERFORM DECLARA.
3.REG. PRINT FORMAT
4.STOP REG PRINTING
5.TRAINING MODE
2. Press 5 to display the ENTER/EXIT TRAINING screen.
ENTER/EXIT TRAINING
REGIST. IS CURRENTLY
NOT IN TRAINING
TO ENTER TRAINING,
ENTER 4 DIGIT PASSWD
AND PRESS ENTER
3. Enter the four digit password (the password must be programmed to use training mode), press
ENTER (CASH/TEND). The MANAGER MODE screen returns. The register is now in
training mode.
80 Manager Functions Samsung ER-550 Electronic Cash Register
Page 83

To Exit Training Mode
1. Turn the Control lock to the MANAGER position. The MANAGER MODE menu displays:
MANAGER MODE
0.PRINT REPORTS
1.DISPLAY REPORTS
2.PERFORM DECLARA.
3.REG. PRINT FORMAT
4.STOP REG PRINTING
5.TRAINING MODE
2. Press 5 to display the ENTER/EXIT TRAINING screen.
ENTER/EXIT TRAINING
REGIST. IS CURRENTLY
IN TRAINING
TO EXIT TRAINING,
ENTER 0000 AND
PRESS ENTER
3. Enter the 0000, press ENTER (CASH/TEND). The MANAGER MODE screen returns. The
register is now out of training mode.
Samsung ER-550 Electronic Cash Register Manager Functions 81
Page 84

82 Manager Functions Samsung ER-550 Electronic Cash Register
Page 85

Programming Instructions
Program Mode
Turn the control lock to the PROGRAM position. The first page of the PROGRAM MODE
menu displays:
PROGRAM MODE
0.DEPARTMENT
1.PLU
2.SALES TAX
3.SYSTEM OPTION
4.PRINT OPTION
5.FUNCTION KEYS
6.CLERK
Press PAGE DOWN to view the remainder of the PROGRAM MODE menu:
PROGRAM MODE
7.LOGO DESC.
8.GROUP DESC
9.TARE WEIGHT
00.MORE
Press the PAGE UP key to return to the first page of the PROGRAM MODE menu.
Samsung ER-550 Electronic Cash Register Programming Instructions 83
Page 86
Programming Menu - Reference Information
Option # Description
0
1
2
3
4
5
6
7
8
9
00
Press 0 to program the department descriptor, tax status and other department
options. See "Department Programming" on page 85.
Press 1 to program the PLU descriptor, tax status and other price look up
options. See "PLU Programming" on page 89.
Press 2 to program the type of tax (table, percentage rate, VAT) and the tax rate
or breakpoints. "Sales Tax Programming" on page 93.
Press 3 to program system options, where general options relating to operations
are set. See "System Option Programming" on page 101.
Press 4 to program printing options, where options relating to printing of receipts
and reports are set. See "Print Option Programming" on page 107.
Press 5 to program function key descriptors, limits and other options that are
specific to each different function key. See "Function Key Programming" on
page 112.
Press 6 to program clerk names and codes. See "Clerk Programming" on page
118.
Press 7 to program messages for the receipt logo. See "Logo Descriptor
Programming" on page 119.
Press 8 to program descriptors for groups. See "Group Descriptor
Programming" on page 120.
Press 9 to program tare weights. See "Tare Weight Programming" on page 121.
Press 00 for MORE programs, including editing clerk clock in and clock out
times, setting department or PLU inventory levels, programming the date and
time, or print program scans. See "More Menu Programs" on page 122.
PROGRAMMING NOTES:
To select an option from the menu displayed on the screen, press the number
next to the option you wish to program.
If you need help, press the HELP SCREEN key. Press ESC (CLEAR) to exit
a help screen and return to the original screen.
Be sure to press ENTER (CASH/TEND) after changing a selection. If you do
not press ENTER (CASH/TEND), the change will not be accepted.
84 Programming Instructions Samsung ER-550 Electronic Cash Register
Page 87

Department Programming
1. At the PROGRAM control lock position menu, press 0 for Department Programming. The
DEPARTMENT NUMBER screen displays:
DEPARTMENT NUMBER
PUSH DEPT TO BE
PROGRAMMED
USE DEPT SHIFT
IF NEEDED
0
Samsung ER-550 Electronic Cash Register Programming Instructions 85
Page 88
y
f
2. To view the DEPT # PROGRAMMING screen, press the department you wish to program, or
press DEPT SHIFT and the appropriate department.
3. Refer to "Department Options - Reference Information" on page 87 to make program entries or
changes, press the CLEAR key to finalize and return to the PROGRAM MODE screen.
To enter a
descriptor, press the
corresponding
number from the
10-key pad. I
necessary, press the
same key again to
advance to the letter
you wish to use.
After you select
each letter, p ress
ENTER (CASH
TEND
). See "How
to Enter Descriptors
in Program Mode"
on page 26 for more
information.
Enter the Group
you wish to link
with the 10-ke
pad. The
default group
is '0'.
DEPT #1 PROGRAMMING
DESC: DEPT.1
PRESET N
PRICE/HALO 0
TAXable BY TAX1 N
TAXable BY TAX2 N
TAXable BY TAX3 N
TAXable BY TAX4 N
DEPT #1 PROGRAMMING
LINK GROUP(0-9) 0
NEGATIVE ITEM N
SINGLE ITEM N
NON-ADD # COMP. N
GALLONAGE ITEM N
DISABLE N
INVENTORY ITEM N
DEPT #1 PROGRAMMING
SCALABLE N
AUTO SCALE N
AUTO TARE (1-5) N
SEND TO KITCHEN N
PRINT RED ON KP N
ENTER
Press
advance the
arrow to the next
option.
YES/NO
Press
to toggle from
''Y' to 'N' for
yes or no
decisions.
Press
PAGE DO WN
to view the
second
Department
Programming
screen.
PAGE Up
Press
once to return to
the first option
on a screen .
PAGE Up
Press
again to return
to the previous
screen.
Press
PAGE DO WN
to view the third
Department
Programming
screen.
to
86 Programming Instructions Samsung ER-550 Electronic Cash Register
Page 89
Department Options - Reference Information
Option Entry Description
DESC. Alpha numeric
12 character
PRESET Y or N
You can program a descriptor for each department. The default
descriptors are DEPT #1, DEPT #2, etc.
Choose Y for a preset department. Choose N for an open
department. Open departments accept amount entries. Use open
departments to enter different priced items into the same
department. Preset departments automatically register a
preprogrammed price when the department key is pressed. Use
preset departments to register an individual item quickly and
accurately. For example, cigarette packs or food items can be
assigned to departments as presets.
PRICE/HALO 7 digit amount If the department is open, the amount entered here is the high
amount lock out (HALO). You can limit errors by setting the
maximum amount that can be entered into a department. If the
department is preset, the amount entered here is the amount that is
registered automatically when the department key is pressed.
TAXable BY TAX1
TAXable BY TAX2
Y or N
Select N for non taxable items. Select Y to apply the appropriate
tax automatically to entries in a department.
TAXable BY TAX3
TAXable BY TAX4
LINK GROUP (0-9) 0-9 Enter a group where this department's sales will accumulate. Ten
group totals are available to summarize department sales. Group
totals appear on reports, so that you can track sales of different
types of items.
NEGATIVE ITEM Y or N
Select Y to register items that subtract, rather than add to the sale
total.
SINGLE ITEM Y or N
Select Y to for a single item department. Single item departments
automatically total as a cash sale immediately after the department
entry. Single item departments are used to speed up one item
sales.
NON-ADD # COMP Y or N
Select Y to enforce the entry of a non-add number before a
registration can be made.
GALLONAGE ITEM Y or N
Select Y to compute gallons sold. The gallons sold will print
along with the price entry on the receipt. The total gallons sold
will accumulate in the department counter. You must program the
price per gallon (in tenths of a cent, i.e. $1.299 for $1.29 and 9/10)
in the PRICE/HALO field.
DISABLE Y or N
Select Y to disable the department. Entries can not be made into
disabled departments.
INVENTORY ITEM Y or N
Select Y if you wish the department sales counter to decrement to
track the number of items remaining in inventory.
Samsung ER-550 Electronic Cash Register Programming Instructions 87
Page 90
Option Entry Description
SCALEABLE Y or N
If Y, the department will work only when you are multiplying a
weight from an optional scale.
AUTO SCALE Y or N
Select Y if you wish entries into this department to be
automatically multiplied by the weight on the optional scale
AUTO TARE (1-5) 0-5 Enter a value (1-5) to indicate the number of the preprogrammed
tare weight you want to automatically subtract when the
department is used for a scale entry (using an optional scale).
Enter 0 to disable automatic tare subtraction.
SEND TO KITCHEN Y or N
Select Y if you wish entries into this department to print on the
optional remote kitchen printer.
PRINT RED ON KP Y or N
Select Y if you wish entries into this department to print red on the
optional remote kitchen printer.
88 Programming Instructions Samsung ER-550 Electronic Cash Register
Page 91

PLU Programming
1. At the PROGRAM control lock position menu, press 1 for PLU Programming. The PLU
NUMBER screen displays:
PLU NUMBER
ENTER PLU NUMBER
AND PUSH PLU KEY
0
Samsung ER-550 Electronic Cash Register Programming Instructions 89
Page 92
f
2. To view the PLU # PROGRAMMING screen, enter the number of the PLU you wish to
program.
3. Refer to "PLU Options - Reference Information" on page 91 to make program entries or
changes, press the CLEAR key to finalize and return to the PROGRAM MODE screen.
To enter a
descriptor, press the
corresponding
number from the
10-key pad. I
necessary, press the
same key again to
advance to the letter
you wish to use.
After you select
each letter, p ress
ENTER (CASH
TEND
). See "How
to Enter Descriptors
in Program Mode"
on page 26 for more
information.
If you wish the
registration of
this PLU to
automatically
cause t he
registration of
another PLU,
Enter the PLU #
you wish to link
with the 10-key
pad. Enter ' 0'
for no link.
PLU #1 PROGRAMMING
DESC: PLU1
PRESET N
PRICE/HALO 0
LINK DEPT(1-24) 0
TAXable BY TAX1 N
TAXable BY TAX2 N
TAXable BY TAX3 N
PLU #1 PROGRAMMING
TAXable BY TAX4 N
NEGATIVE ITEM N
SINGLE ITEM N
NON-ADD # COMP. N
GALLONAGE ITEM N
DISABLE N
INVENTORY ITEM N
PLU #1 PROGRAMMING
SCALABLE N
AUTO SCALE N
AUTO TARE (1-5) 0
LINK PLU(0-70) 0
SEND TO KITCHEN N
PRINT RED ON KP N
ENTER
Press
advance the
arrow to the next
option.
YES/NO
Press
to toggle from
''Y' to 'N' for
yes or no
decisions.
Press
PAGE DO WN
to view the
second PLU
Programming
screen.
PAGE Up
Press
once to return to
the first option
on a screen .
PAGE Up
Press
again to return
to the previous
screen.
Press
PAGE DO WN
to view the third
PLU
Programming
screen.
to
90 Programming Instructions Samsung ER-550 Electronic Cash Register
Page 93
PLU Options - Reference Information
Option Entry Description
DESC. Alpha numeric
12 character
PRESET Y or N
You can program a descriptor for each PLU. The default
descriptors are PLU #1, PLU #2, etc.
Choose Y for a preset PLU. Choose N for an open PLU. Open
PLUs accept amount entries. Use open PLUs to enter different
priced items into the same PLU. Preset PLUs automatically
register a preprogrammed price when the PLU is entered. Use
preset PLUs to register an individual item quickly and accurately.
For example, cigarette packs or food items can be assigned to
PLUs.
PRICE/HALO 7 digit amount If the PLU is open, the amount entered here is the high amount
lock out (HALO). You can limit errors by setting the maximum
amount that can be entered into a PLU. If the PLU is preset, the
amount entered here is the amount that is registered automatically
when the PLU is entered.
LINK DEPT (1-24) 1-24 Enter a department where this PLU's sales will accumulate. 24
department totals are available to summarize PLU sales.
TAXable BY TAX1
TAXable BY TAX2
TAXable BY TAX3
Y or N
Select N for non taxable items. Select Y to apply the appropriate
tax automatically to entries in a department.
TAXable BY TAX4
NEGATIVE ITEM Y or N
Select Y to register items that subtract, rather than add to the sale
total.
SINGLE ITEM Y or N
Select Y to for a single item PLU. Single item PLUs automatically
total as a cash sale immediately after the PLU entry. Single item
PLUs are used to speed up one item sales.
NON-ADD # COMP Y or N
Select Y to enforce the entry of a non-add number before a
registration can be made.
GALLONAGE ITEM Y or N
Select Y to compute gallons sold. The gallons sold will print
along with the price entry on the receipt. The total gallons sold
will accumulate in the PLU counter. You must program the price
per gallon (in tenths of a cent, i.e. $1.299 for $1.29 and 9/10) in
the PRICE/HALO field.
DISABLE Y or N
Select Y to disable the PLU. Entries can not be made into disabled
PLUs.
INVENTORY ITEM Y or N
Select Y if you wish the PLU sales counter to decrement to track
the number of items remaining in inventory.
Samsung ER-550 Electronic Cash Register Programming Instructions 91
Page 94
Option Entry Description
SCALEABLE Y or N
If Y, the PLU will work only when you are multiplying a weight
from an optional scale.
AUTO SCALE Y or N
Select Y if you wish entries into this department to be
automatically multiplied by the weight on the optional scale
AUTO TARE (1-5) 0-5 Enter a value (1-5) to indicate the number of the preprogrammed
tare weight you want to automatically subtract when the
department is used for a scale entry (using an optional scale).
Enter 0 to disable automatic tare subtraction.
LINK PLU(0-70) 0-70 If you wish the registration of this PLU to automatically cause the
registration of another PLU, Enter the PLU # you wish to link with
the 10-key pad. Enter 0 for no link. (Note: the total number of
PLUs available may vary. Ask your Samsung dealer for more
information.)
SEND TO KITCHEN Y or N
Select Y if you wish entries into this PLU to print on the optional
remote kitchen printer.
PRINT RED ON KP Y or N
Select Y if you wish entries into this PLU to print red on the
optional remote kitchen printer.
92 Programming Instructions Samsung ER-550 Electronic Cash Register
Page 95

Sales Tax Programming
The ER 550 allows three calculation options for each of the four possible taxes.
Add-On - most sales taxes can be programmed by entering an add-on tax percentage rate.
Tax Table - if a tax entered as an add-on tax percentage does not follow exactly the tax chart that
apply in your area, tax table programming will match tax collection exactly to the break points of
your tax table.
VAT - if tax is included in the cost of the item, you can use value added tax (VAT) to calculate the
tax share of each sale.
A fourth tax programming option, for the Canadian Goods and Services tax (GST) can be set
using tax rate 4.
Important Note: After you have entered your tax program, test for accuracy
by entering several transactions of different dollar amounts. Carefully check
to make sure the tax charged by the cash register matches the tax amounts on
the printed tax chart for your area. As a merchant, you are responsible for
accurate tax collection. If the cash register is not calculating tax accurately, or
if you cannot program your tax properly from the information in this manual,
contact your Samsung Dealer for assistance.
Samsung ER-550 Electronic Cash Register Programming Instructions 93
Page 96

Programming an Add-On Tax Rate Percentage
When tax requirements can be met using a straight percentage rate, use the following method to
program a tax as a straight percentage.
1. Turn the control lock to the PROGRAM position.
2. From the PROGRAM MODE menu, press 2 to view the TAX PROG. screen.
TAX PROG.
TAX NUMBER (1-4) 1
TAX TYPE (0-2) 0
0 : ADD-ON
1 : TAX TABLE
2 : VAT
3. When the arrow is pointed at the TAX NUMBER field, enter the number of the tax you wish to
program. (There are four taxes available, enter 1, 2, 3, or 4.) The arrow will move to the TAX
TYPE field.
4. Enter 0 for an ADD-ON tax with a straight percentage rate. The appropriate TAX #
PROGRAMMING screen displays.
TAX #1 PROGRAMMING
TAX RATE 0.000
5. When the arrow is pointed at the TAX RATE field, enter the percentage rate for the sales tax.
For example if the tax is 6 percent, enter 6.000 or 6.0. If the tax is 7.5 percent, enter 7.500 or
7.5 using the decimal key. If the tax is 10 percent, enter 10.000 or 10.0. Press the ENTER
(CASH/TEND) to set the rate.
6. The TAX PROG. screen will return prompting you to enter the next tax, if necessary. Continue
to program additional taxes or press CLEAR to return to the PROGRAM MODE screen.
94 Programming Instructions Samsung ER-550 Electronic Cash Register
Page 97
Programming a Tax Table
In some cases, a tax that is entered as a percentage does not follow exactly the tax charts that apply
in your area (even if the tax chart is based on a percentage). In these cases, we recommend that you
enter your tax using tax table programming. This method will match tax collection exactly to the
break points of your tax table.
Before programming, obtain a copy of the tax table you wish to program. You will need the printed
tax table if you wish to determine the break point entries yourself. The "Tax Table Programming
Example - Illinois 6% Tax Table" on page 98 is used as an example in the steps that follow.
Note: You can enter up to 60 break points.
1. Turn the control lock to the PROGRAM position.
2. From the PROGRAM MODE menu, press 2 to view the TAX PROG. screen.
TAX PROG.
TAX NUMBER (1-4) 1
TAX TYPE (0-2) 1
0 : ADD-ON
1 : TAX TABLE
2 : VAT
3. When the arrow is pointed at the TAX NUMBER field, enter the number of the tax you wish to
program. (There are four taxes available, enter 1, 2, 3, or 4.) The arrow will move to the TAX
TYPE field.
4. Enter 1 for an TAX TABLE programming. The appropriate TAX # PROGRAMMING screen
displays.
5. Use the table below as a guide in filling the fields on this screen. After completing these entries,
your screen should look like the screen that follows.
Field Description
FIRST TAX AMOUNT
NON-TAXable AMOUNT
# OF NON-REPEAT BRK
# OF REPEAT BREAK
Enter the first tax amount that is charged. For
this example the entry is 0.01.
Enter the highest amount where no tax is
charged. For this example the entry is 0.10.
Enter the number of Non-repeat breaks. For
this example the entry is 5.
Enter the number of repeat breaks. For this
example the entry is 3.
Samsung ER-550 Electronic Cash Register Programming Instructions 95
Page 98

TAX #1 PROGRAMMING
FIRST TAX AMOUNT
0.01
NON-TAXable AMOUNT
0.10
# OF NON-REPEAT
BREAK 5
# OF REPEAT BRK 3
6. After entering the # OF REPEAT BRK field, the next TAX TABLE PROG. screen will
display. Using the printed copy of your tax table, enter information in the SALE AMOUNT
RANGE fields. Enter the information as it appears on your tax table. Enter the high amount of
the first range where you are prompted. The low amount of the next range will be computed
automatically. After completing the tax range entries, your screen should look like the
following screen. Note that this screen should look exactly like the corresponding part of the
printed tax table.
TAX TABLE PROG.
TAX SALE AMT RANGE
0.00 0.00 0.10
0.01 0.11 0.21
0.02 0.22 0.38
0.03 0.39 0.56
0.04 0.57 0.73
0.05 0.74 0.91
7. Because this tax table has more than 5 break points (the number of break points that can be
displayed on the first screen), you must continue to enter SALE AMT RANGE information on
the additional screens until information has been entered for each break point. After completing
the tax range entries, your screen should look like the following screen. Note that this screen
should look exactly like the corresponding part of the printed tax table.
TAX TABLE PROG.
TAX SALE AMT RANGE
0.06 0.92 1.08
0.07 1.09 1.24
0.08 1.25 1.41
96 Programming Instructions Samsung ER-550 Electronic Cash Register
Page 99

8. After you have completed entering the SALES AMOUNT RANGE information, the TAX
PROG. screen will return prompting you to enter the next tax, if necessary. Continue to
program additional taxes or press CLEAR to return to the PROGRAM MODE screen.
Note: Some tax tables are very complex. Contact your Samsung Dealer for
assistance should you have difficulty entering your Tax Table.
Samsung ER-550 Electronic Cash Register Programming Instructions 97
Page 100

Tax Table Programming Example - Illinois 6% Tax Table
1. Examine the printed tax table for the tax you are programming.
2. Calculate the break point differences by subtracting the high side of the previous range from the
high side of the sale amount range.
3. Examine the pattern of break point differences to determine when the break points begin to
repeat. Mark the beginning break points that do not fit a pattern as “non-repeat breaks.” Mark
the break points that are repeating in a pattern as “repeat breaks.” Count the number of repeat
and non-repeat breaks.
Tax Charged
Sale Amount
Range
$0.00 $0.00 - $0.10
$0.01 $0.11 - $0.21 1
$0.02 $0.22 - $0.38 1
$0.03 $0.39 - $0.56 1
$0.04 $0.57 - $0.73 1
$0.05 $0.74 - $0.91 1
$0.06 $0.92 - $1.08 1
$0.07 $1.09 - $1.24 1
$0.08 $1.25 - $1.41 1
$0.09 $1.42 - $1.58 1
$0.10 $1.59 - $1.74 1
$0.11 $1.75 - $1.91 1
$0.12 $1.92 - $2.08 1
$0.13 $2.09 - $2.24 1
$0.14 $2.25 - $2.41 1
Break point
Differences
1
7
Non-Repeat
8
7
8
7
Repeat
6
7
7
6
7
7
6
7
98 Programming Instructions Samsung ER-550 Electronic Cash Register
 Loading...