

Page 1
Getting Started with the
CLERK
1
BOTTLE
WATER
5 X/TIME
BOTTLE
WATER
Q X/TIME
BOTTLE
WATER
9 9 8
CASH
2
SUB
00 0
CLERK
0
CASH
SUB
00 5
9 1 9 0 CHRG
Samsung ER-285
General Operation
Opening the Register
If the display on the register reads “CLOSED”, you will need to
open the register by assigning a clerk to it. To do this…
1. Turn the key to the <Reg> position
2. Press 1
3. Press the CLERK key
4. The register is now open and available to ring in sales.
5. To close the register, press 0 and then CLERK
Ringing in Sales
\Using preset items on the keyboard
1. For items with a preset price, simply hit the key for that
item on the keyboard.
2. To ring multiples of an item, i.e., 5 Bottled Waters
a. enter the quantity of the item
b. press X/TIME
c. press the item key
For open items that do not have set prices
1. Enter the quantity (Q) if greater than one
2. Press the X/TIME key
3. Enter a price for the item, example, for a $8.99, enter
899. DO NOT USE DECIMAL POINT
4. Press an open item key, for example MISC SALES
Using the Scanner
1. Point scanner at bar code and push button on scanner. If
the scanner is in a scanner stand, pressing the button is
not necessary as scanning occurs automatically.
(If multiples of same item. Enter the quantity, press
X/TIME and then scan item.)
Finishing the Sale
1. Press the SBTL key to display the current total. Tell
customer total owed (i.e, $15.99).
2. Enter the amount received from customer (i.e. $20 bill)
and press CASH, CHECK, CHARGE, ECT. Amount
of change to give back to customer will be displayed on
screen.
Split Tender
1. If the customer would like to pay using cash and putting
the remaining balance on a credit card. Ring in the
amount of the cash and press CASH, and then the
remaining amount and press CHARGE.
TOTAL
TOTAL
Page 2
Manual Credit Card Entry
SUB
TOTAL
LG T
-
SHIRT
10%
DISC
$3
CANCEL
CASH
RCPT
CLEAR
CHRG
SUB
TOTAL
CLEAR
CASH
CASH
CLEAR
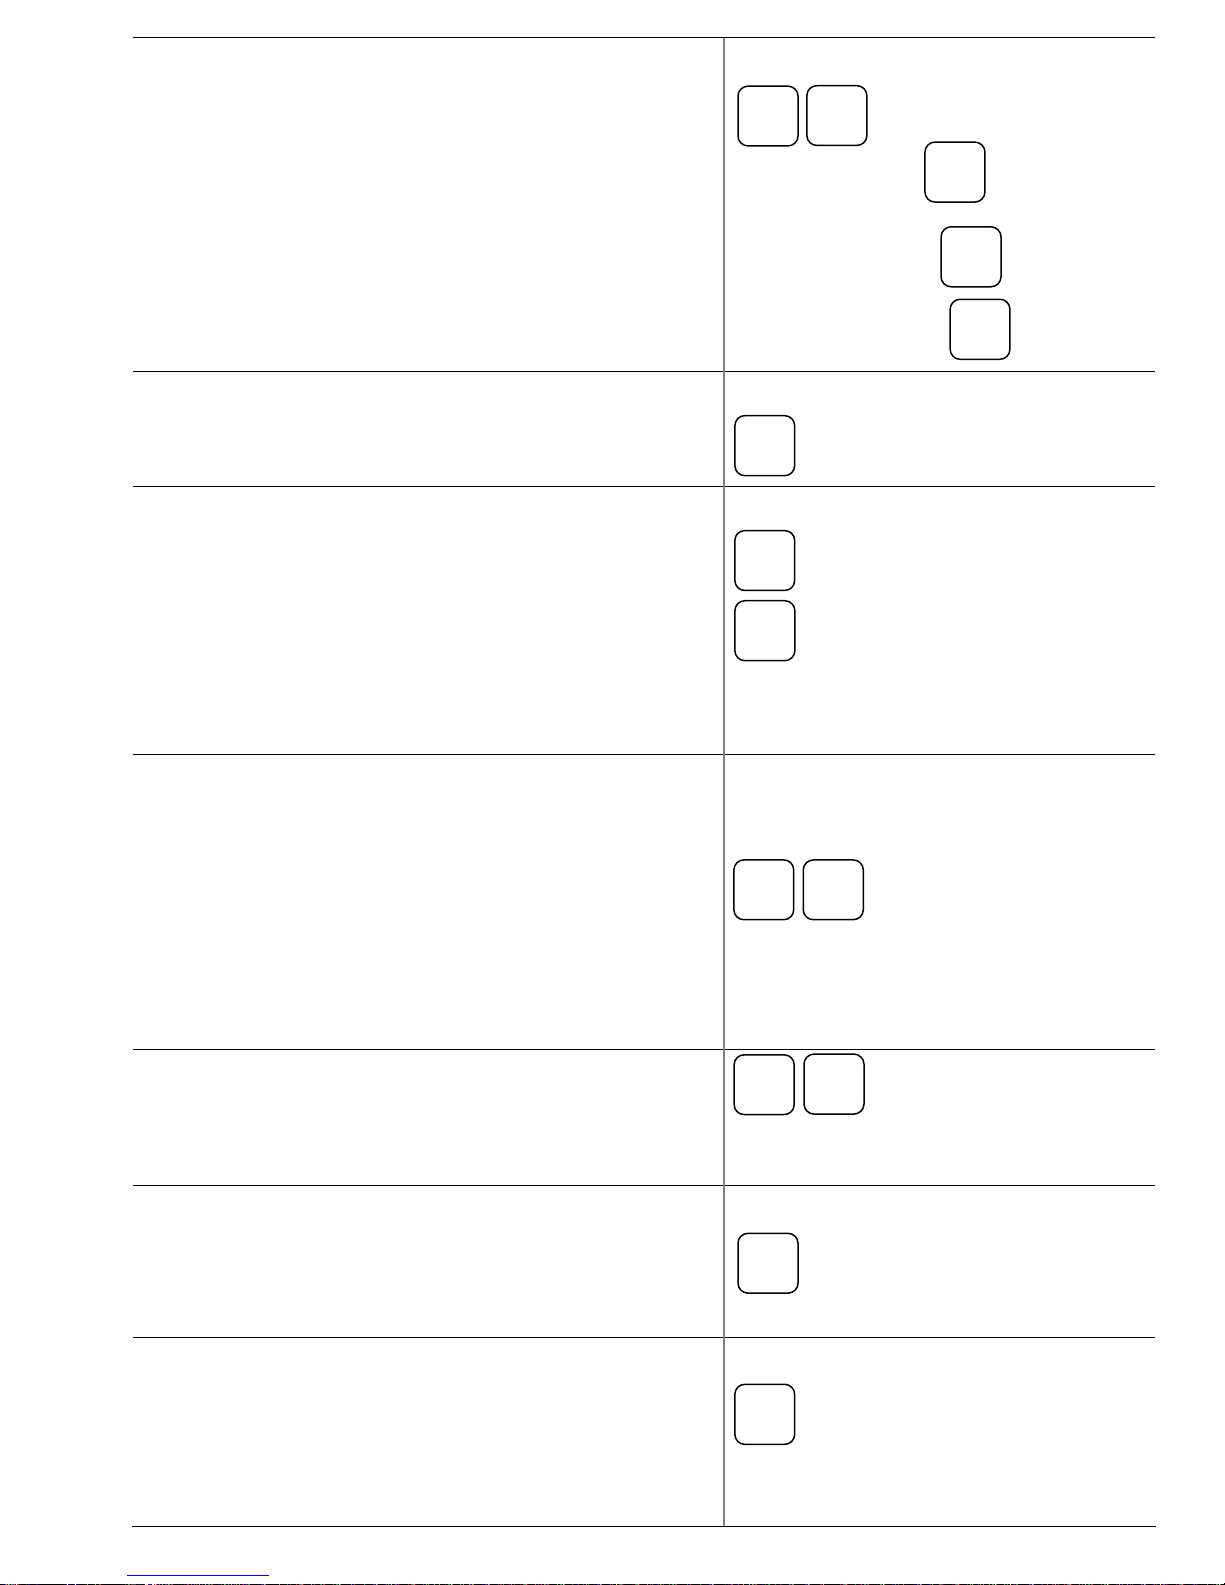
2. Ring in the sale
3. Press SUBTOTAL and then CHARGE
4. If the card cannot be read when the message [SWIPE
CARD] appears, press CLEAR
5. Enter the 16 digit account number on the card when you
see the message [ENTER ACCT NO] and press CASH
6. When [ENTER EXP DATE] appears, enter the date on
the card as MMYY and press CASH
7. Print receipt for signature and place in drawer.
Declined Credit Card
1. If you get a [CARD DECLINED] message, Press clear
and ask the customer for another card or cash
[SWIPE CARD]
[ENTER ACCT NO]
[ENTER EXP DATE]
Receipts
1. If a receipt did not automatically print, or if the
customer requests an additional copy, press the cash
button again after the sale.
2. To change the default receipt printing setting, press the
RCPT ON/OFF button. Pressing this button while in the
middle of a sale will cause an error. Only press this
button after finishing a transaction.
Discounts
Subtotal Discounts
Discount buttons programmed to discount the entire sale will
only be operational after the SUBTOTAL key has been pressed
1. Ring in sale
2. Press SUBTOTAL
3. Press discount key, example 10% DISC
Item Discounts
Item discounts are applied to individual items and are rung up
after pressing an item button.
1. Press item that qualifies for discount, i.e. LG T-SHIRT
2. Press discount button, example $3 DISC
3. Continue ringing additional items, or finalize sale.
Error Correction
Clear
The CLEAR button is used to remove any numerical keystrokes
made in error or to clear any error messages and stop the
corresponding beeping. CLEAR does not change or remove any
items within the current sale.
Cancel
If you have rung up multiple items and there is something
wrong or customer does not have money you can press
CANCEL key to void the whole sale and start again if
necessary.
ON/OFF
DISC
Page 3
Void
Item to be
ITEM
#1
ITEM
#2
VOID
ITEM
#1
RETRN
ITEM
#2
SUB
TOTAL
CASH
Repeat for multiple
TAX
SHIFT
ITEM
ORIG
ITEMS
SUB
TOTAL
CASH
CHRGE or
CASH
CASH
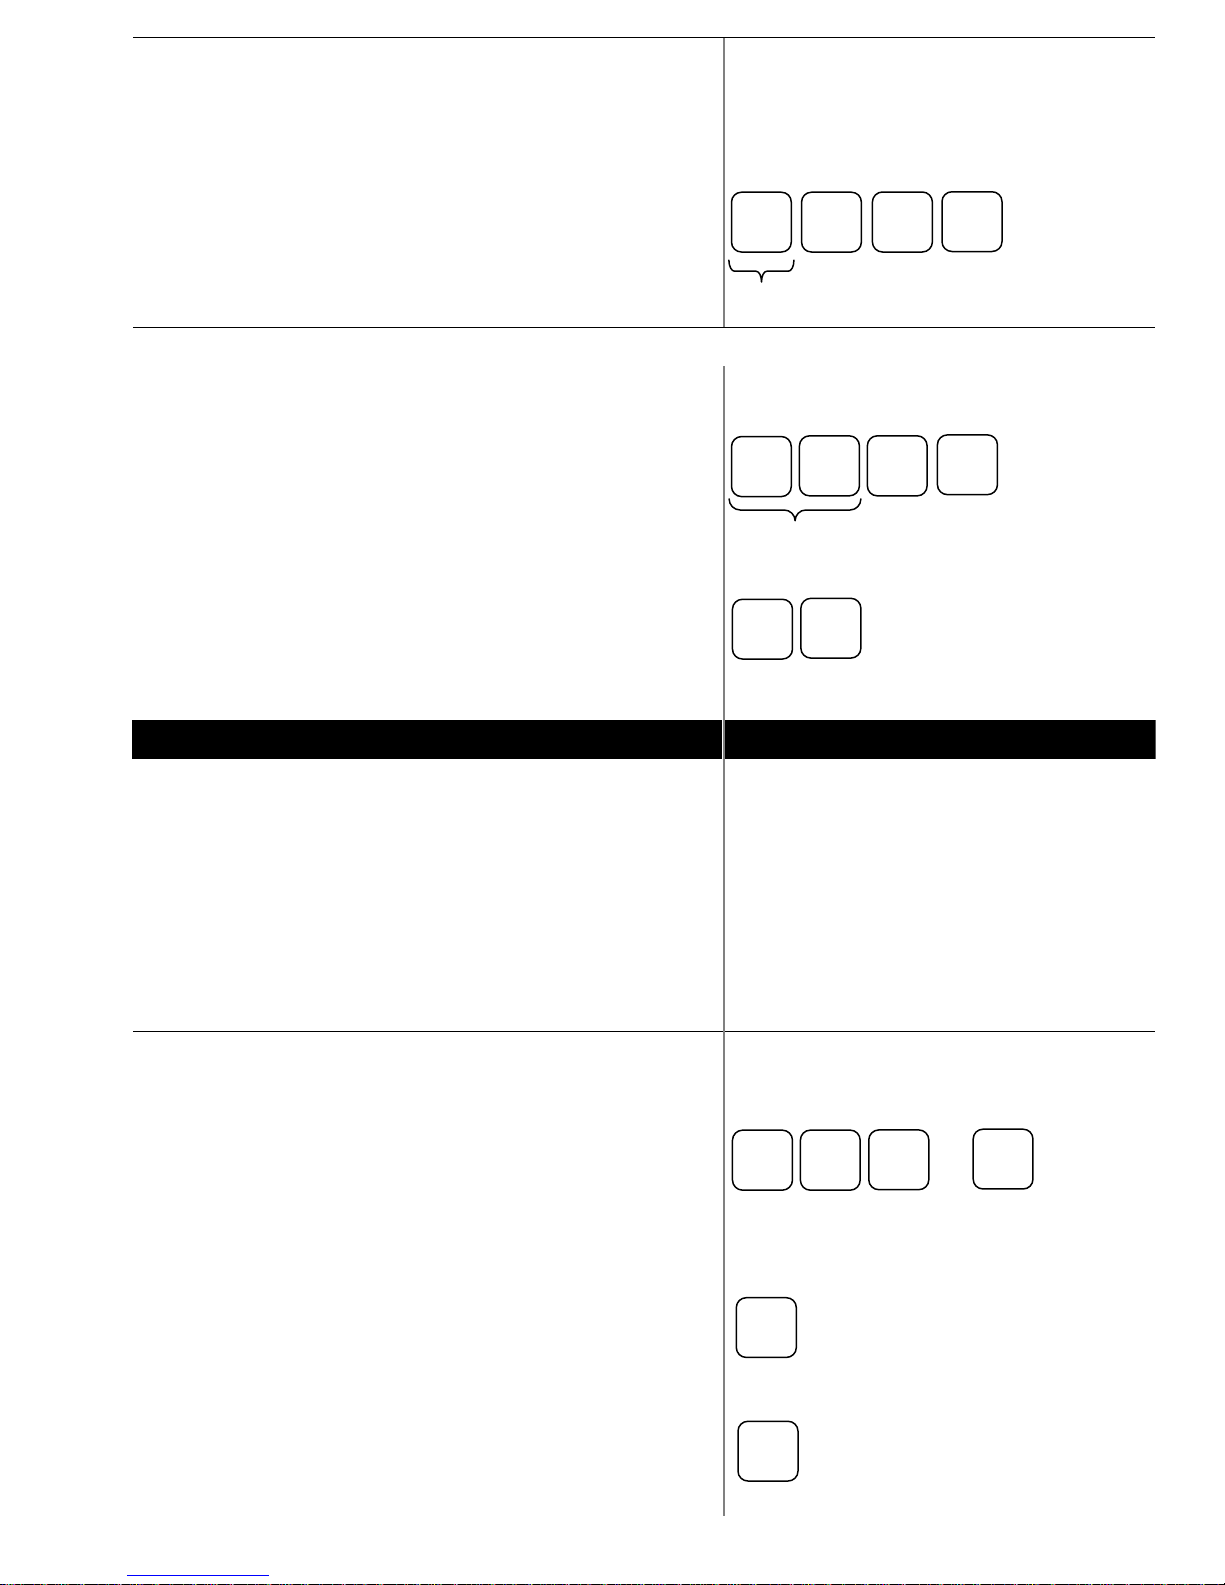
The void button is used within a sale to remove one previously
entered item at a time. Void can be used either before or after
subtotal has been pressed, but must be done prior to sale
finalization.
1. After ringing in an item that needs to be removed from
the sale, press the void button.
2. Press the item button you wish to remove. You will see
the item show up on the display with a minus (-) next to
the price indicating it has been removed from the sale.
removed
Return
(Cash sales only. For credit card returns, see Transaction Void under Manager Operations.)
The return button is used to remove an item from a sale after it
has been finalized. Use original receipt to verify items.
1. Make sure you are not in the middle of a sale
2. Press RETURN button
3. Press item button to be returned.
4. Finalize the return by pressing the CASH button.
Tax Exempt
Tax Shift (or Tax 1) will allow for tax exempt customers to
have items rung in without tax getting added. Press TAX SHIFT
after each item to remove the tax calculation at subtotal
Manager Operations
Reloading Paper
Keep paper in the printer at all times. If the register stops
functioning and the message “**WARNING** RECPT
PAPER END) is displayed, replace with a new roll of paper
making sure paper feeds from the underside of the roll. Register
will begin printing right where it left off with no data lost.
Change it when it gets low. Never pull the paper through the
printer without lifting the blue release lever first.
items
Transaction void
To correct over-rings or handle returns/voids charged to a credit
card, follow these steps.
1. Turn the mode lock switch to the <VOID> position
2. Ring in the sale you wish to void exactly like it was
rung up the first time. Use the receipt as a reference.
You will see each item displayed with a negative price.
3. Complete the void with the same tender option as the
original with either CASH or CHARGE
4. If the void was done on a credit card sale, you will see
the message [ENTER APP CODE] on the display. Enter
the number next to APP on the original receipt and
press CASH
5. [ENTER REF CODE] will then be displayed. Enter the
number next to REC NO from the receipt and press
CASH
6. Turn the mode lock switch back to the <REG> position.
Key to VOID Position
if charge, continue below
[SWIPE CARD]
[ENTER APP CODE] use APP from receipt
[ENTER REF CODE] use REC NO from
receipt
Page 4
Reports
3
SUB
TOTAL
1 0 0
H H M M X/TIME
M M D D Y
X/TIME
CASH
Y
T T . T T T
0 0 1 TAX
CASH
0 1 0
S S
SUB
NEW
ITEM
CASH
X/TIME
DAILY
DAILY
EVENT
While in
X Position
-
amine current totals
In
Z Position
-
In
Z Position
-
all
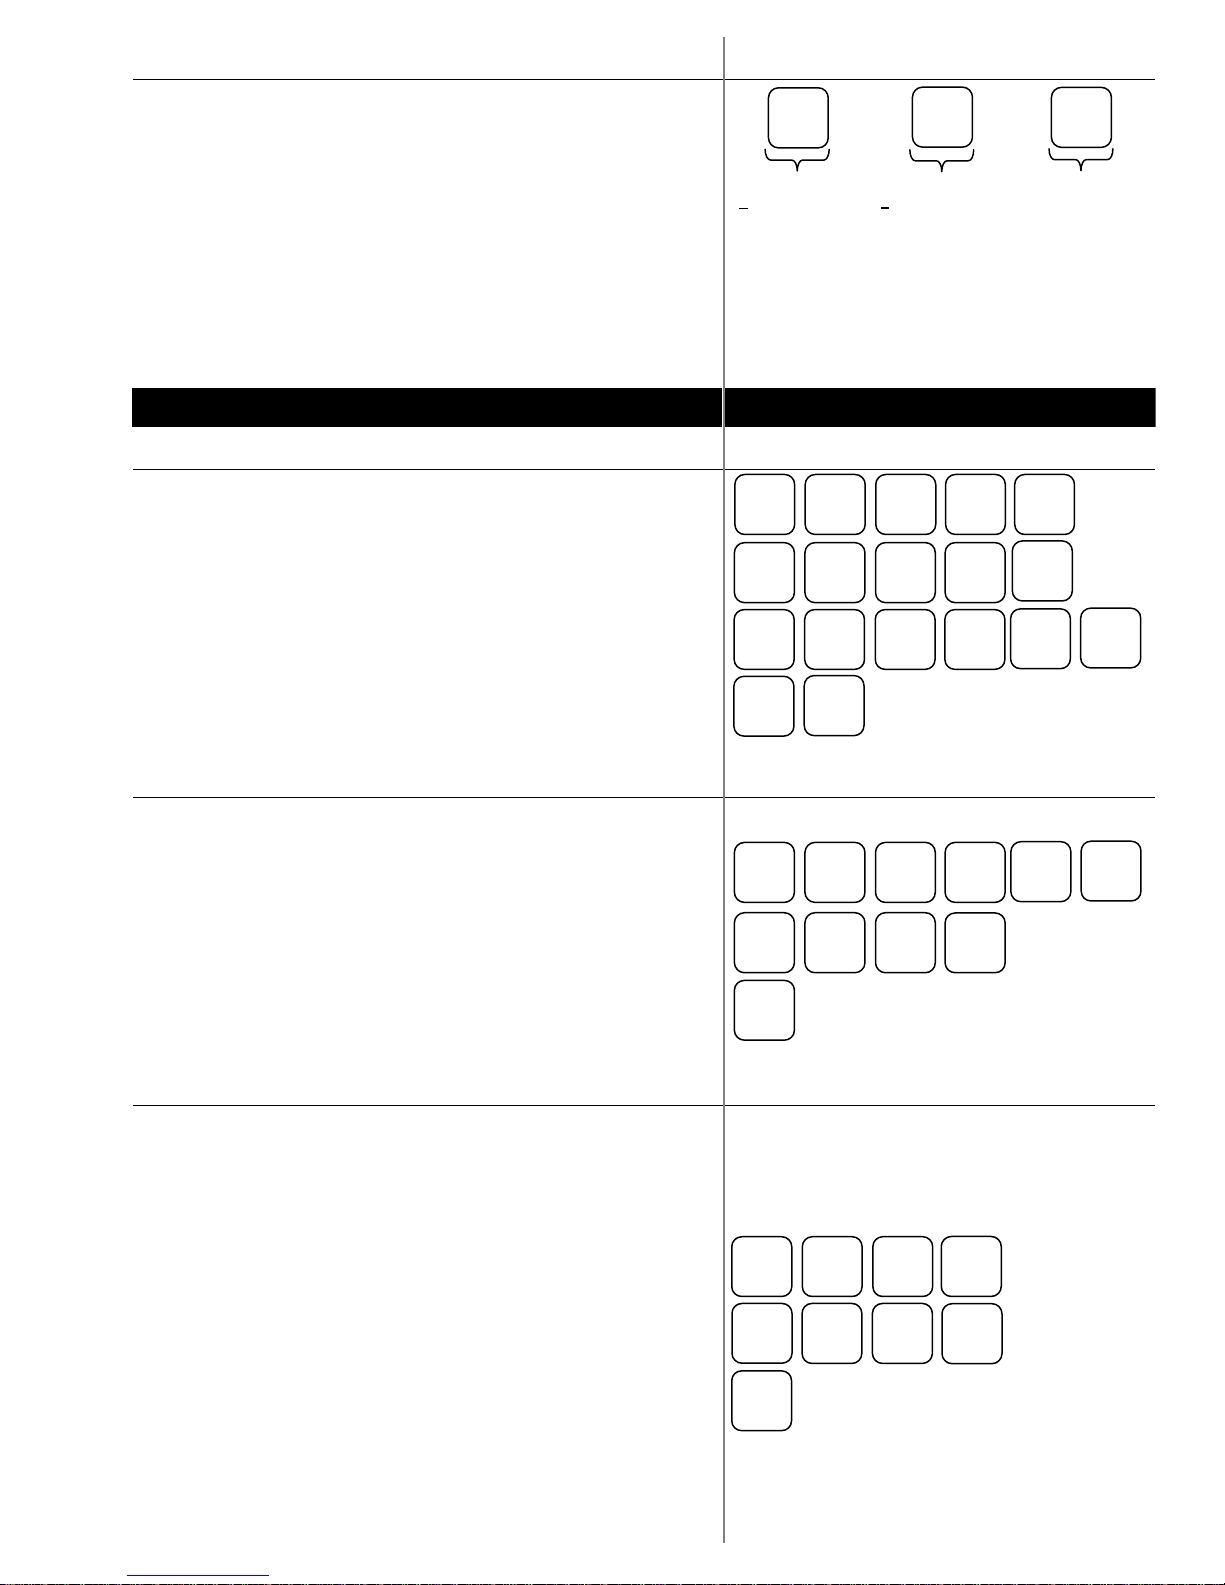
Run a Daily Report (X1) while in X mode to view current totals.
This can be done at any time. A Daily Report (Z1) or End of
Event Report (Z2) preformed while the key is in the Z position
will reset all totals after the report is run. These should be run at
then end of each night (Z1) and end of entire event (Z2). Be
sure to run both a Z1 and Z2 prior to the start of your event
if you have done any training or test sales.
1. Turn the key to the X position for X report or Z position
for Daily and Event reports
2. Press the desired REPORT button
Common Programming Functions
Changing the Date/Time
1. Turn the key to the PGM position
2. Press 1300 then press subtotal
3. Enter the time in Military Standard Time (based on 24
hours) as a four digit number (i.e. 3:30 pm = 1530);
press the X/TIME button
4. Enter the date in MM (month) DD (day) YY (year)
format.
5. Then press X/TIME.
6. Press CASH to finalize the program
REPORT
eX
leaving them intact
REPORT
Zeros totals resetting
for new day’s sales
REPORT
Cumulative totals of
previous daily reports
Changing the Tax Rate
To change the tax rate of your register follow these steps
1. Turn the key to the PGM position
2. Enter the percent tax rate including the decimal out to
three places. Example, for 6.75%, press 06.750.
3. Assign the type of tax by pressing 001.
4. Press the TAX button on the keyboard.
5. Press the CASH button on the keyboard.
6. Return the key to the REG position.
Adding or editing items
There are 4 programs to adding a new item. All 4 parts need to
be done for each new item. Editing existing items – you can do
just the program needed.
I. Assign a status to the item
1. turn the key to the P position
2. enter 100, then press SUBTOTAL
3. scan the item or press the button on the keyboard
4. enter the Status (S) code from the options below
a. preset taxable item = 40
b. preset nontaxable item = 00
c. open taxable item = 50
d. open nontaxable item = 10
5. press the X/TIME button, repeat steps 3 through 5 for
additional items
6. press CASH to finalize program sequence.
TOTAL
Page 5
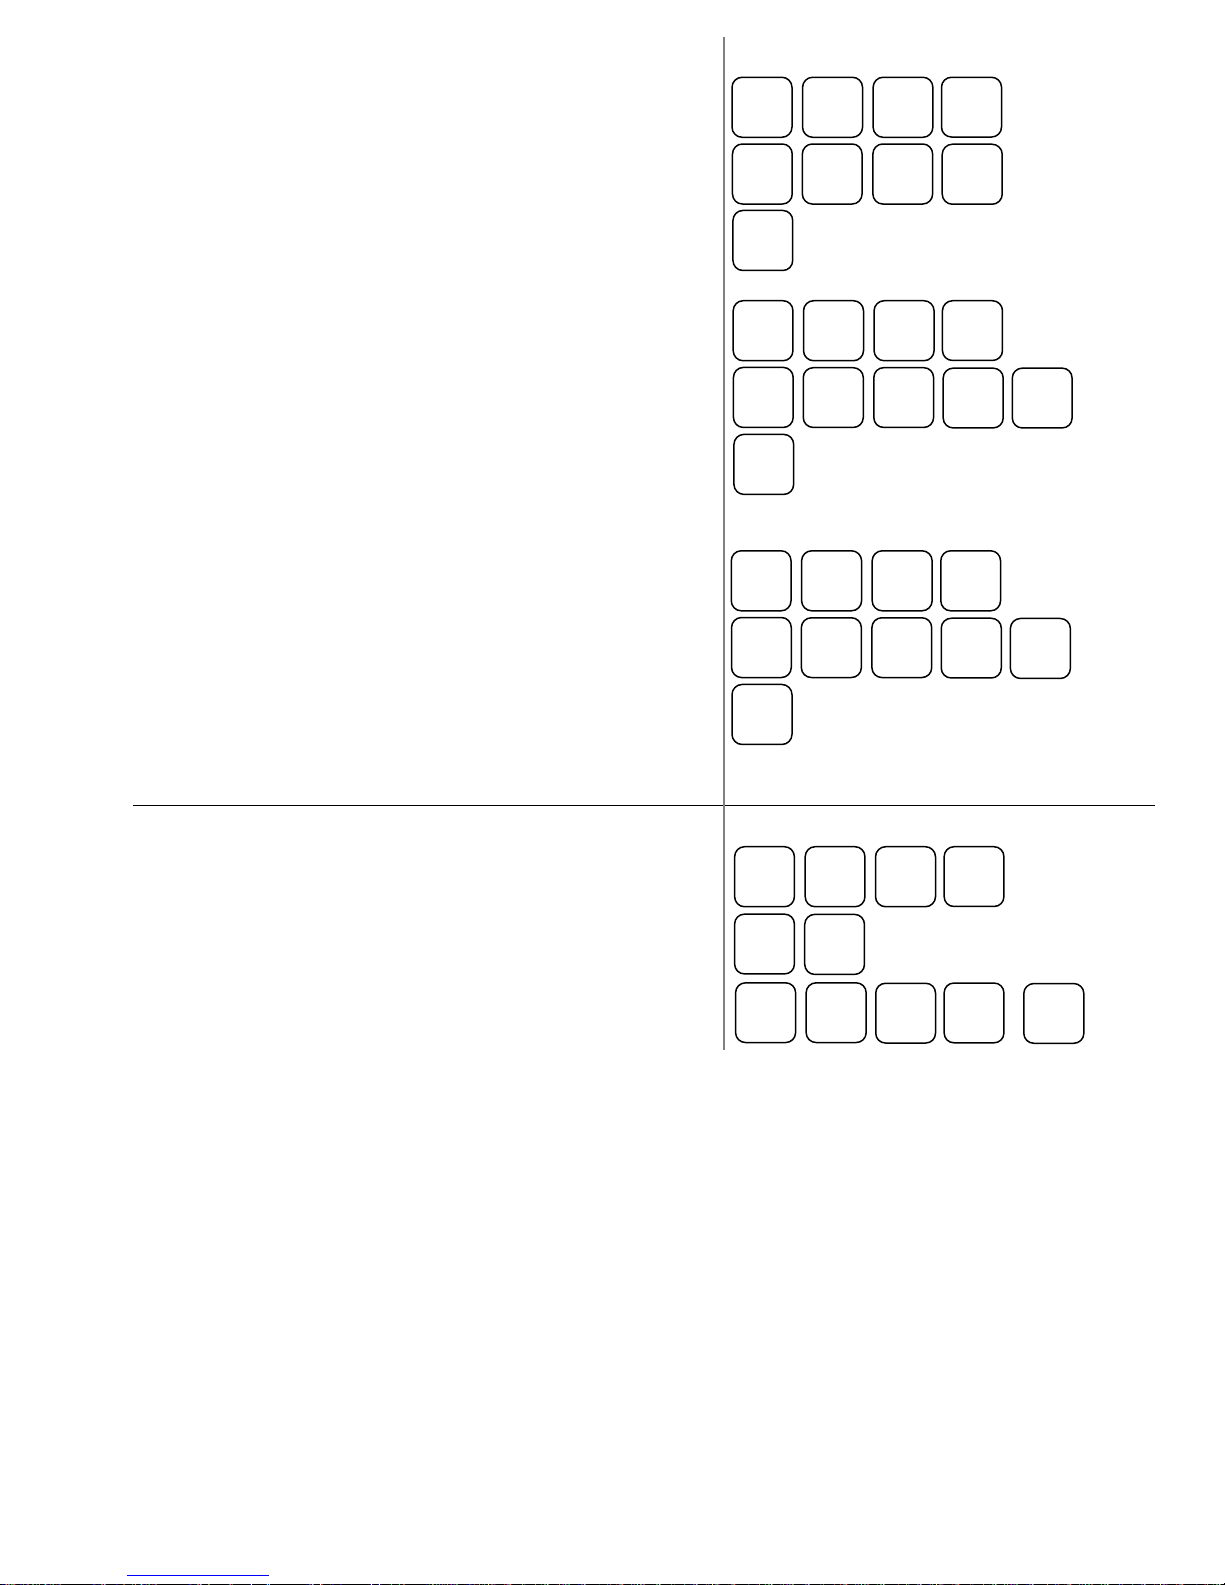
II. Assign a group link to the item
5 1 0
G G
SUB
TOTAL
NEW
ITEM
CASH
X/TIME
0 2 0
P P
SUB
TOTAL
NEW
ITEM
CASH
P X/TIME
0 3 0
SUB
TOTAL
NEW
CASH
X/TIME
0 7 0
SUB
TOTAL
X/TIME
L
CASH
SUB
TOTAL
1. turn the key to the P position
2. enter 150, then press SUBTOTAL
3. scan the item or press the button on the keyboard
4. enter the Group # (G) that you want linked to this item
5. press the X/TIME button
6. press CASH
III. Assign a price to the item
1. turn the key to the P position
2. enter 200, then press SUBTOTAL
3. scan the item or press the button on the keyboard
4. enter the Price (P) for this item (do NOT use the
decimal point
5. press the X/TIME button
6. press CASH
IV. Assign a description to the item
1. turn the key to the P position
2. enter 300, then press SUBTOTAL
3. scan the item or press the button on the keyboard
4. place the alpha overlay (found under the keyboard) on
the keyboard and enter up to 18 characters
5. press the X/TIME button
6. press CASH
Receipt Header Change
To add/change the description in the receipt header
1. turn the key to the P position
2. enter 700, then press SUBTOTAL
3. enter the line number (L) you wish to change (1-6) and
then press X/TIME
4. use the alpha overlay to enter the description (up to 32
characters) and press SUBTOTAL
5. press CASH to finalize
ITEM
 Loading...