

Samsung EC-WB250FBPBUS, ECWB250FFPRUS, ECWB250FFPWUS, ECWB250FFPAUS, EC-WB250FBPWUS User Manual
...
USER
MANUAL
WB250F/WB251F/WB252F/WB280F
Click a topic
Basic troubleshooting Quick reference Contents
Basic functions Extended functions Shooting options
Playback/Editing Wireless network Settings
Appendixes Index
This user manual includes detailed usage instructions for
your camera. Please read this manual thoroughly.

Health and safety information
Always comply with the following precautions and usage tips to avoid dangerous situations and ensure peak performance of your camera.
Warning—situations that could cause injury to yourself or others
Do not disassemble or attempt to repair your camera.
This may result in electric shock or damage to the camera.
Do not use your camera near ammable or explosive gases and liquids.
This may cause a re or explosion.
Do not insert ammable materials into the camera or store these materials
near the camera.
This may cause a re or electric shock.
Do not handle your camera with wet hands.
This may result in electric shock.
Prevent damage to subjects’ eyesight.
Do not use the ash in close proximity (closer than 1 m/3 ft) to people or animals.
If you use the ash too close to your subject’s eyes, you can cause temporary or
permanent eyesight damage.
Keep your camera away from small children and pets.
Keep your camera and all accessories out of the reach of small children and animals.
Small parts may cause choking or serious injury if swallowed. Moving parts and
accessories may present physical dangers as well.
Do not expose the camera to direct sunlight or high temperatures for an
extended period of time.
Prolonged exposure to sunlight or extreme temperatures can cause permanent
damage to your camera’s internal components.
1

Health and safety information
Avoid covering the camera or charger with blankets or clothes.
The camera may overheat, which may distort the camera or cause a re.
Do not handle the power supply cord or go near the charger during a
thunderstorm.
This may result in electric shock.
If liquid or foreign objects enter your camera, immediately disconnect all
power sources, such as the battery or charger, and then contact a Samsung
service center.
Comply with any regulations that restrict the use of a camera in a certain area.
•
Avoid interference with other electronic devices.
•
Turn o the camera when in an aircraft. Your camera can cause interference with
aircraft equipment. Follow all airline regulations and turn o your camera when
directed by airline personnel.
•
Turn o the camera near medical equipment. Your camera can interfere with
medical equipment in hospitals or health care facilities. Follow all regulations,
posted warnings, and directions from medical personnel.
Avoid interference with pacemakers.
Maintain the distance between this camera and all pacemakers to avoid potential
interference, as recommended by the manufacturer and research groups. If you
have any reason to suspect that your camera is interfering with a pacemaker
or other medical device, turn o the camera immediately and contact the
manufacturer of the pacemaker or medical device for guidance.
2

Health and safety information
Caution—situations that could cause damage to your camera or other
equipment
Remove the batteries from your camera when storing it for an extended period
of time.
Installed batteries may leak or corrode over time and cause serious damage to your
camera.
Use only authentic, manufacturer-recommended, Lithium-ion replacement
batteries. Do not damage or heat the battery.
Inauthentic, damaged, or heated batteries may cause a re or personal injury.
Use only Samsung-approved batteries, chargers, cables and accessories.
•
Using unauthorized batteries, chargers, cables or accessories can cause batteries
to explode, damage your camera, or cause injury.
•
Samsung is not responsible for damage or injuries caused by unapproved
batteries, chargers, cables or accessories.
Use the battery only for its intended purpose.
Misusing the battery may cause a re or electric shock.
Do not touch the ash while it res.
The ash is very hot when red and may burn your skin.
When you use the AC charger, turn o the camera before you disconnect the
power to the AC charger.
Failing to do so may result in re or electric shock.
Disconnect the charger from the wall socket when not in use.
Failing to do so may result in re or electric shock.
Do not use a damaged power supply cord, plug, or loose outlet when you
charge batteries.
This may cause a re or electric shock.
Do not allow the AC charger to come in contact with the +/- terminals on the
battery.
This may cause a re or electric shock.
3

Health and safety information
Do not drop or subject the camera to strong impacts.
Doing so may damage the screen or external or internal components.
Exercise caution when you connect cables or adapters and install batteries and
memory cards.
If you force the connectors, improperly connect cables, or improperly install
batteries and memory cards, you can damage ports, connectors, and accessories.
Keep cards with magnetic strips away from the camera case.
Information stored on the card may be damaged or erased.
Never use a damaged charger, battery, or memory card.
This may result in electric shock or camera malfunction or cause a re.
Do not place the camera in or near magnetic elds.
Doing so may cause the camera to malfunction.
Do not use the camera if the screen is damaged.
If the glass or acrylic parts are broken, visit a Samsung Electronics Service Center to
have the camera repaired.
Check that the camera is operating properly before use.
The manufacturer takes no responsibility for any loss of les or damage that may
result from camera malfunction or improper use.
You must plug the small end of the USB cable into your camera.
If the cable is reversed, it may damage your les. The manufacturer is not
responsible for any loss of data.
Avoid interference with other electronic devices.
Your camera emits radio frequency (RF) signals that may interfere with unshielded
or improperly shielded electronic equipment, such as pacemakers, hearing aids,
medical devices, and other electronic devices in homes or vehicles. Consult the
manufacturers of your electronic devices to solve any interference problems you
experience. To prevent unwanted interference, use only Samsung-approved devices
or accessories.
Use your camera in the normal position.
Avoid contact with your camera’s internal antenna.
Data transference and your responsibilities
•
Data transferred via WLAN can be hacked, so avoid transferring sensitive data in
public areas or on open networks.
•
The camera manufacturer is not liable for any data transfers that infringe on
copyrights, trademarks, intellectual property laws, or public decency ordinances.
4

Outline of the User Manual
Copyright information
•
Microsoft Windows and the Windows logo are registered trademarks of the
Microsoft Corporation.
•
Mac and Apple App Store are registered trademarks of the Apple
Corporation.
•
Google Play Store is a registered trademark of Google, Inc.
•
microSD™, microSDHC™, and microSDXC™ are registered trademarks of the
SD Association.
•
Wi-Fi®, the Wi-Fi CERTIFIED logo, and the Wi-Fi logo are registered
trademarks of the Wi-Fi Alliance.
•
Trademarks and trade names used in this manual are the property of their
respective owners.
•
Camera specications or contents of this manual may be changed
without prior notice due to an upgrade of the camera's functions.
•
We recommend using your camera within the country where you
purchased it.
•
Use this camera responsibly and adhere to all laws and regulations
concerning its use.
•
You are not allowed to reuse or distribute any part of this manual
without prior permission.
Basic functions 19
Learn about your camera’s layout, icons, and basic functions for
shooting.
Extended functions 42
Learn how to capture a photo and record a video by selecting a
mode.
Shooting options 63
Learn how to set the options in Shooting mode.
Playback/Editing 87
Learn how to play back photos or videos, and edit photos. Also, learn
how to connect your camera to your computer or TV.
Wireless network 111
Learn how to connect to wireless local area networks (WLANs) and
use functions.
Settings 131
Refer to options to congure your camera’s settings.
Appendixes 137
Get information about error messages, specications, and
maintenance.
5
Indicators used in this manual
Mode Indicator
Smart Auto
Program
Aperture Priority, Shutter Priority, Manual
Smart
Best Face
Magic Plus
Settings
Wi-Fi
Shooting mode icons
These icons appear in the text when a function is available in a mode. See the
example below.
s
Note: The
For example:
or g mode may not support functions for all scenes or modes.
T
p
G
s
i
g
n
w
Available in Program,
Aperture Priority, and
Shutter Priority modes
Icons used in this manual
Icon Function
Additional information
Safety warnings and precautions
Camera buttons. For example, [Shutter] represents the shutter button.
[]
Page number of related information
()
The order of options or menus you must select to perform a step; for
example: Select Face Detection Normal (represents Select Face
Detection, and then select Normal).
Annotation
*
6

Expressions used in this manual
Pressing the shutter
•
Half-press [Shutter]: Press the shutter halfway down
•
Press [Shutter]: Press the shutter all the way down
Half-press [Shutter] Press [Shutter]
Subject, background, and composition
•
Subject: The main object in a scene, such as a person, animal, or still life
•
Background: The objects around the subject
•
Composition: The combination of a subject and background
Background
Subject
Composition
Exposure (Brightness)
he amount of light that enters your camera determines the exposure. You can alter
T
the exposure by changing the shutter speed, aperture value, or ISO sensitivity.
By altering the exposure, your photos will be darker or lighter.
Normal exposure
S
Overexposure (too bright)
S
7

Special features of your camera
Using the Touch screen and camera buttons
You can operate the camera by either touching the screen or pressing the camera
buttons.
Using the DIRECT LINK button
Press the DIRECT LINK button to activate the Wi-Fi function that you have
designated.
Setting a DIRECT LINK button option
You can select a Wi-Fi function to launch when you press the DIRECT LINK button.
Access Settings.
1
Access the DIRECT LINK button option.
2
Select a Wi-Fi feature from the list.
3
8
Special features of your camera
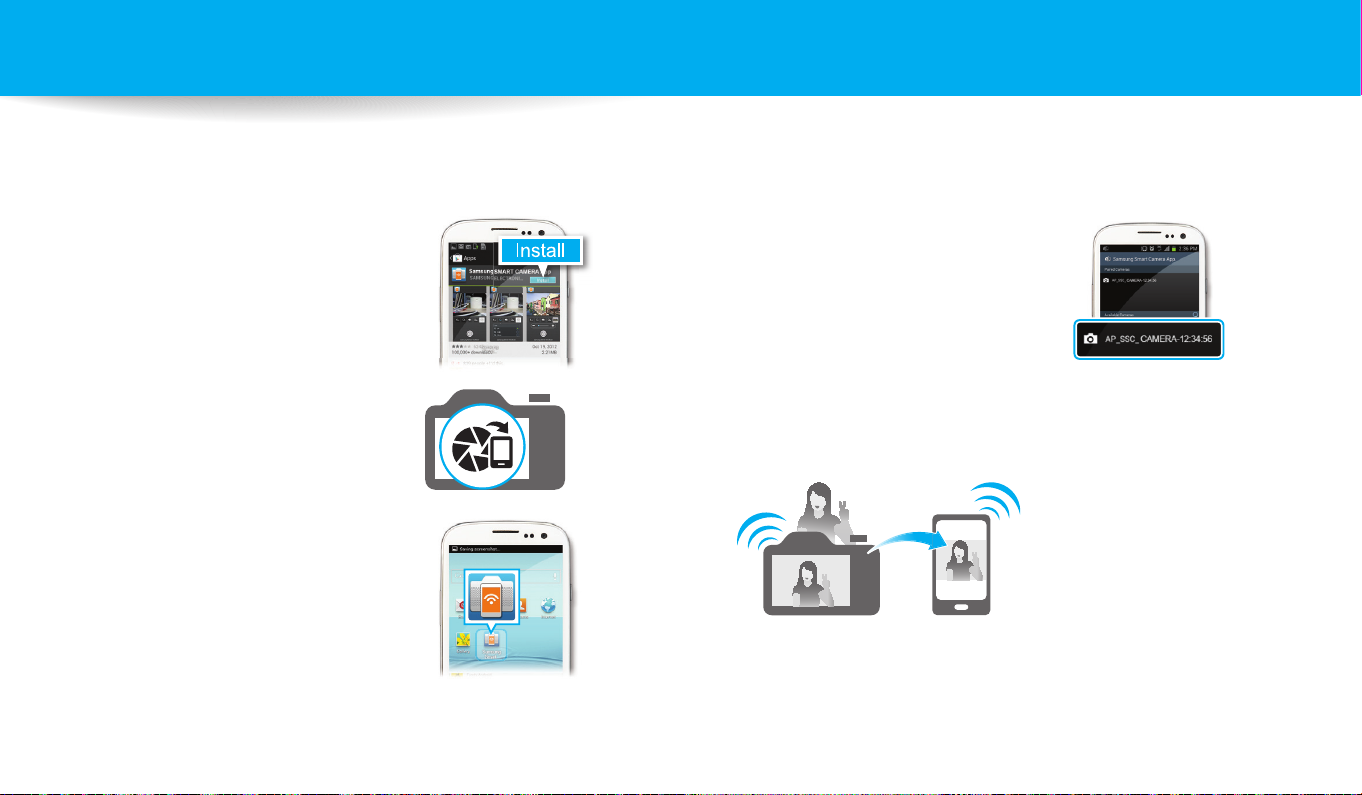
Using AutoShare
When you capture a photo with your camera, the photo is saved to the smart phone automatically. The camera connects to a smart phone wirelessly.
Install Samsung SMART CAMERA
1
App on the smart phone.
Turn on the AutoShare feature.
2
Launch Samsung SMART CAMERA
3
App on the smart phone.
9
Select the camera from the list and
4
connect the smart phone to the
camera.
•
If a pop-up message appears on your
camera, allow the smart phone to
connect to your camera.
Capture a photo.
5
•
The captured photo is saved to the camera, and then transferred to the smart
phone.
Special features of your camera
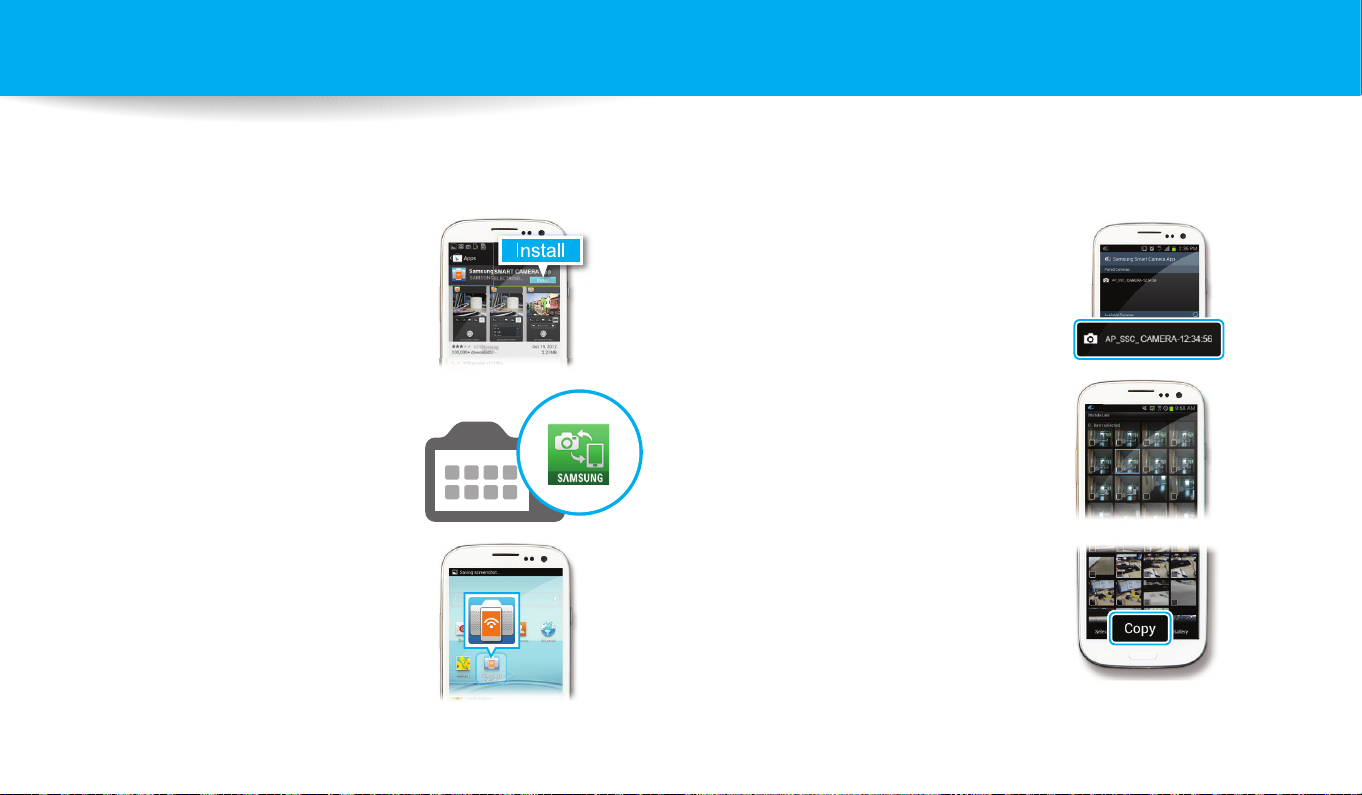
Using MobileLink
You can send les easily from your camera to a smart phone. The camera connects wirelessly to smart phones that support the MobileLink feature.
Install Samsung SMART CAMERA
1
App on the smart phone.
Access the MobileLink mode.
2
•
If a pop-up message appears, select an
option.
Launch Samsung SMART CAMERA
3
App on the smart phone.
10
Select the camera from the list and
4
connect the smart phone to the
camera.
•
If a pop-up message appears on your
camera, allow the smart phone to
connect to your camera.
On the smart phone or camera,
5
select les to transfer from the
camera.
On the smart phone, touch the copy
6
button or on the camera, select
Share.

Special features of your camera
Using Remote Viewnder
You can remotely control your camera from a smart phone. The camera connects to a smart phone wirelessly. Use the smart phone as a remote shutter release with the Remote
Viewnder feature. The captured photo will appear on the smart phone.
Install Samsung SMART CAMERA
1
App on the smart phone.
Access the Remote Viewnder
2
mode.
Launch Samsung SMART CAMERA
3
App on the smart phone.
11
Select the camera from the list and
4
connect the smart phone to the
camera.
•
If a pop-up message appears on your
camera, allow the smart phone to
connect to your camera.
Touch and hold to focus, and
5
then release it to capture a photo.
Touch the thumbnail to view the
6
photo.

Special features of your camera
Shooting samples – Macro
You can capture close up shots of small subjects, such as owers or insects.
The example image may dier from the actual photo that you capture.
Select the macro option ( ).
1
Capture a photo.
2
12

Basic troubleshooting
Learn to solve common problems by setting shooting options.
The subject’s eyes
appear red.
Photos have dust spots. If dust particles are present in the air, you may capture them in photos when you use the ash.
Photos are blurred. Blurring can occur if you capture photos in low light conditions or hold the camera incorrectly.
Photos are blurred when
shooting at night.
Subjects come out
too dark because of
backlighting.
Red eye occurs when the subject's eyes reect light from the camera ash.
•
Set the ash option to Red-eye or Red-eye Fix. (p. 66)
•
If the photo has already been captured, select Red-eye Fix in the edit menu. (p. 100)
•
Turn o the ash or avoid capturing photos in a dusty place.
•
Set ISO sensitivity options. (p. 69)
Use the OIS function or half-press [Shutter] to ensure the subject is in focus. (p. 40)
As the camera tries to let in more light, the shutter speed slows. This can make it dicult to hold the camera steady long
enough to capture a clear photo and may result in camera shake.
•
Select Low Light Shot in s mode. (p. 50)
•
Turn on the ash. (p. 67)
•
Set ISO sensitivity options. (p. 69)
•
Use a tripod to prevent your camera from shaking.
When the light source is behind the subject or when there is a high contrast between light and dark areas, the subject may
oo dark.
appear t
•
Avoid shooting toward the sun.
•
Set the ash option to Fill in. (p. 67)
•
Adjust the exposure. (p. 78)
•
Set the Auto Contrast Balance (ACB) option. (p. 79)
•
Set the metering option to Spot if a subject is in the center of the frame. (p. 79)
13

Quick reference
Capturing photos of people
• s
mode > Beauty Face f 50
• i
mode f 53
•
Red-eye/Red-eye Fix (to prevent or correct red-eye)
66
f
•
Face Detection f 75
•
Self-Portrait f 75
Capturing photos at night or in the dark
• s
mode > Silhouette, Fireworks, Light Trace,
Low Light Shot
•
Flash options f 67
•
ISO sensitivity (to adjust the sensitivity to light) f 69
Capturing action photos
•
Shutter Priority mode f 48
• s
mode > Action Freeze, Continuous Shot f 50
•
Continuous f 83
Capturing photos of text, insects, or
owers
• s
mode > Macro f 50
•
Macro f 70
f
50
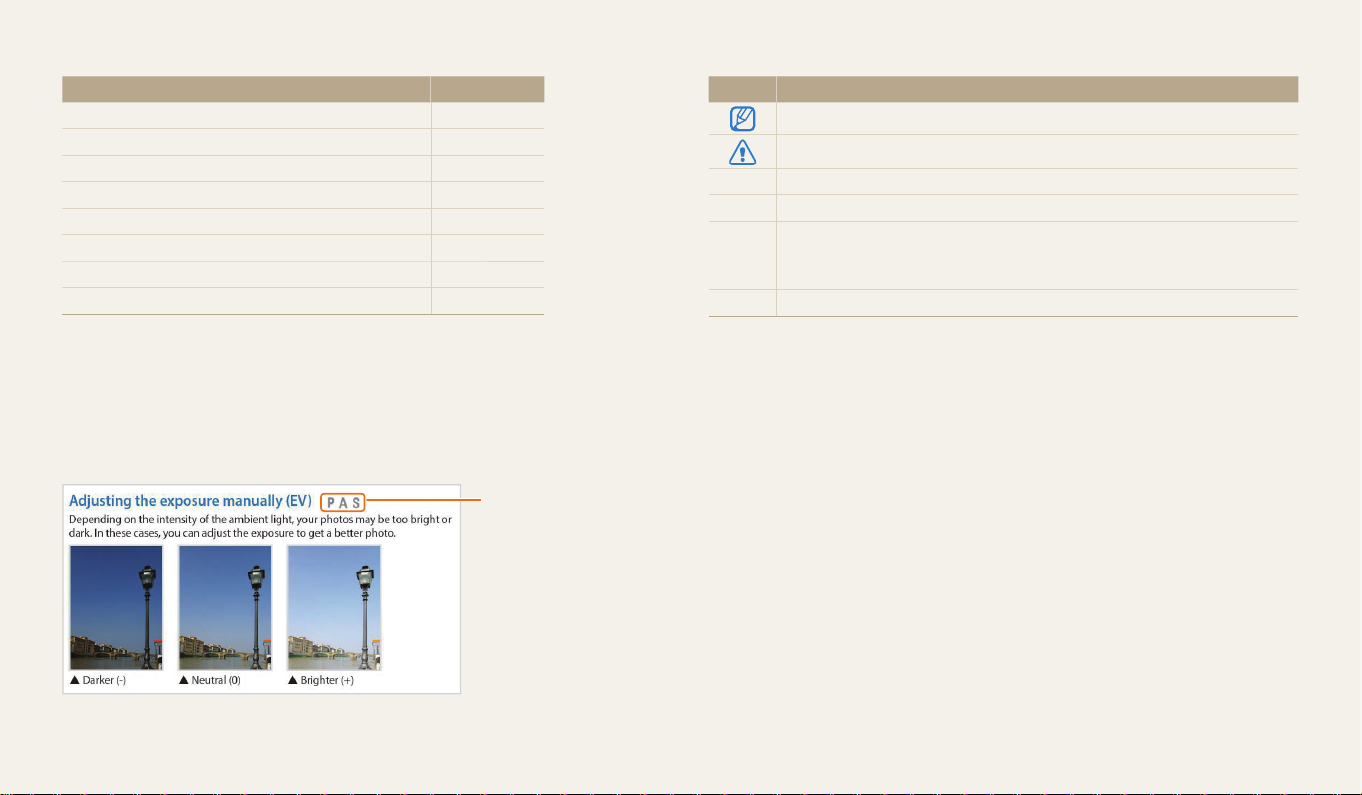
Adjusting the exposure (brightness)
• s
mode > Rich Tones f 50
•
ISO sensitivity (to adjust the sensitivity to light) f 69
•
EV (to adjust exposure) f 78
•
ACB (to compensate for subjects against bright
backgrounds)
•
Metering f 79
•
AE Bracket (to capture 3 photos of the same scene with
dierent exposures)
• s
mode > Landscape, Waterfall f 50
• s
mode > Panorama f 51
• g
mode > My Magic Frame f 54
• g
mode > Split Shot f 56
• g
mode > Motion Photo f 57
• g
mode > Photo Filter f 58
•
Image Adjust (to adjust Sharpness, Contrast, or
Saturation)
79
f
84
f
Capturing photos of scenery
Applying eects to photos
85
f
Applying eects to videos
• g
mode > Movie Filter f 59
Reducing camera shake
•
Optical Image Stabilization (OIS) f 39
•
Viewing les as thumbnails f 90
•
Viewing les by category f 90
•
Deleting all les on the memory f 92
•
Viewing les as a slide show f 94
•
Viewing les on a TV f 101
•
Connecting your camera to a computer f 102
•
Sending photos or videos via email f 124
•
Using photo or video sharing websites f 125
•
Adjusting sound and volume f 133
•
Adjusting the brightness of the display f 134
•
Changing the display language f 135
•
Setting the date and time f 135
•
Before contacting a service center f 149
14

Contents
Basic functions
................................................................................................................. 19
Unpacking ................................................................................................................... 20
Camera layout ............................................................................................................ 21
Using the DIRECT LINK button ............................................................................. 23
Inserting the battery and memory card .......................................................... 24
Charging the battery and turning on your camera ..................................... 25
Charging the battery ............................................................................................. 25
Turning on your camera ........................................................................................ 25
Performing the initial setup ................................................................................. 26
Learning icons ........................................................................................................... 28
Selecting modes ....................................................................................................... 29
Icons on the Mode screen ..................................................................................... 29
Selecting options or menus .................................................................................. 31
Selecting with buttons .......................................................................................... 31
Selecting by touch ................................................................................................. 32
Setting the display and sound ............................................................................. 34
Setting the display type ........................................................................................ 34
Setting the sound ................................................................................................... 35
Capturing photos ..................................................................................................... 36
Zooming .................................................................................................................. 37
Reducing camera shake (OIS) ............................................................................... 39
Tips for getting a clearer photo ........................................................................... 40
Extended functions
....................................................................................................... 42
Using the Smart Auto mode ................................................................................. 43
Using the Program mode ...................................................................................... 45
Using the Aperture Priority, Shutter Priority, or Manual mode ............... 46
Using the Aperture Priority mode ....................................................................... 47
Using the Shutter Priority mode .......................................................................... 48
Using the Manual mode ........................................................................................ 49
Using the Smart mode ............................................................................................ 50
Using the Panorama mode ................................................................................... 51
Using the Best Face mode ..................................................................................... 53
Using the Magic Plus mode .................................................................................. 54
Using the My Magic Frame mode ........................................................................ 54
Using the Split Shot mode .................................................................................... 56
Using the Motion Photo mode ............................................................................ 57
Using the Photo Filter mode ................................................................................ 58
Using the Movie Filter mode ................................................................................ 59
Recording a video .................................................................................................... 60
Recording a video with the Smart Scene Detection function ........................ 61
15

Contents
Shooting options
............................................................................................................ 63
Selecting a resolution and quality ..................................................................... 64
Selecting a resolution ............................................................................................ 64
Selecting a photo quality ...................................................................................... 65
Shooting in the dark ................................................................................................ 66
Preventing red-eye ................................................................................................. 66
Using the ash ........................................................................................................ 66
Setting a ash option ............................................................................................. 67
Adjusting the ISO sensitivity ................................................................................. 69
Changing the camera’s focus ............................................................................... 70
Using macro ............................................................................................................ 70
Using auto focus ..................................................................................................... 70
Adjusting the focus area ....................................................................................... 72
Adjusting the focus by touch ............................................................................... 72
Using Face Detection .............................................................................................. 75
Detecting faces ....................................................................................................... 75
Capturing a self portrait shot ............................................................................... 75
Capturing a smile shot ........................................................................................... 76
Detecting eye blinking .......................................................................................... 76
Tips for detecting faces ......................................................................................... 77
Adjusting brightness and color ........................................................................... 78
Adjusting the exposure manually (EV) ............................................................... 78
Compensating for backlighting (ACB) ................................................................ 79
Changing the metering option ............................................................................ 79
Selecting a White Balance setting ....................................................................... 80
Using burst modes ................................................................................................... 83
Capturing continuous photos .............................................................................. 83
Using the timer ....................................................................................................... 84
Capturing bracketed photos ................................................................................ 84
Adjusting images ..................................................................................................... 85
Reducing the sound of the zoom ....................................................................... 86
16

Contents
Playback/Editing
............................................................................................................. 87
Viewing photos or videos in Playback mode ................................................. 88
Starting Playback mode ........................................................................................ 88
Viewing photos ....................................................................................................... 93
Playing a video ........................................................................................................ 95
Editing a photo .......................................................................................................... 97
Resizing photos ...................................................................................................... 97
Rotating a photo .................................................................................................... 97
Cropping a photo ................................................................................................... 98
Applying Smart Filter eects ................................................................................ 98
Adjusting your photos ........................................................................................... 99
Viewing les on a TV ............................................................................................. 101
Transferring les to the computer ................................................................... 102
Transferring les to your Windows OS computer ........................................... 102
Transferring les to your Mac OS computer .................................................... 103
Using programs on a computer ........................................................................ 105
Installing i-Launcher ............................................................................................ 105
Using i-Launcher .................................................................................................. 106
Wireless network
.......................................................................................................... 111
Connecting to a WLAN and conguring network settings ..................... 112
Connecting to a WLAN ........................................................................................ 112
Using the login browser ...................................................................................... 113
Network connection tips .................................................................................... 114
Entering text .......................................................................................................... 115
Saving les to a smart phone automatically ................................................ 116
Sending photos or videos to a smart phone ................................................ 117
Using a smart phone as a remote shutter release ...................................... 118
Using Auto Backup to send photos or videos .............................................. 120
Installing the program for Auto Backup on your PC ....................................... 120
Sending photos or videos to a PC ..................................................................... 120
Sending photos or videos via email ................................................................ 122
Changing email settings ..................................................................................... 122
Sending photos or videos via email .................................................................. 124
Using photo or video sharing websites ......................................................... 125
Accessing a website ............................................................................................. 125
Uploading photos or videos ............................................................................... 125
Using AllShare Play to send les ....................................................................... 127
Uploading photos to online storage ................................................................. 127
Viewing photos or videos on devices that support AllShare Play ................ 128
Sending photos using Wi-Fi Direct .................................................................. 130
17

Contents
Settings
............................................................................................................................. 131
Settings menu ......................................................................................................... 132
Accessing the settings menu ............................................................................. 132
Sound ..................................................................................................................... 133
Display .................................................................................................................... 133
Connectivity .......................................................................................................... 134
General ................................................................................................................... 135
Appendixes
..................................................................................................................... 137
Error messages ........................................................................................................ 138
Camera maintenance ............................................................................................ 140
Cleaning your camera .......................................................................................... 140
Using or storing the camera ............................................................................... 141
About memory cards ........................................................................................... 142
About the battery ................................................................................................. 145
Before contacting a service center ................................................................... 149
Camera specications ........................................................................................... 152
Glossary ..................................................................................................................... 156
Index ........................................................................................................................... 161
18

Basic functions
Learn about your camera’s layout, icons, and basic functions for shooting.
Unpacking
Camera layout
Using the DIRECT LINK button
Inserting the battery and memory card
……………………………………… 20
…………………………………… 21
………………… 23
……… 24
Charging the battery and turning on your
…………………………………………… 25
camera
Charging the battery
Turning on your camera
Performing the initial setup
Learning icons
Selecting modes
Icons on the Mode screen
…………………………… 25
……………………… 25
…………………… 26
…………………………………… 28
………………………………… 29
……………………… 29
Selecting options or menus
Selecting with buttons
Selecting by touch
…………………… 31
………………………… 31
……………………………… 32
Setting the display and sound
Setting the display type
Setting the sound
Capturing photos
Zooming
Reducing camera shake (OIS)
……………………………………… 37
………………………… 34
……………………………… 35
……………………………… 36
Tips for getting a clearer photo
………………… 34
………………… 39
………………… 40

Unpacking
The following items are included in your product box.
Camera AC adapter/USB cable
Optional accessories
Camera case A/V cable Battery charger
Rechargeable battery Strap
Quick Start Guide
Basic functions
Memory card Memory card/Memory card adapter
•
The illustrations may dier slightly from the items shipped with your product.
•
The items included in the box may dier depending on the model.
•
You can purchase optional accessories at a retailer or a Samsung service center.
Samsung is not responsible for any problems caused by using unauthorized
accessories.
20

Camera layout
Before you start, familiarize yourself with your camera’s parts and their functions.
Flash pop-up button
Shutter button
Flash*
* While not in use, keep the ash
unit closed to prevent damage.
Forcing to open the ash unit may
cause damage to your camera.
Power button
Speaker
Tripod mount
Battery chamber cover
Insert a memory card and battery
Microphone
Internal antenna*
* Avoid contact with the internal antenna while
using the wireless network.
AF-assist light/Timer lamp
Lens
USB and A/V port
Accepts USB cable and A/V cable
Basic functions
21

Camera layout
DIRECT LINK button
Start a preset Wi-Fi function
Status lamp
•
Blinking: When the camera is saving
a photo or video, being read by a
computer, when the image is out of
focus, there is a problem charging
the battery, or when the camera is
connecting to WLAN or sending a photo
•
Steady: When the camera is connected
to a computer, charging the battery, or
when the image is in focus
Display
Basic functions
Buttons
(p. 23)
22
Zoom button
•
In Shooting mode: Zoom in or out
•
In Playback mode: Zoom in on part of a photo or view
les as thumbnails, or adjust the volume
Mode dial
(p. 29)
Attaching the strap
x
y

Camera layout
Buttons
Button Description
Start recording a video.
Access options or menus.
Go back.
D
c
F
t
Conrm the highlighted option or menu.
Enter Playback mode.
Delete les in Playback mode.
Basic functions Other functions
Change the display option. Move up
Change the macro option. Move down
Change the ash option. Move left
Change the timer and burst
options.
Move right
Using the DIRECT LINK button
You can turn on the Wi-Fi feature conveniently with [DIRECT LINK].
Press [DIRECT LINK] to activate the Wi-Fi function that you have designated.
Press [DIRECT LINK] again to return to the previous mode.
Setting a DIRECT LINK button option
You can select a Wi-Fi function to launch when you press [DIRECT LINK].
Rotate the mode dial to n.
1
Select General DIRECT LINK (Wi-Fi Button).
2
Select a Wi-Fi feature. (p. 136)
3
Basic functions
23

Inserting the battery and memory card
Learn how to insert the battery and an optional memory card into the camera.
Removing the battery and memory card
Slide the lock down to release
the battery.
Battery lock
Rechargeable battery
Memory card
Rechargeable battery
Insert a memory card with the goldcolored contacts facing up.
Insert the battery with the Samsung
logo facing up.
Basic functions
Push the card gently until it disengages
from the camera, and then pull it out of
the slot.
Memory card
Using the memory card adapter
To use micro memory cards with this product, a PC,
or a memory card reader, insert the card into an adapter.
You can use the internal memory for temporary storage if a memory card is not
inserted.
24

Charging the battery and turning on your camera
Charging the battery
Before you use the camera for the rst time, you must charge the battery. Plug the
small end of the USB cable into your camera, and then plug the other end of the
USB cable into the AC adapter.
Status lamp
•
Red light on: Charging
•
Red light o: Fully charged
•
Red light blinking: Error
Use only the AC adapter and USB cable supplied with your camera. If you use
another AC adapter (such as SAC-48), the camera battery may not charge or work
properly.
Turning on your camera
Press [X] to turn your camera on or o.
•
The initial setup screen appears when you turn on
the camera for the rst time. (p. 26)
Turning on your camera in Playback mode
Press [P]. The camera turns on and immediately
accesses Playback mode.
Basic functions
25

Performing the initial setup
When you turn on your camera for the rst time, the initial setup screen appears. Follow the steps below to congure the camera’s basic settings. The language is preset for the
country or region where the camera is sold. You can change the language as desired. You can also select an item by touching it on the screen.
Press [c] to select Time Zone, and then press [t] or [o].
1
Press [
2
3
4
D/c
•
When you travel to another country, select Visit, and then select a new time
zone.
Press [
D/c
Time Zone
[GMT +00:00] London
[GMT +01:00] Berlin, Paris, Rome
[GMT +02:00] Athens, Helsinki
[GMT +03:00] Moscow
Back Set
Press [b].
] to select Home, and then press [o].
] to select a time zone, and then press [o].
Press [c] to select Date/Time Set, and then press [t] or [o].
5
Date/Time Set
Year Month Day Hr Min DST
Cancel Set
•
The screen may dier depending on the language selected.
Press [F/t] to select an item.
6
Press [
7
then press [
D/c
] to set the date, time, and daylight-saving time, and
o
].
Basic functions
26

Performing the initial setup
Press [c] to select Date Type, and then press [t] or [o].
8
Press [
9
10
11
12
D/c
Press [c] to select Time Type, and then press [t] or [o].
Press [
D/c
Press [b] to nish the initial setup.
] to select a date type, and then press [o].
] to select a time type, and then press [o].
Basic functions
27

Learning icons
The icons the camera displays on the screen change according to the mode you select or the options you set. If you change a shooting option, the corresponding icon will blink
briey in yellow.
1
Shooting information
Icon Description
Shooting mode
Aperture value
Shutter speed
Available recording time
Exposure value
Current date
Current time
Available number of photos
3
1
2
Icon Description
Memory card inserted
•
: Fully charged
•
: Partially charged
•
: Empty (Recharge)
•
: Charging (Connected with the
charger)
Auto focus frame
Camera shake
Zoom indicator
Photo resolution when the
Intelli zoom is on
Zoom ratio
Histogram (p. 34)
2
Shooting option
Icon Description
ISO sensitivity
Flash
Photo resolution
Video resolution
Icon Description
Frame rate (per second)
Sound Alive on
Intelli zoom on
Optical Image Stabilization (OIS)
Metering
Burst option
Timer
White balance
Image adjustment (sharpness, contrast,
and saturation)
Focus area
Focus option
Face detection
3
Shooting option (touch)
Icon Description
AutoShare On
Touch AF option
m
Shooting options
Basic functions
28

Selecting modes
Photo
r
Split Shot
Mov
ie
ter
Pho
to Edito
Motion
o
My Ma
Fra
m
Use the mode dial to select a shooting mode or function. Rotate the mode dial to a desired mode. You can also select an icon on the Mode screen in some modes.
My Magic
▲
For example: When you select My Magic Frame in Magic Plus mode
Frame
Movie
Filter
Fil
Split Shot
Photo
Editor
r
Motion
Photo
Phot
Photo
Filter
Filte
No. Description
Current Mode screen
1
•
Rotate the mode dial to go to another mode screen.
Mode icons
•
Press [D/c/F/t] to scroll to a desired mode, and then press [o]
2
to access the mode.
•
Touch an icon to access a mode or function.
1
2
Icons on the Mode screen
Icon Description
T
G
Smart Auto: Capture a photo with a Scene mode selected
automatically by the camera. (p. 43)
Program: Capture a photo with settings you have adjusted manually.
p
(p. 45)
Aperture Priority: Set the aperture value manually while the
camera automatically selects an appropriate shutter speed.
(p. 47)
Shutter Priority: Set the shutter speed manually while the
camera automatically selects an appropriate aperture value.
(p. 48)
Manual: Adjust both the aperture value and the shutter
speed manually. (p. 49)
Smart: Capture a photo with options that are preset for a specic
s
scene. (p. 50)
Best Face: Capture multiple photos and replace faces to create the best
i
possible image. (p. 53)
Basic functions
29
 Loading...