

Page 1

Electronic reading & writing device
E65
Contents
Safety precautions
Get started
Books
Bookstore
Notes
Calendar
Dictionary
Music
User manual
Images
Settings
Appendix
Index
Read this manual thoroughly for proper
use and maintenance instructions.
Page 2

Contents
Copyright information
Rights to all technologies and products that
comprise this device are the property of
their respective owners:
●
EmoLink is a registered trademark of
SAMSUNG ELECTRONICS CO., LTD.
●
This device contains Adobe
Mobile software under license from Adobe
Systems Incorporated, Copyright © 1995-2010
Adobe Systems Incorporated. All rights reserved.
Adobe and Reader are trademarks of Adobe
Systems Incorporated.
●
This device is Wi-Fi certified via
●
This device includes software licensed from
MS, an affiliate of the Microsoft Corporation.
Microsoft and software bearing the Microsoft
name are registered trademarks of the Microsoft
Corporation.
©2010 SAMSUNG ELECTRONICS CO., LTD.
●
It is strictly forbidden to copy or use any parts of
this manual without permission from SAMSUNG
ELECTRONICS CO., LTD
●
Product specifications or contents of this manual
may be changed without prior notice due to
upgrade of product functions.
®
Reader®
.
Safety precautions .................. 3
Get started ............................... 5
Unpack ................................. 5
Get to know your device ....... 6
Insert the battery ................... 8
Charge the battery .............. 10
Turn on the device .............. 12
Use the stylus ..................... 13
Insert a memory card
(optional) .............................
15
Copy files ............................ 16
Send or receive files via
EmoLink .............................
19
Access a menu ................... 22
Get to know the Home
screen.................................
23
Customize basic settings .... 25
Register your device to
Adobe Digital Editions (ADE)
27
Books ...................................... 28
View content files on the device
28
View content files on a TV
screen.................................
32
Use bookmarks .................. 33
Use highlights ..................... 34
Delete books ...................... 36
Bookstore ............................... 37
Notes ....................................... 38
Create notes ....................... 38
View notes .......................... 42
Delete notes ....................... 45
Calendar .................................47
Create events ..................... 47
View events ........................ 48
Delete events ...................... 50
View Microsoft Outlook
schedules ...........................
51
Dictionary ...............................53
Look up a word .................. 53
View search results ............. 55
Music ....................................... 57
Play music files ................... 57
Delete music files ................ 60
Images ....................................61
View images ....................... 61
Delete images ..................... 64
Settings ................................... 65
Appendix ................................70
Reset the device ................. 70
Install and use the Virtual
Printer .................................
71
Update firmware ................. 73
Troubleshooting .................. 75
Specifications ..................... 76
Open Source License ......... 77
Index .................................. 78
Page 3

Safety precautions
Read the followings carefully to ensure your safety and prevent damages to property.
●
Warning - situations that could cause injury to
yourself or others
Caution - situations that could cause damages to
your device or other equipment
Note - notes, usage tips, or additional information
Warning
Comply with the following precautions to avoid injuries to
yourself or others.
●
Do not touch the USB cable with wet hands, as it may result
electric shocks.
●
Place the USB cable and product away from high-traffic areas
and other objects so that they are unlikely to be stepped on or
pinched by items placed on or against them.
●
Always turn the power off and disconnect the USB cable when
moving the product to reduce the risk of electric shocks, fire, or
malfunction of the product.
●
To reduce the risk of fire, do not place the product, battery
or USB cable in direct sunlight or near heat sources such as
heaters, candles, mosquito coils.
Do not drop the product or subject the product to any strong
impacts.
If the product is damaged, contact a dealer or an authorized service center.
●
If there are unusual noises, a burning smell, or smoke coming
from the product, turn the power off immediately and contact a
dealer or an authorized service center.
●
Do not disassemble, repair, or alter the product on your own.
If the product is damaged, contact a dealer or an authorized service center.
●
Be careful about the use of batteries.
Using unapproved batteries may result in explosion. Do not puncture the battery with sharp objects or subject the battery to any strong impacts.
Do not leave the battery in a high temperature environment. Do not allow the battery to come in contact with water. Keep the battery away from children and pets. Do not allow the battery terminals to come in contact with metals.
●
Do not apply water or cleanser directly to the product when
cleaning as this may cause the surface of the product to
deteriorate or the product logo and button indicators to fade.
3
Page 4

Safety precautions
Caution
Comply with the following precautions to avoid damage to your
device or other equipment.
●
Do not disconnect the USB cable while a file transfer is in
progress, as this may corrupt or erase your data.
●
Do not connect the product to a USB hub.
●
Do not leave the product in high or low temperature
environments or in places with high humidity or exposure to
water sources.
●
Do not place objects with strong magnetic fields near the
product.
●
Do not lay the product face down.
●
Use only Samsung-approved batteries and accessories.
●
Keep all accessories out of the reach of children and pets.
●
Do not expose the product to any chemicals, such as waxes,
benzene, alcohol, thinners, insecticides, air fresheners,
lubricants, or detergents.
●
Use only a soft, dry cloth when cleaning the product, so it does
not scratch the product.
4
Page 5
Get started
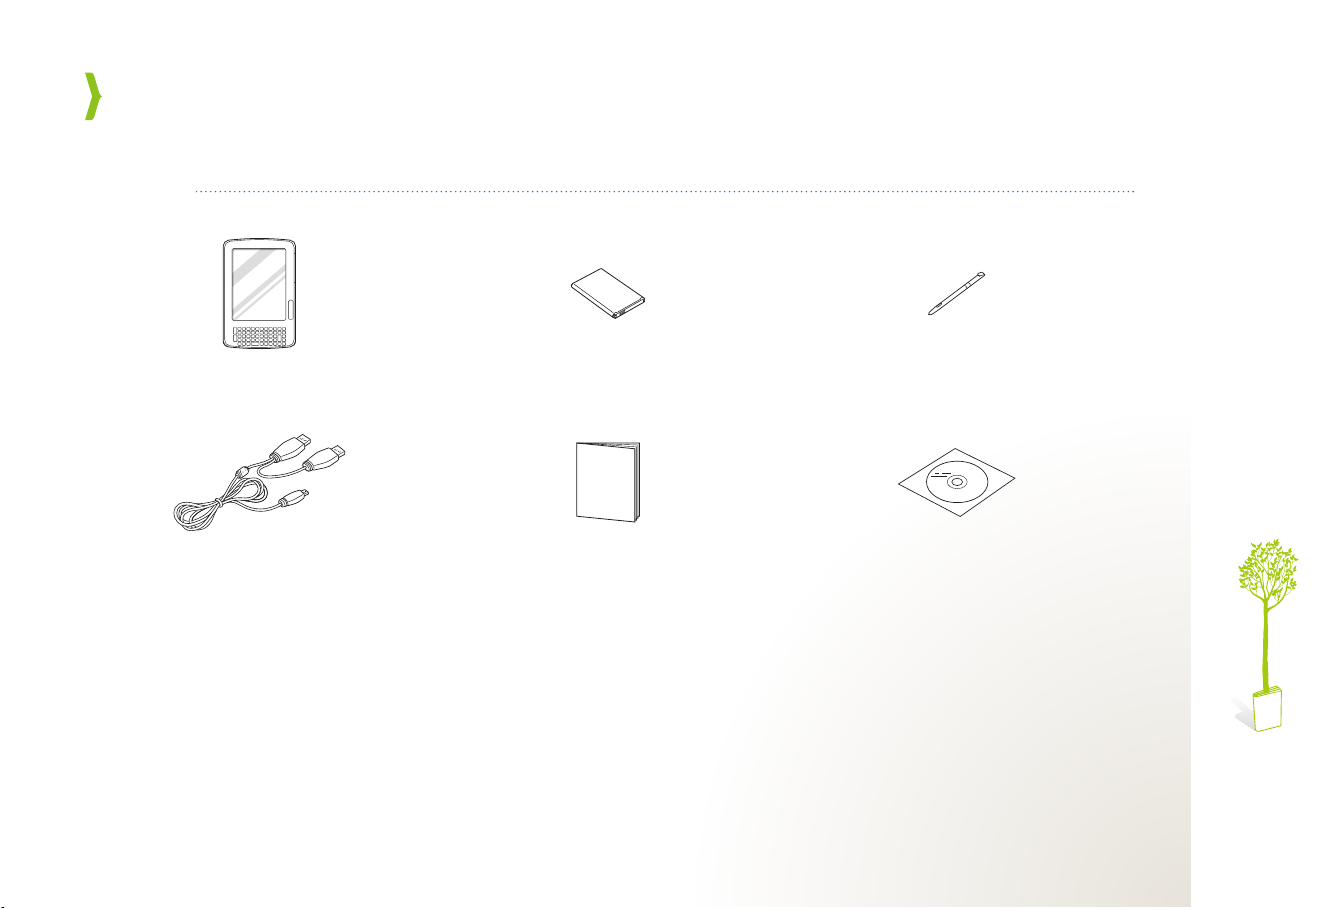
Unpack
E65 device Battery (1) Stylus
USB cable Quick Start Manual CD-ROM
(User manual, Virtual Printer,
and Samsung Outlook Sync)
5
Page 6
Get started
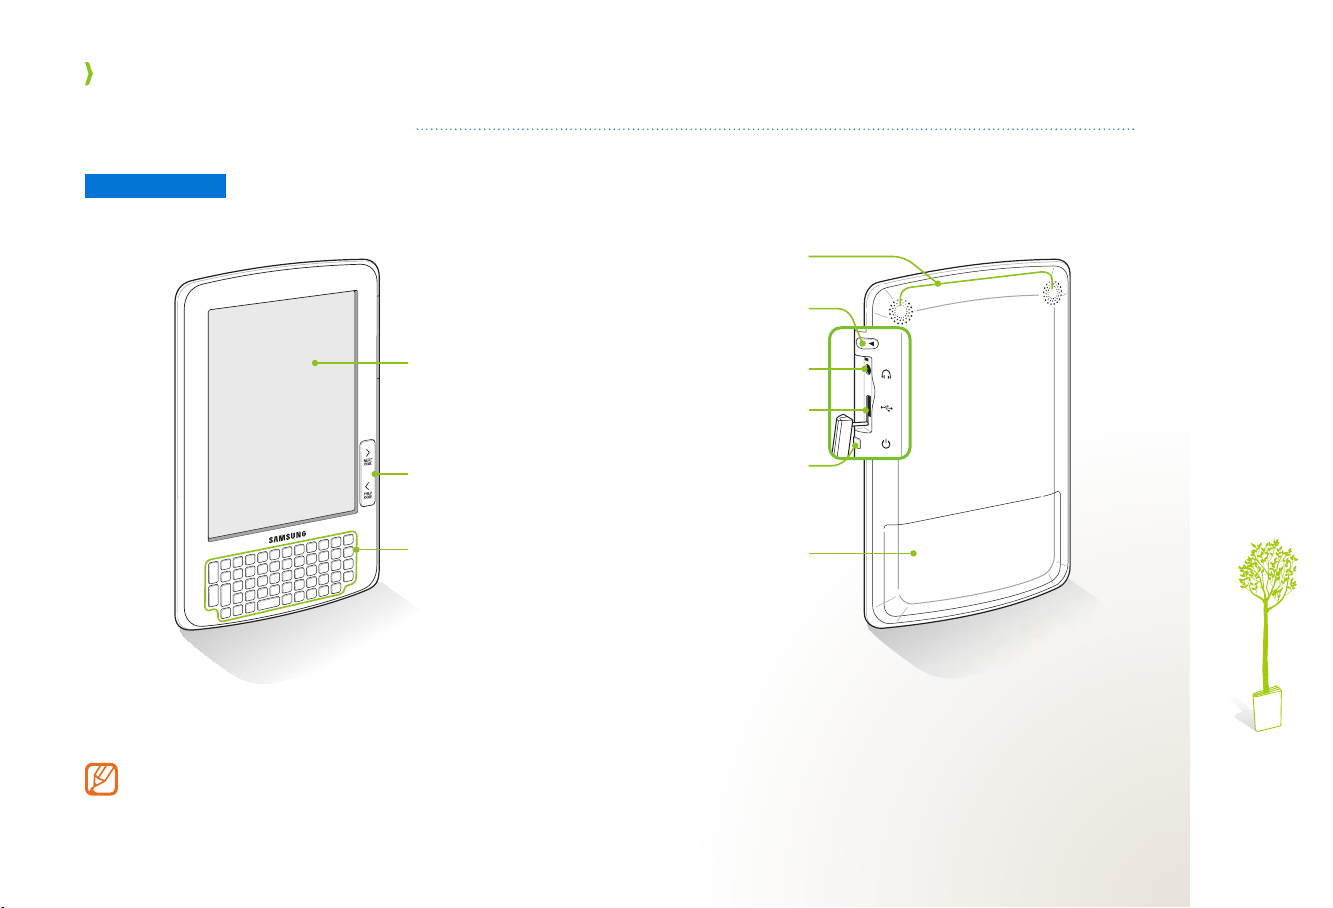
Get to know your device
Device layout
Touch screen
Speakers
Stylus and
stylus slot
Earphone
connection port
USB cable
connection port
Page moving
button
Keyboard
●
This device recognizes inputs only from the provided stylus.
●
When you use the device under direct sunlight, the touch screen may appear blurred, due to characteristics of the
screen. This is not a malfunction of the device and the device will function normally if you avoid using it under direct
sunlight.
Power button
Battery cover
6
Page 7

Get started
Buttons
Button Function
While reading a book
●
Return to the previous page
●
Return to the previous index or chapter (press and hold)
While viewing a list of books
●
Move to the previous list page
●
Move to the first list page (press and hold)
While reading a book
●
Move to the next page
●
Move to the next index or chapter (press and hold)
While viewing a list of books
●
Move to the next list page
●
Move to the last list page (press and hold)
Delete a letter
Return to the Home screen (p. 23)
Return to the previous menu
Open a corresponding menu
Input a capital letter
Button Function
Input a special character
*
●
Special characters you can input are in orange color on
the keyboard
*
Activate a shortcut function of a number button
Insert a space
Input diacritical marks
Activate the EmoLink function (p. 19)
Move left, right, up, or down
Select a menu or function
●
Power on
●
Power off (press and hold)
●
Lock or unlock the touch screen while using functions
(p.12)
* To input a special character or activate a shortcut function of a number button,
press a corresponding button and then press an orange-colored special
character or a number button. If you simultaneously press two buttons, it may
not work.
7
Page 8
Get started
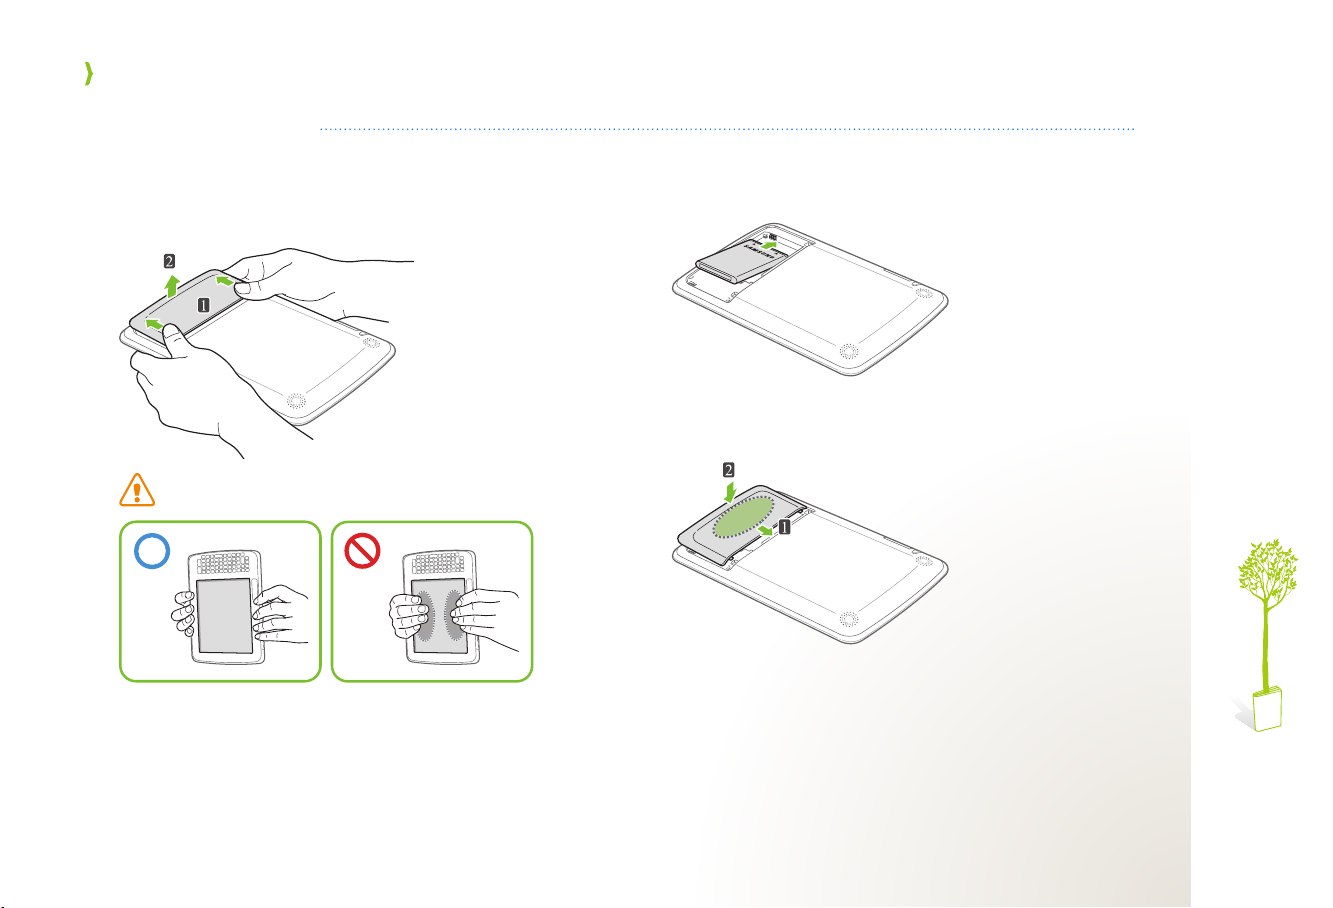
Insert the battery
To insert the battery,
Remove the battery cover.
1
Be careful not to damage the touch screen by using too
much pressure when you remove the battery cover.
Insert the battery.
2
Replace the battery cover.
3
●
Slide the battery cover fully into place.
8
Page 9
Get started
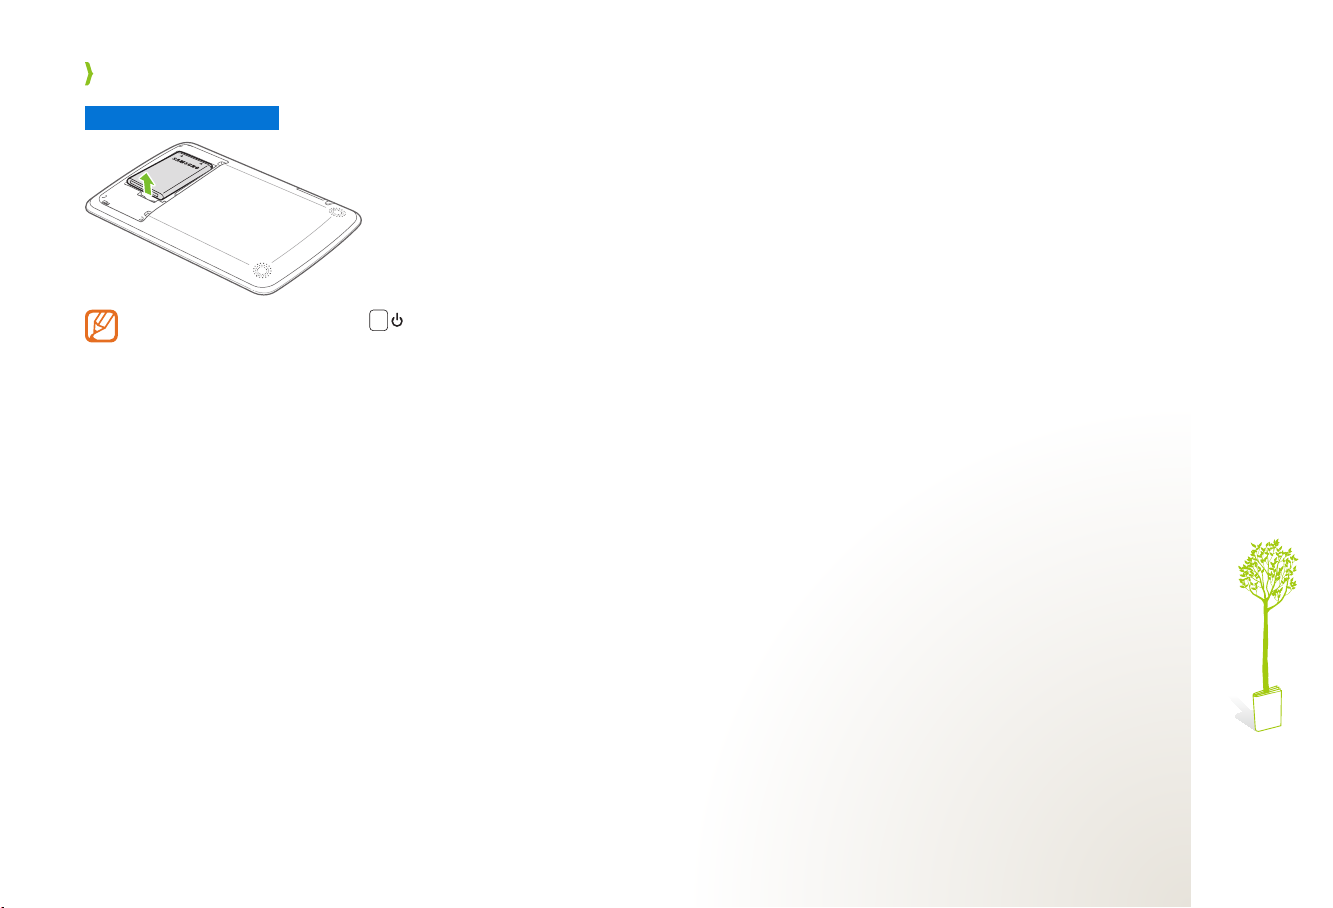
Remove the battery
If the device is on, press and hold to turn it off before
removing the battery.
9
Page 10
Get started
Charge the battery
To charge the battery,
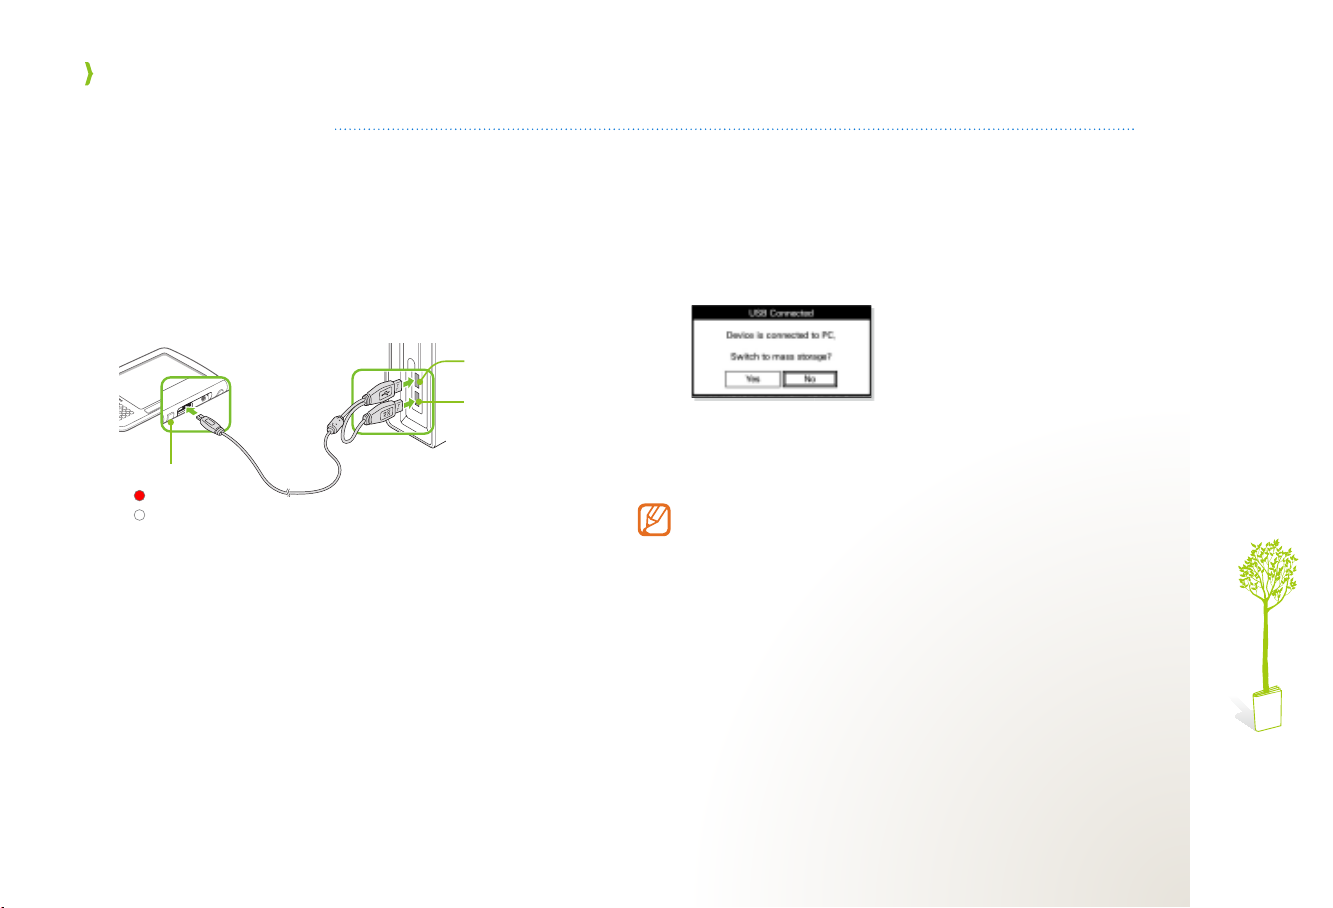
Connect the smaller end of the USB cable to the
1
device, and the USB connector and the secondary
power connector to the USB port of a PC.
●
While charging the device, connect the secondary power
connector to prevent damage to the device.
Charging indicator
: Charging
:
Charging complete
USB
connector
Secondary
power
connector
Select 2 No
to charge the device while using the device’s
functions.
Select ●Yes
disk. (Copy files → p. 16)
●
The device recognizes inputs only from the provided stylus.
Disconnect the USB cable when charging is complete.
3
●
When charging is complete, the charging indicator will turn
off.
When you connect the USB cable to the device while using it,
you can charge the battery whether or not you use the device
as a removable disk.
to charge the device while using it as a removable
10
Page 11

Get started
Charging and operating time of the battery
●
Charging time is approximately 4 hours.
●
With a fully charged battery, you can use the device as
follows.
Reading: 20 hours (if switching pages at 20 seconds -
interval)
Writing: 5 hours (if writing continuously) Listening to music: 10 hours (if listening to music with the -
earphones continuously)
●
The charging and operating time of the battery may vary
according to the charging condition, environment, and
length of use.
●
Do not connect the device to a PC via a USB hub. The
battery may not be charged properly.
●
When charging the battery with a laptop, ensure that the
laptop has an adequate power supply.
●
The battery will consume power even when the device is
not in use and the maximum operating time will gradually
shorten. If the maximum operating time decreases by
more than half, it is time to buy a new battery.
11
Page 12
Get started
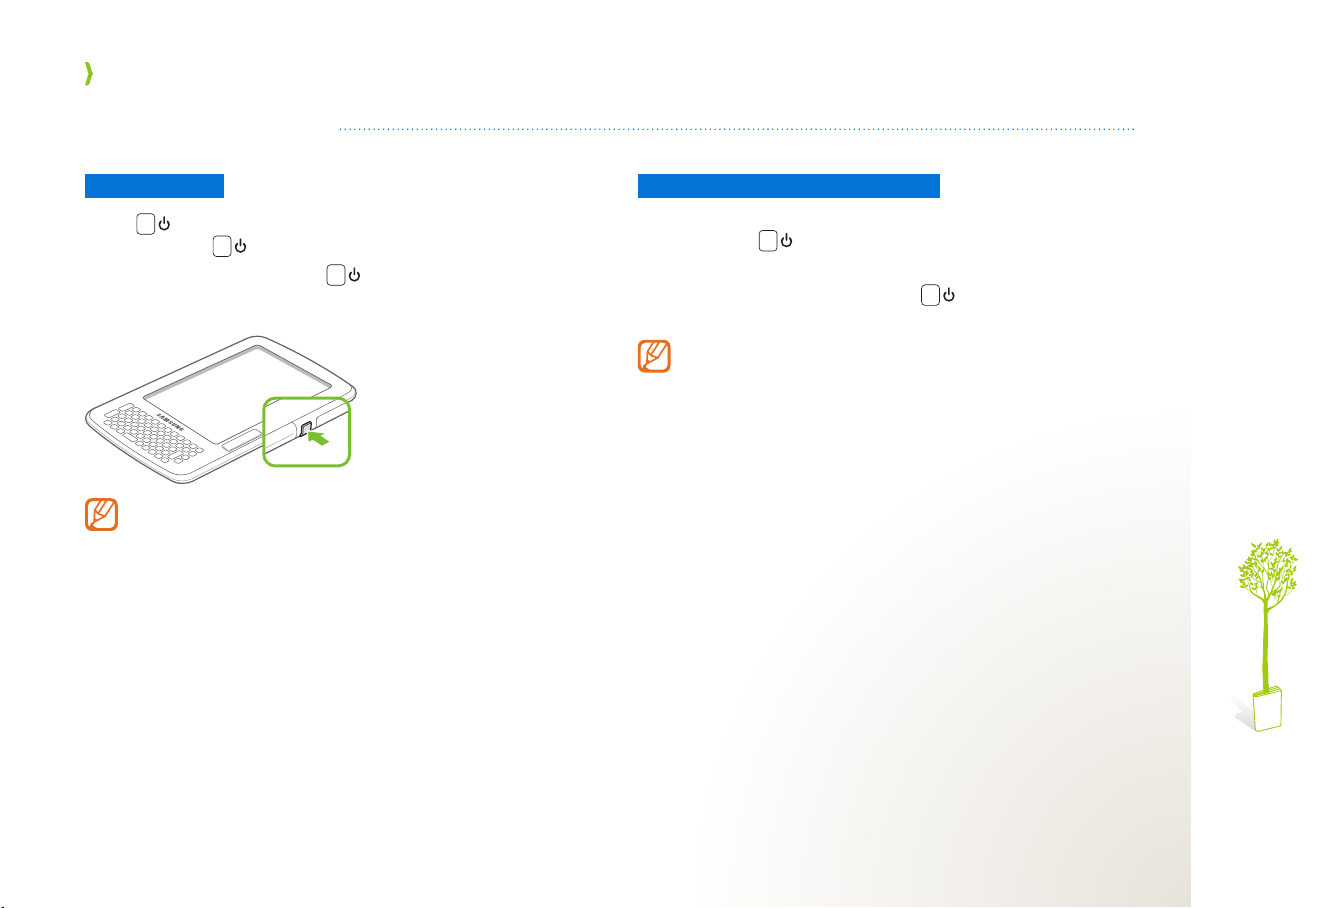
Turn on the device
Turn on or off
Press
press and hold .
While the device is turning on, ● turns blue.
●
The first time you turn on the device, a user manual will appear
before activating the Home screen. (p. 23)
to turn the device on. To turn the device off,
Due to the electronic paper capabilities of the touch screen, the
last data viewed may remain on the screen if you remove the
battery while the power is switched on.
Lock or unlock the touch screen
If you do not use the screen for an extended period of time
or if you press
screen and buttons will become locked.
To unlock the touch screen, press
●
The touch screen will turn on.
●
You can change the time delay that locks the touch screen.
(Sleep Timer → p. 66)
●
When you lock the touch screen, it will take 2-3 seconds
to save the current data. If you attempt to unlock the touch
screen during this time, the device may not work properly.
when the device is in use, the touch
.
12
Page 13
Get started
Use the stylus
With the stylus, you can select menus, perform functions, or write on the screen. The device only recognizes inputs from the
provided stylus. Use caution to avoid losing it.
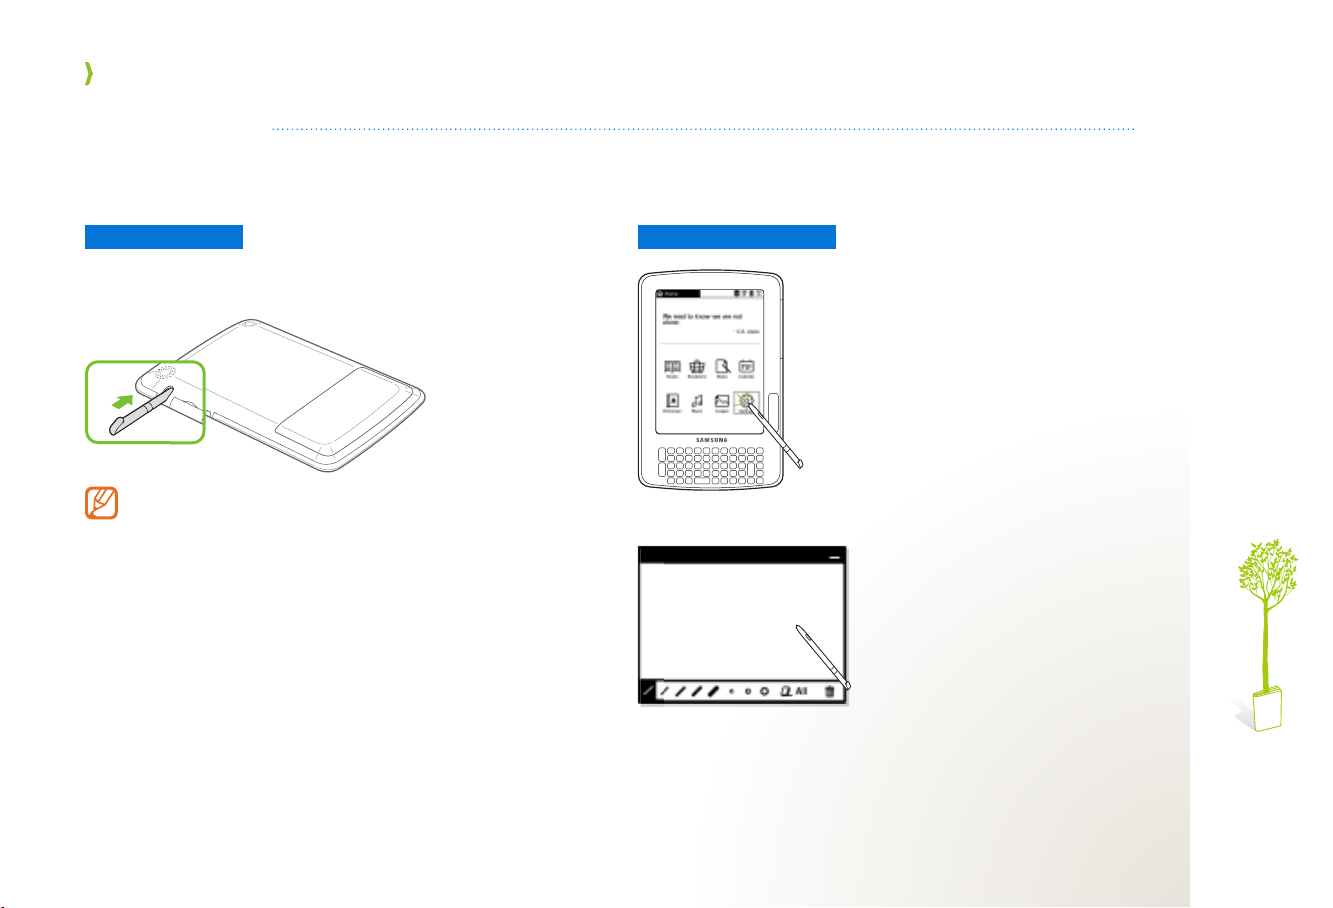
Store the stylus
Push the stylus into the stylus slot.
●
Push the stylus until it locks in place.
●
To remove the stylus, pull the stylus out of the stylus slot.
●
If you lose your stylus, you can buy a new one from a
Samsung service center.
Work with the stylus
Tap menus or options with
the tip of the stylus.
Write characters on the touch screen.
A B C
13
Page 14
Get started
Draw a line to select text.
●
The stylus may not work properly when wet. Do not allow the
stylus to come in contact with liquids.
●
If you drop the stylus, the tip may be damaged and the stylus
may not work properly. Use caution to avoid dropping it.
●
The touch screen may not recognize the stylus inputs if you
hold it at an extreme angle. For example, there may be a
maximum 1 mm error when using the stylus at a 30° angle.
14
Page 15
Get started
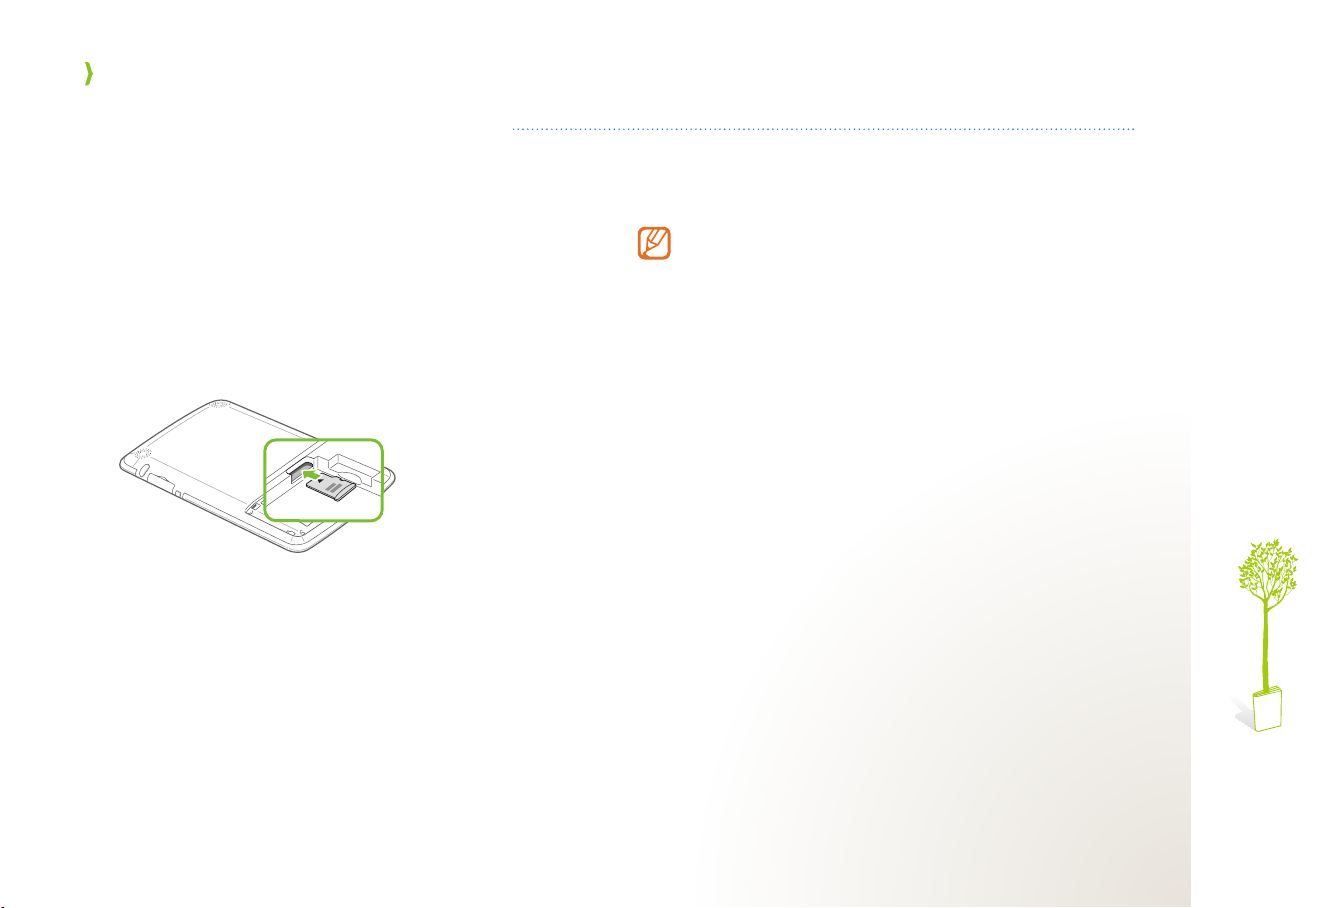
Insert a memory card (optional)
You can store large files or important data on a memory card. The device supports microSD or microSDHC cards up to16 GB.
The maximum capacities may vary depending on the memory card manufacturer.
●
To insert a memory card,
Turn off the device.
1
Remove the battery cover and battery.
2
Slide a memory card into the memory card slot as
3
shown.
Replace the battery and the battery cover.
4
Attempting to insert a memory card with the battery installed
may damage the device or memory card.
●
When you insert a memory card,
be created automatically. Note and purchased content files
should be stored in the appropriate folder, but music and
image files can be stored in any folder.
●
While using the device, do not remove and reinsert a memory
card. If you do, the device may not recognize the memory
card.
●
The supported memory card capacity is based on Samsung’s
test standards. It may vary depending on the memory card
manufacturer.
Books, Notes
folders will
15
Page 16
Get started
Copy les
Transfer books, dictionaries, images and music files from a PC to your device. You can also transfer notes and schedule files
from your device to a PC.
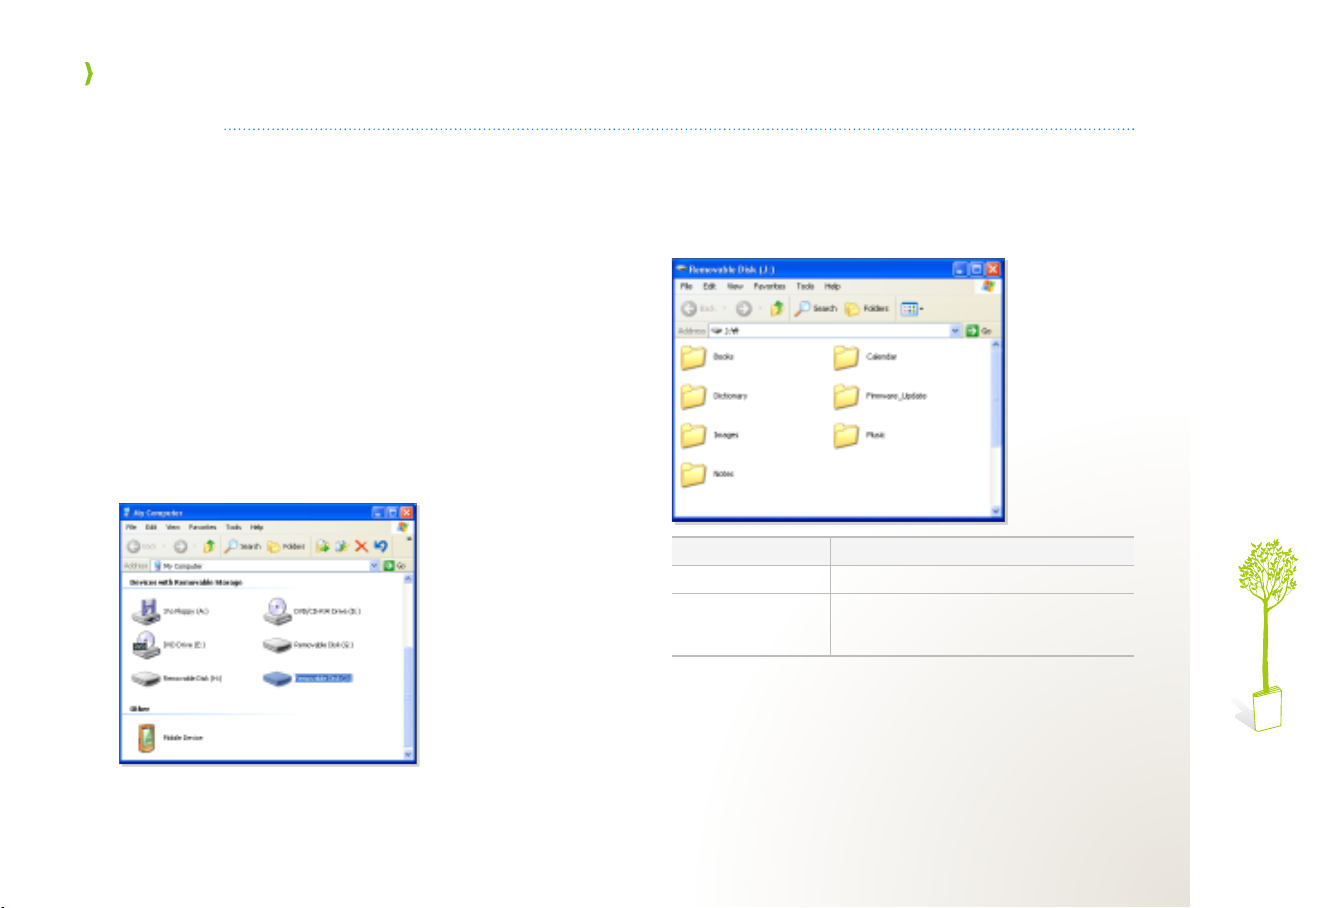
To copy files to or from your device,
Connect the device to a PC with the USB cable.
1
●
The pop-up window appears.
Tap 2 Yes
Click 3 Open folder to view files
.
The ● Removable Disk
Or, double-click ●My Computer
removable disk icon.
●
The name of the removable disk may vary by PC.
screen appears.
→ OK.
on the desktop and the
Open a folder you want.
4
Folder Function
Firmware_Update
Books/Dictionary/
Images/Calendar/
Notes/Music*
* Do not change the folder or file names. If you do, the device may not
work properly, or it may take longer for the device to turn on after
ending the mass storage connection.
New firmware files to be upgraded
Books, dictionaries, images, schedules,
notes, and music files saved on the device
16
Page 17
Get started
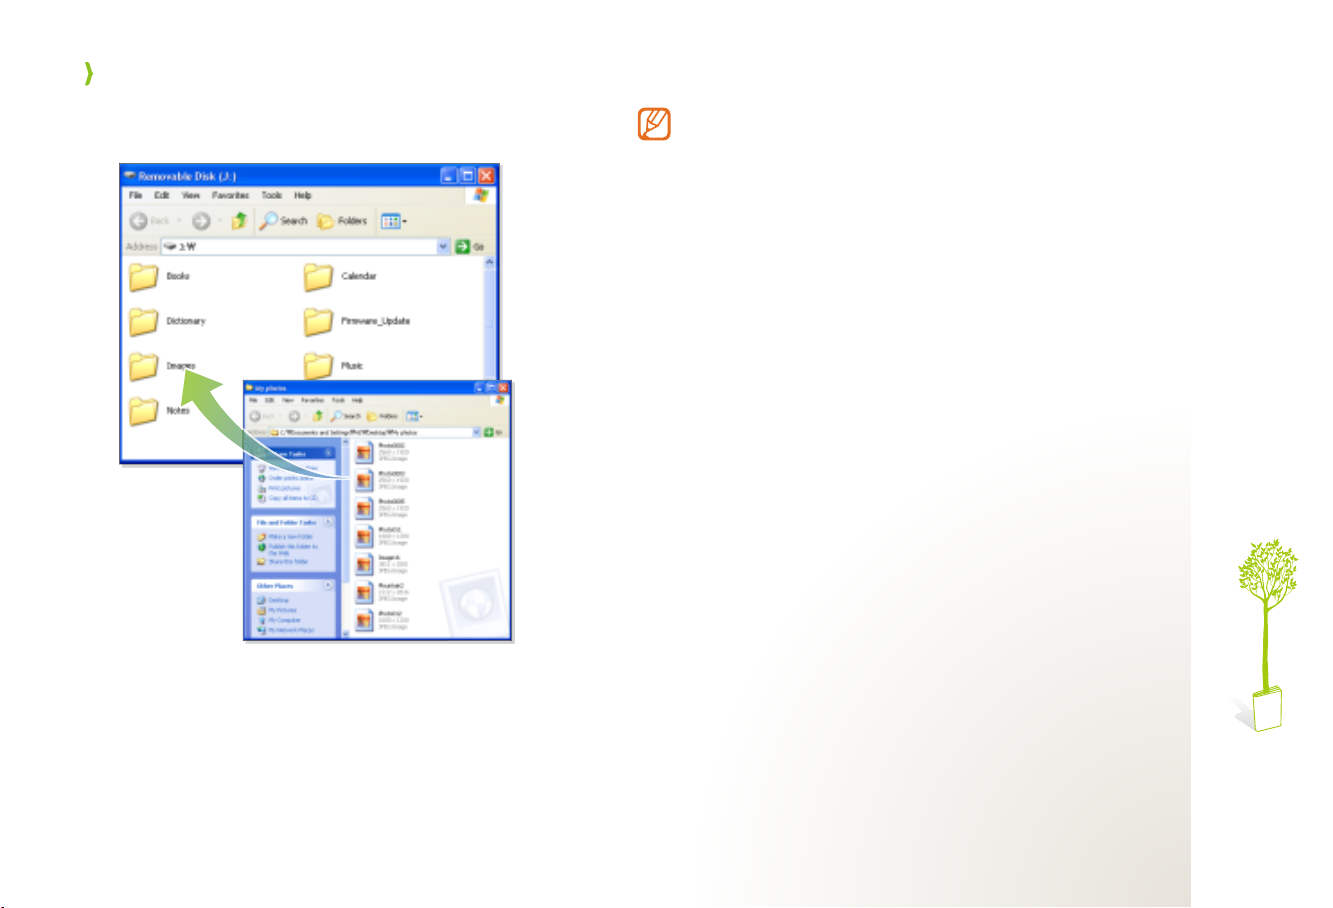
Drag and drop or copy and paste files between the PC
5
and the device.
●
Do not disconnect the USB cable or turn the device off while
copying files. This may result in loss of data or damage to the
device.
●
Do not connect the device to a PC via a USB hub.
●
When you copy files to the device, place in the appropriate
folder. For example, if you place a book file into a dictionary
folder, the book file will not be viewable.
●
If you transfer unsupported files, they may not appear on the
file list. Ensure that the files you transfer are supported by the
device. (Books → p. 28, Music → p. 57, Images → p. 61)
●
The maximum capacity for the removable disk is 1.7 GB.
When the device exceeds the maximum capacity, files will not
be stored on the device.
17
Page 18

Get started
End the mass storage connection
End the connection properly to prevent damage to the
device or loss of your data.
Click
1
Click the pop-up message.
2
Disconnect the USB cable only when the message says
3
that it is safe to remove the hardware.
on the Windows taskbar.
●
Do not disconnect the USB cable while files are being
transferred as this could result in loss of data or damage to
the device.
●
You can not end the connection if you have device files open
on the PC. Close all device files and attempt to end the
connection.
18
Page 19
Get started
Send or receive les via EmoLink
You can send or receive books, notes, music, and image files between devices that provide the EmoLink function. You can not
transfer DRM-protected files via EmoLink. The maximum distance between devices using EmoLink is 20 meters in a straight
line. This distance may be reduced according to the environment of an access point.
Initialize EmoLink
To use EmoLink, you must initialize it.
Press
1
Enter a device name and tap
2
Tap
3
Send a file via EmoLink
Open a file to send.
1
●
You can send files via EmoLink while reading books, viewing
notes, listening to music, viewing images, or viewing file lists.
(except for the notes lists)
Press 2 and tap
●
The device will be connected to the other device via the
direct connection mode. (p. 68)
●
This step will not appear if the wireless network is active.
Press 3 .
and tap
Yes
and read the EmoLink help.
Yes
Yes
.
.
Next
.
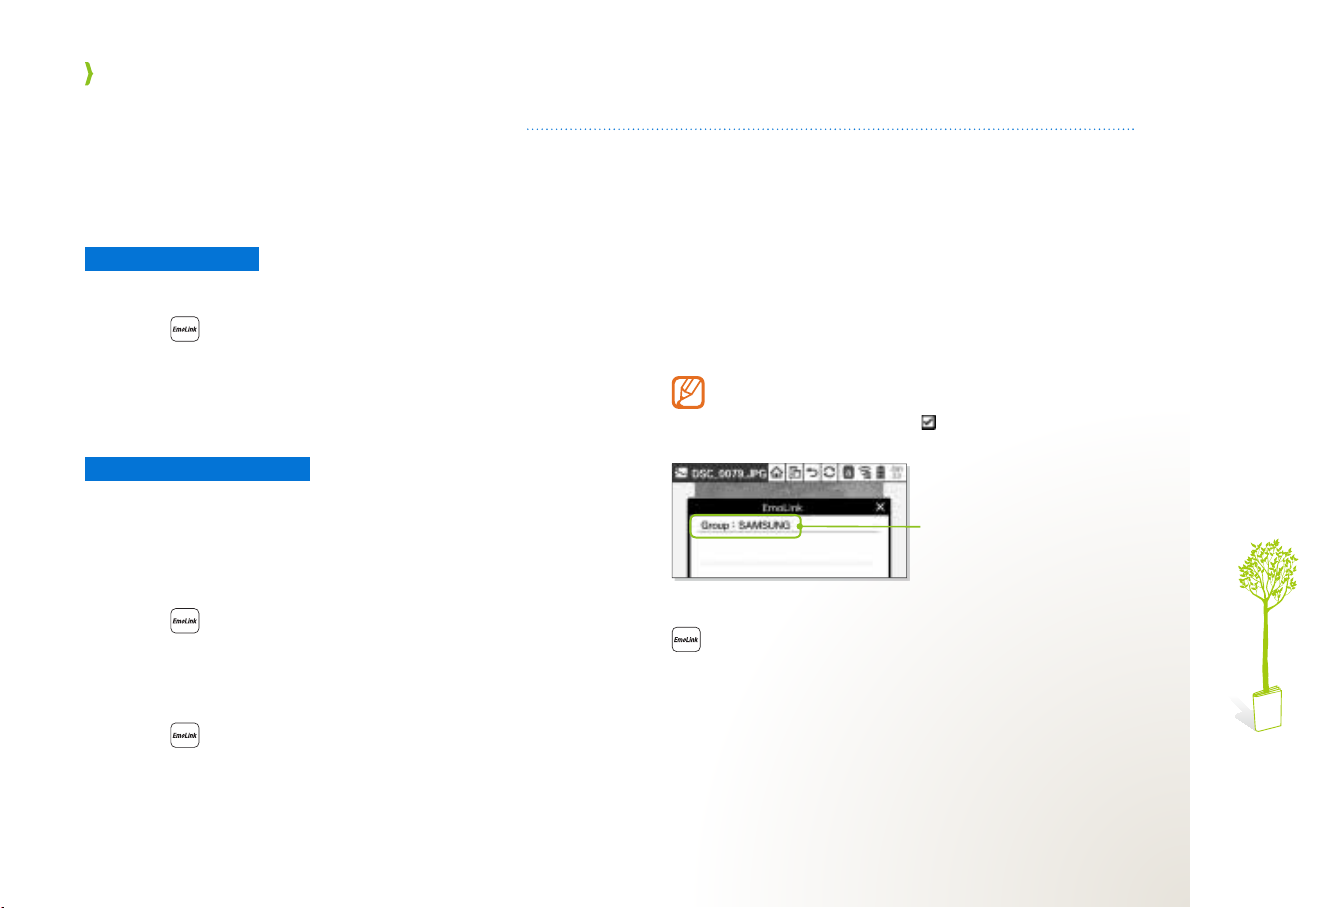
Check the group name.
4
●
The device belongs to the Samsung group by default.
●
If the other device belongs to a different group, you can not
transfer files via EmoLink. (Change the EmoLink group →
p. 21
)
To transfer a file to a device that belongs to a different
group, select
Change Group
unknown group to join.
Ask the other party to connect to your group and press
5
.
Settings
→
Network
and then tap next to
Group name
tab →
EmoLink
Allow devices of
→
19
Page 20
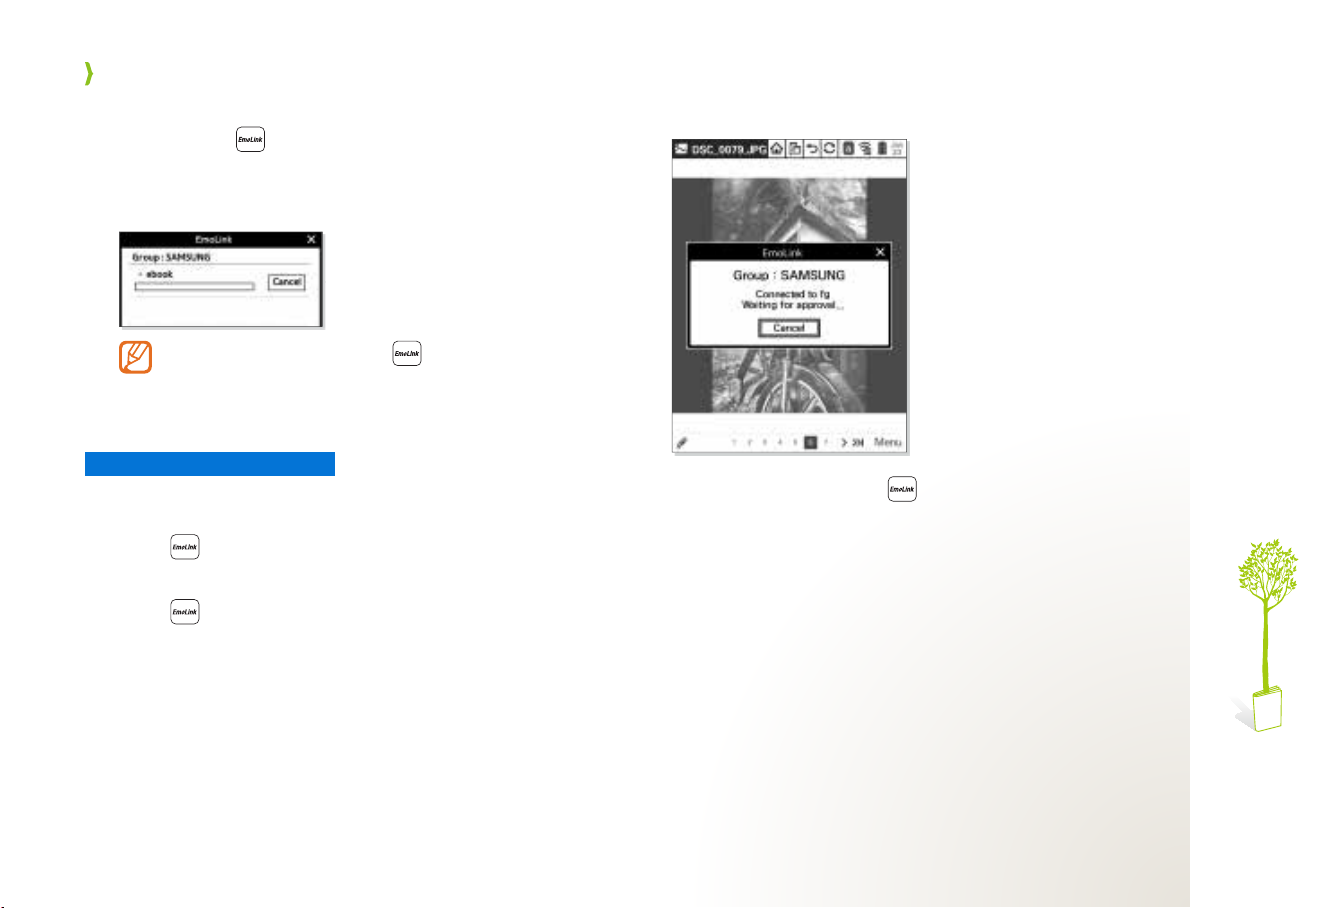
Get started
When the other device’s name and connection alert
6
appear, press to transfer the file.
●
After the transfer is complete, the devices will be
disconnected. If you want to send a file again, reconnect the
devices via EmoLink.
If the other party does not press on
the receiving device, the two devices will be
disconnected automatically.
Receive a file via EmoLink
On a sending device, send a file via EmoLink. (p.
1
Press
2
●
This step will not appear if the wireless network is active.
Press 3 when the other party asks you to press it.
●
The device will be connected to the other device via the
direct connection mode. (p. 68)
and tap
Yes
.
19)
Check the authorization screen.
4
When the sender presses 5 , the file will be received
automatically.
View
6
Tap
●
●
.
Received files are stored in the Inbox. Book files will appear in
the list of books.
After the transfer is complete, the devices will be
disconnected. If you want to receive another file, reconnect
the devices via EmoLink.
20
Page 21

Get started
Change the EmoLink group
From the Home screen, tap
1
Network
Tap
2
Change Group
Tap
3
Edit
Tap
4
OK
Tap
5
●
The new group will be added and selected.
Tap ●Edit
tab →
and enter a new group name.
.
to edit the group name.
EmoLink
.
Settings
.
.
21
Page 22
Get started
Access a menu
You can access a menu by pressing buttons or touching it with the stylus. The following examples explain how to listen to
music.
Use the stylus
Tap
1
Tap
2
Tap a music file you want.
3
Listen to music.
4
to open the Home screen.
Music
.
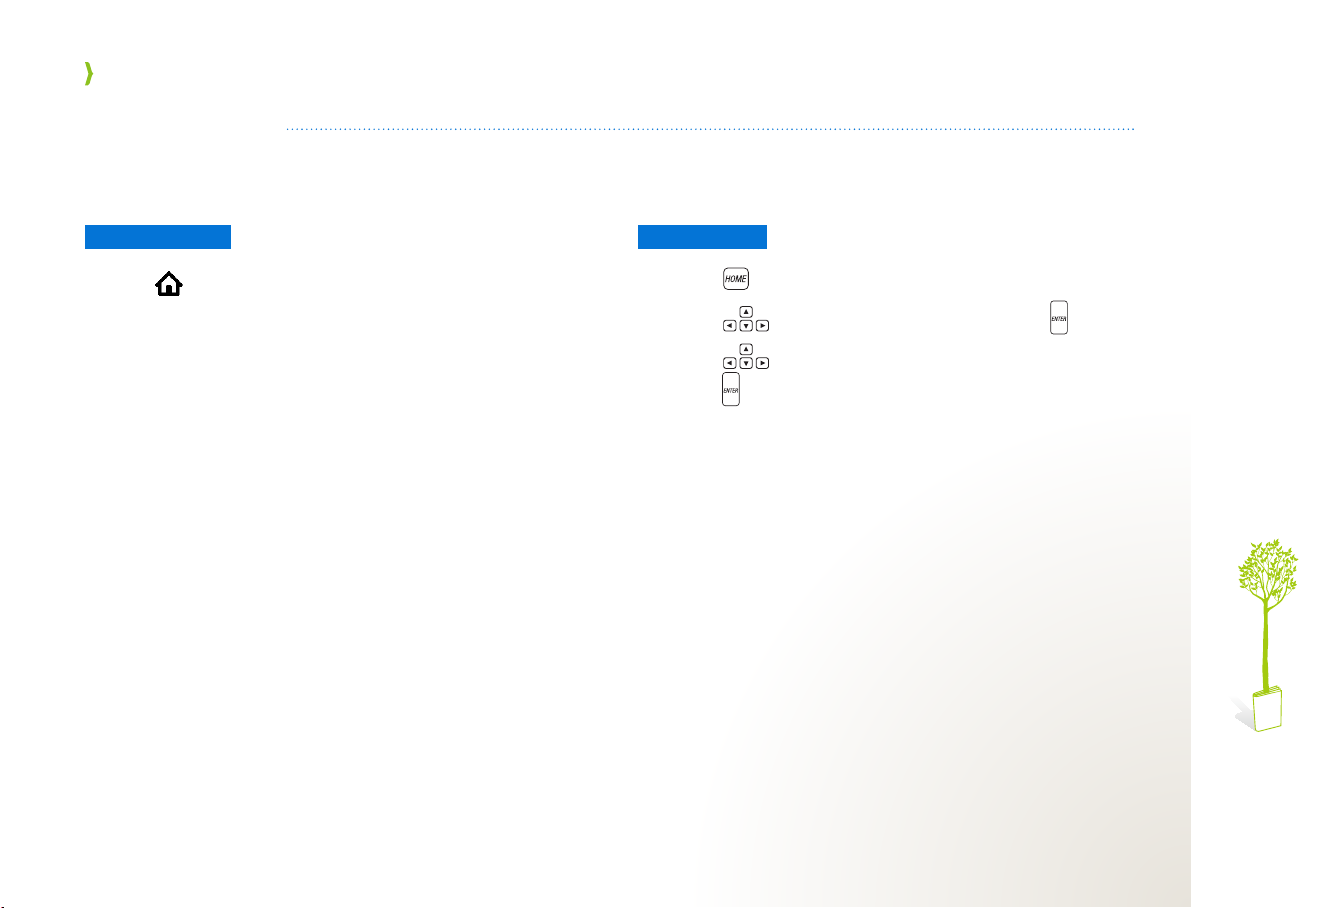
Use buttons
Press
1
Press
2
Press
3
press .
Listen to music.
4
to open the Home screen.
to scroll to
to scroll to a music file you want and then
Music
and then press .
22
Page 23
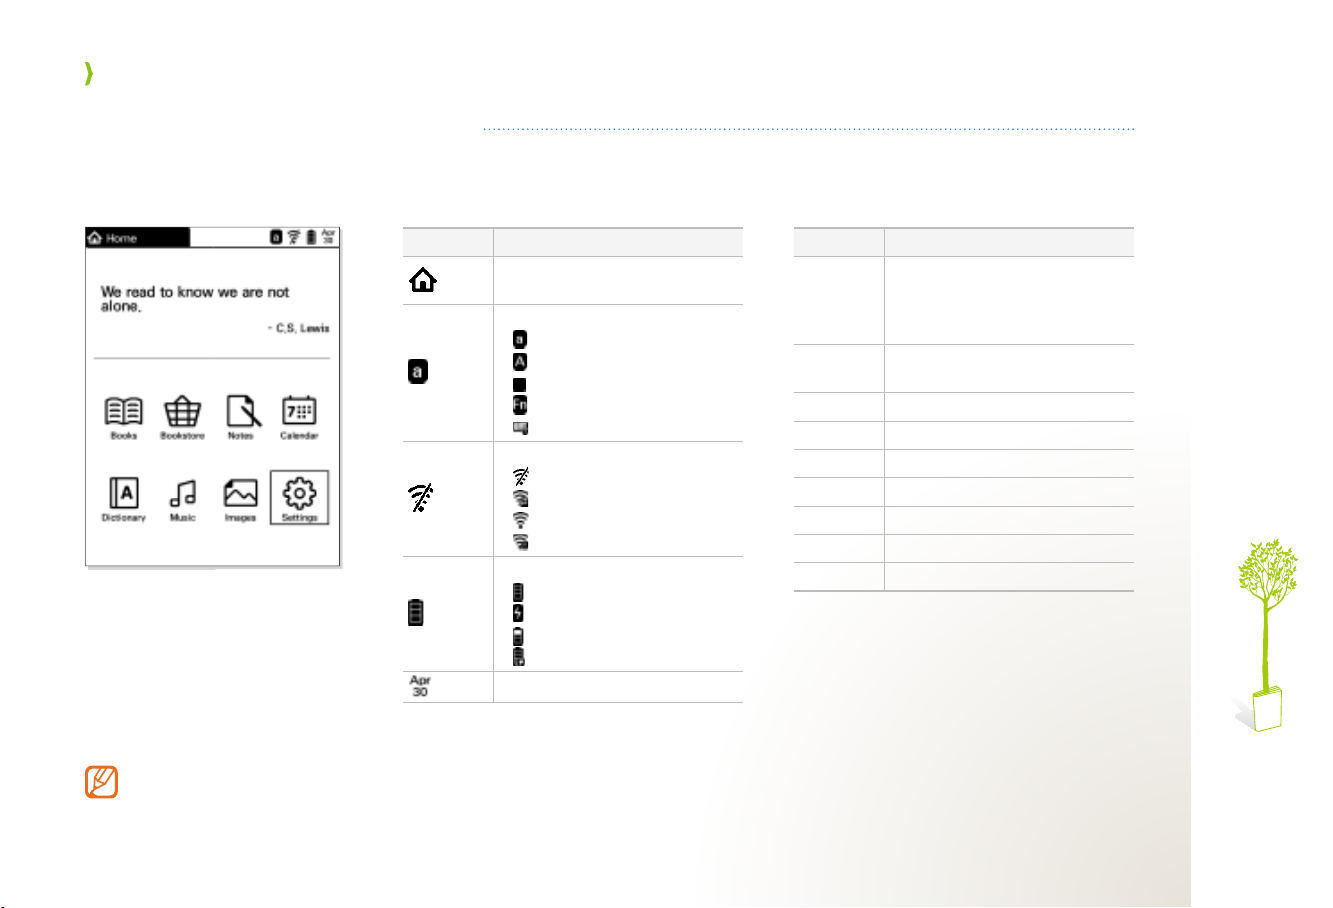
Get started
Get to know the Home screen
The Home screen will be shown when the device turns on. You can view books or image files, and create notes or schedules.
You can also listen to music, view a dictionary, and customize device settings.
You can set a menu to
display when the device is
switched on.
(Startup Mode → p. 66)
Icon/Menu Function
Display the current activated
function
Display the keyboard input mode
●
: Small letter input mode
●
: Capital input mode
●
: Special character input mode
●
: Shortcut function mode
●
: Keyboard locked
Display the wireless network status
●
: Off
●
: Directly connected
●
: Connected
●
: Not connected
Battery icon
●
: Full
●
: Needs charging
●
: Low
●
: Charging
Display the current date
Icon/Menu Function
Preview the last book you were
Preview
Books
Bookstore
Notes
Calendar
Dictionary
Music
Images
Settings
reading (If you were not reading
a book, the device displays a
famous saying.)
View your books and documents
(p. 28)
Access the bookstore (p. 37)
Create and view notes (p. 38)
Manage events (p. 47)
View the dictionary (p. 53)
Listen to music (p. 57)
View images (p. 61)
Customize settings (p. 65)
23
Page 24
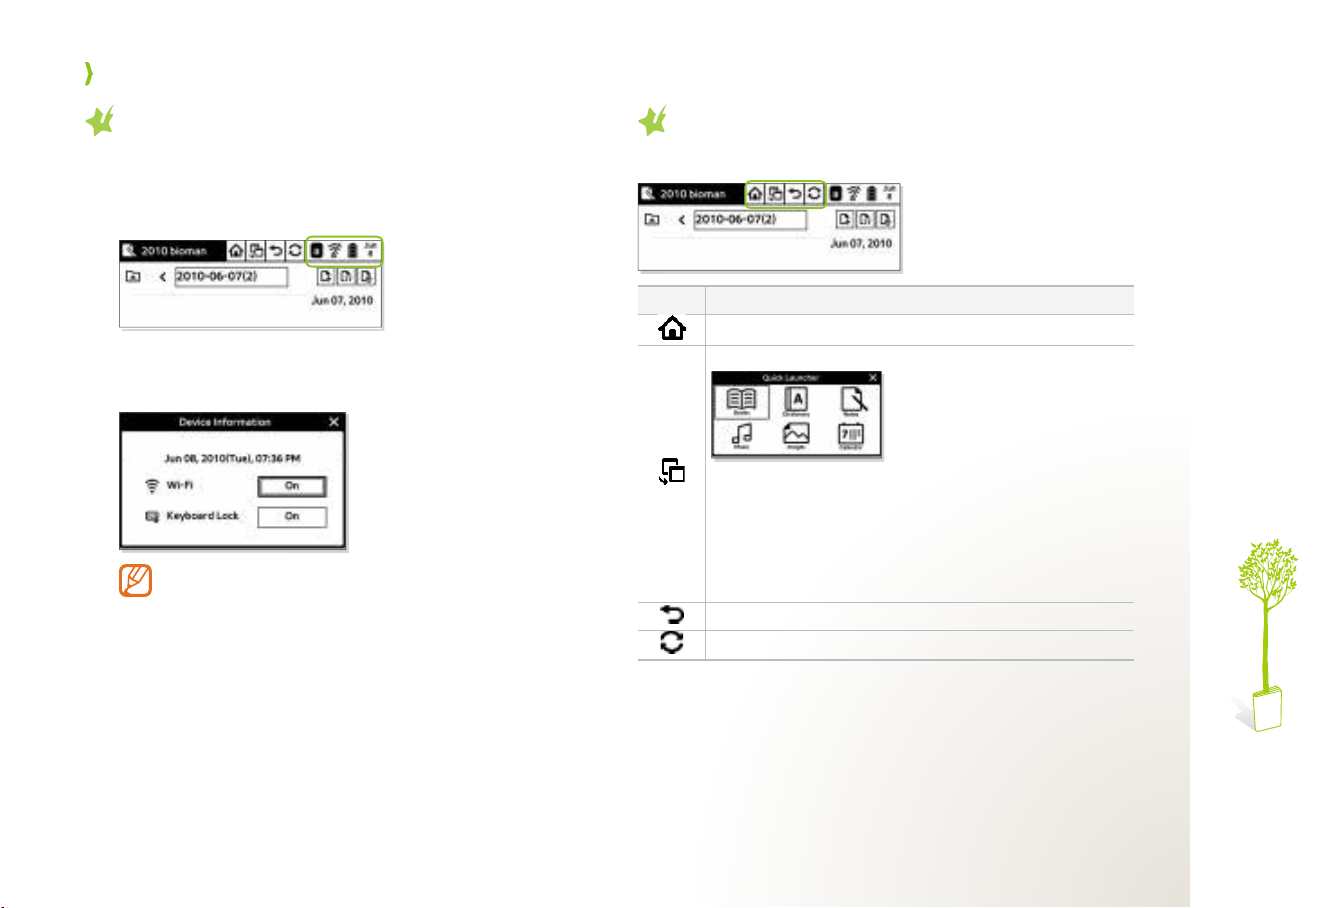
Get started
Activate the wireless network and lock the
keyboard
Tap the corresponding part from the Home screen or
1
while you are using a function.
Turn the wireless network on, or lock the keyboard.
2
●
You can also see the current time and date.
If you lock the keyboard, you can not enter text and
activate a function using the keyboard.
Use the icons at the top of the screen
Tap an icon while using a function.
Icon Function
Return to the Home screen
Open the shortcut window
Books ●: View the last book you were reading (p. 28)
●
Dictionary
●
Notes
●
Music
●
Images
●
Calendar
Return to the previous menu
Refresh
: Look up a word (p. 53)
: Create a note (p. 38)
: Play music (p. 57)
: View an image (p. 61)
: View an event (p. 47)
24
Page 25

Get started
Customize basic settings
Select a language and set the current time and date. You can also change your device’s password.
Select a language
From the Home screen, tap
1
Tap a language.
2
Settings
→
Language
Set current time/date and time zone
.
From the Home screen, tap
1
Tap
2
and date.
Tap time zone box to set the local time.
3
Tap 4 OK
, , numbers, or text to set the current time
●
You can set the date and time from January 1 2000 1:00
A.M. to December 31 11:59 P.M.
.
Settings
Date
Time
→
Clock Set
.
25
Page 26

Get started
Change the password
From the Home screen, tap
1
Password
Enter the current password by tapping the virtual keys
2
or pressing the buttons on the keyboard.
●
The default password is 0000.
Enter a new password and confirm it.
3
Tap 4 OK
.
to confirm.
Settings
→
Change
Currently
selected cell
Clear all
numbers
entered
Backspace
26
Page 27

Get started
Register your device to Adobe Digital Editions (ADE)
Your device must be authorized by Adobe Digital Editions (ADE) to view files with Adobe Reader. You can use the wireless
network or a PC to register your device with Adobe Digital Editions. Before the authorisation, the current time/date and time
zone must be set. (p. 25)
To register your device with Adobe Digital Editions using the
wireless network,
Visit the Adobe Digital Editions web page
1
(http://www.adobe.com/products/digitaleditions/) and
create your Adobe account.
●
If you are already registered, you do not need to set up a new
account.
Activate the wireless network. (p. 2 24)
Bookstore
Tap
3
Enter your user ID and password.
4
Tap 5 Activate
If you do not want to purchase and download contents files
from the bookstore on your device wirelessly, you can view
files already downloaded and stored on your PC by copying
them onto your device. For authorization, install the Adobe
Digital Editions program on the PC.
.
to register your device, and then tap OK.
To register your device with Adobe Digital Editions using a
PC,
Visit the Adobe Digital Editions web page
1
(http://www.adobe.com/products/digitaleditions/) and
create your Adobe account.
●
If you are already registered, you do not need to set up a new
account.
Download and install the Adobe Digital Editions
2
program on your PC.
When the installation is complete, double-click the
3
Adobe Digital Editions icon on the desktop.
Connect the device with a USB cable to the PC.
4
Enter your user ID and password.
5
Tap 6 Activate
Digital Editions program.
to register your device with the Adobe
27
Page 28

Books
View personal content files (ePUB, PDF, TXT format) saved on the device. You can also view files on Samsung TVs that support AllShare.
Content files are not saved on the device by default. Save content files to the device first. (Copy files → p. 16)
View content les on the device
To view content files on the device,
Title
Author
page
●
To download books, refer to the content
provider’s instructions.
●
PDF files will not be displayed properly if they
do not comply with the PDF/A standard.
●
ePUB files may not be displayed properly if
they do not comply with the ePUB standard of
Adobe Reader.
From the Home screen, tap
1
Tap ●Continue Reading
reading.
Tap a book title.
2
From the book list, tap ●Menu
Option Function
Sort
View
Search
Book Info
Add to Library
Edit
Screen Share On
Select a sort option (By Recent Reading, By Recent Buy, By Title,
By Author)
Select how to view the list of books (List, Thumbnail)
Search a book by keyword
View book details including publisher and genre
Add a book to your library (p. 30)
Delete a book (p. 36)
View a book on a TV screen (p. 32)
Books
.
from the Home screen to view the last book you were
to use the following options.
28
Page 29

Books
Create notes
while reading
a book
●
The following features are available only for
selected file formats:
-
Font Size
-
Zoom In
PDF
-
Auto Alignment On
TXT
●
If a PDF file contains unsupported fonts,
portions of the file may be unavailable.
●
You can view content files written in English,
French, Spanish, Italian, and Dutch.
●
The TTS function supports English, and the
device should be set to the same language
of the book file.
, Search, TTS: ePub, TXT
/Zoom Out, Crop On/Crop Off:
/Auto Alignment Off:
Navigate the content files with the following icons.
3
Icon Function
Create notes while reading a book
●
Parts of memos drawn on images may seem to be remaining after
erasing by the stylus. Tap to erase the afterimage.
/
View the previous or next page
●
You can also turn pages by pressing
Skip to the previous or next chapter (Book Flipping Option → p. 69)
/
●
You can also skip chapters by pressing and holding
View the current page or move pages
●
You can jump to any pages by tapping the box and put the page
number, and then tap GO.
Open menus
Menu
●
Add Bookmark
●
Font Size
●
Rotation
●
Zoom In
●
Crop On
●
Chapter
●
Auto Alignment On
●
Bookmarks&Notes
●
Search
●
Add page memo
●
My Impressions
●
Full Screen On
/Delete Bookmark: Add or delete a bookmark (p. 33)
: Select a font size
: Rotate the current page
/Zoom Out: Zoom in or out
/Crop Off: Crop a part of a PDF file to enlarge it
: View the current chapter
/Auto Alignment Off: Automatically align text in a file
: View a list of notes
: Search for a word or phrase
/Edit page memo: Create and edit a note
: Note your impressions about the book
/Full Screen Off: View a book in full-screen mode or exit
full-screen mode
●
Hide Note
●
TTS
●
Screen Share On
* It will appear only on the page with note contents.
/Show Note*: Hide or show notes
: Use the text-to-speech feature to read the book aloud
: View a book file from the TV screen (p. 32)
or .
or .
29
Page 30

Books
Use a shortcut button when reading a book
To use a shortcut button, press
button.
Number Function
Add or delete a bookmark (p. 33)
1
Select a font size
2
Search for a word or phrase
3
Rotate the current page
4
Open a window to enter a special character when searching
0
for a word or phrase
Use a library
Add books to a library
Store a book to the library you want.
From the Home screen, tap
1
Menu
→
Tap
2
Tap
3
Tap a library.
4
To add a new library, tap ●New Library
64 letters for the title.
Add to Library
at the right of a book you want to add.
and then press a number
Books
.
.
. You can enter up to
View books by library
You can select a library and read a book from the library.
Form the Home screen, tap
1
My Library
Tap
2
Tap a library.
3
Tap a book.
4
Crop a PDF file
Crop a part of a PDF file to enlarge it.
When you crop a part of a PDF file, notes and highlights you
saved will be deleted, and the TTS function will not work.
From the Home screen, tap 1 Books
Tap a PDF file to view.
2
Tap 3 Menu
Tap a starting point to crop.
4
To cancel the cropping, tap ●X
→
.
Crop On
Books
.
.
.
.
Tap 5 OK
.
30
Page 31

Books
Tap an ending point to crop.
5
Check the part of the file you cropped.
6
View the table of contents
Tap
Menu
→
Chapter
current document.
Access a specific page
Tap the bar at the bottom of the screen and enter a page
number.
Send or receive a book via EmoLink
Send or receive a file between devices by pressing while
viewing book files or book file list. (p. 19)
You can not send a content file with Digital Rights Management
(DRM).
to view the table of contents for the
To return to the original view tap
Menu
→
Crop Off
.
31
Page 32

Books
View content les on a TV screen
You can view content files only on Samsung TVs that support AllShare. You can not view DRM-protected files on a TV screen.
To view content files on a TV screen,
Tap the top right corner of the screen and turn the
1
wireless network on.
Books
From the Home screen, tap
2
Menu
→
Tap
3
●
The device will automatically search for other devices
connected to the same network and attempt to connect to
them.
Select a book from the TV screen using the TV remote
4
control.
Press ● to exit the screen share mode.
Screen Share On
.
.
32
Page 33

Books
Use bookmarks
Add bookmarks to save your page and quickly return to it later.
Add a bookmark
Add a bookmark at an important location.
While reading a book, tap
Or, tap the upper-right corner of the page to add a
bookmark.
●
will appear at the top right of the screen.
Menu
→
Add Bookmark
View a bookmark or note
Directly access a bookmarked page or view a note.
.
While reading a book, tap
Delete a bookmark
Delete a bookmark previously added.
While reading a book, tap
Or, tap the bookmark icon
●
The bookmark will be deleted.
Menu
→
Bookmarks&Notes
Menu
→
Delete Bookmark
to delete the bookmark.
.
.
33
Page 34

Books
Use highlights
While reading a book, you can highlight text with the stylus. You can also add memos to highlighted text.
The following features are not available on a PDF file format: text highlight, instant dictionary and notes.
Highlight a text
Drag the stylus across words or lines to highlight them.
●
A dictionary can be displayed at the bottom of the screen when
you use the highlight function. (Look up a word → p. 53)
Remove a highlight
Tap highlighted text with the stylus.
1
When the pop-up window appears, tap 2 Delete
Highlight
When the pop-up window appears, tap 3 Yes
.
.
34
Page 35

Books
Add a memo to highlighted text
Tap highlighted text with the stylus.
1
Tap 2 Add memo
When the memo input window appears, create a memo
3
and then tap .
●
will appear next to the highlighted text.
(Tap
refer to this
for presentation
.
to edit the memo.)
Highlight all the same words of highlight text
Tap highlighted text with the stylus.
1
Tap 2 Search the word
●
All the same words on the book will be highlighted.
To see the page of the highlighted word, tap ●/ .
Look up highlighted words in the dictionary
Tap highlighted text with the stylus.
1
Tap 2 Search in the Dictionary
View the definitions, idioms, and usage examples for
3
the word.
When you want to search for a word directly, enter the word in
the input field at the bottom of the screen.
.
.
35
Page 36

Books
Delete books
To delete a book file,
From the Home screen, tap
1
From the book list screen, tap
2
●
will appear in the book list.
Tap 3 at the right of a book that you want to delete.
When the pop-up window appears, tap
4
To exit the edit mode, tap ●.
Books
Menu
.
→
Edit
Yes
.
.
36
Page 37

Bookstore
Purchase and download content files from a bookstore. To access the bookstore on the device, it must be connected to a wireless
network. (p. 67)
For details about the bookstore, refer to a separate bookstore guide.
37
Page 38

Notes
Save important information by creating notes. You can add new note pages to existing notes and manage notes by folder.
Create notes
Create pages in a single note
When you access
pages in a single note.
Notes
, the note list appears. You can create up to 99
From the Home screen, tap
1
Select a newly created note dated today from the list.
2
Tap ● to add a new note.
Notes
.
38
Page 39

Notes
Note title
(Tap to open
the note list)
Text input
field
Pen thickness Eraser size
A B C
Using the stylus, write a note in the text input field.
3
●
You can not use the keyboard to make a note. Use the stylus.
Tap ● to add a new page.
Icon Function
View a list of saved notes
Create and save a new note
Modify a note title
●
Press the buttons on the keyboard to enter a title. The title can be up to
64 letters, and you can not enter some special characters.
Delete notes
Delete all text in the current page
Bookmark (★) the current note page/Clear a bookmark
/
Lock page/Unlock page
/
Add a new page/Delete the current page
/
Search for note contents
View your notes by page
Select layouts
Cancel the previous action/Recover the canceled action
/
Crop a part of notes
Current page/Total number of pages
(Enter a page number to move directly to that page)
When you access a note during music playback, you can adjust the volume by
pressing
remains invisible.
and the 5 and 6 number buttons. In this case, volume control bar
39
Page 40

Notes
Send or receive a memo via EmoLink
From the creating notes screen, press to send or
receive files between devices. (p. 19)
Bookmark pages in a single note
Bookmark note pages to easily locate and refer to them
later.
On any note page, tap
To clear the bookmark, tap ●.
Icon Function
Bookmark added
Bookmark cleared
To see bookmarks, from the note creation screen, tap and
then tap the
Lock pages
Protect your private notes with a password. The default
password is 0000. (p. 26)
On any note page, tap
To unlock pages, tap ●.
Icon Function
Locked page
Unlocked page
★
Pages
at the bottom of the screen.
tab.
in a page.
Search for note contents
From the page creation screen, tap
1
Enter a keyword, and tap
2
View the contents.
3
Crop a note page
Crop a part of a note page to copy or delete it.
From the page creation screen, tap
1
Select a part to crop.
2
Select an editing tool.
3
Icon Function
Delete the selected area
Copy the selected area
Cancel the selection
Check the edited page.
4
When you select ●, copied part will be saved to the clip
board. Tap
to select copied part and point where to paste.
or press .
.
.
40
Page 41

Notes
Create notes
Create new notes. You can create up to 99 notes in a folder.
From the Home screen, tap
1
Menu
→
Tap
2
Tap ● to view a list of notes from the page creation screen.
Write a note in the new page.
3
Tap ● to add more pages to a note.
New Note
Notes
, or tap .
.
41
Page 42

Notes
View notes
View or manage your notes by pages, notes, and folders.
View note pages
Folder title
From the page creation screen, tap
Note title
1
Tap a tab.
2
Tab Function
All
Date
★
Tap a page.
3
View the page.
4
.
View all saved pages
View pages by date
●
To view a page created today, tap
Pages
To jump to another page, tap ● or , or the folder title and select a folder.
To create a new note page, tap ●. (Create pages in a single note → p. 38)
View bookmarked pages (p. 40)
.
42
Page 43

Notes
View notes
From the page creation screen, tap
1
Tap a note.
2
To jump to another page, tap ● or , or the folder title and select a folder.
●
From the note list, tap
Option Function
New Note
Page View
Search
Sort
View
Edit
Create a new note
Change the view mode
Search for a note content
Select a sort option (By Alphabet, By Creation Date, By Access Date,
By Access Frequency)
Select how to view notes (List, Thumbnail)
Move a note to another folder or delete a note
Menu
to use the following options.
.
43
Page 44

Notes
View notes by folders
Manage your notes by folders. You can add or delete folders.
From the Home screen, tap
1
/ to select a folder.
Tap
2
To view all folders, tap a folder title and select ●All Folders
Icon Function
Create a new folder
Change a folder title
●
The title can be up to 64 letters and you can not enter some special
characters.
Delete a folder
●
You can not delete
Notes
Inbox.
.
.
44
Page 45

Notes
Delete notes
Delete notes and folders.
Delete notes
When you delete a note, all pages of the note will be deleted.
Creation date
From the Home screen, tap
1
From the note list, tap
2
To view the note list while creating a note, tap ●.
Tap 3 to delete notes.
Tap ● to re-name or move notes to another folder.
When the pop-up window appears, tap 4 Yes
To exit the edit mode, tap ●.
Menu
Notes
→
Edit
.
.
.
45
Page 46

Notes
Delete folders
When you delete a folder, all notes of the folder will be deleted.
From the Home screen, tap
1
/ to select a folder.
Tap
2
●
To view the note list while creating a note, tap
Tap
3
When the pop-up window appears, tap
4
.
To exit the edit mode, tap ●.
Notes
.
.
Yes
.
46
Page 47

Calendar
Create events or anniversaries to manage your schedule. You can also view Microsoft Outlook schedules from your device.
Create events
To create an event,
Preview input
field (appears in
Month view)
Text input field
Dinner appointment
A B C
▲ Day View
From the Home screen, tap
1
You can write your schedule directly on the month screen. Tap ● to show the
writing tools.
Tap 2 Menu
Mode Function
Year View
Month View*
Day View
Today
* The default setting of the
View
Tap a date and write details with the stylus.
3
To move to today’s date, tap ● in Month view.
●
For
●
For
●
You can not use the keyboard to enter event details. Use the stylus.
to select a view mode.
View a calendar by six months
View by month
View by week
View today's events
and
Day View
Year View
Day View
modes.
or
Month View
, write on the preview and text input fields.
Calendar
Calendar
is
, tap and write directly on the calendar.
.
Month View
. You can see this option in the
Year
47
Page 48

Calendar
View events
View events in Month view
Preview
schedule
Dinner appointment
▲ Month View
From the Home screen, tap
1
Menu
→
Tap
2
or to scroll to a year or month.
Tap
3
Tap a date.
4
Dates with an event will be marked with ● in the top right corner.
Month View
Calendar
.
.
48
Page 49

Calendar
View date
and day
Dinner appointment
A B C
▲ Day View
View events in Day view
From the Home screen, tap
1
Menu
→
Tap
2
or to scroll to a week.
Tap
3
Tap a date.
4
Dates with an event will be marked with ● in the top right corner.
To go back to Month view, tap on the top left of the screen.
Day View
Calendar
.
.
49
Page 50

Calendar
Delete events
To delete an event,
▲ Day View
A B C
From the Home screen, tap
1
You can edit your schedule directly on the calendar. Tap ● to show the writing
tools.
Tap 2 Menu
Mode Function
Year View
Month View*
Day View
Today
* The default setting of the
View
Tap a date.
3
Tap
4
●
Tap an eraser size and use the stylus to delete your inputs.
Although you delete inputs with an eraser, will still appear on the calendar date.
to select a view mode.
View by six months
View by month
View by week
View today’s events
and
Day View
→
modes.
Yes
to clear all inputs on the selected date.
Calendar
Calendar
is
Month View
.
. You can see this option in the
Year
50
Page 51

Calendar
View Microso Outlook schedules
Synchronize the device with Microsoft Outlook to view your schedules on the device. This feature allows you to view schedules
but does not allow you to edit or delete the schedules from the device.
Install Samsung Outlook Sync
Insert the CD-ROM into an appropriate drive on your
1
PC.
Samsung Outlook Sync
Click
2
instructions to install the program.
and follow the on-screen
Synchronize your schedules
Launch the Microsoft Outlook program and enter your
1
user ID and password to log in.
Enter your schedules.
2
Double-click the Samsung Outlook Sync icon on the
3
desktop to launch the program.
Connect the device to a PC with the USB cable and tap
4
Yes
.
Sync
Click
5
with Microsoft Outlook.
●
Schedules in Microsoft Outlook will be transferred to your
device.
Disconnect the USB cable when the synchronization is
6
complete.
on the desktop to synchronize schedules
51
Page 52

Calendar
View Microsoft Outlook schedules on the device
Preview
schedule
View date
and day
▲ Month View
From the Home screen, tap
1
Menu
→
Tap
2
Outlook Schedule
Tap
3
Tap a date to view details.
4
●
You can not edit the schedules on the device.
Month View
or
.
Calendar
Day View
.
.
▲ Day View
52
Page 53

Dictionary
Look up the meaning of a word, save searched words, and add words to your word list.
Look up a word
To look up a word in the dictionary,
From the Home screen, tap
1
Enter a word in the input field and tap
2
●
Words you have searched for previously will be listed.
Select a word.
3
View the search result. (p. 4 55)
To see idioms or examples related to the word, tap ●Idioms
●
While you are viewing a book or dictionary, it may be more convenient to use the
instant dictionary function. (p. 54)
●
Supported dictionary: Collins English-English dictionary
Dictionary
.
or press .
or
Examples
.
53
Page 54

Dictionary
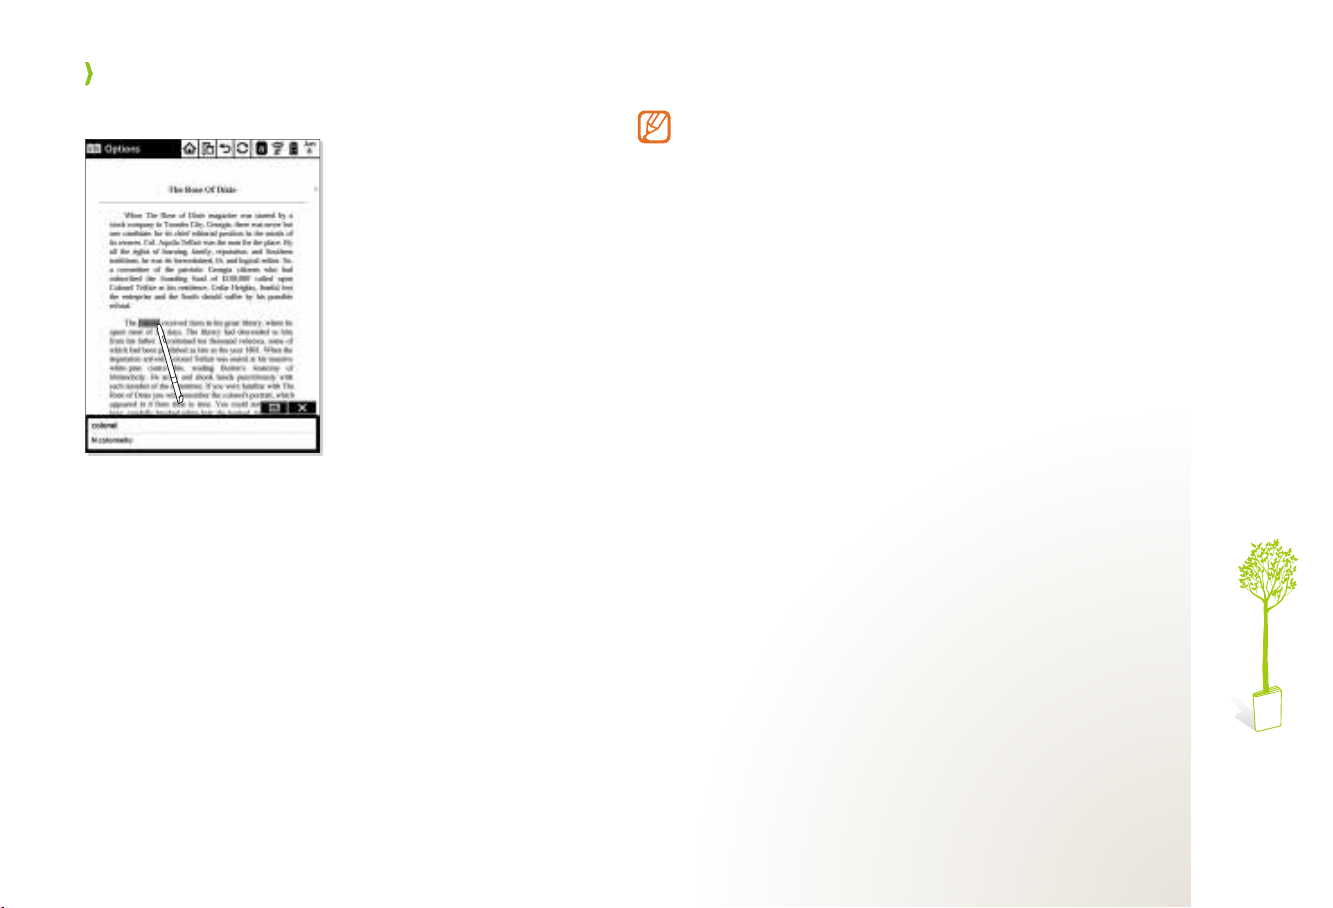
Use the instant dictionary function
While reading text, tap a word with the stylus.
●
The dictionary screen will appear with English expressions or definitions.
●
If you tap a word on the page you are reading with the dictionary screen opened, the
device will activate the dictionary function.
54
Page 55

Dictionary
View search results
To view search results,
From the search result screen, tap a tab you want.
1
Tab Function
All
Idioms
Examples
View the search results.
2
Use the following icons.
3
Icon Function
While you are viewing a book or dictionary, it may be more convenient to search for
a word using the highlight function. (p. 34)
View all search results
View idioms only
View examples only
Add to your word list
View your word list
55
Page 56

Dictionary
Add to your word list
To add words to your word list,
From the search results screen, tap
1
When the pop-up window appears, tap
2
●
You can add up to 1000 words to your word list. This limit
may change depending on the available capacity of your
device.
Open your word list
To open your word list,
From the dictionary screen, tap
1
By Latest Search
Tap
2
To delete a word, tap ●.
Tap a word.
3
or
By Alphabet
.
.
OK
.
.
56
Page 57

Music
Listen to stored music files in MP3 (ID3 v 2.3 supported) format. (Copy files → p. 16)
Play music les
To play music files,
From the Home screen, tap
1
Tap a list of music.
2
Folder Function
My Playlist
Relaxing Sound
Inbox
To change how to view the list of music, tap ●Menu
Music files you have added to your custom playlist
Music files categorized as relaxing
Music files received via EmoLink
Music
.
→
View
.
57
Page 58

Music
Tap a music file.
3
Listen to music and use the following icons.
4
●
You can use shortcut buttons to control playback conveniently.
(Use shortcut buttons while listening to music → p. 59)
Icon Function
Play/Pause
/
Scan backward/Scan forward
/
Skip to previous track/Skip to next track
/
●
: Play the current track once
●
: Repeat the current track
●
: Repeat all songs in the folder
●
: Repeat all songs
Shuffle music playback/Turn Shuffle off
/
Add to Playlist ● : Add to My Playlist
●
Menu
Shuffle On
●
Repeat
While listening to music, you can use other functions such as reading books or
creating notes.
/Shuffle Off : Turn Shuffle on or off
: None, Repeat 1, Repeat Folder, Repeat All
Send or receive music files via EmoLink
From the playing music or music list screen, press to send or receive
files between devices. (p. 19)
58
Page 59

Music
Use shortcut buttons while listening to music
Press
control playback while listening to music.
Number Function
When you use other functions while listening to music, you
can also use shortcut buttons.
and then press a corresponding number button to
Adjust the volume down
5
Adjust the volume up
6
Skip to previous track
7
Pause playback/Resume playback
8
Skip to next track
9
59
Page 60

Music
Delete music les
To delete a music file,
From the Home screen, tap
1
Menu
→
Edit
Tap
2
at the right of a music file that you want to delete.
Tap
3
When the pop-up window appears, tap
4
To exit the edit mode, tap ●.
You can not delete music files stored in the
.
Music
.
Yes
Relaxing Sound
.
folder.
60
Page 61

Images
View images (BMP, JPG and JPEG formats) saved on the device. You can also view zipped files of images similarly to book files.
(Copy files → p. 16)
View images
View images
From the Home screen, tap
1
Tap an image list.
2
Tap ●Menu
Option Function
Sort
View
Edit
Tap an image.
3
to use the following options.
Select how to sort images (By Date, By File Name)
Select how to view the list of images (List, Thumbnail)
Delete images
Images
.
61
Page 62

Images
View the image.
4
To write a memo on the image, tap ●.
●
Menu
Tap
Option Function
Zoom
Aspect Ratio
Full Screen On/
Full Screen Off
Hide Scribble/
Show Scribble*
* This option will appear only when you write a memo on the image.
(This option will remain available even after you delete a memo.)
●
The maximum pixel value supported by the device is 12 mega-pixels for the JPG
and JPEG formats, and 6 mega-pixels for the BMP format. You can automatically
optimize image size and file formats with the Virtual Printer provided on the CDROM. (Install and use the Virtual Printer → p. 71)
●
If an image title is over 256 bytes, any memo you write on the image will not be
saved.
to use the following options.
Zoom in (x1.0, x1.2, x1.5, x2.0)
●
You can also zoom in by pressing
button.
Adjust the ratio of an image (Original Fit, Auto Fit, Fit to Screen)
View an image in full-screen mode or exit full-screen mode
Hide or show memos on an image
and then the 2 number
Send or receive image files via EmoLink
Send or receive a file between devices by pressing in the viewing image,
image list, or thumbnail screens. (p. 19)
62
Page 63

Images
View zip file images
You can view zipped files of images. When JPG/JPEG/BMP
image files are zipped, the maximum pixel value supported
by the device is 6 mega-pixels for each file.
To view zip file images,
From the Home screen, tap
1
Tap a zip file.
2
Navigate the image files with the following icons.
3
Icon Function
View the previous or next image
/
●
You can also view images by pressing
Skip to the first or last image
●
/
You can also skip to the first or last image by pressing
and holding or .
Images
.
or .
Customize settings for zip file images
While viewing the zip file images, tap 1 Menu
Tap a menu to customize the following settings.
2
Option Function
Enhance Image
View
Add Bookmark/
Delete Bookmark
Bookmarks
Series View
Zoom
Full Screen On/
Full Screen Off
Adjust the contrast of the image
Change how to view images (Original, Page
Split (L → R), Page Split (R → L))
Add or delete a bookmark
View bookmarked images
View the next image file manually or
automatically (On, Off, Check Everytime)
Zoom in (x1.0, x1.2, x1.5, x2.0)
View an image in full-screen mode or exit fullscreen mode
.
63
Page 64

Images
Delete images
To delete an image,
From the Home screen, tap
1
Menu
→
Edit
Tap
2
at the right of an image that you want to delete.
Tap
3
When the pop-up window appears, tap
4
To exit the edit mode, tap ●.
.
Images
.
Yes
.
64
Page 65

Settings
Customize the screen settings, such as language, startup mode timer, wireless network settings, and EmoLlink settings. Manage the
device by updating firmware or resetting.
To customize settings,
From the Home screen, tap
1
Tap a tab.
2
Tab Function
All
General
Network
App.
Support
Tap an option to customize the setting.
3
View menus over all tabs
Customize settings for Language, Clock Set, Change Password,
Device Lock, Sleep Timer, Auto Power Off, Startup Mode
Customize settings for Wi-Fi, Auto Wi-Fi Off Timer, EmoLink
Customize settings for Instant Dictionary , Book Flipping Option, Auto
Refresh
Update the firmware, reset the device, and view device information
Settings
.
65
Page 66

Settings
General
Language
Clock Set
Change Password
Device Lock
Sleep Timer
Auto Power Off
Startup Mode
Select a display language. (p. 25)
Set the current time and date. (p. 25)
Change the password for the lock function. (p. 26)
Set the device to be locked automatically when it is switched on.
●
To unlock the device, you must enter your password.
Set the screen to lock automatically when the device is not used for a specific length of time.
(5 Minutes, 10 Minutes, 20 Minutes, 30 Minutes)
Set the device to automatically switch off 30 minutes after entering sleep mode.
Select a menu to be displayed when the device is switched on.
●
: Display the main menu screen. (p. 23)
Home
●
Last Mode
●
Continue Reading
: Display the last function you were using.
: Display the last book you were reading.
In
Continue Reading
were reading.
mode, if you reboot the device while reading a book, it may take some time to load the last page you
66
Page 67

Settings
Network
When you connect the device over the wireless network, you can purchase books from online bookstores or download content
files,
Select 1 On
Select an available Wi-Fi network.
2
Enter the password and tap 3 Yes
When Wi-Fi is connected, download various content files.
4
If you tap the wireless network antenna area at the top of the screen, you can view the current time and turn the Wi-Fi feature
on or off directly. (p. 24)
.
.
Wi-Fi
Auto Wi-Fi Off
Timer
Customize proxy server settings
To connect to the wireless network with a proxy server, you must first customize the proxy server settings.
Tap 1 Proxy Server: Off
Tap
On
2
3
Set the device to disconnect the wireless network after a specified interval. (10 Minutes, 20 Minutes, 30 Minutes, Off)
●
You can set an alarm message to appear when the wireless network is disconnecting. Tap
message.
.
Enter the URL address and port number and then tap
●
If you enter an empty space by pressing
●
You can enter from 1 to 65535 for port number.
For the URL address and port number of the proxy server, contact your network administrator.
.
OK
.
in the server URL field, the server URL will not be saved.
next to Turn on the alarm
67
Page 68

Settings
EmoLink
Customize EmoLink settings.
●
EmoLink
●
Device Name
●
Change Group: Add or change an EmoLink group. Also, set whether or not devices from other groups are allowed to connect.
Connect Mode ●: Select an EmoLink connection mode.
Direct Network Settings ●: Select a direct connection mode.
●
Learn How to Use
: Turn on or off.
: Register or edit the device name that is shown when the device is connected to another device.
-
You can enter up to 60 characters with alphabet or numbers for the group title.
-
Direct Mode
-
AP Mode
●
-
Auto
-
Manual
-
You can enter up to 32 characters with alphabet or numbers for SSID.
-
You can enter only letters and numbers for WEP password. The size will be limited to 5, 10, 13, 26 bytes depending on the
wireless network.
: Automatically connect with any EmoLink-enabled device within range.
: Automatically search for and connect to wireless networks.
When connected to a wireless network in ●AP Mode
previously connected. If it fails, the device will connect to the unsecured network with the strongest signal. To select a
wireless network manually, tap
When connected to a wireless network in
EmoLink.
: The device attempts to connect to automatically an EmoLink-enabled device.
: Manually enter SSID and WEP passwords when connecting directly to a device.
: View helpful instructions for using EmoLink.
Settings
→
AP Mode
, your device attempts to connect to the network to which you
Network
tab →
Wi-Fi
and then tap On.
, only devices on the same network are allowed to transfer files via
68
Page 69

Settings
App.
Instant Dictionary
Book Flipping
Option
Auto Refresh
Support
Update Firmware
Reset
Information
Set to look up words instantly when you tap them on the reading screen. (p. 54)
Specify the action taken when you press and hold or , or tap or while reading a book. (Chapter, Bookmarks&Notes)
Set an interval to refresh the screen while reading a book.
(Every Page, Every Third Page, Every Fifth Page, Every Tenth Page, Off)
●
The screen turns off and on quickly at every refresh interval.
●
Due to the electronic paper capabilities of the touch screen, your device may have afterimages.
Tap to refresh the screen whenever needed.
Update your device with the most recent firmware. (p. 73)
Reset all settings to the factory defaults. (p. 70)
Product Information ● : Enter or edit the device name, and view the model name, firmware version, manufacturer information, and
MAC address.
●
Memory Information
●
User Information
-
You can enter up to 64 bytes with letters, numbers, or special characters for each user information field.
: View used and available memory.
: Enter your personal information. (name, company, phone, and email address)
69
Page 70

Appendix
Reset the device
Reset the device using the reset button
If the device does not respond properly or will not turn
off, press the reset button with your stylus to reset the
device. Your saved files and customized settings will not be
affected.
Reset all settings
Reset all settings to the factory defaults.
From the Home screen, tap
1
2
Support
Tap
tab →
Reset
Settings
.
.
Tap an option.
3
Option Function
Reset to Default
Settings
Delete All Data
Although you reset the device, your password, the time,
and the product and user information you saved will not be
affected.
When the pop-up window appears, tap 4 Yes
▲ When you select
When the reset is complete, tap 5 OK
Reset the settings that you have customized
Reset the device to the factory default settings
Delete All Data
.
.
70
Page 71

Appendix
Install and use the Virtual Printer
The Virtual Printer program is provided on the supplied CD-ROM. You can use this program to optimize book and image files
for viewing on your device.
Install Virtual Printer
Insert the CD-ROM into an appropriate drive on your
1
PC.
Virtual Printer
Click
2
instructions to install the program.
From the default printer setting screen, click ●No
Virtual Printer or
default printer.
and follow the on-screen
Yes
to install and set Virtual Printer as a
to install
When the installation is complete, connect the device to
3
the PC with the USB cable.
●
The Virtual Printer program can be used only with your device.
●
To directly convert book or image files without the need to
change printer settings, set the Virtual Printer as the default.
To print files, you must select a physical printer.
Use Virtual Printer
Connect the device to a PC with the USB cable.
1
●
The pop-up window appears.
Tap 2 Yes
Open a book or image files on the PC.
3
.
71
Page 72

Appendix
Make the print order and select 4 Samsung Virtual
Printer
from the name drop-down list.
When the 5 Samsung Virtual Printer
click
Print
.
●
If the Samsung Virtual Printer window appears, select a
location to save the output file, folder name, and a file format,
Print
and then click
●
Optimized files will be saved in the
device. You can view optimized files by accessing the
Images
menu on your device.
Preview the file Select a destination folder
.
(available only when
connected to a PC)
window appears,
Images
folder on your
Convertible file
formats
72
Page 73

Appendix
Update rmware
Download and install the latest firmware from the Samsung Electronics web page http://www.samsung.com/
Connect the device to a PC with the USB cable.
1
When the pop-up window appears, tap 2 Yes
Visit the Samsung Electronics web page
3
(http://www.samsung.com/) and enter your device’s
model name to search for the latest firmware.
My Computer
Open
4
the removable disk icon.
●
The name of the removable disk may vary by PC.
Transfer the new firmware to the 5 Firmware_Update
folder. (Copy files → p. 16)
.
on the desktop and double-click
73
Page 74

Appendix
Safely remove the removable disk from the PC and
6
disconnect the USB cable. (p. 18)
From the Home screen, tap
7
Support
Tap
8
●
The pop-up window appears.
When the pop-up window appears, tap 9 Yes
●
The firmware will be updated.
●
When the update is complete, the device will reboot
automatically.
●
Do not disconnect the USB cable or turn the device off while
the update is in progress, as this may result in loss of data or
damage to the device.
●
You can check the current firmware by tapping
Support
tab →
tab →
Update Firmware
Information
Settings
→
.
.
Product Information
.
Settings
. (p. 69)
→
74
Page 75

Appendix
Troubleshooting
If you are having trouble with your device, try these troubleshooting before contacting a service professional.
Issue Resolution
●
I pressed the power button, but
the device does not turn on.
The device will not charge even
with the USB cable connected.
The device will not turn on even
with the USB cable connected.
The screen always seems to be
locked.
The time setting is not correct.
I can not see a downloaded or
copied book in the book list.
The device turns off when I
disconnect the USB cable from a
PC during data synchronization.
I draw a curve, but it appears as
a straight line.
Letters and images are not clear.
Image files do not display on the
screen.
Connect the USB cable to charge the battery.
Disconnect the USB cable and then press the reset button with the stylus. (p. ●70)
Ensure that the USB cable is connected properly.
Check the connection between the device and the USB cable.
From the Home screen, tap Settings → General tab → Sleep Timer to change the time delay.
(Sleep Timer → p. 66)
The current time settings may be lost when the battery discharges completely. Set the current time again. (p. 25)
Connect the USB cable and ensure the device is recognized as a removable disk. Then disconnect the USB cable
to synchronize with a PC. (Copy files → p. 16)
Reset the device and then copy files to the device by connecting the USB cable.
(Reset the device → p. 70, Copy files → p. 16)
Your device may not recognize your inputs correctly right after refreshing the screen. Wait until the refresh is
complete.
Tap .
The maximum resolution supported by the device is 12M. Image files with a higher resolution will appear in the file
list, but the image itself can not be displayed on the screen.
75
Page 76

Appendix
Specications
Model name
Panel
Hardware
Touch screen
Software
Sound
Wireless
Product
USB cable
File support
* Specifications in the user manual are subject to be changed without prior notice.
* The wireless device can not provide services related to personal safety because of the possibility of radio interference.
* This device is a domestic DSRC (Dedicated Short Range Communication) wireless device.
** PDF files are not displayed properly if the files do not comply with the PDF/A standard.
*
E65
Type Active Matrix Electrophoretic Display
Resolution 600×800 pixel
Color 8 Level Gray Scale
Flash memory Available for a removable disk: 1.7 GB
USB Device 2.0
Voltage When connected to a PC: USB 5 V
Battery Li-Ion 1500 mAh
Type EMR Pen Touch Type (Text Input, OSK supported)
OS Linux 2.6.29
Stereo 0.3w + 0.3w (Earphone supported)
Wi-Fi 802.11b/g
Dimensions (W x H x D) 125.5x194x13 mm
Weight 212g (including the battery: 244 g)
Micro type
Books ePUB, PDF**, TXT
Music MP3
Images BMP, JPG, JPEG (Progressive JPG is not supported)
76
Page 77

Appendix
Open Source License
To send inquiries and requests for matters regarding open sources, contact Samsung via email (oss.request@samsung.com).
●
This product uses some software programs that are distributed under the Independent JPEG Group.
●
This product uses some software programs that are distributed under the Freetype Project.
●
This product uses some software programs that are distributed under the OpenSSL Project..
●
This product uses some software programs that are distributed under the GPL/LGPL.
GPL software: Linux Kernel, Busybox, Binutils, MPlayer, wpa_supplicant, U-boot, Wireless_tools
LGPL software: Glibc, avahi
To view unofficial translations of the GPL and LGPL, please visit the following link:
http://www.gnu.org/licenses/old-licenses/gpl-2.0-translations.html
http://www.gnu.org/licenses/old-licenses/lgpl-2.1-translations.html
To see more details, click Open Source License on the main screen of the CD-ROM.
77
Page 78

Appendix
Index
A
Adobe Digital Editions 27
B
Battery
capacity 11
charging 10
inserting 8
removing 9
Bookmarks 33
Books
deleting 36
downloading 16
viewing 28
viewing on TV screen 32
Bookstore 37
C
Calendar 47
Charging indicator 10
D
Dictionary
adding words 56
looking up words 53
using instant function 54
viewing search results 55
viewing word list 54
E
EmoLink
changing group 21
initializing 19
receiving files 20
sending files 19
Events
creating 47
deleting 50
viewing 48
F
Files
copying 16
cropping and zooming PDF 30
downloading 37
receiving via EmoLink 20
sending via EmoLink 19
Firmware 73
H
Highlights
adding memos 35
looking up words 35
using 34
Home screen 23
I
Icons 24
Images
deleting 64
viewing 61
viewing zip files 63
78
Page 79

Appendix
M
Memory card 15
Menus
accessing 22
viewing books 28
viewing images 61
Music
deleting 60
playing 57
N
Notes
adding pages 38
bookmarking 40
creating 38
deleting 45
locking pages 40
viewing 42
O
Outlook
installing Samsung Outlook Sync 51
synchronizing schedules 51
viewing schedules 52
P
Password 26
R
Reset device 70
S
Secondary power connector 10
Settings
applications 69
changing 65
customizing 25
general 66
network 67
resetting to default 70
support 69
Stylus
storing 13
using 13
T
Touch screen
locking and unlocking 12
U
USB
charging 10
disconnecting 18
V
Virtual printer 71
W
Wireless network 24
79
Page 80

U.K 0845 SAMSUNG (7267864)
SPAIN 902 - 1 - SAMSUNG (902 172 678)
Samsung Service center
Samsung Electronics web page http://www.samsung.com/
Adobe Contains Reader® Mobile technology by Adobe Systems Incorporated
FRANCE 01 48 63 00 00
ITALY 800-SAMSUNG (726-7864)
NETHERLANDS 0900-SAMSUNG (0900-7267864) (€ 0,10/Min)
 Loading...