

Page 1

SGH-e635
PORTABLE Tri-Band
TELEPHONE
User Guide
Please read this manual before operating your
phone, and keep it for future reference.
UVEE5_1.2_WCe635_060305_f5
Page 2

Intellectual Property
All Intellectual Property, as defined below, owned by or which is
otherwise the property of Samsung or its respective suppliers
relating to the SAMSUNG Phone, including but not limited to,
accessories, parts, or software relating there to (the “Phone
System”), is proprietary to Samsung and protected under federal
laws, state laws, and international treaty provisions. Intellectual
Property includes, but is not limited to, inventions (patentable or
unpatentable), patents, trade secrets, copyrights, software,
computer programs, and related documentation and other
works of authorship. You may not infringe or otherwise violate
the rights secured by the Intellectual Property. Moreover, you
agree that you will not (and will not attempt to) modify, prepare
derivative works of, reverse engineer, decompile, disassemble,
or otherwise attempt to create source code from the software. No
title to or ownership in the Intellectual Property is transferred to
you. All applicable rights of the Intellectual Property shall
remain with SAMSUNG and its suppliers.
Samsung Telecommunications America (STA),
Inc.
Headquarters: Customer Care Center:
1301 E. Lookout Drive 1601 E. Plano Parkway, Suite150
Richardson, TX 75082 Plano, TX 75074
Tel: 972.761.7000 Toll Free Tel: 1.888.987.HELP (4357)
Internet Address: http://www.samsungusa.com
©
2005 Samsung Telecommunications America, Inc. is a
registered trademark of Samsung Electronics America, Inc. and
its related entities.
Page 3

GH68-06940A
Openwave® is a registered Trademark of Openwave, Inc.
RSA® is a registered Trademark RSA Security, Inc.
Disclaimer of Warranties; Exclusion of Liability
EXCEPT AS SET FORTH IN THE EXPRESS WARRANTY
CONTAINED ON THE WARRANTY PAGE ENCLOSED WITH
THE PRODUCT, THE PURCHASER TAKES THE PRODUCT "AS
IS", AND SAMSUNG MAKES NO EXPRESS OR IMPLIED
WARRANTY OF ANY KIND WHATSOEVER WITH RESPECT
TO THE PRODUCT, INCLUDING BUT NOT LIMITED TO THE
MERCHANTABILITY OF THE PRODUCT OR ITS FITNESS FOR
ANY PARTICULAR PURPOSE OR USE; THE DESIGN,
CONDITION OR QUALITY OF THE PRODUCT; THE
PERFORMANCE OF THE PRODUCT; THE WORKMANSHIP
OF THE PRODUCT OR THE COMPONENTS CONTAINED
THEREIN; OR COMPLIANCE OF THE PRODUCT WITH THE
REQUIREMENTS OF ANY LAW, RULE, SPECIFICATION OR
CONTRACT PERTAINING THERETO. NOTHING
CONTAINED IN THE INSTRUCTION MANUAL SHALL BE
CONSTRUED TO CREATE AN EXPRESS OR IMPLIED
WARRANTY OF ANY KIND WHATSOEVER WITH RESPECT
TO THE PRODUCT. IN ADDITION, SAMSUNG SHALL NOT BE
LIABLE FOR ANY DAMAGES OF ANY KIND RESULTING
FROM THE PURCHASE OR USE OF THE PRODUCT OR
ARISING FROM THE BREACH OF THE EXPRESS WARRANTY,
INCLUDING INCIDENTAL, SPECIAL OR CONSEQUENTIAL
DAMAGES, OR LOSS OF ANTICIPATED PROFITS OR
BENEFITS.
Page 4

Page 5

Table of Contents
Section 1: Getting Started ................................. 5
Activating Your Phone ...................................................... 6
Switching your Phone On or Off ...................................... 10
Setting Up Your Voice Mail .............................................11
Section 2: Understanding Your Phone ............ 13
Features of Your Phone .................................................. 14
View of Your Phone ........................................................ 14
Keys ...............................................................................15
Display Layout ...............................................................17
Section 3: Call Functions ................................. 21
Making a Call .................................................................22
Adjusting the Call Volume ...............................................24
Answering a Call ............................................................ 25
Call Log ..........................................................................26
Call Records ................................................................... 28
Silent Mode .................................................................... 30
Selecting Functions and Options ....................................30
Section 4: Menu Navigation ............................ 39
Menu Navigation ............................................................ 40
Menu Outline .................................................................41
Section 5: Entering Text .................................. 47
Changing the Text Input Mode ........................................ 48
Using T9 Mode ............................................................... 49
Using ABC Mode ............................................................51
Using Symbols ...............................................................53
Using Numbers ..............................................................53
Section 6: Understanding Your Phonebook .... 55
Storing a Number in the SIM Card .................................. 56
Storing a Number in the Phone’s Memory ......................57
Table of Contents 1
Table of Contents
Page 6

Finding a Phonebook Entry .............................................58
Using Phonebook Entry Options ......................................59
Dialing a Number from Phonebook .................................60
Speed Dialing .................................................................60
Editing a caller group ......................................................61
Dialing a Number from the SIM Card ..............................62
Tab l e of C o nten t s
Copying all SIM Phonebook Entries .................................62
Deleting all Phonebook Entries .......................................62
Finding My Own Phone Number .....................................63
Using the Service Dialing Numbers .................................64
Checking the Memory Status ..........................................64
Section 7: Messaging ...................................... 67
Types of Messages .........................................................68
Voice Messages .............................................................68
Text Messages ...............................................................70
Picture Messages ...........................................................74
Browser Messages .........................................................81
Voice Mail Messages ......................................................82
Broadcast Messages (SIM Dependent) ............................82
Settings ..........................................................................82
IM (Instant Messaging) ...................................................84
Memory Status ...............................................................85
Section 8: Changing Your Settings .................87
Time & Date ...................................................................88
Display Settings .............................................................89
Sound Settings ...............................................................91
Get More Help ................................................................93
Greeting Message ..........................................................93
Language .......................................................................94
Security ..........................................................................94
Slide Settings .................................................................97
Infrared Activation ..........................................................98
2
Page 7

Extra Settings .................................................................99
Reset Settings .............................................................. 100
Network Services Settings ...........................................100
Section 9: Organizer ...................................... 105
Alarm ...........................................................................106
Calendar ......................................................................107
Calculator ....................................................................110
To Do List ....................................................................111
Voice Memo .................................................................112
Conversion ...................................................................114
Timer ...........................................................................114
Stopwatch ....................................................................115
Section 10: Camera .......................................117
Using the Camera .........................................................118
Take and Send .............................................................118
Accessing Pictures in My Photos .................................. 121
Accessing Pictures in My Album ...................................123
My Journal ...................................................................123
Delete All .....................................................................123
Settings .......................................................................124
Memory Status .............................................................124
Section 11: Funbox ........................................ 125
t-zones ........................................................................126
Sounds ........................................................................126
Images .........................................................................126
Games .........................................................................127
My Photos ....................................................................129
Delete All .....................................................................130
Memory Status .............................................................130
Melody Composer ........................................................131
Section 12: t-zones ........................................ 135
t-zones ........................................................................136
Table of Contents 3
Table of Contents
Page 8

Section 13: Health and Safety Information ...141
Health and Safety Information .......................................142
Consumer Information on Wireless Phones ...................144
Road Safety ..................................................................154
Operating Environment .................................................156
Using Your Phone Near Other Electronic Devices ..........156
Tab l e of C o nten t s
Potentially Explosive Environments ...............................158
Emergency Calls ...........................................................159
FCC Notice and Cautions ..............................................160
Other Important Safety Information ...............................161
Product Performance ....................................................162
Availability of Various Features/Ring Tones ...................163
Battery Standby and Talk Time .....................................164
Battery Precautions ......................................................164
Care and Maintenance ..................................................166
Section 14: Warranty Information .................169
Standard Limited Warranty ...........................................170
Intellectual Property Statement .....................................176
Samsung Telecommunications America (STA), Inc. .......177
Index ............................................................... 179
4
Page 9

Section 1: Getting Started
Topics Covered
• Activating Your Phone
• Switching Your Phone On or Off
• Setting Up Voicemail
This section allows you to start using your phone by
activating your service and setting up your voice mail.
Section 1
Section 1: Getting Started 5
Page 10
Activating Your Phone
When you subscribe to a cellular network, you are
provided with a plug-in SIM card loaded with your
subscription details, such as your PIN, any optional
services available, and many others.
Installing the SIM Card
Important! The plug-in SIM card and its contacts can be easily damaged
by scratching or bending, so be careful when handling, inserting, or
removing the card.
Keep all SIM cards out of reach of small children.
If necessary, switch off the phone by holding down the
Section 1
key until the power-off image displays.
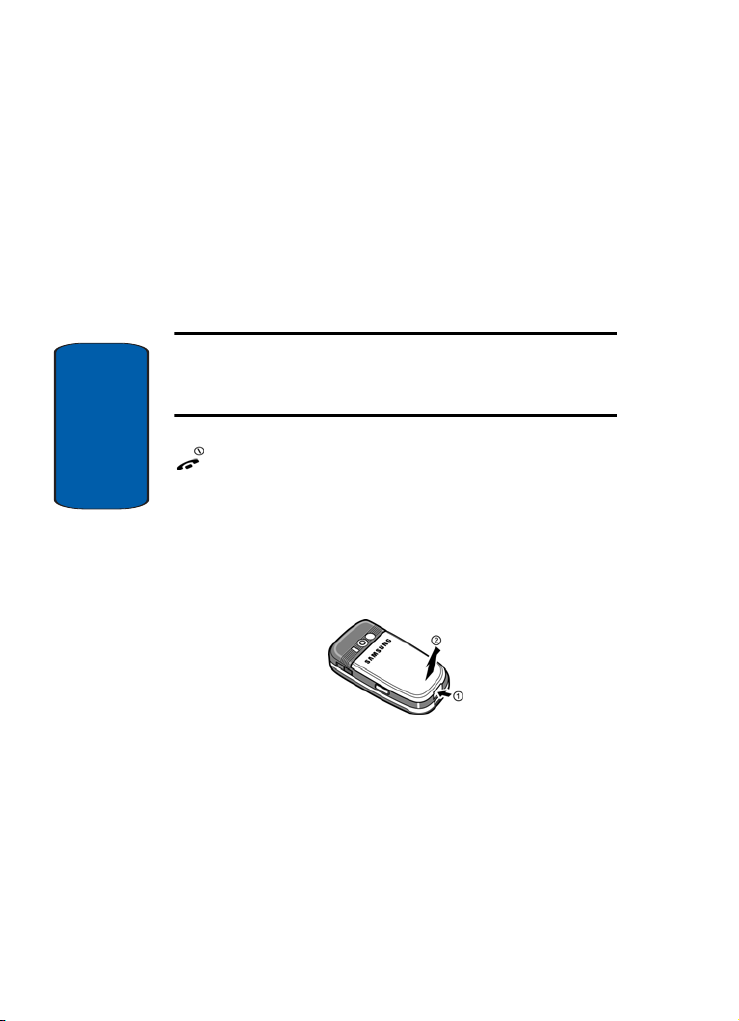
Remove the battery. To do so:
1. Push in the battery lock toward the top of the phone and
hold it in that position.
2. Lift the battery away, as shown.
6
Page 11

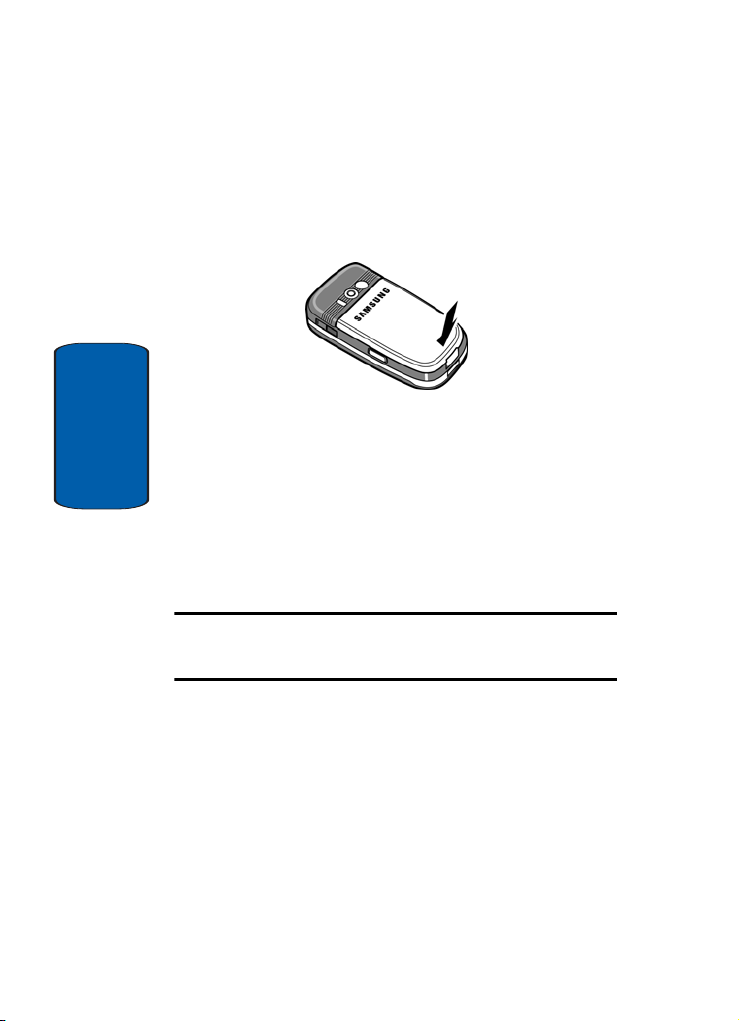
Activating Your Phone
3. Slide the SIM card into the SIM card socket so that the
card locks into place. Make sure the gold contacts of the
card face into the phone.
Note: When you need to remove the SIM card, slide it, as shown, and
take it out of the socket.
4. Place the battery so that the tabs on the end align with
the slots at the bottom of the phone.
Section 1
Section 1: Getting Started 7
Page 12
5. Press the battery down until it clicks into place. Make
sure that the battery is properly installed before
switching on the phone.
Charging a Battery
Section 1
Your phone is powered by a rechargeable Li-ion battery. A
travel adapter comes with your phone for charging the
battery. Use only approved batteries and chargers. Ask
your local Samsung dealer for further details.
You can use the phone while the battery is charging, but
this causes the phone to charge more slowly.
Note: You must fully charge the battery before using your phone for the
first time. A discharged battery recharges fully in approximately 200
minutes.
8
Page 13
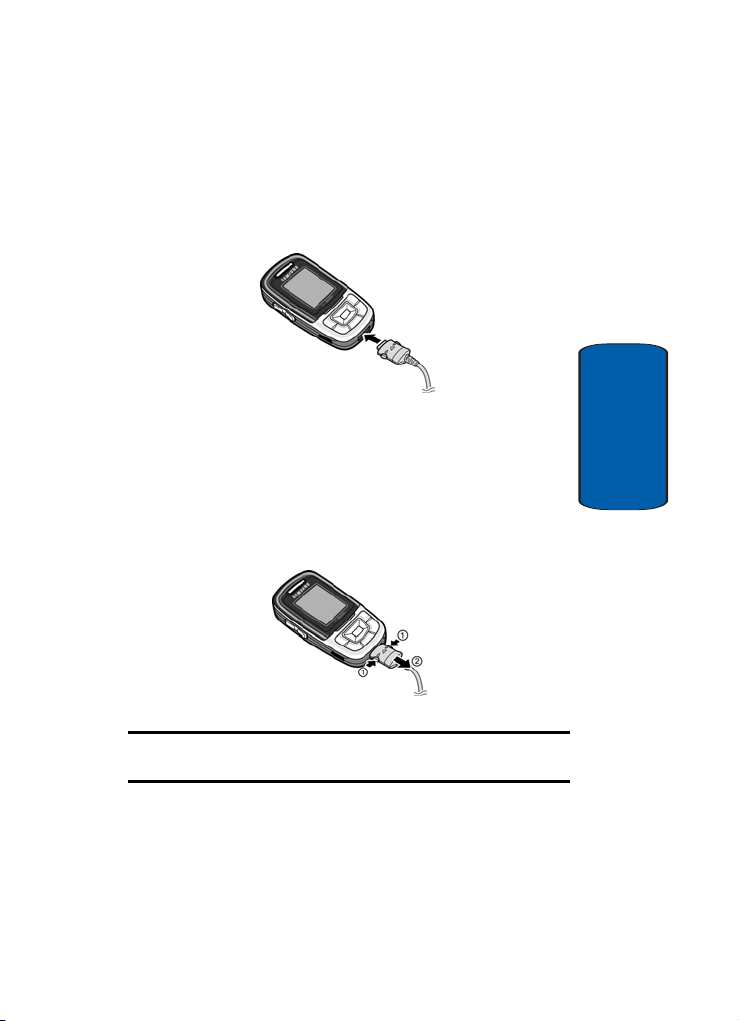
Activating Your Phone
1. With the battery in position on the phone, plug the
connector of the travel adapter into the jack at the
bottom of the phone.
2. Plug the adapter into a standard AC wall outlet.
3. When charging is finished, unplug the adapter from the
AC wall outlet and disconnect it from the phone by
pressing the buttons on both sides of the connector and
pulling the connector out.
Section 1
Note: You must unplug the adapter before you remove the battery from the
phone during charging; otherwise, the phone could be damaged.
Section 1: Getting Started 9
Page 14

Low Battery Indicator
When the battery is weak and only a few minutes of talk
time remain, your phone does the following:
• Sounds a warning tone.
• Repeats the “Warning Low Battery” message at regular
intervals on the display.
• Turns off the display backlight to conserve the remaining
battery power.
When the battery level becomes too low, the phone
automatically turns itself off.
Switching your Phone On or Off
Section 1
1. Slide the phone open.
2. Press and hold the key until the phone switches on.
3. If the phone asks you to enter the phone password, enter
the password and press the OK soft key or the key.
The password is preset to “00000000” at the factory. For
further details, see "Change Password" on page 95.
4. If the phone asks for a PIN, enter the PIN and press the
OK soft key or the key. For further details, see "PIN
Check" on page 94.
The phone searches for your network and after finding it,
the Idle screen appears. Now, you can make or receive
calls.
Note: The display language is preset to English at the factory. To change
the language, use the Language menu. For further details, see
"Language" on page 94.
10
Page 15

Setting Up Your Voice Mail
5. When you wish to switch off the phone, press and hold
the key until the power-off image displays.
Setting Up Your Voice Mail
For new users, follow the instructions below to set up
voicemail:
To set up your voice mail, use the following steps:
1. Slide your phone open to access the keypad.
2. In idle mode, press and hold the key on the keypad.
You are prompted to enter the password.
3. Follow the tutorial to create a password, a greeting, and
your name.
Note: These steps may be different depending on your network.
Accessing Your Voice Mail
To access you voice mail from your keypad, use the
following steps:
1. Slide your phone open to access the keypad.
2. From the Idle screen, press and hold the key.
3. Follow the voice mail prompts to access your messages.
To access you voice mail by using the menu, use the
following steps:
1. In Idle mode, press the Menu soft key to access Menu
mode.
2. Highlight Messages and press the Select soft key or the
key.
Section 1
Section 1: Getting Started 11
Page 16

3. Highlight Voice mail and press the Select soft key or the
key.
4. Highlight Call voice mail and press the Select soft key
or the key. Your phone dials the specified voice mail
number.
5. When connected, follow the voice prompts from the
voice mail center.
Changing the Voice Mail Number
Your SIM card gives you the default service number of the
voice mail center. However, you may need to change the
number. To change your voice mail number, use the
Section 1
following procedures:
1. In Idle mode, press the Menu soft key to access the
Menu mode.
2. Highlight Messages and press Select soft key or the
key.
3. Highlight Voice mail and press Select soft key or the
key.
4. Highlight Voice server number and press the Select
soft key or the key.
5. Highlight Empty and press the Select soft key or the
key.
6. Highlight Edit number and press the Select soft key or
the key to change the number.
7. Edit the number, then press the OK soft key or the
key to save the update.
8. Press the key to return to Idle mode.
12
Page 17

Section 2: Understanding Your Phone
Topics Covered
• Features of Your Phone
• View of Your Phone
•Keys
• Display Layout
This section outlines some key features of your phone. It
also displays the screen and the icons that are displayed
when the phone is in use.
Section 2
Section 2: Understanding Your Phone 13
Page 18
Features of Your Phone
Your phone is lightweight, easy-to-use and offers many
significant features. The following list outlines a few of the
features included in your phone.
• User friendly, menu driven access to features and options
• Instant Messaging capability
• Multimedia capability
• Organizer feature provides alarms, calendar, calculator, to-do
list, voice memo, conversion capabilities, timer, and stopwatch.
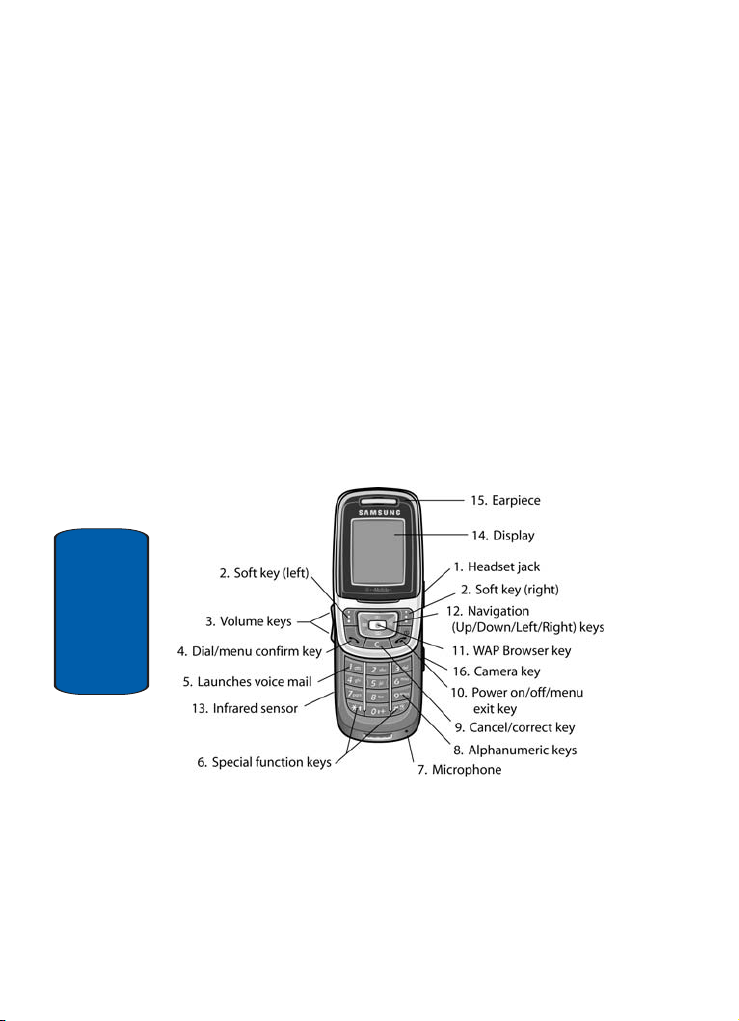
View of Your Phone
The following illustrations show the main elements of
your phone:
Section 2
14
Page 19
Keys
The following list correlates to the illustrations.
1.
The headset jack is used for the hands-free headset.
2.
Performs the functions indicated by the screen text on
the bottom line of the display.
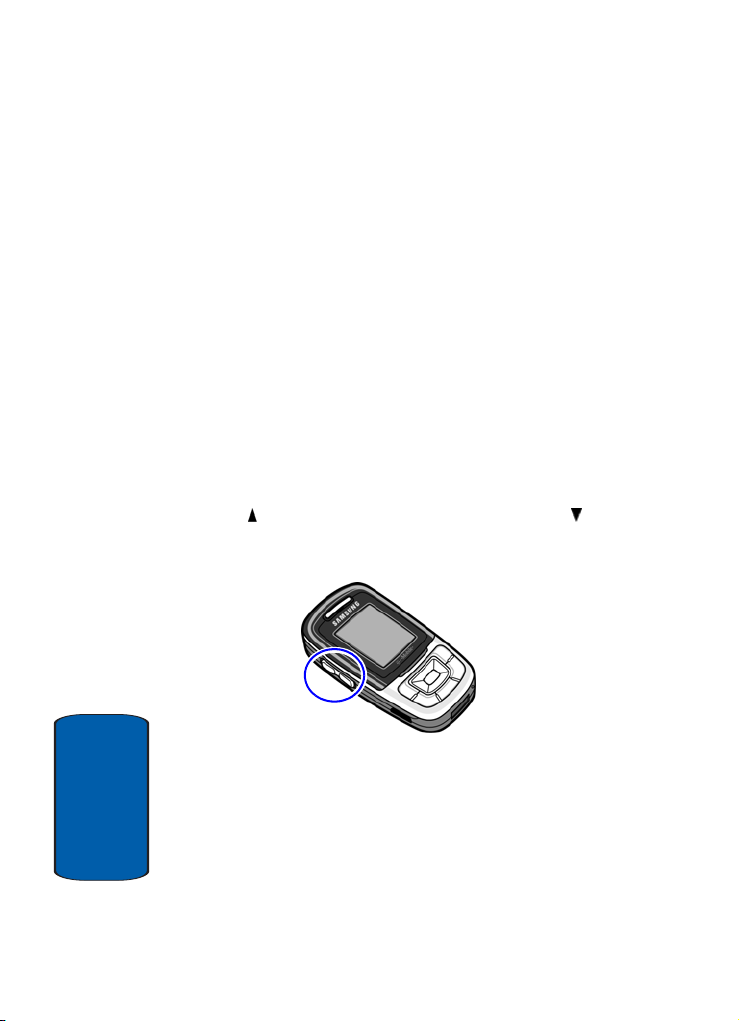
3. During a call, adjusts the earpiece volume.
In Idle mode with the phone open, adjusts the keypad
tone volume.
4. Makes or answers a call.
In Idle mode, recalls the last number dialed or received
when held down.
In Menu mode, selects a menu function or stores
information that you have entered, such as a name in the
phone or SIM memory.
5. In Idle mode, when held down accesses voice mail.
6. Enters special characters. Performs various functions.
7. The microphone used during phone calls and voice
memo recordings.
Section 2: Understanding Your Phone 15
Keys
Section 2
Page 20

Section 2
16
8. Enters numbers, letters, and some special characters.
In idle mode, switches phone to silent mode when held
down.
9. Deletes characters from the display.
In Menu mode, returns you to the previous menu level.
10. Ends a call. Also switches the phone on and off when
held down.
In Menu mode, cancels your input and returns the phone
to Idle mode.
11. In Idle mode, launches the WAP (Wireless Application
Protocol) browser.
In Menu mode, selects the highlighted menu options.
12. In Menu mode, scrolls through the menus and
Phonebook.
When entering text, moves the cursor to the left or right,
depending on which side you push.
In Idle mode you can use the following shortcuts:
• The Down key allows you to access the Phonebook Search
menu
• The
Up key accesses the Camera
Left key allows you to write a text message
• The
Right key allows you to make a voice recording
• The
13. The infrared sensor is used to send and receive data.
14. Display area where text and graphics are displayed.
15. The earpiece is used to listen to audio from your phone.
16. The camera key is used to launch the camera (with a
press and hold) and to take a photo (with a short press).
Page 21

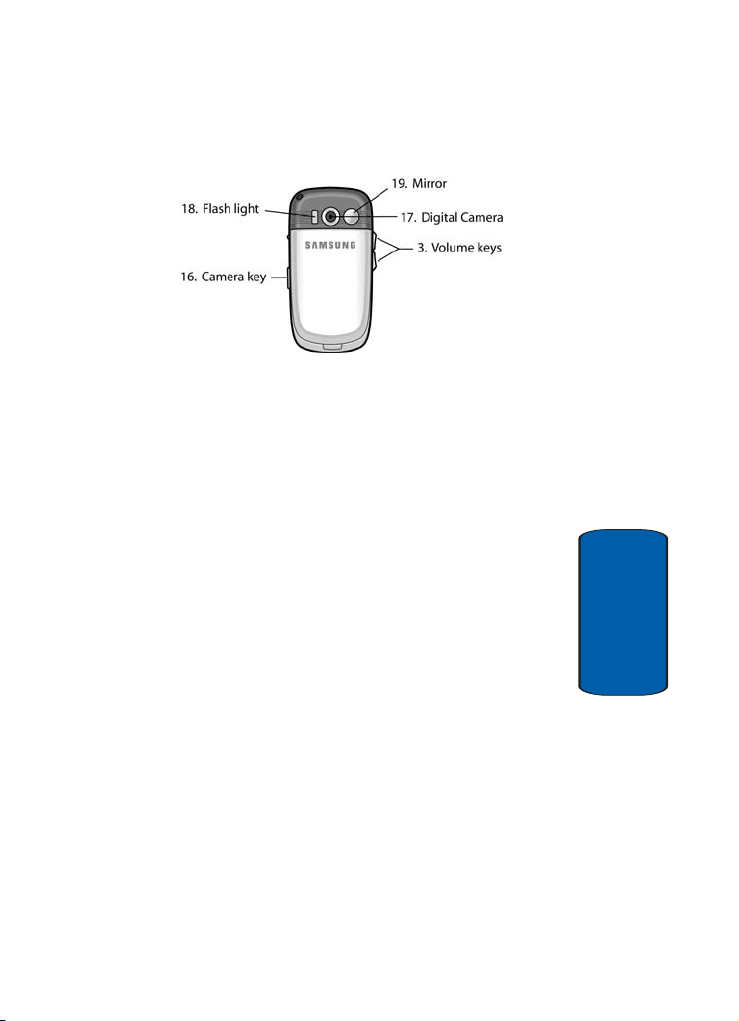
Display Layout
17. The built-in digital camera has video capture
capabilities.
18. The built-in flash has manual and automatic capabilities.
19. The mirror allows you to adjust the camera when taking
a picture of yourself.
Display Layout
The display on your phone indicates when you have an
incoming call or message. It also alerts you at a specified
time when you have set an alarm. The backlight turns on
and the corresponding icon appears on the display.
When you close the phone, the display shows the current
time on a digital clock. And the backlight gradually dims.
The display has 3 areas:
Section 2
Icons
Shows the received signal strength. The greater the
number of bars, the stronger the signal.
Appears when a new text message has been received.
Appears when a new voice mail has been received.
Section 2: Understanding Your Phone 17
Page 22

Appears when a new multimedia message has been
received.
Appears when the IrDA port is active. For details, see
"Infrared Activation" on page 98.
Appears when you set an alarm to ring at a specified time.
For details, see page "Alarm" on page 106.
Appears when you are out of your service area.
Appears when a call is in progress.
Appears when the Call Forwarding feature is active. For
details, see page "Call Forwarding" on page 100.
Appears when Alert type is vibration or you set the phone
to vibrate when you receive a call.
Appears when the flash is set to on.
Appears when Silent mode is active.
Appears in the soft key function indicator area when Mute
is active.
Section 2
Shows the level of your battery. The more bars you see,
the more power you have remaining.
Backlight
A backlight illuminates the display and the keypad.
When you press any key or slide open the phone, the
backlight comes on. It goes off when no keys are pressed
within a given period of time, depending on the setting in
the Backlight menu. The display turns off after one
minute to conserve battery power.
18
Page 23

Display Layout
To specify the length of time the backlight is active, set the
Backlight menu option. To access the Backlight menu,
from the idle screen, press the Menu (left) soft key, then
press (Settings), press (Display settings), and
(Backlight). See "Backlight" on page 90 for further
details.
Section 2
Section 2: Understanding Your Phone 19
Page 24

Section 2
20
Page 25

Section 3: Call Functions
Topics Covered
• Making a Call
• Adjusting the Call Volume
• Answering a Call
•Call Log
•Call Records
• Silent Mode
• Selecting Functions and Options
This section describes how to make or answer a call. It also
includes the features and functionality associated with
making or answering a call.
Section 3: Call Functions 21
Section 3
Page 26

Making a Call
When the idle screen displays, enter the area code and
phone number, and press the key.
Note: When you activate the Auto redial option in the Extra settings menu,
the phone will automatically redial up to 10 times when the person does
not answer the call or is already on the phone. See "Extra Settings" on
page 99 for further details.
Making an International Call
1. Press and hold the 0 key. The + character appears.
2. Enter the country code, area code, and phone number
and press the key.
Correcting the Number
1. To clear the last digit displayed, press the C key.
2. To clear any other digit in the number, press the Left or
Right Navigation key until the cursor is immediately to
the right of the digit to be cleared. Press the C key. You
can also enter a missing digit.
3. To clear the whole display, press and hold the C key.
Ending a Call
When you want to finish your call, briefly press the
key.
Section 3
22
Page 27

Making a Call
Redialing the Last Number
The phone stores the numbers of the calls you’ve dialed,
received, or missed if the call recipient or caller is
identified. See "Caller ID" on page 104 for further details.
To recall any of these numbers:
1. If you have typed characters on the display, press the
key to return to Idle mode.
2. Press the key to display a list of the most recent
numbers used in the order you dialed or received them.
3. Use the Up and Down keys to scroll through the
numbers until the number you want highlights.
4. To dial the number, press the key.
Before you dial the number, you also have the following
options:
• To see the details of the number, press the Options soft key
and select
• To dial the number, press the
Call back. Press the Select soft key or the key.
• To send a message to the number, press the
and select
message.
• To edit the number, press the
Edit. Press the Select soft key or the key. Edit the
number, then press the
• To delete the number, press the
Delete. Press the Select soft key or the key.
• To delete all of the numbers, press the
select
Details. Press the Select soft key or the key.
Options soft key and select
Options soft key
Send Message. Press the Select soft key or the
key. You have the option of sending a text, picture, or voice
Options soft key and select
Save soft key.
Options soft key and select
Options soft key and
Delete all. Press the Select soft key or the key.
Section 3
Section 3: Call Functions 23
Page 28
Making a Call from the Phonebook
You can store phone numbers that you use regularly on
your SIM card or in your phone’s memory. These entries
are collectively stored in the Phonebook.
Once you have stored a number in the Phonebook, you
can dial the number by pressing a few keys.
You can also assign Speed Dial keys to your most
frequently-used numbers.
For further details about the Phonebook feature, see
"Using Phonebook Entry Options" on page 59.
Adjusting the Call Volume
During a call, if you want to adjust the earpiece volume,
use the Volume keys on the left side of the phone.
Press the key to increase the volume level and the key
to decrease the level.
In Idle mode, you can also adjust the keypad tone volume
using these keys.
Section 3
24
Page 29

Answering a Call
Answering a Call
When somebody calls you, the phone rings and displays
the incoming call image.
The caller’s phone number, or name if stored in
Phonebook, displays.
1. If necessary, open the phone. Press the key or the
Accept soft key to answer the incoming call.
If the Anykey answer option in the Extra Settings menu
is activated, you can press any key to answer a call
except for the key and the Reject soft key.
If the Accept Call option in the Slide Settings menu is
activated, you can answer the call simply by sliding the
phone open.
Note: To reject an incoming call, press and hold the Volume keys on the left
side of the phone before opening the phone, or press the Reject soft key or
key.
2. End the call by closing the phone or pressing the
key.
Note: You can answer a call while using the Phonebook or menu features.
After ending the call, the phone returns to the function screen you were
using.
Section 3: Call Functions 25
Section 3
Page 30

Call Log
All incoming, outgoing and missed calls are listed in the
Call Log.
1. To access the Call Log option, press the key. A list of
calls displays.
2. Press the Options soft key to see Details, Call back, Edit,
Send message, or Delete the calls.
3. To place a call press the key.
Viewing Missed Calls
When you are unable to answer a call for any reason, you
can find out who is calling you, if this service is available,
so that you can call the person back.
The number of calls you have missed displays on the idle
screen immediately after a call is missed.
To view a missed call immediately:
1. If the phone is closed, open the phone.
2. Press the View soft key.
The number corresponding to the most recent missed call
displays, if available.
3. To scroll through the missed calls, press the Up or Down
key.
4. To call the number displayed, press the key.
Editing a Missed Call Number
To edit a missed call number:
Section 3
1. Press the View soft key. Press the Options soft key and
select Edit.
26
Page 31

Call Log
2. Change the number and press the Save soft key or the
key.
3. Select a location (SIM or Phone) and press the Select
soft key or the key.
4. If you saved the number to Phone, highlight a phone
type and press the Select soft key or the key.
5. Enter a name and press the OK soft key or the key.
6. Press the Options soft key to Send message, Assign
speed dial, Edit name or number, Delete entry, Copy, or
Send via infrared.
Note: When the number corresponding to the missed call is not available,
the Edit option does not display.
Deleting a Missed Call
1. Press the View soft key. A list of missed calls displays.
2. If necessary, press the Up or Down key to highlight the
missed call and press the Options soft key.
3. Highlight Delete and press the Select soft key or the
key.
4. Select Yes to confirm deletion or No to cancel.
You can press the key at any time to exit the Missed
Call feature.
Note: You can access the Missed Call feature at any time by selecting the
Missed calls menu.
Section 3
Section 3: Call Functions 27
Page 32

Call Records
In this menu, you can view:
• missed calls, incoming calls, and outgoing calls.
• length of your calls.
Note: You can access the call records of incoming, outgoing, and missed
calls by pressing the key in Idle mode.
Note: The number of call records the phone can store may vary, depending
on your SIM card.
Missed calls
This menu lets you view the 20 most recent calls you
received, but did not answer.
The number and name, if already stored in your
Phonebook, displays with the time and date the call was
received.
Incoming calls
This menu lets you view the 20 most recent calls you
received.
The number and name, if already stored in your
Phonebook, displays with the time and date the call was
received.
Outgoing calls
This menu lets you view the 20 most recent calls you
dialed.
Section 3
28
Page 33

Call Records
The number and name, if already stored in your
Phonebook, displays with the time and date the call was
made.
Delete all
This menu allows you to delete all of the records in each
call record separately, or you can delete all of your call
records at one time.
1. Highlight the type of calls you want to delete and press
the Select soft key or the key to make a check mark.
2. Press the
3. When a confirmation message displays, press the
Delete
soft key to delete the calls.
Yes
soft key or key to confirm.
Call time
This menu lets you view the time log for calls made and
received.
Note: The actual time invoiced by your service provider may vary,
depending on network features, rounding-off for billing purposes, and so
on.
The following time logs are available:
• Last call: shows the length of your last call.
• Total outgoing: shows the total length of all calls you have
made since the timer was last reset.
• Total incoming: shows the total length of all calls you have
received since the timer was last reset.
• Life time: shows the total length of time for incoming and
outgoing calls. The length of call time must be at least 1
Section 3
Section 3: Call Functions 29
Page 34

minute to increment this field. This information cannot be
cleared.
• Reset timers: allows you to reset the call timers. You must
first enter the phone password and then press the
or key.
Note: The password is preset to “00000000” at the factory. To change this
password, see "Change Password" on page 95.
Note: This will not reset the Life time timer option.
Silent Mode
Silent mode is convenient when you wish to stop the
phone from making noise, in a theater for example.
In Idle mode, press and hold the key until the “Silent
Mode On” message and the Silent Mode icon ( ) is
displayed.
In Silent mode, instead of sounds, your phone will
vibrate.
To exit and reactivate the previous sound settings, press
and hold the key again until “Exit Silent Mode”
appears. The Silent Mode icon ( ) no longer displays.
Selecting Functions and Options
Your phone offers a set of functions that allow you to
customize it. These functions are arranged in menus and
sub-menus, accessed using the two soft keys. Each menu
and sub-menu allows you to view and alter the settings of
Section 3
a particular function.
OK soft key
30
Page 35

Selecting Functions and Options
Soft Keys
The roles of the soft keys vary depending on the function
you are currently using; the labels on the bottom line of the
display just above each key indicate their current role.
Menu Ph.Book
Press the left soft key
Menu
for
mode.
Press the right soft key
to access the
menu.
Ph.Book
Selecting Options
To view the various functions and options available and
to select the one you want:
1. Press the appropriate soft key.
2. To select the function displayed or the option
highlighted, press the Select soft key or the key.
3. To view the next function or highlight the next option on
a list, press the Down Navigation key.
Section 3: Call Functions 31
Section 3
Page 36

4. To move back to the previous function or option on a list,
press the Up key.
5. To move back up one level in the menu structure, press
the key.
6. To exit the menu structure without changing the settings,
press the key.
In some functions, you may be asked for a password or
PIN. Enter the code and press the OK soft key or the
key.
When you access a list of options, your phone highlights
the currently active option. If, however, there are only two
options, such as On/Off or Enable/Disable, your phone
highlights the option that is not currently active, so that
you can select it directly.
Options During a Call
Your phone provides a number of control functions that
you can use during a call.
Putting a Call on Hold
You can place the current call on hold whenever you
want. You can make another call while you have a call in
progress if your network supports this service.
To place a call on hold, simply press the Options soft key,
highlight the Hold option and press the Select soft key or
the key. You can reactivate the call whenever you
want, by pressing the Resume soft key.
To make a call while you have a call in progress:
Section 3
1. Enter the phone number that you wish to dial or look it up
in the Phonebook.
32
Page 37

Selecting Functions and Options
2. Press the key to dial the second call.
The first call is automatically put on hold.
Or
1. Press the Options soft key and select New call.
2. Make the second call in the normal way.
When you have an active call and a call on hold, you can
switch between the two calls, changing the one on hold to
active and placing the other on hold.
To switch between the two calls, simply press the Swap
soft key.
The current call is placed on hold and the call on hold is
reactivated so that you can continue conversing with that
person.
When you want to finish, end each call normally by
pressing the key.
Switching off the Microphone (Mute)
You can temporarily switch your phone’s microphone
off, so that the other person cannot hear you.
Example: You wish to say something to another person in the room, but do
not want the person on the phone to hear you.
To switch the microphone off temporarily:
1. Press the Options soft key or the key.
2. If necessary, press the Down key to highlight the Mute
option.
3. Press the Select soft key or the key. The other
person can no longer hear you.
Section 3: Call Functions 33
Section 3
Page 38

To switch the microphone back on:
1. Press the Opt. soft key or the key.
2. If necessary, press the Down key to highlight the
Unmute option.
3. Press the Select soft key or the key. The other
person can hear you again.
Using the Speakerphone
While on a call, you can use your Speakerphone by
following these steps:
1. Press the Spkr on soft key.
2. You will receive the confirmation, Speaker On?
3. Press the Yes soft key.
4. To turn the Speakerphone off, press the Spkr off soft
key.
Muting or Sending Key Tones
These options allow you to turn the key tones off or on. If
the Mute keys option is selected, your phone does not
transmit the DTMF (Dual Tone Multi-Frequency) tones of
the keys, which allows you to press keys without hearing
annoying key tones during a call.
Note: To communicate with answering machines or computerized
telephone systems, the Send keys option must be selected.
Searching for a Number in Phonebook
You can search for a number in Phonebook during a call.
Section 3
1. Press the Options soft key or the key.
34
Page 39

Selecting Functions and Options
2. Press the Down key to highlight the Phonebook option
and press the Select soft key or the key.
3. Press the Down key to highlight the Search option and
press the Select soft key or the key.
The Phonebook entries are listed.
4. Enter the name that you wish to find in the textbox
located below the entries.
5. If you enter the first few letters of the name, the
Phonebook entries are listed starting with the first entry
matching your input.
6. To view the highlighted entry, press the View soft key.
For further details about the Phonebook feature, see
"Finding a Phonebook Entry" on page 58.
Call Waiting
You can answer an incoming call while you have a call in
progress, if this service is supported by the network and
you have set the Call waiting menu to Activate. You are
notified of an incoming call by a call waiting tone.
To answer a call while you have a call in progress:
1. Press the key to answer the incoming call. The first
call is automatically put on hold.
2. To switch between the two calls, press the Swap soft
key.
To end a call on hold, press the Options soft key or the
key and select the End held call option.
To end the current call, press the key.
Section 3
Section 3: Call Functions 35
Page 40

Making a Multi-Party Call
A multi-party call is a network service that allows up to six
people to take part simultaneously in a multi-party or
conference call.
For further details about subscribing to this service,
contact your service provider.
Setting up a Multi-Party Call
1. Call the first participant in the normal way.
2. Call the second participant in the normal way. The first
call is automatically put on hold.
3. To join the first participant to the multi-party call, press
the Options soft key or the key and select Join.
Press the OK soft key or the key.
4. To add a new person to the multi-party call, call the new
person in the normal way and then press the Options
soft key or the key. Select the Join option and press
the OK soft key or the key.
You can add incoming callers by answering the call and
pressing the Options soft key or the key, and selecting
Join. Repeat as required.
Having a Private Conversation With One Participant
1. Press the Options soft key or the key and choose the
Split option. Press the Select soft key or the key.
The list of call participants appears.
Section 3
2. Highlight a person by pressing the Up or Down key, and
press the Select soft key, the key, or the key.
36
Page 41

Selecting Functions and Options
Now you can talk privately to that person. The other
participants can continue to converse with each other.
3. To return to the multi-party call, press the Options soft
key or the key and select Join. Press the Select soft
key or the key.
All of the multi-party call participants can now hear each
other.
Dropping One Participant
1. Press the Options soft key or the key and choose the
Split option. Press the Select soft key or the key.
The list of call participants appears.
2. Highlight a person by pressing the Up or Down key, and
press the Select soft key or the key.
3. Press the Options soft key. Highlight the End held
multiparty option. Press the Select soft key or the
key.
The call with that participant ends, but you can continue
to talk to the other participants.
4. When you want to end the multi-party call, close the
phone or press the key.
Section 3: Call Functions 37
Section 3
Page 42

Section 3
38
Page 43

Section 4: Menu Navigation
Topics Covered
• Menu Navigation
• Menu Outline
This section explains the menu navigation for your
phone. It also includes an outline of all the available
menus associated with your phone.
Section 4
Section 4: Menu Navigation 39
Page 44

Menu Navigation
You can tailor the phone’s range of functions to your
needs using menus and sub-menus. Menus and submenus can be accessed by scrolling using the Navigation
keys or by using the shortcuts.
Section 4
Accessing a Menu Function by Scrolling
1. In Idle mode, press the Menu soft key to access Menu
mode.
2. Scroll using the Navigation keys to reach a main menu
Settings, for example. Press the Select soft key or the
key to enter the menu.
3. If the menu contains sub-menus, Language for
example, you can access them by pressing the Select
soft key or the key.
If the menu that you have selected contains further
options, repeat this step.
4. To scroll through the menus, press the Up or Down
Navigation keys.
5. To confirm the chosen setting, press the Select soft key,
or the key.
6. To return to the previous menu level, press the key, or
the key.
7. To exit the menu without changing the settings, press
the key.
40
Page 45

Menu Outline
Using Shortcuts
The menu items, such as menus, sub-menus, and options,
are numbered and can be accessed quickly by using their
shortcut numbers. For the main menus, you can access
any one of them by pressing the number keys (1 to 0)
corresponding to their location on the screen.
Example: Accessing the Language menu.
1. Press the Menu soft key.
2. Press the 9 key for Settings.
3. Press the 6 key for Language.
Menu Outline
The following list shows the menu structure and
indicates the number assigned to each option.
1 Voice messages
2 Call records
2.1 Missed calls
2.2 Incoming calls
2.3 Outgoing calls
2.4 Delete all
2.5 Call time
2.5.1 Last call
2.5.2 Total outgoing
2.5.3 Total incoming
2.5.4 Life time
2.5.5 Reset timers
Section 4
Section 4: Menu Navigation 41
Page 46

3t-zones
3.1 Home
3.2 Favorites
3.3 Go to URL
Section 4
3.4 Clear cache
4IM
5 Messages
5.1 Text messages
5.2 Picture messages
5.3 Browser messages
5.4 Voice mail
5.5 Broadcast messages*
5.6 Settings
5.7 Memory status
5.1.1 Create
5.1.2 Inbox
5.1.3 Outbox
5.1.4 Delete all
5.2.1 Create
5.2.2 Inbox
5.2.3 Outbox
5.2.4 Draft
5.2.5 Delete all
5.3.1 Inbox
5.3.2 Receive
5.3.3 Delete all
5.4.1 Call voice mail
5.4.2 Voice server number
5.6.1 Text messages
5.6.2 Picture messages
42
Page 47

5.7.1 Text messages
5.7.2 Picture messages
6 Fun box
6.1 t-zones
6.2 Sounds
6.3 Images
6.4 Games
6.5 My photos
6.6 Delete all
6.6.1 Sounds
6.6.2 Images
6.6.3 My photos
6.7 Memory status
6.7.1 Sounds & Images
6.7.2 Games
6.8 Melody composer
6.8.1 Compose melody
6.8.2 Memory status
7 Organizer
7.1 Alarm
7.2 Calendar
7.3 Calculator
7.4 To do list
7.5 Voice memo
7.5.1 Record voice
7.5.2 Voice memos
7.5.3 Delete all
7.5.4 Settings
7.5.5 Memory status
7.6 Conversion
Menu Outline
Section 4
Section 4: Menu Navigation 43
Page 48

Section 4
7.7 Timer
7.8 Stopwatch
8Camera
8.1 Take and Send
8.2 My photos
8.3 My Album
8.4 My Journal
8.5 Delete all
8.6 Settings
8.7 Memory status
9 Settings
9.1 Time & Date
9.2 Display settings
7.6.1 Length
7.6.2 Weight
7.6.3 Volume
7.6.4 Area
7.6.5 Temperature
8.6.1 Photo size
8.6.2 Shutter sound
8.6.3 Flash light
8.6.4 Default name
9.1.1 Set date
9.1.2 World time
9.1.3 Set time
9.1.4 Time format
9.1.5 Auto update
9.2.1 Wallpaper
9.2.2 Display
9.2.3 Backlight
44
Page 49

9.2.4 Brightness control
9.2.5 Dialing font color
9.3 Sound settings
9.3.1 My MegaTones
9.3.2 Get More MegaTones
9.3.3 Ringtones
9.3.4 Ring volume
9.3.5 Alert type
9.3.6 Keypad tone
9.3.7 Message tone
9.3.8 Power on/off
9.3.9 Alerts on call
9.3.0 Silent mode
9.3.* Extra tones
9.4 Get More Help
9.5 Greeting message
9.6 Language
9.6.1 Text language
9.6.2 Input mode
9.7 Security
9.7.1 PIN check
9.7.2 Change PIN
9.7.3 Phone lock
9.7.4 Change password
9.7.5 Privacy
9.7.6 FDN mode
9.7.7 Change PIN2
9.8 Slide settings
9.8.1 Up
9.8.2 Down
9.9 Infrared activation
9.0 Extra settings
9.* Reset settings
Menu Outline
Section 4
Section 4: Menu Navigation 45
Page 50

9.*.1 Sound settings
9.*.2 Phone settings
9.*.3 All settings
9.# Network services
Section 4
9.#.1 Call forwarding
9.#.2 Call waiting
9.#.3 Network selection
9.#.4 Caller ID
9.#.5 Band selection
* Shows only if supported by your SIM card.
46
Page 51

Section 5: Entering Text
Topics Covered
• Changing the Text Input Mode
• Using T9 Mode
• Using ABC Mode
• Using Symbols
• Using Numbers
This section outlines how to select the desired text input
mode when entering characters into your phone. This
section also describes how to use the T9 predictive text
entry system to reduce the number of key strokes
associated with entering text.
Section 5
Section 5: Entering Text 47
Page 52

Changing the Text Input Mode
When using your phone, you will often need to enter text,
such as when storing a name in Phonebook, creating your
personal greeting or scheduling ev en ts on yo ur ca le nd ar.
You can enter alphanumeric characters by using your
phone’s keypad.
Your phone has the following text input modes:
• ABC mode: allows you to enter letters by pressing the key
labeled with the letter you want. Press the key once, twice,
three, or four times until it displays.
• T9 mode: allows you to enter words with only one keystroke
per letter. Each key on the keypad has more than one letter; for
Section 5
example, pressing the 5 key can enter J, K, or L. However, the
T9 mode automatically compares the series of keystrokes you
make with an internal linguistic dictionary to determine the
most likely word, thus requiring far fewer keystrokes than the
traditional ABC mode.
• Symbol mode: This mode allows you to enter symbols, such as
punctuation marks.
• Number mode: This mode allows you to enter numbers.
When you are in a field that allows characters to be
entered, you will notice the text input mode indicator on
the display.
Example: Writing a text message.
48
Page 53

Using T9 Mode
T ext input mode
indicator
1. To change the text input mode, press the key.
2. Highlight the input option you want, and press the
Select (left) soft key ( ) or the key.
3. Choose from the following options:
: ABC mode
: T9 mode
: Number mode
Using T9 Mode
T9 is a predictive text input mode that allows you to key
in any character using single keystrokes. This text input
mode is based on a built-in dictionary.
To enter a word in T9 mode:
1. When you are in T9 mode, start entering a word by
pressing the 2 to 9 keys. Press each key only once for
each letter.
Section 5
Example: To enter “Hello” in T9 mode, press the 4, 3, 5, 5, and 6 keys.
Section 5: Entering Text 49
Page 54

The word that you are typing appears on the display. It
may change with each key that you press.
2. Enter the whole word before editing or deleting the
keystrokes.
3. When the word displays correctly, go to step 4.
If the word doesn’t display correctly, press the 0 key to
display alternative word choices for the keys that you
have pressed.
Example: Both “Of” and “Me” have the 6 and 3 keys. The phone displays
the most commonly used choice first.
Section 5
4. Insert a space by pressing the key and start entering
the next word.
To add a new word into the T9 dictionary:
1. After pressing the keys corresponding to the word you
want to add, press the 0 key to display the alternative
words.
2. When you press the 0 key at the last alternative word,
the display shows Spell on the bottom line. Press the
Spell soft key or the key.
3. Enter the word you want to add using ABC mode.
4. Press the OK soft key.
The word is added to the T9 dictionary and becomes a
word for the associated keypress series.
Note: This feature may not be available for some languages.
50
Page 55

Using ABC Mode
• To enter periods, hyphens, or apostrophes, press the 1 key. T9
mode applies grammar rules to ensure that correct punctuation
is used.
• To see all of the symbols, press and hold the key. Use the Up
and Down Navigation keys to page through the different
symbols. Press the corresponding number to the symbol you
want. Press the OK soft key.
• To shift case in T9 mode, use the key. There are 3 cases:
Initial capital, Capital lock, and Lower case.
• You can move the cursor by using the Left and Right keys. To
delete letters, press the C key. Press and hold the C key to
clear the display.
Using ABC Mode
To use ABC Mode, use the 1 to 0 keys to enter your text.
1. Press the key labeled with the letter you want:
• - Once for the first letter
• - Twice for the second letter
• - And so on
2. Select the other letters in the same way.
Note: The cursor moves to the right when you press a different key. When
entering the same letter twice or a different letter on the same key, just
wait for a few seconds for the cursor to move to the right automatically,
and then select the next letter.
Section 5
Keys
Section 5: Entering Text 51
Page 56

Section 5
52
Page 57

Using Symbols
Using Symbols
Symbol mode enables you to insert symbols and
punctuation marks into text.
1. To select a symbol, press the corresponding number key.
2. To display more symbols, press the Up or Down
Navigation key.
3. To clear the symbol(s), press the C key. When the input
field is empty, this key returns the display to the
previous mode.
4. To insert the symbol(s) into your message, press the OK
soft key or the key.
Using Numbers
Number mode enables you to enter numbers into a text
message. Press the keys corresponding to the digits you
want to enter.
Section 5
Section 5: Entering Text 53
Page 58

Section 5
54
Page 59

Section 6: Understanding Your Phonebook
Topics Covered
• Storing a Number in the SIM Card
• Storing a Number in the Phone’s Memory
• Finding a Phonebook Entry
• Using Phonebook Entry Options
• Dialing a Number from Phonebook
• Speed Dialing
• Editing a Caller Group
• Dialing a Number from the SIM Card
• Copying all SIM Phonebook Entries
• Deleting all Phonebook Entries
• Finding My Phone Number
• Using the Service Dialing Numbers
• Checking the Memory Status
This section allows you to manage your daily contacts by
storing their name and number in your Phonebook.
Phonebook entries can be sorted by name, entry, or group.
Section 6
Section 6: Understanding Your Phonebook 55
Page 60

Storing a Number in the SIM Card
1. At the Idle screen, press the Ph.Book soft key.
2. Scroll to New entry by pressing the Up or Down key and
press the Select soft key or the key.
3. Highlight the SIM option, by pressing the Up or Down
key and press the Select soft key or the key.
4. Enter a phone number and press the Save soft key or the
key.
5. Enter a name and press the OK soft key or the key.
For further details about how to enter characters, see
"Using ABC Mode" on page 51.
After storing, the phone displays the Phonebook entry
number you just created.
6. To use the entry options, press the Options soft key.
The following options are available:
• Send message: allows you to create a message for the
selected Phonebook entry.
•
Section 6
Assign speed dial: allows you to assign a speed dial key
number to the selected Phonebook entry.
•
Edit number: allows you to edit the number. Press the OK
key to save.
•
Edit name: allows you to edit the number. Press the OK key
to save.
•
Delete entry: allows you to delete the entry you have
selected. Press
Copy to Phone: allows you to copy the number to your
•
phone.
Yes to confirm delete action, or No to cancel.
56
Page 61

Storing a Number in the Phone’s Memory
• Send via infrared: allows you to send your phonebook data
to another number.
7. To return to the Idle screen, press the key.
Storing a Number in the Phone’s Memory
1. At the Idle screen, press the Ph.Book soft key.
2. Scroll to New entry by pressing the Up or Down key and
press the Select soft key or the key.
3. Select the Phone option by pressing the Up or Down key
and press the Select soft key or the key.
4. Select a number Type by pressing the Up or Down key,
and press the Select soft key or the key.
The following types are available:
• Mobile: assigns the number entered to the Mobile entry.
Home: assigns the number entered to the Home entry.
•
Office: assigns the number entered to the Office entry.
•
Fax: assigns the number entered to the Fax entry.
•
Other: allows you to enter more detailed information for the
•
entry.
•
E-mail: allows you to enter an e-mail address for the number
entered.
5. Enter the number you want to store and press the Save
soft key or the key.
6. Enter a name and press the OK soft key or the key.
For further details about how to enter characters, see
"Using ABC Mode" on page 51.
After storing, the phone displays the Phonebook entry
and name you just created.
Section 6: Understanding Your Phonebook 57
Section 6
Page 62

7. To use the entry options, press the Options soft key. The
following options are available:
• Send message: allows you to send a text or picture
message for the selected Phonebook entry.
• Assign speed dial: allows you to assign a speed dial key
number to the selected Phonebook entry.
•
Edit number: allows you to edit the number.
Edit Name: allows you to edit the name.
•
Delete entry: allows you to delete the name and number
•
from Phonebook. You are asked to confirm that you wish to
delete the name and number by pressing the
Copy to SIM: allows you to store the number on your SIM
•
card.
•
Send via infrared: allows you to send your phonebook data
to another number.
Yes soft key.
8. To return to the Idle screen, press the key.
Finding a Phonebook Entry
You can store phone numbers and their corresponding
names in your SIM card and phone’s memories. They are
physically separate but are used as a single entity, called
Section 6
Phonebook.
Depending on your particular SIM card, the maximum
number of phone numbers the SIM card can store may
differ.
1. When the idle screen displays, press the Ph.Book soft
key.
2. Highlight the Search option and press the Select soft
key or the key.
58
Page 63

Using Phonebook Entry Options
3. Use the Up or Down Navigation key to highlight the entry
you want. Or, you may enter the first few letters of the
name in the text box.
The Phonebook entries are listed, starting with the first
entry matching your input.
4. To view the highlighted entry, press the View soft key.
5. To select a different entry, press the Up or Down
Navigation key until the enter you want is highlighted.
6. To look for a name starting with a different letter, press
the key labeled with the letter you want.
7. Once you have found the entry, press the key to dial
the number, or press the Options soft key to access the
Phonebook entry options.
Using Phonebook Entry Options
While accessing any Phonebook entry, press the Options
soft key to use the options for the entry. The following
options are available:
• Send message: allows you to create a message for the
selected Phonebook entry.
• Assign speed dial: allows you to assign a speed dial key
number to the selected Phonebook entry.
• Edit number: allows you to edit the number. Press the OK key
to save.
• Edit name: allows you to edit the number. Press the OK key to
save.
• Delete entry: allows you to delete the entry you have selected.
Press Ye s to confirm delete action, or No to cancel.
Section 6
Section 6: Understanding Your Phonebook 59
Page 64

• Copy to SIM/Phone: allows you to copy the number to another
location. You can select the memory location, either SIM or
Phone, and the location number.
• Send via infrared: allows you to send your phonebook data to
another number.
Dialing a Number from Phonebook
Once you have stored phone numbers in the Phonebook,
you can dial them easily and quickly by using the location
numbers that were assigned to them in the Phonebook.
Note: If you cannot remember a location number, you must go into the
Search menu in the Phonebook menu to search for the entry by name. For
details, see "Finding a Phonebook Entry" on page 58.
Speed Dialing
Once you have stored phone numbers in your
Phonebook, you can set up to 8 speed dial entries and then
dial them easily whenever you want, simply by pressing
the associated number key.
In Idle mode, to speed dial the numbers assigned to keys
(2 through 9), press and hold the appropriate key.
Section 6
Setting Up Speed Dial Entries
1. When the Idle screen displays, press the Ph.Book soft
key.
2. Scroll to Speed dial by pressing the Up or Down key and
press the Select soft key or the key.
3. Select the key to which you wish to assign the speeddialing number, from the 2 to 9 keys, and press the
Select soft key or the key.
60
Page 65

Editing a caller group
Note: Memory location 1 is reserved for your Voice mail server number.
4. Choose from the following options:
• Edit number: allows you to change the number you’ve
assigned to this speed dial number.
• Edit name: allows you to enter or change the name you
assigned to the speed dial number.
•
Delete: allows you to delete the name and number you’ve
assigned to the speed dial number.
Editing a caller group
1. When the idle screen displays, press the Ph.Book soft
key.
2. Scroll to Group settings by pressing the Up or Down
key and press the Select soft key or the key.
3. Scroll through the group list by pressing the Up or Down
key.
4. Highlight the group you want and press the Select soft
key or the key.
5. Select each option and change the settings, as required.
The following options are available:
• Melody: allows you to set the ring tone to be used when you
receive a voice call from a member of that group.
•
Edit name: allows you to change the name of the group.
View image: allows you to view the image for that group.
•
6. When you are finished, press the C key or the key.
Section 6
Section 6: Understanding Your Phonebook 61
Page 66

Dialing a Number from the SIM Card
1. In Idle mode, enter the location number for the phone
number you want to dial and press the key.
The list of entries in the SIM card appears, with the
desired number highlighted.
2. You can press the Up or Down key to find other numbers
on the list.
3. Press the Dial soft key, the key, or the key when
you have selected the number you want.
Copying all SIM Phonebook Entries
You can copy all SIM entries to the Phone using this
option. When you copy entries to the phone, duplicate
entries are created.
Note: Options are available for phone entries that are not available when
stored to the SIM card. For details see "Storing a Number in the Phone’s
Memory" on page 57.
Deleting all Phonebook Entries
Section 6
You can delete all your entries from your phone’s
memory, your SIM card, or both.
1. When the idle screen displays, press the Ph.Book soft
key.
2. Scroll to Delete all by pressing the Up or Down key and
press the Select soft key or the key.
3. To place a check mark by the memory location you want
to empty, All, SIM, or Phone, press the Select soft key
or the key.
62
Page 67

Finding My Own Phone Number
You can remove the check mark by pressing the Select
soft key or the key.
4. Press the Delete soft key to delete the entries in the
selected memory location.
5. When the confirmation message appears, press the Ye s
soft key or the key.
6. To cancel the deletion, press the No soft key.
7. When you are finished, press the C key or the key.
Finding My Own Phone Number
This function is a memory aid, which you can use to check
your own phone number if you need to do so.
You can assign a name to each of your own phone
numbers registered on your SIM card. You can also edit
the names and numbers. Any changes made here do not
in any way affect the actual subscriber numbers on your
SIM card.
1. At the Idle screen, press the Ph.Book soft key.
2. Select the Own number option by pressing the Up or
Down key and press the Select soft key or the key.
3. Highlight the Empty option and press the Select key or
the key.
4. To edit the number, highlight the Edit number option
and press the Select soft key or the key. Edit the
number and press the OK soft key or the key.
5. To edit the Name, highlight the Edit name option and
press the Select soft key or the key. Edit the name
and press the OK soft key or the key.
Section 6: Understanding Your Phonebook 63
Section 6
Page 68

6. To delete the number, highlight Delete and press the
Select soft key or the key. Select Yes to confirm
deletion or No to cancel.
Using the Service Dialing Numbers
You can view the list of Service Dialling Numbers (SDN)
assigned by your service provider. These numbers
include emergency numbers, directory enquiries and
voice mail numbers.
1. When the idle screen displays, press the Ph.book soft
key.
2. Select the SDN option by pressing the Up or Down key
and press the Select soft key or the key.
3. Scroll through the numbers by using the Up or Down
key.
4. To dial the number displayed, press the Dial soft key or
the key.
Note: This function is available only if it is supported by your service
provider.
Section 6
Checking the Memory Status
You can check how many names and numbers are stored
in the Phonebook, in both SIM card and the phone
memory. You can also see the capacity of both memories.
1. When the idle screen displays, press the Ph.Book soft
key.
2. Select the Memory status option by pressing the Up or
Down key and press the Select soft key or the key.
64
Page 69

Checking the Memory Status
3. When you are finished, press the soft key or the
key.
Section 6
Section 6: Understanding Your Phonebook 65
Page 70

Section 6
66
Page 71

Section 7: Messaging
Topics Covered
• Types of Messages
• Voice Messages
• Text Messages
• Picture Messages
• Browser Messages
• Voice mail Messages
• Broadcast Messages
• Settings
• IM (Instant Messaging)
• Memory Status
This section allows you to send or receive different types
of messages. It also includes the features and functionality
associated with messaging.
Section 7: Messaging 67
Section 7
Page 72

Types of Messages
Your phone provides the following message types:
• Voice Messages
• Tex t M essa g e s
• Picture Messages
• Browser Messages
• Voice Mail Messages
• Broadcast Messages (SIM Dependent)
Voice Messages
In this menu, you can record a voice memo of up to one
minute long and then immediately send it by a Picture
Messaging message.
When you access this menu, a timer appears on the screen.
1. Press the Record soft key to start recording.
2. Record a memo by speaking into the microphone.
The display shows the elapsed time and the remaining
time at one time.
3. When you are finished, press the Stop soft key or the
key. Or, when the recording time is expired, the
display switches to the next screen.
4. Choose from the following options and press the Select
soft key or the key:
• Recent log: allows you to select a number or an address
Section 7
from the 5 last destinations you entered for sending the last
messages.
68
Page 73

Voice Messages
• Phonebook: allows you to retrieve a number from your
Phonebook.
•
Phone number: allows you to enter the phone number you
want.
• E-mail address: allows you to enter the e-mail address of
the recipient.
Note: You can access the following options by pressing the Options soft
key:
• Replay: plays back your voice memo.
Re-record: discards the voice memo and enables you to
•
record another one.
•
Send: allows you to send the voice memo.
Default destination: allows you to send the voice message
•
directly without entering another destination. To select a default
destination, press the
available options.
•
Save: saves the voice message and continues to the send
options.
Select soft key and select from the
5. Enter a number or an e-mail address, or select a
destination from the Phonebook or Recent log list.
Press the Select soft key.
6. When the correct number or address displays, press the
Select soft key or the key.
7. To add a destination, select Empty and press the Select
soft key. Repeat from step 4. You can enter up to 10
destinations.
If you want to edit the destinations, select one and press
the Select soft key. You can change or delete it.
Section 7
Section 7: Messaging 69
Page 74

8. When you have finished entering the destinations, press
the Send soft key or the key.
Your phone sends the message. After sending, the
message is saved in the Outbox in the Picture messages
menu.
Text Messages
Short Message Service (SMS) allows you to send and
receive short text messages to and from other mobile
phones. In addition, your phone supports the Enhanced
Messaging Service (EMS), which enables you to include
simple pictures, melodies, and animated images in your
messages. To use this feature, you must subscribe to your
service provider’s message service.
When the Message icon ( ) appears, you have received
new text messages. When the memory is full, an error
message displays and you cannot receive any new
messages. Use the Delete option in each message box to
delete obsolete messages.
Create
In this menu, you can write and send a text message.
Creating a Simple Text Message
1. Create your message.
You can create a message using standard Alphabet
characters or special Uni-code characters, depending on
the setting in the Character support menu.
Section 7
Notes: For further details about entering characters, see "Using ABC
Mode" on page 51.
You can enter up to 160 standard Alphabet characters in your message.
70
Page 75

Text Messages
When you enter text using Uni-code characters, the maximum number of
characters that can be in a message is reduced to 70.
2. When you finish entering your message, press the
Options soft key. The following options are available:
• Send: allows you to send the message. The message is
deleted after sending.
•
Text formatting: allows you to format the style of the text.
For the Size attribute, Normal, Large, and Small size are
available. Mode options are Normal, Underline, and
Strikethrough. The options for Bold and Italic are Off and On.
Alignment options are Left, Center, and Right.
•
Add content: allows you to add a picture, melody, or
animation to your message. Select the category of the item to
be added. In each category, you can select from the various
factory-set items or choose an item received from other
sources, such as the Internet or other phones.
•
Templates: allows you to apply one of the preset message
templates to the text. Select one of the 4 items stored in the
Templates menu.
•
Save message: allows you to save a copy of the message
to the Phone or SIM card.
3. Select Send and press the Select soft key or the
key.
Note: When the phone fails to send the message, it asks you if you want to
retry. Press the Yes soft key to confirm. Otherwise, press the No soft key
to return to the message screen.
Inbox
This message box is used to store messages that you have
received.
Section 7: Messaging 71
Section 7
Page 76

When you enter this menu, the list of messages in the box
displays with the sender’s phone numbers, or names, if
available in your Phonebook.
1. Select a text message from the list and press the
Options soft key or the key.
Options available are:
• View: read the text message.
Text reply: create a new message to reply with.
•
Call back: dials the number that sent the text message.
•
Delete: deletes the text message.
•
2. Highlight the View option and press the Select soft key
or the key to read the message contents.
3. To scroll through the contents, press the Up or Down
key.
4. To scroll to the previous or next message, press the Left
or Right key.
While reading a message, you can choose the following
options by pressing the Options soft key:
• Tex t rep ly: allows you to send a reply to the sender by sending
a text message.
• Call back: allows you to call the sender.
• Delete: allows you to delete the message.
• Save address: allows you to extract the sender’s number and
URL, e-mail addresses or phone numbers from the message
text, so that you can save them in your phone’s memory.
• Forward: allows you to send/resend the message. For further
Section 7
information about how to send a message, see "Create" on
page 70.
72
Page 77

Text Messages
• Select content: allows you to save media items, such as
sounds or images, from the message into your phone’s
memory. You can then use the items when writing a message.
• Move to Phone: allows you to move the message from the SIM
card to the phone’s memory. This option is only available for
messages stored in the SIM card.
• Move to SIM: allows you to move the message from the
phone’s memory to the SIM card. This option is only available
for messages stored in the phone’s memory.
Outbox
This message box is used to store messages that you have
sent or will send.
When you enter this menu, the list of messages in the box
displays with the recipients’ phone numbers or names, if
available in your Phonebook.
1. Select a text message from the list and press the
Options soft key.
2. Highlight the View option and press the Select soft key
or the key to read the message contents.
3. To scroll through the contents, press the Up or Down
Navigation key.
4. To scroll to the previous or next message, press the Left
or Right Navigation key.
While reading a message, you can choose the following
options by pressing the Options soft key:
• Delete: allows you to delete the message.
• Save address: allows you to extract the destination number
and URL, e-mail addresses or phone numbers from the
message text, so that you can save them in your phone’s
memory.
Section 7: Messaging 73
Section 7
Page 78

• Send: allows you to send/resend the message. For further
information about how to send a message see "Create" on
page 70.
• Forward: allows you to send/resend the message. For further
information about how to send a message, see "Create" on
page 70.
• Move to phone: allows you to move the message from the SIM
card to the phone’s memory. This option is only available for
messages stored in the SIM card.
• Move to SIM: allows you to move the message from the
phone’s memory to the SIM card. This option is only available
for messages stored in the phone’s memory.
Delete All
This menu allows you to delete all of the text messages in
each message box. You can also delete all of your
messages at one time.
1. To select a text message box to clear, press the Up or
Down key. To delete all of your messages, select All
messages.
2. To place or remove a check mark, press the key.
3. Press the Delete soft key to delete the marked objects.
4. When the phone asks for confirmation again, press the
Ye s soft key.
Picture Messages
This menu allows you to use the Multimedia Message
Service.
Picture Messaging is a messaging service that provides
Section 7
delivery of personal multimedia messages from phone to
phone or from phone to e-mail.
74
Page 79

Picture Messages
In addition to the familiar text content of text messages,
multimedia messages can contain images, graphics,
voice, and audio clips. A Picture Messaging message is a
multimedia presentation in a single file. It is not a text file
with attachments.
Using the Picture Messaging feature, your phone can
receive and send messages that contain multimedia files,
such as photos, sounds and images you downloaded from
the Internet and voice memos you recorded. This function
is available only if it is supported by your service
provider. Only phones that offer multimedia messaging
features can receive and display multimedia messages.
Create
This menu allows you to create a new multimedia
message and send to one or multiple destinations.
Creating and Sending a Multimedia Message
1. When you highlight Subject, press the Add soft key or
the key.
2. Enter the subject of your message and press the OK soft
key or the key.
Note: For more information about entering characters, see "Using ABC
Mode" on page 51.
3. To add a picture, highlight the Picture option and press
the Add soft key or the key.
4. Highlight one of the following options and press the
Select soft key or the key.
Section 7: Messaging 75
Section 7
Page 80

Section 7
• New photo: take a picture with your camera to add to your
message.
•
My photos: takes you to My photos to select a picture to
add.
• Images: allows you to select a picture from your Images
folder.
5. Select a photo or image and press the Add soft key or
the key to add the picture to your message.
6. To add a sound, highlight the Sound option and press
the Add soft key or the key.
7. Highlight one of the following options and press the
Select soft key or the key.
• Record new: allows you to record a new voice message.
Voice memos: takes you to the Voice memos folder in your
•
Organizer to select a voice memo to add.
•
Sounds: allows you to select a sound from your Sounds
folder.
8. Select a Sound or Voice memo and press the Add soft
key or the key to add the picture to your message.
9. To add a message, highlight Message, press the Add
soft key or the key.
10. Enter your message and press the Opt. soft key or the
key.
11. Highlight the Done option and press the Select soft key
or the key. You may select the Te mpla te s option to
add pre-defined phrases.
12. Press the Opt. soft key for the following options:
• Send: sends the Picture Messaging message.
76
Page 81

Picture Messages
• Preview: allows you to see the message before you send.
Add page: allows you to add another page for the Picture
•
Messaging message.
•
Page timing: page timing allows you to set how long each
page of the Picture Messaging is displayed. The default time is
5 seconds, maximum 99 seconds.
•
Tex t effect : allows you to change the color, size, and style of
the Picture Messaging text.
•
Clear picture: allows you to remove the selected picture.
Delete page: allows you to delete the page selected.
•
Save message: allows you to save the Picture Messaging
•
message
13. To change the text or replace the image or sound with
another one, select a category and press the Opt. soft
key. Depending on the category selected, highlight Clear
picture/sound/message/subject to remove the item.
14. When you have finished creating the message, press the
Opt. key and choose Send. Press the Select soft key or
the key.
15. Choose one of the following options and press the Select
soft key or the key:
• Recent log: allows you to select a number or an address
from the 5 last destinations you entered for sending the last
messages.
•
Phonebook: allows you to enter the phone number you
want.
•
Phone number: allows you enter a phone number or
choose one from the Ph.Book.
•
E-mail address: allows you to enter the e-mail address of
the recipient.
Section 7: Messaging 77
Section 7
Page 82

• My Album: allows you to send the message to the My Album
folder.
•
My Journal: allows you to send the message to My Journal.
16. Press the Send soft key to send the message. Your
phone sends the message.
Inbox
Viewing a Message When You Receive It
When a new multimedia message comes in, the display
shows the Picture Messaging Message icon.
1. Press the View soft key to view the message.
Press the Exit soft key if you want to view the message
later in the Inbox.
2. Press the Opt. soft key or the key to access the
following options:
• Reply: allows you to create a message and reply to the
sender.
•
Reply all: allows you to create a message and reply to the
sender and all numbers he originally sent the message to.
•
Replay: if there are multiple screens to this message, allows
you to replay the message from the beginning.
•
Delete: deletes the message.
Forward: allows you to forward this message to another
•
destination.
•
Call back: allows you to dial the number from which this
message was sent.
•
Save content: allows you to save the contents of this
Section 7
message (picture or sound) to send to another destination in a
different message.
78
Page 83

Picture Messages
• Save address: allows you to store the address from which
this message was sent. You can also reply to the message
from this option.
•
Properties: shows you information about the message, such
as the sender’s e-mail address or phone number, message
size, recipient’s e-mail address or phone number, priority,
class, and the time and date the message was received.
3. When you are finished, press the key.
Viewing a Received Message in the Inbox
When you access the Inbox menu, a list of multimedia
messages you received displays along with the message
subjects. The icons on the left tell you the status of the
messages.
Picture Messaging notifications that have been opened.
Picture Messaging notifications that have not been opened.
1. Select a message on the list and press the Select soft
key or the key.
The message displays and scrolls to the next page, if it
has one, after a specified time.
2. To scroll through the message, press the Up or Down
Navigation key. If the message has more than one page,
you can scroll through the pages by using the Left and
Right Navigation keys.
While viewing a message, you can choose the message
options by pressing the Opt. soft key.
Section 7
Section 7: Messaging 79
Page 84

Outbox
When you access this menu, the list of multimedia
messages that you have sent or saved displays. The icons
on the left tell you the status of each message:
Messages sent
Messages currently being sent
Messages your phone couldn’t send
Messages to be sent
Messages deferred
1. Select a message on the list and press the Select soft
key or the key.
The message displays and scrolls to the next page, if it
has one, after a specified time.
2. To scroll through the message, press the Up or Down
Navigation key. If the message has more than one page,
you can scroll through the pages by using the Left and
Right Navigation keys.
While viewing a message, you can choose the following
options by pressing the Opt. soft key:
• Delete: allows you to delete the message.
• Replay: allows you to replay the message from the beginning.
• Send: allows you to send/resend the message.
• Properties: shows you information about the message, such as
the time and date, to (recipient number), size, priority, and
Section 7
class.
80
Page 85

Browser Messages
Draft
After creating a multimedia message, you can store it in
this message box to be sent at a later time.
For further details about viewing a message in the
Outbox, see "Outbox" on page 80.
Delete All
This menu allows you to delete all of the multimedia
messages in each message box separately. You can also
delete all of your messages at one time.
1. To select Picture messages to clear, press the Up or
Down key.
2. Highlight the message box. Press the Select soft key or
the key. To delete all of your messages, select All
messages.
3. To remove a check mark, press the key.
4. To delete the marked messages, press the Delete soft
key. When a confirmation message displays, press the
Yes soft key to confirm.
Browser Messages
This menu allows you to receive web messages from the
server, or to set the phone not to receive Web messages.
The following options are available:
• Inbox: allows you to read the messages received from the web
server.
• Receive: allows you to set whether or not your phone receives
web messages.
• Delete all: allows you to delete all of the web messages.
Section 7: Messaging 81
Section 7
Page 86

Voice Mail Messages
This menu provides you with a way of accessing your
voice mailbox, if provided by your network.
The following options are available:
• Call voice mail: before using the Voice Mail feature, you must
enter the voice server number obtained from your service
provider. You can then select this option and press the Select
soft key or the key to listen to your messages.
You can connect to the voice server by pressing and holding the
1 key in Idle mode.
• Voice server number: allows you to change the voice mail
server number, if necessary.
Note: Voice mail is a network feature. Please contact your service provider
for further details.
Broadcast Messages (SIM Dependent)
This network service allows you to receive text messages
on various topics, such as the weather or traffic.
Please contact your service provider for further details.
Settings
In this menu, you can set up default text message and
picture message information. The last setting you
accessed is automatically activated for sending
subsequent messages.
Text Messages
•
Section 7
Service center: allows you to store or change the number of
your message center, which is required when sending
82
Page 87

Settings
messages. You must obtain this number from your service
provider.
• Validity period: allows you to set the length of time your text
messages are stored at the message center while attempts are
made to deliver them.
• Message type: allows you to view the type of message sent.
• Reply path: allows the recipient of your message to send you a
reply message using your message center, if your network
supports this service.
• Delivery report: allows you to activate or deactivate the report
function. When this function is activated, the network informs
you whether or not your message has been delivered.
• Character support: allows you to select a character encoding
type, either GSM-alphabet, Uni-code, or Automatic. If you
select Automatic, the phone automatically changes the
encoding type from GSM-alphabet to Uni-code when you enter
a Uni-code character.
When you select Uni-code, the maximum number of
characters which can be in a message is 70. If your
recipient’s phone does not support Uni-code characters,
he/she may not be able to read your message correctly.
Note: If your phone doesn’t have the Character support menu, the phone
provides the Automatic character encoding by default.
Picture Messages
The following options are used to set Send and Receive
settings for Picture messages.
Send Settings
• Priority: you can select the priority level of your messages.
Section 7
Section 7: Messaging 83
Page 88

• Validity period: set the length of time your messages are
stored in the message center while the network attempts to
deliver them.
• Delivery after: you can set a delay time before the phone sends
your messages.
• Delivery report: when this option is enabled, the network
informs you whether or not your message has been delivered.
• Read reply: when this option is enabled, your phone sends a
request for a reply along with your message to the recipient.
Receive Settings
• Msg. reception: you can set your phone to automatically
receive incoming messages.
• Ads reject: you can set your phone to automatically reject or
receive advertising messages.
• Report allowed: you can set the option to receive a delivery
report.
IM (Instant Messaging)
Instant Messenger (IM) is a way of sending short, simple
messages that are delivered immediately to users online
at that moment.
Before using this feature, you need to subscribe to a
messenger service. For further details, contact your
service provider.
Starting your IM
1. Select the messenger service to which you subscribed
using the Left or Right key and press the Select soft key
Section 7
84
or the key.
2. Enter your screen name. The name will be displayed on
other people’s phones or PCs.
Page 89

Memory Status
3. Press the Down key and enter your password in the
password textbox.
4. Press the Options soft key.
5. Highlight the Sign In option and press the Select soft
key or the key. You will be logged onto your IM
account.
Using the Instant Messenger Options
On the sign-on screen of the messenger, press the Options
soft key to access the following options:
• Sign On: allows you to login to your IM account.
• Saved Conversations: shows the records of your connections
to the messenger service.
Memory Status
You can check the amount of the memory being used and
the memory remaining for multimedia messages.
The display shows the total space including the used and
free space. You can also view how much space is currently
occupied by each message box.
Section 7: Messaging 85
Section 7
Page 90

Section 7
86
Page 91

Section 8: Changing Your Settings
Topics Covered
• Time & Date Settings
• Display Settings
• Sound Settings
•Get More Help
• Greeting Message Settings
• Language Settings
• Security Settings
• Slide Settings
• Infrared Activation Settings
• Extra Settings
• Reset Settings
• Network Services Settings
This section explains the sound and phone settings for
your phone. It includes display settings, security settings,
slide settings, infrared portal settings, and extra settings
associated with your phone.
Section 8
Section 8: Changing Your Settings 87
Page 92

Time & Date
This menu allows you to change the current time and date
displayed. You can also find out what time it is in another
part of the word.
Section 8
The following options are available:
Set date
The Set date option allows you to enter the month, day,
and year.
World time
The World time option allows you to set your time zone,
using the Left and Right Navigation keys.
The screen shows the:
• city name.
• current time and date.
• city selected as your time zone.
To select your time zone:
1. Select the city corresponding to your time zone by
pressing the Left or Right key one or more times. The
local time and date display.
2. Press the Set soft key or the key.
Set time
The Set time option allows you to enter the current time.
You can choose the time format in the Time format menu.
88
Page 93

Display Settings
Time format
This option allows you to set the time format to 12 hours
or 24 hours.
Auto update
The Auto update option allows you to receive time
information from your service provider’s network. Auto
update options are:
• Off: you need to manually set the time and date according to
the current time zone using the Time & Date menu.
• On: the phone automatically updates the time and date
according to the current time zone using the network service.
• Confirm first: the phone asks for a confirmation before the
update.
Note: Automatic updates of time and date do not change the time you have
set for alarm settings or calendar memos.
Display Settings
In this menu, you can change various settings for the
display or backlight.
Wallpaper
This menu allows you to change the background image or
the color of the text to be displayed in Idle mode.
The following options are available:
• Animations: you can select a background image to be
displayed on the idle screen.
Section 8
Section 8: Changing Your Settings 89
Page 94

• Get More Wallpapers: You can also select any images
downloaded from the Internet, t-zones
EasyStudio 1.0 program, or received in messages.
SM
and optional
• My photos: you can select a background from the photos you
Section 8
have taken.
• Images: you can select a background from the phones
preloaded images.
• Text color: you can select the phone’s display text color and
shading.
To change the background image:
1. Scroll through the list by pressing the Navigation keys.
You have various preset images available.
2. Press the Select soft key or the key when the image
you want highlights.
Display
You can select the color of the menus displayed.
Backlight
In this menu, you can select the length of time the
backlight is on and the phone is in Dimming mode.
Settings available are: 15 seconds, 30 seconds, 1 minute, 3
minutes, and 10 minutes.
Brightness Control
You can adjust the brightness of your display to see it
better in different lighting conditions.
Press the Up or Down Navigation key or press the
Vo l um e keys to adjust the brightness.
90
Page 95

Sound Settings
Dialing Font Color
This menu allows you to select the color of your dialing
font. You can choose a variety of colors. Highlight the
color you want and press the Select soft key or the key.
Sound Settings
You can customize various sound settings.
My MegaTones
This menu displays the different ringtones you have
downloaded from the Internet.
Get More MegaTones
This menu allows you to download different ringtone
melodies from the Internet. To enable a downloaded
ringtone, use the Ringtone option.
Ringtones
This menu allows you to select a ring melody. You can
choose between many different melodies.
Ring Volume
This menu allows you to adjust the ring volume to one of
five levels.
Use the Up and Down keys or the Vol u m e keys on the left
side of the phone to increase or decrease the volume.
Alert Type
This menu allows you to specify how you are to be
informed of incoming calls.
The following options are available:
Section 8
Section 8: Changing Your Settings 91
Page 96

• Melody: the phone rings using the ring melody selected in the
Ringtone menu.
• Vibration: the phone vibrates but does not ring.
• Vibration then melody: the phone first vibrates 3 times and
Section 8
then starts ringing.
Keypad Tone
This menu allows you to select the tone that the phone
sounds when you press a key.
To turn off the sound, select Off.
Message Tone
This menu allows you to set up the ringer for incoming
messages, text messages, and Picture messages.
Power On/Off
This menu allows you to select the melody that the
phone sounds when it is switched on and off.
To turn off the sound, select Off.
Alerts on Call
This menu allows you to choose whether or not the phone
informs you when you receive a new message or when the
time for an alarm comes during a call.
The following options are available:
• Off: the phone doesn’t actively alert you to incoming messages
or alarms. It only displays the corresponding notification.
• On: the phone alerts you with a beep and displays the
corresponding notification.
92
Page 97

Get More Help
Silent Mode
This menu allows you to choose whether or not your
phone will vibrate when a call is received while in Silent
Mode. You may set your phone to Vibration or Mute.
Extra Tones
You can customize additional tones for the phone.
The following options are available:
• Indicative tones: sets whether or not the phone informs you
when you make a mistake.
• Minute minder: sets whether or not the phone beeps every
minute during an outgoing call to keep you informed of the
length of your call.
• Connect tone: sets whether or not the phone beeps when your
call is connected to the system.
Note: To turn a given tone on, press the Select soft key or the key. A
check mark displays in front of the option. To turn a given tone off, press
the Select soft key or the
front of the option.
key. The check mark no longer displays in
Get More Help
This menu provides online help for your phone. You may
browse general help topics, or enter specific search topics.
Information located on this site is maintained by
T-Mobile.
Section 8
Greeting Message
This menu allows you to set a greeting to be displayed
briefly when the phone is switched on.
Section 8: Changing Your Settings 93
Page 98

For details about entering characters, see "Using ABC
Mode" on page 51.
Language
This menu allows you to select a display language for Text
Section 8
language and Input mode. Choose from English, French,
and Spanish.
Security
The Security feature enables you to restrict the use of
your phone by others and to restrict the types of calls.
Various codes and passwords are used to protect the
features of your phone.
PIN Check
When the PIN Check feature is enabled, you must enter
your PIN each time you switch on the phone.
Consequently, any person who does not have your PIN
cannot use your phone without your approval.
Note: Before disabling the PIN Check feature, you must enter your PIN.
The following options are available:
• Disable: the phone connects directly to the network when you
switch it on.
• Enable: you must enter the PIN each time the phone is
switched on.
94
Page 99

Security
Change PIN
This feature allows you to change your current PIN,
provided that the PIN Check feature is enabled. You must
enter the current PIN before you can specify a new one.
Once you have entered a new PIN, you are asked to
confirm it by entering it again.
Phone Lock
When the Phone lock feature is enabled, the phone is
locked and you must enter the 4- to 8-digit phone
password each time the phone is switched on.
The password is preset to “00000000” at the factory. To
change the phone password, see "Change Password" on
page 95.
Once the correct password has been entered, you can use
the phone until you switch it off.
The following options are available:
• Disable: you are not asked to enter the phone password when
you switch on the phone.
• Enable: you are required to enter the phone password when
you switch on the phone.
Change Password
The Change Password feature allows you to change your
current phone password to a new one. You must enter the
current password before you can specify a new one.
The password is preset to “00000000” at the factory. Once
you have entered a new password, you are asked to
confirm it by entering it again.
Section 8
Section 8: Changing Your Settings 95
Page 100

Privacy
Using this menu, you can lock your media contents, such
as picture messages, Voice messages, Voice list, images,
and sounds. Once you have locked the contents, you must
enter the phone’s password to access the associated
Section 8
menus.
1. To select an item to lock, press the Up or Down key. To
lock all of the contents, select All.
2. To place a check mark, press the Select soft key or the
key.
3. To remove a check mark, press the Select soft key or
the key.
4. To lock the marked items, press the OK soft key.
5. Enter a password and press the OK key.
When the phone asks for the password, enter the
password and press the OK soft key or the key.
Note: The password is preset to “00000000” at the factory.
To change this password, see "Change Password" on page
95.
FDN Mode
FDN (Fixed Dial Number) mode, if supported by your
SIM card, allows you to restrict your outgoing calls to a
limited set of phone numbers.
The following options are available:
• Disable: you can call any number.
• Enable: you can only call phone numbers stored in Phonebook.
You must enter your PIN2. The following options are available:
96
 Loading...