

Page 1

* Some of the contents in this manual may differ from your
phone, depending on the software installed or your
service provider.
World Wide Web
http://www.samsungmobile.com
Printed in Korea
Code No.: GH68-05553A
English. 09/2004. Rev. 1.0
Page 2

GPRS TELEPHONE
SGH-E330
Page 3

Page 4

Contents
Important safety precautions ...................... 7
Unpacking .................................................... 9
Your phone ................................................ 10
Phone layout ................................................... 10
Displays.......................................................... 14
External display ............................................... 17
Service light .................................................... 18
Camera........................................................... 18
Built-in antenna ............................................... 19
Getting started........................................... 20
Inserting/Removing the SIM card ....................... 20
Installing/Removing/Charging the battery............ 21
Switching the phone on or off ............................ 25
Selecting functions and options .......................... 26
Call functions ............................................. 28
Making a call ................................................... 28
Ending a call.................................................... 31
Answering a call............................................... 31
Rejecting a call ................................................ 31
Adjusting the volume........................................ 32
Accessing options during a call........................... 33
Using the headset ............................................ 41
Entering text .............................................. 42
Changing the text input mode............................ 43
Using ABC mode .............................................. 44
Using T9 mode................................................. 46
Using symbolic mode ........................................ 49
Using number mode ......................................... 49
Using the menus ........................................ 50
Accessing a menu function ................................ 50
List of menu functions....................................... 51
3
Page 5

Contents
Phonebook menu ....................................... 57
Find name
Add entry
Speed-dial list
Copy all to phone
Delete all
Own number
Group setting
Memory status
Service directory
(Phonebook 1.1) .................................. 57
(Phonebook 1.2) ................................... 60
(Phonebook 1.3)............................. 61
(Phonebook 1.4) ........................ 63
(Phonebook 1.5) .................................... 64
(Phonebook 2.1) ............................... 64
(Phonebook 2.2).............................. 65
(Phonebook 2.3) ............................ 66
(Phonebook 3.1) ......................... 66
SIM-AT (SIM Application Toolkit) .............. 67
Call records ................................................ 68
Missed calls
Received calls
Dialled calls
Delete all
Call time
Call costs
(Menu 2.1) ........................................ 68
(Menu 2.2) ..................................... 68
(Menu 2.3) ........................................ 69
(Menu 2.4) ........................................... 69
(Menu 2.5) ............................................ 70
(Menu 2.6) ........................................... 70
Network services ....................................... 72
Call diverting
Call barring
Call waiting
Network selection
Caller ID
Active line
(Menu 3.1) ...................................... 72
(Menu 3.2) ........................................ 74
(Menu 3.3) ........................................ 77
(Menu 3.4) ............................... 78
(Menu 3.5) ............................................ 79
(Menu 3.6) .......................................... 79
Sound settings ........................................... 80
Incoming calls
Messages
Power on/off
Connection tone
Key tone
Minute minder
Quiet mode
Alerts on call
(Menu 4.1) .................................... 80
(Menu 4.2) ........................................... 81
(Menu 4.3)....................................... 82
(Menu 4.4) ................................. 82
(Menu 4.5) ............................................ 82
(Menu 4.6) .................................... 83
(Menu 4.7) ........................................ 83
(Menu 4.8) ...................................... 84
4
Page 6

Contents
Messages ................................................... 85
Short messages
Multimedia messages
Push messages
Preset messages
Voice mail
Broadcast
Settings
Memory status
(Menu 5.1) .................................. 85
(Menu 5.2) .......................... 92
(Menu 5.3) ................................. 103
(Menu 5.4)............................... 104
(Menu 5.5) ........................................ 105
(Menu 5.6) ......................................... 106
(Menu 5.7) ........................................... 107
(Menu 5.8).................................. 111
Fun box .................................................... 112
WWW services
Media box
JAVA world (Menu 6.3) ....................................... 121
(Menu 6.1) ................................. 112
(Menu 6.2) ........................................ 118
Organiser ................................................. 126
New memo
Calendar
To do list
Clock
Alarm
Voice recorder
Calculator
Conversion
Timer
Stopwatch
(Menu 7.1)....................................... 126
(Menu 7.2) .......................................... 128
(Menu 7.3) .......................................... 130
(Menu 7.4) ............................................... 132
(Menu 7.5)............................................... 133
(Menu 7.6) ................................. 136
(Menu 7.7)......................................... 138
(Menu 7.8) ....................................... 139
(Menu 7.9) ............................................... 141
(Menu 7.10) ...................................... 142
Camera .................................................... 143
Take photos
My photos
My albums
Delete all
Settings
Memory status
(Menu 8.1) ..................................... 143
(Menu 8.2) ........................................ 149
(Menu 8.3) ....................................... 150
(Menu 8.4) ......................................... 150
(Menu 8.5) ........................................... 151
(Menu 8.6).................................. 152
5
Page 7

Contents
Phone settings ......................................... 153
Display
(Menu 9.1)............................................. 153
Greeting message
Language
Security
Auto redial
Voiceclarity
Active folder
Side key
Anykey answer
Reset settings
(Menu 9.3) ......................................... 156
(Menu 9.4) .......................................... 156
(Menu 9.8)........................................... 160
(Menu 9.2) ............................. 155
(Menu 9.5) ....................................... 159
(Menu 9.6) ..................................... 160
(Menu 9.7) ..................................... 160
(Menu 9.9) ................................. 161
(Menu 9.10) ................................. 161
Using ALS (Alternate Line Service) .......... 162
Solving problems ..................................... 164
Access codes ............................................ 167
Phone password............................................. 167
PIN .............................................................. 167
PIN2............................................................. 168
PUK.............................................................. 168
PUK2 ............................................................ 169
Call barring password ..................................... 169
Health and safety information.................. 170
SAR certification information............................ 170
Precautions when using batteries...................... 171
Road safety ................................................... 173
Operating environment ................................... 173
Electronic devices........................................... 174
Potentially explosive atmospheres .................... 175
Emergency calls............................................. 176
Other important safety information................... 177
Care and maintenance .................................... 178
Glossary................................................... 180
Index ....................................................... 184
Quick reference card ................................ 189
6
Page 8

Important safety precautions
Read these guidelines before using your wireless
phone. Failure to comply with them may be
dangerous or illegal.
Road safety at all times
Do not use a hand-held phone while driving; park
the vehicle first.
Switching off when refuelling
Do not use the phone at a refuelling point (service
station) or near fuels or chemicals.
Switching off in aircraft
Wireless phones can cause interference. Using them
in aircraft is both illegal and dangerous.
Switching off near all medical equipment
Switch off your phone near the medical equipment.
Hospitals or health care facilities may be using
equipment that could be sensitive to external RF
energy. Follow any regulations or rules in force.
Interference
All wireless phones may be subject to interference,
which could affect their performance.
Special regulations
Meet any special regulations in force in any area and
always switch off your phone whenever it is
forbidden to use it, or when it may cause
interference or danger (in a hospital for example).
Water resistance
Your phone is not water-resistant. Keep it dry.
7
Page 9

Important safety precautions
Sensible use
Use only in the normal position (held to the ear).
Avoid unnecessary contact with the antenna when
the phone is switched on, especially when the phone
is in service.
Emergency call
Key in the emergency number for your present
location, then press the key. Give all the
necessary information as accurately as possible. Do
not cut off the call until given permission to do so.
Keeping small children away from your phone
Keep the phone and all its parts including
accessories out of the reach of small children.
Accessories and batteries
Use only Samsung-approved accessories. Use of any
unauthorised accessories could damage your phone
and may be dangerous.
Use only Samsung-approved batteries and recharge
your battery only with Samsung-approved chargers.
Qualified service
Only qualified service personnel may install or repair
your phone.
For more detailed safety information, see “Health
and safety information” on page 170.
CAUTION
RISK OF EXPLOSION IF A BATTERY IS REPLACED
BY AN INCORRECT TYPE.
DISPOSE USED BATTERIES ACCORDING
TO THE INSTRUCTIONS.
8
Page 10

Unpacking
Your package contains the following items:
Phone
Battery
In addition, you can obtain the following
accessories for your phone from your local
Samsung dealer:
• Advanced handsfree car kit
• Simple handsfree car kit
• PC data link kit
Note
: This items supplied with your phone and
available accessories may be different,
depending on your country or service provider.
Travel adapter
Owner’s manual
9
Page 11

Your phone
Phone layout
The following illustrations show the main elements
of your phone:
Open view
Earpiece
Main display
Folder
WAP b rows er
key
Navigation keys
Soft key (left)
Headset jack
Volume keys
Dial/Menu
confirmation key
Cancel/Back/
Correction key
Special
function keys
(Up/Down/Left/
Right)
Soft key (right)
Power on/off
/Menu exit
key
Alphanumeric
keys
Microphone
Charger connector
10
Page 12

Closed view
Key(s) Description
Perform the functions indicated by the
text above them, on the bottom line of
(soft keys)
the display.
In menu mode, scroll through the menu
options and the Phonebook memory.
In idle mode, the Left key accesses the
new SMS message writing screen
Menu 5.1.1
(
the incoming call melody setting menu
Menu 4.1.1
(
camera
menu (
key accesses the calendar menu (
).
7.2
Your phone
Camera
Camera key
Service light/
Flash
), the Right key accesses
), the Up key accesses the
Menu 8
), and the Down
Menu
In idle mode, launches the WAP
(Wireless Application Protocol) browser
directly.
11
Page 13

Your phone
Key(s) Description
Initiates or answers a call.
In idle mode, accesses the call log list.
In menu mode, selects a menu function
or stores information that you have
ent ered, such as a name i n t he phon e or
SIM memory.
Deletes characters from the display.
When pressed and held in idle mode,
quickly accesses the new memo screen
Menu 7.1
(
In menu mode, returns to previous
screen.
Ends a call.
When pressed and held, switches the
phone on or off.
In menu mode, cancels your input and
returns to idle mode.
When pressed and held in idle mode,
quickly accesses your voice mail server.
).
12
Enter numbers, letters, and some
special characters.
Page 14

Key(s) Description
Used for various purposes in different
functions.
When pressed and held while entering a
phone number, the key enters a
pause.
When pressed and held in idle mode, the
key enters or exits quiet mode.
(on the left side of the phone)
During a call, adjusts the earpiece
volume.
In idle mode with the phone open,
adjusts the key tone volume.
When pressed and held as a call is
coming in, rejects the call or silences the
ring tone. See page 160.
In the capture mode, flip the picture
vertically by pressing the volume up key
and horizontally by pressing the volume
down key.
(on the right side of the phone)
When pressed and held, turns the
camera capture mode on. In capture
mode, works as the camera shutter
release.
Your phone
13
Page 15

Your phone
Displays
Main display
The display has three areas:
Icons
Tex t a n d
graphic area
Menu Phonebook
Soft key Indications
Area Description
First line Displays various icons. See
page 15.
Middle Display messages, instructions,
and any information that you
enter, such as a number to be
dialled.
Last line Shows the functions currently
assigned to the two soft keys.
14
Page 16

Icons
Your phone
Icon Description
Shows the received signal strength. The
more bars, the stronger the signal.
Appears when a call is in progress. When
your SIM card supports ALS (Alternate
Line Service), this icon may appear with
the number 1, 2, or both.
For example , , or .
Appears when you are out of a service
area. When it displays, you cannot make
or receive calls.
Appears when you have new or
unchecked voice messages. When your
SIM card supports ALS (Alternate Line
Service), this icon may appear as , ,
or .
(This icon may be shown only if your
service provider supports this.)
Appears when you have new or unread
messages.
Appears when you have new or
unchecked multimedia messages.
Appears when you are retrieving a
multimedia message.
Appears when you are sending a
multimedia message.
15
Page 17

Your phone
Icon Description
(continued)
Appears when you set the alarm(s) to ring
at a specified time.
Appears when the Call diverting feature is
activated. When your SIM card supports
ALS (Alternate Line Service), this icon
may appears with the number 1, 2, or
both. For example: , , or .
(This icon may be shown only if your
service provider supports this.)
Appears when you are connected to the
GPRS network.
Appears when you are in your home zone.
May be shown only if your service provider
(
supports this feature)
Appears when you are in your office zone.
May be shown only if your service provider
(
supports this feature)
Appears when you set the alert type for
incoming calls to
then melody
Vibration
. For further details, see
page 81.
Appears when the quiet mode is active.
Shows the level of your battery. The more
bars you see, the more power you have
left.
or
Vibration
Backlight on mode
The displays and the keypad are illuminated by a
backlight. When you press any key or open the
16
Page 18

Your phone
folder, the backlight illuminates. It turns off if no
key is pressed within a given period of time,
depending on the
page 154 for further details.
Backlight
option settings. See
Dim mode
If no key is pressed for a given period of time which
you can set in the
9.1.4
), the backlight dims to save power. Press any
key to awaken it from dim mode.
Backlight
menu option (
Menu
Main display off mode
If no key is pressed for one minute after the
backlight dims, the main display shuts off. Press
any key to reactivate the main display.
External display
Your phone has an external display on the folder.
It indicates that you have an incoming call or
message, and notifies you at the specified time if
you have set an alarm.
When you press and hold either of the volume keys
with the folder closed, the external display will
illuminate.
When the headset is connected, you can also use its
button to turn on the external display.
17
Page 19

Your phone
Service light
The service light is on the folder. It flashes when
services are available on the phone.
To activate or deactivate the service light, set the
Service light
menu (
Menu 9.1.6
). See page 155.
Service light
Camera
The camera embedded in your phone allows you to
take a picture of people or events while on the
move.
For further details about using the Camera feature,
see page 143.
18
Camera
Page 20

Your phone
Built-in antenna
Your phone has a built-in antenna. As with other
mobile radio transmitting equipment, do not touch
the antenna unnecessarily when the phone is
switched on. Contact with the antenna affects call
quality and may cause the phone to operate at a
higher power level than needed.
Built-in antenna
19
Page 21

Getting started
Inserting/Removing the SIM card
When you subscribe to a cellular network, you are
provided with a SIM card loaded with your
subscription details, such as your PIN, any optional
services available, and so on.
• Keep all SIM cards out of the reach of small
children.
• The SIM card and its data can be easily damaged
by scratches or bending, so be careful when you
are handling, inserting, or removing the card.
• When you are installing the SIM card, always
make sure that the phone is switched off, as you
will need to remove the battery.
Inserting the SIM card
1. If necessary, remove the battery by referring to
page 21.
2. Insert and slide the SIM card under the tab,
ensuring that the notched corner goes to the top
left and the gold contacts of the card face go
into the phone.
20
Page 22

Getting started
Removing the SIM card
To remove the SIM card, slide the card out of the
holder, as shown.
Installing/Removing/Charging the battery
Your phone is powered by a rechargeable Li-ion
battery. Use only approved batteries and chargers.
Ask your local Samsung dealer for further details.
Note
: You must fully charge the battery before using
your phone for the first time. A discharged
standard battery is fully recharged in
approximately 130 minutes.
Installing the battery
1. Insert the teeth on the bottom of the battery
into the corresponding slots on the phone.
21
Page 23

Getting started
2. Press the battery against the back of the phone
until it clicks into place.
Removing the battery
1. Switch off the phone by pressing and holding the
key.
2. To remove the battery, pull the battery catch
toward the top of the phone and hold it in that
position. Lift the battery away from the phone.
22
Page 24

Getting started
Charging the battery by using the travel
adapter
Note
: The phone can be used while the battery is
being charged, but this causes the battery to
charge more slowly.
1. Plug the travel adapter connecter into the jack
at the bottom of the phone.
Check that the arrow on the connector is facing
up, as is the phone.
2. Plug the adapter into a standard AC wall outlet.
While charging, the battery icon at the top righthand corner of the display repeatedly fills to
show that the battery is charging.
23
Page 25

Getting started
3. When charging is finished and the ‘Fully
charged’ message is displayed, disconnect the
adapter from the power outlet and from the
phone by pressing the grey tabs on both sides of
the connector and pulling the connector out.
Low Battery Indicator
When the battery is weak and only a few minutes of
talk time remain, the battery sensor informs you in
the following ways: an empty battery icon flashes
( ), you hear a warning tone, and a message
repeats at regular intervals on the display.
When the battery becomes too weak for the phone
to operate, it switches off automatically.
24
Page 26

Getting started
Switching the phone on or off
To switch the phone on:
1. Hold down the key until the phone
switches on.
2. If the phone asks for a PIN, enter the PIN and
press the
page 167.
The phone searches your network and the
current date and time appear on the display.
After your phone find its network, you can make
and receive a call.
Note
To switch the phone off:
Hold down the key until the power-off
animation displays.
OK
soft key. For further details, see
Service Provider
Fri 17 Sep 04
12:53
Menu Phonebook
: To change the language, use the
Language
menu option (Menu 9.3). For
further details, see page 156.
25
Page 27

Getting started
Selecting functions and options
Your phone offers a set of functions that allows you
to customise your phone. These functions are
arranged in menus and sub-menus, accessed via
the two soft keys marked and Each menu
and sub-menu allows you to view and alter the
settings of a particular function.
The roles of the soft keys vary according to the
current context; the labels or icons on the bottom
line of the display, just above the soft keys, indicate
their current roles.
Example
:
Service Prov ider
Fri 17 Se p 04
12:53
Menu Phonebook
Press the left soft
key to access the
menu functions.
26
Press the right soft
key to access the
Phonebook feature.
Page 28

Getting started
To view various functions/options available or select
the one you want:
1. Press the appropriate soft key.
2.
To Press the
select the:
Select
soft key.
• function displayed
• option highlighted
view the next function or
Down key.
highlight the next option
on a list
move back to the
Up key.
previous function or
option on a list
move back up one level
in the structure
(or
key or
Back
C
key.
) soft
return to idle mode key.
In some functions, you may be asked for a
password or PIN. Enter the required code and press
OK
soft key.
the
27
Page 29

Call functions
Making a call
Using the number keypad
When the idle screen is displayed, enter the area
code and phone number, and press the key.
Note:
If you have set the
9.5
) to On, the number will be redialled
automatically up to ten times if the person you
called does not answer or the line is busy. For
further details, see page 159.
Correcting the number
To clear Press the
the last digit
displayed
any other digit Navigation keys until the
all digits displayed
Auto redial
C
key.
cursor (|) is immediately to
the right of the digit to be
cleared and press the
You can also insert a missing
digit simply by pressing the
appropriate key.
C
key and hold it down for
more than one second.
option (
Menu
C
key.
28
Page 30

Call functions
Making an international call
1. Press and hold the 0 key for the international
prefix. The + character appears.
2. Enter the country code, area code, and phone
number and press the key.
Making a call from Phonebook
You can store the names and phone numbers you
call regularly in the SIM card and the phone’s
memory, which are jointly called Phonebook. You
then do not need to remember all your numbers;
simply select the required name to recall the
associated number.
For further details about the Phonebook feature,
see page 57.
Using the call logs
The phone stores up to 20 calls dialled, received, or
missed, chronologically. The last call is saved in the
first position. If the same number occurs more than
once, only the latest occurrence is saved.
To recall any of these numbers:
1. Press the key in idle mode to access the Call
log list.
2. Use the Up and Down keys to scroll through the
list until the number you want highlights.
The call logs are listed with the following icons:
• : Dialled calls
• : Received calls
• : Missed calls
(Menu 2.3)
(Menu 2.2)
(Menu 2.1)
29
Page 31

Call functions
3. To dial the number, press the key.
To view each call record separately, see ‘Call
records’ on page 68.
Viewing missed calls
If you have a subscription that includes Caller Line
Identification (CLI) and you are unable to answer a
call, you can find out who was calling you so that
you can call the person back.
The number of missed calls displays on the idle
screen immediately after a call has been missed.
To view the missed calls immediately:
1. If the folder is closed, open it up.
2. Press the
Missed
soft key.
The list of missed calls displays.
3. If necessary, scroll to the number you want by
pressing the Up or Down key.
4. To dial the number, press the key.
To use the missed call options, see ‘Missed calls’ on
page 68.
Note
: To clear the missed call notification on the
display, press the key. When you also
have missed calls, voice mails, short messages
or multimedia messages, and multiple Cell
Broadcasts (CBs), the right soft key indication
Missed
,
.
30
changes in the following order:
Connect, View, CB, and
Phonebook
Page 32

Call functions
Speed-dialling from Phonebook
Once you have stored numbers in the Phonebook,
you can dial a number simply by pressing one or two
keys. For further details, see page 61.
Ending a call
When you want to finish your call, briefly press the
key or close the folder.
Answering a call
When somebody calls you, the phone rings and
displays the incoming call animation.
If the caller can be identified, the caller’s phone
number, or name if stored in your Phonebook,
displays.
To answer a call, open the folder. If it is already
Accept
open, press the key or
Note
: You can answer a call while using the Phonebook
or menu features. The current operation stops.
soft key.
Rejecting a call
To reject an incoming call, press the key.
If the
Side key
press and hold either of the volume keys on the left
side of the phone to reject an incoming call; see
page 160.
option is set to
Reject
, you can
31
Page 33
Call functions
Adjusting the volume
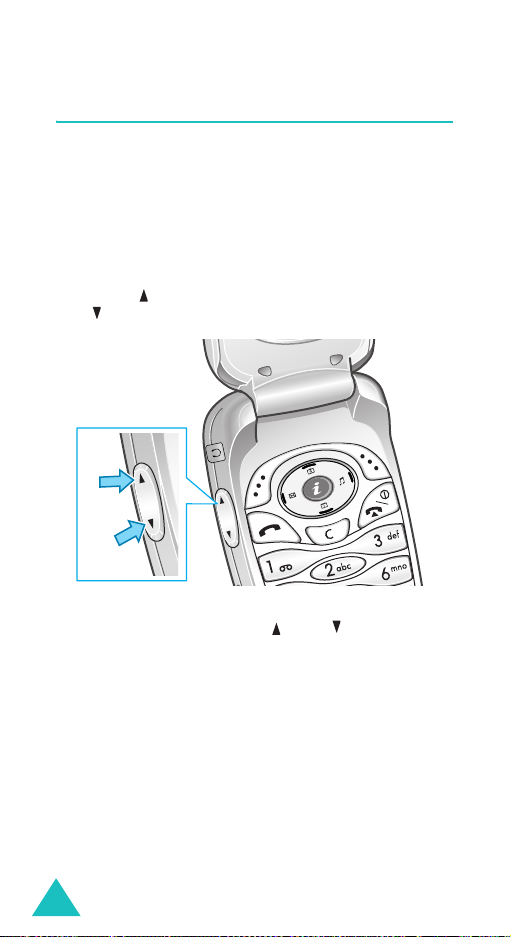
During a call, if you wish to adjust the earpiece
volume, use the volume keys on the left side of the
phone.
When you hear a sound, such as a ringtone, you
can also adjust the earpiece volume. However, the
volume adjustment will not be permanent.
Press the key to increase the volume level and
the key to decrease it.
In idle mode with the folder open, you can adjust
the key tone volume using and keys.
Note
: When a call comes in, you can reject the call or
mute the call ringer by pressing and holding
one of the volume keys, depending on the
key
option settings (Menu 9.8). For further
details, see page 160.
32
Side
Page 34

Call functions
Accessing options during a call
Your phone provides a number of control functions
that you can use during a call.
Using the loudspeaker
You can speak and listen to the phone from a short
distance without holding the phone to your ear.
Turn on / off the loudspeaker
1. Press the
2. Press the Up or Down key to highlight the
spk. on
Select
CAUTIONS
Options
/
Loud spk. off
soft key.
: Do not hold the phone near to your
ear when you use the loudspeaker, as
the volume may be extremely loud.
soft key.
option. Press the
Loud
Using Voiceclarity
Voiceclarity feature makes received sound louder
and clearer during a call. It is useful when you are
in a noisy place.
The phone turns on Voiceclarity feature
automatically after a while when you are in a noisy
place and Voiceclarity is set to on.
Turn on / off Voiceclarity
1. Press the
2. Press the Up or Down key to highlight the
Voiceclarity on / Voiceclarity off
Press the
Options
Select
soft key.
option.
soft key.
33
Page 35

Call functions
Note
: You cannot activate Voiceclarity when you use
the loudspeaker or the handsfree car kit.
Putting a call on hold
You can place a call on hold whenever you want.
You can make another call while you have a call in
progress if this service is supported by your
network. Of these two calls, one is active and the
other is on hold, and you can switch between the
two.
To place a call on hold, simply press the
and select the
call whenever you want by pressing
key.
Hold
option. You can reactivate the
option
Retrie.
key
soft
Switching the microphone off (Mute)
You can temporarily switch your phone’s
microphone off so that the person with whom you
are speaking cannot hear you.
Example
: You may wish to say something to
another person in the room, but do not
want the person on the phone to hear you.
1. Press the
2. When
key.
The Mute icon ( ) appears on the bottom line
of the display and your correspondent can no
longer hear you.
To switch the microphone back on:
1. Press the
34
Options
Mute
Options
soft key.
highlights, press the
soft key.
Select
soft
Page 36

Call functions
2. When
Unmute
highlights, press the
Select
soft
key.
The Mute icon disappears and your
correspondent can once again hear you.
Muting/Sending key tones
You can turn the key tones off or on during a call.
When the
does not transmit key tones. This allows you to
press keys without hearing annoying key tones
during a call.
To communicate with answering machines or
computerised telephone systems, the
option must be selected.
Mute keys
option is selected, your phone
Send keys
Searching for a number in Phonebook
You can search for a number in your Phonebook
during a call.
1. Press the
2. If necessary, press the Up or Down key to
highlight the
Select
3. Select the
Select
The Phonebook entries are listed.
Options
Phonebook
soft key.
Find name
soft key.
soft key.
option. Press the
option and press the
4. Enter the first few letters of the name that you
want to find. The Phonebook entries will be
listed, starting with the first entry matching your
input.
35
Page 37

Call functions
Note
: You can also scroll through Phonebook from
the beginning, by pressing
.
key
5. To view the highlighted entry, press the OK soft
key.
For further details about the Phonebook feature,
see page 57.
the Up or Down
Sending DTMF tones
You can send the DTMF (Dual Tone Multi-Frequency)
tones of the number on the display during a call.
This option is helpful for entering a password or
account number when you call an automated
system, like a banking service.
To send the DTMF tones:
1. When you are connected to the teleservice
system, press the
2. Press the Up or Down key to highlight the
DTMF
option. Press the
3. Enter the number you want to send and press
the
OK
soft key.
The tones of the displayed number are sent.
Options
Select
soft key.
Send
soft key.
Using the message service
You can read or write a new message during a call.
1. Press the
2. Press the Up or Down key to highlight the
Message
36
Options
option. Press the
soft key.
Select
soft key.
Page 38

Call functions
3. To read a received message, select the
option, and then scroll to the message that you
want to read.
To write a new message, select the
option.
4. Press the
For further details about the SMS feature, see
page 85.
Select
soft key.
Inbox
Create
Recording the telephonic conversation
You can record your conversation during a call.
This option is helpful to save some important
conversations for a future reference. You can find
conversation you have recorded on the
Memo 7.6.2
menu (
page 137.
). For more information, see
Voices
Using the SIM-AT (SIM Application
Toolkit)
If you use a SAT card that provides additional
services, the SAT menu displays. For further details,
see your SIM card instructions.
Making a second call
You can make another call while you have a call in
progress, if this service is supported by your
network.
To make a call while you have a call in progress:
1. Enter the phone number that you want to dial or
look it up in the Phonebook.
37
Page 39

Call functions
2. Press the key to dial the second call.
The first call is automatically put on hold.
Or alternatively:
1. Put the current call on hold by pressing the
option
soft key and the
Hold
option.
2. Make the second call in the normal way.
To switch between the two calls, simply press the
option
softkey and the
Swap
option.
The current call is placed on hold and the call on
hold is reactivated so that you can continue
conversing with the other person.
To end the call on hold, press the
and select the
End held call
option.
Options
soft key
When you want to finish, end each call normally by
pressing the key. If you want to finish all calls
at once, close the folder.
Answering a second call
You can answer an incoming call while you have a
call in progress, if this service is supported by your
network and you have activated the
option (see page 77). You will be notified of an
incoming call by a call waiting tone.
To answer a call while you have another call in
progress:
Call waiting
1. Press the key to answer the incoming call.
The first call is automatically put on hold.
2. To switch between the two calls, press the
option
38
softkey and select the
Swap
option.
Page 40

Call functions
3. To end the call on hold, press the
key and select the
To end the current call, press the key.
The call on hold is automatically reconnected to
you.
End held call
Options
option.
soft
Transferring a call
You can transfer the current call to the call on hold
if this service is supported by the network, so that
the callers can talk to each other. You are
disconnected from both of them.
1. During a call, answer or make a call in the
normal way, and press the
2. Press the Up or Down key to select the
option and press the
The two people are connected to each other.
Select
Options
soft key.
soft key.
Transfer
Making a multi-party call
A multi-party calling is a feature of some networks
service that allows up to six people to take part
simultaneously in a multi-party or conference call.
For more information, contact your service provider.
Setting up a multi-party call
1. Call the first participant in the normal way.
2. Call the second participant in the normal way.
The first call is automatically put on hold.
3. To join the first participant to the multi-party
call, press the
option. Press the
Join
Options
soft key and select the
Select
soft key.
39
Page 41

Call functions
4. To add a new person to the multi-party call, call
the person in the normal way. Then press the
Options
Press the
soft key and select the
Select
soft key.
Join
option.
You can add incoming callers by answering the call
Join
and selecting the
option. Repeat as needed.
Getting a second call during a multi-party call
To make a call when you are on a multi-party call:
See ‘Making a second call’ on page 37.
To answer a call when you have the multi-party call:
1. Press the key to answer the incoming call.
The multi-party call is automatically put on hold.
The other call participants can continue talking.
2. To switch between the two calls, press the
option
softkey and the
Swap
option.
3. To end the call on hold, press the
key and select the
or
End held call
End held multiparty
option.
Options
To end the current call, press the key.
The call on hold is recontinued to you.
Having a private conversation with one
participant
1. Press the
option. Press the
Options
soft key and select the
Select
soft key.
2. Press the Up or Down key to highlight a
participant and press the
Select
soft key.
Now you can talk privately with that person. The
other participants can continue to converse with
each other.
40
soft
option
Split
Page 42

Call functions
3. To return to the multi-party call, press the
Options
4. Press the
All of the multi-party call participants can now
hear each other.
Removing one participant
soft key and select the
Select
soft key.
Join
option.
1. Press the
Remove
2. Press the Up or Down key to highlight a
participant and press the
The call with that participant ends, but you can
continue to talk with the other participants.
3. End the multi-party call by pressing the
key.
Options
option.
soft key and select the
Select
soft key.
Using the headset
With the headset, you can make or answer a call
without holding the phone.
When you connect the headset to the jack at the
left side of the phone, the button on the
headset works as listed below:
To Press
redial the last call the button twice in idle mode.
answer a call and hold the button.
end a call and hold the button.
41
Page 43

Entering text
There are many situations in which you need to
enter text, such as when storing a name in
Phonebook, writing a message, creating your
personal greeting, or scheduling events on your
calendar.
You are provided with the following text input
modes:
ABC mode
•
This mode allows you to enter letters by pressing
the key labelled with the required letter once,
twice, three, or four times until the desired letter
displays.
•
T9 mode
This mode allows you to enter words with only
one keystroke per letter. Each key on the keypad
has more than one letter – for example, when
you press the
The T9 mode automatically compares your
keystrokes with an internal linguistic dictionary to
determine the correct word, thus requiring far
fewer keystrokes than the traditional ABC mode.
Symbolic mode
•
This mode allows you to enter special characters.
•
Number mode
This mode allows you to enter numbers.
*
5
key, J, K, or L can be displayed.
*
is a registered trademark of Tegic Communications,
Inc. and is licensed under U.S. Patent 5,818,437/
5,953,541/ 6,011,554.
42
Page 44
Entering text
Changing the text input mode
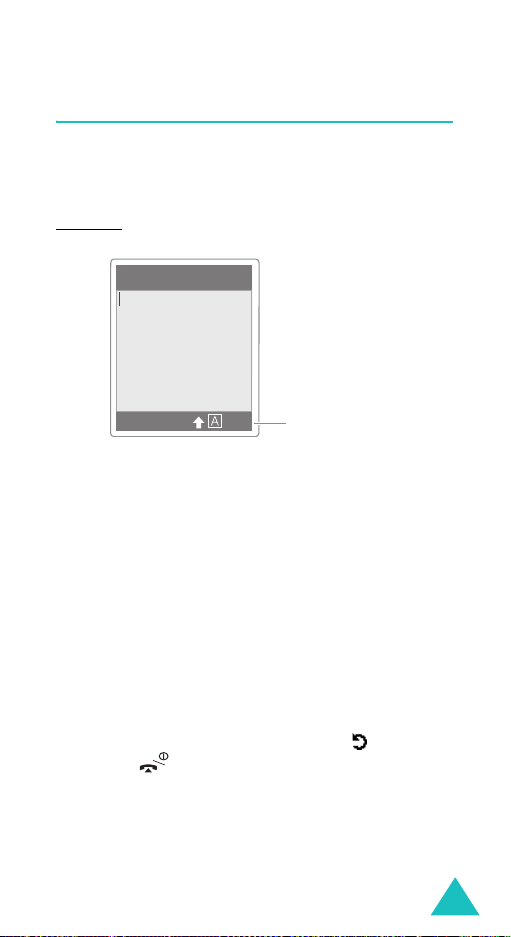
When you are in a field that allows characters to be
entered, you will see the text input mode indicator
at the bottom of the display.
Example
: Entering a name in the Phonebook
Enter name
OK
20
Eng
Text input mode indicator:
ABC English mode
To change to another text input mode:
1. Press the right soft key indicating the current
text input mode.
2. Scroll to the mode you want to use by pressing
the Up or Down key.
The
Language select
option allows you to
change the text input language.
You can use the
Add word
option to add new
words into the T9 dictionary. See page 47.
Note
: If you want to exit the menu without
changing the mode, press the soft key or
key.
3. Press the
Select
soft key to confirm the
highlighted text input mode.
43
Page 45

Entering text
Quickly changing the text input mode
To switch between the Press and hold the
Number and previous mode key.
Symbol and previous mode key.
ABC and T9 mode right soft key.
Using ABC mode
When inputting words in ABC mode, press the key
labelled with the required letter:
- Once for the first letter
- Twice for the second letter
- And so on
Example
Note
Refer to the table below for more information about
the characters available. The characters vary,
depending on the text input language.
You can select the language by setting one of the
following options:
•
•
: To display the letter “C”, quickly press the
2
key three times. To display the letter
“K”, press the
called Multi-tap typing.
: The cursor moves to the right when you press a
key. When entering the same letter twice or a
different letter on the same key, just press the
Right key, or alternatively, wait a few seconds
for the cursor to move to the right
automatically, and then enter the next letter.
Language select
Input mode (Menu 9.3.2
5
key twice. This method is
: see page 43.
): see page 156.
44
Page 46

Entering text
List of the characters available
Key characters in the order displayed
1 . , - ? ! ‘ @ : 1
2 A B C 2
3 D E F 3
4 G H I 4
5 J K L 5
6 M N O 6
7 P Q R S 7
8 T U V 8
9 W X Y Z 9
00
(Capital Lock mode in English
Changing the case
To change the case of the next letter(s) that you
enter, press the key. There are three cases:
• Lower Case (no indicator)
• Initial Capital ( )
• Capital Lock ( )
)
Inserting a space
To insert a space between words, press the key.
45
Page 47

Entering text
Scrolling
To move the cursor to the left, right, up, or down
within the text, press the navigation keys.
Clearing letters and words
To clear the letter to the left of the cursor, press the
C
key. You can clear all of the letters on the display
by pressing and holding the
C
key.
Returning to the previous screen
After the text input field has been cleared, you can
press and hold the
screen.
C
key to return to the previous
Using T9 mode
To input a word in T9 mode:
1. Start entering the word by pressing keys
Press each key only once for each letter.
Example
The word you are typing appears on the display.
It may change with each key that you press.
2. Enter the whole word before editing or deleting
any keystrokes.
3. If the word is correct, start entering the next
word. Otherwise, while the word is highlighted,
press the
word choices for the keys that you have
pressed.
46
: To enter “hello” in the T9 mode, press
4, 3, 5, 5
the
0
key repeatedly to display alternative
, and 6 keys.
2
to 9.
Page 48

Entering text
Example: Both “of” and “me” have the sequence
6
and 3. The phone displays the
of
most commonly used choice first.
4. Insert a space between words by pressing the
key.
5. Enter the next word.
If
Spell
appears above the left soft key while you
are entering text, the word does not exist in the T9
dictionary. To type words not found in the T9
dictionary, change the text input mode to the ABC
mode, or proceed as follows:
Spell
1. Press the
key and select the
soft key, or press the right soft
Add word
option.
2. Enter the word you want to add using the ABC
mode (see page 44) and press the
OK
soft key.
The word is saved in the T9 dictionary and
inserted in the input field.
3. Continue entering other words in the T9 mode.
Smart punctuation
To enter periods, hyphens, or apostrophes, press
1
key. The T9 mode applies rules of grammar to
the
insert the correct punctuation.
Example
: The 1 key is used twice to display two
punctuation marks.
l e t ’ s e a t .
47
Page 49

Entering text
Changing the case
To change the case of the next letter(s) that you
enter, press the key. There are three cases:
• Lower Case (no indicator)
• Initial Capital ( )
• Capital Lock ( )
Inserting a space
To insert a space between words, press the key.
Entering a number directly
To enter a number, press and hold the number key.
Scrolling
To move the cursor to the left, right, up, or down
within the text, press the navigation keys.
Clearing letters and words
To clear the letter to the left of the cursor, press the
C
key. You can clear all of the letters on the display
by pressing and holding the
C
key.
Returning to the previous screen
After the text input field has been cleared, you can
press and hold the
screen.
48
C
key to return to the previous
Page 50
Entering text
Using symbolic mode
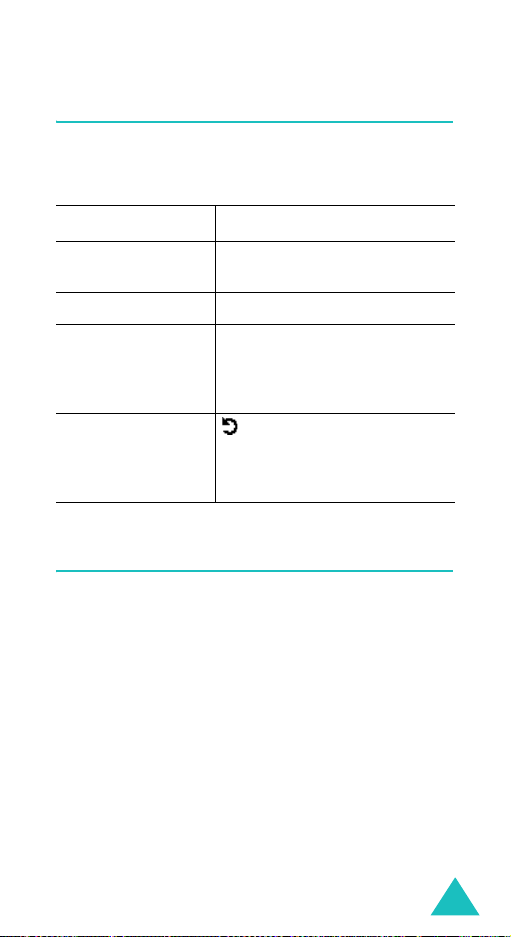
Symbolic mode enables you to enter symbols in
your text.
To Press the
display more
symbols
enter a symbol corresponding number key.
return to the
previous text input
mode with entered
symbol(s)
return to the
previous text input
mode without
entered symbol(s)
Up or Down key.
OK
soft key.
soft key.
Using number mode
Number mode enables you to enter numbers in
your text. Press the keys corresponding to the digits
you want to enter.
49
Page 51

Using the menus
The phone offers a range of functions that allows
you to tailor the phone to your needs. These
functions are arranged in menus and sub-menus.
Accessing a menu function
The menus and sub-menus can be accessed by
pressing the
mode, then scrolling with the navigation keys.
1. In idle mode, press the
the main menu or press the
key to access Phonebook menu.
2. Scroll through the menus using the navigation
keys. If you are using the main menu, press
select
3. Find the sub-menu that you wish to use by
scrolling with the Up or Down key.
4. Press the
menu.
If the menu that you have selected contains
further sub-menus, repeat steps 3 and 4.
5. Scroll to the option you want to choose with the
Up or Down key.
6. Press the
Note
Menu
or
Phonebook
Menu
soft key to choose what you want.
Select
soft key to access the sub-
Select
soft key to choose the setting.
: You can return to the previous menu level by
pressing the soft key.
soft key in idle
soft key to access
Phonebook
soft
50
Page 52

Using the menus
You can also access the menus and sub-menus by
quickly entering the corresponding menu number.
Example: Accessing the
press the
Voice mail
Menu
soft key and 5, 5 in idle
menu option,
mode.
List of menu functions
Various menus let you check or change your phone
settings. The following list shows the menu
structure.
The numbers assigned to each menu option may
not match the menu number on the phone. It
depends on the services supported by your SIM
card.
Phonebook menu
1. Phonebook
1.1 Find name
1.2 Add entry
1.3 Speed-dial list
1.4 Copy all to phone
1.5 Delete all
2. Management
2.1 Own number
2.2 Group setting
2.3 Memory status
(see page 57)
(see page 64)
3. Services
3.1 Service directory
(see page 66)
51
Page 53

Using the menus
Main menu
1. SIM-AT (SIM Application Toolkit)
(see page 67)
*
2. Call records
2.1 Missed calls
2.2 Received calls
2.3 Dialled calls
2.4 Delete all
2.5 Call time
6. Call costs*
(see page 68)
2.5.1 Last call time
2.5.2 Total sent
2.5.3 Total received
2.5.4 Reset timers
2.6.1 Last call cost
2.6.2 Total cost
2.6.3 Max cost
2.6.4 Reset counters
2.6.5 Set max cost
2.6.6 Price/Unit
3. Network services
3.1 Call diverting
3.1.1 Divert always
3.1.2 Busy
3.1.3 No reply
3.1.4 Unreachable
3.1.5 Cancel all
3.2 Call barring
3.2.1 All outgoing
3.2.2 International
3.2.3 International except to home
3.2.4 All incoming
3.2.5 Incoming while abroad
3.2.6 Cancel all
3.2.7 Change barring password
(see page 72)
*Shown only if it is supported by your SIM card.
52
Page 54

3.3 Call waiting
3.4 Network selection
3.5 Caller ID
3.6 Active line
*
Using the menus
4. Sound settings
4.1 Incoming calls
4.1.1 Default melodies
4.1.2 My sounds
4.1.3 Ring volume
4.1.4 Alert type
4.2 Messages
4.1 Short messages
4.2 Multimedia messages
4.3 Power on/off
4.4 Connection tone
4.5 Key tone
4.6 Minute minder
4.7 Quiet mode
4.8 Alerts on call
5. Messages
5.1 Short messages
5.2 Multimedia messages
5.3 Push messages
(see page 85)
5.1.1 Create
5.1.2 Inbox
5.1.3 Outbox
5.1.4 Delete all
5.2.1 Create
5.2.2 Inbox
5.2.3 Outbox
5.2.4 Draft
5.2.5 My folder
5.2.6 Delete all
5.3.1 Inbox
5.3.2 Setting
5.3.3 Delete all
(see page 80)
*
Shown only if it is supported by your SIM card
53
Page 55

Using the menus
5.4 Preset messages
5.5 Voice mail
5.6 Broadcast
5.7 Settings
5.8 Memory status
5.5.1 Connect to voice mail
5.5.2 Voice server number
5.6.1 Read
5.6.2 Receive
5.6.3 Channel
5.6.4 Language
5.7.1 Short messages
5.7.2 Multimedia messages
5.8.1 Short messages
5.8.2 Multimedia messages
6. Fun box
(see page 112)
6.1 WWW services
*
6.1.1 Home
6.1.2 Bookmark
6.1.3 Go to URL
6.1.4 Clear cache
6.1.5 Proxy settings
6.1.6 Current proxy
6.2 Media box
6.2.1 Photos
6.2.2 Images
6.2.3 Sounds
6.2.4 Delete all
6.2.5 Memory status
6.3 JAVA world
6.3.1 Downloads
6.3.2 Internet settings
6.3.3 Memory status
* May not be shown or supported by your network service
provider.
54
Page 56

Using the menus
7. Organiser
7.1 New memo
7.2 Calendar
7.3 To do list
7.4 Clock
7.4.1 Set time
7.4.2 Set date
7.4.3 Set world time
7.4.4 Set format
7.5 Alarm
7.6 Voice recorder
7.7 Calculator
7.8 Conversion
7.8.1 Currency
7.8.2 Length
7.8.3 Weight
7.8.4 Volume
7.8.5 Area
7.8.6 Temperature
7.9 Timer
7.10 Stopwatch
8. Camera
(see
8.1 Take photos
8.2 My photos
8.3 My albums
8.4 Delete all
8.5 Settings
8.6 Memory status
(see page 126)
page 143
)
55
Page 57

Using the menus
9. Phone settings
9.1 Display
9.1.1 Wallpaper
9.1.2 Front LCD
9.1.3 Skin
9.1.4 Backlight
9.1.5 LCD contrast
9.1.6 Service light
9.2 Greeting message
9.3 Language
9.3.1 Text language
9.3.2 Input mode
9.4 Security
9.4.1 PIN check
9.4.2 Change PIN
9.4.3 Phone lock
9.4.4 Change password
9.4.5 Privacy
9.4.6 SIM lock
9.4.7 FDN mode
9.4.8 Change PIN2*
9.5 Auto redial
9.6 Voiceclarity
9.7 Active folder
9.8 Side key
9.9 Anykey answer
9.10 Reset settings
9.10.1 Sound settings
9.10.2 Phone settings
9.10.3 All settings
(see page 153)
*
* Shown only if it is supported by your SIM card.
56
Page 58

Phonebook menu
Phonebook offers the following features:
•
Phonebook
up the speed-dialling feature, and manage
Phonebook.
•
Management
your own number, set up caller groups and check
memory status.
Services
•
depending on your SIM card.
: allows you to find, create, and set
: allows you to create, or remove
: allows you to use the service directory
Find name
To search for a number in Phonebook, proceed as
follows.
1. Enter the initial letter(s) of the name that you
want to find.
Phonebook entries are listed, highlighting the
entry matching your input.
2. If necessary, press the Up or Down key to scroll
to the entry you want.
3. Once you have found the entry, press the
soft key.
4.
To Press the
dial the displayed
number
change Phonebook
entries
(Phonebook 1.1)
Options
further details, see
page 58.
key.
OK
soft key. For
57
Page 59

Phonebook menu
Editing phone memory entries
While looking at a Phonebook entry, scroll to the
category that you want to edit by pressing the Left
or Right key. The following categories are available
and you can edit the information of each category
by pressing the
Category Then
Mobile
Home
Office
Fax
Other
E-Mail Enter or edit e-mail address.
Note Enter or edit the memo.
Group Set one of the groups or no group.
Graphic Set one of the images or no image.
Alert Set one of the melodies or do not
Options
soft key.
Select one of the following options. For
details about these options, refer to
the page 59.
Edit number
Change name
Send message
(shown if the category
contains a number)
Copy
(shown if the category contains a
number)
Delete entry
assign a melody
58
Page 60

Phonebook menu
Editing SIM memory entries
To change SIM memory entry information, press the
Options
The following options are available:
Edit number
This option allows you to change the number. You
can also add a new number if none has been stored
for the selected entry.
Change name
This option allows you to change the name of the
entry.
To clear the old name, press the
information about how to enter characters, see
page 42.
Send message
This option allows you to send a message to the
number. For more information about how to send a
message, see page 87.
Copy
This option allows you to copy the entry from the
SIM card to the phone’s memory.
Delete entry
This option allows you to delete the entry from
Phonebook. To confirm the deletion, press the
soft key. Otherwise, press the
soft key.
C
key. For more
No
soft key.
Yes
59
Page 61

Phonebook menu
Add entry
You can store phone numbers and the
corresponding names in the memory of your SIM
card. In addition, you can store up to 1000 names
in the phone’s memory, and each name can be
associated with up to five numbers.
1. Enter the number you want to save.
Notes
• If you make a mistake while entering a number,
correct it using the
page 28.
• To insert a dialling pause for special phone
services, such as banking by phone, hold down
the key. “P” is displayed to indicate that a
pause will be inserted at that point in the dialling.
2. When you are sure that the number is correct,
press the
3. Select the memory where the number is to be
stored, either
Select
Note
(Phonebook 1.2)
:
C
key. For further details, see
Save
soft key.
Phone
or
SIM
soft key.
: If you change phones, any numbers stored
in your SIM card will automatically be
available with the new phone, whereas any
numbers stored in the phone’s memory
must be entered again.
, and press the
4. If you select
If you select
type using the Up or Down key and press the
Select
5. Enter the associated name.
60
SIM
Phone
soft key.
in step 3, go to step 5.
in step 3, choose a number
Page 62

Phonebook menu
For information about how to enter characters,
see page 42.
6. When you are satisfied, press the
7. If you select
If you select
number and press the
8. If you want to change the entry, use the options.
for information about how to do it, see page 58.
If you want to return to idle mode, press the
soft key or the key.
Phone
in step 3, go to step 8.
SIM
in step 3, enter the location
OK
soft key.
OK
soft key.
Storing a number in idle mode
As soon as you start to enter a number in idle
Save
mode,
you to store the number in Phonebook.
Continue the procedure from step 1 on page 60 to
store the number.
Speed-dial list
You can set up to eight speed-dial entries and then
dial them easily whenever you want, simply by
pressing the associated number key.
appears above the left soft key to allow
(Phonebook 1.3)
Setting up speed-dial entries
1. Press the Up or Down key to scroll to an empty
location and press the
2. When the
the
Select
Edit number
soft key.
Select
soft key.
option highlights, press
61
Page 63

Phonebook menu
3. Enter a phone number and press the
key. Or,
To retrieve a number from your Phonebook,
press the
from the list and press the
the
4. When you have finished, press the soft key or
the key to exit.
Phonebook
OK
soft key to save it.
soft key. Select an entry
OK
OK
soft
soft key. Press
Editing speed-dial entries
1. Select the speed-dial entry you want to edit
from the list and press the
2. Select one of the following menu options by
pressing the Up or Down key and press the
Select
soft key:
•
Edit number
number.
•
Change name
name of the entry.
•
Delete
no number is assigned to the key.
3. When you have finished, press the soft key or
the key to exit.
: allows you to change the
: allows you to change the
: allows you to clear the setting so that
Select
soft key.
Using the speed-dial feature
When the idle screen is displayed, press the number
2
to 9, assigned to the speed-dial entry and
key,
press the key. You can also press and hold the
number key.
Note
: The 1 key is reserved for your voice mail server
number.
62
Page 64

Phonebook menu
Dialling a number stored in the SIM card
Once you have stored phone numbers in your SIM
card, you can dial them easily whenever required.
To dial a number stored in the SIM card:
1. Enter the number of the SIM card location where
the number you want to dial is stored.
2. Press the key.
The display shows the name and number stored
in that location.
3. Press the
Copy all to phone
You can copy all of the numbers stored in the SIM
card to the phone’s memory.
1. When a confirming message appears, press the
Yes
The numbers in the SIM card are copied to the
phone’s memory, labelled with
default.
Otherwise, press the
2. When you have finished, press the soft key or
the key to exit.
Dial
soft key or the key.
soft key to copy.
(Phonebook 1.4)
Mobile
No
soft key.
by
63
Page 65

Phonebook menu
Delete all
You can delete Phonebook entries selectively
depending on their memory location, or all entries
at once.
1. Scroll to a desired memory selection and place a
check mark ahead of it by pressing the
soft key.
Selecting
memory sites.
2. If necessary, repeat step 1 to check another
option.
3. When you have finished checking, press the
soft key.
4. When a confirming message appears, press the
Yes
memory or memories. Then enter the phone
password and press the
password is preset to “00000000” by default. To
change it, see page 158.
Otherwise, press the
Own number
(Phonebook 1.5)
Select
All
places check marks on both of the
soft key to delete all of the entries in the
OK
soft key. The
No
soft key.
(Phonebook 2.1)
OK
To store your own phone number(s) with a name:
1. Scroll to an empty location by pressing the Up or
Down key and press the
2. When
3. Enter your number and press the
64
Edit number
soft key.
Select
soft key.
highlights, press the
OK
key.
Select
Page 66

Phonebook menu
4. To assign a name, press the Down key to move
Change name
to
and press the
Select
soft key.
5. Enter a name and press the
6. When you have finished, press the soft key or
the key to exit.
To remove one of your numbers:
1. Select the entry you want to delete from the
Own number list and press the
2. Scroll to
and press the
3. When a confirming message appears, press the
Yes
Otherwise, press the
4. When you have finished, press the soft key or
the key to exit.
Group setting
You can change the settings of the ten predefined
caller groups.
1. Select a caller group by pressing the Up or Down
key and press the
2. Scroll to a setting option by pressing the Up or
Down key and press the
The following options are available:
•
Delete
by pressing the Up or Down key
Select
soft key to delete the number.
(Phonebook 2.2)
Select
Melody
sound when a call comes in from a member of
the group.
: allows you to select a melody to
soft key.
No
soft key.
soft key.
Select
OK
soft key.
Select
soft key.
soft key.
65
Page 67

Phonebook menu
•
Change name
name of the group; for further details about
how to enter characters, see page 42.
View image
•
when a call comes in from a member of the
group.
3. Change the setting as required and press the
Select
soft key.
4. Repeat steps 2 and 3 to change other options.
When you have finished, press the soft key or
the key to exit.
: allows you to change the
: shows the image to display
Memory status
You can check how many names and numbers are
stored in Phonebook, phone’s memory, SIM card,
and how many free locations remain.
When you have finished, press the soft key or
the key to exit.
Service directory
Note
: This feature may not be available depending on
your SIM card.
The display shows the list of the numbers in the
Service directory.
If necessary, scroll to a number by pressing the Up
or Down key and press the key to dial the
number.
66
(Phonebook 2.3)
(Phonebook 3.1)
Page 68

SIM-AT (SIM Application Toolkit)
If you use a SAT card that provides additional
services, the SAT menu displays. For further details,
see your SIM card instructions.
Shown only if it is supported by your SIM card.
67
Page 69

Call records
Via this menu, you can view the:
• calls you missed, received, or dialled.
• cost of your calls.
• length of your calls.
Note
: You can access the phone numbers that are in
the three types of call records by pressing the
key in idle mode.
Missed calls
This option lets you view the last 20 unanswered
calls, if caller line identification is available.
The number, or name if available, displays together
with the date and time when the call was missed.
By pressing the
• delete the current call record from the list.
• delete all of the calls.
• paste the number into Phonebook.
Received calls
This option lets you view the last 20 received calls,
if caller line identification is available.
The number, or name if available, displays together
with the date and time when the call was received.
68
(Menu 2.1)
Options
(Menu 2.2)
soft key, you can also:
Page 70

Call records
By pressing the
• delete the current call record from the list.
• delete all of the calls.
• paste the number into Phonebook.
Dialled calls
This option lets you view the last 20 dialled
numbers.
The number, or name if available, displays together
with the date and time when the call was made.
By pressing the
• delete the current call record from the list.
• delete all the calls.
• paste the number into Phonebook.
Delete all
You can delete all of the numbers stored in each call
record.
When a confirming messages appears, press the
Yes
soft key to confirm.
Otherwise, press the
Options
(Menu 2.3)
Options
(Menu 2.4)
No
soft key, you can also:
soft key, you can also:
soft key.
69
Page 71

Call records
Call time
This option lets you view the timers for calls made
and received.
Notes:
• If your SIM card supports ALS (Alternate Line
Service), you must first select the appropriate line.
• The actual time invoiced for calls by your service
provider may vary, depending on network features,
rounding-off for billing purposes, and other reasons.
The following timers are available:
Last call time
Total sent
the timer was last reset.
Total received
since the timer was last reset.
Reset timers
timers. You need to enter the phone password and
then press the
Call costs
This feature lets you view the cost of calls.
Notes
• Shown only if it is supported by your SIM card.
• This feature is not intended to be used for billing
purposes.
• AOC (Advice Of Charge) information may display in
idle mode, depending on your SIM card or service
provider.
(Menu 2.5)
: the length of the last call.
: the total length of all calls made since
: the total length of all calls received
: this option used to reset the call
OK
soft key.
(Menu 2.6)
:
70
Page 72

Call records
The following options are available:
Last call cost
Total cost
: cost of the last call made.
: total cost of all calls made since the
cost counter was last reset. If the total cost exceeds
the maximum cost set via the
Set max cost
option, you can not make any calls until you reset
the counter.
Max cost
: maximum cost set via the
Set max cost
option.
Reset counters
: this option is used to reset the
cost counter; you must first enter your PIN2 (see
OK
page 168) and then press the
Set max cost
: this option is used to enter the
soft key.
maximum cost that you authorise for your calls;
you must first enter your PIN2 (see page 168) and
OK
then press the
Price/Unit
soft key.
: this option is used to set the cost of
one unit (the units by which your cost is calculated.
It may be 5 or 10 or 20 seconds, and is set by the
Network); this price per unit is applied when
calculating the cost of your calls; you must first
enter your PIN2 (see page 168) and then press the
OK
soft key.
71
Page 73

Network services
These menu functions are network services.
Please contact your service provider to check their
availability and subscribe to them, if you wish.
Call diverting
Note
: Call divert options may be different depending
on your SIM card. Those not supported by your
network operator may not be shown on your
phone.
This network service enables incoming calls to be
rerouted to a number that you specify.
Example
Call diverting can be set up in the following ways:
Divert always
Busy
on another call.
No reply
the phone.
Unreachable
area covered by your service provider.
Cancel all
deactivated.
You can specify individual call diverting options for
each of the following call types:
• Voice calls only
: You may wish to divert your business calls
to a colleague while you are on holiday.
: calls are diverted if your phone is engaged
: calls are diverted if you do not answer
: all call diverting options are
(Menu 3.1)
: all calls are diverted.
: calls are diverted if you are not in an
72
Page 74

Network services
• Data calls only (not available when line 2 is in
use)
Example
: You can divert voice calls to your
colleague if you are already using the
phone.
Setting call diverting options
1. Select the type of call diverting by pressing the
Up or Down key and then press the
key.
2. Select the type of calls to be diverted by
pressing the Up or Down key and then press the
Select
soft key.
3. Press the
settings.
4. Enter the number to which the calls are to be
diverted.
To enter an international code, hold down the
key until the + sign displays.
You can also select a number in Phonebook or
the voice mail server number, by pressing the
Options
Voice server
5. When you are satisfied, press the
The phone sends your settings to the network
and displays the network’s acknowledgement.
Activate
soft key, followed by
soft key to confirm your
.
Select
Phonebook
OK
soft key.
soft
or
Deactivating specific call diverting
options
0
73
Page 75

Network services
1. Select the call diverting option to be
deactivated.
2. Select the type of calls to which this option
applies.
3. Press the
The phone sends your settings to the network
and displays the network’s acknowledgement.
You can also deactivate all call diverting options by
selecting the
Remove
Cancel all
Call barring
The call barring network service allows you to
restrict your calls.
Call barring can be set up in the following ways:
All outgoing
International
International except to home
calls can be made only to numbers within the
current country and to your home country, that is
the country where your home network provider is
located.
All incoming
Incoming while abroad
when you are using your phone outside the country
of your service network.
Cancel all
calls can be made and received normally.
: calls cannot be made.
: calls cannot be received.
: all call barring options are deactivated;
soft key.
option.
(Menu 3.2)
: international calls cannot be made.
: when abroad,
: calls cannot be received
74
Page 76

Network services
You can specify individual call barring options for
each of the following call types:
• Voice calls only
• Data calls only (not available when line 2 is in
use)
Setting call barring options
1. Select the type of call barring by pressing the Up
or Down key and then press the
2. Select the type of calls to be barred by pressing
the Up or Down key and then press the
soft key.
Select
soft key.
Select
3. Press the
settings.
4. Enter the call barring password supplied by your
service provider and press the
The phone sends your settings to the network
and displays the network’s acknowledgement.
Activate
soft key to confirm your
OK
soft key.
Deactivating specific call barring options
1. Select the call barring option to be deactivated.
75
Page 77

Network services
2. Select the type of calls to which this option
applies.
3. Press the
Deactivate
soft key.
4. Enter the call barring password supplied by your
service provider.
The phone sends your settings to the network
and displays the network’s acknowledgement.
You can also deactivate all call barring options by
selecting the
Cancel all
option.
Changing the barring password
You can set and change the call barring password
obtained from your service provider.
1. Select
2. Enter the current password and press the
3. Enter a new password and press the
4. Enter the new password again to confirm it and
Change barring password
Call barring screen, and press the
key.
soft key.
key.
press the
OK
soft key.
from the
Select
soft
OK
soft
OK
76
Page 78

Network services
Call waiting
This network service informs you when someone is
trying to reach you while you are on another call.
You can specify individual call waiting options for
each of the following call types:
• Voice calls only
• Data calls only (not available when line 2 is in
use)
(Menu 3.3)
Activating the call waiting feature
1. Select the type of calls to which the call waiting
option is to be applied by pressing the Up or
Down key and then press the
2. Press the
settings.
The phone sends your settings to the network
and displays the network’s acknowledgement.
Activate
soft key to confirm your
Select
soft key.
Deactivating specific call waiting options
1. Select the type of call to which the option
applies.
2. Press the
The phone sends your settings to the network
and displays the network’s acknowledgement.
You can also deactivate all call waiting options by
selecting the
Deactivate
Cancel all
soft key.
option.
77
Page 79

Network services
Network selection
The Network selection feature enables you to
manually select the network used when roaming
outside your home area or to let the phone
automatically select the roaming network.
Note
: You can select a network other than your home
network only if it has a valid roaming
agreement with your home network.
To choose to automatically or manually select the
network when roaming:
1. Press the Up or Down key until the appropriate
option highlights and press the
If you select
the first available network when roaming.
If you select
available networks. Go to step 2.
2. Press the Up or Down key until the preferred
network highlights and press the
key.
You are connected to that network when
roaming.
Automatic
Manual
(Menu 3.4)
Select
soft key.
, you are connected to
, the phone scans for the
Select
soft
78
Page 80

Network services
Caller ID
You can prevent your phone number from being
displayed on the phone of the person being called.
Note
The following options are available:
Default
network is used.
Hide number
the other person’s phone.
Send number
make a call.
Active line
Some SIM cards may be used with two subscriber
numbers. This functions is available only if your SIM
card supports it.
This menu option allows you to select the line to be
used to make calls. However, calls can be answered
on both lines, regardless of the selected line.
(Menu 3.5)
: Some networks do not allow the user to change
this setting.
: the default setting provided by the
: your number does not display on
: your number is sent each time you
(Menu 3.6)
79
Page 81

Sound settings
You can use the Sound settings feature to
customise various settings, such as the:
• ringtone, volume, and type for incoming calls or
messages.
• sounds made when your call is connected or
when you press a key.
• quiet mode to which your phone switches to when
you hold down the key in idle mode.
Incoming calls
This option allows you to set up the ringer for
incoming calls.
Note
: If your SIM card supports ALS (Alternate Line
Service), you must first select the line you wish
to change.
The following options are available:
Each time you select a melody from the list, the
melody plays.
Default melodies
predefined melodies.
My sounds
from other sources, such as WAP sites, EasyStudio
PC software, or received multimedia messages.
Ring volume
volume. Use the Up and Down keys or the volume
keys on the left side of the phone. The more bars
you see, the louder the volume will be.
80
: allows you to select a sound received
(Menu 4.1)
: allows you to select one of the
: allows you to adjust the ring
Page 82

Sound settings
Alert type
of incoming calls.
Melody
the
Vibration
Vibration then melody
then plays the melody selected via the Melody
option. See above.
Light only
phone neither rings nor vibrates.
Messages
This option allows you to set up separate alert types
for incoming short and multimedia messages.
Short messages
Multimedia messages
The following options are available:
Tone
Each time you select a tone from the list, the tone is
played.
Alert type
of any incoming messages.
Light only
phone neither rings nor vibrates.
Ton e
Tone
Vibration
Vibration then tone
then plays the tone selected via the
: lets you specify how you are informed
: the phone plays the melody selected via
Melody
option. See above.
: the phone vibrates, but does not ring.
: the phone first vibrates and
: only the text notification appears; the
(Menu 4.2)
(Menu 4.2.1)
: lets you choose from many different tones.
: lets you specify how you are informed
: only the text notification appears; the
: the phone plays the tone selected via the
option. See above.
: the phone vibrates, but does not ring.
: the phone first vibrates and
/
(Menu 4.2.2)
Tone
option.
81
Page 83

Sound settings
Repetition
phone informs you of a new message. You can
choose either
Power on/off
This option allows you to select the melody that the
phone sounds when you switch it on or off.
You can choose either
don’t want the phone to play any sound at all when
turning on or off, select
Connection tone
This menu option allows you to specify whether or
not the phone beeps when it connects to the
network.
The following options are available:
Off
: the phone does not beep.
On
: the phone beeps when your phone connects to
a network.
: allows you to specify how often the
Once
or
Periodic
(Menu 4.3)
Basic
Off
(Menu 4.4)
or
.
.
Cheerful
. If you
Key tone
This menu option allows you to select the tone that
the keypad sounds when you press the dial keys.
The following options are available:
82
(Menu 4.5)
Page 84

Sound settings
Off
: the keys do not make any sound.
Tone
: each key, when pressed, makes a different
sound.
Beep
: each key, when pressed, makes the same
sound.
Piano / Drum
sound of a piano or a drum, depending on which
you choose.
To adjust the key tone volume, press the volume
keys on the left side of the phone in idle mode.
: each key, when pressed, makes the
Minute minder
This menu option allows you to specify whether or
not the phone beeps every minute during a call to
keep you informed of the length of your call.
The following options are available:
Off
: the phone does not beep.
On
: the phone beeps every minute.
Quiet mode
When you hold the key down in idle mode, the
phone switches to quiet mode. You can specify
whether the phone vibrates or mutes all sounds in
quiet mode.
The following options are available:
Vibration
when in quiet mode.
Mute
: the phone vibrates rather than rings
: the phone mutes all sound in quiet mode.
(Menu 4.6)
(Menu 4.7)
83
Page 85

Sound settings
Alerts on call
This menu allows you to choose whether or not the
phone informs you when you receive a new
message or when an alarm goes off during a call.
The following options are available:
Off
: the phone doesn’t alert you to incoming
messages or alarms.
On
: the phone alerts you with a beep. The alert
occurs only in your earpiece, so the person with
whom you are talking doesn’t hear it.
(Menu 4.8)
84
Page 86

Messages
This menu allows you to create, send, read, and
save messages with the Short Message Service
(SMS: text messages), Enhanced Message Service
(EMS: messages including simple images,
animations, or melodies) and Multimedia Message
Service (MMS: messages supporting the
presentation of various media types, such as full
colour images, polyphonic ring tones). Voice mails
are also available.
Note
: This feature is only available if your service
provider’s network supports it. Contact your
service provider for more information.
Short messages
Short message service (SMS) allows you to send
and receive short text messages to and from other
GSM mobile phones. In addition, your phone
supports the Enhanced Messaging Service (EMS),
which enables you to create short messages
consisting of simple pictures, melodies, animations,
and stylized text, all of which adds a new dimension
to simple text messages.
To send text messages by phone, you must obtain
the number of the SMS centre from your service
provider.
Receiving a new message
When you receive a new message, the New
message icon ( ) and a text notification showing
the number of the message appear on the display.
You also hear an alert, depending on the message
sound setting; for further details, see page 81.
(Menu 5.1)
85
Page 87

Messages
To read the new message(s) immediately, press the
View
soft key. The list of messages appears.
Note:
To clear the new message notification on the
display, press the key. Also when you
have missed calls, voice mails, short messages
or multimedia messages, and multi CBs, the
right soft key indication changes in the
following order:
Phonebook
and
Missed, Connect, View, CB
.
Managing memory
Inbox and Outbox share a given amount of memory
on your phone or SIM card. When the message
memory is full, the New message icon ( ) blinks
and an error message displays. (It disappears when
key
you press the
, but it reappears if you
don’t delete any messages to free up some
memory.) In this situation, you cannot receive any
new messages. You must delete one or more
messages to create space for incoming messages.
Delete
You can do this by using the
or Outbox, or by using the
Delete all
option in Inbox
option; for
further details, see page 91.
,
Create
(Menu 5.1.1)
Using this menu, you can write messages
containing text, images, and melodies.
1. Create a message.
On the first line of the display, you see the
remaining number of characters you are able to
enter, the designated number of the current
message with the maximum number of
86
Page 88

Messages
messages you can create, and the font style you
Text
set in the
Note
: For further information about how to enter
option.
characters, see page 42.
2. While entering your message, press the
Options
•
soft key to use the following options.
Send
: allows you to send the message. Refer
to the next step.
•
Text
: allows you to format the text. The
following text attributes can all be combined
as required.
Text size
Tex t m o d e
Bold
Italic
Alignment
•
Add media
: Small/Medium/Large
: Normal/Underscore/Strikethrough
: Off/On
: Off/On
: Left/Center/Right
: allows you to add pictures,
animations, and/or melodies to the message.
Select a category:
animation
Add picture, Add
or
Add melody
. You can then
choose a factory-set object or an object that
you have received from another source and
stored in the Media box. See page 118.
•
Preset messages
: allows you to add a preset
message to your text. Select one of nine
messages stored in the
menu option (
Save message
•
Menu 5.4
: allows you to save the
Preset messages
) See page 104.
message so that it can be sent later. You can
read the message in the Outbox.
3. When you have finished entering your message,
choose
Send
from the options.
87
Page 89

Messages
4. Enter a destination number on the Address
screen.
You can search for a number in Phonebook by
pressing the
Note
: To clear part or all of your input, press or press
and hold the
you can press and hold the
Phonebook
C
key. If or when there is no input,
soft key.
C
key to move to the
previous screen.
To send the message up to 5 different
Add
destinations, press the
soft key and repeat
step 4.
5. When you have finished entering the numbers,
press the
OK
soft key.
6. If the Enter centre screen displays, enter the SMS
service centre number and press the
You
can store the SMS service centre number on
OK
soft key.
your phone. For details, see page 107.
Note
: If the message is not sent successfully, press the
Retry
soft key to try to send the message again.
Or, press the
No
soft key and the
Save
soft key
to save the message, or exit the menu by
No
pressing the
soft key.
Inbox
(Menu 5.1.2)
Your phone receives incoming messages and saves
them in the Inbox. SMS messages are usually saved
on the SIM card, but if the SIM memory is full, the
incoming messages will be saved in the phone’s
memory.
88
Page 90

Messages
When the
Inbox
menu is selected, the list of
messages received displays with the:
• sender’s phone number, or name if stored in
Phonebook.
• message status; for a read message, for a
message to read or for an incomplete
message.
To view a message, scroll to it and press the
Select
soft key. The screen shows the:
• date and time when the message was received.
• memory site where the message is stored:
for the SIM card or for the phone’s memory.
• message contents.
You can scroll to the next or previous message by
pressing the Left or Right key.
To scroll through the message contents, press the
Up or Down key. When you select on an object that
includes a melody, the melody is played.
You can choose the following options by pressing
the
Options
Delete
Message reply:
Call back
Cut address:
soft key:
: allows you to delete the message.
allows you to reply to a message.
: allows you to call the sender back.
extracts phone numbers, email
addresses, or URL addresses in the text, so that you
can call the number or send a message to the
number or save it in your Phonebook.
Send
: allows you to send the message to another
person.
89
Page 91

Messages
Edit:
allows you to edit the message.
Extract media:
you can save media (except
predefined EMS animations and sounds) from the
message into the Media box. You can then use
these items when writing future messages.
Transfer:
allows you to transfer the message from
the SIM card to the phone’s memory or vice versa.
Outbox
(Menu 5.1.3)
Outbox stores any messages that you have already
sent, or saved without sending.
When the
Outbox
menu option is selected, the list
of messages you have sent or saved displays with
the:
• recipient’s phone number, or name if stored in
Phonebook.
• message status: for a sent message or for
a message to send.
To view a message, scroll to it and press the
Select
soft key. The screen shows the:
• message status: for a sent message or for
a message to send.
• memory site where the message is stored:
for the SIM card or for the phone’s memory.
• message contents.
You can scroll to the next or previous message by
pressing the Left or Right key.
To scroll through the message, press the Up or
Down key.
90
Page 92

Messages
You can choose the following options by pressing
Options
the
Delete:
Cut address
soft key:
allows you to delete the message.
: extracts phone numbers, email
addresses, or URL addresses in the text, so that you
can call the number or send a message to the
number or save it in your Phonebook.
Send:
allows you to send the message to another
person.
Edit:
allows you to edit the message.
Transfer:
allows you to transfer the message from
the SIM card to the phone’s memory or vice versa.
Delete all
(Menu 5.1.4)
You can delete all messages stored in the SIM card
and phone’s memory.
1. Scroll to a message box and place a check mark
Select
next to it by pressing the
Selecting
All
places check marks on all of the
soft key.
message boxes.
2. If necessary, repeat step 1 to check other boxes.
3. When you have finished making your selections,
OK
press the
soft key.
4. When a confirming message appears, press the
Yes
soft key to delete all of the messages in the
selected box(es).
No
Otherwise, press the
soft key.
91
Page 93

Messages
Multimedia messages
Multimedia Message Service (MMS) is a messaging
service very similar to Short Message Service
(SMS). It provides automatic and immediate
delivery of personal multimedia messages from
phone to phone or from phone to e-mail.
In addition to the familiar text content of text
messages, multimedia messages can contain
images, graphics, voice, and sounds. An MMS
message is a multimedia presentation in a single
entry. It is not a text file with attachments.
Using the MMS feature, your phone can receive
multimedia messages. You can also send
multimedia messages. This function is available
only if it is supported by your service provider. Only
phones that offer multimedia message features can
receive and display multimedia messages.
Note
: When you buy media content from the Internet,
this content is delivered to you in MMS
messages. You can retrieve the messages from
the server and then save the items in your
phone’s memory. You can’t forward these
messages to other people or add the saved
items to a MMS message.
(Menu 5.2)
Retrieving a new message
When you are retrieving a message, the Retrieving
icon ( ) appears on the display. When you finish
retrieving a new message, the New message icon
( ) and a text notification showing the number of
the message appear on the display. You also hear
an alert, depending on the message sound setting;
for further details, see page 81.
92
Page 94

Messages
To read the new message in idle mode, press the
View
soft key. You will see the Inbox contents.
Select a message to view it.
Notes:
• When you set
Automatic
to
menu (
Message reception
, you cannot enter the
Menu 6.3.1
) and also cannot access WAP
(see page 109)
Downloads
sites while retrieving a new message. If a message
comes in while you are playing a Java game, a
notification message only will be delivered to your
phone. After you have finished your game, you can
retrieve the message by accessing the notification
message.
• To clear the new message notification on the display,
press the key. When you have also missed
calls, voice mails, short messages or multimedia
messages, and multi CBs, the right soft key
indication changes in the following order:
Connect, View, CB
If
Message reception
, and
Phonebook
has been set to
Missed
.
Manual
,
(for
details, see page 109), when the new message icon
( ) appears on the display, you must go to the
Inbox to retrieve the message. You can select
messages with the following icons: , , or .
Then you can retrieve or delete the message using
Opt.
the
soft key.
Managing memory
When the memory is full, the New message icon
( ) blinks and an error message displays. (It
disappears when you press the
reappears if you don’t delete any messages to free
up some memory.) In this situation, you cannot
receive any new messages, You must delete one or
more messages to create space for incoming
key
, but it
93
Page 95

Messages
messages. You can do this by using the
Delete
option in Inbox, Outbox, Draft, or My folder, or by
using the
Delete all
option; for further details, see
page 103.
Notes
:
• You can receive up to 150 messages.
• Multimedia message boxes, Camera, and Media box
share a given amount of memory in your phone. You
can use the
Delete all
option to delete
Delete
or
some sounds or images in Camera or Media box.
Create
(Menu 5.2.1)
This menu option allows you to create a new
multimedia message and then send it to one or
multiple destinations.
1. There are four categories of items that can be
added to multimedia messages: scroll to select
Add
the one that you want, and press the
soft
key. Then proceed according to the instructions
below.
Item How to add
Subject 1. Enter a subject for your message.
For details about entering
characters, see page 42.
94
2. Press the
Note
: To move to a previous screen while
OK
soft key.
entering a subject, delete all of the
entered characters and hold down
C
key.
the
Page 96

Item How to add
Picture To add a new picture:
1. Select the
Create new
2. Take a photo using the camera
feature. For details about the
camera feature, see page 143.
3. Select a picture you want to add.
The picture is displayed.
4. Press the
Add
soft key.
Messages
option.
To add a picture from Media box
1. From the MMS images file, select
the picture you want to add to the
message. The picture will be
displayed.
2. Press the
Add
soft key.
You may not be able to add some
downloaded images if they are not
in the correct format.
Sound To add a new sound
1. Select the
2. Press the
Record new
Record
recording.
3. Press the
Stop
recording.
4. Press the
Play
soft key to replay the
sound. Or, press the
add the sound. Enter a name for the
sound and press the
The sound will be both added to the
message and saved in the Media
box.
:
:
option.
soft key to start
soft key to stop
Add
soft key to
OK
soft key.
95
Page 97

Messages
Item How to add
Sound
To add a sound from Media box
(Con’t)
1. Select one of the sound storage
sites. Sounds stored at the site are
displayed.
2. Select the sound you want to add.
:
3. Press the
Select
soft key to add it.
You may not be able to add some
downloaded sounds if they are not
in the correct format.
Message
1. Enter a new message. Or you can
enter a preset message.
To enter a preset message;
• Press the
Preset messages
Opt.
soft key and select
.
• Select one of the preset messages.
2. Press the
Done
Note
: To move to a previous screen while
Opt.
soft key and select
to add the message.
entering a message, press and
2. Press the
hold the
Opt.
soft key to use the following
C
key.
optio ns.
•
Preview
: shows your message as it will
display on the recipient’s phone. To go back to
the message screen, press the
To send the message, press the
Edit
Send
soft key.
soft key
and go to step 4.
•
Send
: allows you to send the message. Refer
to the next steps.
96
Page 98

Messages
•
Add page
: allows you to add up to 10 pages.
You can move to each page using the Left or
Right key on the message screen.
Page timing
•
: allows you to set how long one
page of the message will display to the
recipient before scrolling automatically to the
next page.
•
Text effect
: allows you to set the colour, size,
and style of the message text.
•
Clear subject/picture/sound/message
:
allows you to delete the subject, image,
sound, or message, separately.
Delete page
•
: allows you to delete the current
page.
•
Save message
(see page 101) or
Note
: To go back to the edit screen, press the
soft key or the
: saves the message in
My folder
C
key.
(see page 102).
Draft
3. When you finish creating the message, select
Send
from the options.
4. Select an entry on the Send screen.
If the entry is empty, enter a destination as
below. Select:
Number
Email
Phonebook
: to enter a destination number.
: to enter an e-mail address.
: to enter a destination from
Phonebook.
OK
After entering a destination, press the
soft
key.
97
Page 99

Messages
If the entry is not empty, you can choose one of
the following. Select:
Edit address
Delete address
Note
: To clear part or all of your input, press or press
and hold the
displayed, press and hold the
: to edit the selected address.
: to delete the selected address.
C
key, If there is no input
C
key to move to
the previous screen.
5. To send the message to up to 20 different
destinations, repeat step 4.
6. When you have finished entering the
Send
destinations, press the
soft key.
If you want to cancel a sending message or resend
a message that you failed to send, go to the
Outbox
. Then select the message and the option
in point. For further details, see page 100.
Inbox
(Menu 5.2.2)
Your phone receives incoming messages and saves
them in the Inbox.
Inbox
When the
menu is selected, the list of
messages received displays with the:
• message’s subject, or no subject if the message
has no subject.
• sender’s phone number, or name if stored in
Phonebook.
• message status: for a retrieving message,
for a read message, for an unread
message, for a read notification message,
and for an unread notification message.
98
Page 100

Messages
Note
: There are several different message status
icons ( ,
,
) corresponding to the
priority assigned to the message by the sender
(see page 108).
To view a message, scroll to it and press the
Select
soft key.
To scroll through the message contents, press the
Up or Down key. When the message has more than
one page, you can press the Left or Right key to
move through the pages, or the pages will cycle
automatically according to time settings determined
by the sender.
Notes
:
•
Your phone may not be able to play or display
some types of sound or picture files.
•
If an incoming message has a video clip attached,
the attachment icon
()
appears on the title line.
You will not be able to view the attachment, nor
extract it from the message.
While viewing a message, you can choose the
following options by pressing the
Delete
: deletes the message
Replay
: replays the message.
Reply
: allows you to send a reply to the sender.
Forward
: forwards the message to another person.
Opt.
soft key:
When the message contains media contents you
has bought on the Internet, forwarding is not
available.
Call back
Cut media
: allows you to call the sender.
: extracts a picture or sound, so that you
can set them as wallpaper or a ringtone, or you can
include them as part of a multimedia message.
99
 Loading...