

Page 1
Dishwasher
user manual
DW80H997 Series
DW80H995 Series
DW80H994 Series
DW80H993 Series
imagine the possibilities
Thank you for purchasing this Samsung product.
DW80H9950-00149A-02_EN_140609.indd 1DW80H9950-00149A-02_EN_140609.indd 1 2014-06-09 6:05:152014-06-09 6:05:15
Page 2

contents
SETTING UP YOUR DISHWASHER
6
USING YOUR DISHWASHER
8
CLEANING AND MAINTAINING YOUR
DISHWASHER
22
CYCLES
24
6 Unpacking your dishwasher
6 Checking parts
7 Meeting installation requirements
8 Control panel
12 Cycle selector
12 Progress displays
13 Basic guidelines
15 Adjusting the angle of the plate supports
16 Adjusting the height of the upper rack
16 Loading the lower rack
17 Loading the upper rack
18 Using the 3
models)
19 Using the cutlery basket
20 Using detergent
21 Using rinse aid
22 Cleaning the exterior
22 Cleaning the interior
22 Cleaning the nozzles
23 Cleaning the fi lter
23 Storing your dishwasher
24 Cycle chart
rd
(cutlery) rack (for some
TROUBLESHOOTING
25 Check these points if your dishwasher…
28 Information codes
25
APPENDIX
29 Helping the environment
29 Specifi cations
29
English - 2
DW80H9950-00149A-02_EN_140609.indd Sec9:2DW80H9950-00149A-02_EN_140609.indd Sec9:2 2014-06-09 6:05:182014-06-09 6:05:18
Page 3

safety information
Congratulations on your new Samsung Dish washer. This manual contains important
information on the installation, use, and care of your appliance. Please take time to
read this manual to take full advantage of your washer’s many benefi ts and features.
WHAT YOU NEED TO KNOW ABOUT THE SAFETY INSTRUCTIONS
Warnings and Important Safety Instructions in this manual do not cover all
possible conditions and situations that may occur. It is your responsibility to use
common sense, caution, and care when installing, maintaining, and operating
your washer.
IMPORTANT SAFETY INSTRUCTIONS
What the icons and signs in this user manual mean:
Hazards or unsafe practices that may result in severe personal injury or death.
WARNING
CAUTION
To reduce the risk of fi re, explosion, electric shock, or personal injury when using
your washer, follow these basic safety precautions:
Hazards or unsafe practices that may result in minor personal injury or property
damage.
Do NOT attempt.
Do NOT disassemble.
Do NOT touch.
Follow directions explicity.
Unplug the power plug from the wall socket.
Make sure the machine is grounded to prevent electric shock.
Call the service center for help.
01 safety information
Note
These warning signs are here to prevent injury to you and others.
Please follow them explicitly.
After reading this section, keep it in a safe place for future reference.
SAVE THESE INSTRUCTIONS
English - 3
DW80H9950-00149A-02_EN_140609.indd Sec1:3DW80H9950-00149A-02_EN_140609.indd Sec1:3 2014-06-09 6:05:182014-06-09 6:05:18
Page 4

safety information
WARNING : When using your dishwasher, follow basic precautions, including the following:
WARNING
1. Read all instructions before using the dishwasher.
2. Use the dishwasher only for its intended function.
3. Use only detergents or wetting agents recommended for use in a dishwasher and keep them
out of the reach of children.
4. When loading items to be washed:
- locate sharp items so that they are not likely to damage the door seal, and
- load sharp knives with the handles up to reduce the risk of cut-type injuries.
5. Do not wash plastic items unless they are marked "dishwasher safe" or the equivalent. For
plastic items not so marked, check the manufacturer’s recommendations.
6. Do not touch the HEATING ELEMENT during or immediately after use.
7. Do not operate your dishwasher unless all ENCLOSURE panels are properly in place.
8. Do not tamper with controls.
9. Do not abuse, sit on, or stand on the door or dish rack of the dishwasher.
10. To reduce the risk of injury, do not allow children to play in or on a dishwasher.
11. Under certain conditions, hydrogen gas may be produced in a hot-water system that has
not been used for two weeks or more. HYDROGEN GAS IS EXPLOSIVE. If the hot-water
system has not been used for such a period, before using the dishwasher turn on all hotwater faucets and let the water fl ow from each for several minutes. This will release any
accumulated hydrogen gas. As the gas is fl ammable, do not smoke or use an open fl ame
during this time.
12. Remove the door to the washing compartment when removing an old dishwasher from
service or discarding it.
WARNING:
This product contains chemicals known to the State of California to cause cancer and
WARNING
reproductive toxicity.
• After unpacking the dishwasher, keep the packaging out of the reach of children.
CAUTION
• The dishwasher is extremely heavy. Do not attempt to move or carry the dishwasher by
yourself. Two or more people are needed to move a dishwasher and avoid potential injuries.
• As with any equipment using electricity, water, and moving parts, potential hazards exist.
• Do not install the dishwasher near electrical components. Keep the dishwasher away from
open fl ames.
• Install and level your dishwasher on an uncarpeted fl oor that can support its weight.
• Your dishwasher must be properly grounded. Never connect it to an ungrounded outlet. See
page 7 for more information on grounding your dishwasher.
• Connect the ground wire to the green ground connector in the terminal box.
• After the dishwasher is installed, check that the drain hose is properly connected and
that there is no leakage from the hose connectors. If the drain hose is loose, it may cause
property damage.
• The water supply line is susceptible to breakage. As time goes by, it becomes less fl exible.
Check the line periodically. If it is swollen, torn, cut, or there is a water leak, replace it
immediately.
• To safely operate this appliance, familiarize yourself with its operations and exercise care
when using it.
SAVE THESE INSTRUCTIONS
English - 4
DW80H9950-00149A-02_EN_140609.indd Sec1:4DW80H9950-00149A-02_EN_140609.indd Sec1:4 2014-06-09 6:05:192014-06-09 6:05:19
Page 5
• Do not put gasoline, solvents, or other flammable materials inside the dishwasher. Do not
wash dishes exposed to these materials.
• Keep your dishwasher detergent out of the reach of children. Detergent has an adverse
effect on human organs. It contains elements for polishing and is corrosive. Avoid letting the
detergent come into contact with your skin and eyes.
• Do not push or place pressure on the door when it is open, as this may damage the
dishwasher or cause harm.
• Do not allow children to play in or on the dishwasher. They may harm themselves or damage
the dishwasher.
• Disconnect the power cable (or set the circuit breaker to off) before servicing your
dishwasher.
• Do not repair, replace, or service any part of your dishwasher yourself. Disassembly, repairs,
and modifi cations are permitted by authorized service technicians only. Work done by an
unauthorized person may void your warranty.
• Before disposing of your dishwasher, remove the door of the washing compartment or the
door latch so that children or small animals cannot get trapped inside.
• If the dishwasher is left unused for an extended period of time, turn off the water supply.
• This dishwasher is intended for residential use only.
BEFORE USING YOUR DISHWASHER
WARNING
WARNING
Tip-Over Hazard
- Do not use the dishwasher until it is correctly installed.
- Do not push down on an open door.
- Do not place excessive weight on the open door.
Electric Shock Hazard
Failure to follow these instructions can result in death, fi re, or electric shock:
- Electrically ground the dishwasher
- Connect the ground wire to the green ground connector in the junction box.
- Do not use an extension cord.
01 safety information
SAVE THESE INSTRUCTIONS
English - 5
DW80H9950-00149A-02_EN_140609.indd Sec1:5DW80H9950-00149A-02_EN_140609.indd Sec1:5 2014-06-09 6:05:192014-06-09 6:05:19
Page 6

setting up your dishwasher
Be sure to have your installer follow these instructions closely so that your new
dishwasher works properly and that you’re not at risk of injury when washing
dishes.
UNPACKING YOUR DISHWASHER
• Once your new dishwasher has been delivered to you, carefully unpack it and check for any damage.
If the dishwasher has been damaged, make note of it on the waybill and keep a copy.
Do not install the dishwasher, and contact Samsung Customer Service at the number listed below.
• If there is no damage to the product, you can proceed with the installation. If you are going to install it
yourself, make sure to read through the installation guide and follow the directions inside.
• After unpacking your dishwasher, keep the packaging out of the reach of children to ensure their safety.
CHECKING PARTS
When your dishwasher has been unpacked, make sure you’ve received all the parts shown below.
If your dishwasher was damaged during shipping, or if you do not have all the parts, contact Samsung
Customer Service at 1-800-SAMSUNG (726-7864)
Lower nozzle
Water refl ector
Dispenser
Vapor vent cover
Control panel
Door
Upper nozzle
Lower rackUpper rack
Accessory parts - User/Installation manual, Installation Kit, Drain Hose, Holder Drain Hose,
Hose Clamp, Kick Plate.
Cutlery rack 3rd rack
(for some models)
Top nozzle
Base
3rd rack PAD
(for some models)
English - 6
DW80H9950-00149A-02_EN_140609.indd Sec3:6DW80H9950-00149A-02_EN_140609.indd Sec3:6 2014-06-09 6:05:192014-06-09 6:05:19
Page 7

MEETING INSTALLATION REQUIREMENTS
Electrical supply and grounding
To prevent the risk of fire, electric shock, or personal injury, all wiring and grounding must be
done in accordance with the National Electrical Code ANSI/FNPA, No. 70 Latest Revision and
local codes and ordinances. It is the personal responsibility of the appliance owner to provide
adequate electrical service for this appliance.
Never use an extension cord.
CAUTION
When preparing for installation, ensure that your power supply provides:
• An individual 120 Volt, 60Hz branch circuit serving only your dishwasher with a 15 AMP fuse
or circuit breaker
Your dishwasher must be grounded. If your dishwasher malfunctions or breaks down, grounding
will reduce the risk of electric shock by providing a path of least resistance for the electric
current.
Never connect the ground wire to plastic plumbing lines, gas lines, or hot water pipes.
WARNING
GROUNDING INSTRUCTIONS
For a permanently connected appliance:
This appliance must be connected to a grounded metal, permanent wiring system, or an
equipment-grounding conductor must be run with the circuit conductors and then connected to
the equipment-grounding terminal or lead on the appliance.
Water supply
The hot water supply line pressure must be between 20 ~ 120 psi (140 ~ 830 kPa).
Adjust the water heater to deliver water between 120 ˚F (49 ˚C) ~ 149 ˚F (65 ˚C).
Most plumbing supply stores sell water supply lines of various lengths up to 10 feet
(305cm) long.
You can reduce the risk of leaks and water damage by:
• Making water faucets easily accessible.
• Turning off faucets when the dishwasher is not in use.
• Periodically checking for leaks at water supply line fittings.
Before using your dishwasher for the first time, check all connections at the water supply valve
and faucets for leaks.
WARNING
Flooring
For safety, your dishwasher must be installed on a solidly constructed fl oor.
Never install your dishwasher on a platform or poorly supported structure.
02 setting up your dishwasher
Your dishwasher must be properly installed in accordance with the Installation Guide before you use it.
If you did not receive an Installation Guide with your dishwasher, you can obtain one by visiting our website
at www.samsung.com.
English - 7
DW80H9950-00149A-02_EN_140609.indd Sec3:7DW80H9950-00149A-02_EN_140609.indd Sec3:7 2014-06-09 6:05:212014-06-09 6:05:21
Page 8
using your dishwasher
WARNING: To reduce the risk of fi re, electric shock, or injury to persons, read the IMPORTANT
SAFETY INSTRUCTIONS before operating this appliance.
WARNING
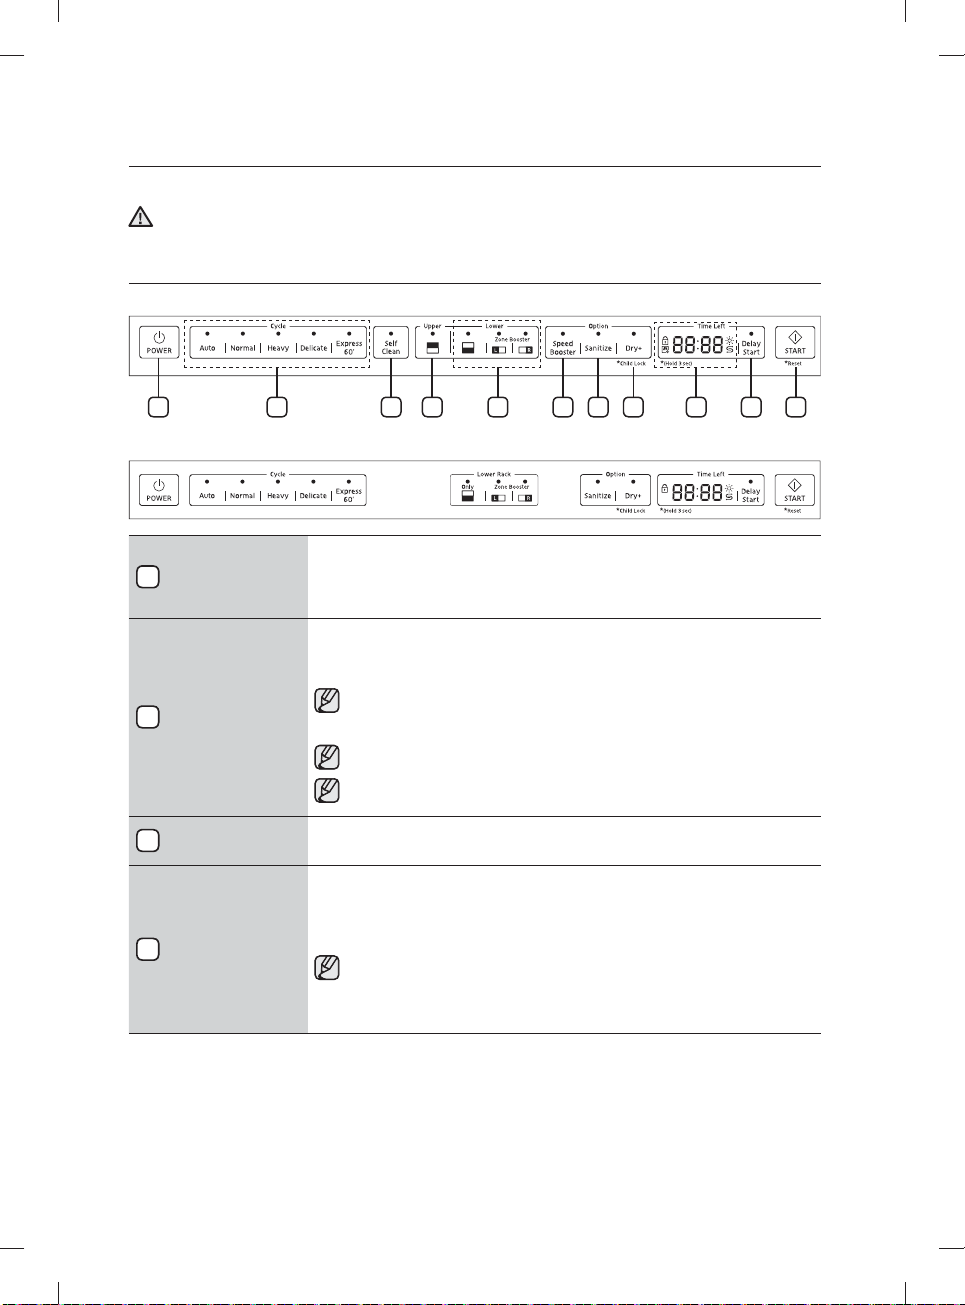
CONTROL PANEL
DW80H997 / DW80H995 / DW80H994 Series
DW80H993 Series
1
Power
2
Cycle Selector
Self Clean
3
(for some models)
Upper
4
(for some models)
2 83 61 4 5
When you press the Power button, the light of the most recently fi nished
cycle turns on. When the cycle you selected has fi nished, all other indicator
lights are turned off and the "End" light is illuminated for some minutes.
Then, the Power turns off automatically.
Select the appropriate wash cycle depending on the soil level of your dishes.
After you select a cycle, the Cycle On light for that cycle lights.
Also, the Upper and Lower zone lights turn on by default.
If you want to change the cycle once it has started, press the Reset
button and turn off the dishwasher. Then, turn on the dishwasher again
and select a new cycle.
The default cycle is Normal.
When turning on the dishwasher after it has been reset, the last run
cycle is selected by default.
Select this option to clean the dishwasher TUB. Run with the dishwasher
empty. The Upper and Lower options are turned off by default.
When you select Upper, only the upper rack nozzle is activated.
The lower nozzle will not operate.
Use this feature to wash a small load of dishes or glasses placed in the upper
rack.
When you select Upper, place dishes, glasses, etc. in the upper rack
only. The dishwasher will not wash items placed in the lower rack.
Selecting Upper reduces both the cycle time and the amount of electricity
consumed.
7 9
10 11
English - 8
DW80H9950-00149A-02_EN_140609.indd 8DW80H9950-00149A-02_EN_140609.indd 8 2014-06-09 6:05:212014-06-09 6:05:21
Page 9
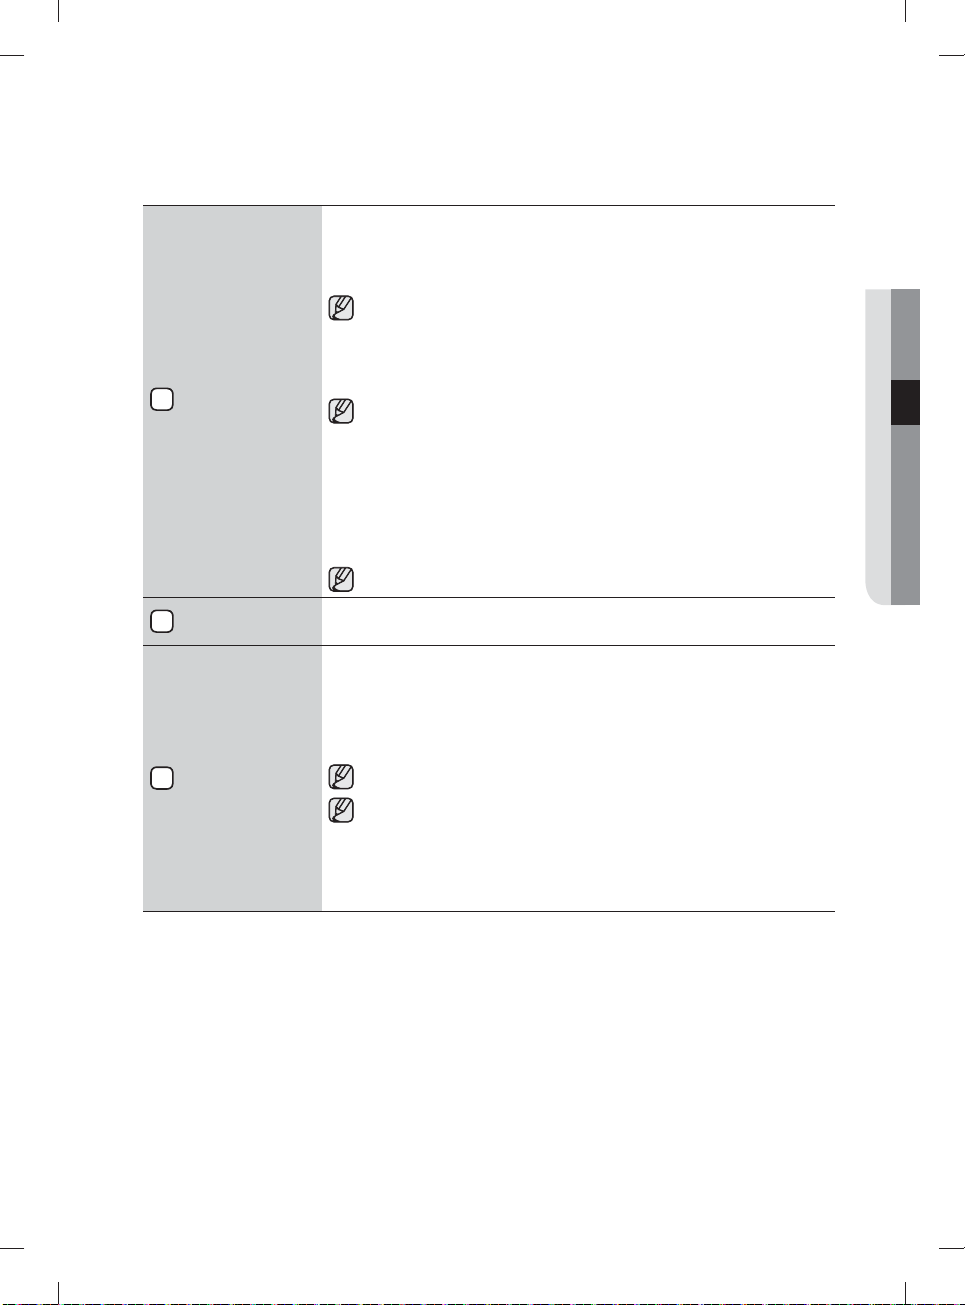
Lower
(for some models) /
5
Lower Rack - Only
(for some models)
Speed Booster
6
(for some models)
7
Sanitize
When you select Lower (Lower Rack - Only), only the lower rack nozzle is
activated. The upper nozzle will not operate.
Use this feature to wash a small load of dishes or glasses placed in the lower
rack.
When you select Lower (Lower Rack - Only), place items, glasses, etc.
in the lower rack only. The dishwasher will not wash items placed in the
upper rack.
Selecting Lower (Lower Rack - Only) reduces both the cycle time and the
amount of electricity consumed.
If you want to wash heavily soiled items such as pots and pans, select
the Zone Booster option. (This option consumes slightly more water
and energy.)
Select Zone Booster L option: Applies intensive washing power to the
left part of the lower rack.
Select Zone Booster R option: Applies intensive washing power to the
right part of the lower rack.
Select both Zone Booster L & R options: Applies intensive washing
power to the whole lower rack.
Selecting a Zone Booster option does not turn off the Upper Nozzle.
Select this option to reduce washing time.
With the Sanitize option selected, the water temperature is increased to
162˚F (72 ˚C) in the fi nal rinse cycle for high temperature sanitization.
If you select the Sanitize option, the "Sanitize" lamp blinks when the water
temperature reaches the sanitary temperature (over 155 ˚F (68 ˚C)), and then
remains illuminated until the Sanitize option ends. When you open the door
or press the Power button, the "Sanitize" lamp turns off.
You cannot select the Sanitize option if you select the Delicate cycle.
The Sanitize feature operates in accordance with NSF/ANSI Standard
184 for Residential Dishwashers. Certifi ed residential dishwashers are
not intended for licensed food establishments. Your dishwasher is NSF
Certifi ed.
The cycle that is NSF certifi ed is the Normal Cycle with the Sanitize option
selected.
03 using your dishwasher
English - 9
DW80H9950-00149A-02_EN_140609.indd 9DW80H9950-00149A-02_EN_140609.indd 9 2014-06-09 6:05:212014-06-09 6:05:21
Page 10

using your dishwasher
Use this option when you want to dry your dishes more completely.
The temperature rises to 162 ˚F (72 ˚C) in the fi nal rinse cycle and dry time is
increased.
If you select the this option, electricity consumption is increased.
The next time you use the dishwasher, the Dry+ option will be selected
automatically and applied to the next cycle. You can turn off the Dry+ option
by pressing the Dry+ button.
You cannot select the Dry+ option if you select the Delicate cycle.
8
Dry+ / Child Lock
9
Display
*Child Lock : This option allows you to lock the buttons on the control panel -
except the Power button - so children cannot accidently start the dishwasher
by pressing the buttons on the panel. Only the Power button remains active.
To lock or unlock the buttons on the control panel, press and hold the
Dry+/Child Lock button for three (3) seconds.
- When the Power is On : Press and hold the "Dry+/Child Lock" button for
three (3)seconds.
- When the Power is Off : Push the Power button fi rst, and then press and
hold the "Dry+/Child Lock" button for three (3) seconds.
-
Child Lock
options or start the dishwasher when
Displays cycle time and remaining hours and minutes, Delay Start hours, and
Error messages.
If an error occurs during an operation, an error message is displayed with a
warning sound.
Refer to the information codes page.
remains active until you turn it off. You cannot select cycles or
Child Lock indicator
Turns on if the Child Lock is set (or the dishwasher is in the standby or
-
pause modes).
- Turns off while the dishwasher is operating.
- When Child Lock is on, the Child Lock indicator blinks for several
seconds if any button except the Power button is pressed.
Self Clean indicator (for some models)
- Turns on when the Self Clean option is enabled (or the dishwasher is
in the standby or pause modes), but turns off while the dishwasher is
operating.
- Blinks for 5 seconds every 20 to 22 cycles.
- The cycle counter disappears when the Self Clean operation is
complete or when the dishwasher reaches the 23rd cycle without the
Self Clean cycle being used. (The Reset or Self Clean operation is not
counted by the cycle counter.)
Rinse Refi ll indicator
- Turns on if the dishwasher runs out of rinse aid (or the dishwasher is in
the standby or pause modes).
- Turns off while the dishwasher is operating.
Child Lock
is on.
English - 10
DW80H9950-00149A-02_EN_140609.indd 10DW80H9950-00149A-02_EN_140609.indd 10 2014-06-09 6:05:212014-06-09 6:05:21
Page 11

Lack of salt indicator (*applicable models only)
rns on when the water softener runs out of salt. (or the dishwasher is
- Tu
in the standby or pause modes.)
- Turns off while the dishwasher is operating.
Delay a cycle for up to 24 hours in one-hour increments. To increase the delay
start time, press or hold the Delay Start button. The hour displayed indicates
the time at which the wash will be started.
10
Delay Start
11
Start
You can select options (Self Clean, Upper, Lower, Speed Booster, Sanitize, Dry+, Delay Start) before
starting a cycle. If you change the cycle after selecting an option, the original cycle is reset.
To prevent the touchpad from losing response sensitivity, follow these instructions:
- Touch the center of each keypad using one fi nger. Do not push.
- Clean the touch control’s surface regularly with a soft, damp cloth.
- Be careful not to touch more than one touch key pad at a time, except as directed.
When you pause a cycle by opening the door during operation, press the Start button before closing
the door to continue the cycle.
- After setting the delay time, press the Start button, and then close the
door to start the cycle.
- If you want to change the delay time once the dishwasher has started,
press the Reset button and turn off the dishwasher. Then, turn on the
dishwasher again and select a new cycle with a new delay setting.
To start a cycle, press the Start button before closing the door.
*Reset : To cancel a currently running cycle and drain the dishwasher, press
and hold the Start button for three (3) seconds.
Once the dishwasher is reset, select a cycle and option, and then press Start
to restart the dishwasher.
03 using your dishwasher
OO X
English - 11
DW80H9950-00149A-02_EN_140609.indd 11DW80H9950-00149A-02_EN_140609.indd 11 2014-06-09 6:05:212014-06-09 6:05:21
Page 12

using your dishwasher
CYCLE SELECTOR
1 2 3 4 5
1
Auto
2
Normal
3
Heavy Use this cycle for heavily soiled dishes.
4
Delicate
5
Express 60'
This cycle detects the level of soil and automatically initiates the optimal cycle
after a few minutes of operation.
Use this cycle for normally soiled dishes.
The energy-usage label is based on this cycle.
Use this cycle for soiled fragile items such as glasses.
You cannot select the Zone Booster, Dry+, or Sanitize option if you select
this cycle.
Use this cycle when you need to wash dishes quickly. It takes about 1 hour.
You cannot select the Speed Booster or Zone Booster option if you select
this cycle.
PROGRESS DISPLAYS
DW80H997 Series DW80H995 / DW80H994 Series
1
Wash
2
Rinse
3
Dry
4
Clean
When the dishwasher starts a cycle, the light that corresponds to the current operation turns on to
show the progress of the cycle.
DW80H993 Series
On DW80H993 series dishwashers, the Pocket LED lights when the dishwasher operates.
When the dishwasher is in a wash portion of a cycle, the fi rst
arrow light is illuminated and the remaining time is displayed.
When the dishwasher is in a rinse portion of a cycle, the
second arrow light is illuminated and the remaining time is
displayed.
When the dishwasher is in a drying portion of a cycle, the third
arrow light is illuminated and the remaining time is displayed.
After the dishwasher has completed all portions of a cycle, all
other indicator lights are turned off.
The dishwasher chimes and End is displayed for several
minutes.
English - 12
DW80H9950-00149A-02_EN_140609.indd 12DW80H9950-00149A-02_EN_140609.indd 12 2014-06-09 6:05:212014-06-09 6:05:21
Page 13

BASIC GUIDELINES
1. Open the door and load your dishes (see page 16 ~ 19).
- Place dishes into the upper and lower racks, unless you have selected the Upper or Lower
(Lower Rack - Only) option.
- Remove any food remains from the dishes before placing them in the rack(s).
- After placing the dishes into the racks, turn the upper nozzles to make sure none of the dishes will
block nozzle rotation.
- Make sure the dishes will not prevent the detergent dispenser from opening.
2. Add detergent to the dispenser (see page 20).
- Make sure to use only automatic dishwasher detergent.
- Refer to "Using detergent" on how to add detergent.
3. Press the Power button.
- When you press the Power button, the cycle light of the most recently fi nished cycle lights up.
- If "Rinse Refi ll" Indicator is illuminated, you should refi ll the rinse aid dispenser to improve washing
and drying performance.
4. Select an appropriate cleaning cycle depending on the soil level of the dishes. (see pages 12 and 24).
- Press the appropriate Cycle button.
- When you press a Cycle button, the cycle indicator light is illuminated.
- For information about selecting a cycle according to the soil level of the dishes, see "Cycle
selector".
5. Press the Start button, and then close the door.
- Push the racks back so that they are in place, and then press the Start button and close the door.
- Make sure to close the door fi rmly. If the door is slightly ajar, the selected cycle will not start
automatically.
- The dishwasher will start draining after a few seconds, and then start the cycle you selected.
6. When the wash cycle is completed.
- The "End" light illuminates and the dishwasher sounds a chime.
- The power is automatically turned off after a few minutes.
If you want to load more dishes or pause the dishwasher while it is already running, make sure to open
the door slowly and carefully as there is a possibility of injury from the hot steam or water inside the
CAUTION
dishwasher.
(If the door is opened while the dishwasher is running, a safety mechanism is activated and stops the
cycle.) To resume operation, press the Start button, and then close the door.
Note that adding dishes several minutes after the dishwasher started operating may affect the
performance.
You should use rinse aids for better drying performance. You can further improve drying performance
by also selecting the Dry+ option.
03 using your dishwasher
English - 13
DW80H9950-00149A-02_EN_140609.indd 13DW80H9950-00149A-02_EN_140609.indd 13 2014-06-09 6:05:222014-06-09 6:05:22
Page 14
using your dishwasher
Touch Controls
Touch controls allow you to operate the dishwasher easily.
• They are convenient to operate, requiring only a soft touch.
• Have a simple and stylish design.
• Are easy to clean.
If you have children or you want to clean the Control Interface, we recommend activating
the Child Lock feature to lock the control buttons.
- Children will not be able to accidently start the dishwasher by touching the controls with
this option selected.
- If a cycle is running, the buttons will not respond. (except the Power button and
ChildLock & Reset options)
- If dishwasher is off, only the Power button responds.
Delay Start
When you select the Delay Start option, your dishwasher will begin the selected cycle when the
delay time expires.
The Water Refl ector Interference Alarm:
• The water refl ector interference feature automatically detects obstacles in the tub. If it detects
an obstacle, the display blinks and the dishwasher chimes for several minutes. If an obstacle
is detected at the end a cycle, End blinks for several minutes.
• Remove any obstacles in the bottom of the dishwasher.
Setting Mode
The Setting Mode lets you change the dishwasher's sound setting and LED brightness setting.
To enter the Setting mode, press the Delay Start + Sanitize buttons for 3 seconds while
the dishwasher is on. Press the Sanitize button to select a sub-setting menu and press the
Delay Start button to change a setting.
- Sound Setting: Press the Sanitize button until "S on" or "SoFF" is displayed. To change
the setting, press the Delay Start button. "SoFF" means that the sound is off for all cycles.
The dishwasher maintains the Sound Setting you have selected until you change it.
- Pocket LED Brightness Setting: Press the Sanitize button until "B0 ~ B5" is displayed.
The higher the number, the brighter the LEDs. To change the setting on an H9930 series
dishwasher, press the Delay Start button.
When using the dishwasher, try to arrange the dishes properly as described on page 16.
WARNING
• You should remove food remains such as bones, fruit seeds, etc. and any other waste such
as toothpicks, paper, etc. from the dishes as these may cause damage to the dishes, create
noise, or cause the dishwasher to malfunction.
• Select the appropriate cycle depending on the level of soil and the type of dishes.
• Use only the proper amount of detergent and rinsing agent.
Do not wash the following items
WARNING
• Acrylic or Aluminum items: Acrylic and aluminum items can discolor dishes with printed
gold rim decoration and mar other items.
• Dishes treated with adhesive: Treated plastics can come apart. Wood, ivory, copper, and tin
glued to dishes can come loose.
• Plastics with a temperature tolerance less than 194 ˚F (90 ˚C): Thin plastics wash and dry
poorly, and may be damaged by elevated wash temperatures.
• Tin: Tin should be washed by hand and dried immediately as it can rust.
• Wooden utensils: Wooden items can crack.
English - 14
DW80H9950-00149A-02_EN_140609.indd 14DW80H9950-00149A-02_EN_140609.indd 14 2014-06-09 6:05:222014-06-09 6:05:22
Page 15

ADJUSTING THE ANGLE OF THE PLATE SUPPORTS
You can adjust the angle of the tines in the upper rack to three different positions to match the size and
shape of your dishes. To adjust the tines, grasp the handle at the back of the rack, and then push it left or
right. See the illustration below.
In the lower rack, you can easily fold down the fold-down tines to make room for large items such as pots
and pans. Remove the rack from the dishwasher, and then fold down the tines one at a time. See the
illustration below.
Upper rack
Lower rack
03 using your dishwasher
English - 15
DW80H9950-00149A-02_EN_140609.indd 15DW80H9950-00149A-02_EN_140609.indd 15 2014-06-09 6:05:222014-06-09 6:05:22
Page 16
using your dishwasher
ADJUSTING THE HEIGHT OF THE UPPER RACK
You can adjust the height of the upper rack in your Samsung dishwasher so that the lower rack can
accommodate larger sized dishes. Depending on where you set the upper rack height, the lower rack can
accommodate plates up to 12 in. (30 cm) in diameter and the upper rack can accommodated plates up to
8 in. (20 cm) in diameter.
1. To lower the upper rack by 2 in. (5 cm), pull
the adjust handles located at the left and
right sides of the upper rack, and then push
the upper rack downwards slightly at the
same time.
2. To raise the upper rack, just pull the upper
rack upwards. The adjuster handle will latch
and the upper rack will move to the high
position.
We recommend adjusting the height of
the upper rack before loading dishes into
CAUTION
the rack. If you adjust the the rack after
loading the dishes, you may damage the
dishes. If you do not adjust with left and right handle together, the dishwasher door may not close
properly.
Pull out the upper rack from the tub until it is fully revealed before adjusting the upper rack.
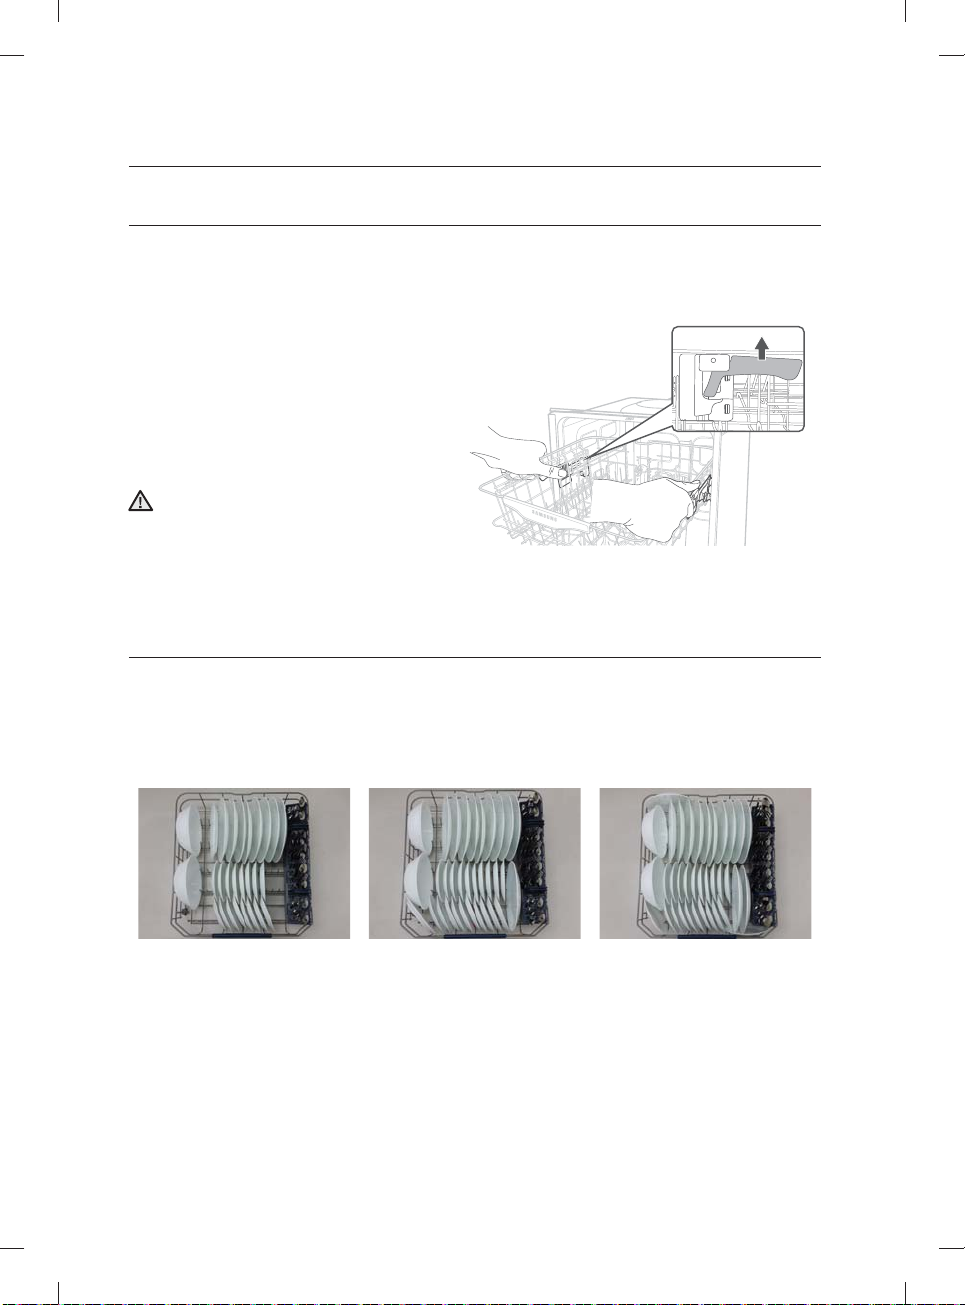
LOADING THE LOWER RACK
Load cookware (pots, pans, etc.), up to 12 in. (30 cm) in diameter into the lower rack. The lower rack has
been especially designed for dinner dishes, soup bowls, plates, pots, lids, and casserole dishes.
Load your plates into the center column of the rack so that their top sides face each other. Load large items
such as pans and pots into the dishwasher so their inner cavities face downwards. We recommend loading
cups, stemware, and small plates into the upper rack.
See the recommended loading patterns below.
8 place setting 10 place setting 12 place setting
English - 16
DW80H9950-00149A-02_EN_140609.indd 16DW80H9950-00149A-02_EN_140609.indd 16 2014-06-09 6:05:222014-06-09 6:05:22
Page 17
Loading large items into the Zone Booster Areas
You can load large items such as pots and pans into the left
and/or right sides of the lower rack - the Zone Booster areas for more effective cleaning. When you select the Zone Booster
option, an additional, powerful jet is activated and directed at
items in the Zone Booster areas. Make sure pot handles and
other items do not interfere with the rotation of the nozzles and
the water refl ector.
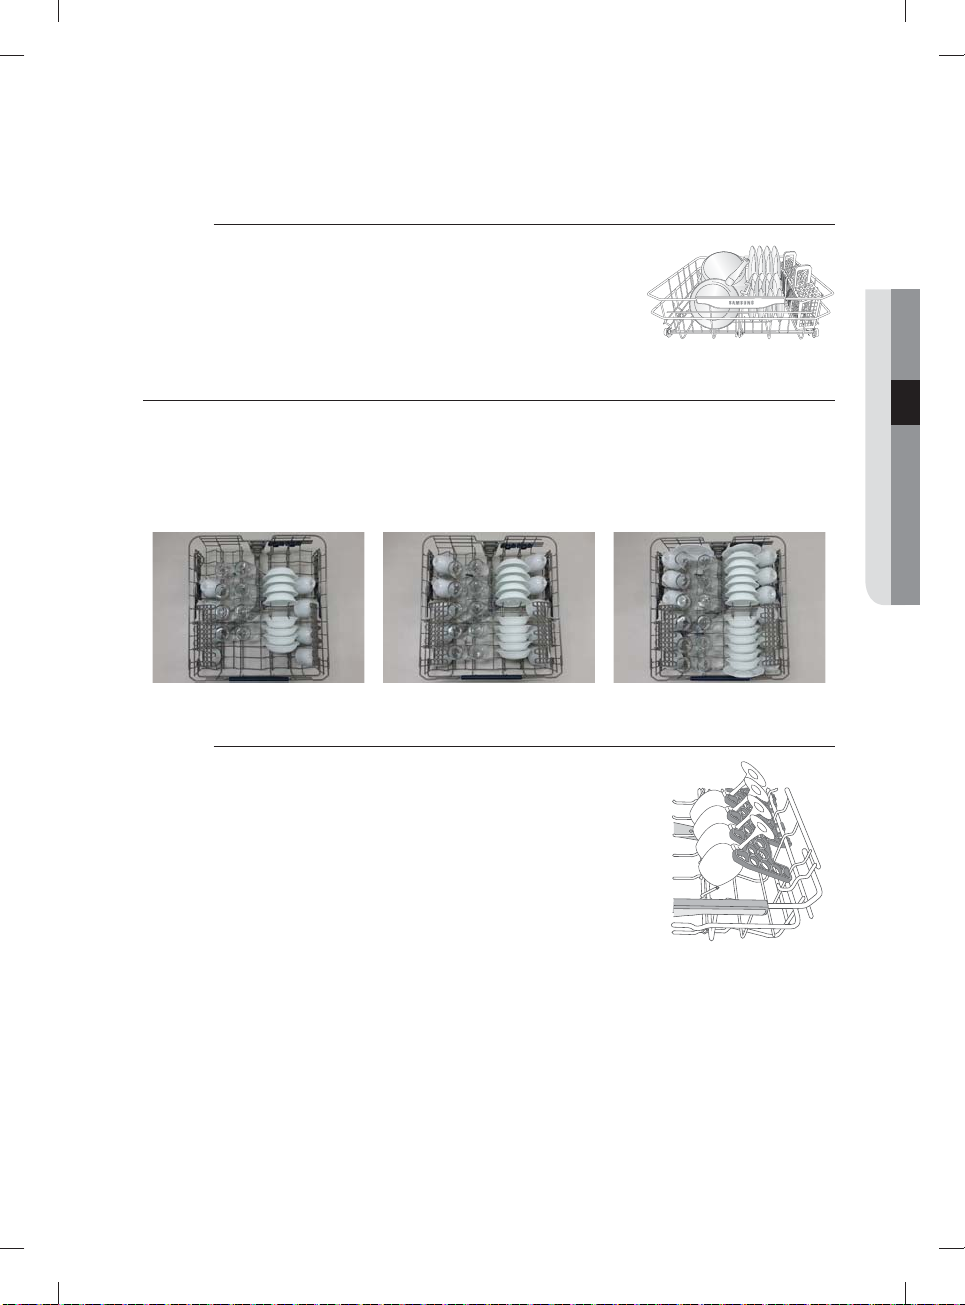
LOADING THE UPPER RACK
The upper rack has been designed for small plates, mugs, glasses, and plastic items marked "dishwasher
safe". Load your plates into the dishwasher so that their top sides face each other.
Make sure the loaded dishes do not interfere with the rotation of the nozzle which is located at the bottom
of the upper rack. (Check this by rotating the nozzle by hand.)
When loading dishes, pull the upper rack out suffi ciently so you can load it without striking the counter
above.
8 place setting 10 place setting 12 place setting
Using the glass support
You can load cups or glasses onto the glass support. This is also
very convenient for washing wine glasses. Hang your wine glasses
onto the pegs of the glass support.
You can fold the glass support back when it is not being used.
03 using your dishwasher
English - 17
DW80H9950-00149A-02_EN_140609.indd 17DW80H9950-00149A-02_EN_140609.indd 17 2014-06-09 6:05:252014-06-09 6:05:25
Page 18

using your dishwasher
USING THE 3RD (CUTLERY) RACK (FOR SOME MODELS)
Loading the cutlery rack
<Place items randomly or regularly.>
In addition to the standard cutlery basket in the lower rack, some models come with a cutlery rack.
The cutlery rack is best suited for fl atware and cooking or serving utensils. You can place cutlery and
utensils randomly or regularly on the cutlery rack.
Heavily soiled utensils or items with baked on foods should be placed in the lower cutlery basket for
the most effective cleaning.
Removing the Cutlery Rack
The entire cutlery rack can be removed if more space is needed on the upper rack for larger items.
Loading the cutlery pad
<Place items randomly or regularly.>
Some models come with a removable, foldable cutlery pad along with a cutlery rack. To use,
place the pad on the cutlery rack. and then place cutlery and serving and cooking utensils on the
pad in a random or regular fashion. After a wash cycle is complete, and the cutlery and utensils
are dry, you can fold the pad and carry the cutlery and utensils in the pad to their storage
locations.
Use caution when folding and moving the rack with a long thin item inside the pad.
The item may fall out in this process, causing physical injury.
WARNING
It is advisable not to move the pad while it is wet.
Wait until the pad is dry.
The pad dries quickly after a wash cycle when exposed to
air for a few minutes.
English - 18
DW80H9950-00149A-02_EN_140609.indd 18DW80H9950-00149A-02_EN_140609.indd 18 2014-06-09 6:05:282014-06-09 6:05:28
Page 19
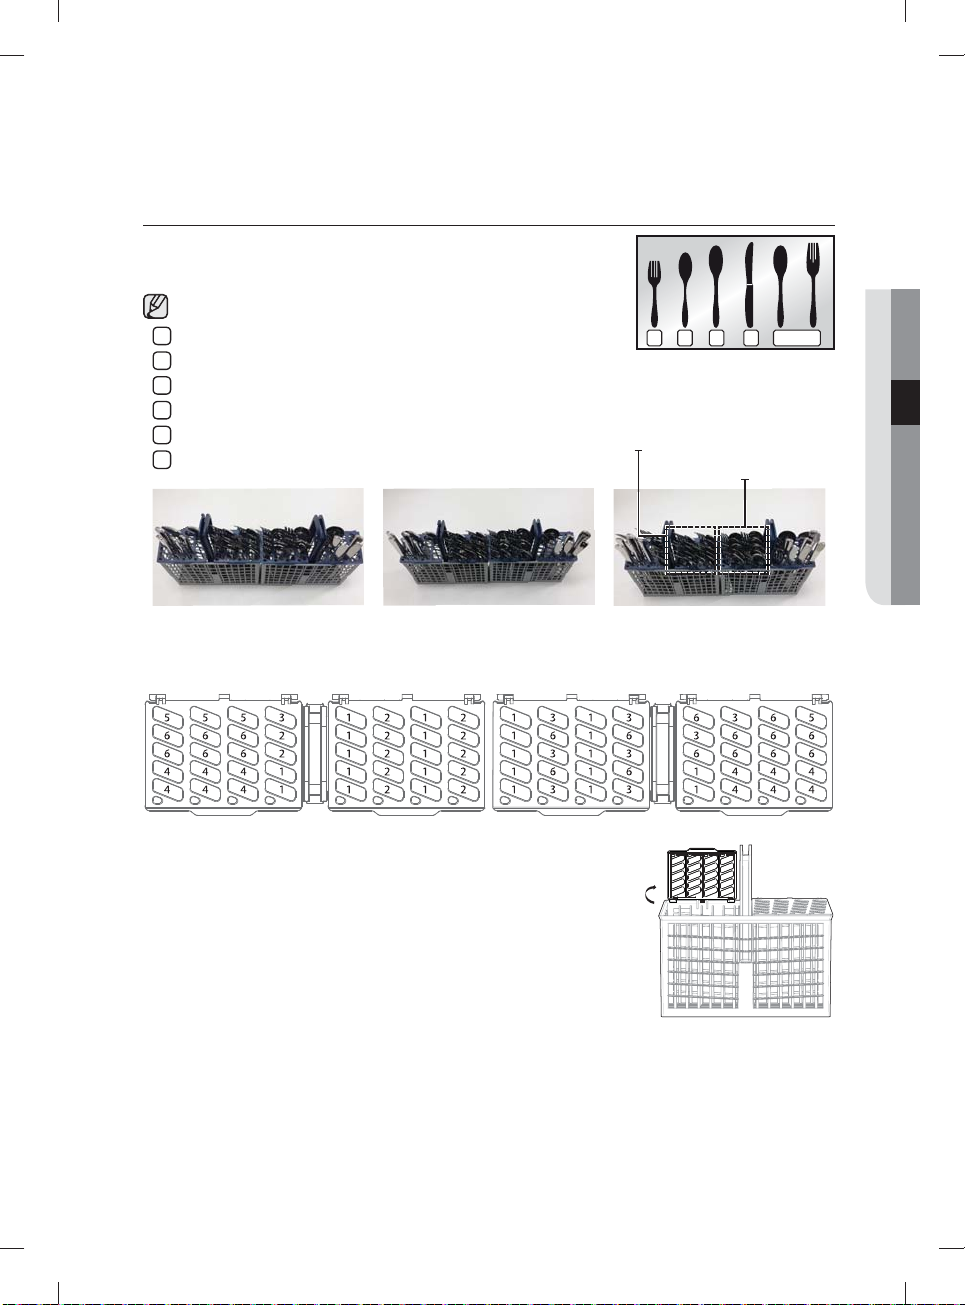
USING THE CUTLERY BASKET
The cutlery basket consists of two compartments.
You can place each knife, spoon, or fork separately into the cutlery stands
in the basket’s covers to prevent chipping and discoloration.
DO NOT let any item extend through the bottom.
Forks
1
Tea spoons
2
Dinner spoons
3
Knives
4
Serving spoons and Serving forks
5
Remaining items
6
8 place setting 10 place setting 12 place setting
The cutlery stands as seen from above with the suggested placement of cutlery items. Match the numbers
in the diagram to the numbers in the list of cutlery items above.
1 3 42 5
Salad fork, Tea spoon
Dinner fork, Dinner spoon
03 using your dishwasher
You can use the cutlery basket with the covers open.
Refer to the illustration to the right.
English - 19
DW80H9950-00149A-02_EN_140609.indd 19DW80H9950-00149A-02_EN_140609.indd 19 2014-06-09 6:05:282014-06-09 6:05:28
Page 20

using your dishwasher
USING DETERGENT
All dishwasher cycles require detergent in the detergent compartment.
Add the correct amount of detergent for the selected cycle to ensure the best performance.
Use dishwasher detergent only. Regular detergent produces too much foam, which may decrease the
dishwasher’s performance or cause it to malfunction.
CAUTION
Do not swallow dishwasher detergent. Avoid breathing in the fumes. Dishwasher detergent contains
irritants and caustic chemicals that can induce respiratory conditions. If you have swallowed
WARNING
dishwasher detergent or inhaled the fumes, seek medical attention immediately.
Keep dishwasher detergent out of the reach of children.
WARNING
Filling the detergent dispenser
1. Open the detergent dispenser fl ap by pushing the detergent
dispenser release catch.
The fl ap is always open at the end of a dishwashing cycle.
2. Add the recommended amount of detergent to the main
wash detergent compartment.
3. Close the fl ap by sliding it to the left and then pressing it
down.
4. For better cleaning result, especially if you have very dirt
items, pour a small amount (about 1/2 of an ounce or 15g)
of detergent onto the door.
The additional detergent will activate during the pre-wash
phase.
English - 20
DW80H9950-00149A-02_EN_140609.indd 20DW80H9950-00149A-02_EN_140609.indd 20 2014-06-09 6:05:322014-06-09 6:05:32
Page 21
The cover opens automatically to dispense the detergent during the wash.
CYCLE
Auto, Normal 3/4 oz (20 g) 1/3 oz (10 g)
Heavy, Express 60' 1 oz (30 g) 1/2 oz (15 g)
Delicate 3/4 oz (20 g) 1/5 oz (5 g)
The numbers inside the dispenser refer to grams.
USING RINSE AID
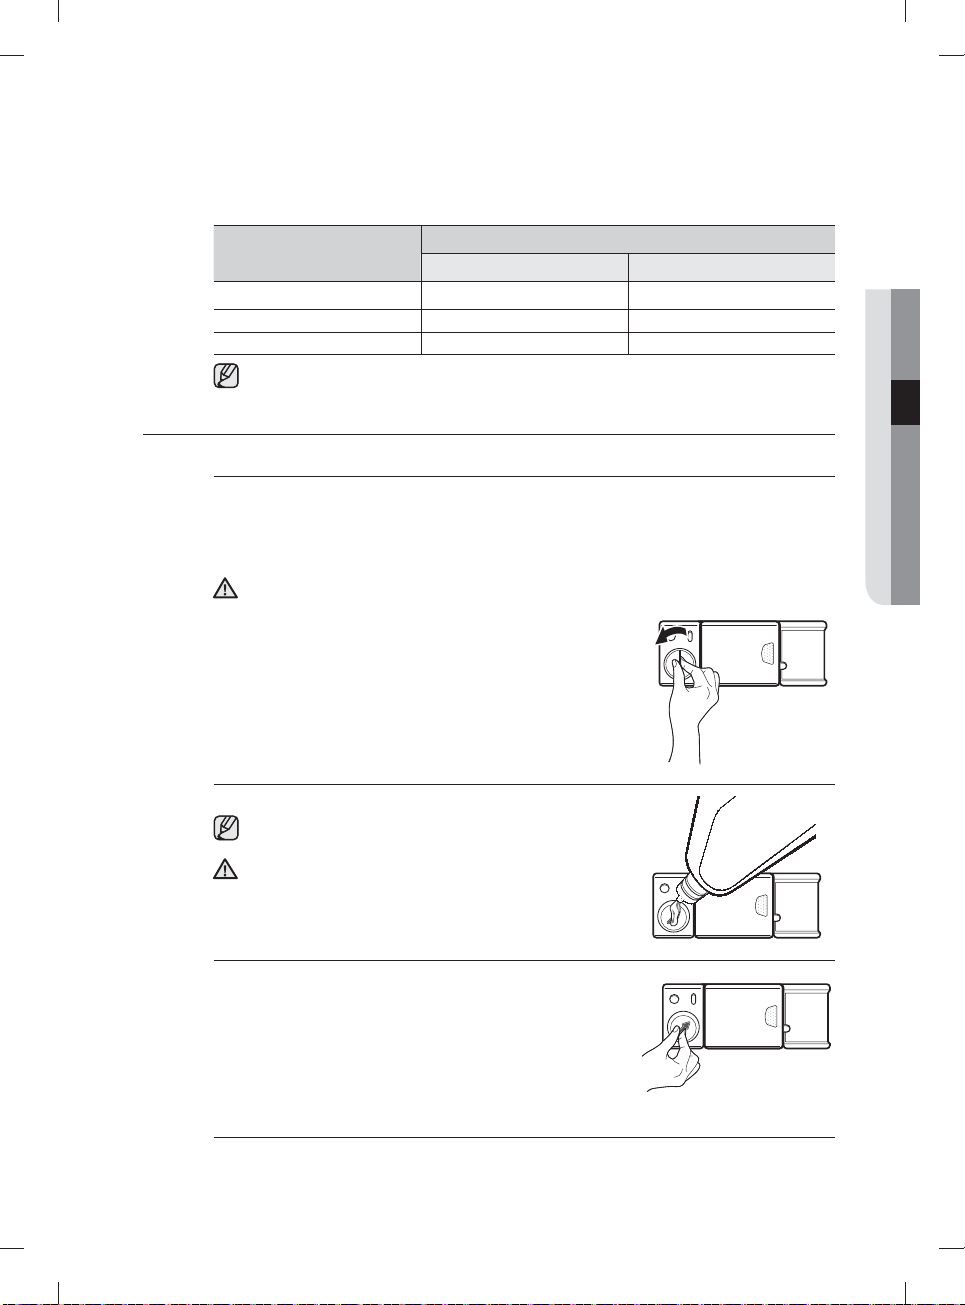
Filling the rinse aid reservoir
When the Rinse Refi ll indicator lights up on the control panel, refi ll with rinse aid.
Your dishwasher has been designed to use liquid rinse aid only.
Using a powdered rinse aid will clog the reservoir opening and cause the dishwasher to
malfunction.
Rinse aid improves the drying performance of the dishwasher.
Do not add regular detergent to the rinse aid reservoir.
CAUTION
1. Remove the rinse aid reservoir cap by rotating it
counterclockwise.
AMOUNT OF DETERGENT
Main wash dispenser Onto the door for pre-wash
03 using your dishwasher
2. Fill the rinse aid reservoir with rinse aid.
Use the viewing port when fi lling the rinse aid reservoir.
Do not fi ll the reservoir above the full level indicator.
Excess rinse aid can overfl ow during the wash cycle.
CAUTION
3. Turn the rinse aid indicator dial to a number between 1 and
6. The higher the number, the more rinse aid the dishwasher
uses. If you are unable to rotate the rinse aid dial easily, try
using a coin.
4. Close the rinse aid reservoir cap by rotating it clockwise.
English - 21
DW80H9950-00149A-02_EN_140609.indd 21DW80H9950-00149A-02_EN_140609.indd 21 2014-06-09 6:05:322014-06-09 6:05:32
Page 22
cleaning and maintaining your
dishwasher
Keeping your dishwasher clean improves its performance, reduces unnecessary
repairs, and lengthens its life.
CLEANING THE EXTERIOR
It’s best to clean spills on the outside of your dishwasher as they occur. Use a soft, damp cloth on the
control panel to gently wipe away spills and dust. Do not use benzene, wax, thinner, chlorine bleach, or
alcohol. These materials may discolor the door panel and other outer surfaces and cause stains. Do not
clean the dishwasher by sprinkling water over it and avoid letting water come into contact with any of the
electrical parts.
If your dishwasher has a stainless steel door panel, you can clean it with a stainless steel cleaner for
Home Appliances or similar product using a clean, soft cloth.
CLEANING THE INTERIOR
Clean the interior of your dishwasher periodically to remove any dirt or food particles. Wipe the inside of
the dishwasher and the inner part of the door with a wet dishcloth. We recommend fi lling the detergent
dispenser with dish detergent, and then running the dishwasher empty periodically using the Self Clean
option. To keep the cutlery pad clean, turn it over. This will keep your dishwasher clean.
If white spots and odor are still present in your dishwasher, run the Self Clean option with the dishwasher
empty and without detergent until it fl ushes. Then, interrupt the cycle and put an 8 ounce cup of white
vinegar into the lower basket. Close the dishwasher and let the cycle fi nish.
Do not remove the tub front seal (the long rubber seal enclosing the opening of the dishwasher).
CAUTION
CLEANING THE NOZZLES
If your dishwasher does not seem to be cleaning adequately or the nozzles seem clogged, you can clean
each of the nozzles. When removing the nozzles, take care as they may break.
Upper nozzle
1. Pull the upper rack towards the front
2. Check whether the nozzle holes are
clogged by food particles.
3. If cleaning is needed, remove the nozzle.
4. To remove the nozzle, unfasten and remove
the nut, and then remove the nozzle.
5. Clean the nozzle, re-insert it, and fasten the
nut.
6. When fastening the nut, turn it fi rmly by
hand.
7. Check whether the nozzle is engaged
correctly by rotating it by hand.
English - 22
DW80H9950-00149A-02_EN_140609.indd Sec5:22DW80H9950-00149A-02_EN_140609.indd Sec5:22 2014-06-09 6:05:322014-06-09 6:05:32
Page 23

Top nozzle
1. Check whether the nozzle holes are
clogged by food particles.
2. If cleaning is needed, remove the nozzle.
3. To remove the nozzle, pull out the upper
rack fi rst, unfasten the nozzle cap by turning
it counterclockwise, and then remove the
upper nozzle.
4. Clean the nozzle, re-insert it, and then
fasten the nozzle cap to the nozzle by
turning the cap clockwise.
5. Check whether the nozzle is engaged
correctly by rotating it by hand.
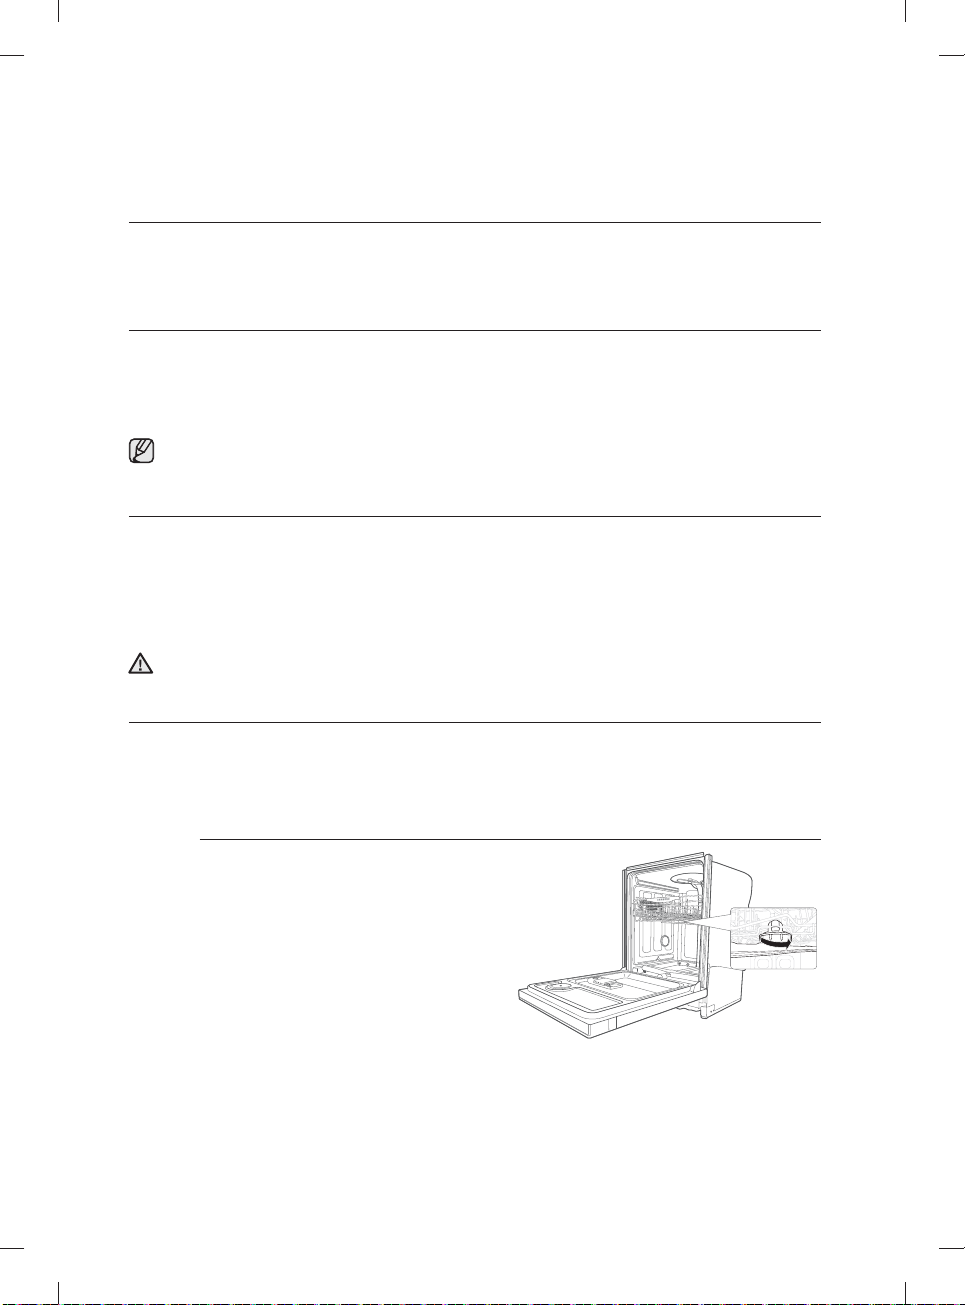
CLEANING THE FILTER
1. Remove the lower rack fi rst.
2. Rotate the fi lter handle counterclockwise to unfasten the fi lter
compartment door.
3. Remove the fi lter door, and then the
fl at micro fi lter underneath.
1
2
Cap
nozzle
04 cleaning and maintaining
Filter with handle Flat micro fi lter
4. Remove any dirt or other remains
from the micro fi lter and the fi lter door,
and then rinse them under running
water.
5. Re-install the fl at micro fi lter, and then the fi lter door.
6. Rotate the fi lter door handle clockwise to lock the fi lter door.
Once a month, clean the fi lter for better washing performance.
If the fi lter door does not close properly, cleaning performance will be decreased.
CAUTION
STORING YOUR DISHWASHER
If you need to store your dishwasher for an extended period of time, fi rst drain and disconnect it. If you
leave water in the hoses and internal components, you can damage the dishwasher.
After draining and disconnecting the dishwasher, be sure to turn off the water supply valve and circuit
breaker.
English - 23
DW80H9950-00149A-02_EN_140609.indd Sec5:23DW80H9950-00149A-02_EN_140609.indd Sec5:23 2014-06-09 6:05:332014-06-09 6:05:33
Page 24

cycles
CYCLE CHART
( : Basic, : Optional step)
Cycle Pre-wash1 Pre-wash2 Main wash Rinse1 Rinse2 Rinse3 Rinse4
Auto
Normal
Heavy
Delicate
Express 60'
138 ˚F (59 ˚C)
143 ~ 118 ˚F
(62 ~ 48 ˚C)
149 ˚F (65 ˚C)
122 ˚F (50 ˚C)
140 ˚F (60 ˚C)
Cycle
Auto
Normal
Heavy
Delicate
Express 60'
Last Rinse
[Sanitize]
136 ˚F (58 ˚C)
[162 ˚F (72 ˚C)]
136 ˚F (58 ˚C)
[162 ˚F (72 ˚C)]
158 ˚F (70 ˚C)
[162 ˚F (72 ˚C)]
149 ˚F (65 ˚C)
149 ˚F (65 ˚C)
[162 ˚F (72 ˚C)]
Dry Water [gal(ℓ)]
6.5 ~ 3.6
(24.6 ~ 13.6 ℓ)
7.1 ~ 2.4
(27.0 ~ 9.0 ℓ)
6.1
(23.1 ℓ)
4.4
(16.6 ℓ)
3.7
(14 ℓ)
• The numbers in parentheses in the Last Rinse column represent the temperature when you select
Sanitize.
• When you select the Auto or Normal cycle, you can eliminate optional steps depending on the soil level
of the dishes.
• The water consumption and wash time varies depending on the steps or options you add, and on the
pressure and temperature of the supplied water.
• When the Rinse Aid is empty, wash time and Last Rinse temperature can increase a little.
English - 24
DW80H9950-00149A-02_EN_140609.indd Sec6:24DW80H9950-00149A-02_EN_140609.indd Sec6:24 2014-06-09 6:05:332014-06-09 6:05:33
Page 25

troubleshooting
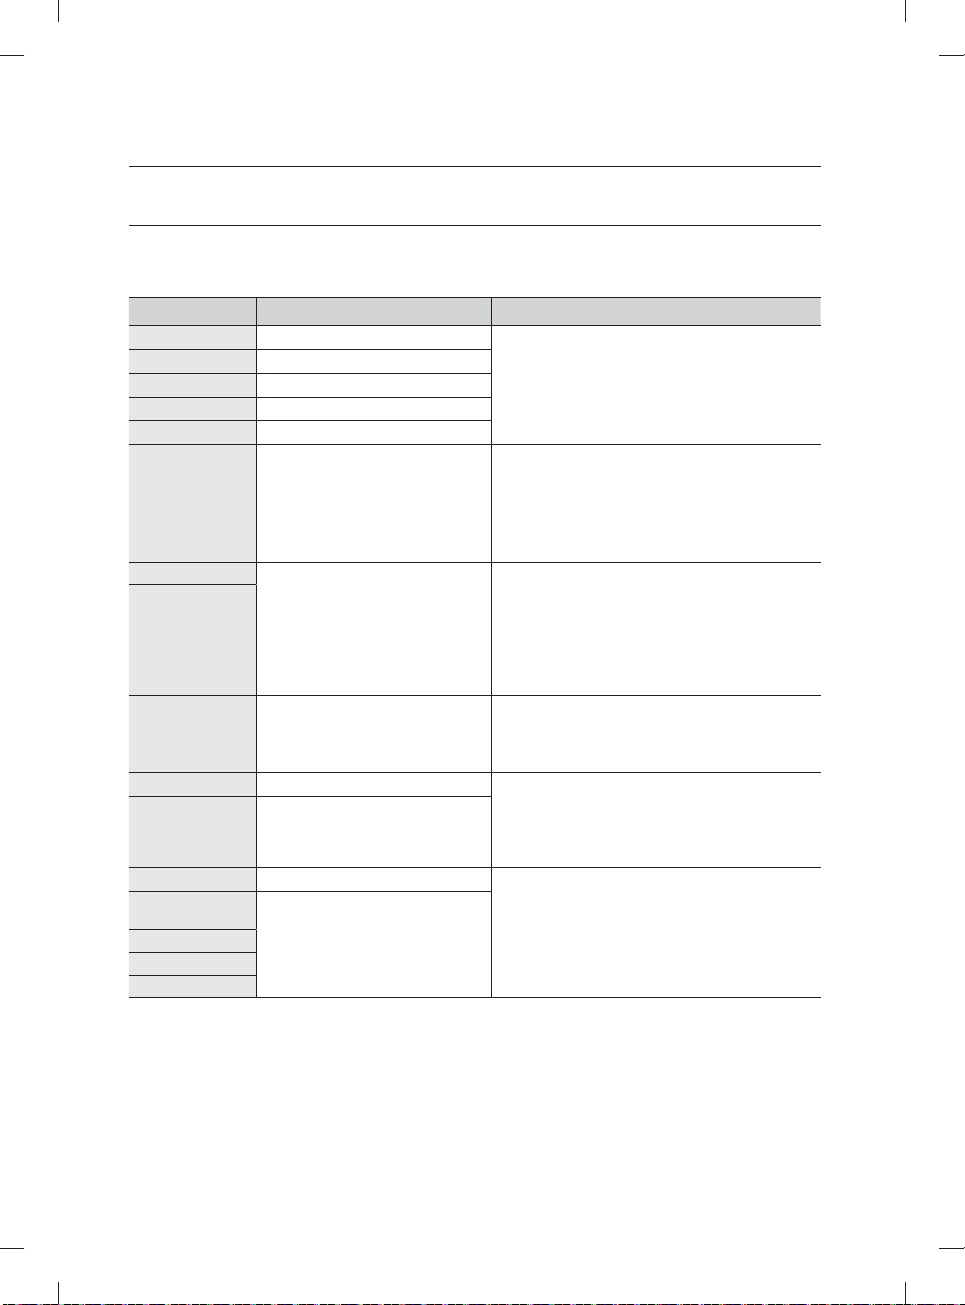
CHECK THESE POINTS IF YOUR DISHWASHER…
PROBLEM POSSIBLE CAUSE SOLUTION
Will not start.
It’s taking too long
with an operation or
cycle.
There are food
particles remaining
on dishes.
(Not cleaning
properly.)
The door is not closed completely. Check if the door is latched and closed
No cycle is selected. Select a proper cycle.
The power cable is not connected. Connect the power cable properly.
The water supply does not work. Check if the water supply valve is open.
The Control Panel is locked. Unlock the child lock, (See page 10.)
A circuit breaker is open. Reset the circuit breaker.
Cold water is being supplied. Check if the water supply line is connected
The cycle selected was unsuitable. Select a cycle according to the number and
The water temperature is low. Connect the water supply line to a hot
Low water pressure. The water pressure should be between
The water is too hard. Use a commercial dishwasher cleaner.
Dishwasher detergent was not
used.
Detergent remains in the
dispenser.
There is no rinse aid. Check the dispenser and add rinse aid.
A nozzle is clogged. Clean the nozzle. See pages 22 and 23.
completely.
to a hot water supply.
(Additional time is required to heat cold
water.)
soil level of the dishes, as directed in this
manual.
water supply.
For best performance, the temperature of
the supplied water should be 120 ˚F (49 ˚C).
20and 120 psi (140 ~ 830 kPa).
Use high-quality, fresh detergent with rinse
aid.
Use automatic dishwasher detergent.
We recommend a powder or gel type
dishwasher detergent.
Make sure large items such as cookie
sheets, cutting boards, or contaners, etc.
are not blocking the detergent dispenser
and preventing it from opening properly.
Rearrange the dishes so they do not
interfere with detergent dispenser
operation.
Use liquid type rinse aid.
06 troubleshooting
The dishes are improperly loaded.
Too many dishes have been
loaded.
Rearrange the dishes so they do not
interfere with nozzle rotation and detergent
dispenser operation.
Load only an appropriate number of dishes.
Load your dishes as recommended.
(See page 16.)
English - 25
DW80H9950-00149A-02_EN_140609.indd Sec7:25DW80H9950-00149A-02_EN_140609.indd Sec7:25 2014-06-09 6:05:332014-06-09 6:05:33
Page 26

troubleshooting
PROBLEM POSSIBLE CAUSE SOLUTION
Leaves glasses with
a light fi lm.
Leaves a yellow
or brown fi lm on
the inside of the
dishwasher.
Does not dry dishes
well.
Has a bad odor.
Is too noisy.
Does not have a
smoothly rotating
nozzle.
The water supplied is soft and too
much detergent was used.
Aluminum dishes were included in
the wash load.
This is caused by coffee and tea
soils.
There is no rinse aid in the
dispenser.
The temperature of the water
is low when the dishwasher is
running.
Too many dishes have been
loaded.
Glasses and cups with concave
bottoms hold water. This water
may spill onto other items when
unloading.
Water was left over from an
incomplete cycle.
The Drain Hose is obstructed. Contact a qualifi ed service technician to
The dishwasher is not used daily
or soiled dishes are left in unit too
long.
Sound is generated when the
dispenser cover is open and the
drain pump is operating in an early
stage.
The dishwasher is not level. Ensure the dishwasher is level.
Foreign material (a screw, a plastic
piece) is in the pump chamber.
There is a ‘chopping’ sound
because a nozzle is bumping
against the dishes.
The nozzle hole is clogged with
food particles.
The nozzle is blocked by a dish or
pot and cannot rotate.
Underload the dishwasher and use a rinse
aid to minimize this.
Remove the marks on the dishes using a
low sensitivity cleaner.
Remove the soils using a spot cleaner.
Check the dispenser and add rinse aid.
Use a liquid type rinse aid.
Connect the water supply line to a hot
water supply.
Use rinse aid with the Sanitize option.
Proper loading of items can affect drying.
Load your dishes as recommended.
(See page 16.)
After fi nishing the cycle, empty the lower
rack fi rst and then the upper rack. This will
prevent water dripping from the upper rack
onto the dishes in the lower rack.
Insert detergent without loading dishes,
and run the Normal cycle to clean the
dishwasher.
remove any obstruction from the drain
hose.
With the dishwasher empty and no
detergent, place a glass with 8 ounces of
vinegar upright into the lower rack, and
then run a Normal cycle.
This is normal operation.
Contact a qualifi ed service technician to
remove foreign material from the pump
chamber.
Rearrange the dishes.
Clean the nozzle hole.
See pages 22 and 23.
After placing the dishes into the racks,
rotate the nozzles by hand to check
whether any of the dishes interfere with
them.
English - 26
DW80H9950-00149A-02_EN_140609.indd Sec7:26DW80H9950-00149A-02_EN_140609.indd Sec7:26 2014-06-09 6:05:332014-06-09 6:05:33
Page 27

PROBLEM POSSIBLE CAUSE SOLUTION
Water won’t
pump out of the
dishwasher.
Has a bent upper
rack after loading
dishes.
The drain is clogged. Contact a qualifi ed service technician to
remove any obstruction from the drain hose
and check the drain pump operation.
The dishes are not loaded
properly.
Load your dishes as recommended.
(See page 16.)
06 troubleshooting
English - 27
DW80H9950-00149A-02_EN_140609.indd Sec7:27DW80H9950-00149A-02_EN_140609.indd Sec7:27 2014-06-09 6:05:332014-06-09 6:05:33
Page 28
troubleshooting
INFORMATION CODES
The Control Panel displays information codes to help you understand what is occurring with your
dishwasher. If you see any of the codes listed below, you should select the Reset option, and then follow
the instructions in the Solution column.
CODE SYMBOL MEANING SOLUTION
tE
HE1
HE
1E
PE
7E
4E
4E5
5E
(5E1 ~ 5E5)
OE
LE
bE2
3E
(3E1 ~ 3E4)
AE
bE3
AE6
For any codes not listed above, call 1-800-SAMSUNG (726-7864)
Temperature Sensor error
Heater error
High temperature heating error
Low water level error
Half load function error
Refl ector function error
Water supply error
Drain error
Over-level water error Functional error. Close the water supply valve
Leakage
Button error
Communication Error
Functional error. With the dishwasher empty, add
detergent, and then run a cycle.
If the problem continues, go to your house
circuit breaker panel, set the dishwasher’s
circuit breaker switch to off, and then contact an
authorized Samsung service center.
Check if fl atware or dishware interferes with
the water refl ector and the water refl ector does
not operate as a result.
If this happens without any interference, close
the water supply valve and contact an authorized
Samsung service center.
Check whether the water supply valve is closed,
the water supply is suspended, or the water
inlet valve or line is frozen or clogged by foreign
particles.
If the problem continues, close the water supply
valve, and then contact an authorized Samsung
service center.
Check whether the drain hose is clogged or
folded. If the problem continues, close the water
supply valve, and then contact an authorized
Samsung service center.
and go to your house circuit breaker panel, set
the dishwasher’s circuit breaker switch to off,
and then contact an authorized Samsung service
center.
Functional error. Turn off the dishwasher and try
to start it again.
If the problem continues, contact an authorized
Samsung service center.
English - 28
DW80H9950-00149A-02_EN_140609.indd Sec7:28DW80H9950-00149A-02_EN_140609.indd Sec7:28 2014-06-09 6:05:332014-06-09 6:05:33
Page 29
appendix
HELPING THE ENVIRONMENT
• Your dishwasher is manufactured from recyclable materials. If you decide to dispose of it, please
observe local waste disposal regulations. Cut off the power cable so that the appliance cannot be
connected to a power source.
• Remove the door so that animals and small children cannot get trapped inside the appliance.
• Do not exceed the detergent quantities recommended in the detergent manufacturers’ instructions.
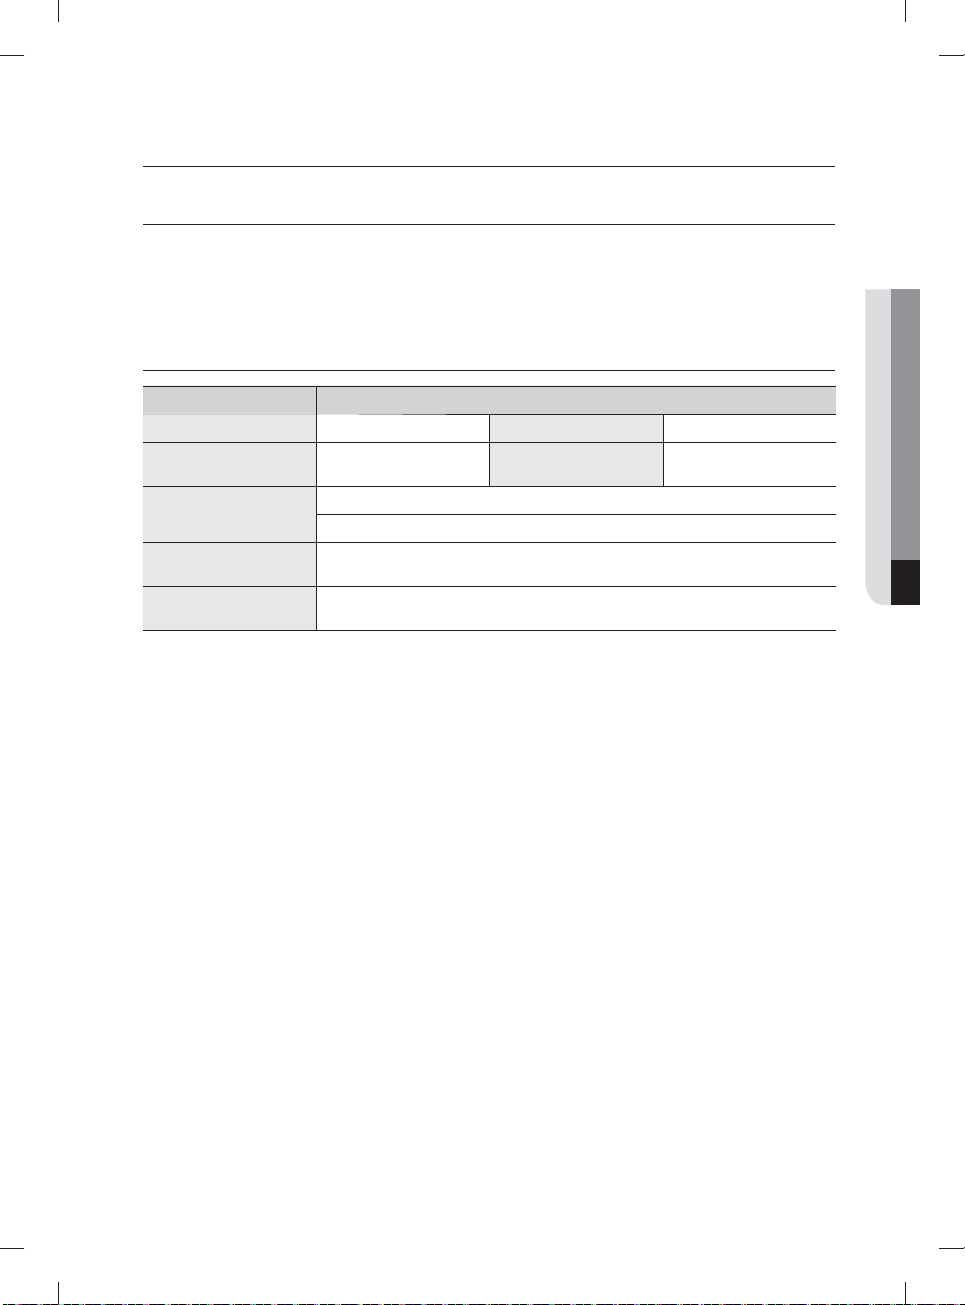
SPECIFICATIONS
Model DW80H9970US / DW80H9950US / DW80H9940US / DW80H9930US
Type Built-in Dishwasher Wash capacity 15 place setting
Power
Rated power uasge
Dimensions
(Width × Depth × Height)
Weight
120 V / 60 Hz AC only, 15
A circuit breaker
Wash Motor : 60 ~ 100 W
Heater : 1100 W
23⅞ x 25 x 33⅞ in. (605 x 636 x 860 mm)
Unpacked 97 lb (44 Kg) [DW80H9970US / DW80H9950US / DW80H9930US]
Unpacked 93 lb (42 Kg) [DW80H9940US]
Used water pressure
20 ~ 120 psi
(140 ~ 830 kPa)
07 appendix
English - 29
DW80H9950-00149A-02_EN_140609.indd Sec8:29DW80H9950-00149A-02_EN_140609.indd Sec8:29 2014-06-09 6:05:332014-06-09 6:05:33
Page 30

warranty
SAMSUNG DISHWASHER
LIMITED WARRANTY TO ORIGINAL PURCHASER
This SAMSUNG brand product, as supplied and distributed by USA: SAMSUNG ELECTRONICS AMERICA,
INC./CANADA: SAMSUNG ELECTRONICS CANADA, INC. (SAMSUNG) and delivered new, in the original
carton to the original consumer purchaser, is warranted by SAMSUNG against manufacturing defects in
materials and workmanship for a limited warranty period of:
One (1) Year All Parts and Labor, Five (5) Years Linear Motion Parts*, Printed Circuit Board, Racking (Labor
Charges for in-home service starting from the 2nd year is customer’s responsibility), and Lifetime Stainless
Door Liner & Tub for leakage. Samsung will replace your unit with same or current model (that is better or
equivalent in functionality) (Labor related to replacement is customer’s responsibility).
* Linear Motion Parts: Belt operating AC motor [Motor Geared], Belt V-Timing, Rail, Holder Rail [Front Up,
Front Low].
This limited warranty begins on the original date of purchase, and is valid only on products purchased and
used in the United States/Canada. To receive warranty service, the purchaser must contact SAMSUNG for
problem determination and service procedures. Warranty service can only be performed by a SAMSUNG
authorized service center. The original dated bill of sale must be presented upon request as proof of
purchase to SAMSUNG or SAMSUNG’s authorized service center. SAMSUNG will provide in-home service
during the warranty period at no charge, subject to availability within the contiguous United States/Canada.
In home service is not available in all areas.
To receive in-home service, product must be unobstructed and accessible to the service agent. If service
is not available, SAMSUNG may elect to provide transportation of the product to and from an authorized
service center.
SAMSUNG will repair, replace, or refund this product at our option and at no charge as stipulated herein,
with new or reconditioned parts or products if found to be defective during the limited warranty period
specifi ed above. All replaced parts and products become the property of SAMSUNG and must be returned
to SAMSUNG. Replacement parts and products assume the remaining original warranty, or ninety (90)
days, whichever is longer.
This limited warranty covers manufacturing defects in materials and workmanship encountered in normal,
noncommercial use of this product and shall not apply to the following: damage that occurs in shipment;
delivery and installation; applications and uses for which this product was not intended; altered product or
serial numbers; cosmetic damage or exterior fi nish; accidents, abuse, neglect, fi re, water, lightning, or other
acts of nature or God; use of products, equipment, systems, utilities, services, parts, supplies, accessories,
applications, installations, repairs, external wiring or connectors not supplied or authorized by SAMSUNG
that damage this product or result in service problems; incorrect electrical line voltage, fl uctuations and
surges; customer adjustments and failure to follow operating instructions, maintenance and environmental
instructions that are covered and prescribed in the instruction book; product removal and reinstallation;
problems caused by pest infestations. This limited warranty does not cover problems resulting from
incorrect electric current, voltage or supply, light bulbs, house fuses, house wiring, cost of a service call for
instructions, or fi xing installation errors. SAMSUNG does not warrant uninterrupted or error-free operation of
the product.
English - 30
DW80H9950-00149A-02_EN_140609.indd Sec10:30DW80H9950-00149A-02_EN_140609.indd Sec10:30 2014-06-09 6:05:332014-06-09 6:05:33
Page 31

EXCEPT AS SET FORTH HEREIN, THERE ARE NO WARRANTIES ON THIS PRODUCT EITHER EXPRESS
OR IMPLIED, AND SAMSUNG DISCLAIMS ALL WARRANTIES INCLUDING, BUT NOT LIMITED TO, ANY
IMPLIED WARRANTIES OF MERCHANTABILITY, INFRINGEMENT OR FITNESS FOR A PARTICULAR
PURPOSE. NO WARRANTY OR GUARANTEE GIVEN BY ANY PERSON, FIRM, OR CORPORATION WITH
RESPECT TO THIS PRODUCT SHALL BE BINDING ON SAMSUNG. SAMSUNG SHALL NOT BE LIABLE
FOR LOSS OF REVENUE OR PROFITS, FAILURE TO REALIZE SAVINGS OR OTHER BENEFITS, OR ANY
OTHER SPECIAL, INCIDENTAL OR CONSEQUENTIAL DAMAGES CAUSED BY THE USE, MISUSE, OR
INABILITY TO USE THIS PRODUCT, REGARDLESS OF THE LEGAL THEORY ON WHICH THE CLAIM IS
BASED, AND EVEN IF SAMSUNG HAS BEEN ADVISED OF THE POSSIBILITY OF SUCH DAMAGES.
NOR SHALL RECOVERY OF ANY KIND AGAINST SAMSUNG BE GREATER IN AMOUNT THAN THE
PURCHASE PRICE OF THE PRODUCT SOLD BY SAMSUNG AND CAUSING THE ALLEGED DAMAGE.
WITHOUT LIMITING THE FOREGOING, PURCHASER ASSUMES ALL RISK AND LIABILITY FOR LOSS,
DAMAGE, OR INJURY TO PURCHASER AND PURCHASER’S PROPERTY AND TO OTHERS AND THEIR
PROPERTY ARISING OUT OF THE USE, MISUSE, OR INABILITY TO USE THIS PRODUCT. THIS LIMITED
WARRANTY SHALL NOT EXTEND TO ANYONE OTHER THAN THE ORIGINAL PURCHASER OF THIS
PRODUCT, IS NONTRANSFERABLE AND STATES YOUR EXCLUSIVE REMEDY.
Some states or provinces do not allow limitations on how long an implied warranty lasts, or the exclusion
or limitation of incidental or consequential damages, so the above limitations or exclusions may not apply
to you. This warranty gives you specifi c rights, and you may also have other rights, which vary from state to
state or province to province.
To obtain warranty service, please contact SAMSUNG at:
In USA
Samsung Electronics America, Inc.
85 Challenger Road Ridgefi eld Park, NJ 07660
1-800-SAMSUNG(726-7864)
www.samsung.com/us/support
In CANADA
Samsung Electronics Canada Inc.
2050 Derry Road West, Mississauga, Ontario L5N 0B9 Canada
1-800-SAMSUNG(726-7864)
www.samsung.com/ca/support (English)
www.samsung.com/ca_fr/support (French)
English - 31
DW80H9950-00149A-02_EN_140609.indd Sec10:31DW80H9950-00149A-02_EN_140609.indd Sec10:31 2014-06-09 6:05:332014-06-09 6:05:33
Page 32

bit.ly/samsungdishwashers
Questions or Comments?
Country CALL OR VISIT US ONLINE AT
U.S.A 1-800-SAMSUNG (726-7864) www.samsung.com/us/support
CANADA 1-800-SAMSUNG (726-7864)
DW80H9950-00149A-02_EN_140609.indd Sec10:32DW80H9950-00149A-02_EN_140609.indd Sec10:32 2014-06-09 6:05:332014-06-09 6:05:33
www.samsung.com/ca/support (English)
www.samsung.com/ca_fr/support (French)
DD68-00149A-02
Page 33

Lave-vaisselle
manuel d'utilisation
Série DW80H997
Série DW80H995
Série DW80H994
Série DW80H993
Un monde de possibilités
Nous vous remercions d'avoir choisi ce produit Samsung.
DW80H9950-00149A-02_CFR_140609.indd 1DW80H9950-00149A-02_CFR_140609.indd 1 2014-06-09 6:05:482014-06-09 6:05:48
Page 34

sommaire
INSTALLATION DU LAVE-VAISSELLE
6
UTILISATION DU LAVE-VAISSELLE
8
NETTOYAGE ET ENTRETIEN DU
LAVE-VAISSELLE
22
PROGRAMMES
24
6 Déballage du lave-vaisselle
6 Contrôle du contenu
7 Conditions indispensables à l'installation
8 Tableau de commande
12 Sélecteur de programme
12 Affi chages de la progression
13 Instructions de base
15 Réglage de l'inclinaison des porte-assiettes
16 Réglage de la hauteur du panier supérieur
16 Chargement du panier inférieur
17 Chargement du panier supérieur
18 Utilisation du 3
certains modèles)
19 Utilisation du panier à couverts
20 Utilisation du produit de lavage
21 Utilisation du produit de rinçage
22 Nettoyage de la partie extérieure
22 Nettoyage de la partie intérieure
22 Nettoyage des gicleurs
23 Nettoyage du fi ltre
23 Entreposage de votre lave-vaisselle
24 Tableau des programmes
ème
panier (couverts) (sur
DÉPANNAGE
25 Consultez cette rubrique si vous rencontrez
l'un des problèmes suivants...
28 Codes d'erreur
25
ANNEXE
29 Protection de l'environnement
29 Caractéristiques techniques
29
Français - 2
DW80H9950-00149A-02_CFR_140609.indd Sec9:2DW80H9950-00149A-02_CFR_140609.indd Sec9:2 2014-06-09 6:05:512014-06-09 6:05:51
Page 35

consignes de sécurité
Félicitations pour l'acquisition de votre nouveau lave-vaisselle Samsung. Ce manuel
contient des informations importantes concernant l'installation, l'utilisation et
l'entretien de votre appareil. Veuillez le lire attentivement afi n de profi ter pleinement
des nombreux avantages et fonctions qu'offre votre lave-vaisselle.
CE QUE VOUS DEVEZ SAVOIR SUR LES CONSIGNES DE SÉCURITÉ
Les avertissements et les consignes de sécurité importantes contenus dans
ce manuel ne sont pas exhaustifs. Il est de votre responsabilité de faire appel à
votre bon sens et de faire preuve de prudence et de minutie lors de l'installation,
de l'entretien et de l'utilisation du lave-vaisselle.
CONSIGNES DE SÉCURITÉ IMPORTANTES
Signifi cation des icônes et des symboles utilisés dans ce manuel:
Risques ou manipulations dangereuses susceptibles d'entraîner des blessures
graves, voire mortelles.
AVERTISSEMENT
ATTENTION
Afi n de réduire les risques d'incendie, d'explosion, d'électrocution ou de
blessures lors de l'utilisation du lave-vaisselle, vous devez respecter ces règles
de sécurité de base:
Risques ou manipulations dangereuses susceptibles d'entraîner des blessures
légères ou des dégâts matériels.
NE PAS tenter.
NE PAS démonter.
01 consignes de sécurité
NE PAS toucher.
Suivez scrupuleusement les consignes.
Débranchez la fi che de la prise murale.
Assurez-vous que l'appareil est relié à la terre afi n d'éviter tout risque
d'électrocution.
Contactez le service d'assistance technique.
Remarque
Ces signes et symboles d'avertissement visent à éviter que vous ou quelqu'un de votre
entourage ne se blesse.
Veuillez vous y conformer.
Lorsque vous aurez terminé de lire ce manuel, conservez-le dans un endroit sûr afi n de
pouvoir le consulter ultérieurement.
CONSERVEZ PRÉCIEUSEMENT CES CONSIGNES
Français - 3
DW80H9950-00149A-02_CFR_140609.indd Sec1:3DW80H9950-00149A-02_CFR_140609.indd Sec1:3 2014-06-09 6:05:512014-06-09 6:05:51
Page 36

consignes de sécurité
AVERTISSEMENT: Lorsque vous utilisez le lave-vaisselle, respectez les consignes de base suivantes:
AVERTISSEMENT
1. Lisez toutes les consignes de sécurité avant d'utiliser le lave-vaisselle.
2. Utilisez le lave-vaisselle uniquement pour l'utilisation prévue.
3. Utilisez uniquement des produits de lavage et des produits mouillants spécialement conçus pour lave-
vaisselle et maintenez-les hors de portée des enfants.
4. Lors du chargement d'objets à laver:
- positionnez les objets tranchants de manière à ce qu'ils ne risquent pas d'endommager le joint de
la porte et
- chargez les couteaux tranchants avec le manche vers le haut afi n de réduire le risque de coupures.
5. Ne lavez pas d'objets en plastique à moins qu'ils ne portent la mention «Lavable au lave-vaisselle»
(ou équivalent). Pour les objets en plastique dépourvus de cette mention, consultez les
recommandations du fabricant.
6. Ne touchez pas l'ÉLÉMENT CHAUFFANT pendant ou immédiatement après utilisation.
7. Ne faites jamais fonctionner le lave-vaisselle si tous les panneaux du CHÂSSIS ne sont pas en place.
8. Ne modifi ez pas les touches de commande.
9. Ne forcez pas, ne vous asseyez pas et ne marchez pas sur la porte ou les paniers du lave-vaisselle.
10. Afi n de limiter les risques de blessures, ne laissez pas les enfants jouer dans ou sur un lave-vaisselle.
11. Dans certaines conditions, de l'hydrogène peut être généré dans un système d'eau chaude qui n'a pas
été utilisé pendant deux semaines voire plus. L'HYDROGÈNE EST UN GAZ EXPLOSIF. Si le système
d'eau chaude est resté inutilisé pendant une telle durée, avant d'utiliser le lave-vaisselle, ouvrez tous
les robinets d'eau chaude et laissez l'eau couler plusieurs minutes. Cela permet d'évacuer l'hydrogène
éventuellement présent. Le gaz étant infl ammable, ne fumez pas et n'utilisez pas de fl amme nue lors de
cette opération.
12. Retirez la porte du compartiment de lavage d'un ancien lave-vaisselle avant de le rapporter du service
de réparation ou de le mettre au rebut.
AVERTISSEMENT :
Ce produit contient des produits chimiques connus de l'État de la Californie pour être à l'origine de cancers
AVERTISSEMENT
et d'effets nocifs sur la reproduction.
• Après déballage du lave-vaisselle, maintenez les emballages hors de portée des enfants.
ATTENTION
• Le lave-vaisselle est très lourd. N'essayez pas de le déplacer ou de le soulever seul. Au minimum deux
personnes sont nécessaires pour déplacer le lave-vaisselle et ainsi éviter tout risque de blessures.
• À l'instar de tout type d'équipement électrique, utilisant l'eau et comportant des parties mobiles, des
risques potentiels existent.
• N'installez pas le lave-vaisselle près d'appareils électriques. Éloignez-le des fl ammes nues.
• Installez et mettez à niveau votre lave-vaisselle sur un sol non recouvert de moquette et capable de
supporter son poids.
• Votre lave-vaisselle doit être correctement relié à la terre. Ne le branchez jamais à une prise non reliée à
la terre. Reportez-vous page 7 pour plus d'informations sur la mise à la terre de votre lave-vaisselle.
• Connectez le fi l de terre au connecteur de terre vert du bornier.
• Une fois le lave-vaisselle installé, vérifi ez que le tuyau d'évacuation est correctement raccordé et que
les raccords du tuyau ne présentent aucune fuite. Si le tuyau d'évacuation est mal fi xé, cela risque
d'entraîner des dégâts matériels.
• Le tuyau d'alimentation en eau est susceptible de se rompre. Avec le temps, il devient moins fl exible.
Vérifi ez-le régulièrement. S'il est gonfl é, craquelé, coupé ou s'il présente une fuite d'eau, remplacez-le
immédiatement.
CONSERVEZ PRÉCIEUSEMENT CES CONSIGNES
Français - 4
DW80H9950-00149A-02_CFR_140609.indd Sec1:4DW80H9950-00149A-02_CFR_140609.indd Sec1:4 2014-06-09 6:05:512014-06-09 6:05:51
Page 37

• Pour une utilisation sûre de cet appareil, il est fortement recommandé de vous familiariser avec ses
fonctions et de rester vigilant lors de son utilisation.
• Ne mettez pas d'essence, de solvants ou autres matières infl ammables dans le lave-vaisselle.
Ne lavez pas d'objets ayant été exposés à ce type de matières.
• Maintenez le produit de lavage pour lave-vaisselle hors de la portée des enfants.
Ce type de produits est dangereux pour la santé. Contenant des éléments de polissage, ils sont
corrosifs. Évitez tout contact avec la peau ou les yeux.
• N'exercez aucune pression sur la porte lorsqu'elle est ouverte car cela risquerait d'endommager le
lave-vaisselle et vous pourriez vous blesser.
• Ne laissez pas les enfants jouer dans ou sur le lave-vaisselle. Ils risqueraient de se blesser ou
d'endommager le lave-vaisselle.
• Débranchez le câble d'alimentation (ou coupez le disjoncteur) avant de procéder à l'entretien de votre
lave-vaisselle.
• Ne réparez pas et ne remplacez pas vous-même des éléments du lave-vaisselle. Le démontage, les
réparations et les modifi cations ne doivent être effectués que par des techniciens de maintenance
agréés. Toute intervention de la part d'une personne non autorisée risque d'annuler la garantie.
• Avant de mettre votre lave-vaisselle au rebut, retirez la porte du compartiment de lavage ou le loquet
de la porte de manière à ce que des enfants ou de petits animaux ne puissent pas être emprisonnés à
l'intérieur.
• Si le lave-vaisselle reste inutilisé pendant une période prolongée, coupez l'arrivée d'eau.
• Ce lave-vaisselle est prévu pour une utilisation privée uniquement.
AVANT D'UTILISER VOTRE LAVE-VAISSELLE
AVERTISSEMENT
AVERTISSEMENT
Risque de basculement
- N'utilisez pas le lave-vaisselle avant qu'il ne soit correctement installé.
- N'appuyez pas sur la porte ouverte.
- Ne placez pas de poids excessif sur la porte ouverte.
01 consignes de sécurité
Risque d'électrocution
Le non-respect de ces consignes peut entraîner un incendie ou une électrocution et avoir des
conséquences mortelles.
- Reliez le lave-vaisselle à la terre.
- Connectez le fi l de terre au connecteur de terre vert de la boîte de jonction.
- N'utilisez pas de rallonge.
CONSERVEZ PRÉCIEUSEMENT CES CONSIGNES
Français - 5
DW80H9950-00149A-02_CFR_140609.indd Sec1:5DW80H9950-00149A-02_CFR_140609.indd Sec1:5 2014-06-09 6:05:512014-06-09 6:05:51
Page 38

installation du lave-vaisselle
Gicleur intégré au
panier supérieur
Veillez à ce que votre installateur respecte soigneusement ces consignes afi n de
garantir le bon fonctionnement de votre lave-vaisselle et d'éviter tout risque de
blessures lors de son utilisation.
DÉBALLAGE DU LAVE-VAISSELLE
• Après la livraison de votre nouveau lave-vaisselle, déballez-le soigneusement et vérifi ez qu'il n'a pas été
endommagé. Si tel est le cas, précisez-le sur le bordereau de livraison et gardez-en une copie.
N'installez pas le lave-vaisselle et contactez le service client Samsung au numéro fi gurant ci-dessous.
• Si l'appareil n'est pas endommagé, vous pouvez procéder à l'installation. Si vous effectuez vous-même
l'installation, lisez d'abord le guide d'installation et suivez les instructions qui y fi gurent.
• Après déballage du lave-vaisselle, maintenez les emballages hors de portée des enfants pour des raisons de sécurité.
CONTRÔLE DU CONTENU
Une fois votre lave-vaisselle déballé, assurez-vous que vous avez reçu toutes les pièces illustrées ci-dessous.
Si votre lave-vaisselle a été endommagé lors du transport ou si des pièces sont manquantes, contactez le
service client Samsung au 1-800-SAMSUNG (726-7864)
Compartiment du produit de
Tableau de commande
Gicleur intégré au
panier supérieur
Accessoires - Manuel d'utilisation/d'installation, Kit d'installation, Tuyau d'évacuation, Support du tuyau
Grille de ventilation
d'évacuation, Collier de serrage, Plaque de protection.
Gicleur inférieur
Réfl ecteur d'eau
lavage
Panier inférieurPanier supérieur
Porte
Panier à
couverts
ème
3
panier
(disponible sur
certains modèles)
Gicleur supérieur
Base
ème
3
grille à couverts
(disponible sur
certains modèles)
Français - 6
DW80H9950-00149A-02_CFR_140609.indd Sec3:6DW80H9950-00149A-02_CFR_140609.indd Sec3:6 2014-06-09 6:05:512014-06-09 6:05:51
Page 39

CONDITIONS INDISPENSABLES À L'INSTALLATION
Mise à la terre et alimentation électrique
Afi n d'éviter tout risque d'incendie, de choc électrique ou de blessure, le câblage et la mise à la terre
doivent être conformes au National Electrical Code (Code national sur les installations électriques) ANSI/
FNPA, N°70 (dernière édition) et aux directives et règlements locaux en vigueur. Il relève de la responsabilité
du propriétaire de l'appareil de fournir une installation électrique conforme.
N'utilisez jamais de rallonge.
ATTENTION
Pendant la phase de préparation de l'installation, assurez-vous que l'alimentation électrique comporte:
• Un circuit terminal individuel 120volts, 60Hz relié uniquement au lave-vaisselle avec un fusible de 15A
ou un disjoncteur.
Votre lave-vaisselle doit être mis à la terre. En cas de dysfonctionnement ou de panne, la mise à la terre
permet de réduire le risque d'électrocution en créant un chemin de moindre résistance pour le courant
électrique.
Ne branchez jamais le câble de mise à la terre sur des canalisations en plastique ou des conduites de gaz
ou d'eau chaude.
AVERTISSEMENT
INSTRUCTIONS DE MISE À LA TERRE
Branchement permanent de l'appareil:
Cet appareil doit être connecté à une canalisation électrique permanente métallique avec mise à la terre;
si ce n'est pas le cas, un conducteur de protection doit être installé avec les conducteurs du circuit puis
connecté à la borne ou au fi l de mise à la terre de l'appareil.
Alimentation en eau
La pression d'alimentation en eau chaude doit se situer entre 20 et 120psi (140 et 830kPa).
Réglez le chauffe-eau de façon à ce que l'eau chaude se situe entre 120°F (49°C) et 149°F (65°C).
La plupart des magasins spécialisés en matériel de plomberie proposent des tuyaux d'arrivée d'eau
pouvant aller jusqu'à 10pieds (3,05mètres) de long.
Pour limiter les risques de fuite et les dommages dus à l'eau:
• Faites en sorte que les robinets soient facilement accessibles.
• Fermez les robinets lorsque le lave-vaisselle n'est pas utilisé.
• Vérifi ez régulièrement l'état des tuyaux d'arrivée d'eau (fuites).
Avant la première utilisation du lave-vaisselle, contrôlez le bon état de tous les raccordements au niveau de
la vanne et des robinets (fuites).
AVERTISSEMENT
Sol
Pour des raisons de sécurité, votre lave-vaisselle doit être installé sur un sol stable et solide.
N'installez jamais votre appareil sur une plateforme ou une structure fragile.
02 installation du lave-vaisselle
Il doit être installé conformément au manuel d'installation avant de pouvoir être utilisé.
Si le manuel d'installation n'a pas été fourni avec le lave-vaisselle, faites-en la demande en vous connectant sur le site
www.samsung.com.
Français - 7
DW80H9950-00149A-02_CFR_140609.indd Sec3:7DW80H9950-00149A-02_CFR_140609.indd Sec3:7 2014-06-09 6:05:532014-06-09 6:05:53
Page 40

utilisation du lave-vaisselle
AVERTISSEMENT: Afi n de réduire les risques d'incendie, d'électrocution ou de blessures, lisez les
CONSIGNES DE SÉCURITÉ IMPORTANTES avant de faire fonctionner cet appareil.
AVERTISSEMENT
TABLEAU DE COMMANDE
Séries DW80H997 / DW80H995 / DW80H994
Série DW80H993
1
Power (Marche)
Sélecteur de
2
programme
Self Clean
(Auto Nettoyage)
3
(disponible sur
certains modèles).
Upper (Supérieur)
4
(disponible sur
certains modèles).
2 83 61 4 5
Lorsque vous appuyez sur le bouton Power (Marche), le voyant du dernier programme
utilisé s'allume. Une fois le programme sélectionné terminé, tous les autres voyants
s'éteignent et le voyant «End (Fin)» s'allume pendant plusieurs minutes. L'alimentation
Power (Marche) est ensuite automatiquement coupée.
Cette option vous permet de sélectionner le programme de lavage approprié en fonction
du degré de salissure de votre vaisselle. Après avoir sélectionné un programme, le
voyant d'activité correspondant au programme s'allume. En outre, les voyants des zones
Upper (Supérieur) et Lower (Inférieur) s'allument par défaut.
Si vous souhaitez changer le programme une fois qu'il a démarré, appuyez sur le
bouton Reset (Réinitialiser) et éteignez le lave-vaisselle. Puis, allumez le lave-vaisselle à
nouveau et sélectionnez un nouveau programme.
Le programme par défaut est Normal.
Lorsque vous allumez le lave-vaisselle après qu'il a été réinitialisé, le dernier
programme utilisé est sélectionné par défaut.
Sélectionnez cette option pour nettoyer la cuve du lave-vaisselle. Faites fonctionner le lavevaisselle à vide. Les options Upper (Supérieur) et Lower (Inférieur) sont désactivées par
défaut.
Lorsque vous sélectionnez Upper (Supérieur), seul le gicleur du panier supérieur est activé.
Le gicleur inférieur ne fonctionnera pas.
Utilisez cette fonction pour nettoyer une petite quantité de vaisselle ou des verres placés
dans le panier supérieur.
Lorsque vous sélectionnez Upper (Supérieur), répartissez la vaisselle, les verres, etc.
uniquement dans le panier supérieur. Le lave-vaisselle ne lavera pas les objets placés
dans le panier inférieur.
Sélectionner Upper (Supérieur) réduit à la fois le temps du programme et la quantité
d'électricité consommée.
7 9
10 11
Français - 8
DW80H9950-00149A-02_CFR_140609.indd 8DW80H9950-00149A-02_CFR_140609.indd 8 2014-06-09 6:05:542014-06-09 6:05:54
Page 41

Lower (Inférieur)
(disponible sur
certains modèles) /
Lower Rack - Only
5
(Panier inférieur Seulement)
(disponible sur
certains modèles).
Speed Booster
(Accélérateur de
6
vitesse)
(disponible sur
certains modèles).
Sanitize
7
(Assainissement)
Lorsque vous sélectionnez Lower (Inférieur) (Lower Rack - Only (Panier inférieur Seulement)), seul le gicleur du panier inférieur est activé. Le gicleur intégré au panier
supérieur ne fonctionnera pas.
Utilisez cette fonction pour nettoyer une petite quantité de vaisselle ou des verres placés
dans le panier inférieur.
Lorsque vous sélectionnez Lower (Inférieur) (Lower Rack - Only (Panier inférieur
- Seulement)), répartissez les objets, les verres, etc. uniquement dans le panier
inférieur. Le lave-vaisselle ne lavera pas les articles placés dans le panier supérieur.
Sélectionner Lower (Inférieur) (Lower Rack - Only (Panier inférieur - Seulement)) réduit à
la fois le temps du programme et la quantité d'électricité consommée.
Si vous souhaitez laver de la vaisselle très sale telle que des casseroles et des poêles,
sélectionnez l'option Zone Booster.
(Cette option consomme légèrement plus d'eau et d'énergie.)
Sélectionner l'option Zone Booster L: applique la puissance de lavage intensif sur la
partie gauche du panier inférieur.
Sélectionner l'option Zone Booster R : applique la puissance de lavage intensif sur la
partie droite du panier inférieur.
Sélectionner à la fois les options Zone Booster L & R : applique la puissance de
lavage intensif sur la totalité du panier inférieur.
Sélectionner l'option Zone Booster n'éteint pas le gicleur intégré au panier supérieur.
Sélectionnez cette option pour réduire la durée de lavage.
Avec l'option Sanitize (Assainissement) sélectionnée, la température de l'eau est
augmentée jusqu'à 162°F (72°C) lors de la phase de rinçage fi nale pour un assainissement
à haute température.
Si vous sélectionnez l'option Sanitize (Assainissement), «Sanitize (Assainissement)»
le voyant clignote lorsque la température de l'eau atteint la température
d'assainissement (supérieure à 155°F (68°C)) puis reste allumé jusqu'à la fi n de
l'option Sanitize (Assainissement). Si vous ouvrez la porte ou appuyez sur le bouton
Power (Marche), le voyant «Sanitize (Assainissement)» s'éteint.
Vous ne pouvez pas sélectionner l'option Sanitize (Assainissement) si vous
sélectionnez le programme Delicate (Délicat).
La fonction Sanitize (Assainissement) opère en conformité à la norme 184 NSF/ANSI
pour les lave-vaisselle domestiques. Les lave-vaisselle domestiques certifi és ne sont
pas conçus pour une utilisation commerciale. Votre lave-vaisselle est certifi é NSF.
Le programme certifi é NSF est le programme Normal avec l'option Sanitize (Assainissement)
sélectionnée.
03 utilisation du lave-vaisselle
Français - 9
DW80H9950-00149A-02_CFR_140609.indd 9DW80H9950-00149A-02_CFR_140609.indd 9 2014-06-09 6:05:542014-06-09 6:05:54
Page 42

utilisation du lave-vaisselle
Utilisez cette option lorsque vous décidez de sécher vraiment complètement votre vaisselle.
La température monte jusqu'à 162°F (72°C) lors de la phase de rinçage fi nale et le temps
de séchage est augmenté.
Si vous sélectionnez cette option, la consommation électrique est augmentée.
La prochaine fois que vous utiliserez le lave-vaisselle, l'option Dry+ (Séchage+) sera
sélectionnée automatiquement et sera automatiquement appliquée au programme
suivant. Vous pouvez désactiver l'option Dry+ (Séchage+) en appuyant sur le bouton
Dry+ (Séchage+).
Vous ne pouvez pas sélectionner l'option Dry+ (Séchage+) si vous sélectionnez le
programme Delicate (Délicat).
Dry+ (Séchage+)
/ Child Lock
8
(Verrouillage
parental activé)
9
Écran
*Child Lock (Verrouillage parental activé): Cette option vous permet de verrouiller les
boutons du panneau de commande - sauf le bouton Power (Marche) - afi n que les enfants
ne puissent pas démarrer accidentellement le lave-vaisselle en appuyant sur un bouton.
Seul le bouton Power (Marche) reste activé.
Pour verrouiller ou déverrouiller les boutons du panneau de commande, appuyez sur
le bouton Dry+ (Séchage+) / Child Lock (Verrouillage parental activé) pendant trois
(3)secondes.
- Lorsque Power (Marche) est activé: Appuyez sur le bouton « Dry+ (Séchage+) /
Child Lock (Verrouillage parental activé) » pendant trois (3)secondes.
- Lorsque Power (Marche) est désactivé: Appuyez tout d'abord sur le
bouton Power (Marche), puis appuyez sur le bouton « Dry+ (Séchage+) /
Child Lock (Verrouillage parental activé) » pendant trois (3)secondes.
- Child Lock (Verrouillage parental activé) reste actif jusqu'à ce que vous le désactiviez.
Vous ne pouvez pas sélectionner les programmes ou les options ni démarrer le lavevaisselle lorsque Child Lock (Verrouillage parental activé) est activé.
Il affi che le temps du programme et les heures et minutes restantes.
Les heures de Delay Start (Démarrage différé) et les messages d'erreur.
En cas d'erreur, un message s'affi che et un signal sonore retentit.
Reportez-vous à la page des codes d'erreur.
Voyant Child Lock (Verrouillage parental activé)
- Il s'allume si l'option Child Lock (Verrouillage parental activé) est réglée
(ou si le lave-vaisselle est en mode veille ou en mode pause).
- Il s'éteint lorsque le lave-vaisselle est en marche.
- Lorsque Child Lock (Verrouillage parental activé) est activé, le voyant
Child Lock (Verrouillage parental activé) clignote pendant quelques secondes si
un bouton, excepté le bouton Power (Marche) est pressé.
Voyant Self Clean (Auto Nettoyage) (disponible sur certains modèles)
- Il s'allume lorsque l'option Self Clean (Auto Nettoyage) est activée
(ou que le lave-vaisselle est en mode veille ou en mode pause), mais il s'éteint
lorsque le lave-vaisselle fonctionne.
- Il clignote pendant 5secondes tous les 20 à 22cycles.
- Le compteur de cycles disparaît lorsque l'opération Self Clean (Auto Nettoyage)
est terminée ou lorsque le lave-vaisselle atteint le 23ème cycle sans que le cycle
Self Clean (Auto Nettoyage) n'ait été utilisé. (L'opération Reset (Réinitialiser)
ou l'opération Self Clean (Auto Nettoyage) ne sont pas comptabilisées par le
compteur de cycles.
Français - 10
DW80H9950-00149A-02_CFR_140609.indd 10DW80H9950-00149A-02_CFR_140609.indd 10 2014-06-09 6:05:542014-06-09 6:05:54
Page 43

Voyant Remplissage de produit de rinçage
- Il s'allume si le lave-vaisselle est à court de liquide de rinçage
(ou si le lave-vaisselle est en mode veille ou en mode pause).
- Il s'éteint lorsque le lave-vaisselle est en marche.
Voyant Manque de sel (* modèles applicables uniquement)
- Il s'allume si le lave-vaisselle est à court de sel (ou si le lave-vaisselle est en mode
veille ou en mode pause).
- Il s'éteint lorsque le lave-vaisselle est en marche.
Permet de différer le démarrage d'un programme jusqu'à 24heures (par incréments
d'une heure). Pour augmenter le temps avant le démarrage différé, appuyez et maintenez
le bouton Delay Start (Démarrage différé). L'heure affi chée indique l'heure à laquelle le
lavage démarrera.
Delay Start
10
(Démarrage différé)
11
Start (Démarrage)
Vous pouvez sélectionner les options (Self Clean (Auto Nettoyage), Upper (Supérieur), Lower (Inférieur),
Speed Booster (Accélérateur de vitesse), Sanitize (Assainissement), Dry+ (Séchage+),
Delay Start (Démarrage différé)) avant de lancer un programme. Si vous changez le programme après avoir
sélectionné une option, le programme d'origine est remis à zéro.
Pour éviter que le touchpad perde de la sensibilité, suivez ces instructions:
- Appuyez bien au centre de chaque touche. Ne poussez pas.
- Nettoyez la surface du panneau de commande régulièrement avec un chiffon doux et humide.
- Veillez à ne pas appuyez sur plus d'une touche à la fois, sauf en cas de directive contraire.
Lorsque vous mettez en pause un programme en ouvrant la porte en cours de fonctionnement, appuyez sur le
bouton Start (Démarrage) avant de fermer la porte pour continuer le programme.
- Après avoir réglé le temps différé, appuyez sur le bouton Start (Démarrage), puis
fermez la porte pour démarrer le programme.
- Si vous souhaitez changer le temps différé une fois que le lave-vaisselle a démarré,
appuyez sur le bouton Reset (Réinitialiser) et éteignez le lave-vaisselle.
Puis, allumez le lave-vaisselle à nouveau et sélectionnez un nouveau programme avec
un nouveau réglage différé.
Pour démarrer un programme, appuyez sur le bouton Start (Démarrage) avant de fermer la
porte.
*Reset (Réinitialiser) : pour annuler un programme actuellement en cours et vidanger le
lave-vaisselle, appuyez sur le bouton Start (Démarrage) pendant trois (3)secondes.
Une fois le lave-vaisselle réinitialisé, sélectionnez un programme et une option, puis appuyez
sur Start (Démarrage) pour redémarrer le lave-vaisselle.
03 utilisation du lave-vaisselle
OO X
Français - 11
DW80H9950-00149A-02_CFR_140609.indd 11DW80H9950-00149A-02_CFR_140609.indd 11 2014-06-09 6:05:542014-06-09 6:05:54
Page 44

utilisation du lave-vaisselle
SÉLECTEUR DE PROGRAMME
1 2 3 4 5
1
Auto (Automatique)
2
Normal
3
Heavy (Intensif) Utilisez ce programme pour la vaisselle très sale.
4
Delicate (Délicat)
5
Express 60'
Ce programme détecte le degré de salissure de la vaisselle et lance automatiquement le
programme le mieux adapté après quelques minutes de fonctionnement.
Utilisez ce programme pour la vaisselle normalement sale.
L'étiquette de l'utilisation d'énergie est basée sur le programme.
Utilisez ce programme pour les objets sales et fragiles, comme les verres.
Vous ne pouvez pas sélectionner l'option Zone Booster, Dry+ (Séchage+) ou l'option
Sanitize (Assainissement) si vous sélectionnez ce programme.
Utilisez ce programme lorsque vous avez besoin de nettoyer de la vaisselle rapidement.
Il dure environ 1heure.
Vous ne pouvez pas sélectionner l'option Speed Booster (Accélérateur de vitesse) ou
l'option Zone Booster si vous sélectionnez ce programme.
AFFICHAGES DE LA PROGRESSION
Série DW80H997 Série DW80H995 / DW80H994
1
Wash (Lavage)
2
Rinse (Rinçage)
3
Dry (Séchage)
4
Clean (Propre)
Lorsque le lave-vaisselle démarre un programme, le voyant correspondant au mode en cours clignote pour
indiquer la progression.
Série DW80H993
Sur les lave-vaisselle de la série
DW80H993
Lorsque le lave-vaisselle est en phase de lavage d'un programme, la
première fl èche s'allume et le temps restant est affi ché.
Lorsque le lave-vaisselle est en phase de rinçage d'un programme, la
seconde fl èche s'allume et le temps restant est affi ché.
Lorsque le lave-vaisselle est en phase de séchage d'un programme,
la troisième fl èche s'allume et le temps restant est affi ché.
Lorsque le lave-vaisselle a terminé toutes les parties d'un programme,
toutes les lumières s'éteignent.
Le lave-vaisselle émet un signal sonore et End (Fin) est affi ché
pendant quelques minutes.
, la DEL de la poche s'allume lorsque le lave-vaisselle fonctionne.
Français - 12
DW80H9950-00149A-02_CFR_140609.indd 12DW80H9950-00149A-02_CFR_140609.indd 12 2014-06-09 6:05:542014-06-09 6:05:54
Page 45

INSTRUCTIONS DE BASE
1. Ouvrez la porte de l'appareil et chargez la vaisselle (voir page 16- 19).
- Placez la vaisselle dans les paniers supérieur et inférieur, sauf si vous avez sélectionné l'option
Upper (Supérieur) ou l'option Lower (Inférieur) (Lower Rack - Only (Panier inférieur - Seulement)).
- Éliminez tout reste de nourriture avant de placer la vaisselle dans le ou les paniers.
- Après avoir placé la vaisselle dans les paniers, tournez les gicleurs intégrés au panier supérieur pour vous
assurer qu'aucun élément de la vaisselle ne bloquera la rotation des gicleurs.
- Assurez-vous que la vaisselle n'empêche pas le réservoir du produit de lavage de s'ouvrir.
2. Versez du produit de lavage dans le réservoir (voir page 20).
- Assurez-vous d'utiliser uniquement un produit de lavage spécial lave-vaisselle.
- Reportez-vous à « Utilisation du produit de lavage » pour savoir comment ajouter du produit de lavage.
3. Appuyez sur le bouton Power (Marche).
- Une fois le bouton Power (Marche) actionné, le voyant du dernier programme utilisé s'allume.
- Si le voyant « Remplissage de produit de rinçage » est allumé, cela signifi e que vous devez remplir le réservoir
de produit de rinçage afi n d'optimiser les opérations de lavage et de séchage.
4. Sélectionnez un programme de lavage approprié en fonction du degré de salissure de votre vaisselle.
(voir pages 12 et 24).
- Appuyez sur le boutondu programme approprié.
- Lorsque vous appuyez sur le bouton d'un programme, le voyant correspondant s'allume.
- Pour savoir comment choisir un programme en fonction du degré de salissure de la vaisselle, reportez-vous au
chapitre « Sélecteur de programme ».
5. Appuyez sur le bouton Start (Démarrage), puis fermez la porte.
- Poussez les paniers afi n qu'ils se positionnent, puis appuyez sur le bouton Start (Démarrage) et fermez la
porte.
- Assurez-vous de fermer correctement la porte. Si ce n'est pas le cas et que la porte est légèrement
entrouverte, le programme sélectionné ne démarre pas automatiquement.
- Le lave-vaisselle démarre la vidange après quelques secondes, puis lance le programme que vous avez
sélectionné.
6. À la fi n du programme de lavage:
- Le voyant « End (Fin) » s'allume et le signal sonore du lave-vaisselle retentit.
- L'appareil est automatiquement mis hors tension après quelques minutes.
Si vous souhaitez rajouter de la vaisselle ou mettre l'appareil en pause en cours de programme, ouvrez la
porte lentement et avec prudence afi n d'éviter tout risque de brûlure en raison de la vapeur brûlante et de l'eau
ATTENTION
contenues dans l'appareil.
(Si la porte est ouverte en cours de fonctionnement, un mécanisme de sécurité s'enclenche et arrête
automatiquement le programme.) Pour reprendre le fonctionnement, appuyez sur le bouton Start (Démarrage),
puis fermez la porte.
Notez qu'ajouter de la vaisselle quelques minutes après que le lave-vaisselle a démarré peut altérer les
performances.
Utilisez un liquide de rinçage afi n de faciliter la phase de séchage. Pour améliorer encore les performances de
séchage, sélectionnez également l'option Dry+ (Séchage+).
03 utilisation du lave-vaisselle
Français - 13
DW80H9950-00149A-02_CFR_140609.indd 13DW80H9950-00149A-02_CFR_140609.indd 13 2014-06-09 6:05:542014-06-09 6:05:54
Page 46

utilisation du lave-vaisselle
Commandes tactiles
Les commandes tactiles vous permettent d’utiliser facilement les fonctions du lave-vaisselle.
• Une pression légère suffi t à activer la fonction.
• Leur conception est simple et élégante.
• Elles sont faciles à nettoyer.
Si vous avez des enfants ou si vous souhaitez nettoyer l'interface de commande, il est conseillé de
sélectionner la fonction Child Lock (Verrouillage parental activé) qui permet de désactiver les touches.
- Grâce à cette option, les enfants ne pourront pas démarrer le lave-vaisselle par inadvertance.
- Lorsqu'un programme est en cours, les touches ne fonctionnent pas (sauf le bouton Power (Marche) et
les options Child Lock (Verrouillage parental activé) et Reset (Réinitialiser)).
- Si le lave-vaisselle est hors tension, seul le bouton Power (Marche) peut être actionné.
Démarrage différé
Lorsque vous sélectionnez l'option Delay Start (Démarrage différé), votre lave-vaisselle démarrera le programme
sélectionné lorsque le temps différé expirera.
L'alarme d'interférence du réfl ecteur d'eau :
• La fonction d'interférence du réfl ecteur d'eau détecte automatiquement les obstacles dans la cuve.
Si elle détecte des obstacles, l'affi chage clignote et le lave-vaisselle émet un signal sonore pendant plusieurs
minutes. Si un obstacle est détecté à la fi n d'un programme, End (Fin) clignote pendant plusieurs minutes.
• Retirez tous les obstacles dans la partie inférieure du lave-vaisselle.
Mode Réglage
Le mode Setting (Réglage) vous permet de changer les réglages sonores du lave-vaisselle et les
réglages de luminosité des DEL. Pour entrer en mode Setting (Réglage), appuyez sur les boutons
Delay Start (Démarrage différé) + Sanitize (Assainissement) pendant 3 secondes, le lave-vaisselle étant
sous tension. Appuyez sur le bouton Sanitize (Assainissement) pour sélectionner un menu de sous-réglage et
appuyez sur le bouton Delay Start (Démarrage différé) pour changer un réglage.
- Réglage sonore : Appuyez sur le bouton Sanitize (Assainissement) jusqu'à ce que « S on »
(S activé) ou « SoFF » (S désactivé) soit affi ché. Pour changer le réglage, appuyez sur le bouton
Delay Start (Démarrage différé). « SoFF » (S désactivé) signifi e que le son est désactivé pour tous les
programmes. Le lave-vaisselle conserve le réglage sonore que vous avez sélectionné jusqu'à ce que
vous le changiez.
- Réglage de la luminosité des DEL de la poche : Appuyez sur le bouton Sanitize (Assainissement)
jusqu'à ce que «B0 - B5» (B0 à B5) soit affi ché. Plus le chiffre est élevé, plus les DEL sont
lumineuses. Pour changer le réglage sur un lave-vaisselle de la série H9930, appuyez sur le bouton
Delay Start (Démarrage différé).
Répartissez la vaisselle de manière appropriée comme décrit à la page 16.
AVERTISSEMENT
• Retirez tout reste de nourriture (ex.: os, pépins, etc.) ou tout autre déchet (cure-dents, papier, etc.) afi n
d'éviter d'endommager la vaisselle, de rendre le fonctionnement de l'appareil bruyant ou de provoquer un
dysfonctionnement.
• Sélectionnez le programme en fonction du degré de salissure et du type de vaisselle.
• Utilisez uniquement la quantité appropriée de produits de lavage et de rinçage.
Les éléments suivants ne sont pas résistants au lave-vaisselle:
AVERTISSEMENT
• Objets en acrylique ou en aluminium: Les objets en acrylique ou en aluminium peuvent décolorer les plats
avec ornements dorés et marquer les autres éléments.
• Éléments assemblés par collage: Les éléments en plastique assemblés peuvent se détacher.
Des éléments en bois, en ivoire, en cuivre et en étain collés aux plats peuvent se détacher.
• Éléments en plastique ne tolérant pas des températures supérieures à 194°F (90°C): les plastiques
fi ns se lavent et se sèchent diffi cilement et risquent d'être endommagés en raison des températures de
lavage élevées.
• Étain: l'étain doit être lavé à la main et séché immédiatement car il risque de rouiller.
• Éléments en bois: les objets en bois risquent de se fendre.
Français - 14
DW80H9950-00149A-02_CFR_140609.indd 14DW80H9950-00149A-02_CFR_140609.indd 14 2014-06-09 6:05:542014-06-09 6:05:54
Page 47

RÉGLAGE DE L'INCLINAISON DES PORTE-ASSIETTES
Vous pouvez régler l'angle des tiges du panier supérieur sur trois positions différentes pour l'adapter à la taille et à la
forme de votre vaisselle. Pour régler la position des tiges, poussez le levier situé à l'arrière du panier vers la gauche ou
vers la droite. Voir l’illustration ci-dessous.
Dans le panier inférieur, les tiges peuvent être facilement rabattues afi n de pouvoir installer des objets volumineux,
comme des chaudrons et des casseroles. Retirez le panier du lave-vaisselle, et rabattez ensuite les tiges une par une.
Voir l’illustration ci-dessous.
Panier supérieur
Panier inférieur
03 utilisation du lave-vaisselle
Français - 15
DW80H9950-00149A-02_CFR_140609.indd 15DW80H9950-00149A-02_CFR_140609.indd 15 2014-06-09 6:05:542014-06-09 6:05:54
Page 48

utilisation du lave-vaisselle
RÉGLAGE DE LA HAUTEUR DU PANIER SUPÉRIEUR
Vous pouvez régler la hauteur du panier supérieur de votre lave-vaisselle Samsung de manière à pouvoir placer des
plats de plus grande taille dans le panier inférieur. Selon la hauteur choisie pour le panier supérieur, le panier inférieur
peut accueillir des assiettes de 12po (30cm) de diamètre et le panier supérieur, des assiettes de 8po (20cm) de
diamètre.
1. Pour abaisser le panier supérieur de 2po (5cm),
tirez sur les poignées réglables situées de part et
d'autre de celui-ci, tout en exerçant une légère
pression sur le panier.
2. Pour soulever le panier supérieur, tirez-le
simplement vers le haut. Les poignées réglables
se bloquent, fi xant le panier supérieur en
position haute.
Nous vous conseillons de régler la hauteur
du panier supérieur avant d'y charger la
ATTENTION
vaisselle. Dans le cas contraire, vous risquez
d'endommager cette dernière. Si vous
n'effectuez pas le réglage avec les deux mains,
la porte du lave-vaisselle peut ne pas se fermer correctement.
Retirez le panier supérieur de la cuve jusqu'à ce qu'il apparaisse entièrement avant de l'ajuster.
CHARGEMENT DU PANIER INFÉRIEUR
Placez la batterie de cuisine (chaudrons, casseroles, etc.) d'un diamètre de 12pouces (30cm) maximum dans le panier
inférieur. Il a été spécialement conçu pour accueillir la vaisselle de table, les bols, les assiettes, les plats, les couvercles
et les casseroles.
Chargez vos assiettes dans la colonne centrale du panier, afi n que leurs faces intérieures soient face à face.
Chargez les objets volumineux (casseroles, chaudrons) face intérieure tournée vers le bas.
Il est conseillé de charger les tasses, les verres à pied et les soucoupes dans le panier supérieur.
Reportez-vous aux modèles de chargement conseillés ci-dessous.
8couverts 10couverts 12couverts
Français - 16
DW80H9950-00149A-02_CFR_140609.indd 16DW80H9950-00149A-02_CFR_140609.indd 16 2014-06-09 6:05:552014-06-09 6:05:55
Page 49

Chargement de grands éléments dans les Zones Booster
Vous pouvez charger des objets volumineux (chaudrons et casseroles)
dans les côtés droit et/ou gauche du panier inférieur; les zones
Zone Booster, pour un nettoyage plus effi cace. Lorsque vous
sélectionnez l'option Zone Booster, un jet puissant supplémentaire est
activé et dirigé vers les objets des zones Zone Booster. Assurez-vous
que les poignées des chaudrons ou des casseroles n'empêchent pas la
rotation des gicleurs et du réfl ecteur d'eau.
CHARGEMENT DU PANIER SUPÉRIEUR
Le panier supérieur est conçu pour accueillir les soucoupes, les tasses, les verres et les objets en plastique portant la
mention «lavable au lave-vaisselle». Chargez vos assiettes dans le lave-vaisselle afi n que leurs faces intérieures soient
face à face.
Assurez-vous que la vaisselle n'empêche pas le gicleur situé sous le panier supérieur de tourner (Vérifi ez en faisant
tourner le gicleur manuellement.).
Lorsque vous chargez la vaisselle, tirez suffi samment le panier supérieur de façon à pouvoir le remplir sans heurter le
haut du lave-vaisselle.
8couverts 10couverts 12couverts
Utilisation du porte-verres
Vous pouvez charger les tasses et les verres dans le porte-verres.
Il est également très pratique pour laver les verres à pied. Glissez vos
verres à pied dans les encoches du porte-verres prévues à cet effet.
Vous pouvez replier le porte-verres si vous ne souhaitez pas vous en
servir au cours d'un lavage.
03 utilisation du lave-vaisselle
Français - 17
DW80H9950-00149A-02_CFR_140609.indd 17DW80H9950-00149A-02_CFR_140609.indd 17 2014-06-09 6:05:582014-06-09 6:05:58
Page 50

utilisation du lave-vaisselle
UTILISATION DU 3
Chargement du panier à couverts
En plus du panier à couverts standard dans le panier inférieur, certains modèles sont fournis avec un second
panier à couverts.
Ce panier à couverts est mieux adapté pour la vaisselle plate ou les ustensiles de cuisson et de service.
Vous pouvez placez les couverts et les ustensiles de manière aléatoire ou régulière dans ce panier à couverts.
Les ustensiles ou éléments très sales avec des particules d'aliment incrustées doivent être placés dans le
panier à couverts inférieur pour un nettoyage plus effi cace.
Retrait du panier à couverts
Le panier à couverts entier peut être retiré si vous avez besoin de plus d'espace sur le panier supérieur
pour des éléments plus grands.
Chargement de la grille à couverts
ÈME
PANIER (COUVERTS) (SUR CERTAINS MODÈLES)
<Placez les articles de manière aléatoire ou régulière.>
<Placez les articles de manière aléatoire ou régulière.>
Certains modèles sont fournis avec une grille à couverts à utiliser avec le panier à couverts qui est
amovible et repliable. Pour l'utiliser, placez la grille sur le panier à couverts et placez ensuite les couverts
et les ustensiles de cuisine et de service sur la grille d'une manière aléatoire ou régulière. Après la fi n d'un
programme de lavage, les couverts et ustensiles étant secs, vous pouvez replier la grille et transporter les
couverts et les ustensiles qu'elle contient jusqu'à leur rangement.
Soyez prudent lorsque vous pliez et déplacez le panier s'il y a un objet long et fi n à l'intérieur de la
grille. L'objet pourrait tomber au cours de cette action et blesser physiquement quelqu'un.
AVERTISSEMENT
Il est recommandé de ne pas déplacer la grille lorsqu'elle est
mouillée. Patientez jusqu'à ce qu'elle soit sèche.
La grille sèche rapidement après un programme de lavage
lorsqu'elle est exposée à l'air pendant quelques minutes.
Français - 18
DW80H9950-00149A-02_CFR_140609.indd 18DW80H9950-00149A-02_CFR_140609.indd 18 2014-06-09 6:06:012014-06-09 6:06:01
Page 51

UTILISATION DU PANIER À COUVERTS
Le panier à couverts est divisé en deux compartiments.
Vous pouvez placer chaque couteau, cuillère ou fourchette séparément dans
les supports de couverts des couvercles du panier pour éviter tout écaillage ou
décoloration.
NE laissez JAMAIS un couvert dépasser par le bas.
Fourchettes
1
Cuillères à thé
2
Cuillères de table
3
Couteaux
4
Cuillères de service et Fourchettes de service
5
Autres
6
8couverts 10couverts 12couverts
Suggestion de disposition des couverts dans le panier (vue de dessus). À chaque couvert correspond un numéro
(consultez le schéma ci-dessus).
1 3 42 5
Fourchette à salade,
cuillère à thé
Fourchette de table,
cuillère de table
03 utilisation du lave-vaisselle
Vous pouvez utiliser le panier à couverts avec les couvercles ouverts.
Reportez-vous à l'illustration de droite.
Français - 19
DW80H9950-00149A-02_CFR_140609.indd 19DW80H9950-00149A-02_CFR_140609.indd 19 2014-06-09 6:06:022014-06-09 6:06:02
Page 52

utilisation du lave-vaisselle
UTILISATION DU PRODUIT DE LAVAGE
Tous les programmes du lave-vaisselle nécessitent la présence de produit de lavage dans le compartiment dédié.
Ajoutez la quantité correcte de produit de lavage pour le programme sélectionné afi n d'assurer la meilleure
performance.
Utilisez uniquement du produit de lavage pour lave-vaisselle. Le produit de lavage ordinaire produit trop de
mousse, ce qui diminue les performances du lave-vaisselle ou provoque son dysfonctionnement.
ATTENTION
N'avalez pas de produit de lavage pour lave-vaisselle. Évitez de respirer dans les vapeurs. Le produit de
lavage pour lave-vaisselle contient des produits chimiques corrosifs et irritants qui peuvent induire les
AVERTISSEMENT
problèmes respiratoires. Si vous avez avalé du produit de lavage ou si vous avez inhalé des vapeurs, consultez
immédiatement un médecin.
Maintenez le produit de lavage pour lave-vaisselle hors de la portée des enfants.
AVERTISSEMENT
Remplissage du réservoir de produit de lavage
1. Ouvrez le couvercle du réservoir de produit de lavage en poussant le
loquet de libération du réservoir.
Le couvercle est toujours ouvert à la fi n d'un programme de
lavage.
2. Ajoutez la quantité recommandée de produit dans le compartiment
principal de produit de lavage.
3. Fermez le couvercle en le faisant glisser vers la gauche puis en le
pressant vers le bas.
4. Pour un meilleur résultat de lavage, notamment si vous avez
des éléments très sales, ajoutez une petite quantité (environ une
1/2once ou 15g) de produit de lavage dans la porte.
Le produit de lavage supplémentaire s'activera pendant la phase de
pré-lavage.
Français - 20
DW80H9950-00149A-02_CFR_140609.indd 20DW80H9950-00149A-02_CFR_140609.indd 20 2014-06-09 6:06:052014-06-09 6:06:05
Page 53

Le couvercle s'ouvrira automatiquement pour déverser le produit dans la machine au cours du lavage.
CYCLE (PROGRAMME)
Auto (Automatique), Normal 3/4oz (20g) 1/3oz (10g)
Heavy (Intensif), Express 60' 1oz (30g) 1/2oz (15g)
Delicate (Délicat) 3/4oz (20g) 1/5oz (5g)
Réservoir de lavage principal Dans la porte pour le pré-lavage
QUANTITÉ DE PRODUIT DE LAVAGE
Les chiffres fi gurant sur le réservoir sont en grammes.
UTILISATION DU PRODUIT DE RINÇAGE
Remplissage du réservoir de produit de rinçage
Lorsque le voyant Remplissage de produit de rinçage s'allume sur le panneau de commande, remplissez
le réservoir de produit de rinçage. Votre lave-vaisselle a été conçu pour utiliser uniquement du produit
de rinçage liquide. L'utilisation d'un produit de rinçage en poudre colmatera l'ouverture du réservoir
provoquant un dysfonctionnement du lave-vaisselle.
Le produit de rinçage améliore la performance de séchage du lave-vaisselle.
N'ajoutez pas de produit de lavage ordinaire dans le réservoir de produit de rinçage.
ATTENTION
1. Ouvrez le bouchon du réservoir de produit de rinçage en le tournant
en sens antihoraire.
03 utilisation du lave-vaisselle
2. Remplissez le réservoir avec du produit de rinçage.
Utilisez l'orifi ce de visualisation lors du remplissage du produit de
rinçage.
Ne remplissez pas le réservoir au-dessus du niveau indiqué.
Un excès de produit de rinçage peut déborder au cours du
ATTENTION
programme de lavage.
3. Réglez le cadran du produit de rinçage sur un chiffre entre 1 et 6.
Plus le chiffre est élevé, plus le lave-vaisselle utilisera de produit. Si
vous ne parvenez pas à tourner facilement le cadran du produit de
rinçage, essayez avec une pièce de monnaie.
4. Fermez le bouchon du réservoir de produit de rinçage en le tournant en sens horaire.
Français - 21
DW80H9950-00149A-02_CFR_140609.indd 21DW80H9950-00149A-02_CFR_140609.indd 21 2014-06-09 6:06:062014-06-09 6:06:06
Page 54

nettoyage et entretien du lave-vaisselle
Garder votre lave-vaisselle propre permet d'améliorer ses performances, de
limiter les réparations et d'allonger sa durée de vie.
NETTOYAGE DE LA PARTIE EXTÉRIEURE
Nettoyez immédiatement les parois extérieures de votre lave-vaisselle en cas de projections. Pour retirer délicatement
les taches et la poussière du panneau de commande, utilisez un chiffon doux légèrement humide. N'utilisez jamais de
benzène, de cire, de diluant, d'agent de blanchiment chloré ou d'alcool. Ces produits peuvent décolorer le panneau de
la porte et les autres surfaces extérieures et former des taches. Ne nettoyez pas le lave-vaisselle en aspergeant de l'eau
dessus et évitez de laisser l'eau venir en contact avec les composants électriques.
Si votre lave-vaisselle est équipé d'un panneau de porte en inox, vous pouvez le nettoyer avec un produit spécial
acier inoxydable pour appareils ménagers ou un produit similaire à l'aide d'un chiffon doux et propre.
NETTOYAGE DE LA PARTIE INTÉRIEURE
Nettoyez régulièrement l'intérieur de votre lave-vaisselle afi n d'en retirer les saletés et les résidus de nourriture. Essuyez
l'intérieur de l'appareil et la partie intérieure de la porte à l'aide d'un chiffon humide. Il est recommandé de remplir le
réservoir de produit de lavage avec du produit spécial vaisselle puis de faire fonctionner régulièrement le lave-vaisselle
en utilisant l'option Self Clean (Auto Nettoyage).
Cela permettra de le maintenir propre.
Si des traces blanches ou de mauvaises odeurs persistent dans votre lave-vaisselle, lancez l'option
Self Clean (Auto Nettoyage) à vide et sans produit de lavage jusqu'à la vidange Puis, interrompez le programme et
placez une tasse contenant 8onces de vinaigre blanc dans le panier inférieur. Refermez le lave-vaisselle et poursuivez le
programme.
Ne retirez pas la garniture d'étanchéité à l'avant de la cuve (long joint en caoutchouc entourant l'ouverture du
lave-vaisselle).
ATTENTION
NETTOYAGE DES GICLEURS
Si la vaisselle n'est pas propre après un lavage ou si les gicleurs semblent obstrués, vous pouvez les
nettoyer. Retirez les gicleurs avec précaution afi n d'éviter qu'ils ne se cassent.
Pour que la grille à couverts reste propre, retournez-la.
Gicleur intégré au panier supérieur
1. Tirez le panier supérieur vers vous
2. Vérifi ez que le gicleur n'est pas obstrué par
des particules d'aliments.
3. Si un nettoyage s'avère nécessaire, retirez
le gicleur.
4. Pour retirer le gicleur, desserrez l'écrou,
retirez-le puis enlevez le gicleur.
5. Nettoyez le gicleur, remettez-le en place
puis resserrez l'écrou.
6. Serrez l'écrou fermement à la main.
7. Vérifi ez que le gicleur est correctement
positionné en le faisant tourner
manuellement.
Français - 22
DW80H9950-00149A-02_CFR_140609.indd Sec5:22DW80H9950-00149A-02_CFR_140609.indd Sec5:22 2014-06-09 6:06:062014-06-09 6:06:06
Page 55

Gicleur supérieur
1. Vérifi ez que le gicleur n'est pas obstrué par des
particules d'aliments.
2. Si un nettoyage s'avère nécessaire, retirez le
gicleur.
3. Pour retirer le gicleur, retirez d'abord le panier
supérieur, détachez le support du gicleur en le
tournant dans le sens antihoraire puis retirez le
gicleur intégré au panier supérieur.
4. Nettoyez le gicleur, remettez-le en place, puis
rattachez le support du gicleur sur le gicleur en le
tournant dans le sens horaire.
5. Vérifi ez que le gicleur est correctement positionné
en le faisant tourner manuellement.
NETTOYAGE DU FILTRE
1. Retirez tout d'abord le panier inférieur.
2. Faites tourner la poignée du fi ltre en sens antihoraire pour détacher la
trappe du compartiment du fi ltre.
3. Retirez la trappe du fi ltre avec la poignée
et le microfi ltre plat situé en dessous.
1
2
Support
du gicleur
04 nettoyage et entretien du lave-vaisselle
Filtre avec la poignée Microfi ltre plat
4. Retirez toutes les saletés ou autres
présentes dans le microfi ltre et la trappe
du fi ltre, puis rincez-les sous l'eau
courante.
5. Réinstallez le microfi ltre plat, puis la trappe du fi ltre.
6. Faites tourner la poignée de la trappe du fi ltre en sens horaire pour verrouiller la trappe du fi ltre.
Une fois par mois, nettoyez le fi ltre pour obtenir de meilleures performances de lavage.
Si la trappe du fi ltre n'est pas fermée correctement, le lavage sera moins performant.
ATTENTION
ENTREPOSAGE DE VOTRE LAVE-VAISSELLE
Si vous devez entreposer votre lave-vaisselle pendant une période prolongée, vidangez-le puis débranchez-le.
En effet, votre lave-vaisselle risque d'être endommagé si de l'eau stagne dans les tuyaux ou les composants internes.
Après avoir vidangé et débranché le lave-vaisselle, assurez-vous de fermer la vanne d'alimentation en eau ainsi que le
disjoncteur.
Français - 23
DW80H9950-00149A-02_CFR_140609.indd Sec5:23DW80H9950-00149A-02_CFR_140609.indd Sec5:23 2014-06-09 6:06:062014-06-09 6:06:06
Page 56

programmes
TABLEAU DES PROGRAMMES
( : standard, : étape optionnelle)
Cycle (Programme) Prélavage 1 Prélavage 2
Auto (Automatique)
Normal
Heavy (Intensif)
Delicate (Délicat)
Express 60'
Cycle (Programme)
Dernier rinçage
[Sanitize] (Assainissement)
Auto (Automatique)
136°F (58°C)
[162°F (72°C)]
Normal
136°F (58°C)
[162°F (72°C)]
Heavy (Intensif)
Delicate (Délicat)
158°F (70°C)
[162°F (72°C)]
149°F (65°C)
Express 60'
149°F (65°C)
[162°F (72°C)]
• Les chiffres entre parenthèses dans la colonne Dernier rinçage correspondent à la température lorsque l'option
Sanitize (Assainissement) est sélectionnée.
• Lorsque vous sélectionnez le programme Auto (Automatique) ou Normal, vous pouvez éliminer les étapes
optionnelles selon le degré de salissure de la vaisselle.
• La consommation en eau et le temps de lavage varient en fonction des étapes ou des options que vous ajoutez et
de la pression et de la température de l'alimentation en eau.
• Lorsque le liquide de rinçage est épuisé, le temps de lavage et la température du dernier rinçage peuvent
légèrement augmenter.
Lavage
principal
138°F
(59°C)
143 à 118°F
(62 à 48°C)
149°F
(65°C)
122°F
(50°C)
140°F
(60°C)
Rinçage1 Rinçage2 Rinçage3 Rinçage4
Dry (Séchage) Eau [gal(ℓ)]
6,5 à 3,6
(24,6 à 13,6 ℓ)
7,1 à 2,4
(27,0 à 9,0 ℓ)
6,1
(23,1 ℓ)
4,4
(16,6 ℓ)
3,7
(14 ℓ)
Français - 24
DW80H9950-00149A-02_CFR_140609.indd Sec6:24DW80H9950-00149A-02_CFR_140609.indd Sec6:24 2014-06-09 6:06:072014-06-09 6:06:07
Page 57

dépannage
CONSULTEZ CETTE RUBRIQUE SI VOUS RENCONTREZ L'UN DES
PROBLÈMES SUIVANTS...
PROBLÈME CAUSE POSSIBLE SOLUTION
L'appareil ne démarre
pas.
La durée d'une opération
ou d'un programme est
trop longue.
Il reste des particules
d'aliments sur la
vaisselle.
(Le lavage ne s'effectue
pas correctement.)
La porte n'est pas correctement
fermée.
Aucun programme n'est
sélectionné.
Le câble d'alimentation n'est pas
branché.
L'arrivée d'eau ne fonctionne pas. Vérifi ez si la vanne d'alimentation en eau est ouverte.
Le panneau de commande est
verrouillé.
Un disjoncteur est ouvert. Réarmez le disjoncteur.
L'eau qui arrive est froide. Vérifi ez si le circuit d'alimentation en eau est connecté au
Le programme sélectionné était
inadapté.
La température de l'eau est trop
basse.
La pression de l'eau est faible. La pression de l'eau doit être comprise entre 20 et
L'eau est trop dure. Utilisez un produit de lavage disponible dans le
Aucun produit de lavage pour
lave-vaisselle n'a été ajouté.
Il reste du produit de lavage dans
le réservoir.
Aucun produit de rinçage n'a été
ajouté.
Un gicleur est bouché. Nettoyez le gicleur. Voir pages 22 et 23.
La vaisselle n'est pas
correctement répartie.
L'appareil est surchargé.
Vérifi ez si le loquet de la porte est bien enclenché et si la
porte est correctement fermée.
Sélectionnez un programme adapté.
Branchez correctement le câble d'alimentation.
Déverrouillez le verrouillage parental (voir page 10.)
réseau d'eau chaude.
(Chauffer de l'eau froide nécessite plus de temps.)
Sélectionnez un programme en fonction du degré de
salissure de la vaisselle, comme indiqué dans ce manuel.
Raccordez le tuyau d'arrivée d'eau au réseau d'eau
chaude.
Pour un résultat optimal, la température de l'eau doit être
de 120°F (49°C).
120psi (140 à 830kPa).
commerce.
Utilisez du produit de lavage de bonne qualité, récent,
contenant un produit de rinçage.
Ajoutez un produit de lavage spécial lave-vaisselle.
Nous recommandons l'utilisation d'un produit de lavage
en poudre ou en gel.
Assurez-vous que des articles de grande taille, tels que
des plaques de cuisson, des planches à découper, des
récipients, etc. n'empêchent pas l'ouverture correcte du
réservoir de produit de lavage.
Réorganisez la vaisselle de manière à ce qu'elle n'entrave
pas le fonctionnement du réservoir de produit de lavage.
Vérifi ez le réservoir et ajoutez du produit de rinçage au
besoin. Utilisez un produit de rinçage sous forme liquide.
Réorganisez la vaisselle de manière à ce qu'elle
n'empêche ni la rotation des gicleurs ni la diffusion du
produit.
Ne chargez pas plus de vaisselle que la quantité
conseillée.
Chargez la vaisselle conformément aux instructions.
(Voir page 16.)
06 dépannage
Français - 25
DW80H9950-00149A-02_CFR_140609.indd Sec7:25DW80H9950-00149A-02_CFR_140609.indd Sec7:25 2014-06-09 6:06:072014-06-09 6:06:07
Page 58

dépannage
PROBLÈME CAUSE POSSIBLE SOLUTION
Les verres sont
recouverts d'une mince
pellicule.
Une pellicule jaune
ou marron recouvre
l'intérieur du lavevaisselle.
La vaisselle n'est pas
sèche.
L'appareil dégage de
mauvaises odeurs.
Le lave-vaisselle est trop
bruyant.
Le gicleur ne tourne pas
librement.
L'eau utilisée est douce et la
quantité de produit de lavage trop
importante.
De la vaisselle en aluminium a été
placée dans le lave-vaisselle.
Cela est dû à des taches de café
ou de thé.
Aucun produit de rinçage n'a été
ajouté dans le réservoir.
La température de l'eau est trop
basse pendant un programme.
L'appareil est surchargé. Un chargement incorrect de la vaisselle peut infl uer sur
Les verres et les tasses à fond
concave retiennent l'eau. Cette
eau peut se renverser sur d'autres
articles lors du déchargement.
De l'eau stagne depuis un
programme incomplet.
Le tuyau d'évacuation est bouché. Contactez un technicien de maintenance qualifi é pour
Le lave-vaisselle n'est pas utilisé
quotidiennement ou de la vaisselle
sale a été laissée trop longtemps
dans l'appareil.
Du bruit se produit lorsque le
couvercle du réservoir est ouvert
et lorsque la pompe de vidange
fonctionne au début du cycle.
Le lave-vaisselle n'est pas
parfaitement stable.
Un objet étranger (une vis, une
pièce en plastique) se trouve dans
la cavité de la pompe.
Le bruit peut provenir d'un gicleur
qui heurte la vaisselle.
L'orifi ce du gicleur est obstrué par
des particules d'aliments.
Un plat ou un chaudron empêche
le gicleur de tourner.
Ne chargez pas trop le lave-vaisselle et utilisez un produit
de rinçage pour minimiser ce phénomène.
Retirez les taches à l'aide d'un nettoyant doux.
Retirez-les à l'aide d'un détachant classique.
Vérifi ez le réservoir et ajoutez du produit de rinçage au
besoin. Utilisez un produit de rinçage sous forme liquide.
Raccordez le tuyau d'arrivée d'eau au réseau d'eau
chaude.
Utilisez du liquide de rinçage avec l'option Sanitize
(Assainissement).
son séchage.
Suivez les conseils de chargement fournis dans ce
manuel. (Voir page 16.)
Une fois le programme en cours terminé, videz le panier
inférieur en premier. Vous éviterez ainsi de faire couler
l'eau résiduelle du panier supérieur dans le panier
inférieur.
Ajoutez du produit de lavage sans aucune vaisselle, puis
effectuez le programme Normal pour nettoyer le lavevaisselle.
déboucher le tuyau d'évacuation.
Placez un verre contenant 8onces de vinaigre blanc dans
le panier inférieur, puis lancez un programme Normal à
vide (sans produit de lavage).
Ce phénomène est normal.
Assurez-vous que le lave-vaisselle a été installé de niveau.
Contactez un technicien de maintenance qualifi é pour
extraire l'objet étranger de la cavité de la pompe.
Réorganisez la vaisselle.
Nettoyez l'orifi ce du gicleur. Voir pages 22 et 23.
Une fois la vaisselle en place dans les paniers, faites
tourner les gicleurs manuellement pour vérifi er qu'aucun
obstacle ne se trouve dans leur champ de rotation.
Français - 26
DW80H9950-00149A-02_CFR_140609.indd Sec7:26DW80H9950-00149A-02_CFR_140609.indd Sec7:26 2014-06-09 6:06:072014-06-09 6:06:07
Page 59

PROBLÈME CAUSE POSSIBLE SOLUTION
L'eau ne s'évacue pas
du lave-vaisselle.
Le panier supérieur
penche après
chargement de la
L'évacuation est obstruée. Contactez un technicien de maintenance qualifi é pour
déboucher le tuyau d'évacuation et vérifi er le bon
fonctionnement de la pompe de vidange.
La vaisselle n'est pas
correctement répartie.
Chargez la vaisselle conformément aux instructions.
(Voir page 16.)
vaisselle.
06 dépannage
Français - 27
DW80H9950-00149A-02_CFR_140609.indd Sec7:27DW80H9950-00149A-02_CFR_140609.indd Sec7:27 2014-06-09 6:06:072014-06-09 6:06:07
Page 60

dépannage
CODES D'ERREUR
Le panneau de commande affi che des codes d'erreur pour vous aider à comprendre l'état dans lequel se trouve
votre lave-vaisselle. Si l'un des codes suivants s'affi che, sélectionnez l'option Reset (Réinitialiser), puis suivez les
instructions indiquées dans la colonne Solution.
CODE LUMINEUX SIGNIFICATION SOLUTION
tE
HE1
HE
1E
PE
7E
4E
4E5
5E
(5E1 à 5E5)
OE
LE
bE2
3E
(3E1 à 3E4)
AE
bE3
AE6
Si un code non répertorié ci-dessus s'affi che, appelez le 1-800-SAMSUNG (726-7864).
Erreur du capteur thermique Erreur fonctionnelle. Avec le lave-vaisselle
Problème de résistance
Erreur de chauffage à haute température
Erreur de niveau d'eau: trop faible
Erreur de la fonction Half load (Demi-charge)
Erreur de la fonction Refl ector (Réfl ecteur)
Problème d'alimentation en eau
Erreur de vidange
Erreur de niveau d'eau: trop élevé Erreur fonctionnelle. Fermez la vanne
Fuite
Erreur de touche
Erreur de communication
vide, ajoutez du produit de lavage puis lancez
un programme.
Si le problème persiste, allez vers le tableau
électrique de votre habitation, désactivez
l'interrupteur du disjoncteur de votre
lave-vaisselle puis contactez un centre de
maintenance Samsung agréé.
Vérifi ez si les assiettes plates ou la vaisselle
interfère(nt) avec le réfl ecteur d'eau,
ce dernier ne fonctionnant alors pas
correctement.
Si cela se produit sans aucune interférence,
coupez l'alimentation en eau puis contactez
un centre de maintenance Samsung agréé.
Vérifi ez que la vanne d'alimentation en eau
n'est pas fermée ou que l'arrivée d'eau n'est
pas bloquée (vanne ou tuyau gelé(e) ou
obstrué(e) par des corps étrangers).
Si le problème persiste, fermez la vanne
d'arrivée d'eau et contactez un centre de
maintenance Samsung agréé.
Vérifi ez que le tuyau d'évacuation n'est
ni bouché ni plié. Si le problème persiste,
fermez la vanne d'arrivée d'eau et contactez
un centre de maintenance Samsung agréé.
d'arrivée d'eau, allez vers le tableau
électrique de votre habitation, désactivez
l'interrupteur du disjoncteur de votre
lave-vaisselle puis contactez un centre de
maintenance Samsung agréé.
Erreur fonctionnelle. Eteignez le lave-vaisselle
et essayez de le redémarrer.
Si le problème persiste, contactez un centre
de maintenance Samsung agréé.
Français - 28
DW80H9950-00149A-02_CFR_140609.indd Sec7:28DW80H9950-00149A-02_CFR_140609.indd Sec7:28 2014-06-09 6:06:072014-06-09 6:06:07
Page 61

annexe
PROTECTION DE L'ENVIRONNEMENT
• Votre lave-vaisselle est fabriqué à partir de matériaux recyclables. Si vous décidez de vous en débarrasser, veuillez
respecter la réglementation locale relative à l'élimination des déchets. Coupez le câble d'alimentation de manière à
ce que l'appareil ne puisse plus être branché sur une source d'alimentation.
• Retirez la porte afi n d'éviter que des enfants ou de petits animaux ne se fassent piéger à l'intérieur de la machine.
• Ne dépassez pas les quantités de produit de lavage recommandées par le fabricant du produit.
CARACTÉRISTIQUES TECHNIQUES
Modèle
Type Lave-vaisselle encastrable Capacité de lavage 15couverts
Alimentation
Puissance nominale
Dimensions
(Longueur × Profondeur × Hauteur)
Poids
DW80H9970US / DW80H9950US /
DW80H9940US / DW80H9930US
120V / 60Hz, CA
uniquement, disjoncteur 15A
Moteur de lavage: 60 à 100W
Résistance chauffe-eau: 1100W
23⅞ x 25 x 33⅞po (605 x 636 x 860mm)
Poids net 97lb (44Kg) [DW80H9970US / DW80H9950US / DW80H9930US]
Poids net 93lb (42Kg) [DW80H9940US]
Pression de l'eau
20 à 120psi
(140 à 830kPa)
07 annexe
Français - 29
DW80H9950-00149A-02_CFR_140609.indd Sec8:29DW80H9950-00149A-02_CFR_140609.indd Sec8:29 2014-06-09 6:06:072014-06-09 6:06:07
Page 62

garantie
LAVE-VAISSELLE SAMSUNG
GARANTIE LIMITÉE À L'ACHETEUR INITIAL
Ce produit de la marque SAMSUNG, fourni et distribué par USA: SAMSUNG ELECTRONICS AMERICA,
INC./CANADA: SAMSUNG ELECTRONICS CANADA, INC. (SAMSUNG) et livré à l'état neuf et dans son
carton d'origine à l'acheteur initial, est garanti par SAMSUNG sur les défauts de fabrication ou de matériaux
pendant une période de:
Un (1) an pour toutes les pièces et la main-d'œuvre, cinq (5) ans pour les pièces de mouvement linéaire*,
le circuit imprimé, les paniers (les frais de main-d'œuvre pour les interventions à domicile sont à la charge
du client dès la deuxième année) et à vie pour la contre-porte et la cuve en acier inoxydable (fuites).
Samsung remplace votre unité par le même modèle ou un modèle plus récent (dont les fonctionnalités sont
supérieures ou équivalentes) (la main-d'œuvre pour le remplacement est à la charge du client).
* Pièces de mouvement linéaire: moteur à courant alternatif d'entraînement de la courroie [moto-réducteur],
courroie de synchronisation en V, rail, rail support (avant en haut, avant en bas).
Cette garantie limitée prend effet le jour de l'achat initial; elle est uniquement valable pour les produits
achetés et utilisés aux États-Unis ou au Canada. Pour se prévaloir du service de garantie, l'acheteur doit
contacter SAMSUNG afi n d'établir les procédures relatives au diagnostic et à l'intervention nécessaire. Pour
être couverte par la garantie, la maintenance ne peut être effectuée que par un service technique agréé
SAMSUNG. Lors de la remise d'un produit défectueux à SAMSUNG ou à un centre de service SAMSUNG
agréé, l'acquéreur est tenu de présenter le coupon d'achat d'origine à la demande des intéressés à titre
de preuve d'achat. SAMSUNG fournit un service de réparation gratuit à domicile pendant la période de
garantie, en fonction de la disponibilité à l'intérieur des États contigus des États-Unis et du Canada.
Le service de réparation à domicile n'est pas disponible partout.
Pour en bénéfi cier, vous devez veiller à ce que le produit soit accessible pour l'agent de maintenance. Si le
service de réparation à domicile n'est pas disponible, SAMSUNG peut organiser le transport du produit vers
ou depuis un centre technique agréé.
SAMSUNG s'engage à réparer, remplacer ou rembourser ce produit à sa discrétion et gratuitement comme
stipulé dans les présentes conditions, avec des pièces ou produits neufs ou reconditionnés, si un défaut est
constaté pendant la période de garantie limitée spécifi ée ci-dessus. Toute pièce ou tout produit remplacé
devient la propriété de SAMSUNG et doit lui être restitué. Les pièces et produits de rechange sont protégés
pour le reste de la période de garantie initiale ou pour quatre-vingt-dix (90) jours, selon l’éventualité la plus
éloignée.
Cette garantie limitée couvre les défauts de fabrication relatifs aux matériaux ou à la main-d’œuvre
survenant dans le cadre d’un usage normal et non commercial de ce produit et ne s’applique pas aux
situations suivantes: dommages liés au transport, à la livraison et à l’installation; applications ou usages
pour lesquels ce produit n'est pas conçu; modifi cation du produit ou des numéros de série; dommages
d'ordre esthétique ou fi nition extérieure; accidents, abus, négligence, incendie, inondation, foudre et autres
catastrophes naturelles; utilisation de produits, matériel, systèmes, utilitaires, services, pièces, fournitures,
accessoires, applications, installations, réparations, câblage externe ou connecteurs non fournis ou non
autorisés par SAMSUNG et pouvant endommager ce produit ou entraîner des problèmes d’entretien;
tension secteur inadéquate, fl uctuations et surtensions; réglages faits par le client et non respect des
consignes d’utilisation et d'entretien ou des instructions environnementales décrites et prescrites dans
le présent manuel; déplacement et réinstallation du produit; problèmes causés par la vermine. Cette
garantie limitée ne couvre pas les problèmes résultant d'un courant électrique, d'une tension ou d'une
alimentation électrique inadéquat(e)s, les ampoules, les fusibles, le câblage, le coût des appels pour obtenir
des instructions, ni les erreurs d'installation. SAMSUNG ne garantit pas un fonctionnement continu ou sans
erreur de ce produit.
Français - 30
DW80H9950-00149A-02_CFR_140609.indd Sec10:30DW80H9950-00149A-02_CFR_140609.indd Sec10:30 2014-06-09 6:06:072014-06-09 6:06:07
Page 63

À L'EXCEPTION DE CELLES EXPOSÉES PAR LA PRÉSENTE, IL N'EXISTE AUCUNE AUTRE GARANTIE
SUR CE PRODUIT, QU'ELLE SOIT EXPRESSE OU IMPLICITE, ET SAMSUNG REJETTE TOUTE AUTRE
GARANTIE Y COMPRIS, MAIS SANS S'Y LIMITER, TOUTE GARANTIE IMPLICITE RELATIVE À LA
QUALITÉ MARCHANDE, À L'ABSENCE DE CONTREFAÇON OU À L'ADAPTATION À UN USAGE
PARTICULIER. SAMSUNG NE SERA TENU D’HONORER AUCUNE AUTRE GARANTIE DONNÉE PAR
UNE PERSONNE, UNE FIRME OU UNE SOCIÉTÉ QUELCONQUE EN REGARD DE CE PRODUIT.
SAMSUNG NE SERA AUCUNEMENT RESPONSABLE DE LA PERTE DE BÉNÉFICES, DE REVENUS OU
DE FONDS COMMERCIAL, OU DE L'IMPOSSIBILITÉ DE RÉALISER LES ÉCONOMIES ESCOMPTÉES,
NI DES AUTRES DOMMAGES ACCESSOIRES, INDIRECTS OU SPÉCIAUX CAUSÉS PAR L’USAGE,
L’USAGE ABUSIF OU L’INCAPACITÉ D’UTILISER CE PRODUIT, QUELLE QUE SOIT LA BASE JURIDIQUE
INVOQUÉE POUR JUSTIFIER L’ASSERTION, ET MÊME SI SAMSUNG A ÉTÉ AVISÉ DE LA POSSIBILITÉ
DE TELS DOMMAGES.
TOUT TYPE DE COMPENSATION EXIGÉ AUPRÈS DE SAMSUNG NE DEVRA EN AUCUN CAS EXCÉDER
LE PRIX D’ACHAT DU PRODUIT VENDU PAR SAMSUNG ET À L’ORIGINE DES DOMMAGES ALLÉGUÉS.
SANS LIMITATION AUX DISPOSITIONS PRÉCÉDENTES, L’ACHETEUR ASSUME TOUS LES RISQUES
ET TOUTES LES RESPONSABILITÉS EN CAS DE PERTE, DE DOMMAGES OU DE BLESSURES
ÉVENTUELLES LIÉS À L’ACHETEUR ET À LA PROPRIÉTÉ DE L’ACHETEUR OU À AUTRUI ET À SES
PROPRIÉTÉS DÉCOULANT DE L’USAGE, DE L’USAGE ABUSIF OU DE L’INCAPACITÉ D’UTILISER CE
PRODUIT. CETTE GARANTIE LIMITÉE N’EST VALABLE POUR PERSONNE D’AUTRE QUE L’ACHETEUR
INITIAL DU PRODUIT, N’EST PAS TRANSFÉRABLE ET ÉNONCE VOTRE RECOURS EXCLUSIF.
Certains États ou provinces et certaines juridictions n'autorisent pas de limitations quant à la durée des
garanties implicites ni l'exclusion ou la limitation de dommages accessoires ou indirects; il se peut par
conséquent que les limitations et exclusions énoncées ci-dessus ne s'appliquent pas à votre cas. Cette
garantie vous confère des droits légaux spécifi ques; il est donc possible que vous bénéfi ciez d’autres droits
qui varieront d’une juridiction ou d'une province à une autre.
Pour bénéfi cier d'un service d'assistance couvert par votre garantie, contactez SAMSUNG à
l'adresse suivante:
Aux États-Unis
Samsung Electronics America, Inc.
85 Challenger Road Ridgefi eld Park, NJ 07660.
1-800-SAMSUNG (726-7864)
www.samsung.com/us/support
Au CANADA
Samsung Electronics Canada Inc.
2050 Derry Road West, Mississauga, Ontario L5N 0B9 Canada
1-800-SAMSUNG (726-7864)
www.samsung.com/ca/support (English)
www.samsung.com/ca_fr/support (French)
Français - 31
DW80H9950-00149A-02_CFR_140609.indd Sec10:31DW80H9950-00149A-02_CFR_140609.indd Sec10:31 2014-06-09 6:06:072014-06-09 6:06:07
Page 64

bit.ly/samsungdishwashers
Des questions ou des commentaires?
Pays N° de téléphone SITE INTERNET
U.S.A 1-800-SAMSUNG (726-7864) www.samsung.com/us/support
CANADA 1-800-SAMSUNG (726-7864)
DW80H9950-00149A-02_CFR_140609.indd Sec10:32DW80H9950-00149A-02_CFR_140609.indd Sec10:32 2014-06-09 6:06:072014-06-09 6:06:07
www.samsung.com/ca/support (English)
www.samsung.com/ca_fr/support (French)
DD68-00149A-02
Page 65

Lavavajillas
manual del usuario
Serie DW80H997
Serie DW80H995
Serie DW80H994
Serie DW80H993
imagine las posibilidades
Gracias por adquirir este producto Samsung.
DW80H9950-00149A-02_MES_140609.indd 1DW80H9950-00149A-02_MES_140609.indd 1 2014-06-09 6:04:122014-06-09 6:04:12
Page 66

contenido
CONFIGURACIÓN DE SU LAVAVAJILLAS
6
USO DE LA LAVAVAJILLAS
8
LIMPIEZA Y MANTENIMIENTO DE LA
LAVAVAJILLAS
22
CICLOS
24
6 Desempaque de la lavavajillas
6 Verifi cación de las piezas
7 Cumplimiento de los requisitos de instalación
8 Panel de control
12 Selector de ciclos
12 Pantallas de progreso
13 Pautas básicas
15 Ajuste del ángulo de los soportes para platos
16 Ajuste de la altura del estante superior
16 Carga del estante inferior
17 Carga del estante superior
18 Uso del 3
19 Uso de la canasta para cubiertos
20 Uso del detergente
21 Uso del producto de enjuague
22 Limpieza del exterior
22 Limpieza del interior
22 Limpieza de las boquillas
23 Limpieza de los fi ltros
23 Cómo guardar la lavavajillas
24 Tabla de ciclos
er
estante (cubiertos) (en algunos modelos)
SOLUCIÓN DE PROBLEMAS
25 Controle estos puntos si su lavavajillas…
28 Códigos de información
25
APÉNDICE
29 Ayuda al medioambiente
29 Especifi caciones
29
Español - 2
DW80H9950-00149A-02_MES_140609.indd Sec9:2DW80H9950-00149A-02_MES_140609.indd Sec9:2 2014-06-09 6:04:272014-06-09 6:04:27
Page 67

información sobre seguridad
Felicitaciones por la compra de su nueva lavavajillas Samsung. Este manual contiene
información importante acerca de la instalación, el uso y el cuidado del electrodoméstico.
Lea detenidamente estas instrucciones a fi n de aprovechar al máximo los múltiples
benefi cios y funciones de la lavavajillas.
LO QUE NECESITA SABER SOBRE LAS INSTRUCCIONES DE SEGURIDAD
Las advertencias y las instrucciones de seguridad importantes de este manual no cubren
todas las posibles condiciones y situaciones que pueden ocurrir. Es su responsabilidad
actuar con sentido común, precaución y cuidado cuando instale, realice el mantenimiento
y ponga en funcionamiento la máquina lavavajillas.
INSTRUCCIONES DE SEGURIDAD IMPORTANTES
Signifi cado de los íconos y señales de este manual del usuario:
Peligros o prácticas inseguras que pueden causar lesiones físicas graves o la
muerte.
ADVERTENCIA
PRECAUCIÓN
Para reducir el riesgo de incendio, explosión, descargas eléctricas o lesiones físicas cuando
usa esta lavavajillas, siga estas instrucciones de seguridad básicas:
Peligros o prácticas inseguras que pueden causar lesiones físicas leves o
daños a la propiedad.
NO intente hacer nada.
NO desensamble.
01 información sobre seguridad
NO toque.
Siga las instrucciones explícitamente.
Desenchufe el cable de alimentación del tomacorriente de pared.
Asegúrese de que la máquina esté conectada a tierra para evitar descargas eléctricas.
Llame al servicio técnico para solicitar ayuda.
Nota
Estas señales de advertencia sirven para evitar que usted y otras personas sufran daños.
Sígalos explícitamente.
Después de leer esta sección, guárdela en un lugar seguro para consultas futuras.
CONSERVE ESTAS INSTRUCCIONES
Español - 3
DW80H9950-00149A-02_MES_140609.indd Sec1:3DW80H9950-00149A-02_MES_140609.indd Sec1:3 2014-06-09 6:04:272014-06-09 6:04:27
Page 68

información sobre seguridad
ADVERTENCIA: Cuando utilice la lavavajillas, tome todas las precauciones básicas, incluyendo las siguientes:
ADVERTENCIA
1. Lea todas las instrucciones antes de usar la lavavajillas.
2. Utilice la lavavajillas únicamente para la función para la cual está diseñada.
3. Utilice únicamente detergentes o productos humectantes recomendados para utilizarse en lavavajillas y
manténgalos fuera del alcance de los niños.
4. Cuando cargue los artículos que se lavarán:
- coloque los artículos cortantes de manera que no dañen las juntas de la puerta y
- cargue los cuchillos fi losos con el mango hacia arriba para reducir el riesgo de sufrir lesiones por cortes.
5. No lave artículos de plástico a menos que tengan el rótulo "apto para lavavajillas" o su equivalente.
En el caso de los artículos de plástico que no tengan tal rótulo, consulte las recomendaciones del fabricante.
6. No toque el ELEMENTO CALENTADOR durante el uso o inmediatamente luego de él.
7. No ponga en funcionamiento la lavavajillas a menos que todos los paneles de CIERRE estén correctamente
colocados.
8. No manipule indebidamente los controles.
9. Trate con cuidado la puerta y el estante de la lavavajillas, no se siente o pare sobre ellas.
10. Para reducir el riesgo de lesiones, evite que los niños jueguen dentro o fuera de la lavavajillas.
11. En ciertas circunstancias, se puede producir gas hidrógeno en un sistema de agua caliente que no se ha
usado durante dos semanas o más. EL GAS HIDRÓGENO ES EXPLOSIVO. Si el sistema de agua caliente no
se ha usado durante dicho período, abra todas las llaves de agua caliente y deje que el agua fl uya durante
varios minutos antes de usar la lavavajillas. Esto disipará el gas hidrógeno acumulado. Dado que el gas es
infl amable, no fume ni utilice una llama abierta en ese momento.
12. Cuando deje de utilizar o descarte una lavavajillas antigua, retire la puerta del compartimiento de lavado.
ADVERTENCIA:
Este producto contiene sustancias químicas que, según el Estado de California, provocan cáncer y toxicidad
ADVERTENCIA
reproductiva.
• Después de desempacar la lavavajillas, mantenga el empaque fuera del alcance de los niños.
PRECAUCIÓN
• La máquina lavavajillas es muy pesada. No intente mover o trasladarla usted mismo. Se necesitan dos o más
personas para mover una lavavajillas y evitar lesiones potenciales.
• Al igual que con cualquier equipo que use electricidad, agua y piezas movibles, existen riesgos potenciales.
• No instale la lavavajillas cerca de componentes eléctricos. Mantenga la lavavajillas alejada de llamas abiertas.
• Instale y nivele la lavavajillas sobre una superfi cie no alfombrada que pueda soportar su peso.
• La lavavajillas debe conectarse a tierra correctamente. Nunca la conecte a un tomacorriente sin conexión a
tierra. Consulte la página 7 para obtener más información sobre cómo conectar la lavavajillas a tierra.
• Conecte el cable a tierra a la conexión a tierra de color verde de la caja de terminales.
• Después de instalar la lavavajillas, asegúrese que la manguera de desagüe esté correctamente conectada
y que las conexiones de la manguera no tengan pérdidas. Si la manguera de desagüe está fl oja, puede
ocasionar pérdidas materiales.
• El conducto puede romperse. A medida que transcurre el tiempo, pierde su fl exibilidad. Revise el conducto
periódicamente. Si está hinchado, rasgado, cortado o si hay pérdida de agua, reemplácelo inmediatamente.
• Para usar este electrodoméstico en forma segura, familiarícese con su funcionamiento y manéjelo con
cuidado cuando lo use.
• No vierta gasolina, solventes ni otros materiales infl amables dentro de la lavavajillas. No lave vajilla que haya
sido expuesta a estos materiales.
CONSERVE ESTAS INSTRUCCIONES
Español - 4
DW80H9950-00149A-02_MES_140609.indd Sec1:4DW80H9950-00149A-02_MES_140609.indd Sec1:4 2014-06-09 6:04:272014-06-09 6:04:27
Page 69

• Mantenga el detergente de la lavavajillas fuera del alcance de los niños. El detergente causa un efecto
adverso en los órganos del cuerpo humano. Contiene sustancias para otorgar brillo y es corrosivo.
Evite que el detergente entre en contacto con la piel o los ojos.
• No empuje ni presione la puerta cuando esté abierta, ya que al hacerlo podría dañar la lavavajillas o hacerse
daño.
• No permita que los niños jueguen dentro o encima de la máquina lavavajillas. Pueden hacerse daño o dañar
la lavavajillas.
•
Desconecte el cable de alimentación (o corte el disyuntor) antes de realizar el mantenimiento
de la lavavajillas.
•
No repare, reemplace ni realice el mantenimiento de ninguna de las piezas de su lavavajillas
usted mismo. Sólo se permite que técnicos califi cados autorizados realicen el desensamble,
las reparaciones y las modifi caciones. El trabajo efectuado por una persona no autorizada
puede invalidar su garantía.
•
Antes de deshacerse de su lavavajillas, retire la puerta del compartimiento de lavado o la
traba de la puerta para evitar que niños o animales pequeños puedan quedar atrapados
adentro.
•
Si no va a utilizarse la lavavajillas durante un período prolongado, corte el suministro de agua.
• Esta lavavajillas ha sido diseñada para uso residencial únicamente.
ANTES DE USAR LA LAVAVAJILLAS
ADVERTENCIA
ADVERTENCIA
Riesgo de vuelco
- No utilice la lavavajillas hasta que no esté correctamente instalada.
- No ejerza presión sobre una puerta abierta.
- No coloque peso excesivo sobre una puerta abierta.
Riesgo de descarga eléctrica
El incumplimiento con estas instrucciones puede tener como resultado la muerte, incendios o descargas
eléctricas:
- Conecte a tierra la lavavajillas.
- Conecte el cable a tierra a la conexión a tierra de color verde de la caja de conexiones.
- No utilice un cable prolongador.
01 información sobre seguridad
CONSERVE ESTAS INSTRUCCIONES
Español - 5
DW80H9950-00149A-02_MES_140609.indd Sec1:5DW80H9950-00149A-02_MES_140609.indd Sec1:5 2014-06-09 6:04:272014-06-09 6:04:27
Page 70

confi guración de su lavavajillas
Asegúrese de que su instalador siga estas instrucciones minuciosamente para que su
nueva lavavajillas funcione adecuadamente y no existan riesgos de sufrir lesiones al lavar
los platos.
DESEMPAQUE DE LA LAVAVAJILLAS
• Cuando haya recibido su nueva lavavajillas, desempáquela con cuidado y verifi que que no esté dañada.
Si la lavavajillas está dañada, tome nota de ello en la carta de porte y guarde una copia.
No instale la lavavajillas y comuníquese con el Servicio al cliente de Samsung al número que se indica a continuación.
• Si el producto no está dañado, comience con la instalación. Si va a instalarlo por su cuenta, asegúrese de leer la guía de
instalación y de seguir sus instrucciones.
• Después de desempacar la lavavajillas, mantenga el empaque fuera del alcance de los niños para garantizar su seguridad.
VERIFICACIÓN DE LAS PIEZAS
Una vez desempacada la lavavajillas, asegúrese de haber recibido todas las piezas que aparecen a continuación.
Si su lavavajillas sufrió daños durante el transporte, o si falta alguna pieza, comuníquese con el Servicio al cliente de
Samsung al 1-800-SAMSUNG (726-7864).
Boquilla inferior
Refl ector de agua
Dosifi cador
Tapa de la ventilación de
Panel de control
Boquilla superior
Accesorios - Manual del usuario/instalación, kit de instalación, manguera de desagüe, soporte de manguera
vapor
Puerta
Estante inferiorEstante superior
de desagüe, abrazadera de manguera, placa de protección.
Estante para
cubiertos
3er estante
(en algunos modelos)
Boquilla superior
Base
Rejilla del 3er estante
(en algunos modelos)
Español - 6
DW80H9950-00149A-02_MES_140609.indd Sec3:6DW80H9950-00149A-02_MES_140609.indd Sec3:6 2014-06-09 6:04:272014-06-09 6:04:27
Page 71

CUMPLIMIENTO DE LOS REQUISITOS DE INSTALACIÓN
Suministro eléctrico y conexión a tierra
Para evitar el riesgo de incendio, descarga eléctrica o lesiones físicas, todo el cableado y la conexión a tierra
deben realizarse de conformidad con la versión más reciente del Código Eléctrico Nacional, ANSI/FNPA,
Nro.70y los códigos y ordenanzas locales. Es exclusiva responsabilidad del propietario del electrodoméstico
proveer los servicios eléctricos adecuados para este electrodoméstico.
Nunca utilice un cable prolongador.
PRECAUCIÓN
Cuando prepare la instalación, asegúrese de que el suministro eléctrico ofrezca las siguientes características:
• Un circuito derivado individual de 120 voltios, 60 Hz destinado únicamente a la lavavajillas con un fusible o
disyuntor de 15 amp.
La lavavajillas debe estar conectada a tierra. En caso de que la lavavajillas funcione mal o se descomponga, la
conexión a tierra reducirá el riesgo de descarga eléctrica al ofrecer una vía de menor resistencia para la corriente
eléctrica.
Nunca conecte un cable a tierra a las tuberías de plástico, las tuberías de gas o las cañerías de agua caliente.
ADVERTENCIA
INSTRUCCIONES DE CONEXIÓN A TIERRA
Para un electrodoméstico con conexión permanente:
Este electrodoméstico debe estar conectado a un metal con conexión a tierra, a un sistema de cableado
permanente, o se debe conectar el conductor de conexión a tierra del equipo a los conductores del circuito y
luego a la terminal de conexión a tierra del equipo.
Suministro de agua
La presión del conducto de agua caliente debe estar entre 20 y 120 psi (140 y 830 kPa).
Ajuste el calentador de agua para obtener una temperatura de agua entre 120 ˚F (49 ˚C) y 149 ˚F (65 ˚C).
La mayoría de las tiendas de suministros de plomería venden conductos de diversas longitudes, de hasta
10 pies (305 cm) de largo.
Para reducir el riesgo de pérdidas y daños ocasionados por el agua puede hacer lo siguiente:
• Coloque las llaves de agua en un lugar de fácil acceso.
• Cierre las llaves cuando no use la lavavajillas.
• Verifi que periódicamente que no haya pérdidas de agua en los accesorios del conducto.
Antes de utilizar la lavavajillas por primera vez verifi que que no haya pérdidas en ninguna de las conexiones de la
válvula de suministro de agua ni en las llaves.
ADVERTENCIA
Piso
Por razones de seguridad, su lavavajillas debe estar instalada sobre un piso de construcción sólida.
Nunca instale la lavavajillas sobre una plataforma o sobre una estructura con soportes poco resistentes.
02 confi guración de su lavavajillas
La lavavajillas debe instalarse adecuadamente, conforme a la Guía de instalación, antes de utilizarla. Si no recibió una Guía de
instalación junto con la lavavajillas, puede obtener una en nuestro sitio Web www.samsung.com.
Español - 7
DW80H9950-00149A-02_MES_140609.indd Sec3:7DW80H9950-00149A-02_MES_140609.indd Sec3:7 2014-06-09 6:04:292014-06-09 6:04:29
Page 72

uso de la lavavajillas
ADVERTENCIA: Para reducir el riesgo de incendio, descarga eléctrica o lesiones personales, lea las INSTRUCCIONES
DE SEGURIDAD IMPORTANTES antes de poner en marcha este electrodoméstico.
ADVERTENCIA
PANEL DE CONTROL
Series DW80H997 / DW80H995 / DW80H994
Series DW80H993
1
Power (Encendido)
2
Selector de ciclos
Self Clean
(Autolimpieza)
3
(en algunos modelos)
Upper (Superior)
4
(en algunos modelos)
2 83 61 4 5
Cuando presiona el botón Power (Encendido), se enciende la luz del último ciclo
fi nalizado. Cuando fi naliza el ciclo seleccionado, se apagan los otros indicadores
y se enciende el indicador "End (Fin)" durante algunos minutos. A continuación
Power (Encendido) se apaga automáticamente.
Seleccione el ciclo de lavado adecuado según el nivel de suciedad de la vajilla. Cuando
se selecciona un ciclo, se enciende el indicador de ciclo activado correspondiente. El
indicador de la zona Upper (Superior) y Lower (Inferior) también se enciende de manera
predeterminada.
Si desea modifi car el ciclo una vez iniciado, presione el botón Reset (Restablecer) y
apague la lavavajillas. Luego encienda de nuevo la lavavajillas y seleccione un nuevo
ciclo.
El ciclo predeterminado es Normal.
Cuando se enciende la lavavajillas después de haberla restablecido, el último ciclo
ejecutado se selecciona de manera predeterminada.
Seleccione esta opción para limpiar la tina de la lavavajillas. Ejecute la opción con la
lavavajillas vacía. Las opciones Upper (Superior) y Lower (Inferior) se apagan de manera
predeterminada.
Cuando selecciona Upper (Superior), únicamente se activa la boquilla del estante superior.
Laboquilla inferior no funciona.
Utilice esta función para lavar cargas pequeñas de platos o vasos colocados en el estante
superior.
Cuando seleccione Upper (Superior), coloque platos, vasos, etc. únicamente en el
estante superior. La lavavajillas no lavará los artículos colocados en el estante inferior.
Si selecciona Upper (Superior) se reduce el tiempo del ciclo y el consumo de electricidad.
7 9
10 11
Español - 8
DW80H9950-00149A-02_MES_140609.indd 8DW80H9950-00149A-02_MES_140609.indd 8 2014-06-09 6:04:292014-06-09 6:04:29
Page 73

Lower (Inferior)
(enalgunos modelos)
/ Lower Rack - Only
5
(Estante inferior Solo) (en algunos
modelos)
Speed Booster
6
(Aumentar velocidad)
(en algunos modelos)
Sanitize
7
(Desinfección)
Cuando selecciona Lower (Lower Rack - Only) (Inferior (Estante inferior - Solo)),
únicamente se activa la boquilla del estante inferior. Laboquilla superior no funciona.
Utilice esta función para lavar cargas pequeñas de platos o vasos colocados en el estante
inferior.
Cuando seleccione Lower (Lower Rack - Only) (Inferior (Estante inferior - Solo)),
03 uso de la lavavajillas
coloque elementos, vasos, etc., únicamente en el estante inferior. La lavavajillas no
lavará los artículos colocados en el estante superior.
Si selecciona Lower (Lower Rack - Only) (Inferior (Estante inferior - Solo)), se reduce el
tiempo del ciclo y el consumo de electricidad.
Si desea lavar recipientes muy sucios como ollas y sartenes, seleccione la opción
Zone Booster (Zona refuerzo). (Esta opción consume algo más de agua y energía.)
Seleccione la opción Zone Booster (Zona refuerzo) L (I): Efectúa un lavado intensivo
en la zona izquierda del estante inferior.
Seleccione la opción Zone Booster (Zona refuerzo) R (D): Efectúa un lavado
intensivo en la zona derecha del estante inferior.
Seleccione las opciones L (I) y R (D) de la Zone Booster (Zona refuerzo): Efectúa un
lavado intensivo en todo el estante inferior.
Seleccionando una opción de Zone Booster (Zona refuerzo) no se apaga la boquilla
superior.
Seleccione esta opción para reducir el tiempo de lavado.
Cuando se selecciona la opción Sanitize (Desinfección), la temperatura del agua se eleva
a 162 ˚F (72 ˚C) en el ciclo de enjuague fi nal para la desinfección a alta temperatura.
Si selecciona la opción Sanitize (Desinfección), el indicador "Sanitize (Desinfección)"
parpadea cuando la temperatura del agua alcanza la temperatura de desinfección, más
de 155˚F (68 ˚C), y permanece encendido hasta el fi nal del ciclo Sanitize (Desinfección).
Cuando abre la puerta o presiona el botón Power (Encendido), el indicador
"Sanitize (Desinfección)" se apaga.
No puede seleccionar la opción Sanitize (Desinfección) si selecciona el ciclo
Delicate (Vajilla delicada).
La función Sanitize (Desinfección) cumple con la Norma 184 NSF/ANSI para
Lavavajillas Residenciales. Las lavavajillas residenciales certifi cadas no han sido
diseñadas para los establecimientos alimentarios autorizados. Su lavavajillas ha sido
certifi cada por NSF.
El ciclo certifi cado por NSF es el ciclo Normal con la opción Sanitize (Desinfección)
seleccionada.
Español - 9
DW80H9950-00149A-02_MES_140609.indd 9DW80H9950-00149A-02_MES_140609.indd 9 2014-06-09 6:04:292014-06-09 6:04:29
Page 74

uso de la lavavajillas
Utilice esta opción cuando quiera secar los platos completamente.
La temperatura se eleva a 162 ˚F (72 ˚C) en el ciclo de enjuague fi nal y se incrementa el
tiempo de secado.
Si selecciona esta opción, se aumenta el consumo de electricidad.
La próxima vez que utilice la lavavajillas, la opción Dry+ (Secado+) se seleccionará
automáticamente y se aplicará al siguiente ciclo. Puede desactivar la opción
Dry+ (Secado+) pulsando el botón Dry+ (Secado+).
No puede seleccionar la opción Dry+ (Secado+) si selecciona el ciclo
Delicate (Vajilla delicada).
Dry+ (Secado+) /
8
Child Lock (Bloqueo
para niños)
9
Pantalla
*Child Lock (Bloqueo para niños): Esta opción le permite bloquear los botones del panel
de control, excepto el botón Power (Encendido), para que los niños no puedan encender
la lavavajillas en forma accidental al presionar los botones del panel de control. Únicamente
el botón Power (Encendido) permanece activo.
Para bloquear o desbloquear los botones del panel de control, mantenga presionado el
botón Dry+ / Child Lock (Secado+ / Bloqueo para niños) durante tres (3) segundos.
- Cuando está encendida: Mantenga presionado el botón
"Dry+ / Child Lock (Secado+ / Bloqueo para niños)" durante tres (3) segundos.
- Cuando está apagada: Presione primero el botón Power (Encendido) y luego
presione el botón "Dry+ / Child Lock (Secado+ / Bloqueo para niños)" durante tres
(3)segundos.
- Child Lock (Bloqueo para niños) seguirá activo hasta que lo apague. No
puede seleccionar ciclos ni opciones ni encender la lavavajillas cuando
Child Lock (Bloqueo para niños) está encendido.
Muestra el tiempo del ciclo y las horas y los minutos restantes, las horas del
Delay Start (Inicio Retardado) y los mensajes de error.
Si ocurre un error durante el funcionamiento, aparece un mensaje de error con un sonido
de advertencia.
Consulte la página de códigos de información.
Indicador Child Lock (Bloqueo para niños)
- Está encendido cuando Child Lock (Bloqueo para niños) está activado (o la
lavavajillas está en el modo de espera o de pausa).
- Está apagado cuando la lavavajillas está en funcionamiento.
- Cuando Child Lock (Bloqueo para niños) está activado, el indicador
Child Lock (Bloqueo para niños) parpadea durante unos segundos si no se
presiona ningún botón excepto Power (Encendido).
Indicador Self Clean (Autolimpieza) ((en algunos modelos))
- Está encendido cuando la opción Self Clean (Autolimpieza) está activada (o la
lavavajillas está en el modo de espera o de pausa), pero se apaga cuando la
lavavajillas está en funcionamiento.
- Parpadea durante 5 segundos cada 20 o 22 ciclos.
- El contador de ciclos desaparece cuando se completa el ciclo
Self Clean (Autolimpieza) o cuando la lavavajillas alcanza el ciclo 23 sin que
se utilice el ciclo Self Clean (Autolimpieza). (El contador de ciclos no cuenta el
funcionamiento de Reset (Restablecer) o Self Clean (Autolimpieza).)
Español - 10
DW80H9950-00149A-02_MES_140609.indd 10DW80H9950-00149A-02_MES_140609.indd 10 2014-06-09 6:04:292014-06-09 6:04:29
Page 75

Indicador Rinse Refi ll (Reponer producto de enjuague)
- Está encendido cuando se agota el producto de enjuague de la lavavajillas (o la
lavavajillas está en el modo de espera o de pausa).
- Está apagado cuando la lavavajillas está en funcionamiento.
Indicador Lack of salt (Falta sal) (*solo modelos aplicables)
- Se enciende cuando se agota la sal del ablandador de agua
(o la lavavajillas está en el modo de espera o de pausa).
- Está apagado cuando la lavavajillas está en funcionamiento.
Retarde un ciclo hasta 24 horas, en incrementos de una hora. Para aumentar el tiempo del
inicio retardado, presione o mantenga presionado el botón Delay Start (Inicio Retardado).
Lahora en pantalla indica el tiempo en el cual comenzará el lavado.
Delay Start
10
(Inicio Retardado)
11
Start (Inicio)
Puede seleccionar las opciones (Self Clean (Autolimpieza), Upper (Superior), Lower (Inferior),
Speed Booster (Aumentar velocidad), Sanitize (Desinfección), Dry+ (Secado+), Delay Start (Inicio Retardado)) antes de
iniciar un ciclo. Si cambia el ciclo después de seleccionar una opción, se regresa al ciclo original.
Para impedir que el teclado táctil pierda sensibilidad de respuesta, siga estas instrucciones:
- Toque con el dedo el centro de cada tecla. No ejerza presión.
- Limpie de forma regular la superfi cie del control táctil con un trapo suave y húmedo.
- Tenga cuidado de no tocar más de una tecla al mismo tiempo, excepto cuando sea necesario.
Cuando pause un ciclo abriendo la puerta, presione el botón Start (Inicio) antes de cerrar la puerta para reanudar el ciclo.
- Después de confi gurar el tiempo de retardo, presione el botón Start (Inicio) y cierre la
puerta para iniciar el ciclo.
- Si desea modifi car el tiempo de retardo después de la puesta en marcha de la
lavavajillas, presione el botón Reset (Restablecer) y apague la lavavajillas. Luego
encienda de nuevo la lavavajillas y seleccione un nuevo ciclo con una nueva
confi guración de inicio retardado.
Para iniciar un ciclo, presione el botón Start (Inicio) antes de cerrar la puerta.
*Reset (Restablecer) : Para cancelar un ciclo que esté ejecutándose y desaguar la
lavavajillas, mantenga presionado el botón Start (Inicio) durante tres (3) segundos.
Una vez restablecida la lavavajillas, seleccione un ciclo y una opción y luego presione
Start (Inicio) para reiniciar la lavavajillas.
03 uso de la lavavajillas
OO X
Español - 11
DW80H9950-00149A-02_MES_140609.indd 11DW80H9950-00149A-02_MES_140609.indd 11 2014-06-09 6:04:292014-06-09 6:04:29
Page 76

uso de la lavavajillas
SELECTOR DE CICLOS
1 2 3 4 5
1
Auto
2
Normal
3
Heavy (Muy sucio) Utilice este ciclo para vajilla muy sucia.
Delicate
4
(Vajilla delicada)
5
Express 60'
Este ciclo detecta el nivel de suciedad e inicia automáticamente el ciclo óptimo luego de
algunos minutos de funcionamiento.
Utilice este ciclo para vajilla medianamente sucia.
La etiqueta del uso de energía se basa en este ciclo.
Utilice este ciclo para artículos frágiles, tales como las copas.
No puede seleccionar la opción Zone Booster (Zona refuerzo), Dry+ (Secado+) o
Sanitize (Desinfección) si selecciona este ciclo.
Utilice este ciclo cuando desee lavar la vajilla rápidamente. Tarda aproximadamente 1 hora.
No puede seleccionar la opción Speed Booster (Aumentar velocidad) o
Zone Booster (Zona refuerzo) si selecciona este ciclo.
PANTALLAS DE PROGRESO
Serie DW80H997 Serie DW80H995 / DW80H994
Wash
1
(Lavado)
Rinse
2
(Enjuague)
Dry
3
(Secado)
Clean
4
(Limpio)
Cuando la lavavajillas inicia un ciclo, el indicador correspondiente al funcionamiento actual se enciende para mostrar el
progreso del ciclo.
Serie DW80H993
En las lavavajillas de la serie DW80H993, el LED de bolsillo se enciende cuando la lavavajillas está funcionando.
Cuando la lavavajillas está ejecutando la parte de lavado de un ciclo, se
enciende el primer indicador de fl echa y se muestra el tiempo restante.
Cuando la lavavajillas está ejecutando la parte de enjuague de un ciclo, se
enciende el segundo indicador de fl echa y se muestra el tiempo restante.
Cuando la lavavajillas está ejecutando la parte de secado de un ciclo, se
enciende el tercer indicador de fl echa y se muestra el tiempo restante.
Cuando la lavavajillas ha completado todo el ciclo, se apagan todos los
demás indicadores.
La lavavajillas emite una señal sonora y End (Fin) se muestra durante
algunos minutos.
Español - 12
DW80H9950-00149A-02_MES_140609.indd 12DW80H9950-00149A-02_MES_140609.indd 12 2014-06-09 6:04:302014-06-09 6:04:30
Page 77

PAUTAS BÁSICAS
1. Abra la puerta y cargue la vajilla (consulte la página 16-19).
- Coloque la vajilla en los estantes superior e inferior, a menos que haya seleccionado la opción Upper (Superior) o
Lower (Lower Rack - Only) (Inferior (Estante inferior - Solo)).
- Retire los restos de comida de la vajilla antes de colocarla en los estantes.
- Después de cargar la vajilla en los estantes, rote las boquillas superiores para asegurarse de que ninguno de los
platos bloquee la rotación de las boquillas.
- Asegúrese de que los platos no impidan que se abra la apertura del dosifi cador del detergente.
2. Agregue detergente al dosifi cador (página 20).
- Asegúrese de
- Consulte "Uso del detergente" para saber cómo agregar el detergente.
3. Presione el botón Power (Encendido).
- Cuando presiona el botón Power (Encendido), se enciende el indicador del último ciclo fi nalizado.
- Si se enciende el indicador "Rinse Refi ll (Reponer producto de enjuague)", debe reponer el producto de enjuague para
mejorar el desempeño del lavado y del secado.
4. Seleccione el ciclo de limpieza adecuado según el nivel de suciedad de la vajilla. (consulte las páginas 12 y 24).
- Presione el botón de ciclo adecuado.
- Cuando presiona un botón de ciclo, se enciende el indicador correspondiente.
- Para obtener información sobre cómo seleccionar un ciclo según el nivel de suciedad de la vajilla, consulte "Selector
de ciclos".
5. Presione el botón Start (Inicio) y cierre la puerta.
- Empuje los estantes hacia atrás para colocarlos en su lugar, pulse el botón Start (Inicio) y cierre la puerta.
- Asegúrese de cerrar la puerta fi rmemente. Si la puerta está levemente entreabierta, el ciclo seleccionado no
comenzará automáticamente.
- La lavavajillas comenzará a drenar después de unos segundos y luego iniciará el ciclo seleccionado.
6. Cuando se completa el ciclo de lavado.
- Se enciende el indicador "End (Fin)" y la lavavajillas emite una señal sonora.
- La lavavajillas se apaga automáticamente luego de algunos minutos.
Para cargar más vajilla o para hacer una pausa durante el funcionamiento, abra la puerta despacio y con cuidado, ya
que existe la posibilidad de sufrir lesiones a causa del vapor caliente contenido en el interior de la lavavajillas.
PRECAUCIÓN
(Si se abre la puerta cuando la lavavajillas está funcionando, se activa un mecanismo de seguridad y se detiene el ciclo.)
Para reanudar el funcionamiento, presione el botón Start (Inicio) y cierre la puerta.
Tenga en cuenta que agregar vajilla algunos minutos después de que la lavavajillas comience a funcionar puede afectar
al desempeño.
Para lograr un mejor desempeño en el secado debe utilizar productos para el enjuague. Puede lograr un mejor
desempeño del secado seleccionando la opción Dry+ (Secado+).
utilizar únicamente detergente para lavavajillas automática.
03 uso de la lavavajillas
Español - 13
DW80H9950-00149A-02_MES_140609.indd 13DW80H9950-00149A-02_MES_140609.indd 13 2014-06-09 6:04:302014-06-09 6:04:30
Page 78

uso de la lavavajillas
Controles táctiles
Los controles táctiles le permiten operar fácilmente la máquina lavavajillas.
• Se activan fácilmente con un toque suave.
• Tienen un diseño sencillo y elegante.
• Son fáciles de limpiar.
Si tiene niños o desea limpiar la Interfaz de control, recomendamos activar la función
Child Lock (Bloqueo para niños) para bloquear los botones de control.
- Cuando esta opción esté seleccionada, los niños no podrán encender la lavavajillas en forma accidental
al tocar los controles.
- Si un ciclo se está ejecutando, los botones no responderán. (excepto el botón Power (Encendido) y las
opciones Child Lock (Bloqueo para niños) y Reset (Restablecer))
- Si la lavavajillas está apagada, únicamente responderá el botón Power (Encendido).
Inicio Retardado
Al seleccionar la opción de Delay Start (Inicio Retardado), la lavavajillas inicia el ciclo seleccionado luego de que
se cumpla el tiempo establecido.
Alarma de interferencia del refl ector de agua:
• La función de interferencia del refl ector de agua detecta automáticamente los obstáculos en la tina.
Sidetecta algún obstáculo, la pantalla parpadea y la lavavajillas emite una señal sonora durante unos
minutos. Si se detecta algún obstáculo al fi nal del ciclo, End (Fin) parpadea durante unos minutos.
• Retire cualquier obstáculo de la parte inferior de la lavavajillas.
Modo de confi guración
El modo de confi guración permite cambiar el sonido y el brillo del LED de la lavavajillas. Para ingresar en el modo
de confi guración, presione los botones Delay Start (Inicio Retardado) + Sanitize (Desinfección) durante
3 segundos con la lavavajillas encendida. Presione el botón Sanitize (Desinfección) para seleccionar un
subelemento del menú de confi guración y presione el botón Delay Start (Inicio Retardado) para cambiar una
confi guración.
- Confi guración del sonido: Presione el botón Sanitize (Desinfección) hasta que se muestre "S on"
(Sonido activado) o "SoFF" (Sonido desactivado). Para cambiar la confi guración, presione el botón
Delay Start (Inicio Retardado). "SoFF" signifi ca que el sonido está desactivado durante todos los
ciclos. La lavavajillas conservará la confi guración del sonido seleccionada hasta que vuelva a cambiarla.
- Confi guración del brillo del LED de bolsillo: Presione el botón Sanitize (Desinfección) hasta que
se muestre "B0 - B5". Los números más altos indican más brillo.) Cuanto más alto es el número, más
brillan los LED. Para cambiar la confi guración en una lavavajillas de la serie H9930, presione el botón
Delay Start (Inicio Retardado).
Cuando utilice la lavavajillas, trate de acomodar los platos de manera adecuada, como se describe en la página 16.
ADVERTENCIA
• Debe retirar de la vajilla todos los restos de comida, como huesos, semillas, etc., y cualquier otro tipo de
desecho como los palillos, papel u otros, ya que es posible que dañen la vajilla, generen ruidos u ocasionen
incluso mal funcionamiento.
• Presione el botón de ciclo adecuado según el nivel de suciedad y el tipo de vajilla.
• Utilice únicamente la cantidad adecuada de detergente y de producto para el enjuague.
No deben lavarse los siguientes artículos
ADVERTENCIA
• Artículos de acrílico o aluminio: Los artículos de acrílico o aluminio pueden decolorar los platos con un
borde dorado impreso y dañar otros artículos.
• Platos tratados con adhesivos: Los plásticos tratados se deben lavar aparte. Pueden
despegarse los adornos de madera, marfi l, cobre y hojalata de los platos.
• Plásticos con una tolerancia a la temperatura inferior a 194 ˚F (90 ˚C): Los plásticos delgados no se lavan
ni secan bien y es posible que se dañen debido a las altas temperaturas de lavado.
• Hojalata: La hojalata debe lavarse a mano y secarse inmediatamente, ya que puede oxidarse.
• Utensilios de madera: Los artículos de madera pueden agrietarse.
Español - 14
DW80H9950-00149A-02_MES_140609.indd 14DW80H9950-00149A-02_MES_140609.indd 14 2014-06-09 6:04:302014-06-09 6:04:30
Page 79

AJUSTE DEL ÁNGULO DE LOS SOPORTES PARA PLATOS
Puede ajustar el ángulo de los dientes del estante superior en tres posiciones distintas para que coincida con el tamaño y la
forma de la vajilla. Para ajustar los dientes, sujete la manija de la parte posterior del estante y empuje hacia la izquierda o hacia
la derecha. Consulte la ilustración inferior.
En el estante inferior, puede plegar fácilmente los dientes plegables para hacer lugar para artículos grandes, como ollas y
sartenes. Retire el estante de la lavavajillas, luego pliegue los dientes uno a uno. Consulte la ilustración inferior.
Estante superior
Estante inferior
03 uso de la lavavajillas
Español - 15
DW80H9950-00149A-02_MES_140609.indd 15DW80H9950-00149A-02_MES_140609.indd 15 2014-06-09 6:04:302014-06-09 6:04:30
Page 80

uso de la lavavajillas
AJUSTE DE LA ALTURA DEL ESTANTE SUPERIOR
Puede ajustar la altura del estante superior de su lavavajillas Samsung para dar cabida a platos de mayor tamaño en el estante
inferior. Según la altura del estante superior que establezca, en el estante inferior puede ubicar platos de hasta 12 pulgadas
(30 cm) de diámetro y en el estante superior platos de hasta 8 pulgadas (20 cm) de diámetro.
1. Para bajar el estante superior 2 pulgadas (5 cm),
presione las manijas de ajuste que están situadas
a la izquierda y a la derecha del estante superior y
luego presiónelo suavemente hacia abajo al mismo
tiempo.
2. Para subir el estante superior, simplemente empújelo
hacia arriba. La manija de ajuste se trabará y el
estante superior quedará en posición alta.
Recomendamos que ajuste la altura del estante
superior antes de cargar la vajilla. Si ajusta el
PRECAUCIÓN
estante luego de cargar la vajilla, esta puede
resultar dañada. Si no la ajusta utilizando las
manijas izquierda y derecha al mismo, la puerta de
la lavavajillas puede que no se cierre correctamente.
Tire del estante superior hasta retirarlo totalmente de la tina para poder ajustar el estante superior.
CARGA DEL ESTANTE INFERIOR
Cargue los utensilios de cocina (recipientes, ollas, etc.) de hasta 12 pulgadas (30 cm) de diámetro en el estante inferior.
Se ha diseñado el estante inferior específi camente para la vajilla para comida, tazones para sopa, platos, ollas, tapas y fuentes
de horno.
Cargue los platos en la columna central del estante de manera que los lados superiores se enfrenten unos a otros.
Cargue los artículos grandes como recipientes y ollas en la lavavajillas de manera que las cavidades internas miren hacia
abajo. Recomendamos cargar las tazas, la cristalería y los platos pequeños en el estante superior.
Observe los patrones recomendados de carga que se encuentran a continuación.
8 puestos 10 puestos 12 puestos
Español - 16
DW80H9950-00149A-02_MES_140609.indd 16DW80H9950-00149A-02_MES_140609.indd 16 2014-06-09 6:04:312014-06-09 6:04:31
Page 81

Carga de artículos grandes en las zonas de refuerzo
Puede cargar artículos grandes como ollas y sartenes en el lado izquierdo y/o
derecho del estante inferior -las secciones de Zone Booster (Zona refuerzo)para obtener un lavado más efectivo. Cuando se selecciona la opción
Zone Booster (Zona refuerzo), se activa un potente chorro adicional
que se dirige directamente a los elementos de las secciones de
Zone Booster (Zona refuerzo). Asegúrese de que las manijas de las ollas y otros
artículos no interfi eran con la rotación de las boquillas y el refl ector de agua.
CARGA DEL ESTANTE SUPERIOR
El estante superior está diseñado para platos pequeños, tazones para café, vasos y artículos de plástico que tengan el rótulo
"apto para lavavajillas". Cargue los platos en la lavavajillas de manera que los lados superiores se enfrenten unos a otros.
Asegúrese de que la vajilla cargada no interfi era con la rotación de la boquilla que se encuentra en la parte inferior del estante
superior. (Para verifi carlo, haga rotar la boquilla a mano.)
Para cargar la vajilla, tire del estante superior dejando el espacio sufi ciente para que pueda cargarlo sin golpear la encimera
superior.
8 puestos 10 puestos 12 puestos
Uso del soporte para copas
Puede cargar tazas o vasos en el soporte para copas. Resulta muy práctico
también para lavar copas de vino. Cuelgue sus copas de vino de las espigas
del soporte para copas.
Puede plegar el soporte para copas cuando no se use.
03 uso de la lavavajillas
Español - 17
DW80H9950-00149A-02_MES_140609.indd 17DW80H9950-00149A-02_MES_140609.indd 17 2014-06-09 6:04:332014-06-09 6:04:33
Page 82

uso de la lavavajillas
USO DEL 3ER ESTANTE (CUBIERTOS) (EN ALGUNOS MODELOS)
Carga del estante para cubiertos
<Ubique los artículos en forma aleatoria u ordenada.>
Además de la canasta para cubiertos estándar del estante superior, algunos modelos tienen un estante para
cubiertos.
El estante para cubiertos es adecuado para cubiertos y utensilios para cocinar y servir.
Puede acomodar los cubiertos y utensilios en forma aleatoria u ordenada en el estante para cubiertos.
Para una limpieza más efi caz, los utensilios o artículos muy sucios o con restos de alimentos adheridos deben
colocarse en la canasta para cubiertos inferior.
Cómo retirar el estante para cubiertos
Se puede retirar el estante para cubiertos completo si se necesita disponer de más espacio en el estante superior
para artículos voluminosos.
Carga de la rejilla para cubiertos
<Ubique los artículos en forma aleatoria u ordenada.>
Algunos modelos tienen una rejilla plegable junto con el estante para cubiertos. Para utilizarla, coloque la rejilla
en el estante para cubiertos y luego acomode los cubiertos y los utensilios para cocinar y servir en la parrilla en
forma aleatoria u ordenada. Luego de completar el ciclo de lavado, y cuando los cubiertos y utensilios estén
secos, puede plegar la rejilla y llevar los cubiertos y utensilios en la rejilla a su lugar de almacenamiento.
Actúe con precaución cuando pliegue o mueva el estante con un artículo delgado y largo en la rejilla.
El artículo se podría caer y provocar lesiones personales.
ADVERTENCIA
Es recomendable no mover la rejilla mientras esté húmeda.
Espere a que se seque.
La rejilla se seca rápidamente si luego del ciclo de lavado se expone
unos minutos al aire.
Español - 18
DW80H9950-00149A-02_MES_140609.indd 18DW80H9950-00149A-02_MES_140609.indd 18 2014-06-09 6:04:362014-06-09 6:04:36
Page 83

USO DE LA CANASTA PARA CUBIERTOS
La canasta para cubiertos consiste en dos compartimientos.
Puede colocar independientemente cada cuchillo, cuchara o tenedor en el soporte para
cubiertos en la cubierta de la canasta para evitar roturas o decoloración.
NO permita que ningún artículo llegue hasta la parte inferior.
Tenedores
1
Cucharitas para té
2
Cucharas
3
Cuchillos
4
Cucharas y tenedores de servir
5
Elementos restantes
6
8 puestos 10 puestos 12 puestos
Soporte para cubiertos visto desde arriba con las ubicaciones sugeridas para los cubiertos.
Haga coincidir los números del diagrama con los números de la lista superior de los cubiertos.
1 3 42 5
Tenedor para ensaladas,
cucharitas
Tenedores, cucharas
03 uso de la lavavajillas
La canasta para cubiertos puede utilizarse con las cubiertas abiertas.
Consulte la ilustración de la derecha.
Español - 19
DW80H9950-00149A-02_MES_140609.indd 19DW80H9950-00149A-02_MES_140609.indd 19 2014-06-09 6:04:372014-06-09 6:04:37
Page 84

uso de la lavavajillas
USO DEL DETERGENTE
Todos los ciclos de la lavavajillas requieren detergente en el compartimiento correspondiente.
Agregue la cantidad adecuada de detergente para el ciclo seleccionado para asegurar el mejor desempeño.
Use solamente detergente para lavavajillas. Los detergentes normales producen demasiada espuma, lo que puede
reducir el desempeño de la lavavajillas o causar su malfuncionamiento.
PRECAUCIÓN
No ingiera detergente para lavavajillas. Evite inhalar las emanaciones. Los detergentes para lavavajillas contienen
productos químicos irritantes y cáusticos que pueden provocar trastornos respiratorios.
ADVERTENCIA
Si ingirió detergente para lavavajillas o inhaló sus emanaciones, procúrese atención médica inmediatamente.
Mantenga el detergente para lavavajillas fuera del alcance de los niños.
ADVERTENCIA
Llenado del dosifi cador de detergente
1. Abra la tapa del dosifi cador de detergente empujando su pestillo de
liberación.
La tapa siempre está abierta al fi nal del ciclo de lavado.
2. Agregue la cantidad recomendada de detergente en el compartimiento
del detergente de lavado principal.
3. Cierre la tapa deslizándola hacia la izquierda y presionándola.
4. Para obtener los mejores resultados, en especial con los artículos muy
sucios, vierta una pequeña cantidad (alrededor de 1/2 de onza u 15g)
de detergente en la puerta.
El detergente adicional se utilizará durante la fase de prelavado.
Español - 20
DW80H9950-00149A-02_MES_140609.indd 20DW80H9950-00149A-02_MES_140609.indd 20 2014-06-09 6:04:402014-06-09 6:04:40
Page 85

La cubierta se abre automáticamente para dosifi car el detergente durante el lavado.
CICLO
Auto, Normal 3/4 oz (20 g) 1/3 oz (10 g)
Heavy (Muy sucio), Express 60' 1 oz (30 g) 1/2 oz (15 g)
Delicate (Vajilla delicada) 3/4 oz (20 g) 1/5 oz (5 g)
Dosifi cador para el lavado principal En la puerta para el prelavado
Los números que se encuentran dentro del dosifi cador aluden a gramos.
USO DEL PRODUCTO DE ENJUAGUE
Llenado del depósito de producto de enjuague
Cuando el indicador “Rinse Refi ll (Reponer producto de enjuague)” se enciende, reponga el producto para el
enjuague. La lavavajillas se ha diseñado para usar solo producto de enjuague líquido.
El uso de un producto en polvo puede obstruir la apertura del depósito y hacer que la lavavajillas no funcione
correctamente.
El producto de enjuague mejora el desempeño del secado de la lavavajillas.
No agregue un detergente normal en el depósito del producto de enjuague.
PRECAUCIÓN
1. Retire la tapa del depósito del producto de enjuague girándola en
sentido contrario al de las agujas del reloj.
CANTIDAD DE DETERGENTE
03 uso de la lavavajillas
2. Llene el depósito de producto para el enjuague.
Utilice el orifi cio de visualización al llenar el depósito de producto para
el enjuague.
No sobrepase el indicador de nivel lleno. El exceso de producto de
enjuague se puede derramar durante el ciclo de lavado.
PRECAUCIÓN
3. Gire el dial del indicador del producto de enjuague hasta un número
entre 1 y 6. Cuanto más alto es el número, más cantidad de producto
de enjuague utiliza la lavavajillas. Si no puede rotar el dial del producto
de enjuague fácilmente, inténtelo con una moneda.
4. Cierre la tapa del depósito de producto para el enjuague girándola en el sentido de las agujas del reloj.
Español - 21
DW80H9950-00149A-02_MES_140609.indd 21DW80H9950-00149A-02_MES_140609.indd 21 2014-06-09 6:04:402014-06-09 6:04:40
Page 86

limpieza y mantenimiento de la
lavavajillas
Mantener la lavavajillas limpia mejora su desempeño, reduce la cantidad de reparaciones
innecesarias y alarga su vida.
LIMPIEZA DEL EXTERIOR
Se recomienda limpiar los derrames en el exterior de la lavavajillas a medida que ocurran. Utilice un paño suave y húmedo para
limpiar suavemente todos los derrames y el polvo del panel de control. No utilice benceno, cera, diluyente, blanqueador a base
de cloro ni alcohol. Estos materiales pueden decolorar el panel de la puerta y las superfi cies externas y producir manchas.
No debe rociarse agua sobre la lavavajillas para limpiarla y debe evitarse que el agua entre en contacto con cualquiera de las
partes eléctricas.
Si la lavavajillas posee un panel de acero inoxidable en la puerta, puede limpiarlo con un paño limpio y suave y un
limpiador para acero inoxidable de electrodomésticos o un producto semejante.
LIMPIEZA DEL INTERIOR
Limpie periódicamente el interior de la lavavajillas para eliminar las partículas de suciedad o comida. Limpie el interior de la
lavavajillas y la parte interior de la puerta con un repasador húmedo. Recomendamos que llene el dosifi cador con detergente
para platos y luego opere la lavavajillas vacía periódicamente usando la opción Self Clean (Autolimpieza).
Para mantener la rejilla para cubiertos despejada, voltéela. Esto mantendrá limpia su lavavajillas.
Si en la lavavajillas hay aún manchas blancas y olores, ejecute la opción Self Clean (Autolimpieza) con la lavavajillas vacía
y sin detergente hasta que se vacíe. Luego, interrumpa el ciclo y ponga una tasa de 230 cm
inferior. Cierre la lavavajillas y deje terminar el ciclo.
No quite el sello frontal de la tina (el sello de goma largo que rodea la abertura de la lavavajillas).
PRECAUCIÓN
LIMPIEZA DE LAS BOQUILLAS
Si la lavavajillas no limpia correctamente o las boquillas parecen estar obstruidas, puede limpiarlas en forma individual.
Tenga cuidado al retirar las boquillas, ya que pueden romperse.
3
de vinagre blanco en la canasta
Boquilla superior
1. Jale el estante superior hacia el frente
2. Verifi que que los agujeros de la boquilla no
estén obstruidos con partículas de comida.
3. Si hace falta limpiar la boquilla, retírela.
4. Para hacerlo, afl oje y retire la tuerca y luego
quite la boquilla.
5. Limpie la boquilla, insértela nuevamente y
ajuste la tuerca.
6. Para ajustar la tuerca, gírela fi rmemente con
la mano.
7. Haga rotar manualmente la boquilla para
verifi car que haya quedado instalada
correctamente.
Español - 22
DW80H9950-00149A-02_MES_140609.indd Sec5:22DW80H9950-00149A-02_MES_140609.indd Sec5:22 2014-06-09 6:04:412014-06-09 6:04:41
Page 87

Boquilla superior
1. Verifi que que los agujeros de la boquilla no
estén obstruidos con partículas de comida.
2. Si hace falta limpiar la boquilla, retírela.
3. Para retirar la boquilla quite primero el estante
superior, afl oje la tapa de la boquilla girándola
en sentido contrario al de las agujas del reloj y
luego extraiga la boquilla.
4. Limpie la boquilla, insértela nuevamente y
ajuste la tapa de la boquilla girándola en el
sentido de las agujas del reloj.
5. Haga rotar manualmente la boquilla para
verifi car que haya quedado instalada
correctamente.
LIMPIEZA DE LOS FILTRO
1. Retire el estante inferior.
2. Rote la manija del fi ltro en sentido contrario al de las agujas del reloj para
afl ojar la puerta del compartimiento del fi ltro.
3. Retire la puerta del fi ltro con manija y el
microfi ltro plano que está debajo.
1
2
Tapa de la
boquilla
04 limpieza y mantenimiento de la lavavajillas
Filtro con manija Microfi ltro plano
4. Elimine el polvo y cualquier otro residuo del
microfi ltro y la puerta del fi ltro y enjuague estos
con agua de la llave.
5. Vuelva a colocar el microfi ltro plano y la puerta del fi ltro.
6. Rote la manija de la puerta del fi ltro en el sentido de las agujas del reloj para bloquear la puerta del fi ltro.
Una vez al mes, limpie el fi ltro para obtener el mejor desempeño de lavado.
Si la puerta del fi ltro no está bien cerrada, el desempeño de la limpieza se reduce.
PRECAUCIÓN
CÓMO GUARDAR LA LAVAVAJILLAS
Si necesita guardar su lavavajillas durante un período prolongado, primero drénela y desconéctela. Si queda agua en las
mangueras y los componentes internos se puede dañar la lavavajillas.
Después de drenar y desconectar la lavavajillas, asegúrese de cerrar la válvula de suministro de agua y de cortar el disyuntor.
Español - 23
DW80H9950-00149A-02_MES_140609.indd Sec5:23DW80H9950-00149A-02_MES_140609.indd Sec5:23 2014-06-09 6:04:412014-06-09 6:04:41
Page 88

ciclos
TABLA DE CICLOS
( : Básico, : paso opcional)
Ciclo Prelavado 1 Prelavado 2
Auto
Normal
Heavy (Muy sucio)
Delicate (Vajilla delicada)
Express 60'
Lavado
principal
138 ˚F (59 ˚C)
143 - 118 ˚F
(62 - 48 ˚C)
149 ˚F (65 ˚C)
122 ˚F (50 ˚C)
140 ˚F (60 ˚C)
Enjuague 1 Enjuague 2 Enjuague 3 Enjuague 4
Ciclo
Auto
Normal
Heavy (Muy sucio)
Delicate (Vajilla delicada)
Express 60'
Último enjuague
[Desinfección]
136 ˚F (58 ˚C)
[162 ˚F (72 ˚C)]
136 ˚F (58 ˚C)
[162 ˚F (72 ˚C)]
158 ˚F (70 ˚C)
[162 ˚F (72 ˚C)]
149 ˚F (65 ˚C)
149 ˚F (65 ˚C)
[162 ˚F (72 ˚C)]
Secado Agua [gal (ℓ)]
6,5 - 3,6
(24,6 - 13,6 ℓ)
7,1 - 2,4
(27,0 - 9,0 ℓ)
6,1
(23,1 ℓ)
4,4
(16,6 ℓ)
3,7
(14 ℓ)
• Los números que se encuentran entre paréntesis en la columna Último enjuague representan la temperatura cuando está
seleccionada la opción Sanitize (Desinfección).
• Cuando selecciona el ciclo Auto o Normal, puede eliminar los pasos opcionales según el nivel de suciedad de la vajilla.
• El consumo de agua y el tiempo de lavado depende de los pasos o las opciones que agregue, y de la presión y la
temperatura del agua suministrada.
• Cuando falta producto de enjuague, el tiempo de lavado y la temperatura del último enjuague se pueden incrementar un
poco.
Español - 24
DW80H9950-00149A-02_MES_140609.indd Sec6:24DW80H9950-00149A-02_MES_140609.indd Sec6:24 2014-06-09 6:04:412014-06-09 6:04:41
Page 89

solución de problemas
CONTROLE ESTOS PUNTOS SI SU LAVAVAJILLAS…
PROBLEMA CAUSA POSIBLE SOLUCIÓN
No enciende.
Tarda demasiado
tiempo con una
operación o un ciclo.
La vajilla presenta
partículas de comida.
(No limpia
correctamente.)
La puerta no está completamente
cerrada.
No se ha seleccionado ningún ciclo. Seleccione un ciclo adecuado.
El cable de alimentación no está
conectado.
No funciona el suministro de agua. Verifi que que la válvula de suministro de agua esté
El panel de control está bloqueado. Desactive el bloqueo para niños (consulte la página 10).
Un disyuntor está abierto. Reinicie el disyuntor.
Se suministra agua fría. Verifi que que el conducto esté conectado al suministro
El ciclo seleccionado no es el
adecuado.
La temperatura del agua es baja. Conecte el conducto al suministro de agua caliente.
Presión de agua baja. La presión del agua debe estar entre 20 y
El agua es demasiado dura. Use un limpiador para lavavajillas comercial.
No se usó detergente para lavavajillas. Utilice detergente para lavavajillas automático.
Quedan restos de detergente en el
dosifi cador.
No hay producto de enjuague. Revise el dosifi cador y agregue producto de enjuague.
Hay una boquilla obstruida. Limpie la boquilla. Consulte las páginas 22 y 23.
La vajilla no se cargó correctamente.
Se cargó demasiada vajilla.
Verifi que que la puerta esté trabada y completamente
cerrada.
Conecte el cable de alimentación adecuadamente.
abierta.
de agua caliente.
(Se necesita tiempo adicional para calentar el agua fría.)
Seleccione un ciclo de acuerdo con la cantidad de
vajilla y su nivel de suciedad, tal como lo indica este
manual.
Para un mejor desempeño, la temperatura del agua
suministrada debe ser de 120 ˚F (49 ˚C).
120psi(140- 830 kPa).
Utilice un detergente fresco, de alta calidad, con
producto de enjuague.
Recomendamos un detergente para lavavajillas en
polvo o en gel.
Asegúrese de que los artículos grandes, como láminas
para hornear galletas, tablas para cortar, recipientes,
etc. no bloqueen el dosifi cador de detergente o
impidan que se abra adecuadamente.
Reacomode la vajilla de manera que no interfi era con el
funcionamiento del dosifi cador del detergente.
Use producto líquido para el enjuague.
Reacomode la vajilla de manera que no interfi era con
la rotación de la boquilla ni con el funcionamiento del
dosifi cador del detergente.
Cargue únicamente la cantidad adecuada de vajilla.
Cargue la vajilla según las recomendaciones.
(Consulte la página 16.)
06 solución de problemas
Español - 25
DW80H9950-00149A-02_MES_140609.indd Sec7:25DW80H9950-00149A-02_MES_140609.indd Sec7:25 2014-06-09 6:04:412014-06-09 6:04:41
Page 90

solución de problemas
PROBLEMA CAUSA POSIBLE SOLUCIÓN
Deja los vasos con una
ligera película.
Deja una película
amarilla o marrón
en el interior de la
lavavajillas.
No seca bien la vajilla.
Tiene mal olor.
Hace demasiado ruido.
No rotan las boquillas
con suavidad.
El agua suministrada es blanda y se ha
usado demasiado detergente.
La carga incluye vajilla de aluminio. Elimine las marcas de la vajilla con un limpiador de baja
Esto es debido a restos de café o té. Elimine esta suciedad con un limpiador de manchas.
No hay producto de enjuague en el
dosifi cador.
Cuando la lavavajillas está
funcionando, la temperatura del agua
es baja.
Se cargó demasiada vajilla. Las carga inadecuada de los artículos puede afectar
Los vasos y las copas cóncavos
retienen agua. El agua puede
derramarse sobre otros objetos al
sacarlos.
Quedó agua después de un ciclo
incompleto.
La manguera de desagüe está
obstruida.
No usa la lavavajillas cada día o deja
vajilla sucia en la unidad demasiado
tiempo.
Cuando la cubierta del dosifi cador
está abierta y el funcionamiento de
la bomba de desagüe está en las
primeras etapas, se genera ruido.
La lavavajillas no está nivelada. Asegúrese de que la lavavajillas esté nivelada.
Hay materiales extraños (un tornillo,
una pieza de plástico) en la cámara de
la bomba.
Se escucha un "golpeteo" porque una
boquilla golpea contra la vajilla.
El agujero de la boquilla está obstruido
con partículas de comida.
Un plato o una olla bloquean la
boquilla y esta no puede girar.
No cargue completamente la lavavajillas y utilice un
producto de enjuague para minimizar este efecto.
sensibilidad.
Revise el dosifi cador y agregue producto de enjuague.
Use un producto líquido para el enjuague.
Conecte el conducto al suministro de agua caliente.
Utilice producto de enjuague con la opción
Sanitize (Desinfección).
el secado.
Cargue la vajilla según las recomendaciones.
(Consulte la página 16.)
Luego de fi nalizar el ciclo, vacíe primero el estante
inferior y luego el superior. Esto evitará que el agua
del estante superior gotee sobre la vajilla del estante
inferior.
Coloque detergente, sin cargar vajilla, y haga funcionar
el ciclo Normal para limpiar la lavavajillas.
Comuníquese con un técnico califi cado para retirar
cualquier obstrucción de la manguera de desagüe.
Con la lavavajillas vacía y sin detergente, coloque un
vaso con 8 onzas de vinagre boca arriba en el estante
inferior y ejecute el ciclo Normal.
Este funcionamiento es normal.
Comuníquese con un técnico califi cado para retirar los
materiales extraños de la cámara de la bomba.
Reacomode la vajilla.
Limpie el agujero de la boquilla.
Consulte las páginas 22 y 23.
Después de cargar la vajilla en los estantes, rote las
boquillas a mano para controlar si alguno de los platos
interfi ere con ellas.
Español - 26
DW80H9950-00149A-02_MES_140609.indd Sec7:26DW80H9950-00149A-02_MES_140609.indd Sec7:26 2014-06-09 6:04:412014-06-09 6:04:41
Page 91

PROBLEMA CAUSA POSIBLE SOLUCIÓN
No se vacía el agua de
la lavavajillas.
Presenta su estante
superior doblado luego
de cargar la vajilla.
El drenaje se obstruyó. Comuníquese con un técnico califi cado para retirar
cualquier obstrucción de la manguera de desagüe y
revise el funcionamiento de la bomba de drenaje.
Se cargó incorrectamente la vajilla. Cargue la vajilla según las recomendaciones.
(Consulte la página 16.)
06 solución de problemas
Español - 27
DW80H9950-00149A-02_MES_140609.indd Sec7:27DW80H9950-00149A-02_MES_140609.indd Sec7:27 2014-06-09 6:04:412014-06-09 6:04:41
Page 92

solución de problemas
CÓDIGOS DE INFORMACIÓN
El panel de control muestra códigos de información para ayudarle a comprender mejor qué ocurre con la lavavajillas.
Si ve alguno de los códigos de la tabla siguiente, seleccione la opción Reset (Restablecer) y siga las instrucciones de la
columna Solución.
SÍMBOLO DEL
CÓDIGO
tE
HE1
HE
1E
PE
7E
4E
4E5
5E
(5E1 - 5E5)
OE
LE
bE2
3E
(3E1 - 3E4)
AE
bE3
AE6
Para los códigos que no fi guran más arriba, llame al 1-800-SAMSUNG (726-7864).
SIGNIFICADO SOLUCIÓN
Error del sensor de temperatura
Error en el calentador
Error de calentamiento de temperatura alta
Error de nivel bajo de agua
Error de la función de media carga
Error de funcionamiento del refl ector
Error en el suministro de agua
Error de drenaje
Error del nivel alto de agua Error funcional. Cierre la válvula de suministro de agua,
Pérdida
Error del botón
Error de comunicación
Error funcional. Con la lavavajillas vacía agregue
detergente y ejecute un ciclo.
Si el problema continúa, vaya al panel del disyuntor
de su casa, desconecte el disyuntor de la lavavajillas y
contacte a un servicio técnico de Samsung autorizado.
Revise si los cubiertos o la vajilla interfi eren el refl ector
de agua y, en consecuencia, este no funciona.
Si esto sucede sin haber interferencias, cierre el
suministro de agua y contacte a un servicio técnico de
Samsung autorizado.
Verifi que si la válvula de suministro de agua está
cerrada, si se ha suspendido el suministro de agua o
si el conducto o la válvula de entrada de agua están
congelados u obstruidos.
Si el problema continúa, cierre la válvula del suministro
de agua y contacte a un servicio técnico de Samsung
autorizado.
Revise si la manguera de desagüe está obstruida o
doblada. Si el problema continúa, cierre la válvula del
suministro de agua y contacte a un servicio técnico de
Samsung autorizado.
vaya al panel del disyuntor de su casa, desconecte
el disyuntor de la lavavajillas y contacte a un servicio
técnico de Samsung autorizado.
Error funcional. Apague la lavavajillas y enciéndala
nuevamente.
Si el problema continúa, contacte a un servicio técnico
de Samsung autorizado.
Español - 28
DW80H9950-00149A-02_MES_140609.indd Sec7:28DW80H9950-00149A-02_MES_140609.indd Sec7:28 2014-06-09 6:04:412014-06-09 6:04:41
Page 93

apéndice
AYUDA AL MEDIOAMBIENTE
• Esta lavavajillas se fabrica con materiales reciclables. Si decide deshacerse de ella, siga la normativa local relacionada
con la eliminación de desechos. Corte el cable de alimentación para que el aparato no pueda conectarse a una fuente de
alimentación.
• Quite la puerta para que los animales y los niños pequeños no puedan quedar atrapados dentro del electrodoméstico.
• No utilice cantidades de detergente superiores a las recomendadas por el fabricante del detergente.
ESPECIFICACIONES
Modelo DW80H9970US / DW80H9950US / DW80H9940US / DW80H9930US
Tipo Lavavajillas integrable Capacidad de lavado 15 puestos
Alimentación
Uso de potencia nominal
Dimensiones
(Ancho × Profundidad × Altura)
Peso
120 V / 60 Hz AC
solamente, disyuntor 15 A
Motor de lavado: 60 - 100 W
Calentador: 1100 W
23⅞ x 25 x 33⅞ pulgada (605 x 636 x 860 mm)
Desempacado 97 lb (44 Kg) [DW80H9970US / DW80H9950US / DW80H9930US]
Desempacado 93 lb (42 Kg) [DW80H9940US]
Presión de agua utilizada
20 - 120 psi
(140 - 830 kPa)
07 apéndice
Español - 29
DW80H9950-00149A-02_MES_140609.indd Sec8:29DW80H9950-00149A-02_MES_140609.indd Sec8:29 2014-06-09 6:04:412014-06-09 6:04:41
Page 94

garantía
LAVAVAJILLAS SAMSUNG
GARANTÍA LIMITADA PARA EL COMPRADOR ORIGINAL
El presente producto de la marca SAMSUNG, tal como lo provee y distribuye SAMSUNG ELECTRONICS AMERICA, INC. en
EE.UU./ SAMSUNG ELECTRONICS CANADA, INC. en CANADÁ (SAMSUNG) y lo entrega como nuevo, en su embalaje de
cartón original al comprador o consumidor original, está garantizado por SAMSUNG contra defectos de fabricación de los
materiales y la mano de obra durante el período limitado de la garantía de:
Un (1) año para todas las piezas y la mano de obra, cinco (5) años para las piezas de movimiento lineal,* la placa de
circuito impreso, los estantes (los gastos de mano de obra del servicio técnico a domicilio a partir del segundo año son
responsabilidad del cliente), y toda la vida para el revestimiento inoxidable de la puerta y la tina de acero inoxidable con
respecto a pérdidas. Samsung reemplazará la unidad por el mismo modelo o por el actual (es decir, mejor o equivalente en
prestaciones) (La mano de obra necesaria para el reemplazo es responsabilidad del cliente).
* Piezas de movimiento lineal: Motor AC de accionamiento por correa [motor de engranajes], correa de distribución en V, riel,
riel de soporte [frontal superior, frontal inferior].
La presente garantía limitada comienza en la fecha original de compra y es válida únicamente para productos comprados y
usados en los Estados Unidos/Canadá. Para recibir el servicio técnico de la garantía, el comprador debe comunicarse con
SAMSUNG con el fi n de que se determine el problema y los procedimientos del servicio. El servicio técnico de la garantía
solo puede ser prestado por un centro de servicio técnico autorizado de SAMSUNG. Se debe presentar la factura de compra
original como prueba de compra a SAMSUNG o al servicio técnico autorizado de SAMSUNG. SAMSUNG prestará servicio
técnico a domicilio durante el período de la garantía sin costo, sujeto a la disponibilidad dentro de los Estados Unidos/Canadá
contiguos.
El servicio técnico a domicilio no está disponible en todas las áreas.
Para recibir el servicio técnico a domicilio, el producto no debe presentar obstrucciones y debe ser accesible para el agente
del servicio técnico. Si el servicio técnico no está disponible, SAMSUNG puede optar por transportar el producto hasta y
desde el servicio técnico autorizado.
SAMSUNG reparará, reemplazará el producto u ofrecerá un reembolso a nuestra discreción y sin cargo adicional, tal como se
establece en la presente garantía, con piezas o productos nuevos o reacondicionados si se comprueba que es defectuoso
durante el período limitado de la garantía especifi cado anteriormente. Todas las piezas y los productos reemplazados pasan
a ser propiedad de SAMSUNG y deben ser devueltos a SAMSUNG. Las piezas y los productos reemplazados asumen la
garantía original que resta, o noventa (90) días, el período que sea el más prolongado.
La presente garantía limitada cubre defectos de fabricación de los materiales y la mano de obra encontrados durante el
uso normal y doméstico de este producto y no será válida para lo siguiente: daños que ocurran durante el envío; entrega
e instalación; aplicaciones y usos para los cuales el presente producto no fue destinado; producto o números de serie
alterados; daño cosmético o acabado exterior; accidentes, abuso, descuido, incendio, inundación, caída de rayos, u otros
casos fortuitos o de fuerza mayor; uso de productos, equipo, sistemas, utilidades, servicios, piezas, suministros, accesorios,
aplicaciones, instalaciones, reparaciones, cableado externo o conectores no provistos ni autorizados por SAMSUNG
que dañen este producto o que acarreen problemas en el servicio; voltaje de la línea eléctrica incorrecto, fl uctuaciones
y sobretensión; ajustes del cliente e incumplimiento de lo establecido en el manual de instrucciones, instrucciones de
mantenimiento y ambientales que están cubiertas y recomendadas en el manual de instrucciones; traslado y reinstalación
del producto; problemas causados por plagas. La presente garantía limitada no cubre problemas derivados de la corriente,
el voltaje o el suministro eléctrico incorrectos, las bombillas de luz, los fusibles de la casa, el cableado de la casa, el costo
del servicio técnico para recibir instrucciones o corregir errores en la instalación. SAMSUNG no garantiza el funcionamiento
ininterrumpido o sin errores del producto.
Español - 30
DW80H9950-00149A-02_MES_140609.indd Sec10:30DW80H9950-00149A-02_MES_140609.indd Sec10:30 2014-06-09 6:04:422014-06-09 6:04:42
Page 95

SALVO LO ESTABLECIDO EN LA PRESENTE GARANTÍA, NO EXISTEN GARANTÍAS SOBRE EL PRESENTE PRODUCTO,
YA SEAN EXPRESAS O TÁCITAS, Y SAMSUNG DESCONOCE TODAS LAS GARANTÍAS QUE INCLUYEN, AUNQUE NO
EN CARÁCTER TAXATIVO, CUALQUIER GARANTÍA TÁCITA DE QUE EL PRODUCTO SE ENCUENTRA EN CONDICIONES
APTAS PARA LA VENTA, DE DEFRAUDACIÓN DE DERECHOS O DE QUE EL PRODUCTO SE ADECUA A LOS FINES
ESPECÍFICOS PARA LOS CUALES SE ADQUIERE. NINGÚN AVAL O GARANTÍA OTORGADOS POR PERSONA, COMPAÑÍA
O CORPORACIÓN ALGUNA CON RESPECTO AL PRESENTE PRODUCTO REVESTIRÁ CARÁCTER VINCULANTE PARA
SAMSUNG. SAMSUNG NO SERÁ RESPONSABLE POR PÉRDIDA DE INGRESOS O LUCRO CESANTE, IMPOSIBILIDAD
DE GENERAR AHORROS U OBTENER OTROS BENEFICIOS, O CUALQUIER DAÑO DERIVADO DE CIRCUNSTANCIAS
ESPECIALES, DAÑO IMPREVISTO O DERIVADO CAUSADO POR EL USO, USO INCORRECTO, O INCAPACIDAD PARA
USAR EL PRESENTE PRODUCTO, INDEPENDIENTEMENTE DE LA TEORÍA LEGAL EN QUE SE FUNDE EL RECLAMO Y
AUN CUANDO SE LE HAYA NOTIFICADO A SAMSUNG DE LA POSIBILIDAD DE TALES DAÑOS.
NINGÚN RESARCIMIENTO DE NINGUNA ÍNDOLE CONTRA SAMSUNG SUPERARÁ EL MONTO DEL PRECIO DE COMPRA
DEL PRODUCTO VENDIDO POR SAMSUNG Y CAUSANTE DEL PRESUNTO DAÑO.
SIN LIMITAR LO PRECEDENTE, EL COMPRADOR ASUME TODO EL RIESGO Y LA RESPONSABILIDAD POR PÉRDIDA,
DAÑO O LESIÓN AL COMPRADOR Y A LOS BIENES DEL COMPRADOR Y A TERCEROS Y A SUS BIENES DERIVADOS
DEL USO, USO INCORRECTO O INCAPACIDAD PARA USAR EL PRESENTE PRODUCTO. LA PRESENTE GARANTÍA
LIMITADA NO SE EXTENDERÁ A NINGUNA PERSONA DISTINTA DEL COMPRADOR ORIGINAL DEL PRESENTE
PRODUCTO, ES INTRANSFERIBLE Y ESTABLECE SU EXCLUSIVA REPARACIÓN.
Algunos estados o provincias no permiten limitaciones en cuanto al plazo de una garantía implícita, o la exclusión o limitación
de daños imprevistos o derivados, por lo tanto las limitaciones o exclusiones antedichas pueden no aplicarse en su caso. Esta
garantía le otorga derechos específi cos, y además puede tener otros derechos que varían según el estado o la provincia.
Para recibir un servicio técnico de garantía, comuníquese con SAMSUNG a:
En EE.UU.
Samsung Electronics America, Inc.
85 Challenger Road Ridgefi eld Park, NJ 07660
1-800-SAMSUNG(726-7864)
www.samsung.com/us/support
En CANADÁ
Samsung Electronics Canada Inc.
2050 Derry Road West, Mississauga, Ontario L5N 0B9 Canada
1-800-SAMSUNG(726-7864)
www.samsung.com/ca/support (English)
www.samsung.com/ca_fr/support (French)
Español - 31
DW80H9950-00149A-02_MES_140609.indd Sec10:31DW80H9950-00149A-02_MES_140609.indd Sec10:31 2014-06-09 6:04:422014-06-09 6:04:42
Page 96

bit.ly/samsungdishwashers
¿Tiene alguna pregunta o algún comentario?
País LLAME AL O VISÍTENOS EN LÍNEA EN
U.S.A 1-800-SAMSUNG (726-7864) www.samsung.com/us/support
CANADA 1-800-SAMSUNG (726-7864)
DW80H9950-00149A-02_MES_140609.indd Sec10:32DW80H9950-00149A-02_MES_140609.indd Sec10:32 2014-06-09 6:04:422014-06-09 6:04:42
www.samsung.com/ca/support (English)
www.samsung.com/ca_fr/support (French)
DD68-00149A-02
 Loading...