

Page 1

SAMSUNG DVM-Pro 2008 User Guide
SAMSUNG DVM-Pro 2008
User’s Manual (Sales mode)
English Version
2008 . 02 . 28
1
Page 2

SAMSUNG DVM-Pro 2008 User Guide
Contents
1. User’s manual for Sales mode of DVM Pro
1-1. Architecture of sales mode
2. Top Down menu
2-1. File
2-2. View
2-3. Setup
2-4. Help
3. Project
3-1. Project Information
3-1-1. Project name
3-1-2. Country
3-1-3. Customer Information
3-1-4. Designer Information
3-2. Setup Space
3-3. Workspace management
4. Indoor unit
4-1. Workspace
4-2. Add Indoor
4-3. Edit Indoor
4-4. Delete Indoor
4-5. View Indoor
4-6. Setup options
5. Outdoor unit
5-1. Workspace
5-2. Add Outdoor
5-3. Edit Outdoor
5-4. Delete Outdoor
5-5. Copy Outdoor
5-6. Compensate Outdoor
5-7. Window for Outdoor Information
5-8. Indoor which not linked
6. Piping
2
Page 3

SAMSUNG DVM-Pro 2008 User Guide
6-1. Workspace
6-2. Piping
6-2-1. Select Indoor
6-2-2. Select Piping connection tools
6-2-3. Basic Pipe, Standard Pipe, Manual Pipe
6-2-4. Draw Piping manually
6-2-5. View Diagram
6-2-6. Check System
7. Wiring
8. Control System
9. Report
9-1. Insert Logo
9-2. Reporting Information
9-3. Workspace to in clude in Report
9-4. Currency
9-4. Takes Report off
3
Page 4
SAMSUNG DVM-Pro 2008 User Guide
1. User’s manual for Sales mode of DVM Pro
1-1. Architecture of sales mode
-. The sales mode of DVM Pro is an application software to help business of System A/C. It’s
configured with Project, Indoor, Outdoor, Piping, Wiring, Control System and Report. And
can’t move to next step if no completion of current step because these works would be
executed, step by step.
2. Top Down menu : This menus are shown on upper-end the screen and configured with File, View, Setup
and Help. If select each menu, it shows the related commands.
2-1. File : Configured wiith NEW, Open, Close, Save, Save As and View Recent files.
2-2. View : Manage the status bar line showing at lower-end of program. It’s toggled as on or
off.
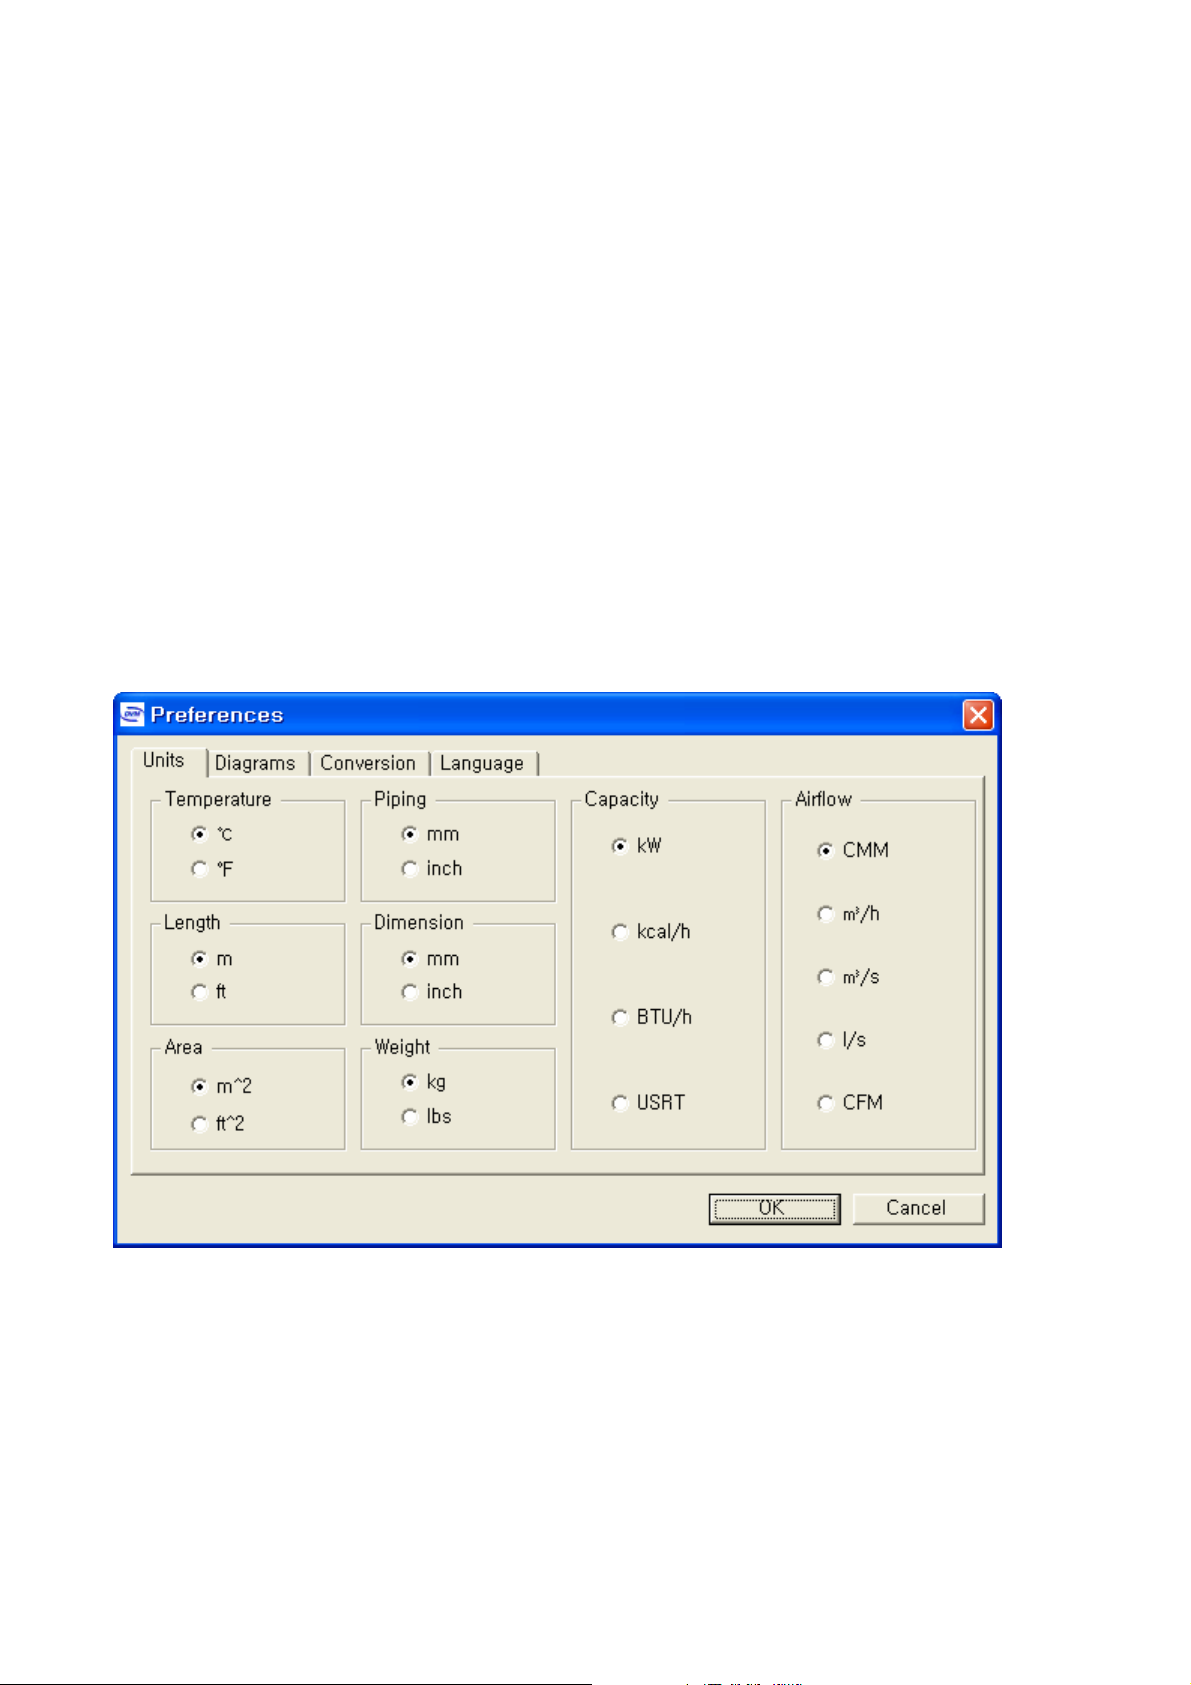
2-3. Setup : Select Unit, Diagrams, Conversion, Language.
-. Unit
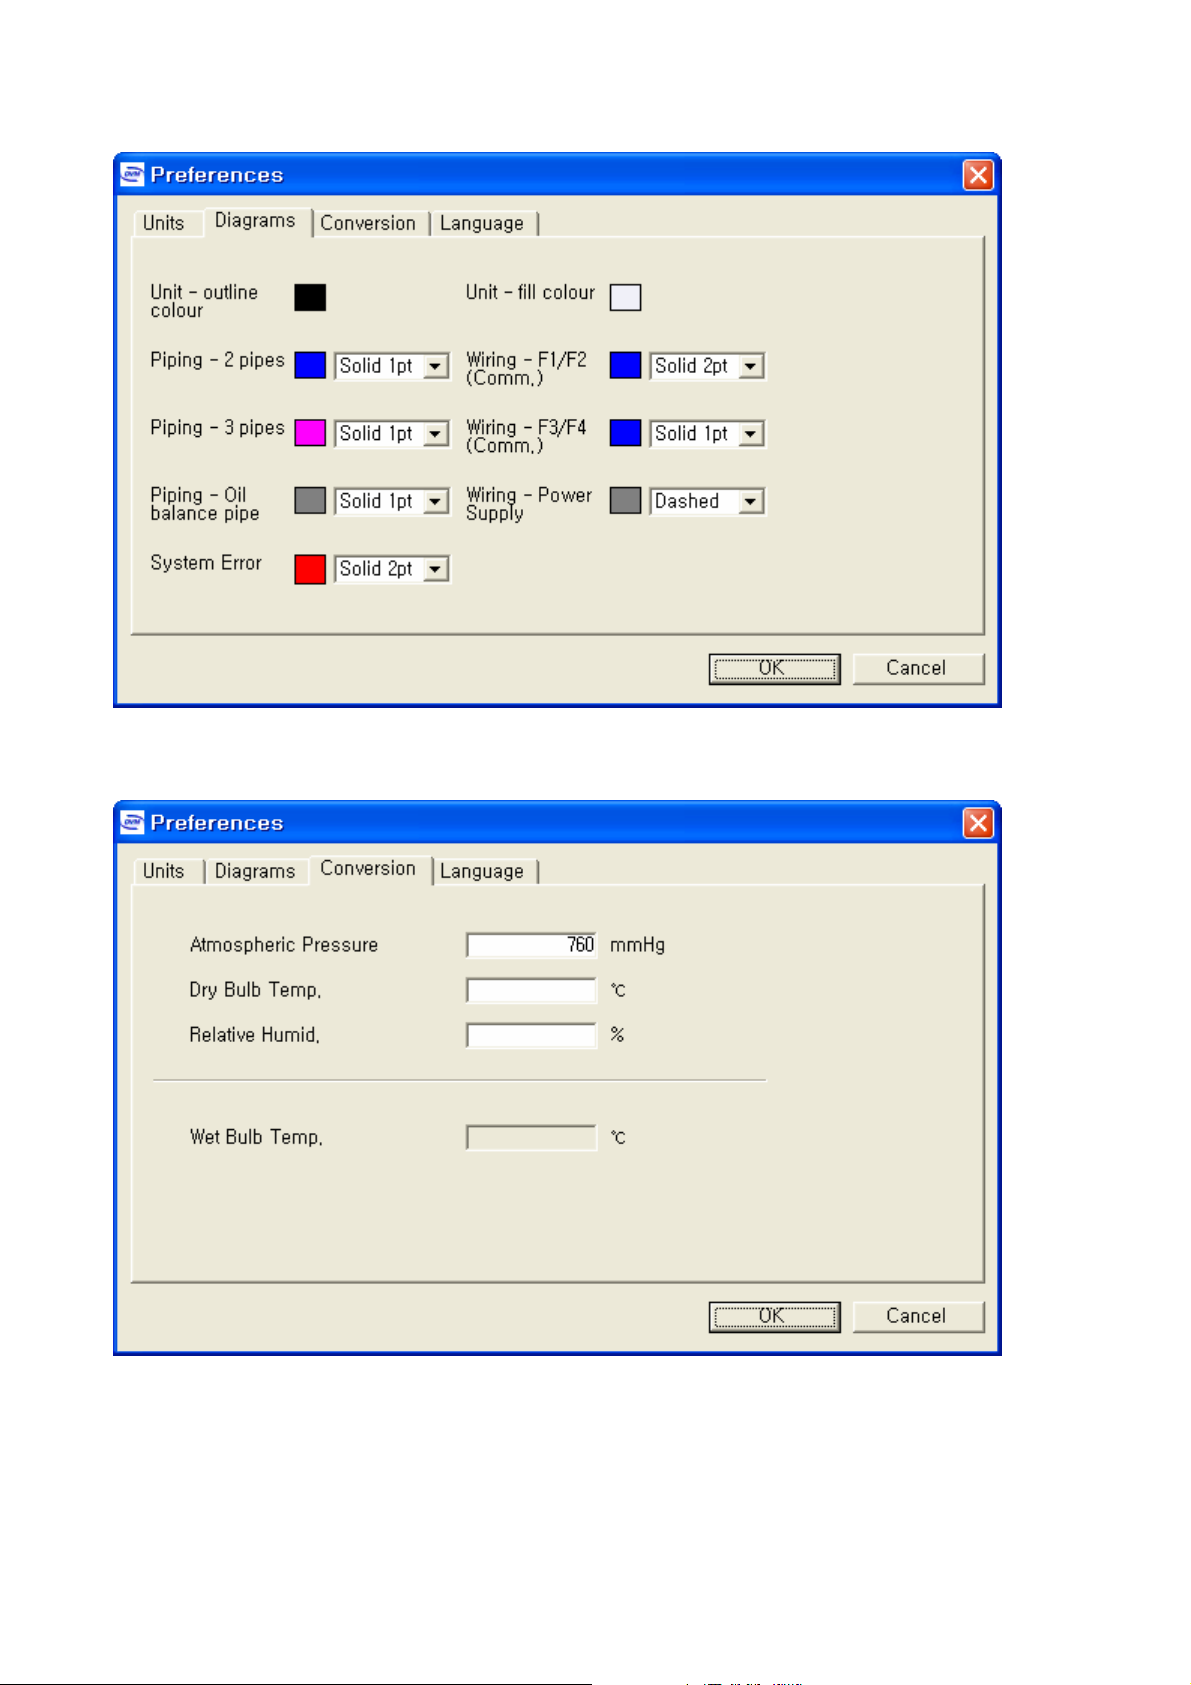
-. Diagrams
4
Page 5
SAMSUNG DVM-Pro 2008 User Guide
-. Conversion
5
Page 6
SAMSUNG DVM-Pro 2008 User Guide
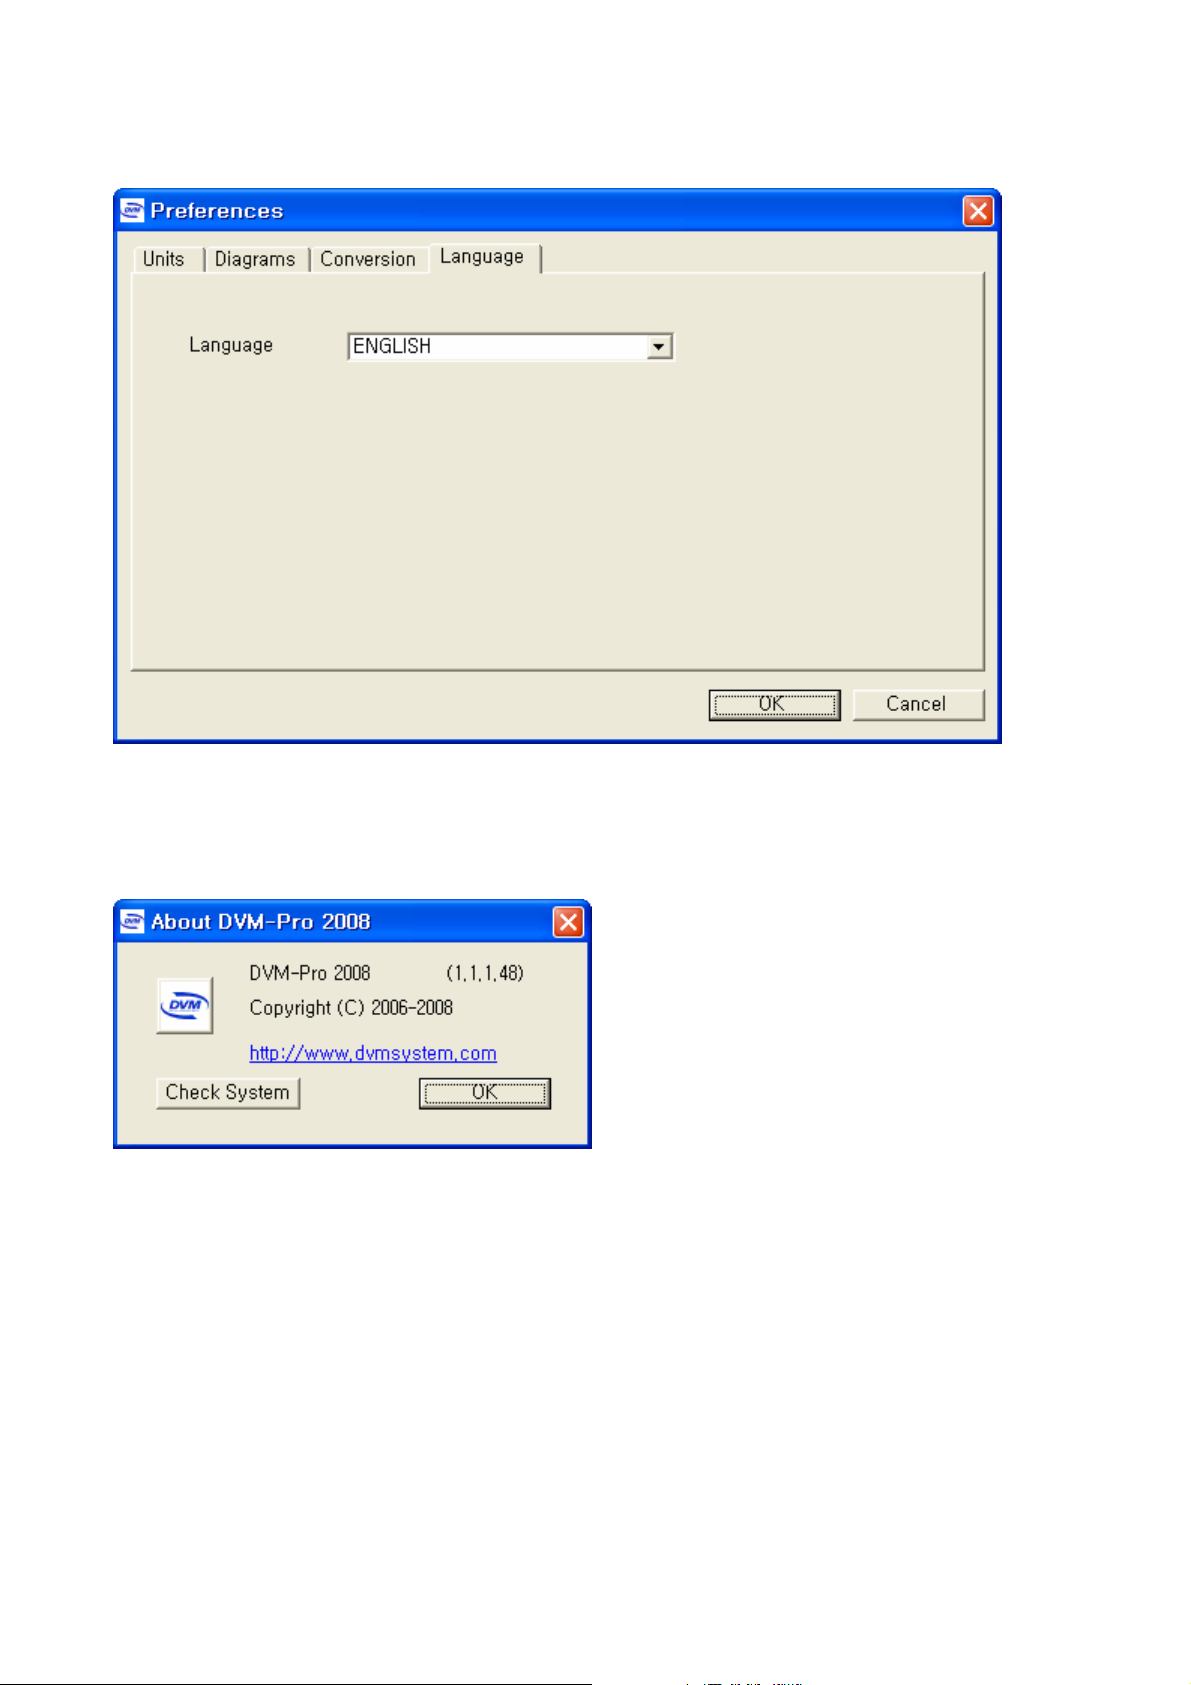
-. Languages
2-4. Help : Show the version information of DVM program and user can move to the related
web page directly.
6
Page 7
SAMSUNG DVM-Pro 2008 User Guide
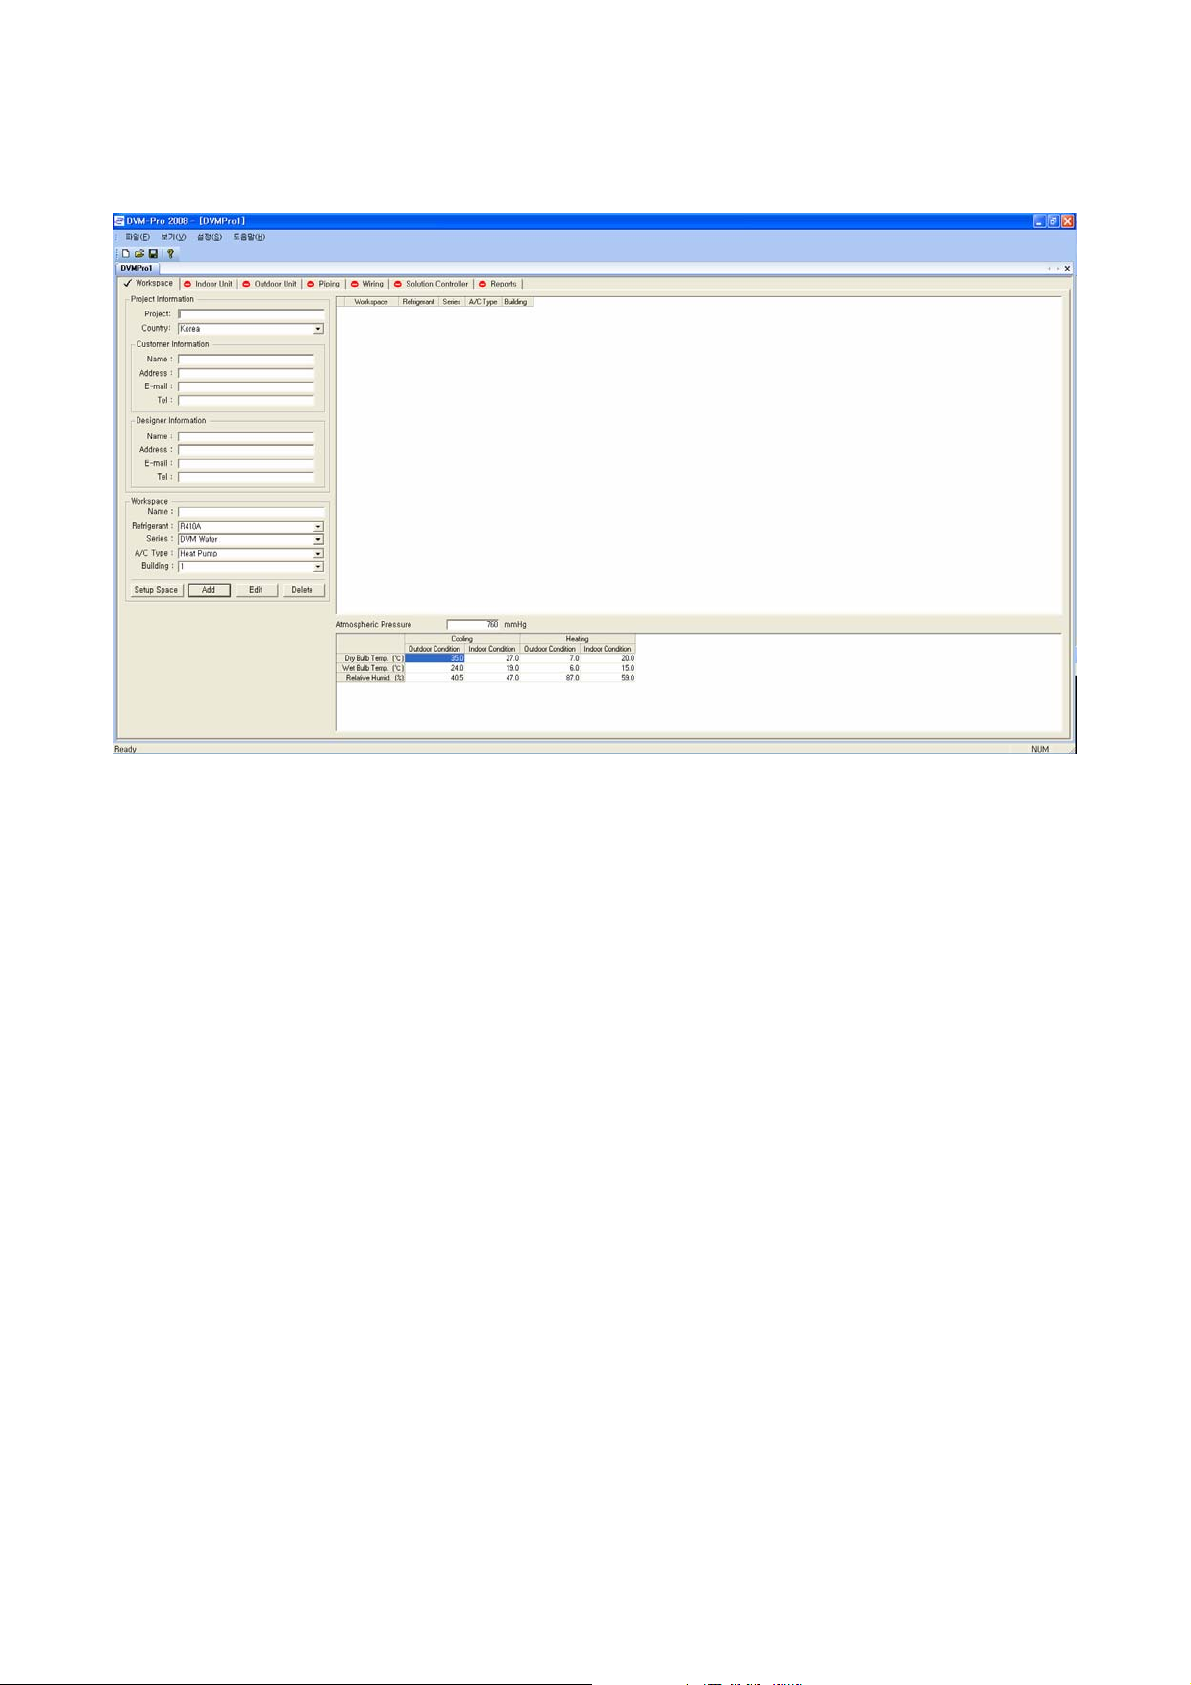
3. Project : Set Project registration and Workspace.
3-1. Project Information :
. User can register the project when start new project. User must fill out all blanks of
project registration fields if new project.
. Show the related information if it’s current project.
3-1-1. Project name : Enter project name to be registered.
3-1-2. Country : Select country.
3-1-3. Customer information : Enter customer information.
3-1-4. Designer information : Enter designer name.
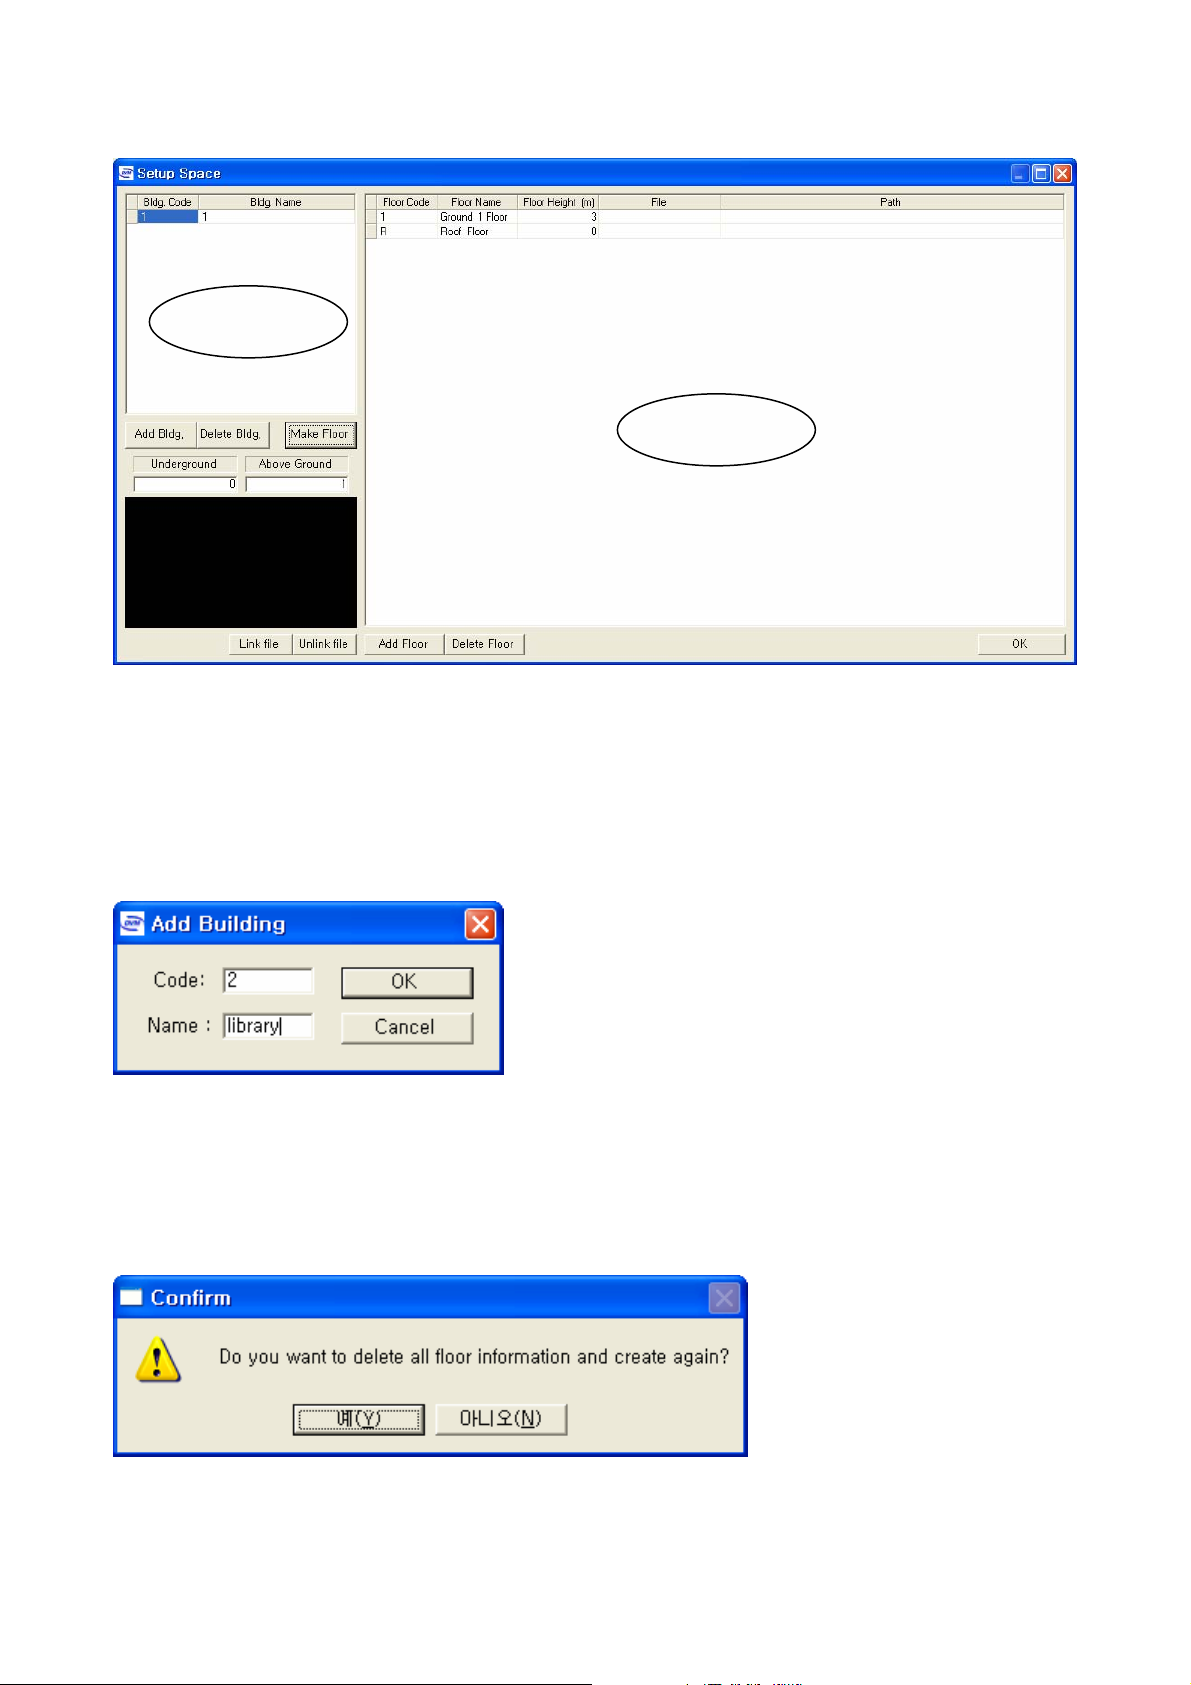
3-2. Setup space : Show and edit the building, floor, name, status of connected drawing of
Project.
-. Press “Setup space”
7
Page 8
SAMSUNG DVM-Pro 2008 User Guide
Bldg Area
Floor Area
-. Setup building
a. Add Building : add the building.
-. New building is added if enter building code and name after press [add
building].
* Can’t duplicate the code name and the code are configured with alphabet
and Arabic.
b. Make Floor : Form the floor per each building.
-. Select the building to make floor.
-. Enter the number of floor for Basement and Ground.
-. Select [Yes] if it shows a message that “Are you going to make Floor again
after delete all floor information ?” if press [Make Floor].
8
Page 9
SAMSUNG DVM-Pro 2008 User Guide
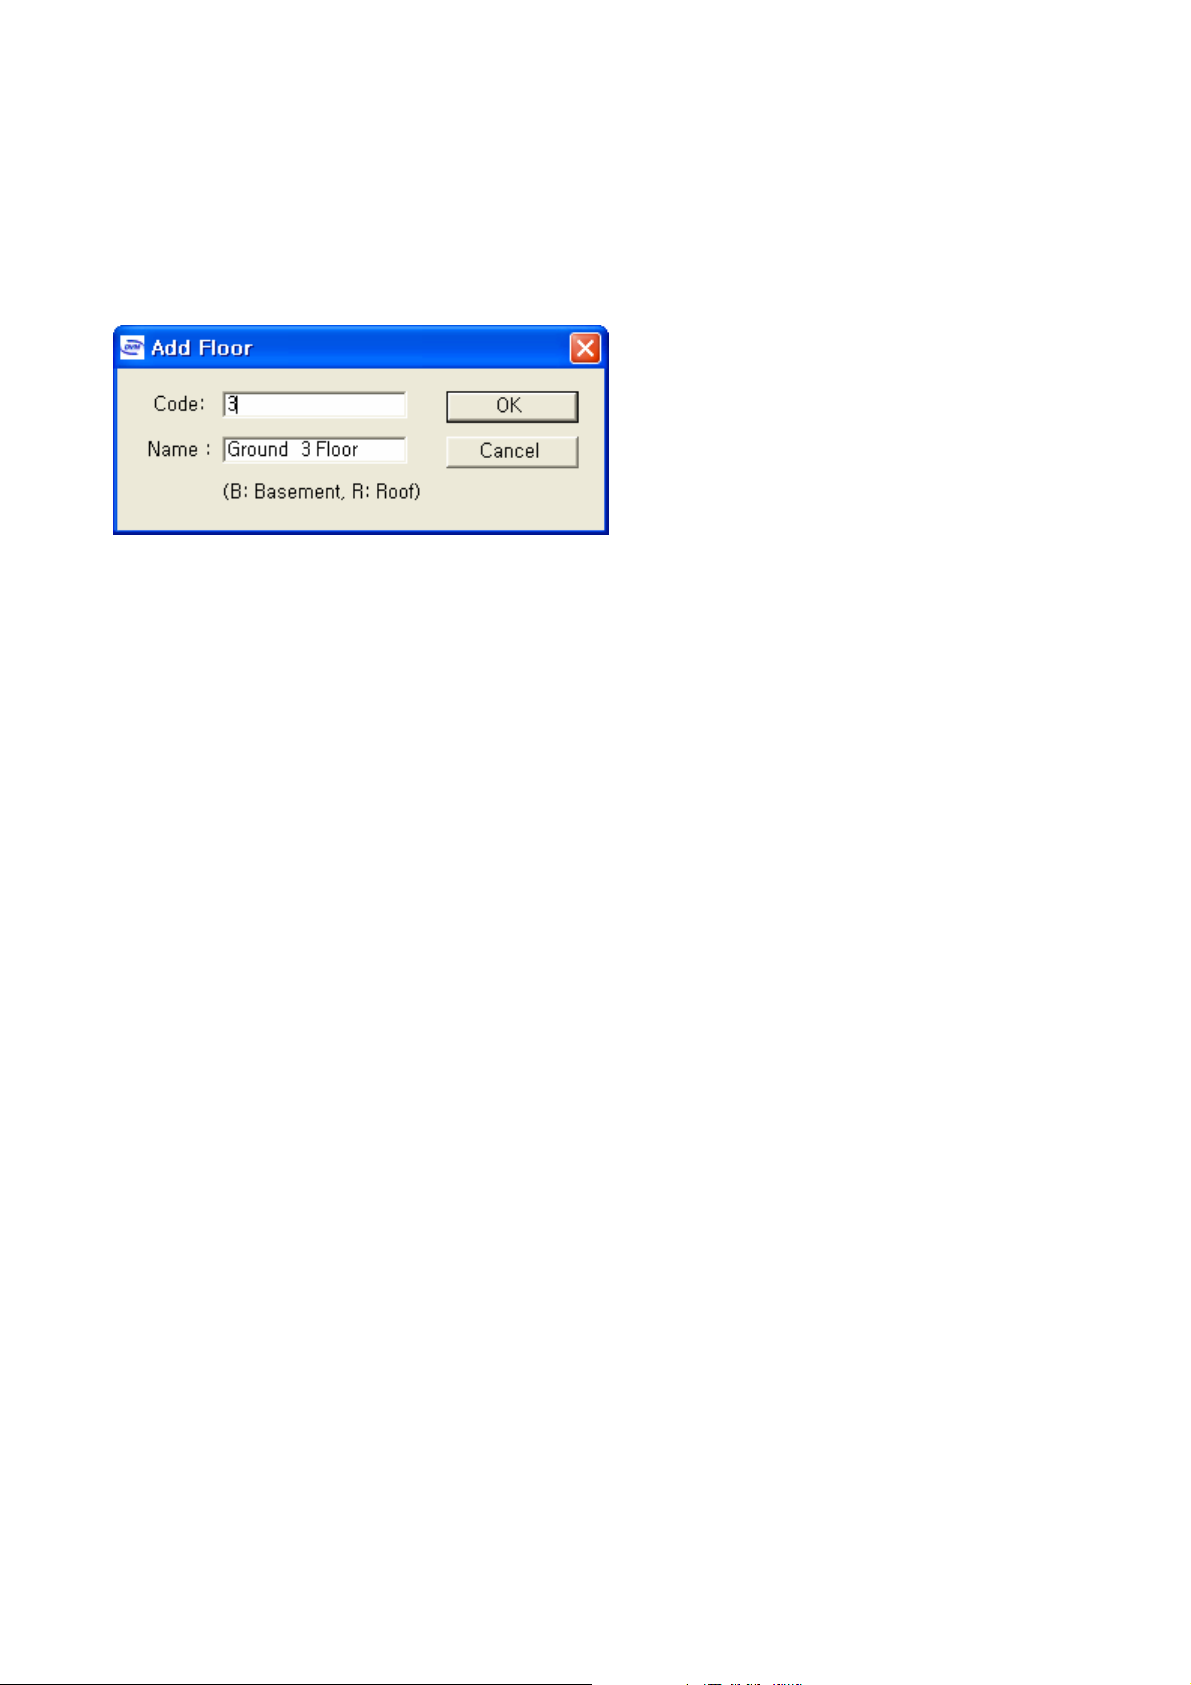
c. Add / delete floor : Can create or delete additional floor after make the floor. .
-. New floor is added if enter building code and name after press [add floor].
* Can’t duplicate the code name and the code are configured with alphabet
and Arabic.
d. Edit Floor height : Edit current floor height.
-. Edit the floor height after select the relevant position of floor under title of floor
height.
-. Can edit the height of one floor and several floor using CTRL+ c and CTRL+
v if want to be same floor in different floor, too.
e. Link file : Connect the drawing file to be used to project.
-. Because drawing connection means to link only one file, it must be
architecture basis drawing of all floors in a file.
* Drawing connection does not mean to connect the each file.
-. Select any space under title that is a file in floor area.
-. Select drawing to connect after press [link file], and presses confirmation.
3-3. Setup Workspace :
User can define the same refrigerant, product series and A/C type to one standard
unit. All works is done by workspace base. If chooses indoor unit in one workspace,
choose Outdoor unit that is correct for the product automatically. If do not choose
workspace, can't move to the step of Indoor unit that is next step.
-. Press [setup workspace]
Enter name
Choose the refrigerant piping, product series, A/C type and building.
If press addition button, it's added on workspace area of right-side.
Can edit or delete according to need.
-. It shows Workspace's status that is added on workspace inquiry window of screen rightside.
9
Page 10

SAMSUNG DVM-Pro 2008 User Guide
4. Indoor unit : User can select, add and delete Indoor unit. And can select option per each Indoor
unit.
4-1
Workspace : It shows the detailed information about workspace that displays,
and can change, and using workspace that is using present in workspace
selection window.
4-2. Add Indoor : Can add Indoor unit that wish to use.
a. Indoor unit : Select name, type, Model Name.
* If cancel check indication in front of Model Name, it's selected according to
design condition of lower column.
b. Design condition : A/C load, heating load appears if check near Model Name part.
* In case of choose Indoor unit on design condition, it's displayed the yellow
mark in query of Indoor unit.
c. If Indoor unit selection is ended, it's added by [add] button. The added Indoor unit
appears on Indoor unit query window in right-side..
4-3. Edit Indoor unit : Select and edit the Indoor unit that wish to be edited.
-. Select Indoor unit that wish to be edited in Indoor unit query window.
-. Press [edit] button after change the item that wish to change from Indoor unit part and
design condition part on screen left-side of Indoor unit.
4-4. Delete Indoor unit : Select and delete Indoor unit that wish to delete.
-. Select Indoor unit that wish to delete in Indoor unit query window.
-. Press [Yes] if it shows message that "Do you want to delete the selected ‘Indoor xx ?"
10
Page 11

SAMSUNG DVM-Pro 2008 User Guide
after press [edit] button.
4-5. [View Indoor unit] window : It shows Indoor to be used.
-. Display Indoor unit name, Model Name, cooling temperature, cooling capacity,
Cooling (kW), heating temperature, heating capacity, heating (kW), Indoor unit type,
floor, K2 and etc.
-. After do [add Indoor unit], it shows the yellow indication in front of the relevant Indoor
unit in case of it's selected manually by Indoor unit correction.
-. K 2 is unconnected with centralized control in case of being checked to item
connected with control and is controlled individually.
-. In case of there is fluorescent light shape in front of Indoor unit name, it means the
Indoor unit is already connected with that Outdoor unit.
4-6. Setup option : Can establish option by singleness or multiplex to Indoor unit.
-. Press mouse of right button after selects Indoor unit to select option by one or
multiplex and selects option. Indoor unit that option selection is ended shows the
check indication in option column. Each Indoor unit gets ONLY proper option to
oneself even though any mismatched option with Indoor unit that try to apply option
in case of select by multiplex.
11
Page 12

SAMSUNG DVM-Pro 2008 User Guide
5. Outdoor unit
5-1. Workspace : It shows the detailed information about workspace that displays, and can
change, and using workspace that is using present in workspace selection window.
-. Choose workspace that wish to work.
5-2. Add Outdoor : Add Outdoor unit to connect the unconnected Indoor unit with Outdoor
unit.
-. Press confirmation after input the name, combination rate, floor, cooling temperature
and heating temperature after press [add].
12
Page 13

SAMSUNG DVM-Pro 2008 User Guide
-. When add Outdoor unit, Outdoor unit of smallest capacity is added by workspace base.
The capacity fluctuates automatically according to modification of the connected
Indoor unit.
-. Connect Indoor unit that adds to Outdoor unit in existing, or unconnects after add
Outdoor unit pressing [add] button in case of there is the unconnected Outdoor unit.
Method that connect
Indoor unit to addon one or member with name of Outdoor unit to connect tut that
press right button after selection by multiplex Gajyeobe.
13
Page 14

SAMSUNG DVM-Pro 2008 User Guide
-. If there is “
” ICON In front of Outdoor unit ”, user must add more Indoor than
combination rate.
-. How to do if ondoor unit were connected with more Indoors than the combination rate ?
. Add Outdoor unit.
. Move Indoor unit toward Outdoor which was added.
. User must adjust the combination rate.
5-3. Edit Outdoor
-. Edit outdoor after press "Edit" button after select Outdoor unit to be edited if need to edit
Outdoor unit.
14
Page 15

SAMSUNG DVM-Pro 2008 User Guide
5-4. Delete Outdoor unit
-. When delete Outdoor unit, it shows message that "do you want to delete the selected
“Outdoor xx?" if press “delete” button after select Outdoor unit to delete.
It would be deleted if presses “yes”.
Now Indoor units had connected with the deleted Outdoor unit would be moved to
“unconnected Indoor unit” window on right-side lower column.
5-5. Copy Indoor
-. Selects Outdoor unit that wish to copy
Presses [copy] button
It shows a message whether user will copy the selected Outdoor unit and the related
Indoor unit.
It's done if presses [yes].
15
Page 16

SAMSUNG DVM-Pro 2008 User Guide
5-6. Compensate Outdoor
-. Outdoor Compensation can operate after refrigerant piping is linked, and it's not activated
in case of there is more than combination rate.
-. Select Outdoor unit to need [Compensate Outdoor].
-. Press '[Compensate Outdoor] button.
-. Select the area to need [compensation option] among compensation and heating
compensation selects necessary segment.
-. Choose installation position of Indoor unit and Outdoor unit.
-. Press “Simulation” after input design condition of Indoor unit, design condition of Outdoor
unit alike Piping Length, The Piping Height.
-. if it's any issue to performance compensation, it happened an error message.
if it's no issue to performance compensation, it shows a message of completion
(it shows "GOOD" at end of Indoor at lower of [Compensate Outdoor].
16
Page 17

SAMSUNG DVM-Pro 2008 User Guide
5-7. Window of Outdoor Information
-. The detailed information regarding Outdoor unit and Indoor unit on the right-end
screen is seen automatically. Impossible to edit the detailed information.
17
Page 18

SAMSUNG DVM-Pro 2008 User Guide
5-8. Indoor units not yet attached
-. In case of there is unconnected Indoor unit, piping connection mode is not activated.
-. Delete it by delete command after select no needful indoor among unconnected Indoor
unit
6. Piping
6-1. Workspace : It shows the details information about workspace that displays and can
change, and uses workspace that is using present in workspace selection window.
-. Choose workspace that wish to work.
6-2. Piping
6-2-1. Select Outdoor
Can select ONLY piping system diagram of Outdoor unit wanting in the same
workspace.
6-2-2. Select Piping connection tool
If User starts to draw Piping diagram after translate to manual Pipe, it will be activated.
It's ok if drag and drop the connection tool to need when design by manual Pipe.
6-2-3. basic pipe, standard Pipe and manual Pipe : User can apply any pipe.
-. Basic Pipe : Piping design way to connect all indoors on one of main pipe-line.
-. Standard Pipe : DVM Pro recommends this way.
All Indoors would be got a way alike distributed as 50 to 50 rate.
-. Manual Pipe : User can edit the Piping at free.
18
Page 19

SAMSUNG DVM-Pro 2008 User Guide
6-2-4. Draw Manual Pipe : User can edit the Piping at free.
-. If check manual Pipe], piping connection tool is activated.
-. Remove Net :
It shows [Remove Net] if press a right mouse on the Ref Joint that is blue triangle
part of piping system diagram or on the Indoor unit.
If select [Remove Net], the pipe at lower of the selected Ref Joint will be
disappeared and next Indoor of Ref Joint will be moved to No-linked Indoor.
-. Before [Remove Net]
19
Page 20

SAMSUNG DVM-Pro 2008 User Guide
-. After [Remove Net]
-. If remove net, square empty box appears and inserts the connection tool in the box
and can connect user free piping.
-. After insert piping connection tool
-. It's inserted if put in empty quadrilateral attracting Indoor unit that unconnect
after link the connection tool.
-. Image that Indoor units are inserted
20
Page 21

SAMSUNG DVM-Pro 2008 User Guide
6-2-5. Viewing Diagram
-. Full size : View the diagram on a large scale.
-. Vertical : View the vertical diagram after check [vertical].
6-2-6. Input Pipe length
[Input Pipe length] shows if presses a right mouse on Ref Joint that is blue
triangle part of piping system diagram or Indoor unit.
can input length of each piping, and give an effect to [check system] if the length is
inputted.
6-2-7. Check System
Examine piping connection state, Pipe length, the difference between floors and etc.
-. If press [Check system], it’s opened window of [Check system].
21
Page 22

SAMSUNG DVM-Pro 2008 User Guide
-. If didn't set piping length at free, enter the piping length with clicking Apply piping
length, "Do you apply the piping length of all visible units?"
If window that will apply together comes out, press “yes”.
-. Press [Yes] after enter piping length to apply.
-. Press beginning button. In case of there is no issue, it shows [Check system]
completion message. and an addition refrigerant quantity appears in window of
[Check system].
22
Page 23

SAMSUNG DVM-Pro 2008 User Guide
-. If press close button, all inspections are expressed blue to piping system diagram,
and it means that it's no issue to show blue color.
-. If there is any issue while checking the system, it shows error message. if confirm the
system piping diagram, pipe that problem happens was expressed in red color..
23
Page 24

SAMSUNG DVM-Pro 2008 User Guide
7. Wiring : Show electricity wiring state of indoor & outdoor units.
7-1. Workspace : It shows details information about workspace that displays and
can change, and uses workspace that is using present in
window of workspace selection..
-. Choose workspace that wish to work.
24
Page 25

SAMSUNG DVM-Pro 2008 User Guide
7-2. Select Outdoor unit : Can select wiring schematic diagram of Outdoor unit wanting in
the same workspace.
8. Control system : Form control system.
-. Press addition button, and input a name.
-. Include Outdoor units to add in control using middle transfer button.
* It's excepted in control if it’s checked in K2 options among Indoor unit.
-. Press [Setup system].
-. Continue the decided steps after selects control system, and presses confirmation.
25
Page 26

SAMSUNG DVM-Pro 2008 User Guide
-. If is ended, control diagram appears on screen.
9. Report
26
Page 27

SAMSUNG DVM-Pro 2008 User Guide
9-1. Insert Logo : Store image file of logo to be used in report.
9-2. Report contents : equipment list, Indoor unit specification, Outdoor unit specification, piping, wiring
diagram and estimates.
and displays or prints ONLY the checked report.
9-3. Workspace to include to report : when print out report, can choose workspace Outdoor unit etc.
that wish to display to user at free.
9-4. Currency : Can choose currency.
9-5. If user free selection ends, print the report with [makes report] button.
If check [open] by word processor, the edit window is activated as soon as do [make report].
27
 Loading...