

Page 1

ENG
ENG
AK68-00049C
D
D
VD PLA
VD PLA
YER
YER
DVD-S126G
DVD-S226KG
DVD-S326KG
DVD-S426KG
S126g/..cover(gb) 4/13/02 4:24 PM Page 1
Page 2
Precautions Precautions
2 3
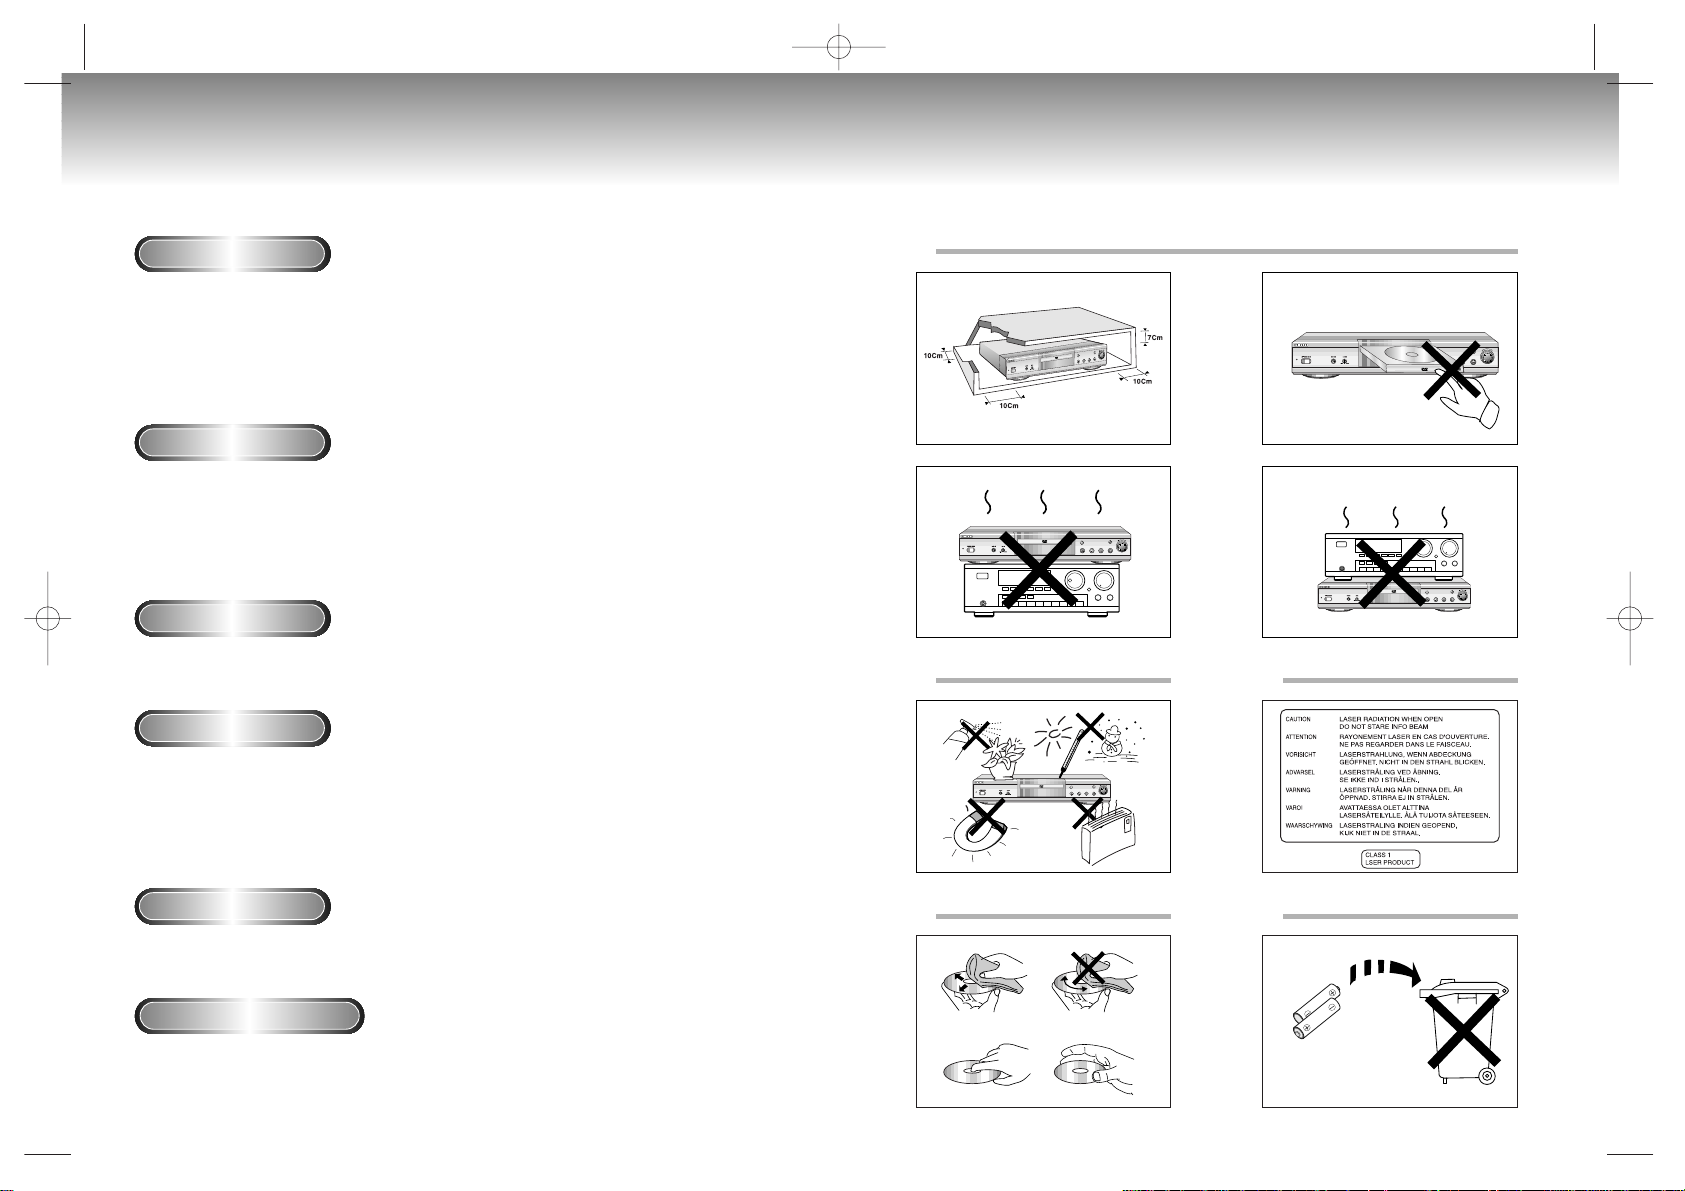
Ensure that the mains supply in your house complies with that indicated on the identification sticker
located at the back of your play. Install your player horizontally, on a suitable base (furniture),
with enough space around it for ventilation (7~10cm). Make sure the ventilation slots are not covered.
Do not stack other, or heavy devices on top of the player. Do not place the player on amplifiers or other
equipment which may become hot. Before moving the player ensure the disc tray is empty.
This player is designed for continuous use. Switching off the DVD player to the stand-by mode does
not disconnect the electricity supply In order to separate the player completely from the mains,it has
to be disconnected by unplugging the main plug, especially when left unused for a long period of time.
1. Setting up
Protect the player from moisture (dripping or splashing and objects filled with liquids), and excess heat
(e.g.fireplace) or equipment creating strong magnetic or electric fields (i.e.speakers...). Disconnect the power
cable from the mains electricity supply if the player malfunctions. Your player is not intended for industrial
use but for domestic purposes only. Use of this product is for personal use only. If your player or disc has
been stored in a cold atmosphere for example during transportation in the winter, wait for approximately 2
hours until they have reached room temperature, before use.
2. Caution
Never open the player or any of its components. It can be dangerous for you or certain fragile components.
You could receive an electric shock or touch the laser beam. Do not place your eyes close to the opening of
the disc tray or any other opening to look inside the player.
3. For your safety
Be careful handle your discs with care. Hold a disc with finger on the border or hole. Always place disc
with the label facing upward (in case of a single side disc ). Always use a soft cloth to clean disc if
necessary, wipe from the centre to the border. Always put disc back into their cases after playing and store
in vertical position. Always place the disc properly into the tray using the proper guide area. Never use
record cleaning sprays, benzine, static electricity liquids or any other solvent, if the disc surface is dirty.
Wipe gently with a soft damp (water only) cloth, never wipe the disc in a circular motion, since circular
scratches are likely to occur and could cause noise during playback.
4. Disc
The battery used in this product contains chemicals that are harmful to the environment.
Do not dispose of batteries in the general household waster. It is recommended that the replacement
of the battery should be done by a technician.
5. Battery
For safety reasons, be sure to disconnect the AC power cord from the AC outlet.
• Do not use benzene, thinner, or other solvents for cleaning.
• Wipe the cabinet with a soft cloth.
6. Maintenance of cabinet
1
2 3
4 5
S126g/226/326K/426K(gb) 4/13/02 4:29 PM Page 2
Page 3
SETUP
CONNECTIONS
BASIC
FUNCTIONS
ADVANCED
FUNCTIONS
CHANGING
SETUP MENU
KARAOKE
FUNCTIONS
REFERENCE
Before You Start
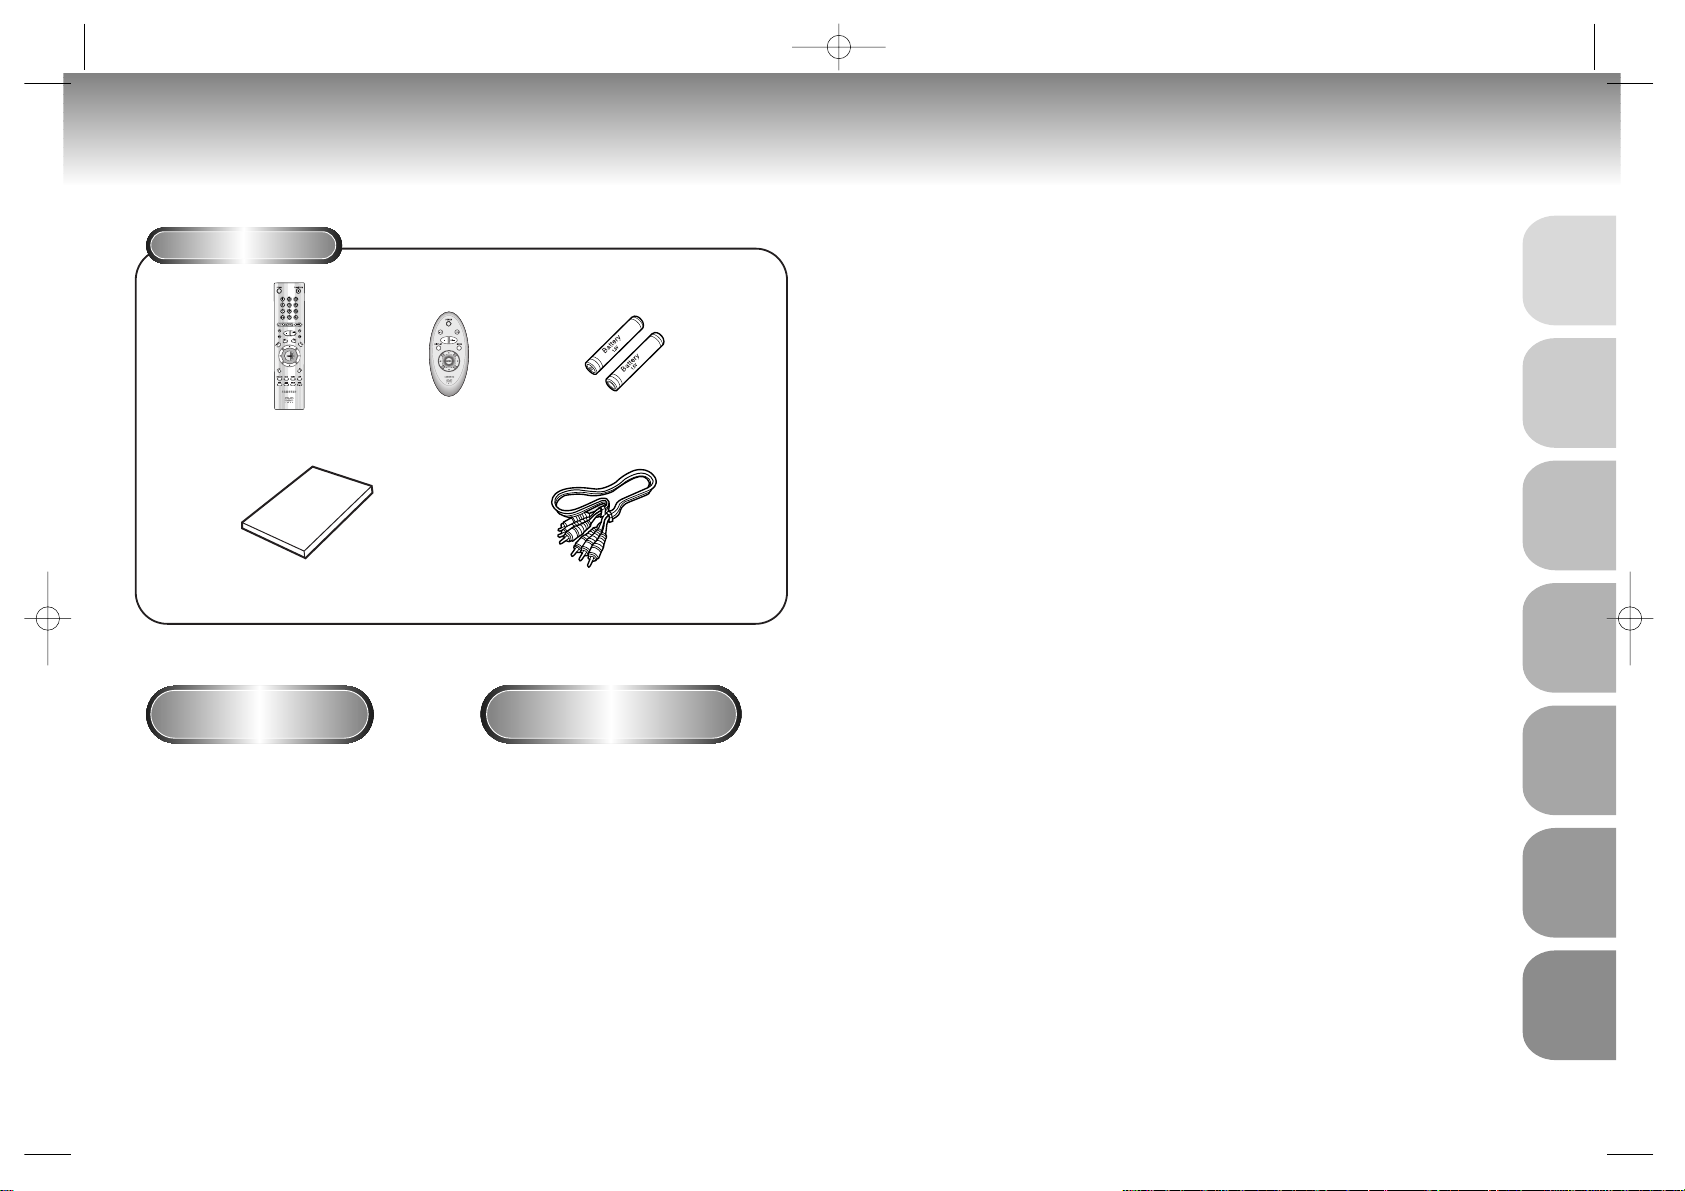
Accessories
Install Batteries in the
Remote
If remote doesn’t operate
properly:
Remote Control
User’s Manual
Batteries for
Remote Control (AA Size)
Video/Audio Cable
1
Open the battery cover on the
back of the remote.
2
Insert two AA batteries. Make
sure that the polarities (+ and -)
are aligned correctly.
3
Replace the battery cover.
• Check the polarity + - of the batteries
(Dry-Cell)
• Check if the batteries are drained.
• Check if remote sensor is blocked by
obstacles.
• Check if there is any fluorescent
lighting nearby.
TABLE OF CONTENTS
General Features ....................................................................................................6
Disc Type and Characteristics ................................................................................ 7
Description-Front Panel............................................................................................8
Display Indicators ................................................................................................10
Description-Rear Panel..........................................................................................11
Tour of the Remote Control ....................................................................................14
Choosing a Connection ........................................................................................22
Playing a Disc ......................................................................................................24
Using the Search & Skip Functions ........................................................................26
Using the Display Function ....................................................................................27
Repeat Play..........................................................................................................28
Program Play & Random Play................................................................................29
S.FIT Play ............................................................................................................30
Digest Play ..........................................................................................................31
Using the Disc View Function ................................................................................32
Slow Repeat play..................................................................................................33
Selecting the Audio Language ..............................................................................34
Selecting the Subtitle Language ..............................................................................35
Changing the Camera Angle ................................................................................36
Using the Instant Replay Function ..........................................................................37
Using the Bookmark Function ................................................................................38
Using the Zoom & 3D Sound Functions ..................................................................................39
MP3 Play ................................................................................................................................40
Beginning Karaoke Functions ................................................................................42
Reserving a Song..................................................................................................43
Vocal Function......................................................................................................44
Using the Setup Menu ..........................................................................................45
Setting Up the Language Features..........................................................................46
Setting Up the Parental Control..............................................................................48
Setting Up the Audio Options................................................................................49
Surround Sound Speaker Setup ............................................................................50
Setting Up the Display Options..............................................................................51
Controlling a TV with the Remote ..........................................................................52
Troubleshooting....................................................................................................53
Specifications ......................................................................................................54
4 5
Easy Remote Control
(DVD-S426KG only)
S126g/226/326K/426K(gb) 4/13/02 4:29 PM Page 4
Page 4
SETUP
General Features
Disc Type and Characteristics
COPY PROTECTION
Disc Markings
Play Region Number
• Many DVD discs are encoded with copy protection. Because of this, you should only connect your DVD player
directly to your TV, not to a VCR. Connecting to a VCR results in a distorted picture from copy-protected DVD
discs.
• This product incorporates copyright protection technology that is protected by methods claims of certain U.S.
patents and other intellectual property rights owned by Macrovision Corporation and other rights owners. Use of
this copyright protection technology must be authorized by Macrovision Corporation, and is intended for home
and other limited viewing uses only unless otherwise authorized by Macrovision Corporation. Reverse engineering
or disassembly is prohibited.
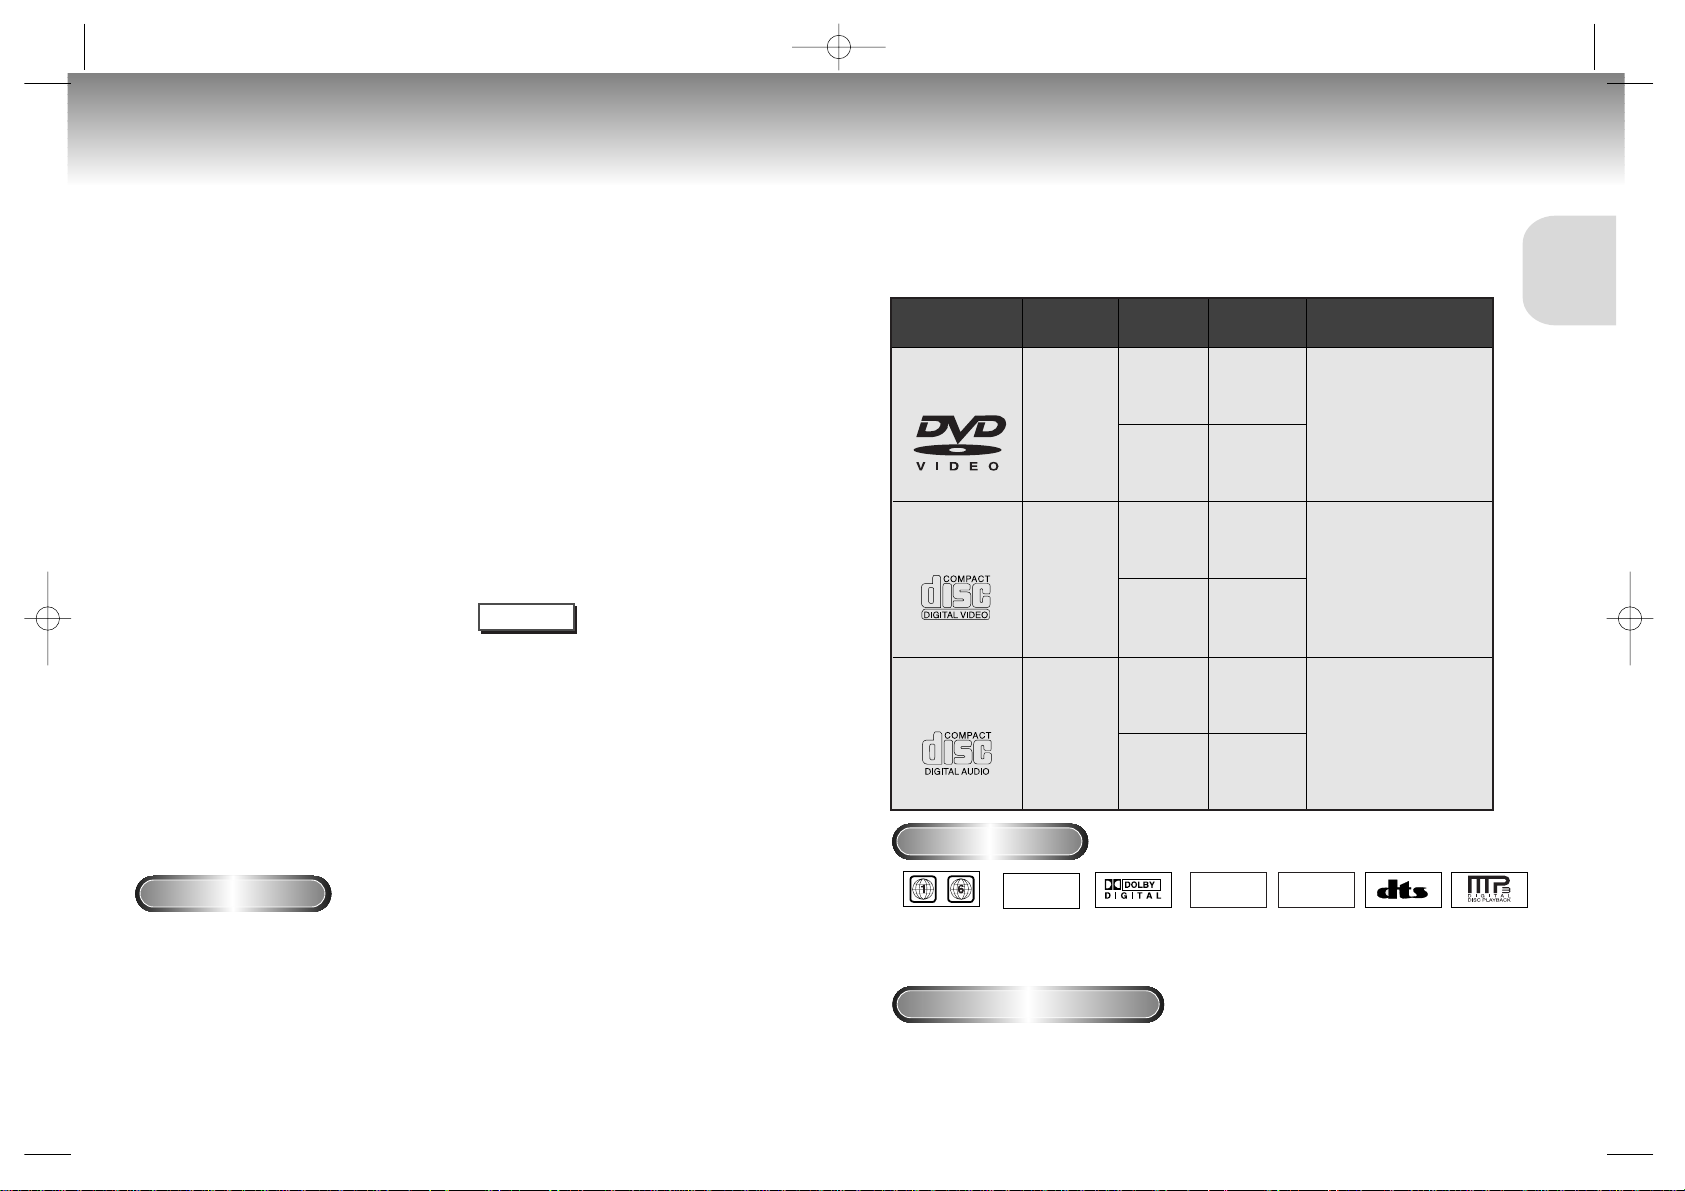
This DVD player is capable of playing the following types of discs with the
corresponding logos:
12 Cm
8 Cm
Single-sided
240 min.
Double-sided
480 min.
Single-sided
80 min.
Double-sided
160 min.
Audio
+
Video
Audio
+
Video
Audio
• CD is recorded as a
Digital Signal with better
audio quality, less
distortion and less
deterioration of audio
quality over time.
• Video with CD sound, VHS
quality & MPEG-1
compression technology.
• DVD contains excellent sound
and video due to Dolby Digital
and MPEG-2 system.
• Various screen and audio
functions can be easily
selected through the onscreen menu.
VIDEO-CD
AUDIO-CD
12 Cm
8 Cm
74 min.
20 min.
12 Cm
8 Cm
74 min.
20 min.
Disc Types
(Logos)
Recording
Types
Disc Size
Max.
Playing Time
Characteristics
DVD
~
DIGITAL
SOUND
STEREO
PAL
• Play
Region
Number
• PAL broadcast
system in U.K,
France,
Germany, etc.
• Dolby
Digital disc
• Stereo disc
• Digital
Audio disc
• DTS disc
Both the DVD player and the discs are coded by region. These regional codes must match in order for the disc
to play. If the codes do not match, the disc will not play.
The Region Number for this player is described on the rear panel of the player.
6 7
Excellent Sound
Dolby Digital, a technology
developed by Dolby Laboratories provides
crystal clear sound reproduction.
Screen
Video with MPEG-2 compression technology.
Both regular and widescreen(16:9) pictures
can be viewed.
Slow Motion
An important scene can be viewed in slow
motion.
Programmed Play
You can program tracks to play in desired
order.
Parental Control
The parental control allows users to set the
level necessary to prohibit children from
viewing harmful movies such as those with
violence, adult subject matter, etc.
Various On-Screen Menu Functions
You can select various
languages(Audio/Subtitle) and screen angles
while enjoying movies.
Repeat
You can repeat a song or movie simply by
pressing the REPEAT button.
MP3
This unit can play discs created from MP3
files.
Instant Replay
This function is used to replay the previous
10 seconds of the movie from the current
position.
Easy Remocon (DVD-S426KG only)
You can easily operate this player by
combining only the functions that are
frequently used.
* Discs which cannot be played with this player:
• DVD-ROM • DVD-RAM
• CD-ROM • CDV
• CDI
• HD layer of super Audio CD
• CDGs play audio only, not graphics.
* Ability to play back may depend on recording
conditions:
• DVD-R • CD-RW
• DVD+RW, -RW
NOTE
• MP3 disc
S126g/226/326K/426K(gb) 4/13/02 4:29 PM Page 6
Page 5
SETUP
Description-Front Panel Description-Front Panel
8 9
Front Panel Controls
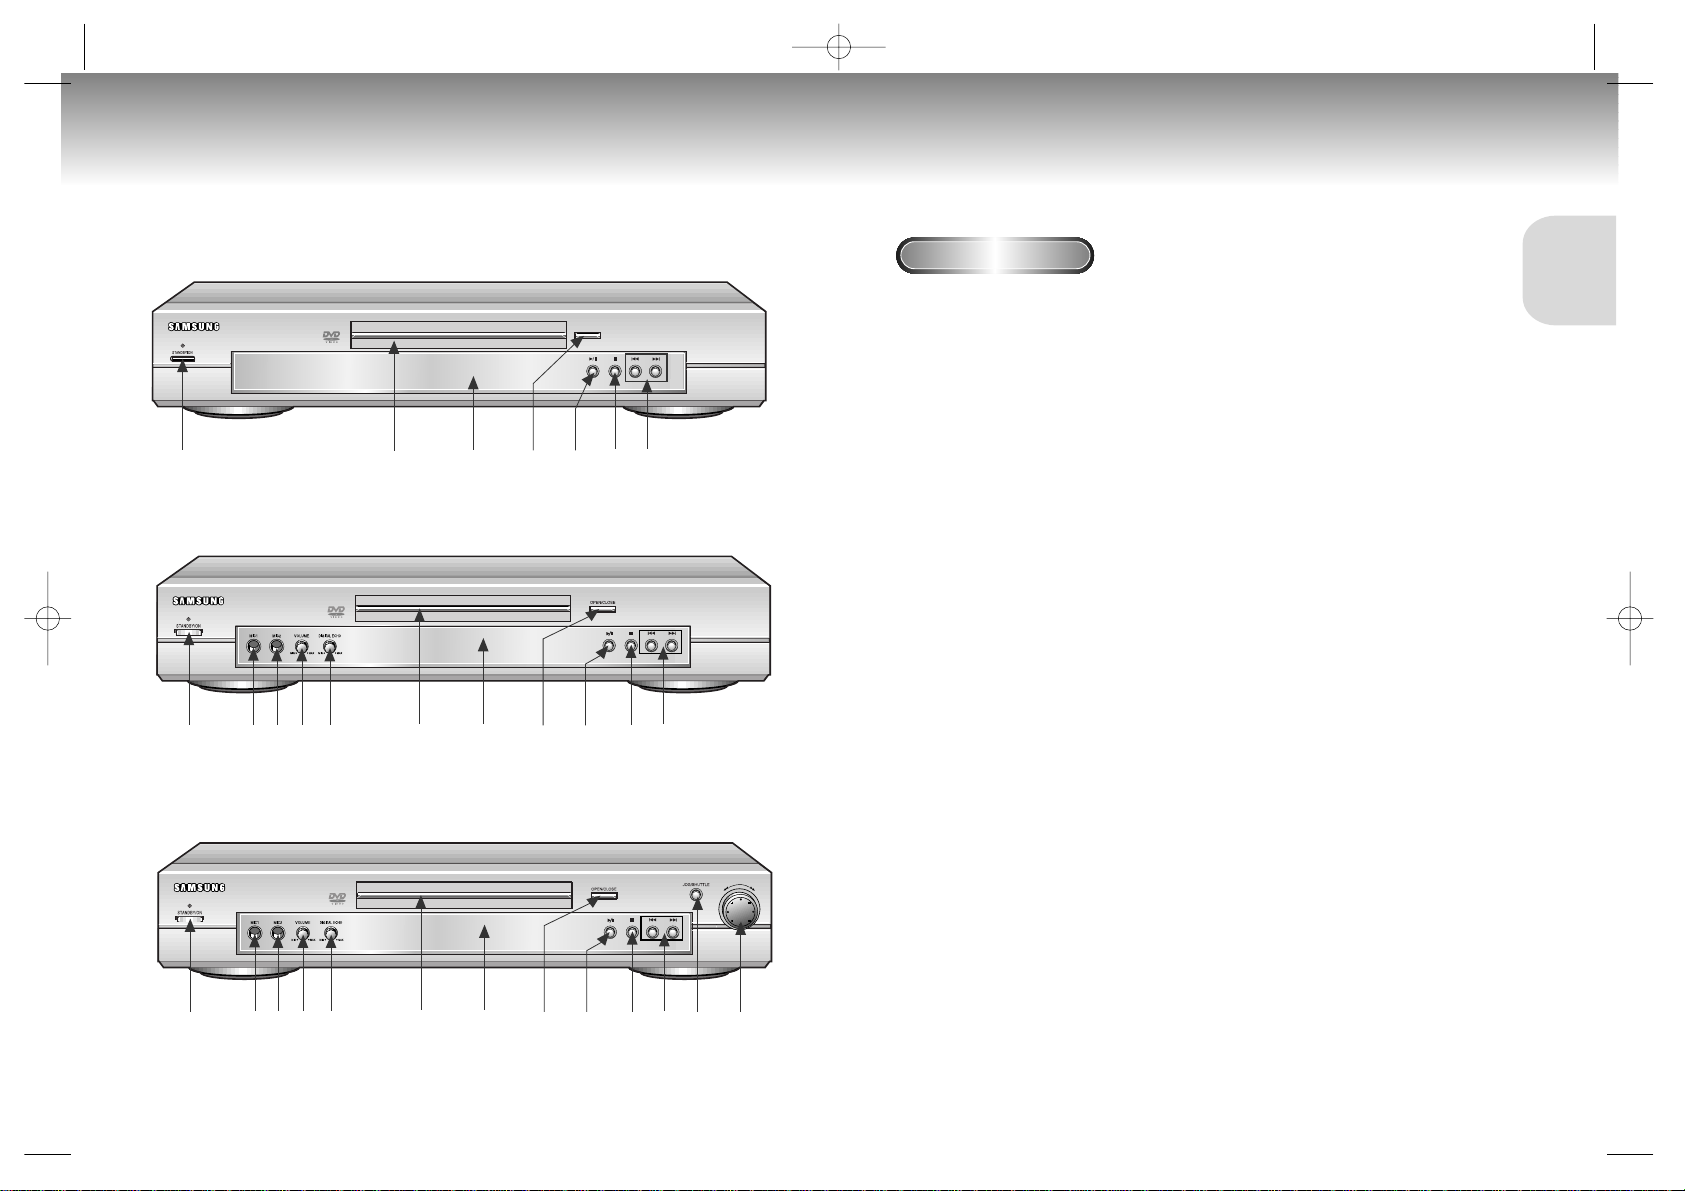
1. STANDBY / ON
• When the unit is first plugged in, the indicator lights. When STANDBY/ON is pressed on again,
the light goes out and the player is turned on.
2. MIC 1
• Connect microphone 1 for Karaoke functions.
3. MIC 2
• Connect microphone 2 for Karaoke functions.
4. VOLUME
• Use to adjust microphone volume level.
5. DIGITAL ECHO
• Use to adjust echo delay.
6. DISC TRAY
• Load the disc here.
7. DISPLAY
• Operation indicators are displayed here.
8. OPEN/CLOSE
• Press to open and close the disc tray.
9. PLAY/PAUSE
• Begin or pause disc play.
10. STOP
• Stops disc play.
11. SKIP
• Use to skip a scene or music.
12. JOG
• Use to access certain Shuttle features with the Shuttle dial : When JOG is pressed, indicator
lights up.
13. SHUTTLE
• Use during DVD and CD play to fast forward or reverse. In JOG mode(JOG button pressed),
used for frame advance/CD track selection.
OPEN/CLOSE
DVD-S126G
DVD-S226KG
1
12345 67891011
DVD-S326KG/DVD-S426KG
12345 678910111213
6 7 8 9 10 11
S126g/226/326K/426K(gb) 4/13/02 4:29 PM Page 8
Page 6
SETUP
Rear Panel
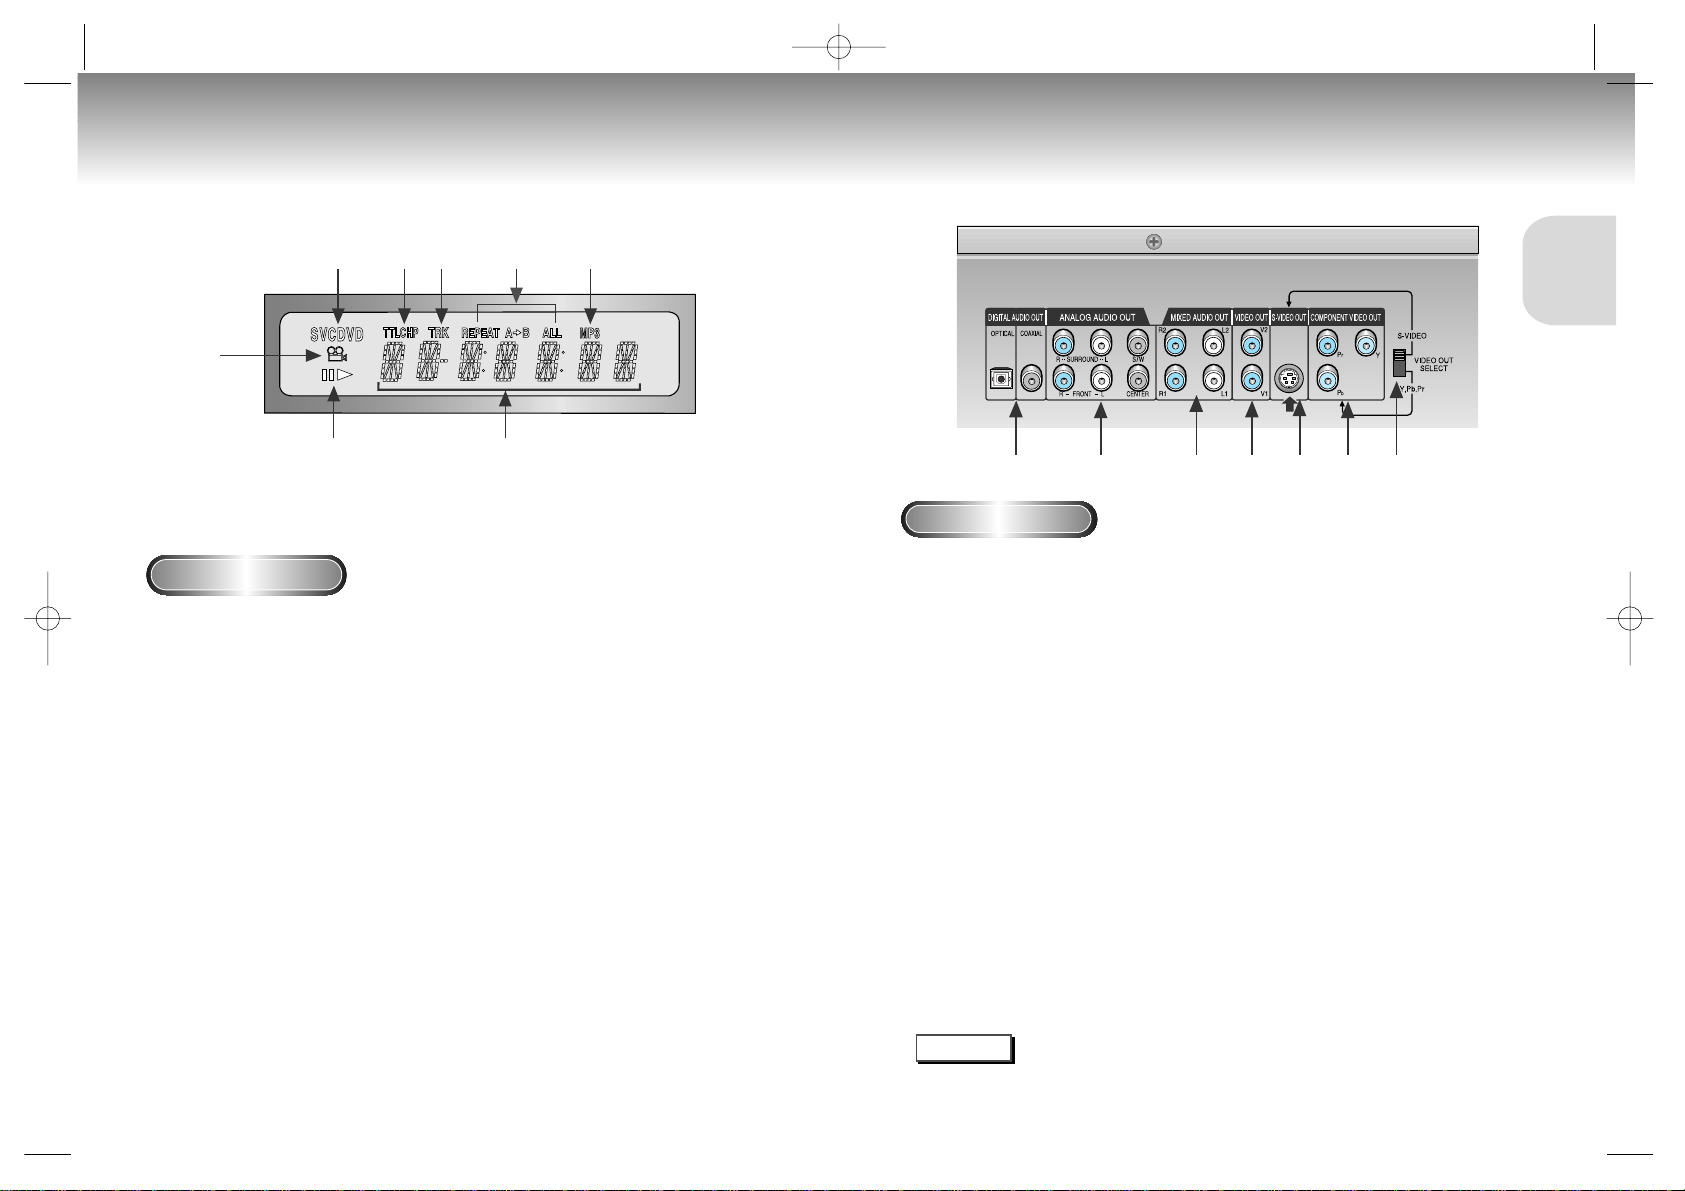
1. DIGITAL AUDIO OUT JACKS
• Use either an optical or coaxial digital cable to connect to a compatible Dolby Digital receiver.
Use to connect to an A/V Amplifier that contains a Dolby Digital or DTS decoder.
2. ANALOG AUDIO OUT JACKS
• Connect to an amplifier with 5.1ch analog input jacks.
3. MIXED AUDIO OUT JACKS
• Connect to the Audio input jacks of your television, audio/video receiver, or VCR.
4. VIDEO OUT JACKS
• Use a video cable to connect to the Video input jack on your television.
5. S-VIDEO OUT JACK
• Use the S-Video cable to connect this jack to the S-Video jack on your television for a higher quality
picture. The S-Video must be selected in the VIDEO OUT SELECT.
6. COMPONENT VIDEO OUT JACKS
• Use these jacks if you have a TV with Component Video in jacks. These jacks provide Pr, Pb and Y
video. Along with S-Video, Component Video provides the best picture quality. The Y, Pb, Pr must be
selected in the VIDEO OUT SELECT.
7. VIDEO OUT SELECT SWITCH
• Use the switch to set video out. If Y, Pb, Pr is selected, S-Video may not work. If S-Video is selected,
Y, Pb, Pr may not work.
Description-Rear PanelDisplay Indicators
10 11
Front Panel Display
1. Angle indicator. You can select multiple angles of a scene recorded by different cameras.
2. Disc type indicators
3. Play /
Pause / Forward play
4. DVD : Title, Chapter number.
5. Video/Audio CD : Track number
6. Repeat play mode
7. MP3 indicators
8. Displays various messages concerning operations such as PLAY, STOP, LOAD, ...
no DISC : No disc loaded.
OPEN : The disc tray is open.
LOAD : Player is loading disc information.
1
38
2
45 6 7
12 34567
DVD-S426KG
* Select the VIDEO OUT SELECT switch in the Stop or Power Of f mode.
NOTE
S126g/226/326K/426K(gb) 4/13/02 4:29 PM Page 10
Page 7
SETUP
12 13
Description-Rear PanelDescription-Rear Panel
Rear Panel
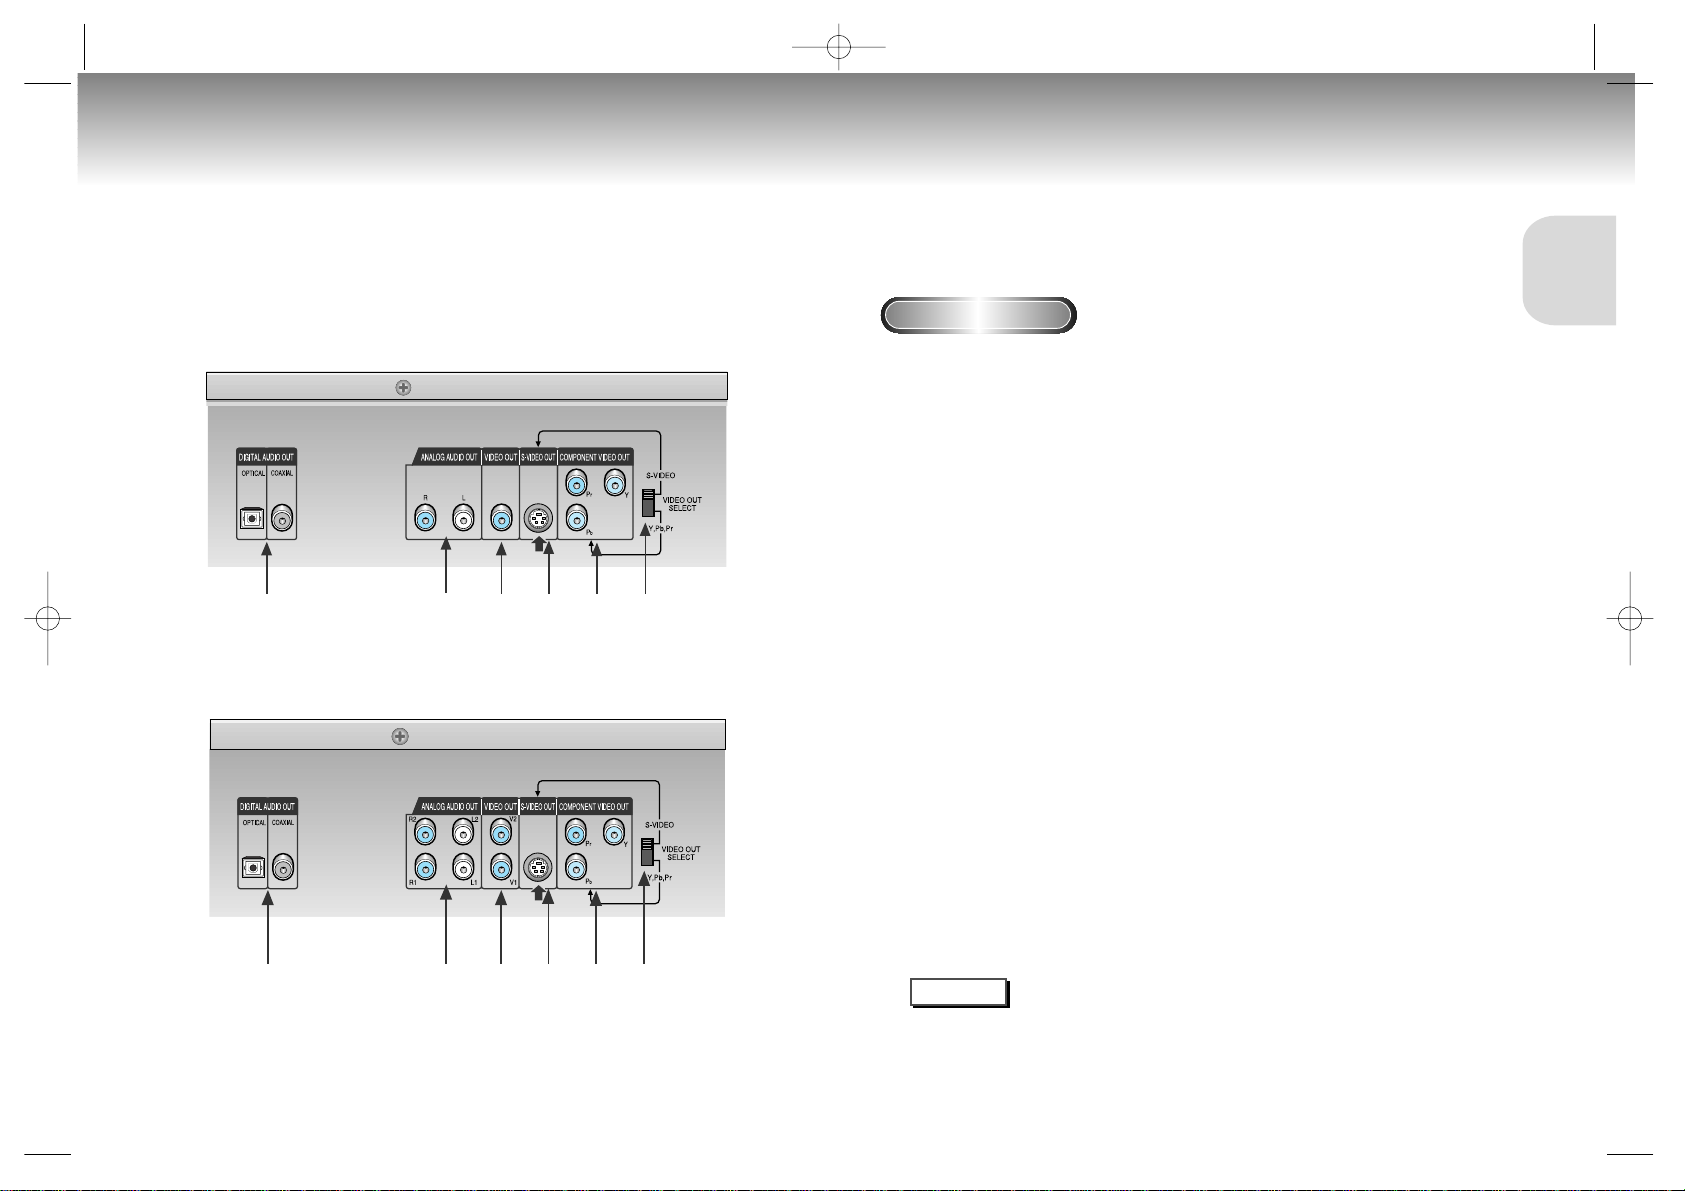
1. DIGITAL AUDIO OUT JACKS
• Use either an optical or coaxial digital cable to connect to a compatible Dolby Digital receiver.
Use to connect to an A/V Amplifier that contains a Dolby Digital or DTS decoder.
2. ANALOG AUDIO OUT JACKS
• Connect to the Audio input jacks of your television, audio/video receiver, or VCR.
3. VIDEO OUT JACKS
• Use a video cable to connect to the Video input jack on your television.
4. S-VIDEO OUT JACK
• Use the S-Video cable to connect this jack to the S-Video jack on your television for a higher quality
picture. The S-Video must be selected in the VIDEO OUT SELECT.
5. COMPONENT VIDEO OUT JACKS
• Use these jacks if you have a TV with Component Video in jacks. These jacks provide Pr, Pb and Y
video. Along with S-Video, Component Video provides the best picture quality. The Y, Pb, Pr must be
selected in the VIDEO OUT SELECT.
6. VIDEO OUT SELECT SWITCH
• Use the switch to set video out. If Y, Pb, Pr is selected, S-Video may not work. If S-Video is selected,
Y, Pb, Pr may not work.
DVD-S126G/DVD-S226KG
DVD-S326KG
1
1 2 3456
23456
* Select the VIDEO OUT SELECT switch in the Stop or Power Of f mode.
NOTE
S126g/226/326K/426K(gb) 4/13/02 4:29 PM Page 12
Page 8
SETUP
Tour of the Remote Control
DVD-S126G
Tour of the Remote Control
DVD Function Buttons
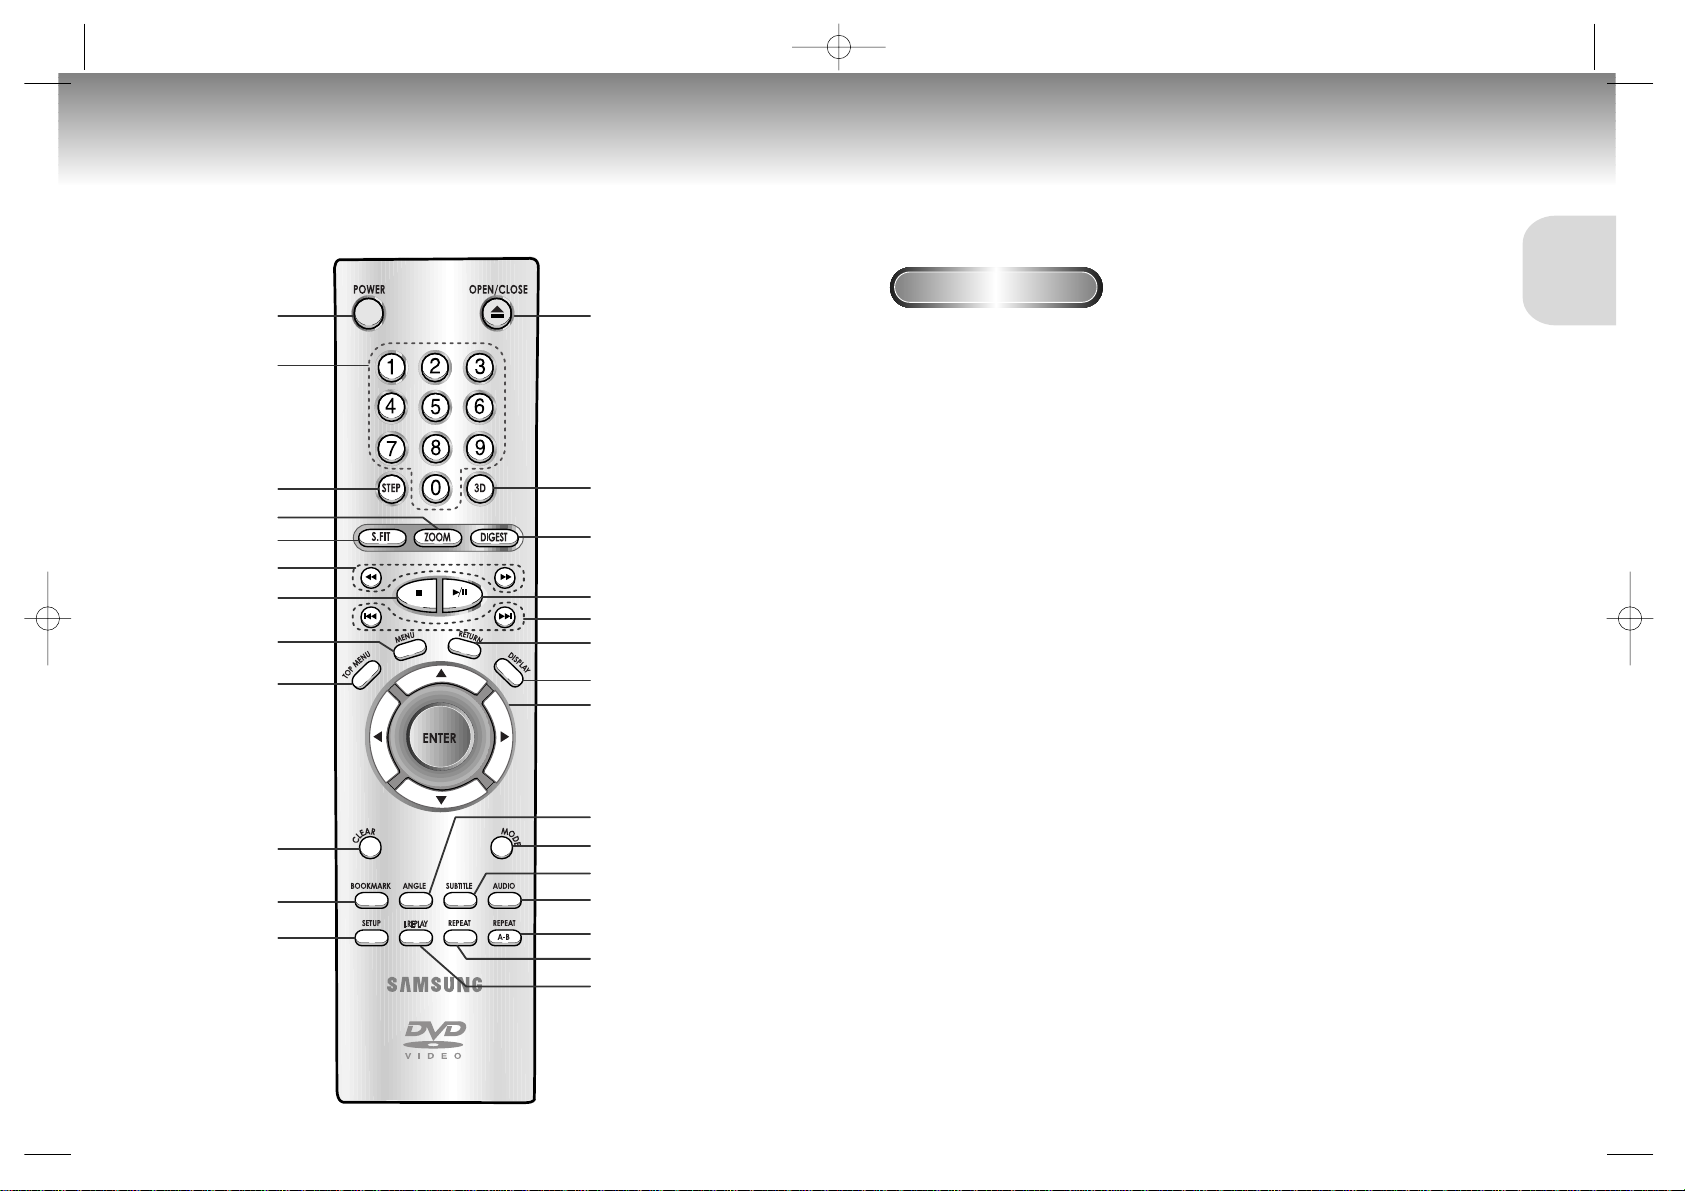
1. DVD POWER Button
2. NUMBER Buttons
3. STEP Button
• Advances play one frame at a time.
4. ZOOM Button
5. S.FIT Button
6. SEARCH Buttons
•
Allows you to search forward/backward through a disc.
7. STOP Button
8. MENU Button
• Brings up the Disc menu.
9. TOP MENU Button
10. CLEAR Button
•
Use to remove menus or status displays from the screen.
11. BOOKMARK Button
12. SETUP Button
• Brings up the DVD player’s Setup menu.
13. OPEN/CLOSE Button
14. 3D Button
15. DIGEST Button
16. PLAY/PAUSE Button
• Begin/Pause disc play.
17. SKIP Buttons
• Use to skip the title, chapter, or track.
18. RETURN Button
• Returns to a previous menu.
19. DISPLAY Button
• Displays the current disc mode.
20. ENTER/DIRECTION Button
(UP/DOWN or LEFT/RIGHT Buttons)
• This button functions as a toggle switch.
21. ANGLE Button
• Use to access various camera angles on a DVD.
22. MODE Button
• Allows you to program a specific order.
23. SUBTITLE Button
24. AUDIO Button
•
Use this button to access various audio functions on a disc.
25. REPEAT A-B Button
• Use to mark a segment to repeat between A and B.
26. REPEAT Button
•
Allows you to repeat play a title, chapter, track, or disc.
27. I.REPLAY Button
•
This function is used to replay the previous 10 seconds of
the movie from the current position.
14 15
113
14
15
16
17
18
19
20
21
22
23
24
25
26
27
2
3
4
5
6
7
8
9
10
11
12
S126g/226/326K/426K(gb) 4/13/02 4:29 PM Page 14
Page 9

SETUP
DVD-S226KG
DVD Function Buttons
1. DVD POWER Button
2. NUMBER Buttons
3. STEP Button
• Advances play one frame at a time.
4. ZOOM Button
5. S.FIT Button
6. SEARCH Buttons
•
Allows you to search forward/backward through a disc.
7. STOP Button
8. MENU Button
• Brings up the Disc menu.
9. TOP MENU Button
10. CLEAR Button
•
Use to remove menus or status displays from the screen.
11. BOOKMARK Button
12. SETUP Button
• Brings up the DVD player’s Setup menu.
13. OPEN/CLOSE Button
14. 3D Button
15. DIGEST Button
16. PLAY/PAUSE Button
• Begin/Pause disc play.
17. SKIP Buttons
• Use to skip the title, chapter, or track.
18. RETURN Button
• Returns to a previous menu.
19. DISPLAY Button
• Displays the current disc mode.
20. ENTER/DIRECTION Button
(UP/DOWN or LEFT/RIGHT Buttons)
• This button functions as a toggle switch.
21. ANGLE Button
• Use to access various camera angles on a DVD.
22. MODE Button
• Allows you to program a specific order.
23. SUBTITLE Button
24. AUDIO Button
•
Use this button to access various audio functions on a disc.
25. KARAOKE Button
• Use to begin Karaoke functions.
26. REPEAT Button
•
Allows you to repeat play a title, chapter, track, or disc.
27. I.REPLAY Button
•
This function is used to replay the previous 10 seconds of
the movie from the current position.
113
14
15
16
17
18
19
20
21
22
23
24
25
26
27
2
3
4
5
6
7
8
9
10
11
12
Tour of the Remote Control
Tour of the Remote Control
16 17
S126g/226/326K/426K(gb) 4/13/02 4:30 PM Page 16
Page 10
SETUP
Tour of the Remote Control
DVD-S326KG
Tour of the Remote Control
DVD Function Buttons
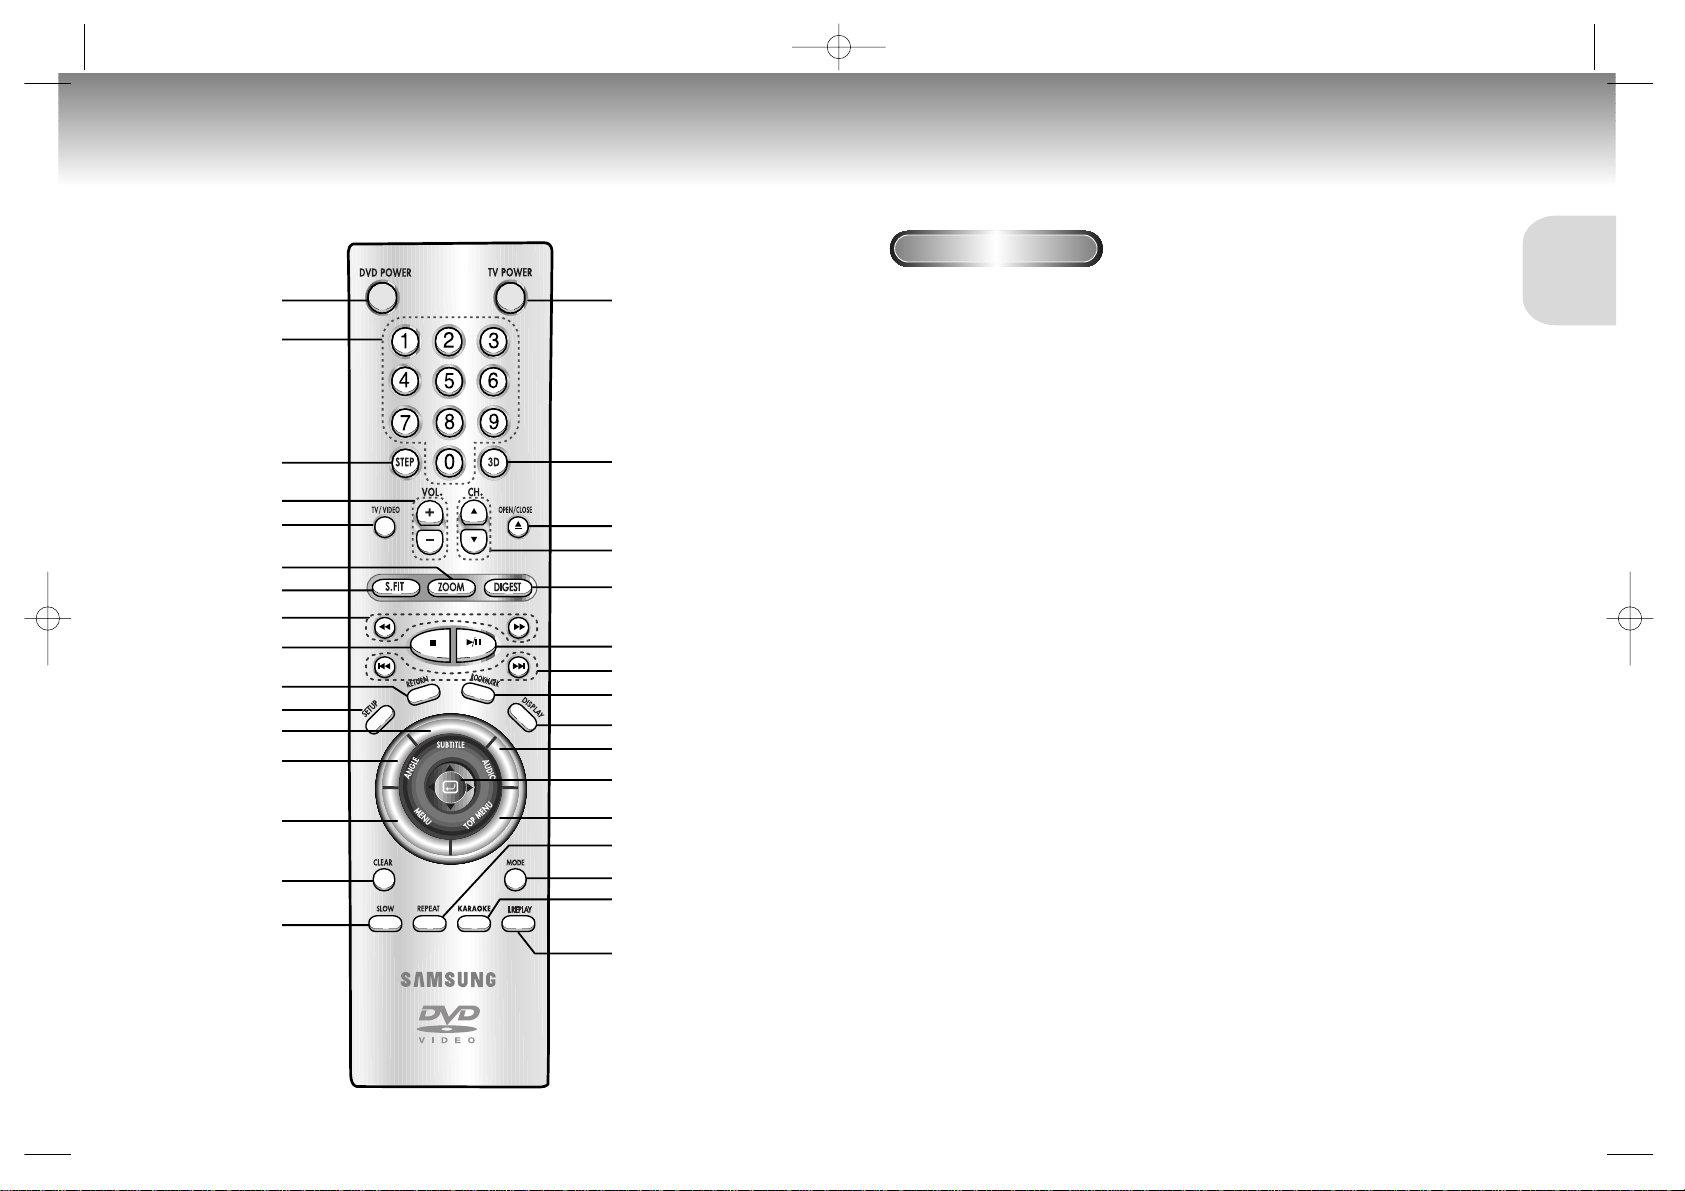
1. DVD POWER Button
2. NUMBER Buttons
3. STEP Button
4. VOLUME Buttons
5. TV/VIDEO Button
6. ZOOM Button
7. S.FIT Button
8. SEARCH Buttons
•
Allows you to search forward/backward through a disc.
9. STOP Button
10. RETURN Button
• Returns to a previous menu.
11. SETUP Button
• Brings up the DVD player’s Setup menu.
12. SUBTITLE Button
13. ANGLE Button
• Use to access various camera angles on a DVD.
14. MENU Button
• Brings up the Disc menu.
15. CLEAR Button
•
Use to remove menus or status displays from the screen.
16. SLOW Button
17. TV POWER Button
18. 3D Button
19. OPEN/CLOSE Button
20. CHANNEL Buttons
21. DIGEST Button
22. PLAY/PAUSE Button
• Begin/Pause disc play.
23. SKIP Buttons
• Use to skip the title, chapter, or track.
24. BOOKMARK Button
25. DISPLAY Button
• Displays the current disc mode.
26. AUDIO Button
•
Use this button to access various audio functions on a disc.
27. ENTER/DIRECTION Button
(UP/DOWN or LEFT/RIGHT Button)
•This button functions as a toggle switch.
28. TOP MENU Button
29. REPEAT Button
•
Allows you to repeat play a title, chapter, track, or disc.
30. MODE Button
• Allows you to program a specific order.
31. KARAOKE Button
• Use to begin Karaoke functions.
32. I.REPLAY Button
•
This function is used to replay the previous 10 seconds
of the movie from the current position.
18 19
1
18
17
19
20
21
22
23
24
25
26
27
28
29
30
31
32
2
3
4
5
6
7
8
9
10
11
12
13
14
15
16
S126g/226/326K/426K(gb) 4/13/02 4:30 PM Page 18
Page 11
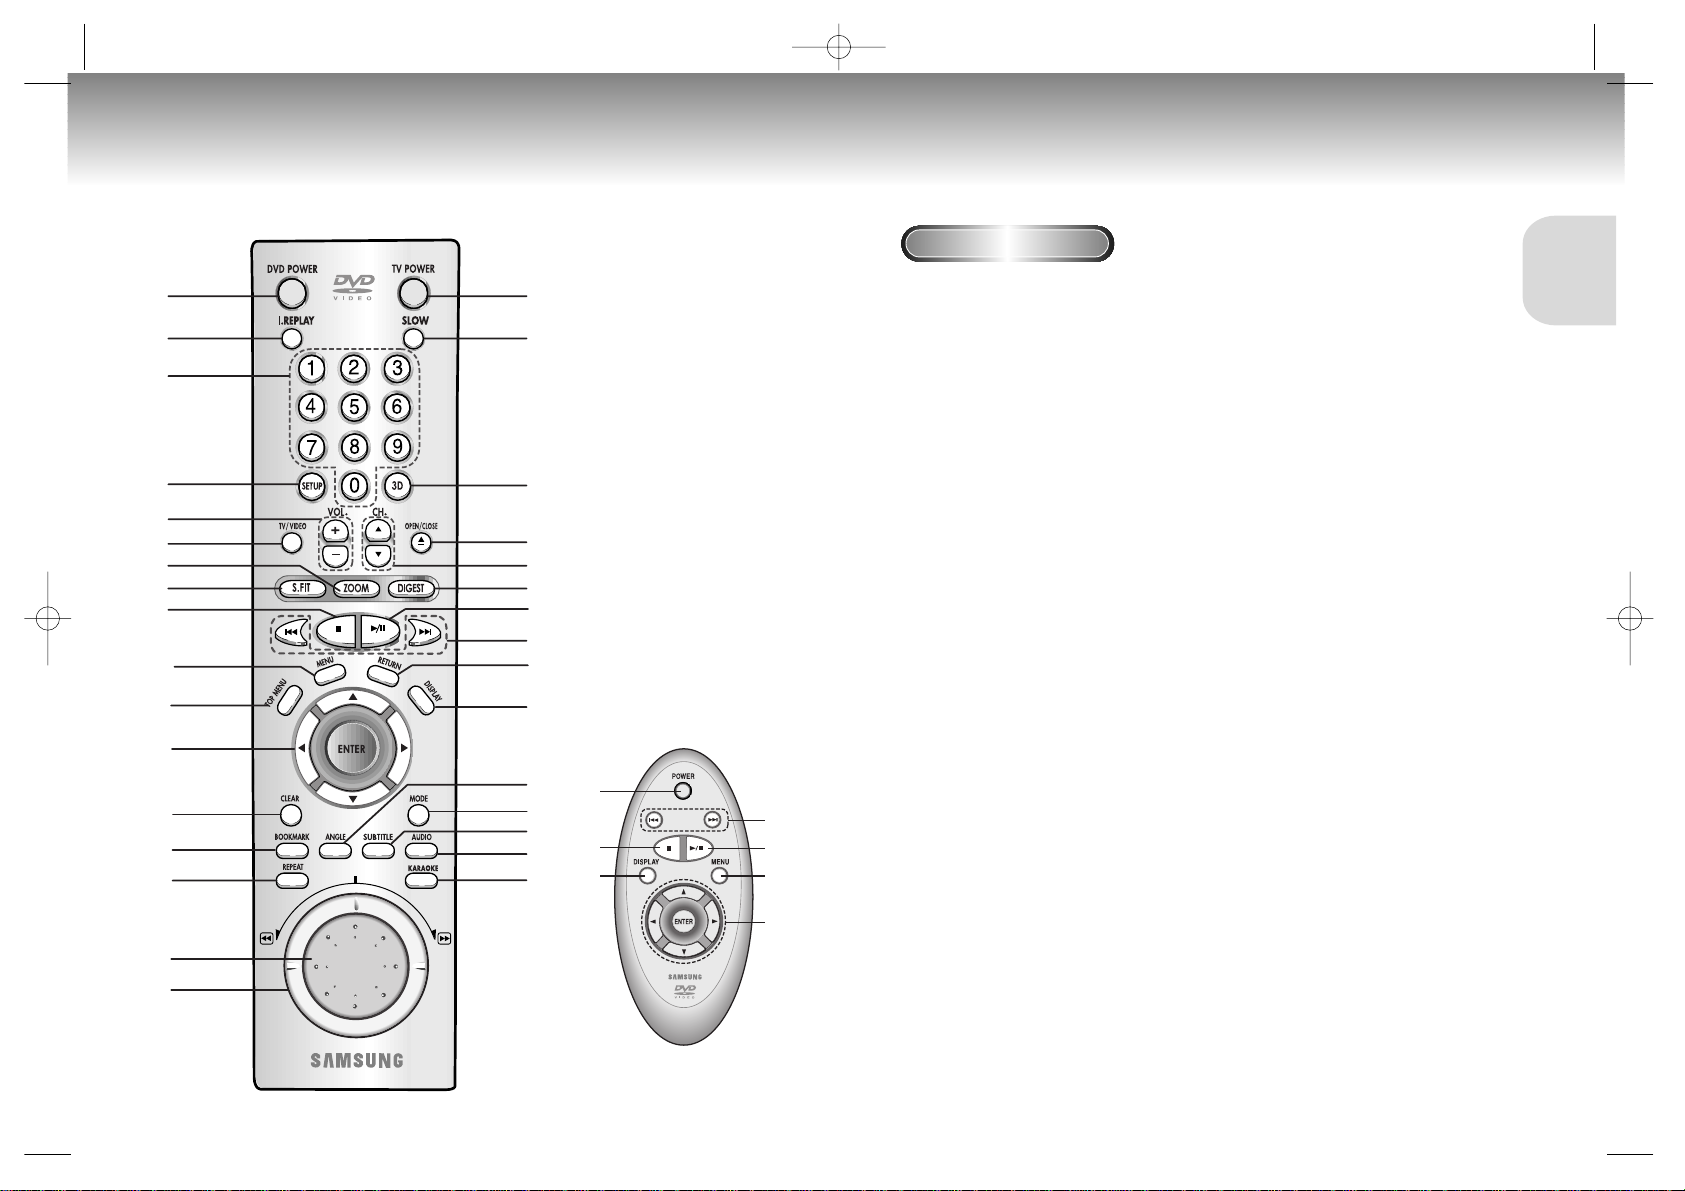
SETUP
18. TV POWER Button
19. SLOW Button
20. 3D Button
21. OPEN/CLOSE Button
22. CHANNEL Buttons
23. DIGEST Button
24. PLAY/PAUSE Button
• Begin/Pause disc play.
25. SKIP Buttons
• Use to skip the title, chapter, or track.
26. RETURN Button
• Returns to a previous menu.
27. DISPLAY Button
• Displays the current disc mode.
28. ANGLE Button
• Use to access various camera angles on a DVD.
29. MODE Button
• Allows you to program a specific order.
30. SUBTITLE Button
31. AUDIO Button
•
Use this button to access various audio functions on a disc.
32. KARAOKE Button
• Use to begin Karaoke functions.
Tour of the Remote Control Tour of the Remote Control
DVD Function Buttons
1. DVD POWER Button
2. I.REPLAY Button
•
This function is used to replay the previous 10 seconds of
the movie from the current position.
3. NUMBER Buttons
4. SETUP Button
• Brings up the DVD player’s Setup menu.
5. VOLUME Buttons
6. TV/VIDEO Button
7. ZOOM Button
8. S.FIT Button
9. STOP Button
10. MENU Button
• Brings up the Disc menu.
11. TOP MENU Button
12. ENTER/DIRECTION Button
(UP/DOWN or LEFT/RIGHT buttons)
• This button functions as a toggle switch.
13. CLEAR Button
•
Use to remove menus or status displays from the screen.
14. BOOKMARK Button
15. REPEAT Button
•
Allows you to repeat play a title, chapter, track, or disc.
16. JOG DIAL
• Operates frame by frame play. In CD mode,
performs track search.
17. SHUTTLE DIAL
• Performs fast or slow motion play.
20 21
DVD-S426KG
1
18
19
20
21
22
23
24
25
26
27
28
29
30
31
32
2
3
4
5
6
7
8
9
10
11
12
13
14
15
16
17
25
24
10
12
9
27
1
(Easy Remote Control)
S126g/226/326K/426K(gb) 4/13/02 4:30 PM Page 20
Page 12
CONNECTIONS
Choosing a Connection Choosing a Connection
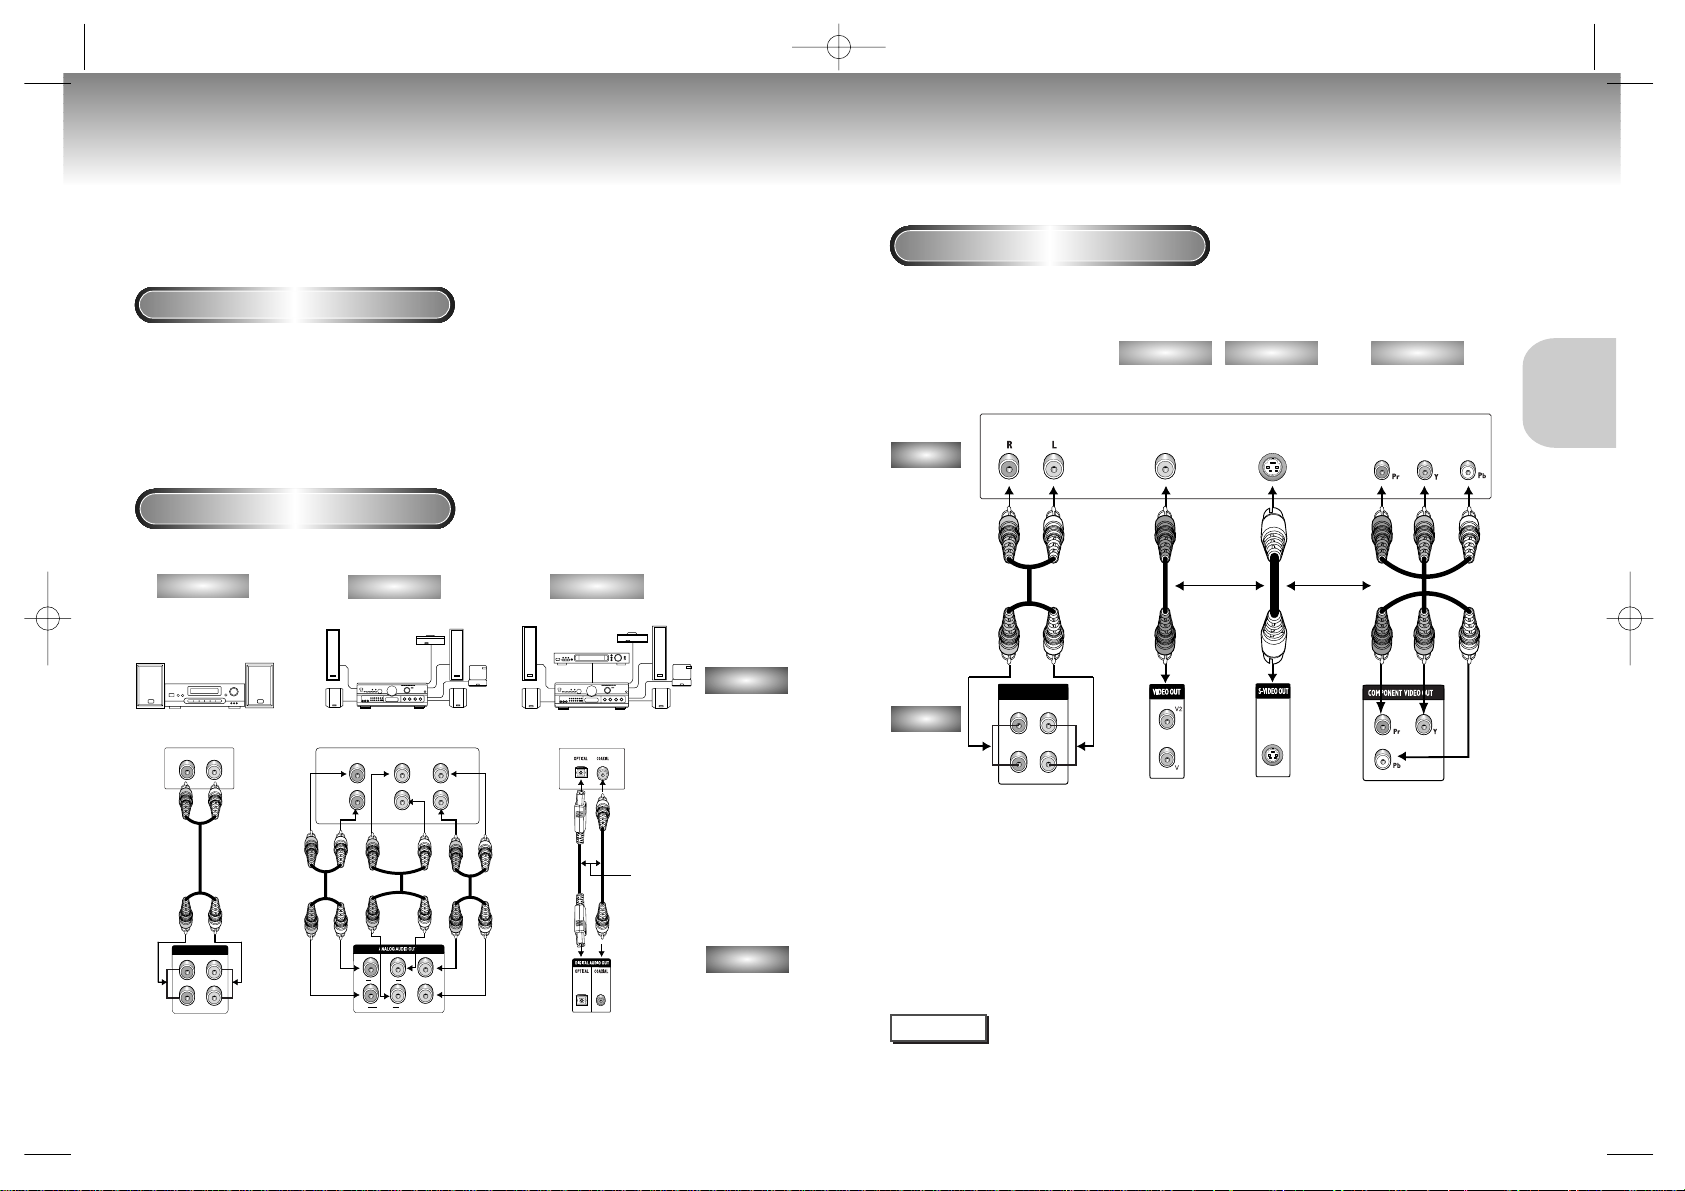
The following show examples of connections commonly used to connect the DVD player with a
TV and other components.
Before Connecting the DVD Player
• Always turn off the DVD player, TV, and other components before you
connect or disconnect any cables.
• Refer to the owner’s manual of the additional components you are connecting for
more information on those particular components.
22 23
Connection to an Audio System
Method 1
Method 2
Method 3
R1
R2
L1
R
Front (RH) Front (LH) Center
Rear (RH) Rear (LH) Subwooper
L
L2
R FRONT L
R SURROUND L
CENTER
S/W
MIXED AUDIO OUT
Mixed Audio Out
Analog Audio Out
Digital Audio Out
2ch Amplifier
Audio Input Jacks
5.1ch Analog Amplifier
Audio Input Jacks
Dolby Digital Decoder
Digital Audio Input Jacks
AUDIO
DVD
OR
Connection to a TV (For Video)
TV (Normal, Widescreen, Projection, etc..)
Good picture
Basic Audio
Better picture
Best picture
Method 1
Method 2
Method 3
NOTE
• If Y, Pb or Pr is selected, S-Video will not work.
• If S-Video is selected, Y, Pb or Pr will not work.
R1
R2
L1
L2
1
MIXED AUDIO OUT
Audio Output Jacks
OR
OR
AV Cable
S-Video
Cable
Video Cables
Video Output Jack
S-Video Jack
Component Video
Jacks
DVD
TV
• Method 1 DVD Player + TV with Video Input Jack
• Method 2 DVD Player + TV with S-Video Input Jack
(If S-Video is selected in the VIDEO OUT SELECT.)
• Method 3 DVD Player + TV with Component Video Jacks
(If Y, Pb or Pr is selected in the VIDEO OUT SELECT.)
S126g/226/326K/426K(gb) 4/13/02 4:30 PM Page 22
Page 13
BASIC
FUNCTIONS
Playing a Disc Playing a Disc
Before Play
Play
• Turn on your TV and press the TV/VIDEO button to select the video
mode.
• Turn on your Audio System and select AUX, CD or DVD.
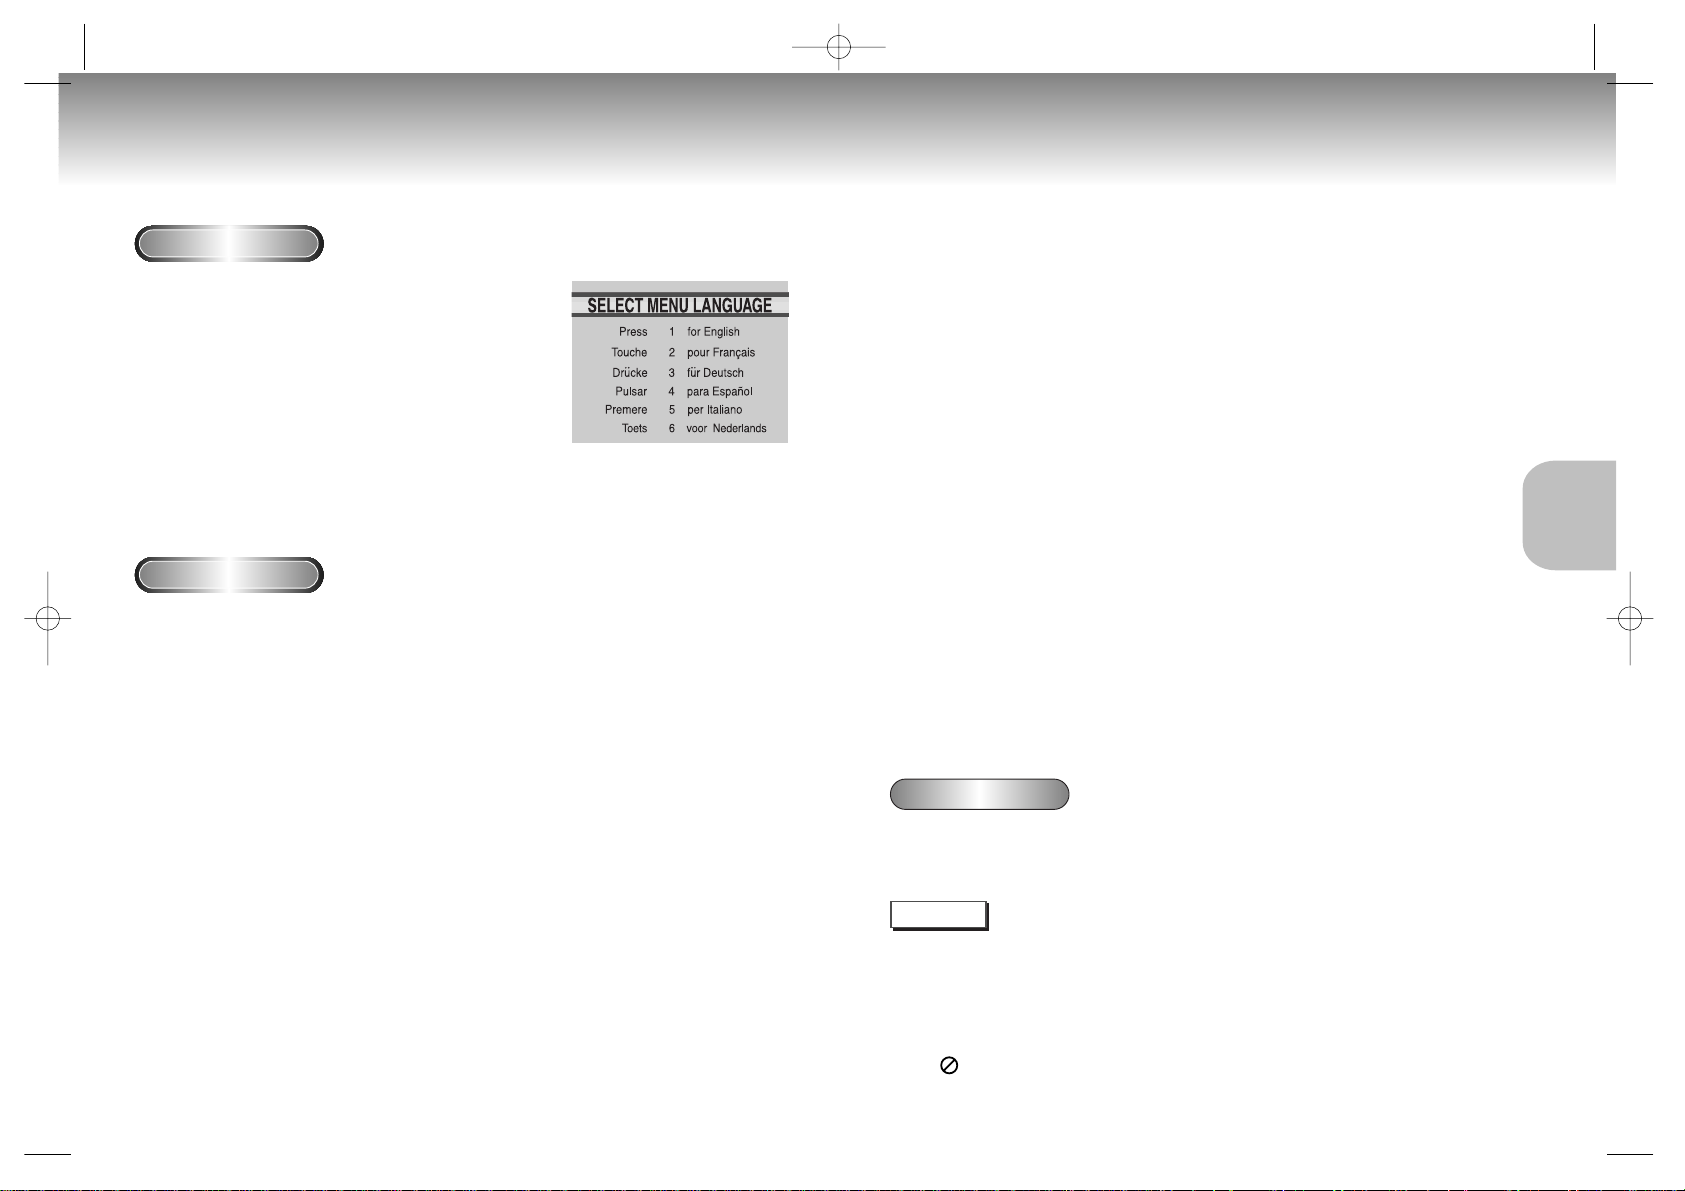
After plugging in the player, the first time you press the DVD POWER
button, this screen comes up :
If you want to select the language, press a NUMBER button. (This screen
will only appear the very first time you plug in the player.)
1
1
Press the OPEN/CLOSE button.
The STANDBY indicator light goes out and the tray opens.
2
2
Place a disc gently into the tray with the disc’s label
facing up.
3
3
Press the PLAY/PAUSE button or OPEN/CLOSE button
to close the disc tray.
4
4
Stopping Play
Press the STOP button during play.
5
5
Removing Disc
Press the OPEN/CLOSE button.
6
6
Pausing Play
Press the PLAY/PAUSE or STEP button on the remote during play.
- Screen stops, no sound.
- To resume again, press PLAY/PAUSE button once again.
7
7
Step Motion Play. (Except CD)
If turning JOG DIAL, you can view one by one. (DVD-S426KG only)
Press the STEP button on the remote during play. (DVD-S126G/DVD-S226KG/DVD-S326KG only)
- Each time the button is pressed, a new frame will appear.
- No sound is heard during STEP mode.
- Press PLAY/PAUSE to resume normal play.
(You can only perform step motion play in the for ward direction.)
8
8
Slow Motion Play. (Except CD)
•
DVD-S126G/DVD-S226KG/DVD-S326KG : Press the FWD SEARCH (
¨¨
) or REV SEARCH (ÃÃ)
button on the remote during PAUSE or STEP mode.
By pressing the FWD SEARCH (¨¨) or REV SEARCH (ÃÃ) button, you can select slow motion
play for 1/8, 1/4 or 1/2 of normal speed.
•
DVD-S426KG : Press and hold the SKIP button to choose the play speed between 1/8, 1/4 and
1/2 of normal.
- No sound is heard during slow mode.
- Press PLAY/PAUSE to resume normal play.
- When playing a VCD, the reverse slow motion play will not work.
RESUME function
When you stop disc play, the player remembers where you stopped, so when you press PLAY again, it will pick up
where you left off (unless the disc is removed, the STOP button is pressed twice or the player is unplugged.).
• If the player is left for 5 minutes in pause mode, it will stop.
• If the player is left in the stop mode for more than 30 minutes, the power will automatically shut off.
(Automatic Power-Off Function) (DVD-S126G only)
• If the player is left in the stop mode for more than one minute without any user interaction, a screen
saver will be activated, and the TV screen will fade in and out repeatedly. Press the PLAY button to
resume normal play.
• This icon indicates an invalid button press.
NOTE
24 25
S126g/226/326K/426K(gb) 4/13/02 4:30 PM Page 24
Page 14
BASIC
FUNCTIONS
CD
T : 01
0 : 01 : 09
64
Using the Search & Skip Functions Using the Display Function
During play, you can search quickly through a chapter or track or use the skip
function to jump to the next selection.
Searching through a Chapter or Track
Skipping Tracks
1
1
During play, press the NEXT SKIP or BACK SKIP button.
• When playing a DVD, if you press the NEXT SKIP button, it moves to the
next chapter. If you press the BACK SKIP button, it moves to the
beginning of the chapter. One more press makes it move to the
beginning of the previous chapter.
• When playing a VCD 2.0 in MENU OFF mode, a VCD 1.1 or a CD, if
you press the NEXT SKIP button, it moves to the next track. If you press
the BACK SKIP button, it moves to the beginning of the track.
One more press makes it move to the beginning of the previous track.
• If a track exceeds 15 minutes when playing a VCD and you press the NEXT
SKIP button, it moves forward 5 minutes. If you press the BACK SKIP button,
it moves backward 5 minutes.
• When playing a VCD 2.0 in the MENU OFF or Track View function, if
you press the NEXT SKIP button, it moves to the next MENU or the next
Track View display.
If you press the BACK SKIP button, it moves to the previous
MENU or the previous Track View display. (See page 32.)
When Playing a DVD
When Playing a CD/VCD
1
1
• DVD-S126G/DVD-S226KG/DVD-S326KG: Press the REVERSE or
FORWARD SEARCH button on the remote and press again to
search at faster speed on the DVD,VCD,CD.
• DVD-S426KG: Turn the shuttle diad of remote control during disc
play. Turn the Jog/Shuttle on the front can amultiple-speed
operation if desiring to use the key on the front.
DVD
VCD
CD
2X, 4X, 8X, 16X, 32X, 128X
4X, 8X
2X, 4X, 8X
A
DVD
T : 01
C : 02
0 : 01 : 09
ENG 5.1CH
ENG
64
1
1
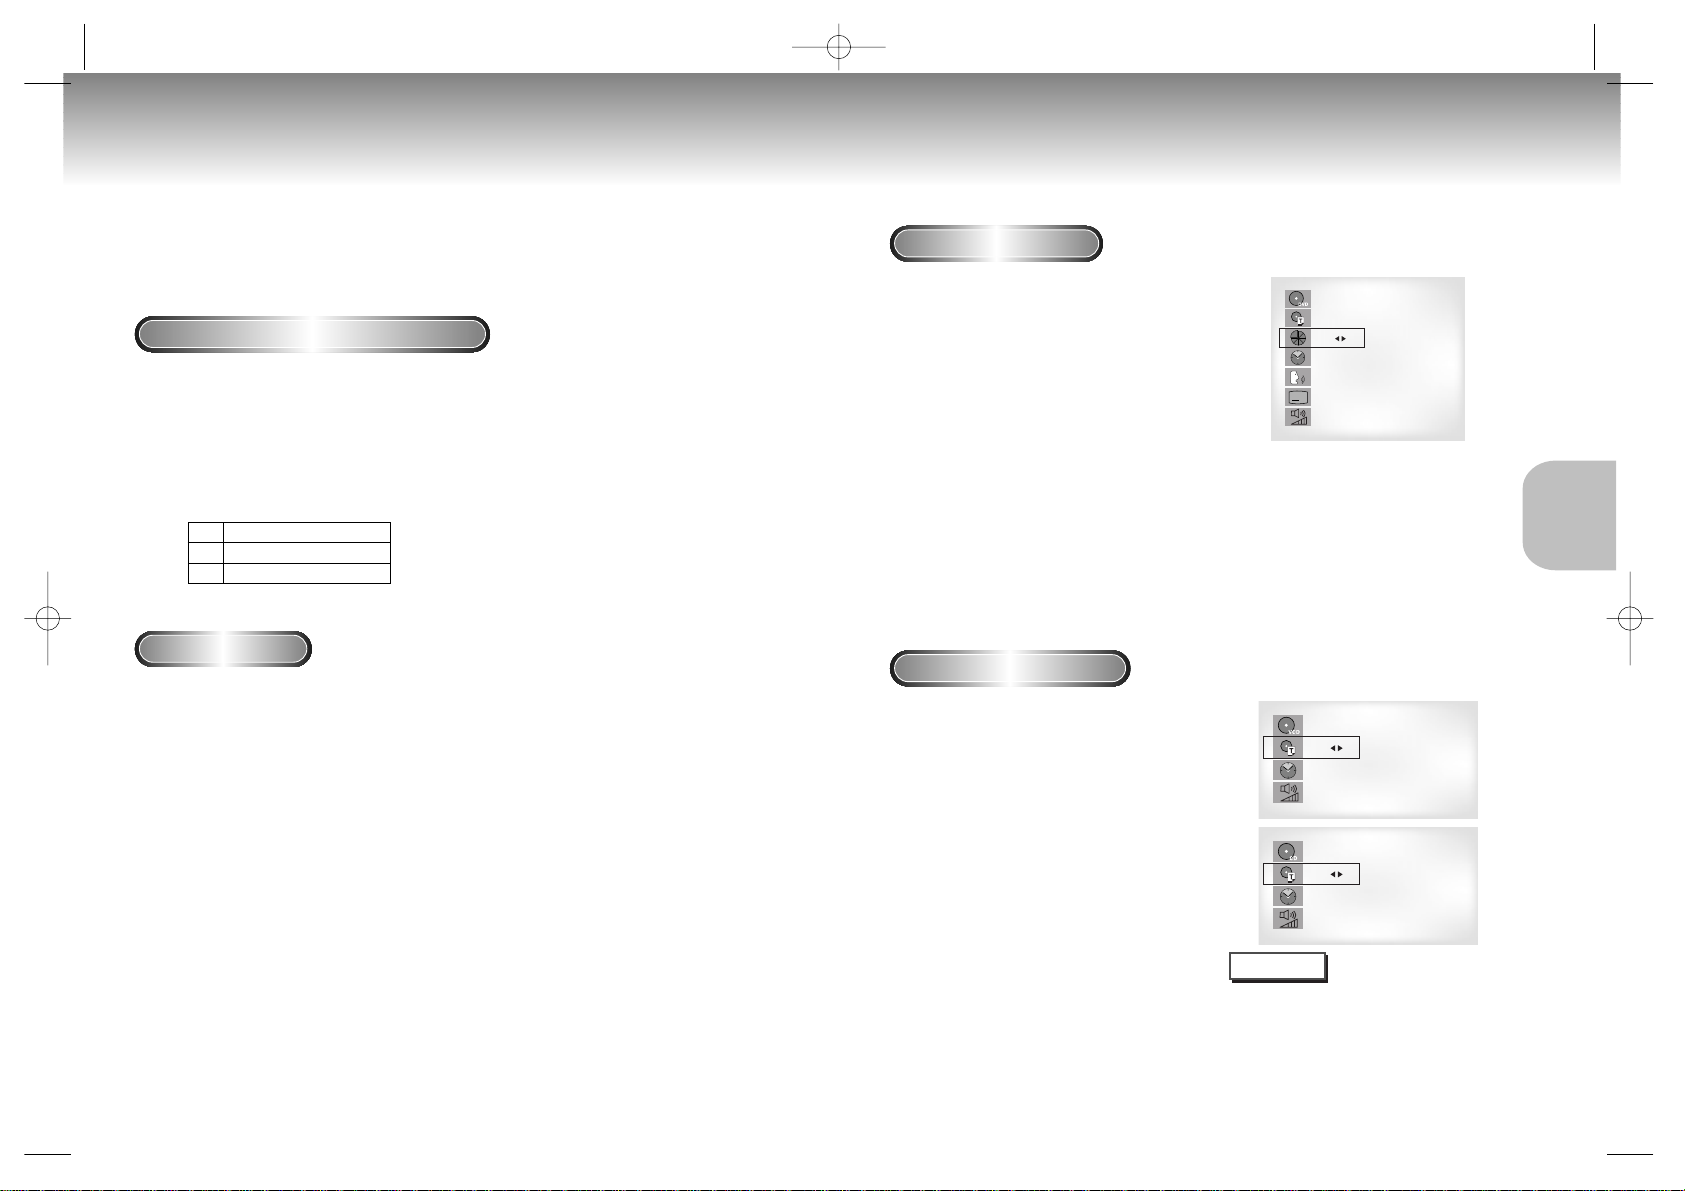
During play, press the DISPLAY button
on the remote.
- Current title, chapter number, elapsed time,
audio, subtitle and volume control will be
displayed.
• Use the NUMBER buttons to enter a different title,
then press the ENTER button.
• Use the LEFT/RIGHT or NUMBER buttons to enter
a chapter number, then press the ENTER button.
• To enter the time from which you want to start,
use the UP/DOWN buttons to select, then use the
NUMBER buttons to enter the time.
Then press the ENTER button.
• Use the LEFT/RIGHT buttons to change the values
of the current audio, subtitle and volume.
• To make the screen disappear, press the DISPLAY
button again.
1
1
During play, press the DISPLAY button
on the remote.
- Current track NUMBER, elapsed time and
volume control will be displayed.
• Use the UP/DOWN buttons to select a track.
Use the LEFT/RIGHT buttons or NUMBER
buttons to enter a different track number, then
press the ENTER button.
• To enter the time from which you want to start,
use the UP/DOWN buttons to select, then use
the NUMBER buttons to enter the time.
Press the ENTER button.
• To change the value of the volume, use the
LEFT/RIGHT buttons.
- To make the screen disappear, press the DISPLAY
button again.
*
In VCD 2.0 mode (MENU ON mode), only the
volume control will appear on screen.
VCD
T : 01
0 : 01 : 09
64
VCD
CD
What is a Chapter?
Each Title on a DVD is usually divided into
chapters (similar to tracks on an audio CD).
What is a Title?
A DVD may contain several different titles.
For example, if a disc contains four different
movies, each might be considered a title.
NOTE
26 27
S126g/226/326K/426K(gb) 4/13/02 4:30 PM Page 26
Page 15
BASIC
FUNCTIONS
Repeat Play Program Play & Random Play
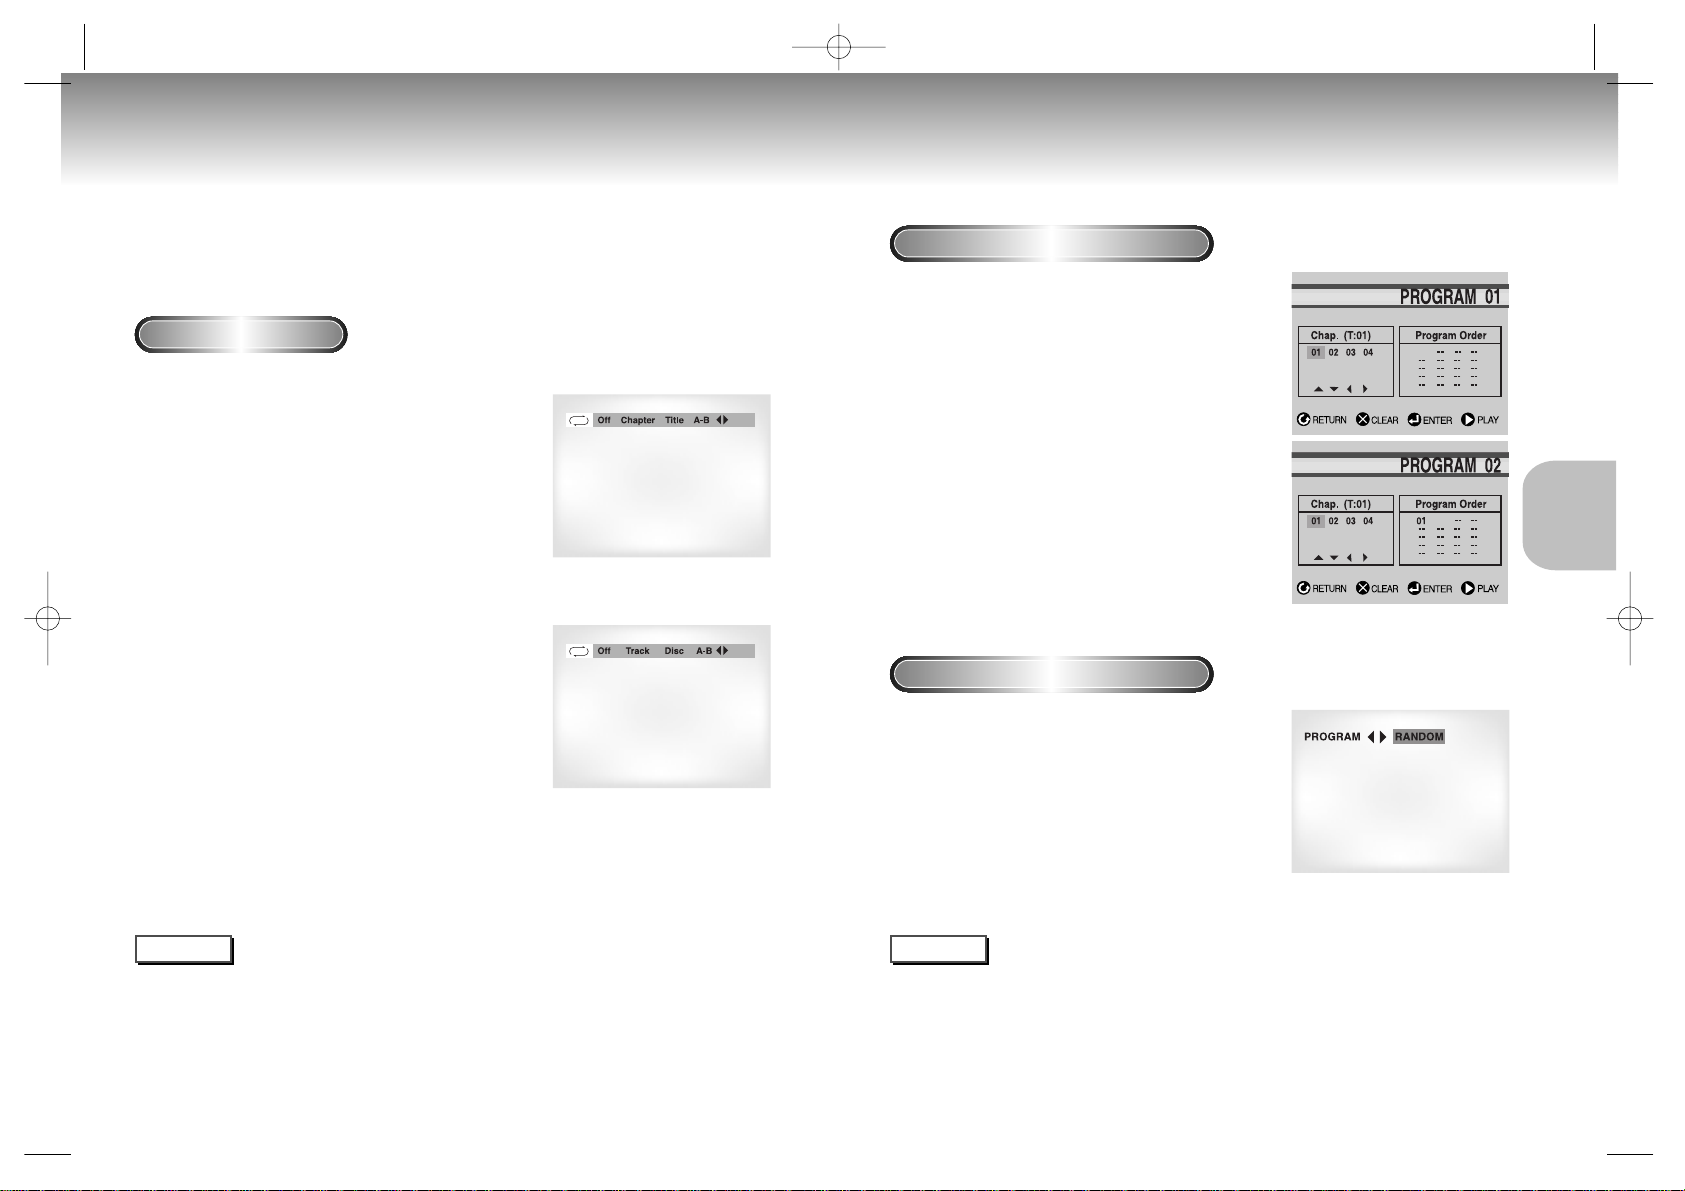
Repeat the current track, chapter, title, a chosen section (A-B), or all of the disc.
When playing a DVD
1
1
Press the REPEAT button on the remote. Repeat
screen appears.
2
2
Select Chapter, Title or A-B using the
LEFT/RIGHT buttons.
- Repeat A-B
• Press the REPEAT button. Select A-B on screen with the
LEFT/RIGHT buttons or press the A-B button on the remote.
• Press ENTER at the point where you want the repeat play to
start (A). The B is automatically highlighted.
• Press ENTER at the point where you want the repeat play to
stop (B).
3
3
Press ENTER.
4
4
To return to normal play, press REPEAT again,
then press the LEFT/RIGHT buttons to select Off
and press ENTER.
NOTE
• DVD repeats play by chapter or title, CD and VCD repeat play by disc or track.
See page 36 to MP3 disc repeat play.
• Depending on the disc, the Repeat function may not work.
• If the title or track is completed before marking the end (B), the end of title or track becomes B automatically.
• When in VCD 2.0 mode (MENU ON mode), this function does not work.
NOTE
• Depending on the disc, the Program and Random Play function may not work.
• When in VCD 2.0 mode (MENU ON mode), these functions do not work.
• To resume normal play, press the CLEAR button.
Program Play (DVD/VCD/CD/MP3)
Random Play (DVD/VCD/CD/MP3)
1
1
Press the MODE button.
2
2
Use the LEFT/RIGHT buttons to select PROGRAM.
Press the ENTER button.
3
3
Use the LEFT/RIGHT buttons to select the first
chapter (or track) to add to the program. Press
the ENTER button. The selection numbers appear
in the Program Order box.
4
4
Press the PLAY/PAUSE button. The disc will be
played in programmed order.
1
1
Press the MODE button.
2
2
Use the LEFT/RIGHT buttons to select RANDOM.
Press the ENTER button.
The disc will be played in random order.
DVD
VCD/CD
28 29
S126g/226/326K/426K(gb) 4/13/02 4:30 PM Page 28
Page 16
ADVANCED
FUNCTIONS
S.FIT Play
Digest Play
Screen Fit Play
1
1
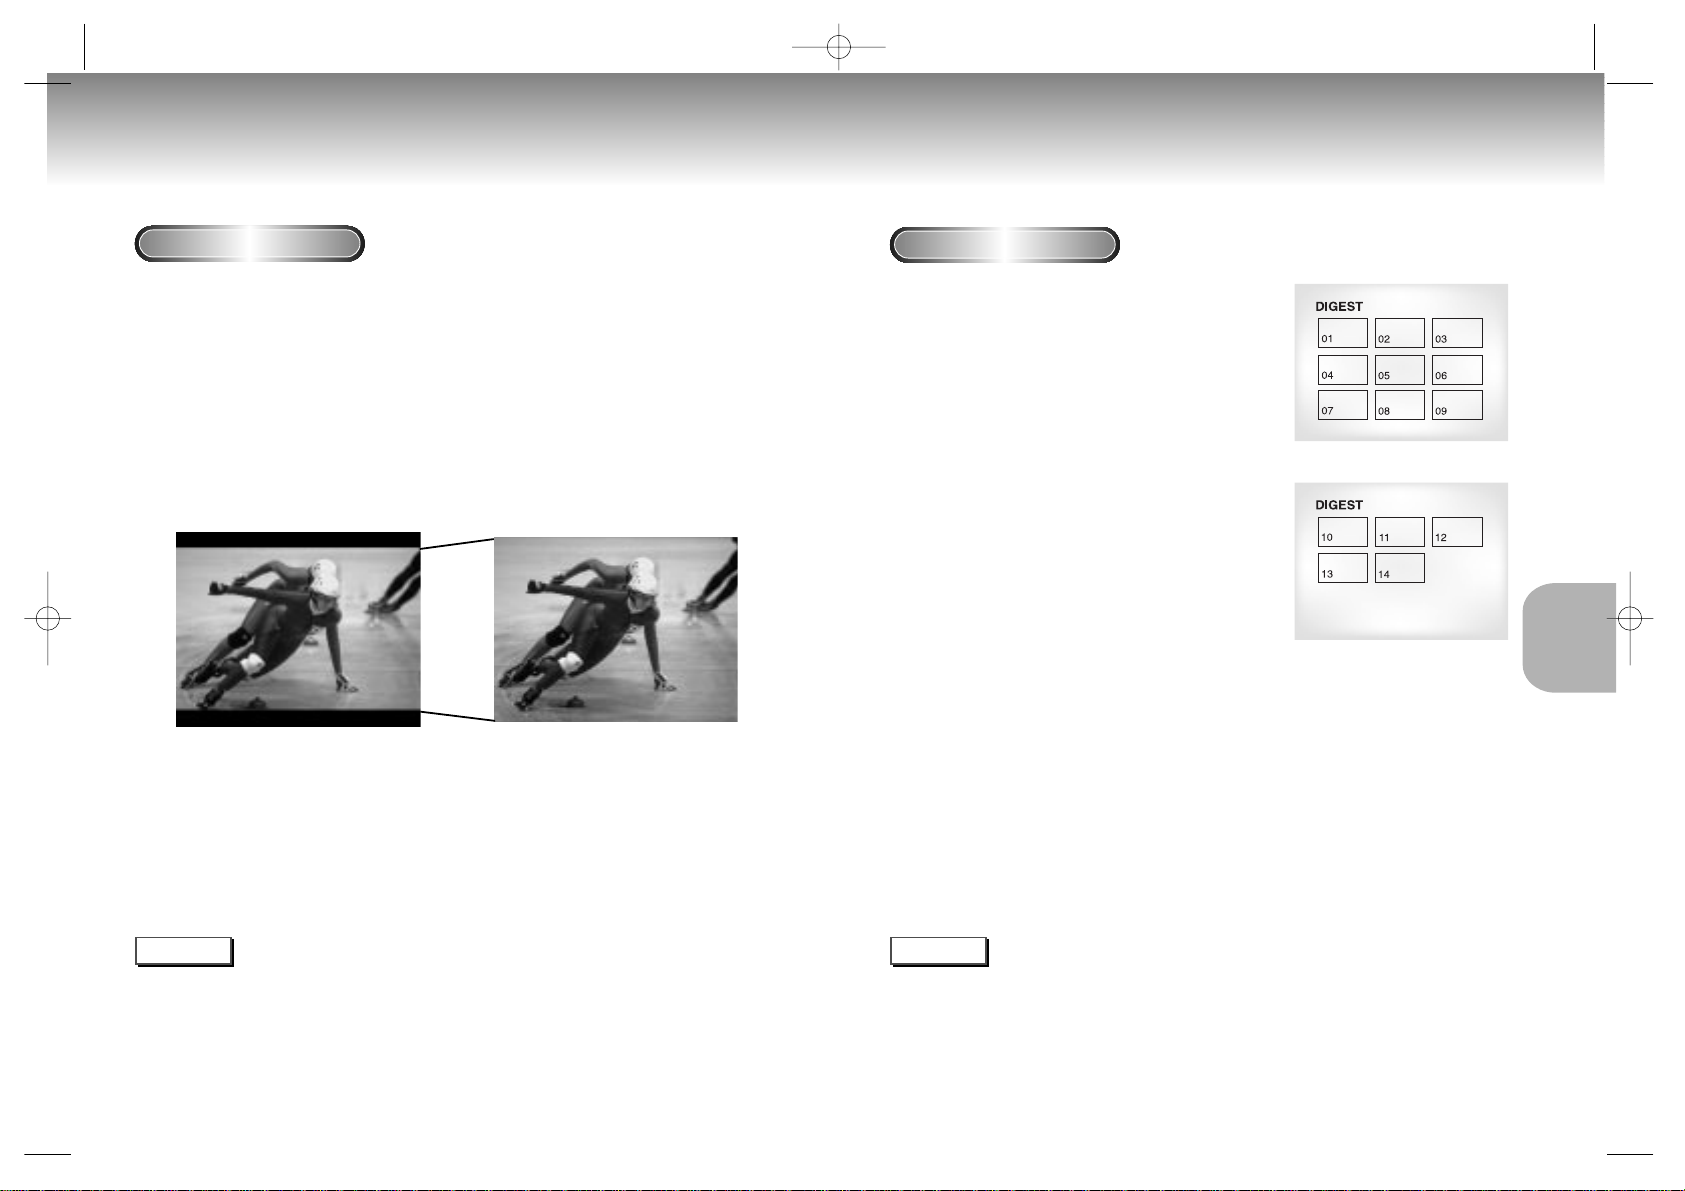
During play, press the DIGEST button.
- You'll see the 9 individual windows representing each of
the chapters on the TV screen.
- When each window is displayed, the first 3 seconds of the
chapter will be played.
2
2
Press UP/DOWN/LEFT/RIGHT buttons or
NUMBER buttons to select the window you'd like
to see, and press the ENTER button.
- Up to 9 windows(chapters) can be displayed on the screen
at a time.
- Press the 'Skip' button for the next 9 chapters if the
movie has more than 9.
1
1
During play, press S.FIT button on remote control.
- Allows you to eliminate the black bars in the top and bottom of the
screen when a movie is playing in the Widescreen format(16:9).
- Screen Fit will not work when the Zoom mode is active.
(you can not remove the black bars on the screen)
However, Zoom mode will work when Screen Fit is active.
NOTE
• Various aspect ratios are available only in multiple screen format discs.
• This function does not work when a DVD has been recorded with a multi-camera angle format.
• On some DVDs, the black bars cannot be eliminated due to their aspect ratio.
Digest Play
NOTE
• You can play the DVD player starting with the desired chapter after directly moving to the scene you want.
• 'DIGEST' may not operate depending on the disc in use.
30 31
SKIP button
S126g/226/326K/426K(gb) 4/13/02 4:30 PM Page 30
Page 17
ADVANCED
FUNCTIONS
When playing a DVD
1
1
Press the PLAY/PAUSE button.
2
2
Press and hold the SKIP button to choose the play speed between 1/8X, 1/4X, and
1/2X of normal. (DVD-S426KG only)
Press the F/SEARCH button to choose the play speed between 1/8X, 1/4X, and
1/2X of normal. (DVD-S126G/DVD-S226KG/DVD-S326KG only)
3
3
Press the "REPEAT A-B" of the remote control once at the first section to repeat
while the multiple-speed is selected (A-point selection).
4
4
Press the "REPEAT A-B" button again (B-point selection).
33
NOTE
This feature allows you slowly repeat scenes containing sports, dancing,
musical instruments being played etc. so you can study them more closely.
• The disc will play from A to B repeatedly at the speed you chose.
• To terminate the function, press the 'CLEAR' button or the 'REPEAT (A-B)' button again.
Then press play to resume normal playback.
• A-B REPEAT does not allow you to set point (B) until at least 5 seconds has elapsed after point (A) has been set.
Using the Disc View Function
Track View (VCD)
Index View (VCD)
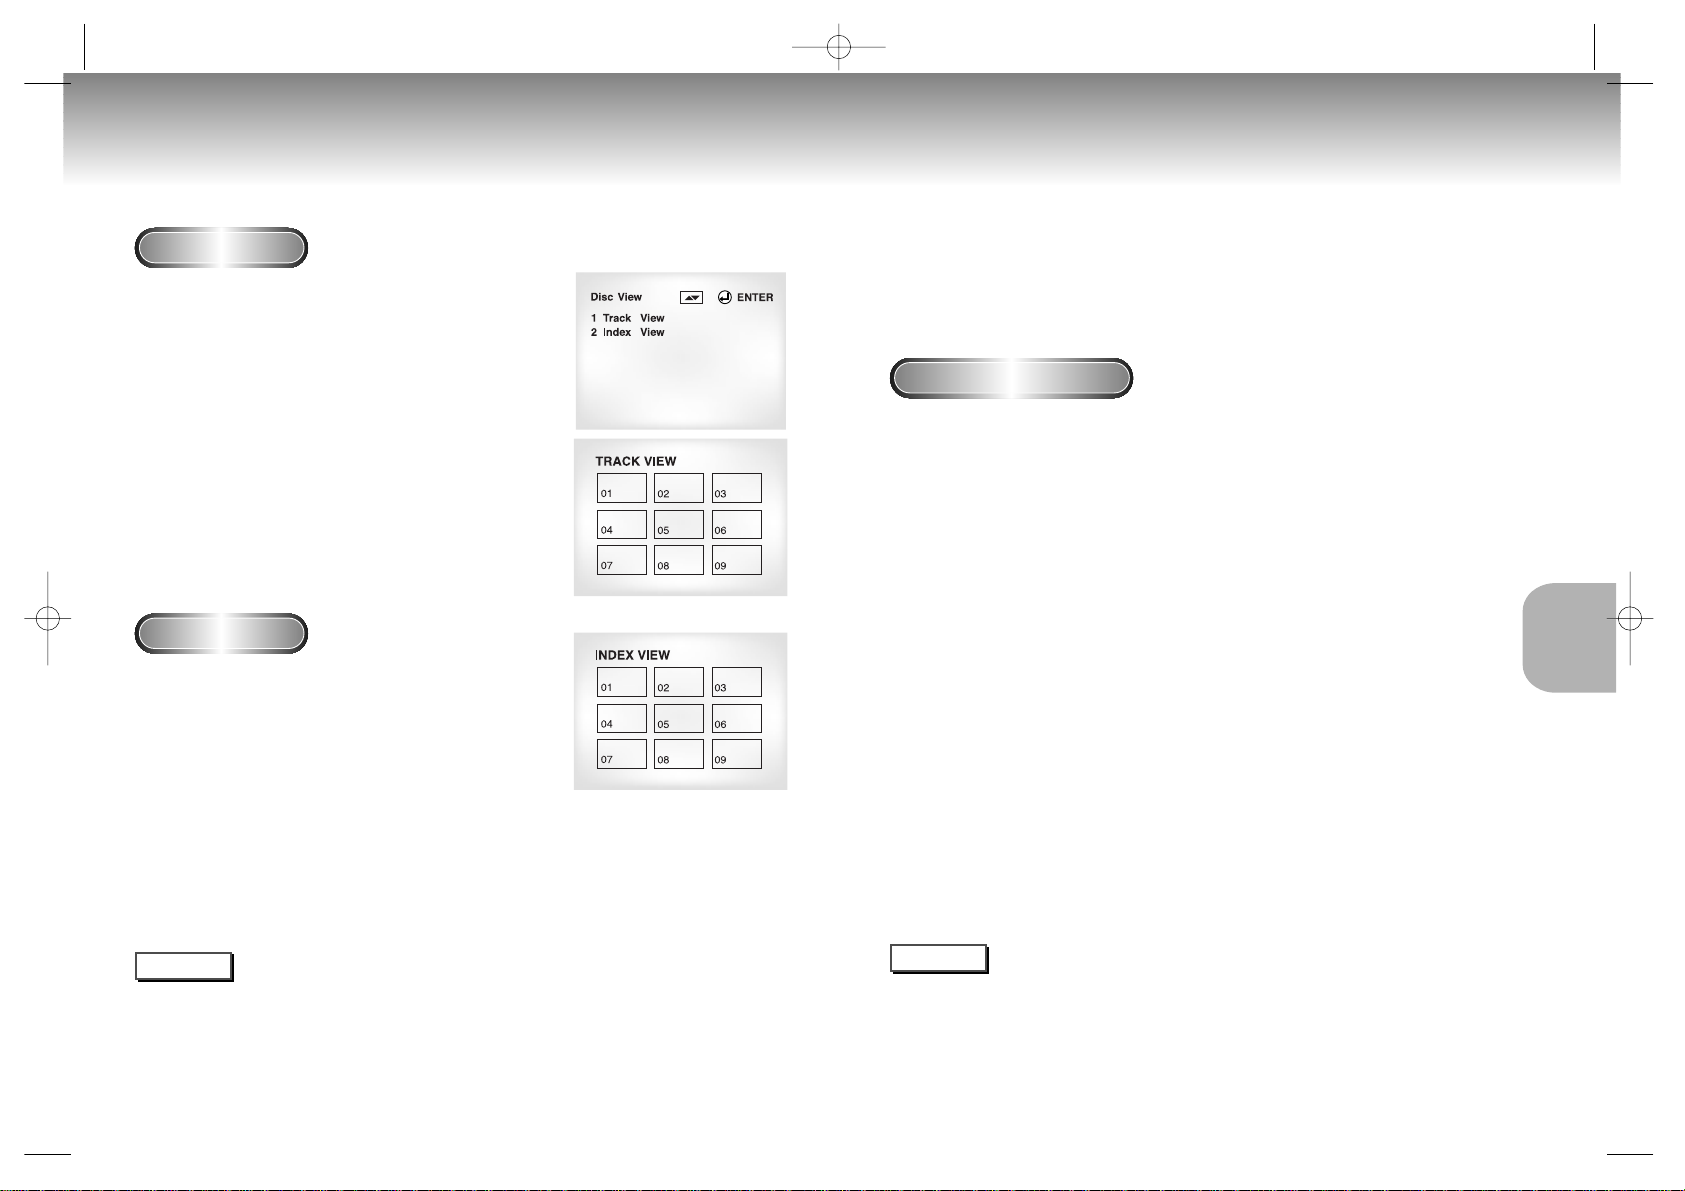
Displays the beginning view of each track and the
track number.
1
1
During play, press the TOP MENU button.
2
2
Press the UP/DOWN buttons to select TRACK
VIEW. Press the ENTER button.
3
3
Select the desired view by pressing the
UP/DOWN or LEFT/RIGHT buttons.
- Press the SKIP button for the next 9 tracks if the
movie has more than 9.
4
4
Press the ENTER button.
Displays the equally divided 9 views of the current
playing track.
1
1
During play, press the TOP MENU button.
2
2
Press UP/DOWN buttons to select INDEX
VIEW. Press the ENTER button.
3
3
Select the desired view by pressing
UP/DOWN or LEFT/RIGHT buttons.
4
4
Press the ENTER button.
NOTE
32
• When pressing the TOP MENU button with a DVD; the disc’s TITLE MENU function comes up. A disc must
have at least two titles for the TITLE MENU function to work.
•
When pressing the TOP MENU button with a CD; the unit enters the INTRO mode. INTRO lets you listen
to the beginning of each track for about 10 seconds.
• You can also operate it using the DIGEST button.
Slow Repeat play
S126g/226/326K/426K(gb) 4/13/02 4:30 PM Page 30
Page 18
ADVANCED
FUNCTIONS
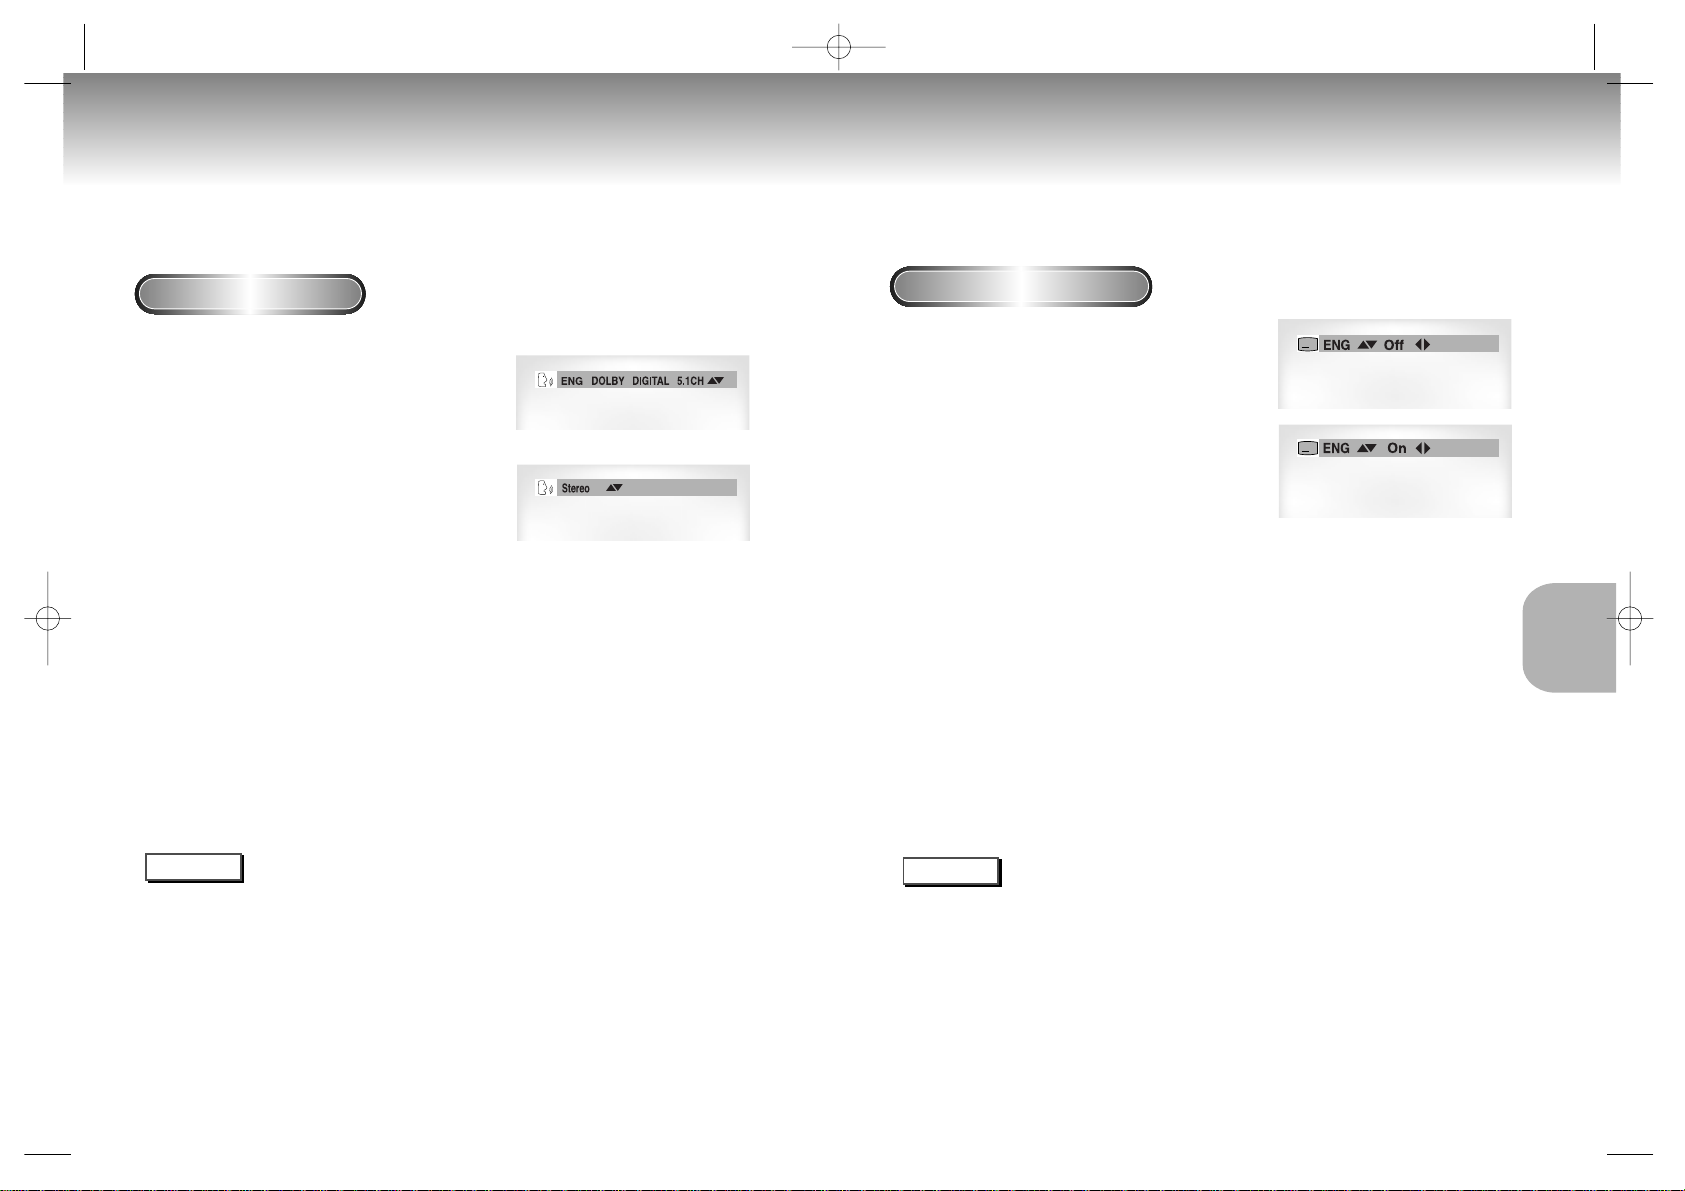
You can select a desired subtitle quickly and easily with the SUBTITLE button.
Using the SUBTITLE button
1
1
Press the SUBTITLE button.
2
2
Use the UP/DOWN buttons to select the
desired subtitle language.
3
3
Use the LEFT/RIGHT buttons to determine
whether or not the subtitle will be displayed.
- Initially, the subtitling will not appear on screen.
- The subtitle languages are represented by abbreviations.
NOTE
• This function depends on what languages are encoded on the disc and may not work with all DVDs.
• A DVD disc can contain up to 32 subtitle languages.
•
How to have the same subtitle language come up whenever you play a DVD;
Refer to “Setting Up the Language Features” on page 46.
A
A
Selecting the Audio Language
You can select a desired language quickly and easily with the AUDIO button.
Using the AUDIO button
1
1
Press the AUDIO button.
2
2
Use the UP/DOWN buttons to select the
desired language on a DVD.
- The audio languages are represented by
abbreviations.
3
3
Use the UP/DOWN buttons to select
Stereo, Right or Left. (On VCD/CD)
NOTE
• This function depends on what languages are encoded on the disc and may not work with all DVDs.
• A DVD disc can contain up to 8 audio languages.
•
How to have the same audio language come up whenever you play a DVD;
Refer to “Setting Up the Language Features” on page 46.
34 35
DVD
VCD/CD
Selecting the Subtitle Language
S126g/226/326K/426K(gb) 4/13/02 4:30 PM Page 32
Page 19
ADVANCED
FUNCTIONS
Using the Instant Replay function (DVD)
If you miss a scene, you can see it again using this
function.
1
1
If you press the I.REPLAY button, the current
scene moves backward about 10 seconds,
and plays back.
* Depending on the disc, the Instant Replay function
may not work.
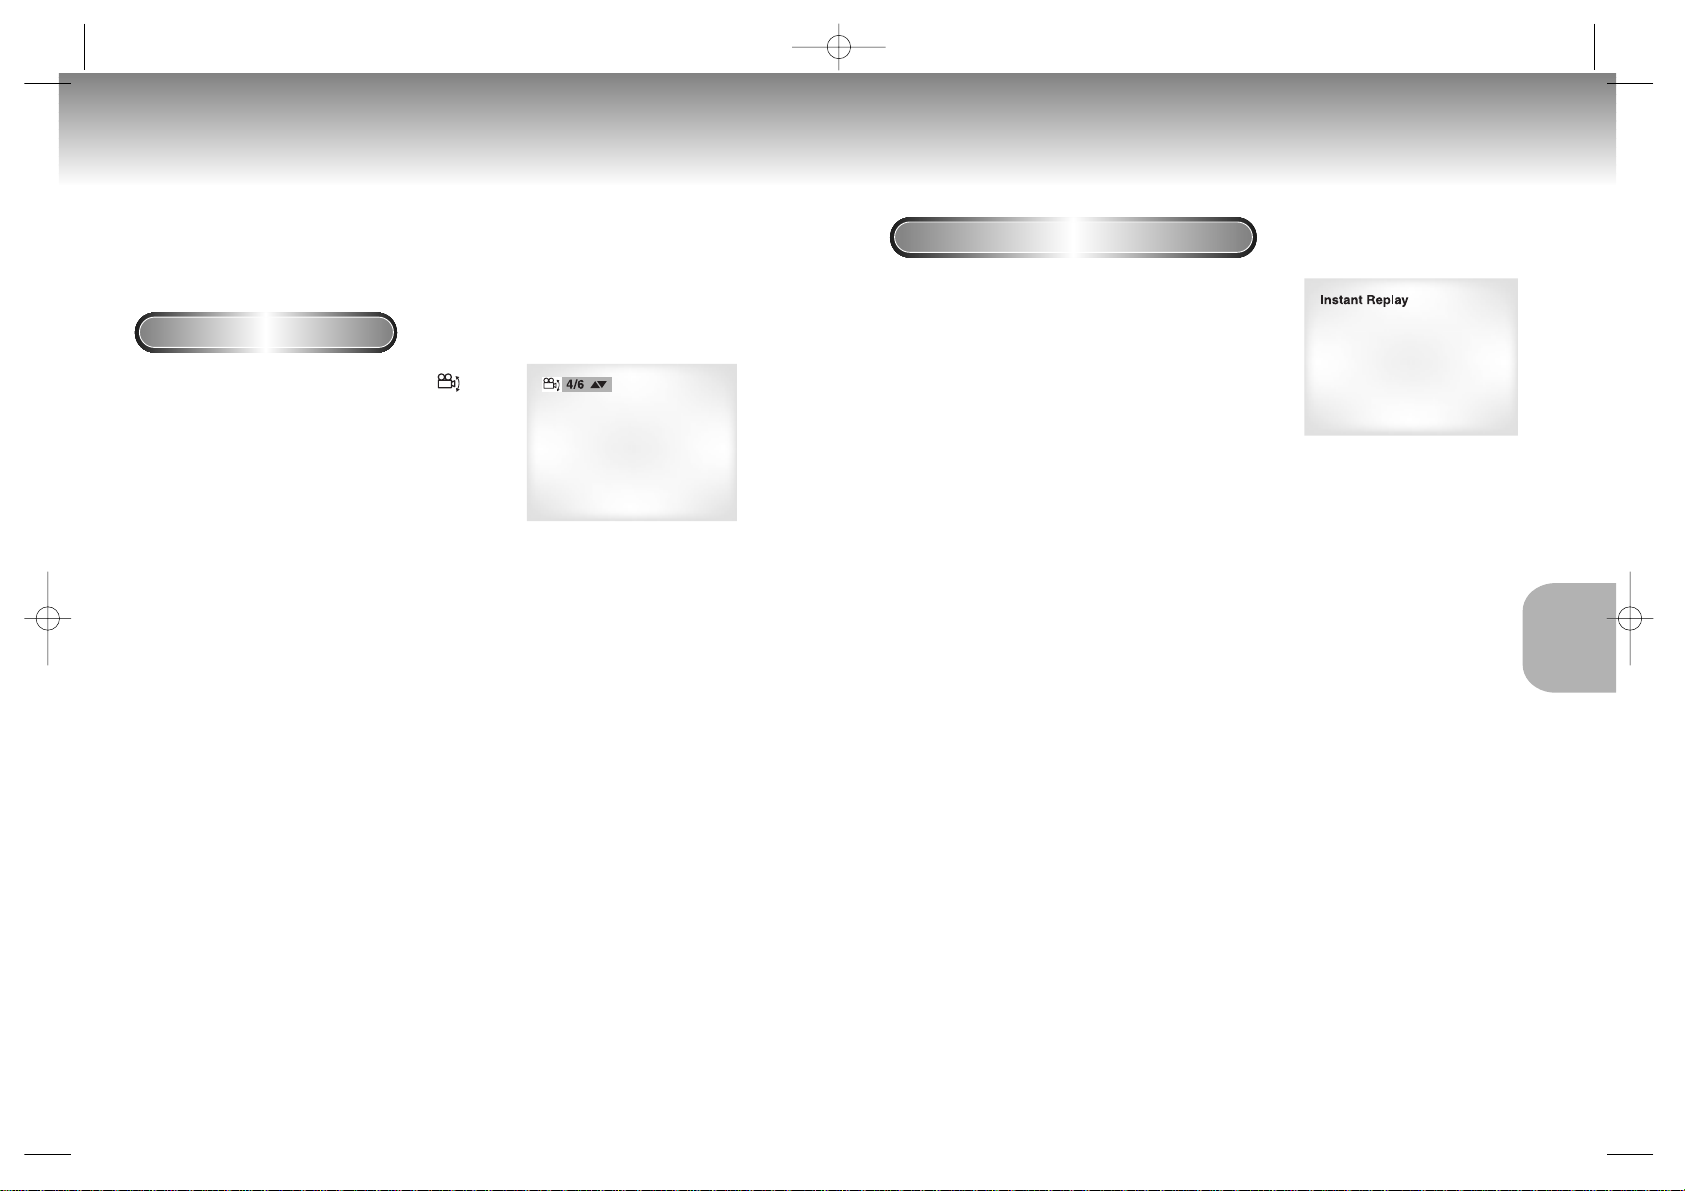
Changing the Camera Angle
When a DVD contains multiple angles of a particular scene, you can select the Angle function.
Using the ANGLE button
Press the ANGLE button to see if an ANGLE ( )
mark is present at the upper right hand corner of
the screen.
1
1
When an ANGLE mark is shown, press the
ANGLE button, then an ANGLE select icon
will appear at the upper left hand corner of
the screen.
2
2
Use the UP/DOWN buttons to select the
desired screen angle.
3
3
To turn off the display, press the ANGLE
button again.
36 37
Using the Instant Replay Function
S126g/226/326K/426K(gb) 4/13/02 4:30 PM Page 34
Page 20
ADVANCED
FUNCTIONS
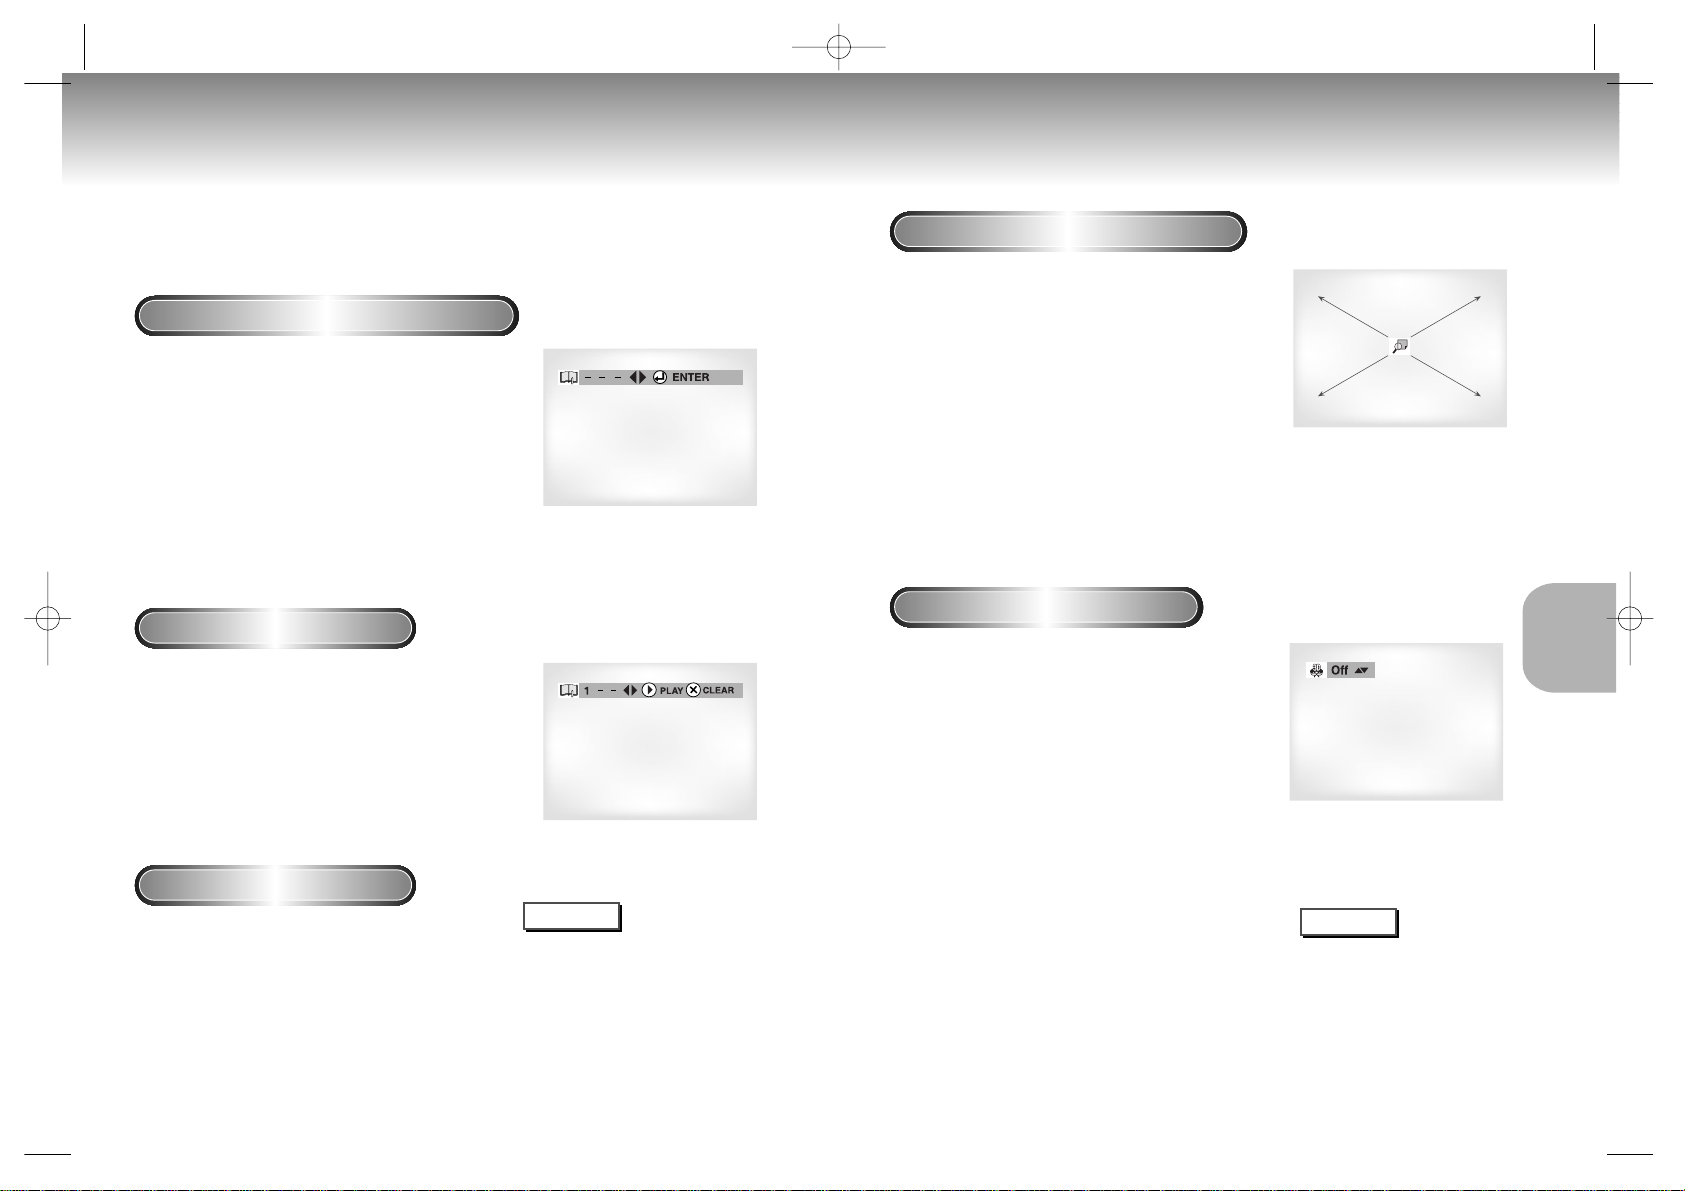
Using the Zoom Function (DVD/VCD)
1
1
During play or pause mode, press the ZOOM
button on the remote. A square will be
displayed on screen.
2
2
Use the UP/DOWN or LEFT/RIGHT
button to select the part of the screen you
want to zoom in on.
3
3
Press the ENTER button.
- During DVD play, press ENTER to zoom in
2X/4X/2X/Normal in order.
- During VCD play, press ENTER to zoom in
2X/normal in order.
Using the 3D Sound Function
The simulated surround effect depends on the disc
contents. If you connect the unit to your stereo
system, you can enhance sound quality and
produce a greater surround effect. This feature is
useful when you are using the DVD player with a
two channel stereo through the analog outputs.
(Discs which are recorded with LPCM or DTS will
not work. When the DIGITAL OUTPUT or MPEG-2
is set to BITSTREAM in the SETUP MENU, the 3D
Sound function will not work.)
1
1
During play, press the 3D button. The 3D
SOUND mark will be displayed on screen.
(Be sure the DIGITAL OUTPUT is set to PCM.)
2
2
Press the UP/DOWN buttons to turn the 3D
Sound feature on or off.
NOTE
• 3D Sound is possible only on discs
recorded using DOLBY SURROUND or
DOLBY DIGITAL. However, some of
these discs do not contain rear channel
sound signals.
• Depending on the disc, the Zoom and
3D Sound function may not work.
Using the Bookmark Function
The Bookmark function lets you select parts of a DVD or VCD (MENU OFF mode) so that you
can quickly find the section at a later time.
Using the Bookmark Function (DVD/VCD)
1
1
During play, press the BOOKMARK button on
the remote. The Bookmark icons will be
displayed.
2
2
Use the LEFT/RIGHT buttons to move to the
desired bookmark icon.
3
3
When you reach the scene you want to mark,
press the ENTER button. The icon will change to
a number (1, 2, or 3).
4
4
Press the BOOKMARK button to turn off the
display.
Recalling a Marked Scene
1
1
During play, press the BOOKMARK button on
the remote.
2
2
Use the LEFT/RIGHT buttons to select a
marked scene.
3
3
Press the PLAY/PAUSE button to skip to the
marked scene.
Clearing a Bookmark
1
1
During play, press the BOOKMARK button
on the remote.
2
2
Use the LEFT/RIGHT buttons to select the
bookmark number you want to delete.
3
3
Press the CLEAR button to delete a bookmark
number. Press the BOOKMARK button to turn
off display.
NOTE
• Up to three scenes may be
marked at a time.
• When in VCD 2.0 mode (MENU
ON mode), this function does not
work.
• Depending on the disc, the
Bookmark function may not work.
38 39
Using the Zoom & 3D Sound Functions
S126g/226/326K/426K(gb) 4/13/02 4:30 PM Page 36
Page 21
ADVANCED
FUNCTIONS
CD-R MP3 disc requirements
When playing CD-R MP3 discs, please follow the recommendations below:
• Your MP3 files should be ISO 9660 or JOLIET format.
ISO 9660 format and Joliet MP3 files are compatible with Microsoft's DOS and Windows, and with Apple's
Mac. These two formats are the most widely used.
• When naming your MP3 files do not exceed 8 characters, and place ".mp3" as the file extension.
General name format of: Title.mp3. When composing your title, make sure that you use 8 characters or
less, have no spaces in the name, and avoid the use of special characters including: (.,/,\,=,+).
• Use a decompression transfer rate of at least 128 Kbps when recording MP3 files.
Sound quality with MP3 files basically depends on the rate of compression/decompression you choose.
Getting audio CD quality sound requires an analog/digital sampling rate (conversion to MP3 format) of at
least 128 Kbps and up to 160 Kbps. However, choosing higher rates, like 192 Kbps or more, only rarely
give better sound quality.
Conversely, files with sampling rates below 128 Kbps will not be played properly.
• Do not try recording copyright protected MP3 files.
Certain "securized" files are encrypted and code protected to prevent illegal copying. These files are of the
following types: Windows Media
TM
(registered trade mark of Microsoft Inc) and SDMITM(registered trade
mark of The SDMI Foundation). You cannot copy such files.
• Your DVD player only accepts one level of file directory.
Consequently you must choose:
-either to save all your MP3 recording files at the root of the disc;
-and/or create folders in the directory for each artist or music type (e.g.classical, rock, jazz, etc)
• Important: The above recommendations cannot be taken as a guarantee that the DVD player will play MP3
recordings, or as an assurance of sound quality.
You should note that certain technologies and methods for MP3 file recording on CD-Rs prevent optimal
playback of these files on your DVD player (degraded sound quality and in some cases, inability of the
player to read the files).
MP3 Play MP3 Play
40 41
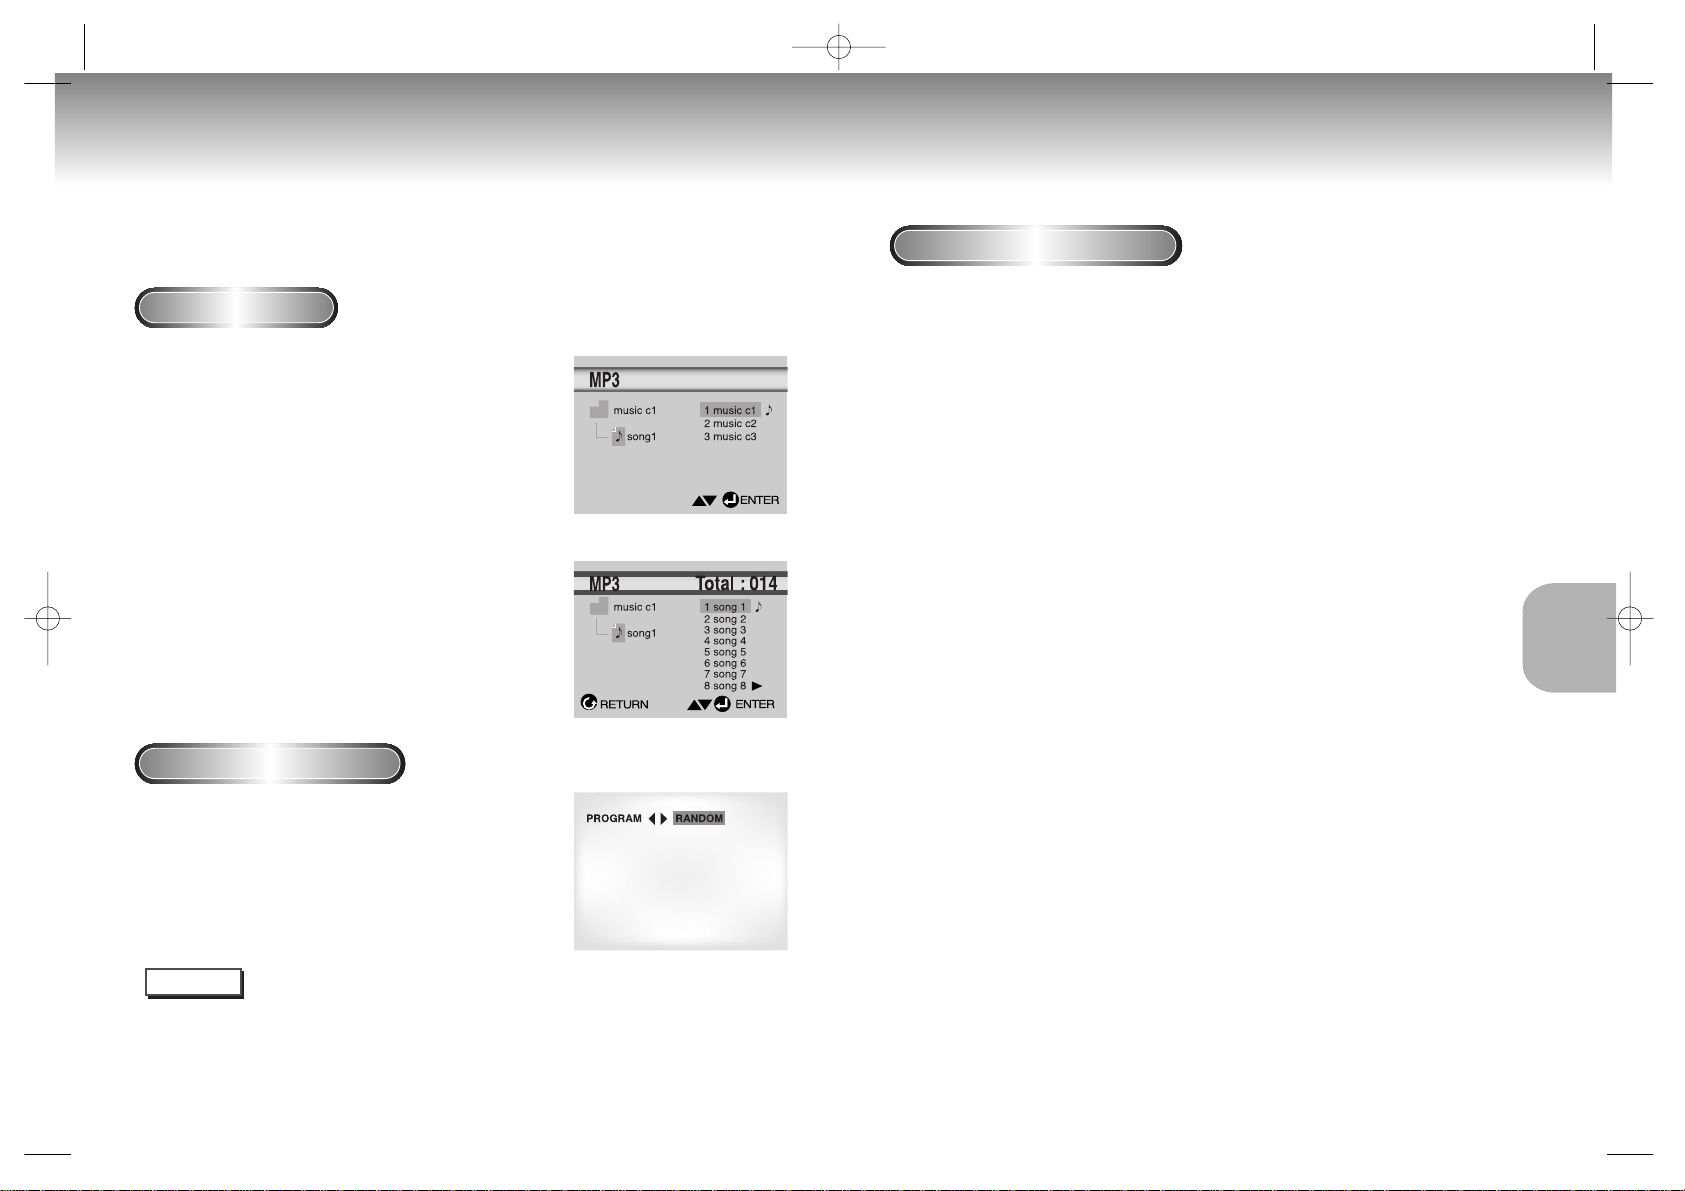
When an MP3 Disc is inserted into the DVD PLAYER, the first song file of the first folder plays.
1
1
Press STOP to stop playback of the first song file, then
press RETURN to display the music folder menu on the
right side of the screen. Up to 8 music folders can be
displayed at a time. If you have more than 8 folders
on a disc, press the LEFT/RIGHT buttons to bring them
up on the screen.
2
2
Use the UP/DOWN buttons to select the desired music
folder, the press ENTER. Use the UP/DOWN buttons
again to select a song file. Press ENTER to begin
playback of the song file.
NOTE
•
A musical note is displayed next to the file currently playing.
•
Press the REPEAT button to hear a song file repeatedly (check mark will appear next to file).
Press Repeat again to release the Repeat mode.
MP3 Play Function
Press the MODE button to switch between the RANDOM
and PROGRAM modes. See page 29 for more information
on these modes.
Program/Random playback
S126g/226/326K/426K(gb) 4/13/02 4:30 PM Page 38
Page 22
KARAOKE
FUNCTIONS
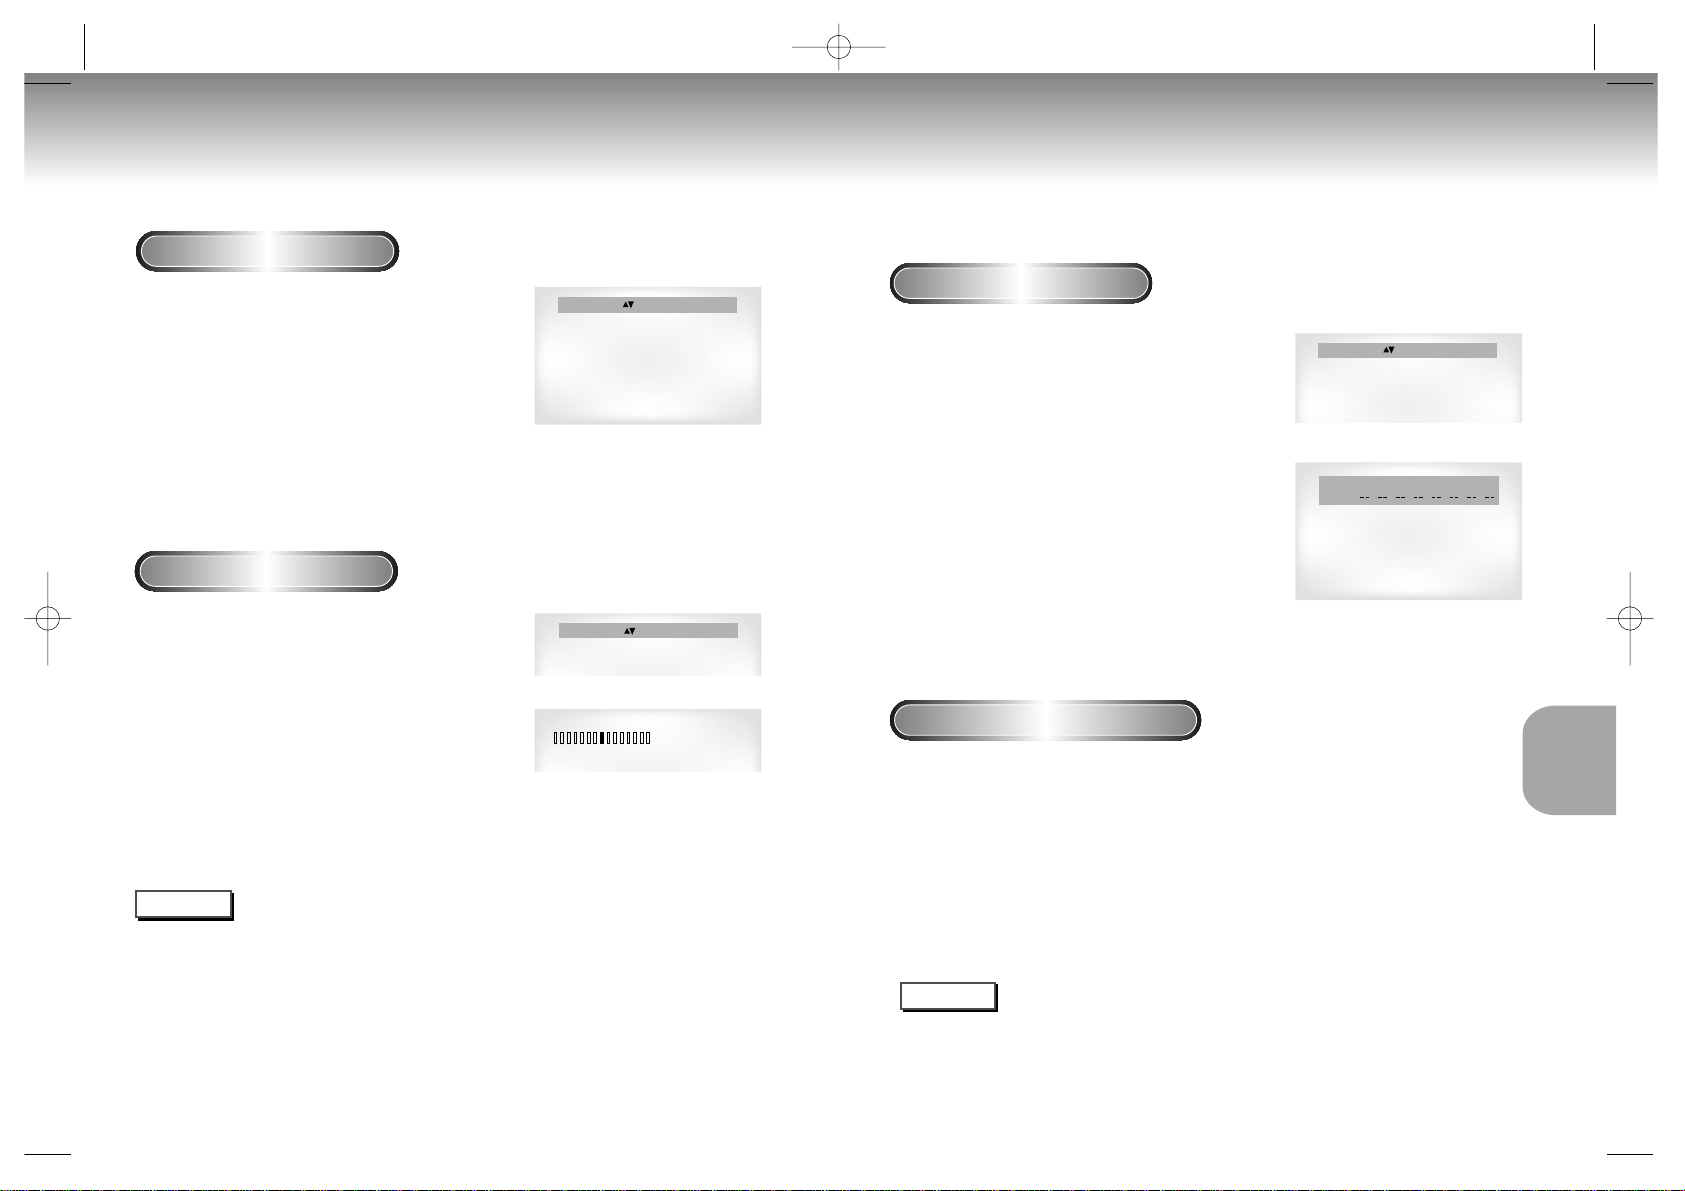
Operation Sequence
1
1
Connect the Mixed Audio Out terminals
with the TV or AMP.
2
2
Press the power button.
3
3
Connect Mic into Mic 1 or Mic 2 jack. Then
the karaoke mode is transferred to ON
mode.
- To disconnect the Mic makes the karaoke mode
transfer to OFF mode automatically.
Key Control
1
1
Pressing the KARAOKE button makes the
karaoke ON mode.
2
2
Select the "KEYCON" using the LEFT/RIGHT
buttons.
3
3
By use of the LEFT/RIGHT buttons, change
to the desired tone.
: To let 7 scales down by half scale.
: Original scale.
: To let 7 scales up by half scale.
NOTE
• Key control function is not applied to the Mic output.
• If you hear strange noises(squealing or howling) while using the karaoke feature,
move the microphone away from the speakers. Turning down the microphone volume
or the speaker volume is also effective.
• MIC does not operate when KARAOKE is in OFF mode.
• The next music plays if performing SEARCH with SCORE displayed in the SCORE ON
MODE for CD or VCD.
• When playing MP3 disc, MIC & Karaoke functions are not operate.
Beginning Karaoke Functions
KARAOKE : on KEYCON REQUEST
b
n
#
KARAOKE : on KEYCON REQUEST
b n #
Reserving a Song
It is the function to reserve the desired song in advance by use of Karaoke function
Sequence of reservation
1
1
Playback the Karaoke Disc containing the
wanted songs.
2
2
After pushing the KARAOKE button of the
remote transfer to the Karaoke ON mode
using the UP/DOWN buttons.
3
3
Select the "REQUEST" using the
LEFT/RIGHT buttons.
4
4
Input the number (Track No.) of the
desired song into the flickering part(--).
- You can reserve up to 10 songs.
5
5
When you want the next reserved song
during playing a song, press the SKIP
button.
Cancellation of reservation
1
1
Cancel by pressing the CLEAR button of
the remote.
- The last reserved song will be erased first.
2
2
Continuous pressing of the CLEAR button
can cancel the next reserved song.
3
3
If the reservation is required again, input
the song number in the flickering part.
NOTE
• Request function is available only when the Karaoke mode is "ON".
• When using "SKIP" button, it can not work at the last song.
• When using Request function, the "DISPLAY" and “REPEAT” function does not work.
KARAOKE : on KEYCON REQUEST
REQUEST
03 02
42 43
(DVD-S226KG/DVD-S326KG/DVD-S426KG only) (DVD-S226KG/DVD-S326KG/DVD-S426KG only)
S126g/226/326K/426K(gb) 4/13/02 4:30 PM Page 40
Page 23
CHANGING
SETUP MENU
45
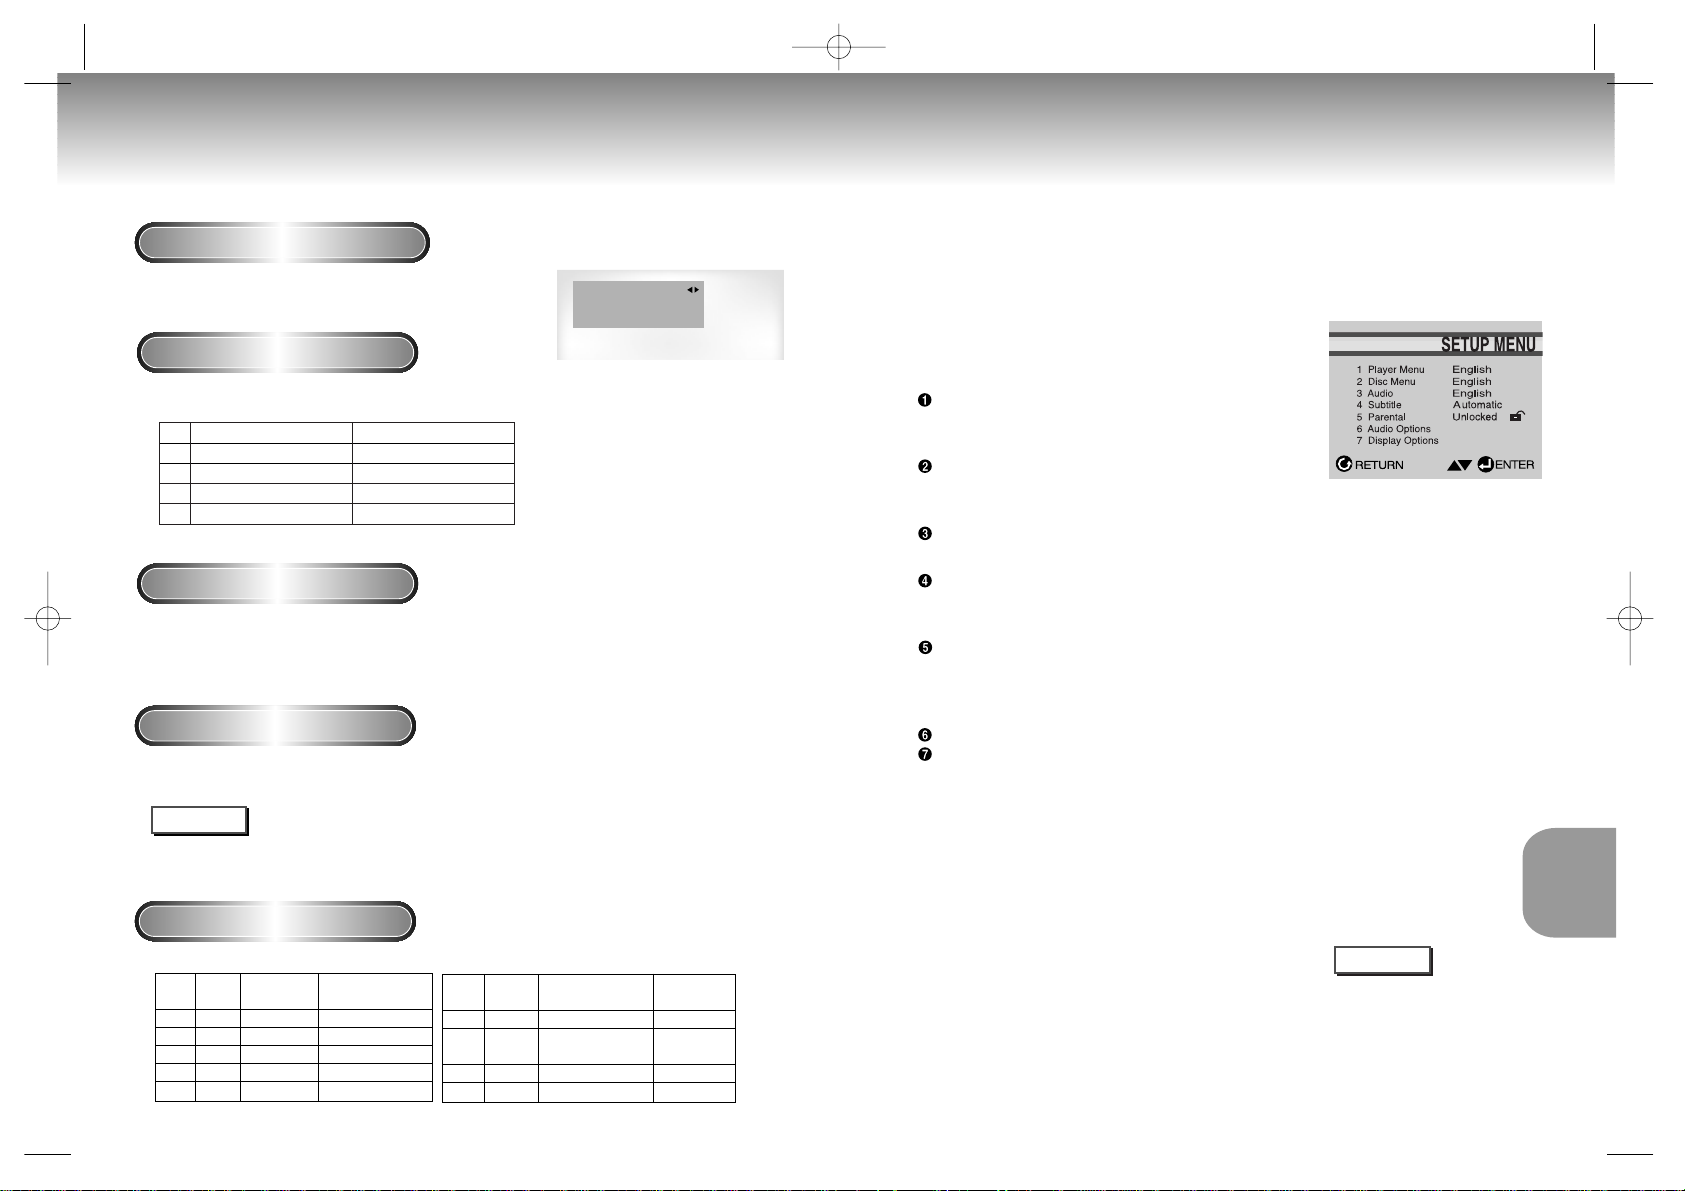
Using the Setup Menu
The Setup menu lets you customize your DVD player by allowing you to select various
language preferences, set up a parental level, even adjust the player to the type of television
screen you have.
1
1
With the unit in Stop mode, press the SETUP button
on the remote.
Player Menu : Setup of the Display Language
Use the Player preference menu to select the
language for the player’s on-screen displays.
Disc Menu : Setup of the Menu Language
Use the Menu preference menu to select the language you want a
DVD’s disc menu to be displayed in.
Audio : Setup of the Audio Language
Use the Audio preference menu to select the soundtrack language.
Subtitle : Setup of the Subtitle Language
Use the Subtitle preference menu to select the language the disc’s
subtitles are to be displayed in.
Parental : Setup of the Parental Level
Allows users to set the level necessary to prevent children from
viewing unsuitable movies such as those with violence, adult subject
matter, etc.
Audio Options : Setup of the Audio Options
Display Options : Setup of the Display Options
Use to select which type of screen you want to watch and several
display options.
2
2
Use the UP/DOWN buttons on the remote to access
the different features.
3
3
Press the ENTER button to access the sub features.
To make the setup screen disappear after setting up, press the
SETUP button again.
NOTE
Depending on the disc, some
Setup Menu selections may not
work.
Vocal Function
Sequence of reservation
1
1
Pressing the KARAOKE button twice displays the
following in Karaoke ON mode:
VOCAL FADER : off
GUIDE MELODY : off
SCORE MODE : off
– The function to make the music only sound by cancelling vocal
when playing a Karaoke disc.
– In VCD, CVD or CD, you can select only the ON or OFF.
Vocal Fader
VOCAL FADER Remark
↓ V1 CH1.Vocal Cancel
↓ V2 CH2.Vocal Cancel
↓ 1 + 2 CH1, CH2.Vocal Cancel
↓ OFF Vocal Fader Off
– To guide melody through xylophone and piano help you sing
easily.
– This function works only on the DVD Karaoke disc on which the
guide melody is recorded.
Guide Melody
Press KARAOKE button twice to turn the Score Mode On.
-Score will pop up whenever a song is completed.
-Make sure to turn the KARAOKE MODE to OFF to play a movie disc or play in a general mode. If you play a
movie disc with the SCORE ON, a score will show up every time when a chapter is over.
CAUTIONS
Score Function
• DVD Karaoke Disc • CVD, VCD Karaoke Disc
Channel
Karaoke
5CH. DVD 2CH. DVD
-Channel
1 CH L Left stereo music Left stereo music + Vocal
2 CH R Right stereo music Right stereo music + Vocal
3 CH M Guide melody 4 CH V1 Vocal track 5 CH V2 Vocal track -
Types of Karaoke disc
Channel
Karaoke
CVD VCD, CD
-Channel
1 CH CH1 LEFT Left stereo music + Vocal Left stereo music
1 CH CH1 RIGHT Right stereo music + Vocal Right stereo music
+ Vocal
2 CH CH2 LEFT Left stereo music 2 CH CH2 RIGHT Right stereo music -
44
(DVD-S226KG/DVD-S326KG/DVD-S426KG only)
S126g/226/326K/426K(gb) 4/13/02 4:30 PM Page 42
Page 24
CHANGING
SETUP MENU
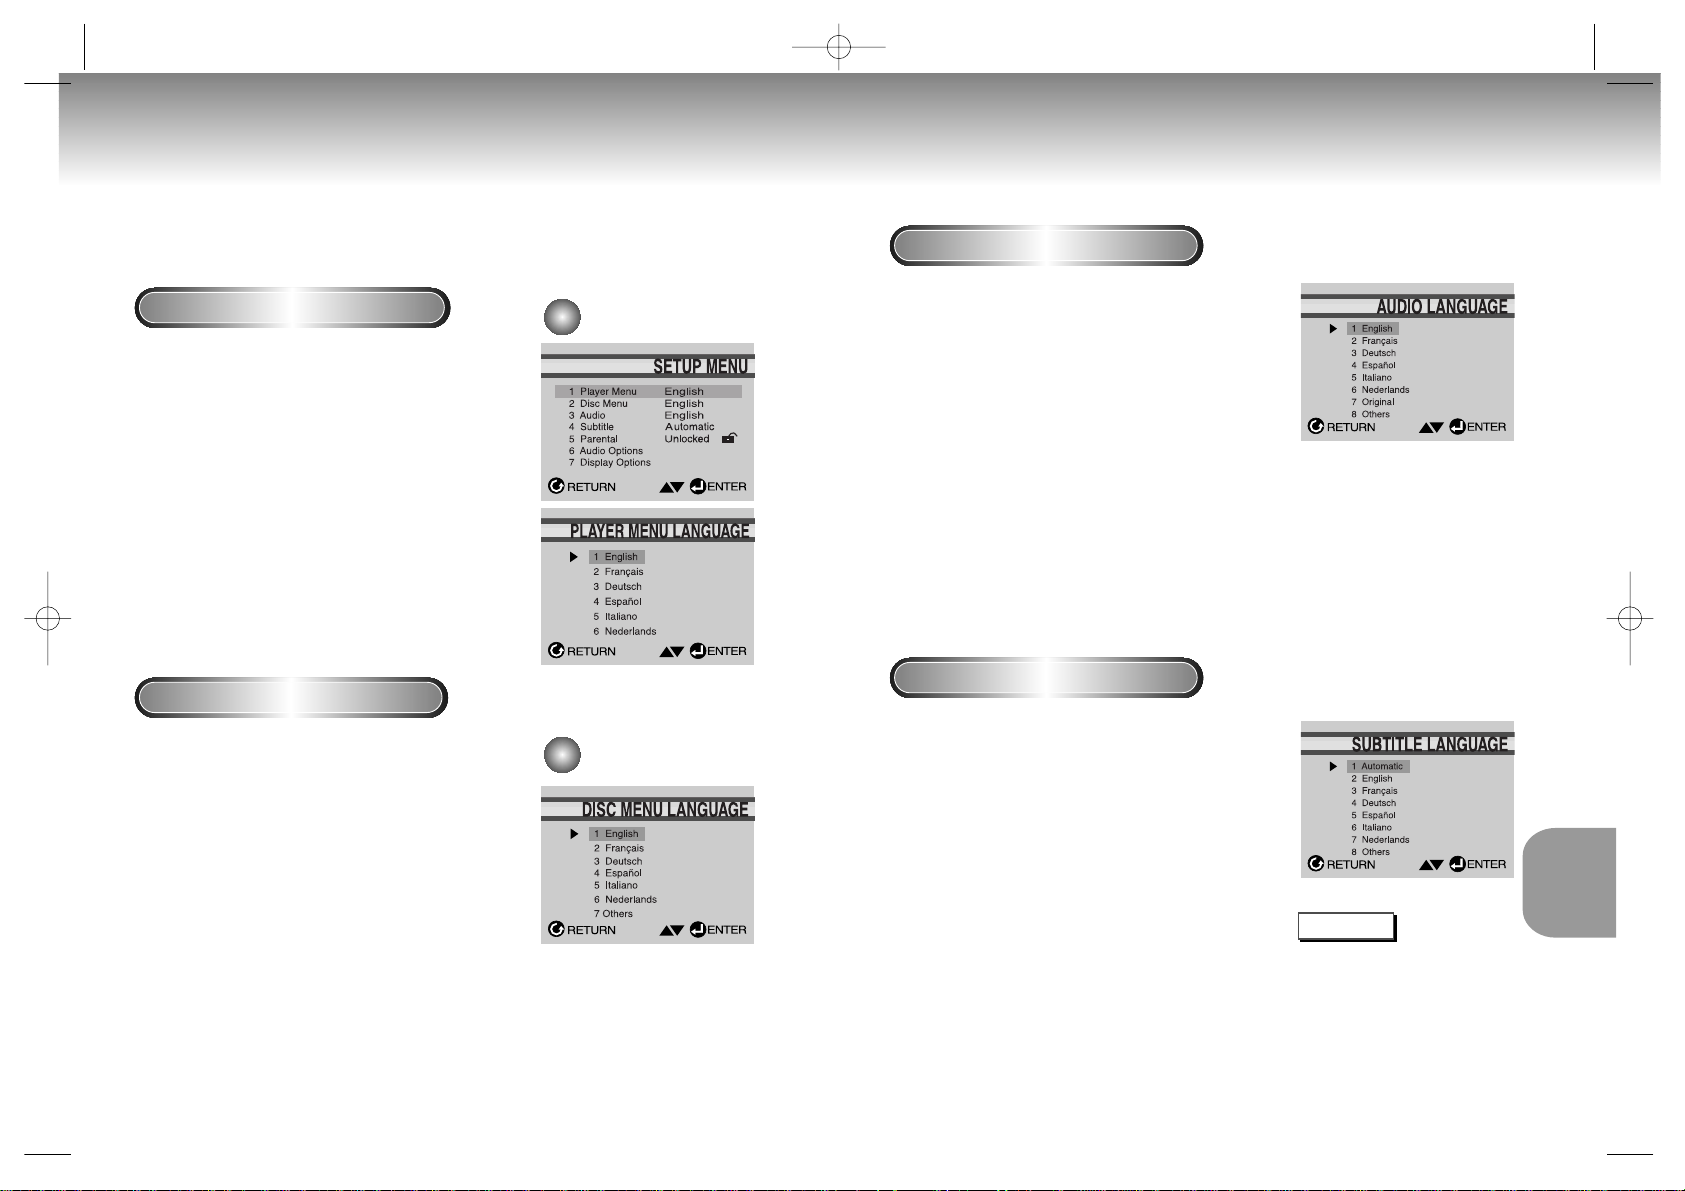
1
1
With the unit in Stop mode, press the SETUP
button.
2
2
Use the UP/DOWN buttons to select Subtitle.
3
3
Press the ENTER button.
4
4
Use the UP/DOWN buttons to select ‘English’.
- Select “Automatic” if you want the subtitle language to be
the same as the language selected as the audio preference.
- Select “Others” if the language you want is not listed. Some
discs may not contain the language you select as
your initial language; in that case the disc will use its
original language setting.
5
5
Press the ENTER button.
- English is selected and the screen returns to SETUP MENU.
4746
Setting Up the Language Features
Using the Audio Language
Using the Subtitle Language
1
1
With the unit in Stop mode, press the SETUP
button.
2
2
Press the UP/DOWN buttons to move to Audio.
3
3
Press the ENTER button.
4
4
Press the UP/DOWN buttons to select ‘English’ .
- Select “Original” if you want the default soundtrack language
to be the original language the disc is recorded in.
- Select “Others” if the language you want is not listed.
5
5
Press the ENTER button.
- English is selected and the screen returns to SETUP MENU.
NOTE
• If the selected language is not
recorded on the disc, the original
pre-recorded language is selected.
•
Howto make the SETUP MENU
disappear or
return to menu screen
during set up; Press RETURN button.
Setting Up the Language Features
Using the Player Menu Language
Using the Disc Menu Language
If you set the player menu, disc menu, audio and subtitle language in advance, they will come
up automatically every time you watch a movie.
1
1
With the unit in Stop mode, press the
SETUP button.
2
2
Use the UP/DOWN buttons to select the
Player Menu.
3
3
Press the ENTER button.
4
4
Use the UP/DOWN buttons to select
‘English’.
5
5
Press the ENTER button.
- English is selected and the screen returns to SETUP
MENU.
- To make the SETUP MENU disappear, press the
RETURN button.
This function changes the text language only
on the disc menu screens.
1
1
With the unit in Stop mode, press the
SETUP button.
2
2
Use the UP/DOWN buttons to select
Disc Menu.
3
3
Press the ENTER button.
4
4
Use the UP/DOWN buttons to select
‘English’.
- Select “Others” if the language you want is not
listed.
5
5
Press the ENTER button.
- English is selected and the screen returns to SETUP
MENU.
e.g
Setting up in English.
e.g
Setting up in English.
S126g/226/326K/426K(gb) 4/13/02 4:30 PM Page 44
Page 25
CHANGING
SETUP MENU
49
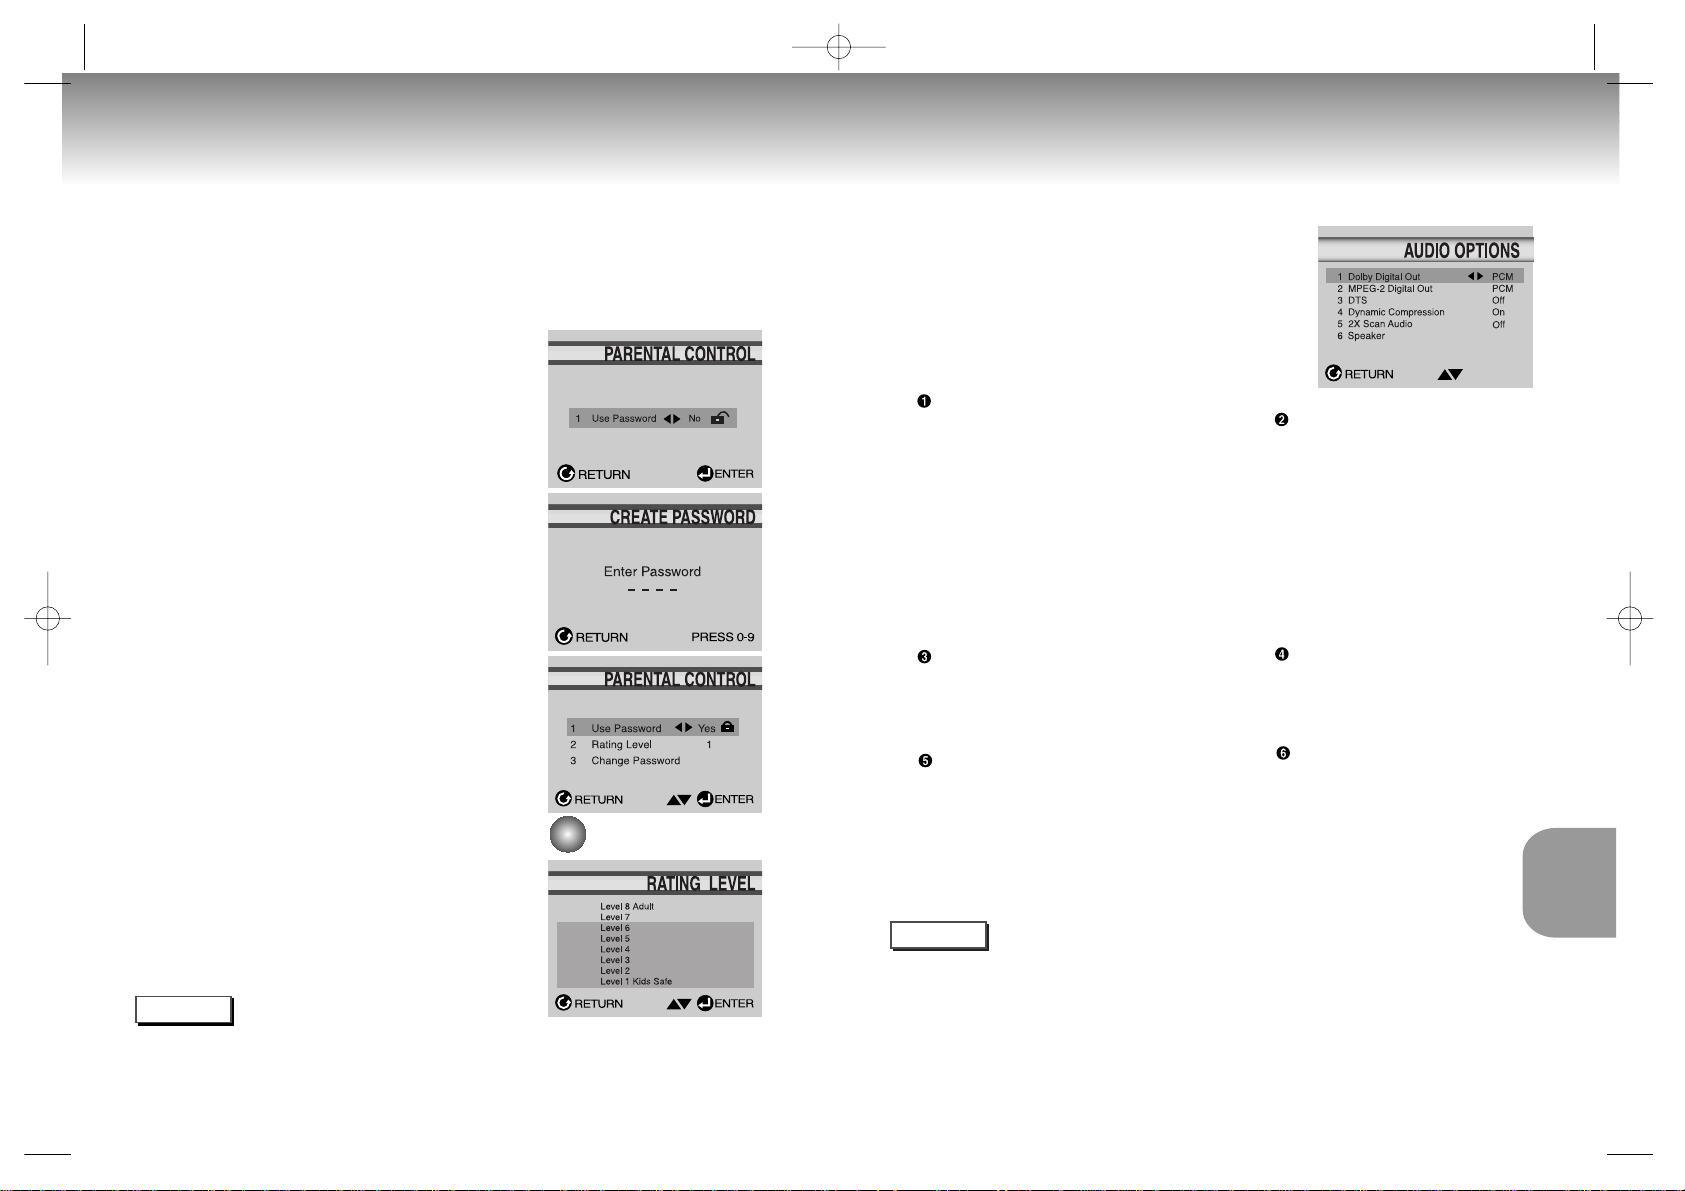
Setting Up the Audio Options
1
1
With the unit in Stop mode, press the SETUP
button.
2
2
Use the UP/DOWN buttons to select Audio Options.
Then press the ENTER button.
3
3
Use the UP/DOWN buttons to select the desired item.
Then press the LEFT/RIGHT buttons.
Dolby Digital Out
1. PCM :
Converts to PCM(2CH) audio.
Select PCM when using the Analog
Audio Outputs.
2. Bitstream :
Converts to Dolby Digital Bitstream (5.1CH).
Select Bitstream when using the Digital
Audio Output.
NNNNOOOOTTTTEE
EE
: Be sure to select the correct Digital Output or
no audio will be heard.
DTS
1. Off : Doesn’t output digital signal.
2. On : Outputs DTS Bitstream via digital output only.
Select DTS when connecting to a DTS Decoder.
2X Scan Audio
1. Off : Turns 2X audio off.
Though 2X Scan Audio is ON in the SETUP MENU,
no sound will be heard on discs which are recorded with
LPCM, DTS or MPEG-2 Audio.
2. On : Turns 2X audio on.
MPEG-2 Digital Out
1. PCM :
Converts to PCM(2CH) audio.
Select PCM when using the Analog
Audio Outputs.
2. Bitstream :
Converts to MPEG-2 Digital Bitstream
(5.1CH or 7.1CH).
Select Bitstream when using the Digital
Audio Output.
Dynamic Compression
1. On : To select dynamic compression.
2. Off : To select the standard range.
Speaker (DVD-S426KG only)
NOTE
•
How to make the SETUP MENU disappear or return to menu screen during set up;
Press RETURN button.
• Manufactured under license from Dolby Laboratories.
”Dolby” and the double-D symbol are trademarks of Dolby Laboratories.
• “DTS” and “DTS Digital Out” are trademarks of Digital Theater Systems, Inc.
Setting Up the Parental Control
The Parental Control function works in conjunction with DVDs that have been assigned a
rating - which helps you control the types of DVDs that your family watches. There are up
to 8 rating levels on a disc.
1
1
With the unit in Stop mode, press SETUP button.
The Setup Menu screen appears.
2
2
Use UP/DOWN to select Parental. Press ENTER.
The Parental Control screen appears.
3
3
Use LEFT/RIGHT to select Yes if you want to use
a password. Press ENTER. The Enter Password
screen appears.
4
4
Enter your password. The Re-enter Password
screen appears to confirm the password. Enter
your password again. The Parental Control
screen appears.
5
5
About the Rating Level ;
The Rating Level will work only when Use
Password is set to Yes. To unlock the player,
use LEFT/RIGHT to select No. Use UP/DOWN
to select Rating level. Press ENTER.
- Use UP/DOWN to select the level(e.g. Level 6) and press
ENTER. Discs that contain Level 7 will now not play.
- To cancel the rating level, use LEFT/RIGHT to select No
in Use Password.
6
6
About the Change Password ;
- Use UP/DOWN to select Change Password. The Change
Password screen appears.
- Enter your new password. Re-enter the new password
again.
NOTE
•
How to make the SETUP MENU disappear or return to menu screen during set up;
Press RETURN button.
• If you have forgotten your password, see Forget Password in the Troubleshooting Guide.
48
e.g
Setting up in LEVEL6.
S126g/226/326K/426K(gb) 4/13/02 4:31 PM Page 46
Page 26
CHANGING
SETUP MENU
•
How to make the SETUP
MENU disappear or return to
menu screen during set up;
Press the RETURN button.
51
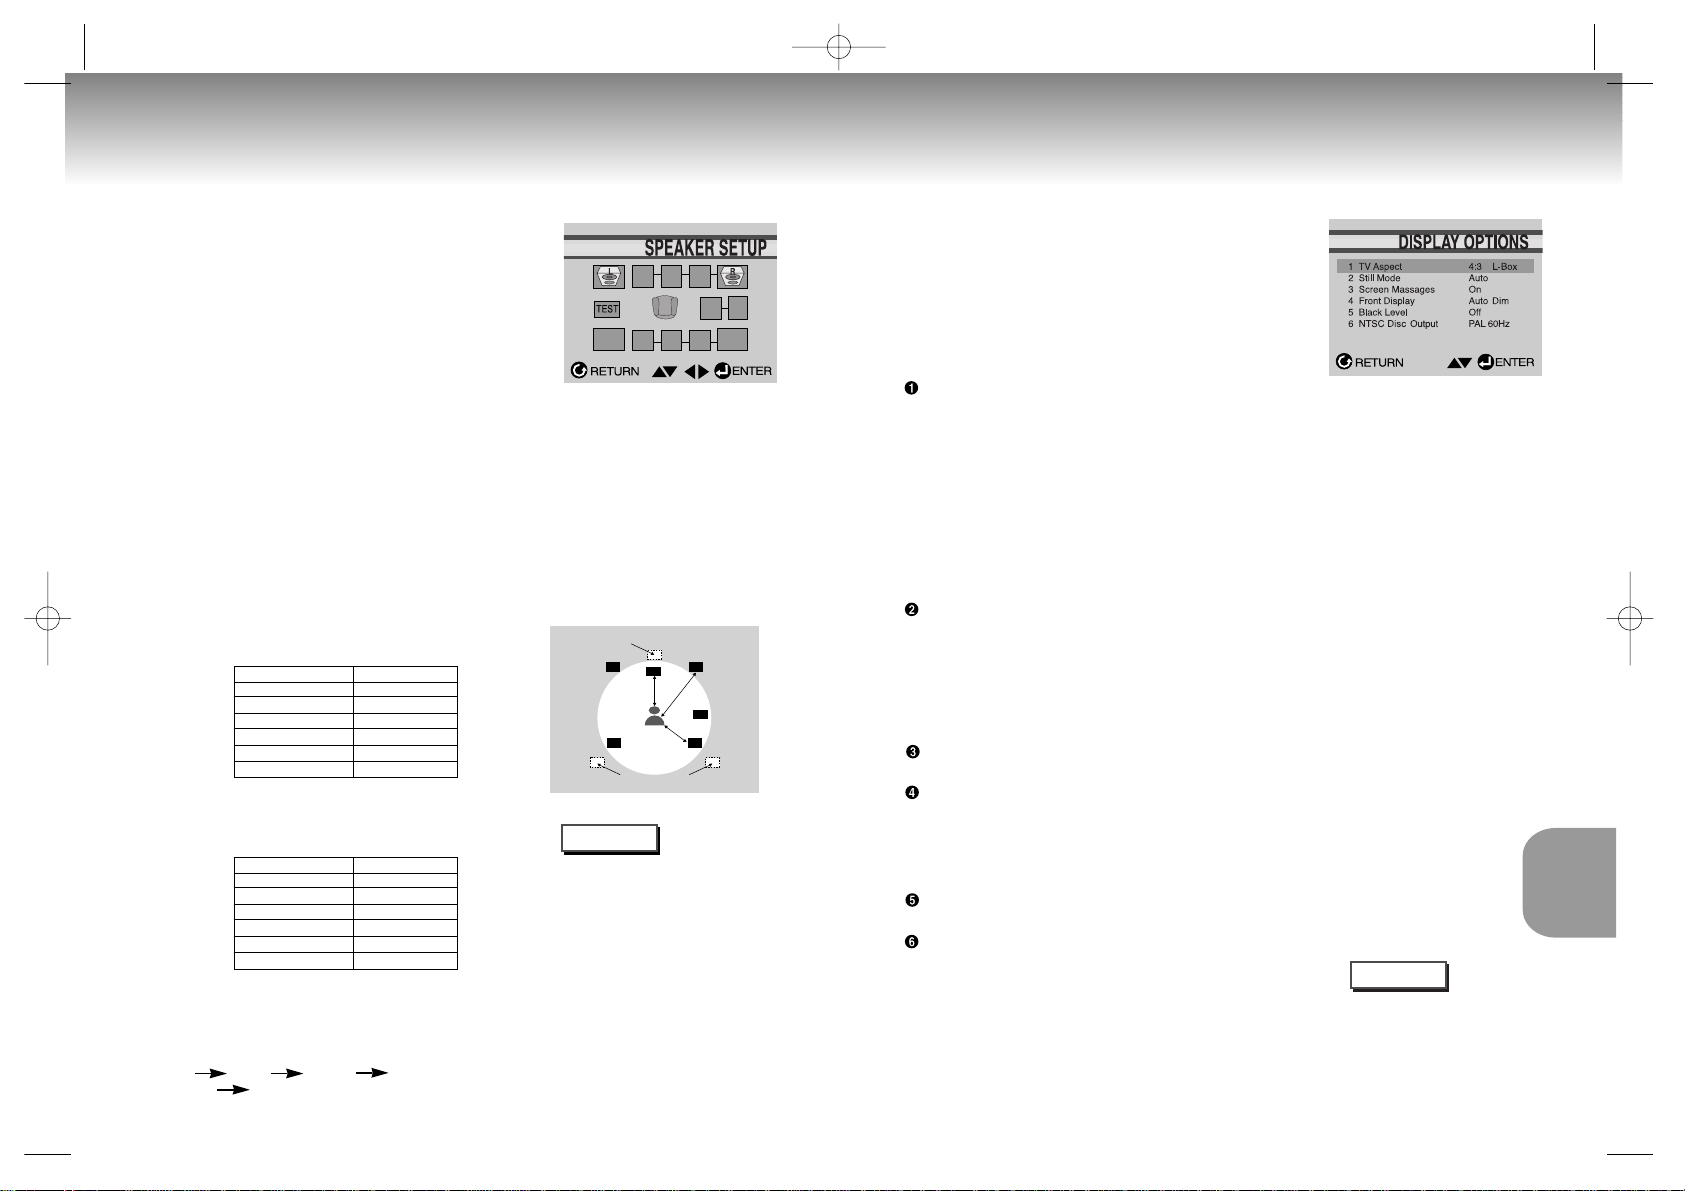
Setting Up the Display Options
1
1
With the unit in Stop mode, press the SETUP button.
2
2
Use the UP/DOWN buttons to select Display Options.
Then press the ENTER button.
3
3
Use the UP/DOWN buttons to select the desired item.
Then press the LEFT/RIGHT buttons.
TV Aspect
Depending on the type of television you have, you may want to adjust
the screen setting (aspect ratio).
1. 4:3 Letter Box :
Select when you want to see the total 16:9 ratio screen DVD
supplies, even though you have a TV with a 4:3 ratio screen.
Black bars will appear at the top and bottom of the screen.
2. 4:3 Pan-Scan :
Select this for conventional size TVs when you want to see the
central portion of the 16:9 screen. (Extreme left and right side of
movie picture will be cut off.)
3. 16:9 Wide :
You can view the full 16:9 picture on your widescreen TV.
Still Mode
These options will help prevent picture shake in still mode and display
small text clearer.
1. Auto : When selecting Auto, Field/Frame mode will be automatically
converted.
2. Field : Select this feature when the screen shakes in the Auto mode.
3. Frame : Select this feature when you want to see small letters more
clearly in the Auto mode.
Screen Messages
Use to turn on-screen messages On or Off.
Front Display
Adjust the brightness of the unit’s front panel display.
1. Auto Dim : Makes the Front Panel Display dim automatically when
playing a DVD.
2. Bright : Makes the Front Panel Display bright.
3. Dim : Makes the Front Panel Display dim.
Black Level
Adjusts the brightness of the screen.(On/Off)
NTSC Disc Output
“NTSC” if the screen only has one NTSC-video entrance. If this is not the
case, you can choose to leave “PAL 60Hz” as is.
NOTE
Surround Sound Speaker Setup
50
0
dB
0
dB
0
dB
0
dB
0
ms
0
ms
1234 5
812
91011
67
1
1
Press the SETUP button in play or stop mode.
2
2
Press the UP/DOWN buttons to select Audio
Options. Then press the ENTER button.
3
3
Use the UP/DOWN buttons to select Speaker
SETUP. Then press the ENTER button.
4
4
Use the UP/DOWN or LEFT/RIGHT buttons to select
the desired item. Then press the ENTER button.
Setting up SPEAKER MODE
• If you have connected the system to a speaker with low frequencies of 100Hz or below,
select ‘Found (Large illustration)’.
• If you have connected the system to a speaker without low frequencies of 100Hz or
below, select ‘Found(Small illustration)’. If you don’t connect a subwoofer, always select
‘Found(Large illustration)’ for the Front Speakers(L/R).
• When you don’t have a particular speaker connected, select ‘Not found
(No illustration visible)’.
Setting up DELAY TIME
• When 5.1CH Surround Sound is played, you can enjoy the best sound if the
distance between you and each speaker is the same. You can set Delay Time in the
Center/Surround Speaker to customize the sound to the acoustic of your room.
Setting CENTER SPEAKER
• If the distance of Dc is equal to or longer than the distance of Df in the left figure,
set the mode as Oms. Otherwise, change the setting according to the table below.
(A) = Df - Dc
Distance of (A)(in) Setting(ms)
0.00 0
0.34 1
0.68 2
1.02 3
1.36 4
1.70 5
Setting SURROUND SPEAKERS
• If the distance of Df is equal to the distance of Ds in the above, set the mode as Oms.
Otherwise, change the setting according to the table on the right.
(B) = Df - Ds
Distance of (B)(in) Setting(ms)
0.00 0
1.02 3
2.04 6
3.06 9
4.08 12
5.10 15
Setting up TEST
The test output signals come clockwise starting from the Front Speaker(L). Adjust Channel
Balance to match to the volume of test
signals memorized in the system.
FRONT(L) CENTER FRONT(R) SUBWOOFER
SURROUND(R) SURROUND(L)
1. Speaker Mode(Front L)
2. Channel Balance(Center)OdB
3. Speaker Mode(Center)
4. Delay Time(Center)Oms
5. Speaker Mode(Front R)
6. Channel Balance(Subwoofer)OdB
7. Speaker Mode(Subwoofer)
8. Speaker Mode(Surround L)
9. Channel Balance(Surround L)OdB
10. Delay Time(Surround L/R)Oms
11. Channel Balance(Surround R)OdB
12. Speaker Mode(Surround R)
•
How to make the SETUP
MENU disappear or return to
menu screen during set up.
Press RETURN button.
• The subwoofer test output
signal is lower than the other
speakers.
• The MPEG Multichannel logo
is a trademark registered by
PHILIPS Corporation.
ldeal CENTER SPEAKER position
ldeal SURROUND SPEAKER position
L
X
R
SR
SL
Ds
Sw
Df
Dc
C
NOTE
(DVD-S426KG only)
S126g/226/326K/426K(gb) 4/13/02 4:31 PM Page 48
Page 27
REFERENCE
53
Troubleshooting
Before requesting service (troubleshooting), please check the following.
No operations can be
performed with remote.
The screen ratio cannot be
changed.
No audio.
Play mode differs from the
Setup Menu selection.
Disc Menu doesn’t appear.
The icon appears on
screen.
Forgot password
If you experience other
problems.
5.1 channel sound is not
being reproduced.
Disc does not play.
• Check the batteries in the remote. May need replacing.
• Operate the remote control at a distance of no more than 20 feet.
• Remove batteries and hold down one or more buttons for several
minutes to drain the microprocessor inside the remote to reset it.
Reinstall batteries and try remote again.
• Ensure that the disc is installed with the label side facing up.
• Check the region number of the DVD.
• 5.1 channel sound is reproduced only when the following conditions
are met. :
1) The DVD player is connected with the proper amplifier
2) The disc is recorded with 5.1 channel sound.
• Check whether the disc being played has the “Dolby 5.1 ch” mark on
the outside.
• Check if your audio system is connected and working properly.
• In a SETUP Menu, is the Audio Output set to Bitstream?
• The features or action cannot be completed at this time because:
1. The DVD’s software restricts it.
2. The DVD’s software doesn’t support the feature (e.g., angles).
3. The feature is not available at the moment.
4. You’ve requested a title or chapter number or search time that is
out of range.
• Check if the disc has a Menu.
• Some of the functions selected in the Setup Menu may not work
properly if the disc is not encoded with the corresponding function.
• The Screen Ratio is fixed on your DVDs.
• Make sure you have selected the correct Digital Output in the Audio
Options Menu.
• Press power on from a cold start with no disc in the unit. Press the STOP
and PLAY buttons simultaneously on the front panel for three seconds. The
Select Menu Language display will appear. Select the desired language
button. Press the SETUP button on the remote control to select the Parental
Mode. The Parental Mode is now unlocked as indicated on the display.
Press the DOWN button to select Parental. Press ENTER and the Create
Password display will appear. You can now set your rating level and
change your password to a new number.
• Go to the contents and find the section of the instruction book that
contains the explanations regarding the current problem, and follow
the procedure once again.
• If the problem still cannot be solved, please contact your nearest
authorized service center.
Action
Problem Page
P4
P 7
P 24,
48~49
P 27
P 44~45
P 44~47
P 50
P 48~49
P 47
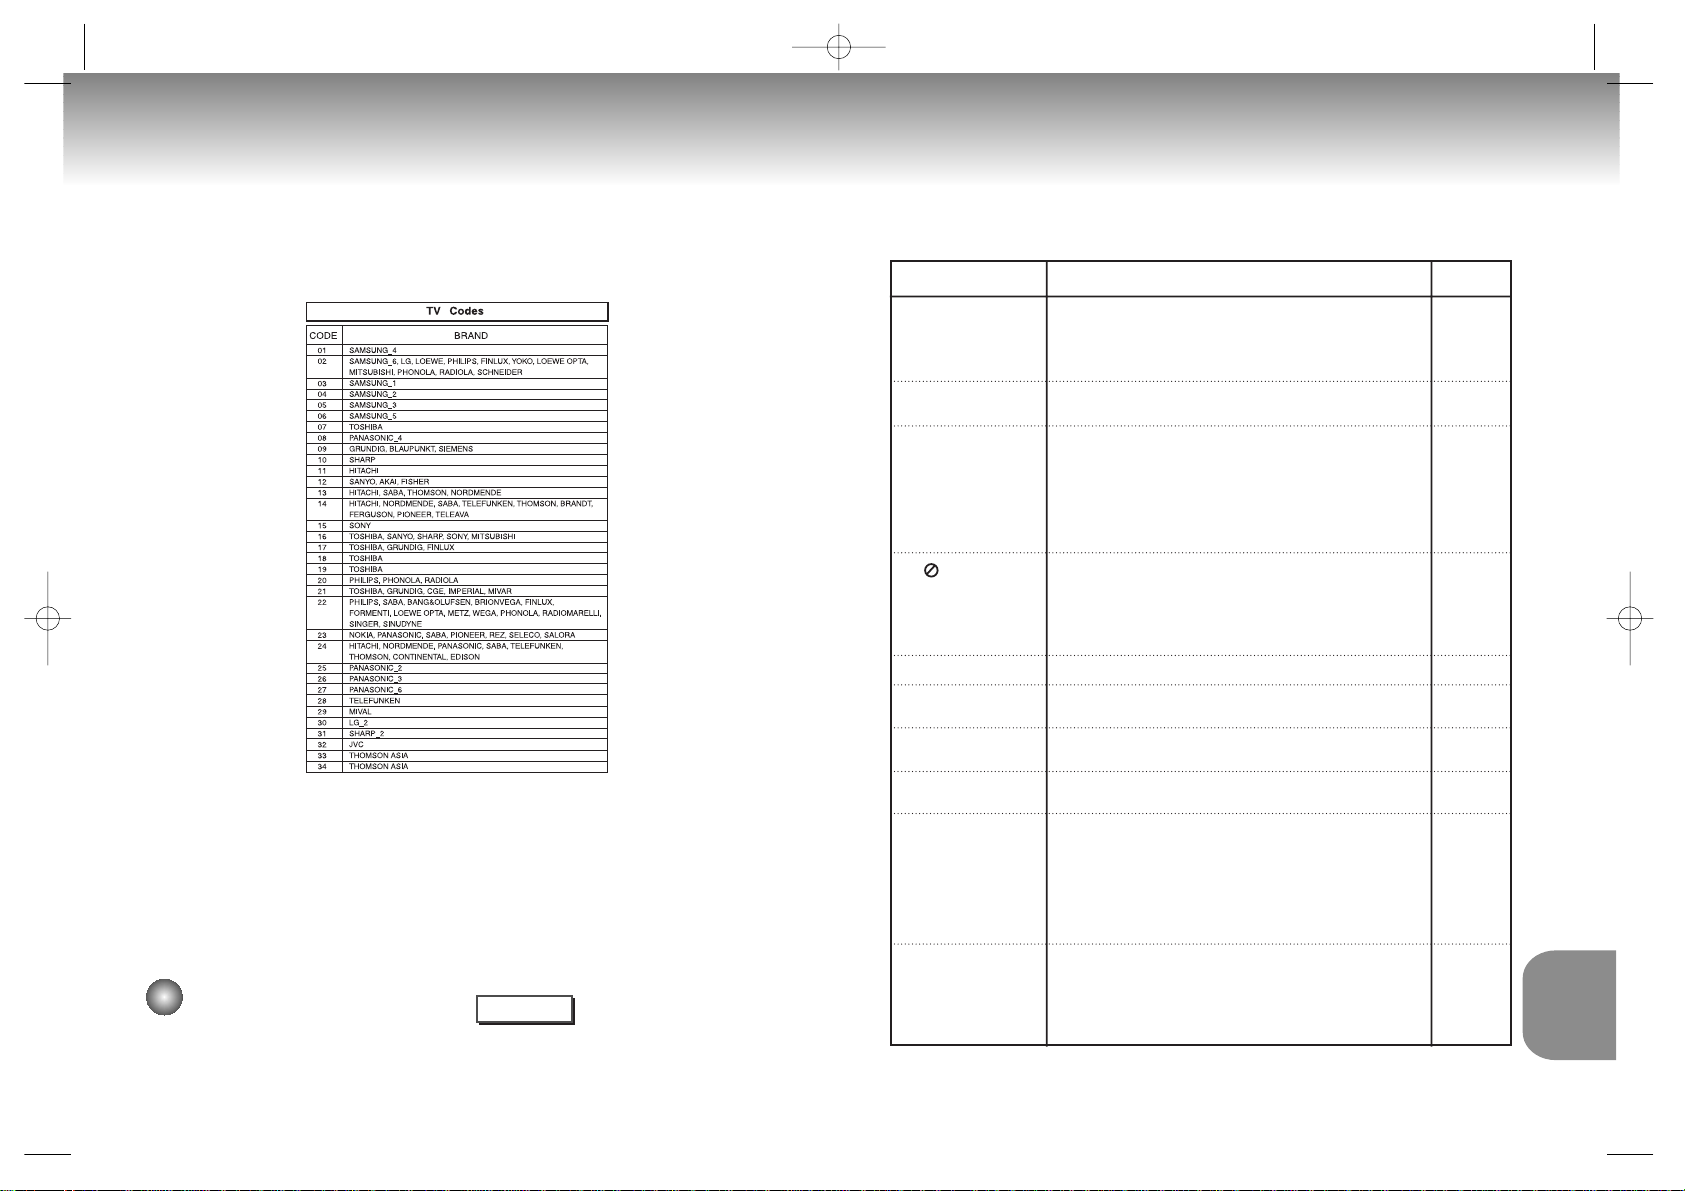
Controlling a TV with the Remote
52
The remote can also be set up to control most TVs. To program the remote, use the code
that corresponds to your brand.
1
1
Turn on the TV.
2
2
Point the DVD’s remote at the TV.
3
3
While holding the TV POWER button
down, enter the code for your brand.
4
4
If the TV turns off, setup is complete.
Enter other codes of the same brand
if the first code does not work.
5
5
To operate the TV, use the “TV
Function Buttons” described on
page 19, 21.
e.g
For SAMSUNG 4 TVs
While holding down the TV POWER button,
enter 0 and then 1.
The remote may not be able to control
every model TV of the brands listed.
NOTE
(DVD-S326KG/DVD-S426KG only)
S126g/226/326K/426K(gb) 4/13/02 4:31 PM Page 50
Page 28
*: Nominal specification
• Samsung Electronics Co., Ltd reserves the right to change the specifications without notice.
• Weight and dimensions are approximate.
54
Power Requirements
Power Consumption
Weight
Dimensions
Operating Temperature Range
Operating Humidity Range
DVD
(DIGITAL VERSATILE DISC)
CD : 12Cm
(COMPACT DISC)
CD : 8Cm
(COMPACT DISC)
VCD : 12Cm
Composite Video
Component Video
S-VIDEO
2 channel
*Frequency Response
*S/N Ratio
*Dynamic Range
*Total Harmonic Distortion
AC 110-240V, 50/60 Hz
13 W (DVD-S126G/DVD-S226KG/DVD-S326KG only)
15W (DVD-S426KG only)
2.8 Kg
430mm ✕ 240mm ✕ 79mm
+5°C to +35°C
10 % to 75 %
Reading Speed : 3.49 m/sec.
Approx. Play Time
(Single Sided, Single Layer Disc) : 135 min.
Reading Speed : 1.2 to 1.4 m/sec.
Maximum Play Time : 74 min.
Reading Speed : 1.2 to 1.4 m/sec.
Maximum Play Time : 20 min.
Reading Speed : 1.2 to 1.4 m/sec.
Maximum Play Time : 74 min. (Video + Audio)
1 channel : 1.0 Vp-p (75 Ω load)
Y : 1.0 Vp-p (75 Ω load)
Pr : 0.70 Vp-p (75 Ω load)
Pb : 0.70 Vp-p (75 Ω load)
Luminance Signal : 1.0 Vp-p (75 Ω load)
Chrominance Signal : 0.286 Vp-p (75 Ω load)
L(1/L), R(2/R)
48 kHz Sampling : 4 Hz to 22 kHz
96 kHz Sampling : 4 Hz to 44 kHz
110 dB (Karaoke off Mode)
100 dB (Karaoke off Mode)
0.004 % (Karaoke off Mode)
General
Disc
Video
Output
Audio
Output
Specifications Memo
S126g/226/326K/426K(gb) 4/13/02 4:31 PM Page 52
 Loading...