

Page 1

DVD
user manual
DVD-R170
imagine the possibilities
Thanks you for purchasing this Samsung product.
To receive more complete service, please register
your product at
www.samsung.com/global/register
Page 2
getting started
WARNING
TO REDUCE THE RISK OF ELECTRIC SHOCK, DO NOT REMOVE THE COVER(OR BACK).
NO USER-SERVICEABLE PARTS ARE INSIDE. REFER SERVICING TO QUALIFIED SERVICE PERSONNEL.
CAUTION
RISK OF ELECTRIC SHOCK
DO NOT OPEN
This symbol indicates that dangerous
voltage consisting a risk of electric shock
is present within this unit.
Do not install this equipment in a confi ned space such as a bookcase or similar unit.
WARNING
To prevent damage which may result in fi re or electric shock hazard, do not expose this appliance to rain or
moisture.
CAUTION
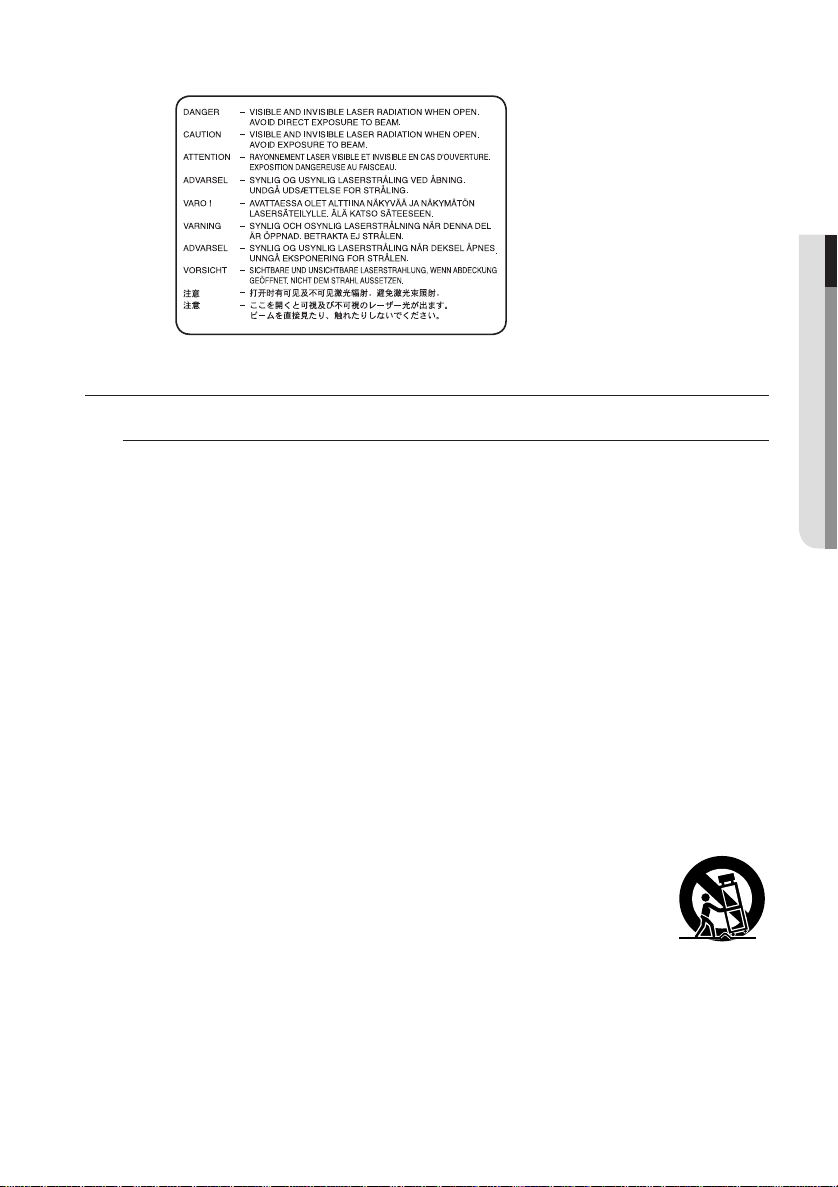
THIS DVD RECORDER USES AN INVISIBLE LASER BEAM WHICH CAN CAUSE HAZARDOUS RADIATION
EXPOSURE IF DIRECTED.
BE SURE TO OPERATE THE RECORDER AS INSTRUCTED.
CAUTION
THIS PRODUCT UTILIZES A LASER. USE OF CONTROLS OR ADJUSTMENTS OR PERFORMANCE OF
PROCEDURES OTHER THAN THOSE SPECIFIED HEREIN MAY RESULT IN HAZARDOUS RADIATION
EXPOSURE.
DO NOT OPEN COVERS AND DO NOT REPAIR YOURSELF. REFER SERVICING TO QUALIFIED PERSONNEL.
CAUTIONS
Caution : To prevent electric shock, match the wide blade of the plug to wide slot of the socket and fully insert.
This product satisfi es FCC regulations when shielded cables and connectors are used to connect the unit to other
equipment. To prevent electromagnetic interference with electric appliances, such as radios and televisions, use
shielded cables and connectors for connections.
CAUTION: TO REDUCE THE RISK OF ELECTRIC
SHOCK, DO NOT REMOVE COVER (OR BACK) NO
USER SERVICEABLE PARTS INSIDE. REFER
SERVICING TO QUALIFIED SERVICE PERSONNEL.
This symbol indicates that there are
important operating and maintenance
instructions in the literature accompanying
this unit.
This unit can be used only where the power supply is AC 110~240V, 50/60Hz. It cannot be used elsewhere.
M
This DVD Recorder is designed and manufactured to respond to the Region Management Information. If the Region
number of a DVD disc does not correspond to the Region number of this , the DVD Recorder cannot play the disc.
This device is protected by U.S. Patent Nos. 6,836,549; 6,381,747; 7,050,698; 6,516,132; and 5,583,936.
This product incorporates copyright protection technology that is protected by U.S. patents and other intellectual
property rights. Use of this copyright protection technology must be authorized by Macrovision,and is intended for
home and other limited viewing uses only unless otherwise authorized by Macrovision. Reverse engineering or
disassembly is prohibited.
This product is covered by one or more of the following U.S. patents:
5,060,220 5,457,669 5,561,649 5,705,762 6,043,912 6,438,099
6,467,061 6,556,521 6,578,163 6,697,307 6,728,474 6,771,891
6,894,963 6,895,593 6,937,815 6,996,327 7,009,926 7,085,221
7,088,649 7,092,327 7,099,566 7,123,564 7,142,493 7,142,495
7,145,861 7,146,624 7,151,729 7,161,879 7,164,647 7,167,437
7,173,891 7,177,250 7,194,187 7,203,891 7,209,423 7,210,067
7,228,062 7,245,566 7,245,567 7,257,065 7,263,045 7,269,110
7,272,086 7,272,106 7,280,460 7,283,729 7,286,454 7,304,938
2_ getting started
Page 3
PRECAUTION
Important Safety Instructions
Read these operating instructions carefully before using the unit. Follow all the safety instructions listed below.
Keep these operating instructions handy for future reference.
Read these instructions.
1)
Keep these instructions.
2)
Heed all warnings.
3)
Follow all instructions.
4)
Do not use this apparatus near water.
5)
Clean only with a dry cloth.
6)
7)
Do not block any ventilation openings. Install in accordance with the manufacturer's instructions.
Do not install near any heat sources such as radiators, heat registers, stoves, or other apparatus
8)
(including amplifi ers) that produce heat.
Do not defeat the safety purpose of the polarized or grounding- type plug. A polarized plug has two
9)
blades with one wider than the other. A groundingtype plug has two blades and a third grounding prong.
The wide blade or the third prong is provided for your safety. If the provided plug does not fi t into your
outlet, consult an electrician for replacement of the obsolete outlet.
Protect the power cord from being walked on or pinched particularly at plugs, convenience receptacles,
10)
and the point where they exit from the apparatus.
Only use attachments/accessories specifi ed by the manufacturer.
11)
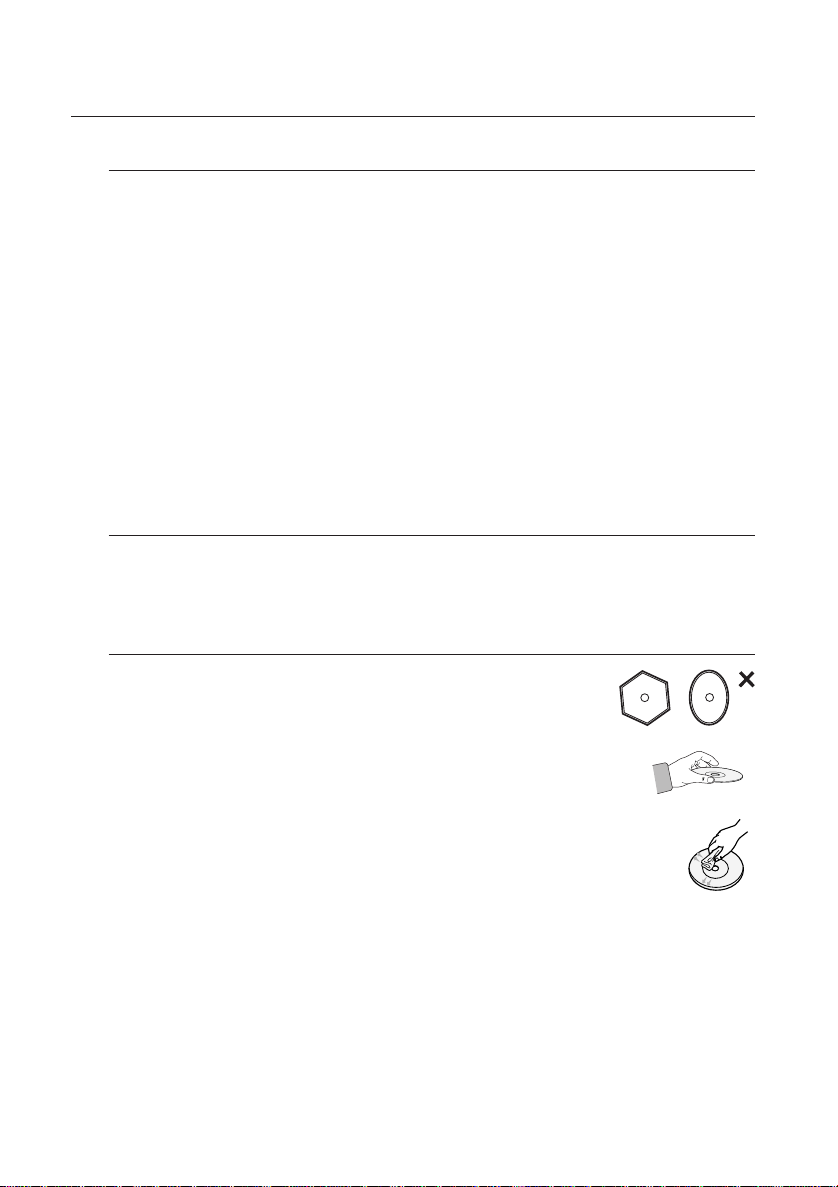
Use only with the cart, stand, tripod, bracket, or table specifi ed by the manufacturer, or
12)
sold with the apparatus. When a cart is used, use caution when moving the cart/
apparatus combination to avoid injury from tip-over.
Unplug this apparatus during lightning storms or when unused for long periods of time.
13)
Refer all servicing to qualifi ed service personnel. Service is required when the apparatus
14)
has been damaged in any way, such as the power-supply cord or plug is damaged,
liquid has been spilled or objects have fallen into the apparatus. Service is also required if the apparatus
has been exposed to rain or moisture, does not operate normally, or has been dropped.
● GETTING STARTED
English _3
Page 4
getting started
Handling Cautions
Before connecting other components to this recorder, be sure to turn them all off.
•
Do not move the recorder while a disc is being played, or the disc may be scratched or broken, and the
•
recorder’s internal parts may be damaged.
•
Do not put a fl ower vase fi lled with water or any small metal objects on the recorder.
•
Be careful not to put your hand into the disc tray.
•
Do not place anything other than the disc in the disc tray.
•
Exterior interference such as lightning and static electricity can affect normal operation of this recorder.
If this occurs, turn the DVD Recorder off and on again with the POWER button, or disconnect and then
reconnect the AC power cord to the AC power outlet. The recorder will operate normally.
•
Be sure to remove the disc and turn off the recorder after use.
•
Disconnect the AC power cord from the AC outlet when you don’t intend to use the recorder for long
periods of time.
•
Clean the disc by wiping in a straight line from the inside to the outside of the disc.
•
Apparatus shall not be exposed to dripping or splashing and no objects fi lled with liquids, such as vases,
shall be placed on the apparatus.
•
The Mains plug is used as a disconnect device and shall stay readily operable at any time.
Maintenance of Cabinet
For safety reasons, be sure to disconnect the AC power cord from the AC outlet.
•
Do not use benzene, thinner, or other solvents for cleaning.
•
Wipe the cabinet with a soft cloth.
Disc Handling
•
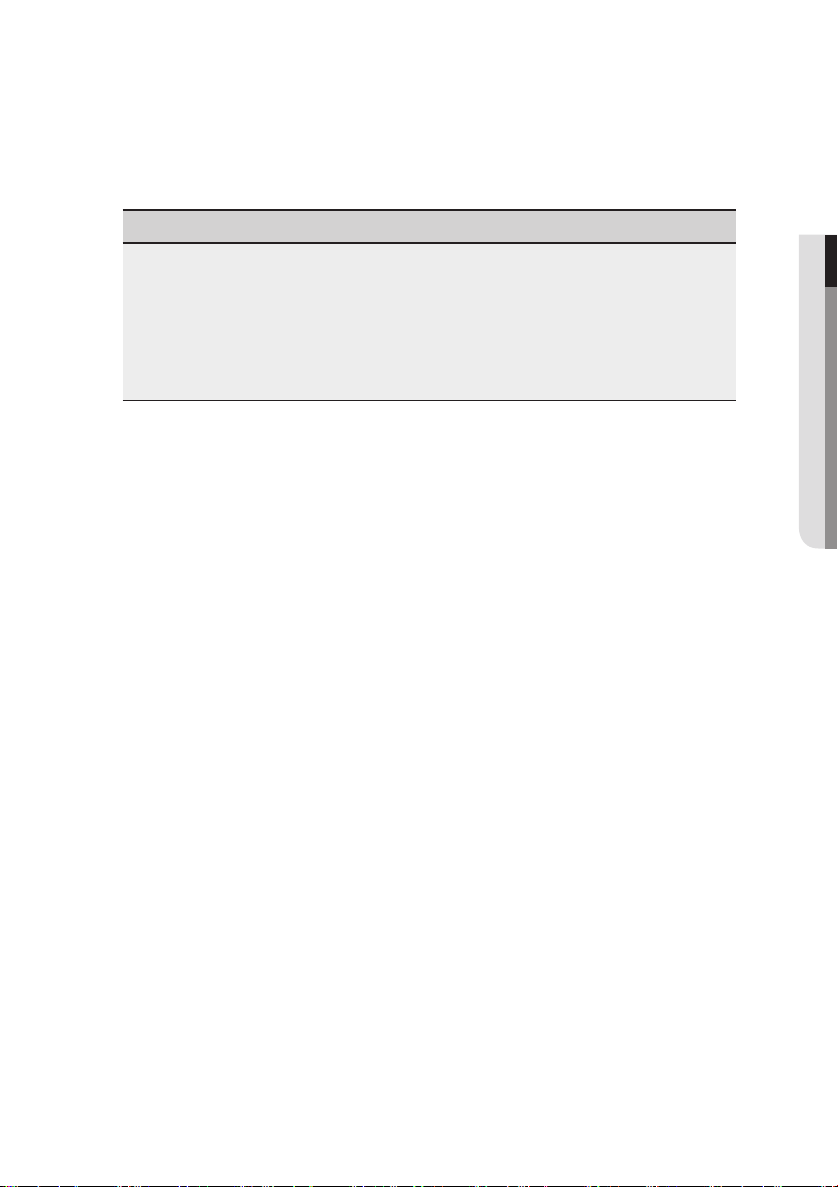
Use discs with regular shapes. If an irregular disc (a disc with a special shape)
is used, this DVD Recorder may be damaged.
Holding discs
•
Avoid touching the surface of a disc where recording is performed.
DVD-RAM, DVD±RW and DVD±R
•
Clean with an optional DVD-RAM/PD disc cleaner. Do not use cleaners or cloths for
CDs to clean DVD-RAM/DVD±RW/DVD±R discs.
DVD-Video, Audio CD
•
Wipe off dirt or contamination on the disc with a soft cloth.
4_ getting started
Page 5

Cautions on handling discs
Do not write on the printed side with a ball-point pen or pencil.
•
Do not use record cleaning sprays or antistatic. Also, do not use volatile chemicals, such as benzene or
•
thinner.
Do not apply labels or stickers to discs. (Do not use discs fi xed with exposed tape adhesive or leftover
•
peeled-off stickers.)
Do not use scratch-proof protectors or covers.
•
Do not use discs printed with label printers available on the market.
•
Do not load warped or cracked discs.
•
Disc Storage
Be careful not to damage the disc because the data on these discs are highly vulnerable to the environment.
•
Do not keep under direct sunlight.
•
Keep in a cool ventilated area.
•
Store vertically.
•
Keep in a clean protection jacket.
•
If you move your DVD Recorder suddenly from a cold place to a warm place, condensation may generate
on the operating parts, including the lens, and cause abnormal disc playback. In this case, do not connect
the plug to the power outlet and wait for two hours. Then insert the disc and try to play back again. It will
work properly when condensation has evaporated.
Disc Specifi cations
DVD-Video
A digital versatile disc (DVD) can contain up to 135- minutes of images, 8 audio languages and 32 subtitle
•
languages. It is equipped with MPEG-2 picture compression and Dolby 3D surround, allowing you to enjoy
vivid and clear theater quality images in the comfort of your own home.
When switching from the fi rst layer to the second layer of a double-layered DVD Video disc, there may be
•
momentary distortion in the image and sound. This is not a malfunction of the unit.
Once a DVD-RW(V)/-R(V)/+R recorded is fi nalized, it is playable in a standard DVD player.
•
Video CD
Only CD-R disks made in the VCD format (ver 1.1 or 2.0) can be played back.
•
The moving pictures for PCs can be played back only provided that they are recorded in VCD format in the
•
CD-Recording program.
Please contact the CD-R maker for the inquiries related to discs.
•
Audio CD
An audio disc on which 44.1kHz PCM Audio is recorded.
•
Plays CD-DA format audio CD-R and CD-RW discs. This unit may not be able to play some CD-R or
•
CD-RW discs due to the condition of the recording.
CD-RW/-R
MP3 CD-RW/-R
❖
Only CD-R discs with MP3 fi les recorded with ISO9660 or JOLIET format can be played back
•
Only MP3 fi les with the "mp3" or "MP3" extension can be used.
•
Playable bitrate range is from 32 Kbps to 320Kbps.
•
The unit can handle a maximum of 499 fi les and folders.
•
DVD-RAM/±RW/±R discs that contain MP3 fi les can be played back.
•
● GETTING STARTED
English _5
Page 6

getting started
JPEG CD-RW/-R
❖
Only JPEG fi les with the ".jpg", ".JPG" extension can be used.
•
The unit can handle a maximum of 1000 fi les and folders.
•
Maximum size of progressive JPEG is 3M pixels.
•
MOTION JPEG is not supported.
•
DVD-RAM/±RW/±R discs that contain JPEG fi les can be played back.
•
Using CD-RW/-R
❖
Use a 700MB(80 minutes) CD-RW/-R disc. If possible, do not use a 800MB(90 minutes) or above disc, as
•
the disc may not play back.
If the CD-RW/-R disc was not recorded as a closed session, you may experience a delay in the early
•
play-back time, and all recorded fi les may not play.
Some CD-RW/-R discs may not be playable with this unit, depending on the device which was used to
•
burn them. For contents recorded on CD-RW/-R media from CDs for your personal use, playability may
vary depending on contents and discs.
When recording from CDs for your personal use to CD-RW/-R discs, playability may vary depending on the
•
contents and discs.
Using DivX disc
❖
Disc : CD-RW/-R, DVD-RAM/±RW/±R
•
Video File with following extensions can be played. : .avi, .divx, .AVI, .DIVX
•
DivX Video (Codec) Format : DivX 3.11 DivX 4.x DivX 5.x (without QPEL and GMC)
•
DivX Audio (Codec) Format : MP3, AC3, DTS
•
Supported subtitle fi le formats: .smi, .srt, .sub, .psb, .txt, .ass
•
Each folder can have up to 500 items including fi les and sub folders.
•
You cannot play back the disc that is larger than a 720 x 576 pixel resolution.
•
DVD-RW/-R Disc Playback and Recording
Recording and playback can be performed on DVD-R/-RW discs in both Video and VR Modes.
•
Once a DVD-RW/-R is recorded in VR or Video mode and fi nalized, you cannot perform additional
•
recordings.
Once a DVD-RW/-R is recorded in Video Mode and fi nalized, it becomes a DVD-Video.
•
In both modes, playback can be performed before and after fi nalization, but additional recording, deleting
•
and editing can not be performed after fi nalization.
If you want to record the disc in VR Mode and then record in V Mode, be sure to execute format. Be careful
•
when executing Format because all the recorded data may be lost. You can change the disc mode only
one times when the unused DVD-R disc is inserted.
• DVD-RW/-R (VR mode)
- You can record multiple titles, edit, delete, partial delete, create a playlist, etc.
- A disc that is recorded in this mode may not be played by existing DVD players.
• DVD-RW/-R (Video mode)
- The disc can be played by an existing DVD player once it has been fi nalized.
- If a disc that has been recorded in Video mode by a different manufacturer's recorder but has not been
fi nalized it cannot be played or recorded by this recorder.
- When programing is erased from a DVD-R, that space does not become available. Once an area on a
DVD-R is recorded on, that area is no longer available for recording, whether the recording is erased or not.
6_ getting started
Page 7
DVD-RAM Disc Playback and Recording
For cartridge type DVD-RAM discs, remove the cartridge and use only the disc.
•
You cannot play a DVD-RAM in most DVD players due to compatibility issues.
•
Only DVD-RAM standard Version 2.0 discs can be played in this unit.
•
DVD-RAM discs recorded on this unit may not work with other DVD Players. To determine compatibility
•
with these DVD-RAM discs, refer to the user’s manual for the player.
COPY PROTECTION
• Many DVD discs are encoded with copy protection. Because of this, you should only connect your DVD Recorder
directly to your TV, not to a VCR. Connecting your recorder to a VCR results in a distorted picture from copyprotected DVD discs.
• This product incorporates copyright protection technology that is protected by methods claims of certain U.S. patents
and other intellectual property rights owned by Macrovision Corporation and other rights owners. Use of this
copyright protection technology must be authorized by Macrovision Corporation, and is intended for home and other
limited viewing uses only unless otherwise authorized by Macrovision Corporation. Reverse engineering or
disassembly is prohibited.
Protection
Program-protection: See page 56 “Locking a Title”
•
Disc-protection: See page 62 “Disc Protection”
•
❋ DVD-RAM/DVD-RW/DVD-R discs that are incompatible with the DVD-VIDEO format cannot be played with
this product.
For more information on DVD recording compatibility, consult your DVD-RAM/DVD-RW/DVD-R manufacturer.
❋
❋ Use of poor quality DVD-RAM/DVD-RW/DVD-R discs may cause the following unexpected problems
including, recording failure, loss of recorded or edited materials, or damage to the recorder.
Do not use the following discs!
LD, CD-G, CD-I, CD-ROM and DVD-ROM, Divx discs should not be used in this product.
•
[Note]
Some commercial discs and DVD discs purchased outside your region may not be playable with this
•
product. When these discs are played, either “No Disc” or "Playback prohibited by region code" will be
displayed.
If your DVD-RAM/DVD-RW/DVD-R disc is an illegal copy or is not in DVD video format, it may also not be playable.
•
Disc Compatibility
❖
Not all brands of discs will be compatible with this unit.
•
The latest fi rmware upgrade to improve recording & playback quality can be downloaded from our web site.
•
(Download Center at www.samsung.com)
If disc compatibility problems continue, or there is an issue upgrading your recorder, contact the Call Center
•
at 0800-124-421 or 4004-0000.
● GETTING STARTED
English _7
Page 8

getting started
GETTING STARTED
2
CONNECTING & SETTING UP
18
SYSTEM SETUP
25
2 Warning
3 Precaution
10 General Features
11 Before Reading the User’s Manual
12 How to use the DVD Recorder
13 Unpacking
16 Description
18 Connecting the Antenna Cable
20 Connecting the Video Output
21 Connecting the Audio Cable
23 Connecting External Devices
25 On-Screen Menu Navigation
25 Easy Setup
26 Tuner Preset
27 Clock Set
28 Setting up the Video Options
30 Setting up the Audio Options
32 Setting up the Features
35 Setting up the Options
8_ getting started
PLAYBACK
37
37 Region code (DVD-Video only)
37 Logos of Discs that can be played
38 Disc types that can be played
39 Playing a Disc
40 Using the Disc Menu and Title Menu
40 Using the Search & Skip Functions
41 Slow Motion Play/Step Motion Play
42 Using the ANYKEY button
44 Playing Back an Audio CD (CD-DA)/MP3
45 Playing back a Picture Disc
46 Playing a DivX Disc
Page 9

RECORDING
47
47 Recordable discs
48 Recording Mode
49 Unrecordable Video
50 Recording immediately
51 Making a One Touch Recording (OTR)
52 Making a Timer Recording
53 Editing the Timer List
54 Erasing the Timer List
54 Check Remaining Time
● GETTING STARTED
EDITING
55
REFERENCE
66
APPENDIX
70
55 Playing the Title List
56 Basic Editing (Title List)
59 Advanced Editing (Playlist)
62 Disc Setting
66 Troubleshooting (DVD-VIDEO/DVD-RAM/
DVD-RW/DVD-R)
67 Troubleshooting (DVD)
68 Problems and Solutions (Display error
Message)
70 Specifi cations
English _9
Page 10

getting started
GENERAL FEATURES
The DVD-R170 allows you to record, edit and play high quality digital video on DVD-RAM/DVD-RW/DVD-R discs.
High quality digital audio/video recording and playback
You can record up to approximately 16-hours of video on a double side 9.4 GB DVD-RAM disc,up to 15hours on a dual-layer 8.5GB DVD-R disc, and up to 8-hours on a 4.7 GB DVD-RAM/DVD-RW/DVD-R disc,
depending on the recording mode.
Creating DVD video titles using DVD-RW/DVD-R discs
With the DVD-R170, you can create your own DVD video titles on 4.7 GB DVD-RW/DVD-R or 8.5GB DVD-R
discs.
A Variety of Recording Options
You can set your DVD Recorder to one of eight different recording modes, each varying in recording quality
and length. Select a recording mode according to the time and picture quality you need.
For example, if picture quality is your top priority, select “HQ” (high quality).
If recording time is your priority, “SLP” may be a possible choice.
Dual layer DVD-Rs have approximately double the capacity of single layer DVD-Rs.
High quality progressive scan
Progressive scanning provides high resolution and fl icker free video. The 10-bit 54-MHz DAC, 2D Y/C
Separating circuitry and Time Base Corrector processor technology provide you with the highest image
playback and recording quality. (See page 20.)
A variety of functions with an easy-to-use user interface
The Integrated menu systems and messaging functionality allow you to perform the desired operations easily
and conveniently. With a DVD-RAM/DVD-RW/DVD-R(VR mode) disc, you can edit recorded images, create
playlist, and edit videos in a specifi c sequence according to your needs.
DivX Certifi cation
DivX, DivX Certifi ed, and associated logos are trademarks of DivX Networks, Inc and are used
under licence.
Offi cial DivX
•
Plays all versions of DivX
•
EZ Record Mode
This function allows you Finalize a disc automatically. (See page 34.)
®
Certifi ed product
®
video (including DivX® 6) with standard playback of DivX® media fi les
10_ getting started
Page 11
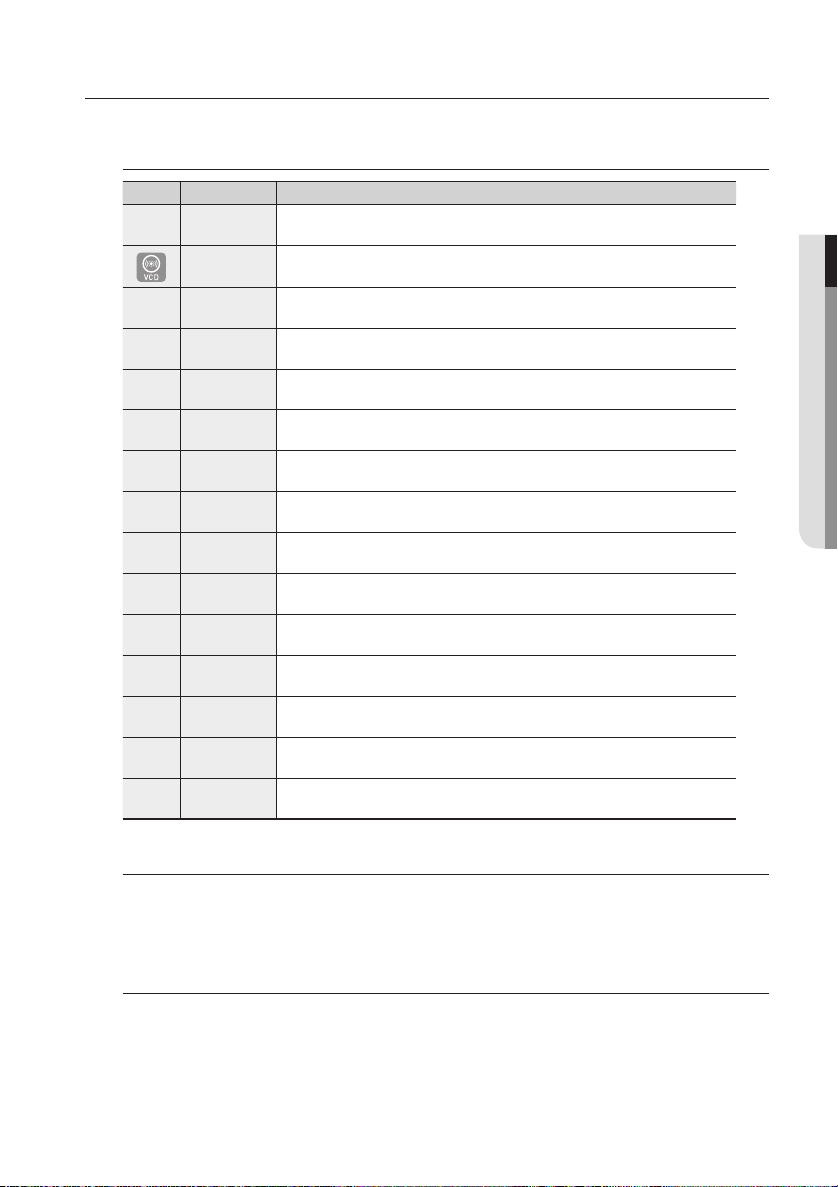
BEFORE READING THE USER’S MANUAL
Make sure to check the following terms before reading the user’s manual.
Icons that will be used in manual
Icon Term Defi nition
Z
DVD
VCD This involves a function available with VCD or CD-R/CD-RW discs.
This involves a function available with DVD or DVD-R(V)/DVD-RW(V)/+R discs
that have been recorded and fi nalized.
● GETTING STARTED
X
C
V
K
L
B
G
A
D
J
M
N
H
RAM This involves a function available with DVD-RAM discs.
-RW This involves a function available with DVD-RW discs.
-R This involves a function available with DVD-R discs.
+RW This involves a function available with DVD+RW discs.
+R This involves a function available with DVD+R discs.
CD This involves a function available with a data CD (CD-RW or CD-R).
JPEG
MP3
DivX
Caution
NOTE This involves tips or instructions on the page that help each function operate.
One-Touch
button
ANYKEY
button
This involves a JPEG function available with CD-RW/-R or DVD-RAM/
DVD±RW/DVD±R discs.
This involves an MP3 function available with CD-RW/-R or DVD-RAM/
DVD±RW/DVD±R discs.
This involves a function available on CD-RW/-R, DVD-RAM/DVD±RW/
DVD±R discs.
This involves a case where a function does not operate or settings may be
cancelled.
A function that can be operated by using only one button.
A function that can be operated by using the ANYKEY button.
About the use of this user’s manual
Be sure to be familiarize yourself with the Safety Instructions before using this product. (See pages 2~7)
1)
If a problem occurs, check the Troubleshooting section.
2)
(See pages 66~67)
Copyright
©2008 Samsung Electronics Co.
All rights reserved; No part or whole of this user’s manual may be reproduced or copied without the prior
written permission of Samsung Electronics Co.
English _11
Page 12
getting started
HOW TO USE THE DVD RECORDER
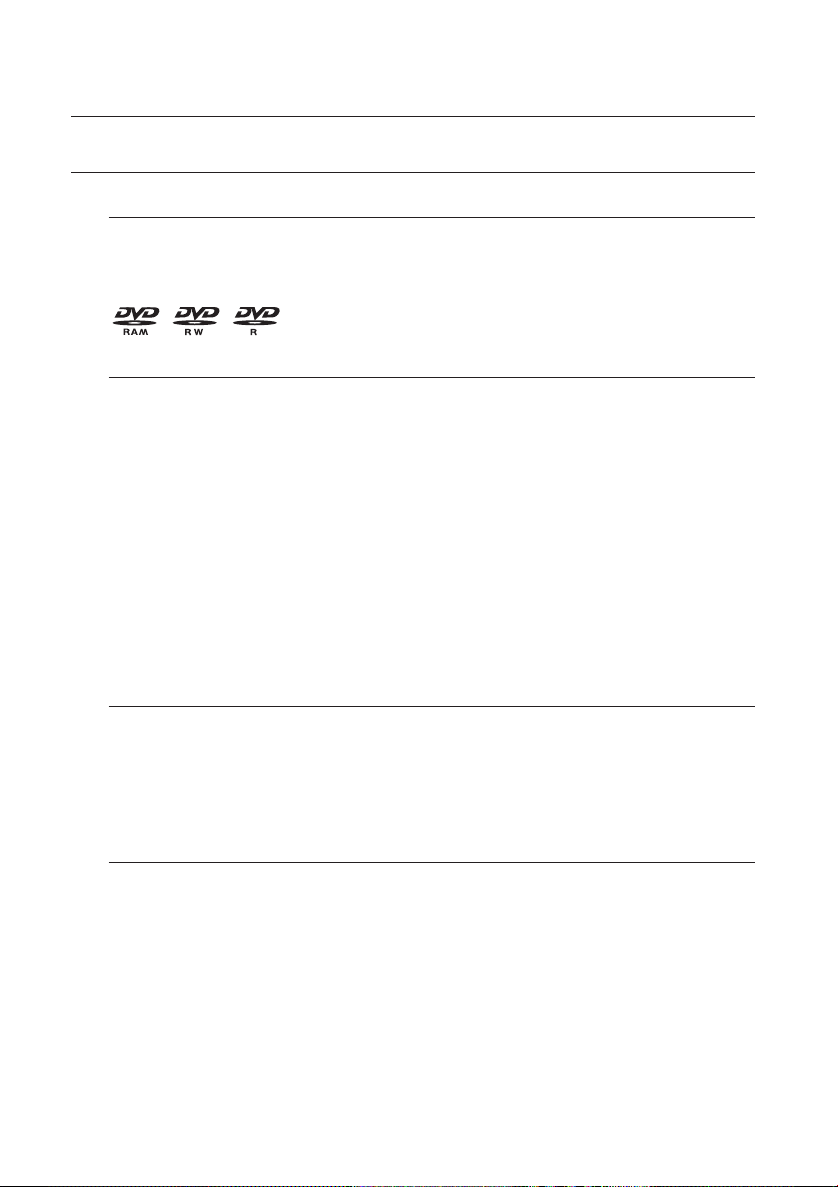
Step 1 : Select the disc type
This unit can record on the following types of discs.
If you want to repeatedly record on the same disc or you want to edit the disc after recording, select a
rewritable DVD-RW or DVD-RAM type disc. If you want to save a recording without making any changes,
choose a non-rewritable DVD-R.
Step 2 : Format the disc to start recording
The recorder automatically starts formatting when an unused disc is inserted.
Using a DVD-RAM/-RW
When an unused DVD-RAM/-RW disc is fi rst inserted, the message "Unformatted Disc. Formatting. Please
wait." will be displayed.
Using a DVD-R
It is not necessary to format a new DVD-R disc. When it is inserted, it will operate in Video mode.
It can also be formatted in VR mode in the setup menu.
You can change the disc mode only once when an unused DVD-R disc is inserted.
You can only use either the VR or Video mode on a DVD-RW/-R, but not both at the same time.
M
You can format a DVD-RW/-R to V or VR mode using disc setting.
It should be noted that the disc's data will be lost when changing formats.
Step 3 : Recording
There are two different recording methods, Direct Recording(recording a program you are currently watching)
and Timer Recording.
Timer recording is classifi ed as follows : Recording mode : HQ (high quality mode), HSP, SP (standard quality
mode), LSP, ESP, LP, EP, SLP (Long duration mode) according to the recording mode.
When recording is set in the AUTO mode, the best quality picture is recorded with regards to the remaining
time on the disc.
Step 4 : Playing
To start playback, select the title you want to play from the title list.
A DVD consists of sections called titles, and sub sections called chapters.
During recording, a title is created between two points where you start and stop recording. Chapters will be
created automatically regardless of the disc type when it is set at the setup menu.
12_ getting started
Page 13
Step 5 : Editing a recorded disc
Editing on discs is easier than conventional video tapes. The recorder supports many different edit functions,
possible only with DVDs.
With a simple and easy edit menu, you can operate various edit functions, such as delete, rename, lock, etc.,
on a recorded title.
Creating a playlist (DVD-RAM/-RW/-R in VR mode)
With this recorder, you can create/edit a new playlist on the same disc without changing the original
recording.
Step 6 : Finalizing & Playing on other DVD components
To play your DVD on other DVD players, fi nalizing may be necessary. First, fi nish all editing and recording
operations, then fi nalize the disc.
When using a DVD-RW/-R disc in VR Mode
Although fi nalizing is generally unnecessary when playing the disc on a VR Mode compatible component, a
fi nalized disc should be used for playback.
When using a DVD-RW/-R disc in Video Mode
The disc should be fi nalized fi rst to enable playback on anything other than this recorder. No more editing or
recording can be made on the disc once it has been fi nalized.
You can fi nalize automatically using the EZ Record. (See page 34)
M
UNPACKING
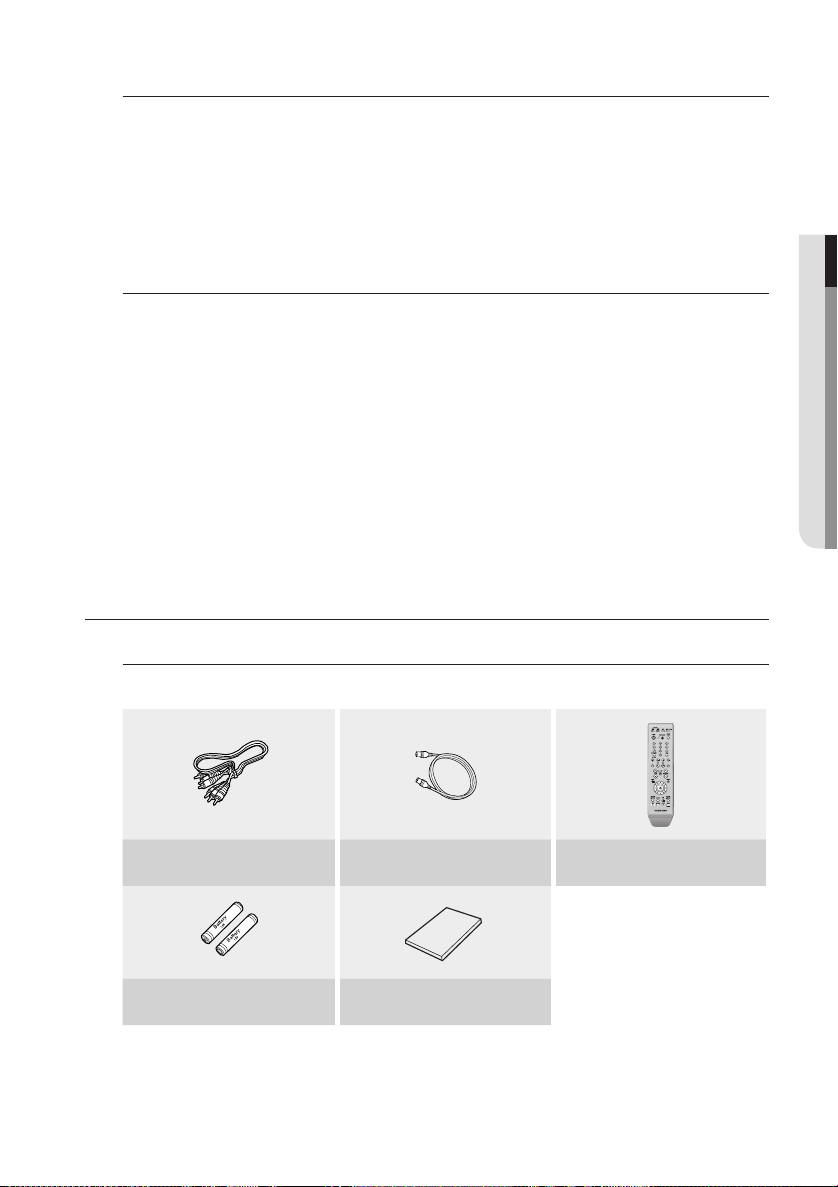
Accessories
● GETTING STARTED
Check for the supplied accessories below.
Video/Audio Cable
(AC39-00073A)
Batteries for Remote Control (AAA Size)
(AC43-12002H)
RF Cable for TV
(AC39-42001J)
Instruction Manual
(AK68-01580A)
Remote Control
(AK59-00061S)
English _13
Page 14
getting started
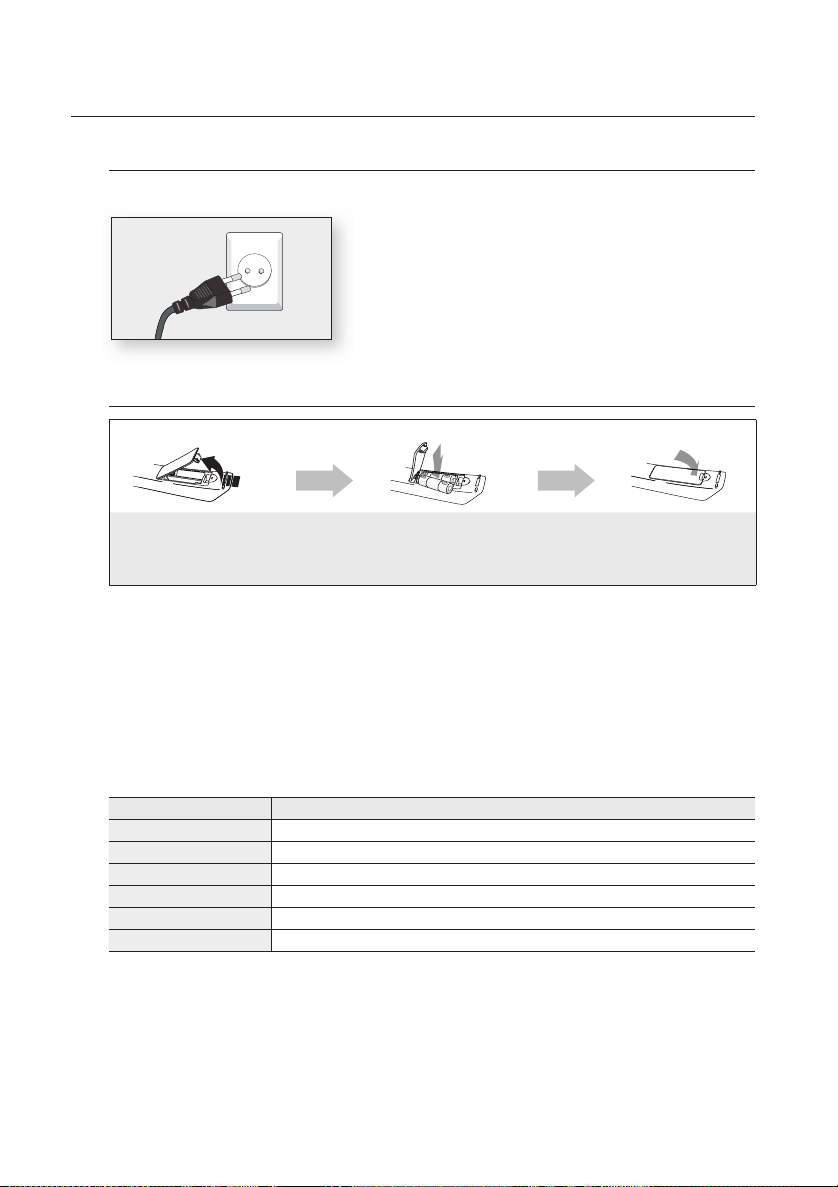
Connecting the Power Cord
After all connections are complete, plug the power cord into a wall outlet.
Preparing the Remote Control
Installing batteries in the Remote Control
1. Lift the cover at the back of the
remote control upward as shown.
If the remote control does not operate properly:
•
Check the polarity +/- of the batteries.
•
Check if the batteries are drained.
•
Check if the remote sensor is blocked by obstacles.
•
Check if there is any fl uorescent lighting nearby.
Dispose of batteries according to local environmental regulations.
Do not put them in the household trash.
You can then control the television using the following buttons.
Button Function
TV POWER Used to switch the television on and off.
INPUT SEL. Used to select an external source.
TV VOL +/- Used to adjust the volume of the television.
CH (,.) Used to select the desired channel.
0~9 Used to input number directly.
100+ Button Used to select channels over 100.
You can control only Samsung TV with this remote control.
M
The various functions may not be able to be controlled on all televisions. If you encounter problems, operate the
television directly.
2. Install two AAA size batteries.
Make sure to match the “+” and “–”
ends of the batteries with the diagram
inside the compartment.
3. Replace the cover.
Assuming typical TV usage,
the batteries last for about one
year.
14_ getting started
Page 15
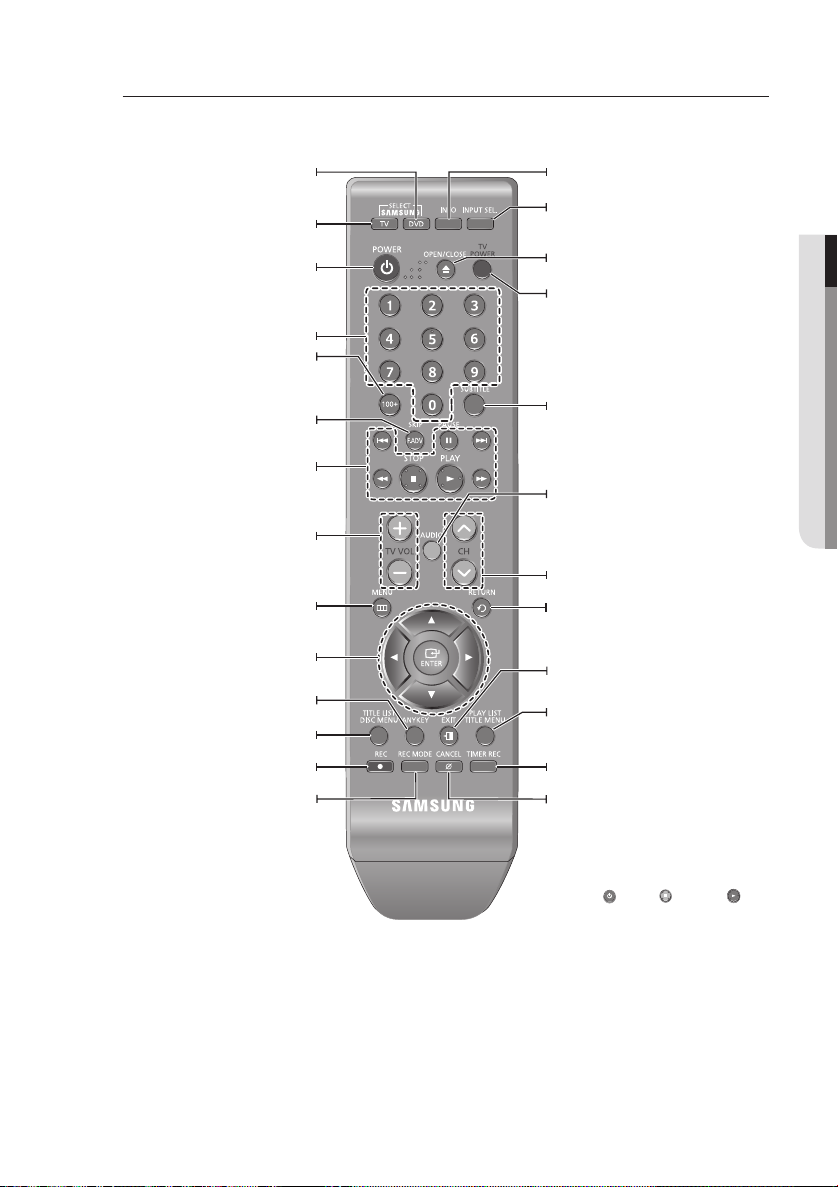
Tour of the Remote Control
Press this when you use the DVD recorder/player.
Press to power the DVD Recorder on and off.
DVD Button
Press this to operate your TV.
TV Button
POWER Button
NUMBER Buttons
Press this to select channels 100 or higher.
Press to skip a disc backwards or forwards.
Playback-related Buttons
Forward/Rewind, Search, Skip, Stop, Play, Pause.
TV VOL (Volume) Button
Press this to bring up the DVD Recorder’s setup menu.
ENTER/Direction Buttons
(UP/DOWN or LEFT/RIGHT Buttons)
This button functions as a toggle switch.
Press this to set the status of the disc that is being played.
TITLE LIST/DISC MENU Button
Press this to enter the TITLE LIST/Disc menu.
Press this to make a recording on DVD-RAM/-RW/-R discs.
Press this to set the desired recording time and picture
100+ Button
F.ADV/SKIP Button
TV volume adjustment
MENU Button
ANYKEY Button
REC Button
REC MODE Button
quality.
INFO Button
Press this to display current setting or disc status.
INPUT SEL. Button
Press this to select the AV input signal in external
input mode. (Tuner, AV 1 or AV 2).
OPEN/CLOSE Button
Press this to open and close the disc tray.
TV POWER Button
Press to power your TV on and off.
SUBTITLE Button
Press this to switch the DVD’s subtitle language.
AUDIO Button
Press this to access various audio functions.
Selects one of the audio tracks recorded on the disc when
pressed repeatedly.
DVD-RW(VR)/-R (VR) : Selects the main or sub sound.
DVD VIDEO : Selects the audio source.
CH Button
Use this to select a TV channel.
RETURN Button
Returns to a previous menu.
EXIT Button
Exit the current menu.
PLAY LIST/TITLE MENU Button
Press this to enter the Edit playlist/Title menu.
TIMER REC Button
Press this when you use Timer Recording.
CANCEL Button
● GETTING STARTED
❋ This is a special remote control for the visually
impaired, and has Braille points on the
), STOP( ) and PLAY( )
POWER(
buttons.
English _15
Page 16
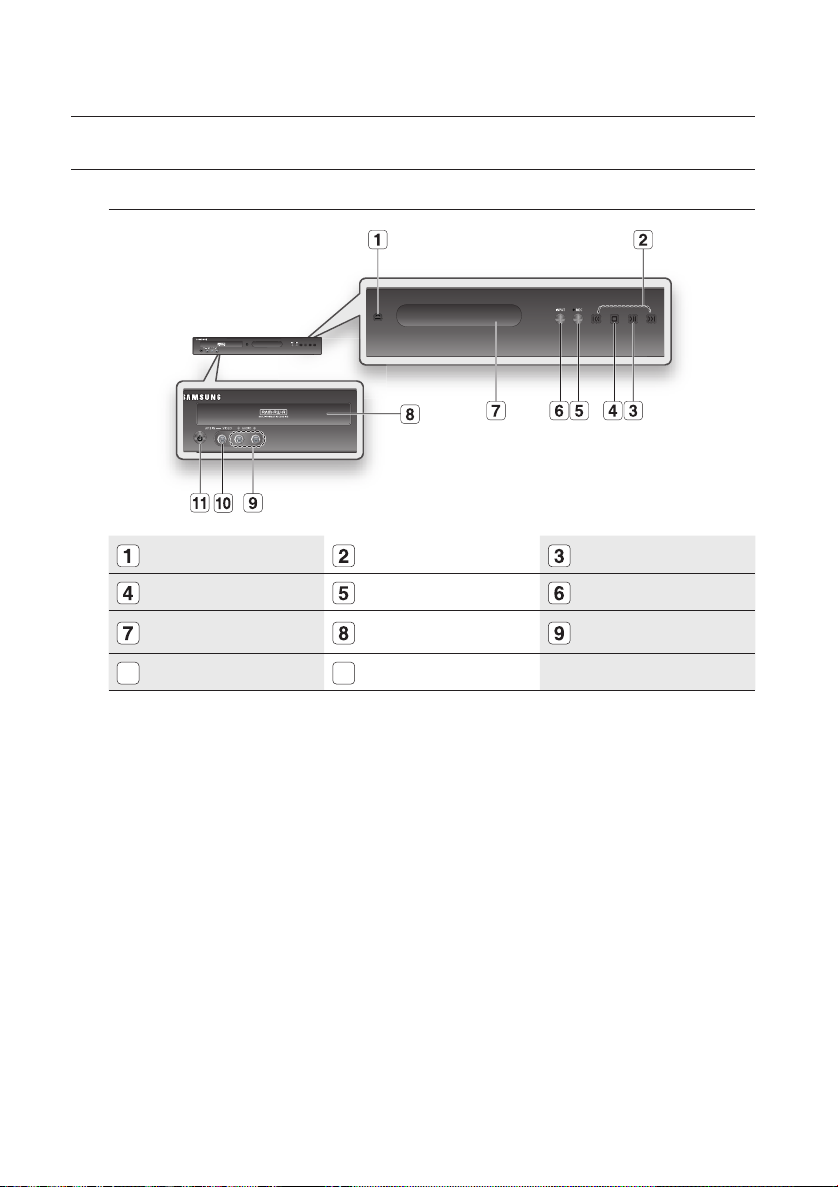
getting started
DESCRIPTION
Front Panel
DVD OPEN/CLOSE BUTTON
STOP BUTTON REC BUTTON INPUT BUTTON
FRONT PANEL DISPLAY DVD DECK
VIDEO INPUT JACK (AV 2 IN) POWER BUTTON
10 11
CH (./,), SEARCH/SKIP BUTTON
PLAY/PAUSE BUTTON
AUDIO L, R INPUT JACKS
(AV 2 IN)
16_ getting started
Page 17
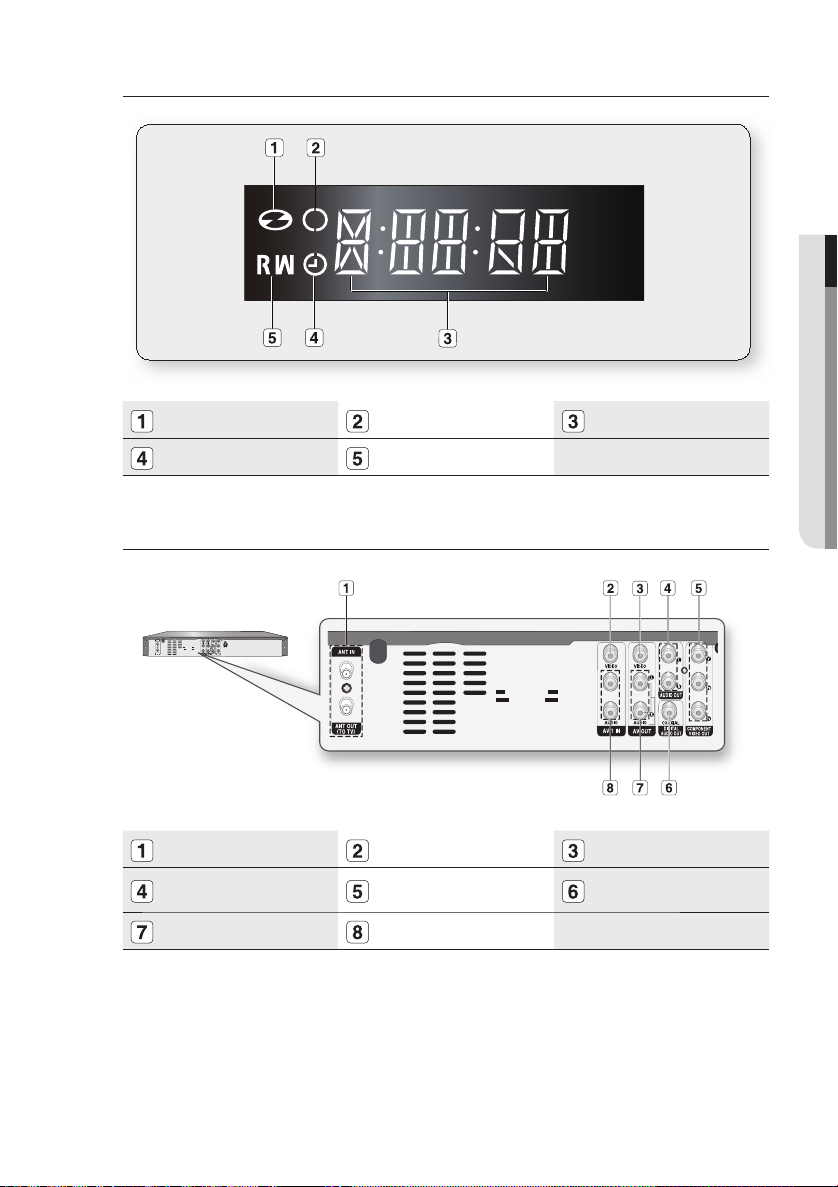
Front Panel Display
● GETTING STARTED
In Disc Indicator Rec Indicator
TIMER Indicator Disc Media Indicator
STATUS Indicator
Rear Panel
ANT IN/ANT OUT CONNECTORS VIDEO INPUT JACK (AV 1 IN) VIDEO OUT JACK (AV OUT)
AUDIO OUT JACKS
(COMPONENT OUT)
AUDIO OUT JACKS (AV OUT) AUDIO INPUT JACKS (AV 1 IN)
COMPONENT VIDEO OUT JACKS
DIGITAL AUDIO OUT JACK
(COAXIAL)
English _17
Page 18
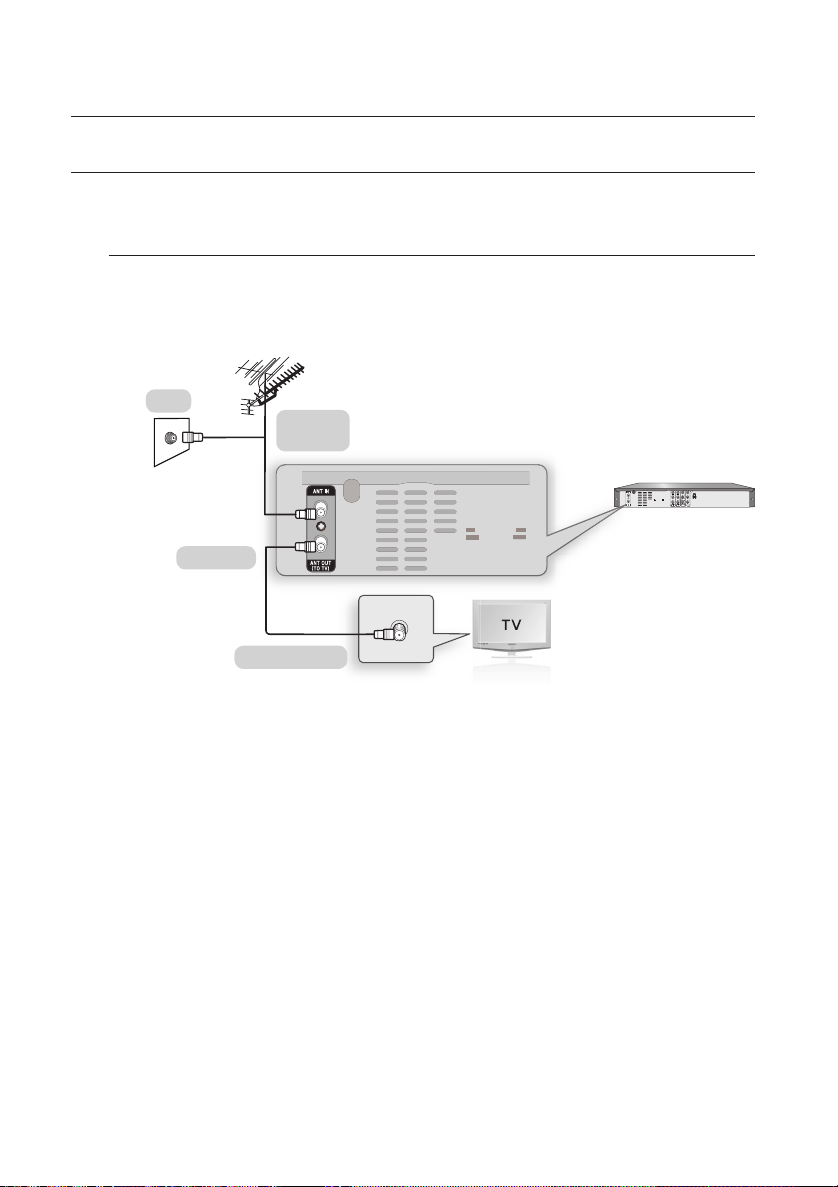
connecting & setting upconnecting & setting up
CONNECTING THE ANTENNA CABLE
There are several ways to connect your DVD Recorder. Select the antenna connection that best suits you below.
Antenna + DVD Recorder + TV:No Cable Box
You can record non-scrambled channels by selecting the channel on the DVD Recorder. Also use this
method if you watch channels without a cable box.
Wall
RF Cable
(supplied)
TO ANT OUT
TO ANT INPUT
The VHF/UHF ANT (RF) OUT jack of this product sends only signals received through the antenna. It does not output
M
Audio/Video signals. You must connect Audio/Video cables to view Video from the unit.
(i.e. DVD playback)
18_ connecting & setting up
Page 19
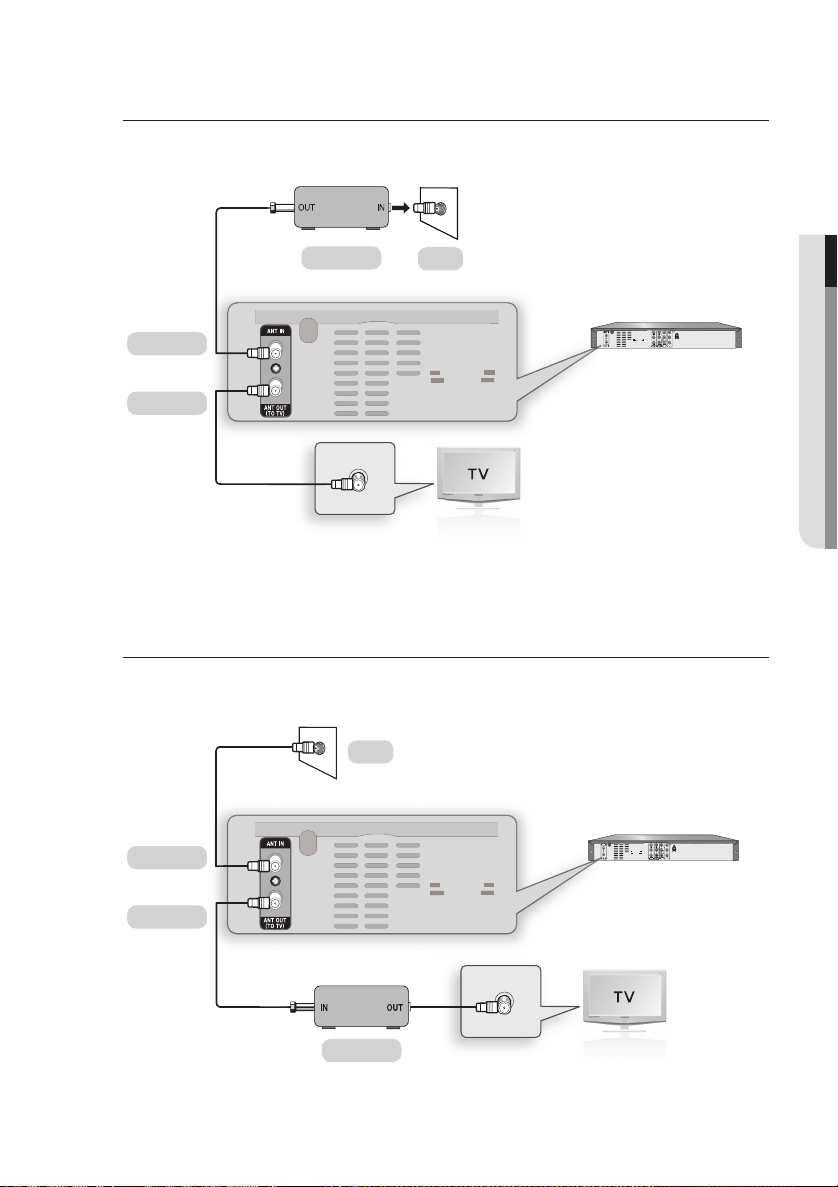
Antenna + Cable box + DVD Recorder + TV : Cable box with many
scrambled channels
You can record channels by selecting the channel on the cable box. You cannot record one channel while
watching another channel. Be sure that the cable box is turned on.
Cable box
TO ANT IN
TO ANT OUT
The VHF/UHF ANT (RF) OUT jack of this product sends only signals received through the antenna. It does not output
M
Audio/Video signals. You must connect Audio/Video cables to view Video from the unit. (i.e. DVD playback)
Wall
Antenna + DVD Recorder + Cable box + TV : Cable box with a few
scrambled channels
You can record non-scrambled channels by selecting the channel on the DVD Recorder. You cannot record
scrambled channels that require a cable box.
Wall
● CONNECTING & SETTING UP
TO ANT IN
TO ANT OUT
Cable box
The VHF/UHF ANT (RF) OUT jack of this product sends only signals received through the antenna. It does not output
M
Audio/Video signals. You must connect Audio/Video cables to view Video from the unit. (i.e. DVD playback)
English _19
Page 20
connecting & setting up
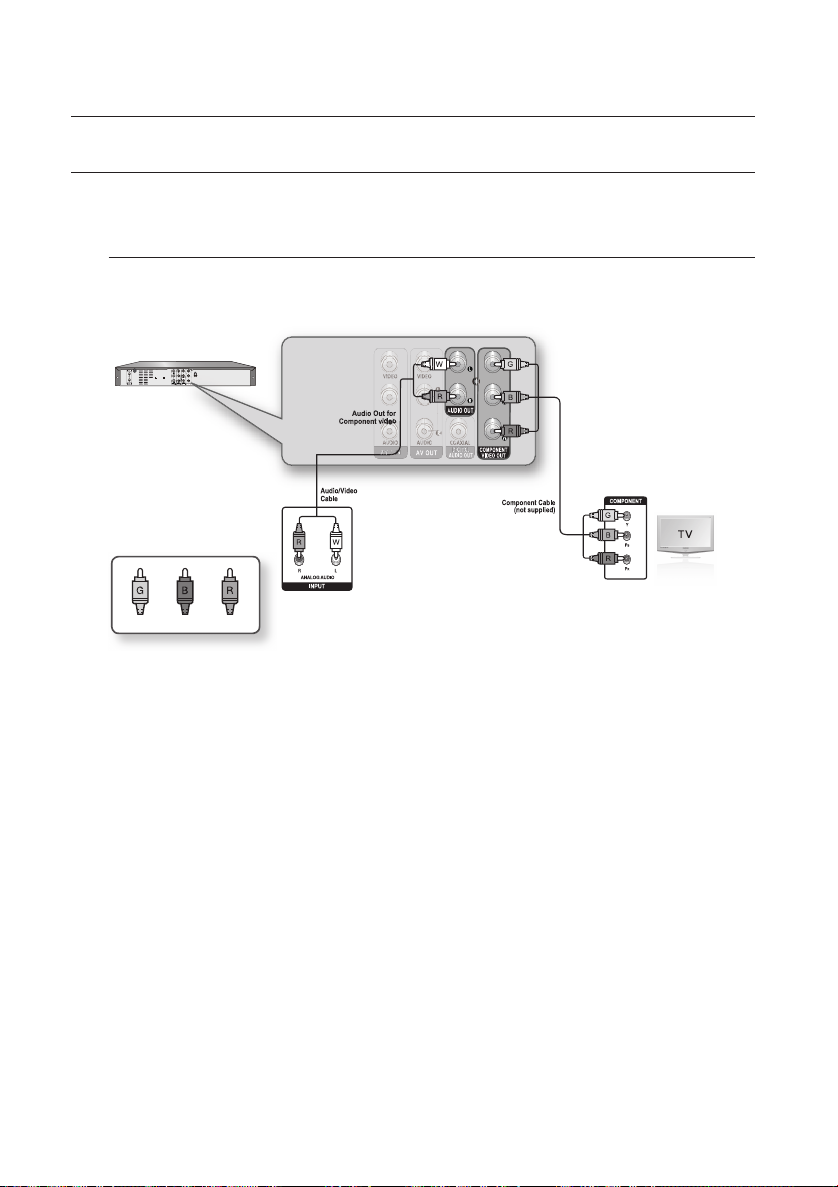
CONNECTING THE VIDEO OUTPUT
There are several other ways to connect your DVD Recorder.
Select one of the video connections on the following pages.
Connecting to Component Video Input Jacks (Y, PB, PR)
Connect Component video cables (not supplied) between the COMPONENT OUT (Y, PB, PR) jacks on the
DVD Recorder and COMPONENT IN (Y, PB, PR) jacks on your TV.
BlueGreen Red
•
You will enjoy high quality images. Component video separates the picture element into black and white(Y),
B), red(PR) signals to present clear and clean images.
blue(P
•
Connect the audio cables(white and red) between the Component AUDIO OUT jacks on the DVD Recorder
and Component AUDIO IN jacks on your TV(or AV amplifi er). (See pages 21~22)
•
Progressive scan
- If your TV supports Progressive Scan, you can enjoy higher quality video by Progressive Scan Setting.
(The component cable has to be connected.)
Compared to standard interlaced video, progressive scan doubles the amount of video lines fed to your TV, resulting
M
in a clearer, more stable, and fl icker free image than interlaced video. The component output jack of the DVD player
can be used for progressive output mode, which is only available with TVs that support progressive scan.
Progressive Scan Output (480p)
Consumers should note that not all high defi nition television sets are fully compatible with this product and may
cause artifacts to be displayed in the picture. If you experience 480p progressive scan picture problems, it is
recommended that you switch the connection to the ‘standard defi nition’ output. If there are questions regarding TV
set compatibility with this model, please contact our customer service center at 1-800-SAMSUNG.
20_ connecting & setting up
Page 21
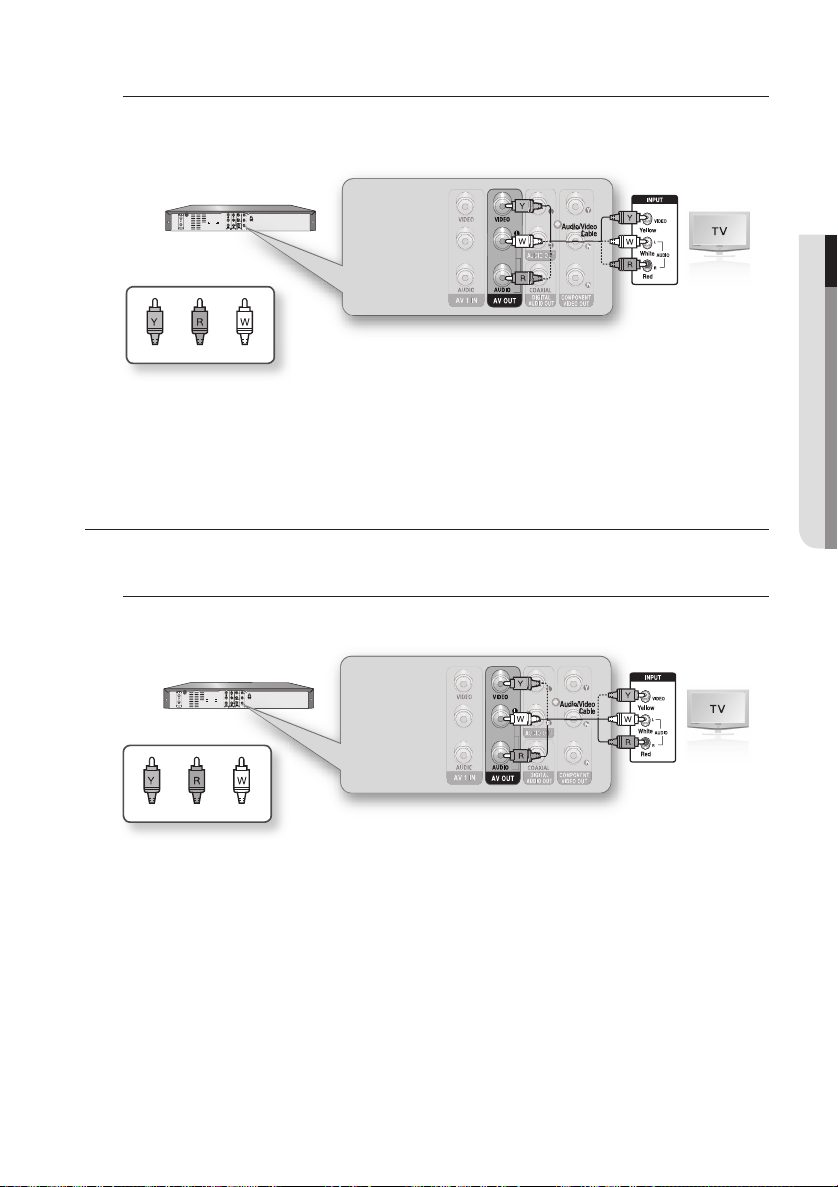
Connecting to a Video Input Jack
Connect a video(yellow) cable between the VIDEO(yellow) OUT jack on the DVD Recorder and VIDEO(yellow)
IN jack on the TV.
RedYellow White
•
You will enjoy regular quality images.
This connection outputs the 480i resolution to your TV.
•
Connect the audio cables(white and red) between the AUDIO OUT jacks on the DVD Recorder and AUDIO
IN jacks on your TV(or AV amplifi er). (See pages 21~22)
CONNECTING THE AUDIO CABLE
Select one of the Audio connections on the following pages.
Connecting to your TV
This connection will use your TV’s speakers.
● CONNECTING & SETTING UP
RedYellow White
English _21
Page 22
connecting & setting up
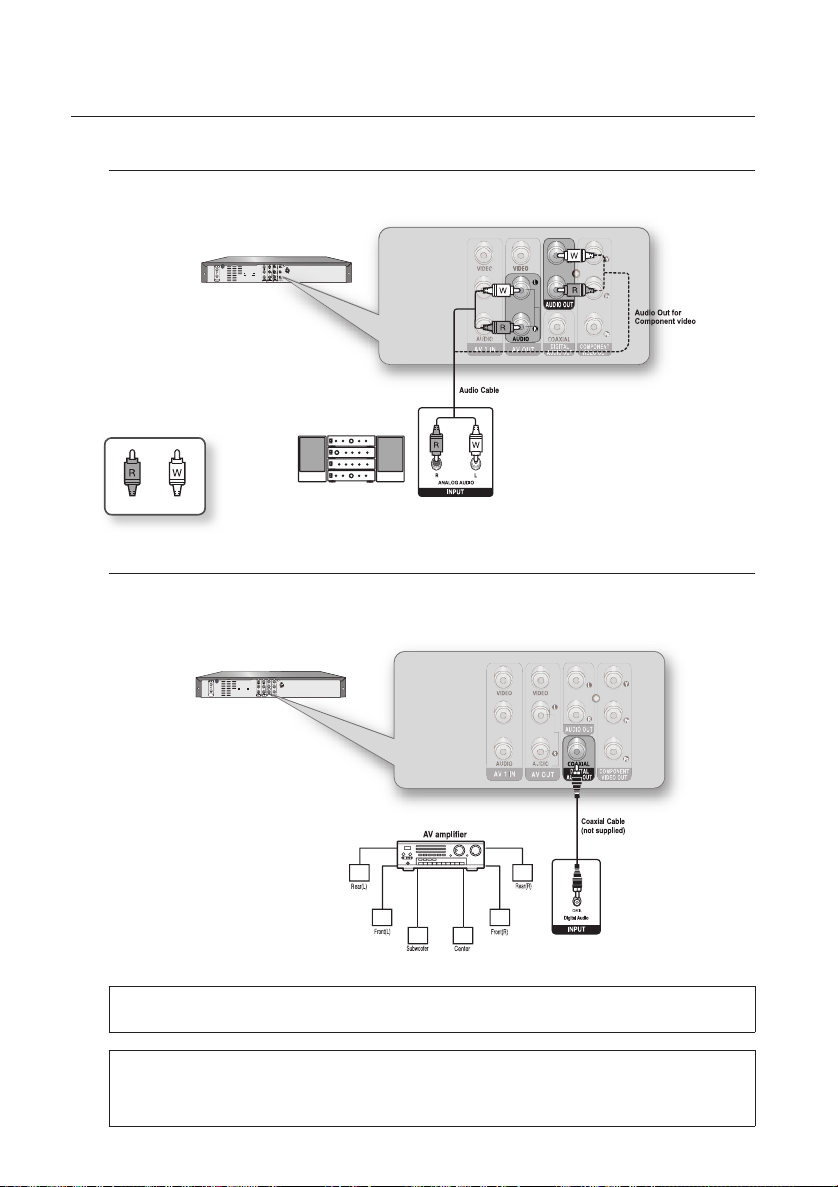
Connecting to a Stereo Amplifi er with Analog Input Jacks
If your stereo amplifi er only has AUDIO INPUT jacks(L and R), use the AUDIO OUT (AV OUT) jacks.
Red
White
Connecting to an AV Amplifi er with a Digital Input Jack
If your AV amplifi er has a Dolby Digital or DTS decoder and a digital input jack, use this connection.
To enjoy Dolby Digital or DTS sound, you will need to set up the audio settings. (See pages 30~32)
Manufactured under license from Dolby Laboratories. “Dolby” and the double-D symbol are trademarks of
Dolby Laboratories.
Manufactured under license under U.S. Patent #: 5,451,942 & other U.S. and worldwide patents issued & pending.
DTS and DTS Digital Out are registered trademarks and the DTS logos and Symbol are trademarks of DTS, Inc.
© 1996-2007 DTS, Inc. All Rights Reserved.
22_ connecting & setting up
Page 23
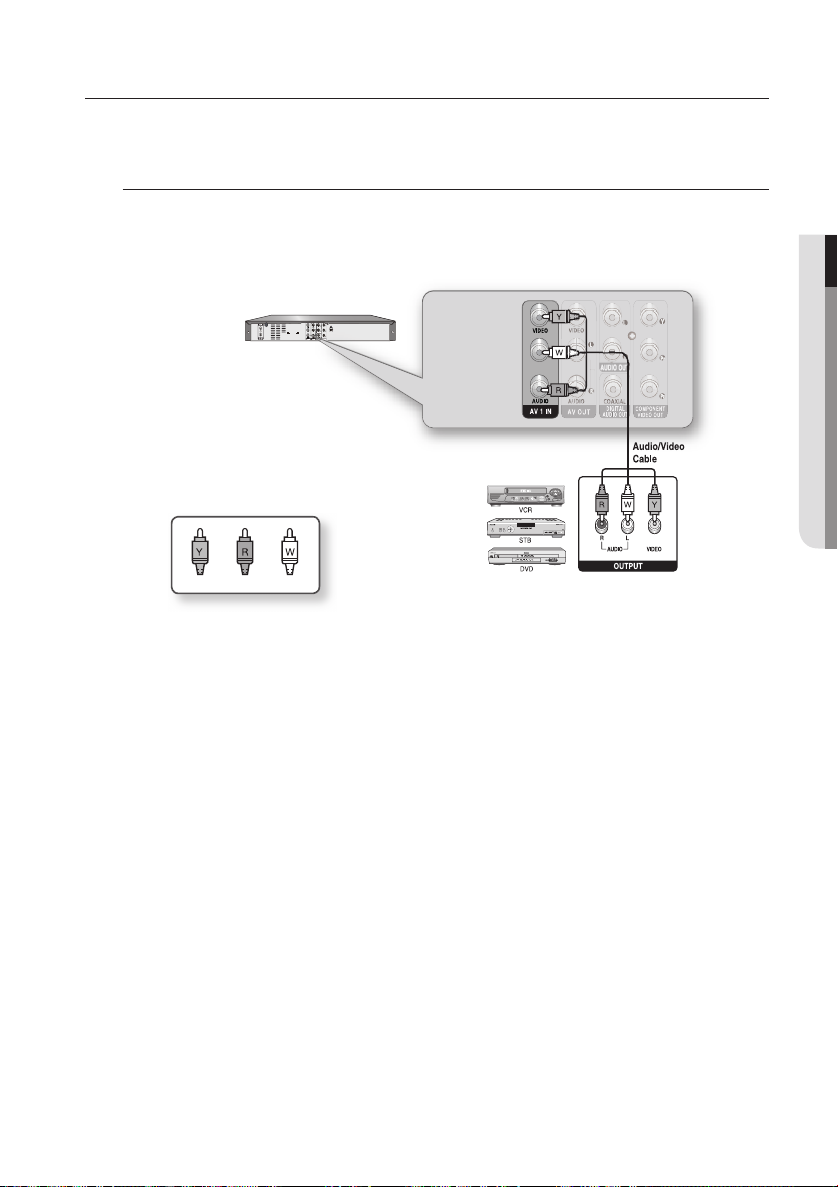
CONNECTING EXTERNAL DEVICES
This allows you to connect your DVD Recorder to other external devices and view or record their outputs.
Connecting a VCR, Set top/Cable box, satellite receiver or DVD player
to the AV 1 IN Jack
Connecting a VCR or external device to AV 1 IN jacks of the DVD Recorder.
You can record from connected equipment (VCR, Set top/Cable box, satellite receiver or DVD).
RedYellow White
You can also use the AV 2 IN jacks on the front panel of the DVD Recorder.
M
Press the INPUT SEL. button to select AV1.
Copy protected content cannot be recorded.
● CONNECTING & SETTING UP
English _23
Page 24
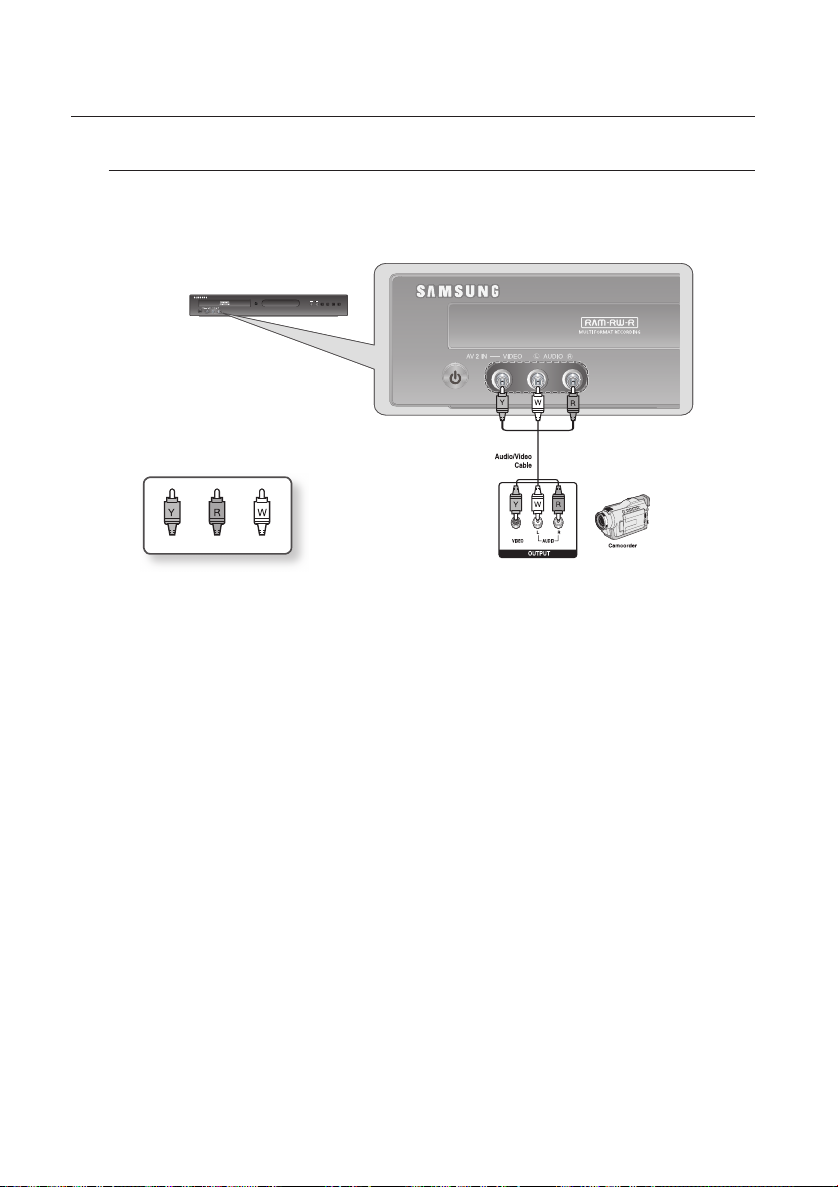
connecting & setting up
Connecting a Camcorder
You can record from connected equipment, such as a camcorder by using the AV2 IN jacks on front of the
DVD Recorder.
RedYellow White
Check your camcorder's owner's manual to see how to use the camcorder in this mode.
M
24_ connecting & setting up
Page 25

system setup
ON-SCREEN MENU NAVIGATION
The on-screen menus allow you to enable or disable various functions on your DVD Recorder.
Press the MENU button to open the on-screen menu and then use the following buttons to navigate through the on
screen menus.
▲▼
Buttons
1.
Press these buttons on the remote control to move the selection
▲▼
to cycle through the menu options.
bar
2.
ENTER Button
Press this button on the remote control to confi rm any new settings.
3.
RETURN Button
Press this button on the remote control to return to the previous
menu screen displayed or to exit the on-screen menu.
4.
EXIT Button
Timer
Title List
Timer - Standard
Timer List
Timer
Edit
Disc
Setting
Setup
> Move sEnter rReturn eExit
Press this button to exit the on-screen menu.
EASY SETUP
After plugging in the recorder, the fi rst time you press the POWER button, easy setup comes up.
You can set this menu by using setup menu.
Follow the steps below to make the minimum number of basic adjustments for using the recorder.
Settings are made in the following order.
1.
With the unit in Stop mode, press the MENU button.
2.
Press the
▲▼
buttons to select Setup, then press the ENTER
button.
3.
Press the ▲▼ buttons to select Easy Setup, then press the
ENTER button.
The message "Follow the guide to make initial settings. Before
you start, Check that you have made all necessary connections."
is displayed.
4.
Press the
◄ ►
buttons to select Start.
5.
Press the ENTER button.
The setup display for selecting the language used in the
on-screen display appears.
6.
Press the
▲▼
buttons to select the desired language, then press
the ENTER button.
The message “Press [ENTER] to start scanning Analog channels.”
Setup
Title List
Tuner Preset
Clock Set
Timer
Video
Edit
Audio
Disc
Features
Setting
Options
Setup
Easy Setup
> Move sEnter rReturn eExit
Easy Setup
Select the screen language.
Portuguese
✔ English
Español
> Move sEnter rReturn eExit
Easy Setup
Press [ENTER] to start scanning
Analog channels.
12:00
12:00
12:00
12:00
● SYSTEM SETUP
Start
sEnter rReturn eExit
English _25
Page 26

system setup
Press the ENTER button.
7.
Press the
▲▼
buttons to select the desired broadcasting
system, then press the ENTER button.
Start the auto scanning, and then for clock setting appears.
Press the ▲▼
8.
◄ ►
buttons to select the Current Date and Time,
then press the ENTER button.
For details see page 28.
Press the
9.
▲▼
buttons to select the desired TV screen type, then
press the ENTER button.
The message "Easy Setup is fi nished." is displayed.
Press the ENTER button.
10.
Easy setup is fi nished. All connections and setup operations are
complete.
Easy Setup
Searching for receivable Analog channels.
Please wait.
Stop
sEnter rReturn eExit
Easy Setup
Set the time and date manually.
Month Day
Year
01 01 2008 Tue
Hour
Min
12 : 00
m Move sEnter eExit
Easy Setup
Select your TV screen type.
16:9
✔ 4:3 Letter Box
4:3 Pan Scan
> Move sEnter rReturn eExit
Easy Setup
Easy Setup is finished.
Finish
12:00
12:00
12:00
12:00
TUNER PRESET
With the unit in Stop mode/No Disc mode, press the MENU button.
1.
Press the ▲▼ buttons to select Setup, then press the ENTER button.
2.
Press the ▲▼ buttons to select Tuner Preset, then press the ENTER button.
3.
Antenna/Cable
You do not need to preset the stations if you have already set them
automatically (See Easy Setup on pages 25~26).
Select the broadcasting system from the RF cable.
To setup, follow steps 1~3
• Antenna
• Cable
26_ system setup
sEnter rReturn eExit
Tuner Preset
Title List
Antenna/Cable : Antenna
Auto Preset
Timer
Manual Set
Edit
Disc
Setting
Setup
> Move sEnter rReturn eExit
Antenna
✔ Cable
12:00
Page 27
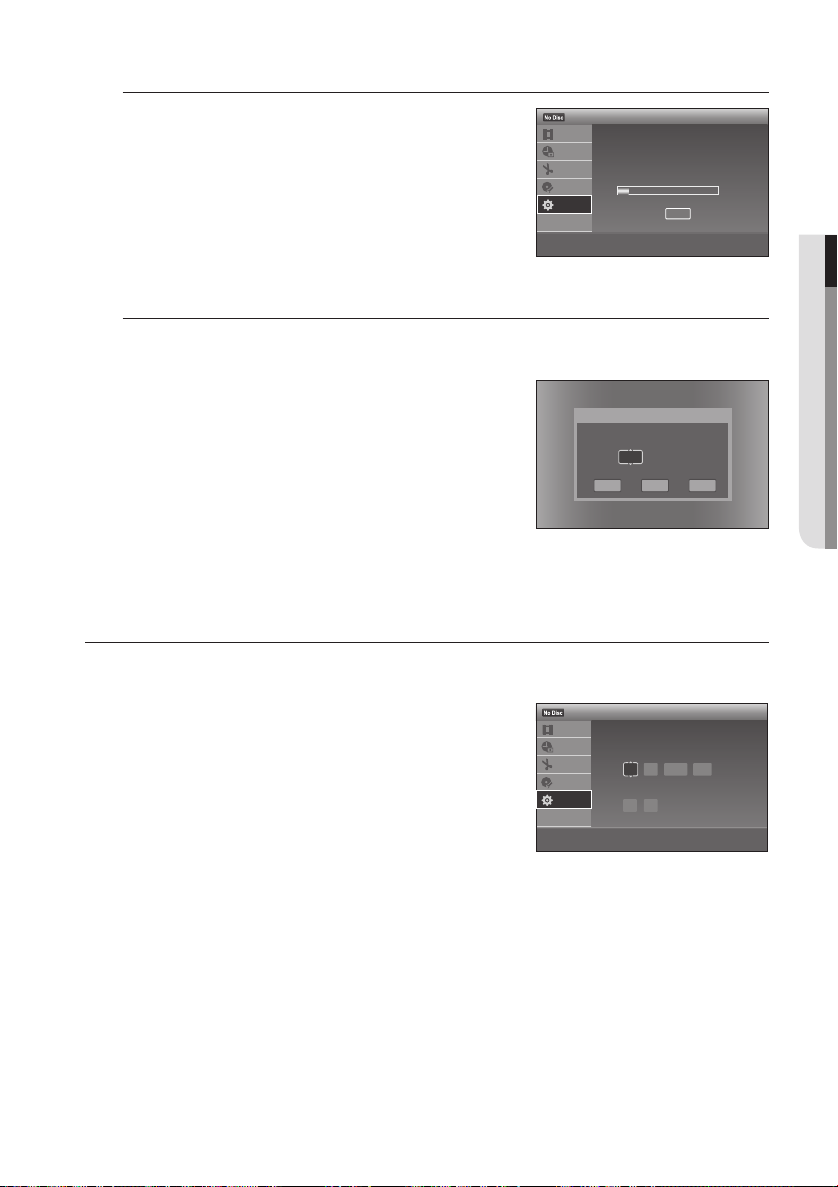
Auto Preset
Auto Preset will automatically seek and store all active channels in
your area.
The DVD Recorder will automatically search for all available channels
M
in the selected tuner band. This procedure may take a few minutes to
complete.
When fi nished, the lowest channel will be displayed.
If you want to stop or cancel scanning, press the ENTER button.
Auto Preset
Title List
Searching for receivable Analog channels.
Timer
Edit
Disc
Setting
Setup
> Move sEnter rReturn eExit
Please wait.
5%
Stop
Manual Set
Use this feature if Auto Preset missed a channel that you would like to add or if you wish to remove a channel.
Press the
▲▼
1.
buttons to select Manusl Set, then press the
ENTER button.
Press the
▲▼
2.
to add or erase on the Select channel screen. Then, press the
ENTER button.
Using CH (./,) buttons for channel selection allows the user
•
or number buttons to select the channels you want
Select a channel:
1
Add Erase Exit
to add/erase one channel at a time.
▲▼
Using
•
buttons for channel selection jumps to the next
channel memorized in Auto Preset.
Press the
◄ ►
3.
buttons to select Add , Erase or Exit, then press the ENTER button.
CLOCK SET
12:00
● SYSTEM SETUP
This menu is used to set the current time. You need to set the time to use timer recording.
1.
With the unit in Stop mode/No Disc mode, press the MENU button.
2.
Press the ▲▼ buttons to select Setup, then press ENTER
button
.
3.
Press the ▲▼ buttons to select Clock Set, then press ENTER
button
.
▲▼◄ ►
4.
Press the
buttons to select the Current Date and Time,
then press the ENTER button.
When the current time is stored in memory and then the set is
powered off, the current time will appear in the front panel display.
▲ ▼
: Sets the value
Clock Set
Title List
Set the time and date manually.
Timer
Month Day Year
Edit
01 01 2008 Tue
Disc
Setting
Hour Min
Setup
12 : 00
m Move sEnter rReturn eExit
You can set the value using the number (0~9) buttons.
◄ ►
: Moves to items
12:00
English _27
Page 28
system setup
SETTING UP THE VIDEO OPTIONS
This function allows you to setup the video setting.
This function depends on disc type. It may not work for some disc types.
With the unit in Stop mode, press the MENU button.
1.
Press the
2.
▲▼
buttons to select Setup, then press the ENTER
button.
3.
Press the
▲▼
buttons to select Video, then press the ENTER
button.
Video setup menu will be displayed.
4.
Press the
▲▼
buttons to select the desired video option shown
on the next few pages, then press the ENTER button.
5.
Press the
▲▼
buttons to select the desired item, then press the
ENTER button.
Press the RETURN button to return to the previous menu.
M
Press the EXIT (
) button to exit the menu.
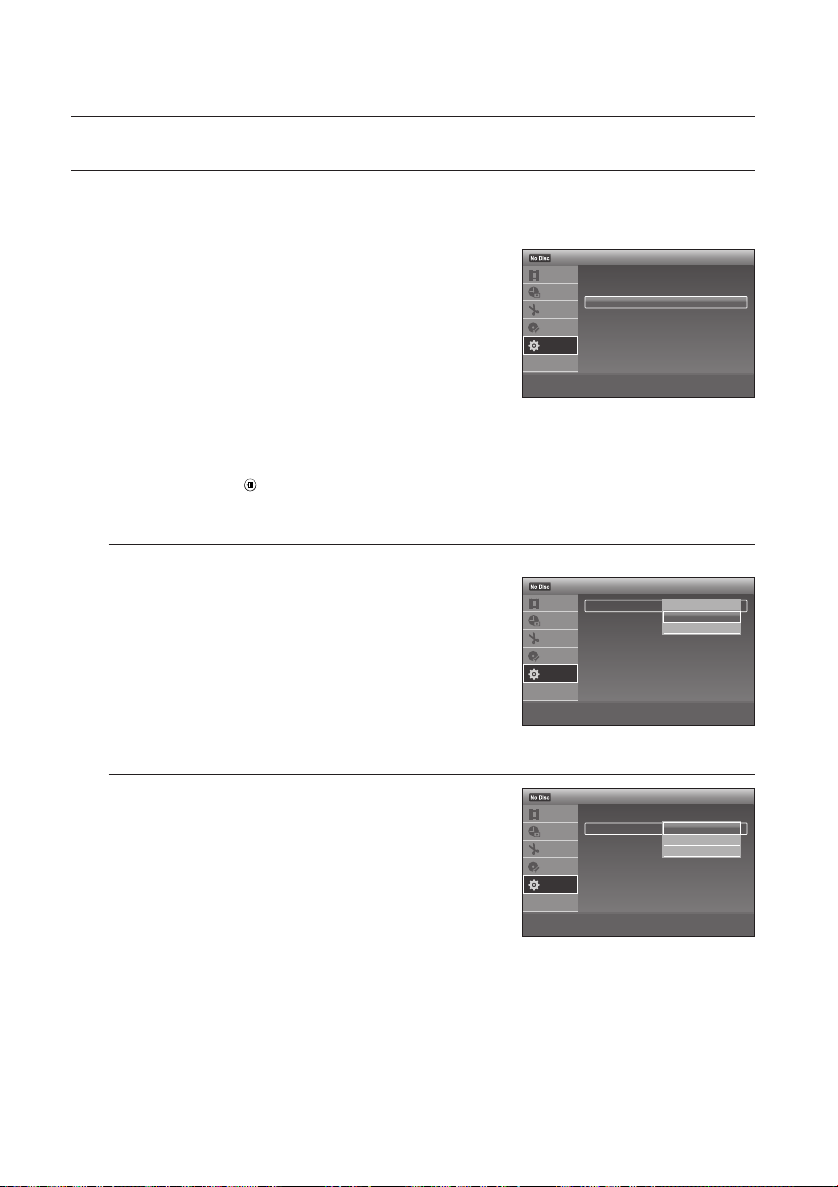
TV Type
Depending on the type of television you have, you may want to adjust the screen setting. (aspect ratio)
16:9 : You can view the full 16:9 picture on your wide screen TV.
•
4:3 Letter Box : Select when you want to see the total 16:9
•
ratio screen DVD supplies, even though you have a TV with a
4:3 ratio screen. Black bars will appear at the top and bottom
of the screen.
4:3 Pan Scan : Select this for conventional size TV when you
•
want to see the central portion of the 16:9 screen. (Extreme left
and right side of movie picture will be cut off.)
Setup
Title List
Tuner Preset
Clock Set
Timer
Video
Edit
Audio
Disc
Features
Setting
Options
Setup
Easy Setup
> Move sEnter rReturn eExit
Video
Title List
TV Type : 4:3 Letter Box
Input System : Auto
Timer
Black Level : On
Edit
Picture Control : Standard
Disc
Progressive : On
Setting
Setup
> Move sEnter rReturn eExit
16:9
✔ 4:3 Letter Box
4:3 Pan Scan
12:00
12:00
Input System
You can select the required system standard. Otherwise, the system
automatically selects the reception standard when you select Auto.
•
Auto
•
PAL-M
•
NTSC
•
28_ system setup
Video
Title List
TV Type : 4:3 Letter Box
Input System : Auto
Timer
Black Level : On
Edit
Picture Control : Standard
Disc
Progressive : On
Setting
Setup
> Move sEnter rReturn eExit
✔ Auto
PAL- M
NTSC
12:00
Page 29
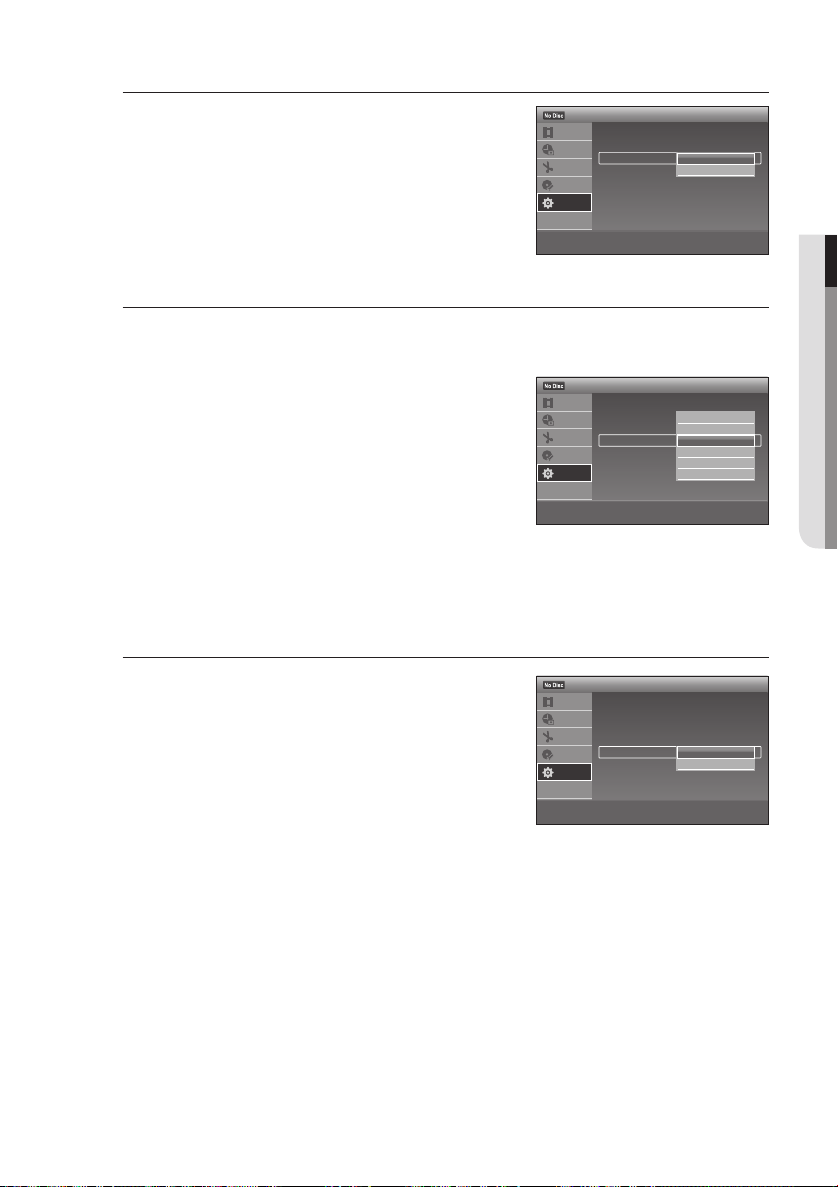
Black Level
Adjusts the black level of the screen.
•
On : This is the standard NTSC reference black level for
consistent brightness/contrast across all sources.
Select this when you want to make the screen darker.
•
Off : This will enhance the black level for increased brightness/
contrast when viewing DVDs. Select this when you want to
make the screen lighter.
Video
TV Type : 4:3 Letter Box
Title List
Input System : Auto
Timer
Black Level : On
Edit
Picture Control : Standard
Disc
Progressive : On
Setting
Setup
> Move sEnter rReturn eExit
✔ On
Off
Picture Control
Selects the picture control for the video signals output from the AV output jacks.
You can adjust the DVD video signal from the recorder to obtain the picture quality you want.
Select the setting that best suits the program you are watching.
•
This function can only be used when you have the Video
Out(AV out) jacks connected and does not work with
Component.
•
Dynamic 1 : Produces a bold dynamic picture by increasing
the picture contrast and the color.
•
Dynamic 2 : Produces a more dynamic picture than “Dynamic
1” by further increasing the picture contrast and the color.
•
Standard : Displays a standard picture (function turned off ).
•
Cinema 1 : White colors become brighter and black colors
become richer,and the color contrast is increased.
•
Cinema 2 :
Personal : Adjusts Contrast, Brightness, Color and Hue using
•
Enhances detail in dark areas by increasing the black level.
Video
TV Type : 4:3 Letter Box
Title List
Input System : Auto
Timer
Black Level : On
Edit
Picture Control : Standard
Disc
Progressive : On
Setting
Setup
> Move sEnter rReturn eExit
▲▼◄►
buttons.
Dynamic1
Dynamic2
✔ Standard
Cinema1
Cinema2
Personal
Progressive Scan
12:00
● SYSTEM SETUP
12:00
This function is available when video output is component. This setting
enables you to select a desired progressive mode. To view ‘Progressive
scan mode’, fi rst connect the component cable. (See page 20) Be
sure the Component cables are connected properly.
On
•
Off
•
Progressive setting is only available when the Recorder is in stop mode.
M
Video
TV Type : 4:3 Letter Box
Title List
Input System : Auto
Timer
Black Level : On
Edit
Picture Control : Standard
Disc
Progressive : On
Setting
Setup
> Move sEnter rReturn eExit
✔ On
Off
English _29
12:00
Page 30
system setup
SETTING UP THE AUDIO OPTIONS
This function allows you to set up the Audio options.
1.
With the unit in Stop mode, press the MENU button.
▲▼
2.
Press the
buttons to select Setup, then press the ENTER
button.
Press the ▲▼ buttons to select Audio, then press the ENTER
3.
button.
▲▼
Press the
4.
buttons to select the desired audio option shown
on the next few pages, then press the ENTER button.
Press the ▲▼ buttons to select the desired item, then press the ENTER button.
5.
Press the RETURN button to return to the previous menu.
M
Press the EXIT (
) button to exit the menu.
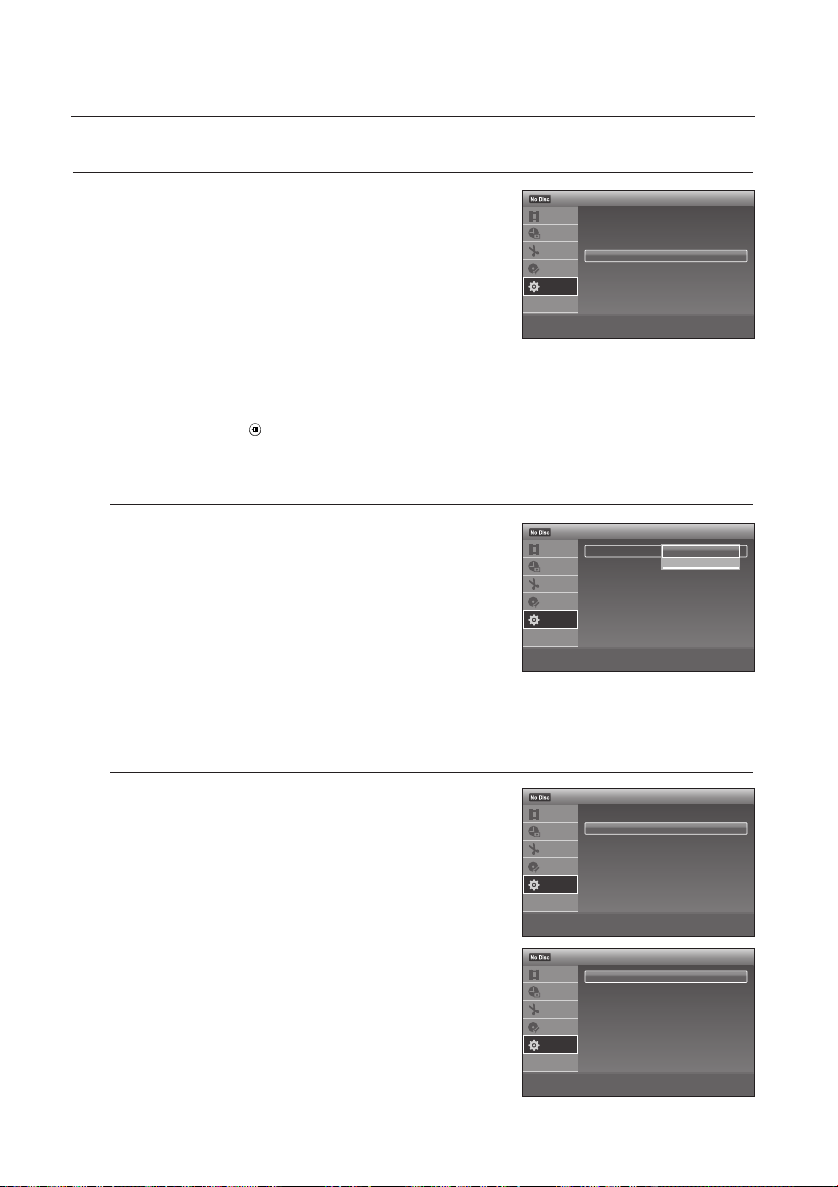
Tuner Audio
Main : Select Main if you want to hear the normal sound.
•
The main sound generally means the normal broadcast audio
signal.
SAP : When there is bilingual broadcast program, you may
•
select SAP to listen to the SAP(Secondary Audio Program)
sound. Please make sure that the program you received
includes SAP signal.
Digital Out
Setup
Title List
Tuner Preset
Clock Set
Timer
Video
Edit
Audio
Disc
Features
Setting
Options
Setup
Easy Setup
> Move sEnter rReturn eExit
Audio
Tuner Audio : Main
Title List
Digital Out
Timer
Downmix : Dolby Surround
Edit
Audio DRC : Standard
Disc
Scan Audio : On
Setting
Surround : Off
Setup
AV Audio Input : Stereo
> Move sEnter rReturn eExit
✔ Main
SAP
12:00
12:00
Selects audio options for signals output from the DIGITAL AUDIO
OUT (COAXIAL).
The following setup items switch the method of outputting audio
signals when you connect a component such as an amplifi er
(receiver) with a digital input jack. For connection details, see "AV
Receiver Connections" on page 22.
If you connect a component that does not accept the selected audio
M
signal, a loud noise (or no sound) will come out from the speakers, and
may affect your ears or cause speaker damage.
30_ system setup
Audio
Tuner Audio : Main
Title List
Digital Out
Timer
Downmix : Dolby Surround
Edit
Audio DRC : Standard
Disc
Scan Audio : On
Setting
Surround : Off
Setup
AV Audio Input : Stereo
> Move sEnter rReturn eExit
Digital Out
Dolby Digital : D-PCM
Title List
DTS : Off
Timer
Edit
Disc
Setting
Setup
> Move sEnter rReturn eExit
12:00
12:00
Page 31
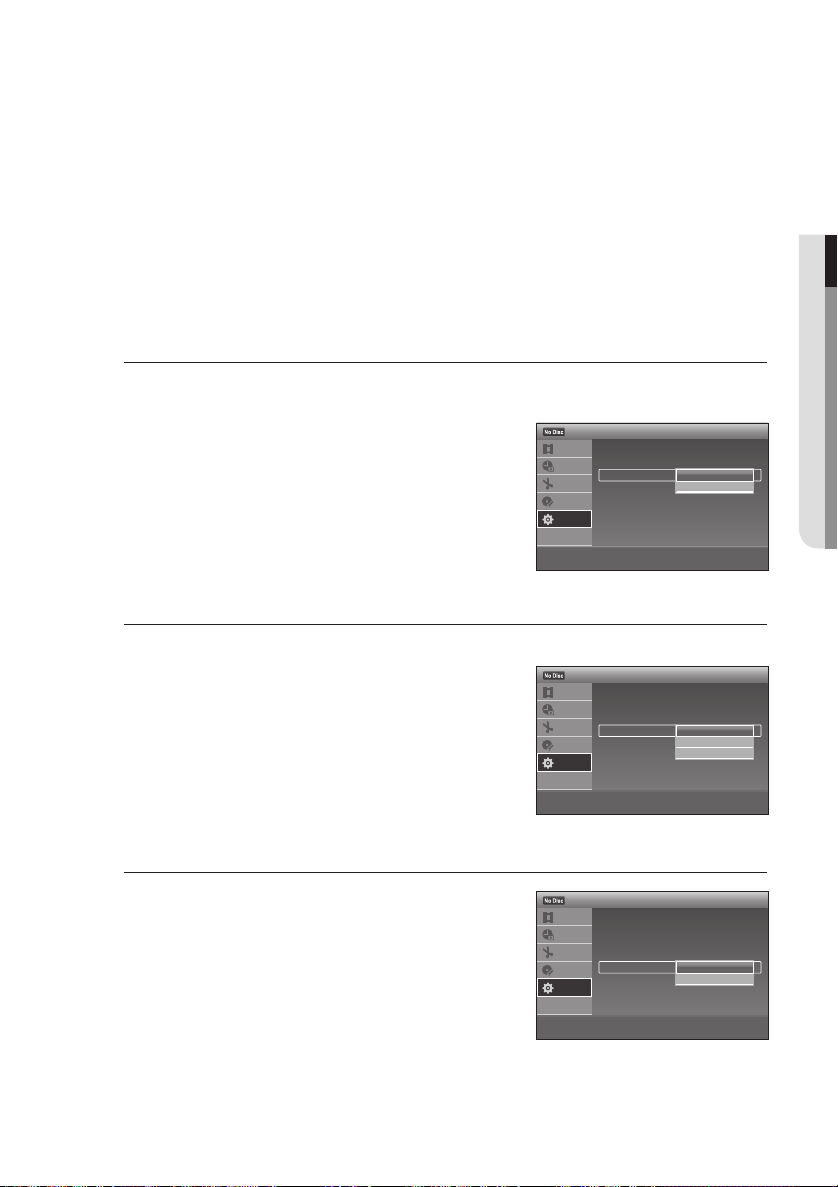
Dolby Digital (DVDs only)
Selects the type of Dolby Digital signal.
•
D-PCM : Select this when the recorder is connected to an audio component that does not have a
built-in Dolby Digital decoder.
•
Dolby Digital : Select this when the recorder is connected to an audio component with a built-in Dolby
Digital decoder.
DTS (DVD VIDEOs only)
Selects whether or not to output DTS signals.
•
On : Select this when the recorder is connected to an audio component with a built-in DTS decoder.
•
Off : Select this when the recorder is connected to an audio component without a built-in DTS
decoder.
Downmix (DVDs only)
Switches the method for mixing down to two channels when you play a DVD which has rear sound elements
(channels) or is recorded in Dolby Digital format.
•
Dolby Surround : Select this setting to enjoy Multi-channel
DVDs over two channels.
•
Normal : Multi-channel audio signals are downmixed to two
channels for use with your stereo.
To enjoy the surround effect of Dolby Digital, turn off the surround
M
settings of this recorder.
Audio
Tuner Audio : Main
Title List
Digital Out
Timer
Downmix : Dolby Surround
Edit
Audio DRC : Standard
Disc
Scan Audio : On
Setting
Surround : Off
Setup
AV Audio Input : Stereo
> Move sEnter rReturn eExit
✔ Dolby Surround
12:00
Normal
Audio DRC (Dynamic Range Control) (DVDs only)
Makes the sound clearer when the volume is turned down when playing a DVD.
•
Standard : Normal setting.
•
TV Mode : Makes low sounds clear even if you turn the volume
down.
•
Wide Range : Gives you the feeling of being at a live
performance.
Audio
Tuner Audio : Main
Title List
Digital Out
Timer
Downmix : Dolby Surround
Edit
Audio DRC : Standard
Disc
Scan Audio : On
Setting
Surround : Off
Setup
AV Audio Input : Stereo
> Move sEnter rReturn eExit
✔ Standard
TV Mode
Wide Range
12:00
● SYSTEM SETUP
Scan Audio (DVDs only)
On : Outputs audio signals during FF1 fast-forward of a DVD
•
disc with Dolby Digital soundtracks.
Off : Turns off the function. No sound is output during FF1
•
fast-forward.
Sound will be interrupted during Scan Audio.
M
If the audio format is LPCM, this function is not supported.
Audio
Tuner Audio : Main
Title List
Digital Out
Timer
Downmix : Dolby Surround
Edit
Audio DRC : Standard
Disc
Scan Audio : On
Setting
Surround : Off
Setup
AV Audio Input : Stereo
> Move sEnter rReturn eExit
✔ On
Off
English _31
12:00
Page 32

system setup
Surround
Turns on the surround function to create virtual rear speakers from a stereo TV or two separate front
speakers.
Off : No surround effect
•
Surround 1 : Creates one set of virtual surround speakers.
•
Surround 2 : Creates two sets of virtual surround speakers.
•
Surround 3 : Creates three sets of virtual surround speakers.
•
When the playback signal does not contain surround audio signals,
M
the surround effects will not be heard.
When you select one of the surround modes, turn off the surround
settings of the connected TV or amplifi er (receiver).
AV Audio Input
When recording from equipment connected to the AV input jacks to a DVD disc in this recorder, select AV
input audio.
•
Stereo : Records stereo sound only.
•
Main/Sub : You can record audio from two different sources
on the left and right channels with DVD-RWs/(VR mode) and
DVD-Rs/(VR mode). You can select either the Main(left) or
Sub(right) soundtrack when playing back.
Please refer to the AUDIO button. (See page 15)
Audio
Tuner Audio : Main
Title List
Digital Out
Timer
Downmix : Dolby Surround
Edit
Audio DRC : Standard
Disc
Scan Audio : On
Setting
Surround : Off
Setup
AV Audio Input : Stereo
> Move sEnter rReturn eExit
Audio
Tuner Audio : Main
Title List
Digital Out
Timer
Downmix : Dolby Surround
Edit
Audio DRC : Standard
Disc
Scan Audio : On
Setting
Surround : Off
Setup
AV Audio Input : Stereo
> Move sEnter rReturn eExit
✔ Off
Surround1
Surround2
Surround3
✔ Stereo
Main/Sub
12:00
12:00
SETTING UP THE FEATURES
This function allows you to setup the Features setting.
1.
With the unit in Stop mode, press the MENU button.
2.
Press the ▲▼ buttons to select Setup, then press the ENTER button.
3.
Press the ▲▼ buttons to select Features, then press the ENTER
button.
4.
Press the ▲▼ buttons to select the desired features options
shown on the next few pages, then press the ENTER button.
5.
Press the ▲▼ buttons to select the desired item, then press the
ENTER button.
32_ system setup
Setup
Title List
Tuner Preset
Clock Set
Timer
Video
Edit
Audio
Disc
Features
Setting
Options
Setup
Easy Setup
> Move sEnter rReturn eExit
12:00
Page 33
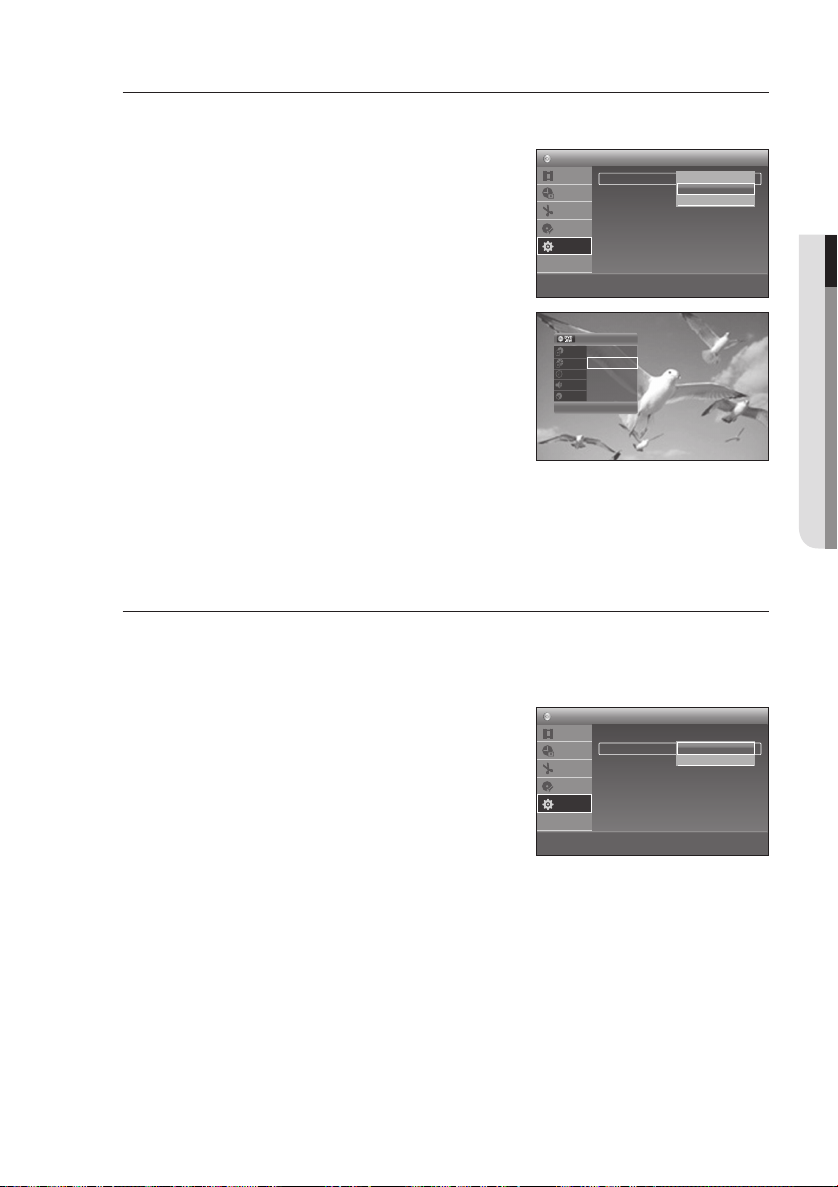
DVD Auto Chapter
A DVD-Video consists of ‘Titles’ and ‘Chapters’.
When you record one program, it makes one Title.
If you use this function, the Title will be divided into Chapters.
A recording(a title) is automatically divided into chapters by inserting
chapter markings at specifi ed intervals. The markings are inserted
while the recording is being made.
Press the
▲▼
1.
buttons to select DVD Auto Chapter, then press
the ENTER button.
Press the ▲▼ buttons to select Off , 5Min or 15Min, then press
2.
the ENTER button.
Off : No chapter mark is inserted.
•
5Min :
Inserts chapter marks at approximately 5 minute intervals.
•
•
15Min :
Inserts chapter marks at approximately 15 minute intervals.
Press the EXIT button to exit the menu.
3.
Press the REC button to start recording. (See page 48 about how
to set the recording mode)
4.
Press the STOP button to stop recording.
5.
During playback, you can check the created chapters by pressing the ANYKEY button.
You can create up to 99 chapters.
M
DVD
Features
-RW
Title List
DVD Auto Chapter : 5 Min
Format DVD-RW : VR
Timer
EZ Record : Off
Edit
DivX Registration Code
Disc
Setting
Setup
> Move sEnter rReturn eExit
Title
2/2
Chapter
1/5
Time
00:00:52
*** Dolby D 2ch(1/1)
Audio
00:00:52
Remain
<Adjust sEnter
Format DVD-RW
When inserting a unused DVD-RW disc, you can select a recording format (VR mode or Video mode)
according to your needs(Please refer to page 6).
XCV
12:00
Off
✔ 5 Min
15 Min
● SYSTEM SETUP
VR : Automatically formats the disc in VR mode
•
Video : Automatically formats the disc in Video mode
•
DVD
Features
-RW
Title List
DVD Auto Chapter : 5 Min
Format DVD-RW : VR
Timer
EZ Record : Off
Edit
DivX Registration Code
Disc
Setting
Setup
> Move sEnter rReturn eExit
✔ VR
Video
English _33
C
12:00
Page 34
system setup
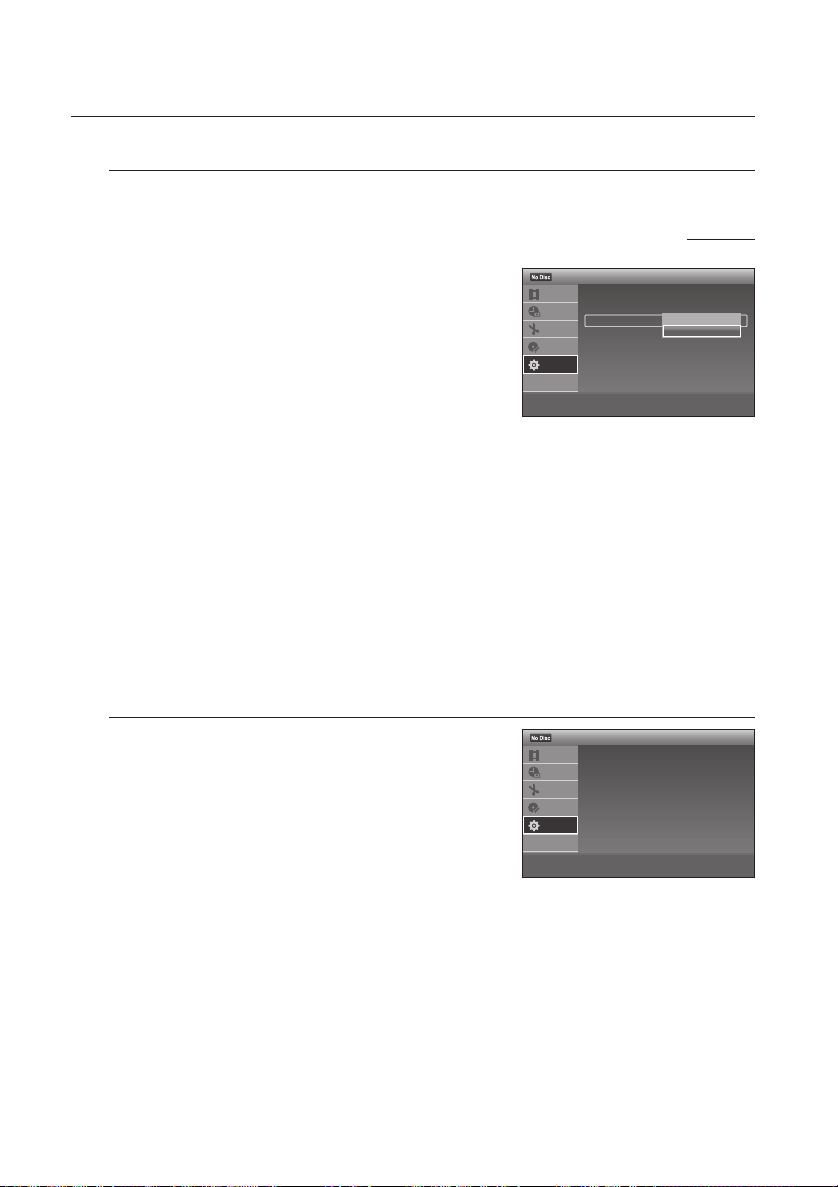
EZ Record
This function allows you fi nalize a disc automatically.
(V-mode)
Press the ▲▼ buttons to select EZ Record, then press the ENTER
1.
button.
Press the ▲▼ buttons to select On, then press the
2.
ENTER
button.
Press the EXIT button to exit the menu.
Insert a disc.
3.
If the disc is a new DVD-RW, it is initialized to V mode
automatically.
Press the REC (●) button.
4.
EZ Record function will automatically fi nalize the disc under the following conditions.
5.
When you press the OPEN/CLOSE button on your DVD Recorder after recording on at least 30% of
•
the disc. The tray will open after the disc has been fi nalized.
The above feature is available only when a DVD-RW(V)/-R(V) disc is inserted.
•
If you select off, you must fi nalize the disc manually in the Disc Setting menu. (see page 64)
M
The length of Recording is different according to recording mode.
(see page 48)
When the EZ Record is set to 'On', a DVD-RW disc will be formatted to V mode automatically, even if you select the
VR mode in the Format DVD-RW option.
Features
Title List
DVD Auto Chapter : 5 Min
Format DVD-RW : VR
Timer
EZ Record : Off
Edit
DivX Registration Code
Disc
Setting
Setup
> Move sEnter rReturn eExit
On
✔ Off
CV
12:00
DivX Registration Code
Please use the Registration code to register this DVD Recorder with
the DivX Video On Demand format. For more information, visit
www.divx.com/vod
34_ system setup
Features
Title List
Timer
Edit
Disc
Setting
Setup
> Move sEnter rReturn eExit
DivX Video On Demand.
Your registration code is : XXXXXXXX
To learn more visit www.divx.com/vod
12:00
Page 35
SETTING UP THE OPTIONS
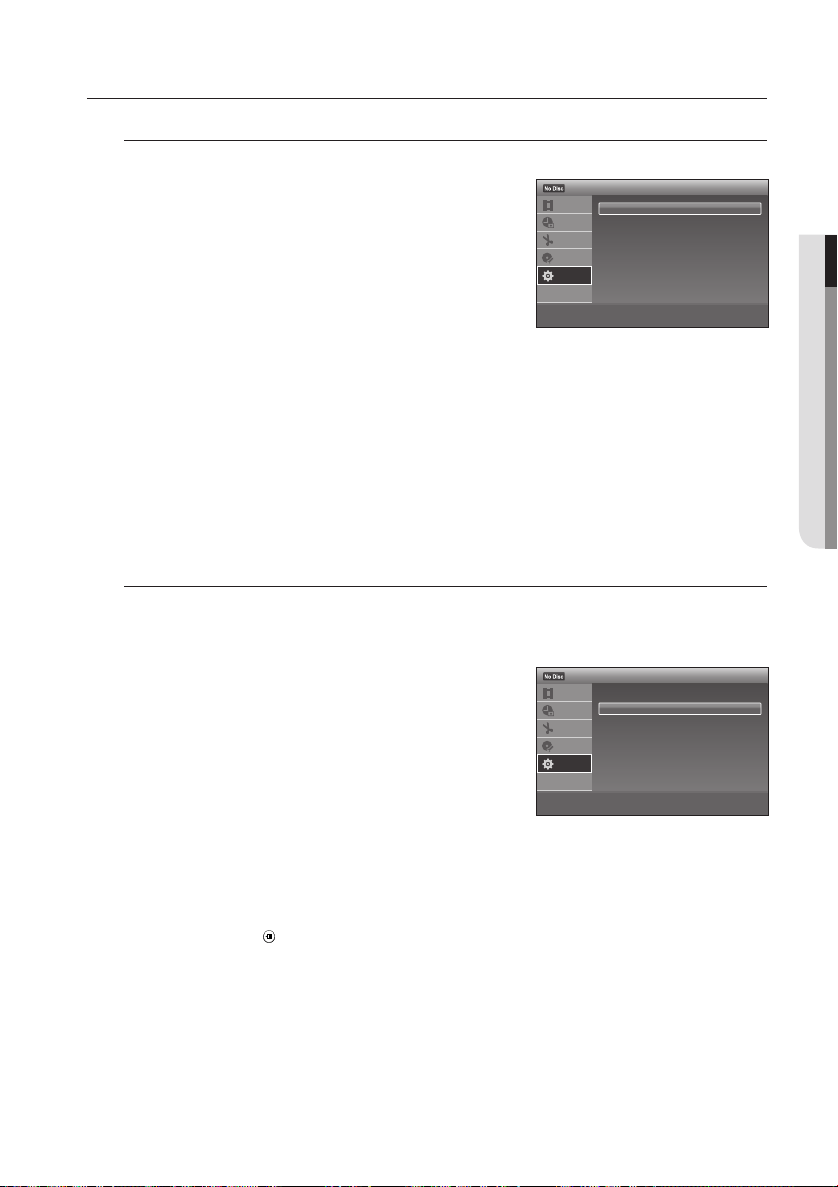
Language
If you set the language options in advance, they will come up automatically every time you watch a movie.
1.
With the unit in Stop mode, press the MENU button.
2.
Press the ▲▼ buttons to select Setup, then press the
ENTER
button.
Press the ▲▼ buttons to select Options, then press the
3.
ENTER
button.
Press the ▲▼ buttons to select Language, then press the
4.
ENTER button.
Language setup menu will be displayed.
5.
Press the ▲▼ buttons to select the desired language option, then press the ENTER button.
OSD : For the on-screen menu of your DVD Recorder.
•
Disc Menu : For the disc menu contained on the disc.
•
Audio : For the disc audio language.
•
Subtitle : For the disc subtitles.
•
Press the
▲▼
6.
M
buttons to select the desired language, then press the ENTER button.
If the selected language is not recorded on the disc, the original pre-recorded language is selected.
Setting up the Parental
The Parental function works in conjunction with DVDs that have been assigned a rating, which helps you
control the types of DVDs that your family watches. There are up to 8 rating levels on a disc.
Language
Title List
OSD : English
Disc Menu : English
Timer
Audio : Original
Edit
Setting
Setup
Disc
Subtitle : Auto
> Move sEnter rReturn eExit
12:00
● SYSTEM SETUP
1.
With the unit in Stop mode, press the MENU button.
▲▼
2.
Press the
buttons to select Setup, then press the ENTER
button.
▲▼
3.
Press the
buttons to select Options, the press the ENTER
button.
Press the ▲▼ buttons to select Parental, then press the ENTER
4.
button.
When you operate your DVD Recorder for the fi rst time, the
Options
Title List
Language
Parental
Timer
Factory Setting
Edit
Disc
Setting
Setup
> Move sEnter rReturn eExit
“Create the password” message will be displayed.
Enter a 4-digit password using the number buttons on the remote control.
5.
The “Confi rm the password” message will be displayed. Enter your password again.
Press the RETURN button to return to the previous menu.
M
Press the EXIT (
) button to exit the menu.
If you forgot your password
1.
Remove the disc.
2.
Press and hold the CH (./,) button on the front panel for 10 seconds or more.
The tray opens and password reverts to the factory settings. See the next page to create a new
password.
12:00
English _35
Page 36
system setup
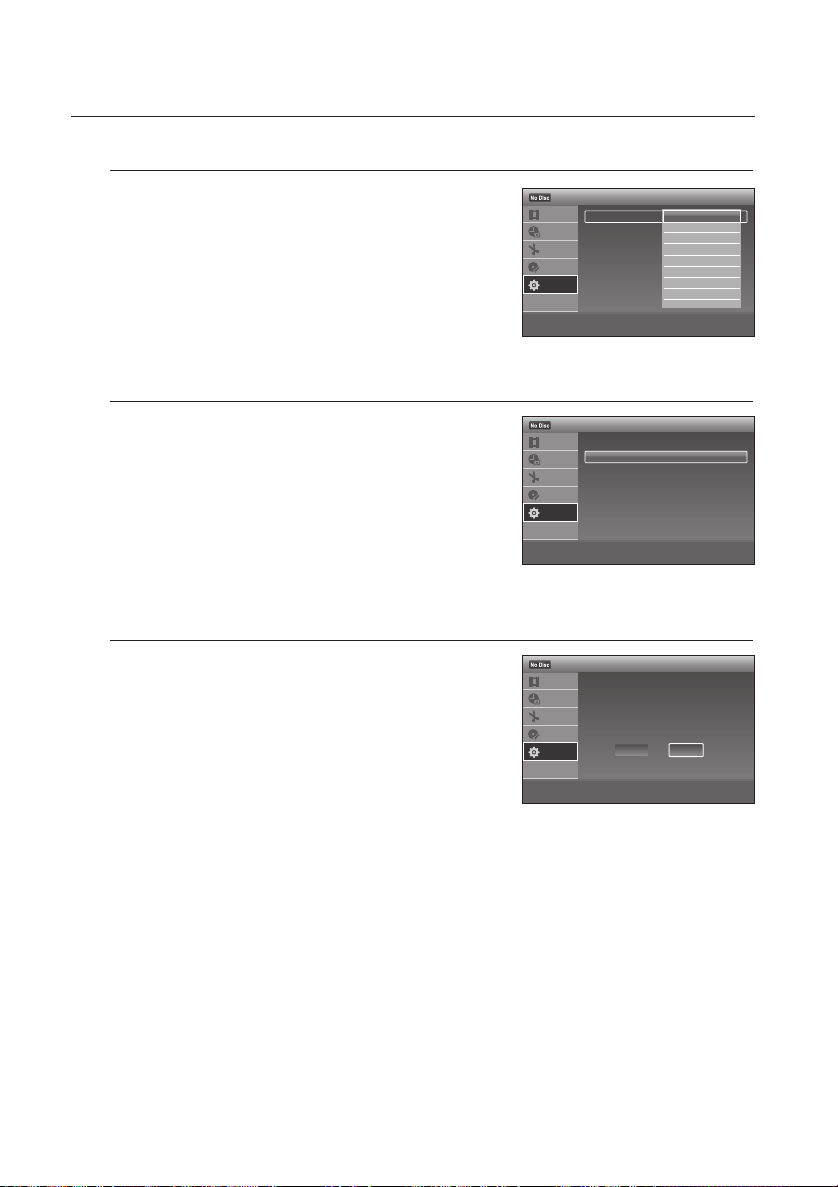
Setting the Rating Level
Press the ▲▼ buttons to select Rating Level, then press the
1.
ENTER button.
Press the ▲▼ buttons to select the Rating Level you want, then
2.
press the ENTER button.
For example, if you select up to Level 6, discs that contain Level
7, 8 will not play.
A larger number indicates that the program is intended for adult
use only.
Changing the Password
Parental
Rating Level : Off
Title List
Change Password
Timer
Edit
Disc
Setting
Setup
> Move sEnter rReturn eExit
✔ Off
Level 8(Adults)
Level 7
Level 6
Level 5
Level 4
Level 3
Level 2
\
12:00
1.
Press the ▲▼ buttons to select Change Password, then press
the ENTER button. The "Enter your password" message will be
displayed.
2.
Enter a new 4-digit password using the number buttons on the
remote control. The “Confi rm the password” message will be
displayed.
3.
Enter your new password again using the number buttons on the
remote control.
Parental
Rating Level : Off
Title List
Change Password
Timer
Edit
Disc
Setting
Setup
> Move sEnter rReturn eExit
Factory Setting
Allows you to return the setup setting to their factory defaults.
All of your previous settings will be lost.
M
Press the
▲▼
1.
buttons to select Factory Setting, then press the
ENTER button.
button
Select Start and press ENTER
2.
.
The setup settings return to their factory defaults.
The message "Settings are complete." will be displayed.
3.
Press the ENTER button.
Factory Setting
Title List
Timer
Edit
Disc
Setting
Setup
> Move sEnter rReturn eExit
Setup will be
reset to the factory settings.
Start
12:00
12:00
Cancel
36_ system setup
Page 37
playback
This section introduces basic functions of playback and playback by disc type.
Read the following information before playing a disc.
REGION CODE (DVD-VIDEO ONLY)
Both the DVD Recorder and the discs are coded by region. These regional codes must match in order for the
disc to play. If the codes do not match, the disc will not play. The Region Number for this DVD Recorder is
described on the rear panel of the DVD Recorder.
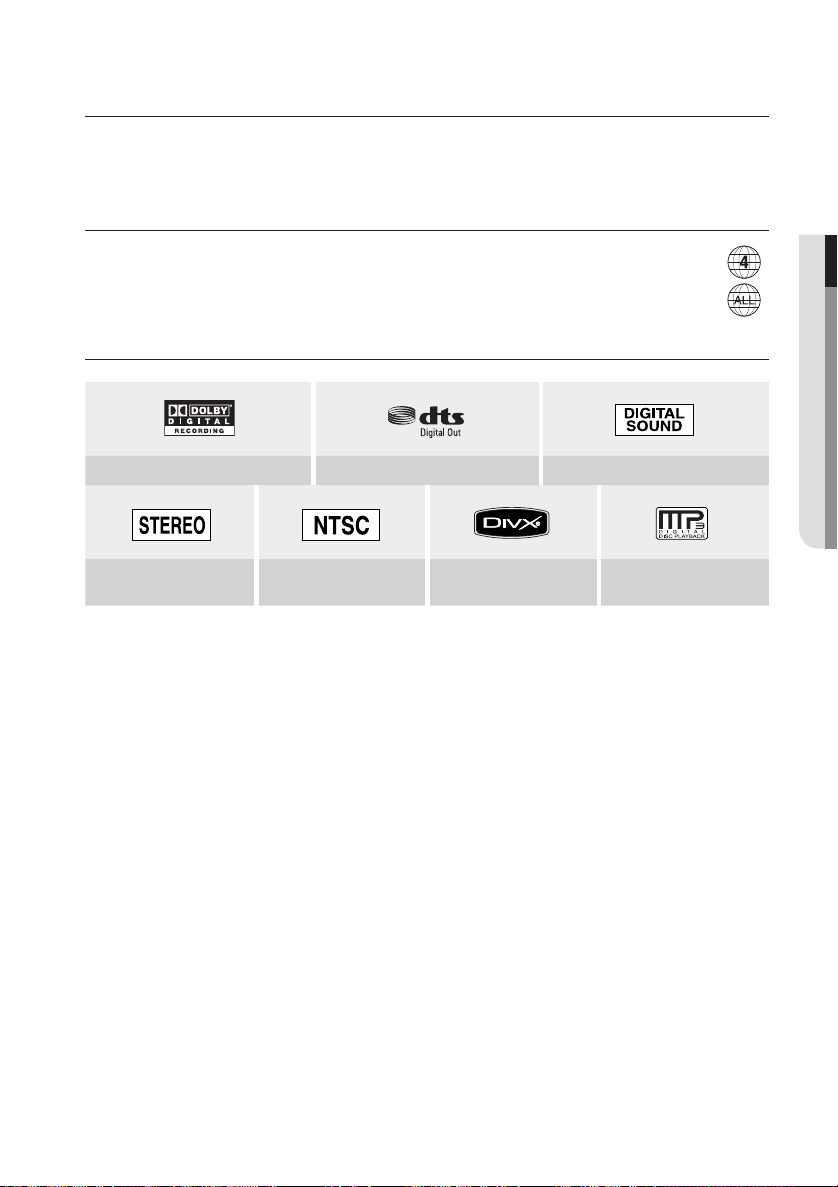
LOGOS OF DISCS THAT CAN BE PLAYED
Dolby Digital DTS Digital Audio
● PLAYBACK
Stereo
NTSC broadcast system in U.S.A,
Canada, Korea, Japan,etc.
DivX MP3
English _37
Page 38
playback
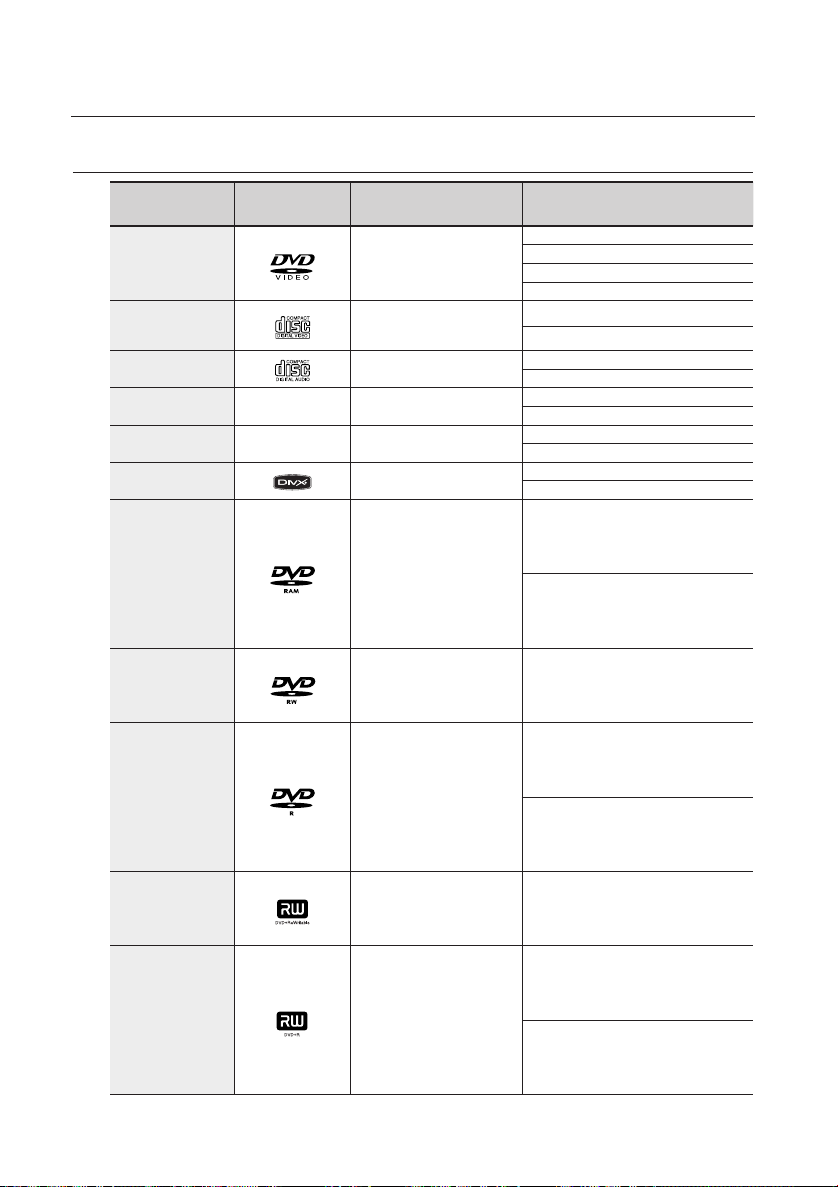
DISC TYPES THAT CAN BE PLAYED
Disc Types Disc Logo
DVD-VIDEO
VIDEO-CD
AUDIO-CD
JPEG JPEG Image
MP3 MP3 Audio
DivX
DVD-RAM
DVD-RW
DVD-R
Recorded
content
DivX Movie
VIDEO
AUDIO
VIDEO
AUDIO
AUDIO
VIDEO
AUDIO
VIDEO
AUDIO
VIDEO
AUDIO
Disc Shape or minute
Single sided(5”)
Double sided(5”)
Single sided(3.5”)
Double sided(3.5”)
Single sided(5”)
Single sided(3.5”)
Single sided(5”)
Single sided(3.5”)
Single sided(5”)
Single sided(3.5”)
Single sided(5”)
Single sided(3.5”)
Single sided(5”)
Single sided(3.5”)
Single sided(5”)
(4.7GB)
Double sided(5”)
(9.4GB)
5” (4.7GB)
Single Layer(5”)
(4.7GB)
Double Layer(5”)
(8.5GB)
DVD+RW
38_ playback
DVD+R
VIDEO
AUDIO
VIDEO
AUDIO
5” (4.7GB)
Single Layer(5”)
(4.7GB)
Double Layer(5”)
(8.5GB)
Page 39
Discs That Cannot be Played
DVD-Video with a region number other than “4” or “ALL”
•
3.9 GB DVD-R Disc for Authoring.
•
A DVD-RW(V)/-R(V)/+R disc which has been recorded and not fi nalized in a different manufacturer's recorder.
•
PAL discs
•
DVD-ROM/PD/MV-Disc, etc.
•
CVD/SVCD/CD-ROM/CDV/CD-G/CD-I
•
This DVD Recorder can only operate with discs that are compatible with DVD-RAM Standard Version 2.0.
M
Playback and/or recording may not work for some types of discs or when specifi c operations, such as angle change
and aspect ratio adjustment, are being performed. Information about the disc is written in detail on the box. Please
refer to this if necessary.
Do not allow the disc to become dirty or scratched.
Fingerprints, dirt, dust, scratches and deposits of cigarette smoke on the recording surface may make it impossible
to use the disc for recording.
DVD-RAM/-RW/-R discs may not be able to play on some DVD players, depending on the player, disc and the
condition of the recording.
Discs with PAL programs recorded on them cannot be played using this product.
PLAYING A DISC
Press the OPEN/CLOSE button.
1.
Place a disc gently into the tray with the disc’s label facing up.
2.
Press OPEN/CLOSE button to close the disc tray.
3.
Your DVD Recorder closes the disc tray and plays the disc automatically.
•
The recorder does not play discs automatically after initially being powered on.
•
When the recorder is powered on and a disc is in the tray, the unit will be activated and wait in stop
•
mode. Press the PLAY
•
Power on the unit with the PLAY
powered off.
4.
Press the STOP ( ) button to stop playback.
( ) button to start playback.
( )
button if you wish to automatically play a disc in the recorder while it is
● PLAYBACK
When you stop playing the disc, the DVD Recorder remembers where you stopped. When you press the PLAY ( )
M
button again, it will pick up where you left off. (unless the disc is removed, the DVD Recorder is unplugged, or if you
press the STOP ( ) button twice.) This function is only applicable to DVD-VIDEO, DVD-RAM, DVD±RW, DVD±R or
Audio CDs (CD-DA).
Do not move your DVD Recorder while playing, as this may cause damage to the disc.
J
Make sure to press the OPEN/CLOSE button to open or close the disc tray.
Do not push the disc tray while it is being opened or closed, as this may cause a product malfunction.
Do not place foreign materials on or in the disc tray.
Some functions may perform differently or be disabled depending on the disc type.
If this occurs, refer to the instructions written on the disc case.
Be especially careful that children's fi ngers are not caught between the disc tray and the tray chassis when it closes.
After turning the power on, it will take a few seconds until the DVD Recorder operates.
English _39
Page 40
playback
USING THE DISC MENU AND TITLE MENU
Some discs contain a dedicated menu system that allows you to select special functions for title, chapters, audio
track, subtitles, fi lm previews, information on characters, etc.
For DVD-VIDEO Discs
Z
Disc Menu : Press the DISC MENU button to enter the disc menu of the disc.
• Move to the setup menu related to playback operation.
• You can select audio language and subtitle etc., provided by the disc.
•
Title Menu : Press the TITLE MENU button to move to the title menu of the disc.
• Use this button if the disc contains more than one title. Some discs may not support the title
• VCD and CD do not support the title menu.
For DVD-RAM/DVD±RW/DVD±R Discs
Title List
Press the TITLE LIST button. The Title List is simply a list of titles on a disc. If a title is deleted, that title cannot
be played again.
Playlist (DVD-RAM/-RW(VR)/-R(VR))
Press the PLAY LIST button. A playlist is a custom-made list of titles. When one playlist is played, only the
titles within the playlist will play and then stop. Even if that playlist is deleted, the original recording will not be
deleted.
When playing a VCD2.0, you can choose Menu On or Menu Off by using the DISC MENU button.
menu functionality.
XCVKL
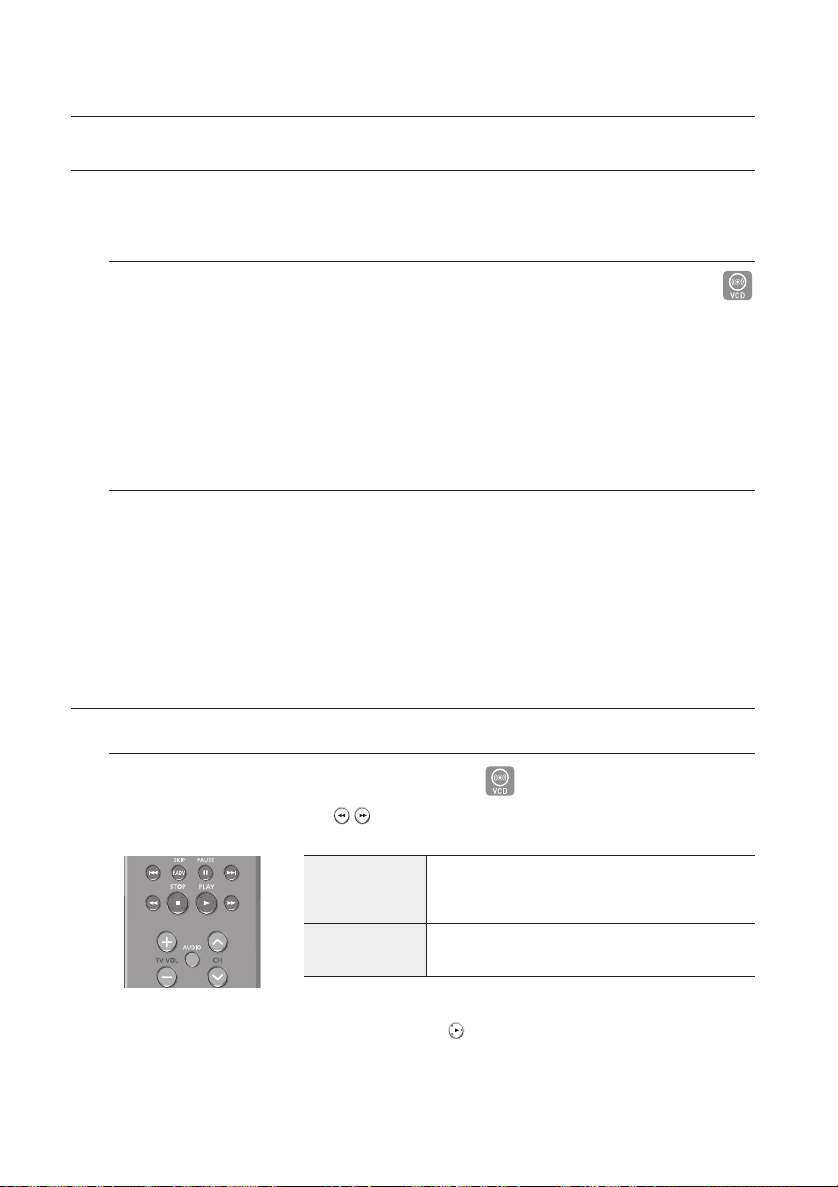
USING THE SEARCH & SKIP FUNCTIONS
Searching Through a Chapter or Track
Z XCVBDKL
During playback, press the SEARCH ( ) button on the remote control.
Each time you press the SEARCH button, the playback speed will change as follows.
DVD-VIDEO/VIDEO-CD/
DVD-RAM/DVD±RW/
DVD±R/DivX
AUDIO CD (CD-DA)
•
You can scan the program in reverse order.
To return to normal speed playback, press the PLAY (
You can hear sound during forward search (FF1) in DVD-VIDEO/DVD-RAM/±RW/±R disc.
M
The speed marked in this function may be different from the actual playback speed.
40_ playback
FF1/ FR1 FF2/ FR2
FF3/ FR3 FF1/ FR1
FF1/ FR1 FF2/ FR2
FF1/ FR1
) button.
Page 41
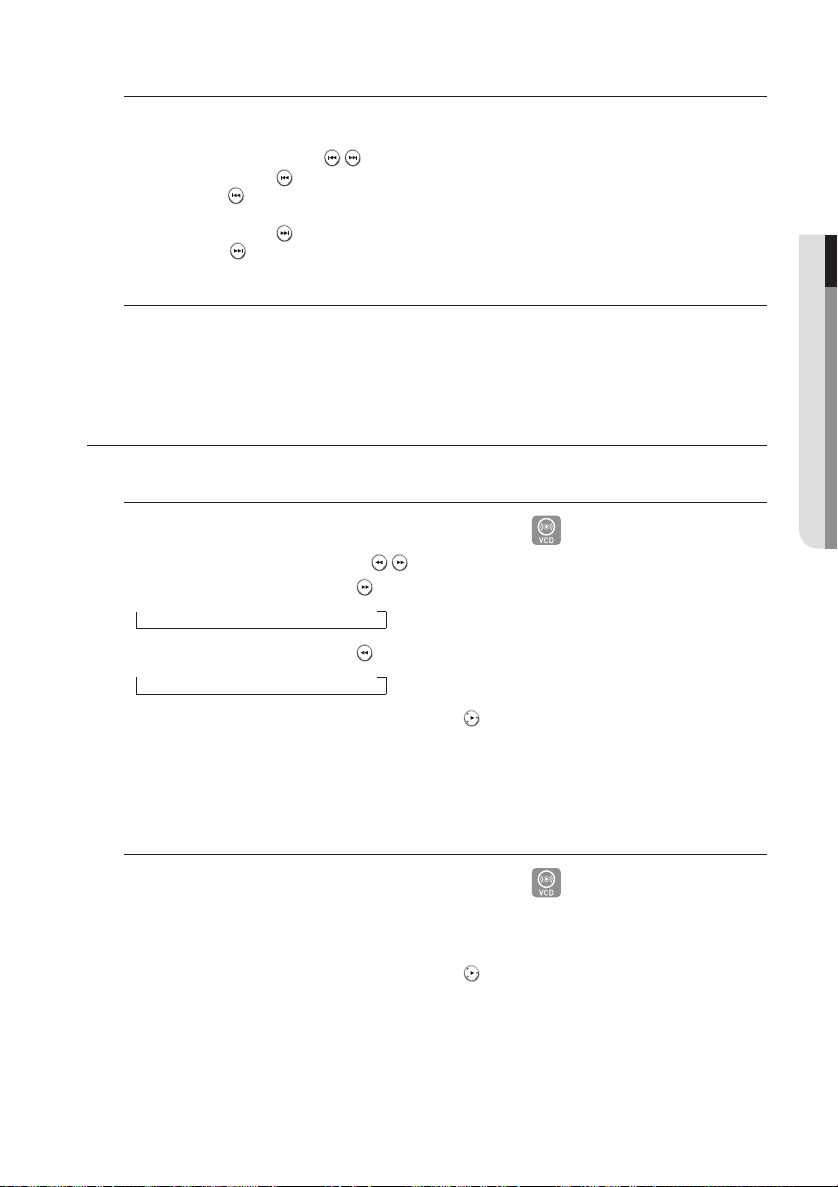
Skipping Chapters or Tracks
ZXCVBDKL
During playback, press the SKIP ( ) button on the remote control.
If you press the SKIP (
•
If you press the button, it moves to the beginning of the chapter or track.
Pressing the button once again within 3 seconds returns to the beginning of the previous chapter
If you press the SKIP ( ) button
•
If you press the button, it moves to the next chapter or track.
) button
Skipping Ahead 30 Seconds
ZXCVKL
During the playback, press F.ADV/SKIP button to skip ahead exactly 30 seconds.
SLOW MOTION PLAY/STEP MOTION PLAY
Slow Motion Play
Z XCVDKL
During Pause mode, press the SEARCH ( ) button on the remote control for more than 1 second.
Each time you press the
•
Slow 3 Slow 2 Slow 1
SEARCH ( ) button :
or
track.
● PLAYBACK
•
Each time you press the
Slow 3 Slow 2 Slow 1
To return to normal speed playback, press the PLAY (
The speed marked in this function may be different from the actual playback speed.
M
Slow motion operates only in the forward direction on VIDEO-CD/DivX discs.
SEARCH ( ) button :
) button.
Step Motion Play
Z XCVDKL
During Pause mode, press the F.ADV/SKIP button on the remote control.
Each time the button is pressed, a new frame will appear.
•
To return to normal speed playback, press the PLAY (
No sound is heard during Step or Slow mode.
M
) button.
English _41
Page 42

playback
USING THE ANYKEY BUTTON
The ANYKEY functions allows you to easily search for a desired scene by accessing title, chapter, track and time.
You can also change the subtitle and audio settings and set some features including Angle.
Moving to a desired scene directly
Z XCVDKL
If you want to move to a certain title, chapter or time, use this
function.
1.
Press the ANYKEY button during playback.
2.
Press the
3.
Press the ◄► buttons or number (0~9) buttons to select the
▲▼
buttons to select Title, Chapter or Time.
desired scene. (When searching a time, enter the time in the
sequence of hours, minutes, seconds using the number buttons.)
4.
Then, press the ENTER button.
M
This may not work for some discs. When an audio CD (CD-DA) or an MP3 disc is inserted, according to the disc
type, the information display may not be appear.
The Time Search function does not operate on some discs.
To make the sub-menu disappear, press the ANYKEY or RETURN button again.
Selecting the Audio language
Audio languages may not work depending on the disc type. This is only available during playback.
You can also operate this function by pressing the AUDIO button on the remote control.
Title
2/6
Chapter
2/12
Time
00:00:52
*** Dolby D 2ch(1/1)
Audio
00:00:52
Remain
Off
Subtitle
Angle
1/1
<Adjust sEnter
Press the ANYKEY button during playback.
1.
▲▼
Press the
2.
buttons to select Audio, then press the
buttons to select the desired audio language.
Press the ENTER button.
3.
Audio languages may be different because they are disc-specifi c.
M
Some discs allow you to select the audio language for the disc menu
only.
To make the sub-menu disappear, press the ANYKEY or RETURN button again.
42_ playback
◄ ►
Title
2/6
Chapter
2/12
Time
00:00:52
Audio
*** Dolby D 2ch(1/1)
Remain
00:00:52
Subtitle
Off
Angle
1/1
<Adjust sEnter
ZD
Page 43
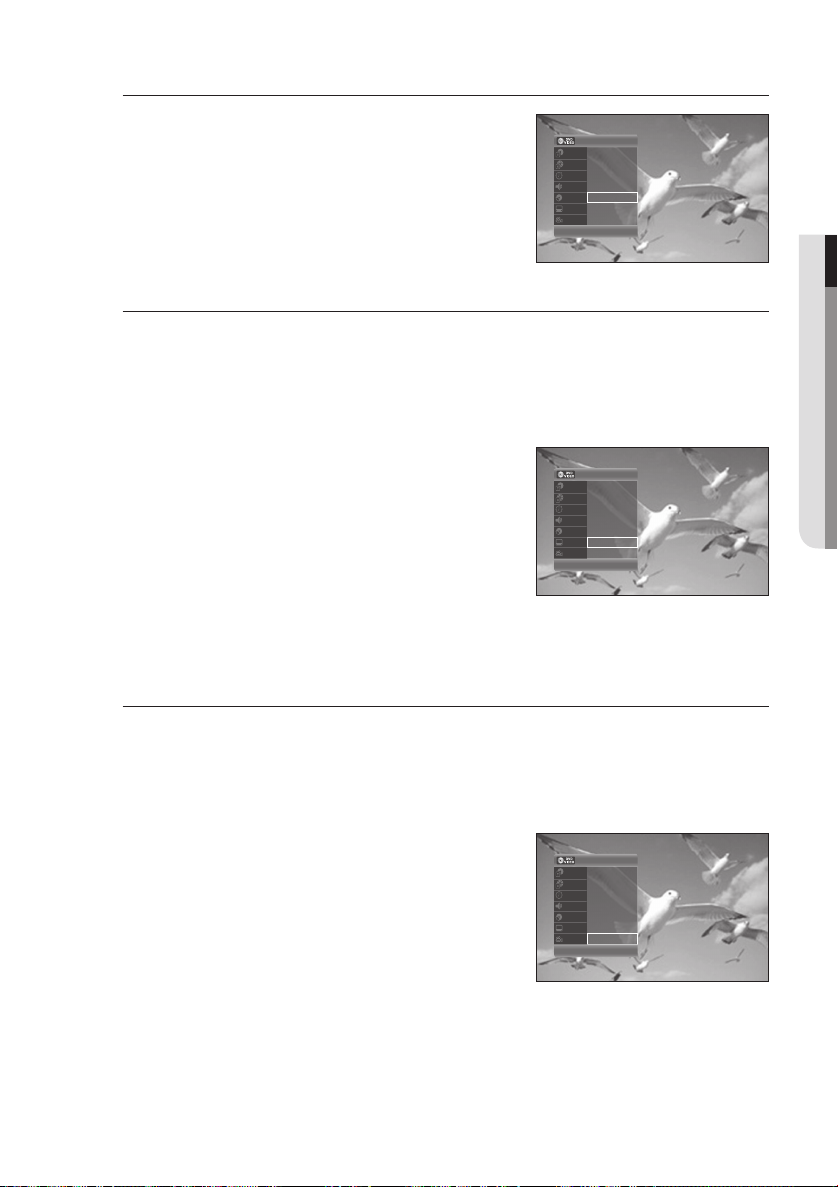
Remain
You can check the remaining time of the current title.
1.
Press the ANYKEY button during playback.
Title
Chapter
Time
Audio
Remain
Subtitle
Angle
>Move
2/6
3/12
00:00:52
*** Dolby D 2ch(1/1)
00:00:52
Off
1/1
Selecting the Subtitle Language
ZD
This enables you to select the available subtitle languages on a disc.
Subtitle languages may not work depending on the disc type. This is only available during playback.
You can also operate this function by pressing the SUBTITLE button on the remote control.
1.
Press the ANYKEY button during playback.
2.
Press the
▲▼
buttons to select the desired subtitle language.
buttons to select Subtitle, then press the ◄►
3.
Press the ENTER button.
The subtitle display may be different depending on the disc type.
M
If the subtitles overlap, disable the caption function on your TV.
Some discs allow you to select the language for the disc menu only.
To make the sub-menu disappear,press the ANYKEY or RETURN button again.
Title
2/6
Chapter
3/12
Time
00:00:52
*** Dolby D 2ch(1/1)
Audio
00:00:52
Remain
Off
Subtitle
Angle
1/1
<Adjust sEnter
● PLAYBACK
Changing the Camera Angle
Z
If a DVD-VIDEO contains multiple angles of a particular scene, you can use the Angle function.
If the disc contains multiple angles, the ANGLE appears on the screen.
1.
Press the ANYKEY button during playback.
2.
3.
M
▲▼
Press the
buttons to select Angle, then press the ◄►
buttons or number (0~9) buttons to select the desired angle
scene.
Press the ENTER button.
This function is disc-dependent, and may not work on all DVDs.
This function does not work when a DVD has not been recorded with
a multi-camera angle system.
To make the sub-menu disappear, press the ANYKEY or RETURN button again.
Title
2/6
Chapter
3/12
Time
00:00:52
Audio
*** Dolby D 2ch(1/1)
Remain
00:00:52
Subtitle
Off
Angle
1/1
<Adjust sEnter
English _43
Page 44
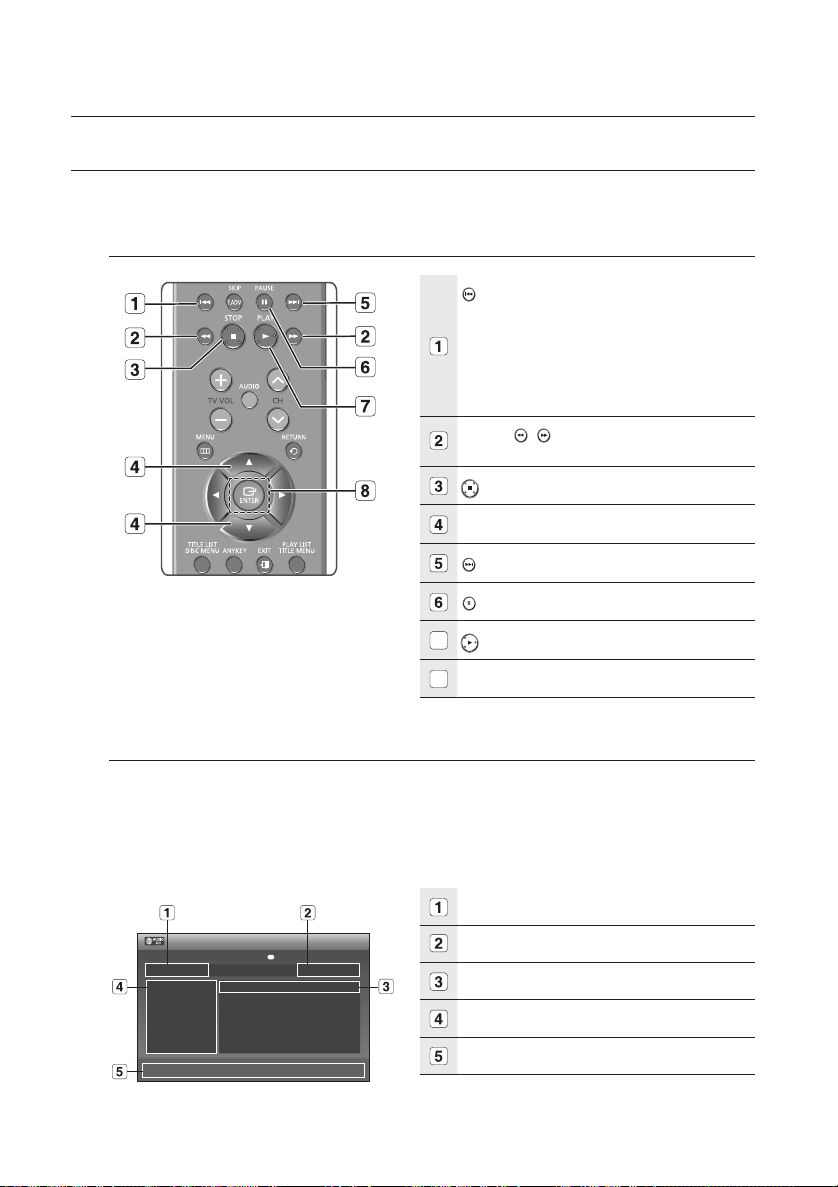
playback
PLAYING BACK AN AUDIO CD (CD-DA)/MP3
Buttons on the Remote Control Used for Audio CD(CD-DA)/MP3
Playback
button : Returns to the beginning of the current track
when pressed during playback. If pressed again, your DVD
Recorder moves to and plays the previous track.
If you press this button within three seconds after playback
starts, the previous track will be played. If you press this
button after three seconds, the current track will be replayed
from the beginning.
Press the ( / ) buttons : Fast Play (FF1/FR1,FF2/FR2)
(Audio CD only)
: Stops a track (song).
▲▼
: Selects a track (song).
button : Plays the next track.
: Pauses playback.
7
: Plays a track (song).
8
ENTER button : Plays the selected track (song).
Playing an Audio CD(CD-DA)
Insert an audio CD (CD-DA) into the disc tray.
1.
•
The audio CD menu appears and the tracks (songs) are played automatically.
2.
Press the
▲▼
buttons to select the track (song) you want to hear, and then press the ENTER button.
Audio CD(CD-DA) Screen Elements
Music
Q TRACK01.CD Play 00:00:19
♫
> Move sSelect eExit
44_ playback
1/15
(( )) Surround : Off
q♫ TRACK01.CD 03:52
♫
TRACK01.CD 04:02
♫
TRACK01.CD 03:51
♫
TRACK01.CD 03:49
♫
TRACK01.CD 04:31
♫
TRACK01.CD 03:46
12:00
Current track (song) : Displays the number of the track
currently being played.
This shows the operating state of a disc and a playback time
corresponding to a portion that is currently played.
Displays the track list (song list).
Displays the current fi le.
Displays available buttons.
Page 45
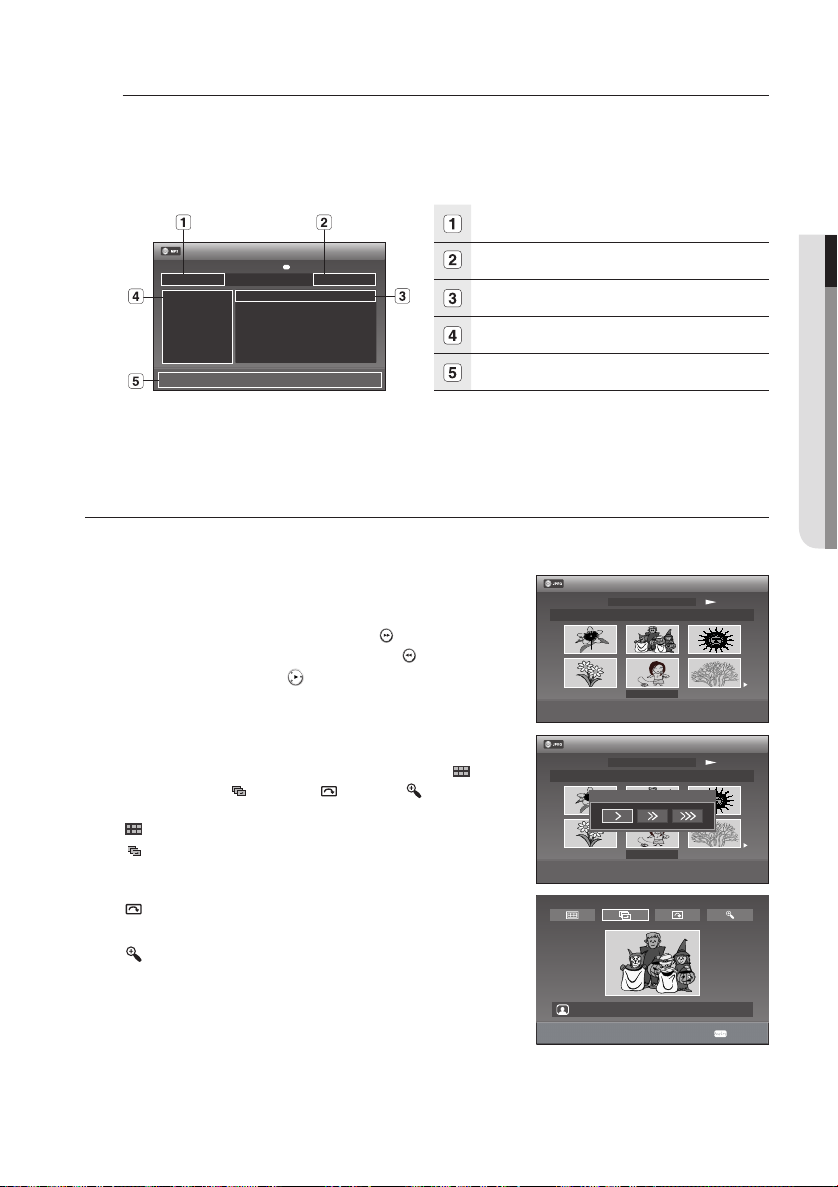
Playing an MP3 Disc
1.
Insert an MP3 disc into the disc tray.
•
The menu is displayed.
▲▼
2.
Press the
buttons to select the track you want to hear, and then press the ENTER button.
MP3 Screen Elements
Current track (song): Displays the number of the track
Music
Q SONG01.MP3 Play 00:00:19
E \
♫
1/15
> Move sEnter rReturn eExit
If select the Music, MP3 fi les will only be displayed.
M
If there are no MP3 fi les, empty folder will only be displayed.
(( )) Surround : Off
q♫ SONG01.MP3
♫
SONG02.MP3
♫
SONG03.MP3
♫
SONG04.MP3
♫
SONG05.MP3
♫
SONG06.MP3
12:00
currently being played.
This shows the operating state of a disc and a playback time
corresponding to a portion that is currently played.
Displays the track list (song list).
Displays the current fi le.
Displays available buttons.
PLAYING BACK A PICTURE DISC
Insert a JPEG Disc into the disc tray.
1.
The photo menu is displayed.
•
Press the
2.
3-1. If you press the PLAY ( ) button, the Slide Show Speed
screen will appear.
Press the ◄► buttons to set the slide show speed, then press
3-2. Press the ENTER button with a picture selected in the Album
screen and select a display mode (Album screen ( ),
Slide show (
buttons, then press the ENTER button.
speed) must be set.
up to 4X(Four times the normal size).
Press the ANYKEY button to display the menu bar.
•
Press the ANYKEY button again to clear the menu bar.
•
M
▲▼◄►
buttons to select a picture.
To see the next 6 pictures, press the
•
To see the previous 6 pictures, press the
•
button.
button.
the ENTER button.
), Rotation ( ) or Zoom ( )) using the ◄►
: Returns to the Album screen.
: The unit enters slide show mode.
Before the slide show begins, the picture interval (Slide show
: Each time the ENTER button is pressed, the picture rotates 90
degrees clockwise.
: Each time the ENTER button is pressed, the picture is enlarged
If select the Photo, JPEG fi les will only be displayed.
If there are no JPEG fi les, empty folder will only be displayed.
m Move sEnter rReturn Stop
<Adjust sEnter rReturn
<
Photo
beautiful 1
Photo
beautiful 1
Move
s
JPEG01.JPG
Enter
Picture 1 / 10
Page 1 / 2
Picture 1 / 10
Slideshow Speed
Page 1 / 2
r
Return Anykey
● PLAYBACK
G
12:00
Slideshow
12:00
Slideshow
English _45
Page 46

playback
Music/Photo Simultaneous Playback
Insert a Mixed disc(Music+JPEG) into the disc tray.
1.
Press the ▲▼ buttons to select Mix, and then press the ENTER button.
2.
The track list will be displayed.
Press the ENTER button.
3.
The message "Do you want to view the photo with MP3?" will be displayed.
Press the ◄► button to select 'Yes', then press the ENTER button.
4.
You can listen to the music while watching the photo.
To operate this function, you have to select the disc containing both
M
music fi les and photo fi le.
PLAYING A DivX DISC
Insert a DivX disc into the disc tray.
1.
The menu is displayed
•
Press the ▲▼ buttons to select DivX, and then press the Enter
2.
button.
Press the
▲▼
3.
Enter or PLAY (
4.
When DivX fi le is played, you can use following functions. Pressing
the STOP (
pressing the button again will exit the menu screen.
DivX Function Description
buttons to select the avi fi le (DivX), then press the
) button.
) button once during playback will display the fi le list,
Music
Q SONG01.MP3 Play 00:00:19
E /
♫
1/15
> Move sEnter rReturn eExit
D
Album File
Stop 00:00:00
E \
1/2
> Move sEnter rReturn eExit
DivX
q♫ SONG01.MP3
Do you want to view
♫
SONG02.MP3
the photo with MP3?
♫
SONG03.MP3
♫
SONG04.MP3
♫
SONG05.MP3
Yes
♫
SONG06.MP3
3 DIVX01.AVI
3 DIVX02.AVI
(( )) Surround : Off
12:00
No
12:00
Function Description
Skip Scene
During play, press the SKIP (
) buttons, it moves previous or next track.
During play, press the SEARCH (
Search Scene
Slow Motion
speed.
(
FF1/ FR1 FF2/ FR2 FF3/ FR3 FF1/ FR1)
In pause mode, press the SEARCH (
Slow 3 Slow 2 Slow 1) Reverse Slow Motion Play is not available.
(
Step Motion In pause or play mode, press the F.ADV/SKIP button on the remote control.
This unit can play the following video compression formats,
M
- DivX Video (Codec) Format : DivX 3.11 DivX 4.x DivX 5.x (without QPEL and GMC)
- DivX Audio (Codec) Format : MP3, AC3, DTS
Supported subtitle fi le formats : .smi, .srt, .sub, .txt, .ass (The subtitle fi le should have exactly the same name to
corresponding DivX fi le name)
Some DivX fi les created on a personal computer may not be play back. That is why Codec Type, Version and Higher
resolution over specifi cation are not supported.
You cannot play back the disc that is larger than a 720 x 576 pixel resolution.
46_ playback
) buttons and press again to search at a faster
) button on the remote control.
Page 47
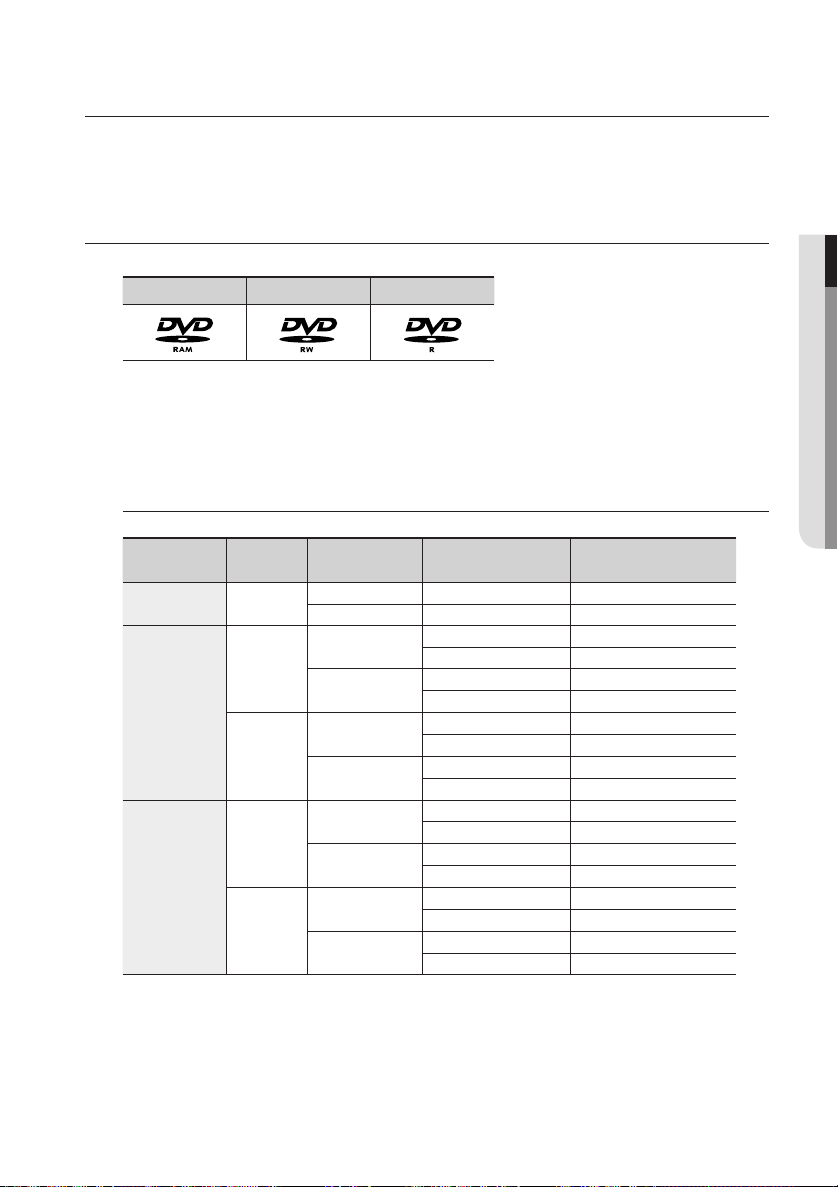
recording
This section explains various DVD recording methods.
This unit can record on various types of discs. Before recording, read the following instructions and
select the disc type according to your preference.
RECORDABLE DISCS
This recorder can record on the following discs.
DVD-RAM DVD-RW DVD-R
DVD-RWs and DVD-RAMs are rewritable.
•
•
DVD-Rs are non-rewritable.
Discs that cannot be recorded on
M
- 3.5" discs
- DVD+R/+RW discs
Compatibility between Samsung and other manufacturer's Recorders
X : not possible
•
Disc Types
DVD-RAM VR Mode
DVD-RW
DVD-R
Finalize
M
- This closes the DVD-RW/-R so no additional recording can be done.
- The DVD-RAM disc cannot be fi nalized.
Unfi nalize
- This allows additional recording on a DVD-RW disc originally recorded on the DVD-R170.
- A DVD-RW disc that has been recorded by DAO(Disc At Once) on a PC cannot be unfi nalized.
- A DVD-RW disc that has been recorded in Video Mode of a different manufacturer's recorder cannot be unfi nalized.
- A DVD-R disc cannot be unfi nalized.
Recording
format
VR Mode
V Mode
VR Mode
V Mode
Recording Device Finalizing
Samsung X Recordable
Other Company X Recordable
Samsung
Other Company
Samsung
Other Company
Samsung
Other Company
Samsung
Other Company
fi nalized Not recordable
not fi nalized Recordable
fi nalized Not recordable
not fi nalized Recordable
fi nalized Not recordable
not fi nalized Not recordable
fi nalized Not recordable
not fi nalized Not recordable
fi nalized Not recordable
not fi nalized Recordable
fi nalized Not recordable
not fi nalized Recordable
fi nalized Not recordable
not fi nalized Not recordable
fi nalized Not recordable
not fi nalized Not recordable
Additional Recording in
Samsung Recorder
● RECORDING
English _47
Page 48
recording
Recording Formats
Since available functions differ depending on the disc type, select a disc that best fi ts your preference.
When you insert an unused disc, the following message appears.
DVD-RAM/-RW : Format will be started automatically.
•
DVD-R : Initializing the disc is unnecessary.
•
DVD-RAM/-RW(VR)/-R(VR)
This mode involves multiple editing functions (such as deletion of the
•
whole title, partial deletion of a title, etc.).
Various editing options using a created Playlist.
•
DVD-RW(V)/-R(V)
Chapters will be created automatically when you fi nalize recording on
•
DVD-R/DVD-RW discs in Video mode.
Simple editing (erasing titles/changing title name).
•
RECORDING MODE
With the unit in Stop mode, select one of eight recording modes by pressing the REC MODE button repeatedly for the desired recording
time and picture quality. In general, picture quality improves as the recording time decreases.
In AUTO mode, the most suitable record mode is adjusted automatically, according to remaining time on the disc and length of the timer
recording.
Recording Mode
HQ (high quality mode) Approx. 1 hour
HSP Approx. 1 hour 30 minutes
SP (standard quality mode) Approx. 2 hours
LSP Approx. 2 hours 30 minutes
ESP Approx. 3 hours
LP (long recording mode) Approx. 4 hours
EP Approx. 6 hours
SLP (long duration mode) Approx. 8 hours
•
The dual layer DVD-Rs have approximately double the capacity of single layer DVD-Rs. (See page 38.)
<DVD-RAM/-RW>
Recording Times
DVD-RAM/-RW/-R
Unformatted Disc.
Formatting. Please wait.
48_ recording
Page 49
UNRECORDABLE VIDEO
Pictures with copy protection cannot be recorded on this DVD Recorder.
When the DVD Recorder receives a copy guard signal while recording,
recording stops and the following message appears on the screen.
You cannot record.
copy protected movie.
Concerning Copy Control Signals
TV broadcasts that contain copy control signals may have one of the following three signal types, Copy-Free,
Copy-Once and Copy-Never.
If you want to record a copy-once type program, use a DVD-RW with CPRM in VR Mode or DVD-RAM discs.
('O' : Supported, '-' : Not Supported)
● RECORDING
Media
DVD-RW (Ver.1.1) O - DVD-RW (Ver.1.1)
with CPRM
VR mode
DVD-R O - DVD-RAM (Ver.2.0) O O* -
Once “Copy Once” has been recorded, additional recordings cannot be performed.
* compatible with CPRM.
Content Protection for Recordable Media (CPRM)
❖
CPRM is a mechanism that ties a recording to the media on which it is recorded.
It is supported by some DVD Recorders, but not by many DVD players.
Each blank recordable DVD has a unique 64-bit media ID etched in the BCA(Burst Cutting Area).
When protected content is recorded onto the disc, it can be encrypted with a 56-bit C2 (Cryptomeria) cipher
derived from the media ID.
Disc contents cannot be copied to other media.
Signal type
Copy-Free Copy-Once Copy-Never
OO*-
English _49
Page 50
recording
RECORDING IMMEDIATELY
Before you start
Make sure the antenna cable is connected.
1.
Press the OPEN/CLOSE button and place a recordable disc on the disc tray.
2.
Check the remaining time on the disc.
3.
DVD-RAM/DVD-RW discs should be formatted or initialized in advance before beginning recording. Most new discs are
sold unformatted. Make sure to format your unformatted discs before recording.
Press the OPEN/CLOSE button to close the disc tray.
4.
Wait until LOAD disappears from the front panel display.
Recording the current program you are watching
1.
Press the CH (./,) buttons or number buttons to select the
station you want to record.
Press the REC MODE button repeatedly, to select the recording
2.
Speed (quality).
→ HQ → HSP → SP → LSP → ESP → LP → EP → SLP
Press the REC button.
3.
Recording from external equipment you are watching
Power on your DVD Recorder and switch to AV IN mode by prssing the INPUT SEL. button on the remote
1.
control.
→ AV1 → AV2 → CH
DVD
VR SP AV 1
-RW
XCV
2.
Press the REC MODE button repeatedly to select the recording Speed (quality).
→ HQ → HSP → SP → LSP → ESP → LP → EP → SLP
When your DVD Recorder is in the Stop mode, set the operation mode of your external devices to play
3.
mode.
Press the REC button on your DVD Recorder when the image from which you want to start recording is
4.
displayed.
To pause recording
Press the PAUSE ( ) button to pause a recording in progress.
Press the PAUSE (
•
•
You can switch channels by pressing the CH (./,) buttons while recording pauses.
) button again to resume recording.
To stop recording
Press the STOP button to stop a recording in progress.
When using DVD-RAM/-RW/-R discs, the message “Updating the information of disc.
•
Please wait for a moment.” is displayed.
50_ recording
Page 51

You can not change the recording mode and the program while recording.
M
Recording will stop automatically if there is no free space left on the disc.
Up to 99 titles can be recorded onto a DVD-RAM/-RW/-R disc.
If the power interrupted due to power failure or other reasons, the title being recorded will not be saved onto the disc.
Recording will stop automatically if a copy protected image is selected.
Do not use DVD-R authoring discs with this unit.
Refer to the user manual for your External Devices when recording from external equipment using the Audio/Video
cable.
MAKING A ONE TOUCH RECORDING (OTR)
One-Touch Recording (OTR) allows you to add recording time in preset increments up to 8 hours by pressing the
REC button repeatedly.
XCV
If you want to record a TV channel, use the CH (./,) buttons or number buttons to select a desired channel.
1.
If you want to record through a connected external component, press the INPUT SEL. button to select
an appropriate external input (AV1 or AV2).
Press the REC button to start recording.
2.
While in Record mode, press the REC button again to activate the One-Touch Recording (OTR).
3.
Record length 0:30 appears on the On-Screen Display and the DVD Recorder will record for exactly 30
•
minutes.
Continue press the REC button to add recording time in preset increments up to 8 hours.
4.
→ 0:30 → 1:00 → 1:30 → 2:00 → 2:30 → 3:00 → 3:30 → 4:00 → 4:30 → 5:00 → 5:30 → 6:00 → 6:30 → 7:00 → 7:30 → 8:00 → Normal
The DVD Recorder stops recording automatically when the time has elapsed.
•
● RECORDING
To stop recording
Press the STOP ( ) button.
1.
The message “Press STOP button once more to cancel Timer record.” is displayed.
Press the STOP (
2.
The message “Updating the Information of disc.
Please wait for a moment.” is displayed.
The timer counter decreases by the minute from the recording time set to 0:00, then the DVD Recorder stops
M
recording.
) button again.
English _51
Page 52

recording
MAKING A TIMER RECORDING
The clock (Setup – Clock Set) must be set before proceeding with a timer recording. (See page 27)
XCV
1.
Press the OPEN/CLOSE button, and place a recordable disc on
the disc tray.
2.
Press the OPEN/CLOSE button to close the disc tray. Wait until
“LOAD” disappears from the front panel display.
3.
With the unit in Stop mode, press the MENU button.
4.
Press the
▲▼
buttons to select Timer, then press the ENTER
button.
5.
Press the
▲▼
buttons to select Timer-Standard, then press the
ENTER button.
You can go to the Timer recording screen directly by pressing the TIMER REC button.
The Timer Recording screen is displayed.
6.
Fill in the items using the
◄►
: Moves to the previous/next item,
▲▼
or 0~9 : To set or change items in the Scheduled Record List Menu.
•
Date : Date that the timer recording starts
- Sets the date using
▲▼◄ ►
▲
button.
buttons.
- To record the same program every day or the same day every week, press
see below :
1month later Sat
Mon
Sun
Mon-Fri
Mon-Sat
Sun-Sat
Today
Timer
Title List
Timer - Standard
Timer List
Timer
Edit
Disc
Setting
Setup
> Move sEnter rReturn eExit
▼
button.
Timer-Standard
No. Date Start End Ch Mode Edit
No.01
01 01/01 12:00 12:00 AV 1 --
02 --/-- --:-- --:-- ---- --
Date Start End Ch
Today 12 : 00 12 : 11 AV1 SP
03 --/-- --:-- --:-- ---- --
04 --/-- --:-- --:-- ---- --
05 --/-- --:-- --:-- ---- --
06 --/-- --:-- --:-- ---- --
> Adjust <Move rReturn eExit
Mode
12:00
12:00
►
►
►
►
►
►
•
Start/End Time : Start and end time of the timer recording.
•
Ch : The video input source(AV1 or AV2) or the broadcasting channel you want to make a timer
recording from.
Recording Mode
❖
AUTO : Select when you want to set video quality automatically. In AUTO mode, the most suitable record
mode is adjusted automatically, according to remaining time on the disc and length of the timer recording.
This function is selected only one mode in HQ, HSP, SP, LSP, ESP, LP, EP and SLP modes and you can
use this mode for timer recording.
HQ : Approx. 1 hour
HSP : Approx. 1 hour 30 minutes
SP (standard quality) : Approx. 2 hours
LSP : Approx. 2 hours 30 minutes
ESP : Approx. 3 hour
LP : Approx. 4 hour
EP (extended mode) : Approx. 6 hour
SLP (long duration mode) : Approx. 8 hours
The dual layer DVD-Rs have approximately double the capacity of single layer DVD-Rs.
52_ recording
Page 53
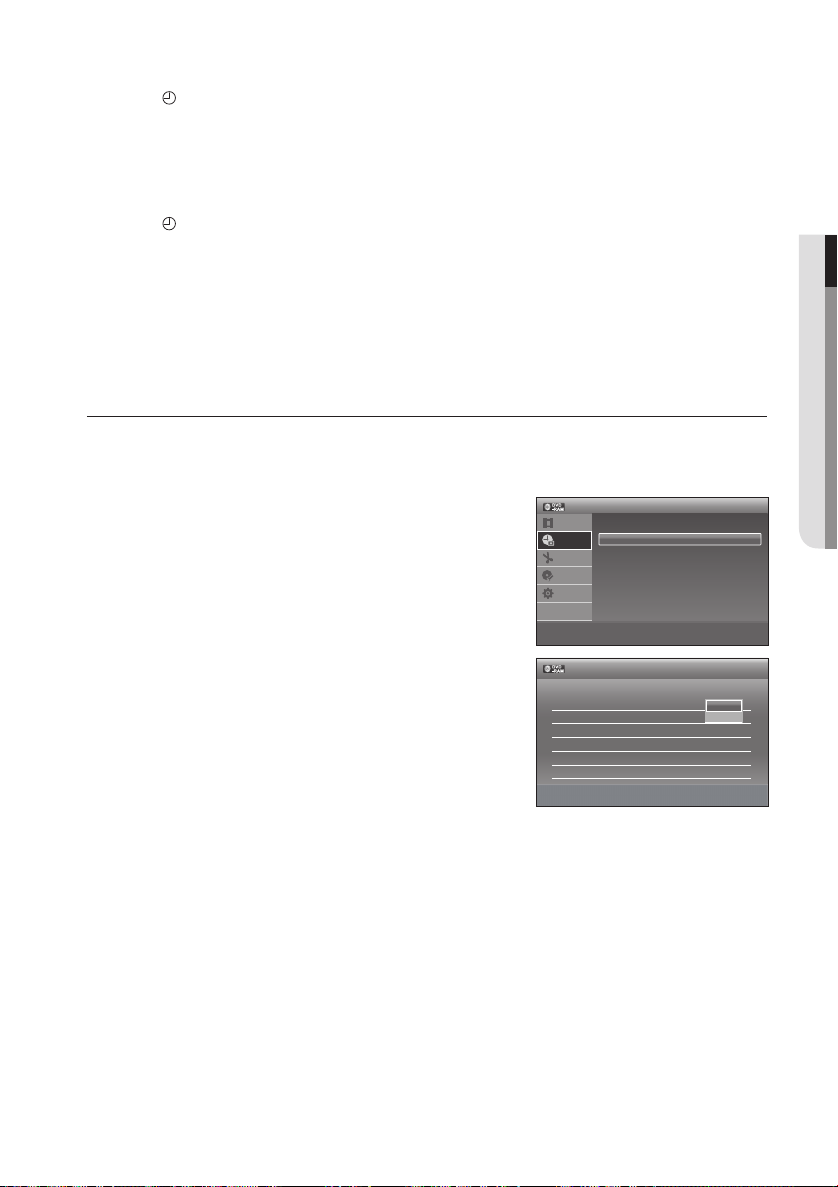
Press the ENTER button.
7.
will appear on the front panel. It means that a timer recording is registered.
•
If the timer settings overlap
The fi rst program has priority. After recording of the fi rst program is complete, the second program starts
being recorded.
Turn the power off to fi nish the timer recording.
8.
will blink if a disc is not inserted.
•
The timer recording time may differ from the set time depending on disc status and overall timer recording status
M
(for example, recording times overlapping, or when the previous recording ends within 3 minutes before the start
time of the next recording.)
EDITING THE TIMER LIST
Follow these directions to edit the timer record list.
Press the MENU button.
1.
▲▼
Press the
2.
button to select Timer, then press the ENTER
button.
▲▼
Press the
3.
button to select Timer List, then press the
ENTER button.
Press the ▲▼ button to select the number of the Timer List you
4.
want to edit, then press the ENTER button.
The Edit and Erase items are displayed.
•
Press the
5.
▲▼
button to select Edit, then press the ENTER
button.
•
The Timer Recording screen is displayed. Edit the items you
want to modify.
See the Timer Recording section for more information on Timer
Recording Input items. (See pages 52~53)
6.
Press the ENTER button to confi rm the edited setting.
Timer
Title List
Timer - Standard
Timer List
Timer
Edit
Disc
Setting
Setup
> Move sEnter rReturn eExit
Timer List
No. Date Start End Ch Mode Edit
01 01/01 12:00 12:00 AV 1 --
02 --/-- --:-- --:-- ---- --
03 --/-- --:-- --:-- ---- --
04 --/-- --:-- --:-- ---- --
05 --/-- --:-- --:-- ---- --
06 --/-- --:-- --:-- ---- --
m Move sEnter rReturn eExit
XCV
12:00
12:00
►
Edit
Erase
►
►
►
►
►
● RECORDING
English _53
Page 54

recording
ERASING THE TIMER LIST
Follow these directions to erase a title from the timer record list.
Press the MENU button.
1.
Press the ▲▼ button to select Timer, then press the ENTER
2.
button.
▲▼
Press the
3.
button.
Press the ▲▼ button to select the number of the scheduled
4.
record list you want to erase, and then press the ENTER button.
The Edit and Erase items are displayed.
•
5.
Press the ▲▼ button to select erase, then press the
•
You will be prompted with a delete confi rm message such as “Do you want to erase ‘No.01’?”.
6.
Press the
•
The selected title will be erased from the list.
M
CHECK REMAINING TIME
button to select Timer List, then press the ENTER
ENTER
◄►
buttons to select OK, then press the ENTER button.
You can not delete programs that are currently being recorded.
Timer List
No. Date Start End Ch Mode Edit
01 01/01 12:00 12:00 AV 1 --
02 --/-- --:-- --:-- ---- --
Do you want to erase "No. 01"?
03 --/-- --:-- --:-- ---- --
04 --/-- --:-- --:-- ---- --
05 --/-- --:-- --:-- ---- --
06 --/-- --:-- --:-- ---- --
m Move sEnter rReturn eExit
button.
OK
XCV
12:00
Cancel
►
►
►
►
►
►
Press the INFO button on the remote control.
The following information will be displayed.
(Current deck status, recording speed, remaining time, input channel,
current time.)
54_ recording
DVD-RAM
Stop
00:00:00
LSP
Rem 02:00
AV 1
Page 55
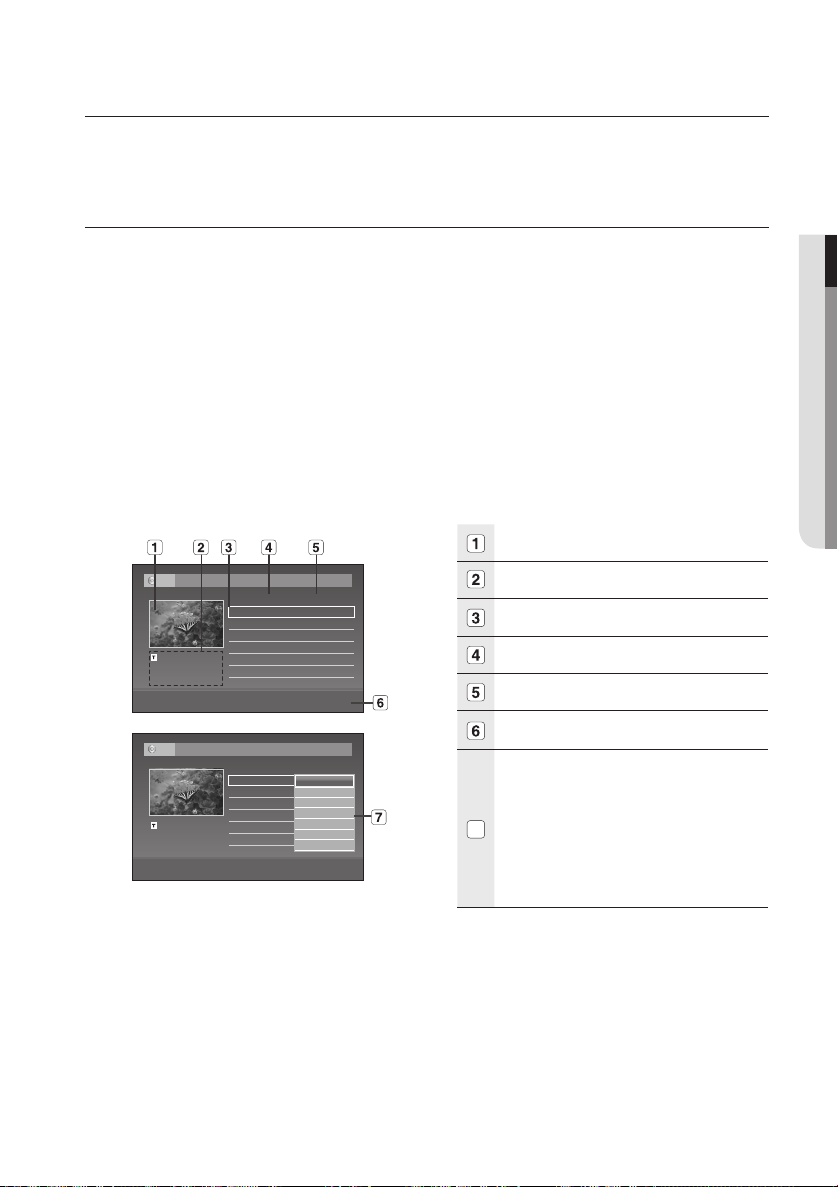
editing
This section introduces basic functions of DVD editing and explains both edit
functions for recording on a disc and edit functions for the entire disc.
PLAYING THE TITLE LIST
Follow these instructions to play back a scene from the Title List.
XCV
1.
Press the TITLE LIST button.
The Title List screen is displayed.
2.
Press the ▲▼ buttons to select a Title, then press the ENTER button.
3.
4.
Title List Screen Elements
> Move sEnter rReturn eExit
> Move sEnter rReturn eExit
▲▼
Press the
buttons to select Play to play the title list, then press the ENTER button.
The selected title will be played back.
Press the STOP button to stop playing.
To return the title list screen, press the TITLE LIST button.
Playback screen for recorded titles
DVD
Title List (Original) 12:00
-RAM
1/4
No. Title Length Edit
01 AV1 00:00:11 ►
02 AV1 00:00:09 ►
03 AV1 00:01:36 ►
AV1
4
Jan/01/2008
12:06 1LSP
04 AV1 00:00:11 ►
Information window for the selected title: Title name,
recording date, lock status, recording mode
Recorded title No.
Recorded title name
Recording Length (i.e., the playing time)
DVD
Title List (Original) 12:00
-RAM
1/4
No. Title Length Edit
01 AV1 00:00:11 ►
02 AV1 00:00:09 ►
03 AV1 00:01:36 ►
AV1
4
Jan/01/2008
12:06 1LSP
04 AV1 00:00:11 ►
Play
Title Erase
Chapter Erase
Protect
Title Name
A-B Erase
Divide Title
Button display
Edit menu
Play : Plays the selected title.
Title Erase : Erase the selected title from the list.
Chapter Erase :
7
Protect : Locks or unlocks the selected title.
Erase the selected chapter from the title.
Title Name : Changes the name of a selected title.
A-B Erase :
Erase the selected section (scene) from the title.
Divide Title : Divide a title into two.
● EDITING
This may depend on the disc type.
M
DVD-RW(V)/-R(V) discs have limited editing functions.
English _55
Page 56
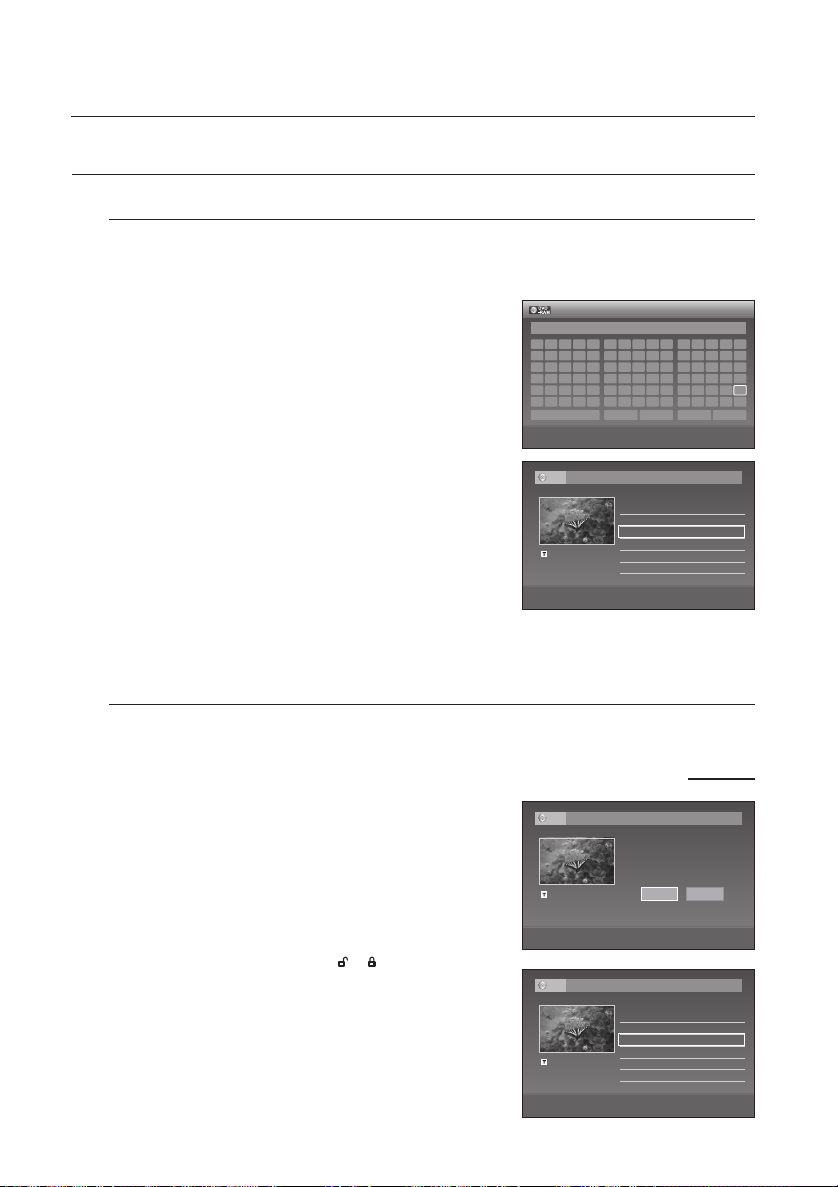
editing
BASIC EDITING (TITLE LIST)
Changing the Name of a Title (Title Name)
Follow these instructions to rename a title list name, i.e., to edit the title of a recorded program.
Press the TITLE LIST button.
1.
The Title List screen is displayed.
▲▼
Press the
2.
buttons to select a title you want to rename from
the Title List, then press the ENTER button.
Press the
3.
▲▼
buttons to select Title Name, then press the
ENTER button. The Title Name screen is displayed.
▲▼◄ ►
Select the desired characters using the
4.
buttons, then
press the ENTER button.
Backspace : Moves the cursor one position backwards.
•
Space : Enters a blank and moves the cursor one forward
•
(to the right).
Delete : Deletes the character at the cursor position.
•
Clear : Deletes all the character inputs.
•
Finish : Registers the character inputs.
•
Press the
5.
▲▼◄►
buttons to select Finish, and then press the
Finish button.
The changed title name is displayed in the title fi eld of the
selected title.
Title Name
Sports(A1)
A B C D Eabcde1 2 3 4 5
F G H I J fgh ij6 7 8 9 0
K L M N O k l
P Q R S T
U V W X Y
Z
Backspace Space Delete Clear Finish
m Move sEnter rReturn eExit
DVD
Title List (Original) 12:00
-RAM
3/4
Sports(A1)
4
Jan/01/2008
12:06 1LSP
> Move sEnter rReturn eExit
XCV
r s
t ~ !@# $
y
_
% ^ &
m n o p q
u v w x
z
No. Title Length Edit
01 AV1 00:00:11 ►
02 AV1 00:00:09 ►
03 Sports(A1) 00:01:36 ►
04 AV1 00:00:11 ►
12:00
+ = .
( )
Locking (Protecting) a Title
Follow these instructions to lock a title to protect it from accidental deletion.
XCV
(VR mode)
1.
Press the TITLE LIST button.
The Title List screen is displayed.
2.
Press the
Title List, then press the ENTER
3.
Press the
▲▼
buttons to select a title you want to protect in the
▲▼
buttons to select Protect, then press the ENTER
button.
button.
4.
Press the
◄►
buttons to select On, then press the ENTER
button. The lock icon on the information window for the selected
title changes to the locked status. (
→
)
56_ editing
DVD
Title List (Original) 12:00
-RAM
3/4
Select the protection
status for this title.
AV1
4
Jan/01/2008
12:06
1
> Move sEnter rReturn eExit
DVD
Title List (Original) 12:00
-RAM
3/4
AV1
4
Jan/01/2008
12:06 0 LSP
> Move sEnter rReturn eExit
On Off
LSP
No. Title Length Edit
01 AV1 00:00:11 ►
02 AV1 00:00:09 ►
03 AV1 00:01:36 ►
04 AV1 00:00:11 ►
Page 57
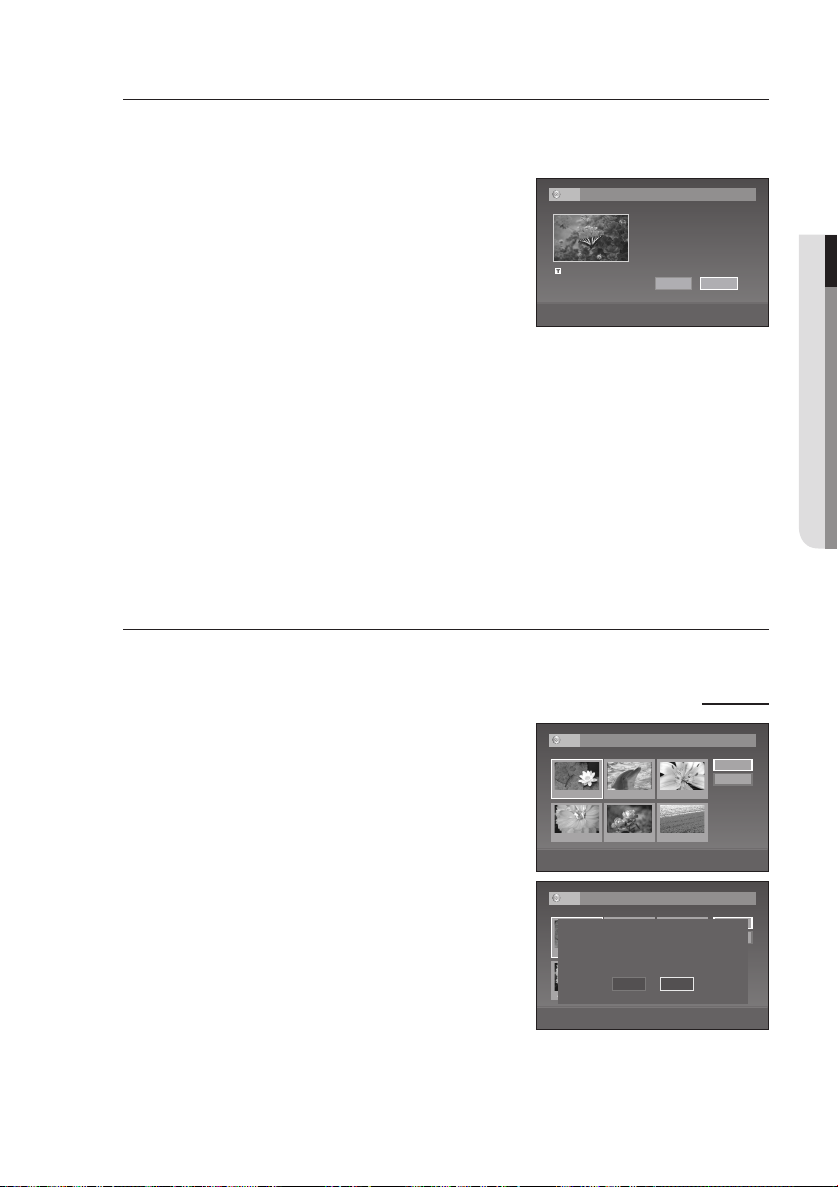
Erasing a Title (Title Erase)
Follow these instructions to delete a title from the Title List.
XCV
Press the TITLE LIST button.
1.
The Title List screen is displayed.
▲▼
Press the
2.
buttons to select a title you want to erase in the
Title List, then press the ENTER button.
Press the ▲▼ buttons to select Title Erase, then press the
3.
ENTER button.
You will be prompted with a confi rmation message.
DVD-RAM, DVD-RW(VR), DVD-R(VR) : Since a Playlist is present,
the message ‘Do you want to erase "NO.01"? (If you have created a
Playlist or Dubbing list with this title, part of that Playlist or Dubbing list will be also be erased.)’ is displayed.
DVD-RW(V), DVD-R(V) : Since a Playlist is not present, the message ‘Do you want to erase "No.01"?’ is
displayed.
The message may depend on the type of disc.
•
Press the
4.
M
◄►
buttons to select OK, then press the ENTER button.
You cannot erase a protected title. If you want to erase a protected title, select Off in the Title Protect menu.
Once a title is erased from the Title List it cannot be recovered.
Once a DVD-R, DVD-RW is fi nalized, it cannot be erased.
With DVD-R discs, titles are only erased from the menu, however, the Title remains physically on the disc.
Erasing a chapter (Chapter Erase)
Follow these instructions to erase a chapter from the Title List.
DVD
Title List (Original) 12:00
-RAM
1/4
AV1
4
Jan/01/2008
12:06
1
> Move sEnter rReturn eExit
Do you want to erase
(If you have created a Playlist
or Dubbing list with this title,
part of that Playlist or Dubbing
list will be also be erased.)
LSP
OK
"NO.01"?
Cancel
● EDITING
XCV
(VR mode)
Press the TITLE LIST button.
1.
The Title List screen is displayed.
▲▼
Press the
2.
buttons to select a title you want to erase from the
Title List, then press the ENTER button.
Press the ▲▼ buttons to select Chapter Erase, then press the
3.
ENTER button.
The Chapter Erase screen is displayed.
Press the
▲▼◄►
4.
buttons to select a chapter you want to erase
from the Title List, then press the ENTER button. Check is
selected.
To preview the chapter, press the ENTER button.
When you press the RETURN button, the display returns to
Chapter Erase (Original).
▲▼
Press the
5.
buttons to select Erase, then press the ENTER
button.
You will be prompted with a confi rmation message.
The Message "Do you want to erase "No. 01"?" is displayed.
Press the
◄ ►
6.
buttons to select OK, then press the ENTER button.
The selected chapter is erased from the title.
To erase other chapters, repeat from step 4.
DVD
Chapter Erase (Original) 12:00
-RAM
Chapter No. 1 / 7 Title No.01
01 00:00:03 02 00:00:42
04 00:00:03 05 00:00:11 06 00:00:04
m Move sEnter rReturn eExit
DVD
Chapter Erase (Original) 12:00
-RAM
Chapter No. 1 / 7 Title No.01
01 00:00:03 02 00:00:42
04 00:00:03 05 00:00:11 06 00:00:04
m Move sEnter rReturn eExit
03 00:00:04
Do you want to erase "No.01"?
03 00:00:04
OK Cancel
Check
Erase
Check
Erase
English _57
Page 58

editing
You can also erase chapters from a Playlist title.
M
If you erase an original title used in a Playlist, that Playlist is also erased.
Erasing a section of a Title (A-B Erase)
Follow these instructions to erase a section of a Title List entry.
XCV
(VR mode)
1.
Press the TITLE LIST button.
The Title List screen is displayed.
▲▼
2.
Press the
buttons to select a title you want to edit from the
Title List, then press the ENTER button.
Press the ▲▼ buttons to select A-B Erase, then press the
3.
ENTER button.
The A-B Erase screen is displayed.
4.
Press the ENTER button at the starting point.
The image and starting point time are displayed in the section
deletion starting point window.
Press the ENTER button at the end point.
5.
The image and end point time is displayed in the Section deletion
ending point window.
▲▼
Press the
6.
buttons to select Erase, then press the ENTER
button.
◄ ►
Press the
7.
buttons to select OK, then press the ENTER
button.
The selected section has been deleted.
To return to the Title List, press the ▲▼ buttons to select Finish.
DVD
A-B Erase 12:00
-RAM
►
Title No. 2
4
Jan/01/2008 02:15
> Move sEnter rReturn eExit
Title No. 2
4
Jan/01/2008 02:15
> Move sEnter rReturn eExit
Title No. 2
4
Jan/01/2008 02:15
> Move sEnter rReturn eExit
00:00:02
DVD
A-B Erase 12:00
-RAM
■
00:00:15
DVD
A-B Erase 12:00
-RAM
Do you want to erase?
Erased part will not be restored.
OK Cancel
Title No. 03
Start 00:00:02
End 00:00:00
Title No. 03
Start 00:00:02
End 00:00:15
Title No. 03
Start 00:00:02
End 00:00:15
Start
End
Erase
Finish
Start
End
Erase
Finish
Start
End
Erase
Finish
A-B Erase Screen Elements
❖
DVD
A-B Erase 12:00
-RAM
►
Title No. 2
4
Jan/01/2008 02:15
> Move sEnter rReturn eExit
00:00:02
58_ editing
Title No. 02
Start 00:00:02
End 00:00:00
Start
End
Erase
Finish
Playback bar
Section deletion starting point window and time
Playtime
Section deletion end point window and time
• Select the start and end points of the section you want
to delete using the playback related buttons.
• Playback related buttons : ( ,
, , , ,
)
Page 59
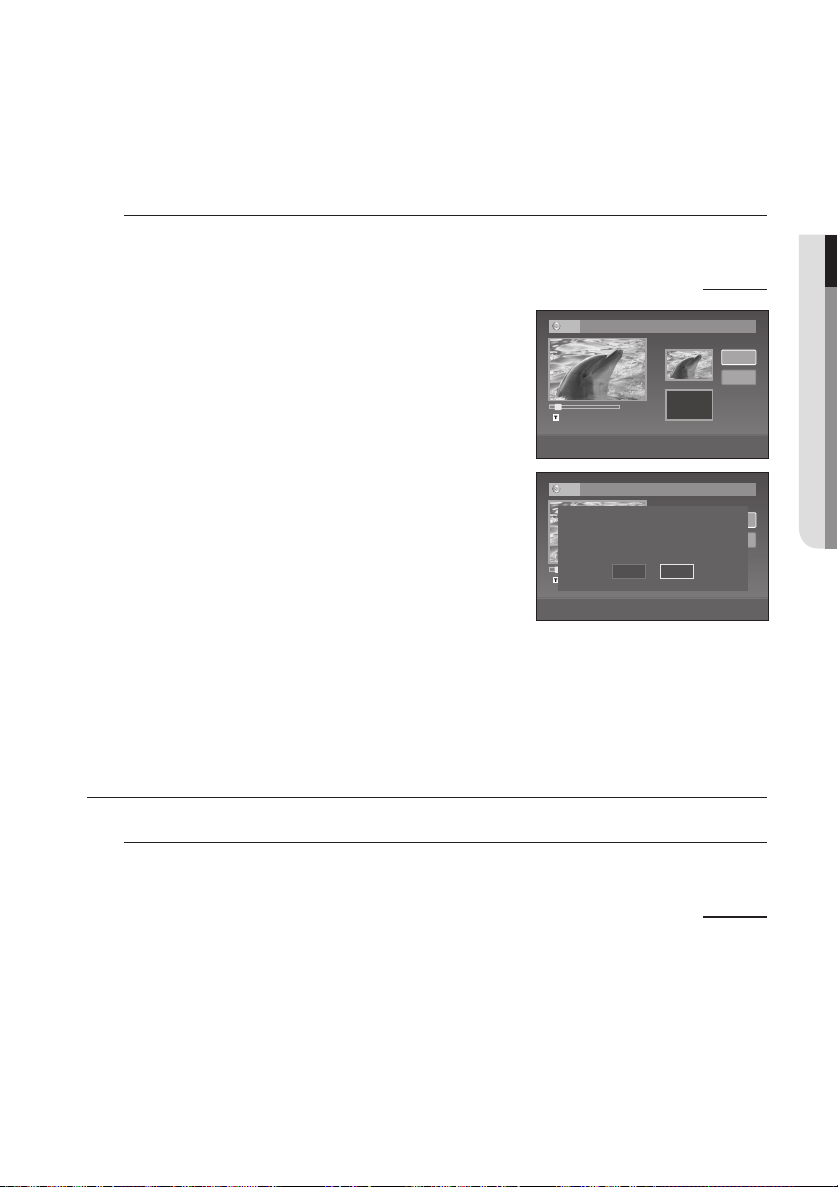
The length of the section to be deleted must be at least 5 seconds long.
M
End point cannot be marked earlier than start point.
The section cannot be deleted when it includes a still picture.
Dividing a title into two (Divide Title)
Follow these instructions to divide a title into two.
XCV
(VR mode)
Press the TITLE LIST button.
1.
The Title List screen is displayed.
Press the ▲▼ buttons to select a title you want to divide from the
2.
Title List, then press the ENTER button.
Press the ▲▼ buttons to select
3.
button.
Divide Title
, then press the
ENTER
The setting the dividing point screen is displayed.
Point is selected.
Press the
ENTER
4.
button at the point where you want to divide the title.
Divide is selected.
Press the
ENTER
5.
button.
You will be prompted with a confi rmation message.
The Message “Do you want to divide title “No.01”?” is displayed.
To reset the dividing point, select No and press the
ENTER
button,
then repeat from step 4.
The display asks whether you want to rename the title.
To use the same name as before, select No and press the
ENTER
button to
fi nish.
Press the ◄► buttons to select Yes, then press the
6.
ENTER
button.
The Title Name screen is displayed.
Follow steps 3 to 5 of Changing the Name of a Title (page 56) to complete renaming.
7.
The divided title appears in the Title List with the new name.
ADVANCED EDITING (PLAYLIST)
DVD
Divide Title (Original) 12:00
-RAM
►
Title No. 1
4
Jan/01/2008 02:15
> Move sEnter rReturn eExit
►
Title No. 1
4
Jan/01/2008 02:15
> Move sEnter rReturn eExit
00:00:02
DVD
Divide Title (Original) 12:00
-RAM
Do you want to divide title "No. 01"?
Yes No
Title No. 01
Start 00:00:02
End 00:00:00
Title No. 01
Start 00:00:02
End 00:00:00
Point
Divide
Point
Divide
● EDITING
Creating a Playlist
Follow these instructions to create a new playlist title from a recorded title.
XCV
(VR mode)
With the unit in Stop mode, press the MENU button.
1.
▲▼
Press the
2.
Press the ▲▼ buttons to select Create Playlist, then press the ENTER button.
3.
The Create Playlist screen is displayed.
Press the ENTER button at the start point.
4.
buttons to select Edit, then press the ENTER button.
English _59
Page 60
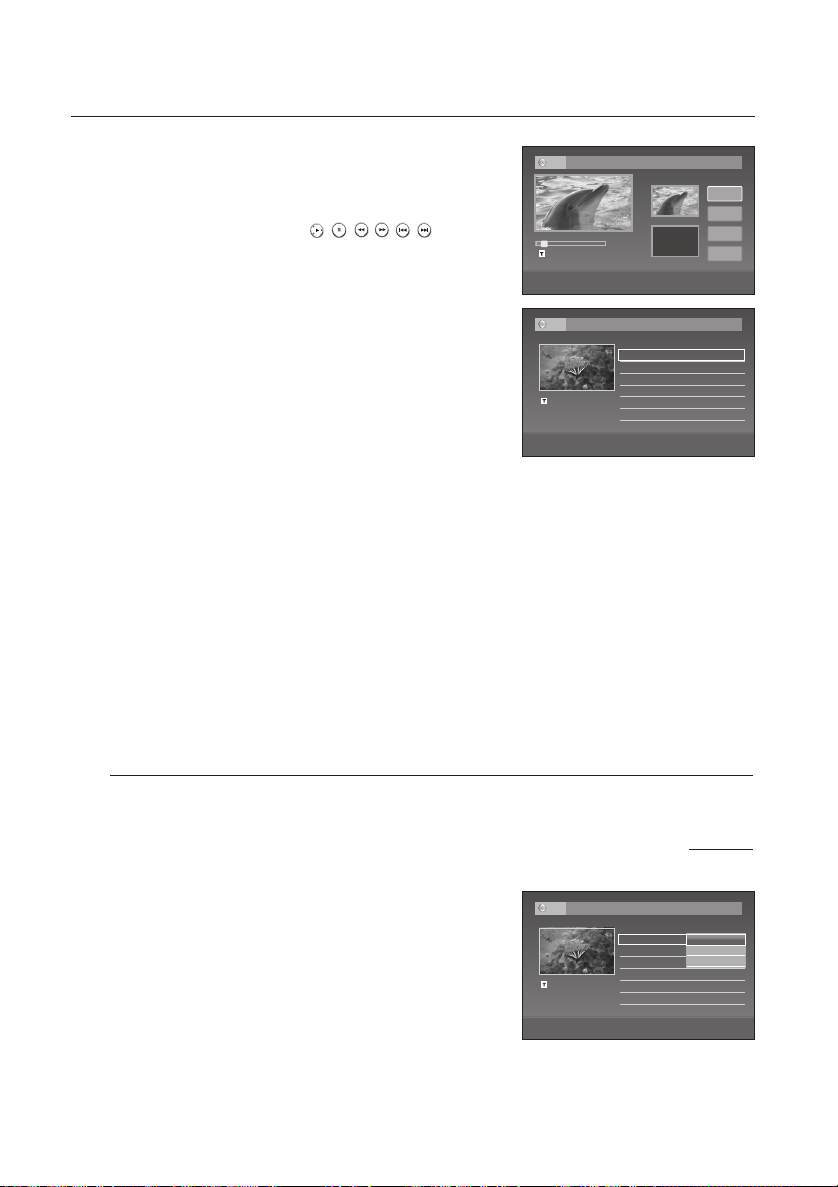
editing
The image and time at the start point are displayed on the Start
•
window.
•
Select the starting point of the section from which you want to
create a new scene using the playback related buttons.
•
Playback related buttons : (
Press the ENTER button at the end point.
5.
The image and end point time are displayed in the End
•
window.
- To make a new playlist -
Press the
6.
▲▼
buttons to select Make, then press the ENTER
button.
A new Make Scene screen is displayed.
A new Scene will be added to the current Playlist.
You can check and see all the scenes on the Edit Playlist screen.
M
Repeat steps 1~5 if you want to make a new playlist.
Repeat steps 4~5 if you want to make scenes of the playlist.
- To return to Edit Playlist menu -
▲▼
7.
Press the
buttons to select Finish, then press the ENTER button.
The Edit Playlist screen is displayed.
You can create up to 99 playlist titles.
M
Depending on the kind of disc, the displayed screen may be slightly different.
, , , , ,
DVD
Create Playlist 12:00
-RAM
)
Title No. 01
►
Playlist No. 01
4
Jan/01/2008 02:15
> Move sEnter rReturn eExit
AV1
4
> Move sEnter rReturn eExit
00:00:01
DVD
Playlist 12:00
-RW
1/3
Jan/01/2008
12:06 1LSP
Scene No. 01
Start
Start 00:00:01
End 00:00:00
No. Title Length Edit
01 AV1 00:00:11 ►
02 AV1 00:00:25 ►
03 Sports(A1) 00:00:05 ►
End
Make
Finish
Playing Titles in the Playlist
Follow these instructions to play the playlist titles.
XCV
(VR mode)
Press the TITLE LIST button with the disc stopped, then press
1.
the PLAY LIST button.
The Edit Playlist screen is displayed.
Press the ▲▼ buttons to select the title you want to play from
2.
the Playlist, then press the ENTER button.
Press the ▲▼ buttons to select Play, then press the ENTER
3.
button.
The playlist titles will be played back.
Press the STOP button to stop playing.
4.
60_ editing
DVD
Playlist 12:00
-RAM
1/3
No. Title Length Edit
01 AV1 00:00:11 ►
02 AV1 00:00:09 ►
03 AV1 00:01:36 ►
AV1
4
Jan/01/2008
12:06
> Move sEnter rReturn eExit
Play
Title Erase
Title Name
Page 61

Changing the Name of a Playlist
Follow these instructions to rename a playlist title, i.e. to edit the title of a playlist title.
XCV
(VR mode)
Press the TITLE LIST button with the disc stopped, then press
1.
the PLAY LIST button.
The Edit Playlist screen is displayed.
Press the ▲▼ buttons to select the title you want to rename from
2.
the Playlist, then press the ENTER button.
▲▼
Press the
3.
buttons to select Title Name, then press the
ENTER button.
The Title Name screen is displayed.
Enter the desired characters using the
4.
Back Space : Moves the cursor one position backwards.
•
Space : Enters a blank and moves the cursor one forward
•
▲▼◄ ►
buttons.
(to the right).
Delete : Deletes the character at the cursor position.
•
Clear : Deletes all the character inputs.
•
Finish : Registers the character inputs.
•
Press the
5.
▲▼◄ ►
buttons to select Finish, then press the
ENTER button.
The changed title is displayed in the title fi eld of the selected title.
Deleting a Playlist Title from the Playlist
Press the TITLE LIST button with the disc stopped, then press
1.
the PLAY LIST button.
The Edit Playlist screen is displayed.
Press the ▲▼ buttons to select the title you want to delete from
2.
the Playlist, then press the ENTER button.
▲▼
Press the
3.
ENTER button.
Press the
4.
button.
After the delete operation is complete, it will automatically return to the Edit Playlist screen.
buttons to select Title Erase, then press the
◄►
buttons to select OK, then press the ENTER
Title Name
Dolphin
A B C D Eabcde1 2 3 4 5
F G H I J fgh ij6 7 8 9 0
K L M N O k l
P Q R S T
U V W X Y
Z
m Move sEnter rReturn eExit
DVD
-RAM
Dolphin
4
Jan/01/2008
12:06
> Move sEnter rReturn eExit
4
> Move sEnter rReturn eExit
p q
u v w x
z
Backspace Space Delete Clear Finish
Playlist 12:00
3/4
No. Title Length Edit
01 AV1 00:00:11 ►
02 AV1 00:00:09 ►
03 Dolphin 00:01:36 ►
04 AV1 00:00:11 ►
Playlist
2/2
AV1
Jan/01/2008
12:06
m n o r s
t ~ !@# $
y
Do you want to erase
"No.02"?
OK Cancel
_
% ^ &
+ = .
12:00
( )
12:00
● EDITING
English _61
Page 62

editing
DISC SETTING
Menu items may vary, depending on the existence of a recorded title.
Editing the Disc Name
Follow these instructions to give a name to a disc.
With the unit in Stop mode, press the MENU button.
1.
Press the ▲▼ buttons to select Disc Setting, then press the
2.
ENTER button.
Press the ▲▼ buttons to select Disc Name, then press the
3.
ENTER.
The Disc Name screen is displayed.
▲▼◄ ►
Enter the desired characters using the
4.
Backspace : Moves the cursor one position backwards.
•
Space : Enters a blank and moves the cursor one forward (to
•
the right).
Delete : Deletes the character at the cursor position.
•
Clear : Deletes all the character inputs.
•
Finish : Registers the character inputs.
•
Press the
5.
▲▼◄►
buttons to select Finish, then press the
ENTER button.
A disc name is given to the disc.
You may need to clear disc protection before editing.
M
Depending on the kind of disc, the displayed screen may be different.
buttons.
XCV
Disc Name
Disc
A B C D Eabcde1 2 3 4 5
F G H I J fgh ij6 7 8 9 0
K L M N O k l
P Q R S T
U V W X Y
Z
Backspace Space Delete Clear Finish
m Move sEnter rReturn eExit
Disc Setting
Title List
Timer
Edit
Disc
Setting
Setup
> Move sEnter rReturn eExit
m n o p q
u v w x
z
Disc Name : Disc
Disc Protect : Not Protected
Disc Format : VR Mode
Disc Finalize : Unfinalized
Disc Information
Erese All Titles
r s
t ~ !@# $
y
_
% ^ &
+ = .
12:00
( )
12:00
Disc Protection
Disc Protect allows you to protect your discs from being formatted or deleted due to unintended operations.
XCV
With the unit in Stop mode, press the MENU button.
1.
Press the
2.
▲▼
buttons to select Disc Setting, then press the
ENTER.
▲▼
Press the
3.
buttons to select Disc Protect, then press the
ENTER.
Press the
4.
▲▼
button to select Protected, then press the
ENTER.
62_ editing
Disc Setting
Title List
Disc Name : Disc
Disc Protect : Not Protected
Timer
Disc Format : VR Mode
Edit
Disc Finalize : Unfinalized
Disc
Disc Information
Setting
Erese All Titles
Setup
m Move sEnter rReturn eExit
(VR mode)
12:00
Page 63
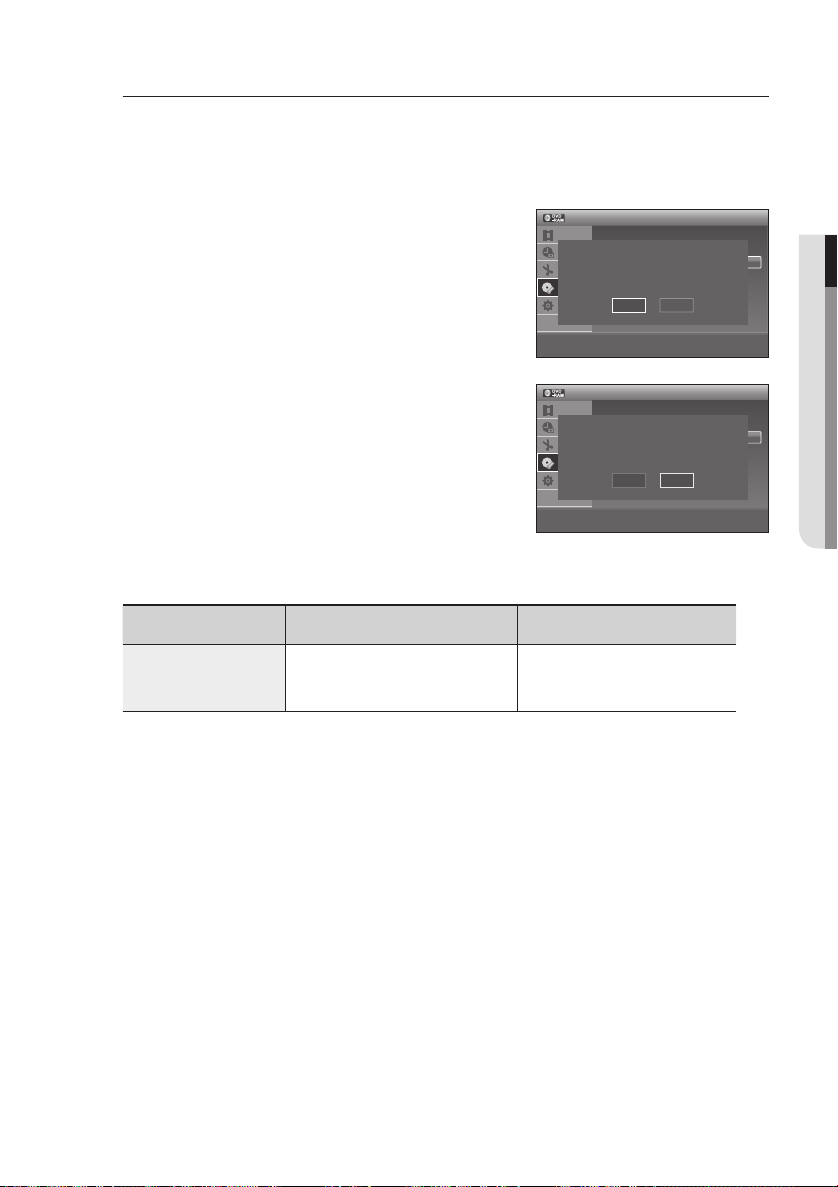
Formatting a Disc
e
Use these instructions to format a disc.
Disable disc protection before formatting.
XC
With the unit in Stop mode, press the MENU button.
1.
▲▼
Press the
2.
buttons to select Disc Setting, then press the
ENTER button.
▲▼
Press the
3.
buttons to select Disc Format, then press the
ENTER button.
DVD-RAM/-RW
You will be prompted with the confi rmation message ‘Select
•
the recording format.’ (When using a DVD-RAM disc, you can
select VR mode only)
•
You will be prompted with the confi rmation message 'All of the
data will be erased (even protected titles). Do you want to
format this disc?'.
4.
Press the
◄►
buttons to select OK, then press the ENTER
button.
The disc is formatted.
<DVD-RAM>
Disc Format
Title List
Disc Name : Disc
Disc Protect : Not Protected
Timer
Disc Format : VR Mode
Edit
Select the recording format.
Disc Finalize : Unfinalized
Disc
Disc Information
Setting
Erese All Titles
VR ModeVideo Mod
Setup
m Move sEnter rReturn eExit
<DVD-RW>
Disc Format
Title List
Disc Name : Disc
Disc Protect : Not Protected
Timer
Disc Format : VR Mode
Edit
Select the recording format.
Disc Finalize : Unfinalized
Disc
Disc Information
Setting
Erese All Titles
VR Mode
Setup
Video Mode
12:00
● EDITING
12:00
You can change the disc mode only one time when the unused DVD-
M
R disc is inserted.
m Move sEnter rReturn eExit
DVD-VR and DVD-V modes are compatible with the following disc types.
DVD-VR DVD-V
DVD-RAM
DISC
DVD-RW
DVD-R
DVD-RW
DVD-R
English _63
Page 64

editing
e
Finalizing a Disc
After you record titles onto a DVD-RW/DVD-R disc with your DVD Recorder, it needs to be fi nalized before it
can be played back on external devices.
With the unit in Stop mode, press the MENU button.
1.
▲▼
Press the
2.
buttons to select Disc Setting, then press the
ENTER button.
Press the ▲▼ button to select Disc Finalize, then press the
3.
ENTER button.
You will be prompted with the message 'Do you want to fi nalize
this disc?'.
Press the ◄ ► buttons to select Finalize, then press the ENTER
4.
button.
You will be prompted again with the message “Disc will be fi nalized. Do you want to continue?”.
◄ ►
Press the
5.
buttons to select OK, then press the ENTER button.
The disc is fi nalized.
Once a disc is fi nalized, you cannot delete titles from the record list.
M
Once a DVD-R/DVD-RW (video mode)disc is fi nalized, it is playable in a standard DVD player.
Depending on the disc type, the displayed screen may be different.
Finalizing time may be different depending on the amount of data recorded on the disc.
Data on the disc will be damaged if the recorder is powered off during the fi nalization process.
You can automatically fi nalize a disc using EZ Record. (See page 34)
Disc Finalize
Title List
Disc Name : Disc
Disc Protect : Not Protected
Timer
Disc Format : VR Mode
Do you want to finalize this disc?
Edit
Disc Finalize : Unfinalized
Disc
Disc Information
Setting
Erese All Titles
FinalizeUnfinaliz
Setup
> Move sEnter rReturn eExit
CV
12:00
Unfi nalizing a disc (V/VR mode)
With the unit in Stop mode, press the MENU button.
1.
▲▼
Press the
2.
buttons to select Disc Setting, then press the
ENTER button.
Press the ▲▼ button to select Disc Unfi nalize, then press the
3.
ENTER.
You will be prompted with the message 'Do you want to
unfi nalize disc?'.
Press the ◄► buttons to select Unfi nalize, then press the
4.
ENTER button.
You will be prompted again with the message “This disc will be unfi nalized. Do you want to continue?”.
◄►
Press the
5.
buttons to select OK, then press the ENTER button.
The disc is unfi nalized.
64_ editing
Disc Finalize
Title List
Disc Name : Disc
Disc Protect : Not Protected
Timer
Disc Format : VR Mode
Do you want to unfinalize disc?
Edit
Disc Finalize : Unfinalized
Disc
Disc Information
Setting
Erese All Titles
FinalizeUnfinalize
Setup
> Move sEnter rReturn eExit
C
12:00
Page 65
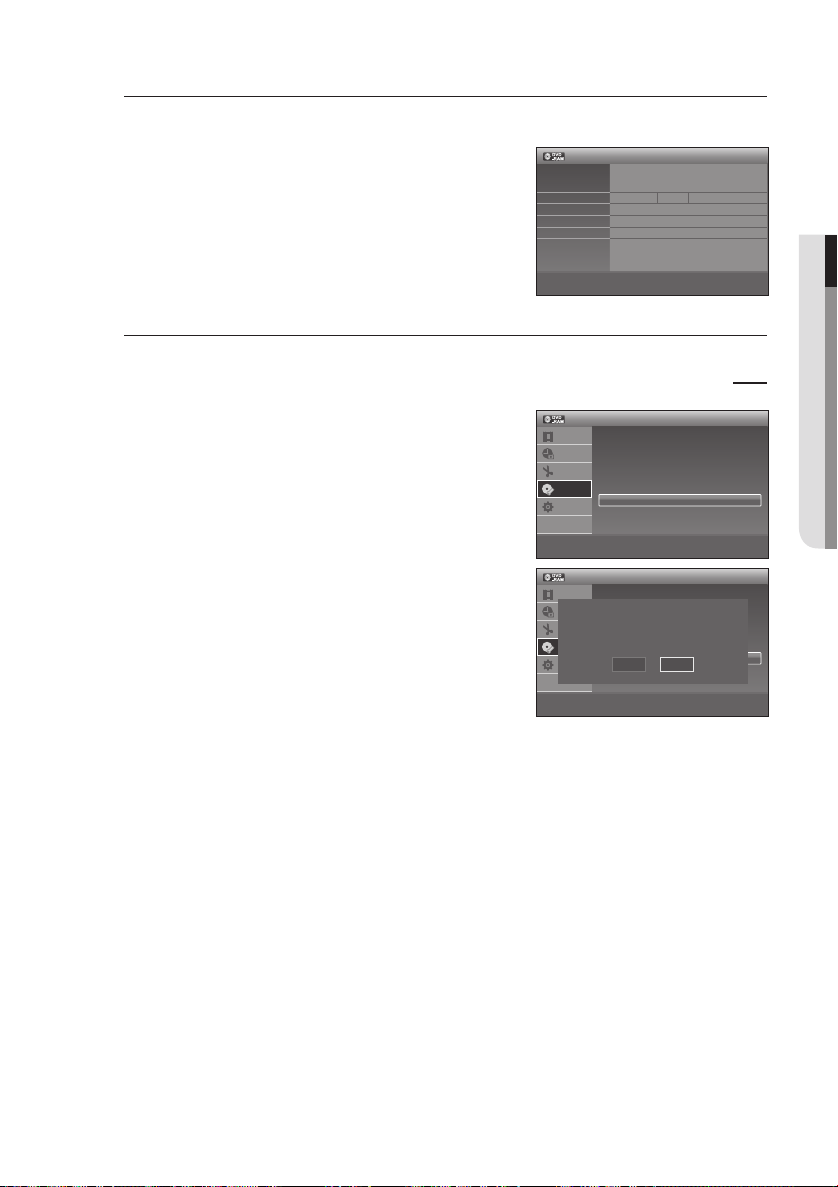
Disc Information
With the unit in Stop mode, press the MENU button.
1.
2.
Press the ▲▼ buttons to select Disc Setting, then press the
button.
3.
Press the ▲▼ buttons to select Disc Information, then press
the
ENTER
button.
The Disc Information is displayed.
Erase All Titles
1.
With the unit in Stop mode, press the MENU button.
▲▼
2.
Press the
button.
Press the
3.
button.
You will be prompted with the confi rmation message 'Do you
•
want to erase all title lists?'.
When Protected Title exists: The
•
operate. If there is a title containing a still picture, however, that
function will not operate. If you want to delete a protected title,
disable Protect for it on the Lock item.
Press the
3.
All title lists are deleted.
buttons to select Disc Setting, then press the ENTER
▲▼
button to select Erase All Titles, then press the ENTER
Erase All Titles
◄ ►
buttons to select OK, then press the ENTER button.
function will
ENTER
XCV
Disc Information
Disc Name
Media
Title No.
Protected
Date
Remainder
rReturn eExit
DVD-RAM Format VR Mode
Original 1 / Playlist 0
Not Protected
--.--.----
1.03.2008 ~
HQ : 0H59M HSP : 1H29M SP : 2HOM
LSP : 2H29M ESP : 2H59M LP : 4H0M
EP : 6H1M SLP : 8HOM 4.6 / 4.7GB
XCV
Disc Setting
Title List
Disc Name : Disc
Disc Protect : Not Protected
Timer
Disc Format : VR Mode
Edit
Disc Finalize : Unfinalized
Disc
Disc Information
Setting
Erese All Titles
Setup
m Move sEnter rReturn eExit
not
Disc Setting
Title List
Disc Name : Disc
Disc Protect : Not Protected
Timer
Disc Format : VR Mode
Edit
Do you want to erase all the titles?
Disc Finalize : Unfinalized
Disc
Disc Information
Setting
Erese All Titles
OK Cancel
Setup
12:00
● EDITING
(VR mode)
12:00
12:00
m Move sEnter rReturn eExit
English _65
Page 66
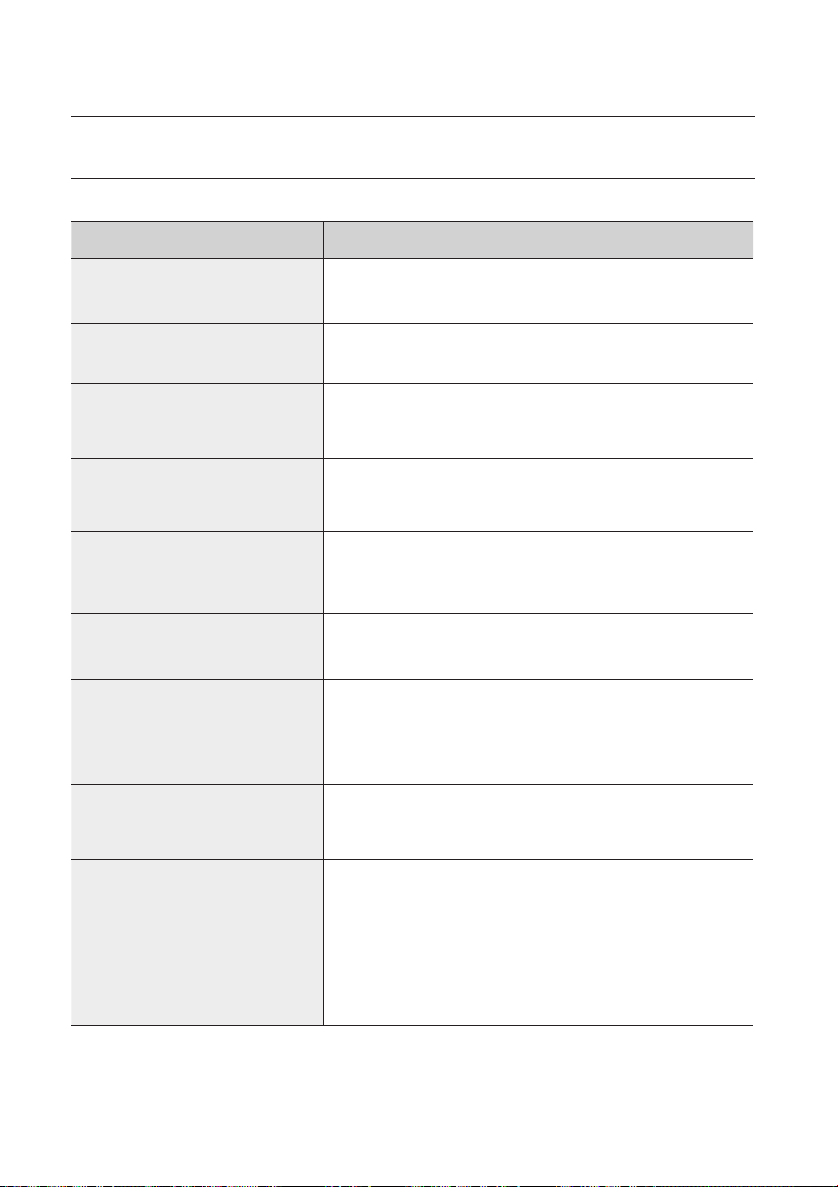
reference
TROUBLESHOOTING (DVD-VIDEO/DVD-RAM/DVD-RW/DVD-R)
If your product malfunctions, go through the check points below before contacting Samsung customer service.
PROBLEM EXPLANATION/SOLUTION
No power.
The input is displayed for a while when the
power turns on.
Cannot record TV programs. • Check whether the power cord is securely plugged into the power outlet.
Timer recording does not work properly. • Check the recording time, end time and current time settings again.
Cannot record.
I pressed the REC button but there is no
response.
I forgot the parental control password. • Press and hold the CH./CH,( I❮❮ / ❯❯I ) button on the front panel of your unit
Cannot play the disc. • Check whether the disc is inserted correctly with the label facing up.
• Check whether the power cord is securely plugged into the power outlet.
• Did you press the power button of your DVD Recorder.
• The DVD Recorder requires some time to initialize after it is turned on.
• Did you set the DVD Recorder channel settings correctly?
• Check the free space on your DVD-RAM/DVD-RW/DVD-R disc.
• Recording will be cancelled if the power is interrupted due to a power failure or other
reason during recording.
• Check whether the disc is formatted. This product can record on formatted discs
only. (See pages 48, 63.)
• Check whether your DVD-RAM/DVD-RW/DVD-R disc has a suffi cient free space.
• Recording is available on DVD-RAM/DVD-RW/DVD-R discs only.
• If a program is copy protected, you cannot record it.
for more than 10 seconds with no disc, and then press the POWER OFF/ON button.
All settings including the password will revert to factory settings. Only do this if it is
absolutely necessary. (Note that this function is available only when there is no disc
inserted.)
• Check the regional code of your DVD disc.
• This DVD Recorder cannot playback some types of disc. (See pages 6, 39.)
No sound. • Are you watching a program in slow or skip mode?
If you are playing a program at a speed other than normal speed, sound is not
output. (But, you can hear sound during forward search (FF1) in DVD-VIDEO/
DVD-RAM/-RW/-R disc.)
• Check the connections and initial settings.
• Check whether the disc is damaged.
• Clean the disc, if necessary.
• Check whether the disc is inserted correctly with the label facing up.
66_ reference
Page 67

TROUBLESHOOTING (DVD)
PROBLEM EXPLANATION/SOLUTION
icon appears on the screen.
Play mode settings are different from the
settings confi gured with the Setting menu.
Cannot change the aspect ratio. Aspect ratio is fi xed on DVD disc.
No audio output.
No video or audio output.
The disc tray is ejected after 2 to 5 seconds.
Angle operation does not work during
playback of a DVD disc.
The disc revolves, but no image or bad
quality images are output.
Desired sound language and subtitle
language are not played.
No progressive output.
The remote control doesn't work. • Point the remote control at the remote control sensor on your DVD Recorder.
Other problems • Read the table of contents and then fi nd and read the sections describing your
You cannot use the operation or function due to one of the following reasons:
(1) Your DVD disc does not support the feature (for example, angles)
(2) You've requested a title, chapter, or scan time that is out of the correct range.
The disc does not support all the selected functions.
In this case, some settings you confi gure on the Setting menu may not work properly.
Check whether you selected the correct digital output in the Audio Output Options menu.
Did you move your DVD Recorder suddenly from a cold place to a warm place?
In this case, do not connect the plug to the power outlet and wait for two hours.
Then insert the disc and try to play back again. It will work properly when condensation
has evaporated.
Angle operation is available only when the disc contains images captured at different angles.
• Check whether there is damage or foreign materials on your disc.
• Some discs with bad manufacturing quality may not be played back.
• If the scene changes from dark to bright suddenly, the screen may jitter temporarily,
but it is not defective.
Sound languages and subtitle languages are disc-specifi c.
Only the sound and subtitle languages contained on a DVD disc are available and
displayed on the disc menu.
• Check whether you selected the corrent Progessive options in the Video Options.
Operate within distance. (15ft)
Remove obstacles between your DVD Recorder and remote control.
• Check whether the batteries are depleted.
problem, and follow the directions given.
• Turn the unit off and on.
• If your problem still persists, contact your nearest Samsung customer service.
● REFERENCE
If you are unable to solve the problem after reading the above instructions, note:
• The model and serial number on the rear of your DVD Recorder
• The warranty information
• A clear description of the problem
Then contact SAMSUNG customer service at 0800-124-421 or 4004-0000.
English _67
Page 68
reference
PROBLEMS AND SOLUTIONS (DISPLAY ERROR MESSAGE)
Before contacting a Samsung authorized service center, perform the following simple checks.
PROBLEM EXPLANATION/SOLUTION
You cannot record a copy protected movie. • You can’t record the video since it is protected by copyright.
You cannot record. This disc is protected.
This disc cannot be formatted
(the disc is protected).
This disc cannot be renamed
(the disc is protected).
This disc cannot be fi nalized
(the disc is protected).
This [Menu] is not available
(the disc is protected).
The disc cannot be played, Please check the
regional code of the disc.
This disc cannot be formatted.
Please check the disc.
You could not format the disc because of
error detection.
You could not fi nalize the disc because of
error detection.
You could not unfi nalize the disc because of
error detection.
The disc cannot be played, Please check the
TV system.
The disc can be neither played nor recorded.
The disc cannot be played, Please check the
disc.
If the disc has invalid information, no more
titles can be recorded.
Please format the disc beforehand.
• The disc you are using is protected. To record on this disc or use this function,
cancel the disc protection function. Refer to page 62.
• The disc does not match the regional code for your area and cannot be played on
this device.
• Make sure there are no scratches or dirt on the disc.
• The disc is PAL format and cannot be played on this unit.
• Make sure there are no scratches or dirt on the disc.
• You can’t use the disc because it contains errors from previous recordings.
Use the disc after formatting.
68_ reference
Page 69

PROBLEMS AND SOLUTIONS (DISPLAY ERROR MESSAGE)
PROBLEM EXPLANATION/SOLUTION
Error is detected on the disc.
System error is found.
Please try it again after turning off the power.
If you are unable to solve the problem after reading the above instructions, note:
• The model and serial number on the rear of your DVD Recorder
• The warranty information
• A clear description of the problem
Then contact SAMSUNG customer service at 0800-124-421 or 4004-0000.
• You can’t use the disc because it contains errors from previous recordings.
Use the disc after formatting.
• When operating, errors happen. Turn off the device.
(To turn off, press and hold the power button on the front of the device for 10
seconds.)
After turning off, press the Open button and remove the disc from the device.
● REFERENCE
English _69
Page 70
appendix
SPECIFICATIONS
Power requirements 110~240V AC, 50/60Hz
Power consumption 19 Watts
General
Input
Output
DVD
Weight 3.3 Kg
Dimensions 430(W) x 218(D) x 55(H)mm
Operating temp. 5°C to 35°C
Other conditions Keep level when operating. Operate in less than 75% humidity
Video
Max. Audio Input Level 2Vrms
Audio
Video
Picture Compression format MPEG-II
Audio Compression format Dolby AC-3 256kbps
Recording Quality
Video S/N Ratio Min. 50dB at standard recording
Audio S/N Ratio Min. 75dB
Audio frequency characteristics 20 Hz ~ 20 KHz
1.0 V p-p at 75Ω load, sync negative
Audio output jacks
Coaxial digital audio output support
Min. 100 dB signal-to-noise ratio
Max. 0.005% total harmonic distortion (T.H.D)
at average 1 KHz
Video output jacks
Component output (Y: 1.0Vp-p, Pb: 0.70Vp-p, Pr: 0.70Vp-p at 75Ω load)
HQ(Approx. 1 hour), HSP(Approx. 1 hour 30 minutes), SP(Approx. 2
hours), LSP(Approx. 2 hours 30 minutes), ESP(Approx. 3 hours),
LP(Approx. 4 hours), EP(Approx. 6 hours), SLP(Approx. 8 hours)
Audio Output
For DVD discs, audio signals recorded at 96kHz sampling frequency are converted into and output at 48kHz.
Disc Type DVD
Analog Audio Output 48 / 96KHz 44.1KHz 44.1KHz
Digital Audio Output 48KHz 44.1KHz 44.1KHz
VCD
AUDIO CD (CD-DA)
70_ appendix
Page 71
Contact SAMSUNG WORLD WIDE
If you have any questions or comments relating to Samsung products, please contact the SAMSUNG
customer care center.
Region Country
North America
Latin America
Europe
CIS
Asia Pacifi c
Middle East &
Africa
CANADA 1-800-SAMSUNG(726-7864) www.samsung.com/ca
MEXICO 01-800-SAMSUNG(726-7864) www.samsung.com
U.S.A 1-800-SAMSUNG(726-7864) www.samsung.com
ARGENTINE 0800-333-3733 www.samsung.com/ar
BRAZIL 0800-124-421 , 4004-0000 www.samsung.com
CHILE 800-SAMSUNG(726-7864) www.samsung.com/cl
NICARAGUA 00-1800-5077267
HONDURAS 800-7919267
COSTA RICA 0-800-507-7267 www.samsung.com/latin
ECUADOR 1-800-10-7267 www.samsung.com/latin
EL SALVADOR 800-6225 www.samsung.com/latin
GUATEMALA 1-800-299-0013 www.samsung.com/latin
JAMAICA 1-800-234-7267 www.samsung.com/latin
PANAMA 800-7267 www.samsung.com/latin
PUERTO RICO 1-800-682-3180 www.samsung.com/latin
REP. DOMINICA 1-800-751-2676 www.samsung.com/latin
TRINIDAD & TOBAGO 1-800-SAMSUNG(726-7864) www.samsung.com/latin
VENEZUELA 0-800-100-5303 www.samsung.com/latin
COLOMBIA 01-8000112112 www.samsung.com.co
BELGIUM 0032 (0)2 201 24 18 www.samsung.com/be
CZECH REPUBLIC
DENMARK 70 70 19 70 www.samsung.com/dk
FINLAND 030-6227 515 www.samsung.com/fi
FRANCE
GERMANY
HUNGARY 06-80-SAMSUNG(726-7864) www.samsung.com
ITALIA 800-SAMSUNG(726-7864) www.samsung.com
LUXEMBURG 0035 (0)2 261 03 710 www.samsung.com/be
NETHERLANDS
NORWAY 815-56 480 www.samsung.com/no
POLAND 0 801 801 881 , 022-607-93-33 www.samsung.com/pl
PORTUGAL 80820-SAMSUNG(726-7864) www.samsung.com/pt
SLOVAKIA 0800-SAMSUNG(726-7864) www.samsung.com/sk
SPAIN 902 10 11 30 www.samsung.com
SWEDEN 0771-400 200 www.samsung.com/se
U.K 0845 SAMSUNG (7267864) www.samsung.com
EIRE 0818 717 100 www.samsung.com/ie
AUSTRIA 0800-SAMSUNG(726-7864) www.samsung.com/at
SWITZERLAND 0800-SAMSUNG(726-7864) www.samsung.com/ch
RUSSIA 8-800-555-55-55 www.samsung.com
KAZAHSTAN 8-10-800-500-55-500 www.samsung.kz
UZBEKISTAN 8-10-800-500-55-500 www.samsung.uz
KYRGYZSTAN 00-800-500-55-500
TADJIKISTAN 8-10-800-500-55-500
UKRAINE 8-800-502-0000 www.samsung.com
LITHUANIA 8-800-77777 www.samsung.lt
LATVIA 800-7267 www.samsung.com/lv
ESTONIA 800-7267 www.samsung.ee
AUSTRALIA 1300 362 603 www.samsung.com
NEW ZEALAND 0800SAMSUNG(726-7864) www.samsung.com/nz
CHINA 800-810-5858 , 010-6475 1880 www.samsung.com
HONG KONG 3698-4698 www.samsung.com/hk
INDIA 3030 8282 , 1800 110011 www.samsung.com
INDONESIA 0800-112-8888 www.samsung.com
JAPAN 0120-327-527 www.samsung.com/jp
MALAYSIA 1800-88-9999 www.samsung.com/my
PHILIPPINES 1800-10-SAMSUNG(726-7864) www.samsung.com/ph
SINGAPORE 1800-SAMSUNG(726-7864) www.samsung.com
THAILAND 1800-29-3232 , 02-689-3232 www.samsung.com
TAIWAN 0800-329-999 www.samsung.com/tw
VIETNAM 1 800 588 889 www.samsung.com
TURKEY 444 77 11 www.samsung.com
SOUTH AFRICA 0860-SAMSUNG(726-7864 ) www.samsung.com
U.A.E 800-SAMSUNG (726-7864), 8000-4726
Customer Care Center
844 000 844
Distributor pro Českou republiku:
Samsung Zrt., česka organizační složka
Vysko čilova 4, 14000 Praha 4
3260 SAMSUNG (€ 0,15/Min),
08 25 08 65 65 (€ 0,15/Min)
01805 - SAMSUNG(726-7864) (€ 0,14/Min)
0900-SAMSUNG(726-7864) (€ 0,10/Min)
Web Site
www.samsung.com/cz
www.samsung.com
www.samsung.com
www.samsung.com/nl
www.samsung.com
Page 72

Code No. AK68-01580A
Page 73

DVD
manuel d'utilisation
DVD-R170
imaginez les possibilités
Nous vous remercions d’avoir acheté ce produit
Samsung. Pour bénéfi cier d’un service plus
complet,veuillez enregistrer votre produit à cette
adresse :
www.samsung.com/global/registe
Page 74
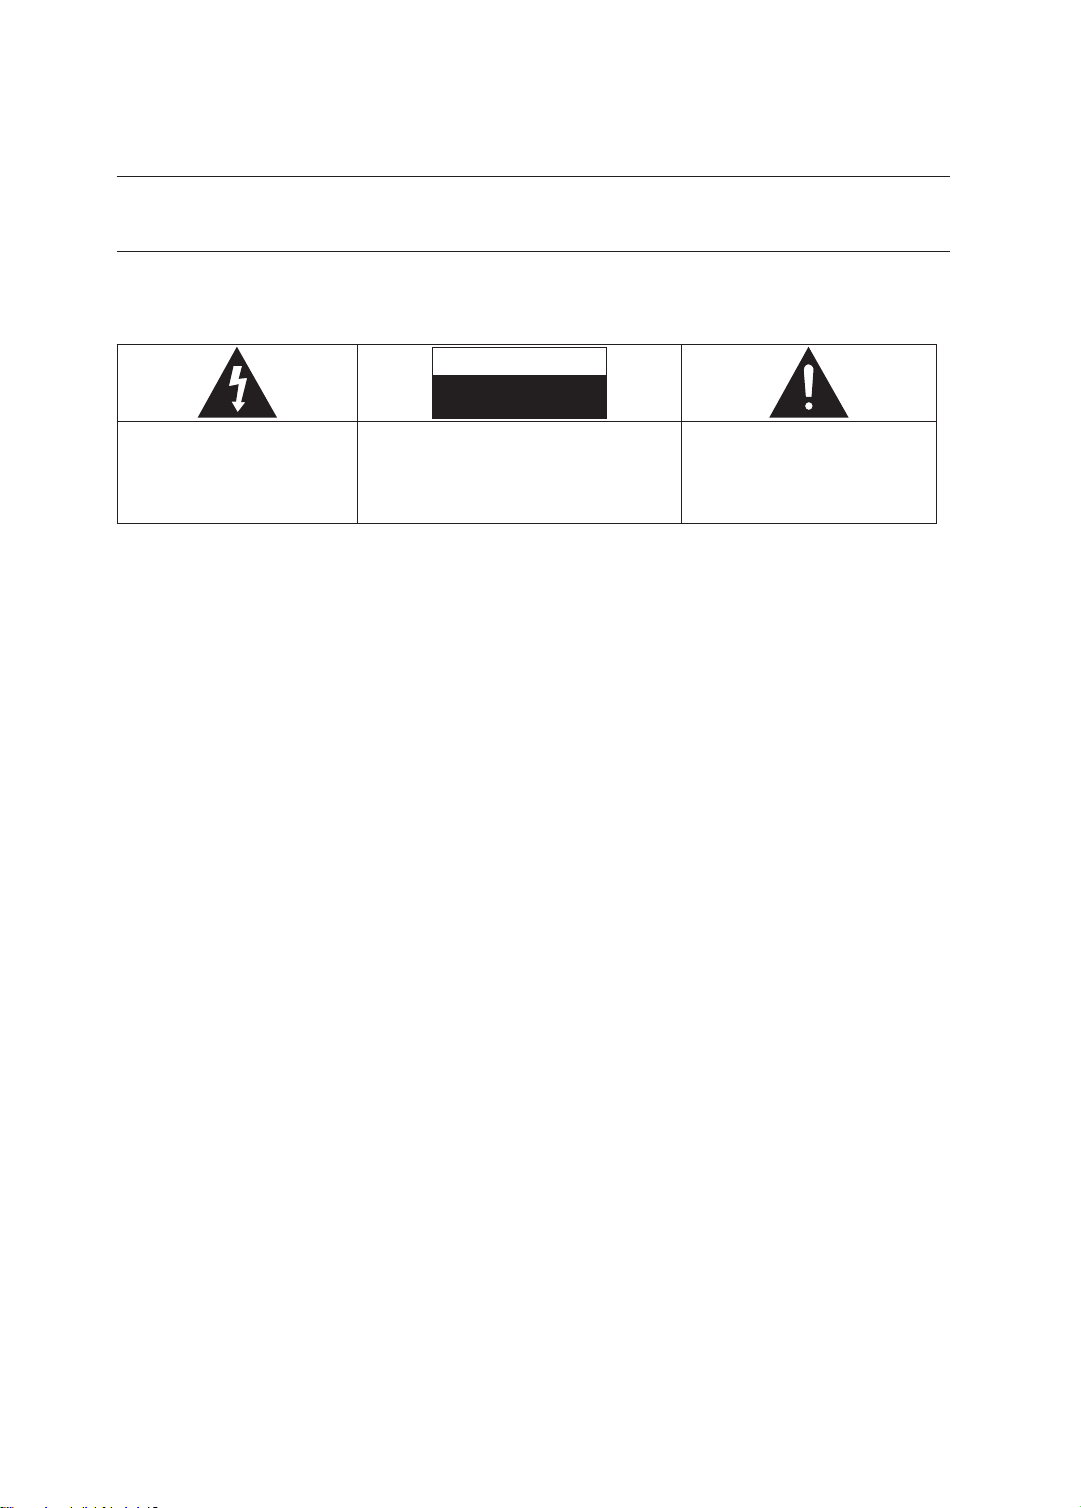
Mise en route
AVERTISSEMENT
POUR RÉDUIRE LES RISQUES D'ÉLECTROCUTION, NE DÉMONTEZ PAS LE COUVERCLE OU LE PANNEAU
ARRIÈRE. NE CONTIENT AUCUNE PIÈCE POUVANT ÊTRE RÉPARÉE PAR L'UTILISATEUR. CONFIEZ LES
RÉPARATIONS À UN TECHNICIEN QUALIFIÉ.
CAUTION
RISK OF ELECTRIC SHOCK
DO NOT OPEN
Ce symbole indique qu’une tension
dangereuse constituant un risque
d’électrocution est présente dans cet
appareil.
N’installez pas cet équipement dans un espace réduit comme une bibliothèque ou un meuble de ce type.
AVERTISSEMENT
Pour éviter tout dommage pouvant causer un incendie ou une électrocution, n’exposez pas cet appareil à la pluie ni
à une humidité excessive.
ATTENTION
LES ENREGISTREURS DVD UTILISENT UN FAISCEAU LASER QUI PEUT REPRÉSENTER UNE SOURCE
DANGEREUSE D’EXPOSITION AUX RAYONNEMENTS LORSQU’ELLE EST DIRIGÉE VERS LES PERSONNES.
RESPECTEZ LES INSTRUCTIONS AFIN .D’UTILISER L’ENREGISTREUR EN TOUTE CONFORMITÉ.
ATTENTION: POUR RÉDUIRE LES RISQUES
D'ÉLECTROCUTION, NE DÉMONTEZ PAS LE COUVERCLE
OU LE PANNEAU ARRIÈRE. NE CONTIENT AUCUNE PIÈCE
POUVANT ÊTRE RÉPARÉE PAR L'UTILISATEUR. CONFIEZ
LES RÉPARATIONS À UN TECHNICIEN QUALIFIÉ.
Ce symbole indique que les documents
accompagnant cet appareil contiennent
des consignes d’exploitation et d’entretien
importantes.
ATTENTION
CE PRODUIT COMPORTE UN LASER.L’UTILISATION DE COMMANDES, DE RÉGLAGES OU DE PROCÉDURES
DE FONCTIONNEMENT AUTRES QUE CELLES INDIQUÉES DANS LES PRÉSENTES INSTRUCTIONS PEUT
REPRÉSENTERUNE SOURCE DANGEREUSE D’EXPOSITION AUX RAYONNEMENTS.N’OUVREZ PAS LE
BOÎTIER ET NE RÉPAREZ PAS VOUS-MÊMES L'APPAREIL. CONFIEZ LES RÉPARATIONS À UN TECHNICIEN
QUALIFIÉ.
PRÉCAUTIONS
Avertissement : Pour éviter un risque de décharge électrique, faites correspondre la broche large de la fi che mâle
Cet appareil est conforme à la réglementation de la FCC (Commission fédérale des communications des États-Unis)
lorsqu’il est branché à d’autres équipements à l’aide de câbles et de connecteurs blindés. N’utilisez que des câbles
et des connecteurs blindés afi n d’éviter toute interférence électromagnétique avec d’autres appareils électriques
comme un téléviseur ou une radio.
AVIS DE LA FCC (pour les É-U) :
Cet appareil a été mis à l’essai, il est conforme aux exigences en matière de limites pour un appareil numérique de
classe B, selon le paragraphe 15 de la Réglementation de la FCC. Ces limites sont conçues pour prévenir
raisonnablement les brouillages préjudiciables pour les installations domestiques. Cet appareil génère, utilise et peut
émettre de l’énergie radio-électrique. S’il n’est pas installé et utilisé selon les instructions, il peut provoquer des
brouillages préjudiciables pour la réception radio ou télévision. Ces brouillages peuvent être déterminés en allumant
et en éteignant l’appareil. L’utilisateur est encouragé à essayer de corriger le brouillage à l’aide de l’une ou l’autre
des mesures suivantes:
Réorientez l’antenne de réception ou changez son emplacement.
•
Augmentez la distance entre l’appareil et le récepteur.
•
Branchez l’appareil sur une prise murale différente de celle à laquelle le récepteur est relié.
•
Demandez de l’aide au revendeur ou à un technicien radio/TV expérimenté.
•
Avertissement: la réglementation de la FCC américaine stipule que tout changement ou toute modifi cation non
avec la fente large de la prise femelle et insérez-les complètement l’une dans l’autre.
autorisée de cet appareil peut annuler les droits d’exploitation de l’utilisateur.
2_ mise en route
Page 75
M
Cet appareil doit être utilisé uniquement avec une alimentation électrique de 120 V c.a., 60 Hz. Ne pas l’utiliser dans
d’autres conditions.
Cet enregistreur DVD a été conçu et fabriqué en conformité avec les indications de codes de régions. Si le code de
région d’un disque DVD ne correspond à aucun de ceux pris en charge par cet appareil, l’enregistreur DVD ne
pourra pas lire les données contenues sur le DVD.
Cet appareil est protégé par les brevets américains numéros. 6,836,549; 6,381,747; 7,050,698; 6,516,132; et
5,583,936. Il comprend une technologie de protection des droits d'auteur qui est protégée par des brevets
américains ou d’autres sources de droits de propriété intellectuelle. L’utilisation de cette technologie de protection
des droits d'auteur doit être autorisée par la société Macrovision et doit se limiter à des fi ns de divertissement privé
à moins d'une autorisation préalable et explicite de Macrovision. Toute rétro-ingénierie ou tout démontage est
interdit.
Ce produit est protégé par un ou plusieurs des brevets américains ci-après :
5,060,220 5,457,669 5,561,649 5,705,762 6,043,912 6,438,099
6,467,061 6,556,521 6,578,163 6,697,307 6,728,474 6,771,891
6,894,963 6,895,593 6,937,815 6,996,327 7,009,926 7,085,221
7,088,649 7,092,327 7,099,566 7,123,564 7,142,493 7,142,495
7,145,861 7,146,624 7,151,729 7,161,879 7,164,647 7,167,437
7,173,891 7,177,250 7,194,187 7,203,891 7,209,423 7,210,067
7,228,062 7,245,566 7,245,567 7,257,065 7,263,045 7,269,110
7,272,086 7,272,106 7,280,460 7,283,729 7,286,454 7,304,938
● MISE EN ROUTE
PRÉCAUTIONS
Remarques importantes sur la sécurité
Vous êtes prié de lire attentivement ces instructions avant d’utiliser l’appareil. Respectez toutes les consignes
de sécurité indiquées ci-dessous.Gardez ce manuel d'instructions à portée de la main pour vous y reporter si
nécessaire.
Lisez attentivement toutes les instructions.
1)
Conservez ces instructions pour usage ultérieur.
2)
Appliquez toutes les consignes des avertissements.
3)
Respectez toutes les instructions.
4)
N’utilisez pas cet appareil près d’une source d’eau.
5)
6)
Nettoyez-le en utilisant uniquement un chiffon sec.
Installez l’appareil conformément aux instructions du fabricant, sans obstruer les orifi ces d’aération.
7)
Français _3
Page 76

Mise en route
N’installez pas cet appareil près d’une source de chaleur tel qu’un radiateur, une bouche d’air chaud,
8)
une cuisinière ou tout autre appareil émettant de la chaleur (y compris un amplifi cateur).
N’essayez pas de contourner la protection assurée par la fi che ou la prise polarisée. Sur une fi che
9)
polarisée, une des lames est plus large que l’autre. Une prise polarisée comporte deux fentes dont une
est plus large que l’autre, ainsi qu’un conducteur circulaire de mise à la terre. La lame la plus large ou le
conducteur circulaire procure une protection accrue. Si ce type de fi che ne peut être inséré dans votre
prise de courant, communiquez avec un électricien pour remplacer la prise.
Placez le cordon d’alimentation de telle sorte qu’on ne puisse marcher dessus ou qu’il
10)
ne soit coincé, en particulier à proximité des prises de courant et de l’emplacement de
connexion sur l’appareil.
Utilisez uniquement les accessoires ou périphériques recommandés par le fabricant.
11)
Utilisez le support vendu avec l’appareil ou utilisez uniquement un support, table à
12)
roulettes, meuble, trépied ou table qui est conforme aux recommandations du fabricant.
Si l’appareil est installé sur une table à roulettes, déplacez-la avec la plus grande précaution afi n d’éviter
toute blessure et tout dommage.
Débranchez l’appareil lors d’un orage électrique ou en cas de non utilisation prolongée.
13)
Confi ez l'ensemble des réparations au personnel qualifi é. Vous devez faire réparer l’appareil dès qu’il est
14)
endommagé de quelque façon qu’il soit : cordon ou fi che endommagée, humidité par renversement de
liquide ou si des objets ont pénétré dans l’appareil. Vous devez aussi le faire réparer s’il a été exposé à la
pluie ou à l’humidité, ne fonctionne pas normalement ou s’il est tombé.
Précautions à prendre lors de la manipulation de cet appareil
Mettez tout composant hors tension avant de le brancher sur l’appareil.
•
Ne déplacez pas l’enregistreur DVD avec magnétoscope lorsqu'un disque est en cours de lecture car cette
•
manoeuvre pourrait endommager le disque et les pièces internes de l’appareil.
Ne placez pas de pot à fl eurs rempli d’eau ni aucun objet métallique de petite dimension sur l’enregistreur.
•
N'introduisez jamais les doigts à l'intérieur du plateau de disque.
•
N’insérez aucun autre objet que des disques dans le plateau à disques.
•
Toute source externe d'interférence telle que des éclairs ou de l’électricité statique peut nuire au bon
•
fonctionnement de cet enregistreur. Dans un tel cas, éteignez l’enregistreur DVD puis rallumez-le en appuyant sur
la touche POWER, ou débranchez puis rebranchez le cordon d'alimentation c.a. à la prise de courant c.a.
L’appareil devrait alors fonctionner normalement.
Retirez le disque et éteignez l’appareil après utilisation.
•
Débranchez le cordon d’alimentation c.a. de la prise c.a. si vous ne comptez pas utiliser l'appareil pendant une
•
période de temps prolongée.
Lorsque vous nettoyez le disque, essuyez-le en partant de son centre.
•
L’appareil ne doit pas être exposé aux gouttes ou aux éclaboussures et aucun objet contenant du liquide, comme
•
un vase, ne doit être posé sur l’appareil.
La fi che d’alimentation principale est utilisée comme sectionneur de courant et doit demeurer accessible en tout
•
temps.
Entretien du boîtier
Par mesure de sécurité, débranchez le cordon d'alimentation c.a. de la prise de courant.
Ne jamais utiliser de benzène, de diluant ni tout autre solvant pour nettoyer l'appareil.
•
Essuyez le boîtier avec un chiffon doux.
•
Manipulation des disques
N’utilisez que des disques de forme régulière. L’utilisation d’un disque de forme
•
irrégulière (un disque qui n'est pas de forme ronde, par exemple) peut endommager
l’enregistreur DVD.
Comment tenir un disque
Évitez d’entrer en contact avec la surface du disque lorsqu'un enregistrement est en cours.
•
4_ mise en route
Page 77

DVD-RAM, DVD-RW et DVD-R
Nettoyez en utilisant le nettoyeur pour disques DVD-RAM/PD vendu séparément. N’utilisez ni les
•
nettoyeurs ni les tissus pour CD pour nettoyer les disques DVD-RAM, DVD-RW et DVD-R.
DVD vidéo, CD
•
Essuyez les saletés et les empreintes sur le disque avec un chiffon doux.
Précautions à prendre lors de la manipulation des disques
•
N’écrivez pas avec un crayon ou un stylo à bille sur le côté imprimé du disque.
•
N’utilisez pas de nettoyeur en vaporisateur ou antistatique. N’utilisez pas de produits chimiques volatiles tels que
le benzène ou un diluant.
Ne pas apposer d’étiquette ni de vignette autocollante sur les disques. (N’utilisez pas de disque comportant des
•
morceaux apparents de ruban adhésif ou de restants d’étiquette.)
N'utilisez pas de protecteur ou de couvercle anti-rayures.
•
N’utilisez pas les disques produits à l'aide des imprimantes à étiquettes vendues dans le commerce.
•
N’utilisez pas de disque tordu ou fendu.
•
Rangement des disques
Rangez les disques dans un endroit adéquat car les données qui y sont enregistrées sont très sensibles
aux conditions ambiantes.
•
N'exposez pas les disques à un ensoleillement direct.
•
Conservez-les dans un endroit frais et bien aéré.
•
Rangez-les verticalement.
•
Gardez-les dans un étui protecteur propre.
•
Si vous déplacez soudainement votre graveur DVD d’un endroit froid dans un endroit chaud, il pourrait se
former de la condensation sur les pièces mobiles et sur les lentilles ; cela pourrait affecter la lecture des
disques. Dans le cas présent, ne branchez pas la fi che dans la prise murale et attendez deux heures. Ensuite,
insérez le disque et tentez une nouvelle lecture. Il fonctionnera correctement après l’évaporation de la
condensation.
● MISE EN ROUTE
Fiche technique des disques
DVD vidéo
•
Un disque DVD peut contenir jusqu’à 135 minutes d'images vidéo, 8 langues audio et 32 langues de soustitrage. Il est doté de la technologie de compression d’images MPEG-2 et des effets sonores ambiophoniques
Dolby 3D qui vous permettent d’apprécier des images d’une grande clarté et luminosité en mode grand écran
dans le confort de votre foyer.
•
Avec un disque DVD vidéo double couche, le passage de la première couche à la seconde peut occasionner
une distorsion temporaire de l'image et du son. Ceci n’est pas dû à une défectuosité de l’appareil.
Lorsqu'un DVD-RW(V)/-R(V) enregistré est fi nalisé, il peut être lu par un lecteur DVD standard.
•
CD audio
•
Un CD audio est un disque sur lequel des données audio sont gravées par codage PCM à une fréquence
d’échantillonnage de 44,1 kHz.
•
L’appareil est compatible avec les formats CD audio des disques CD-R et CD-RW. Il est possible que certains
disque CD-R ou CD-RW ne soient pas pris en charge par cet appareil, selon les conditions dans lesquelles ils
ont été gravés.
CD-RW et CD-R
CD-RW ET CD-R de format MP3
❖
Seuls les disques CD-R comportant des fi chiers MP3 gravés selon la norme ISO 9660 ou le format JOLIET
•
peuvent être lus.
Pour être lus, les fi chiers MP3 doivent comporter l’extension du nom de fi chier “ mp3 ” ou “ MP3 ”.
•
La plage du débit qui peut être lue s’étend de 32 à 320 kbit/s
•
L’appareil peut prendre en charge jusqu’à 499 fi chiers et dossiers.
•
Les DVD-RAM/-RW/-R contenant des fi chiers MP3 peuvent être lus.
•
.
Français _5
Page 78

Mise en route
CD-RW et CD-R de format JPEG
❖
Pour être lus, les fi chiers JPEG doivent comporter l’extension du nom de fi chier “.jpg” ou “.JPG ”.
•
L’appareil peut prendre en charge jusqu’à 1000 fi chiers et dossiers.
•
La taille maximale d’une image JPEG progressive est de 3M de pixels.
•
Cet appareil ne prend pas en charge le format MOTION JPEG.
•
Les DVD-RAM/-RW/-R contenant des fi chiers JPEG peuvent être lus.
•
Utilisation d'un CD-RW ou d'un CD-R
❖
Utilisez un disque CD-RW ou CD-R d'une capacité de 700 Mo (80 minutes). Dans la mesure du possible, n’utilisez
•
pas de disques d’une capacité de 800 Mo (90 minutes) ou plus, car ils ne sont pas toujours lus correctement.
Si le CD-RW ou le CD-R n’a pas été gravé en session fermée, il pourrait y avoir un délai au début de la lecture et
•
certains fi chiers pourraient être omis.
Il est possible que cet appareil ne prenne pas en charge certains disques CD-RW et CD-R, selon l’appareil qui est
•
utilisé pour graver le disque. La qualité de lecture des disques CD-RW ou CD-R dont le contenu a été gravé à
partir d’un CD, à des fi ns personnelles, variera en fonction du contenu et du type de disque.
Si vous copiez un CD vers un disque CD-RW/-R pour votre usage personnel, sa lecture peut varier en fonction du
•
contenu ou du disque.
Utilisation du disque DivX
❖
Disque : CD-RW/-R, DVD-RAM/-RW/-R
•
Le fi chier et les extensions suivantes peuvent être lus.: .avi, .divx, .AVI, .DIVX
•
Format vidéo DivX (Codec) : DivX 3.11 DivX 4.x DivX 5.x (sans QPEL et GMC)
•
Format audio DivX (Codec) : MP3, MPEG1 2 couches audio, LPCM, AC3, DTS
•
Formats de fi chier sous-titre pris en charge .smi, .srt, .sub, .psb, .txt, .ass
•
Chaque dossier peut contenir jusqu’à 500 éléments incluant des sous-dossiers et des fi chiers.
•
Il est impossible de lire un disque au format de résolution de plus de 720 x 576 pixels.
•
Lecture et enregistrement d'un disque DVD-RW/-R
L’enregistrement et la lecture de disques DVD-RW/-R peuvent être réalisés en modes vidéo ou VR.
•
Une fois l'enregistrement sur un DVD-RW/-R fi nalisé que ce soit en mode Vidéo ou en mode VR, vous ne pouvez
•
pas réaliser d'enregistrements supplémentaires.
Un DVD-RW/-R enregistré en mode vidéo devient un DVD vidéo lorsque l’enregistrement est terminé.
•
Dans ces deux modes, le DVD-RW/-R peut être lu avant et après le processus d’enregistrement; vous ne pourrez
•
cependant plus enregistrer, supprimer ou modifi er des données une fois l’enregistrement terminé.
Si vous souhaitez enregistrer en mode V sur un disque qui a déjà été enregistré en mode DVD-VR, vous devez
•
d'abord formater le disque. Procédez avec précaution lorsque vous formatez un disque, car cette commande
supprime toutes les données contenues sur le disque concerné
modifi é qu’une seule fois à l’insertion.
• DVD-RW/-R (mode DVD-VR)
- Dans ce mode, vous pouvez enregistrer des titres, les modifi er, les supprimer totalement ou en partie, créer une
Liste de Titres, etc.
- Un disque gravé dans ce mode n'est pas pris en charge par les lecteurs de DVD standard.
• DVD-RW/-R (mode vidéo)
- Un disque gravé dans ce mode peut être lu sur un lecteur DVD standard.
- Le graveur ne peut lire ou ajouter un enregistrement sur un disque non fi nalisé enregistré en mode Vidéo par un
graveur d’une marque différente.
- Si vous supprimez un programme sur le DVD-R, l’espace qu'il occupait est conservé et n’est pas disponible.
Vous ne pouvez enregistrer qu’une seule fois sur chacune des plages physiques du DVD-R. Même si vous
supprimez l’information qui se trouve sur une plage, l’espace ainsi libéré n'est plus utilisable à d'autres fi ns.
. Le mode du disque DVD-R neuf ne peut être
6_ mise en route
Page 79

Lecture et enregistrement d'un disque DVD-RAM
Retirez le disque DVD-RAM de sa cartouche, le cas échéant. Le disque doit être utilisé seul.
•
•
La plupart des lecteurs DVD ne prennent pas en charge les DVD-RAM car les formats utilisés sont incompatibles.
•
Cet appareil prend en charge uniquement les disques DVD-RAM standard de version 2.0.
•
Les DVD-RAM gravés à l'aide de cet appareil ne sont pas compatibles avec les autres lecteurs DVD. Vérifi ez la
compatibilité avec les disques DVD-RAM en consultant le guide de l'utilisateur du lecteur
.
PROTECTION CONTRE LA COPIE
•
La plupart des disques DVD sont codés afi n de les protéger contre la copie. Pour cette raison, vous devez brancher
votre enregistreur DVD avec magnétoscope directement à votre téléviseur, et non à un magnétoscope. Les disques DVD
codés qui sont protégés contre la copie produiront une image déformée si l’appareil est branché à un magnétoscope.
• Cet appareil comprend une technologie de protection des droits d'auteur qui est protégée par des brevets américains,
ainsi que d'autres droits de propriété intellectuelle détenus par Macrovision Corporation et d’autres détenteurs de droits.
L’utilisation de cette technologie de protection des droits d'auteur doit être autorisée par Macrovision Corporation et doit
se limiter à des fi ns de divertissement privé à moins d'une autorisation préalable et explicite de Macrovision
Corporation. Toute rétro-ingénierie ou tout démontage est interdit.
Protection
Protection du programme : consultez la section “Verrouillage d’un titre” à la page 57.
•
Protection du disque : consulter la section “Protection du disque” à la page
•
❋ Les disques DVD-RAM, DVD-RW et DVD-R qui ne sont pas compatibles avec le format DVD vidéo ne
sont pas pris en charge par cet appareil.
❋ Pour plus d’information concernant la compatibilité des enregistrements sur DVD, communiquez avec le
fabricant des DVD-RAM, DVD-RW ou DVD-R
.
❋ L’utilisation de disques DVD-RAM, DVD-RW ou DVD-R de mauvaise qualité peut causer des problèmes
imprévisibles dont, sans s'y limiter, l’échec de la session d'enregistrement, la perte de données
enregistrées ou modifi ées et des dommages à l’appareil lui-même.
63.
● MISE EN ROUTE
N’utilisez pas les disques suivants!
Les disques LD, CD-G, CD-I, CD-ROM, DVD-ROM ne doivent pas être utilisés avec cet appareil.
•
[Remarque]
Il est également possible que certains disques commerciaux et DVD achetés à l’extérieur de votre région ne
•
soient pas pris en charge par cet appareil. Lorsque ces disques sont lus, le message “Aucun disque” ou “Ce
disque ne peut être lu. Veuillez vérifi er le code régional du disque” s’affi che.
Certains disques DVD-RAM/DVD-RW/DVD-R constituant des copie illégales ne seront pas pris en charge; il en
•
va de même pour ceux qui ne sont pas en format DVD vidéo
Compatibilité des disques
❖
Toutes les marques de disques ne sont pas compatibles.
•
La dernière mise à jour du micrologiciel permettant d'améliorer la qualité de lecture et d’enregistrement peut
•
être téléchargée depuis notre site Internet.(site de téléchargement sur www.samsung.com/global/register).
Si les problèmes de compatibilité persistent, ou si vous ne parvenez pas à mettre à jour votre graveur,
•
contactez le service à la clientèle.
.
Français _7
Page 80

Mise en route
MISE EN ROUTE
2
RACCORDEMENT ET
CONFIGURATION
19
CONFIGURATION DU SYSTÈME
25
2 Avertissement
é
3 Pr
10 Caract
11 Avant de lire le guide de l'utilisateur
12 Utilisation de l'enregistreur DVD
13 D
17 Description
19 Raccordement du câble d'antenne
20 Raccordement de la sortie vidéo
21 Raccordement du câble audio
23 Raccordement d'appareils p
25 Navigation dans le menu de l'
25 R
26 Pr
27 R
29 Confi guration des options d'affi chage vid
30 Confi guration des options audio
33 Confi guration des caract
35 Confi guration des options
cautions
é
ristiques de base
éballage
églage facile
éréglage du syntoniseur
églage horloge
ériphériques
écran
éristiques
éo
8_ mise en route
LECTURE
38
38 Code de r
38 Logo des disques pouvant être lus
39 Les types de disque pris en charge sont les
suivants
40 Lecture d'un disque
41 Utilisation du disque menu et du titre menu
41 Utilisation des fonctions de recherche et de
saut
42 Lecture au ralenti / lecture par sauts
43 Utilisation de la touche
43 S
élection de la langue
44 Reste
44 S
élection de la langue de sous-titrage
44 Changement de l'angle de caméra
45 Lecture d'un CD audio (CD-DA)/MP3
46 Lecture d'un disque photo
47 Lecture d'un fi chier MPEG4
égion (Pour DVD-Vidéo seulement)
ANYKEY
Page 81

ENREGISTREMENT
48
48 Disques inscriptibles
49 Mode d'enregistrement
50 Vid
51 Enregistrement imm
52 Enregistrement imm
53 Enregistrement par minuterie
54
54 Effacement liste de minuterie
55 V
55 Caract
éo ne pouvant être enregistrée
édiat
édiat (OTR)
Modifi cation
érifi cation de la durée restante
au magnétoscope
liste de minuterie
éristiques d'enregistrement spécifi ques
● MISE EN ROUTE
MODIFICATIONS
56
OUTILS DE RÉFÉRENCE
67
APPENDICE
71
56 Lecture de la liste de titres
57 Fonctions de modifi cations de base liste de
titres
60 Modifi cations avanc
63 R
églages du disque
67 D
épannage
RW/DVD-R)
68 D
épannage
69 Problèmes et solutions (Affi chage des
messages d'erreur)
71 Fiche technique
72 Garantie
(DVD-VIDEO/DVD-RAM/DVD-
(DVD)
ées (Liste de lecture)
Français _9
Page 82

Mise en route
CARACTÉRISTIQUES DE BASE
Le DVD-R170 vous permet d’enregistrer modifi er et de lire des vidéos de haute qualité sur des disques DVDRAM/DVD-RW/DVD-R.
Enregistrement et lecture audio et vidéo en format numérique de qualité supérieure
Vous pouvez effectuer un enregistrement vidéo d'environ 16 heures max. sur un DVD-RAM double face de
9,4 Go, de 15 heures sur un DVD-R double couche de 8,5 Go et de 8 heures sur un DVD-RAM/DVD-RW/
DVD-R de 4,7 Go en fonction du mode d'enregistrement utilisé.
Création d’un DVD vidéo sur un disque DVD-RW ou DVD-R
Le DVD-R170 vous permet de créer vos propres titres vidéo DVD sur un disque DVD-RW/DVD-R de 4,7
Go ou DVD-R de 8,5 Go.
Une panoplie d’options d’enregistrement
Vous pouvez régler votre graveur DVD sur l’un des huit modes d’enregistrement différents. Chacun fait varier
la qualité et la durée d’enregistrement. Sélectionnez un mode d’enregistrement en fonction de la durée et de
la qualité souhaitées pour votre enregistrement.
Si la qualité est votre priorité, sélectionnez « HQ » (haute qualité) par exemple.
Si la durée de l’enregistrement demeure votre priorité, vous pourriez sélectionner « SLP » (enregistrement à
vitesse lente)
Les disques DVD
simple couche.
Balayage progressif de qualité supérieure
Le balayage progressif produit une image vidéo à haute défi nition et sans scintillement. La technologie est
basée sur un processeur de conversion numérique analogique à 10 bits, 54 MHz qui gère des circuits de
séparation 2D Y/C et un correcteur de base de temps afi n de produire une lecture et un enregistrement
d’images de la plus haute qualité possible. (Consultez la page
-R à doubles couches possèdent environ le double de la capacité d’un disque DVD-R à
20
pour plus d’information.)
Une interface simple qui comporte une panoplie de fonctions
Réalisez vos opérations facilement grâce à des outils pratiques tels que le système de menus intégrés et la
fonctionnalité de messagerie. En mode DVD-VR avec un disque DVD-RAM,DVD-RW ou DVD-R, vous
pouvez modifi er les images enregistrées, créer une playlist (Liste de Lecture) et modifi er une vidéo dans
l’ordre établi en fonction de vos besoins.
Certifi cation DivX
DivX, DivX Certifi ed et les logos qui leur sont associés sont des marques déposées de DivXNetworks Inc et
font l’objet d’une licence.
•
Produit offi ciellement certifi é par DivX®
•
Lit toutes les versions de vidéos DivX® (incluant DivX® 6) en plus des fi chiers média DivX®
standard.
Mode EZ Record
Cette fonction vous permet d’initialiser et de fi naliser un disque automatiquement. (Voir la page 34.)
10_ mise en route
Page 83
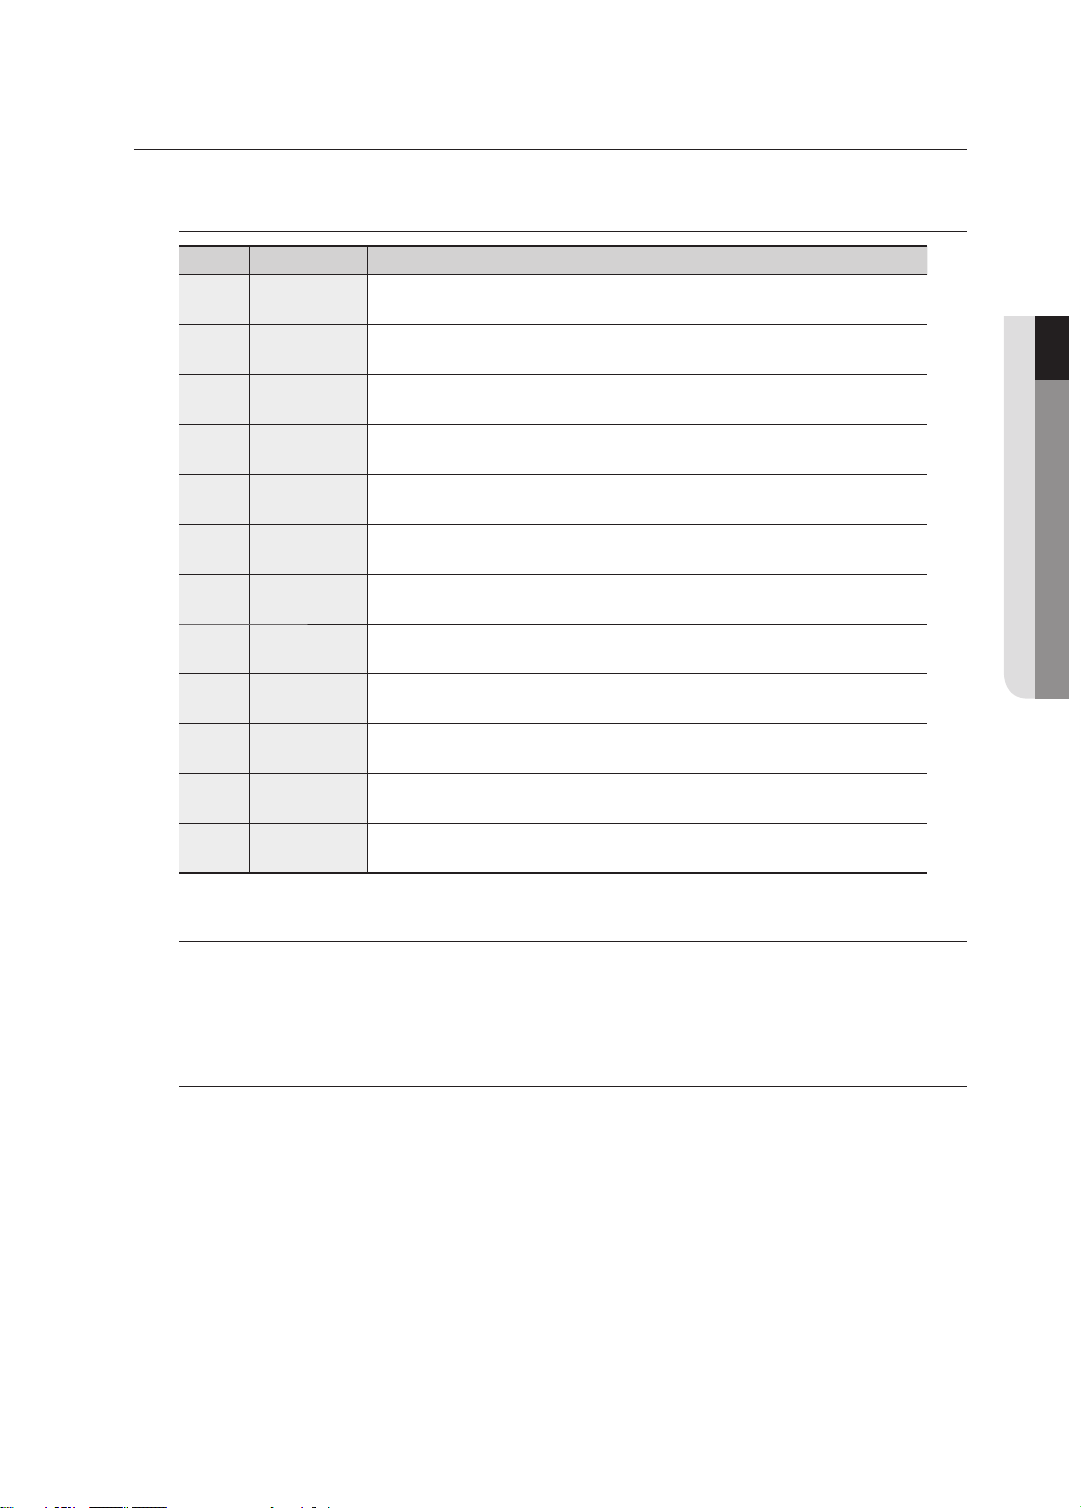
AVANT DE LIRE LE GUIDE DE L’UTILISATEUR
Familiarisez-vous avec les termes ci-dessous avant de lire le guide de l’utilisateur.
Icônes utilisées dans ce manuel
Icône Terme Défi nition
Indique qu’une fonction est disponible sur les disques DVD, DVD-R(V) ou
DVD-RW(V) qui ont été enregistrés en mode vidéo.
Z
X
DVD
RAM Désigne une fonction disponible sur un DVD-RAM.
● MISE EN ROUTE
C
V
B
G
A
D
J
M
N
H
-RW Désigne une fonction disponible sur un DVD-RW.
-R Désigne une fonction disponible sur un DVD-R.
CD
JPEG
MP3
DivX
Attention
REMARQUE
Touche
express
Touche
ANYKEY
Indique qu’une fonction est disponible sur CD de données (CD-R ou CDRW)).
Implique que la fonction JPEG est disponible pour les disques CD-RW/
-R ou DVD-RW/-R/-RAM.
Implique que la fonction MP3 est disponible pour les disques CD-RW/
-R ou DVD-RAW/-RW/-R.
Implique que la fonction est disponible pour les disques CD-RW/
-R ou DVD-RAW/-RW/-R.
Indique que la confi guration peut être annulée ou qu’une fonction n'est pas
prise en charge.
Indique que la page comporte des conseils ou des instructions permettant
de mieux utiliser une ou plusieurs fonctions.
Fonction qui peut être activée en n’appuyant que sur une touche.
Fonction qui peut être activée en appuyant sur la touche ANYKEY.
Comment utiliser ce guide
Assurez-vous de lire attentivement le chapitre Consignes de sécurité avant d’utiliser ce produit.
1)
(Voir les pages 2 à 7)
En cas de problème, consultez la section Dépannage aux pages 67 à 68.
2)
Droits d'auteur
©2008 Samsung Electronics Co.
Tous droits réservés. Toute reproduction du présent guide, partiellement ou dans sa totalité, est interdite
sans le consentement écrit de Samsung Electronics Co.
Français _11
Page 84

Mise en route
UTILISATION DE L’ENREGISTREUR DVD
Étape 1 : choix du type de disque
Cet appareil permet d’effectuer des enregistrements sur les types de disques ci-dessous. Utilisez un disque
réinscriptible DVD-RW ou DVD-RAM si vous prévoyez enregistrer à plusieurs reprises sur le même disque,
ou si vous souhaitez modifi er le contenu du disque après l'enregistrement. Choisissez un disque DVD-R (qui
n’est pas réinscriptible) si vous souhaitez protéger votre enregistrement sans y apporter de modifi cation
ultérieure.
Étape 2 : formatage du disque avant l'enregistrement
L’enregistreur DVD formate automatiquement un disque vierge lorsqu’il est inséré dans l’appareil.
Utilisation d'un DVD-RAM/-RW
Lorsque vous insérez un disque DVD-RAM/-RW vierge, le message “Disque non initialisé. Souhaitez-vous
initialiser ce disque?” s’affi che.
Utilisation d'un DVD-R
Il n’est pas nécessaire de formater un disque DVD-R neuf. Il fonctionne automatiquement en mode vidéo à
son insertion.Le menu de confi guration vous permet de le formater au format VR. Le mode du disque neuf ne
peut être modifi é qu’une seule fois à l’insertion.
Un DVD-RW/-R peut être utilisé en mode DVD-V ou en mode DVD-VR, mais pas les deux à la fois.
M
Vous pouvez formater un DVD-RW/-R en mode V ou VR via le gestionnaire de réglages du disques. Cependant, toutes
les données sont perdues lors de cette réinitialisation.
Étape 3 : enregistrement
Il existe deux méthodes d’enregistrement : l’enregistrement direct (
télévision en cours de visionnement
L’enregistrement programmé est déterminé comme suit :Mode d’enregistrement : HQ (haute qualité), HSP,
SP (qualité normale), LSP, ESP, LP, EP, SLP (enregistrement à vitesse lente).Lorsque l’enregistrement est en
mode AUTO, le disque est enregistré à la meilleure qualité d’image permis par le temps résiduel du disque.
) et le Timer Recording (l’enregistrement par minuterie).
Enregistrement d'un programme de
Étape 4 : lecture
Sélectionnez le titre souhaité dans la liste des titres pour commencer la lecture.Un DVD est composé de
sections qu'on nomme des Titles (titres) et de Subsections (sous-titres) qu’on nomme des chapitres. Au
cours d’un enregistrement, un title (titre) est créé à chaque coupure, c’est-à-dire chaque fois que vous
arrêtez puis redémarrez l’enregistrement.
chapitres sont créés automatiquement sans tenir compte du type de disque.
Si la fonction est réglée dans le menu de confi guration, les
Étape 5 : modifi cation d’un disque déjà enregistré
Le contenu d’un disque peut être modifi é plus facilement que celui d’une cassette vidéo. Cet enregistreur
DVD offre plusieurs fonctions de modifi cations qui ne sont utilisables qu'avec des DVD.
Un menu simple et facile à utiliser vous permet de supprimer, renommer, verrouiller, etc. les éléments d'un
title (titre) enregistré
.
12_ mise en route
Page 85

Création d’une playlist (Liste de Lecture) (pour DVD-RAM,DVD-RW et DVD-R
en mode DVD-VR)
Ce graveur vous permet de créer/modifi er une nouvelle liste de lecture sur le même disque sans en
modifi er l’enregistrement original.
Étape 6 : Enregistrement complet et lecture sur d’autres appareils DVD
Si vous souhaitez lire votre DVD sur d'autres appareils DVD, vous devez d'abord terminer l’enregistrement.
Complétez d'abord toutes vos opérations de modifi cation et d’enregistrement. Terminez l’enregistrement
du disque.
Si vous utilisez un disque DVD-RW/-R en mode DVD-VR
Vous devez toujours terminer l’enregistrement d’un disque avant d'en faire la lecture, bien qu’en général
cela ne soit pas nécessaire sur un appareil compatible avec le mode DVD-VR.
Si vous utilisez un disque DVD-RW/-R en mode vidéo (DVD-V)
Terminez l’enregistrement du disque si vous souhaitez en faire la lecture sur un autre appareil que cet
enregistreur DVD. Lorsque vous avez terminé l’enregistrement, vous ne pouvez plus enregistrer d’autres
titres ni modifi er son contenu.
Le mode EZ Record vous permet d’initialiser automatiquement. (Voir la page 34)
M
DÉBALLAGE
● MISE EN ROUTE
Accessories
Vérifi ez la présence de tous les accessoires indiqués plus bas.
Câble audio/vidéo
(AC39-00073A)
Piles AAA pour la télécommande
(AC43-12002H)
Câble RF pour raccordement au téléviseur
(AC39-42001j)
Manuel d’instructions
(AK68-00000A)
Télécommande
(AK59-00061S)
Guide de prise en main rapide
(AK68-00000A)
Français _13
Page 86
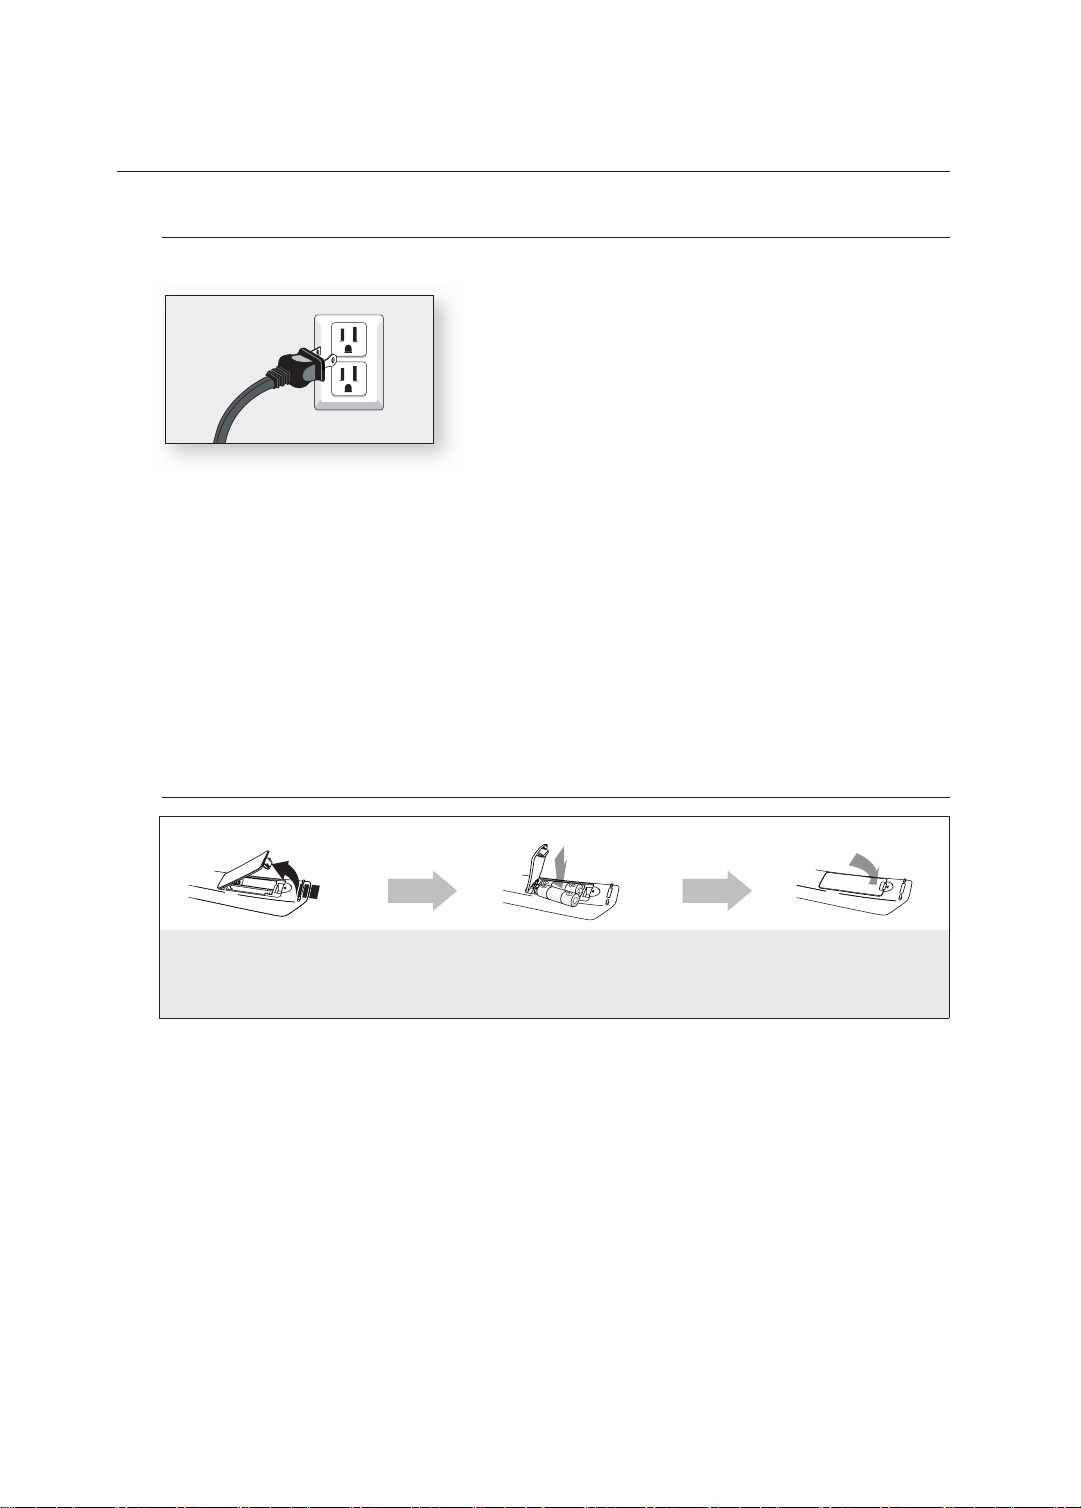
Mise en route
Branchement du cordon électrique
Après avoir raccordé tous les appareils, branchez le cordon d’alimentation à la prise de courant murale.
“Auto” s’affi che à l’écran. Ceci signifi e que l’heure actuelle est en cours de réglage automatique (Programme
Auto) par le biais de l’antenne connectée et que la chaîne est également en cours de réglage.
Ce réglage peut durer quelques minutes.
Si le graveur DVD fonctionne correctement, l’heure se règle automatiquement et s’affi che sur le panneau
frontal.
Suite au réglage automatique de l’heure, le graveur exécutera la programmation du préréglage automatique pendant
M
3 minutes.
Ce processus dure 3 minutes environ. Si le graveur est allumé pendant le processus celui-ci s’arrêtera. Dans ce cas,
effectuer le réglage automatique à partir du MENU (voir page 27).
Préparation de la télécommande
Insertion des piles dans la t
1. Retirez le couvercle à l’arrière de
la télécommande tel qu’indiqué. .
Si la télécommande ne fonctionne pas correctement:
Vérifi ez la polarité +/- des piles.
•
•
Vérifi ez si les piles sont déchargées.
•
Vérifi ez si un obstacle empêche le signal de la télécommande de se rendre à l’enregistreur DVD avec magnétoscope.
•
Vérifi er s’il y a une source d’éclairage fl uorescent à proximité.
Débarrassez-vous des piles déchargées conformément à la réglementation environnementale en vigueur
dans votre région. Ne les jetez pas avec les ordures ménagères.
élécommande
2. Insérez deux piles AAA.
Veillez à ce que les pôles 《 + 》 et
des piles s’alignent avec l’illustration à
l’intérieur du compartiment.
3. Replacez le couvercle.
《
》
–
Les piles devraient durer
environ douze mois en
utilisation normale.
14_ mise en route
Page 87

delete this page.
● MISE EN ROUTE
Français _15
Page 88

Mise en route
Aperçu de la télécommande
Pour commander l'enregistreur Graveur/lecteur DVD.
Appuyez pour allumer ou éteindre le graveur DVD avec caméscope.
Touche DVD
Pour commander le téléviseur
Touche TV
Touche POWER
Touches numériques
100+
Appuyez sur cette touche pour sélectionner les chaînes à partir
Touche
de 100.
Touche F.ADV/SKIP
Appuyez pour sauter vers l’arrière ou l’avant.
Avance/rembobinage, recherche, saut, arrêt, lecture
Pour afficher le menu de paramétrisation de l'enregistreur DVD
Touche ENTER et touches de déplacement
(Touches HAUT/BAS et GAUCHE/DROITE) Fonctionne comme
Pour consulter l'état du disque en cours de lecture.
Touche TITLE LIST (DISC MENU)
Pour accéder à la liste de titre (menu du disque).
Pour enregistrer sur un disque DVD-RAM, DVD-RW, DVD-R.
Pour régler le temps d’enregistrement et la qualité de l’image.
Touches de lecture
Touche TV VOL (Volume
Pour régler le volume du téléviseur.
, Pause.
Touche MENU
une touche à bascule.
Touche ANYKEY
Touche REC
Touche REC MODE
Touche INFO
Pour afficher les paramètres activés ou l’état du disque
Touche INPUT SEL.
Pour sélectionner le signal d’entrée AV d’une source
externe. (Syntoniseur,
OPEN/CLOSE
Pour ouvrir et fermer le plateau de disques.
TV POWER
Appuyez pour allumer ou éteindre le téléviseur.
AV 1ou AV2).
.
Touche SUBTITLE
.
.
Pour modifier la langue des sous-titres du DVD.
Touche AUDIO
Appuyez pour accéder à diverses fonctions audio.Appuyez plusieurs
fois pour sélectionner l’une des trames sonores enregistrées
DVD-RW(VR)/-R (VR) :
principale ou secondaire
DVD VIDEO :
Touche CH
Pour sélectionner une chaîne.
Touche RETURN
Pour revenir au menu précédent.
Touche EXIT
Quittez le menu actuel.
Touche PLAY LIST/TITLE MENU
Pour accéder au menu de modification de la liste de
titres (menu du disque).
Touche TIMER REC
Pour utiliser le Timer Recording (l'enregistrement par
minuterie.
Touche CANCEL
Permet de sélectionner la trame sonore
.
pour sélectionner la source audio.
.
16_ mise en route
❋
Il s'agit d'une télécommande spécialement conçue pour les
malvoyants. Les touches
et PLAY(
POWER( ), STOP( )
)
sont en Braille.
Page 89

DESCRIPTION
Panneau avant
● MISE EN ROUTE
OUVERTURE ET FERMETURE DU
PLATEAU DE DISQUES DVD
TOUCHE STOP (ARRÊT) ENREGISTREMENT
AFFICHEUR DU PANNEAU AVANT PLATEAU DE DISQUES DVD
PRISE D’ENTRÉE VIDÉO (AV IN 2) TOUCHE ALIMENTATION
10 11
TOUCHE CH (./,),
RECHERCHE/SAUT
TOUCHE LECTURE/PAUSE
Touche INPUT (SOURCE)
PRISES D’ENTRÉE AUDIO L
(GAUCHE), R (DROITE) (AV IN 2)
Français _17
Page 90
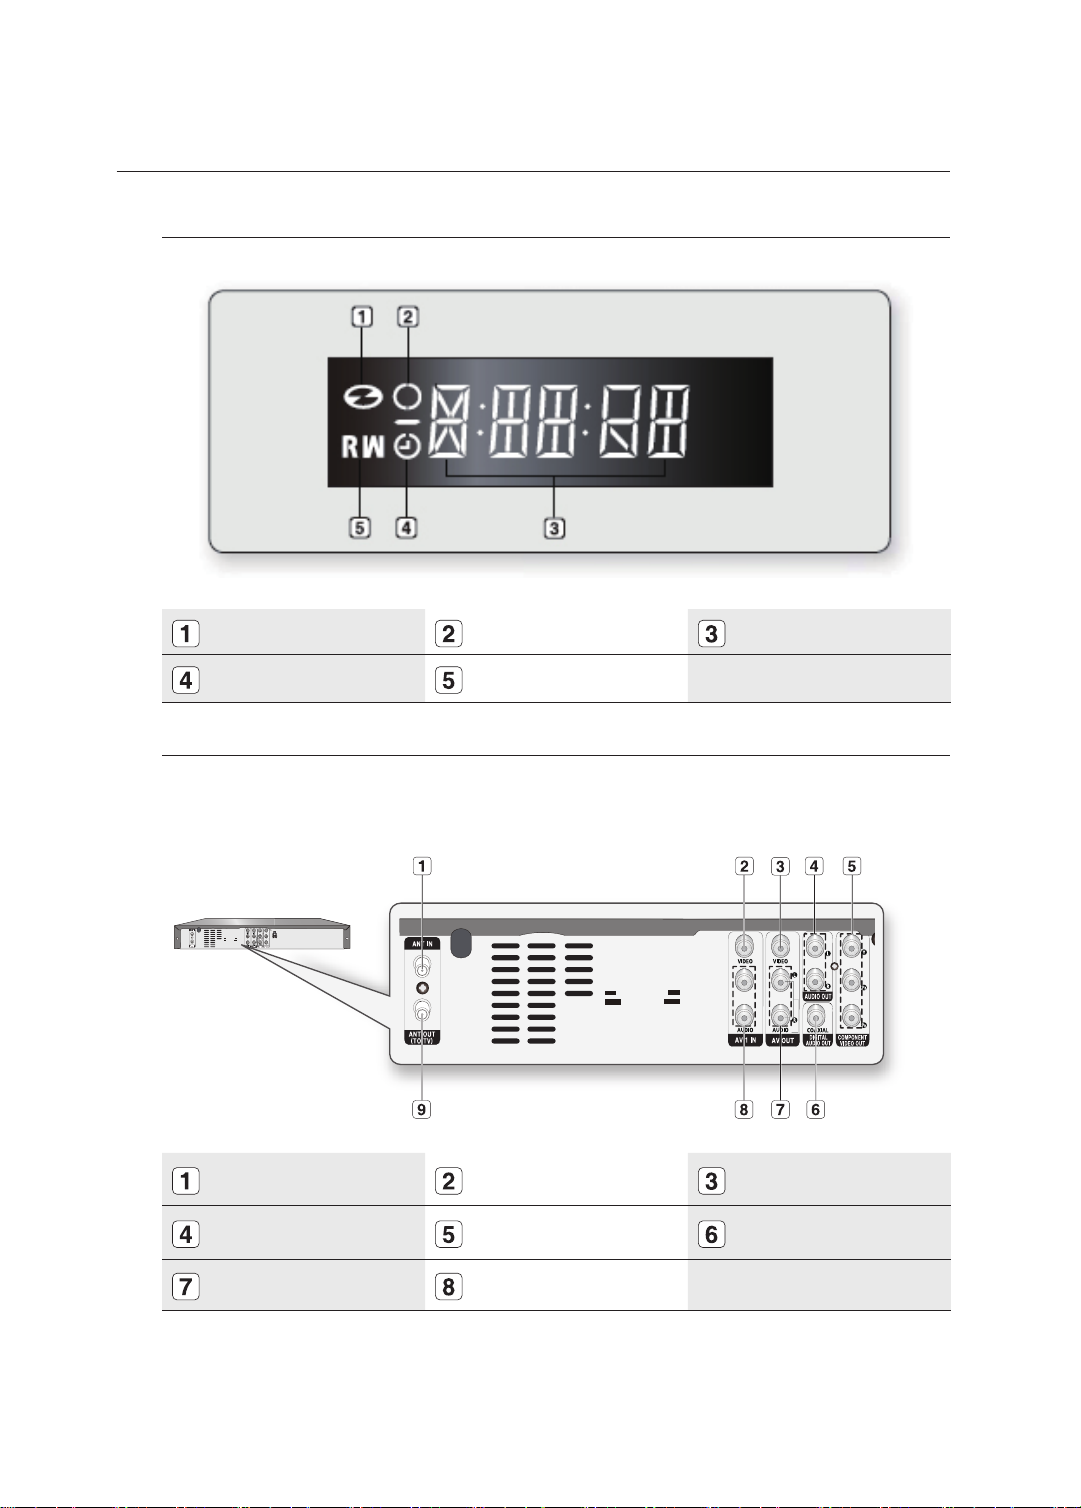
Mise en route
Affi cheur du panneau avant
Témoin Disque présent Témoin ENR. Témoin ÉTAT
Témoin MINUTERIE Témoin MÉDIA du disque
Panneau arrière
ENTRÉE D’ANTENNE / SORTIE
D’ANTENNE
PRISES D’ENTRÉE AUDIO
(SORTIE COMPOSANT)
PRISES DE SORTIE AUDIO (AV
OUT)
18_ mise en route
PRISE D’ENTRÉE VIDÉO (AV 1 IN)
PRISES DE SORTIE VIDÉO
COMPOSANT
PRISES D’ENTRÉE AUDIO (AV 1
IN)
PRISES DE SORTIE VIDÉO (AV
OUT)
PRISE DE SORTIE AUDIO
NUMÉRIQUE(COAXIALE)
Page 91
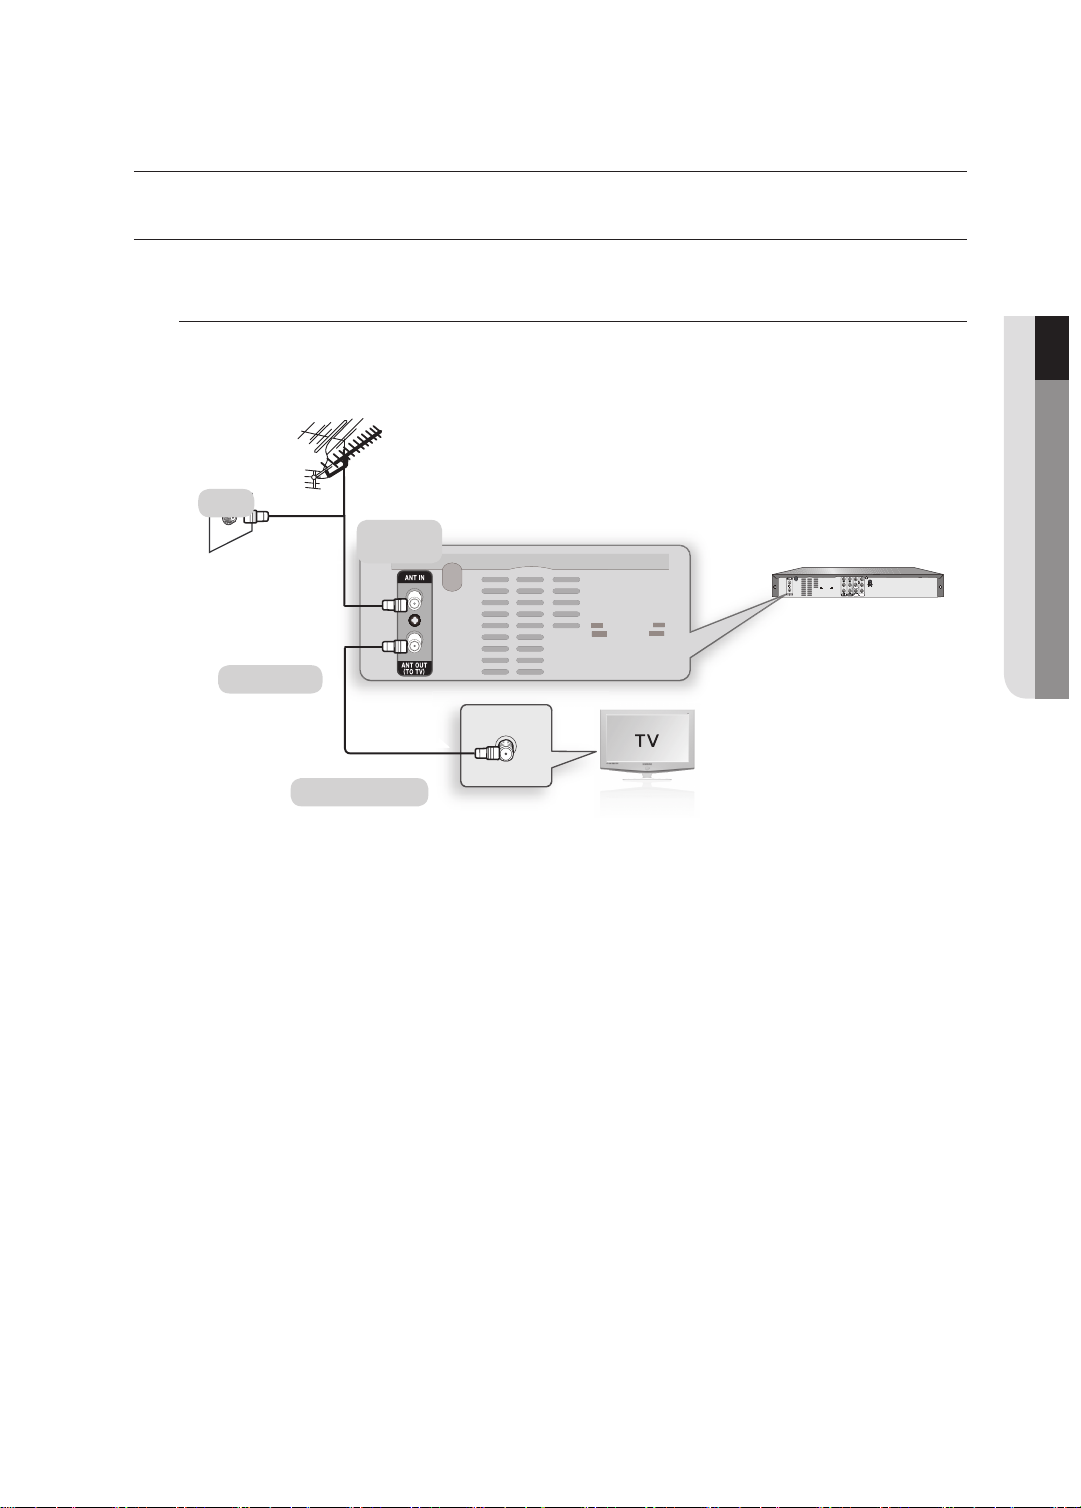
raccordement et confi guration
RACCORDEMENT DU CÂBLE D’ANTENNE
Il existe plusieurs façons de raccorder votre graveur de DVD . Sélectionnez ci-dessous le type d'antenne souhaité.
Antenne + Graveur DVD + téléviseur : Sans câblosélecteur
Vous pouvez enregistrer les canaux non brouillés en sélectionnant la chaîne sur le graveur DVD. Utilisez aussi
cette méthode si vous visionnez les chaînes sans câblosélecteur.
Au mur
Câble RF
(compris)
DE <ANT OUT>
DE <ANT INPUT>
Le connecteur VHF/UHF ANT (RF) OUT (SORTIE VHF / UHF / RF) de cet appareil ne transmet que les signaux reçus
M
par l’antenne. Il ne transmet pas de signaux Audio/Vidéo. Vous devez raccorder les câbles Audio/Vidéo pour visionner
un vidéo à partir de l’appareil. (Lecture DVD par exemple)
● RACCORDEMENT ET CONFIGURATION
Français _19
Page 92

raccordement et confi guration
RACCORDEMENT DE LA SORTIE VIDÉO
Il existe plusieurs façons de raccorder votre graveur de DVD .
Vous devez utiliser l’un des raccordements audio / vidéo suivants pour cet appareil.
Raccordement aux prises d’entrée vidéo Composante
Raccordez des câbles Component (Composante) (non fournis) entre la prise COMPONENT OUT (SORTIE
COMPOSANTE) (Y, PB, PR) du graveur DVD et les prises COMPONENT IN (ENTRÉE COMPOSANTE) (Y, PB,
PR) du téléviseur.
BleuVert Rouge
Vous pourrez profi ter d’images de qualité. La connexion composant vidéo décompose l'image en signaux noirs
•
et blancs
Branchez les câbles audio (blanc et rouge) sur les prises AUDIO OUT composant de l'enregistreur DVD et les
•
prises AUDIO IN composant du téléviseur. (Voir les pages 21 à 22)
Balayage progressif
•
-
(Y), bleus (PB), et rouges (PR), permettant ainsi de fournir des images claires et nettes.
Si votre téléviseur peut accueillir le balayage progressif, vous pourrez apprécier des vidéos de très haute
qualité en appuyant sur la
confi guration du balayage progressif. (Le câble Composante doit être raccordé.)
(Y, PB, PR)
M
Comparé au balayage vidéo entrelacé standard, le balayage progressif double le nombre de lignes de trame transmises
à votre téléviseur, reproduisant une image plus stable, sans scintillement et plus nette que le balayage vidéo entrelacé.
La prise de sortie Component (composantes) du lecteur DVD peut être utilisée pour le mode de sortie progressif
disponible uniquement avec les téléviseurs pouvant accueillir ce mode
Sortie Progressive Scan (Balayage progressif)
Les consommateurs devraient remarquer que tous les téléviseurs à haute défi nition ne sont pas compatibles avec cet
appareil et pourraient reproduire certains objets dans l’image. Si vous éprouvez des problèmes de balayage progressif
480p, nous vous recommandons le retour au raccordement à la sortie <standard defi nition> (défi nition normale). Si
vous avez des questions concernant la compatibilité de votre téléviseur avec ce modèle, veuillez contacter notre service
à la clientèle au 1.800.SAMSUNG
20_ raccordement et confi guration
.
(480p)
.
Page 93
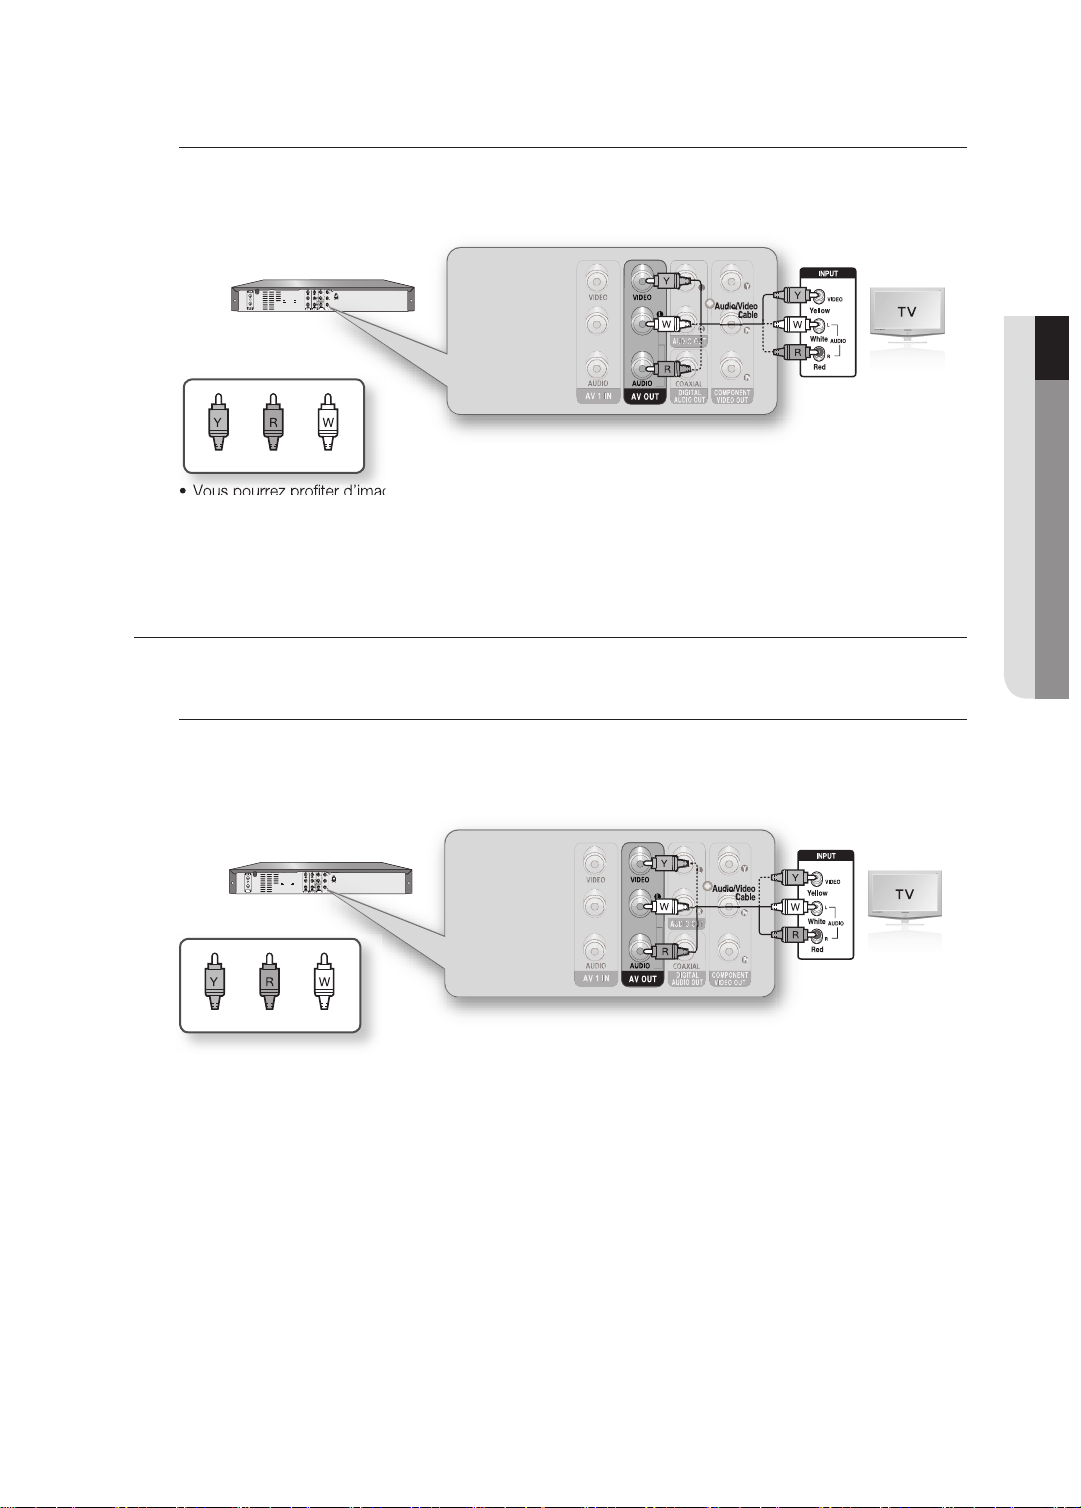
Raccordement à une prise d’entrée vidéo
Raccordez un câble vidéo (jaune) entre la prise d’entrée VIDEO OUT (SORTIE VIDÉO) (jaune) du graveur DVD
et la prise d’entrée VIDEO IN (ENTRÉE VIDÉO) (jaune) du téléviseur.
RougeJaune Blanc
Vous pourrez profi ter d’images de qualité.
•
Cette connexion fournit la sortie à résolution 480i pour votre téléviseur.
•
Raccordez les câbles audio (blanc et rouge) entre les prises AUDIO OUT (SORTIE AUDIO) du graveur DVD et
les prises AUDIO IN (ENTRÉE AUDIO) du téléviseur. (Voir les pages 21 à 22)
RACCORDEMENT DU CÂBLE AUDIO
Sélectionnez une connexion audio sur les pages suivantes.
Raccordement à un téléviseur
● RACCORDEMENT ET CONFIGURATION
Ce raccordement utilise les haut-parleurs de votre téléviseur.
RougeJaune Blanc
Français _21
Page 94
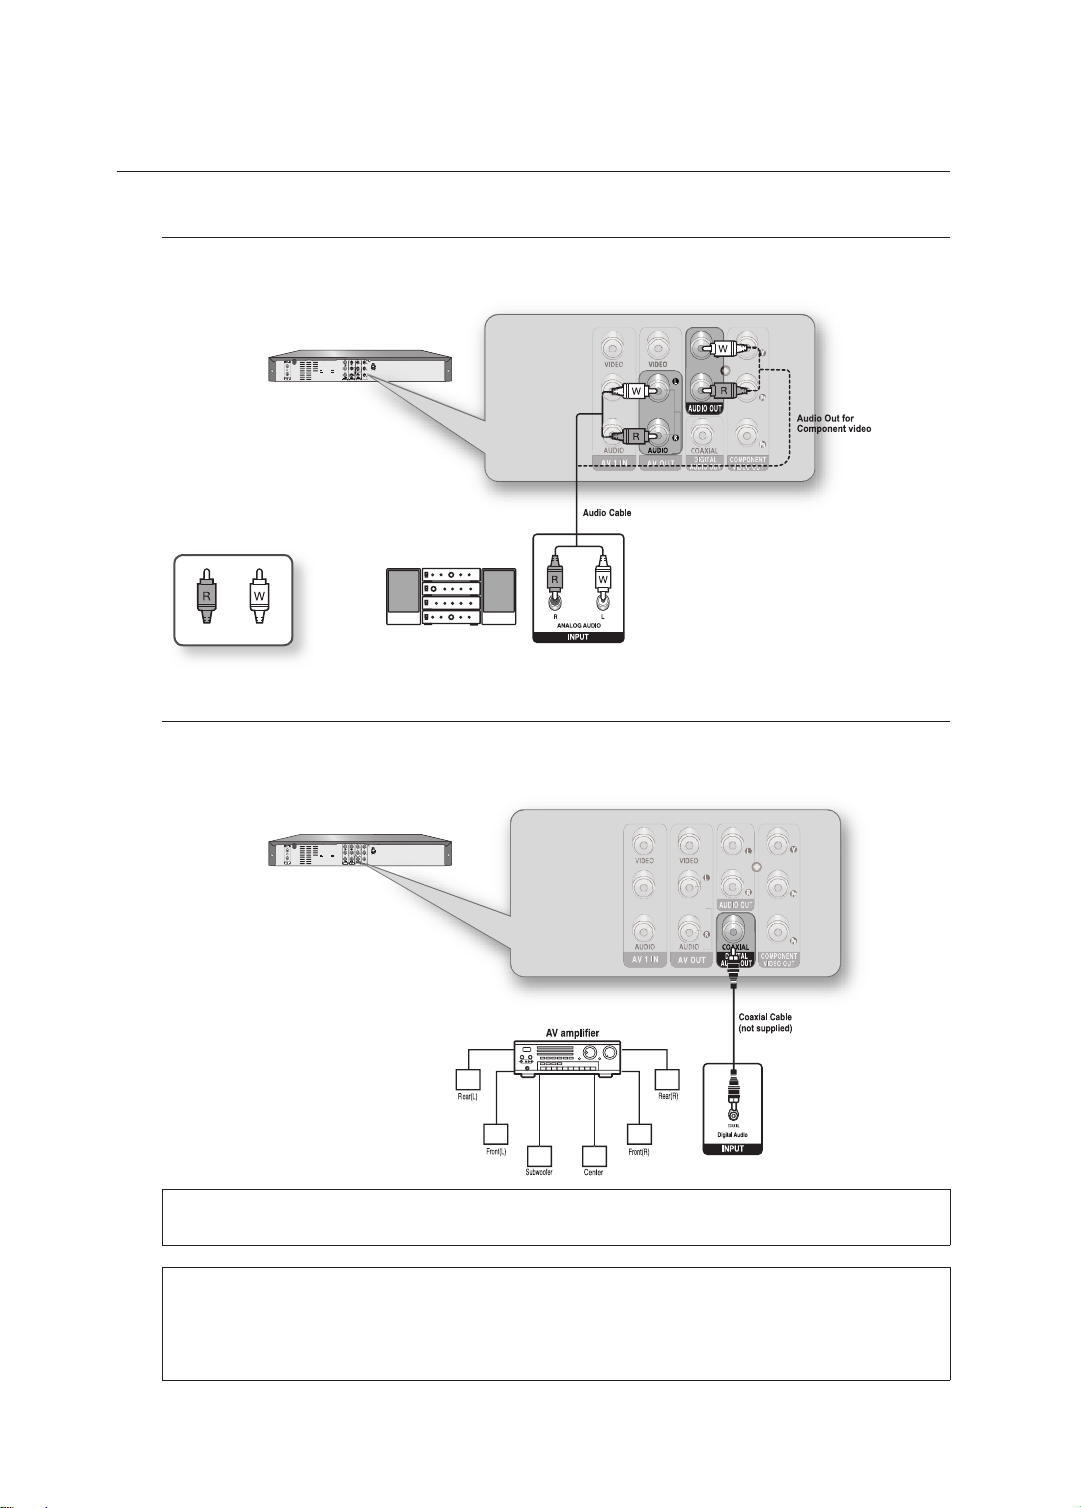
raccordement et confi guration
Raccordement à un amplifi cateur stéréo à prises d’entrée analogiques
Utilisez les prises AUDIO OUT (SORTIE AV) si votre amplifi cateur stéréophonique ne possède que les prises
AUDIO INPUT (L & R) (ENTRÉE AUDIO) (G et D).
Rouge
Blanc
Raccordement à un amplifi cateur AV à prises d’entrée numériques
Utilisez ce raccordement si votre amplifi cateur AV possède un décodeur numérique Dolby Digital ou DTS et
une prise d’entrée numérique. Vous devez régler les conditions audio pour profi ter du son numérique Dolby
Digital ou DTS. (Voir la page 30~32)
Fabriqué sous licence de Dolby Laboratories. “Dolby” et le symbole du double-D sont des marques de
commerce de Dolby Laboratories.
Fabriqué sous licence des № de brevets des É.-U. : 5,451,942 & autres brevets des É.-U. et mondiaux ou brevets en
instance.
DTS et DTS Digital Out sont des marques deposes et les logos et symbols DTS demeurent des marques de
commerce de DTS, Inc.
© 1996-2007 DTS, Inc. Tous droits réservés.
22_ raccordement et confi guration
Page 95
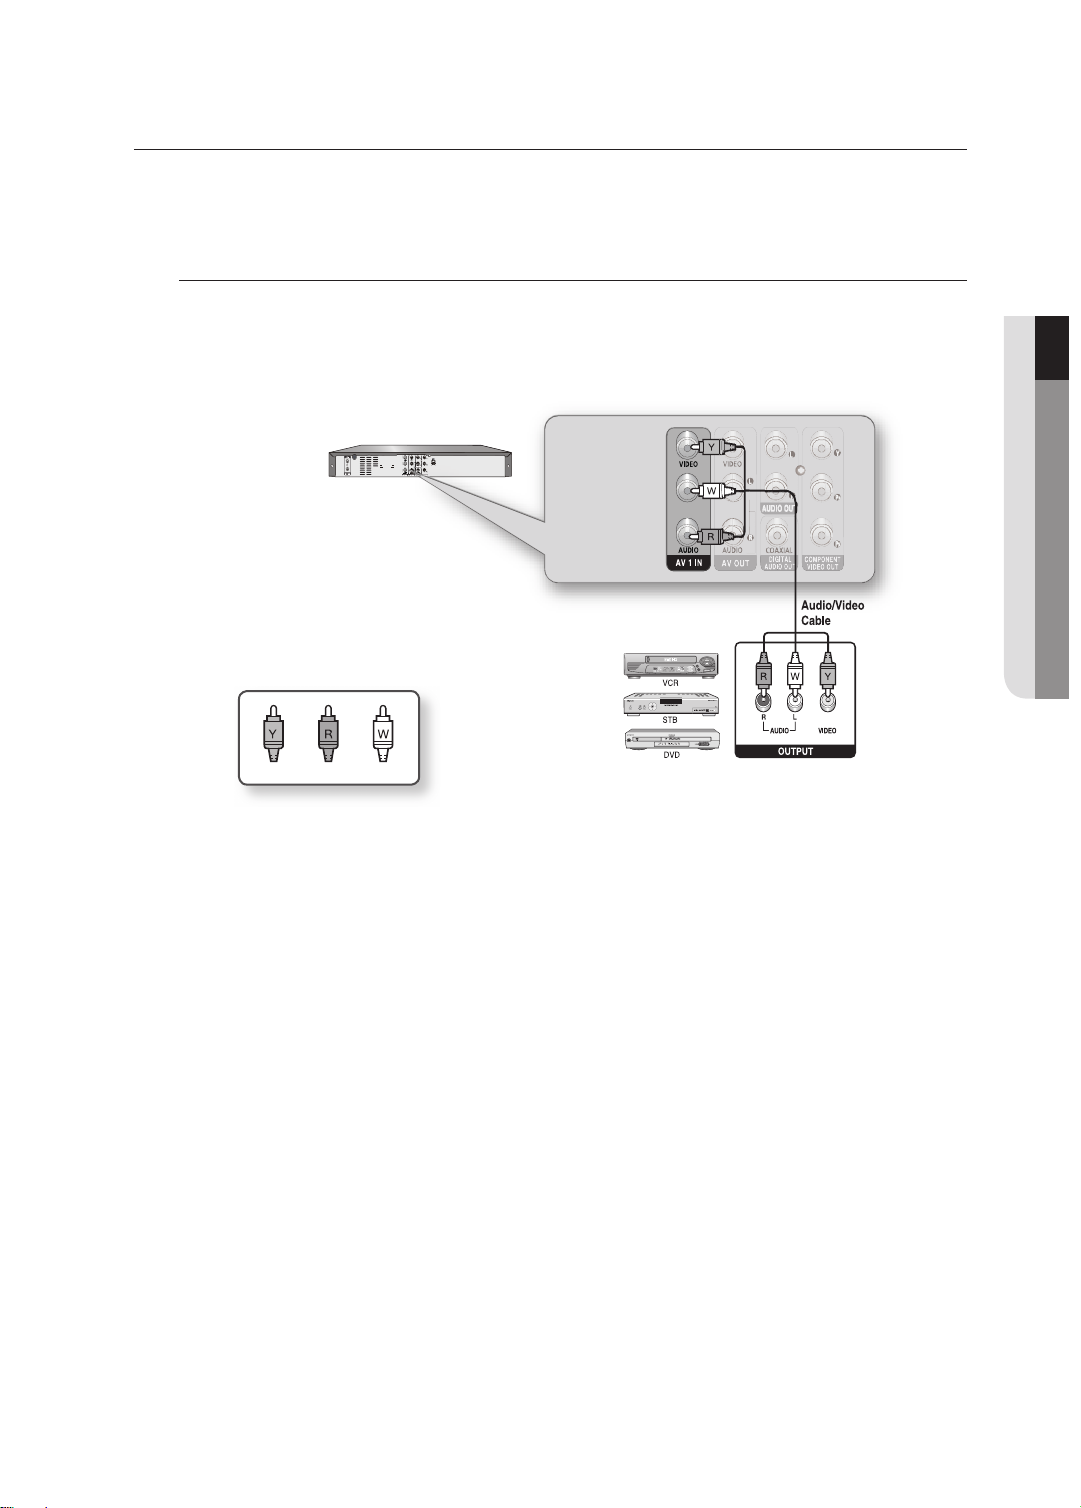
RACCORDEMENT D’APPAREILS PÉRIPHÉRIQUES
Vous pouvez raccorder le graveur DVD à des appareils périphériques et visualiser ou enregistrer leurs contenus de
sortie.
Raccord d’un magnétoscope,décodeur/récepteur satellite ou lecteur
DVD aux prises AV 1 IN
Raccordement d’un magnétoscope ou d’un appareil périphérique aux prises AV 1 IN (ENTRÉE AV) du
graveur DVD.
Il vous est possible d’enregistrer à partir d’appareils périphériques (magnétoscope, boîtier décodeur ou
lecteur DVD) (Magnétoscope, décodeur/récepteur satellite ou DVD).
RougeJaune Jaune
Permet aussi l’utilisation des prises AV 2 IN (ENTRÉE AV 2) sur le panneau avant du graveur DVD.
M
Appuyez sur la touche INPUT SEL. pour sélectionner l'entrée AV1.
Les contenus protégés contre la copie ne peuvent être enregistrés.
● RACCORDEMENT ET CONFIGURATION
Français _23
Page 96
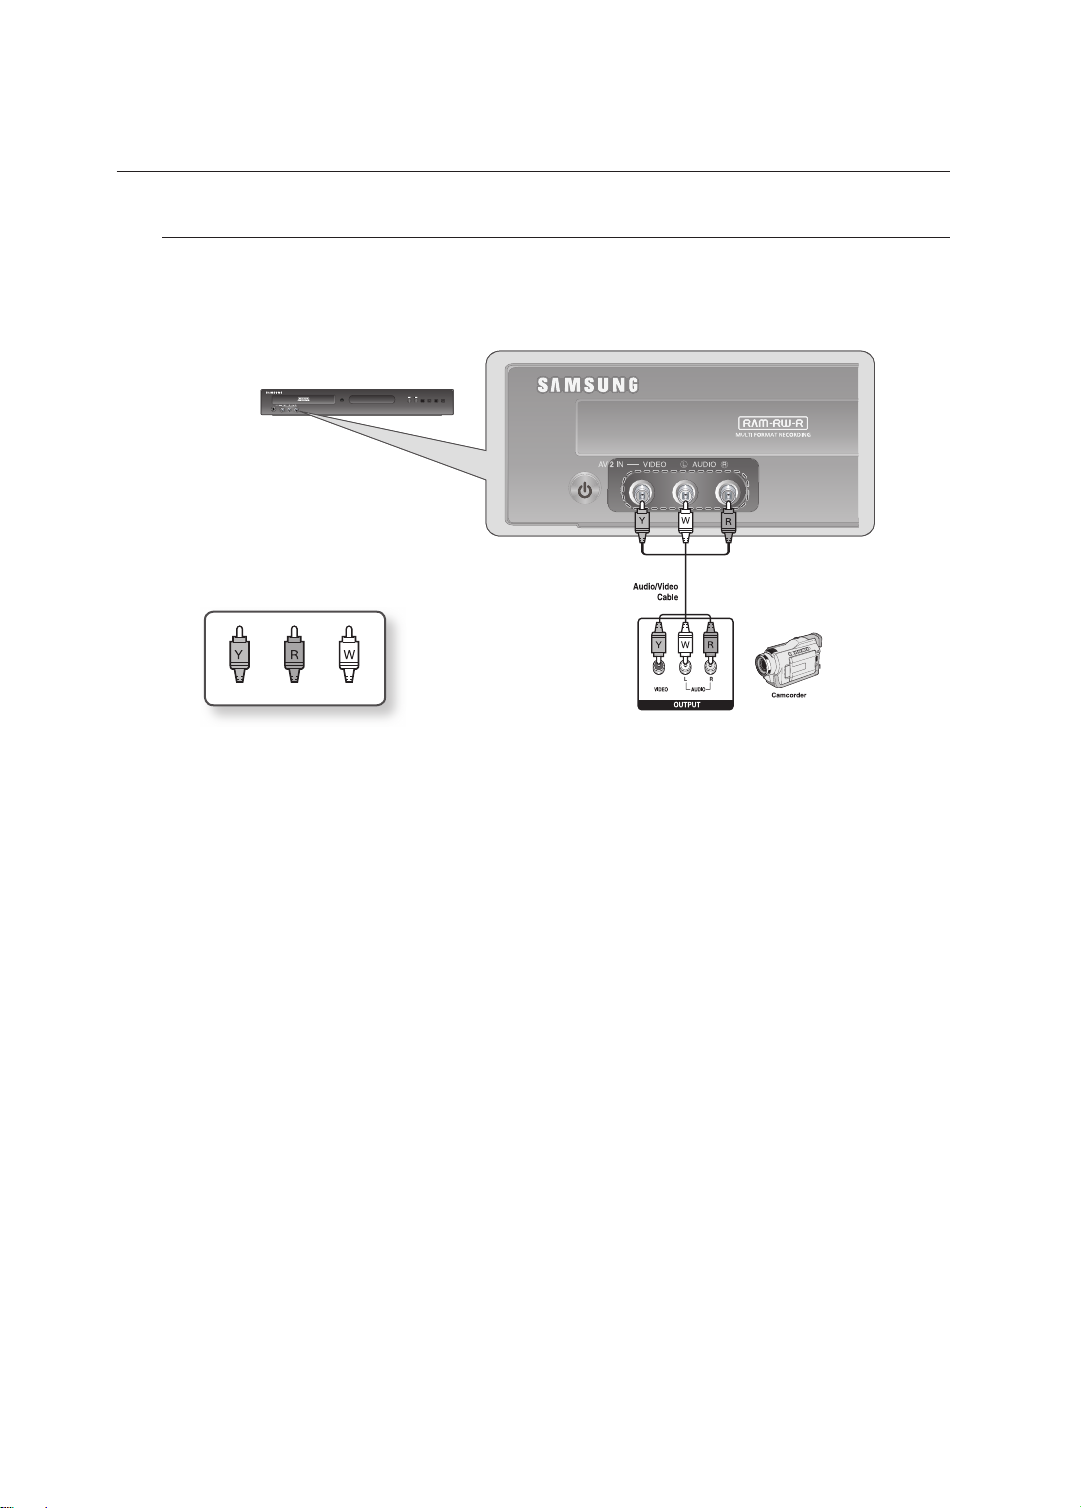
raccordement et confi guration
Raccord à un caméscope
L’enregistrement à partir d’un périphérique (caméscope) est possible grâce aux prises AV2 IN (ENTRÉE)
situées sur le devant du graveur DVD.
RougeJaune Jaune
M
Pour utiliser le caméscope dans ce mode, reportez-vous au manuel de l’usager.
24_ raccordement et confi guration
Page 97

confi guration du système
NAVIGATION DANS LE MENU DE L'ÉCRAN
Le menu de l’écran permet d’activer et de désactiver certaines fonctions de l’enregistreur DVD.
Appuyez sur la touche MENU pour accéder à l’écran des menus puis utilisez les touches suivantes pour naviguer
dans les menus.
● CONFIGURATION DU SYSTÈME
Touches
1.
Pour déplacer la barre de sélection soit verticalement ▲▼,
soit horizontalement vers d’autres sous-menus ou options.
Touche ENTER
2.
Pour confi rmer tout nouveau réglage
Touche RETURN
3.
▲▼
Minuterie
List
des titres
Minuterie - Standard
Liste de minuterie
Minuterie
Éditer
.
Réglages
du disque
Réglage
Pour revenir au menu précédent ou pour quitter le menu à
l’écran.
Touche EXIT
4.
>Dépla. sEntrée rRetour eQuitter
Appuyez pour quitter le menu d'affi chage à l'écran.
R
ÉGLAGE FACILE
Pour effectuer le minimum de réglages de base avant d'utiliser votre graveur DVD, suivez les étapes ci-après.
Effectuez la confi guration dans l'ordre suivant.
Lorsque l’appareil est en mode Stop (Arrêt), appuyez sur la
1.
touche MENU.
Sélectionnez Réglage en déplaçant la barre de sélection à l’aide
2.
des touches
Sélectionnez
3.
à l’aide des touches
▲▼
,
puis appuyez sur ENTER.
Réglage facile en déplaçant la barre de sélection
▲▼
,
puis appuyez sur ENTER.
Réglage
List
des titres
Minuterie
Éditer
Réglages
du disque
Réglage
Préréglage du syntoniseur
Réglage horloge
Vidéo
Audio
Caractéristiques
Options
Réglage facile
Le message " Suivez le guide pour les réglages initiaux. Avant de
commencer, assurez-vous que vous avez effectué toutes les
connections nécessaires."
Sélectionnez Début en déplaçant la barre de sélection à l’aide
4.
des touches
Appuyez sur ENTER.
5.
◄ ►
.
apparaît.
L'écran de confi guration de la langue d'affi chage apparaît.
6.
Sélectionnez l’écran pour laquelle vous souhaitez choisir une
langue, en déplaçant la barre de sélection à l’aide des touches
puis appuyez sur ENTER
▲▼,
Le message "
canaux analogiques.
Appuyez sur [ENTER] pour démarrer le balayage des
" apparaît.
> Dépla. sEntrée rRetour eQuitter
Réglage facile
Sélectionnez la langue de l'écran.
English
✔ Français
> Dépla. sEntrée rRetour eQuitter
Español
Réglage facile
Sélectionnez la manière dont vous
désirez recevoir les canaux
-:-- --
-:-- --
-:-- --
-:-- --
Antenne
✔ Câble
> Dépla. sEntrée rRetour eQuitter
Français _25
Page 98
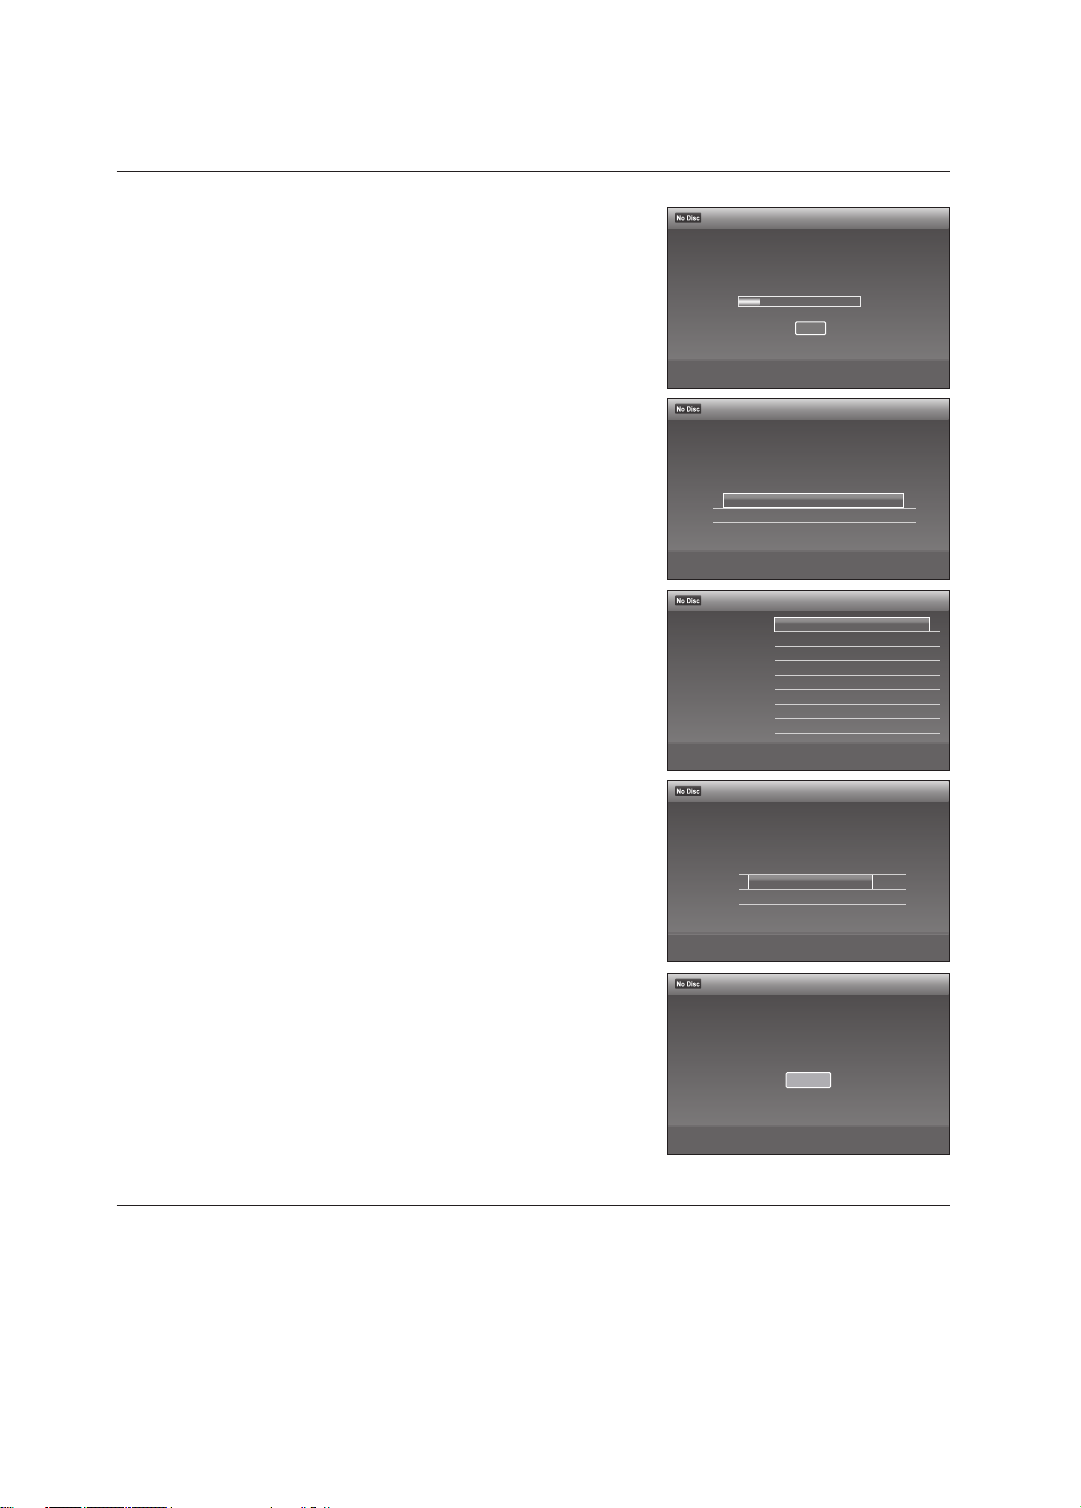
confi guration du système
7.
Appuyez sur ENTER.
▲▼
Appuyez sur les fl èches
pour sélectionner le système de
diffusion souhaité. puis appuyez sur ENTER.
Lancez le balayage automatique, puis pour faire apparaître
ensuite les réglages de l’horloge.
Appuyez sur les fl èches ▲▼ pour sélectionner une méthode de
8.
réglage de l'horloge. puis appuyez sur ENTER.
Si vous sélectionnez Auto, l'écran de confi guration du fuseau
horaire apparaît.
Appuyez sur les fl èches ▲▼ pour sélectionner le fuseau horaire
9.
de votre région, puis appuyez sur ENTER.
L'écran de confi guration du type de téléviseur apparaît.
10.
Sélectionnez
type de téléviseur que vous souhaitez paramétrer
en déplaçant la barre de sélection dans la liste à l’aide des
touches
▲▼,puis appuyez sur ENTER.
Le message "
11.
Appuyez sur ENTER.
Le réglage facile est terminé.
Le réglage facile est terminé
." apparaît.
Tous les raccordements et les
paramétrages sont complétés.
Réglage facile
Recherche canaux analogiques recevables.
Veuillez patienter.
Arrêt
sEntrée rRetour eQuitter
Réglage facile
Sélectionnez une méthode de réglage de l'horloge.
Si vous sélectionnez
recherche un signal horaire lorsque vous l'éteignez.
✔ Auto
Manuel
> Dépla. sEntrée rRetour eQuitter
Réglage facile
Sélectionnez le fuseau
horaire pour votre zone.
> Dépla. sEntrée rRetour eQuitter
Réglage facile
Sélectionnez le type d'écran du téléviseur.
> Dépla. sEntrée rRetour eQuitter
Réglage facile
sEntrée rRetour eQuitter
《Auto》,cet enregistreur
✔ Auto
Atlantic
Eastern
Central
Montagne
Pacifique
Alaska
Hawaii
16:9
✔ 4:3 Letter Box
4:3 Pan Scan
Le réglage facile est terminé.
Terminer
-:-- --
15%
-:-- --
-:-- --
-:-- --
-:-- --
PRÉRÉGLAGE DU SYNTONISEUR
Lorsque l’appareil est en mode Stop (Arrêt) ou aucun disque, appuyez sur la touche MENU.
1.
Sélectionnez Réglage en déplaçant la barre de sélection à l’aide des touches
2.
.
ENTER
Sélectionnez Préréglage du syntoniseur en déplaçant la barre de sélection à l’aide des touches
3.
appuyez sur ENTER.
26_ confi guration du système
▲▼ ,
puis appuyez sur
▲▼
,puis
Page 99

Antenne/Câble
Si les chaînes ont été détectées automatiquement, il n'est pas
nécessaire de les programmer (voir la prise en main rapide, pages
25 et 26).Sélectionnez le système de diffusion par câble RF.
Pour régler, suivez les étapes 1 à 3
• Antenne
• Câble
Pr
éréglage auto
Préréglage du syntoniseur
List
des titres
Antenne/Câble : Antenna
éréglage auto
Pr
Minuterie
R
églage manuel
Éditer
Réglages
du disque
Réglage
> Dépla. sEntrée rRetour eQuitter
Antenne
✔ Câble
-:-- --
● CONFIGURATION DU SYSTÈME
Préréglage auto permet de prérégler automatiquement tous les
canaux recevables.
M
automatiquement toutes les canaux recevables pour le syntoniseur
L’enregistreur DVD avec magnétoscope recherchera
sélectionné.Cette procédure peut durer quelques minutes.
Après avoir terminé cette procédure, l’enregistreur affi chera le canal
recevable dont le numéro est le plus bas
Si vous souhaitez interrompre ou annuler le balayage, appuyez sur la
.
Préréglage du syntoniseur
List
des titres
Minuterie
Réglages
du disque
> Dépla. sEntrée rRetour eQuitter
Recherche canaux analogiques recevables.
veuillez patienter.
Éditer
Réglage
Arrêt
-:-- --
5%
touche ENTER.
Réglage manuel
Utilisez cette fonction pour ajouter des chaînes qui n’ont pas été détectées par la fonction Préréglage auto ou
pour supprimer une chaîne détectée.
1.
Sélectionnez
appuyez sur ENTER.
2.
À partir de l’écran Sélectionner un canal, appuyez sur ▲▼ ou
Réglage manuel,
sur les touches numériques pour sélectionner les canaux que
vous souhaitez ajouter ou effacer . Appuyez ensuite sur ENTER.
L’utilisation des touches CH/TRK (,/.) pour sélectionner un
•
canal permet d’ajouter ou d'effacer un canal à la fois en entrant
son numéro
Utilisez les touches ▲▼ de la section de la télécommande pour
•
.
passer directement au prochain numéro de canal détecté avec la fonction
Sélectionnez Ajouter,Effacer ou Quitter en déplaçant la barre de sélection à l’aide des touches ◄►, puis
3.
appuyez sur ENTER.
à l’aide des touches
▲▼
puis
Sélectionnez un canal:
1
Ajouter Effacer Quitter
Préréglage auto.
RÉGLAGE HORLOGE
Ce sous-menu permet de réglage l’horloge.
Lorsque l’appareil est en mode Stop (Arrêt) ou Pas de disque,
1.
appuyez sur la touche MENU
2.
Sélectionnez Réglage en déplaçant la barre de sélection à l’aide
des touches
3.
Sélectionnez Réglage horloge en déplaçant la barre de
▲▼
,puis appuyez sur ENTER.
sélection à l’aide des touches
4.
Appuyez sur les fl èches ▲▼ pour sélectionner l'option de
réglage de l'horodatage illustrée sur les pages qui suivent, puis
appuyez sur ENTER
5.
Sélectionnez le sous-élément spécifi que à cette option que vous souhaitez paramétrer en déplaçant la
.
barre de sélection dans la liste à l’aide des touches
.
▲▼
,puis appuyez sur ENTER.
▲▼, puis appuyez sur ENTER.
Réglage
List
des titres
Préréglage du syntoniseur
Réglage horloge
Minuterie
Vidéo
Éditer
Audio
Réglages
Caractéristiques
du disque
Options
Réglage
Réglage facile
> Dépla. sEntrée rRetour eQuitter
-:-- --
Français _27
Page 100
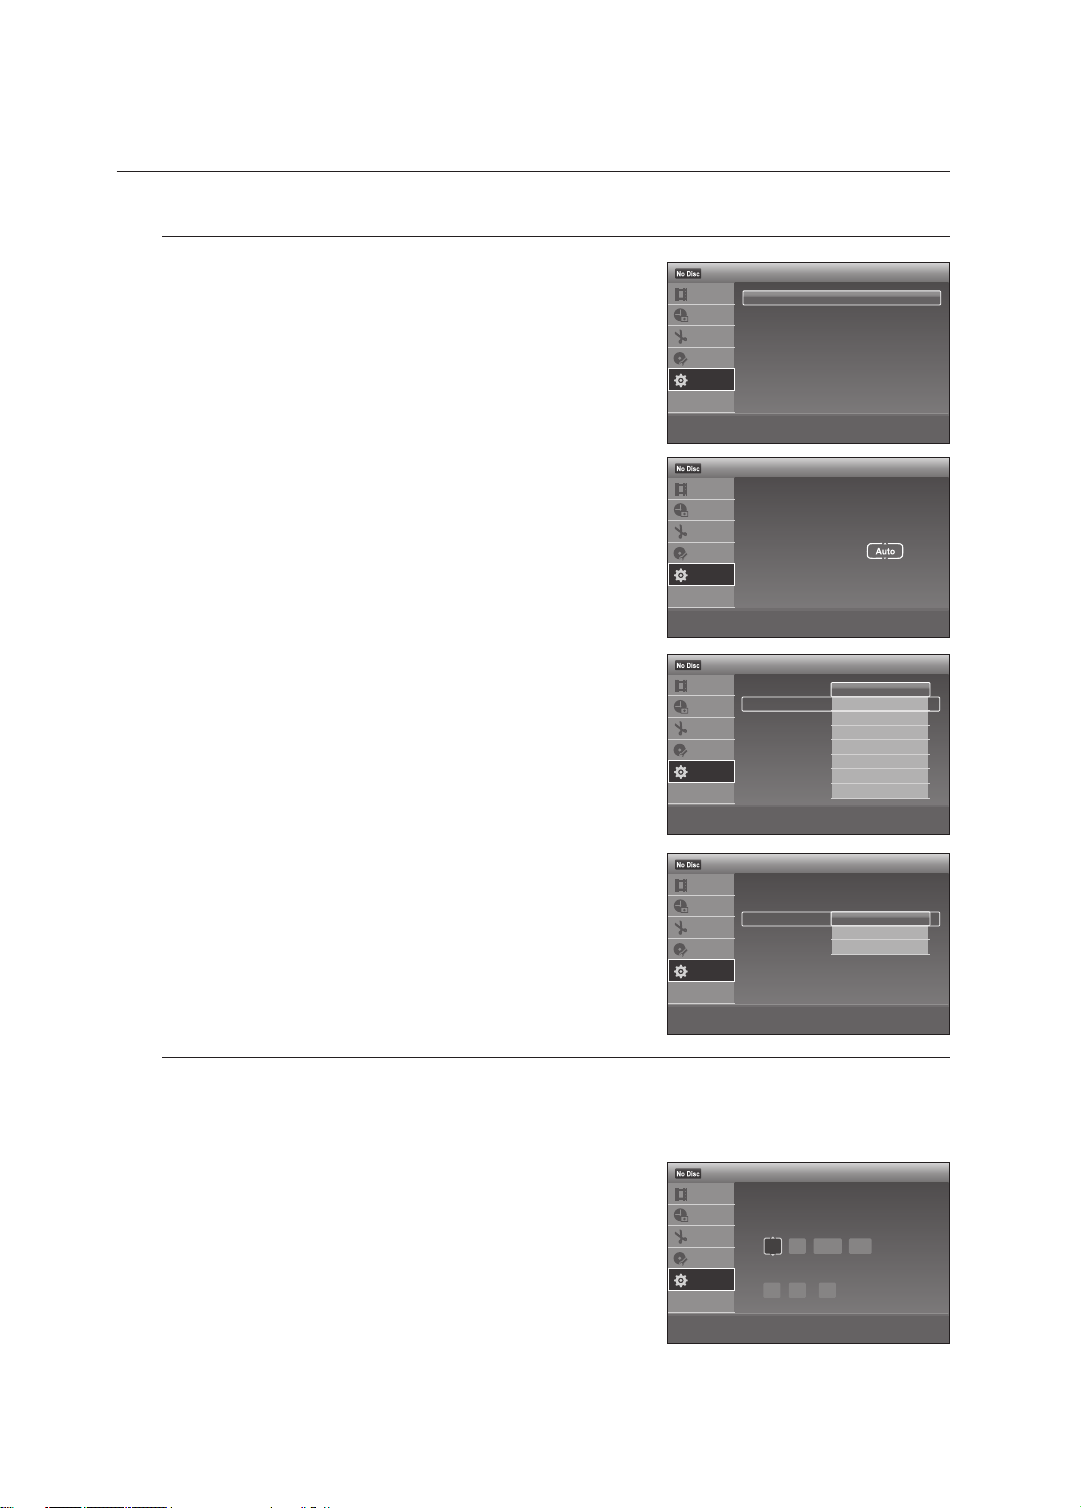
confi guration du système
R
églage auto horloge
Ce sous-menu permet de régler l’horloge. L’horloge doit être réglée
si vous comptez utiliser le timer recording (l’enregistrement par
minuterie).
Sélectionnez Auto en déplaçant la barre de sélection à l’aide
1.
des touches
Accédez au sous-menu (Can.réglage horloge, Fuseau horaire ou
2.
▲▼
,puis appuyez sur ENTER.
Heure d’été), en appuyant sur les touches ▲▼ , puis appuyez sur
M
ENTER.
L’antenne doit être branchée pour régler l’Auto Clock (Auto Horloge).
Consultez les pages 19 pour plus d’information concernant la
> Dépla. sEntrée rRetour eQuitter
connexion de l’antenne.
L’horloge se règle automatiquement dès que vous éteignez
l’enregistreur DVD avec magnétoscope.
Can.réglage horloge :
> Dépla. sEntrée rRetour eQuitter
Sélectionnez un canal dont le signal contient la date et l’heure en
déplaçant la barre de sélection à l’aide des touches
sur ENTER.
, puis appuyez
▲▼
Sélectionnez Automatique pour trouver automatiquement le canal.
Fuseau horaire
Sélectionnez le fuseau horaire correspondant à votre région en
déplaçant la barre de sélection à l’aide des touches
sur ENTER.
, puis appuyez
▲▼
Sélectionnez Automatique pour régler le fuseau horaire automatiquement.
> Dépla. sEntrée rRetour eQuitter
Heure d'été :
Appuyez sur les touches ▲▼ pour sélectionner Oui ou Non puis
appuyez sur la touche ENTER.
Sélectionnez Auto pour régler l’heure d’été automatiquement.
R
églage de l’horloge manuellement
> Dépla. sEntrée rRetour eQuitter
Réglage de l'horloge
List
des titres
Can.réglage horloge : Auto
Fuseau horaire : Auto
Minuterie
Heure d'
Éditer
Réglages
du disque
Réglage
Can.réglage horloge
List
des titres
Minuterie
Éditer
Réglages
du disque
Réglage
Auto
List
des titres
Can.réglage horloge : Auto
Fuseau horaire : Auto
Minuterie
Heure d'
Éditer
Réglages
du disque
Réglage
Auto
List
des titres
Can.réglage horloge : Auto
Fuseau horaire : Auto
Minuterie
Heure d'
Éditer
Réglages
du disque
Réglage
été
: Auto
Sélectionnez un canal:
✔ Auto
: Auto
: Auto
Eastern
Central
Montagne
Pacifique
Alaska
Hawaii
✔ Auto
Non
été
été
-:-- --
-:-- --
-:-- --
Atlantic
-:-- --
Oui
Si le processus de confi guration automatique ne parvient pas à régler l’horloge interne de l’enregistreur
DVD en trouvant un canal de télévision locale, réglez la date et l’heure manuellement en procédant comme
suit.
Sélectionnez Manuel en déplaçant la barre de sélection à l’aide des touches
1.
ENTER.
2.
Sélectionnez la Date du jour et l'heure actuelle en déplaçant la
barre de sélection à l’aide des touches
▲▼◄ ►
,puis appuyez
sur ENTER.
L’heure actuelle, après avoir été sauvegardée en mémoire,
des titres
Minuterie
Réglages
du disque
apparaît sur l’affi cheur du panneau avant lorsque l’appareil est
éteint.
▲▼ : Permet de régler la valeur à entrer.
m Dépla. sEntrée rRetour eQuitter
▲▼
Réglage
List
Éditer
Réglage
,puis appuyez sur
horloge
R
égler manuellement l'heure et la date
Mois Jour Ann
01 01 2008 Mar
Heures Min AM/PM
12 : 00 AM
ée
Vous pouvez également régler cette valeur en utilisant les
touches numériques de 1 à 9.
◄ ►
: Permet de se déplacer d’un élément à l’autre.
28_ confi guration du système
12:00 AM
.
 Loading...