

Samsung DVD-P250K, DVD-P255K Instruction Manual

DVD Player
DVD-P250K
DVD-P255K
To prevent any malfunctioning and to avoid any damages, read carefully this
user's manual before you connect and operate this DVD player.
Keep these instructions for future reference.Thank you.
Precautions
STANDBY/ON
LOADINGPLAY
EZ VIEW
STANDBY/ON
LOADINGPLAY
EZ VIEW
STANDBY/ON
LOADINGPLAY
EZ VIEW
STANDBY/ON
LOADINGPLAY
EZ VIEW
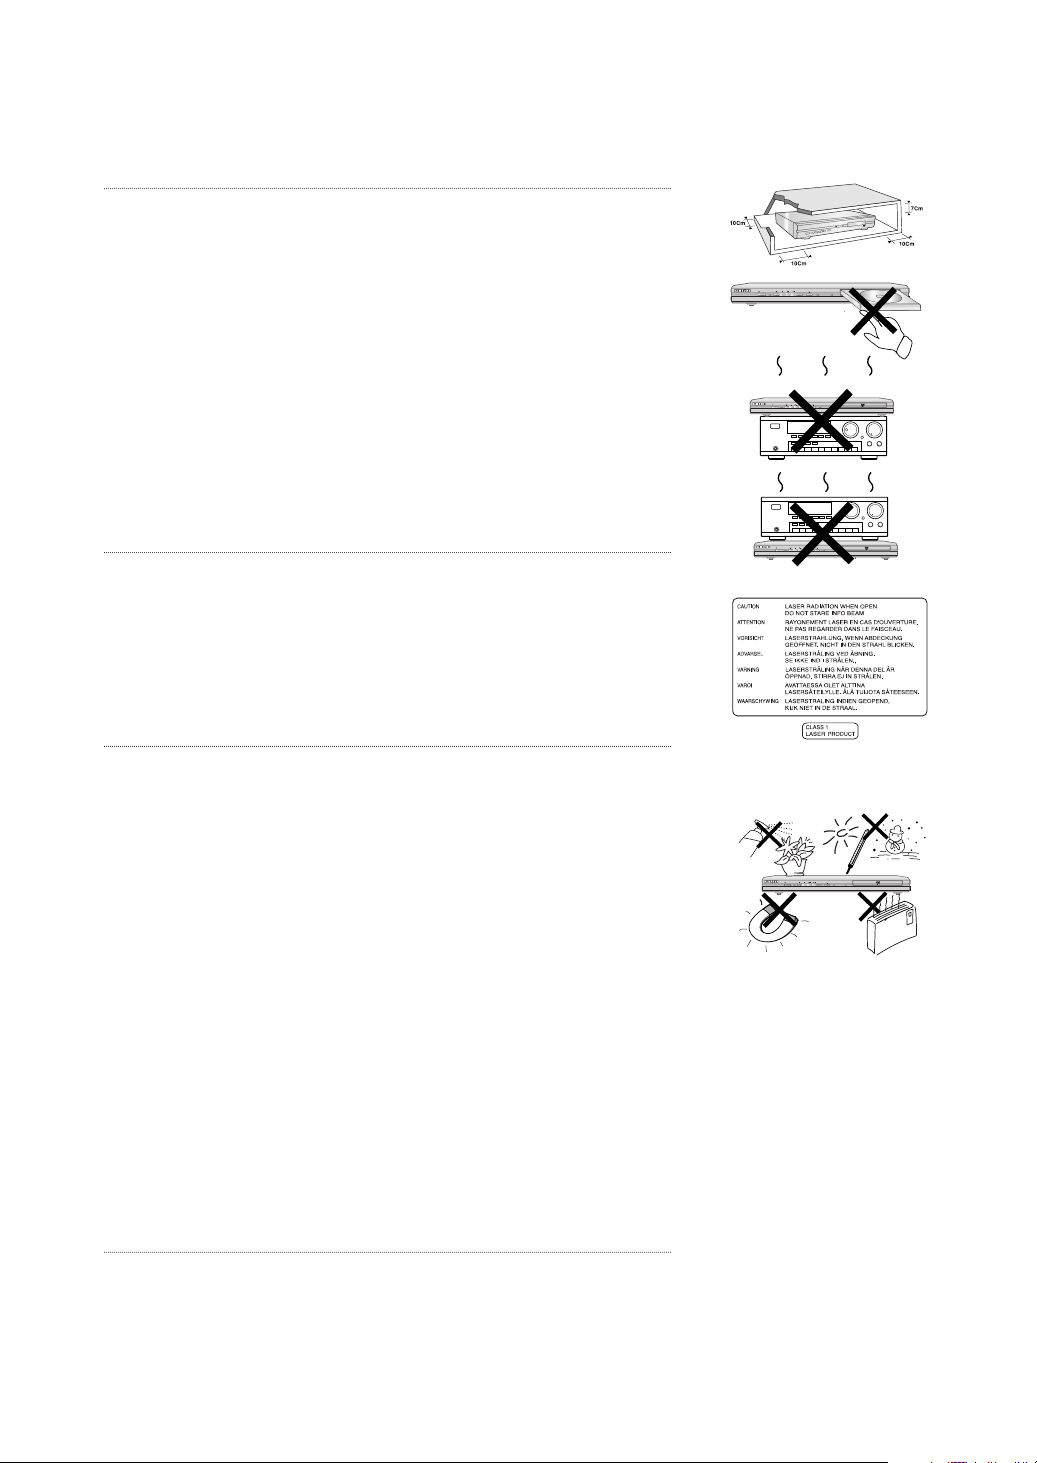
1. Setting up
Refer to the identification label located on the rear of your
player for its proper operating voltage. Install horizontally, on
an appropriate support (cabinet) with space enough around
the device to provide adequate ventilation (7 to 10 cm).
Be sure to keep the ventilation openings clear.
Do not stack anything on top of the DVD player.
Do not place the player over amplifiers or other units that
produce heat. Check that the disc compartment be empty
before moving the player.
This unit has been designed to work continuously.
When you turn it off (standby position) it is not disconnected
from the network. If you want to disconnect it, unplug it; it is
recommended whenever you use the device for a long time.
2. For your safety
Never open the player or touch the parts inside. It may be
dangerous for you and for some sensitive parts. Also, it could
cause electric shock and exposure to laser beams. Do not get
your eyes close to the record rack or other openings to look at
the inner side of the unit.
3. Attention
Protect the unit from moisture and excessive heat (chimney),
and any other appliances that create powerful electromagnetic fields (speakers, etc.).
Unplug the power cord when the player does not work
properly. This unit is intended for industrial environments, but
for domestic environments. Use of this product is for personal
use only.
Disc copying or music downloading for sale or any commercial
purposes is o may be in violation of the copyright laws.
DISCLAIMER:TO THE EXTENT PERMISSIBLE BY
APPLICABLE LAW, IT IS EXCLUDED ANY DECLARATION
OR GUARANTEE OF NO COPYRIGHT VIOLATION OR ANY
OTHER COPYRIGHT RIGHTS RESULTING FROM THE USE
OF THIS PRODUCT UNDER DIFFERENT TERMS EXCEPT
FROM THE ONES SPECIFIED ABOVE.
Condensation: When moving the player or the discs from a
cold place into a warm place, as it may happen in winter time,
wait about two hours for them to get the temperature in the
room. This way you will avoid serious damages.
ENG-2

4. Discs
Handle the discs carefully. Hold them by the edges or the
hole. Place the disc with the labeled side up (on one-side
discs). Wipe the discs with a dry soft cloth. Store the discs in
their cases in vertical position. Insert the disc in the tray
properly using the guide area. Do not use aerosol cleaners or
thinners when the disc is dirty. Use a damp cloth (with water
only) in a round movement, otherwise you can scratch it
resulting on noises during playback.
5. Batteries
The battery used in this product contains chemicals that may
result harmful to the environment.
Dispose of batteries in the proper way. Battery replacement
should be performed by a qualified technician.
6. Case Maintenance
For security reasons, be sure to unplug it from the wall
socket.
- Do not use benzene or other thinners for cleaning.
- Wipe the case with a smooth cloth.
CAUTION: THE USE OF ANY CONTROL, PROCEDURES EXCEPT FROM THOSE SPECIFIED
ABOVE CAN RESULT ON HARMFUL RADIATION EXPOSURE.
ENG-3

Before you start
Accessories
Remote
Control
Batteries for
Remote Control
(AAA Size)
Install Batteries in the Remote control
1
Open the battery
cover on the back of
the remote control.
2
Insert two AAA batteries.
Make sure that the
polarities (+ and -) are
aligned correctly.
User’s
Manual
Video/Audio
Cable
3
Replace the battery
cover.
If the remote control doesn’t operate properly
- Check the polarity + - of the batteries (Dry-Cell)
- Check if the batteries are drained.
- Check if remote control sensor is blocked by obstacles.
- Check if there is any fluorescent lighting nearby.
ENG-4

TABLE OF C ONTENTS
Precautions . . . . . . . . . . . . . . . . . . . . . . . . . . . . . . . . . . . . . . . . . . . . . . . . . . . . . . . . . . . 2
Before you start . . . . . . . . . . . . . . . . . . . . . . . . . . . . . . . . . . . . . . . . . . . . . . . . . . . . . . . 4
Chapter 1:
Chapter 2: Connections
Chapter 3: Basic Functions
Chapter 4: Advanced Functions
Chapter 5: Karaoke Functions
Chapter 6: Changing Setup Menu
Chapter 7: Reference
Setup
General Features . . . . . . . . . . . . . . . . . . . . . . . . . . . . . . . . . . . . . . . . . . . 6
Disc Type and Characteristics . . . . . . . . . . . . . . . . . . . . . . . . . . . . . . . . . 7
Description . . . . . . . . . . . . . . . . . . . . . . . . . . . . . . . . . . . . . . . . . . . . . . . . 8
Tour of the Remote Control . . . . . . . . . . . . . . . . . . . . . . . . . . . . . . . . . . 10
Choosing a Connection . . . . . . . . . . . . . . . . . . . . . . . . . . . . . . . . . . . . . 11
Playing a Disc . . . . . . . . . . . . . . . . . . . . . . . . . . . . . . . . . . . . . . . . . . . . 17
Using the Search and Skip Functions . . . . . . . . . . . . . . . . . . . . . . . . . . 19
Using the Display Function . . . . . . . . . . . . . . . . . . . . . . . . . . . . . . . . . . 20
Using the Disc and Title Menu . . . . . . . . . . . . . . . . . . . . . . . . . . . . . . . . 22
Using the Function Menu . . . . . . . . . . . . . . . . . . . . . . . . . . . . . . . . . . . . 23
Repeat Play . . . . . . . . . . . . . . . . . . . . . . . . . . . . . . . . . . . . . . . . . . . . . . 24
Slow Repeat Play . . . . . . . . . . . . . . . . . . . . . . . . . . . . . . . . . . . . . . . . . 25
Program Play & Random Play . . . . . . . . . . . . . . . . . . . . . . . . . . . . . . . . 26
Adjusting the Aspect Ratio (EZ View). . . . . . . . . . . . . . . . . . . . . . . . . . . 27
Selecting the Audio Language . . . . . . . . . . . . . . . . . . . . . . . . . . . . . . . . 29
Selecting the Subtitle Language. . . . . . . . . . . . . . . . . . . . . . . . . . . . . . . 30
Changing the Camera Angle . . . . . . . . . . . . . . . . . . . . . . . . . . . . . . . . . 31
Using the Instant Replay/Skip Function . . . . . . . . . . . . . . . . . . . . . . . . . 31
Using the Bookmark Function . . . . . . . . . . . . . . . . . . . . . . . . . . . . . . . . 32
Using the Zoom Function . . . . . . . . . . . . . . . . . . . . . . . . . . . . . . . . . . . . 34
Clips Menu for MP3/WMA/JPEG . . . . . . . . . . . . . . . . . . . . . . . . . . . . . . 35
Folder Selection . . . . . . . . . . . . . . . . . . . . . . . . . . . . . . . . . . . . . . . . . . . 35
MP3/WMA Playback. . . . . . . . . . . . . . . . . . . . . . . . . . . . . . . . . . . . . . . . 36
Picture CD Playback. . . . . . . . . . . . . . . . . . . . . . . . . . . . . . . . . . . . . . . . 38
Karaoke Functions . . . . . . . . . . . . . . . . . . . . . . . . . . . . . . . . . . . . . . . . . 40
Reserving a Song . . . . . . . . . . . . . . . . . . . . . . . . . . . . . . . . . . . . . . . . . . 41
Vocal Function . . . . . . . . . . . . . . . . . . . . . . . . . . . . . . . . . . . . . . . . . . . . 42
Using the Setup Menu . . . . . . . . . . . . . . . . . . . . . . . . . . . . . . . . . . . . . . 43
Setting Up the Language Features. . . . . . . . . . . . . . . . . . . . . . . . . . . . . 44
Setting Up the Audio Options . . . . . . . . . . . . . . . . . . . . . . . . . . . . . . . . . 48
Setting Up the Display Options. . . . . . . . . . . . . . . . . . . . . . . . . . . . . . . . 50
Setting Up the Parental Control . . . . . . . . . . . . . . . . . . . . . . . . . . . . . . . 52
Troubleshooting . . . . . . . . . . . . . . . . . . . . . . . . . . . . . . . . . . . . . . . . . . . 55
Specifications . . . . . . . . . . . . . . . . . . . . . . . . . . . . . . . . . . . . . . . . . . . . . 56
ENG-5

Chapter 1
SETUP
General Features
Excellent Sound
Dolby Digital, a technology developed by Dolby
Laboratories, provides crystal clear sound
reproduction.
Screen
Both regular and widescreen(16:9) pictures can be
viewed.
Slow Motion
An important scene can be viewed in slow motion.
Program Play (CD)
You can program tracks to play in desired order.
Parental Control (DVD)
The parental control allows users to set the level
necessary to prohibit children from viewing harmful
movies such as those with violence, adult subject
matter, etc.
Various On-Screen Menu Functions
You can select various languages (Audio/Subtitle)
and screen angles while enjoying movies.
Progressive Scan
Progressive scanning creates an improved picture
with double the scan lines of a conventional
interlaced picture.
EZ VIEW (DVD)
Easy View enables picture adjustment to match your
TV's screen size (16:9 or 4:3).
Digital Photo Viewer (JPEG)
You can view Digital Photos on your TV.
Repeat
You can repeat a song or movie simply by pressing
the REPEAT button.
MP3/WMA
This unit can play discs created from MP3/WMA files.
Instant Replay (DVD)
This function is used to replay the previous 10
seconds of a movie from the current position.
Instant Skip (DVD)
This function skips playback ahead 10 seconds.
Note
- Discs which cannot be played with this
player.
• DVD-ROM • DVD-RAM
• CD-ROM • CDV
• CDI • CVD
• Super Audio CD (except CD layer)
• CDGs play audio only, not graphics.
- Ability to play back may depend on recording
conditions.
• DVD-R, +R
• CD-RW
• DVD+RW, -RW (V mode)
- The unit may not play certain CD-R, CD-RW
and DVD-R due to the disc type or recording
conditions.
COPY PROTECTION
Many DVD discs are encoded with copy
protection. Because of this, you should only connect
your DVD player directly to your TV, not to a VCR.
Connecting to a VCR results in a distorted picture
from copy-protected DVD discs.
This product incorporates copyright protection
technology that is protected by methods claims of
certain U.S. patents and other intellectual property
rights owned by Macrovision Corporation and other
rights owners. Use of this copyright protection
technology must be authorized by Macrovision
Corporation, and is intended for home and other
limited viewing uses only unless otherwise authorized
by Macrovision Corporation. Reverse engineering or
disassembly is prohibited.
PROGRESSIVE SCAN OUTPUTS
(525p)
“CONSUMERS SHOULD NOTE THAT NOT ALL HIGH
DEFINITION TELEVISION SETS ARE FULLY
COMPATIBLE WITH THIS PRODUCT AND MAY
CAUSE ARTIFACTS TO BE DISPLAYED IN THE
PICTURE, IF 525 PROGRESSIVE SCAN PICTURE
PROBLEMS OCCUR, IT IS RECOMMENDED THAT
THE USER SWITCH THE CONNECTION TO THE
‘STANDARD DEFINITION’ OUTPUT. IF THERE ARE
QUESTIONS REGARDING YOUR TV SET
COMPATIBILITY WITH THIS MODEL 525p DVD
PLAYER, PLEASE CONTACT SAMSUNG'S
CUSTOMER SERVICE CENTER.”
ENG-6
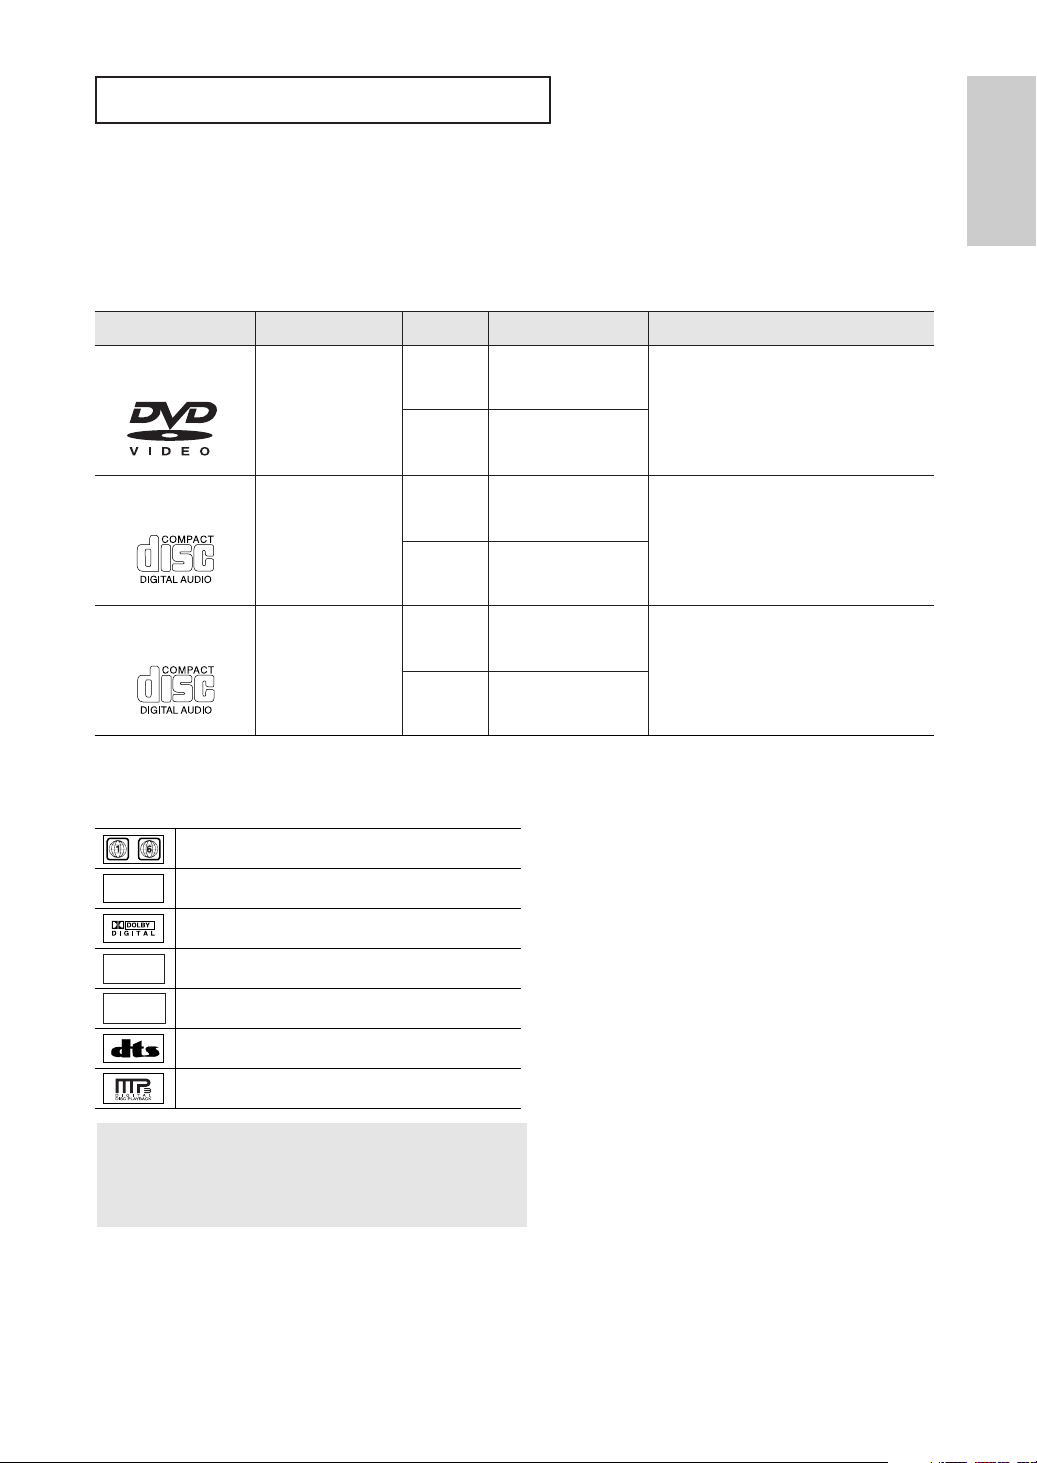
SETUP
Disc Type and Characteristics
This DVD player is capable of playing the following types of discs with the corresponding logos:
Setup
Disc Types (Logos)
DVD
VIDEO-CD
AUDIO-CD
Recording Types Disc Size Max. Playing Time Characteristics
- DVD contains excellent sound and
video due to Dolby Digital and
MPEG-2 system.
- Various screen and audio functions
can be easily selected through the
on-screen menu.
- Video with CD sound, VHS quality &
MPEG-1 compression technology.
- CD is recorded as a Digital Signal with
better audio quality, less distortion and
less deterioration of audio quality over
time.
Audio
+
Video
Audio
+
Video
Audio
12 Cm
8 Cm
12 Cm
8 Cm
12 Cm
8 Cm
Single-sided 240 min.
Double-sided 480 min.
Single-sided 80 min.
Double-sided 160 min.
74 min.
20 min.
74 min.
20 min.
Disc Markings Region Number
~
NTSC
STEREO
DIGITAL
SOUND
Play Region Number
NTSC broadcast system in U.S.A, Canada, Korea,
Japan, etc.
Dolby Digital disc
Stereo disc
Digital Audio disc
Both the DVD player and the discs are
coded by region. These regional
codes must match in order for the disc
to play. If the codes do not match, the
disc will not play.
The Region Number for this player
is described on the rear panel of the
player.
DTS disc
MP3 disc
You must only insert one DVD disc at a time.
Inserting two or more discs will not allow
playback and may cause damage to the DVD
player.
ENG-7
MIC 1 MIC 2
- VOLUME +
STANDBY/ON
EZ VIEW
STANDBY/ON
MIN
MIC
VOLUME
MAX
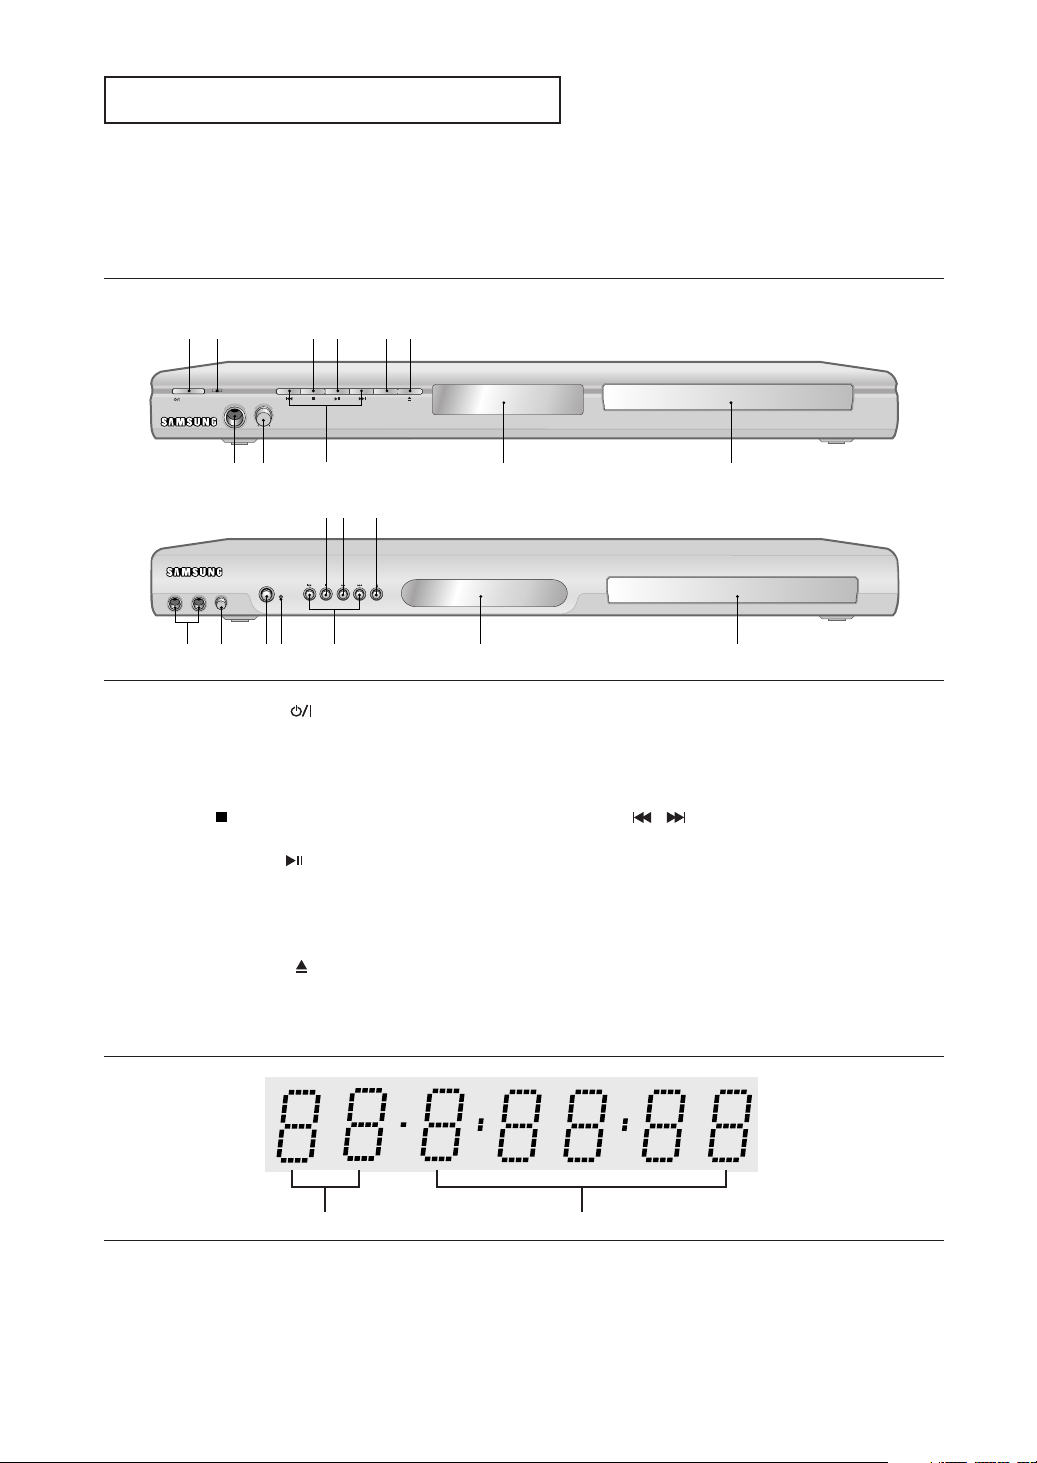
Description
Front Panel Controls
DVD-P250K
1
234
SETUP
56
DVD-P255K
87
12
897
9
34 6
1. STANDBY/ON ( )
When STANDBY/ON is pressed on, the indicator goes
out and the player is turned on.
2. STANDBY indicator
When the unit is first plugged in, this indicator lights.
3. STOP ( )
Stops disc play.
4. PLAY/PAUSE ( )
Begin or pause disc play.
5. EZ VIEW
(DVD-P250K)
The aspect ratio of a picture can easily be adjusted to
your TV's screen size (16:9 or 4:3).
6. OPEN/CLOSE ( )
Press to open and close the disc tray.
Front Panel Display
10
10
7. MIC 1/2
Connect Microphone for karaoke functions.
8. MICROPHONE VOLUME
Use to adjust microphone volume level. Use the button by
pressing it. Turn it to the left or right to control the volume.
9. SKIP ( / ) SEARCH
Allow you to search forward/backward through
a disc. Use to skip the title, chapter or track.
10. DISPLAY
Operation indicators are displayed here.
11. DISC TRAY
Place the disc here.
11
11
12
1. Chapter/Track number indicator 2. Total playing time/Displays various
messages concerning operations
such as PLAY, STOP, LOAD ...
no DISC: No disc loaded.
OPEN: The disc tray is open.
ENG-8
LOAD: Player is loading disc information.
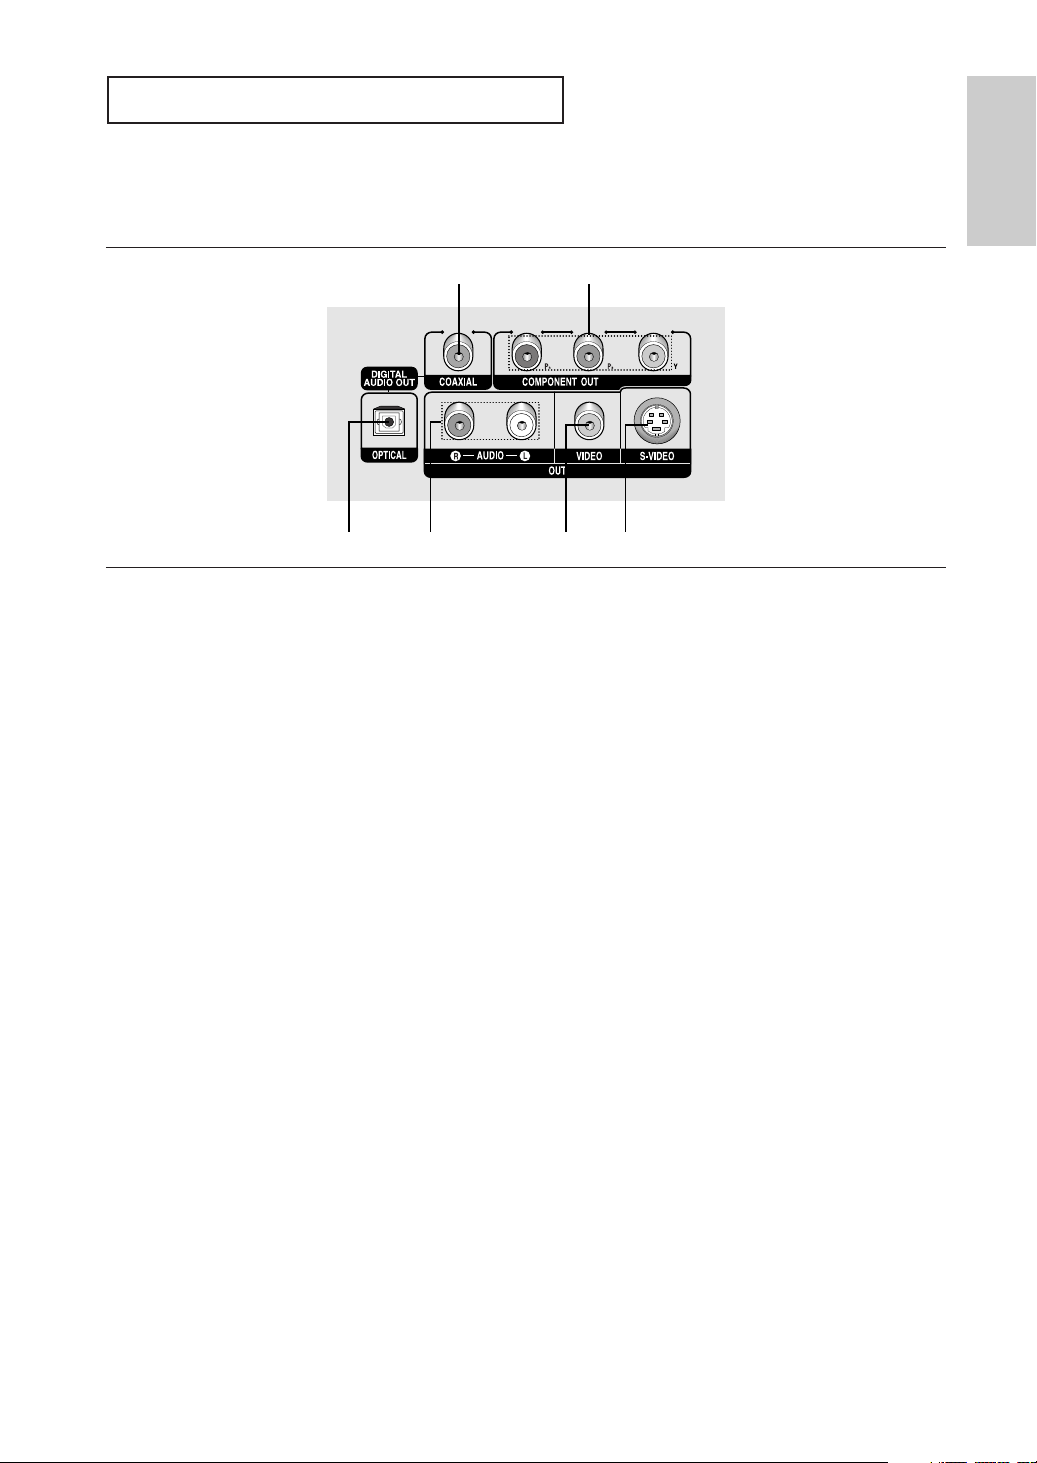
Rear Panel
SETUP
Setup
1
13 45
1. DIGITAL AUDIO OUT JACKS
- Use either an optical or coaxial digital cable to connect
to a compatible Dolby Digital receiver.
- Use either an optical or coaxial digital cable to connect
to an A/V Amplifier that contains a Dolby Digital,
MPEG2 or DTS decoder.
2. COMPONENT VIDEO OUT JACKS
- Use these jacks if you have a TV with Component
Video in jacks. These jacks provide PR, PBand Y video.
- If Component(P-SCAN) Video Output is selected in
Setup Menu, progressive scan mode will work.
- If Component(I-SCAN) Video Output is selected in
Setup Menu, interlaced scan mode will work.
3. AUDIO OUT JACKS
Connect to the Audio input jacks of your television or
audio/video receiver.
2
4. VIDEO OUT JACK
- Use a video cable to connect to the Video input jack on
your television.
- The Video Output in Setup Menu must be set to
S-Video.
5. S-VIDEO OUT JACK
- Use the S-Video cable to connect this jack to the
S-Video jack on your television for higher picture
quality.
- The Video Output in Setup Menu must be set to
S-Video.
Note
-
Consult your TV User’s Manual to find out if your TV supports Progressive Scan (P-SCAN).
If Progressive Scan is supported, follow the TV User’s Manual regarding Progressive Scan settings in the
TV’s menu system.
- If Component (P-SCAN) Video Output is selected in Setup Menu, Video and S-Video Outputs do not work.
- See pages 50 ~ 51 to get more information on how to use the setup menu.
ENG-9
SETUP
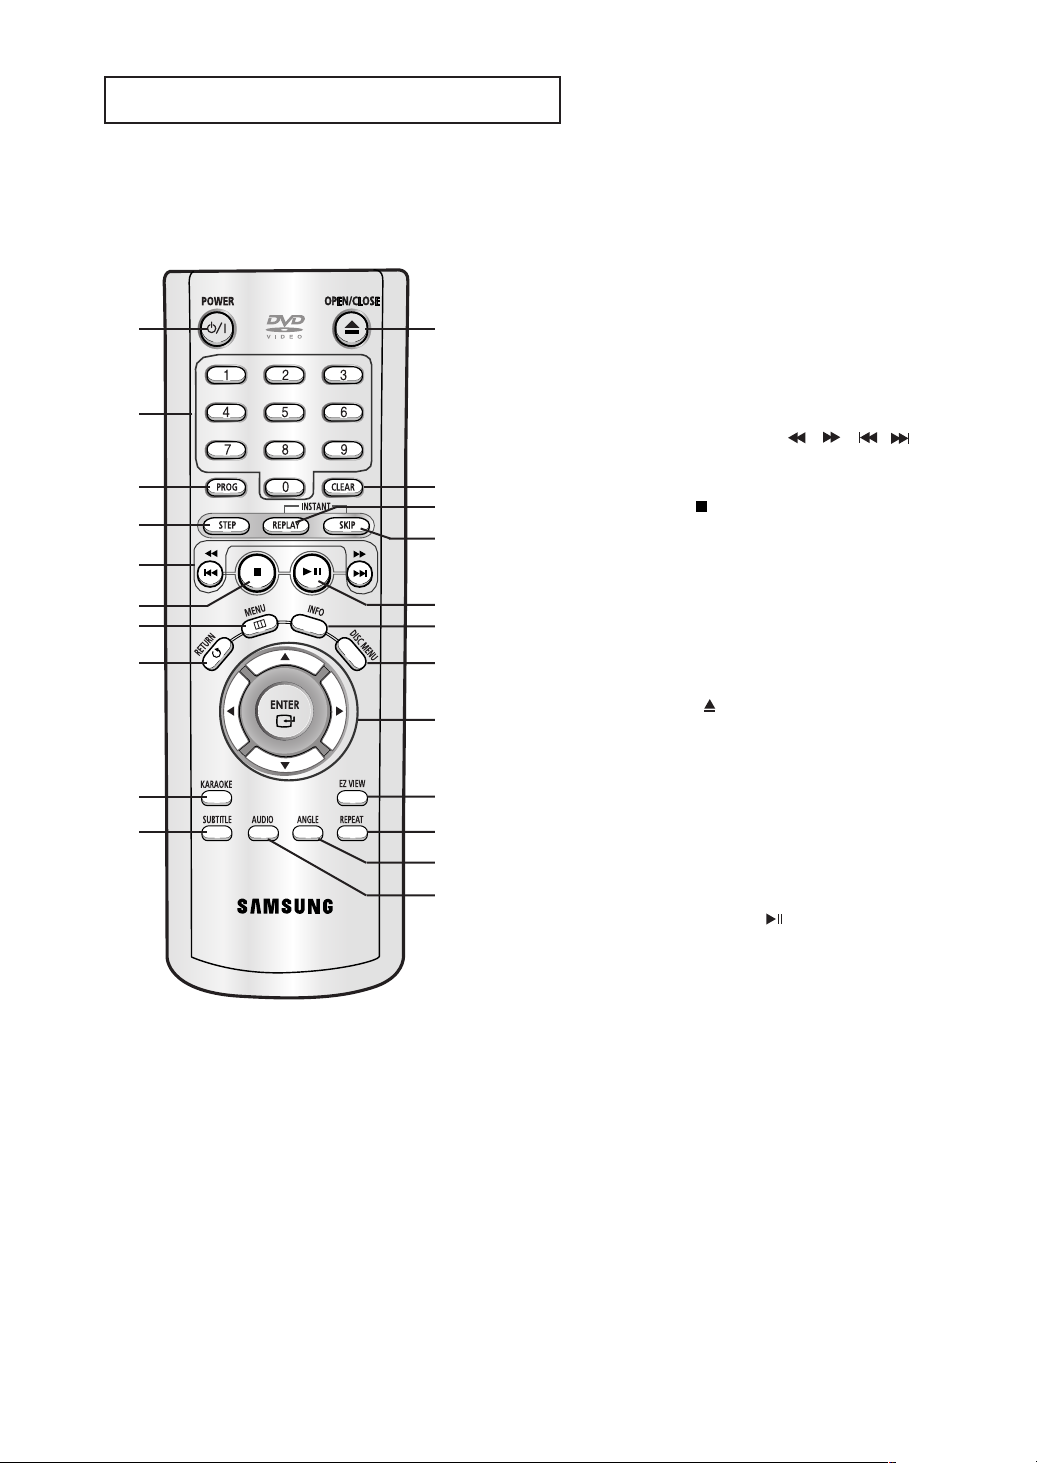
Tour of the Remote Control
1
2
3
4
5
6
7
8
9
10
11
12
13
14
15
16
17
18
19
20
21
22
1. DVD POWER Button
Turns the power on or off.
2. NUMBER Buttons
3. PROG Button
Allows you to program a specific order.
4. STEP Button
Advances play one frame at a time.
5. SEARCH/SKIP Buttons (
Allow you to search forward/backward through a disc.
Use to skip the title, chapter or track.
6. STOP Button ( )
7. MENU Button
Brings up the DVD player’s menu.
8. RETURN Button
Returns to a previous menu.
9. KARAOKE Button
Use to begin Karaoke functions.
10. SUBTITLE Button
11. OPEN/CLOSE ( ) Button
To open and close the disc tray.
12. CLEAR Button
Use to remove menus or status displays from the screen.
13. INSTANT REPLAY Button
This function is used to replay the previous 10 seconds of a
movie from the current position.
14. INSTANT SKIP Button
This function skips playback ahead 10 seconds.
15. PLAY/PAUSE Button ( )
Begin/Pause disc play.
16. INFO Button
Displays the current disc mode.
17. DISC MENU Button
Brings up the Disc menu.
18. ENTER/
This button functions as a toggle switch.
19. EZ VIEW Button
The aspect ratio of a picture can easily be adjusted according
to the screen size of your TV (16:9 or 4:3).
20. REPEAT Button
Allows you to repeat play a title, chapter, track, or disc.
21. ANGLE Button
Use to access various camera angles on a DVD.
22. AUDIO Button
Use this button to access various audio functions on a disc.
……††œœ √√
Buttons
,
/
/
)
ENG-10

Chapter 2
CONNECTIONS
Choosing a Connection
The following shows examples of connections commonly used to connect the DVD player with a TV
and other components.
Before Connecting the DVD Player
- Always turn off the DVD player, TV, and other components before you connect or disconnect any
cables.
- Refer to the user’s manual of the additional components (such as a TV) you are connecting for
more information on those particular components.
Connection to a TV (Video)
1
Using video/audio cables, connect the VIDEO (yellow)/AUDIO
(red and white) OUT terminals on the rear of the DVD player to
the VIDEO (yellow)/AUDIO (red and white) IN terminals of your
TV.
2
Turn on the DVD player and TV.
YELLOW
RED
WHITE
Audio Cable
Video Cable
Connections
WHITE
RED
YELLOW
3
Press the input selector on your TV remote control until the
Video signal from the DVD player appears on the TV screen.
Note
- Noise may be generated if the audio cable placed too close to the power cable.
- If you want to connect to an Amplifier, please refer to the Amplifier connection page. (See pages 15 to 16)
- The number and position of terminals may vary depending on your TV set.
Please refer to the user's manual of your TV.
- If there is one audio input terminal on the TV, connect it to the [AUDIO OUT][left] (white) terminal of the DVD
player.
ENG-11
CONNECTIONS
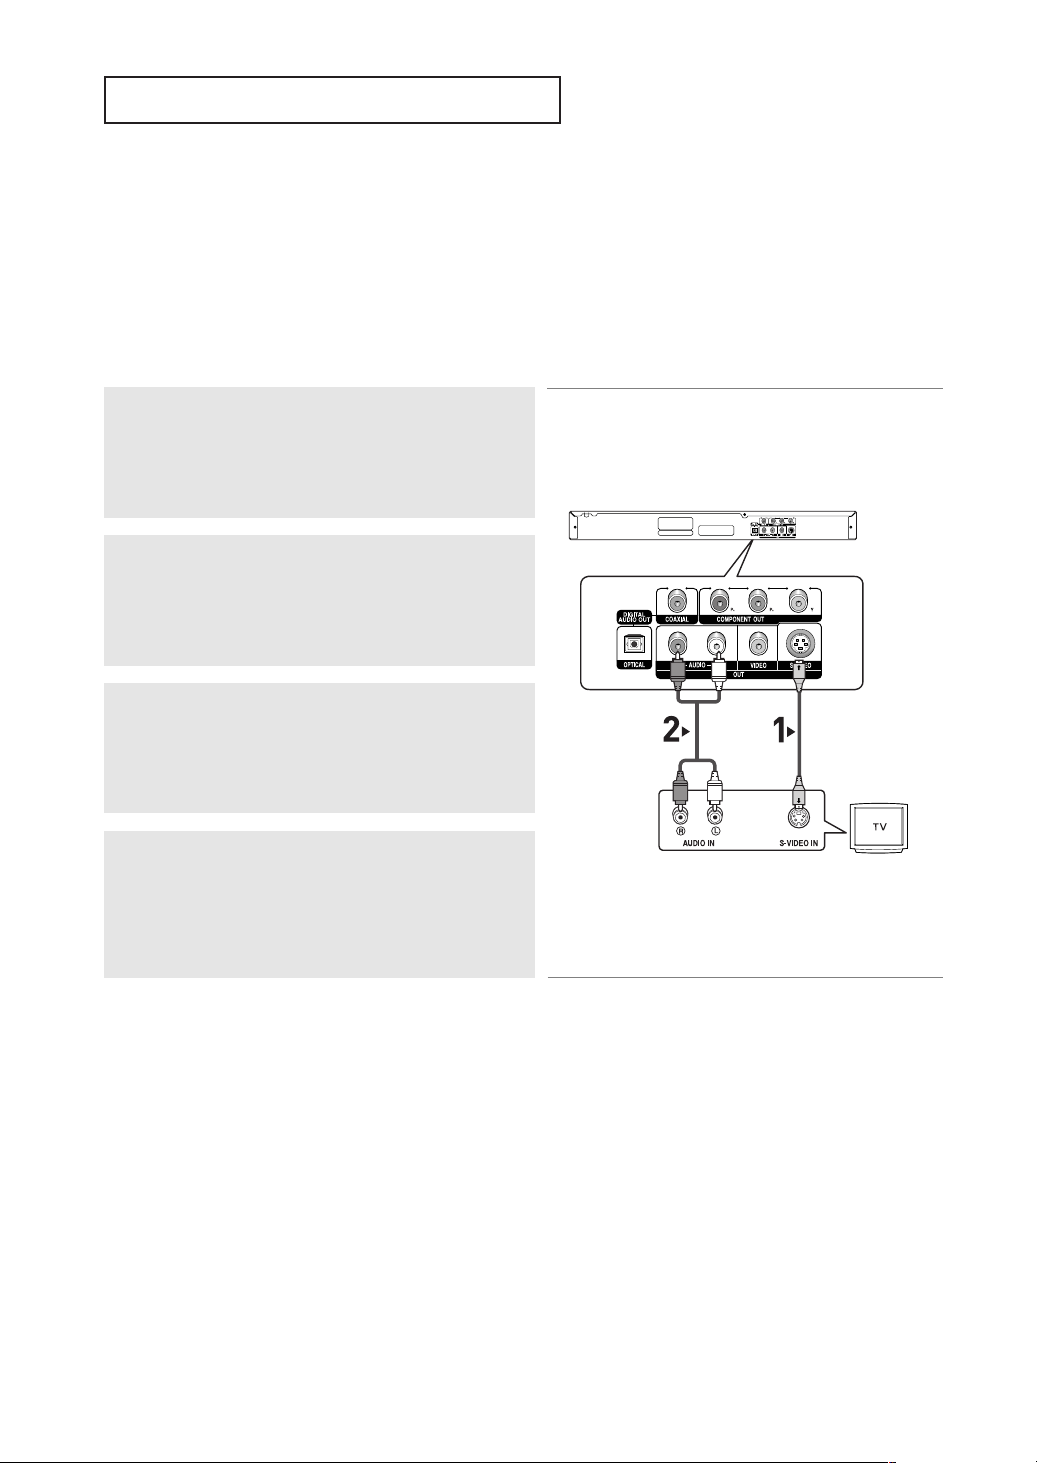
Connection to a TV (S-Video)
- Connecting to your TV using an S-Video cable.
- You will enjoy high quality images. S-Video separates the picture element into black and white(Y)
and color(C) signals to present clearer images than regular video input mode. (Audio signals are
delivered through the audio output.)
1
Using an S-Video cable (not included), connect the S-VIDEO
OUT terminal on the rear of the DVD player to the
S-VIDEO IN terminal of your TV.
2
Using the audio cables, connect the AUDIO (red and white)
OUT terminals on the rear of the DVD player to the AUDIO (red
and white) IN terminals of your TV.
Turn on the DVD player and TV.
RED
WHITE
3
Press the input selector on your TV remote control until the
S-Video signal from the DVD player appears on your TV
screen.
Audio Cable
RED
WHITE
S-Video Cable
(not included)
4
Set the Video Output to S-Video in the Display Setup menu.
(See pages 50 to 51)
Note
- If you want to connect to an Amplifier, please refer to the Amplifier connection page. (See pages 15 to 16)
- The number and position of terminals may vary depending on the TV set.
Please refer to the user's manual of your TV.
ENG-12
CONNECTIONS
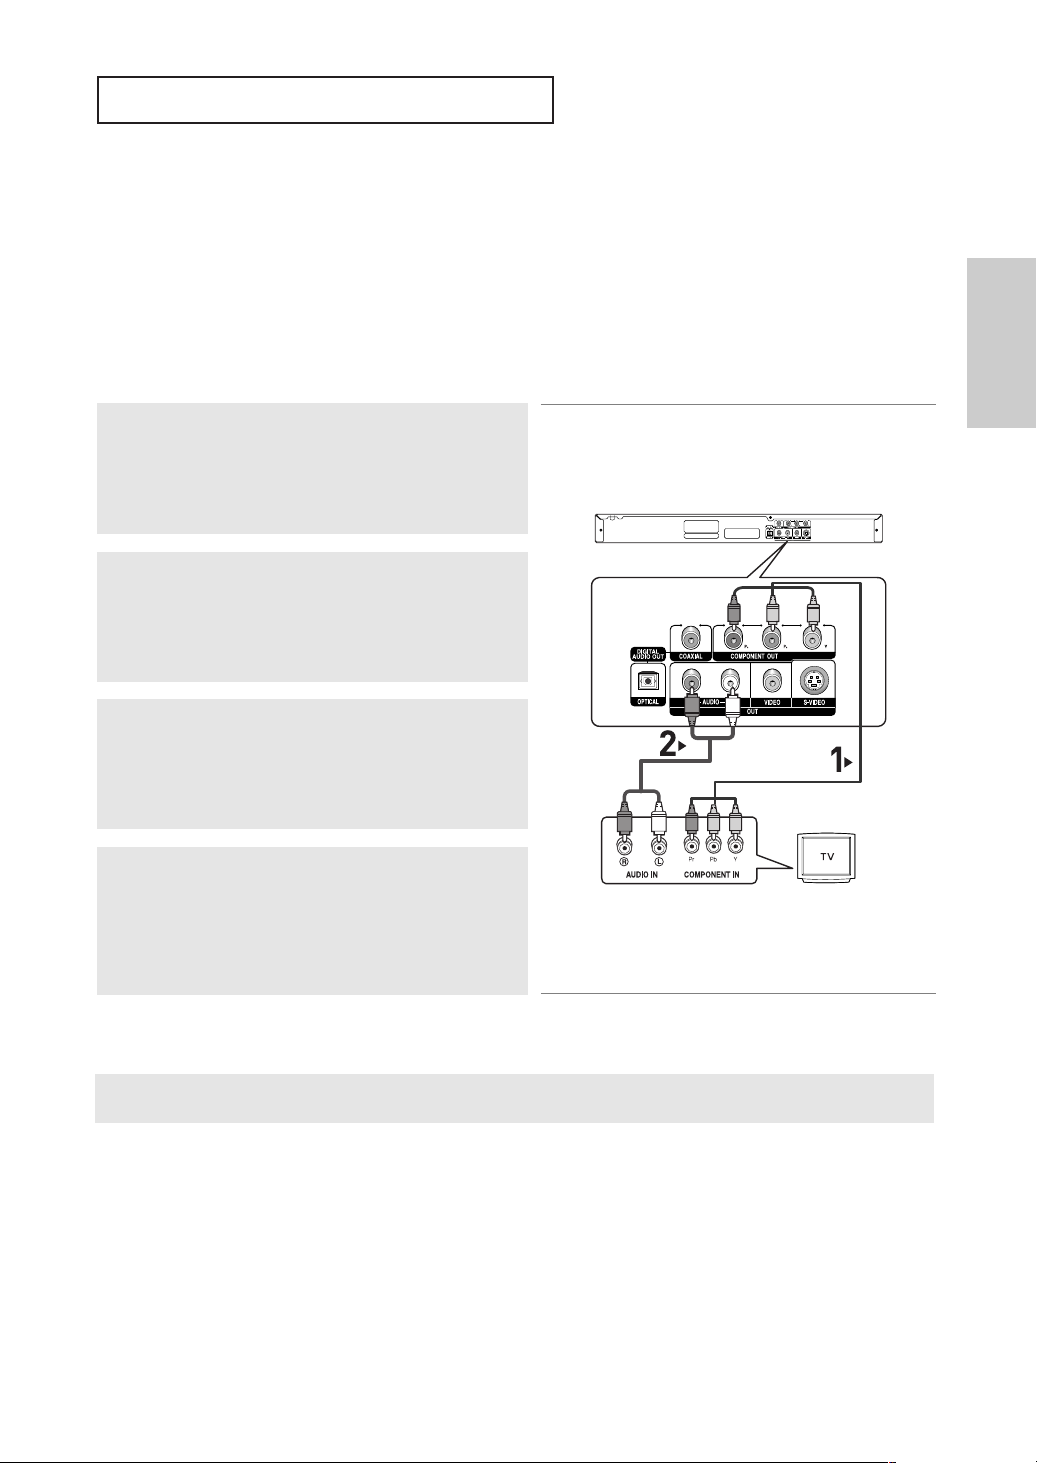
Connection to a TV (Interlace)
- Connecting to your TV using Component video cables.
- You will enjoy high quality and accurate color reproduction images. Component video separates
the picture element into black and white(Y), blue(PB), red(PR) signals to present clear and clean
images. (Audio signals are delivered through the audio output.)
1
Using component video cables (not included), connect the
COMPONENT VIDEO OUT terminals on the rear of the DVD
player to the COMPONENT IN terminals of your TV.
2
Using the audio cables, connect the AUDIO (red and white)
OUT terminals on the rear of the DVD player to the AUDIO (red
and white) IN terminals of your TV.
Turn on the DVD player and TV.
3
Press the input selector on your TV remote control until the
Component signal from the DVD player appears on the TV
screen.
RED WHITE
Audio Cable
RED
RED WHITE
RED
BLUE
GREEN
BLUE
GREEN
Component cable
(not included)
Connections
4
Set the Video Output to Component (I-SCAN) in the Display
Setup menu. (See pages 50 to 51)
Note
- If Video output is incorrectly set to S-Video with the Component cables connected, the screen will
turn red.
- If you want to connect to an Amplifier, please refer to the Amplifier connection page. (See pages 15 to 16)
- The component terminal of your TV may be marked “R-Y, B-Y, Y” or “Cr, Cb, Y” instead of “P
depending on the manufacturer. The number and position of terminals may vary depending on the TV set.
Please refer to the user's manual of your TV.
ENG-13
R
, PB, Y”
CONNECTIONS
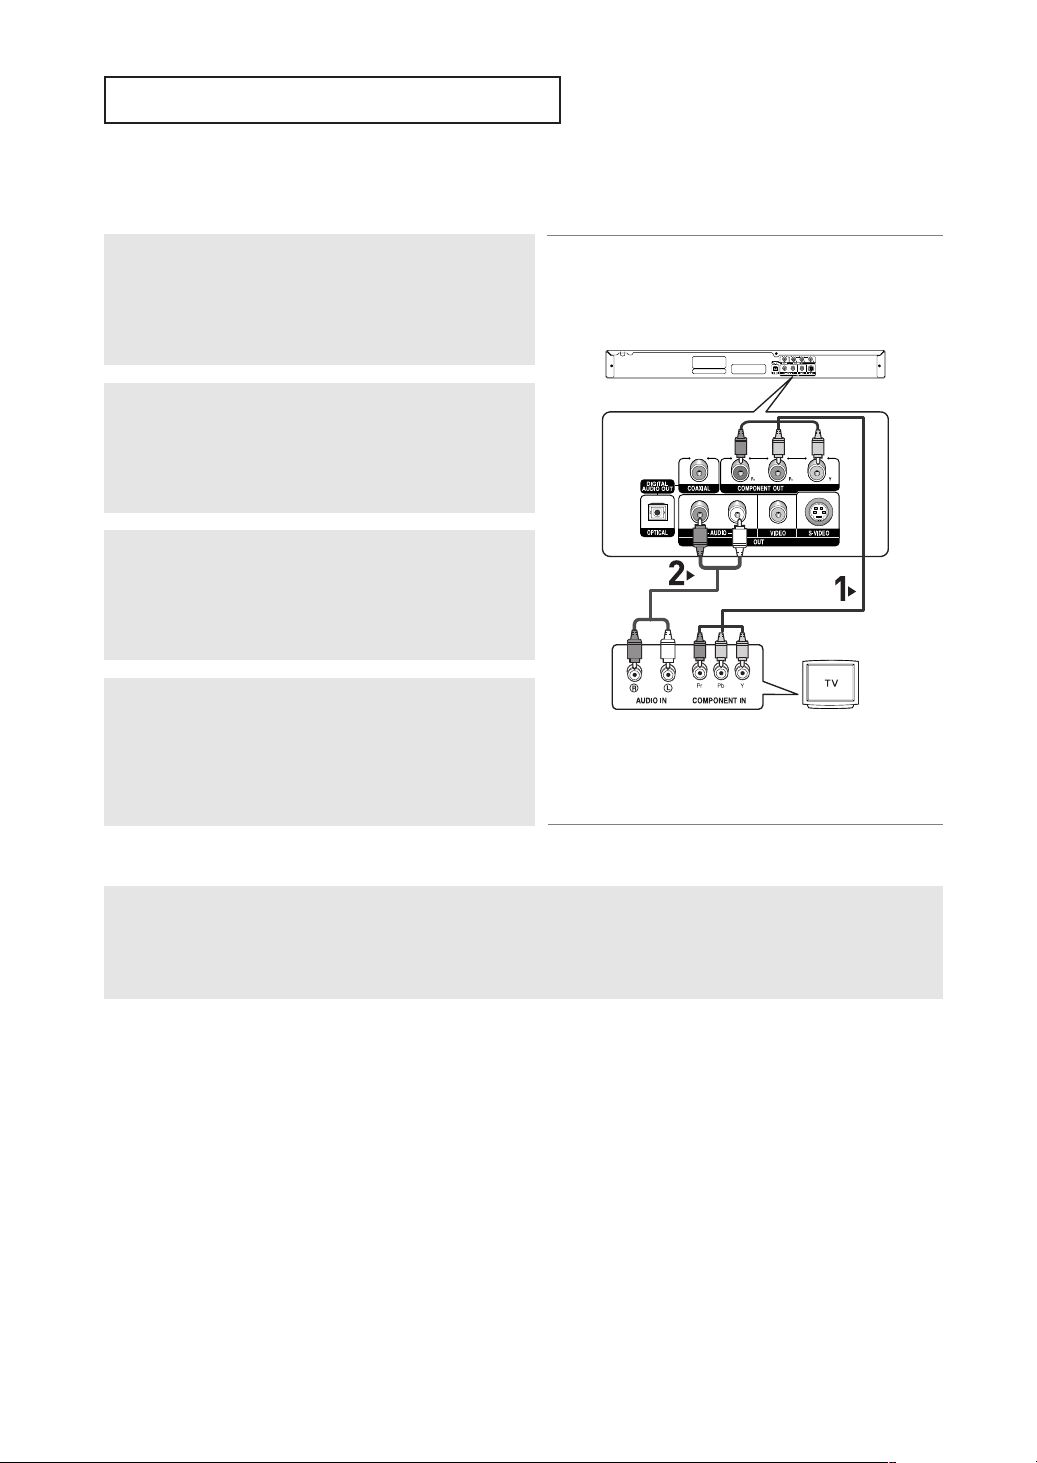
Connection to a TV (Progressive)
1
Using component video cables (not included), connect the
COMPONENT VIDEO OUT terminals on the rear of the DVD
player to the COMPONENT IN terminals of your TV.
2
Using the audio cables, connect the AUDIO (red and white)
RED
BLUE
GREEN
OUT terminals on the rear of the DVD player to the AUDIO (red
and white) IN terminals of your TV.
Turn on the DVD player and TV.
Audio Cable
RED WHITE
RED
BLUE
GREEN
Component cable
(not included)
3
Press the input selector on your TV remote control until the
Component signal from the DVD player appears on the TV
screen.
RED WHITE
4
Set the Video Output to Component (P-SCAN) in the Display
Setup menu. (See pages 50 to 51)
To see the progressive video output,
- Consult your TV User’s Manual to find out if your TV supports Progressive Scan. If Progressive
You need a TV set supporting the progressive scan input
Scan is supported, follow the TV User’s Manual regarding Progressive Scan settings in the TV’s
function. And you have to set up the TV menu to the
menu system.
progressive scan input.
- Depending on your TV, the connection method may differ from the illustration above.
Note
- What is "Progressive Scan"?
Progressive scan has twice as many scanning lines as the interlace output method.
Progressive scanning method provides better and clearer picture quality.
ENG-14

CONNECTIONS
Connection to an Audio System (2 Channel Amplifier)
1
Using the audio cables, connect the AUDIO (red and white)
OUT terminals on the rear of the DVD player to the AUDIO (red
and white) IN terminals of the Amplifier.
2
Using the video signal cable(s), connect the VIDEO, S-VIDEO or
COMPONENT OUT terminals on the rear of the DVD player to
the VIDEO, S-VIDEO or COMPONENT IN terminal of your TV
as described on pages 11 to 14.
3
Turn on the DVD player, TV, and Amplifier.
4
Press the input select button of the Amplifier to select external
input in order to hear sound from the DVD player.
Refer to your Amplifier's user manual to set the Amplifier's
audio input.
Connections
RED WHITE
Audio Cable
RED WHITE
2-Channel stereo amp
Note
- Please turn the volume down when you turn on the Amplifier. Sudden loud sound may cause
damage to the speakers and your ears.
- Please set the audio in the menu screen according to the Amplifier. (See pages 48 to 49)
- The position of terminals may vary depending on the Amplifier.
Please refer to the user's manual of the Amplifier.
ENG-15

CONNECTIONS
Connection to an Audio System (Dolby digital, MPEG2 or DTS Amplifier)
1
If using an optical cable (not included), connect the DIGITAL
AUDIO OUT (OPTICAL) terminal on the rear of the DVD player
to the DIGITAL AUDIO IN (OPTICAL) terminal of the Amplifier.
If using a coaxial cable (not included), connect the DIGITAL
AUDIO OUT (COAXIAL) terminal on the rear of the DVD player
to the DIGITAL AUDIO IN (COAXIAL) terminal of the Amplifier.
2
Using the video signal cable(s), connect the VIDEO, S-VIDEO
or COMPONENT OUT terminals on the rear of the DVD player
to the VIDEO, S-VIDEO or COMPONENT IN terminal of your
TV as described on pages 11 to 14.
Coaxial Cable
or
3
Turn on the DVD player, TV, and Amplifier.
Optical Cable
(not included)
(not included)
Dolby digital or
DTS amp
4
Press the input select button of the Amplifier to select external
input in order to hear sound from the DVD player.
Refer to your Amplifier's user manual to set the Amplifier's
audio input.
Note
- When you connect the DVD player to DTS Amplifier and play a DTS disc, set the DTS to On in Audio
Setup menu. If it is set to Off, sound will not be heard, or there will be a loud sound.
- Please turn the volume down when you turn on the Amplifier. Sudden loud sound may cause
damage to the speakers and your ears.
- Please set the audio in the menu screen according to the Amplifier. (See pages 48 to 49)
- The position of terminals may vary depending on the Amplifier.
Please refer to the user's manual of the Amplifier.
- Please remove the dust cover before using the optical cable (not included) and put the cover on the cable
again when it's not used.
ENG-16
Chapter 3
BASIC FUNCTIONS
Playing a Disc
Before Play
- Turn on your TV and set it to the correct Video Input on the TV's remote control.
- If you connected an external Audio System, turn on your Audio System and set it to the correct
Audio Input.
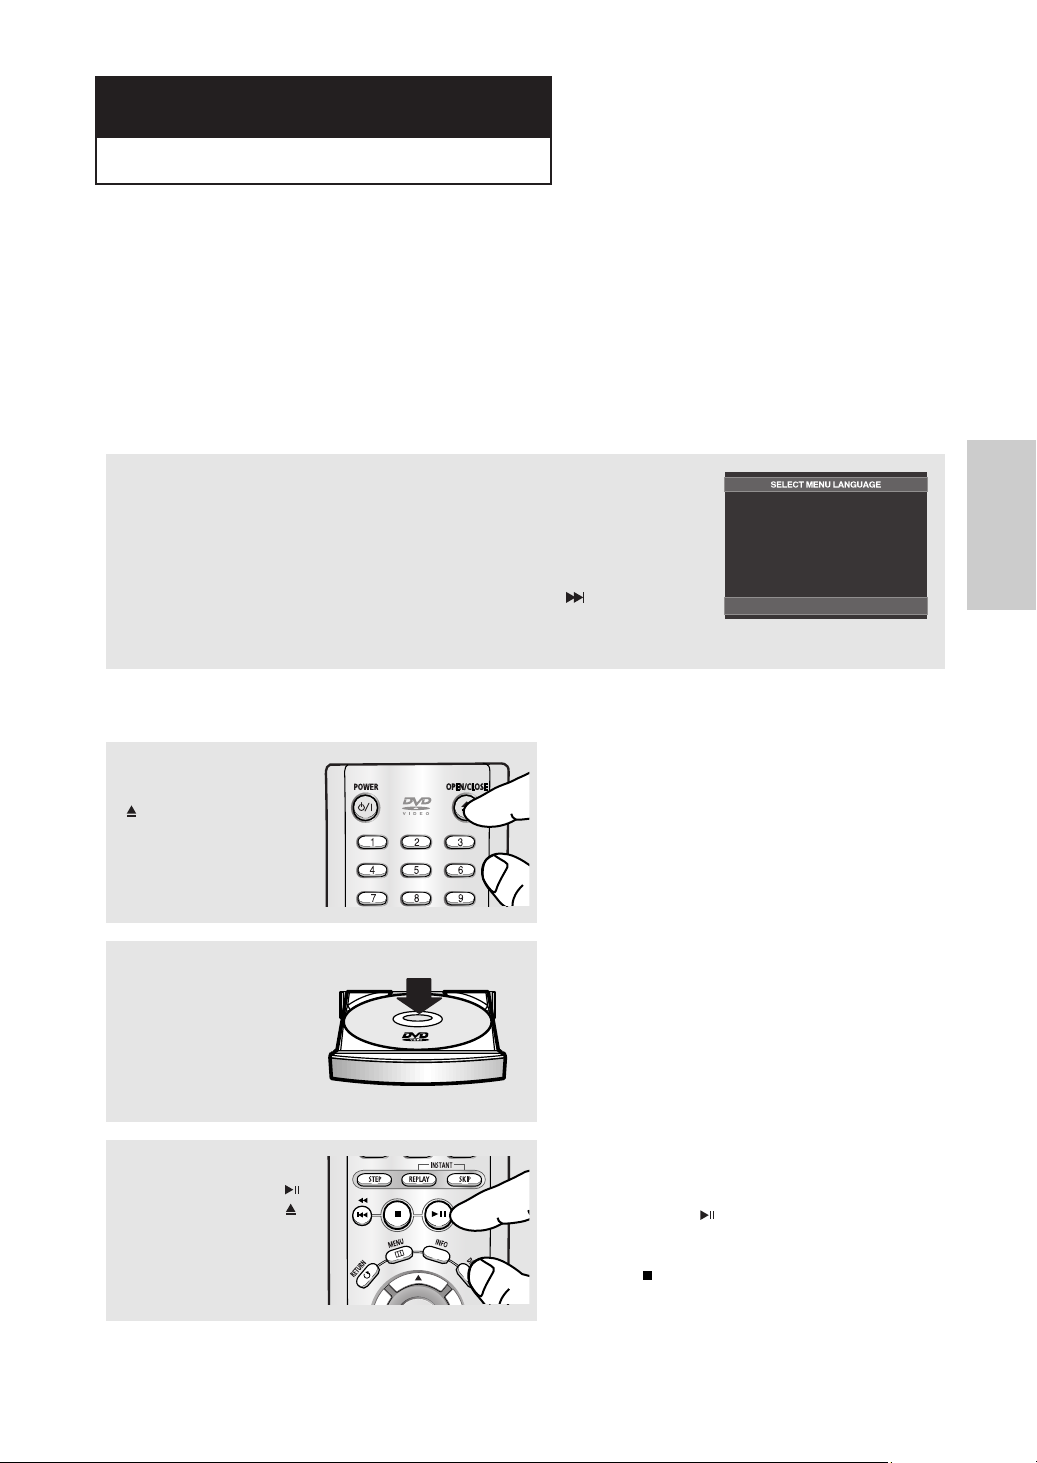
After plugging in the player, the first time you press the DVD POWER button, this screen
comes up: If you want to select a language, press a NUMBER button. (This screen will
only appear when you plug in the player for the first time.)
If the language for the startup screen is not set, the settings may change whenever you
turn the power on or off. Therefore, make sure that you select the language you want to
use.
Once you select a menu language, you can change it by pressing the button on the
front panel of the unit for more than 5 seconds with no disc in the unit. Then the SELECT
MENU LANGUAGE window appears again where you can reset your preferred language.
Playback
1
Press the OPEN/CLOSE
()button.
The STANDBY indicator
light goes out and the tray
opens.
2
Place a disc gently into the
tray with the disc’s label
facing up.
Press 1 for English
Touche 2 pour Français
Drücken Sie 3 für Deutsch
Pulsar 4 para Español
Premere 5 per Italiano
Druk op 6 voor Nederlands
Functions
Basic
3
Press the PLAY/PAUSE ( )
button or OPEN/CLOSE ( )
button to close the disc tray.
ENG-17
▼
RESUME function
When you stop disc play, the player remembers
where you stopped, so when you press
PLAY/PAUSE ( ) button again, it will pick up
where you left off. (unless the disc is removed
or the player is unplugged, or if you press the
STOP ( ) button twice.)

BASIC FUNCTIONS
4
Stopping Play
Press the STOP ( ) button
during play.
5
Removing Disc
Press the OPEN/CLOSE
()button.
6
Pausing Play
Press the PLAY/PAUSE
()or STEP button on the
remote control during play.
7
Step Motion Play (Except
CD)
Press the STEP button on
the remote control during
play.
Note
- If the player is left in the stop mode for more than
one minute without any user interaction, a screen
saver will be activated. Press the PLAY/PAUSE
( ) button to resume normal play.
- If the player is left in the stop mode for more than
30 minutes, the power will automatically turn off
except when the MIC is connected. (Automatic
Power-Off Function)
▼
Screen stops, no sound.
To resume, press the PLAY/PAUSE ( ) button
once again.
Note
If the player is left for about 5 minutes in pause
mode, it will stop.
▼
Each time the button is pressed, a new frame
will appear.
No sound is heard during STEP mode.
Press the PLAY/PAUSE ( ) button to resume
normal play.
You can only perform step motion play in the
forward direction.
8
Slow Motion Play (Except
CD)
Press and hold the
SEARCH ( ) button to
choose the play speed
between 1/8, 1/4 and 1/2 of
normal during PAUSE or
STEP mode.
▼
No sound is heard during slow mode.
Press the PLAY/PAUSE ( ) button to resume
normal play.
Reverse slow motion play will not work.
Note
This ( ) icon indicates an invalid button press.
ENG-18
 Loading...