

Samsung DVD-P2000, DVD-P2000M User Manual

J
O
G
/
S
H
U
T
T
L
E
MEMORY STICK
J
O
G
/
S
H
U
T
T
L
E
MEMORY STICK
J
O
G
/
S
H
U
T
T
L
E
MEMORY STICK
J
O
G
/
S
H
U
T
T
L
E
MEMORY STICK
DVD-P2000M 00049Z-1(GB) 8/10/02 10:43 AM Page 2
Precautions Precautions
1. Setting up
Ensure that the mains supply in your house complies with that indicated on the identification sticker
located at the back of your play. Install your player horizontally, on a suitable base (furniture),
with enough space around it for ventilation (7~10cm). Make sure the ventilation slots are not covered.
Do not stack other, or heavy devices on top of the player. Do not place the player on amplifiers or other
equipment which may become hot. Before moving the player ensure the disc tray is empty.
This player is designed for continuous use. Switching off the DVD player to the stand-by mode does
not disconnect the electricity supply In order to separate the player completely from the mains,it has
to be disconnected by unplugging the main plug, especially when left unused for a long period of time.
2. Caution
Protect the player from moisture (dripping or splashing and objects filled with liquids), and excess heat
(e.g.fireplace) or equipment creating strong magnetic or electric fields (i.e.speakers...). Disconnect the power
cable from the mains electricity supply if the player malfunctions. Your player is not intended for industrial
use but for domestic purposes only. Use of this product is for personal use only. If your player or disc has
been stored in a cold atmosphere for example during transportation in the winter, wait for approximately 2
hours until they have reached room temperature, before use.
3. For your safety
Never open the player or any of its components. It can be dangerous for you or certain fragile components.
You could receive an electric shock or touch the laser beam. Do not place your eyes close to the opening of
the disc tray or any other opening to look inside the player.
4. Disc
1
2 3
Be careful handle your discs with care. Hold a disc with finger on the border or hole. Always place disc
with the label facing upward (in case of a single side disc ). Always use a soft cloth to clean disc if
H
U
S
T
/
T
G
L
O
E
J
MEMORY STICK
necessary, wipe from the centre to the border. Always put disc back into their cases after playing and store
in vertical position. Always place the disc properly into the tray using the proper guide area. Never use
record cleaning sprays, benzine, static electricity liquids or any other solvent, if the disc surface is dirty.
Wipe gently with a soft damp (water only) cloth, never wipe the disc in a circular motion, since circular
scratches are likely to occur and could cause noise during playback.
5. Battery
4 5
The battery used in this product contains chemicals that are harmful to the environment.
Do not dispose of batteries in the general household waster. It is recommended that the replacement
of the battery should be done by a technician.
6. Maintenance of cabinet
For safety reasons, be sure to disconnect the AC power cord from the AC outlet.
• Do not use benzene, thinner, or other solvents for cleaning.
• Wipe the cabinet with a soft cloth.
2 3
DVD-P2000M 00049Z-1(GB) 8/10/02 10:43 AM Page 4
Before You Start
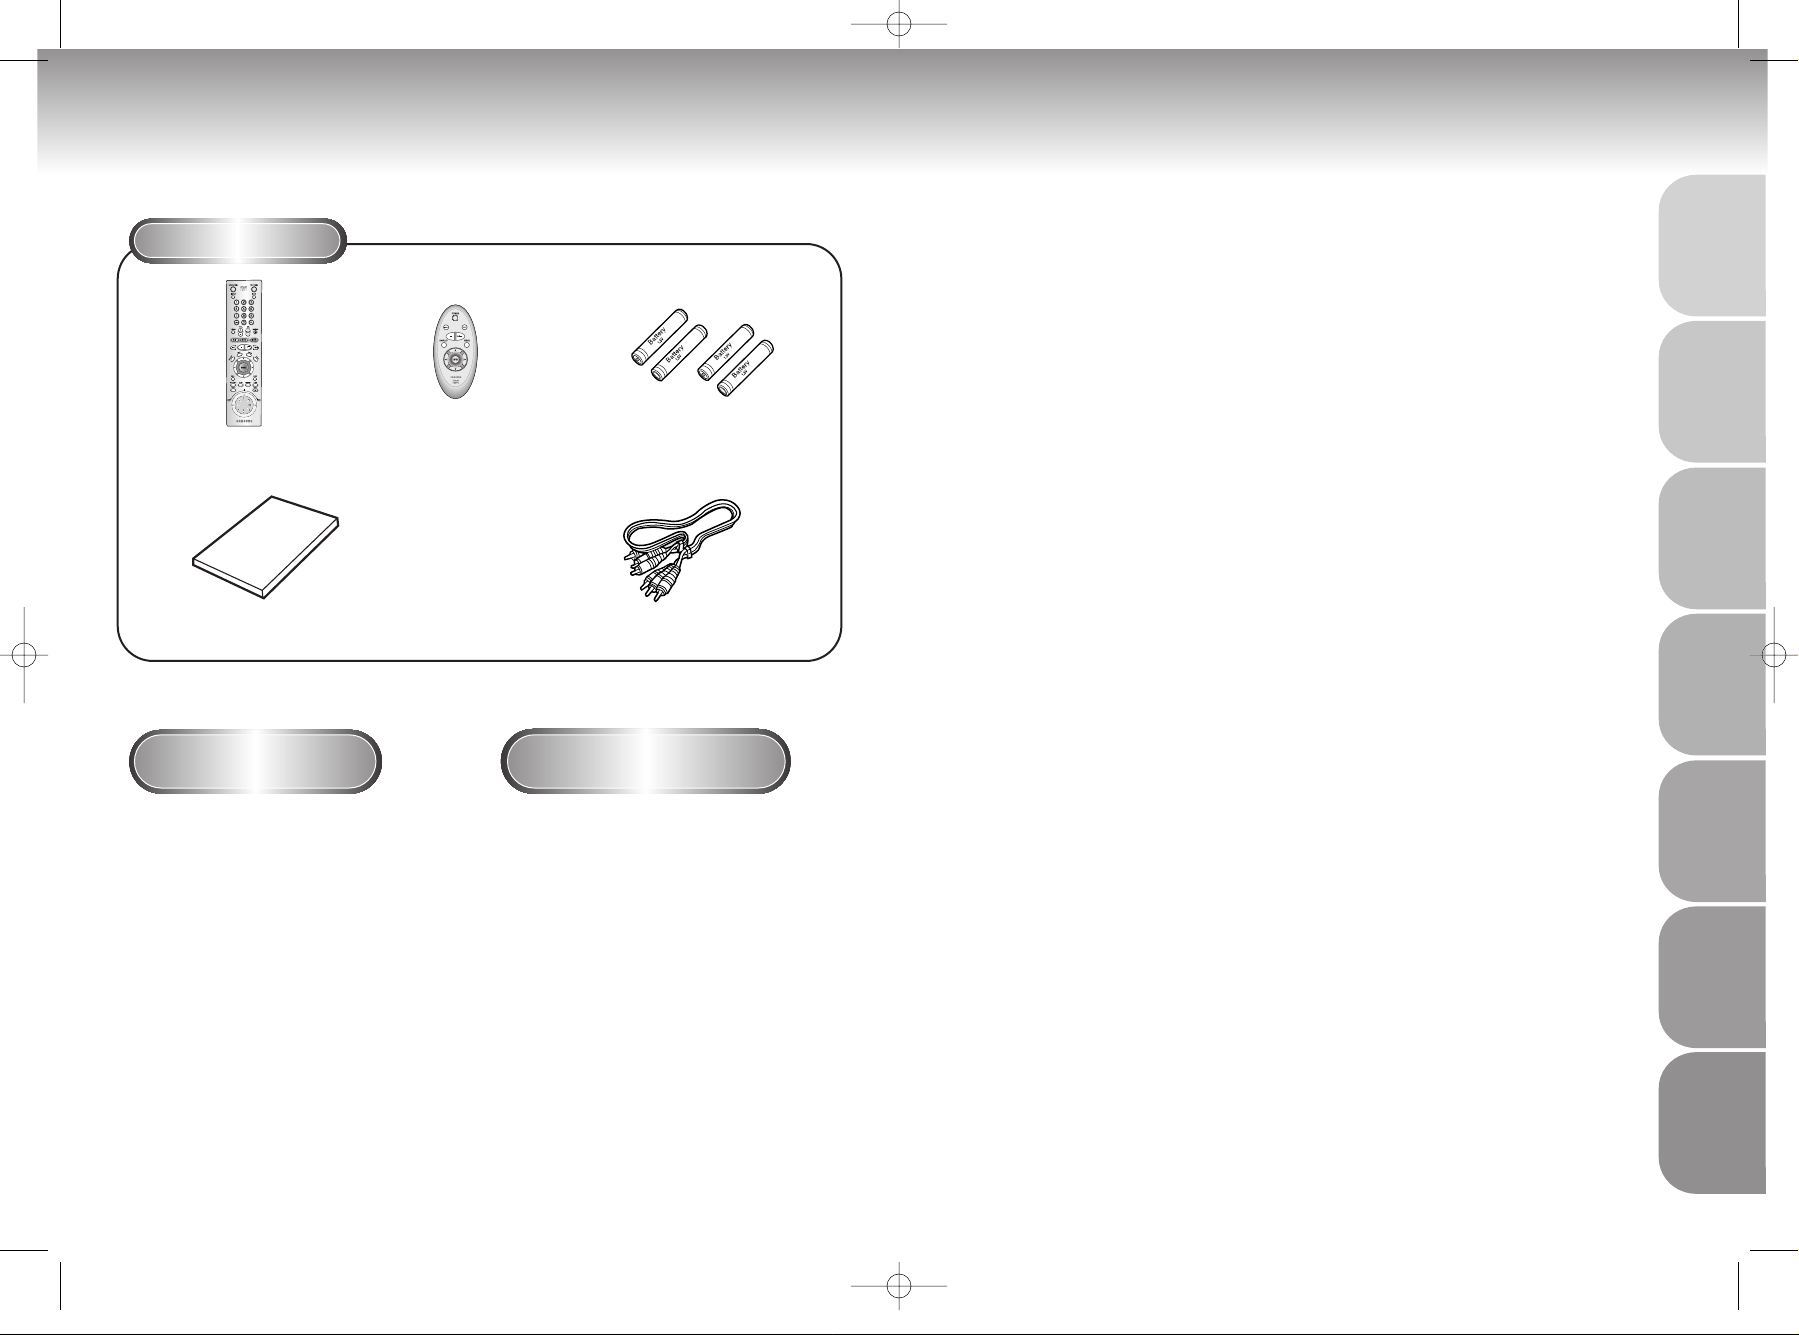
Accessories
Remote Control
User’s Manual
Install Batteries in the
Remote
Open the battery cover on the
1
back of the remote.
1
Easy Remote Control
• Check the polarity + - of the batteries
(Dry-Cell)
Batteries for
Remote Controls (AA Size)
Video/Audio Cable
If remote doesn’t operate
properly:
TABLE OF CONTENTS
SETUP
General Features ............................................................................................ 6
Disc Type and Characteristics .......................................................................... 7
Description-Front Panel ....................................................................................8
Description-Rear Panel ....................................................................................9
Tour of the Remote Control ............................................................................10
Choosing a Connection ..................................................................................12
Playing a Disc................................................................................................14
Using the Search & Skip Functions ..........................................................
Using the Display Function..............................................................................17
Repeat Play ..................................................................................................18
Program Play & Random Play ........................................................................19
S.FIT Play ......................................................................................................20
Selecting the Audio Language ........................................................................21
Selecting the Subtitle Language ......................................................................22
Changing the Camera Angle..........................................................................23
Using the Instant Replay Function....................................................................24
Using the Bookmark Function..........................................................................25
Using the Zoom & 3D Sound Functions ..........................................................26
MP3 Play ......................................................................................................27
Memory Stick ................................................................................................29
DAM (Digital Audio Manager) Playback..........................................................33
Memory Stick Pull out ....................................................................................34
DPM (Digital Photo Manager) Playback ..........................................................35
Slide Show ....................................................................................................36
Slide Show Order ..........................................................................................37
Photo View....................................................................................................38
Edit Photo......................................................................................................39
16
SETUP
CONNECTIONS
CONNECTIONS
FUNCTIONS
FUNCTIONS
BASIC
BASIC
FUNCTIONS
FUNCTIONS
ADV
ADV
ANCED
ANCED
MEMOR
MEMOR
STICK
STICK
Y
Y
Insert two AA batteries. Make
2
sure that the polarities (+ and -)
2
are aligned correctly.
Replace the battery cover.
3
3
4 5
• Check if the batteries are drained.
• Check if remote sensor is blocked by
obstacles.
• Check if there is any fluorescent
lighting nearby.
Using the Setup Menu ....................................................................................40
Setting Up the Language Features ..................................................................41
Setting Up the Parental Control ......................................................................43
Setting Up the Audio......................................................................................44
Surround Sound Speaker Setup ......................................................................45
Setting Up the Display....................................................................................46
Controlling a TV with the Remote ....................................................................47
Troubleshooting..............................................................................................48
Specifications ................................................................................................49
SETUP MENU
SETUP MENU
CHANGING
CHANGING
REFERENCE
REFERENCE
TM
DVD-P2000M 00049Z-1(GB) 8/10/02 10:43 AM Page 6
General Features
Excellent Sound
Dolby Digital, a technology
developed by Dolby Laboratories provides crystal
clear sound reproduction.
Screen
Both regular and widescreen(16:9) pictures can be
viewed.
Slow Motion
An important scene can be viewed in slow motion.
Programmed Play
You can program tracks to play in desired order .
Parental Control
The parental control allows users to set the level
necessary to prohibit children from viewing harmful
movies such as those with violence, adult subject
matter, etc.
V arious On-Screen Menu Functions
You can select various languages(Audio/Subtitle)
and screen angles while enjoying movies.
Memory Stick
"Memory Stick" is a new compact, por table
and versatile IC (Integrated Circuit) recording
medium with a data capacity that exceeds a
floppy disk.
COPY PROTECTION
• Many DVD discs are encoded with copy protection. Because of this, you should only connect your DVD player
directly to your TV, not to a VCR. Connecting to a VCR results in a distorted picture from copy-protected DVD
discs.
• This product incorporates copyright protection technology that is protected by methods claims of certain U.S.
patents and other intellectual property rights owned by Macrovision Corporation and other rights owners. Use of
this copyright protection technology must be authorized by Macrovision Corporation, and is intended for home
and other limited viewing uses only unless otherwise authorized by Macrovision Corporation. Reverse engineering
or disassembly is prohibited.
Repeat
You can repeat a song or movie simply by
pressing the REPEAT button.
MP3
This unit can play discs created from MP3 files.
Instant Replay
This function is used to replay the previous 10
seconds of the movie from the current position.
Progressive Scan
Progressive scanning creates an improved
picture with double the scan lines of a
conventional interlaced picture.
Easy Remocon
The Easy Remocon combines
frequently used functions for easier
operation.
NOTE
* Discs which cannot be played with this player:
• DVD-ROM • DVD-RAM
• CD-ROM • CDV
• CDI • SVCD, CVD
• HD layer of super Audio CD
• CDGs play audio only, not graphics.
* Ability to play back may depend on recording
conditions:
• DVD-R • CD-RW
• DVD+RW, -RW • Picture CD
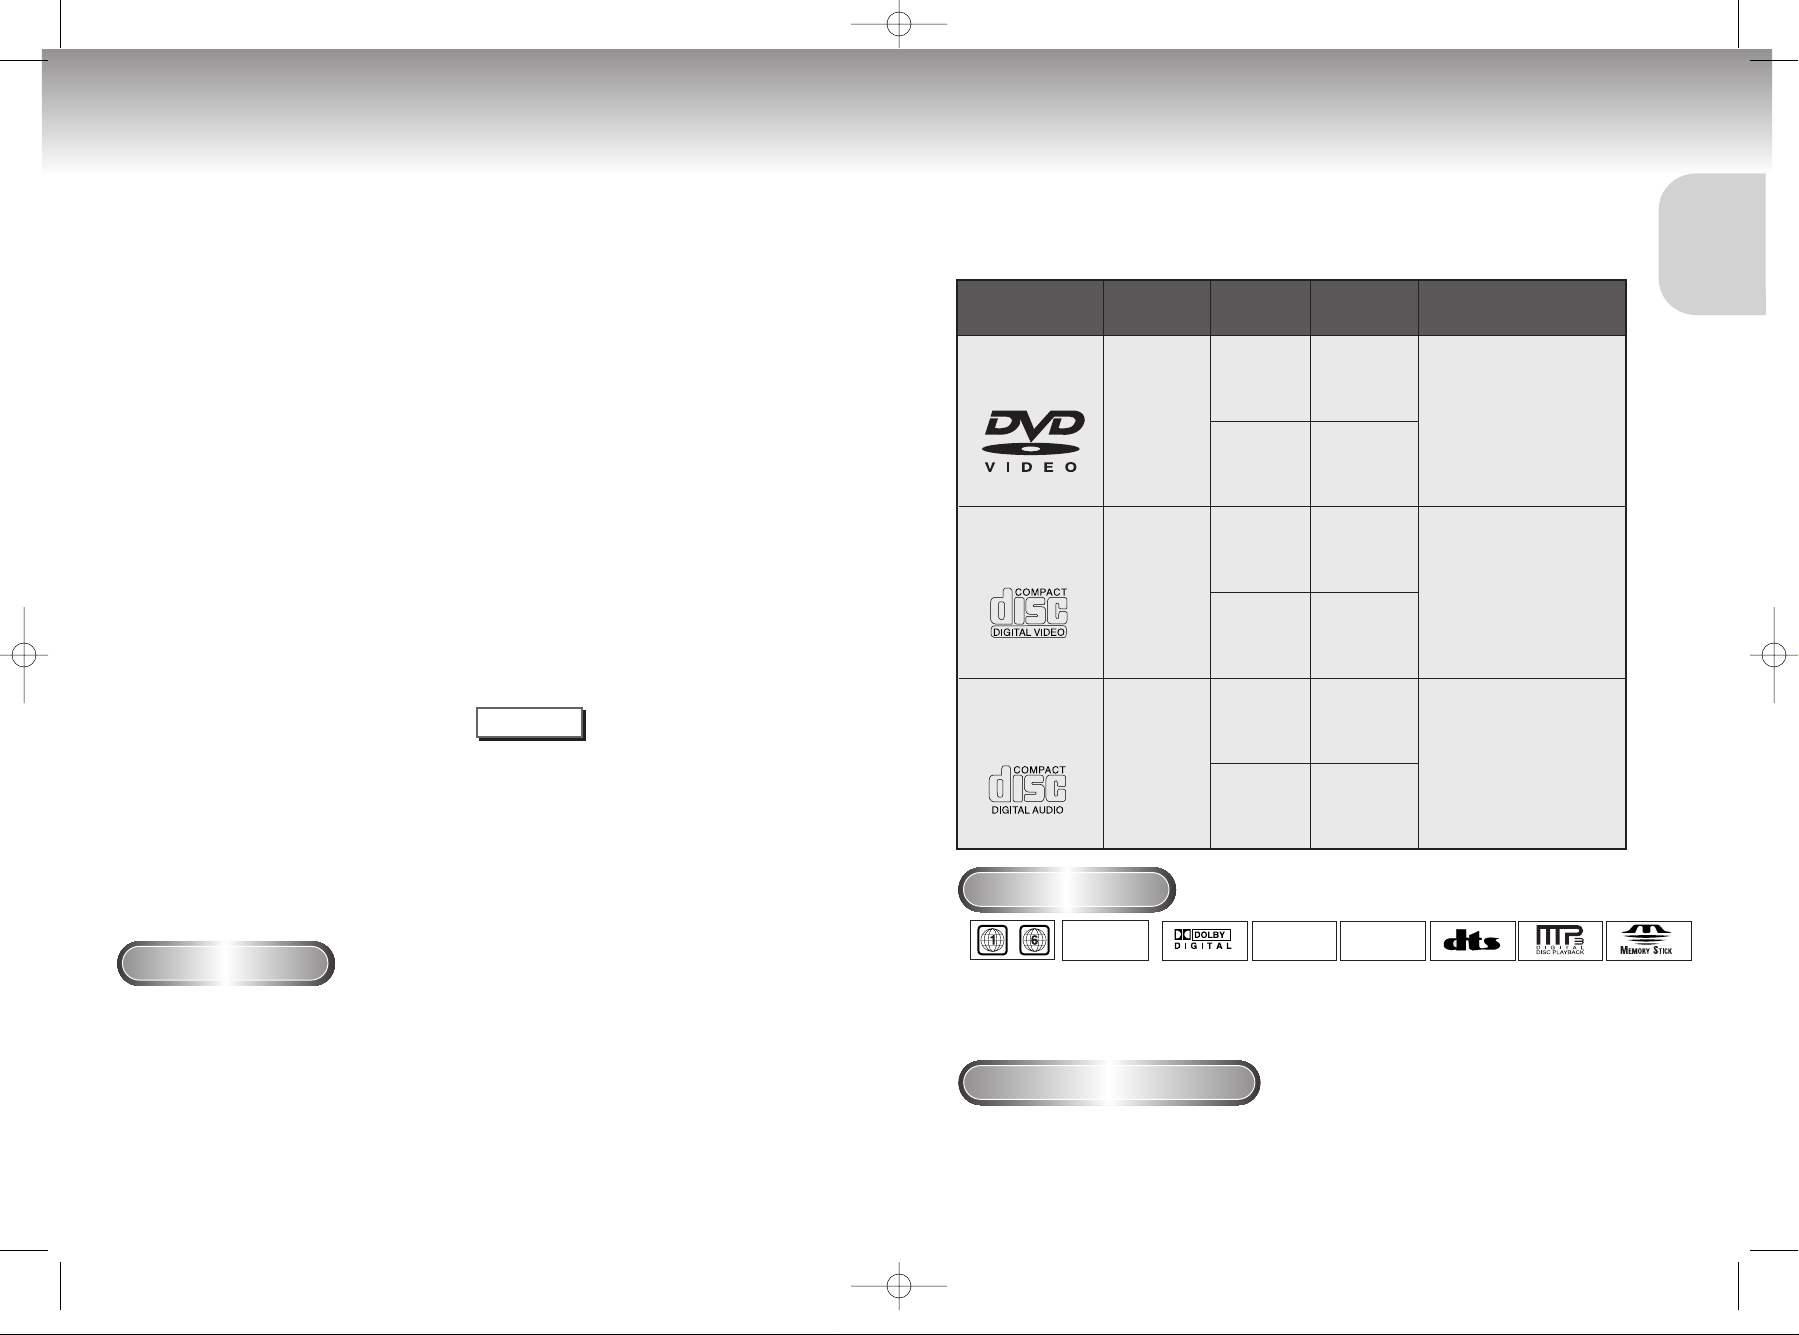
This DVD player is capable of playing the following types of discs with the
corresponding logos:
Disc Types
(Logos)
DVD
VIDEO-CD
AUDIO-CD
Disc Markings
~
• Play
Region
Number
• PAL
broadcast
system in
U.K, France,
Germany, etc.
Play Region Number
Both the DVD player and the discs are coded by region. These regional codes must match in order for the disc
to play. If the codes do not match, the disc will not play.
The Region Number for this player is described on the rear panel of the player.
Disc Type and Characteristics
PAL
Recording
Types
Audio
+
Video
Audio
+
Video
Audio
• Dolby
Digital disc
Disc Size
12cm
8cm
12cm
8cm
12cm
8cm
STEREO
• Stereo disc
Max.
Playing Time
Single-sided
240 min.
Double-sided
480 min.
Single-sided
80 min.
Double-sided
160 min.
74 min.
20 min.
74 min.
20 min.
DIGITAL
SOUND
• Digital
Audio disc
Characteristics
• DVD contains excellent sound
and video due to Dolby Digital
and MPEG-2 system.
• Various screen and audio
functions can be easily
selected through the onscreen menu.
• Video with CD sound, VHS
quality & MPEG-1
compression technology.
• CD is recorded as a
Digital Signal with better
audio quality, less
distortion and less
deterioration of audio
quality over time.
• DTS disc
• MP3 disc
• Memory
stick
6 7
SETUP
SETUP
SURROUND
FRONT
CENTER
S/W
R2
R1
L2L1V2
V1
MIXED AUDIO OUT
SCREEN FIT
MEMORY STICK
J
O
G
/
S
H
U
T
T
L
E
DVD-P2000M 00049Z-1(GB) 8/10/02 10:43 AM Page 8
Description-Front Panel
Description-Rear Panel
1234 56789101112
Front Panel Controls
1. STANDBY / ON
•
When the unit is first plugged in, the indicator lights.
When STANDBY/ON is pressed on again, the light
goes out and the player is turned on.
2. HEADPHONES JACK
•
You can attach headphones here for private listening.
3. HEADPHONES VOLUME
•
Use to adjust headphones volume level.
4. DISC TRAY
•
Load the disc here.
5. DISPLAY
•
Operation indicators are displayed here.
6. MEMORY STICK
25 67 8 9 10
1
Front Panel Display
1. Angle indicator. You can select multiple angles
of a scene recorded by different cameras.
2. Disc type indicators
Reverse play / Pause / Forward play
3.
4. Lights when 3D surround is turned on.
5. DVD : Title number
6. DVD : Chapter number.
7. Video/Audio CD : Track number
8. Repeat play mode
8 9
7. OPEN/CLOSE
•
Press to open and close the disc tray.
8. SCREEN FIT
9. PLAY/PAUSE
• Begin or pause disc play.
10. SKIP/SEARCH
11. STOP
• Stops disc play.
12. JOG/SHUTTLE
• Shuttle(outer dial) - Use during DVD and CD play to fast
forward or reverse.
• Jog(inner dial) - Use for frame advance/CD track
selection.
11
12131443
9. Linear PCM audio output
10. Dolby Digital Disc
11. DTS (Digital Theater System) output
12. MPEG-2 Audio output
13. MP3 indicators
14. Displays various messages concerning operations
such as PLAY, STOP, LOAD ...
no DISC : No disc loaded.
OPEN : The disc tray is open.
LOAD : Player is loading disc information.
1234567
Rear Panel
1. DIGITAL AUDIO OUT JACKS
• Use either an optical or coaxial digital cable to connect to a compatible Dolby Digital receiver.
Use to connect to an A/V Amplifier that contains a Dolby Digital or DTS decoder.
2. ANALOG AUDIO OUT JACKS
• Connect to a 5.1ch analog input jack on a speaker.
3. MIXED AUDIO OUT JACKS
• Connecting to audio input jacks on your television, audio/video receiver or VCR.
4. VIDEO OUT JACK
• Use a video cable to connect to the Video input jack on your television.
• The VIDEO OUT SELECT switch must be set to the 525I(480I) position.
5. S-VIDEO OUT JACK
•
Use the S-Video cable to connect this jack to the S-Video jack on your television for a higher quality picture.
• The VIDEO OUT SELECT switch must be set to the 525I(480I) position.
6. COMPONENT VIDEO OUT JACKS
• Use these jacks if you have a TV with Component Video in jacks. These jacks provide Pr, Pb and Y
video. Along with S-Video, Component Video provides the best picture quality.
• If 525P(480P) VIDEO is selected, progressive scan mode will work.
• If 525I(480I) VIDEO is selected, interlaced scan mode will work.
7. VIDEO OUT SELECT SWITCH
• Use the switch to set video out.
• If 525P(480P) VIDEO is selected, VIDEO and S-VIDEO will not work.
Important Note
• Consult your TV User’s Manual to find out if your TV supports Progressive Scan.
If Progressive Scan is supported, follow the TV User’s Manual’s instructions regarding
Progressive Scan settings in the TV’s menu system.
• If 525P(480P) VIDEO OUT is Selected, VIDEO and S-VIDEO will not work.
SETUP
SETUP
M.STICK
DVD-P2000M 00049Z-1(GB) 8/10/02 10:43 AM Page 10
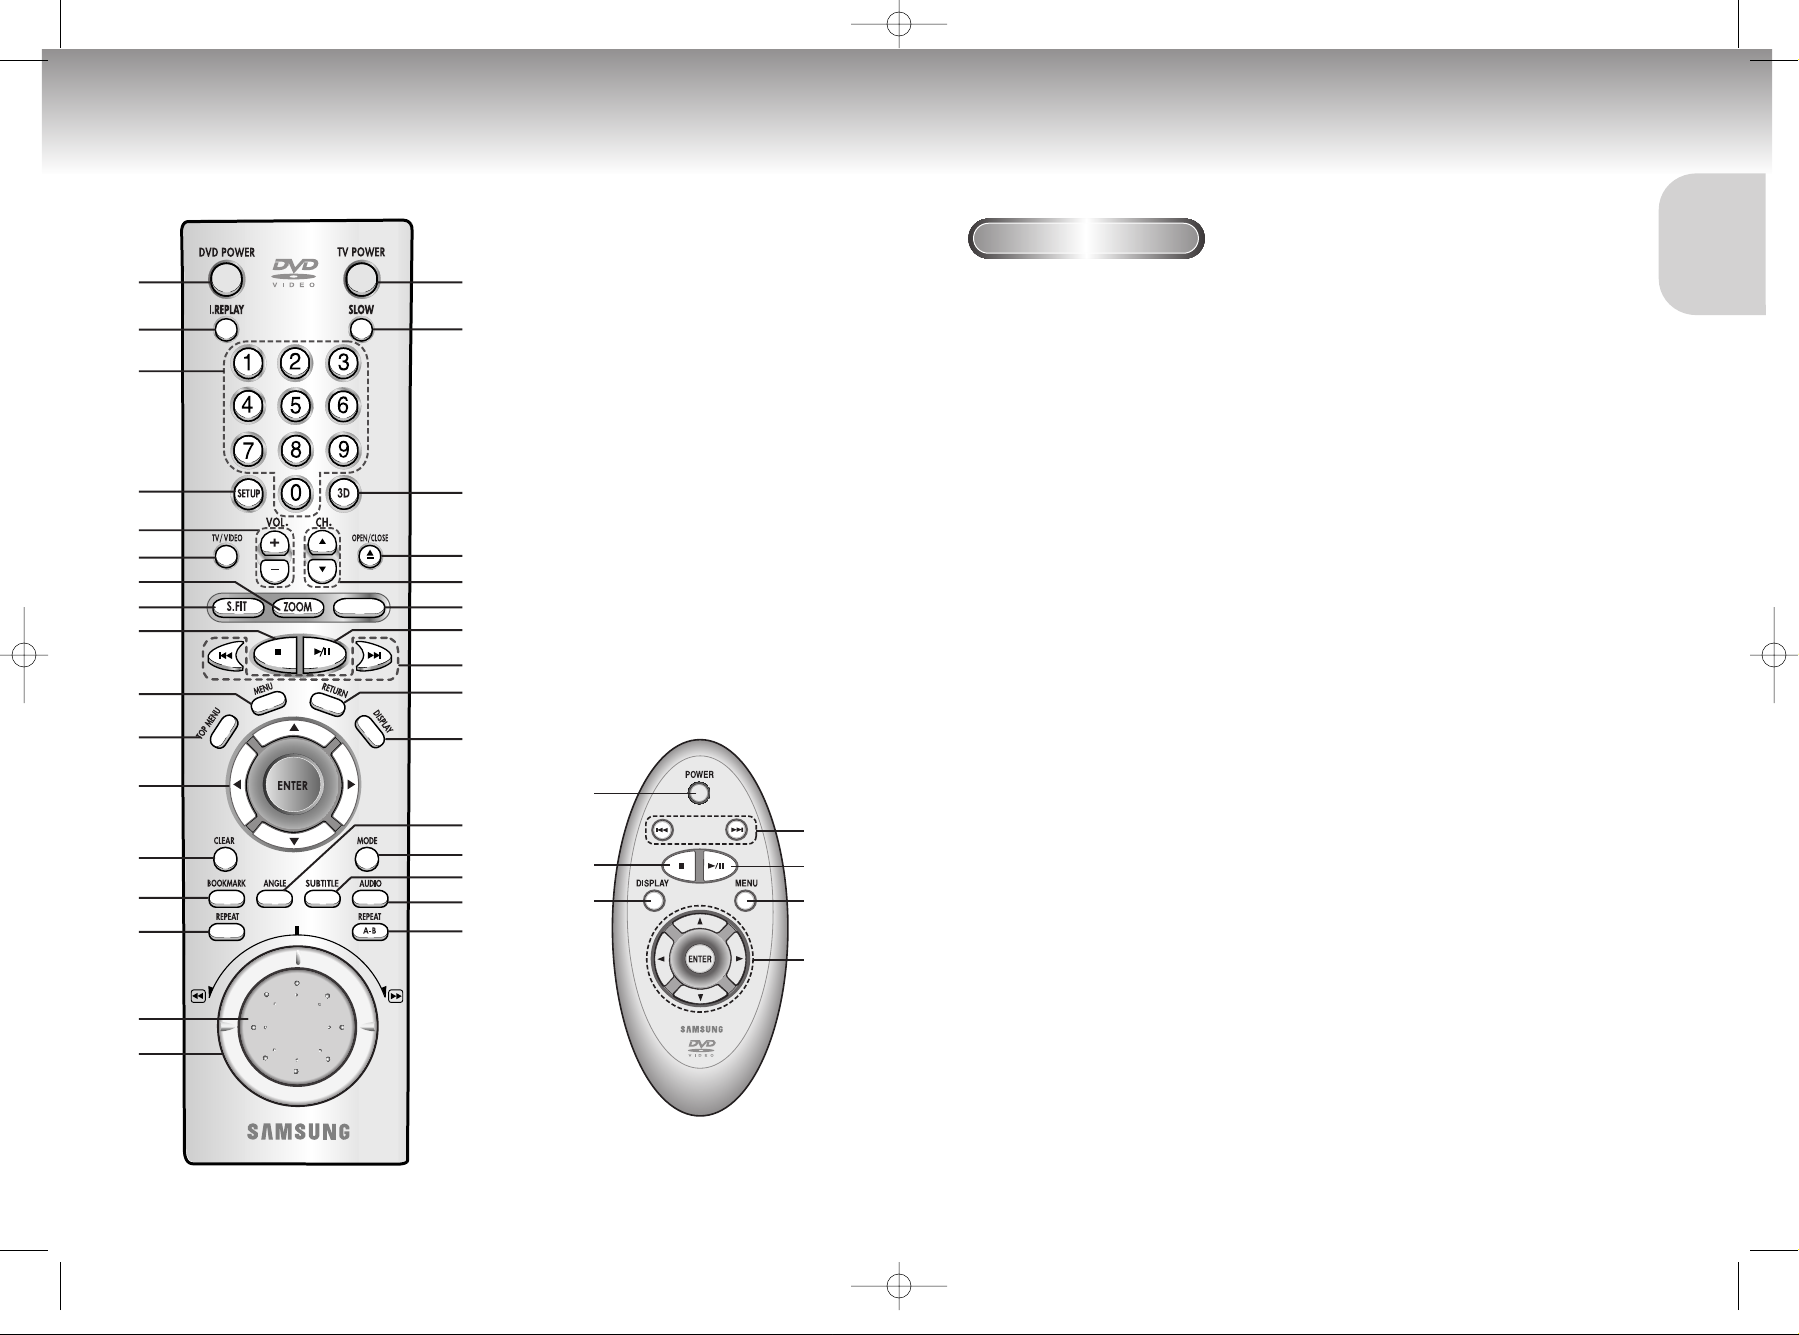
Tour of the Remote Control
1
2
3
4
5
6
7
8
9
10
11
12
13
14
15
16
17
18
19
20
21
22
23
24
25
26
27
28
29
30
31
32
1
9
27
25
24
10
12
Tour of the Remote Control
DVD Function Buttons
1. DVD POWER Button
2. I.REPLAY Button
•
This function is used to replay the previous 10 seconds of
the movie from the current position.
3. NUMBER Buttons
4. SETUP Button
• Brings up the DVD player’s Setup menu.
5. VOLUME Buttons
6. TV/VIDEO Button
7. ZOOM Button
8. S.FIT Button
9. STOP Button
10. MENU Button
• Brings up the Disc menu.
11. TOP MENU Button
12. ENTER/DIRECTION Button
(UP/DOWN or LEFT/RIGHT buttons)
• This button functions as a toggle switch.
13. CLEAR Button
•
Use to remove menus or status displays from the screen.
14. BOOKMARK Button
15. REPEAT Button
•
Allows you to repeat play a title, chapter, track, or disc.
16. JOG DIAL
• Operates frame by frame play. In CD mode,
performs track search.
17. SHUTTLE DIAL
• Performs fast or slow motion play.
18. TV POWER Button
19. SLOW Button
20. 3D Button
21. OPEN/CLOSE Button
22. CHANNEL Buttons
23. M.STICK(Memory Stick) Button
24. PLAY/PAUSE Button
• Begin/Pause disc play.
25. SKIP Buttons
• Use to skip the title, chapter, or track.
26. RETURN Button
• Returns to a previous menu.
27. DISPLAY Button
• Displays the current disc mode.
28. ANGLE Button
• Use to access various camera angles on a DVD.
29. MODE Button
• Allows you to program a specific order.
30. SUBTITLE Button
31. AUDIO Button
•
Use this button to access various audio functions on a disc.
32. REPEAT A-B Button
• Use to mark a segment to repeat between A and B.
SETUP
SETUP
(Easy Remote Control)
10 11

R1R2L1
L2
MIXED AUDIO OUT
1
R1
R2
L1
R
Front (RH) Front (LH) Center
Rear (RH) Rear (LH) Subwooper
L
L2
R FRONT L
R SURROUND L
CENTER
S/W
MIXED AUDIO OUT
DVD-P2000M 00049Z-1(GB) 8/10/02 10:43 AM Page 12
Choosing a Connection Choosing a Connection
The following show examples of connections commonly used to connect the DVD player with a
TV and other components.
Before Connecting the DVD Player
• Always turn off the DVD player, TV, and other components before you
connect or disconnect any cables.
• Refer to the owner’s manual of the additional components you are
connecting for more information on those particular components.
Connection to an Audio System
Method 1
Method 2
Method 3
AUDIO
2ch Amplifier
Audio Input Jacks
5.1ch Analog Amplifier
Audio Input Jacks
Dolby Digital Decoder
Digital Audio Input Jacks
OR
DVD
Connection to a TV (For Video)
TV (Normal, Widescreen, Projection, etc..)
Basic Audio
Method 1
Good picture
Method 2
Better picture
TV
AV Cable
S-Video
Cable
OR
Video Cables
OR
DVD
Audio Output Jacks
• Method 1 DVD Player + TV with Video Input Jack
(The VIDEO OUT SELECT switch must be set to the 525I(480I) position.)
• Method 2 DVD Player + TV with S-Video Input Jack
(The VIDEO OUT SELECT switch must be set to the 525I(480I) position.)
• Method 3 DVD Player + TV with Component Video Jacks
(The VIDEO OUT SELECT switch must be set to the 525I(480I) position.)
• Method 4 DVD Player + TV with Progressive Scan Jacks.
(The VIDEO OUT SELECT switch must be set to the 525P(480P) position).
•If 525P(480P) VIDEO OUT is Selected, VIDEO and S-VIDEO will not work.
•Depending on your TV, your hookup for Method 4 may differ from the illustration.
Important Note
Video Output Jack
S-Video Jack
Method 3
Best picture
Component Video Jacks
Method 4
Optimum picture
CONNECTIONS
CONNECTIONS
Mixed Audio Out
Analog Audio Out
Digital Audio Out
supported, follow the TV User’s Manual’s instructions regarding Progressive Scan settings in the TV’s
menu system.
Consult your TV User’s Manual to find out if your TV supports Progressive Scan. If Progressive Scan is
12 13

Select
menu
language
DVD-P2000M 00049Z-1(GB) 8/10/02 10:43 AM Page 14
Playing a Disc Playing a Disc
Before Play
• Turn on your TV and press the TV/VIDEO button to select the video mode.
• Turn on your Audio System and select AUX, CD or DVD.
After plugging in the player, the first time you press the DVD POWER
button, this screen comes up :
If you want to select the language, press a NUMBER button.
(This screen will only appear the very first time you plug in the player.)
Play
Press the OPEN/CLOSE button.
1
1
The STANDBY indicator light goes out and the tray opens.
Place a disc gently into the tray with the disc’s label
2
facing up.
2
Press the PLAY/PAUSE button or OPEN/CLOSE button
3
to close the disc tray.
3
Stopping Play
4
4
Press the STOP button during play.
Step Motion Play (Except CD)
7
7
When the JOG DIAL is turned, you can view frames one by one.
- Each time the button is pressed, a new frame will appear.
- No sound is heard during STEP mode.
- Press PLAY/PAUSE to resume normal play.
(You can only perfor m step motion play in the for ward direction.)
Slow Motion Play (Except CD)
- Press and hold the SKIP button to choose playback speed among 1/8X, 1/4X, and 1/2X of normal.
8
8
- No sound is heard during slow mode.
- Press PLAY/PAUSE to resume normal play.
- When playing a VCD, the reverse slow motion play will not work.
FUNCTIONS
FUNCTIONS
BASIC
BASIC
Removing Disc
5
5
Press the OPEN/CLOSE button.
Pausing Play
6
6
Press the PLAY/PAUSE or STEP button on the remote during play.
- Screen stops, no sound.
- To resume again, press PLAY/PAUSE button once again.
14 15
RESUME function
When you stop disc play, the player remembers where you stopped, so when you press PLAY again, it will pick up
where you left off. (unless the disc is removed, the STOP button is pressed twice or the player is unplugged.)
NOTE
• If the player is left for 5 minutes in pause mode, it will stop.
• If the player is left in the stop mode for more than 30 minutes, the power will automatically shut off.
(Automatic Power-Off Function)
• If the player is left in the stop mode for more than one minute without any user interaction, a screen saver
will be activated, and the TV screen will fade in and out repeatedly. Press the PLAY button to resume
normal play.
• This icon indicates an invalid button press.

Title
1 / 10
10 / 40
00 : 23 : 25
ENG 5.1CH
Off
1 / 1
Off
Off
Chapter
Time
Audio
Subtitle
Display
Angle
Repeat
3D
A
Return
Enter
Stereo
Audio
Track
1 / 17
00 : 00 :15
Off
Off
Display
3D
Repeat
Time
Return
Enter
DVD-P2000M 00049Z-1(GB) 8/10/02 10:43 AM Page 16
Using the Search & Skip Functions Using the Display Function
During play, you can search quickly through a chapter or track or use the skip
When Playing a DVD
function to jump to the next selection.
During play, press the DISPLAY button
1
on the remote.
1
Searching through a Chapter or Track
Turn the shuttle dial of remote control during disc play. Turn the
Jog/Shuttle on the front can amultiple-speed operation if desiring
1
1
to use the key on the front.
DVD
VCD/CD
• Depending on the disc, audio may not be heard when a disc is in 2X play mode.
2X, 4X, 8X, 16X, 32X, 128X
2X, 4X, 8X
Skipping Tracks
During play, press the NEXT SKIP
1
1
BACK SKIP
(
I
ÃÃ
)
button.
(
¨¨
)
or
I
- Current title, chapter number, elapsed time,
Audio, Subtitle, Angle, Repeat and 3D control will
be displayed.
• Use the NUMBER buttons to enter a different title,
then press the ENTER button.
• Use the LEFT/RIGHT or NUMBER buttons to enter
a chapter number, then press the ENTER button.
• To enter the time from which you want to start,
use the UP/DOWN buttons to select, then use the
NUMBER buttons to enter the time.
Then press the ENTER button.
• Use the LEFT/RIGHT buttons to change the values of
the current audio, subtitle, Angle, Repeat and 3D.
• To make the screen disappear, press the DISPLAY
button again.
When Playing a CD/VCD
During play, press the DISPLAY button on
1
the remote.
• When playing a DVD, if you press the NEXT SKIP button, it moves to the
next chapter. If you press the BACK SKIP button, it moves to the beginning
of the chapter.
One more press makes it move to the beginning of the previous chapter.
• When playing a VCD 2.0 in MENU OFF mode, a VCD 1.1 or a CD, if
you press the NEXT SKIP button, it moves to the next track.
If you press the BACK SKIP button, it moves to the beginning of the track.
One more press makes it move to the beginning of the previous track.
• If a track exceeds 15 minutes when playing a VCD and you press the NEXT
SKIP button, it moves forward 5 minutes.
If you press the BACK SKIP button, it moves backward 5 minutes.
16 17
1
- Current track number, elapsed time, Audio, Repeat
and 3D control will be displayed.
• Use the UP/DOWN buttons to select a track. Use
the LEFT/RIGHT buttons or NUMBER buttons to
enter a different track number, then press the
ENTER button.
• To enter the time from which you want to start, use
the UP/DOWN buttons to select, then use the
NUMBER buttons to enter the time.
Press the ENTER button.
• Use the LEFT/RIGHT buttons to change the values of the
current audio, Repeat and 3D.
- To make the screen disappear, press the DISPLAY
button again.
In VCD 2.0 mode (MENU ON mode), only the
*
volume control will appear on screen.
NOTE
What is a Chapter?
Each Title on a DVD is usually divided into
chapters (similar to tracks on an audio CD).
What is a Title?
A DVD may contain several different titles.
For example, if a disc contains four different
movies, each might be considered a title.
FUNCTIONS
FUNCTIONS
BASIC
BASIC
 Loading...