

Samsung DVD-L200-XAX User Manual
US
HEADQUARTERS
105 Challenger Road, Ridgefield Park,
N.J.07660-0511
TEL: 1-800-SAMSUNG
SERVICE DIVISION
400 Valley Road, Suite 201
Mount Arlington, NJ 07856
1-800-SAMSUNG (1-800-726-7864)
www.samsungusa.com
AK68-00184A
Portable DVD Player
DVD-L200
3
2
ENGLISH ENGLISH
1. Read these instructions.
2. Keep these instructions.
3. Heed all warnings.
4. Follow all instructions.
5. Do not use this apparatus near water.
6. Clean only with dry cloth.
7. Do not block any ventilation openings, Install in accordance with
the manufacturer's instructions.
8. Do not install near any heat sources such as radiators, heat
registers, or other apparatus (including amplifiers) that produce
heat.
9. Do not defeat the safety purpose of the polarized or groundingtype plug. Apolarized plug has two blades with one wider than
the other. A grounding type plug has two blades and a third
grounding prong. The wide blade or the third prong are provided
for your safety. if the provided plug does not fit into your outlet,
consult an electrician for replacement of the obsolete outlet.
10. Protect the power cord from being walked on or pinched
particularly at plugs, convenience receptacles, and the point
where they exit from the apparatus.
11. Only use attachments/accessories specified by the
manufacturer.
12. Use only with cart, stand, tripod, bracket, or table specified by
the manufacturer, or sold with the apparatus.
13. Unplug this apparatus.
When a cart is used, use caution when moving the
cart/apparatus combination to avoid injury from tip-over.
14. Refer all servicing to qualified service personnel.
Servicing is required when the apparatus has been damaged in
any way, such as power-supply cord or plug is damaged, liquid
has been spilled or objects have fallen into the apparatus the
apparatus has been exposed to rain or moisture, does not
operate normally, or has been dropped.
Safety Precautions
CAUTION:
TO REDUCE THE RISK OF ELECTRIC SHOCK, DO
NOT REMOVE COVER (OR BACK). NO USER
SERVICEABLE PARTS INSIDE, REFER SERVICING TO
QUALIFIED SERVICE PERSONNEL.
This symbol indicates high voltage is present
inside. It is dangerous to make any kind of
contact with any inside part of this product.
This symbol alerts you that important
literature concerning operation and
maintenance has been included with this
product.
Note to CATV system installer: This reminder is provided to call CATV system installer’s attention to Article 820-40 of the
National Electrical Code (Section 54 of Canadian Electrical Code, Part I), that provides guidelines for proper grounding and,
in particular, specifies that the cable ground shall be connected to the grounding system of the building as close to the point
of cable entry as practical.
Caution: FCC/CSA regulations state that any unauthorized changes or modifications to this equipment may void the user’s
authority to operate it.
Caution: To prevent electric shock, match the wide blade of plug to the wide slot, and fully insert the plug.
Attention: Pour éviter les chocs électriques, introduíre la lame la plus large de la fiche dans la borne correspondante de la
prise et pousser jusqu au fond.
Important: One Federal Court has held that unauthorized recording of copyrighted TV programs is an infringement of U.S.
copyright laws. Certain Canadian programs may also be copyrighted and any unauthorized recording in whole or
in part may be in violation of these rights.
To prevent damage which may result in fire or electric shock hazard, do not expose this appliance to rain or moisture.
CAUTION : DVD PLAYERS USE AN INVISIBLE LASER BEAM WHICH CAN CAUSE HAZARDOUS RADIATION EXPOSURE
IF DIRECTED. BE SURE TO OPERATE PLAYER CORRECTLYAS INSTRUCTED.
Important Safety Instructions
CAUTION
RISK OF ELECTRIC SHOCK DO NOT OPEN

5
ENGLISH
4
ENGLISH
This product is designed with the latest technology to provide trouble-free operation.
If the pick-up lens or disk drive gets dirty, the video quality will decrease.
Condensation may form inside this player under following conditions:
• If warm air comes in contact with any cold parts inside the player;
• If the player is located in a room with high humidity; and
• If the player is exposed to sudden temperature changes from cold to hot.
When condensation forms inside the player, the player may not operate correctly.
If this occurs, leave the player at room temperature until the inside of the player becomes dry
and operational.
Safety Information
Assuring the Finest Performance
Moisture Condensation
Laser Safety
Caution
This product utilizes a laser. Use of controls or adjustments or
performance of procedures other than those specified herein may
result in hazardous radiation exposure. Do not open covers and do
not look inside the product if interlock mechanism is damaged.
Warning
Be careful not to damage the interlock mechanism.
Safety Precautions
FCC NOTE (for U.S.A):
This equipment has been tested and found to comply with the limits for a Class B digital device, pursuant to Part 15 of the FCC rules.
These limits are designed to provide reasonable protection against harmful interference in a residential installation.
This equipment generates, uses and can radiate radio frequency energy and, if not installed and used in accordance with the instructions,
may cause harmful interference to radio or television reception, which can be determined by turning the equipment off and on. the user is
encouraged to try to correct the interference by one or more of the following measures.
• Reorient or relocate the receiving antenna.
• Increase the separation between the equipment and receiver.
• Connect this equipment into an outlet on a circuit different from that to which the receiver is connected.
• Consult the dealer or an experienced radio/TV technician for help.
This class B digital apparatus meets all requirements of the Canadian Interference -Causing Equipment Regulations.
CAUTION : THIS PRODUCT UTILIZES A LASER. USE OF CONTROLS OR ADJUSTMENTS OR PERFORMANCE OF PROCEDURES
OTHER THAN THOSE SPECIFIED HEREIN MAYRESULTIN HAZARDOUS RADIATION EXPOSURE. DO NOTOPEN
COVER AND DO NOT REPAIR YOURSELF. REFER SERVICING TO QUALIFIED PERSONNEL.
• Many DVD discs are encoded with copy protection. Because of this, you should only connect your DVD player directly to your TV, not to a
VCR. Connecting to a VCR results in a distorted picture from copy-protected DVD discs.
• This product incorporates copyright protection technology that is protected by methods claims of certain U.S. patents and other intellectual
property rights owned by Macrovision Corporation and other rights owners. Use of this copyright protection technology must be authorized
by Macrovision Corporation, and is intended for home and other limited viewing uses only unless otherwise authorized by Macrovision
Corporation. Reverse engineering or disassembly is prohibited.
Copy Protection
CLASS 1 LASER PRODUCT
KLASSE 1 LASER PRODUKT
LUOKAN 1 LASER LAITE
KLASS 1 LASER APPARAT
PRODUCTO LÁSER CLASE 1

7
ENGLISHENGLISH
6
Table of Contents Table of Contents
Features
. . . . . . . . . . . . . . . . . . . . . . . . . . . . . . . . . . . . . . . . . . . . . . . . . . . . . . . . . . . . . . . . . . . . . . . . . . . . . . . . . . .
8
Accessories
. . . . . . . . . . . . . . . . . . . . . . . . . . . . . . . . . . . . . . . . . . . . . . . . . . . . . . . . . . . . . . . . . . . . . . . . . . . . . . . . .
9
Disc Type and Characteristics
. . . . . . . . . . . . . . . . . . . . . . . . . . . . . . . . . . . . . . . . . . . . . . . . . . . . . . . . . . . . . . . . . . .
10
Description-Front Panel
. . . . . . . . . . . . . . . . . . . . . . . . . . . . . . . . . . . . . . . . . . . . . . . . . . . . . . . . . . . . . . . . . . . . . . . .
12
Tour of the Remote Control
. . . . . . . . . . . . . . . . . . . . . . . . . . . . . . . . . . . . . . . . . . . . . . . . . . . . . . . . . . . . . . . . . . . . .
15
Using the Remote Control Unit
. . . . . . . . . . . . . . . . . . . . . . . . . . . . . . . . . . . . . . . . . . . . . . . . . . . . . . . . . . . . . . . . . .
16
Connecting Headphones to the DVD
. . . . . . . . . . . . . . . . . . . . . . . . . . . . . . . . . . . . . . . . . . . . . . . . . . . . . . . . . . . . . .
17
Connecting to an External Component (Input Select)
. . . . . . . . . . . . . . . . . . . . . . . . . . . . . . . . . . . . . . . . . . . . . . . . . .
18
Viewing a Video from an External Component
. . . . . . . . . . . . . . . . . . . . . . . . . . . . . . . . . . . . . . . . . . . . . . . . . . . . . . .
19
Connecting to a TV
. . . . . . . . . . . . . . . . . . . . . . . . . . . . . . . . . . . . . . . . . . . . . . . . . . . . . . . . . . . . . . . . . . . . . . . . . . .
20
Connecting to a Stereo Component
. . . . . . . . . . . . . . . . . . . . . . . . . . . . . . . . . . . . . . . . . . . . . . . . . . . . . . . . . . . . . . .
21
Using the AC adapter
. . . . . . . . . . . . . . . . . . . . . . . . . . . . . . . . . . . . . . . . . . . . . . . . . . . . . . . . . . . . . . . . . . . . . . . . .
24
Using the battery pack
. . . . . . . . . . . . . . . . . . . . . . . . . . . . . . . . . . . . . . . . . . . . . . . . . . . . . . . . . . . . . . . . . . . . . . . . .
26
Battery level display
. . . . . . . . . . . . . . . . . . . . . . . . . . . . . . . . . . . . . . . . . . . . . . . . . . . . . . . . . . . . . . . . . . . . . . . . . . .
27
Playing a Disc
. . . . . . . . . . . . . . . . . . . . . . . . . . . . . . . . . . . . . . . . . . . . . . . . . . . . . . . . . . . . . . . . . . . . . . . . . . . . . . .
28
Using the Search & Skip Functions
. . . . . . . . . . . . . . . . . . . . . . . . . . . . . . . . . . . . . . . . . . . . . . . . . . . . . . . . . . . . . . .
30
Using the Display Function
. . . . . . . . . . . . . . . . . . . . . . . . . . . . . . . . . . . . . . . . . . . . . . . . . . . . . . . . . . . . . . . . . . . . .
31
Using the Disc and Title Menu
. . . . . . . . . . . . . . . . . . . . . . . . . . . . . . . . . . . . . . . . . . . . . . . . . . . . . . . . . . . . . . . . . . .
32
Using the Function Menu
. . . . . . . . . . . . . . . . . . . . . . . . . . . . . . . . . . . . . . . . . . . . . . . . . . . . . . . . . . . . . . . . . . . . . .
33
Repeat Play
. . . . . . . . . . . . . . . . . . . . . . . . . . . . . . . . . . . . . . . . . . . . . . . . . . . . . . . . . . . . . . . . . . . . . . . . . . . . . . . . .
34
Adjusting the Aspect Ratio (EZ View)
. . . . . . . . . . . . . . . . . . . . . . . . . . . . . . . . . . . . . . . . . . . . . . . . . . . . . . . . . . . . . .
35
Selecting the Audio Language
. . . . . . . . . . . . . . . . . . . . . . . . . . . . . . . . . . . . . . . . . . . . . . . . . . . . . . . . . . . . . . . . . . .
37
Selecting the Subtitle Language
. . . . . . . . . . . . . . . . . . . . . . . . . . . . . . . . . . . . . . . . . . . . . . . . . . . . . . . . . . . . . . . . . .
38
Changing the Camera Angle
. . . . . . . . . . . . . . . . . . . . . . . . . . . . . . . . . . . . . . . . . . . . . . . . . . . . . . . . . . . . . . . . . . . .
39
Using the Bookmark Function
. . . . . . . . . . . . . . . . . . . . . . . . . . . . . . . . . . . . . . . . . . . . . . . . . . . . . . . . . . . . . . . . . . .
40
Using the Zoom & 3D Sound Functions
. . . . . . . . . . . . . . . . . . . . . . . . . . . . . . . . . . . . . . . . . . . . . . . . . . . . . . . . . . . .
41
MP3/WMA Play
. . . . . . . . . . . . . . . . . . . . . . . . . . . . . . . . . . . . . . . . . . . . . . . . . . . . . . . . . . . . . . . . . . . . . . . . . . . . . .
42
Picture CD Playback
. . . . . . . . . . . . . . . . . . . . . . . . . . . . . . . . . . . . . . . . . . . . . . . . . . . . . . . . . . . . . . . . . . . . . . . . . .
44
Using the Setup Menu
. . . . . . . . . . . . . . . . . . . . . . . . . . . . . . . . . . . . . . . . . . . . . . . . . . . . . . . . . . . . . . . . . . . . . . . . .
46
Setting Up the Language Features
. . . . . . . . . . . . . . . . . . . . . . . . . . . . . . . . . . . . . . . . . . . . . . . . . . . . . . . . . . . . . . . .
47
Setting Up the Audio Options
. . . . . . . . . . . . . . . . . . . . . . . . . . . . . . . . . . . . . . . . . . . . . . . . . . . . . . . . . . . . . . . . . . . .
49
Setting Up the Display Options
. . . . . . . . . . . . . . . . . . . . . . . . . . . . . . . . . . . . . . . . . . . . . . . . . . . . . . . . . . . . . . . . . .
50
Setting Up the Parental Control
. . . . . . . . . . . . . . . . . . . . . . . . . . . . . . . . . . . . . . . . . . . . . . . . . . . . . . . . . . . . . . . . . .
51
Cautionary Notes
. . . . . . . . . . . . . . . . . . . . . . . . . . . . . . . . . . . . . . . . . . . . . . . . . . . . . . . . . . . . . . . . . . . . . . . . . . . . .
52
Troubleshooting
. . . . . . . . . . . . . . . . . . . . . . . . . . . . . . . . . . . . . . . . . . . . . . . . . . . . . . . . . . . . . . . . . . . . . . . . . . . . . .
57
Specifications
. . . . . . . . . . . . . . . . . . . . . . . . . . . . . . . . . . . . . . . . . . . . . . . . . . . . . . . . . . . . . . . . . . . . . . . . . . . . . . .
60
Warranty
. . . . . . . . . . . . . . . . . . . . . . . . . . . . . . . . . . . . . . . . . . . . . . . . . . . . . . . . . . . . . . . . . . . . . . . . . . . . . . . . . . .
61
Setup Advanced Functions
Changing Setup menu
Reference
Connections
Adapter directions
Basic Functions

ENGLISH
8
9
Accessories
ENGLISH
If disc features differ from the explanation in the manual
• Some functions or operations are disc-dependent and may not work in all cases.
Follow the instructions shown on the screen. This manual only covers basic disc operations.
• may appear during some operations. This mark indicates that the disc in use does not currently support operations
explained in this manual.
Plays DVD discs and audio CDs
• CD-R/RW discs containing MP3/WMA files can be played.
10 in. LCD display and built-in stereo speakers
• With the built-in 10 in. LCD display and stereo speakers, you
can enjoy a DVD movie without requiring a separate TV.
Convenient 2-Way power supply
• You can use your DVD player virtually anywhere by using the
supplied AC adapter indoors and the battery pack
outdoors.
Compact size/light-weight design
• Compact and lightweight design makes the player easy to carry.
High-resolution image
• High-resolution LCD screen with 384,000 pixels provides a clear
picture.
AV input/output, optical digital output jack
•*
1
Dolby Digital 5.1-CH audio and *2DTS digital audio can be
output through the optical digital output jack. You can enjoy
unsurpassed surround sound when a Dolby Digital/DTS digital
surround processor or amplifier is connect to this jack.
• You can connect a VCR or camcorder to your DVD player
using the AV input/output jacks or you can connect to a TV for a
larger screen.
*
1
Manufactured under license from Dolby Laboratories. “Dolby”,
“Pro Logic”, and the double-D symbol ( ) are trademarks of
Dolby Laboratories. Confidential unpublished works © 1992-1997.
Dolby Laboratories. Inc. All rights reserved.
*
2
“DTS” and “DTS Digital Out” are trademarks of Digital
Theater Systems, Inc.
EZ VIEW
• Easy View can convert Letter Box images to full screen viewing
on your conventional TV.
INPUT : For viewing a video from an external component such as a
VCR, Camcorder etc..
Features
Lithium battery
(AC43-12002G)
Remocon
AC Cord
User’s Manual
(AK68-00184A)
(AD39-00076A)
(AH59-01053F)
Battery pack (AH97-01017A)
Audio cable
(AK39-00008A)
AC power Adapter
(AK44-00004A)
Video cable
(AK39-00007A)
11
ENGLISHENGLISH
10
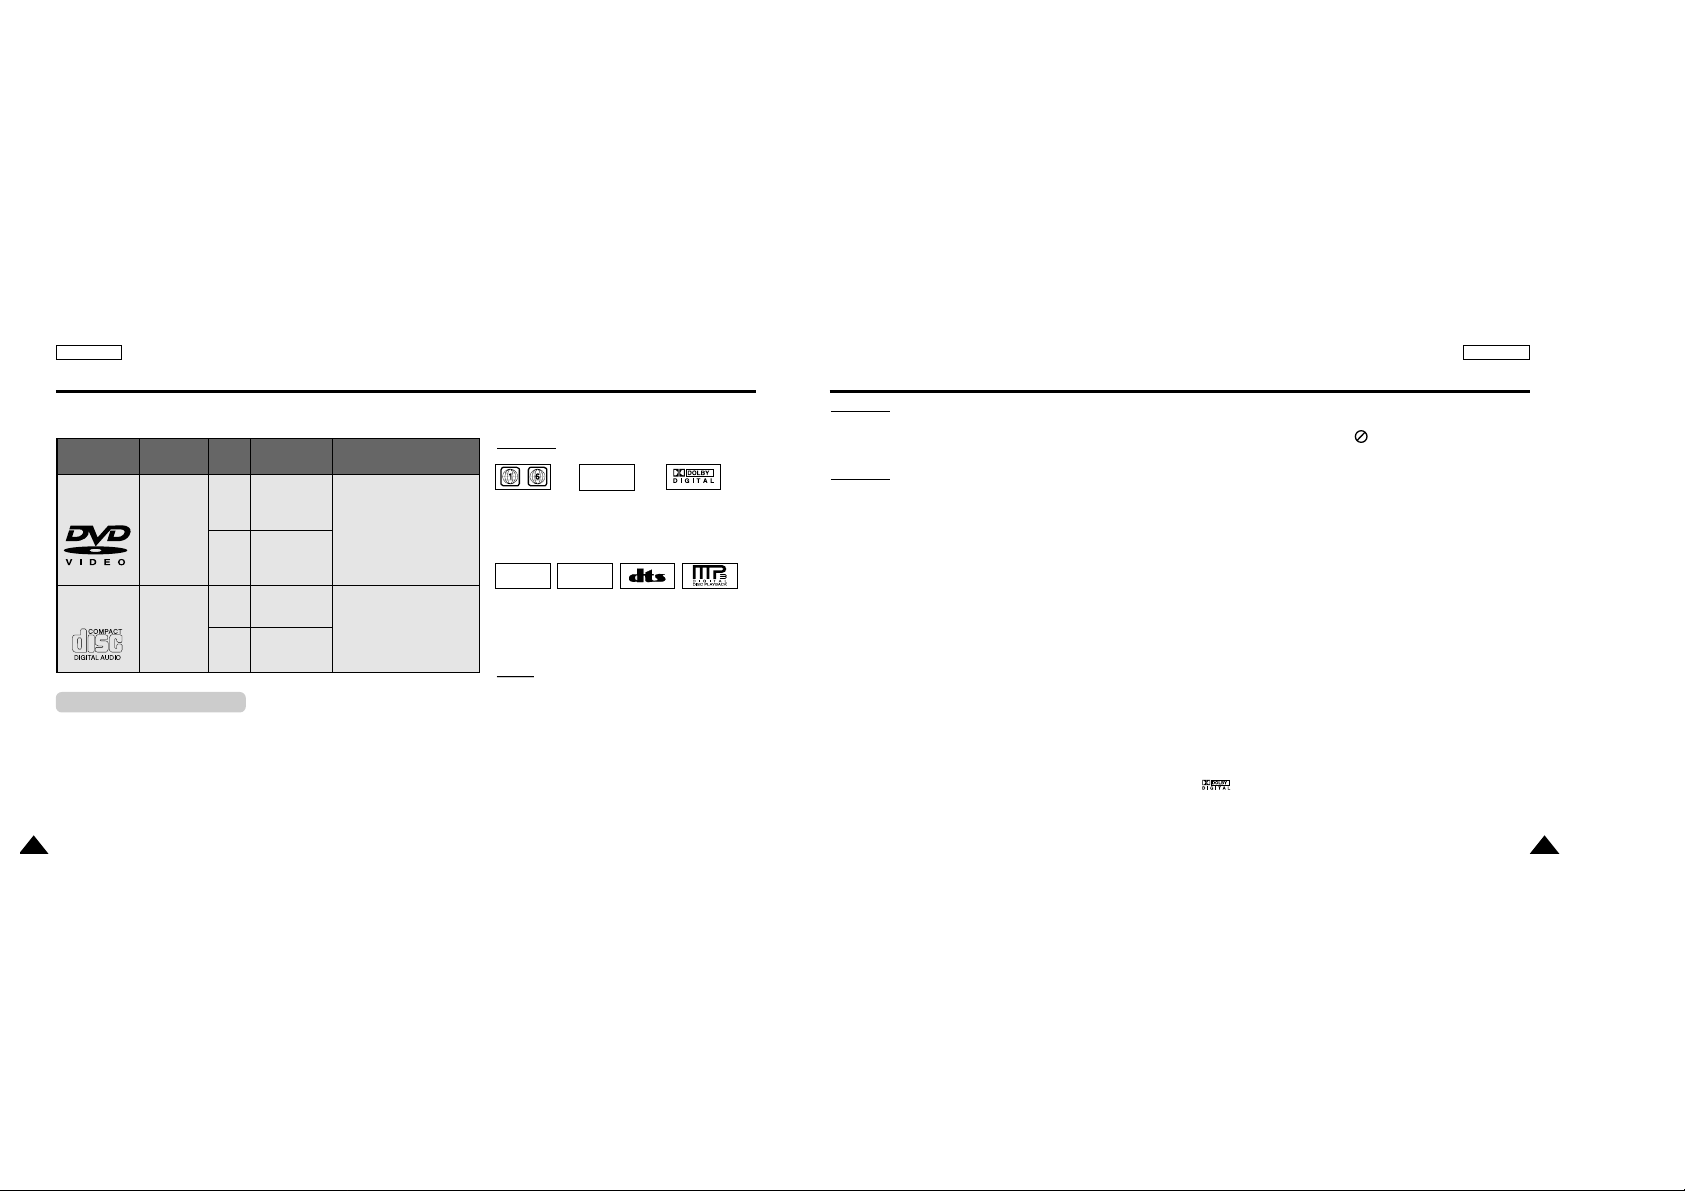
Disc Type and Characteristics Disc Type and Characteristics
Play Region Number
This DVD player is capable of playing the following types of discs with the corresponding logos:
DIGITAL
SOUND
STEREO
NTSC
• Play
Region
Number
*
Caution 1
•
NTSC broadcast
system in U.S.A,
Canada, Korea,
Japan, etc.
• Dolby
Digital
disc
• Stereo
disc
• Digital
Audio
disc
• DTS disc
Both the DVD player and the discs are coded by region. These regional codes must
match in order for the disc to play. If the codes do not match, the disc will not play.
The Region Number for this player is described on the housing bottom of the
player.
• MP3
disc
AUDIO-CD
Disc Types
(Logos)
Recording
Types
Disc
Size
Max.
Playing Time
Characteristics
DVD
Audio
+
Video
Audio
5"
31/2"
5"
31/2"
Single-sided
240 min.
Double-sided
480 min.
Single-sided
80 min.
Double-sided
160 min
.
74 min.
20 min.
• DVD contains excellent
sound and video due to
Dolby Digital and
MPEG-2 system.
• Various screen and audio
functions can be easily
selected through the
on-screen menu.
• CD is recorded as a Digital
Signal with better audio
quality, less distortion and
less deterioration of audio
quality over time.
*
Caution 2
• Some playback functions of a DVD vary by manufacturer.
This DVD player reproduces the disc data according to guidelines provided by the disc manufacturer. If appears
during disc operations, the disc manufacturer has placed a limit on that function.
*
Caution 3
• The LCD display does not support Closed Captions. However, you can view captions by connecting this unit
to a TV with the caption function.
Discs that cannot be played
1. Illegally manufactured discs
2. Disc with scratches; and
3. Disc with fingerprints, dirt, and debris.
• If the disc surface has dirt or scratches, No Disc will be displayed and the disc will not
be played correctly. (Refer to page 5 and clean the surface of the disc.)
If the player encounters dirt or scratches while playing, video playback may be interrupted.
(Some block-like patterns appear. When this occurs, your player will restore the image in 2~3 seconds.)
About Copyrights
•
Any kind of unauthorized and commercial duplication, public performance, broadcasting, renting, copying and
making transmittable of the content of discs is strictly prohibited by law.
•
This product is equipped with anti-copy protection device and connecting to a VCR for recording purpose results
in a distorted picture.
•
This product incorporates copyright protection technology that is protected by method claims of certain U.S.
patents and other intellectual property rights owned by Macrovision
Corporation and other rights owners. Use of this copyright protection technology must be authorized by
Macrovision Corporation, and is intended for home and other limited viewing uses only unless otherwise authorized by Macrovision Corporation. Reverse engineering or disassembly is prohibited.
•
Manufactured under license from Dolby Laboratories.
“Dolby”, “Dolby Digital”, “Dolby Pro Logic”, and the double-D symbol ( ) are trademarks of Dolby
Laboratories.
•
“DTS” is a trademark of Digital Theater System, Inc.
NOTE:
NOTE:
* Discs which cannot be played with this player:
• DVD-ROM • DVD-RAM
• CD-ROM • CDV
• CDI
• HD layer of super Audio CD
• CDGs play audio only, not graphics.
* Ability to play back may depend on recording
conditions:
• DVD-R • CD - RW
• DVD+RW, -RW
• Picture CD
~

13
ENGLISHENGLISH
12
1. POWER
• Press the POWER button for 1 second to power off.
2. OPEN
3. DISC COVER
4. REVERSE DISPLAY
5. EZ VIEW
6. INFO
7. INPUT
8. LCD
9. SPEAKER
10. MENU
11. RETURN
12. CLEAR
13. ENTER ( ), DIRECTION (UP/DOWN/LEFT/RIGHT)
14. PLAYetc..
PLAY( ), PAUSE( ❙❙ )/STEP, STOP( ■ ), REV-SKIP( ),
FWD-SKIP( )
1
4
5
6
7
2
3
8
9
10
11
12
13
14
1. HEADPHONES 1, 2
2. VOLUME
3. CHARGING INDICATOR
4. REMOTE SENSOR
5. OPEN
6. STANDBY INDICATOR
1
2
4
5
6
3
1
2
3
4
1. AUDIO IN/OUT / DIGITALOUT
2. VIDEO IN/OUT / S-VIDEO OUT
3. DC IN 8.4V
4. BATTERYPACK
Description-Front Panel Description-Front Panel
Front View Right View
Left View
15
ENGLISHENGLISH
14
1. BATTERYPACK
2. RELEASE (Battery pack separation switch)
3. OPEN
Press in the direction of the arrow.
Slide battery pack to the left, then out.
1
2
2
3
1
Description-Front Panel
1
2
3
4
5
6
7
8
9
10
11
12
13
14
15
16
17
18
19
20
21
22
23
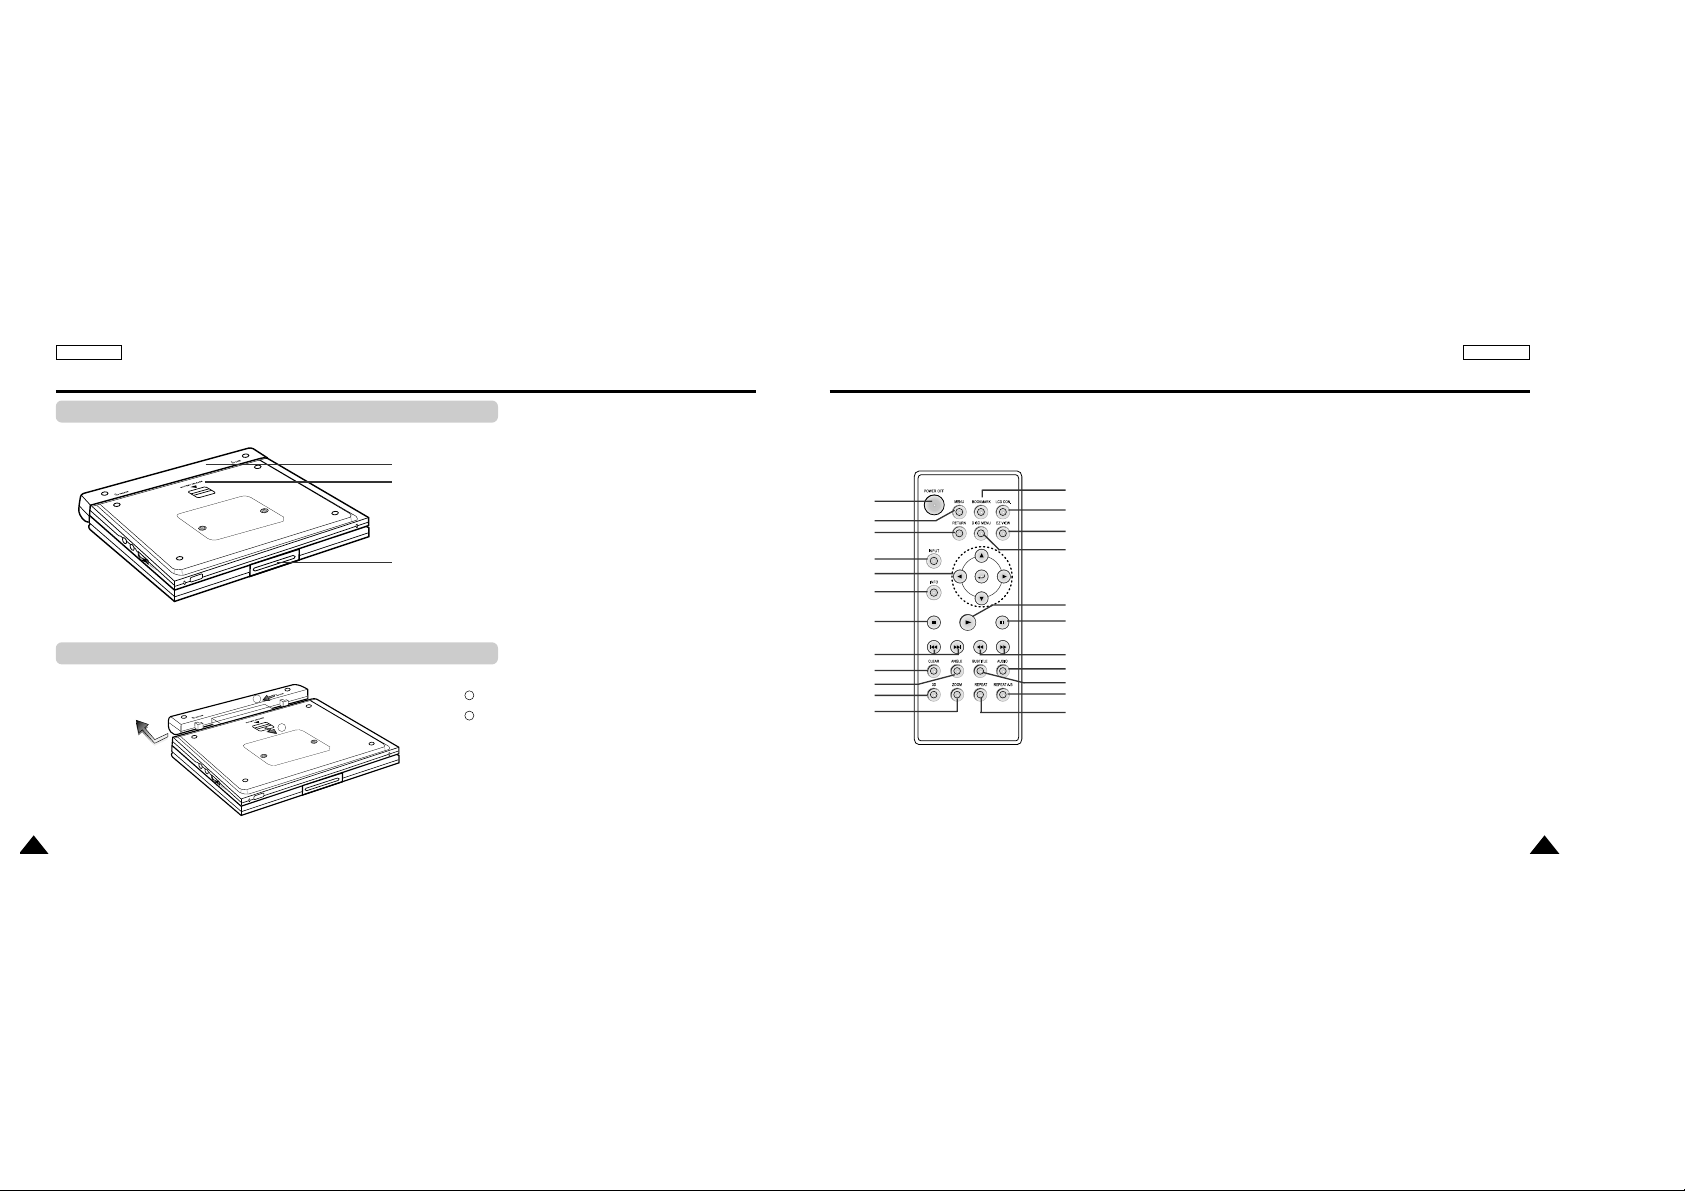
1. DVD POWER OFF Button
• When the set turns off, it remains low
power consumption mode. So you must
press the set POWER button to turn on.
2. MENU Button
• Brings up the DVD player’s setup menu.
3. RETURN Button
• Returns to the previous menu.
4. INPUT Button
• Use to select signal from external
sources.
5. ENTER/DIRECTION Buttons
(UP/DOWN or LEFT/RIGHT buttons)
• This button functions as a toggle switch.
6. INFO Button
• Displays the current disc mode.
7. STOP
• Stops disc play
8. SKIP Buttons
• Use to skip the title, chapter, or track.
9. CLEAR Button
• Use to remove menus or status displays
from the screen.
10. ANGLE Button
• Use to access various camera angles on a
DVD.
11. 3D Button
12. ZOOM Button
13. BOOKMARK Button
14. LCD CON. Button
• Change the LCD display status.
(Wide
➝ 4:3 ➝ Off)
15. EZ VIEW Button
• Easy View can convert Letter Box
images to full screen viewing on your
conventional TV.
16. DISC MENU Button
• Brings up the Disc menu.
17. PLAYButton
• Starts disc play.
18. PAUSE/STEP Button
• Pauses disc play.
19. SEARCH Buttons
• Allows you to search forward/backward
through a disc.
20. AUDIO Button
• Use this button to access various audio
functions on a disc.
21. SUBTITLE Button
22. REPEAT A-B Button
• Use to mark a segment to repeat
between A and B.
23. REPEAT Button
• Allows you to repeat play a title,
chapter, track, or disc.
Tour of the Remote Control
Bottom View
Battery pack separation method
1
2

17
ENGLISH
You can attach headphones with a stereo mini-jack plug (not supplied) to the
PHONES jack for private listening. There are two jacks available.
Connecting Headphones to the DVD
How to use headphones
1. Insert headphones into the PHONES jack.
• This jack is a stereo mini-jack.
Important!
• Turn the headphone volume down to the minimum setting before connecting.
Caution
• Once you connect headphones to the DVD, your DVD Player’s speakers will be disconnected.
2. Adjust the volume level by using the VOLUME control dial.
Not supplied
PHONES
ENGLISH
16
Using the Remote Control Unit
Installing the Battery in the Remote
Operating Range of Remote Control Unit
1. Remove the battery compartment in the direction of the arrow. 2. Place the lithium battery in the battery compartment and put
the battery compartment cover back on the remote.
•
Match the polarities (+ and -) on the battery with the marks
in the battery compartment. If the battery is inserted in the
wrong direction, your remote control may not work correclty.
Important!
Do not subject the remote control unit to strong vibration or shock.
Keep the remote control unit free from moisture and water.
Caution
•
After battery replacement, your remote control unit may not work.
If this occurs, remove the battery and re-insert in about 5 minutes.
•
It may be difficult to operate the remote control unit if the remote control sensor on
the DVD player is exposed to direct sunlight or strong artificial light.
Try operating the remote away from such light sources.
•
Remove the battery when not planning to use the remote control unit for a long
period of time.
Hole
(Back of the remote control)
(Remote Control Sensor)
1
2
2m(6.56ft)
30
30

19
ENGLISH
Connecting to an External Component (Input Select)
You can enjoy video from your VCR or Camcorder on your DVD player.
Important!
• Always turn off the DVD Player and other components before you connect any cables.
• Refer to owner’s manual of the components you are connecting for more information on those particular components.
NOTE:
NOTE:
• In the INPUT mode, the video input must be the standard NTSC.
When connecting to an external component
Jack/Plug Color
Video: Yellow
Audio (left): White
Audio (right): Red
To AUDIO OUT To VIDEO OUT
Audio Cable
Video Cable
VCR or other component equipped with external output connectors
ENGLISH
18
Viewing a Video from an External Component
Use the procedure below to view a video from a VCR or Camcorder on your DVD player.
1. Connect the external component according to the procedure outlined on page 18.
2. Turn on the external component.
3. Turn on the DVD player.
4. Press the INPUT button to set the INPUT mode.
5. Press the PLAY button on the external component.
Caution
•
Power is not supplied from this device to the connected DVD player.
•
When not using your DVD player, always remove all connecting cables from the video or
audio input/output jacks.
•
If no signal is input for more than 5 minutes while in the input mode, this unit enters
the standby mode.
To view a video from an external component
INPUT
 Loading...