

Samsung DVD-L200W Instruction Manual
AK68-00184P
Portable DVD Player
DVD-L200W
ENG
00184P-L200W(A+GB)COVER 8/28/03 9:53 AM Page 100
2
ENGLISH
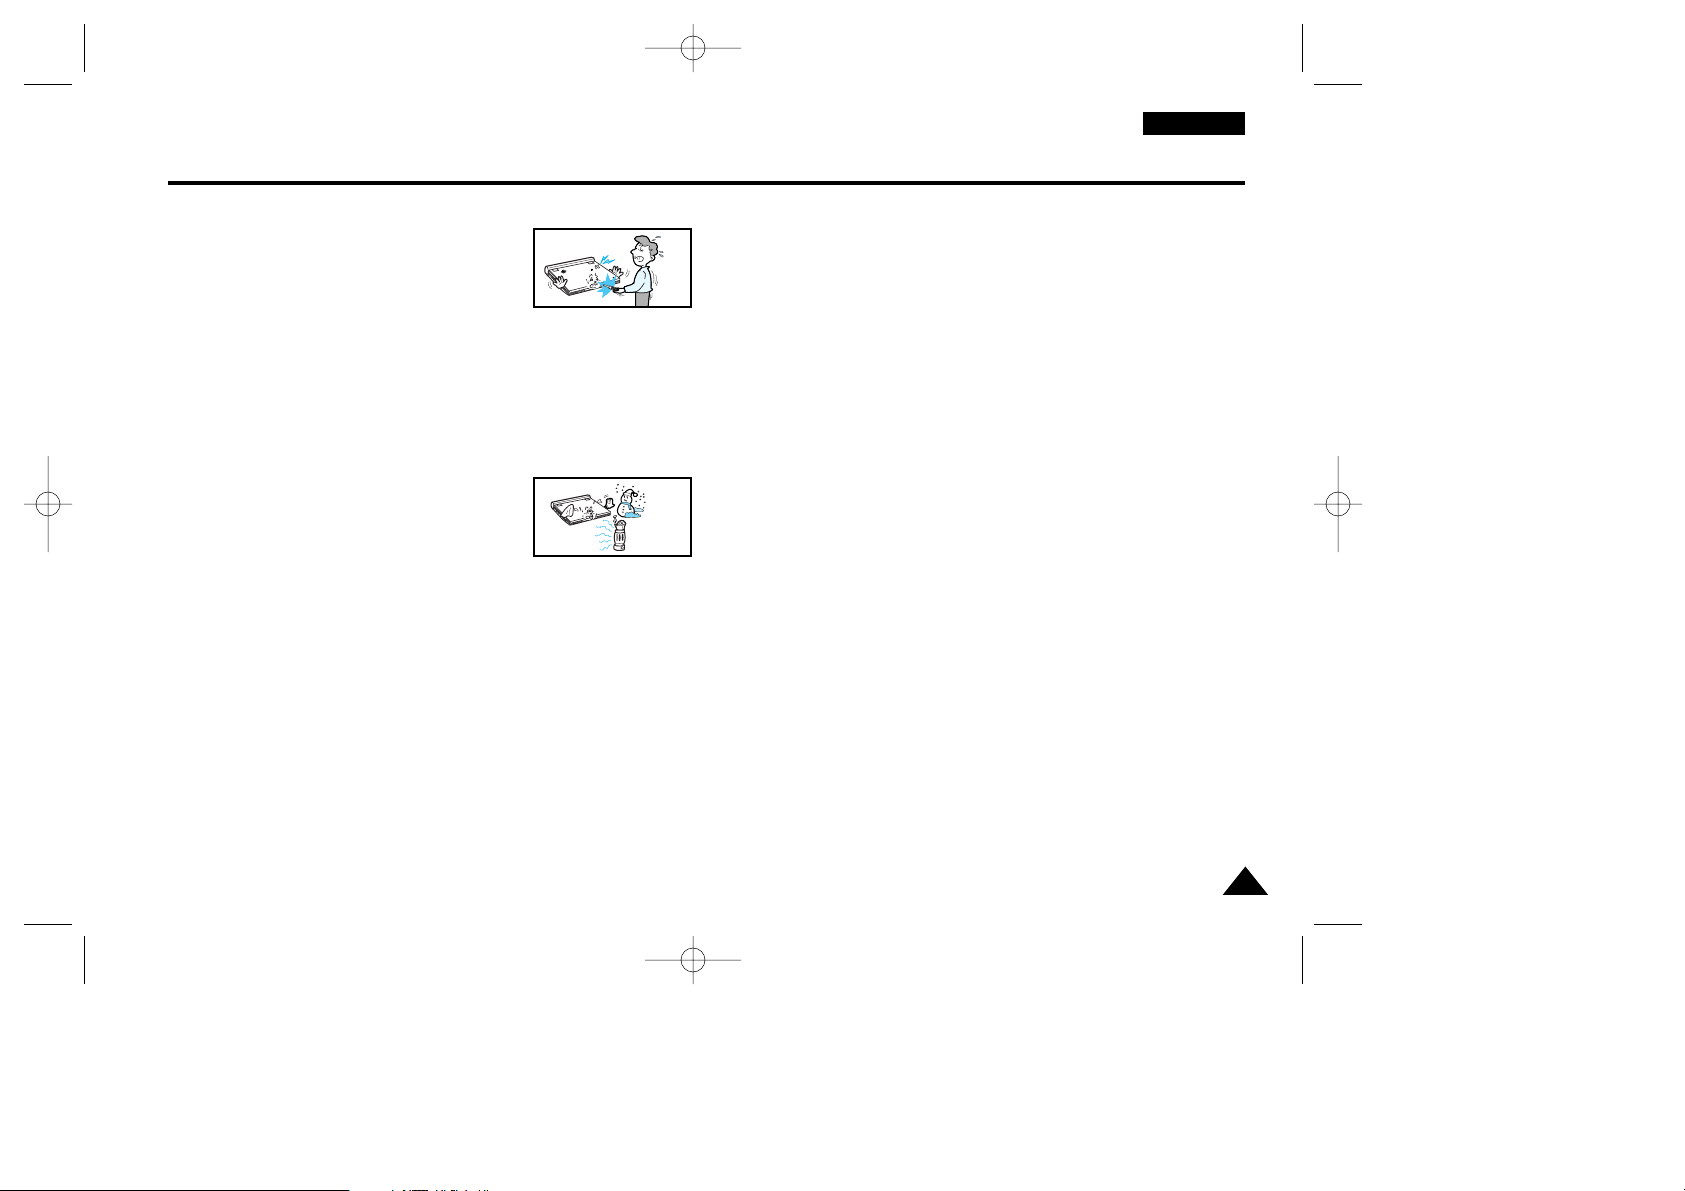
1. Unplug the power cord from the AC outlet before cleaning the unit.
Do not use liquid cleaner or aerosol cleaner. Wipe with a damp cloth.
2. Do not use accessories or attachments not recommended by the
manufacturer. They may cause hazards.
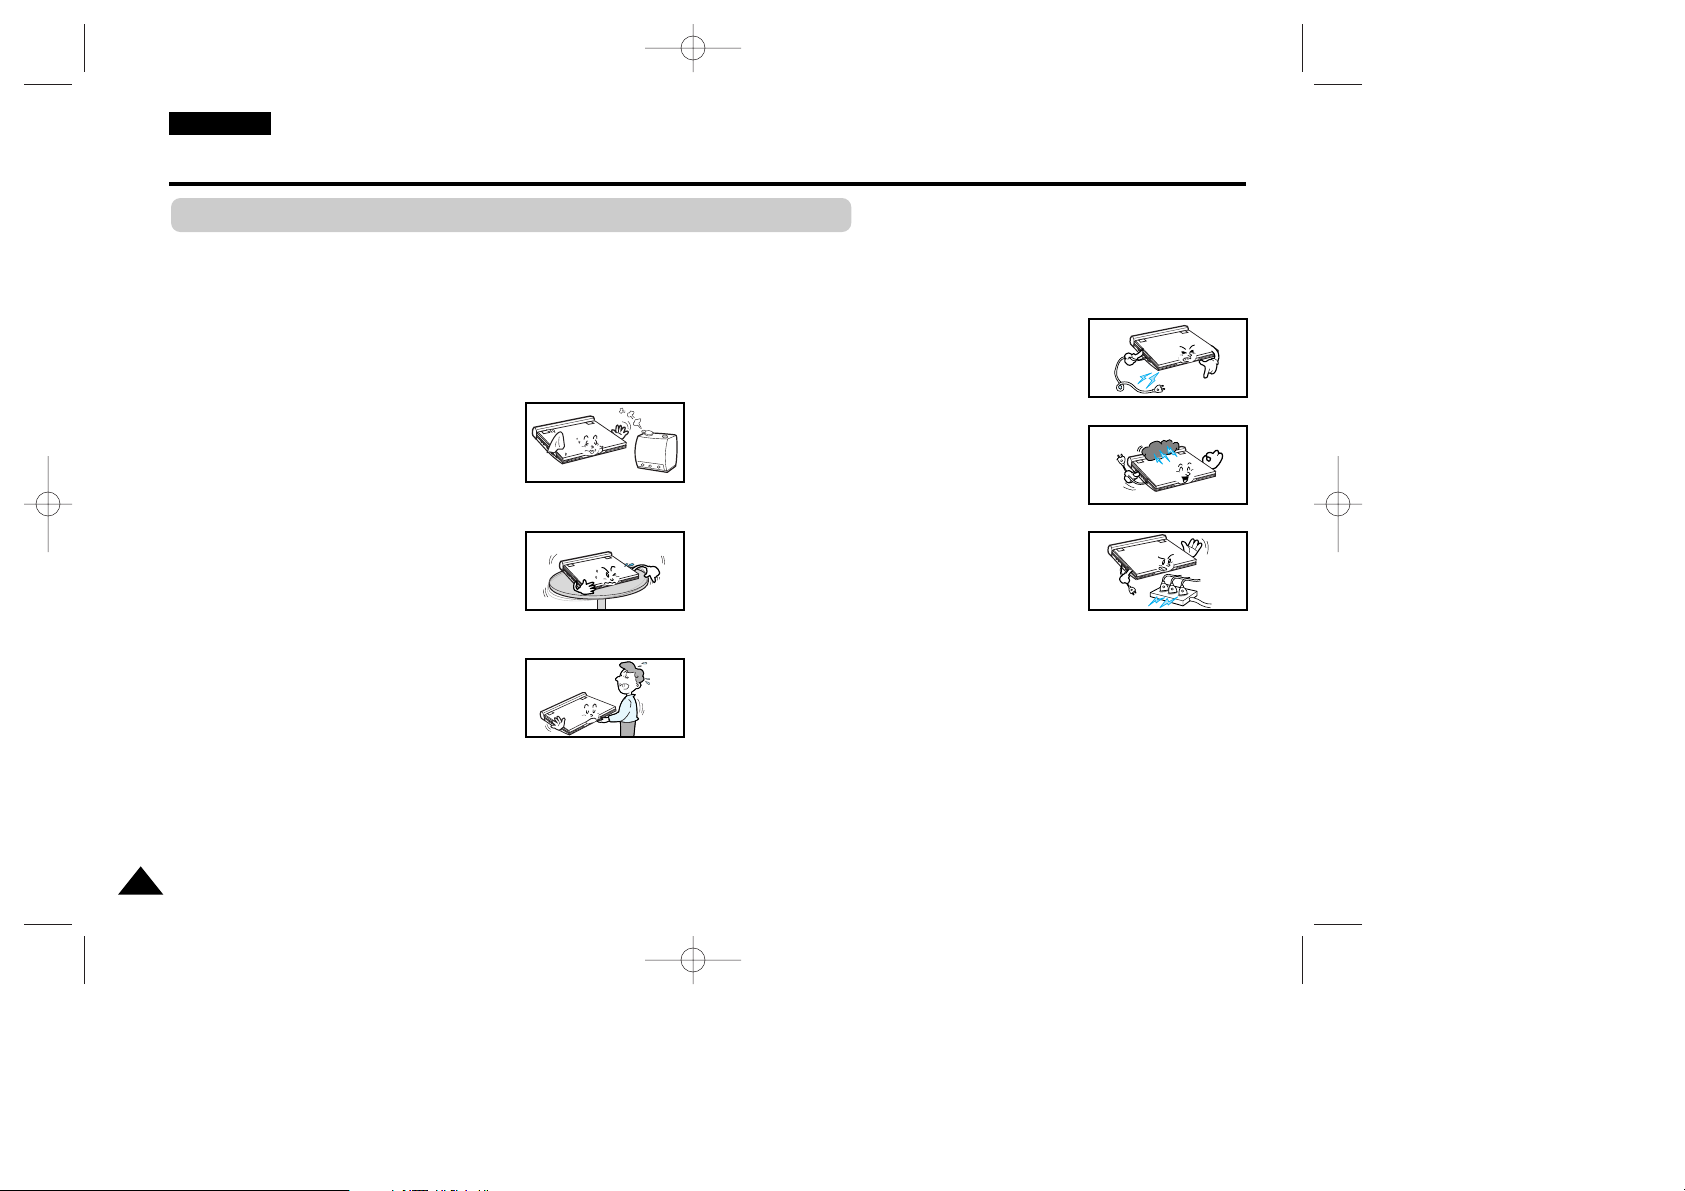
3. Do not place this unit near water - for example,
near a bathtub, kitchen sink or laundry tub, in a
wet basement or near a swimming pool.
4. Do not place the unit on an unstable stand, rack or
table.
The unit may fall, causing serious personal injury or
damage to the unit.
Use only a table recommended by the
manufacturer, or sold with the unit.
Be sure to install according to the instructions,
using the recommended installation
accessories.
5. The unit should be moved with care. Quick
stops, excessive force, and uneven surfaces
may cuase the unit and cart combination to
overturn.
6. Operate the unit using only the type of power source indicated
on the marking label. If you are not certain of your voltage
requirement, please contact the authorised dealer from whom you
purchased the product.
If you want to operate the unit with batteries or other type of power
source, please refer to the manual.
7. Route the power cord so that it is not likely to be
walked on or pinched by objects placed upon or
against it. Pay particular attention to the cord at
the plug and the point where it exits from the unit.
8. During an electrical storm, or when the unit is
unused for a long period of time, unplug the
power cord from the AC outlet and disconnect
the lines between the unit and the antenna.
This is to prevent damage caused by lightning
and serious injury from electric shock.
9. Do not overload wall outlets or extension cords.
This may cause fire or electrical shock.
10. Do not let foreign objects fall into the unit. If a
foreign object touches internal parts or some
areas inside the unit which are subject to high
voltage, this can result in a risk of fire or
electrical shock.
Do not spill any liquid into the unit.
Notices and Safety Instructions
Safety Instructions
Be sure to read the safety and operating instructions before using this product.
Keep this manual in a safe place for future reference.
Be sure to adhere to all warnings on the product.
00184P-L200W(ENG) 8/28/03 9:55 AM Page 2
3
ENGLISH
11. Do not attempt to service the unit yourself by
opening or removing the covers.
You may be exposed to high voltage and other
hazards.
Refer all servicing to qualified service personnel.
12. When replacement of the AC adapter is necessary, purchase
and use the same type of adapter.
13. Make sure the service technician uses replacement parts
specified by the manufacturer or parts that have the same
characteristics as the original. Unauthorised substitutions may result
in fire, electrical shock, or other hazards.
14. Do not place this unit near a radiator, heater,
stove, or any other heat-emitting equipment
(including amplifiers).
15. Do not view the video on the LCD screen while moving.
Do not play the DVD player or do not view the video while driving or
walking.
Doing so may result in a risk of personal injury.
16. Do not apply voltage exceeding the upper limit of the rated voltage
for this DVD player.
- Do not apply voltage outside the voltage range indicated on this
DVD player.
- Using this unit with incorrect voltage can cause fire and/or electric
shock.
17. Do not apply excessive force on the display.
- The outer surface of the screen is made of glass. The glass may
break if a strong force is applied.
18. Do not use the DVD player on your lap for a long period of time.
- You may get a minor burn due to the heat produced by the DVD
player.
CAUTION : USE OF ANY CONTROLS, ADJUSTMENTS, OR
PROCEDURES OTHER THAN SPECIFIED HEREIN MAY RESULT IN
HAZARDOUS RADIATION EXPOSURE.
Notices and Safety Instructions
00184P-L200W(ENG) 8/28/03 9:55 AM Page 3

4
ENGLISH
Notices and Safety Instructions
Copy Protection
• Many DVD discs are encoded with copy protection. Because of this, you should only connect your DVD
player directly to your TV, not to a VCR. Connecting to a VCR results in a distorted picture from copy-protected
DVD discs.
• This product incorporates copyright protection technology that is protected by methods claims of certain U.S.
patents and other intellectual property rights owned by Macrovision Corporation and other rights owners.
Use of this copyright protection technology must be authorized by Macrovision Corporation, and is intended for
home and other limited viewing uses only unless otherwise authorized by Macrovision Corporation. Reverse
engineering or disassembly is prohibited.
00184P-L200W(ENG) 8/28/03 9:55 AM Page 4
5
ENGLISH
This product is designed with the latest technology to provide trouble-free operation.
If the pick-up lens or disk drive gets dirty, the video quality will decrease.
Condensation may form inside this player under following conditions:
• If warm air comes in contact with any cold parts inside the player;
• If the player is located in a room with high humidity; and
• If the player is exposed to sudden temperature changes from cold to hot.
When condensation forms inside the player, the player may not operate correctly.
If this occurs, leave the player at room temperature until the inside of the player becomes dry
and operational.
Safety Information
Assuring the Finest Performance
Moisture Condensation
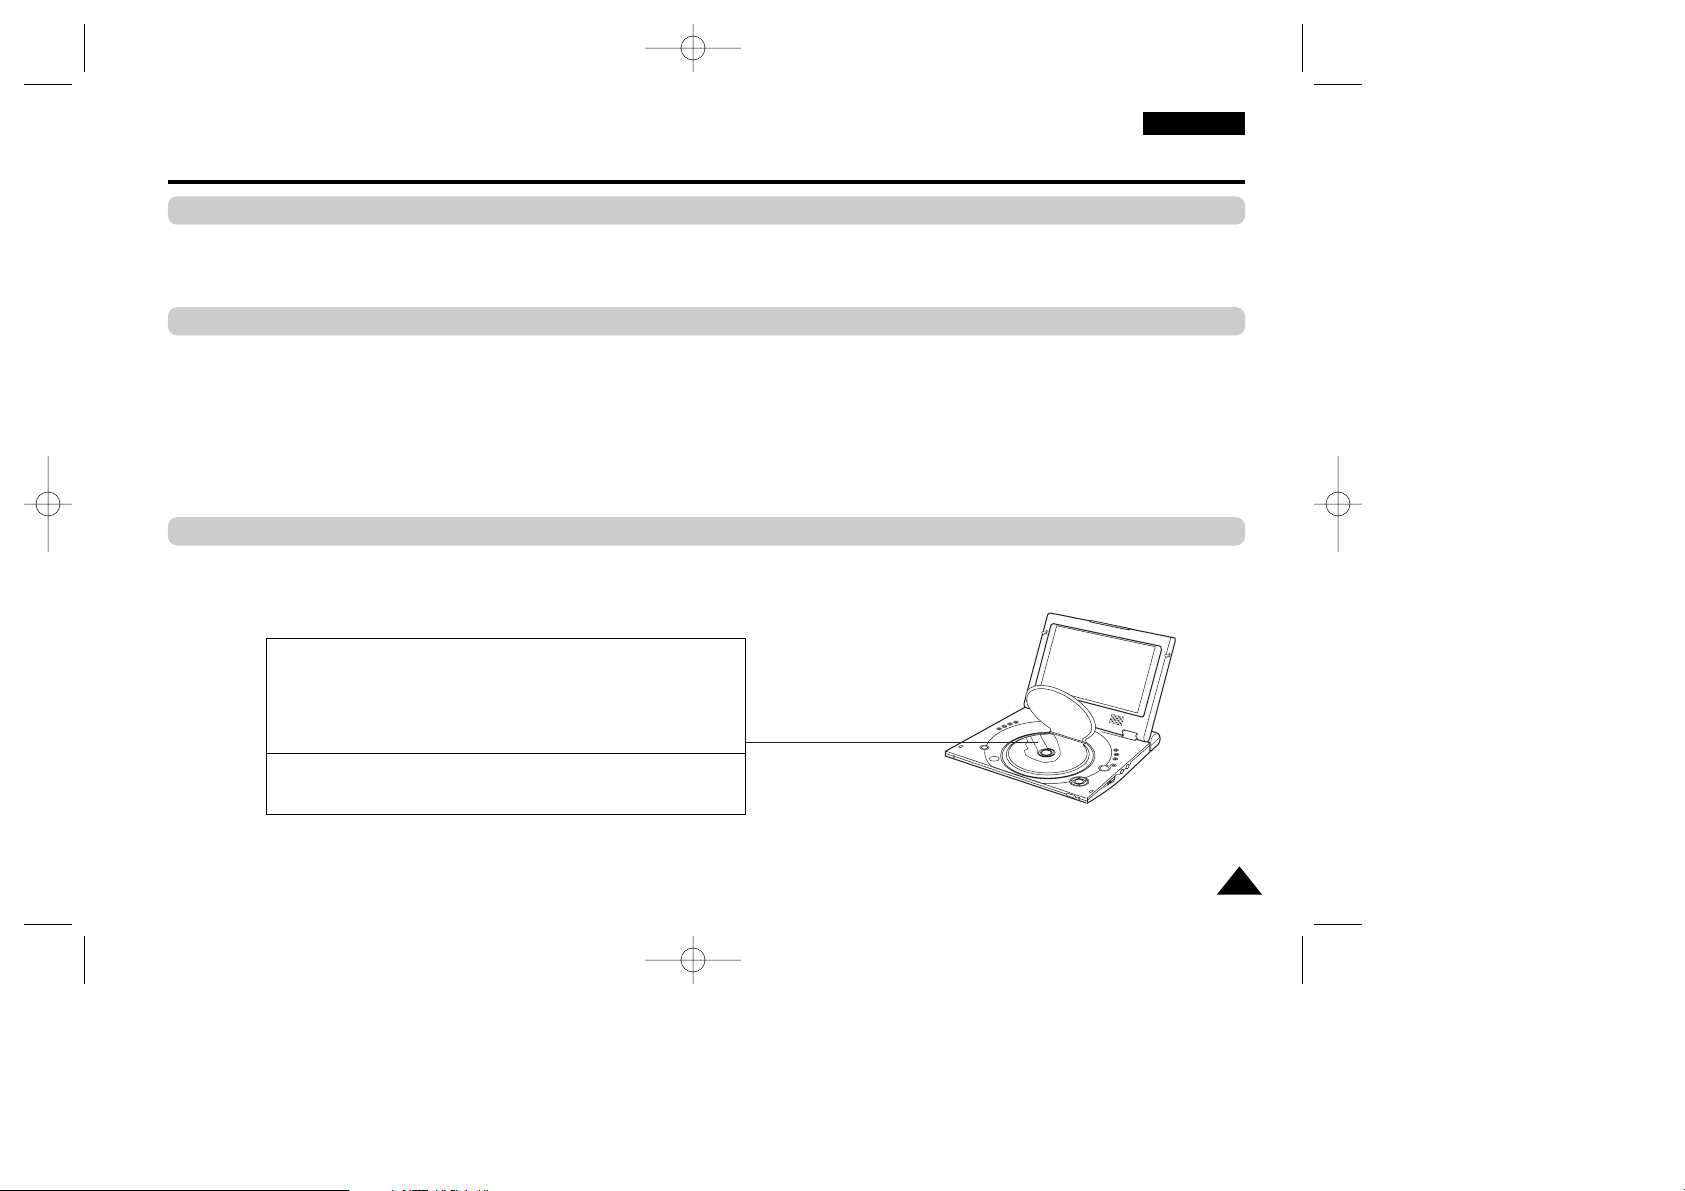
Laser Safety
Caution
This product utilizes a laser. Use of controls or adjustments or
performance of procedures other than those specified herein may
result in hazardous radiation exposure. Do not open covers and do
not look inside the product if interlock mechanism is damaged.
Warning
Be careful not to damage the interlock mechanism.
00184P-L200W(ENG) 8/28/03 9:55 AM Page 5

ENGLISH
6
Table of Contents
Features
. . . . . . . . . . . . . . . . . . . . . . . . . . . . . . . . . . . . . . . . . . . . . . . . . . . . . . . . . . . . . . . . . . . . . . . . . . . . . . . . . . .
8
Accessories
. . . . . . . . . . . . . . . . . . . . . . . . . . . . . . . . . . . . . . . . . . . . . . . . . . . . . . . . . . . . . . . . . . . . . . . . . . . . . . . . .
9
Disc Type and Characteristics
. . . . . . . . . . . . . . . . . . . . . . . . . . . . . . . . . . . . . . . . . . . . . . . . . . . . . . . . . . . . . . . . . . .
10
Description-Front Panel
. . . . . . . . . . . . . . . . . . . . . . . . . . . . . . . . . . . . . . . . . . . . . . . . . . . . . . . . . . . . . . . . . . . . . . . .
12
Tour of the Remote Control
. . . . . . . . . . . . . . . . . . . . . . . . . . . . . . . . . . . . . . . . . . . . . . . . . . . . . . . . . . . . . . . . . . . . .
15
Using the Remote Control Unit
. . . . . . . . . . . . . . . . . . . . . . . . . . . . . . . . . . . . . . . . . . . . . . . . . . . . . . . . . . . . . . . . . .
16
Connecting Headphones to the DVD
. . . . . . . . . . . . . . . . . . . . . . . . . . . . . . . . . . . . . . . . . . . . . . . . . . . . . . . . . . . . . .
17
Connecting to an External Component (Input Select)
. . . . . . . . . . . . . . . . . . . . . . . . . . . . . . . . . . . . . . . . . . . . . . . . . .
18
Viewing a Video from an External Component
. . . . . . . . . . . . . . . . . . . . . . . . . . . . . . . . . . . . . . . . . . . . . . . . . . . . . . .
19
Connecting to a TV
. . . . . . . . . . . . . . . . . . . . . . . . . . . . . . . . . . . . . . . . . . . . . . . . . . . . . . . . . . . . . . . . . . . . . . . . . . .
20
Connecting to a Stereo Component
. . . . . . . . . . . . . . . . . . . . . . . . . . . . . . . . . . . . . . . . . . . . . . . . . . . . . . . . . . . . . . .
21
Using the AC adapter
. . . . . . . . . . . . . . . . . . . . . . . . . . . . . . . . . . . . . . . . . . . . . . . . . . . . . . . . . . . . . . . . . . . . . . . . .
24
Using the battery pack
. . . . . . . . . . . . . . . . . . . . . . . . . . . . . . . . . . . . . . . . . . . . . . . . . . . . . . . . . . . . . . . . . . . . . . . . .
26
Battery level display
. . . . . . . . . . . . . . . . . . . . . . . . . . . . . . . . . . . . . . . . . . . . . . . . . . . . . . . . . . . . . . . . . . . . . . . . . . .
27
Playing a Disc
. . . . . . . . . . . . . . . . . . . . . . . . . . . . . . . . . . . . . . . . . . . . . . . . . . . . . . . . . . . . . . . . . . . . . . . . . . . . . . .
28
Using the Search & Skip Functions
. . . . . . . . . . . . . . . . . . . . . . . . . . . . . . . . . . . . . . . . . . . . . . . . . . . . . . . . . . . . . . .
30
Using the Display Function
. . . . . . . . . . . . . . . . . . . . . . . . . . . . . . . . . . . . . . . . . . . . . . . . . . . . . . . . . . . . . . . . . . . . .
31
Using the Disc and Title Menu
. . . . . . . . . . . . . . . . . . . . . . . . . . . . . . . . . . . . . . . . . . . . . . . . . . . . . . . . . . . . . . . . . . .
32
Using the Function Menu
. . . . . . . . . . . . . . . . . . . . . . . . . . . . . . . . . . . . . . . . . . . . . . . . . . . . . . . . . . . . . . . . . . . . . .
33
Repeat Play
. . . . . . . . . . . . . . . . . . . . . . . . . . . . . . . . . . . . . . . . . . . . . . . . . . . . . . . . . . . . . . . . . . . . . . . . . . . . . . . . .
34
Setup
Connections
Adapter directions
Basic Functions
00184P-L200W(ENG) 8/28/03 9:55 AM Page 6

7
ENGLISH
Table of Contents
Slow Repeat Play . . . . . . . . . . . . . . . . . . . . . . . . . . . . . . . . . . . . . . . . . . . . . . . . . . . . . . . . . . . . . . . . . . . . . . . . . . . . . 35
Adjusting the Aspect Ratio (EZ View)
. . . . . . . . . . . . . . . . . . . . . . . . . . . . . . . . . . . . . . . . . . . . . . . . . . . . . . . . . . . . . .
36
Selecting the Audio Language
. . . . . . . . . . . . . . . . . . . . . . . . . . . . . . . . . . . . . . . . . . . . . . . . . . . . . . . . . . . . . . . . . . .
38
Selecting the Subtitle Language
. . . . . . . . . . . . . . . . . . . . . . . . . . . . . . . . . . . . . . . . . . . . . . . . . . . . . . . . . . . . . . . . . .
39
Changing the Camera Angle
. . . . . . . . . . . . . . . . . . . . . . . . . . . . . . . . . . . . . . . . . . . . . . . . . . . . . . . . . . . . . . . . . . . .
40
Using the Bookmark Function
. . . . . . . . . . . . . . . . . . . . . . . . . . . . . . . . . . . . . . . . . . . . . . . . . . . . . . . . . . . . . . . . . . .
41
Using the Zoom & 3D Sound Functions
. . . . . . . . . . . . . . . . . . . . . . . . . . . . . . . . . . . . . . . . . . . . . . . . . . . . . . . . . . . .
42
MP3/WMA Play
. . . . . . . . . . . . . . . . . . . . . . . . . . . . . . . . . . . . . . . . . . . . . . . . . . . . . . . . . . . . . . . . . . . . . . . . . . . . . .
43
Picture CD Playback
. . . . . . . . . . . . . . . . . . . . . . . . . . . . . . . . . . . . . . . . . . . . . . . . . . . . . . . . . . . . . . . . . . . . . . . . . .
45
Using the Setup Menu
. . . . . . . . . . . . . . . . . . . . . . . . . . . . . . . . . . . . . . . . . . . . . . . . . . . . . . . . . . . . . . . . . . . . . . . . .
47
Setting Up the Language Features
. . . . . . . . . . . . . . . . . . . . . . . . . . . . . . . . . . . . . . . . . . . . . . . . . . . . . . . . . . . . . . . .
48
Setting Up the Audio Options
. . . . . . . . . . . . . . . . . . . . . . . . . . . . . . . . . . . . . . . . . . . . . . . . . . . . . . . . . . . . . . . . . . . .
50
Setting Up the Display Options
. . . . . . . . . . . . . . . . . . . . . . . . . . . . . . . . . . . . . . . . . . . . . . . . . . . . . . . . . . . . . . . . . .
51
Setting Up the Parental Control
. . . . . . . . . . . . . . . . . . . . . . . . . . . . . . . . . . . . . . . . . . . . . . . . . . . . . . . . . . . . . . . . . .
52
Cautionary Notes
. . . . . . . . . . . . . . . . . . . . . . . . . . . . . . . . . . . . . . . . . . . . . . . . . . . . . . . . . . . . . . . . . . . . . . . . . . . . .
53
Troubleshooting
. . . . . . . . . . . . . . . . . . . . . . . . . . . . . . . . . . . . . . . . . . . . . . . . . . . . . . . . . . . . . . . . . . . . . . . . . . . . . .
58
Specifications
. . . . . . . . . . . . . . . . . . . . . . . . . . . . . . . . . . . . . . . . . . . . . . . . . . . . . . . . . . . . . . . . . . . . . . . . . . . . . . .
61
Advanced Functions
Changing Setup menu
Reference
00184P-L200W(ENG) 8/28/03 9:55 AM Page 7

ENGLISH
8
Plays DVD discs and audio CDs
• CD-R/RW discs containing MP3/WMA files can be played.
10 in. LCD display and built-in stereo speakers
• With the built-in 10 in. LCD display and stereo speakers, you
can enjoy a DVD movie without requiring a separate TV.
Convenient 2-Way power supply
• You can use your DVD player virtually anywhere by using the
supplied AC adapter indoors and the battery pack
outdoors.
Compact size/light-weight design
• Compact and lightweight design makes the player easy to carry.
High-resolution image
• High-resolution LCD screen with 384,000 pixels provides a clear
picture.
AV input/output, optical digital output jack
•*
1
Dolby Digital 5.1-CH audio and *2DTS digital audio can be
output through the optical digital output jack. You can enjoy
unsurpassed surround sound when a Dolby Digital/DTS digital
surround processor or amplifier is connect to this jack.
• You can connect a VCR or camcorder to your DVD player
using the AV input/output jacks or you can connect to a TV for a
larger screen.
*
1
Manufactured under license from Dolby Laboratories. “Dolby”,
“Pro Logic”, and the double-D symbol ( ) are trademarks of
Dolby Laboratories. Confidential unpublished works © 1992-1997.
Dolby Laboratories. Inc. All rights reserved.
*
2
“DTS” and “DTS Digital Out” are trademarks of Digital
Theater Systems, Inc.
EZ VIEW
• Easy View can convert Letter Box images to full screen viewing
on your conventional TV.
INPUT : For viewing a video from an external component such as a
VCR, Camcorder etc..
Features
00184P-L200W(ENG) 8/28/03 9:55 AM Page 8
9
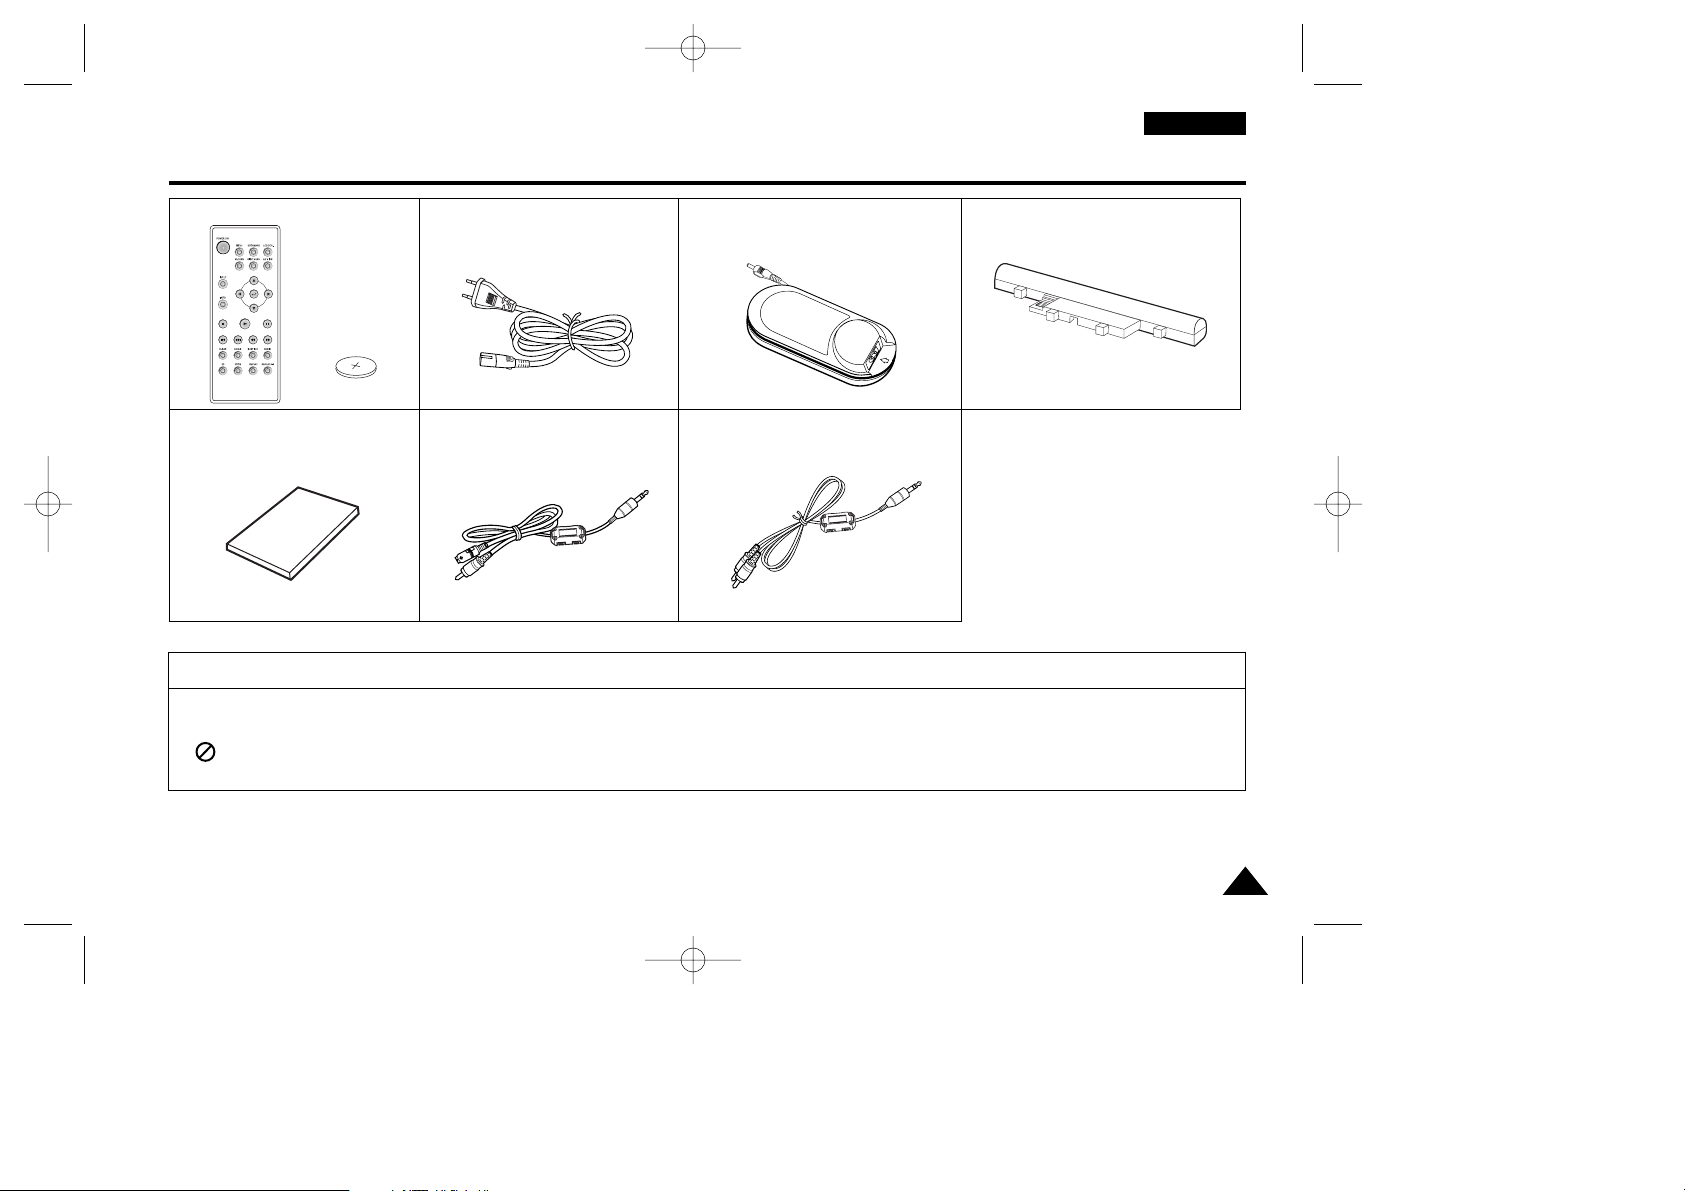
Accessories
ENGLISH
If disc features differ from the explanation in the manual
• Some functions or operations are disc-dependent and may not work in all cases.
Follow the instructions shown on the screen. This manual only covers basic disc operations.
• may appear during some operations. This mark indicates that the disc in use does not currently support operations
explained in this manual.
Lithium battery
Remocon
AC Cord
User’s Manual
Battery pack
Audio cable
AC power Adapter
Video cable
00184P-L200W(ENG) 8/28/03 9:55 AM Page 9
ENGLISH
10
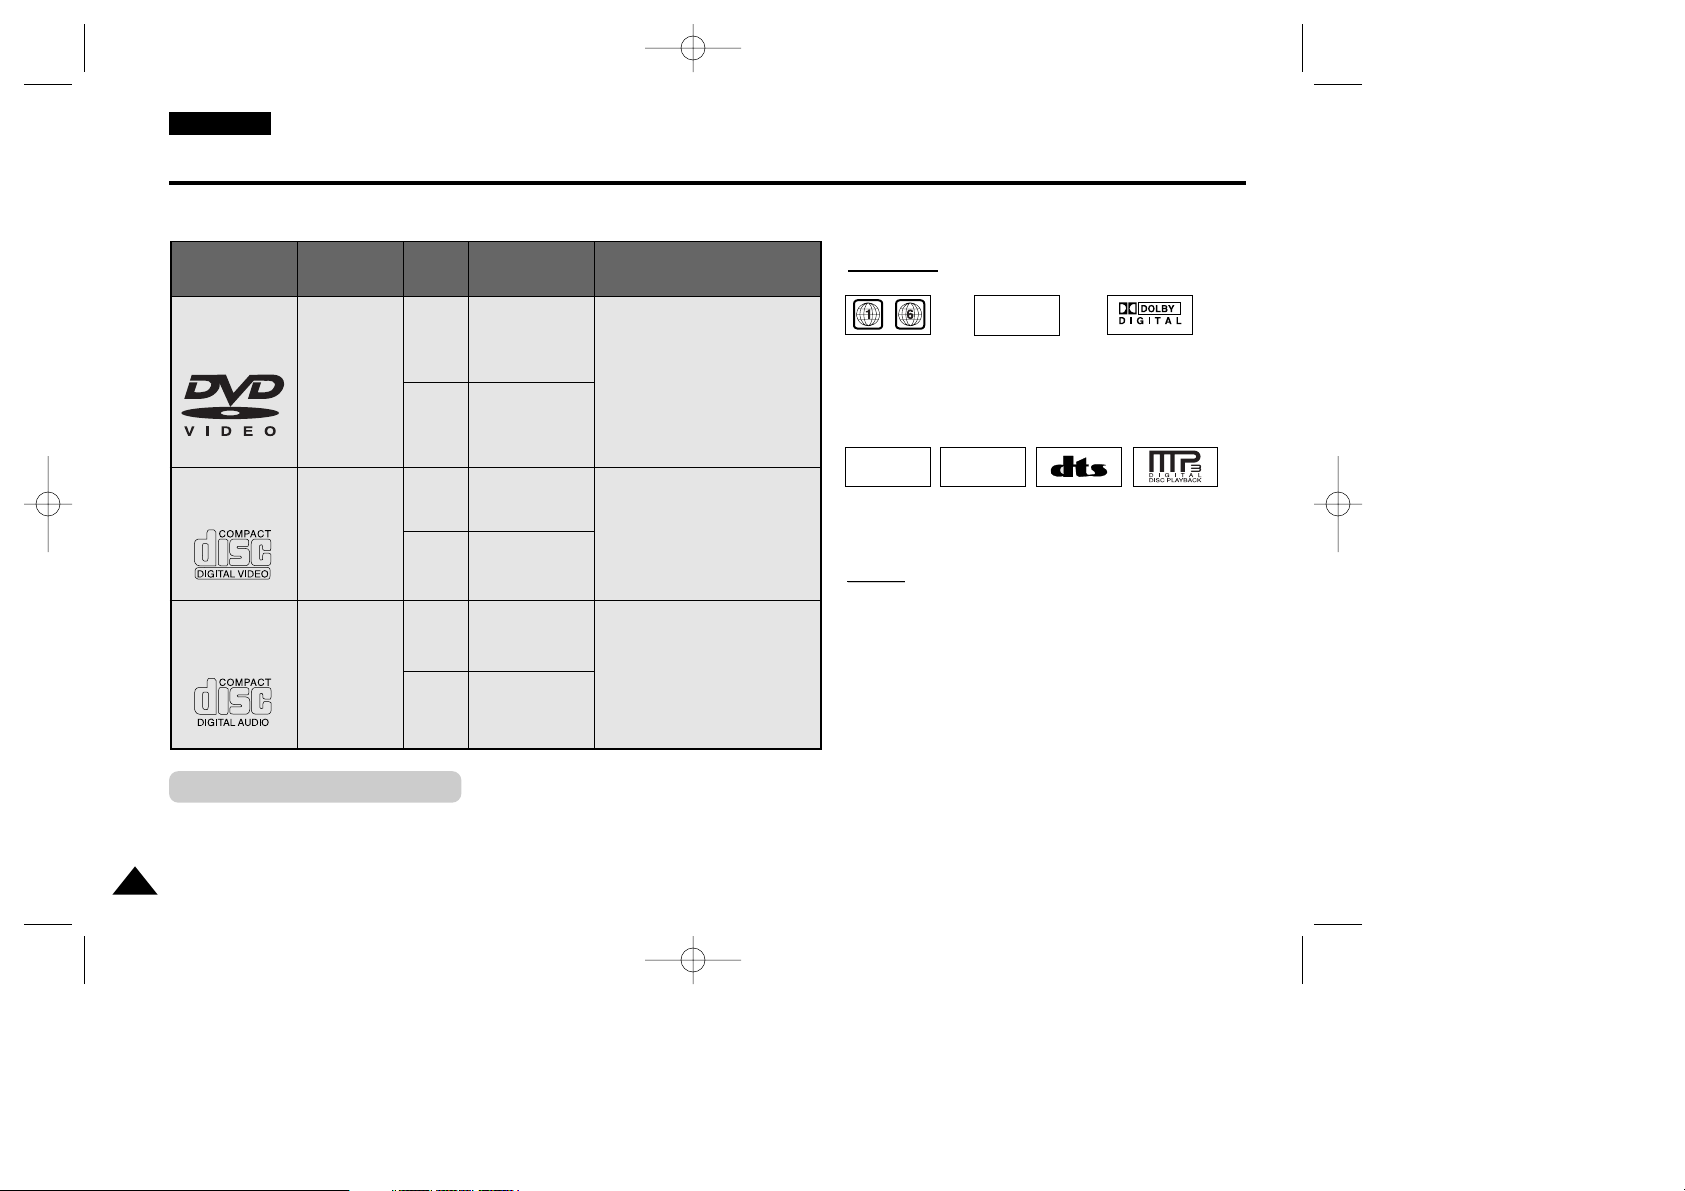
Disc Type and Characteristics
Play Region Number
This DVD player is capable of playing the following types of discs with the corresponding logos:
DIGITAL
SOUND
STEREO
PAL
• Play
Region
Number
*
Caution 1
•
PAL broadcast
system in U.K,
France, Germany,
etc.
• Dolby
Digital
disc
• Stereo
disc
• Digital
Audio
disc
• DTS disc
Both the DVD player and the discs are coded by region. These regional codes must match
in order for the disc to play. If the codes do not match, the disc will not play.
The Region Number for this player is described on the housing bottom of the player.
• MP3
disc
NOTE:
NOTE:
* Discs which cannot be played with this player:
• DVD-ROM • DVD-RAM
• CD-ROM • CDV
• CDI
• HD layer of super Audio CD
• CDGs play audio only, not graphics.
* Ability to play back may depend on recording
conditions:
• DVD-R • CD - RW
• DVD+RW, -RW • Picture CD
*
It may not be to play CD-R, CD-RW and DVD-R
in all cases due to the type of disc or condition of
the recording.
* It plays a VCD 2.0 disc as a VCD 1.1 mode
(MENU OFF Mode).
~
VIDEO-CD
AUDIO-CD
Disc Types
(Logos)
Recording
Types
Disc
Size
Max.
Playing Time
Characteristics
DVD
Audio
+
Video
Audio
+
Video
Audio
12cm
8cm
12cm
8cm
12cm
8cm
Single-sided
240 min.
Double-sided
480 min.
Single-sided
80 min.
Double-sided
160 min
.
74 min.
20 min.
74 min.
20 min.
• DVD contains excellent
sound and video due to
Dolby Digital and
MPEG-2 system.
• Various screen and audio
functions can be easily
selected through the
on-screen menu.
• Video with CD sound,
VHS quality & MPEG-1
compression technology.
• CD is recorded as a Digital
Signal with better audio
quality, less distortion and
less deterioration of audio
quality over time.
00184P-L200W(ENG) 8/28/03 9:55 AM Page 10

11
ENGLISH
Disc Type and Characteristics
* Caution 2
• Some playback functions of a DVD vary by manufacturer.
This DVD player reproduces the disc data according to guidelines provided by the disc manufacturer. If appears
during disc operations, the disc manufacturer has placed a limit on that function.
*
Caution 3
• The LCD display does not support Closed Captions. However, you can view captions by connecting this unit
to a TV with the caption function.
Discs that cannot be played
1. Illegally manufactured discs
2. Disc with scratches; and
3. Disc with fingerprints, dirt, and debris.
• If the disc surface has dirt or scratches, No Disc will be displayed and the disc will not
be played correctly. (Refer to page 5 and clean the surface of the disc.)
If the player encounters dirt or scratches while playing, video playback may be interrupted.
(Some block-like patterns appear. When this occurs, your player will restore the image in 2~3 seconds.)
About Copyrights
•
Any kind of unauthorized and commercial duplication, public performance, broadcasting, renting, copying and
making transmittable of the content of discs is strictly prohibited by law.
•
This product is equipped with anti-copy protection device and connecting to a VCR for recording purpose results
in a distorted picture.
•
This product incorporates copyright protection technology that is protected by method claims of certain U.S.
patents and other intellectual property rights owned by Macrovision
Corporation and other rights owners. Use of this copyright protection technology must be authorized by
Macrovision Corporation, and is intended for home and other limited viewing uses only unless otherwise authorized by Macrovision Corporation. Reverse engineering or disassembly is prohibited.
•
Manufactured under license from Dolby Laboratories.
“Dolby”, “Dolby Digital”, “Dolby Pro Logic”, and the double-D symbol ( ) are trademarks of Dolby
Laboratories.
•
“DTS” is a trademark of Digital Theater System, Inc.
00184P-L200W(ENG) 8/28/03 9:55 AM Page 11
ENGLISH
12
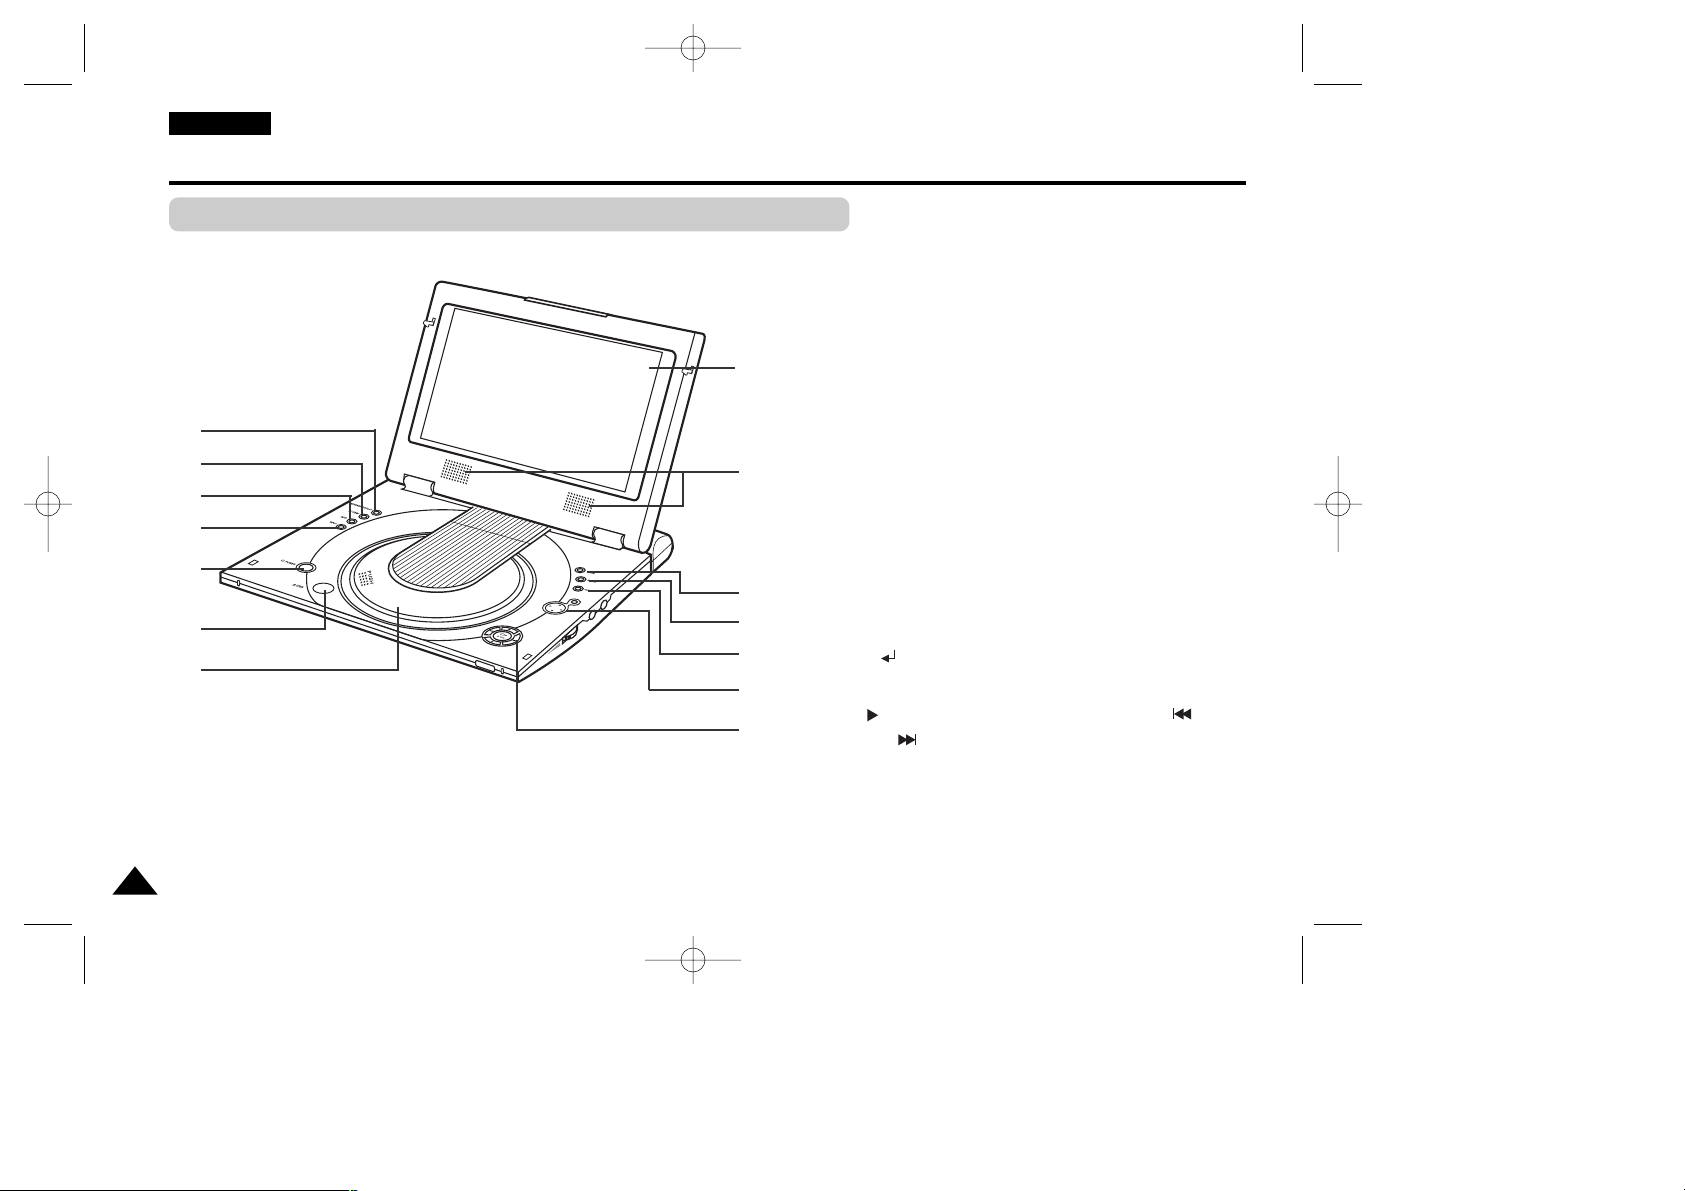
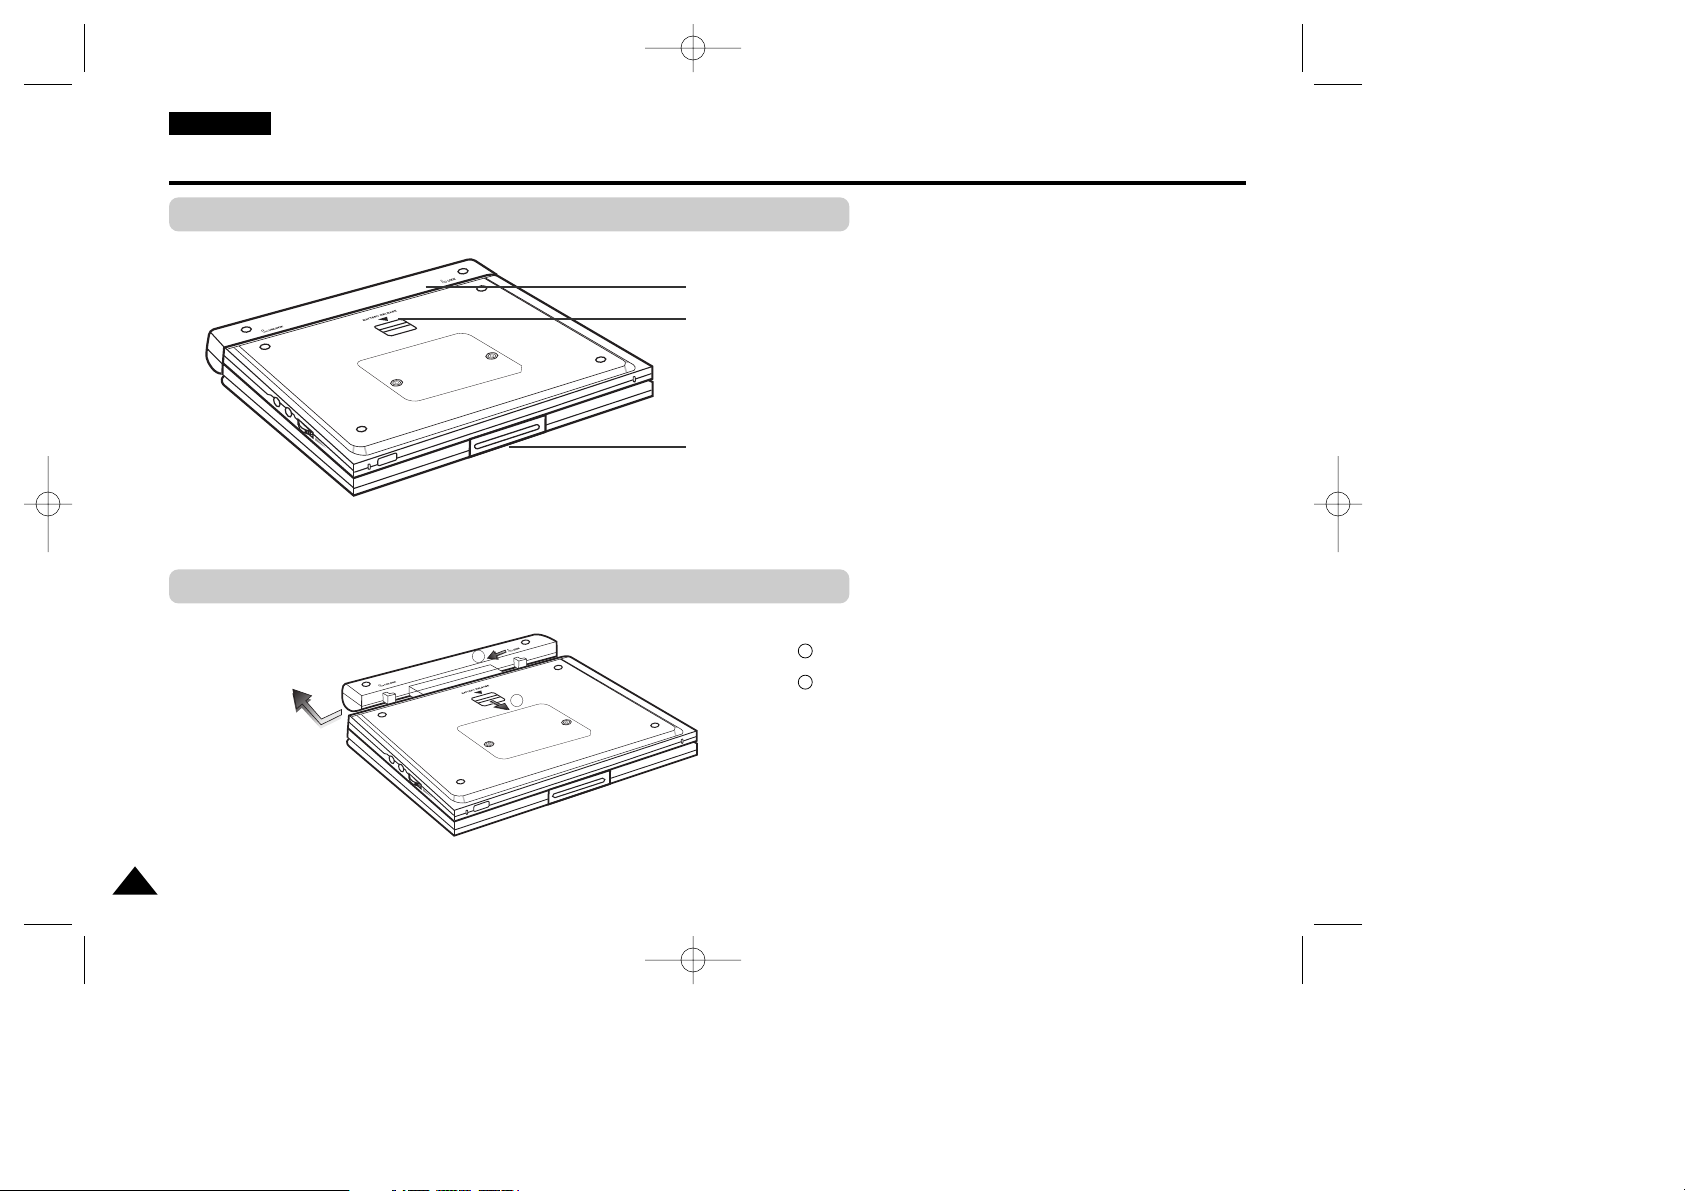
1. POWER
• Press the POWER button for 1 second to power off.
2. OPEN
3. DISC COVER
4. REVERSE DISPLAY
5. EZ VIEW
6. INFO
7. INPUT
8. LCD
9. SPEAKER
10. MENU
11. RETURN
12. CLEAR
13. ENTER ( ), DIRECTION (UP/DOWN/LEFT/RIGHT)
14. PLAY etc..
PLAY( ), PAUSE( ❙❙ )/STEP, STOP( ■ ), REV-SKIP( ),
FWD-SKIP( )
1
4
5
6
7
2
3
8
9
10
11
12
13
14
Description-Front Panel
Front View
00184P-L200W(ENG) 8/28/03 9:55 AM Page 12
13
ENGLISH
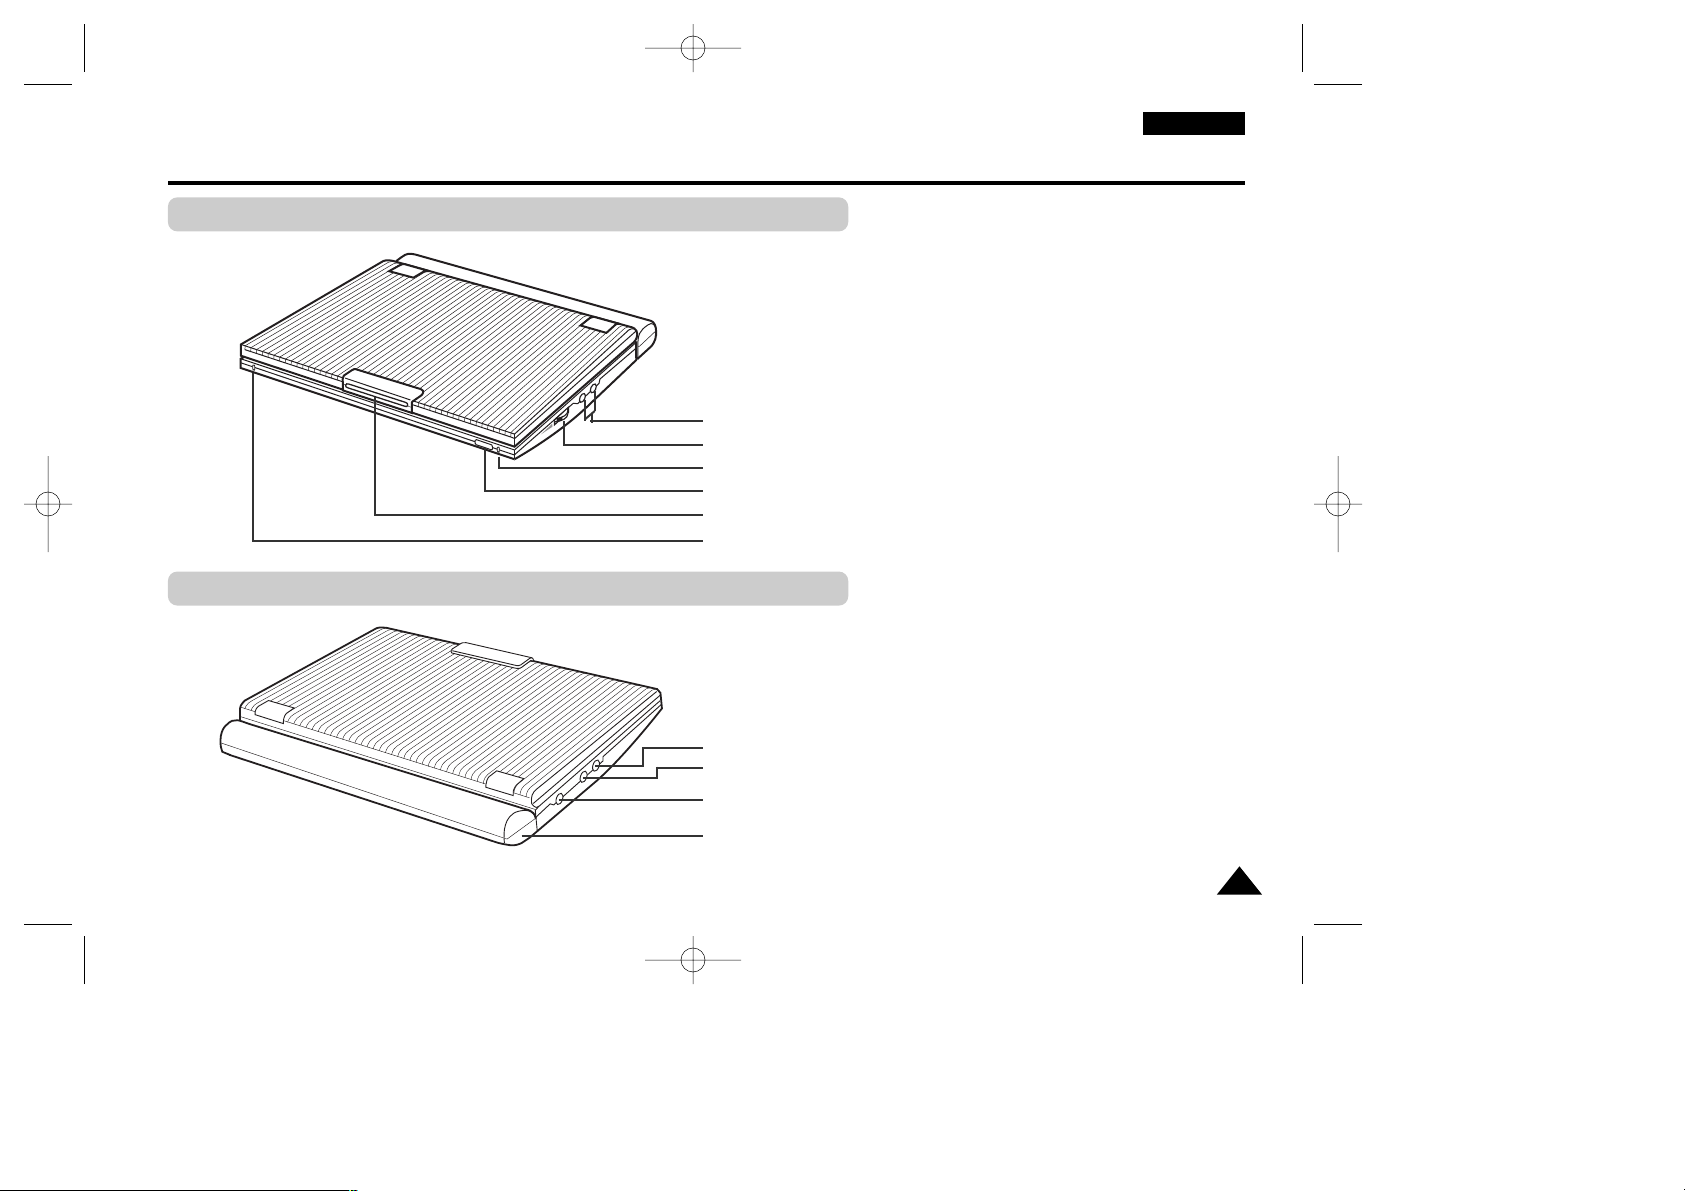
1. HEADPHONES 1,2
2. VOLUME
3. CHARGING INDICATOR
4. REMOTE SENSOR
5. OPEN
6. STANDBY INDICATOR
1
2
4
5
6
3
1
2
3
4
1. AUDIO IN/OUT / DIGITAL OUT
2. VIDEO IN/OUT / S-VIDEO OUT
3. DC IN 8.4V
4. BATTERY PACK
Description-Front Panel
Right View
Left View
00184P-L200W(ENG) 8/28/03 9:55 AM Page 13
ENGLISH
14
1. BATTERY PACK
2. RELEASE (Battery pack separation switch)
3. OPEN
Press in the direction of the arrow.
Slide battery pack to the left, then out.
1
2
2
3
1
Description-Front Panel
Bottom View
Battery pack separation method
1
2
00184P-L200W(ENG) 8/28/03 9:55 AM Page 14
15
ENGLISH
1
2
3
4
5
6
7
8
9
10
11
12
13
14
15
16
17
18
19
20
21
22
23
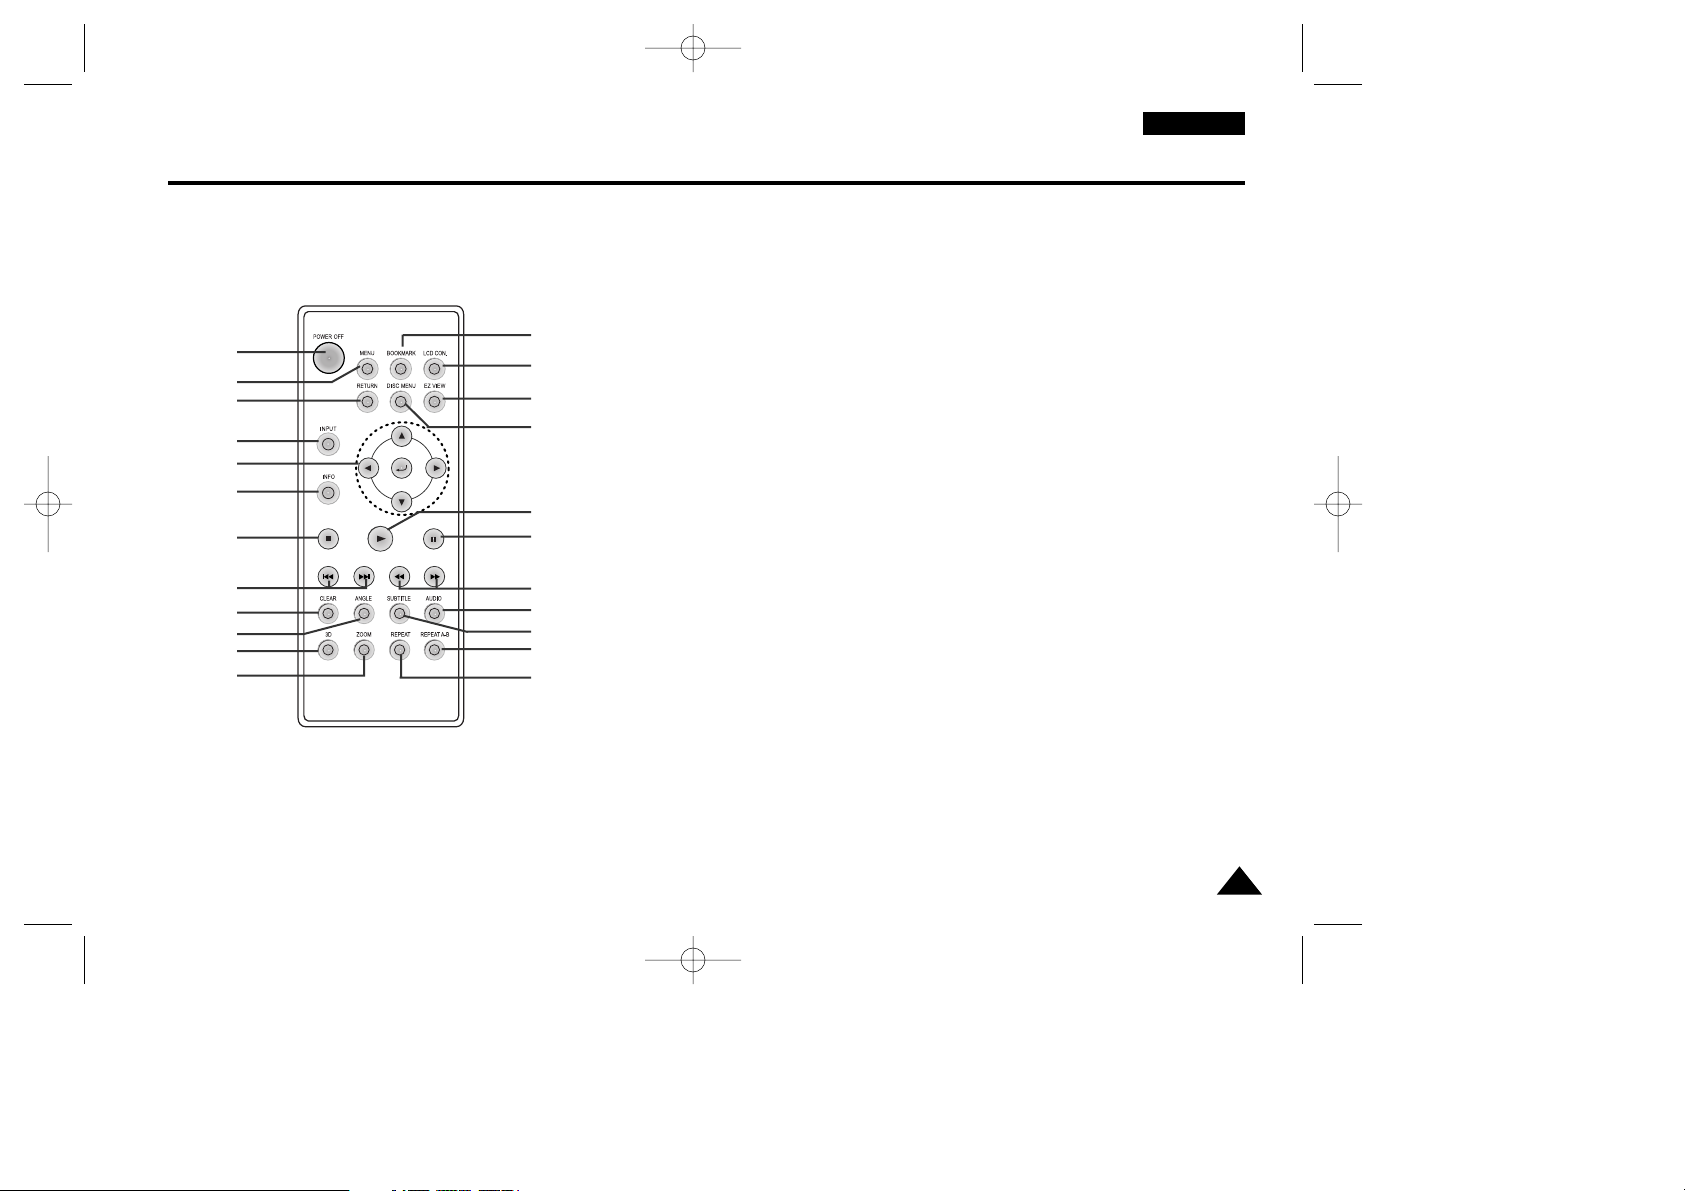
1. DVD POWER OFF Button
• When the set turns off, it remains low
power consumption mode. So you must
press the set POWER button to turn on.
2. MENU Button
• Brings up the DVD player’s setup menu.
3. RETURN Button
• Returns to the previous menu.
4. INPUT Button
• Use to select signal from external
sources.
5. ENTER/DIRECTION Buttons
(UP/DOWN or LEFT/RIGHT buttons)
• This button functions as a toggle switch.
6. INFO Button
• Displays the current disc mode.
7. STOP
• Stops disc play
8. SKIP Buttons
• Use to skip the title, chapter, or track.
9. CLEAR Button
• Use to remove menus or status displays
from the screen.
10. ANGLE Button
• Use to access various camera angles on a
DVD.
11. 3D Button
12. ZOOM Button
13. BOOKMARK Button
14. LCD CON. Button
• Change the LCD display status.
(Wide
➝ 4:3 ➝ Off)
15. EZ VIEW Button
• Easy View can convert Letter Box
images to full screen viewing on your
conventional TV.
16. DISC MENU Button
• Brings up the Disc menu.
17. PLAY Button
• Starts disc play.
18. PAUSE/STEP Button
• Pauses disc play.
19. SEARCH Buttons
• Allows you to search forward/backward
through a disc.
20. AUDIO Button
• Use this button to access various audio
functions on a disc.
21. SUBTITLE Button
22. REPEAT A-B Button
• Use to mark a segment to repeat
between A and B.
23. REPEAT Button
• Allows you to repeat play a title,
chapter, track, or disc.
Tour of the Remote Control
00184P-L200W(ENG) 8/28/03 9:55 AM Page 15
ENGLISH
16
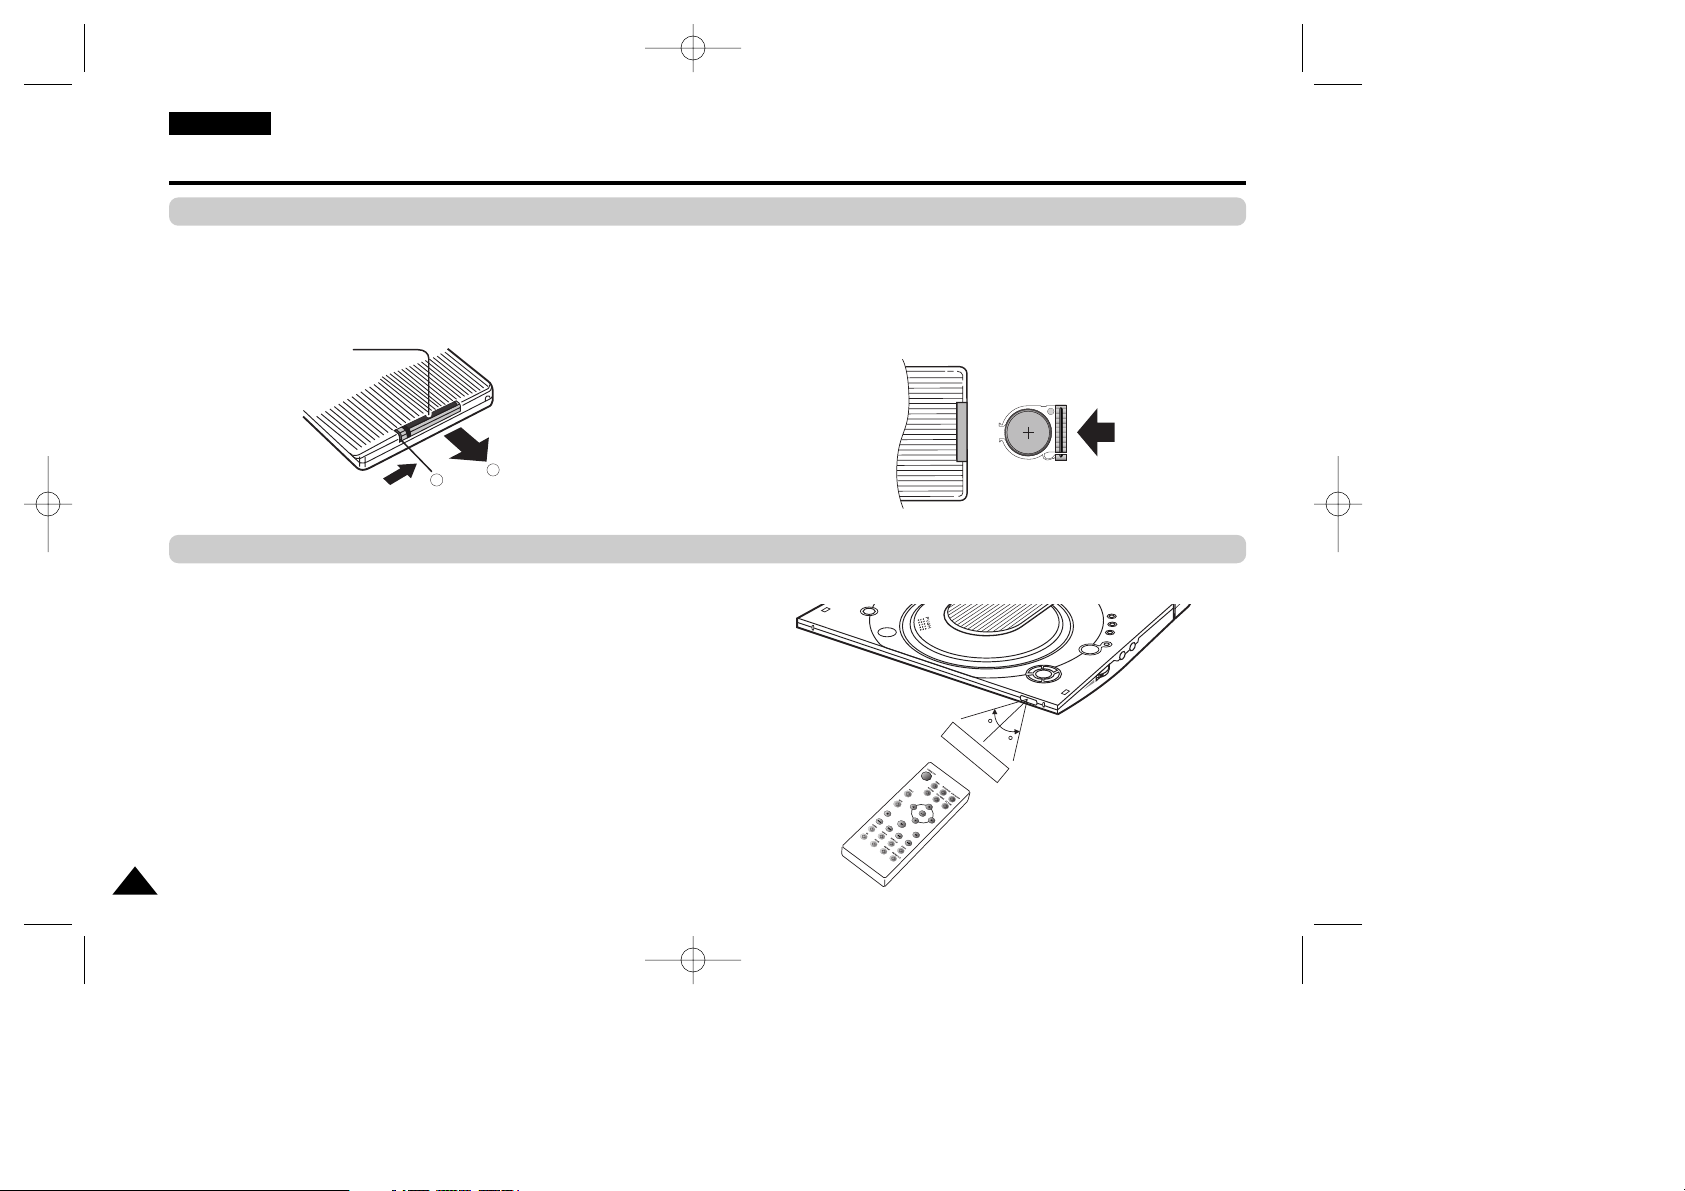
Using the Remote Control Unit
Installing the Battery in the Remote
Operating Range of Remote Control Unit
1. Remove the battery compartment in the direction of the arrow. 2. Place the lithium battery in the battery compartment and put
the battery compartment cover back on the remote.
•
Match the polarities (+ and -) on the battery with the marks
in the battery compartment. If the battery is inserted in the
wrong direction, your remote control may not work correclty.
Important!
Do not subject the remote control unit to strong vibration or shock.
Keep the remote control unit free from moisture and water.
Caution
•
After battery replacement, your remote control unit may not work.
If this occurs, remove the battery and re-insert in about 5 minutes.
•
It may be difficult to operate the remote control unit if the remote control sensor on
the DVD player is exposed to direct sunlight or strong artificial light.
Try operating the remote away from such light sources.
•
Remove the battery when not planning to use the remote control unit for a long
period of time.
Hole
(Back of the remote control)
(Remote Control Sensor)
1
2
2m(6.56ft)
30
30
00184P-L200W(ENG) 8/28/03 9:55 AM Page 16
17
ENGLISH
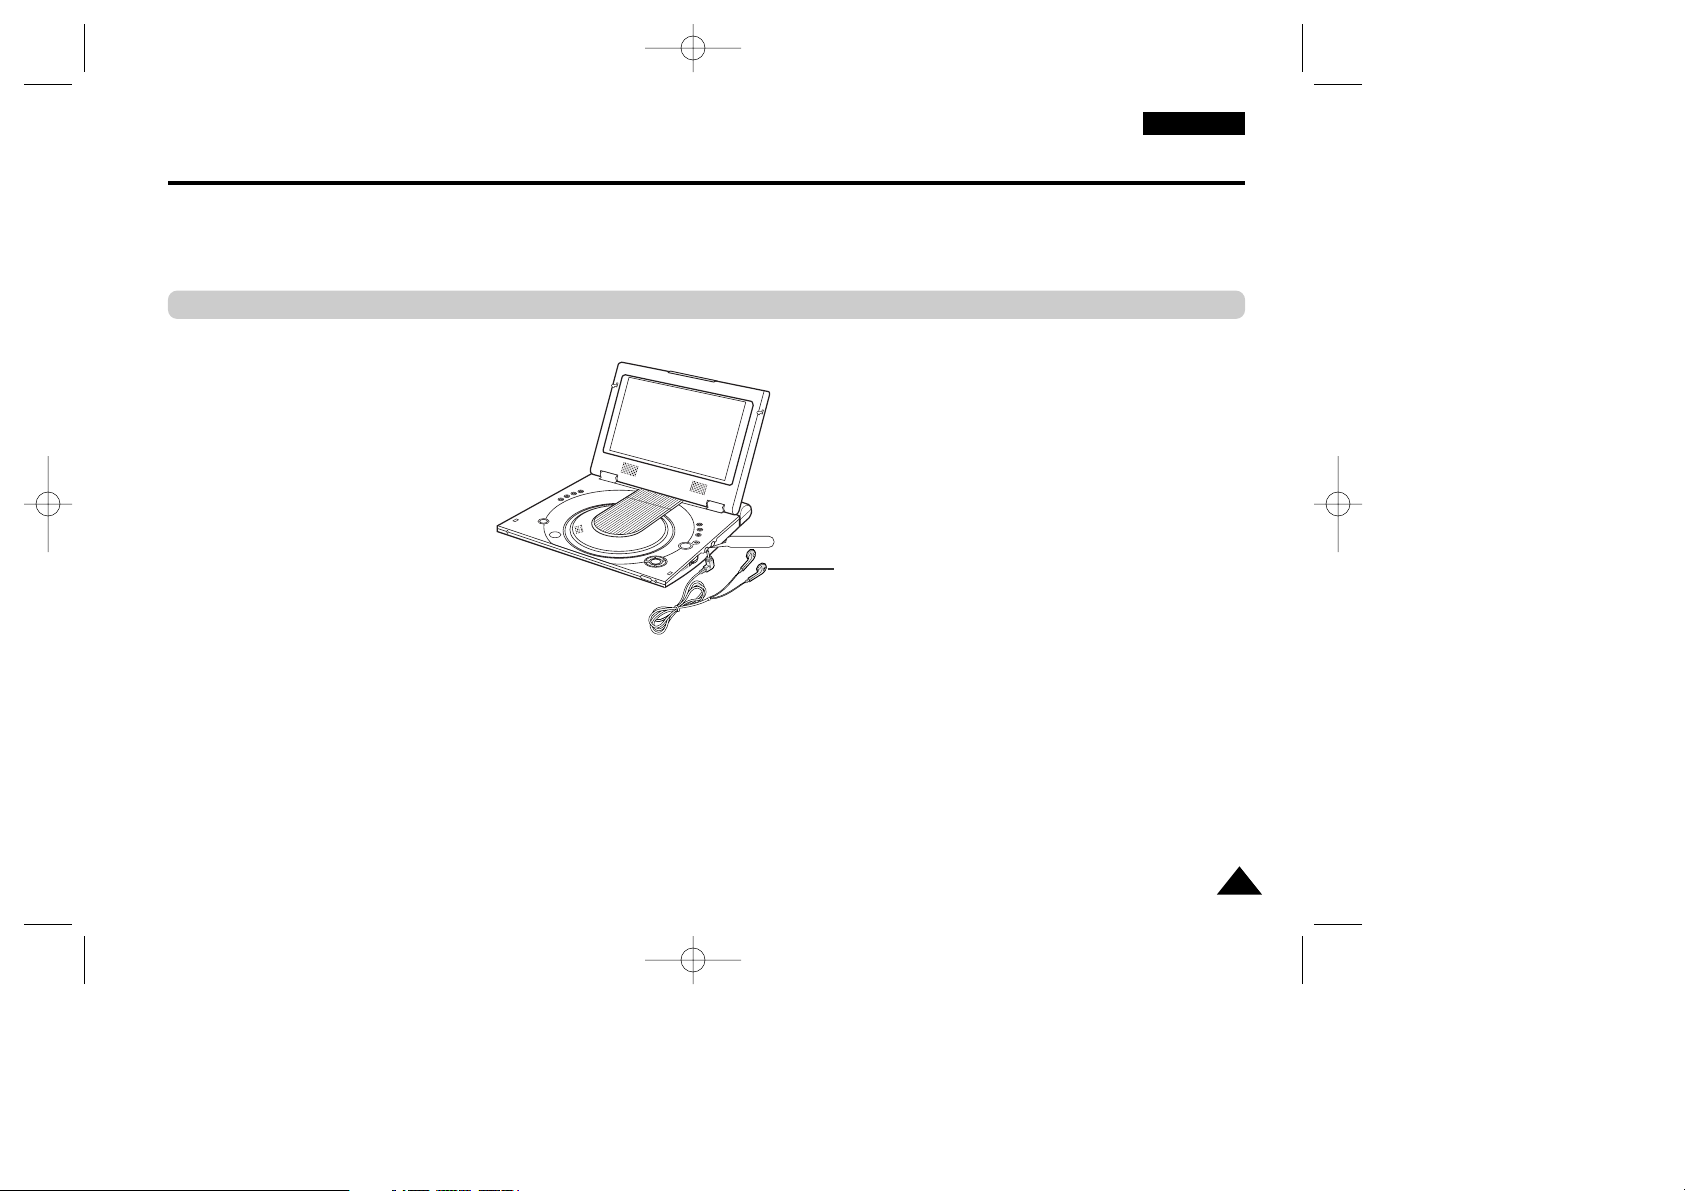
You can attach headphones with a stereo mini-jack plug (not supplied) to the
PHONES jack for private listening. There are two jacks available.
Connecting Headphones to the DVD
How to use headphones
1. Insert headphones into the PHONES jack.
• This jack is a stereo mini-jack.
Important!
• Turn the headphone volume down to the minimum setting before connecting.
Caution
• Once you connect headphones to the DVD, your DVD Player’s speakers will be disconnected.
2. Adjust the volume level by using the VOLUME control dial.
PHONES
Not supplied
00184P-L200W(ENG) 8/28/03 9:55 AM Page 17
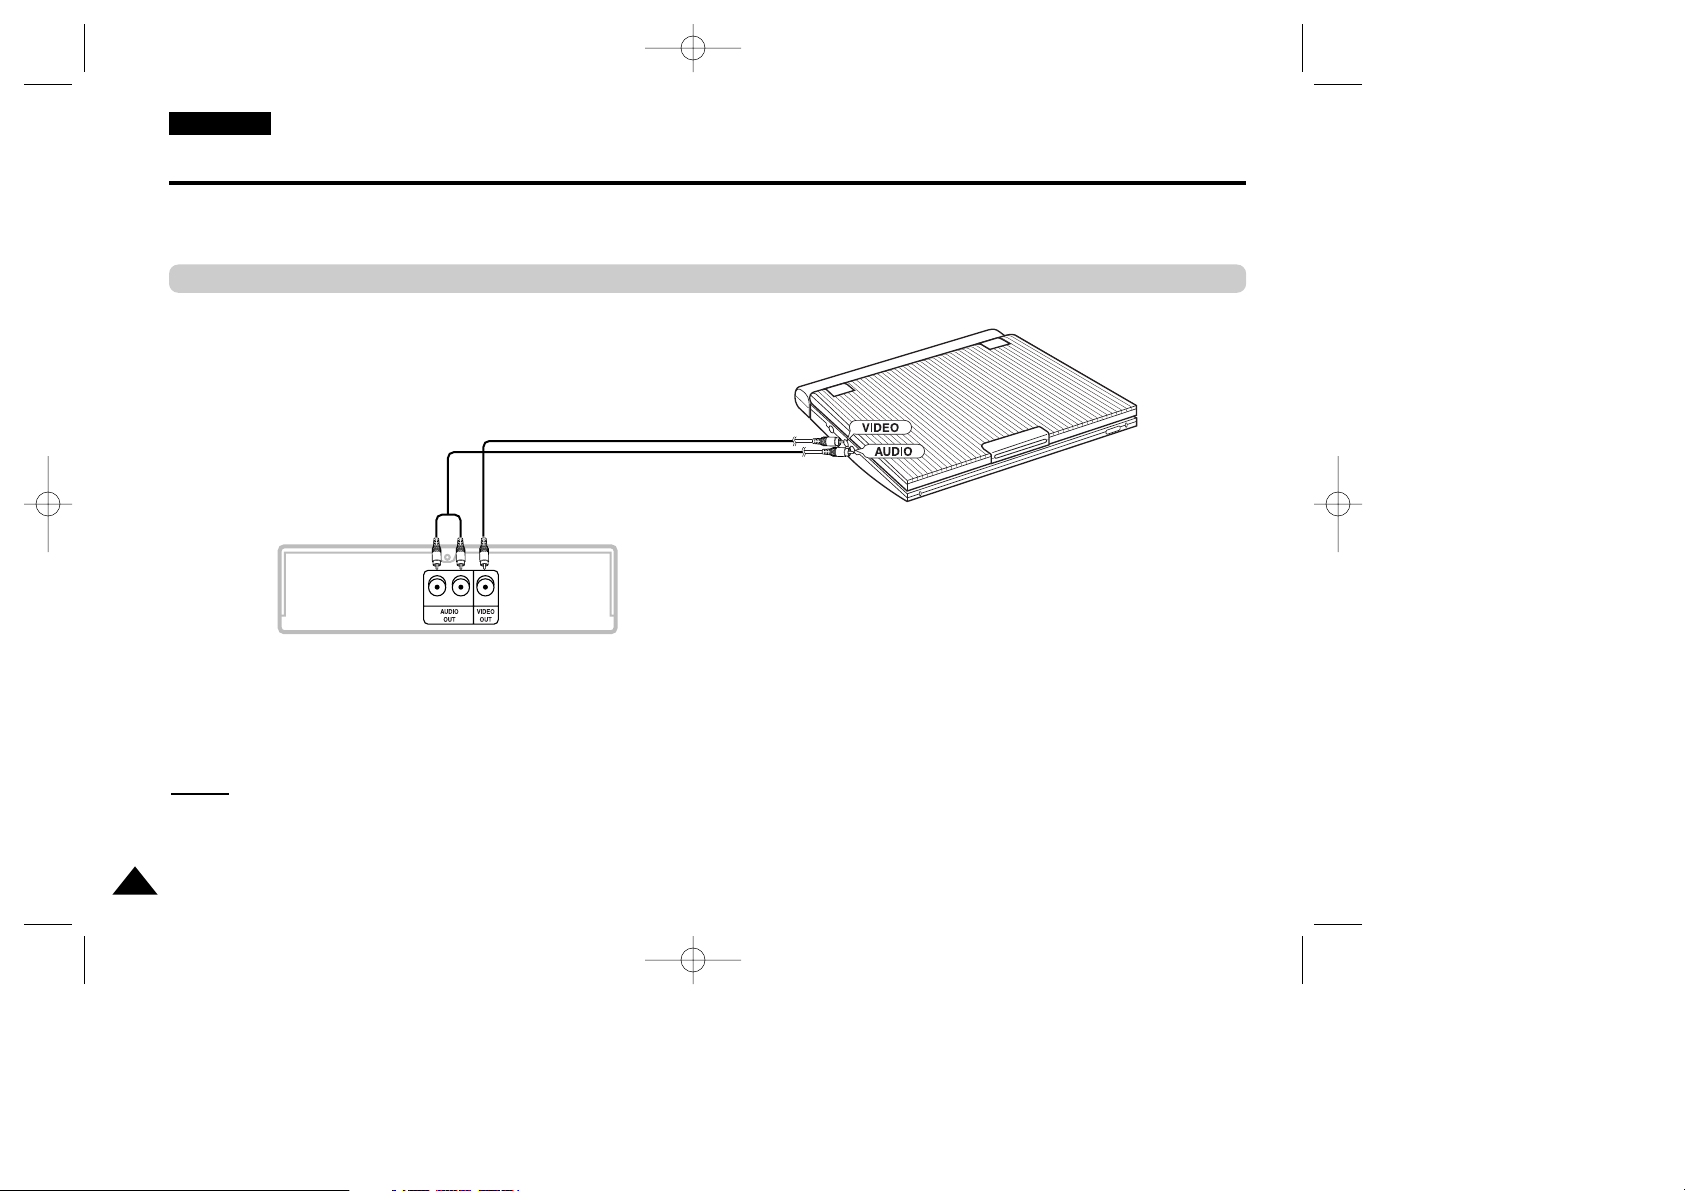
Connecting to an External Component (Input Select)
You can enjoy video from your VCR or Camcorder on your DVD player.
Important!
• Always turn off the DVD Player and other components before you connect any cables.
• Refer to owner’s manual of the components you are connecting for more information on those particular components.
NOTE:
NOTE:
• In the INPUT mode, the video input must be the standard PAL or NTSC.
When connecting to an external component
Jack/Plug Color
Video: Yellow
Audio (left): White
Audio (right): Red
To AUDIO OUT To VIDEO OUT
Audio Cable
Video Cable
VCR or other component equipped with external output connectors
ENGLISH
18
00184P-L200W(ENG) 8/28/03 9:55 AM Page 18

19
ENGLISH
Viewing a Video from an External Component
Use the procedure below to view a video from a VCR or Camcorder on your DVD player.
1. Connect the external component according to the procedure outlined on page 18.
2. Turn on the external component.
3. Turn on the DVD player.
4. Press the INPUT button to set the INPUT mode.
5. Press the PLAY button on the external component.
Caution
•
Power is not supplied from this device to the connected DVD player.
•
When not using your DVD player, always remove all connecting cables from the video or
audio input/output jacks.
•
If no signal is input for more than 5 minutes while in the input mode, this unit enters
the standby mode.
To view a video from an external component
INPUT
00184P-L200W(ENG) 8/28/03 9:55 AM Page 19
 Loading...