

Page 1
English-1
Quick Setup Guide
HDD & DVD RECORDER
DVD-893M/895M/897M
1 EZ Record
2 Getting Connected
3 DTV Functions
4 Basic Operation
EZ Record
This function allows you Initialise and Finalise a disc automatically.
(Refer to page 48 of the Instruction Manual for more information.)
With the unit in Stop mode, press the MENU button.
Press the buttons to select Setup, then press the OK or ► button.
Press the buttons to select Recording, then press the OK or ► button.
Press the
buttons to select EZ Record, then press the OK or ► button.
Press the buttons to select On, then press the OK or ► button.
Press the EXIT button to exit the menu.
Insert a disc.
If the disc is new, it is initialised to V mode automatically. (DVD-RW only)
Press the REC button.
1
1.
2.
3.
4.
5.
6.
7.
Recordable Discs
DVD-RAM/±RW/±R
Getting Connected
Select one of the following three types of connections :
The VHF/UHF RF OUT jack of this product sends only signals received through the antenna.
It does not output audio/video signals.
You must use one of the following connections on this unit.
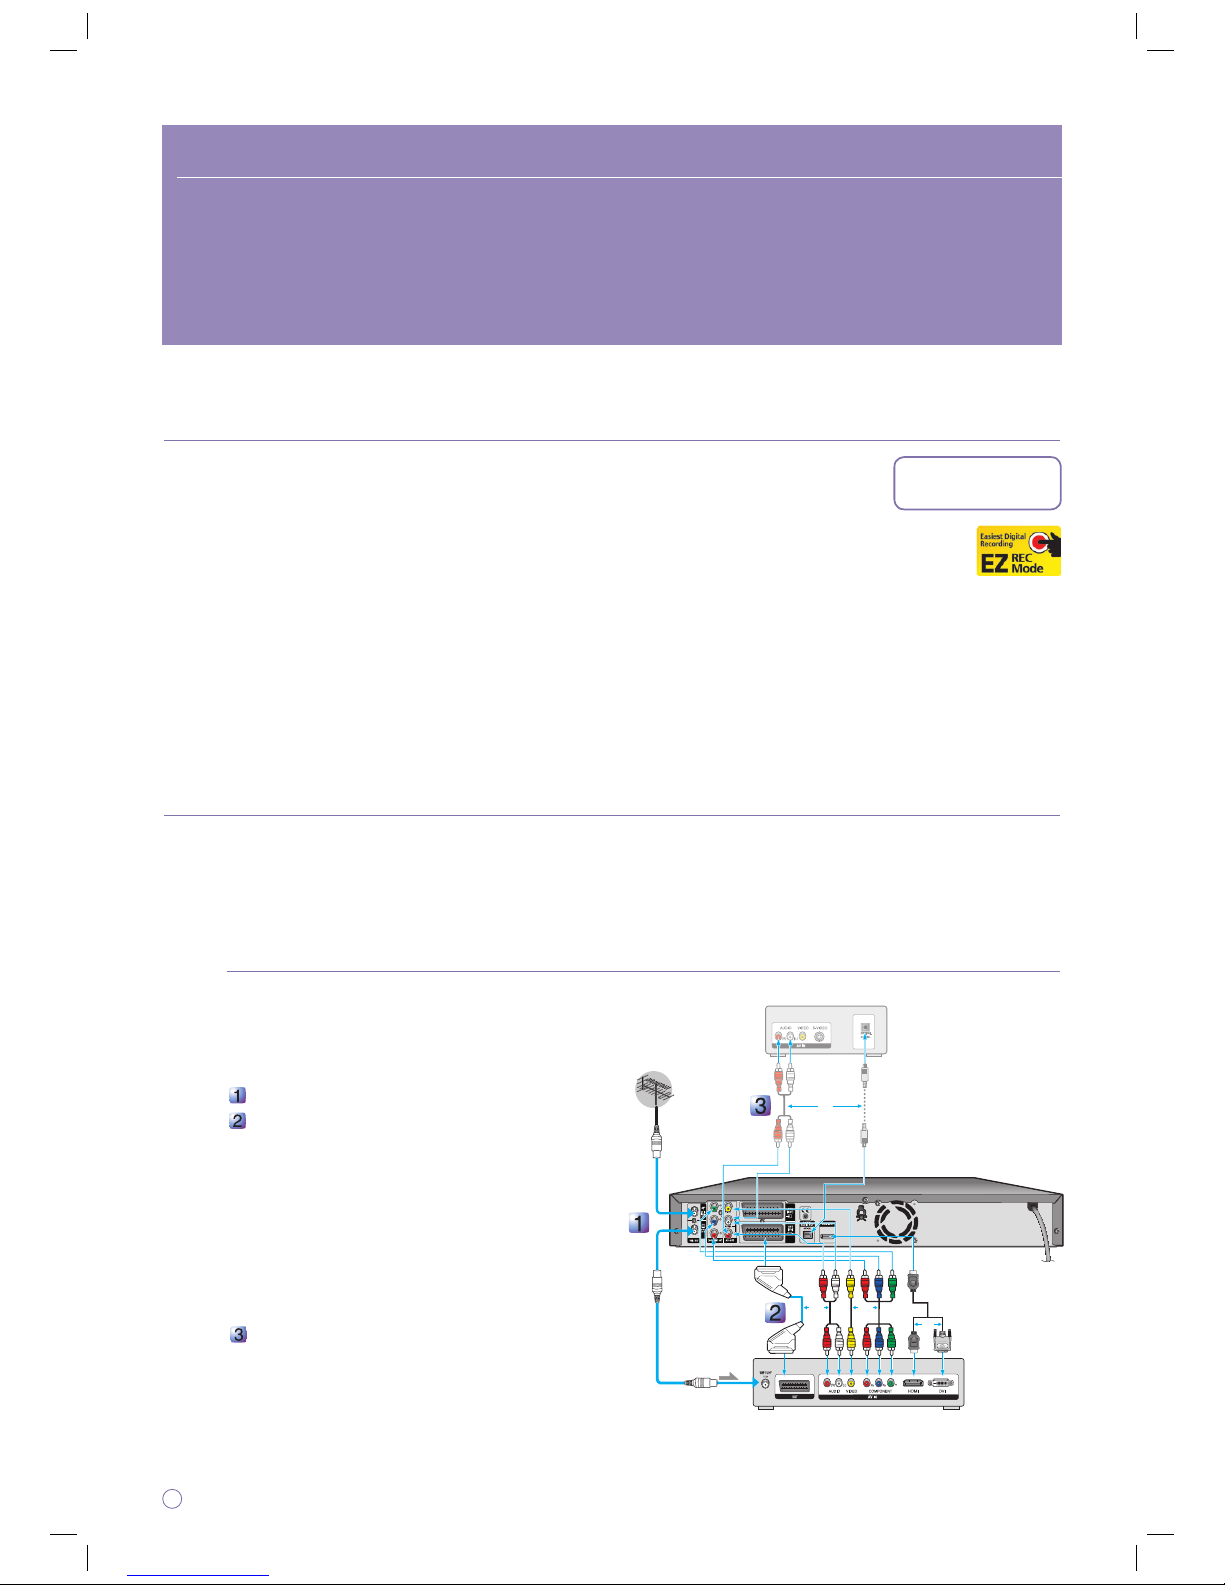
Antenna + HDD & DVD Recorder + TV
You can connect your HDD & DVD Recorder to the
television using the SCART cable if the appropriate input is
available on the television. You thus:
Obtain better quality sound and pictures
Simplify the setting up procedure of your HDD & DVD Recorder
Connect the RF cable as shown.
Connect one end of the SCART cable to the AV1 jack
on the rear of the HDD & DVD Recorder. Also use the
Video/Audio Cable to connect AUDIO OUT(R/L)/VIDEO
OUT jacks on the HDD & DVD Recorder to the Audio &
Video jacks on the TV.
For the best picture quality, if your TV has Component
video jacks, you can use component cables instead of
the yellow video connector on the Video/Audio cable. If
your TV has a HDMI or DVI jack, you can use the HDMI
or HDMI-DVI cable instead of the yellow video
connector on the Video/Audio cable.
If you have an AV amplifi er
Connect either audio cables from the AUDIO OUT(R/L) jacks on
the HDD & DVD Recorder to the AUDIO IN jacks on your AV
amplifi er, or a digital cable from the DIGITAL AUDIO OUT
(OPTICAL) jack on the HDD & DVD Recorder to the DIGITAL
AUDIO IN jack on your AV amplifi er.
2
•
•
•
C Samsung Electronics
To RF IN
To RF OUT
RF Cable
To ANT INPUT
AV amplifier (receiver) ▼
▲ HDD & DVD Recorder
▲ TV
OR
OR
OROR
Page 2
Antenna + VCR/Satellite receiver + HDD & DVD Recorder + TV
Before making or changing any rear panel connections, make sure that
all components are switched off and unplugged from the wall outlet.
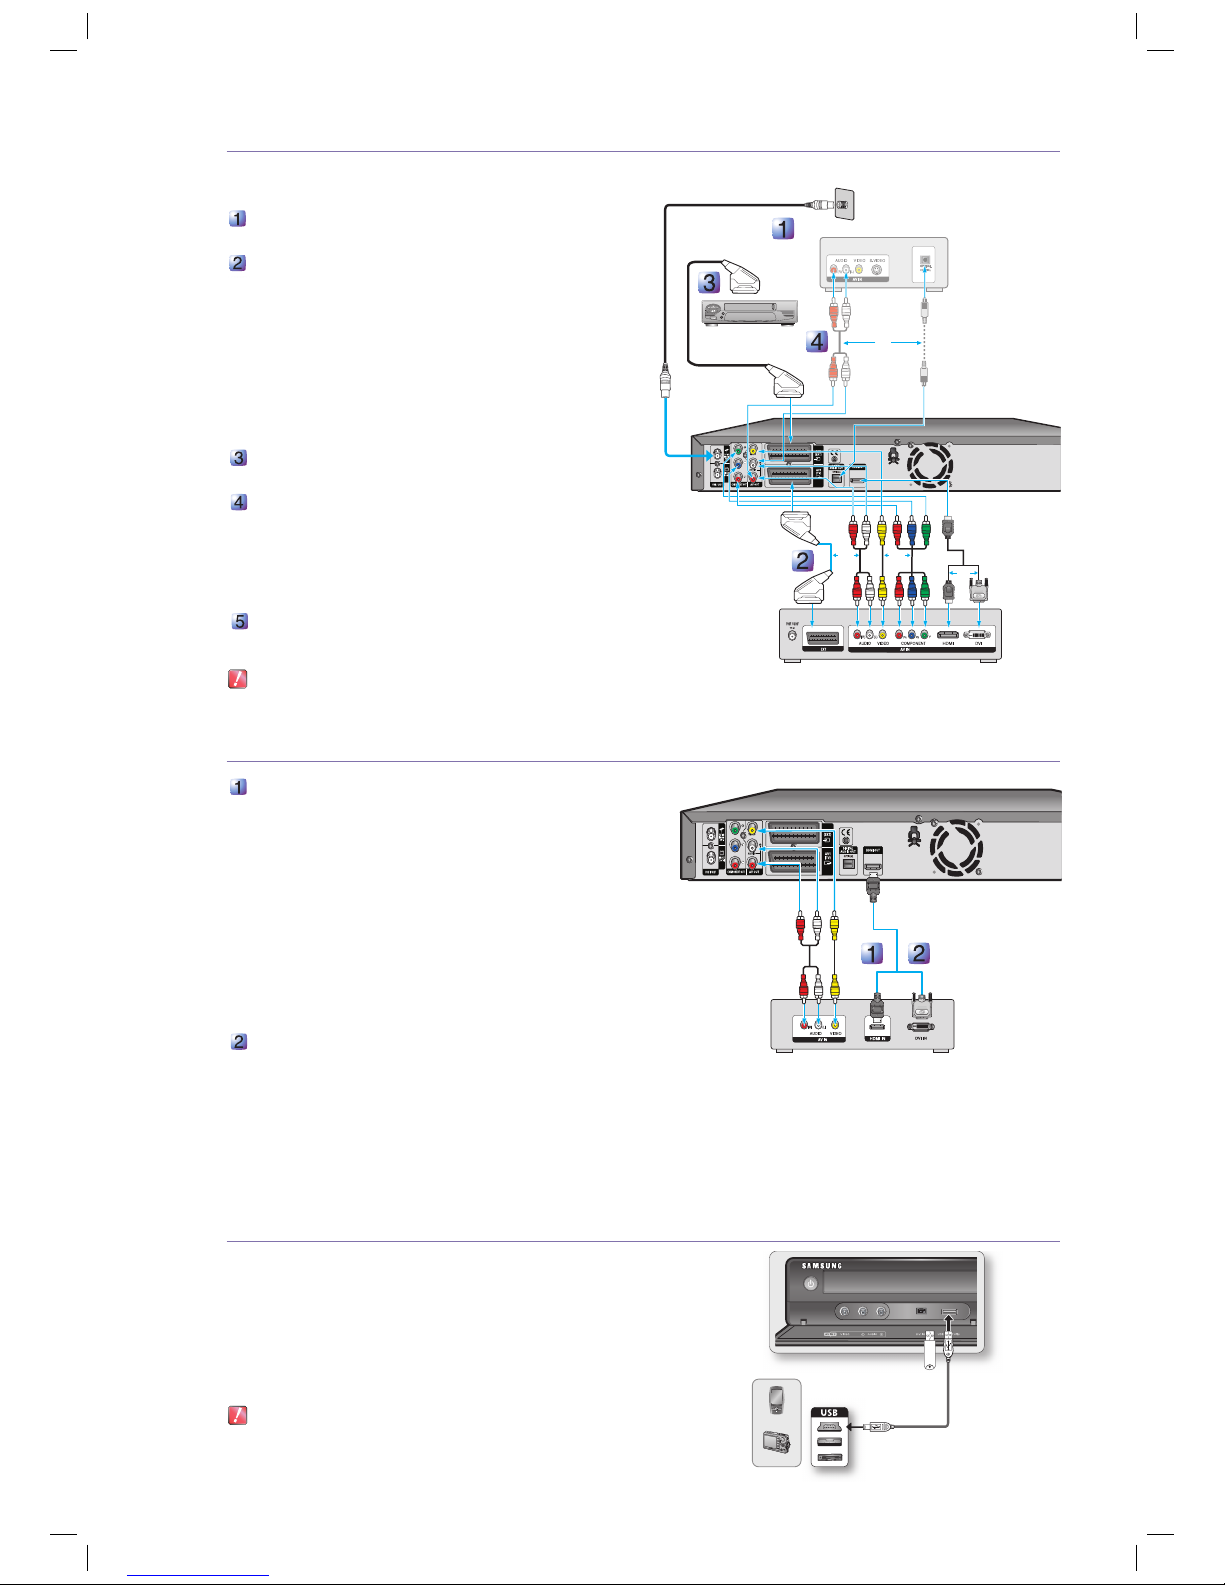
Connect the cable from the antenna/cable TV outlet to HDD &
DVD Recorder.
Connect the AV1 connector on HDD & DVD Recorder to the
SCART AV connector on TV using a SCART cable. Also use
the Video/Audio Cable to connect AUDIO OUT(R/L)/VIDEO
OUT jacks on the HDD & DVD Recorder to the Audio & Video
jacks on the TV.
For the best picture quality, if your TV has Component video
jacks, you can use component cables instead of the yellow
video connector on the Video/Audio cable. If your TV has a
HDMI or DVI jack, you can use the HDMI or HDMI-DVI cable
instead of the yellow video connector on the Video/Audio cable.
Connect the AV2 connector to a SCART AV connector on
VCR/Satellite receiver.
If you have an AV amplifi er
Connect either audio cables from the AUDIO OUT(R/L) jacks
on the HDD & DVD Recorder to the AUDIO IN jacks on your
AV amplifi er, or a digital cable from the DIGITAL AUDIO OUT
(OPTICAL) jack on the HDD & DVD Recorder to the DIGITAL
AUDIO IN jack on your AV amplifi er.
Setup “V
ideo Output” using on-screen menu.
Refer to pages 44~45 of the Instruction Manual for more information.
The Antenna con
nection does not pass audio/video signals.
To watch a DVD on your TV, you must connect audio/video or Scart cables.
Connecting HDMI/DVI to a TV
Connecting to a TV with HDMI Jack
Using the HDMI cable connect the HDMI OUT terminal on the rear of the
HDD & DVD Recorder to the HDMI IN terminal of your TV.
Press the input selector on your TV remote control until the HDMI
signal from the HDD & DVD Recorder appears on your TV screen.
If you use an HDMI cable to connect a Samsung TV to the HDD
& DVD RECORDER, you can operate the recorder using the TV
remote control. (This is only available with SAMSUNG TVs that
support Anynet+.
Please check the n logo (If your TV has an n logo, then it
supports Anynet+ function.)
Refer to pages 39~40
of the Instruction Manual for more
information.
Connecting to a TV w
ith DVI Jack
Using the DVI Adapter Cable, connect the HDMI OUT terminal on the
rear of the HDD & DVD Recorder to the DVI IN terminal of your TV.
Using the audio cables, connect the AUDIO (red and white) OUT terminals on the rear of the HDD & DVD Recorder to the AUDIO
(red and white) IN terminals of your TV. Turn on the HDD & DVD Recorder and TV.
Press the input selector on your TV remote control until the DVI signal from the HDD & DVD Recorder appears on your TV screen.
If the HDD & DVD Recorder is connected to your TV in HDMI 1080p output mode, you must use High speed(category2) HDMI cable.
Connecting a USB memory, MP3 player, Digital Camera to the USB HOST.
You can transfer JPEG, MP3 and DivX fi le of the MP3 player, USB memory or
digital camera to a HDD & DVD RECORDER using the USB interface.
You can also copy JPEG, MP3 and DivX fi le of the HDD & DVD RECORDER to
MP3 player, USB memory or digital camera using the USB interface.
(Refer to page 32 of the instruction Manual for more information)
Connecting a USB memory or other USB device to USB HOST of the
HDD & DVD RECORDER.
Disconnecting the USB cable during the data transfer will stop the
communication and may damage data stored in the memory.
•
•
•
M
1.
DVI
AdapterCable
(Not Included)
HDMI Cable
(Not Included)
▲ HDD & DVD Recorder
▲ TV
Wall
▲
external device
(VCR/Satellite receiver)
To RF IN
AV amplifier (receiver) ▼
▲ HDD & DVD Recorder
▲ TV
OR
OR OR
OR
MP3 Player
Digital Camera
English-2
Page 3

English-3
DTV Functions
Display Screen
After the television channels have been stored, you will see the
following picture(banner) each time you switch channels.
◆ Banner Elements
1. Displays the favorite channel.
2. Displays the teletext.
3. Displays the subtitle.
4. Displays the multi audio.
■ The icon is displayed according to the service
information of signal.
■ The icon is displayed only with more than one audio type
and language.
■ By pressing the
button, you can see the detailed
information.
Guide
The electronic programme guide gives you a channel list
for the channels.
With the unit in Stop mode, press the MENU button.
Press the buttons to select Guide, then press the
OK or ► button.
Press the GUIDE button while you are viewing a
programme. (DTV)
RED(A) button (Timer Record) : Setting the Timer
Record.
($) button : Go to next day
(#) button : Go to previous day
➝
It displays programme from now to 7 days after.
◄ ►
button : select the programme and
station.
INFO button (Information) : View the detail information
3
1.
2.
•
•
•
•
•
•
Basic Operation
Formatting a Disc
When you insert an unused disc, the following message
appears. Since available functions differ depending on the
disc type, select a disc that best fi ts your preferences.
DVD-RAM/DVD+R
: Formatting will be started
automatically.
DVD+RW : Use after formatting the disc.
DVD-RW : Use after initializing the disc. If you want to
change the V or VR mode, refer to "Formatting a
Disc" on the Instruction Manual.
DVD-R : Formatting disc is unnecessary and only
Video Mode Recording is supported.
4
With the unit in Stop mode, press the MENU button.
Press the
buttons to select “Disc Manager”, then
press the OK or
►
button.
Press the
◄ ►
buttons to select “Format”, then press
the OK button.
HDD/DVD-RAM/DVD+RW
You will be prompted with the confi rmation message
“
Current media :
***
Do you want to format?”.
Press the ◄ ► buttons to select “Yes”, then press the
OK button.
DVD-RW
You will be prompted with the confi rmation message
“Choose the recording format for DVD-RW”.
Press the ◄ ► buttons to select the desired format
type, then press OK button. “All data will be deleted.
Do you want to continue?” is displayed.
Press the ◄ ► buttons to select “Yes”, then press the
OK button.
The disc is formatted.
Recording the current TV programme
you are watching
Press the HDD or DVD button.
If you select DVD, Press the OPEN/CLOSE button
and place a recordable disc on the disc tray.
Press the OPEN/CLOSE button to close the disc tray.
Wait until “LOAD” disappears from the front panel
display.
Press the PROG (
) or Number buttons to select
the current programme you want to record.
Press the REC MODE button repeatedly, (or press the
REC MODE button and then press the buttons)
to select the recording speed (quality).
SPLPEPXP
• DVD-SH893M
HDD(160GB)
XP(High,approx. 33 hours) ➝ SP(Standard,approx. 67
hours) ➝ LP(Low,approx. 133 hours) ➝
EP(Extended,approx. 199 hours/264 hours) ➝
FR(Flexible,approx. 33~264 hours)
• DVD-SH895M
HDD(250GB)
XP(High,approx. 53 hours) ➝ SP(Standard,approx.
106 hours) ➝ LP(Low,approx. 211 hours) ➝
EP(Extended,approx. 316 hours/421 hours) ➝
FR(Flexible,approx. 53~421 hours)
• DVD-SH897M
HDD(320GB)
XP(High,approx. 68 hours) ➝ SP(Standard,approx.
135 hours) ➝ LP(Low,approx. 270 hours) ➝
EP(Extended,approx. 405 hours/534 hours) ➝
FR(Flexible,approx. 68~534 hours)
DVD
XP(High,approx. 1 hour) ➝ SP(Standard,approx. 2
hours) ➝ LP(Low,approx. 4 hours) ➝
EP(Extended,approx. 6 hours/8 hours) ➝
FR(Flexible,approx. 1~8 hours)
1.
2.
3.
•
•
4.
1.
2.
3.
4.
DTV 001
TF1
HDD
Record Mode
SP (02:12)
Page 4
English-4
Press the REC button.
Information concerning the channel being recorded is
displayed on the screen and then recording begins.
Icon (● REC) is displayed on the front panel.
To stop recording
Press the STOP ( ) button to stop or fi nish a recording in progress.
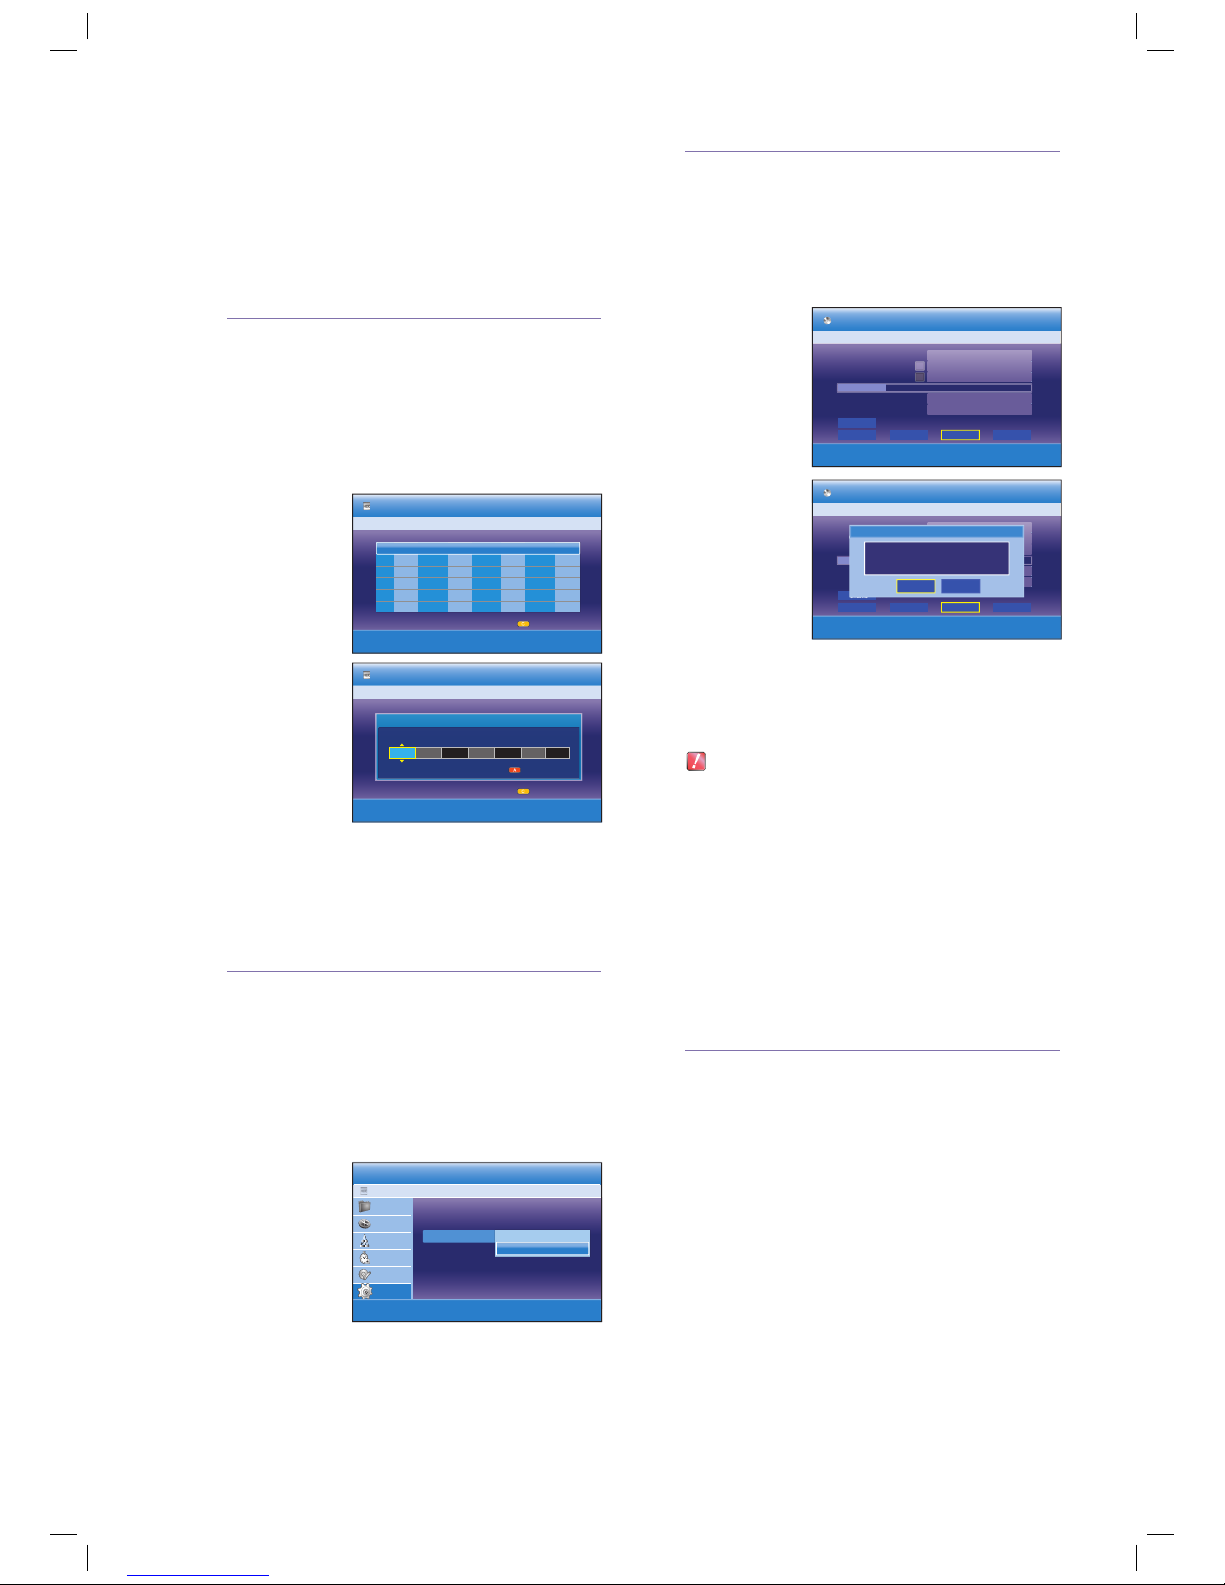
Making a Timer Recording
Press the OPEN/CLOSE button, place a recordable
disc on the disc tray.
Press the OPEN/CLOSE button to close the disc tray.
Wait until “LOAD” disappears from the front panel display.
With the unit in Stop mode, press the TIMER button.
Press the
button to select the
Scheduled List
,
then press the OK or ► button.
Press the OK
button to select
“Add a list”.
The Timer
Record Input
items (Date/
Time etc.) are
displayed.
Fill in the items
using the ◄
► and number
buttons.
After selecting
the set up
value for each
mode, press
the OK button
to select
“Save”.
Turn the power off to fi nish the Timer Recording setting.
Timer Recording will not work when the power is on.
Anynet+(HDMI CEC)
Anynet+ is a function that can be used to operate the
recorder using a Samsung TV remote control, by
connecting the HDD & DVD RECORDER to a SAMSUNG
TV using an HDMI Cable. (This is only available with
SAMSUNG TVs that support Anynet+.)
With the unit in Stop mode, press the MENU button.
Press the
buttons to select Setup, then press the
OK or ► button.
Press the
buttons
to select
System,
then press
the OK or ►
button.
Press the
buttons
to select Anynet+ (HDMI CEC), then press the OK or
►
button. Anynet+ (HDMI CEC) items will be
displayed.
Press the buttons to select On, then press the OK
or ► button.
5.
1.
2.
3.
4.
5.
6.
7.
1.
2.
3.
4.
5.
Finalising a Disc
After you record titles onto a DVD-RW/±R disc with your
HDD & DVD Recorder, it needs to be fi nalised before it can
be played back on external devices.
With the unit in Stop mode, press the MENU button.
Press the
buttons to select “Disc Manager”, then
press the OK or
►
button.
Press the
◄ ► button
to select
“Finalise”, then
press the OK
button.
You will be
prompted with
the message
“Do you want
to fi nalise
disc?”.
If you select
"Yes", you will
be prompted
again with the
message “Disc
will be fi nalised.
Do you want
to continue?”.
Press the
◄ ►
buttons to select “Yes”, then press the
OK button.
The disc is fi nalised.
• Once a disc is fi nalised, you cannot delete entries
from the record list.
After being fi nalised, the DVD±R/DVD-RW(V-mode)
operates in the same manner as a DVD-Video.
Depending on the disc type, the displayed screen
may be different.
Finalising time may be different depending on the
amount of data recorded on the disc.
Data on the disc will be damaged if the recorder is
powered off during fi nalisation process.
You can fi nalise the disc automatically using
EZ Record. Refer to page 48 of the Instruction
Manual for more information
Disc compatibility
Not all brands of discs will be compatible with this unit.
1.
2.
3.
4.
•
•
•
•
•
•
AK68-01594B
< MOVE sSELECT rRETURN eEXIT
HDD Scheduled List
Current Time 10:54
No. To Source Date Start End
Mode
PDC
Add a list
Recordable Time HDD 69:30 SP
Recorded List
< MOVE sSELECT rRETURN eEXIT
HDD Scheduled List
Current Time 10:54
No. To Source Date Start End
Mode
PDC
No.01 No Title
To Source Date Start End Mode
PDC
HDD AV 1 JAN 01 12:00 14:00 SP Off
Recordable Time HDD 69:30 SP Title
s
Save
Recordable Time HDD 69:30 SP
Recorded List
< MOVE sSELECT rRETURN eEXIT
DVD-RW(VR)
Disc Manager
Protection Delete All Finalise Format
Disc Name
Used Space
Available Space
Disc Protection Info
Current Rec. Mode
00:17 ( 0.52 GB)
01:54 SP ( 3.85 GB)
Not Protected
VR-Mode
Rename
< MOVE sSELECT rRETURN eEXIT
DVD-RW(VR)
Disc Manager
Protection Delete All Finalise Format
Disc Name
Used Space
Available Space
Disc Protection Info
Current Rec. Mode
00:17 ( 0.52 GB)
01:54 SP ( 3.85 GB)
Not Protected
VR-Mode
Rename
Do you want to finalise disc?
NoYes
HDD & DVD RECORDER
HDD
Library
Guide
Channel
Timer Record
Disc Manager
Setup
System
Auto Power Off : Off ►
Power Save : Off ►
Anynet+ (HDMI CEC) : On ►
DVB-T Auto Subtitle : On ►
Touch Key Sound : Off ►
DivX(R) Registration ►
m MOVE sSELECT rRETURN eEXIT
Off
On ✔
 Loading...