

Page 1
Heat Pump Dryer
User manual
DV9*T*2****/DV8*T*2****
U-PJT_DRYER_SimpleUX_WEB_SSEC-00_EU_English.indd 1 2021/11/9 17:26:24
Page 2
Contents
English
Safety information 4
What you need to know about the safety instructions 4
Important safety symbols 4
Important safety precautions 5
Critical installation warnings 7
Critical usage warnings 8
Usage cautions 9
Critical cleaning warnings 11
Care for preventing freezing 11
Instructions about the WEEE 12
Installation 13
What’s included 13
Installation requirements 15
Step-by-step installation 16
Door reversal 20
Before you start 25
Initial setup 25
Drying guidelines 26
Operations 28
Control panel 28
Operating a cycle 30
Cycle overview 31
Additional functions 34
System functions 36
Special features 38
Maintenance 43
Emptying the water tank 43
Cleaning 44
English2
U-PJT_DRYER_SimpleUX_WEB_SSEC-00_EU_English.indd 2 2021/11/9 17:26:24
Page 3
Troubleshooting 48
Checkpoints 48
Information codes 50
Appendix 51
Fabric care chart 51
Protecting the environment 52
Specification 53
Contact information 54
QUESTIONS OR COMMENTS? 54
English
English 3
U-PJT_DRYER_SimpleUX_WEB_SSEC-00_EU_English.indd 3 2021/11/9 17:26:24
Page 4
Safety information
Congratulations on your new Samsung dryer. This manual contains important information on the
English
installation, use, and care of your appliance. Please take the time to read this manual to take full advantage
of your dryer’s many benefits and features.
What you need to know about the safety instructions
Warnings and Important Safety Instructions in this manual do not cover all possible conditions and
situations that may occur. It is your responsibility to caution and care when installing, maintaining, or
operating your dryer.
Always contact your manufacturer about problems or conditions you do not understand.
Important safety symbols
What the icons and signs in this user manual mean:
WARNING
Hazards or unsafe practices that may result in severe personal injury, death and/or property damage.
CAUTION
Hazards or unsafe practices that may result in personal injury and/or property damage.
NOTE
Indicates that a risk of personal injury or material damage exists.
These warning signs are here to prevent injury to yourself and others.
Please follow them explicitly.
After reading this manual, store it in a safe place for future reference.
Read all instructions before using the appliance.
As with any equipment that uses electricity and moving parts, potential hazards exist. To safely operate this
appliance, familiarize yourself with its operation and exercise care when using it.
WARNING
Risk of Fire
• Clothes dryer installation must be performed by a qualified technician.
• Install the clothes dryer according to the manufacturer’s instructions and local codes.
• To reduce the risk of severe injury or death, follow all installation instructions.
English4
U-PJT_DRYER_SimpleUX_WEB_SSEC-00_EU_English.indd 4 2021/11/9 17:26:24
Page 5
Important safety precautions
WARNING
To reduce the risk of fire, electric shock, or injury to persons when using your
appliance, follow basic precautions, including the following:
1. This appliance is not to be used by persons (including children) with reduced
physical, sensory or mental capabilities, or lack of experience and knowledge,
unless they have been given supervision or instruction concerning use of the
appliance by a person responsible for their safety.
2. For use in Europe: This appliance can be used by children aged from 8 years
and above and persons with reduced physical, sensory or mental capabilities
or lack of experience and knowledge if they have been given supervision or
instruction concerning use of the appliance in a safe way and understand the
hazards involved. Children shall not play with the appliance. Cleaning and user
maintenance shall not be made by children without supervision.
3. Children should be supervised to ensure that they do not play with the
English
appliance.
4. If the supply cord is damaged, it must be replaced by the manufacturer, its
service agent or similarly qualified persons in order to avoid a hazard.
5. The new hose-sets supplied with the appliance are to be used and that old hose-
sets should not be reused.
6. For appliances with ventilation openings in the base, that a carpet must not
obstruct the openings.
7. For use in Europe: Children of less than 3 years should be kept away unless
continuously supervised.
8. CAUTION: In order to avoid a hazard due to inadvertent resetting of the thermal
cut-out, this appliance must not be supplied through an external switching
device, such as a timer, or connected to a circuit that is regularly switched on
and off by the utility.
9. The tumble dryer is not to be used if industrial chemicals have been used for
cleaning.
English 5
U-PJT_DRYER_SimpleUX_WEB_SSEC-00_EU_English.indd 5 2021/11/9 17:26:25
Page 6
Safety information
10. The lint trap has to be cleaned frequently, if applicable.
English
11. Lint must not to be allowed to accumulate around the tumble dryer. (not
applicable for appliances intended to be vented to the exterior of the building)
12. Adequate ventilation has to be provided to avoid the back flow of gases into the
room from appliances burning other fuels, including open fires.
13. Do not dry unwashed items in the tumble dryer.
14. Items that have been soiled with substances such as cooking oil, acetone,
alcohol, petrol, kerosene, spot removers, turpentine, waxes and wax removers
should be washed in hot water with an extra amount of detergent before being
dried in the tumble dryer.
15. Items such as foam rubber (latex foam), shower caps, waterproof textiles,
rubber backed articles and clothes or pillows fitted with foam rubber pads
should not be dried in the tumble dryer.
16. Fabric softeners, or similar products, should be used as specified by the fabric
softener instructions.
17. The final part of a tumble dryer cycle occurs without heat (cool down cycle) to
ensure that the items are left at a temperature that ensures that the items will
not be damaged.
18. Remove all objects from pockets such as lighters and matches.
19. WARNING: Never stop a tumble dryer before the end of the drying cycle unless
all items are quickly removed and spread out so that the heat is dissipated.
20. Exhaust air must not be discharged into a flue which is used for exhausting
fumes from appliances burning gas or other fuels.
21. The appliance must not be installed behind a lockable door, a sliding door or a
door with a hinge on the opposite side to that of the tumble dryer, in such a way
that a full opening of the tumble dryer door is restricted.
22. WARNING: The appliance must not be supplied through an external switching
device, such as a timer, or connected to a circuit that is regularly switched on
and off by a utility.
English6
U-PJT_DRYER_SimpleUX_WEB_SSEC-00_EU_English.indd 6 2021/11/9 17:26:25
Page 7
Heat pump model only: The instructions shall also include the substance of the
following:
WARNING: In the appliance enclosure or in the built-in structure, keep
ventilation openings clear of obstruction.
WARNING: Do not damage the refrigerant circuit.
Critical installation warnings
WARNING
The installation of this appliance must be performed by a qualified technician or service company.
• Failure to do so may result in electric shock, fire, an explosion, problems with the product, or injury.
Plug the power cord into a wall socket and use the socket for this appliance only. In addition, do not use an
extension cord.
• Sharing a wall socket with other appliances using a power strip or extending the power cord may result
in electric shock or fire.
• Ensure that the power voltage, frequency and current are the same as those of the product
specifications. Failure to do so may result in electric shock or fire. Failure Plug the power plug into the
wall socket firmly.
Remove all foreign substances such as dust or water from the power plug terminals and contact points
using a dry cloth on a regular basis.
• Unplug the power plug and clean it with a dry cloth.
• Failure to do so may result in electric shock or fire.
English
Keep all packaging materials well out of the reach of children, as packaging materials can be dangerous to
children.
• If a child places a bag over its head, it may result in suffocation.
This appliance must be properly grounded.
Do not ground the appliance to a gas pipe, plastic water pipe, or telephone line.
• This may result in electric shock, fire, an explosion, or problems with the product
• Never plug the power cord into a socket that is not grounded correctly and make sure that it is in
accordance with local and national codes.
Do not install or keep the product exposed to the outdoor elements.
Do not use a damaged power plug, damaged power cord or loose wall socket.
• This may result in electric shock or fire.
If the plug (power supply cord) is damaged, it must be replaced by the manufacturer or its service agent or a
similar qualified technician in order to avoid a hazard.
This appliance should be positioned to be accessible to the power plug after installation.
Do not pull or excessively bend the power cord.
Do not twist or tie the power cord.
English 7
U-PJT_DRYER_SimpleUX_WEB_SSEC-00_EU_English.indd 7 2021/11/9 17:26:25
Page 8
Safety information
Do not hook the power cord over a metal object, place a heavy object on the power cord, insert the power
English
cord between objects, or push the power cord into the space behind the appliance.
• This may result in electric shock or fire.
Do not pull the power cord, when unplugging the power plug.
• Unplug the power plug by holding the plug.
• Failure to do so may result in electric shock or fire.
This appliance must be properly grounded. Never plug the power cord into a receptacle that is not grounded
adequately and in accordance with local and national codes. See installation instructions for grounding this
appliance.
Install this appliance in a location with solid, level floor.
• Failing to do so may result in abnormal vibrations, noise or problems with the product.
Since an ingredient in hair spray may degrade the hydrophile property of the heat exchanger so that dew
may appear on the outer surface of the appliance when the cooling operation is running, do not install the
appliance in a beauty salon.
This appliance should be positioned so that the power plug, the water supply taps, and the drain pipes are
accessible.
Critical usage warnings
WARNING
Do not let children or pets on or into the product. In addition, when disposing of this product, disassemble
the door lock (lever).
• This may result in children falling and injuring themselves.
• If children become locked in the product, there is a danger of suffocation.
Do not try to access the inside of the product when the drum is rotating.
Do not sit on the product or lean against the door.
• This may result in the product turning over and resulting in injury.
Dry the laundry only after it was spun by an appropriate washing machine.
Do not dry unwashed items in the tumble dryer.
Do not drink the condensed water.
Never stop a tumble dryer before the end of the drying cycle unless all items are quickly removed and
spread out so that the heat is dissipated.
Do not dry laundry contaminated by inflammable materials such as gasoline, kerosene, benzene, thinner,
alcohol, etc.
• This may result in electric shock, fire or explosion.
Do not let pets chew or play with the dryer.
• This may result in electric shock or injury.
When disposing of the product, separate the door and the power cord before disposing of the product.
• Failing to do so may result in damage to the power code or an injury.
English8
U-PJT_DRYER_SimpleUX_WEB_SSEC-00_EU_English.indd 8 2021/11/9 17:26:25
Page 9
Do not touch the power plug with wet hands.
• This may result in electric shock.
When gas (city gas, propane gas, LP gas) leaks, do not touch this appliance or the power cord, ventilate
immediately.
• At this time, do not use the ventilating fan.
• A spark may cause an explosion or fire.
Do not repair, replace, or attempt to service any part of the appliance unless specifically recommended in
the user-repair instructions. You must also have the skills necessary to service this appliance.
Do not attempt to repair, disassemble, or modify the appliance yourself.
• Do not use any fuse(such as cooper, steel wire, etc.) other than the standard fuse.
• When repairing or reinstalling the appliance is required, contact your nearest service center.
• Failure to do so may result in electric shock, fire, problems with the product, or injury.
The product you have purchased is designed for domestic use only.
The use for business purposes qualifies as product misuse. In this case, the product will not be covered
by the standard warranty provided by Samsung and no responsibility can be attributed to Samsung for
malfunctions or damages resulting from such misuse.
If the product generates strange noise, smells of something burning, or generates smoke, immediately cutoff the power and contact the service center.
• Otherwise, it may cause an electric shock or fire as a result.
English
Do not let children (or pets) play in or on your product. The product door does not open easily from the
inside and children may be seriously injured if trapped inside.
Usage cautions
CAUTION
Do not stand on top of the appliance or place objects (such as laundry, lighted candles, lighted cigarettes,
dishes, chemicals, metal objects, etc.) on the appliance.
• This may result in electric shock, fire, problems with the product, or injury.
Do not touch the glass door and inside of the drum during or just after drying as it is hot.
• This may result in burns.
The door glass becomes hot during drying. Therefore, do not touch the door glass.
Also, do not allow children to play around the dryer or touch the door glass.
• This may result in burns.
Do not press the buttons using sharp objects such as pins, knifes, fingernails, etc.
• This may result in electric shock or injury.
Do not dry laundry containing forming rubber (latex) or similar rubber textures.
• If forming rubber is heated, it may start a fire.
English 9
U-PJT_DRYER_SimpleUX_WEB_SSEC-00_EU_English.indd 9 2021/11/9 17:26:25
Page 10
Safety information
Do not dry laundry contaminated by vegetable oil or cooking oil as a large amount of the oil will not be
English
removed when washing the laundry. In addition, use the unheated dry cycle so that the laundry is not
heated.
• The oxidization heat of the oil may start a fire.
Do not dry laundry contaminated by foreign substances such as oil, cream, lotion, or other chemicals that
are used in places such as skincare room, massage parlor, beauty salon, or hospital.
• This may result in electric shock, fire, malfunction, and injury.
Make sure that the pockets of all clothing to be dried are empty.
• Hard, sharp objects, such as coins, safety pins, nails, screws, or stones can cause extensive damage to the
appliance.
Do not dry clothing with large buckles, buttons, or other heavy metal (zippers, hooks and eyelets, button-up
covers).
If necessary, use the laundry net for small and lightweight laundry such as fabric tie belt, apron strings, and
underwire bras which can dissolve or break during a cycle.
Dryer sheets are compatible with this model, and are recommended for better drying performance.
Dryer sheets are also beneficial in reducing the static electricity generated during a drying cycle. Static
electricity could lead to damage of laundry items and potentially the appliance.
Do not use the dryer near dangerous powders such as coal dust, wheat flour, etc.
• This may result in electric shock, fire or an explosion.
Do not place inflammable materials near the product.
• This may result in toxic gases from the product, damage to parts, electric shock, fire or an explosion.
• The appliance should not be placed behind lockable doors etc.
Do not touch the rear side of the appliance during or immediately after drying is complete.
• The appliance remains hot and may cause burns.
English10
U-PJT_DRYER_SimpleUX_WEB_SSEC-00_EU_English.indd 10 2021/11/9 17:26:25
Page 11
Critical cleaning warnings
WARNING
Do not clean the appliance by spraying water directly onto it.
Do not use benzene, thinner or alcohol to clean the appliance.
• This may result in discoloration, deformation, damage, electric shock or fire.
Before cleaning or performing maintenance, unplug the appliance from the wall socket.
• Failure to do so may result in electric shock or fire.
Clean the filter case before and after using the dryer.
Clean the inside of the product on a regular basis by asking an authorized service engineer.
Clean the Heat Exchanger with a soft brush or vacuum cleaner once a month, Do not touch the heat
exchanger with your hand. Otherwise, it may cause an injury.
The interior of the dryer should be cleaned periodically by qualified service personnel.
Care for preventing freezing
• Install the dryer in an area where the temperature does not drop below zero degree Celsius.
• If draining directly using a long drain hose, water remaining inside the hose can freeze in winter. Make
sure there is no water left inside the hose after use.
• If the drain hose has frozen, wrap the hose with a towel soaked in warm water for approximately ten
minutes to thaw it.
English
English 11
U-PJT_DRYER_SimpleUX_WEB_SSEC-00_EU_English.indd 11 2021/11/9 17:26:25
Page 12
Safety information
Instructions about the WEEE
English
Correct Disposal of This Product (Waste Electrical & Electronic Equipment)
(Applicable in countries with separate collection systems)
This marking on the product, accessories or literature indicates that the product and
its electronic accessories (e.g. charger, headset, USB cable) should not be disposed
of with other household waste at the end of their working life. To prevent possible
harm to the environment or human health from uncontrolled waste disposal, please
separate these items from other types of waste and recycle them responsibly to
promote the sustainable reuse of material resources.
Household users should contact either the retailer where they purchased this product,
or their local government office, for details of where and how they can take these
items for environmentally safe recycling.
Business users should contact their supplier and check the terms and conditions of
the purchase contract. This product and its electronic accessories should not be mixed
with other commercial wastes for disposal.
For information on Samsung’s environmental commitments and product regulatory obligations, e.g. REACH,
WEEE or Batteries, visit our sustainability page available via www.samsung.com
English12
U-PJT_DRYER_SimpleUX_WEB_SSEC-00_EU_English.indd 12 2021/11/9 17:26:25
Page 13
Installation
01
02
03
04
05
06
07
What’s included
Carefully unpack the dryer. Keep all packaging materials away from children. The parts and location of parts
shown below may differ from your dryer. Before installation, make sure the dryer has all the parts listed
here. If the dryer and/or parts are damaged or missing, contact the nearest Samsung customer service
center.
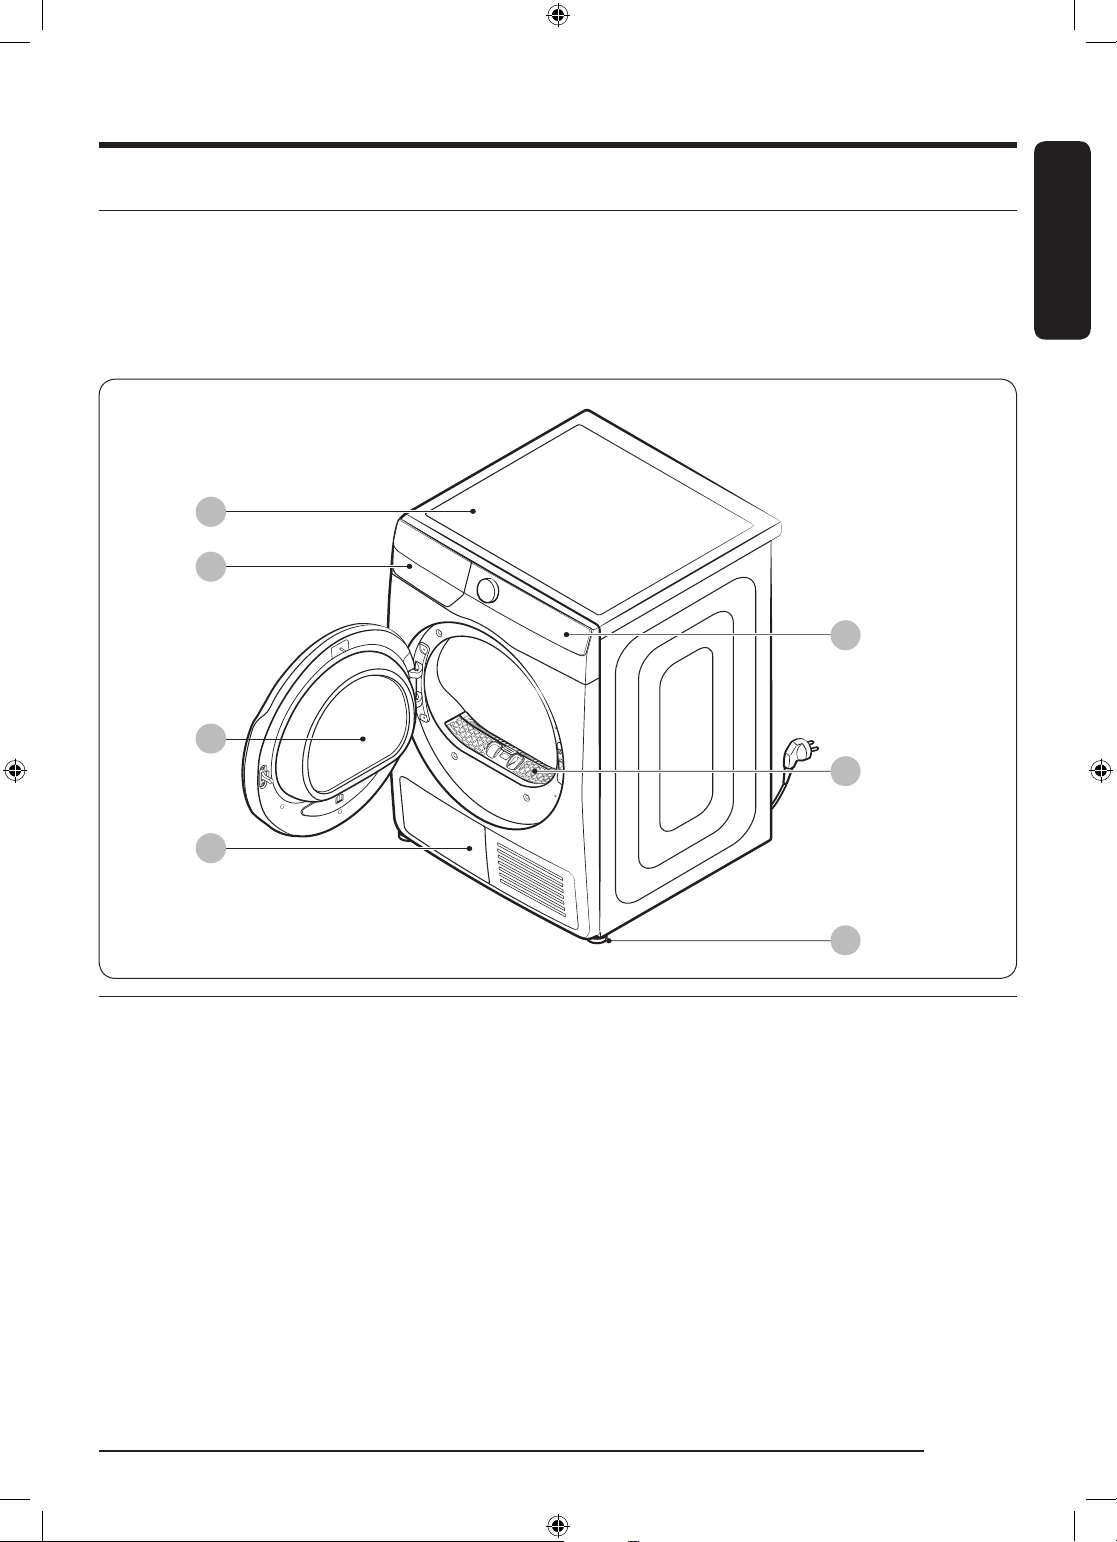
Dryer at a glance
English
01 Top cover 02 Water tank
03 Door 04 Heat exchanger
05 Control panel 06 Lint filter
07 Levelling leg
English 13
U-PJT_DRYER_SimpleUX_WEB_SSEC-00_EU_English.indd 13 2021/11/9 17:26:25
Page 14
Installation
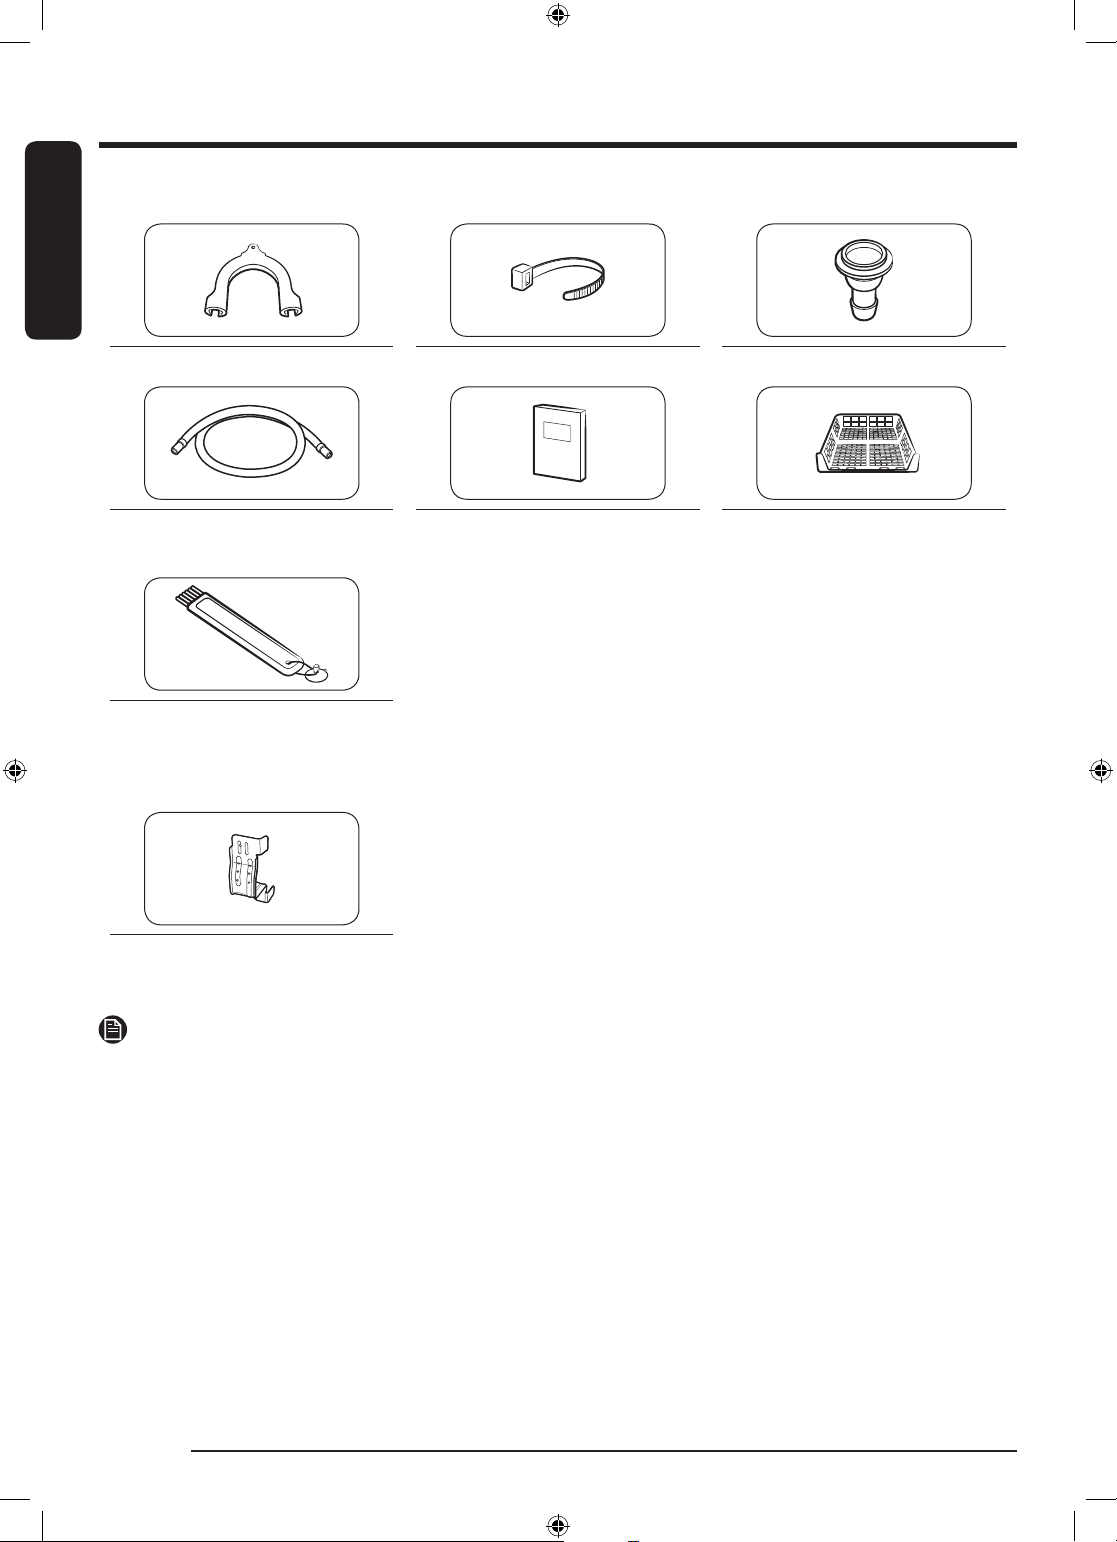
Accessories (supplied)
English
Hose guide Cable tie Hose connector
Long drain hose (2 m) User manual Drying rack (applicable models
only)
Cleaning brush
Accessories (not supplied)
Stacking kit bracket
(Part # SK-DH; SK-DA; SKK-DF)
NOTE
• For stacking instructions with the dryer, see the installation manual included in the stacking kit.
• For information on which stacking kit model you can use to stack your dryer on the washing machine,
see the user manual included in your Samsung washing machine.
English14
U-PJT_DRYER_SimpleUX_WEB_SSEC-00_EU_English.indd 14 2021/11/9 17:26:26
Page 15
Installation requirements
NOTE
This dryer must be installed by a qualified installer. If service is required due to poor or faulty installation,
it is considered the owner’s responsibility and may void the warranty. Keep these instructions for future
reference.
WARNING
• Do not plug the power cord into a wall outlet before the dryer is completely installed.
• Have two or more persons help move the dryer.
• Do not let children or pets play in, on, or around the dryer. Proper supervision is necessary at all times.
• Keep all packaging materials away from children.
• Do not replace a damaged power cord or power plug yourself. Have Samsung or a qualified service
technician replace a damaged power cord or power plug.
• Do not attempt to repair, disassemble, or modify the dryer. For any repairs, contact the nearest Samsung
service center.
• Remove the door/lids from all discarded appliances to avoid children from suffocating.
• If the dryer generates a strange noise, burning smells, or smoke, unplug the power plug immediately
and contact the nearest Samsung service center.
• Do not unplug the dryer while it is operating.
• Do not place flammable objects near the dryer.
English
Electrical and grounding requirements
• The dryer requires an AC 220-240 V / 50 Hz electrical supply.
• The dryer must be properly grounded. If the dryer malfunctions or breaks down, grounding reduces the
risk of electric shock by providing a path of least resistance for the electric current. The dryer comes
with a power cord that has a 3-prong grounding plug. The plug must be plugged into an appropriate
outlet that is properly installed and grounded in accordance with all local codes and ordinances.
• If you have any questions regarding the electrical or grounding requirements, please contact Samsung
or a qualified electrician.
WARNING
• Plug the power cord into a grounded, 3-prong outlet.
• Do not use a damaged power plug, cord, or loose or damaged wall outlet.
• Do not use an adapter or an extension cord.
• Improper connection of the equipment-grounding conductor may result in electric shock. If you are
unsure if the dryer is properly grounded, check with a qualified electrician.
• Do not modify the power plug, power cord, or power outlet in any way.
• Do not connect the ground wire to plastic plumbing lines, gas lines, or hot water pipes.
English 15
U-PJT_DRYER_SimpleUX_WEB_SSEC-00_EU_English.indd 15 2021/11/9 17:26:26
Page 16
Installation
Alcove or closet installation
English
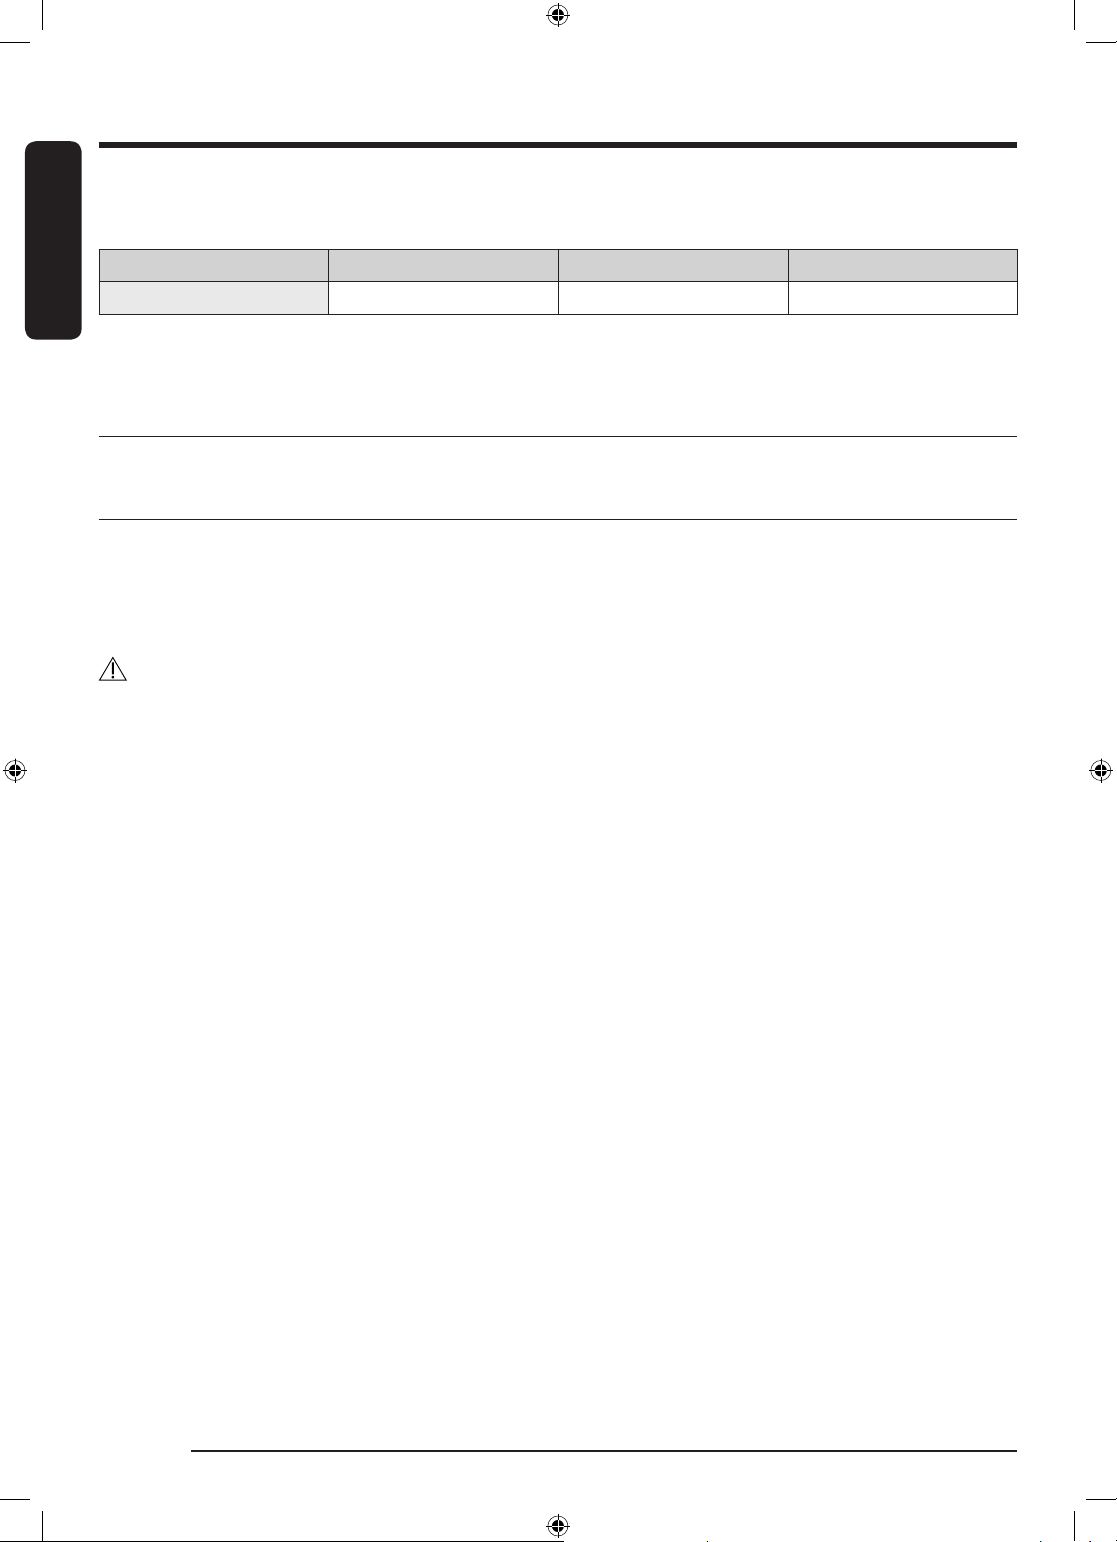
For alcove or closet installation, the dryer requires the following minimum clearances:
Sides Top Front Rear
25 mm 25 mm 490 mm 50 mm
If installing the dryer with a washing machine, the front of the alcove or closet must have an unobstructed
air opening of at least 550 mm.
Step-by-step installation
Before you install your dryer, make sure you have read Installation requirements on page 15.
STEP 1 Select a location
Location requirements
Select a level, well-constructed surface that will withstand vibrations. Select a location where a grounded,
3-prong outlet is easily accessible.
For convenience, consider installing the dryer next to your washing machine.
WARNING
• Install the dryer indoors only.
• Do not install the dryer in areas exposed to the weather.
• Do not install the dryer where the temperature may fall below 5 °C or rise above 35 °C.
• Do not install the dryer where gas may leak.
English16
U-PJT_DRYER_SimpleUX_WEB_SSEC-00_EU_English.indd 16 2021/11/9 17:26:26
Page 17
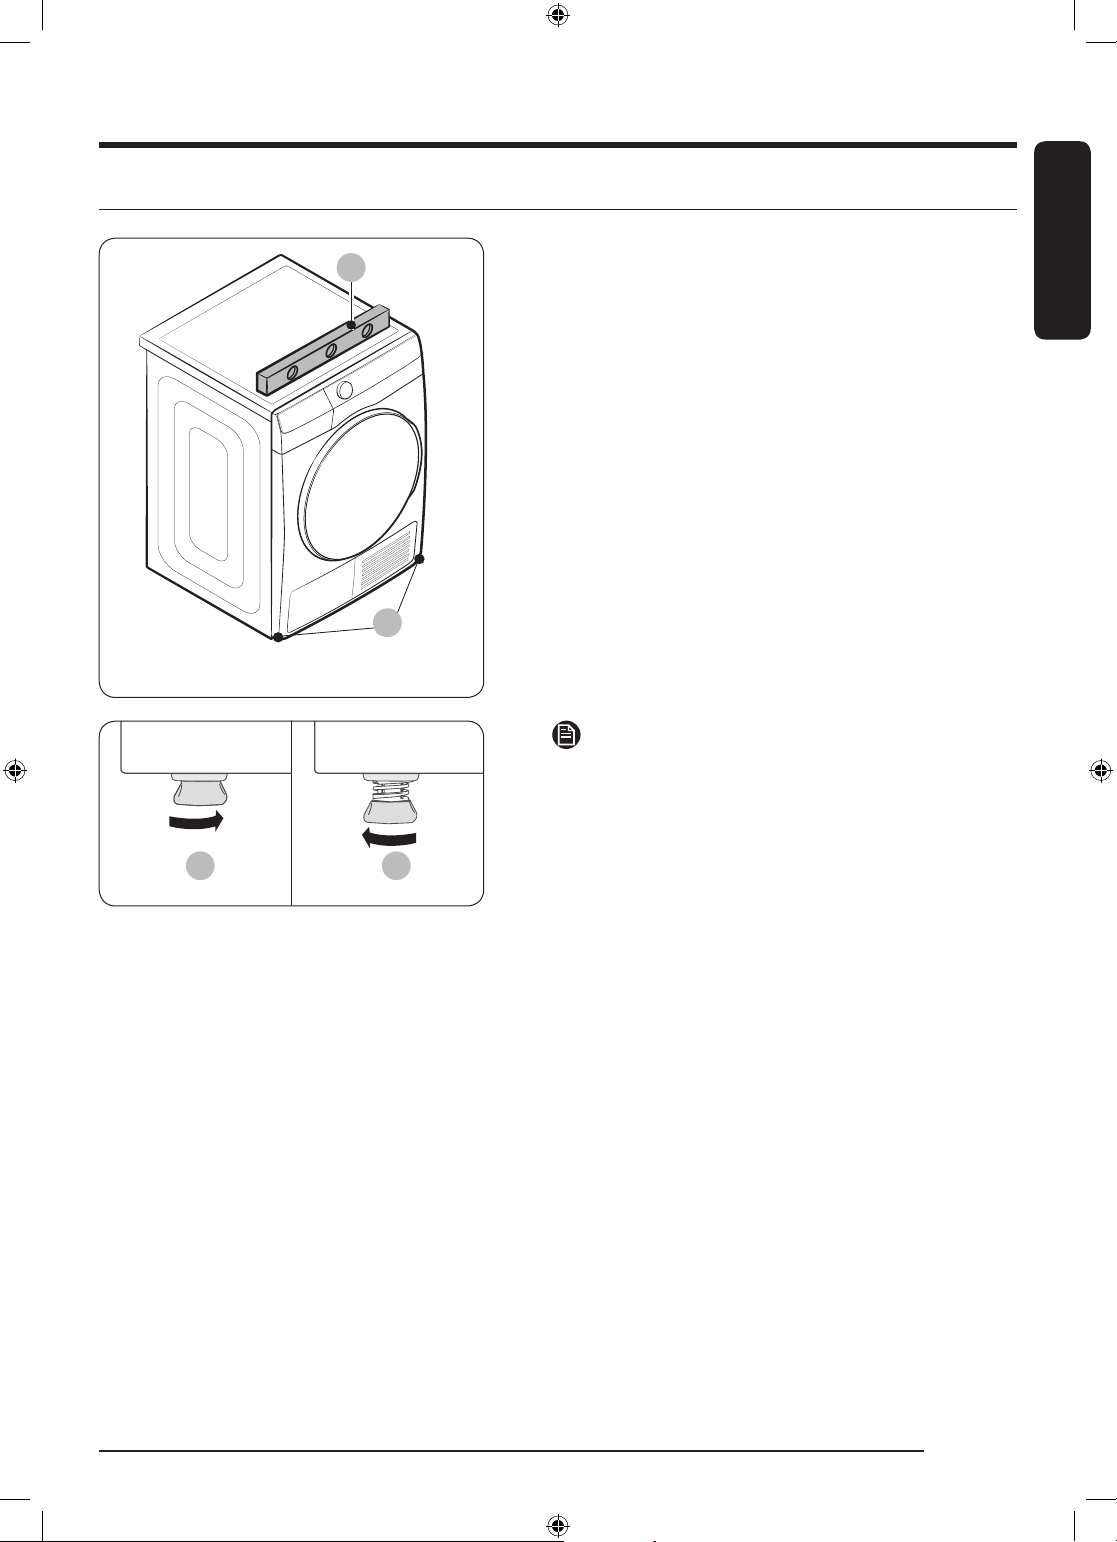
STEP 2 Adjust the levelling feet
B
A
C D
English
1. Gently slide the dryer into the desired location.
2. Use a level (A) and check the levelness of the dryer
from side to side and front to back.
3. If the dryer is not level, turn the levelling feet (B)
left or right to adjust the height.
4. Once the dryer is level, make sure the dryer stands
firmly on the floor.
5. Plug in the dryer.
NOTE
• To set the dryer to the same height as the washing
machine, turn the levelling feet to the right until
it fully retracts (C). Then, turn the levelling feet
to the left to extend (D) it until the dryer and the
washing machine are the same height.
• Extend the levelling leg only as much as necessary.
Extending the levelling leg more than necessary
can cause the dryer to vibrate.
U-PJT_DRYER_SimpleUX_WEB_SSEC-00_EU_English.indd 17 2021/11/9 17:26:26
English 17
Page 18
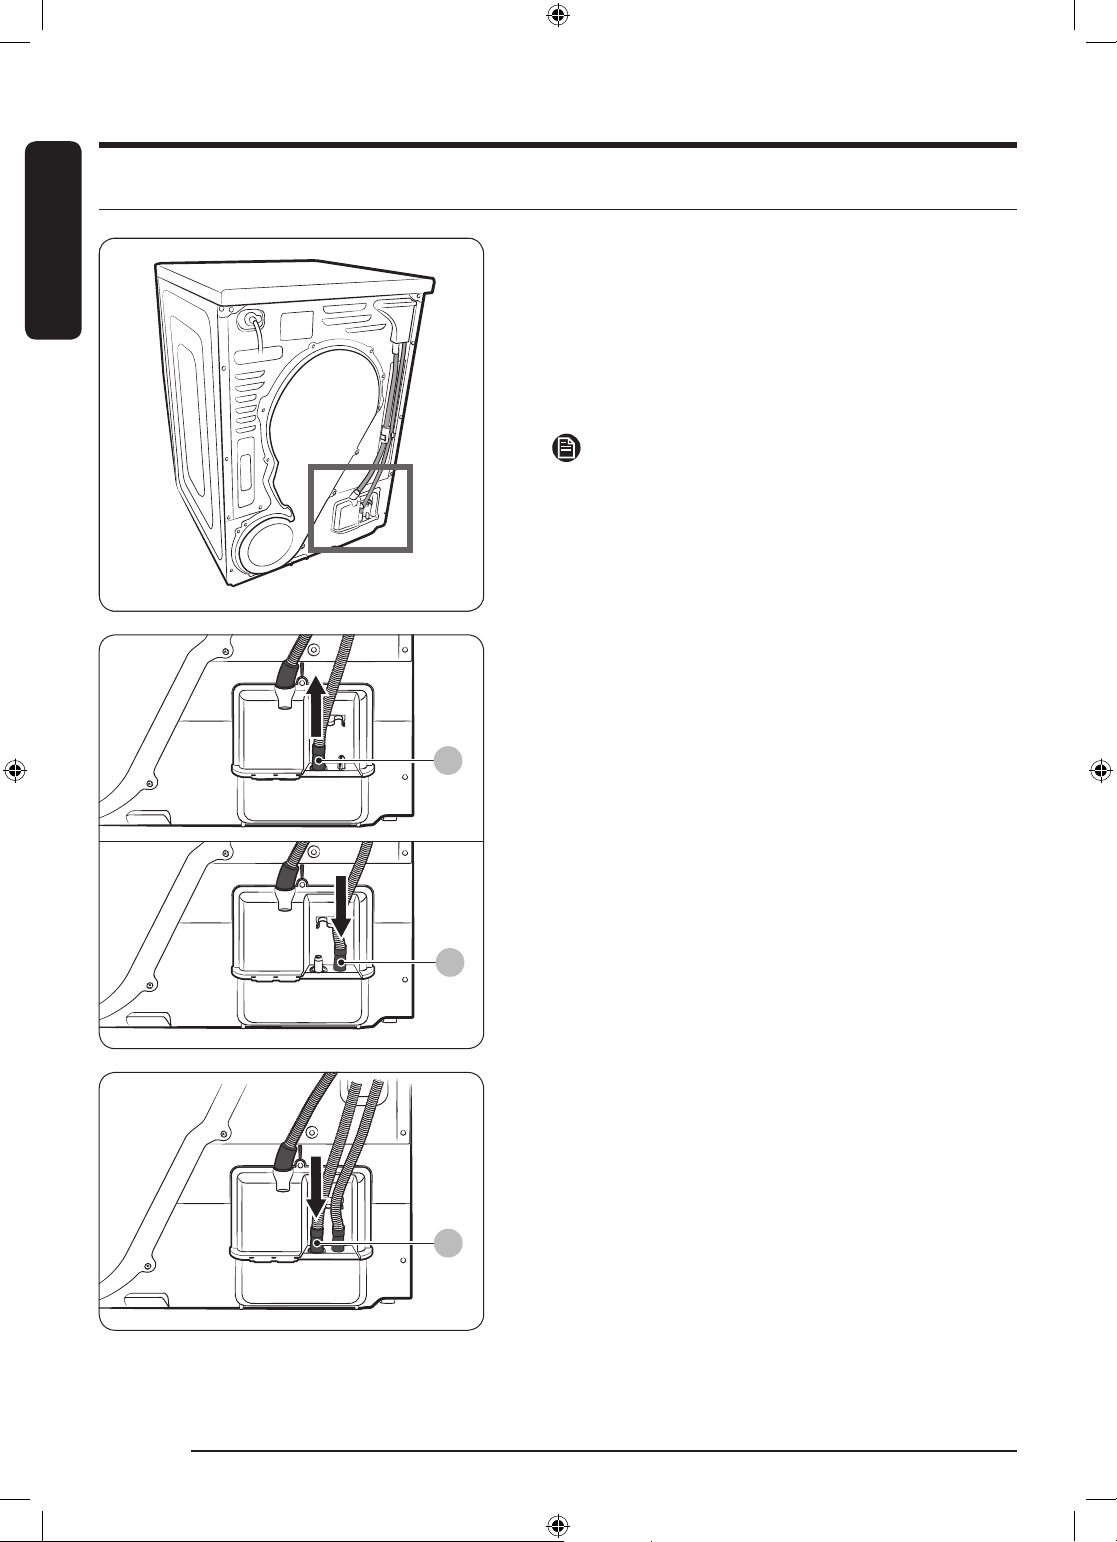
Installation
A
B
A
STEP 3 Connect the drain hose
English
• We strongly recommend connecting the drain hose
to your drainage system.
• If the drain hose connected on the dryer is too
short to reach the drainage system, use the
provided accessory hose (long drain hose).
• Use the built-in water tank only if you cannot
connect the drain hose to a drainage system.
NOTE
As a factory default, this dryer is set to use the built-in
water tank to drain condensed water.
1. Remove the drain hose from hole (A), and insert it
into part (B).
2. Insert one end of the accessory hose (long drain
hose) into hole (A).
3. Insert the other end (outlet) of the accessory hose
to the drainage system in one of the following
ways:
English18
U-PJT_DRYER_SimpleUX_WEB_SSEC-00_EU_English.indd 18 2021/11/9 17:26:27
Page 19
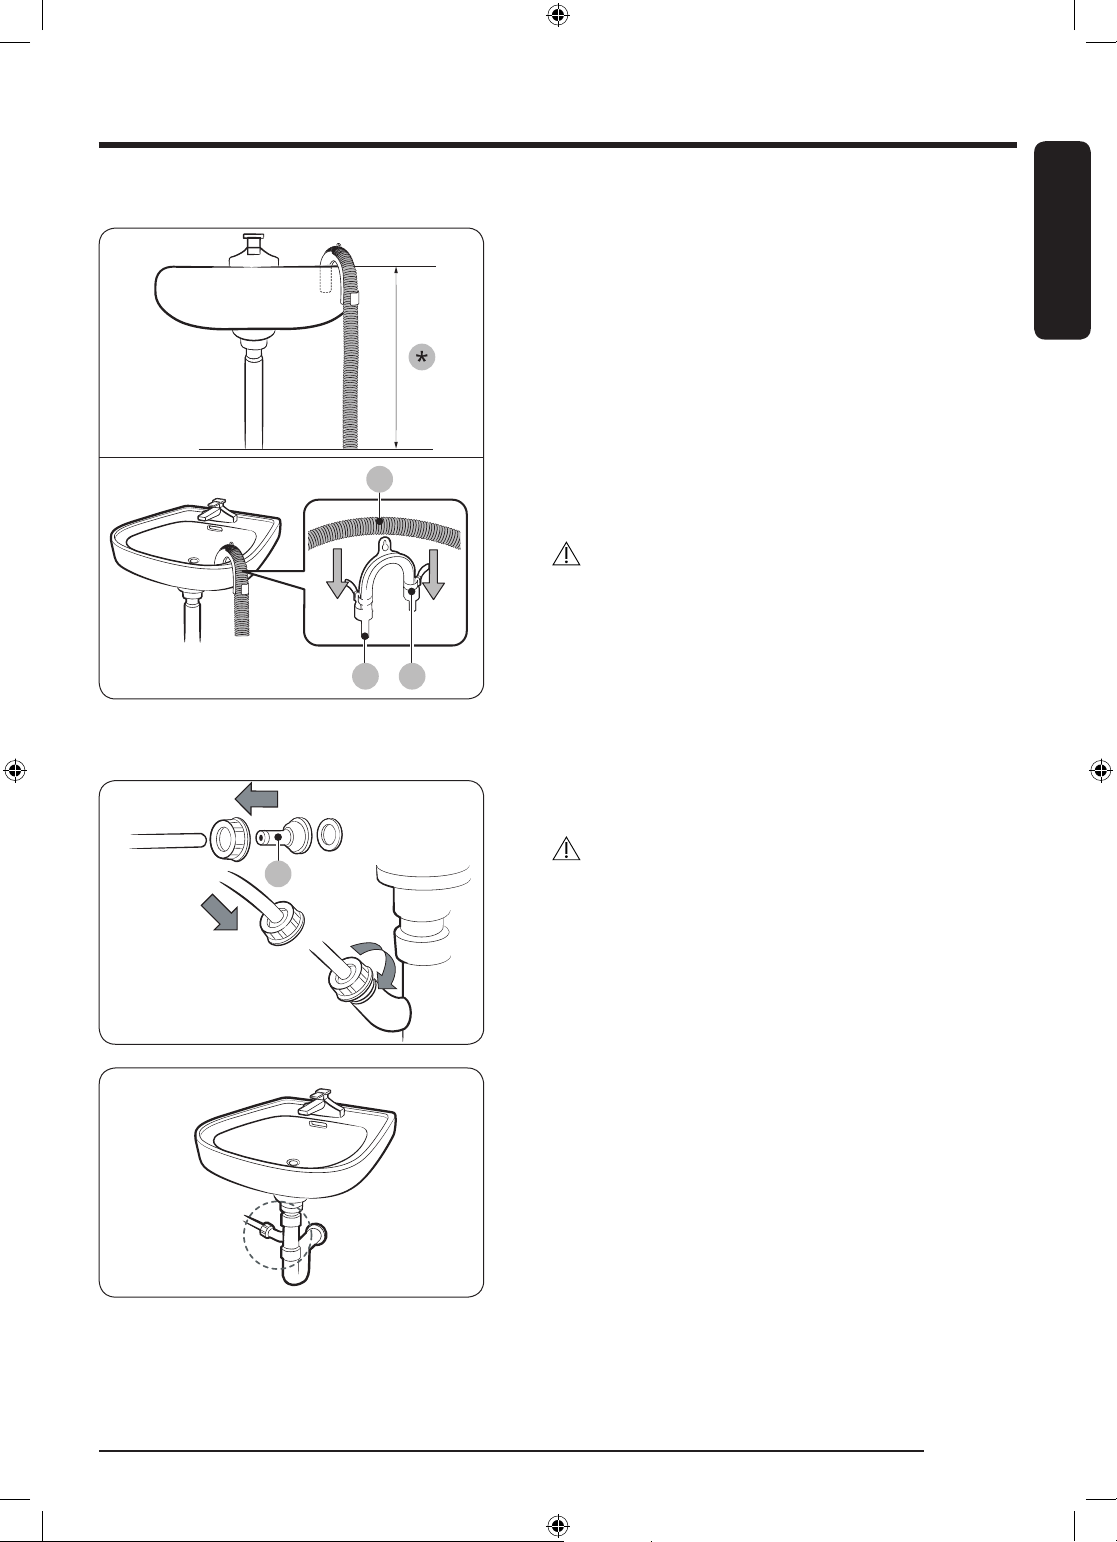
Over a wash basin:
A
CB
A
By using the drain pipe of the wash basin:
English
1. Make sure to place the end of the accessory hose
lower than 90 cm (*) from the bottom of dryer.
2. To bend some point of the accessory hose, use
the supplied plastic hose guide (B) and secure the
guide to the wall with a hook or to the tap with a
piece of string. Assemble the drain hose (A) and
the hose guide (B) and fix them with the cable-tie
(C).
3. You can drain the condensed water by connecting
the accessory hose (long drain hose) to the drainoutlet directly.
CAUTION
Do not extend the drain hose. Water may leak from
the connected area. Use a long drain hose.
1. Assemble the hose connector (A), and attach it to
the end of the accessory hose as shown.
CAUTION
To prevent water leak, make sure to connect the hose
and the connector firmly.
2. Connect the hose adapter directly to the drain pipe
of the wash basin.
English 19
U-PJT_DRYER_SimpleUX_WEB_SSEC-00_EU_English.indd 19 2021/11/9 17:26:27
Page 20
Installation
STEP 4 Check the installation
English
• All packaging material is completely removed and properly disposed.
• The dryer is level and standing firmly on the floor.
• Make sure no accessory remains inside the drum.
• Do not block the air inlet hole of the cooling grill at the front of the dryer.
• Do not place inflammable objects near the dryer and keep the surroundings clean.
• Do not remove the adjustable levelling legs of the dryer. They are necessary to keep the dryer level with
the ground.
• After installation, we recommend that you wait at least 1 hour before using the dryer.
STEP 5 Power on
Plug the power cord into a wall socket protected by a fuse or circuit breaker. Then, tap to turn on the
dryer.
NOTE
Run the Time Dry cycle for 20 minutes to make sure that it runs, heats, and shuts off. If the HC information
code is displayed, contact a local service center.
Door reversal
You might want to reverse the direction of the door, depending on your site conditions or to your needs.
WARNING
Make sure door reversal is performed by a qualified technician.
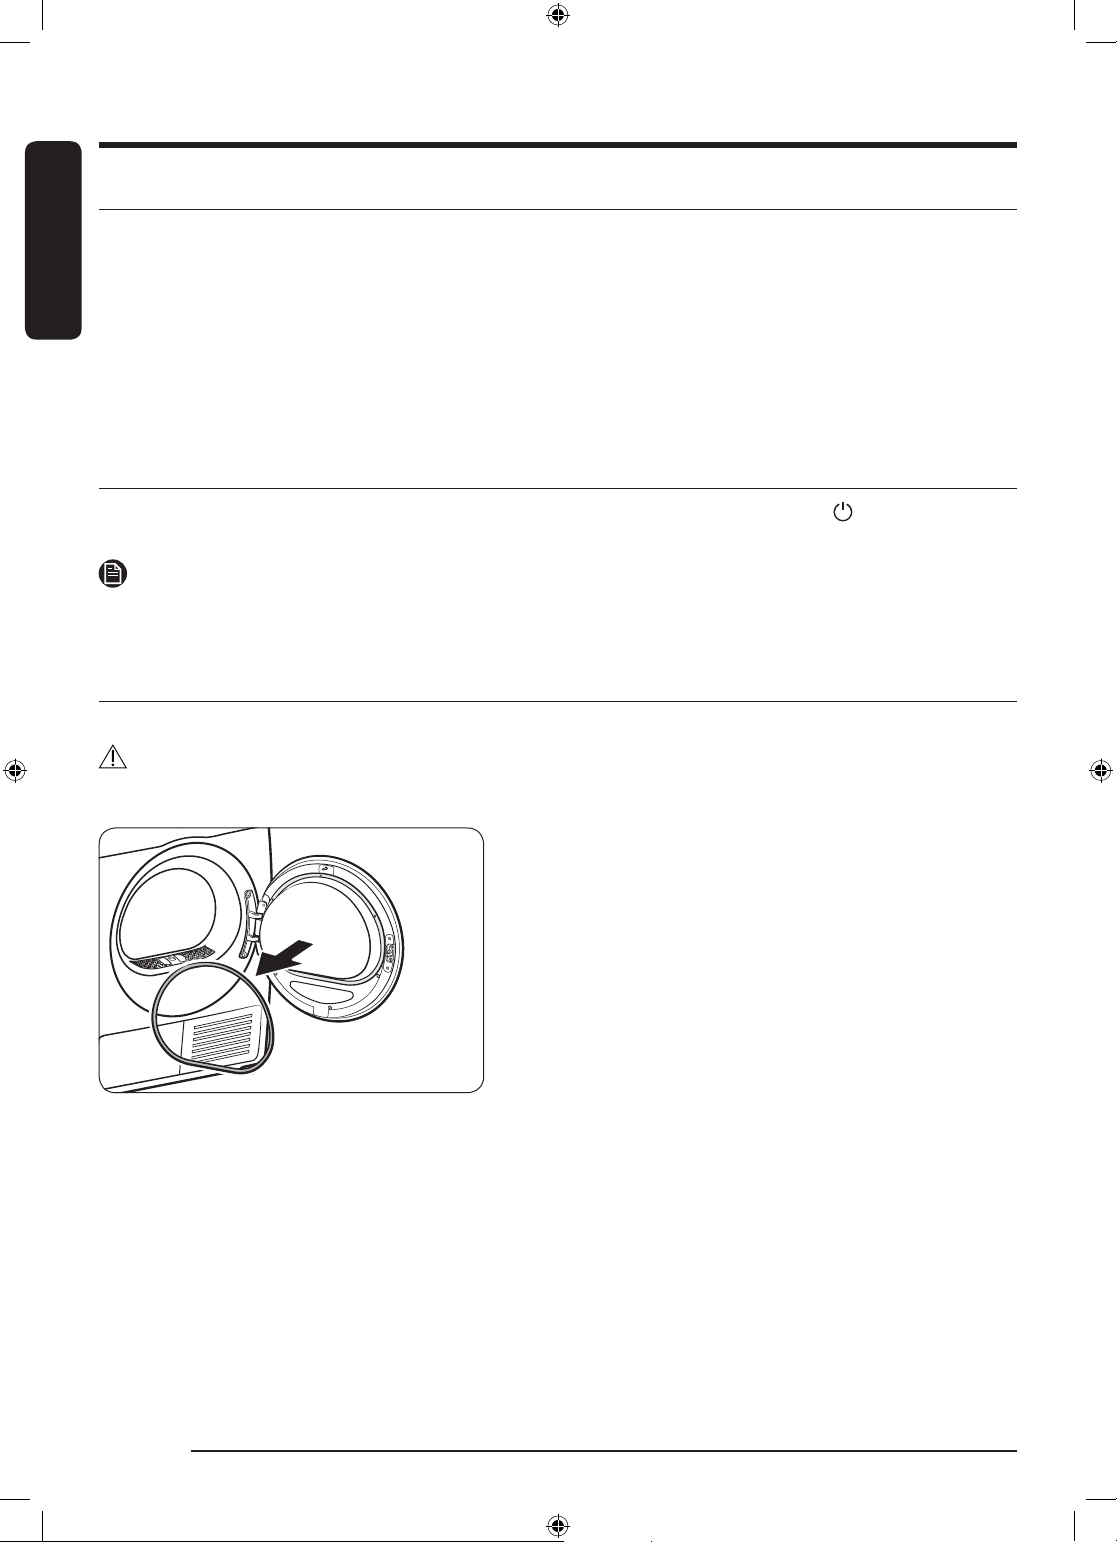
1. Remove the door packing from the door.
English20
U-PJT_DRYER_SimpleUX_WEB_SSEC-00_EU_English.indd 20 2021/11/9 17:26:27
Page 21
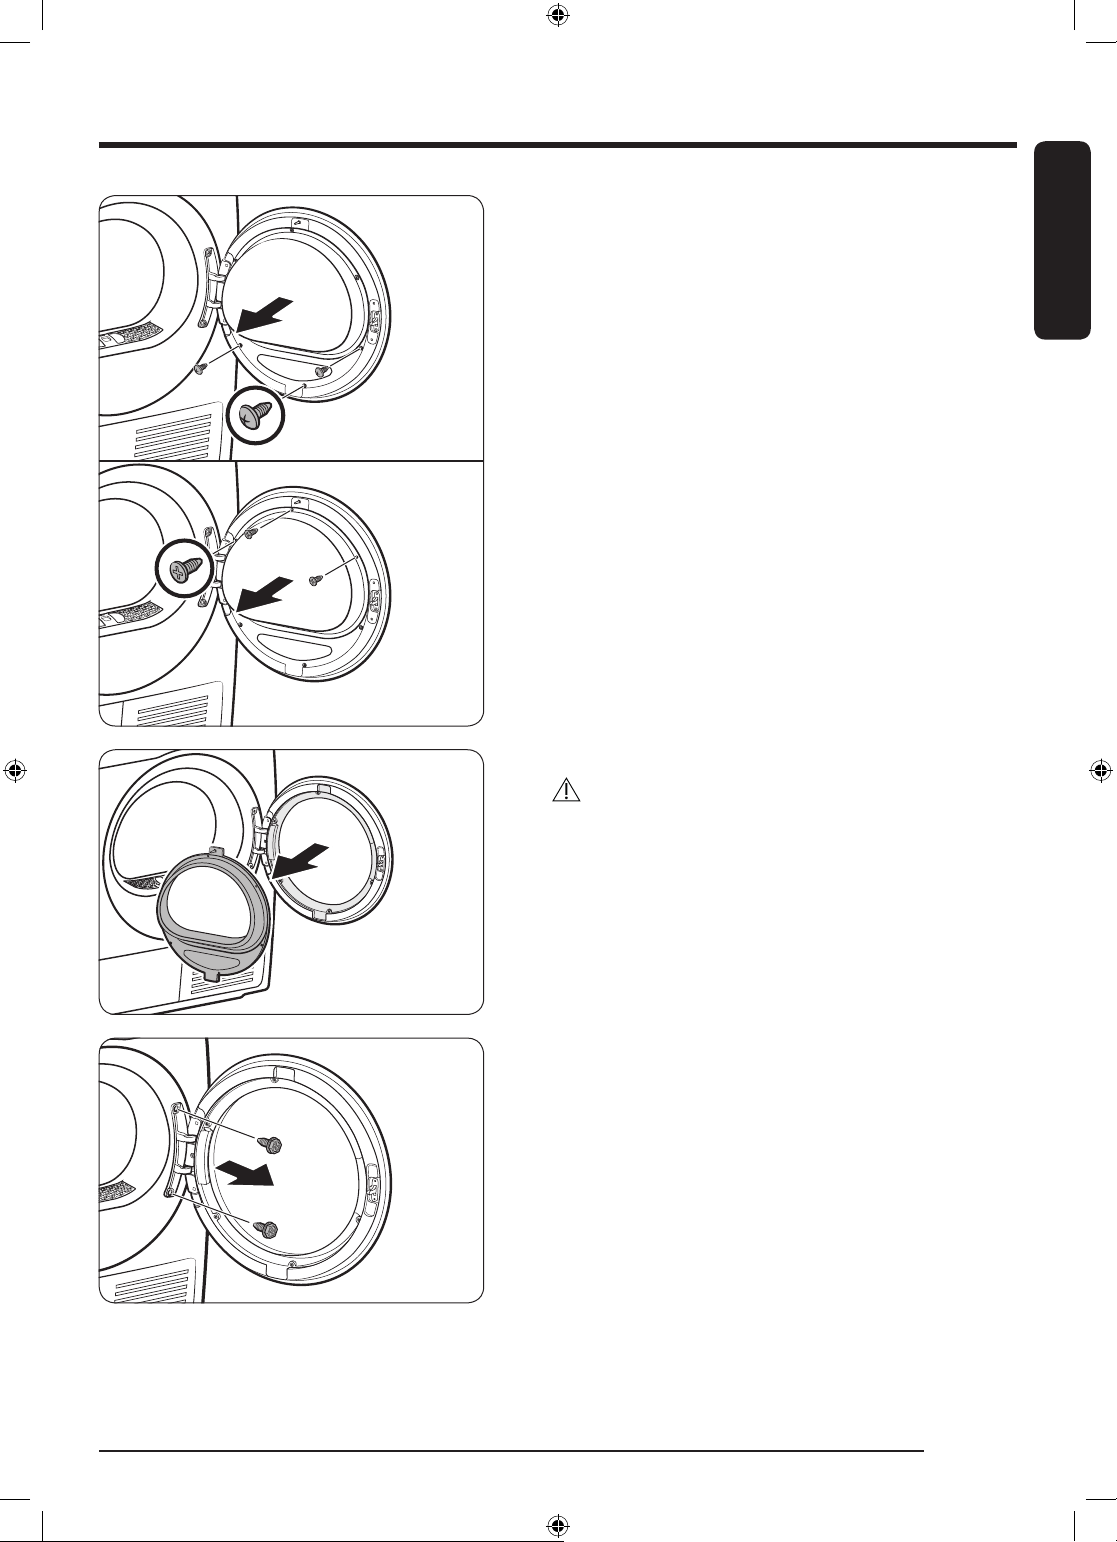
2. Remove the screws on the inner glass holder of the
door.
- First, loosen and remove the 3 screws on the
bottom. Then, loosen and remove the 3 screws
on the top of the holder.
3. Detach the glass holder.
CAUTION
Use caution not to drop any part of the holder when
detaching it. Property damage (cracks or breaks) or
physical injury may occur.
English
4. Remove the hinge screws, and then detach the
door.
- Loosen and remove the 2 bolts on the door
frame.
- To prevent abrasion on the bolts, use a hex
screwdriver.
English 21
U-PJT_DRYER_SimpleUX_WEB_SSEC-00_EU_English.indd 21 2021/11/9 17:26:28
Page 22
Installation
English
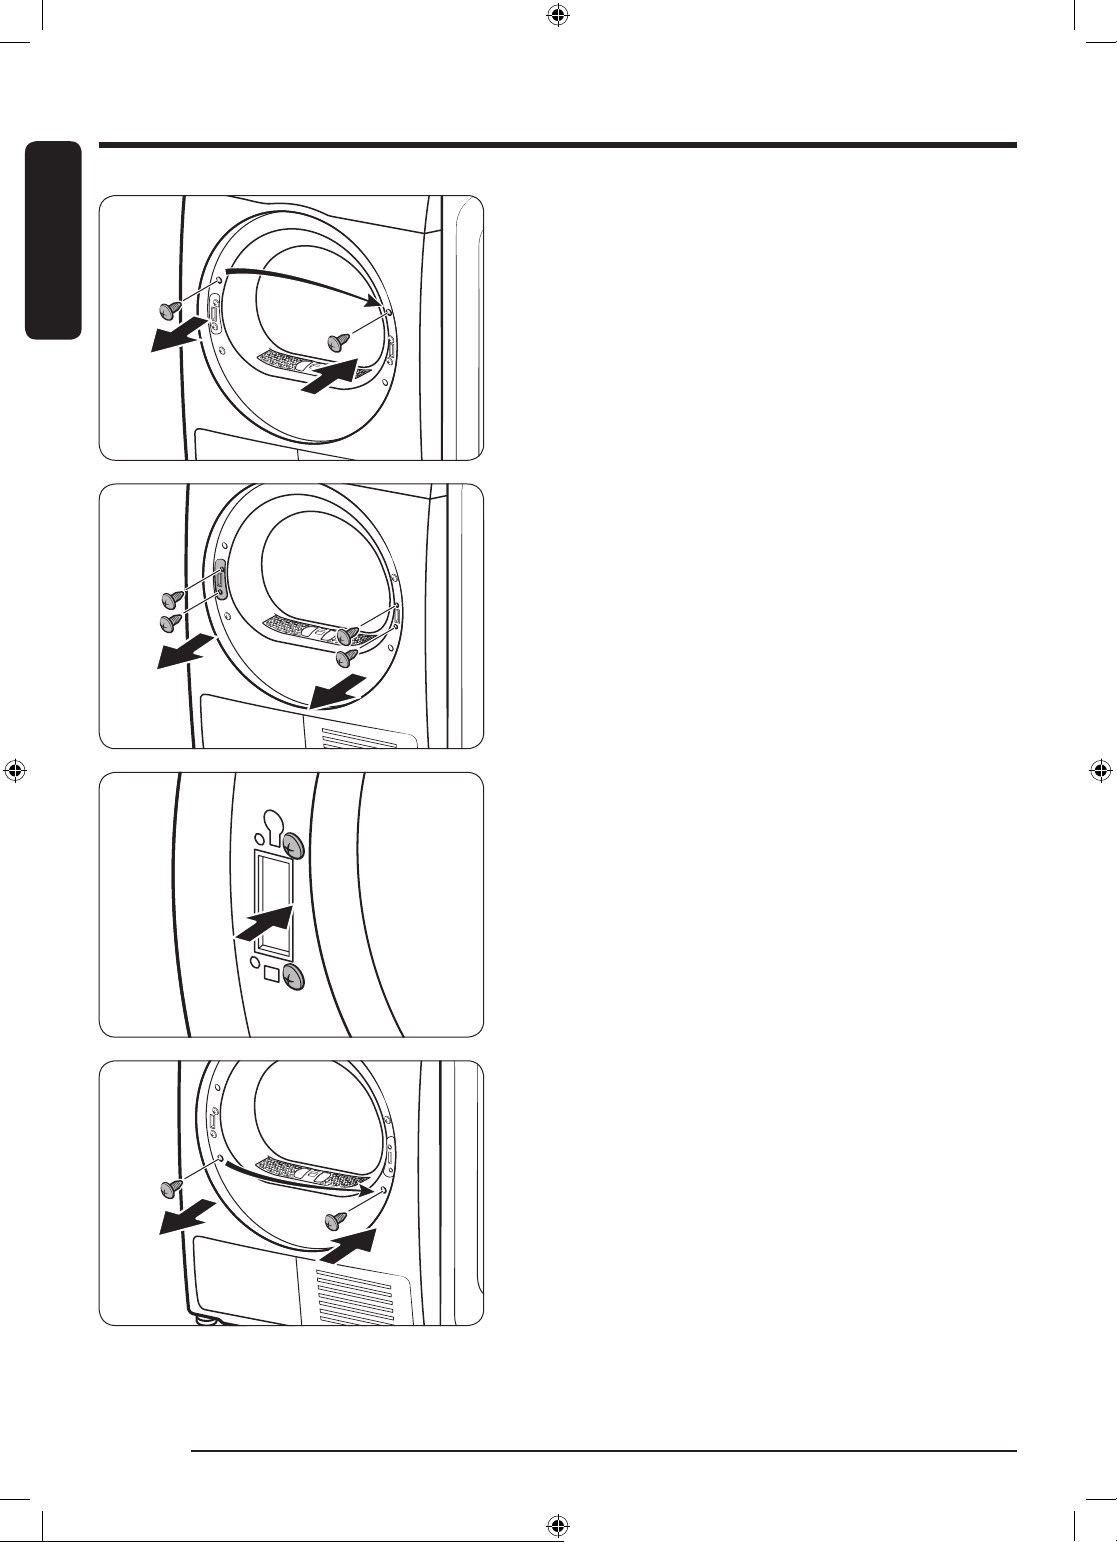
5. Remove the upper screw on the left of the door
frame, and then insert it in the corresponding right
hole of the door frame. Do not remove the lower
bracket screws.
6. Remove the 2 bracket screws on the right frame,
and then remove the 2 holder screws on the left
frame.
7. Insert the 2 removed bracket screws in the left
frame as shown.
- See the figure on the right for the correct
position of the screws.
8. Remove the bottom screw on the left frame, and
then insert it in the corresponding hole on the right
frame.
English22
U-PJT_DRYER_SimpleUX_WEB_SSEC-00_EU_English.indd 22 2021/11/9 17:26:28
Page 23
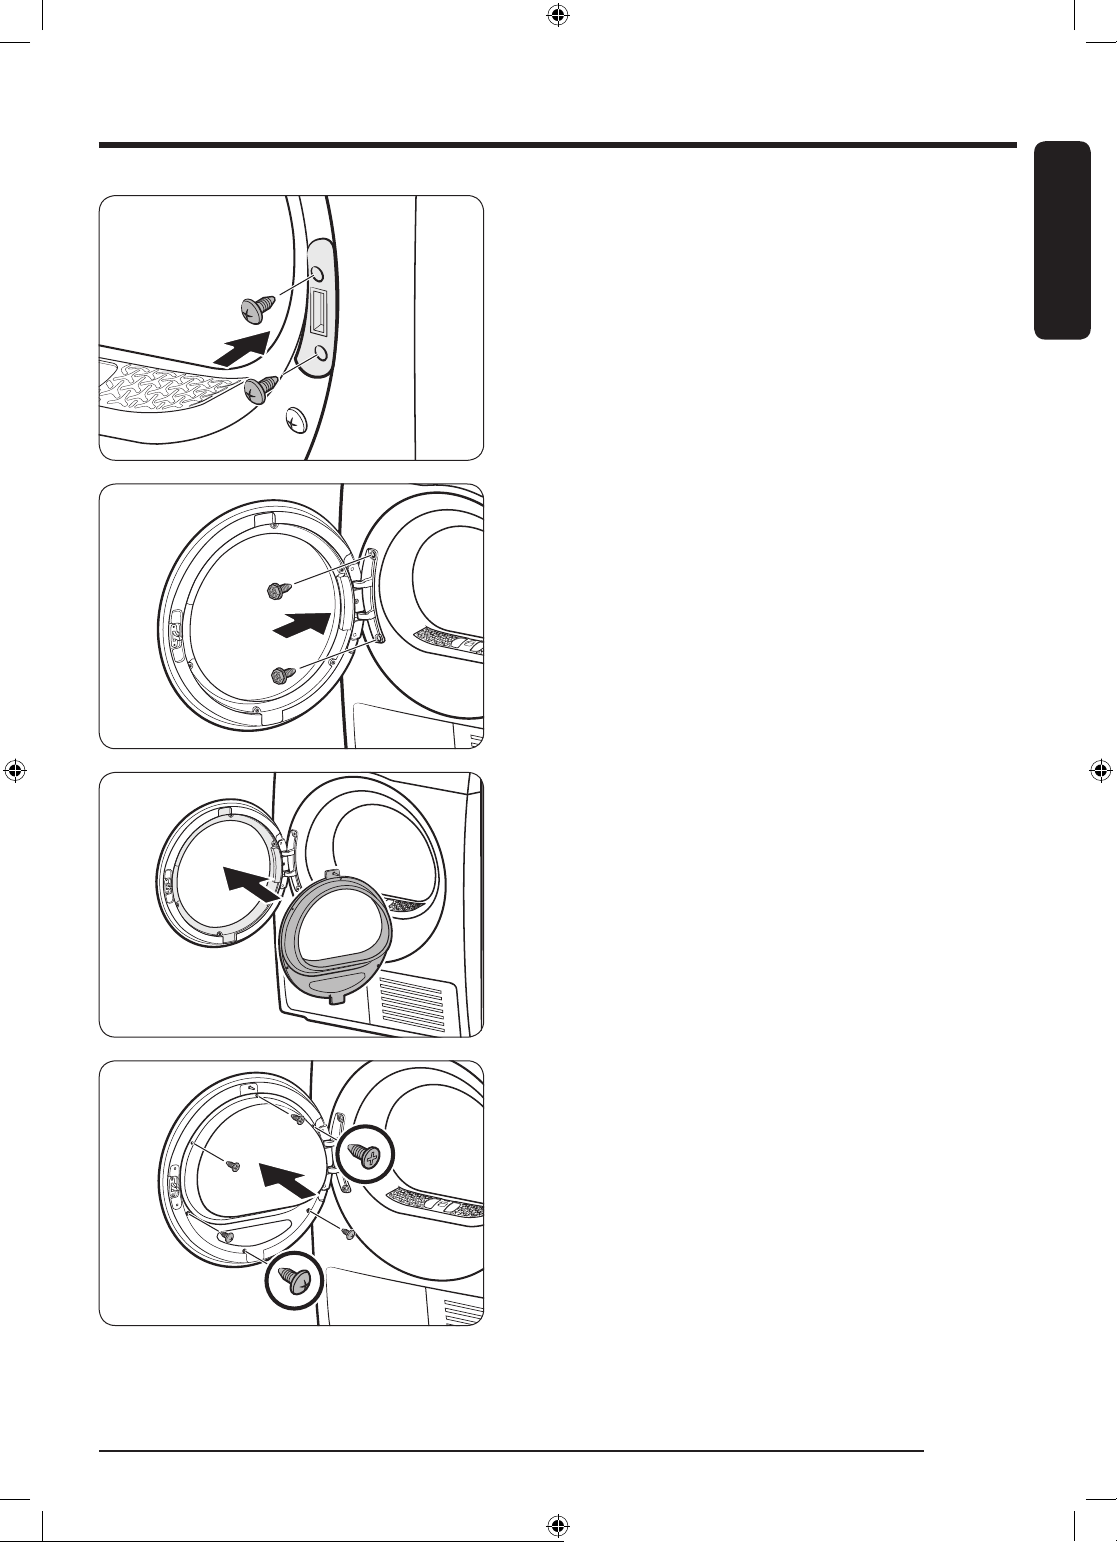
9. Insert the lever holder on the right frame, and then
tighten the 2 holder screws.
10. Insert the door hinge in the opposite position of
the door frame, and then, tighten the 2 bolt screws.
English
11. Insert the inner glass holder in the door cover that
has been installed on the left frame.
12. Tighten the 3 holder screws on the top. Then,
tighten the 3 holder screws on the bottom.
English 23
U-PJT_DRYER_SimpleUX_WEB_SSEC-00_EU_English.indd 23 2021/11/9 17:26:29
Page 24
Installation
English
NOTE
To return the door to the initial position, follow the steps again. Please note that the door, hinges, and other
parts would be in the opposite orientation as listed in these steps.
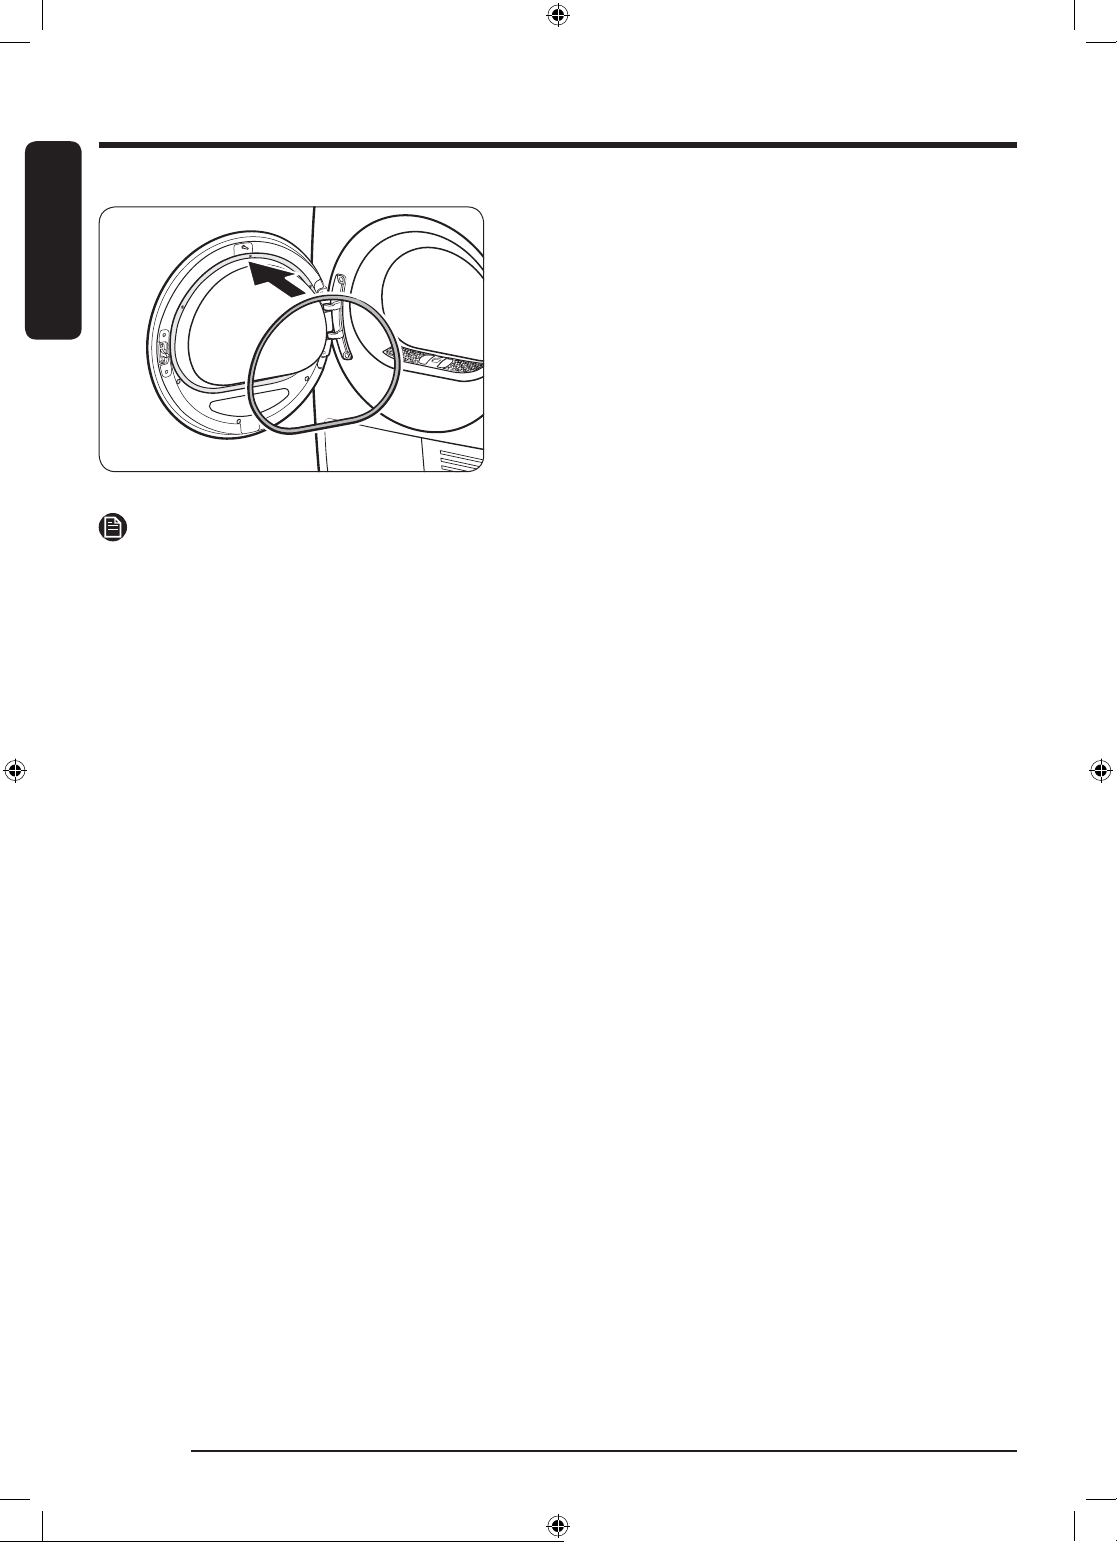
13. Attach the door packing to the door.
English24
U-PJT_DRYER_SimpleUX_WEB_SSEC-00_EU_English.indd 24 2021/11/9 17:26:29
Page 25
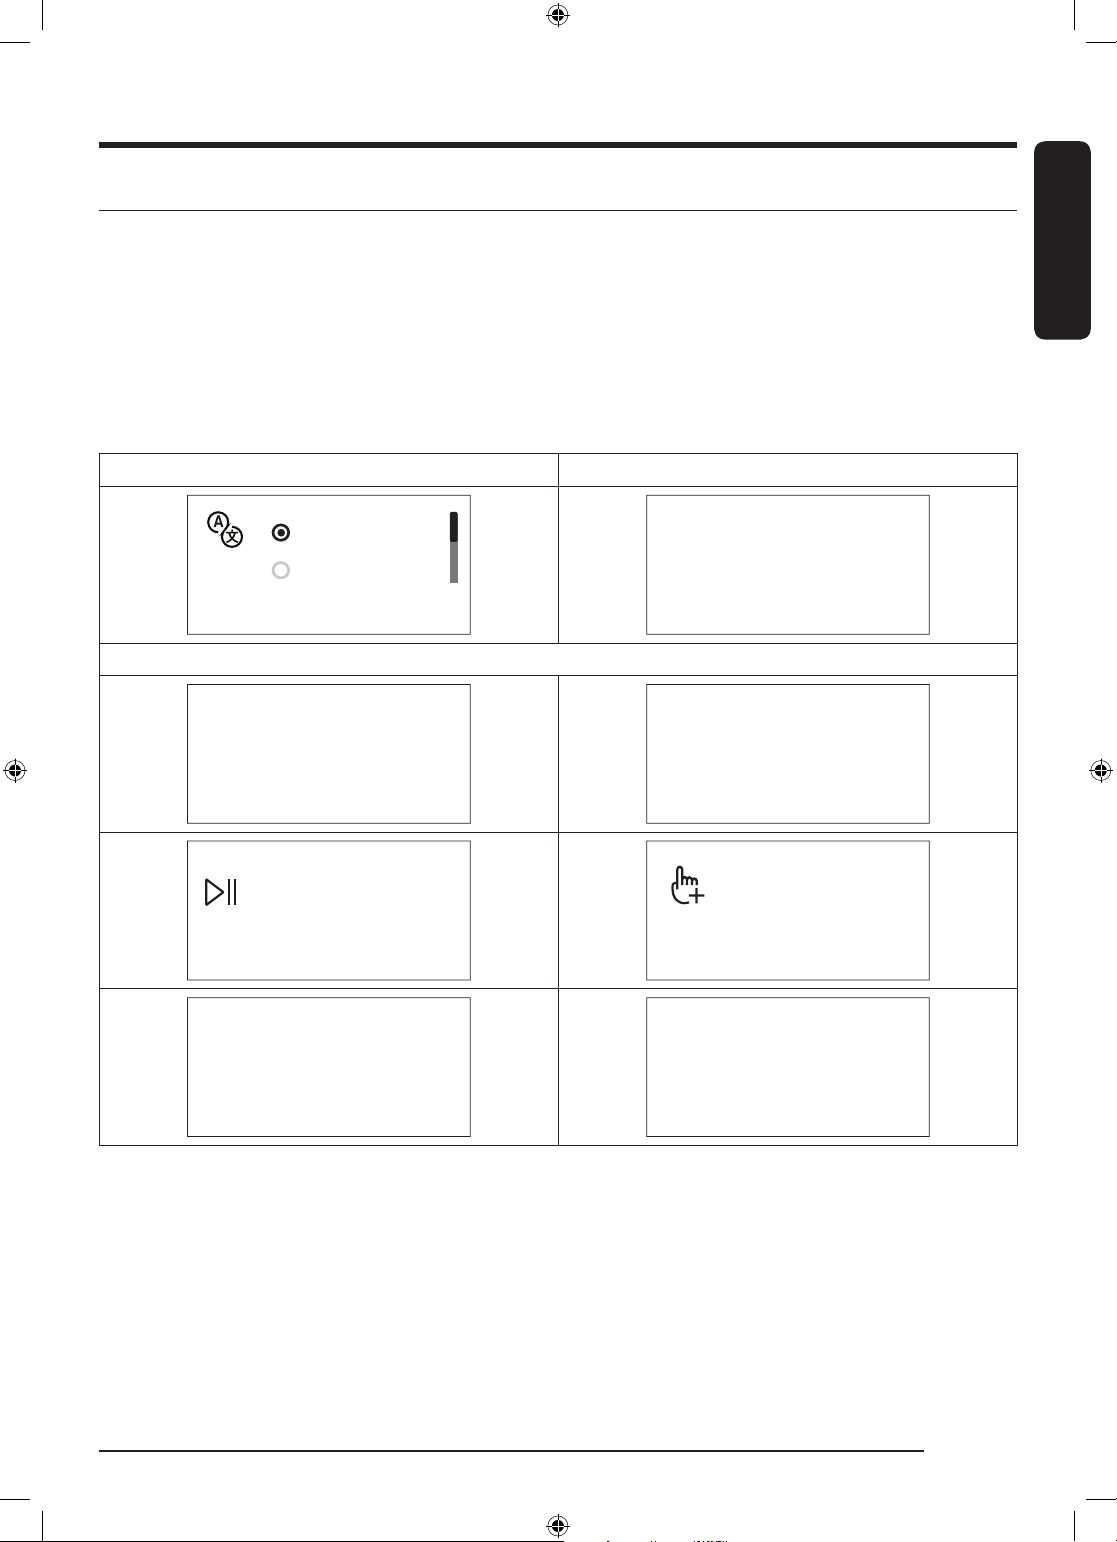
Before you start
Initial setup
• When you turn on your dryer for the first time, the screen shows the initial setup process. Follow the onscreen instructions to complete it.
• If you complete the initial setup and operate a cycle for more than a minute, the initial setup will not
appear again.
• The initial setup includes language selection and a brief tutorial.
• When tapping a button, tap exactly over the icon.
• Operating the washing machine and dryer at the same time may result in a loss of power depending on
where they are installed and your electrical power status.
01 Language selection 02 Welcome screen
English
Welcome!
03 Tutorial
Suomi
Turn dial & Tap O
Let’s explore your new dryer!
Turn the dial to explore cycles
English
[Tap O to skip] [Tap O to skip]
Tap to see
Now hold to start a cycle
[Tap O to skip]
Try saving favourites
in My Cycles
additional functions
[Tap O to skip]
A dryer that knows you!
All Done!
English 25
U-PJT_DRYER_SimpleUX_WEB_SSEC-00_EU_English.indd 25 2021/11/9 17:26:30
Page 26
Before you start
Drying guidelines
English
STEP 1 Sort
• Do not mix heavy and lightweight items together.
• Wash and dry dark-colored items separately from light-colored items.
• Unless recommended on the care label, do not dry woolens or fiberglass items.
• Do not dry items soiled with oil, alcohol, gasoline, etc.
• Avoid drying unwashed items
• Do not dry wet items that have not been fully spin-dried after washing. This could cause an odor inside
the dryer or cause the dryer to malfunction.
• Using a laundry net is recommended for baby socks and other small, light items.
STEP 2 Empty pockets and turn them inside out
• Turn dark-colored clothes inside out before drying them. This will prevent fabric damage due to friction
during the drying process and protect internal parts of the dryer from discoloration and damage.
• Turn the items with buttons or embroideries inside out before drying them.
CAUTION
• Empty the pockets. Metallic objects such as coins, pins, and buckles on clothing may damage other
laundry items as well as the drum.
• Remove any metallic objects attached to items, pull up zippers, and latch hooks before drying. Metallic
objects attached to items may damage other items as well as the drum.
STEP 3 Check the lint filter
Ensure that the lint filter is installed correctly before putting items in the dryer. The dryer does not work
without the lint filter.
• Always clean the lint filter before drying. For more information on filter cleaning, see the “Lint filter”
section on page 44
English26
U-PJT_DRYER_SimpleUX_WEB_SSEC-00_EU_English.indd 26 2021/11/9 17:26:30
Page 27
STEP 4 Determine the load capacity
Do not overload the dryer. Overloading reduces the tumbling action, resulting in uneven drying and
wrinkling.
• Put one wash load in the dryer at a time.
• To improve drying efficiency for one or two items, add a dry towel to the load.
• For best results, untangle items before inserting them into the dryer. Tangled items may degrade the
drying efficiency or cause the door to open.
CAUTION
Add or remove items into or from the dryer with the lint filter installed. If the filter is not in place, small
items can fall into the filter slot and cause the dryer to malfunction.
STEP 5 After finishing the drying
• Empty the water tank to prevent leaks. For more information on emptying the water tank, see the
“Emptying the water tank” section on page 43
• If the “Clean heat exchanger” message appears on the display, refer to the “Heat exchanger” section on
page 46 and clean the heat exchanger.
• Keep the dryer door and the heat exchanger cover open after finishing the drying to keep the inside of
the dryer more hygienic.
English
English 27
U-PJT_DRYER_SimpleUX_WEB_SSEC-00_EU_English.indd 27 2021/11/9 17:26:30
Page 28
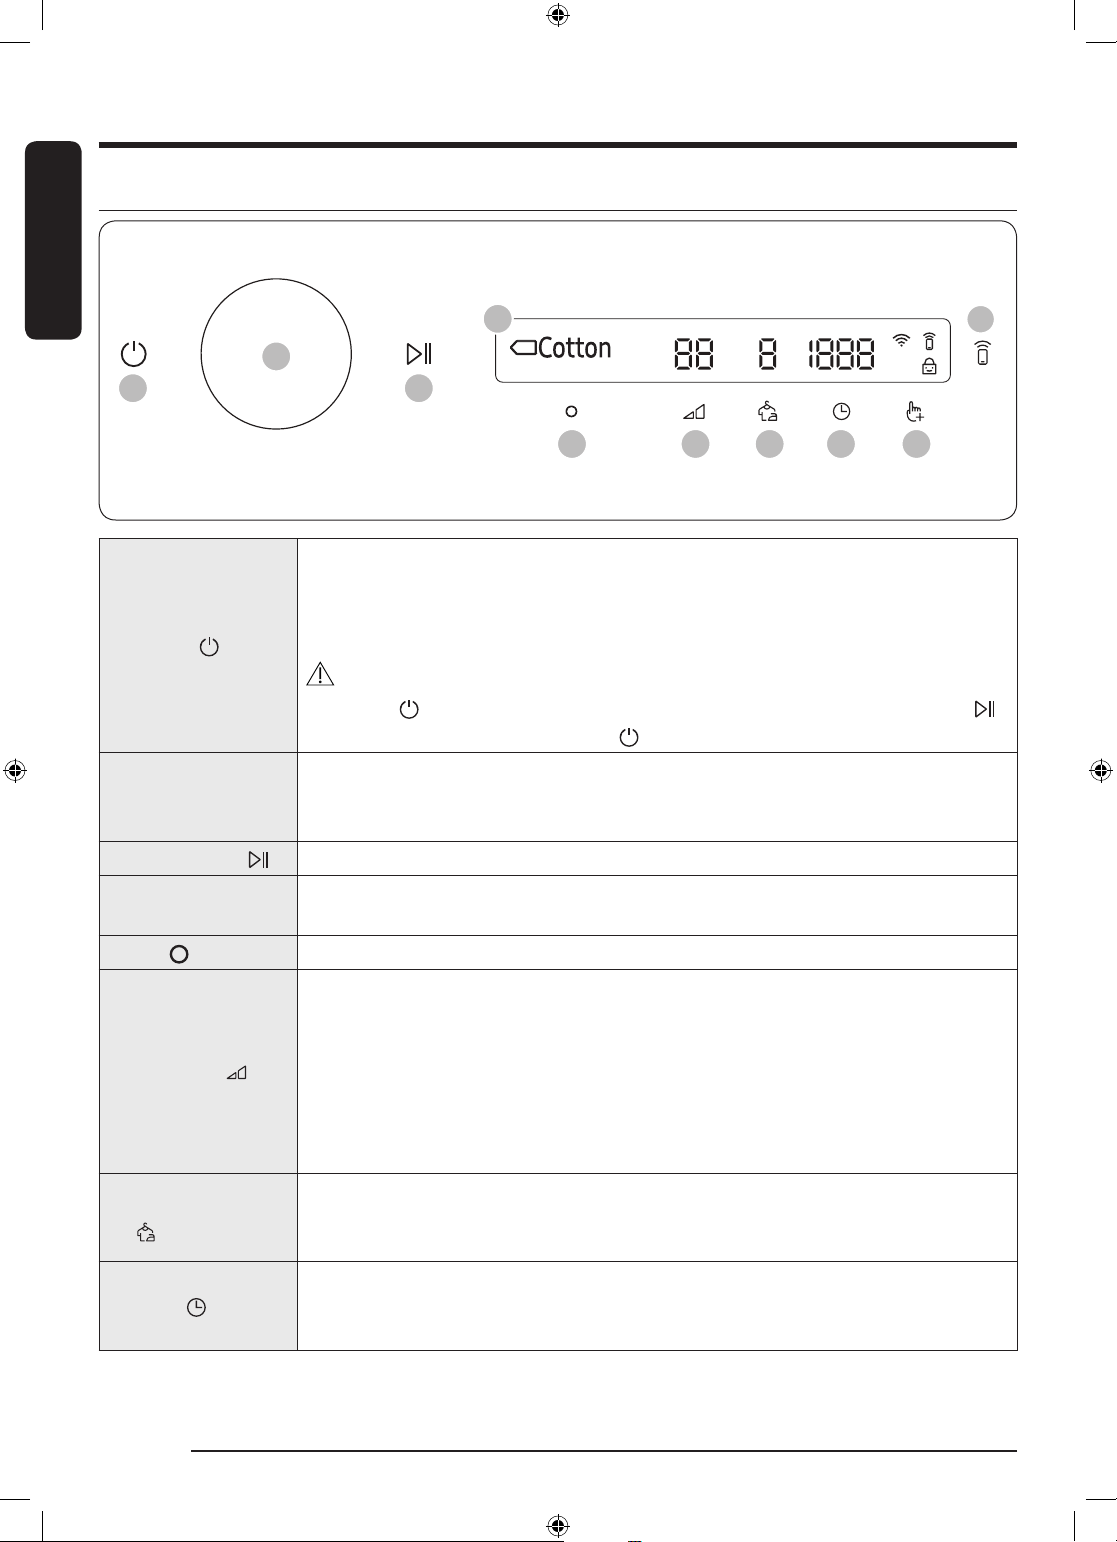
Operations
3
hrs 40min
max 9kg
04
10
05 06 07 08 09
01 03
02
Control panel
English
Tap to turn the dryer on or off.
• If you do not manipulate the control panel for 10 minutes after the dryer is
01 Power
02 Navigation dial
03 Start/Pause
04 Display
05 OK
06 Dry Level
07 Wrinkle Prevent
08 Time
• The dryer automatically turns off when the drying completes.
Do not tap to turn the dryer off while the drying is in progress. Tap and hold
to pause the cycle first, and then tap to turn the dryer off.
Turn the Navigation dial left or right to navigate through cycles and functions.
When you turn the Navigation dial, the display shows your selection (such as cycle,
additional functions, and system functions).
Tap and hold to start or pause an operation.
The display shows the current cycle, estimated time remaining, cycle options, and
other useful or alert messages.
Tap to confirm your selection of function or setting.
Tap to change the dry level for the selected cycle. You can select from level 1 to 3,
but available level depends on the selected cycle.
• 3: Suitable for large and thick items.
• 2: Standard drying level.
• 1: Gently dries items to protect fabric. Suitable for delicate items or items you
Tap to turn the Wrinkle Prevent function on or off. When the function is on, the
dryer rotates the drum intermittently after completing the dry cycle to prevent
wrinkles.
Tap to select the cycle time for Time Dry, Warm Air, or Cool Air. You can set the
drying time between 20 minutes and 240 minutes. Available drying time depend
on the selected cycle.
turned on, the dryer automatically turns off.
CAUTION
want to naturally dry (by hanging or laying flat on drying rack) while they are
damp.
English28
U-PJT_DRYER_SimpleUX_WEB_SSEC-00_EU_English.indd 28 2021/11/9 17:26:30
Page 29
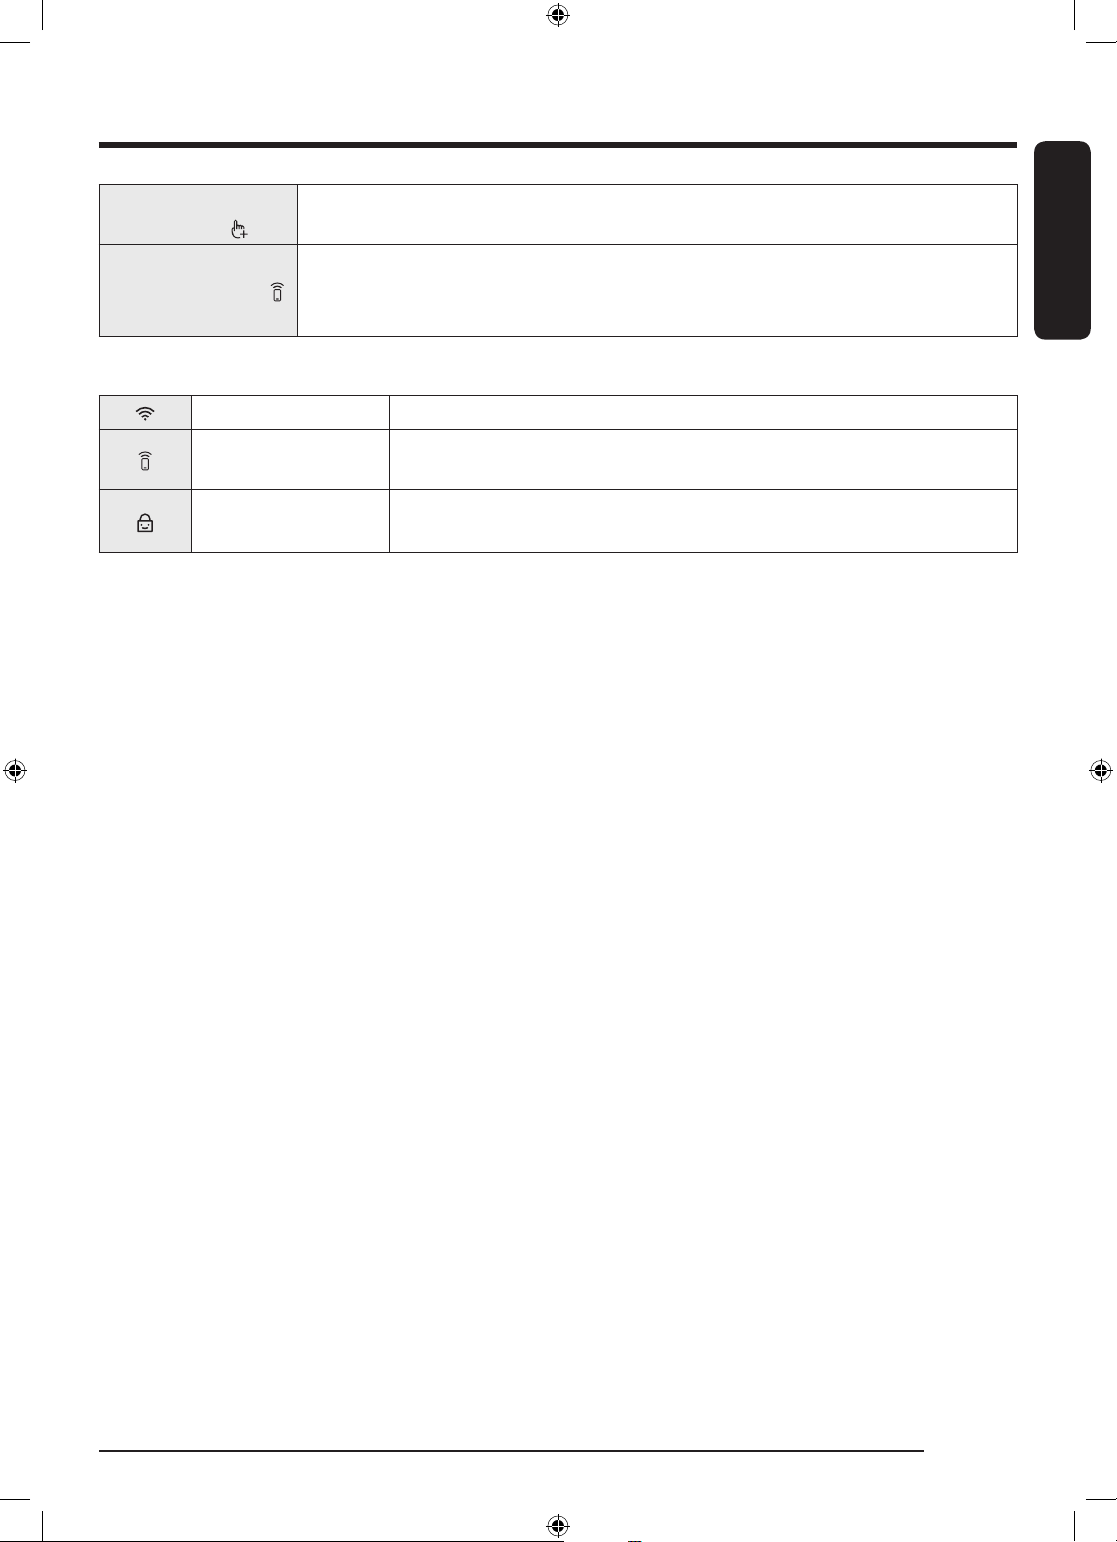
09 Additional
Functions
10 Smart Control
Icon description
Wi-Fi This icon indicates that the dryer is connected to Wi-Fi.
Smart Control
Child Lock
• Tap to enter the additional functions menu.
• Tap and hold for 3 seconds to enter the system functions menu.
Tap to activate or deactivate the Smart Control function.
• When the Smart Control function is activated, you can control your dryer
remotely using the SmartThings app in your smartphone.
This icon indicates that Smart Control is on. For more information on
“Smart Control”, see page 38.
This icon indicates that Child Lock is on.
For more information on “Child Lock”, see page 35.
English
English 29
U-PJT_DRYER_SimpleUX_WEB_SSEC-00_EU_English.indd 29 2021/11/9 17:26:31
Page 30
Operations
3
hrs 40min
max 9kg
05 03 04
01 06
02
Operating a cycle
English
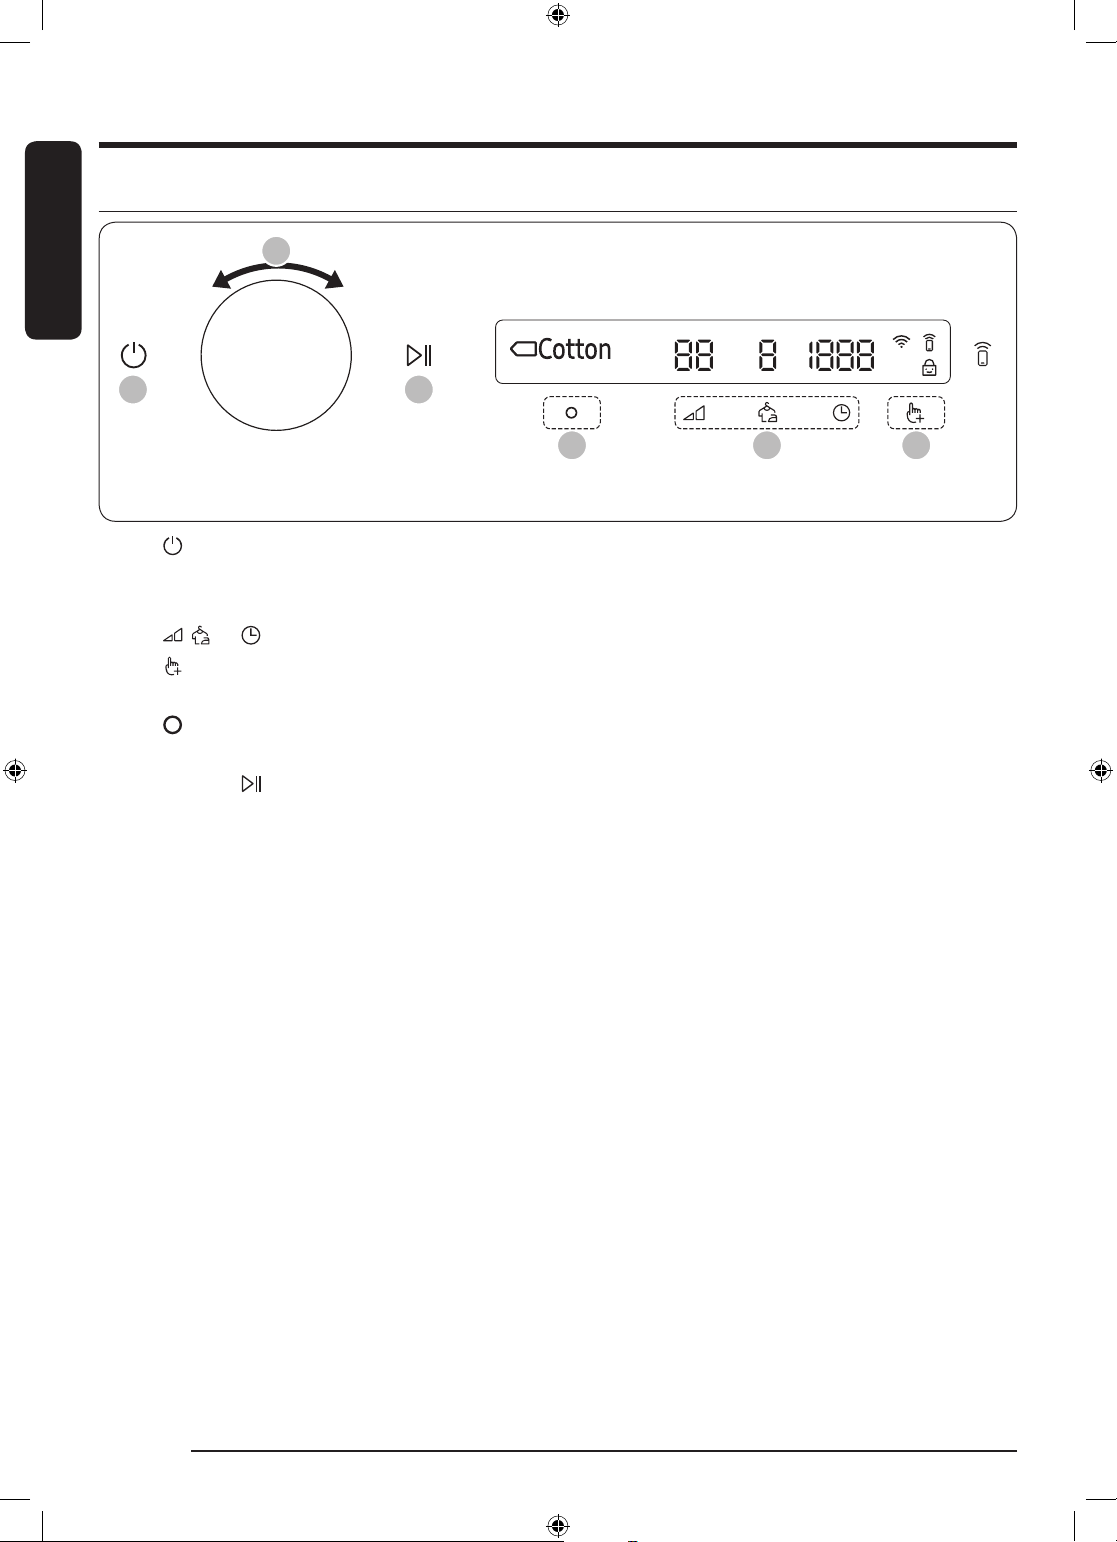
1. Tap to turn on the dryer.
2. Turn the Navigation dial to select the cycle you want. For more information on “Cycle overview”, see
page 31.
3. Tap , , or to change the default cycle settings.
4. Tap , and then turn the Navigation dial to select additional function. For more information on
“Additional functions”, see page 34.
5. Tap to change the settings for selected additional function. Not all cycles have additional functions
available.
6. Tap and hold to start operation. Once you set the cycle you want, the screen displays a brief cycle
description, maximum laundry load, and cycle time. You can also check the cycle progress, remaining
cycle time, and information codes.
English30
U-PJT_DRYER_SimpleUX_WEB_SSEC-00_EU_English.indd 30 2021/11/9 17:26:31
Page 31
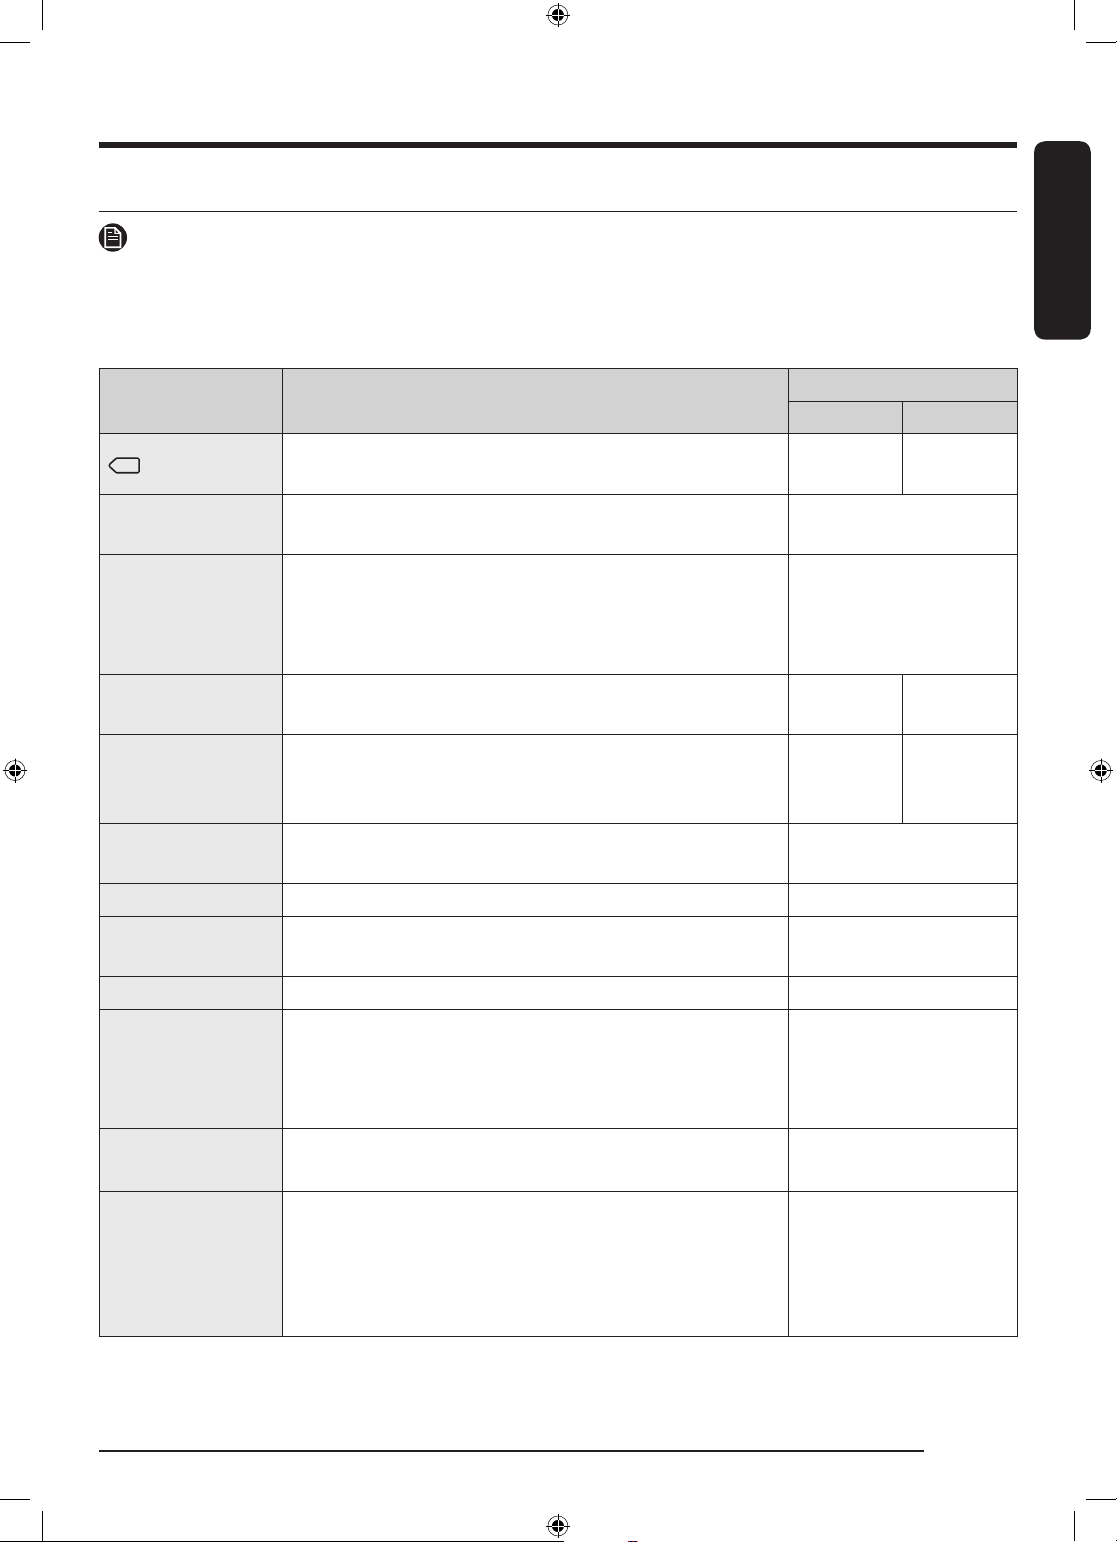
Cycle overview
NOTE
Other cycles can be used after adding them to your cycle list using the My Cycles function. For more
information, see the “My Cycles” section on page 35.
Sensor dry cycles
English
Cycle Description
Max load (kg)
DV9*** DV8***
Cotton
Quick Dry 35’
For cottons, bed linen, table linen, underwear, towels,
and shirts.
For drying light cotton synthetics or items that needs
quick drying. The default dry time is 35 minutes.
9.0 8.0
1.0
For mixed loads consisting of cotton and synthetic
Super Speed
fabrics.
• DV9*T82**** / DV9*T72**** / DV8*T72**** models
3.0
only.
Mixed Load
For mixed loads consisting of cotton and synthetic
fabrics.
9.0 8.0
For blouses, and shirts that are made of polyester
Synthetics
(Diolen, Trevira), polyamide (Perlon, nylon), or other
4.5 4.0
similar blends.
Delicates
For the delicate items to be handled with care such as
lingerie.
2.0
Towels Use to dry loads such as bath towels. 4.0
Bedding
For bulky items such as blankets, sheets, comforters, and
light duvets.
2.0
Shirts Use to quickly dry one item such as a shirt. 2.0
For sanitizing wet and dry clothes, linen, and toys to
Hygiene Care
eliminate bacteria.
• DV9*T82**** / DV9*T72**** / DV8*T72**** /
2.0
DV9*T62**** / DV8*T62**** models only.
Wool
For machine washable and tumble dryable wool only.
For best results, turn laundry inside out before drying.
1.0
For outdoor wear such as skiwear and mountain clothing,
and also for fabrics such as spandex, stretch, and
Outdoor
microfiber. It is recommended to use this cycle after you
2.0
have washed your laundry using the Outdoor with your
washing machine.
English 31
U-PJT_DRYER_SimpleUX_WEB_SSEC-00_EU_English.indd 31 2021/11/9 17:26:31
Page 32
Operations
English
Silent Dry
Iron Dry
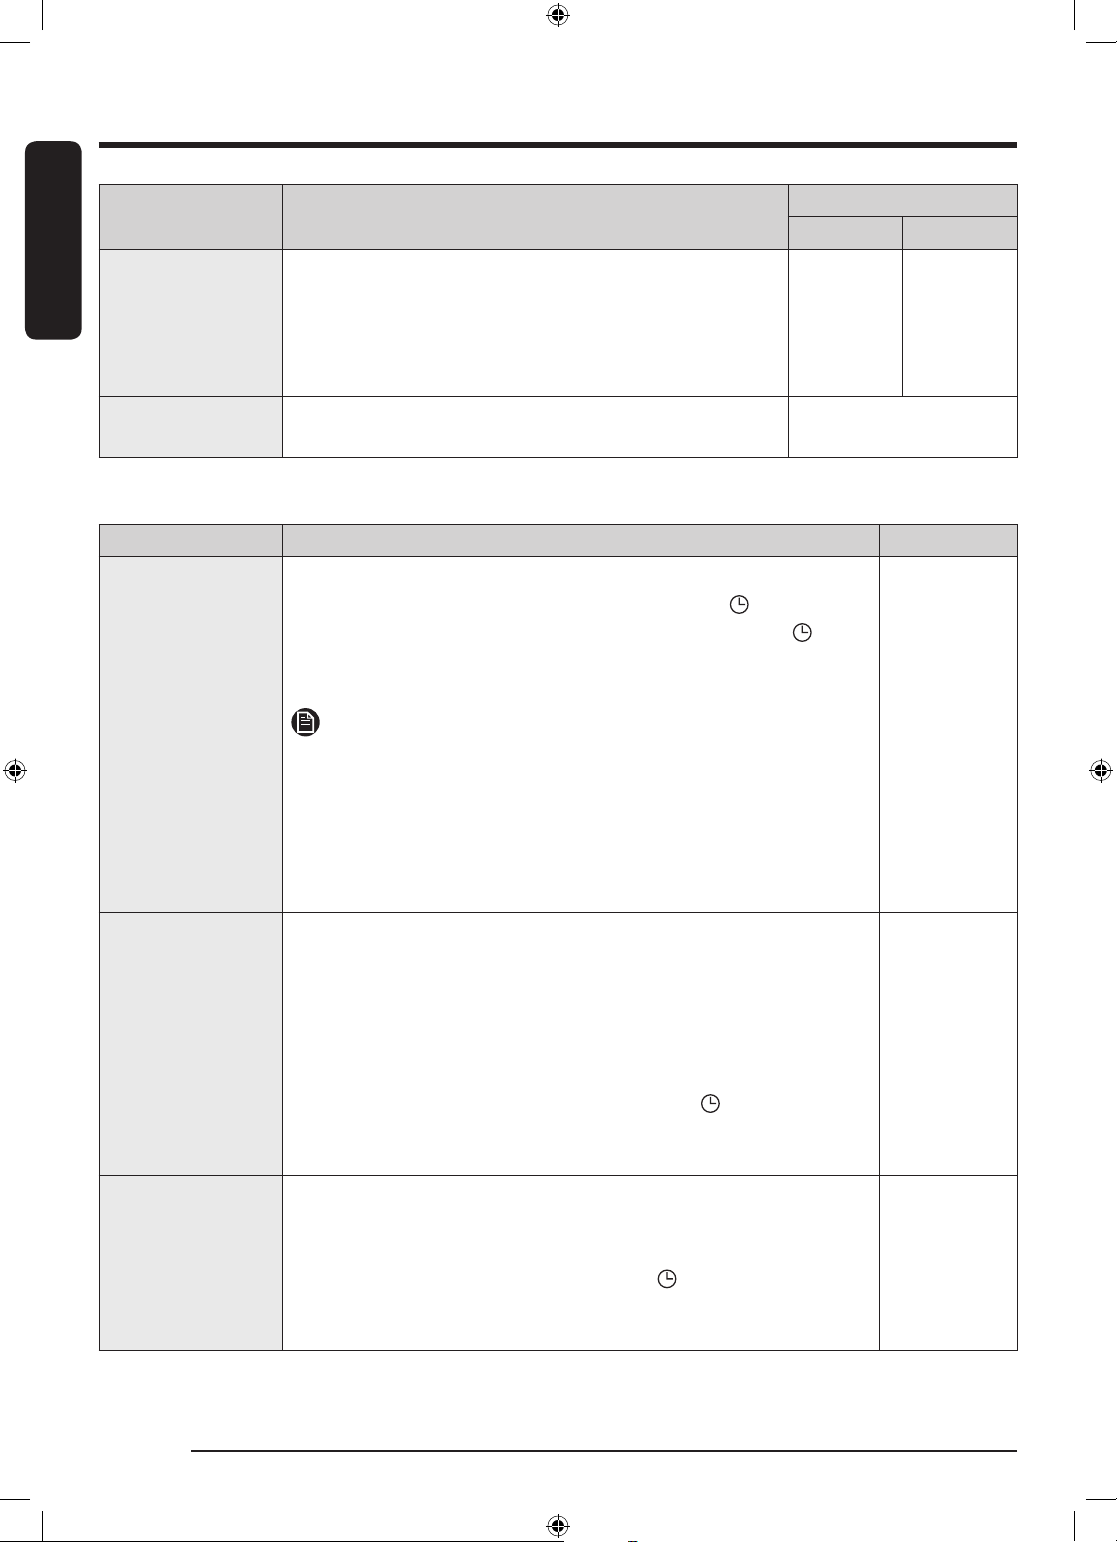
Manual dry cycles
Time Dry
Warm Air
Cool Air
Cycle Description
For mixed loads of cotton and synthetic fabrics that you
want to dry silently. This can be used with the Wrinkle
Prevent option, so you can start a cycle before going to
bed and have it completed in the morning.
• DV9*T82**** models only.
This cycle finishes the drying process in a moist state,
which facilitates ironing.
Cycle Description Max load (kg)
Use to set a desired dry time.
Turn the Navigation dial to select Time Dry and tap to set
the drying time between 20 minutes and 240 minutes. Tap
repeatedly to select the available time options in this order: 20 / 30
/ 40 / 50 / 60 / 90 / 120 / 150 / 180 / 240.
NOTE
• The actual cycle time may differ depending on the dryness of
items.
• If you use this cycle for additional drying after finishing one
of the Sensor Dry cycles (listed on page 31), set the minimum
drying time (20 minutes). Excessive drying may cause damage or
deform to an item.
For small, pre-dried items.
Timed cycle for all types of fabric except for wool and silk. Dry
laundry that is still slightly damp or has already been pre-dried.
Also suitable for the subsequent drying of multi-layered, thick
laundry that does not dry readily.
Turn Navigation dial to select Warm Air and tap to set the drying
time between 20 minutes and 240 minutes. Tap repeatedly to
select the available time options in this order: 20 / 30 / 40 / 50 / 60
/ 90 / 120 / 150 / 180 / 240.
All types of fabric. For freshening up or airing items of laundry that
have not been worn for long.
Turn Navigation dial to select Cool Air and tap to set the drying time
between 20 minutes and 240 minutes. Tap repeatedly to select
the available time options in this order: 20 / 30 / 40 / 50 / 60 / 90 /
120 / 150 / 180 / 240.
Max load (kg)
DV9*** DV8***
9.0 8.0
4.0
-
-
-
English32
U-PJT_DRYER_SimpleUX_WEB_SSEC-00_EU_English.indd 32 2021/11/9 17:26:31
Page 33
Other cycles
Cycle Description Max load (kg)
Air Wash
Use this cycle to disinfect clothes and make them feel fresher and
cleaner.
• DV9*T82**** / DV9*T72**** / DV8*T72**** / DV9*T62**** /
DV8*T62**** models only.
English
1.0
English 33
U-PJT_DRYER_SimpleUX_WEB_SSEC-00_EU_English.indd 33 2021/11/9 17:26:31
Page 34
Operations
Damp Alert
Tap O to set alert
Off
03 01
02
02
Additional functions
English
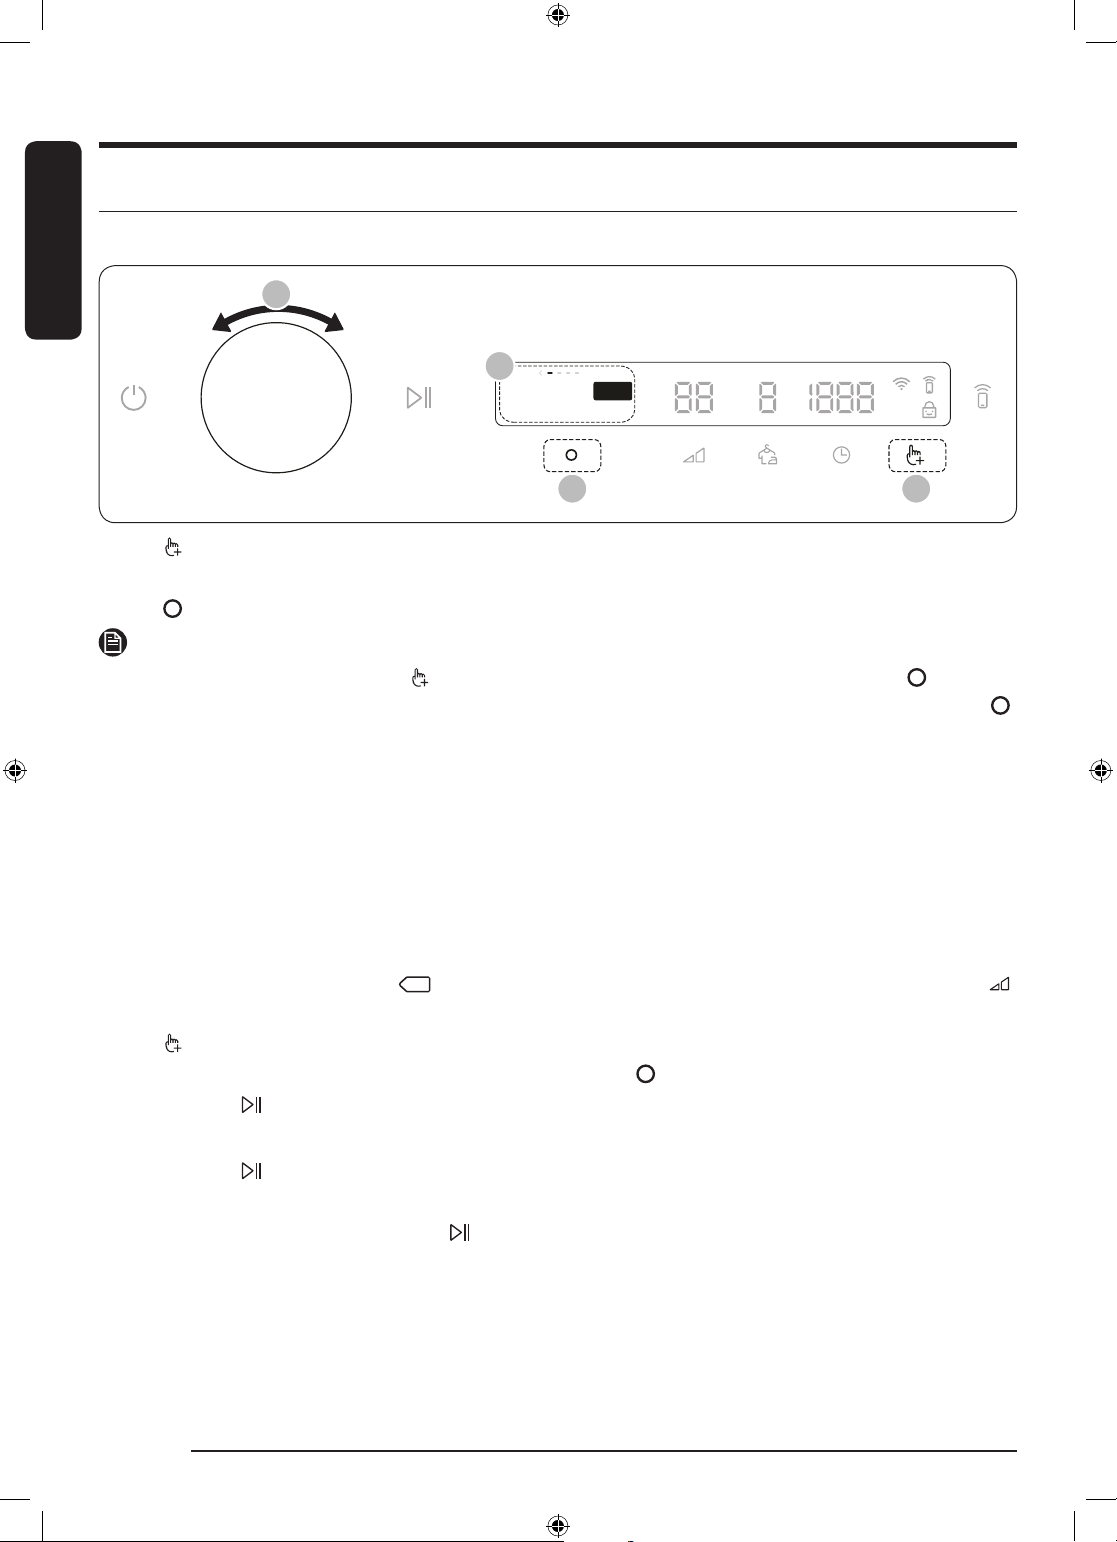
Using Additional Functions
1. Tap .
2. Turn the Navigation dial to select the desired additional function.
3. Tap to change the selected function’s settings or start the function.
NOTE
• To return to the main screen, tap again or turn the Navigation dial to select Back and tap .
• If the selected function is not supported, the "Currently not supported" message is displayed, and the
button is not activated.
• When you select an additional function, a brief help message appears for the first ten times of use.
• If you do not manipulate the control panel for 7 seconds after entering the Additional Functions menu,
the display returns to the main screen.
Damp Alert
This function alerts you when shirts and other items that require ironing are dry enough to be suitable for
ironing.
1. Select a cycle and change the cycle settings as necessary.
- This function is available for Cotton, Synthetics, Mixed Load, and Silent Dry with the Dry Level
set to 2 or 3.
2. Tap .
3. Turn the Navigation dial to select Damp Alert, and then tap .
4. Tap and hold .
Alarm during drying:
1. Tap and hold to pause the cycle.
2. Open the door and take out the items you want to iron.
3. Close the door, and then tap and hold to dry the remaining items.
English34
U-PJT_DRYER_SimpleUX_WEB_SSEC-00_EU_English.indd 34 2021/11/9 17:26:32
Page 35
My Cycles
Add or remove cycles to create a personal cycle list.
1. Tap .
2. Turn the Navigation dial to select My Cycles, and then tap .
- You can only edit a cycle to create a personal cycle when the dryer is not operating.
3. Turn the Navigation dial to select a desired cycle.
4. Tap to add or remove the selected cycle.
- Addition and removal of a cycle is saved automatically.
5. Once you finish creating My Cycles, tap to return to the cycles screen.
NOTE
The Cotton, Synthetics, and Iron Dry cycles cannot be removed from the cycles list.
Delay End
You can set the dryer to finish your drying automatically at a later time by choosing a delay of between 1 to
24 hours (in 1 hour increments). The hour displayed indicates the time the dry will finish.
1. Select a cycle and change the cycle settings as necessary.
2. Tap .
3. Turn the Navigation dial to select Delay End, and then tap .
4. Turn the Navigation dial to select the desired time, and then tap .
5. Tap and hold .
- To cancel Delay End, tap restart the dryer.
English
Child Lock
To prevent children or infants from accidentally starting or setting the dryer, Child Lock locks all buttons
except for and .
1. Close the door.
2. Tap .
3. Turn the Navigation dial to select Child Lock, and then tap .
4. Tap to select On or Off.
- The Child Lock icon turns on when the function is on.
- You cannot turn on Child Lock with the door open. If you get the "Door is open" message on the
display while you try to turn on Child Lock, close the door and try again.
NOTE
• When Child Lock is on, all buttons are disabled except for and .
• It you tap a button with Child Lock on, an alarm triggers with the “Child Lock on” message.
• If you open and close the door with Child Lock on, an alarm triggers with the “Open door & check inside”
and “Child Lock on” message.
• To dismiss a notification message, turn off Child Lock or the power.
English 35
U-PJT_DRYER_SimpleUX_WEB_SSEC-00_EU_English.indd 35 2021/11/9 17:26:32
Page 36
Operations
AI Patten
Tap O to set alert
Off
03 01
02
*
02
System functions
English
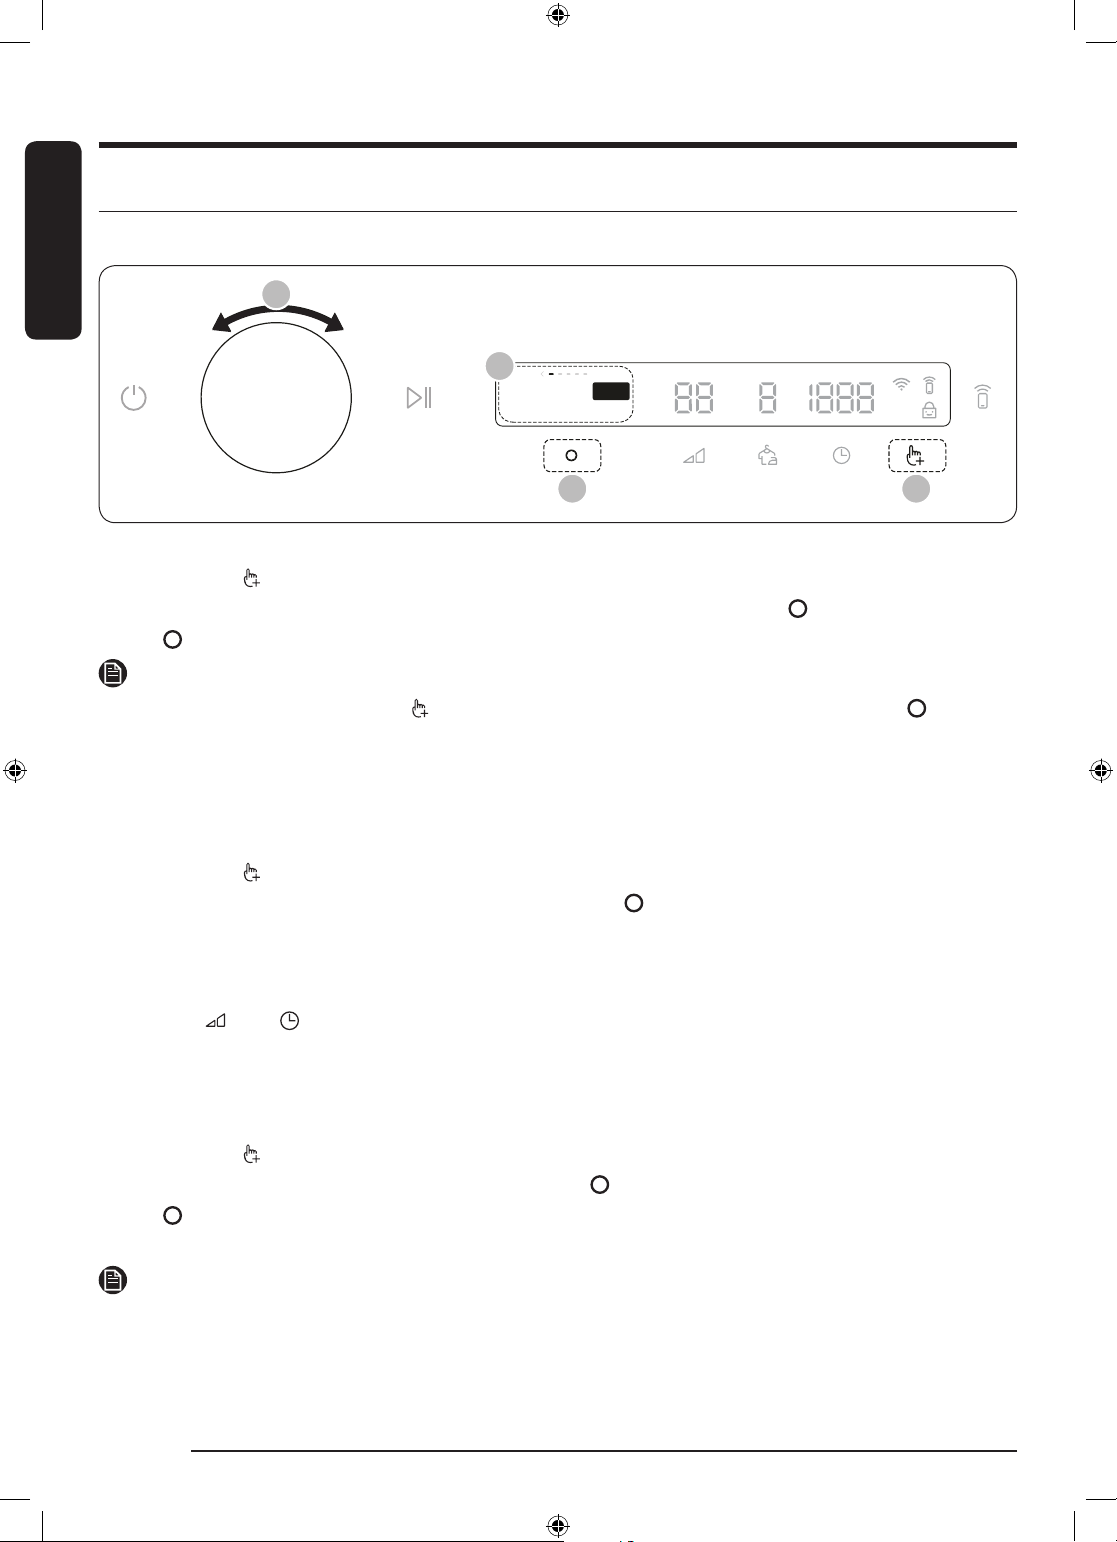
Using System Functions
* Tap and hold 3 seconds.
1. Tap and hold for 3 seconds.
2. Turn the Navigation dial and select the desired system function, and then tap .
3. Tap to change the selected function’s settings or start the function.
NOTE
• To return to the main screen, tap again or turn the Navigation dial to select Back and tap .
• If you do not manipulate the control panel for 7 seconds after entering the System Functions menu, the
display returns to the main screen.
AI Pattern
This function saves your frequently used cycles and settings.
1. Tap and hold for 3 seconds.
2. Turn the Navigation dial to select AI Pattern, and then tap .
3. Tap to select On or Off.
- The default setting is On. Set it to Off if you do not want to use this function.
- When you turn the function on, the dryer remembers frequently used cycles and their settings (Dry
Level , Time ) and save them in frequently used order.
- When you turn off the function, all the saved data resets.
Alarm
You can enable/disable alarm sounds.
1. Tap and hold for 3 seconds.
2. Turn the Navigation dial to select Alarm, and then tap .
3. Tap to select On or Off.
- The default setting is On.
NOTE
The setting remains unchanged even if you restart the dryer.
English36
U-PJT_DRYER_SimpleUX_WEB_SSEC-00_EU_English.indd 36 2021/11/9 17:26:32
Page 37
Wi-Fi
You can turn the dryer's Wi-Fi on or off.
1. Tap and hold for 3 seconds.
2. Turn the Navigation dial to select Wi-Fi, and then tap .
3. Tap to select On or Off.
- The dryer's Wi-Fi is off as a factory default setting. However, the dryer's Wi-Fi turns on automatically
when you turn on the dryer for the first time. Then, the final Wi-Fi setting maintains regardless of the
dryer power status.
- Once you turn on the dryer's Wi-Fi and connect to a network, the dryer remains connected to the
network even when you turn off the power.
- The Wi-Fi indicates that the dryer is connected to the router through the Wi-Fi connection.
Language
You can change the system language.
1. Tap and hold for 3 seconds.
2. Turn the Navigation dial to select Language, and then tap .
3. Turn the Navigation dial to select the desired language, and then tap .
Factory Reset
You can reset your dryer.
1. Tap and hold for 3 seconds.
2. Turn the Navigation dial to select Factory Reset, and then tap .
- Your dryer resets to the factory setting.
English
English 37
U-PJT_DRYER_SimpleUX_WEB_SSEC-00_EU_English.indd 37 2021/11/9 17:26:32
Page 38
Operations
Special features
English
Smart Control
You can connect to the SmartThings app and control your dryer remotely.
Connecting your dryer
• Download and open the SmartThings app on your mobile device
• Tap and hold to turn on the dryer.
• Tap and hold on the dryer.
a. The dryer enters AP mode and connects to your mobile device.
b. Tap to authenticate your dryer on your mobile device.
c. Once the authentication process is complete, your dryer is successfully connected to the app. Use
various features available in the SmartThings app.
NOTE
• If your dryer fails to connect with the SmartThings app, try again.
• Check your router if you experience any Internet connection problem after connecting your dryer with
the SmartThings app.
• If the Wi-Fi is off, tap and hold for 3 seconds to navigate to System Functions, select Wi-Fi and tap
to turn it on.
• Turning the dryer's Wi-Fi on allows you connect to the dryer via SmartThings app on your smartphone
regardless of the power status of the dryer. However, the dryer appears offline on the SmartThings app
if the dryer's Wi-Fi is off.
• Close the door before starting the Smart Control function.
• If you use the dryer 20 times without being connected to SmartThings, the next time you turn the dryer
on, a pop-up about Smart Control connection will appear for 3 seconds.
• If the dryer's Wi-Fi is not connected to an AP (access point), the Wi-Fi will turn off when you turn of the
power.
Stay Connect
Set up the Stay Connect function in your SmartThings app. Your dryer stays connected to the app so you can
use the dryer when you are away from home.
1. If you turn on the Stay Connect function on the SmartThings app, the dryer will stay in standby power
saving mode after completing a cycle.
- The Stay Connect function will remain active for up to 24 hour if the door remains closed.
2. When the Stay Connect function is active, the Smart Control and Wi-Fi turn on your dryer display.
3. Conveniently control your dryer using the SmartThings app
NOTE
The dryer switches to standby power saving mode when operation is paused even if the machine is not
connected to the SmartThings app.
English38
U-PJT_DRYER_SimpleUX_WEB_SSEC-00_EU_English.indd 38 2021/11/9 17:26:32
Page 39
SmartThings
Wi-Fi connection
On your smartphone, go to Settings and turn on the wireless connection and select an AP (Access Point).
• This appliance supports the Wi-Fi 2.4 GHz protocols.
Download
On an app market (Google Play Store, Apple App Store, Samsung Galaxy Apps), find the SmartThings app
with a search term of “SmartThings”. Download and install the app on your device.
NOTE
The app is subject to change without notice for improved performance.
In addition, the further updates on app or the function in the app may stop due to usability and security
reasons, even if updates are currently supported on your OS.
Log in
You must first log into SmartThings with your Samsung account. To create a new Samsung account, follow
the instructions on the app. You don’t need a separate app to create your account.
NOTE
If you have a Samsung account, use the account to log in. A registered Samsung smartphone user
automatically logs in.
To register your appliance to SmartThings
1. Make sure your smartphone is connected to a wireless network. If not, go to Settings and turn on the
wireless connection and select an AP (Access Point).
2. Open SmartThings on your smartphone.
3. If a message of “A new device is found.”, select Add.
4. If no message appears, select + and select your appliance in a list of devices available. If your appliance
is not listed, select Device Type > Specific Device Model, and then add your appliance manually.
5. Register your appliance to the SmartThings app as follows.
a. Add your appliance to SmartThings. Make sure your appliance is connected to SmartThings.
b. When registration is complete, your appliance appears on your smartphone.
English
English 39
U-PJT_DRYER_SimpleUX_WEB_SSEC-00_EU_English.indd 39 2021/11/9 17:26:32
Page 40
Operations
Open Source Announcement
English
The software included in this product contains open source software. You may obtain the complete
corresponding source code for a period of three years after the last shipment of this product by contacting
our support team via http://opensource.samsung.com (Please use the “Inquiry” menu.)
It is also possible to obtain the complete corresponding source code in a physical medium such as a CDROM; a minimal charge will be required.
The following URL http://opensource.samsung.com/opensource/SMART_AT_051/seq/0 leads to the
open source license information as related to this product. This offer is valid to anyone in receipt of this
information.
NOTE
Hereby, Samsung declares that this radio equipment is in compliance with Directive 2014/53/EU and
with the relevant statutory requirements in the UK. The full text of the EU declaration of conformity and
the UK declaration of conformity is available at the following internet address: The official Declaration of
conformity may be found at http://www.samsung.com, go to Support > Support home and enter the model
name.
Wi-Fi max transmitter power : 20 dBm at 2.412 GHz – 2.472 GHz
English40
U-PJT_DRYER_SimpleUX_WEB_SSEC-00_EU_English.indd 40 2021/11/9 17:26:33
Page 41
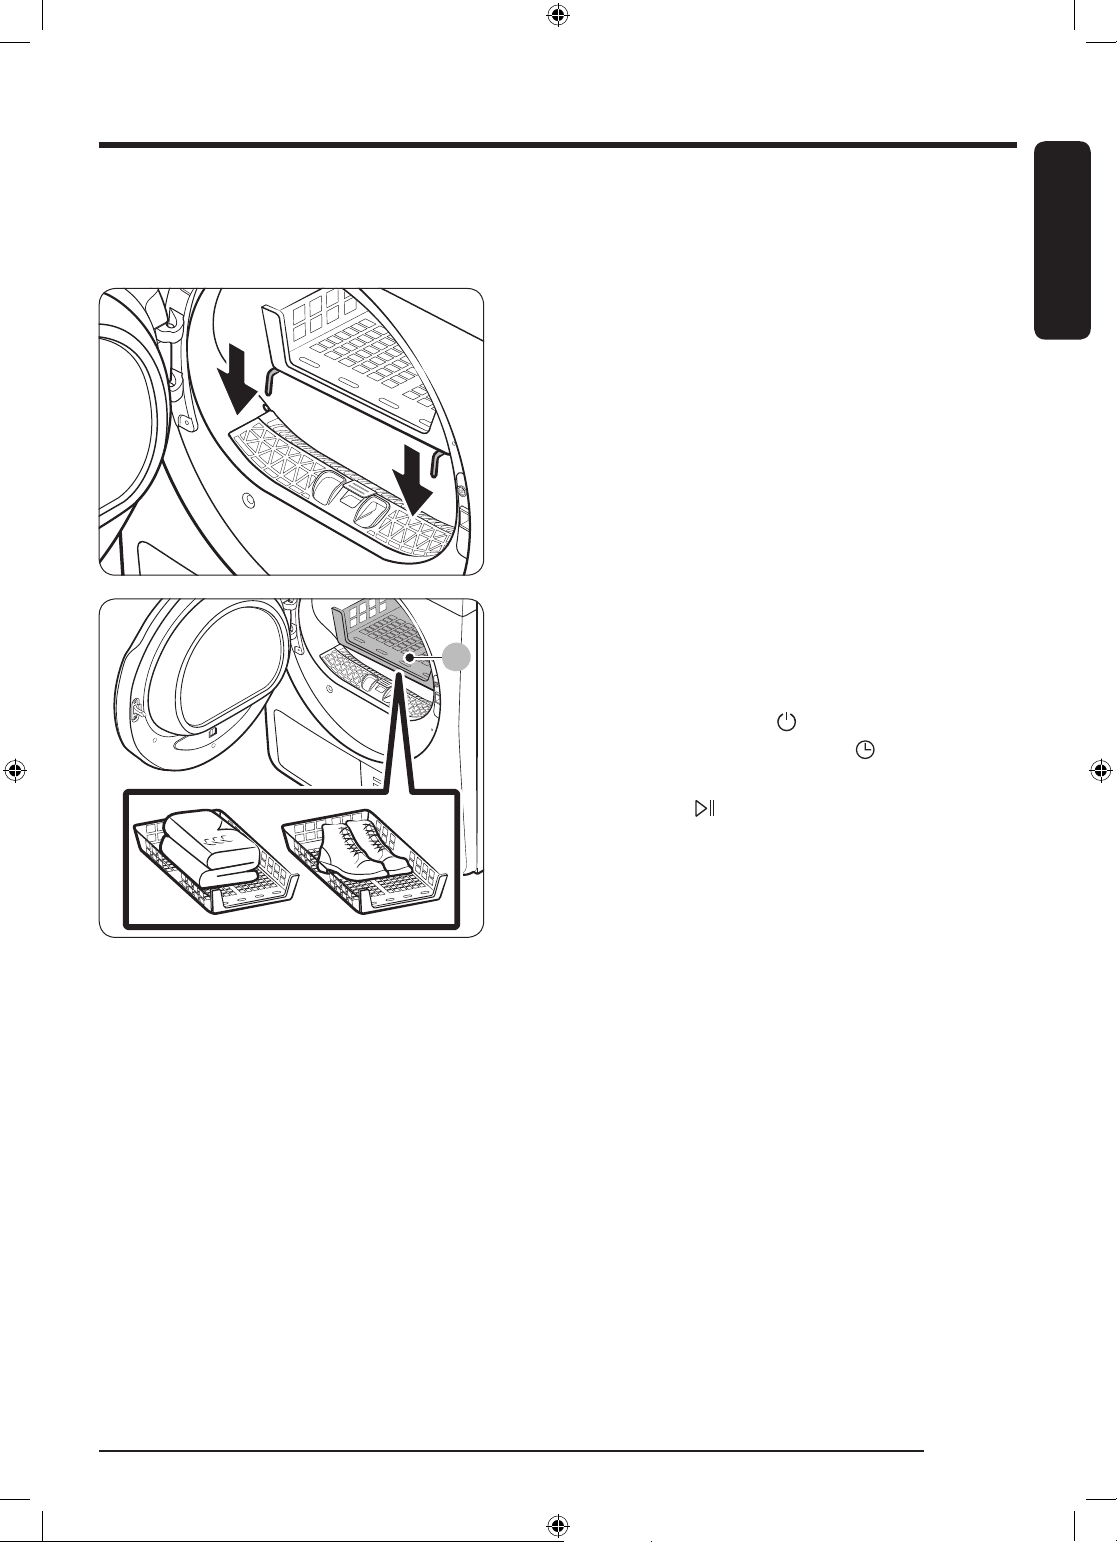
Using the drying rack (applicable models only)
A
Set the drying time up to 150 minutes according to the moisture and weight of the items to dry. When
drying laundry using the drying rack, the Time Dry cycle is recommended.
1. Position the drying rack in the drum, inserting the
front lips of the rack into the holes of the door
diaphram.
2. Place items on the rack, leaving enough space
where air can circulate. For clothing items, fold and
place flat on the rack. For shoes, place shoes with
their soles facing down.
3. Close the door and tap . Turn the Navigation dial
to select Time Dry, and then tap to select the
drying time.
4. Tap and hold .
English
A. Drying rack
English 41
U-PJT_DRYER_SimpleUX_WEB_SSEC-00_EU_English.indd 41 2021/11/9 17:26:33
Page 42
Operations
Drying suggestions
English
Items (max 1.5 kg) Description
Washable sweaters (block to shape and lay flat on
rack)
Stuffed toys (cotton or polyester fiber filled)
Stuffed toys (foam or rubber-filled)
Foam rubber pillows
Sneakers To dry sports shoes, place the shoes on the rack so
CAUTION
• Drying foam rubber, plastic, or rubber on a heat setting may cause damage to the items and lead to a fire
hazard.
• To prevent damage to shoes, use the drying rack.
When drying the laundry using the rack, fold
and place the clothes on the rack to prevent the
clothing from becoming wrinkled.
that the soles of the shoes are facing downwards.
English42
U-PJT_DRYER_SimpleUX_WEB_SSEC-00_EU_English.indd 42 2021/11/9 17:26:33
Page 43
Maintenance
A
B
Emptying the water tank
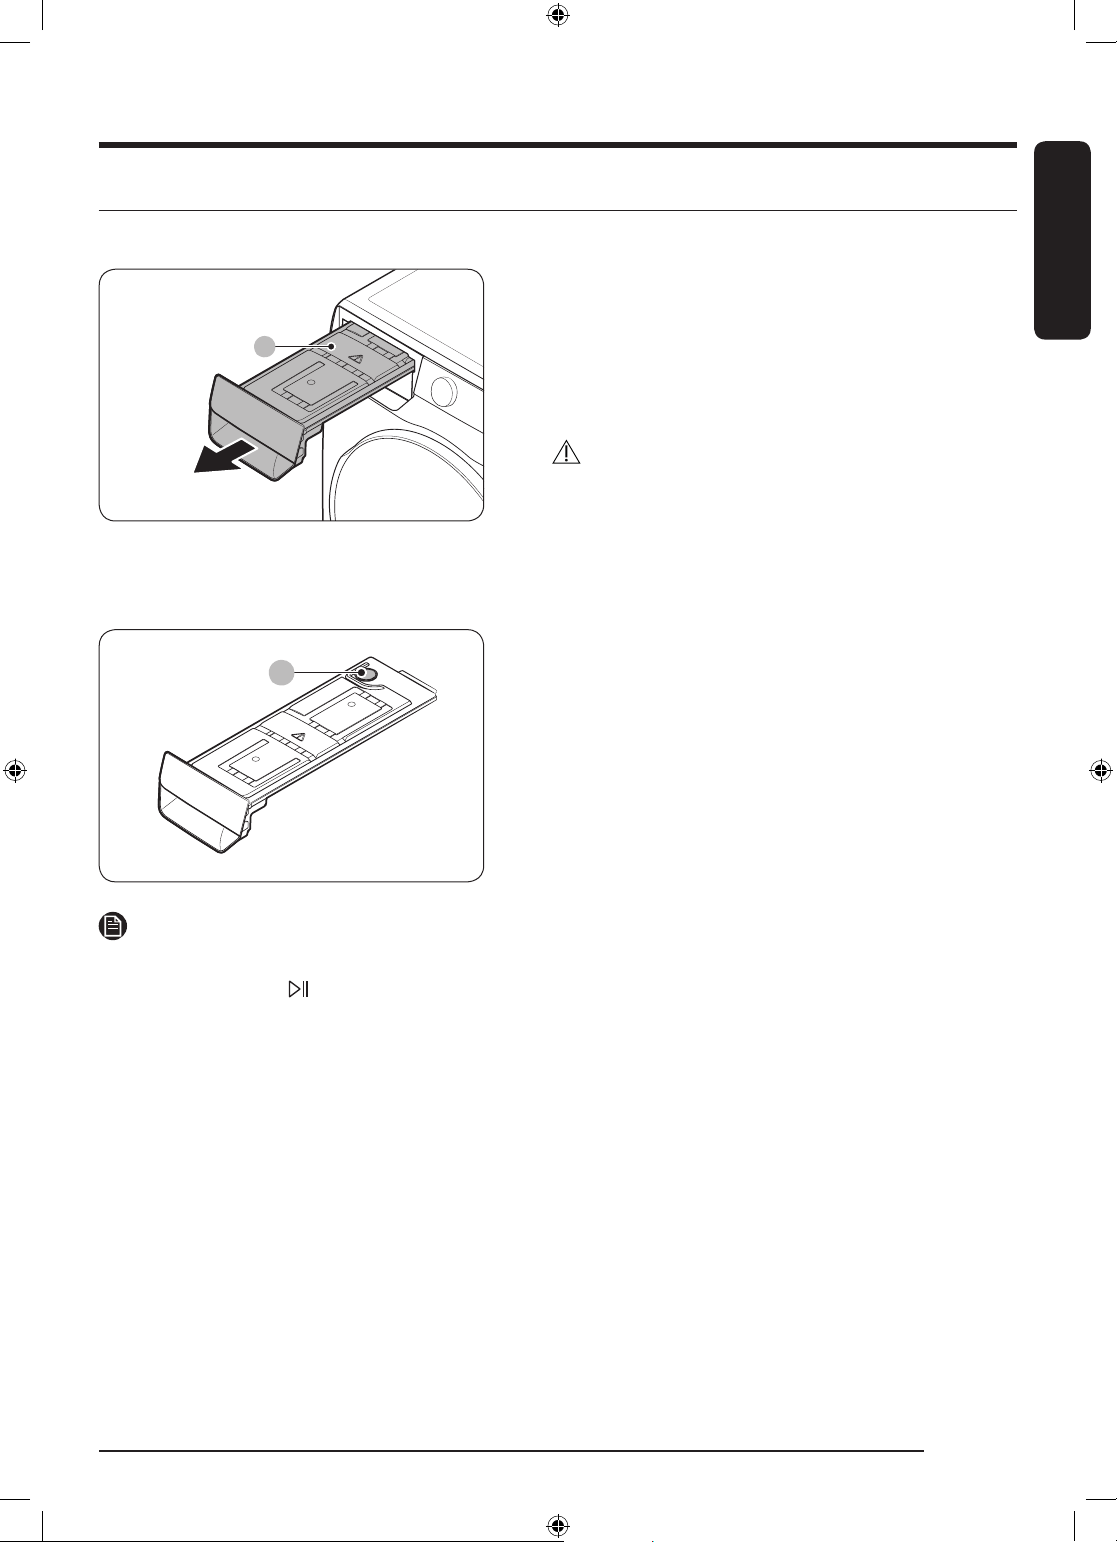
Empty the water tank after each use to prevent leaks.
English
1. Remove the water tank (A) from the dryer.
- Pull the water tank handle with one hand until
the tank is halfway out.
- Once the water tank is halfway out, support the
bottom of the tank with the other hand and pull
it slowly with both hands.
CAUTION
• The water tank is heavy. Slowly remove the water
tank using both hands while keeping the tank at a
level.
• Be careful when removing the full water tank. It is
very heavy and can cause injury if you drop it.
2. Empty the water through the drain hole (B), and
then clean inside the water tank.
- Mix some neutral detergent in lukewarm water.
Fill the water tank with the mixture through the
drain hole (B) and leave it for 30 minutes. Then,
rinse the tank with clean water and completely
dry it.
3. Place the water tank back into place.
NOTE
If the dryer displays the “Empty the tank” message and stops while drying is in progress, empty the water
tank and tap and hold . The “Empty the tank” message will disappear, and the dryer will resume drying.
English 43
U-PJT_DRYER_SimpleUX_WEB_SSEC-00_EU_English.indd 43 2021/11/9 17:26:33
Page 44
Maintenance
Cleaning
English
WARNING
• Do not clean the dryer by directly spraying water onto the dryer.
• Do not clean the dryer with benzene, thinner, alcohol, or acetone. This may cause discoloration,
deformation, damage, electric shock, or fire.
• Before cleaning the dryer, be sure to unplug the power cord.
Exterior
Clean with a soft, damp cloth. Do not use abrasive cleaners. Avoid using or placing sharp or heavy objects
near/on the dryer. Keep detergent and laundry supplies on the pedestal (sold separately) or in a separate
storage container.
Control panel
Clean with a soft, damp cloth. Do not use abrasive cleaners. Do not spray cleaners directly on the panel.
Immediately wipe up any spills or liquids from the control panel.
Drum
Clean with a damp cloth with a mild, non-abrasive cleaner suitable for stainless steel.
Wipe remaining residue with a clean, dry cloth.
Door
Foreign substances can contaminate or build up on the inside of the door. Clean the inside of the door using
a soft piece of cloth or brush.
CAUTION
Do not detach the door’s rubber sealing.
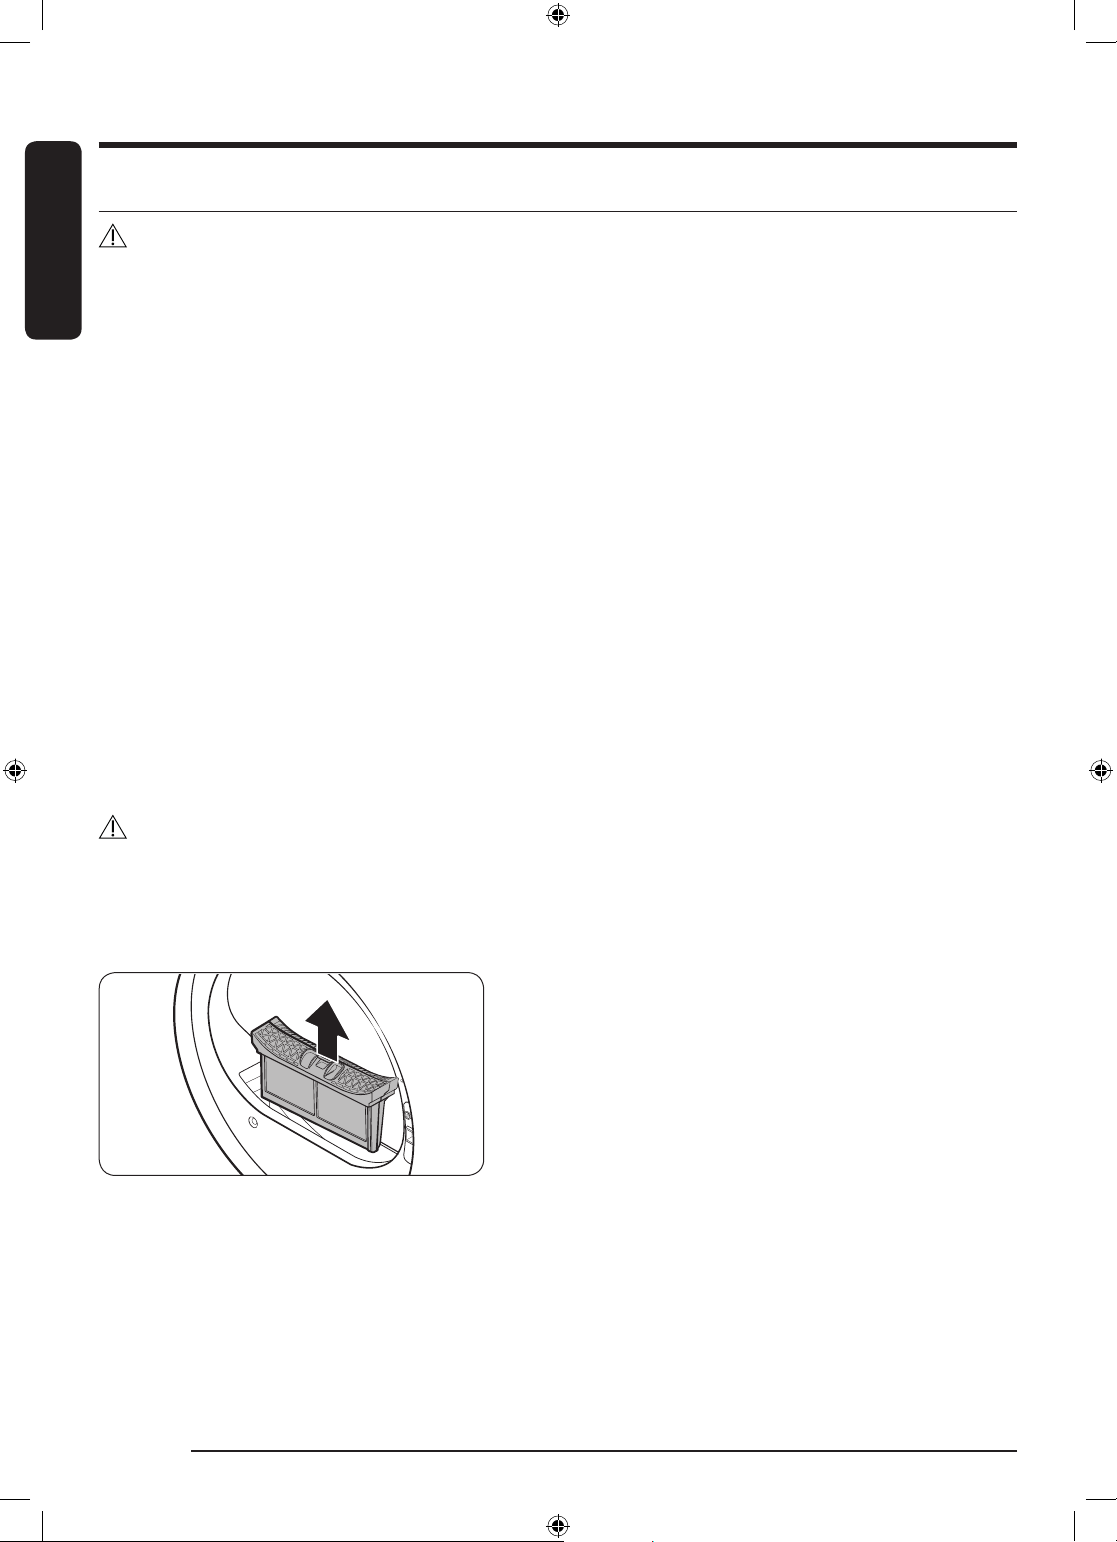
Lint filter
Clean the lint filter after each use.
1. Open the dryer door, grab the top of the lint filter,
and pull to remove the filter.
- Do not detach the rubber sealing after
removing the filter.
English44
U-PJT_DRYER_SimpleUX_WEB_SSEC-00_EU_English.indd 44 2021/11/9 17:26:33
Page 45
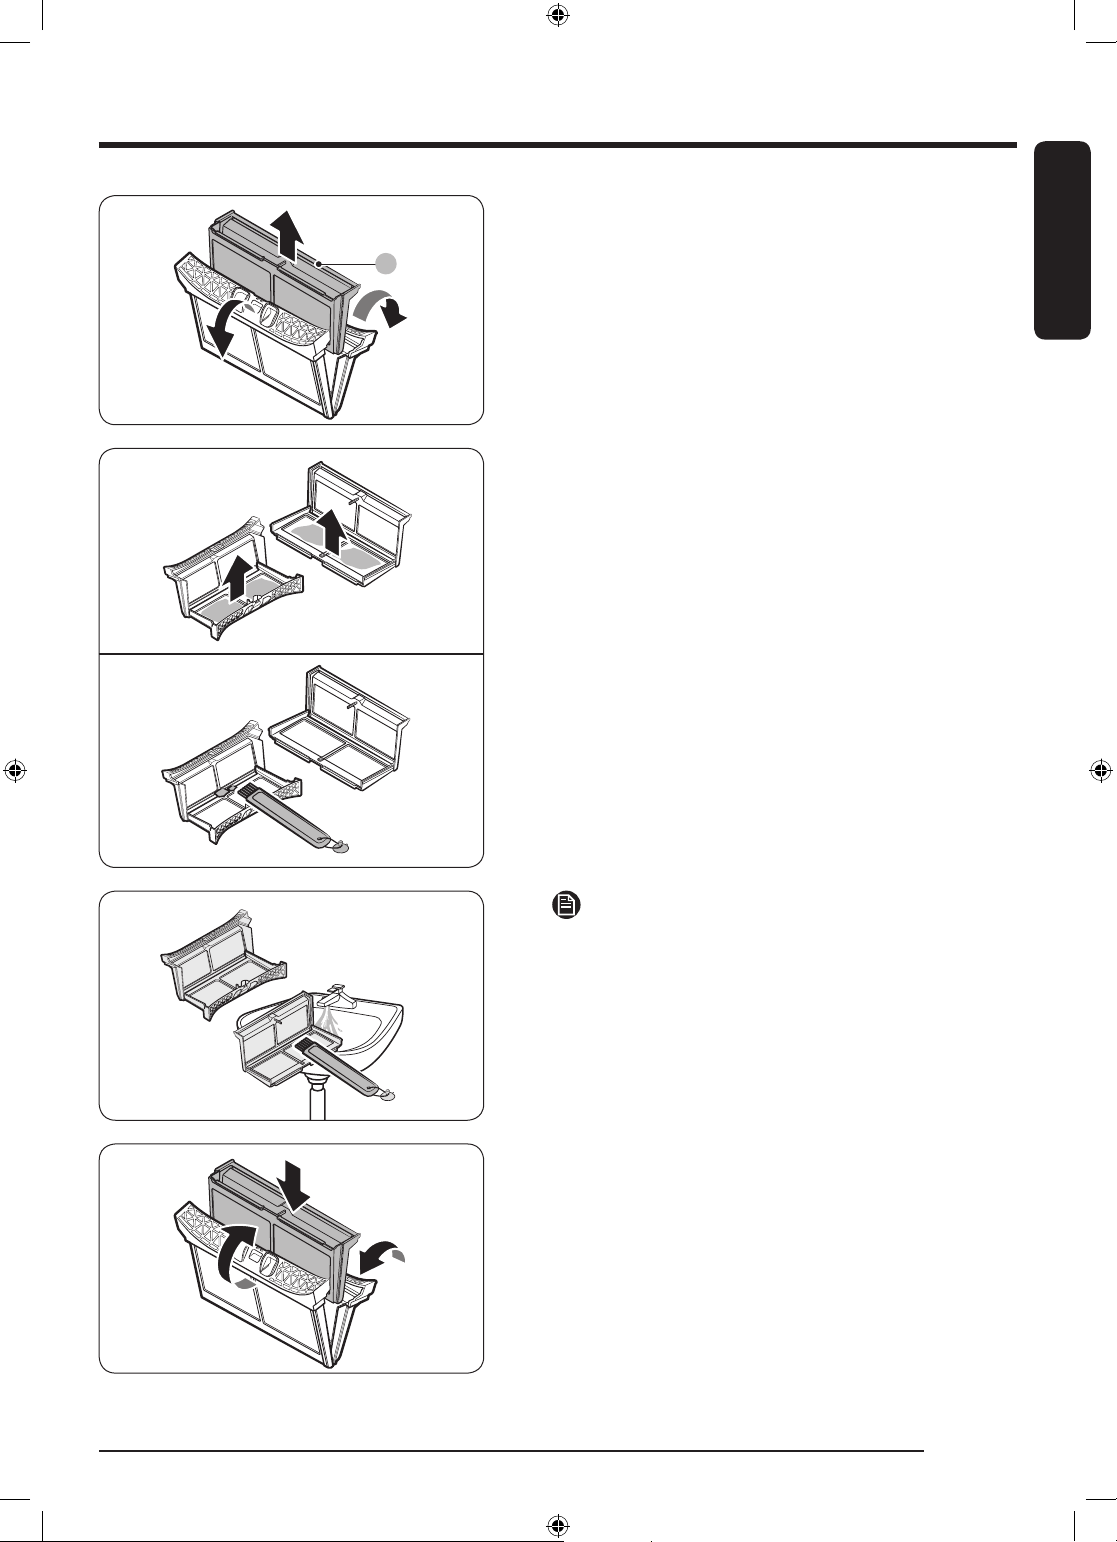
A
2. Open the outer filter and remove the inner filter
(A).
3. Spread open the outer filter and the inner filter.
4. Remove the lint from both filters, and then clean
the filters with the cleaning brush.
English
NOTE
To clean the filters thoroughly, clean the filters in
running water, and then dry them completely.
5. Put the inner filter into the outer filter, and then
reinsert the lint filter into the original position.
English 45
U-PJT_DRYER_SimpleUX_WEB_SSEC-00_EU_English.indd 45 2021/11/9 17:26:34
Page 46
Maintenance
A
B
B
English
CAUTION
• Clean the lint filter after each load. Otherwise, the drying performance may decrease.
• If the filter surface is wet, allow it to completely dry before use.
- Inserting the filter while it is wet can cause mold and/or odor to form and/or result in less drying.
• When cleaning or removing the lint filter, do not shake or tap on the filter. Doing so can damage the
filter.
• Opening the outer and inner filters carelessly and with excessive force can damage the filters.
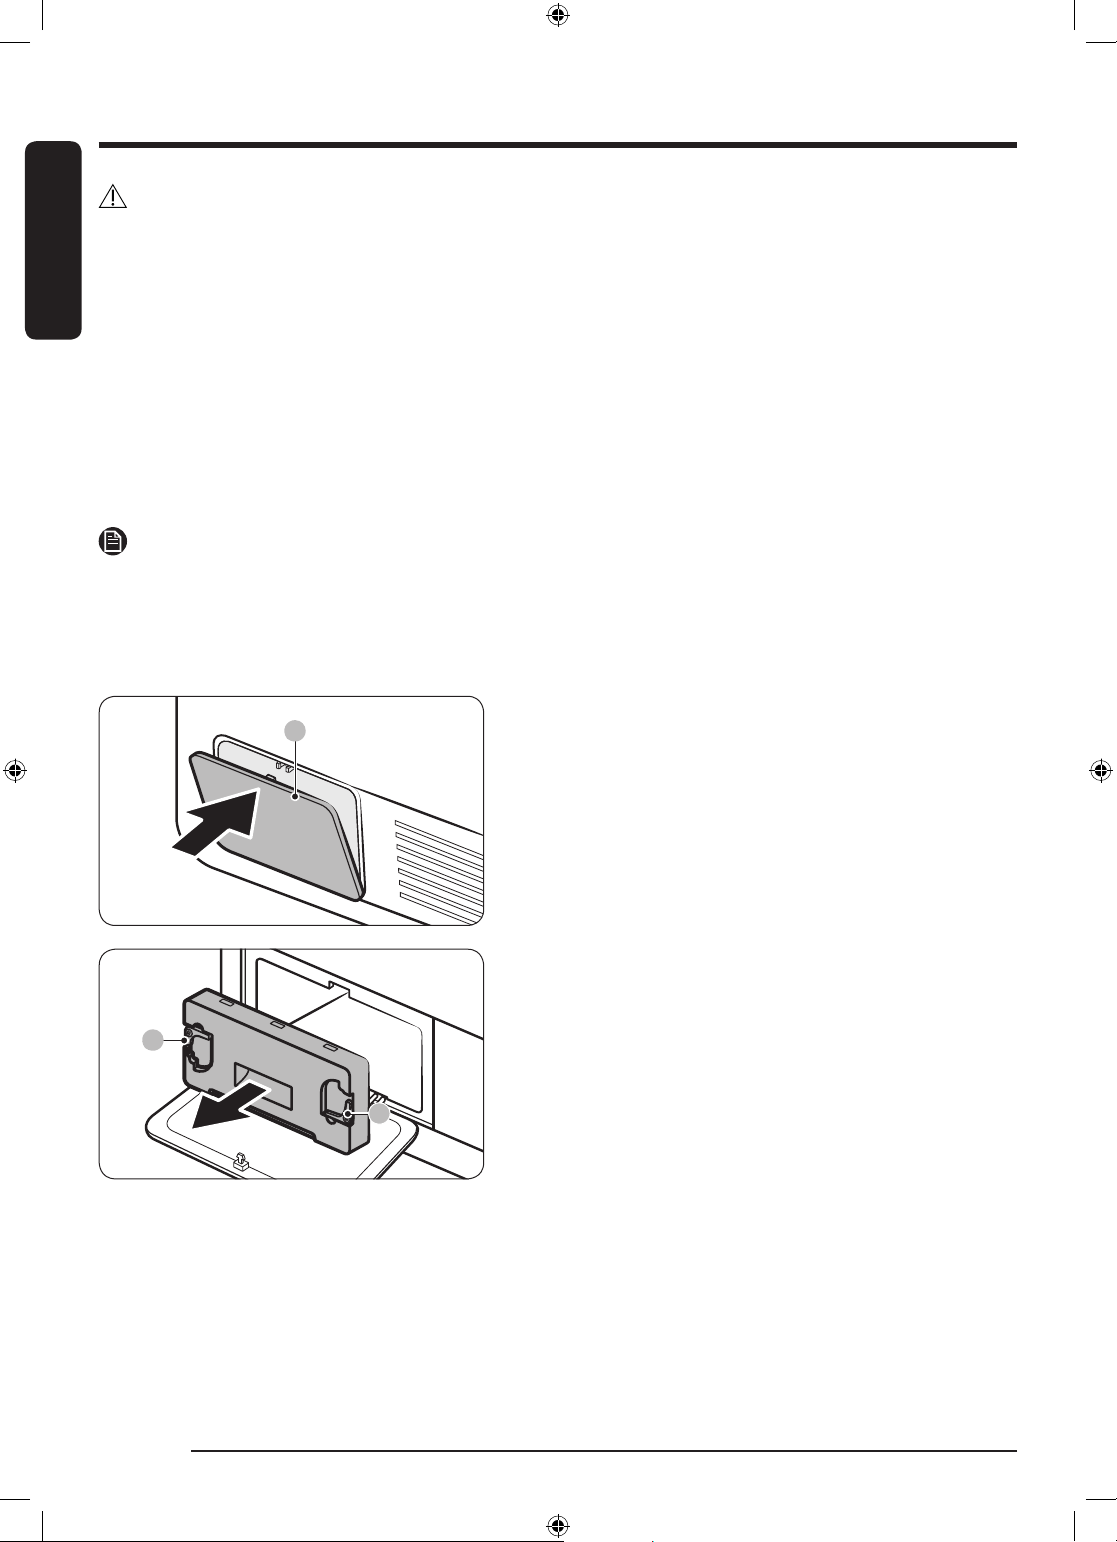
Heat exchanger
When it is time to clean the heat exchanger, the dryer will alert you by displaying the “Clean heat
exchanger” message.
A dirty heat exchanger will hinder the product’s performance and should be cleaned regularly.
NOTE
• Water droplets can form around the heat exchanger due to condensation caused by a temperature
difference. This is normal and is not a sign of a leak.
• If you are not planning on using the dryer for a long period of time, open the heat exchanger cover and
ventilate.
1. Gently press the top part of the outer cover (A) to
open.
2. Unlock the inner cover fixers (B), and then pull the
inner cover to remove.
English46
U-PJT_DRYER_SimpleUX_WEB_SSEC-00_EU_English.indd 46 2021/11/9 17:26:34
Page 47
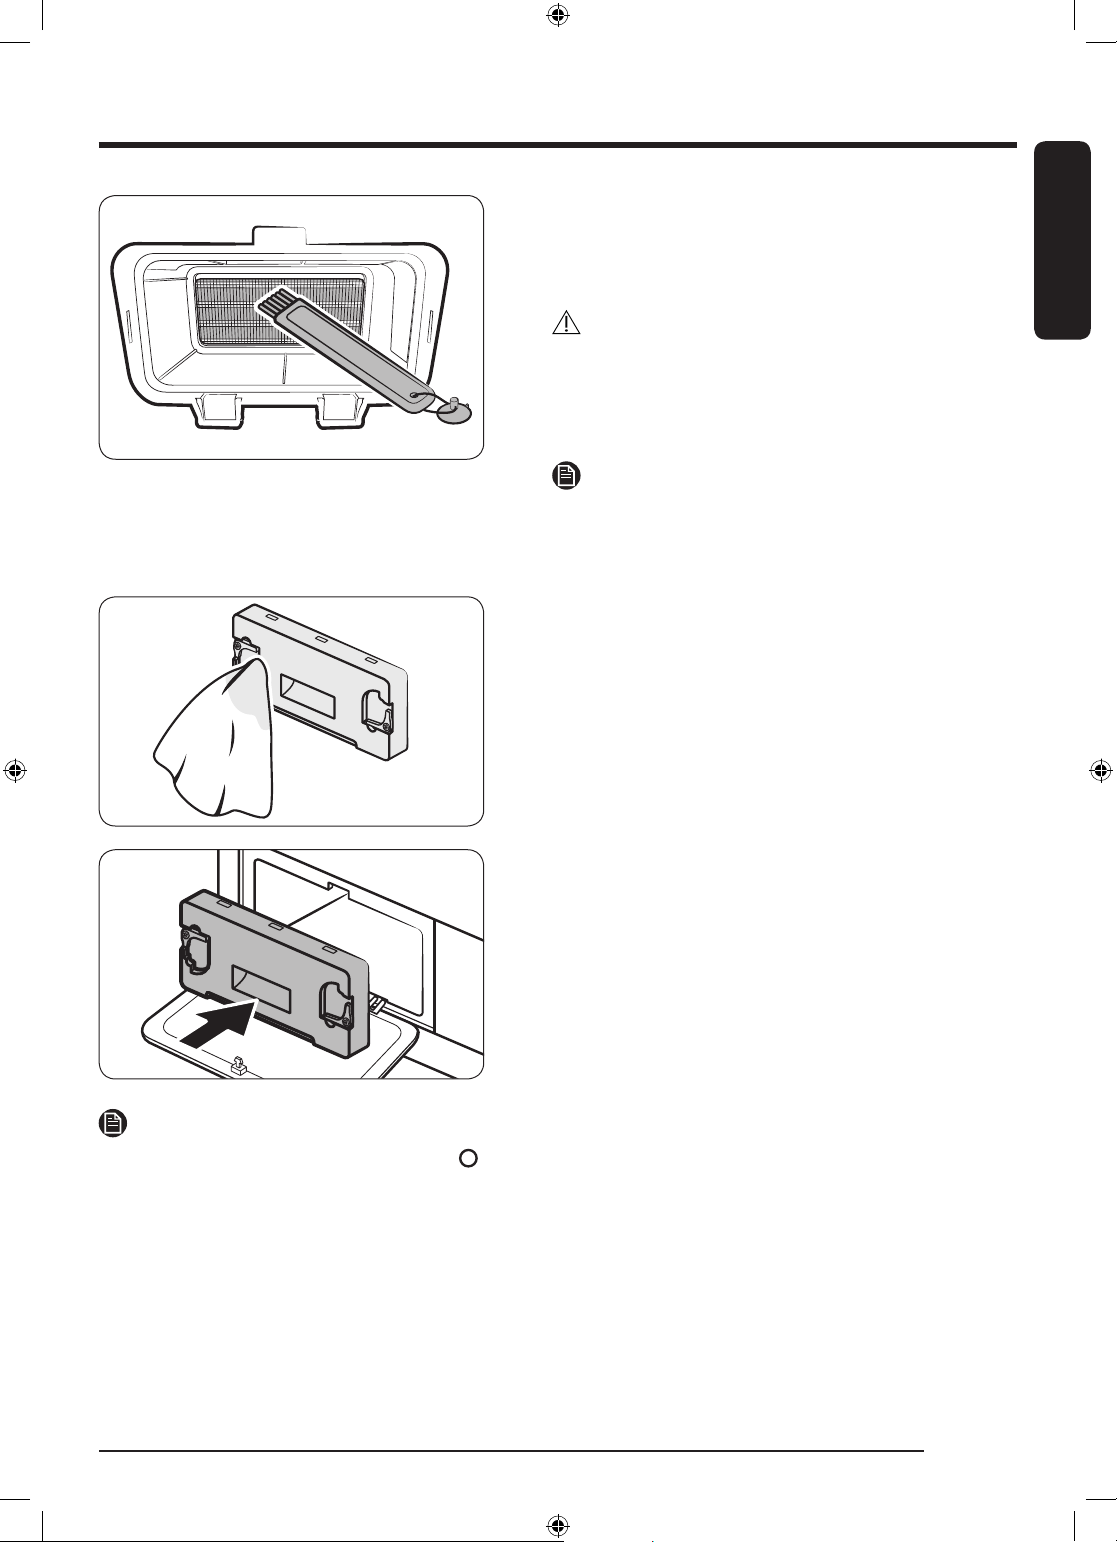
3. Clean the dust on the heat exchanger using the
provided brush.
- After cleaning with the brush, wipe off the
remaining dust using a smooth, damp cloth.
CAUTION
• To avoid physical injury and burns, do not touch or
clean the heat exchanger with bare hands.
• When cleaning the heat exchanger, be careful not
to damage the fins.
NOTE
If the heat exchanger is completely dry and therefore
hard to clean, spray some water on the heat
exchanger and clean using a brush.
4. Clean the inner cover with a smooth, damp cloth.
- There may be moisture and/or foreign
substances around the inner cover.
English
5. Reinsert the inner cover to its original position, and
then lock the fixers.
6. Close the heat exchanger’s outer cover.
NOTE
• After cleaning the heat exchanger, tap to dismiss the notification message. The message remains on
until you dismiss it.
• If the alarm continues after you have dismissed it, unplug and then plug in the power cord or remove
and reinsert the heat exchanger's inner cover.
English 47
U-PJT_DRYER_SimpleUX_WEB_SSEC-00_EU_English.indd 47 2021/11/9 17:26:34
Page 48
Troubleshooting
Checkpoints
English
If you encounter a problem with the dryer, first check the table below and try the suggestions.
Problem Action
• Make sure the dryer is plugged in.
• Make sure the door is properly closed.
Dryer does not start.
The dryer does not warm
up.
Items are not dried.
The dryer is too loud.
Items are not dried evenly.
There is a smell coming
from the dryer.
The dryer turns off before
the items are dry.
• Check the fuse or reset the circuit breaker.
• If you opened the door during a cycle, tap and hold again.
• Clean the filter.
• Make sure Child Lock is not activated.
• Check the fuse or reset the circuit breaker.
• Check the lint filter and the heat exchanger. Clean them if necessary.
• The dryer may be in the cooling down process of the cycle.
Check all of the above. Additionally:
• Do not overload the dryer. If the dryer is overloaded, it could take longer
for items to dry.
• Dry heavy fabrics separately from light fabrics.
• The item(s) are too small and may not getting enough spinning inside the
drum.
• Clean the filter.
• Clean the heat exchanger.
• If a drain hose is connected, make sure water is draining properly.
• Look for coins, loose buttons, nails, and other objects and remove them
immediately.
• Check the lint filter. Remove any items stuck inside the lint filter.
• Make sure the dryer is level and standing firmly on the floor.
• The dryer may hum due to air moving through the drum and fan. This is
normal.
• Seams, pockets, and other parts of clothing are harder to dry than others.
This is normal.
• Sort heavy and light items separately.
• The smell of paint, varnish, cleaning agents, and other household items
could have circulated in the air and entered the dryer. If you notice such a
smell, ventilate completely before using the dryer.
• If drying in an enclosed area, the dryer could cause the ambient
temperature to rise. Accordingly, make sure to open a window and
ventilate the area.
• Do not attempt to dry wet items after leaving them in the washing
machine or dryer for a long time.
• The load is too small. Throw in few additional items like towels and try
drying again.
English48
U-PJT_DRYER_SimpleUX_WEB_SSEC-00_EU_English.indd 48 2021/11/9 17:26:34
Page 49
Problem Action
The clothes have lint on
them.
The ambient temperature
around the dryer rises or
there is a damp, soggy
smell.
Water is not draining.
English
• Always make sure the lint filter is clean before putting items into the
dryer. When drying items that generate a large amount of lint, you may
need to clean the lint filter in the middle of a cycle.
• Some fabrics (such as white towels) causes more lint and should be dried
separately from fabrics that lint attaches easily (such as black linen
pants).
• Check the inside of the pockets to make sure they are empty before
drying.
• Heat pump dryers circulate ambient air inside and outside the dryer
during the drying process to cool the system. Using the dryer in a poorly
ventilated area may, depending on the operating environment, raise the
ambient humidity level and/or cause a damp, soggy smell to develop.
Ensure proper ventilation when using the dryer.
• Check the draining hose for twists and kinks.
Straighten out the hose if it is twisted or kinked and securely connect it
to the drain on the floor.
• Check to see if the draining hose is frozen.
If the hose is frozen, submerge it in warm water to allow the water inside
the hose to melt and drain out. Reconnect the hose and check for proper
draining.
If a problem persists, contact a local Samsung service center.
English 49
U-PJT_DRYER_SimpleUX_WEB_SSEC-00_EU_English.indd 49 2021/11/9 17:26:34
Page 50
Troubleshooting
Information codes
English
If the dryer fails to operate, you may see an information code on the screen. Check the table below and try
the suggestions.
Information code Meaning Action
• Close the door and start again.
• If this continues, call for service.
Door is open
Open door & check
inside (Child Lock
on)
Check filter Lint filter problem
Check inner cover
of heat exchanger
Check drainage /
Empty the tank
tC Air temperature sensor problem
tC5
3C Check the motor for operation.
AC6
HC Compressor overheating • Call for service.
Dryer operation with the door
open
Child Lock is on. Open the door
and check inside the drum.
Internal heat exchanger cover
problem
Draining malfunction
Draining pump malfunction
Frozen draining hose
Water tank full
Compressor temperature sensor
problem
Check communications between
the main and the inverter PBAs.
• Check if Child Lock is on. If Child Lock is
on, you may get this message when you
open the door even though the dryer is not
operating.
• If Child Lock is on, turn off Child Lock or the
power.
• Check the lint filter assembly.
• If this continues, call for service.
• Check the internal heat exchanger cover
assembly.
• If this continues, call for service.
• Make sure the draining hose is not bent or
damaged.
• If the hose is frozen, wrap the hose
with a towel soaked in warm water for
approximately ten minutes to thaw the
hose.
• Empty the water tank, turn on the dryer, and
start again.
• If this continues, call for service.
• Clean the lint filter or the heat exchanger.
• If this continues, call for service.
• Wait two to three minutes.
• Turn the power back on and start again.
• Try restarting the cycle.
• If this continues, call for service.
• Try restarting the cycle.
• If this continues, call for service.
If any information code keeps appearing on the screen, contact a local Samsung service center.
English50
U-PJT_DRYER_SimpleUX_WEB_SSEC-00_EU_English.indd 50 2021/11/9 17:26:35
Page 51
Appendix
Fabric care chart
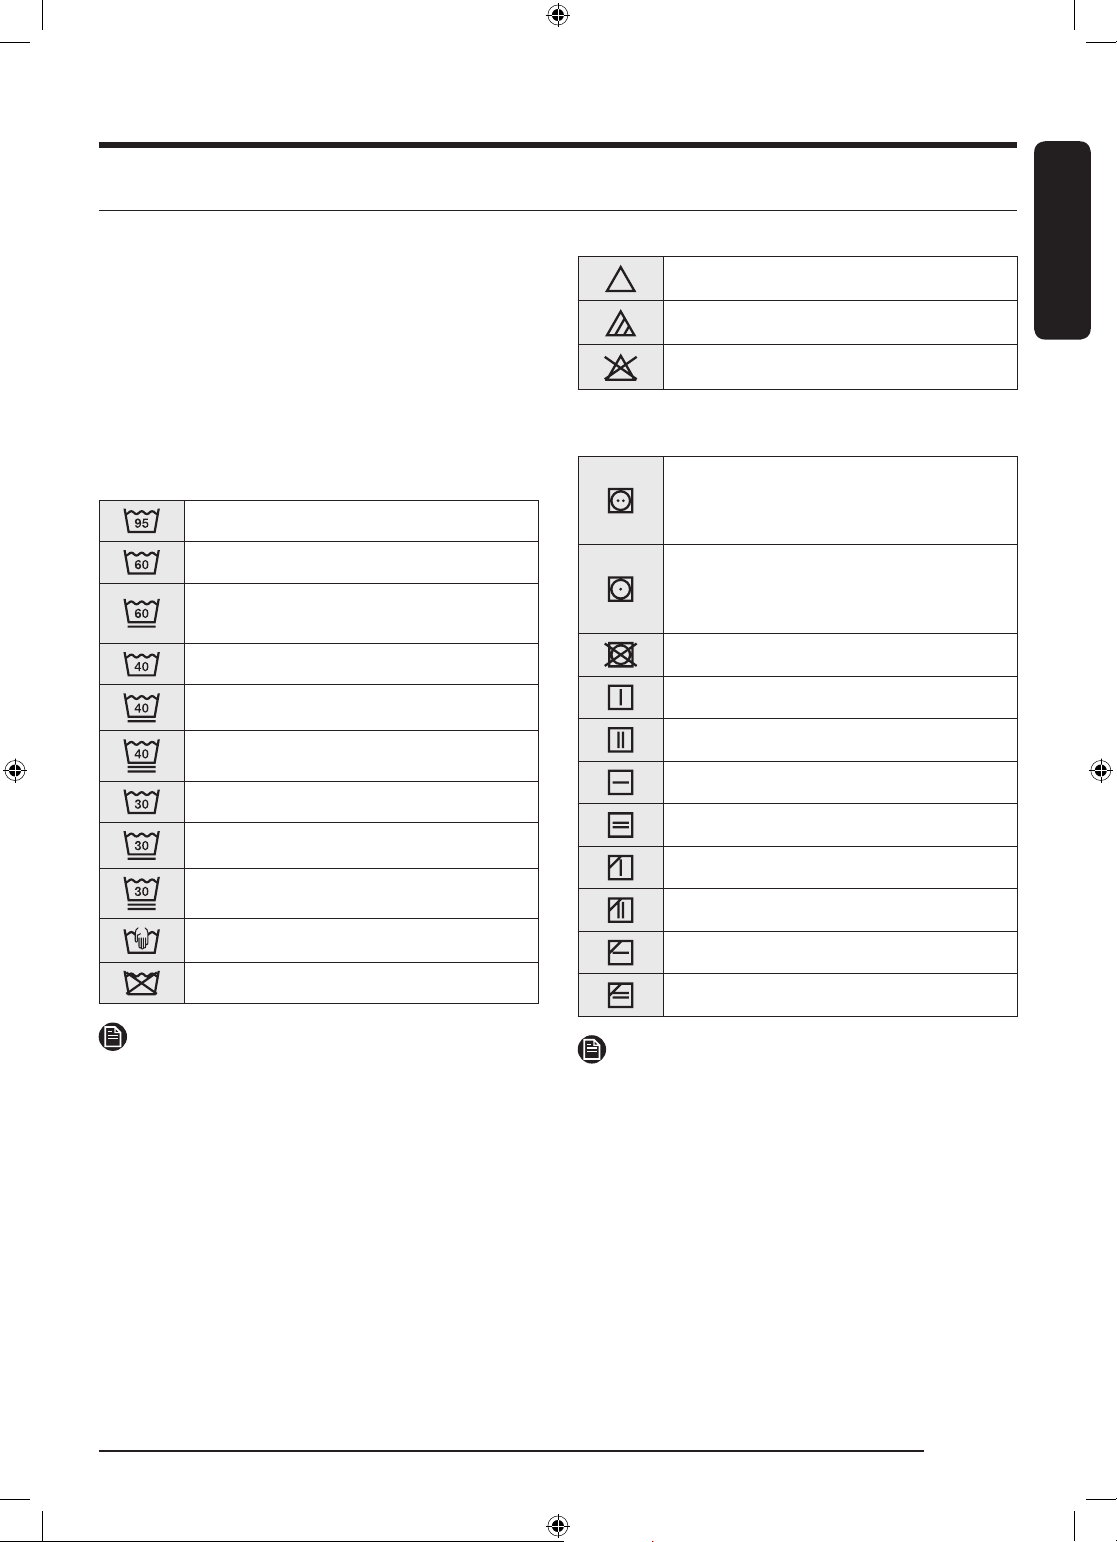
The following symbols provide garment care
direction. The Clothing care labels include
symbols for drying, bleaching, drying and ironing,
or dry cleaning when necessary. The use of
symbols ensures consistency among garment
manufacturers of domestic and imported items.
Follow care label directions to maximize garment
life and reduce laundering problems.
Washing
95 °C boil wash.
60 °C coloured wash.
60 °C coloured wash. (“Easy care”
coloured wash)
40 °C coloured wash.
40 °C mild wash.
40 °C very mild wash.
30 °C fine wash.
30 °C mild fine wash.
30 °C very mild fine wash.
Hand wash.
Do not wash.
English
Bleaching
Any bleach allowed.
Only oxygen bleach allowed.
Do not bleach.
Drying
Tumble drying / Drying at a
temperature of 80 °C with a normal
drying process.
Tumble drying / Drying at a
temperature of 60 °C with a mild
drying process.
Do not tumble dry
Line drying.
Drip line drying.
Flat drying.
Drip flat drying.
Line drying in the shade.
Drip line drying in the shade.
Flat drying in the shade.
Drip flat drying in the shade.
NOTE
The numbers in the wash tub specify the maximum
washing temperatures in degrees celsius which
must not be exceeded.
U-PJT_DRYER_SimpleUX_WEB_SSEC-00_EU_English.indd 51 2021/11/9 17:26:37
NOTE
• The dots indicate the drying level of the dryer.
• The lines indicate the type and place of the
drying.
English 51
Page 52
Appendix
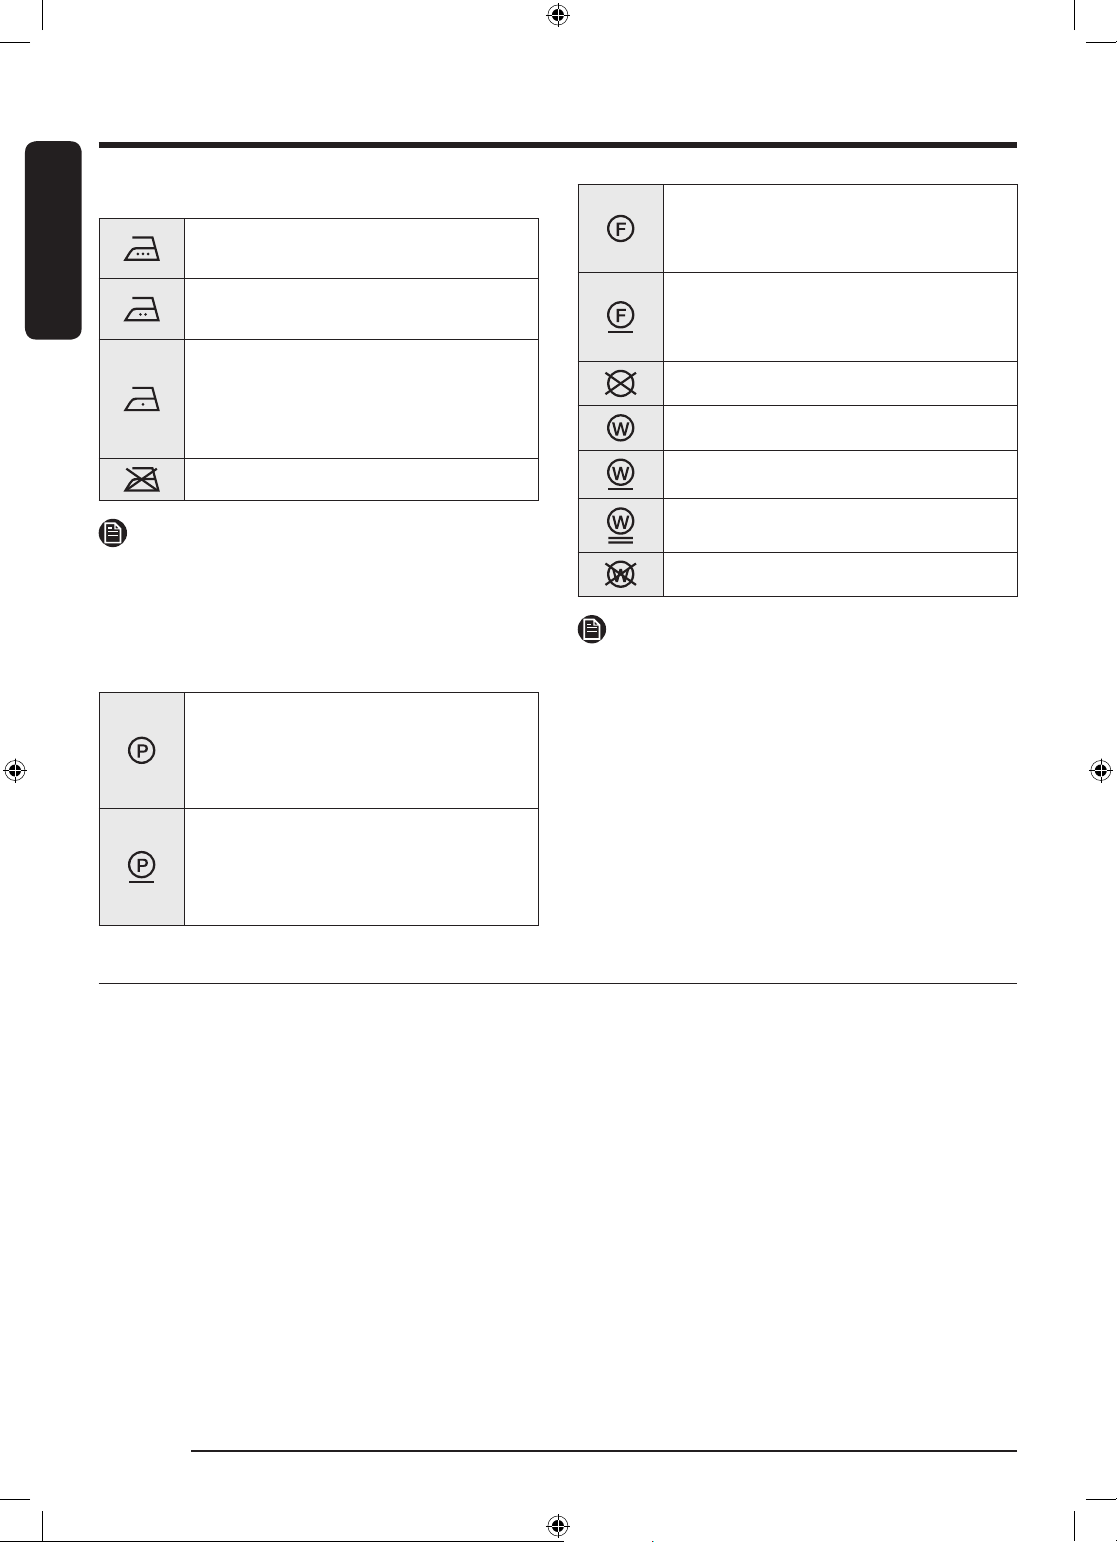
Ironing
English
Iron at maximum sole plate
temperature of 200 °C.
Iron at maximum sole plate
temperature of 150 °C.
Iron at maximum sole plate
temperature of 110 °C.
Caution when using steam irons (work
without steam).
Do not iron.
Professional dry-cleaning in
hydrocarbons (heavy benzines) with
normal process.
Professional dry-cleaning in
hydrocarbons (heavy benzines) with
gentle process.
Do not dry-clean.
Professional wet-cleaning.
Mild professional wet-cleaning.
NOTE
The dots indicate the temperature ranges for
ironing (regulator, steam, travel irons and ironing
machines).
Professional care
Professional dry-cleaning in
perchloroethylene and/or
hydrocarbons (heavy benzines) with
normal process.
Professional dry-cleaning in
perchloroethylene and/or
hydrocarbons (heavy benzines) with
gentle process.
NOTE
• The letters in a circle indicate the solvents (P, F)
used in dry cleaning or wet cleaning (W).
• Generally, the line under the symbol indicates
a milder treatment (e.g. gentle cycle for easycare items). The double line indicates care levels
with particularly gentle treatment.
Very mild professional wet-cleaning.
Do not wet-clean.
Protecting the environment
• This appliance is manufactured from recyclable materials. If you decide to dispose of this appliance,
please observe local waste disposal regulations. Cut off the power cord so that the appliance cannot be
connected to a power source. Remove the door so that animals and small children cannot get trapped
inside the appliance.
• Contains fluorinated greenhouse gases.
Hermetically sealed equipment.
Do not vent gases into the atmosphere.
Refrigerant (Type): R-134a (GWP = 1430)
Refrigerant (Charging) : 0.43 kg, 0.615 tCO2e
English52
U-PJT_DRYER_SimpleUX_WEB_SSEC-00_EU_English.indd 52 2021/11/9 17:26:38
Page 53
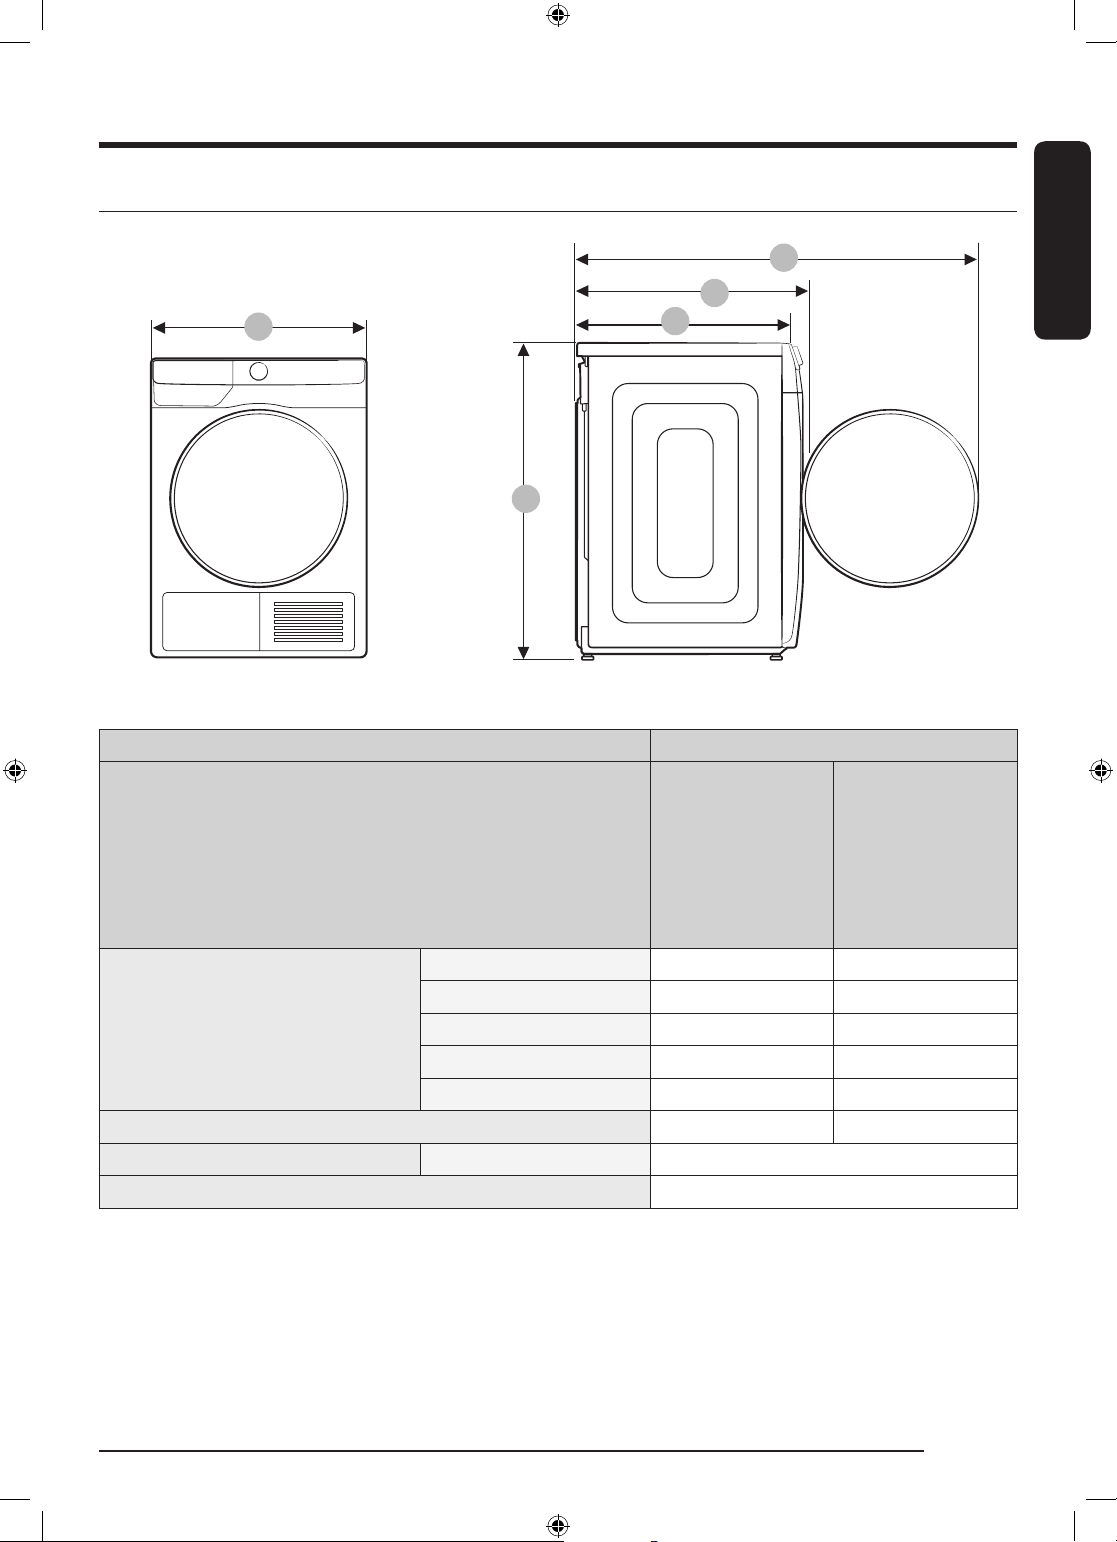
Specification
E
D
A
B
TYPE FRONT LOADING DRYER
MODEL NAME
A 600 mm 600 mm
B 850 mm 850 mm
DIMENSIONS
C 600 mm 600 mm
D 650 mm 660 mm
E 1100 mm 1110 mm
WEIGHT 50.0 kg 54.0 kg
ELECTRICAL REQUIREMENTS AC 220–240 V / 50 Hz 780-800 W
ALLOWABLE TEMPERATURE 5-35 °C
C
DV9*T7*****
DV8*T7*****
DV9*T6*****
DV8*T6*****
DV9*T5*****
DV8*T5*****
DV9*T8*****
English
English 53
U-PJT_DRYER_SimpleUX_WEB_SSEC-00_EU_English.indd 53 2021/11/9 17:26:38
Page 54
Contact information
QUESTIONS OR COMMENTS?
English
COUNTRY CALL OR VISIT US ONLINE AT
UK 0333 000 0333 www.samsung.com/uk/support
IRELAND (EIRE) 0818 717100 www.samsung.com/ie/support
GERMANY 06196 77 555 77 www.samsung.com/de/support
FRANCE 01 48 63 00 00 www.samsung.com/fr/support
SPAIN 91 175 00 15 www.samsung.com/es/support
PORTUGAL 808 207 267 www.samsung.com/pt/support
LUXEMBURG 261 03 710 www.samsung.com/be_fr/support
NETHERLANDS 088 90 90 100 www.samsung.com/nl/support
BELGIUM 02-201-24-18
NORWAY 21629099 www.samsung.com/no/support
DENMARK 707 019 70 www.samsung.com/dk/support
FINLAND 030-6227 515 www.samsung.com/fi/support
SWEDEN 0771 726 786 www.samsung.com/se/support
AUSTRIA 0800 72 67 864 (0800-SAMSUNG) www.samsung.com/at/support
SWITZERLAND 0800 726 786
HUNGARY 0680SAMSUNG (0680-726-7864) www.samsung.com/hu/support
CZECH 800 - SAMSUNG (800-726786) www.samsung.com/cz/support
SLOVAKIA 0800 - SAMSUNG (0800-726 786) www.samsung.com/sk/support
CROATIA 072 726 786 www.samsung.com/hr/support
BOSNIA 055 233 999 www.samsung.com/ba/support
North
Macedonia
MONTENEGRO 020 405 888 www.samsung.com/support
SLOVENIA 080 697 267 (brezplačna številka) www.samsung.com/si/support
SERBIA 011 321 6899 www.samsung.com/rs/support
Kosovo 0800 10 10 1 www.samsung.com/support
ALBANIA 045 620 202 www.samsung.com/al/support
023 207 777 www.samsung.com/mk/support
www.samsung.com/be/support (Dutch)
www.samsung.com/be_fr/support (French)
www.samsung.com/ch/support (German)
www.samsung.com/ch_fr/support (French)
English54
U-PJT_DRYER_SimpleUX_WEB_SSEC-00_EU_English.indd 54 2021/11/9 17:26:38
Page 55
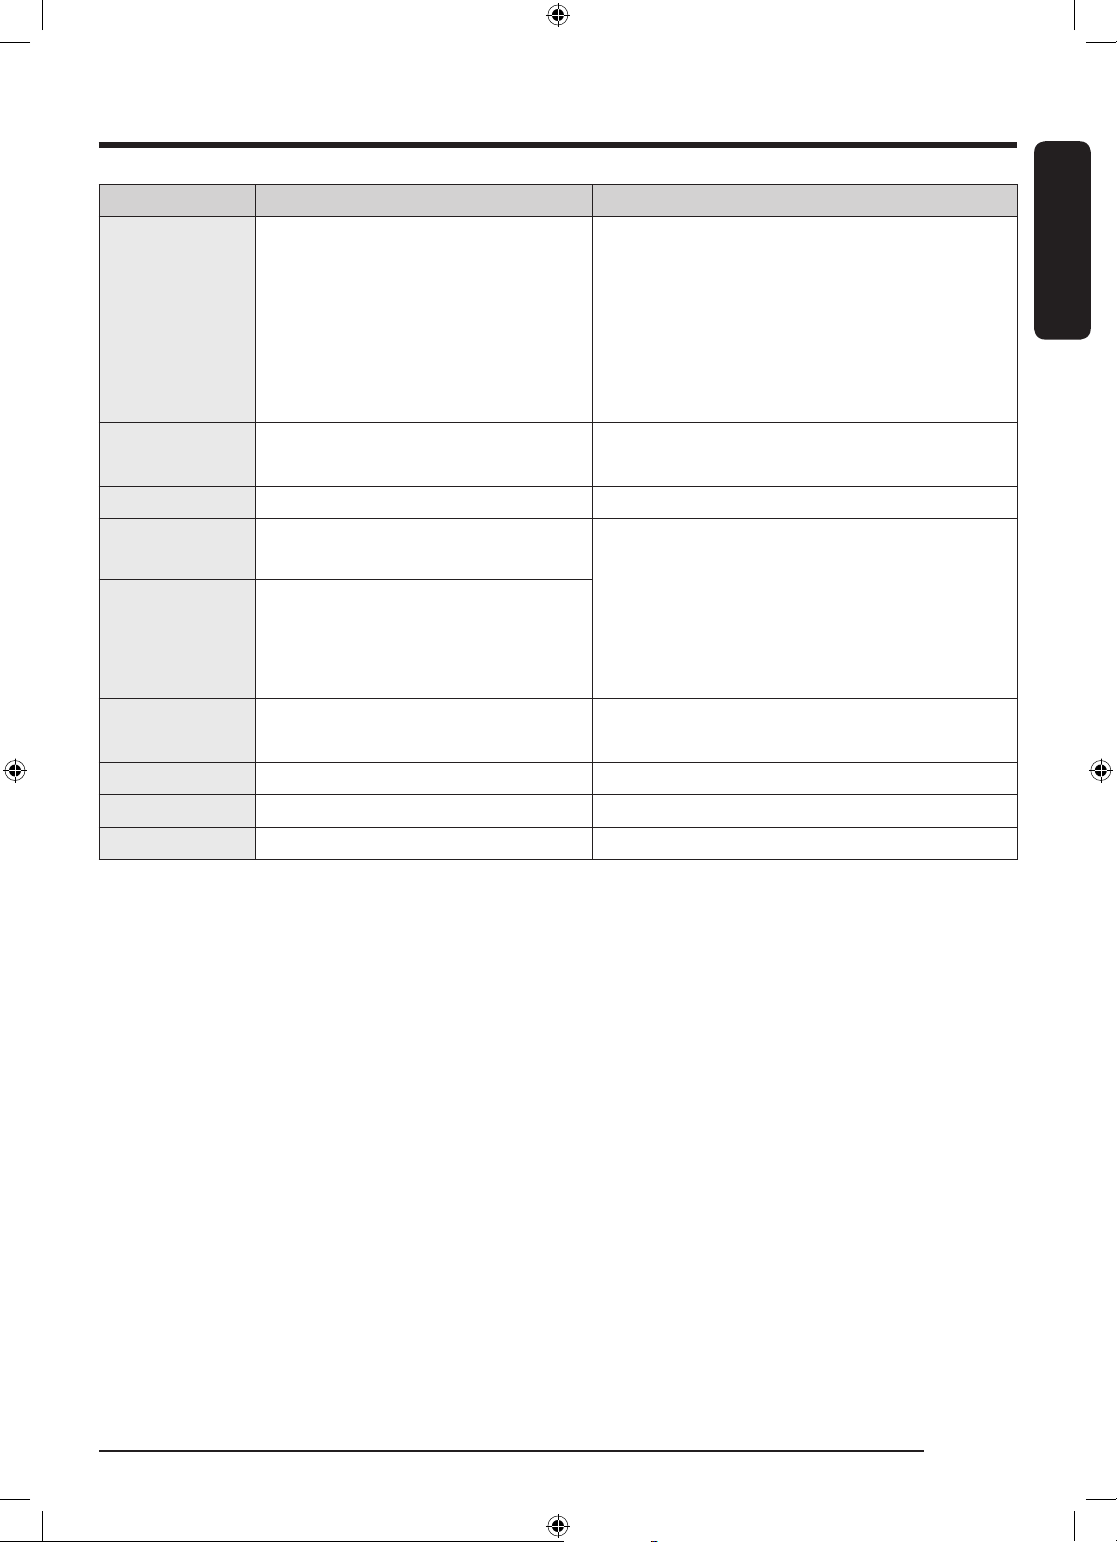
COUNTRY CALL OR VISIT US ONLINE AT
0800 111 31 - Безплатен за всички
оператори
*3000 - Цена на един градски
BULGARIA
разговор или според тарифата на
www.samsung.com/bg/support
мобилният оператор
09:00 до 18:00 - Понеделник до
Петък
ROMANIA
0800872678 - Apel gratuit
*8000 - Apel tarifat în reţea
www.samsung.com/ro/support
ITALIA 800-SAMSUNG (800.7267864) www.samsung.com/it/support
CYPRUS
GREECE
8009 4000 only from landline, toll
free
80111-SAMSUNG (80111 726 7864)
only from land line
(+30) 210 6897691 from mobile and
www.samsung.com/gr/support
land line
POLAND
801-172-678* lub +48 22 607-93-33*
* (opłata według taryfy operatora)
http://www.samsung.com/pl/support/
LITHUANIA 8-800-77777 www.samsung.com/lt/support
LATVIA 8000-7267 www.samsung.com/lv/support
ESTONIA 800-7267 www.samsung.com/ee/support
English
English 55
U-PJT_DRYER_SimpleUX_WEB_SSEC-00_EU_English.indd 55 2021/11/9 17:26:38
Page 56
U-PJT_DRYER_SimpleUX_WEB_SSEC-00_EU_English.indd 56 2021/11/9 17:26:39
 Loading...