

Samsung DV42H5200EF/A3-00, DV42H5400GW/A3-00, DV42H5400GF/A3-00, DV42H5400EW/A3-00, DV42H5400EF/A3-00 Owner’s Manual
...
Gas and Electric
User manual
Imagine the possibilities
TI ionk iou for 13,Jrd J_sln'_ thl_ _ar N-%III,£jpr,Jd uc.t
p]da_ rei_Jbt_r ,_DUI proLitl __ dt Or ,_lD[ItdLJ
Dryer
^/_,/\6 ¢ F ¢
\ ,_.Jamsunu.comzrejb_er
1 -Z_IIZII_I-S A IV] S LI I _ G / 72t_,- ?,_'64;
@ Contents
Safety instructions
What you need to know about safety instructions ..................................................... 4
Important safety symbols and precautions .............................................................. 4
Important safety instructions ......................................................................... 6
Installing your dryer
Unpacking your dryer ................................................................................ 8
What's included ...................................................................................... 8
Accessories ............................................................................................. 8
Important to installer ................................................................................. 9
Basic requirements ................................................................................... 9
Grounding ........................................................................................... 9
Gas models ............................................................................................. 9
Electric models .......................................................................................... 9
Location considerations ............................................................................. 10
Alcove or closet installations ......................................................................... 10
Ducting requirements ............................................................................... 12
Exhausting ............................................................................................ 13
Dryer exhaust tips ..................................................................................... 14
Gas requirements .................................................................................... 15
Commonwealth of massachusetts installation instructions ............................................ 15
Electrical requirements .............................................................................. 16
Electrical connections ................................................................................. 16
Connecting the inlet hose ........................................................................... 18
Replacement parts and accessories .................................................................. 19
Installation .......................................................................................... 19
Door reversal ........................................................................................ 20
Final installation checklist ............................................................................ 21
Operating instructions, tips ,,
Overview of the control panel ........................................................................ 22
Load the dryer properly ............................................................................... 26
Getting started ........................................................................................ 26
Rack dry (DV42H5400 _ Only) .......................................................................... 28
Child Lock............................................................................................. 29
Drum Light ........................................................................................... 29
English _2

Sound Off............................................................................................. 29
My Cycle .............................................................................................. 30
Smart Care............................................................................................ 30
Care and cleaning i_]:::_"
Control panel ......................................................................................... 31
Tumbler ............................................................................................... 31
Stainless steel tumbler ................................................................................ 31
Dryer exterior ......................................................................................... 31
Dryer exhaust system ................................................................................. 31
Clean the lint filter .................................................................................... 31
Special laundry tips
Special laundry tips .................................................................................. 32
Troubleshooting ......_,
Check these points if your dryer ...................................................................... 33
Information codes ................................................................................... 34
t? ?
Appendix
Fabric care chart ..................................................................................... 35
Protecting the environment .......................................................................... 36
Declaration of conformity ............................................................................ 36
Specifications ....................................................................................... 36
English _3
I Safety instructions
Congratulations on your new Samsung Dryer. This manual contains important information on the installation, use,
and care of your appliance. Please take the time to read this manual to take full advantage of your dryer's many
benefits and features.
What you need to know about safety instructions
Please read this manual thoroughly to ensure that you know how to operate the extensive features and functions
of your new appliance safely and emciently. Retain the manual in a safe place near the appliance for future
reference. Use this appliance only for its intended purpose as described in this instruction manual. The Warnings
and Important Safety Instructions in this manual do not cover all possible conditions and situations that may
occur. It is your responsibility to use common sense, caution, and care when installing, maintaining, or operating
your dryer.
Always contact your manufacturer about problems or conditions you do not understand.
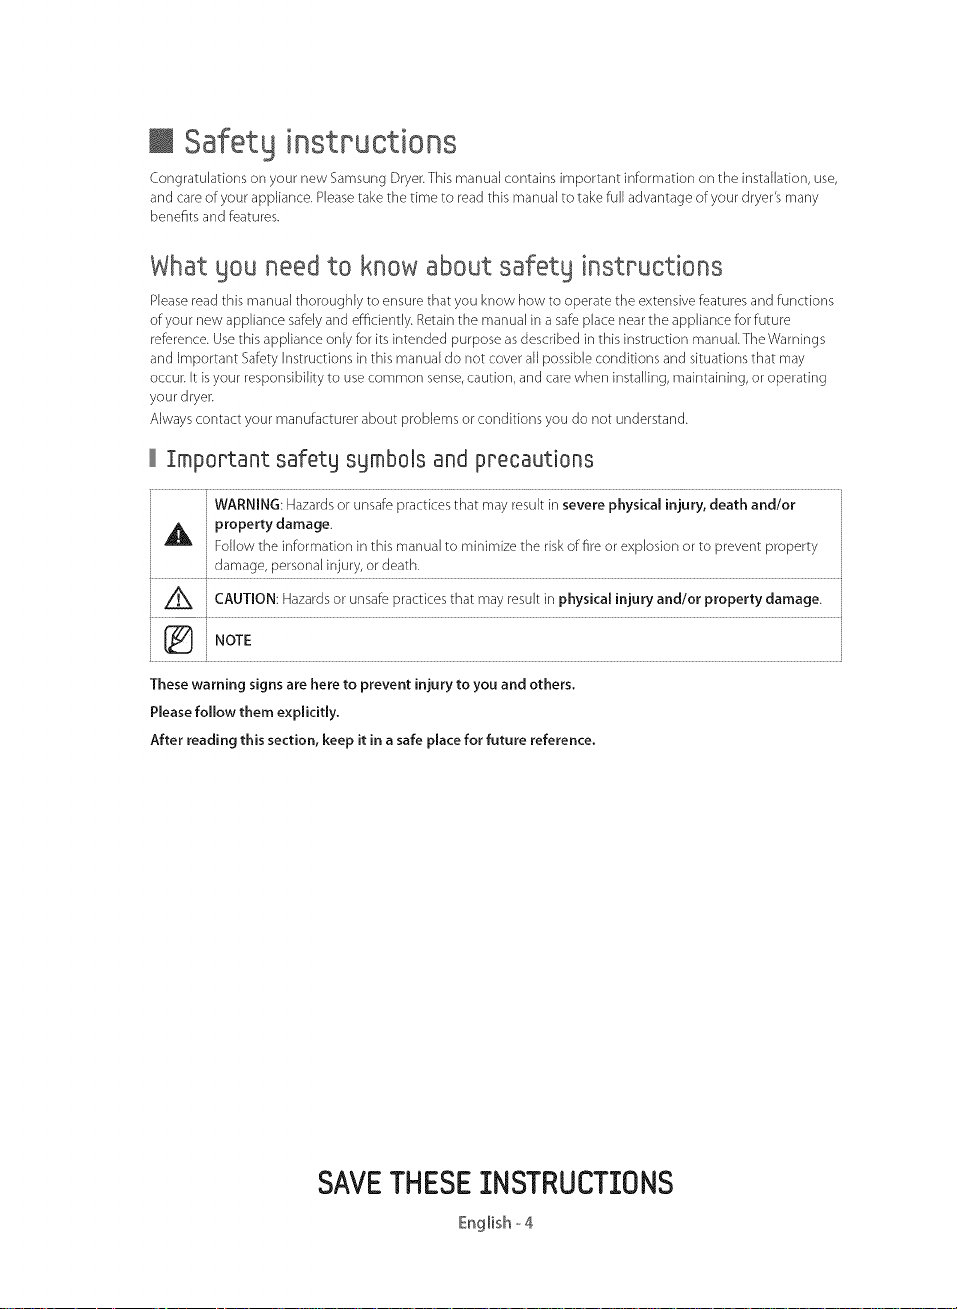
Important safety sgmbols and precautions
WARNING: Hazards or unsafe practices that may result in severe physical injury, death and/or
_ roperty damage.
Follow the information in this manual to minimize the risk of fire or explosion or to prevent property
damage, personal injury, or death.
A CAUTION: Hazards or unsafe practices that may result in physical injury and/or property damage.
NOTE
These warning signs are here to prevent injury to you and others,
Please follow them explicitly.
After reading this section, keep it in a safe place for future reference.
SAVETHESE INSTRUCTIONS
English-4

WARNING =RiSK OF FiRE
= • Clothes dryer installation must be performed by a qualified installer.
, • Install the clothes dryer according to the manufacturer's instructions and local codes.
• Do not install a clothes dryer with flexible plastic venting materials. If flexible metal (foil type) duct is
installed, it must be of a specific type identified by the appliance manufacturer as suitable for use with
clothes dryers. Flexible venting materials are known to collapse, be easily crushed, and trap lint.These
conditions will obstruct clothes dryer airflow and increase the risk of fire.
, . To reduce the risk of severe injury or death, BIIow all installation instructions.
TO REDUCE THE RISK OF FIRE OR EXPLOSION:
Do not dry items that have beer] previously cleaned, washed, soaked, or spotted with gasoline, dry cleaning
solvents, or other flammable or explosive substances.They emit vapors that could ignite or explode. Any
material that has been in contact with a cleaning solvent or flammable liquids or solids should not be placed
in the dryer until all traces of these flammable liquids or solids and their fumes have been removed.
There are many highly flammable items used in homes, such as acetone, denatured alcohol, gasoline,
kerosene, some liquid household cleaners, some spot removers, turpentine, waxes, and wax removers.
Do not dry items containing foam rubber (may be labeled latex Barn) or similarly textured rubber-like
materials on a heat setting. Heated foam rubber materials can, under certain circumstances, produce fire by
spontaneous combustion.
,A WHATTODOIF YOUSMELL GAS:
I_)onot try to light any appliance.
Do not turn on the appliance.
Do not touch any electrical switch.
Do not use any phone in your building.
Clear the room, building or area of all occupants.
Immediately call your gas supplier from a neighbor's phone. Follow the gas supplier's instructions.
If you cannot reach your gas supplier, call the fire department.
Installation and service must be performed by a qualified installer, service agency, or the gas supplier.
SAVETHESE INSTRUCTIONS
English _5
Important safety instructions
,d_ WARNING
To reduce the risk of fire, electric shock, or injury to persons when using your appliance, follow basic
precautions, including the following:
1. Read all instructions before using this appliance.
2. Do not use the dryer to dry clothes which have traces of any flammable substance, such asvegetable oil,
cooking oil, machine oil, flammable chemicals, thinner, etc., or anything containing wax or chemicals, such as
mops and cleaning cloths. Flammable substances may cause the fabric to catch fire by itself.
3. Do not store or use gasoline or other flammable vapors and liquids near this or any other appliance.
4. Do not allow children or pets to play on, in, or in front of the appliance. Close supervision is necessary when
the appliance is used near children and pets.
5. Before the appliance is removed from service or discarded, remove the door to the drying compartment to
prevent children or animals from becoming trapped inside.
6. Do not reach into the appliance when the drum is moving.
7. Do not install or store this appliance where it will be exposed to the weather.
8. Do not temper with the internal controls.
9. Do not repair or replace any part of the appliance or attempt any servicing unless specifically recommended
in the user-maintenance instructions or published in the user-repair instructions that you understand and
have the skills to carry out.
10. Do not use fabric softeners or products to eliminate static unless recommended by the manufacturer of the
fabric softener or product.
11. Clean the lint screen before or after each load.
12. Do not use heat to dry articles containing foam rubber or similarly textured rubber-like materials.
13. Keep the area around the exhaust opening and surrounding areas free from lint, dust, and dirt.
14. The interior of the dryer and exhaust duct should be cleaned periodically by qualified service personnel.
15. Do not place items exposed to cooking oils in your dryer. Items contaminated with cooking oils may
contribute to a chemical reaction that could cause a load to catch fire.
16. This appliance must be grounded. See"Electrical requirements'and "Grounding'in the"lnstalling your dryer"
section.
17. This appliance must be properly grounded. Never plug the power cord into a receptacle that is not grounded
adequately and in accordance with local and national codes. Refer to installation instructions for grounding
this appliance.
18. Ensure pockets are free from small irregularly shaped hard objects and foreign material, i.e. coins, knives, pins,
etc.These objects could damage your dryer.
19. Gas leaks may occur in your system, resulting in a dangerous situation.
20. Gas leaks may not be detected by smell alone.
21. Gas suppliers recommend you purchase and install a Ubapproved gas detector.
SAVETHESE INSTRUCTIONS
English _6
_, WARNING
GasAppliances;
WARNING:This product contains chemicals known to the State of California to cause cancer and reproductive
toxicity.
Gasappliances can cause Iowqevel exposure to Proposition 65 listed substances, including but not limited to,
benzene, carbon monoxide, formaldehyde and soot, substances resulting from the incomplete combustion of
natural gas or LPfuels.
iB, CAUTION
1. Do not sit on top of the dryer.
2. Because of continuing product improvements, Samsung reserves the right to change specifications without
notice. For complete details, seethe Installation Instructions packed with your product before selecting
cabinetry, making cutouts, or beginning installation.
3. Do not wash clothing with large buckles, buttons, or other heavy metal or solid things.
4. Install and use in accordance with the manufacturer's instructions.
5. All washed and unwashed fabrics that contain vegetable oil or cooking oil can be dangerous. Washing these
items in hot water with extra detergent will reduce, but not eliminate, the hazard. Always use the Cool Down
cycle for these items to reduce their temperature. Never remove these items from the dryer hot or interrupt
the drying cycle until the items have run through the Cool Down cycle. Never pile or stack these items when
they are hot.
6. Take care that children's fingers are not caught in the door when closing it. This may result in injury.
SAVETHESEINSTRUCTIONS
English _7
I Znstalling your dpyer
Unpackingyour dnyep
Unpack your Dryer and inspect it for shipping damage. Make sure you have received all the items shown below, if
your Dryer was damaged during shipping, or you do not have all the items, contact 1-800-SAMSUNG (726-7864).
,_ WARNING
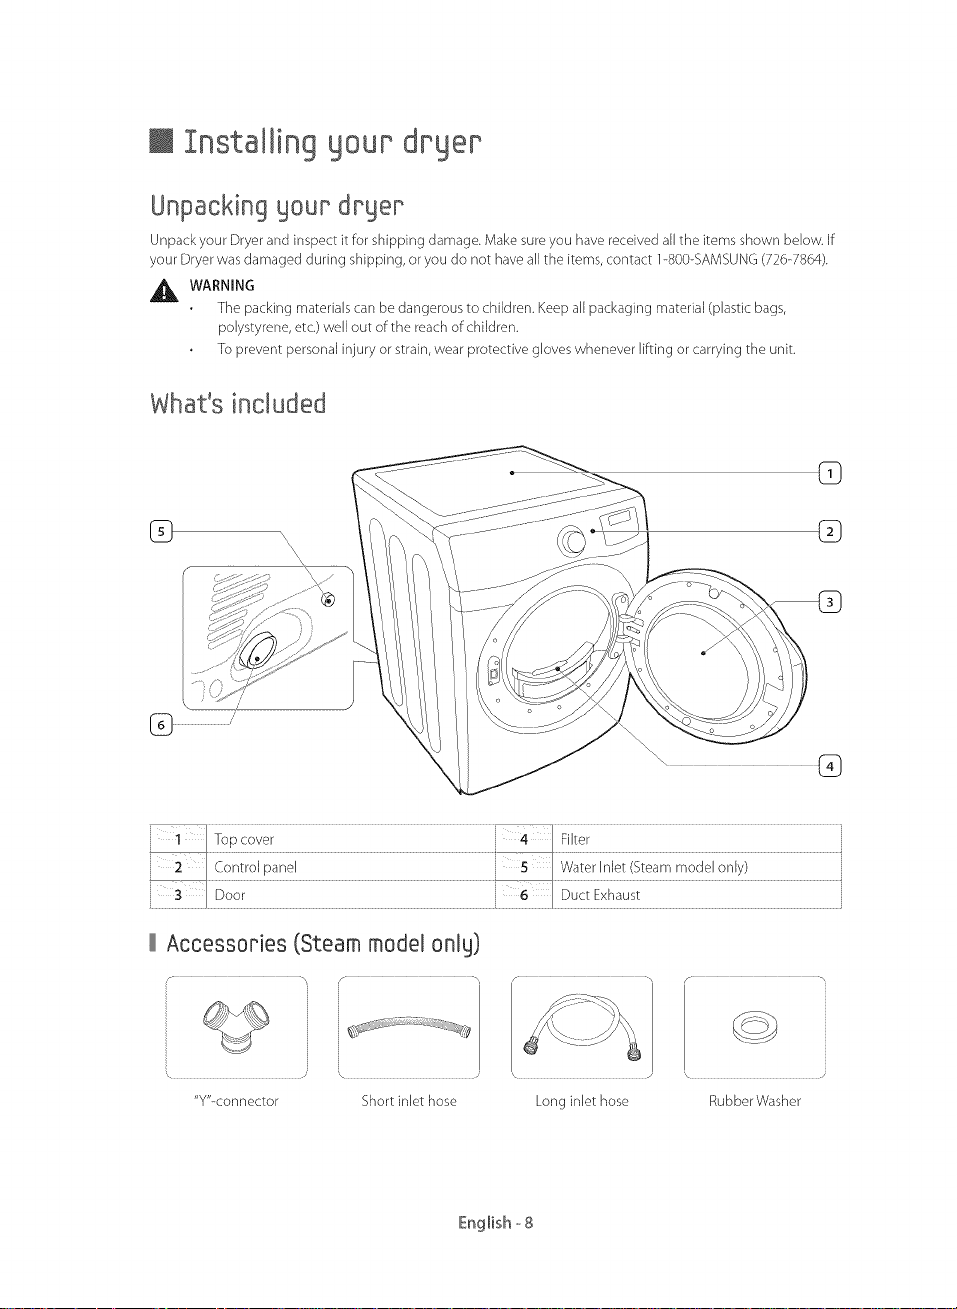
What's included
8} @
The packing materials can be dangerous to children. Keep all packaging material (plastic bags,
polystyrene, etc.) well out of the reach of children.
To prevent personal in]ury or strain, wear protective gloves whenever lifting or carrying the unit.
Accessories (Steam model onlg)
"y'Lconnector Short inlet hose
English-8
Important to installer
Please read the following instructions carefully before installing the dryer.These instructions should be kept for
future reference.
,_. WARNING: Remove the door from all discarded appliances to avoid the danger of a child being trapped
and suffocating.
Basic requirements
Make sure you have everything necessary for the proper installation
A GROUNDED ELECTRICALOUTLET is required.
A POWER CORD electric dryer (except for Canada).
GAS LINES (ifa gas dryer) must meet national and local codes.
The EXHAUST SYSTEM must be made of rigid metal or flexible stiff-walled metal exhaust ducting.
Grounding
This dryer must be grounded. In the event of a malfunction or breakdown, grounding the product will reduce the
risk of electrical shock by providing a path of least resistance for the electrical current.
Gas models
Your dryer has a cord with an equipment-grounding conductor and a grounding plug.
The plug must be plugged into an appropriate outlet that is properly installed and grounded in accordance
with all local codes and ordinances.
Do not modify the plug provided with your dryer if it doesn't fit the outlet, have a proper outlet installed by
a qualified electrician.
Never connect the ground wire to the plastic plumbing lines, gas lines, or hot water pipes.
Electricmodels
Your dryer has an optional cord with an equipment-grounding conductor and a grounding plug, which is sold
separately.
The plug must be plugged into an appropriate outlet that is properly installed and grounded in accordance
with all local codes and ordinances.
Do not modify the plug provided with your dryer if it doesn't fit the outlet, have a proper outlet installed by
a qualified electrician.
If a power cord is not used and the electric dryer is to be permanently wired, the dryer must be connected to
a permanently grounded metal wiring system, or an equipment grounding conductor must be run with the
circuit conductors and connected to the equipment grounding terminal or lead on the dryer.
Enq[ish-9

Location considerations
The dryer should be located where there is enough space at the front for loading the dryer, and enough space
behind for the exhaust system.This dryer is factory-ready for the rear exhaust option.To exhaust out the bottom,
right or the left, use the accessory exhaust kit. Instructions are included with the kit. Make sure the room in which
the dryer is located has enough fresh air.The dryer must be located where there are no air-flow obstructions.
For gas dryers, adequate clearance must be maintained as noted on the data plate to ensure adequate air for
combustion and the proper dryer operation.
The dryer must not be installed or stored in an area where it will be exposed to water and/or weather.The dryer
area must be kept clear of combustible materials, gasoline, and other flammable vapors and liquids. A dryer
produces combustible lint.The area around the dryer should be kept lint-free.
Alcove or closet installations
WARNING
The dryer must be exhausted to the outside to reduce the risk of fire when installed in an alcove or
closet.
No other fuePburning appliance should be installed in the same closet as the dryer.
Minimum clearances between the dryer and adjacent walls or other surfaces:
js_a--es n!_mm! i%ar _ n!!_Omm! i
Top !_!n!_ ra!! iaoie;iront1_!n!.s?ra!! j
A in. (25 mm)
L
q )}(( )}
R 27 in. (686 ram)
C 17 in. (432 mm)
D 2 in. (50 mm)
F 32.4 in. (823 ram)
F 5 in.(127 mm)
o il. o Vi' E _
Recessedarea
Sideview
(closetor confined area)
English _ 10

Installation with pedesta!
_1
A
D
A 38.7in.(984mm)
B .53.3in. (1S55 mm)
C 27 in. (686 ram)
53 in. (1345 mm) to
D
clear open door
t
J E 32.4in.(823 ram)
F 5 in.(127 mm)
C
i' '1
E
Znsta[lation wRh stacked washing machine and dpgep
i_ A 3 in.(76 mm)
B 48 in.2(3100 m m2)
_:__::rrrrrrr
The front of the closet must have two unobstructed air openings (B, C) for a combined minimum total2 2
area of 72 in (465 cm )with a minimum clearance of 3 in. (7.6 cm) at the top (A) and bottom (D).
External exhaust elbow requires additional space (L).
Stacking (MODEL NO: SK-SA)
Samsung's Washer and Dryer can be stacked to maximize usable space.
The dryer legs need to be removed to stack the Washer and Dryer. You can purchase an optional stacking
kit from your Samsung retailer.
C 24 in.2(15.50mm 2)
÷
D 3 in. (76 ram)
E 6 in.(152 mm) _
F 773 in. (1968 mm)
G 1 in. (25 ram)
H 27 in. (686 ram)
[
I 5 in.@27 mm)
J , 1 in.(25 mm)
K 32.4 in. (823
L , 8in.(203 mm)
ram)
4
English _ 11

Ducdng pequbements
i
i Rigid Metallic Flexible _ Rigid Metallic Flexible _
i 0 24.4 m (80 ft.) 12.4 m (41 ft.) 22.6 m (74 ft.) 10.1 m (33 ft.)
i
i t 20.7 m (68 ft.) 11.2 m (37 ft.) 18.9 m (62 ft.) 8.8 m (29 ft.)
i
i 2 17.4 m (57 ft.) 10.1 m (33 ft.) 15.5 m (51 ft.) 7.6 m (25 ft.)
3 14.3 m (47 ft.) ' 9.0 m (29 ft.) ' 12.5 m (41 ft.) 6..5m (2 ] ft.)
Do not use
_ non-metallic flexible ducts.
Use a 4 inch (10.2 cm) diameter rigid aluminum or rigid galvanized steel duct.
Do not use a smaller duct.
Ducts larger than 4 inches (10.2 cm) in diameter can result in increased accumulation of lint.
Lint should be removed regularly.
If a flexible metal duct must be used, use the type with a stiff sheet metal wall. Do not use a flexible duct with
a thin foil wall. A serious blockage can result if the flexible metal duct is bent too sharply.
Never install any type of flexible duct in walls, ceilings, or other concealed spaces.
Keep the exhaust duct as straight and short as possible.
Secure joints with duct tape. Do not use screws.
Plastic flexible ducts can kink, sag, be punctured, reduce airflow, extend drying times, and affect the dryer
operation.
Exhaust systems longer than recommended can extend drying times, affect machine operations, and collect
lint.
The exhaust duct should end with an exhaust hood with a swing-out damper to prevent back drafts and
entry of wildlife. Never use an exhaust hood with a magnetic damper.
The hood should have at least 12 inches (30.5 cm) of clearance between the bottom of the hood and the
ground or other obstruction.The hood opening should point down.
Never install a screen over the exhaust outlet.
To avoid lint buildup, do not exhaust the dryer directly into a window well. Do not exhaust under a house or
porch.
If the exhaust duct must run through an unheated area, the duct should be insulated and slope slightly down
towards the exhaust hood to reduce condensation and lint buildup.
Inspect and clean the interior of the exhaust system at least once a year. Unplug the power cord before
cleaning.
Check frequently to make sure the exhaust hood damper opens and closes freely.
Check once per month, and clean at least once per year. Note: If your clothes are not getting dry, then check
the duct for obstructions.
Do not exhaust the dryer into a wall, ceiling, crawl space, or concealed space of a building, gas vent, or any
other common duct or chimney.This could create a fire hazard from the lint expelled by the dryer.
Recommended Use only for short-run installation
English - 12
If the new dryer is installed into an existing exhaust system you must make sure:
The exhaust system meets all local, state, and national codes.
That a flexible plastic duct is not used.
To inspect and clean all lint buildup from inside the existing duct.
The duct is not dented or crushed.
The exhaust hood damper opens and closes freely.
The static pressure in any exhaust system must not exceed 0.83 inches of water column, or be less than 0.
This can be measured with the dryer running with a manometer at the point where the exhaust duct
connects to the dryer. A no-heat setting should be used.The dryer tumbler should be empty and the lint filter
clean.
Exhausting
The dryer shall not be exhausted into a chimney, a wall, a ceiling, an attic, a crawl space, or a concealed space of a
building.
Exhausting the dryer to the outside will prevent large amounts of lint and moisture from being blown into the
room.
• All dryers must be exhausted to the outside.
Do not assemble the duct with screws or other fastening means that extend into the duct and catch
lint.
The exhaust duct should be 4 inches (102 mm) in diameter.
The total length of flexible metal duct shall not exceed 2.4 m (7.8 ft.).
In the United States:
Use only those foiPtype flexible ducts, if any, specifically identified for use with the appliance by the manufacturer
and that comply with the OutEine for Clothes DryerTransition Ducts, Subject 21S8A.
In Canada:
Use only those foiPtype flexible ducts, if any, specifically identified for use with the appliance by the manufacturer.
Outside the U.S and Canada:
Refer to the local codes.
WARNING
The dryer must be exhausted to the outside to reduce the risk of fire when installed in an alcove or
closet.
NEVERUSEA PLASTICOR NON-METAL FLEXIBLEDUCT.
If your existing ductwork is plastic, non-metal, or combustible, replace it with metal.
Use only a metal exhaust duct that is non-flammable to ensure containment of the exhaust air, heat,
and lint.
English - 13

Dryer exhaust tips
WARNING: A plastic or non-metal flexible duct presents a potential fire hazard.
Make sure your dryer is installed properly so it exhausts air easily.
Use a 4"diameter rigid metal duct.Tape all joints, including at the dryer.
Never use lint-trapping screws.
Keep ducts asstraight as possible.
Clean all old ducts before installing your new dryer.
Be sure the vent flap opens and closes freely.
inspect and clean the exhaust system annually.
Don't let a poor exhaust sustain slowthe drying process bg:
Restricting your dryer with a poor exhaust system. "-...................................................................................................................................................
Using a plastic, thin foil, or non-metal flexible duct.
Unnecessarily using long ducts that have many elbows.
Allowing dented or clogged ducts and vent.
English _14
\
Gas pequipements
THE INSTALLATION MUST CONFORM WITH LOCAL CODES, OR IN THE ABSENCE OF LOCAL CODES, WITH
THE NATIONAL FUEL GAS CODE ANSIIZ223.1, LATEST REVISION (FOR THE UNITED STATES), OR WITH THE
CANICGA-B149 INSTALLATION CODES (FOR CANADA).
Use only natural or LP(liquid propane) gases.
This dryer designed for use with natural gas. If you plan to use your dryer with LP gas (liquid propane), the
conversion must be done by a qualified service technician in order to achieve safe and proper performance.
A 1/2 inch (1.27 cm) gas supply line is recommended and must be reduced to connect to the 3/8 inch (l cm)
gas line on your dryer:The National Fuel Gas Code requires that an accessible, approved manual gas shut-off
valve be installed within 6 inches of your dryer.
Gas dryers installed in residential garages must be raised 18 inches (46 cm) above the floor.
Additionally, a 1/8 inch (0.3 cm) N.RT. (National PipeThread) plugged tapping, accessible for test gauge
connection, must be installed immediately upstream of your dryer's gas supply connection.
Your dryer must be disconnected from the gas supply pipe system during any pressure testing of the system.
DO NOT reuse old flexible metal gas lines. Flexible gas lines must be design certified by the American Gas
Association (CGA in Canada).
• Any pipe joint compound used must be resistant to the action of any liquefied petroleum gas.
As a courtesy, most local gas utilities will inspect a gas appliance installation.
GAS IGNITION -Your dryer uses an automatic ignition system to ignite the burner. There is no constant
burning pilot.
Commonwealth of massachusetts installation instructions
Your dryer must be installed by a licensed plumber or gas fitter. A'T" handle manual gas valve must be installed in
the gas supply line to your dryer. If a flexible gas connector is used to install your dryer, the connector may not be
longer than 3 feet (36 inches).
WARNING
Gas leaks may occur in your system, creating a dangerous situation.
Gas leaks may not be detected by smell alone.
Gas suppliers recommend that you purchase and install a UL-approved gas detector.
Install and use it in accordance with the manufacturer's instructions.
English - 15
Electpical pequipements
The wiring diagram is located onthe plate below the control panel.
,_ WARNING
Beforeoperating or testing, follow all grounding instructions in the"Grounding"section on page 13.
Anindividual branch (or separate)circuit serving only your dryerisrecommended. DO NOTUSEANEXTENSION
CORD.
A120volt, 60 HzA( approved electrical service,with a 1S-amperefuseor circuit breakeris required.
Most U.S.dryers requirea 120/240volt,60 HzACapproved electrical service.Some require 120/208volt,60 Hz
approved electricalservice.Theelectric servicerequirementscan be found on the datalabel located behind the
door.A 30-amperefuse or circuit breakeron both sidesof the lineis required.
Ifapower cord isused,the cord should be plugged into a30-ampere receptacle.
The power cordis NOTprovided with U.S.electric model dryers.
_k WARNING- RISKOFELECTRICSHOCK
The improper connection of the equipment grounding conductor canresult in a riskofelectric
shock.Checkwith aqualified electrician or serviceman ifyou arein doubt asto whether your dryeris
properly grounded. Do not modify the plug provided with your dryer- if it doesn't fit the outlet, have
aproper outlet installed by aqualified electrician.
To prevent unnecessaryriskoffire, electricalshock,or personalinjury, allwiring and grounding must
bedone in accordancewith local codes,or in the absenceof localcodes,with the NationalElectrical
Code,ANSI/NFPANo.70-LatestRevision(forthe U.S.)or the CanadianElectricalCode CSAC22.1-
LatestRevisionsand localcodes andordinances.It isyour responsibilityto provideadequate electrical
servicesfor your dryer.
All gasinstallations must bedone in accordancewith the national FuelCodeANSVZ2231-Latest
Revision(forthe U.S.)orCAN/CGA- B149InstallationCodes- LatestRevision(forCanada)and local
codesand ordinances.
ElectPical connections
6as models = U.S.and Canada
Electpic models - U.S.0n!y
When local codes allow,the dectrical supply of the dryermay be connected by means of a new power
supplycord kit,marked for usewith adryer,that is U.Llisted and ratedat aminimum of120/240volts,
30-amperewith three No.10 copper wire conductors terminated with closedloop terminals, open-end
spadelugswith turned up ends,or with tinned leads.
Do not reuseapower supply cord from an old dryer.The power cord electric supplywiring must be
retained atthe dryer cabinet with asuitable Ublisted strainrelief.
Grounding through the neutral conductor is prohibited for (1)new branch-circuit installations,(2)
mobile homes,(3)recreationalvehicles,and (4)areaswhere local codes prohibit grounding through
the neutral conductor. (Usea4-prong plug for 4wire receptacles,NEMAtype 14-gOR.)
EJectpicmodels = Canada0n!y
A 120/240volt, 60 HzACapproved electrical servicefused through a30-ampere fuseor circuit breakeron
both sidesof the line isrequired.
AllCanadianmodels areshipped with the power cord attached.The power cord should be plugged into a
30-amperereceptacle.
InCanada,you may not converta dryerto 208
volts.
English _ 16

3-WZREsystem connections
1, Loosen or remove the center terminal block screw.
2. Connect the neutral wire (white or center wire) of the power cord to the center, silver-colored terminal screw
of the terminal block.Tighten the screw.
3. Connect the other wires to the outer terminal block screws. Tighten the screws.
4. Tighten the strain reEiefscrews.
5. Insert the tab of the terminaE block cover into your dryer's rear paneEslot.
6. Secure the cover with a holddown screw.
If converting from a4-wire electrical system to a g-wire, the ground strap must be reconnected to the
terminal block support to ground the dryer frame to the neutral conductor.
4-WZREsgstem connections
1,
Remove the center terminal block screw.
2.
Connect the ground wire (green or unwrapped) of the power cord to the external ground conductor screw.
3.
Connect the neutral wire (white or center wire) of the power cord and the appliance ground wire (green with
yellow stripes) under the central screw of the terminal block.
4,
Connect the other wires to the outer terminal block screws. Tighten the screws.
S.
Tighten the strain relief screws.
6.
Insert the tab of the terminal block cover into your dryer's rear panel slot.
7.
Secure the cover with a holddown screw.
i_ Externa ground connector i A ,--- _j_ .............
i B Greenorbarecopperwireofthepowercord l t_ ,h%i,Y %
_' B I
J_ 314 in. (1.9 cm) UL-listed strain relief j i --E
J f
j_i Grounding wire(green/yellow) J ii _ I
J_ Neutral wire (white or center wire)
i
8. With a level, check your dryer and make the necessary adjustments to the leveling legs.
9. At this time, make sure all gas connections (on gas models), exhaust and electrical connections are complete.
Plug in your dryer, and check its operation by using the checklist below.
10. (GAS MODELS ONLY)
The burner may not ignite initially due to air in the gas line. AHowing your dryer to operate on a heat setting
will purge the line. If the gas does not ignite within 5 minutes, turn your dryer off and wait 5 minutes. Be sure
the gas supply to your dryer has been turned on. In order to confirm the gas ignition, check the exhaust for
heat.
English - 17
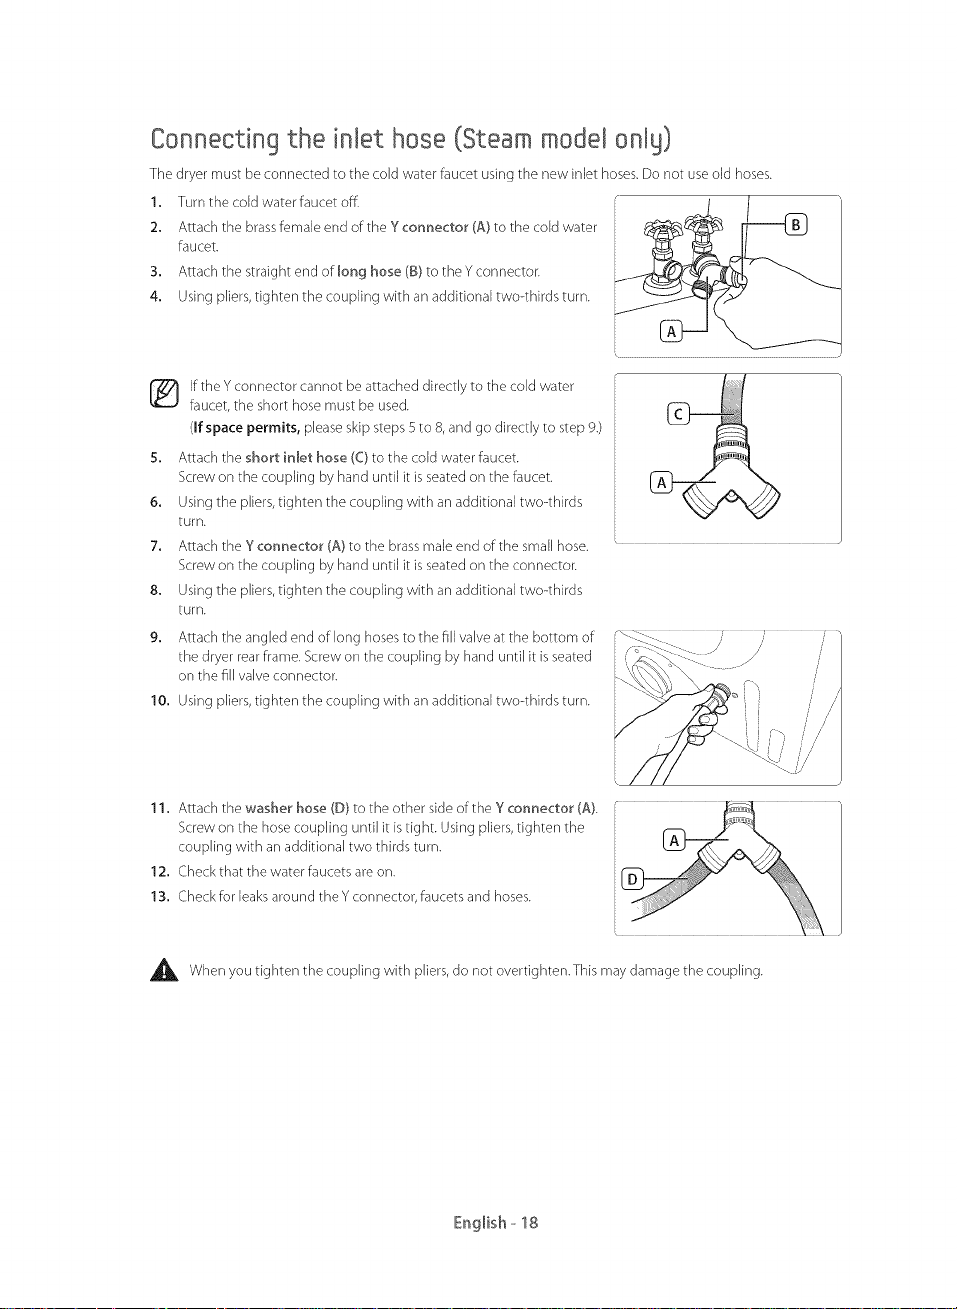
Connecting the inlet hose (Steam model only)
The dryer must be connected to the cold water faucet using the new inlet hoses. Do not use old hoses.
1. Turn the cold water faucet off.
2, Attach the brass female end of the Y connector CA)to the cold water
faucet.
3. Attach the straight end of long hose (B) to the Y connector.
4, Using pliers, tighten the coupling with an additional two4hirds turn.
If the Y connector cannot be attached directly to the cold water
faucet, the short hose must be used.
(If space permits, please skip steps 5 to 8, and go directly to step 9.)
5,
Attach the short inlet hose (C} to the cold water faucet.
Screw on the coupling by hand until it is seated on the faucet. ___
6.
Using the pliers, tighten the coupling with an additional two-thirds
turf].
7.
Attach the Y connector CA)to the brass male end of the small hose. "
Screw on the coupling by hand until it is seated on the connector.
8.
Using the pliers, tighten the coupling with an additional two4hirds
turf].
9.
Attach the angled end of long hoses to the fill valve at the bottom of
the dryer rear frame. Screw on the coupling by hand until it is seated
on the fill valve connector.
10. Using pliers, tighten the coupling with an additional two-thirds turn.
11. Attach the washer hose (D) to the other side of the Y connector CA).
Screw on the hose coupling until it istight. Using pliers, tighten the
coupling with an additional two thirds turn.
12. Check that the water faucets are on.
13. Check for leaks around the Y connector, faucets and hoses.
When you tighten the coupling with pliers, do not overtighten.This may damage the coupling.
English _18
Replacement parts and accessories
If your dryer requires replacement parts or accessories, contact the dealer where you purchased your dryer or the
SAMSUNG customer care center at 1-800-SAMSUNG (726-7864).
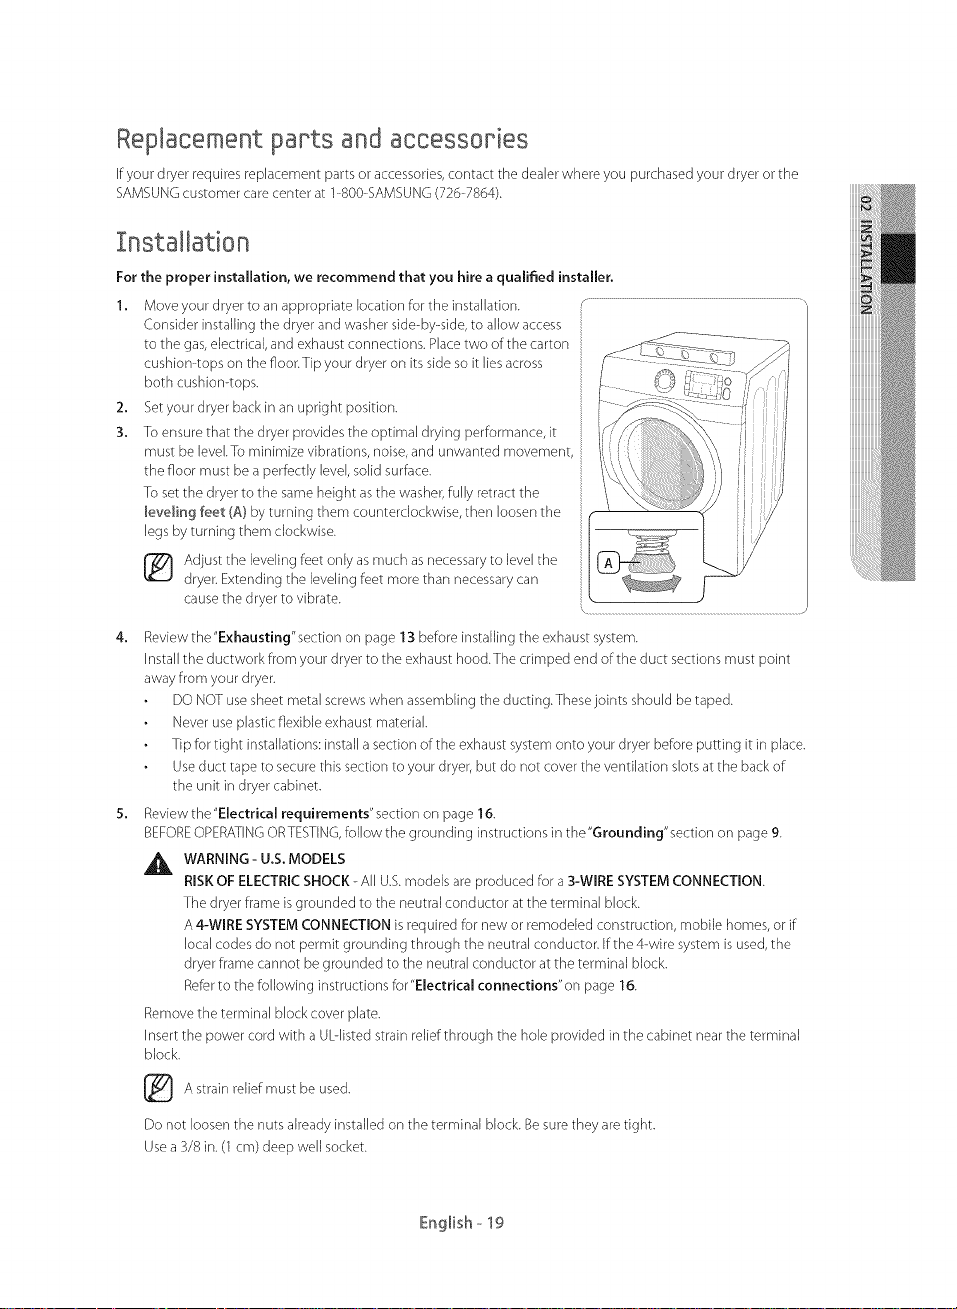
Installation
For the proper installation, we recommend that you hire a qualified installer.
1. Move your dryer to an appropriate location for the installation.
Consider installing the dryer and washer side-by-side, to allow access
to the gas, electrical, and exhaust connections. Place two of the carton
cushion-tops on the floor.Tip your dryer on its side so it lies across
both cushion-tops.
2, Set your dryer back in an upright position.
3, To ensure that the dryer provides the optimal drying performance, it
must be level. To minimize vibrations, noise, and unwanted movement,
the floor must be a perfectly level, solid surface.
To set the dryer to the same height asthe washer, fully retract the
leveling feet CA)by turning them counterclockwise, then loosen the
legs by turning them clockwise.
Adjust the leveling feet only as much as necessary to level the
dryer. Extending the leveling feet more than necessary can
cause the dryer to vibrate.
Review the"Exhausting'section on page 13 before installing the exhaust system.
Install the ductwork from your dryer to the exhaust hood.The crimped end of the duct sections must point
away from your dryer.
DQ NOT use sheet metal screws when assembling the ducting.Thesejoints should be taped.
Never use plastic flexible exhaust material.
Tip for tight installations: install a section of the exhaust system onto your dryer before putting it in place.
Use duct tape to secure this section to your dryer, but do not cover the ventilation slots at the back of
the unit in dryer cabinet.
Review the"Electrical requirements" section on page 16.
BEFOREOPERATINGORTESTING, follow the grounding instructions in the"Grounding"section on page 9.
_IL WARNING- U.S. MODELS
RISK OF ELECTRIC SHOCK - All U.S.models are produced for a S-WIRE SYSTEM CONNECTION.
The dryer frame is grounded to the neutral conductor at the terminal block.
A4-WIRE SYSTEM CONNECTION is required for new or remodeled construction, mobile homes, or if
local codes do not permit grounding through the neutral conductor, if the 4-wire system is used, the
dryer frame cannot be grounded to the neutral conductor at the terminal block.
Refer to the following instructions lot"Electrical connections" on page 16.
Remove the terminal block cover plate.
Insert the power cord with a Ublisted strain relief through the hole provided in the cabinet near the terminal
block.
relief be used.
A strain must
Do not loosen the nuts already installed on the terminal block. Be sure they are tight.
Use a 3/8 in. (1 cm) deep well socket.
English- 19
Review the"Gas requirements" section on page 1S.
Remove the pipe thread protective cap. Apply a pipejoint compound or about 1V2wraps of Teflon tape over
all threaded connections.
The pipe joint compound must be resistant to the actions of any liquefied petroleum gas.
Connect the gas supply to your dryer. An additional fitting is required to connect the 3/4" (1.9 cm) female
thread end of a flexible connector to the 3/8" (1 cm) male threaded end on the dryer.
Securely tighten the gas line fitting over the threads.
Turn on the gas supply.
Check all gas connections for leaks using a soap solution.
If bubbles appear, tighten the connections and recheck. DO NOT use an open flame to check for gas leaks.
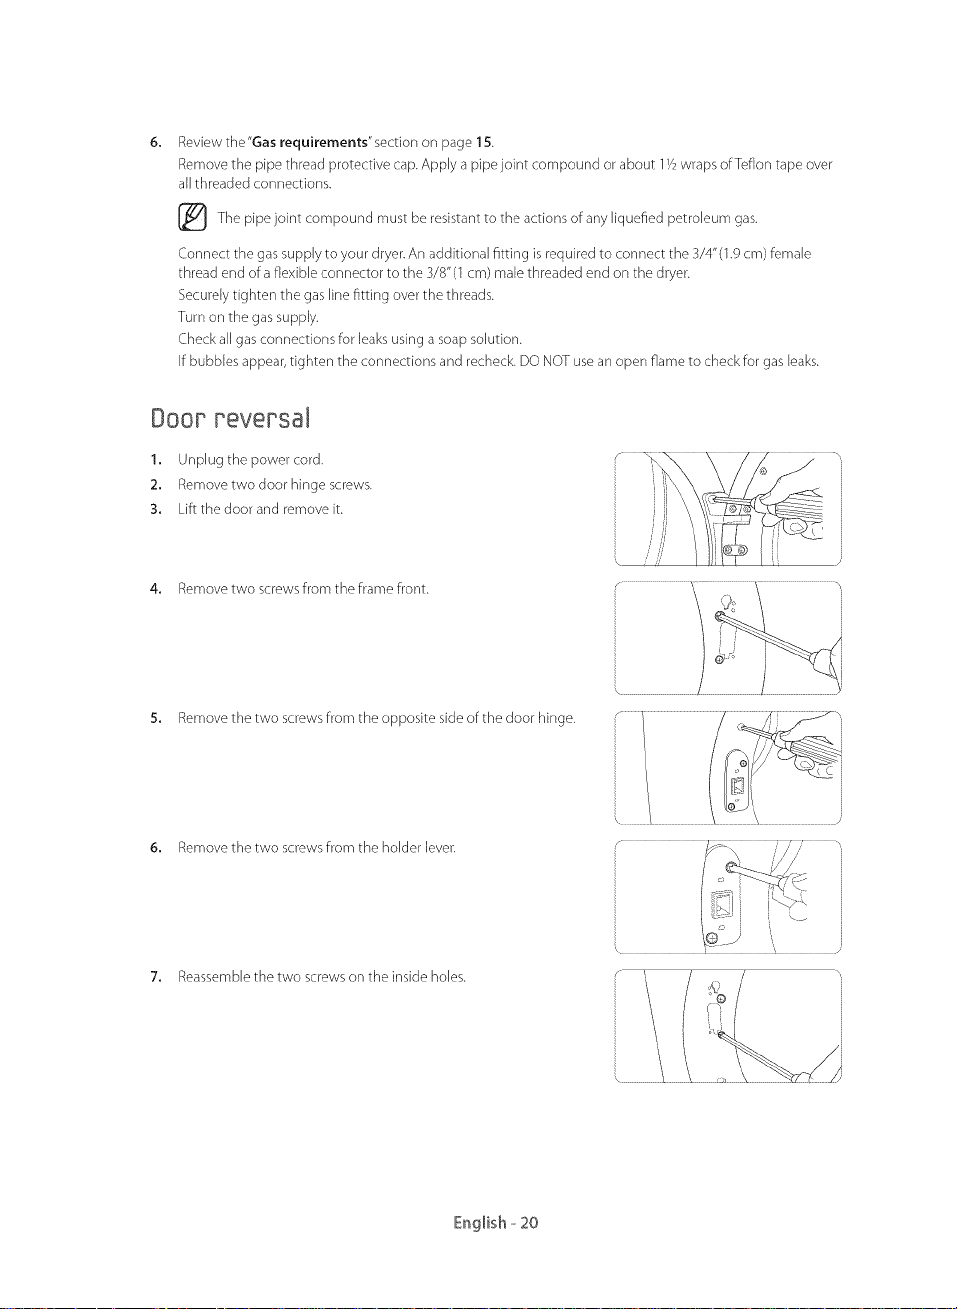
Doop peversaJ
1. Unplug the power cord.
2. Remove two door hinge screws.
3. Lift the door and remove it.
4. Remove two screws from the frame front.
5. Remove the two screws from the opposite side of the door hinge.
6. Remove the two screws from the holder lever.
7. Reassemble the two screws on the inside holes.
English _20
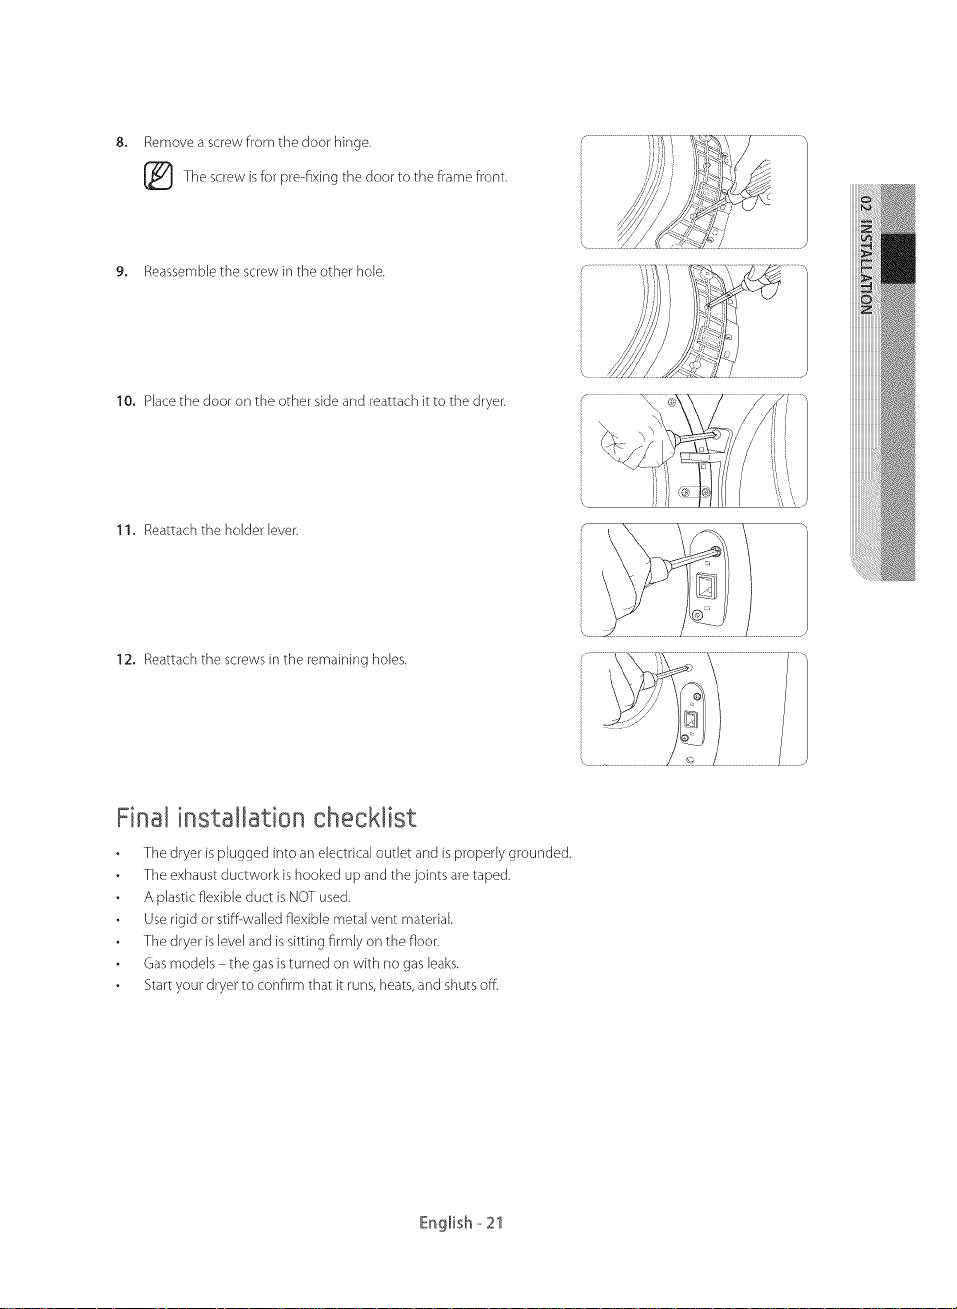
8, Remove a screw from the door hinge.
The screw is for pre-flxing the door to the frame front.
9, Reassemble the screw in the other hole.
10. Place the door on the other side and reattach it to the dryer.
11. Reattach the holder lever.
12. Reattach the screws in the remaining holes.
Final installation checklist
The dryer is plugged into an electrical outlet and is properly grounded.
The exhaust ductwork ishooked up and the joints are taped.
A plastic flexible duct is NOT used.
Use rigid or stiff-walled flexible metal vent material.
The dryer is level and is sitting firmly on the floor.
Gas models the gas is turned on with no gas leaks.
Start your dryer to confirm that it runs, heats, and shuts off.
English- 21

@ OpeRating instructions, tips
To reduce the risk of fire, electric shock, or injury to persons,read the IMPORTANT SAFETYINSTRU(-TIQNS
before operating this appliance.
Overview of the control panel
The courses and functions differ depending on the model.
Please check your model before proceeding,
DV42H5400*
......... [] @ e ........... @
HEAVY DUTY NORMAL ACTIVE WEAR
BEDDING QUICK DRY pO_WER
..............
RERM AIR FLUFF _I N_ I
WOOL ' _ REFRESH
DELICATES ' , JWRINWRINKLE AWAY
'TES_k__ ,//\'_"\ /" /
1
[] ......... y @ ...... ycles• @ @ e @ @
DV42H5000*
I
'EAVVODTV NOgT_E QU,CKDRYBEDDING TIME DRY
PERM PRESS /// "' AIR FLUFF
DELICATE
[] Sensor Dry Manual Dry []
\ /
English - 22
DV425000 DCBB-O3381Aindd 22 2013-12-19 _ 1:07:14
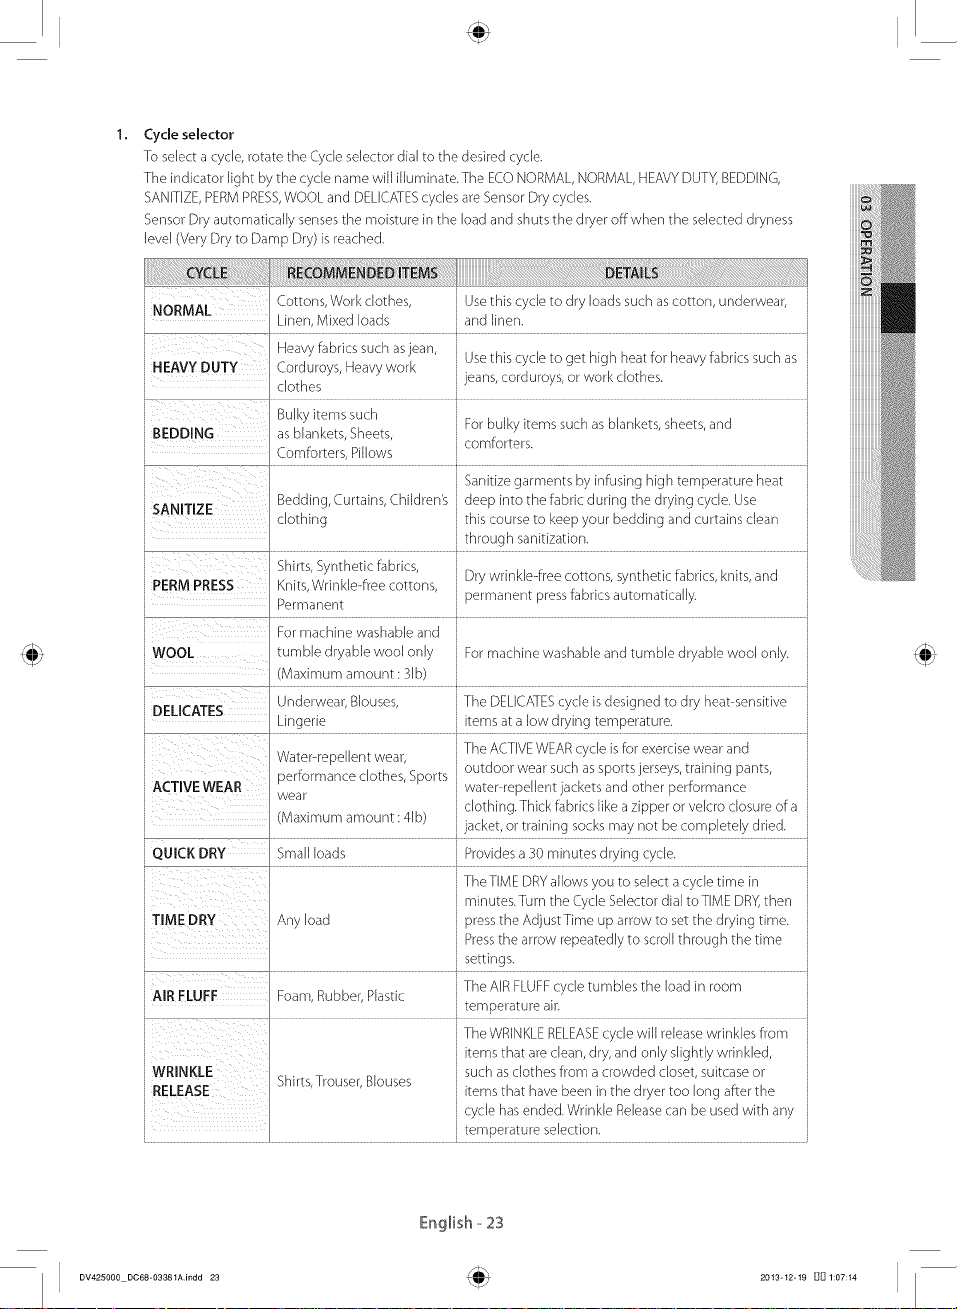
Cycle selector
To select a cycle, rotate the Cycle selector dial to the desired cycle.
The indicator light by the cycle name will illuminate.The ECO NORMAL, NORMAL, HEAVY DUTY, BEDDING,
SANITIZE, PERM PRESS,WOOL and DELICATEScycles are Sensor Dry cycles.
Sensor Dry automatically senses the moisture in the load and shuts the dryer offwhen the selected dryness
level (Very Dry to Damp Dry) is reached.
i Cottons, Work clothes, Use this cycle to dry loads such as cotton, underwear,
NORMAL
' Linen, Mixed loads arid linen.
J ... Heavy fabrics such as jean, Use this cycle to get high heat for heavy fabrics such as
lNEAV¥DUTY Corduroys,Heavywork
i_ _ clothes ijeans,corduroys,orworkclothes.
Bulky items such
i BEDDING as blankets, Sheets, comforters.
j Comforters, Pillows j
l
i SANITIZE Bedding, Curtains, Children's deep into the fabric during the drying cycle. Use
, clothing this course to keep your bedding and curtains clean
, through sanitization.
PERM PRESS Knits, Wrinkle-free cottons, , Dry wrinkle-free cottons, synthetic fabrics, knits, and
i Permanent ' permanent press fabrics automatically.
i
j For rnachine washable and '
JWOOL tumble dryable wool only For machine washable and tumble dryable wool only.
J
i Maximum amount : 3lb) ,
i Underwear, Blouses, The DELICATEScycle is designed to dry heat-sensitive
DELICATES
, Lingerie items at a low drying temperature.
K T . ,
j ACT!VEWEAR water-repdlentjackets and other performance
i wear clothing. Thick fabrics like a zipper or velcro closure of a
i QUICKDRY Small loads Provides a 30 minutes drying cycle.
i TheTIME DRY allows you to select a cycle time in
J minutes.Turn the Cycle Selector dial toTIME DRY,then
i
] TIME DRY Any load press the Adjust Time up arrow to set the drying time.
] settings.
l
i The AIR FLUFFcycle tumbles the load in room
i AIRELUFF Foam, Rubber, Plastic
i temperature air.
Shirts, Synt hetic fabrics, '
Water-repellent wear,
)erformance clothes, Sports outdoor wear such as sports jerseys, training pants,
(Maximurn amount : 41b) acket, or training socks rnay not be cornpletely dried.
i For bulky items such as blankets, sheets, and
Sanitize garments by infusing high temperature heat
The ACTIVEWEAR cycle is for exercise wear and
Press the arrow repeatedly to scroll through the time
TheWRINKLERELEASEcyclew,llreleasewr,nklesfrom
WRINKLE ... suchasclothesfromacrowdedclosetsuitcaseor
JRELEASE bhlrts Trouser Blouses ........ ' _ ,
' ' _ternsthat have been _nthe dryer too long atter the
items that are dean, dry, arid only slightly wrinkled,
cycle has ended. Wrinkle Release can be used with any
, temperature selection.
English- 23
DV425000 DO68-O3381Aindd 23 2013-12-19 D_ 1:07:14
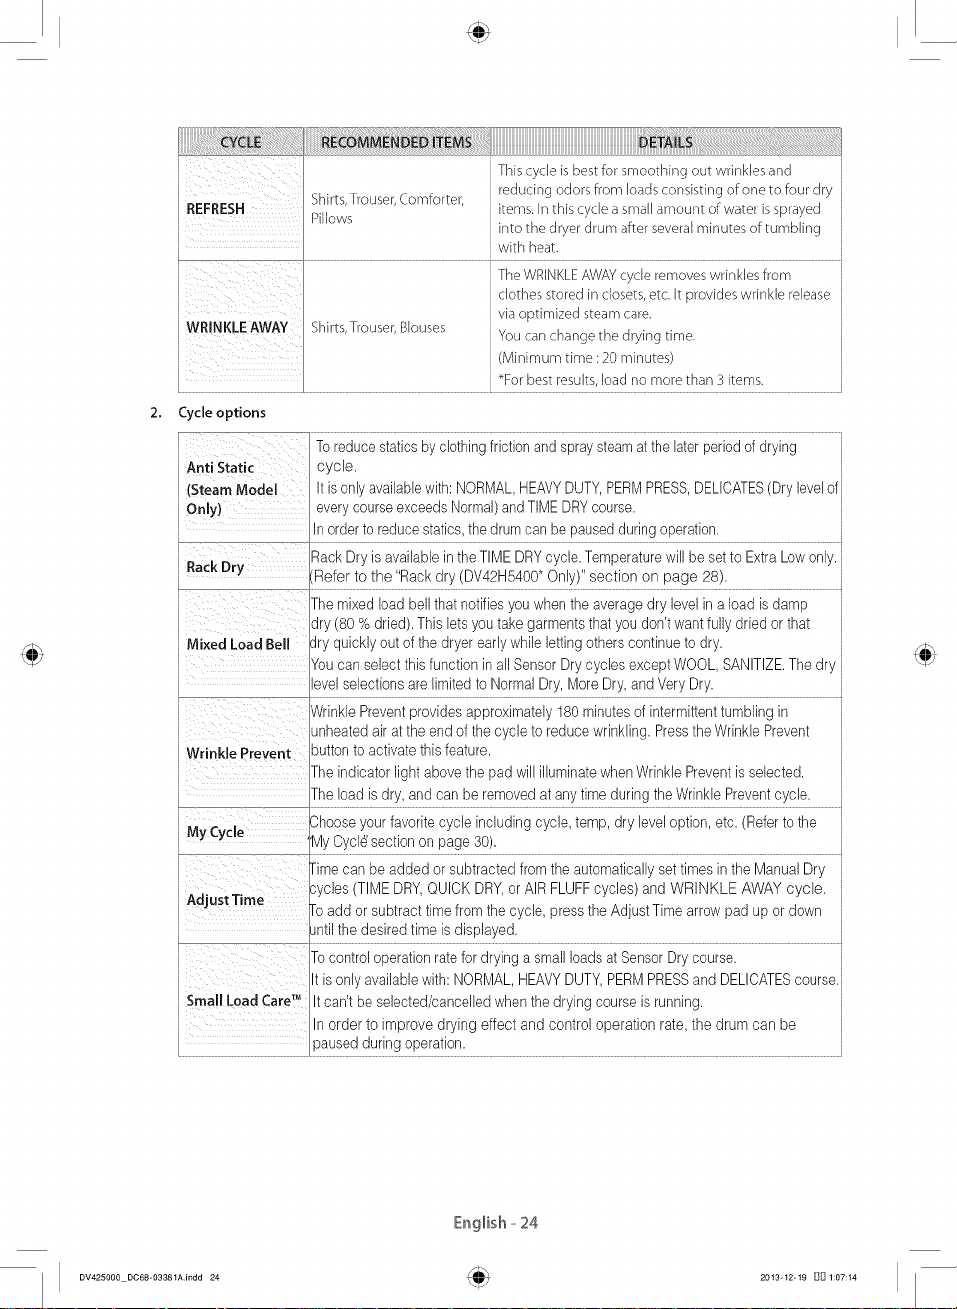
i This cycleisbestfor smoothing out wrinkles and
i Shirts,Trouser,Comforter,
JREFRESH items. Inthis cycle a smallamount ofwater issprayed
j Pillows ' into the dryer drum after severalminutesof tumbling
J
j with heat.
reducing odorsfrom loadsconsisting of oneto four dry
TheWRINKLEAWAYcycle removeswrinkles from '
clothes stored in closets,etc.It provideswrinkle release
JWR NKLEAWAY Shirts,Trouser,Blouses
viaoptimized steamcare.
Youcan changethe drying time.
(Minimum time : 20 minutes)
i . _Forbestresults,load no morethan 3 items.
Cycle options
,i Toreducestaticsby clothing frictionand spraysteamat the laterperiod of drying
iAnti Static cycle.
i(Steam Mode! It isonly availablewith: NORMAL,HEAVYDUTY,PERMPRESS,DELICATES(Drylevelofj
ionly) everycourseexceedsNormal)and TIMEDRYcourse.
: Inorder to reducestatics,the drumcan be pausedduring operation.
Rack Dry Rack Dry isavailable intheTIME DRYcycle. Temperaturewill be set to ExtraLowonly.
i Themixed load bell that notifies youwhen the average dry level in a load is damp
'Refer to the "Rackdry (DV42H5400*Only)" section on page 28).
q
dry (80 % dried). This letsyou take garments that you don't wantfully dried or that
] Mixed Load Bell Jry quickly out of thedryer early while letting others continue to dry.
i
i Youcan select thisfunction in all SensorDry cyclesexcept WOOL,SANITIZE.Thedry
j level selections are limitedto Normal Dry, MoreDry,and VeryDry. ,
i Wrinkle Preventprovides approximately180 minutes of intermittenttumbling in
J
unheated airat the end ofthe cycle to reduce wrinkling. Press theWrinkle Prevent
iWrinkle Prevent button to activate thisfeature.
i The indicator light abovethe pad will illuminatewhen Wrinkle Preventis selected.
l
j The load is dry,and can be removed atany time duringthe WrinklePreventcycle.
J
iMy cycle 3hoose your favoritecycle including cycle, temp, dry level option,etc. (Refertothe
My Cyclg section on page 30),
rime can be added or subtracted from the automaticallyset timesin the Manual Dry
iAdju't'nme
3ycles (TIME DRY,QUICK DRY,or AIR FLUFFcycles) and WRINKLE AWAY cycle.
ro add or subtracttime from thecycle, press theAdjust Time arrow pad up or down
i Jntilthe desired time is displayed.
To control operation ratefor drying a small loadsat Sensor Dry course.
Itis onlyavailable with: NORMAL,HEAVYDUTY,PERMPRESSand DELIOATEScourse.
] Small Load care'_' It can't be selected/cancelled when thedrying course is running.
i In order to improve drying effect and control operation rate,the drum can be
i _ausedduring operation.
English- 24
DV425000 DO68-O3381Aindd 24 2013-12-19 D_ 1:07:14
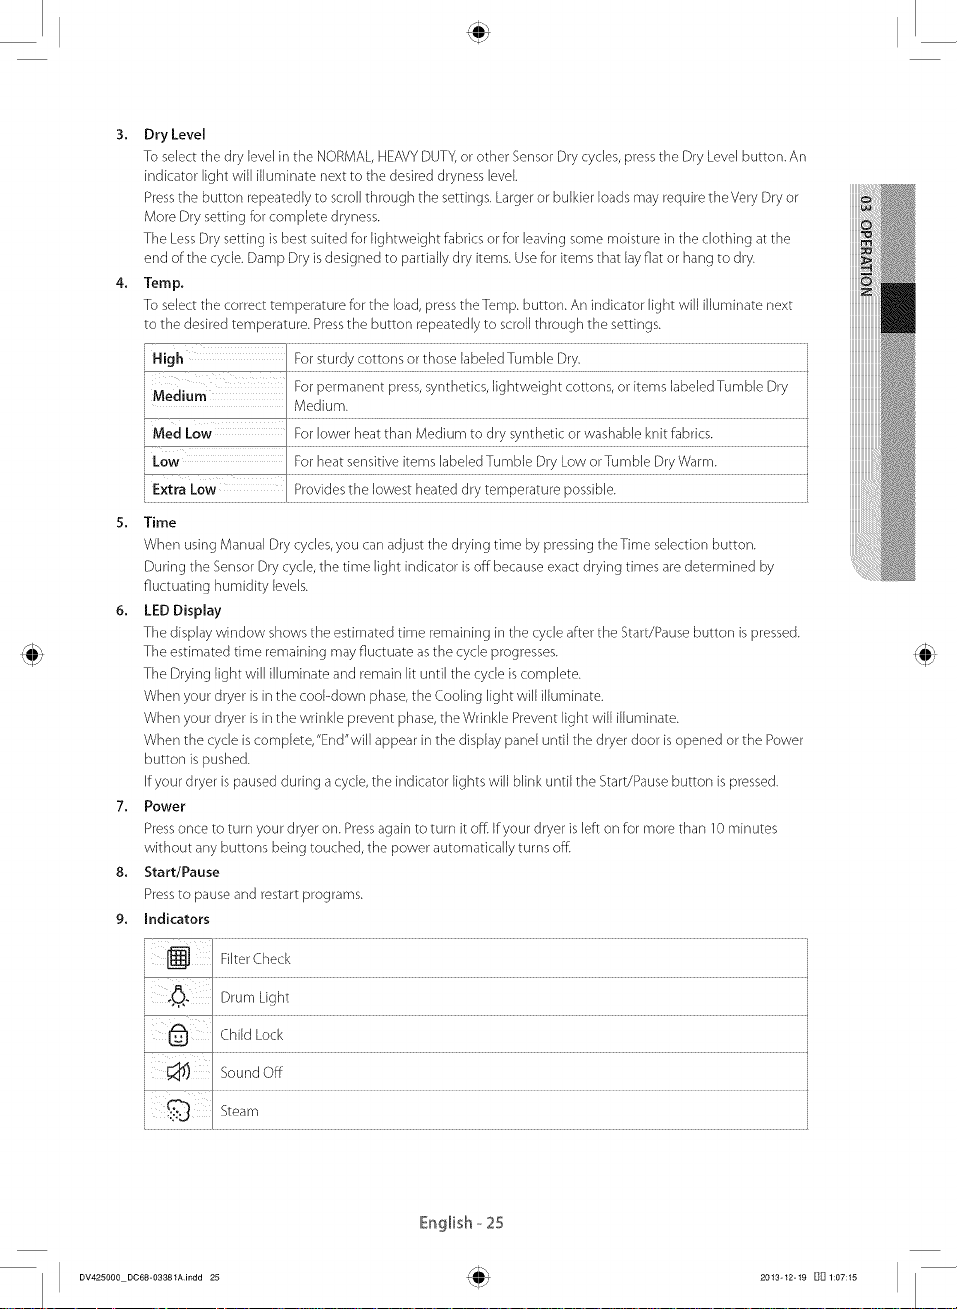
Dry Level
To select the dry level in the NORMAL, HEAVYDUTY, or other Sensor Dry cycles, press the Dry Level button. An
indicator light will illuminate next to the desired dryness level.
Press the button repeatedly to scroll through the settings. Larger or bulkier loads may require theVery Dry or
More Dry setting for complete dryness.
The LessDry setting is best suited for lightweight fabrics or for leaving some moisture in the clothing at the
end of the cycle. Damp Dry is designed to partially dry items. Use for items that lay fiat or hang to dry.
Temp.
To select the correct temperature for the load, press theTemp, button. An indicator light will illuminate next
to the desired temperature. Pressthe button repeatedly to scroll through the settings.
High For sturdy cottons or those labeled Tumble Dry.
]
j Medium For permanent press, synthetics, lightweight cottons, or items labeled Tumble Dry
i
i Med Low For lower heat than Medium to dry synthetic or washable knit fabrics.
Low For heat sensitive items labeled Tumble Dry Low orTumble Dry Warm.
E×tra Provides the lowest heated dry temperature possible.
Time
When using Manual Dry cycles, you can adjust the drying time by pressing theTime selection button.
During the Sensor Dry cycle, the time light indicator is off because exact drying times are determined by
fluctuating humidity levels.
LED Display
The display window shows the estimated time remaining in the cycle after the Start/Pause button is pressed.
The estimated time remaining may fluctuate as the cycle progresses.
The Drying light will illuminate and remain lit until the cycle is complete.
When your dryer is in the cooPdown phase, the Cooling light will illuminate.
When your dryer is in the wrinkle prevent phase, the Wrinkle Prevent light will illuminate.
When the cycle is complete,"End'will appear in the display panel until the dryer door is opened or the Power
button is pushed.
If your dryer is paused during a cycle, the indicator lights will blink until the Start/Pause button is pressed.
Power
Press once to turn your dryer on. Press again to turn it off. if your dryer is left on for more than 10 minutes
without any buttons being touched, the power automatically turns off.
8,
Start/Pause
Press to pause and restart programs.
9.
Indicators
Medium.
i
@ Child Lock
j _ Sound Off
L
Filter Check
._. Drum Light
Steam
'
English- 25
DV425000 DO68-O3381Aindd 25 2013-12-19 []0 1:07:15
Load the drLjer properlLJ
Place only one washload in your dryer at a time.
Mixed loads of heavy and lightweight fabrics will dry differently, which may result in lightweight fabrics being
dry while heavy fabrics remain damp at the end of a drying cycle.
Add one or more similar items to your dryer when only one or two articles of clothing need drying.
This improves the tumbling action and drying efficiency.
Overloading restricts tumbling action, resulting in uneven drying aswell as excessive wrinkling of some
fabrics.
If you insert laundry into your dryer while it is extremely tangled immediately after your washer has
finished a wash or spin cycle, it may degrade the drying efficiency or cause the door to open. We
recommend that you untangle your laundry appropriately before inserting it.
Getting started
1. Load your dryer loosely (DO NOT overload).
2. CIosethe door.
3. Select the appropriate cycle and options for the load. (For detail, refer to the "Cycle overview" on next page.)
4, Press the Start/Pause button.
5. The dryer indicator light will illuminate.
6. The estimated cycle time will appear in the display.
The time may fluctuate as humidity levels fluctuate in the dryer.
• When the cycle is complete,"End" will appear in the display.
Pressing Power cancels the cycle and stops your dryer.
The Drying, Cooling, and Wrinkle Prevent indicator lights will illuminate during those portions of the
cycle.
,_ Do not place anything on top of your dryer while it is running.
English- 26
DV425000 DO68-O3381Aindd 26 2013-12-19 D_ 1:07:15
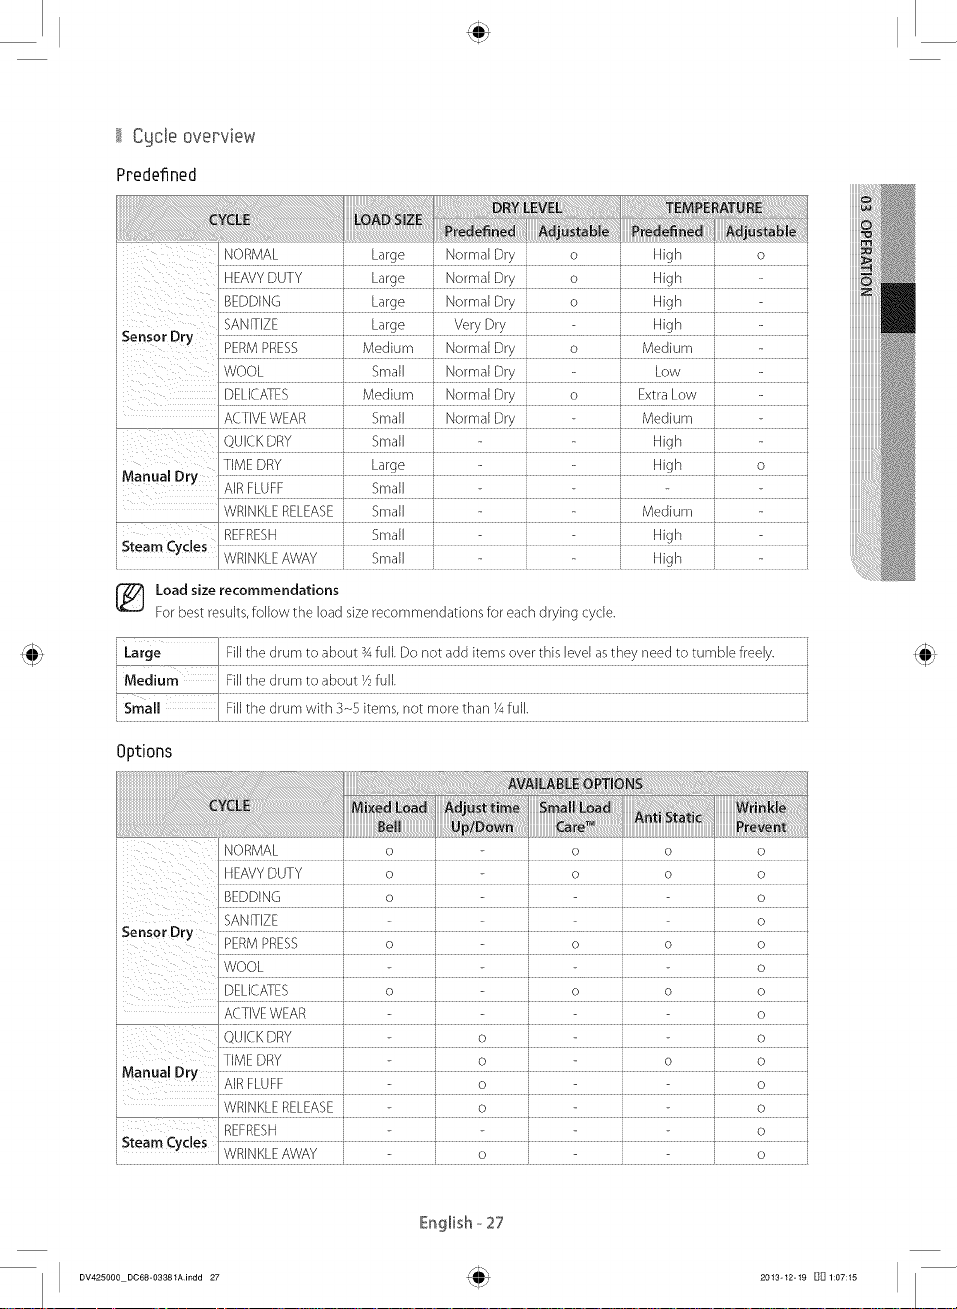
Cycle overview
Predefined
NORMAL _ Large _ NormalDry , o _ High , o ,
i HEAVYDUTY Large Normal Dry o High
i SANITIZE Large VeryDry High
MSensorOr__ERM_RESSj Mediumi Norma_Dryj o i Medium - j
ACTIVEWEAR . Small _ Normal Dry _ _ Medium _
QU,_KDRY, Small, _ , High,
iMan_a_Dry _i_£U_F Sm;ii ' _ ' : _ _ '
i , ÷ ÷ ÷ ÷
i
l WRINKLERELEASE Small Medium
'l<;t_,amCv4e,_ REFRESH . Small _ _ _ High _ - .
Loadsize recommendations
Forbest results,follow the load sizerecommendationsfor each drying cycle.
TIMEDRY Large High o
WRINKLEAWAY , Small , High
Options
l NORMAL o o o o
HEAVYDUTY , o , + o _ o , o ,
_EDD_N__ o .... o
SANITIZE - - - o
i DELICATES o o o o
j ACTIVEWEAR o
i Manua! Dry
J _ WRINKLERELEASE o L i o ,
DV425000 DO68-O3381Aindd 27 2013-12-19 []_ 1:07:15
WOOL o ,
QUICKDRY o o
TIMEDRY o o o
REFRESH
WRINKLEAWAY , , o o
i , _ ÷ +
0
English _ 27
 Loading...