

Page 1

DSB-A100F
Instructions for use
GB
REV. 1.0MF68-00312A
DIGITAL SATELLITE RECEIVERDIGITAL SATELLITE RECEIVER
Page 2
SAFETY INSTRUCTIONS
This STB has been manufactured to satisfy international safety standards.
Please read the following recommended safety precautions carefully.
MAINS SUPPLY: AC 100-240V~, 50/60Hz
OVERLOADING: Do not overload wall outlets, extension cords or adapters
as this can result in fire or electrical shock.
LIQUIDS: Keep liquids away from the STB.
CLEANING: Before cleaning, disconnect the STB from the wall socket.
Use a cloth lightly dampened with water(no solvents) to
clean the exterior.
VENTILATION: Do not block the STB ventilation holes. Ensure that free airflow
is maintained around the STB. Never store the STB where it is
exposed to direct sunlight or near heating equipment e.g. a
radiator.
Never stack other electronic equipment on top of the STB.
Place the STB at least 30mm from the wall.
ATTACHMENTS: Do not use any attachment that is not recommended by the
manufacturer; it may cause a hazard or damage the equipment.
CONNECTION TO THE SATELLITE DISH LNB:
The LNB connector cable has voltage in its center core. It is
therefore recommended that the STB be disconnected from
the mains power before connecting or disconnecting this cable.
FAILURE TO DO SO COULD DAMAGE THE LNB.
SERVICING: Do not attempt to service this product yourself.
Any attempt to do so will make the warranty invalid.
Refer all servicing to a qualified service agent.
LIGHTNING: If the STB is installed in an area subject to intense lightning
activity, protection devices for the STB mains connector and
modem telephone line are essential.
The individual manufacturer’s instruction for safeguarding other
equipment, such as TV set, Hi-Fi, etc., connected to the STB must
also be followed during lightning storms.
GROUNDING: The ground of the LNB cable must be directly connected to the
system ground for the satellite dish.
The grounding system must comply with local regulations
NNoottee :Dispose the used batteries at designated place for environment protection
DSB-A100F
GB
GB-1
Page 3

DSB-A100F
DSB-A100F
CONTENT GENERAL FEATURES
Safety Instructions . . . . . . . . . . . . . . . . . . . . . . . . . . . . . . . . . . . . . 1
General Features . . . . . . . . . . . . . . . . . . . . . . . . . . . . . . . . . . . . . . . 3
Connecting Your “STB” . . . . . . . . . . . . . . . . . . . . . . . . . . . . . . . . . . 4
Description . . . . . . . . . . . . . . . . . . . . . . . . . . . . . . . . . . . . . . . . . . . 6
Front Panel . . . . . . . . . . . . . . . . . . . . . . . . . . . . . . . . . . . . . . . . . . . 6
Rear Panel . . . . . . . . . . . . . . . . . . . . . . . . . . . . . . . . . . . . . . . . . . . 7
Remote Control Unit . . . . . . . . . . . . . . . . . . . . . . . . . . . . . . . . . . . . 8
Basic Functions. . . . . . . . . . . . . . . . . . . . . . . . . . . . . . . . . . . . . . . . 10
Operating The Receiver . . . . . . . . . . . . . . . . . . . . . . . . . . . . . . . . . 16
Main Menu . . . . . . . . . . . . . . . . . . . . . . . . . . . . . . . . . . . . . . . . . . . . 16
1. Installation . . . . . . . . . . . . . . . . . . . . . . . . . . . . . . . . . . . . . . . . 16
1.1 LNB Setting . . . . . . . . . . . . . . . . . . . . . . . . . . . . . . . . . . . . 17
1.2 Positioner Setting. . . . . . . . . . . . . . . . . . . . . . . . . . . . . . . . 17
1.2.1 User Mode . . . . . . . . . . . . . . . . . . . . . . . . . . . . . . . . . . . 18
1.2.2 Installer Mode . . . . . . . . . . . . . . . . . . . . . . . . . . . . . . . . . 18
1.3 Solarsat Setting . . . . . . . . . . . . . . . . . . . . . . . . . . . . . . . . . 19
1.4 Auto Scanning . . . . . . . . . . . . . . . . . . . . . . . . . . . . . . . . . . 19
1.5 Manual Scanning . . . . . . . . . . . . . . . . . . . . . . . . . . . . . . . . 20
1.6 SMATV Scanning . . . . . . . . . . . . . . . . . . . . . . . . . . . . . . . . 21
1.7 Reset to Factory Defaults . . . . . . . . . . . . . . . . . . . . . . . . . . 21
2. Channel Organising . . . . . . . . . . . . . . . . . . . . . . . . . . . . . . . . . 22
2.1 Delete Satellite . . . . . . . . . . . . . . . . . . . . . . . . . . . . . . . . . . 22
2.2 Delete Transponder . . . . . . . . . . . . . . . . . . . . . . . . . . . . . . 22
2.3 Delete Channel . . . . . . . . . . . . . . . . . . . . . . . . . . . . . . . . . 22
2.4 Delete All Channels . . . . . . . . . . . . . . . . . . . . . . . . . . . . . . 23
2.5 Delete Scrambled Channels . . . . . . . . . . . . . . . . . . . . . . . . 23
2.6 Favorite Channels . . . . . . . . . . . . . . . . . . . . . . . . . . . . . . . 23
2.7 Move & Edit Channel . . . . . . . . . . . . . . . . . . . . . . . . . . . . . 24
3. Parental Lock . . . . . . . . . . . . . . . . . . . . . . . . . . . . . . . . . . . . . . 25
3.1 Set Channel Lock. . . . . . . . . . . . . . . . . . . . . . . . . . . . . . . . 25
3.2 Change PIN Code . . . . . . . . . . . . . . . . . . . . . . . . . . . . . . . 26
4. System Setup . . . . . . . . . . . . . . . . . . . . . . . . . . . . . . . . . . . . . . 26
4.1 Language Selection . . . . . . . . . . . . . . . . . . . . . . . . . . . . . . 26
4.2 OSD Setting. . . . . . . . . . . . . . . . . . . . . . . . . . . . . . . . . . . . 27
4.3 Media Settings. . . . . . . . . . . . . . . . . . . . . . . . . . . . . . . . . . 28
4.4 Time &Timer Setting . . . . . . . . . . . . . . . . . . . . . . . . . . . . . . 29
4.5 System Information . . . . . . . . . . . . . . . . . . . . . . . . . . . . . . 30
4.6 Software Upgrade . . . . . . . . . . . . . . . . . . . . . . . . . . . . . . . 30
4.7 Copy Channel Data . . . . . . . . . . . . . . . . . . . . . . . . . . . . . . 31
Troubleshooting. . . . . . . . . . . . . . . . . . . . . . . . . . . . . . . . . . . . . . . . 32
Disposal . . . . . . . . . . . . . . . . . . . . . . . . . . . . . . . . . . . . . . . . . . . . . . 32
Technical Specifications . . . . . . . . . . . . . . . . . . . . . . . . . . . . . . . . . 33
1. USER SECTION
2. TUNER SECTION
3. VIDEO SECTION
4. AUDIO SECTION
4000 PROGRAMMABLE CHANNELS
SOFTWARE DOWNLOAD VIA SATELLITE & PC(Secured)
ADVANCED ELECTRONIC PROGRAM GUIDE
MULTI LANGUAGE SUPPORTED FOR OSD
SUBTITLE & TELETEXT(OSD & VBI)SUPPORTED
WITH MULTI LANGUAGE
DiSEqC 1.2 SUPPORTED
FULL FUNCTION INFRARED REMOTE CONTROL UNIT
7 SEGMENT LED DISPLAY
AUTO AND MANUAL SCAN FACILITY
CHANNEL ORGANIZING(PROGRAMMABLE)
RCA OUTPUT
LOW POWER CONSUMPTION
9 FAVORITE LISTS
AUTO UPDATED EPG
PASS LOOP FOR RGB SIGNAL
15 TIMERS TO RESERVE PROGRAMS(EVENTS) FOR TURNING
ON/OFF
950~2150 MHz WIDE BAND TUNER
IF OUTPUT WITH DC PASS LOOP FOR ANALOG RECEIVER
SUPPORTING DiSEqC 1.2 VERSION
13V/18V SWITCHING
22KHz CONTINUOUS TONE CONTROL
DVB-S COMPLIANT
MPEG-2 VIDEO(MP@ML)
2~45 MS/s SYMBOL RATE
COMPATIBLE FOR BOTH SCPC/MCPC
SUPPORTS ASPECT RATIO 4:3(NORMAL) AND
16:9(WIDE SCREEN)
MODULATOR OUTPUT
MPEG 1 AUDIO LAYER I & II
MONO, DUAL, STEREO AND JOINT STEREO AUDIO MODE
32, 44.1 AND 48 KHz SAMPLING FREQUENCIES
VOLUME CONTROL AND MUTE FUNCTION THROUGH
REMOTE CONTROL UNIT
GB
GB-2
DIGITAL SATELLITE RECEIVER
GB-3
Page 4

DSB-A100F
DSB-A100F
CONNECTING YOUR "STB"
CONNECTING YOUR “STB”
1. LOCATION OF THE RECEIVER
Your “STB” should be placed under proper ventilation.
Don’t put in completely enclosed cabinet that will restrict the flow of air, resulting in
overheating.
The location should be safeguarded from direct sunlight, excess moisture, rough
handling or household pets.
Avoid stacking other electronic components on the top of the receiver.
The location should be safely accessible by the cable from your antenna system.
2. CONNECTING THE RECEIVER WITH ANTENNA SYSTEM
After installing your antenna system, connect the coaxial cable from the LNB of your
antenna to “DISH INPUT” terminal marked at the rear of the STB.
All cable connectors should be finger tightened; do not use any kind of wrench while
tightening connectors.
The cable should be 75 ohm impedance coaxial twisted at the end with an “F” type
connector.
3. CONNECTING THE RECEIVER TO TV
To connect the receiver with your television, you can follow two methods: through RF
cable, and through to RCA cable.
Connect the RF cable to the terminal marked “TV” at the rear panel of STB and its other
end to the TV RF input socket.
In the case of connecting your TV through RCA cable, connect the Receiver Terminal
marked Video to the TV Port.
4. CONNECTING EXTERNAL AUDIO/HI-FI-SYSTEM
To connect any external Audio Hi-Fi system, the receiver has been provided with two
RCA connectors at the back of the receiver, marked with Audio L and R respectively to
connect the Left and Right Audio.
Connecting Figure
GB
GB-4
DIGITAL SATELLITE RECEIVER
GB-5
Page 5

DSB-A100F
DSB-A100F
DESCRIPTION
DESCRIPTION
Front Panel
1
1.
2. OK
3. ,
4. ,
5. 7
Segment Display This LED display will show the current channel number.
6. Infrar
ed Sensor This is to receive the IR commands from the Remote Control Unit.
23 645
This key is for turning the receiver on and Standby.
This key is for entering and confirming any data to the receiver in the
menu system. This key is for selecting the item. Press while viewing
TV and a list of channels is displayed.
These keys are for changing the channels during watching TV and for
moving the highlight bar for selecting options on the menu.
These keys are for increasing and decreasing the volume level manually
during watching TV and for moving the highlight bar for selecting options
on the menu.
While the receiver is in Standby mode, the display will show the current
time.
Rear Panel
1
1. AC MAINS This is to plug in the AC mains power cord.
The input AC voltage range is 100V to 240V~, 50Hz/60Hz supply.
2. RS 232 DATA PORT This is for connecting your receiver to a computer for reading
and loading data information.
3. DISH INPUT This port is to connect the coaxial cable from LNB of your dish.
The IF input is provided through this port and the input frequency range
is 950-2150 MHz. Also the voltage switching 13 V and 18 V is passed
through this port.
4. VIDEO These RCA connectors are used to connect TV or any external video
system.
5. AUDIO R/L These RCA connectors are used to connect TV or any external audio
system.
6.
ANT IN This is used to connect your local terrestrial antenna to your TV set.
7. TV This is used to connect your TV through RF cable.
672543
GB
GB-6
DIGITAL SATELLITE RECEIVER
GB-7
Page 6

DSB-A100F
Remote Control Unit
DSB-A100F
DESCRIPTION DESCRIPTION
NNoo ttee : When inserting batteries,
make sure that the polarity(+/-) is correct.
1. POWER
This is for switching the receiver
ON/STANDBY mode.
2. 0-9 NUMERICAL keys
These keys are to enter numeric values and
to select the channel directly by entering its
number.
3. PG+/PG-
These keys are for moving up or down pages on
the menu and TV/Radio list.
4. TV/RADIO
This key is for toggling between the TV channel
and Radio channel.
5. MUTE
This key is for toggling between
normal & muted audio.
6. FAV
Use the key to switch between favorite lists.
7. EPG
Electronic Program Guide key displays the
TV/Radio Program guide.
8. LAST
This key is for calling up directly whatever
channel you were watching from the list.
9. TEXT(GREEN)
This key is for selecting the subtitle mode.
This key functions same as the GREEN
key on the menu.
Press it once and subtitle appears. You can
select the language you want using the
channel up/down keys.
Press twice it. Then Teletext will be displayed
on TV Screen without operating anything on TV.
This Teletext can be displayed on TV which
doesn’t support Teletext functionality.
Press three times it. Then Teletext will be
available on TV. It means that Teletext can be
chosen by TV with TV RCU.
GB-8
DIGITAL SATELLITE RECEIVER
10. ALT(YELLOW) This key is for selecting the soundtrack list for the current service.
This key functions same as the YELLOW key on the menu.
Press it once and sound track appears.
Press it twice and video track appears.
The sound and video track services are not provided for every
channel and depend on the conditions the operator is in.
This key is for displaying the help message in the sub-menu.
11. AUDIO(BLUE) This key is for changing the Audio to the left, right or both channels,
This key functions same as the BLUE key on the menu.
12.
i
(INFORMATION) This key is for displaying the program information box in the screen.
(RED) This key functions same as the RED key on the menu.
Press it once and you can get simple information on the program.
Press it twice and you can get detailed information on the channel in
text box.
13. MENU This key is for opening up the menu or returning to the previous menu.
14. EXIT This key is for exiting a menu or returning to the previous menu or exiting
some banners.
15. OK This key is for entering and confirming any data to the receiver in the
menu system. This key is for selecting the item. Press while viewing
TV and a list of channels is displayed.
/ / /
16.
These keys are for moving the highlight bar for selecting
options on the menu.
17. CH /CH These keys are for changing channels.
18. VOL+/VOL- These keys are for increasing or decreasing the volume.
19. TIMER This key is for reserving events(programs) into timer(s) in EPG. If a event is
set in timer, it will be turned on/off automatically based on start/end time of
event. This key activates/deactivates timer(s) in EPG as toggle type.
After activating EPG screen by pressing ‘EPG’ key, you can select the
interesting event (program) using the
/
keys and / keys. Then,
press ‘timer’ key. If this event is reserved in the timer, ® is displayed
on the right corner of this event name. ‘EPG’ on ‘Event Repetition’ in
‘Time & Timer Settings’ menu is displayed, too.
However, if there is no event on EPG for the channel, this Timer can’t
be supported.
GB-9
GB
Page 7
DSB-A100F
DSB-A100F
BASIC FUNCTIONS
BASIC FUNCTIONS
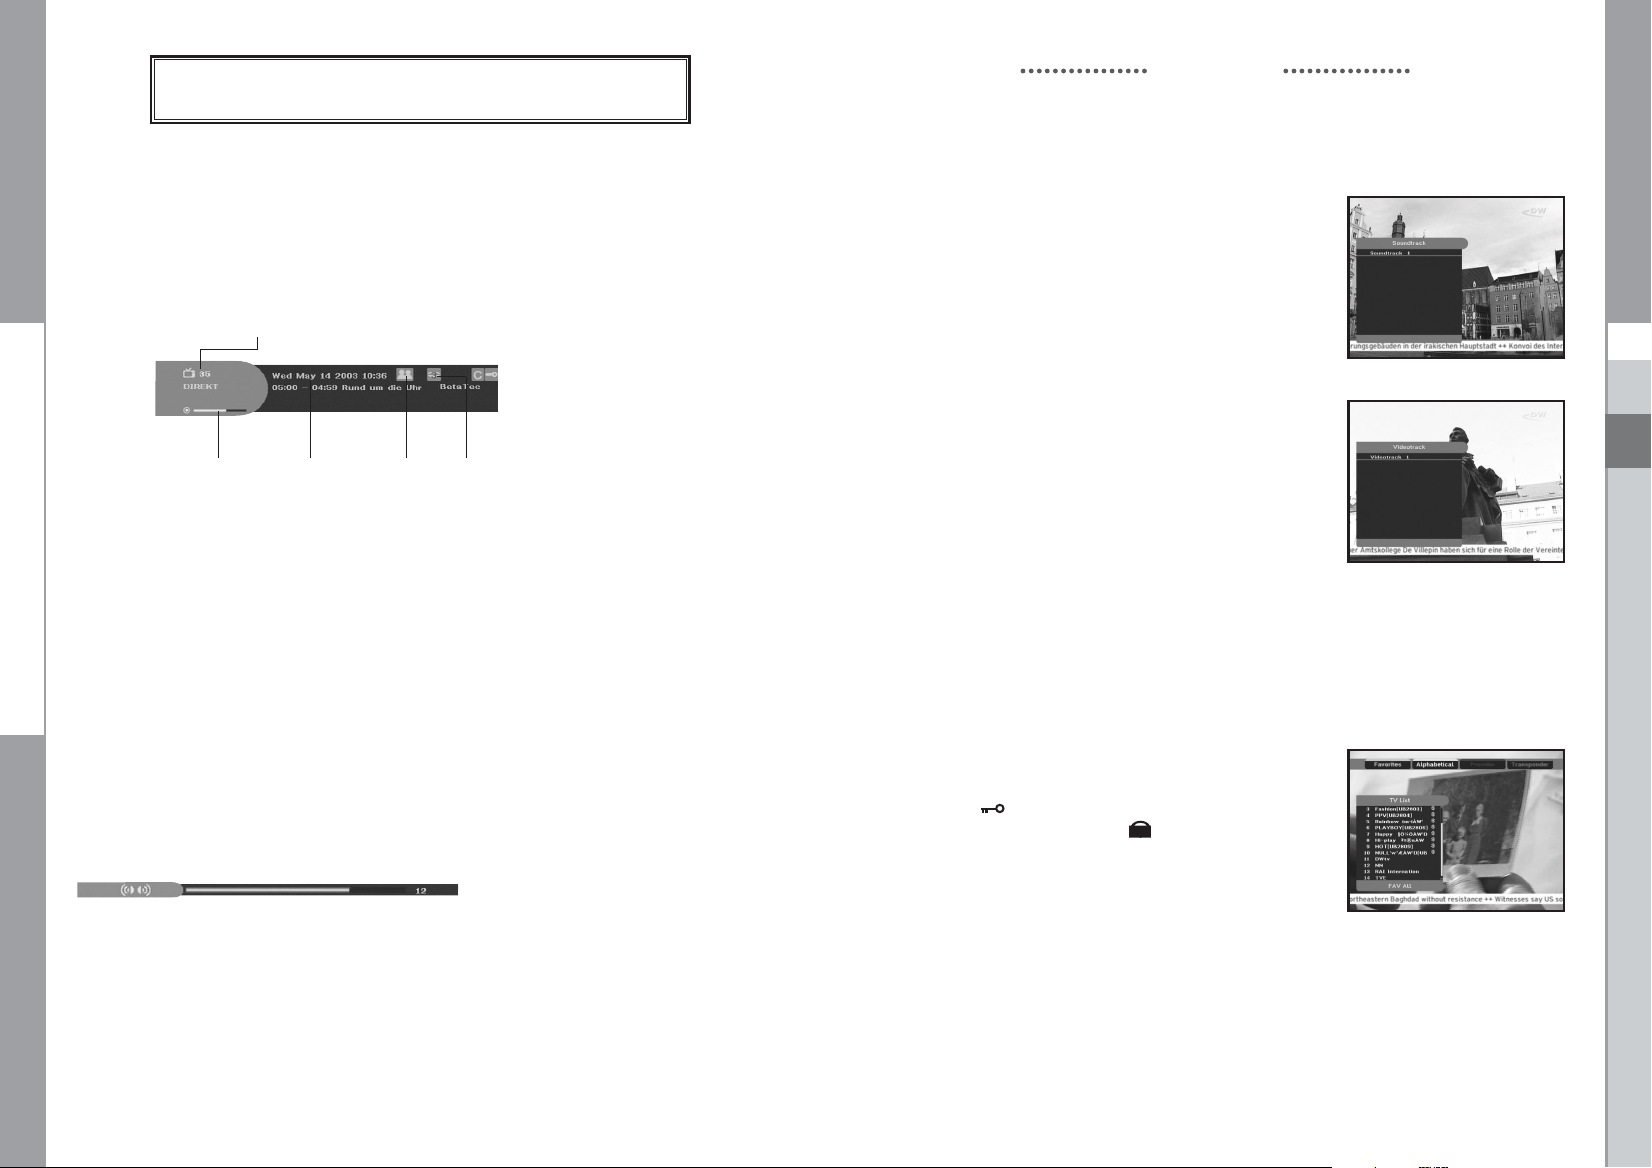
1. Display Screen
Before you can view the television program, you must perform the installation.
Therefore you will see only menu images at first.
After the television channels have been programmed, you will see the following
picture(banner) each time you switch channels:
Channel Number
Program Information Current FavoriteSignal Status
● Press the RED( i ) key in view mode.
● Select the channel by pressing NUMERICAL (0~9) keys or
The number of soundtrack in current channel
/
keys and select
TV/RADIO key to move to TV or Radio channel.
You will also see this picture each time you change channels.
When you press TV/RADIO key on the Remote Control Unit, TV and RADIO program are toggled.
Detailed program information
● Press the RED( i ) key twice while you are viewing a program.
First you will see the banner described above.
After the RED( i ) key is pressed in the second time, detailed information for current program can
be displayed on another banner, if there is more information. When this information is more than
one page, PG+/PG- keys can be used for page up and down.
NNoottee
: This service depends on service provider.
2. Volume Control
To control the volume level :
● Press
● Press MUTE key to turn to silence mode.
● Press MUTE key again or
/
, VOL- or VOL+
keys to adjust the volume level.
/
keys in order to cancel the mute function.
3. Select Soundtrack
● Press YELLOW(ALT) key to see the soundtrack list.
● Press
/
and OK key to select one.
4. Select Videotrack
● Press YELLOW(ALT) key twice to see the videotrack list.
● Press
/
and OK key to select one.
5. Sub channel List
When subchannels are available on current channel (program)
after changing channel, [C] is displayed at the right corner
on the banner. In this case, press the YELLOW(ALT) key.
Then you can get all subchannel list.
Select subchannel which you want among subchannel list.
6. Service List
● Press OK key to while you are viewing a program.
● Select list by pressing TV/RADIO or FAV key.
The icon behind the channel name symbolises
scrambled channel, and the icon behind the
channel name shows parental lock channel.
● Select the channel by pressing
● Press OK key to watch that channel.
The colour key corresponds the following service list.
● Green(TEXT) key : Favorites
● Yellow(ALT) key : Alphabetical
● Blue(AUDIO) key : Provider
● Red( i ) key : Transponder
/
, PG+/PG-.
GB
GB-10
DIGITAL SATELLITE RECEIVER
GB-11
Page 8
DSB-A100F
DSB-A100F
BASIC FUNCTIONS BASIC FUNCTIONS
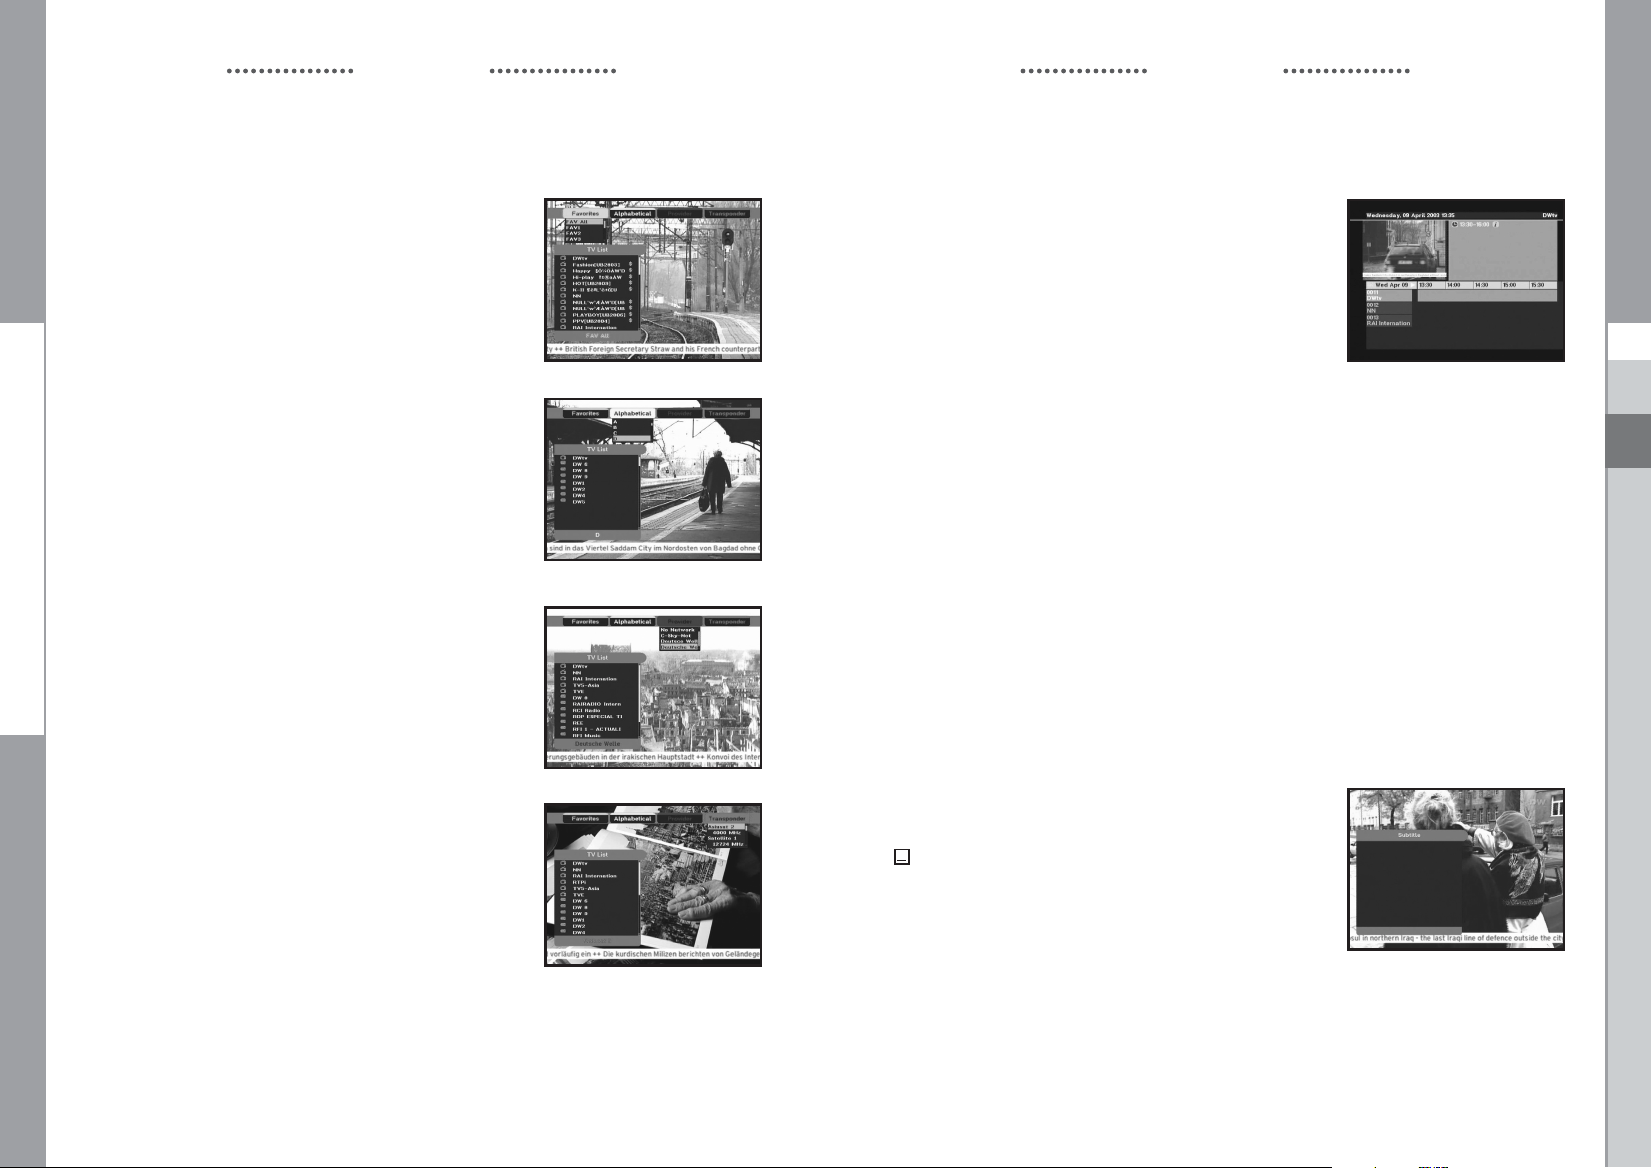
6.1 Service Favorites
● Press the GREEN(TEXT) key on the control unit to select the
Favorites list.
● Press the GREEN(TEXT) key to switch between favorite list
and channel list.
● Use the
/
, PG+/PG- keys to select a favorite group or a
channel that you want.
6.2 Service Alphabetical
● Press the YELLOW(ALT) key on the remote control unit to
select the Alphabetical list.
● Press the YELLOW(ALT) key to switch between alphabet list
and channel list.
● Use the
/
, PG+/PG- keys to select a Alphabetical group
or a channel that you want.
6.3 Service Provider
● Press the BLUE(AUDIO) key on the remote control unit to
select the Provider list.
● Press the BLUE(AUDIO) key to switch between Provider list
and channel list.
● Use the
/
, PG+/PG- keys to select a Provider group or a
channel that you want.
7. Program Information
EPG-Electronic Program Guide
The electronic program guide gives you information
for the channels.
NNoottee
: 1. This service depends on service provider.
2. After receiver recognized the GMT-time
from the signal which takes few seconds,
it can display correct EPG information.
● Press EPG key while you are viewing a program.
This function is displayed on the screen by using only time.
You will see “EPG” in the LED display of the receiver.
● GREEN(TEXT) key: Green key is for moving back to the previous date.
● YELLOW(ALT) key: Yellow key is for moving to the next coming date.
● BLUE(AUDIO) key can be used for page up, if there is more information than one page.
● RED( i ) key can be used for page down, if there is more information than one page.
Time interval can be adjusted by press keys as followings on EPG screen:
1 key: 1 hour and 30 minutes 2 key: 30 minutes 3 key: 15 minutes
With the TV/RADIO or FAV key you can browse among the various programs lists.
● Select the channel by pressing
Current event can be returned by pressing LAST key during moving events on this channel.
● When the TIMER key on the remote control is pressed in the EPG screen, if the current channel
involves an event, timer is set immediately and the set timer is indicated on the EPG screen.
A program that has been set in this way is indicated on Timer Field of Time & Timer Setting.
/
, PG+/PG- keys and press OK key to watch this channel.
GB
6.4 Service Transponder
● Press the RED( i ) key on the remote control unit to select the
Transponder list.
● Press the RED( i ) key to switch between Transponder list and
channel list.
● Use the
/
, PG+/PG- keys to select a Transponder group
or a channel that you want.
GB-12
8. Subtitle
When the current broadcasting program provides subtitle,
press the GREEN(TEXT) key to see the current subtitle
language list. If Subtitle is available on current program,
is displayed on the banner after changing program(channel)
or pressing RED( i ) key.
To change the subtitle language:
● Press the GREEN(TEXT) key to see the subtitle language
List.
● Use the
● Press the OK key and then the subtitle language you want is displayed.
The menu display is carefully created and user friendly to assure the easy operation
of the receiver by the user.
DIGITAL SATELLITE RECEIVER
/
keys to select a subtitle language you want.
GB-13
Page 9
DSB-A100F
DSB-A100F
BASIC FUNCTIONS BASIC FUNCTIONS
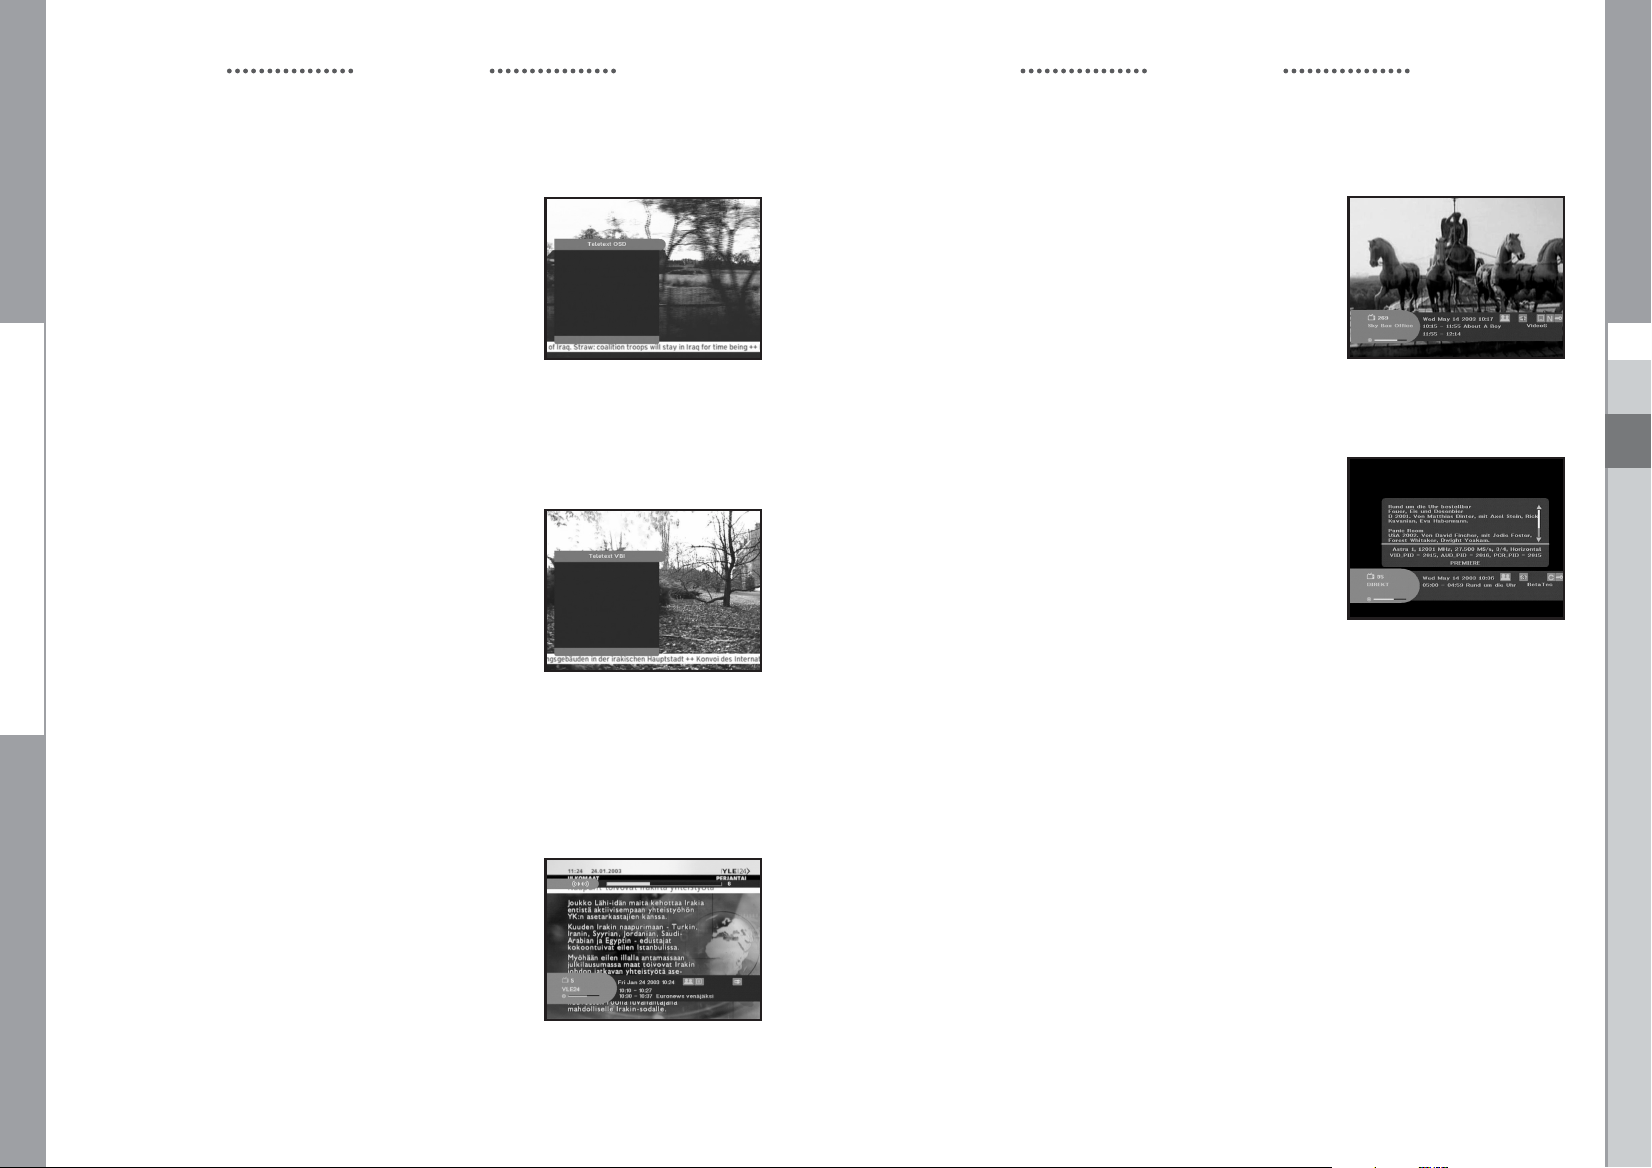
9. Teletext OSD
When the current broadcasting program provides Teletext, press
the GREEN(TEXT) key twice to see the current language list for
Teletext in order to get teletext in OSD regardless of TV type.
[T] at the right corner on the banner shows that Teletext is
available on this event(program). Even [T] is displayed on the
banner, Teletext may not be available due to broadcasting.
To change the Teletext OSD:
● Use the
● Press the OK key and then the Teletext OSD you want is
/
keys to select a Teletext OSD you want.
displayed on the screen.
10. Teletext VBI
When the current broadcasting program provides
Teletext VBI, press the GREEN(TEXT) key three times to
see the current language list for Teletext.
This Teletext will be displayed to the screen by TV, which
supports Teletext.
[T] at the right corner on the banner shows that Teletext is
available on this event(program). Even [T] is displayed on the
banner, Teletext may not be available due to broadcasting
To change the Teletext VBI:
● Use the
● Press the OK key and then the Teletext VBI you want is
/
keys to select a Teletext VBI you want.
displayed on the screen.
12. Near Video on Demand (NVOD)
If the changed channel is a NVOD service channel,
[N] is displayed at the right corner on the banner. In this case,
press the YELLOW(ALT) key.
Then you can get all NVOD list.
Select NVOD program among those lists.
Select the desired time to watch using the
/
keys,
and then press the OK key to watch the desired program.
13. Multi feed channel or subchannel
If the changed channel is a multi feed service channel,
[C] is displayed at the right corner on the banner.
In this case, press the YELLOW(ALT) key.
Then you can get all subchannel list.
Select a program among those list, using the
and then press the OK key to watch the selected program.
/
keys,
GB
11. Audio Mode
You can choose a mode among left, right or stereo using the
BLUE(AUDIO) key.
To change the audio mode:
● Press the BLUE(AUDIO) key to select the left, right or stereo.
● Press the EXIT key to save and escape from this menu.
GB-14
DIGITAL SATELLITE RECEIVER
GB-15
Page 10
DSB-A100F
DSB-A100F
OPERATING THE RECEIVER
OPERATING THE RECEIVER
Main Menu
After installing your antenna system and STB with appropriate connectors.
● Plug in the AC main power and switch on the receiver.
● Press MENU key to bring up the main menu.
The LED display will show “MENU”.
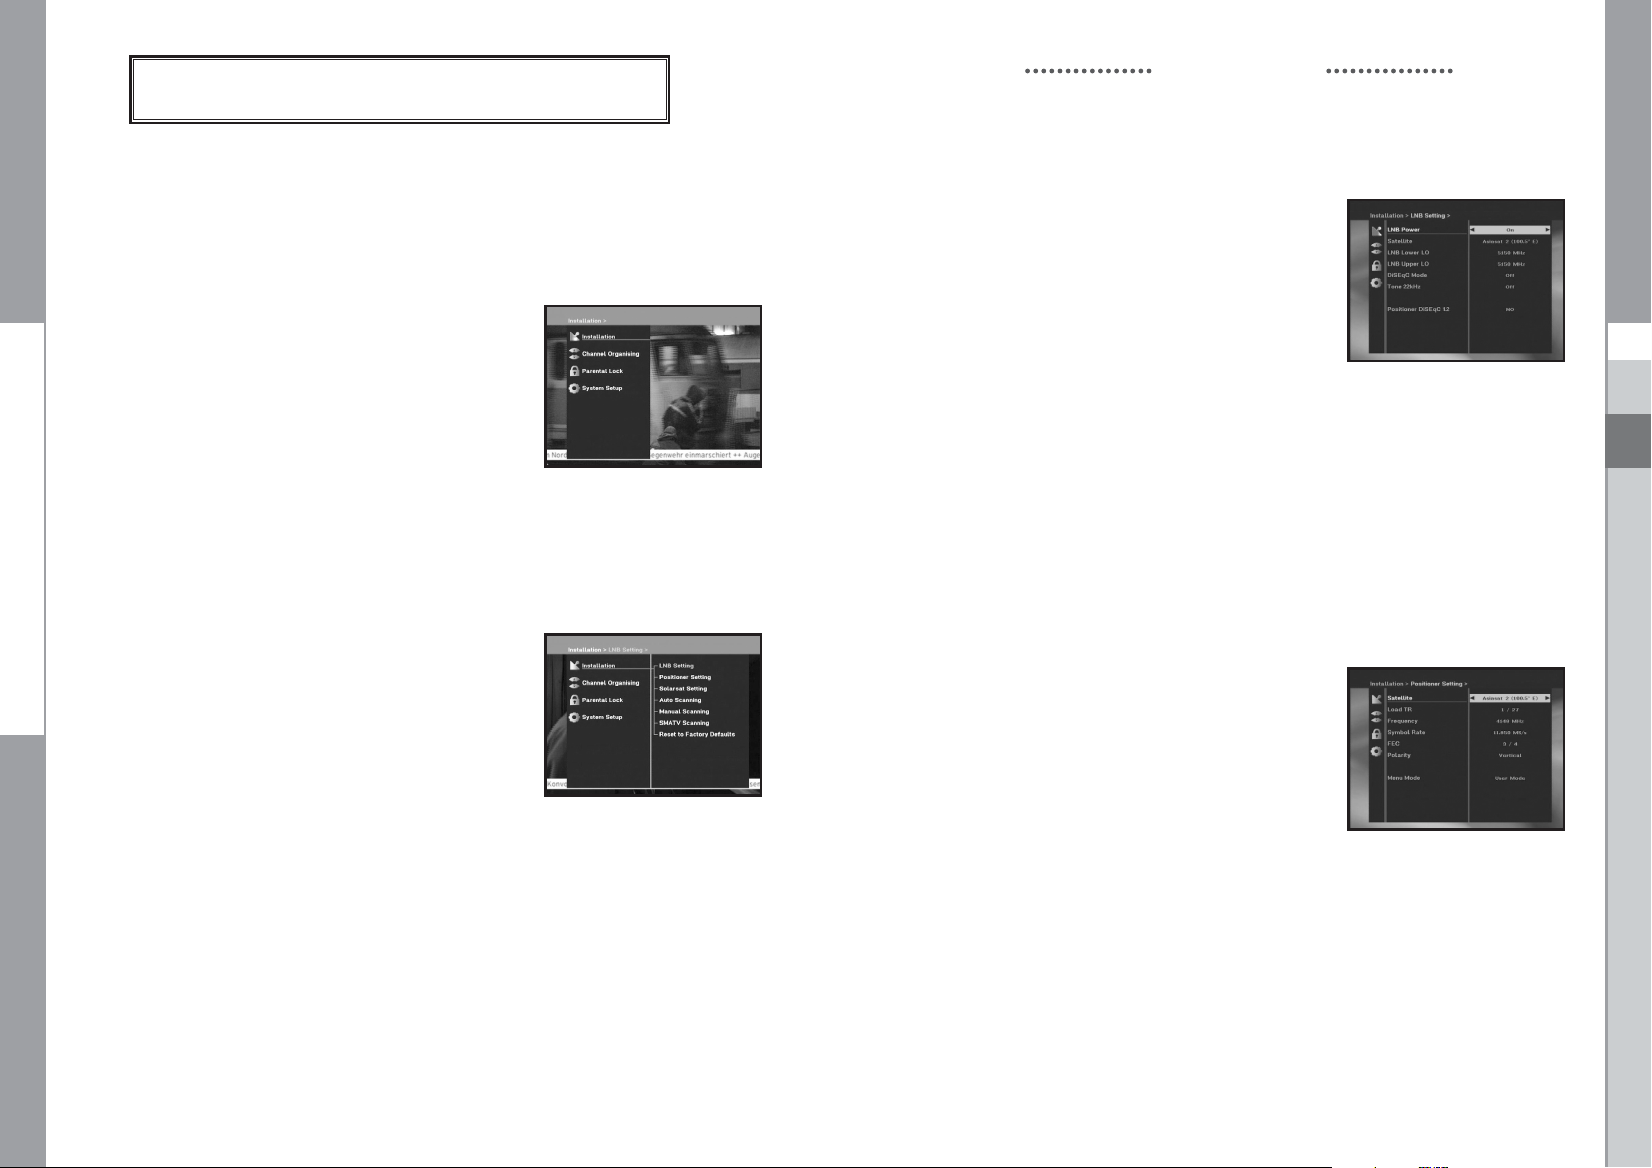
The following on screen display will appear:
The sub menu topics will be displayed.
For the sub-menus Installation, Channel Organising and
Parental Lock you need the PIN Code.
Before you begin with the “Installation” menu,
you should check in the 4th menu “System Setup”
whether all the information there is applicable for you.
● To see the help message, press the YELLOW(ALT) key.
1. Installation
The menu provides settings for customizing, adding new
services and displaying the status of the receiver.
● Select “Installation” in the main menu mode to select the
sub menu.
● Enter the PIN Code.
If you have not entered your own PIN Code then the
PIN Code 0000 applies, which was set at the factory.
1.1 LNB Setting
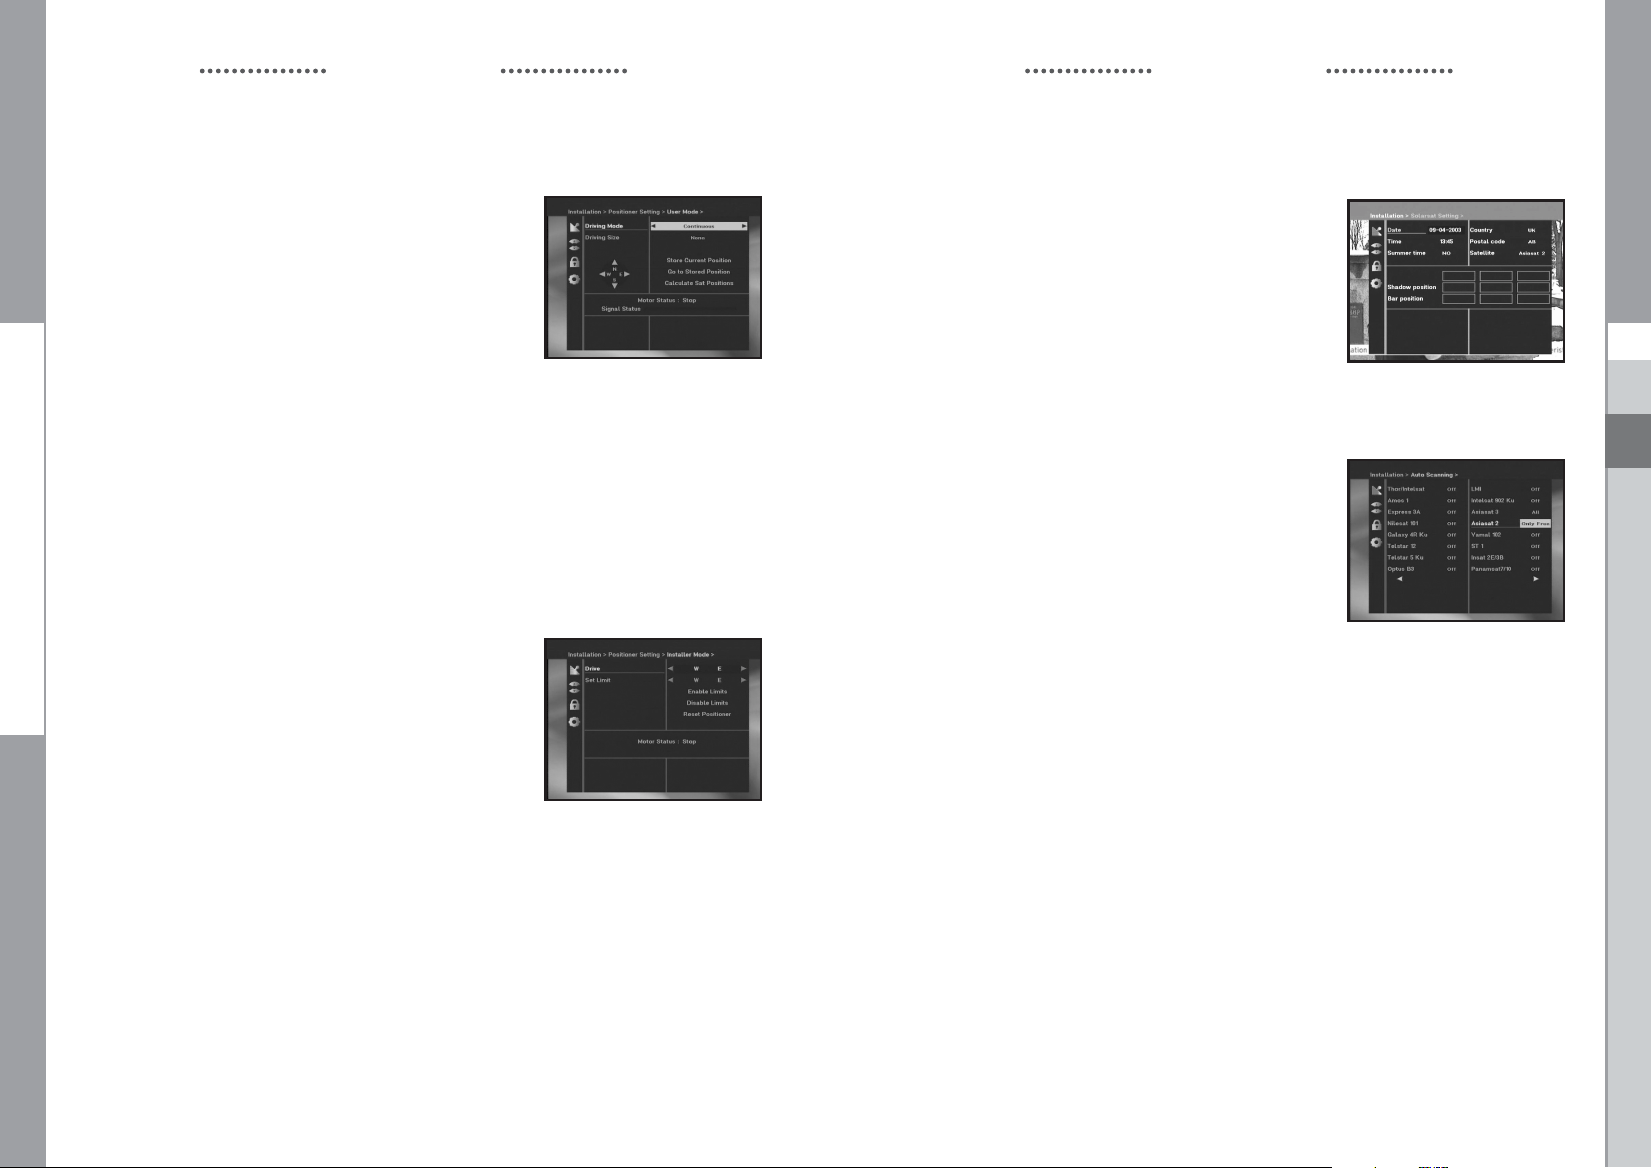
You can select the satellite and LNB setting conditions to
execute channel search and you can alter the settings for
22KHz tone. The parameters set in this menu are needed for
programming the channels for the “Auto scanning” and
“Manual scanning”.
The necessary information can be found at your antenna and
LNB brochures, or you can ask your dealer.
● Select LNB power supply “On”.
● Select the desired satellite name.
● Select the LNB type (frequency).
● Select the DiSEqC Mode
(Off, DiSEqC A, DiSEqC B, DiSEqC C, DiSEqC D, Tone Burst A, Tone Burst B)
If you are using a Positioner, select Positioner DiSEqC1.2 (“Ye s” or “No”)
22KHz: In case you are using a dual LNB or two antennas connected to a 22KHz tone
switch box, with the 22 KHz tone switch (“On”, “Off” or “Auto”) you can switch
between both LNB or antennas.
1.2 Positioner Setting
If you have a DiSEqC 1.2 motorized system which is fully
compatible with DiSEqC1.2, then you can take advantage
of the DiSEqC 1.2 functions available.
● Select Satellite.
● Select any transponder from above satellites and
check out the Frequency, Symbol Rate, FEC and Polarity.
In case problems arise, ask your dealer.
Sometimes this transponder may not exist due to broadcasting.
It is better to select main transponder among them for the
desired satellite.
● Select from Menu Mode:
“User” mode : Enables control of basic positioner function
recommended for beginners. General user uses “User” mode.
“Installer” mode : This is used to search for the position of a satellite manually.
GB
GB-16
DIGITAL SATELLITE RECEIVER
GB-17
Page 11
DSB-A100F
DSB-A100F
OPERATING THE RECEIVER
1.2.1 User Mode
● Select Driving Mode:
You have an option to choose the positioner’s movement type:
Continuous, Step or Time.
● Position the antenna with north, south, east and west and
use the/ / / key to drive motor.key drives to west,
key drives to east,key drives to north andkey drives
to south.
● If you finished driving of motor, select “Store current Position.”
and press OK key, to reset new driving motor.
NNoottee
: The level indicated in the “Signal Status” is only for reference.
The signal quality may be adequate even though the level indicated is not maximum.
● Go to Stored Position.
When the stored position is reached then screen displays “Stop”,
you can now continue with the further operations.
● Select the Calculate Sat Positions to recalculate the satellite position and OK key.
1.2.2 Installer Mode
After checking the positioner’s state, installer should use this menu.
He should set the “Disable Limits” before using User mode.
● Select the Drive Motor West/East and use the
/
keys
to drive motor.
key drives to west andkey drives to east.
● Select “Enable Limit”, in order to enable “Set Limit”.
● Select “Disable Limit”, in order to disable “Set Limit”.
● Select “Reset Positioner” and OK key to reset positioner.
OPERATING THE RECEIVER
1.3 Solarsat Setting
This menu is only for the Solarsat antenna.
When you press this menu, you will get this message,
“This menu is only for the Solarsat antenna.
If you have one-press OK, otherwise-press EXIT.”
You can set the value according to your location.
● To set the Value of Date and Time, use the PG+/PG- keys
to change the value.
● Use the
● Use the
/
keys to change position.
/
keys to move each filed.
1.4 Auto Scanning
The sub menu “Auto Scanning” will enable download the
channels automatically from the preprogrammed satellites.
To download channels automatically:
You can select All/Off/Only Free option mode with the the
/
keys in each satellite, which can be displayed more by
the PG+/PG- keys .
Off : No Scan
All : Scan all the channels
Only Free : Scan free channels
● Press OK key.
Auto Scanning menu will be displayed.
All the channels in the list from the selected satellite will be
automatically downloaded.
After scanning you will see “Your digital receiver found...”.
Then, you should press OK key to store all channels into STB.
GB
GB-18
DIGITAL SATELLITE RECEIVER
GB-19
Page 12
DSB-A100F
DSB-A100F
OPERATING THE RECEIVER
1.5 Manual Scanning
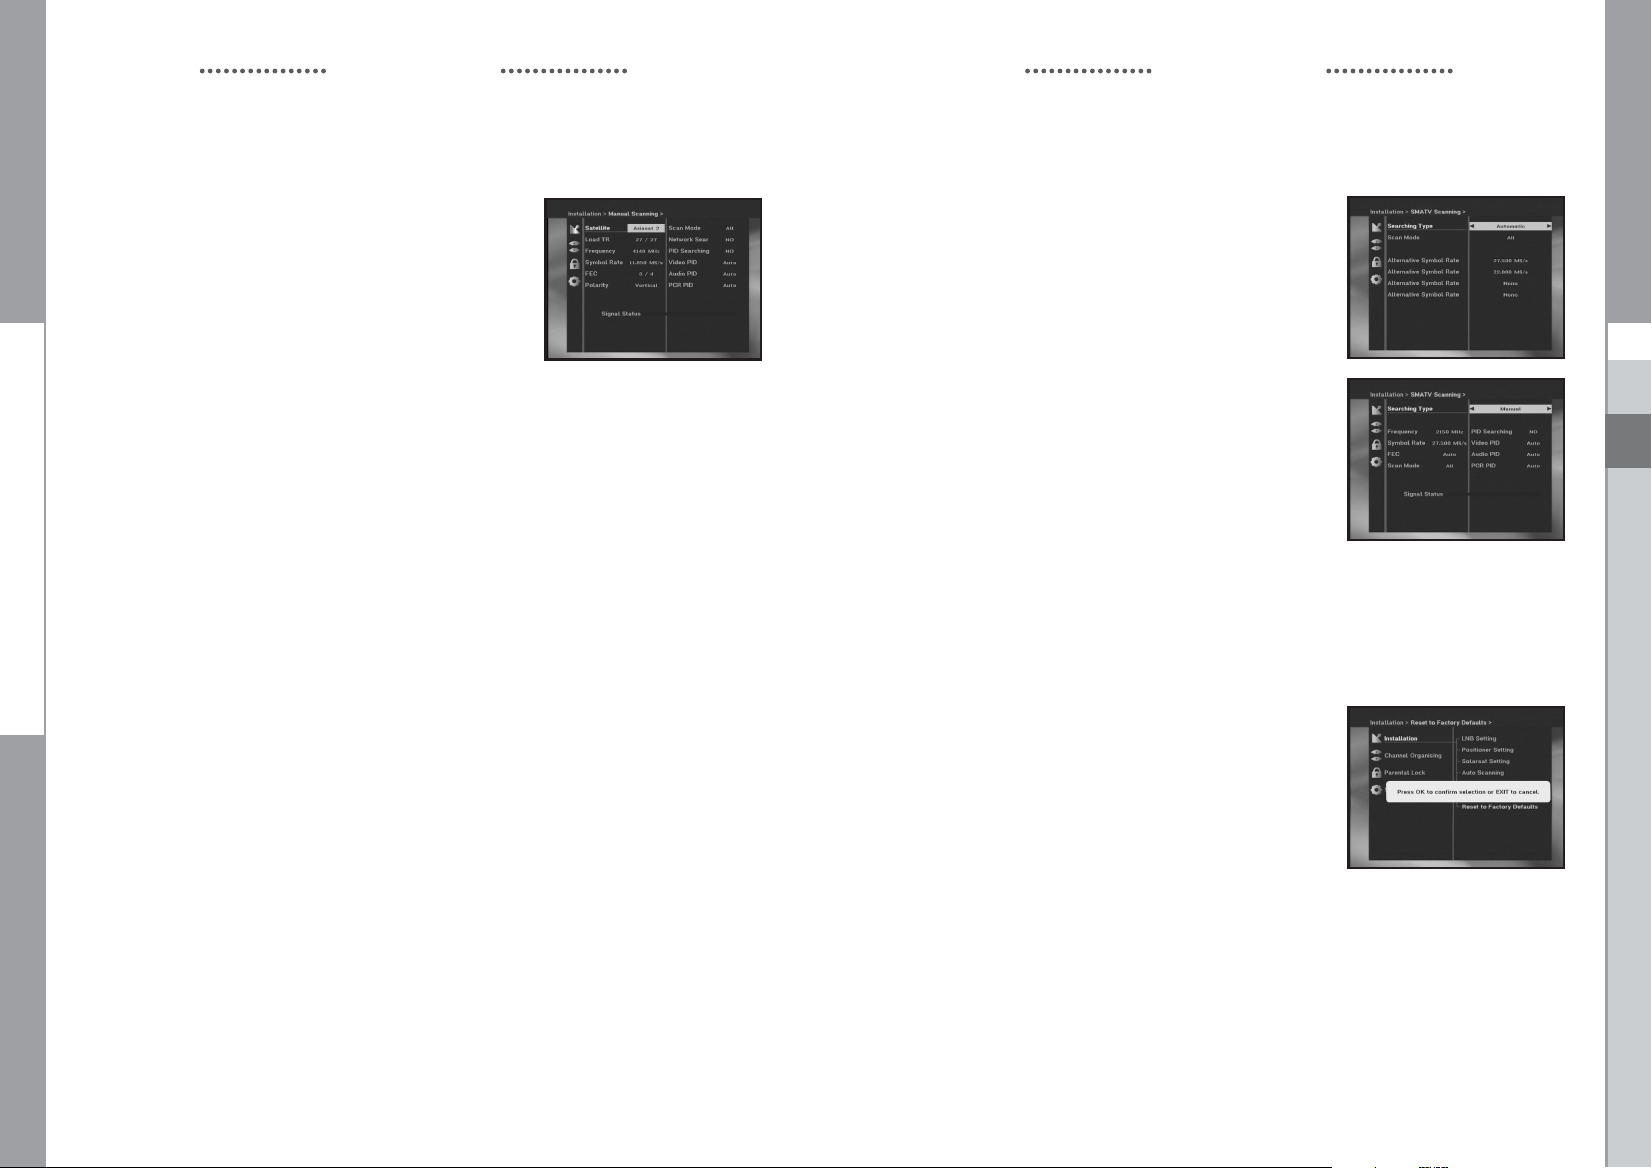
To tune-in new channels and weak signals, the STB has been
provided with the option “Manual Scanning” where the channel
data can be entered by the user.
After selecting the “Manual Scanning” from the Installation Menu,
the following screen will be displayed:
● Select the target satellite for manual search. In order to scan
programs from the satellite which is not listed on this menu,
select ‘Satellite 1’, ‘Satellite 2’ or ‘Satellite 3’.
In case of ‘Satellite 1’, ‘Satellite 2’ or ‘Satellite 3’,
all information about the satellite which you are interested in should be put.
● Load a transponder.
This option will enable the user to load any transponder from the preprogrammed list
available within the receiver.
NNoottee
: Especially on New transponder at Load TR, this new transponder can be added
into transponder list so that you can use it on Auto Scanning later, only if at least
one channel is found with this new transponder. In order to save it, press OK key.
In order to get ‘NEW’ as new transponder at Load TR, enter ‘0’ at Load TR or go to
‘NEW’ using the
● Input the frequency of the transponder you want to find.
● Input the symbol rate of the transponder you want to find.
● Select the FEC(Forward Error Correction)of the transponder you want to find.
You can select the value of 1/2, 2/3, 3/4, 5/6, 7/8 or Auto.
● Select the polarization of the transponder you want to find.
(Horizontal/Vertical/Circular Left/Circular Right)
In the case of horizontal, 18V and in the case of vertical, 13V are output through LNB line.
● Select Scan Mode “All” or “Only Free”.
● Set “Ye s” on Network Search. You can get more channels from transponder using
the homing transponder. Additionally, you can get ‘Net Name’ on the screen. This service
depends on the information from broadcasting signal.
● Select PID searching “Ye s”. only if you are interested in SCPC program. You can manually
search by entering individual PID(Packet Identifier)(Video/Audio/PCR) values.
● After select option, press OK key to start the scan process.
/
keys.
OPERATING THE RECEIVER
1.6 SMATV Scanning
In case that several generations use Antenna and LNB in
common, search the service the from 950 to 2150MHz.
● Select Searching Type “Automatic” or “Manual”.
● Select Scan Mode “All” or “Only Free”.
● You can input alternative symbol rate from 1st to 4th.
NNoottee
: 1. When your searching type is set to Automatic
during SMATV scanning, you have only to enter
the alternative symbol rate(1~4) you want.
2. When your searching type is set to Manual
during SMATV scanning, you must enter both
frequency and symbol rate.
3. DiSEqC switch can be supported for SMATV on
‘LNB Settings’. SMATV as the satellite on
‘LNB Settings’ should be selected for supporting
DiSEqC switch.
When you select “Automatic”, STB will search all available
channels based on symbol rates over whole frequencies.
On the other hand, it will scan channels with exact
information for symbol rate and frequency on “Manual”.
1.7 Reset to Factory Defaults
This is to recover the Factory set values in case the user has
encountered some problems after changing any values of
channel data and others which may be in error.
The screen display will be as follows:
At the request window,
if you press OK key, the receiver will be reset to factory default
settings automatically.
NNoottee
: This cause your previous settings to be deleted!
All settings and information including channel data will be deleted.
GB
GB-20
DIGITAL SATELLITE RECEIVER
GB-21
Page 13
DSB-A100F
DSB-A100F
OPERATING THE RECEIVER
2. Channel Organising
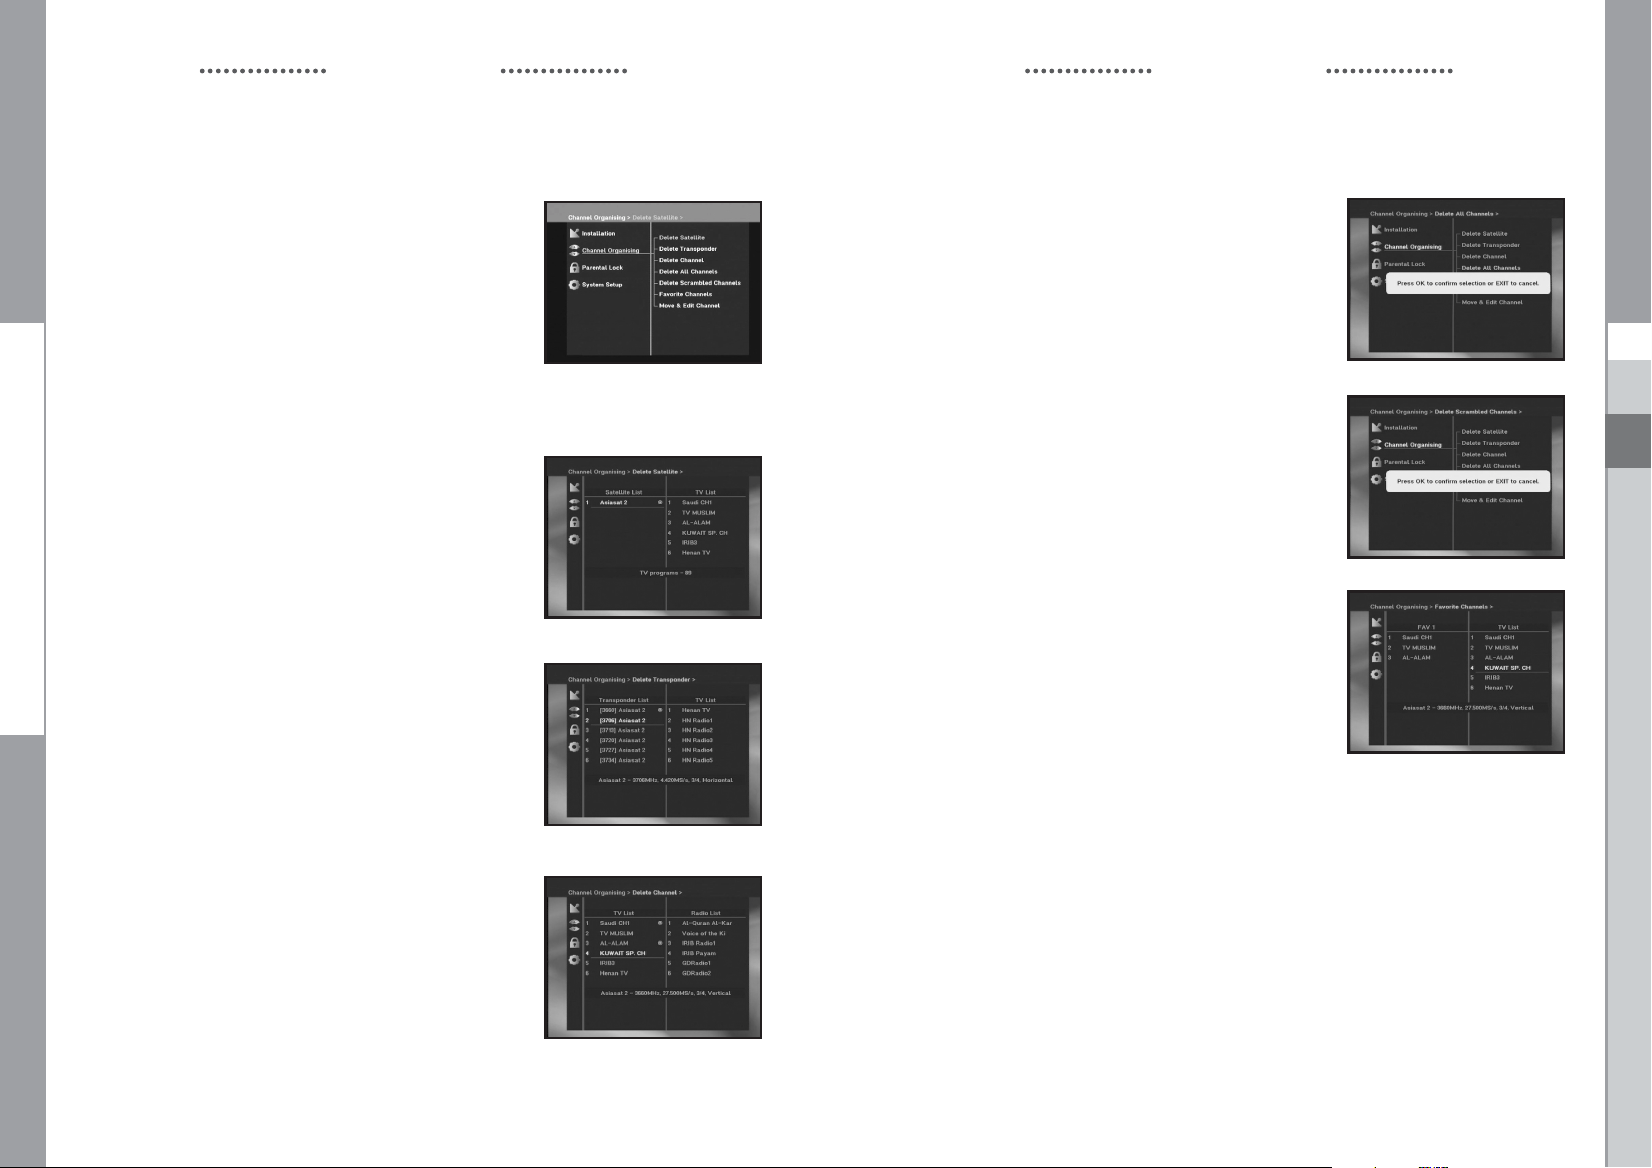
The “Channel Organising” menu has seven functions:
This menu is for removing some channels from channel list
which are related with designated Satellite or Transponder.
And it provides making favorite list and moving channel position
as you want.
● Enter the PIN Code.
If you have not entered your own PIN Code 0000 applies,
which was set at the factory.
2.1 Delete Satellite
● Select the desired satellite list you want to delete by
pressing RED( i ) key.
● Press OK key for confirmation.
NNoottee
: This feature doesn’t delete satellite itself but
deletes the list of channels registered at the
selected Satellite.
2.2 Delete Transponder
● Select the desired transponder list you want to delete by
pressing RED( i ) key.
● Press OK key for confirmation.
NNoottee
: This feature doesn’t delete transponder itself but
deletes the list of channels registered at the
selected transponder.
2.3 Delete Channel
● Select the desired channel you want to delete by pressing
RED( i ) key.
● Press OK key for confirmation.
OPERATING THE RECEIVER
2.4 Delete All Channels
At the request window, press OK key to delete
all channels and press EXIT to exit.
2.5 Delete Scrambled Channels
At the request window, press OK key to delete
scrambled channels and press EXIT to exit.
2.6 Favorite Channels
You can immediately register the present channel to
the desired Favorite Group.
In addition, you can register a channel to multiple favorite
groups.
● Select the desired Favorite Group(FAV1~FAV9)
using the FAV key.
● Select the desired channel list using the
keys or numeric keys at the TV or RADIO list window.
● Press the RED( i ) key and then register the selected
channel at the Favorite Group.
● Then press the OK key for confirmation.
You can change TV list or Radio list by the TV/RADIO key and
change favorite list by the FAV key.
● When you press the TV/RADIO key, TV list and Radio list are toggled.
● Press the FAV key to select another favorite list.
To delete channels from Favorite Group:
● Select a channel list to delete with
● Press the RED( i ) key to delete the selected channel from the favorite channels.
NNoottee
: One favorite list can contain max. 200 channels.
/
or PG+/PG-
/
or PG+/PG- keys or numeric keys.
GB
GB-22
DIGITAL SATELLITE RECEIVER
GB-23
Page 14
DSB-A100F
DSB-A100F
OPERATING THE RECEIVER
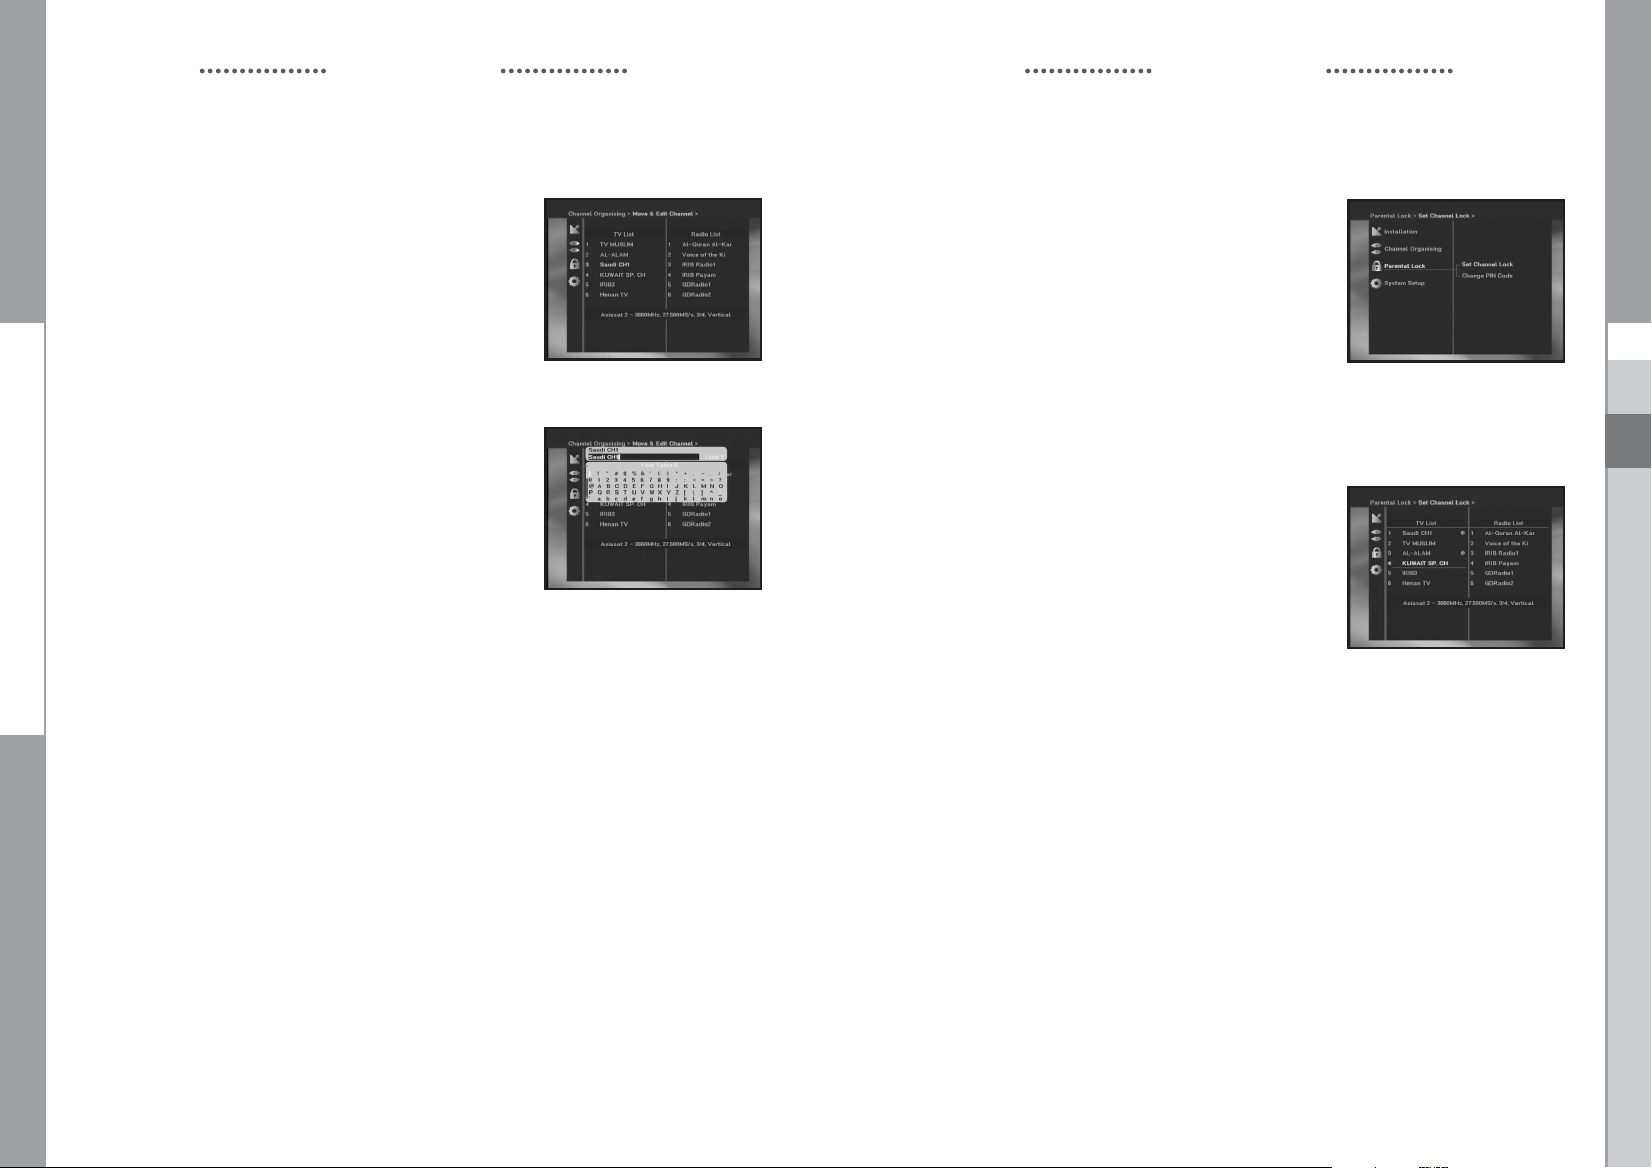
2.7 Move & Edit Channel
● Select the TV/RADIO list with
● Select a channel in the TV or Radio list with
PG+/PG- keys or numeric keys.
● Select channel by pressing the RED( i ) key.
● Press the
/
or PG+/PG- keys to change the position of
the channel you want, and press the OK key for confirmation.
● If you want to return the channel to the initial position,
do not press the OK key but press the BLUE(AUDIO) key.
To edit Channel Name
● Select the TV/RADIO list with
● Select a channel to rename with
numeric keys.
● Press GREEN(TEXT) key. Font Table will be displayed.
● Select desired font table using the Num.1~6 keys.
● Select desired character with
the OK key to paste character to the string.
NNoottee
: RED key : Backspace.
EXIT key : To exit font table without changing channel name.
PG+/PG- key : To move the highlight “Move & Edit Channel”
● Press the MENU key and then press the OK key
to save the set data.
/
or TV/RADIO key.
/
or
/
or TV/RADIO key.
/
or PG+/PG- keys or
/ / /
and then press
is applied on the all channel list.
OPERATING THE RECEIVER
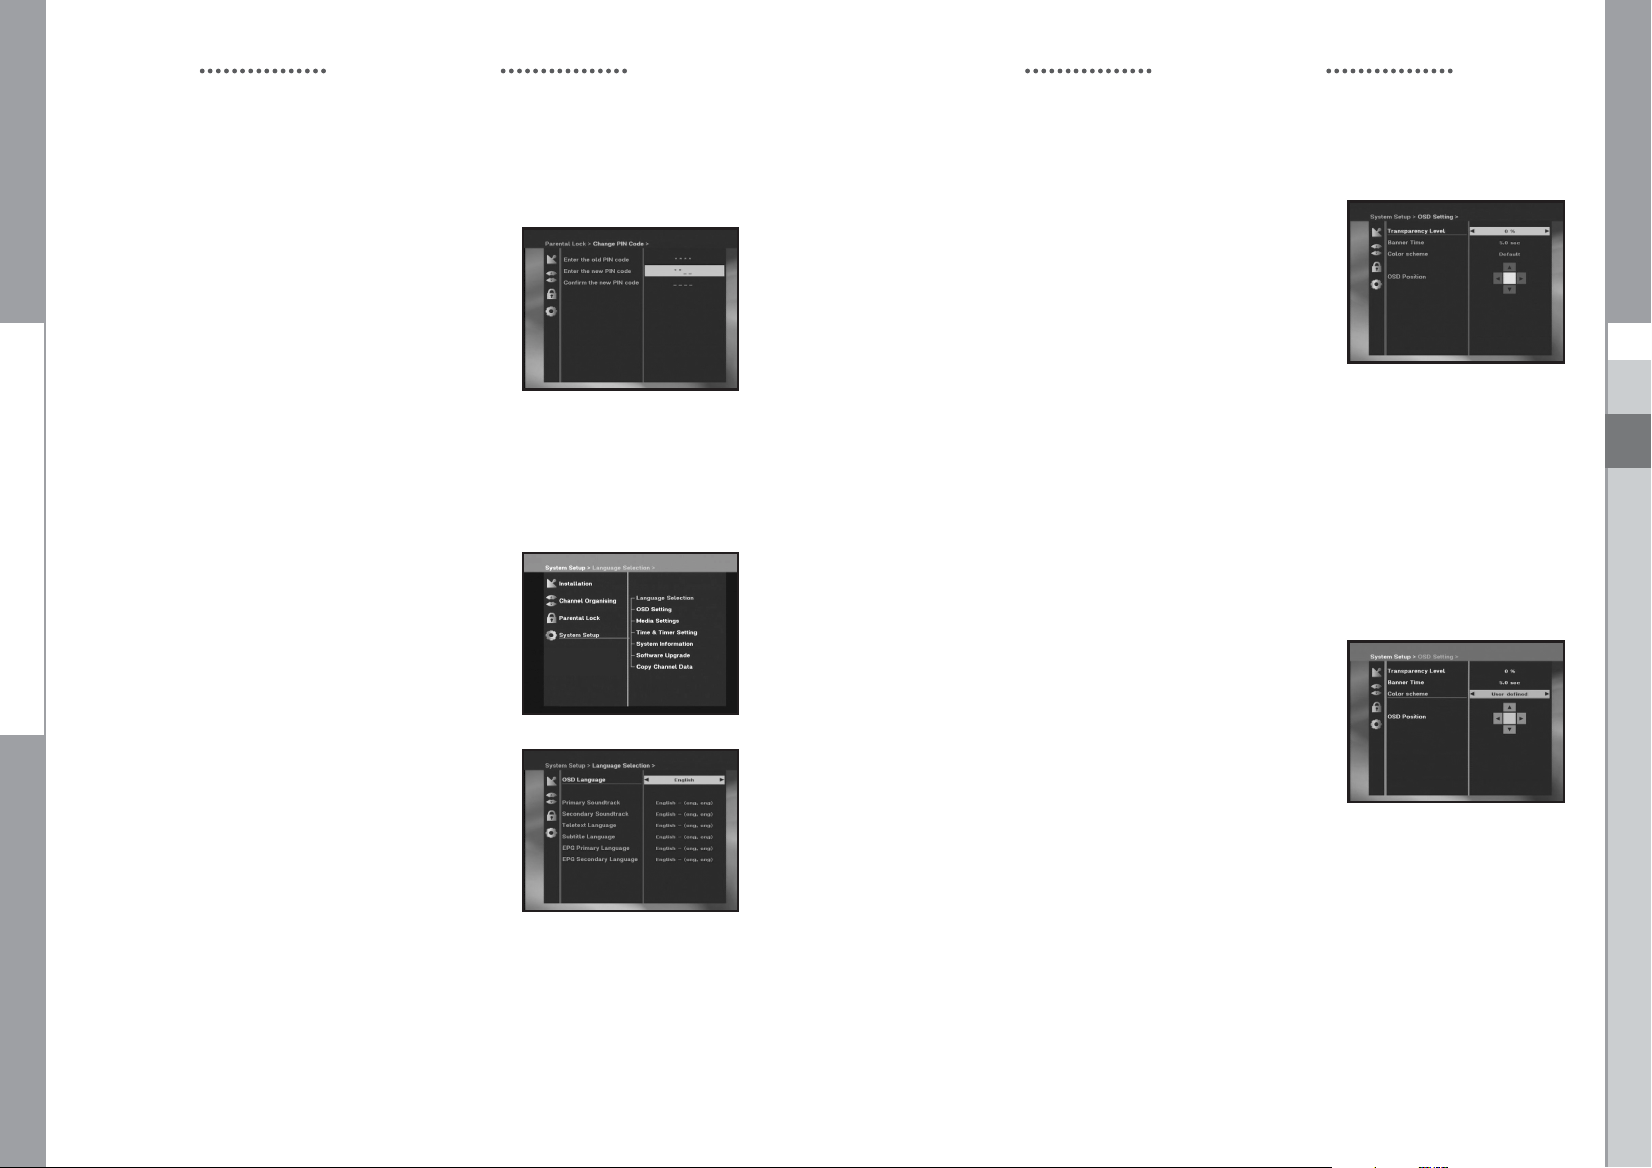
3. Parental Lock
This “Parental Lock” feature sets viewing restrictions and
prevents unauthorized access to your STB through the PIN
(Personal Identification Number), which is a 4 digit number.
(The factory preset PIN Code : 0000)
On selecting this menu, you will have two options:
to set lock for any desired channel and to change your
PIN value.
● Enter PIN Code.
If you have not entered your own PIN Code then the
PIN Code 0000 applies, which was set at the factory.
3.1 Set Channel Lock
● Select the channel by pressing
numeric keys.
● When you press the TV/RADIO key, TV list and Radio list
are toggled.
● Select the channel lock by pressing RED( i ) key.
● Press OK key for confirmation.
This will lock the channel. Whenever you need to view
the channel, you will have to enter the PIN at the request
window.
After entering PIN Code to able to access a parental locked
channel, it will work on all parental locked channels.
It means that you can access all parental locked
channels with entering PIN Code on any parental locked
channel successfully.
/
, PG+/PG-, / or
GB
GB-24
To cancel the lock :
● Press RED( i ) key again in order to cancel the lock.
DIGITAL SATELLITE RECEIVER
GB-25
Page 15
DSB-A100F
DSB-A100F
OPERATING THE RECEIVER
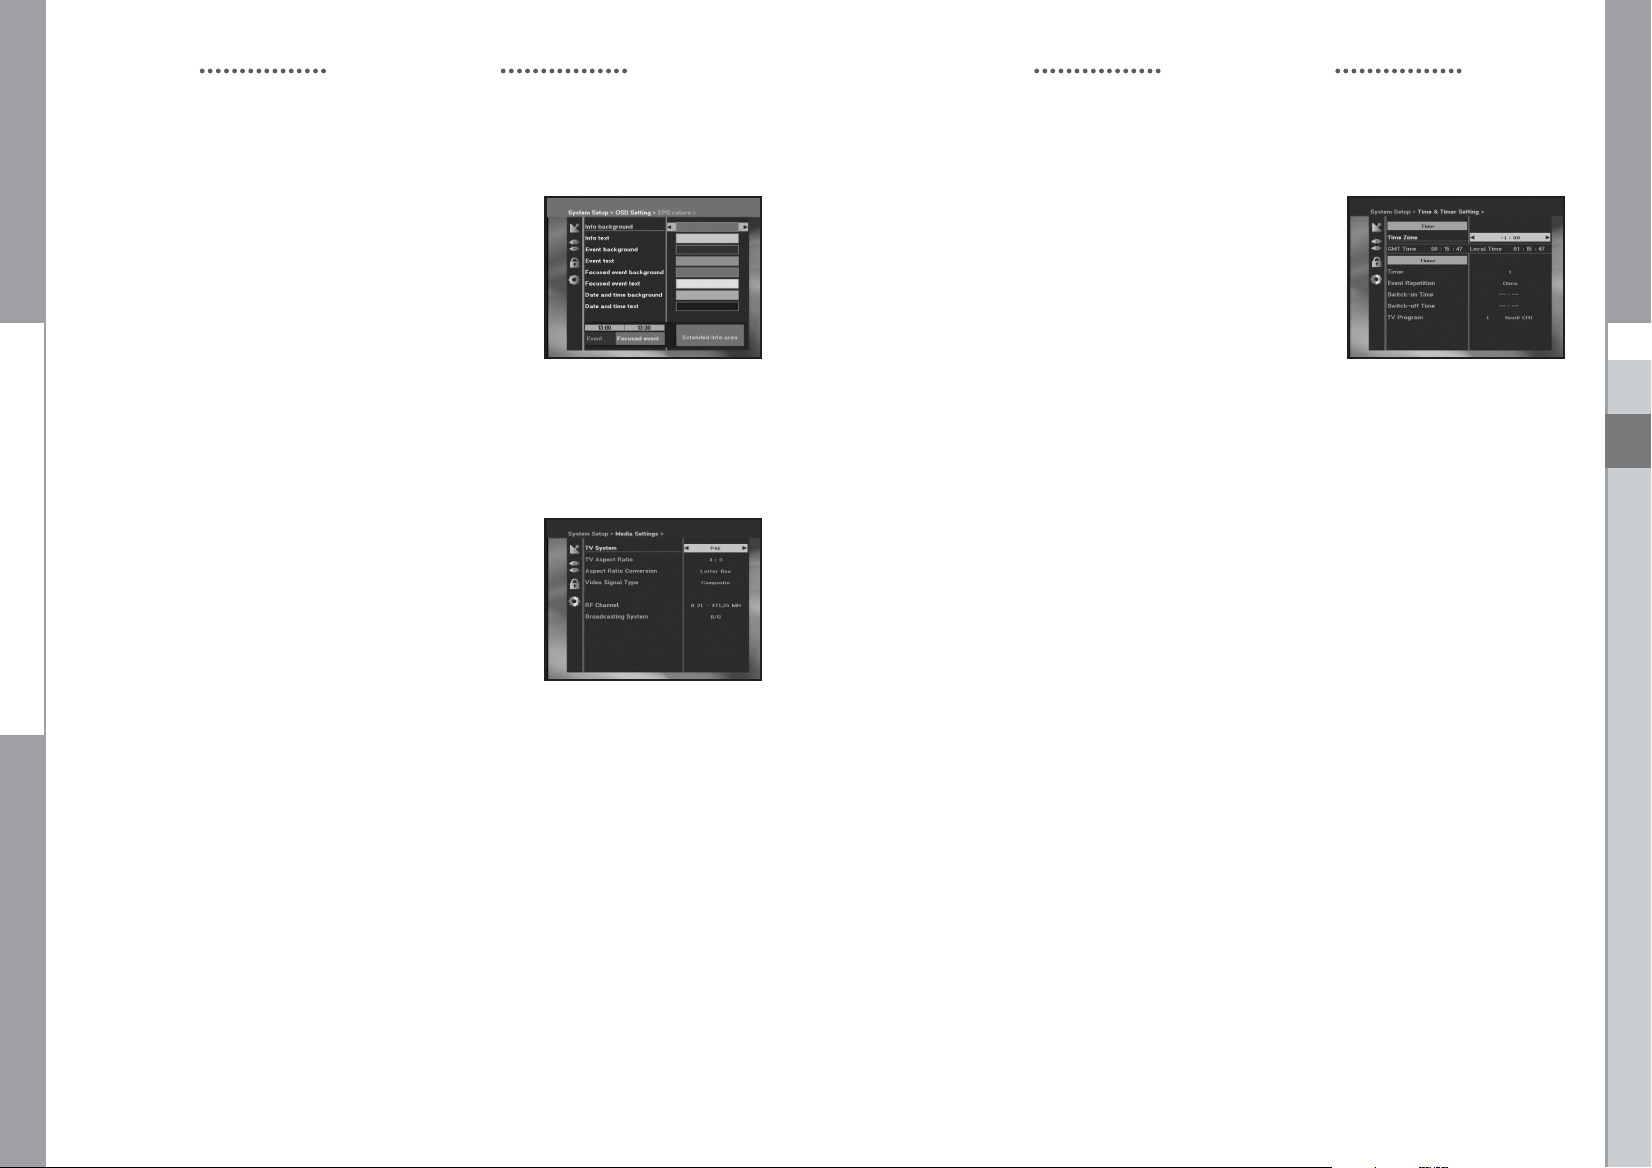
3.2 Change PIN Code
To change the PIN Code, select the second option “Change PIN Code”.
This will take you to the following menu:
In this option, you need to enter the current PIN Code at
the first cursor, and at the second cursor enter the desired
PIN Code.
To confirm, you need to enter the new PIN Code again.
Please remember the PIN Code should be a 4 digit numerical
value.
THE FACTORY PRESET PIN Code : 0 0 0 0.
NNoottee
: If you forget the PIN Code, refer to ‘System information’ part.
Once you change password, please do not forget and keep well.
4. System Setup
This option enables you to change the factory preset
system settings as per your requirements.
4.1 Language Selection
The “Language Selection” option allows the user to select
the desired language of the OSD, Soundtrack, Teletext,
Subtitle or EPG. However, these languages for Soundtrack,
Teletext, Subtitle and EPG depend on broadcasting.
For example, even the language for Subtitle can be selected,
it may not be supported because of no Subtitle on the
program.
● To accommodate user from different regions speaking
different languages, OSD languages are available
20 languages.
● To select the desired language menu, press
change language and press OK.
● The OSD Language, Soundtrack, Teletext, Subtitle,
or EPG will vary according to the selected language.
/
keys to
OPERATING THE RECEIVER
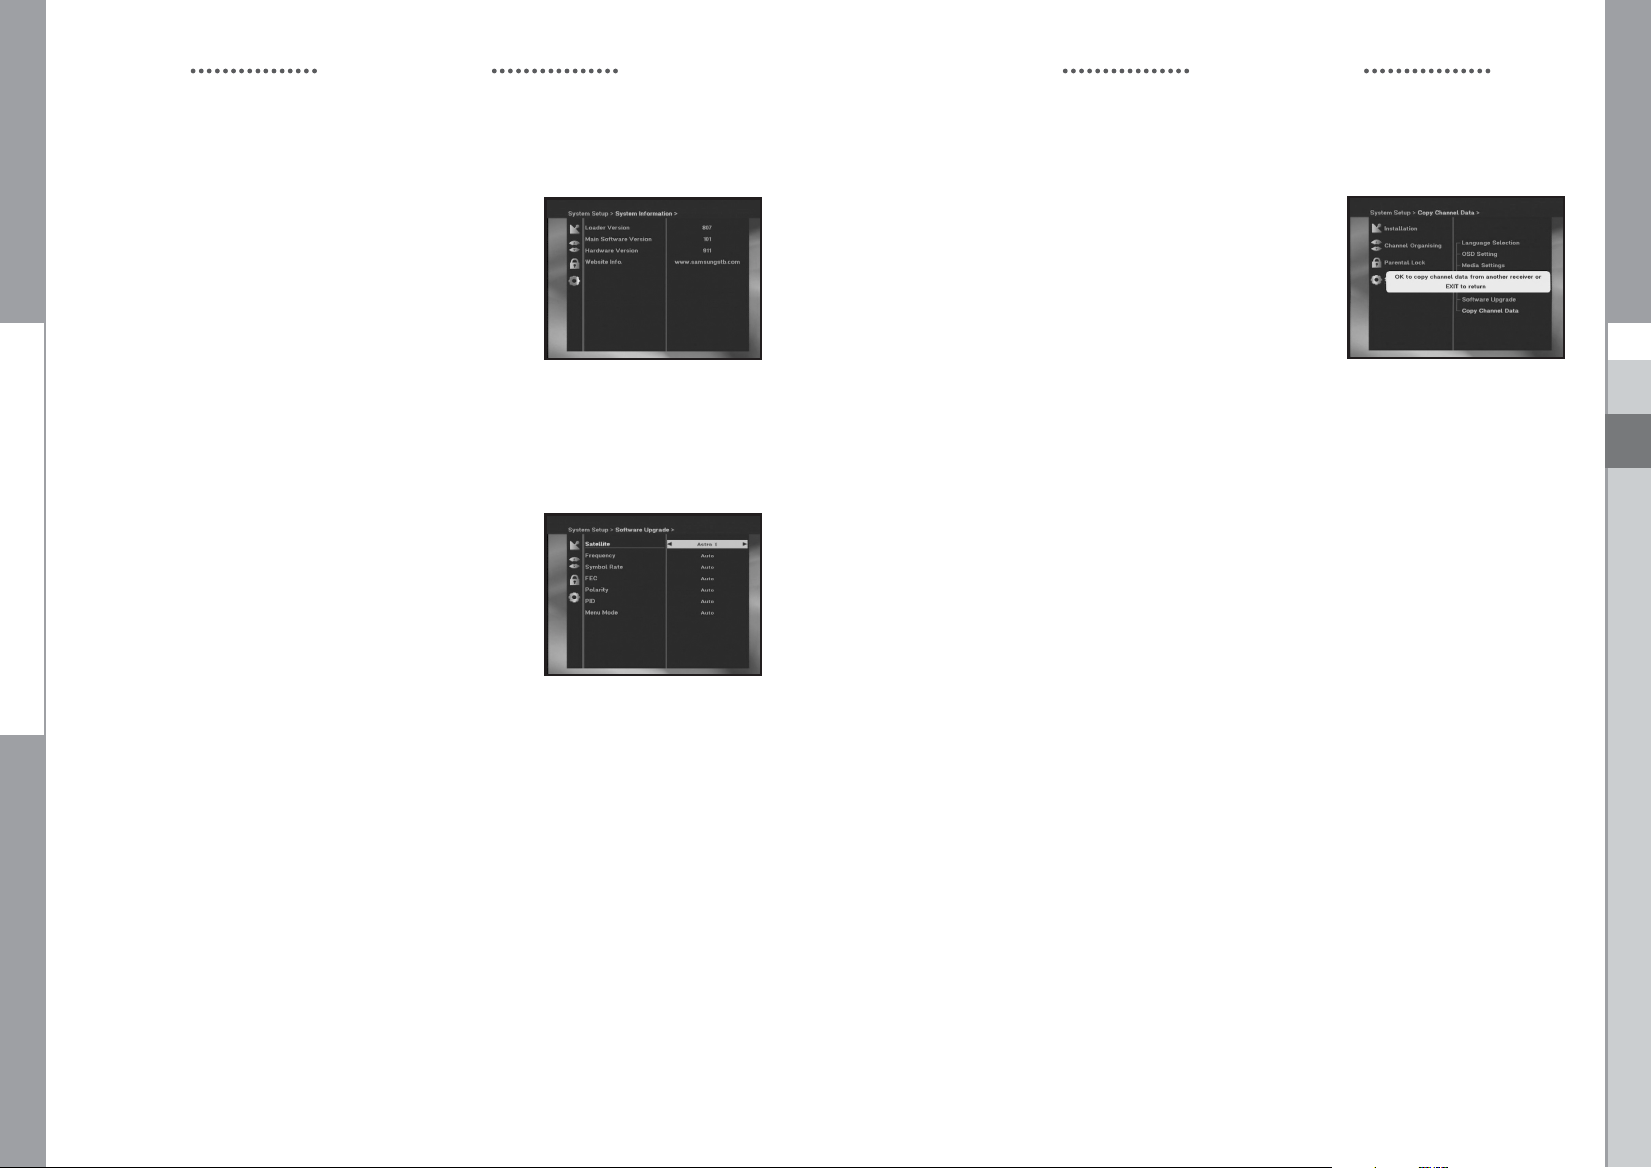
4.2 OSD Setting
You can set the OSD transparency, the display time,
Color Scheme and OSD Position.
● Select OSD Transparency level.
The OSD Transparency level from 0 to 100%.
Setting is made with the numeric keys, / keys or
PG+/PG- keys.
/
keys : Setting in increment of 1%.
PG+/PG- keys : Setting in increment of 10%.
NNoottee
: This transparency is NOT applied to color scheme with
“User Defined” option.
● Set the display duration of the information(banner) box
displayed in the screen.
The time ranges from 0.5 to 60.0 seconds.
Setting is made with the numeric keys,
/
keys : Adjusting in increment of 0.5sec.
PG+/PG- keys : Adjusting in increment of 1 sec.
● Set the Color Scheme :
You can change color according to your preference.
(i.e background, text, symbol, line, etc)
/
keys : select the color scheme mode.
Color scheme 1: changes the menu to sky blue color.
Color scheme 2: changes the menu to green color.
Color scheme 3: changes the menu to dark brown color.
User defined: Sets the color according to user preference.
EPG colors: Sets the color in the EPG menu.
NNoottee
: Color scheme 1, 2 and 3 may be changed in the future
by upgrading software.
/
keys or PG+/PG- keys.
GB
GB-26
DIGITAL SATELLITE RECEIVER
GB-27
Page 16
DSB-A100F
DSB-A100F
OPERATING THE RECEIVER
To set User defined mode or EPG color mode
● Press the GREEN(TEXT) key.
The item which you want to change will appear.
● Move the item which you want to change using the
● Set the color you want using the
● Press the OK key to set.
/
keys.
/
To see the help message, press the YELLOW(ALT) key.
OSD Position
● Place the cursor on the position you want, and press the
/
keys or / keys until the screen moves to the position you want.
The screen will move to the position you want.
4.3 Media Settings
You can set the various media settings you want.
Place the cursor on this sub menu and press OK.
● Press the
/
● Press the OK key to confirm.
● Press the MENU/EXIT keys to exit the menu.
● Select the TV system : PAL, SECAM, NTSC, PAL ➔
(auto)NTSC, SECAM ➔ (auto)NTSC, NTSC ➔
(auto)PAL, NTSC ➔ (auto)SEC
● Select the TV type according to your TV:
STANDARD 4: 3 ratio or WIDE SCREEN 16 : 9 ratio type.
● Select the aspect ratio conversion :
Letter box, Pan & Scan, Mixed or Full
● Select the Video Signal Type :
Composite
● Select the RF Channel : Ch 21~Ch 69
● Select Broadcasting System : B/G, I or D/K
/
keys to move the sub items and press the
keys to select the option.
keys.
OPERATING THE RECEIVER
4.4 Time & Timer Setting
1) Time
● Place the cursor on this sub menu and press OK.
● Press
GMT is referred to the standard time of Greenwich by
broadcasting signal. This cannot be changed.
2) Timer
15 timers are supported including timer(s) from EPG.
● Select the timer number on ‘Timer’ using
● Press the
● Press the Numerical (0~9) keys to set the time you want and press the
● Select TV program to set the event program by pressing
● Even you can set timers on Daily and Every Monday or Every Sunday, etc.
/
keys to change local time in Time Zone.
The local time will be changed according to your location.
/
keys from 1 to 15.
/
keys to choose event repetition you want to reserve :
Daily, Every Sunday, Every Monday, Every Tuesday, Every Wednesday, Every Thursday,
Every Friday, Every Saturday, Once.
If the timer is set from EPG screen, EPG is displayed on ‘Event Repetition’.
/
keys to
choose a switch time you want to reserve. If set time on ‘Switch-on Time’ is same as one
on ’Switch-off Time’, this timer works for 24 hours.
/
keys.
When you press the TV/RADIO key, TV program and Radio program are toggled.
The priority has the repetition event which is less. For example, when you set timers on
Once and daily, ‘Once’ will work in stead of ‘Daily’ at that day. If the timer is running,
‘Running’ message with a timer number is displayed on ‘Timer’.
GB
GB-28
DIGITAL SATELLITE RECEIVER
GB-29
Page 17
DSB-A100F
DSB-A100F
OPERATING THE RECEIVER
4.5 System Information
If you have to contact your service provider or a service center
they might ask for information available from this menu.
Place the cursor on this sub menu and press the OK key.
The following will be the on-screen display.
NNoottee
: If you forgot PIN Code, press ‘0’ key four times.
Then, current PIN Code is displayed.
Keep in mind that your children or other people can
get this PIN Code using this method.
4.6 Software Upgrade
You can download and upgrade the software of this STB
through ASTRA and Hotbird or Sirius satellite when the new
software is released.
NNoottee
: These satellites for upgrading software on Samsung
Brand can be changed in the future.
During downloading don’t turn off the STB.
If there is a new version of software to download, you are
asked if you will update or not.
If you press OK key, the update starts right away.
In case update is impossible, you get this message “You can’t update software!”
Or in case you don’t need to update, “You don’t need to update software!” will be displayed.
If you get information that a Transponder is changed to different one for Samsung software,
you should select ‘User Advanced Mode’ at Menu mode by using the
Then you should set exact parameters for the new transponder for Samsung.
NNoottee
: Upgrade via Personal Computer
To maintain the STB up-to-date, it will be possible to upgrade the software of the STB via
STB and personal computer.
New versions of the software may include new or improved functions for the latest one.
If you want to download and upgrade the software via personal computer, visit our
homepage (http : //www.samsungstb.com) to get more information and the new software.
You can check to see the correct version was installed by comparing the software version
in the 4.5 System Information menu.
/
key.
OPERATING THE RECEIVER
4.7 Copy Channel Data
If you want to copy the channel data from one receiver
to another, please follow the instruction below.
Please make your own channel data, such as favorite
& lock channel with your own master box.
Then take your master box when you install another box.
1. Plug on both master & slave receivers
2. Master Box(Installed Box) : Stand-by Mode
3. Slave Box(Installing Box) : Menu Mode
4. Connect 2 Boxes with RS232 serial cable
(Both end should have male connector with crossed signals)
5. Select the ‘System Setup’ and press the OK key.
6. Select the ‘Copy Channel Data’ with the
7. Press ‘OK’ to start channel data copy
/
keys.
GB
GB-30
DIGITAL SATELLITE RECEIVER
GB-31
Page 18
DSB-A100F
DSB-A100F
TROUBLESHOOTING
Problem Possible cause Solution of the problem
No display LED on Power cord Power cord plug in correctly
the front panel; not plugged in correctly
No power supply
No pictures on the screen Receiver in Standby mode; Set receiver to “On”;
Scart not connected tightly Check connection and correct;
to video output of television;
incorrect channel or video Check channel and video output and
output selected on television correct (TV instruction manual)
No sound Audio cord connected Check connection and correct;
incorrectly;
Loudness level = 0; Increase loudness on television set;
Muting active Press the MUTE key
Remote Control does not incorrect operation; Point remote control
operate directly towards the Receiver.
Batteries dead or inserted Replace batteries or insert correctly
incorrectly
Poor picture quality Signal strength to low Check all wire connections. Check the
signal strength in the “Auto Scanning” menu, correct
alignment of your antenna
On-Screen Error Message Antenna cable not connected Check connection and correct;
“Searching for signal” or not tight;
LNB defective; Change LNB;
incorrect position of the Check position and correct,
satellite antenna; Check the signal strength in
LNB is set to "OFF" in the “Auto Scanning” menu
LNB Setting menu
On-Screen Error Message Satellite not yet set Scan of in “Automatic scanning”
“Channel data or “Manual scanning” menu
does not exist.”
On-Screen Error Messages: Smartcard: (depend on model)
“Please check the - not plugged in correctly; Check the Smartcard.
Smartcard”; - not plugged in. “Insert the Smartcard.”
“Please insert the
Smartcard”.
TECHNICAL SPECIFICATIONS
Power supply
Type : SMPS
Input voltage : AC 100-240V~, 50/60 Hz
Fuse rating : 250 V/T1.6AH
Tuner
Freq. Range : 950 ~ 2150 MHz
Input signal level : -65 ~ -25 dBm
Channel selection : PLL frequency synthesizer
Input impedance : 75 Ω unbalanced
Connector type : F type female
LNB power control : 13 V/18 V, 22 kHz tone
DiSEqC : 1.2 supported
Demodulator
Type : QPSK DEMODULATION (DVB-S)
Symbol rate : 2 ~ 45 Ms/s
Inner FEC : Viterbi Convolutional
Coding Rate - 1/2,2/3,3/4,5/6,7/8
Outer FEC : Reed Solomon Coding (204,188), t = 8
Video decoder
System decoding : MPEG 2 ISO/TEC 13818
(Transport Stream)
Profile and level : MPEG 2 MP@ML (4:2:2)
Data rate : 1~ 15 Mb/s
Video formats : 4:3 (normal) & 16:9 (widescreen)
Picture resolution : 720(H) x 576(V) x 50 fields/sec
Audio Decoder
System decoding : MPEG 1 ISO/TEC 11172~3 layer I & II
Audio mode : MONO, DUAL, STEREO, JOINT STEREO
Sampling frequency : 32, 44.1, 48 kHz
GB
DISPOSAL
The device, packaging material (e.g. Styrofoam) and the batteries must never be disposed of with
household refuse. Please obtain appropriate information about the regulations in your community,
and dispose of all refuse in accordance with regulations at the separate locations provided.
GB-32
DIGITAL SATELLITE RECEIVER
GB-33
Page 19
DSB-A100F
A/V output
RCA JACK : VIDEO (CVBS), AUDIO R&L
RF modulator
Modulator output : CH 21_69 (preset to CH 21)
Video type : PAL B/G, I, D/K
UHF output level : 70 ± 5 dBµV
Output connector : IEC male
Ant. O/P connector : IEC female
Tuning method : PLL frequency synthesizer
DSB-A100F
TECHNICAL SPECIFICATIONS
MEMO
Serial data interface
Standard : RS232C, Max. 115.2 kB
Connector type : 9 pin D-type female
GB
GB-34
DIGITAL SATELLITE RECEIVER
GB-35
 Loading...