


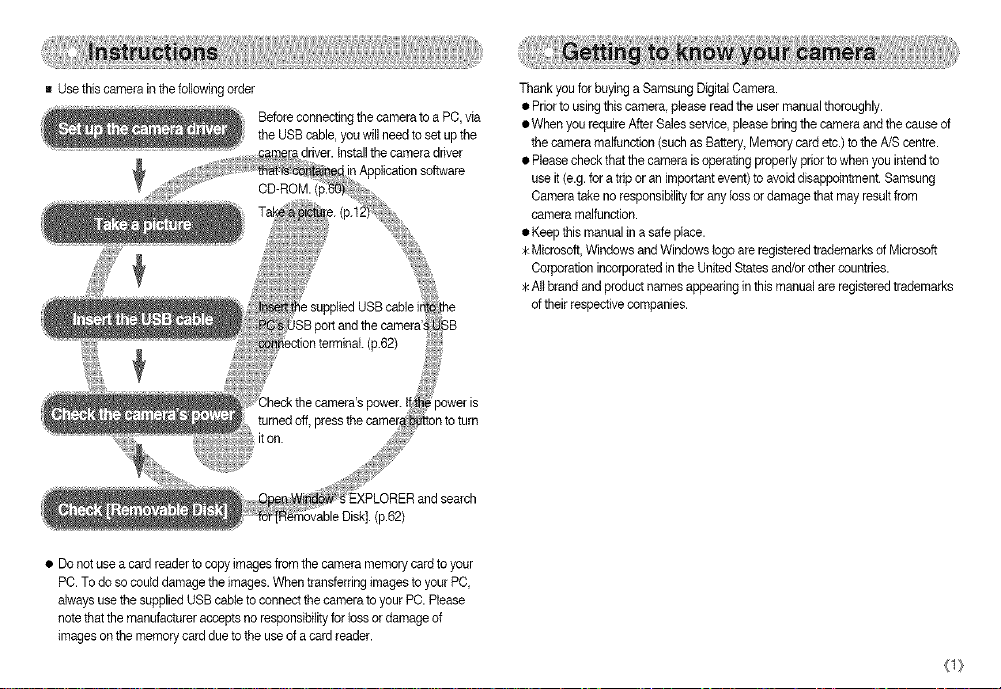
BUsethiscamerainthefollowingorder
BeforeconnectingthecameratoaPC,via
theUSBcable,youwillneedtosotupthe
•adriver,tnstallthecameradriver
p.62)
• Donotuseacardreadertocopyimagesfromthecameramemorycardtoyour
PC.Todosocoulddamagetheimages.WhentransferringimagestoyourPC,
alwaysusethesuppliedUSBcabletoconnectthecameratoyourPC.Please
notethatthemanufactureracceptsnoresponsibilityforlossordamageof
imagesonthememorycardduetotheuseofacardreader.
ThankyouforbuyingaSamsungDigitalCamera.
•Priortousingthiscamera,pleasereadtheusermanualthoroughly.
•WhenyourequireAfterSalessorviso,pleasebringthecameraandthecauseof
thecameramalfunction(suchasBattery,Memorycardetc.)totheA/Scentre.
•Pleasecheckthatthecameraisoperatingproperlypriortowhenyouintendto
useit(e.g.foratriporanimportantevent)toavoiddisappointment.Samsung
Cameratakenoresponsibilityforanylossordamagethatmayresultfrom
cameramalfunction.
•Keepthismanualinasafeplace.
>kMicrosoft,WindowsandWindowslogoareregisteredtrademarksofMicrosoft
CorporationincorporatedintheUnitedStatesand/orothercountries.
Altbrandandproductnamesappearinginthismanualareregisteredtrademarks
oftheirrespectivecompanies.
<1}
: DANGER indicates an imminently hazardous situationwhich, ifnot avoided,will
result indeath or serious injury.
• Do notattemptto mod_ thiscamer_,_n@_vTa_.Thismayresultin fire,injury,electhc
shookorseveredamagetoyouor(}0u rd!_ternal inspection,maintenanceand
repairsshouldbe carriedoutbyyourd_ei_or Sa_sung CameraServicecentre
• Please donot use this prod_ in clode_oximit}i_t£ flammableor explosive
gases, as this couldincre_"e the risk !explosionl ,
• Shouldanyformofliquidora:breignobject@_e camera,ch.notuseit.Switchoffthecamera,
the_disconnectthepo,_source.¥ea_Stco_t#rde_rorS_su_C_mera
Sewicacentre.Donotcnoitd_ele_the_<ascqlsmay_se afireorelect_shock.
• Donotinsertordropmetalii_o_infb&m_l_ te[_ @jects_te:thecamerathroughaccess
pointse.g.thememoryca_islot I_T_bei_si_q_ causeaitreorelectricslleak.
• Do notoperatethiscamerawith wethands. Thiscouldposea riskofelectricshock.
: WARNING indicatesa potentiallyhazardous situation which, if not avoided, could
result indeath or serious injury.
• Do not use the flashin close proximityto peopleor animals. Positioningthe flash
too closeto your subject'seyes ma _J _ eyesightdamage.
• For safetyreasons keepthis prod_t a_d #c_cessoriesout of reach of children or
animals to prevent accidentse.g_f _ _
• Swallowingbatteryor small,me ss_ies. Ifan accident shouldoccur,
please consult a doctor th_ediateiy_:! :L
• There is the possibility 9_ihjury froth_e camer_ moving parts.
• Batteryandcameramay_ hotduring useand_)ay rssuitincameramaituoctce.
Sbeu]dthisbethecase,aJlo_t_cameratos_e thrafewminut@toallowittimetocool
• Do not leavethis camei:8_aeesCe_ect teey_emel_ hightemperatures, such
as a sealedvehicle,dir_ct_s_n_ght:o_:_p_e:[_!_s £:_e)<treme variancesin
temperature.Exposure _t[b _a_r_s_adver setyaffectthe
camera's internal components andcould causea fire.
• Wheninuse,donotcoverthe cameraorCharger.Thismaycauseheattobuildupaobdistortthe
camerabodyorcauseaitre,Alwaysusethecame'aanditsaccessoriesinawell-vantilatedarea.
(2}
: CAUTION indicatesa potentiallyhazardoussituation which,if not avoided, may
result in a minoror moderate injury.
• Leaking, overheating, or burst batterycould result infire or injury.
• Use battery with the correct specificationforthe camera.
• Do not shortcircuit, heat or dispo§e,_battery in fire.
• Do not insertthe battery withth¢_oIarit_s reversed.
time. Batterymay leakcorros _ elate a_rmanenffy damage the
camera's components. _:_
Do notfire theflash while i_i_ in conta_with hand';or objects.Do not touch the
i Remove the batterywhen not p!d_ni_ u_!he camera for a longperiod of
flash after using it continUOusly.Itm seburnsi*__
When usingthe AC C_rger, do not _b_e the camer_!_whileitis switched on.
After use, always switcS'offthe_canlera_ tlnpiugging thepower cable from
the wail socket.Then_ak# s_ _at a'ay_¢op_o(c£rds orcables to other
devices aredisconnect_ef0fe tt_ing the _f_Failure to doso may lead
tocable damage cause a fire orelectric shock.
• Take carenot totouch the lens and lenscover to avoidtaking an unclearimage
and possibly causingcameramaffunction.
• Avoidobstructing the lensor the flashwhen you captureanimage.
ii!iiiiiiiiii ! i ii
• Systemchart .............................. 4
• Identificationof features .............. ,5
• Front& Top .............................. 5
• Back&Bottom .......................... .6
• Side/S-functionbutton................. .7
• Self-timerlamp .......................... .7
• CameraStatusLamp ................. .7
• Mode icon................................. 7
• Connectingto a PowerSource ...... 8
• Insertingthe memorycard ........... .6
• Instructionson howtouse the
memorycard .............................. 9
• LODmonitorindicator.................. 11
• Changingthe recordingmode ...... 12
• Selectingthe[MODE] menu......... 12
• ifthe[STILL & MOVIE]menuwas
selected ................................. 12
• ifthe[FULL]menu was selected ...13
• Startingthe recordingmode ......... 13
• Hewto use theAuto mode ......... 13
• Hewto use the Moviedip mode -..13
• Howto use the Programmode -..14
• Howto use the Scenemodes ...... 14
• Howto use the VOICE
RECORDING mode ............... 15
• Pausingwhi_ereoD_i%avoicerece_i%.,15
• Normalfocus mode .................. 16
• Macrofocus mode .................... .16
• Thingsto Watch OutforWhen Taking
Pictures ................................. 16
• Usingthe camerabuttonsto adjust
the camera .............................. 16
• Powerbutton ........................... 16
• SHUTTERbutton ..................... 16
• ZOOMW/T button ..................... 17
• Voicerecording/Voicememo/UPbu_on.-.18
• Downbutton ........................... 18
• Flash/Left button ..................... 18
• Self-timer/Rightbutton ............... 20
• MENU/OK button ..................... 21
• M(Mode) button ........................ 2t
• E(Effect)button ........................ 22
• SpecialEffect :Celour ............... 23
• Spes_alEffect:Presetfocusframes-.-23
• SpecialEffect:Compositeshooting.-.24
• SpecialEffect : PhotoFrame......... 25
• +/-button ................................ 25
• RGB .................................... 25
• ISO ....................................... 26
• White balance ........................ 26
• Exposurecompensation ............ 27
• Usingthe LCDmonitorto adjust
the camerasettings .................. 28
• Howto use the menu.................. 29
• Mode .................................... 29
• MODESET .............................. 30
• Size ....................................... 30
• Quality/Frame rate .................... .3t
• Metering ................................ 31
• ContinuousShooting .................. 32
• Sharpness .............................. 32
• OSD(OnScreenDis#ay)information--33
• Startingplaymode .................... ,33
• Playingback a stillimage ............ 33
• Playingback a movieclip ............ 34
• Rowto capturethe movie clip ...... 34
• Playingback a recordedvoice ...... 34
• LODmonitorindicator................. ,35
• Usingthe camerabuttonsto adjust
the camera .............................. 35
• Thumbnail/Enlargementbutton ...35
• Voicememo/Up button .............. ,37
• Play & Pause/Down button ......... 37
• Deletebutton .......................... -38
• Left/Right/Menu/OK button......... 38
• Settingup the ptayback function
usingthe LODmonitor .............. -39
• Startingthe slideshow .............. 41
• Rotatingan image..................... 42
• Resize .................................... 42
• Protectingimages..................... 43
• Deletingall images .................... 43
• DPOF .................................... 44
• DPOF : STANDARD ................. 44
• DPOF : INDEX ....................... 44
• DPOF : PRINTSIZE ................. 45
• DPOF : CANCEL .................... 45
• COPYTO CARD .................... 45
• PictBridge .............................. 46
• PictBridge: PictureSelection ...... 46
• PictBridge: PrintSetting ............ 47
• PictBridge: Printing ................. 48
• PictBtidge: DPOFPrinting ......... 48
• PictBridge : RESET .................. 48
• Setupmenu .............................. 49
• File name ................................. 50
• Autopower off.......................... 60
• Language................................. 50
• Formattinga memory.................. 51
• Settingup the Date/ Datetype ......51
• Settingup thetime ..................... 51
• imprintingthe recordingdate ......52
• ConnectinganExternalDevice(USB) ...52
• Sound .................................... 52
• LODbrightness ........................ 52
• Quickview .............................. 52
• Initialisation .............................. 53
• Settingup the MYCAMmenu ...... 53
• Startup image ........................ 53
• Startup sound .......................... 63
• Importantnotes ........................ 54
• Warningindicator ..................... 55
• Beforecontactingaservicecentre ...56
• Specifications .......................... ,,,,,,,,,,,,,,,,,,,68
• SoftwareNotes ........................ 59
• SystemRequirements ............... 59
• Aboutthe software ..................... 60
• Settingupthe applicationsoftware.-60
• StartingPC mode ..................... 62
• Removingthe removabledisk ...... 63
• SettinguptheUSB Driverfor MAC...64
• Usingthe USB Driverfor MAC ......64
• Uninstallingthe USBDriver for
Windows98SE ........................ 64
• Digimax Master ........................ 65
• FAQ ....................................... 67
{3}
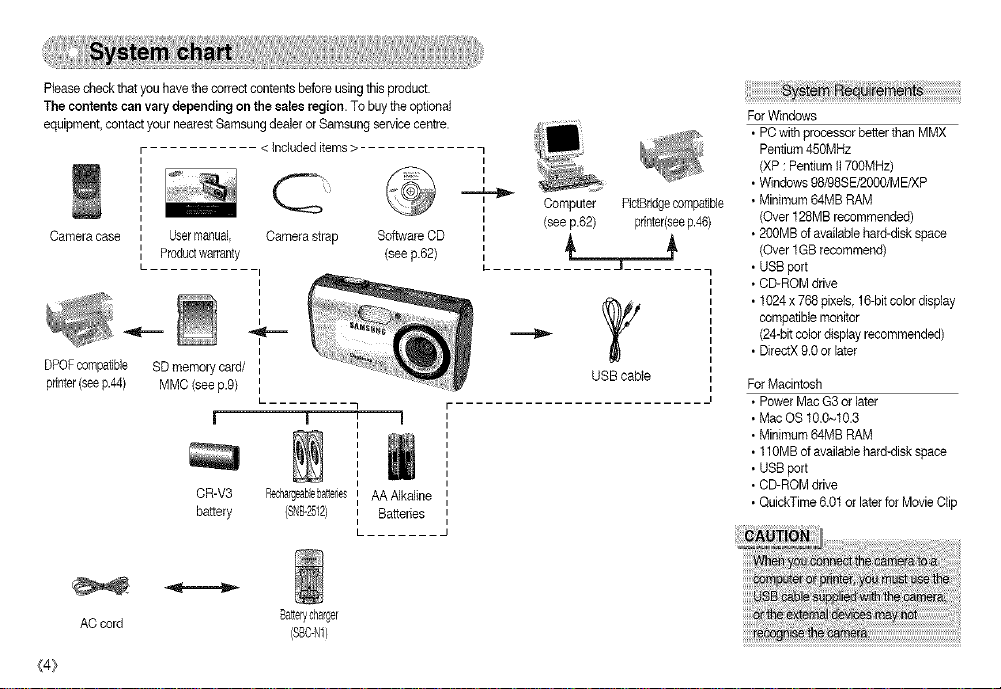
Pleasecheck thatyou havethe correctcontents beforeusingthis product.
The contente can vary depending on the eatesregion. To buythe optional
equipment, contact your nearestSamsung dealer or Samsung servicecentre.
< Includeditems >
Cameracase
Usermanual, Camerastrap Software CD
Productwarranty (see F62)
DPOPcompatible SDmemorycard/
printer(seep.44) MMC(seep.9)
!
OR-V3 Rechargeabebatteries
battery (SNE_2512}
AA Alkaline
Batteries
ForWindows
• PC with processor betterthan MMX
l
I
I
Computer PictBiidgecompatible • Minimum 64MB RAM
(see p.62) printer(seep.46) (Over 128MBrecommended)
J
USB cable
Pentium450MHz
(XP : Pentiumti 700MHz)
• Windows 98/98SE/2000/ME/XP
• 200MB of available hard-disk space
(Over 1GBrecommend)
• USB port
• CD-ROM drive
• 1024 x768 pixels, 16-bitcolor display
compatiblemonitor
(24-bitcolordisplay recommended)
• DirectX 9.0 or later
ForMacintosh
• Power MacG3 or later
• Mac OS 10.0~10.3
• Minimum 64MB RAM
• 110MB of available hard-disk space
• USB port
• CD-ROM drive
• QuickTime 6.0t or later for Movie Qip
wh _ _ r_:to
(4}
AC cord
Batten/dlar#er
(SBC-N1}
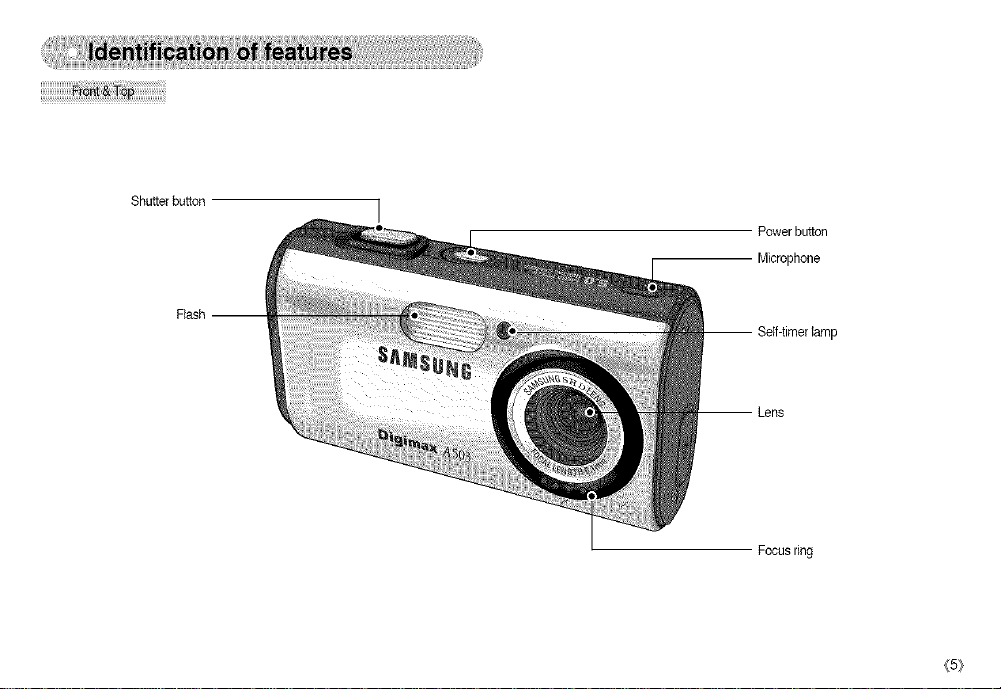
Shutter button
Powerbutton
Microphone
-- Self-timerlamp
-- Lens
Focusring
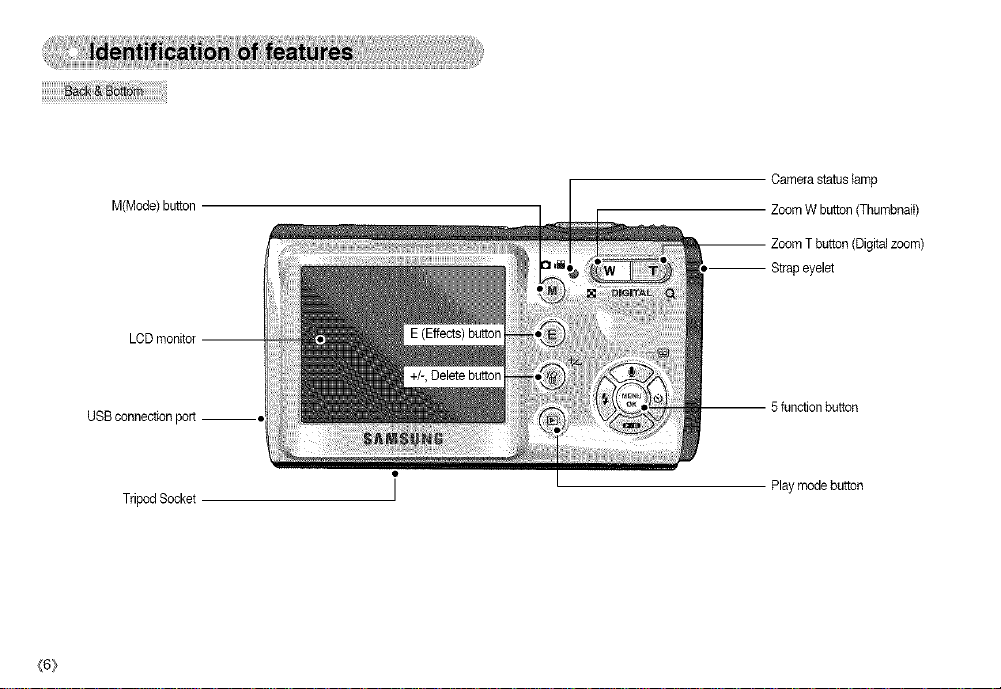
M(Mode)button
LCDmonitor
Camerastatuslamp
ZoomWbutton(Thumbnail)
-- ZoomTbutton(Digitalzoom)
Strapeyelet
USBconnectionport__
_6_
TripodSocket
-- 5functionbutton
Playmodebutton
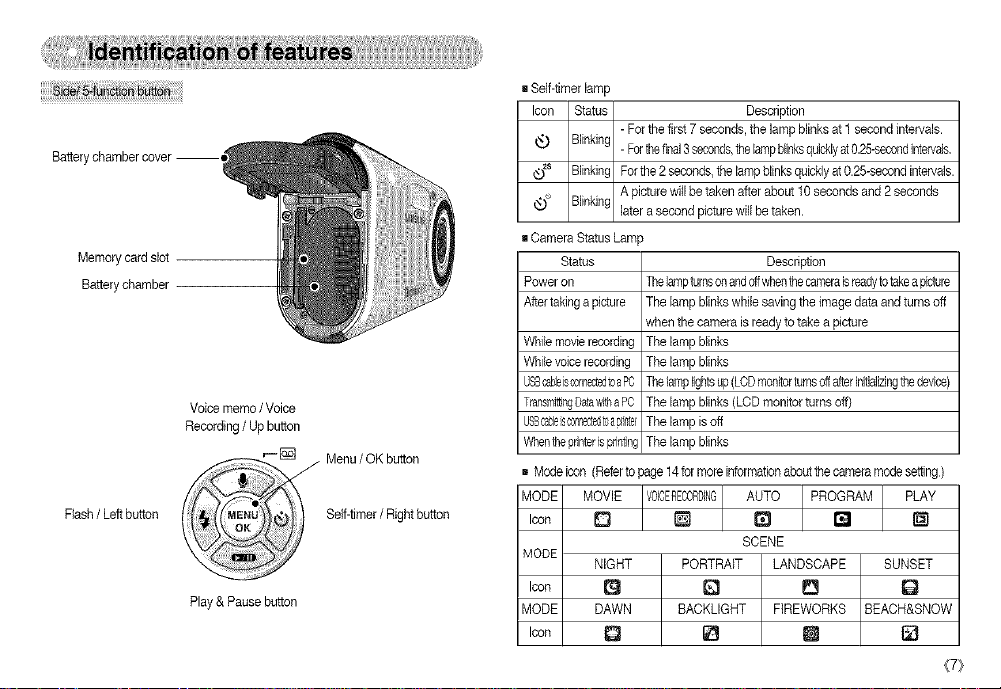
Batterychambercover--ql
Memorycardslot
Batterychamber
Voicememo /Voice
Recording/ Up button
Flash/ Left button
Play& Pause button
Menu/ OK button
Seff-timer/ Right button
g Seff-timerlamp
Icon Status Description
-Forthe first 7 seconds, the lamp blinksat 1 second intervals.
Blinking
-Forthefinal3seconds,thelampblinksquicklyat0.25-secondintervals,
_2s Blinking Forthe 2 seconds,the lampblinksquicklyat0.25-secoodintervals.
_)_ Blinking laterasecond picturewill betaken.
g Camera StatusLain
Poweron
Aftertaking a picture
WNe movierecording
Whilevoicerecording
USBcobleisconnectedmaPC
Transmitt4ngDataw_raPC
USScableSoaBnectec[,"apH}ter
Whentheprinterisprinting
Modeicon (Refertopage 14formoreinformationaboL_the cameramode setting)
MODE MOVIE AUTO PROGRAM PLAY
A picturewill be takenafter about 10seconds and 2seconds
Status
Thelampturnsonandoftwhenthecameraisreadytotakeapidum
The lamp blinkswhi_esaving the image dataand turns off
when the camera isready to take a picture
The lamp blinks
The lamp blinks
Re lamplightsup(LCDmonitorturnsoffafterinitializingthedeaice)
The lamp blinks (LCDmonitorturns off)
The lamp isoff
The lamp blinks
Description
Icon D _ ra @
MODE
Icon
MODE DAWN
Icon Q
NIGHT
PORTRAIT LANDSCAPE
BACKLIGHT FIREWORKS
SCENE
El [3
_ U
SUNSET
Q
BEACH&SNOW
{7}
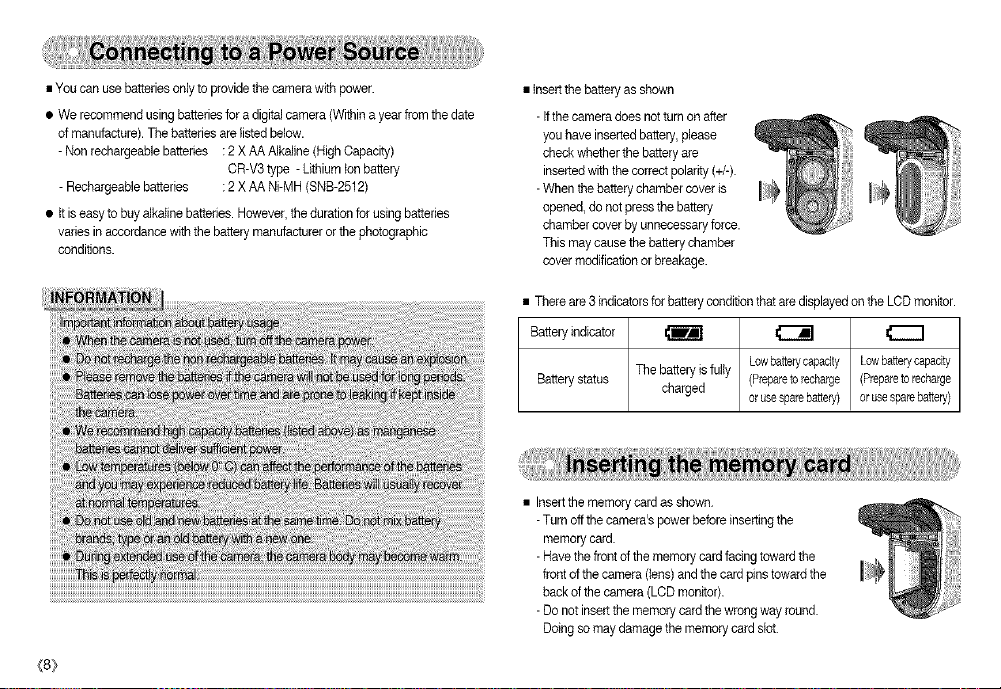
•Youcanusebatteriesonlytoprovidethecamerawithpower.
• Werecommendusingbatteriesforadigitalcamera(Withinayearfromthedate
ofmanufacture).Thebatteriesarelistedbelow.
-Nonrechargeablebatteries:2XAAAlkaline(HighCapacity)
CR-V3type-Lithiumtonbattery
-Rechargeablebatteries:2XAANi-MH(SNB-2512)
• itiseasytobayalkalinebatteries.However,thedurationforusingbatteries
variesinaccordancewiththebatterymanufacturerorthephotographic
conditions.
{8}
•Insertthebatteryasshown
-Ifthecameradoesnotturnonafter
youhaveinsertedbattery,please
checkwhetherthebatteryare
insertedwiththecorrectpolarity(+/-).
-Whenthebatterychambercoveris
opened,donotpressthebattery
chambercoverbyunnecessaryforce.
Thismaycausethebatterychamber
covermodificationorbreakage.
There are 3 indicatorsforbattery conditionthat are displayedonthe LCDmonitor.
Batteryindicator _IIml
Batterystatus The battery isfully (Prepareto recharge (Preparetorecharge
charged orusesparebattery) or usesparebattery)
• Insertthe memorycard asshown.
-Turn offthe camera%power beforeinserting the
memory card.
-Havethe frontof the memory card facing towardthe
frontofthe camera (tens)and the cardpins towardthe
back of the camera (LCDmonitor).
-Do not insert the memory card the wrongway round.
Doing so may damage the memory card slot.
Lowbatterycapacity Lowbatterycapacity

•Besuretoformatthememorycard(seep.51)ifyouareusinganewlypurchased
memoryforthefirsttime,orifcontainsdatathatthecameracannotrecognise,
orifitcontainsimagescapturedwithadifferentcamera.
•Turnoffthecamerapowerwheneverthememorycardisbeinginsertedor
removed.
•Repeateduseofthememorycardwilleventuallyreducethememorycard's
performance.Shouldthisbethecase,youwillneedtopurchaseanewmemory
card.WearandtearonthememorycardisnotcoveredbytheSamsung
warranty.
oThememorycardisanelectronicprecisiondevice.
Donotbend,droporsubjectittoanyheavyimpact.
•Donotstorethememorycardnearwithstrongelectronicormagneticfields,e.g.
nearloudspeakersorTVreceivers.
•Pleasedonotuseorstoreinextremetemperatures.
•Donotallowthememorycardtobecomedirtyortocomeintocontactwithany
liquid.Shouldthishappen,carefullycleanthememorycardwithasoftcloth.
•Pleasekeepthememorycardinitscasewhennotinuse.
•Duringandafterperiodsofextendeduse,youmaynoticethatthememorycard
iswarm.Thisisperfectlynormal.
•Donotuseamemorycardthatisusedinanotherdigitalcamera.Tousethe
memorycardinthiscamera,formatthememorycardbyusingthiscamera.
•Donotuseamemorycardformattedbyanotherdigitalcameraormemorycard
reader.
•Ifthememorycardissubjectedtoanyofthefollowing,therecordeddatamay
becomecorrupted:
- When the memory card is used incorrectly.
- Ifthe power is switched off or the memorycard is removed while recording,
deleting (formatting)or reading.
• Samsung cannotbe heldresponsible for lostdata.
• Itis advisableto copy importantdata ontoother media as back-up e.g. floppy
disks, harddisks, etc.as soon as possible.
• Ifthere is insufficientmemoryavailable
:A [CARD FULL!] messagewill appear and thecamera willnot operate.
To optimisethe amount ofmemory available replacethe memorycard or
delete unnecessaryimages storedon the memory.
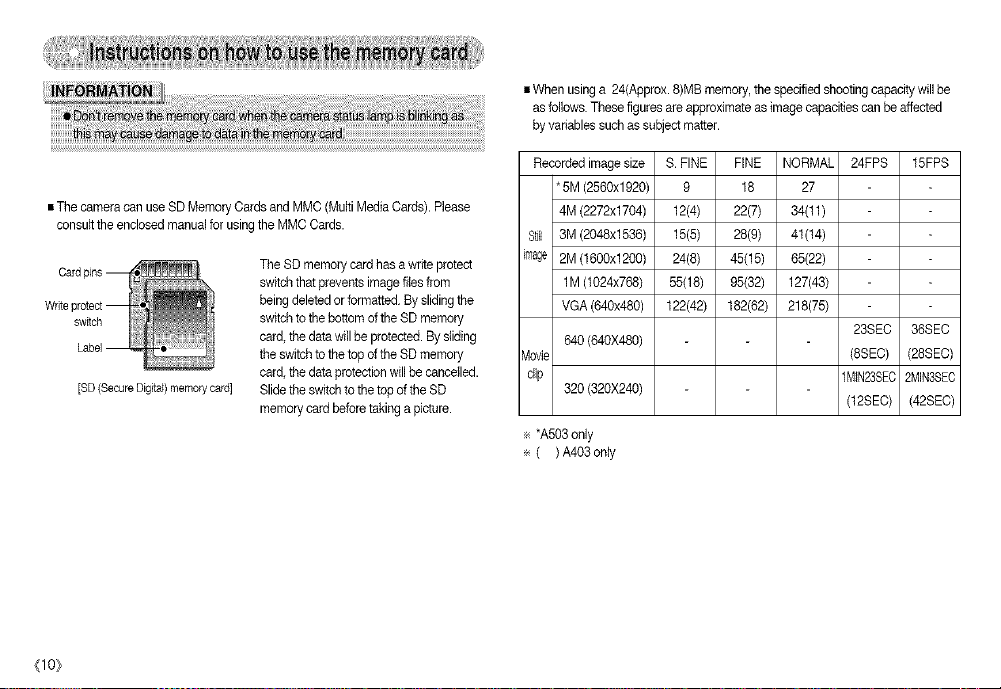
•ThecameracanuseSDMemoryCardsandMMC(MultiMediaCards).Please
consulttheenclosedmanualforusingtheMMCCards.
Card TheSDmemorycardhasawriteprotect
switchthatpreventsimagefilesfrom
beingdeletedorformatted.Byslidingthe
switch switchtothebottomoftheSDmemory
card,thedatawillbeprotected.Bysliding
Label theswitchtothetopoftheSDmemory
card,thedataprotectionwillbecancelled.
[SD(SecureDigital)memorycard]SlidetheswitchtothetopoftheSD
memorycardbeforetakingapicture.
(lO)
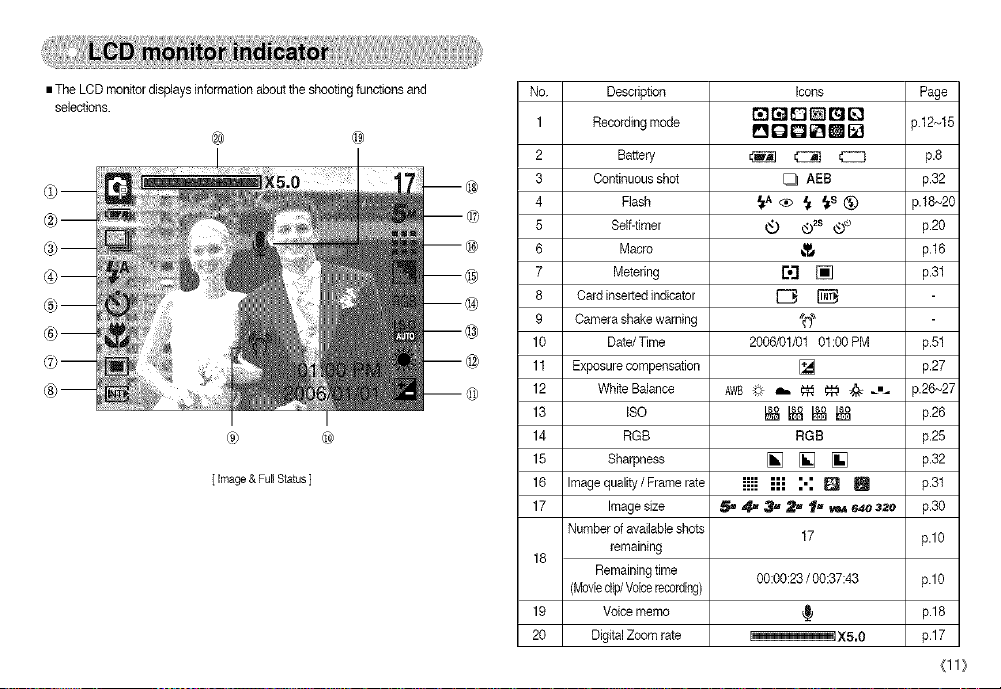
iWhenusinga24(Approx.8)MBmemory,thespecifiedshootingcapacitywillbe
asfollows.Thesefiguresareapproximateasimagecapacitiescanbeaffected
byvariablessuchassubjectmatter.
Recorded imagesize S. FINE FINE NORMAL 24FPS 15FPS
*5M (2580x1920) 9 18 27
4M (2272x1704) 12(4) 22(7) 34(11)
Still 3M (2048x1536) 15(5) 28(9) 4t(t4)
ir_age 2M (1800x1200) 24(8) 45(15) 65(22)
1M (1024x758) 55(18) 95(32) 127(43)
VGA (840x480) 122(42) 182(82) 218(75)
640(640X480)
Movie (8SEC) (28SEC)
clip 1MtN23SEC2MIN38EO
320 (320X240)
÷ *A503only
÷ ( ) A403 only
23SEC 36SEC
(12SEC) (42SEC)
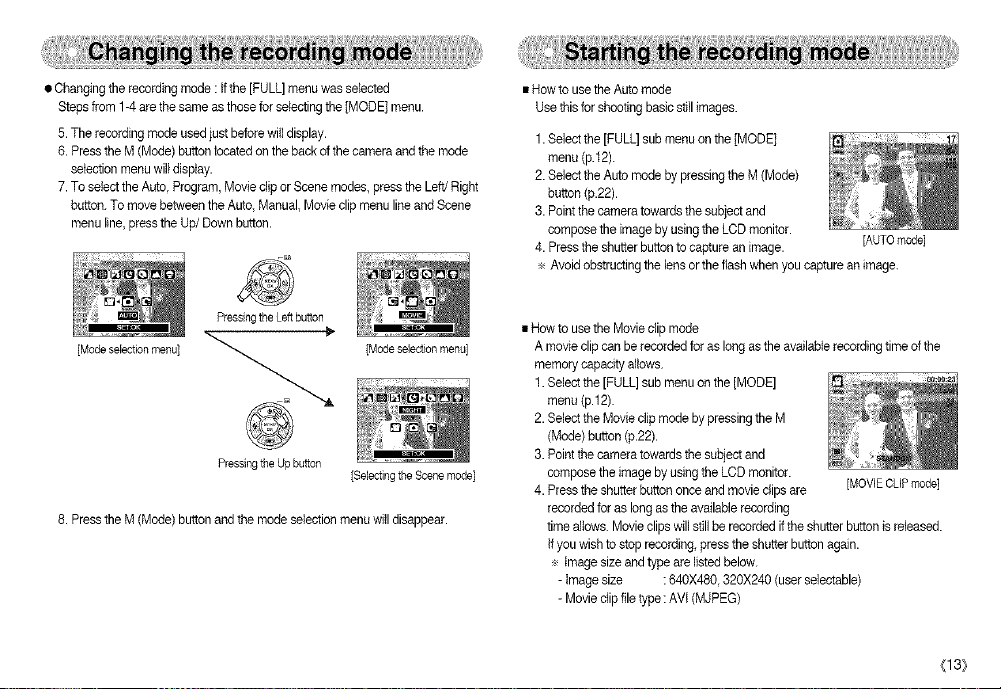
• The LCD monitordisplays informationabout the shootingfunctions and
selections.
® @
® @
[ Image& FullStatus]
No. Description Icons Page
1 Recordingmode P'_O [] [] m _]
2 Battery _ @ _ p.8
3 Continuous shot [_ AEB p.32
4 Flash _A ® _ _S _) p.18~20
5 Self-timer _ _2s _,_ p.20
6 Macre _ p.16
7 Metering ro3 [] p.31
8 Cardinserted indicator _
9 Camera shake warning '_("_
10 Date/Time 2006/01/01 01:00 PM p.51
11 Exposurecompensation [] p.27
12 AWB;_ _ _ _ _ J'_ p.26"-,27
13 _ _ _ _:_ p.26
14 RGB p.25
15 [] [] [] p.32
16 iiii ;_ :': [] _ p.31
17 5_ 4_ 3_ 2- t,_ _ e4e3_e p.30
18
19
20 i I_X5,0 i
White Balance
ISO
RGB
Sharpness
Image quality / Frame rate
Imagesize
Number of availableshots
remaining
Remaining time
(Movieclip/Voicerecording)
Voicememo
Digital Zoom rate
i'_l _ _'_]_ _I [_ 3.12_15
17 p.10
00:00:23/ 00:37:43
p.10
p.18
p.17
(11}

gYoucanselectthedesiredworkingmodebytheM(mode)buttonlocatedonthe
backofthecameraand[MODE],[MODESET]menu.Auto,Program,movie
clip,scene(night,portrait,landscapesunset,dawn,bacHight,fireworks,beach
&snow)cameramodesareavailable.
®Selectingthe[MODE]menu
1.Insertthebattery(p.8)
2.Insertthememorycard(p.8).Asthiscamerahasa24MBinternalmemory,
youdonothavetoinsertthememorycard.Ifthememorycardisnotinserted,
animagewillbestoredintheintema!memory.Ifthememorycardisinserted
animagewillbestoredonthememorycard.
3.Closethebatterychambercover.
4.Pressthepowerbuttontoturnonthecamera.
5.Pressthemenubuttonandamenuwilldisplay.
6.UsetheLeft/Rightbuttontoselectthe[MODE]
menu.
7.Select[STILL&MOVIE]or[PULL]submenuby
pressingtheUP/DOWNbutton.
-[STILL&MOVIE]:Astiffimagemodethatwasselectedonthe[MODESET]
menuandmovieclipmodecanbeselected.
Refertopage14formoreinformationaboutusingthe[MODESET]menu.
-[FULL]:Auto,ProgramMovieclipandscenemodescanbeselected.
8.PresstheMENUbuttonandthemenuwilldisappear.
{12}
•Changingtherecordingmode:Ifthe[STILL&MOVIE]menuwasselected
Stepsfrom1-4arethesameasthoseforselectingthe[MODE]menu.
5.Therecordingmodeusedjustbeforewilldisplay.
6.PresstheM(Mode)buttonlocatedonthebackofthecameraandthe
recordingmodewillchangetothemovieclipmode.
7.PresstheM(Mode)buttonagainandastillimagemodeselectedonthe
[MODESET]menuwillbeselected.
PressingtheM{Mode)button
[AUTO mode] [MOVIE CLIPmode]
• Changing the recording mode :if the [FULL] menu wasselected
Stepsfrom 1-4are the sameas those forselectingthe [MODE) menu.
5.The recordingmode used just before wilIdisplay.
6.Press the M(Mode) button locatedon the backof thecamera and the mode
selection menu wiltdisplay.
7.To selectthe Auto Program, Movieclip or Scene modes, press the Left/Right
button. Tomove between the Auto, Manual, Movieclipmenu lineand Scene
menu line,press the Up/Down button.
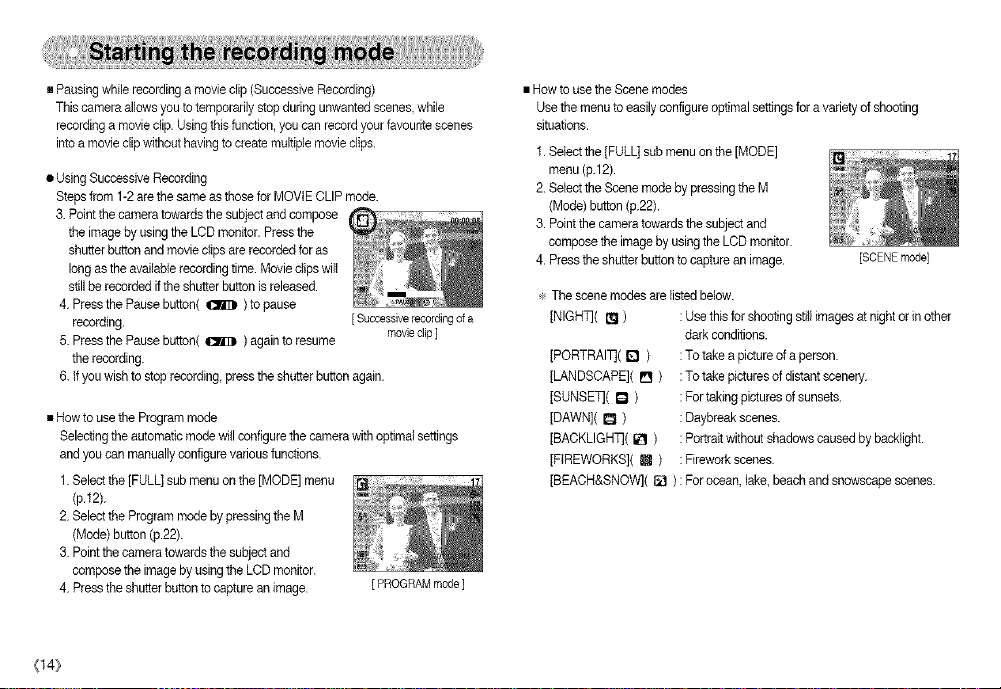
• How to use the Auto mode
Use this for shooting basic stillimages.
1.Select the [FULL] submenu on the [MODE)
menu (p.12).
2.Select the Auto mode by pressingthe M (Mode)
button (p.22).
3. Pointthe camera towards the subject and
compose the image by usingthe LCD monitor.
4. Pressthe shutter buttonto capture an image. [AUTOmode]
÷ Avoidobstructingthe lens orthe flash when you capture an image.
PressingtheLeftbutton
[Mode selection menu] [Mode selection menu]
PressingtheUpbutton
[Selectingthe Scene mode]
8. Pressthe M(Mode) button andthe mode selectionmenu will disappear.
• Howto use the Movieclip mode
A movieclip can be recorded for as long asthe availablerecording time of the
memory capacity allows.
1.Select the [FULL] sub menu on the [MODE]
menu (p.12).
2.Select the Movie clip modeby pressing the M
[Mode) button (p.22).
3.Point the camera towards the subjectand
compose the image byusing the LOD monitor.
4. Press the shutterbutton once and movie clipsare
[MOVIE CLIP mode]
recorded for as longas the available recording
time allows. Movieclipswill stillbe recordedif the shutter buttonis released.
If youwish to stop recording,press the shutter button again.
÷ imagesize andtype are listed below.
-Image size :640X480, 320X240 (userselectable)
-Movie clip file type: AVl (MJPEG)
(13}
• Pausingwhile recordinga movieclip(Successive Recording)
This camera allows you totemporarily stop duringunwantedscenes, while
recordinga movieclip. Using this function, you can recordyour favouritescenes
into a movie clip withouthaving to createmultiple movieclips.
• UsingSuccessive Recording
Stepsfrom 1-2are the sameas those for MOVIECLIP mode.
3. Point the camera towardsthe subject andcompose
the imageby using the LCD monitor. Pressthe
shutterbutton andmovie clips arerecorded foras
long asthe available recordingtime. Movie clips will
still be recorded if the shutter button isreleased.
4. Pressthe Pausebutton( _ )to pause
recording.
5. Pressthe Pausebutton( _ ) again toresume
[ Successive recording ofa
movie clip ]
the recording.
6. ifyou wishto stoprecording, pressthe shutter button again.
• Howto use the Programmode
Selecting the automatic mode willconfigure the camerawith optimalsettings
and you canmanuallyconfigure various functions.
1.Select the[FULL] sub menu on the [MODE] menu
(p.12).
2. Select the Program mode bypressing the M
[Mode) button (p.22).
3. Pointthe camera towards the subject and
composethe imageby usingthe LCDmonitor.
4. Pressthe shutter buttonto capture animage.
[PROGRAM mode]
{14}
• Howto use the Scenemodes
Usethe menuto easilyconfigure optimal settingsfor avariety of shooting
situations.
1.Select the [FULL[ submenu on the [MODE]
menu (p.12).
2. Select the Scene mode by pressingthe M
[Mode) button (p.22).
3. Point the camera towardsthe subjectand
compose the imageby using the LCDmonitor.
4. Press theshutter buttonto capture animage. [SCENEmode]
÷ The scene modes are listed below.
[NIGHT]( _ ) : Usethis forshooting stillimages at night or in other
dark conditions.
[PORTRAI]]( D )
[LANDSCAPE]( [] )
[SUNSET]( D )
[DAWN]( [] )
[BACKLIGH_( [] )
[FIREWORKS]( m )
: To take a picture of a person.
: To take picturesof distantscenery.
: For taking picturesofsunsets.
: Daybreak scenes.
: Portraitwithout shadows caused by backlight.
: Firework scenes.
[BEACH&SNOW]( [] ): Forocean, lake, beach and snowscape scenes.
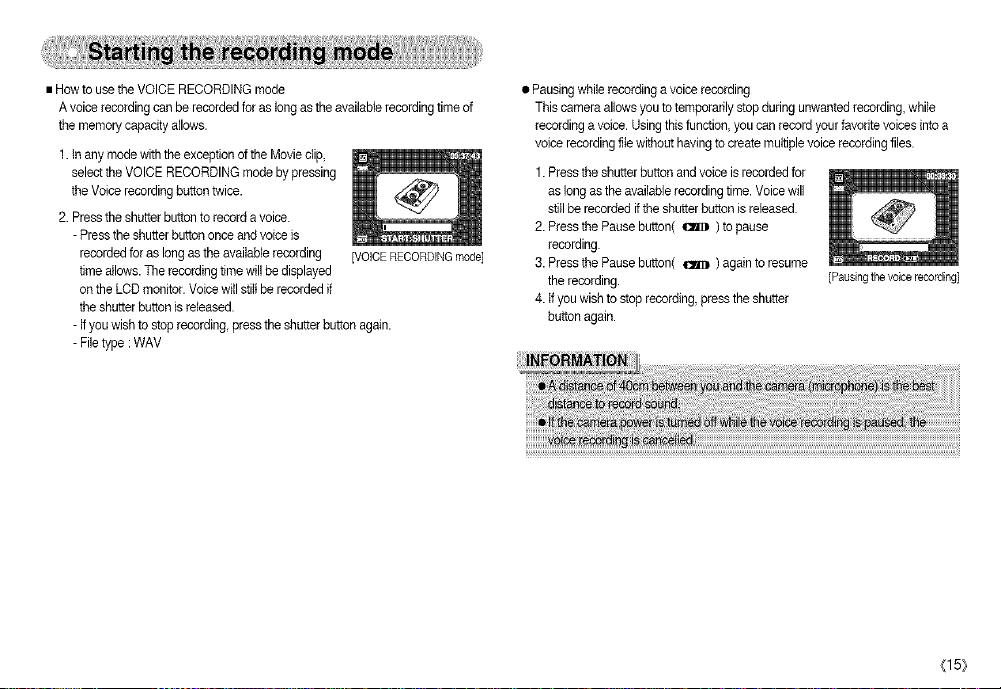
•HowtousetheVOICERECORDINGmode
Avoicerecordingcanberecordedforaslongastheavailablerecordingtimeof
thememorycapacityallows.
1.Inanymodewiththeexception ofthe Movieclip,
select the VOICE RECORDINGmode by pressing
the Voice recordingbuttontwice.
2. Pressthe shutter buttonto record a voice.
- Pressthe shutterbutton once and voice is
recordedfor as longas the available recording [VOICERECORDINGmode]
time allows. The recording timewill be displayed
on the LCD monitor. Voicewill stiltbe recordedif
the shutter buttonis released.
- ifyou wishto stop recording, pressthe shutter buttonagain.
- Fib type :WAV
• Pausingwhile recording avoice recording
This cameraallows you to temporarily stopduring unwantedrecording,while
recordinga voice. Using thisfunction, youcan recordyour favorite voicesinto a
voice recordingfib without having tocreate multiplevoice recordingfibs.
1. Pressthe shutterbutton andvoice isrecorded for
as long as the availablerecordingtime. Voice will
still be recorded if the shutter button is reEeased.
2. Pressthe Pause button( _ ) topause
recording.
3. Pressthe Pause button( _ ) again toresume
the recording.
4. ifyou wishto stop recording press the shutter
button again.
[Pausing thevoice recording]
(15}
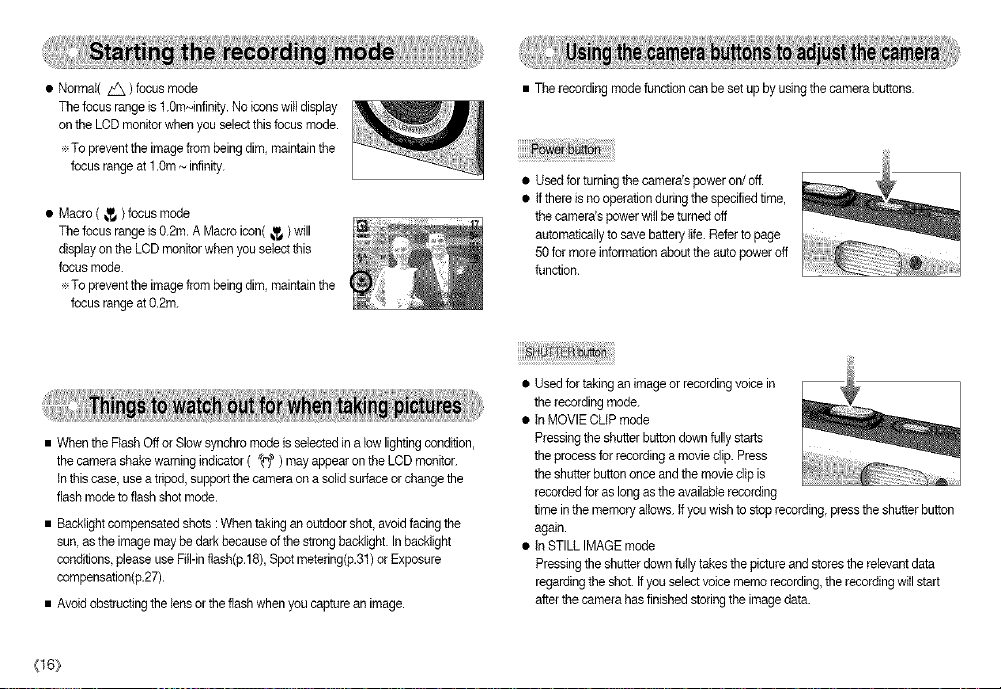
• Normal( _ ) focus mode
The focus range is t.0m~infinity. Noicons will display
on the LCD monitor when you select this focusmode.
÷ To preventthe image frombeing dim maintain the
focus range at 1.0m_ infinity.
• Macro ( _ ) focus mode
The focus range )s0.2m. AMacro icon( _,,_)will
display on the LCD monitorwhen you selectthis
focus mode.
÷ To preventthe image frombeing dim maintain the
focus range at0.2m.
• When the Flash Offor Slowsynchromode is selectedin a lowlightingcondition,
the camerashake warningindicator ( @ ) mayappear on the LCDmonitor.
Inthis case, usea tripod, supportthe cameraon a solid surface or changethe
flash mode to flashshot mode.
• Backtightcompensated shots : Whentaking an outdoor shot, avoidfacingthe
sun asthe imagemay be dark because of the strong backlight. Inbacklight
conditions, please use Fi(I-inflash(p.18),Spot metering(p.31) or Exposure
compensation(p.27).
• Avoidobstructing the lensor the flashwhen you captureanimage.
(16_
• The recordingmodefunction can be set up by usingthe camera buttons.
• Used for turningthe camera's power on/off.
• tf thereis no operationduring the specifiedtime,
the camera'spower wiil be turnedoft
automaticallyto save battery(ife. Referto page
50 for moreinformation aboutthe autopower off
function.
• Usedfor taking an image or recordingvoice in
the recordingmode.
• )nMOVIE CLiP mode
Pressingthe shutter button down fullystarts
the processforrecording amovie clip. Press
the shatterbutton once andthe movie clip is
recorded for as long asthe available recording
time inthe memory aUows.Ifyou wishto stop recording pressthe shatter button
again.
• tnSTILL IMAGE mode
Pressing the shatterdown fully takesthe picture and stores the re(evantdata
regarding the shot.Ifyou select voice memorecording, the recordingwi(Istart
afterthe camera has finishedstoring the imagedata.
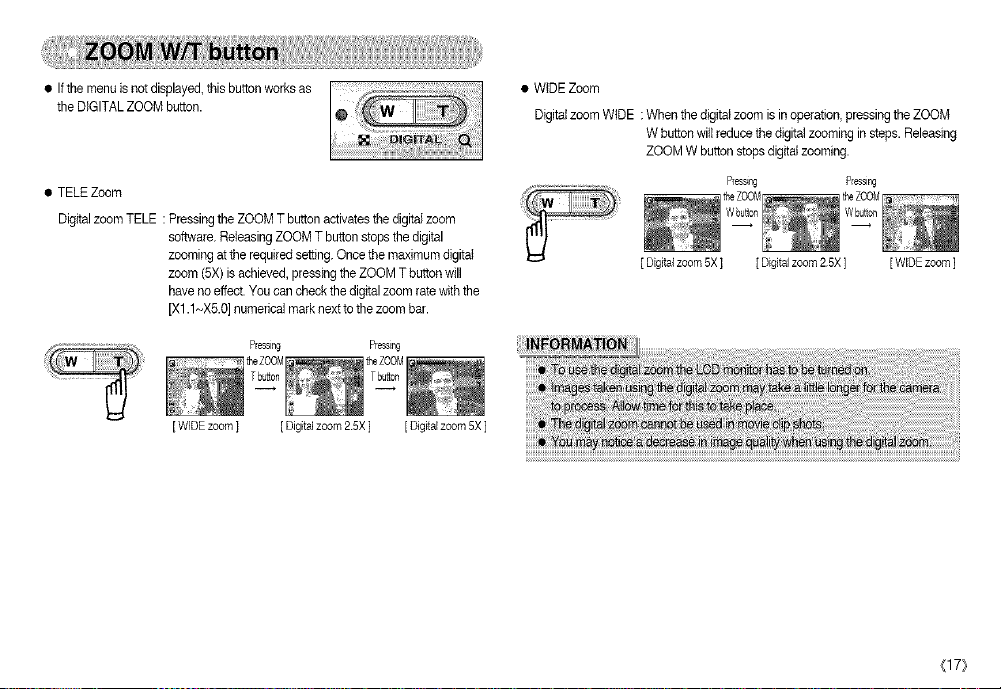
• Ifthemenuisnotdisplayed,thisbuttonworksas
theDIGITALZOOMbutton.
•TELEZoom
DigitalzoomTELE:PressingtheZOOMTbuttonactivatesthedigitalzoom
software.ReleasingZOOMTbuttonstopsthedigital
zoomingattherequiredsetting.Oncethemaximumdigital
zoom(5X)isachieved,pressingtheZOOMTbuttonwill
havenoeffect.Youcancheckthedigitalzoomratewiththe
[X1.1~X5.0]numericalmarknexttothezoombar.
Pressing Ressing
[WiDE zoom ] [ Digitalzoom 25X ] [ Digr_alzoom 5X]
• WIDE Zoom
Digitalzoom WIDE :When thedigital zoom is inoperation, pressing the ZOOM
W button wilIreduce the digital zooming in steps. Releasing
ZOOM W buttonstopsdigital zooming.
Ress_ Plessing
[ Digitalzoom 5X] [ Digitalzoom 25X ] [ WiDE zoom ]
(17}
• Whitethe menu isshowing, pressthe UP button to moveup the submenu
cursor.When the menuis notdisplayed onthe LCD monitor,the UPbutton
operatesas the voice recording or voice memobutton. You canrecordyour
voiceor addyour voice-overto a stored stillimage. Refer topage 15for more
informationabout the voice recording.
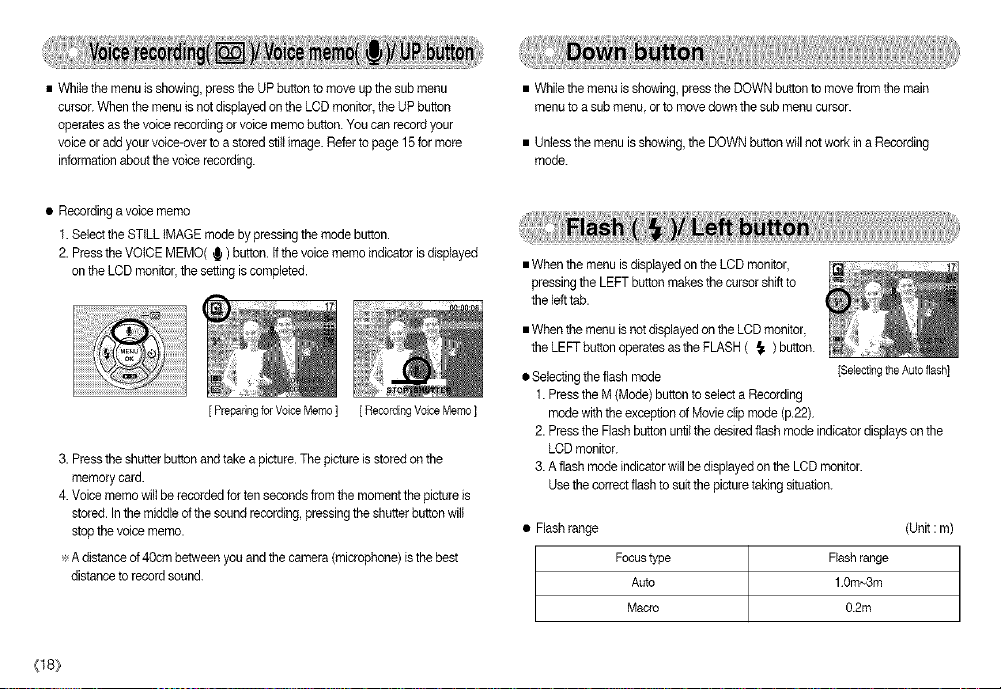
• Recordinga voice memo
f. Selectthe STILL IMAGE modeby pressing the mode button.
2. Pressthe VOICEMEMO( _ ) button. Ifthe voice memo indicator isdisplayed
on the LCD monitor, the setting iscompleted.
[ Preparing for Voice Memo ] [ Recording Voice Memo ]
3. Pressthe shutter buttonand take a picture.The picture isstored onthe
memory card.
4. Voicememo wiltbe recorded for ten seconds from the moment the pictureis
stored.In the middleof the soundrecording, pressingthe shutterbuttonwill
stopthe voice memo.
÷ A distanceof 40cmbetween youand the camera (microphone) isthe best
distance torecord sound.
(18}
• Whilethe menu isshowing, press the DOWN button to movefrom the main
menuto a sub menu or to rnovedown the sub menu cursor.
• Unlessthe menu is showing,the DOWNbutton will not work in a Recording
mode.
• When the menu is dispIayedon the LCD monitor,
pressing the LEFT buttonmakes the cursorshift to
the lefttab.
• When the menu isnot displayedon the LCD monitor,
the LEFTbutton operatesas the FLASH ( { ) button.
• Selecting the flash mode
[Selecting the Auto flash]
1.Pressthe M (Mode)button to select a Recording
modewith the exception of Movie clip mode (p.22).
2. Pressthe Flashbutton untilthe desired flash mode indicatordisplays on the
LCDmonitor.
3.A flash mode indicatorwitl be displayed on the LCD monitor.
Usethe correctflash to suitthe picture taking situation.
• Flashrange (Unit : m)
Focus type Flash range
Auto 10m_3m
Macro 0.2m
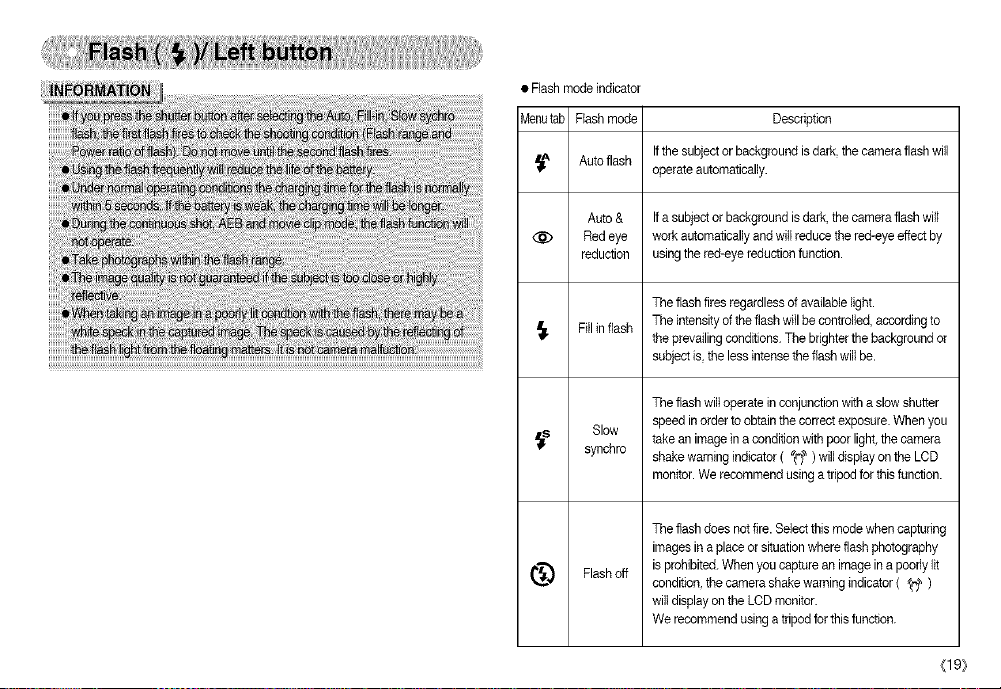
• Rash mode indicator
Menutab Flash mode Description
Autoflash
Auto & Ifa subjector background is dark,the cameraflash wilt
@ Red eye work automaticallyandwill reduce thered-eye effectby
reduction usingthe red-eye reductionfunction.
Fillin flash The intensityof theflash willbe controlled, according to
,_s synchro shakewarning indicator( '_€'_) willdisplay on the LCD
Flash off
_"_ condition,the camera shake warningindicator ( '_ )
Ifthe subject or background is dark,the cameraflash will
operateautomatically.
Theflash fires regardlessof available light.
theprevailing conditions. The brighterthe backgroundor
subjectis,the less intensethe flash will be.
Theflash wilt operate in conjunctionwith a slow shutter
Slow speed inorder to obtain the correctexposure. When you
takean imagein a condition with poorlight, the camera
monitor. We recommendusing a tripodfor thisfunction.
Theflash does not fire.Select this modewhen capturing
images inaplace or situationwhere flash photography
is prohibited.When you capturean image in a poorly lit
wiltdisplay onthe LCD monitor.
Werecommend usinga tripodfor this function.
(19}
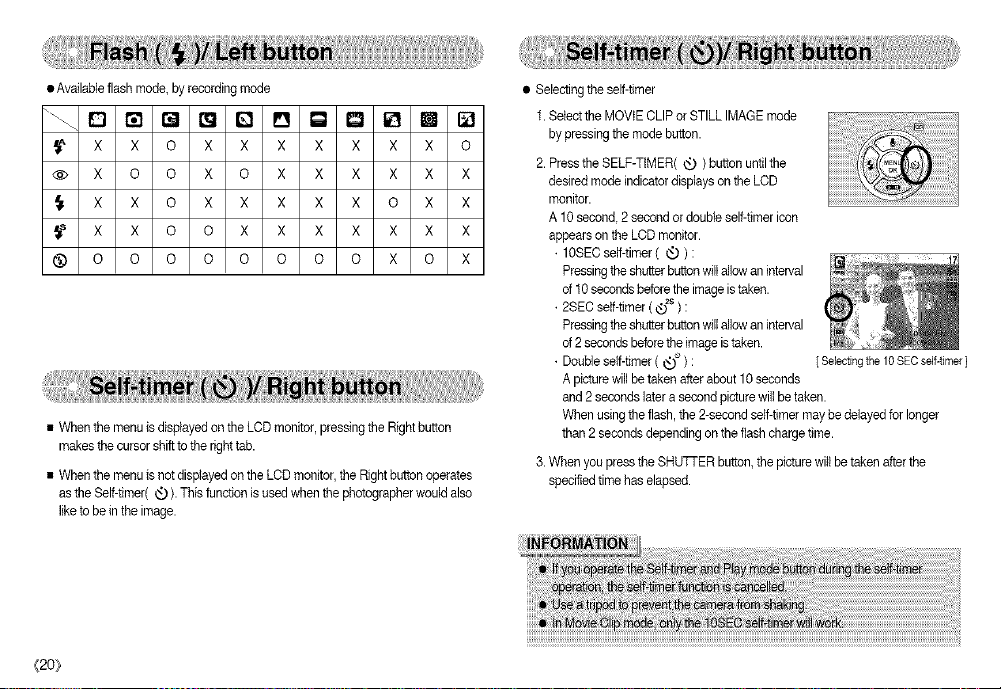
•Availableflashmode,byrecordingmode
X X 0 X X X X X X X 0
X 0 0 X 0 X X X X X X
X X 0 X X X X X 0 X X
X X 0 0 X X X X X X X
0 0 0 0 0 0 0 0 X 0 X
• When the menu isdisplayed on the LCD monitor,pressingthe Rightbutton
makes the cursor shiftto the righttab.
• When the menu isnot displayed on the LCD monitor,the Rightbutton operates
as the Self-timer(_). Thisfunction is usedwhen the photographerwould also
liketo be inthe image.
{20_
• Selecting the self-timer
1.Select the MOVIE CLIPor STILL IMAGE mode
by pressingthe modebutton.
2.Pressthe SELF-TIMER( _ )button untilthe
desired mode indicatordisplays on the LCD
monitor.
A 10 second 2 second or doubleself-timer icon
appears on the LCD monitor.
• 10SECserf-timer( _ ):
Pressingthe shutterbutton willallowan interval
of10 secondsbefore the imageistaken.
• 2SEC serf-timer ( @2s) :
Pressingthe shtAer button willallowan interval
of2 secondsbeforethe image is taken.
• Doubleserf-timer( _ ) :
Apicturewill be takenafter about 10seconds
and2 seconds latera second picturewillbe taken.
When usingthe flash, the 2-second serf-timermaybe delayed for longer
than 2 secondsdepending on the flashchargetime.
3. When youpress the SHU]q-ER button, the picture will betaken afterthe
specifiedtime has elapsed.
[ Selecting the 10 SEC self-timer]
• MENU button
-When youpress the MENU button, a menurelated toeach camera mode wilt
be displayed on the LCD monitor. Pressingit again wiltreturn the LODto the
initial display.
-A menu optioncan be displayed when Movieclip, Auto Programand Scene
modes are seiected.Tbereis no menu availablewhen the Voicerecording
mode is selected.
• You can select the desired recordingmode.
The selectablerecordingmodes are differentfrom what you selected sub menu
in the ]MODE] menu.
-]STILL & MOVIE] : Selectfrom a recordingmode selectedin the [MODE SE]]
menuand Movie clip mode.
-]FULL] : Selectfrom Auto, Movie clip, Programand Scene modes.
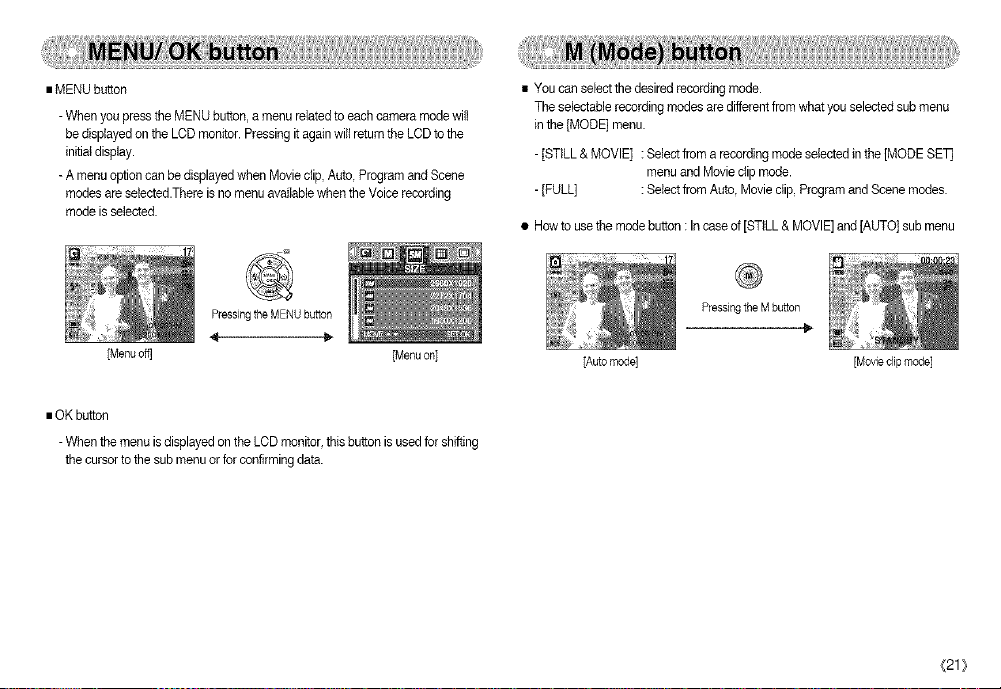
• Howto usethe mode button : Incase of[STILL & MOVIE]and[AUTO] sub menu
PressingtheMENUbutton
[Menu oft] ]Menu on]
• OK button
-When the menu is displayed on the LODmonitor, thisbutton isused for shifting
the cursorto the sub menuor forconfirming data,
PressingtheMbutton
[Auto mode] [Movie clip mode]
_21_

• How to use the mode button : Incase of[FULL]sub menuand Auto mode
• Itis possibletoadd special effectsto your imagesby usingthis button.
• Still image mode :You canselect the colour, focus,composite andframe menus.
Movie clipmode : You can select the colour menu.
• Available Effects,by recording mode(0 :SetectableX: Notselectable)
[Auto mode[
Pressing the Mode
button
[Mode selection menu]
Pressingthe Up button ,
[Scene mode]
st Pressthe Mode button andthe mode selection menuwill disappear.
{22}
I
PressingtheRightbutton
ID
Pressing theLeft button
PressingtheLeft/Rtghtbutton
[Selecting a scene mode]
[Program mode]
[Moviecliipmode]
t_ o o o o o
I_ x x o x x
x x o x x
@ x x o x x
st This button willnot operate in the Voicerecording modeandsome scenemodes
(Night, Sunset, Dawn, Backlight, Fireworks andBeach& Snow)
tf a specialeffect isselected, the rest of the specialeffect functions(Presetfocus
frames,Composite shooting,Photo frame) setbefore, are cancelled
automatically.
• Even if the camera is turned off,the specialeffectsetting will bepreserved.
To cancelthe specialeffect, select ( i'_ ) inthe sub menu ofthe Colourmenu
and select (I_ )in the sub menu of the special effectmenu.
•Byusingthecamera'sdigitalprocessor,itispcesibIetoaddspecialeffectsto
yourimages
1.PresstheEbuttoninthestiltimagemodeorMovieclipmode.
2.Selectthe_ menutabbypressingtheLeft/Rightbutton.
[Stillimagemode[ [Movieclipmode]
3.SelectadesiredsubmenubypressingtheUp/DownbuttonandpresstheOK
button.
_7._:Noeffectisaddedtotheimage
_2i,:Capturedimageswillbestoredinblackandwhite.
_@_,:Capturedimageswillbestoredinasepiatone
(agradientofyellowishbrowncelours).
_{_:Capturedimageswillbestoredinabluetone.
_ :Capturedimageswillbestoredinaredtone.
_:_:Capturedimageswillbestoredinagreentone.
(_ :Savetheimageinnegativemode.
4.Presstheshutterbuttontocaptureanimage.
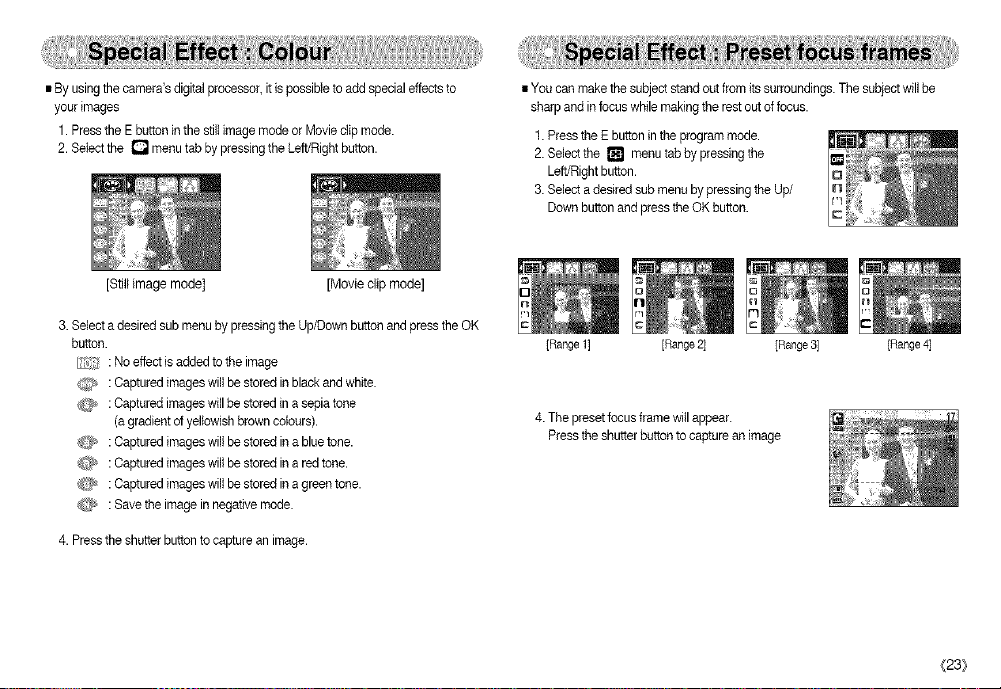
•Youcanmakethesubjectstandoutfromitssurroundings.Thesubjectwillbe
sharpandinfocuswhilemakingtherestoutoffocus.
1.PresstheEbuttonintheprogrammode.
2.Selectthe_ menutabbypressingthe
Left/Rightbutton.
3.SelectadesiredsubmenubypressingtheUp/
DownbuttonandpresstheOKbutton.
[Range 1] [Range 2] [Range 3] [Range 4]
4.The preset focus frame willappear.
Pressthe shutterbutton to capturean image
(23}

•Youcancombine2~4differentshotsinastillimage.
1.PresstheEbuttonintheprogrammode.
2.Selectthe_ menutabbypressingtheLeft/
Rightbutton.
3.SelectadesiredsubmenubypressingtheUp/
DownbuttonandpresstheOKbutton.
:cancelsthecompositeshooting
:2differentshotsarecombinedinastillimage.
IT'I : 3different shots arecombined in astill image.
E] :4 differentshots are combinedin astill image.
B : 2different panorama shotsare combined ina still image.
4. The numberof frames you selected in step3 is displayedon the LCD monitor.
Pressthe shutter button tostart the composite shooting
st Selecting 2 composite shooting
• Changing a part of composite shot beforetaking the last shot
Before taking the last composite shot, you can change a part ofcomposite shot.
1. Duringthe composite shots,press the +/- button.
2.A previous image willbe deleted and newframe will display.
Ifthere is an image taken before, press the +/-buttonagain and a previous
image will bedeleted again.
[Readyfor taking] [Firstshot] [Secondshot] [Thefinalptcture]
5. After taking the last shot, the image wilt be saved.
{24}
Pressing the +/-button
[Before taking the3rd shot]
3. Pressthe shutterbutton to capture a new image.
4_
[Moving backward to the 2nd shot]

•Youcanadd9typesofframe-likeborderstoastillimageyouwanttocapture.
1.PresstheEbuttonintheprogrammode.
2.Selectthe[] menutabbypressingtheLeft/Right
button.
3.SelectadesiredsubmenubypressingtheUp/
DownbuttonandpresstheOKbutton.
-_ :Thephotoframewillnotbeadded.
4.Thephotoframewillappear.
Presstheshutterbuttontocaptureanimage
÷Beforetakingapicture,youcanchangetheframe
bypressingtheEbutton.Changetheframetype
bypressingtheUp/Down/Left/Rightbutton.
•Youcanusethe4-/-buttontoadjustthevaluesfortheRGB,ISO,whitebalance
andexposurecompensation.
Mainmenu Submenu Availablecameramode
RGB R(Red),G(Green),B(Blue) [_ Im
ISO AUTO,100,200,400 [_
AUTO,DAYLIGHT,CLOUDY,
WHITEBALANCEFLUORESCENTH, [_ Im
FLUORESCENTL,
TUNGSTENCUSTOM.
Exposurecompensation-2.0~0.0_+2.0(0.5EVsteps) _ I_
•RGB:AllowstheusertoadjusttheR(Red),G(Green),andB(Blue)valuesof
theimagestobecaptured.
• Setting RGB Values
1.Press the +/-button, andthen use the UPand
DOWN buttons toselectthe RGB icon ( RGB)-
The RGB menubar wiltappear as shown.
2.Use the UP/DOWN/LEFT and RIGHT buttons to
select the desired RGBvalue.
-Up/Down Button : Navigates between R,G,
-Left/Right Button : Changesvalue ofeach icon.
3.When you pressthe +/- button again, thevalue you set willbe saved and RGB
setup mode willend.
÷ When special effect(colour)fromthe icon other than _ isselected,it will
notbe able to selectthe RGB.
andB icons.
(25}

• tSO :You canselect the tSOsensitivity when taking pictures.
The speed or specific light-sensitivityof a camerais ratedby ISO numbers.
• Selecting an ISOSensitivity
1. Pressthe +/- button,and then use the UP and
DOWNbuttons to selectthe tSOicon( [] ).
The tSOmenu barwill appear as shown.
2. Use the LEFT and RIGHTbuttons to select the
desired ISOsensitivity value.
- AUTO :The camera's sensitivityis automatically
changedby variablessuch as lighting
value or subjectbrightness.
-100, 200, 400 : Youcan increasethe shutter speedwhilethe same amount
oflight ispresent, by increasing the ISOsensitivity. However,
the image maybe saturatedin high luminance. The higher
the tSOvalue, the higherthe camera's sensitivityto light is
andthereforethe greater its capadty totake pictures in dark
conditions. However,the noise levelin the image will increase
asthe ISOvalue increases, makingthe image appear
coarse.
3. When youpress the +/- buttonagain, the valueyou setwill be saved and ISO
setup mode will end.
{26}
• Whitebalance : The white balancecontrol allows you toadjust the coloursto
appear more natural.
• Selecting a White Balance
1.Pressthe +/- button, andthen use the UP and
DOWN buttonsto selectthe whitebalance
icon(AWB).Thewhite balancemenu bar will
appear as shown.
2. Use the LEFT and RIGHT buttonsto set the white
balancetothe desired value. Thevalue you set
willbe displayedon the LCD monitor.
AUTO AWB:The camera automaticallyselectsthe appropriatewhite
balancesettings,dependingon the prevailinglighting
conditions.
DAYLIGHT _ : For taking imagesoutside.
CLOUDY am :For taking images under a cloudyand overcast sky.
FluorescentH _ : Forshooting under daylighttype fluorescentlighting.
FluorescentL _ : Shootingunderwhitefluorescent lighting.
TUNGSTEN _ : Forshootingundertungsten(standardlightbulb) lighting.
CUSTOM _,_ : Allowsthe user to setthe whitebalanceaccording to
the shootingcondition.
Differentlighting conditions maycause a colourcast on your images.
3. Pressthe +/- buttonagain. Thevalue you set willbe savedand White Balance
setup mode willend.

•UsingtheCustomWhiteBalance
Whitebalancesettingsmayvaryslightlydependingontheshooting
environment.Youcanselectthemostappropriatewhitebalancesettingfora
givenshootingenvironmentbysettingupthecustomwhitebalance.
• Exposure compensation :This camera automaticallyadjusts the exposure
accordingtothe ambient lightingconditions.
You can alsoselect the exposure value by usingthe
+/-button.
1.SelecttheCUSTOM(_m_)menuoftheWhite
BalanceandpresstheOKbutton.
2.Placeasheetofwhitepaperinfrontofthecamera
sothattheLCDmonitorshowsonlywhite,and
thenpresstheSHUTERbutton.
3.PresstheOKbuttonandyourcustomwhite
balancevalueisstored.
-Thecustomwhitebalancevaluewillbeapplied,
startingwiththenextpictureyoutake.
-Theuserconfiguredwhitebalancewillberemain
effectiveuntilitisove_ritten.
[Whitepaper]
• Compensating Exposure
1.Press the +/-button, andthen use the UPand
DOWN buttons toselectthe exposure
compensation icon( [] ). The exposure
compensation menubar will appear as shown.
2.Usa the LEFT and RIGHT buttonsto set the
desired exposure compensation factor.
3.Press the +/-buttonagain. The valueyou set will
be saved andthe Exposure Compensation setup modewili close. If you
change the exposure value,the exposure indicator ( [] )will be displayed
on the bottom ofthe LCD monitor.
st A negativeexposure compensationvalue reduces the exposure.
Notethat a positiveexposure compensation value increasesthe exposure
and the LCDmonitorwill appear white or youmay notget good pictures.
_[27}

•YoucanusethemenuontheLCDmonitortosetuprecordingfunctions,inany
modewiththeexceptionofVOICERECORDINGmode,pressingtheMENU
buttondisplaysthemenuontheLCDmonitor.
÷ThemenuwillnotbedisplayedontheLCDmonitorinthefollowing
circumstances:
-Whenanotherbuttonisbeingoperated.
-While image data is being processed.
- When thereis no battery capacity.
• The followingfunctions areavailable,dependingon the modeyou have selected.
The items indicatedby are default settings.
Menutab Main menu Sub menu Cameraworkingmode Page
MODE
0
FULL
i'_ 0_ Ib'7I_ I_ I_ p.29
E] []l_ml_
PROGRAM
MOVIE NIGHT
MODESET
(Stiltimage)
SIZE/Mo,,ieo,p/i a20X240
[3 [3 p.3o
QUALITY
{28}
PORTRAIT LANDSCAPE
SUNSET DAWN
BACKLIGHT FIREWORKS
BEACH&SNOW
_XI_ 2272X1704
SiZE ............................................................
2048X1536 1600X1200
1024X768 640X480
SF,NE
NORMAL
i'_ 1_ It"l[] D IW_ p30
OD_ml_
ral_O00 p.3O
ODi_ml_
t"_l[] I_ I_ _1 p.31
Menutab Mainmenu Submenu Csmeraworki%mode Page
FRAMERATE24_t? 15 FPS [] p.31
D METER'NG MULT| SPOT r_ p.31
C_ SHOOTING .... [] p.32
SHARPNESS VIVID ............................................................
INFORMATIONSAVE............................................................MODE [] E3 _ m []
÷ Menus aresubject to changewithout prior notice.
÷ *A503 only
SidLE CONTINUOUS
AEB
SOFT [] p.32
0% SAS_COSD[] [] [][][] _ p.ss

1.TurnonthecameraandpresstheMENUbutton.Amenuforeachcamera
modeappears.However,thereisnomenuforVoiceRecordingmode(_ ).
2.UsetheLEFTandRIGHTbuttonstonavigatethroughthemenus.
3.UsetheUPandDOWNbuttonstoselectasubmenu.
4.Selectasubmenu,andthenthevalueyousetwillbesaved.PresstheMENU
buttonandthemenuwilldisappear.
•YoucanselectthedesiredworkingmodebytheM(Mode)buttonlocatedonthe
backofthecameraand[MODE]menu.Auto,Program,Movieclipand
Scene(night,portrait,landscape,sunset,dawn,becklightfireworks,beach&
snow)cameramodesareavailable.
-[STILL&MOVIE]:Astillimagemodethatwas
-[FULL] :Auto,Program,Movieclipand
selectedonthe[MODESET
menuandmoviedipmodecan
beselected.
Scenemodescanbeselected.
(29/

•Youcanselectthedesiredrecordingmode.
[AUTO]
[PROGRAM[
[MOVIE]
[NIGH]]
[PORTRAI]]
[LANDSCAPE]
[SUNSEq
[DAWN]
[BACKLIGH_]
[FIREWORKS]
[BEACH&SNOW]
(30}
:Forshootingbasicstillimage
:Youcanmanuallyconfigureall
functions.
:Fortakingamovieclip
:Usethisforshootingstitl
imagesatnightorinotherdark
conditions.
:Totakeapictureofaperson.
:Scenerywithgreenwoodsorbluesky.
:Fortakingpicturesofsunsets.
:Daybreakscenes.
:Portraitwithoutshadowscausedbybacklight.
:Fireworkscenes.
:Forocean,lake,beachandsnowscapescenes.
•Youcanselecttheimagesizeappropriateforyourapplication.
Mode STILLIMAGEmode MOVIECLIPmode
Icon *5M 4M I 3M I 2M I 1M VGA 640 320
Size 25@X9202272X7042_8X 536 600X200 024X768640X480640X480320X240
*A503 only
I I I
[ STILL IMAGE mode ] [ MOVIE CLIP mode ]

• You can selectthe compression ratio appropriate foryour application ofthe
captured images.The higherthe compression ratio the lower the picture
quality.
Mode STILL IMAGE mode MOVIECLIPmode
loon i !!! :': D B
Submenu S.FINE FINE NORMAL 24FPS 15FPS
File Format jpeg jpeg jpeg avi avi
• If you cannot obtain suitable exposure conditions,you can change the metering
methodto take brighterpictures.
[MULTI] ( [] ) : Exposure willbe calculated
[SPOT ( _o_ ) : Only the rectangularareain the
based onan averageof the
available light inthe image area.
However, thecalculation wiiI be
biased towards the centre of the
image area.This issuitable for
generaluse.
centre of the LCD monitorwill bemetered for light.Use this
setting when you wantthe subject in the centreto be correctly
exposed, regardlessofthe back lighting.
[PROGRAM mode[
[ STILL IMAGE mode ] [ MOVIE CLIP mode [
÷ Ifthe subject isnot the centreof the focus area, donot use the spot metering
asthis may result inan exposure error. In this circumstance, It is betterto use
exposure compensation.
(31}

•Selectthenumberofpicturesincontinuousshooting.
-[SINGLE[:Takeonepictureonly
-[CONTINUOUS]:Imageswillbetaken
continuouslyuntiltheshutter
buttonisreleased.Theshooting
capacitydependsonthe
memory.
-[AEB] :Takethreepicturesinaseriesin
differentexposures:standard
[PROGRAMmode]
exposure(0.0EV),shortexposure(-0.5EV)andover
exposure(+0.5EV).Usethemodeifitishardtodecide
exposureoftheobject.
_:tHighresolutionandpicturequalityincreasesfilesavingtime,whichincreases
stand-bytime.
_:ttfthe[CONTINUOUS[submenuisselected,theflashwillbeoffautomatically.
÷iflessthan3picturesareavailabIeinthememory,theAEBsettingwiltnot
work.
÷itisbesttouseatripodfortheAEBshootingasthetimetosaveeachimage
fileislongerandtheblurringcausedbycamerashakemayoccur.
{32/
•Youcanadjustthesharpnessofthepictureyouwant
totake.Youcannotcheckthesharpnesseffecton
theLCDmonitorbeforeyoutakeapicture,because
thisfunctionisappliedonlywhenthecapturedimage
isstoredonthememory.
[PROGRAM mode]
Sub menu icon Description
SOFT
NORMAL
VIVID will appear sharp, but noise mayoccur inthe recorded
The edges ofthe image are softened.
This effectis suitablefor editingimages on yourPC.
The edges ofthe image are sharp.
This is suitablefor printing.
The edges ofthe image are emphasized.The edges
image.

•InanymodewiththeexceptionofVOICE
RECORDINGmode,youcanchecktherecording
statusintheLCDmonitor.
•Idlemode:Ifyouselectthe[SAVEMODE]andthe
cameraisn'toperatedduringthe
specifiedtime(about30SEC.),the
camerapowerwillbeidle(LCDmonitor
:OFF,Camerastatuslamp:Blinking)automatically.
-Tousethecameraagain,pressanyofthecamerabuttonsexceptthepower
button.
-Ifthereisnooperationduringthespecifiedtime,thecamerapowerwillbe
turnedoffautomaticallytosavebatterylife.Refertopage50formore
informationabouttheautopowerofffunction.
[Full informationmode] [Basic information mode]
• tfthe memory card isinserted in the camera,allthe camera functions applyonly
tothe memory card.
• tfthe memory card isnot inserted in thecamera, all the camerafunctionsapply
onlytothe internal memory.
• tf youhave turned onthecamera by pressingthe POWER button, youcan press
the PLAY MODEbuttononce to switchto Play modeand press itagain to switch
to Recordingmode.
• You can turn the poweron with the play mode button. The camera is turned onin
playmode. Press the play mode buttonagain toswitch to shootingmode.
• You can set up the PLAY mode functionby using the camera buttons and LCD
monitor.
• Playing back a stillimage
1.Select the PLAY mode by pressingthe play
mode button ( _ ).
2.The last imagestored on the memory is
displayed onthe LCDmonitor.
3.Select animage thatyou wantto play back by
pressing the LEFT/RIGHT button.
st Pressand holdthe Leftor Rightbuttonto fast
forward the imagesplayed.
(33}

® Playingback a movieclip
Steps from 1-2are the sameas those to playback a stitJimage.
3. Selectthe recorded movieclip and press the Play
&Pause button ( _ )to play back.
-To pause a movieclip file while playing itback,
pressthe play & pause button again.
- Pressingthe play& pause button againwill
cause the movieclipfile to restart.
-To rewind the movieclipwhile itis playing,press
the LEFTbutton. Tofast forward the movieclip,
pressthe RIGHT button.
-To stop playback ofthe movieclip, press the
play&pause button, andthen pressthe LEFT
or RIGHT button.
{34}
B
Movieclipcapture function :capture stillimages fromthe movieclip.
®
Howto capture the movie clip
Steps 1-3are the sameas those for playingback a
movie clip
4. Pressthe Play/Pause buttonwhile playingthe
movieclip. Thenpress the E button.
5.The paused movie clipis saved in a new file name
[Paused]
The capturedmovie clipfilehas same size as the
originalmovie clip(640X480, 320X240).
[Pressing the E button]
Playingback a recordedvoice
Inordertoplayback voicefilesrecordedwiththe camera,
the cameramustbeconnectedtoyourPC(Seep.62). _12;
Your PC must have a sound card and speakers
installed.Please be sureto installthe cameradriver
beforeconnectingthe camerato your PC.
1.Connect thecamera toyour PC.
2.Open Windows Explorer and open the DICM/
100SSCAM folderof the RemovableDrive.
3. Select a voice file(wav). [ PlayButton]
4. Right-clickand select]Copy].
5.Select thefolder on your PC to which you want to savethe file, right-click,and
select [Paste].
6.Clickon the fileyou just saved.The playerwill appearon the leftside ofthe
Explorerwindow.
7.Clickon the Playbutton to playback the voice file.
* The methodof playingback voice memos added tostill images isthe same as
the methodof playingback voicefiles.

• TheLCDmonitordisplaysshootinginformationaboutthedisplayedimage.
--(7)
1 Play mode []
2 Battery _ _ _[CC] p.8
3 File Type _ []
4 Voice memo ,_b p.18
5 Protectindicator 0,_ p.43
6 DPOFindicator .13. p.44
7 FoldernameandStoredimagenumber 100-0009
• By pressingthe Play mode button forover 1Sec., youcan checkthe recording
information.
SIZE2560X1920 Size
AV F3 2 Aperturevalue
TV 1/60S Shutterspeed
ISO 100 ISOsensitivity
[Playmode display]
F_SH:OFF Whethe_o[ r_t
modebutton [Recording information] DATE 2006/01/01Recoldingdate
theflashisused
• tn Play mode,you canuse the buttons on the camera to convenientlyset upthe
Play mode functions.
oYou can view multiplepictures,enlarge a selectedpicture,and crop and save a
selectedarea of an image.
• Thumbnaildisplay
1.While an image isdisplayed on fullscreen, press
tbe thumbnaiI button.
2.The thumbnaildisplay will highlight the image that O,
had been showingatthe time the thumbnailmode
was selected.
3.Press the 5function buttonto move to a desired image.
4. Toview an image separately, pressthe enlargement button.
Pressingthe thumbnail
button( [] )
Pressing theenlargement
button(O.)
[ Normal display mode ]
Highlighted image
[ Thumbnail display mode ]
(35}

• image enlargement
1.Select animage thatyou wantto enlarge and
press theenlargement button.
2. Differentparts of the imagecan beviewed by
pressingthe 5 function button.
3. Pressingthe thumbnailbutton will zoom back to
the originalfull sizedimage.
- You cantell whether the imagedisplayed is an
enlargedview by checkingthe image
enlargementindicator shown atthe bottom left
ofthe LCD monitor. (Ifthe image is notan
enlargedview, the indicator willnot be
displayed.)You canalsocheck the areaofenlargement.
- Movieclips and WAVfiles can't be enlarged.
- If an image isenlarged, aloss ofquality mayoccur.
{36}
• The maximumenlargement rate inproportionto the image size.
Imagesize %M 4M 3M 2M 1M VGA
Maxe'u_'enargemerae X80 X7.1 X6.4 X5.0 X32 X2.0
*A503 only
• Trimming :You can selectpart ofthe image and
save it separately.
1.Select animagethat you wantto trim and press
the MENU button.A message willbe displayedas
shownalongside.
2. Select adesired sub menu by pressing the UP/
DOWNbutton and pressthe OK button.
- [TRIM] :The trimmed image will save as a new filename, and display on
the LCD monitor.
- [CANCEL] :The trimming menuwill disappear.
÷ ifthere isinsuffident free memory space inwhich tosave the trimmed
image,the image cant betrimmed.

•WhenthemenuisdisplayedontheLCDmonitor,pressingtheUPbuttonmakes
themenucursormoveup.
•WhenthemenuisnotdisplayedontheLCDmonitor,theUPbuttonoperatesas
thevoicememobutton.Youcan add yourvoice to a storedstillimage.
• Adding a Voice Memoto a Still _mage
1.Press the LEFT/RIGHT button to selectan image
thatyou wish to addsound to.
2.Press thevoice memo button ( _ ) and the
voicememo indicatorwill display.The camera is
now readyto record a voice memo.
3.Press the shutterbutton tostart recording a voice
memo to thestill imagefor upto 10 seconds.
Whitethe voice isrecording, the recordingstatus
windowwill be displayed as shown alongside.
4.The recordingcan be stoppedby pressing the
shutter buttonagain.
5.The ( ,,,b ) icon will be displayed onthe LCD
monitoraftervoice memo recordinghas finished.
-Voice memos can't be recorded ontomovie
dip flies and voicerecordingfiles.
-Adistance of40cm between you andthe camera(microphone) isthe best
distanceto recordsound.
-The voicememo wilIbe saved in *.wav format but has the same ritename
as the stillimageto whichit corresponds.
-If you add e new voicememo to the still imagethat already hase voice
memo, the existingvoice memo willbe erased.
• Inplaymode, the play &pause/down button works asfollows:
- Ifthe menuis displayed
Pressthe DOWN buttonto move fromthe main menuto a sub menu, or to
move down the sub menu cursor.
- Ifa movieclip isplaying
InStopmode : Plays a movieclip
During playback :Temporarily stops playback
InPausemode :Resumes playback
[Movie clip is stepped] [ Movie clip is playing ] [ Movie clip is paused ]
(37}

• This deletes imagesstored on the memory card.
• Deleting Images inPlay Mode
1. Selectan imagethat you want todelete by
pressingthe LEFT/RIGHT button and press the
DELETE( t_' )button.
2. Amessage willdisplay as shown alongside onthe
LCDmonitor.
3. Selectthe sub menu values by pressingthe UP/
DOWNbutton and thenpress the OKbutton.
If [DELETE]is selected : deletesthe selected
images.
If [CANCEL]is selected : cancels "DeleteImage".
• Deleting Images inThumbnail Display Mode
1. Use the UP, DOWN, LEFT,and RIGHT buttonsto select the image youwant
to delete,and then press the DELETE ( t_, )button.
2. Thefollowing message willbe displayed onthe LCD monitor.
3. Selectthe sub menu values by pressingthe UP/DOWN button andthen
pressthe OK button.
If [DELETE]is selected :deletes the selected images.
If [CANCEL]is selected :cancels "Delete Image".
Press the
DELETE button
{38_
• LEFT/RIGHT/MENU/OK buttons activate the following.
- LEFT button : Whilethe menuis showing,press the LEFTbutton to select
the menutab tothe leftof the cursor.
- RIGHT button : Whilethe menuis showing,press the RIGHTbutton to select
the menutab tothe right of the cursor, or to move an
secondary menu.
- MENU button : Whenyou pressthe MENU button,the playmode menu will
be displayedon the LCDmonitor. Pressing it again will return
the LCDto the initialdisplay.
- OK button :When the menu is displayed on the LCDmonitor, the OK
button isused for confirmingdata that ischanged by usingthe
5function button.

• PLAYmodefunctionscanbechangedbyusingtheLCDmonitor.InthePLAY
mode,pressingtheMENUbuttondisplaysthemenuontheLCDmonitor.The
menusyoucansetupinPlaymodeareasfollows.Tocaptureanimageafter
settinguptheplaymenu,pressthePLAYbuttonorshutterbutton.
Menutab Mainmenu Submenu
SHOW
iNTERVAL
O SLIDE
EFFECT
SecondarymenuPage
PLAY/REPEAT
1.3.5.10
OFF p.4t
E1~4
MIX
RIGHTgO°
LEFT90°
ROTATE
1800
p.42
HORIZONTAL
VERTICAL
"2272X1784
2048Xl536
RESIZE
1600X1200
1024X768
p.42
640X480
USERiMAGE12
PROTECT
SELECT
ALL
UNLOCK/LOCK
UNLOCK/LOCK
p.43
Menu_b Mainmenu
DELETEALL
DPOF
COPYTOCARD
÷*A503only
Submenu
SecondarymenuPage
SELECT
ALL
STANDARD
ONEPIC/ALLPIOS
iNDEX
PRtNTSIZE
CANCEL
DE=AULTf3XS/_X6/5X7/8X10
STAN©A£D/INDEX/PRINTSIZE
NO
YES
p._
NO/YES
p.44~45
p.45
(39_

• This menu isavailable while the camerais connected to a PictBridgesupporting
printer (directconnection to the camera,sold separately) with a USB cable.
Menutab Mainmenu Secondary menu Page
IMAGES
AUTO SET
CUSTOMSET
{40_
Sub menu
ONE PIC
ALL PICS
NO
YES
SIZE
LAYOUT
AUTO
POSTCARD
CARD
LETTER
4X6
L
2L
A4
A3
AUTO
FULL
1
2
4
8
9
16
p.46
p.47
p.47
Menutab Main menu Sub menu Secondarymenu Page
AUTO
TYPE
QUALITY
CUSTOM SET
DATE
FiLE NAME
PRINT
DPOF PRINT
RESET
st Menus aresubject to change without prior notice.
STANDARD
INDEX
NO
YES
NO
YES
PLAIN
PHOTO
FAST PHO.
AUTO
DRAFT
NORMAL
FINE
AUTO
OFF
ON
AUTO
OFF
ON
p.47
p.48
p.48
p.48

RImagescanbedisplayedcontinuouslyatpre-setintervals.Youcanviewthe
slideshowbyconnectingthecameratoanexternalmonitor.
1.Presstheplaymodebuttonandpressthemenubutton.
2.PresstheLEFT/ RIGHT button andsalect the [SLIDE] menutab.
• Start the sfide show :The slide showcan startonly in the [SHOW] menu.
1.Use the Up/Down buttonsto select the [SHOW]
menu andpress the Rightbutton.
2.Select a desired sub menu by pressingthe Up/
Down button.
[PLAY] : The slide showis closed afterone
[REPEA_] : The slide show is repeated until
3. Pressthe OKbutton tostart the slide show.
- Pressthe Pausebutton to pausethe slide show.
- Pressthe Pausebutton ( _ ) againto resumethe slide show.
-To stopthe slide show, press the Pausebutton and thenpress LEFT/
cycle.
cancelled.
RIGHT button.
• Setting play interval:Setthe slide showplay interval
1.Use the Up/Down buttons to salectthe
[INTERVAL] menu andpressthe Right button.
2.Use the Up/Down buttons to selectthe desired
interval.
3.Press the OKbutton tosave theconfiguration.
• Configureslideshoweffects :Uniquescreen effectscan beusedforthe slideshow.
1.Select the [EFFECT] sub menu by pressingthe
UP /DOWN button andpress the RIGHTbutton.
2.Use the Up/ Down button to select thetype of
effect.
[OFF] :Normaldisplay.
[El] :Imageisdisplayed slowlyfrom the left.
[E2] : Imageisdisplayed slowlyfrom the centre
outwards.
[E3] : Imagemoves fromthe top left.
[E4] :The imageslides diagonallyfrom top left to bottomright.
[MIX] :The imageslides irregularly.
3.Press the OKbutton toconfirm the setting.
(41}

• You can rotatethe storedimages by variousdegrees.
1. Pressthe playmode button andpress the menu
button.
2. Pressthe LEFT/RIGHT button and selectthe
[ROTATE] menu tab.
3. Selecta desired sub menu by pressing the UP/
DOWNbutton.
[RIGHT90°] : [LEFT 90°] : [tS0"] :
Rotate picture in a Rotate picturein a counter- Rotate picture 180
clock-wisedirection dock-wise direction degrees
[HORIZONTAL] : [VERTICAL] :
Rotate picture Rotate picture vertically
horizontally
4. Pressthe OKbutton. The rotated imagewill be saved with a new file name and
the menuwilldisappear, tfyou display the rotatedimage on the LCD monitor,
empty spaces may appearto the left and rightof the image.
{42}
• Changethe resolution(size) ofpicturestaken. Select [USER IMAGE] to savean
imageto bethe start-up image.The resizedimage wilthave a new file name.
1.Pressthe play mode buttonand pressthe menu
button.
2.Pressthe LEFT/RIGHT button and selectthe
[RESlZE] menu tab.
3. Select a desired sub menu by pressingthe UP/
DOWN button andpressthe OK button.
• image ResizeTypes
* 2272 X 2048X 1600X 1024X 640X USER
Resize
1704 1536 1200 768 480 IMAGE1,2
* 2592 0 0 0 0 0 0
2272 X 0 0 0 0 0
2048 X X O O O O
1600 X X X O O O
1024 X X X X O O
VGA X X X X X O
st A large sized image can be resizedto a smaller sized image, but not vice versa.
st Only JPG images canbe resized. MOVIE andWAV files can't be resized.
÷ Youcan changethe resolution of only thoseflies compressedin the JPEG 4:2:2
format.
st The resized imagewill have a newfile name.The [USER IMAGE] imageis
stored not on the memorycard but onthe intemal memory.
st Only two [USER IMAGE]images can besaved. Ifyou save a new [USER
IMAGE] image,the existingstart@ image willbe deleted.
st tf thememory capacity isinsufficient to store theresized image, a [CARD FULL!]
message willdisplay on the LCD monitor andthe resized imagewill not be stored.
st * A503 only
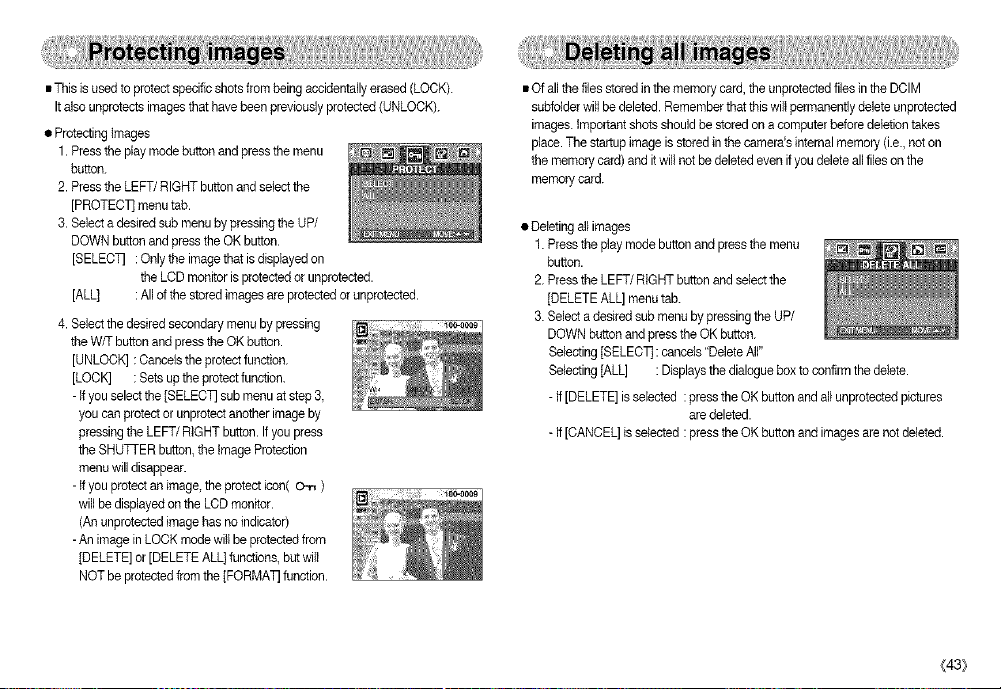
•Thisisusedtoprotectspecificshotsfrombeingaccidentallyerased(LOCK).
Italsounprotectsimagesthathavebeenpreviouslyprotected(UNLOCK).
•ProtectingImages
1.Presstheplaymodebuttonandpressthemenu
button.
2.PresstheLEFT/RIGHTbuttonandselectthe
[PROTEC]]menutab.
3.SelectadesiredsubmenubypressingtheUP/
DOWNbuttonandpresstheOKbutton.
[SELECT]:Onlytbeimagetbetisdisplayedon
theLCDmonitorisprotectedorunprotected.
[ALL] :Allofthestoredimagesareprotectedorunprotected.
4.Selectthedesiredsecondarymenubypressing
theW/TbuttonandpresstheOKbutton.
[UNLOCK]:Cancelstheprotectfunction.
[LOCK]:Setsuptheprotectfunction.
-Ifyouselectthe[SELECTsubmenuatstep3,
youcanprotectorunprotectanotherimageby
pressingtheLEFT/RIGHTbutton.Ifyoupress
theSHUTTERbutton,theImageProtection
menuwilldisappear.
-Ifyouprotectanimage,theprotecticon(O-n)
willbedisplayedontheLCDmonitor.
(Anunprotectedimagehasnoindicator)
-AnimageinLOCKmodewillbeprotectedfrom
[DELETE]or[DELETEALL]functions,butwilI
NOTbeprotectedfromthe[FORMAl]function.
•Ofallthefilesstoredinthememorycard,theunprotectedfilesintheDCIM
subfolderwillbedeleted.Rememberthatthiswiltpermanentlydeleteunprotected
images.Importantshotsshouldbestoredonacomputerbeforedeletiontakes
place.Thestar[upimageisstoredinthecamera'sinternalmemory(i.e.,noton
thememorycard)anditwillnotbedeletedevenifyoudeleteallfilesonthe
memorycard.
•Deletingallimages
1.Presstheplaymodebuttonandpressthemenu
button.
2.PresstheLEFT/RIGHTbuttonandselectthe
[DELETEALL]menutab.
3.SelectadesiredsubmenubypressingtheUP/
DOWNbuttonandpresstheOKbutton.
Selecting[SELEC]]:cancels"DeleteAll"
Selecting[ALL]:Displaysthedialogueboxtoconfirmthedelete.
-If[DELETE]isselected:presstheOKbuttonandallunprotectedpictures
aredeleted.
-If[CANCEL]isselected:presstheOKbuttonandimagesarenotdeleted.
(43_

• DPOF(Digital PrintOrder Format) allowsyou toembed printinginformation on
your memory card's MISC folder. Select the pictures to be printedand how many
prints to make.
• The DPOF indicator will displayon the LCDmonitorwhen an imagethat has
DPOF informationplays back. Images canthen beprinted on DPOF printers,
or atan increasingnumber of photo labs.
• This functionis not avai}ablefor Movieclipsand Voice recording flies.
• The DPOF riteis onlystored on the memory card.
• This functionallows youto embed print quantityinformation on a storedimage.
1. Pressthe playmode button andpress the menu
button.
2. Pressthe LEFT/RIGHT button and selectthe
[DPOF]menutab.
3. Selectthe [STANDARD] menu by pressingthe
UP/DOWN button andpressthe RIGHT button.
4. Use the UPand DOWN buttonsto select [ONE
PIC]or [ALL PICS], andthen press the OK
button.A windowfor selectingnumber of copies
will display.
[ONE PIC] : Set the number of copies to printfor
the currentpicture only.
[ALL PICS]: Setthe numberof copiesto printfor
each picture,excluding movie clips andvoice recordings.
5. Use the UPand DOWN buttonsto select the number of copies andthen press
the OK button.
-The DPOF icon ( .D. ) will appear by the picturesfor whichthe number of
copies to print isset.
{44_
• Images (exceptfor movie clips andvoicefile) areprinted as indextype.
Indextype will placea number of imagesas thumbnails on a single sheet.
1.Pressthe play modebutton and pressthe menu
button.
2. Pressthe LEFT/RIGHT button and selectthe
[DPOF]menutab.
3. Selectthe [INDEX] menu by pressingthe UP/
DOWNbutton and pressthe RIGHT button.
4. Select adesired sub menu by pressing the UP/
DOWNbutton.
If[NO] isselected :The image witl not be printed in indexformat.
If[YES] isselected :The image witl beprintedin indexformat.
5. Pressthe OK buttonto confirm the setting.
6. Pressthe menu button twice andthe menu willdisappear.

•Youcanspecifytheprintsizewhenprintingimagesstoredonthememorycard.
The[PRINTSIZE]menuisavailableonlyforDPOF1.1compatible printers.
• Settingthe PrintSize
1.Presstheplay modebuttonandpressthemenubutton
2.Press the LEFT/RIGHT button and selectthe
[DPOF] menutab.
3.Select the [PRINT SIZE] menu by pressingthe
UP/DOWN button and pressthe RIGHT button.
4.Select a desired sub menu by pressingthe UP/
DOWN button andpressthe OK button.
* PRINTSIZE :DEFAULT, 3X5, 4X6, 5X7,8X10
* The [DEFAULT]print sizevaries depending on the printer manufacturer.
Foryour printer'sdefault value, please refer to the user's guidethat came with
your printer.
• You can cancel the [STANDARD],[INDEX], or [PRINTSIZE] settings. Cancelthe
settingto reset thevalue to its default.
1.Press the playmode button andpress the menu
button.
2.Press the LEFT/RIGHT button and selectthe
[DPOF] menutab.
3.Select the [CANCEL] menu bypressing the UP/
DOWN button andpressthe RIGHTbutton.
4.Select a desired sub menu by pressingthe UP/DOWN button.
If[STANDARD] is selected :Cancels the standard printsetting.
If[INDEX] is selected :Cancels the index print setting.
If[PRINT SIZE]is selected :Cancels the printsize setting.
5. Pressthe OKbutton toconfirm the setting.
• This enablesyou to copyimagefiles to the memorycard.
• Copyingto the Memory Card
1.Press the playmode button andpress the menu
button.
2.Select the [COPY TO CARD] menu tab by
pressing the LEFT/RIGHT button.
3.Select a desired sub menu by pressingthe UP/
DOWN button and pressthe OK button.
-[NO] : cancelsthe [COPY TO CARD]function.
-[YES] : NI images saved inthe internal memoryare copiedto the memory
card after the [PROCESSING!] messageis displayed. After copying
has been completed,the screen willreturn to piaymode.
(45}

• You can use the USB cableto connect this camera to a printerthatsupports
PictBridge (soldseparately) and printthe stored images directly. Movieclips and
voicefiles cannotbeprinted.
• Connecting the Camerato a Printer
1. Slidethe power switchto turn the camerapower on.
2. Use thesupplied USB cable toconnectthe camera
to the printeras shown below.
3.Turn on the printer to connectthe camerato the
phnter.
4. Awindow for selectingan external devicewill
display on the LCDmonitor.
5. Select[PRINTER] menuby pressing the Up/Down buttonand press the OK
button.
• Select pictures to print
1.Usethe LEFT and RIGHT buttonsto select the
[IMAGE] menu tab.
2. Usethe UP andDOWN buttons toselect the
desired sub menuvalue, and then press the OK
button.
When [ONE PtC] is selected
:The PictBridgefunction willbe appliedonly to
the picturecurrentlydisplayed.
When [ALL PICS] isselected
:The PictBridgefunction willbe appliedto all pictures,excludingmovie clips
and voicefiles.
• Setting the Number of Copies to Print
- Select [ONEPtC] or [ALL PtCS].A screen where you can setthe numberof
copiesto printwillappear as shown below.
st tfyou selected[COMPUTER] in Step 5, when you connectthe camerato your
printer,the [CONNECTING COMPUTER] messagewilt display and the
connectionwill notbeestablished. In this case,disconnect the USB cable, and
then followthe procedurefrom Step 2 and onward.
{46}
[When [ONE PIC] is selected ]
[When [ALL PICS] is selected ]
- Pressthe Up/Down button toselect the number of prints. Maximum 30 prints.
- When youselect [ONEPIC] menu, usethe Left/Right button toselect another
pictureandselect the number of printsfor anotherpicture.
- After settingthe number of prints,press the OK button to save.
- Pressthe Shutter buttonto return to the menuwithoutsetting the number of
prints.

•AUTOSET
1.UsetheLEFTandRIGHTbuttonstoselectthe
[AUTOSET]menutab.
2.UsetheUPandDOWNbuttonstoselectthe
desiredsubmenuvalue,andthenpresstheOK
button.
[NO]:[CUSTOMSETvaluesarekept.
[YES]:Allvaluesinthe[CUSTOMSETjare
automaticallychanged.
•CUSTOMSET:YoucanselectthePaperSize,PrintFormat,PaperType,Print
Quality,DatePrint,andFileNamePrintmenusforprinted
pictures.
1.UsetheLEFTandRIGHTbuttonstoselectthe
[CUSTOMSETmenutab.
2.UsetheUPandDOWNbuttonstoselectthe
desiredsubmenuvalue,andthenpressthe
RIGHTbutton.
3.UsetheUPandDOWNbuttonstoselectthe
desiredsubmenuvalue,andthenpresstheOK
button.
•Themenusyoucansetupareasfollows:
Menu Function Submenu
SIZESettingthesizeoftheprintingAUTO,POSTCARD,CARD,
paper LE'FIER,4X6,L,2L,A4,A3
LAYOUTSettingthenumberofpicturestoAUTO,FULL,1,2,4,8,9,16
QUALITY Setting the qualityof the AUTO, DRAFT, NORMAL, FINE
FILENAME Settingwbetbertoprinttbefile AUTO, OFF, ON
÷ Somemenuoptions are notsupported inall manufacturerand printer models.
÷ Ifthe setting values are notchanged in the automatic/manualsetting, the setting
values are automatically kept.
beprintedonasheetd paper
TYPE Setting the qualityof the AUTO, PLAIN,PHOTO,
printing paper FASTPHO.
pictureto be printed
DATE Setting whetherto print the
date AUTO, OFF, ON
name
(47}

• Printing Pictures
1. Use the LEFT and R{GHTbuttons to select the
[PRIN]] menu tab.
2. Use the UPand DOWN buttonsto select the
desired submenuvalue, andthen press the OK
button.
[STANDARD] :Printthe picturesstored inthe
memory card in set numbers.
One pictureis printedon one piece ofpaper.
[INDEX] :Print multipleimages on one sheetofpaper.
3.The screen shown on the rightwilt appear and the
picturewillbe printed. Ifno pictureisselected,the
[NO IMAGE!] messagewill bedisplayed. Press
the shutter buttonwhile printingto cancel the
printingand the [IMAGES] menuis displayed.
_ Number ofpicturesin a index print variesdepends
on the printer used.
{48}
• DPOF PRINT :Thisallows you to directly printthe flies with DPOF information.
1.Usethe LEFT and RIGHT buttonsto select the
[DPOF PRINT]menu tab.
2. Usethe UP andDOWN buttons toselect the
desired sub menuvalue, and then press the OK
button.
[NO] :Cancelthe printing
[YES] :Directlyprint the file with the DPOF
information
÷ Dependingon the manufacturerand printermodel somemenus may notbe
available.When a printerdoes not supportthe DPOF, the menuis stilt
displayedbut not available.
• Initialisesuser-changed configurations.
1.Usethe LEFT and RIGHT buttonsto select the
[RESE]] menu tab.
2. Usethe UP andDOWN buttons toselect the
desired sub menuvalue, and then press the OK
button.
- if[NO] is selected :Settings will not be reset.
- if[YES] is selected :All printand image
st Default printsetting variesdepending on the printer manufacturer.
Foryour printer's defaultsetting, referto the user's guidethat came with your
printer.
settings wilI be reset.

RInthismode,youcansetupbasicsettings.Youcanusethesetupmenuinall
cameramodes,exceptVoiceRecordingmode.
Theitemsindicatedby aredefaultsettings.
Menu tab Main menu Sub menu Secondary menu Page
FILE
PWR SAVE
LANGUAGE
FORMAT
DATE
TIME
iiiiiiiiiiiiiiiii_
RESET
OFF, I,_5MtN
ENGLISH
FRANCAIS
ESPANOL
PYCCKH_
DUTOH
SVENSKA
POLSKI
T0rkge
YES
06_1_1
MM/DD_Y
DD/MM_Y
13:00
DEUTSOH
ITALIANO
PORTUGUES
DANSK
SUOMt
BAHASA
(_e_tina
Magyar
OFF
p.50
p.50
p.50
p.51
p.51
Menutab Main menu Submenu
USB
BEEP
hOD
Q.VIEW OFF/&5, 1,3SEC
RESET
Menusare subjectto change without prior notice.
PRINTER
iiiiiiiiiiiiiiiiiiiiiiiiii
OFF
DARK
BRIGHT
YES
Secondary menu Page
p.52
p.52
p.52
p.52
p.53
IMPRINT
DATE
DATE&TIME
p.52
_49_

[Filename]
•Thisfunctionallowstheusertoselectthefi{enamingformat.
• AssigningFileNames
1.InanymodewiththeexceptionofVoice
Recordingmode,presstheMENUbutton.
2.PresstheLEFT/RIGHTbuttonandselectthe
[SETUP]menutab.
3.Selectthe[FILE]menubypressingtheUP/
DOWNbuttonandpresstheRIGHTbutton.
4.SelectadesiredsubmenubypressingtheUP/
DOWNbuttonandpresstheOKbutton.
[SERIES]:Newfilesarenamedusingnumbersthatfollowtheprevious
sequence,evenwhenanewmemorycardisused,orafter
formatting,orafterdeletingallpictures.
[RESET]:Afterusingtheresetfunctionthenextfilenamewillbesetfrom
0001evenafterformatting,deletingallorinsertinganewmemory
card.
5.Pressthemenubuttontwiceandthemenuwiltdisappear.
-Thefirststoredfoldernameis100SSCAM,andthefirstfilenameis$5030001.
•ThefilenameofA403is$4030001.
-FilenamesareassignedsequentiallyfromS5030001_S5030002_~
S5039999.
-Thefoldernumberisassignedsequenfiallyfrom100to999asfollows:
100SSCAM_101SSCAM_~_999SSCAM.
-ThefliesusedwiththememorycardconformtotheDOF(Designrulefor
CameraFilesystems)format.
_5o_
[ Auto power off]
==This function switchesthe cameraoff after aset amount of time inorder to
preventunnecessary batterydrainage.
® Submenus
[OFF] : The poweroff functionwill notoperate.
[1,3, 5 MIN] :The power wiltturn off automaticallyif
not usedfor the period of time
specified.
÷ Afterreplacingthe battery,the power offsetting wiilbe preserved.
Note that the automatic power off functionwitl not operate if thecamera is in
PC mode,slide show playing back a voicerecording, playingback a movie
clipor takinga composite shot.
[Language ]
g Thereis achoice of languages thatcanbe disptayedon the LCD monitor.
Even if the battery isremoved and inserted again,the languagesetting willbe
preserved.
-LANGUAGE sub menu :English, Korean,French,
German, Spanish, italian,S.Ohinese, T.Ohinese,
Russian, Portuguese Dutch Danish, Swedish,
Finnish Thai BAHASA (MALAY/INDONESIAN),
Arabic, Hungarian,Czech Polishand Turkish.

[ Formatting a memory ]
• Thisisusedforformattingthememory,tf yourun[FORMA_onthememory,
allimagesalreadyinthememory,includingprotectedimages,wiltbedeleted.
Besureto downloadimportantimagestoyourPCbeforeformattingthememory.
• Sub menus
[NO] : The memorywill not befen'hatted.
Pressthe menu buttonthree timesand the
menudisplay will disappear.
[YES] :A confirmation windowwill display,Select
the [FORMATJmessage andpress the OK
button,A [PROCESSING!]message
appears and the memory card will be
formatted, Ifyou ran FORMAT in Play
mode, a [NO IMAGE!]message will
appear.
÷ Besure torun [FORMAT]on thefollowing types ofmemory card.
-A new memory card,or an unformatted memory card
-A memory cardthat has afile this camera can't recognise or one that has
been takenfrom anothercamera.
÷ Alwaysformat the memory by using this camera,tfyou inserta memorycard
that has been formatted byusing other cameras memorycard readers, or
PCs,you will get a[CARD ERROR!]message.
[Settingup the Date/ Datetype ]
• You can change the date thatwill be displayed on the captured images and set
up the date type.
• Setting Date & Selecting DateFormat
RIGHT button: Selectsthe year/month/day date
type.
LEFT button : Movesthe cursor tothe [DATE] main
menuifthe cursor isat the first item
ofthe date and time setup. In all
other cases,the cursor will be shifted
to the leftof its current position.
UPand DOWNbuttons : Changesthe setting value.
-Date type : [YY/MM/DD], [DD/MM/YY],[MM/DD/YY], [OFF]
[Settingup the time ]
• You can change the timethat willbe displayedon the captured images.
• Setting time
RIGHT button :Selectsthe hour/minute
type.
UP andDOWN buttons :Changes the setting value.
(51}

[Imprintingthe recordingdate]
• There is an option toinclude DATE/TIME on still
images.
• Sub menus
[OFF] :The DATE&TIME willnot be
imprintedon the image file.
[DATE] :Only the DATE willbe imprinted
on the imagefile.
[DATE & TIME] :The DATE& TIME willbe
imprintedon the image file.
[Connecting an ExternalDevice(USB)]
• You can select an externaldevice towhich youwant to connectthe camera
usingthe USBcable.
• Sub menus
- ]COMPUTER[ :Selectthis if you wantto connect
the camera toyour PC.Refer to
page 62for instructionson how
to connectthe camerato yourPC.
- ]PRINTER[ : Selectthis if you want to connect
the camera toyour printer.Refer
to page 44 for instructionson
bowto connect the camera to
your printer.
(52_
[ BEEP ]
• Ifyou setthe operationbeep to ON, variousbeeps will be activatedfor camera
startup,when buttons are pressed,so that youcan be aware ofthe camera
operationstatus.
• [BEEP] submenu : OFF/ON
[LCD brightness]
• You can adjustthe LCD brightness.
• [LCD]sub menu : DARK,NORMAL, BRIGHT
[Quick view ]
• tfyou enableQuick Viewbefore capturing an image,youcan view the image you
just captured onthe LCD monitor for the duration set inthe [Q.VIEW] setup.
Quickview is possibleonlywith stillimages.
• Sub menus
[OFF] :The quickviewfunction can't be
activated.
[0.5, 1,3 SEC]: The captured image isbriefly
displayed duringthe selected time.

[Initialisation]
• All camera menuand functionsettings willbe restoredtotheir defaultvalues.
However,values for DATE,TIME and LANGUAGE willnet bechanged.
• Sub menus
[NO] : Settingswillnot be restoredto their defaults.
[YES] :All settingswill be restoredtotheir defaults.
• You can setup a start up image, shuttersound. Evel7 camera working mode
(with the exception ofVoice recording mode) hasthe MyCAM menu.
The itemsindicated by _ are defaultsettings.
Menutab Mainmenu Submenu Page
S.IMAGE
S.BEEP OFF p.52
* Menusare subject to change without priornotice.
USER IMAGE1 USERIMAGE2
LOGO
p.51
• You can select the imagethat isfirst displayed onthe LCD monitor whenever the
camera is turnedon.
• Start up image :[OFF], [LOGO], [USER iMAGE1],
st Use a savedimage forthe start-upimage with
the [USER IMAGE] inthe [RESlZE] menu inthe
playmode.
_ The start-up image willnot be deletedby
[DELETE]or [FORMA]] menu.
st The User imageswill be deleted by [RESET] menu.
• You can select the soundthat isactivated whenever the camera isturned on.
• Start up sound :[OFF], [ON]
- Ifthe startup image is setto [OFF],the start up
sound willnot activate,even though you may
havesetthese toon.
[USER IMAGE2]
(53}

Be sureto observethe following precautions!
• This unit containsprecision electronic components. Donot use or storethis unit
in the followinglocations.
- Areas exposedtosevere changes in temperatureand humidity.
- Areas exposedtodust and dirt.
- Areas exposedtodirect sunlight; orthe inside of avehicle in hot weather.
- Environmentswhere there is high magnetism or excessive vibration.
- Areas withhighexplosivesor highly flammablematerials.
• Do not leave thiscamera in places subjecttodust, chemicals (likenaphthalene
and mothball),high temperatureand highhumidity.
Keepthis camera with silicagel in a hermeticallysealed boxwhen notplanning
to usethe camera for a long period oftime
-Thiscamera is not waterproof.
Toavoid dangerous electricalshocks, neverhold or operate thecamera with
wet hands.
-Ifyou use this camerain wet places, suchas beach or pool,do not let water or
sandget inside the camera. Doing so may result infailureor may permanently
damage the unit.
Extremesin temperature may causeproblems.
-Ifthe camera istransferred froma coldto a warm andhumid environment,
condensation can formon the delicate electronic circuitandthe camera may
not workproperly. Ifthisoccurs, turn the camera offand waitfor at least 1hour
untilallmoisture isdispersed. Moisture build upcan alsooccur inthe memory
card. tfthis happens, turnoff thecamera andremove the memory card. Wait
untilthe moisturehas dispersed.
• Sand can beparticularly troublesome tocameras.
- Do not letsand get insidethe unitwhen using iton beaches, coastaldunes, or
other areas where there is lotsof sand.
- Doing somay result infailure or may permanentlyrenderthe unitunusable.
• Handling the camera
- Neverdrop the camera or subject itto severeshocks or vibrations.
- Protectthe largeLCD monitorfrom knocks andscratches. Whenthiscamera is
notused, keep thiscamera in the cameracase.
- Avoidobstructingthe lensor the flash when you capturean image.
{54}
• Caution on Usingthe Lens
-Ifthe lensis subjectedto direct sunlight,it couldresult in discoloration and
deteriorationof the image sensor.
-Pay attentionnotto get fingerprintsor foreign substanceson the surfaceof the
lens.
• Ifthe digital camerais not usedfora long pedod, anelectric dischargecan occur.
Itis a good ideato remove the battery andthe memory cardif you do not intend
using the camerafor an extended period oftime.

• tfthe camera isexposedto an electronic interference, it will turn itselfoff to
protectthe memory card•
• Camera Maintenance
- Usea soft brash(availablefrom photo stores) togently cleanthe lensandLCD
assemblies, ff thisdoes not work, lens-cleaningpaperwith lens cleaningfluid
can be used.
Clean the camera body witha soft cloth. De not a_lowthiscamera to come into
contact withsolvent materials such as benzol, insecticide,thinnersetc.This
may damagethe body shellof thecamera and alsoaffectits performance.
Rough handling candamage the LCDmonitor. Take care to avoiddamage
and keepthe camera in itsprotectivecarry case atall timeswhen not inuse.
• There are several warningsthatmay appear onthe LCDdisplay
CARD ERROR!
• Memory card error
Turn offthe camera powerand turn it on again
Insertthe memory card again
Insertthe memorycard andformatthe memory card(p.51)
MEMORY ERROR!
• Internalmemory error
Turn offthe camera powerand turn it on again
Formatthe memory with the memory card removed.(p.51)
• Do not attempt to disassembleor modify the camera.
• Under certainconditions, staticelectricitycan cause the flash unit to fire.This is
not harmfultothe camera and is not a malfunction.
• Before an importantevent or goingon atrip, you should checkthe camera
condition.
-Take a picturefor testingthe camera conditionand prepareextra battery.
-Samsung cannot be held responsiblefor camera malfunctions.
CARD LOCKED!
• The memory card is locked
SD memorycard :Slidethe write protect switch tothe top ofthe memory card
CARD FULL!/MEMORY FULL!
• There is insufficientmemory capacityto take an image
Inserta newmemory card
Deleteunnecessary image filestofree up somememory
NO IMAGE!
• There are no images stored on the memory
Take images
Inserta memory card thatis holding some images
(55_

FILE ERROR!
• Fileerror
Formatthe memory card
• Memory card error
Contact a camera service centre
LOW BAlqERY!
•There is low batterycapacity
Insertfresh batteries
OUT OF NUMBER
•When selectingtoo many printingpages inthe PictBridge menu.
Select printing page withinthe limitation.
• Pleasecheck the following
The camera doesn't switchon
•There is low batterycapacity
Insertfresh batteries
• Batteryis insertedincorrectlywiththe polaritiesreversed
Insertthe battery accordingtothe polarity marks (+,-)
{56_
The camera powerceases while in use
•The battery areexhausted
Insertfresh batteries
•The camera isturned off automatically
Turn onthe camerapower again.
Batteryquickly losespower
•The camera isbeing used inlow temperatures
Keepthe camera in warmconditions (i.e. insidea coat orjacket) andonly
removeit in ordertotake images
Camera does nottake images when pressing the Shutterbutton
•There is insufficientmemory capacity
Delete unnecessaryimage files
•The memory card has notbeen formatted
Formatthe memory card (p.51)
•The memory card isexhausted
insert a new memory card
•The memory card islocked
Refer to [CARDLOCKED!]error message (p.55)
•The camera's power isoff
Turnthe camera power on
•The battery areexhausted
Insertfresh batteries.
• Batteryis insettedincorrectlywith the polarities reversed
insert the battery accordingto the polarity marks(+, -)

Tirecamera suddenlystops working while in use
. The camera was stopped dueto a malfunction
Remove/re-insert battery andswitch the camera on
The imagesdon't playback
• Incorrectfile name (ViolationofDCF format)
Do not change the imagefile name
Tire imagesare unclear
- An incorrectfocus modeis selected•
Select a correct focus moderelated tothe distance.
- The picturewas takenwith the subjectbeyondthe flash range
Take a picturewithin theflash range
- The lensis smudged or dirty
Clean the lens
Tireflashdoes not fire
- Flash offmodehas been selected
Disengageflash offmode
- The cameramode can't use tire flash
Referto the FLASH instruction(p.18)
Incorrectdate andtime is displayed
- The date and time have beenset incorrectlyor the camerahas adoptedthe
defaultsettings
Resetthe date and time correctly
Tirecamera buttons do not operate
- Camera malfunction
Remove/re-insert battery andswitch the camera on
Acard errorhas occurred while the memory card is in the camera.
- Incorrectmemory card format
Refomqatthe memory card
Colour of image is differentto the originalscone
• White balancesetting is incorrect
Selectappropriate White balance
Images are too bright
• Exposure isexcessive
Reset exposurecompensation
When using the PC's explorer,the [Removable Disk] file doesnot show
Cable connection is incorrect
Checkthe connection
The camerais off
Turn the cameraon
Tire operatingsystem isnot Windows 98,98SE, 2000, ME, XP/Mac OS 10.0
10.3.Alternatively the PC doesnot support USB.
installWindows 98, 98SE, 2000,ME, XP/Mac OS 10.0 _ 10.3 to PCthat
supports USB.
The cameradriver isnot installed
Installa [USB Storage Driver]
(57}

= ImageSensor
-Type : 1/2.5"COD
t A503 A403EffectivePixels Approx50 Mega-pixel Approx40 Mega-pixel
| TotalPixels Approx53 Mega-pixel Approx.42 Mega-pixel
ii Lens
-Focal Length: SHD Lens f=6.1mm (35mm _m equivalent:36mm)
-F No. : F32 / F7.0
-Digital Zoom : " Still Imagemode: 1.0X_5.0X
" Play mode: 1.0X~ 8.0X(dependson Image size)
= LOD : 20" color TFT LOD(115K)
= Focusing
-Type : Fixedfocuswith two steps manual adjustment
-Range : - Normal : 1.0m _ infinity
• Macro : 0.2m
= Shutter
-Type : Mechanical and Electronic shutter
-Speed : 3-1/1000 sec. (Night Mode :8 - 1/1000sec.)
= Exposure
-Control : • ProgrammedAE
• Metering: Multi,Spot
-Compensation :+2EV (0.5EVsteps)
- ISO Equivalent:Auto,100 200400
= Flash
-Modes : Auto,Auto & Red- eye reduction, FilFinflash, Slow sync, FlashOff
-Range :02m ~ 3m
-Recharging Time : Approx. 5 sec.
= Sharpness :Soft Normal,Vivid
_58:_
= Effect : Color:Normal, B&W, Sepia, Negative,Red, Green, Blue,RGB,
HigNight, Composite, Photo Frame
= White Balance : Auto, Daylight, Qoudy, Sunset, Fluorescent(R) Fluorescent (L),
Tungsten Custom
= VoiceRecording :Voice Recording(depend on memorysize and t_ttery
capacity) Voice Memo onStill image (max 10sec)
= DateImprinting :Off, Date, Date& Time(User selectable)
= Shooting
-Still Image: " Mode:Auto Program,Scene
Scene: (Night,Portrait Landscape,Sunset, Dawn, Backtight,
Fireworks Beach/Snow)
• Continuous: Single,Continuous,AEB
• Self-timer: 10 sec., 2sec., Double selftimer (10sec. & 2sec.)
- MovieClip : • Withaudio (recording time: memorycapacity dependent)
• Size: 640x 480, 320x 240
• Frame rate:24fps, 15fps
= Storage
- Media : Internalmemory: Approx. 24(Approx. 8)MBflash memory
Extemal memory:SD card/High Speed MMD (1GB Guaranteed)
- File Format: • Still Image: JPEG (DCF), EXlF2.2, DPOF 1.1, PictBridge1.0
" Movie Clip:AVl (MJPEG)
" Audio:WAV
- Image Size

-Capacity[24(Approx.8)MB]
*5M 4M 3M 2M 1M VGA
Superfine 9 12(4) 15(5) 24(8) 55(18) 122(42)
Fine 18 22(7) 28(9) 45(15) 95(32) 182(82)
Normal 27 34(11) 41(14) 55(22) 127(43) 218(75)
÷ Thesefiguresare measured underSamsung's standard conditionsand may
vary dependingon shooting conditionsand camera settings.
÷ *A503 only
( )A403 only
• Image Play
-Type : Single image/Thumbnaiisl Slideshowl Movieclip
- Editing : Rotation, Trimming,Resizing
• Interface
- Digitaloutput connector:USB 2.0
• Power Source
-Primary Battery :2 xAA Alkaline (High Capacity)/lx OR-V3
-Rechargeable battery (Optional): SNB-2512(Ni-MH)
Included power source may vary depending on sales region•
• Dimensions(WxHxD) : 96.4 x 53 x 28.4 mm
• Weight: Approx•98g (withoutbatteries and card)
• Operating Temperature :0~ 400C
• Operating Humidity :5N 85%
• Software
- CameraDriver:StorageDriver(Windows98/98SE/2000/ME/XP,MacO8 10.0_10.3)
- Application : Digimax Master
• Special Features : PowerMovieClip (Pause Functionin MovieClip&VGA),
Various Scene Modes, RGB Color Effect, Voice Recording,
PicthridgePrinting, 24MB InternalMemory
÷ Specificationsaresubject to changewithout prior notice.
÷ Alltrademarksare the propertyof their respectiveowners.
Pleaseread this instruction manual carefullybefore installingthe software.
•The attached software is acamera driver and imageediting software toolfor
Windows.
• Underno circumstancesshould atlor part ofeither the software or the user
manual be reproduced•
• Copyrightsfor software are licensedonlyfor use witha camera•
• Inthe unlikelyevent of amanufacturingfault,we willrepair or exchangeyour
camera•Wecannot, however, behem responsiblein anyway for damage
causedby inappropriate use.
• Usinga Hand-madePC or a PC andOS that hasnot been guaranteed bythe
manufactureris notcovered by the Samsung warranty•
• Before reading this manual,you should have a basic knowledge of computers
andO/S (Operating Systems)•
ForWindows For Macintosh
PCwithprocessorbetterthanMMX PowerMac G3 or later
Pentium450MHz(XP :PentiumII700MHz)
Windows 98/98SE/200O/ME/XP Mac OS 10.0~10.3 or later
Minimum64MB RAM Minimum64MB RAM
(Over128MB recommended) 110MBof availablehard-diskspace
200MBof available berd-diskspace
(Over1GB recommend)
USB port USB port
CD-ROM drive CD-ROM drive
1024x788pixeis, 16-bitcolordisplay QuickTime 6•01 or laterfor MovieClip
compatible monitor(24-bit color
display recommended)
DirectX9.0 or later
(59}

AfterinsertingtheCD-ROMprovidedwiththiscameraintotheCD-ROMdrivethe
followingwindowshouldautomaticallyrun.
Beforeconnectingthecameratothe
PO,youshouldfirstinstallthecamera
driver.
Thismanualisbasedonthe
DigimaxA503.A403maydiffer
fromA503insomecontents.
=Cameradriver :This enables images to transfer between the camera and PC.
This camera uses the USB Storage Driver as the camera driver. You can use
the camera as a USBcard reader.After installingthe driverand connecting this
camera tothe PC, you can find [Removable Disk]in [Windows Explorer]or [My
computer]. A USB StorageDriveris providedonly for Windows.A USB Driver
for MAC is not includedwith the ApplicationCD. But you can use the camera
with Mac OS 10.0_ 10.3.
= Digimax Master :This is theall-in-one multi media software solution.
You can download,view, editand save yourdigital images and movie clipsclip
with this software. Thissoftware is only compatiblewith Windows.
{60}
g To use this camera with a PC, installthe applicationsoftware first.
After this has been done,the storedimages in the camera canbe movedtothe
PO and canbe edited by an image editingprogram.
g Youcan visit the Samsung web-sitethrough the internet.
http://www.samsungcamera.com: English
http://www.samsungcamera.co.kr : Korean
1.The auto run frame willdisplay. Click the
[install] menu inthe Auto runframe.
2.Installthe DirectX,Digimax Master by selectinga buttonshown on the
monitor.

3.After restartingthecomputer,connectthecamera to yourPCwiththe USBcable.
4.Tum the camera poweron. The [Found
NewHardware Wizard]will open andthe
computer willrecognisethe camera.
÷ tf your OS is Windows XP, animage
viewer programwill open.
If the downloadwindowof the Digimax
Master softwareopens afterstarting
Digimax Master, the camera driverwas
set up successfully.
(61}

•IfyouconnecttheUSBcabletoaUSBportonyourPCandthenturnonthe
power,thecamerawiltautomaticallyswitchto"computerconnectionmode".
•Inthismode,youcandownloadstoredimagestoyourPCthroughtheUSBcable.
•TheLCDmonitorisalwaysturnedoffinthismode.
•ConnectingthecameratoaPC
1.InanymodewiththeexceptionofVoice
Recordingmode,presstheMenubutton.
2.PresstheLEFT/RIGHTbuttonandselectthe
[SETUP]menutab.
3.Selectthe[USB]menubypressingtheUP/
DOWNbuttonandpresstheRIGHTbutton.
4.UsetheUPandDOWNbuttonstoselect
[COMPUTER],andthenpresstheOKbutton.
5.Pressthemenubuttontwiceandthemenuwil_disappear.
6.ConnectthePCtothecamerawiththeUSBcabIe.
÷Ifyouselected[PRINTER]inStep4,
whenyouconnectthecamerato
yourprinter,the[CONNECTING
PRINTER]messagewiltdisplayand
theconnectionwillnotbe
established.Inthiscase,disconnect
theUSBcable,andthenfollowthe
procedurefromStep2andonward.
{62/
•Downloadingstoredimages
YoucandownloadthestilIimagesstoredonthecameratoyourPC'sharddisk
andprintthemoruseaphotoeditingso_,_aratoeditthem.
1.ConnectthecameratoyourPCwiththeUSBcable.
2.Onyourcomputer'sdesktapdisplay,select
[Mycomputer]anddoubleclick[Removable
Disk_DCtM_100SSCAM].
Theimagefileswillthenbedisplayed.
3. Select an image and press the right
mouse button.
4. Apop-up menuwilt open.
Clickthe [Cut] or [Copy] menu.
-[Cut] :cuts a selectedfile.
-[Copy[:copies files.
5.Clicka folderwhere you wantto paste the file.

6.Presstherightmousebuttonandapop-upmenu
willopen.Click[Paste].
7.Animagefileistransferredfromthecamerato
yourPC.
-Byusing[DigimaxMaster],youcanseethestoredimagesinthememory
directlyonthePCmonitorandyoucancopyormovetheimagefiles.
•Windows98SE
1.CheckwhetherthecameraandPCaretransferringafile.
tfthecamerastatustampblinks,pleasewaituntilthelamphasfinished
blinkingandisconstantlyon.
2.UnplugtheUSBcable.
•Windows2000/ME/XP
(TheillustrationsmaybedifferentfromtherealdisplayinaccordancewiththeWindowsO/S.)
1.Check whether thecamera and PC aretransferring a file.
Ifthe camera status tampblinks, pleasewait untilthe lamp hasfinished
blinking and isconstantlyon.
2. Double-clickthe [Unplug or Eject Hardware]iCOnonthe task bar.
[Double-click!]
3.The [Unplug or Eject Hardware] windowwill
open. Select the [USB Mass Storage Device]
and click the [Stop] button.
4.The [Stop a Hardwaredevice] window willopen.
Select the [USB Mass Storage Device] and click
the [OK] button.
5.A [Safe to Remove Hardware] windowwill
open. Clickthe [OK] button.
(63_

6.A[UnplugorEjectHardware]windowwill
open.Clickthe[Close[buttonandthe
removablediskwillberemovedsafely.
7.UnplugtheUSBcable.
1.AUSBDriverforMACisnotincludedwiththesoftwareCDasMACOS
supportsthecameradriver.
2.ChecktheMACOS.YoucanchecktheMACOSversionduringMACOS
start-up.ThiscameraiscompatiblewithMACOS10.0~10.3.
3.ConnectthecameratotheMacintoshandturnthecamerapoweron.
4.Anewiconwillbedisplayedonthedesktopafterconnectingthecamerato
theMAC.
1.Doubleclickanewicononthedesktopandthefolderinthememorywillbe
displayed.
2.SelectanimagefileandcopyormoveittoMAC.
(64_
•ToremovetheUSBdriver,refertotheprocessshownbelow.
1.ConnectthecameraandyourPC,turnthemon.
2.CheckwhethertheRemovableDiskisonthe[MyComputer].
3.Removethe[SamsungDigitalCamera[ontheDevicemanager.
4.DisconnecttheUSBcable.
5.Removethe[DigimaxA503]ontheAdd/RemoveProgramsProperties.
6.Uninstallationiscomplete.

• Youcan download,view, edit and saveyour imagesand movieswiththis software.
Thissoftwareis compatiblewith all WindowsOperatingSystems from Windows
98SEonwards.
• Tostart the program, click[Start _ Programs_ Samsung _ DigimaxMaster].
• Downloading images
1. Connectthe camerato your PC.
2.A window for downloadingimages will
display after connecting thecamera and
your PC.
-To download the captured images, select
the [Select All]button.
- Selectdesired folder inthe window and
click the [Select All]button. You can save
captured images andselected folder.
- Ifyou click the [Cancel]button,
downloading will be cancelled.
4.Select adestination and makea folderto
save downloadedimages andfolders.
- Foldernames can be made inorder of
date and images willbe downloaded.
- Foldername wilt be made as youwant
and images wiflbe downloaded.
-After selectinga folderthat was made
before, imageswill be downloaded.
5. Click[Next>] button.
6.A window will open as shown alongside.
The destinationd the selectedfolder will
be displayed on the upper side of the
window.
Click the [Start]buttonto downloadthe
images.
3. Click[Next >] button.
7. Downloadedimages wiflbe displayed.
_65_

•Imageviewer:Youcanviewthestoredimages.
_ i iil iiiii ii_! iili! !
67---_ _;iii
• Imageedit: Youcaneditthestillimage.
- Image viewerfunctions are listedbelow.
(_)Menu bar : You can select menus.
File, Edit,View, Tools, Change functions Auto download,help etc.
_ Imageselection window : You can selectthe desired images in thiswindow.
(#_Media type selection menu :You can select imageviewer, imageedit and
movie edit functionsinthis menu.
(4.)Preview window :You canpreview an image or a movieclip and checkthe
multi mediainformation.
(_ Zoom bar :You can change preview size.
_ Folderdisplay window :You can see the folder locationofthe selectedimage.
(_ Imagedisplay window :images ofthe selectedfolder are displayed.
÷ Refertothe [HeEp]menu inDigimax Master forfurther information.
(66_
-Image editfunctionsare listedbelow.
¢1)Edit menu : Youcan select the followingmenus.
[TooEs] : You can resize or cropthe selectedimage. See the [Help] menu.
[Adjust] : You can modify imagequality. See the [Hetp] menu.
[Retouch] : You can change image or insert effectson the image.See the
[Help] menu.
¢2_Drawing tools : Tools forediting animage.
(_ image dispEaywindow : a selected image displays inthis window.
(_)Preview window :You can preview the changedimage.
e A stitlimageedited with Digimax Master can't be piayed backon the camera.
÷ Referto the [Help] menu inDigimax Master for further information.

• Movieedit:Youcancombineastillimage,movieclip,narration,andmusicfiles
togetherinasinglefile.
-Movieclipeditfunctionsarelistedbelow.
_)Editmenu:Youcanselectthefollowingmenus.
[AddMedia]:Youcanaddothermediaelementstoamovie.
[EditClip]:Youcanchangethebrightness,contrast,colourandsaturation.
[Effects]:Youcaninsertaneffect.
[SetText]:Youcaninserttexts.
[Narrate]:Youcaninsertanarration.
[Produce]:Youcansavetheeditedmultimediaasanewfilename.Youcan
selectAVI,Windowsmedia(wmv)Window'smedia(asf)and
movieclipforthiscamera(avi,MPEG-4)filetypes.
(_Framedisptaywindow:Youcaninsertmultimediainthiswindow.
÷Somemovieclipsthatwerecompressedwithacobecthatisnotcompatiblewith
theDigimaxMastercan'tbeplayedbackintheDigimaxMaster.
÷Refertothe[Help]menuinDigimaxMasterforfurtherinformation.
•PleasecheckthefollowingiftheUSBconnectionmalfunctions.
USBcableisnotconnectedoritisnotthesuppliedUSBcable.
.... _ConnectthesuppliedUSBcable.
ThecameraisnotrecognisedbyyourPC.
Sometimes,thecameramayappearunder[UnknownDevices]in
DeviceManager.
installthecameradrivercorrectly.
Turnoffthecamera,removetheUSBcable,plugintheUSBcable
again,andthenturnonthecamera.
_3 Thereisanunexpectederrorduringfiletransfer.
: _Turnthecamerapoweroffandonagain.Transferthefileagain.
_Se_ WhenusingaUSBhub.
TheremaybeaprobleminconnectingthecameratothePCthrough
aUSBhubifthePCandthehubarenotcompatible.Whenever
possibleconnectthecameradirectlytothePC.
Ca_(#AreotherUSBcablesconnectedtothePC?
.... _ThecameramaymalfunctionwhenitisconnectedtothePCatthe
sametimeasotherUSBcables,tnthiscase,disconnecttheother
USBcablesfromthecomputerandonlyconnecttheoneUSBcable
fromthecameratothePC.
_[67}

WhentopentheDeviceManager(byclickingStart_(Settings)
ControlPanel_(PerformanceandMaintenance)_System
(Hardware)_DeviceManager),thereareUnknownDevicesorOther
Devicesentrieswithayellowquestionmark(?)besidethemordevices
withanexclamationmarkd)besidethem.
Right-clickontheentrywiththequestion(?)orexclamation(!)mark
andselect"Remove".RestartthePCandconnectthecamerathe
again.ForWindows98PC,removethecameradriveralso,restartthe
PC,andthenreinstallthecameradriver.
Insomesecurityprograms(NortonAntiVirus,V3,etc.),thecomputer
maynotrecegnisethecameraasaremovabledisk.
Stopthesecurityprogramsandre-connectthecameratothe
computer.Refertothesecurityprograminstructionsabouthowtostop
theprogram.
ThecameraisconnectedtotheUSBportlocatedonthefrontofthe
computer.
WhenthecameraisconnectedtotheUSBportlocatedonthefrontof
thecomputer,thecomputermaynotrecognisethecamera.
ConnectthecameratotheUSBportlocatedonthebackofthe
computer.
•Whenthemovieclipdoesn'tplaybackonthePC
÷Whenthemoviecliprecordedbythecameradoesn'tplaybackonthePC,
thecausesaremostlyduetothecodecinstalledonthePC.
_68_
When the DirectX 9.0 or later is notinstalled
Install the DirectX 9.0or later
f) tnsertthe CD providedwith the camera
2) Runthewindows explorer and selectthe [CD-ROM drive:\ USB
Dfiver\DirectX9.0]folder and clickthe DXSETUP.exe file.The DirectXwill be
installed. Visitthe following sitefor downloading the
DirectX.http://www.microsoft.cem/directx
tf a PC (Windows98) stopsresponding while the camera andPC areconnected
repeatedly
If a PC (Windows98) istamed on fora long time and the camera is
connected repeatedly, the PC may not recegnise the camera. Inthis case,
re-startthe PC.
ff a PC connectedwith the camera stops responding while Windows isstarting.
Inthis case, disconnectthe PCand the cameraand Windows willstart.
If the problemhappenscontinuously, set the LegacyUSB Supportto disable
and re-startthe PC.The Legacy USB Supportis in the BIOS setup menu.
(The BIOS setupmenudiffers from the PCmanufacturers andsome BtOS
menus don't have Legacy USB Support) tfyou can't change the menuby
yourself, contactto the PC manufactureror BIOS manufacturer.
If the movieclipcan't bedeleted,removabledisk can't be extracted or an error
message displaysduring thefile transfer.
If youinstallonly the Digimax Master,the problemsmentioned above
occasionally happen.
- Closethe DigimaxMaster program byclicking the Digimax Master iconon
the Taskbar.
- Installall the application programs includedin the software CD.
(You must installthe Movieclip codec)

Equipment)
CorrectDisposatof This Product (Waste Electrical & Electronic
(Applicablein the EuropeanUnionand other Europeancountrieswith
separate collectionsystems)This markingshown onthe product or its
literature,indicates thatitshould not be disposed with otherhousehold
wastes at the end ofits working life.
To preventpossible harm to theenvironment or humanhealth from uncontrolled
waste disposal, please separatethis from othertypes of wastes and recycteit
responeib}yto promotethe sustainablereuse of materialresources. Household
users should contact eitherthe retailerwhere they purchased this product, ortheir
localgovernment office,for details of where and how they cantake this itemfor
environmentallysafe recycling.Business usersshould contacttheir supplier and
check the terms and conditionsofthe purchase contract.
This productshould not be mixedwith othercommercial wastes for disposal.
! Declaration of Conformity
Trade Name :SAMSUNG TECHWIN
ModelNo. : DigimaxA503
ResponsibleParty :Samsung Opto-ElectronicsAmerica, INC.
Address : 40 Seaview Dr. Secaucus,NJ 07094
Telephone No. : 201-902-0347
This devicecomplies with Part 15of the FCC Rules.Operation issubjectto
the followingtwo conditions: (1)This device may not causeharmful
interference,and (2)this device mustaccept any interferencereceived,
including interferencethat may causeundesired operation.
(69}

SAMSUN0,TECHWIN0,O_UfD
OPTICS& D]0,ff£L IMAGINGD_VISION
145_3,SANGDAEWON1-DONG_JUN0,WONGU,
SDNGNAM-qP/KVUNGKPDO_KOREA
¢82-121
TEL :(82)31-74-0-8086,@88 80%_8092 8099
FAX :(82}81-740-8398
vtc_'wsamsu%camelaaOM
SAMSUNGFF/4tqOESAS
BP51TOUR_,4A_NEMONTPARNASSE83,
AVDU MAINE75755 PARISCEDEX15 FRANOE
HO1LINEPUOTONUMER/QUE:
0088022% 3727(Num¢roVeCAppe_@atut)
TEL:(38)1-4279-2%0
FAX:(%} 1-48%-4510
w_/sarr sungp/_otoI__
i SAMSUN0,OPTO_ELECTRON_CSUKLWITED
!
SAMSUN0,HOUSE1000IqLLSWOODDRIVE
CHER_SEYK516 OPSUK
TEL :00800122_#727
(freeforcalbfromUK only)
SAMSUNGOPTO-ELEOTRONI{£3AMER/OAINC
HEADQUAMERS
40SEAMIEWDR/VE,SECAUCUS,
NJ07%4 USA
TEL :(1)201-902-03-4,7
F}_X:(1}201-902-9842
WESTERNRE0,1Ot_ALOFFICE
18600BROADWIOKST
RANOHODOMIN0,UE$,OA%220,USA
TEL :(1)310-900-5%8/5264_
FAX :(1}310-537-1566
vt@_vsamsu%cs_erausacorn
SAMSUNGOPTO-ELECTrIONICSGMBH
AUKRONBER0,ERHANG6
D-68824SCH//VALBACR£SGERMA Y
TEL:@ (O)619666 530,3
FAX:49{0)61966653 66
w_7 sarrsungcamerade
T/ANJINSAMSUN0,OPTOELEC1RONIOSCO I_TD
7PINGOHANGRO£D NANKA/DST T'ANJIN
PR CHINA POSTOODE:3%_190
Internetaddress - http://www samsungcameracorn
-_i The DE Markis a Directiveconformity
i markof theEuropeanCommunity(EC)
.........................J 6806-31 59
 Loading...