

Page 1
Clothing Care System
(AIRDRESSER)
User manual
DF60*8****G
Page 2

Contents
Contents
Safety information 3
What you need to know about the safety instructions 3
Important safety symbols 3
Important safety precautions 4
General warnings 5
Electrical warnings 7
Installation warnings 8
Cleaning warnings 9
Instructions about the WEEE 10
Before you start 11
Installation 11
Product overview 14
Control panel 16
Cycle overview 18
Fabric care guide 22
Fabric care labels 26
Smart control 27
Product and accessory use 31
Using a cycle 31
Using the accessories 33
Cleaning and maintenance 41
Exterior 41
Water tanks 42
Water tray 43
Air Filter 44
Lint lter 46
Descaling 47
Moving the product to another location 48
Troubleshooting 49
Notication messages 49
Checkpoint 50
Specications 52
English2
Page 3

Safety information
Congratulations on your new Samsung product. This manual contains important
information on the installation, use and care of your product. Please take some time to
read this manual to take full advantage of your product’s many benets and features.
What you need to know about the safety instructions
Please read this manual thoroughly to ensure that you know how to safely and efciently
operate the extensive features and functions of your new product. Please store the
manual in a safe location close to the product for future reference. Use this product only
for its intended purpose as described in this instruction manual. Warnings and Important
Safety Instructions in this manual do not cover all possible conditions and situations that
may occur. It is your responsibility to use common sense, caution and care when installing,
maintaining and operating your product. Because the following operating instructions
cover various models, the characteristics of your product may differ slightly from those
described in this manual and not all warning signs may be applicable. If you have any
questions or concerns, contact your nearest service centre or nd help and information
online at www.samsung.com.
Safety information
Important safety symbols
What the icons and signs in this user manual mean:
WARNING
Hazards or unsafe practises that may result in severe personal injury, death and/or
property damage.
CAUTION
Hazards or unsafe practises that may result in personal injury and/or property damage.
CAUTION, Hot surface
NOTE
Indicates that a risk of personal injury or material damage exists.
These warning signs are here to prevent injury to yourself and others.
Please follow them explicitly.
After reading this manual, store it in a safe place for future reference.
Read all instructions before using the product.
As with any equipment that uses electricity and moving parts, potential hazards exist. To
safely operate this product, familiarise yourself with its operation and exercise care when
using it.
English 3
Page 4

Safety information
Important safety precautions
WARNING
To reduce the risk of re, electric shock, or injury to persons
when using your appliance, follow basic precautions, including the
Safety information
following:
1. This appliance is not intended for use by persons (including
children) with reduced physical, sensory or mental capabilities, or
lack of experience and knowledge, unless they have been given
supervision or instruction concerning use of the appliance by a
person responsible for their safety.
2. This appliance can be used by children aged from 8 years and
above and persons with reduced physical, sensory or mental
capabilities or lack of experience and knowledge if they have been
given supervision or instruction concerning use of the appliance
in a safe way and understand the hazards involved. Children shall
not play with the appliance. Cleaning and user maintenance shall
not be made by children without supervision.
3. Children should be supervised to ensure that they do not play with
the appliance.
4. If the supply cord is damaged, it must be replaced by the
manufacturer, its service agent or similarly qualied persons in
order to avoid a hazard.
5. CAUTION: In order to avoid a hazard due to inadvertent resetting
of the thermal cut-out, this appliance must not be supplied through
an external switching device, such as a timer, or connected to a
circuit that is regularly switched on and off by the utility.
English4
Page 5

6. This appliance is intended to be used in household and similar
applications such as:
- staff kitchen areas in shops, ofces and other working
environments;
- farm houses;
- by clients in hotels, motels and other residential type
environments;
- bed and breakfast type environments.
7. WARNING: This appliance is intended only for drying textiles
washed in water.
General warnings
WARNING
• To avoid electric shock, re, and/or death, make sure the product is properly installed
and grounded as described in this manual before using the product.
• Only use the product for its intended purposes. Damage incurred from using the
product for purposes other than those specied in this manual are not covered by the
warranty.
• To avoid physical injury and/or product damage, do not climb, stand, or hang on the
product.
• Do not disassemble or modify the product in any way.
• Do not allow children to play in, on, or around the product. Close supervision of
children is necessary at all times.
• To avoid re, physical injury, and/or death, keep all packaging material away from
children and properly remove and dispose all packaging material.
• Do not touch or operate the product with wet hands.
• To avoid electric shock and/or re, keep all animals or other foreign objects out of the
product.
• If you hear strange noises, smell strange odours, and/or detect smoke from the
product, immediately unplug the product.
• Do not place heavy or dangerous objects in, on, or around the product.
• To avoid electric shock, re, and/or death, do not repair or replace any part of the
product or attempt any servicing unless specically recommended in the user manual
or in published user-repair instructions that you understand and have the skills to carry
out.
Safety information
English 5
Page 6

Safety information
• Take out all personal belongings (electric devices, lighters, matchboxes, and so on) from
pockets.
• To avoid re and/or explosions, do not dry items that have been previously cleaned in,
washed in, soaked in, or spotted with gasoline, dry-cleaning solvents, cooking oils, or
other ammable or explosive substances.
• The product is not intended for use by persons (including children) with reduced
Safety information
physical, sensory, or mental capabilities, or lack of experience and knowledge, unless
they have been given supervision or instruction concerning the use of the product by a
person responsible for their safety.
• Before disposing of the product, remove the door to the drying compartment, and cut
off the power plug to prevent reuse.
• Do not touch or disassemble the electrical outlet of the product. In the event of a gas
leak, make sure to ventilate the location and immediately contact a Samsung service
centre.
• To avoid damaging the glass panel, make sure to protect the front at all times.
• To avoid physical injury and/or product damage, do not step on the tank doors.
• Do not put hands, feet, other body parts, or metal objects under the product.
• Do not use other products to dry the interior. Do not use candles to remove interior
odours.
• Do not open the door while the product is operating. Opening the door while the
product is operating will affect product performance and may cause condensation to
damage ooring.
• Do not drink the water from the Rell Tank or the Drain Tank.
• Clean the lint lter before or after each load.
• Do not use fabric softeners or other products to eliminate static unless recommended
by the manufacturer of the fabric softeners or products.
• Keep ngers out of pinch point areas. Use caution when closing the door when children
are nearby.
• Do not use the product to dry items containing foam rubber or other rubber-textured
items.
• To avoid product damage, excessive noise, or re, do not insert objects into the steam
nozzle.
• Do not place your hands or body near the steam nozzle during operation. The hot
steam can cause an injury.
• Do not open the door during operation. The high internal temperature can cause an
injury.
• If a problem occurs during steam process, stop the product immediately and remove
all items from the product. If items are not removed immediately, they will stay damp,
causing damage to the fabric or smell.
• Before placing the clothing into the product, make sure to empty all pockets.
English6
Page 7

• Contains uorinated greenhouse gases.
Hermetically sealed equipment.
Do not vent gases into the atmosphere.
- Refrigerant (Type): R-134a (GWP = 1430)
- Refrigerant (Charging): 0.15 kg, 0.214 tCO2e
Electrical warnings
WARNING
• Regularly remove all foreign substances such as dust or water from the power plug
terminals and contact points using a dry cloth.
• Unplug the power plug and clean it with a dry cloth.
• To avoid risk of electric shock, always unplug the product before disassembly or repair.
• Do not pull the power cord when unplugging the power plug. To unplug the power
plug, rmly pull the power plug straight out.
• To avoid electric shock, do not use an extension cord.
• Do not use a damaged power cord or power plug. Do not attempt to repair,
disassemble, or modify the power cord or power plug. For any repairs, contact your
nearest Samsung service centre.
• Plug the power cord into a wall socket that meets local electrical specications. Use the
socket for this appliance only, and do not use an extension cord.
• When moving the product, make sure to keep the power cord protected at all times.
• To avoid electric shock, re, serious injury, product damage, and/or death, the product
must be plugged into a properly grounded outlet. Make sure the wall outlet and circuit
are checked by a qualied electrician.
• The product must be equipped with a cord having an equipment-grounding conductor
and a grounding plug. The plug must be plugged into an appropriate outlet that is
properly installed and grounded in accordance with all local codes and ordinances.
• The product must be grounded. In the event of malfunction or breakdown, grounding
will reduce the risk of electric shock by providing a path of least resistance for electric
current.
• Before using, make sure there is dedicated, grounded electrical-outlet rated for use
with this product. It is the owner's responsibility to replace a standard 2-prong wall
outlet with a standard 3-prong outlet.
• To avoid electric shock, properly ground the product that conforms to all governing
codes and ordinances. Follow the instructions in the user manual.
Safety information
English 7
Page 8

Safety information
• The product must be plugged into its own individual electrical outlet which has a
voltage rating that matches the rating plate. This provides the best performance and
also prevents overloading house wiring circuits which could cause a re hazard from
overheated wires.
• Connect to a properly rated, protected, and sized power circuit to avoid electrical
overload. Improper power circuits can melt, creating electric shock or re.
Safety information
• Do not, under any circumstances, cut or remove the ground prong from the power
cord. To prevent personal injury or product damage, the electrical power cord must be
plugged into a properly grounded outlet.
• Do not use a multi socket outlet which is not properly grounded (portable). Upon using
a properly-grounded multi socket outlet (portable), use a product with the current
capacity of 15 A or higher alone. Failure to do so may result in electric shock or re
due to the heat of multi socket outlet. The power may be shut off when the circuit
breaker is operated.
• The product must be connected to a grounded metal, permanent wiring system or an
equipment-grounding conductor must be run with the circuit conductors and connected
to the equipment-grounding terminal or lead on the appliance. Electric shock can result
if the product is not properly grounded.
• Improper connection of the equipment grounding conductor can result in electric shock.
Check with a qualied electrician or service person if you are in doubt that the product
is properly grounded.
Installation warnings
WARNING
• Only install the product in a stable, well-oored location. Do not install the product
in locations prone to vibrations or where the product may tip over, such as ships
or airplanes. Contact a Samsung service centre if you are unsure of the installation
location.
• Do not install the product in locations exposed to the weather or temperatures below
freezing. If the product was shipped in or at temperatures below freezing, allow the
product to warm before installing.
• To avoid electric shock, re, serious injury, product damage, and/or death, do not install
the product in humid locations (such as a bathroom or sauna).
• To avoid re, smoke, and/or product damage, do not install the product near other heat
sources (such as a stove or heater).
• To avoid re or smoke and/or product damage, do not place candles or other
ammables on, in, or around the product.
English8
Page 9

• To avoid physical injury and/or product damage, contact a Samsung service centre
before moving the product.
• Install the product where the power plug is easily accessible. To avoid electric shock
and/or re, unplug the product when not in use.
• If the installation location has been ooded, do not go near the product and
immediately contact a Samsung service centre.
• To avoid re, smoke, and/or product damage, remove all protective lm from the
product.
• To prevent product damage and/or physical injury, have at least two people move the
product.
Cleaning warnings
WARNING
• To avoid electric shock, do not use sharp objects to operate or clean the product.
• Do not spray water directly onto the product when cleaning it.
• Do not use bleaching agents on the exterior of the product. Bleaching agents may
discolour the exterior.
• Wipe the interior with a dry cloth after use.
• After using the product, wipe its inner side with a dry cloth.
- The product could be stained by contamination such as long hair or due to dust and
water drops that may form inside.
• If contamination (detergent, dirt, food residue, etc.) has accumulated in the product or
any accessories, unplug the power cable and then wipe the contaminated area with a
soft, wet cloth.
- Do not expose the product or the accessory to cleaning or bleaching agents or apply
these to the product or accessory.
- Otherwise, this may result in discoloration, deformation, damage, or rust.
Safety information
English 9
Page 10

Safety information
Instructions about the WEEE
Correct Disposal of This Product (Waste Electrical & Electronic
Equipment)
(Applicable in countries with separate collection systems)
Safety information
For information on Samsung’s environmental commitments and product regulatory
obligations, e.g. REACH, WEEE or Batteries, visit our sustainability page available via
www.samsung.com
This marking on the product, accessories or literature indicates
that the product and its electronic accessories (e.g. charger,
headset, USB cable) should not be disposed of with other
household waste at the end of their working life. To prevent
possible harm to the environment or human health from
uncontrolled waste disposal, please separate these items from
other types of waste and recycle them responsibly to promote the
sustainable reuse of material resources.
Household users should contact either the retailer where they
purchased this product, or their local government ofce, for details
of where and how they can take these items for environmentally
safe recycling.
Business users should contact their supplier and check the terms
and conditions of the purchase contract. This product and its
electronic accessories should not be mixed with other commercial
wastes for disposal.
English10
Page 11
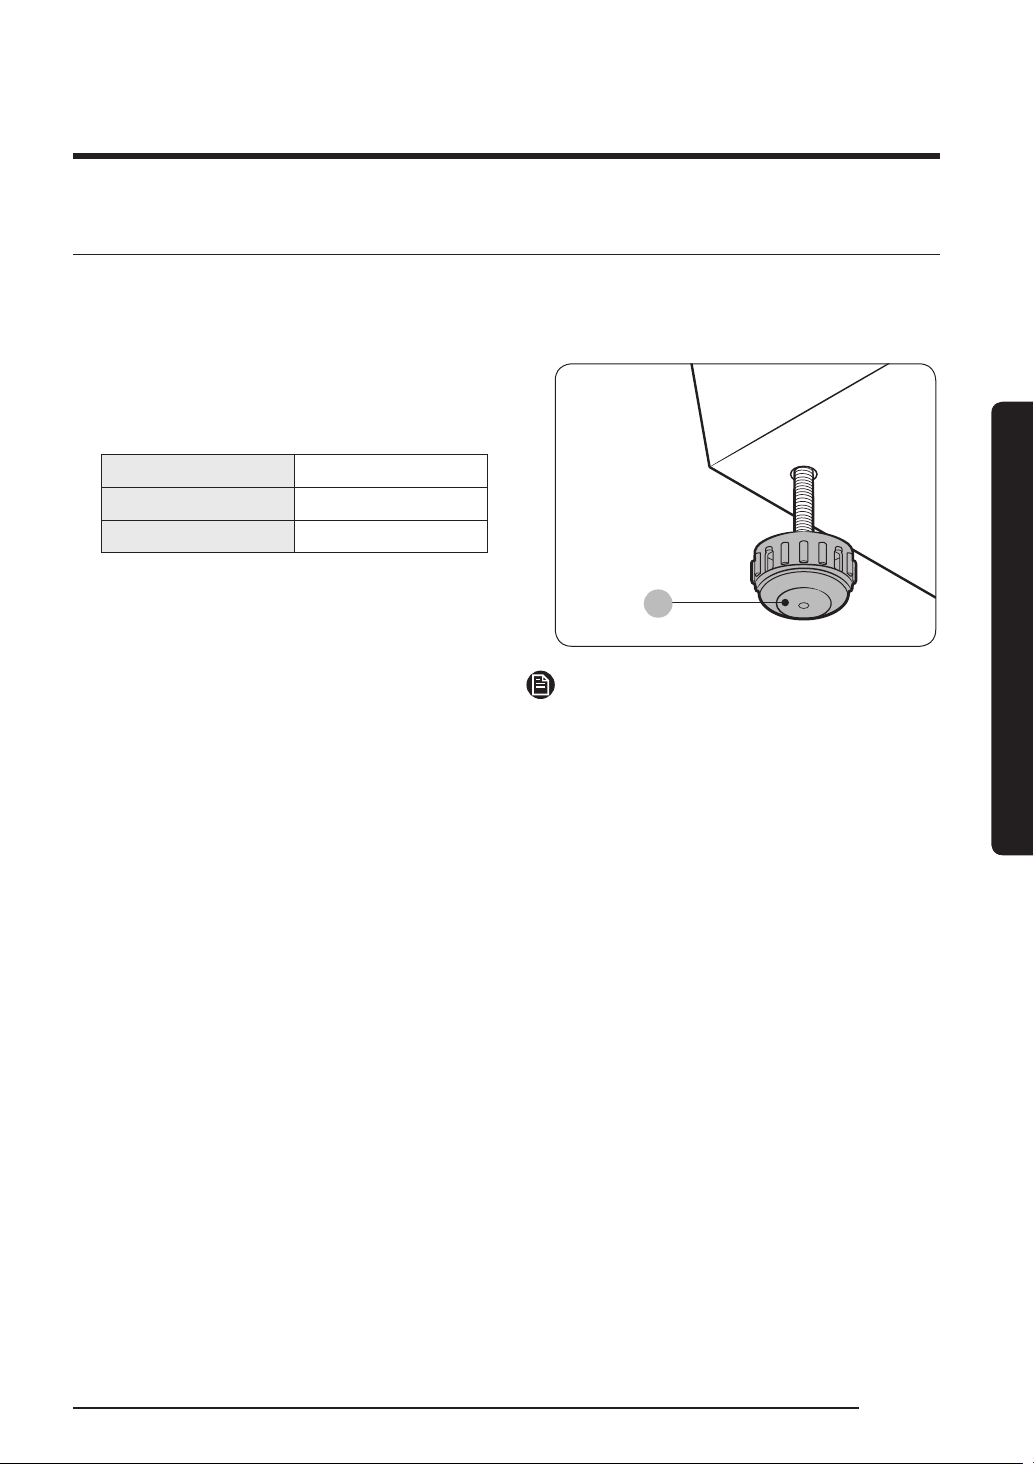
Before you start
A
Installation
Install the product according to the
instructions in this manual and local codes.
Installing the product
1. Select a solid, level location with
adequate space for the following
clearances.
Top 25 mm
Sides 5 mm
Rear 15 mm
- If the minimum clearances are not
met, performance will decrease due
poor ventilation and condensation
may occur on the product exterior.
- Do not install the product in direct
sunlight or hot and cold places.
The ambient temperature must be
between 10 °C-35 °C. If the ambient
temperature is too high or too
low, the product may not operate
normally, or performance may
decrease.
2. Turn the leveling feet (A) clockwise or
counterclockwise to adjust the height
until the product is level.
Before you start
NOTE
If the product wobbles or if you want to
raise the height of the rear side, assemble
the provided rear levelling feet on the
bottom-rear sides of the product.
English 11
Page 12

Before you start
3. Insert the water tray as shown in the
gures.
- Make sure the side marked ‘TOP’ is
facing upward.
Before you start
4. Plug in the product to a 230 V / 50 Hz
grounded outlet.
- If you do not have grounded outlets,
contact a Samsung service centre for
alternative methods to ground the
product.
NOTE
• After installing the product, you must
wait at least 2 hours before using it.
• The product consumes more water the
rst time the product is used. You may
have to ll the Rell Tank more than
one time.
English12
Page 13
Securing AIRDRESSER with the anti-tip
ՋՍ
ՋՌ
strap (optional)
AIRDRESSER may tip-over by external
force or children. If necessary, use the
anti-tip strap to secure AIRDRESSER and
prevent tip-over. (Refer to the gure.)
CAUTION
You must unplug the product before
securing AIRDRESSER with the anti-tip
strap.
Setting the language
When you turn on the product for the rst
time after the installation, the language
selection screen appears on the control
panel display. Follow the instructions to
select the language.
1. Tap < or > to select a language.
2. Tap and hold Start/Pause to save the
selected language.
NOTE
• Language setting may not be applicable
in some countries.
• To change the language afterward, tap
and hold Normal and Delicates for 3
seconds, and then follow the above
instructions.
Before you start
NOTE
• Use the provided screw to fasten the
anti-strap to a wall.
• Use the screws fastened on top of
AIRDRESSER to fasten the anti-strap to
AIRDRESSER.
English 13
Page 14
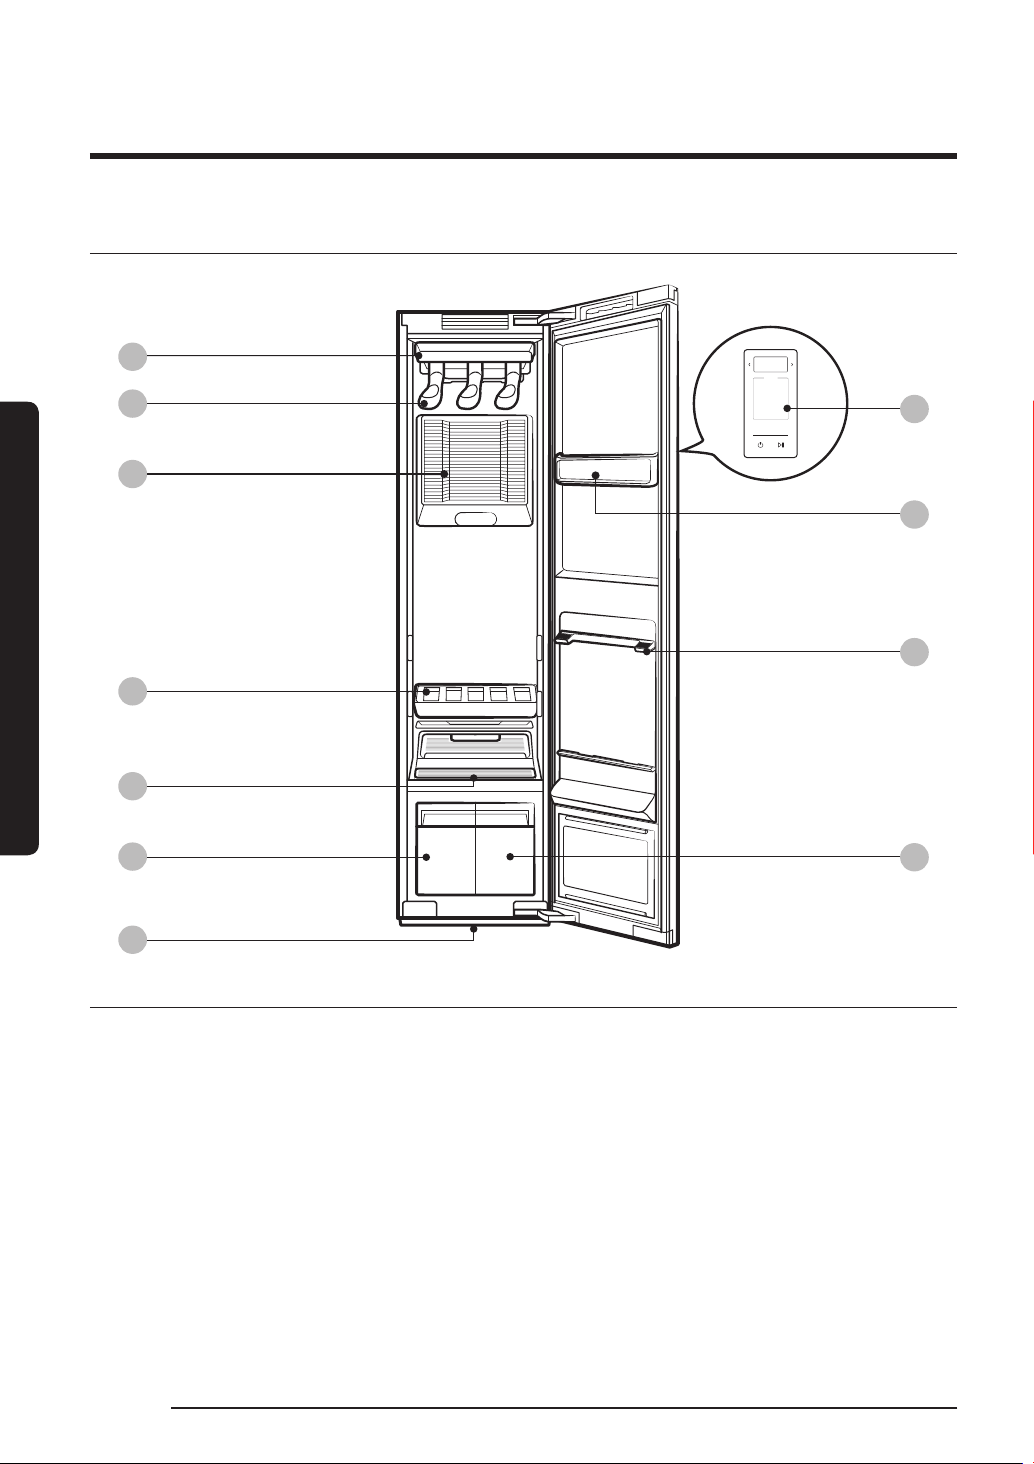
Before you start
Product overview
01
02
03
Before you start
04
05
06
07
08
09
10
11
01 Air hole 02 Air hanger 03 Air Filter
04 Shelf 05 Lint lter 06 Drain Tank
07 Water tray 08 Control panel 09 Accessory care zone
10 Shelf holder 11 Rell Tank
English14
Page 15
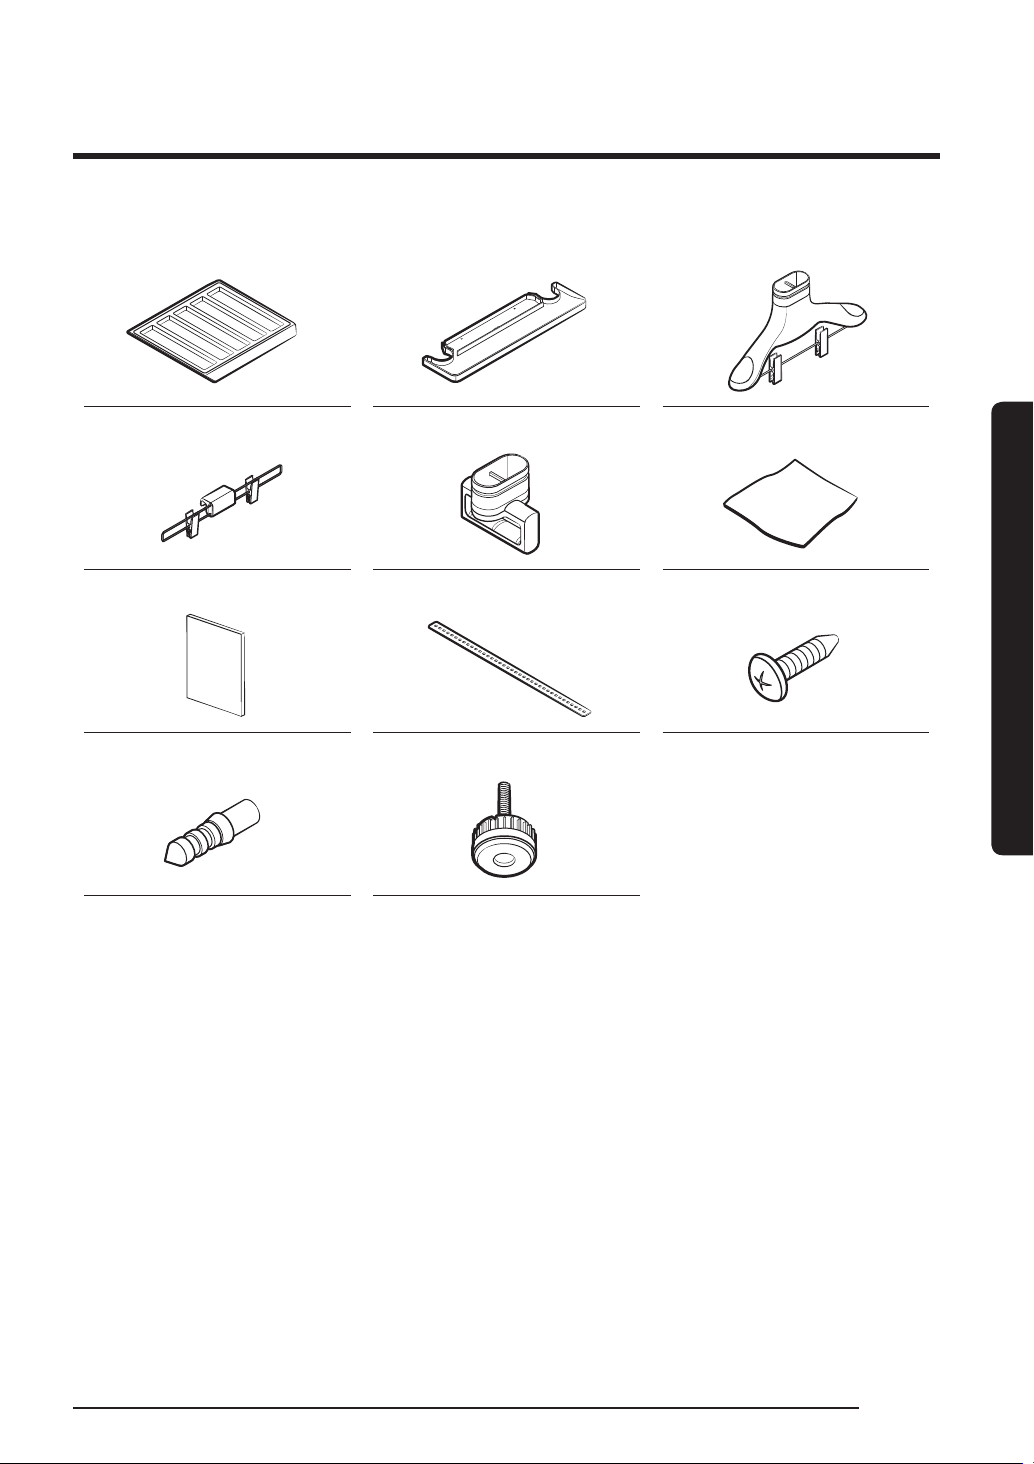
Accessories
Weight kit Regular hanger kit Cleaning cloth
User manual Anti-tip strap Screw (for anti-tip strap)
Shelf Water tray Air hanger
Before you start
Screw anchor (for anti-tip
strap)
Rear levelling feet
English 15
Page 16
Before you start
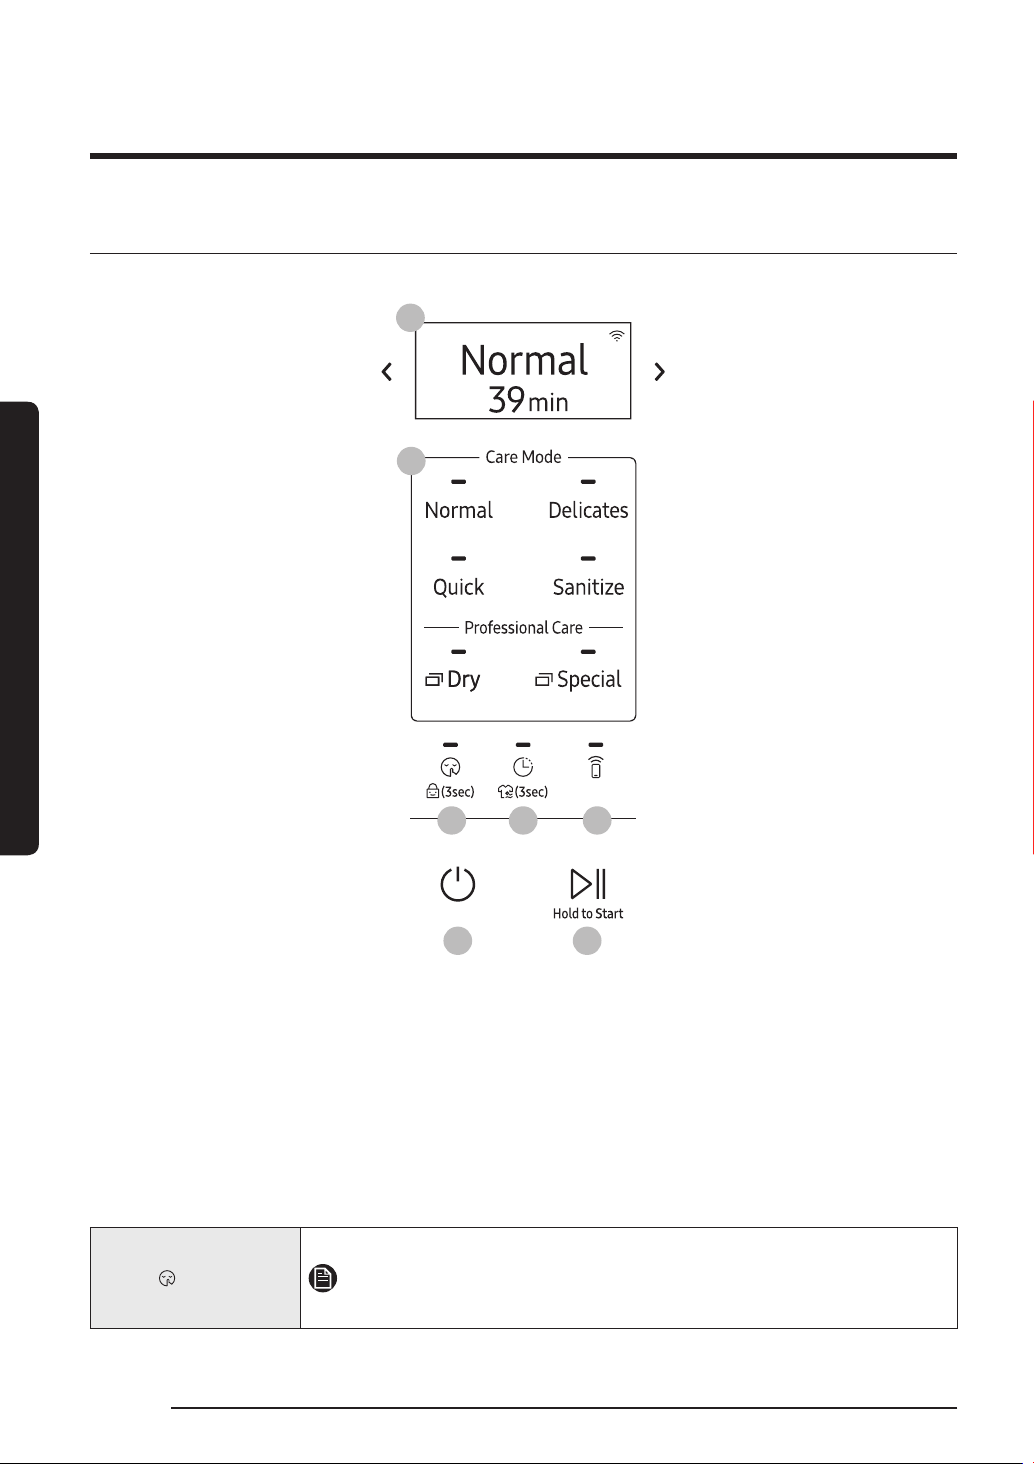
Control panel
Before you start
01
02
03
06
04 05
07
01 Display
Displays the selected cycle and estimated time remaining, notications, and Wi-Fi
connectivity.
02 Cycles
Tap a cycle to select. For more information about cycles, see page 18.
03 Silent / Child Lock (3 sec)
Tap to turn Silent on or off. Silent reduces operating noise.
Silent
NOTE
Silent will increase cycle time.
English16
Page 17
Tap and hold for 3 seconds to turn Child Lock on or off. Child Lock
deactivates all buttons except Power .
Child Lock
NOTE
When Child Lock is on, it will remain on until you turn it off.
04 Delay End / Keep Fresh (3 sec)
Tap to turn Delay End on, and then tap to increase the end time
(from 1-24 hours).
NOTE
• You cannot use Delay End with Sensor Dry.
Delay End
• When Delay End is on, the display will turn off to save energy.
• Some end times may not be available depending on the
selected cycle.
• Depending on the items and environment, the actual end time
may be different than the set time.
Tap and hold for 3 seconds to turn Keep Fresh on or off. You can
keep items fresh if you will not be able to immediately take items
out after a cycle has nished.
Before you start
Keep Fresh
NOTE
• Keep Fresh stays on up to 24 hours after a cycle has nished.
• Turning off the power or opening the door turns Keep Fresh
off.
• When Keep Fresh is on, the display will turn off to save energy.
05 Smart Control
Tap to turn Smart Control on or off. For more information about Smart control, see page
27.
06 Power
Tap to turn the power on or off.
07 Start/Pause
Tap and hold to start the product. Tap to pause the product.
English 17
Page 18
Before you start
Cycle overview
Daily cycles
Normal • For freshening your everyday wear.
Delicates
Quick • To quickly care for items with light odours and wrinkles.
Before you start
Sanitize
Cycle Description
• For delicate items such as chiffon, lace, and items with
decorations.
• For rayon, you must use this cycle.
• To sanitize your clothes with steam.
NOTE
• Do not put more than one large or bulky item. Large or bulky
items may block the steam and airow.
• If you stop or change the cycle when the Sanitizing message
appears on the display, items may get damaged or not dry
completely.
English18
Page 19
Dry cycles
CAUTION
Do not use any of the following items for Dry cycles.
• Leather, fur, feather, velvet, silk.
• Any items containing rubber or sponge.
• Items made of wool blended fabrics, water-repellent fabrics, silk-blended, or hempblended fabric.
• Fur blankets with fur length exceeding 1 cm, wool blankets, carpets, mattresses.
• Lingerie with laces, pantyhose, stockings.
NOTE
Drying results may vary depending on thickness of the items.
Cycle Description
AIRDRESSER automatically sets the time to dry items.
NOTE
Sensor Dry
• Using Sensor Dry causes the Drain Tank to ll quickly.
• Sensor Dry may not dry excessively wet items and large or
bulky items well. If items are not dry, run the cycle again.
Manually set the time (1-3 hours) to dry items.
Before you start
Time Dry
Room Care
NOTE
• Time Dry may not dry excessively wet items and large or
bulky items well. If items are not dry, run the cycle again.
For dehumidifying the surrounding area. You can select 2 or 4
hours.
NOTE
• Make sure the product is empty when using Room Care.
• The indoor temperature may increase.
English 19
Page 20
Before you start
Special cycles
Cycle Description
For sharpening creases in trousers.
NOTE
Suits
School uniform For school uniforms that cannot be washed or dried daily.
• Put the jacket in the middle air hole and trousers on the right
air hole.
• For best results, use with the weight kit.
For woollen or knit items.
Before you start
Wool/Knit
Outdoor For outdoor or active wear.
Down Jackets
Fur/Leather
Heavy Duty For caring for thick fabric items such as sweaters.
Self Clean
NOTE
To avoid deforming items, neatly fold items and lay on the shelf.
To uff heavy, down-lled jackets that have been stored for a
long time.
NOTE
To prevent blocking air circulation, hang only one item in the
middle air hole.
Eliminates moisture and dust from fur and leather items.
NOTE
• Operating noise may be louder during this cycle.
• Follow all item care labels.
• For best results, use for only one item.
• Make sure fur items are dry before using this cycle.
Automatically cleans the product.
NOTE
• Make sure the product is empty.
• For best results and optimal cleaning, do not stop the cycle
or open the door before Self Clean is complete.
• This cycle does not eliminate mould.
English20
Page 21

Download cycles
You can download more cycles from the SmartThings app.
1. Tap Power .
2. Tap Special repeatedly to select Download.
3. On your smartphone, follow the onscreen instructions to download available cycles.
• You can download up to 10 cycles.
• You can download the following cycles.
- Winter Coat, Denim, Down Dry, Babywear, Bedding, Doll, Accessories.
Before you start
English 21
Page 22

Before you start
Fabric care guide
• Fabrics have different care management depending on how they were processed and
nished. This fabric care guide does not cover all materials and therefore use it for
just a reference. Make sure to check the care label on your clothing before using with
AIRDRESSER to prevent any damage.
• Do not put items that are not colourfast, are heat-sensitive, or are not suitable for
washing with water in the General, Special, or Sanitize cycles. Do a water blot test on a
small, inconspicuous spot (an inside seam) to determine if the fabric is colourfast. For
further assistance, consult the clothing manufacturer, a dry-cleaning professional, or a
more detailed fabric care guide.
Before you start
Cycle category
Refer to the following table to check specic cycles included in each category stated in the
Fabric care guide table.
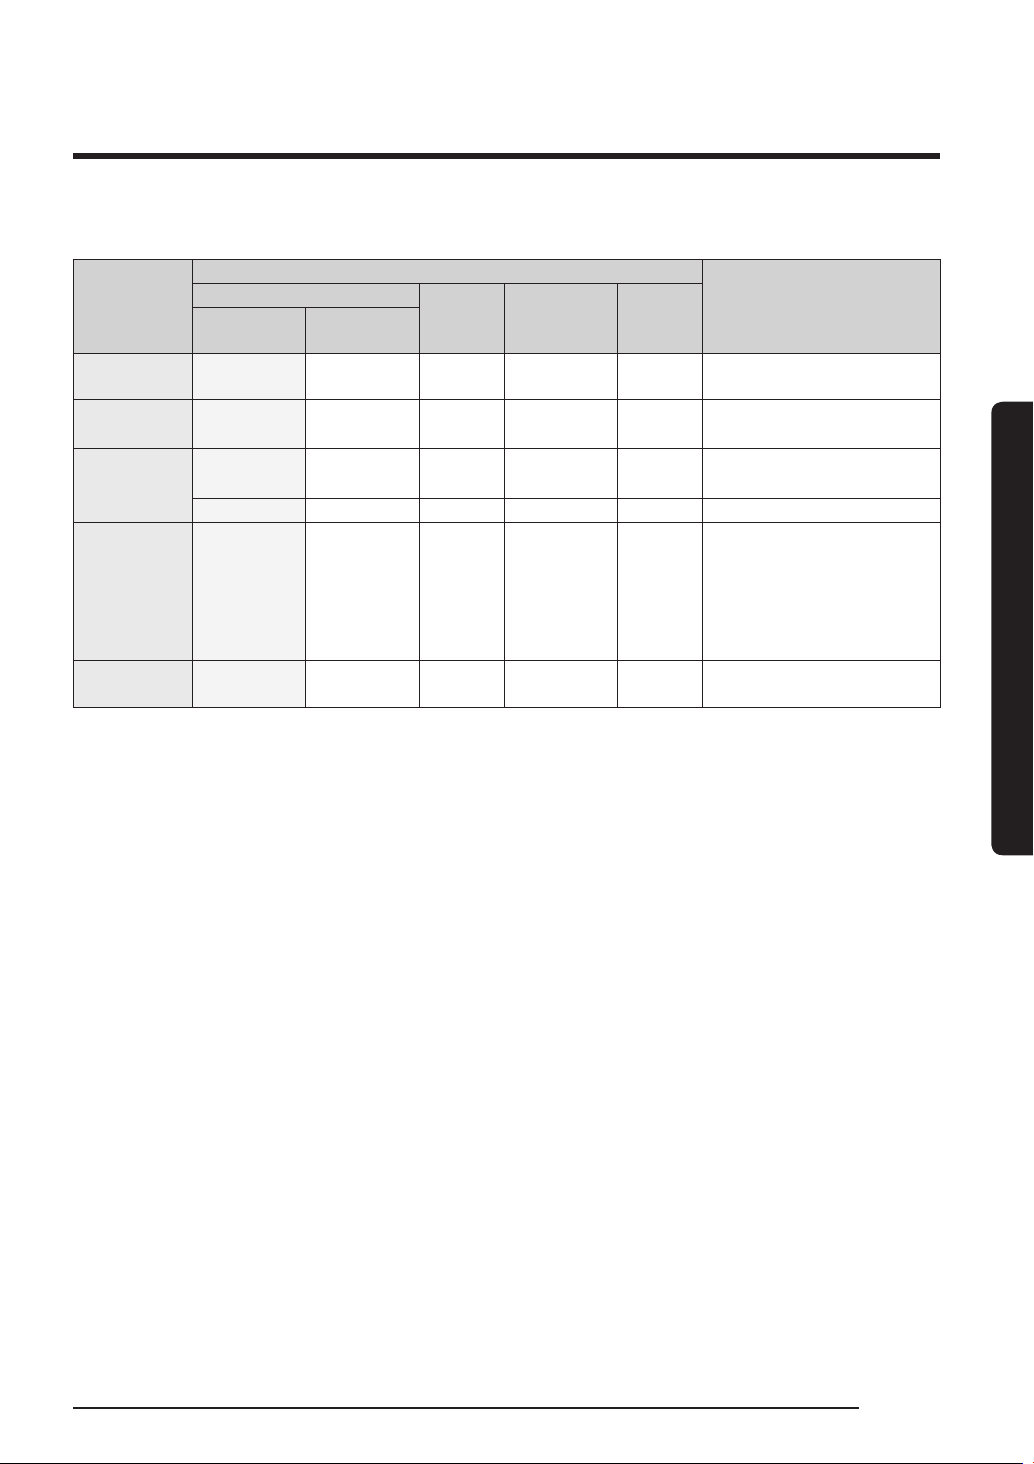
General cycles Normal, Quick, Delicates
Special cycles
Sanitize cycles Sanitize, Babywear**, Bedding**, Doll**
Dry cycles Sensor Dry, Time Dry, Down Dry**
* = Special cycles / ** = Download cycles
Category Cycles
Suits, School uniform, Wool/Knit, Outdoor, Down Jackets,
Fur/Leather, Heavy Duty, Winter Coat**, Denim**,
Accessories*
English22
Page 23

Fabric care guide table
Natural bres - vegetable bres
Cycles
Fabric
Cotton
Linen, hemp,
ramie
Rayon
= Possible / = Check care label
Reducing
wrinkles
General
Deodorising
Special Sanitize Dry
Clothes / Remarks
Towels, socks, underwear,
jeans, sportswear, t-shirts,
blankets
Wrinkles on 100 % cotton
fabrics may remain. Iron after
cycle if desired.
Summer clothes, tablecloths
Some wrinkles may remain.
Make sure fabrics are
washable/hand washable
before using the General,
Special, or Sanitize cycles. Lay
delicate clothes on shelf. Do
not use starched clothes.
Suit lining, blouses, neckties,
pyjamas
Before you start
Natural bres - animal bres
Cycles
Fabric
Alpaca,
camel hair,
cashmere
Fur, leather *
Silk
Reducing
wrinkles
General
Deodorising
Special Sanitize Dry
Clothes / Remarks
Coats, suits
Lay knitwears on the shelf.
Alpaca and camel hair shrink
in hot water.
Scarves, knitwear
Lay knitwears on the shelf.
Alpaca and camel hair shrink
in hot water.
Coats, scarves
* Only use Fur/Leather cycle.
Leather must be 100 %
natural leather (No articial
leather)
Silk neckties, ribbons, scarves,
blouses
Silk fabrics are not suitable
for AIRDRESSER.
English 23
Page 24

Before you start
Fabric
Before you start
Wool
Cycles
General
Reducing
wrinkles
*
Deodorising
*
Special Sanitize Dry
Clothes / Remarks
Sweaters, knitwear
Lay knitwears on the shelf.
Some wool shrinks when
washed in hot water. Make
sure fabrics are washable/
hand washable before using
the General or Special cycles.
* Wool/Knit cycle is
recommended.
Winter coat, suits
Lay knitwears on the shelf.
Some wool shrinks when
washed in hot water. Make
sure fabrics are washable/
hand washable before using
the General, Special, or
Sanitize cycles.
* Winter Coat or Suits cycle is
recommended.
= Possible / = Check care label
English24
Page 25
Articial bres
Cycles
Fabric
Acetate
Acrylic
Nylon
Polyurethane
Polyester
= Possible / = Check care label
Reducing
wrinkles
General
Deodorising
Sportswear
Special Sanitize Dry
Clothes / Remarks
Suit lining, blouses, neckties,
pyjamas
Thermal underwear, knitwear
Lay clothes on shelf.
Stockings, lingerie
Lay clothes on shelf.
Stretchable clothing
(containing less than 5 %)
If the item contains more
then 5 % polyurethane (ex.
Swimwear), check the care
label.
Outdoor wear, sports wear,
T-shirts, shirts, blouses
Before you start
English 25
Page 26
Before you start
Fabric care labels
Most clothing includes fabric care labels which contain instruction for proper care. The
following table contains some of the symbols that may help you choose appropriate items
for AIRDRESSER.
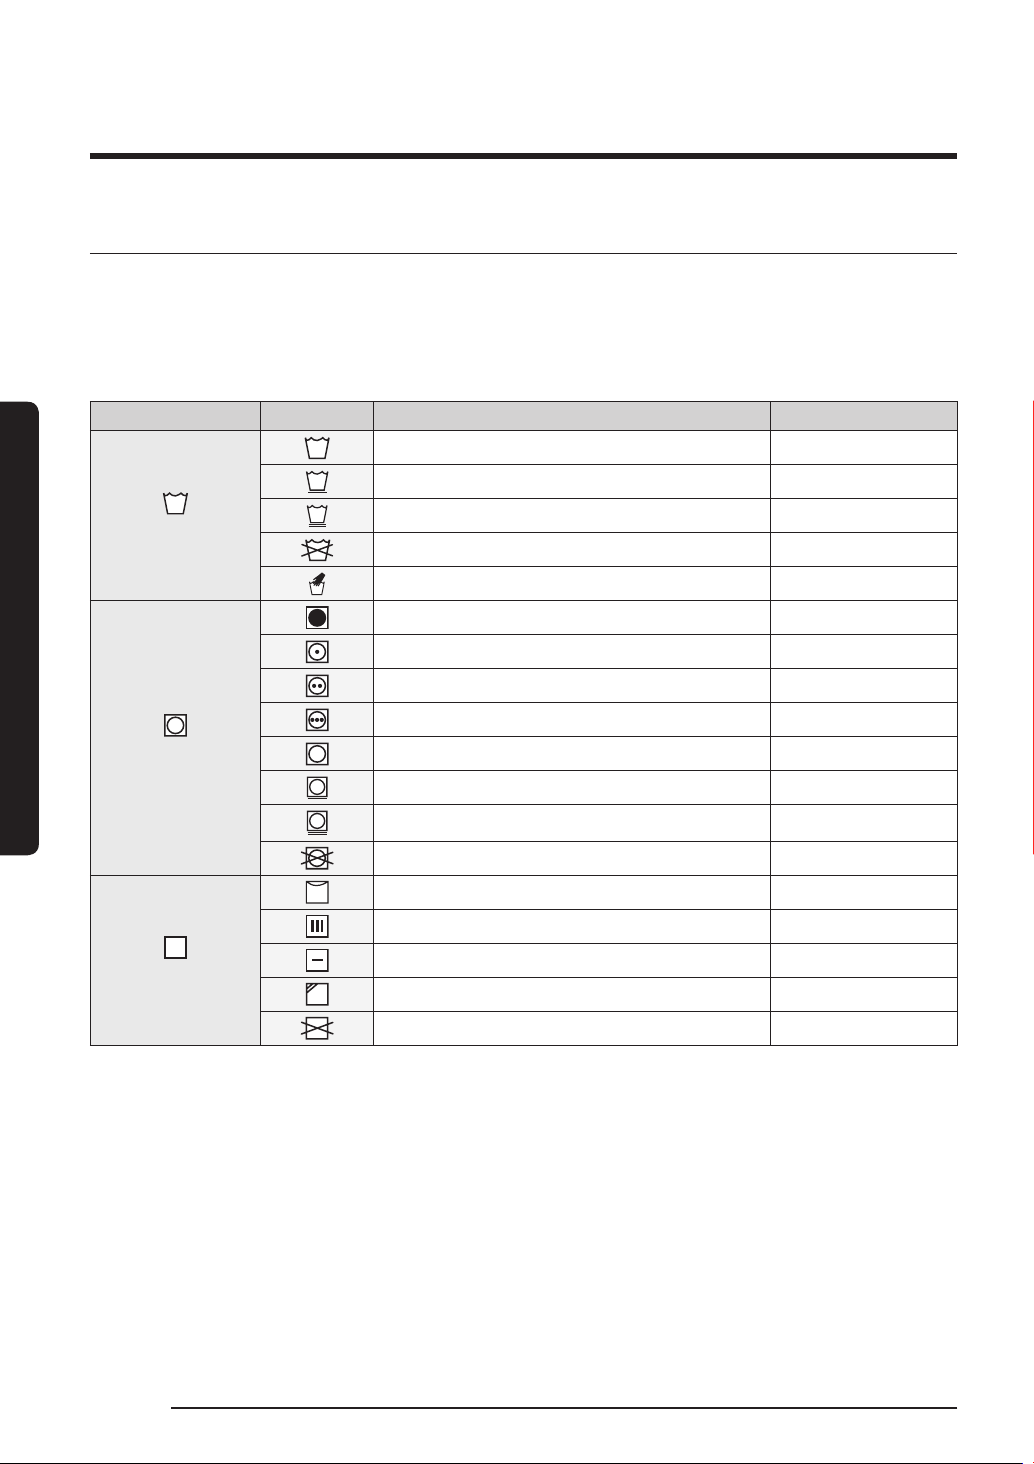
Fabric care labels that can be used with AIRDRESSER
Category Label Meaning Use with AIRDRESSER
Normal O
Permanent press O
Before you start
Washing labels
Tumble dryer labels
Drying labels
* Some clothing that does not recommend washing (such as fur or leather fabrics) can be
used with AIRDRESSER. Please refer to the fabric care guide.
** Use the rack for items with this symbol on the fabric care label.
Delicate O
Do not wash O*
Hand wash O
No heat X
Low O
Medium O
High O
Normal O
Permanent press O
Delicate O
Do not tumble dry O
Hang dry O
Drip dry O
Dry Flat O**
Dry in shade O
Do not dry X
English26
Page 27

Smart control
Wi-Fi connection
• Recommended encryption methods are WPA/TKIP and WPA2/AES. Newly developed
Wi-Fi protocols or unapproved Wi-Fi protocols are not supported.
• The reception sensitivity of a wireless network may be affected by surrounding
wireless environments.
• If your Internet provider has registered the MAC address of your PC or the modem
module for permanent use, your Samsung AIRDRESSER may fail to connect to the
Internet. If this is the case, contact your Internet provider
• The Internet rewall may interrupt your Internet connection. If this happens, contact
your Internet provider.
• If Internet failure continues after following the measurement of your Internet provider,
contact a local Samsung retailer or service centre.
Downloading the app
On an app market (Google Play Store, Apple App Store, Samsung Galaxy Apps), search for
the SmartThings app, and then download and install the app on your device.
NOTE
• SmartThings may not be compatible on some tablets or smartphones.
- The recommended Android OS is 6.0 or higher (with minimum 2 GB or RAM).
- The supported display resolutions for Android are 1280 x 720 (HD), 1920 X 1080
(FHD), 2560 x 1440 (WQHD).
- The recommended iOS is 10.0 or higher (iPhones must be iPhone 6 or higher).
- The supported display resolutions for apple devices are 1334 X 750, 1920 x 1080.
• The app is subject to change without notice for improved performance.
Before you start
Log in
You must rst log into SmartThings with your Samsung account. To create a new Samsung
account, follow the instructions on the app. You don’t need a separate app to create your
account.
NOTE
If you have a Samsung account, use the account to log in. A registered Samsung
smartphone user automatically logs in.
English 27
Page 28
Before you start
Registering your appliance to SmartThings
1. Make sure your smartphone is connected to a wireless network. If not, go to Settings,
turn on the wireless connection, and then select an AP (Access Point).
2. Open SmartThings on your smartphone.
3. If a message of “A new device is found.”, select Add.
4. If no message appears, select + and select your appliance in a list of devices available.
If your appliance is not listed, select Device Type > Specic Device Model, and then add
your appliance manually.
5. Follow the onscreen instructions to complete registration.
SmartThings overview
Before you start
Category Function Description
Monitoring
Control Start / Pause / Cancel
Notication Cycle Completed
Cycle Status
Smart Control
Energy Monitoring
You can check the current cycle and
options, and the remaining cycle
time.
The Smart Control status is shown
for AIRDRESSER.
You can monitor the energy
consumption status.
Select a cycle and necessary options,
and then select Start / Pause /
Cancel to start and operation, to
stop temporarily, or to cancel the
current operation.
Noties you the current cycle is
complete.
English28
Page 29
Category Function Description
Select the fabric type and options
Care Recipe
and get recommendations for the
most suitable cycle.
By inputting clothing information
(such as fabric material), you can
My Closet
add your clothes to the app and get
recommended cycles and a care
AIRDRESSER
functions
Special Cycle Management
history.
You can save up to 9 cycles and you
can delete or change the order of
the cycles.
Get advice to help you keep your
AIRDRESSER in perfect condition.
HomeCare Manager
Check your cycle usage patterns,
energy consumption, and get alerts
for product maintenance.
Before you start
English 29
Page 30

Before you start
Open Source Announcement
The software included in this product contains open source software. You may obtain the
complete corresponding source code for a period of three years after the last shipment of
this product by sending an email to mailto:oss.request@samsung.com.
It is also possible to obtain the complete corresponding source code in a physical medium
such as a CD-ROM; a minimal charge will be required.
The following URL http://opensource.samsung.com/opensource/SMART_AT_051/seq/0
leads to the download page of the source code made available and open source license
information as related to this product. This offer is valid to anyone in receipt of this
information.
Before you start
NOTE
Hereby, Samsung declares that this radio equipment is in compliance with Directive
2014/53/EU and with the relevant statutory requirements in the UK. The full text of the
EU declaration of conformity and the UK declaration of conformity is available at the
following internet address: The ofcial Declaration of conformity may be found at http://
www.samsung.com, go to Support > Support Home and enter the model name.
Wi-Fi max transmitter power : 20 dBm at 2.412 GHz – 2.472 GHz
English30
Page 31

Product and accessory use
A
B
4 7
5
6
Using a cycle
1. Make sure the Rell Tank (A) is lled
with water.
2. Make sure the lint lter (B) is clean.
3. Input clothes as instructed in the Using
the accessories section.
Product and accessory use
4. Tap Power .
5. Select a cycle.
- Tap Normal, Delicates, Quick or
Sanitize.
- For Dry cycles, tap Dry repeatedly to
select a desired dry cycle.
- For Special cycles, tap Special
repeatedly to select a desired special
cycle.
6. Select options if necessary.
- Silent , Child Lock , Delay End ,
Keep Fresh .
7. Tap and hold Start/Pause for 3
seconds.
English 31
Page 32

Product and accessory use
Usage guidelines
Before use
• This product cannot be used to clean items. For best results, wash and dry all items
before using the product.
• Before using the product, we recommend washing items with strong odours or items
that have been stored for a long time.
• Separate items by odour strength.
• Check all clothing or item labels before using the product.
• Before placing the clothing into the product, make sure to empty all pockets.
• Do not use the product as a storage closet.
• The product may not remove pet hair.
During use
• Make sure items are not touching the bottom of the product. If necessary, use the shelf
Product and accessory use
to stop items that are hung from touching the bottom of the product.
• Hissing noises may occur during a steam process.
• If you need to stop a cycle before it will nish, make sure to run the Dry cycle.
• Operating time depends on the environment and type of items.
• If used consecutively, the product may display a different operating time than what
will occur.
• Do not open the door while the product is operating.
After use
• The amount of wrinkles removed may vary depending on the fabric type.
• Remove items immediately after a cycle has nished. If you cannot remove items
immediately, use Delay End or Keep Fresh.
• When removing items, hold both the items and the hanger.
English32
Page 33

Using the accessories
Air hangers
Use the provided Air hangers for items such as jackets, sportscoats, and blazers.
NOTE
• Make sure the interior and exterior of the hangers are clean and free of foreign matter.
• Do not use hangers for knits, wools, lingerie.
• The maximum lengths of items must be 110 cm for tops and 100 cm for bottoms.
• Depending on the type or size of the fabric, unwanted wrinkles may form on the neck
of your clothing.
To use the Air hangers
1. Hang items on hangers in the same
direction.
- To prevent items from falling off
the hangers, make sure to button all
buttons and zip all zippers.
- Make sure all items are hung atly.
Make sure the hanger clips do not
protrude outward.
2. Slide the hangers into the air holes until
you hear a clicking sound.
- Make sure hangers are facing the
same direction.
- If the Air hangers are not properly
inserted into the air hole, vibrations
and noises may occur.
Product and accessory use
NOTE
For best results, avoid hanging longer
items from the middle hole.
English 33
Page 34

Product and accessory use
Regular hanger kit
You can use the regular hanger kit to use regular hangers to hang your items. However,
for best results, we recommend using the Air hangers.
NOTE
• Use hangers that will not be deformed by heat.
• Make sure the interior and exterior of the hangers are clean and free of foreign matter.
• Do not use plastic/silicone/wooden hanger and hangers with adhesive.
• Do not use hangers from laundry that may become rusty.
Product and accessory use
To use the regular hanger kit
1. Hang items on hangers in the same
direction.
- To prevent items from falling off
the hangers, make sure to button all
buttons and zip all zippers.
- Make sure all items are hung atly.
Make sure the hanger clips do not
protrude outward.
2. Slide the regular-hanger kit into the air
holes until you hear a clicking sound,
and then hang the hangers on the
regular-hanger kit.
- Make sure hangers are facing the
same direction.
- If the regular-hanger kit is not
properly inserted into the air hole,
vibrations and noises may occur.
NOTE
For best results, avoid hanging longer
items from the middle hole.
English34
Page 35

Weight kit
NOTE
• Make sure the trousers or weight kit does not touch the bottom of the product.
• The maximum length of trousers must be 100 cm.
To use the weight kit
1. Clip the bottom of the trousers to the
Air hanger.
2. Clip the other end of the trousers to the
weight kit.
3. Slide the Air hanger into the air holes
until you hear a clicking sound.
NOTE
For sharper creases, spread out the
trousers by moving the clips outward.
Store the weight kit on the accessory care
zone when not in use.
Product and accessory use
English 35
Page 36

Product and accessory use
Shelf
Use the provided shelf for items that cannot be used with hangers.
NOTE
• Only place clothes or clothing accessories. Do not put heavy items or use the shelf to
store any other objects
• Make sure children do not sit or climb on the shelf.
• Make sure items do not hang off the front, back, or sides of the shelf, or hang through
the shelf grates.
• Do not stack items on top of other items.
Product and accessory use
To use the shelf
1. On the side walls, press the bottom part
of the shelf holders to turn them out.
2. Place the shelf on the shelf holders.
Make sure the grooves on the shelf are
rmly sitting on the holder.
NOTE
A gap between the sides of shelf and the
side walls is normal.
Store the shelf on the door when not in
use. Place the shelf on the bottom holder,
and then hang it on the top holders.
English36
Page 37

Accessory care zone
Use the accessory care zone for scarves.
To securely hang the scarf, refer to the gures below.
Method 1
Method 2
Product and accessory use
• Make sure the lengths of both ends are even.
• Depending on the fabric type, wrinkles may not be removed.
English 37
Page 38

Product and accessory use
MAX
Rell Tank
NOTE
• Before using the product, make sure there is water in the Rell Tank.
• The product consumes more water the rst time the product is used.
• It is recommended to use ltered water.
• If you are not going to use the product for a long time, empty the Rell Tank.
• A full Rell Tank lasts approximately 4 cycles.
• Fill the Rell Tank with water only. Putting any other liquids, such as detergent or
fabric softener, may cause a problem.
• Do not use the water in the Drain Tank to ll the Rell Tank.
Product and accessory use
To ll the Rell Tank
1. Pull out the Rell Tank.
2. Open the back cover, ll to the MAX
line.
3. Reinsert the Rell Tank.
English38
Page 39

Drain Tank
Before using the product or if you are not going to use the product for a long time, make
sure to empty the Drain Tank.
To empty the Drain Tank
1. Pull out the Drain Tank.
2. Empty the tank.
3. Reinsert the Drain Tank.
Samsung Fresh Finish
Samsung Fresh Finish gives items a pleasant fragrance.
NOTE
• Spray your desired perfume 4-5 times on a cotton pad, and then place the pad in
Samsung Fresh Finish. The strength of the scent diffused through Samsung Fresh
Finish may differ depending on the perfume used, and the scent may remain inside the
AIRDRESSER even after the cycle is complete.
• Mold may grow if you leave the cotton pad in Samsung Fresh Finish for too long.
To change the cotton pad
1. Remove Samsung Fresh Finish.
Product and accessory use
English 39
Page 40

Product and accessory use
Product and accessory use
2. Spray a desired perfume 4-5 times on
a cotton pad, and then place the pad in
Samsung Fresh Finish.
3. Close the cover of Samsung Fresh
Finish until you hear it click into place.
4. Reinsert Samsung Fresh Finish.
NOTE
• If you use a perfume with Samsung Fresh Finish, the scent of the perfume may remain
inside AIRDRESSER even after the cycle is complete.
• The cotton pad is not provided with the product.
• The effectiveness of Samsung Fresh Finish cannot be guaranteed since it depends on
the perfume used.
English40
Page 41

Cleaning and maintenance
CAUTION
• Unplug the product before cleaning it.
• Do not use abrasive or ammable cleaners.
• Do not spray water directly onto the product when cleaning it.
Exterior
Use the cleaning cloth to clean the
exterior. For stubborn stains, use a damp
cloth and then wipe dry.
Cleaning and maintenance
English 41
Page 42

Cleaning and maintenance
Water tanks
Clean both tanks on a regular basis. Completely dry before reinserting.
Use a damp cloth to clean the exterior.
Use a soft brush to clean the interior.
Cleaning and maintenance
Use a soft brush to clean the tanks’ inlet
and outlet.
English42
Page 43

Water tray
NOTE
• Empty the water tray on a regular basis.
• Make sure to reinsert the water tray after emptying the water.
Correctly insert the water tray as shown in
the gures.
• Make sure the side with TOP is facing
up.
Cleaning and maintenance
English 43
Page 44

Cleaning and maintenance
Air Filter
If you frequently use the product for heavy items or items that accumulate a large amount
of dust, we recommend cleaning the Air Filter frequently.
To replace the Air Filter
1. Hold the bottom of the cover and pull
out.
2. While pressing the two hooks on the
upper part of the lter, pull to remove.
Cleaning and maintenance
3. Use a brush and running water to clean
the lter.
4. Completely dry the lter in a shaded
area and reinsert the lter.
English44
Page 45

5. Insert the top of the cover into the
product, and then push the cover.
Cleaning and maintenance
English 45
Page 46

Cleaning and maintenance
Lint lter
• For best results, clean the lint lter before or after using the product.
• Replace a damaged lint lter with a new lint lter.
To clean the lint lter
1. Open the cover.
2. Remove the lint lter.
Cleaning and maintenance
3. Use a brush and running water to clean
the lint lter. Completely dry the lint
lter in a shaded area.
4. Reinsert the lint lter, and then close
the cover.
English46
Page 47

Descaling
Perform descaling regularly to increase the performance and lengthen the lifespan of
the product. If you do not perform descaling immediately after getting the notication
message, some functions may be restricted for use and may cause performance decrease
or even shortens the lifespan of the product.
1. When the Descaling Required message appears on the display, remove all items from
the product and then tap and hold Sanitize and Dry for 3 seconds.
2. Empty the Rell Tank and the Drain Tank.
3. Dilute a descaling agent with water as recommended by the manufacturer.
4. Fill the Rell Tank with the diluted descaling agent up to the MAX line.
5. Tap and hold Start/Pause to start descaling.
- If the Drain the tank message appears on the display during descaling, empty the
Drain Tank.
6. When the Rell/Drain the tank message appears on the display, empty both the Rell
Tank and the Drain Tank, and then rinse them thoroughly.
7. Fill the Rell Tank with clean water up to the MAX line, and then insert the Rell Tank
and the Drain Tank.
8. When Supply/Drainage Complete message appears on the display, tap and hold Start/
Pause .
- If the Drain the tank message appears on the display during descaling, empty the
Drain Tank.
9. When descaling is complete, empty the Drain Tank and ll the Rell Tank with water.
- You can use AIRDRESSER once you nish all these steps.
Cleaning and maintenance
NOTE
• Vibration and noise may occur during the descaling process; this is normal, and there is
no problem with the product.
• You may see the Rell the tank message when you use the product the rst time after
descaling. This is normal. Fill the Rell Tank with water and press Start/Pause to
resume.
• Bubbles may form if the descaling agent is not rinsed thoroughly. Make sure to rinse
the Rell Tank and the Drain Tank thoroughly after descaling.
English 47
Page 48

Cleaning and maintenance
Moving the product to another location
• There are two wheels underneath the product to assist moving it.
• To prevent the product from tipping over when moving the product, we recommend
pushing the middle of the product. Do not push the top or the bottom.
• Empty the Rell Tank and the Drain Tank before moving the product to another
location. If the tanks are not emptied, water can spill while moving the product.
Cleaning and maintenance
English48
Page 49

Troubleshooting
Notication messages
Message Action
• Check if the Rell Tank has enough water.
Rell the tank
Rell the tank with
water
Drain the tank
Drain water from the
tank
Door Open
Close the door & Start
again
Abnormality Alert
Open the Door &
Check Inside
WIFI Not Connected
Check the router
- Fill the water up to the MAX line, reinsert the Rell Tank,
and then tap Start/Pause to start.
• Check if the Rell Tank is properly inserted.
- Properly insert the Drain Tank, and then tap Start/Pause
to start.
• Check if the Drain Tank is full.
- Empty the Drain Tank, reinsert the Drain Tank, and then
tap Start/Pause to start.
• Check if the Drain Tank is properly inserted.
- Properly insert the Rell Tank, and then tap Start/Pause
to start.
• Check if the door is open.
- Make sure the door is closed, and then tap Start/Pause
to start.
• Check if the door is open and if Child Lock is on.
- Make sure the door is closed, and then tap Start/Pause
to start. Make sure children or pets are not in the product.
• Check if the router is off.
- Turn the router on, and then connect to the Internet.
Troubleshooting
NOTE
If a problem persists, contact a local Samsung service centre.
English 49
Page 50

Troubleshooting
Checkpoint
The product does not
turn on.
The product does not
operate.
The product makes
sounds.
Troubleshooting
The control panel
does not work.
The product vibrates.
The Rell Tank is
empty after one use.
Steam or air is
coming out from the
door.
Problem Action
• Tap Power to turn the product on.
• Make sure the power cord is properly plugged in.
• Make sure the circuit breaker is on.
• Make sure the power cord is plugged into a power outlet
rated for this product.
• Make sure the door is closed, and then tap Start/Pause .
• If you hear water owing or boiling sounds, the product is
preparing for a steam process. This is normal.
• Make sure Child Lock is off.
• The product may not operate if you have used any liquid
other than water. Please contact a Samsung service centre.
• The product may generate sounds when the compressor
operates. This is normal.
• The product may generate sounds when it circulates air. This
is normal.
• The product may generate sounds before and during a steam
process. This is normal.
• The product may generate sounds to pump out and drain the
water. This is normal.
• When opening the door, sounds may come from the Rell
Tank when the water is owing through the pipe. This is
normal.
• If noises become louder, contact a Samsung service centre.
• After plugging in the product, wait for a moment and try
again. The control panel will respond 10 seconds after the
power cord has been plugged in.
• Clean the control panel and try again. If the problem
continues, contact a Samsung service centre.
• Make sure the product is installed on a solid, level surface.
• Make sure the product is level.
• The product consumes more water the rst time it is used.
This is normal.
• Make sure there are no items caught in the door.
• Make sure the door is properly closed.
English50
Page 51

Problem Action
Operation time
continues to increase.
Items are wet after a
cycle.
Items are not
deodorised.
Wrinkles are not
removed.
Smoke comes out
from the product
when the door is
opened.
• Wet items may take longer to dry. Operation time can
increase depending on the quantity and moisture level of the
items.
• Make sure the lint lter is clean and properly inserted.
• Make sure the door gasket is not damaged or items are not
caught on the door. If the door gasket is damaged, unplug the
power cord and contact a Samsung service centre.
• Wash items with strong odours or items that have been
stored for a long time.
• Wash items contaminated by oils.
• Large items such as down-lled jackets may not be
deodorised well. Put large items by themselves and run an
additional cycle if necessary.
• Do not put items with strong odour with other items. Separate
items by odour strength.
• Make sure the lint lter and both tanks are clean.
• Iron items that have been stored for a long time.
• Some cycles generate steam that may appear to be smoke.
This is normal.
Troubleshooting
English 51
Page 52

Specications
C
B
Specications
A
Type
Dimensions
(mm)
D. Depth with door open 1001
E. Width with door open 618
Rated power
Fuse (Fixed fuse in main PBA)
Weight (kg) 89.0
D
E
Clothing Care System (AIRDRESSER)
DF60*8****G
A. Height 1850
B. Width 445
C. Depth 615
220-240 V / 50 Hz
1700-1900 W
250 V / 12 A
Tube type High breaking capacity type
English52
Page 53

Memo
Page 54

Memo
Page 55

Memo
Page 56

QUESTIONS OR COMMENTS?
COUNTRY CALL OR VISIT US ONLINE AT
ITALIA 800-SAMSUNG (800.7267864) www.samsung.com/it/support
NETHERLANDS 088 90 90 100 www.samsung.com/nl/support
LATVIA 8000-7267 www.samsung.com/lv/support
LITHUANIA 8-800-77777 www.samsung.com/lt/support
ESTONIA 800-7267 www.samsung.com/ee/support
801-172-678* lub +48 22 607-
POLAND
93-33*
* (opłata według taryfy
http://www.samsung.com/pl/
support/
operatora)
DC68-04022G-01
Page 57

Sistema di trattamento per
indumenti (AIRDRESSER)
Manuale dell'utente
DF60*8****G
Page 58

Indice
Indice
Informazioni di sicurezza 3
Cosa sapere delle istruzioni di sicurezza 3
Importanti simboli di sicurezza 3
Precauzioni di sicurezza importanti. 4
Avvertenze generali 5
Avvertenze elettriche 7
Avvertenze di installazione 8
Avvertenze per la pulizia 9
Istruzioni relative alla normativa WEEE 10
Prima di iniziare 11
Installazione 11
Panoramica del prodotto 14
Pannello di controllo 16
Panoramica dei programmi 18
Guida alla cura dei tessuti 22
Etichette per la cura del tessuti 26
Smart Control 27
Uso del prodotto e degli accessori 31
Uso di un programma 31
Uso degli accessori 33
Pulizia e manutenzione 41
Esterno 41
Serbatoi dell'acqua 42
Vassoio dell'acqua 43
Filtro dell'aria 44
Filtro anti lanugine 46
Decalcicazione 47
Spostamento del prodotto in una diversa posizione 48
Risoluzione dei problemi 49
Messaggi di notica 49
Punto di verica 50
Speciche 52
Italiano2
Page 59

Informazioni di sicurezza
Congratulazioni per aver acquistato un nuovo prodotto Samsung. Questo manuale contiene importanti
informazioni riguardanti l'installazione, l'uso e la cura del tuo prodotto. Si prega di leggere completamente
questo Manuale dell'utente in modo da poter usufruire appieno delle caratteristiche del prodotto.
Cosa sapere delle istruzioni di sicurezza
Leggere completamente questo manuale in modo da conoscere l'uso sicuro ed efciente delle
caratteristiche e funzioni del nuovo prodotto. Conservare il manuale con cura vicino al prodotto in modo
da poterlo consultare in caso di necessità. Utilizzare questo prodotto solo per lo scopo per il quale è
stato progettato, come descritto in questo manuale. Le avvertenze e le importanti istruzioni di sicurezza
riportate in questo manuale non coprono tutte le possibili condizioni e situazioni che possono vericarsi. È
responsabilità dell'utente usare buonsenso, prestando la massima attenzione e cura in fase di installazione,
manutenzione e funzionamento. Poiché le seguenti istruzioni operative coprono i vari modelli disponibili,
le caratteristiche possono differire leggermente da quelle descritte in questo manuale e non tutti i simboli
di avvertenza possono essere pertinenti. In caso di dubbi o domande rivolgersi al Centro di assistenza
autorizzato di zona o visitare il sito www.samsung.com per reperire online le informazioni necessarie.
Importanti simboli di sicurezza
Informazioni di sicurezza
Signicato delle diciture e simboli contenuti in questo manuale:
AVVERTENZA
Pericoli o pratiche non sicure che possono causare lesioni personali gravi, la morte e/o danni materiali.
ATTENZIONE
Pericoli o pratiche non sicure che possono causare lesioni personali e/o danni materiali.
ATTENZIONE, supercie bollente
NOTA
Indica il rischio di lesioni personali o danni materiali.
Questi simboli di avvertenza hanno lo scopo di prevenire lesioni personali.
Seguire scrupolosamente le istruzioni.
Una volta letto, si raccomanda di conservare il manuale in un luogo sicuro per future consultazioni.
Leggere tutte le istruzioni prima di utilizzare il prodotto.
Come per qualsiasi altro dispositivo che utilizza elettricità ed è dotato di parti mobili, sussistono potenziali
pericoli. Per utilizzare il prodotto in sicurezza, familiarizzare con le sue funzioni e prestare attenzione
durante l'uso.
Italiano 3
Page 60

Informazioni di sicurezza
Precauzioni di sicurezza importanti.
AVVERTENZA
Al ne di ridurre eventuali principi di incendio, scariche elettriche o lesioni
personali durante l'uso del dispositivo, seguire le precauzioni di base tra le quali:
Informazioni di sicurezza
1. Questo apparecchio non è progettato per l'uso da parte di persone (bambini
inclusi) con ridotte capacità siche, sensoriali o mentali, inesperte o prive di
un'adeguata conoscenza, a meno che una persona responsabile per la loro
sicurezza fornisca loro una corretta supervisione e istruzioni all'uso.
2. Questo apparecchio può essere utilizzato da bambini di età superiore agli
8 anni e da persone con ridotte capacità siche, sensoriali o mentali o
senza esperienza o conoscenza del prodotto solo sotto la supervisione di
una persona responsabile o nel caso in cui abbiano ricevuto informazioni
speciche sull'uso sicuro dell'apparecchio e ne abbiano compreso i rischi ad
esso associati. Non consentire ai bambini di giocare con l'apparecchio. La
pulizia e la manutenzione dell'apparecchio non può essere eseguita da minori
senza la diretta supervisione di un adulto.
3. Controllare che i bambini non giochino con l’apparecchio.
4. Se il cavo di alimentazione è danneggiato, richiederne la sostituzione al
produttore, a un tecnico dell'assistenza o un tecnico specializzato al ne di
evitare potenziali pericoli
5. ATTENZIONE: Al ne di evitare eventuali pericoli a causa di un ripristino
dell'interruttore termico, questo apparecchio non deve prevedere una
alimentazione attraverso un interruttore esterno, quale ad esempio un timer, e
non deve essere collegata ad un circuito regolarmente disattivato e riattivato
dalla utility.
Italiano4
Page 61

6. Questo apparecchio è progettato per un uso domestico o applicazioni simili
quali:
- angoli cottura per il personale di punti vendita, ufci e altri ambienti
lavorativi;
- aziende agricole;
- uso da parte dei clienti in hotel, motel ed altri ambienti residenziali;
- bed and breakfast.
7. AVVERTENZA: Questo apparecchio è unicamente progettato per asciugare capi
lavati in acqua.
Avvertenze generali
AVVERTENZA
• Al ne di evitare scariche elettriche, incendi e causare la morte delle persone, assicurarsi che il
prodotto sia debitamente installato e sia dotato di una messa a terra come descritto in questo manuale
prima di utilizzarlo.
• Usare il prodotto per il solo scopo per il quale è stato progettato. Eventuali usi del prodotto per scopi
diversi da quelli specicati in questo manuale non sono coperti dalla garanzia.
• Al ne di evitare lesioni siche e/o danni al prodotto, non salire sopra, non appoggiarsi o appendersi al
prodotto.
• Non tentare di smontare o modicare il prodotto in alcun modo.
• Non permettere ai bambini di giocare con o intorno al prodotto. Mantenere sempre una stretta
supervisione dei bambini.
• Al ne di evitare rischi di incendio, lesioni siche e/o la morte, tenere tutti i materiali di imballaggio
lontano dalla portata dei minori e rimuoverli e smaltirli in modo responsabile secondo le normative
vigenti.
• Non toccare o azionare il prodotto con le mani bagnate.
• Al ne di evitare scariche elettriche e/o incendi, tenere gli animali domestici o altri oggetti estranei
lontano dalla portata del prodotto.
• Qualora si avvertano strani rumori, strani odori e/o si noti del fumo fuoriuscire dal prodotto,
scollegarlo immediatamente dalla presa di corrente.
• Non posizionare oggetti pesanti o pericolosi all'interno o intorno al prodotto.
• Al ne di evitare scariche elettriche, incendi, e/o il rischio di morte delle persone, non tentare di
riparare autonomamente o effettuare interventi di manutenzione su qualsiasi parte del prodotto a
meno che non sia specicamente indicato nel manuale dell'utente o in eventuali altre istruzioni per la
riparazione in autonomia.
Informazioni di sicurezza
Italiano 5
Page 62

Informazioni di sicurezza
• Estrarre tutti gli effetti personali (dispositivi elettrici, ammiferi ecc.) dalle tasche.
• Al ne di evitare incendi e/o esplosioni, non asciugare capi precedentemente lavati o macchiati con
benzina o solventi specici, olii per cottura o altre sostanze inammabili o esplosive.
• Il prodotto non è progettato per l'uso da parte di persone (bambini inclusi) con ridotte capacità
siche, sensoriali o mentali, inesperte o prive di un'adeguata conoscenza, a meno che una persona
Informazioni di sicurezza
responsabile per la loro sicurezza fornisca loro una corretta supervisione e istruzioni all'uso.
• Prima di effettuare lo smaltimento del prodotto, rimuovere la porta e tagliare la spina elettrica in modo
da impedirne un riutilizzo.
• Non toccare o disassemblare la presa elettrica del prodotto. In caso di una perdita di gas, ventilare
immediatamente il locale e contattare un Centro di assistenza autorizzato Samsung.
• Al ne di evitare danni al pannello in vetro, accertarsi di proteggere sempre il frontale del prodotto.
• Al ne di evitare lesioni siche e/o danni al prodotto, non salire sopra al prodotto o far leva sugli
sportelli del serbatoio.
• Non inserire le mani, i piedi o altre parti del corpo o oggetti in metallo al di sotto del prodotto.
• Per asciugare l'interno non utilizzare altri prodotti. Per eliminare eventuali cattivi odori interni non
utilizzare delle candele.
• Non aprire lo sportello mentre il prodotto è in funzione. Aprendo lo sportello mentre il prodotto è in
funzione si inuenzeranno le prestazioni ottimali, si potrà provocare una condensa e danneggiare il
pavimento.
• Non bere l'acqua contenuta nel serbatoio di rabbocco o di scarico.
• Pulire il ltro anti lanugine prima o dopo ogni carico.
• Non usare ammorbidenti per tessuti o prodotti simili a meno che non sia specicamente indicato dal
produttore degli ammorbidenti o dei prodotti.
• Tenere le dita lontano dalle aree di possibile schiacciamento. Prestare attenzione nel richiudere lo
sportello qualora vi sia la presenza di bambini.
• Non usare il prodotto per asciugare capi contenenti imbottiture in schiuma di gomma o inserti in
gomma.
• Al ne di evitare danni, una eccessiva rumorosità o un possibile incendio, non inserire corpi estranei
negli ugelli del vapore.
• Non posizionare le mani o il corpo vicino agli ugelli del vapore durante il loro funzionamento. Il vapore
bollente può provocare serie lesioni.
• Non aprire lo sportello durante il funzionamento. L'elevata temperatura interna può provocare serie
lesioni.
• In caso di insorgenza di un problema durante l'emissione del vapore, fermare il prodotto
immediatamente e rimuovere tutti i capi dal suo interno. Qualora i capi non vengano rimossi
immediatamente, rimarrebbero umidi, il che provocherebbe danni ai loro tessuti o li farebbe odorare.
• Prima di inserire i capi nel prodotto, accertarsi che le tasche siano vuote.
Italiano6
Page 63

• Contiene gas serra uorurati.
Apparecchio ermeticamente sigillato.
Non liberare i gas nell'atmosfera.
- Refrigerante (Tipo): R-134a (GWP = 1430)
- Refrigerante (Carica): 0,15 kg, 0,214 tCO
e
2
Avvertenze elettriche
AVVERTENZA
• Con un panno asciutto, rimuovere regolarmente eventuali sostanze estranee quali polvere o acqua dai
terminali elettrici e dai contatti.
• Scollegare la spina elettrica e pulirla con un panno asciutto.
• Al ne di evitare rischi di scariche elettriche, scollegare sempre il prodotto dalla presa di corrente
prima di disassemblarlo o eseguirne una manutenzione.
• Per scollegare il prodotto dalla corrente elettrica non tirare il cavo di alimentazione. Per scollegare la
presa di corrente, afferrare saldamente la presa ed estrarla.
• Al ne di evitare scariche elettriche, non utilizzare un cavo di prolunga.
• Non usare un cavo o una spina di alimentazione danneggiati o una presa allentata. Non tentare di
riparare, smontare o modicare autonomamente il cavo di alimentazione. Per eventuali riparazioni,
contattare il più vicino Centro di assistenza autorizzato Samsung.
• Inserire la spina del cavo di alimentazione in una presa di corrente che rispecchi le caratteristiche
elettriche locali. Usare la presa solo per alimentare questo apparecchio e non utilizzare un cavo di
prolunga.
• In caso di spostamento del prodotto, accertarsi di proteggere sempre il cavo di alimentazione.
• Al ne di evitare eventuali scariche elettriche, incendi o lesioni gravi o danni al prodotto e/o la morte,
collegare il prodotto ad una presa di corrente dotata di una idonea messa a terra. Accertarsi che la
presa a parete ed il circuito siano stati controllati da un tecnico qualicato.
• Il prodotto deve essere dotato di un cavo e di una spina di messa a terra. La spina deve essere inserita
in una idonea presa di corrente adeguatamente installata e dotata di messa a terra che rispetti le
vigenti normative elettriche locali.
• Il prodotto deve essere collegato alla terra. In caso di malfunzionamento o di guasto, la messa terra
ridurrà il rischio di scariche elettriche fornendo un percorso di minore resistenza per la corrente
elettrica.
• Prima dell'uso, accertarsi che il prodotto sia collegato ad una presa di corrente dedicata dotata di
messa a terra idonea per l'uso. È responsabilità dell'utente sostituire una presa di corrente standard a
2-poli con una a 3-poli.
• Al ne di evitare possibili scariche elettriche, il prodotto deve essere dotato di una adeguata messa a
terra conforme alle vigenti normative locali. Seguire le istruzioni riportate nel manuale dell'utente
Informazioni di sicurezza
Italiano 7
Page 64

Informazioni di sicurezza
• Il prodotto deve essere sempre collegato a una presa elettrica separata che abbia una tensione
corrispondente a quanto riportato sull’etichetta. Ciò consente di ottenere le migliori prestazioni
e prevenire il sovraccarico dell'impianto domestico che potrebbe causare un incendio a causa del
surriscaldamento dei cavi.
• Collegare il prodotto ad una presa di corrente adeguata, protetta e collegata ad un impianto dalle
Informazioni di sicurezza
dimensioni adeguate alla potenza utilizzata, al ne di evitare possibili sovraccarichi elettrici. Circuiti
elettrici mal dimensionati possono fondersi generando scariche elettriche o incendi.
• Non tagliare, per alcun motivo, il cavo di messa a terra del cavo di alimentazione. Al ne di prevenire
eventuali lesioni personali o danni al prodotto, il cavo di alimentazione deve essere collegato ad una
presa di corrente dotata di messa a terra.
• Non utilizzare una presa multipla che non sia dotata di messa a terra (portatile). In caso di uso di
una multi presa dotata di messa a terra (portatile), usare un prodotto con capacità di sostenere una
corrente di 15 A o superiore. Il mancato rispetto di questa indicazione può portare ad una scarica
elettrica o un principio di incendio a causa del calore accumulato nella multi presa. Azionando
l'interruttore l'alimentazione di corrente può essere interrotta.
• Il prodotto deve essere collegato ad un oggetto metallico collegato alla terra, un cablaggio o un
conduttore di messa a terra collegato con il terminale di messa a terra dell'apparecchio. Qualora il
prodotto non venga collegato alla terra possono vericarsi scariche elettriche.
• Il collegamento inappropriato del conduttore di messa a terra può comportare il rischio di scariche
elettriche. Se in dubbio sul collegamento a terra del prodotto, consultare un elettricista qualicato.
Avvertenze di installazione
AVVERTENZA
• Installare il prodotto solo in una posizione stabile e ben livellata. Non installare il prodotto in luoghi
soggetti a vibrazioni o laddove il prodotto corra il rischio di cadere, quali navi o aerei. Qualora non si
sia sicuri della posizione di installazione, contattare un Centro di assistenza autorizzato Samsung.
• Non installare il prodotto in luoghi esposti alle intemperie o a temperature sottozero. Qualora il
prodotto venga spedito con temperature sottozero, lasciarlo riscaldare prima di procedere con
l'installazione.
• Per evitare scariche elettriche, incendi, lesioni serie, danni al prodotto e/o morte dell'utente, non
installare il prodotto in luoghi umidi (come bagni o saune).
• Per evitare incendi, fumo e/o danni al prodotto, non installarlo vicino o sopra fonti di calore (come
stufette o caloriferi).
• Per evitare incendi o fumo e/o danni al prodotto, non posizionarvi candele o altre amme libere sopra
o intorno.
• Al ne di evitare lesioni siche e/o danni al prodotto, prima di spostare il prodotto contattare un
Centro di assistenza autorizzato Samsung.
Italiano8
Page 65

• Installare il prodotto laddove la presa di corrente sia facilmente accessibile. Per evitare scariche
elettriche e/o incendi, in caso di inutilizzo scollegare il prodotto dalla presa di corrente.
• Qualora il luogo di installazione sia stato soggetto ad allagamento, non avvicinarsi al prodotto e
contattare immediatamente un Centro di assistenza autorizzato Samsung.
• Per evitare incendi, fumo e/o danni al prodotto, rimuovere tutte le pellicole protettive del prodotto
prima dell'uso.
• Al ne di evitare danni al prodotto e/o lesioni siche, spostare il prodotto con l'ausilio di un'altra
persona.
Informazioni di sicurezza
Avvertenze per la pulizia
AVVERTENZA
• Per evitare scariche elettriche, non usare oggetti appuntiti per azionare o pulire il prodotto.
• Durante la pulizia non spruzzare acqua direttamente sulla supercie del prodotto.
• Non usare candeggina sull'esterno del prodotto. La candeggina può scolorire il rivestimento esterno
del prodotto.
• Pulire l'interno con un panno asciutto dopo l'uso.
• Al termine dell'uso, asciugare l'interno del prodotto con un panno asciutto.
- All'interno del prodotto potrebbero rimanere impurità come capelli lunghi, polvere o gocce d'acqua.
• In caso di accumulo di impurità (detersivo, sporco, residui di cibo, ecc.) nel prodotto o negli accessori,
scollegare il cavo di alimentazione ed asciugarlo con un panno asciutto.
- Non applicare sul prodotto o sugli accessori detersivi o candeggianti.
- In caso contrario il prodotto potrà scolorire, deformarsi, danneggiarsi o formare ruggine.
Italiano 9
Page 66

Informazioni di sicurezza
Istruzioni relative alla normativa WEEE
Informazioni di sicurezza
Corretto smaltimento del prodotto (riuti elettrici ed elettronici)
(Applicabile nei Paesi con sistemi di raccolta differenziata)
Il simbolo riportato sul prodotto, sugli accessori o sulla documentazione indica
che il prodotto e i relativi accessori elettronici (quali caricabatterie, cufa
e cavo USB) non devono essere smaltiti con altri riuti al termine del ciclo
di vita. Per evitare eventuali danni all'ambiente o alla salute causati dallo
smaltimento dei riuti non corretto, si invita l'utente a separare il prodotto e
i suddetti accessori da altri tipi di riuti, conferendoli ai soggetti autorizzati
secondo le normative locali.
Gli utenti domestici, in alternativa alla gestione autonoma di cui sopra,
potranno consegnare l’apparecchiatura che si desidera smaltire al rivenditore,
al momento dell’acquisto di una nuova apparecchiatura di tipo equivalente.
Presso i rivenditori di prodotti elettronici con supercie di vendita di almeno
400 m2 è inoltre possibile consegnare gratuitamente, senza obbligo di
acquisto, i prodotti elettronici da smaltire con dimensioni inferiori a 25 cm.
Gli utenti professionali (imprese e professionisti) sono invitati a contattare il
proprio fornitore e vericare i termini e le condizioni del contratto di acquisto.
Questo prodotto e i relativi accessori elettronici non devono essere smaltiti
unitamente ad altri riuti commerciali.
Per ulteriori informazioni sull'impegno ambientale di Samsung e sugli obblighi normativi specici dei
singoli prodotti es. REACH, WEEE o Batteries, visitare la pagina sulla sostenibilità disponibile nel sito www.
samsung.com
Italiano10
Page 67

Prima di iniziare
A
Installazione
Installare il prodotto secondo le istruzioni
contenute in questo manuale e le normative locali
vigenti.
Installazione del prodotto
1. Individuare una posizione stabile, livellata con
adeguato spazio secondo i criteri indicati sotto.
Sopra 25 mm
Lati 5 mm
Retro 15 mm
- Qualora gli spazi minimi non vengano
rispettati, le prestazioni potrebbero
risultare inferiori a causa di una impropria
ventilazione causando una possibile
condensa sull'esterno del prodotto.
- Non installare il prodotto alla luce solare
diretta o in luoghi soggetti al caldo o al
freddo. La temperatura dell'ambiente
deve essere compresa tra 10°C e 35°C.
Se la temperatura è troppo alta o troppo
bassa, il prodotto potrebbe non funzionare
correttamente o avere prestazioni non
ottimali.
2. Ruotare il piedino di livellamento (A) in senso
orario o antiorario per regolare l'altezza no a
quando il prodotto è livellato.
Prima di iniziare
NOTA
Qualora il prodotto traballi o si desideri
incrementare l'altezza del lato posteriore, montare
il piedino di livellamento posteriore in dotazione
sui lati posteriori del prodotto.
Italiano 11
Page 68

Prima di iniziare
3. Inserire il vassoio dell'acqua seguendo le
indicazioni riportate nelle gure.
- Assicurarsi che il lato con indicato 'TOP' sia
rivolto verso l'alto.
Prima di iniziare
4. Collegare il prodotto ad una presa di corrente
da 230 V / 50 Hz dotata di messa a terra.
- Qualora non si disponga di una presa di
corrente dotata di messa a terra rivolgersi
ad un Centro di assistenza autorizzato
Samsung per conoscere metodi alternativi
per effettuare la messa a terra del prodotto.
NOTA
• Una volta effettuata l'installazione del
prodotto, attendere 2 ore prima di iniziarne
l'utilizzo.
• Il prodotto consuma un maggior quantitativo
di acqua al primo utilizzo. Potrebbe essere
necessario riempire il serbatoio più volte.
Italiano12
Page 69

Fissare AIRDRESSER con un cavo di sicurezza
ՋՍ
ՋՌ
(opzionale)
AIRDRESSER potrebbe ribaltarsi a causa di una
azione esterna o dell'azione di un bambino.
Se necessario, usare il cavo di sicurezza per
ssare AIRDRESSER impedendone il possibile
ribaltamento (vedere la gura).
ATTENZIONE
Prima di ssare il cavo di sicurezza al
AIRDRESSER, scollegarlo dalla presa di corrente.
Impostazione della lingua
Alla prima attivazione dopo l'installazione, sul
display del pannello di controllo verrà visualizzata
la schermata di selezione della lingua. Seguire le
istruzioni visualizzate per selezionare la lingua
desiderata.
1. Premere < o > per selezionare la lingua
desiderata.
2. Tenere premuto Avvia/Pausa per
memorizzare la lingua selezionata.
NOTA
• L'impostazione della lingua potrebbe non
essere disponibile in alcuni paesi.
• Per cambiare la lingua in seguito, tenere
premuto Normal (Normale) e Delicates
(Delicati) per 3 secondi, quindi seguire le
istruzioni sopra.
Prima di iniziare
NOTA
• Per ssare il cavo di sicurezza ad una parete
usare le viti in dotazione.
• Per ssare il cavo di sicurezza al AIRDRESSER
usare le viti predisposte sulla sommità.
Italiano 13
Page 70

Prima di iniziare
Panoramica del prodotto
01
02
03
Prima di iniziare
04
05
06
07
08
09
10
11
01 Fori di ventilazione 02 Appendiabito ad aria 03 Filtro dell'aria
04 Ripiano 05 Filtro anti lanugine 06 Serbatoio di scarico
07 Vassoio dell'acqua 08 Pannello di controllo 09 Scomparto accessori
10 Supporto per ripiano 11 Serbatoio di riempimento
Italiano14
Page 71

Accessori
Manuale dell'utente Cavo di sicurezza Vite (per cavo di sicurezza)
Ripiano Vassoio dell'acqua Appendiabito ad aria
Prima di iniziare
Kit pesi Kit appendiabiti Panno di pulizia
Ancoraggio a vite (per cavo di
sicurezza)
Piedino di livellamento
posteriore
Italiano 15
Page 72

Prima di iniziare
Pannello di controllo
Prima di iniziare
01
02
03
06
04 05
07
01 Display
Visualizza il programma selezionato ed il tempo rimanente stimato, le notiche e la connettività Wi-Fi.
02 Programmi
Premere un programma per selezionarlo. Per maggiori informazioni sui programmi, vedere a pagina 18.
03 Silenzioso / Sicurezza bambini (3 sec)
Premere per attivare / disattivare Silenzioso. Silenzioso riduce la rumorosità di
funzionamento.
Silenzioso
NOTA
Silenzioso aumenta il tempo del programma.
Italiano16
Page 73

Tenere premuto per 3 secondi per attivare o disattivare la funzione Sicurezza
bambini. Sicurezza bambini disattiva tutti i pulsanti tranne Accensione .
Sicurezza bambini
NOTA
Quando Sicurezza bambini è attiva, rimane attiva no alla sua disattivazione.
04 Fine ritardata / Mantieni fresco (3 sec)
Premere per attivare la funzione Fine ritardata e per incrementare il tempo di
ne programma (da 1 a 24 ore).
NOTA
• La funzione Fine ritardata non è utilizzabile inseme alla funzione
Asciugatura con sensore.
Fine ritardata
• Quando la funzione Fine ritardata è attiva, il display si spegne per
risparmiare energia.
• Alcune impostazioni possono non essere disponibili in base al programma
selezionato.
• In base ai capi ed alle condizioni ambientali, il tempo effettivo di
completamento del programma può essere diverso da quanto impostato.
Tenere premuto per 3 secondi per attivare o disattivare la funzione Mantieni
fresco. Qualora non sia possibile estrarre immediatamente i capi al termine di
un programma, è possibile mantenerli freschi.
Prima di iniziare
NOTA
Mantieni fresco
• Mantieni fresco rimane attiva no a 24 ore dopo il termine di un
programma.
• Spegnendo il prodotto o aprendo lo sportello la funzione Mantieni fresco si
disattiva.
• Quando la funzione Mantieni fresco è attiva, il display si spegne per
risparmiare energia.
05 Smart Control
Premere per attivare / disattivare Smart Control. Per maggiori informazioni su Smart Control, vedere a
pagina 27.
06 Accensione
Premere per accendere o spegnere l'apparecchio.
07 Avvia/Pausa
Tenere premuto per avviare il prodotto. Premere per mettere in pausa il prodotto
Italiano 17
Page 74

Prima di iniziare
Panoramica dei programmi
Programmi giornalieri
Programma Descrizione
Normal (Normale) • Per rinfrescare i capi di tutti i giorni.
Delicates (Delicati)
Quick (Rapido) • Per rinfrescare rapidamente capi con lievi odori e pieghe.
Prima di iniziare
Sanitize (Igienizza)
• Per capi delicati in chiffon, pizzo e capi decorati.
• Per capi in raion, usare questo programma.
• Per igienizzare i capi con il vapore.
NOTA
• Non inserire più di un capo o un oggetto di grandi dimensioni. I capi o
gli oggetti di grandi dimensioni possono bloccare il usso di vapore e la
circolazione dell'aria.
• Interrompendo o cambiando il programma alla comparsa sul display
del messaggio Sanitizing (Igienizzazione in corso), i capi possono
danneggiarsi o non asciugare completamente.
Italiano18
Page 75

Programmi di asciugatura
ATTENZIONE
Non usare i capi indicati di seguito con la funzione Asciugatura.
• Pelle, pelliccia, piuma, velluto, seta.
• Qualsiasi capo contenente gomma o spugna.
• Articoli realizzati in tessuti di lana, tessuti idrorepellenti, tessuti di seta o tessuti di canapa.
• Coperte di pelliccia con una lunghezza della pelliccia superiore a 1 cm, coperte di lana, tappeti,
materassi.
• Intimo con lacci, collant, calze.
NOTA
I risultati dell'asciugatura possono variare a seconda dello spessore degli articoli.
Programma Descrizione
AIRDRESSER imposta automaticamente il tempo di asciugatura dei capi.
NOTA
Sensor Dry (Asciugatura
con sensore)
• L'uso della funzione Asciugatura con sensore causa il rapido
svuotamento del serbatoio di scarico.
• Asciugatura con sensore potrebbe non asciugare in modo ottimale i capi
eccessivamente bagnati e gli oggetti di grandi dimensioni. Se i capi non
risultati asciugati in modo ottimale, eseguire nuovamente il programma.
Impostare il tempo manualmente (1-3 ore) per asciugare i capi.
Prima di iniziare
Time Dry (Asciugatura a
tempo)
Room Care (Cura
ambientale)
NOTA
• Asciugatura a tempo potrebbe non asciugare in modo ottimale i capi
eccessivamente bagnati e gli oggetti di grandi dimensioni. Se i capi non
risultati asciugati in modo ottimale, eseguire nuovamente il programma.
Programma per deumidicare l'ambiente circostante. È possibile impostare
un tempo di 2 o 4 ore.
NOTA
• Assicurarsi che il prodotto sia vuoto durante l'uso della funzione Cura
ambientale.
• La temperatura interna può aumentare.
Italiano 19
Page 76

Prima di iniziare
Programmi speciali
Programma Descrizione
Suits (Abiti)
School uniform (Uniformi
scolastiche)
Prima di iniziare
Wool/Knit (Lana/
Maglieria)
Outdoor Per abbigliamento sportivo.
Per afnare le pieghe nei pantaloni.
NOTA
• Inserire la giacca nel foro dell'aria centrale e i pantaloni nel foro dell'aria
destro.
• Per ottenere risultati ottimali, usare con il kit peso.
Programma idoneo per le uniformi scolastiche che non possono essere
lavate e asciugate giornalmente.
Per capi in lana o maglie.
NOTA
Al ne di evitare la deformazione dei capi, piegare i capi con cura ed
appoggiarli sul ripiano.
Per rinvigorire pesanti giacche in piumino conservate a lungo.
Down Jackets (Giacche in
piumino)
Fur/Leather (Pellicce/
Pelle)
Heavy Duty (Alto carico) Per la cura dei tessuti di alto spessore come ad esempio i maglioni.
Self Clean (Auto pulizia)
NOTA
Per prevenire il blocco della circolazione dell'aria, appendere un solo capo
sul foro centrale dell'aria.
Elimina l'umidità e la polvere dagli indumenti in pelliccia e in pelle.
NOTA
• Durante questo programma il prodotto potrebbe risultare più rumoroso.
• Seguire le indicazioni riportate sulle etichette dei singoli indumenti.
• Per ottenere risultati ottimali, trattare un solo capo per volta.
• Accertarsi che gli indumenti in pelliccia siano asciutti prima di utilizzare
questo programma.
Pulisce automaticamente il prodotto.
NOTA
• Assicurarsi che il prodotto sia vuoto.
• Per ottenere risultati ottimali, non interrompere il programma o aprire
lo sportello prima che il programma Auto pulizia sia terminato.
• Questo programma non elimina eventuale muffa.
Italiano20
Page 77

Download di programmi
È possibile eseguire il download di ulteriori programmi mediante la app SmartThings.
1. Premere Accensione .
2. Premere Special (Speciale) più volte per selezionare Download (Scarico).
3. Sul proprio smartphone, seguire le istruzioni visualizzate sullo schermo per eseguire il download di
eventuali programmi.
• È possibile eseguire il download di un massimo di 10 programmi.
• È possibile eseguire il download dei seguenti programmi.
- Winter Coat (Cappotti), Denim, Down Dry (Piumini), Babywear (Indumenti per bambini), Bedding
(Lenzuola), Doll (Peluche), Accessories (Accessori).
Prima di iniziare
Italiano 21
Page 78

Prima di iniziare
Guida alla cura dei tessuti
• I tessuti hanno diverse modalità di trattamento in base alla loro composizione e nitura. Questa guida
alla cura dei tessuti non copre tutti i materiali e pertanto il suo uso è da intendersi esclusivamente
come riferimento. Assicurarsi di vericare l'etichetta apposta su ogni capo prima di usare AIRDRESSER
al ne di prevenire eventuali danni ai tessuti.
• Non inserire capi con colori non resistenti, sensibili al calore o che non siano idonei per il lavaggio
in acqua con i programmi Generico, Speciale o Igienizza. Eseguire un test con acqua su una piccola
porzione di tessuto in una zona interna per vedere se i colori sono resistenti. Per ulteriore assistenza,
consultare il produttore dell'indumento, un professionista del lavaggio a secco, o una guida per la cura
dei tessuti più completa.
Prima di iniziare
Categoria dei programmi
Vedere la tabella che segue per controllare i programmi specici di ogni categoria riportata nella tabella
della guida alla cura dei tessuti.
Programmi generici Normal (Normale), Quick (Rapido), Delicates (Delicati)
Programmi speciali
Programmi di igienizzazione
Programmi di asciugatura
* = Programmi speciali / ** = Programmi di scarico
Categoria Programmi
Suits (Abiti), School uniform (Uniformi scolastiche), Wool/Knit (Lana/
Maglieria), Outdoor, Down Jackets (Giacche in piumino), Fur/Leather
(Pellicce/Pelle), Heavy Duty (Alto carico), Winter Coat (Cappotti)**,
Denim**, Accessories (Accessori)*
Sanitize (Igienizza), Babywear (Indumenti per bambini)**, Bedding
(Lenzuola)**, Doll (Peluche)**
Sensor Dry (Asciugatura con sensore), Time Dry (Asciugatura a
tempo), Down Dry (Piumini)**
Italiano22
Page 79

Tabella Guida alla cura dei tessuti
Fibre naturali - bre vegetali
Programmi
Tessuto
Riduci pieghe Deodorante
Cotone
Lino, canapa,
ramie
Raion
= Possibile / = Controllare etichetta
Generico
Speciale Igienizza Asciugatura
Indumenti / Note
Asciugamani, calze, intimo, jeans,
capi sportivi, magliette, coperte
Sui tessuti in cotone 100% è
possibile che rimangano alcune
pieghe. Se necessario, al termine
del programma stirare gli
indumenti.
Indumenti estivi, tovaglie
È possibile che rimangano alcune
pieghe Accertarsi che i capi siano
lavabili a mano ed in lavatrice
prima di usare i programmi
Generico, Speciale o Igienizza.
Appoggiare i capi delicati sul
ripiano. Non trattare indumenti
inamidati.
Fodere, camicette, cravatte,
pigiami
Prima di iniziare
Italiano 23
Page 80

Prima di iniziare
Fibre naturali - bre animali
Tessuto
Alpaca, pelo
di cammello,
cashmere
Prima di iniziare
Pellicce, pelle *
Seta
Lana
Programmi
Generico
Riduci pieghe Deodorante
*
*
Speciale Igienizza Asciugatura
Indumenti / Note
Cappotti, abiti
Appoggiare i capi di maglieria
sul ripiano. Il pelo di alpaca e di
cammello si restringono in acqua
calda.
Sciarpe, maglieria
Appoggiare i capi di maglieria
sul ripiano. Il pelo di alpaca e di
cammello si restringono in acqua
calda.
Cappotti, sciarpe
* Usare solo il programma Fur/
Leather (Pellicce/Pelle). La pelle
deve essere naturale al 100 % (non
pelle sintetica)
Cravatte, nastri, sciarpe, camicette
di seta
I tessuti in seta non sono
idonei per il trattamento con
AIRDRESSER.
Maglioni, maglieria
Appoggiare i capi di maglieria
sul ripiano. Alcuni tipi di lana si
restringono se lavati in acqua
calda. Assicurarsi che i tessuti
siano lavabili in lavatrice/a mano
prima di usare i programmi
Generico o Speciale.
* Si consiglia l'uso del programma
Wool/Knit (Lana/Maglieria).
Cappotti, abiti
Appoggiare i capi di maglieria
sul ripiano. Alcuni tipi di lana si
restringono se lavati in acqua
calda. Accertarsi che i capi siano
lavabili a mano ed in lavatrice
prima di usare i programmi
Generico, Speciale o Igienizza.
* Si consiglia l'uso dei programmi
Winter Coat (Cappotti) o Suits
(Abiti).
= Possibile / = Controllare etichetta
Italiano24
Page 81

Fibre sintetiche
Programmi
Tessuto
Riduci pieghe Deodorante
Acetati
Acrilico
Nylon
Poliuretano
Poliestere
= Possibile / = Controllare etichetta
Generico
Indumenti sportivi
Speciale Igienizza Asciugatura
Indumenti / Note
Fodere, camicette, cravatte,
pigiami
Intimo termico, maglieria
Appoggiare i capi sul ripiano.
Calze, lingerie
Appoggiare i capi sul ripiano.
Indumenti elastici (con meno del
5%)
Se i capi contengono più del
5% di poliuretano (es. costumi),
vericare l'etichetta.
Indumenti per Outdoor, indumenti
sportivi, T-shirt, camicie, camicette
Prima di iniziare
Italiano 25
Page 82

Prima di iniziare
Etichette per la cura del tessuti
La maggior parte degli indumenti è dotata di etichette contenenti istruzioni dettagliate per la cura del
tessuto. La tabella che segue contiene alcuni dei simboli che possono aiutare a scegliere le impostazioni
corrette per AIRDRESSER.
Etichette per la cura dei tessuti che possono essere usate con AIRDRESSER
Categoria Etichetta Signicato Uso con AIRDRESSER
Normale O
Pressa permanente O
Prima di iniziare
Etichette per il lavaggio
Etichette per
asciugatrice
Etichette di asciugatura
* Alcuni indumenti per i quali si sconsiglia il lavaggio (come ad esempio le pellicce o i tessuti in pelle)
possono invece essere trattati con AIRDRESSER. Vedere la guida alla cura dei tessuti.
** Per i capi che riportano questo simbolo nell'etichetta di cura dei tessuti usare il ripiano.
Delicato O
Non lavare O*
Lavaggio a mano O
Nessun calore X
Basso O
Medio O
Alto O
Normale O
Pressa permanente O
Delicato O
Non asciugare in asciugatrice O
Asciugare appeso O
Asciugare senza stirare O
Asciugare steso O**
Asciugare all'ombra O
Non asciugare X
Italiano26
Page 83

Smart Control
Connessione WiFi
• I sistemi di crittograa consigliati sono WPA/TKIP e WPA2/AES. I protocollo Wi-Fi di nuovo sviluppo o
non approvati non sono supportati.
• La qualità della connessione del network wireless può essere inuenzata dalle condizioni ambientali
circostanti.
• Se il proprio Internet service provider ha registrato l'indirizzo MAC del PC o del modem per identicare
l'utente, Samsung AIRDRESSER potrebbe non riuscire a connettersi ad Internet. In questo caso,
contattare il proprio Internet provider
• Il rewall Internet potrebbe interrompere la connessione Internet. In questo caso, contattare il proprio
Internet provider
• Se il malfunzionamento Internet dovesse continuare anche dopo l'intervento del Internet provider,
contattare un Rivenditore autorizzato o un Centro di assistenza autorizzato Samsung.
Download delle app
Nel app market (Google Play Store, Apple App Store, Samsung Galaxy Apps), cercare la app SmartThings,
quindi eseguirne il download ed installarla sul proprio dispositivo.
NOTA
• SmartThings potrebbe non essere compatibile con alcuni tablet o smartphone.
- La app necessita di Android OS 6.0 o superiore (con un minimo di 2 GB di RAM).
- Le risoluzioni video supportate per Android sono 1280 x 720 (HD), 1920 X 1080 (FHD), 2560 x
1440 (WQHD).
- La app necessita di iOS 10.0 o superiore (gli iPhone supportati sono iPhone 6 o successivi).
- Le risoluzioni video supportate per i dispositivi Apple sono 1334 X 750, 1920 x 1080.
• La app è soggetta a modiche senza preavviso ai ni di migliorarne le prestazioni.
Prima di iniziare
Log in
È necessario effettuare prima l'accesso a SmartThings mediante il proprio account Samsung. Per creare
un nuovo account Samsung, seguire le istruzioni visualizzate dalla app. Non è necessario usare una app
diversa per creare il proprio account.
NOTA
Qualora si disponga di un account Samsung, usarlo per effettuare l'accesso. Un utente di uno smartphone
Samsung effettua automaticamente l'accesso.
Italiano 27
Page 84

Prima di iniziare
Registrazione del dispositivo in SmartThings
1. Accertarsi che lo smartphone sia collegato ad una rete wireless. In caso contrario, accedere a Settings
(Impostazioni), attivare la connessione wireless e selezionare un AP (Access Point).
2. Avviare la app SmartThings sul proprio smartphone.
3. In caso di comparsa del messaggio “A new device is found. (È stato trovato un nuovo dispositivo.)”,
selezionare Add (Aggiungi).
4. Qualora non compaia alcun messaggio, selezionare + quindi selezionare il proprio dispositivo
nell'elenco dei dispositivi disponibili. Se il proprio dispositivo non è elencato, selezionare Device Type
(Tipo dispositivo) > Specic Device Model (Specica modello dispositivo) ed aggiungerlo manualmente.
5. Seguire le istruzioni riportate sullo schermo per completare la registrazione.
Prima di iniziare
Panoramica SmartThings
Categoria Funzione Descrizione
Monitoraggio
Controllo Avvia / Pausa / Annulla
Notica Programma completato
Stato programma
Smart Control
Monitoraggio energetico
È possibile vericare il programma in
corso e le opzioni così come il tempo
rimanente prima del suo completamento.
Lo stato dello Smart Control è mostrato per
AIRDRESSER.
Per monitorare il consumo energetico
effettivo del dispositivo.
Selezionare un programma e le necessarie
opzioni, quindi selezionare Avvia / Pausa
/ Annulla per avviare il dispositivo,
interromperlo temporaneamente o per
annullare il programma in corso.
Notica all'utente il completamento del
programma impostato.
Italiano28
Page 85

Categoria Funzione Descrizione
Selezionare il tipo di tessuto e le opzioni
Ricette per il trattamento dei capi
desiderate per ricevere suggerimenti sul
programma più adatto.
Inserendo le informazioni relative agli
abiti (ad esempio le informazioni sui
Il mio guardaroba
tessuti) è possibile aggiungere i propri
indumenti alla app e ricevere suggerimenti
sul trattamento e la storia dei trattamenti
effettuati.
Funzioni AIRDRESSER
Gestione programmi speciali
È possibile impostare un massimo di
9 programmi che possono essere in
seguito eliminati o per i quali è possibile
modicarne l'ordine.
Per ricevere un aiuto nel conservare il
proprio AIRDRESSER in perfette condizioni
HomeCare Manager
operative. Vericare lo stato di usura, il
consumo energetico e ricevere notiche
di allarme relative alla manutenzione del
prodotto.
Prima di iniziare
Italiano 29
Page 86

Prima di iniziare
Dichiarazione Open Source
Il software incluso in questo prodotto contiene software open source. È possibile ottenere il codice
sorgente completo corrispondente per un periodo di tre anni dopo l'ultima spedizione inviando una email
a mailto:oss.request@samsung.com.
È anche possibile ottenere il codice sorgente corrispondente su un supporto sico come un CD-ROM; per
tale richiesta è previsto un addebito minimo.
Per la pagina di download e le informazioni sulla licenza open source relativa a questo prodotto vedere
la pagina http://opensource.samsung.com/opensource/SMART_AT_051/seq/0. Questa offerta è valida per
chiunque riceva questa informazione.
Prima di iniziare
NOTA
Con la presente, Samsung dichiara che il dispositivo radio è conforme alla Direttiva 2014/53/UE ed
alle clausole pertinenti nel Regno Unito. Il testo completo della Dichiarazione di conformità UE e della
Dichiarazione di conformità nel Regno Unito è disponibile all'indirizzo internet: La Dichiarazione di
conformità ufciale è reperibile all'indirizzo http://www.samsung.com, accedendo alla pagina Support
(Supporto) > Support Home (Home Page Supporto) e digitando il modello del prodotto.
Potenza max di trasmissione Wi-Fi: 20 dBm a 2,412 GHz – 2,472 GHz
Italiano30
Page 87

Uso del prodotto e degli accessori
A
B
4 7
5
6
Uso di un programma
1. Vericare che il serbatoio dell'acqua (A) sia
pieno.
2. Vericare che il ltro anti lanugine (B) sia
pulito.
3. Inserire gli indumenti come indicato nella
sezione Uso degli accessori.
Uso del prodotto e degli accessori
4. Premere Accensione .
5. Selezionare un programma.
- Premere Normal (Normale), Delicates
(Delicati), Quick (Rapido) o Sanitize
(Igienizza).
- Per i programmi di Asciugatura, premere
Dry (Asciugatura) più volte per impostare il
programma desiderato.
- Per i programmi Speciale, premere Special
(Speciale) più volte per impostare il
programma desiderato.
6. Selezionare le opzioni desiderate.
- Silenzioso , Sicurezza bambini , Fine
ritardata , Mantieni fresco .
7. Tenere premuto Avvia/Pausa per 3 secondi.
Italiano 31
Page 88

Uso del prodotto e degli accessori
Linee guida per l'uso
Prima dell’uso
• Questo prodotto non è progettato per pulire gli indumenti. Per ottenere risultati ottimali, lavare ed
asciugare gli indumenti prima di trattarli con questo prodotto.
• Prima di utilizzare il prodotto, consigliamo di lavare gli indumenti dotati di un forte odore o conservati
a lungo.
• Separare gli indumenti in base alla consistenza dell'odore.
• Vericare tutte le etichette di lavaggio prima di trattare gli indumenti con questo prodotto.
• Prima di inserire i capi nel prodotto, accertarsi che le tasche siano vuote.
• Non usare l'apparecchio come armadio.
• Il prodotto potrebbe non essere in grado di rimuovere i peli degli animali domestici.
Durante l'uso
Uso del prodotto e degli accessori
• Assicurarsi che gli indumenti non siano a contatto con il fondo del prodotto. Se necessario, usare il
ripiano per disporre gli indumenti appesi impedendo che tocchino il fondo del prodotto.
• Durante il processo di trattamento con il vapore si potranno avvertire alcuni sibili.
• Per interrompere un programma prima del suo termine, usare il programma di Asciugatura.
• La durata dipende dalle condizioni ambientali ed il tipo di indumenti inseriti.
• Se usati più programmi consecutivamente, il display potrebbe mostrare una durata dei programmi
diversa da quella indicata.
• Non aprire lo sportello mentre il prodotto è in funzione.
Dopo l'uso
• La quantità di pieghe eliminate può variare in base al tipo di tessuto.
• Rimuovere gli indumenti subito dopo il completamento di un programma. Qualora non sia possibile
estrarre gli indumenti subito dopo il termine di un programma, usare la funzione Fine ritardata o
Mantieni fresco.
• Nell'estrarre gli indumenti, afferrare sia l'indumento sia l'appendiabito.
Italiano32
Page 89

Uso degli accessori
Appendiabito ad aria
Usare l'appendiabito ad aria per indumenti quali giacche, cappotti sportivi e blazer.
NOTA
• Accertarsi che sia la parte interna sia la parte esterna degli appendiabiti siano pulite e prive di oggetti
estranei.
• Non usare gli appendiabiti per maglieria, indumenti in lana e intimo.
• La lunghezza massima degli indumenti è di 110 cm per la parte superiore e 100 cm per la parte
inferiore.
• In base al tipo e dimensioni del tessuto, è possibile che si formino alcune pieghe sul collo degli abiti.
Per usare gli Appendiabiti
1. Appendere gli indumenti sugli appendiabiti
nello stesso verso.
- Al ne di prevenire la caduta degli
indumenti dagli appendiabiti, abbottonare
tutti i bottoni e chiudere tutte le cerniere.
- Accertarsi che gli indumenti siano appesi
in modo piatto. Accertarsi che le clip degli
appendiabiti non sporgano verso avanti.
2. Far scorrere gli appendiabiti nei fori di
ventilazione no ad avvertire uno scatto.
- Accertarsi che gli appendiabiti siano rivolti
nello stesso verso.
- Qualora gli appendiabiti non siano
correttamente inseriti nei fori di
ventilazione, si potrà avvertire una
rumorosità e alcune vibrazioni.
Uso del prodotto e degli accessori
NOTA
Al ne di ottenere risultati ottimali, evitare di
appendere gli indumenti più lunghi nel foro
centrale.
Italiano 33
Page 90

Uso del prodotto e degli accessori
Kit appendiabiti
È possibile usare il kit l'hanger kit in modo da usare gli appendiabiti normali per appendere gli indumenti.
Tuttavia, al ne di ottenere risultati ottimali si consiglia l'uso degli Air hanger.
NOTA
• Usare solo appendiabiti che non si deformano con il calore.
• Accertarsi che sia la parte interna sia la parte esterna degli appendiabiti siano pulite e prive di oggetti
estranei.
• Non utilizzare appendiabiti in plastica/silicone/legno o appendiabiti con adesivo.
• Non utilizzare appendiabiti che possano arrugginire.
Uso del prodotto e degli accessori
Per usare il kit appendiabiti
1. Appendere gli indumenti sugli appendiabiti
nello stesso verso.
- Al ne di prevenire la caduta degli
indumenti dagli appendiabiti, abbottonare
tutti i bottoni e chiudere tutte le cerniere.
- Accertarsi che gli indumenti siano appesi
in modo piatto. Accertarsi che le clip degli
appendiabiti non sporgano verso avanti.
2. Far scorrere il kit appendiabiti no ad
avvertire uno scatto, quindi appendere gli
appendiabiti sul kit appendiabiti.
- Accertarsi che gli appendiabiti siano rivolti
nello stesso verso.
- Qualora gli appendiabiti non siano
correttamente inseriti nei fori di
ventilazione, si potrà avvertire una
rumorosità e alcune vibrazioni.
NOTA
Al ne di ottenere risultati ottimali, evitare di
appendere gli indumenti più lunghi nel foro
centrale.
Italiano34
Page 91

Kit pesi
NOTA
• Accertarsi che i pantaloni ed il kit pesi non tocchi il fondo del prodotto.
• La lunghezza massima dei pantaloni deve essere 100 cm.
Per usare il kit pesi
1. Fissare il fondo dei pantaloni all'appendiabiti
ad aria.
2. Fissare l'altro capo dei pantaloni al kit pesi.
3. Far scorrere l'appendiabiti ad aria nei fori di
ventilazione no ad avvertire uno scatto.
NOTA
Per ottenere pieghe più nette, allargare i pantaloni
muovendo i fermi verso fuori.
Quando non utilizzato, conservare il kit pesi nella
zona degli accessori.
Uso del prodotto e degli accessori
Italiano 35
Page 92

Uso del prodotto e degli accessori
Ripiano
Usare il ripiano in dotazione per gli indumenti che non possono essere appesi sugli appendiabiti.
NOTA
• Posizionare solo indumenti e accessori. Non appoggiare oggetti pesanti o usare il ripiano per
conservare oggetti diversi
• Assicurarsi che i bambini non possa arrampicarsi o sedere sul ripiano.
• Assicurarsi che gli indumenti non penzoli sul davanti, retro o lato del ripiano, o rimanga appeso sulle
grate del ripiano.
• Non appoggiare più capi uno sull'altro.
Uso del prodotto e degli accessori
Per utilizzare il ripiano
1. Sulle pareti laterali, premere il pulsante posto
sui fermi del ripiano per bloccarlo.
2. Posizionare il ripiano sui fermi. Accertarsi che
le scanalature del ripiano siano fermamente
alloggiate nel fermo.
NOTA
È normale che vi sia dello spazio tra i lati del
ripiano e le pareti laterali.
Quando non viene utilizzato, conservare il ripiano
sullo sportello. Posizionare il ripiano sul fermo
inferiore quindi appenderlo ai fermi superiori.
Italiano36
Page 93

Zona di cura accessori
Per le sciarpe usare la zona di cura degli accessori.
Per appendere le sciarpe, vedere le gure riportate sotto.
Metodo 1
Metodo 2
Uso del prodotto e degli accessori
• Accertarsi che le lunghezze di entrambi i capi siano pari.
• In base al tipo di tessuto, è possibile che le pieghe non vengano eliminate del tutto.
Italiano 37
Page 94

Uso del prodotto e degli accessori
MAX
Serbatoio riempimento
NOTA
• Prima di utilizzare il prodotto, vericare che nel serbatoio di riempimento vi sia acqua.
• Il prodotto consuma un maggior quantitativo di acqua al primo utilizzo.
• Si consiglia di usare acqua ltrata.
• Qualora non si intenda utilizzare il prodotto per un lungo periodo di tempo, vuotare il serbatoio di
riempimento.
• Il serbatoio di riempimento ha una autonomia di circa 4 programmi.
• Riempire il serbatoio di riempimento solo con acqua. Inserendo altri liquidi, quali detersivi o
ammorbidenti, si potrebbe causare un problema.
• Non bere l'acqua contenuta nel serbatoio di riempimento o di scarico.
Uso del prodotto e degli accessori
Per riempire il serbatoio dell'acqua
1. Estrarre il serbatoio di riempimento.
2. Aprire il coperchio posteriore, riempirlo no
alla linea MAX.
3. Reinserire il serbatoio di riempimento.
Italiano38
Page 95

Serbatoio di scarico
Prima di usare il prodotto o qualora non si intenda usare il prodotto per diverso tempo, assicurarsi che il
serbatoio di scarico sia vuoto.
Per vuotare il serbatoio di scarico
1. Estrarre il serbatoio di scarico.
2. Vuotare il serbatoio.
3. Reinserire il serbatoio di scarico.
Samsung Fresh Finish
Samsung Fresh Finish dona agli articoli una piacevole fragranza.
NOTA
• Spruzzare il profumo preferito 4-5 volte su un tampone di cotone e posizionarlo nel Samsung Fresh
Finish. La forza della fragranza diffusa da Samsung Fresh Finish può variare in base al profumo
utilizzaato, e la fragranza può restare all'interno dell'AIRDRESSER anche dopo il termine del
programma.
• Lasciando il tampone di cotone troppo a lungo nel Samsung Fresh Finish può formarsi della muffa.
Per sostituire il tampone di cotone
1. Rimuovere Samsung Fresh Finish.
Uso del prodotto e degli accessori
Italiano 39
Page 96

Uso del prodotto e degli accessori
2. Spruzzare il profumo preferito 4-5 volte su un
tampone di cotone e posizionarlo nel Samsung
Fresh Finish.
Uso del prodotto e degli accessori
NOTA
• Se si utilizza un profumo con Samsung Fresh Finish, la fragranza del profumo può restare all'interno
del AIRDRESSER anche dopo il termine del programma.
• Il tampone di cotone non viene fornito in dotazione al prodotto.
• L'efcacia del Samsung Fresh Finish non può essere garantita poiché dipende al profumo utilizzato.
3. Chiudere il coperchio del Samsung Fresh Finish
no ad avvertire uno scatto.
4. Reinserire Samsung Fresh Finish.
Italiano40
Page 97

Pulizia e manutenzione
ATTENZIONE
• Prima di effettuare la pulizia scollegare il prodotto dalla presa di corrente elettrica.
• Non usare detergenti abrasivi o inammabili.
• Durante la pulizia non spruzzare acqua direttamente sulla supercie del prodotto.
Esterno
Usare un panno di pulizia per pulire la parte
esterna del prodotto. Per eliminare lo sporco
persistente, usare un panno inumidito e poi
asciugare.
Pulizia e manutenzione
Italiano 41
Page 98

Pulizia e manutenzione
Serbatoi dell'acqua
Pulire regolarmente entrambi i serbatoi. Prima di reinserirli lasciarli asciugare completamente.
Per pulire l'esterno usare un panno umido.
Per pulire l'interno usare una spazzola morbida.
Pulizia e manutenzione
Per pulire le bocchetta di entrata e di uscita dei
serbatoi usare una spazzola morbida.
Italiano42
Page 99

Vassoio dell'acqua
NOTA
• Vuotare regolarmente il vassoio dell'acqua.
• Assicurarsi di reinserire il vassoio dell'acqua una volta vuotata l'acqua.
Reinserire il vassoio dell'acqua seguendo le
indicazioni riportate nelle gure.
• Assicurarsi che il lato con indicato TOP sia
rivolto verso l'alto.
Pulizia e manutenzione
Italiano 43
Page 100

Pulizia e manutenzione
Filtro dell'aria
Usando regolarmente il prodotto in modo intensivo o per capi che accumulano una grossa quantità di
polvere, si consiglia di eseguire la pulizia del ltro dell'aria regolarmente.
Per sostituire il ltro dell'aria
1. Trattenere il fondo del coperchio ed estrarlo.
2. Premendo entrambi i ganci della parte
superiore del ltro, estrarlo.
Pulizia e manutenzione
3. Usare una spazzola ed acqua corrente per
pulire il ltro.
4. Lasciare asciugare completamente il ltro
all'ombra quindi reinserirlo.
Italiano44
 Loading...