

Page 1

GT-B3410
user manual
Page 2

using this
manual
This user manual has been specially designed to
guide you through the functions and features of your
mobile phone. To get started quickly,
refer to “introducing your mobile phone,”
“assembling and preparing your mobile phone,”
and “using basic functions.”
ii
Instructional icons
Before you start, familiarize yourself with the icons
you will see in this manual:
Warning
—situations that could cause
injury to yourself or others
Caution
—situations that could cause
damage to your phone or other equipment
Note
—notes, usage tips, or additional
information
X
Refer to
—pages with related information;
X
for example:
page 12”)
p. 12 (represents “see
Page 3

→
[ ]
Followed by
menus you must select to perform a step;
for example: In Menu mode, select
Messages → Create new message
(represents Messages, followed by
Create new message)
Square brackets
example: [ ] (represents the Power/
Menu exit key)
—the order of options or
—phone keys; for
Copyright information
Rights to all technologies and products that
comprise this phone are the property of their
respective owners:
®
•Bluetooth
Bluetooth SIG, Inc. worldwide
Bluetooth QD ID: B015887
• Java™ is a trademark of Sun Microsystems, Inc.
is a registered trademark of the
using this manual
iii
Page 4

safety and usage information ..................1
Safety warnings .......................................... 1
contents
iv
Safety precautions ...................................... 4
Important usage information ....................... 6
introducing your mobile phone ............. 11
Unpack ..................................................... 11
Phone layout .............................................12
Keypad ..................................................... 13
QWERTY keyboard ................................... 13
Icons ......................................................... 14
assembling and preparing your mobile
phone ......................................................16
Install the SIM card and battery ................. 16
Charge the battery .................................... 18
Insert a memory card (optional) ................. 19
Page 5

using basic functions ............................ 21
Turn your phone on and off ....................... 21
Use the touch screen ................................ 22
Access menus .......................................... 23
Open the message composer
screen quickly ........................................... 23
Use widgets .............................................. 23
Customize your phone .............................. 24
Use basic call functions ............................ 26
Send and view messages ......................... 27
Add and find contacts ............................... 30
Use basic camera functions ...................... 31
Listen to music ......................................... 33
Browse the web ........................................ 35
Use the Google services ...........................36
using advanced functions ..................... 37
Use advanced call functions ..................... 37
Use advanced phonebook functions ......... 40
Use advanced messaging functions .......... 41
Use advanced camera functions ............... 44
Use advanced music functions ................. 46
using tools and applications ................. 50
Use services of your service provider ........ 50
Use the Bluetooth wireless feature ............ 51
Activate and send an SOS message ......... 52
Activate the mobile tracker ........................ 53
Make fake calls ......................................... 54
Record and play voice memos .................. 55
Print images .............................................. 55
contents
v
Page 6

Use Java-powered games and
applications .............................................. 56
Create and view world clocks ................... 57
Set and use alarms ................................... 57
Use the calculator ..................................... 58
contents
Convert measurements ............................. 58
Set a countdown timer .............................. 59
Use the stopwatch .................................... 59
Look up words in a dictionary ................... 59
Create a new task ..................................... 61
Create a text memo .................................. 61
Manage your calendar .............................. 61
troubleshooting ........................................ a
index ......................................................... d
vi
Page 7
safety and
usage
information
Safety warnings
Keep your phone away from small
children and pets
Keep your phone and all accessories out of the
reach of small children or animals. Small parts may
cause choking or serious injury if swallowed.
Comply with the following precautions to avoid
dangerous or illegal situations and ensure peak
performance of your mobile phone.
Protect your hearing
Excessive exposure to sound at high
volumes can cause hearing damage.
Always turn the volume down before
plugging the earphones into an audio
source and use only the minimum volume
setting necessary to hear your
conversation or music.
1
Page 8

Install mobile phones and equipment
with caution
Ensure that any mobile phones or related equipment
installed in your vehicle are securely mounted. Avoid
placing your phone and accessories near or in an air
safety and usage information
bag deployment area. Improperly installed wireless
equipment can cause serious injury when air bags
inflate rapidly.
Handle and dispose of batteries and
chargers with care
• Use only Samsung-approved batteries and
chargers specifically designed for your phone.
Incompatible batteries and chargers can cause
serious injuries or damage to your phone.
• Never dispose of batteries or phones in a fire.
Follow all local regulations when disposing of
used batteries or phones.
2
• Never place batteries or phones on or in heating
devices, such as microwave ovens, stoves, or
radiators. Batteries may explode when
overheated.
• Never crush or puncture the battery. Avoid
exposing the battery to high external pressure,
which can lead to an internal short circuit and
overheating.
Avoid interference with pacemakers
Maintain a minimum of 15 cm (6 inches) between
mobile phones and pacemakers to avoid potential
interference, as recommended by manufacturers
and the independent research group, Wireless
Technology Research. If you have any reason to
suspect that your phone is interfering with a
pacemaker or other medical device, turn off the
phone immediately and contact the manufacturer of
the pacemaker or medical device for guidance.
Page 9

Turn off the phone in potentially
explosive environments
Do not use your phone at refueling points (service
stations) or near fuels or chemicals. Turn off your
phone whenever directed by warning signs or
instructions. Your phone could cause explosions or
fire in and around fuel or chemical storage and
transfer areas or blasting areas. Do not store or carry
flammable liquids, gases, or explosive materials in
the same compartment as the phone, its parts, or
accessories.
Reduce the risk of repetitive motion
injuries
While using your phone, hold the phone with a
relaxed grip, press the keys lightly, use special
features that reduce the number of keys you have to
press (such as templates and predictive text), and
take frequent breaks.
Do not use the phone if the screen is
cracked or broken
Broken glass or acrylic could cause injury to your
hand and face. Bring the phone to a Samsung
service center to replace the screen. Damage
caused by careless handling will void your
manufacturer's warranty.
safety and usage information
3
Page 10
Safety precautions
Drive safely at all times
safety and usage information
Avoid using your phone while driving and obey all
regulations that restrict the use of mobile phones
while driving. Use hands-free accessories to
increase your safety when possible.
Follow all safety warnings and
regulations
Comply with any regulations that restrict the use of a
mobile phone in a certain area.
Use only Samsung-approved
accessories
Using incompatible accessories may damage your
phone or cause injury.
4
Turn off the phone near medical
equipment
Your phone can interfere with medical equipment in
hospitals or health care facilities. Follow all
regulations, posted warnings, and directions from
medical personnel.
Turn off the phone or disable the
wireless functions when in an aircraft
Your phone can cause interference with aircraft
equipment. Follow all airline regulations and turn off
your phone or switch to a mode that disables the
wireless functions when directed by airline
personnel.
Page 11

Protect batteries and chargers from
damage
• Avoid exposing batteries to very cold or very hot
temperatures (below 0° C/32° F or above 45° C/
113° F). Extreme temperatures can reduce the
charging capacity and life of your batteries.
• Prevent batteries from contacting metal objects,
as this can create a connection between the +
and - terminals of your batteries and lead to
temporary or permanent battery damage.
• Never use a damaged charger or battery.
Handle your phone carefully and
sensibly
• Do not disassemble your phone due to a risk of
electric shock.
• Do not allow your phone to get wet—liquids can
cause serious damage and will change the color
of the label that indicates water damage inside the
phone. Do not handle your phone with wet
hands. Water damage to your phone can void
your manufacturer’s warranty.
• Avoid using or storing your phone in dusty, dirty
areas to prevent damage to moving parts.
• Your phone is a complex electronic device—
protect it from impacts and rough handling to
avoid serious damage.
• Do not paint your phone, as paint can clog
moving parts and prevent proper operation.
safety and usage information
5
Page 12

• If your phone has a camera flash or light, avoid
using it close to the eyes of children or animals.
• Your phone may be damaged by exposure to
magnetic fields. Do not use carrying cases or
accessories with magnetic closures or allow your
safety and usage information
phone to come in contact with magnetic fields for
extended periods of time.
Avoid interference with other electronic
devices
Your phone emits radio frequency (RF) signals that
may interfere with unshielded or improperly shielded
electronic equipment, such as pacemakers, hearing
aids, medical devices, and other electronic devices
in homes or vehicles. Consult the manufacturers of
your electronic devices to solve any interference
problems you experience.
6
Important usage information
Use your phone in the normal position
Avoid contact with your phone’s internal antenna.
Allow only qualified personnel to service
your phone
Allowing unqualified personnel to service your phone
may result in damage to your phone and will void
your warranty.
Ensure maximum battery and charger
life
• Avoid charging batteries for more than a week, as
overcharging may shorten batter y life.
• Over time, unused batteries will discharge and
must be recharged before use.
Page 13

• Disconnect chargers from power sources when
not in use.
• Use batteries only for their intended purpose.
Handle SIM cards and memory cards
with care
• Do not remove a card while the phone is
transferring or accessing information, as this
could result in loss of data and/or damage to the
card or phone.
• Protect cards from strong shocks, static
electricity, and electrical noise from other devices.
• Frequent writing and erasing will shorten the life
span of memory cards.
• Do not touch gold-colored contacts or terminals
with your fingers or metal objects. If dirty, wipe the
card with a soft cloth.
Ensure access to emergency services
Emergency calls from your phone may not be
possible in some areas or circumstances. Before
traveling in remote or undeveloped areas, plan an
alternate method of contacting emergency services
personnel.
Specific Absorption Rate (SAR)
certification information
Your phone conforms to U.S. Federal
Communications Commission (FCC) standards that
limit human exposure to radio frequency (RF) energy
emitted by radio and telecommunications
equipment. These standards prevent the sale of
phone that exceed a maximum exposure
mobile
level (known as the Specific Absorption Rate, or
SAR) of 1.6 W/kg.
safety and usage information
7
Page 14

During testing, the maximum SAR values recorded
for this model were:
Network
Frequency
safety and usage information
GSM850 (1g)
GSM900 (10g)
GSM1800 (10g)
GSM1900 (1g)
1. When used with accessories that contain no metal and
provide at least 1.5 cm separation between the phone
(including the antenna, whether extended or retracted) and
the wearer's body.
Specific Absorption Rate (W/Kg)
Held to ear Worn on body
0.28 0.97
0.354 -
0.269 -
0.19 0.34
8
In normal use, the actual SAR is likely to be much
lower, as the
phone has been designed to emit only
the RF energy necessary to transmit a signal to the
nearest base station. By automatically emitting lower
1
levels when possible, your
phone reduces your
overall exposure to RF energy.
The FCC has granted an Equipment Authorization for
this model phone based on the compliance of all
reported SAR levels with the FCC RF exposure
guidelines. The authorization can be found on the
FCC Office of Engineering and Technology website
at http://www.fcc.gov/oet/ea (search for grantee
code A3L and product code GTB3410).
Page 15

Disclaimer
Some content and services accessible through this
device belong to third parties and are protected by
copyright, patent, trademark and/or other intellectual
property laws. Such content and services are
provided solely for your personal noncommercial
use. You may not use any content or services in a
manner that has not been authorized by the content
owner or service provider. Without limiting the
foregoing, unless expressly authorized by the
applicable content owner or service provider, you
may not modify, copy, republish, upload, post,
transmit, translate, sell, create derivative works,
exploit, or distribute in any manner or medium any
content or services displayed through this device.
“THIRD PARTY CONTENT AND SERVICES ARE
PROVIDED "AS IS." SAMSUNG DOES NOT
WARRANT CONTENT OR SERVICES SO
PROVIDED, EITHER EXPRESSLY OR IMPLIEDLY,
FOR ANY PURPOSE. SAMSUNG EXPRESSLY
DISCLAIMS ANY IMPLIED WARRANTIES,
INCLUDING BUT NOT LIMITED TO, WARRANTIES
OF MERCHANTABILITY OR FITNESS FOR A
PARTICULAR PURPOSE. SAMSUNG DOES NOT
GUARANTEE THE ACCURACY, VALIDITY,
TIMELINESS, LEGALITY, OR COMPLETENESS OF
ANY CONTENT OR SERVICE MADE AVAILABLE
THROUGH THIS DEVICE AND UNDER NO
CIRCUMSTANCES, INCLUDING NEGLIGENCE,
SHALL SAMSUNG BE LIABLE, WHETHER IN
CONTRACT OR TORT, FOR ANY DIRECT,
INDIRECT, INCIDENTAL, SPECIAL OR
CONSEQUENTIAL DAMAGES, ATTORNEY FEES,
safety and usage information
9
Page 16

EXPENSES, OR ANY OTHER DAMAGES ARISING
OUT OF, OR IN CONNECTION WITH, ANY
INFORMATION CONTAINED IN, OR AS A RESULT
OF THE USE OF ANY CONTENT OR SERVICE BY
YOU OR ANY THIRD PARTY, EVEN IF ADVISED OF
safety and usage information
THE POSSIBILITY OF SUCH DAMAGES."
Third party services may be terminated or interrupted
at any time, and Samsung makes no representation
or warranty that any content or service will remain
available for any period of time. Content and
services are transmitted by third parties by means of
networks and transmission facilities over which
Samsung has no control. Without limiting the
generality of this disclaimer, Samsung expressly
disclaims any responsibility or liability for any
interruption or suspension of any content or ser vice
made available through this device.
10
Samsung is neither responsible nor liable for
customer service related to the content and
services. Any question or request for service relating
to the content or services should be made directly to
the respective content and service providers.
Page 17

introducing your
mobile phone
In this section, learn about your mobile phone’s
layout, keys, and icons.
Unpack
Check your product box for the following items:
• Mobile phone
• Battery
• Travel adapter (charger)
• User manual
• The items supplied with your phone may vary
depending on the software and accessories
available in your region or offered by your
service provider. You can obtain additional
accessories from your local Samsung dealer.
• The supplied accessories perform best for
your phone.
11
Page 18
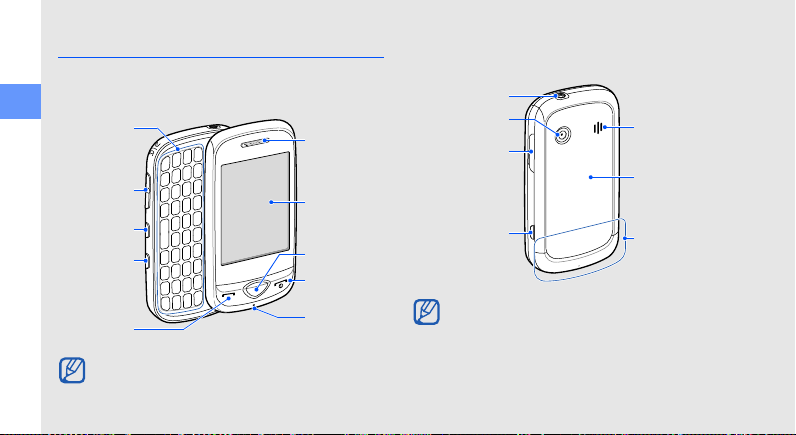
Phone layout
Volu me key
QWERTY
keyboard
Power/Menu
exit key
Earpiece
Touch screen
Back key
Hold key
Mouthpiece
Dial key
Recorder key
Battery cover
Camera key
Internal ante nna
Speaker
Multifunction
jack
Camera lens
Headset jack
The front of your phone includes the following keys
and features:
introducing your mobile phone
The rear of your phone includes the following keys
and features:
12
Depending on your region, the composition of
the QWERTY keyboard may differ.
You can lock the touch screen and keys to
prevent any unwanted phone operations. To
lock, press the Hold key. To unlock, press and
hold the Hold key or touch and hold the lock
icon on the touch screen.
Page 19

Keypad
Key Function
Dial
Back Return to the previous level
Power/
Menu exit
Volume Adjust the phone’s volume
Hold
Recorder
Make or answer a call; In Idle mode,
retrieve recently dialed, missed, or
received numbers
Turn the phone on and off (press
and hold); End a call; In Menu mode,
cancel input and return to Idle mode
Lock the touch screen and keys;
Unlock the touch screen and keys
(press and hold)
Open the voice recorder screen;
Start recording a voice memo (press
and hold); From the FM radio
screen, start recording songs
Key Function
Camera
In Idle mode, turn on the camera
(press and hold); In Camera mode,
take a photo or record a video
QWERTY keyboard
Depending on your region, the composition of
the QWERTY keyboard may differ.
Key Function
Alphanumeric
Shift
Alt
Symbol Enter symbols in a text input field
Enter numbers, letters and special
characters; In Idle mode, press and
hold [1] to access voice mails and
[0] to enter an international call prefix
Change case in a text input field
Use characters on the upper half of
the keys in a text input field
introducing your mobile phone
13
Page 20

Key Function
Messaging
introducing your mobile phone
Space
4-way
navigation
Backspace
Enter
14
In Idle mode, open a new message
composer window; In Idle mode,
access the inbox folder of the
Messages
Insert a space in a text input field; In
Idle mode, switch to the silent profile
(press and hold)
In Idle mode, access user-defined
menus (depending on your service
provider, pre-defined menus may
differ); In Menu mode, scroll through
menu options
Delete characters; In Menu mode,
return to the previous level
Start a new line in a text input field;
In Menu mode, select the
highlighted menu option or confirm
an input
menu (press and hold)
Icons
Learn about the icons that appear on your display.
Icon Definition
Signal strength
GPRS network connected
EDGE network connected
Call in progress
SOS message feature activated
Connecting to secured web page
Call diverting activated
Synchronized w ith PC
Roaming (outside of normal service area)
Bluetooth activated
Music playback in progress
Page 21

Icon Definition
Music playback paused
FM radio on
Memory card inserted
New text message
New multimedia message
New email message
New voice mail message
Alarm activated
Normal profile activated
Silent profile activated
Battery power level
Current time
introducing your mobile phone
15
Page 22

assembling and
preparing your
mobile phone
Get started by assembling and setting up
your mobile phone for its first use.
16
Install the SIM card and battery
When you subscribe to a cellular service, you will
receive a Subscriber Identity Module (SIM) with
subscription details, such as your personal
identification number (PIN) and optional services.
To install the SIM card and battery,
1. Remove the battery cover.
If the phone is on, press and hold [ ] to turn
it off.
Page 23
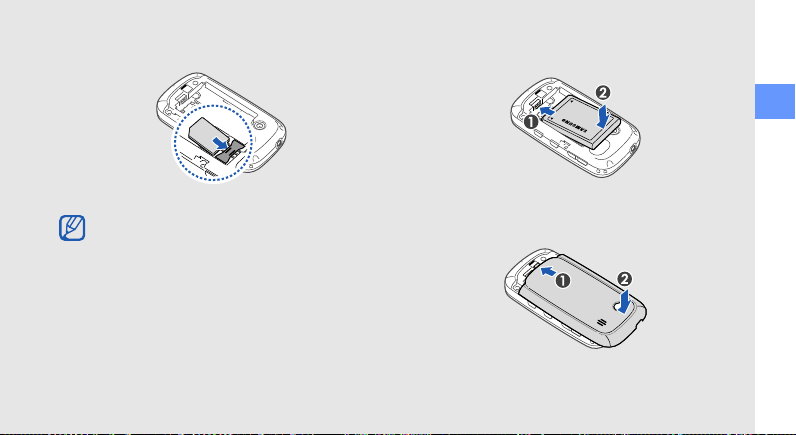
2. Insert the SIM card. 3. Insert the battery.
assembling and preparing your mobile phone
• Place the SIM card in the phone with the
gold-colored contacts facing down.
• Without inserting a SIM card, you can use
your phone’s non-network services and
some menus.
4. Replace the battery cover.
17
Page 24
Charge the battery
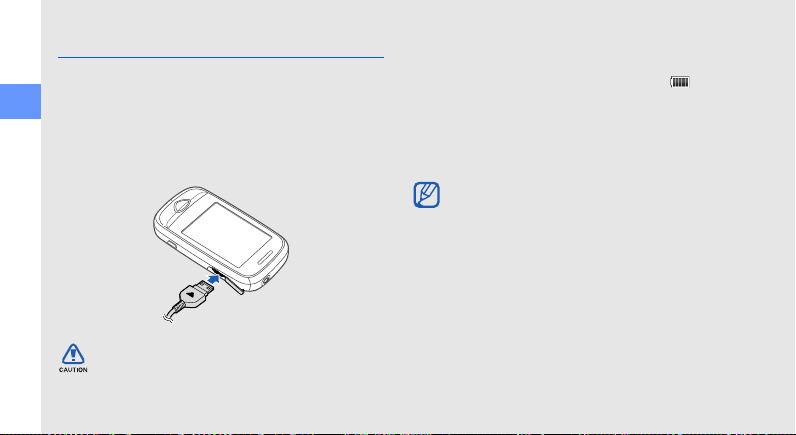
With the triangle
facing up
Before using the phone for the first time, you must
charge the battery.
1. Open the cover to the multifunction jack on the
assembling and preparing your mobile phone
side of the phone.
2. Plug the small end of the travel adapter into the
multifunction jack.
Improperly connecting the travel adapter can
cause serious damage to the phone. Any
damages by misuse are not covered by the
warranty.
18
3. Plug the large end of the travel adapter into a
power outlet.
4. When the battery is fully charged (the icon is
no longer moving), unplug the travel adapter from
the power outlet.
5. Unplug the travel adapter from the phone.
6. Close the cover to the multifunction jack.
About the low battery indicator
When your battery is low, the phone will emit a
warning tone and a low battery message. The
battery icon will also be empty and blinking. If
the battery level becomes too low, the phone
will automatically power off. Recharge your
battery to continue using your phone.
Page 25
Insert a memory card (optional)
To store additional multimedia files, you must insert a
memory card. Your phone accepts microSD™ or
microSDHC™ memory cards up to 8 GB
(depending on memory card manufacturer and
type).
Formatting the memory card on a PC may
cause incompatibility with your phone. Format
the memory card only on the phone.
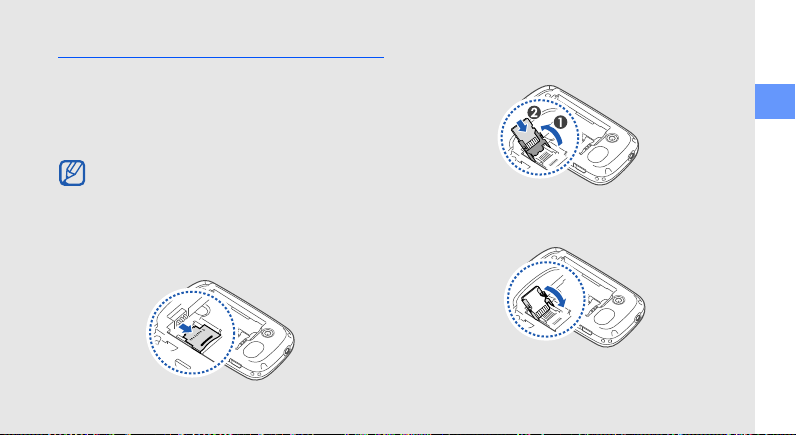
1. Remove the battery cover and the battery.
2. Unlock the memory card holder.
3. Lift the memory card holder and insert a memory
card as shown.
assembling and preparing your mobile phone
4. Close the memory card holder.
19
Page 26
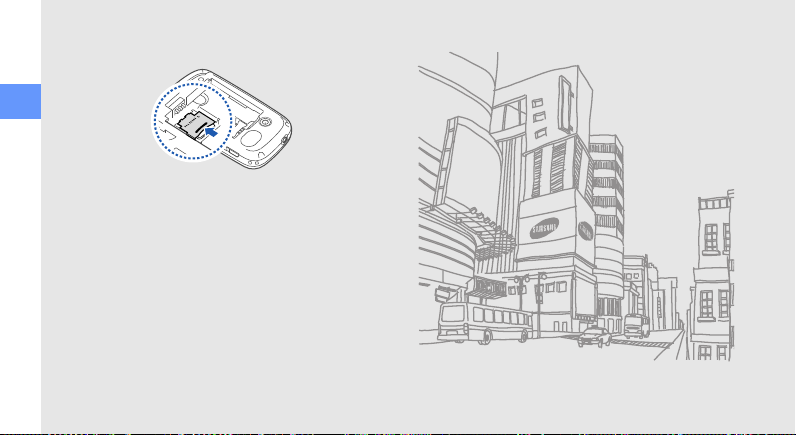
5. Lock the memory card holder.
assembling and preparing your mobile phone
6. Replace the battery and the battery cover.
To remove the memory card, remove the battery
cover and the battery, unlock and lift the memor y
card holder, and remove the memory card.
20
Page 27

using basic
functions
Learn how to perform basic operations and use the
main features of your mobile phone.
Turn your phone on and off
To turn your phone on,
1. Press and hold [ ].
2. Enter your PIN and select Done (if necessary).
To turn your phone off, repeat step 1 above.
Switch to the offline profile
By switching to the offline profile, you can use your
phone’s non-network services in areas where
wireless devices are prohibited, such as airplane
and hospitals.
To switch to the offline profile, in Menu mode, select
Settings → Phone profiles → Offline → Save.
Follow all posted warnings and directions from
official personnel when in areas where wireless
devices are prohibited.
21
Page 28
Use the touch screen
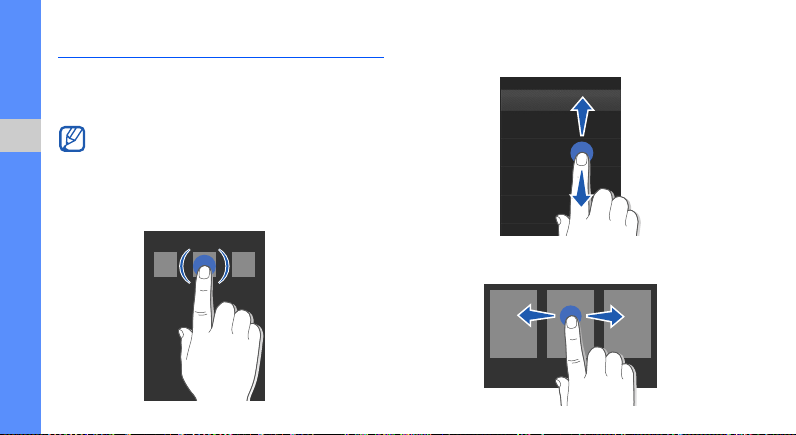
Your phone’s touch screen lets you easily select
items or perform functions. Learn basic actions to
use the touch screen.
For the optimal use of the touch screen,
using basic functions
remove the screen protection film before using
your phone.
• Touch an icon to open a menu or launch an
application.
22
• Drag your finger up or down to scroll through
vertical lists.
• Drag your finger left or right to scroll through
horizontal lists.
Page 29
Access menus
To access your phone’s menus,
1. In Idle mode, select Menu to access Menu
mode.
2. Select a menu or option.
3. Press the Back key to move up one level; Press
[ ] to return to Idle mode.
Open the message composer
screen quickly
Learn to open the message composer screen
quickly by sliding open the phone.
1. In Menu mode, select Settings → Display and
light → Quick access → On → Save (if
necessary).
2. Press [ ] to return to Idle mode.
3. Slide open the phone.
4. Rotate the phone counter-clockwise to
landscape view.
5. Create a new text or multimedia message.
Use widgets
Learn to use widgets on the widget toolbar.
• Some of your widgets connect to web
services. Selecting a web-based widget may
incur additional charges.
• Available widgets may vary depending on
your region or service provider.
Open the widget toolbar
In Idle mode, select the arrow at the bottom left of
the screen to open the widget toolbar. You can
rearrange widgets on the widget toolbar or move
them to the idle screen.
using basic functions
23
Page 30

Move the widgets to the idle screen
1. Open the widget toolbar.
2. Drag a widget from the widget toolbar to the idle
screen. You can position the widget anywhere
on the screen.
using basic functions
Change the widgets
1. In Menu mode, select Settings → Display and
light → Widget.
2. Select the widgets you want to include to the
widget toolbar and select Save.
24
Customize your phone
Get more from your phone by customizing it to
match your preferences.
Adjust the volume of the key tones
In Idle mode, press [ / ] and adjust the key tone
volume.
Adjust the vibration intensity on the
touch screen
You can adjust the intensity of the vibration when you
touch the phone screen.
1. In Idle mode, press [ / ].
2. Select Vibration and adjust the intensity of the
vibration.
Page 31

Switch to or from the silent profile
In Menu mode, select Settings → Phone profiles →
Silent → Save.
Set a phone profile
To change the ringtone of the current profile,
1. In Menu mode, select Settings → Phone
profiles.
2. Scroll to the profile you are using.
If you are using the silent or offline profile, you
are not allowed to change the ringtone.
3. Select Edit → Voice call ringtone.
4. Select a ringtone category → a ringtone.
5. Select Save twice.
To switch to another profile, select it from the list and
select Save.
To create a phone profile,
1. In Menu mode, select Settings → Phone
profiles.
2. Select Create.
3. Enter a name for the profile and select Done.
4. Customize the sound settings as desired.
5. When you are finished, select Save.
Select a wallpaper (Idle mode)
1. In Menu mode, select Settings → Display and
light → Wallpaper.
2. Scroll left or right to an image.
3. Select Set.
using basic functions
25
Page 32

Select a theme for the display
1. In Menu mode, select Settings → Display and
light → My theme.
2. Select a theme and select Save.
Lock your phone
using basic functions
1. In Menu mode, select Settings → Security →
Phone lock → On → Save.
2. Enter a new 4- to 8-digit password and select
Done.
3. Enter the new password again and select Done.
• The first time you access a menu that
requires a password, you will be prompted to
create and confirm a password.
• Samsung is not responsible for any loss of
passwords or private information or other
damages caused by illegal software.
26
Use basic call functions
Learn to make or answer calls and use basic call
functions.
During a call, your phone automatically locks
the touch screen to prevent accidental inputs.
To unlock, press and hold the Hold key.
Make a call
1. In Idle mode, select Keypad and enter an area
code and a phone number.
2. Press [ ] to dial the number
3. To end the call, press [ ].
Answer a call
1. When a call comes in, press [ ].
2. To end the call, press [ ].
Page 33

Adjust the volume
To adjust the volume during a call, press [ / ].
• To answer a call, press the headset button.
• To end a call, press and hold the headset button.
Use the speakerphone feature
1. During a call, select → Yes to activate the
speaker.
2. To switch back to the earpiece, select again.
In noisy environments, you may have difficulty
hearing the calls while using the speakerphone
feature. For better performance, use the normal
phone mode.
Use the headset
By plugging the supplied headset into the phone,
you can make and answer calls:
• To redial the last call, press and hold the headset
button.
Send and view messages
Learn to send or view text (SMS), multimedia (MMS),
or email messages.
Send a text or multimedia message
1. In Menu mode, select Messages → Create new
message → Message.
2. Select Tap to add recipient → Enter manually.
3. Enter a destination number and select Done.
4. Select Tap to add text.
5. Enter your message text and select Done.
X
p. 28
For sending as a text message, skip to step 7.
For attaching multimedia, continue with step 6.
27
using basic functions
Page 34

6. Select Add multimedia and add an item.
7. Select Send to send the message.
Send an email
1. In Menu mode, select Messages → Create new
message → Email.
using basic functions
2. Select Tap to add recipient → Enter manually.
3. Enter an email address and select Done.
4. Select Tap to add subject, enter a subject, and
select Done.
5. Select Tap to add text, enter your email text,
and select Done.
6. Select Attach multimedia and attach a file (if
necessary).
7. Select Send to send the message.
28
Enter text
With your phone’s touch screen or the QWERTY
keyboard, you can enter text and create messages
or notes.
Enter text using the virtual keypad
When you open the text input field, the virtual keypad
appears.
• Select T9 to switch between T9 and ABC modes.
Depending on your region, you may be able to
access an input mode for your specific language.
• Select Abc or T9Ab to change case or switch to
Number mode.
• Select to switch to Symbol mode.
• Select EN to change the input language.
Page 35
You can use the following text input modes: Enter text on the QWERTY keyboard
Mode Function
ABC
T9
Number
Symbol
Select an appropriate
character you want appears on the display.
1. Select appropriate virtual keys to enter an
entire word.
2. When the word displays correctly, select
does not display, select
alternate word.
Select an
number.
Select an
symbol.
virtual key
until the
to insert a space. If the correct word
appropriate virtual key
appropriate virtual key
0
to select an
to enter a
to enter a
When you slide open the phone, you can use the
QWERTY keyboard.
• Press [ ] to change case.
• Press [Alt] to enter characters on the upper half of
the keys.
• Press [Sym] to switch to Symbol mode.
• Press an appropriate key to enter a character,
number, and symbol.
View text or multimedia messages
1. In Menu mode, select Messages → My
messages → Inbox.
2. Select a text or multimedia message.
You can view all text or multimedia messages sent to
and received from a specific contact like a
messenger.
using basic functions
29
Page 36

1. Slide open the phone.
2. Press [ ] to return to Idle mode.
3. Rotate the phone counter-clockwise to
landscape view.
4. Select Conversations.
5. Select a contact.
using basic functions
View an email
1. In Menu mode, select Messages → My
messages → Email inbox.
2. Select an account.
3. Select Download.
4. Select an email or a header.
5. If you selected a header, select Retrieve to view
the body of the email.
30
Add and find contacts
Learn the basics of using the phonebook feature.
The memory location to save new contacts
may preset depending on your service
provider. To change the location, in Menu
mode, select
Settings → Save new contacts to
Add a new contact
1. In Idle mode, select Keypad and enter a phone
number.
2. Select More → Add to Phonebook → a
memory location (if necessary) → New.
3. Select a number type (if necessary).
4. Enter contact information.
5. Select Save to add the contact to memory.
Phonebook → More →
.
Page 37
Find a contact
1. In Menu mode, select Phonebook.
2. Select Search.
3. Enter the first few letters of the name you want to
find and select Done.
4. Select the contact’s name from the search list.
Once you have found a contact, you can:
• call the contact by pressing [ ]
• edit the contact information by selecting
Edit
Use basic camera functions
Learn the basics to capture and view photos and
videos.
Capture photos
1. In Idle mode, press and hold [ ] to turn on the
camera.
2. Rotate the phone counter-clockwise to
landscape view.
3. Aim the lens at the subject and make any
adjustments.
• To set the exposure value, select or press
the Up or Down navigation key from the
QWERTY keyboard.
To zoom in or out, pr
•
Left or Right navigation key from the QWERTY
.
.
keyboard
4. Press [ ] to take a photo. You can also press
[ ] from the QWERTY keyboard to take a
photo.
The photo is saved automatically.
5. Press the Back key or [ ] to take another photo
(step 3).
After capturing photos, select to view photos.
ess [ / ] or press the
using basic functions
31
Page 38
View photos
In Menu mode, select My files → Images → My
photos → a photo file.
While viewing photos, select → or to zoom
in or out. Press the Back key to exit the zoom
screen.
using basic functions
Capture videos
1. In Idle mode, press and hold [ ] to turn on the
camera.
2. Rotate the phone counter-clockwise to
landscape view.
3. Select → to switch to Recording mode.
4. Aim the lens at the subject and make any
adjustments.
• To set the exposure value, select or press
the Up or Down navigation key from the
QWERTY keyboard.
32
To zoom in or out, pr
•
Left or Right navigation key from the QWERTY
.
keyboard
5. Press [ ] to start recording. You can also press
[ ] from the QWERTY keyboard to start
recording.
6. Press [ ] or select to stop recording. You
can also press [ ] from the QWERTY keyboard
to stop recording.
The video is saved automatically.
7. Press the Back key or [ ] to record another
video (step 4).
After capturing videos, select to view videos.
ess [ / ] or press the
View videos
In Menu mode, select My files → Videos → My
video clips → a video file.
Your phone can play 320x240 resolution video
files at 12 frames per second.
Page 39
Listen to music
Learn how to listen to music via the music player or
FM radio.
Listen to the FM radio
1. Plug the supplied headset into the phone.
2. In Menu mode, select Applications → FM
radio.
3. Press to turn on the FM radio.
You can also press [ ] or [ ] from the
QWERTY keyboard to turn on the FM radio.
4. Select Yes to start automatic tuning.
The radio scans and saves available stations
automatically.
The first time you turn on the FM radio, you will
be prompted to start automatic tuning.
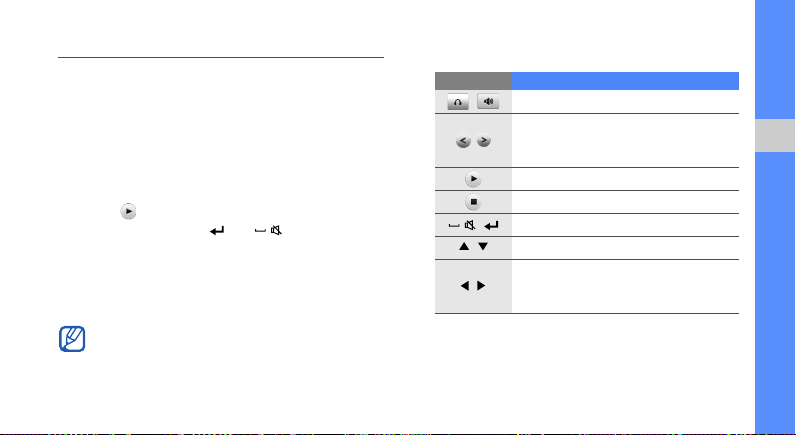
5. Control the FM radio using the following icons
and keys:
Icon/Key Function
Change the sound output
/
Tune a radio station manually; Tune a
radio station automatically (touch and
hold)
Turn on the FM radio
Turn off the FM radio
/
Turn on or off the FM radio
Adjust the volume
/
Tune a radio station manually; Tune a
radio station automatically (press and
/
hold)
using basic functions
33
Page 40
Listen to music files
Start by transferring files to your phone or memory
card:
X
X
p. 47
p. 35
• Download from the wireless web.
• Download from a PC with the optional Samsung
X
PC Studio.
using basic functions
• Receive via Bluetooth.
p. 46
X
p. 52
• Copy to your memory card.
After transferring music files to your phone or
memory card,
1. In Menu mode, select Music.
2. Select a music category → a music file.
34
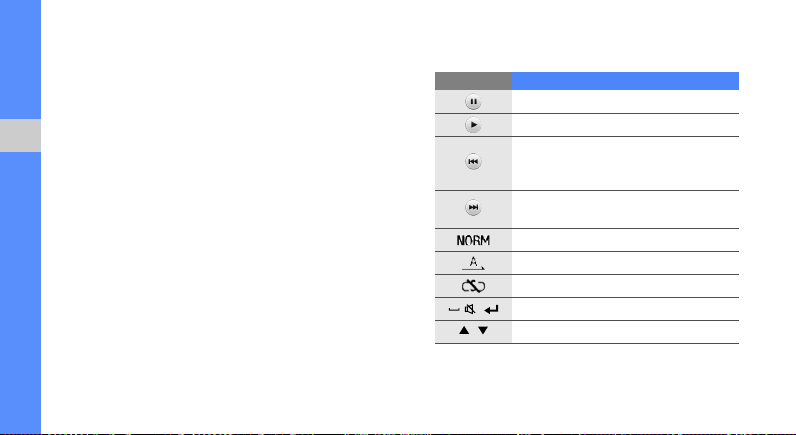
3. Control playback using the following icons and
keys:
Icon/Key Function
Pause playback
Resume playback
Restart playback; Skip backward
(select within 3 seconds); Scan
backward in a file (touch and hold)
Skip forward; Scan forward in a file
(touch and hold)
Change the sound effect
Change the repeat mode
Activate Shuffle mode
/
Pause or resume playback
Adjust the volume
/
Page 41
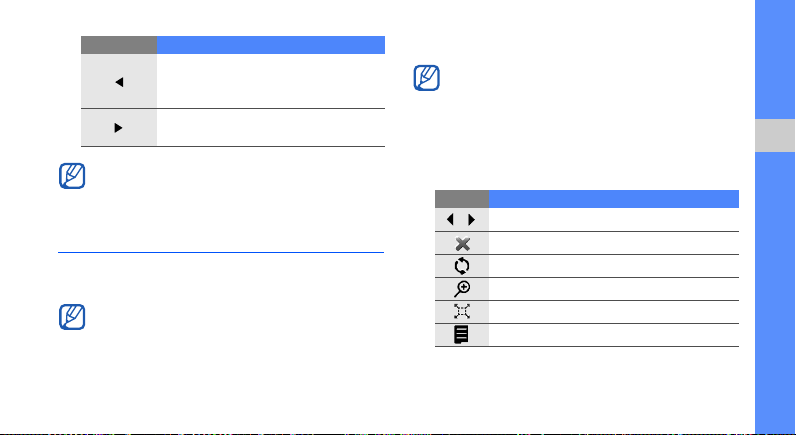
Icon/Key Function
If you select
Restart playback; Skip backward
(press within 3 seconds); Scan
backward in a file (press and hold)
Skip forward; Scan forward in a file
(press and hold)
My files and a music file, you
cannot skip forward or backward during
playback.
Browse the web
Learn to access and bookmark your favorite web
pages.
• You may incur additional charges for
accessing the web and downloading media.
• The browser menu may be labelled differently
depending on your service provider.
• Available icons may vary depending on your
region or service provider.
Browse web pages
You may incur additional charges for accessing
the web and downloading media.
1. In Menu mode, select an application for
connecting to the network → Home to launch
your service provider’s homepage.
2. Navigate web pages using the following icons:
Icon Function
Move backward or forward on a web page
Stop loading the web page
Refresh the current web page
Zoom on a web page
Change the view mode
Access a list of browser options
using basic functions
35
Page 42

Bookmark your favorite web pages
Favorite web pages are preset depending on your
service provider. If necessary, delete some web
pages to bookmark your favorite web pages.
1. In Menu mode, select an application for
connecting to the network → Bookmarks.
using basic functions
2. Select Create.
3. Enter a page title and a web address (URL).
4. Select Save.
36
Use the Google services
Learn how to use various Google services.
• This feature may not be available depending
on your service provider.
• The steps you must select to use this feature
may differ depending on your region or
service provider.
Connect to Search
1. In Menu mode, select Google → Search.
2. Enter a keyword in the search field.
Connect to Mail
1. In Menu mode, select Google → Gmail or Mail.
2. Set up your Google account and sign in.
3. Send or receive emails.
Page 43

using advanced
Use advanced call functions
Learn about your phone’s additional calling
capabilities.
functions
Learn how to perform advanced operations and use
additional features of your mobile phone.
View and dial missed calls
Your phone will display calls you have missed on the
display.
When you have a missed call, select the call from
the event alert widget and select View → a missed
call.
Call a recently dialed number
1. In Idle mode, press [ ] to display a list of
recent numbers.
2. Select the number you want and press [ ] to
dial.
37
Page 44

Hold a call or retrieve a held call
Select to place a call on hold or select to
retrieve a held call.
Dial a second call
If your network supports this function, you can dial
using advanced functions
another number during a call:
1. Select to place the first call on hold.
2. Enter the second number to dial and press
[].
3. Select to switch between the two calls.
4. To end the call on hold, select More → End →
Held call.
5. To end the current call, press [ ].
38
Answer a second call
If your network supports this function, you can
answer a second incoming call:
1. Press [ ] to answer the second call.
The first call is automatically placed on hold.
2. Select to switch between the calls.
Make a multiparty call (conference call)
1. Call the first party you want to add to the
multiparty call.
2. While connected to the first party, call the
second party.
The first party is automatically placed on hold.
3. When connected to the second party, select
More → Conference call.
4. Repeat steps 2 and 3 to add more parties (if
necessary).
Page 45

5. To end the multiparty call, press [ ].
Call an international number
1. In Idle mode, select Keypad and touch and hold
0 to insert the + character.
2. Enter the complete number you want to dial
(country code, area code, and phone number),
and then select More → Call or press [ ] to
dial.
Call a contact from the phonebook
You can call numbers directly from the phonebook
using stored contacts.
1. In Menu mode, select Phonebook.
2. Select the number you want to dial and press
[ ] to dial.
X
p. 31
Reject a call
To reject an incoming call, press [ ]. The caller will
hear a busy tone.
To reject calls from certain numbers automatically,
use the auto rejection. To activate the auto rejection
and set up the reject list,
1. In Menu mode, select Settings → Application
settings → Call → All calls → Auto reject.
2. Select On under Activation.
3. Select Reject list.
4. Select Create.
5. Select the number input field.
6. Enter a number to reject and select Done.
7. Select Match criteria → an option → Select.
8. Select Save.
using advanced functions
39
Page 46

9. Repeat steps 4-8 to add more numbers.
10. Select Save twice.
Use advanced phonebook functions
Learn to create your namecard, set speed dial
numbers, and create groups of contacts.
using advanced functions
Create your namecard
1. In Menu mode, select Phonebook.
2. Select More → My namecard.
3. Enter your personal details.
4. Select Save.
You can send your namecard by attaching it to
a message or email or transferring it via the
Bluetooth wireless feature.
40
Set speed dial numbers
1. In Menu mode, select Phonebook.
2. Select More → Settings → Speed dial.
3. Select a speed dial number you want to set.
4. Select a contact → a number (if necessary) to
assign to the number.
The contact is saved to the speed dial number.
• You can now call this contact from the dialing
screen by touching and holding the assigned
speed dial number.
• The first 3 favorite numbers will be assigned
to the favorite contacts ( ) on the widget
toolbar.
Page 47

Create a group of contacts
By creating groups of contacts, you can assign
ringtones and caller ID photos to each group or send
messages to an entire group. Start by creating a
group:
1. In Menu mode, select Phonebook.
2. Scroll left or right to Groups.
3. Select Create.
4. Enter a group name and select Done.
5. To set the caller ID image, select the new group
→ Group settings → the image field → an image
category → an image → Set (if necessary).
6. To set a group ringtone, select the ringtone field
→ a ringtone category → a ringtone → Set or
Select (if necessary).
7. Select Save.
Use advanced messaging functions
Learn to create and use templates to create new
messages, and use the messengers.
Create a text template
Text templates are preset depending on your service
provider. If necessary, delete some text templates to
create your text template.
1. In Menu mode, select Messages → Templates
→ Text templates.
2. Select Create to open a new template window.
3. Enter your text and select Done to save the
template.
Create a multimedia template
1. In Menu mode, select Messages → Templates
→ Multimedia message templates.
41
using advanced functions
Page 48

2. Select Create to open a new template window.
3. Create a multimedia message, with a subject
and desired attachments, to use as your
template.
4. Select More → Save to → Templates to save
the template.
using advanced functions
X
p. 27
Insert text templates in new messages
1. In Menu mode, select Messages → Create new
message → a message type.
2. In the text field, select More → Insert →
Template → a template.
Create a message from a multimedia
template
1. In Menu mode, select Messages → Templates
→ Multimedia message templates.
2. Select the template you want.
42
3. Select More → Edit.
Your template opens as a new multimedia
message.
Use the Bluetooth messenger
Learn to chat with your family or friends instantly via
the Bluetooth wireless feature.
1. In Menu mode, select Messages → Bluetooth
messenger.
2. Select Search.
3. Select Yes to turn on the Bluetooth wireless
feature.
4. Select a device.
5. Select the message input field.
6. Enter your message and select Done.
7. Select Send.
Page 49

8. Enter a PIN for the Bluetooth wireless feature or
the other device’s Bluetooth PIN, if it has one,
and select OK.
When the owner of the other device enters the
same PIN or accepts the connection, pairing is
complete.
You may not need to enter a PIN depending on
the device.
Use the Palringo messenger
Learn to chat with your family or friends.
This feature may not be available depending on
your service provider.
1. In Menu mode, select Messenger.
2. Select Menu → Sign In.
3. Enter a user name and password and select
Sign In.
4. Select Menu → Services → Add Service... → a
service → OK.
The first time you sign in to the Palringo
messenger, you must add a service to use.
5. Enter a user name and password for the service
and select OK.
When you are signed in to the service, the
contact list shows all of your messenger
contacts.
6. Select a contact you want to chat with. The chat
screen opens.
7. Enter and send your message.
using advanced functions
43
Page 50

Use advanced camera functions
Learn how to capture photos in various modes and
customize camera settings.
Capture a series of photos
1. In Idle mode, press and hold [ ] to turn on the
using advanced functions
camera.
2. Rotate the phone counter-clockwise to
landscape view.
3. Select → Shooting mode → Multi-shot.
4. Make any necessary adjustments.
5. Press and hold [ ] until the number of photos
you want has been taken.
Capture divided photos
1. In Idle mode, press and hold [ ] to turn on the
camera.
44
2. Select → Shooting mode → Mosaic shot.
3. Select an image layout.
4. Make any necessary adjustments.
5. Press [ ] to take photos for each segment.
Capture photos with decorative frames
1. In Idle mode, press and hold [ ] to turn on the
camera.
2. Rotate the phone counter-clockwise to
landscape view.
3. Select → Shooting mode → Frame shot.
4. Select a frame.
5. Make any necessary adjustments.
6. Press [ ] to take a photo with the frame.
Page 51
Use camera options
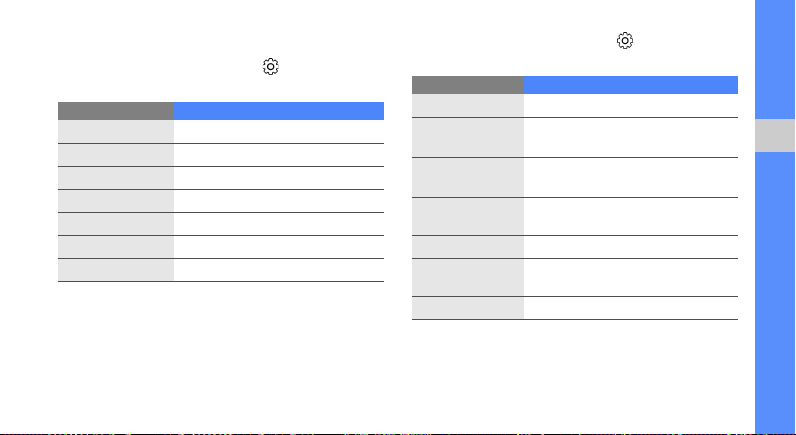
Before capturing a photo, select to access the
following options:
Option Function
Shooting mode
Resolution
Timer
White balance
Effects
Viewfinder mode
More settings
Change the shooting mode
Change the resolution option
Select the time delay
Adjust the color balance
Apply a special effect
Change the preview screen
Change the camera settings
Before capturing a photo, select → More
settings to access the following settings:
Setting Function
Quality
Exposure
metering
Single shot
mode
Shutter sound
Night mode
Default storage
Default name
Adjust the quality of your photos
Select a type of exposure meter
Adjust how the camera saves
captured photos
Select a sound to accompany the
shutter action
Set whether to use Night mode
Select a memory location to store
new photos
Edit a default name for new photos
using advanced functions
45
Page 52

Before capturing a video, select to access the
following options:
Option Function
Recording mode
Resolution
Timer
using advanced functions
White balance
Effects
Audio recording
Viewfinder mode
Quality
Default storage
Default name
Change the recording mode
Change the resolution option
Select the time delay
Adjust the color balance
Apply a special effect
Turn the audio on or off
Change the preview screen
Set the quality of your video clips
Select a memory location to store
new video clips
Edit a default name for new video
clips
46
Use advanced music functions
Learn to prepare music files, create playlists, and
store radio stations.
Copy music files via Samsung PC Studio
1. In Menu mode, select Settings → PC
connections → Mass storage → Save.
2. Using an optional PC data cable, connect the
multifunction jack on your phone to a PC.
3. Run Samsung PC Studio and copy files from the
PC to the phone.
Refer to the Samsung PC Studio help for more
information.
Page 53

Copy music files to a memory card
1. Insert a memory card.
2. In Menu mode, select Settings → PC
connections → Mass storage → Save.
3. Using an optional PC data cable, connect the
multifunction jack on your phone to a PC.
When connected, a pop-up window will appear
on the PC.
4. Open a folder to view files.
5. Copy files from the PC to the memory card.
Create a playlist
1. In Menu mode, select Music → Playlists.
2. Select Create.
3. Enter a title for your new playlist and select
Done.
4. Select the new playlist.
5. Select Add → Tracks.
6. Select the files you want to include and select
Add.
Customize your music player settings
Learn to adjust the playback and sound settings for
your music player.
1. In Menu mode, select Music.
2. Select Settings.
using advanced functions
47
Page 54
3. Adjust the settings to customize your music
player:
Option Function
Repeat
mode
using advanced functions
Shuffle
Background
playing
Sound
effects
Music auto
off
Change the repeat mode
Activate Shuffle mode
Set whether to play music in the
background when you end the
music player
Change the sound effects
Set the timer when the mus ic player
automatically turns off
4. Select Save.
48
Record songs from the FM radio
1. Plug the supplied headset into the phone.
2. In Menu mode, select Applications → FM
radio.
3. Select to start the FM radio.
4. Select More → Record to start recording.
You can also press [ ] to start recording.
5. When you are finished recording, select Stop.
The music file will be saved in FM radio clips (in
Menu mode, select My files → Music).
The recording feature is developed for voice
recording only. The quality of the recording will
be much lower than digital media.
Page 55

Store radio stations automatically
1. Plug the supplied headset into the phone.
2. In Menu mode, select Applications → FM
radio.
3. Select to start the FM radio.
4. Select More → Self-tuning.
5. Select Yes to confirm (if necessary).
The radio scans and saves available stations
automatically.
using advanced functions
49
Page 56

using tools and
applications
Learn how to work with your mobile phone’s tools
and additional applications.
50
Use services of your service
provider
Learn to call numbers and connect to web pages to
get a variety of services and information offered by
your service provider.
• This menu may be labeled differently
depending on your SIM card.
• Available services may vary depending on
your SIM card.
1. In Menu mode, select Applications → SIM-AT.
2. Select a service → OK.
Page 57

Use the Bluetooth wireless feature
Learn about your phone’s ability to connect to other
wireless devices for exchanging data and using
hands-free features.
Turn on the Bluetooth wireless feature
1. In Menu mode, select Applications →
Bluetooth → Activation.
2. Select On → Save.
3. To allow other devices to locate your phone,
select My phone’s visibility → On → Save.
Find and pair with other Bluetoothenabled devices
1. In Menu mode, select Applications →
Bluetooth → My devices → Search new
device.
2. Select a device.
3. Enter a PIN for the Bluetooth wireless feature or
the other device’s Bluetooth PIN, if it has one,
and select Done.
When the owner of the other device enters the
same PIN or accepts the connection, pairing is
complete.
You may not need to enter a PIN depending on
the device.
Send data using the Bluetooth wireless
feature
1. Select the file or item from one of your phone’s
applications that you want to send.
2. Select Send via → Bluetooth or select More →
Send namecard via → Bluetooth (when
sending contact data, specify which data to
send).
using tools and applications
51
Page 58

Receive data using the Bluetooth
wireless feature
1. Enter the PIN for the Bluetooth wireless feature
and select Done (if necessary).
2. Select Yes to confirm that you are willing to
receive data from the device (if necessary).
using tools and applications
Use Remote SIM mode
In Remote SIM mode, you can make or answer calls
only with a connected Bluetooth hands-free car kit
via the SIM card on your phone.
To activate Remote SIM mode,
1. In Menu mode, select Applications
Bluetooth → Remote SIM mode.
2. Select On → Save.
52
→
To use Remote SIM mode, start the Bluetooth
connection from a Bluetooth hands-free car kit.
The Bluetooth hands-free car kit must be
authorized. To authorize, select the device and
More → Authorise device → Yes
select
.
Activate and send an SOS message
When you have an emergency, you can send an
SOS message asking for help.
1. In Menu mode, select Messages → SOS
messages → Sending options.
2. Select On to turn on the SOS messaging
feature.
3. Select Empty under Recipients to open the
recipient list.
4. Select Add recipients → Phonebook to open
your contact list.
Page 59

5. Select the contacts you want.
6. Select a number (if necessary).
7. When you are finished selecting contacts, select
Add to return to the recipient list.
8. Select Save to save the recipients.
9. Scroll down and set the number of times to
repeat the SOS message.
10. Select Save → Yes.
To send an SOS message, the phone must be
closed and the keys locked. Press [ / ] four times.
Once you send an SOS message, all phone
functions will be suspended until you press
and hold the Hold key.
Activate the mobile tracker
When someone inserts a new SIM card in your
phone, the mobile tracker feature will automatically
send the contact number to two recipients to help
you locate and recover your phone.
To activate the mobile tracker,
1. In Menu mode, select Settings → Security →
Mobile tracker.
2. Enter your password and select Done.
3. Select On to turn on the mobile tracker.
4. Select Empty under Recipients to open the
recipient list.
5. Select Add recipients → Phonebook to open
your contact list.
6. Select the contacts you want.
7. Select a number (if necessary).
using tools and applications
53
Page 60

8. When you are finished selecting contacts, select
Add to return to the recipient list.
9. Select Save to save the recipients.
10. Select the sender input field.
11. Enter the sender’s name and select Done.
12. Select Save → Accept.
using tools and applications
Make fake calls
You can simulate an incoming call when you want to
get out of meetings or unwanted conversations. You
can also make it appear as if you are talking on the
phone by playing back a recorded voice.
Make a fake call
In Idle mode, press and hold [ ].
54
Record a voice
1. In Menu mode, select Settings → Application
settings → Call → Fake call → Fake call voice.
2. Select On under Fake call voice.
3. Select Voice recording.
4. Select to start recording.
5. Speak into the microphone.
6. When you are finished speaking, select .
7. Select Back → Save to set the recording as a
response for fake calls.
Change the time delay before fake calls
1. In Menu mode, select Settings → Application
settings → Call → Fake call → Fake call timer.
2. Select an option and select Save.
Page 61

Record and play voice memos
Learn to operate your phone’s voice recorder.
Record a voice memo
1. In Idle mode, press [ ] to open the voice
recorder.
2. Select or Record to start recording.
3. Speak your memo into the microphone.
4. When you are finished speaking, select or
Save.
Play a voice memo
1. In Idle mode, press [ ] and select My voice
clips.
2. Select a file.
Press [ / ] to adjust the volume during
playback.
Print images
Learn to print your image with a USB connection or
the Bluetooth wireless feature.
To print an image using a USB connection,
1. In Menu mode, select Settings → PC
connections → Printer → Save.
2. Connect the multifunction jack on your phone to
a compatible printer.
X
3. Open an image.
4. Select More → Print via → USB.
5. Set print options and print the image.
To print an image using the Bluetooth wireless
feature,
1. Open an image.
2. Select More → Print via → Bluetooth → Print.
p. 32
X
p. 32
using tools and applications
55
Page 62

3. Select a Bluetooth-enabled printer and pair with
the printer.
4. Set print options and print the image.
X
p. 51
Use Java-powered games and
applications
using tools and applications
Learn to use games and applications powered by
award-winning Java technology.
The download of Java games or Java
applications may not be supported depending
on the software of the phone.
Download games or applications
1. In Menu mode, select Pack 2.0.
Your phone connects to the website preset by
your service provider.
56
2. Search for a game or an application and
download it to the phone.
Play games
1. In Menu mode, select Applications → Games
and more.
2. Select a game from the list and follow the onscreen instructions.
Available games may vary, depending on your
region or service provider. Game controls and
options may vary.
Launch applications
1. In Menu mode, select Applications → Games
and more → an application.
2. Select More to access a list of various options
and settings for your application.
Page 63

Create and view world clocks
Learn to view the time in another city and set world
clocks to appear on your display.
Create a world clock
1. In Menu mode, select Organiser → World
clock.
2. Select Add.
3. Scroll left or right to a time zone.
4. To set daylight saving time, select .
5. Select Add to create your world clock.
6. To add more world clocks, repeat steps 2-5
above.
Add a world clock to your display
With the dual clock widget, you can view clocks with
two different time zones on your display.
After you have created world clocks,
1. In Menu mode, select Organiser → World
clock.
2. Scroll to the world clock you want to add and
select More → Set as 2nd clock.
Set and use alarms
Learn to set and control alarms for important events.
Set a new alarm
1. In Menu mode, select Alarms.
2. Select Create.
3. Set alarm details.
57
using tools and applications
Page 64

4. Select Save.
The auto power-up feature sets the phone to
automatically turn on and sound the alarm at
the designated time if the phone is turned off.
Stop an alarm
using tools and applications
When the alarm sounds,
•Select OK to stop the alarm without snooze.
•Select OK to stop the alarm with snooze, or
select Snooze to silence the alarm for the snooze
period.
Deactivate an alarm
1. In Menu mode, select Alarms.
2. Select the alarm you want to deactivate and
select Off under Alarm.
3. Select Save.
58
Use the calculator
1. In Menu mode, select Organiser → Calculator.
2. Use the keys that correspond to the calculator
display to perform basic mathematical
operations.
Convert measurements
1. In Menu mode, select Organiser → Convertor
→ a conversion type.
2. Enter the measurements and units in the
appropriate fields.
Page 65

Set a countdown timer
1. In Menu mode, select Applications → Timer.
2. Select Set.
3. Enter the length of time to count down and select
Done.
4. Select Play to begin or pause the countdown.
5. When the timer expires, select OK to stop the
alert.
Use the stopwatch
1. In Menu mode, select Applications →
Stopwatch.
2. Select Start to begin and record lap times.
3. Select Lap to record lap times.
4. When you are finished, select Stop.
5. Select Reset to clear recorded times.
Look up words in a dictionary
Learn to look up English or Spanish words in your
dictionary.
Look up English words
1. In Menu mode, select Applications →
Dictionary.
2. Select Search.
3. Enter an English word and select Done.
4. Select a word from the list.
5. To save the word in the word book, select Save.
Look up Spanish words
1. In Menu mode, select Applications →
Dictionary.
2. Select Language → Spanish-English.
3. Select Search.
using tools and applications
59
Page 66

4. Enter an English word and select Done.
5. Select a word from the list.
6. To save the word in the word book, select Save.
View the history list
1. In Menu mode, select Applications →
using tools and applications
Dictionary.
2. Select More → History.
3. Select a word from the history list.
View the word book
1. In Menu mode, select Applications →
Dictionary.
2. Select More → Word book.
3. Select a word from the list.
60
Review vocabularies
1. In Menu mode, select Applications →
Dictionary.
2. Select More → Review → a language option.
3. Select Answer and enter the word to answer the
question.
Change the dictionary color
1. In Menu mode, select Applications →
Dictionary.
2. Select More → Set color.
3. Scroll left or right to a color and select Save.
Page 67

Create a new task
1. In Menu mode, select Organiser → Task.
2. Select Create.
3. Enter the details of the task and select Save.
Create a text memo
1. In Menu mode, select Organiser → Memo.
2. Select Create.
3. Enter your memo text and select Done.
Manage your calendar
Learn to change the calendar view and create
events.
Change the calendar view
1. In Menu mode, select Organiser → Calendar.
2. Select View by → Day or Week.
Create an event
1. In Menu mode, select Organiser → Calendar.
2. Select Create → an event type.
3. Enter the details of the event as required and
select Save.
using tools and applications
61
Page 68

View events
To view events of a specific date,
1. In Menu mode, select Organiser → Calendar.
2. Select a date on the calendar.
3. Select an event to view its details.
using tools and applications
To view events by event types,
1. In Menu mode, select Organiser → Calendar.
2. Select More → Event list → an event type.
3. Select an event to view its details.
62
Page 69

troubleshooting
If you are having trouble with your mobile phone, try these troubleshooting procedures before contacting a service
professional.
When you turn on your phone or while you are
using the phone, it prompts you to enter one of
the following codes:
Code Try this to solve the problem:
When the phone lock feature is enabled,
Password
PIN
you must enter the password you set for
the phone.
When using the phone for the first time or
when the PIN requirement is enabled, you
must enter the PIN supplied with the SIM
card. You can disable this feature by
using the
PIN lock
menu.
Code Try this to solve the problem:
PUK
PIN2
Your SIM card is blocked, usually as a
result of entering your PIN incorrectly
several times. You must enter the PUK
supplied by your service provider.
When you access a menu requiring the
PIN2, you must enter the PIN2 supplied
with the SIM card. For details, contact
your service provider.
a
Page 70

The phone prompts you to insert the SIM card.
Ensure that the SIM card is installed correctly.
Your phone displays “No networks found” or
“Network error.”
• When you are in areas with weak signals or poor
reception, you may lose reception. Move to
another area and tr y again.
• You cannot access some options without a
troubleshooting
subscription. Contact your service provider for
more details.
You enter a number, but the call is not dialed.
• Ensure that you have pressed the Dial key: [ ].
• Ensure that you have accessed the right cellular
network.
• Ensure that you have not set call barring for the
phone number.
b
Another caller cannot reach you.
• Ensure that your phone is turned on.
• Ensure that you have accessed the right cellular
network.
• Ensure that you have not set call barring for the
phone number.
Another caller cannot hear you speaking.
• Ensure that you are not covering the built-in
microphone.
• Ensure that the microphone is close to your
mouth.
• If using a headset, ensure that it is properly
connected.
Page 71

The phone beeps and the battery icon flashes.
Your battery is low. Recharge or replace the battery to
continue using the phone.
The audio quality of the call is poor.
• Ensure that you are not blocking the phone’s
internal antenna.
• When you are in areas with weak signals or poor
reception, you may lose reception. Move to
another area and tr y again.
You select a contact to call, but the call is not
dialed.
• Ensure that the correct number is stored in the
contact list.
• Re-enter and save the number, if necessary.
The battery does not charge properly or
sometimes the phone turns itself off.
• The battery terminals may be dirty. Wipe both
gold-colored contacts with a clean, soft cloth and
try charging the battery again.
• If the battery will no longer charge completely,
dispose of the old battery properly and replace it
with a new battery.
Your phone is hot to the touch.
When you use applications that require more power,
your phone may heat up.
This is normal and should not affect your phone’s
lifespan or performance.
troubleshooting
c
Page 72

index
alarms
creating, 57
deactivating,
stopping,
battery
charging,
installing,
low battery indicator,
Bluetooth
activating,
receiving data,
remote SIM mode,
sending data,
Bluetooth messenger
d
58
58
18
16
51
52
51
52
42
18
browser
see web browser
calculator
see tools, calculator
calendar
see tools, calendar
calls
advanced functions,
answering additional calls,
answering,
basic functions,
dialing additional calls,
dialing missed calls,
from the phonebook,
26
26
37
37
39
38
38
international numbers,
making fake calls,
26
making,
multiparty,
placing on hold,
recently dialed,
rejecting,
retrieving held calls,
viewing missed,
conference calls
see calls, multiparty
contacts
adding,
creating groups,
finding,
38
39
30
31
39
54
38
37
38
37
41
Page 73

convertor
see tools, convertor
countdown timer
see tools, countdown timer
dictionary
see tools, dictionary
fake calls
see calls, making fake calls
FM radio
listening to,
recording songs,
storing stations,
headset
images
printing,
internet
see web browser
33
48
49
27
55
Java
accessing applications,
downloading applications,
launching games,
key tones
lock
memo
memory card
messages
24
see phone lock
see text or voice memos
sending email,
sending instant (Bluetooth
messenger),
sending instant (Parlingo
messenger),
sending multimedia,
viewing email,
56
19
28
42
43
30
27
56
56
viewing multimedia,
viewing text,
mobile tracker
multimedia
see messages
music player
creating playlists,
customizing,
listening to music,
namecards
offline profile
Palringo messenger
phone lock
photos
advanced capturing,
capturing,
viewing,
29
53
47
40
21
26
31
32
29
47
index
34
43
44
e
Page 74

radio
see FM radio
ringtone
Samsung PC Studio
silent profile
SIM card
SOS message
index
stopwatch
see tools, stopwatch
task
see tools, task
templates
inserting,
multimedia,
41
text,
f
25
16
25
42
52
41
46
text
creating memos,
entering,
messages,
26
theme
timer
see tools, countdown timer
tools
57
alarm,
calculator,
calendar,
convertor,
countdown timer,
dictionary
stopwatch,
task,
61
61
28
27
58
61
58
59
59
59
videos
capturing,
viewing,
voice memos
playing,
recording,
volume
call volume,
key tone volume,
wallpaper
web browser
adding bookmarks,
launching homepage,
widgets
world clock
creating,
setting dual display,
32
32
55
55
27
25
23
57
24
36
35
57
Page 75

Some of the contents in this manual may differ from your phone depending on the software of the phone or your
service provider.
World Wide Web
http://www.samsungmobile.com
Printed in Korea
Code No.:GH68-26405A
English (LTN). 01/2010. Rev. 1.0
 Loading...