

Samsung CZ21A113N5 User Manual

COLOUR
TELEVISION
Owner’s Instructions
Before operating the unit,
please read this manual thoroughly,
and retain it for future reference.
ENG
REMOTE CONTROL
ON-SCREEN MENUS
TELETEXT FUNCTION
(depending on the model)
S56A_UI_ENG_EU 8/30/03 10:47 AM Page 1
2
ENG
Safety Instructions
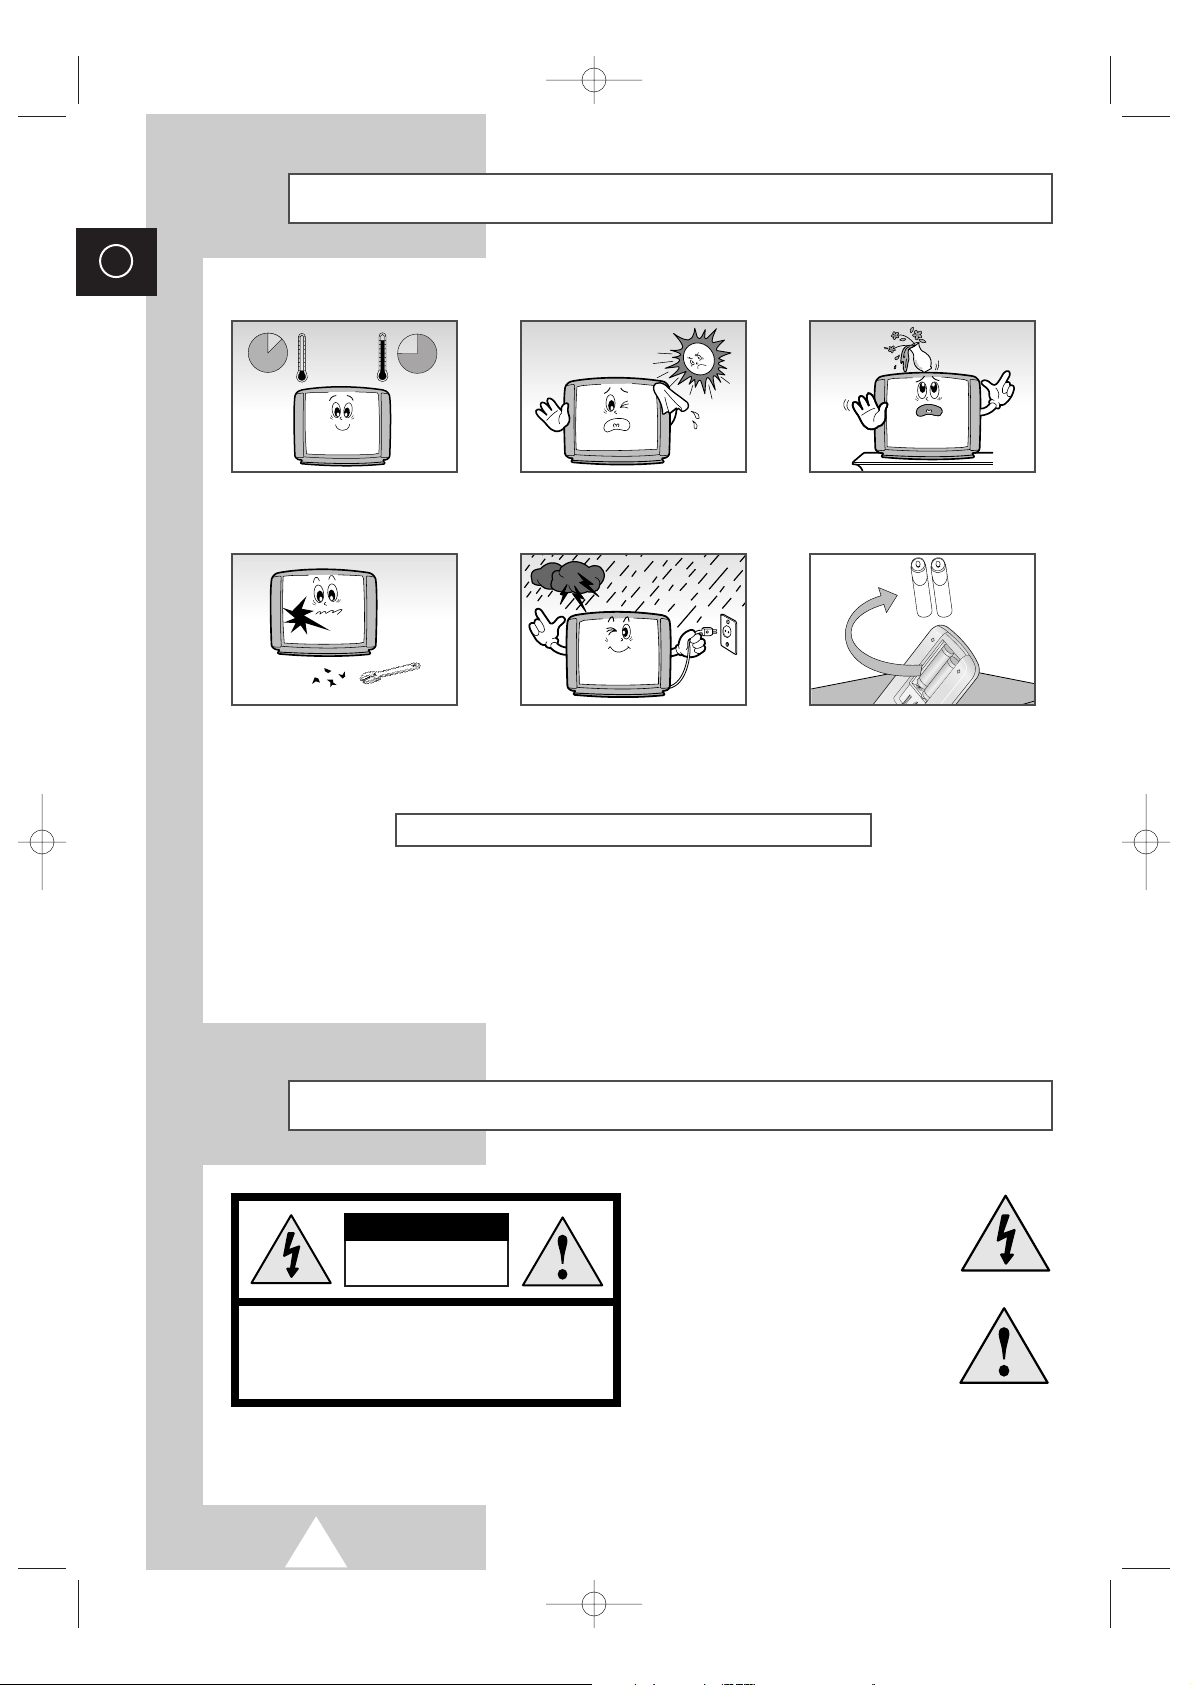
The following illustrations represent the precautions to be taken when using and moving your television.
THIS DEVICE IS NOT FOR USE IN INDUSTRIAL ENVIRONMENTS
Caution
CAUTION: TO PREVENT ELECTRICAL SHOCK, DO
NOT REMOVE REAR COVER, NO USER SERVICEABLE
PARTS INSIDE. REFER SERVICING TO QUALIFIED
SERVICE PERSONNEL.
RISK OF ELECTRIC SHOCK
DO NOT OPEN
CAUTION
Do NOT expose the television to
extreme temperature conditions or
to extreme humidity conditions.
Do NOT expose the television to
direct sunlight.
Do NOT expose the television to
any liquids.
If the television is broken, do not
try to repair it yourself. Contact
qualified service personnel.
During a storm conditions
(especially when there is lightning)
unplug the television from the
mains socket and aerial.
If the remote control is not used for
a long period of time, remove the
batteries and store it in a cool, dry
place.
☛
The main voltage is indicated on the rear of
the TV set and the frequency is 50 or 60Hz.
The lightning flash and arrow head
within the triangle is a warning sign
alerting you of “dangerous voltage”
inside the product.
The exclamation point within the
triangle is a warning sign alerting
you of important instructions
accompanying the product.
WARNING: TO PREVENT DAMAGE WHICH MAY
RESULT IN FIRE OR SHOCK HAZARD. DO NOT EXPOSE
THIS APPLIANCE TO RAIN OR MOISTURE.
☛
Displaying any stationary images that exceed the long time, it can cause uneven aging of
picture tubes (CRTs) that leave subtle, but permanent burned-in ghost images in the television
picture. To avoid this, vary the programming and images, and primarily display full screen
moving images, not stationary patterns or dark bars.
S56A_UI_ENG_EU 8/30/03 10:47 AM Page 2
10%
H
5¡
75%
35¡
H
3
ENG
Contents
◆ PREPARING YOUR TELEVISION
■ Safety Instructions ................................................................................................ 2
■ Caution ................................................................................................................. 2
■ Control Panels ...................................................................................................... 4
■ Connection Panels ............................................................................................... 5
■ Viewing Picture From External Sources ............................................................... 7
■ Infrared Remote Control (All Functions Except Teletext) ..................................... 8
■ Infrared Remote Control (Teletext Functions) ...................................................... 9
■ Inserting the Batteries in the Remote Control....................................................... 10
■ Connecting the Aerial (or Cable Television Network)........................................... 10
■ Switching Your Television On and Off.................................................................. 11
■ Placing Your Television in Standby mode ............................................................ 11
■ Plug & Play Feature (depending on the model).................................................... 12
■ Viewing the Demonstration................................................................................... 13
■ Choosing Your Language..................................................................................... 13
◆ SETTING UP THE CHANNELS
■ Storing the Channels Automatically (depending on the model)............................ 14
■ Storing the Channels Manually (depending on the model)................................... 15
■
Giving Channels Names (depending on the model) ........................................ 17
■ Skipping Unwanted Channels .............................................................................. 18
■ Fine tuning Channel Reception ............................................................................ 19
■ Sorting the Stored Channels ................................................................................ 20
■ Selecting a Channel Numbered Ten or Over ....................................................... 21
◆ USING THE TELEVISION
■ Changing the Picture Standard ............................................................................ 21
■ Adjusting the Picture Settings .............................................................................. 22
■ Setting the Digital Noise Reduction ...................................................................... 23
■ Using the Tilt Control Feature (depending on the model)..................................... 23
■ Selecting the Picture Format ................................................................................ 24
■ Setting the Blue Screen Mode.............................................................................. 24
■ Changing the Sound Standard ............................................................................. 25
■ Adjusting the Sound Settings (depending on the model) ..................................... 26
■ Extra Sound Settings (depending on the model).................................................. 27
(Auto Volume/Melody/Pseudo Stereo/Turbo Sound/Virtual Surround)
■ Selecting the Sound Mode (depending on the model) ......................................... 28
■ Adjusting the Volume............................................................................................ 29
■ Switching the Sound Off Temporarily ................................................................... 29
■ Setting the Sleep Timer (depending on the model) .............................................. 30
■ Setting and Displaying the Current Time (depending on the model).................... 31
■ Switching the Television On and Off Automatically (depending on the model) .... 32
■ Activating the Child Lock ...................................................................................... 33
◆ USING THE TELETEXT FUNCTION (depending on the model)
■ Teletext Decoder .................................................................................................. 34
■ Displaying Teletext Information ............................................................................ 34
■ Selecting a Specific Teletext Page....................................................................... 35
■ Using FLOF to Select a Teletext Page ................................................................. 36
■ Storing Teletext Pages ......................................................................................... 36
◆ INFORMATION ON CONNECTIONS AND RECOMMENDATIONS FOR USE
■ Automatic Degaussing to Remove Color Patches................................................ 37
■ Troubleshooting: Before Contacting Service Personnel....................................... 37
■ Wiring the Mains Power Supply Plug (UK Only)................................................... 38
☛
➢
Symbols
Press Important Note
S56A_UI_ENG_EU 8/30/03 10:47 AM Page 3
4
ENG
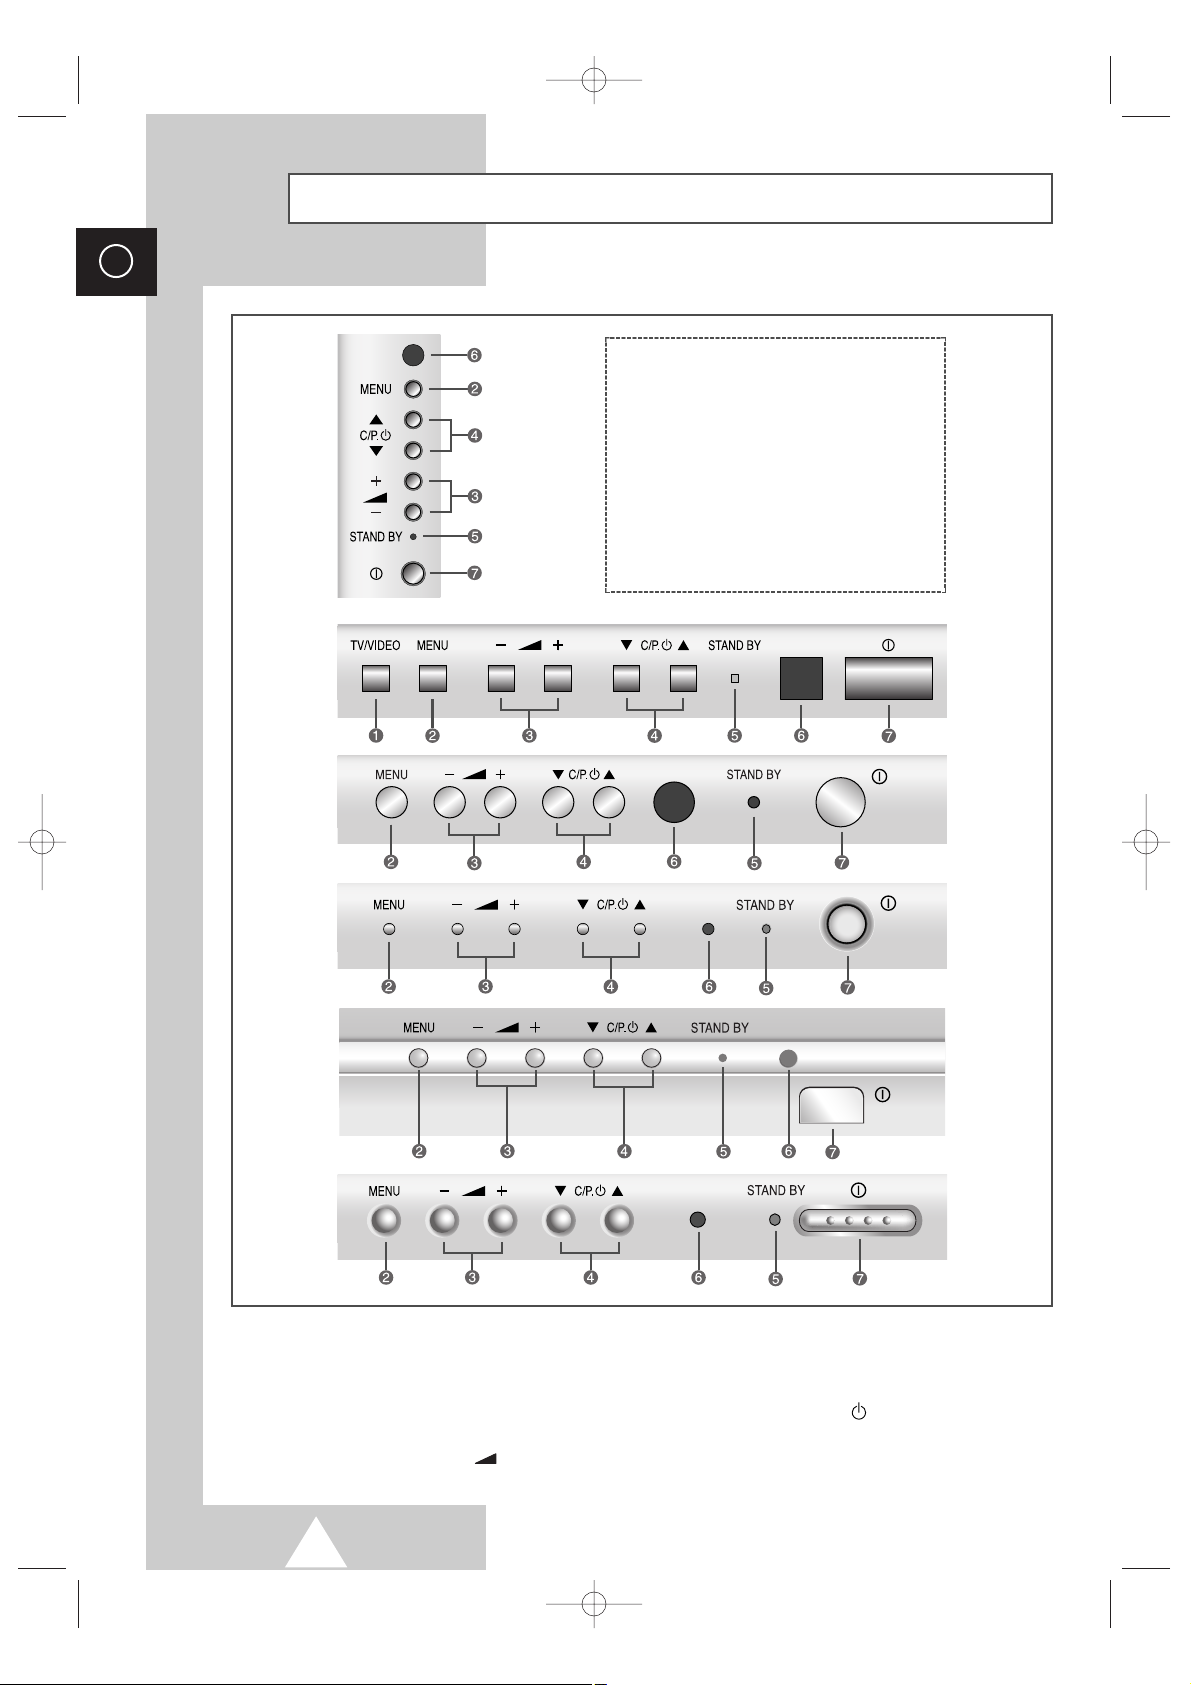
Control Panels
➢
The actual configuration on your TV may be different, depending on
your model.
ΠINPUT SOURCE SELECTION
´ MENU DISPLAY
ˇ VOLUME ADJUSTMENT
¨ CHANNEL SELECTION
ˆ STANDBY INDICATOR
Ø REMOTE CONTROL SENSOR
∏ POWER ON/OFF
➣
Using the Buttons on the Panel
If the remote control no longer works or you have lost it, you can use controls on the panel of the TV to:
◆ Switch on the TV when it is in Standby mode and select channels ( ▼ C/P. ▲ )
◆ Access the main menu ( MENU )
◆ Adjust the volume (
-
+ )
◆ Switch among Video input modes ( TV/VIDEO )
S56A_UI_ENG_EU 8/30/03 10:47 AM Page 4
5
ENG
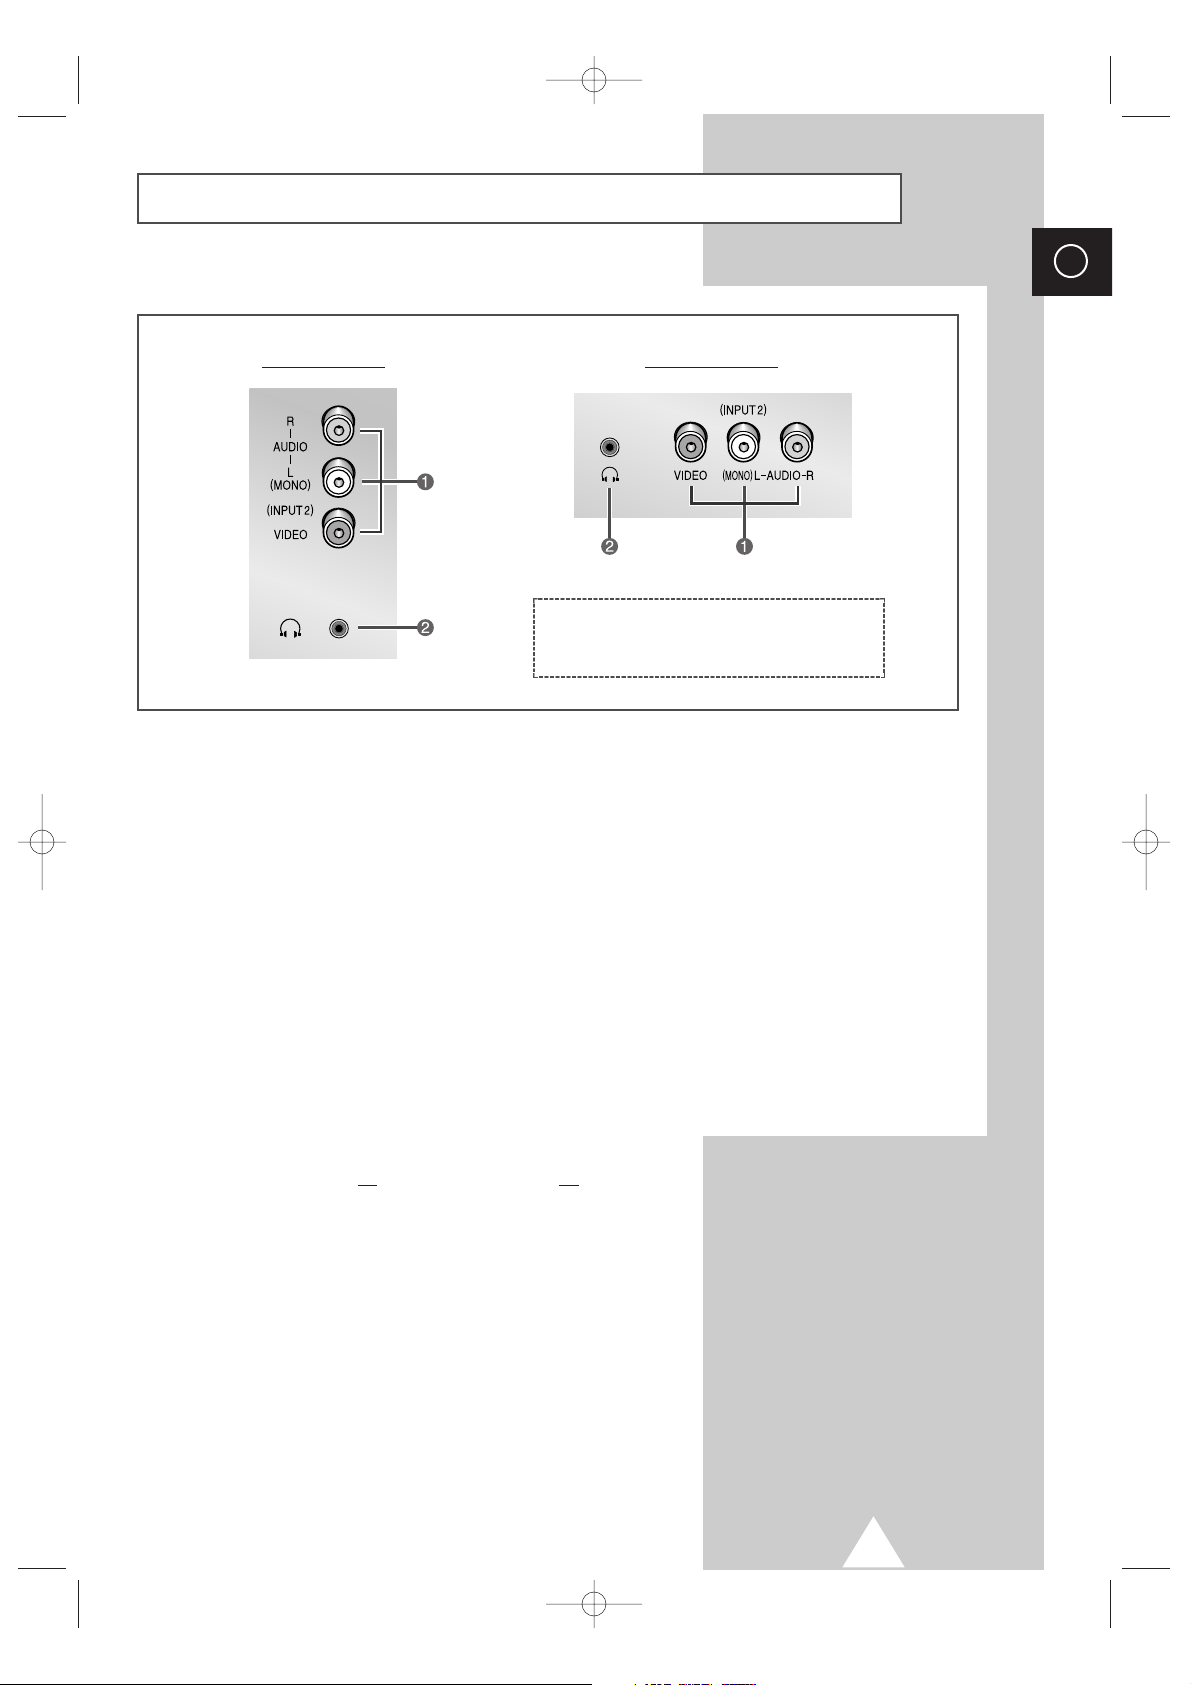
Connection Panels
➢
The actual configuration on your TV may be different, depending on
your model.
ΠAUDIO/VIDEO INPUT
´ HEADPHONE CONNECTOR
Side of the TV Front of the TV
ΠConnecting External A/V Devices (INPUT)
The RCA (VIDEO + AUDIO-L and R) connectors are used for equipment such as camcorders, video disc
players and some video game devices.
➣
◆ When both the side (or front) and rear connectors are connected to external equipment, the side
(or front) AV has the priority.
◆ When using the mono equipment such as camcorders, video disc players and some video game
devices, connect to the “AUDIO-L” input connector.
´ Connecting Headphones
-
You can connect a set of headphones to your television if you wish to watch a television programme without
disturbing the other people in the room.
-
Prolonged use of headphones at a high volume may damage your hearing.
☛
Whenever you connect an audio or video system to your
television, ensure that all
elements are switched off.
Refer to the documentation supplied with your equipment for
detailed connection instructions and associated safety
precautions.
S56A_UI_ENG_EU 8/30/03 10:47 AM Page 5
6
ENG
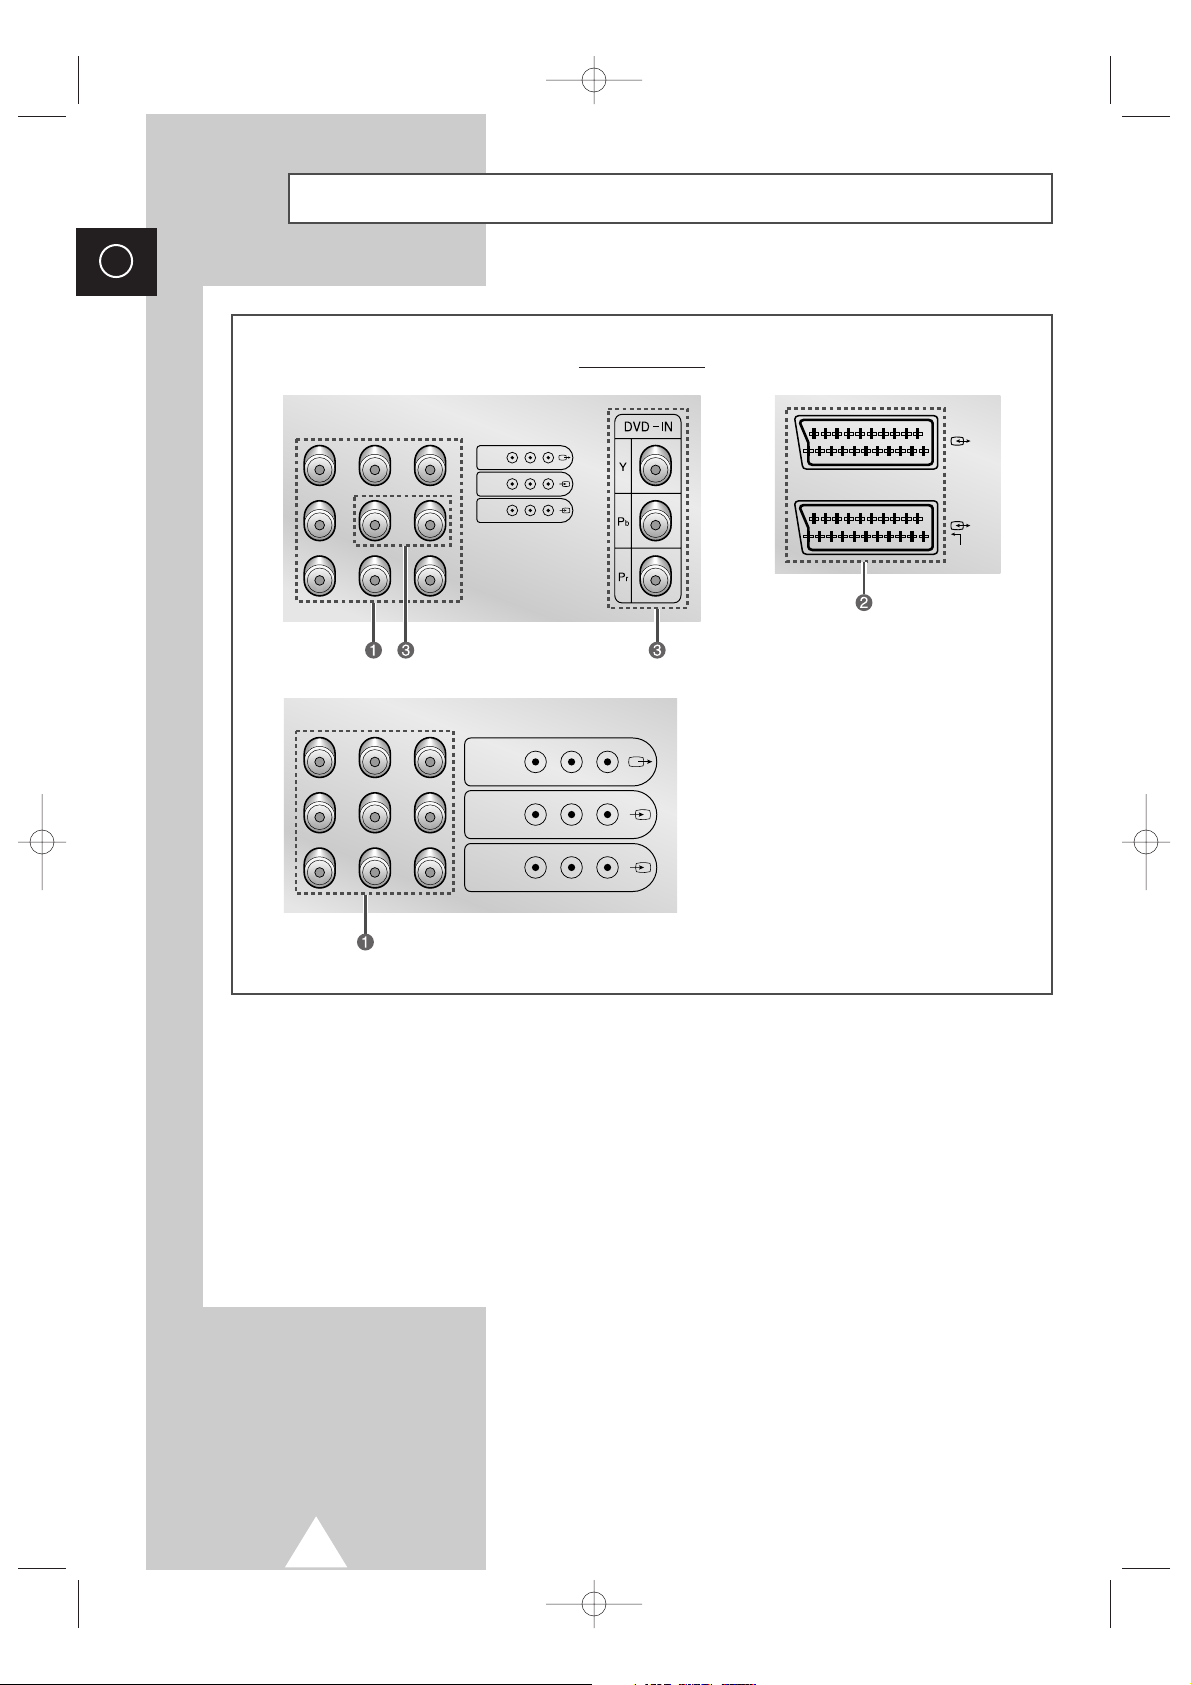
Connection Panels (continued)
➢
The actual configuration on your TV may be different, depending on
your model.
Ϋ Connecting External A/V Devices (INPUT/OUTPUT)
The connectors (RCA or SCART) are used for equipment such as video disc players, video game devices,
camcorder and VCR.
ˇ Connecting DVD
The RCA (Y + Pb + Pr + AUDIO-L and R) connectors are used for a DVD.
➣
When using the mono equipment such as camcorders, video disc players and some video game
devices, connect to the “AUDIO-L” input connector.
Rear of the TV
S56A_UI_ENG_EU 8/30/03 10:47 AM Page 6
(
)
MONO
L-AUDIO-R
VIDEO
MONITOR
-OUT
INPUT 2
INPUT 1
2
1
RGB
(
)
MONO
L-AUDIO-R
VIDEO
MONITOR
-OUT
INPUT 2
INPUT 1
7
ENG
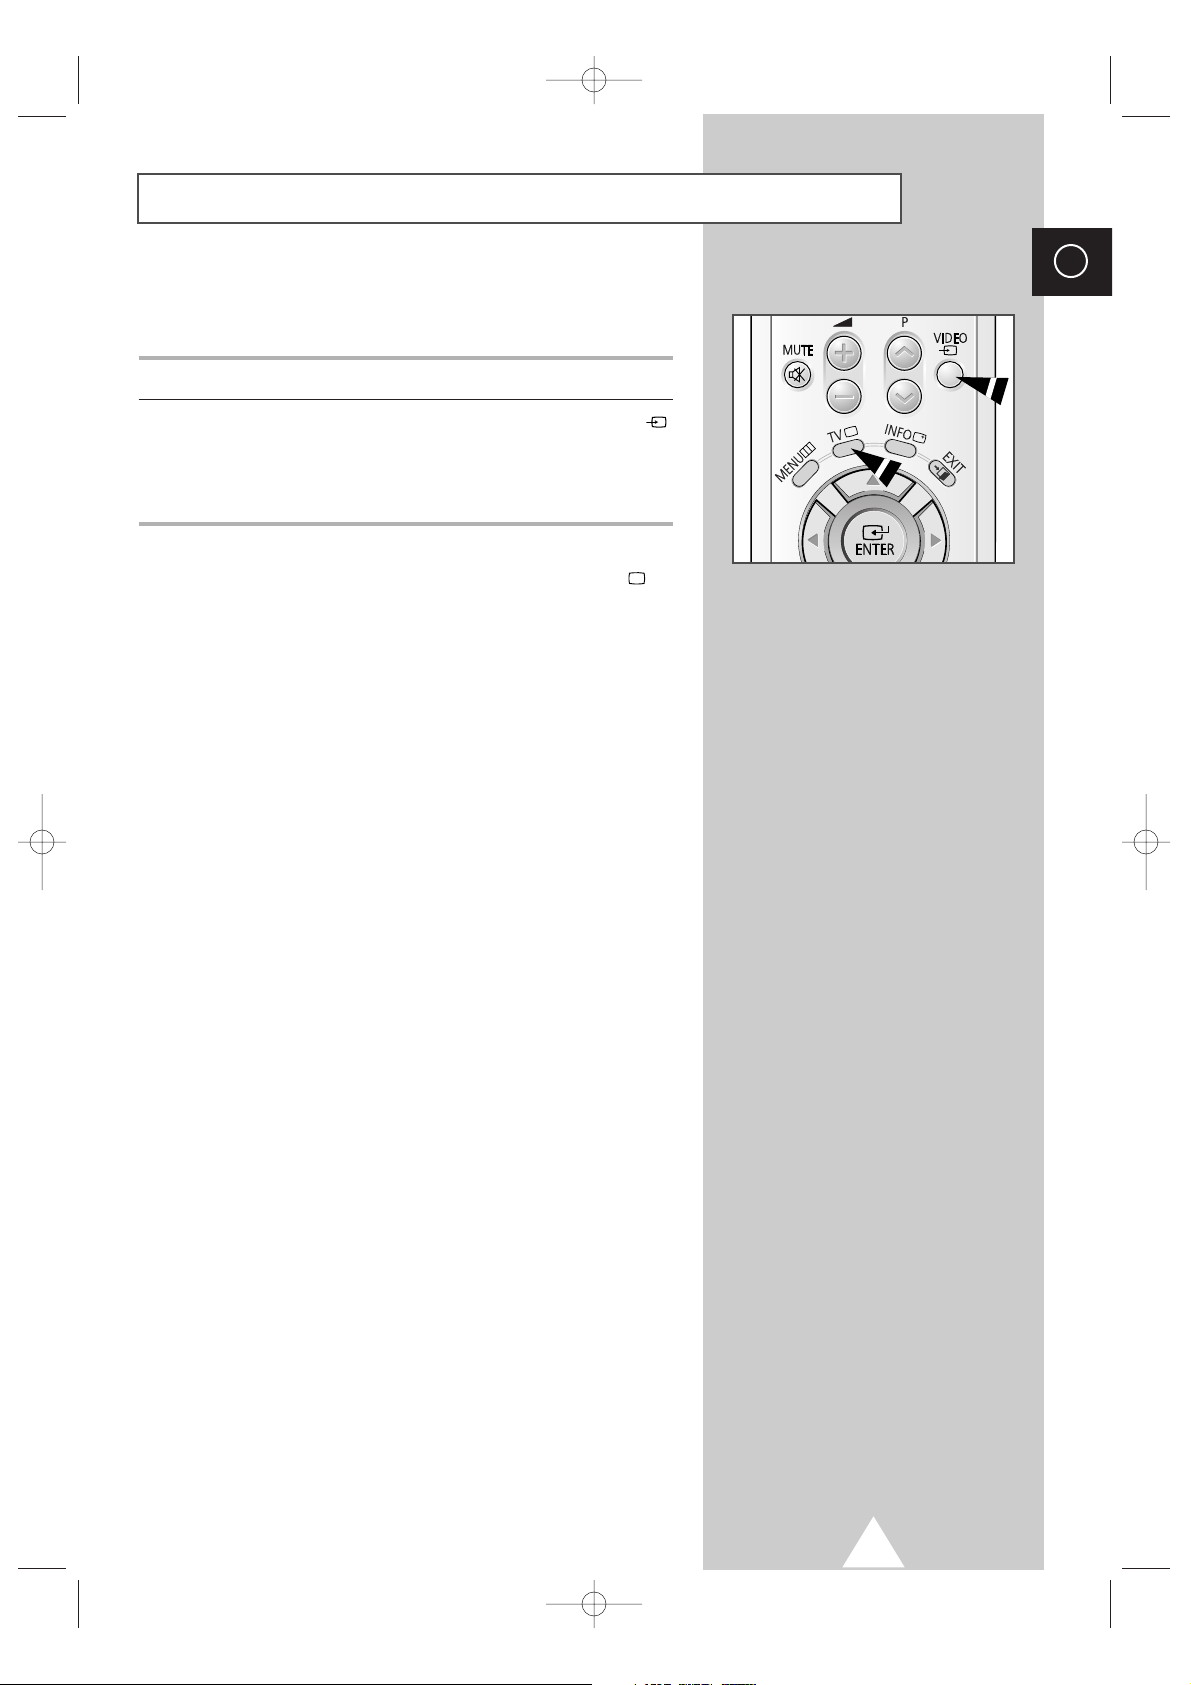
Once you have connected up your various audio and video systems,
you can view the different sources by selecting the appropriate input.
1 Check that all the necessary connections have been made.
2 Switch the television on and if necessary, press the VIDEO ()
button one or more times until the required input is displayed.
➢
Depending on the source selected, the pictures may appear
automatically.
➢
To watch television programmes again, press the TV ()
button and select the number of the channel required.
Viewing Pictures From External Sources
S56A_UI_ENG_EU 8/30/03 10:47 AM Page 7
8
ENG
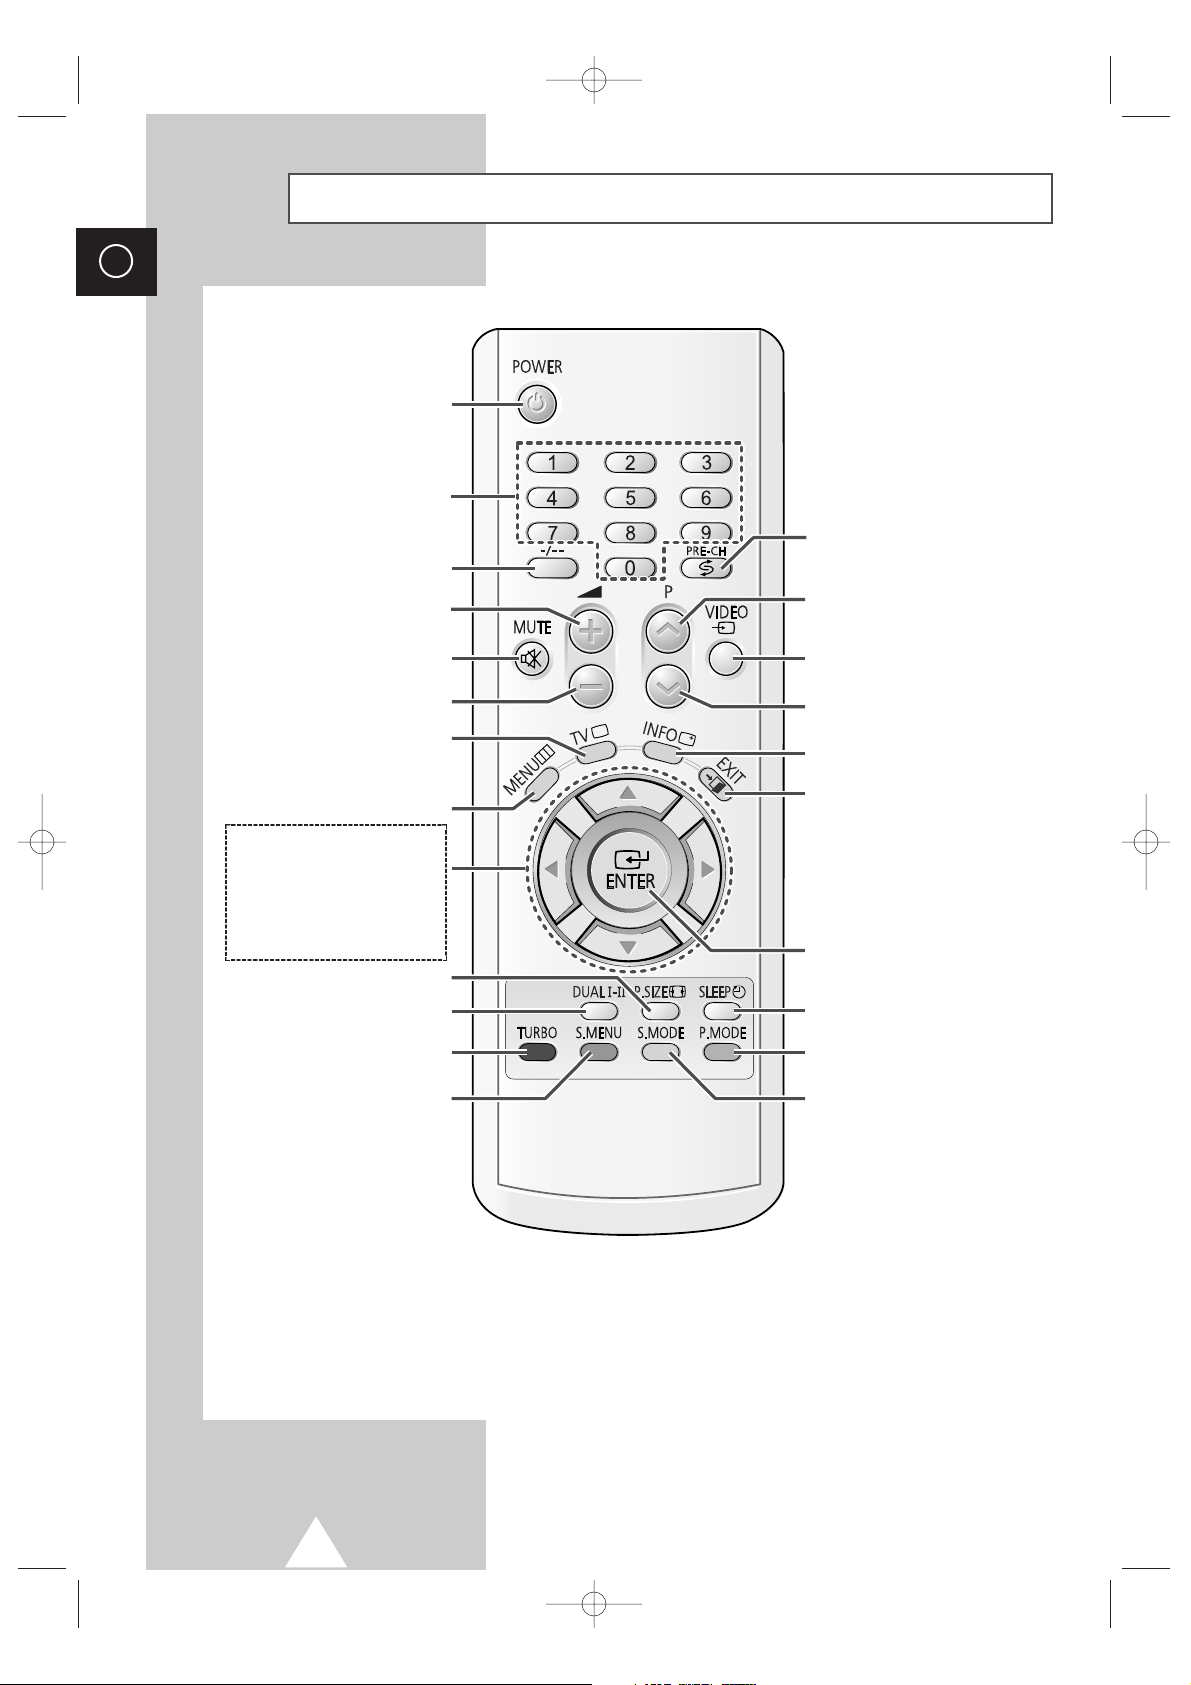
Infrared Remote Control (All Functions Except Teletext)
➣
Buttons and markings are subject to change.
➣
Operation of remote control may be affected by bright artificial light near to the TV set.
POWER
SOUND MENU DISPLAY
(OPTION)
ONE/TWO-DIGIT CHANNEL
SELECTION
TURBO SOUND ON/PLUS/OFF
(OPTION)
TEMPORARY SOUND SWITCH-
OFF
VOLUME DECREASE
PREVIOUS CHANNEL
DIRECT CHANNEL SELECTION
TUNER/CABLE NETWORK
SELECTION
EXTERNAL INPUT SELECTION
ON-SCREEN DISPLAY
AUTOMATIC SWITCH-OFF
PICTURE SIZE
NEXT CHANNEL
VOLUME INCREASE
PICTURE STANDARD
SOUND STANDARD (OPTION)
SOUND MODE SELECTION
(OPTION)
MENU DISPLAY
SWITCH REPEATEDLY
BETWEEN THE LAST TWO
CHANNELS DISPLAYED
EXIT FROM ANY DISPLAY
CHANGE CONFIRMATION/
HIGHLIGHTED OPTION SELECTION
MOVE TO THE REQUIRED MENU
OPTION/
ADJUST AN OPTION VALUE
RESPECTIVELY
➢
This function also works with
the volume adjust and channel
selection buttons.
S56A_UI_ENG_EU 8/30/03 10:47 AM Page 8
9
ENG
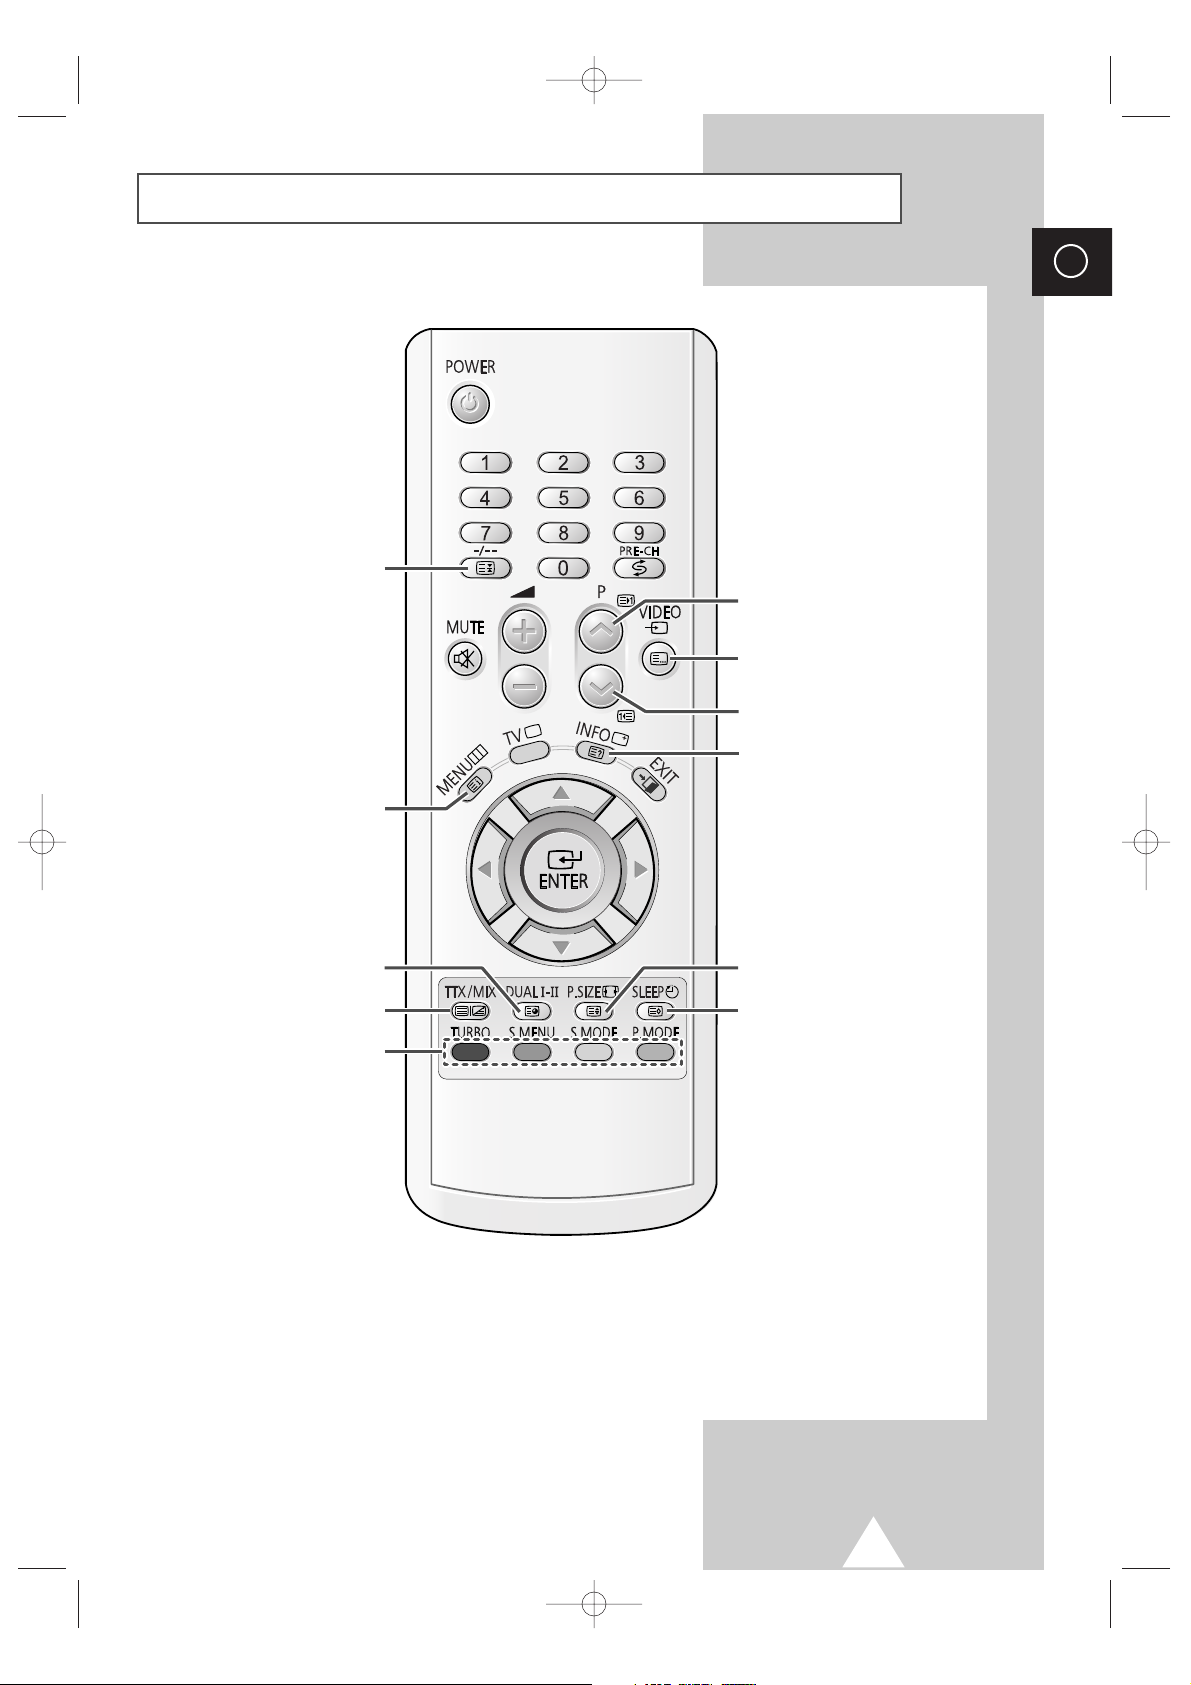
Infrared Remote Control (Teletext Functions)
➣
Buttons and markings are subject to change.
TELETEXT HOLD
FASTEXT TOPIC SELECTION
TELETEXT NEXT PAGE
TELETEXT PREVIOUS PAGE
TELETEXT DISPLAY/MIX
LIST/FLOF MODE SELECTION
TELETEXT REVEAL
TELETEXT STORE
PICTURE SIZE
PROGRAMME SELECTION BY
NAME
TELETEXT SUB-PAGE
S56A_UI_ENG_EU 8/30/03 10:47 AM Page 9
10
ENG
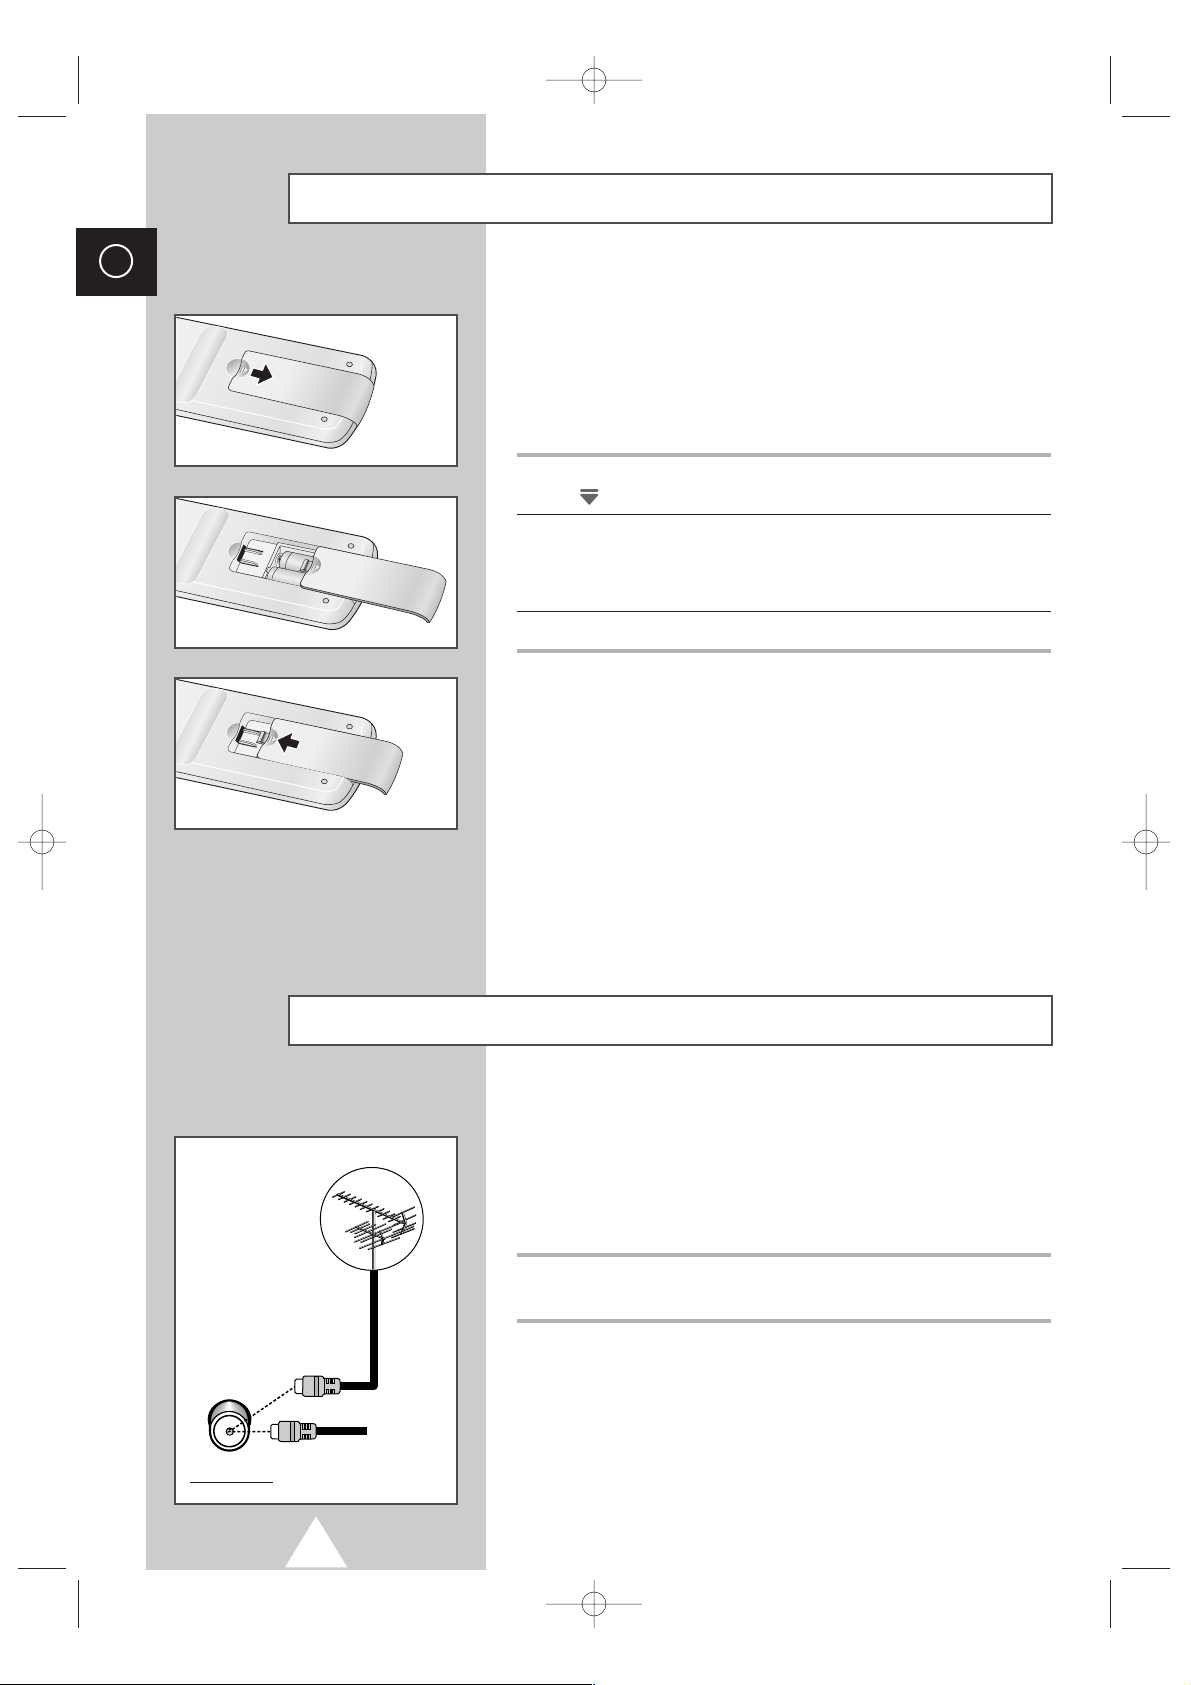
You must insert or replace the batteries in the remote control when
you :
◆ Purchase the television.
◆ Find that the remote control is no longer operating
correctly.
1 Remove the cover of the remote control by pressing the symbol
( ) and pulling the cover in the direction of the arrow.
2 Insert batteries, taking care to respect the polarities:
◆ + on the battery with + on the remote control
◆-on the battery with -on the remote control
3 Replace the cover by pushing it in the direction of the arrow.
To view television channels correctly, a signal must be received by
the set from one of the following sources:
◆ An outdoor aerial
◆ A cable television network
Plug the aerial or cable network input cable to the 75Ω coaxial socket
on the rear of the television.
Inserting the Batteries in the Remote Control
Connecting the Aerial (or Cable Television Network)
Cable
Television
Network
Rear of TV
S56A_UI_ENG_EU 8/30/03 10:47 AM Page 10
75Ω
11
ENG
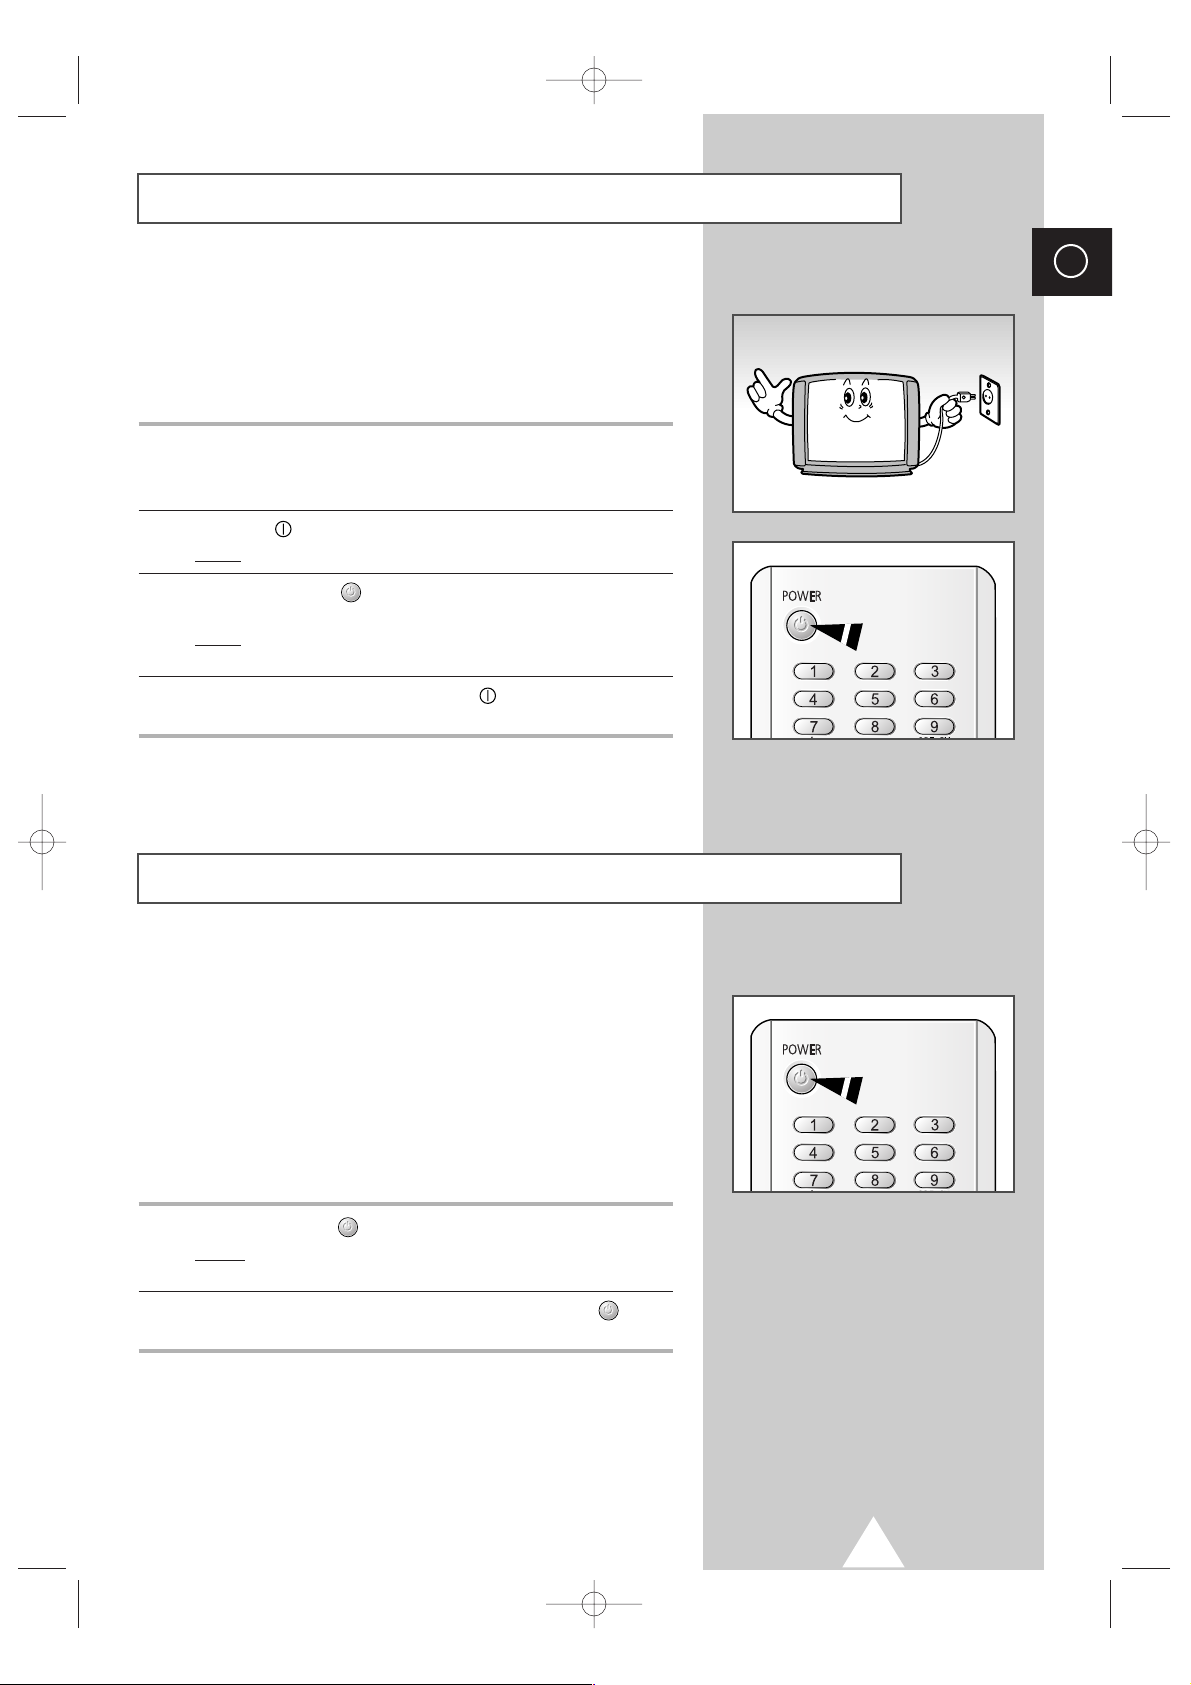
The mains lead is attached to the rear of the television.
☛
If you have purchased this television in the United
Kingdom, refer to page 38 for further instructions on
plug wiring.
1 Plug the mains lead into an appropriate socket.
➢
The main voltage is indicated on the rear of the TV set and
the frequency is 50 or 60Hz.
2 Press the “” (ON/OFF) button on the front of the television.
Result
: The Standby indicator lights up on the front panel.
3 Press the POWER ( ) button on the remote control to switch the
television on.
Result
: The programme that you were watching last is re-
selected automatically.
4 To switch your television off, press the “” (ON/OFF) button again
on the front of the television.
Placing Your Television in Standby mode
Your television can be placed in Standby mode, in order to reduce:
◆ Power consumption
◆ Wear of the cathode ray tube
The Standby mode can be useful when you wish to interrupt
viewing temporarily (during a meal, for example).
The television is placed automatically in Standby mode when you
turn it on.
1 Press the POWER ( ) button on the remote control.
Result:
The screen is turned off and the Standby indicator on
the front of the television lights up.
2 To switch the screen back on, simply press the POWER ( ) button
again on the remote control.
➣
Do not leave your television in standby mode for long
periods of time (when you are away on holiday, for example).
In this case, you should switch it off completely.
Switching Your Television On and Off
S56A_UI_ENG_EU 8/30/03 10:47 AM Page 11
12
ENG
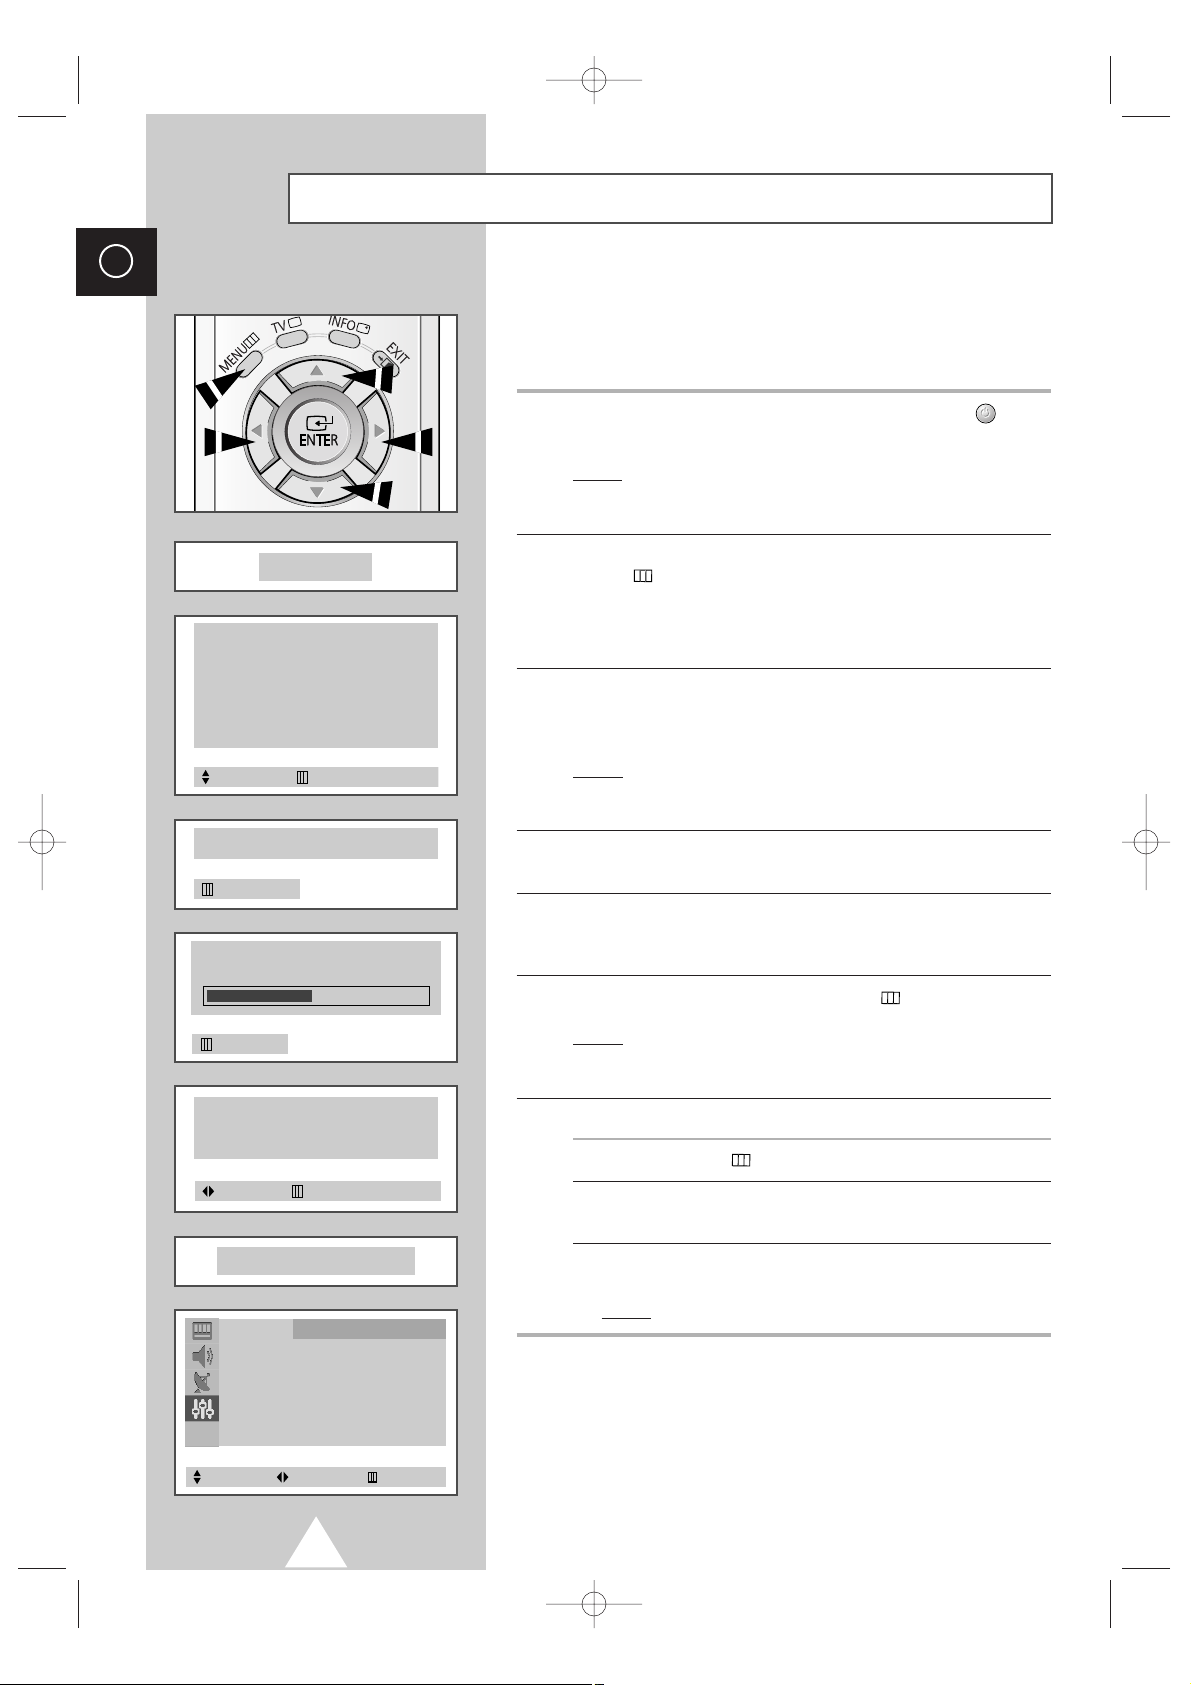
Plug & Play Feature (depending on the model)
When the television is initially powered ON, three basic customer
settings proceed automatically and subsequently: setting the
language, channel and clock.
1 If the television is in Standby mode, press the POWER ( ) button
on the remote control.
Result: The message
Plug & Play
is displayed. It flickers for a
little while and then the “Language” menu is automatically
displayed.
2 Press the ▲ or ▼ button to select required language. Press the
MENU
()
button to enter the language, and then the message
Ant. Input : Check
is displayed.
➣
If any language is not selected on the
Language
menu, the
“Language” menu will be displayed about 30 seconds later.
3 Make sure that the antenna is connected to the TV. And then press
the œ or √ button to store the channels (refer to “Storing the
Channels Automatically” on page 14).
Result: The horizontal bar is displayed, and then channels are
stored in an order which reflects their positions in the
frequency range.
4 When searching and storing is complete, the
Time
menu is
displayed.
5 Press the œ or √ button to move to the hour or minute. Set the
hour or minute by pressing the ▲ or ▼ button (refer to “Setting and
Displaying the Current Time” on page 31).
6 When you have finished, press the MENU ( ) button.
Result:
The message
ENJOY YOUR WATCHING
is displayed, and
then the channel which has been stored will be
activated.
7 If you want to reset this feature...
1 Press the MENU
()
button.
2 Press the ▲ or ▼ button to select the
Function
, and then
press the œ or √ button.
3 Select the
Plug & Play
by pressing the ▲ or ▼ button, and
then press the œ or √ button.
Result:
The message
Plug & Play
is displayed.
Function
Language : English
Time √
Plug & Play √
Blue Screen : Off
Child Lock
√
Demonstration √
Plug & Play
ENJOY YOUR WATCHING
Select Enter Exit
P 1
-- ---
471 MHz 48 %
Exit
Ant. Input : Check
Exit
Time
Clock 11 : 35
Move Exit
Language
English Português
Deusch Italiano
Français Sverige
Nederland Türkçe
Español
EППЛУИО¿
Adjust Select
S56A_UI_ENG_EU 8/30/03 10:47 AM Page 12
 Loading...