

Page 1
COLOR TELEVISION
1 2
CS29Z40/29Z45/29Z50
WS32Z40
Owner’s Instructions
Before operating, please read this manual thoroughly,
and retain it for future reference.
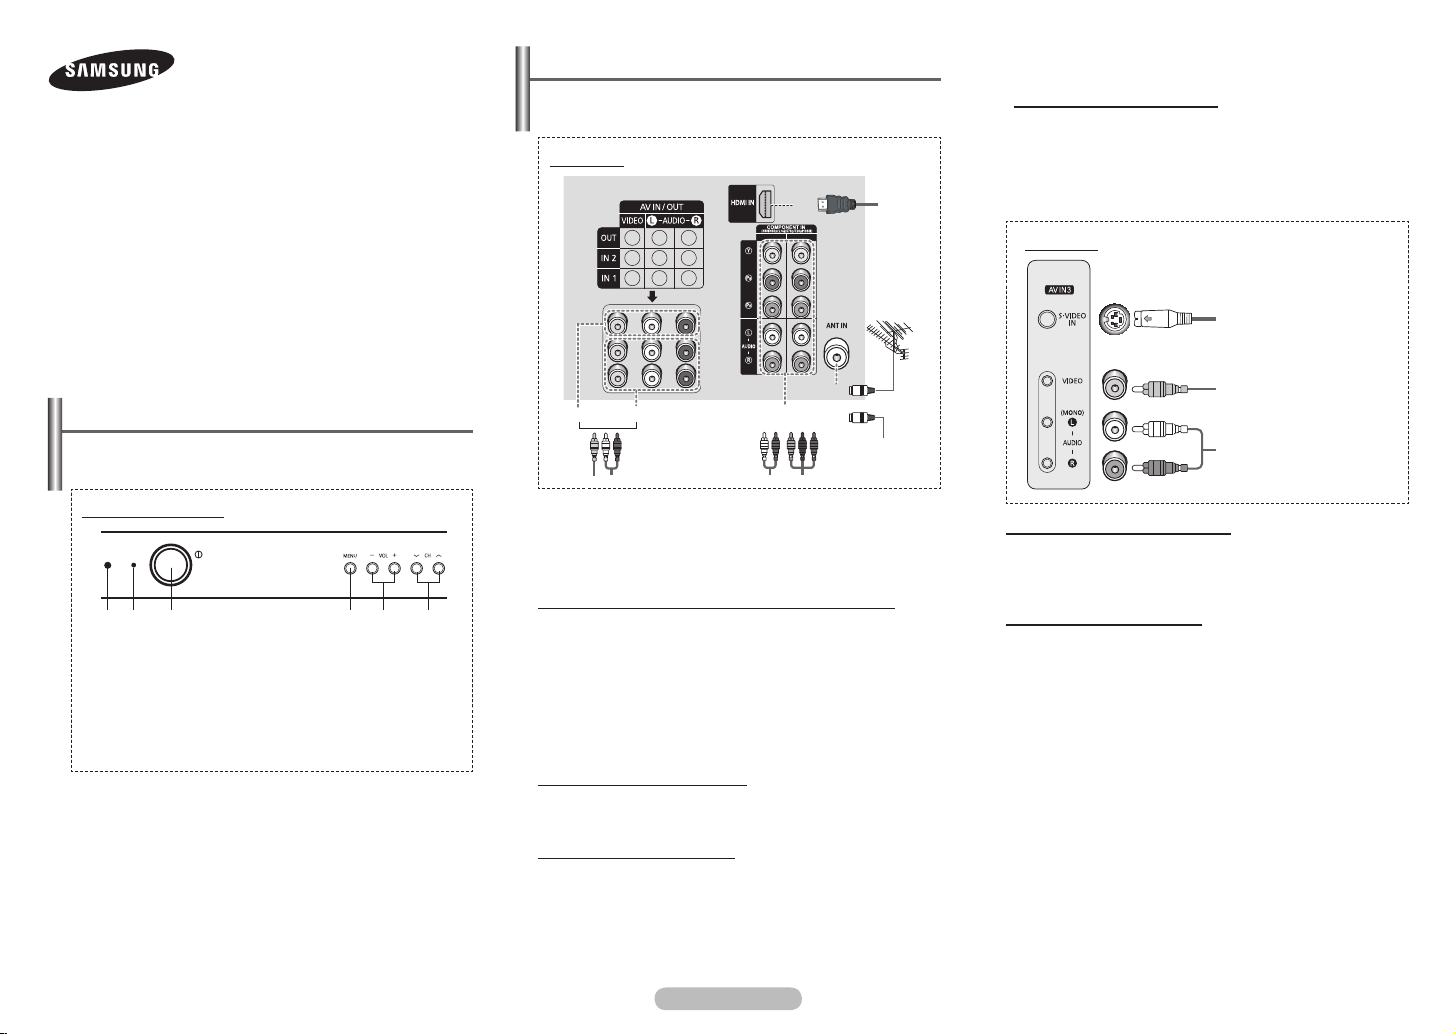
Connection Panel (depending on the model)
The product colour and shape may vary depending on the
➢
model.
Rear Panel
5
Connecting to the HDMI Input
The HDMI
output, such as a Set-Top Box, DVD player, AV receiver or
digital TV.
➢
5 connector is used for equipment with HDMI
No additional Audio connection is needed for an HDMI
to HDMI connection.
Side Panel
Register your product at www.samsung.com/global/register.
Record your Model and Serial number here for future reference.
▪ Model __________ ▪ Serial No. __________
Control Panel (depending on the model)
The product colour and shape may vary depending on the
➢
model.
Front (or Side) Panel
1 2 4 5 63
1 Remote control sensor
2 Standby indicator
3 Power on/off
4 On-screen menu display
5 Volume adjustment
6 Channel selection
You can use the 6 buttons to switch the TV on when it is
in standby mode depending on the model.
The 5 and 6 buttons also have the same function as the
◄/►/▲/▼ buttons on the remote control.
If the remote control no longer works or you have
misplaced it, you can use the controls on the panel of the
television.
1
2 3
Whenever you connect an audio or video system to your
☛
television, ensure that all elements are switched off.
Please be sure to match the colour coded input terminals
☛
and cable jacks.
Connecting to an Aerial or Cable Television Network
Connect the aerial or network input cable to the
coaxial socket).
To view television channels correctly, a signal must be
received by the set from one of the sources: an outdoor aerial,
cable television network, or satellite network.
If you are using an indoor aerial, you may need to adjust it
when tuning your television until you obtain a picture that is
both sharp and clear.
Connecting to the RCA Output
The RCA
2 connectors are used for equipment, such as a
recording VCR or audio system.
Connecting to the RCA Input
3 connectors are used for equipment, such as a
The RCA
VCR, DVD, decoder, satellite receiver, video game device, or
video disc player. (When using the mono equipment, connect
to the
AUDIO-L input connector.)
The RCA
4 connectors are used for equipment such as a
DVD with component output.
4
or
cable television
network
1 (75 Ω
Connecting to the S-VIDEO Input
The 1 (S-VIDEO IN) and 3 (AUDIO-L/R) connectors
are used for equipment with an S-Video output, such as a
camcorder or VCR.
Connecting to the RCA Input
The 3 (AUDIO-L/R) and 2 (VIDEO) connectors are used for
equipment, such as a camcorder, video disc player, or video
game device.
1
S-Video input
2
Video input
3
Audio input
English - 1
AA68-03903A-01
Page 2
2
1
2
1
2
1
2
1
2
1
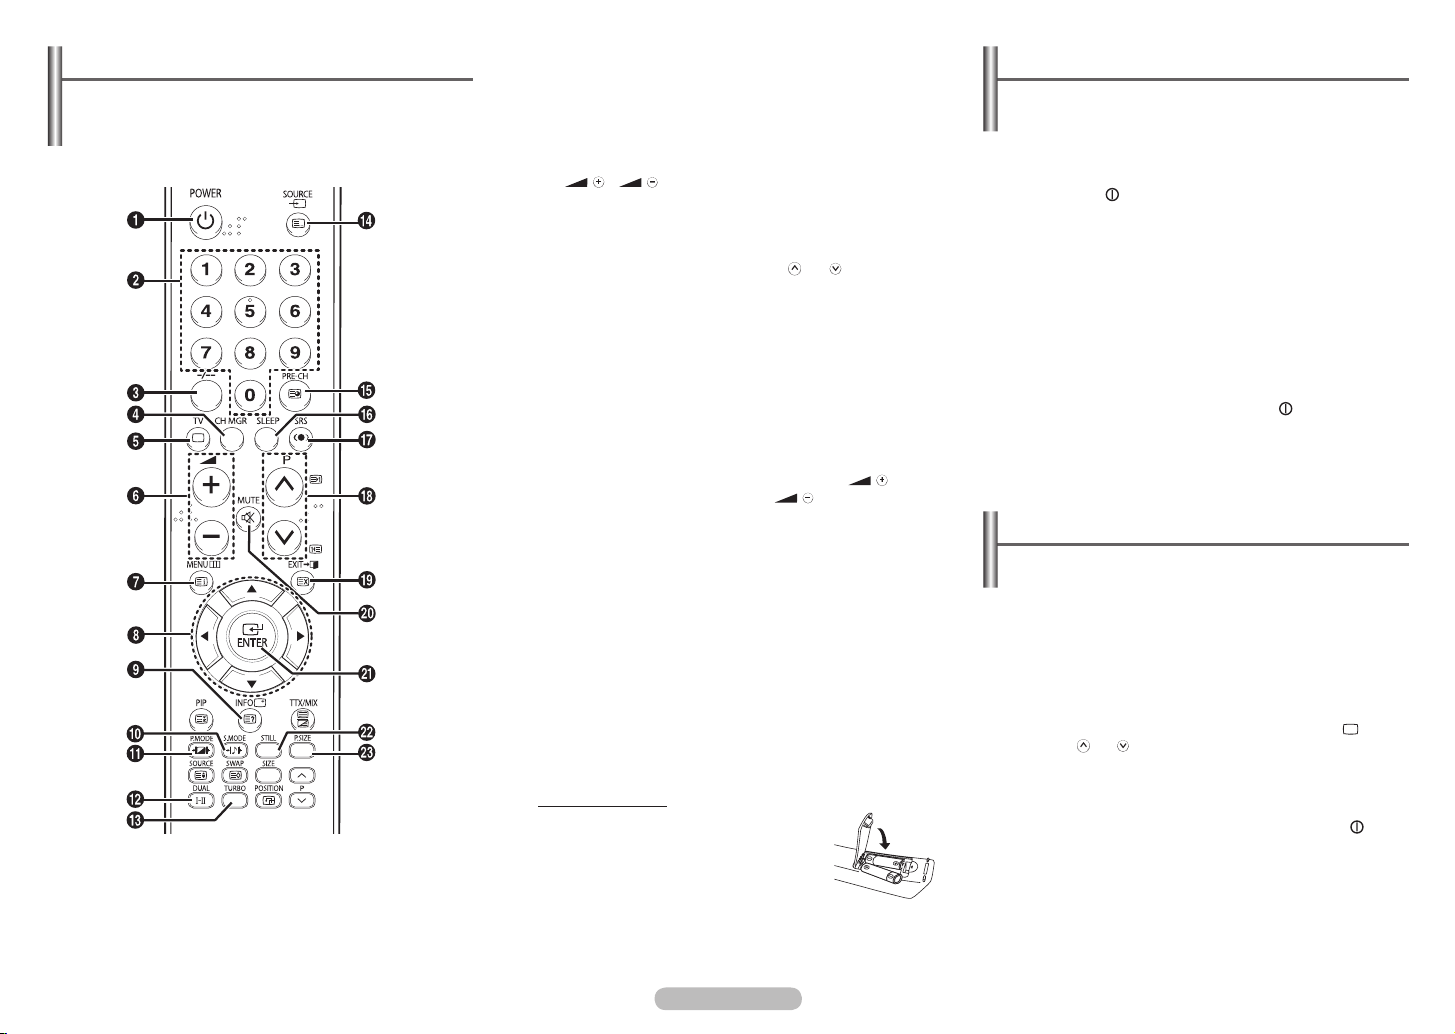
Remote Control (depending on the model)
Operation of remote control may be affected by bright
➢
artificial light near to the TV.
This is a special remote control for the visually impaired,
➢
and has Braille points on the POWER, Channel and
Volume buttons.
4 CH MGR
Used to display channel
lists on the screen.
5 TV
Used to return to the
TV mode when it is in
external input mode.
6
/
Used to increase or
decrease the volume.
7 MENU
Used to display the
on-screen menu or return
to the previous menu.
8 ▲/▼/◄/►
Used to control the
cursor in the menu.
9 INFO
Used to view the channel
information and setting
status you selected.
0 S.MODE
Used to select the sound
effect.
! P.MODE
Used to select the
picture effect.
@ DUAL I-II
Used to select the sound
mode.
# TURBO
Used to select the turbo
sound option.
$ SOURCE
Used to display all of the
available video sources.
% PRE-CH
Used to switch
repeatedly between
the last two channels
displayed.
^ SLEEP
Used to select a
preset time interval for
automatic turn off.
& SRS
Used to select the SRS
TruSurround XT mode.
* P / P
Used to display the
next or previous stored
channel.
( EXIT
Used to exit from any
display or return to
normal viewing.
) MUTE
Used to switch the sound
off temporarily. To turn
the sound back on, press
the MUTE,
button.
a ENTER
While using the
on-screen menus, press
the ENTER button to
activate (or change) a
particular item.
b STILL
Used to freeze the
current picture.
c P.SIZE
Used to change the
screen size.
, or
Switching the Television On and Off
The mains lead is attached to the rear of the television
1 Plug the mains lead into an appropriate socket.
The main voltage is indicated on the rear of the
➢
television and the frequency is 50 or 60Hz.
2 Press the “
television.
3 Press the POWER button on the remote control to switch
the television on. The programme that you were watching
last is re-selected automatically. If you have not yet stored
any channels, no clear picture appears. Refer to “Channel
- Auto Store” on page 3 or “Channel - Manual Store” on
page 4.
If the television is initially powered on, several basic
➢
4 To switch the television off, press the “
(On/Off) on the front of the television.
” button (On/Off) on the front of the
customer settings proceed automatically.
Refer to “Setup - Plug & Play” on page 3.
” button
Placing the Television in Standby Mode
The television can be placed in standby mode, in order to
reduce power consumption and wear of the cathode ray
tube. Standby mode can be useful when you wish to interrupt
viewing temporarily (during a meal, for example).
1 Press the POWER button on the remote control while
viewing.
The television is in standby mode.
2 To switch the television back on, simply press it again.
You can also switch on by pressing the TV (
➢
P
/ P , or numeric button.
),
1 POWER
Used to switch the TV on
and off.
2 Numeric buttons
Used to select channels
directly.
3 -/--
Used to select a channel
numbered ten or over.
Press this button, then
“--” symbol is displayed.
Enter the two-digit
channel number.
Installing Batteries
Remove the cover. Install two AAA size
batteries, then replace the cover.
When the remote control does not operate
normally, check that the “+” and “–” ends of
the batteries are inserted correctly or the
batteries are drained.
Do not mix battery types, i.e. alkaline and manganese.
➢
English - 2
Do not leave the television in standby mode for long
☛
periods of time (when you are away on holiday, for
example). Turn the television off by pressing the “
button (On/Off) on the front (or side) of the television. It is
best to unplug the set from the mains and aerial.
”
Page 3
English - 3
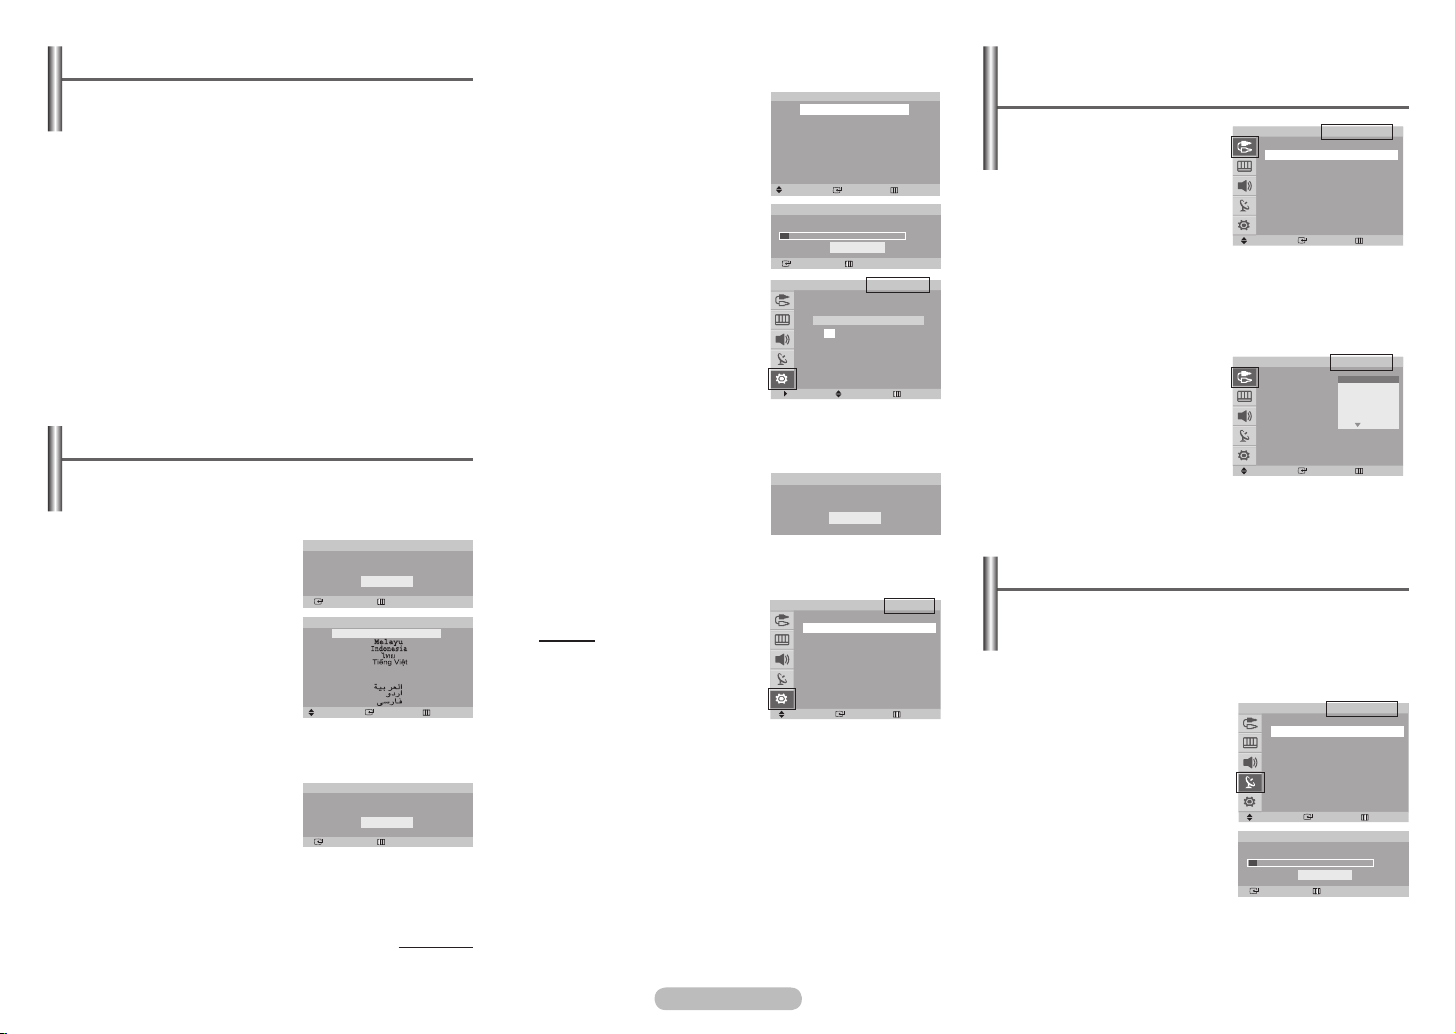
Viewing the Menus
1 Press the MENU button.
The main menu is displayed on the screen. Its left side has
five icons: Input, Picture, Sound, Channel, and Setup.
2 Press the ▲ or ▼ button to select one of the icons. Press
the ENTER button to access the icon’s sub-menu.
3 Press the ▲ or ▼ button to move to items in the menu.
Press the ENTER button to enter items in the menu.
4 Press the ▲/▼/◄/► button to change the selected items.
Press the MENU button to return to the previous menu.
5 Press the EXIT button to exit from the menu.
Setup - Plug & Play
When the television is initially powered on, several basic
customer settings proceed automatically and subsequently.
The following settings are available.
1 If the television is in standby
mode, press the POWER
button on the remote control.
The message Start Plug &
Play.
is displayed.
To start Plug & Play, press the
ENTER button.
The Language menu is
displayed.
The Language menu will
➢
automatically appear after
several seconds, even if the ENTER button is not
pressed.
2 Select the appropriated
language by pressing the
▲ or ▼ button. Press the
ENTER button.
The Check antenna input. is
displayed.
If any language is not selected, the language menu
➢
will disappear about 30 seconds later.
Plug & Play
Start Plug & Play
OK
Enter Return
Language
English
Français
Türkçe
Move Enter Skip
Plug & Play
Check antenna input.
Enter Skip
OK
continued...
3 Make sure that the antenna
is connected to the television
(refer to page 1).
Press the ENTER button.
The Area menu is displayed.
4 Press the ▲ or ▼ button to
select your country.
Press the ENTER button.
5 To search the channels, press
the ENTER button.
To stop the search, press the
ENTER button.
When the channel searching
has finished, the Clock Set
menu is displayed.
6 Press the ◄ or ► button to
move to the hour or minute.
Set the hour or minute by
pressing the ▲ or ▼ button.
7 When you have finished,
press the MENU button.
The Enjoy your watching
is displayed, and then the
channel which has been
stored will be activated.
Re-setting the Plug & Play
Method:
MENU
▲/▼ (Setup) ENTER
▲/▼ (Plug & Play) ENTER
Area
Asia/W.Europ
CIS/E.Europe
China
HONG KONG/UK
Australia
NZL/Indonesia
South Africa
America
Move Enter Skip
P 1 C - -
Enter Skip
T V
Move Adjust Skip
T V
Search
87 MHz
Stop
Clock Set
Hour Minute am/pm
-- -- am
Plug & Play
Enjoy your watching.
OK
Setup
Plug & Play ►
Language : English
Time ►
Blue Screen : On ►
Melody : On ►
Move Enter Return
10%
Input - (depending on the model) Source List / Edit Name
Source List
T V
You can switch between
viewing signal from
connected equipment, such
as a VCR, DVD, set-top box,
and the TV source (broadcast
or cable).
You can change the required external source simply
➢
by pressing the SOURCE button on the remote
Move Enter Return
control. It might take a short period of time for pictures
to be switched. To return to the TV mode, press the
TV button on the remote control.
Edit Name
T V
You can give a name to the
external source.
Move Enter Return
Source List
TV
AV1 : ---AV2 : ---AV3/S-Video : ---Component1 : ---Component2 : ---HDMI : ----
Edit Name
AV1 : ----
AV2 : ----
AV3 : ----
S-Video : ----
Component1 : ---Component2 : ---HDMI : ----
----
VCR
DVD
Cable STB
HD STB
Sat. STB
AV Receiver
Channel - Auto Store
You can scan for the frequency ranges available to you (and
availability depends on your country). Automatically allocated
programme numbers may not correspond to actual or desired
programme numbers. However you can sort numbers
manually and clear any channels you do not wish to watch.
Channels are sorted and stored
T V
in the order which reflects their
position in the frequency range
(with lowest first and highest last).
The programme originally selected
is then displayed.
To stop the search before it
➢
has finished, press the
ENTER
button.
When finished, the
Sort menu
is displayed. To sort the stored
Move Enter Return
P 1 C - -
Enter Return
channels into the desired numerical
order, refer to “Channel - Sort” on page 4.
To exit without sorting, press the
EXIT button.
Area : Asia/W.Europe
Search ►
Auto Store
►
Search
87 MHz
Stop
10%
Page 4

Channel - Manual Store
You can store channels, including
those received via cable networks.
When storing channels manually,
you can choose:
– Whether or not to store each of
the channels found
– The programme number of each
stored channel which you wish
to identify
Programme (Programme number to be assigned to a
channel)
Colour System: Auto / PAL / SECAM / NTSC4.43 /
NTSC3.58
Sound System: B/G / D/K / I / M
Channel (When you know the number of the channel to
be stored)
You can also select the channel number directly by
➢
pressing the numeric buttons (0~9).
Search (When you do not know the channel numbers)
The tuner scans the frequency range until the first channel
or the channel that you selected is received on the screen.
Store (When you store the channel and associated
programme number)
If there is no sound or abnormal sound, re-select the
➢
sound standard required.
Channel mode
☛
P (Programme mode): When completing tuning,
the broadcasting stations in your area have been
assigned to position numbers from P00 to P99.
You can select a channel by entering the position
number in this mode.
C (Air channel mode): You can select a channel
by entering the assigned number for each air
broadcasting station in this mode.
S (Cable channel mode): You can select a channel by
entering the assigned number for each cable channel
in this mode.
T V
Move Adjust Return
Manual Store
Programme : P 1
Colour System : Auto
Sound System : B/G ►
Channel : C-Search : 40 MHz
Store : ?
►
Channel - Channel Manager
You can exclude the channels you have
chosen from the channels you scanned.
When you scan through the stored
channels, those you have chosen to skip
are not displayed.
All of the channels that you do not
specifically choose to skip are displayed
during scanning.
It can be displayed simply by pressing the CH MGR
➢
(Channel Manager) button.
Method:
▲/▼ : Used to select a channel to be added or erased.
ENTER : Used to confirm the channel selected for adding or
erasing.
Channel Manager
P 1 C 4
1/15
Prog.
1 C 4
2 C- 3 S 1
4 S 3
5 S 6
6 S 8
7 S10
Add
Move Enter
Page Return
▲
▼
Channel - Sort
This operation allows you to
change the programme numbers
of stored channels.
This operation may be necessary
T V
From : P 1
To : P-Store : ?
after using auto store.
Move Adjust Return
From : Channel number to be changed.
To : New channel number to be identified.
Store : Confirmation the exchange of channel numbers.
Sort
Channel - Name
Channel names will be assigned
automatically when channel
information is broadcast.
These names can be changed,
allowing you to assign new
names.
Method:
▲/▼ : Used to select a letter or number.
◄/► : Used to move to the previous or next letter.
ENTER : Used to confirm the new name.
T V
Prog. Сh. Name
13 C21 А
14 C23 ----15 C25 ----16 C26 ----17 C28 -----
Move Adjust Return
▼
Channel - Fine Tune
If the reception is clear, you do not
have to fine-tune the channel, as
this is done automatically during
the search and store operation.
If however the signal is weak or
distorted, you may have to fine-tune the channel manually.
Method:
◄/►: You can obtain a sharp and clear picture and good
sound quality.
▲/▼ ENTER : You can reset the setting.
MENU : You can memorise adjusted picture or sound.
Fine Tune
P 2 *
Reset
Move
Adjust Return
Channel - LNA (depending on the model)
This function is very useful in the
situation that the TV is used in
weak signal.
LNA amplifies the
TV signal in the weak signal
area, but not noise.
T V
More
▲
Fine Tune
LNA : Off
Channel
Off
Name
+2
On
English - 4
Move Enter Return
LNA (Low Noise Amplifier) setting is to be made for each
channel. If the picture is noisy with the LNA set to On,
select Off.
Depending on areas, factory mode of LNA will be set up
as On or Off.
Page 5

English - 5
Setup - Time
Clock Set
You can set the television
clock so that the current time
is displayed when pressing
T V
Clock Set : -- : -- am ►
Sleep Timer : Off ►
On Timer : Off ►
Off Timer : Off ►
the INFO button on the
remote control. You must also
set the time if you wish to use
Move Enter Return
the automatic on or off timers.
When pressing the “
➢
the television, the clock setting will be reset.
” button (On/Off) on the front of
Sleep Timer
You can select a time period of between 30 and 180
minutes after which the television automatically switches
to standby mode.
You can select these options simply by pressing the
➢
SLEEP button on the remote control. If the sleep timer
is not yet set, Off is displayed. If it is already set, the
remaining time before which the television switches to
standby mode is displayed.
On Timer / Off Timer
You can set the On/Off timers so that the television will
switch on or off automatically at the time you select.
You must set the clock first.
☛
Auto Power Off
☛
When you set the timer “On”, the TV will eventually turn
off, if no controls are operated for 3 hours after the TV was
turned on by timer. This function is only available in timer
“On” mode and prevents overheating, which may occur if a
TV is on for too long.
Time
Setup Language / Blue Screen / Melody
Language
It is variable depending on
the model. When you start
using the television for the
first time, you must select the
T V
Plug & Play
Language : English
Time ►
Blue Screen : On ►
Melody : On ►
language which will be used
for displaying menus and
indications.
Move Adjust Return
Blue Screen
If no signal is being received or the signal is very weak,
a blue screen automatically replaces the noisy picture
background. If you wish to continue viewing the poor
picture, you must set the Blue Screen to Off.
Melody
You can hear melody sound when the television is
powered on or off.
Setup
Picture - Mode
Mode : Dynamic / Standard /
Movie / Custom
You can select the type
of picture which best
corresponds to your viewing
requirements.
You can select these
➢
options simply by
T V
Mode : Dynamic ►
Contrast : 90 ►
Brightness : 50 ►
Sharpness : 50 ►
Colour : 50 ►
▼ More
Move Enter Return
pressing the P.MODE button on the remote control.
Contrast / Brightness / Sharpness / Colour /
Tint
(NTSC only)
The television has several settings which allow you to
control the picture quality.
Colour Tone : Cool2 / Cool1 / Normal / Warm1 / Warm2
Reset
You can return to the factory defaults.
The reset function is set for each mode
(Dynamic, Standard, Movie, or Custom).
Mode
Picture - Size / Digital NR / DNIe/ Tilt / Film Mode
Size:
►
(depending on the model)
Nomal / Zoom1 / Zoom2
16:9 / Zoom1 / Zoom2 / 4:3
(Wide model)
You can select the picture size
which best corresponds to
T V
Mode : Dynamic
Size : 16:9 ►
Digital NR : On ►
DNIe : Off ►
Tilt : 0
▼ More
Move Enter Return
your viewing requirements.
It is variable depending on the model.
You can change the picture size simply by pressing
➢
the P.SIZE button on the remote control.
Digital NR
If the signal received by the television is weak, you can
activate this feature to reduce any static and ghosting that
may appear on the screen.
DNIe (depending on the model)
This feature bring you more detailed image with detail
enhancement, contrast enhancement and white
enhancement. New image compensation algorithm gives
brighter, clearer, much detailed image to you.
DNIe Jr technology will fit every signals into your eyes.
Tilt (depending on the model)
If you find that the picture received is slightly tilted to one
side, you can adjust the tilt setting (-7 to +7).
Film Mode
You can automatically sense and process film signals from
some sources and adjust the picture for optimum quality.
Not available in the Component or HDMI mode.
➢
Mode discrepancies, such as turning off
Mode while viewing a film source or turning on
Film Mode while viewing Non-film sources, may
affect the picture quality.
Picture
►
Film
Page 6

Picture - PIP (depending on the model)
You can display a sub picture within the main picture of TV
programme or external A/V devices such as VCR or DVD. In
this way you can watch TV program or monitor the video input
from any connected devices while watching TV or other video
input.
T V
More
▲
Film Mode : Off ►
PIP : Off ►
Move Enter Return
Picture
T V
PIP : On
Source : TV ►
Swap ►
Size : Large ►
Position :
Prog. : P 1
Move Enter Return
PIP: On/Off 1
You can activate or deactivate the PIP function.
Source 2
You can select a source of the sub-picture.
Depending on the models, the sub-picture can be
➢
viewed only when a source different from the main
picture's is selected. If a TV programme is viewed
on the main picture, the sub-picture is not available
for TV programmes. If a TV source is selected, the
message Not Available is displayed.
Swap 3
You can interchange the main picture and sub-picture.
Size: Large / Small / Double Window 4
You can select a size of the sub-picture.
Position: / / / 6
You can select a position of the sub-picture.
Prog. 5
You can select a channel of the sub-picture only when the
Source is set to TV.
Easy functions of the remote control
You can freeze the sub-picture.
PIP
►
►
Sound - Mode / Equalizer / SRS TSXT / Auto Volume / Turbo Sound / Pseudo Stereo
Mode: Standard / Music /
Movie / Speech / Custom
You can select the type of
special sound effect to be
used when watching a given
broadcast.
You can select these
➢
options simply by pressing
T V
Mode : Custom
Equalizer ►
SRS TSXT
Auto Volume : Off ►
Turbo Sound : Off ►
Pseudo Stereo : Off ►
Move Enter Return
the S.MODE button on the remote control.
Equalizer
The television has several settings which allow you to
control the sound quality.
If you make any changes to these settings, the sound
➢
mode is automatically switched to Custom.
SRS TSXT
TruSurround XT is a patented SRS technology that solves
the problem of playing 5.1 multichannel content over
two speakers. TruSurround delivers a compelling, virtual
surround sound experience through any two-speaker
playback system, including internal television speakers.
It is fully compatible with all multichannel formats.
You can select these options simply by pressing the
➢
SRS button.
TruSurround XT, SRS and ( )
☛
Symbol are trademarks of SRS Labs,
Inc. TruSurround XT technology is
incorporated under license from SRS Labs, Inc.
Auto Volume
Each broadcasting station has its own signal conditions,
and so it is not easy to adjust the volume every time the
channel is changed. This feature lets you automatically
adjust the volume of the desired channel by lowering the
sound output when the modulation signal is high or by
raising the sound output when the modulation signal is
low.
Turbo Sound
This feature suitably emphasizes both higher and lower
bands of sound (and includes other effects). You can enjoy
more magnificent and dynamic sound when watching
music, movie, or other channels.
You can change the options simply by pressing the
➢
TURBO button on the remote control.
Pseudo Stereo
This feature converts a monaural sound signal into two
identical left and right channels. Once the Pseudo Stereo
is set to On or Off, these settings apply to the sound
effects such as
Standard, Music, Movie, and Speech.
Sound
: Off ►
Selecting the Sound Mode
(depending on the model)
The DUAL I-II button displays/
controls the processing and
►
output of the audio signal. When
power is switched on, the mode is
automatically preset to either “Dual-I ” or “Stereo”, depending
on the current transmission.
NICAM Stereo
Type of broadcast On-screen indication
Regular broadcast
(Standard audio)
Regular +
NICAM Mono
NICAM Stereo
NICAM Dual-I/II
Mono
NICAM
Stereo
NICAM
Dual-I
NICAM
Mono
(Normal use)
↔
↔
Dual-II
↔
NICAM
Mono
(Normal)
Mono
(Normal)
↔
(Normal)
Mono
A2 Stereo
Type of broadcast On-screen indication
Regular broadcast
(Standard audio)
Bilingual or Dual-I/II
Dual-I
Stereo Stereo
If the receiving conditions deteriorate, listening will be
➢
easier if the mode is set to the Mono.
Mono
(Normal use)
↔
↔
(Forced mono)
Dual-II
Mono
If the stereo signal is weak and an automatic
switching occurs, then switch to the Mono.
When receiving a mono sound in the AV mode,
connect to the “AUDIO-L” input connector on the
panel (front or side). If the mono sound comes out
only from left speaker, press the DUAL I-II
button.
English - 6
Page 7

English - 7
2
1
2
1
2
1
2
1
2
1
2
1
2
1
Teletext Feature (depending on the model)
Troubleshooting
Most television stations provide written information services
via teletext. The index page of the teletext service gives you
information on how to use the service. In addition, you can
select various options to suit your requirements by using the
remote control buttons.
For teletext information to be displayed correctly, channel
☛
reception must be stable. Otherwise, information may be
missing or some pages may not be displayed.
Continued...
1
(index)
Used to display the index (contents) page at any time while
you are viewing teletext.
2
(reveal)
Used to display the hidden text (answers to quiz games,
for example). To display normal screen, press it again.
3
(hold)
Used to hold the display on a given page if the selected
page is linked with several secondary pages which follow
on automatically. To resume, press it again.
4
(size)
Press to display the double-size letters in the upper half of
the screen. For lower half of the screen, press it again. To
display normal screen, press it once again.
5
(store)
Used to store the teletext pages.
6
(mode)
Press to select the teletext mode (LIST/FLOF).
If you press it in the LIST mode, it switches into the List
save mode. In the List save mode, you can save teletext
page into list using the
7
(sub-page)
Used to display the available sub-page.
8
(page up)
Used to display the next teletext page.
9
(page down)
Used to display the previous teletext page.
0
(cancel)
Used to display the broadcast when searching for a page.
!
@ Colored buttons (red/green/yellow/blue)
(teletext on/mix)
Press to activate teletext mode after selecting the channel
providing the teletext service. Press it again to overlap the
teletext with the current broadcasting screen.
If the FASTEXT system is used by a broadcasting
company, the different topics covered on a teletext page
are colour-coded and can be selected by pressing the
coloured buttons. Press one of them corresponding to
the required. The page is displayed with other coloured
information that can be selected in the same way. To
display the previous or next page, press the corresponding
coloured button.
(store) button.
Before contacting the Samsung after-sales service, perform
the following simple checks. If you cannot solve the problem
using the instructions below, note the model and serial number
of the television and contact your local dealer.
No sound or picture
Check that the mains lead has been connected to a wall
socket.
Check that you have pressed the “
(On/Off) and the
Check the picture contrast and brightness settings.
Check the volume.
POWER button.
” button
Normal picture but no sound
Check the volume.
Check whether the volume MUTE button on the remote
control has been pressed.
No picture or black and white picture
Adjust the colour settings.
Check that the broadcast system selected is correct.
Sound and picture interference
Try to identify the electrical appliance that is affecting the
television, then move it further away.
Plug the television into a different mains socket.
Blurred or snowy picture, distorted sound
Check the direction, location and connections of your
aerial.
This interference often occurs due to the use of an indoor
aerial.
Remote control malfunctions
Replace the remote control batteries.
Clean the upper edge of the remote control (transmission
window).
Check that the “+” and “-” ends of the batteries are
inserted correctly.
Check that the batteries are drained.
Page 8

OSD Map
Input – Source List
– Edit Name ✽ – VCR / DVD / Cable STB / HD STB / Sat. STB / AV Receiver / DVD Receiver /
Game / Camcorder / DVD Combo / DHR (DVD HDD Recorder) / PC
Picture – Mode – Mode – Dynamic / Standard / Movie / Custom
– Contrast
– Brightness
– Sharpness
– Color
– Tint
– Color Tone – Cool2 / Cool1 / Normal / Warm1 / Warm2
– Reset
– Size ✽ – Nomal / Zoom1 / Zoom2
– 16:9 / Zoom1 / Zoom2 / 4:3 (Wide model)
– Digital NR – Off / On
– DNIe ✽ – Off / On / Demo
– Tilt ✽
– Film Mode – Off / On
– PIP ✽ – PIP – Off / On
– Source ✽
– Swap
– Size
– Position
– Prog.
Sound – Mode – Standard / Music / Movie / Speech / Custom
– Equalizer ✽
– SRS TSXT ✽ – Off / On
– Auto Volume ✽ – Off / On
– Turbo Sound ✽ – Off / On
– Pseudo Stereo ✽ – Off / On
Channel – Auto Store – Area – Asia/W.Europe / CIS/E.Europe / China / HONGKONG/UK /
Austraila / NZL/Indonesia / South Africa / America
– Search
– Manual Store – Programme
– Color System – Auto / PAL / SECAM / NTSC4.43 / NTSC3.58
– Sound System – B/G / D/K / I / M
– Channel
– Search
– Store
– Channel Manager
– Sort
– Name
– Fine Tune
– LNA
Setup – Plug & Play
– Language ✽
– Time – Clock Set
– Sleep Timer
– On Timer
– Off Timer
– Blue Screen – Off / On
– Melody – Off / On
✽
(NTSC only)
✽
✽
✽ : It is variable depending on the model.
Important Warranty Information Regarding Television Format Viewing
Standard screen format televisions (4:3, the aspect ratio of the
screen width to height) are primarily designed to view standard
format full-motion video. The images displayed on them should
primarily be in the standard 4:3 ratio format and constantly
moving. Displaying stationary graphics and images on screen,
such as the dark top and bottom letterbox bars (wide screen
pictures), should be limited to no more than 15% of the total
television viewing per week.
Wide screen format televisions (16:9, the aspect ratio of
the screen width to height) are primarily designed to view
wide screen format full-motion video. The images displayed
on them should primarily be in the wide screen 16:9 ratio
format, or expanded to fill the screen if your model offers this
feature, and constantly moving. Displaying stationary graphics
and images on screen, such as the dark side-bars on nonexpanded standard format television video and programming,
should be limited to no more than 15% of the total television
viewing per week.
Additionally, viewing other stationary images and text such as
stock market reports, video game displays, station logos, web
sites or computer graphics and patterns, should be limited as
described above for all televisions. Displaying any stationary
images that exceed the above guidelines can cause
uneven aging of picture tubes (CRTs) that leave subtle,
but permanent burned-in ghost images in the television
picture. To avoid this, vary the programming and images,
and primarily display full screen moving images, not
stationary patterns or dark bars. On television models that
offer picture sizing features, use these controls to view the
different formats as a full screen picture.
Be careful in the selection and duration of television formats
used for viewing. Uneven CRT aging as a result of format
selection and use, as well as other burned-in images, is not
covered by your Samsung limited warranty.
English - 8
 Loading...