

Samsung CJX-2000FW Series User Manual
User Guide • Benutzerhandbuch
Guide d’utilisation • Manuale per l’utente
Guía del usuario
ok
1
2
3
4
5
6
7
8
9
Wi
0
Fi
Color Inkjet Multifunction CJX-2000FW Series
All-in-One Printers • All-in-One Drucker • Imprimantes multifonctions
Stampanti multifunzione • Impresoras multifunción


SAMSUNG CJX-2000FW All-in-One Printer
Your SAMSUNG All-in-One Printer combines ease-of-use and affordable inks to provide
high-quality pictures and documents.
Resources
Support is available! Go to www.samsung.com/printer for:
■ answers to questions
■ software upgrades
■ and more!
If you prefer, you can chat online, send us an e-mail, or call for technical support.
Go to www.samsung.com/printer.
EN
i


Contact SAMSUNG worldwide
If you have any comments or questions regarding Samsung products, contact the
Samsung customer care center.
Country / Region Customer Care Center Web Site
FRANCE 01 48 63 00 00 www.samsung.com/printer
GERMANY
ITALY 800-SAMSUNG (726-7864) www.samsung.com/printer
01805 - SAMSUNG
(726-7864 € 0,14/min)
www.samsung.com/printer
EN
iii

ENGLISH
Contents
1 Printer Overview ........................................................................... 1
Components .............................................................................................1
Control panel ........................................................................................... 4
Print Manager Software ............................................................................ 6
Configuring printer settings ......................................................................6
Paper .......................................................................................................8
Paper types ........................................................................................................8
Paper sizes .........................................................................................................8
Loading paper ....................................................................................................9
2 Networking Your Printer ..............................................................13
Connecting to a wireless network ........................................................... 13
Before you connect ..........................................................................................13
Connecting to a wireless network using the Wi-Fi Setup Wizard ........................13
Setting up an IP address ...................................................................................18
Viewing the network configuration ...................................................................19
Printing the network configuration ...................................................................20
Changing the printer name ...............................................................................20
Adding a wireless network connection
to a USB-connected computer .................................................................21
Changing from USB to a wireless connection ....................................................21
iv
EN

Contents
3 Basic Functions ............................................................................23
Loading originals .................................................................................... 23
Using the scanner glass ....................................................................................23
Using the Automatic Document Feeder (ADF) ....................................................24
Printing .................................................................................................. 26
Printing documents ..........................................................................................26
Printing pictures ...............................................................................................28
Copying ................................................................................................. 38
Loading originals for copying ............................................................................38
Copying a document ........................................................................................38
Copying a photograph ......................................................................................44
Scanning ................................................................................................ 49
Before you begin scanning ...............................................................................49
Loading originals for scanning ..........................................................................60
Scanning from the computer .............................................................................60
Scanning from the control panel .......................................................................62
Scanning from the Online Printer Management Tool ..........................................65
Faxing .................................................................................................... 66
Before you begin faxing ....................................................................................66
Preparing a fax for transmission ........................................................................83
Sending a fax ...................................................................................................85
Receiving a fax .................................................................................................87
Printing fax reports ...........................................................................................88
Canceling a fax ................................................................................................90
Ordering supplies ...................................................................................90
ENGLISH
EN
v
ENGLISH
Contents
4 Maintaining Your Printer ..............................................................91
General care and cleaning ......................................................................92
Cleaning the scanner glass and document backing............................................92
Replacing ink cartridges ..........................................................................95
Updating the software and printer firmware .......................................... 100
Updating if your printer is connected to a computer with WINDOWS OS ..........100
Updating if your printer is connected to a computer with MAC OS ...................102
Monitoring and adjusting printer performance ....................................... 103
Checking ink levels .........................................................................................103
Resetting factory defaults ...............................................................................103
Replacing the printhead ........................................................................104
5 Troubleshooting .........................................................................111
Basic troubleshooting ........................................................................... 111
Status lights ......................................................................................... 116
Power light ...................................................................................................116
Wi-Fi connectivity LED ...................................................................................117
6 Product and Safety Specification ................................................119
Features and Specifications ................................................................... 119
Print performance ..........................................................................................119
Photo printing features ...................................................................................119
Copy document features .................................................................................120
Copy photo features .......................................................................................121
Scanning features ...........................................................................................122
Faxing features and specifications ...................................................................122
Paper input tray ..............................................................................................123
Automatic Document Feeder (ADF) for originals ..............................................123
vi
EN

Contents
Ink cartridges .................................................................................................123
Connectivity ...................................................................................................125
Software support ............................................................................................125
Physical specifications ....................................................................................126
System requirements ............................................................................127
Computer with WINDOWS OS ........................................................................127
Computer with MAC OS .................................................................................127
Paper types supported ....................................................................................128
Paper sizes supported .....................................................................................129
7 Safety Information .....................................................................131
Safety Information ................................................................................ 131
LCD Screen Safety ..........................................................................................134
Ink Cartridge Safety ........................................................................................134
Declaration of Conformity (European countries) ..................................... 135
Correct Disposal of This Product
(Waste Electrical & Electronic Equipment) .............................................. 137
ENERGY STAR® Qualified ....................................................................138
ENGLISH
EN
vii

1
This printer lets you print, copy, scan, and fax pictures and documents.
Printer Overview
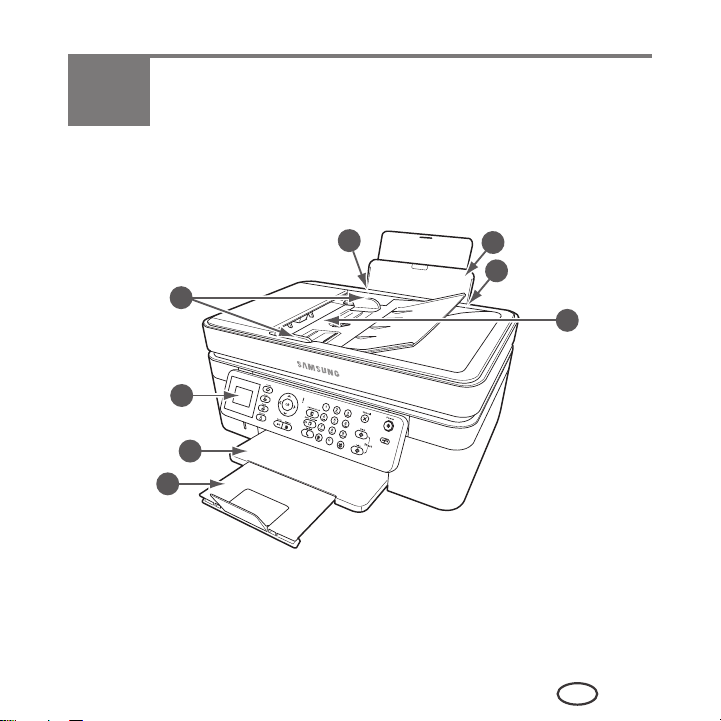
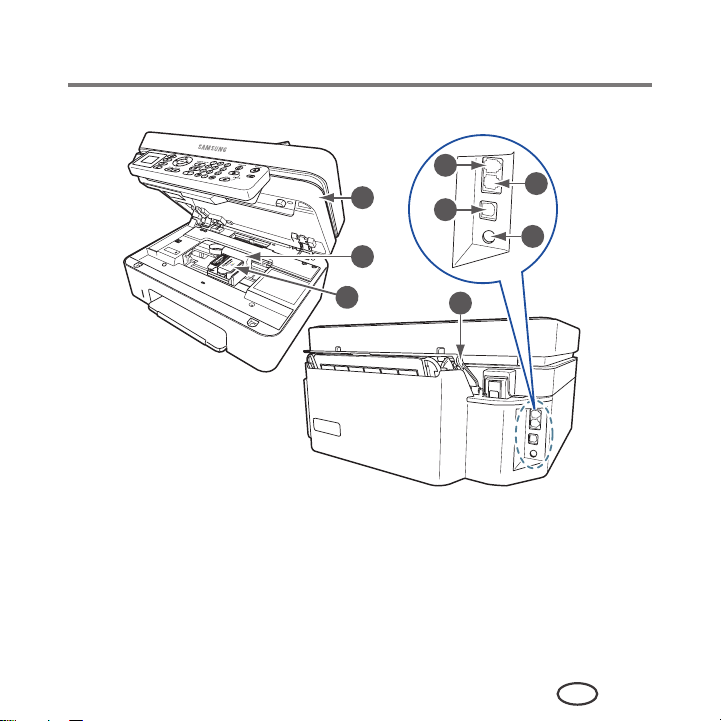
Components
4
3
1
7
8
5
6
2
1 Control panel
2 Automatic document feeder (ADF)
3 ADF paper-edge guides
4 Left paper-edge guide
5 Paper input tray
6 Right paper-edge guide
7 Output tray
8 Output tray extender
EN
1
Printer Overview
9
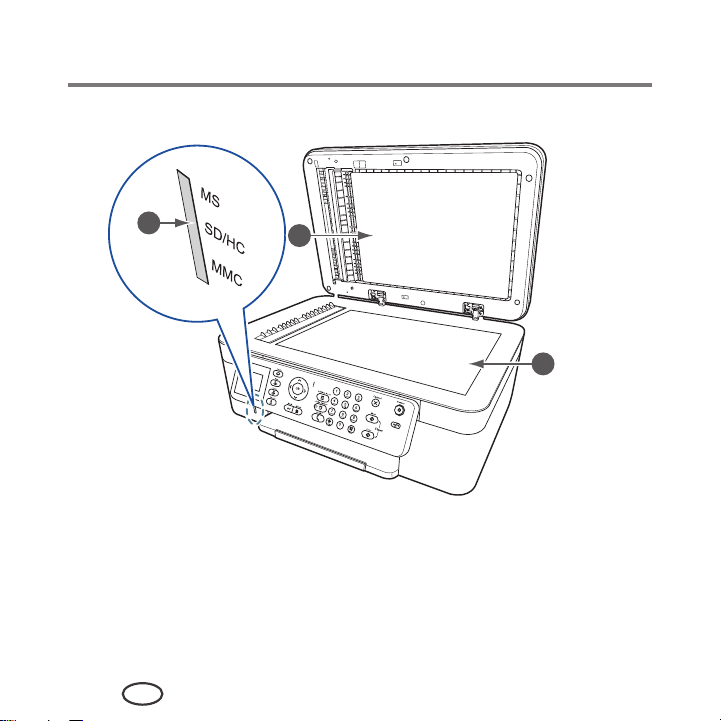
9 Memory card slot
10 Scanner lid
2
EN
10
11
11 Scanner glass
Printer Overview
210
12 Access door
13 Carriage
14 Printhead with ink cartridges installed
15 Paper guard
16
12
18
17
19
13
14
15
16 Line in phone port
17 Ext out phone port
18 USB port (for connecting to computer)
19 Power cord connection port
EN
3
Printer Overview
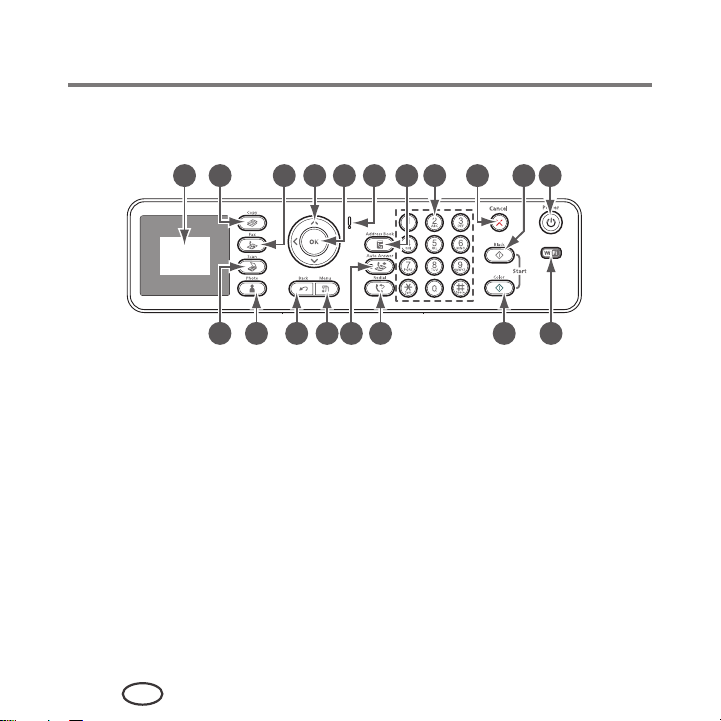
Control panel
1 4 11
2 93 105 6 7
Feature Description
1 LCD Displays pictures, messages, and menus
2 Copy button Displays the Copy Document menu
3 Fax button Lets you enter a phone number for sending a fax, or
4 Navigation buttons Used to navigate menus and scroll through pictures
5 OK button Selects a menu item, accepts a setting, or continues with
6 Attention light Blinks when an error occurs
7 Address Book Displays the phonebook of fax numbers; lets you enter or
4
EN
choose the Fax Options menu
the current operation
edit phone numbers
8
1213161718 141519

Printer Overview
Feature Description
8 Numeric keypad Used to dial a phone number or a Quick Dial number
for faxing; to enter information and Quick Dial settings
into the fax phonebook; to specify a quantity for making
copies; and to enter information for accessing a network
9 Cancel button Stops the current operation and returns to the menu;
clears certain errors to allow scanning or sending a fax
10 Start Black button Starts the selected print, copy, scan, or fax in black and white
11 Power button Turns the printer on or off
12 Wi-Fi connectivity
LED
When lit, signals that the printer is connected to a
wireless (Wi-Fi) network; blinks when searching for an
available Wi-Fi network or when the existing signal is too
weak to transmit or receive wireless signals
13 Start Color button Starts the selected print, copy, scan, or fax in color
14 Redial button Dials the last phone number dialed
15 Auto Answer button
/ LED
• Turns the fax auto answer feature on or off; when on,
the fax answers all incoming calls automatically
• Lights when the fax auto answer feature is on
16 Menu button Displays the main menu
17 Back button Displays the next higher screen in the menu structure
18 Photo button Displays the Print Photo Options menu
19 Scan button Displays the Scan Options menu
EN
5

Printer Overview
Print Manager Software
SAMSUNG Print Manager Software is installed with your SAMSUNG All-in-One Printer
Software unless you chose otherwise during installation. The Print Manager icon will
appear on your desktop.
On a computer with WINDOWS Operating System (OS), you can use Print Manager
Software to browse and edit pictures, print, copy, scan, order supplies, and configure your
all-in-one printer from your computer.
On a computer with MAC OS, you can use Print Manager Software to order supplies and
configure your printer from your computer.
Configuring printer settings
To set or change basic printer settings:
1
Press
Menu
.
2
Press to select
3
Press to select one of the following settings:
■
Date and Time
– Press OK, then press to select
– Press
changes.
– Press
Printer Settings
or to change the values; press OK when you are done making
Back
to go back to the Printer Settings menu.
, then press OK.
Year, Month, Day, Hour
, or
Minute
.
6
EN

Printer Overview
■
Time to Low Power
To conserve energy, your printer will enter a low power (sleep) mode after being
idle for a default delay time of 1 hour. You can increase the delay time to low
power (in 0.5 hour increments) up to 4 hours. Increasing the delay time may
result in reduced energy savings.
to change the time to energy-saving sleep mode (select from 1 to 4
– Press
hours in 0.5 hour increments).
■
Tagged Images Printing
– Press
to select
■
Language
– Press OK, press to select a language, then press OK.
■
Country/Region
– Press OK, press to select a country or region, then press OK.
■
Reset All Settings
NOTE: Resetting factory defaults does not change the date and time, language,
country/region, or network settings.
■
Printer Info
– Press OK to view the Firmware Version number; press OK when you are done.
4
Press
Back
to return to the Main Menu.
(see Printing tagged pictures, page 37)
Off
or On.
(see Resetting factory defaults, page 103)
EN
7

Printer Overview
Paper
For the best photo printing results, use KODAK Photo Papers, which are optimized to
work with SAMSUNG All-in-One Printers.
For the best document printing results, use KODAK Document Papers or a paper with the
COLORLOK Technology logo on the package. Use only paper that is designed for inkjet
printers.
Paper types
You can print on:
■ Plain paper — 16 to 24 lb / 60 to 90 gsm
■ Photo paper — up to 12 mils / 290 gsm
■ Card stock — 110 lb / 200 gsm, max
■ Envelopes — most standard types
■ Labels — all commercially available inkjet varieties on 8.5 x 11-in. or A4 sheets
■ Iron-on transfers — all inkjet varieties on 8.5 x 11-in. or A4 sheets
■ Transparencies — inkjet variety with white stripe on short edge
Paper sizes
You can print on the following paper sizes:
Minimum size Maximum size
English units
Metric units
4 x 6 in. 8.5 x 14 in.
10 x 15 cm 22 x 36 cm
8
EN
Printer Overview
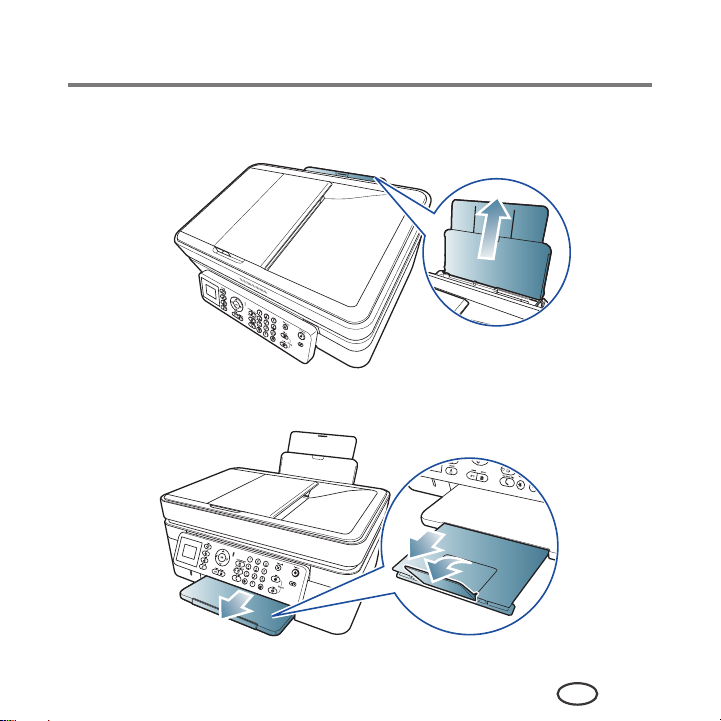
Loading paper
1
Lift the input tray.
2
Pull out the paper output tray and the extender until they are fully extended.
EN
9
Printer Overview
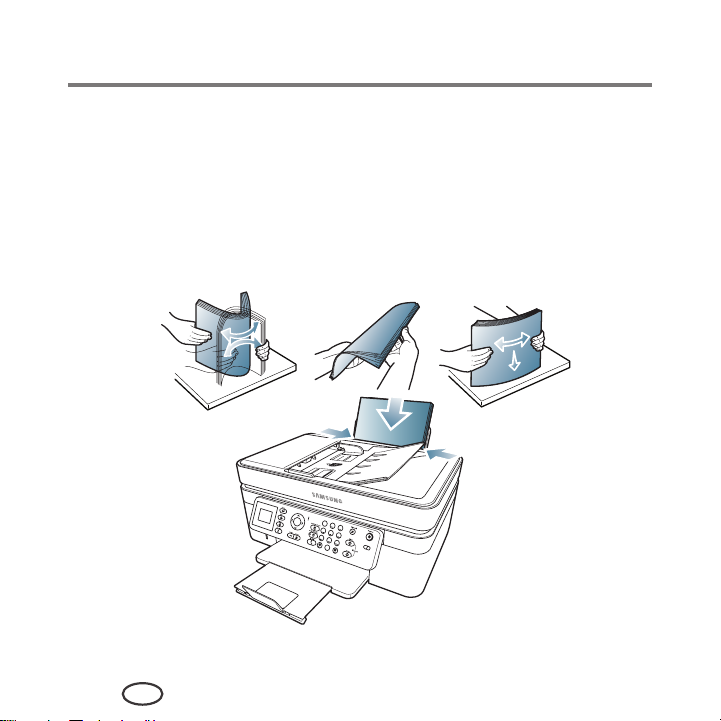
Loading plain paper
The input paper tray capacity is 150 sheets of plain paper.
To load plain paper:
1
Fan and stack the paper.
2
Make sure the left and right paper-edge guides are to the far left and far right, then
insert the paper (short side first) into the input tray.
3
Move the paper-edge guides until they touch the paper.
ok
1
2
3
4
5
6
7
8
9
Wi
0
Fi
10
EN

Loading photo paper
The input paper tray capacity is 20 sheets of photo paper.
To load photo paper:
1
Remove any paper from the input tray.
2
Insert the paper (short side first) into the input tray with the
toward the tray
IMPORTANT:
3
Move the paper-edge guides until they touch the paper.
and the
glossy side toward you
If the photo paper is loaded the wrong way, the image quality will be
affected.
Printer Overview
logo side facing
.
EN
11


Networking Your Printer
2
This section explains how to configure your wireless network settings.
Networking Your Printer
Connecting to a wireless network
To connect your printer to an 802.11b/g/n wireless (Wi-Fi) network, refer to the following
information.
Before you connect
You need:
■ a wireless router.
■ to determine whether your wireless router supports Wi-Fi Protected Setup (WPS).
NOTE: If you have specific questions about your router, see your router manufacturer’s
documentation for more information.
Connecting to a wireless network using the Wi-Fi Setup Wizard
You can use the Wi-Fi Setup Wizard on the printer to connect to your wireless network.
Read the following procedures and use the one that is appropriate for your network
setup.
EN
13
Networking Your Printer
Connecting to a non-WPS wireless router
To connect your printer to your wireless network, you need to know the network name,
also called the Service Set Identifier (SSID). You can obtain your network name from the
wireless router.
If your network has security enabled, you also need to know the Security String
(passphrase or password).
Record your network information in the spaces below, using the correct uppercase and
lowercase letters.
Network Name (SSID): _______________________________________________
Security String (case-sensitive): _________________________________________
1
Press
Menu
.
2
Press to select
3
With
Wi-Fi Setup Wizard
NOTE: The Wi-Fi radio turns on when you select Wi-Fi Setup Wizard.
The Wi-Fi connectivity LED blinks as the printer searches for available wireless
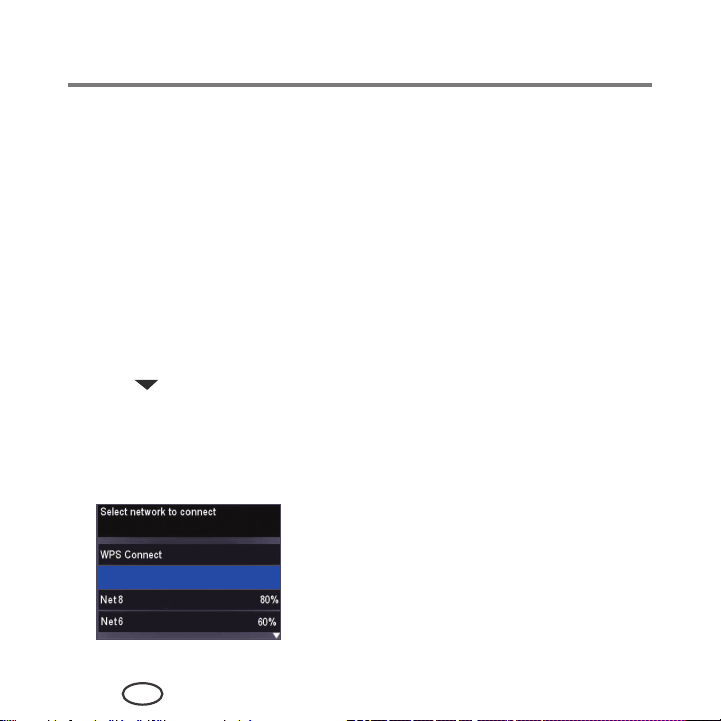
networks within range, then displays the list in order of signal strength. For example:
Network1 100%
Network Settings
selected, press OK.
, then press OK.
14
EN
Networking Your Printer
Rescan for Wireless Networks, then press OK.
is turned on and within range. If the name of your network is still not
listed, go to www.kodak.com/go/inkjetnetworking for more information.
On the control panel, press , , or
to select the letters and numbers, using the
correct uppercase and lowercase letters.
Press OK after each character. When you are
finished, select DONE, then press OK
If there are more networks than can be shown on the LCD, a (page down) symbol
appears in the bottom right of the display.
4
Press to select your network, then press OK.
If you don’t see your network in the list, or if you want to change your network,
select
Rescan for Wireless Networks
, then press OK.
NOTE: If the name of your network is not listed, make sure your wireless router is turned
on and within range.
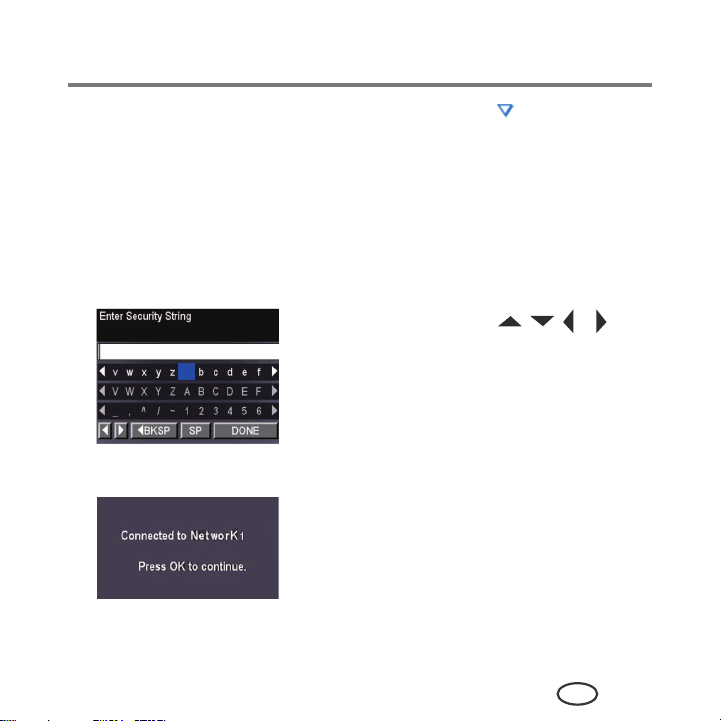
5
If your network requires a password, use the LCD keyboard to enter your Security
String.
a
6
When the confirmation message appears, press OK.
On the control panel, press
select the letters and numbers, using the correct
uppercase and lowercase letters. Press
each character. When you are done, select
DONE
, then press OK.
, , or to
OK
When the printer is successfully connected, the Wi-Fi connectivity LED will stop
blinking and stay on steadily.
after
EN
15

Networking Your Printer
The printer with a wireless connection is listed as the name of the printer plus a
number (for example, Samsung CJX-2000FW+0034).
Connecting to a WPS wireless router
If your router supports Wi-Fi Protected Setup (WPS), you can use WPS Connect. WPS lets
you configure your printer for a wireless network by pressing buttons or entering a PIN.
To connect to a network using WPS:
1
Press
Menu
.
2
Press to select
3
With
Wi-Fi Setup Wizard
NOTE: The Wi-Fi radio turns on automatically when you select Wi-Fi Setup Wizard.
4
With
WPS Connect
WPS Connect
5
Select one of two methods of connecting:
IMPORTANT
: Before you press OK on the printer, make sure you know where the
router’s push button is, or where to enter the generated PIN. If necessary,
consult your Internet service provider or router device manufacturer’s
documentation for more information.
Network Settings
selected, press OK.
selected, press OK.
, then press OK.
16
EN
Networking Your Printer
KODAK ESP C315 All-in-One Printer
IMPORTANT: Before you press OK on the printer, make sure you know where the
router's push button is, or where to enter the generated PIN. If
necessary, consult your Internet service provider or router device
manufacturer’s documentation for more information.
Pressing a button Entering a PIN
NOTE: You will have two minutes to
press or select the WPS button.
It may be a button on the device
or a virtual button in the device’s
software.
a. With Push Button Configuration
selected, press OK.
b. Press or select the WPS button for
your wireless router.
a. Press to select Generate
WPS PIN, then press OK.
b. In your wireless router’s software,
locate the PIN screen.
c. Enter the PIN you received on the
LCD into the PIN screen.
Pressing a button Entering a PIN
NOTE: You will have two minutes to
press or select the WPS button.
It may be a button on the device
or a virtual button in the device’s
software.
a
With
4
When the confirmation message appears, press OK.
When the printer is successfully connected, the Wi-Fi connectivity LED stops blinking
and stays on steadily.
Push Button Configuration
selected, press
b
Press or select the WPS button for
OK
.
your wireless router.
a
Press to select
PIN
, then press OK.
b
In your wireless router’s software,
locate the PIN screen.
c
Enter the PIN you received on the
LCD into the PIN screen.
The printer with a wireless connection is listed as the name of the printer plus a
number (for example, Samsung CJX-2000FW+0034).
Generate WPS
EN
17
Networking Your Printer
Setting up an IP address
MPORTANT
All IP address entries have the following format: 000.000.000.000. Within each threedigit grouping, the number must be right-justified. If an address or subnet mask has only
one or two characters between the periods, include one or two leading zeros in front of
that number. For example:
The address as it may appear in
your documentation
149.89.138.149 149.089.138.149
149.2.40.149 149.002.040.149
To set up your IP address on the printer:
1
2
3
4
18
: You should only need to set up an IP address for your printer if you are
having a problem with connecting. Typically, it is not necessary to set up an
IP address. This procedure is for advanced users who know how to obtain
the IP address for the printer.
How to enter the address in the
printer menu
Press
Menu
.
Press to select
Press to select
Press OK again to continue.
EN
Network Settings
Advanced IP Address Setup
, then press OK.
, then press OK.

Networking Your Printer
5
Select one of the following, then press OK:
■
Dynamic (DHCP)
■
Manual (Static)
6
If you selected
Mask, a Gateway Address, and a DNS Server address. Press
the navigation buttons to enter each digit of the numbers.
Consult your Internet service provider or network administrator for more information.
Manual (Static)
, you are prompted to enter an IP address, a Subnet
OK
after each entry. Use
Viewing the network configuration
To view the network configuration and verify that you are connected to your wireless
network:
1
Press
Menu
.
2
Press to select
3
Press to select
The wireless or Ethernet network settings appear on the LCD, including:
■ Printer Hostname
■ Connection
■ Speed
■ IP Address
■ IP Address Type
■ Network Subnet
■ Connected Network SSID
■ Security
Network Settings
View Network Configuration
, then press OK.
, then press OK.
EN
19

Networking Your Printer
■ Authentication
■ Channel
■ Region
■ Radio (on/off)
■ MAC Address
If the printer is connected to your network, you will see the network name and the
word CONNECTED.
4
To scroll through the information, press .
5
When you are done, press OK.
Printing the network configuration
To print the current network configuration:
1
Load plain paper into the printer. (see Loading plain paper, page 10)
2
Press
Menu
.
3
Press to select
4
Press to select
Network Settings
Print Network Configuration
, then press OK.
, then press OK.
Changing the printer name
When the Online Printer Management Tool is displayed in the browser:
1
Select the
2
Click
3
Highlight the text in the
Network
General
tab.
, then
Friendly name
Friendly name
, if necessary.
field and type the name you want, then click
Save
.
20
EN
 Loading...