

Samsung CH052, CH070 Service Manual
CASSETTETYPEAIR CONDITIONER
INDOOR UNIT
CH052EAM
CH070EAM
SERVICE
OUTDOOR UNIT
UH052EAMT
UH070EAMT
Manual
CONTENTSAIR CONDITIONER
1. Product Specifications
2. Disassembly and Reassembly
3. Refrigerating Cycle Diagram
4. Set Up the Model Option
Control Specification & Troubleshooting
5.
6. Exploded Views and Parts List
7. Block Diagram
8. Wiring Diagram
9. Schematic Diagram
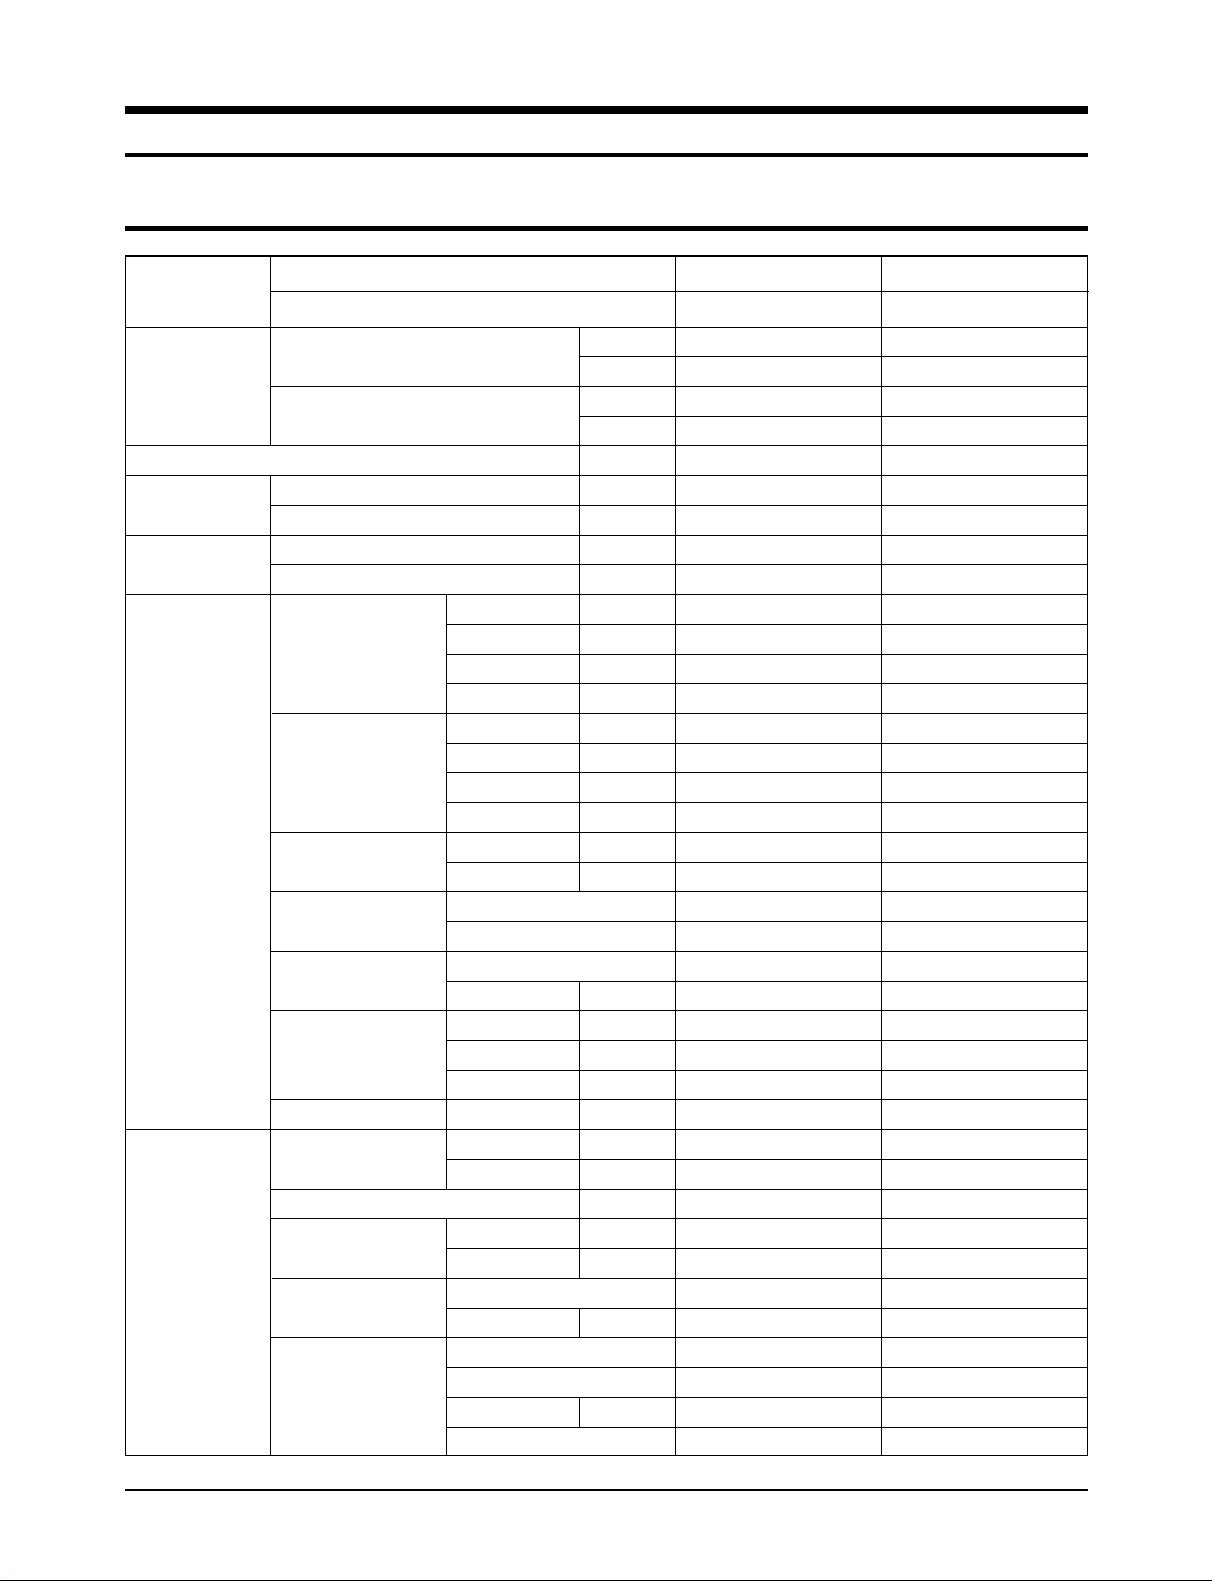
1. Product Specifications
1-1 Table
MODEL
Capacity
Power Input
Running
Current
Indoor Unit
Outdoor Unit
INDOOR UNIT
OUTDOOR UNIT
Cooling
Heating
Power Supply
Cooling W
Heating W
Cooling A
Heating A
H.H r.p.m
Fan Speed
Air Flow
Noise Level(Hi)
(Sound Pressure)
Heat Exchanger
Fan
Dimensions W mm
Weight Net / Gross kg
Fan Speed
Air Flow(Hi)
Noise Level
(Sound Pressure)
Fan
Compressor
Hi r.p.m
Mid r.p.m
Low r.p.m
H.H m
Hi m
Mid m3/min
Low m
Cooling(Hi) dB(A)
Heating(Hi) dB(A)
Type
Row x Stages x Fin pitch
Type
Motor Output W
Hmm
Dmm
Hi r.p.m
Low r.p.m
Cooling(Hi) dB(A)
Heating(Hi) dB(A)
Type
Motor Output W
Type
Model
Motor Output kW
Protection
BTU/h
W
BTU/h
W
ø/V/Hz
3
/min
3
/min
3
/min
3
m
/min
CH052EAM
UH052EAMT
18,700 23,800
5,500 7,000
20,400 26,100
6,000 7,700
1/220 ~ 240/50 1/220 ~ 240/50
1,700 2,400
1,800 2,400
7.5 10.6
7.9 10.6
-340 430
300 330
260 230
--
14 17
12 14
11 11
32 37
32 37
Slit Slit
2 x 8 x 1.4mm 2 x 8 x 1.4mm
Turbo Turbo
9.8 20
230 230
840 840
840 840
26 / 31 26 / 31
750 850
400 340
45 51
60 60
61 61
Propeller Propeller
60 73
Rotary Rotary
NN21VBAMT NN29VACMT
1.3 1.9
Internal Internal
CH070EAM
UH070EAMT
1Samsung Electronics
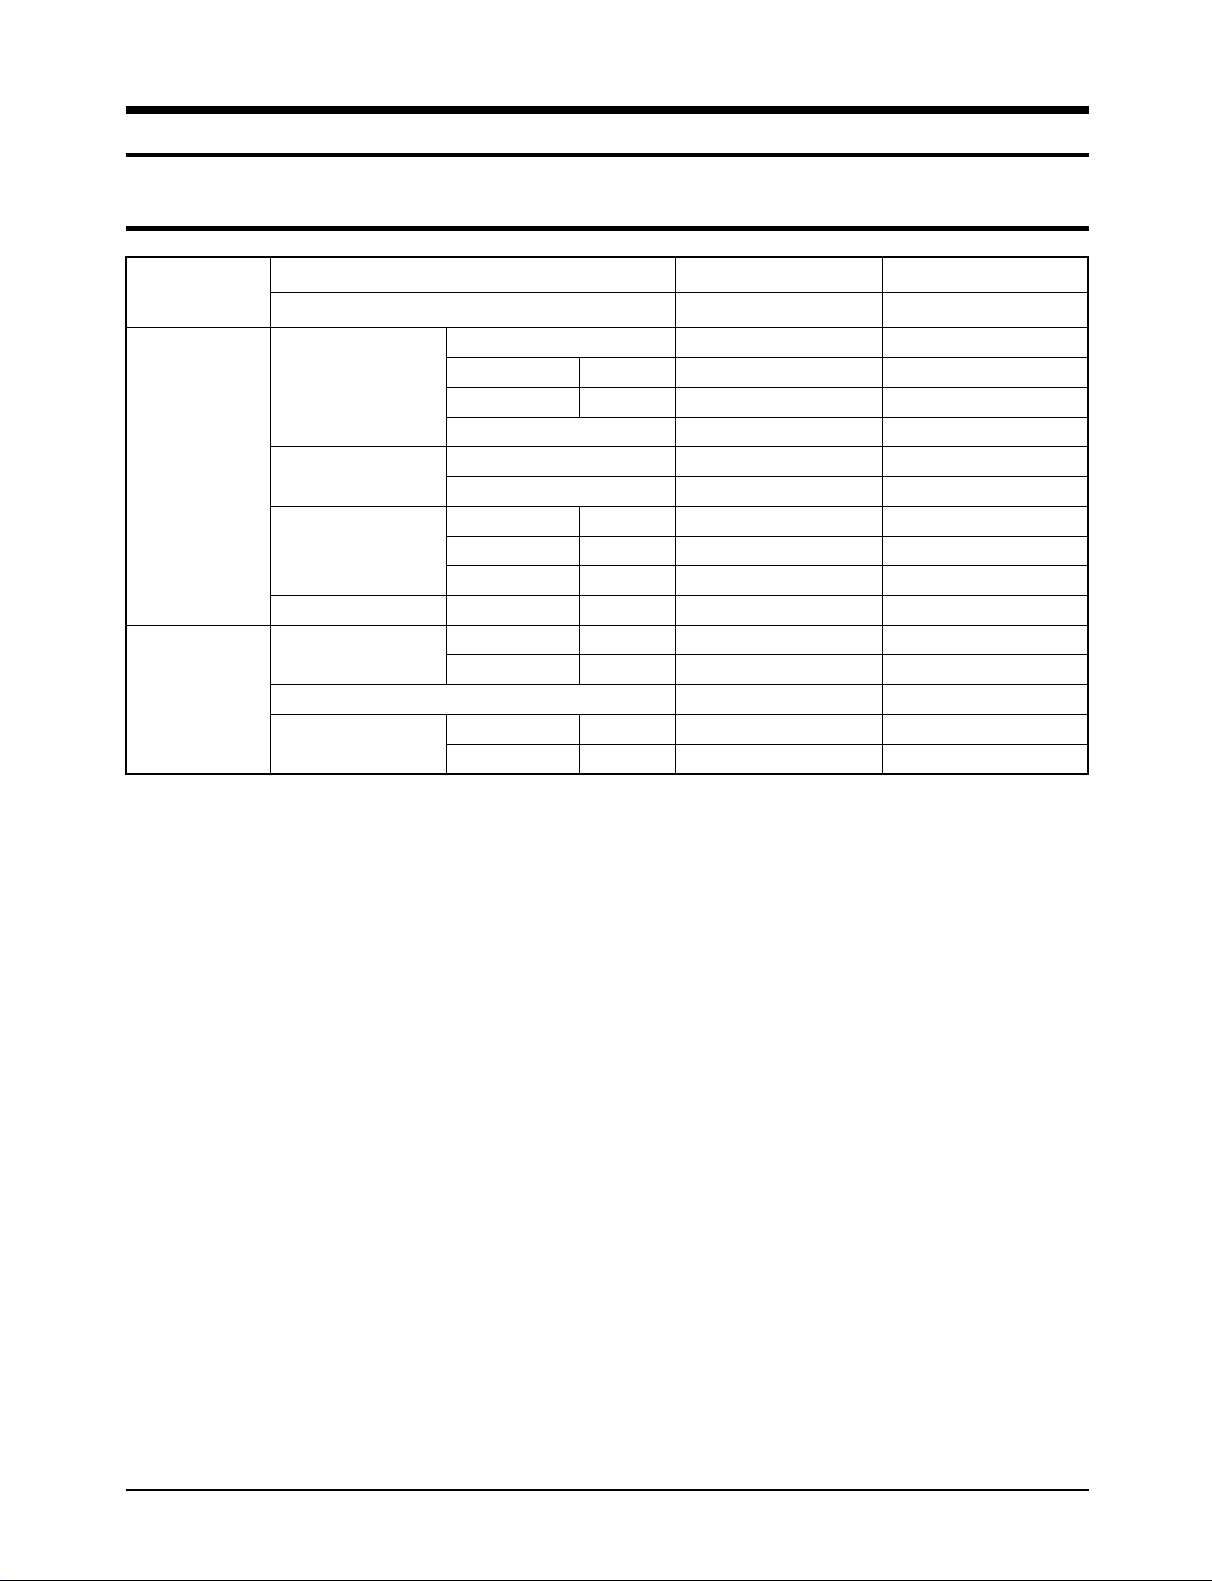
Table(cont.)
MODEL
Outdoor Unit
Piping
INDOOR UNIT
OUTDOOR UNIT
Type
Refrigerant
Heat Exchanger
Dimensions W mm
Weight Net / Gross kg
Pipe O.D Size
Connection Method
Between
Charge g
Adding Charge g / m
Control
Type
Row x Stages x Fin pitch
H mm
Dmm
Liquid mm(inch)
Gas mm(inch)
Height m
Pipe Length m
CH052EAM
UH052EAMT
R410A R410A
1,550 1,650
30 35
Elec.Expansion Valve Elec.Expansion Valve
Slit Slit
2 x 28 x 1.5 2 x 28 x 1.5
648 648
880 880
310 310
67 / 72 69 / 74
6.35(1/4") 6.35(1/4")
12.7(1/2") 15.88(5/8")
Flare Flare
Max.15 Max.15
Max.30 Max.30
CH070EAM
UH070EAMT
Samsung Electronics2
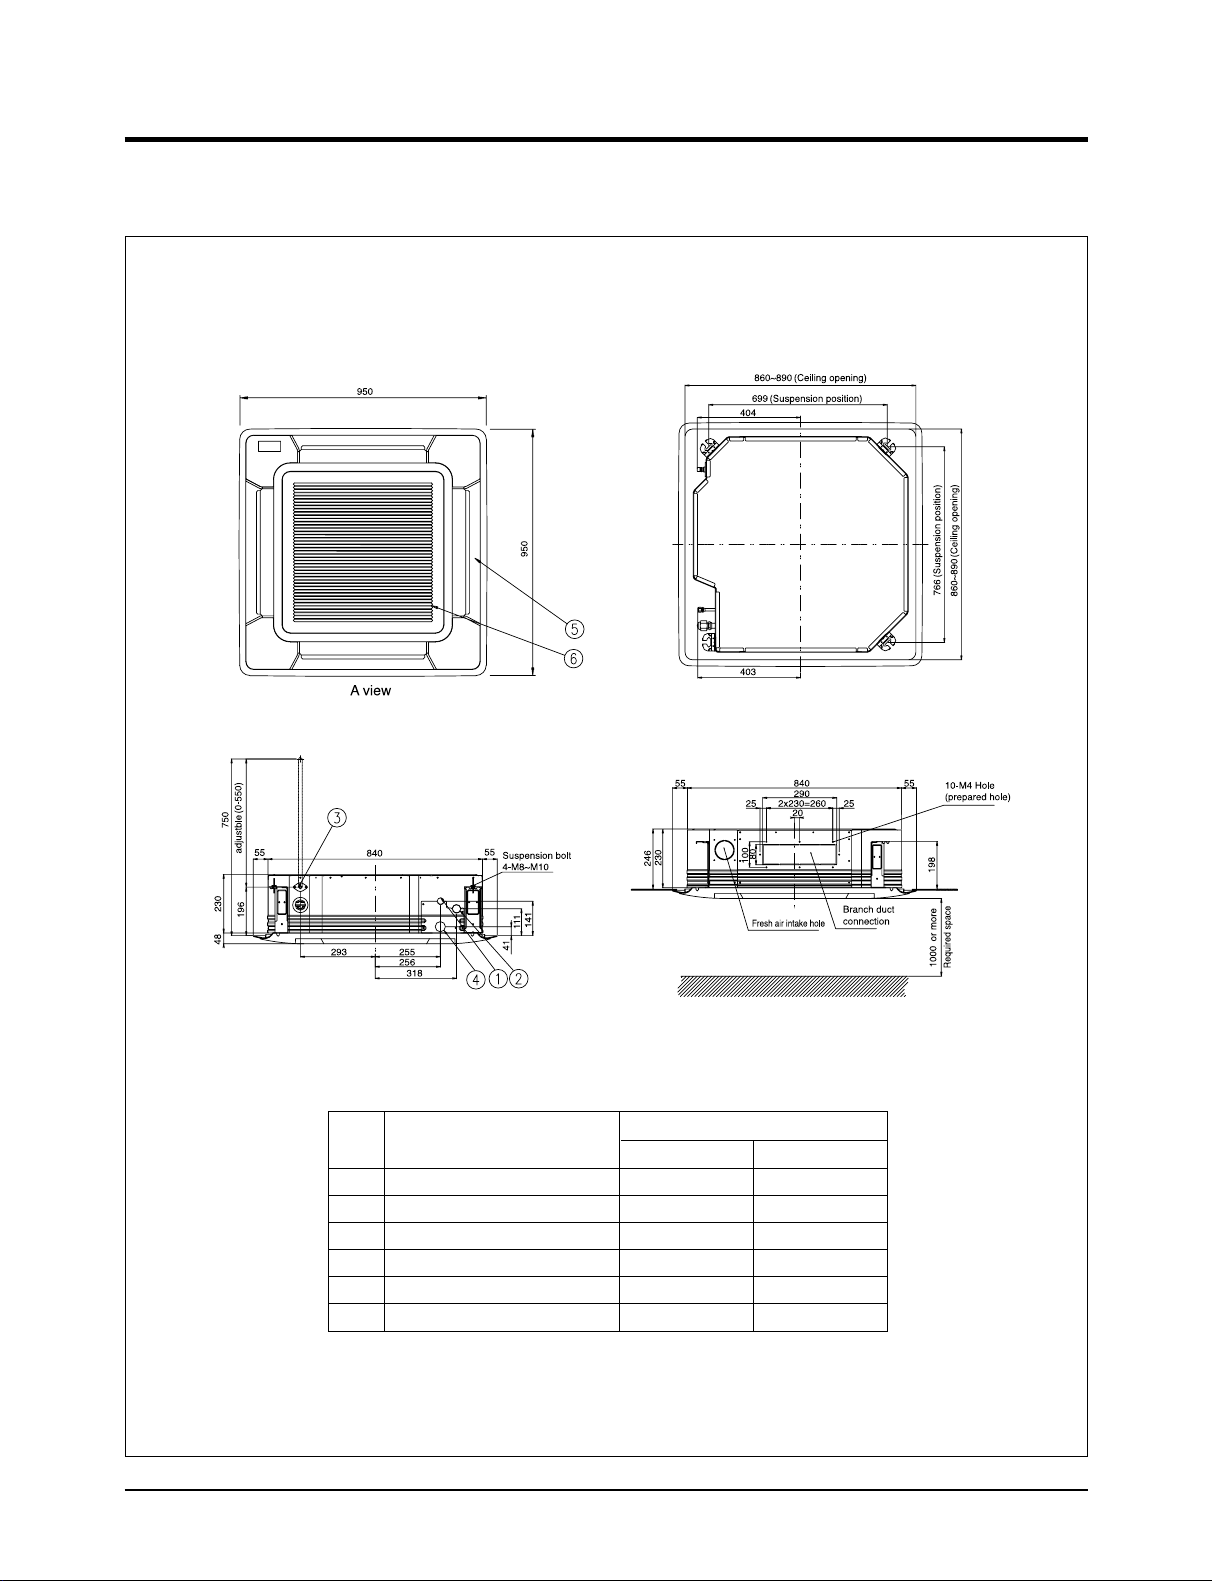
1-2 Dimensions
1-2-1 Indoor Unit
(Unit : mm)
No.
1
2
3
4
5
6
Name
Liquid pipe connection
Gas pipe connection
Drain pipe connection
Power supply connection
Air discharge grille
Air suction grille
Model
CH052EAM CH070EAM
ø6.35(1/4
ø12.7(1/2
")
")
ø6.35(1/4
ø15.88(5/8
")
")
3Samsung Electronics
Product Specifications
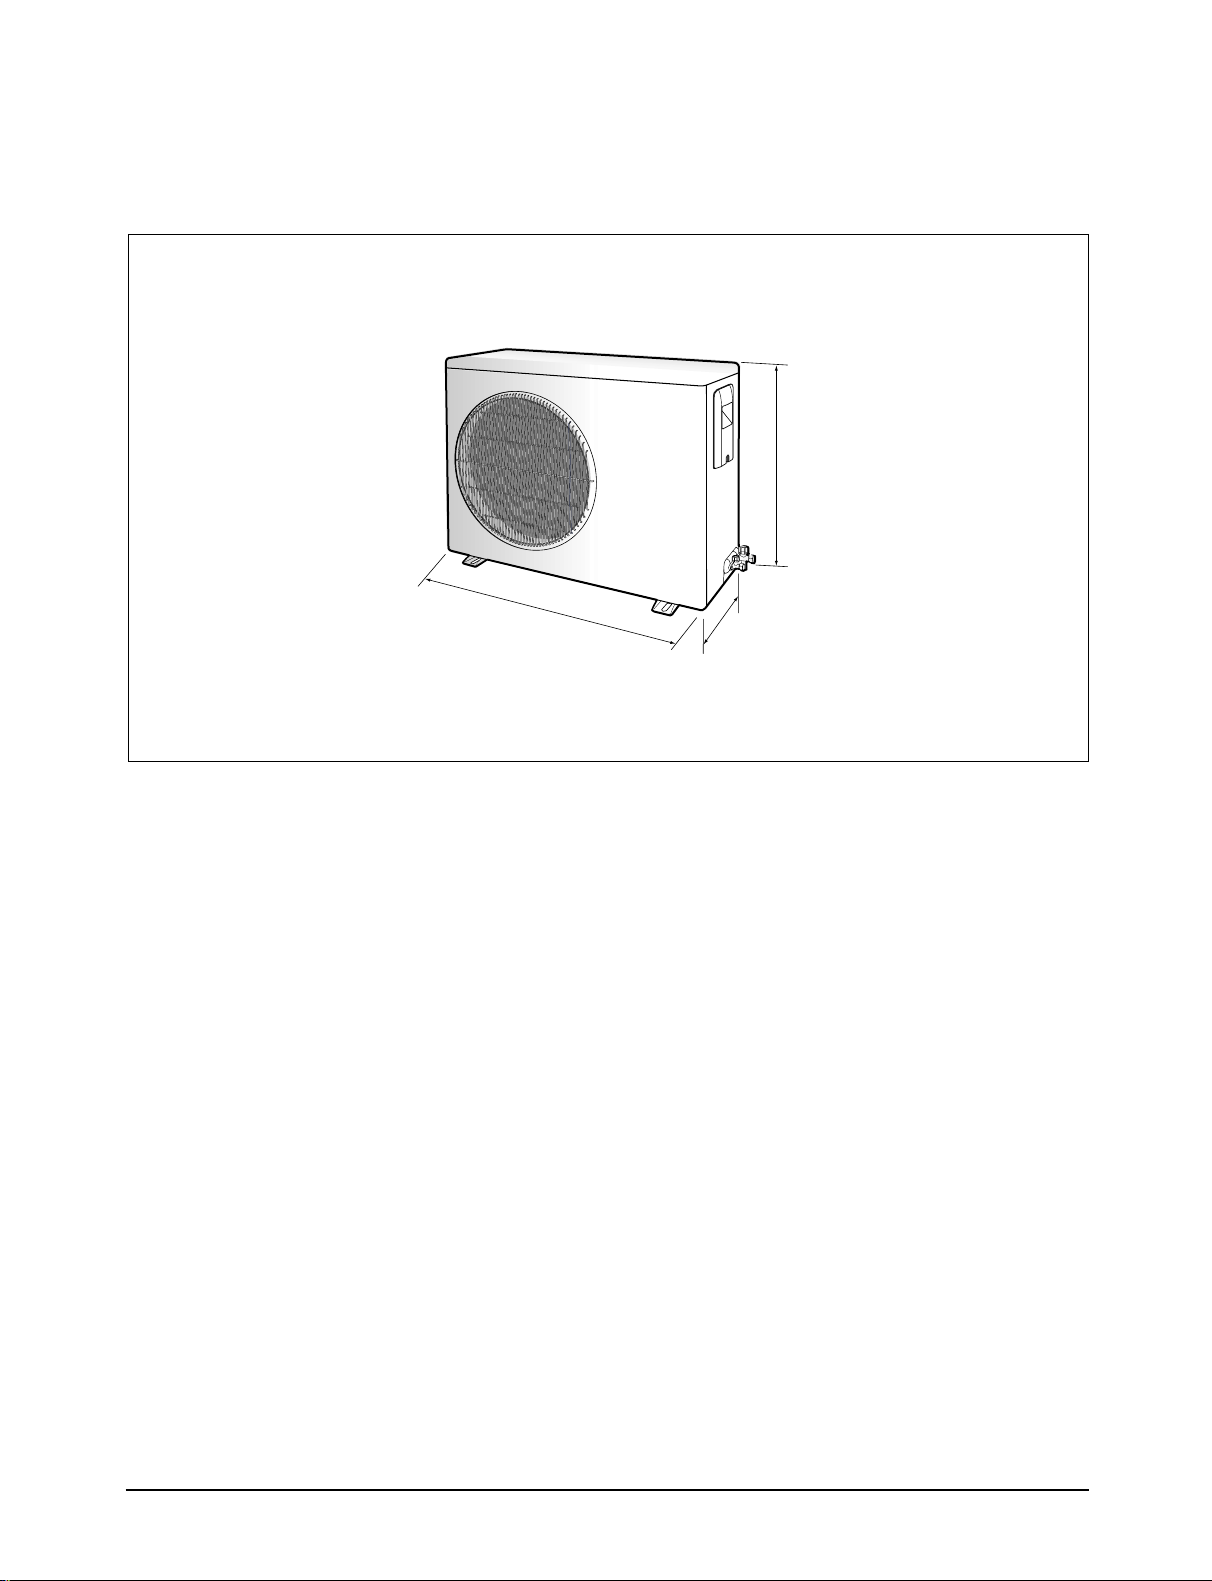
1-2-2 Outdoor Unit
(Unit : mm)
648
880
310
Samsung Electronics4
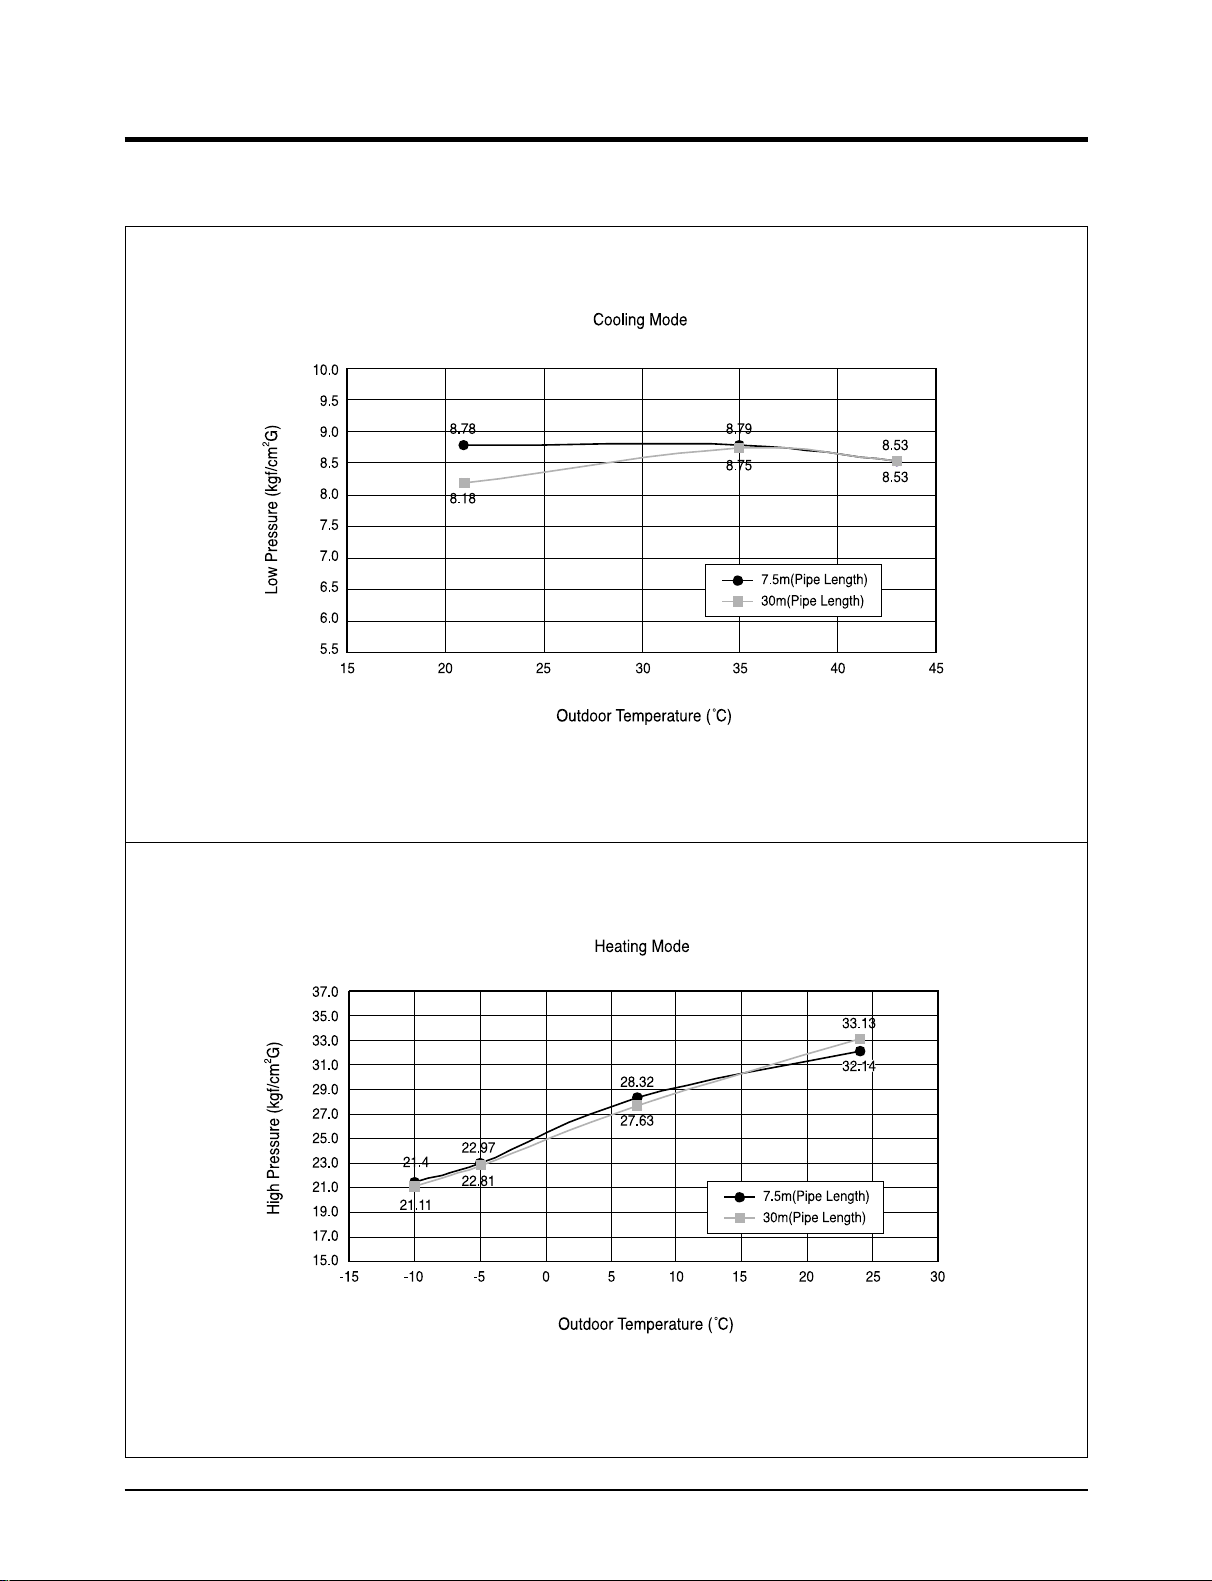
1-3 Pressure Graph
8.78
8.78
8.78
8.78
8.78
21.1
22.97
22.97
22.97
33.13
22.81
21.1
8.78
21.4
8.78
8.78
8.78
8.78
8.78
8.78
■ CH052EAM/UH052EAMT
8.78
8.78
8.78
8.78
8.78
8.78
21.1
21.4
21.1
33.13
22.97
22.97
22.97
1
22.81
1
5Samsung Electronics

Product Specifications
■ CH070EAM/UH070EAMT
Samsung Electronics6
2. Disassembly and Reassembly
Stop operation of the air conditioner and remove the power cord before repairing the unit.
2-1 Indoor Unit
No Parts Procedure Remark
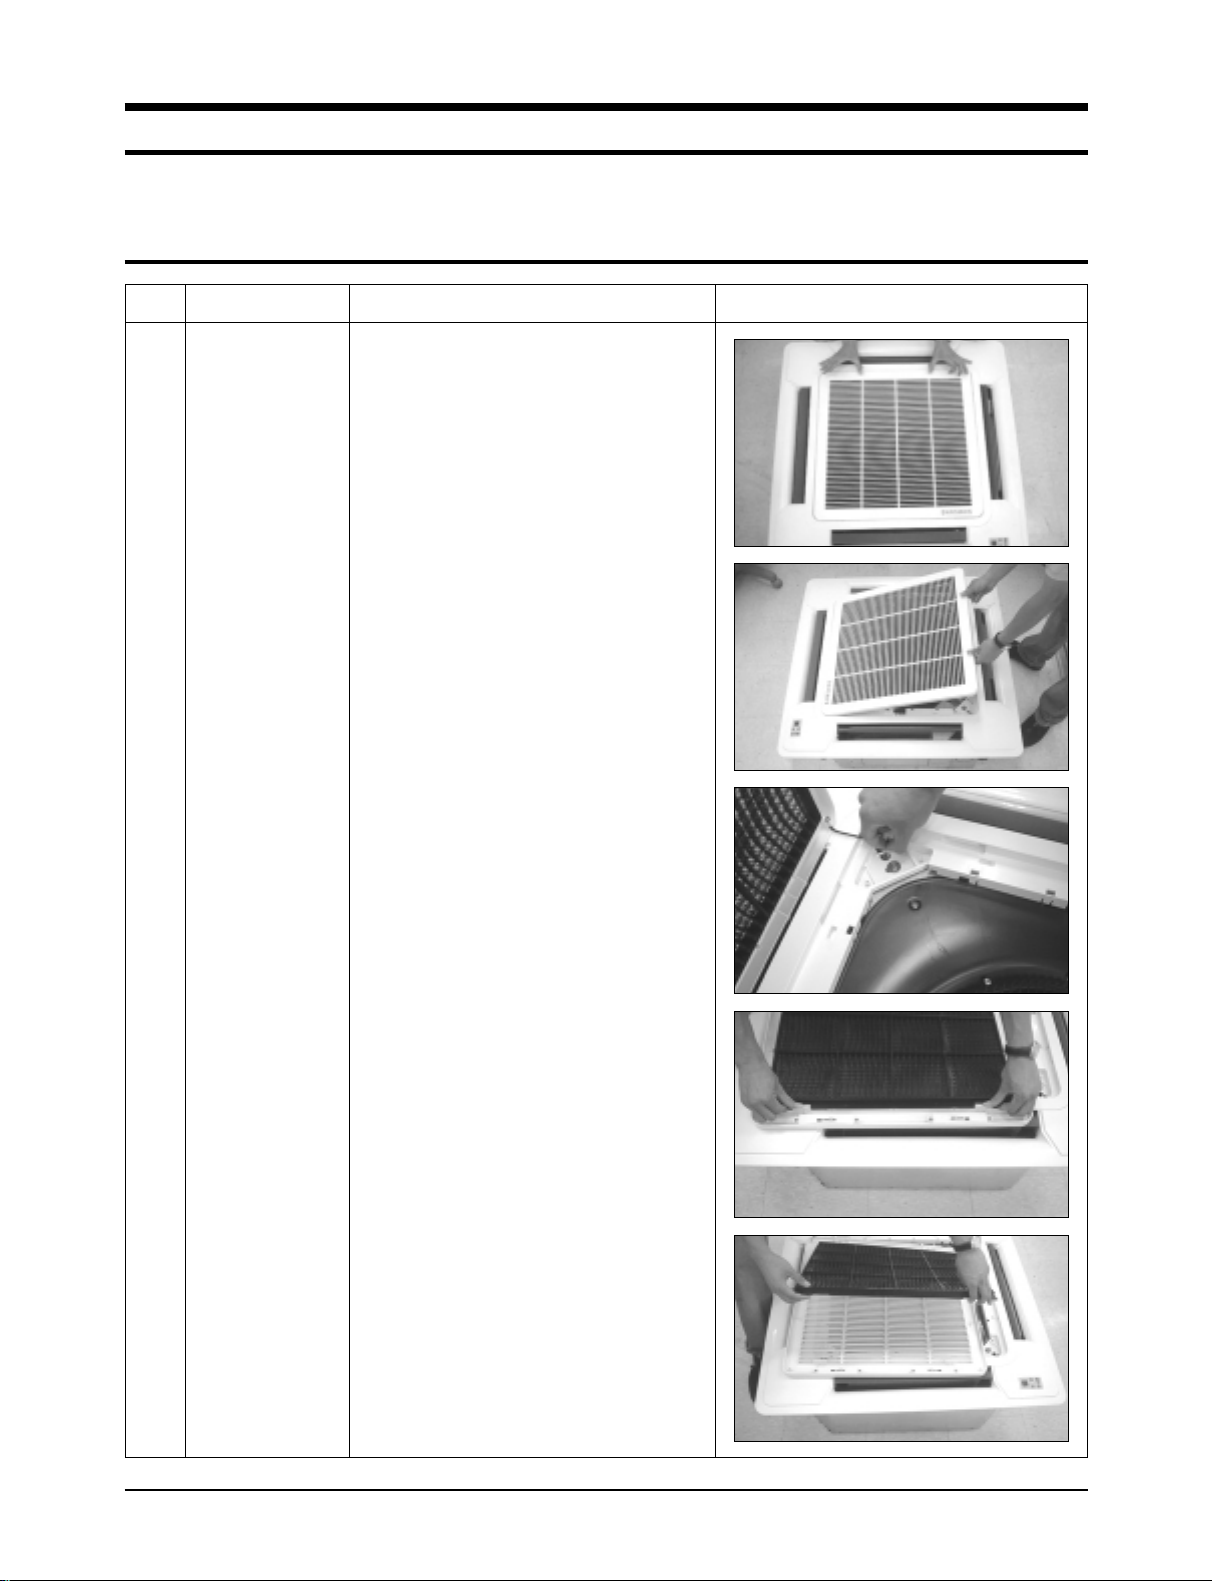
1 Front Grille
- Dust-Collecting
Filter
1) Push the tap on the Front Grille to open it.
2) Disassembly of Front Grille.
(1) Open the Front Grille at about 45˚
degrees and draw it forward.
(2) Disassemble the safety clip.
3) Filter Disassembly
(1) Draw the dust-collecting Filter forward.
(2) Disassemble the Filter.
7Samsung Electronics
Disassembly and Reassembly
No Parts Procedure Remark
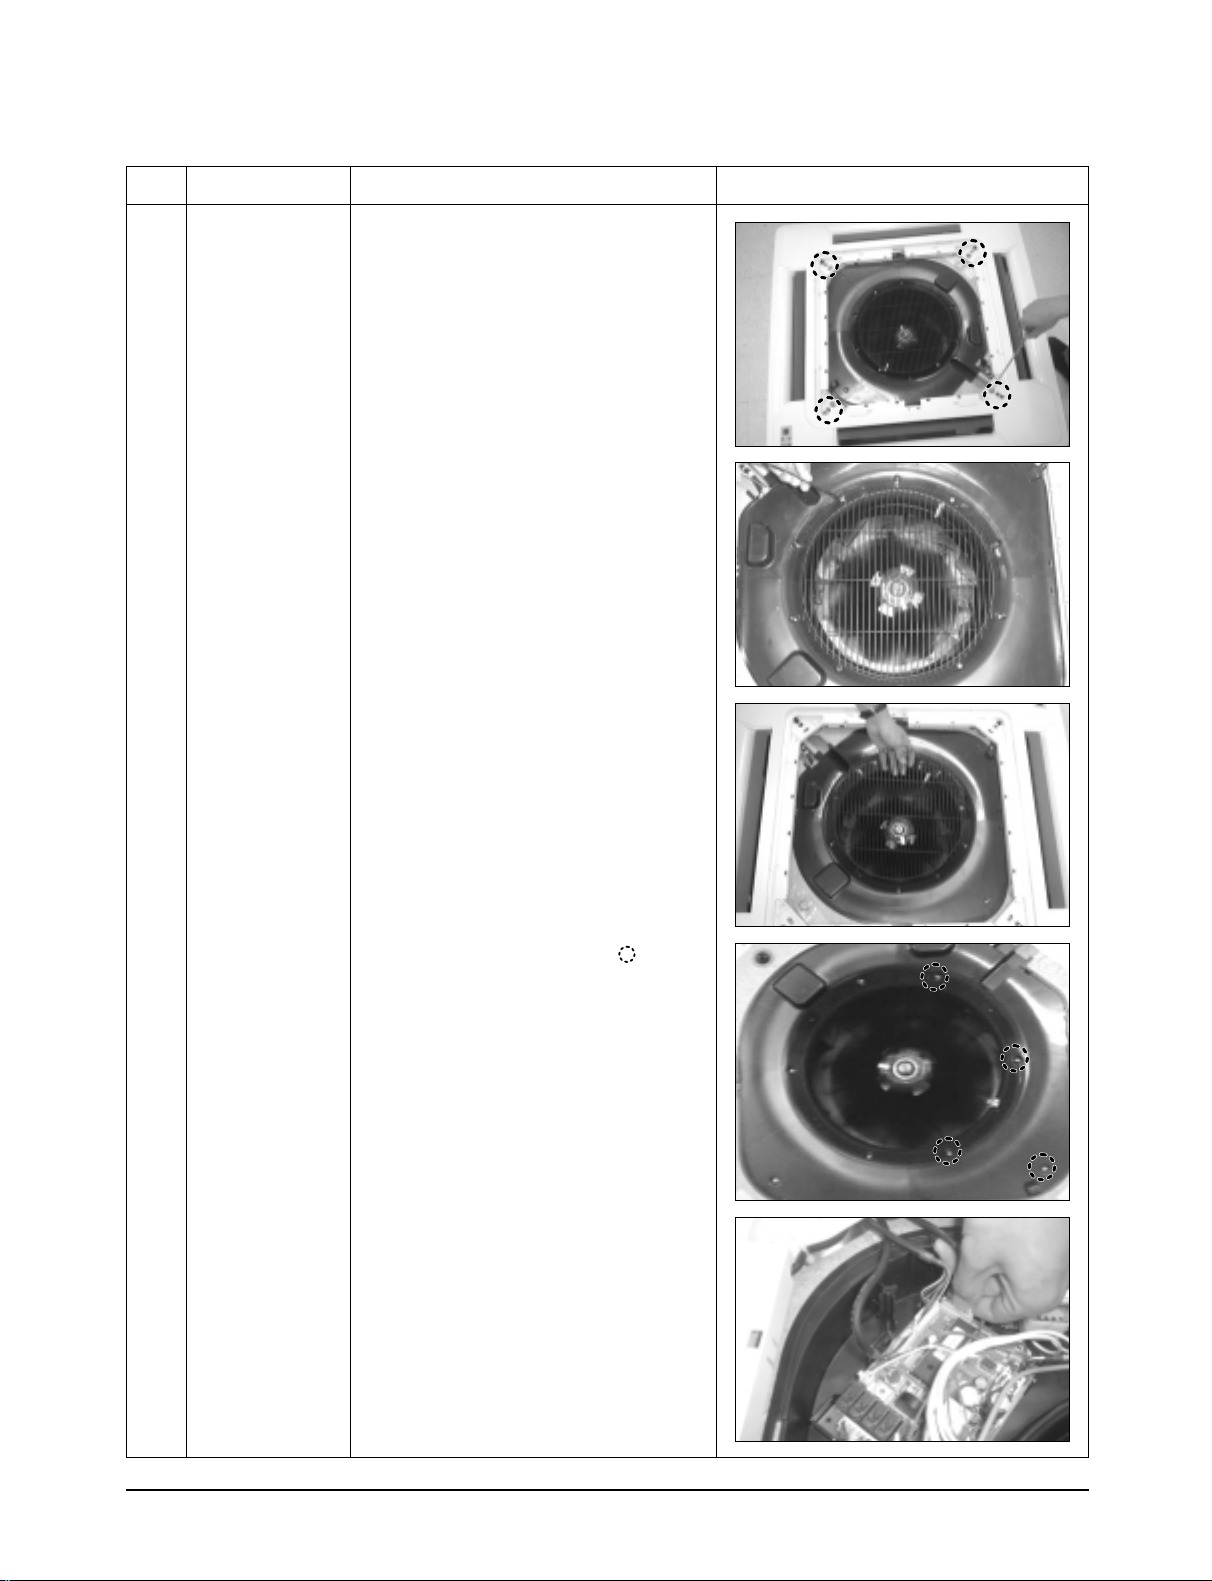
4) Loosen the 4 bolts slowly.
5) Loosen the bolt of the front net to
disassemble the safety net.
6) Loosen the 4 bolts in the mark to
uncover the Component Electric Box
cover.
7) Disassemble the 3 cables between the
indoor unit and the Panel.
- Stepping Motor Connector
- Receiving & Display Unit Connector
Option
Samsung Electronics8
Disassembly and Reassembly
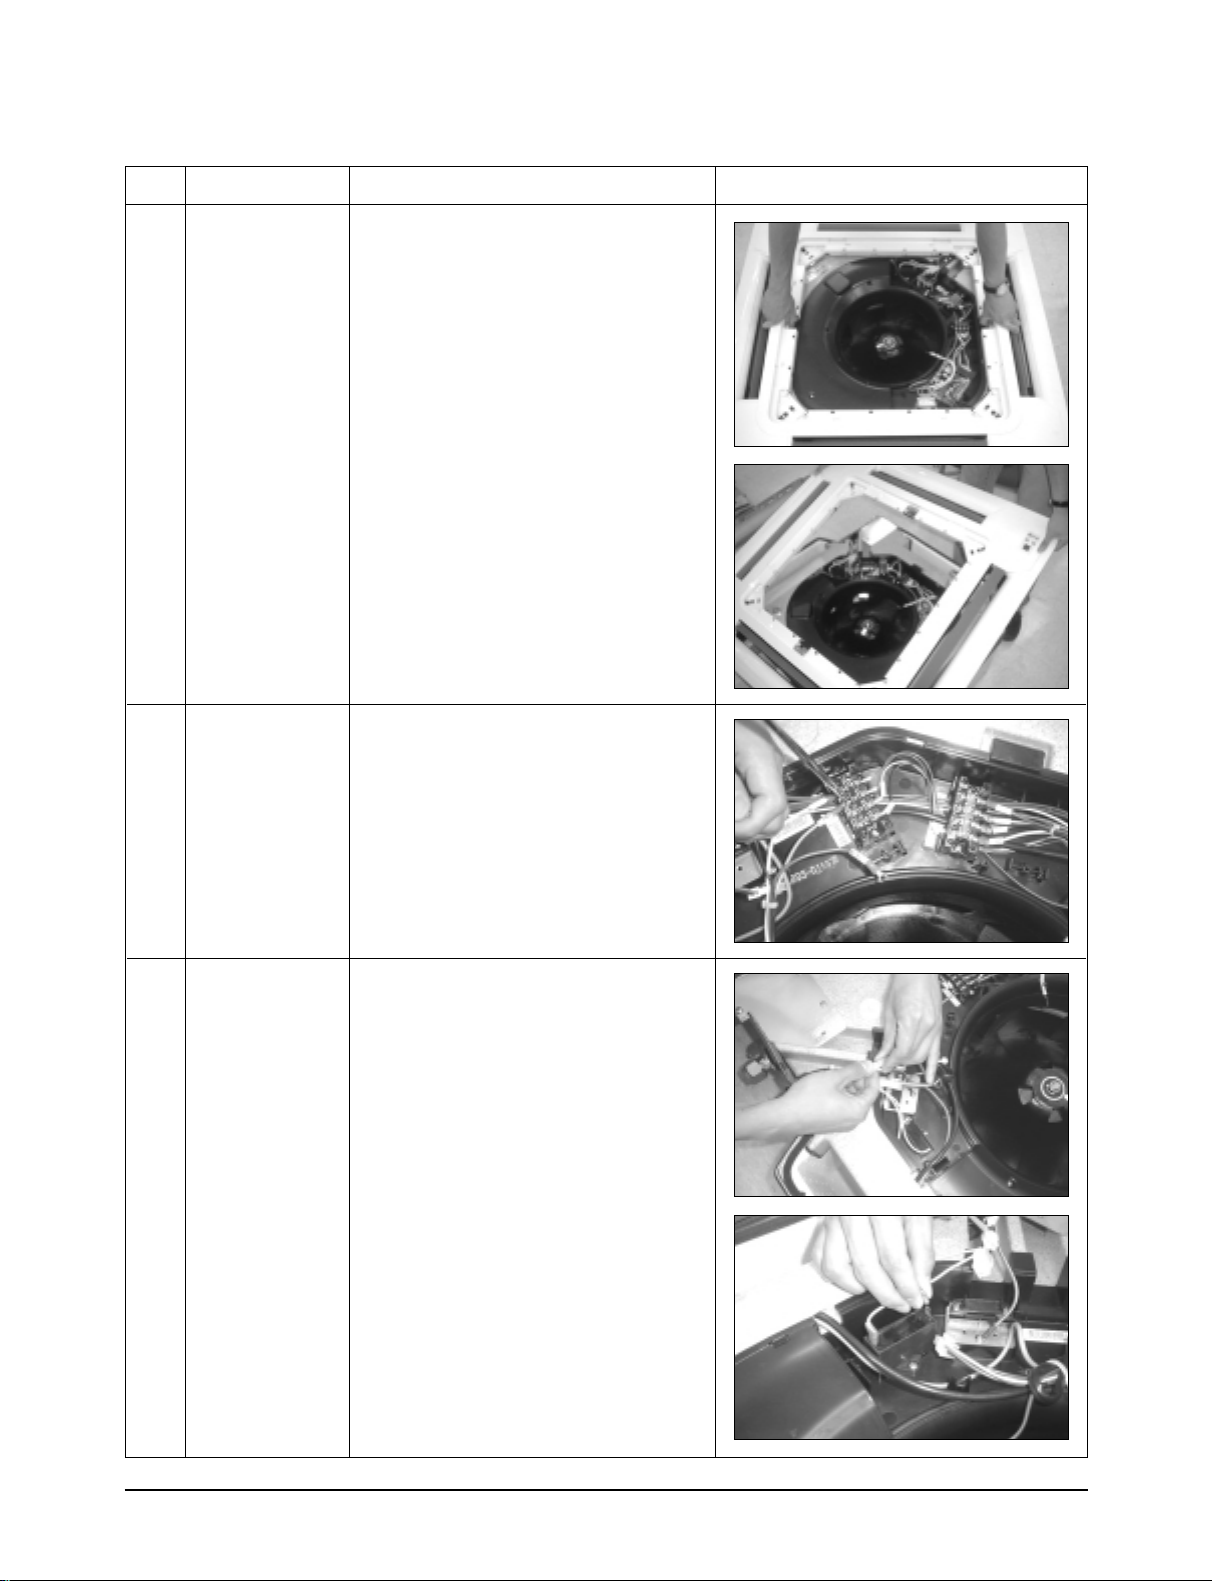
No Parts Procedure Remark
8) Hold on the two hooks on both sides
of the indoor unit and disassemble the
Front Panel.
9) Take away the disassembled Panel out
of the main body.
2
3
Electronic Part
- Indoor & Outdoor
Connecting Cable
Fan
&
Motor
1) Disconnect all the indoor and outdoor
cables connected to the Terminal Board.
1) Disassemble the Fan Motor wire connector,
thermistor wire connector, and Drain Pump
wire connector.
2) Disassemble the wire connector in the
Capacitor.
9Samsung Electronics
Disassembly and Reassembly
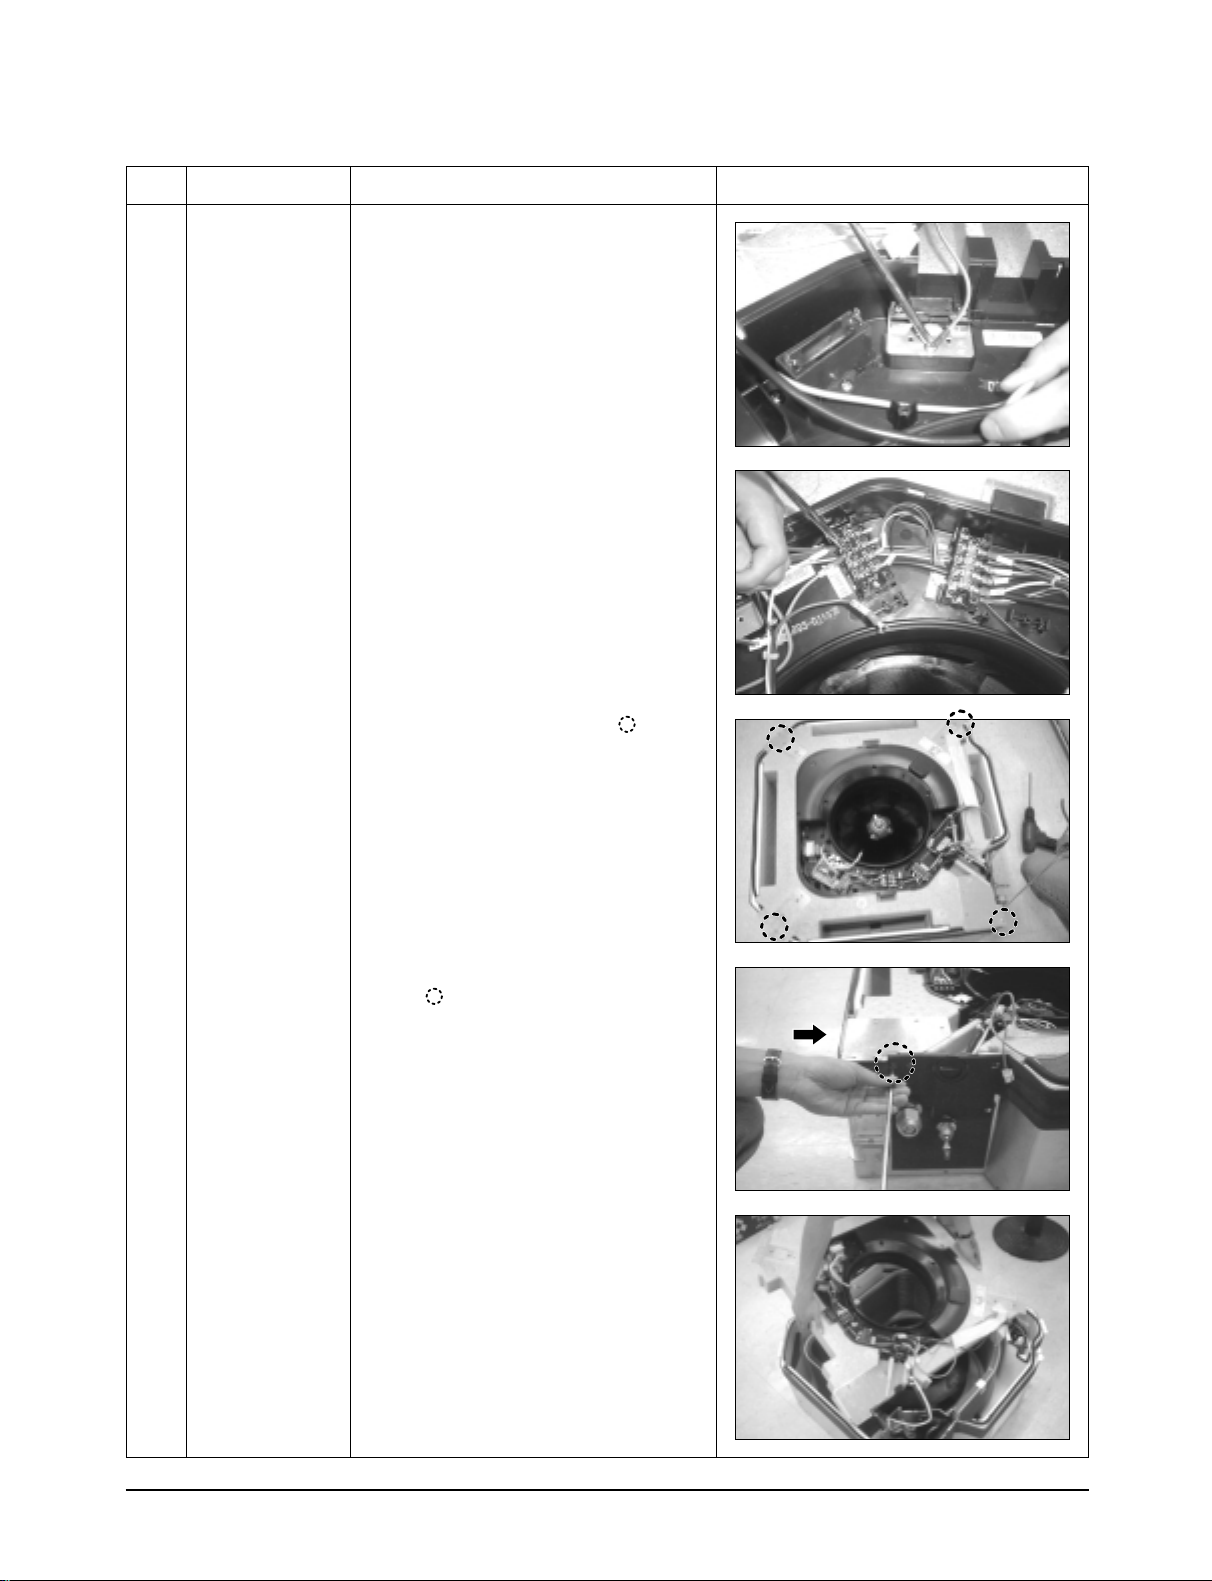
No Parts Procedure Remark
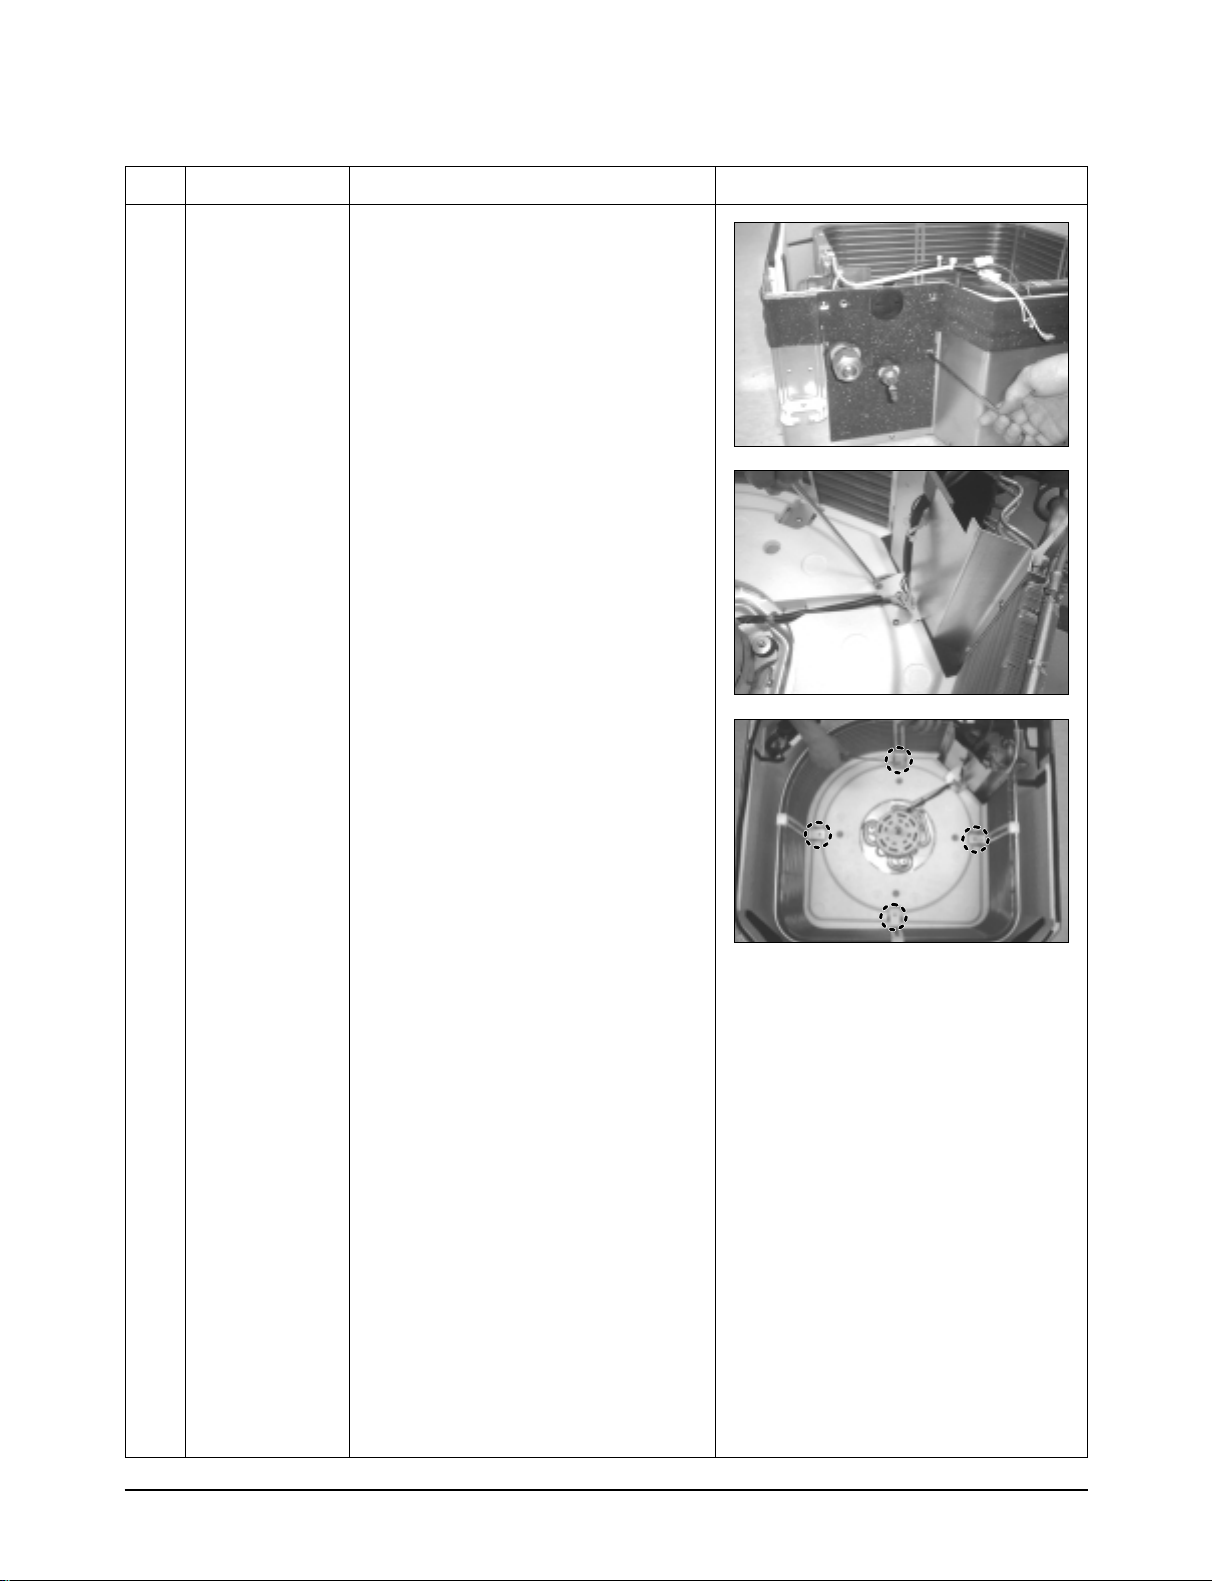
3) Disassemble the ground wire.
4) Disassemble the Float Switch wire
connected to the Terminal Port.(F1, F2)
5) Loosen the 8 bolts in the mark .
6) Loosen a bolt in the arrow direction
and inside.
7) Disassemble the Drain Cushion from the
main body.
Samsung Electronics10
Disassembly and Reassembly
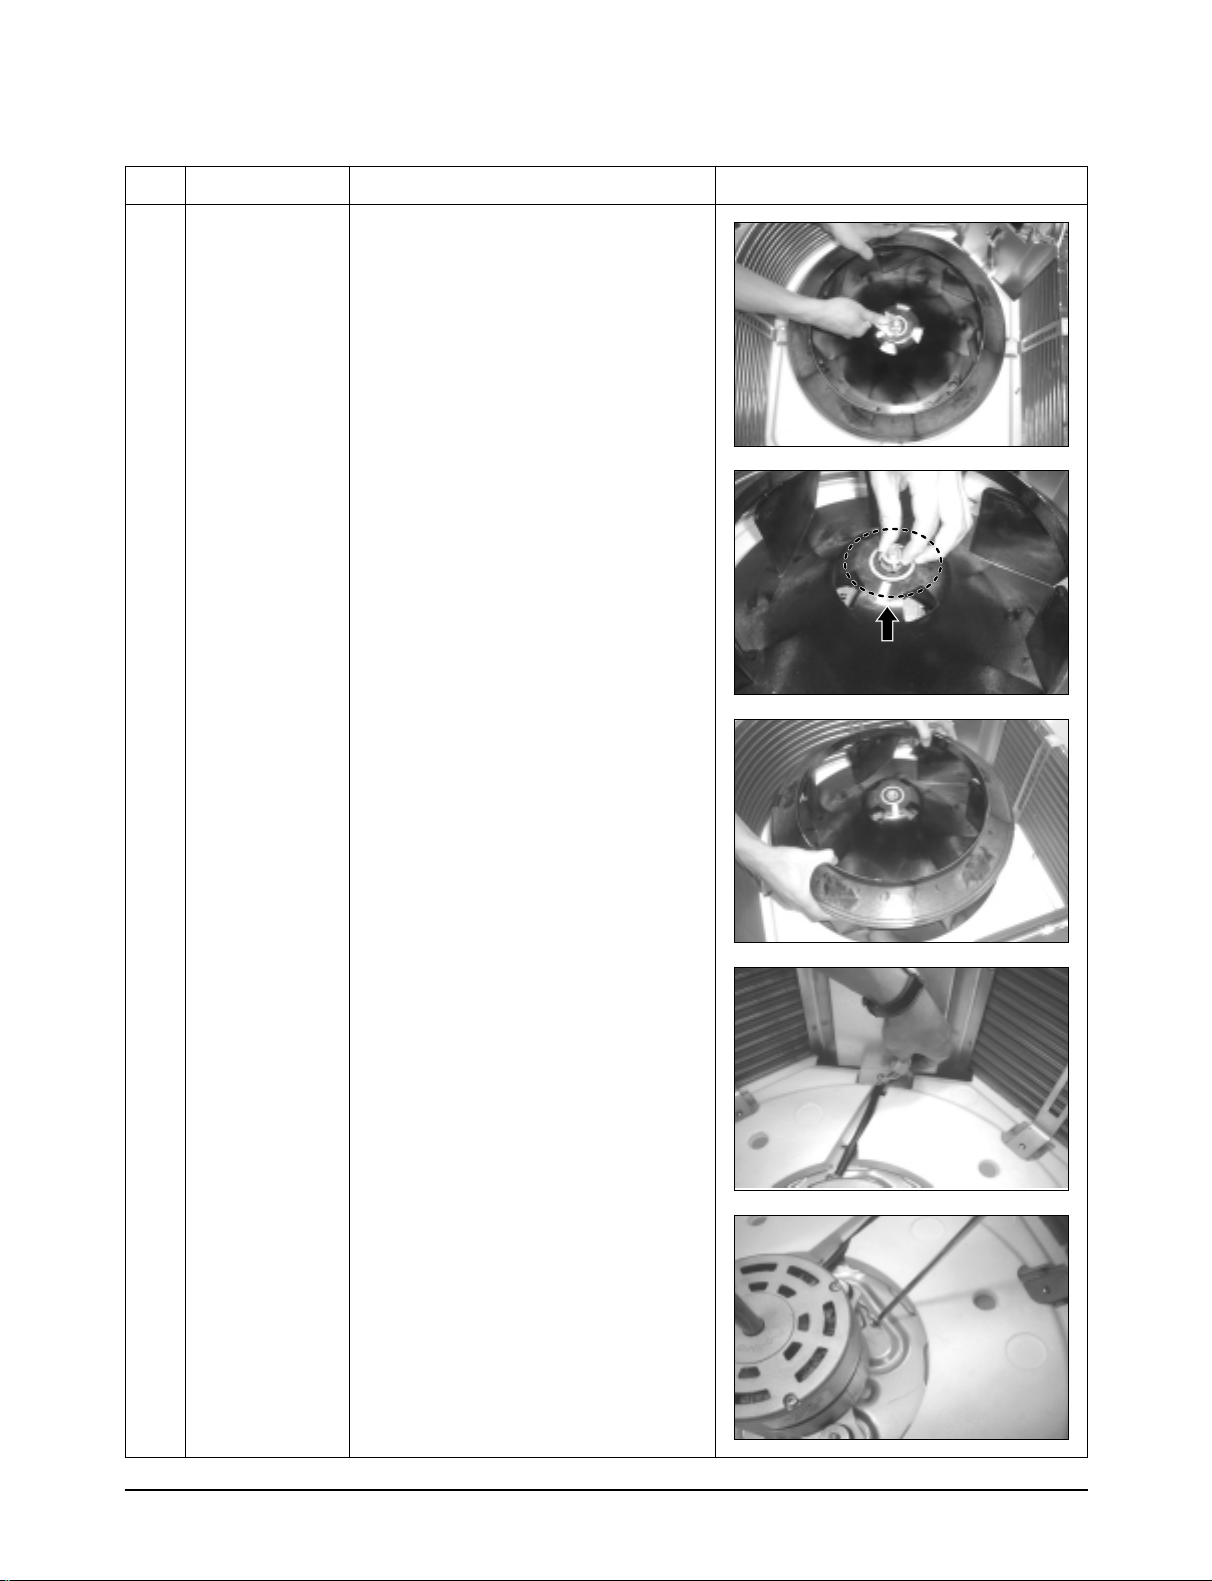
No Parts Procedure Remark
8) Loosen the nut.
9) Lift the fan to disassemble from the Motor.
Take out the washer
Take out the washer
Take out the washer
Take out the washer
Take out the washer
Take out the washer
Take out the washer
Take out the washer
Take out the washer
Take out the washer
Take out the washer
Take out the washer
Take out the washer
Take out the washer
Take out the washer
Take out the washer
Take out the washer
Take out the washer
Take out the washer
Take out the washer
Take out the washer
Take out the washer
Take out the washer
Take out the washer
Take out the washer
Take out the washer
Take out the washer
Take out the washer
Take out the washer
Take out the washer
Take out the washer
Take out the washer
10) Disassemble the Motor connector wire.
11) Disassemble the ground wire.
11Samsung Electronics
Disassembly and Reassembly
No Parts Procedure Remark
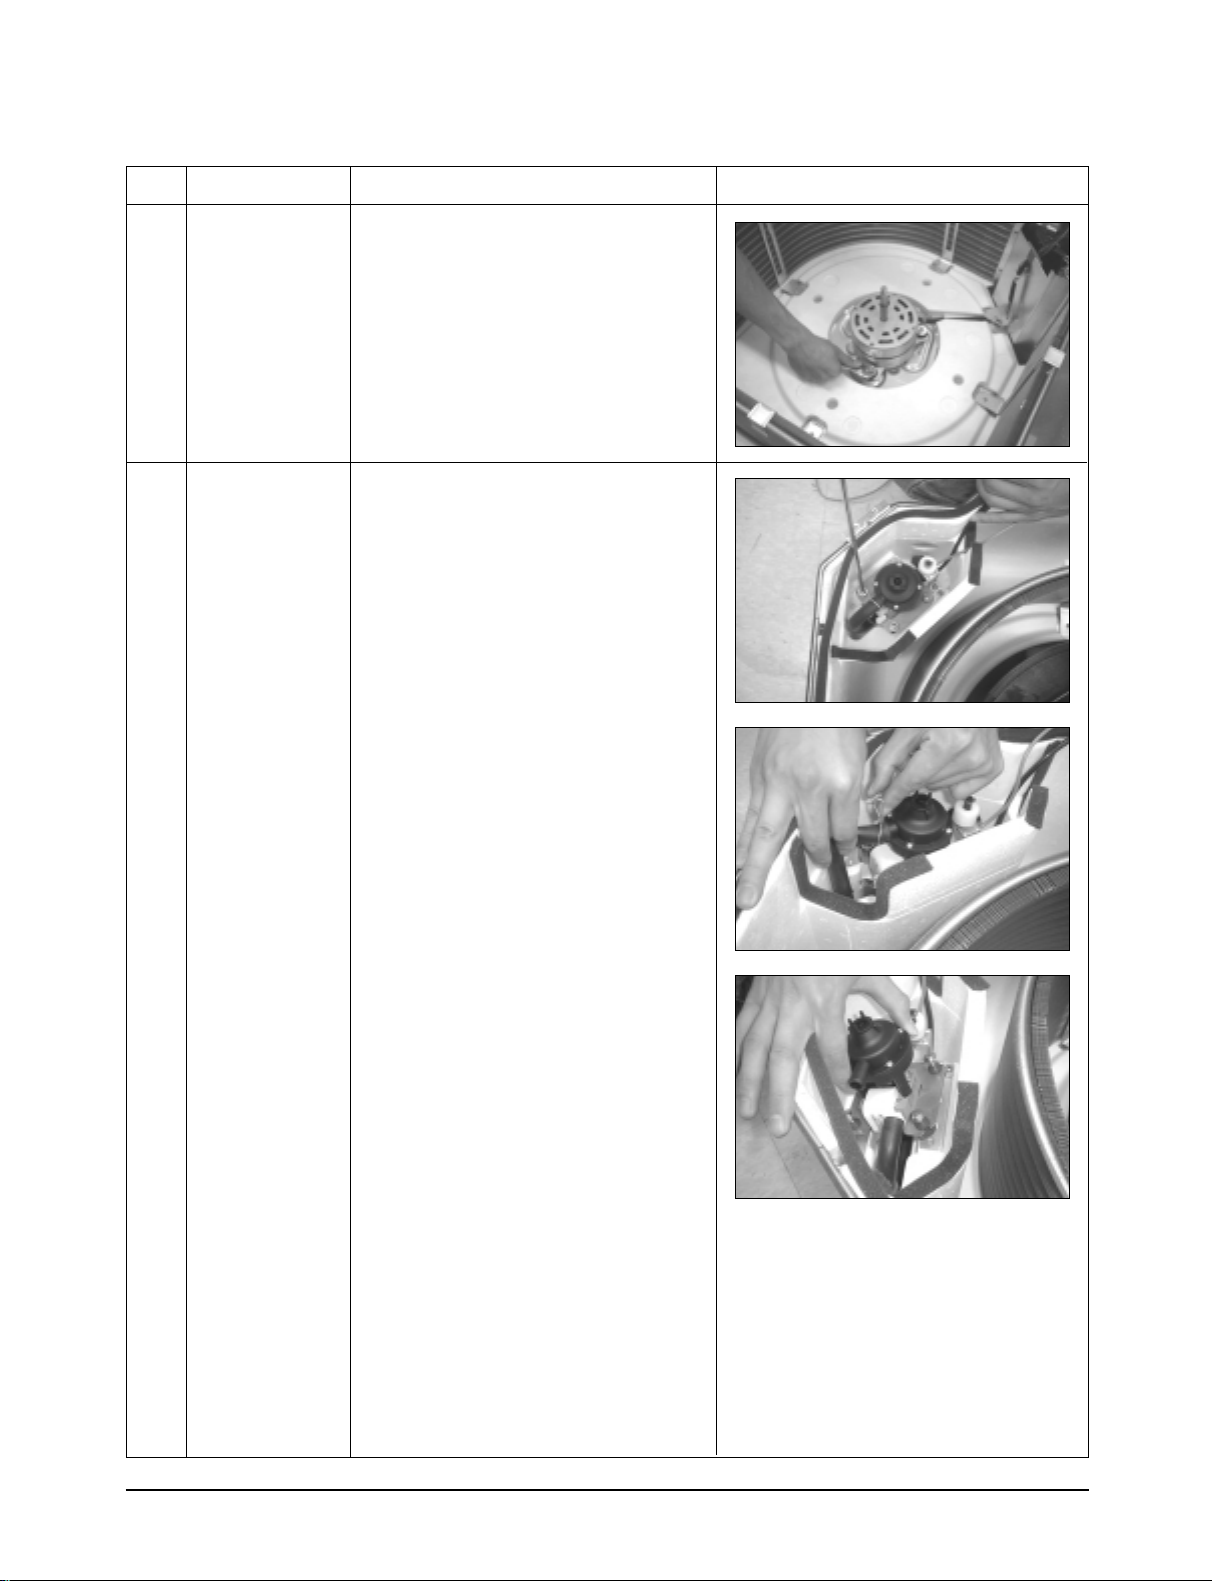
12) Loosen 3 nuts to disassemble the Motor.
4
Pump
1) Loosen the 4 bolts of the Drain Pump.
2) Disassemble the Hose from the
Drain Pump.
3) Disassemble the Pump from the
main body Bracket.
Samsung Electronics12
Disassembly and Reassembly
No Parts Procedure Remark
5
Heat Exchanger
1) Disassemble the cover pipe beside the
main body.
2) Loosen the 2 bolts fixing the
Heat Exchanger to the indoor unit Base.
3) Disassemble the 4 fixing Brackets of the
Heat Exchanger to disassemble it from the
main body.
13Samsung Electronics
Disassembly and Reassembly
No Parts Procedure Remark
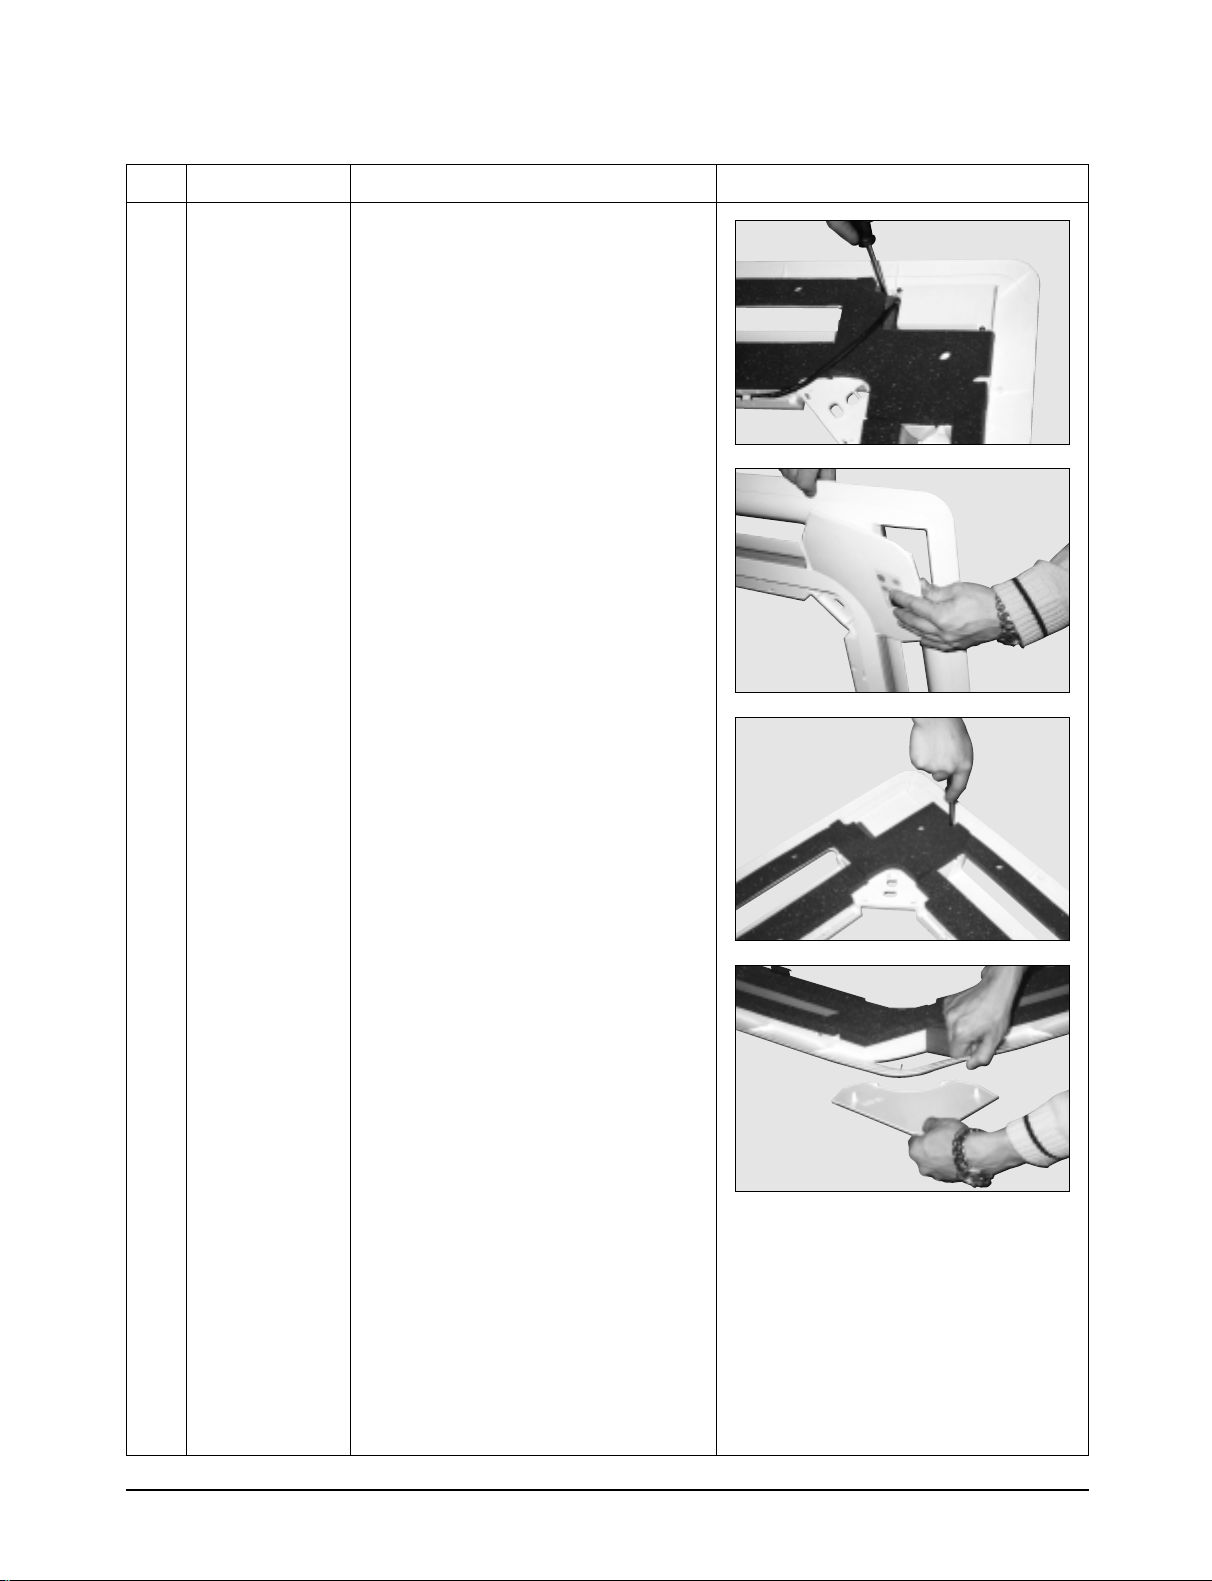
6
Front Panel
- Cover Front
❈
Do "1", above.
Push 3 Cover Front fixing screws inside the
Front Panel and snap fixing part to detach
the Cover Front.
Samsung Electronics14
 Loading...