

Samsung CE117PC, CE117PPTCX, CE117PAECX, CE117PPC, CE117PTC Owner's Instructions & Cooking Manual
...
imagine the possibilities
Thank you for purchasing this Samsung product.
Please register your product at
www.samsung.com/register
Microwave Oven
Owner’s instructions & Cooking guide
CE117PC
CE117PTC
CE117PPC
CE117PPTCX
CE117PAECX
This manual is made with 100% recycled paper.
CE117PAECX_XSA_DE68-04003M_EN.indd 1 19/04/2012 09:41:37
2
ENGLISH
USING THIS INSTRUCTION BOOKLET
You have just purchased a SAMSUNG microwave oven. Your Owner’s
Instructions contain much valuable information on cooking with your
microwave oven:
• Safety precautions
• Usage instructions
• Appropriate accessories and cookware
• Cooking tips
SAFETY INFORMATION
Important safety instructions.
READ CAREFULLY AND KEEP FOR FUTURE REFERENCE.
Before using the oven, confirm that the following instructions are
followed.
•
Use this appliance only for its intended purpose as described in this
instruction manual. Warnings and Important Safety Instructions in this
manual do not cover all possible conditions and situations that may
occur. It is your responsibility to use common sense, caution, and
care when installing, maintaining, and operating your appliance.
•
Because these following operating instructions cover various models,
the characteristics of your microwave oven may dier slightly from
those described in this manual and not all warning signs may be
applicable. If you have any questions or concerns, contact your
nearest service centre or find help and information online at www.
samsung.com.
•
This microwave oven is supposed for heating food. It is intended for
domestic home-use only. Do not heat any type of textiles or cushions
filled with grains, which could cause burns and fire. The manufacturer
cannot be held liable for damage caused by improper or incorrect use
of the appliance.
•
Failure to maintain the oven in a clean condition could lead to
deterioration of the surface that could adversely aect the life of the
appliance and possible result in a hazardous situation.
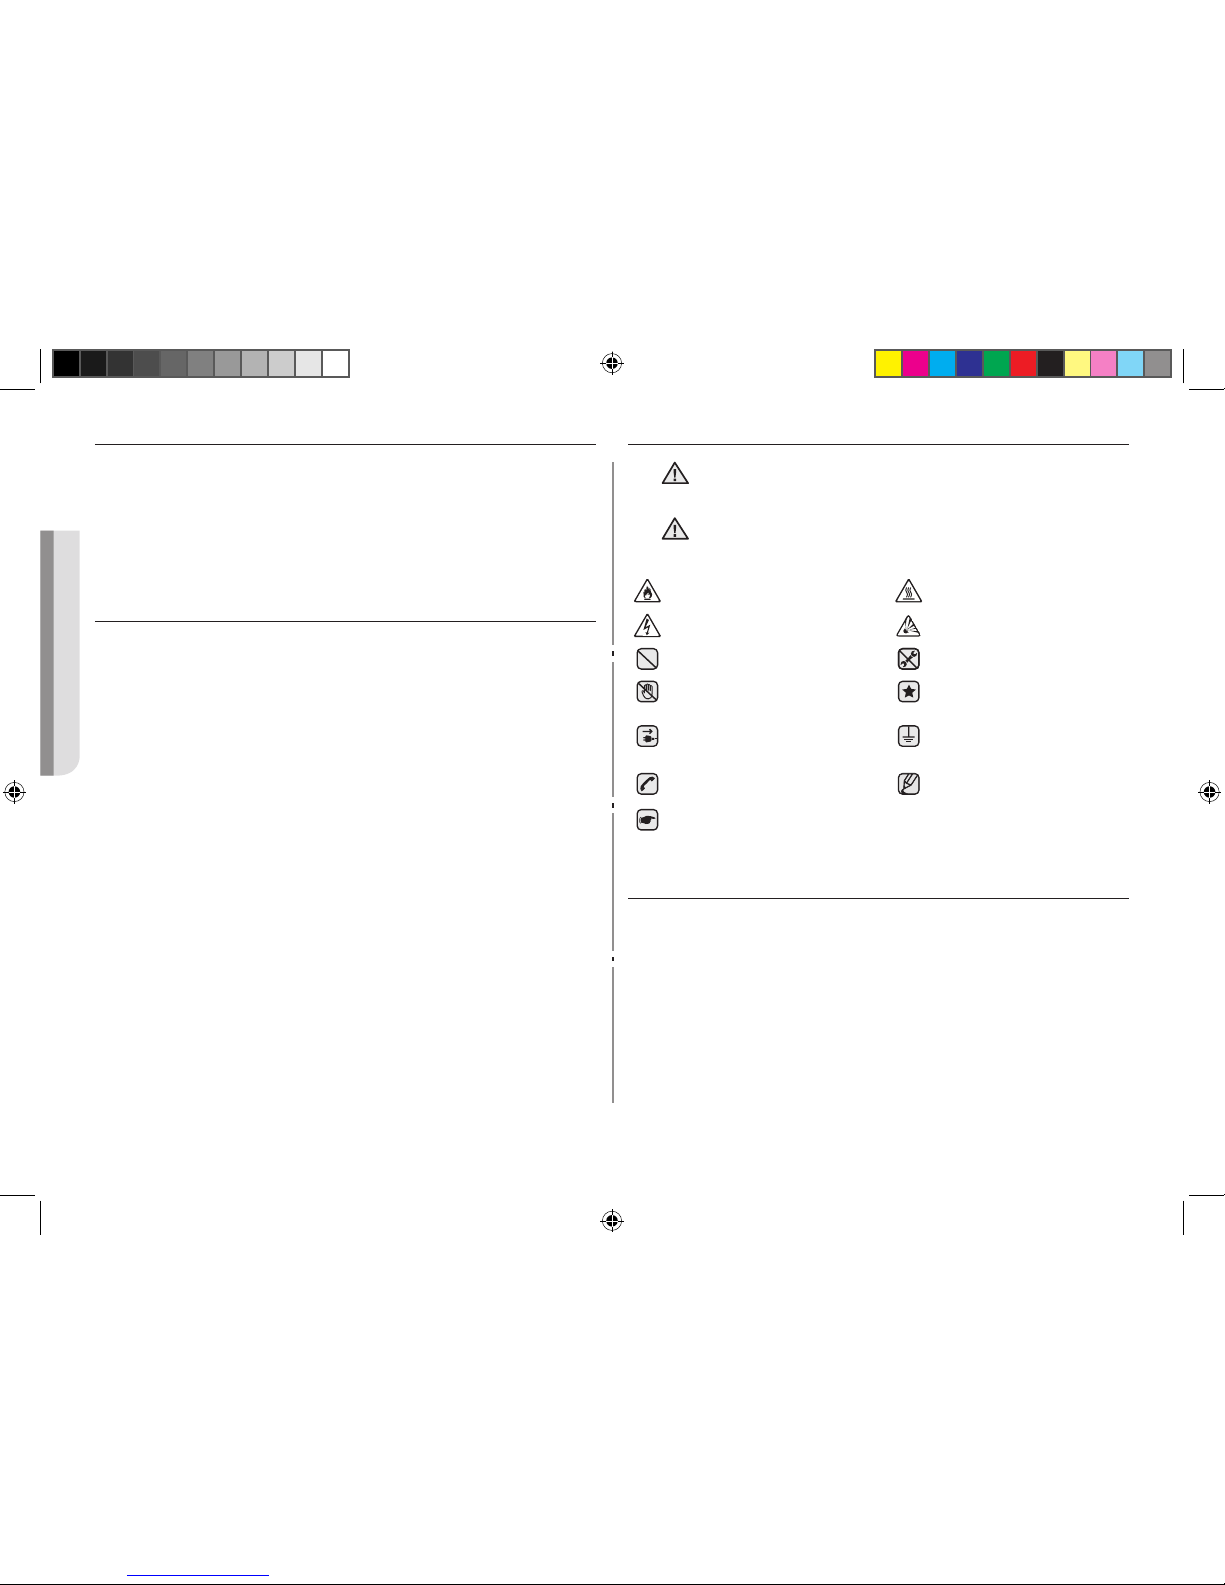
LEGEND FOR SYMBOLS AND ICONS
WARNING
Hazards or unsafe practices that may result in severe personal
injury or death.
CAUTION
Hazards or unsafe practices that may result in minor personal
injury or death.
Warning; Fire hazard Warning; Hot surface
Warning; Electricity Warning; Explosive material
Do NOT attempt. Do NOT disassemble.
Do NOT touch. Follow directions explicitly.
Unplug the power plug from
the wall socket.
Make sure the machine is
grounded to prevent electric
shock.
Call the service center for
help.
Note
Important
PRECAUTIONS TO AVOID POSSIBLE EXPOSURE TO
EXCESSIVE MICROWAVE ENERGY
Failure to observe the following safety precautions may result in harmful
exposure to microwave energy.
(a) Under no circumstances should any attempt be made to operate the
oven with the door open or to tamper with the safety interlocks (door
latches) or to insert anything into the safety interlock holes.
(b) Do NOT place any object between the oven door and front face or
allow food or cleaner residues to accumulate on sealing surfaces.
Ensure that the door and door sealing surfaces are kept clean by
wiping after use first with a damp cloth and then with a soft dry cloth.
(c) Do NOT operate the oven if it is damaged until it has been
repaired by a qualified microwave service technician trained by the
manufacturer. It is particularly important that the oven door closes
properly and that there is no damage to the:
CE117PAECX_XSA_DE68-04003M_EN.indd 2 19/04/2012 09:41:38
3
ENGLISH
(1) Door (bent)
(2) Door hinges (broken or loose)
(3) Door seals and sealing surfaces
(d) The oven should not be adjusted or repaired by anyone other than
a properly qualified microwave service technician trained by the
manufacturer.
This product is a Group 2 Class B ISM equipment. The definition of group
2 which contains all ISM equipment in which radio-frequency energy is
intentionally generated and/or used in the form of electromagnetic radiation
for the treatment of material, and EDM and arc welding equipment.
For Class B equipment is equipment suitable for use in domestic
establishments and in establishments directly connected to a low voltage
power supply network which supplies buildings used for domestic
purposes.
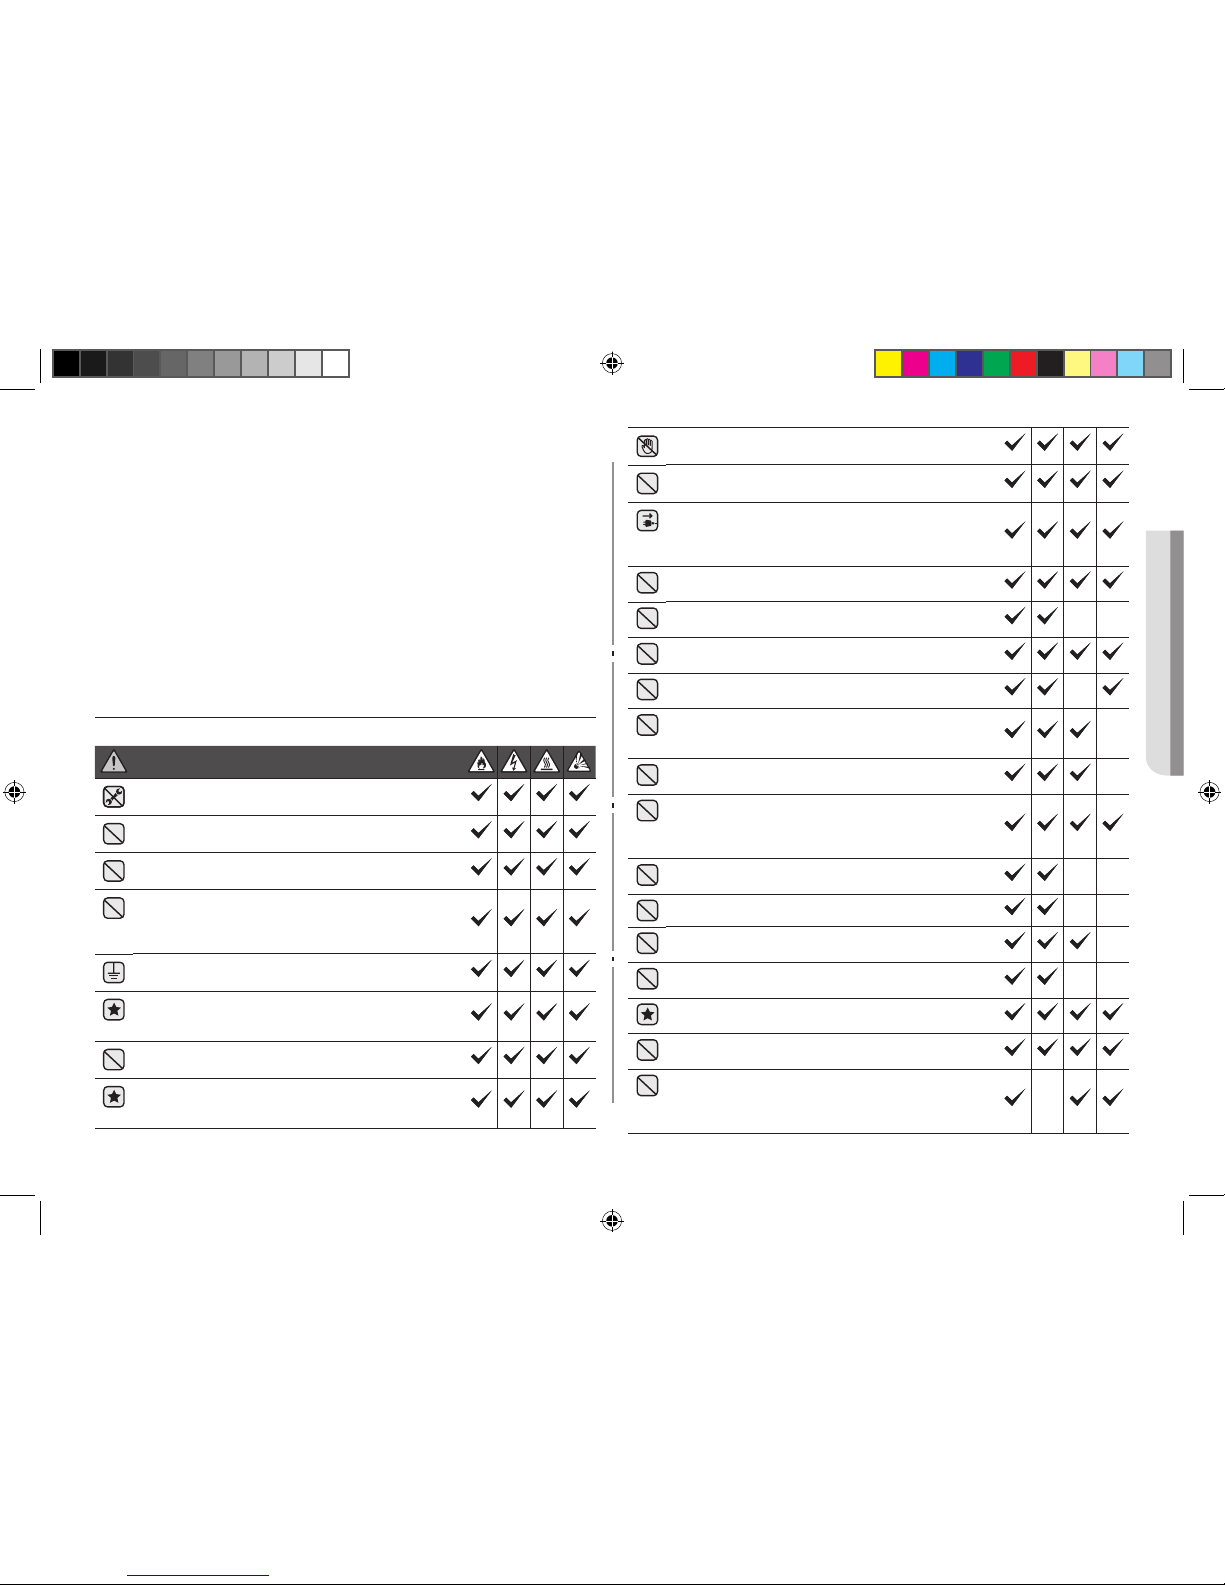
IMPORTANT SAFETY INSTRUCTIONS
Make sure that these safety precautions are obeyed at all times.
WARNING
Only qualified sta should be allowed to modify or
repair the microwave oven.
Do not heat liquids and other food in sealed
containers.
For your safety, do not use high-pressure water
cleaners or steam jet cleaners.
Do not install this appliance; near heater,
inflammable material; in a humid, oily or dusty
location, in a location exposed to direct sunlight and
water or where gas may leak; on un level ground.
This appliance must be properly grounded in
accordance with local and national codes.
Remove all foreign substances such as dust or
water from the power plug terminals and contact
points using a dry cloth on a regular basis.
Do not pull or excessively bend or place heavy
objecton the power cord.
In the event of a gas leak (such as propane gas, LP
gas, etc.), ventilate immediately without touching the
power plug.
Do not touch the power plug with wet hands.
Do not turn the appliance o by unplugging the
power plug while an operation is in progress.
Do not insert fingers or foreign substances, If any
foreign substance such as water has entered the
appliance, unplug the power plug and contact your
nearest service centre.
Do not apply excessive pressure or impact to the
appliance.
Do not place the oven over a fragile object such as
a sink or glass object.
Do not use benzene, thinner, alcohol, steam cleaner
or high pressure cleaner to clean the appliance.
Ensure that the power voltage, frequency and current
are the same as those of the product specifications.
Plug the power plug into the wall socket firmly. Do
not use a multiple plug adapter, an extension cord
or an electric transformer.
Do not hook the power cord on a metal object, insert the
power cord between the objects or behind the oven.
Do not use a damaged power plug, damaged
power cord or loose wall socket. When the power
plug or power cord is damaged, contact your
nearest service centre.
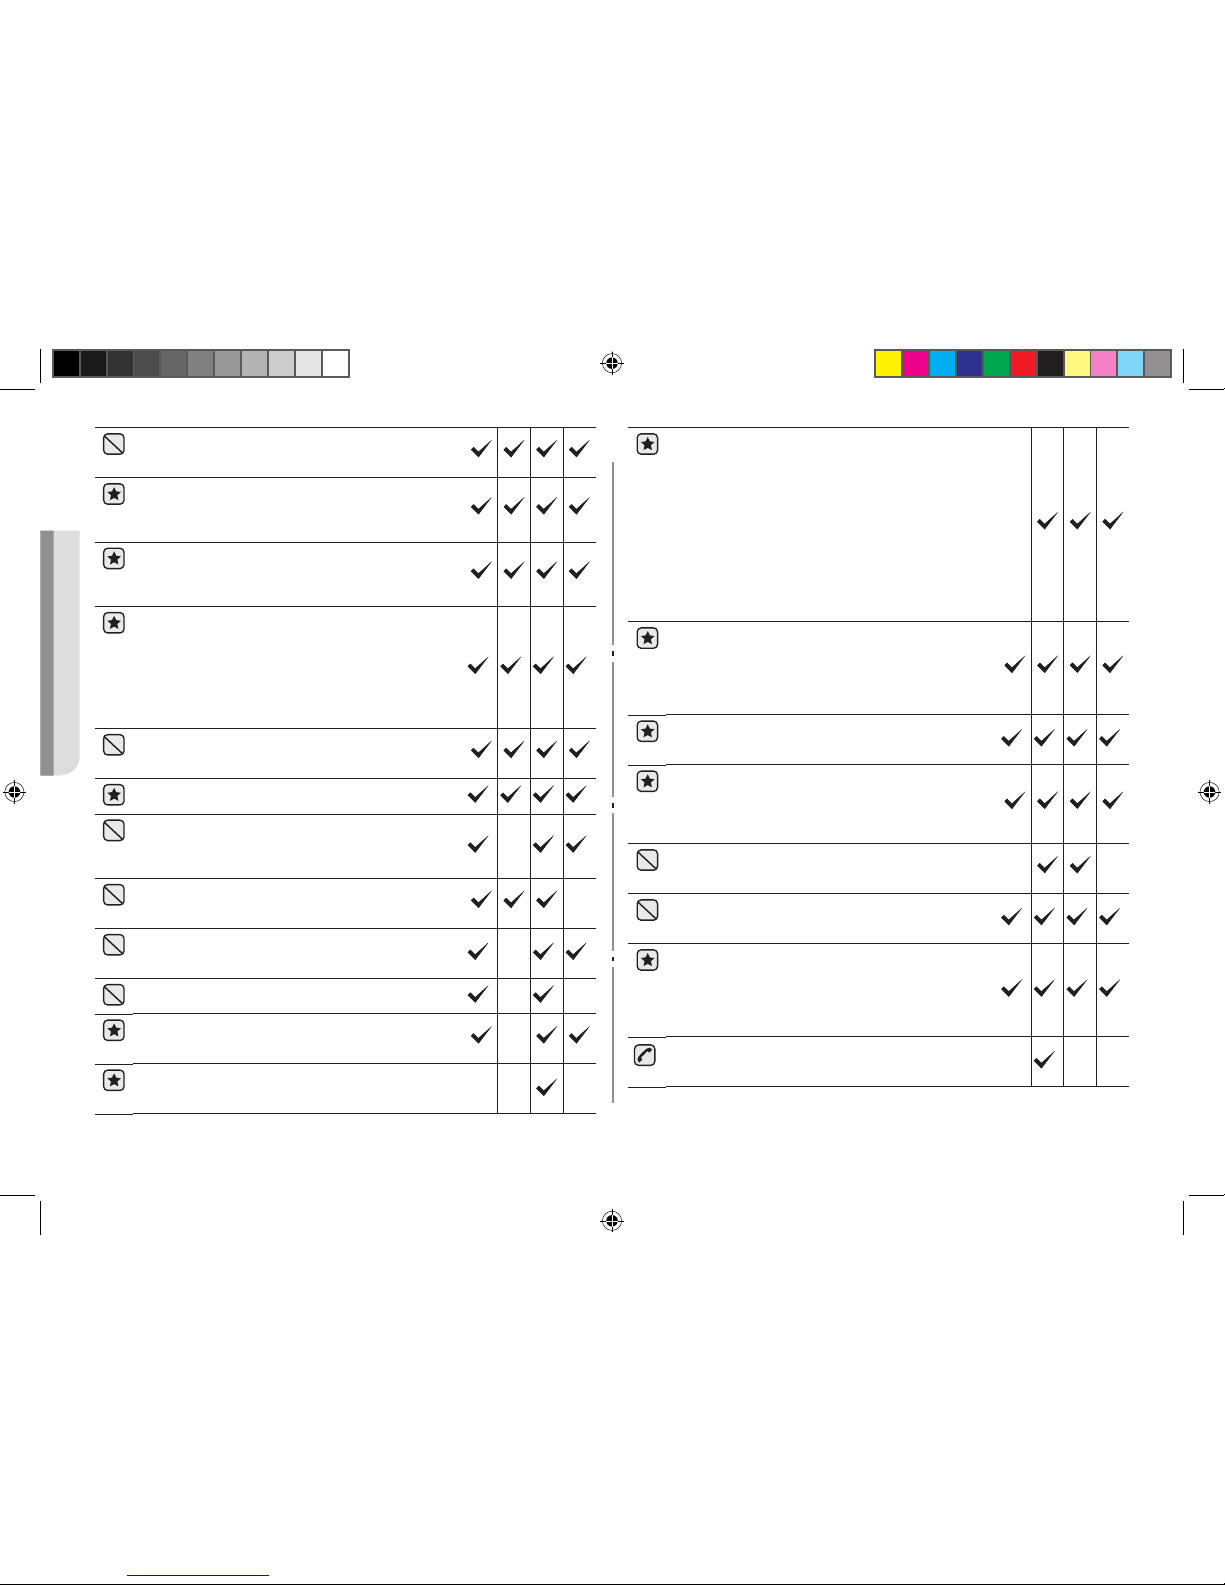
Appliances are not intended to be operated by means of
an external timer or separate remote-control system.
Do not pour or directly spray water onto the oven.
Do not place objects on the oven, inside or on the
door of the oven.
Do not spray volatile material such as insecticide
onto the surface of the oven.
Children should be supervised to ensure that they
do not play with the appliance.
The appliance is not intended for installing in road
vehicles, caravans and similar vehicles etc.
Do not store flammable materials in the oven. Take
special care when heating dishes or drinks that
contain alcohol as alcohol vapours may contact a
hot part of the oven.
CE117PAECX_XSA_DE68-04003M_EN.indd 3 19/04/2012 09:41:43
4
ENGLISH
The microwave oven is intended to be used on the
counter or counter top use only, the microwave oven
shall not be placed in a cabinet.(Counter top model only)
WARNING: The appliance and its accessible parts
become hot during use. Care should be taken to avoid
touching heating elements. Children less than 8 years of
age shall be kept away unless continuously supervised.
WARNING: Only allow children to use the oven without
supervision when adequate instructions have been
given so that the child is able to use the oven in a safe
way and understands the hazards of improper use.
This appliance can be used by children aged from 8
years and above and persons with reduced physical,
sensory or mental capabilities or lack of experience
and knowledge if they have been given supervision or
instruction concerning use of the appliance in a safe way
and understand the hazards involved. Children shall not
play with the appliance. Cleaning and user maintenance
shall not be made by children without supervision.
WARNING: If the door or door seals are damaged,
the oven must not be operated until it has been
repaired by a competent person.
This oven should be positioned proper direction and
height permitting easy access to cavity and control area.
WARNING: It is hazardous for anyone other than a
competent person to carry out any service or repair
operation that involves the removal of a cover which
gives protection against exposure to microwave energy.
WARNING: Ensure that the appliance is switched
o before replacing the lamp to avoid the possibility
of electric shock.
WARNING: Liquids and other foods must not be
heated in sealed containers since they are liable to
explode.
WARNING: Accessible parts may become hot during
use. To avoid burns young children should be kept away.
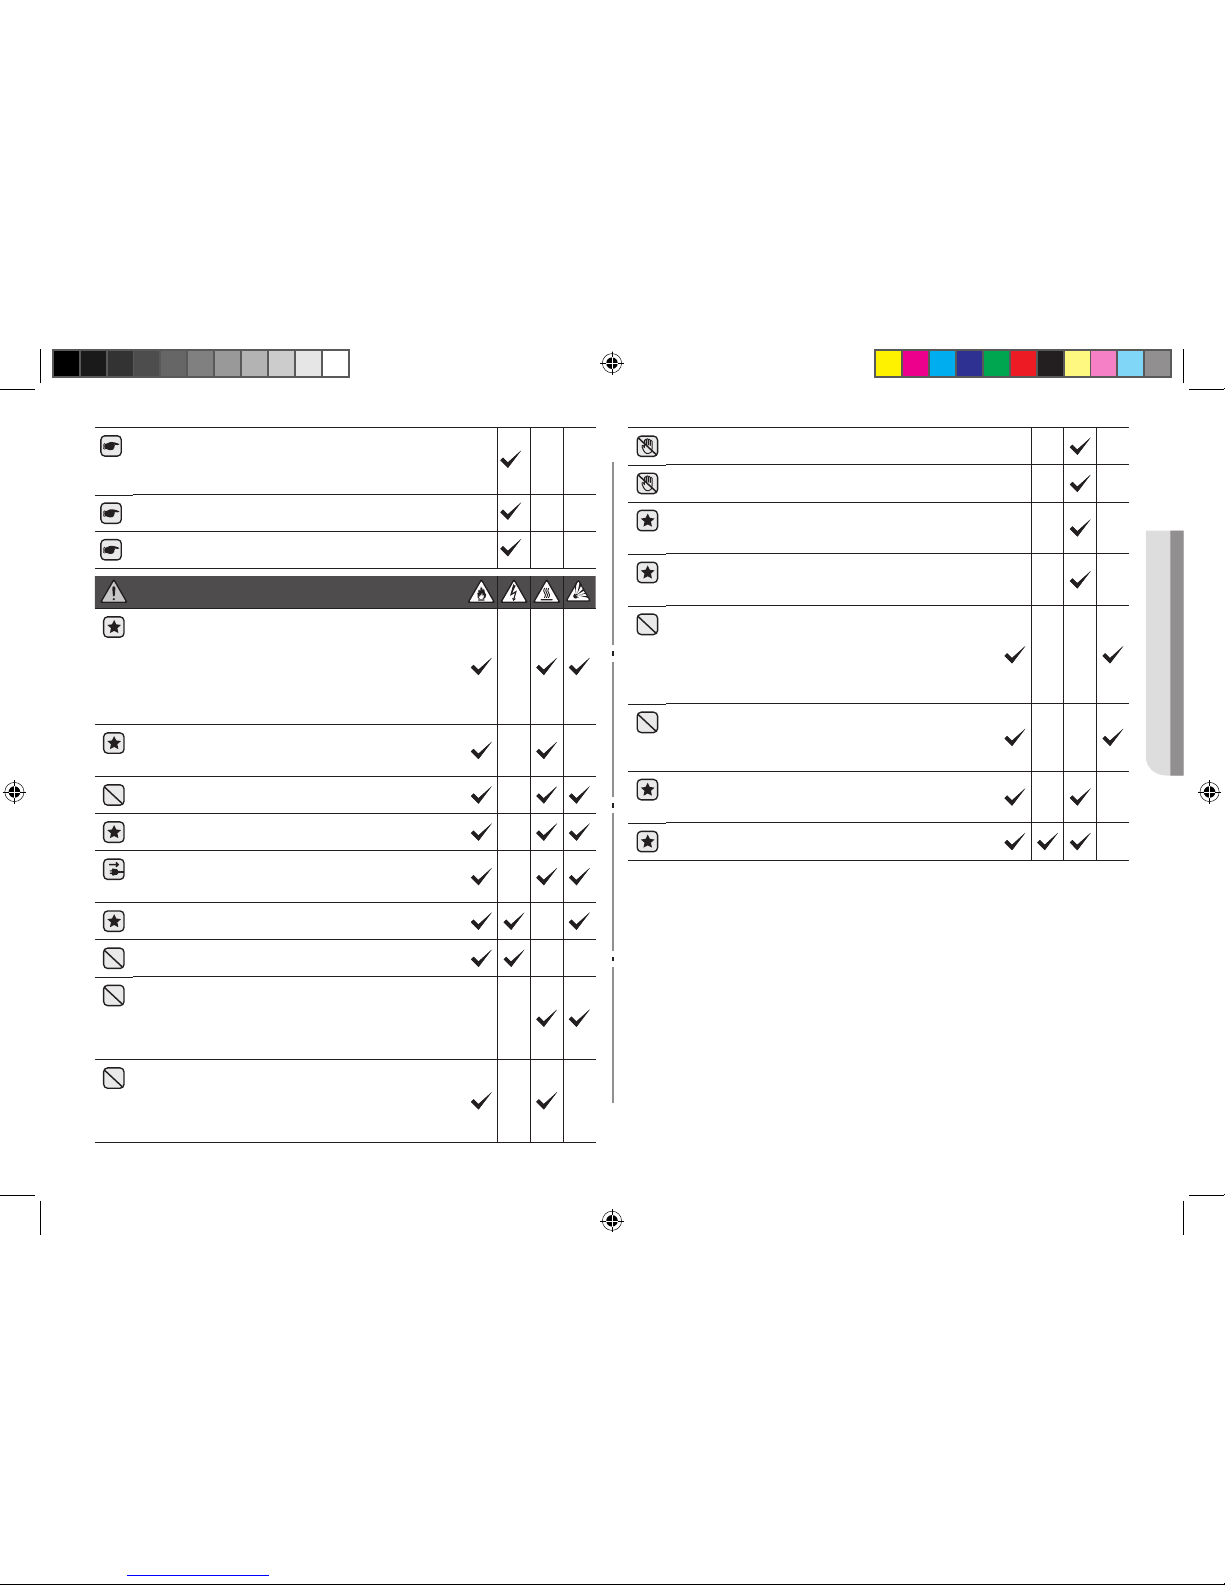
During use the appliance becomes hot. Care should
be taken to avoid touching heating elements inside
the oven.
WARNING: The contents of feeding bottles and baby
food jars shall be stirred or shaken and the temperature
checked before consumption, in order to avoid burns;
WARNING: Microwave heating of beverages can
result in delayed eruptive boiling,therefore care must
be taken when handling the container; To prevent this
situation ALWAYS allow a standing time of at least 20
seconds after the oven has been switched o so that
the temperature can equalize. Stir during heating, if
necessary, and ALWAYS stir after heating.
In the event of scalding, follow these FIRST AID
instructions:
• Immerse the scalded area in cold water for at
least 10 minutes.
• Cover with a clean, dry dressing.
• Do not apply any creams, oils or lotions.
The appliance is not intended for use by persons
(including children) with reduced physical, sensory
or mental capabilities, or lack of experience and
knowledge, unless they have been given supervision
or instruction concerning use of the appliance by a
person responsible for their safety.
Before using the your oven first time, oven should
be operated with the water during 10 minute and
then used.
This microwave oven has to be positioned so that
plug is accessible.If the oven generates a strange
noise, a burning smell, or smoke is emitted, unplug
the power plug immediately and contact your
nearest service center.
During cleaning conditions the surfaces may get
hotter than usual and children should be kept away
(Cleaning function model only)
Excess spillage must be removed before cleaning and
utensils which state in cleaning manual can be left in the
oven during cleaning. (Cleaning function model only)
Appliance should allow to disconnection of the
appliance from the supply after installation. The
disconnection may be achieved by having the plug
accessible or by incorporating a switch in the fixed
wiring in accordance with the wiring rules. (Built-in
model only.)
If the supply cord is damaged, it must be replaced
by the manufacturer, its service agent or similarly
qualifed persons in order to avoid a hazard.
CE117PAECX_XSA_DE68-04003M_EN.indd 4 19/04/2012 09:41:47
5
ENGLISH
Warning: When the appliance is operated in the
combination mode, children should only use
the oven under adult supervision due to the
temperatures generated.
The temperature of accessible surfaces may be high
when the appliance is operating.
The door or the outer surface may get hot when the
appliance is operating.
CAUTION
Only use utensils that are suitable for use in
microwave ovens; DO NOT use any metallic
containers, Dinnerware with gold or silver trimmings,
Skewers, forks, etc. Remove wire twist ties from
paper or plastic bags.
Reason: Electric arcing or sparking may occur and
may damage the oven.
When heating food in plastic or paper containers,
keep an eye on the oven due to the possibility of
ignition;
Do not use your microwave oven to dry papers or
clothes.
Use shorter times for smaller amounts of food to
prevent overheating and burning food.
If smoke is observed, switch o or unplug the
appliance and keep the door closed in order to stifle
any flames;
The oven should be cleaned regularly and any food
deposits removed;
Do not immerse the power cable or power plug in
water and keep the power cable away from heat.
Eggs in their shell and whole hard-boiled eggs
should not be heated in microwave ovens since they
may explode, even after microwave heating has
ended; Also do not heat airtight or vacuum-sealed
bottles, jars, containers, nuts inshells, tomatoes etc.
Do not cover the ventilation slots with cloth or
paper. They may catch fire as hot air escapes from
the oven. The oven may also overheat and switch
itself o automatically, and will remain o until it
cools suciently.
Always use oven mitts when removing a dish from
the oven to avoid unintentional burns.
Do not touch heating elements or interior oven walls
until the oven has cooled down.
Stir liquids halfway during heating or after heating
ends and allow the liquid stand at least 20 seconds
after heating to prevent eruptive boiling.
Stand at arms length from the oven when opening
the door to avoid getting scalded by escaping hot
air or steam.
Do not operate the microwave oven when it is
empty. The microwave oven will automatically
shut down for 30 minutes for safety purposes. We
recommend placing a glass of water inside the oven
at all times to absorb microwave energy in case the
microwave oven is started accidentally.
Do not use harsh abrasive cleaners or sharp
metal scrapers to clean the oven door glass since
they can scratch the surface, which may result in
shattering of the glass
Install the oven in compliance with the clearances
stated in this manual (see Installing Your Microwave
Oven)
Take care when connecting other electrical
appliances to sockets near the oven.
CE117PAECX_XSA_DE68-04003M_EN.indd 5 19/04/2012 09:41:49

6
ENGLISH
CONTENTS “QUICK” LOOK-UP GUIDE
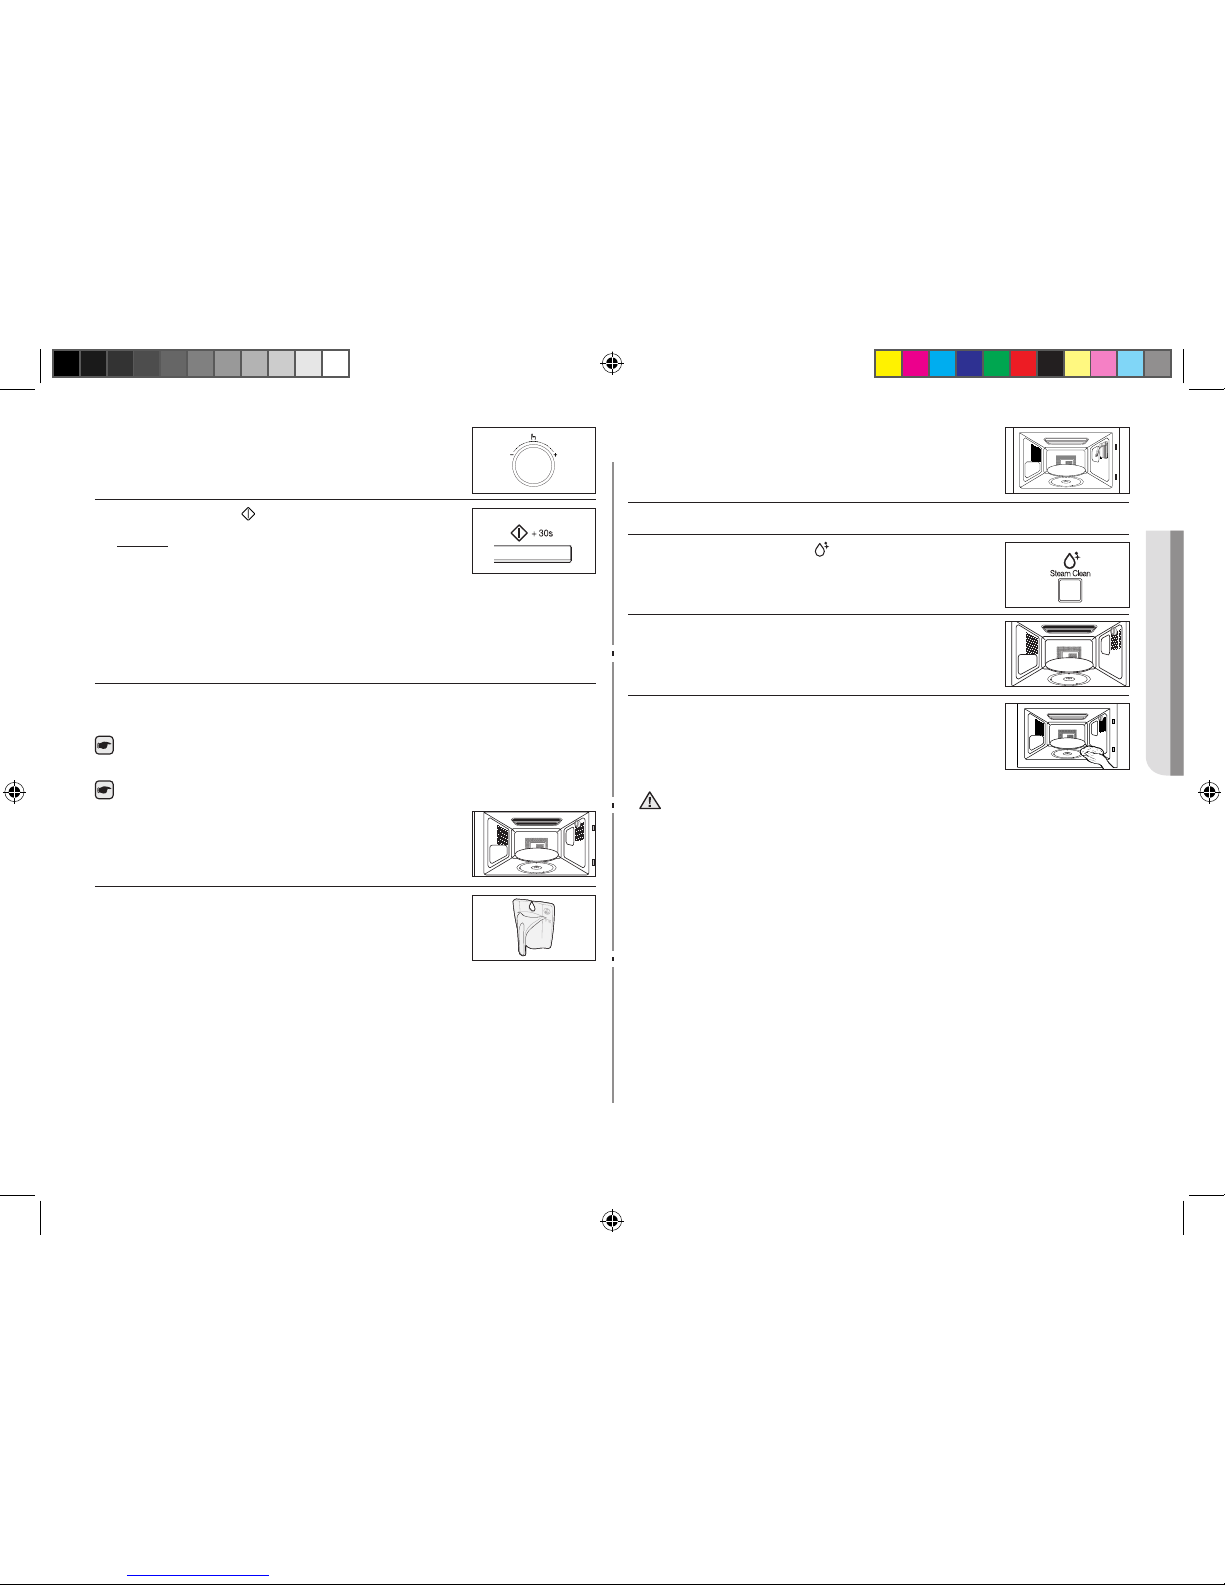
I want to cook some food.
1. Turn Mode Selector Dial to Microwave ( ) mode
position.
2. Turn Multi Funtion Selector Dial to desired until
the appropriate power level is displayed. At that time,
press the Multi Funtion Selector Dial to set the
power level.
3. Set the cooking time by turning the Multi Funtion
Selector Dial.
4. Press Start/+30s ( ) button.
Result: Cooking starts.
• When cooking has finished, the
oven will beep and flash “0” four
times. The oven will then beep one time per minute.
I want to add an extra 30 seconds.
Leave the food in the oven.
Press Start/+30s ( ) button one or more times for
each extra 30 seconds that you wish to add.
I want to Power defrost some food.
1. Press the Power Defrost ( ) button.
2. Set the cooking category by turning the Multi
Funtion Selector Dial. Press Multi Funtion
Selector Dial to set desired.
Using this instruction booklet ................................................................................................. 2
Safety information .................................................................................................................. 2
Legend for symbols and icons ............................................................................................... 2
Precautions to avoid possible exposure to excessive microwave energy ................................ 2
Protection de l’environnement ...............................................................................................3
Important safety instructions .................................................................................................. 3
“Quick” look-up guide ............................................................................................................6
Using the steam cleaning (only CE117PAECX) .......................................................................7
Control panel (only CE117PC, CE117PTC, CE117PPC, CE117PPTCX model) ...................... 8
Control panel (only CE117PAECX model) ............................................................................... 8
Oven .....................................................................................................................................9
Accessories ........................................................................................................................... 9
Installing your microwave oven ..............................................................................................10
Setting the time .....................................................................................................................11
How a microwave oven works ............................................................................................... 11
Checking that your oven is operating correctly ....................................................................... 12
What to do if you are in doubt or have a problem...................................................................12
Cooking/Reheating ................................................................................................................ 13
Power levels and time variations ............................................................................................13
Stopping the cooking ............................................................................................................14
Adjusting the cooking time.....................................................................................................14
Using the auto cook feature ................................................................................................... 14
Using the auto reheat feature ................................................................................................. 16
Fast preheating the oven .......................................................................................................17
Using the power defrost feature ............................................................................................. 17
Using the snack cook feature ................................................................................................19
Using the manual steam cook function (only CE117PAECX model) ........................................ 20
Using the manual crusty cook function (only CE117PTC, CE117PPTCX) ............................... 22
Using the steam cook function (only CE117PPC, CE117PPTCX model) ................................24
Manual steam cook settings ..................................................................................................25
Using the sensor cook feature ............................................................................................... 26
Sensor cook setting ............................................................................................................... 27
Cooking by convection ..........................................................................................................29
Grilling ...................................................................................................................................30
Choosing the accessories ...................................................................................................... 30
Using the deodorize feature (only CE117PC, CE117PTC, CE117PPC, CE117PPTCX model) 30
Combining microwaves and the grill ......................................................................................31
Combining microwaves and convection ................................................................................. 31
Switching the beeper o ........................................................................................................ 32
Setting the energy save mode ...............................................................................................32
Using the keep warm feature ................................................................................................. 32
Safety-locking your microwave oven ...................................................................................... 32
Using the keep warm settings ................................................................................................ 33
Cookware guide ....................................................................................................................33
Cooking guide .......................................................................................................................34
Cleaning your microwave oven ..............................................................................................43
Storing and repairing your microwave oven............................................................................44
Technical specifications ......................................................................................................... 44
CE117PAECX_XSA_DE68-04003M_EN.indd 6 19/04/2012 09:41:51
7
ENGLISH
3. Select the weight by turning the Multi Funtion
Selector Dial as required.
4. Press Start/+30s ( ) button.
Result: Defrosting starts.
• When cooking has finished, the
oven will beep and flash “0” four
times. The oven will then beep one time per minute.
USING THE STEAM CLEANING (ONLY CE117PAECX)
The steam provided by steam clean system will soak the cavity surface.
After using steam clean function, you can easily clean the cavity of oven.
Use this function only after the oven has completely cooled.
(Room temperature)
Use normal water only,and no distilled water.
1. Open the door.
2. Fill with water following guide line inside the water
bowl. (The line is about 30 ml.)
3. Please attach the water bowl in right side of the
oven.
4. Close the door.
5. Press the Steam clean ( ) button.
(Bulb does work during Steam cleaning time.)
6. Open the door.
7. Please clean cavity of oven with dried dishtowel.
Remove the turntable and only under rack with
kitchen paper.
• Water Bowl only can be use during “Steam Clean” mode.
• When cooking non-liquid items, remove water bowl because It
will damage and cause fire to the microwave oven.
WARNING
CE117PAECX_XSA_DE68-04003M_EN.indd 7 19/04/2012 09:41:51
8
ENGLISH
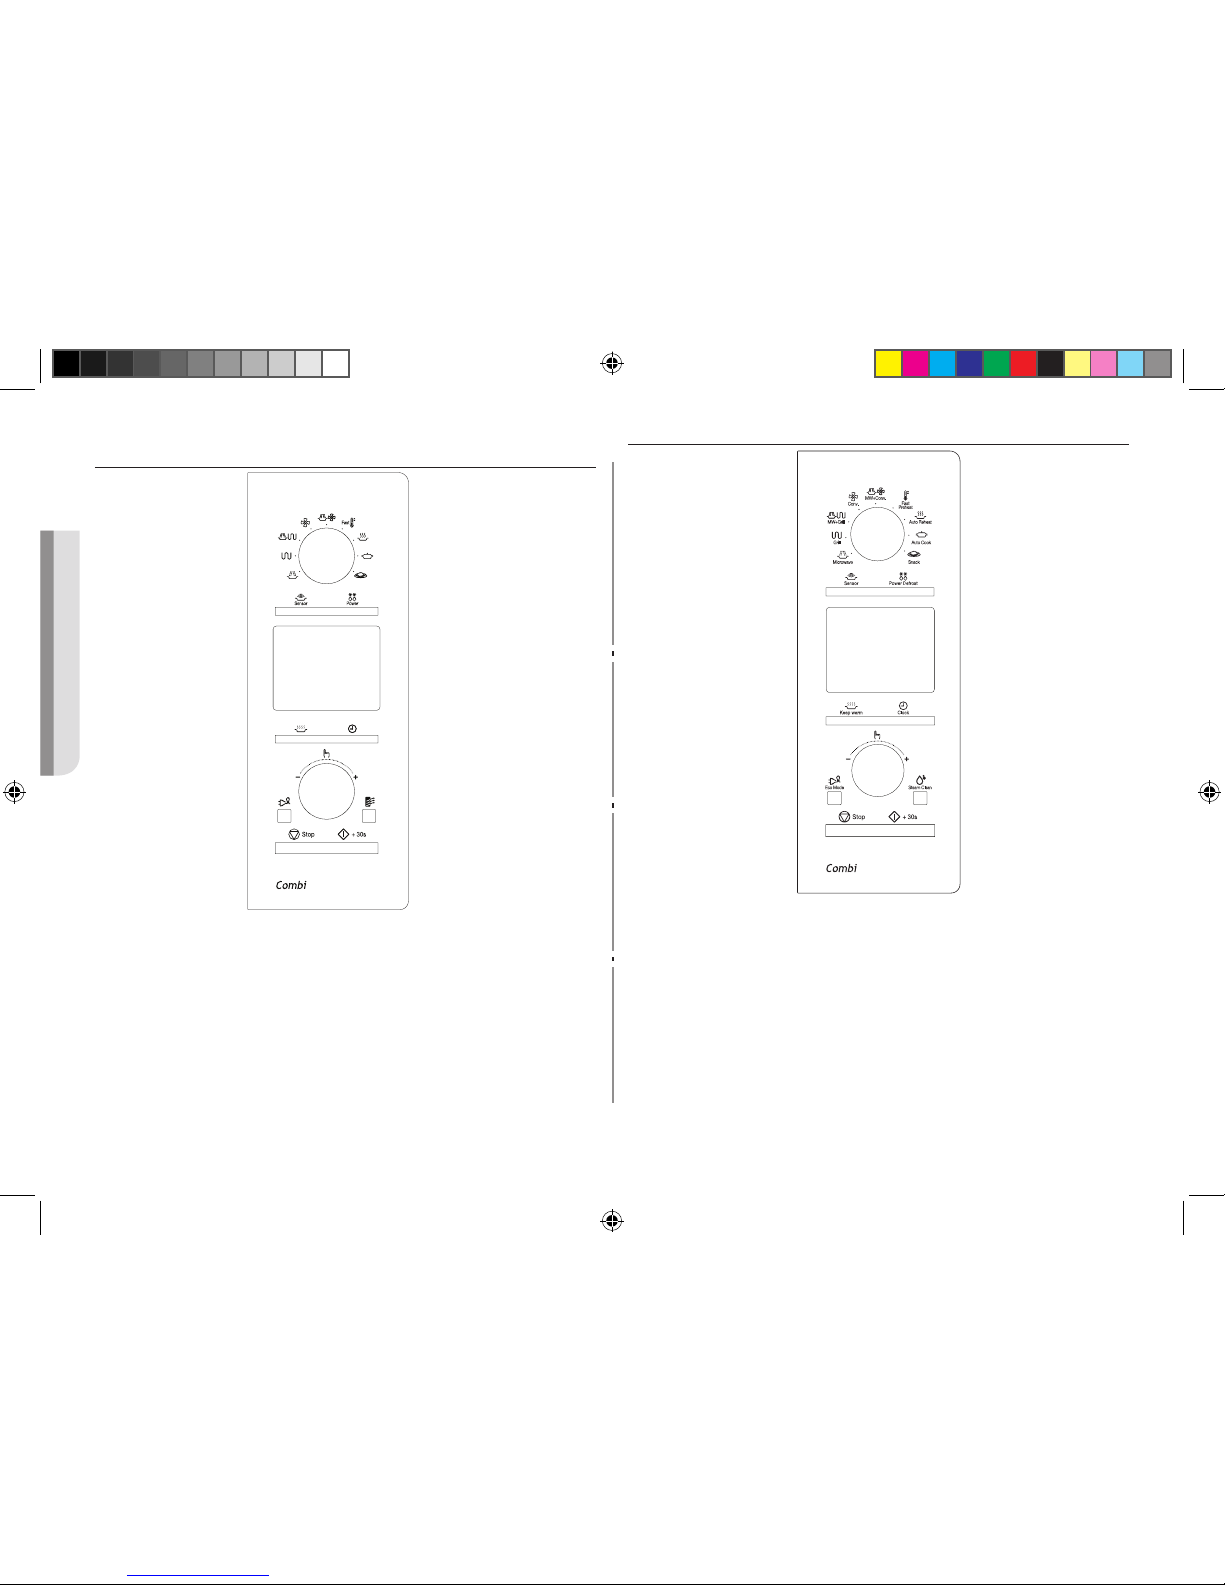
CONTROL PANEL (ONLY CE117PC, CE117PTC,
CE117PPC, CE117PPTCX MODEL)
1. MICROWAVE MODE
2. GRILL MODE
3. MICROWAVE+GRILL MODE
4. CONVECTION MODE
5. MICROWAVE+CONVECTION
MODE
6. FAST PREHEAT MODE
7. AUTO REHEAT FEATURE
MODE
8. AUTO COOK MODE
9. SNACK FEATURE MODE
10. SENSOR COOK BUTTON
11. POWER DEFROST FEATURE
BUTTON
12. KEEP WARM BUTTON
13. CLOCK BUTTON
14. ECO BUTTON
15. DEODORIZE BUTTON
16. STOP/CANCEL BUTTON
17. START/+30S BUTTON
18. DISPLAY
19. MODE SELECTOR DIAL
20. MULTI FUNTION SELECTOR
DIAL
CONTROL PANEL (ONLY CE117PAECX MODEL)
1. MICROWAVE MODE
2. GRILL MODE
3. MICROWAVE+GRILL MODE
4. CONVECTION MODE
5. MICROWAVE+CONVECTION
MODE
6. FAST PREHEAT MODE
7. AUTO REHEAT FEATURE MODE
8. AUTO COOK MODE
9. SNACK FEATURE MODE
10. SENSOR COOK BUTTON
11. POWER DEFROST FEATURE
BUTTON
12. KEEP WARM BUTTON
13. CLOCK BUTTON
14. ECO BUTTON
15. STEAM CLEAN BUTTON
16. STOP/CANCEL BUTTON
17. START/+30S BUTTON
18. DISPLAY
19. MODE SELECTOR DIAL
20. MULTI FUNTION SELECTOR DIAL
3
1
2
4
5
6
7
8
9
10
11
12
13
14
15
16
17
20
18
19
1
10 11
2
3
4
5
6
7
8
9
18
19
12 13
20
15
14
16
17
CE117PAECX_XSA_DE68-04003M_EN.indd 8 19/04/2012 09:41:52
9
ENGLISH
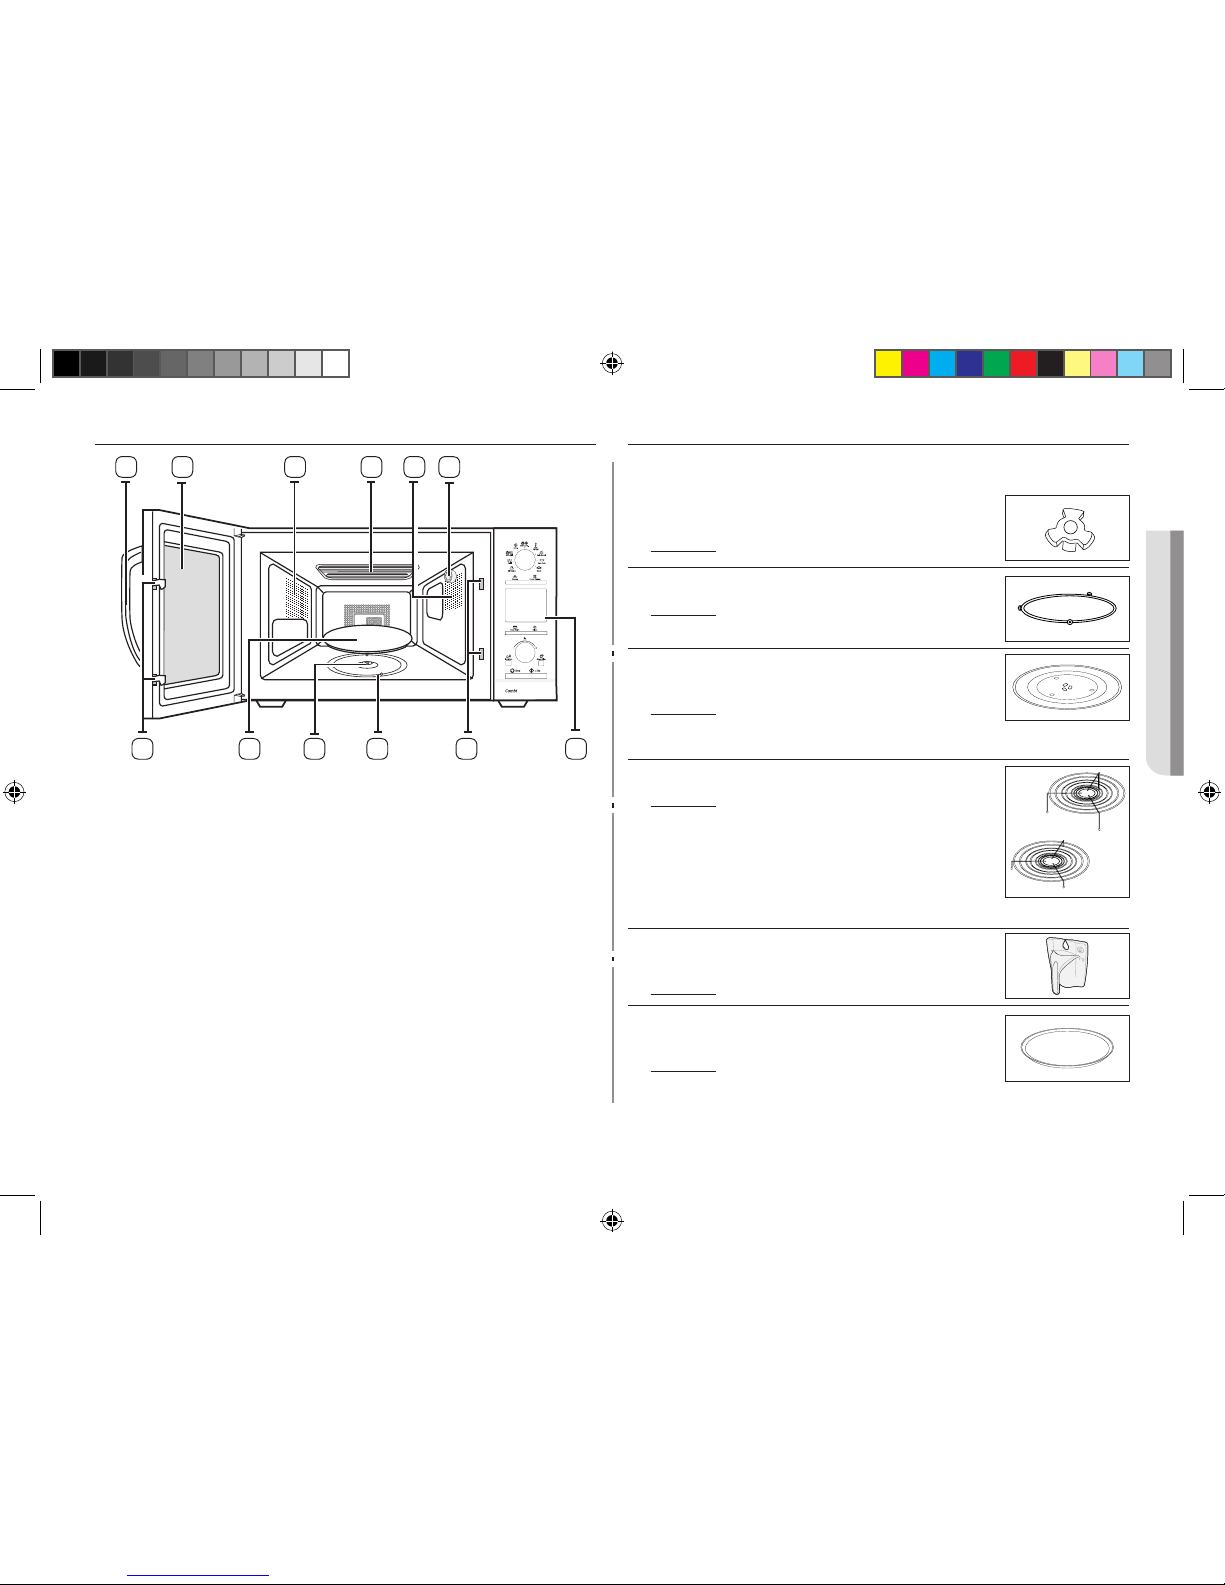
OVEN
1. DOOR HANDLE
2. DOOR
3. VENTILATION HOLES
4. HEATING ELEMENT
5. VENTILATION HOLES
6. WATER BOWL HOLDER
(Only CE117PAECX model.)
7. DOOR LATCHES
8. TURNTABLE
9. COUPLER
10. ROLLER RING
11. SAFETY INTERLOCK HOLES
12. CONTROL PANEL
ACCESSORIES
Depending on the model that you have purchased, you are supplied with
several accessories that can be used in a variety of ways.
1. Coupler, to be placed correctly over the motor shaft
in the base of the oven.
Purpose: The coupler rotates the turntable.
2. Roller ring, to be placed in the center of the oven.
Purpose: The roller ring supports the turntable.
3. Turntable, to be placed on the roller ring with the
center fitting on to the coupler.
Purpose: The turntable serves as the main
cooking surface; it can be easily
removed for cleaning.
4. High rack, Low rack, to be placed on the turntable.
Purpose: The metal racks can be used to cook
two dishes at the same time. A small
dish may be placed on the turntable
and a second dish on the rack. The
metal racks can be used in grill,
convection and combination
cooking.
5. Clean water bowl, to be placed in the right side of
the oven. (Only CE117PAECX model.)
Purpose: The water bowl can be used to clean.
6. Crust plate, to be placed on the turntable.
(Only CE117PTC/CE117PPTCX model.)
Purpose: The crust plate is used to brown botton
of food by using the microwave or grill
combination cooking modes and to keep pastry and pizza
dough crispy.
8 9 10 11 127
1 2 3
4
5
6
CE117PAECX_XSA_DE68-04003M_EN.indd 9 19/04/2012 09:41:53
10
ENGLISH
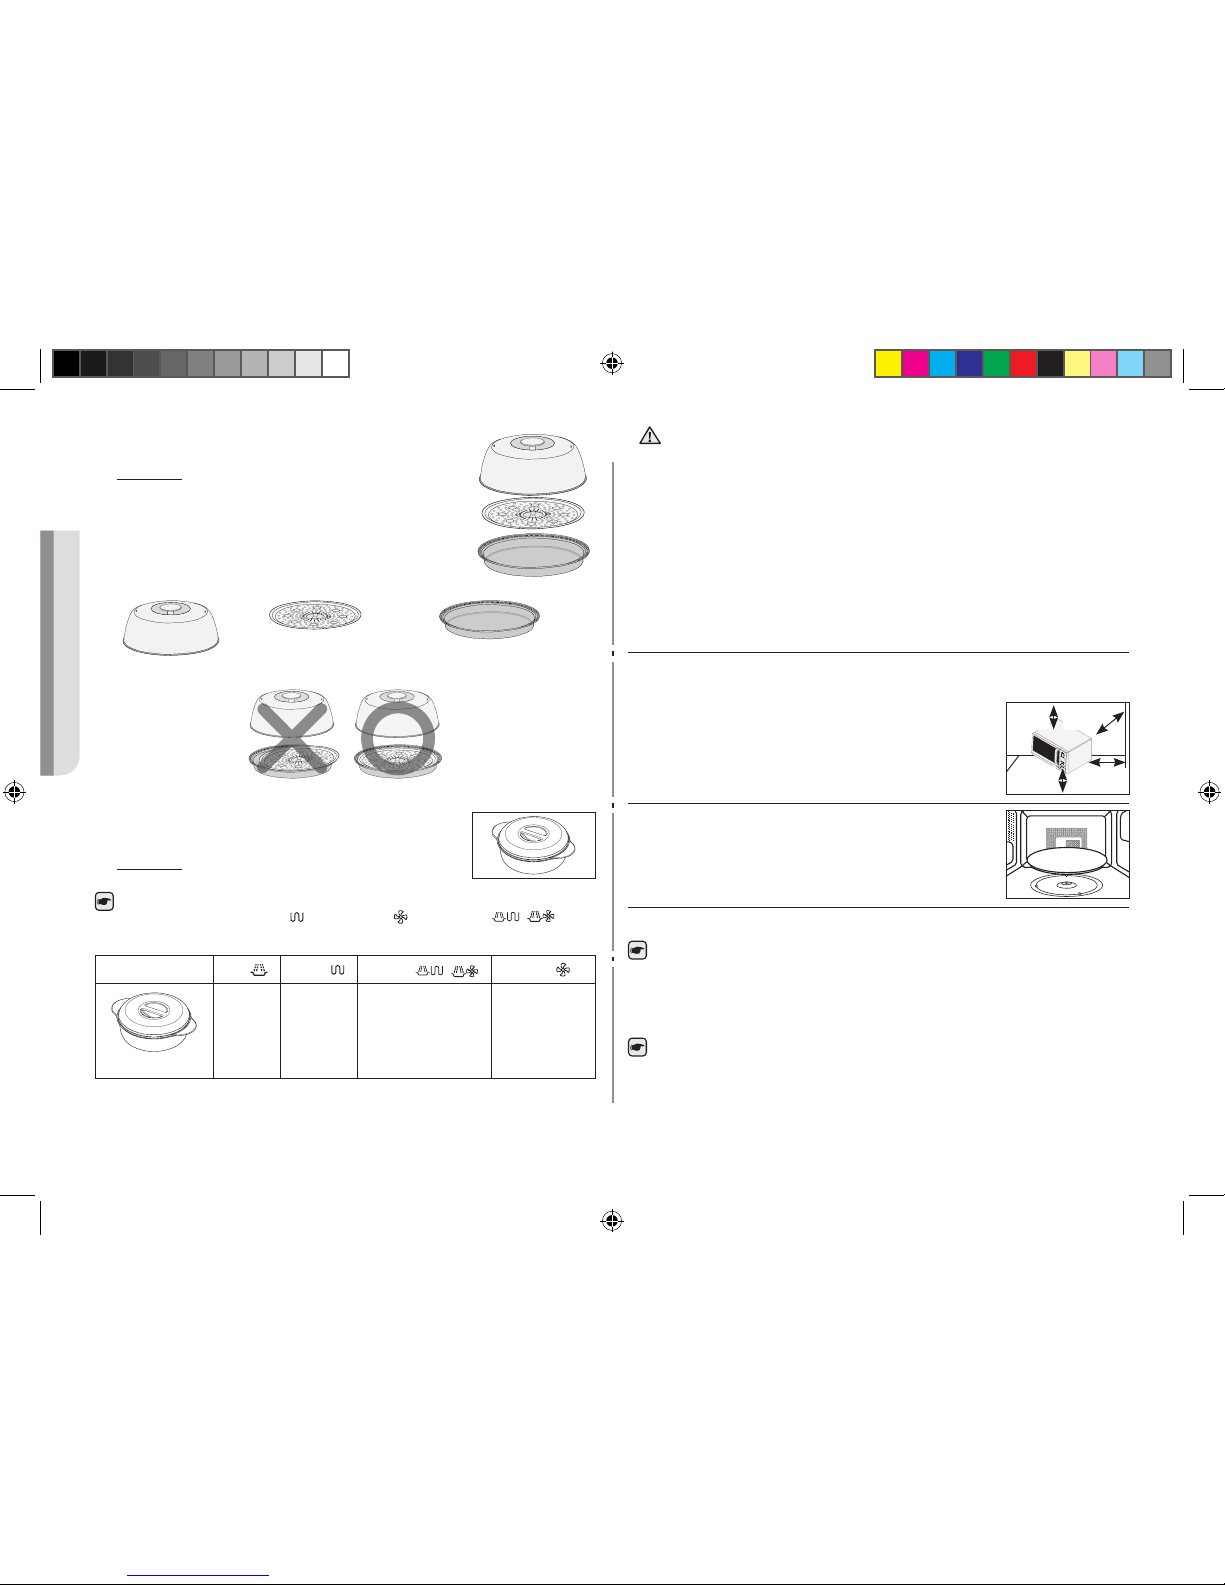
7. Pro steamer/Crusty plate to be placed on the
turntable. (Only CE117PAECX model.)
Purpose: The Pro Steamer can be used to steam
crusty cook. The Crusty plate is used
to brown food better in the microwave
or grill combination cooking modes and
to keep pastry and pizza dough crisp.
Stainless steel lid Steam tray Steam plate/Crusty plate
8. Steam cooker (Only CE117PPC/CE117PPTCX
model.)
Purpose: The plastic steam cooker when using
power steam function.
DO NOT operate the Grill( ), Convection( ) and Combi( , )
mode with Steam cooker.
Operation mode MW( )
GRILL( )
COMBI( , )
CONV( )
(Steam cooker)
O x x x
• Never use this Pro Steamer with a dierent product or model.
It may cause a fire or fatal damage to the product.
• Do not use the Pro Steamer without water or food inside.
When you use this Pro Steamer, pour at least 500 ml of water before
use. If the amount of water is less than 500 ml, it may cause incomplete
cooking, or may cause a fire or fatal damage to the product.
• Caution must be taken when removing the container from inside the
Pro Steamer after cooking, as it will be very hot.
• Make sure you install the cover onto the Pro Steamer so that it fits into
the Steam plate / Crusty plate.
The eggs or the chestnuts would be explode without setting the steam
cover and steam plate as instructed on the Instruction book.
INSTALLING YOUR MICROWAVE OVEN
Place the oven on a flat level surface 85 cm above the floor. The surface
should be strong enough to safely bear the weight of the oven.
1. When you install your oven, make sure there is
adequate ventilation for your oven by leaving at least
10 cm (4 inches) of space behind and, on the sides
of the oven and 20 cm (8 inches) of space above.
2. Remove all packing materials inside the oven.
Install the roller ring and turntable.
Check that the turntable rotates freely.
3. This microwave oven has to be positioned so that plug is accessible.
If the supply cord is damaged, it must be replaced by a special cord or
assembly available from the manufacturer or its service agent.
For your personal safety, plug the cable into a 3-pin, 240 Volt, 50 Hz,
AC earthed socket. If the power cable of this appliance is damaged, it
must be replaced by a special cable.
Do not install the microwave oven in hot or damp surroundings like
next to a traditional oven or radiator. The power supply specifications
of the oven must be respected and any extension cable used must
be of the same standard as the power cable supplied with the oven.
Wipe the interior and the door seal with a damp cloth before using your
microwave oven for the first time.
10 cm
behind
20 cm
above
10 cm on
the side
85 cm of
the floor
CAUTION
CE117PAECX_XSA_DE68-04003M_EN.indd 10 19/04/2012 09:41:54
11
ENGLISH
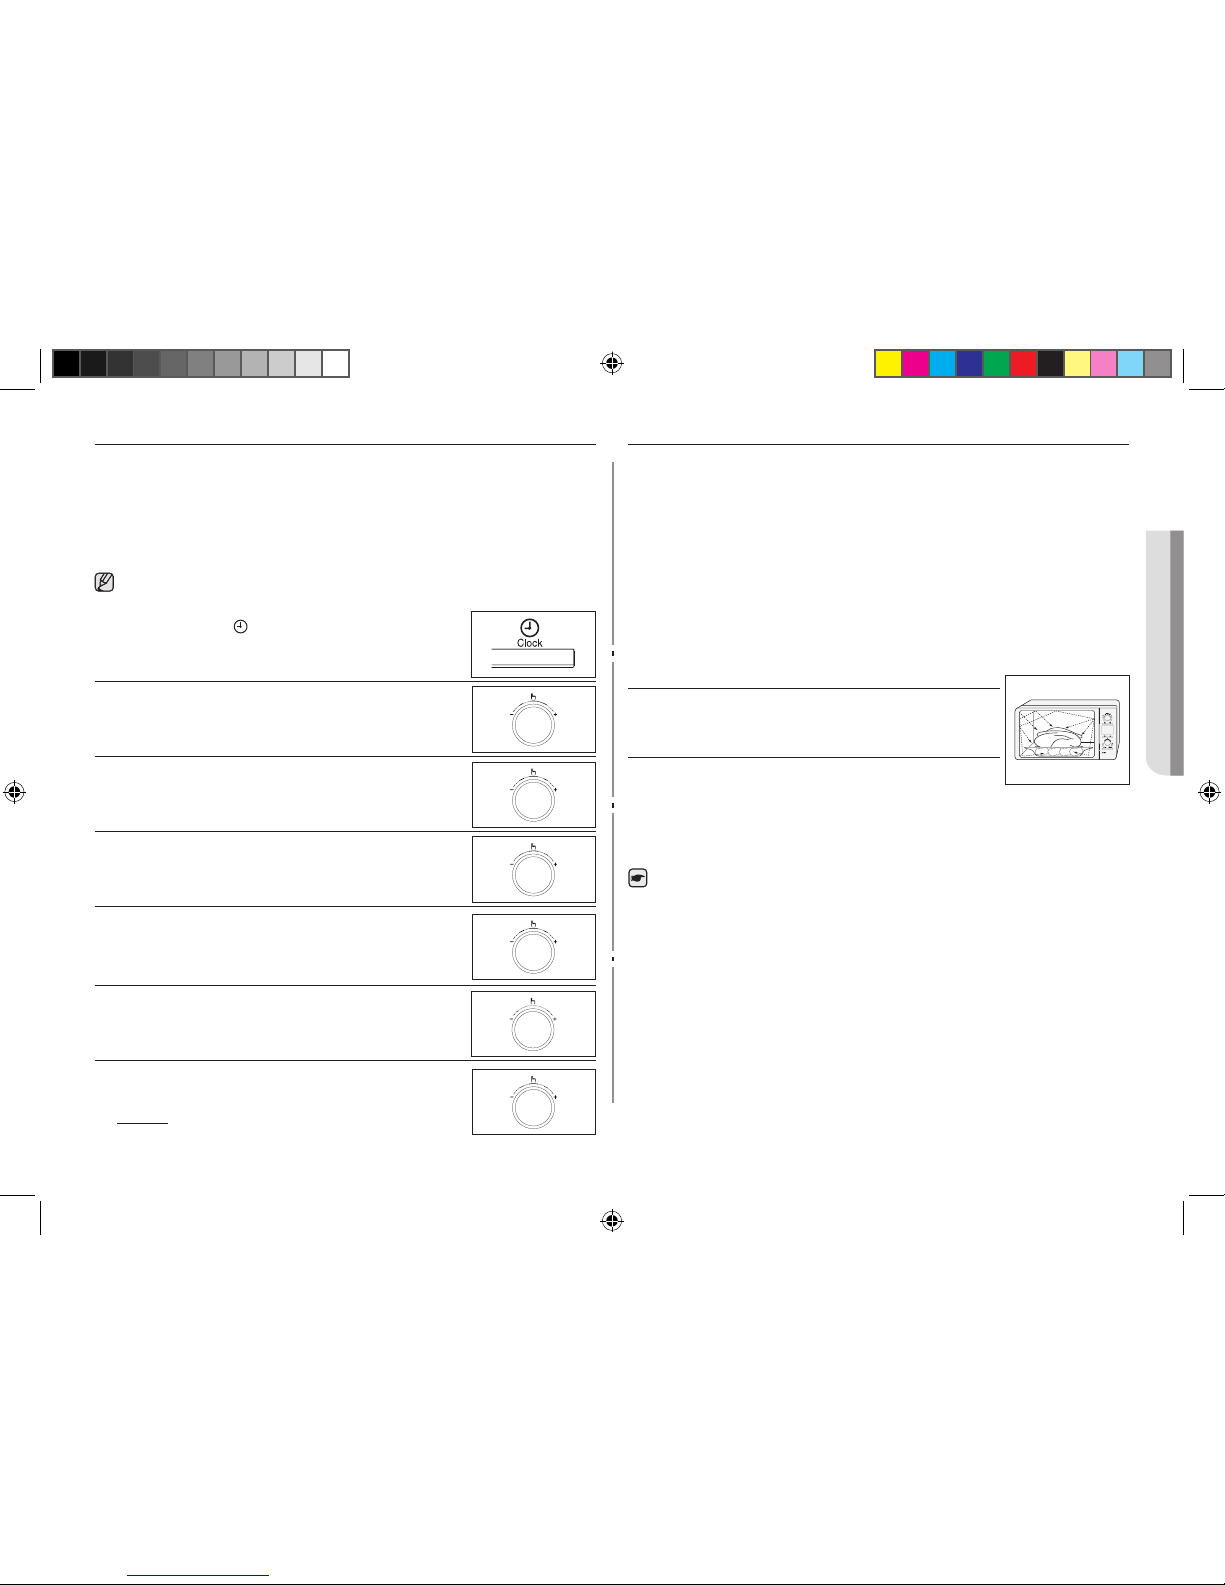
SETTING THE TIME
Your microwave oven has an inbuilt clock. When power is supplied, “:0”,
“88:88” or “12:00” is automatically displayed on the display.
Please set the current time. The time can be displayed in either the 24- hour
or 12-hour notation. You must set the clock:
• When you first install your microwave oven
• After a power failure
Do not forget to reset the clock when you switch to and from summer
and winter time.
1. Press the Clock ( ) button.
2. Turn the Multi Funtion Selector Dial to set time
display type. (12H or 24H)
3. Press the Multi Funtion Selector Dial to complete
the setup.
4. Turn the Multi Funtion Selector Dial to set the
hour.
5. Press the Multi Funtion Selector Dial.
6. Turn the Multi Funtion Selector Dial to set the
minute.
7. When the right time is displayed, press the Multi
Funtion Selector Dial to start the clock.
Result: The time is displayed whenever you are
not using the microwave oven.
HOW A MICROWAVE OVEN WORKS
Microwaves are high-frequency electromagnetic waves; the energy released
enables food to be cooked or reheated without changing either the form or
the colour.
You can use your microwave oven to:
• Defrost
• Reheat
• Cook
Cooking principle.
1. The microwaves generated by the magnetron
reflected at cavity and are distributed uniformly as
the food rotates on the turntable. The food is thus
cooked evenly.
2. The microwaves are absorbed by the food up to
a depth of about 1 inch (2.5 cm). Cooking then
continues as the heat is dissipated within the food.
3. Cooking times vary according to the container used
and the properties of the food:
• Quantity and density
• Water content
• Initial temperature (refrigerated or not)
As the centre of the food is cooked by heat dissipation, cooking
continues even when you have taken the food out of the oven.
Standing times specified in recipes and in this booklet must therefore
be respected to ensure:
• Even cooking of the food right to the centre
• The same temperature throughout the food
CE117PAECX_XSA_DE68-04003M_EN.indd 11 19/04/2012 09:41:55
12
ENGLISH
The food is either overcooked or undercooked.
• Was the appropriate cooking length set for the type of food?
• Was an appropriate power level chosen?
Sparking and cracking occur inside the oven (arcing).
• Have you used a dish with metal trimmings?
• Have you left a fork or other metal utensil inside the oven?
• Is aluminum foil too close to the inside walls?
The oven causes interference with radios or televisions.
• Slight interference may be observed on televisions or radios when the
oven is operating. This is normal.
* Solution: Install the oven away from televisions, radios and aerials.
• If interference is detected by the oven’s microprocessor, the display may
be reset.
* Solution: Disconnect the power plug and reconnect it. Reset the
time.
“E-24” message indicates.
• The “E-24” message is automatically activated prior to the microwave
oven overheating. Should the “E-24” message be activated, then
depress the “Stop/Cancel” key to utilize the initialization mode.
If the above guidelines do not enable you to solve the problem, then contact
your local SAMSUNG customer serivice centre.
Please have the following information read;
• The model and serial numbers, normally printed on the rear of the
oven
• Your warranty details
• A clear description of the problem
Then contact your local dealer or SAMSUNG aftersales service.
CHECKING THAT YOUR OVEN IS OPERATING
CORRECTLY
The following simple procedure enables you to check that your oven is
working correctly at all times. If you are in doubt, refer to the section entitled
“What to do if you are in doubt or have a problem” on the page.
The oven must be plugged into an appropriate wall socket. The
turntable must be in position in the oven. If a power level other than the
maximum (100 % - 900 W) is used, the water takes longer to boil.
Open the oven door by pulling the handle on the right side of the door.
Place a glass of water on the turntable. Close the door.
Press the Start/+30s ( ) button and set the time to 4
or 5 minutes, by pressing the Start/+30s ( ) button the
appropriate number of times.
Result: The oven heats the water for 4 or 5
minutes.
The water should then be boiling.
WHAT TO DO IF YOU ARE IN DOUBT OR HAVE A
PROBLEM
Becoming familiar with a new appliance always takes a little time. If you
have any of the problems listed below, try the solutions given. They may
save you the time and inconvenience of an unnecessary service call.
The following are normal occurrences.
• Condensation inside the oven.
• Air flow around the door and outer casing.
• Light reflection around the door and outer casing.
• Steam escaping from around the door or vents.
The food is not cooked at all.
• Have you set the timer correctly and pressed the Start/+30s ( )
button?
• Is the door closed?
• Have you overloaded the electric circuit and caused a fuse to blow or a
breaker to be triggered.
CE117PAECX_XSA_DE68-04003M_EN.indd 12 19/04/2012 09:41:55
13
ENGLISH
COOKING/REHEATING
The following procedure explains how to cook or reheat food.
ALWAYS check your cooking settings before leaving the oven
unattended.
Open the door. Place the food in the centre of the turntable. Close the door.
Never switch the microwave oven on when it is empty.
1. Turn Mode Selector Dial to Microwave ( ) mode
position.
Result: The following indications are displayed:
(microwave mode)
2. Turn Multi Funtion Selector Dial to desired until
the appropriate power level is displayed. At that time,
press the Multi Funtion Selector Dial to set the
power level.
3. Set the cooking time by turning the Multi Funtion
Selector Dial.
Result: The cooking time is displayed.
4. Press the Start/+30s ( ) button.
Result: The oven light comes on and the
turntable starts rotating. Cooking starts
and when it has finished:
• The oven beep and flash “0” four times.
The oven will then beep one time per minute.
If you would like to know the current Power Level of the oven cavity,
press Multi Funtion Selector Dial once. If you would like to change
the power level during cooking, turn the Multi Funtion Selector Dial.
Quick Start:
If you wish to heat a dish for a short period of time at maximum power
(900 W), you can also simply press the Start/+30s ( ) button once for
each 30 seconds of cooking time. The oven starts immediately.
POWER LEVELS AND TIME VARIATIONS
The power level function enables you to adapt the amount of energy
dissipated and thus the time required to cook or reheat your food,
according to its type and quantity. You can choose between six power
levels.
Power level Percentage Output
HIGH 100 % 900 W
MEDIUM HIGH 67 % 600 W
MEDIUM 50 % 450 W
MEDIUM LOW 33 % 300 W
DEFROST 20 % 180 W
LOW 11 % 100 W
The cooking times given in recipes and in this booklet correspond to the
specific power level indicated.
If you select a... Then the cooking time must be...
Higher power level
Lower power level
Decreased
Increased
CE117PAECX_XSA_DE68-04003M_EN.indd 13 19/04/2012 09:41:55

14
ENGLISH
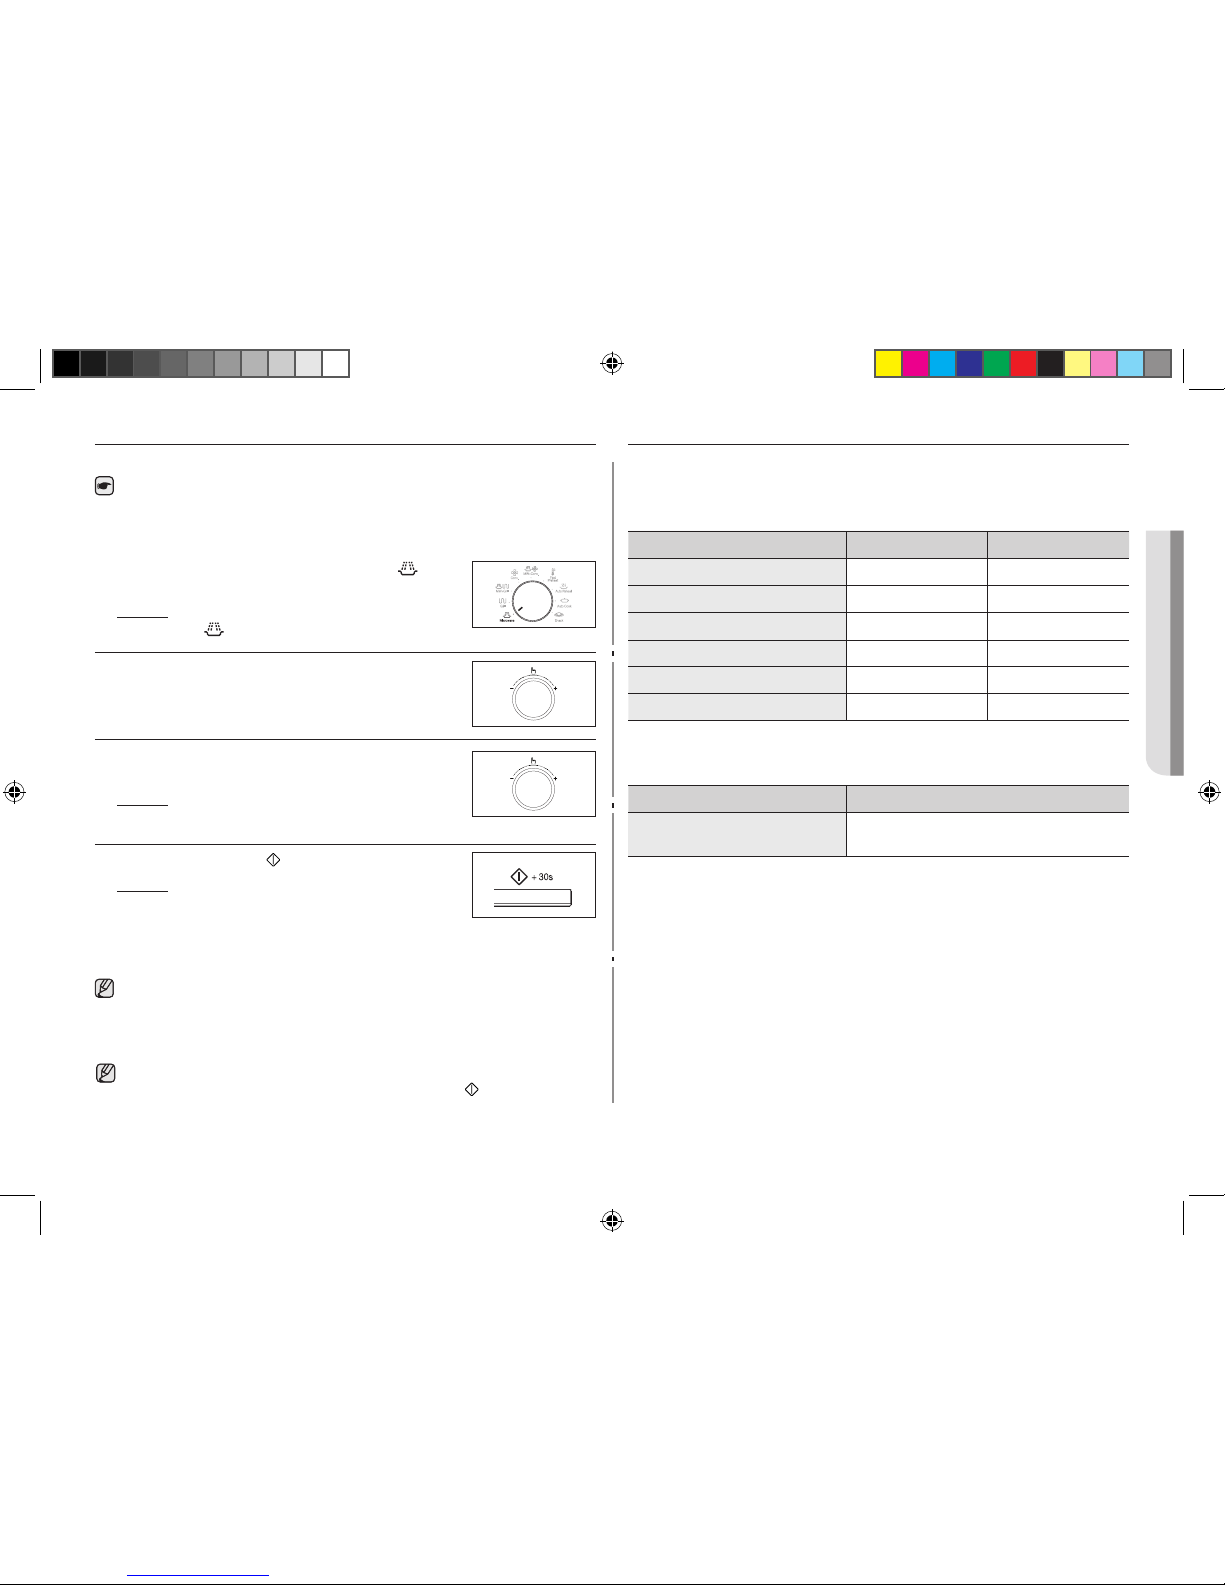
USING THE AUTO COOK FEATURE
The five Auto Cook ( ) features include/provide pre-programmed cooking
times. You do not need to set either the cooking times or the power level.
You can adjust the size of the serving by turning the Dial knob.
Use only recipients that are microwave-safe.
Open the door. Place the food in the centre of the turntable. Close the door.
1. Turn Mode Selector Dial to Auto Cook ( ) mode
position.
2. Select the type of food that you are cooking by
turning the Multi Funtion Selector Dial. Refer to
the table on the following page for a description of
the various pre-programmed settings. At that time,
press the Multi Funtion Selector Dial to select the type of food.
3. Select the size of the serving by turning the Multi
Funtion Selector Dial.
4. Press the Start/+30s ( ) button.
Result: The food is cooked according to the
preprogrammed setting selected.
• When cooking has finished, the oven
will beep and flash “0” four times. The oven will then
beep one time per minute.
STOPPING THE COOKING
You can stop cooking at any time so that you can:
• Check the food
• Turn the food over or stir it
• Leave it to stand
To stop the cooking... Then...
Temporarily Open the door.
Result: Cooking stops.
To resume cooking, close the door again and
press the Start/+30s ( ) button.
Completely Press the Stop/Cancel ( ) button.
Result: Cooking stops.
If you wish to cancel the cooking settings,
press the Stop/Cancel ( ) button again.
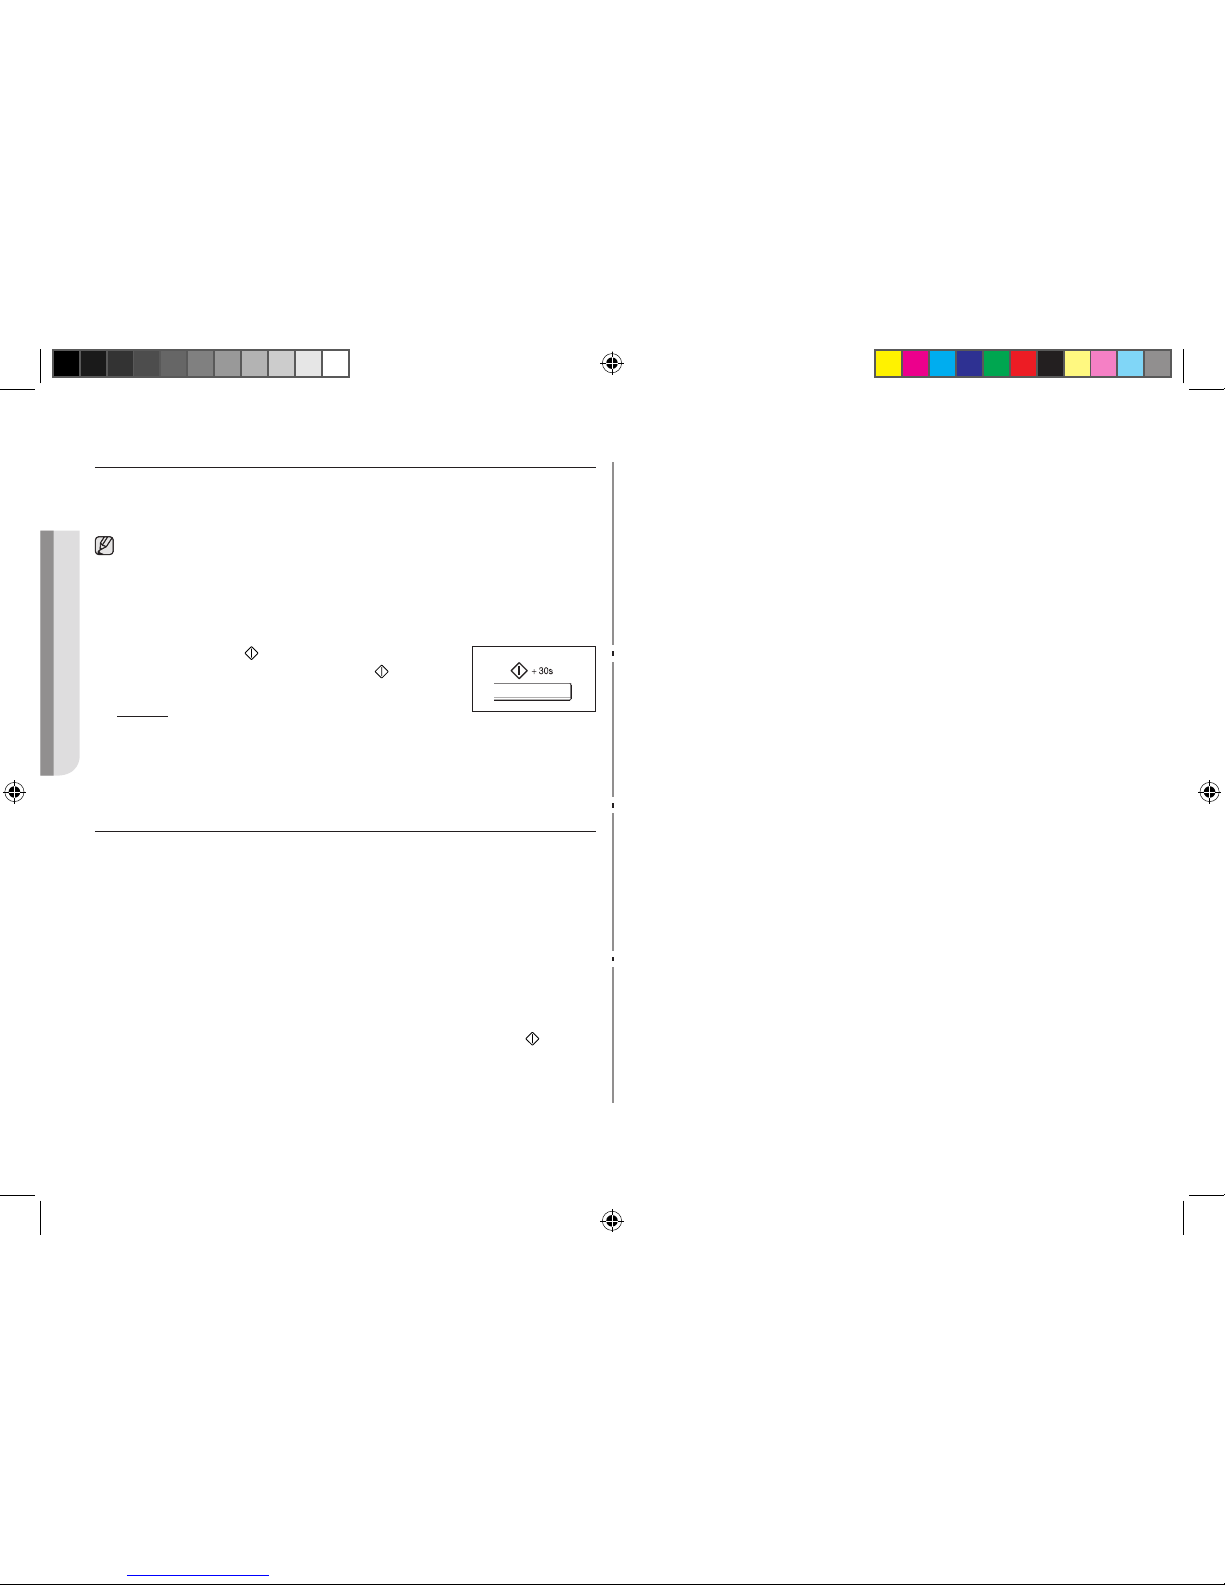
ADJUSTING THE COOKING TIME
You can increase the cooking time by pressing the +30s button once for
each 30 seconds to be added.
• Check how cooking is progressing at any time simply by opening the
door
• Increase the remaining cooking time
To increase the cooking time of your food, press the
Start/+30s ( ) button once for each 30 seconds that
you wish to add.
• Example: To add three minutes, press the
Start/+30s ( ) button six times.
CE117PAECX_XSA_DE68-04003M_EN.indd 14 19/04/2012 09:41:56
 Loading...