

Page 1

CADENCE
Voice / Fax Mail System
USER GUIDE
March 1999
Page 2

Page 3

TABLE OF CONTENTS
ABOUT THIS BOOK . . . . . . . . . . . . . . . . . . . . . . . . . . . 1
CADENCE USER GUIDE FLOW CHART . . . . . . . . . . . . . . 2-3
GETTING STARTED
Accessing your Mailbox . . . . . . . . . . . . . . . . . . . . . . . . . . . . . 4
Outside Callers . . . . . . . . . . . . . . . . . . . . . . . . . . . . . . . . . 4
Inside Callers . . . . . . . . . . . . . . . . . . . . . . . . . . . . . . . . . . . 4
Selecting Personal Options . . . . . . . . . . . . . . . . . . . . . . . . . . 5
Record a Personal Greeting . . . . . . . . . . . . . . . . . . . . . . . . . . 5
Change your Access Code . . . . . . . . . . . . . . . . . . . . . . . . . . . 5
Enter your name . . . . . . . . . . . . . . . . . . . . . . . . . . . . . . . . . . 5
Record your name . . . . . . . . . . . . . . . . . . . . . . . . . . . . . . . . . 6
Additional Personal Greetings . . . . . . . . . . . . . . . . . . . . . . . . 6
Automatic Greeting Change . . . . . . . . . . . . . . . . . . . . . . . . . . 6
RETRIEVING MESSAGES
Message Forwarding Options . . . . . . . . . . . . . . . . . . . . . . . . . 7
Special Sending Options . . . . . . . . . . . . . . . . . . . . . . . . . . . . 8
SENDING MESSAGES10
Direct Messaging / Memo . . . . . . . . . . . . . . . . . . . . . . . . . . . . 9
Self Memo . . . . . . . . . . . . . . . . . . . . . . . . . . . . . . . . . . . . . . . 9
CALL FORWARDING OPTIONS
Message Notification to Beeper . . . . . . . . . . . . . . . . . . . . . . . 11
Outbound Message Notification . . . . . . . . . . . . . . . . . . . . . . 11
Outbound Call Forwarding (Follow Me) . . . . . . . . . . . . . . . . 11
Cancel Call Forwarding . . . . . . . . . . . . . . . . . . . . . . . . . . . . . . 12
Set Notification Interval . . . . . . . . . . . . . . . . . . . . . . . . . . . . . 12
Number of Notifications . . . . . . . . . . . . . . . . . . . . . . . . . . . . . 12
DND (VM/AA Switch) . . . . . . . . . . . . . . . . . . . . . . . . . . . . . . . 12
ADDITIONAL OPTIONS
Review Future Delivery . . . . . . . . . . . . . . . . . . . . . . . . . . . . . 13
Page 4

Undelete Messages . . . . . . . . . . . . . . . . . . . . . . . . . . . . . . . . . 13
KEYSET USER FUNCTIONS
Message Waiting Lights . . . . . . . . . . . . . . . . . . . . . . . . . . . . . . 14
Call Record . . . . . . . . . . . . . . . . . . . . . . . . . . . . . . . . . . . . . . . 14
Answer Machine Emulation . . . . . . . . . . . . . . . . . . . . . . . . . . 14
INTERACTIVE DISPLAYS
Viewing Mailbox Contents . . . . . . . . . . . . . . . . . . . . . . . . . . . 15
Retrieving Messages . . . . . . . . . . . . . . . . . . . . . . . . . . . . . . . . 17
Administration . . . . . . . . . . . . . . . . . . . . . . . . . . . . . . . . . . . . 18
MAILBOX ADMINISTRATION USING SOFT KEYS . . . . . 19
Page 5

ABOUT THIS BOOK
This user guide is a reference guide for the mailbox owner on the
CADENCE system.
It describes how to setup your mailbox features, and how to use the
various mailbox owner features. Please review this guide carefully
before you use your mailbox.
Your voice mail box has the capability of storing private messages
and faxes, offering a number of options for sending or redirecting
messages and faxes and providing several ways to notify you of new
messages or calls.
This guide can be used by mailbox owners from within the office or
from telephones outside the office. The basic operation is the same,
but the access method will be different. See the user guide flow
chart for more details.
Note that some features and prompts detailed here may not be
available to all mailbox owners. See your system administrator if you
have questions about feature availability.
1
Page 6
C A D E N C E
User Guide Flow Chart
Enter ✱ + your
mailbox number
followed by your
password
When prompted
enter your
password
Listen to messages
Send a message
Personal Mailbox Options
Review future delivery
Undelete messages
1
2
3
7
8
Record
2
Page 7

Replay the current message
Play next message
Erase current message
Time Data / Sender
Forward Options
R e w i n d
P a u s e
Fast Forward
E x i t
1
2
3
4
5
7
8
9
✱
Record current greeting
Set access code
Forwarding Options
Enter name
Record name
Record greetings by number
Set current greeting
E x i t
1
2
3
4
5
6
7
✱
Beeper notification
Outbound message notification
Outbound follow me
Disable forwarding
Forwarding interval
Number of retries
Voice mail / AA switch (DND)
E x i t
1
2
3
5
6
7
8
#
Enter Mailbox number or.
To appent
To send by name
To mark urgent
For receipt information
For private
For future
✱1
✱2
✱3
✱4
✱5
✱6
Listen to message
Save and Send
Re Record
Exit without saving
1
2
3
4
F o r w a r d
R e p l y
S e n d
E x i t
1
2
3
#
Set Auto Greeting
Set Specific Greeting
1
2
3
Page 8

GETTING STARTED
Using your new CADENCE mailbox is as simple as following spoken
directions. First time users should read this user guide as a tutorial.
The first thing to do is access your new mailbox, record a personal
greeting, record your name and change your password.
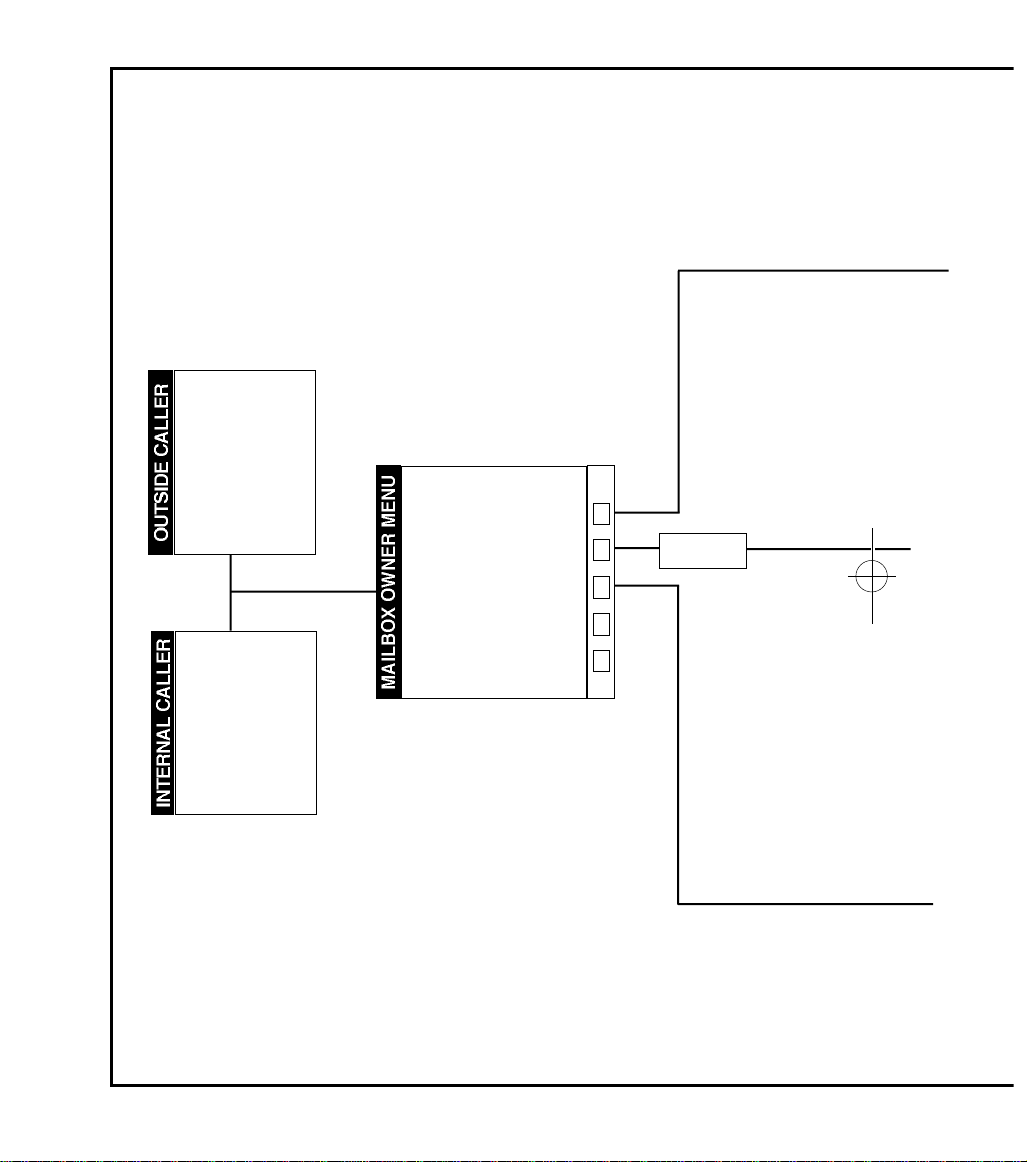
ACCESSING YOUR MAILBOX
Outside callers
°‹ Dial the phone number that will be answered by CADENCE.
The main greeting will answer.
°‹ During the Greeting, enter [✱] .
°‹ Enter your mailbox number (mailbox numbers will usually
match your extension number.
°‹ Enter your access code (the default access code is 9876).
Inside callers
°‹ Dial 529 or press the key assigned to ring CADENCE [ V M M S G] .
°‹ When prompted enter your access code (the default access
code is 9876).
At this point the inside and outside callers follow the same
instructions. You will hear a message stating the number of
messages left in your mailbox. You will then hear the Mailbox
Owner Main Menu with the following options:
[1] Listen to messages
[2] Send a message
[3] Set personal mailbox options
[7] Review future delivery
[8] Undelete message
[✱] Disconnect
[#] Exit and return to the main menu
4
Page 9

SELECTING PERSONAL OPTIONS
At the mailbox Owner Main Menu press [3] CADENCE will play the
Personal Options Menu:
[1] Record your personal greeting
[2] Set your personal access code
[3] Set forwarding options
[4] Enter your name (using the keypad)
[5] Record your name
[6] Record or set new greeting message
[7] Set current personal greeting message
[#] Exit and return to the Mailbox Owner Main Menu
RECORD A PERSONAL GREETING
Your personal greeting will be played every time someone
reaches your mailbox. A typical text for a personal greeting
message is:
“Hi, this is ... sorry I can°Øt take your call right now. Please leave
your name and number and I will get back to you as soon as I can.”
Record your greeting message and press [#] when you are done
(your old message will be played first if it exists). After recording
your message, you will have the following options:
[1] Listen to the message you recorded
[2] Save the message you recorded, and return to the previous menu
[3] Record the message again
[4] Exit without saving the message, and return to the Personal
Options Menu
CHANGE YOUR ACCESS CODE
Choose any 4 digits for your access code. Make sure you write
down your access code for future reference. The factory default
access code for every mailbox is 9876.
ENTER YOUR NAME
If you enter your name, callers who do not know your extension
number may reach you by dialing the letters of your first or last name
5
Page 10

on their telephone keypad. CADENCE will automatically match the
entered letters with your extension and transfer the call.
At the prompt, dial the keys that correspond with the first 3 letters
of your last name. For the letter Q press [7] and for the letter Z
press [9]. If you make a mistake and wish to restart, enter [✱].
Example: If your name is Joe E. Stevens, enter the following
digits from your telephone keypad:
For Stevens enter: [7], [8], [3]
For Joe enter: [5], [6], [3]
N o t e : In order to allow CADENCE to properly handle the name
search function it is absolutely necessary for your names to be entered
correctly into the system as specified in RECORD YOUR NAME.
RECORD YOUR NAME
Use this option to record your name. Your recorded name is
played in various situations. It is very important to have the
mailbox record your name for proper functioning of the
CADENCE system.
Your mailbox is now set up and ready to take messages.
ADDITIONAL PERSONAL GREETINGS
This option provides mailbox owners with a library of up to 9
personal greeting messages. Once this option is selected, the
following message is played:
° ∞To record a new greeting message, press 1
To select the greeting message you wish to use, press 2”.
Select option [1] to record any new message from 1 to 9.
Select option [ 2 ] to activate a new greeting. If you select 2 to
activate new greetings you will first have the option of setting an
Automatic Greeting Change. The default personal greeting
message number is 1.
AUTOMATIC GREETING CHANGE
If your mailbox is so configured, CADENCE will play personal
greeting message based on the day or night mode of operation,
personal greeting number 1 will play during the day, and personal
greeting message number 2 will play during the night.
6
Page 11

RETRIEVING MESSAGES
Select [3] from Mailbox Main Menu. If there are new messages in
your mailbox your VMMSG key will be lit.
Call CADENCE by dialing 529 or pressing the key assigned to ring
CADENCE [ V M M S G ], and when prompted enter your password.
Select [1] option to listen to messages that were left in your mailbox.
At the end of each message played you will hear the Listen Menu
with the following functions (once you are familiar with these options
they can be dialed any time a message is playing):
[ 1 ] To replay the message you just heard
[ 2 ] To save the message you just heard and listen to the next message
[ 3 ] To erase the message you just heard and listen to the next message
[ 4 ] To hear the time and date, and sender’s information of the message
you just heard. Sender information is not available on outside calls.
[ 5 ] For forwarding options (see message forwarding options)
[ 6 ] To return the call directly to the telephone number that left the
message. This feature must be allowed by your system administrator.
[ 7 ] To rewind the message
[ 8 ] To pause during message playback for 15 seconds. During this paused
state you can dial 7 to reduce the playback volume or 9 to increase it
[ 9 ] To fast forward the message
[ # ] Exit and return to the Mailbox Owner Main Menu
MESSAGE FORWARDING OPTIONS
If option [5] is selected you will be given a choice to Forward,
Reply or Send this message.
FORWARD This will forward the message (and keep a
copy in your mailbox).
REPLY This will leave a reply directly in the senders
mailbox.
SEND This will send the message (without leaving
a copy in your mailbox).
7
Page 12

Special Sending Options
After making a selection from the Forwarding Options Menu simply
follow the prompts. Options may include any of the following:
Dial the number to transfer the message to (if you want to
set any of the conditions listed below you must set them
first). Dialing the destination number is the last step.
Append to the message (add your own voice
message) to the forwarded or sent message.
Dial by name to forward or send the message by the
destination’s mailbox owner’s name instead of his
extension number.
Mark the message as urgent.
Message delivery confirmation. Once the message is
received, the system will automatically insert a
confirmation message in the originating mailbox.
Mark the message as Private.
Mark the message as Future delivery. Follow the
prompts to program delivery time.
8
Page 13

SENDING MESSAGES
Select this option to record a message and send it to another
mailbox. Record your message at the tone. After recording the
message, you will hear the Send Menu with the following functions:
[1] Listen to the message you recorded
[2] Save the message you recorded
[3] Record the message again
[4] Exit without saving the message, and return to the Mailbox Owner
Main Menu
When you are done recording, select Save and either enter the
number of the mailbox to which you want the message sent, or
select a special sending option detailed below.
Dial the number to transfer the message to (if you want to set
any of the conditions listed below you must set them first).
Dialing the destination number is the last step.
Dial by name to forward or send the message by the
destination’s mailbox owner’s name instead of his
extension number.
Mark the message as urgent.
Message delivery confirmation. Once the message is
received, the system will automatically insert a
confirmation message in the originating mailbox.
Mark the message as Private.
Mark the message as Future delivery. Follow the prompts
to program delivery time.
DIRECT MESSAGING
To make it easy to leave messages for others in your office
without having to dial their extension number first, keyset users
9
Page 14

may simply dial # plus a mailbox (extension) number and leave a
message directly. If you dial a busy extension press # to connect
directly with the mailbox.
SELF MEMO
Pressing ## will leave a message in your own mailbox.
10
Page 15

CALL FORWARDING OPTIONS
Select [3] from Personal Options.
Forwarding options allows you to redirect phone calls and messages
from your extension or mailbox to another extension, an outside
telephone, or a beeper. The following forwarding options are
available. All outbound forwarding options are controlled by the
system administrator and must be allowed by the administrator
before they can be activated by the mailbox owner.
[1] Activate message notification to your beeper
[2] Activate outbound message notification
[3] Activate outbound call forwarding (follow me)
[5] Cancel call forwarding
[6] Set notification interval
[7] Set number of notifications
[8] DND (VM / AA switch)
[#] Exit and return to the Personal Options Menu
MESSAGE NOTIFICATION TO BEEPER
When this function is activated, CADENCE will call your beeper
service and notify you after each message is left in your voice
mailbox. At the prompt, enter the phone number of your beeper
service followed by the # key.
OUTBOUND MESSAGE NOTIFICATION
When this function is activated, CADENCE will call any outside
telephone number you indicate after each message is left in your
voice mailbox. To hear your message at the remote location, pick
up the telephone and enter your access code.
At the prompt, enter the telephone number of the outside location
where you want to receive calls.
OUTBOUND CALL FORWARDING (FOLLOW ME)
When this function is activated, CADENCE can forward calls
received at your extension to any outside telephone you specify
(please see your system administrator before activating this feature).
11
Page 16

At the prompt, enter the telephone number of the receiving
location for your calls.
When CADENCE calls you at the outbound number, answer the
phone and say “Hello”, this will indicate to CADENCE that the call
has been answered.
This feature is available with auto attendant transfers only.
CANCEL CALL FORWARDING
Use this function to cancel any of the forwarding options
(notification) mentioned above.
SET NOTIFICATION INTERVAL
Use this option to set the time interval between each time the
system will notify when there is a message. The interval time
could be between 1 and 60 minutes.
NUMBER OF NOTIFICATIONS
Use this option to specify the number of times the system will
notify when there is a new message. This number can be any
number between 1 and 15.
DND (VM / AA SWITCH)
Activating this feature will prevent the automated attendant from
transferring calls to your extension. The calls will go immediately
to your mailbox.
12
Page 17

ADDITIONAL OPTIONS
Available from Mailbox Main Menu.
REVIEW FUTURE DELIVERY
This option will play any future delivery messages you have that
are waiting to be sent, that may be kept or deleted.
Undelete Messages
Deleted voice mail messages are temporarily stored in memory
until midnight of the day of message deletion. Select this option
to recover (“unelete”) previously deleted messages during this
period of time.
13
Page 18

KEYSET USER FUNCTIONS
The following options are available if you have a DCS keyset. They
require setup by the system administrator.
MESSAGE WAITING LIGHTS
When a new message is left in your mailbox, the message light
on your keyset will flash. Press this flashing key and follow the
prompts to retrieve messages.
CALL RECORD
If you have a call record key programmed on your keyset you can
press this key to record conversations in progress. Press the key
again to end conversation recording.
NOTE: If you have a display keyset you also have an option to
pause the recording.
WARNING
Before using this feature make sure that you are not violating
any state or federal laws. Some states require that the
recorded party be notified. Samsung Telecommunications is
not responsible for any illegal use of this feature.
ANSWER MACHINE EMULATION
If you have an Answer Machine Emulation key programmed on
your keyset, you can use it to monitor calls going to your voice
mail, and optionally answer them. The operation of this feature is
similar to screening a call on a home answering machine.
Your keyset must be set to forward on no answer to voice mail.
After ringing your station the caller will be connected to voice mail
and hear your personal greeting before leaving a message.
During this time you will be monitoring the connection between
the caller and your voice mail box. You can pick up the call at any
time or ignore it.
To activate this feature press the AME key. It will light and the
14
Page 19

feature is set. Press again to turn off. If this key is pressed while
a station is ringing (during forward no answer), the feature will be
turned on for the current call only.
While the caller is leaving a message or ringing you may:
1. Press [#] to immediately put the caller in your voice mailbox
and monitor it.
2. Press [✱] to immediately disconnect your station. The caller
continues to leave a message normally.
3. Pick up the handset and monitor privately.
4. Press ANS / RLS to answer the call (using the handset or
speaker).
NOTE: If you do not want to hear your personal greeting during
this process you can select AME BGM in your keyset MMC 110.
This will play background music at your keyset instead of your
personal greeting.
15
Page 20

INTERACTIVE DISPLAYS
Display keyset users have a more convenient method to view
mailbox contents, retrieve messages, and perform mailbox
administration.
VIEWING MAILBOX CONTENTS
If you have new messages, in addition to the message waiting
light you will see the following display indicating how many
messages you have:
You can call CADENCE and retrieve messages using the keypad
on your phone or you can press the S C R O L L key twice and
select the Voice Mail option. After entering your password, use
the displays and soft keys to view the Caller*, the callers number*
and the date and time the message was left. This can be useful if
you are waiting for a specific message but do not have time to
hear all new messages.
*Caller ID is needed for this feature.
The following displays indicate the available soft key options
Options for this display include:
16
Page 21

D&T: Display the Date and Time the message was received.
NAME: Display the Name of the person calling (CID data is
needed for this feature).
NUM: Display the Number of the personal calling (CID
data is needed for this feature).
LISTEN: Play the current displayed message
NOTE: Pressing Q will take you to old messages immediately.
RETRIEVING MESSAGES
If you select the listen option, the message will begin to play. In
addition to the spoken prompts, you will have the option of using
the display and soft keys on your keyset to control the messages.
Each screen shows three options. Press the scroll button to view
the next three.
Press Scroll:
Press Scroll:
Options for this display include:
AGAIN: Play the current message again.
NXT: Play the next message ó the current message will
be saved.
DEL: Delete the current message and play the next.
REW: Rewinds the current message by 10 seconds.
FF: Fast forward the current message by 10 seconds.
PAUSE: Pause playback of the current message. Press
17
Page 22

PAUSE again and restart.
FWD: Forward the message to another mailbox. A copy
will be kept in your mailbox.
REPLY: Reply directly to the senders mailbox.
SEND: Send the message to another mailbox. A copy will
not be kept in your mailbox.
RETURN: Return the call to the sender (this must be allowed
by your system administrator).
ADMINISTRATION
To perform mailbox administration via the keyset display and soft
keys, press the scroll key twice and select the VOICE MAIL
option. Enter the password and select ADMIN. Use the flow chart
to familiarize yourself with the mailbox administration displays.
These are the same options that you would receive if you had
called CADENCE and were responding to ‘voice prompts’, but
here they are presented in a visual format that you may find
easier to use.
Practice using your new voice mail box, and if you encounter
any problems call the system administrator.
NOTE: When setting CADENCE Administrator Options use your
keyset display and soft keys. Use soft key #3 to set each option.
Example:
This soft key will set the
new passcode
See the Mailbox Administration Using Soft Keys chart on the next
page.
18
Page 23

Mailbox Administration using
Soft Keys
PRESS SCROLL
PRESS SCROLL
PRESS SCROLL
PRESS SCROLL
PRESS SCROLL
PRESS SCROLL
PRESS SCROLL
PRESS SCROLL
PRESS SCROLL
PRESS SCROLL
19
Page 24

M E M O
 Loading...