

Page 1

SiPTel C01 IP Phone User Manual
SiPTel C01
IP Phone
5.2E version
User Manual 3.1.00
Page 2

SiPTel C01 IP Phone User Manual
SAFETY INFORMATION
Meticulous care had been devoted to ensure the highest safety standards in manufacturing of your SiPTel
IP Phone. Safety is the major factor in designs of every set. But, safety is your responsibility too.
Use only the power chord that comes with your SiPTel IP Phone. (Output: DC 5V/1.5A)
To reduce the risk of electric shock, do not disassemble this product. There are no user serviceable parts.
Opening or removing cove rs may expose you to hazardous voltages. Incorrect reassembly can cause
electric shock when this product is subsequently used.
Never push objects of any kind into the equipment through housing slots since they may touch hazardous
voltage points or short out parts that could result in a risk of electric shock. Never spill liquid of any kind on
the product. If liquid is spilled, however, refer servicing to proper service personnel.
Use only Unshielded Twisted Pair (UTP) Category 5 Ethernet cable for RJ-45 port of the SiPTel IP Phone.
Page 3

1. INTRODUCTION
1.1. Overview
1.2. Features
1.3. Specification
1.4. Structure of SiPTel IP Phone
1.4.1. Keypad
1.4.2. LCD Display
1.4.3. LED Display
1.4.4. Port Structure
2. PRE-INSTALLATION CHECK LIST
2.1. Power Requirements
2.2. Component Check List
2.3. User Requirements
SiPTel C01 IP Phone User Manual
TABLE OF CONTENTS
3. INSTALLATION & INSTRUCTIONS
3.1. Connecting Cables
3.2. Booting Up process
3.3. Keying Instructions
4. GETTING STARTED WITH MENU
4.1. Call Log
4.1.1. Received Calls
4.1.2. Dialed Calls, Missed Calls, Tx / Rx Calls
4.1.3. Delete All
4.2. Phone Book
4.2.1. Find Number
4.2.2. Add
4.2.3. Memory Dial
4.2.4. Delete All
4.3. Ring/Volume
4.3.1. Ring Selection
4.3.2. Ringing tone Volume
4.4. Setup
4.4.1. My Phone
4.4.2. Network
Page 4

4.4.3. Call Setup
4.4.4. Modem
4.4.4.1. Call Options
4.4.5. Time
4.4.6. PSTN
4.4.7. HTTP PROXY
4.5. Information
4.5.1. Network
4.5.2. Version
4.6. BALANCE
4.7. Reboot
5. USING SIPTEL IP PHONE
5.1. Connecting IP Phone to Internet
5.1.1. Using in Dialup Mode
SiPTel C01 IP Phone User Manual
5.1.2. Using with Broadband Cable
5.2. Making a VoIP Call
5.2.1. In On-Hook mode (Pre -dial)
5.2.2. In Off Hook mode
5.3. Making a PSTN Call
5.4. Making a call in Phone Book mode
5.5. Making a call from Call Log mode
5.6. Memory Dial
5.7. Web Access
Page 5

SiPTel C01 IP Phone User Manual
1. INTRODUCTION
1.1. Overview
The SiPTel IP Phone is a single user VoIP (Voice over Internet Protocol) phone for the home or smallmedium size businesses. The SiPTel IP Phone supports ITU -T H.323 protocol for voice communication on
data lines . It is a stand-alone device, which means no PC connection is required to use it. The SiPTel IP
Phone allows user to make long distance call or international call at low cost. Using the standard protocol,
SiPTel IP Phone can interoperate with most Internet devices for communication over the Internet.
1.2. Features
• Easy to use, simple to activate
• VAD (Voice Activity Detection)
• Volume control separate for both PSTN and VoIP calls
• Three Speed Dialing keys
•100 numbers storage Phone book
• Last number redial for both PSTN and VoIP
• 4 line Graphic LCD display
• Call Mute
• Silence Suppression
• Echo Cancellation
• Excellent voice quality DSP technology
• Network management with SNMP-based NMS
• Software updates/upgrades via remote access
• Configurable phone number assignment to match dial plan
• Remote management via SNMP, Telnet and HTTP
1.3. Specification
LAN Interface Standards
IEEE 802.3
Supports Static, DHCP, PPPoE
Dial-up Interface
• Data Rates from 300 bps to 56k bps.
Page 6

SiPTel C01 IP Phone User Manual
• Data Modulation Standards V.90, V.34, V.432bis, V.22bis, V.22, V.23, V.21 and V.23 reversible
(Minitel), Bell 212, Bell 103 Dialup Modem V.42 Error Control
• Country Code support
• V.42 Error Control
• V.42bis Compression
• Protected Against Surge and Over voltage on the Telephone Line
Configuration Management
Telnet, RS -232, Http, LCD display
Protocol & Codec Specifications
Protocol : ITU H.323 v4, H.225, H.245
Codec : ITU G.711, G.729.A, G.723.1
Power
5VDC, 2A
Dimensions
14cm W × 4.3cm H × 17.5cm D
Weight
0.73kg
Operating Temperature
32oF to 131oF (0oC to 55oC)
Operating Humidity
10% to 85% no condensing.
Storage Temperature
32oF to 149oF (0oC to 65oC)
Storage Humidity
5% to 90% non condensing
Page 7

1.4. Structure of SiPTel IP Phone
1.4.1. Keypad
SiPTel C01 IP Phone User Manual
Figure 1) Keypad Structure of SiPTel IP Phone
The description for each key is as follows.
Key name
Menu Ÿ Used to initiate the menu on LCD
M1~M3 Ÿ Memory dial
DEL Ÿ Used to delete the characters in Pre-dial and Phone Book mode.
• Ÿ Used to move up the cursor to select menu.
‚ Ÿ Used to move down the cursor to select menu.
„ Call Log Ÿ Used to move the cursor to the right in Phone Book mode.
Description
Ÿ Used to change between preferences when entering characters (English-
capital and lowercase / numerical / special characters).
Ÿ Used to initiate the Call Log menu in off hook mode.
Page 8
SiPTel C01 IP Phone User Manual
ƒ P-Book Ÿ Used to move the cursor to the left in Phone Book mode.
Ÿ Used to initiate the Phone Book menu.
OK Ÿ Used to complete the input in Phone Book menu.
Ÿ Used to confirm the entered or selected settings.
Cancel Ÿ Used to cancel the selected menu, entered data, or etc.
PSTN Ÿ Used to place the PSTN call.
MUTE Ÿ Used to make the voice not to be heard from the counterpart.
@ISP Ÿ Used to connect to dial-up ISP. (Option).
VOL + / - Ÿ Used to adjust the volume of the handset
FLASH Ÿ Used to place another call by droping the current call while dialing or in
the middle of a connected call. (Available only in PSTN mode).
REDIAL Ÿ Used to redial the number last dialed
Speaker Ÿ Used to carry on the call without picking up the handset. Press again to
turn off the speaker phone
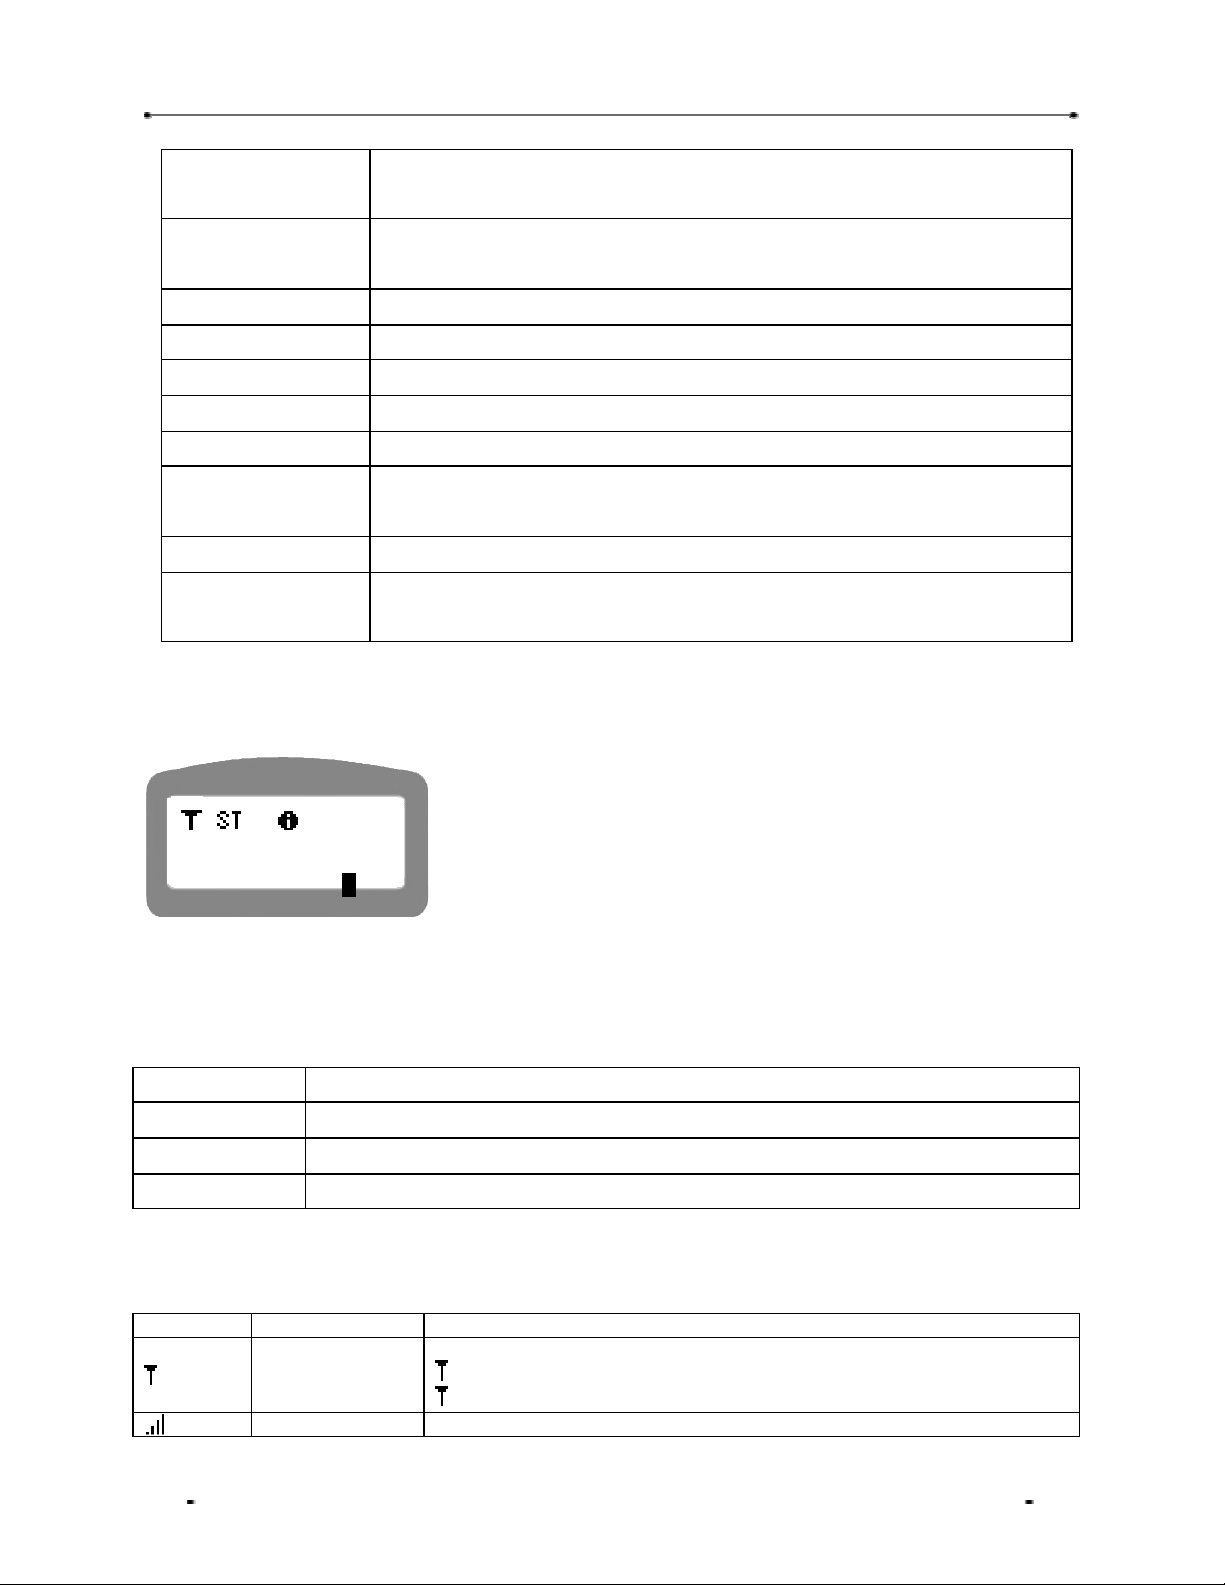
1.4.2. LCD Display
SIPTEL
10100-1000
A12:00
The LCD screen shows the current status of the SiPTel IP Phone, menu options on the LCD screen,
Telephone number dialed or received etc. (4x15)
First Line Status display – displays the present state of the IP Phone.
Second Line Name display – displays the name entered by the user.
Third Line Telephone number display – displays number entered using keypad.
Fourth Line Current time display
The following are icons used to display the present state of the IP Phone
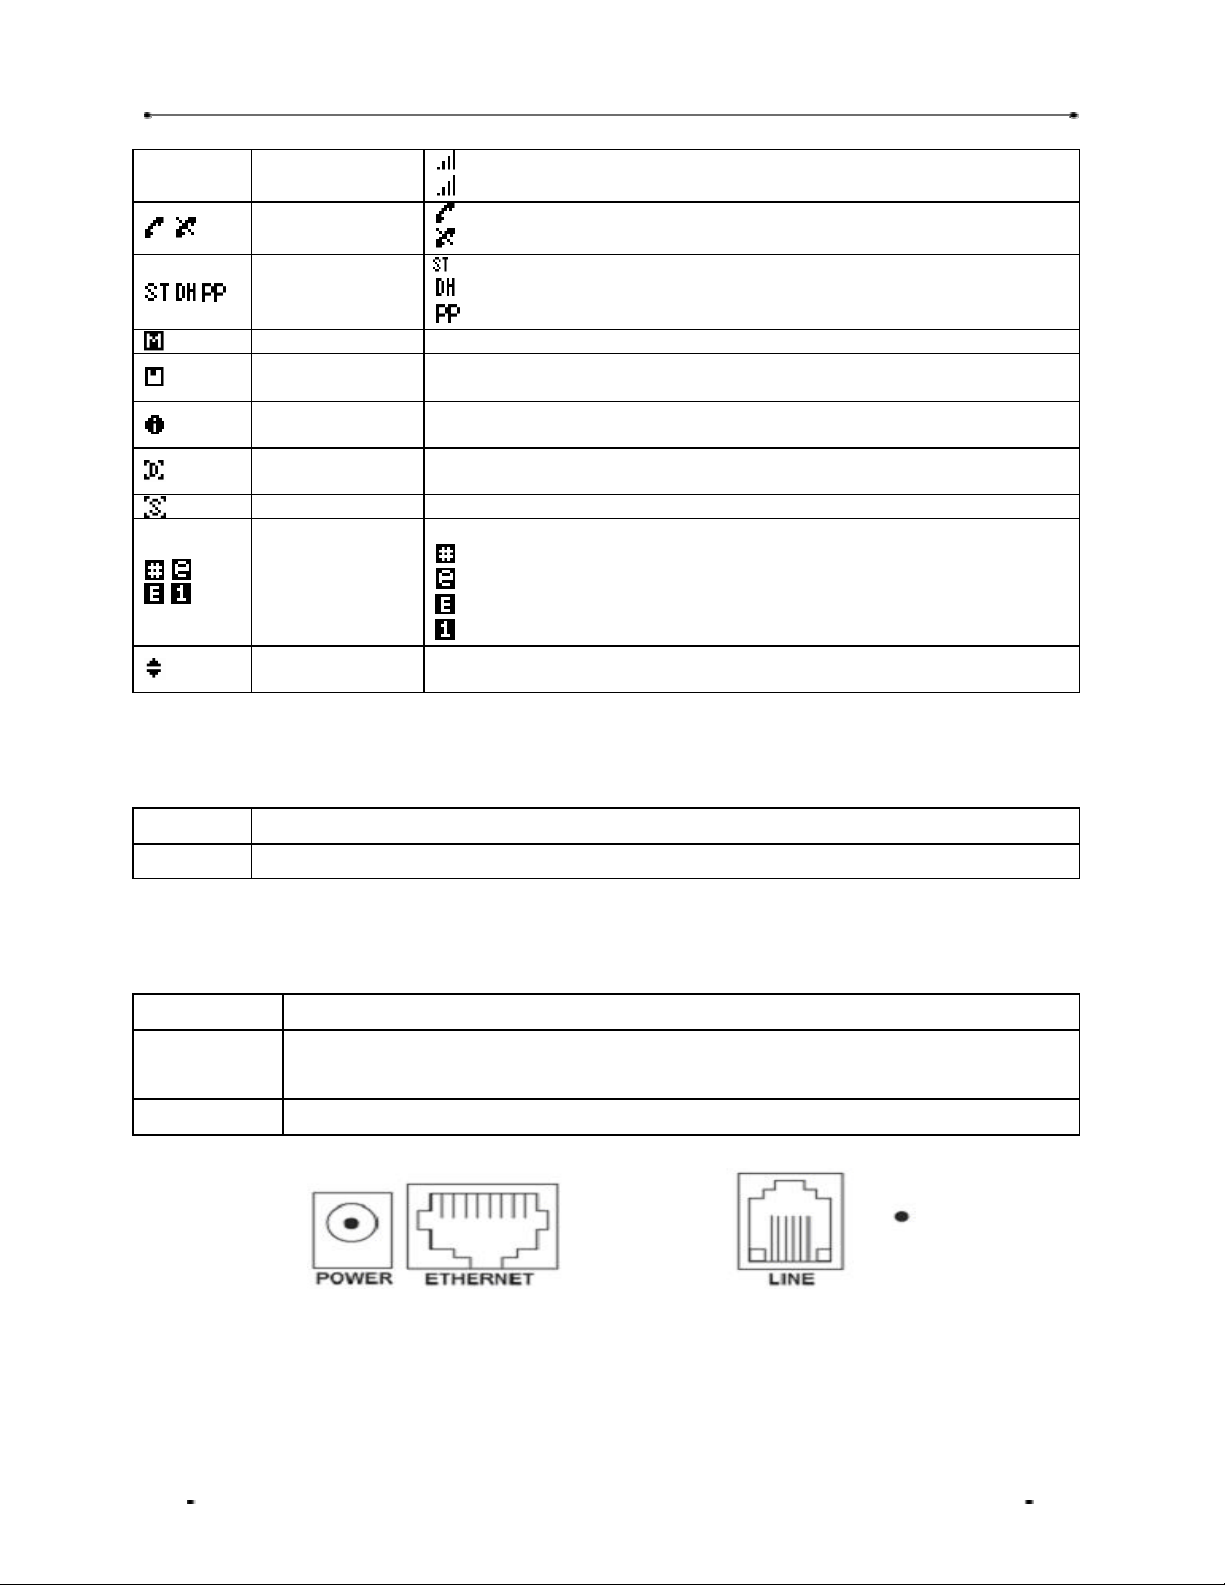
Icon Name Function
Displays the DNS status.
DNS Status
Gatekeeper Displays the G/K registration status.
Flashing : Finding the DNS server
Constant : Could reach the IP Address of the DNS
Page 9
SiPTel C01 IP Phone User Manual
Status
Call status
display
Kinds of
connection
Mute Ÿ Displayed when using Mute function.
Flash save
display
Ethernet
Modem
Summer Time Ÿ Displayed when the summer time is applied.
Entry mode
Navigation key
Flashing : Trying to find the Gatekeeper.
Constant : Registered with Gatekeeper successfully.
: Displayed when the call is connected successfully.
: Displayed when the call isn’t connected.
: Static IP
: DHCP
: PPPoE
Ÿ Displayed when data is being saved in memory
Ÿ Displayed when the SiPTel IP Phone is connected to the Internet
thru Ethernet cable.
Ÿ Displayed when the SiPTel IP Phone is connected to Internet thru
the Modem.
Ÿ Displays the input mode.
: Symbols
: English Lower Case
: English Capital
: Numeric
Ÿ Displayed only when the navigation key is available for menu
selection.
1.4.3. LED Display
PSTN Ÿ Glows when using PSTN mode.
@ISP Ÿ Glows when using Dial-up connection.
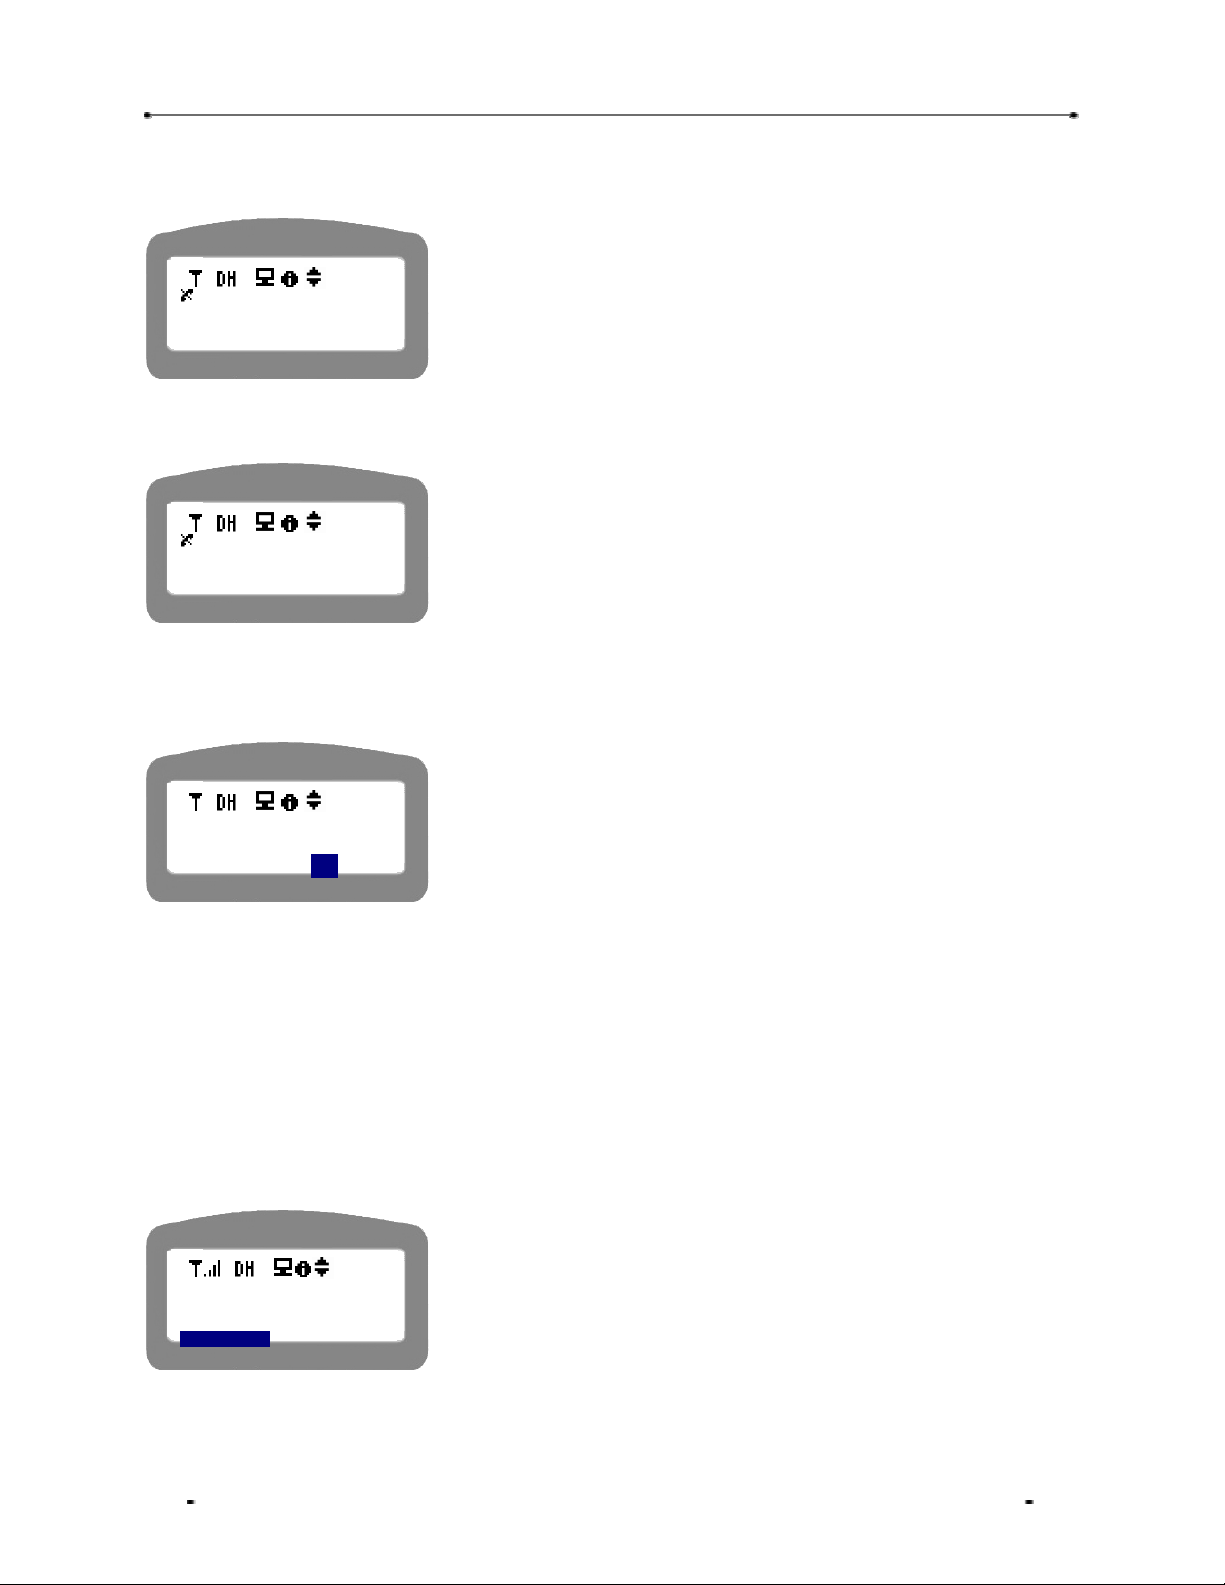
1.4.4. Port Structure
POWER § Use to connect to the power adapter.
ETHERNET § Use to connect to Internet leased line, cable modem, ADSL Modem, or etc. for
internet connection.
LINE § Use to connect to the regular telephone line.
Figure 2) SiPTel IP Phone Rear Panel
Page 10

SiPTel C01 IP Phone User Manual
2. PRE-INSTALLATION CHECK LIST
2.1. Power Requirements
§ AC Voltage : External power adapter (100V -240V, 50/60Hz).
§ Please use only the power adapter provided with the SiPTel IP Phone.
§ For additional power adapter, please ask your product provider.
Safety
Should liquid or solid object get into the cabinet, unplug the unit and have it checked by the
qualified personnel before operating it any further.
To disconnect the cord, pull it out by the plug. Never pull the cord itself.
Do not place the unit in surfaces (rugs, blankets, etc.) or near materials (curtains, draperies)
that may block the ventilation holes.
Installation
Do not install the unit in an extremely hot or humid place or in a place subject to excessive dust
or mechanical vibration. The unit is not designed to be waterproof. Exposure to rain or water
may damage the unit.
Cleaning
Clean the unit with a slightly damp soft cloth. Use a mild household detergent. Never use
strong solvents such s thinner or benzene as they might damage the finish of the unit.
2.2. Component Check List
Open the box of SiPTel IP Phone and make sure all the components are included in the box. The
following is the pictures of SiPTel IP Phone components. The picture can be different with the actually
models of SiPTel IP Phone.
SiPTel IP Phone - 1
Power adaptor - 1 User Manual - 1
Handset - 1
Coiled Cord - 1
Page 11

SiPTel C01 IP Phone User Manual
*************************
2.3. User Requirements
Before you start, please ask your local ISP or network administrator for an Internet account from
User ISP Requirement Common
Static IP User IP address
Gateway
Subnet mask
DNS
DHCP User
PPPoE User User ID
Password
Dial-up User ISP Telephone number
User name
Password
3. INSTALLATION & INSTRUCTIONS
3.1. Connecting Cables
§ H.323 ID
§ E.164 Number
STEP 1 Connect the Ethernet line that came from the Internet leased line, cable modem, or ADSL
STEP 2 (Option) Connect the PSTN line to the PSTN port of the SiPTel IP Phone.
STEP 3 Connect the power port to the power source with a power adaptor.
3.2. Booting Up process
STEP 1 If the cable connection is completed properly, the SiPTel IP Phone will start booting
SYSTEM ON START
INITIALIZING
*************************
modem to the Ethernet port of the SiPTel IP Phone.
automatically.
Wait for a while till the rebooting is completed.
Page 12

SiPTel C01 IP Phone User Manual
STEP 2 If the booting is completed properly, the following display will appear.
SiP Tel
10100-1000
A12:00
You can see some Icons, Brand Name, ITSP given VoIP Phone
Number, Time, etc.
3.3. Keying Instructions
Some setup menus support a few character input mode, English lower -case, English capital, numeric,
and special characters or symbols. In an input mode, if you press ‘Menu’ key, the input mode will be
toggled to another one in order. For example, the input mode will be changed from : English lower -case
to : English-capital or to : Numerical and to : Special characters in order.
When you enter name into the input line, please use the navigation key on the key pad to move to the left
or right in the input line. Use ‘Delete’ key to delete the characters or numeric, and the cursor will move to
the left erasing the character.
When you enter the phone number in the input line, press ‘Menu’ key until you can see the icon on the
top right.
When you enter the special characters into the input line, please press ‘Menu’ key until you can see the
icon on the right of the first line. Please use ‘0’ key on the keypad to select the desired special character.
For English characters, press the number key corresponding to the alphabet more than once till
you can get the desired alphabet.
Page 13

SiPTel C01 IP Phone User Manual
2: Dialed Calls
2: Phone Book
03034
4. GETTING STARTED WITH MENU
4.1. Call Log
This menu allows user to look up the Dialed, Received and Missed calls list. User can look up the call lists
up to 100 lists. User can make a call by using this call logs, and delete them when not required.
4.1.1. Rcvd Calls
STEP 1 Press “Menu” key on the keypad in on -hook mode.
STEP 2 Select “1: Call Log”.
<Menu>
1:Call Log
STEP 3 Select ‘1: Rcvd Calls’.
<Call Log>
1:Rcvd Calls
STEP 4 Select the desired phone number in the received call lists and press ‘OK’ button to view
the details of the selected number.
Rcvd Calls [ 2/20]
03034
Press ‘OK’ button or press the menu number to select the menu
Or Press ‘Cancel’ key to move to the upper menu.
Press ‘OK’ button or select ‘1’ key.
Or Press ‘Cancel’ key to move to the previous screen.
STEP 5 User the left and right arrow key to get more information.
Press ‘Cancel’ button to move to the previous screen.
No Entry
03034
Date:10/16(SUN)
Page 14
SiPTel C01 IP Phone User Manual
5: Delete All
STEP 6 You can see the information such as the Caller Name if exists a phone book entry for that
number, Date [Date/Month(day)], Time, etc.,
No Entry
03034
Time : 08:04A
STEP 7 Last information is Call duration in minutes [HH:MM].
Press ‘Cancel’ button to move to the previous screen.
Press ‘Cancel’ button to move to the previous screen.
No Entry
03034
Duration : [08:37]
STEP 8 You can press DELETE button anytime in the above views, and select Delete from ‘VIEW
/ DELETE’ options displayed on top of the LCD screen, to delete that entry from the list.
The deleted call list can’t be recovered. Please make sure whether it
is ok to delete the call list before you delete call list. Please be sure
Delete
call list ?
YES NO
doing so.
Press ‘Cancel’ button to move to the previous screen.
4.1.2. Dialed , Missed , Tx/Rx Calls
The options for Dialed Calls, Missed Calls and Tx/Rx ( both dialed and received calls ) which follows ‘1.
RCVD Calls’ option will all be same as RCVD Calls options .
4.1.3. Delete All
STEP 1 Select ‘1. Call log’ -> ‘5. Delete All’ after pressing MENU button
Press ‘OK’ button or select menu number key.
<Call Log>
4: Tx/Rx Calls
Page 15

SiPTel C01 IP Phone User Manual
STEP 2 Select Received or Transmitted ( Dialed ) that you want to clear from list.
<Delete All>
1. Received
2. Transmitted
STEP 3 Deleting all the options requires the authentication.
Enter Password
STEP 4 Confirm to delete the selected group of numbers.
Delete all
calling no ?
YES NO
Press ‘Cancel’ button to move to the previous screen.
Enter your user password.
Press ‘Cancel’ button to move to the previous screen.
Use the left or right arrow key to select ‘Yes / No’.
Press ‘Cancel’ button to move to the previous screen.
4.2. Phone Book
Phone Book is used to save and find the contacts in the memory of the phone. User can also use the
menu to make a call after finding the destination phone number in the phone book.
The phone book menu supports several character input mode as explained under
“3.3. Keying Instructions ”
4.2.1. Find Number
User can find phone numbers either by index or name. Index means the registered address of the
memory.
Page 16

SiPTel C01 IP Phone User Manual
4.2.1.1. Find the number by Index
STEP 1 Select ‘1: Find Number’ to find the telephone number registered in the phone book.
<PHONE BOOK>
1: Find Number
2: Add
menu, and press ‘OK’ button.
Press ‘Cancel’ key to move to the upper menu.
STEP 2 Select ‘By Index’.
Use the navigation key or press the menu number to select the
Use the navigation key or press the menu number to select the
<Find Number>
1 : By Index
2 : By Name
menu, and press ‘OK’ button.
Press ‘Cancel’ key to move to the upper menu.
STEP 3 Enter the desired Index number, and press ‘OK’ button.
Press ‘Cancel’ key to move to the upper menu.
By Index
4
STEP 4 The telephone number and name corresponding to the Index number will be displayed.
Press ‘Cancel’ key to move to the upper menu.
12345678901
[04] Uncle
STEP 5 If you want to make a call to the phone number, just pick up the handset. The call will be
made to the phone number.
Page 17

SiPTel C01 IP Phone User Manual
4.2.1.2. Find the number by Name
STEP 1 Select ‘1: Find Number’ to find a telephone number from the phone book.
Use the navigation key or press the menu number to select the
<PHONE BOOK>
1: Find Number
2: Add
STEP 2 Select ‘By Name’
<Find Number>
1: By Index
2:By Name
STEP 3 Enter complete or initial part of the name to find, and press ‘OK’ button.
menu, and press ‘OK’ button.
Press ‘Cancel’ key to move to the upper menu.
Use the navigation key or press the menu number to select the
menu, and press ‘OK’ button.
Press ‘Cancel’ key to move to the upper menu.
Press ‘Cancel’ key to move to the upper menu.
By Name
Unc
STEP 4 The telephone number and name corresponding to the Index number will be displayed.
Press ‘Cancel’ key to move to the upper menu.
12345678901
[04]Uncle
STEP 5 If you want to make a call to the phone number, just pick up the handset.
The call will be made to the phone number.
Page 18

SiPTel C01 IP Phone User Manual
4.2.2. Add
This menu is to register a new telephone number into the phone book of IP Phone. The phone numbers
can be registered up to 100 numbers.
STEP 1 Select ‘2: ADD’ menu in PHONE BOOK menu selection.
Use the navigation key and press OK or press the menu number to
<PHONE BOOK>
1: Find Number
2:ADD
STEP 2 Enter the name, telephone number and the register number(Index). Use navigation key to
move to the next item.
select the menu.
Press ‘Cancel’ key to move to the upper menu.
Use the ‘Menu’ key to toggle the input mode.
<ADD>
NAME:
TEL:
STEP 3 If you entered the name, Tel number, and address properly, you can see the following
display. If you have omitted to enter the name or phone number, you can see the
messages such as “No number to save!” or “No name to save!” etc.
Saved!
Press ‘Cancel’ key to return to the upper menu.
Please wait till this display disappears.
4.2.3. Memory Dial
This menu is to register the frequently dialed telephone numbers in the memory of the
SiPTel IP Phone under three memory keys, and use to make a call by pressing just the memory key
preset.
Page 19

SiPTel C01 IP Phone User Manual
STEP 1 Select ‘3: Memory Dial’ in the PHONE BOOK menu selection.
<PHONE BOOK>
2: ADD
3: Memory Dial
select the menu.
Press ‘Cancel’ key to return to the upper menu.
STEP 2 Select the menu related to which of the three single touch KEYs you want
to use for a particular number
Use navigations key and press OK to select the KEY.
Use navigations key and press OK or press the menu number to
<Memory Dial>
M1: Empty
M 2: Empty
Press ‘Cancel’ key to return to the upper menu.
STEP 3 Select 2
nd
Option from the menu.
Use navigations key and press OK or press the menu number to
<Memory Dial:1>
1: Hidden[Disable]
2: No [Empty]
select the menu.
Press ‘Cancel’ key to return to the upper menu.
STEP 4 Enter the phone number that you want to use under that single touch KEY.
Press ‘Cancel’ key s to return to the On-Hook display.
Save Tel No.
into M1
12345678901
STEP 5 Anytime, lifting handset and pressing M1 or M2 or M3 under which you save the above
phone number will cause Phone to dial that number.
4.2.4. Delete All
This menu is to delete the entire phone numbers registered at the phone book. But the memory dial
numbers will not be deleted.
Page 20

SiPTel C01 IP Phone User Manual
STEP 1 Select ‘4.Delete All‘ from PHONE BOOK menu after press MENU button.
<PHONE BOOK>
3: Memory Dial
4: Delete All
button just besides CANCEL button.
Use navi gations key and press OK button or press the menu number
to select the menu.
STEP 2 Authenticate yourself to delete entries by entering the passowrd and press ‘OK’ button
You can press ‘Cancel’ key to return to the upper menu.
PHONE BOOK menu can be selected even by pressing ‘P-BOOK’
Enter Password
STEP 3 Confirm the deletion once again by selecting YES, if you are sure.
Select YES or NO using navigation keys and press OK.
Delete all ?
YES NO
Pressing ‘Cancel’ key here is like selecting NO and return to the
upper menu
4.3. Ring/Volume
This menu is used to select the ringing tone. Currently, three kinds of bell rings are available.
STEP 1 Press ‘Menu’ key on the keypad of the SiPTel IP Phone.
STEP 2 Select ‘3: Ring / Volume’ menu in the menu selection.
<Menu>
2: Phone Book:
3: Ring/Volume
User the navigation key or press the menu number to select the
menu.
Press ‘Cancel’ key to move to the upper menu.
Page 21

SiPTel C01 IP Phone User Manual
4.3.1. Ring Selection
STEP 1 Select ‘1: Ring Select’ menu in the RING/VOLUME menu.
Use navigation key or press the menu number to select the number.
<Ring/Volume>
1: Ring Select
2: Volume
STEP 2 The cur rent ringing tone will be displayed in the second line of LCD. Select the preferred
one of the three kinds of ringing tones.
<Ring Select 1>
1: Ring 1
2: Ring 2
Press ‘Cancel’ key to move to the previous display.
Use the navigation key to hear how they ring and press OK or press
the number of the desired one to select the ringing tone.
Press ‘Cancel’ key to return to the upper menu.
STEP 3 If you selected the ringing tone, you can see the following display on LCD. Here, you will
hear ringing tone repeatedly till you select ‘YES’ or ‘NO’
Use navigation key to select ‘YES’ or ‘NO’.
Select Ring1?
YES NO
Press ‘Cancel’ key to move to the upper menu without changing the
ringing tone.
4.3.2. Ringing tone Volume
STEP 1 Press ‘Volume’ menu under RING/VOLUME menu.
<Ring/Volume>
1: Ring Select
2: Volume
Use navigation key or press the menu number to select the number.
Press ‘Cancel’ key to move to the previous display.
Page 22

SiPTel C01 IP Phone User Manual
STEP 2 Adjust the ringing tone volume. Use the navigation key to adjust the volume of the ring
tone.
<Ring Volume>
( - ) [ 11 ] (+)
Press ‘OK’ button to save the volume setting and to return to the
upper menu.
Press ‘Cancel’ key to return to the upper menu without adjusting the
volume.
4.4. Setup
This section includes important but basic information for setting the SiPTel IP Phone. To setup the SiPTel
IP Phone, you may need to input some characters or numbers into the input line. Please study the
following instruction on key input prior to setup.
Entering MENU with authentication password.
STEP 1 Press ‘Menu’ key.
STEP 2 Select ‘4. Setup’.
<Menu>
4:Setup
5. Information
Press 4 or select ‘4. Setup’ option using navigation keys and press
OK.
STEP 3 Enter 0000 as password for user authentication which is default and press OK button.
Enter Password
Press CANCEL button to quit from getting into MENU
4.4.1. My Phone
4.4.1.1. User Password
This menu is to change the user password used for SiPTel IP Phone Setup. Following are the options to
change your current password.
Page 23

SiPTel C01 IP Phone User Manual
STEP 1 Select ‘2: User PWD’ option under ‘My Phone’ Menu
<My Phone>
1: My Name
2: User PWD
key.
STEP 2 The icon will appear. Enter the new password. You can enter password up to 15 digits.
Enter the current password, press OK key.
Enter the new password, press OK key and re-enter the new
Press 2 or select ‘2. User PWD’ using navigation keys and press OK
User Password
password to confirm and then press ‘OK’ key again to save the new
password
Pressing “Cancel’ key anytime before confirming password during
the above steps to return to the upper menu without change.
4.4.2. Network Setup
4.4.2.1. Mode Select
This menu allows user to select the proper network manually for SiPTel IP Phone setup.
STEP 1 Select ‘2: Network’ from SETUP menu.
Press 2 or select ‘2. Network’ using navigation keys and pres s OK
<Setup>
1: My Phone
2: Network
key.
STEP 2 Select ‘2: Mode Select’.
<NETWORK>
1:Auto Detect
2:Mode Select
Press 2 or select ‘2: Mode Select’ using navigation keys and press
OK key.
Page 24

SiPTel C01 IP Phone User Manual
4.4.2.1.1. Static IP User
If you are a static IP user, select this menu and setup the static related settings required for using the
SiPTel IP Phone.
STEP 1 Select ‘1: LAN (Static)’ in menu selection.
<Network Mode>
1:LAN(Static)
2:DHCP
Press 1 or select ‘1: LAN (Static)’ using navigation keys and press
OK key.
STEP 2 Enter the IP address for the SiPTel IP Phone. You can use * to get a dot between octets.
Enter the IP Address given by the ISP and press OK key.
?
<Static>
1:IP
61.54.235.53
Ex: To enter 61.54.235.53 you would key in
61*54*235*53
STEP 3 Enter the Subnet Mask
Enter the Subnet Mask given by the ISP and press OK key.
<Static>
2: Subnet Mask
255.255.255.0
Ex: To enter 255.255.255.0, you would key in
255*255*255*0
STEP 4 Enter the Gateway IP address
Enter the Gateway IP Address given by the ISP and press OK key.
<Static>
3: Gateway
61.54.235.254
Ex: To enter 61.54.235.254, you would key in
61*54*235*254
Page 25

SiPTel C01 IP Phone User Manual
STEP 5 Enter the DNS Server IP address, and press ‘OK’ button.
<IP>
4:DNS1
202. 54. 30. 1
Here you can give three DNS Addresses of you choice and press
OK after each DNS entry.
Ex: To enter 202.54.30.1, you would key in 202*54*30*1
STEP 6 If you want to apply the new setting, press ‘OK’ button.
Use left arrow key in navigation keys to select YES and press OK
Enter the DNS IP Address given by ISP and press OK.
YES NO
Apply
New Setting?
STEP 7 Reboot the SiPTel IP Phone to use new IP that is configured.
Select YES using navigation keys and wait till the rebooting process
Reboot System?
YES NO
is completed.
4.4.2.1.2. DHCP User
If you are a cable modem user or using a DHCP network, please select this menu and setup the required
settings.
STEP 1 Select ‘2: DHCP’ from NETWORK mode menu under SETUP menu.
Press 2 or select ‘2: DHCP using navigation keys and press OK key.
<Network Mode>
1: LAN (Static)
2:DHCP
Page 26

SiPTel C01 IP Phone User Manual
STEP 2 Select ‘YES’ to select DHCP, and press ‘OK’ button.
Select DHCP?
YES NO
Use left arrow button from navigation keys to select ‘YES’ option and
press OK key.
STEP 3 After a while you’ll be able to see the following screen
Use left arrow button from the navigation key to select YES and
Reboot system?
YES NO
press OK button to reboot the IP Phone.
4.4.2.1.3. PPPoE (ADSL) User
If you are a PPPoE / ADSL user, please go through the following setup, with the required user -id and
password in hand to configure on SiPTel IP Phone.
STEP 1 Select ‘3: PPPoE’ to setup PPPoE / ADSL related parameters from ‘NETWORK MODE’
under ‘SETUP’ menu.
Press 3 or select ‘3: PPPoE using navigation keys and press OK
<Network Mode>
2: DHCP
3:PPPoE
key.
STEP 2 Enter the username / ID given by your ISP as ADSL ID.
?
<PPPoE Setup>
1: PPPoE ID
XXXXXXX
Enter the User ID for ADSL / PPPoE given by your ISP.
Page 27

STEP 3 Enter the password for your ADSL ID.
SiPTel C01 IP Phone User Manual
?
<PPPoE Setup>
2: PPPoE PW
XXXXXXX
Enter the Password related to the User ID of your ADSL / PPPoE.
STEP 4 Select ‘YES’ to apply the new setting, and press ‘OK’ button.
Use navigation key to select the option YES and wait for a while.
Apply
New Setting?
YES NO
STEP 5 Select ‘YES’ to reboot the system, and press ‘OK’ button.
Reboot system?
YES NO
Use navigation key to select the YES and let the device reboot with
the new settings to use PPPoE.
It may take rather long time for the phone to get the connected to the ADSL service provider. In this case,
SiPTel IP Phone will constantly make attempts to get connected, wait for a while.
4.4.3. Call Setup
Call Setup allow the user to change the priority of gatekeeper selection.
STEP 1 Select ‘3: Call Setup’ from SETUP menu.
Press 3 or select ‘3. Call Setup’ using navigation keys and press OK
<Setup>
2: Network
3: Call Setup
key.
Page 28

SiPTel C01 IP Phone User Manual
STEP 2 Select ‘1. GK Selection[GKx]’ and press ‘OK’ button.
<Service>
1.: GK Selection [GK1]
Just press OK button here as there will be only one option for
selection.
Press CANCEL button to leave thing as it is.
STEP 3 Select GK option that are available from GK1 to GK6.
<GK Select : [1]>
1 : GK1
2 : GK2
Use navigation key to select any GK and press OK.
Press CANCEL button to go back to upper menus
STEP 4 Select ‘YES’ to apply the new setting, and press ‘OK’ button.
Use navigation key to select the option YES and wait for a while.
Apply
New Setting?
YES NO
STEP 5 Select ‘YES’ to reboot the system, and press ‘OK’ button.
Reboot system?
YES NO
Use navigation key to select the YES and let the device reboot. The
Phone will not try to register to the new gatekeeper that you have
just selected.
4.4.4. Modem
This menu is to set the modem related settings. User can enter the information required for connecting to
the dial-up ISP etc.
Page 29

SiPTel C01 IP Phone User Manual
4: Modem
2:Profile2[102]
STEP 1 Select ‘4. Modem’ from SETUP menu after pressing MENU button.
<Setup>
3: Call Setup
key.
4.4.4.1. Editing Profile
This menu is used to configure the ISP account to be used to connect to a dial-up ISP. ISP account
includes dial -up ISP access phone number, user ID, and user password. User can edit the profiles up to
3, and each profile consists of IST tel no., user ID, and user password.
STEP 1 Select ‘1: Profile1’.
Press 4 or select ‘4: Modem’ using navigation keys and press OK
<Modem>
1:Profile1[101]
STEP 2 Select ‘1 : Name [Profile1] to enter the name of the ISP
?
<Edit Prof 1>
1. Name [profile1]
2. Tel [101]
You can select any three of profile options available as first 3 menu
options.
Use the navigation key or menu number to select the menu, and
press ‘OK’ button.
Press 1 or use the up and down arrow keys to select the Name
option and press OK.
STEP 3 Enter the name to be used to discriminate the profile.
Use ‘Menu’ key to toggle the character input mode.
<Profile Name>
My ISP
Press OK key after editing the Name.
Page 30

SiPTel C01 IP Phone User Manual
STEP 4 Select ‘2 : Tel [101] to enter the telephone number of the ISP
Press 2 or use the up and down arrow keys to select the Telephone
?
<Edit Prof 1>
1. Name [MyISP]
2. TEL [01410]
STEP 5 Enter the telephone number of the ISP for the profile.
<Profile Tel#>
172233
option and press OK.
Use ‘Menu’ key to toggle the character input mode.
Press OK key after editing the telephone number
STEP 6 Select ‘3 : ID [uid1] to enter the username of the ISP
Press 3 or use the up and down arrow keys to select the ID option
?
<Edit Prof 1>
2. TEL [172233]
3. ID [uid1]
and press OK.
STEP 7 Enter the username for the ISP of this profile.
Use ‘Menu’ key to toggle the character input mode.
<Profile ID>
my username
Press OK key after editing the username
STEP 8 Select ‘4 : PWD [pwd1] to enter the password of the ISP
Press 4 or use the up and down arrow keys to select the PWD
?
<Edit Prof 1>
3. ID [uid1]
4. PWD [pwd1]
option and press OK.
Page 31

SiPTel C01 IP Phone User Manual
5. Modem Option
STEP 9 Enter the password for the ISP of this profile. If you want to edit the existing password,
use ‘Delete’ key.
Use ‘Menu’ key to toggle the character input mode.
<Profile PWD>
my password
4.4.4.2. ACT: [Profile]
This menu is to select one of the three profiles that are available for you to use while pressing DIALUP
(@ISP) button
STEP 1: Select ‘4:ACT:[Prof-1] using navigation buttons.
Press OK key after editing the password
<Modem>
4:ACT[1:My ISP]
Press ‘OK’ button or select ‘5’ key to select the menu.
STEP 2: Select the desired profile. For example, let’s select ‘2: Profile’.
Press the menu number or use the navigation key to select the
<ACT : MyISP>
1: My ISP
Profile number and press ‘OK’ key
4.4.4.3. Modem Options
4.4.4.3.1. Country Code
STEP 1 Select ‘1: Country Code’
<Modem Option>
1:Country Code
2: Dial Type [Pu]
Press 1 or select ‘1: Country Code’ using navigation keys and press
OK key.
Page 32

SiPTel C01 IP Phone User Manual
2: Pulse
2:Dial Type[Pu]
STEP 2 Select your country. This is also important to get proper time displayed on SiPTel screen.
<Country Code>
[33]
India
Country press OK key.
4.4.4.3.2. Dial Type
STEP 1 Select ‘2: Dial Type’.
Press 2 or select ‘2: Dial Type [Pu]’ using navigation keys and press
Use left and right arrow button in the navigation keys to select your
<Modem Option>
1: Country Code
OK key.
STEP 2 Select ‘1: Tone’ Or ‘2: Pulse’
Press 1 or 2 or select ‘1: Tone’ or ‘2: Pulse’ using navigation keys
<Type: Pulse>
1:Tone
and press OK key.
4.4.4.3.3. Time Out
This menu is to set the time delay that make the dial-up modem disconnected automatically after the time
pre-set in case the user is not using the dial -up. The unit here is one minute.
STEP 1 Select ‘3: Timeout’.
Press 3 or select ‘3: Timeout: [60]’ using navigation keys and press
<Modem Options>
3:TimeOut : [60]
OK key.
Page 33

SiPTel C01 IP Phone User Manual
60
STEP 2 Enter the Time Out value. The range is 0 ~ 255 minutes.
<Time Out>
Range [0-255]
4.4.4.3.4. Speaker
This menu is to select whether you will hear the modem connection beep sound or not.
Modem sound, though it is rather unpleasant to hear, it can be helpful to check the modem connection
status by hearing the sound.
STEP 1 Select ‘4: Speaker’ in menu selection.
Press 4 or select ‘4: Speaker [Off]’ using navigation keys and press
Enter the time-out value, and press ‘OK’ button.
<Modem>
3: Time out [30]
4: Speaker [Off]
OK key.
STEP 2 Select whether you will hear the modem sound or not.
Press 1 or 2 or select ‘1: On’ or ‘2: Off’ using navigation keys and
?
<Speaker [On] >
1: On
2: Off
press OK key.
4.4.5. Time
Time options specifically helps the IP Phone in properly displaying your timings of calls etc., basing on
your local time instead of an universal time. SiPTel IP Phone automatically reaches one of our time
servers to get you the correct time and this selection allows it to adjust the time according to your area.
Page 34

SiPTel C01 IP Phone User Manual
STEP 1 Select ‘5.TIME’ from SETUP menu list after pressing MENU key.
<Setup>
4: Modem
5: Time
Press ‘Cancel’ button to move to the upper menu.
4.4.5.1. Time Zone
STEP 1 Select “1: Time Zone’ from TIME menu under SETUP.
Use navigation key or press the menu number to select the menu.
<Time>
1 : Time Zone
2 : Summ Time [Di]
STEP 2 User Navigational keys to select the Time Zone for your country or area.
Time Zone
+05:30
Use navigation key or press the menu number to select the menu.
Press ‘Cancel’ button to move to the upper menu
Press ‘Cancel’ button to move to the upper menu.
4.4.5.2. Summer Time ( Day light settings )
Some areas on GLOBE requires DAY light settings for correct time in some seasons.
STEP 1 Select “2:Summ Time[Di]”
<Time>
1 : Time Zone
2 : Summ Time [Di]
Use navigation key or press the menu number to select the menu.
Press ‘Cancel’ button to move to the upper menu.
Page 35

SiPTel C01 IP Phone User Manual
STEP 2 Select ENABLE / DISABLE as per your area’s requirement.
<Summ Time:Di>
1 : Enable
2 : Disable
Press ‘Cancel’ button to move to the upper menu.
4.4.6. PSTN
The general telephone network that we have for our Fixed Wire Phones at home are technically known as
PSTN – Public Switched Telephone Network
4.4.6.1. Dial Type
STEP 1 Select ‘6.PSTN’ from the MAIN menu after pressing MENU button.
Use navigation key and press OK or press the menu number to
Use navigation key or press the menu number to select the menu.
<Setup>
5: Time
6: PSTN
select the menu.
Press ‘Cancel’ button to move to the upper menu.
STEP 2 Select ‘2. Dial Type’ from PSTN menu.
Use navigation key and press OK or press the menu number to
<PSTN Setup>
2: Dial Type [Pu]
3: Country Code
select the menu.
Press ‘Cancel’ button to move to the upper menu.
STEP 3 Select either TONE / PULSE depending on what is supported by your Telephone Service
Provider. PULSE also allows TONE enabled lines to work.
Use navigation key and press OK or press the menu number to
<Type : Pulse >
1 : Tone
2 : Pulse
select the menu.
Press ‘Cancel’ button to move to the upper menu.
Page 36

SiPTel C01 IP Phone User Manual
4.4.6.2. Default Call.
Default Call allows you to select whether VOIP or PSTN should work as default when the phone goes offHook. This option mainly required when u have both CABLE and PSTN connected to the same phone for
both VOIP and PSTN calls. If you are only a Dialup user, then no need to worry about this option because
PSTN port is already busy as connected to ISP for internet.
STEP 1 Select ‘5: Dflt Call’ from the PSTN menu.
Use navigation key or press the menu number to select the menu.
<PSTN Setup>
4: RingDuration
5: Dflt Call [Vo]
STEP 2 Select ‘2: VoIP’ to be on VoIP using cable and when not connected to ISP or not
Press ‘Cancel’ button to move to the upper menu.
registered to VoIP Service, PSTN can be available. You can also shift between modes by
press PSTN button as well when using CABLE Internet for VoIP
Use navigation key or press the menu number to select the menu.
<Dflt Call:Vo>
1 : PSTN
2 : VoIP
Press ‘Cancel’ button to move to the upper menu.
4.4.7. HTTP PROXY
HTTP Proxy is included in the phone so as to avoid hindrances for BALANCE option web access due to
proxy servers in between.
STEP 1 Select ‘7.HTTP Proxy’ from the MAIN menu.
<Setup>
6: PSTN
7: HTTP Proxy
Use navigation key and press OK or press the menu number to
select the menu.
Press ‘Cancel’ button to move to the upper menu.
Page 37

SiPTel C01 IP Phone User Manual
4.4.7.1. Proxy IP
STEP 1 Select ‘1. IP’ to enter IP Address of your local proxy server.
<HTTP Proxy>
1: IP
2: Port[0]
Press ‘Cancel’ button to move to the upper menu.
STEP 2 Enter Proxy IP address or DNS name of your local proxy.
Press OK after entering the Proxy IP or its DNS name
Use navigation key or press the menu number to select the menu.
HTTP Proxy IP
IP :
proxy.isp.com
Press ‘Cancel’ button to move to the upper menu.
4.4.7.2. Proxy Port
STEP 1 Select ‘2. Port’ to enter Port that is used for proxying your traffic.
Use navigation key and press OK or press the menu number to
<HTTP Proxy>
1: IP
2: Port[0]
select the menu.
Press ‘Cancel’ button to move to the upper menu.
STEP 2 Enter the proxy port number and press OK.
Press ‘Cancel’ button to move to the upper menu.
HTTP Proxy Port
Port:
8080
Page 38

SiPTel C01 IP Phone User Manual
4.5. Information
This menu is to provide users with the information on the SiPTel IP Phone such as network setting and
version, Mac address etc.
4.5.1. Network
This menu shows the network status the phone is employed, which includes IP address, subnet mask,
default gateway, and DNS etc. In case of modem, it also shows the speed at which the modem got
connected to ISP.
STEP 1 Press ‘Menu’ key.
STEP 2 Select ‘5: Information’, and press ‘OK’ button.
Use navigation key or press the menu number to select the menu.
<Menu>
4: Setup
5:Information
Press ‘Cancel’ button to move to the upper menu.
STEP 3 Select ‘1: Network’, and press ‘OK’ button.
Press ‘Cancel’ button to move to the upper menu.
<Information>
1:Network
2: Version
STEP 4 You can see the network mode information. The following display shows that the current
network mode is DHCP. The network mode can be Static, DHCP, PPPoE (or Dialup).
Use navigation key to see the next information...
<Info. #1>
Network Mode
DHCP
Press ‘Cancel’ key to return to the upper menu.
Page 39

SiPTel C01 IP Phone User Manual
STEP 5 You can see the SiPTel IP Phone IP information in the second information display.
<Info. #2>
IP
XXX.XXX.XXX.XXX
Press ‘Cancel’ key to return to the upper menu.
STEP 6 You can see the subnet mask information in the third information display.
Use navigation key to see the next information.
Use navigation key to see the next information.
<Info. #3>
Subnet Mask
XXX.XXX.XXX.XXX
Press ‘Cancel’ key to return to the upper menu.
STEP 7 You can see the gateway address information in fourth information display.
Use navigation key to see the next information.
<Info. #4>
Gateway
XXX.XXX.XXX.XXX
Press ‘Cancel’ key to return to the upper menu.
STEP 8 You can see the DNS address information in the fifth information display.
Use navigation key to see the next information.
<Info. #5/6/7>
DNS1/2/3
XXX.XXX.XXX.XXX
Press ‘Cancel’ key to return to the upper menu.
4.5.2. Version
Version information is important especially when upgrading the firmware to the latest version. If you have
any problem in the SiPTel IP Phone, please report the version information, and the IP address of the
phone to the service provider.
STEP 1 Press ‘Menu’ button on the key pad of SiPTel IP Phone.
Page 40

STEP 2 Select ‘5: Information’ in menu selection.
SiPTel C01 IP Phone User Manual
<Menu>
4: Setup
5: Information
STEP 3 Select ‘2: Version’ from the menu.
Press OK button or Press 2 to select.
Press OK button or Press 5 to select.
<Information>
1: Network
2: Version
Press ‘Cancel’ key to return to the upper menu.
STEP 4 You can see the following display. ‘Boot’ means the boot ROM version, and App means
the firmware version.
Press ‘Cancel’ key s to go back in the menu structure.
<SW Version>
Boot: V2.07
App: V5.2E--15
4.6. BALANCE
This option is provided so as to check you balance online using phone. And so, this option works only
when phone is connected to Internet.
STEP 1 Select ‘6: BALANCE’ from the MAIN menu selection.
Use navigation key or press the menu number to select the menu.
<Menu>
6: BALANCE
7: Reboot
Press ‘Cancel’ key to return to the initial display.
Page 41

SiPTel C01 IP Phone User Manual
STEP 2 You will see following screen while it attempts to get your account balance.
<Account>
BALANCE:
WAIT A MOMENT
STEP 4 You will see the account balance there after.
<Account>
BALANCE:
USD 10.02
It may take few seconds dependi ng on the speed of internet to get
the account balance.
Please wait for a moment.
It displays your account balance after “USD: “
Press Cancel to go back to main menu.
4.7. Reboot
This menu is used to reboot the system.
STEP 1 Select ‘7: Reboot’ in the MAIN menu selection.
Use navigation key or press the menu number to select the menu.
<Menu>
6: BALANCE
7: Reboot
STEP 2 If you want to reboot SiPTel IP Phone, select ‘YES’, and press ‘OK’ .
Reboot System?
YES NO
Press ‘Cancel’ key to return to the initial display.
Use navigation key to select ‘YES’ or ‘NO’.
Press ‘Cancel’ key to return to the initial display.
Page 42

SiPTel C01 IP Phone User Manual
5. Using SiPTel IP Phone
5.1. Connecting IP phone to Internet
5.1.1. Using in Dial-up Mode
STEP 1 Press @ISP button on the key pad of SiPTel IP Phone. The built-in modem will try to
connect to the dial -up ISP preset in Modem setup.
[Dial-UP]
Connecting
Wait a moment
STEP 2 If you can see ‘ATDT + dial -up ISP Tel number’ on the LCD, it means that the modem is
trying to call your local ISP telephone number.
OK
ATDT 172233
XXXXX
STEP 3 If you can see ‘PPP Start’ message on the LCD, it means that the connection to the dial-
up ISP is succeeded.
XXXXXXXX
Connect 34667
PPP Start
If you want to cancel to connect to an ISP, please press ‘@isp’
button again.
ATDT specified the dialtype as TONE and
ATDP specifies the dialtype as PULSE.
If you can’t see the left display, please try again.
STEP 4 If you can see the following display, it means that the connection is successful, and
SiPTel IP Phone has obtain ed a Dynamic IP address from the dial-up ISP.
If you can’t see the left display, please try again.
IP: XXX.XXX.XXX.XXX
Connection OK
Page 43

SiPTel C01 IP Phone User Manual
STEP 5 If you can see the following display, you can dial the destination number to make a call.
SiP Tel
10-100-1000
A 09:24
Gatekeeper of ITSP.
If you can see constant top left display , you can dial the number.
5.1.2. Using with Broadband Cable.
Once the network is properly configured using the Network menu option, you can straight away start
making calls once the IP Phone is registered with the Gatekeeper of ITSP. See if SiPTel IP Phone
registered with the Gatekeeper of ITSP.
Please wait till the SiPTel IP Phone can be registered with the
SiP Tel
10-100-1000
A 09:24
If you can’t see constant top left display, please check the network
once again or check your balance and your H.323 ID account
configuration as well.
5.2. Making a VoIP Call
User can make or receive a call in either VoIP mode or PSTN mode. There are some differences between
VoIP mode and PSTN mode. Please read carefully the following description not to make have confusion
in making or receiving a call.
Note: Use pound key(#) to make a call immediately after dialing the destination phone number in VoIP mode.
5.2.2. In On-Hook mode (Pre-dial)
This is used to dial the destination number without picking up the handset.
STEP 1 Dial destination number in on hook mode. The dialed number will be displayed on LCD.
Enter the full number of the destination device.
021231234
Pre-dial
A12:00
Here you can correct the digits if you make mistakes and complete
the number.
Page 44

SiPTel C01 IP Phone User Manual
STEP 2 Pick up the handset or Press Speaker button. The call will be dialed to the destination
number automatically.
Please wait till the call is placed successfully.
021231234
STEP 3 If the call is connected to the destination TEL number, the duration of the ongoing calls
Dialing
A12:00
will appear on the LCD display.
[00:37]
021231234
A12:00
conversation.
5.2.3. In Off Hook mode
STEP 1 Pick up the handset, and try to hear the dial tone.
Once the call is connected to the destination party, start your
PRESS DIAL..
A12:00
STEP 2 Dial the destination telephone number.
In this mode you cannot correct your dialed digits. If you go wrong
somewhere with digits, hang the phone and try dialing again.
021231234
PRESS DIAL..
A12:00
dialing the destination number otherwise a delay of 2-3 seconds can
be observed.
You can press ‘#’ key to make the phone call immediately after
Page 45

SiPTel C01 IP Phone User Manual
STEP 3 If the call is connected to the destination party successfully, the call starting time, and call
duration time will be displayed on the LCD.
12:00 [00:37]
021231234
A12:00
If you can see the icon on the LCD, you can start to speak over
the phone.
5.3. Making a PSTN call
To use PSTN mode, you need to connect the PSTN port of SiPTel IP Phone to the phone line. Please
remember, you are not allowed to make any local call when you are in Dialup because your phone line is
already connected to local ISP for Internet to make VoIP calls.
If Broadband cable is used for VoIP registration and the PSTN port is connected to the PSTN network,
you can still make a PSTN call by pressing ‘PSTN’ button on the key pad of the SiPTel IP Phone.
In case the broadband is unavailable or your account is not registered our ITSP service, it’s impossible to
use VoIP mode. In this case, the SiPTel IP Phone will be changed to the PSTN mode automatically when
you go off hook.
STEP 1 Press the ‘PSTN’ key on the key pad of the SiPTel IP Phone.
[PSTN]
A12:00
When you are using PSTN mode, you can see the [PSTN] message
on the LCD.
If you can dial tone, start dialing the destination number.
5.4. Making a call in Phone Book mode
STEP 1 Press ‘P-BOOK’ button, or press ‘MENU’ and select “2: Phone Book”.
STEP 2 Select ‘1 : Find Number’ in Phone Book menu.
STEP 3 Select either ‘By Index’ or ‘By Name’.
STEP 4 Enter the INDEX number or NAME and press OK button.
STEP 5 Pick up the handset. The call will be made to the select number.
Page 46

SiPTel C01 IP Phone User Manual
5.5. Making a call in Call Log mode
STEP 1 Press ‘Call Log’ button, or press ‘MENU’ and select ‘1: Call Log’.
STEP 2 Select either ‘Received Calls’, ‘Dialed Calls’, or ‘TX/Rx Calls’ etc.,
STEP 3 Select the desired number.
STEP 4 Pick up the handset. The call will be made to the selected number.
5.6. Memory Dial
STEP 1 Pickup the hand set.
STEP 2 Press the memory dial key [M1~M3] on the key pad of the SiPTel IP Phone. The one
button touch call will be made immediately.
5.7. Web Access
After connecting your IP Phone on cable network or dialup, you can view the IP Address from
INFORMATION -> NETWORK menu on LCD. Try the following on a browser using that IP from a PC.
http://ip_address_of_phone:8763
Username and password can be acquired from your vendor.
For further Inquiries
E-mail : info@sipmicro.com or support@sipmicro.com
 Loading...