

Page 1
3
Contents 3
Basic Items 4
Overview 5
Setting up the computer 8
Using the digitizer pen (Optional) 10
Using the Slate PC Dock (Optional) 11
Using the Bluetooth Wireless
Keyboard (Optional) 14
Contents
● Text Notations
Icon Notation Description
Caution
Content included in this section includes information
required about the function.
Note
Content included in this section includes helpful
information to use the function.
● Copyright
© 2011 Samsung Electronics Co., Ltd.
Samsung Electronics Co., Ltd. owns the copyright of this manual.
No part of this manual may be reproduced or transmitted in any form or by any means,
electronic or mechanical, without the consent of Samsung Electronics Co., Ltd.
The information in this document is subject to change without notice due to improving the
performance of the product.
Samsung Electronics shall not be liable for any data loss. Please take care to avoid losing
any important data and backup your data to prevent any such data loss.
Page 2
4
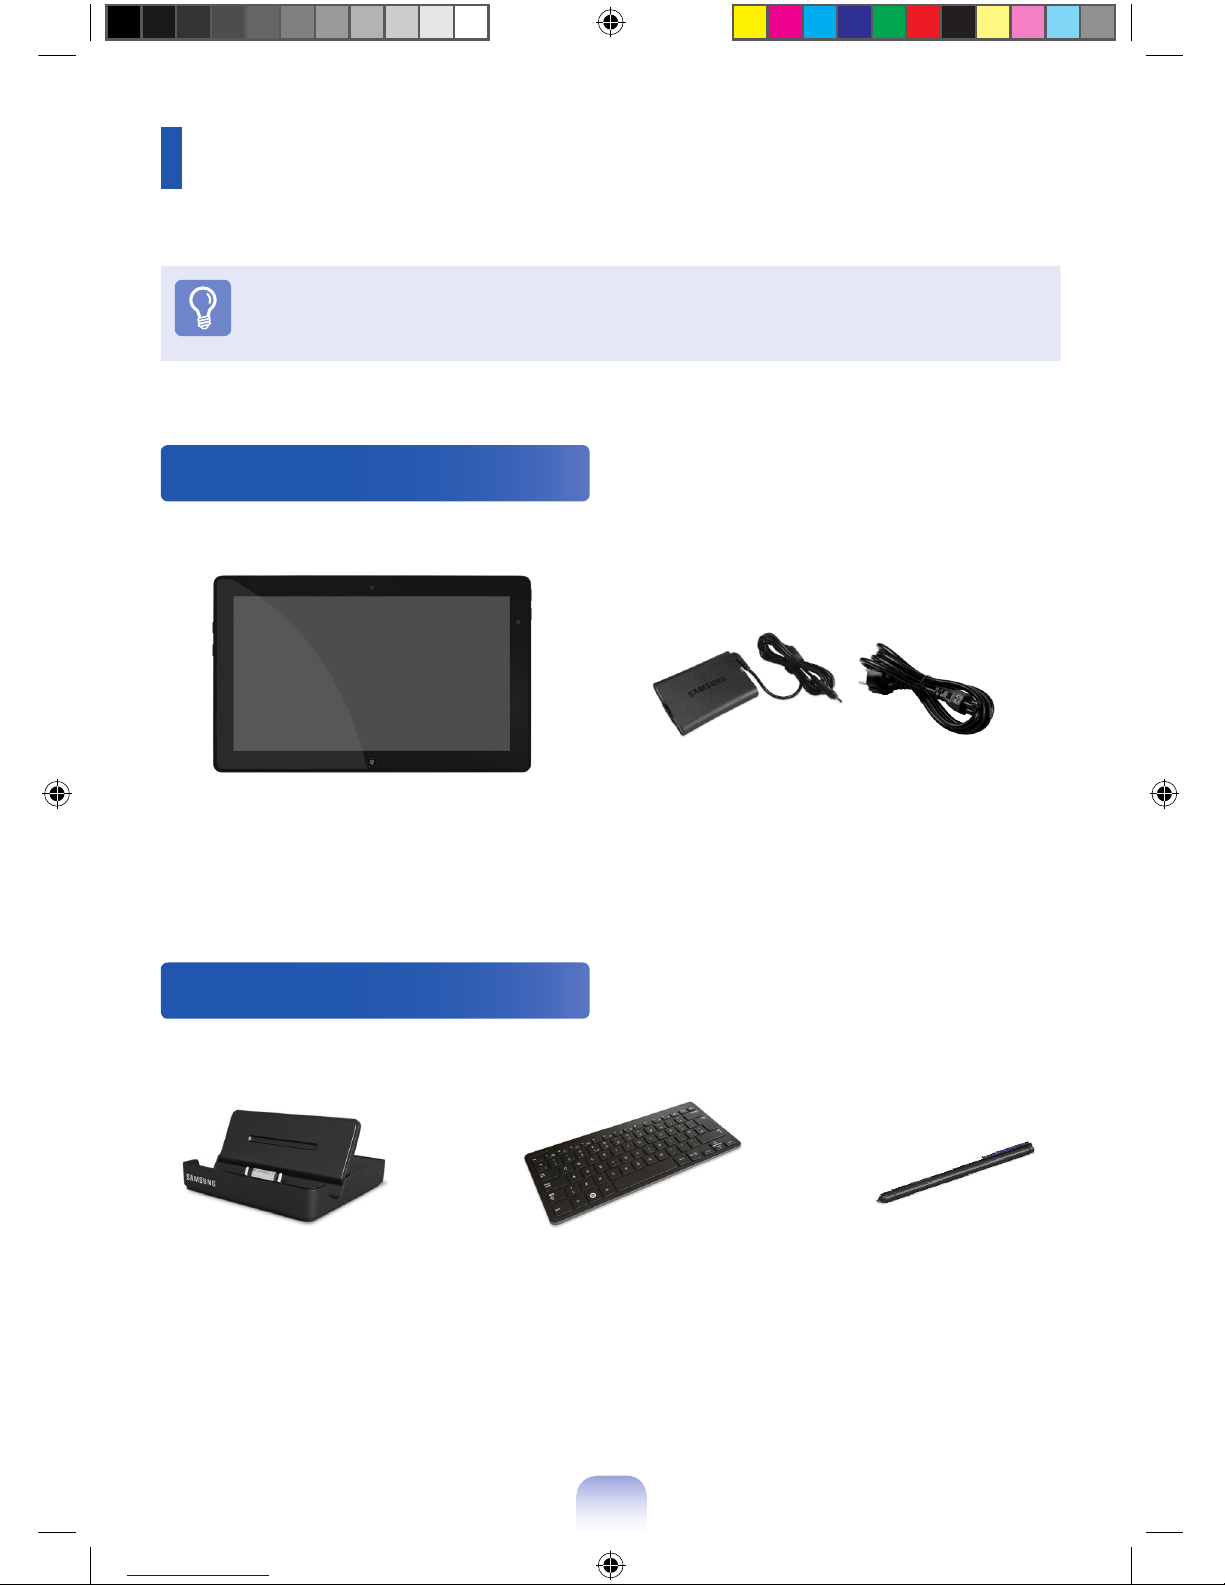
Basic Items
The items included in the package may vary depending on your selection of the
optional items.
The image shown on the cover may differ from the product.
Contents
Accessories (Optional)
AC AdapterComputer
Digitizer PenBluetooth Wireless KeyboardSlate PC Dock
Page 3
5
Overview
Optional items may be changed or may not be provided depending on the
computer model.
The actual color and appearance of the computer may differ from the pictures
used in this guide.
This may not be supported for some devices.
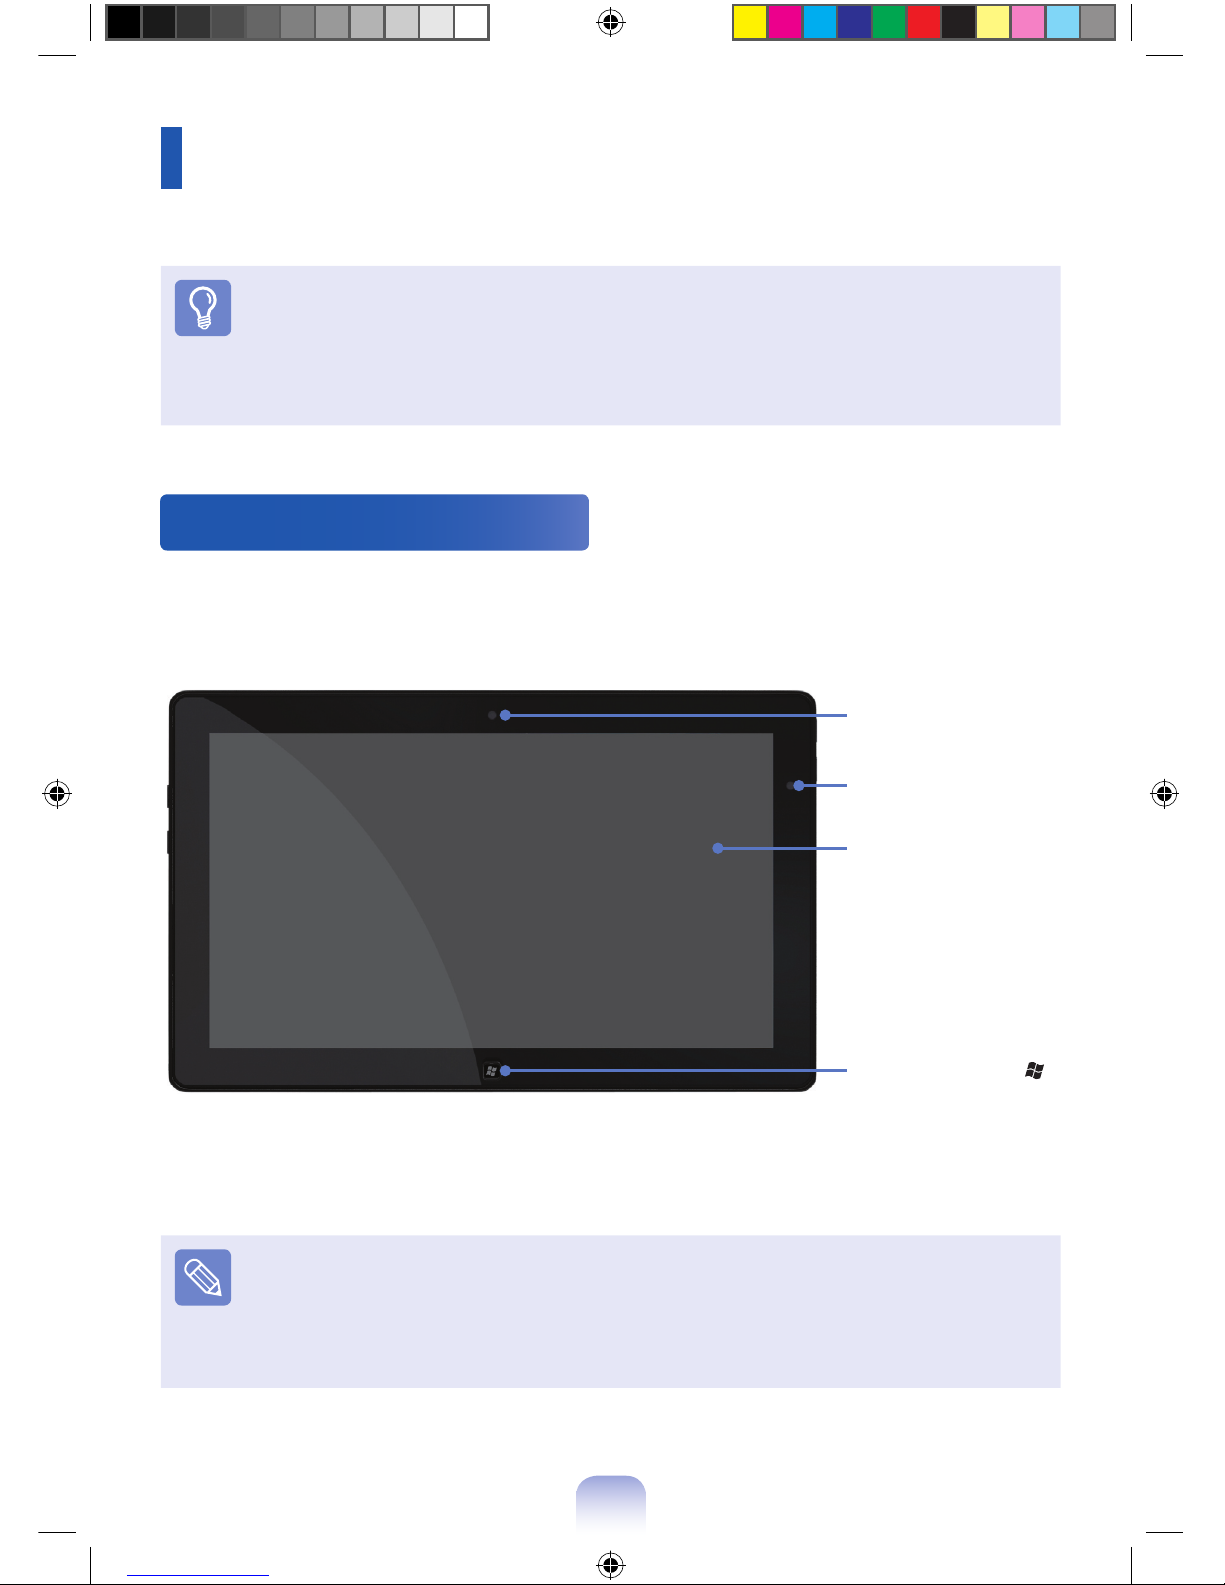
Front View
Camera (Optional)
Touch Screen
Illumination Sensor
Windows button
Illumination Sensor: Using the illumination sensor, the LCD screen brightness
is automatically adjusted depending on the ambient illumination.
If you cover the illumination sensor with your hand, the LCD screen will become
dimmer. Therefore, please take care that you do not cover the sensor when you
use the computer.
Page 4
6
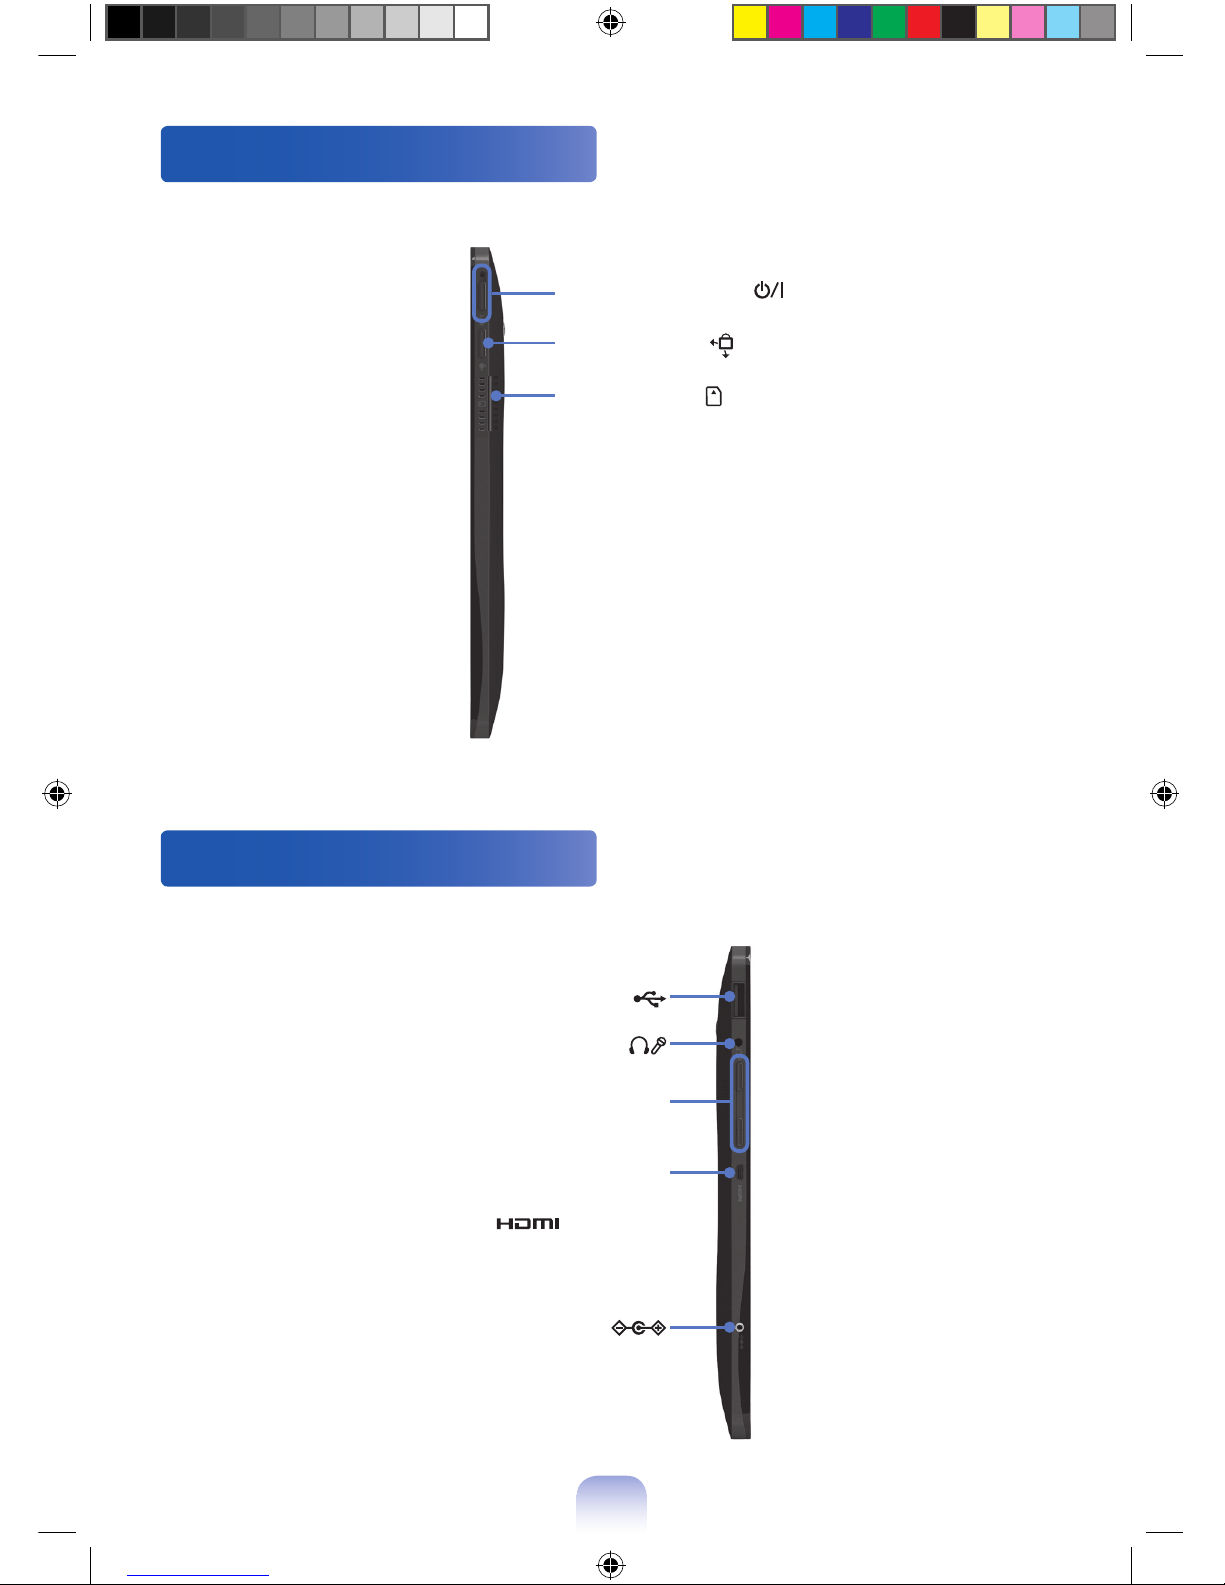
Right View
Left View
Power Button/
Power Button LED
Rotation Lock
SIM Card Slot (Optional)
USB Port
Ear-set / headset Jack
Volume Control Button
Micro Digital Video /
Audio Port (Micro HDMI)
(Optional)
DC Jack
Page 5
7
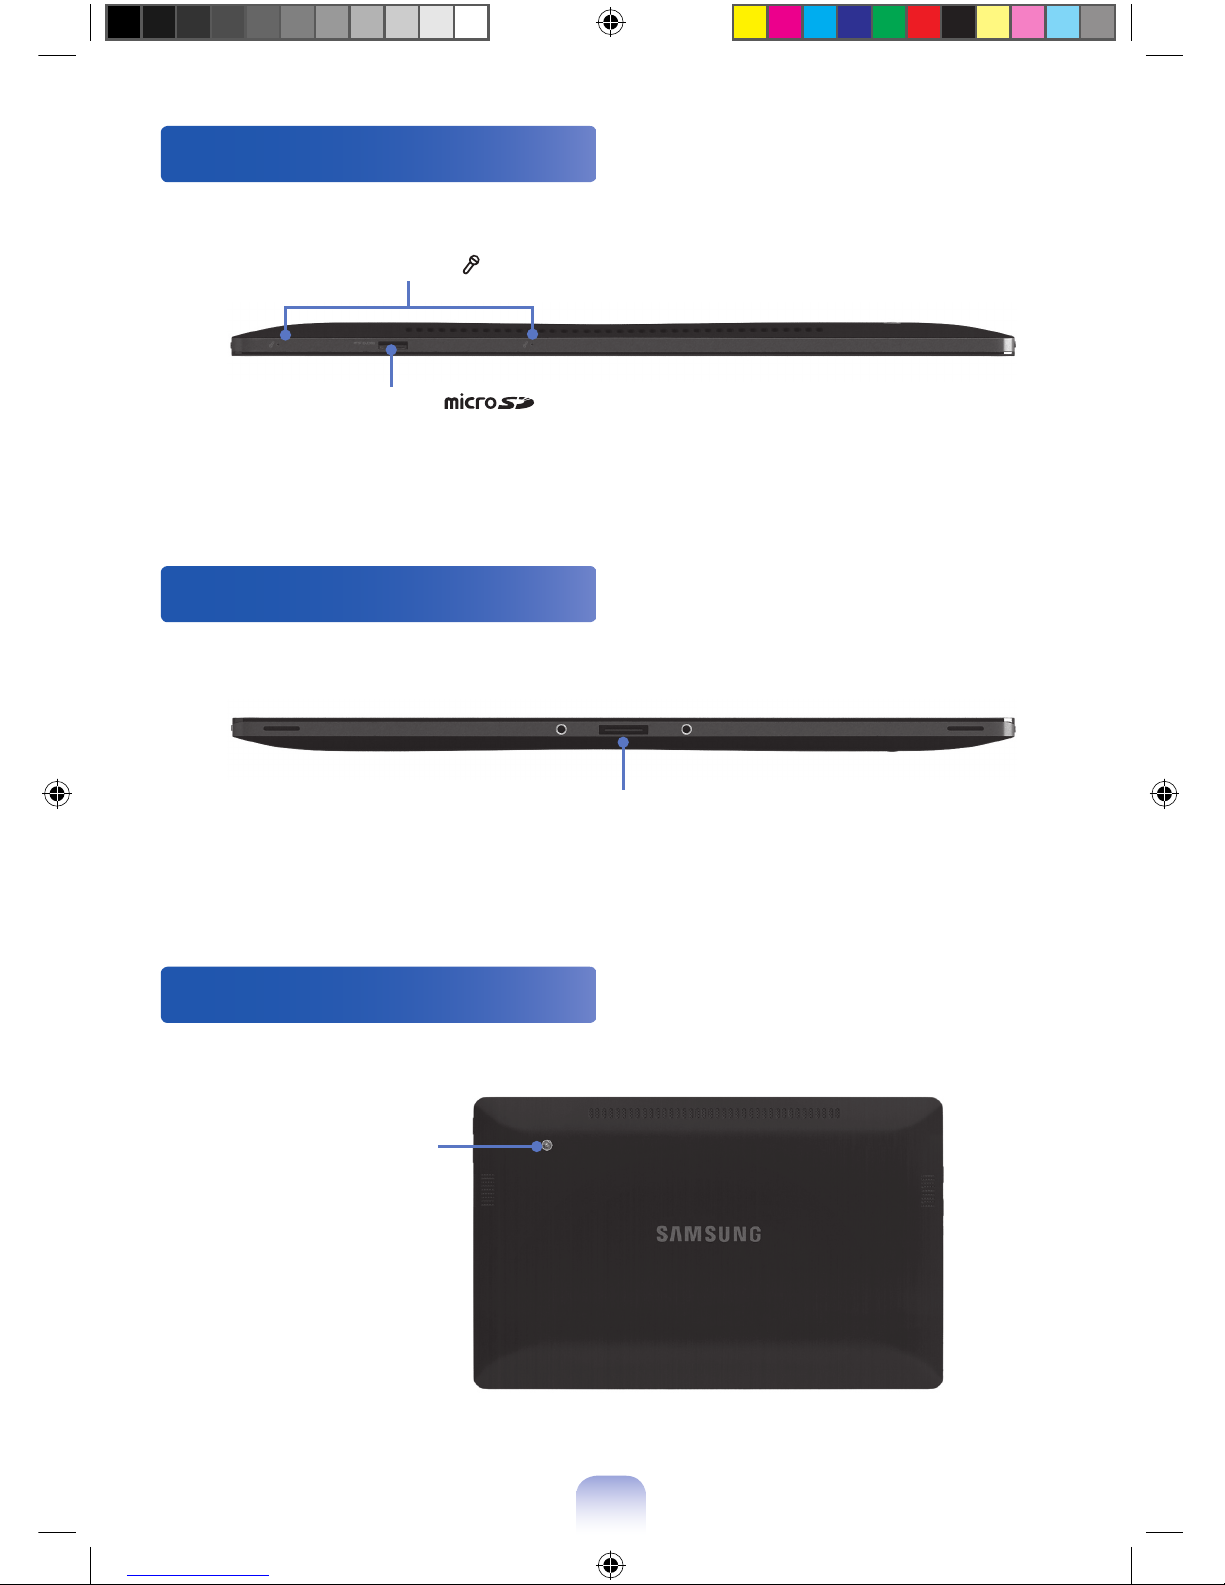
Top View
Bottom View
Rear View
Slate PC Dock port (Optional)
Microphone
Micro SD Card Slot
(Optional)
Camera (Optional)
Page 6
8
Setting up the computer
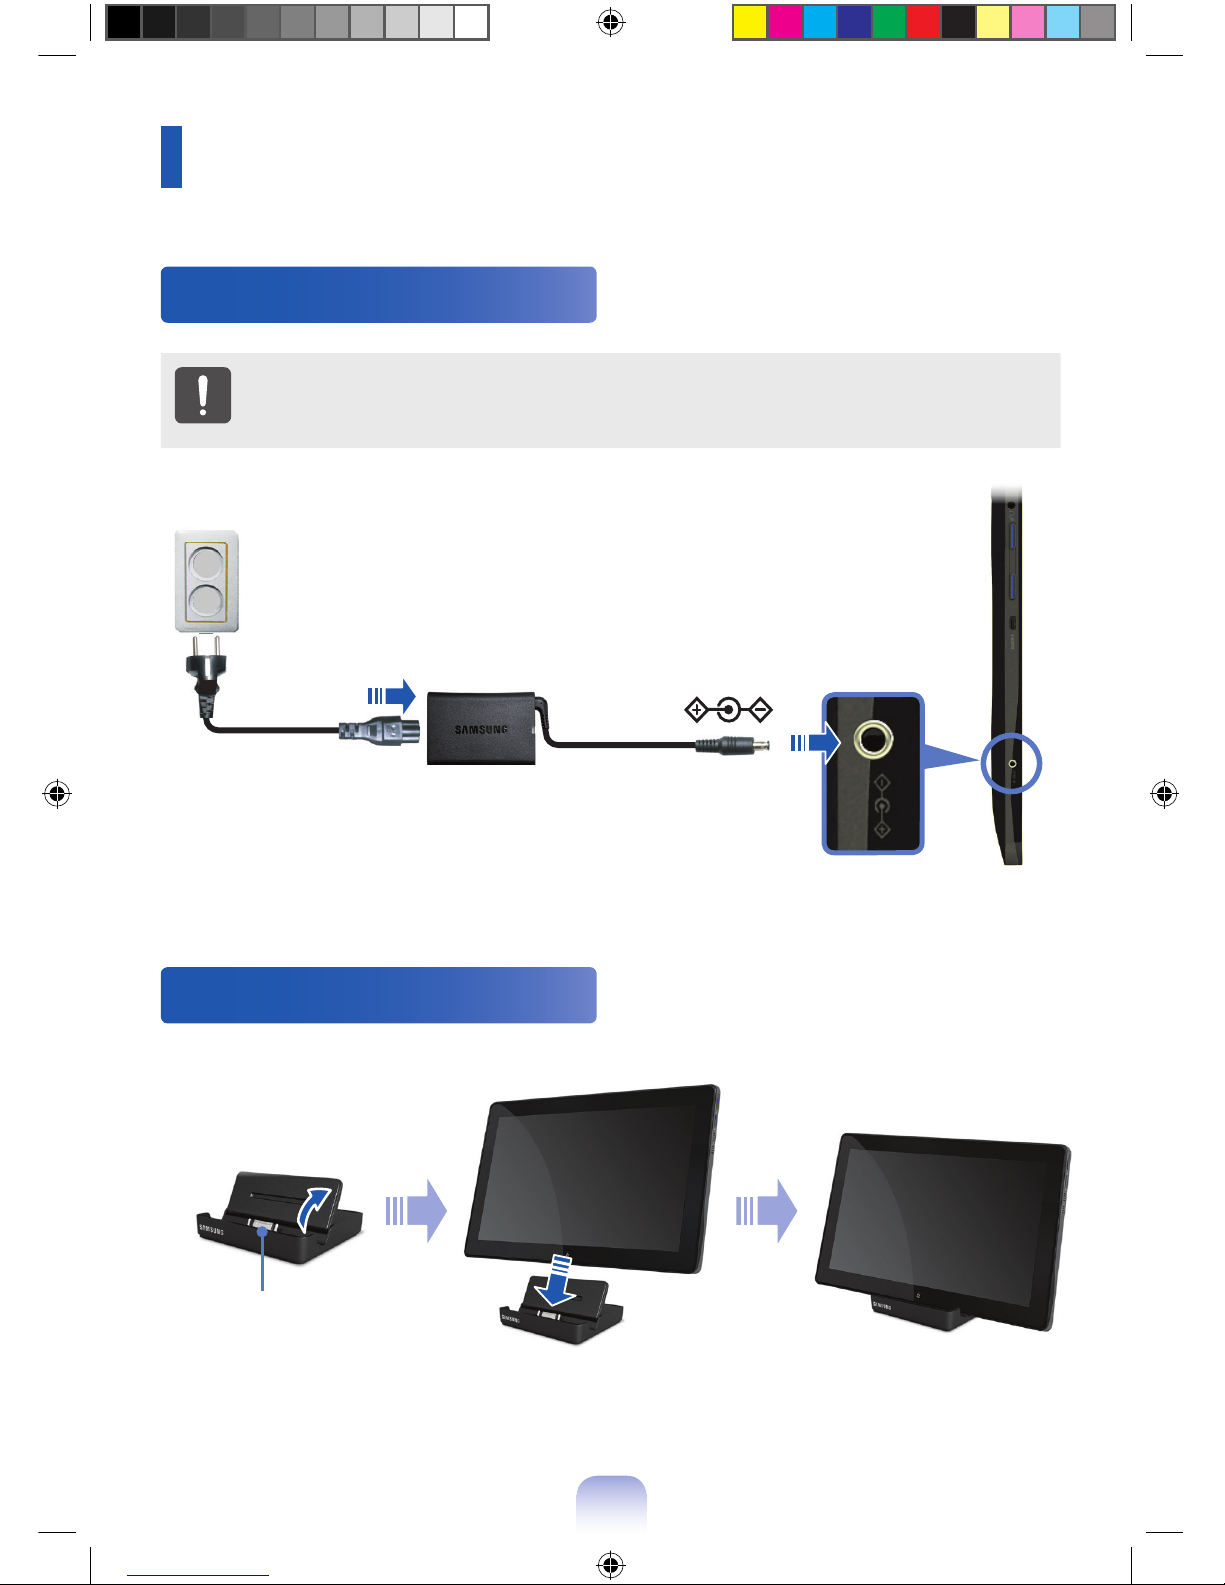
Connect the AC adapter
When using the computer for the rst time, make sure to connect the
AC adapter before pressing the Power button. For safety purposes, the
battery is not charged when the computer is shipped.
x
z
Connect the Slate PC Dock
Computer Connection
Connector
Page 7
9
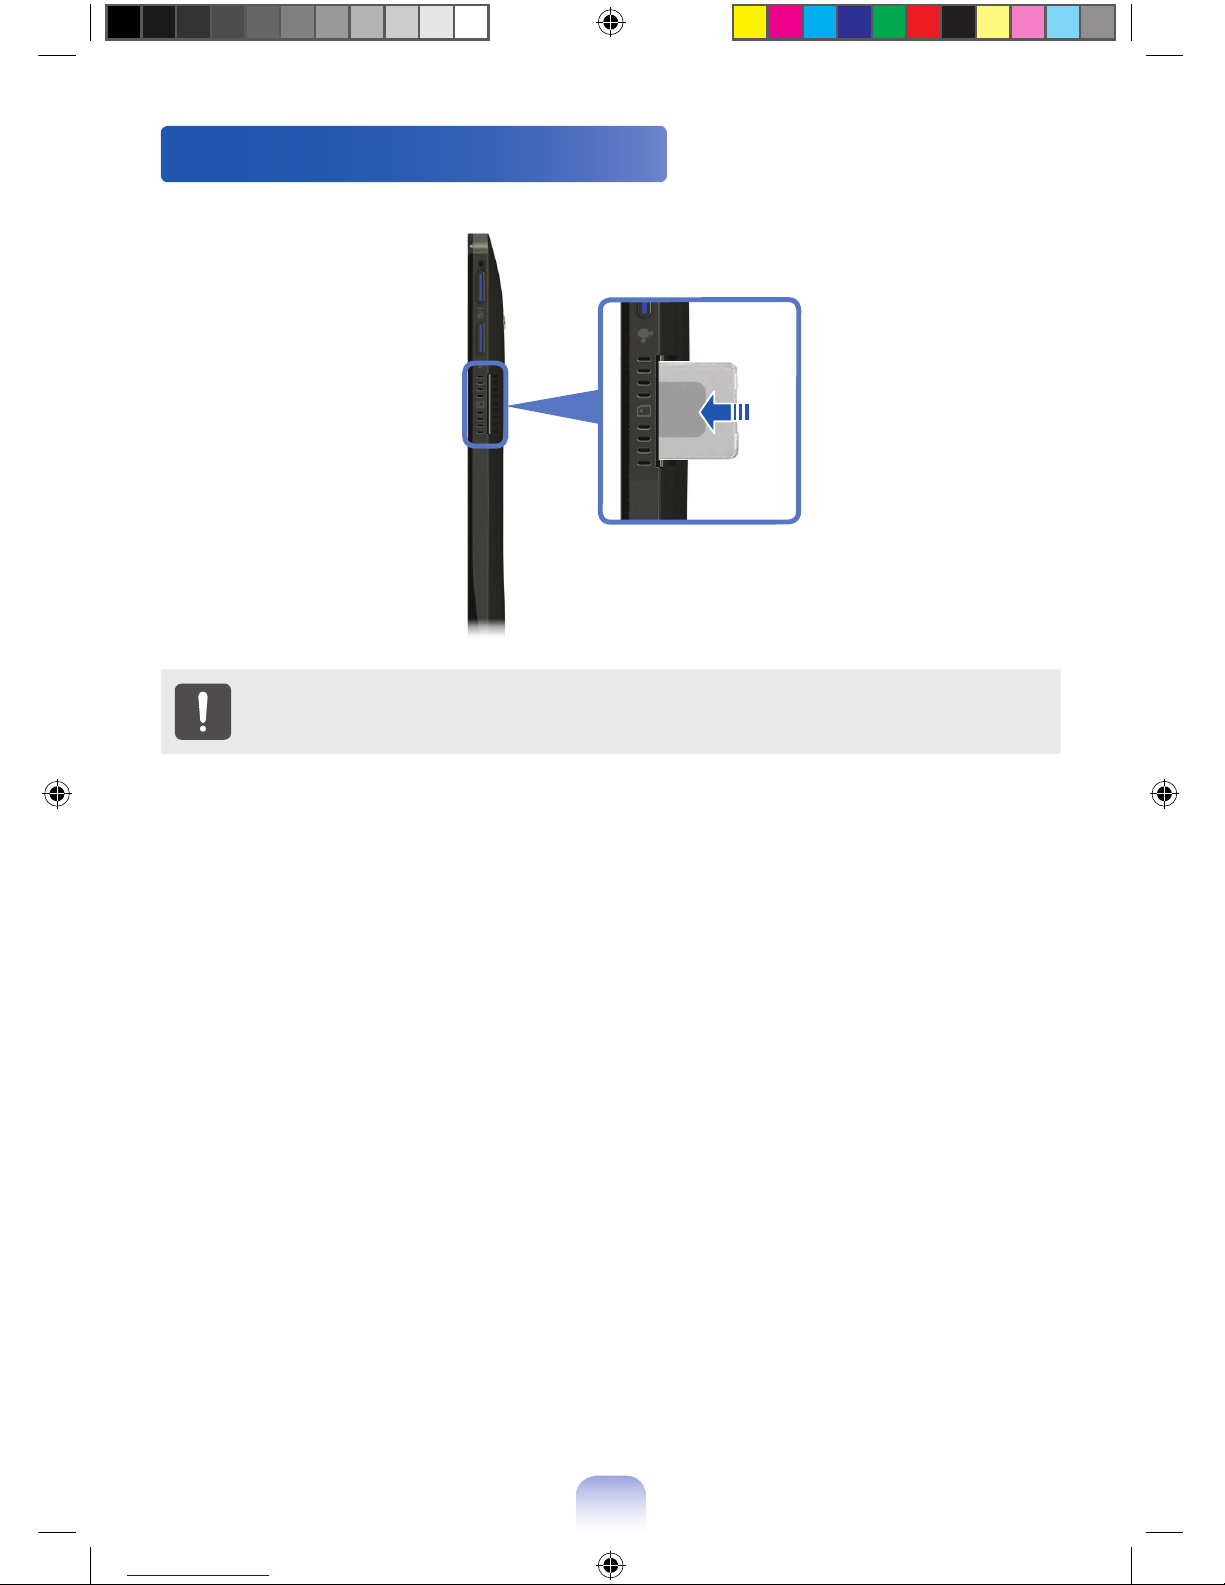
Insert SIM card (Only for 3G models)
Do not insert or remove SIM card while system is turned on, in order to
avoid abnormal behavior of system.
Page 8
10
Using the digitizer pen (Optional)
If a digitizer pen is supplied with the product, you can operate the computer with the pen
instead of your ngers.
You can use the digitizer pen as you would use your ngers.
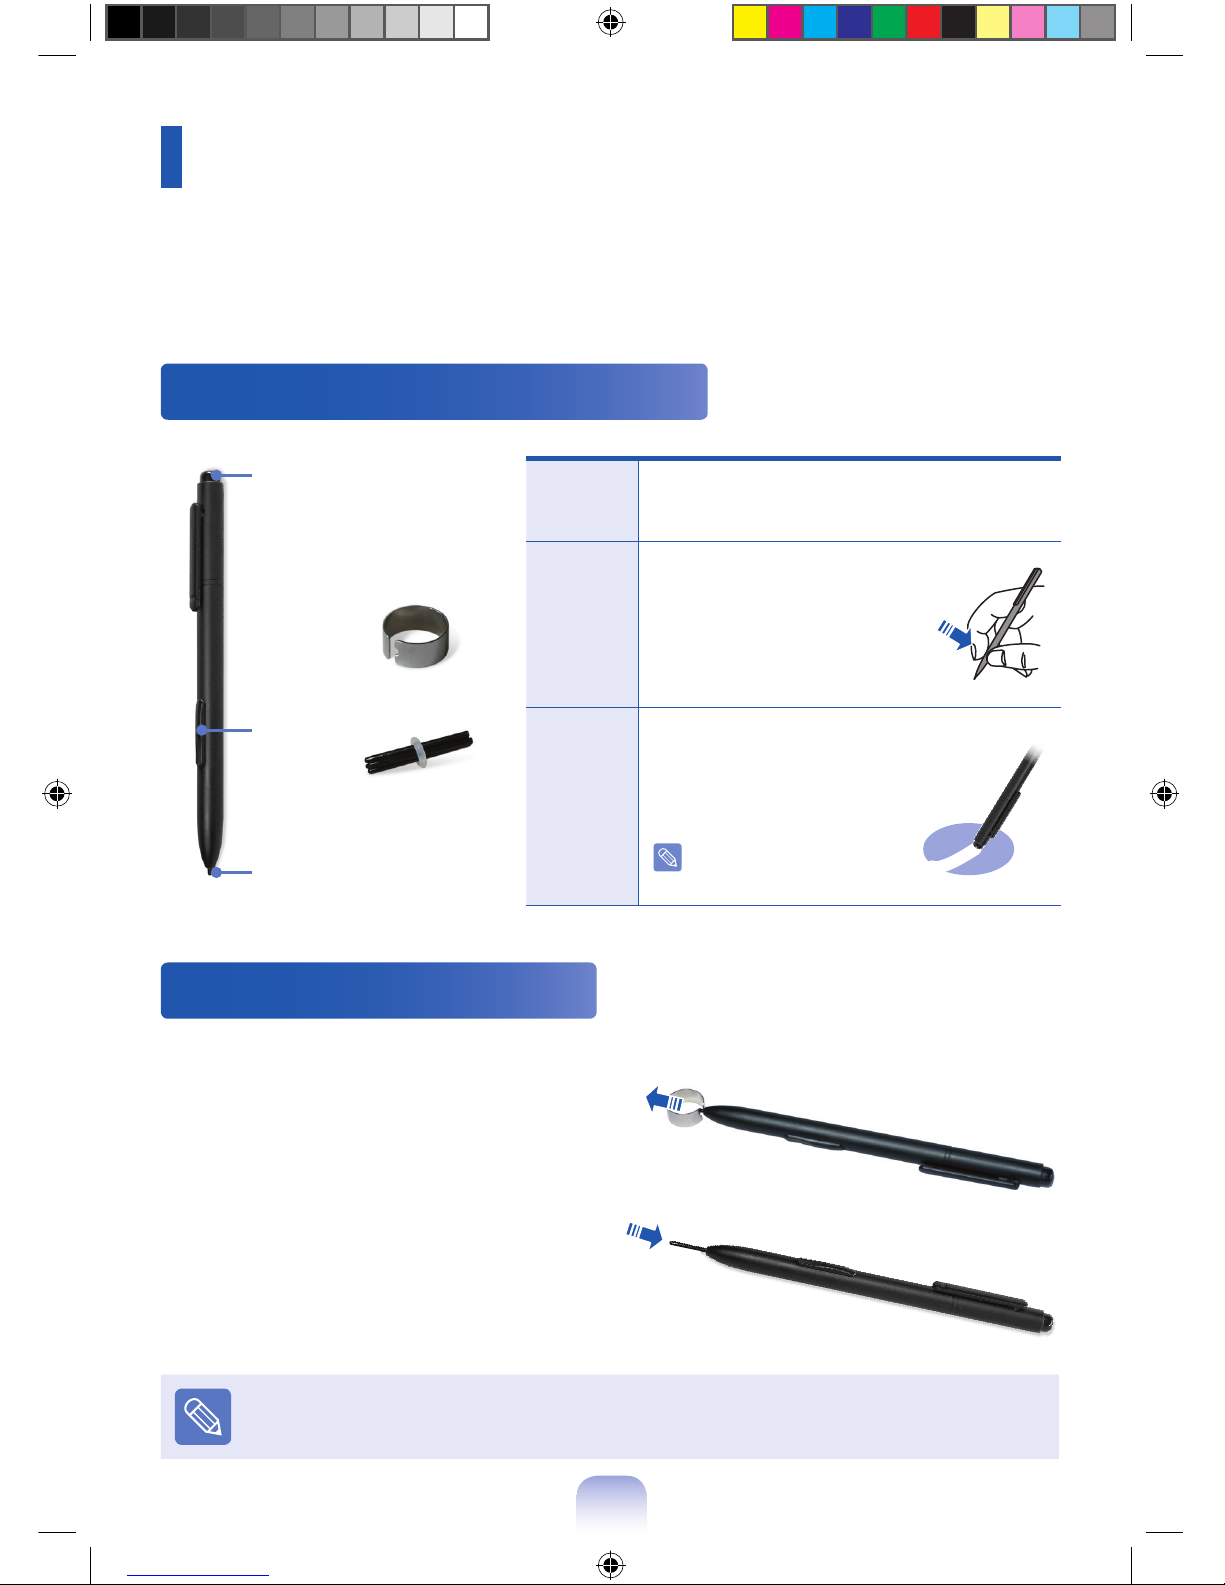
Digitizer pen structure and functions
Pen
tip
This performs the function of your nger
tip when you touch the screen.
Pen
button
Touch the screen with the
digitizer pen while holding
down the pen button.
This performs the right-click
function.
Pen
eraser
Erases letters with the top
end of the digitizer Pen.
This performs the function
of an eraser.
This may not work in
some programs.
Pen
eraser
Pen
button
Pen tip
Pen tip
Ring
Replacing the pen tip
If the pen tip is damaged, you can replace the pen tip as follows:
1
Hold the pen tip by inserting it into the hole
of the ring and remove the tip by pulling it out.
2
Insert the new pen tip into the digitizer pen.
Take care so that the pen tip does not spring out when taking it out.
Page 9
11
Using the Slate PC Dock (Optional)
You can use various types of ports by connecting the Slate PC Dock to compatible Samsung
computers.
You have to purchase the Slate PC Dock additionally.
Use the adapter supplied with the computer. Alternatively, you can purchase a
separate adapter.
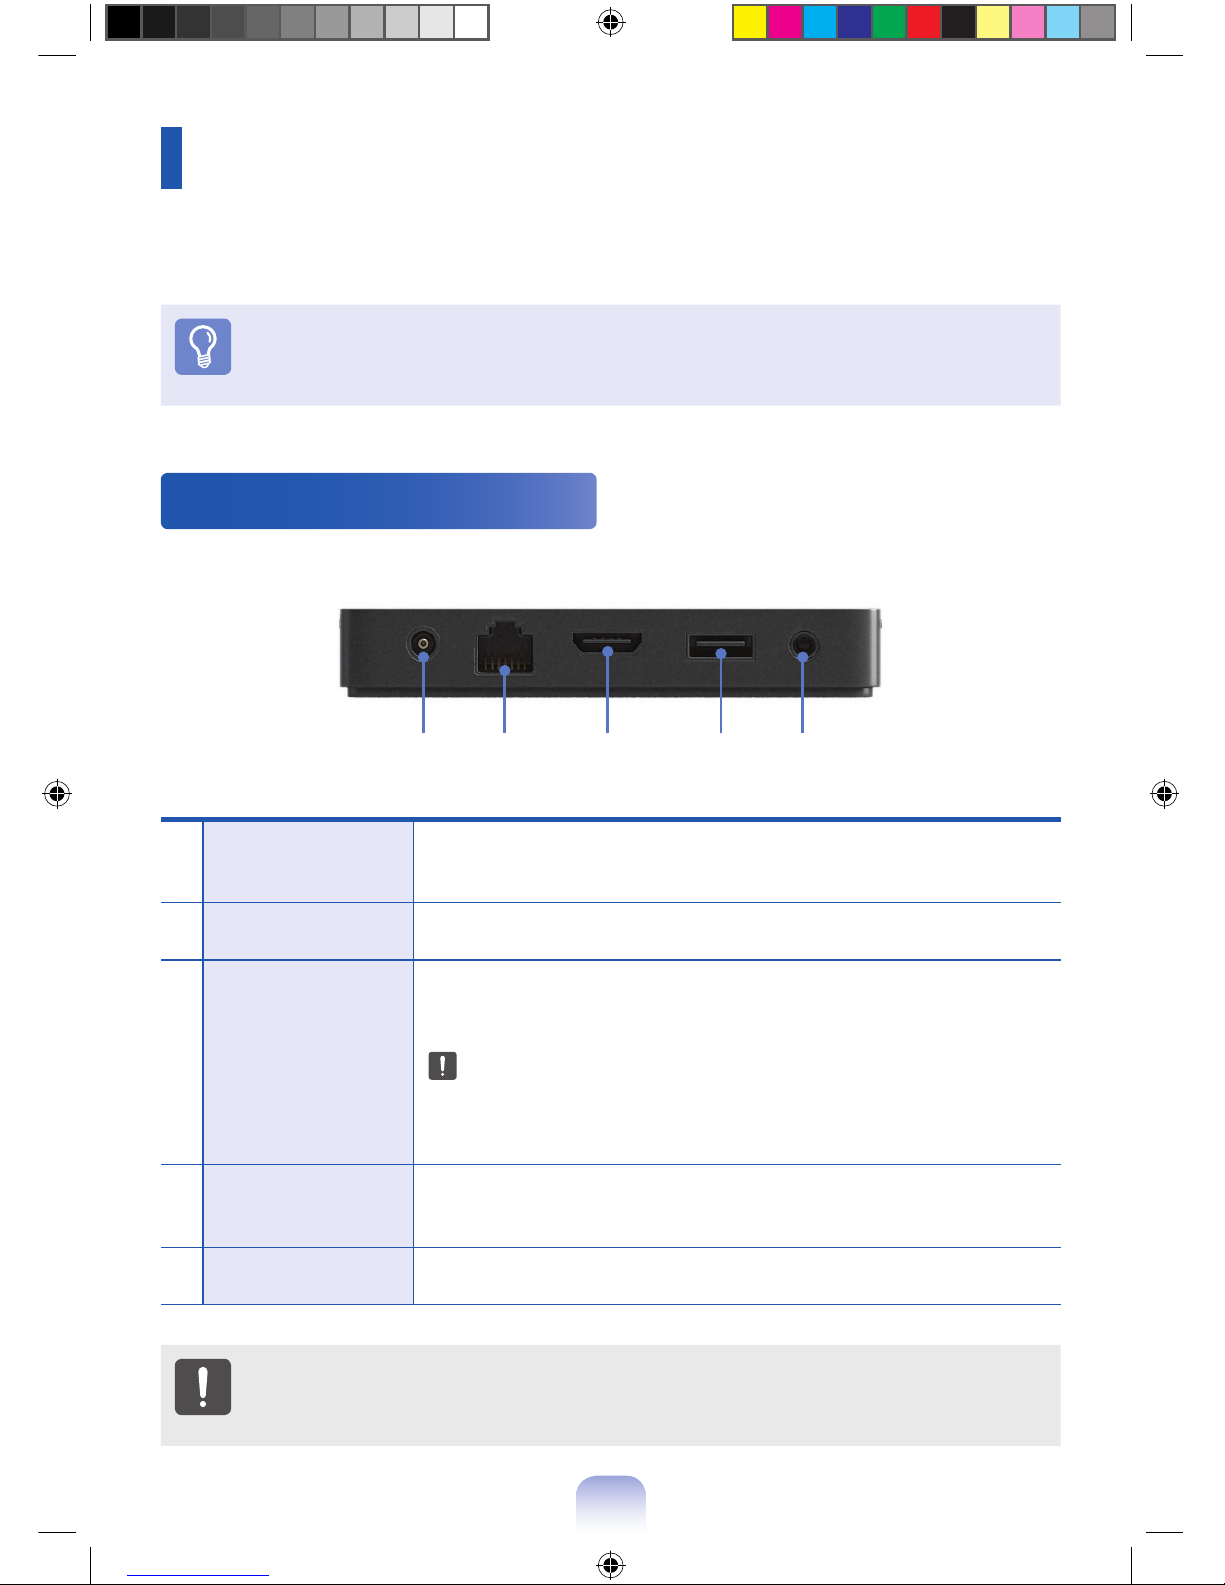
Rear
1 2 3 4 5
1 DC Jack
A jack to connect the AC adapter that supplies power to the
computer.
2 Wired LAN Port Connect the Ethernet cable to this port.
3
Digital Video/
Audio Port (HDMI)
(Optional)
You can connect an HDMI cable to this port. Using this port, you
can enjoy digital video and audio on the TV.
You cannot use both this port and the Micro HDMI port on the
computer at the same time.
To use the Micro HDMI port on the computer, separate the
Slate PC Dock.
4 USB Port
You can connect USB devices to the USB port such as a
keyboard/mouse, digital camera, etc.
5 Headphone Jack A jack used to connect the headphones.
Restrictions
When the Slate PC Dock is connected to the computer, you cannot use the
microphone (USB audio) or the Line-In (USB audio) item of the recording device.
Page 10
12
Installing/Removing
Before installing a computer to the docking station, make sure to disconnect all the
cables connected to the computer.
Installing and separating the Slate PC Dock after turning the computer off is
recommended.
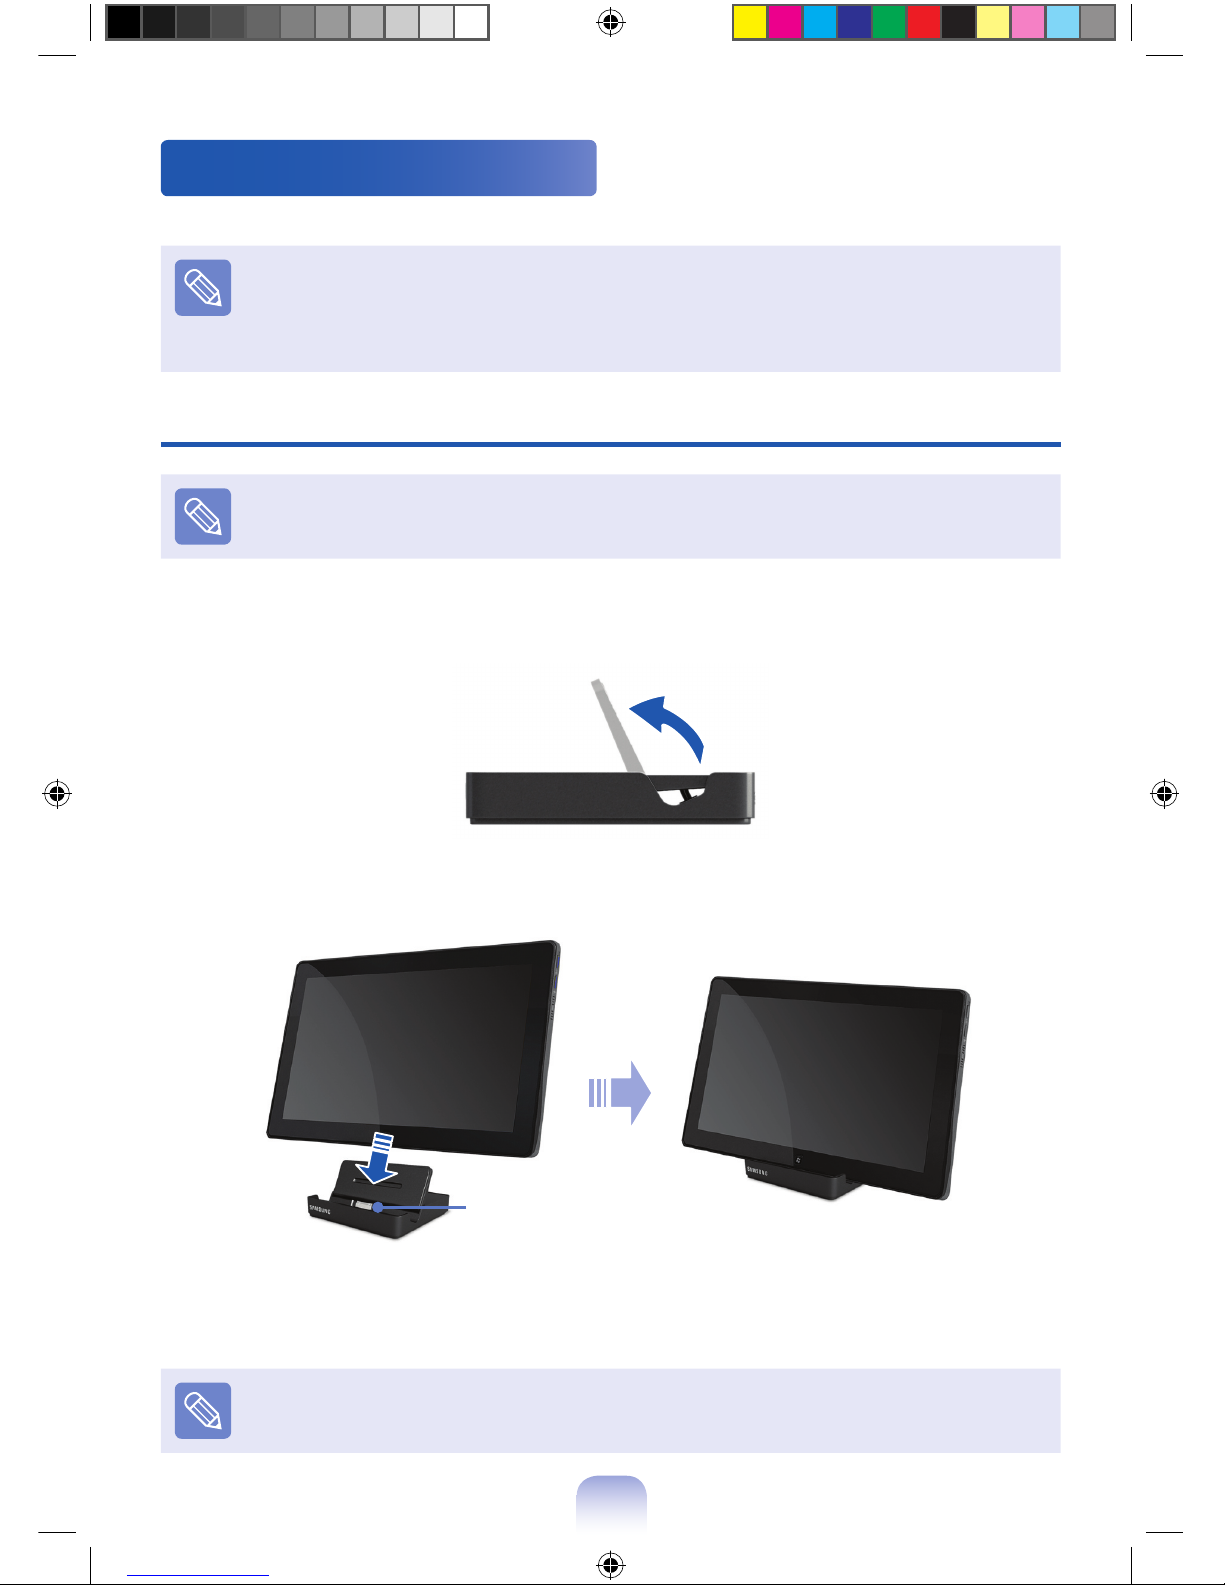
Installing the computer
You can only use the Slate PC Dock with a Samsung computer that supports this
feature.
1
Insert your nger into the groove on the side of the Slate PC Dock to open the top cover of
the Slate PC Dock.
2
Align the computer connector of the Slate PC Dock and the Slate PC Dock port at the
bottom of the computer and connect them.
Computer Connection
Connector
3
Connect the computer’s AC adapter to the Slate PC Dock.
The Slate PC Dock LED is turned on.
You can also use the Slate PC Dock using only the battery power of the computer.
Page 11

13
Separating the Computer
1
Turn the computer off.
2
Pull the computer upward by hand while holding the Slate PC Dock rmly with the other
hand.
Page 12
14
Using the Bluetooth Wireless Keyboard
(Optional)
You can connect and use an external type keyboard. This section describes how to
connect a Bluetooth wireless keyboard provided optionally by Samsung Electronics.
Bluetooth is wireless communications technology that allows access to nearby
devices such as another computer, a cell phone, printer, keyboard, mouse, etc.
without a cable connection.
The Bluetooth supporting function is only available between devices (a computer,
cell phone, PDA, printer, etc.) and the connection may be restricted according to
the prole of the corresponding device.
The keyboard is optional and may not be provided depending on the model.
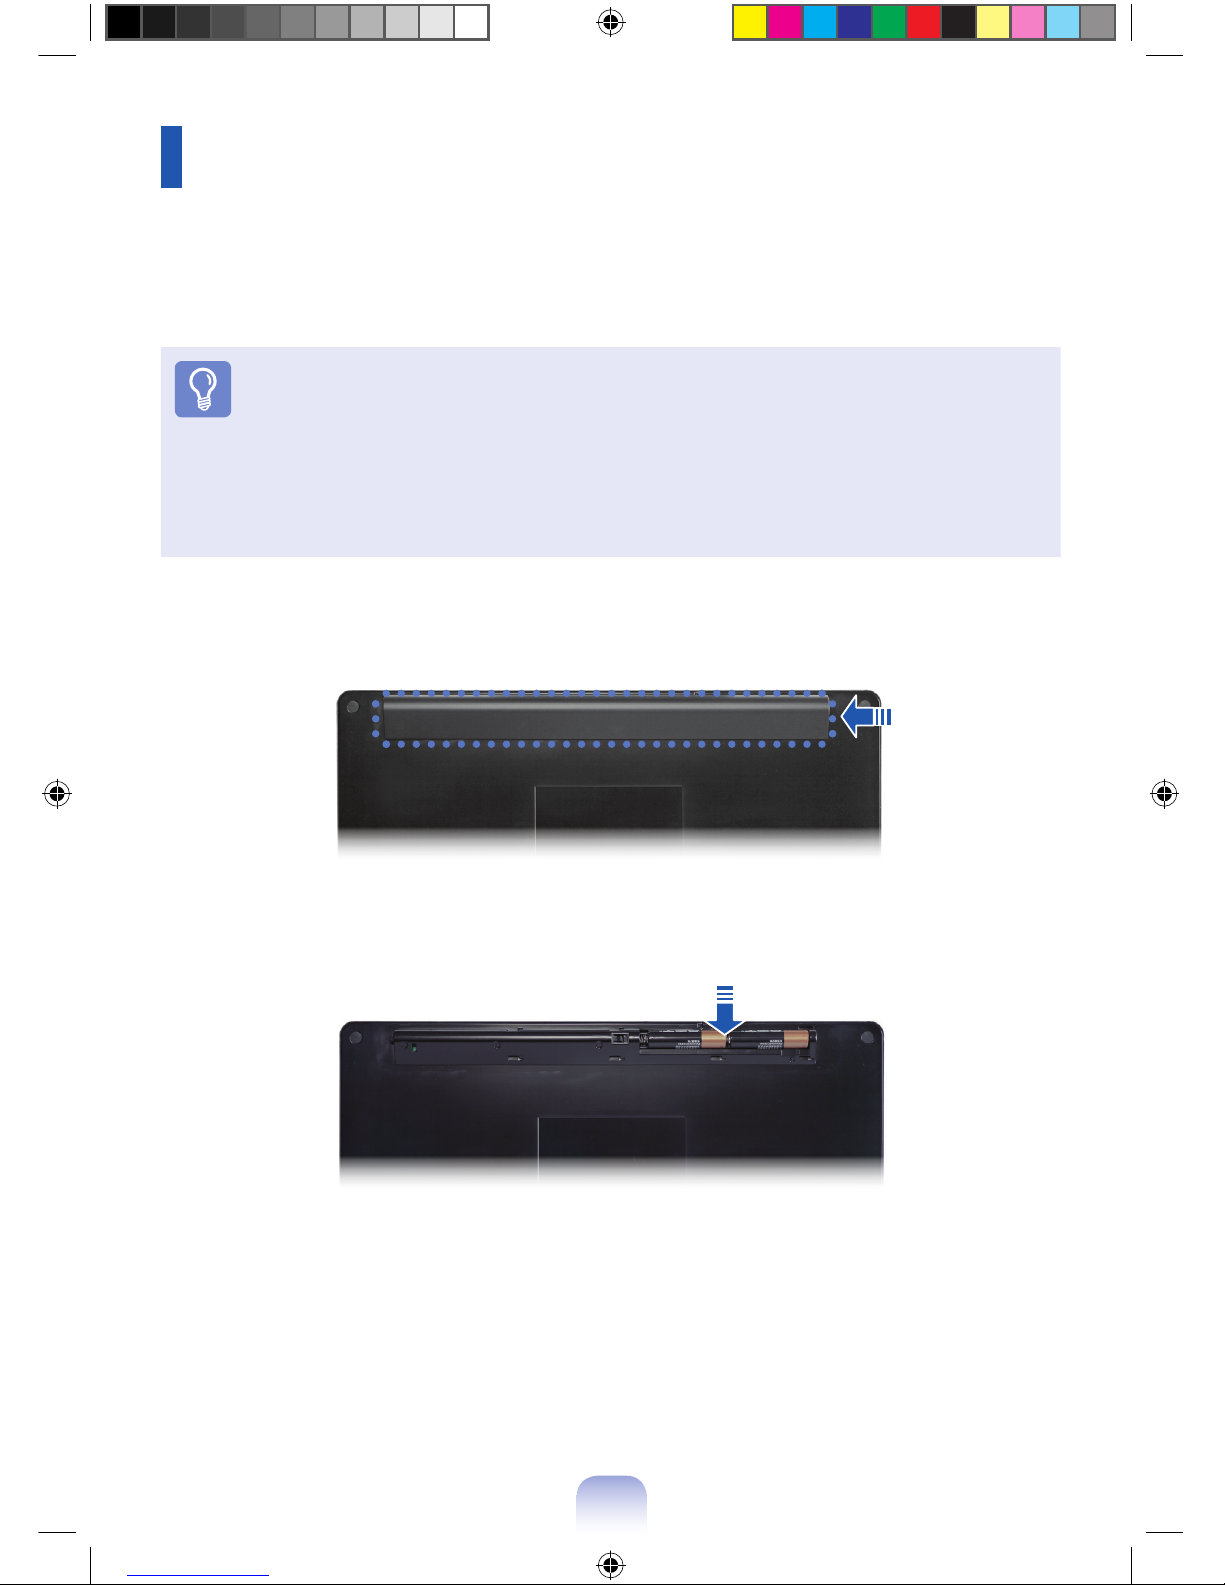
1
Remove the battery compartment cover at the back of the computer.
2
Install the battery and close the cover.
3
If you press and hold the keyboard power button for 3 seconds after starting the
computer, the Bluetooth LED will blink in blue.
4
Add a Bluetooth device by following the instructions on the screen.
 Loading...