

Page 1
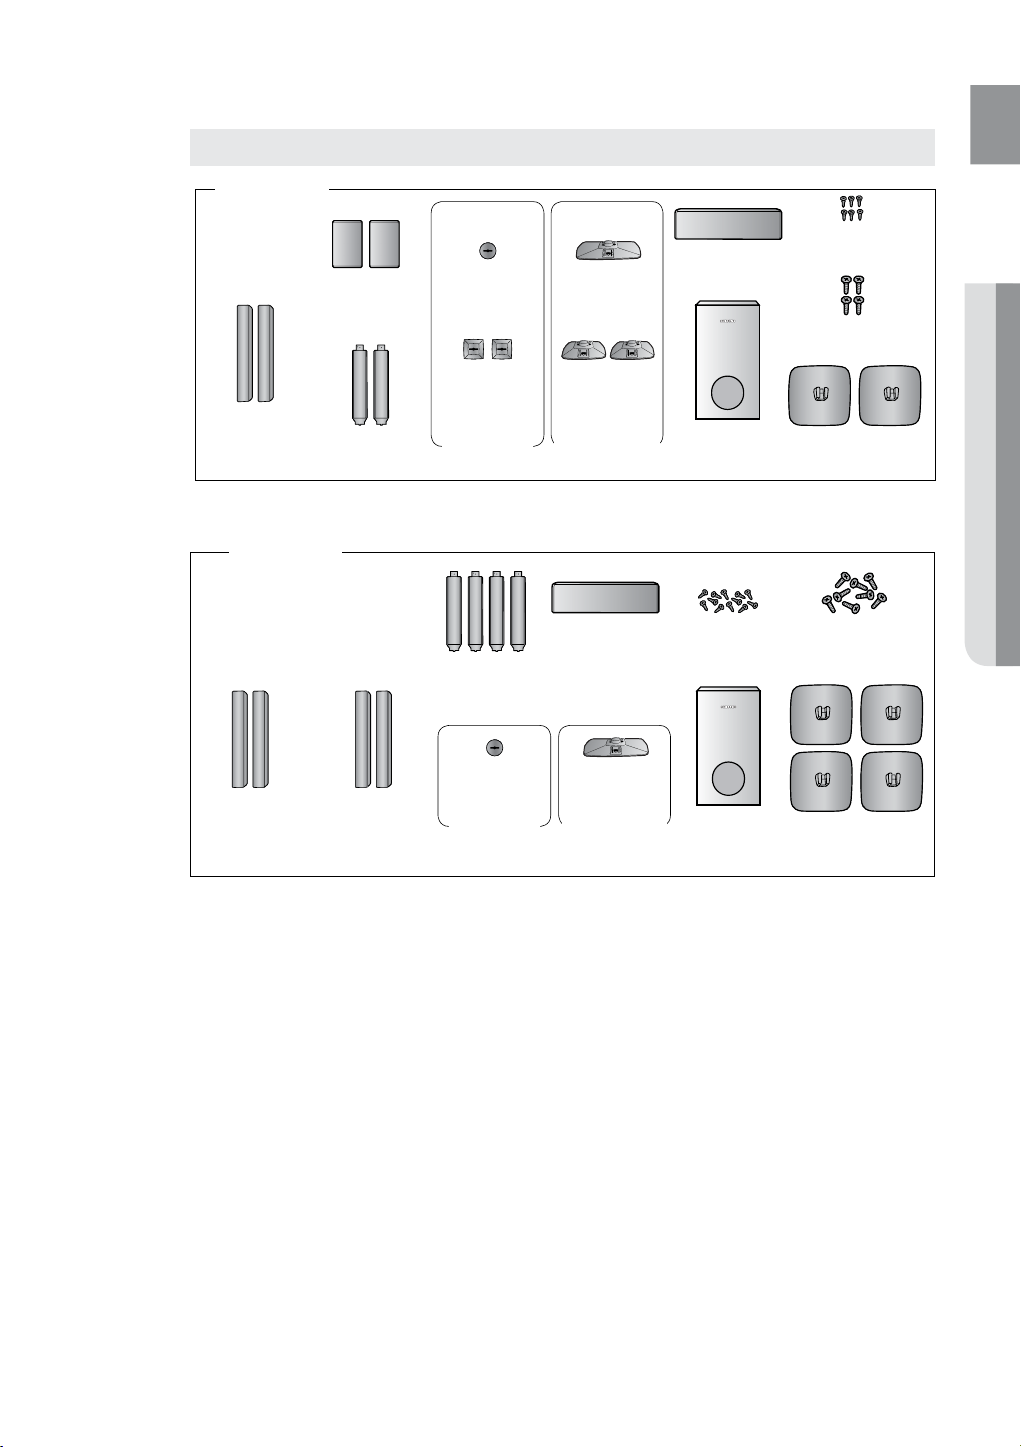
Speaker Components
ENG
HT-TZ522
(L) (R)
FRONT
L
(AH81-04171E)
R
(AH81-03848H)
HT-TZ525
(L) (R)
(L) (R)
REAR
L
(AH81-04171G)
R
(AH81-03848J)
STAND
(AH81-03846N)
(L) (R)
CENTER
(AH81-03853A)
REAR
(AH81-03852A)
HOLE COVER
STAND
(AH81-03846N)
CENTER
(AH81-03469A)
REAR
(AH81-03465A)
CRADLE STAND/
WALL MOUNT
CENTER
(AH81-03846F)
SCREW (Small): 6EA
CENTER
(AH81-04171F)
SUBWOOFER
(AH81-04171D)
SCREW (Small): 12EA
(AH81-03944A)
(AH81-03944A)
SCREW (Large): 4EA
(AH81-03943A)
STAND BASE
(AH81-03846P)
SCREW (Large): 8EA
(AH81-03943A)
● CONNECTIONS
FRONT
L (AH81-03846E)
R (AH81-03846S)
REAR
L (AH81-03846G)
R (AH81-03846T)
CENTER
(AH81-03853A)
HOLE COVER
CENTER
(AH81-03469A)
CRADLE STAND/
WALL MOUNT
SUBWOOFER
(AH81-03846D)
STAND BASE
(AH81-03846P)
21
Page 2
connections
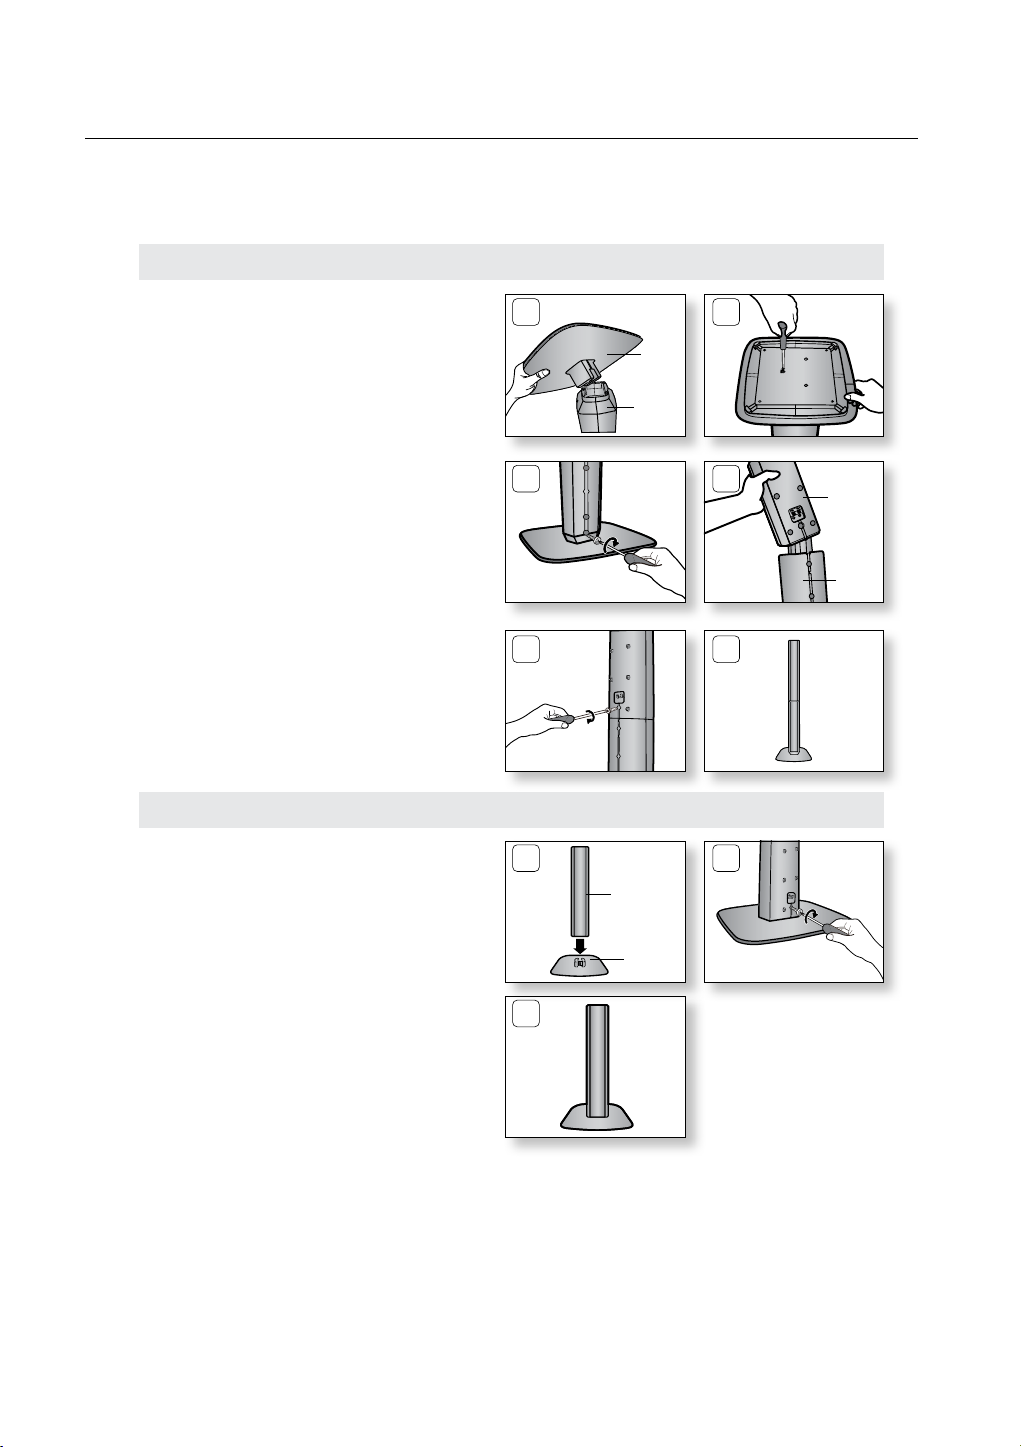
How to Install the Speaker on the Stand (HT-TZ522/TZ525 only)
Turn the 1. STAND upside-down and connect
it to the STAND BASE.
Insert three small 2. SCREWS into three holes
marked with arrows using a screwdriver as
shown in the illustration.
Insert a large 3. SCREW into the hole on the
rear of the Speaker STAND.
Connect the assembled stand to the 4.
SPEAKER.
Insert another large 5. SCREW into the hole
on the rear of the speaker using a
screwdriver as shown in the illustration.
This is the successfully assembled speaker. 6.
Make sure that the speaker is installed on a
flat and stable area. Otherwise it may be
easily knocked over.
1 2
STAND
BASE
STAND
3 4
5 6
How to Install the Speaker on the Stand Base (HT-TZ522/TZ525 only)
Connect the1. SPEAKER with the
STAND BASE.
Insert the Large 2. SCREW into the hole on
the rear of the speaker using a screwdriver
as shown in the illustration.
This is the3. SPEAKER successfully
assembled with the Stand Base.
1 2
SPEAKER
STAND
BASE
3
SPEAKER
STAND
22
Page 3
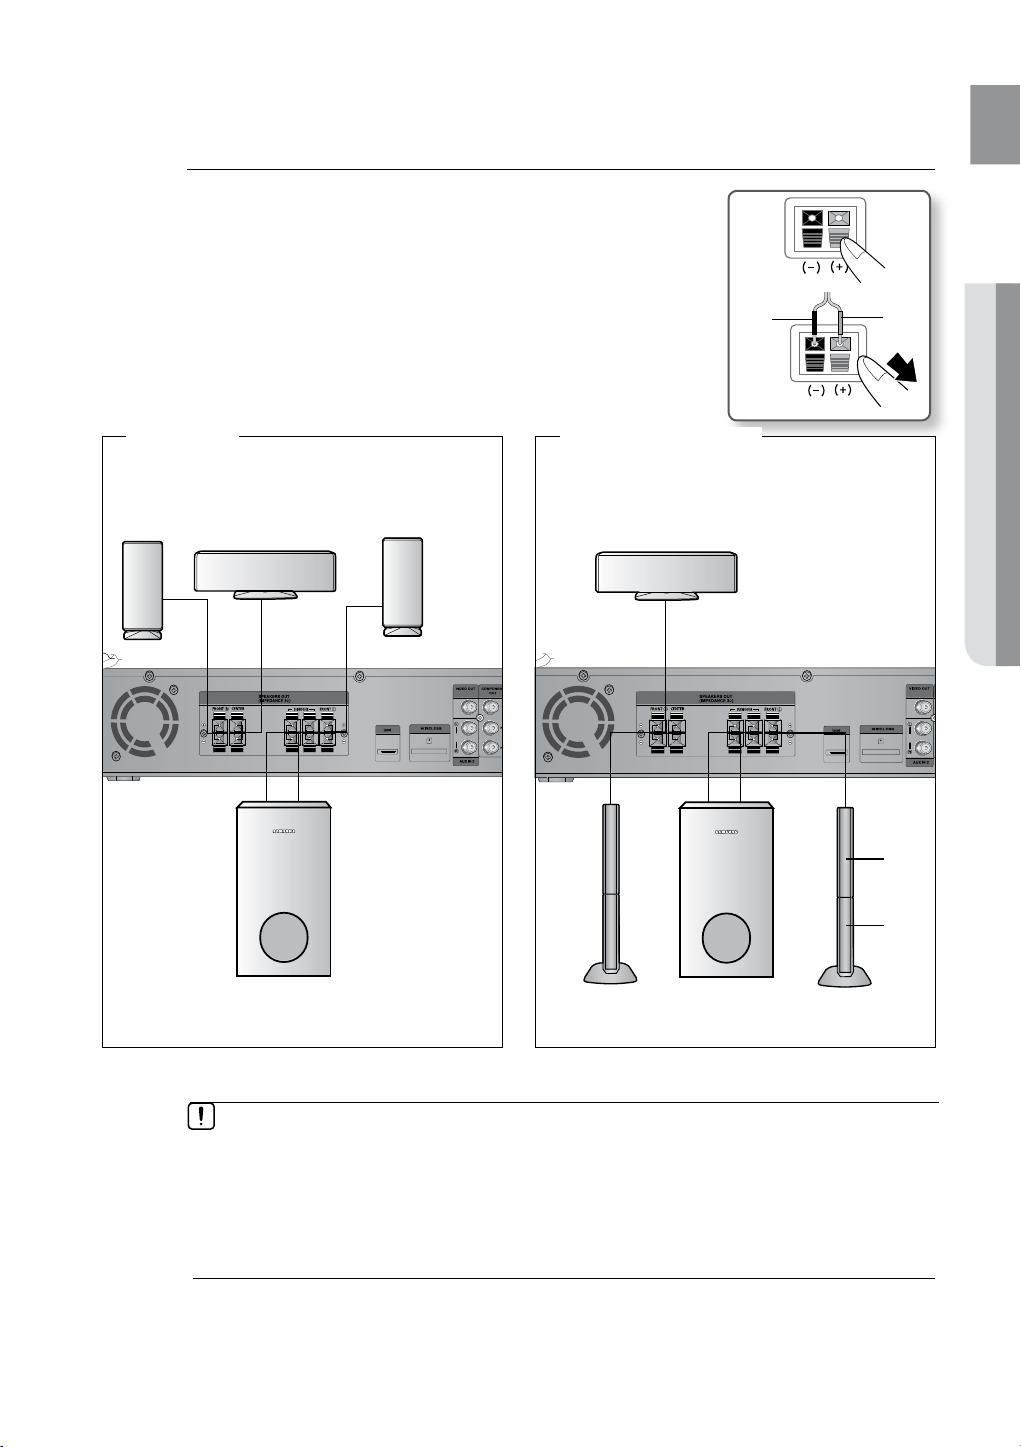
Connecting the Front, Center and Subwoofer Speakers
HDMI IN
AUDIO
HDMI IN
AUDIO
Press down the terminal tab on the back of the speaker. 1.
Insert the black wire into the black terminal (–) and the red wire into 2.
the red (+) terminal, and then release the tab.
Connect the connecting plugs to the back of the Home Theater.3.
Make sure the colors of the speaker terminals match the colors of •
the connecting plugs.
Black
ENG
● CONNECTIONS
Red
HT-Z520
Front
Speaker (R)
Center Speaker
Subwoofer
Front
Speaker (L)
HT-TZ522/TZ525
Center Speaker
Front
Speaker (R)
Subwoofer
Speaker
Stand
Front
Speaker (L)
* To connect the rear speakers, refer to page 24.
Do not let children play with or near the speakers. They could get hurt if the speaker falls.
`
When connecting the speaker wires to the speakers, make sure that the polarity (+/ –) is correct. `
Keep the subwoofer speaker out of reach of children so as to prevent children from `
inserting their hands or alien substances into the duct (hole) of the subwoofer speaker.
Do not hang the subwoofer on
` a wall through the duct (hole).
M
If you place a speaker near your TV set, screen color may be distorted because of the `
magnetic field generated by the speaker. If this occurs, place the speaker away from your
TV set.
23
Page 4
connections
HDMI IN
AUDIO
HDMI IN
AUDIO
HDMI IN
AUDIO
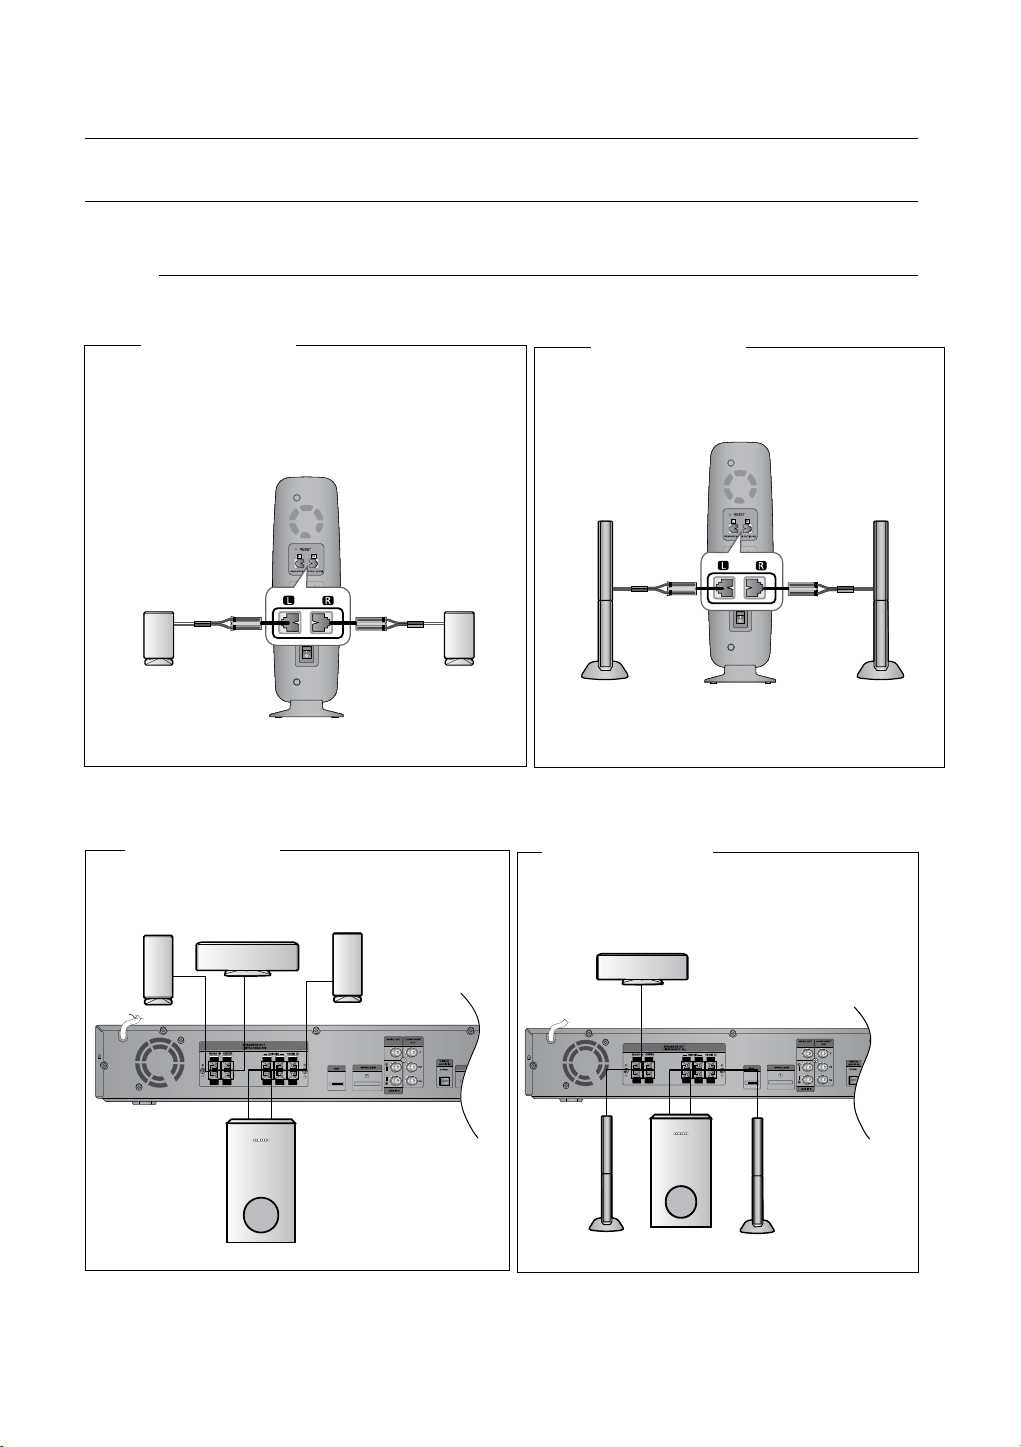
CONNECTING THE REAR SPEAKERS TO THE WIRELESS RECEIVING AMPLIFIER
Wireless Receiving Module (SWA-4100)
HT-Z520/TZ522
Rear Speaker (L)
WIRELESS RECEIVER MODULE
Rear Speaker (R)
HT-TZ525
Rear Speaker (L)
WIRELESS RECEIVER MODULE
Rear Speaker (R)
HT-Z520
Front Speaker (R)
24
Center Speaker
Front Speaker (L)
Subwoofer
HT-TZ522/TZ525
Center Speaker
Front Speaker (R)
Subwoofer
Front Speaker (L)
Page 5
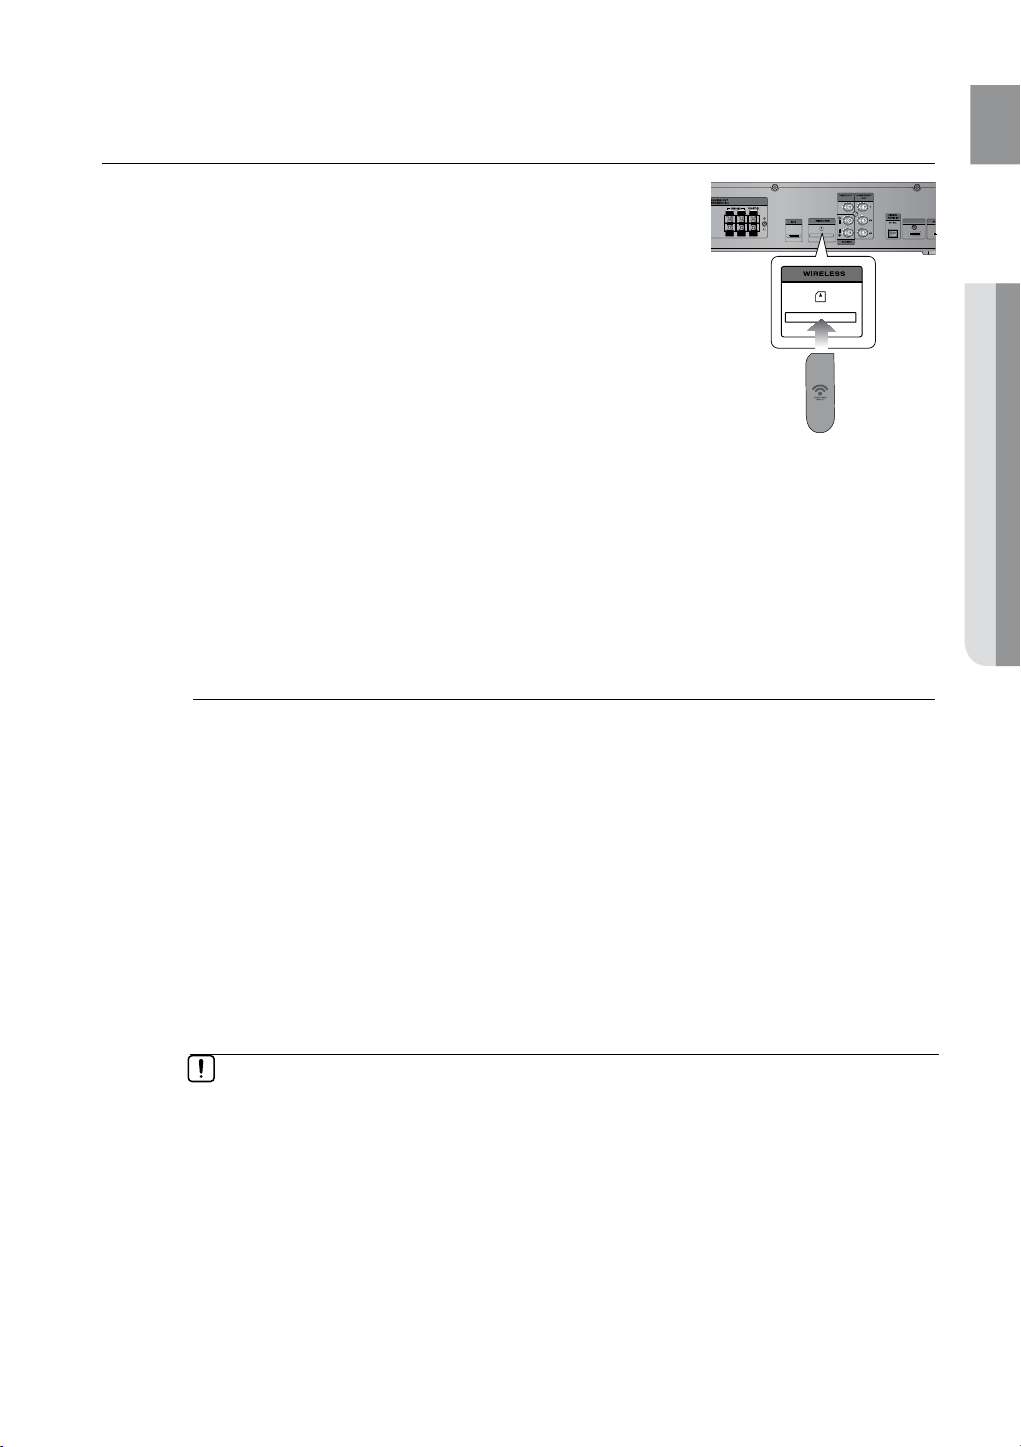
CONNECTING THE REAR SPEAKERS TO THE WIRELESS RECEIVING AMPLIFIER (CON'T)
HDMI IN
AUDIO
Connect the front, center and Subwoofer speakers to the 1.
DVD Player, referring to page 21.
With the DVD Player turned off, insert the TX card into the 2.
TX Card Connection(Wireless) on the back of the main unit.
Hold the TX card so that the slanted side faces to the left •
and insert the card into the port.
The TX card enables communication between the main •
unit and the wireless receiver.
Connect the left and right rear speakers to the wireless 3.
receiving module.
Plug the power cord of the wireless receiving module 4.
in the wall outlet .
Slanted side face left
TX card
ENG
● CONNECTIONS
Place the wireless receiver module at the rear of the listening position. If the wireless `
M
receiver module is too close to the main unit, some sound interruption may be heard due
to interference.
If you use a device such as a microwave oven, wireless LAN Card, Bluetooth equipment,
`
or any other device that uses the same frequency (5.8GHz) near the system, some sound
interruption may be heard due to interference.
The transmission distance from the main unit to the wireless receiving module is about 33
`
feet (10m), but may vary depending on your operating environment. If a steel-concrete wall
or metallic wall is between the main unit and the wireless receiver module, the system may
not operate at all, because the radio wave cannot penetrate metal.
This product(HT-Z520/HT-TZ522/TZ525) is also compatible with the wireless receiver
`
module SWA-4000.
If the main unit doesn't make wireless connection, the system needs ID Setting between
`
main unit and wireless receiver module. With the main unit turned off, press remote
control's number button "0""1""3""5" and unit turned on. With the wireless receiver
module turned on, press "ID SET" button on the back of the unit for 5 seconds.
Do not insert any other card except the TX card dedicated to the product. `
If a different TX card is used, the product may be damaged or the card may not be
removed easily.
Do not insert the TX card upside down or in the reverse direction.
`
Insert the TX card when the DVD Player is turned off. Inserting the card when it is turned `
on may cause a problem.
If the TX Card is inserted and wireless receiving module setting is complete, sound is not
`
output from the Rear Speaker connectors on the main unit.
The wireless receiving antenna is built into the wireless receiver module. Keep the unit
`
away from water and moisture.
For optimal listening performance, make sure that the area around the wireless receiver
`
module location is clear of any obstructions.
If no sound is heard from the wireless rear speakers, switch the mode to DVD 5.1 `
channel or Dolby ProLogic II .
In 2-CH mode, no sound will be heard from the wireless rear speakers. `
25
Page 6
connections
HDMI IN
HDMI IN
AUDIO
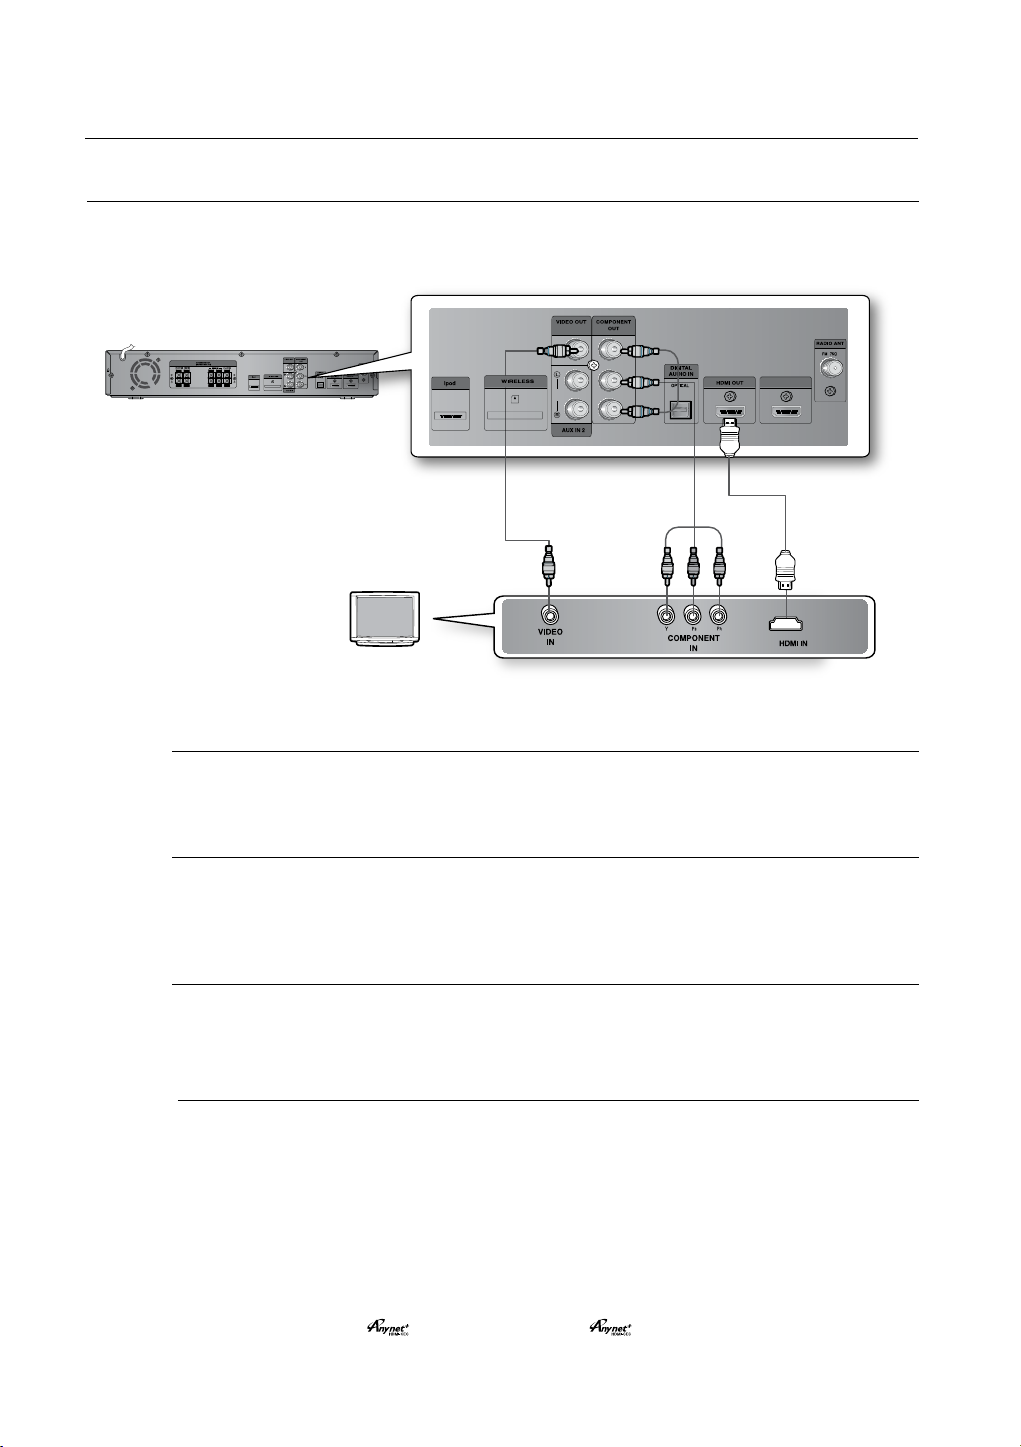
CONNECTING THE VIDEO OUT TO YOUR TV
Choose one of the three methods for connecting to a TV.
METHOD3
(supplied)
METHOD2
(not supplied)
METHOD1
(not supplied)
METHOD 1 : HDMI
Connect the HDMI cable (not supplied) from the HDMI OUT jack on the back of the DVD Home Theater
to the HDMI IN jack on your TV.
METHOD 2 : Component Video
If your television is equipped with Component Video inputs, connect a component video cable(not
supplied) from the Component Video Output (Pr, Pb and Y) Connectors on the back of the main unit to
the Component Video Input Connectors on your TV.
METHOD 3 : Composite Video
Connect the supplied video cable from the VIDEO OUT jack on the back of the main unit to the VIDEO
IN jack on your TV.
26
Resolutions available for the HDMI output are 480p, 720p,1080i/1080p. `
M
This product operates in Interlace scan mode (480i) for Component Output. `
After making the video connection, set the Video input source on your TV to match the `
corresponding Video output (HDMI, Component or Composite) on your Home theater.
See your TV owner's manual for more information on how to select the TV's Video Input source.
If you use an HDMI cable to connect a Samsung TV to the main unit, you can operate the Home
`
Theater using the TV's remote control. (This is only available with SAMSUNG TVs that support
Anynet+(HDMI-CEC).)
Please check the `
function.)
logo (If your TV has an
logo, then it supports Anynet+
Page 7
HDMI IN
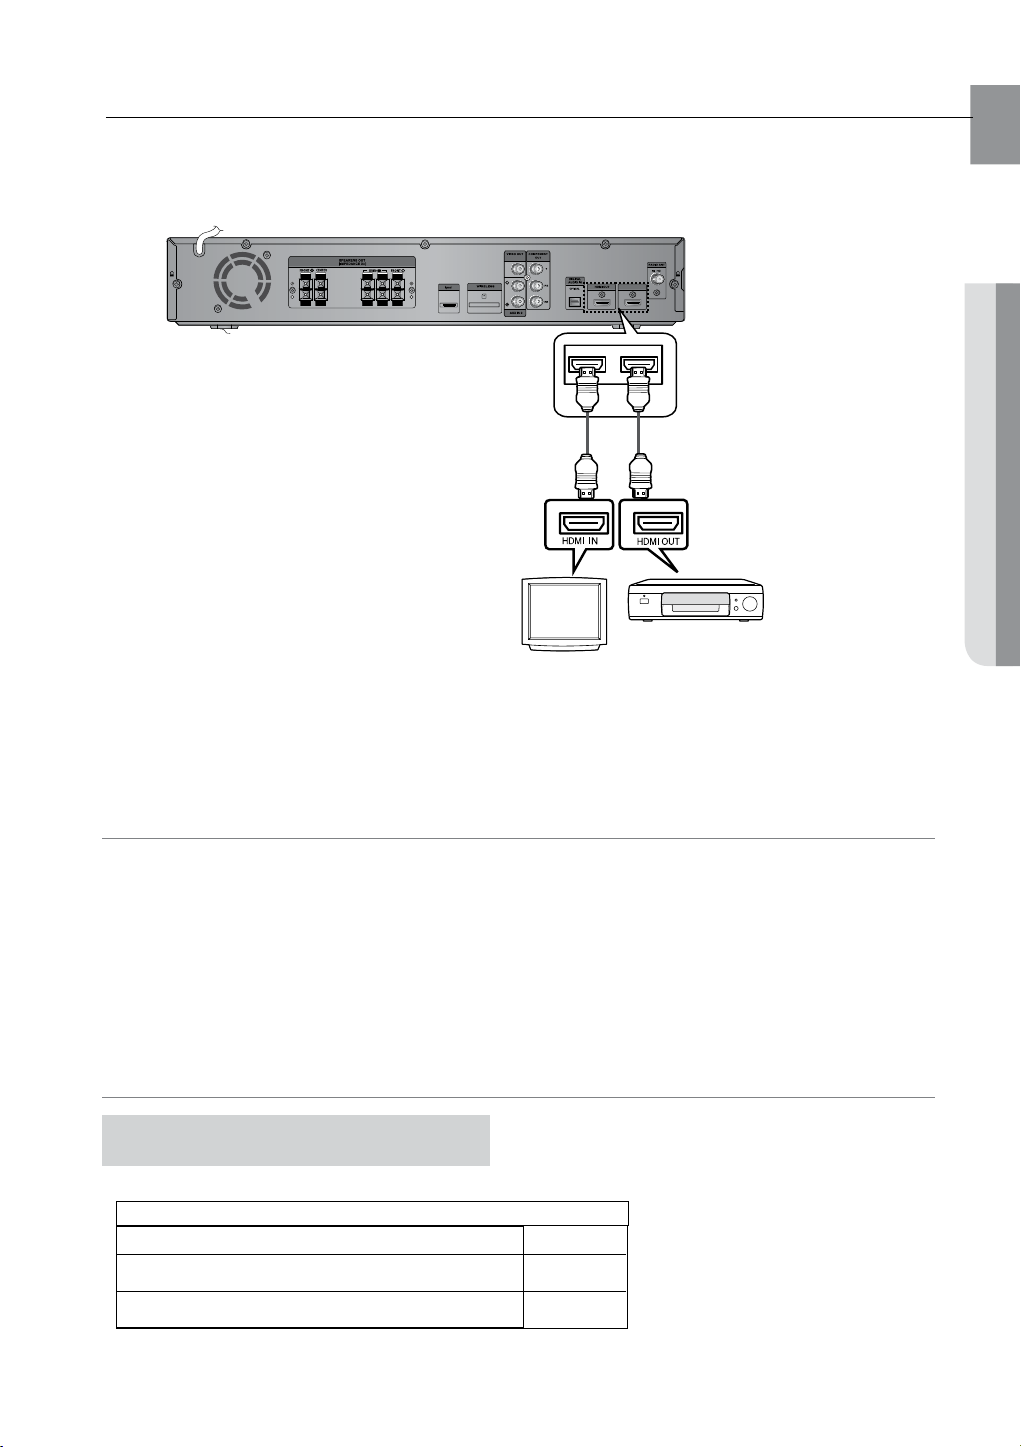
CONNECTING THE HDMI IN/OUT
HDMI (High-Definition Multimedia Interface) is an interface that enables the digital transmission of video and audio
data with just a single cable. In addition, it enables you to enjoy multi-channel digital audio.
HDMI Cable
(not supplied)
ENG
● CONNECTIONS
TV
Set-Top/Cable box
Connect the 1. HDMI IN jack of this unit and the HDMI OUT jack of a Set-Top/Cable Box.
Connect the 2. HDMI OUT jack of this unit and the HDMI IN jack of your TV.
Press the 3. AUX button on the remote control to select <HDMI>.
•
You can also use the FUNCTION button on the main unit.
The mode switches as follows : <DVD/CD> ➞<D-IN> ➞ <AUX 1> ➞<AUX 2> ➞ <HDMI IN> ➞
<USB> ➞<B/T> ➞ <A IPOD> ➞<V IPOD> ➞ <TUNER>.
• Audio from SACD discs cannot be heard via the HDMI connection. To play a DVD disk whose copyright is
protected by CPPM, use a player supporting CPPM.
• The quality of the audio output through the HDMI OUT Jack (sampling frequency and bit rate) may be limited
by the performance of the external device.
• Since HDMI connection supports both video and audio, you don’t have to connect an audio cable.
• When this unit is turned off, no HDMI video or audio signal is output through this unit from a set-top box.
• When a Cable Box/Satellite Receiver is connected to HDMI IN, the SD/HD(Standard Definition/High Definition)
button on the Remote control does not work.
• When the output from an external device is connected via DVI/HDMI to this unit, no audio will be output. In this
case, you can listen to digital audio by connecting the Optical OUT of the source device (Set-Top Box) to the
Optical IN 1 or 2 of this unit.
High-bandwidth Digital Content
Protection System (HDCP) support
To play digital content through the HDMI connection, both
the connected external device and TV must support Highbandwidth Digital Content Protection System (HDCP). This
product supports HDCP.
COMPATIBILITY WITH A TV SUPPORTING HDMI
A TV with an HDMI jack.
A TV with an DVI-D jack (TV that supports HDCP)
A TV with an DVI-D jack (TV that does not support HDCP)
Video/Audio
Video
-
27
Page 8

connections
HDMI Auto Detection Function
The player's video output will automatically change to HDMI mode when connecting an HDMI cable
while power is on. For possible HDMI resolutions.
HDMI (High Definition Multimedia Interface)•
HDMI is an interface that enables the digital transmission of video and audio data with just a single connector.
Using HDMI, the DVD Home Theater transmits a digital video and audio signal and displays a vivid
picture on a TV having an HDMI input jack.
HDMI connection description•
HDMI connector - Supports video and digital audio data.
- HDMI outputs only a pure digital signal to the TV.
- If your TV does not support HDCP (High-bandwidth Digital Content Protection), random noise
appears on the screen.
Why does Samsung use HDMI?•
Analog TVs require an analog video/audio signal. However, when playing a DVD, the data transmitted
to a TV is digital. Therefore either a digital-to-analog converter (in the DVD Home Theater) or an
analog-to-digital converter (in the TV) is required. During this conversion, the picture quality is
degraded due to noise and signal loss. HDMI technology is superior because it requires no D/A
conversion and is a pure digital signal from the player to your TV.
What is the HDCP?•
HDCP (High-band width Digital Content Protection) is a system for protecting DVD content outputted
via HDMI from being copied. It provides a secure digital link between a video source (PC, DVD. etc)
and a display device (TV, projector. etc). Content is encrypted at the source device to prevent
unauthorized copies from being made.
What is Anynet+?•
Anynet+ is a convenient function that offers linked operation of this unit through Samsung TVs with the
Anynet+ feature.
- If your Samsung TV has an
- If you turn on the player and insert a disc, the player will start playing the disc, and the TV will turn on
automatically and switch to HDMI mode.
- If you turn on the player and press the Play button with a disc already inserted, the TV will
immediately turn on and switch to HDMI mode.
logo, then it supports the Anynet+ function.
28
Page 9

BD Wise (only Samsung products)
You can select to use the BD Wise menu only if the BD player is connected to a Samsung TV that
supports BD Wise using the HDMI cable.
What is BD Wise?•
BD Wise automatically adjusts BD Wise-compliant Samsung products to the optimal settings between them.
This feature is enabled only if BD Wise-compliant Samsung TVs are connected with each other using the
HDMI cable.
To use BD Wise•
Use the HDMI cable to connect the Bdplayer to a BD Wise-compliant Samsung TV.1.
Set each BD Wise menu of the BD player and the Samsung TV to On, respectively.2.
- This will optimize the picture quality according to the content (BD, DVD, etc) that you want to play.
- This will also optimize the picture quality between BD Wise- compliant Samsung TVs.
If you want to change the resolution in BD Wise mode, you must set BD mode to Off in advance. `
M
If you set off the BD Wise mode, the resolution of the connected TV will be adjusted to its `
maximum automatically.
BD Wise will be disabled if the player is connected to a device that does not support BD Wise.
`
For a proper operaiotn of BD Wise, set each BD Wise menu of the player and the TV to On, `
respecitively.
ENG
● CONNECTIONS
29
 Loading...