

Page 1
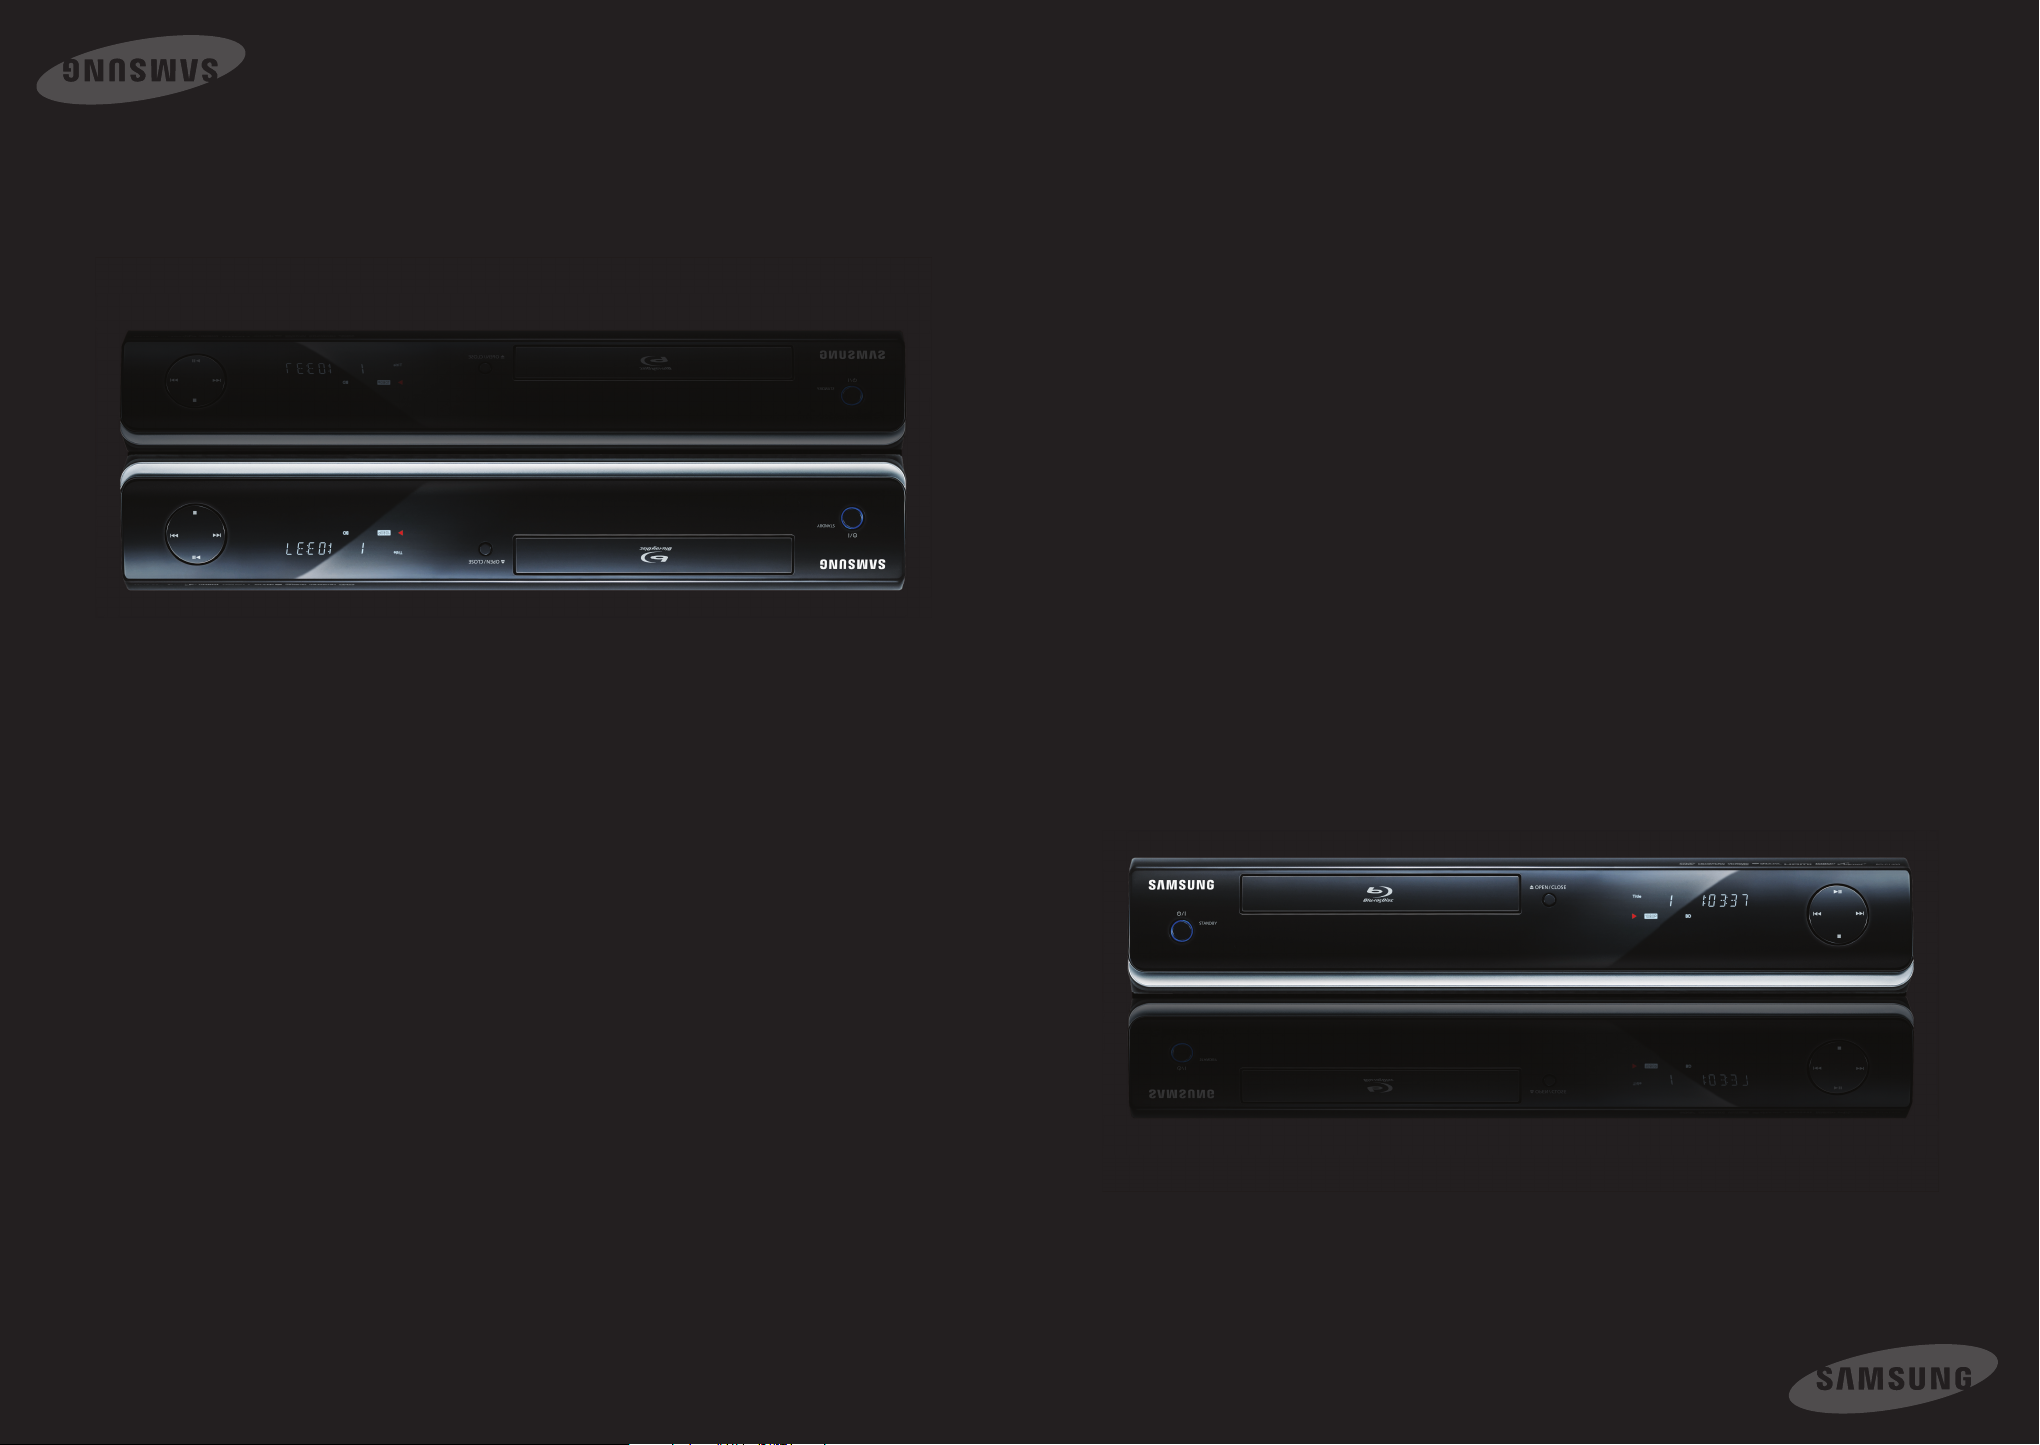
BD-P1400
Manuel d’utilisation
AK68-01454B
Blu-ray Disc Player
Iecteur de disque Blu-ray
User’s Manual
BD-P1400
AK68-01454B
Page 2

Page 3
key features of your new
Blu-ray Disc Player
Player Features
Digital Photo Viewer (JPEG)
You can enjoy digital photos on your TV.
MP3 Playback
This unit can play mp3 fi les from CD-R/-RW, DVD-R/-RW discs.
HDMI (High Defi nition Multimedia Interface)
HDMI reduces picture noise by allowing a pure digital video/audio signal path from the player to your TV.
Simplay HD
Simplay HD guarantees that this player
has been tested according to specifi cations
aimed at maximizing the delivery of HD content.
Blu-ray Disc Features
Blu-ray Discs can store 25 GB (single layer) or 50 GB (dual layer) on a single sided disc - about 5 to 10 times the
capacity of a DVD. Blu-ray Discs also support the highest quality HD video available in the industry (up to 1920 x
1080 at 40 Mbit/sec) - Large capacity means no compromise on video quality. Furthermore, a Blu-ray Disc has the
same familiar size and look as DVD.
* The following Blu-ray Disc features are disc dependant and will vary.
Appearance and navigation of features will also vary from disc to disc.
Not all discs will have the features described below.
Video highlights
The BD-ROM format for movie distribution supports three highly advanced video codecs, including AVC,
VC-1, and MPEG-2.
HD video resolutions are also available:
•
1920 x 1080 HD
1280 x 720 HD
•
For High-Defi nition Playback
To view high-defi nition contents in BD discs, an HDTV (High Defi nition Television) is required. Some discs may
require using the player's HDMI OUT to view high-defi nition content. The ability to view high-defi nition content on
BD discs may be limited depending on the resolution of your TV.
2_ English
Page 4
Graphic planes
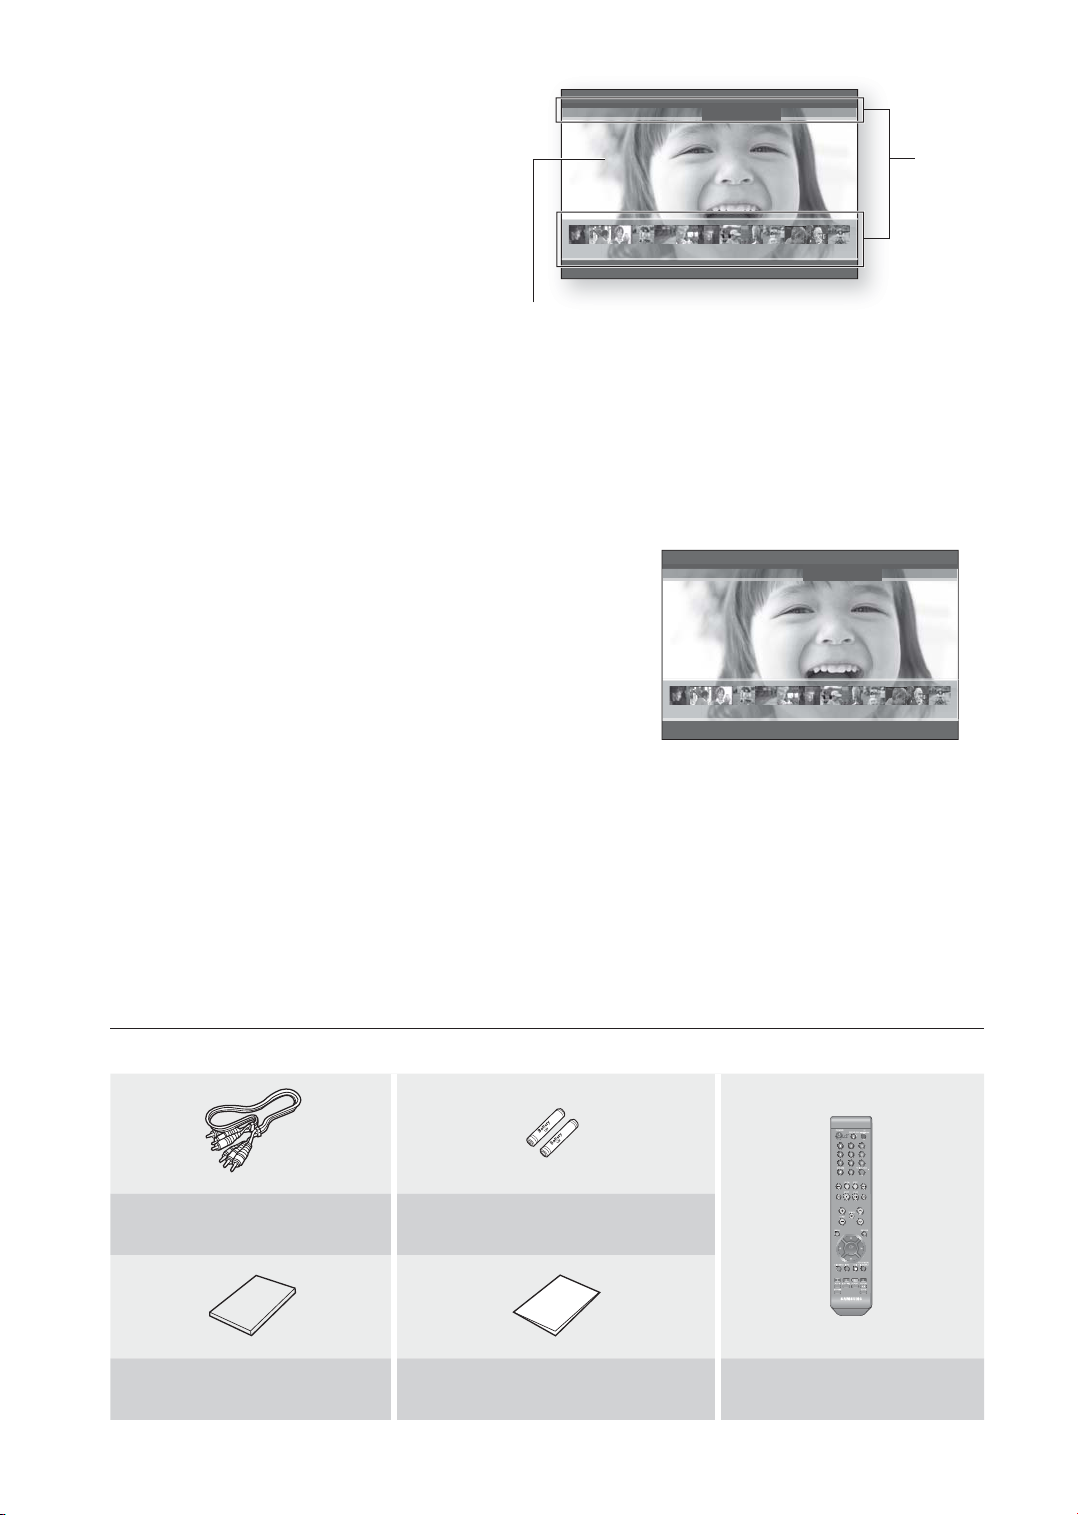
Two individual, full HD resolution (1920x1080) video
layers are available, on top of the HD video layer.
One layer is assigned to video-related graphics (like
subtitles), and the other layer is assigned to
interactive elements, such as buttons or menus.
Various wipes, fades and scroll effects may be
available on both layers.
PLAY MOVIE LANGUAGES SCENE SELECTIONS PREVIEWS
Graphic
Planes
▼
3 4 5 6 7 8 9 10 11 12 13 14 15
HD Video
Menu graphics
Support 256 full color resolution graphics and animation, thereby greatly surpassing the capabilities of DVD-Video.
Unlike DVD, Menus can be accessed during video playback.
Menu sounds
When you highlight or select a menu option on a Blu-ray Disc, sounds can be heard such as button clicks or a
voice-over explaining the highlighted menu choice.
Multi-page/PopUp Menus
With DVD-Video, playback is interrupted each time a new menu
PLAY MOVIE LANGUAGES SCENE SELECTIONS PREVIEWS
screen is accessed. Due to Blu-ray Disc's ability to preload data from
the disc without interrupting playback, a menu may consist of several
pages.
You can browse through the menu pages or select different menu
paths, while the audio and video remain playing in the background.
3 4 5 6 7 8 9 10 11 12 13 14 15
▼
Interactivity
Certain Blu-ray Discs may contain Animated menus and Trivia games.
User Browsable Slideshows
With Blu-ray Discs, you can browse through various still pictures while the audio remains playing.
Subtitles
Depending on what is contained on the Blu-ray Disc, you may be able to select different font styles, sizes and colors
for the subtitles, Subtitles may also be animated, scrolled or faded in and out.
WHAT’S INCLUDED
Check for the supplied accessories below.
Composite (Video), Audio L/R Cable
(MF39-00274A)
User Manual
(AK68-01454B)
Batteries for Remote Control (AAA Size)
(4301-001035)
Quick Guide
(AK68-01455B)
TV PROG
OK
Remote Control
(AK59-00070A)
English _3
Page 5
safety information
WARNING
TO REDUCE THE RISK OF ELECTRIC SHOCK, DO NOT REMOVE THE COVER(OR BACK).
NO USER-SERVICEABLE PARTS ARE INSIDE. REFER SERVICING TO QUALIFIED SERVICE PERSONNEL.
CAUTION
RISK OF ELECTRIC SHOCK
DO NOT OPEN
The lighting fl ash and Arrowhead within
Triangle Is a warning sign alerting you of
dangerous voltage Inside the product
WARNING
To reduce the risk of fi re or electric shock, do not expose this appliance to rain or moisture.
•
•
To prevent injury, this apparatus must be securely attached to the fl oor/wall in accordance with the installation instructions.
•
If this power supply is used at 240V ac, a suitable plug adapter should be used.
Note to CATV system installer
This reminder is provided to call CATV system installer’s attention to Article 820-40 of the National Electrical Code (Section
54 of Canadian Electrical Code, Part I) that provides guidelines for proper grounding and, in particular, specifi es that the
cable ground shall be connected to the grounding system of the building as close to the point of cable entry as practical.
FCC NOTE (for U.S.A):
This equipment has been tested and found to comply with the limits for a Class B digital device, pursuant to Part 15
of the FCC rules. These limits are designed to provide reasonable protection against harmful interference in a
residential installation. This equipment generates, uses and can radiate radio frequency energy and, if not installed
and used in accordance with the instructions, may cause harmful interference to radio or television reception, which
can be determined by turning the equipment off and on.
The user is encouraged to try to correct the interference by one or more of the following measures.
•
Reorient or relocate the receiving antenna.
•
Increase the separation between the equipment and receiver.
•
Connect this equipment into an outlet on a circuit different from that to which the receiver is connected.
•
Consult the dealer or an experienced radio/TV technician for help.
This class B digital apparatus meets all requirements of the Canadian Interference - Causing Equipment
Regulations.
CAUTION: TO REDUCE THE RISK OF ELECTRIC
SHOCK, DO NOT REMOVE COVER (OR BACK) NO
USER SERVICEABLE PARTS INSIDE. REFER
SERVICING TO QULAIFIED SERVICE PERSONNEL.
The explanation point within the triangle
is a warning sign alerting you of
important instructions accompanying
the product.
CLASS 1 LASER PRODUCT
KLASSE 1 LASER PRODUKT
LUOKAN 1 LASER LAITE
KLASS 1 LASER APPARAT
PRODUCTO LÁSER CLASE 1
CLASS 1 LASER PRODUCT
Use of controls, adjustments or performance of procedures other than those specifi ed herein may result in
hazardous radiation exposure.
CAUTION
THIS PRODUCT UTILIZES A LASER. USE OF CONTROLS OR ADJUSTMENTS OR PERFORMANCE OF
PROCEDURES OTHER THAN THOSE SPECIFIED HEREIN MAY RESULT IN HAZARDOUS RADIATION EXPOSURE.
DO NOT OPEN COVER AND DO NOT REPAIR YOURSELF. REFER SERVICING TO QUALIFIED PERSONNEL.
4_ safety information
Page 6

Note:
This unit can be used only where the power supply is AC 120V, 60Hz. It cannot be used elsewhere.
•
•
This Blu-ray Disc Player is designed and manufactured to respond to the Region Management Information.
If the Region number of a BD/DVD disc does not correspond to the Region number of this Blu-ray Disc Player, the
Blu-ray Disc Player cannot play the disc.
•
The product unit accompanying this user manual is licensed under certain intellectual property rights of certain
third parties.
In particular, this product is licensed under the following US patents:
5,060,220 5,457,669 5,561,649 5,705,762 5,987,417 6,043,912 6,222,983 6,272,096 6,377,524 6,377,531
6,385,587 6,389,570 6,408,408 6,466,532 6,473,736 6,477,501 6,480,829 6,556,520 6,556,521 6,556,522
6,578,163 6,594,208 6,631,110 6,658,588 6,674,697 6,674,957 6,687,455 6,697,307 6,707,985 6,721,243
6,721,493 6,728,474 6,741,535 6,744,713 6,744,972 6,765,853 6,765,853 6,771,890 6,771,891 6,775,465
6,778,755 6,788,629 6,788,630 6,795,637 6,810,201 6,862,256 6,868,054 6,894,963 6,937,552
This product is covered by the following U.S. patents:
US4,930,158 US4,930,160
This license is limited to private non-commercial use by end-user consumers for licensed contents.
No rights are granted for commercial use. The license does not cover any product unit other than this product unit
and the license does not extend to any unlicensed product unit or process conforming to ISO/IEC 11172-3 or ISO/
IEC 13818-3 used or sold in combination with this product unit.
The license only covers the use of this product unit to encode and/or decode audio fi les conforming to the ISO/IEC
11172-3 or ISO/IEC 13818-3. No rights are granted under this license for product features or functions that do not
conform to the ISO/IEC 11172-3 or ISO/IEC 13818-3.
PRECAUTIONS
Important Safety Instructions
Read these operating instructions carefully before using the unit. Follow all the safety instructions listed below.
these operating instructions handy for future reference.
1)
Read these instructions.
2)
Keep these instructions.
3)
Heed all warnings.
4)
Follow all instructions.
5)
Do not use this apparatus near water.
6)
Clean only with dry cloth.
7)
Do not block any ventilation openings, Install in accordance with the manufacturer's instructions.
8)
Do not install near any heat sources such as radiators, heat registers, or other apparatus (including amplifi ers)
that produce heat.
9)
Do not defeat the safety purpose of the polarized or grounding- type plug. A polarized plug has two blades with
one wider than the other. A grounding type plug has two blades and a third grounding prong. The wide blade
or the third prong are provided for your safety. If the provided plug does not fi t into your outlet, consult an
electrician for replacement of the obsolete outlet.
10)
Protect the power cord from being walked on or pinched particularly at plugs, convenience receptacles, and
the point where they exit from the apparatus.
11)
Only use attachments/accessories specifi ed by the manufacturer.
12)
Use only with the cart, stand, tripod, bracket, or table specifi ed by the manufacturer,
or sold with the apparatus. When a cart is used, use caution when moving the cart/
apparatus combination to avoid injury from tip-over.
13)
Unplug this apparatus during lightning storms or when unused for long periods of
time.
14)
Refer all servicing to qualifi ed service personnel. Servicing is required when the apparatus has been damaged
in any way, such as power-supply cord or plug is damaged, liquid has been spilled or objects have fallen into
the apparatus, the apparatus has been exposed to rain or moisture, does not operate normally, or has been
dropped.
Keep
English _5
Page 7

safety information
Handling Cautions
Before connecting other components to this Blu-ray Disc Player, be sure to turn them all off.
•
Do not move the Blu-ray Disc Player while a disc is being played, or the disc may be scratched or broken, the Blu-
•
ray Disc Player internal parts may be damaged.
•
Do not put a fl ower vase fi lled with water or any small metal objects on the Blu-ray Disc Player.
Be careful not to put your hand into the disc tray.
•
•
Do not place anything other than the disc in the disc tray.
•
Exterior interference such as lightning and static electricity can affect normal operation of this Blu-ray Disc Player.
If this occurs, turn the Blu-ray Disc Player off and on again with the POWER button, or disconnect and then
reconnect the AC power cord to the AC power outlet. The Blu-ray Disc Player will operate normally.
•
Be sure to remove the disc and turn off the Blu-ray Disc Player after use.
•
Disconnect the AC power cord from the AC outlet when you don’t intend to use the Blu-ray Disc Player for long
periods of time.
•
Clean the disc by wiping in a straight line from the inside to the outside of the disc.
•
Do not expose the player to dripping or splashing liquids.
•
When the AC plug is connected to a wall outlet, the player will still draw power (standby mode) when it is turned
off.
Maintenance of Cabinet
For safety reasons, be sure to disconnect the AC power cord from the AC outlet.
•
Do not use benzene, thinner, or other solvents for cleaning.
•
Wipe the cabinet with a soft cloth.
Restrictions on Playback
•
This player may not respond to all operating commands because some BD, DVD or CD discs allow specifi c or
limited operation and features during playback.
Please note that this is not a defect in the player.
•
Samsung cannot assure that this player will play every disc bearing the BD, DVD and CD logos because disc
formats may evolve, and problems and errors can occur during the creation of BD, DVD and CD software and/or
the manufacture of discs.
This player also operates differently than a standard DVD player or other AV equipment. Please contact the
SAMSUNG customer care center if you have questions or encounter diffi culty in playing BD, DVD or CD discs in
this player. Also, refer to the rest of this Manual for additional information on playback restrictions.
6_ safety information
Page 8

contents
KEY FEATURES OF YOUR
NEW BLU-RAY DISC PLAYER
2
SAFETY INFORMATION
4
GETTING STARTED
9
DESCRIPTION
14
REMOTE CONTROL
16
3 What’s included
4 Warning
5 Precautions
9 Before Reading the User’s Manual
10 Disc Type and Characteristics
13 Disc Storage & Management
14 Front Panel
14 Front Panel Display
15 Rear Panel
16 Tour of the Remote Control
18 Setting the Remote Control
18 REGARDING THE BATTERY
19 Controllable TV Codes
CONNECTIONS
20
BASIC FUNCTIONS OF YOUR
BLU-RAY DISC PLAYER
31
20 Connecting to a TV with HDMI Cable
21 HDMI Auto Detection Function
22 Connecting to a TV with DVI Cable
23 Connecting to a TV (Component)
24 Connecting to a TV (S-Video)
25 Connecting to a TV(Video)
26 Connecting to an Audio System (2 Channel
Amplifi er)
27 Connecting to an Audio System (5.1
Channel Amplifi er)
28 Connecting to an Audio System (Dolby
Digital, DTS Amplifi er)
29 Connecting to an Audio System (HDMI
supported Amplifi er)
30 Connecting to Samsung's FTP/Internet site
for Software Upgrades
31 Before Playing
32 On-Screen Menu Navigation
32 Playing a Disc
33 Using the Search and Skip Functions
33 Slow Motion Play/Step Motion Play
English _7
Page 9

contents
SYSTEM SETUP
34
SYSTEM UPGRADE
45
WATCHING A MOVIE
49
LISTENING TO MUSIC
55
34 Setting up the Language Options
35 Setting up the Audio Options
37 Setting up the Speaker Options
38 Setting up the Video display/output Options
41 Setting up the HDMI setup options
43 Setting up the Parental Lock
45 Firmware Upgrade
47 System Information
47 Network Setup
49 Using the Display Function
50 Using the Disc Menu & Popup/Title Menu
51 Repeat Play
51 Selecting the Audio Language
52 Selecting the Subtitle Language
53 Changing the Camera Angle
53 Using the Bookmark Function
55 Playing an Audio CD(CD-DA)
55 Playing an MP3
55 Audio CD(CD-DA)/MP3 Screen Elements
56 Buttons on the Remote Control used for
Audio CD(CD-DA)/ MP3 disc playback
56 Repeat Audio CD(CD-DA) & MP3
VIEWING A PICTURE
58
TROUBLESHOOTING
60
APPENDIX
62
58 Viewing a Picture
58 Slide Show
58 Rotate
59 Zoom
59 Go To Photo List
60 Troubleshooting
62 Specifi cations
8_ contents
Page 10
getting started
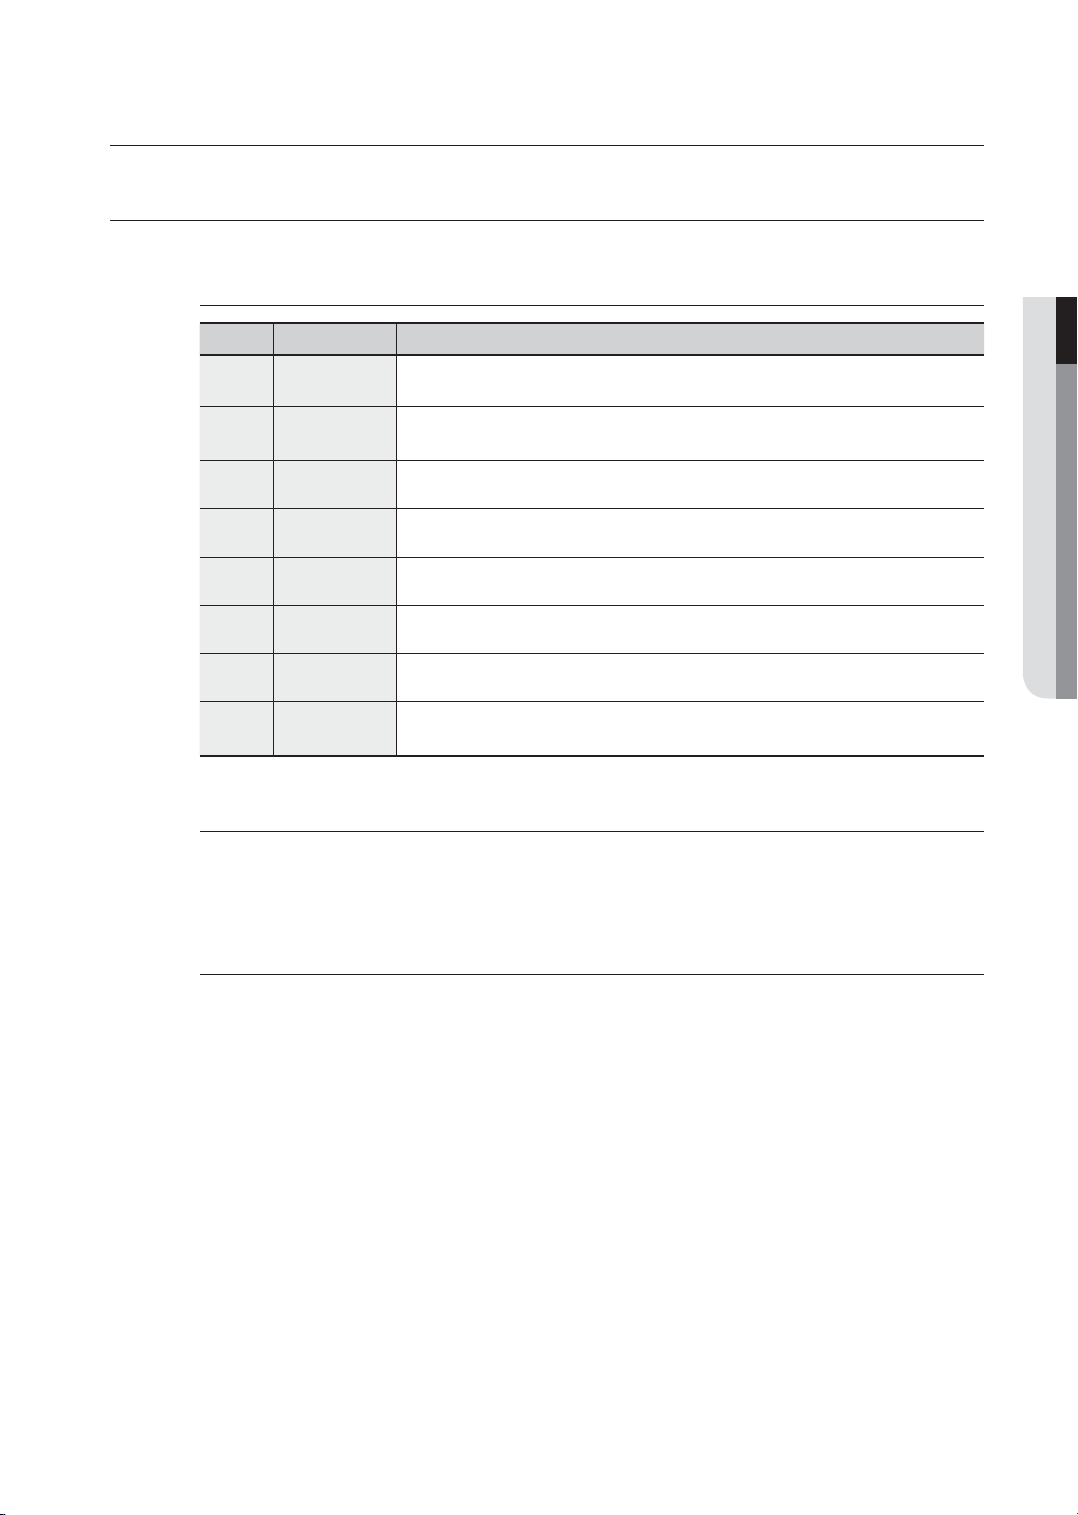
BEFORE READING THE USER’S MANUAL
Make sure to check the following terms before reading the user manual.
Icons that will be used in manual
Icon Term Defi nition
h
Z
C
V
B
G
A
M
About the use of this user’s manual
1)
2)
BD-ROM This involves a function available on a BD-ROM.
DVD-VIDEO
DVD-RW This involves a function available on DVD-RW. (V mode and fi nalized only)
DVD-R This involves a function available on DVD-R. (V mode and fi nalized only)
Audio CD This involves a function available on a data CD (CD-R or CD-RW).
JPEG This involves a function available on CD-R/-RW, DVD-R/-RW discs.
MP3 This involves a function available on CD-R/-RW, DVD-R/-RW discs.
Note
Be sure to be familiar with Safety Instructions before using this product. (See pages 4~6)
If a problem occurs, check the Troubleshooting. (See pages 60~61)
This involves a function available on DVD-Video or DVD-R/DVD-RW discs
that have been recorded and fi nalized in Video Mode.
This involves tips or instructions on the page that help each function
operate.
● GETTING STARTED
Copyright
©2007 Samsung Electronics Co.,Ltd.
All rights reserved; No part or whole of this user’s manual may be reproduced or copied without the
prior written permission of Samsung Electronics Co.,Ltd.
English _9
Page 11
getting started
DISC TYPE AND CHARACTERISTICS
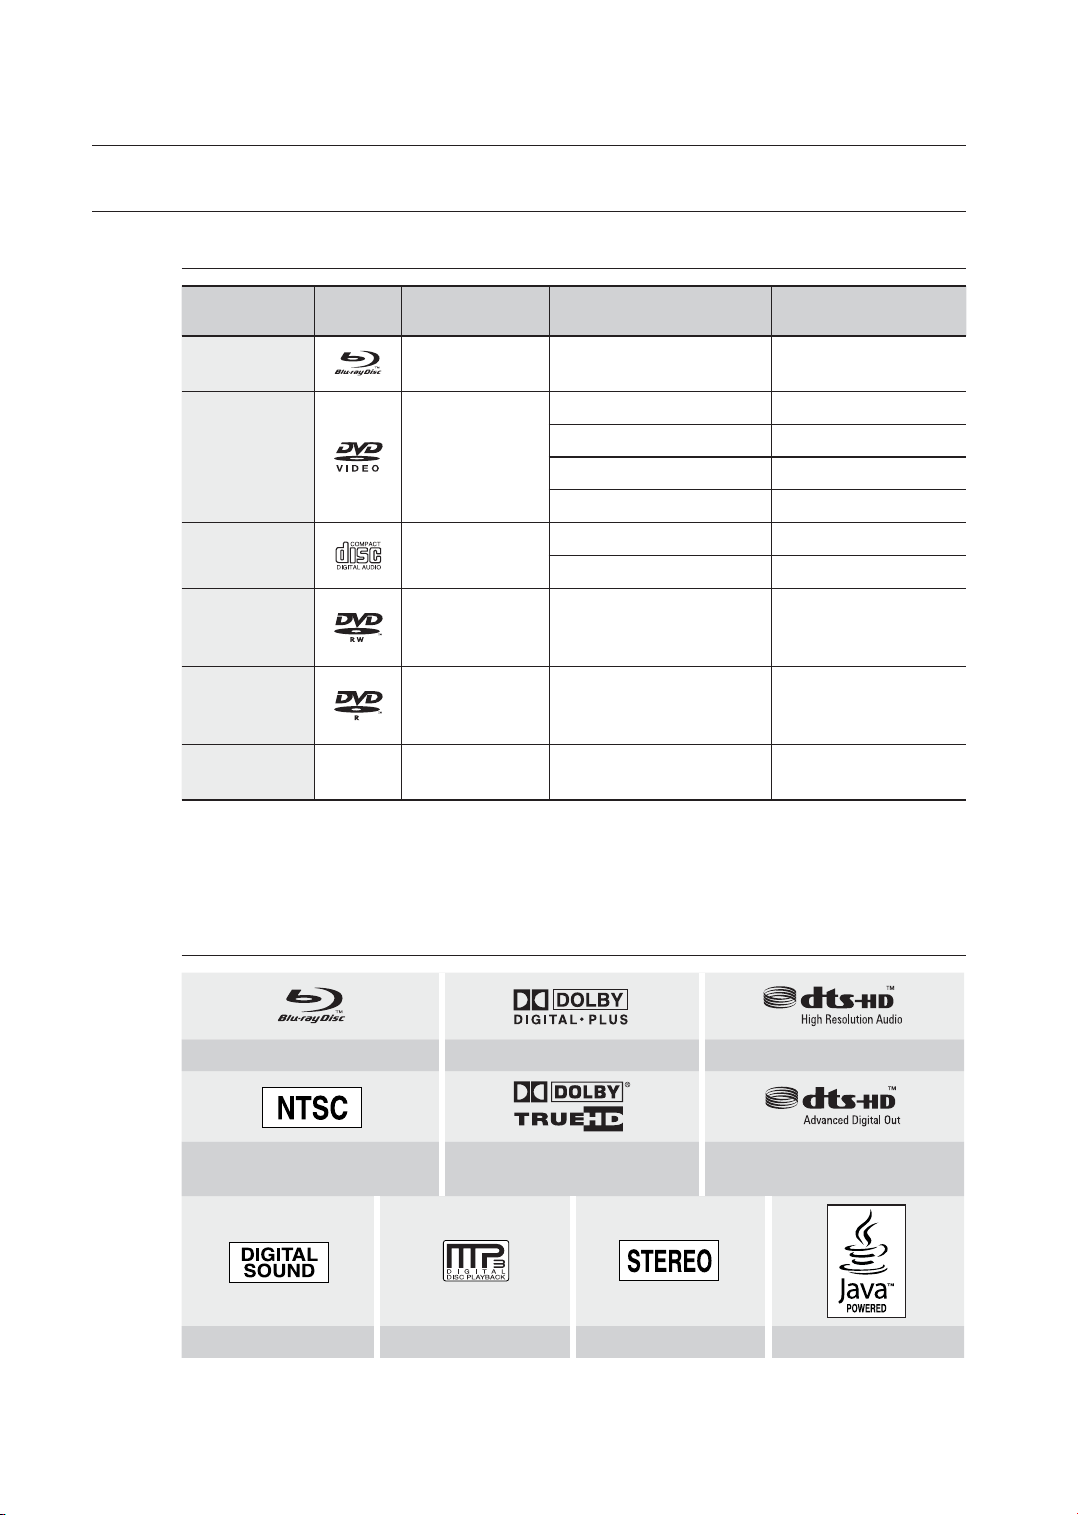
Disc types that can be played
Disc Types Disc Logo Recorded content Disc Shape Max. Playing minute
BD-ROM
DVD-VIDEO
AUDIO-CD
DVD-RW
(V mode and
fi nalized only)
DVD-R
(V mode and
fi nalized only)
CD-R/-RW
DVD-RW/-R
•
This player is compatible with the NTSC color system only.
PAL discs will not play.
•
AUDIO + VIDEO Single sided (25GB/50GB)
Single sided(5 inches) 240
Double sided(5 inches) 480
AUDIO + VIDEO
Single sided(3 1/2 inches) 80
Double sided(3 1/2 inches) 160
Single sided(5 inches) 74
AUDIO
Single sided(3 1/2 inches) 20
AUDIO + VIDEO 5 inches (4.7GB)
AUDIO + VIDEO 5 inches (4.7GB)
JPEG
MP3
Playing time depends
on the Title
480
(EX : Extended Play)
480
(EX : Extended Play)
––
Logos of Discs that can be played
NTSC broadcast system in U.S.A,
Canada, Korea, Japan
Digital Audio MP3 Stereo Java
10_ getting started
Blu-ray Disc Dolby Digital Plus DTS-HD High Resolution Audio
Dolby TrueHD DTS-HD Advanced Digital Out
Page 12
Discs that cannot be played
Blu-ray Discs with a region code other than "Region A".
•
BD-R, BD-RE
•
HD DVD Disc
•
DVD-Video with a region number other than “1” or “ALL”
•
DVD-RAM
•
•
3.9 GB DVD-R Disc for Authoring.
•
DVD-RW(VR mode)
•
DVD-ROM/PD/MV-Disc, etc
•
CVD/CD-ROM/CDV/CD-G/CD-I/LD
[Note]
•
Some commercial discs and DVD discs purchased outside your region may not be playable with this
product. When these discs are played, either “No disc.” or “Please check the regional code of the
disc.” will be displayed.
•
If a DVD-R/-RW disc has not been recorded properly in DVD video format, it will not be playable.
•
The unit cannot play CD-R/-RW and DVD-RW/-R recorded content such as divx, avi, mpg, mov,
wma.
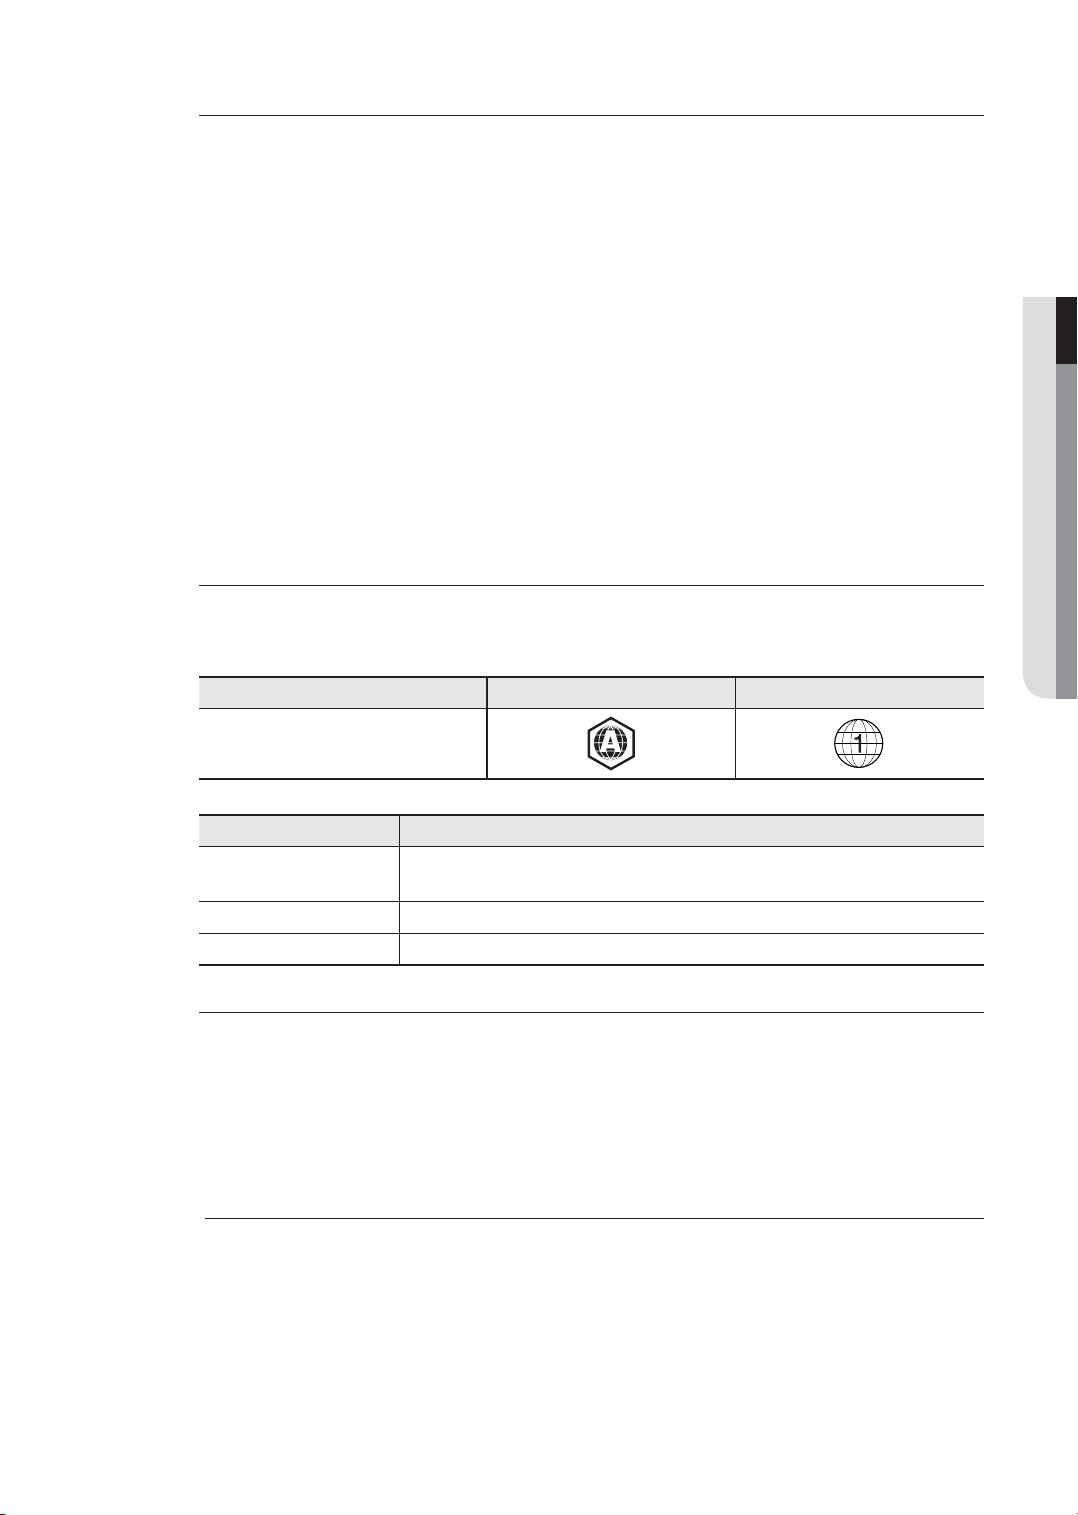
Region code
Both the Blu-ray Disc Player and the discs are coded by region. These regional codes must match in
order to play the disc. If the codes do not match, the disc will not play.
The Region Number for this Blu-ray Disc Player is described on the rear panel of the Blu-ray Disc Player.
● GETTING STARTED
Disc Type Blu-ray DVD-Video
Region code
BD Region Code Area
A
B Europe, Greenland, French territories, Middle East, Africa, Australia and New Zealand.
C India, China, Russia, Central and South Asia.
North America, Central America, South America, Korea, Japan, Taiwan, Hong Kong and
South East Asia.
Blu-ray Disc Compatibility
Blu-ray Disc is a new and evolving format. Accordingly, disc compatibility issues are possible. Not all
discs are compatible and not every disc will play back. For additional information, refer to the
Compliance and Compatibility Notice section of this Manual. If you encounter compatibility problems,
please contact the SAMSUNG customer care center. This Samsung Blu-ray Disc Player (BD-P1400)
supports only the BD-ROM Profi le 1 version 1.0 specifi cation. If you want to play later version discs, you
may need to update player's fi rmware. Please refer to http://www.samsung.com/ca or contact
SAMSUNG customer care center.
Playback may not work for some types of discs, or when specifi c operations, such as angle change and aspect
M
ratio adjustment, are being performed. Information about the discs is written in detail on the box. Please refer
to this if necessary.
Do not allow the disc to become dirty or scratched. Finger prints, dirt, dust, scratches or deposits of cigarette
smoke on the recording surface may make it impossible to use the disc for playback.
Discs with PAL programs recorded on them cannot be played using this product.
When a BD-Java title is played, loading may take longer than a normal title, or some functions may perform slowly.
English _11
Page 13

getting started
Disc Types
BD-ROM
❖
Blu-ray Disc Read Only Memory. A BD-ROM disc contains pre-recorded data. Although a BD-ROM
may contain any form of data, most BD-ROM discs will contain movies in High Defi nition format, for
playback on Blu-ray Disc Players. This unit can play back pre-recorded commercial BD-ROM discs.
❖
DVD-Video
A digital versatile disc (DVD) can contain up to 135-minutes of images, 8 audio languages and 32
•
subtitle languages. It is equipped with MPEG-2 picture compression and Dolby Digital surround,
allowing you to enjoy vivid and clear theatre quality images.
When switching from the fi rst layer to the second layer of a dual-layered DVD Video disc, there may be
•
momentary distortion in the image and sound. This is not a malfunction of the unit.
Once a DVD-RW/-R recorded in Video Mode is fi nalized, it becomes DVD-Video. Pre-recorded (pre-
•
stamped) commercial DVDs with movies are also referred to as DVD-Videos. This unit can play back
pre-recorded commercial DVD discs (DVD-Video discs) with movies.
Audio CD
❖
An audio disc on which 44.1kHz PCM Audio is recorded.
•
This unit can play back CD-DA format audio CD-R and CD-RW discs.
•
The unit may not be able to play some CD-R or CD-RW discs due to the condition of the recording.
•
CD-R/-RW
❖
Use a 700MB(80 minutes) CD-R/-RW disc. If possible, do not use a 800MB(90 minutes) or above
•
disc, as the disc may not play back.
If the CD-R/-RW disc was not recorded as a closed session, you may experience delays when playing
•
back the beginning of the disc or all recorded fi les may not play.
Some CD-R/-RW discs may not be playable with this unit, depending on the device which was used
•
to burn them. For contents recorded on CD-R/-RW media from CDs for your personal use, playability
may vary depending on contents and discs.
DVD-R Disc Playback
❖
Once a DVD-R recorded in Video Mode is fi nalized, it becomes DVD-Video.
•
This unit can play back DVD-R discs recorded and fi nalized with a Samsung DVD video recorder. It
•
may not be able to play some DVD-R discs depending on the disc and the condition of the recording.
DVD-RW Disc Playback
❖
Playback can be performed with DVD-RW discs in the Video Mode and fi nalized only.
•
•
Once a DVD-RW recorded in Video Mode is fi nalized, it becomes DVD-Video. Ability to play back may
depend on recording conditions.
Disc Format
Using MP3 disc
❖
CD-R/-RW, DVD-RW/-R recorded with UDF, ISO9660 or JOLIET format can be played back.
•
Only MP3 fi les with the “.mp3” or “.MP3” extension can be played.
•
Playable bit-rate range is from 56 Kbps to 320 Kbps.
•
Playable sample-rate is 16KHz to 48KHz.
•
The unit can handle a maximum of 1500 fi les and folders under a parent folder. For MP3 fi les recorded
•
with a VBR(Variable Bit Rates), the sound may cut in and out.
12_ getting started
Page 14
Using JPEG disc
❖
CD-R/-RW, DVD-RW/-R recorded with UDF, ISO9660 or JOLIET format can be played back.
•
Only JPEG fi les with the ".jpg", ".JPG", ".jpeg" or "JPEG" extension can be displayed.
•
•
Progressive JPEG is supported.
DVD-RW/-R (V)
❖
This is a format that is used for recording data on a DVD-RW or DVD-R disc. The disc can be played
•
by this Blu-ray Disc Player once it has been fi nalized.
If a disc that has been recorded in Video Mode by a different maker’s recorder but has not been
•
fi nalized, it cannot be played by this Blu-ray Disc Player.
DISC STORAGE & MANAGEMENT
Disc Handling
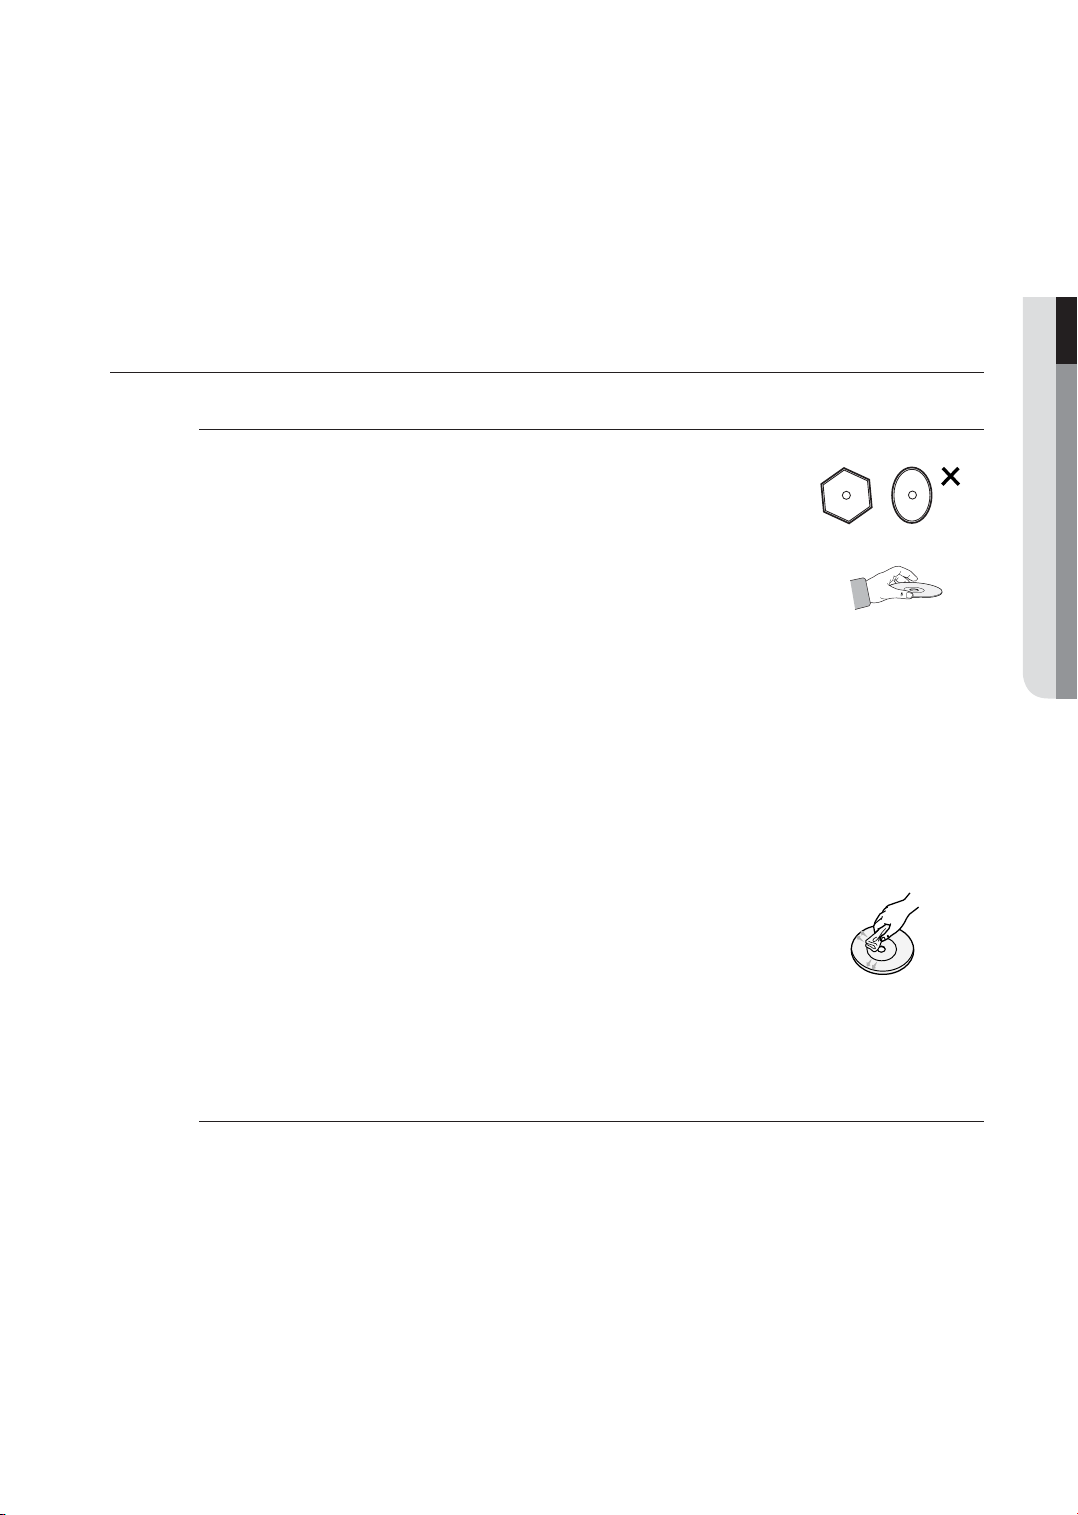
•
Use discs with regular shapes. If an irregular disc (a disc with a special shape)
is used, this Blu-ray Disc Player may be damaged.
Holding discs
❖
Avoid touching the surface of a disc where recording is performed.
•
Blu-ray Discs
❖
If the player is not used for a long period of time, remove the Blu-ray Disc
•
from the player and store it in its case.
Be careful not to leave fi ngerprints or scratches on the surface of the Blu-ray Disc.
•
● GETTING STARTED
DVD-RW and DVD-R
❖
Clean with an optional PD disc cleaner (LF-K200DCA1 where available). Do not use cleaners or
•
cloths for CDs to clean DVD-RW/-R discs.
DVD-Video, Audio-CD
❖
Wipe off dirt or contamination on the disc with a soft cloth.
•
Cautions on handling discs
❖
Do not write on the printed side with a ball-point pen or pencil.
•
Do not use record cleaning sprays or antistatic. Also, do not use volatile
•
chemicals, such as benzene or thinner.
•
Do not apply labels or stickers to discs. (Do not use discs fi xed with exposed
tape adhesive or leftover peeled-off stickers.)
Do not use scratch-proof protectors or covers.
•
Do not use discs printed with label printers available on the market.
•
•
Do not load warped or cracked discs.
Disc Storage
Be careful not to harm the disc because the data on these discs is highly vulnerable to the environment.
•
Do not keep under direct sunlight.
•
Keep in a cool ventilated area.
•
Store vertically.
•
Keep in a clean protection jacket.
•
If you move your Blu-ray Disc Player suddenly from a cold place to a warm place, condensation may
generate on the operating parts and lens and cause abnormal disc playback. If this occurs, do not
connect the plug to the power outlet and wait for two hours. Then insert the disc and try to play back
again.
English _13
Page 15
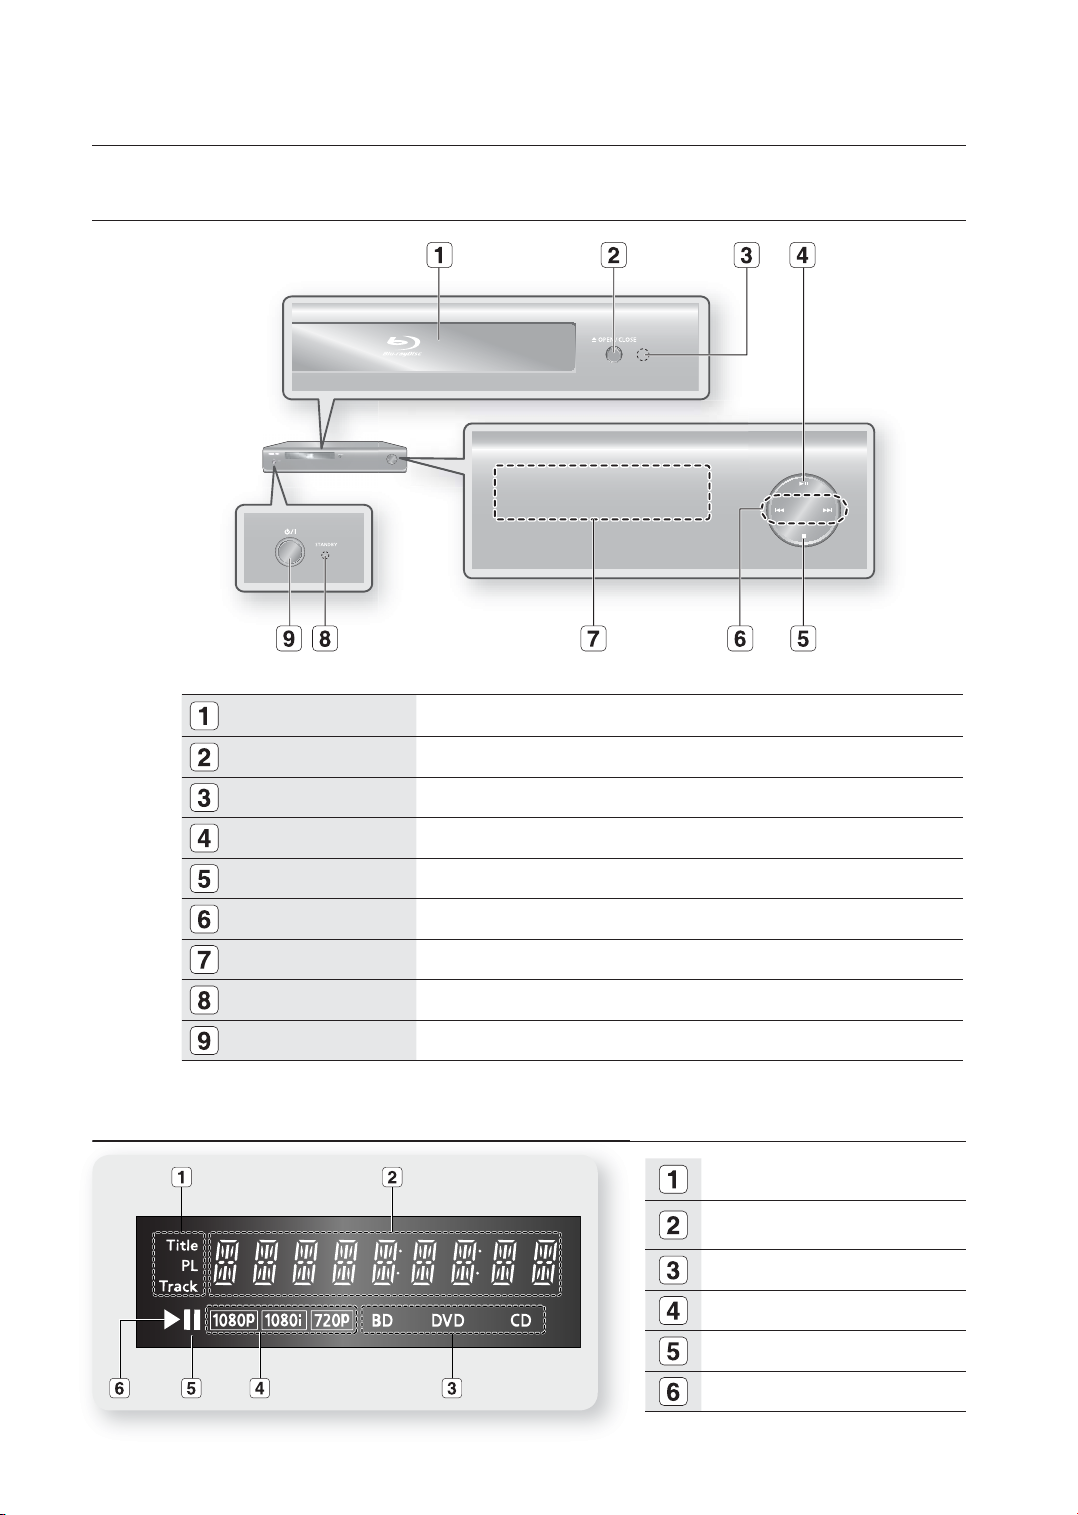
description
FRONT PANEL
DISC TRAY
OPEN/CLOSE BUTTON
Remote Control Sensor
PLAY/PAUSE BUTTON
STOP BUTTON
SEARCH/SKIP BUTTONS
DISPLAY
STANDBY INDICATOR
POWER BUTTON
FRONT PANEL DISPLAY
Opens to accept a disc.
Opens and closes the disc tray.
Plays a disc or pauses playback.
Stops disc playback.
Goes to the next title/chapter/track or goes back to the previous title/chapter/track.
Displays the playing status, time, etc.
When the unit is fi rst plugged in, this indicator lights.
Turns the Blu-ray Disc Player on and off.
Title/PlayList/Track indicator.
Playing time/clock/current status
indicator.
Disc type indicators.
14_ description
Video output resolution indicator.
Pause indicator.
Playback indicator.
Page 16
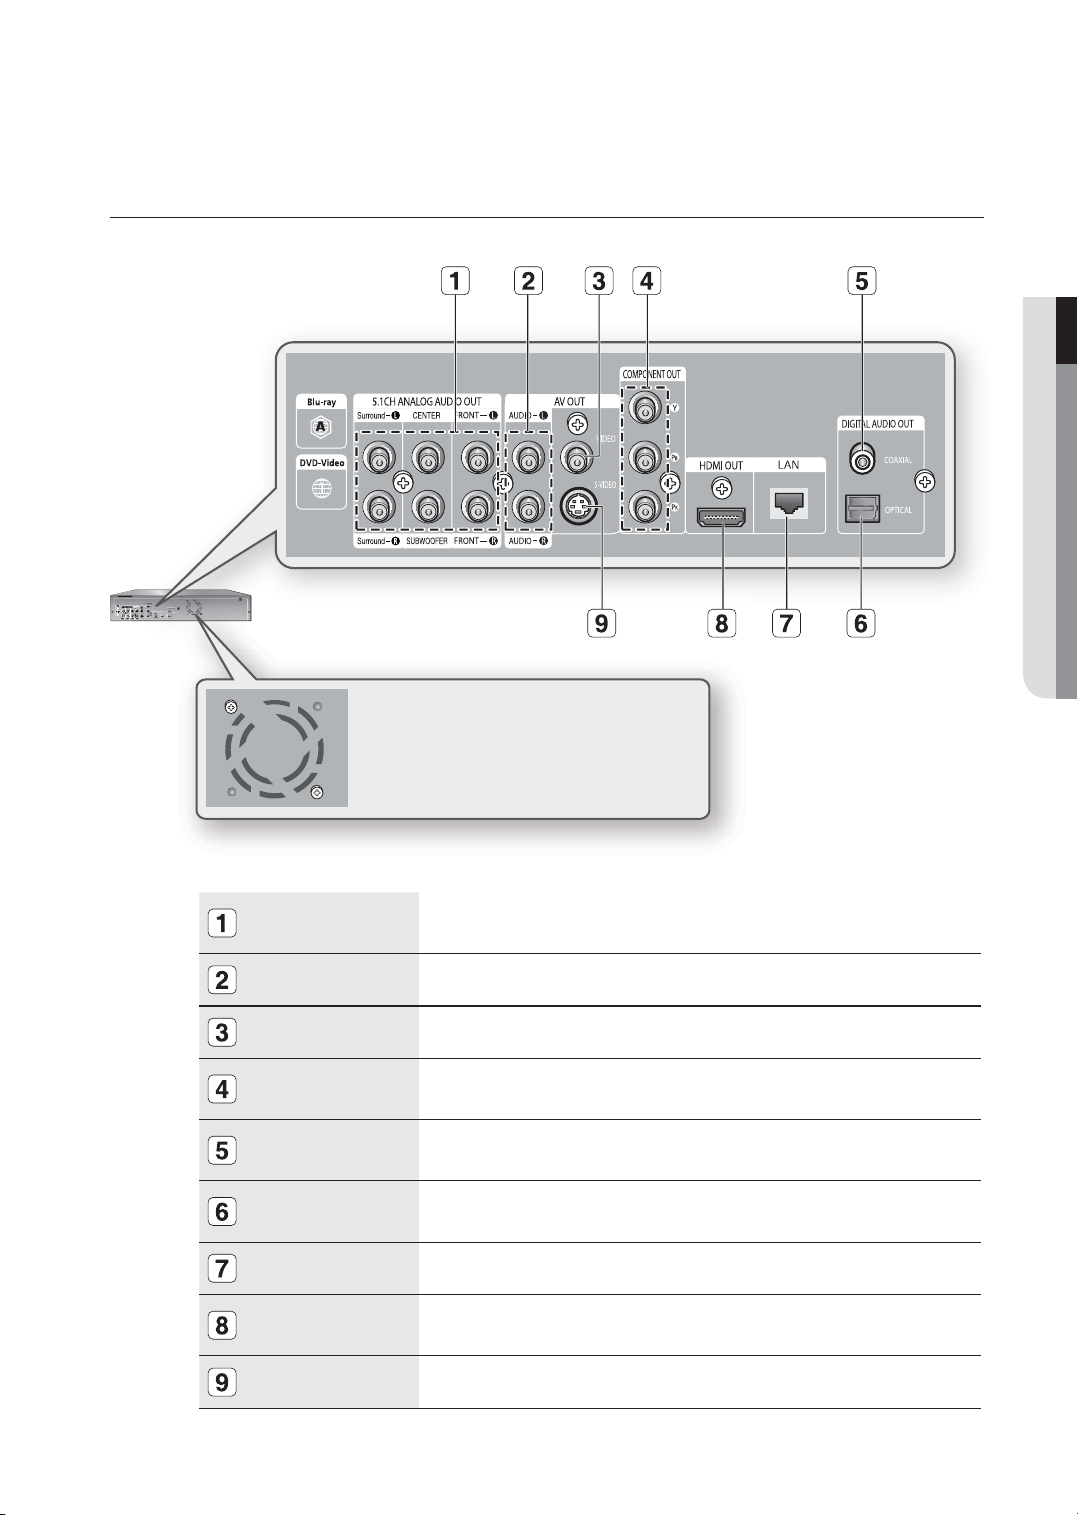
REAR PANEL
● DESCRIPTION
Fan
The fan always revolves when the power is on.
Ensure a minimum of 4 inches of clear space on
all sides of the fan when installing the product.
5.1CH ANALOG
AUDIO OUT
AUDIO OUT
VIDEO OUT
COMPONENT
VIDEO OUT
DIGITAL AUDIO OUT
(COAXIAL)
DIGITAL AUDIO OUT
(OPTICAL)
LAN
HDMI OUT
S-VIDEO OUT
Connect to a 5.1CH analog input on an A/V amplifi er
Connects to the audio input of external equipment using audio cables.
Connects the input of external equipment using a video cable.
Connects to equipment having Component video input.
Connects to an amplifi er having a digital coaxial audio input jack.
Connects to an amplifi er having a digital optical audio input jack.
Connect this LAN terminal to the LAN terminal on your modem for software upgrades.
Use the HDMI cable, connect this HDMI output terminal to the HDMI input terminal on
your TV for the best quality picture.
Connects the input of external equipment using an S-Video cable.
English _15
Page 17
remote control
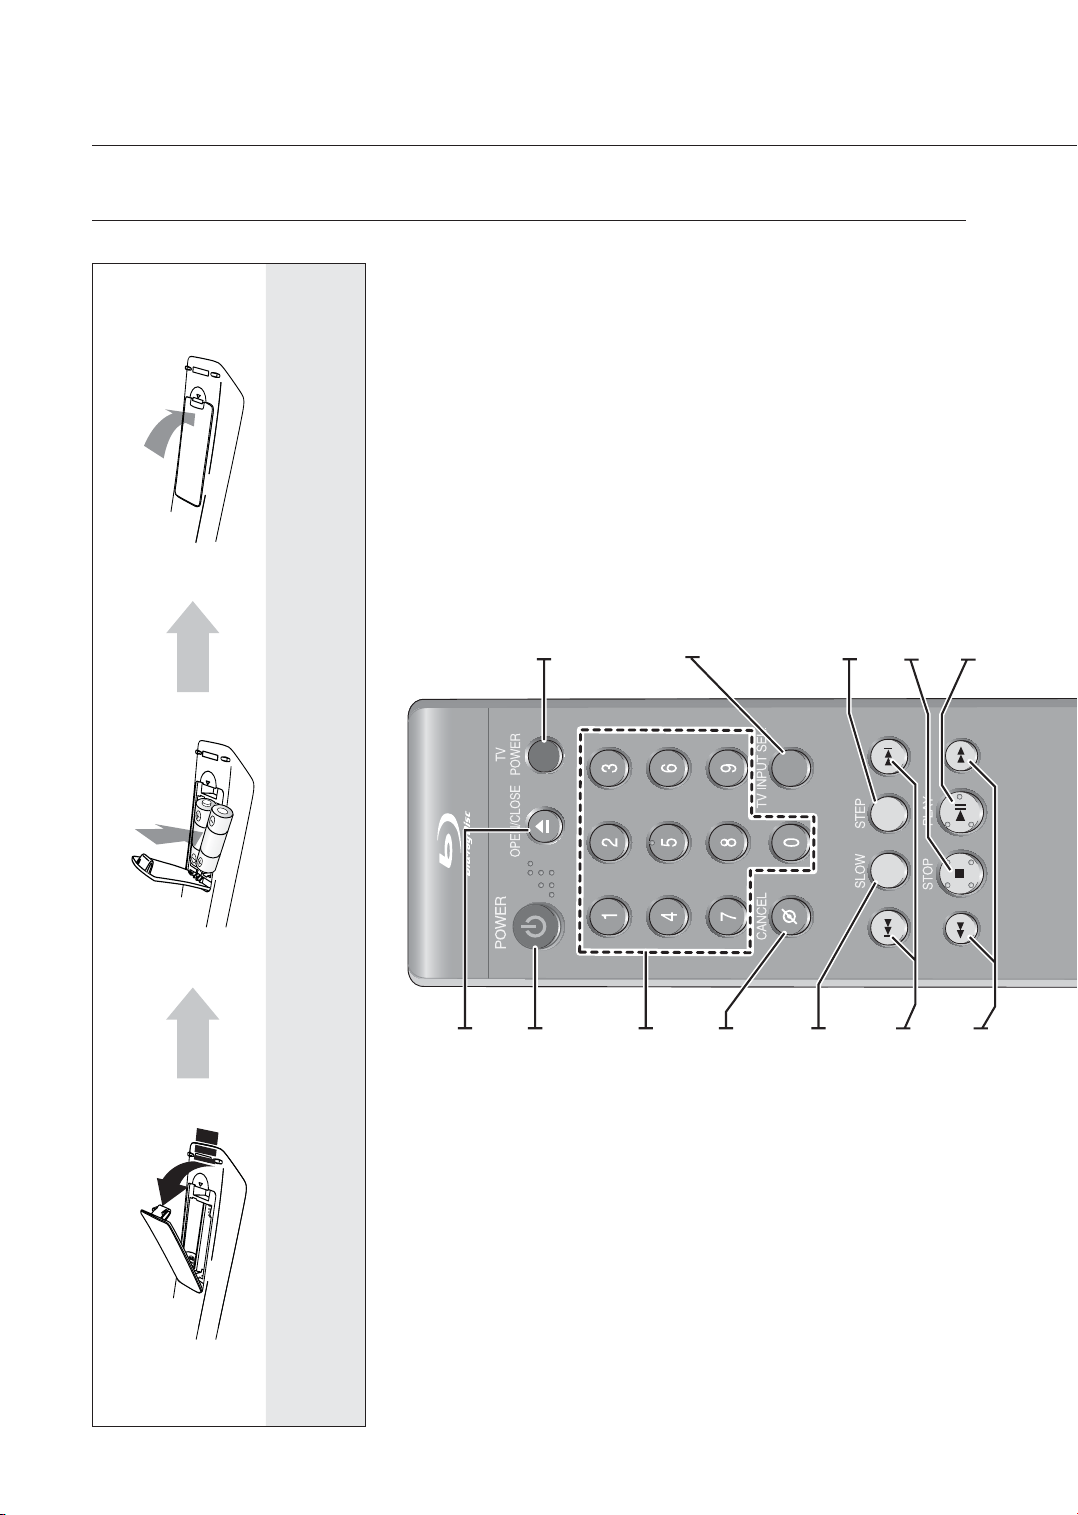
TOUR OF THE REMOTE CONTROL
Assuming typical TV usage, the batteries
last for about one year.
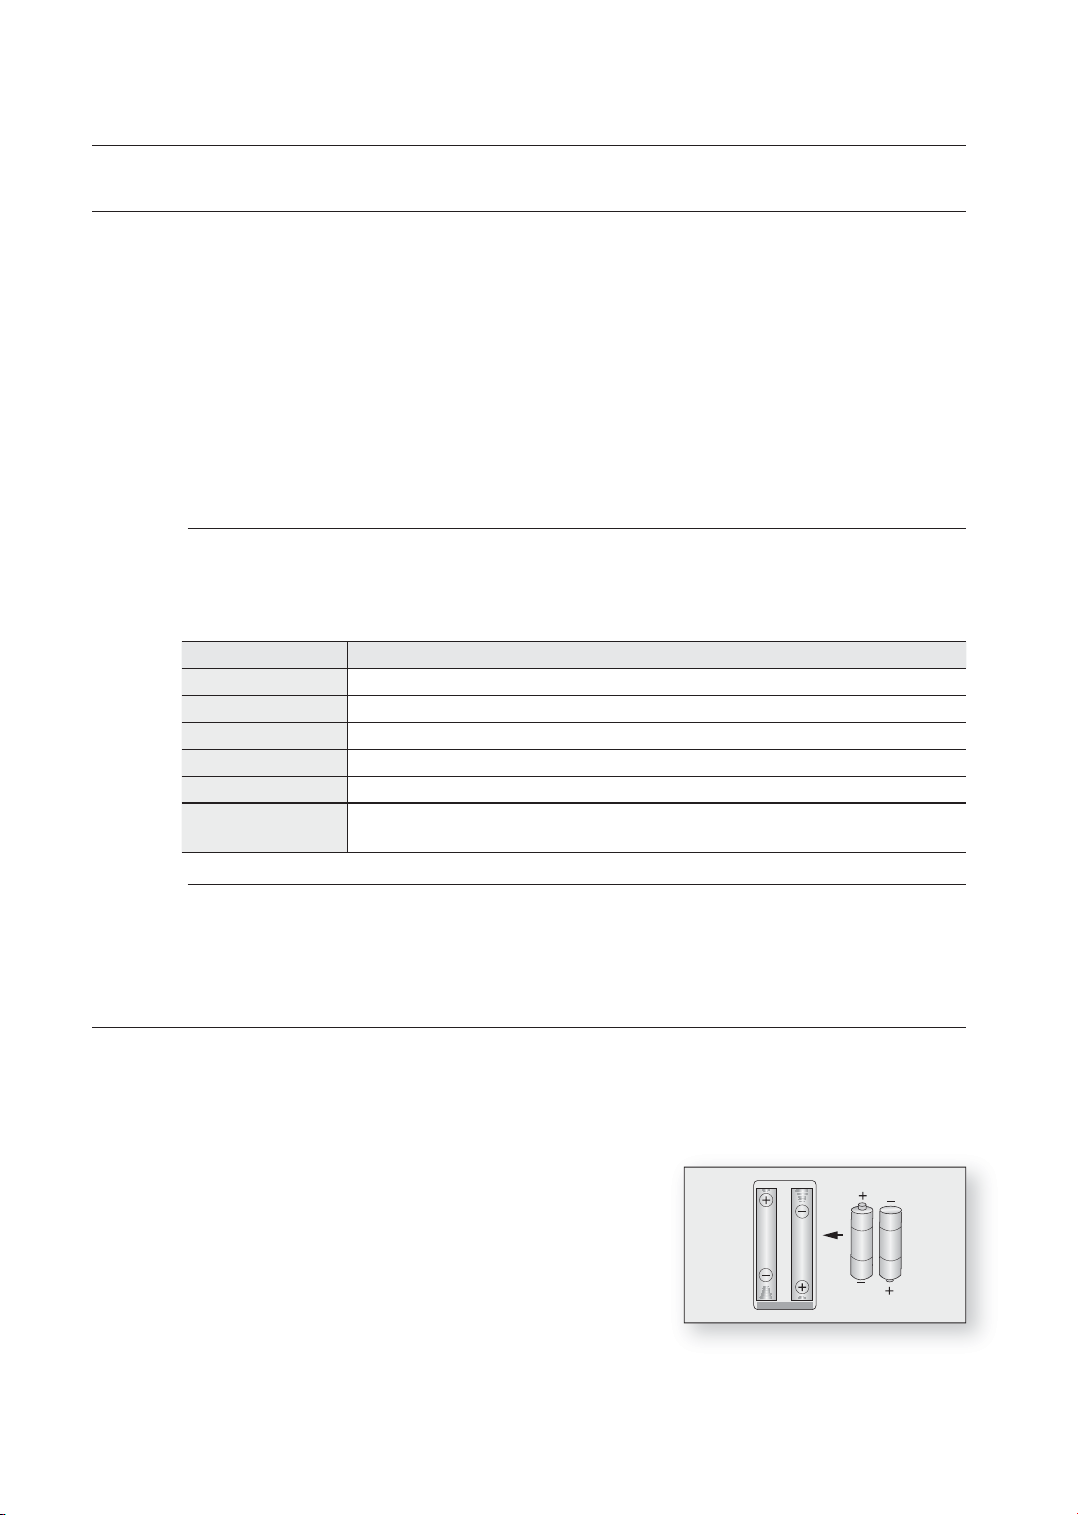
3. Replace the cover.
TV POWER Button
TV INPUT SEL. Button
control, the DIRECTION(up/down/left/right) and ENTER
buttons operate your TV's menu screen, but not the
player. To enable the button operation for the player, press
After setup, allows you to set the input source on your TV.
When the TV INPUT SEL. button is selected on the remote
the RETURN button.
STEP Button
Each time this button is pressed, a new frame will appear.
PLAY/PAUSE Button
STOP Button
Press to play/pause a disc.
Press to stop a disc.
Make sure to match the “+” and “–” ends
of the batteries with the diagram inside
the compartment.
2. Install two AAA size batteries.
OPEN/CLOSE Buttons
To open and close the disc tray.
remote control upward as shown.
Installing batteries in the Remote Control
1. Lift the cover at the back of the
16_ remote control
POWER Button
NUMBER Buttons
SLOW Button
CANCEL Button
Each time this button is pressed, the disc will play slowly.
Press to skip backwards or forwards.
REVERSE/FORWARD SKIP Buttons
Press to search a disc backwards or forwards.
REVERSE/FORWARD SEARCH Buttons
Page 18
● REMOTE CONTROL
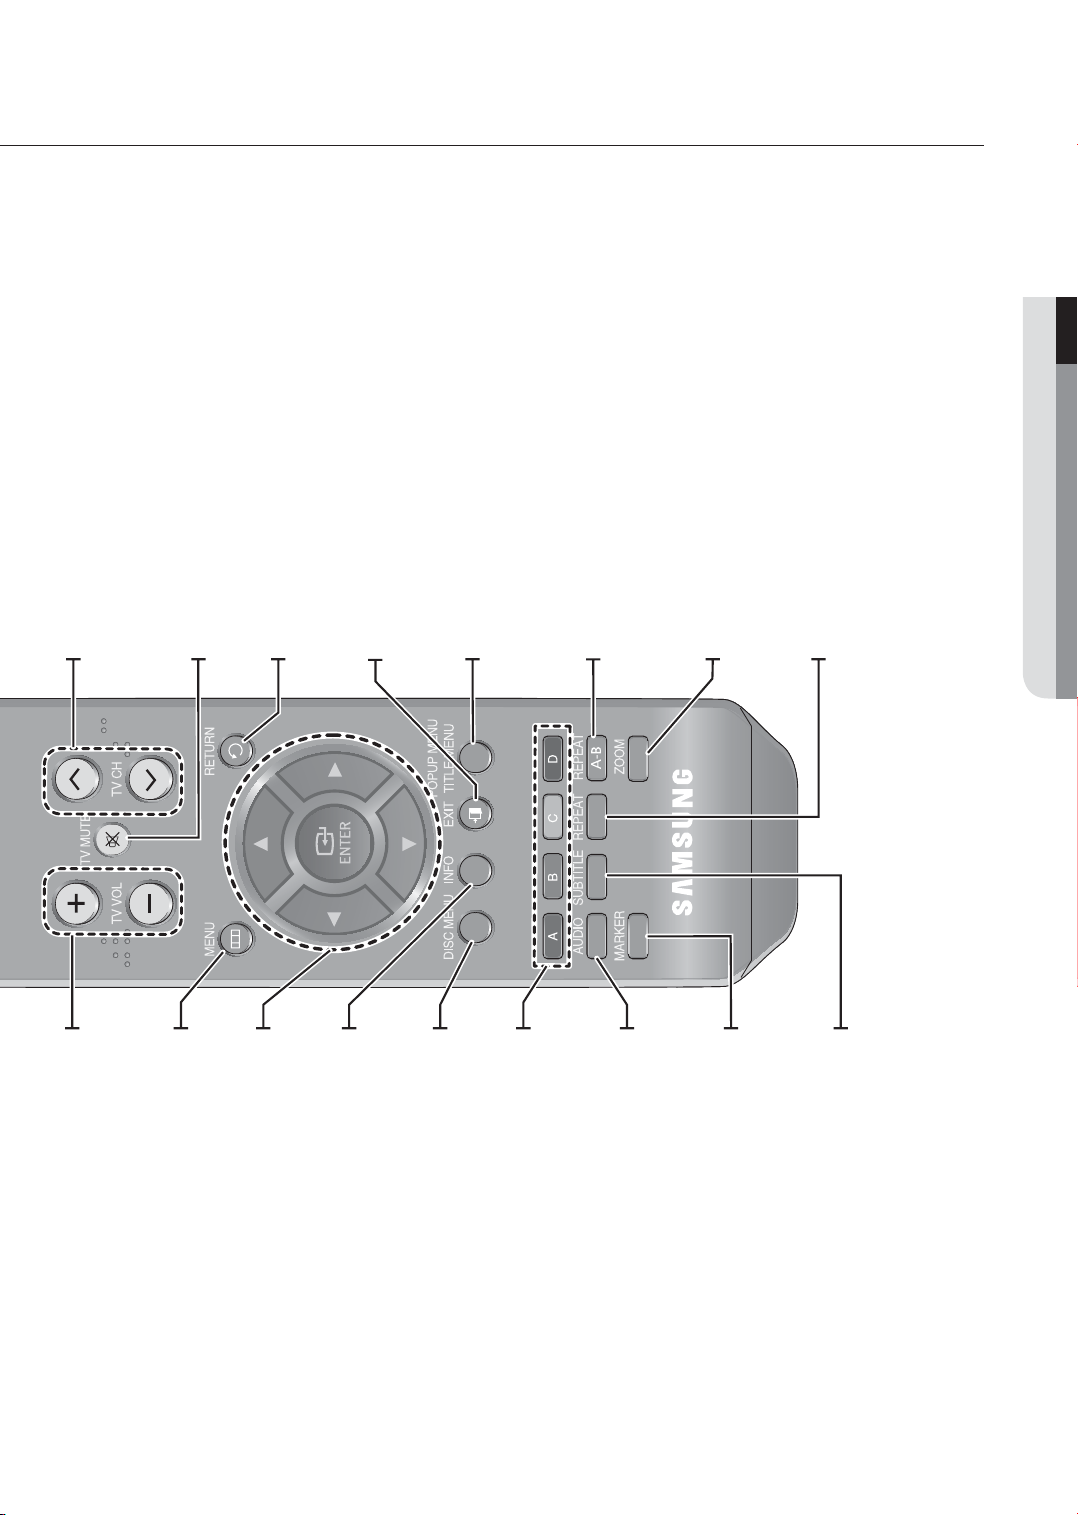
TV CH Button
Use this to select a TV program.
TV MUTE Button
Mutes the speakers of your TV.
MENU Button
TV VOL Buttons
TV volume adjustment
RETURN Button
EXIT Button
INFO Button
(▲▼◄► Buttons)
POPUP MENU/TITLE MENU Button
Use this to enter the popup menu/title menu.
REPEAT A-B Button
Allows you to repeat playback of a certain section.
(BD/DVD).
AUDIO Button
DISC MENU Button
YELLOW(C), BLUE(D)
Use this to enter the disc menu.
ZOOM Button
Enlarges photos on JPEG discs.
MARKER Button
REPEAT Button
Allows you to repeat a title, chapter, track or disc.
SUBTITLE Button
ENTER/DIRECTION Buttons
Brings up the Blu-ray Disc Player’s setup menu.
Displays current setting or disc status.
Player such as the Music or Photo List.
Allow access to common functions of the Blu-ray Disc
Use this to access various audio functions on a disc
Use this to bookmark a position while playing a disc.
COLOR Buttons : RED(A), GREEN (B),
Press this to switch the BD/DVD’s subtitle language.
English _17
Page 19
remote control
SETTING THE REMOTE CONTROL
You can control certain functions of your TV with this remote control.
Control function buttons include : TV POWER, TV CH ,., TV VOL + –, TV MUTE, TV INPUT SEL.,
DIRECTION/ENTER button. However, the DIRECTION/ENTER button can only operate when the TV INPUT SEL.
button has been selected.
To determine whether your television is compatible, follow the instructions below.
1.
Switch your television on.
2.
Point the remote control towards the television.
3.
Press and hold the TV POWER button and enter the two-fi gure code corresponding to the brand of
your television, by pressing the appropriate number buttons. (see the next page for the code list).
If your television is compatible with the remote control, it will switch off.
It is now programmed to operate with the remote control.
If several codes are indicated for your television brand, try each one in turn until you fi nd one that works.
M
If you replace the remote control's batteries, you must set the brand code again.
You can then control the television using the following buttons after pressing the TV button.
Button Function
TV POWER Used to switch the television on and off.
TV INPUT SEL. Used to select an external source.
TV VOL (+ –) Used to adjust the volume of the television.
,.
TV CH (
TV MUTE Used to toggle the sound on and off.
DIRECTION/ENTER
) Used to select the desired channel.
Used to move up/down/left/right (Ɓ, Ƅ, Ƃ, ƃ) and to select a desired item.
*(only works under the TV INPUT SEL. button selected)
The functions listed above will not necessarily work on all televisions. If you encounter problems, operate the
M
television directly.
REGARDING THE BATTERY
If the remote does not operate properly:
Check the polarity + – of the batteries (Dry-Cell)
•
Check if the batteries are drained.
•
Check if remote sensor is blocked by obstacles.
•
Check if there is any fl uorescent lighting nearby.
•
Dispose of batteries according to local environmental
regulations. Do not put them in the household trash.
18_ remote control
Page 20

CONTROLLABLE TV CODES
Brand
SAMSUNG
AIWA
ANAM
BANG & OLUFSEN
BLAUPUNKT
BRANDT
BRIONVEGA
CGE
CONTINENTAL EDISON
DAEWOO
EMERSON
FERGUSON
FINLUX
FORMENTI
FUJITSU
GRADIENTE
GRUNDIG
HITACHI
IMPERIAL
JVC
LG
LOEWE
LOEWE OPTA
MAGNAVOX
METZ
MITSUBISHI
MIVAR
NEC
NEWSAN
NOBLEX
NOKIA
NORDMENDE
PANASONIC
PHILIPS
PHONOLA
PIONEER
RADIOLA
RADIOMARELLI
RCA
REX
SABA
SALORA
SANYO
SCHNEIDER
SELECO
SHARP
SIEMENS
SINGER
SINUDYNE
SONY
TELEAVA
TELEFUNKEN
THOMSON
THOMSON ASIA
TOSHIBA
WEGA
YOKO
ZENITH
Code
TV POWER+01, +02, +03, +04, +05, +06, +07, +08, +09
TV POWER+82
TV POWER+10, +11, +12, +13, +14, +15, +16, +17, +18
TV POWER+57
TV POWER+71
TV POWER+73
TV POWER+57
TV POWER+52
TV POWER+75
TV POWER+19, +20, +23, +24, +25, +26, +27, +28, +29, +30, +31, +32, +33, +34
TV POWER+64
TV POWER+73
TV POWER+06, +49, +57
TV POWER+57
TV POWER+84
TV POWER+70
TV POWER+49, +52, +71
TV POWER+60, +72, +73, +75
TV POWER+52
TV POWER+61, +79
TV POWER+06, +19, +20, +21, +22, +78
TV POWER+06, +69
TV POWER+06, +57
TV POWER+40
TV POWER+57
TV POWER+06, +48, +62, +65
TV POWER+52, +77
TV POWER+83
TV POWER+68
TV POWER+66
TV POWER+74
TV POWER+72, +73, +75
TV POWER+53, +54, +74, +75
TV POWER+06, +55, +56, +57
TV POWER+06, +56, +57
TV POWER+58, +59, +73, +74
TV POWER+06, +56
TV POWER+57
TV POWER+45, +46
TV POWER+74
TV POWER+57, +72, +73, +74, +75
TV POWER+74
TV POWER+41, +42, +43, +44, +48
TV POWER+06
TV POWER+74
TV POWER+36, +37, +38, +39, +48
TV POWER+71
TV POWER+57
TV POWER+57
TV POWER+35, +48
TV POWER+73
TV POWER+67, +73, +75, +76
TV POWER+72, +73, +75
TV POWER+80, +81
TV POWER+47, +48, +49, +50, +51, +52
TV POWER+57
TV POWER+06
TV POWER+63
● REMOTE CONTROL
English _19
Page 21
connections
This section involves various methods of connecting the Blu-ray Disc Player to other
external components.
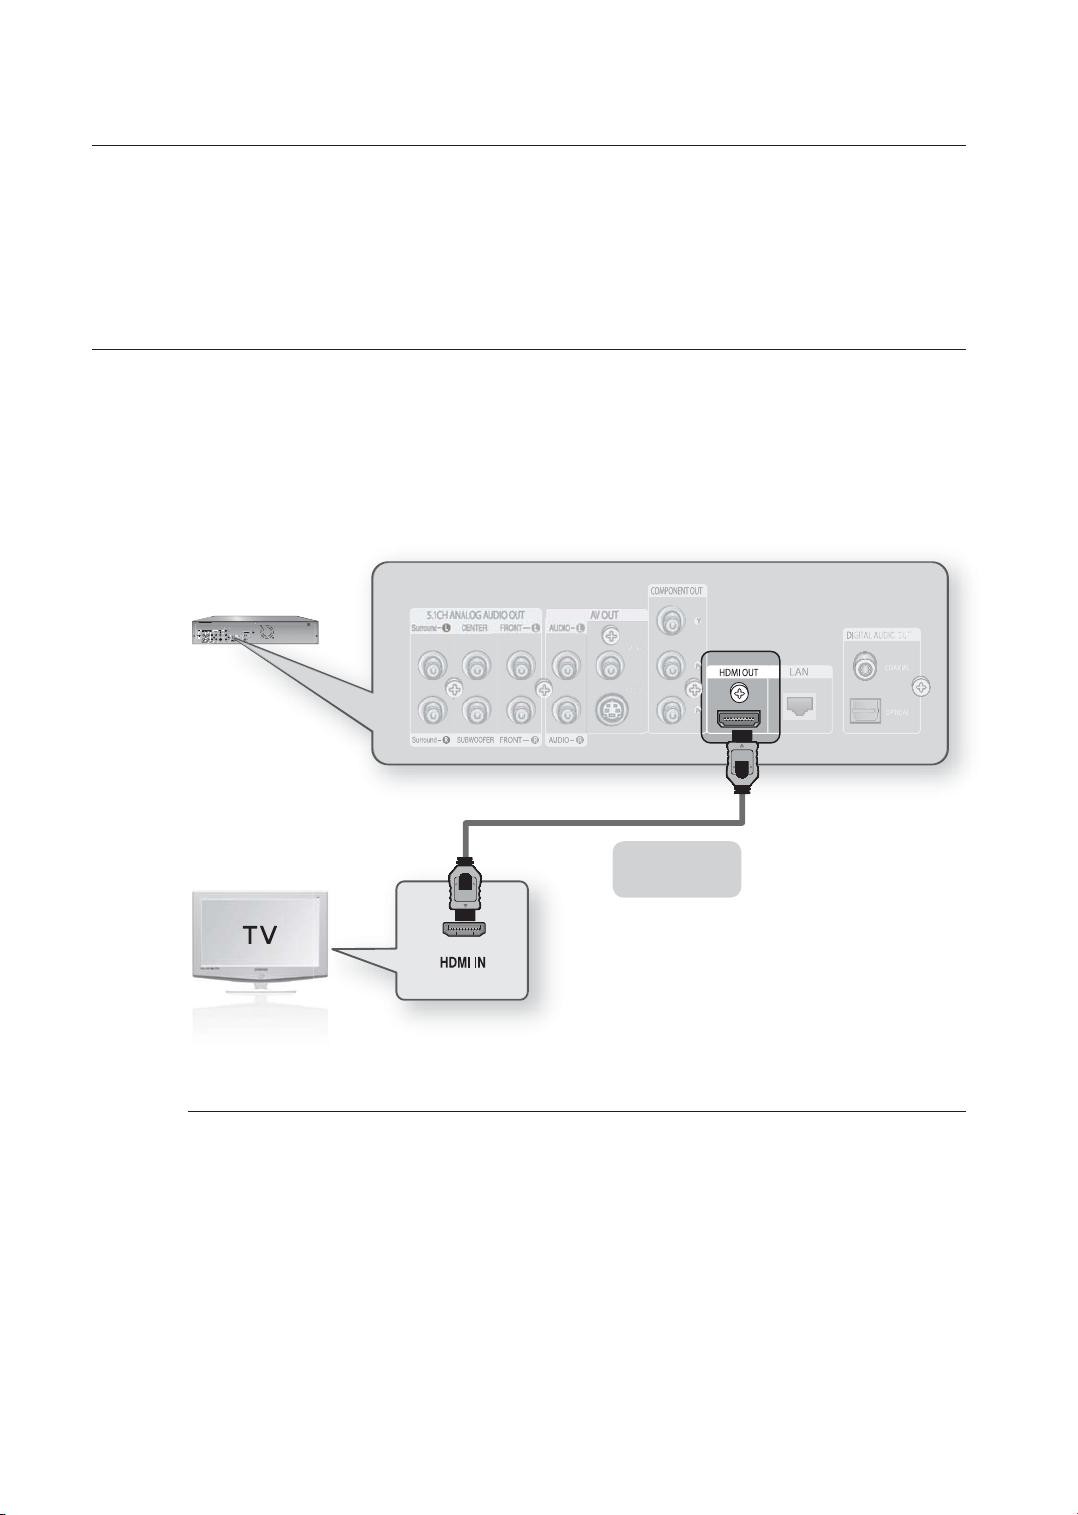
CONNECTING TO A TV WITH AN HDMI CABLE
1.
Using an HDMI-HDMI cable (not included) connect the HDMI OUT terminal on the rear of the Blu-ray Disc Player
to the HDMI IN terminal of your TV.
2.
Press the input selector on your TV remote control until the HDMI signal from the Blu-ray Disc Player appears on
your TV screen.
If you have set the remote control to properly operate with your TV (see pages 18~19), press the TV INPUT
•
SEL. button on the remote control and select HDMI as the external source of the TV.
M
HDMI cable
(not included)
If the HDMI cable is connected or removed during playback of a CDDA, MP3 or JPEG fi le, the player will stop
playing.
20_ connections
Page 22

HDMI AUTO DETECTION FUNCTION
The player's video output will automatically change to HDMI mode when connecting an HDMI cable while power is
on (see page 40).
Depending on your TV, certain HDMI output resolutions may not work.
M
Please refer to the user's manual of your TV.
If an HDMI or HDMI-DVI cable is connected from the player to a TV, the Blu-ray Disc Player’s output is set to
HDMI/DVI automatically within 10 seconds.
If Component and HDMI are both connected, HDMI mode is automatically selected. (See page 40)
When you connect the player to the TV using the HDMI cable for the fi rst time or to a new TV, the HDMI output
resolution will be automatically set to the highest provided by the TV.
If you connect a Samsung TV to the Blu-ray Disc Player using an HDMI cable, the player can be easily operated
using the TV remote control. (This is only available with Samsung TVs that support the Anynet+ feature.) (See
pages 41~42)
HDMI (High Defi nition Multimedia Interface)
•
HDMI is an interface that enables the digital transmission of video and audio data with just a single
connector.
Using HDMI, the Blu-ray Disc Player transmits a digital video and audio signal and displays a vivid
picture on a TV having an HDMI input jack.
HDMI connection description
•
HDMI connector - Supports video and digital audio data (LPCM or Bitstream).
- HDMI outputs only a pure digital signal to the TV.
- If your TV does not support HDCP (High-bandwidth Digital Content Protection), random noise
appears on the screen.
Why does Samsung use HDMI?
•
Analog TVs require an analog video/audio signal. However, when playing a BD/DVD, the data
transmitted to a TV is digital. Therefore either a digital-to-analog converter (in the Blu-ray Disc Player)
or an analog-to-digital converter (in the TV) is required. During this conversion, the picture quality is
degraded due to noise and signal loss. HDMI technology is superior because it requires no D/A
conversion and is a pure digital signal from the player to your TV.
What is the HDCP?
•
HDCP (High-band width Digital Content Protection) is a system for protecting BD/DVD content
outputted via HDMI from being copied. It provides a secure digital link between a video source (PC,
DVD. etc) and a display device (TV, projector. etc). Content is encrypted at the source device to
prevent unauthorized copies from being made.
What is Anynet+?
•
Anynet+ is a convenient function that offers linked operation of this unit through Samsung TVs with the
Anynet+ feature.
- If your Samsung TV has an
- If you turn on the player and insert a disc, the player will start playing the disc, and the TV will turn on
automatically and switch to HDMI mode.
- If you turn on the player and press the Play button with a disc already inserted, the TV will
immediately turn on and switch to HDMI mode.
logo, then it supports Anynet+ function.
● CONNECTIONS
English _21
Page 23
connections
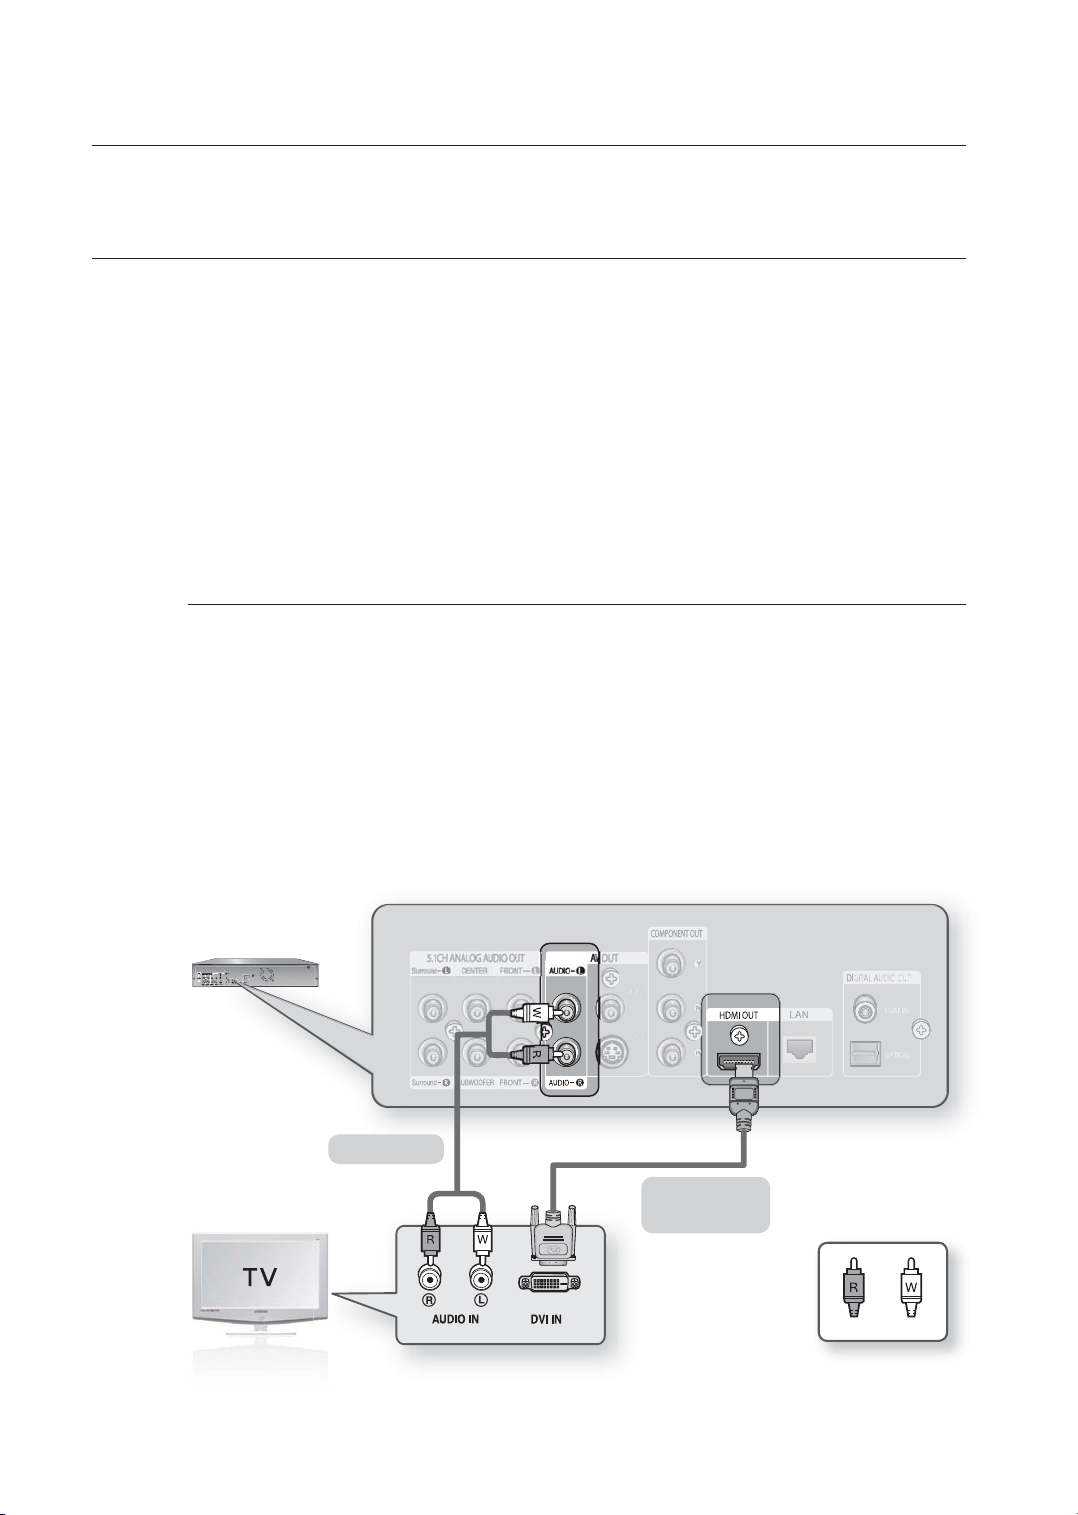
CONNECTING TO A TV WITH DVI CABLE
1.
Using the HDMI-DVI cable (not included), connect the HDMI OUT terminal on the rear of the Blu-ray Disc Player
to the DVI IN terminal of your TV.
2.
Using the audio cables, connect the AUDIO (red and white) OUT terminals on the rear of the Blu-ray Disc
Player to the AUDIO (red and white) IN terminals of your TV.
Turn on the Blu-ray Disc Player and TV.
3.
Press the input selector on your TV remote control until the DVI signal from the Blu-ray Disc Player appears on
your TV screen.
•
If you have set the remote control to properly operate with your TV (see pages 18~19), press the TV INPUT
SEL. button on the remote control and select HDMI as the external source of the TV.
Connecting the HDMI cable while the Blu-ray player's power is on, the player's video output will automatically
change to HDMI mode (see page 40).
Depending on your TV, certain HDMI output resolutions may not work.
M
Please refer to the user's manual of your TV.
If an HDMI or HDMI-DVI cable is plugged into TV, the Blu-ray Disc Player’s output is set to HDMI/DVI
automatically within 10 seconds.
If Component and HDMI are both connected, HDMI mode is automatically selected. (See page 40)
When you connect the player to the TV using the HDMI cable for the fi rst time or to a new TV, the HDMI output
resolution will be automatically set to the highest provided by the TV
If the HDMI cable is connected or removed during playback of a CDDA, MP3 or JPEG fi le, the player will stop
playing.
22_ connections
Audio Cable
HDMI-DVI cable
(not included)
WhiteRed
Page 24
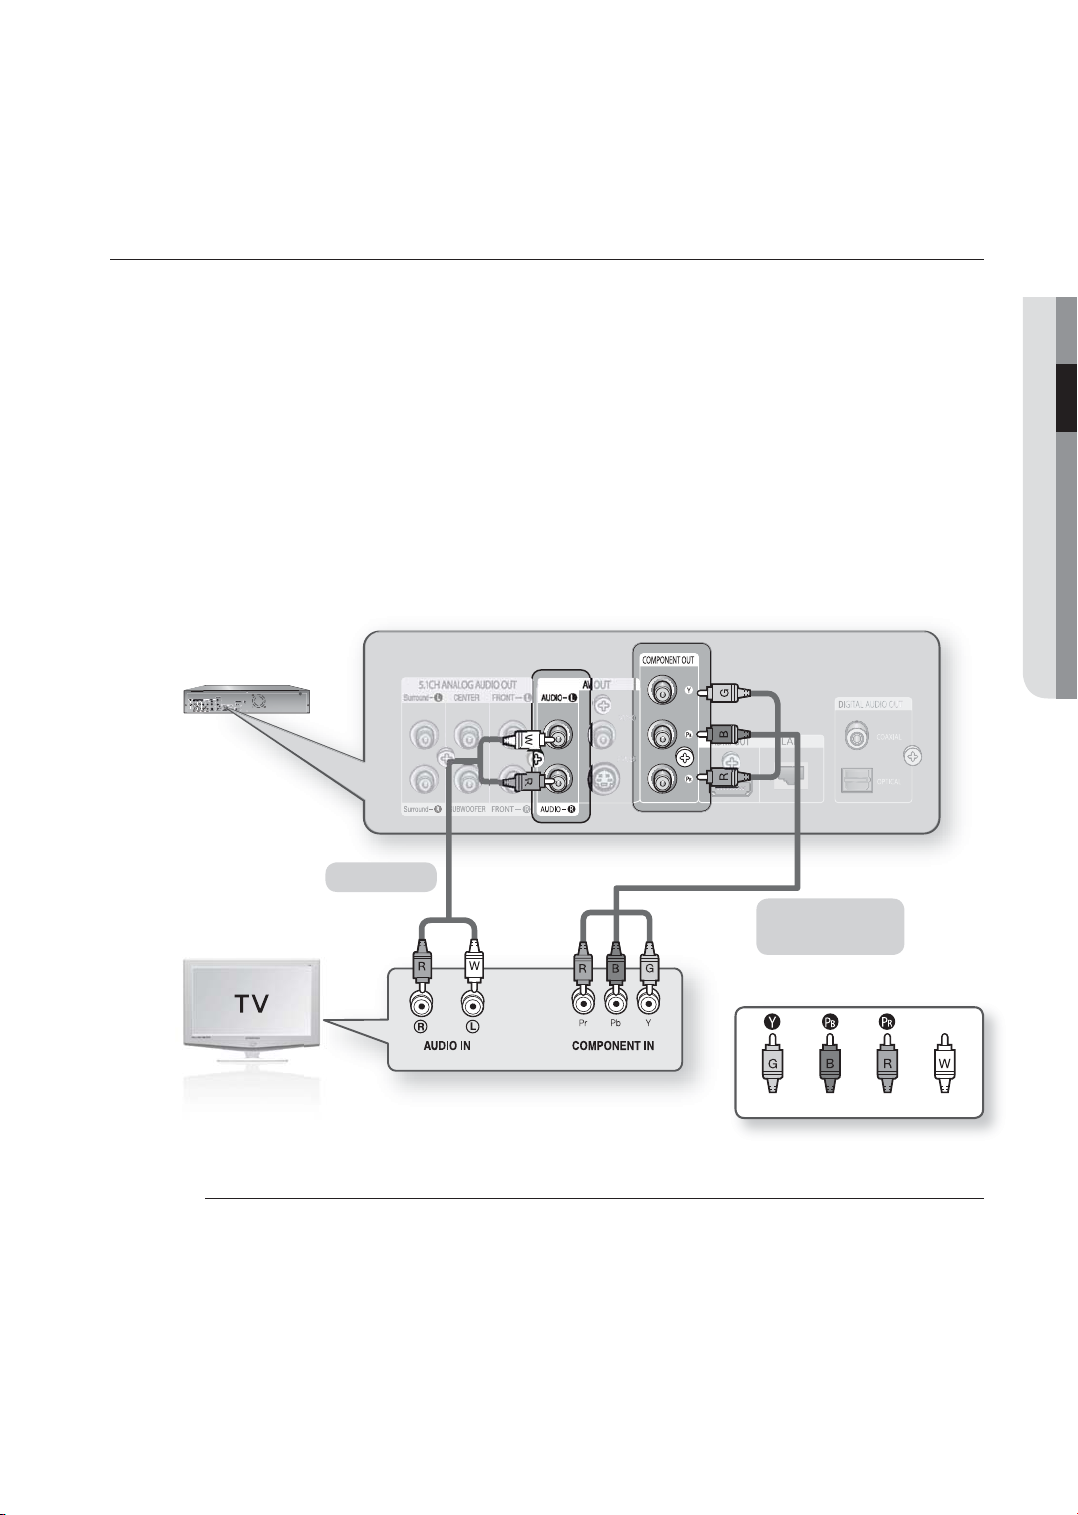
CONNECTING TO A TV (COMPONENT)
Connecting to your TV using Component video cables.
You will enjoy high quality and accurate color reproduction images. Component video separates the picture element
B
into black and white(Y), blue(P
through the audio output.)
1.
Using component video cables (not included), connect the COMPONENT VIDEO OUT terminals on the rear of
the Blu-ray Disc Player to the COMPONENT IN terminals of your TV.
2.
Using the audio cables, connect the AUDIO (red and white) OUT terminals on the rear of the Blu-ray Disc
Player to the AUDIO (red and white) IN terminals of your TV. Turn on the Blu-ray Disc Player and TV.
3.
Press the input selector on your TV remote control until the Component signal from the Blu-ray Disc Player
appears on the TV screen.
•
If you have set the remote control to properly operate with your TV (see pages 18~19), press the TV INPUT
SEL. button on the remote control and select COMPONENT as the external source of the TV.
), red(PR) signals to present clear and clean images. (Audio signals are delivered
● CONNECTIONS
M
Audio Cable
Component cable
(not included)
Green Blue Red White
Depending on the manufacturer, the component terminals on your TV may be marked “R-Y, B-Y, Y” or “Cr,
Cb, Y” instead of “Pr, Pb, Y”. The number and position of terminals may vary depending on the TV set. Please
refer to the user's manual of your TV.
You can select from a variety of resolution settings such as 1080i, 720p, 480p and 480i, depending on the
disc type. (See page 40)
The actual resolution may differ from the setting in the SETUP menu if both Component and HDMI cables are
connected. The resolution may also be different depending on the disc. (See page 40)
English _23
Page 25
connections
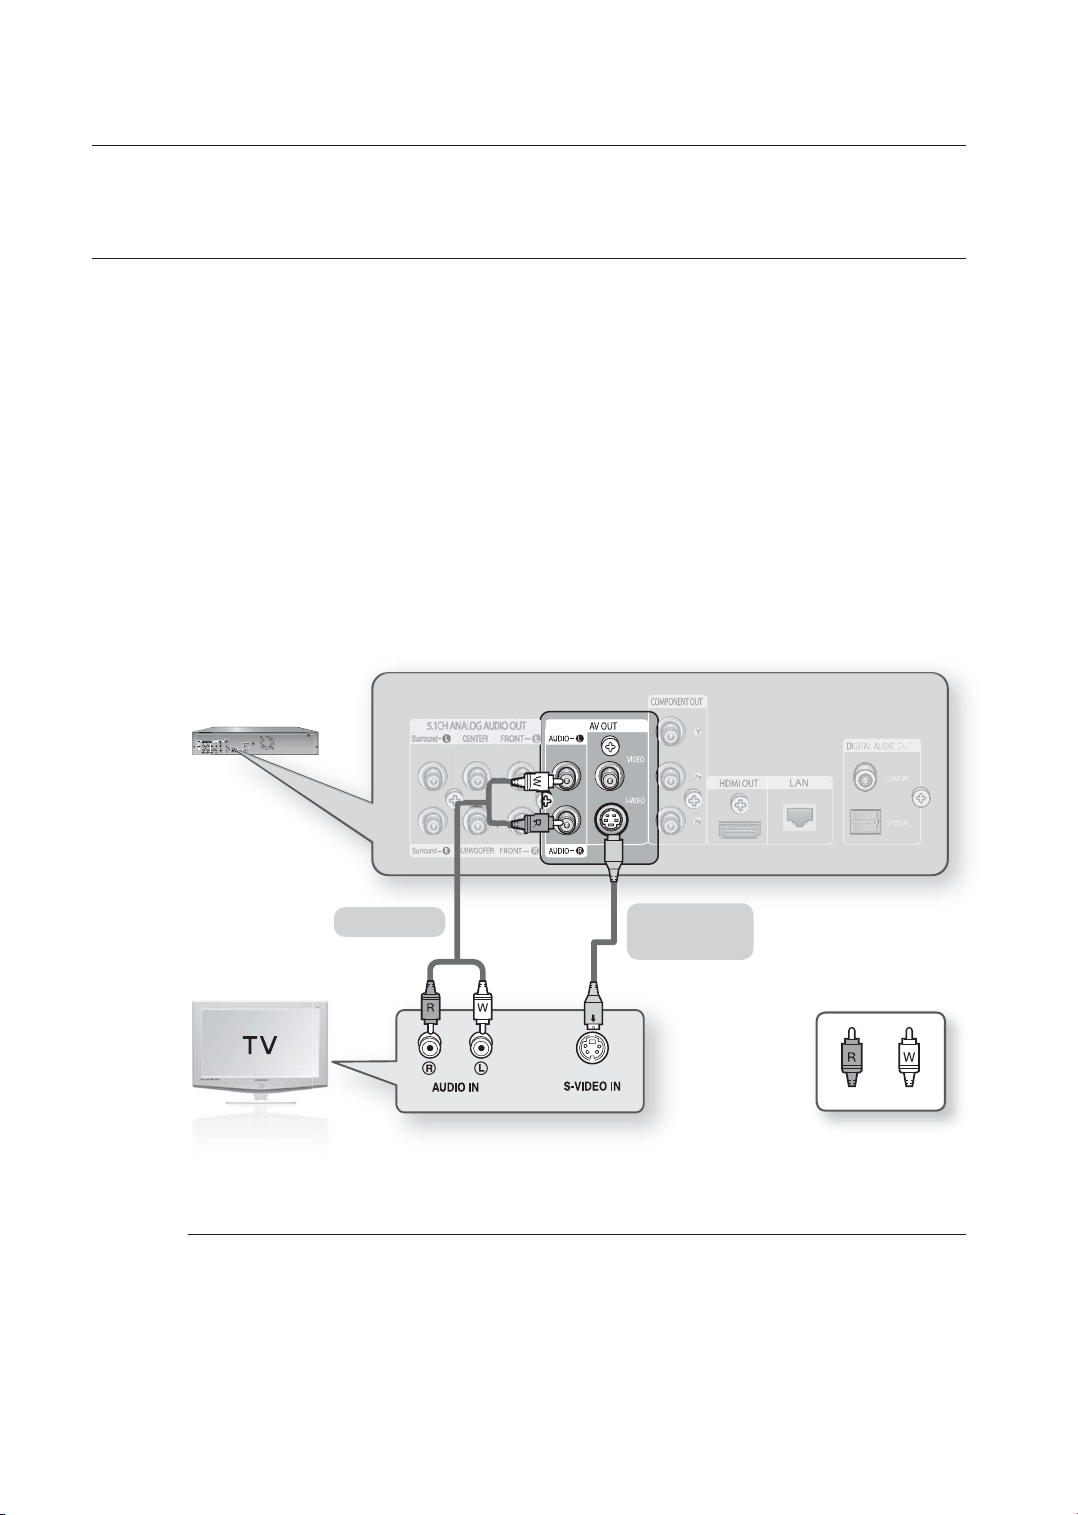
CONNECTING TO A TV (S-VIDEO)
Connecting to your TV using an S-Video cable.
You will enjoy high quality images. S-Video separates the picture element into black and white(Y) and color(C)
signals to present clearer images than regular video input mode.
(Audio signals are delivered through the audio output.)
Using an S-Video cable (not included), connect the S-VIDEO OUT terminal on the rear of the Blu-ray Disc Player
1.
to the S-VIDEO IN terminal of your TV.
Using the audio cables, connect the AUDIO (red and white) OUT terminals on the rear of the Blu-ray Disc
2.
Player to the AUDIO (red and white) IN terminals of your TV. Turn on the Blu-ray Disc Player and TV.
Press the input selector on your TV remote control until the S-Video signal from the Blu-ray Disc Player appears
3.
on your TV screen.
•
If you have set the remote control to properly operate with your TV (see pages 18~19), press the TV INPUT
SEL. button on the remote control and select S-VIDEO as the external source of the TV.
M
24_ connections
Audio Cable
The S-VIDEO source is always output in 480i resolution regardless of the set resolution in the SETUP menu.
(See page 40)
S-Video Cable
(not included)
WhiteRed
Page 26
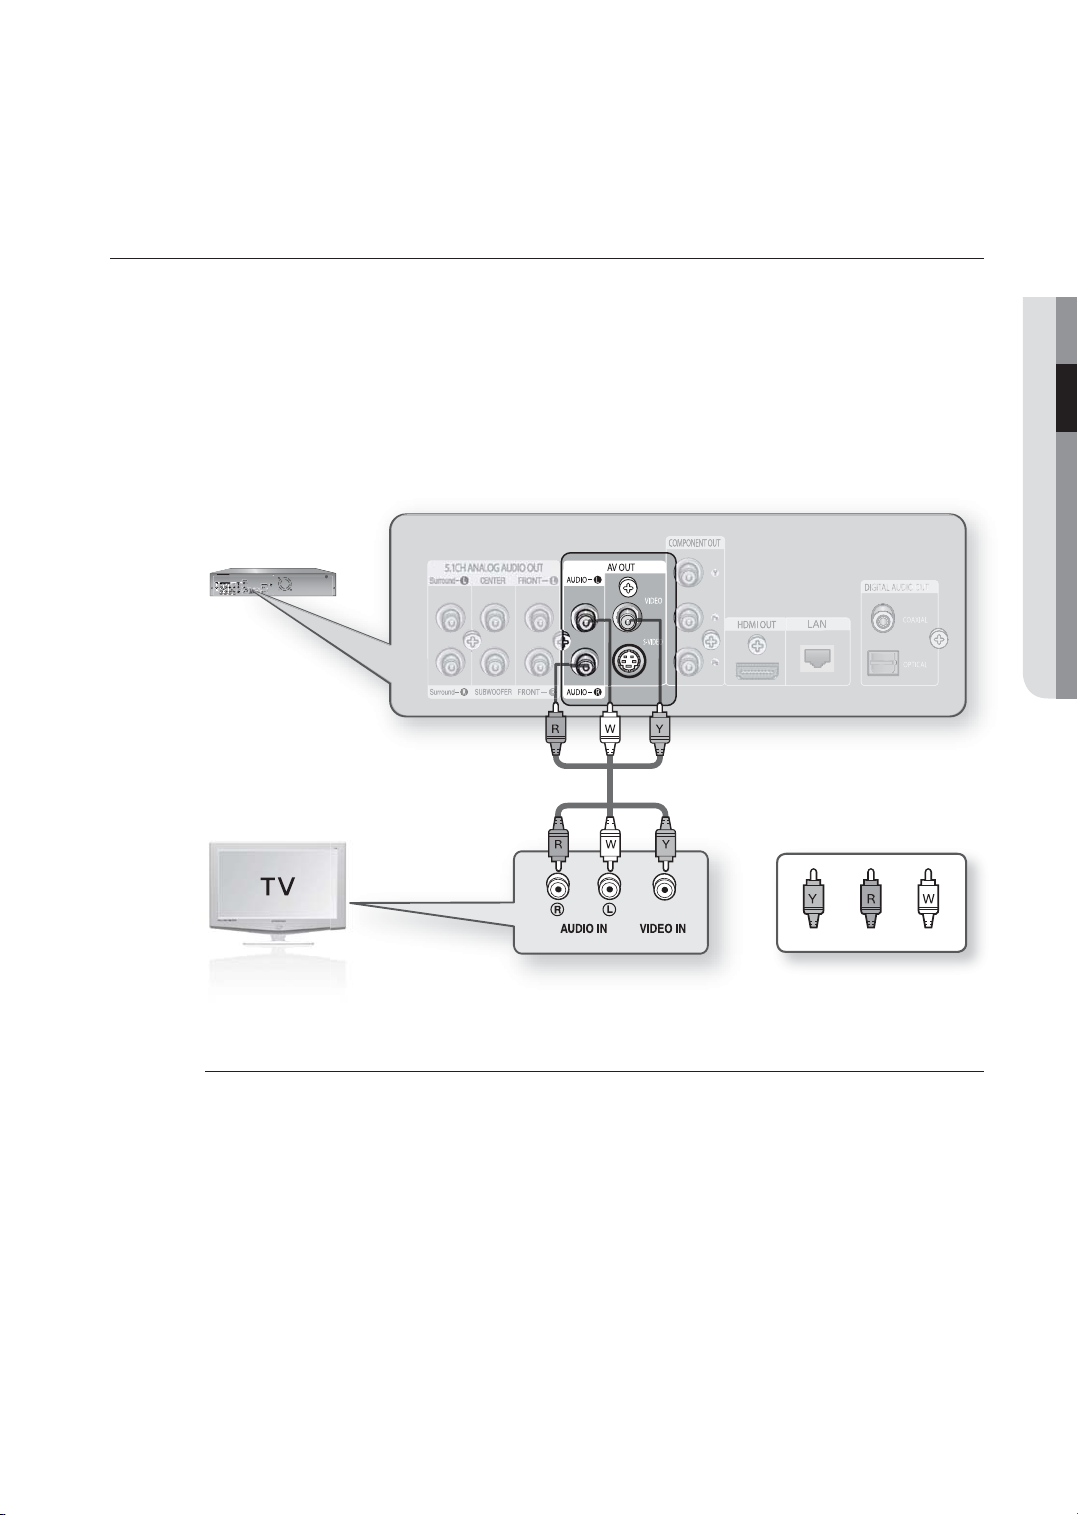
CONNECTING TO A TV(VIDEO)
1.
Using video/audio cables, connect the VIDEO (yellow) / AUDIO (red and white) OUT terminals on the rear of
the Blu-ray Disc Player to the VIDEO (yellow) / AUDIO (red and white) IN terminals of your TV.
2.
Turn on the Blu-ray Disc Player and TV.
3.
Press the input selector on your TV remote control until the Video signal from the Blu-ray Disc Player appears on
the TV screen.
•
If you have set the remote control to properly operate with your TV (see pages 18~19), press the TV INPUT
SEL. button on the remote control and select VIDEO as the external source of the TV.
● CONNECTIONS
M
RedYellow White
Noise may be generated if the audio cable placed too close to the power cable.
If you want to connect to an Amplifi er, please refer to the Amplifi er connection pages. (See pages 26~29)
The number and position of terminals may vary depending on your TV set. Please refer to the user's manual of
your TV.
If there is one audio input terminal on the TV, connect it to the [AUDIO OUT][left] (white) terminal of the Blu-ray
Disc Player.
The VIDEO source is always output in 480i resolution regardless of the set resolution in the SETUP menu.
(See page 40)
English _25
Page 27
connections
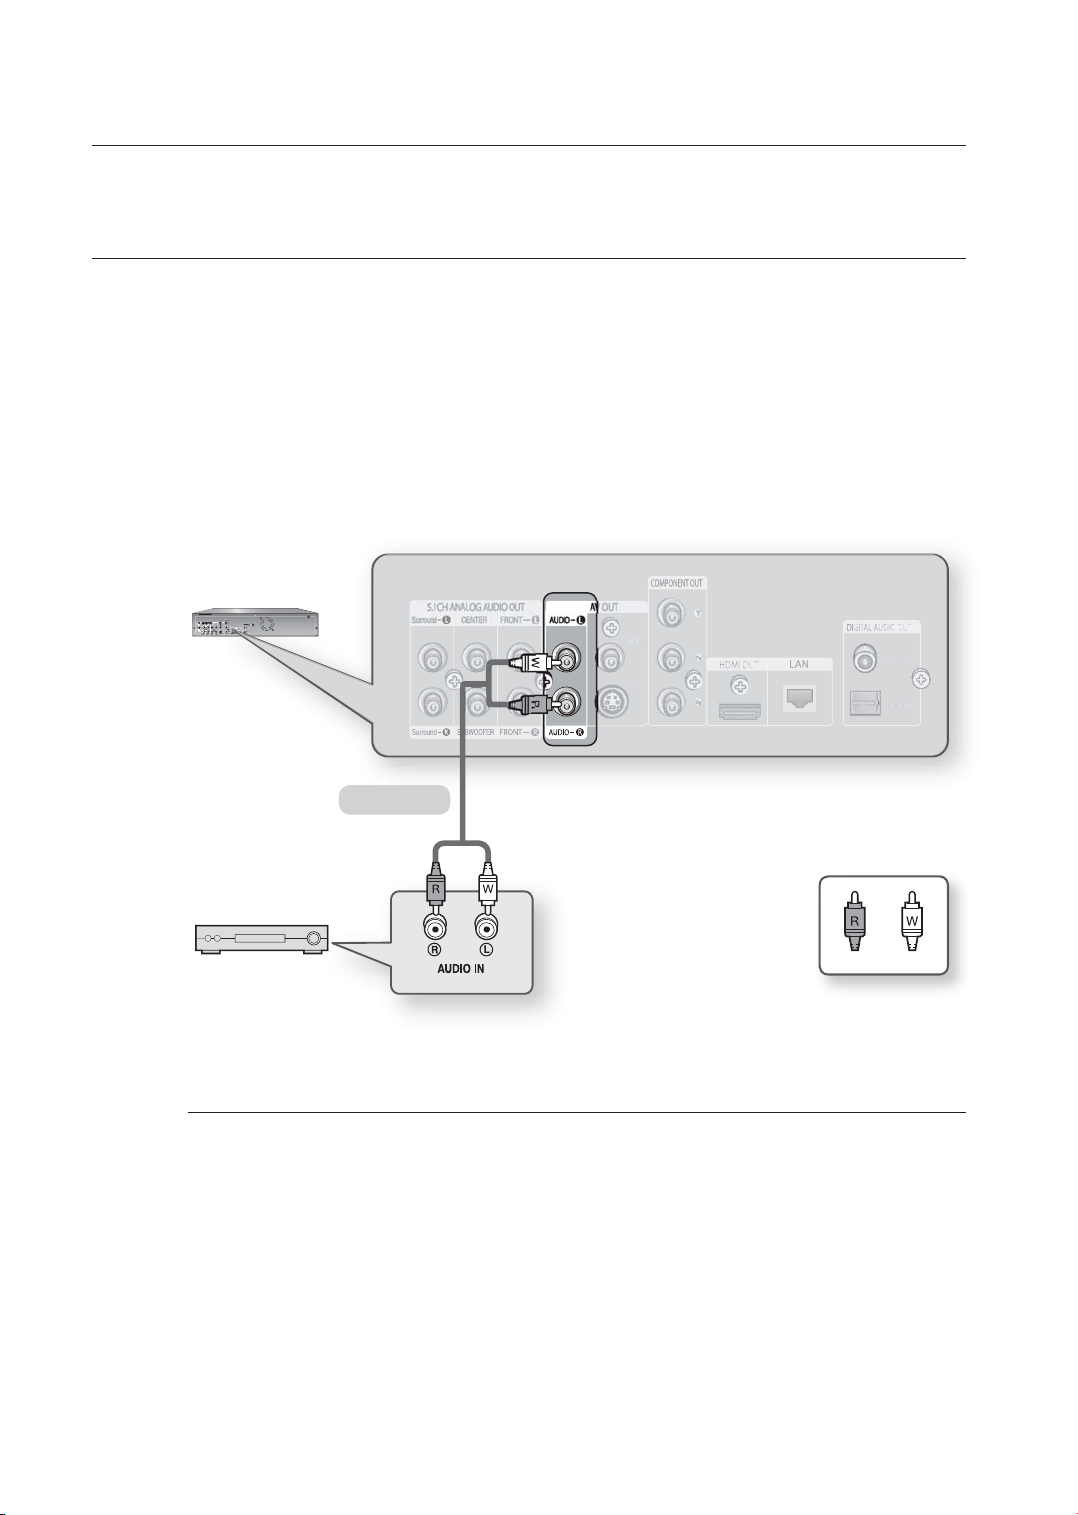
CONNECTING TO AN AUDIO SYSTEM (2 CHANNEL AMPLIFIER)
1.
Using the audio cables, connect the AUDIO (red and white) OUT terminals on the rear of the Blu-ray Disc
Player to the AUDIO (red and white) IN terminals of your Amplifi er.
2.
Using the video signal cable(s), connect the HDMI, COMPONENT, S-VIDEO, or VIDEO OUT terminals on the
rear of the Blu-ray Disc Player to the HDMI, COMPONENT, S-VIDEO, or VIDEO IN terminal of your TV as
described on pages 20 to 25.
3.
Turn on the Blu-ray Disc Player, TV and Amplifi er.
4.
Press the input select button of the Amplifi er to select the external input in order to hear sound from the Blu-ray
Disc Player. Refer to your Amplifi er's user manual to set the Amplifi er's audio input.
2-Channel stereo amp
Manufactured under license from Dolby Laboratories. “Dolby” and the double-D symbol are trademarks of
M
Dolby Laboratories.
“DTS” and “DTS Digital Surround” are registered trademarks of DTS, Inc.
Audio Cable
WhiteRed
26_ connections
Page 28
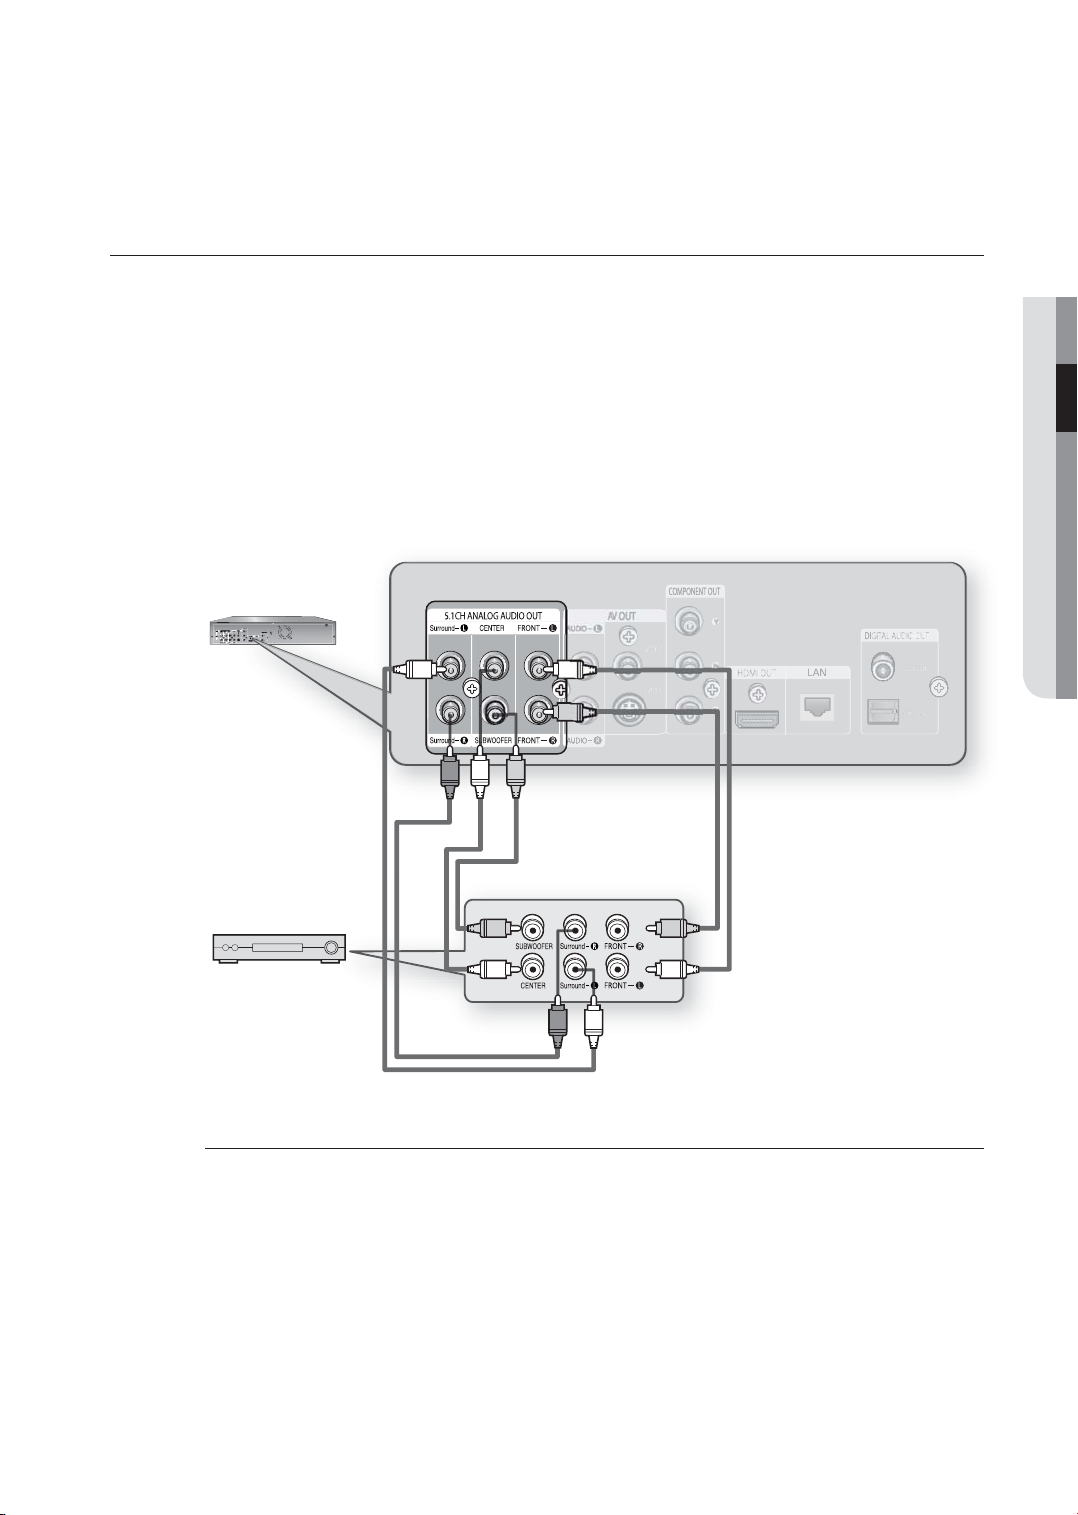
CONNECTING TO AN AUDIO SYSTEM (5.1 CHANNEL AMPLIFIER)
1.
Using the audio cables, connect the 5.1 ANALOG AUDIO OUT (Front R, Front L, CENTER, SUBWOOFER,
Surround L, Surround R) terminals on the rear of the Blu-ray Disc Player to the 5.1 Channel ANALOG AUDIO
IN (Front R, Front L, CENTER, SUBWOOFER, Surround L, Surround R) terminals of your Amplifi er.
2.
Using the video signal cable(s), connect the HDMI, COMPONENT, S-VIDEO, or VIDEO OUT terminals on the
rear of the Blu-ray Disc Player to the HDMI, COMPONENT, S-VIDEO, or VIDEO IN terminal of your TV as
described on pages 20 to 25.
3.
Turn on the Blu-ray Disc Player, TV and Amplifi er.
4.
Press the input select button of the Amplifi er to select external input in order to hear sound from the Blu-ray
Disc Player. Refer to your Amplifi er's user manual to set the Amplifi er's audio input.
● CONNECTIONS
5.1 Channel Amplifi er
Please turn the volume down when you turn on the Amplifi er. Sudden loud sound may cause damage to the
M
speakers and your ears.
Please set the audio in the menu screen according to the Amplifi er. (See pages 35~36)
The position of terminals may vary depending on the Amplifi er. Please refer to the user's manual of your Amplifi er.
The front left and right outputs on your player and 5.1 channel amplifi er must be connected to hear disc menu
audio from certain Blu-Ray discs.
English _27
Page 29
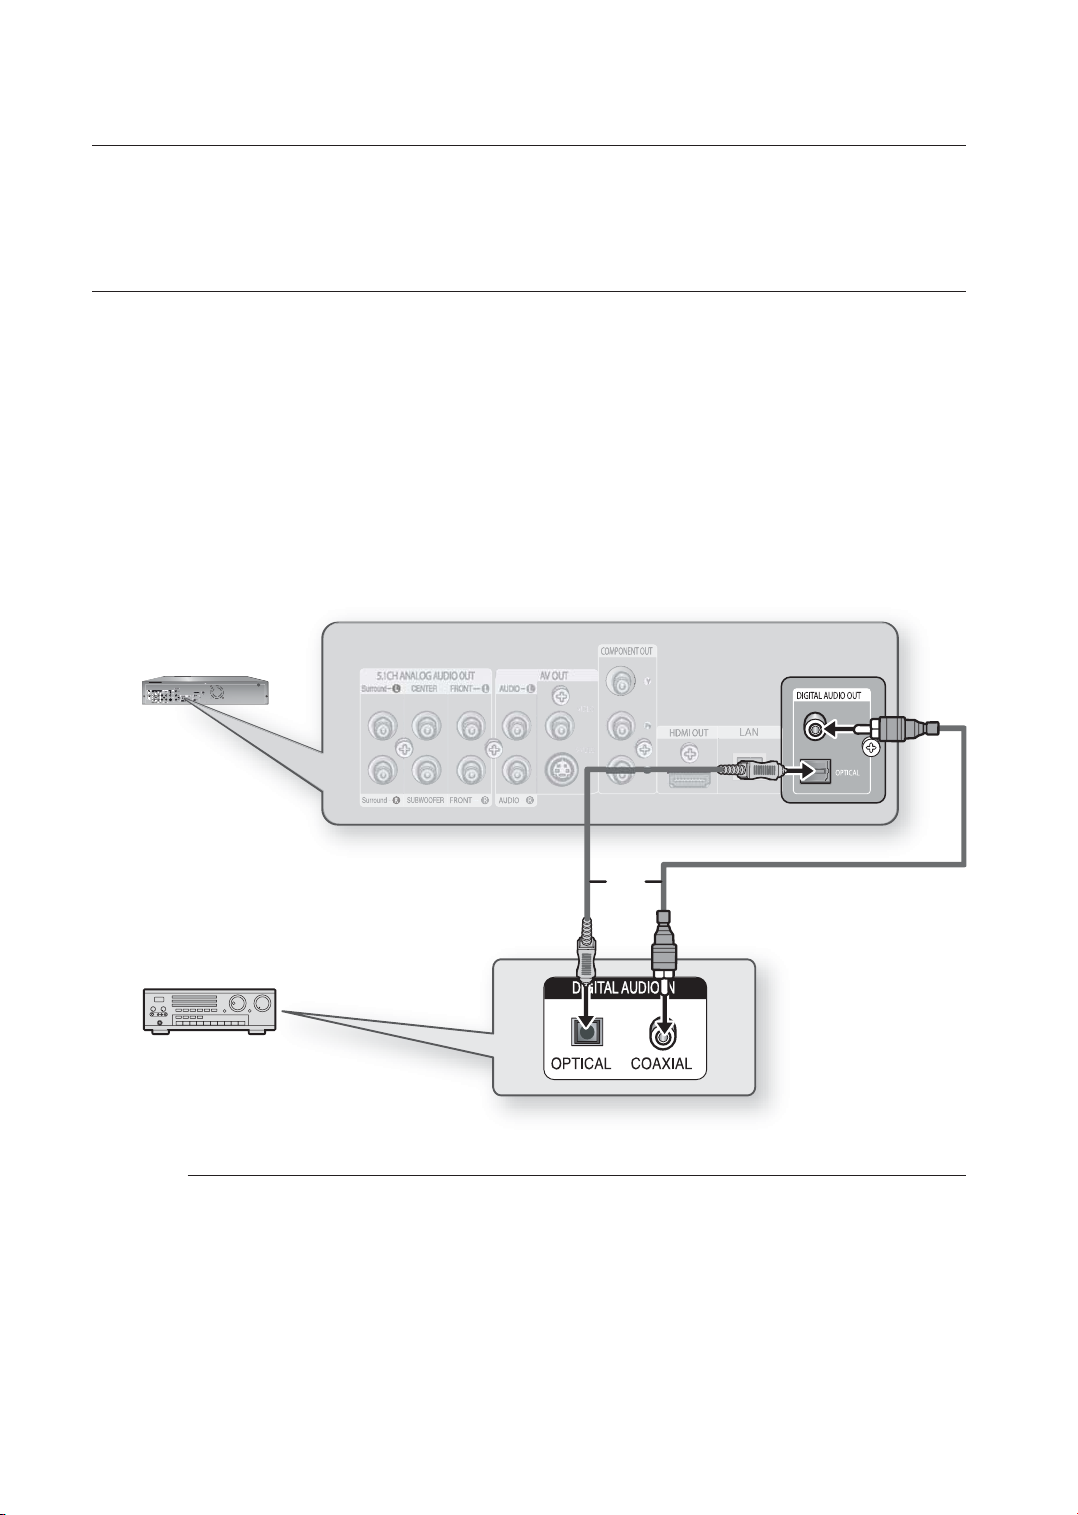
connections
CONNECTING TO AN AUDIO SYSTEM
(DOLBY DIGITAL, DTS AMPLIFIER)
1.
If using an optical cable (not included), connect the DIGITAL AUDIO OUT (OPTICAL) terminal on the rear of the
Blu-ray Disc Player to the DIGITAL AUDIO IN (OPTICAL) terminal of your Amplifi er.
If using a coaxial cable (not included), connect the DIGITAL AUDIO OUT (COAXIAL) terminal on the rear of the
Blu-ray Disc Player to the DIGITAL AUDIO IN (COAXIAL) terminal of the Amplifi er.
2.
Using the video signal cable(s), connect the HDMI , COMPONENT, S-VIDEO, or VIDEO OUT terminals on the
rear of the Blu-ray Disc Player to the HDMI, COMPONENT, S-VIDEO, or VIDEO IN terminals of your TV as
described on pages 20 to 25.
Turn on the Blu-ray Disc Player, TV, and Amplifi er.
3.
4.
Press the input select button of the Amplifi er to select the external input in order to hear sound from the Blu-ray
Disc Player. Refer to your Amplifi er's user manual to set the Amplifi er's audio input.
M
OR
Please turn the volume down when you turn on the Amplifi er. Sudden loud sound may cause damage to the
speakers and your ears.
Please set the audio in the menu screen according to the Amplifi er. (See pages 35~36)
The position of terminals may vary depending on the Amplifi er. Please refer to the user's manual of your Amplifi er.
When using this connection, Blu-ray Discs with an LPCM audio soundtrack will only be heard over the front
two channels.
28_ connections
Page 30
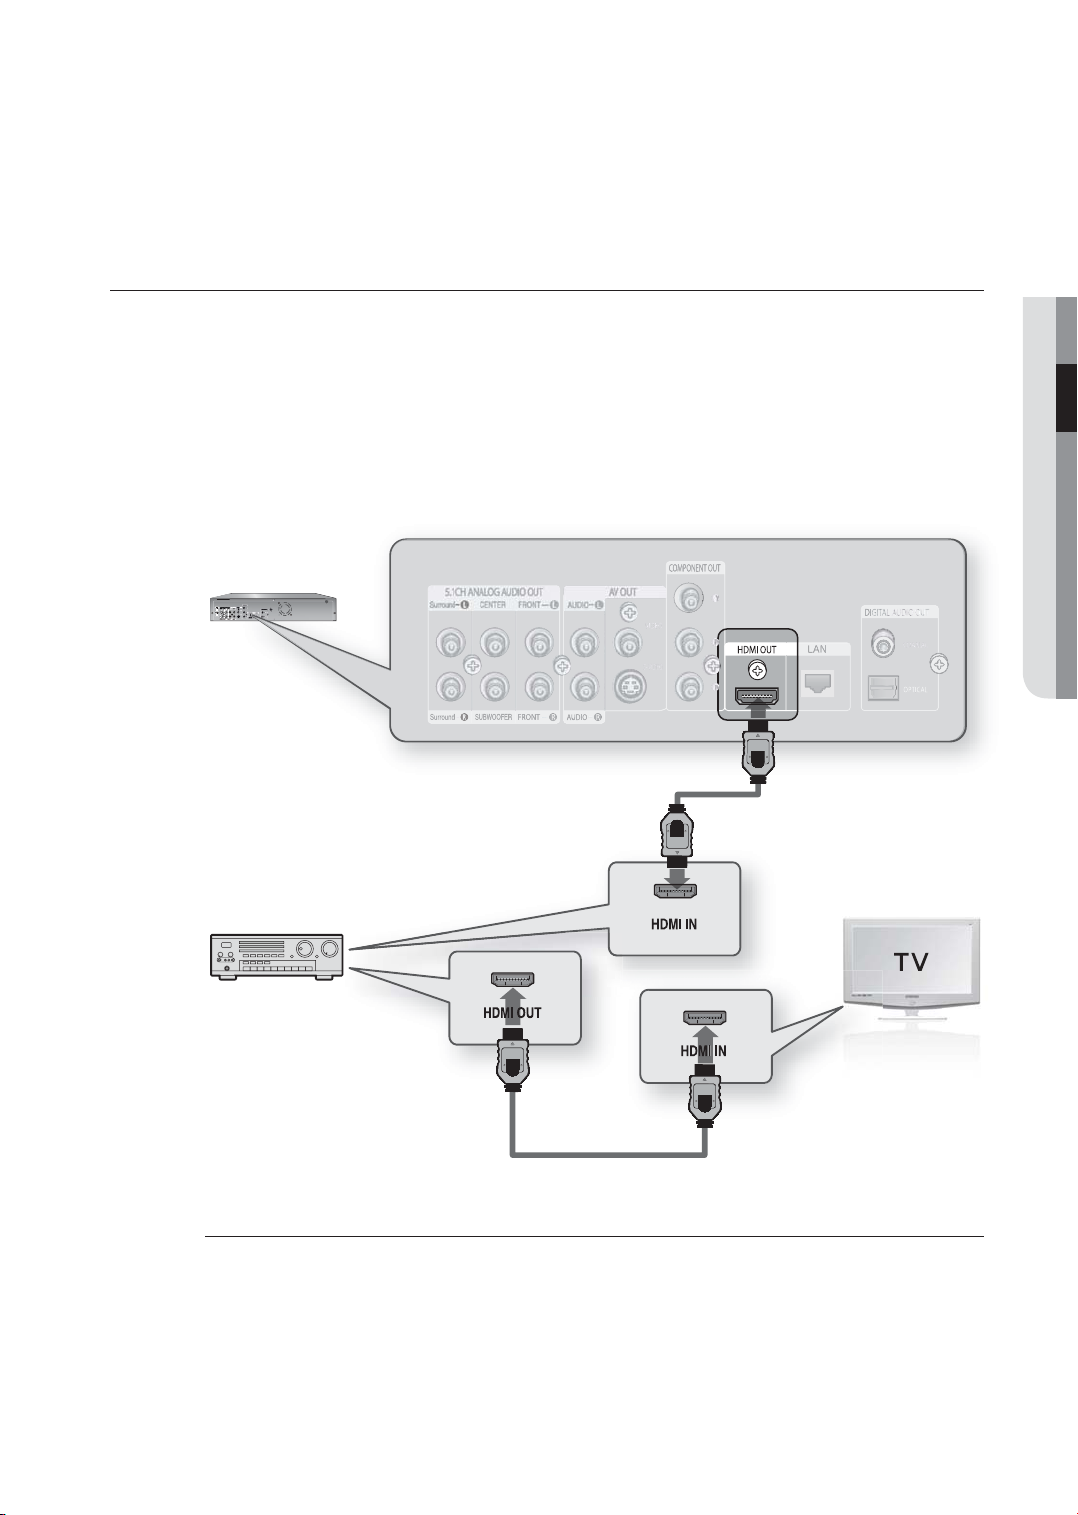
CONNECTING TO AN AUDIO SYSTEM
(HDMI SUPPORTED AMPLIFIER)
Using the HDMI-HDMI cable (not included), connect the HDMI OUT terminal on the rear of the Blu-ray Disc
1.
Player to the HDMI IN terminal of your Amplifi er.
Using the HDMI-HDMI cable, connect the HDMI OUT terminal of the Amplifi er to the HDMI IN terminal of your
2.
TV.
Turn on the Blu-ray Disc Player, TV, and Amplifi er.
3.
Press the input select button of the Amplifi er to select external input in order to hear sound from the Blu-ray
4.
Disc Player. Refer to your Amplifi er's user manual to set the Amplifi er's audio input.
● CONNECTIONS
M
Please turn the volume down when you turn on the Amplifi er. Sudden loud sound may cause damage to the
speakers and your ears.
Please set the audio in the menu screen according to the Amplifi er. (See pages 35~36)
The position of terminals may vary depending on the Amplifi er. Please refer to the user's manual of your Amplifi er.
English _29
Page 31
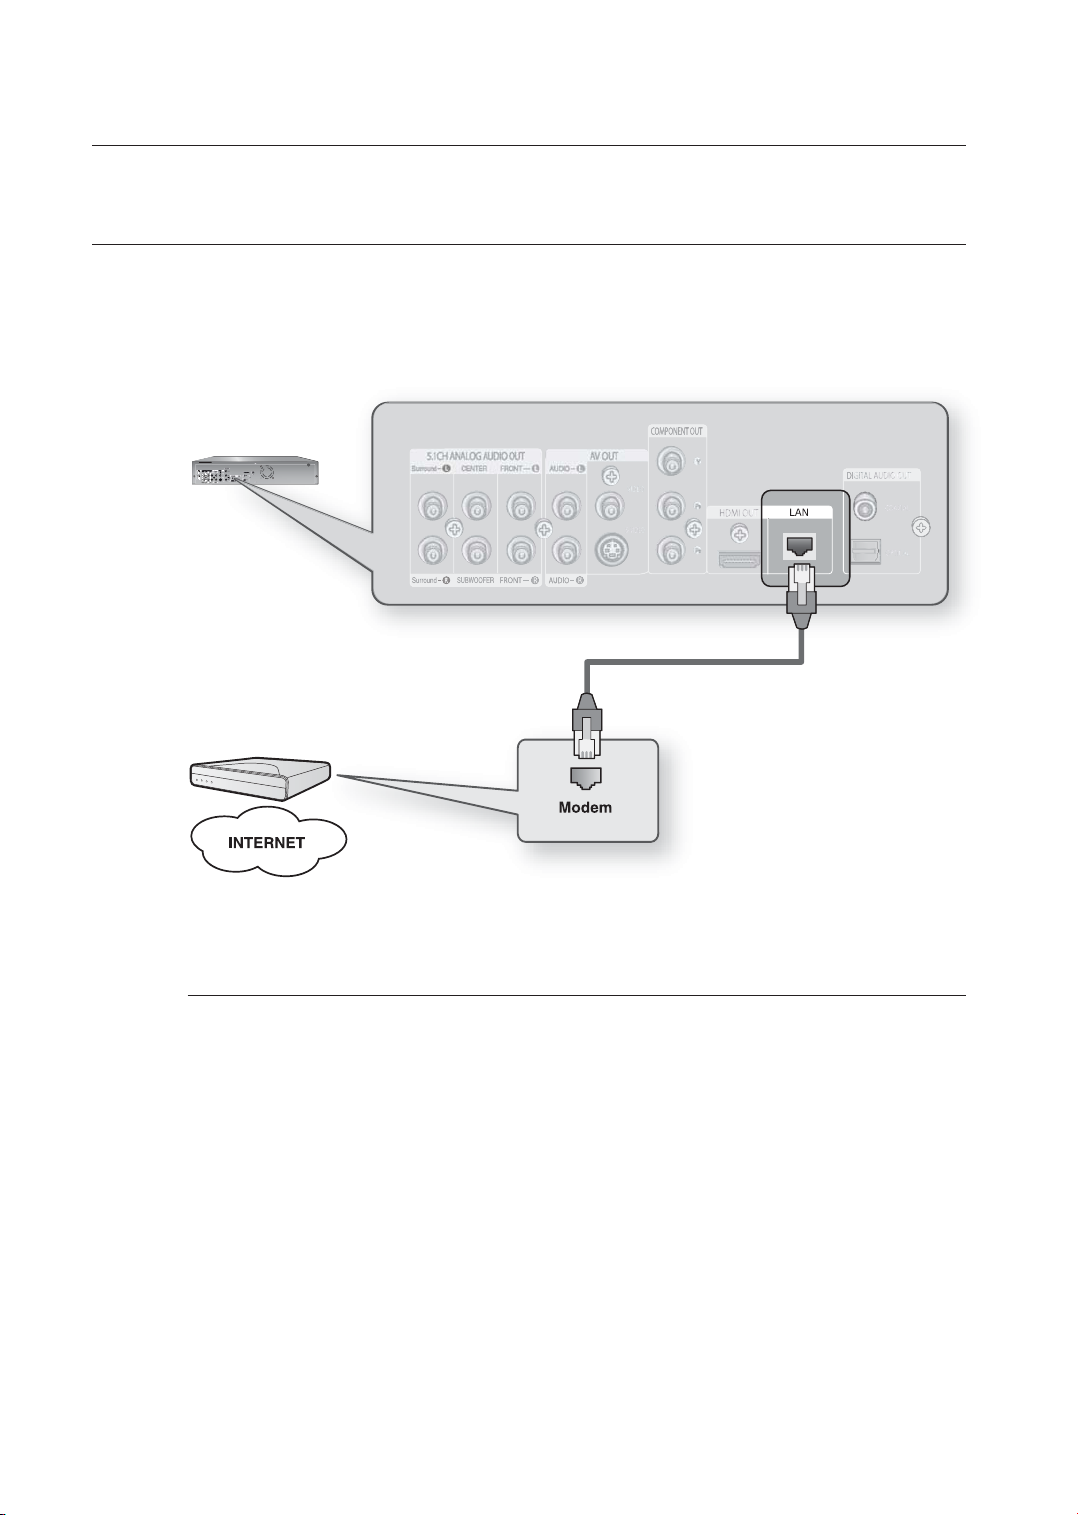
connections
CONNECTING TO SAMSUNG'S FTP/INTERNET SITE FOR
SOFTWARE UPGRADES
1.
Using the Direct LAN Cable (UTP cable), connect the LAN terminal on the rear of the Blu-ray Disc Player to the
LAN terminal of your modem.
- Connect to the Internet for future software upgrades.
M
30_ connections
See pages 45~48 for the Software Upgrade procedure.
Page 32
basic functions of your
Blu-ray Disc Player
This section introduces basic playback functions and playback by disc type.
BEFORE PLAYING
•
Turn on your TV and set it to the correct Video Input (the input the Blu-ray player is connected to).
•
If you connected an external Audio System, turn on your Audio System and set it to the correct Audio Input.
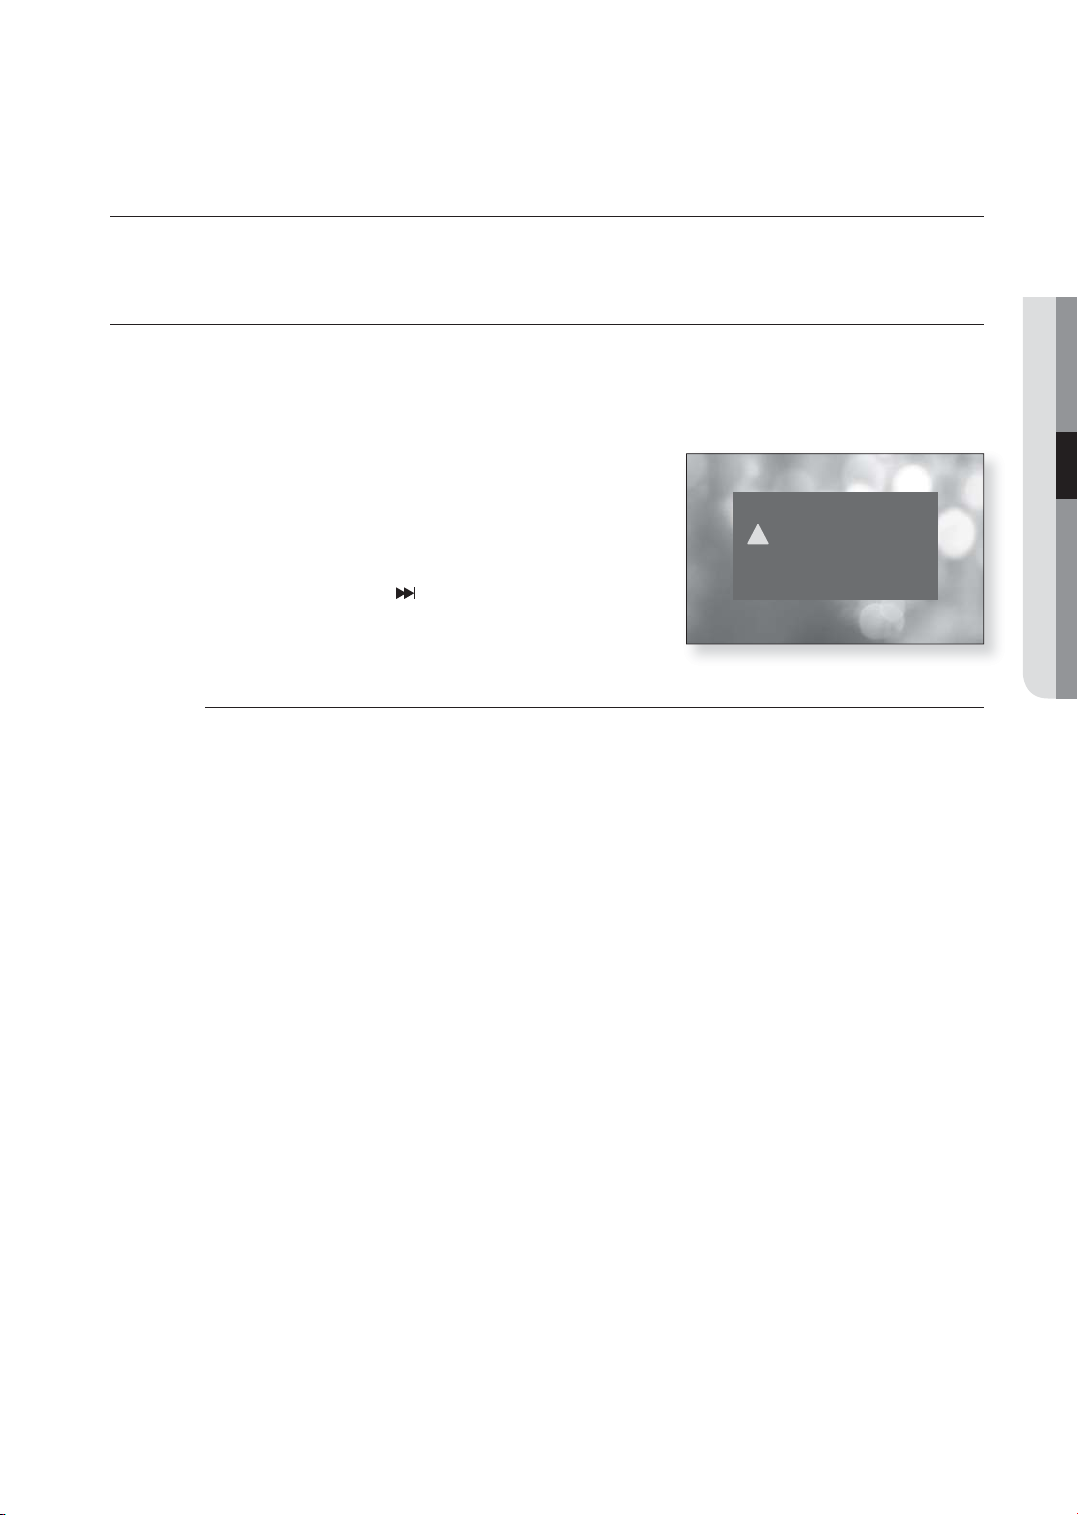
After plugging in the player, the fi rst time you press the POWER button, this screen comes up:
If you want to select a language, press a NUMBER button.
(This screen will only appear when you plug in the player for
the fi rst time.) If the language for the startup screen is not set,
the settings may change whenever you turn the power on or
off. Therefore, make sure that you select the language you
want to use. Once you select a menu language, you can
change it by pressing the
unit for more than 5 seconds with no disc in the unit. Then the
MENU LANGUAGE SELECTION window appears again
where you can reset your preferred language.
Discs which cannot be played on this player.
M
• BD-R • BD-RE • HD DVD • DVD+RW
• DVD+R • DVD-ROM • DVD-RAM • CDV
• CD-ROM • CVD • CD-I
• Super Audio CD(except CD layer) • CDGs play audio only, not graphics.
Ability to play back may depend on recording conditions.
• DVD-R • CD-RW/R • DVD-RW (V mode)
• The unit may not play certain CD-R, CD-RW and DVD-R due to the disc type or recording conditions.
Blu-ray Disc is a new and evolving format. Accordingly, disc compatibility issues with new and existing format
discs are possible. Not all discs are compatible and not every disc will playback.
For additional information, refer to the Disc Type and Characteristics and Compliance and Compatibility Notice
sections of this Manual. If you encounter compatibility problems, please contact SAMSUNG customer care
center.
The unit cannot play CD-R/-RW and DVD-RW/-R recorded content such as divx, avi, mpg, mov, wma.
button on the front panel of the
MENU LANGUAGE SELECTION
Press 1 for English
!
Pulsar 2 para Español
Touche 3 pour Français
Macrovision : BSS01
● BASIC FUNCTIONS
English _31
Page 33
basic functions of your
Blu-ray Disc Player
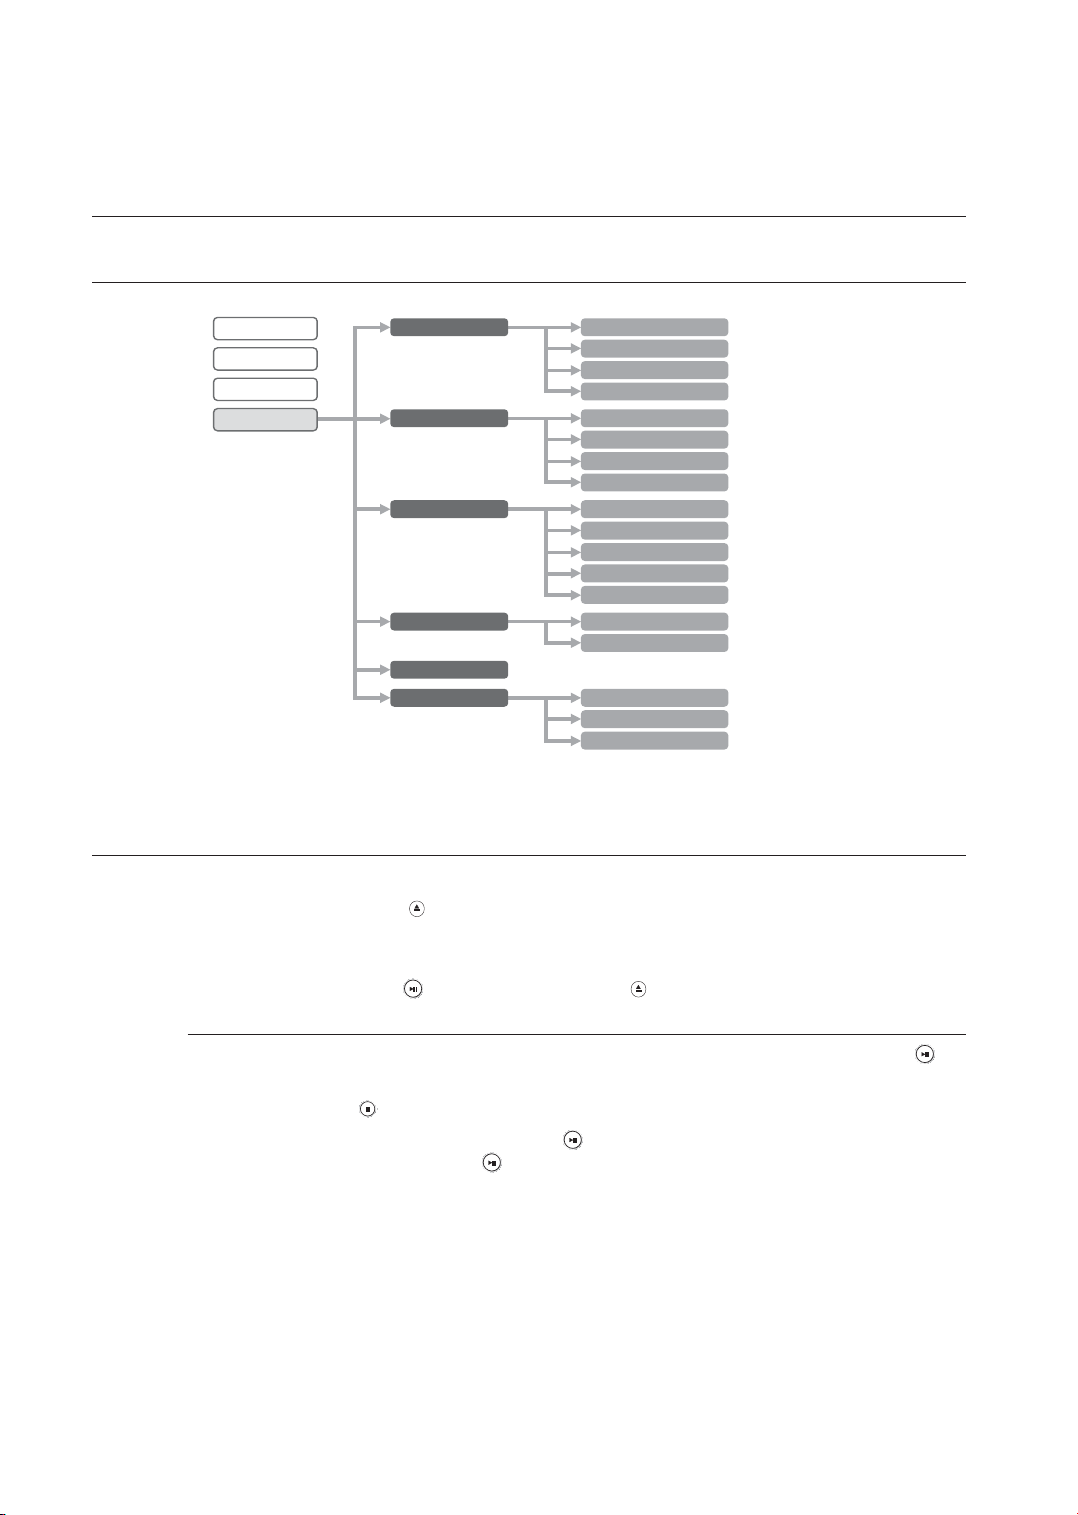
ON-SCREEN MENU NAVIGATION
Video
Music
Photo
Setup
PLAYING A DISC
Language Setup Audio
Subtitle
Disc Menu
Menu
Audio Setup Digital Output
PCM Down Sampling
Dynamic Compression
Speaker Setup
Display Setup TV Aspect
Movie Frame (24 Fs)
Resolution
Screen Message
Front Display
HDMI Setup Anynet+ (HDMI-CEC)
Format
Parental Setup
System Upgrade System Information
Network Setup
Upgrade Start
1.
Press the OPEN/CLOSE ( ) button.
The STANDBY indicator light goes out and the tray opens.
2.
Place a disc gently into the tray with the disc’s label facing up.
3.
Press the PLAY/PAUSE (
When you stop disc play, the player remembers where you stopped, so when you press PLAY/PAUSE ( )
M
button again, it will pick up where you left off.
Press the STOP (
To pause the playback, press the PLAY/PAUSE (
To resume, press the PLAY/PAUSE(
If the player is left in the stop mode for more than 10 minutes without any user interface, a screen saver will
appear on your TV. If the player is left in the screen saver mode for more than 30 minutes, the power will
automatically turn off except during playback of an MP3/CDDA and/or JPEG. (Automatic Power-Off Function)
MP3/CDDA : if no button is pressed for more than 10 minutes, the screen saver appears.
JPEG : the screen saver program or the auto power off function will be deactivated when playing a photo fi le.
32_ basic functions
) button or OPEN/CLOSE ( ) button to close the disc tray.
) button twice during playback to disable the Resume function.
) button during playback.
) button once again.
Page 34
USING THE SEARCH AND SKIP FUNCTIONS
During play, you can search quickly through a chapter or track, and use the skip function to jump to the next
selection.
Searching through a Chapter or Track
During playback, press the SEARCH ( ) button.
If you want to search at a faster speed on the BD/DVD, press this button.
•
If you press the SEARCH (
•
X2 X4 X8 X16 X32 X128
•
If you press the SEARCH (
X2 X4 X8 X16 X32 X128
No sound is heard during search mode.
M
) button,
) button,
Skipping Tracks
During playback, press the SKIP ( ) button.
When playing a BD/DVD, if you press the SKIP (
the SKIP (
beginning of the previous chapter.
) button, it moves to the beginning of the chapter. One more press makes it move to the
) button, it moves to the next chapter. If you press
SLOW MOTION PLAY/STEP MOTION PLAY
hZCV
● BASIC FUNCTIONS
hZCV
Slow Motion Play
In pause or step mode, press the SLOW button on the remote control for Slow Motion play.
If you press the SLOW button,
•
To return to normal speed playback, press the PLAY/PAUSE (
•
This ( ) icon indicates an invalid button press.
M
No sound is heard during slow mode.
Slow motion operates only in the forward direction.
8/1 4/1 2/1
) button.
Step Motion Play
Press the STEP button on the remote control during play for Step Motion play.
•
Each time the button is pressed a new frame will appear.
When the STEP button is pressed, the next frame will be activated.
•
Press the PLAY/PAUSE (
•
No sound is heard during step mode.
M
Step motion operates only in the forward direction.
) button to resume normal play.
hZCV
hZCV
English _33
Page 35
system setup
For your convenience, confi gure proper settings for the external device to connect
or any other environment before using the player.
SETTING UP THE LANGUAGE OPTIONS
If you set the audio, subtitle, disc menu and player menu, in advance, they will come up automatically every time
you watch a movie.
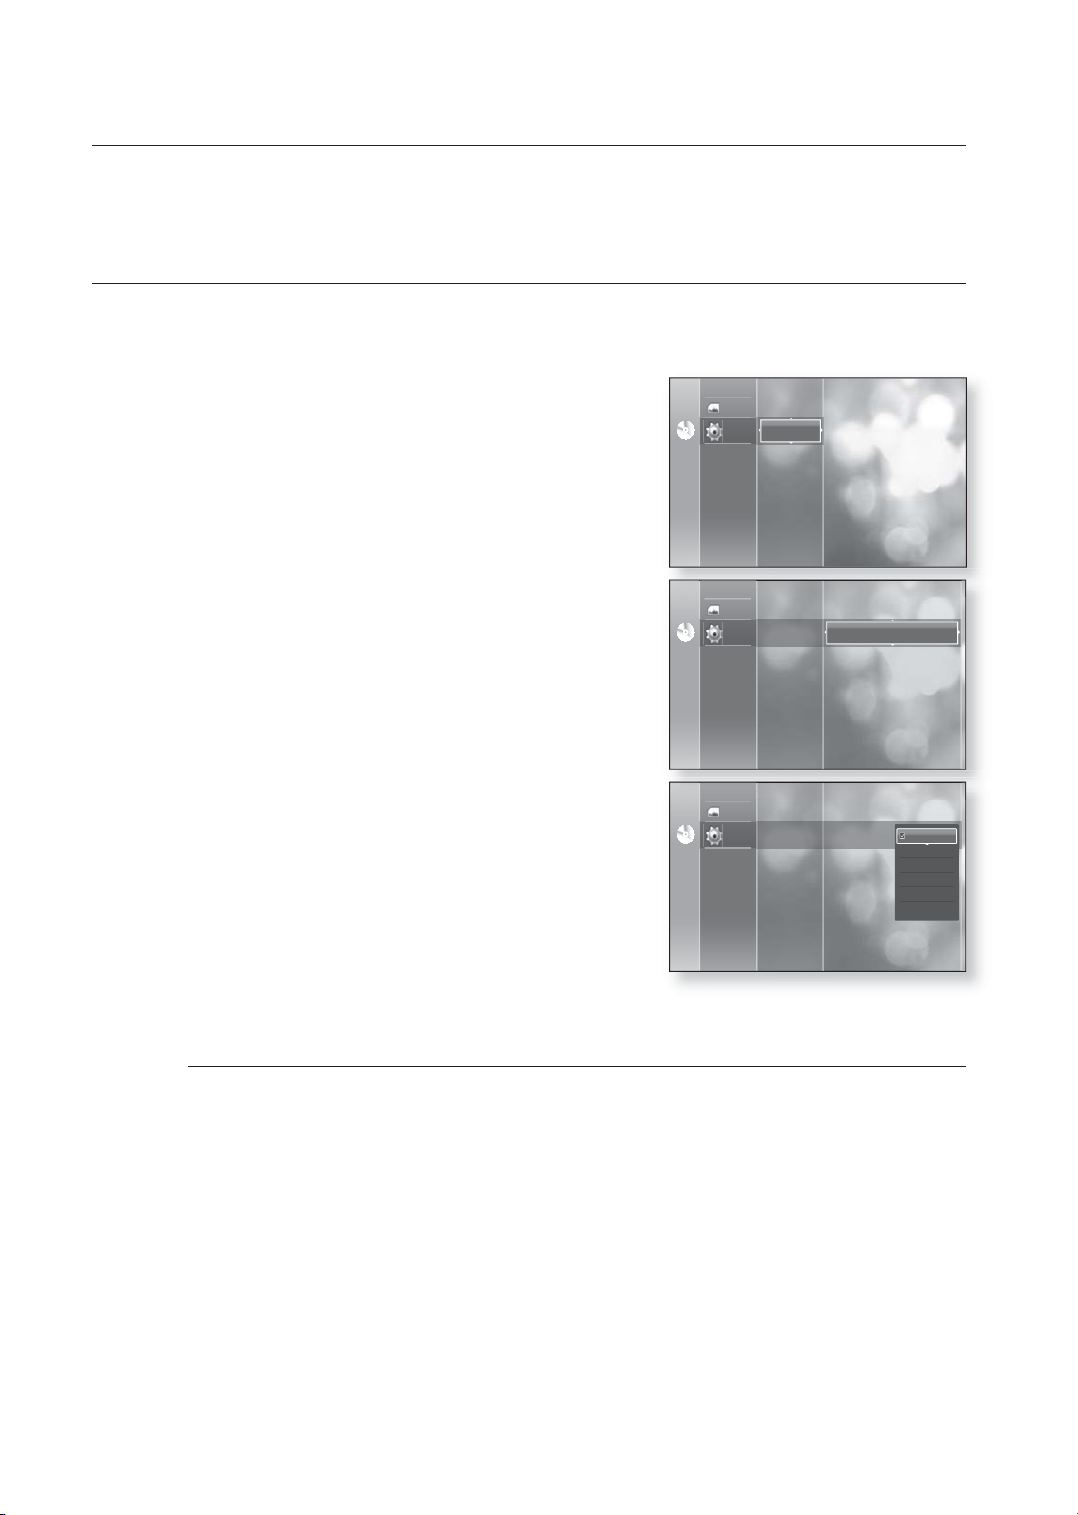
1.
With the unit in Stop mode, press the MENU button.
2.
Press the
ENTER or
▲▼
buttons to select Setup, then press the
►
button.
Photo
Language Setup
Setup
NoDiscNo Disc
Audio Setup
Display Setup
HDMI Setup
Parental Setup
System Upgrade
3.
Press the
press the ENTER or
▲▼
buttons to select Language Setup, then
►
button. Language setup menu will
be displayed.
4.
Press the
option, press the ENTER or
•
•
•
•
▲▼
buttons to select the desired language
►
button.
Audio : For the disc audio language.
Subtitle : For the disc subtitles.
Disc Menu : For the disc menu contained on the disc.
Menu : For the on-screen menu of your Blu-ray Disc
Player.
5.
Press the
M
▲▼
buttons to select the desired language, then press the ENTER button.
Press the RETURN or ◄ button to return to the previous menu. Press the MENU button to exit the menu.
The selected language will only appear if it is supported on the disc.
Photo
NoDiscNo Disc
NoDiscNo Disc
Photo
Setup
Audio Setup
Display Setup
HDMI Setup
Parental Setup
System Upgrade
Language Setup
Audio Setup
Display Setup
HDMI Setup
Parental Setup
System Upgrade
Language Setup
Setup
Audio : Original
Subtitle : Automatic
Disc Menu : English
Menu : English
Audio : Original
Subtitle : Automatic
Disc Menu : English
Menu : English
Original
English
Français
Deutsch
Español
Italiano
34_ system setup
Page 36
SETTING UP THE AUDIO OPTIONS
Allows you to set up the Audio device and sound status depending on the audio system being used with the player.
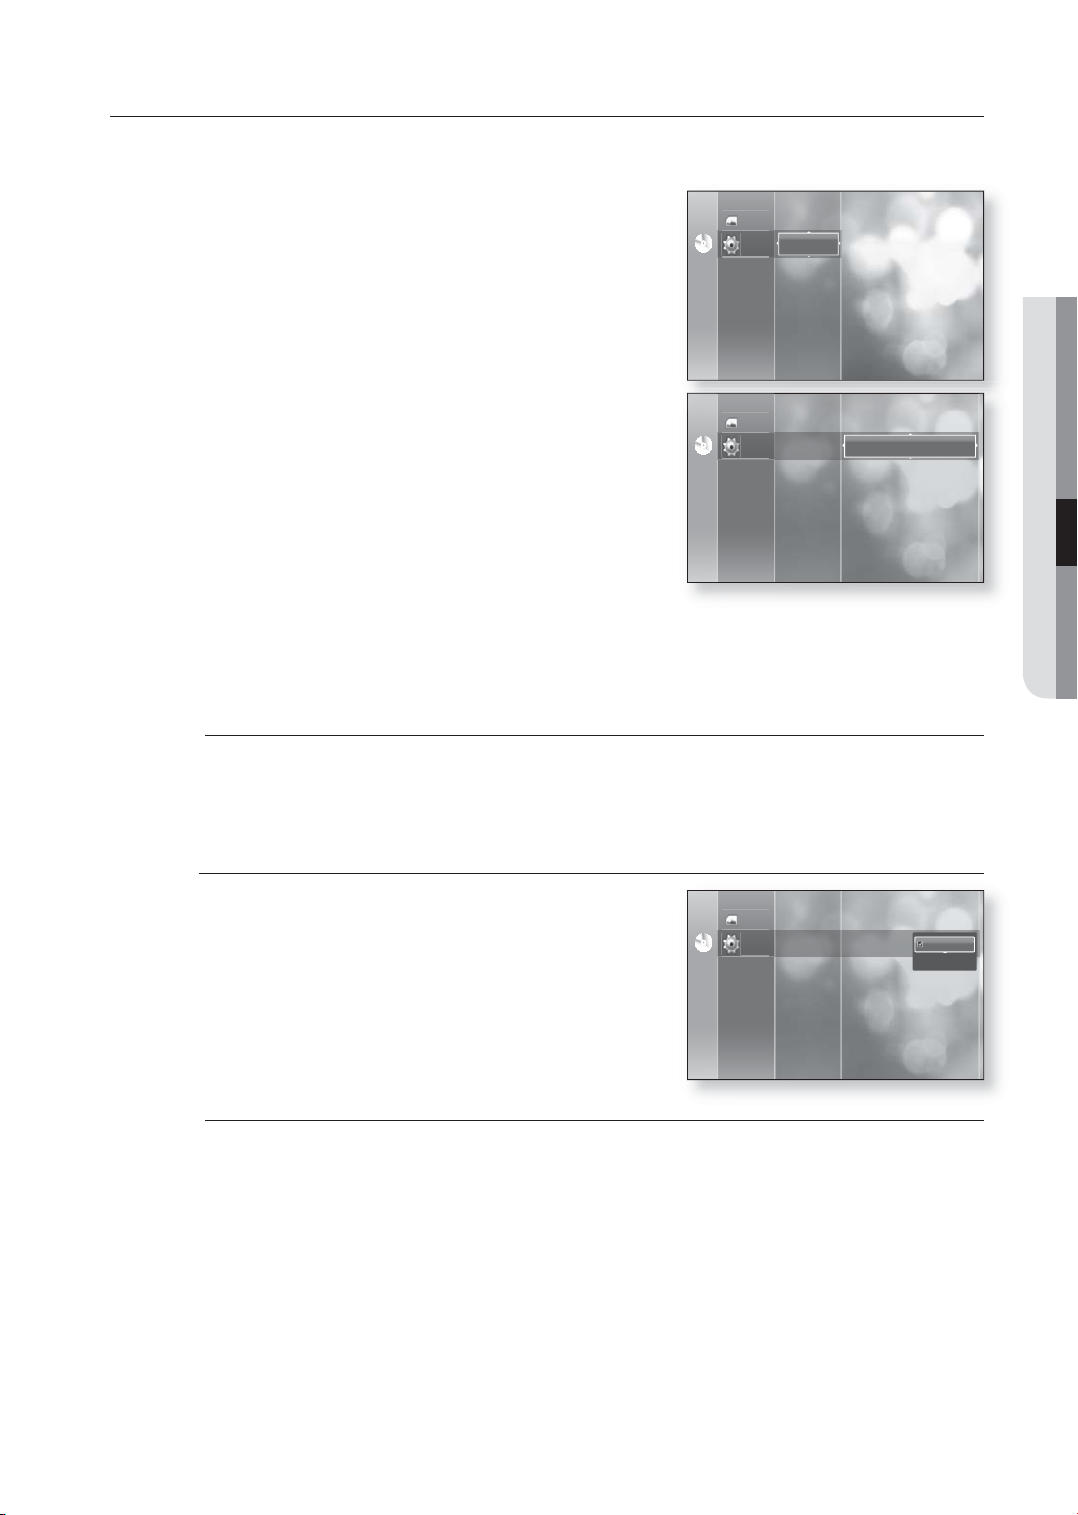
1.
With the unit in Stop mode, press the MENU button.
2.
Press the
ENTER or
▲▼
buttons to select Setup, then press the
►
button.
NoDiscNo Disc
Photo
Setup
Language Setup
Audio Setup
Display Setup
HDMI Setup
Parental Setup
System Upgrade
● SYSTEM SETUP
3.
Press the
the ENTER or
4.
Press the
press the ENTER or
5.
Press the
M
▲▼
buttons to select Audio Setup, then press
►
button.
▲▼
buttons to select the desired audio option from the options described below, then
►
button.
▲▼
buttons to select the desired item, then press the ENTER button.
Press the RETURN or ◄ button to return to the previous menu.
Press the MENU button to exit the menu.
Digital Output
PCM : Select this when your equipment does not decode
•
Dolby Digital.
Bitstream : Outputs Dolby Digital or DTS audio as
•
Bitstream. Select this when your AV receiver or AV amplifi er
has a Dolby Digital or DTS Decoder.
Language Setup
Photo
NoDiscNo Disc
NoDiscNo Disc
Photo
Setup
Display Setup
HDMI Setup
Parental Setup
System Upgrade
Language Setup
Audio Setup
Display Setup
HDMI Setup
Parental Setup
System Upgrade
Audio Setup
Setup
Digital Output : PCM
PCM Down Sampling : On
Dynamic Compression : On
Speaker Setup
Digital Output : PCM
PCM Down Sampling : On
Dynamic Compression : On
Speaker Setup
PCM
Bitstream
M
If you have selected a LPCM sound track on a disc, the output will automatically be set to PCM.
Be sure to select the correct Digital Output or you will hear no sound or a loud noise.
When playing a Dolby Digital movie make sure the Digital Output is set to Bitstream.
If the HDMI device (Receiver, TV) is not compatible with compressed formats (Dolby digital, DTS), The audio
signal outputs as PCM.
English _35
Page 37
system setup
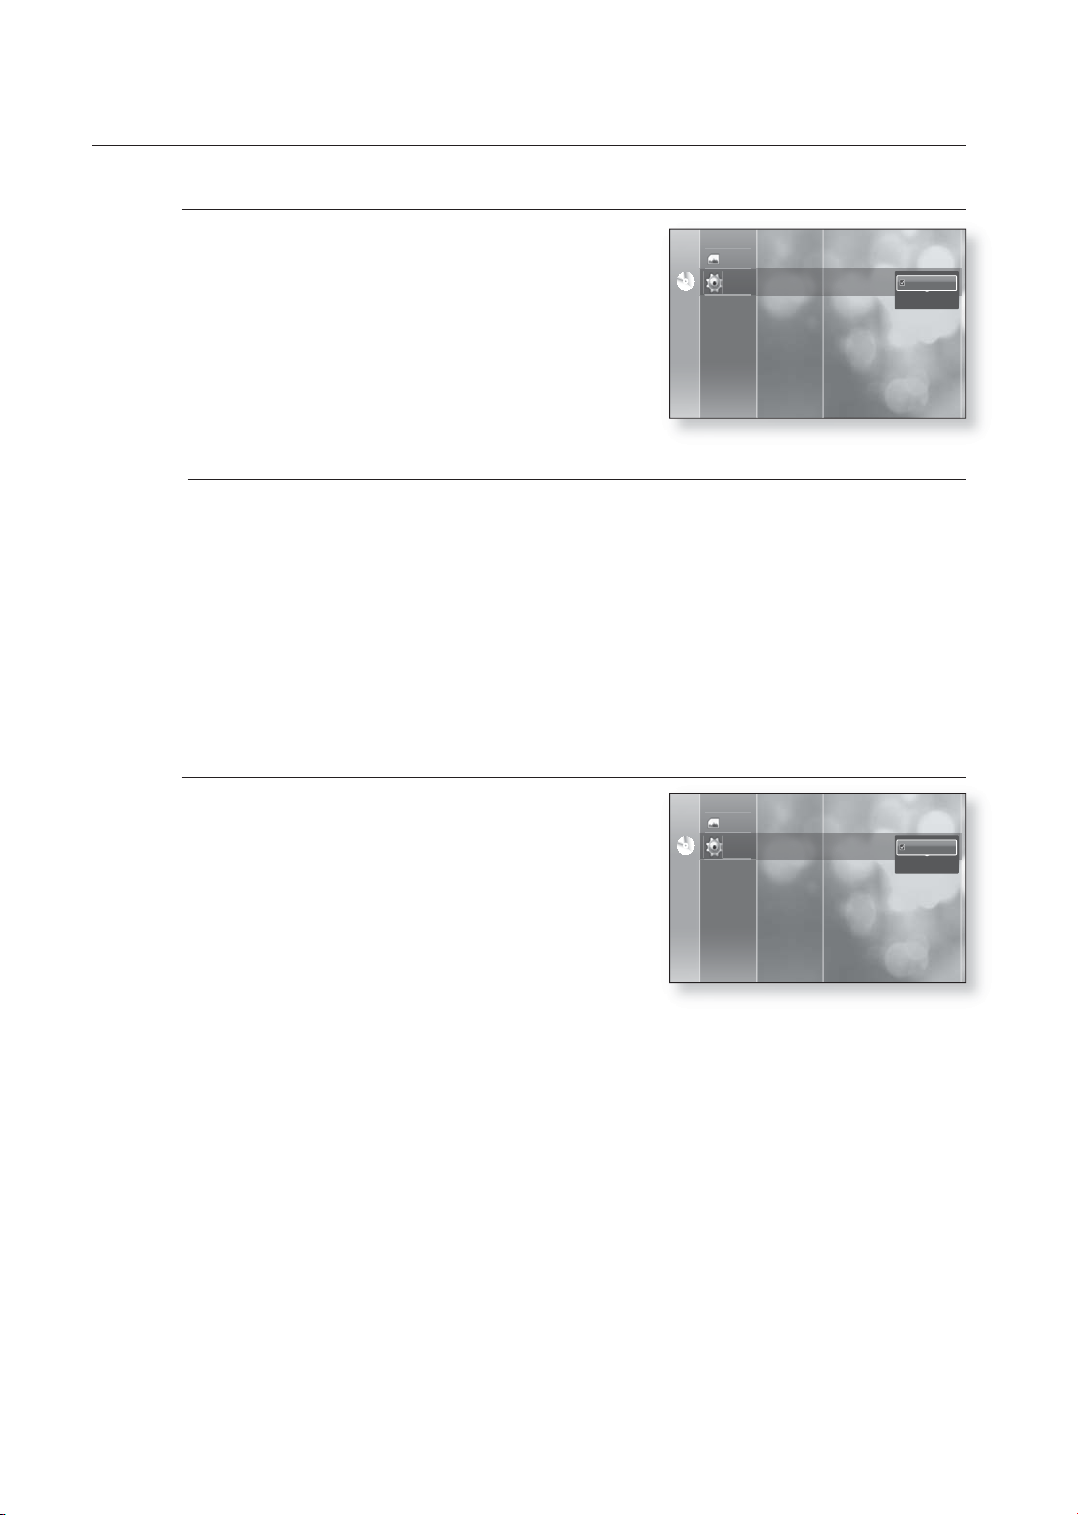
PCM Down Sampling
•
On : Select this when the Amplifi er connected to the player
is not 96KHz compatible. 96KHz signals will be down
converted to 48KHz
Off : Select this when the Amplifi er connected to the player
•
is 96KHz compatible. Signals will be output without any
changes.
Even when PCM Down Sampling is set to Off, some discs will only output downsampled audio through the
M
coaxial and optical digital outputs.
HDMI
•
If your TV is not compatible with compressed multi-channel formats (Dolby Digital, DTS), you should
set Digital Audio to PCM.
•
If your TV is not compatible with LPCM sampling rates over 48kHz, you should set PCM Down
Sampling to On.
Language Setup Digital Output : PCM
Photo
NoDiscNo Disc
Display Setup
HDMI Setup
Parental Setup
System Upgrade
Audio Setup
Setup
PCM Down Sampling : On
Dynamic Compression : On
Speaker Setup
On
Off
Dynamic Compression
This is only active when a Dolby Digital signal is detected.
•
Off : You can enjoy the movie with the standard Dynamic
Range.
•
On : When Movie soundtracks are played at low volume or
from smaller speakers, the system can apply appropriate
compression to make low-level content more intelligible and
prevent dramatic passages from getting too loud.
Language Setup
Photo
Audio Setup
Setup
NoDiscNo Disc
Display Setup
HDMI Setup
Parental Setup
System Upgrade
Digital Output : PCM
PCM Down Sampling : On
Dynamic Compression : On
Speaker Setup
On
Off
36_ system setup
Page 38
SETTING UP THE SPEAKER OPTIONS
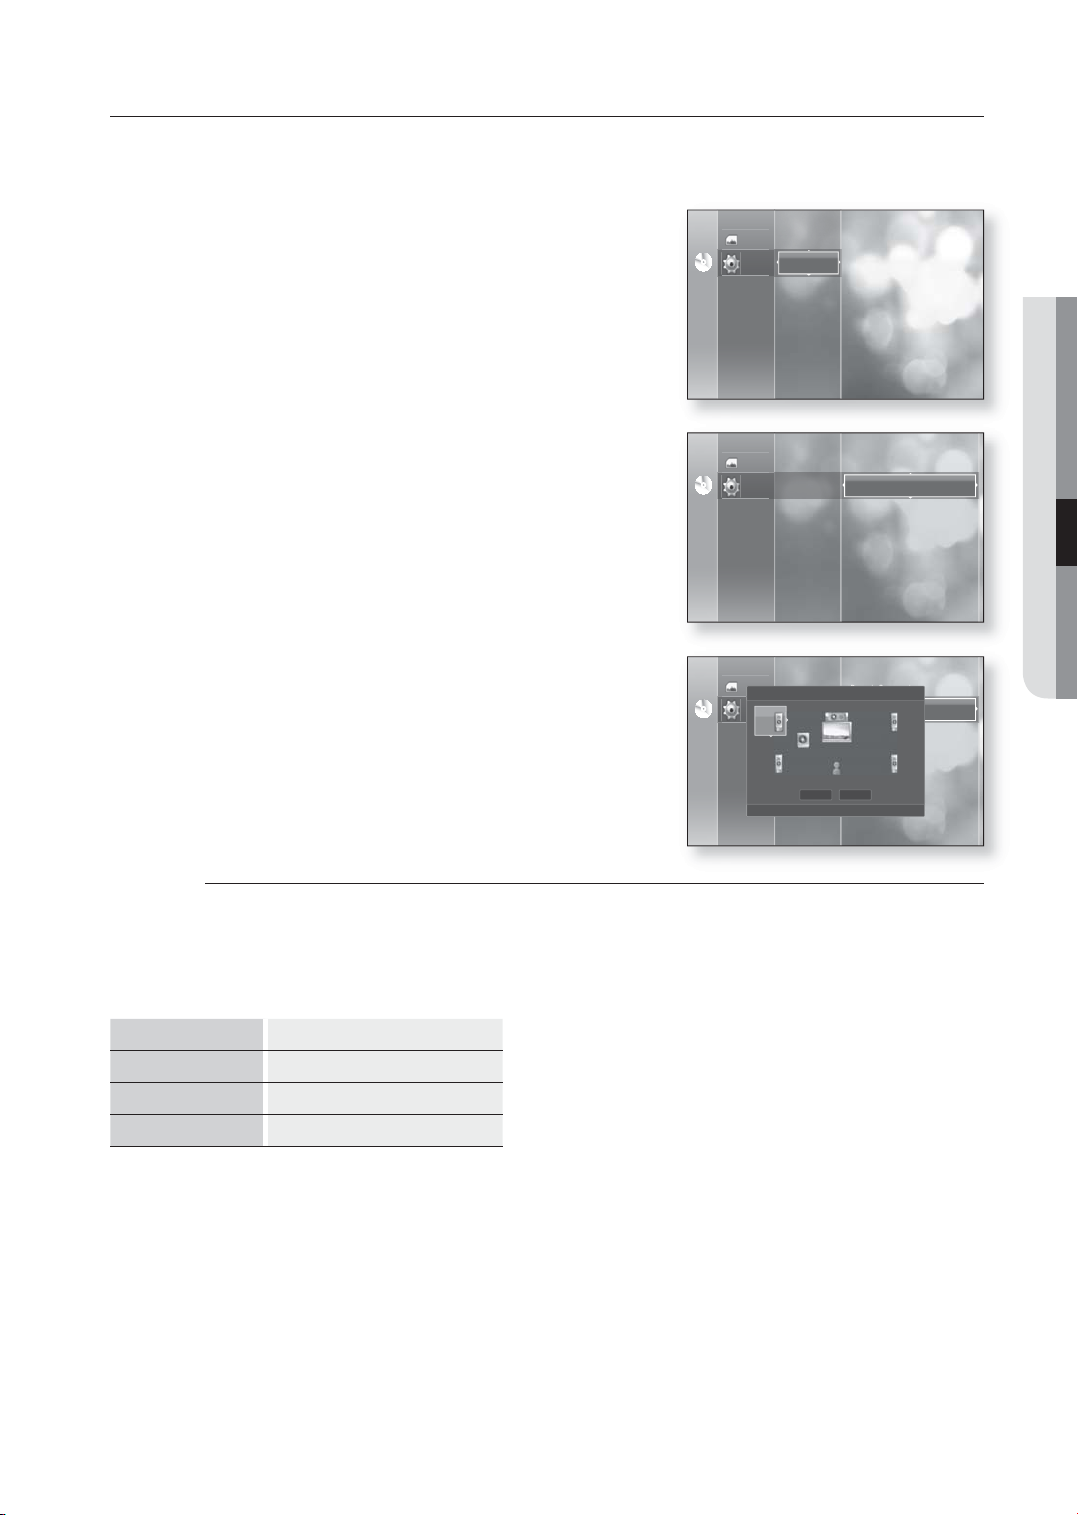
If you have connected this player to an Amp/Receiver or Home theater via the 5.1 channel Analog outputs you need
to set the Speaker Options for the best sound.
With the unit in Stop mode, press the MENU button.
1.
Press the
2.
ENTER or
▲▼
buttons to select Setup, then press the
►
button.
NoDiscNo Disc
Photo
Setup
Language Setup
Audio Setup
Display Setup
HDMI Setup
Parental Setup
System Upgrade
● SYSTEM SETUP
▲▼
3.
Press the
the ENTER or
Press the
4.
buttons to select Audio Setup, then press
►
button.
▲▼
buttons to select Speaker Setup, then
press the ENTER or
Press the
5.
▲▼◄►
then press the ENTER button.
When done, use the
6.
press the ENTER button.
If you don’t want to save your work, use the
buttons to select Cancel, then press the ENTER button.
Press the RETURN or ◄ button to return to the previous menu.
M
Speaker Setup
Front (L, R) Large, Small
Center (C) Large, Small, None
Surround (LS, RS) Large, Small, None
Subwoofer (SW) LFE, None
►
button.
buttons to select the desired Speaker,
▲▼◄►
buttons to select Save, then
▲▼◄►
Subwoofer Speaker
•
LFE : Select to use the subwoofer speaker.
None : Select to disable the subwoofer
•
speaker.
(This option can only be selected when the
Front (L+R) speakers are set to Large.)
Small
LFE
USER
Save Cancel
PCM Down Sampling : On
Dynamic Compression : On
Speaker Setup
PCM Down Sampling : On
Dynamic Compression : On
Speaker Setup
R
Small
RS
Small
Language Setup
Photo
Audio Setup
Setup
NoDiscNo Disc
NoDiscNo Disc
Display Setup
HDMI Setup
Parental Setup
System Upgrade
Language Setup
Photo
Speaker Setup
Audio Setup
Setup
L
Small
Display Setup
Parental Setup
LS
System Upgrade
Small
a
Test Tone s SELECT² RETURN
Speaker
Large : Delivers full bandwidth sound with bass below 100
•
Hz.
•
Small : If LFE is on, bass below 100 Hz will be outputted
through a Subwoofer instead of the speakers. If LFE is off
and the Front Speaker is set to Large, sound will be
outputted through the Front Speaker.
• None : Select to disable the speakers.
Press the RED(A) button
A test tone will be sent to L C R RS
•
LS LFE in order so you can make sure
the speakers are set up correctly.
To end the test tone, press the RED (A)
•
button again.
The test tone can only be activated when no
•
discs are in the unit.
English _37
Page 39
system setup
SETTING UP THE VIDEO DISPLAY/OUTPUT OPTIONS
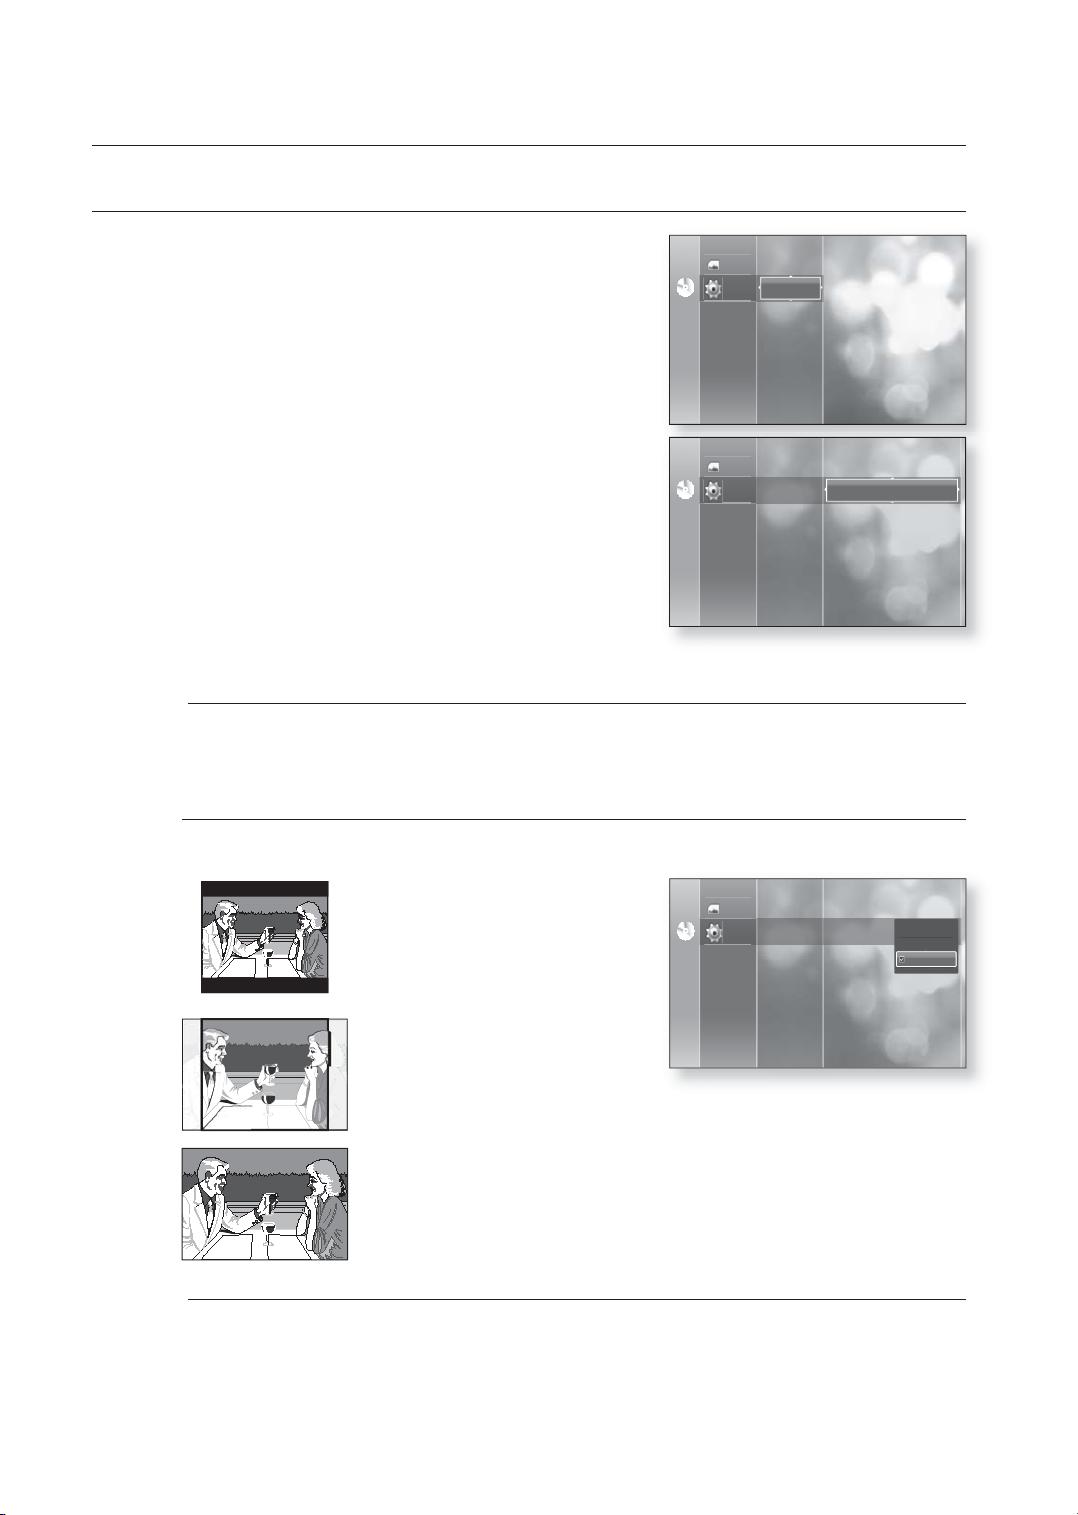
This function allows you to setup the TV screen settings. This function
depends on the disc or TV type. It may not work with some discs or TVs.
1.
With the unit in Stop mode, press the MENU button.
2.
Press the
ENTER or
3.
Press the
press the ENTER or
▲▼
buttons to select Setup, then press the
►
button.
▲▼
buttons to select Display Setup, then
►
button.
Video setup menu will be displayed.
▲▼
Press the
4.
buttons to select the desired display option
from the options on the following pages.
▲▼
5.
Press the
buttons to select the desired sub-menu
item from a video display option, then press the ENTER
button.
Press the RETURN or ◄ button to return to the previous menu. Press the MENU button to exit the menu.
M
TV Aspect
Language Setup
Audio Setup
Photo
Display Setup
Setup
NoDiscNo Disc
NoDiscNo Disc
Photo
Setup
HDMI Setup
Parental Setup
System Upgrade
Language Setup
Audio Setup
Display Setup
HDMI Setup
Parental Setup
System Upgrade
TV Aspect : 16:9 Wide
Movie Frame (24 Fs) : Off
Resolution : 480p
Screen Message : On
Front Display : Automatic
Depending on the type of television you have, you may want to adjust the screen setting. (aspect ratio)
• 4:3 Letter Box :
Select when you want to see the total
16:9 ratio screen BD/DVD supplies, even
though you have a TV with a 4:3 ratio
screen. Black bars will appear at the top
and bottom of the screen.
NoDiscNo Disc
Photo
Setup
Language Setup
Audio Setup
Display Setup
HDMI Setup
Parental Setup
System Upgrade
TV Aspect : 16:9 Wide
Movie Frame (24 Fs) : Off
Resolution : 480p
Screen Message : On
Front Display : Automatic
4:3 Letter Box
4:3 Pan-Scan
16:9 Wide
• 4:3 Pan-Scan :
Select this for conventional size TV when
you want to see the central portion of the
16:9 screen. (Extreme left and right side
of movie picture will be cut off.)
• 16:9 Wide :
You can view the full 16:9 picture on your widescreen TV.
Depending on the disc type, some aspect ratios may not be available.
M
Certain movies will be displayed in 4:3 Pillarbox (black bars on sides of picture) even if 16:9 wide is selected.
38_ system setup
Page 40
Movie Frame (24 Fs)
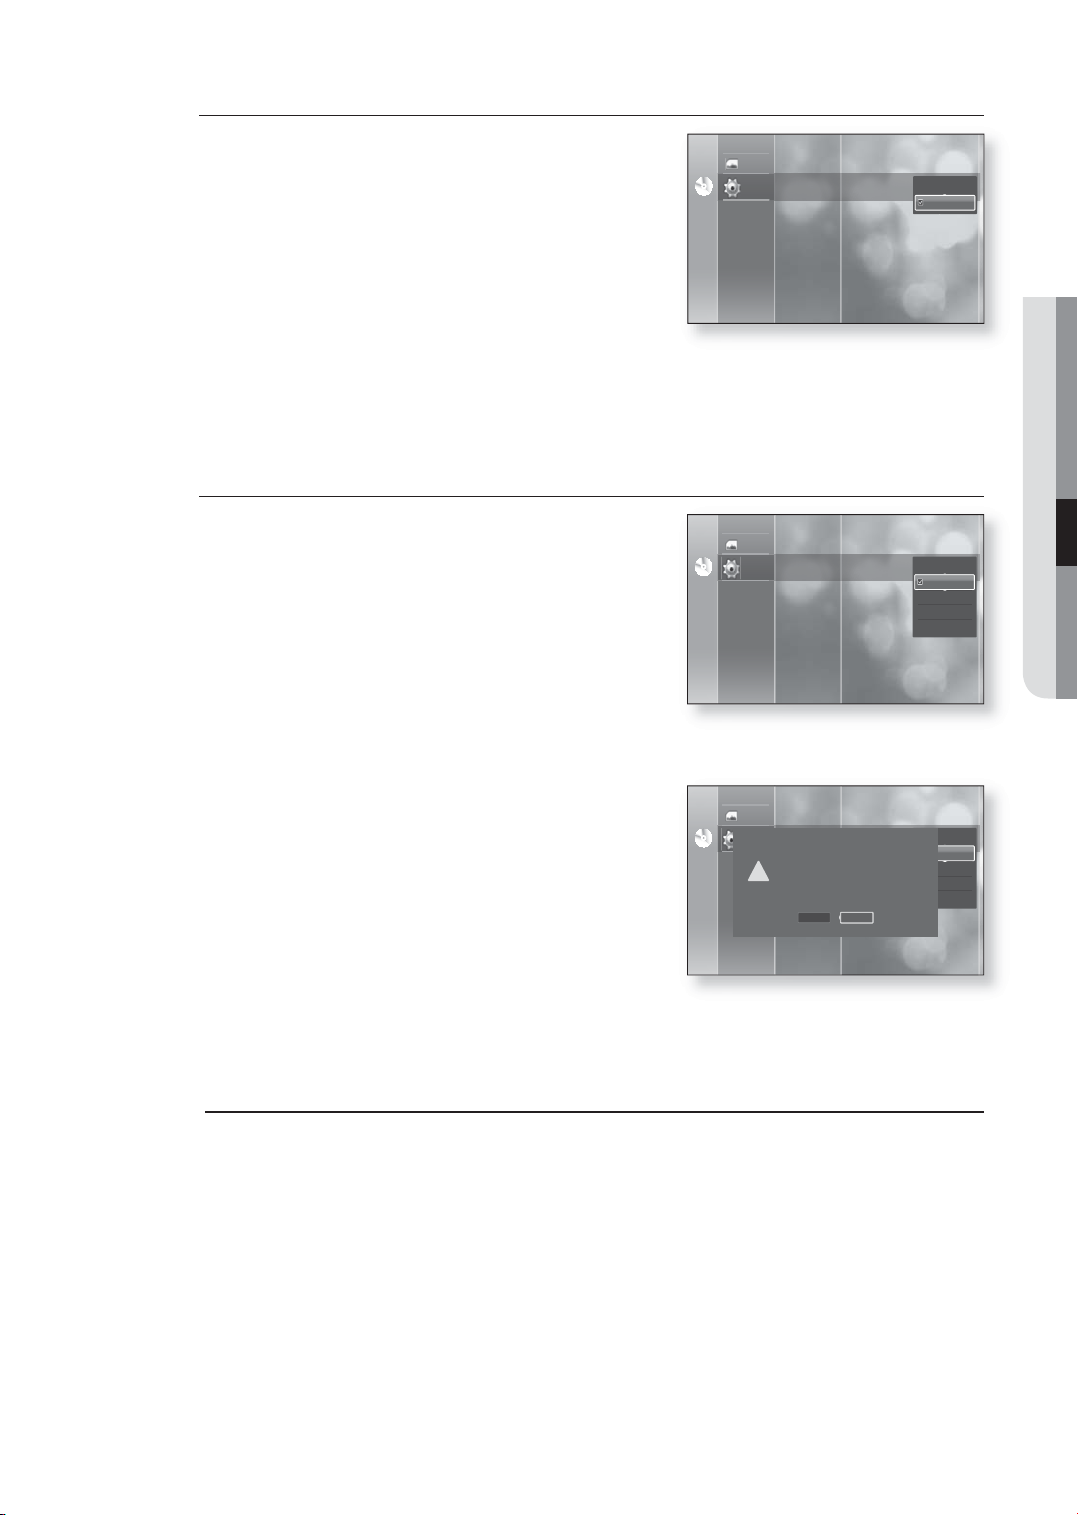
Movies are usually fi lmed at 24 frames per second. Some Bluray Discs have the capability of playing back at this frame rate.
Setting the Movie Frame (24Fs) feature to ON allows you to
adjust the Blu-ray player's HDMI output to 24 frames per
second for improved picture quality.
NoDiscNo Disc
Photo
Setup
Language Setup
Audio Setup
Display Setup
HDMI Setup
Parental Setup
System Upgrade
TV Aspect : 16:9 Wide
Movie Frame (24 Fs) : Off
Resolution : 480p
Screen Message : On
Front Display : Automatic
On
Off
You can enjoy the Movie Fame (24Fs) feature solely on a TV
supporting this frame rate.
This menu can only be selected in 1080i or 1080p HDMI
output resolution modes.
Depending on the disc, two types of source may be included: Movie material (24 frame) and Video
material (30 frame). When the source switches between Movie and Video, the screen may blink for a few
seconds.
Resolution
Sets the output resolution of the Component and HDMI video signal.
The number in 480i, 480p, 720p, 1080p and 1080i indicates
•
the number of lines of video. The i and p indicate interlace
NoDiscNo Disc
and progressive scan, respectively.
- 1080p : Outputs 1080 lines of progressive video.
- 1080i : Outputs 1080 lines of interlaced video.
- 720p : Outputs 720 lines of progressive video.
- 480p : Outputs 480 lines progressive video.
- 480i : Outputs 480 lines of interlaced video.
Photo
Setup
Language Setup
Audio Setup
Display Setup
HDMI Setup
Parental Setup
System Upgrade
TV Aspect : 16:9 Wide
Movie Frame (24 Fs) : Off
Resolution : 480p
Screen Message : On
Front Display : Automatic
1080p
1080i
720p
480p
480i
● SYSTEM SETUP
If the connected TV does not support the movie frame or the
selected resolution, you will see the following message:
If you select Yes and the resolution is not supported, the TV's
screen will be blank.
If the screen is blank, press and hold the $ button on the front of the player for more than 5 seconds
M
(no disc inserted). All settings are restored to the factory default. Follow the steps on the previous page to
access each mode and select the Display Setup that your TV will support.
Language Setup
Audio Setup
Photo
Display Setup
Setup
NoDiscNo Disc
If no pictures are shown after the selection,
please wait for 15 seconds. And then,
HDMI Setup
the resolution will be reverted
!
Parental Setup
to the previous value automatically.
System Upgrade
Would you like to make a selection?
TV Aspect : 16:9 Wide
Movie Frame (24 Fs) : Off
Resolution : 480p
Screen Message : On
Front Display : Automatic
Yes No
1080p
1080i
720p
480p
480i
English _39
Page 41
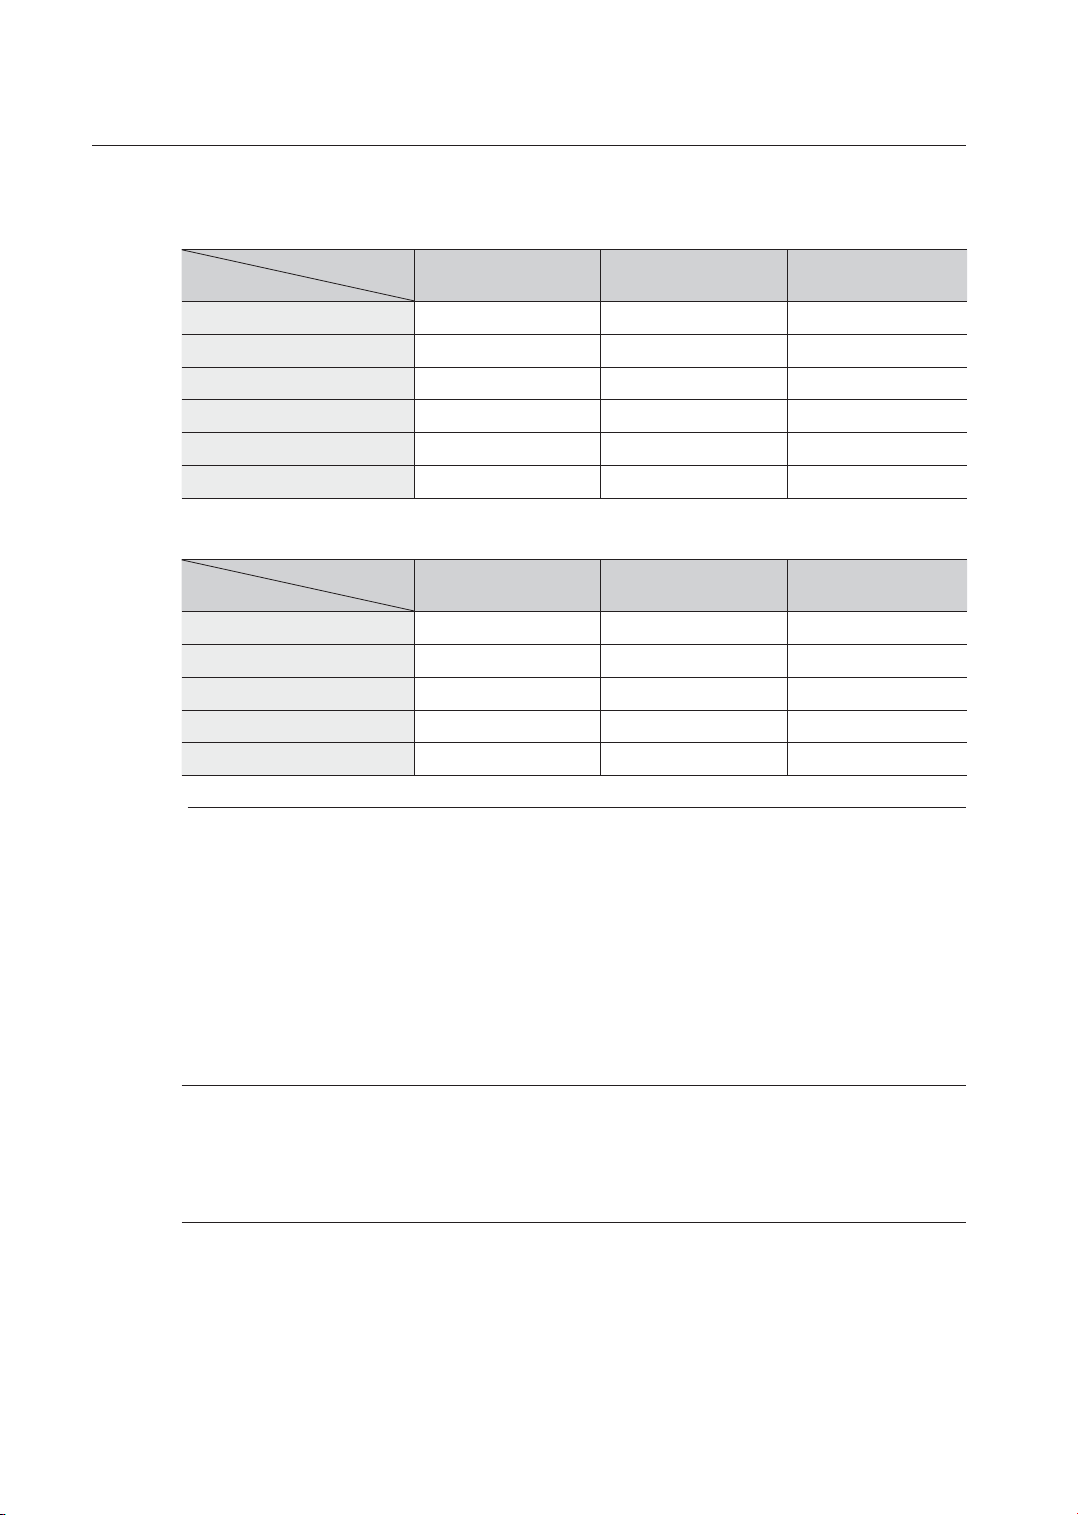
system setup
Resolution according to the output mode
❖
BD playback
•
Output
Setup
1080p, Movie Frame(24Fs) off 1080p@60F 1080i 480i
1080p/1080i, Movie Frame (24Fs) on
1080i, Movie Frame (24Fs) off 1080i 1080i 480i
720p 720p 720p 480i
480p 480p 480p 480i
480i 480p 480i 480i
•
DVD playback
Output
Setup
1080p 1080p@60F 480p 480i
1080i 1080i 480p 480i
720p 720p 480p 480i
480p 480p 480p 480i
480i 480p 480i 480i
This player has the HDMI Auto Detect Feature. When the player is fi rst connected to a TV via HDMI, the
M
player's output will be set automatically to HDMI.
If the HDMI Auto Detection feature does not work, you can't select the 1080p resolution or Movie Frame
(24Fs).
The BD disc must have the 24 frame feature in order to use the Movie Frame (24Fs) mode.
If you have both HDMI and Component cables connected to your TV, the Component resolution may differ from
the chart above.
HDMI Component VIDEO/S-Video
1080p@24F 1080i 480i
HDMI Component VIDEO/S-Video
Screen Message
On : Displays messages related to operation mode.
•
Off : Does not display messages related to operation mode.
•
Front Display
•
Automatic : Display is dark during playback and bright when the unit is in Stop mode.
•
Dim : Select to dim the display window.
•
Bright : Select to brighten the display window.
40_ system setup
Page 42
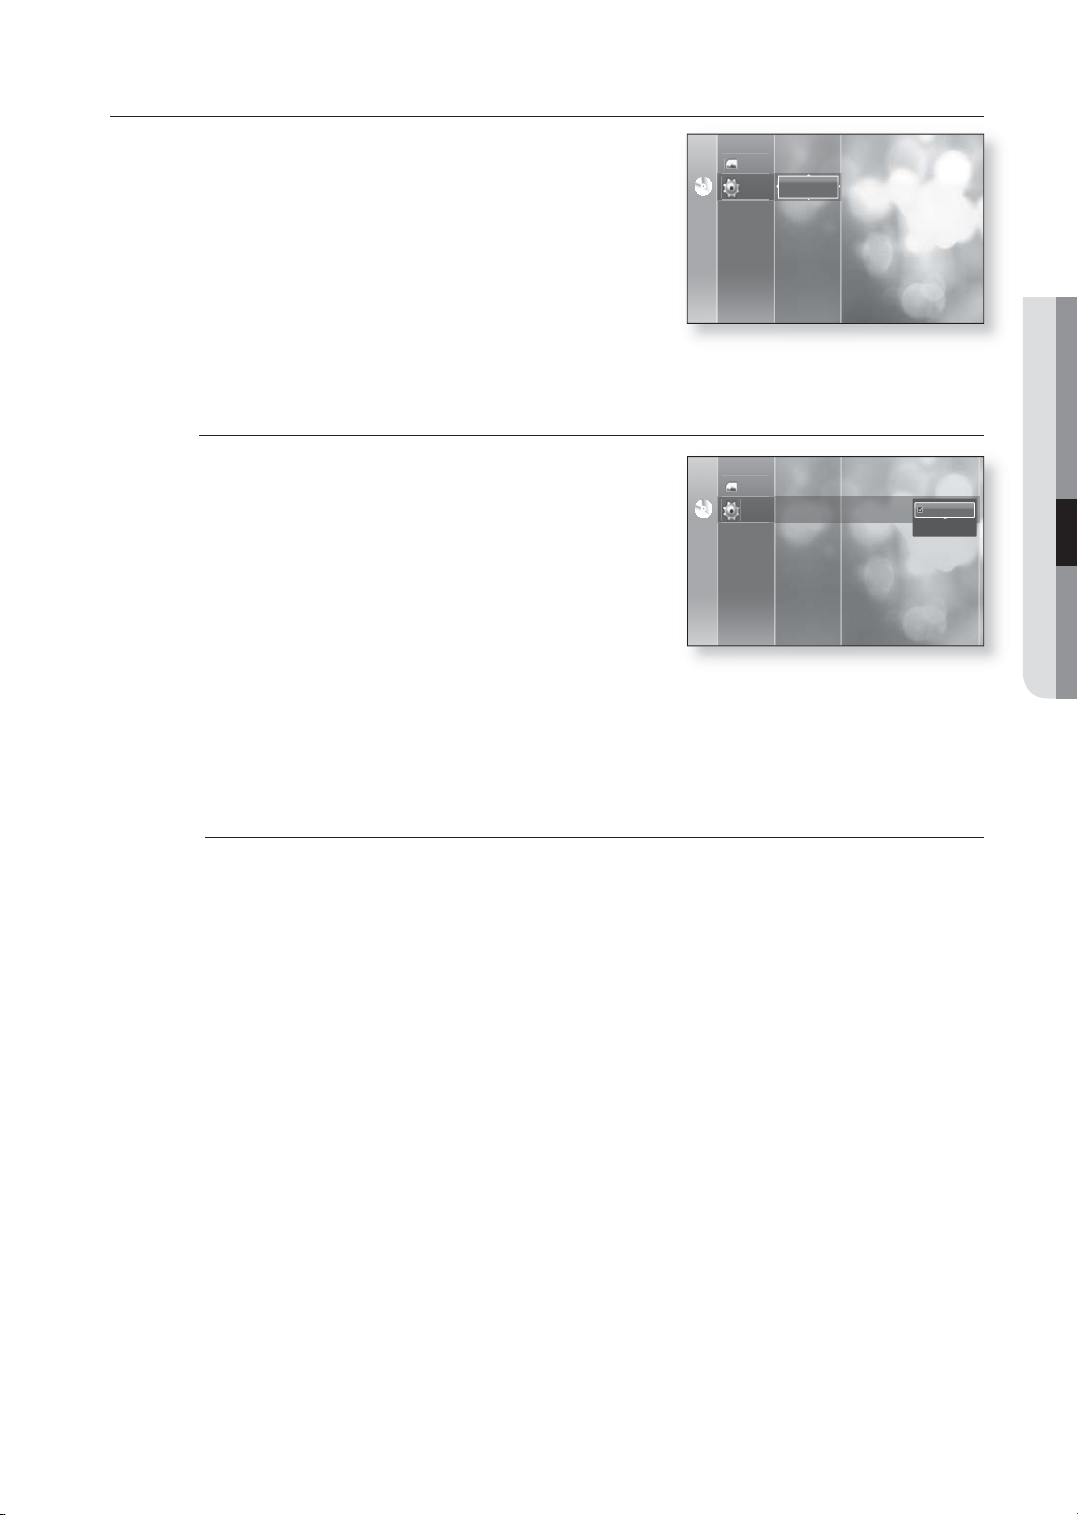
SETTING UP THE HDMI SETUP OPTIONS
With the unit in Stop mode, press the MENU button.
1.
Press the
2.
ENTER or
3.
Press the
the ENTER or
HDMI setup menu will be displayed.
4.
Press the
(Anynet or Format), then press the ENTER or
Anynet+ (HDMI-CEC)
▲▼
buttons to select Setup, then press the
►
button.
▲▼
buttons to select HDMI Setup, then press
►
button.
▲▼
buttons to select the desired display option
►
button.
Audio Setup
Display Setup
Photo
HDMI Setup
Setup
NoDiscNo Disc
Parental Setup
System Upgrade
● SYSTEM SETUP
When HDMI is set to on, you can operate Anynet+ function.
On : Anynet+ functions will work.
•
Off : Anynet+ function will not work.
•
NoDiscNo Disc
Photo
Setup
Audio Setup
Display Setup
HDMI Setup
Parental Setup
System Upgrade
Anynet+ (HDMI-CEC) : On
Format : TV
On
Off
What is Anynet+?
Anynet+ is a convenient function that offers linked operations with other Samsung products with the
Anynet+ feature.
You can operate this unit using a Samsung TV remote control or power on the Samsung TV and Home
theater and start disc playback simply by pressing the PLAY button on the Blu-ray player's remote.
This function is not available if the HDMI cable does not support CEC.
M
To use Anynet+
1.
Connect the BD Player to a Samsung TV with an HDMI cable. (See pages 20~21)
2.
Set the Anynet+ (HDMI CEC) to “On” on your BD Player.
3.
Set the Anynet+ function on your TV. (See the TV instruction manual for more information.)
Anynet+ Functions
•
One touch play
You can power on your Samsung TV and Home Theater, and play the disc in this unit simply by
pressing the PLAY button on the Blu-ray player's remote.
•
One touch watching
Select “Watching BD" or "Connected to BD player" (depending on your TV's menu) in the Anynet+
menu on the TV. The Blu-ray player will automatically turn on and the TV will be switched to HDMI
mode.
•
Remote control Link
You can operate this player with your Samsung TV remote control.
English _41
Page 43
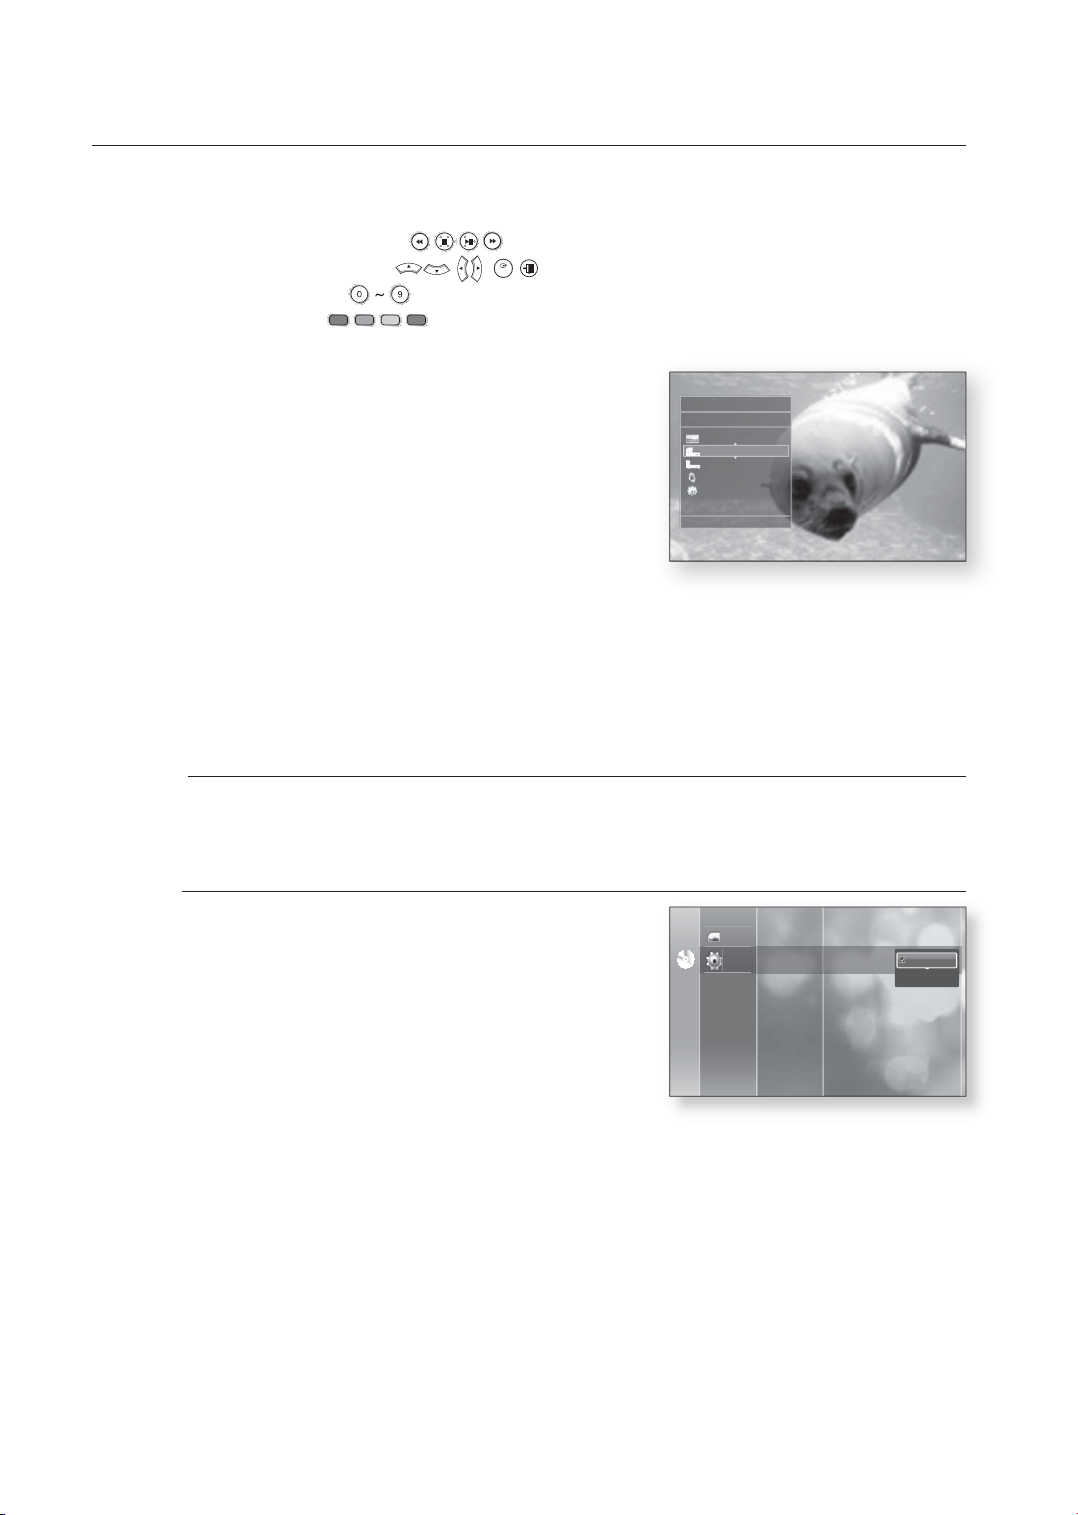
system setup
Available buttons on the Samsung TV remote: These buttons work the same as this player's remote
•
control.
- Playback control buttons :
- Menu operation button :
- Numeric buttons :
- Color buttons :
ABCD
ENTE
R
TV Anynet+ Menu
When pressing the Anynet+ button on your Samsung TV's
remote control, the following On-Screen Display (OSD) will be
shown.
•
BD Player Menu
- When playing a movie : brings up the disc’s menu (same
BD Player
m
MOVEs ENTERe EXIT
n
View TV
BD Player Menu
BD Player Operation
Receiver : Off
Setup
as DISC MENU button on the Blu-ray player’s remote
control)
- In Stop mode : brings up the SETUP menu (same as the MENU button on the Blu-ray player’s
remote control.)
BD Player Operation Menu
•
- When playing a DVD VIDEO, DVD-RW/-R, BD-ROM :
shows INFO OSD (same as INFO button on the player's remote control)
These menus will vary from Samsung TV to TV.
M
Format
You can optimize the HDMI output for connection to a TV or
Monitor.
• TV : Select if connected to a TV via HDMI.
• Monitor : Select if connected to a Monitor via HDMI.
If the player is connected to a TV, the Monitor option is
unavailable.
NoDiscNo Disc
Audio Setup
Display Setup
Photo
HDMI Setup Format : TV
Setup
Parental Setup
System Upgrade
Anynet+ (HDMI-CEC) : On
TV
Monitor
42_ system setup
Page 44
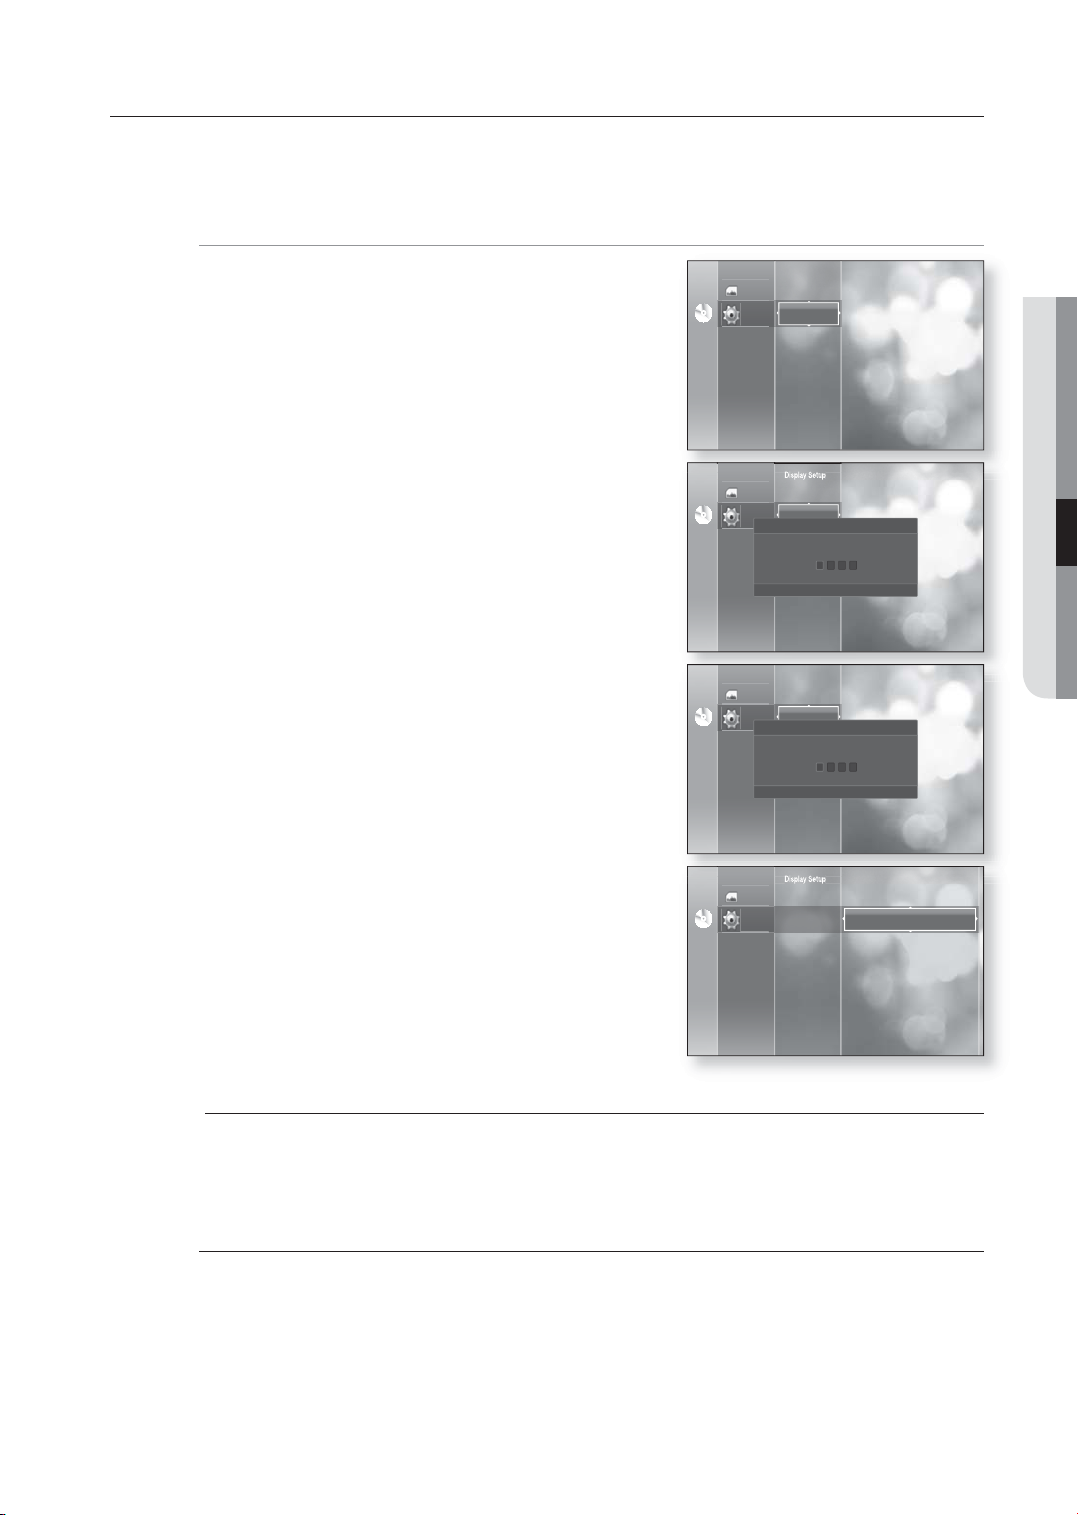
SETTING UP THE PARENTAL LOCK
The Parental Lock function works in conjunction with BD/DVDs that have been assigned a rating which helps you
control the types of BD/DVDs that your family watches. There are up to 8 rating levels on a disc.
hZ
1.
With the unit in Stop mode, press the MENU button.
▲▼
2.
Press the
ENTER or
3.
Press the
press the ENTER or
buttons to select Setup, then press the
►
button.
▲▼
buttons to select Parental Setup, then
►
button.
When you operate your Blu-ray Disc Player for the fi rst
time, the “Enter New password” message will be
displayed.
4.
Enter the 4-digit password using the number buttons on
the remote control.
The “Confi rm the password” message will be displayed.
Enter your password again.
Display Setup
HDMI Setup
Photo
Parental Setup
Setup
NoDiscNo Disc
NoDiscNo Disc
NoDiscNo Disc
Photo
Setup
Parental Setup
«
Photo
Setup
Parental Setup
«
System Upgrade
Display Setup
HDMI Setup
Parental Setup
System Upgrade
Enter New password.
NUMBER
Display Setup
HDMI Setup
Parental Setup
System Upgrade
Confi rm the password.
NUMBER
²
RETURN
²
RETURN
● SYSTEM SETUP
5.
Press the ENTER or
6.
Press the
▲▼
►
button to select Parental Lock.
buttons to select On or Off, then press the
NoDiscNo Disc
ENTER button.
M
Press the RETURN or ◄ button to return to the previous menu.
Press the MENU button to exit the menu.
If you forgot your password
Remove the disc.
1.
Press and hold the $ button on the front panel for 5 seconds or more.
2.
All settings will revert to the factory settings.
•
Photo
Setup
Display Setup
HDMI Setup
Parental Setup
System Upgrade
Parental Lock : Off
Rating Level : 1 (Kids)
New Password
English _43
Page 45
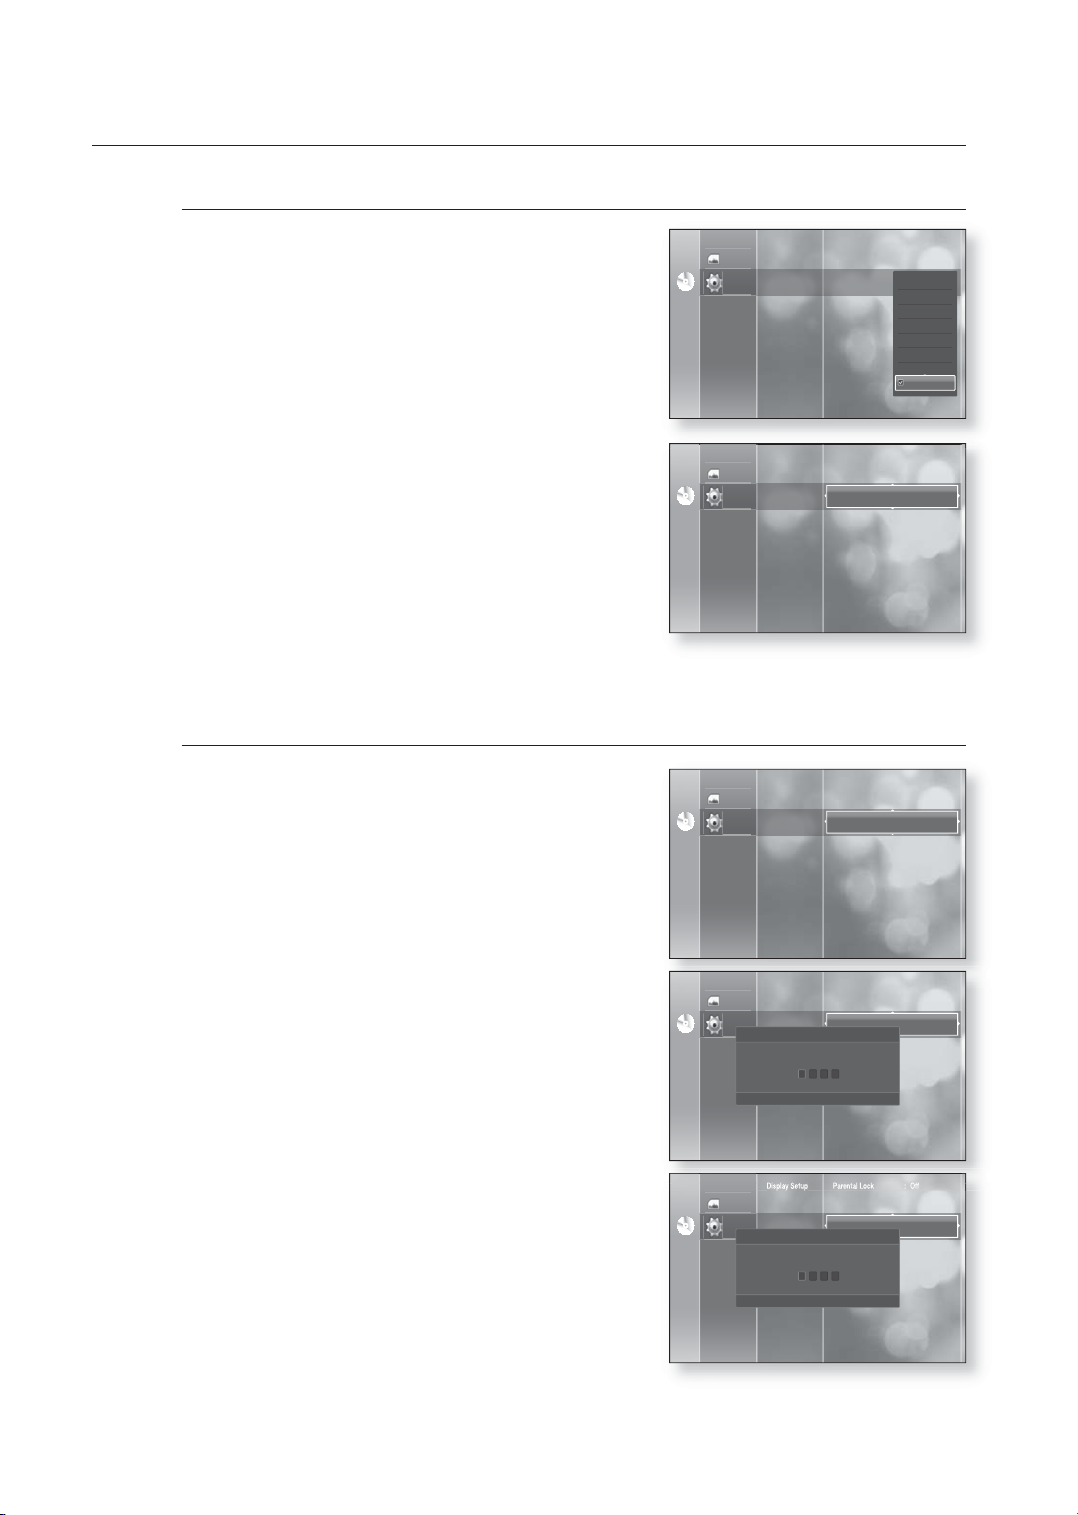
system setup
Setting the Rating Level
Press the ▲▼ buttons to select Rating Level, then press
1.
the ENTER or
►
button.
Display Setup
HDMI Setup Parental Lock : Off
Photo
NoDiscNo Disc
System Upgrade
Parental Setup
Setup
Rating Level : 8 (Adults)
New Password
8 (Adults)
7
6
5
4
3
2
1 (Kids)
▲▼
2.
Press the
buttons to select the rating level you want,
then press the ENTER button. For example, if you select
up to Level 6, discs that contain Level 7, 8 will not play.
A larger number indicates that the program is intended for
adult use only.
Level 1 is the most restrictive and Level 8 is the least.
Changing the Password
Press the ▲▼ buttons to select New Password, then
1.
press the ENTER or
Enter the 4-digit password using the number buttons on
2.
the remote control. The “Enter New password.” message
will be displayed.
►
button.
Display Setup
HDMI Setup Parental Lock : Off
Photo
NoDiscNo Disc
NoDiscNo Disc
NoDiscNo Disc
Photo
Setup
Photo
Setup
Parental Setup
System Upgrade
Display Setup
HDMI Setup
Parental Setup
System Upgrade
Display Setup
HDMI Setup
Parental Setup
System Upgrade
Parental Setup
Setup
Rating Level : 1 (Kids)
New Password
Parental Lock : Off
Rating Level : 1 (Kids)
New Password
Parental Lock : Off
Rating Level : 1 (Kids)
New Password
Enter New password.
Enter your password again using the number buttons on
3.
the remote control.
44_ system setup
«
NUMBER
Display Setup
HDMI Setup
Photo
Parental Setup
Setup
NoDiscNo Disc
Parental Setup
System Upgrade
Confi rm the password.
«
NUMBER
²
RETURN
Parental Lock : Off
Rating Level : 1 (Kids)
New Password
²
RETURN
Page 46
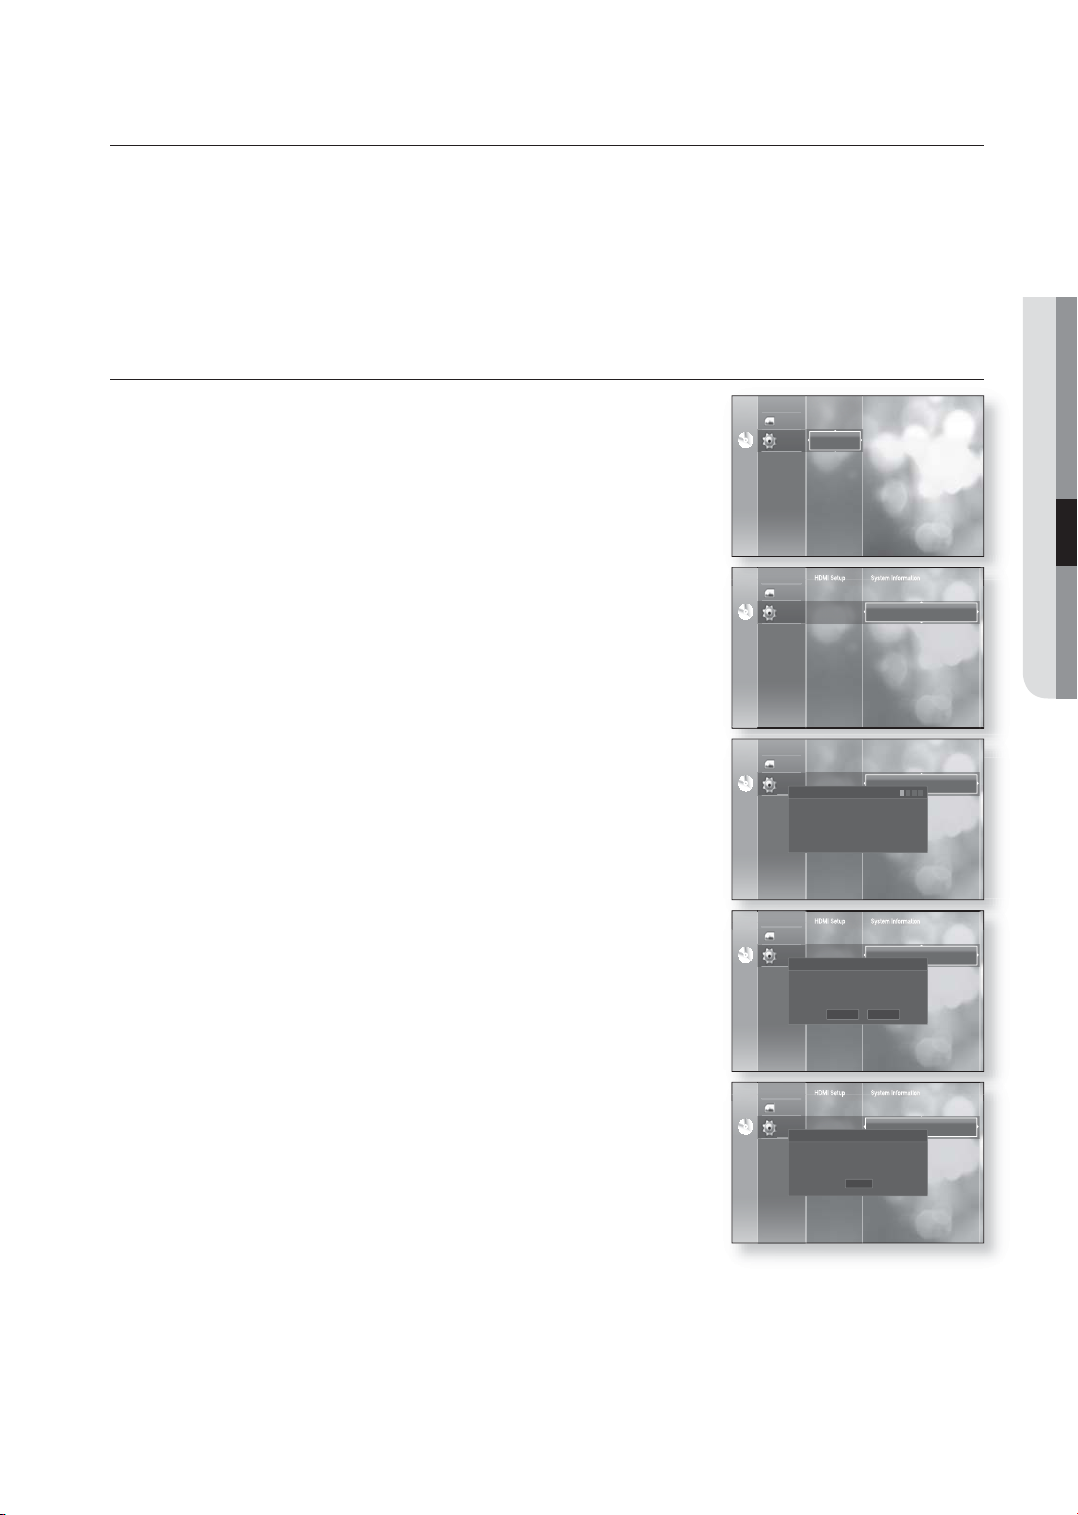
system upgrade
Samsung may offer upgrades to your Blu-ray player's fi rmware in the future. To upgrade this fi rmware you must :
1.
Go to samsung.com and refer to 'SUPPORT' page to download the fi rmware and burn an update CD.
or
Connect this player's LAN terminal to the LAN terminal on your modem (see page 30) and follow the steps
2.
below.
FIRMWARE UPGRADE
● SYSTEM UPGRADE
With the unit in No Disc mode, press the MENU button.
1.
▲▼
Press the
2.
►
button.
or
Press the
3.
the ENTER or
4.
Press the
ENTER or
You will see a window that allows you to check the cable or
5.
buttons to select Setup, then press the ENTER
▲▼
buttons to select System Upgrade, then press
►
button.
▲▼
buttons to select Upgrade Start, then press the
►
button.
network connection status.
If the upgrade is possible : You will see information on the
current and new versions of fi rmware in a message box.
HDMI Setup
Parental Setup
Photo
System Upgrade
Setup
NoDiscNo Disc
HDMI Setup
System Information
Parental Setup
Photo
Setup
NoDiscNo Disc
Photo
Setup
NoDiscNo Disc
System Upgrade
Photo
Setup
NoDiscNo Disc
System Upgrade
Network Setup
System Upgrade Upgrade Start
HDMI Setup
System Information
Parental Setup
Network Setup
System Upgrade Upgrade Start
Now, Checking.
Please wait...
HDMI Setup
Parental Setup
System Upgrade Upgrade Start
The new update data was found.
Current Version : XXXXX
New Version : XXXXX
2 3 4
1
System Information
Network Setup
CancelStart
If the upgrade is not possible : You will see the following
description in the message box.
If the cable is not connected :
•
"This system can not connect to internet for update.
NoDiscNo Disc
HDMI Setup
Parental Setup
Photo
System Upgrade Upgrade Start
Setup
System Upgrade
This system can not connect
to internet for update.
Please, check the network setup.
Please, check the network setup."
If the network connection has failed :
•
"This system can not connected to internet for update.
Please, check the network setup"
If no later version is released (the latest version has been already installed) :
•
"The latest version of the fi rmware is already installed. There is no need to update."
If there is a disc in the player :
•
"Please maintain "No Disc" state for network update."
This indicates that you must remove all discs from the unit to perform the update.
System Information
Network Setup
OK
English _45
Page 47
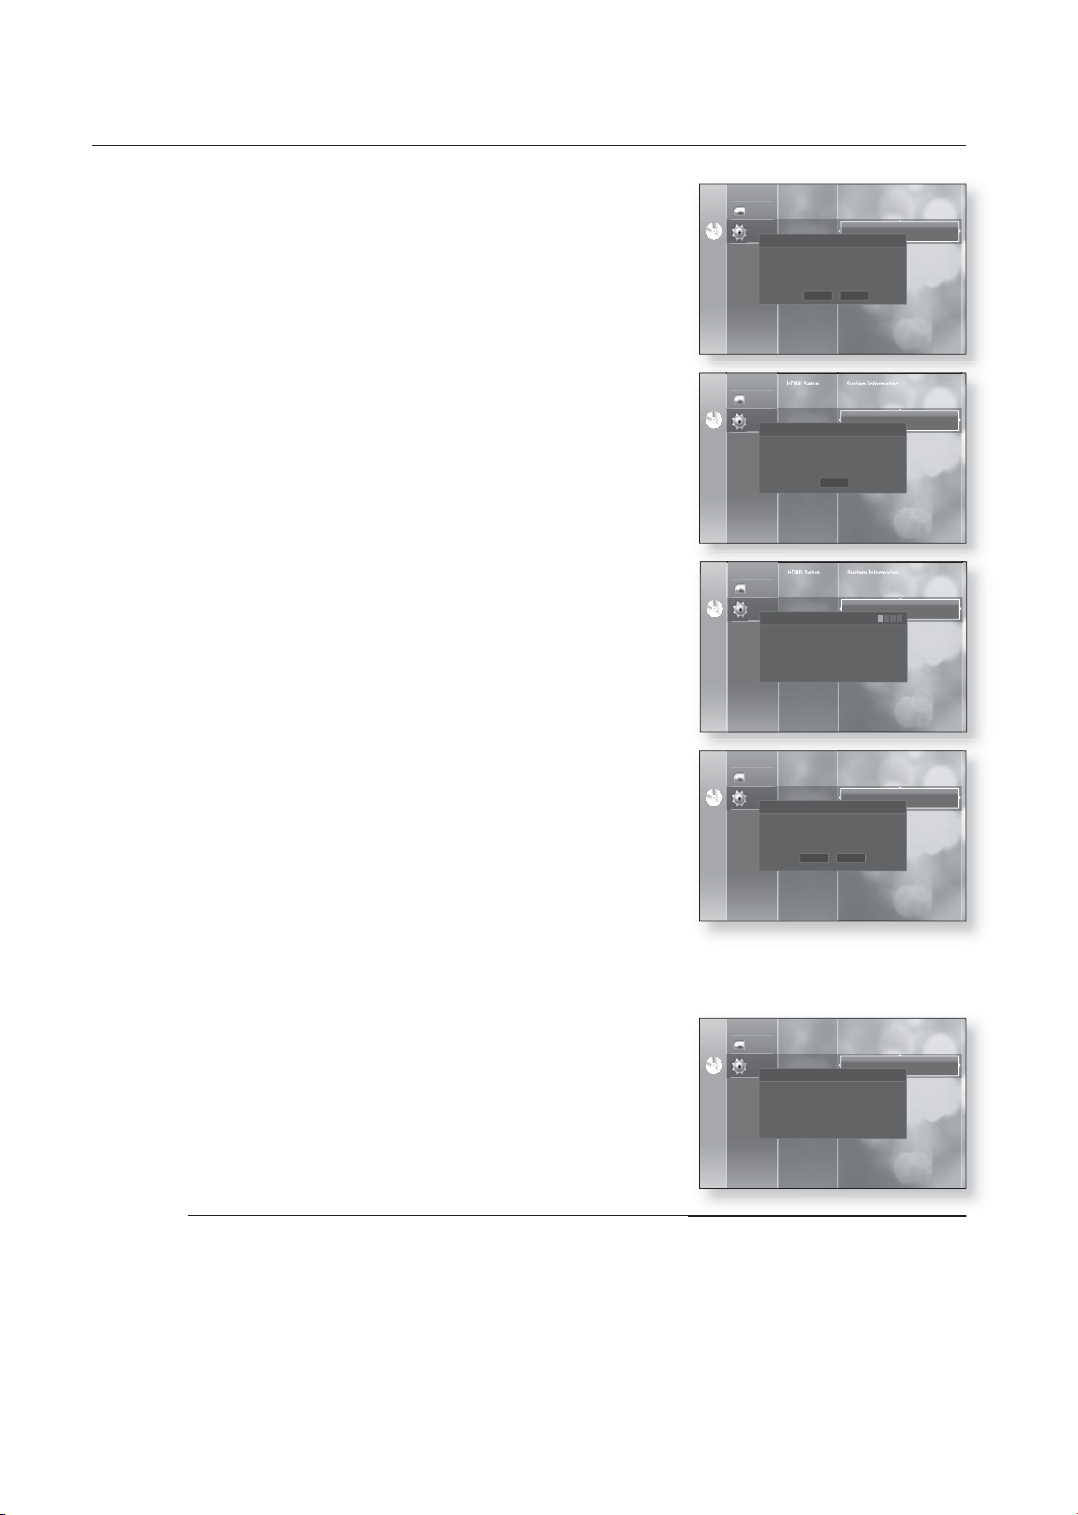
system upgrade
6.
To perform the system upgrade, press the ◄► buttons to
select Start and then press the ENTER button.
7.
The system update gets started.
8.
When the verifi cation is done, you will see a window that
allows you to update fi rmware. To perform the fi rmware
◄►
update,press the
buttons to select Yes and then press
the ENTER button.
•
You will see a message about the upgrade process for
3 seconds.
- When update is fi nished, the power will turn off.
•
If you do not want to update fi rmware, select No and then
press the ENTER button.
HDMI Setup
Parental Setup
Photo
System Upgrade Upgrade Start
Setup
NoDiscNo Disc
System Upgrade
The new update data was found.
Current Version : XXXXX
New Version : XXXXX
HDMI Setup
Parental Setup
Photo
System Upgrade Upgrade Start
Setup
NoDiscNo Disc
System Upgrade
Photo
Setup
NoDiscNo Disc
System Upgrade
HDMI Setup
Parental Setup
Photo
System Upgrade Upgrade Start
Setup
NoDiscNo Disc
System Upgrade
System Information
Network Setup
CancelStart
System Information
Network Setup
Downloading update data...
Please, do not turn off the power.
Cancel
HDMI Setup
System Information
Parental Setup
Network Setup
System Upgrade Upgrade Start
Verifying update data
Please wait...
Do you want to update Firmware?
2 3 4
1
System Information
Network Setup
NoYes
9.
When the installation is done, you will see a message of
“Update Completed”.
The player will automatically turn off in 3 seconds.
All settings will revert to the factory settings. And the next time
you start the system, you will see the menu language selection
window.
If you want to cancel the upgrade in the process of downloading the upgrade data, press the ENTER button.
M
You will see a confi rmation message.
Selecting Yes will end the upgrade process, and selecting No will proceed with the verifi cation step.
When the system upgrade is done, check the fi rmware details in the System Upgrade menu.
Do not turn off the player during the System Upgrade Otherwise, the player may not work properly.
46_ system upgrade
HDMI Setup
Parental Setup
Photo
System Upgrade Upgrade Start
Setup
NoDiscNo Disc
System Upgrade
System Information
Network Setup
Update completed.
Page 48
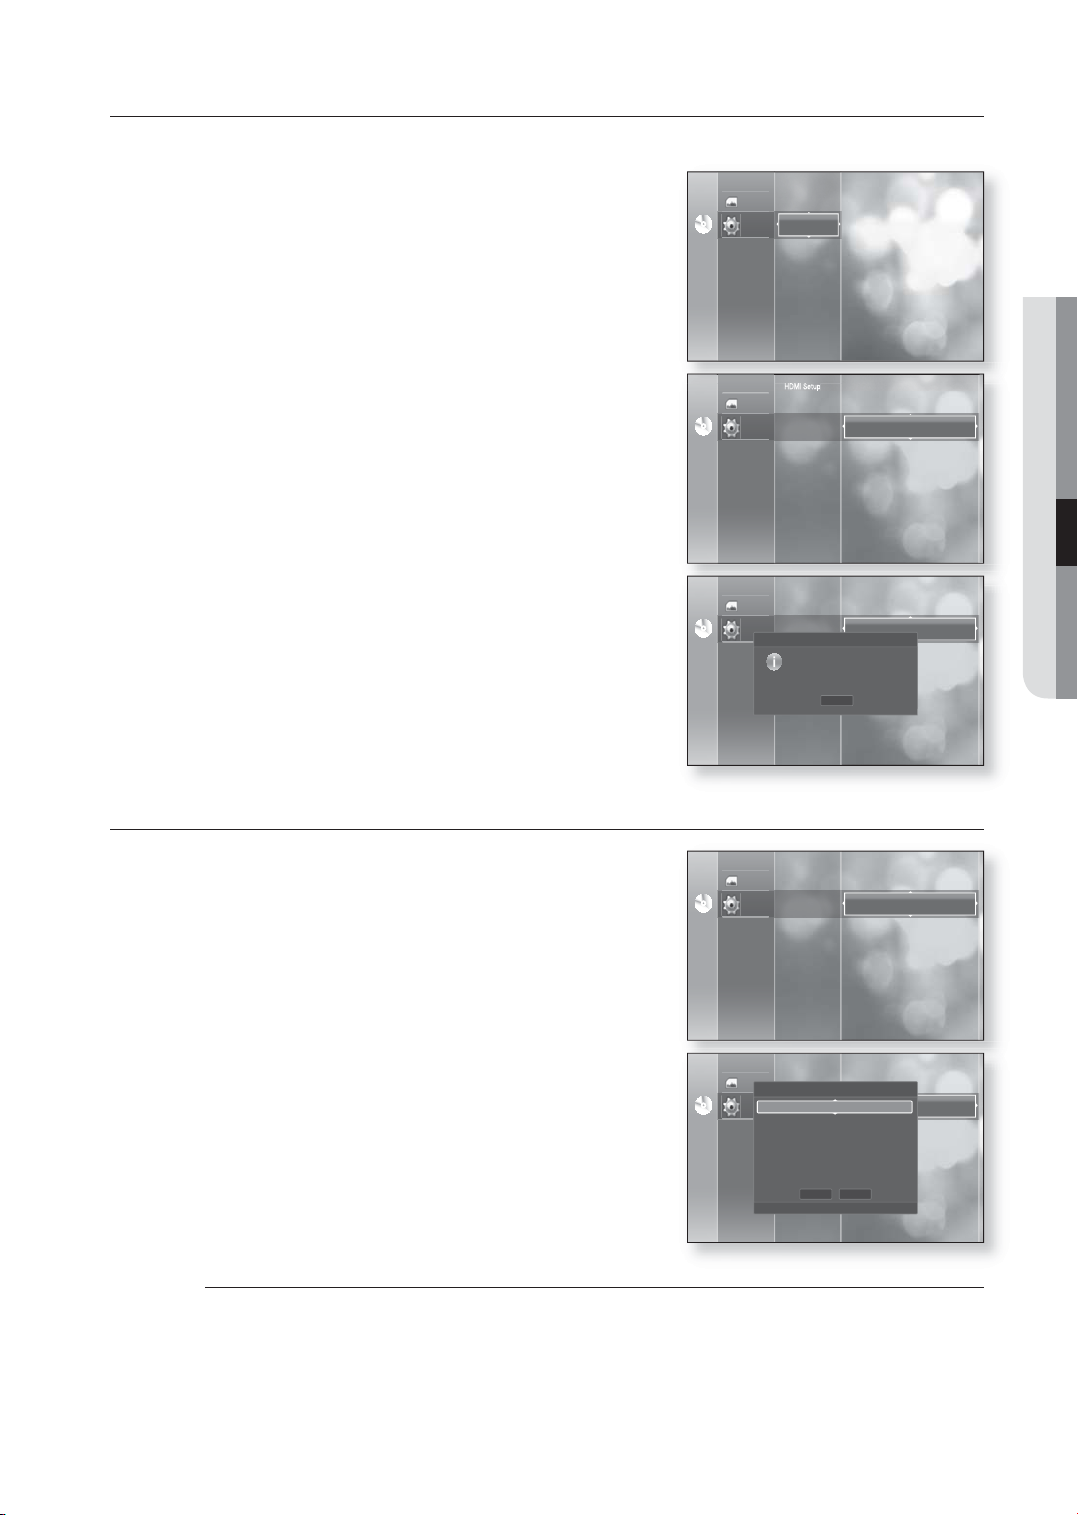
SYSTEM INFORMATION
When the fi rmware upgrade is done, check the fi rmware details by following the steps below.
1.
With the unit in Stop mode, press the MENU button.
2.
Press the
ENTER or
3.
Press the
press the ENTER or
▲▼
buttons to select Setup, then press the
►
button.
▲▼
buttons to select System Upgrade, then
►
button.
NoDiscNo Disc
Photo
Setup
HDMI Setup
Parental Setup
System Upgrade
● SYSTEM UPGRADE
4.
Press the
then press the ENTER or
▲▼
buttons to select System Information,
►
button.
You can see detailed information about the current
fi rmware.
5.
Press the ENTER button to select OK.
System Upgrade menu will be displayed.
NETWORK SETUP
In some rare cases, the fi rmware upgrade may not succeed.
If this occurs, you may need to set up your IP address, Subnet, Mask,
Gateway and DNS by following the steps below.
To setup, follow steps 1 and 3 above
▲▼
Press the
4.
press the ENTER or
You will see a menu that allows you to make network
settings.
buttons to select Network setup, then
►
button.
HDMI Setup
Parental Setup
Photo
System Upgrade
Setup
NoDiscNo Disc
HDMI Setup
Parental Setup
Photo
System Upgrade
Setup
NoDiscNo Disc
NoDiscNo Disc
System Information
S/W : XXXXXX_XXX
Region : A/01 (BD/DVD)
HDMI Setup
Parental Setup System Information
Photo
System Upgrade
Setup
System Information
Network Setup
Upgrade Start
System Information
Network Setup
Upgrade Start
OK
Network Setup
Upgrade Start
Press the
5.
ENTER button.
If DHCP is set to On, you can't select IP Address, Subnet Mask or Gateway.
M
If DNS is set to Automatic, you can’t select Primary/ Secondary DNS.
▲▼
buttons to select DHCP, then press the
HDMI Setup
Parental Setup System Information
Photo
Network Setup
System Upgrade
Setup
NoDiscNo Disc
DHCP : On
IP Address : 000 . 000 . 000 . 000
Subnet Mask : 255 . 255 . 255 . 000
Gateway : 000 . 000 . 000 . 000
DNS : Automatic
Primary DNS : 000 . 000 . 000 . 000
Secondary DNS : 000 . 000 . 000 . 000
Network Setup
Upgrade Start
Save Cancel
s
SELECT² RETURN
English _47
Page 49
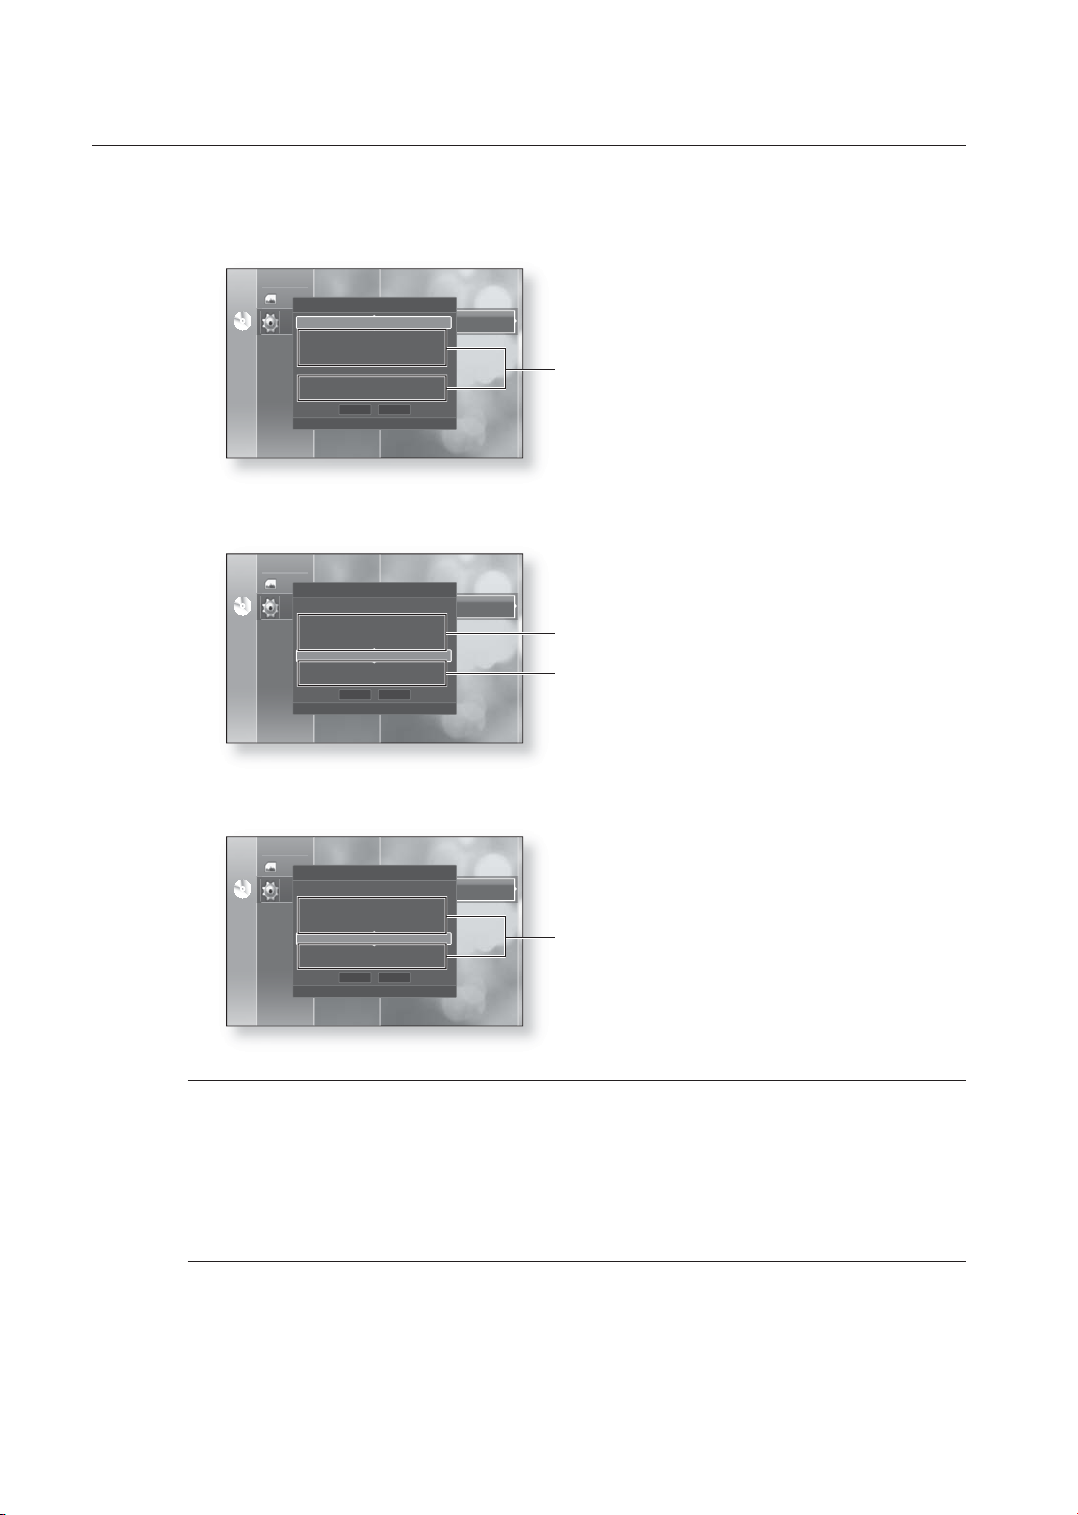
system upgrade
6.
Press the ▲▼ buttons to select a desired item, then press the ENTER button.
If DHCP is set to Off and DNS is set to Manual
•
HDMI Setup
Parental Setup System Information
Photo
Network Setup
System Upgrade
Setup
NoDiscNo Disc
If DHCP is set to On and DNS is set to Manual
•
NoDiscNo Disc
DHCP : Off
IP Address : 000 . 000 . 000 . 000
Subnet Mask : 255 . 255 . 255 . 000
Gateway : 000 . 000 . 000 . 000
DNS : Manual
Primary DNS : 000 . 000 . 000 . 000
Secondary DNS : 000 . 000 . 000 . 000
HDMI Setup
Parental Setup System Information
Photo
Network Setup
System Upgrade
Setup
DHCP : On
IP Address : 000 . 000 . 000 . 000
Subnet Mask : 255 . 255 . 255 . 000
Gateway : 000 . 000 . 000 . 000
DNS : Manual
Primary DNS : 000 . 000 . 000 . 000
Secondary DNS : 000 . 000 . 000 . 000
Network Setup
Upgrade Start
Save Cancel
s
SELECT² RETURN
Network Setup
Upgrade Start
Save Cancel
s
SELECT² RETURN
Setup available
Setup not available
Setup available
If DHCP is set to On and DNS is set to Automatic
•
HDMI Setup
Parental Setup System Information
Photo
Network Setup
System Upgrade
Setup
NoDiscNo Disc
M
When done, use the ▲▼ buttons to select Save, then press the ENTER button.
7.
If you don’t want to save your work, use the
8.
DHCP : On
IP Address : 000 . 000 . 000 . 000
Subnet Mask : 255 . 255 . 255 . 000
Gateway : 000 . 000 . 000 . 000
DNS : Automatic
Primary DNS : 000 . 000 . 000 . 000
Secondary DNS : 000 . 000 . 000 . 000
When you select an item, use the number and ▲▼◄► buttons.
Network Setup
Upgrade Start
Save Cancel
s
SELECT² RETURN
Setup not available
▲▼◄►
buttons to select Cancel, then press the
ENTER button.
The IP address used in this manual is for illustrative purposes only. You must refer to the your network settings
M
for the actual IP address.
48_ system upgrade
Page 50
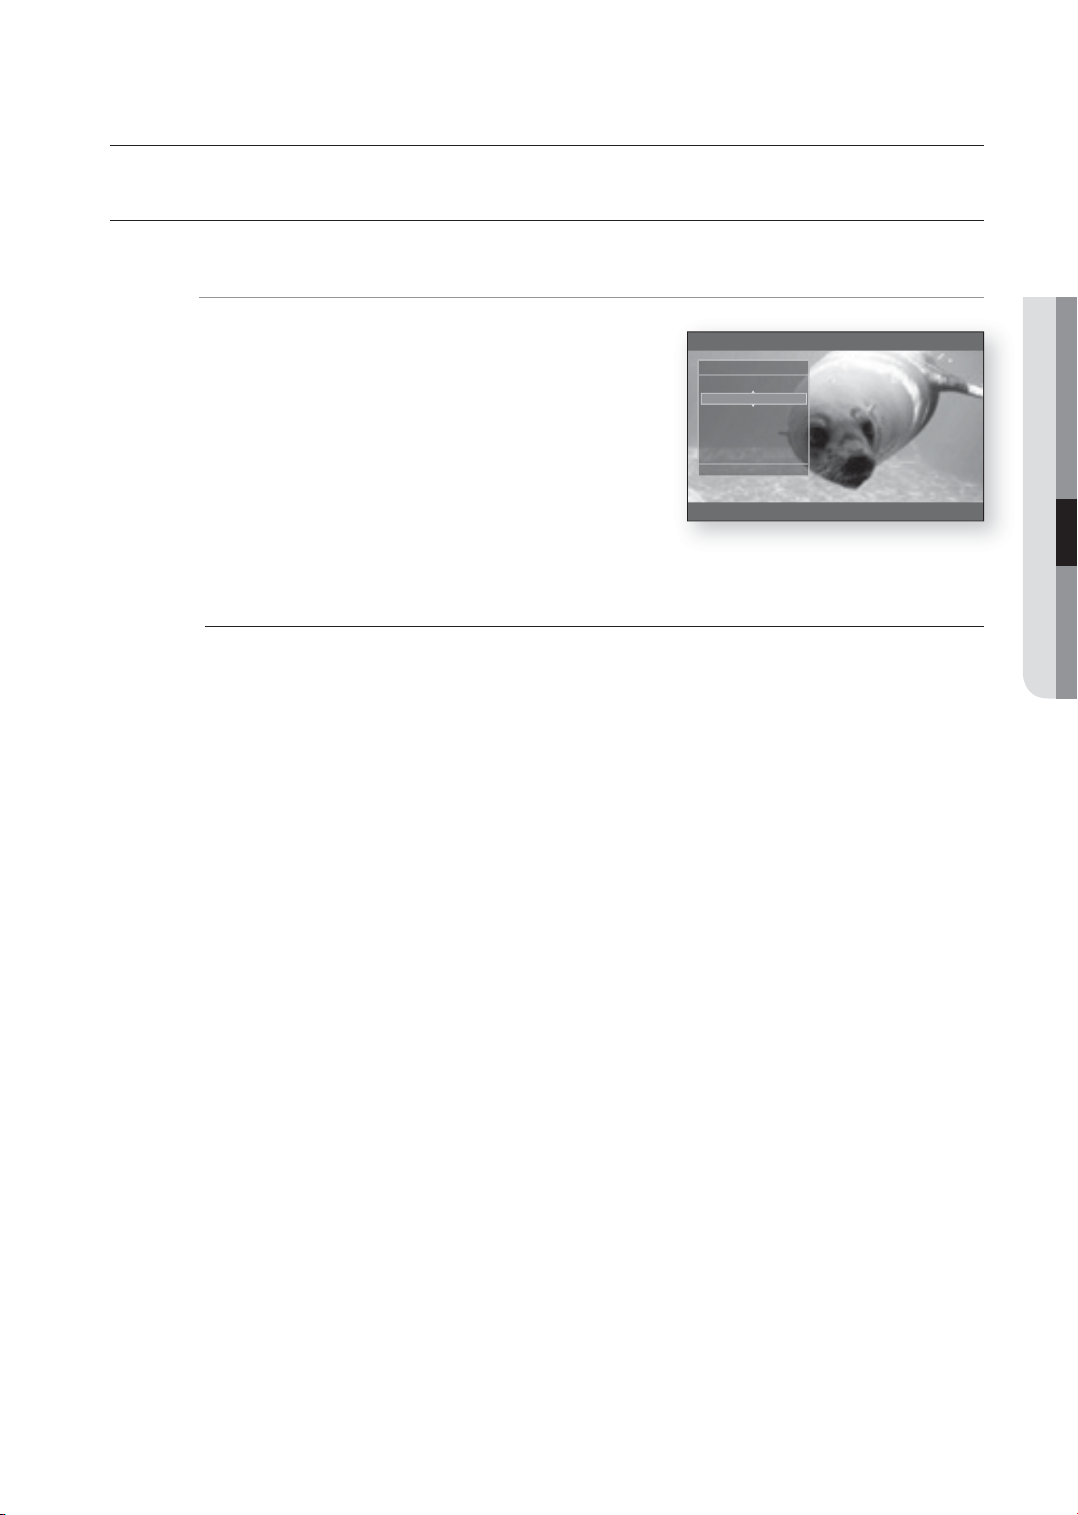
watching a movie
USING THE DISPLAY FUNCTION
1.
During playback, press the INFO button on the remote
control.
2.
Press the
3.
Press the
press the ENTER button.
•
You may use the number buttons of the remote control
to directly access a title, chapter or to start the playback
from a desired time.
4.
To make the screen disappear, press the INFO button again.
If you are playing contents from the Info menu, in some cases, playback may malfunction depending on the
M
title.
Title : To access the desired title when there is more than one in the disc. For example, if there is more than
one movie on a BD/DVD, each movie will be identifi ed as a Title.
Chapter: Most BD/DVD discs are recorded in chapters so that you can quickly fi nd a specifi c passage.
Playing Time : Allows playback of the fi lm from a desired time. You must enter the starting time
as a reference. The time search function does not operate on some discs.
Audio : Refers to the fi lm's soundtrack language. A BD disc can contain up to 32 audio languages and a DVD
up to 8.
Subtitle : Refers to the subtitle languages available in the disc. You will be able to choose the subtitle
languages or, if you prefer, turn them off from the screen. A BD disc can contain up to 255 subtitle languages,
and a DVD up to 32.
Angle : When a BD/DVD contains multiple angles of a particular scene, you can use the ANGLE function.
buttons to select the desired item.
▲▼
◄►
buttons to make the desired setup and then
hZCV
BD Info
Title
: 001/006
: 001/016
Chapter
: 00:04:17
Playing Time
: ENG Multi CH
Audio
: Off
Subtitle
: 01/01
Angle
§
CHANGEs SELECT
● WATCHING A MOVIE
English _49
Page 51
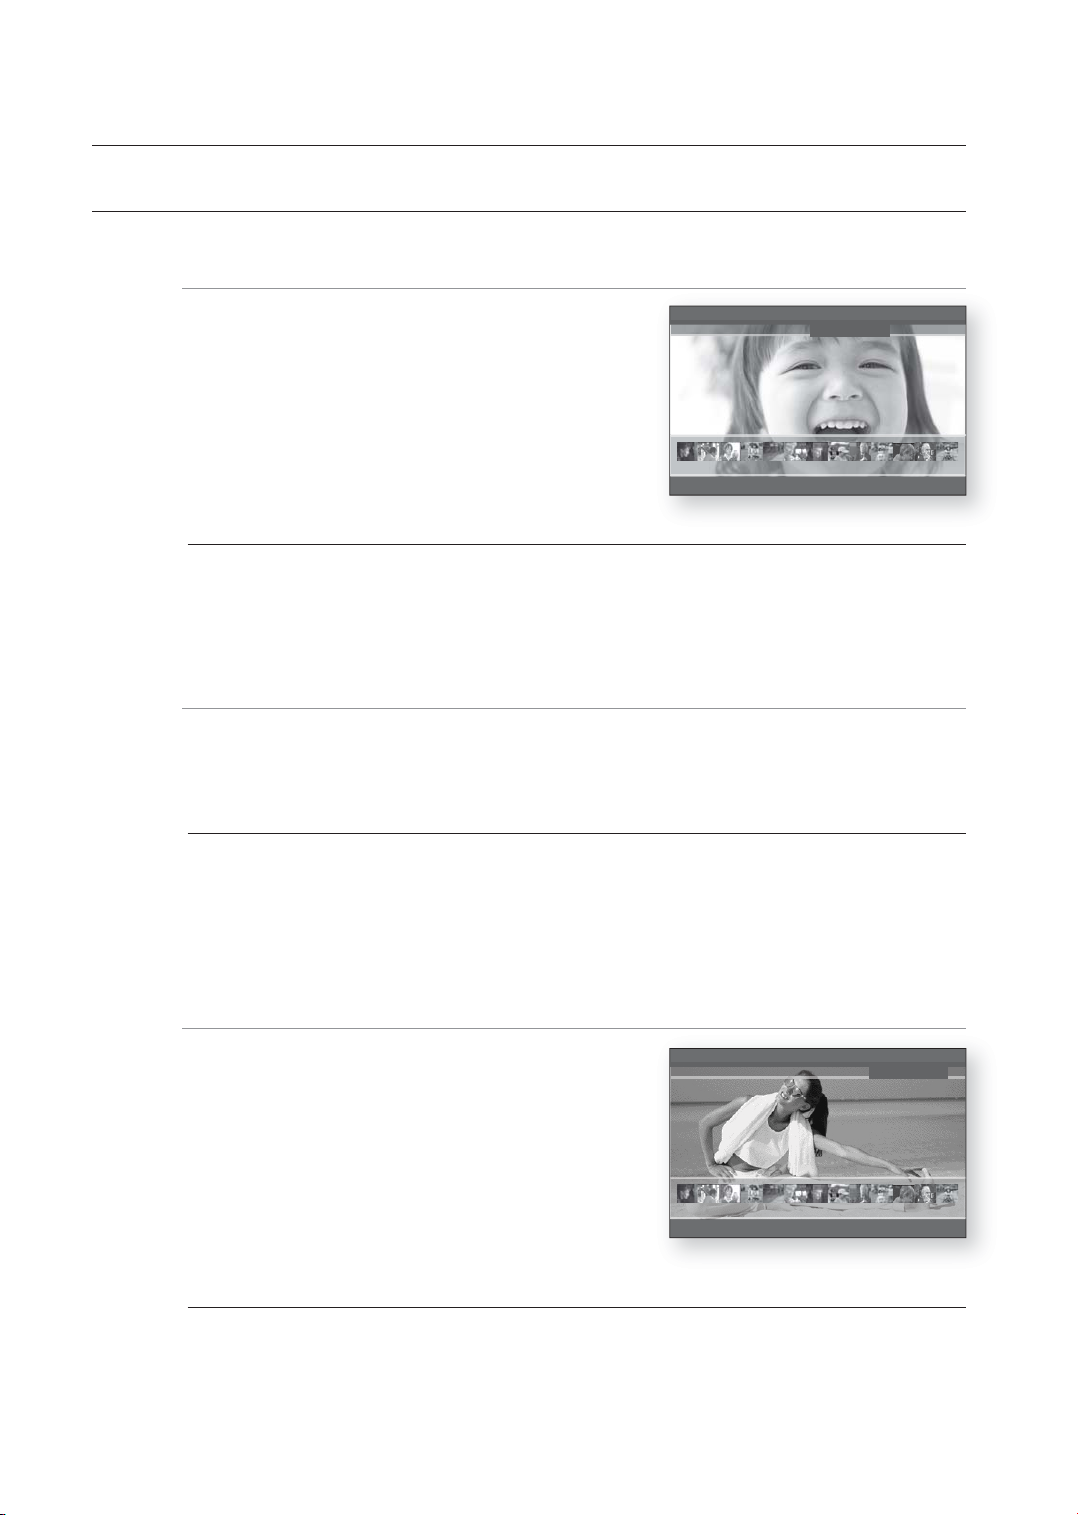
watching a movie
USING THE DISC MENU & POPUP/TITLE MENU
Using the Disc Menu
1.
During playback, press the DISC MENU button on the
remote control.
2.
Press the
then press the
•
M
▲▼◄►
The Disc menu setup items may vary from disc to disc.
Depending on the disc, the Disc Menu may not be available.
buttons to make the desired setup,
►
or ENTER button.
PLAY MOVIE LANGUAGES SCENE SELECTIONS PREVIEWS
3 4 5 6 7 8 9 10 11 12 13 14 15
Using the Title Menu
During playback, press the TITLE MENU button on the remote control.
1.
Press the
2.
•
▲▼◄►
The Title menu setup options may vary from disc to disc.
buttons to make the desired setup, then press the ENTER button.
hZ
▼
Z
Depending on the disc, the Title Menu may not be available.
M
Title Menu will only be displayed if there are at least two titles in the disc.
Using the Popup Menu
During playback, press the POPUP MENU button on the
1.
remote control.
Press the
2.
desired menu.
•
M
▲▼◄►
The Popup menu setup options may vary from disc to
disc.
Depending on the disc, the Popup Menu may not be available.
buttons or ENTER button to select the
h
MAIN MENU AUDIO SETUP SUBTITLES SCENE SELECTIONS
▼
3 4 5 6 7 8 9 10 11 12 13 14 15
50_ watching a movie
Page 52
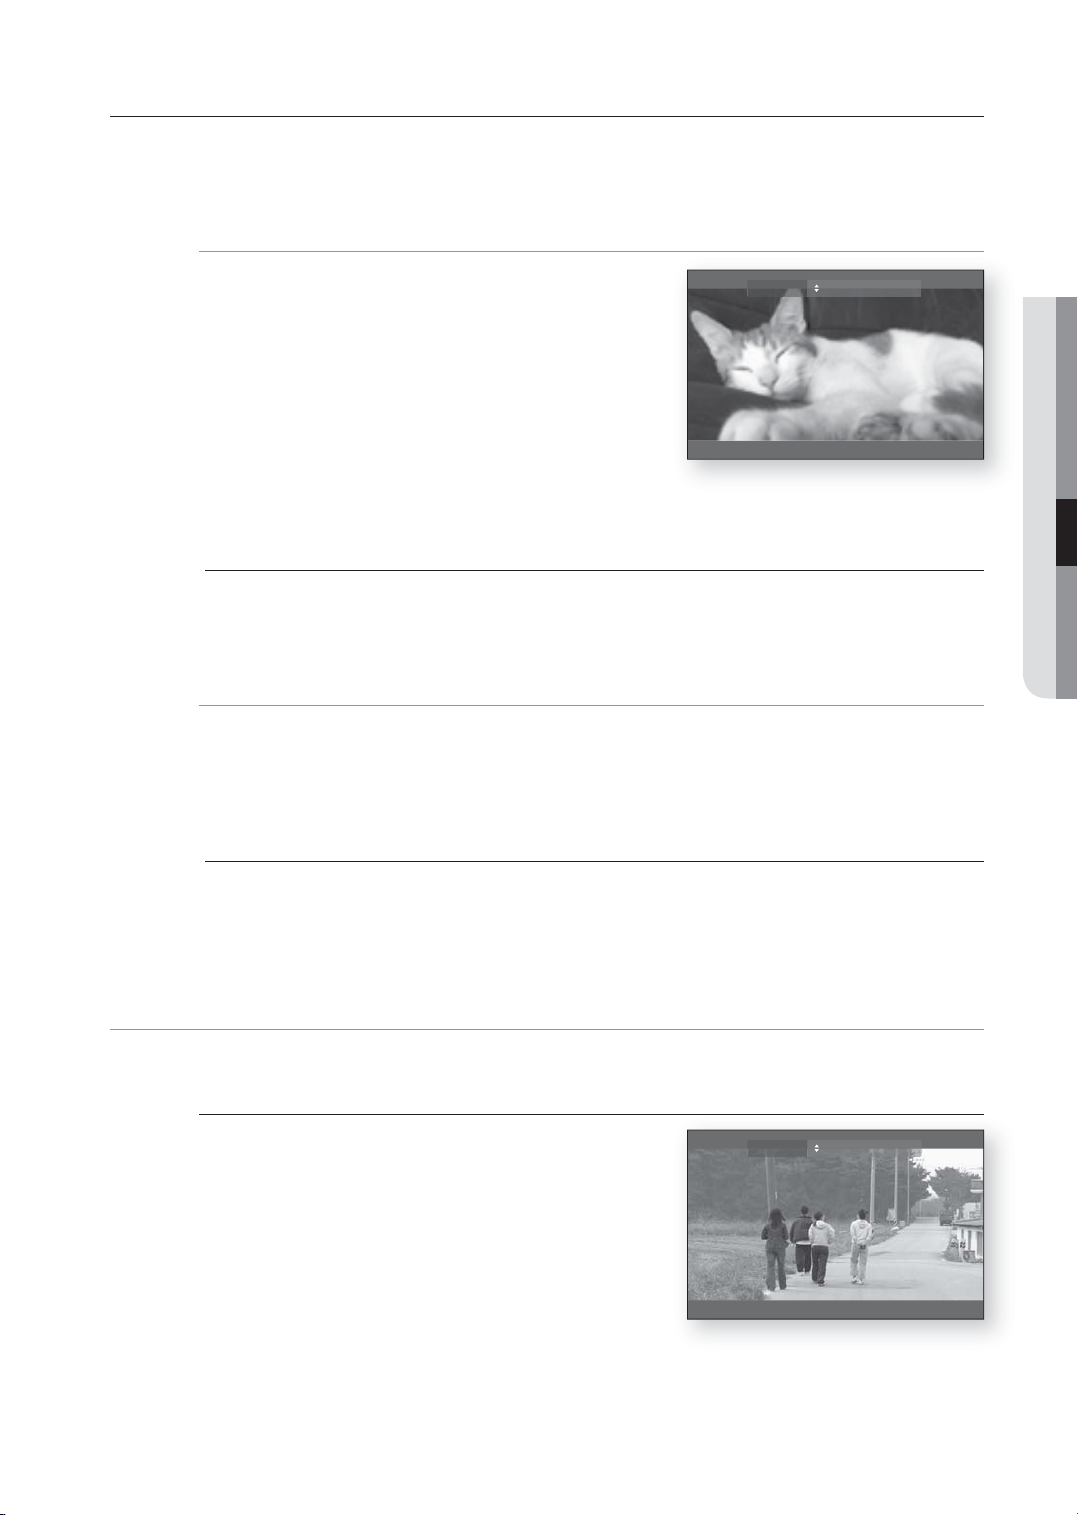
REPEAT PLAY
Repeat the current chapter or title.
Repeat playback
During playback, press the REPEAT button on the remote
1.
control. Repeat screen appears.
▲▼
Press the
2.
BD/DVD repeats play by chapter or title.
•
To return to normal play, press the REPEAT button again, then press the
3.
Depending on the disc, the Repeat function may not be available.
M
buttons to select Chapter or Title.
Repeat Off
▲▼
Using the A-B Repeat function
Press the Repeat A-B button on the remote control.
1.
Press the Repeat A-B button at the point where you want repeat play to start (A).
2.
Press the Repeat A-B button at the point where you want repeat play to stop (B).
3.
To return to normal play, press the CANCEL button.
4.
hZCV
● WATCHING A MOVIE
buttons to select Off.
hZCV
Point B cannot be set until 5 seconds of playback has elapsed from point A.
M
SELECTING THE AUDIO LANGUAGE
You can select a desired audio language quickly and easily with the AUDIO button.
Using the AUDIO button
Press the AUDIO button during playback. The Audio
1.
changes when the button is pressed repeatedly.
The audio languages are represented by abbreviations.
•
To remove the AUDIO icon, press the CANCEL or
2.
RETURN button.
hZ
Audio ENG Dolby Digital Multi CH
English _51
Page 53
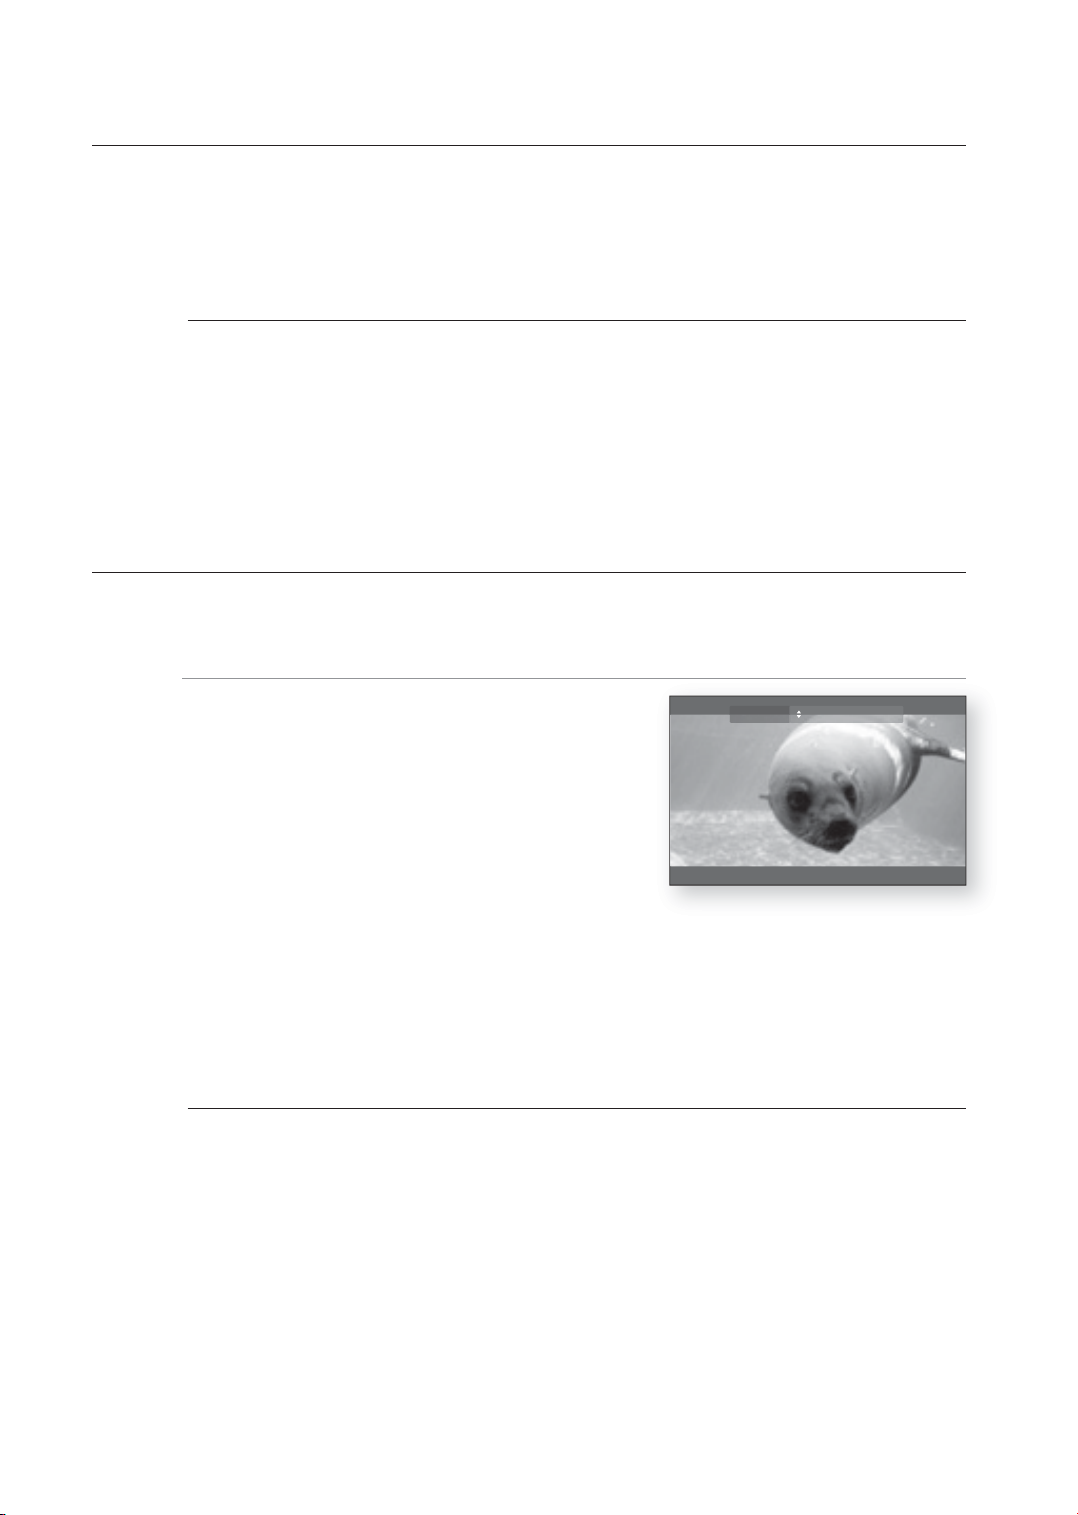
watching a movie
Using the INFO button
1.
During playback, press the INFO button on the remote control.
2.
Press the
3.
Press the
M
SELECTING THE SUBTITLE LANGUAGE
You can select a desired subtitle quickly and easily with the SUBTITLE button.
▲▼
buttons to select Audio language.
◄►
buttons on the remote control to select the desired audio.
This function depends on what audio languages are encoded on the disc and may not be available.
A BD disc can contain up to 32 audio languages and a DVD up to 8.
Depending on the disc type, you can use the Audio button to change the audio sound track as well as the
audio language.
Some Blu-ray Discs may allow you to select either multi-channel LPCM or Dolby digital audio sound track in
English sound tracks.
Using the SUBTITLE button
Press the SUBTITLE button. The subtitle changes when
1.
the button is pressed repeatedly. The subtitle languages
are represented by abbreviations.
To remove the SUBTITLE icon, press the CANCEL or
2.
RETURN button.
Using the INFO button
During playback, press the INFO button on the remote control.
1.
▲▼
Press the
2.
Press the
3.
M
Depending on BD/DVDs, you may have to change the desired subtitle in the Disc Menu. Press the DISC MENU
button.
This function depends on what subtitles are encoded on the disc and may not be available on all BD/DVDs.
A BD disc can contain up to 255 subtitle languages and a DVD up to 32.
buttons to select Subtitle.
◄►
buttons on the remote control to select the desired subtitle language.
hZ
Subtitle ENG
52_ watching a movie
Page 54
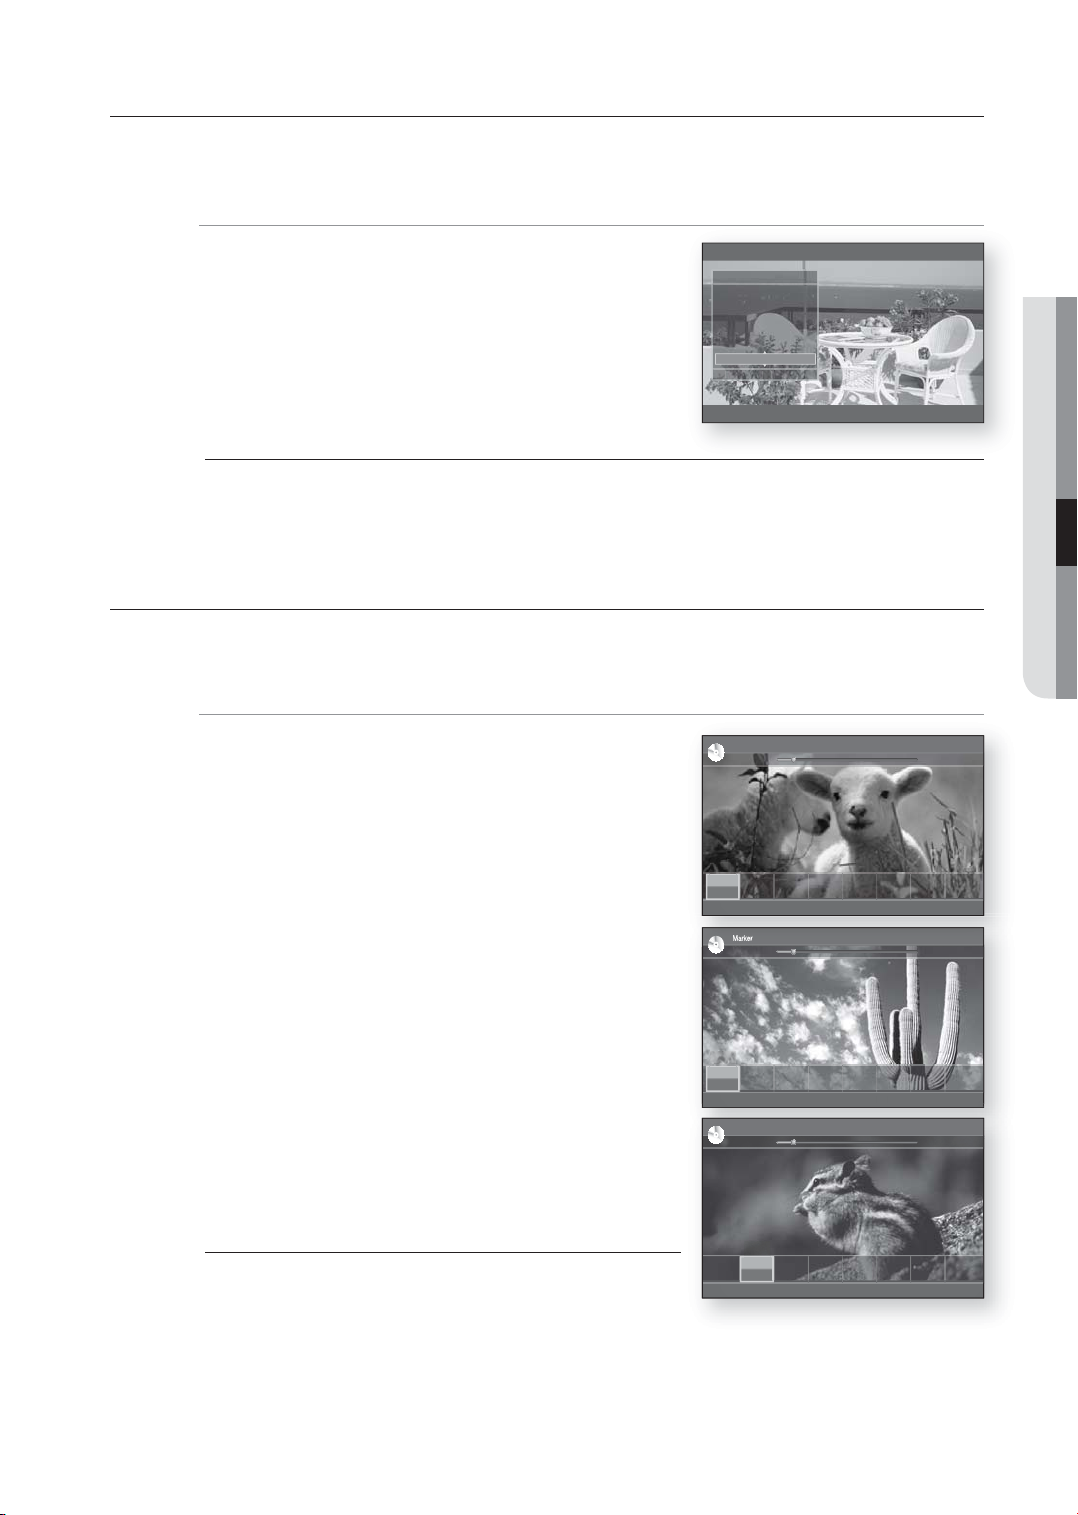
CHANGING THE CAMERA ANGLE
When a BD/DVD contains multiple angles of a particular scene, you can use the ANGLE function.
Using the ANGLE function
During playback, press the INFO button on the remote control.
1.
Press the ▲▼ buttons to select Angle.
2.
Press the ◄►buttons or you can use the number buttons
3.
BD Info
Title
: 001/006
Chapter
: 003/016
Playing Time
: 00:11:14
Audio
: ENG Multi CH
Subtitle
: ENG
Angle
: 01/01
§
CHANGE¨ MOVE
on the remote control to select the desired angle.
M
If the disc has only one angle, this feature won’t work. Currently, very few discs have this feature.
Depending on the disc, these functions may not work.
USING THE BOOKMARK FUNCTION
The features lets you bookmarks sections of a DVD so you can quickly fi nd them at a later time.
Using the MARKER button
During playback, press the MARKER button on the remote
1.
control.
The Bookmark screen appears.
Marker
BD
►
hZCV
hZ
● WATCHING A MOVIE
00:12:13 / 01:53:26
Press the ENTER button when the desired scene appears.
2.
The selected scene will be stored.
◄►
Press the
3.
Press the ENTER button again when the desired scene
4.
buttons to move to the next position.
appears.
The scene will be stored at the selected position and the
bookmark time information will be shown.
Repeat above to bookmark other positions.
•
You can bookmark up to 8 scenes.
•
When the disc tray is opened and then closed, bookmarks will
M
disappear.
Add Add Add Add Add Add Add Add
Marker
BD
►
T:1
Add Add Add Add Add Add Add
00:12:17
a
DELETE
Marker
BD
►
T:1
00:12:17
00:12:27
a
DELETE
§
MOVEs ADD
§
MOVEs Play
T:1
Add Add Add Add Add Add
§
MOVEs Play
e
EXIT
00:12:21 / 01:53:26
e
EXIT
00:12:33 / 01:53:26
e
EXIT
English _53
Page 55
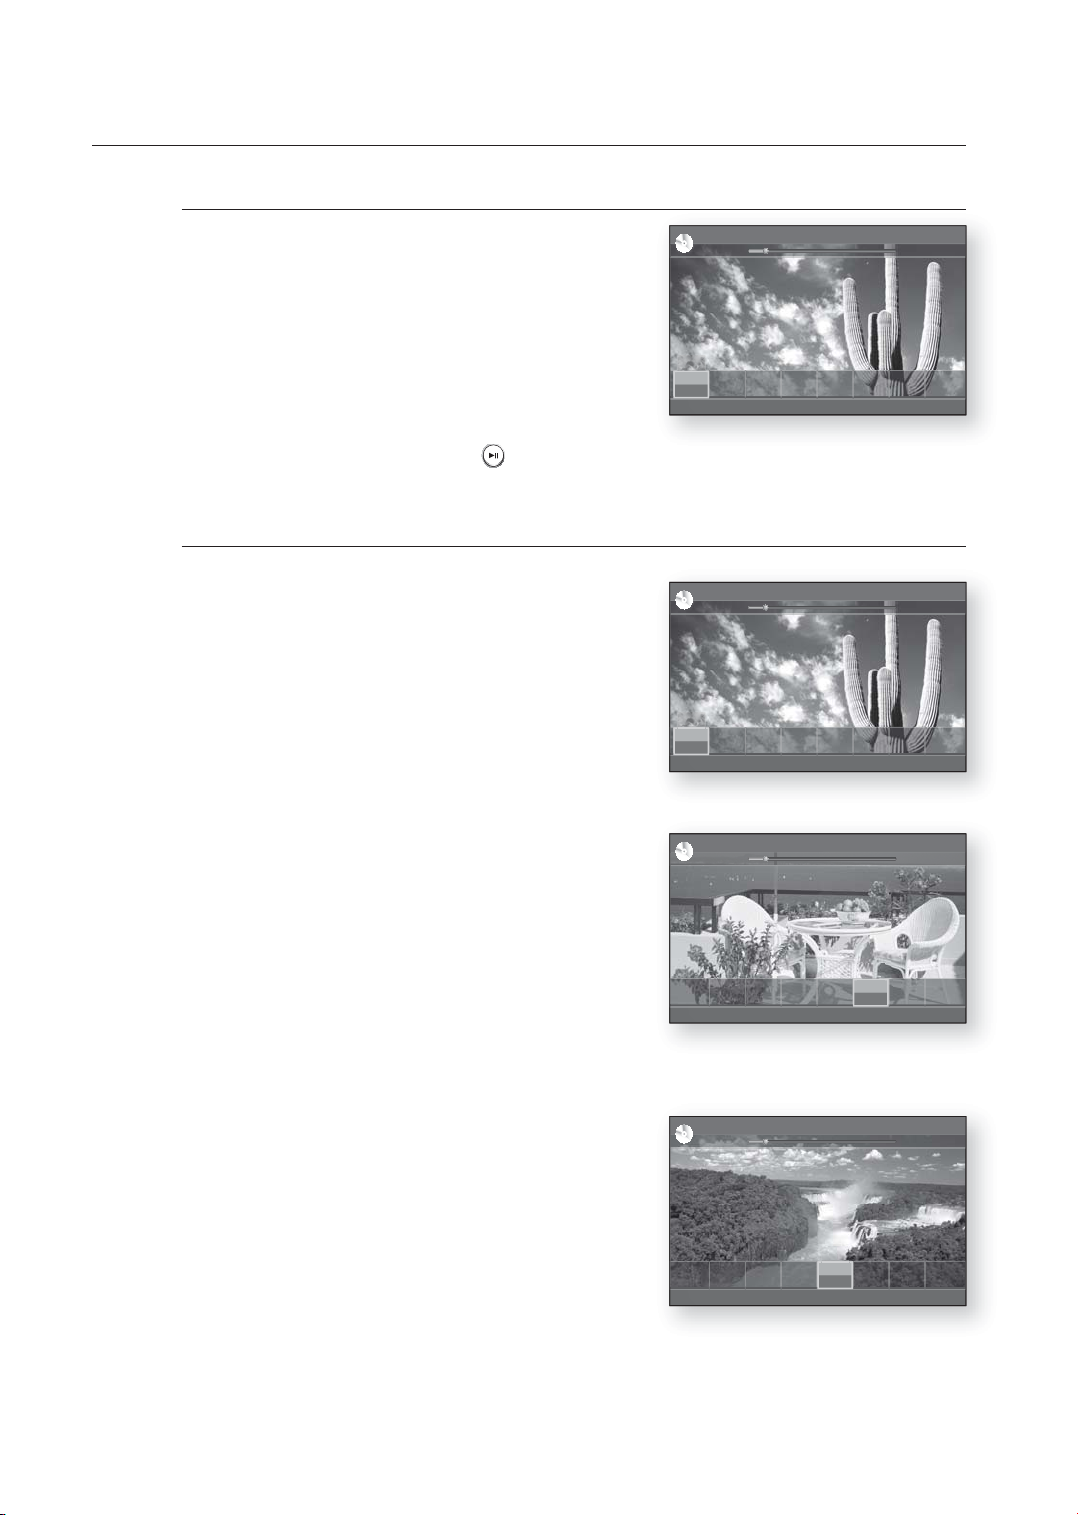
watching a movie
Playing back a bookmark
During playback, press the MARKER button on the
1.
remote control.
◄►
Press the
2.
Press the ENTER or PLAY/PAUSE(
3.
buttons to select a bookmarked scene.
) button to start playing from the selected scene.
Clearing a bookmark
During playback, press the MARKER button on the
1.
remote control.
Marker
BD
►
T:1
T:1
00:12:17
a
DELETE § MOVEs Play
BD
T:1
00:12:17
a
DELETE § MOVEs Play
Add Add Add Add Add Add
00:12:27
Marker
►
T:1
T:1
00:12:53
T:1
00:12:55
00:12:27
T:1
00:12:57
T:1
00:12:59
00:12:21 / 01:53:26
e
EXIT
00:13:11 / 01:53:26
Add Add
e
EXIT
◄►
Press the
2.
Press the RED(A) or CANCEL button to delete the
3.
buttons to select a bookmarked scene.
selected bookmark.
Marker
BD
►
T:1
T:1
T:1
00:12:17
00:12:27
a
DELETE § MOVEs Play
Marker
BD
►
T:1
T:1
00:12:17
00:12:27
a
DELETE § MOVEs Play
00:12:53
T:1
00:12:53
T:1
00:12:55
T:1
00:12:55
T:1
00:12:57
T:1
00:12:57
00:13:27 / 01:53:26
T:1
Add Add
00:12:59
e
EXIT
00:13:38 / 01:53:26
Add Add Add
e
EXIT
54_ watching a movie
Page 56
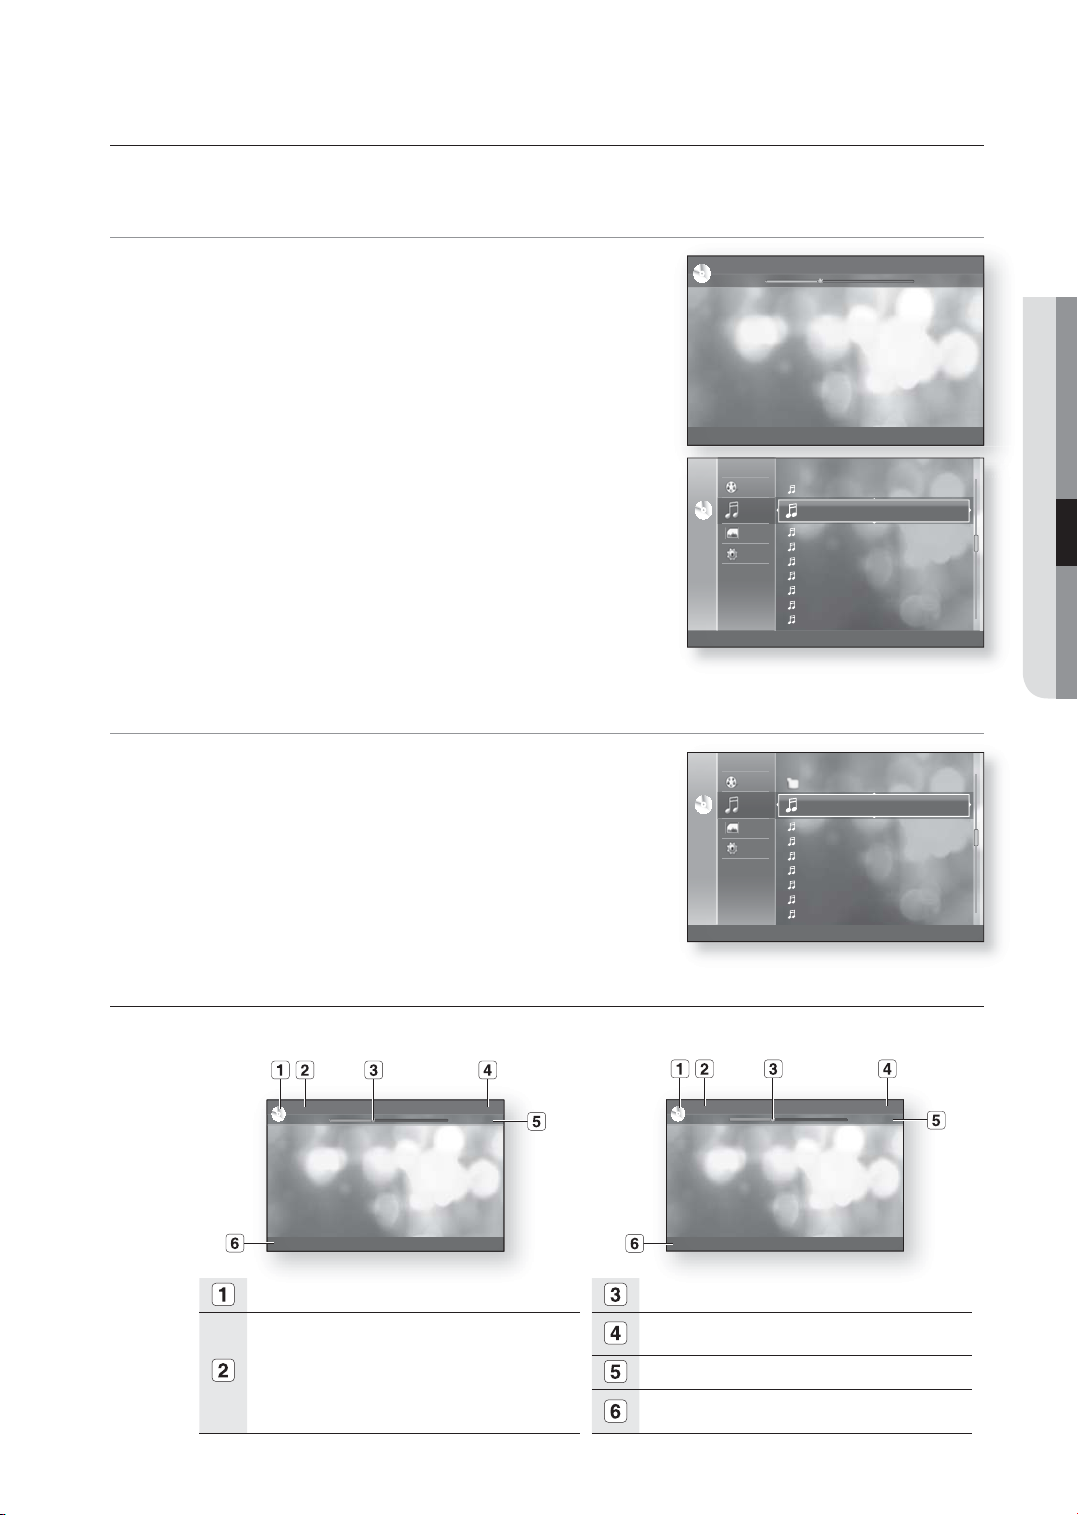
listening to music
PLAYING AN AUDIO CD(CD-DA)
Insert an Audio CD(CD-DA) into the disc tray.
1.
For an audio CD, the fi rst track will be played
automatically.
To move to the Music List, press the STOP or RETURN
2.
button.
The Music List screen is displayed
▲▼
Press the
3.
buttons to select the track you want to play,
and then press the ENTER button.
PLAYING AN MP3
Insert an MP3 disc into the disc tray.
1.
The Menu screen is displayed.
•
Press the
2.
ENTER button.
•
3.
Press the
play, and then press the ENTER button.
▲▼
buttons to select Music, then press the
The Music List is displayed.
▲▼
buttons to select the MP3 fi le you want to
TRACK 001 01/12
CDCD
►
a
Play Mode
Video
TRACK 005 00:03:20
Music
CDCD
Photo
Setup
Video
Music
CDCD
Photo
Setup
TRACK 006 00:03:20
TRACK 007
TRACK 008
TRACK 009
TRACK 010
TRACK 011
TRACK 012
TRACK 013
b
Playlist
Root
Song01.mp3 00:03:06
Song02.mp3
Song03.mp3
Song04.mp3
Song05.mp3
Song06.mp3
Song07.mp3
Song08.mp3
b
Playlist
21 Jun 2007
21 Jun 2007
21 Jun 2007
21 Jun 2007
21 Jun 2007
21 Jun 2007
21 Jun 2007
21 Jun 2007
B
00:01:29 / 00:04:06
00:03:32
00:04:36
00:04:17
00:04:11
00:04:07
00:04:46
00:04:21
A
00:03:32
00:03:38
00:03:41
00:03:43
00:04:05
00:03:27
00:03:51
● LISTENING TO MUSIC
AUDIO CD(CD-DA)/MP3 SCREEN ELEMENTS
<Audio CD(CD-DA)>
TRACK 001 01/12
CDCD
a
►
Play Mode
00:01:29 / 00:04:06
Displays the media type. Play Status Bar.
Current track (song)
Audio CD(CD-DA) : Displays the number of the
track currently being played.
MP3 : Displays the name of the track currently
being played.
<MP3>
a
Displays the current play index, total track number.
Current /Total Play Time.
Displays available COLOR buttons.
(see next page for Color button usage).
Song01.mp3 01/04
CDCD
►
Play Mode
00:00:05 / 00:05:02
English _55
Page 57
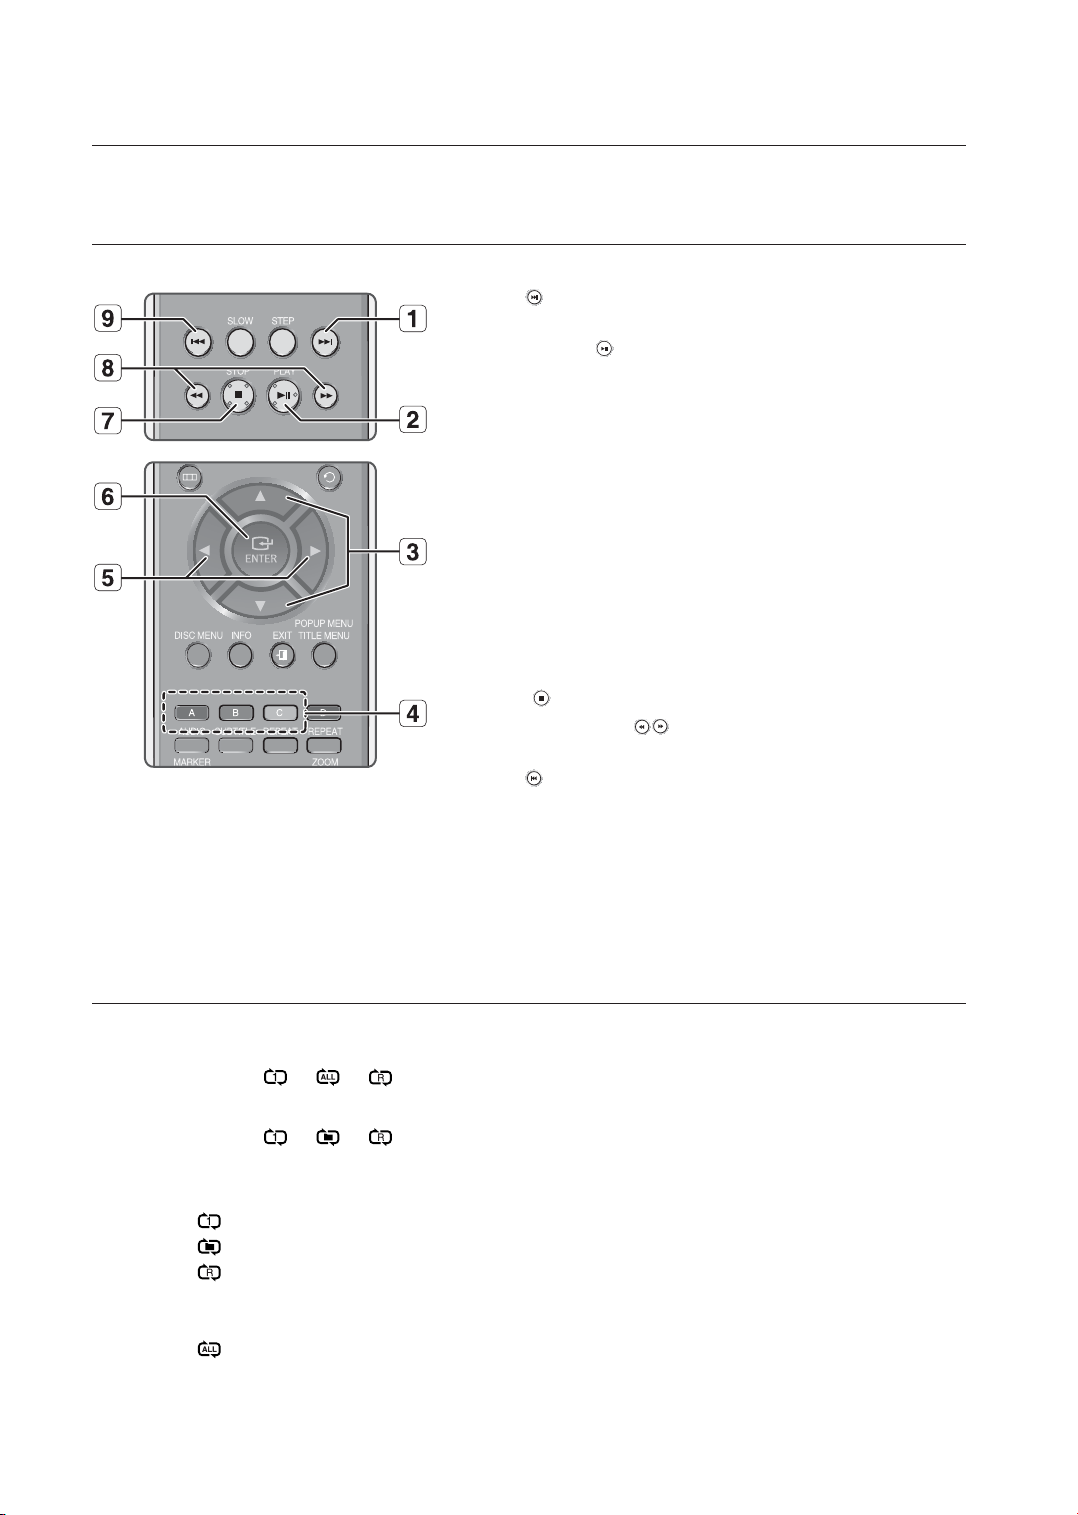
listening to music
BUTTONS ON THE REMOTE CONTROL USED FOR AUDIO CD
(CD-DA)/ MP3 DISC PLAYBACK
SKIP ( ) button: During playback, plays the next track. Moves
1.
to the next page in the Music List or the Playlist.
PLAY/PAUSE (
2.
pressed during playback, the current track is paused.
▲▼
buttons : Selects a track(song) or a folder in Music List or
3.
Playlist.
COLOR buttons: RED(A), GREEN(B), YELLOW(C)
4.
RED(A) button :
•
GREEN(B) button : Go to Playlist from Music List/Go to Music
•
list from Playlist.
YELLOW(C) button : Playlist play.
•
◄►
5.
6.
7.
8.
9.
buttons
►
: Moves to the applicable folder or plays the applicable track,
according to the current position.
◄
: Moves to the parent folder.
ENTER button : Plays the selected track (song).
STOP (
Press the SEARCH (
Fast Play (only Audio CD(CD-DA)).
SKIP (
when pressed during playback. If pressed again, your Blu-ray
Disc Player moves to and plays the previous track.
If you press this button within three seconds after playback
starts, the previous track will be played.
If you press this button after three seconds, the current track will
be replayed from the beginning.
Moves by the page in the Music List or the Playlist.
) button: Stops a track(song).
) button: Returns to the beginning of the current track
) button: Plays the currently selected track. If
Selects the Play Mode(Repeat) during playback.
) buttons :
REPEAT AUDIO CD(CD-DA) & MP3
During playback, press the REPEAT or RED(A) button repeatedly to select the repeat mode you want.
When playing an Audio CD(CD-DA) :
Normal
When playing an MP3 disc :
Normal
Normal (Audio CD(CD-DA)/MP3): Tracks on a disc are played in the order in which they were
•
recorded on the disc.
Repeat Track (Audio CD(CD-DA)/MP3)
•
Repeat Folder (MP3)
•
Random (Audio CD(CD-DA)/MP3)
•
- When playing an Audio CD(CD-DA): The random option plays a disc’s track in random order.
- When playing an MP3 disc : The random option plays a folder’s fi le in random order.
Repeat All (Audio CD(CD-DA)): All tracks are repeated.
•
- To return to normal playback Press the REPEAT or
56_ listening to music
RED(A)
button repeatedly to return to normal playback.
Page 58
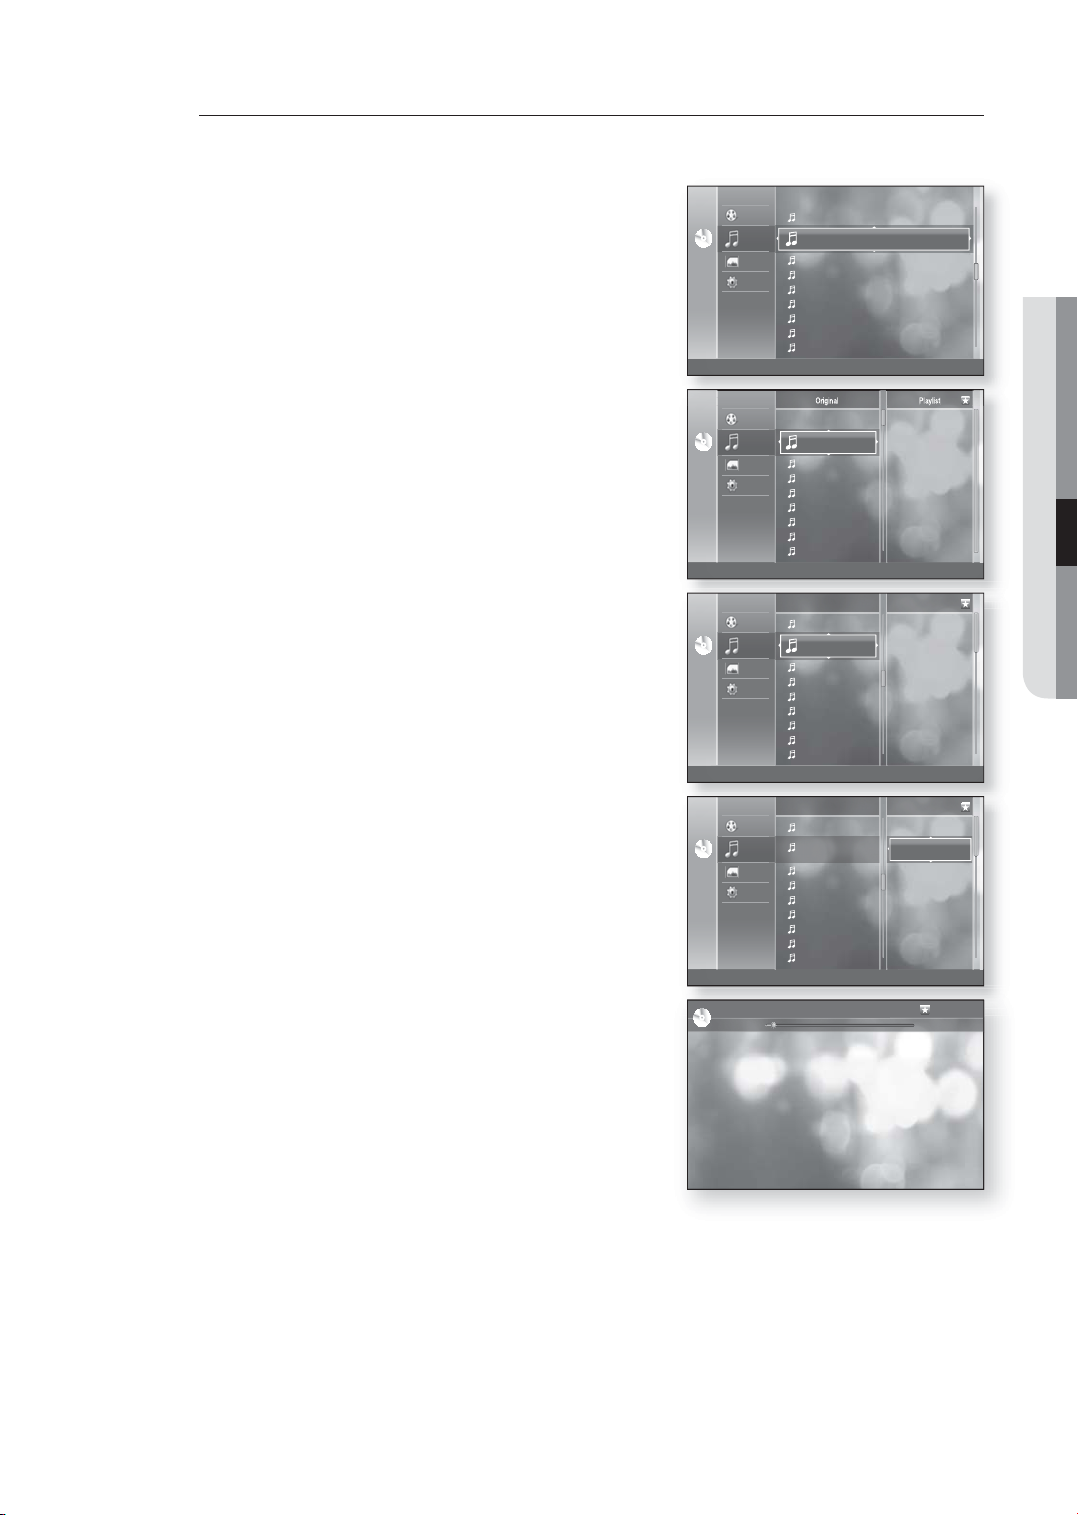
Playlist
You can create a playlist with up to 99 tracks.
To setup, follow steps 1 to 2 in page 55.
1.
Press the GREEN(B) button.
▲▼
2.
Press the
buttons to select a track, then press the
ENTER button to add it to the Playlist. Repeat this
procedure to add additional tracks.
If there is an undesired track in the playlist, press the
3.
►▲▼
button to select that track, and then press the
ENTER button.
The selected track will be deleted.
•
Video
TRACK 006 00:03:20
Music
CDCD
Photo
Setup
Video
Music
CDCD
Photo
Setup
Video
Music
CDCD
Photo
Setup
TRACK 007 00:03:32
TRACK 008
TRACK 009
TRACK 010
TRACK 011
TRACK 012
TRACK 013
TRACK 014
b
Playlist
Original Playlist
TRACK 001
TRACK 002
TRACK 003
TRACK 004
TRACK 005
TRACK 006
TRACK 007
TRACK 008
b
Music List Playlist Play
Original Playlist
TRACK 005
TRACK 006
TRACK 007
TRACK 008
TRACK 009
TRACK 010
TRACK 011
TRACK 012
TRACK 013
b
Music List Playlist Play
s
Add© Play
01.TRACK 002
02.TRACK 003
03.TRACK 004
04.TRACK 006
s
Add© Play
00:04:36
00:04:17
00:04:11
00:04:07
00:04:46
00:04:21
00:03:43
● LISTENING TO MUSIC
Press the YELLOW(C) button to play the selected tracks.
4.
When the track is fi nished, the next track will automatically
play.
To go back to the Music List, press the STOP or
5.
RETURN button.
Video
Music
CDCD
Photo
Setup
b
TRACK 002 01/04
CDCD
►
Original Playlist
TRACK 005
TRACK 006
TRACK 007
TRACK 008
TRACK 009
TRACK 010
TRACK 011
TRACK 012
TRACK 013
Music List Playlist Play
01.TRACK 002
02.TRACK 003
03.TRACK 004
04.TRACK 006
s
Delete© Play
00:00:05 / 00:05:02
English _57
Page 59
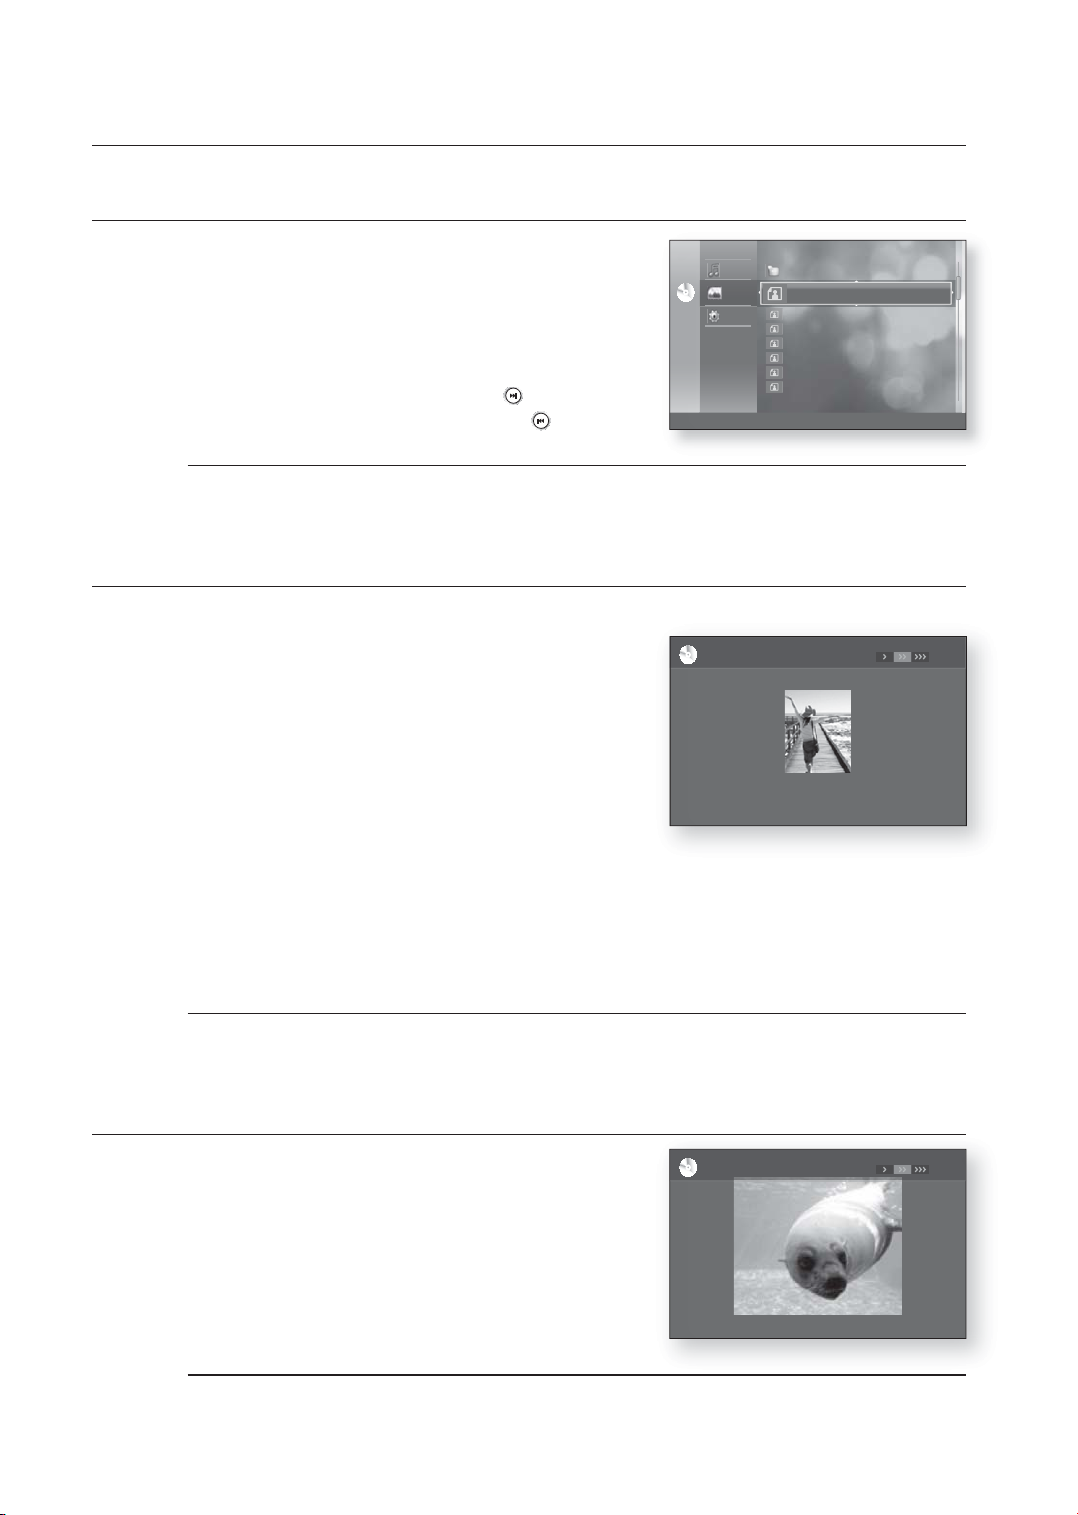
Viewing a Picture
VIEWING A PICTURE
1.
Insert a JPEG disc into the disc tray.
The Menu screen is displayed.
•
2.
Press the ▲▼ buttons to select Photo, then press the
ENTER button.
The Photo List is displayed.
•
Press the ▲▼ buttons to select a picture.
3.
To see the next page, press the SKIP (
•
•
To see the previous page, press the SKIP(
M
SLIDE SHOW
To setup, follow steps 1 and 2 above.
3.
Press the BLUE(D) button.
The slide show starts.
Photo fi les larger than 6Mb or with more than 7 million pixels may not be played.
) button.
) button.
Music
Photo
CDCD
Setup
►
_____1_.JPG
CDCD
Root
d
Slide Show
08 Feb 2003
17 Feb 2004
10 Apr 2003
10 Apr 2003
20 Apr 2002
08 Jul 2004
18 Feb 2004
176.JPG 127 KB
BEACH.JPG
KE.JPG
KE2.JPG
MBHONG.JPG
NEW_BEE.JPT
_____1_.JPG
27 KB
194 KB
191 KB
30 KB
76 KB
17 KB
07/07
4.
- To stop the Slide Show -
Press the STOP or RETURN button.
M
ROTATE
To setup, follow steps 1 and 3 above.
4.
5.
When the SlideShow starts, press the BLUE(D) button to
adjust the play speed.
Each time you press the button, the play speed will increase
accordingly.
JPEG's smaller than 1920 x 1080 will be displayed at normal resolution. They will not fully fi ll the screen.
KE.JPG
CDCD
Press the ENTER button.
Use the RED(A) and GREEN(B) buttons to rotate the image in a
desired direction.
ar90b u90
Zoomd Speed© Slide Show
d
Speed¦ Stop
04/07
M
Photo fi les larger than 6Mb or with more than 7 million pixels cannot be rotated.
58_ Viewing a Picture
Page 60
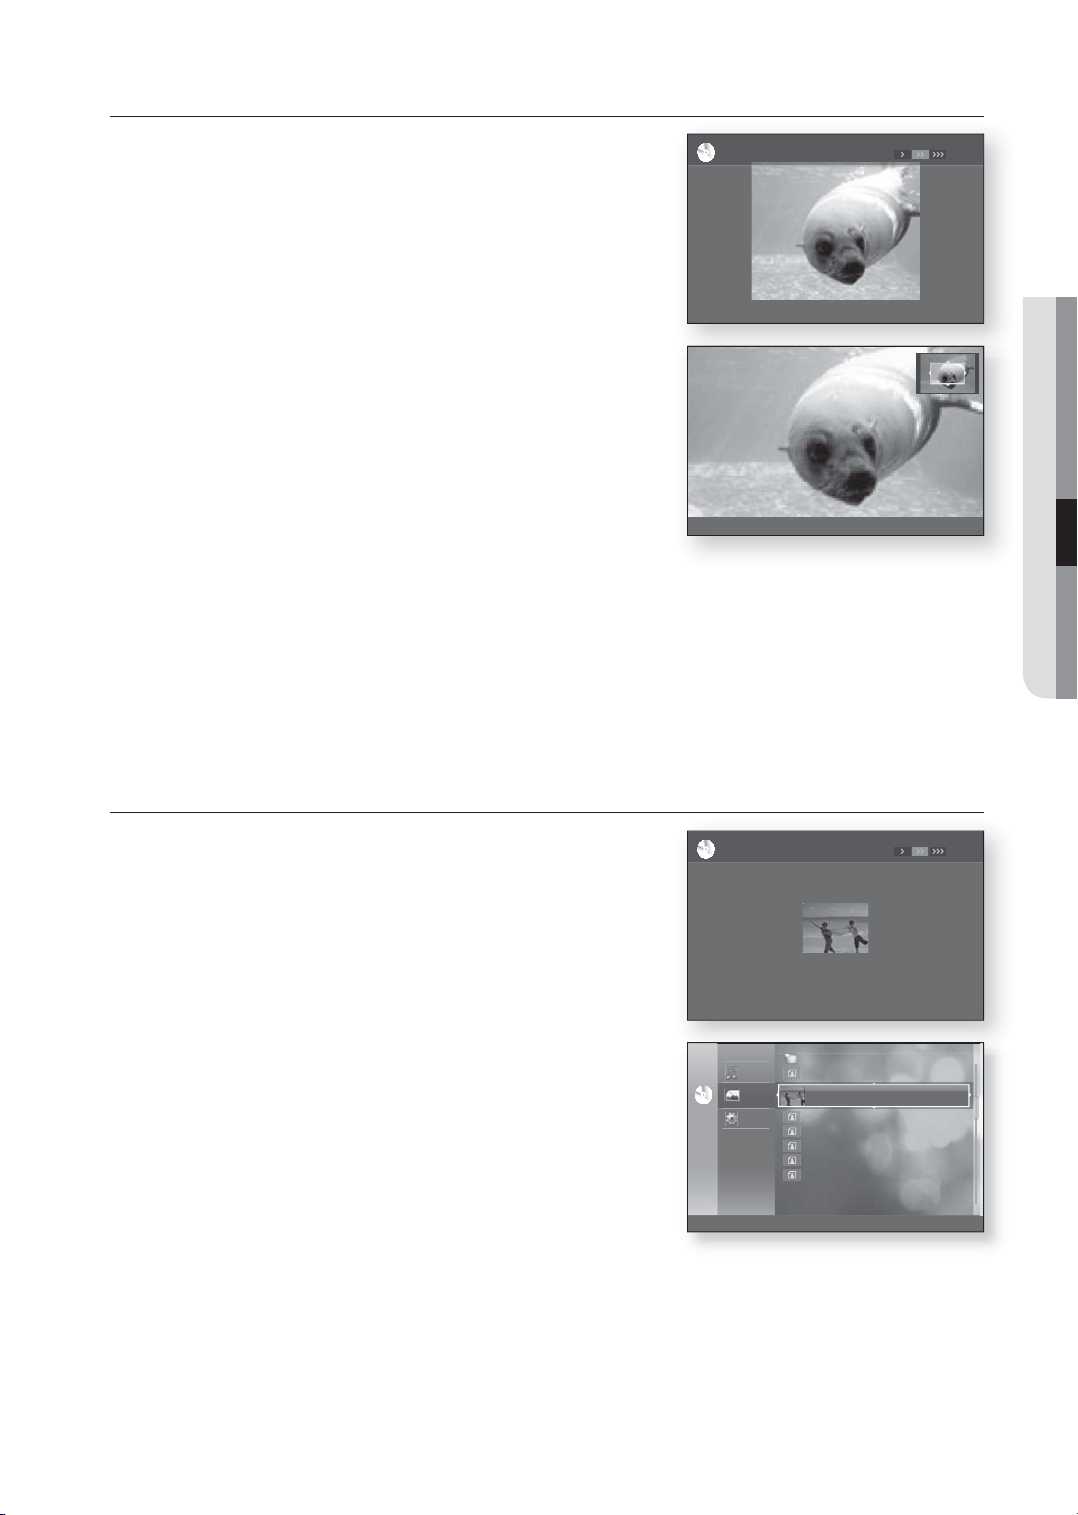
ZOOM
To setup, follow steps 1 to 3 in "Viewing a Picture" on page 58.
Press the ENTER button.
4.
Press the YELLOW(C) button.
5.
Use the RED(A) and GREEN(B) buttons to zoom in/out the
6.
image.
- To stop the Zoom Press the YELLOW(C) button.
KE.JPG
CDCD
ar90b u90
a
Zoom In b Zoom Out Zoom Off
Zoomd Speed© Slide Show
04/07
● VIEWING A PICTURE
x2
m
MOVE
GO TO PHOTO LIST
To setup, follow steps 1 to 3 in "Viewing a Picture" on page
58.
Press the ENTER button.
4.
To go Photo List, press the RETURN or STOP button.
5.
BEACH.JPG
CDCD
ar90b u90
Music
Photo
CDCD
Setup
Zoomd Speed© Slide Show
..
176.JPG
d
Slide Show
17 Feb 2004
10 Apr 2003
10 Apr 2003
20 Apr 2002
08 Jul 2004
18 Feb 2004
BEACH.JPG 27 KB
KE.JPG
KE2.JPG
MBHONG.JPG
NEW_BEE.JPT
_____1_.JPG
03/07
127 KB08 Feb 2003
194 KB
191 KB
30 KB
76 KB
17 KB
English _59
Page 61
troubleshooting
Before requesting service, please check the following.
PROBLEM SOLUTION
No operations can be performed with
the remote control.
Disc does not play.
5.1 channel sound is not being
reproduced.
Disc Menu doesn’t appear.
• Check the batteries in the remote control. They may need replacing.
• Operate the remote control at a distance of no more than 20 feet.
• Remove batteries and hold down one or more buttons for several minutes
to drain the microprocessor inside the remote control to reset it. Reinstall
batteries and try to operate the remote control again.
• Ensure that the disc is installed with the label side facing up.
• Check the region number of the BD/DVD.
• 5.1 channel sound is reproduced only when the following conditions are
met. :
1. The Blu-ray Disc Player is connected with the proper Amplifi er
2. The disc is recorded with 5.1 channel sound.
• Check whether the disc being played has the “5.1 ch” mark on the
outside.
• Check if your audio system is connected and working properly.
• In a SETUP Menu, is the Audio Output set to Bitstream?
• Check if the disc has a Menu.
The icon appears on screen.
Play mode differs from the Setup Menu
selection.
The screen ratio cannot be changed.
No audio.
The screen is blocked
• The features or action cannot be completed at this time because:
1. The BD/DVD’s software restricts it.
2. The BD/DVD’s software doesn’t support the feature (e.g., angles)
3. The feature is not available at the moment.
4. You’ve requested a title or chapter number or search time that is out of
range.
• Some of the functions selected in the Setup Menu may not work properly
if the disc is not encoded with the corresponding function.
• The Screen Ratio is fi xed on your BD/DVDs.
• Make sure you have selected the correct Digital Output in the Audio
Options Menu.
• Press the $ button (in front panel) for more than 5 seconds with no disc
inside. All settings will revert to the factory settings.
60_ troubleshooting
Page 62
PROBLEM SOLUTION
If the HDMI output is set to a resolution
your TV cannot support (for example,
1080p), you may not see a picture on
your TV.
Forgot password
If you experience other problems.
The picture is noisy or distorted
No HDMI output.
• Press the $ button (in front panel) for more than 5 seconds with no disc
inside. All settings will revert to the factory settings.
• Press the $ button (in front panel) for more than 5 seconds with no disc
inside. All settings including the password will revert to the factory
settings. Don't use this unless absolutely necessary.
• Go to the contents and fi nd the section of the instruction book that
contains the explanations regarding the current problem, and follow the
procedure once again.
• If the problem still cannot be solved, please contact your nearest Samsung
authorized service center.
• Make sure that the disc is not dirty or scratched.
• Clean the disc.
• Check the connection between the TV and the HDMI jack of the Blu-ray
Disc Player.
• Check if your TV supports 480p/720p/1080i/1080p HDMI input
resolution.
● TROUBLESHOOTING
Abnormal HDMI output screen.
• If random noise appears on the screen, it means that TV does not support
HDCP (High-bandwidth Digital Content Protection).
English _61
Page 63
appendix
SPECIFICATIONS
Power Requirements AC 120V, 60Hz
Power Consumption 29 W
General
Disc
Video Output
Video/Audio HDMI
Audio Output
Weight 9.3 Ibs
Dimensions 16.9 (W) x 12.8 (D) x 3.1 (H) inches
Operating Temperature Range +41°F to +95°F
Operating Humidity Range 10 % to 75 %
BD (Blu-ray Disc) Reading Speed : 4.917m/sec
DVD (Digital Versatile Disc)
CD : 5 inches (COMPACT DISC)
1
/2 inches (COMPACT DISC)
CD : 3
Composite Video
Component Video
S-Video
2 Channel L(1/L), R(2/R)
5.1 Channel F/L, F/R, R/L, R/R, C/T, S/W
Digital Audio Output Optical/Coaxial
*Frequency Response
*S/N Ratio 110 dB
*Dynamic Range 100 dB
*Total Harmonic Distortion 0.003%
Reading Speed : 3.49 ~ 4.06 m/sec.
Approx. Play Time (Single Sided, Single Layer Disc) : 135 min.
Reading Speed : 4.8 ~ 5.6 m/sec.
Maximum Play Time : 74 min.
Reading Speed : 4.8 ~ 5.6 m/sec.
Maximum Play Time : 20 min.
1 channel : 1.0 Vp-p (75 Ω load)
Blu-ray Disc : 480i DVD : 480i
Y : 1.0 Vp-p (75 Ω load)
Pr : 0.70 Vp-p (75 Ω load)
Pb : 0.70 Vp-p (75 Ω load)
Blu-ray Disc : 1080i, 720p, 480p, 480i DVD : 480p, 480i
Luminance Signal : 1.0 Vp-p (75 Ω load)
Chrominance Signal : 0.3 Vp-p (75 Ω load)
Blu-ray Disc : 480i DVD : 480i
1080p, 1080i, 720p, 480p
PCM multichannel audio, Bitstream audio, PCM audio
48 kHz Sampling : 4 Hz to 22 kHz
96 kHz Sampling : 4 Hz to 44 kHz
*: Nominal specifi cation
- Samsung Electronics Co., Ltd reserves the right to change the specifi cations without notice.
- Weight and dimensions are approximate.
62_ appendix
Page 64

COPY PROTECTION
Because AACS (Advanced Access Content
•
System) is approved as content protection
system for BD format, similar to use of CSS
(Content Scramble System) for DVD format,
certain restrictions are imposed on playback,
analog signal output, etc., of AACS protected
contents. The operation of this product and
restrictions on this product may vary depending
on your time of purchase as those restrictions
may be adopted and/or changed by AACS after
the production of this product. Furthermore, BDROM Mark and BD+ are additionally used as
content protection system for BD format, which
imposes certain restrictions including playback
restrictions for BD-ROM Mark and/or BD+
protected contents. To obtain additional
information on AACS, BD-ROM Mark, BD+, or
this product, please contact SAMSUNG
customer care center.
Many BD/DVD discs are encoded with copy
•
protection. Because of this, you should only
connect your Blu-ray Disc Player directly to your
TV, not to a VCR. Connecting to a VCR results in
a distorted picture from copy-protected BD/DVD
discs.
This product incorporates copyright protection
•
technology that is protected by methods claims
of certain U.S. patents and other intellectual
property rights owned by Macrovision
Corporation and other rights owners. Use of this
copyright protection technology must be
authorized by Macrovision Corporation and is
intended for home and other limited viewing uses
only, unless otherwise authorized by Macrovision
Corporation. Reverse engineering or disassembly
is prohibited.
Under the U.S. Copyright laws and Copyright
•
laws of other countries, unauthorized recording,
use, display, distribution, or revision of television
programs, videotapes, BDs, DVDs, CDs and
other materials may subject you to civil and/or
criminal liability.
For DVD Players with 525p, but not 625p,
•
progressive scan output :
CONSUMERS SHOULD NOTE THAT NOT ALL
HIGH DEFINITION TELEVISION SETS ARE
FULLY COMPATIBLE WITH THIS PRODUCT
AND MAY CAUSE ARTIFACTS TO BE
DISPLAYED IN THE PICTURE. IN CASE OF 525
PROGRESSIVE SCAN PICTURE PROBLEMS, IT
IS RECOMMENDED THAT THE USER SWITCH
THE CONNECTION TO THE `STANDARD
DEFINITION' OUTPUT. IF THERE ARE
QUESTIONS REGARDING OUR TV SET
COMPATIBILITY WITH THIS MODEL 525p DVD
PLAYER, PLEASE CONTACT OUR CUSTOMER
SERVICE CENTER.
Compliance and Compatibility Notice
NOT ALL discs are compatible
•
Subject to the restrictions described below and those
noted throughout this Manual, including the Disc Type
and Characteristics section of this Manual, disc types
that can be played are: pre-recorded commercial BDROM, DVD-Video, and Audio CD discs; DVD-RW / DVDR discs; and CD-RW/CD-R discs.
•
Discs other than the above cannot and/or is not intended
to be played by this player. And some of the above discs
may not play due to one or more reasons provided
below.
•
HD DVD discs cannot be played in this player.
•
Samsung cannot assure that this player will play every
disc bearing the BD-ROM, DVD-Video, DVD-RW / DVDR and CD-RW / CD-R logos, and this player may not
respond to all operating commands or operate all
features of every disc. These and other disc compatibility
and player operation issues with new and existing format
discs are possible because:
- BD format is a new and evolving format and this player may
not operate all features of BD discs because some features
may be optional, additional features may have been added to
the BD format after the production of this player, and certain
available features may be subject to delayed availability;
- not all new and existing disc format versions are supported by
this player;
- new and existing disc formats may be revised, changed,
updated, improved and/or supplemented;
- some discs are produced in a manner that allows specifi c or
limited operation and feature during playback;
- some features may be optional, additional features may have
been added after the production of this player or certain
available features may be subject to delayed availability;
- some discs bearing the BD-ROM, DVD-Video, DVD-RW/
DVD-R and CD-RW/ CD-R logos may still be nonstandardized discs;
- some discs may not be played depending on their physical
state or recording conditions;
- problems and error can occur during the creation of BD, DVD
and CD software and/or the manufacture of discs;
- this player operates differently than a standard DVD player or
other AV equipment; and/or
- for reasons noted throughout this Manual and for other
reason(s) discovered and posted by SAMSUNG customer
care center.
•
If you encounter disc compatibility or player operation
problems, please contact SAMSUNG customer care
center. You may also contact SAMSUNG customer care
center for possible updates on this player.
•
For additional information on playback restrictions and
disc compatibility, refer to the Precautions, Before
Reading the User’s Manual, Disc Types and
Characteristics, and Before Playing sections of this
Manual.
● APPENDIX
English _63
Page 65
LIMITED WARRANTY TO ORIGINAL PURCHASER
Samsung Electronics Canada Inc.(SECA), warrants that this product is free from defective material
and workmanship.
SECA further warrants that if this product falls to operate properly within the specified warranty
period and the failure is due to improper workmanship or defective materials, SECA will repair or
replace the product at its option.
All warranty repairs must be performed by a SECA Authorized Service Center. (The name and
address of the location nearest you can be obtained by calling toll free: 1- 800- SAMSUNG)
LABOR
One year (Carry- in)
On carry-in models, transportation to and from the service center is the customer’s responsibility.
The original dated sales receipt must be retained by the customer and is the only acceptable proof
of purchase. It must be presented to the authorized service center at the time service is requested.
PARTS
One year
EXCLUSIONS (WHAT IS NOT COVERED)
This warranty does not cover damage due to accident, fire, flood and/ or other acts of God; misuse,
incorrect line voltage, improper installation, improper or unauthorized repairs, commercial use or
damage that occurs in shipping. Exterior and interior finish, lamps, glass are not covered under
this warranty. Customer adjustments which are explained in the instruction manual are not covered
under the terms of this warranty. This warranty will automatically be voided for any unit found with
a missing or altered serial number. This warranty is valid only on products purchased and used in
Canada.
HEADQUARTERS
SAMSUNG ELECTRONICS CANADA INC.,
CUSTOMER SERVICE
55 STANDISH COURT MISSISSAUGA, ONTARIO L5R 4B2 CANADA
FABRIQUE EN CORÉE
1-800-SAMSUNG (1-800-7267864)
www.samsung.com/ca
Page 66
Contact SAMSUNG WORLD WIDE
If you have any questions or comments relating to Samsung products, please contact the SAMSUNG customer care
center.
Region Country
North America
Latin America
Europe
CIS
Asia Pacifi c
Middle East &
Africa
CANADA 1-800-SAMSUNG(726-7864) www.samsung.com/ca
MEXICO 01-800-SAMSUNG(726-7864) www.samsung.com/mx
U.S.A 1-800-SAMSUNG(726-7864) www.samsung.com/us
ARGENTINE 0800-333-3733 www.samsung.com/ar
BRAZIL 0800-124-421 , 4004-0000 www.samsung.com/br
CHILE 800-SAMSUNG(726-7864) www.samsung.com/cl
COSTA RICA 0-800-507-7267 www.samsung.com/latin
ECUADOR 1-800-10-7267 www.samsung.com/latin
EL SALVADOR 800-6225 www.samsung.com/latin
GUATEMALA 1-800-299-0013 www.samsung.com/latin
JAMAICA 1-800-234-7267 www.samsung.com/latin
PANAMA 800-7267 www.samsung.com/latin
PUERTO RICO 1-800-682-3180 www.samsung.com/latin
REP. DOMINICA 1-800-751-2676 www.samsung.com/latin
TRINIDAD & TOBAGO 1-800-SAMSUNG(726-7864) www.samsung.com/latin
VENEZUELA 0-800-100-5303 www.samsung.com/latin
COLOMBIA 01-8000112112 www.samsung.com.co
BELGIUM 0032 (0)2 201 24 18 www.samsung.com/be
CZECH REPUBLIC
DENMARK 70 70 19 70 www.samsung.com/dk
FINLAND 030-6227 515 www.samsung.com/fi
FRANCE
GERMANY
HUNGARY 06-80-SAMSUNG(726-7864) www.samsung.com/hu
ITALIA 800-SAMSUNG(726-7864) www.samsung.com/it
LUXEMBURG 0035 (0)2 261 03 710 www.samsung.com/be
NETHERLANDS
NORWAY 815-56 480 www.samsung.com/no
POLAND 0 801 801 881 , 022-607-93-33 www.samsung.com/pl
PORTUGAL 80 8 200 128 www.samsung.com/pt
SLOVAKIA 0800-SAMSUNG(726-7864) www.samsung.com/sk
SPAIN 902 10 11 30 www.samsung.com/es
SWEDEN 0771-400 200 www.samsung.com/se
U.K 0870-SAMSUNG(726-7864) www.samsung.com/uk
Republic of Ireland 0818 717 100 www.samsung.com/ie
AUSTRIA 0800-SAMSUNG(726-7864) www.samsung.com/at
Switzerland 0800-SAMSUNG(726-7864) www.samsung.com/ch
RUSSIA 8-800-555-55-55 www.samsung.ru
KAZAHSTAN 8-10-800-500-55-500 www.samsung.kz
UZBEKISTAN 8-800-120-0-400 www.samsung.uz
KYRGYZSTAN 00-800-500-55-500
UKRAINE 8-800-502-0000 www.samsung.ua
LITHUANIA 8-800-77777 www.samsung.lt
LATVIA 800-7267 www.samsung.com/lv
ESTONIA 800-7267 www.samsung.ee
AUSTRALIA 1300 362 603 www.samsung.com/au
New zealand 0800SAMSUNG(726-7864) www.samsung.com/nz
CHINA 800-810-5858 , 010-6475 1880 www.samsung.com.cn
HONG KONG 3698-4698 www.samsung.com/hk
INDIA 3030 8282 , 1800 110011 www.samsung.com/in
INDONESIA 0800-112-8888 www.samsung.com/id
JAPAN 0120-327-527 www.samsung.com/jp
MALAYSIA 1800-88-9999 www.samsung.com/my
PHILIPPINES 1800-10-SAMSUNG(726-7864) www.samsung.com/ph
SINGAPORE 1800-SAMSUNG(726-7864) www.samsung.com/sg
THAILAND 1800-29-3232 , 02-689-3232 www.samsung.com/th
TAIWAN 0800-329-999 www.samsung.com/tw
VIETNAM 1 800 588 889 www.samsung.com/vn
Turkey 444 77 11 www.samsung.com.tr
SOUTH AFRICA 0860-SAMSUNG(726-7864 ) www.samsung.com/za
U.A.E
Customer Care Center
844 000 844
Distributor pro ýeskou republiku :
Samsung Zrt., þeska organizaþní složka
Vyskoþilova 4, 14000 Praha 4
3260 SAMSUNG(726-7864) or
08 25 08 65 65 (
01805 - 121213 (
0900 20 200 88 ( 0,10/Min)
800-SAMSUNG (726-7864),
8000-4726
0,15/Min)
0,14/Min)
Web Site
www.samsung.com/cz
www.samsung.com/fr
www.samsung.de
www.samsung.com/nl
www.samsung.com/mea
Page 67

Page 68
caractéristiques principales de
votre lecteur de disque Blu-ray
Caractéristiques du lecteur
Visionneuse de photos numériques (JPEG)
Vous pouvez profi ter de vos photos numériques sur votre téléviseur.
Lecture MP3
Cet appareil peut lire les fi chiers MP3 depuis un CD-R/-RW, un DVD-R/-RW.
HDMI (High Defi nition Multimedia Interface) (Interface Multimédia haute défi nition)
Le format HDMI réduit les parasites des images en fournissant un chemin d’accès pur au signaux vidéo / audio
numériques depuis le lecteur jusqu’à votre téléviseur.
Simplay HD
Simplay HD guarranti que ce lecteur a été mis
à l'essai en conformité avec des critères visant
à maximiser la reproduction des contenus HD.
Caractéristiques des disques Blu-ray
Les disques Blu-ray permettent de stocker 25 Go (simple couche) ou 50 Go (bicouche) sur un disque à simple face
– environ 5 à 10 fois plus de capacité qu’un DVD. Les disques Blu-ray peuvent aussi accueillir les vidéos
HD les meilleurs de l’industrie (jusqu’à 1920 x 1080 à 40 Mb/sec) – Une grande capacité signifi e aucun compromis
sur la qualité vidéo. De plus, un disque Blu-ray possède la taille et le look familier d’un DVD.
* Les caractéristiques suivantes des disques Blu-ray dépendent du disque et peuvent varier.
L’apparence et les éléments de navigation varient aussi d’un type de disque à l’autre.
Tous les disques ne possèdent pas les caractéristiques décrites ci-bas.
Points culminants concernant les vidéos
Le format BD-ROM pour la distribution de fi lms peut accueillir trois codecs vidéo hautement améliorés, y compris
AVC, VC-1 et MPEG-2.
Ces formats de résolution vidéo HD sont aussi disponibles :
1920 x 1080 HD
•
1280 x 720 HD
•
Lecture en haute défi nition
Pour visionner le contenu des disques BD en haute défi nition, vous devez utiliser un télévi seur HD (haute défi nition).
Certains disques peuvent nécessiter l’utilisation de la sortie HDMI OUT du lecteur pour en permettre le visionnement
du contenu en haute défi nition. La possibilité de visionnement du contenu à haute défi nition des disques BD peut
être limitée par la résolution de votre téléviseur.
2_ Français
Page 69
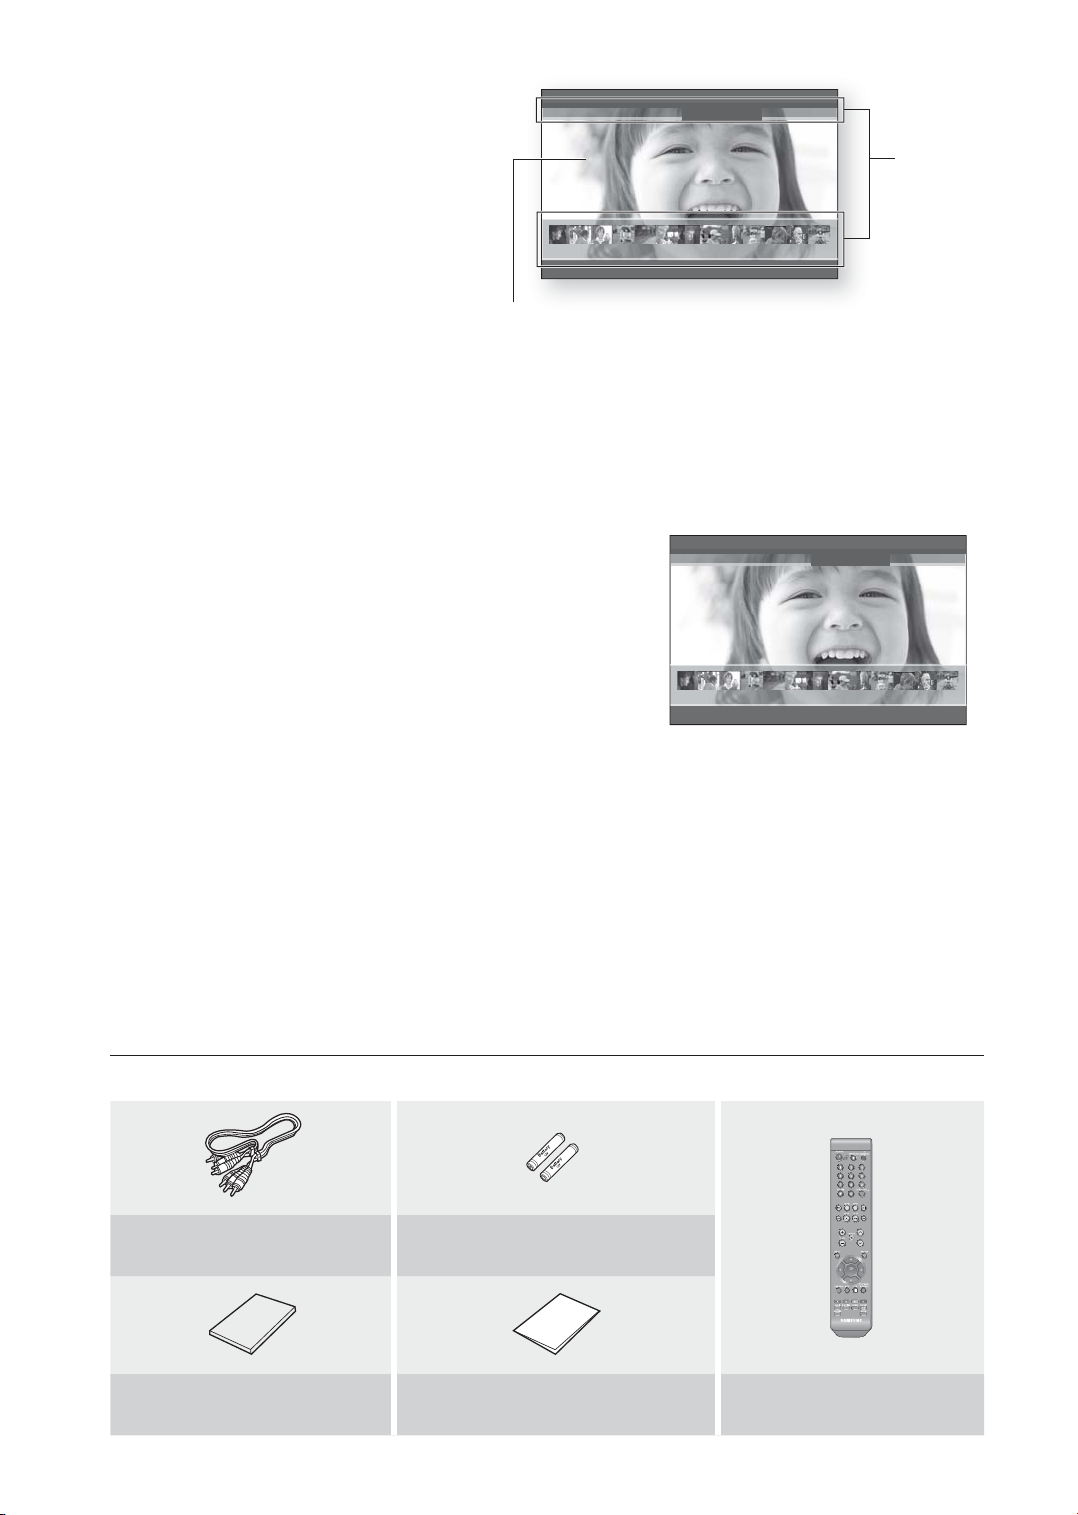
Plans graphiques
Deux couches individuelles à pleine résolution HD
(1920x1080) sont disponibles par dessus la
couche vidéo HD. Une de cescouches est affectée
aux graphiques reliés au vidéo (comme les soustitres) et l’autre aux éléments interactifs comme les
touches ou les menus. Plusieurs effets de volet, de
fondu et de défi lement peuvent être disponibles sur
PLAY MOVIE LANGUAGES SCENE SELECTIONS PREVIEWS
Plans
graphiques
▼
3 4 5 6 7 8 9 10 11 12 13 14 15
les deux couches.
Vidéo HD
raphiques de menu
Peut accueillir les graphiques et les animations en résolution de 256 couleurs vives, surpassant ainsi les capacités
de la vidéo DVD. Contrairement au DVD, il est possible d’accéder aux menus en cours de lecture.
Sons de menu
Lorsque vous sélectionnezou mettez en évidence une option d’un menu sur un disque Blu-ray, vous pouvez
entendre certainssons comme le clic des touches ou une voix hors champ expliquant votre choix mis en évidence
sur le menu.
Pages multiples / menus contextuels
Avec un DVD-Vidéo, la lecture est interrompue à chaque fois que vous
PLAY MOVIE LANGUAGES SCENE SELECTIONS PREVIEWS
accédez à un nouveau menu. Un menu peut comprendre plusieurs
pages en raison de la capacité du disque Blu-ray de précharger les
données du disque sans interrompre la lecture.
Vous pouvez naviguer dans les pages du menu ou en sélectionner
différents chemins d’accès pendant que la lecture audio et vidéo se
poursuit en arrière plan.
3 4 5 6 7 8 9 10 11 12 13 14 15
▼
Interactivité
Certains disques Blu-ray peuvent contenir des menus animés et des jeux de questions anecdotiques.
Diaporamas naviguables par l’utilisateur
Les disques Blu-ray vous permettent de naviguer parmi vos photos pendant que le signal audio continue.
Sous-titrage
Selon le contenu du disque Blu-ray, vous pourriez possiblement sélectionner différents styles, tailles et couleurs de
police pour le sous-titrage.
Les Sous-titrages peuvent être animés, fondus ou vous pouvez les faire défi ler.
À L'INTÉRIEUR
Vérifi ez la présence des accessoires énumérés ci-bas.
Câbles Vidéo composite
et Audio G/D (MF39-00274A)
Guide d'utilisation
(AK68-01454B)
Piles de la télécommande
(format AAA) (4301-001035)
Guide rapide
(AK68-01455B)
TV PROG
OK
Télécommande
(AK59-00070A)
Français _3
Page 70
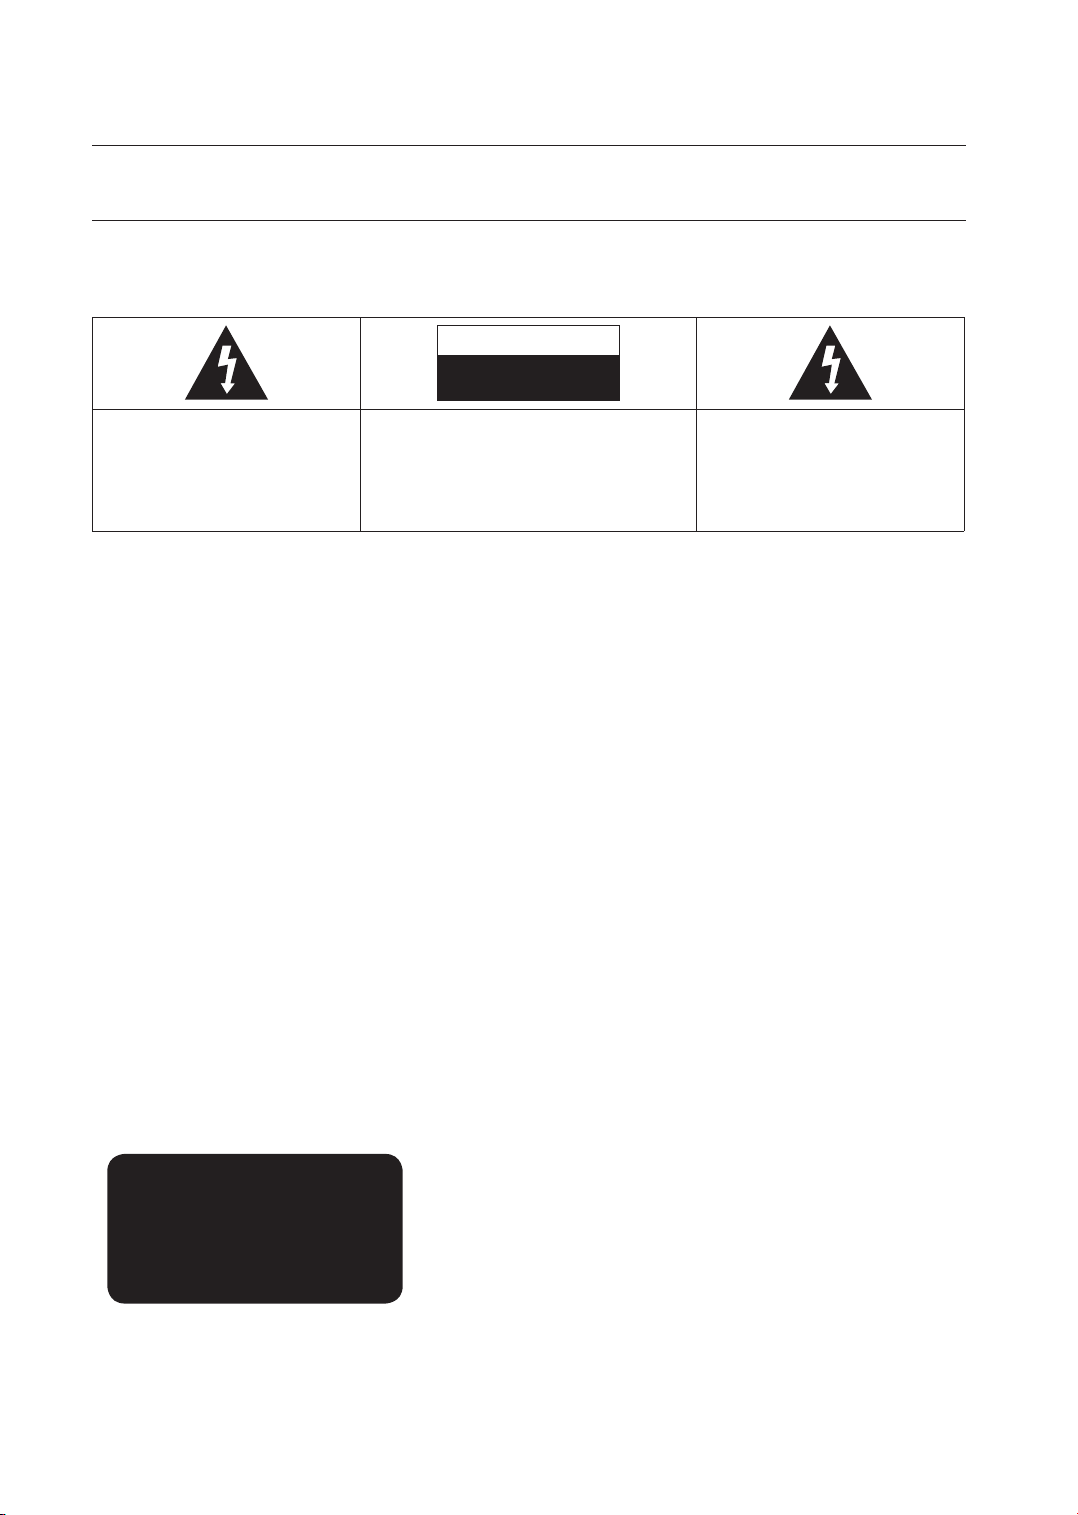
directives de sécurité
AVERTISSEMENT
POUR RÉDUIRE LES RISQUES D’ÉLECTROCUTION, NE RETIREZ PAS LE COUVERCLE (NI LE PANNEAU ARRIÈRE).
AUCUNE PIÈCE SITUÉE À L'INTÉRIEUR NE PEUT ÊTRE RÉPARÉE PAR L'UTILISATEUR. POUR TOUT DÉPANNAGE,
ADRESSEZ-VOUS À UN TECHNICIEN QUALIFIÉ.
ATTENTION
RISQUE D’ÉLECTROCUTION
NE PAS OUVRIR
L’éclair et la fl èche inclus dans le
triangle représentent un avertissement à
l’égard de tensions dangereuses se
trouvant à l’intérieur du produit
AVERTISSEMENT
Afi n de réduire les risques d’incendie ou de chocs électriques, ne pas exposer l'appareil à la pluie ou à l’humidité.
•
Pour éviter des blessures, cet appareil doit être assujetti au plancher ou au mur, conformément aux consignes
•
d’installation.
Si l’on alimente ce bloc d'alimentation sous 240 V c.a., il faudrait utiliser un adaptateur de fi che approprié.
•
Remarque destinée à l’installateur de la câblodistribution :
Ce rappel a pour objectif d’attirer l’attention de l’installateur de la câblodistribution sur l’article 820-40 du Code
national électrique (alinéa 54 du Code électrique canadien, chapitre I) qui donne des instructions pour une mise à la
terre correcte et, notamment, spécifi e que le câble de mise à la terre doit être branché à l’installation de mise à la
terre du bâtiment la plus proche possible du point d’entrée du câble.
AVIS DE LA FCC (pour les É-U) :
Cet appareil a été mis à l’essai, il est conforme aux exigences en matière de limites pour un appareil numérique de
classe B, selon le paragraphe 15 de la Réglementation de la FCC.
Ces limites sont conçues pour prévenir raisonnablement les brouillages préjudiciables pour les installations
domestiques. Cet appareil génère, utilise et peut émettre de l’énergie radioélectrique.
S’il n'est pas installé et utilisé selon les instructions, il peut provoquer des brouillages préjudiciables pour la réception
radio ou télévision. Ces brouillages peuvent être déterminés en allumant et en éteignant l’appareil.
L’utilisateur est encouragé à essayer de corriger le brouillage à l’aide de l’une ou l’autre des mesures suivantes.
Réorientez l'antenne de réception ou changez son emplacement.
•
Augmentez la distance entre l'appareil et le récepteur.
•
Branchez l'appareil sur une prise murale différente de celle à laquelle le récepteur est relié.
•
Demandez de l'aide au revendeur ou à un technicien radio/TV expérimenté.
•
Cet appareil numérique de Classe B satisfait à toutes les exigences du Règlement canadien ICES-003 sur les
appareils produisant du brouillage.
ATTENTION: AFIN DE RÉDUIRE LES RISQUES DE CHOCS
ÉLECTRIQUES, NE PAS RETIRER LE COUVERCLE (OU LE
PANNEAU ARRIÈRE). L'APPAREIL NE CONTIENT PAS DE PIÈCES
EXIGEANT UN ENTRETIEN DE LA PART DE L’UTILISATEUR.
CONFIER L’ENTRETIEN À UN PERSONNEL QUALIFIÉ.
Un triangle contenant un point
d’exclamation signifi e un avertissement
vous demandant de consulter les
instructions importantes qui
accompagnent le produit.
CLASS 1 LASER PRODUCT
KLASSE 1 LASER PRODUKT
LUOKAN 1 LASER LAITE
KLASS 1 LASER APPARAT
PRODUCTO LÁSER CLASE 1
PRODUIT AVEC DISPOSITIF AU LASER DE CLASSE 1
L’utilisation de toute commande ou réglage, ou l’application de toute procédure ou rendement autres que ceux
spécifi és aux présentes pourraient provoquer des radioexpositions dangereuses.
4_ directives de sécurité
Page 71

ATTENTION
CE PRODUIT UTILISE UN RAYON LASER. L’UTILISATION DES COMMANDES OU LE RÉGLAGE OU LA
PERFORMANCE DE PROCÉDURES AUTRES QUE CELLES PRÉCISÉES CI-DESSUS PEUT PROVOQUER UNE
EXPOSITION DANGEREUSE AUX RADIATIONS. NE TENTEZ PAS D’OUVRIR LE COUVERCLE OU DE RÉPARER
VOUS-MÊME L’APPAREIL. POUR TOUT DÉPANNAGE, ADRESSEZ-VOUS À UN TECHNICIEN QUALIFIÉ.
Remarques :
•
Cet appareil ne doit être utilisé qu'avec une alimentation de 120 V CA, 60Hz. Il ne peut être utilisé ailleurs.
Ce lecteur de disque Blu-ray est conçu et fabriqué pour répondre aux informations de gestion des régions. Si le Code
•
régional d’un disque BD/DVD ne correspond pas au code régional de ce lecteur Blu-ray, le disque ne sera pas lu.
•
L’appareil accompagnant ce manuel de l’utilisateur est sous licence de certains droits de propriété intellectuelle
appartenant à des tiers.
In particular, this product is licensed under the following US patents:
5,060,220 5,457,669 5,561,649 5,705,762 5,987,417 6,043,912 6,222,983 6,272,096 6,377,524 6,377,531
6,385,587 6,389,570 6,408,408 6,466,532 6,473,736 6,477,501 6,480,829 6,556,520 6,556,521 6,556,522
6,578,163 6,594,208 6,631,110 6,658,588 6,674,697 6,674,957 6,687,455 6,697,307 6,707,985 6,721,243
6,721,493 6,728,474 6,741,535 6,744,713 6,744,972 6,765,853 6,765,853 6,771,890 6,771,891 6,775,465
6,778,755 6,788,629 6,788,630 6,795,637 6,810,201 6,862,256 6,868,054 6,894,963 6,937,552
Ce produit est protégé par un ou plusieurs des brevets américains ci-après :
US4,930,158 US4,930,160
Cette licence se limite à l’utilisation personnelle et non commerciale de la part des usagers en ce qui concerne les
teneurs licenciés.
Aucun droit n’est accordé pour l’utilisation commerciale. Cette licence ne couvre pas tout produit autre que ledit
appareil et la licence ne couvre pas tout produit ou processus autre non licencié en conformité avec les normes
ISO/IEC 11172-3 ou ISO/IEC 13818-3 utilisé ou vendu en association avec ledit produit.
La licence ne couvre que l’utilisation dudit produit pour l’encodage ou le décodage de fi chiers audio en conformité
avec les normes ISO/IEC 11172-3 ou ISO/IEC 13818-3. Ladite licence n’accorde aucun droit pour les
caractéristiques ou fonctions du produit qui ne sont pas conformes aux normes ISO/IEC 11172-3 ou ISO/IEC
13818-3.
CONSIGNES DE PRÉCAUTIONS
Consignes de sécurité importantes
Lisez attentivement ces directives de fonctionnement avant d’utiliser l’appareil. Observez toutes les consignes de
sécurité énumérées plus bas. Conservez ces directives d’opération en vue d’une consultation ultérieure.
Lisez ces directives.
1)
Conservez ces directives.
2)
3)
Tenez compte de tous les avertissements.
4)
Suivez toutes les directives.
5)
N’utilisez jamais cet appareil à proximité de l’eau.
6)
Nettoyez uniquement avec un chiffon sec.
7)
N’obstruez aucun orifi ce de ventilation, installez l’appareil conformément aux directives du fabricant.
8)
Ne l’installez pas à proximité d’une source de chaleur telle que des radiateurs, des registres de chaleur ou
d’autres appareils (y compris des amplifi cateurs) produisant de la chaleur.
Ne démontez pas le dispositif de sécurité de la prise de terre ou de la prise polarisée. Les fi ches polarisées
9)
disposent de deux broches, dont l’une est plus large que l’autre. Par contre, les prises de mise à la terre
comportent deux broches plus une troisième broche de mise à la terre. La broche large ou la troisième broche
garantissent votre sécurité. Si la fi che fournie ne s'adapte pas sur votre prise murale,
renseignez-vous auprès d’un électricien pour le remplacement de la prise obsolète.
Protégez le cordon électrique contre le piétinement ou les pincements en particulier
10)
près des fi ches, des prises murales et à leur point de sortie de l’appareil.
Utilisez uniquement des accessoires spécifi és par le fabricant.
11)
Français _5
Page 72

directives de sécurité
Utilisez le support vendu avec l’appareil ou utilisez uniquement un support,table à roulettes,meuble,tré pied ou
12)
table qui est conforme aux recommandations du fabricant.Si l’appareil est install é sur une table à
roulettes,déplacez-la avec la plus grande précaution afi n d’éviter toute blessure et tout dommage.
Débranchez l’appareil lors d ’un orage électrique ou en cas de non utilisation prolongée.
13)
Confi ez l'ensemble des réparations au personnel qualifi é. Une réparation est nécessaire lorsque le dispositif est
14)
endommagé de quelque façon que ce soit, incluant les cordons ou les prises endommagés, lorsqu’un liquide a
été renversé ou que des objets sont tombés dans l’appareil, que l’appareil a été exposé à l’humidité ou à la
pluie, qu’il ne fonctionne pas normalement ou qu’il est tombé.
Précautions de manutention
Avant de raccorder d’autres appareils à ce lecteur de disque Blu-ray, veillez à les éteindre tous.
•
Ne déplacez pas le lecteur Blu-ray en cours de lecture d’un disque pour prévenir les égratignures ou la casse des
•
disques ou d’endommager les composantes internes du lecteur Blu-ray.
Ne déposez pas de vases remplis d’eau ou tout objet de métal sur le lecteur Blu-ray.
•
Évitez de placer vos mains à l’intérieur du tiroir disque.
•
Ne déposez rien d’autre qu’un disque dans le tiroir.
•
Toute interférence extérieure comme les éclairs et l’électricité statique peut affecter l’opération du lecteur Blu-ray.
•
Si cela se produit, éteignez le lecteur Blu-ray et rallumez-le à l’aide de la touche POWER (ALIMENTATION), ou
débranchez puis rebranchez le cordon électrique de la prise murale CA. Le lecteur Blu-ray fonctionnera
normalement.
•
Veillez à enlever le disque et à éteindre le lecteur Blu-ray après utilisation.
Débranchez le cordon CA de la prise murale si vous n’avez pas l’intention d’utiliser le lecteur Blu-ray pendant une
•
période prolongée.
Nettoyez le disque en l'essuyant en ligne droite du dedans vers le dehors.
•
•
Évitez d'exposer le lecteur aux gouttes et aux éclaboussures de liquides.
Lorsqu'il demeure branché sur une prise murale CA, le lecteur continue de consommer de l'énergie même s'il est
•
éteint (mode Veille).
Entretien du boîtier
Pour des raisons de sécurité, veillez à débrancher le cordon CA de la prise murale.
•
N’utilisez pas de solvant, d'alcool ou de benzène pour le nettoyage.
•
Essuyez le boîtier avec un chiffon doux.
Limitations de lecture
•
Ce lecteur peut ne pas répondre à toutes les commandepuisque certains disques BD, DVD ou CD ne permettent
la lecture que de certaines caractéristiques ou un fonctionnement limité. Veuillez remarquer que cela ne constitue
pas une dysfonction du lecteur.
Samsung ne peut assurer que ce lecteur puisse lire tous les disques comportant les logos BD, DVD et CD
•
puisque les formats de disque évoluent et que certains problèmes ou erreurs se produisent lors de la création du
logiciel des BD, DVD et CD et / ou de leur fabrication. Ce lecteur peut aussi fonctionner d’une façon autre qu’un
lecteur DVD standard ou qu’un autre appareil AV. Veuillez contacter le centre d’aide à la clientèle SAMSUNG pour
toute question supplémentaire ou si vous rencontrez certaines diffi cultés à effectuer la lecture de disques BD,
DVD ou CD avec ce lecteur. De plus, reportez-vous aux directives contenues dans le reste de ce manuel
concernant les limitations de lecture ou pour des renseignements supplémentaires.
6_ directives de sécurité
Page 73

table des matières
CARACTÉRISTIQUES PRINCIPALES DE
VOTRE LECTEUR DE DISQUE BLU-RAY
2
DIRECTIVES DE SÉCURITÉ
4
PREMIERS PAS
9
DESCRIPTION
14
TÉLÉCOMMANDE
16
3 À L'intérieur
4 Avertissement
5 Consignes de précautions
9 Avant de lire ce manuel de l’utilisateur
10 Type et caractéristiques des disques
13 Stockage des disques et gestion
14 Panneau avant
14 Affi cheur du panneau avant
15 Panneau arrière
16 Tournée de la télécommande
18 Réglage de la télécommande
18 Concernant le bloc-piles
19 Codes téléviseur contrôlables
RACCORDEMENTS
20
FONCTIONS DE BASE DE VOTRE
LECTEUR DE DISQUE BLU-RAY
31
20 Raccordement à un téléviseur avec le câble
HDMI
21 Fonction de détection automatique HDMI
22 Raccordement à un téléviseur avec la prise
DVI
23 Raccordement à un téléviseur (Component)
24 Raccordement à un téléviseur (S-Video)
25 Raccordement à un téléviseur (Video)
26 Raccordement à un système audio
(amplifi cateur à 2 canaux)
27 Raccordement à un système audio
(amplifi cateur à 5,1 canaux)
28 Raccordement à un système audio (Dolby
numérique), amplifi cateur DTS (système
cinéma numérique)
29 Raccordement à un système audio
(amplifi cateur compatible HDMI)
30 Branchement sur lesite FTP/Internet de
Samsung pour la mise à niveau du logiciel
31 Avant d’effectuer une lecture
32 Navigation dans les menus à l’écran
32 Lecture d’un disque
33 Utilisation des fonctions Recherche et saut
33 Pour retourner au début du chapitre
précédent, appuyez de nouveau.
Français _7
Page 74

table des matières
CONFIGURATION DU SYSTÈME
34
MISE À NIVEAU DU SYSTÈME
45
VISIONNER UN FILM
49
ÉCOUTER DE LA MUSIQUE
55
34 Confi guration des paramètres de langue
35 Confi guration des options audio
37 Confi guration des paramètres de langue
38 Confi guration des options d’affi chage et de
sortie vidéo
41 Réglage des options HDMI
43 Confi guration du contrôle parental
45 Mise à niveau du micrologiciel
47 Information système
47 Confi guration du Réseau
49 Utilisation de la fonction AFFICHEUR
50 Utilisation de Menus du Disque & contextuel
/ Titre Menu
51 Lecture en boucle (répétition)
51 Sélection de langue audio
52 Sélectionner la langue de sous-titre
53 Changement de l’angle de caméra
53 Utilisation de la fonction Signet
55 Lecture d’un CD audio (CD-DA)
55 Lecture d’un MP3
55 Éléments de l’écran CD Audio(CD-DA) /
MP3
56 Les touches de la télécommande utilisées
pour la lecture de disques CD audio
(CD-DA) / MP3
56 Lecture en boucle CD Audio(CD-DA) & MP3
VISIONNEMENT D’UNE PHOTO
8_ table des matières
58
DÉPANNAGE
60
APPENDICE
62
58 Visionnement d’une photo
58 Diaporama
58 Rotation
59 Zoom
59 Aller sur la liste de photos
60 Dépannage
62 Caractéristiques techniques
Page 75
premiers pas
AVANT DE LIRE CE MANUEL DE L’UTILISATEUR
Veuillez vérifi er les termes suivants avant de lire le manuel de l’utilisateur.
Les icônes utilisés dans le manuel
Icône Terme Défi nition
h
Z
C
V
B
G
A
M
BD-ROM Implique une fonction disponible sur le BD-ROM.
Vidéo DVD
DVD-RW
DVD-R
Audio CD Implique une fonction disponible sur un CD de données (CD-R ou CD-RW).
JPEG
MP3
Remarque
Implique une fonction disponible sur les disques DVD-vidéo ou DVD-R/
DVD-RW enregistrés et fi nalisés en mode vidéo.
Implique une fonction disponible sur le DVD-RW (fi nalisé uniquement).
(mode V fi nalisé uniquement)
Implique une fonction disponible sur le DVD-R (fi nalisé uniquement).
(Mode V fi nalisé uniquement)
Implique une fonction disponible sur un disque CD-R/-RW, DVD-R/-RW.
Implique une fonction disponible sur les disques CD-R/-RW, DVD-R/-RW.
Implique des trucs ou des directives sur la page permettant à chaque
fonction d’agir.
À propos de l’utilisation de ce manuel
● PREMIERS PAS
Veuillez vous familiariser avec les consignes de sécurité avant d’utiliser ce produit. (Voir les pages 4
1)
Si un problème se produit, vérifi ez le tableau de dépannage. (Voir les pages 60~61)
2)
~
6)
Droits d’auteur
©2007 Samsung Electronics Co.,Ltd.
Tous droits réservés ; ce manuel ne peut être reproduit ou copié en tout ou en partie sans la permission
préalable et écrite de Samsung Electronics Co., Ltd.
Français _9
Page 76
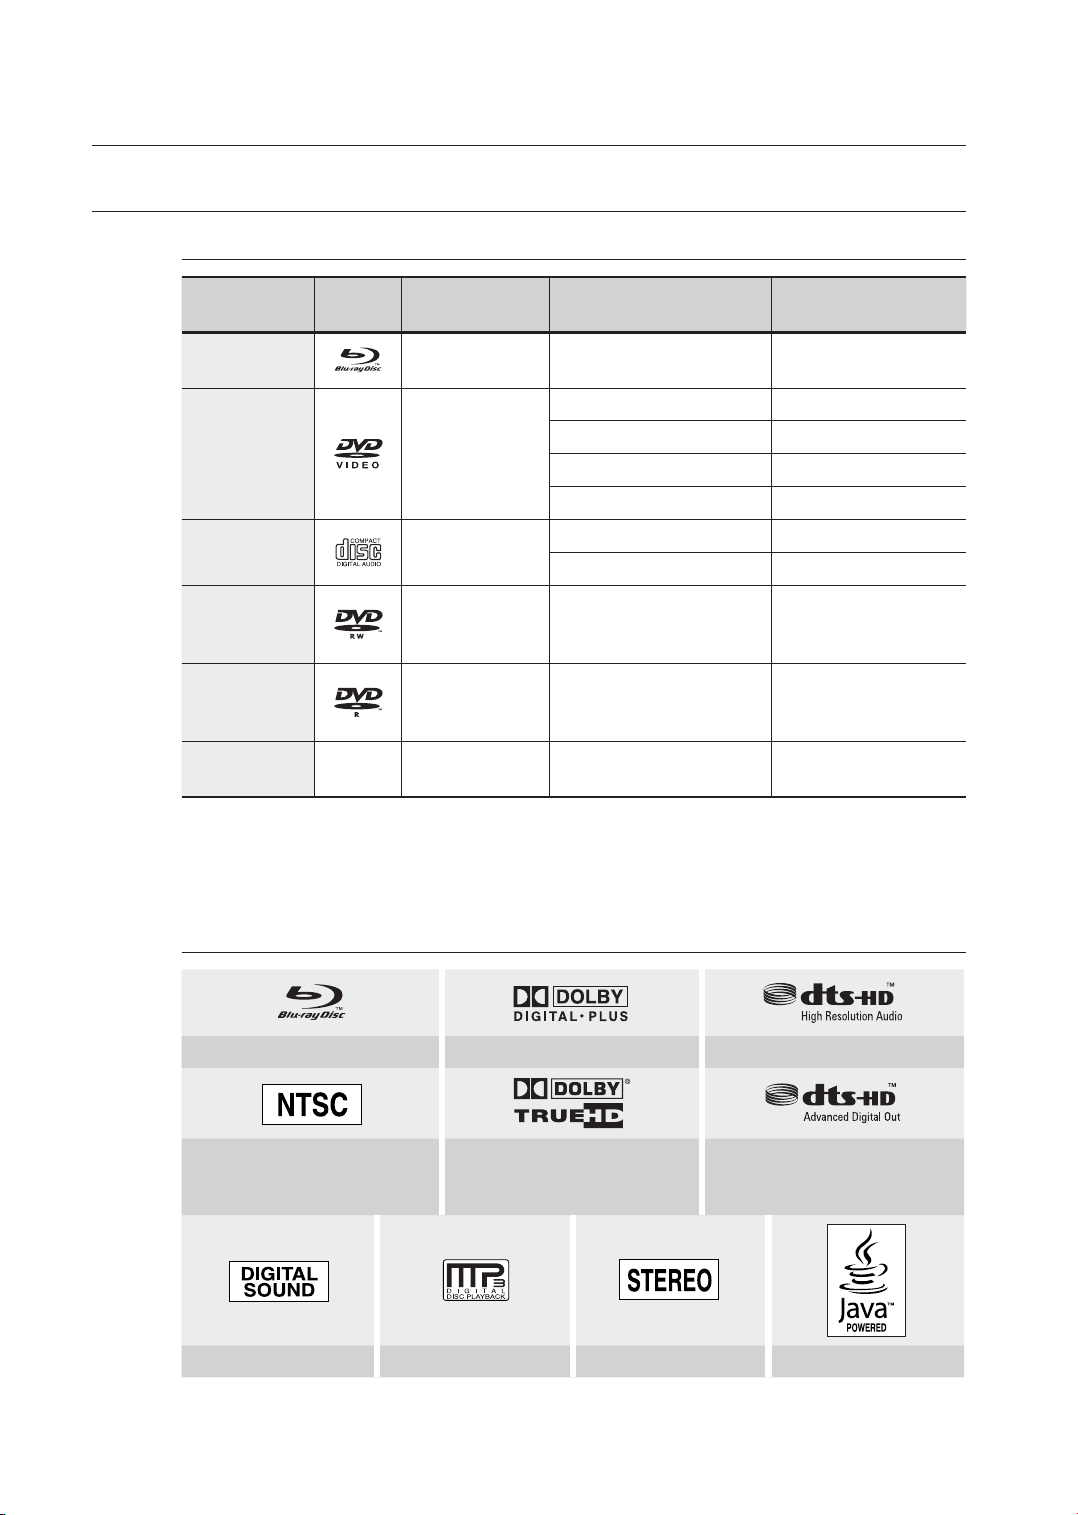
premiers pas
TYPE ET CARACTÉRISTIQUES DES DISQUES
Types de disques compatibles pour la lecture
Types de disque
BD-ROM
DVD-VIDEO
AUDIO-CD
DVD-RW
(Mode V fi nalisé
uniquement)
DVD-R
(Mode V fi nalisé
uniquement)
CD-R/-RW
DVD-RW/-R
•
Ce lecteur est compatible avec le système couleur NTSC uniquement.
•
Les disques PAL ne peuvent pas être lus.
Logo des
disques
Contenu enregistré Forme de disque Durée maximale de lecture
AUDIO + VIDÉO Simple face (25Go/50Go)
Simple face 5 po 240
AUDIO + VIDÉO
AUDIO
AUDIO + VIDÉO 5 po (4,7 Go)
AUDIO + VIDÉO 5 po (4,7 Go)
JPEG
MP3
Double face 5 po 480
Simple face 3 1/2 po 80
Double face 3 1/2 po 160
Simple face 5 po 74
Simple face 3 1/2 po 20
––
La durée de lecture dépend
des titres
480
(EX : Longue durée)
480
(EX : Longue durée)
Logos des disques compatibles
NTSC système de diffusion
au États-Unis d’Amérique,
Digital Audio MP3 Stéréo Java
10_ premiers pas
Blu-ray Disc Dolby Digital Plus Audio haute-défi nition DTS-HD
Dolby TrueHD DTS-HD Advanced Digital Out
Canada, Corée, Japo
Page 77
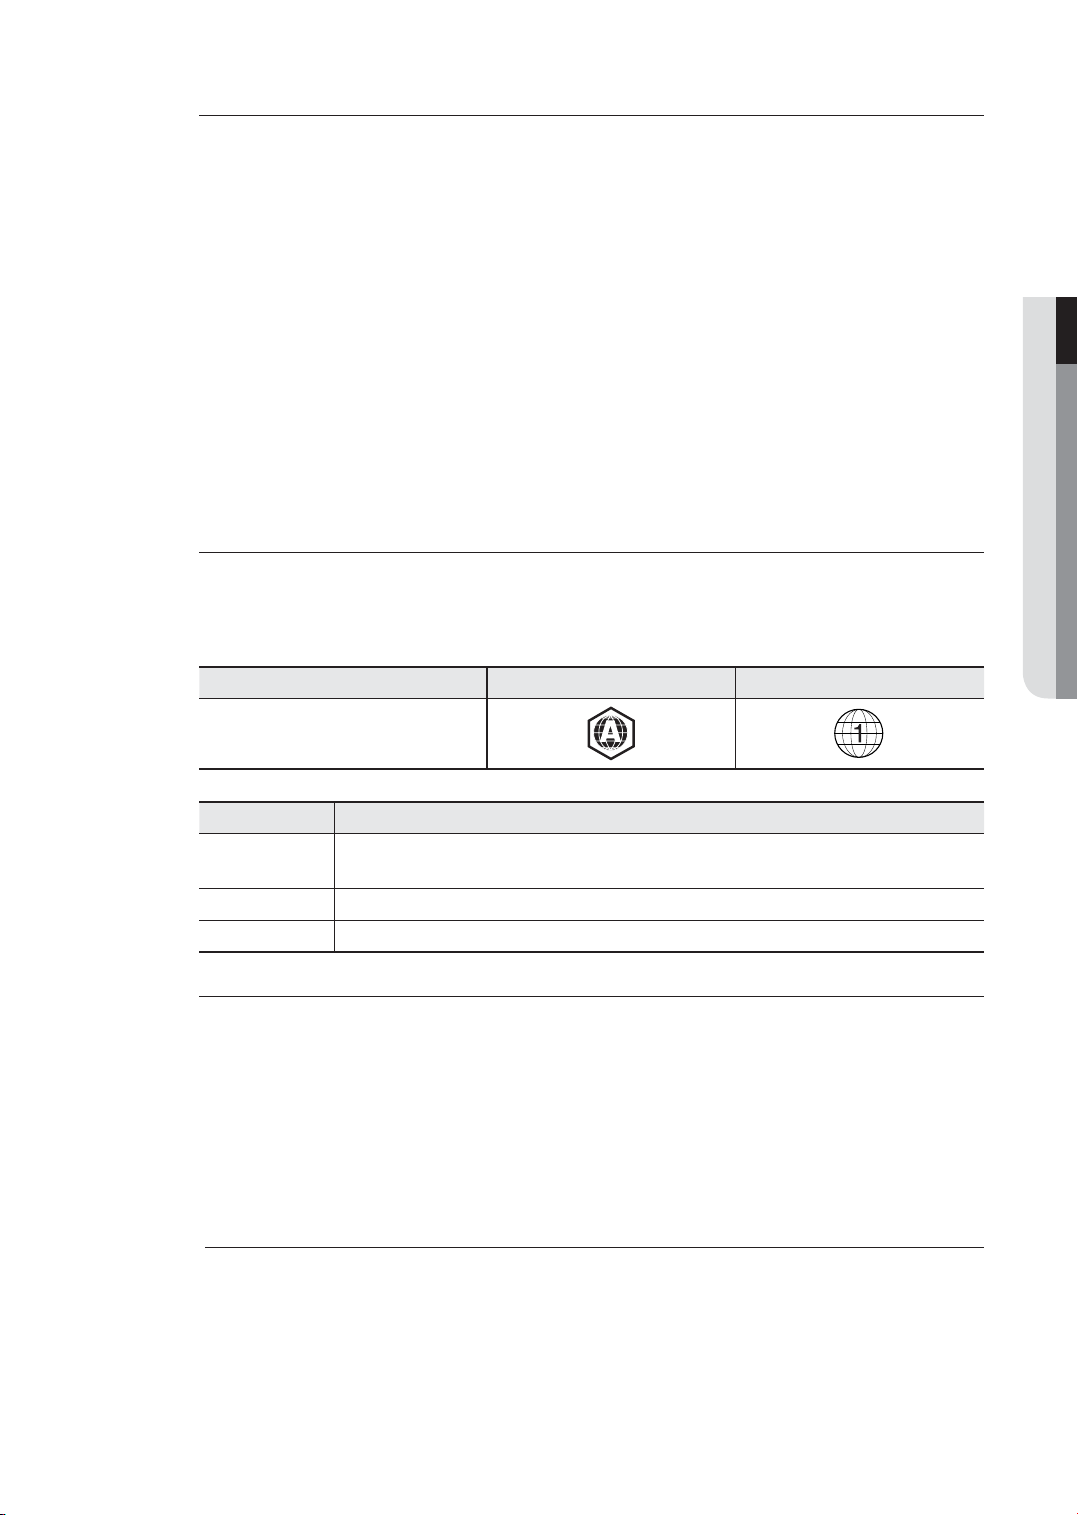
Disques incompatibles
Les disques Blu-ray avec code régional autre que « Region A ».
•
BD-R, BD-RE
•
Disques HD DVD
•
Disques DVD-Vidéo avec code régional autre que le "1" ou "ALL"
•
DVD-RAM
•
Disques DVD-R 3,9 Go pour système auteur.
•
Disques DVD-RW (VR mode)
•
Disques DVD-ROM/PD/MV, etc.
•
Disques CVD/CD-ROM/CDV/CD-G/CD-I/LD
•
[Remarque]
Certains disques pour utilisation commerciale et disques DVD achetés hors de votre région peuvent
•
être incompatibles avec ce produit. Si vous tentez de lire ces disques, le message “No disc (Aucun
disque)” ou “Please check the regional code of the disc (Veuillez vérifi er le code régional du disque)”
s’affi che.
Si un disque DVD-R/-RW n’a pas été enregistré correctement en format DVD vidéo, il sera incompatible.
•
L'appareil ne peut pas lire les CD-R/-RW et DVD-RW/-R enregistrés au format divx, avi, mpg, mov et wma.
•
● PREMIERS PAS
Code régional
Le lecteur et les disques Blu-ray sont codés par région.
Ces codes régionaux doivent correspondre pour permettre la lecture du disque.
Si les codes ne correspondent pas, le disque sera incompatible.
Une description du numéro de code du lecteur de disque Blu-ray se retrouve sur le panneau arrière du lecteur.
Types de disque Blu-ray DVD-Video
Code régional
Code régional BD Région
A
B
C l’Inde, la Chine, la Russie, l’Asie central e et l’Asie méridionale.
L’Amérique du Nord, l’Amérique Centrale, l’Amérique du Sud, la Corée, le Japon, Taiwan, Hongkong
et le Sud-Est asiatique.
L’Europe, le Groenland, les territoires français, le Moyen-Orient, l’Afrique, l’Australie et la Nouvelle Zélande
Compatibilité des disques Blu-ray
Le disque Blu-ray est un nouveau formattoujours en évolution. En conséquence, des problèmes de
compatibilité du disque sont possibles.En conséquence, les problèmes de compatibilité avec de nouveaux
formats ou formats existants de disque sont possibles. Tous les disques ne sont pas compatibles et tous ne
peuvent être lus. Pour plus de renseignements, reportez-vous aussi au chapitre Avis de conformité et de
compatibilité dans ce manuel. Si vous éprouvez des problèmes de compatibilité, veuillez contacter un centre
d’aide à la clientèle SAMSUNG. Le lecteur de disques Blue-ray de Samsung (BD-P1400) ne peut accueillir
que les BD-ROM de norme Profi le 1 version 1,0. Vous devrez mettre à niveau le micrologiciel de votre lecteur
pour écouter des disques de version ultérieure. Veuillez consulter le site http://www.samsung.com/ca ou
contacter un centre d’aide à la clientèle de SAMSUNG en composant.
M
La lecture peut s’avérer impossible avec certains types de disque, ou lorsque des opérations spécifi ques, telles que
les modifi cation d’angle et les réglages du format d’image sont effectués. Les renseignements concernant les
disques sont exprimés en détail sur l’emballage. Vérifi er si nécessaire.
Évitez que les disques ne se salissent ou s’égratignent. Les empreintes digitales, la saleté, la poussière, les égratignures
ou les dépôts de fumée de tabac sur la surface d’enregistrement peuvent rendre la lecture du disque impossible.
Les disques contenant un programme PAL enregistré ne peuvent être lus par ce produit.
si vous écoutez un titre de format BDJava, son chargement peut être plus long que celui d’un titre normal ou
certaines fonctions peuvent ralentir.
Français _11
Page 78

premiers pas
Types de disque
BD-ROM
❖
Disque Blu-ray à mémoire morte. Un disque BD-ROM contient des données préenregistrées. Même si
un BD-ROM peut contenir toute forme de données, la plupart contiennent des fi lms en format à haute
défi nition pour la lecture par le lecteur Blu-ray. Cet appareil peur effectuer la lecture de disques BD-ROM
pré enregistrés de type commercial.
❖
DVD-Video
Un disque numérique polyvalent (DVD) peut contenir jusqu’à 135 minutes d’images, 8 langues audio
•
et 32 langues de sous-titrage. Il est pourvu du système de compression de fi lms MPEG-2 et du
système Dolby Surround numérique vous permettant d’apprécier des images de qualité cinéma
nettes et de couleurs vives.
Durant le passage de la première couche à la deuxième d’un disque DVD-Vidéo bicouche, il peut se produire une
•
déformation momentanée de l’image ou une distorsion du son. Cela n’est pas un défaut de l’appareil.
Dès qu’un disque DVD-RW/-R enregistré en mode Vidéo est fi nalisé, il devient un DVD-Vidéo. Les
•
DVD de type commercial préenregistrés contenant des fi lms sont aussi considérés comme des DVDVidéos. Cet appareil peut effectuer la lecture de disques DVD (DVD-Vidéo) de type commercial
préenregistrés contenant des fi lms.
Audio CD
❖
Un disque audio sur lequel des données audio de 44,1 kHz PCM (modulation par impulsions et
•
codage) sont enregistrées.
Cet appareil peut effectuer la lecture de disques audio de format CD-DA, CD-R et CD-RW.
•
La condition de l’enregistrement peut empêcher l’appareil d’effectuer la lecture de certains disques
•
CD-R ou CD-RW.
CD-R/-RW
❖
Utilisez un disque CD-R/-RW de 700 Mo (80 minutes). Si possible, n’utilisez pas de disque de 800 Mo
•
(90 minutes) ou plus ; il pourrait être impossible de le lire.
Si les disques CD-R/-RW n'ont pas été enregistrés dans une session fi nalisée, vous risquez d'avoir un
•
retard en début de lecture, de ne pas pouvoir lire tous les fi chiers enregistrés.
En fonction du dispositif utilisé pour les graver, certains disques CD-R/-RW peuvent s’avérer
•
incompatibles avec cet appareil. La capacité de lecture du contenu enregistré sur un médium CD-R/RW depuis vos CD personnels peut varier selon leur contenu et le type de disque.
Lecture de disques DVD-R
❖
Dès qu’un disque DVD-R enregistré en mode Vidéo est fi nalisé, il devient un DVD-Vidéo.
•
Cet appareil peut lire les disques DVD-R enregistrés et fi nalisés sur un graveur DVD-Vidéo Samsung.
•
Il peut être incapable de lire certains disques DVD-R selon leur type et la condition de l’enregistrement.
Lecture de disques DVD-RW
❖
Seuls les disques DVD-RW au format vidéo et fi nalisés peuvent être lus.
•
•
Dès qu’un disque DVD-RW enregistré en mode Vidéo est fi nalisé, il devient un DVD-Vidéo. La
compatibilité de lecture peut dépendre des conditions d’enregistrement.
Format de disque
Utilisation des disques MP3
❖
Les disques CD-R/-RW, DVD-RW/-R enregistrés sous format UDF, ISO9660 ou JOLIET peuvent être lus.
•
•
Seuls les fi chiers MP3 possédant l’extension de nom de fi chier “.mp3” ou “.MP3” peuvent être lus.
•
Le débit binaire de lecture varie de 56 Kb/s à 320 Kb/s.
•
La fréquence d’échantillonnage de lecture est de 16 kHz à 48 kHz.
•
L’appareil peut traiter un maximum de 1500 fi chiers et dossiers sous un dossier mère. Les fi chiers
MP3 enregistrés sous format VBR (à débit binaire variable) peuvent provoquer des coupures de son.
12_ premiers pas
Page 79
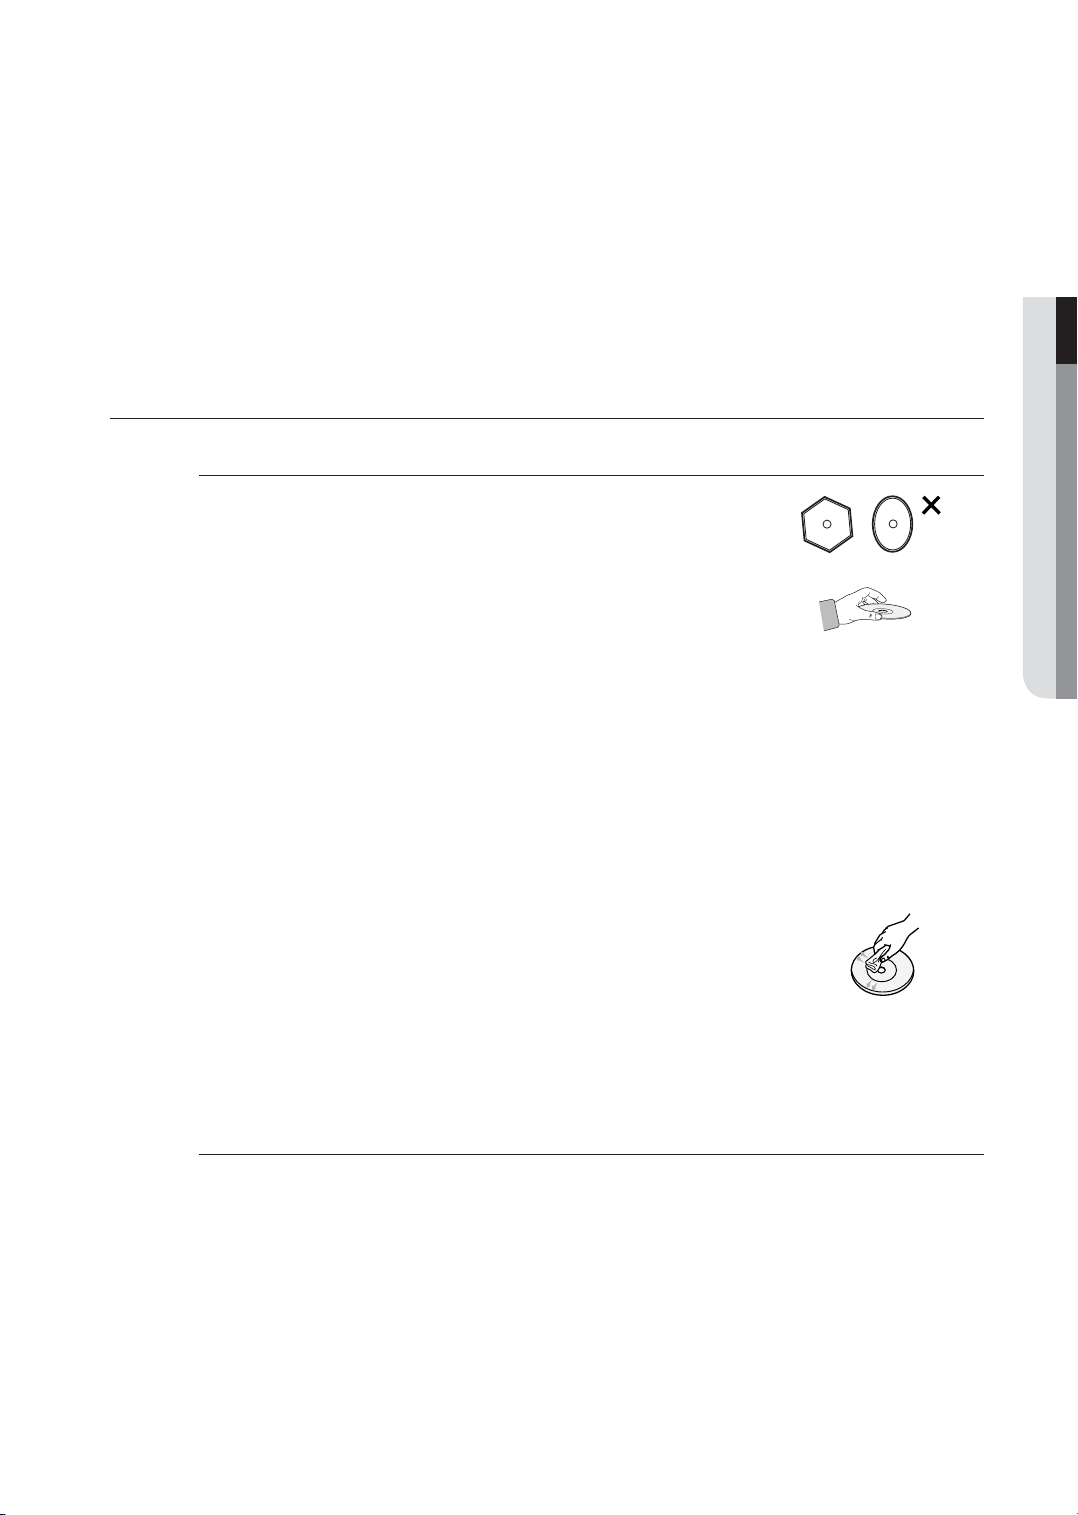
Utilisation des disques JPEG
❖
Les disques CD-R/-RW, DVD-RW/-R enregistrés sous format UDF, ISO9660 ou JOLIET peuvent être
•
lus.
•
Seuls les fi chiers JPEG possédant l’extension de nom de fi chier ".jpg", ".JPG", ".jpeg" ou "JPEG"
peuvent être lus.
Il peut accueillir le format JPEG à balayage progressif.
•
DVD-RW /-R(V)
❖
Ce format est utilisé pour l’enregistrement de données sur un disque DVD-RW ou DVD-R. Un disque
•
fi nalisé peur être lu par ce lecteur Blu-ray.
Si un disque a été enregistré en mode Vidéo sur un graveur d’un autre fabricant et n’a pas été fi nalisé,
•
il ne sera pas lu par ce lecteur Blu-ray.
STOCKAGE DES DISQUES ET GESTION
Manipulation des disques
Utilisez des disques de forme régulière.L’utilisation de disques irréguliers
•
(de forme spéciale) peut endommager le lecteur Bluray.
Manipulation des disques
❖
Évitez de toucher la surface d’enregistrement d’un disque.
•
Disques Blu-ray
❖
Si le lecteur n’est pas utilisé pendant une longue période, retirez le disqueBlu-ray du lecteur et
•
rangez le dans son boîtier.
Évitez de laisser des empreintes de doigt ou d’égratigner la surface des disques Blu-ray.
•
● PREMIERS PAS
❖
DVD-RW et DVD-R
•
Nettoyez avec un nettoyant à disque (non compris) PD (LF-K200DCA1 si disponible). N’utilisez
pas de chiffons ou de nettoyants à CD sur les disques DVD-RW/-R.
DVD-Vidéo, CD audio
❖
Utilisez un chiffon doux pour enlever la saleté ou la contamination déposée sur le disque.
•
Précautions pour la manipulation des disques
❖
N’écrivez pas sur la face imprimée avec un stylo à bille ou un crayon.
•
N’utilisez pas de nettoyant antistatique ou en aérosol. De plus, n’utilisez pas
•
de produits chimiques volatils comme le benzène ou un diluant.
Ne collez pas d’étiquettes ou d’autocollants sur les disques. (N’utilisez pas les
•
disques réparés avec du ruban adhésif ou contenant des restes d’autocollant.)
N'utilisez pas de protecteurs ou de couvercles à l’épreuve des égratignures.
•
N’utilisez pas de disques imprimés avec les imprimantes d’étiquettes disponibles sur le marché.
•
Ne chargez pas les disques déformés ou craquelés.
•
Rangement des disques
Évitez d’endommager les disques puisque les données enregistrées sont vulnérables à l’environnement.
•
Évitez de les laisser en plein soleil.
•
Gardez-les dans un endroit frais et bien aéré.
•
Rangez-les à la verticale.
•
Rangez-les dans une jaquette de protection propre.
•
Si vous déplacez soudainement votre lecteur Blu-ray d’un endroit froid vers un endroit chaud, cela
peut produire de la condensation sur les pièces mobiles et les lentilles et provoquer une lecture
anormale. Si cela se produit, évitez de le brancher dans la prise murale et attendez deux heures.
Insérez ensuite un disque et recommencez la lecture.
Français _13
Page 80
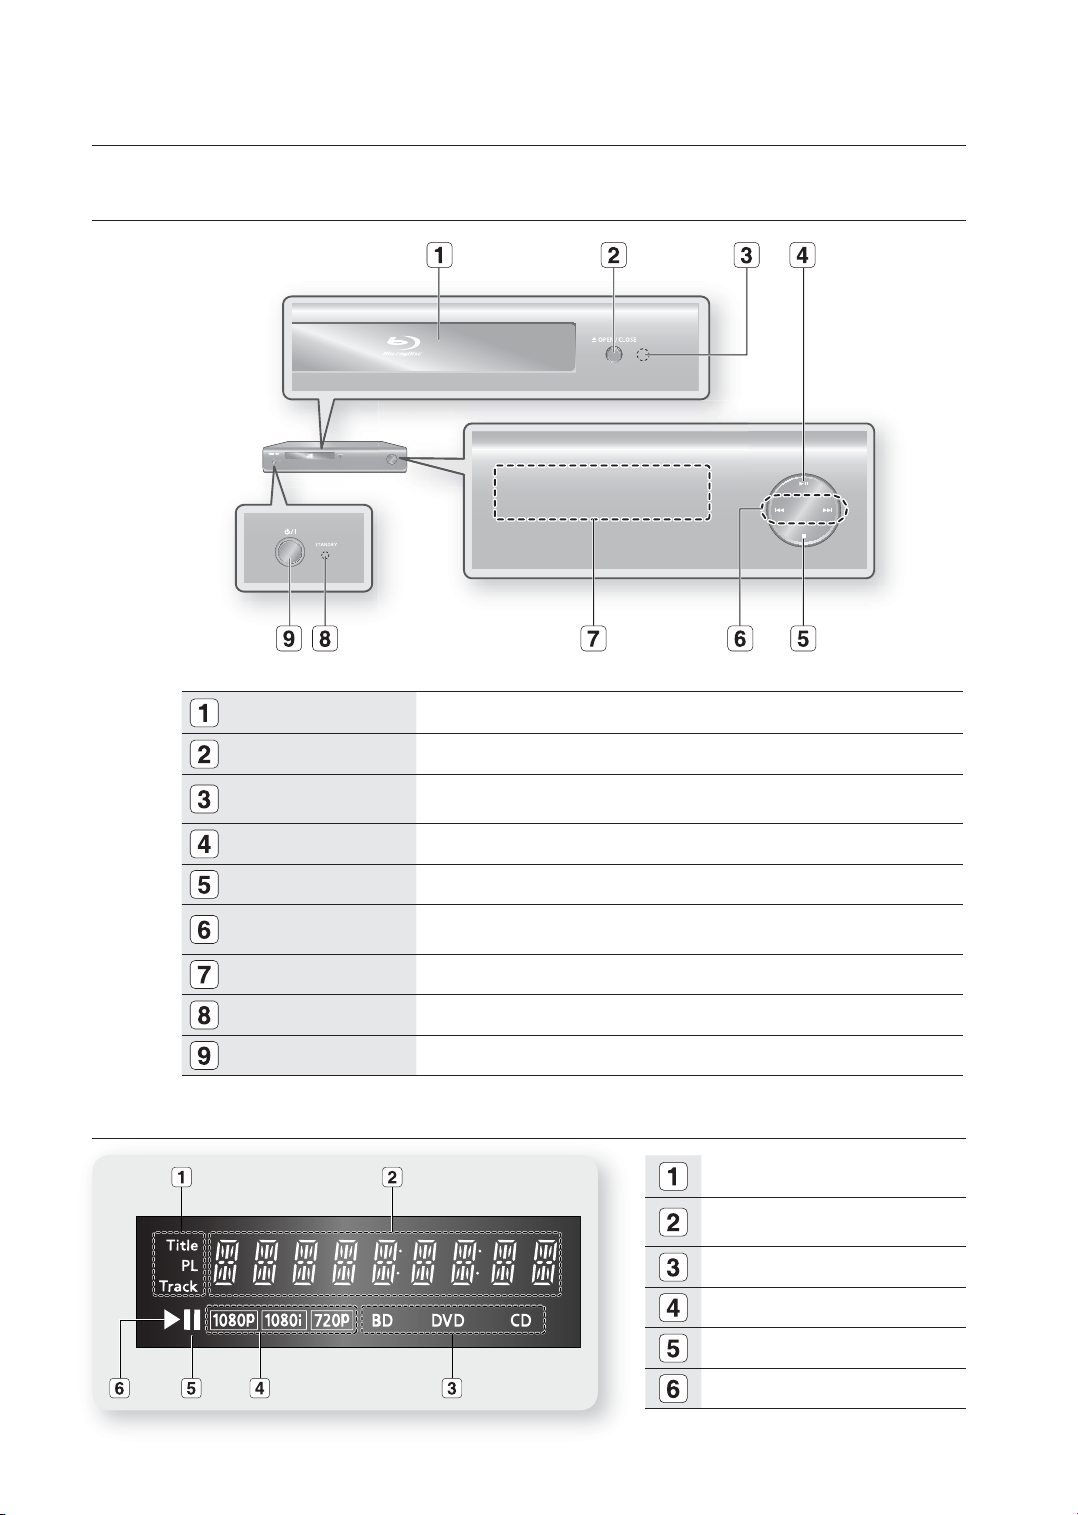
description
PANNEAU AVANT
TIROIR DISQUE
TOUCHE OPEN/CLOSE
CAPTEUR DE LA
TÉLÉCOMMANDE
TOUCHE LECTURE / PAUSE
TOUCHE ARRÊT
TOUCHES RECHERCHE /
SAUT
AFFICHEUR
TÉMOIN EN VEILLE
TOUCHE ALIMENTATION
S’ouvre pour accepter un disque.
Permet d'ouvrir et de fermer le tiroir disque.
Effectue la lecture ou l‘arrête momentanément.
Arrête la lecture.
Saute vers le prochain titre / chapitre / piste ou revient vers le titre / chapitre / piste
précédent.
Affi che l’état de lecture, l’heure, etc.
Ce témoin s’illumine dès le premier branchement de l’appareil.
Allume et éteint le lecteur Blu-ray.
AFFICHEUR DU PANNEAU AVANT
Témoin Titre / Liste de lecture / Piste
Témoin de durée de lecture / horloge /
état courant
Témoin de type de disque
14_ description
Témoin de résolution de sortie vidéo
Témoin de pause
Témoin de lecture
Page 81
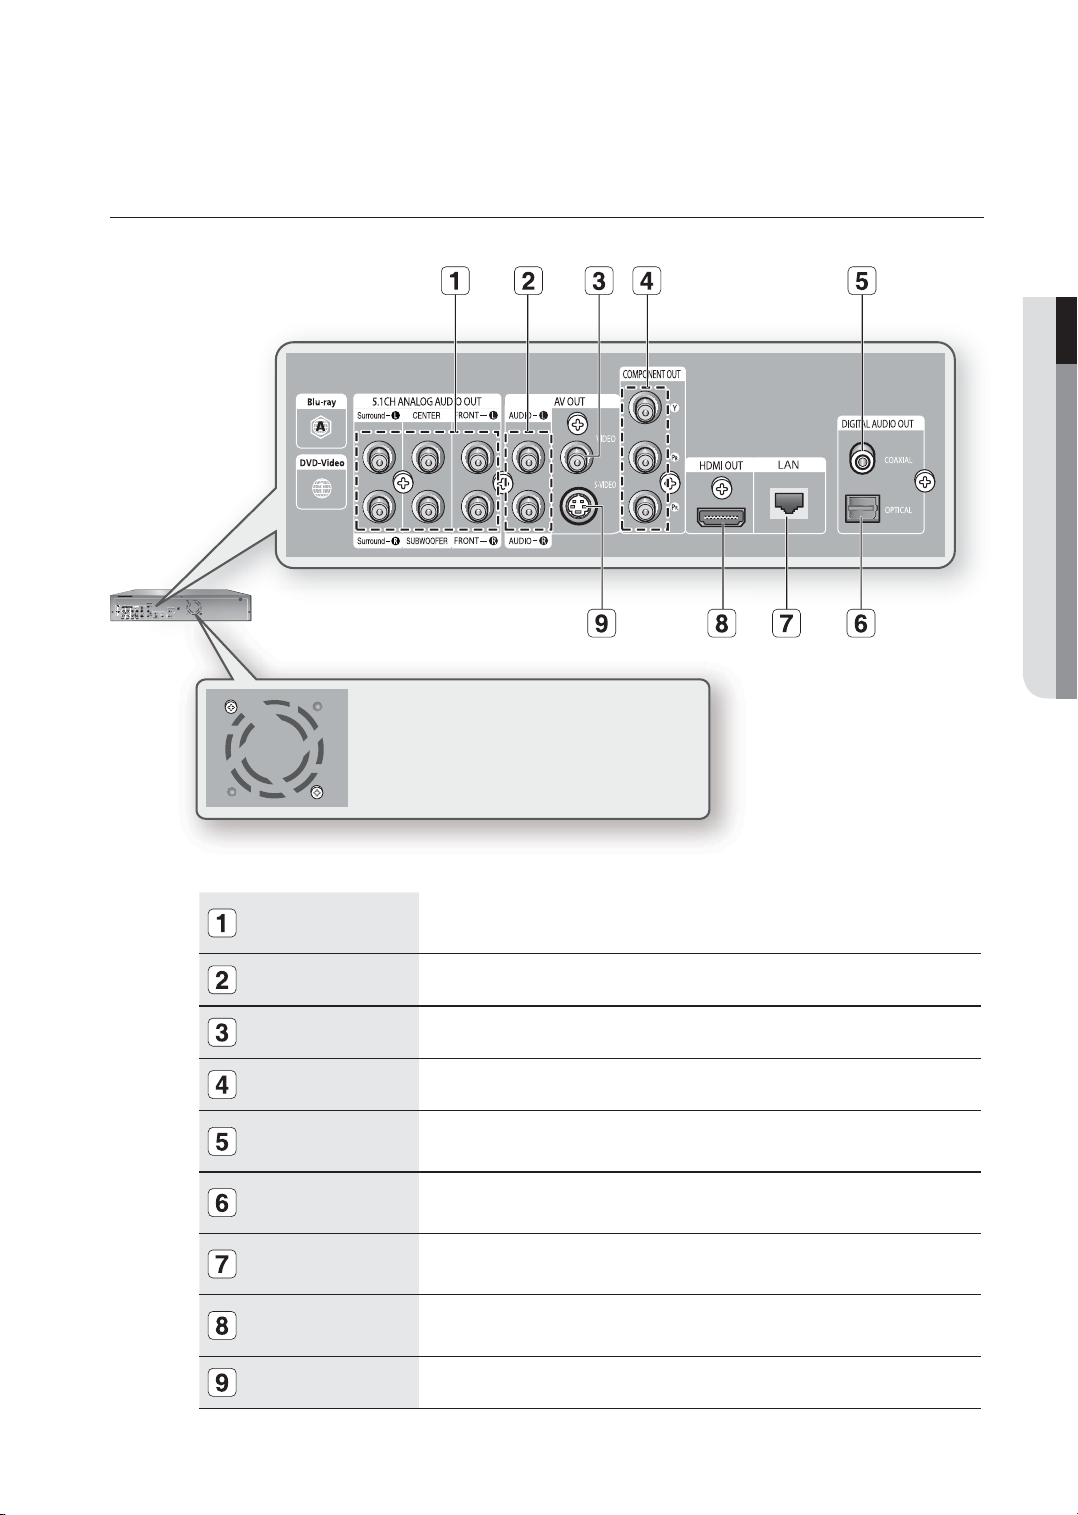
PANNEAU ARRIÈRE
● DESCRIPTION
Ventilateur
Le ventilateur fonctionne continuellement
lorsque l’appareil est alimenté. Veillez à assurer
un minimum d’espace libre de 10 cm (4 po) de
tous les côtés du ventilateur lors del’installation.
5,1CH ANALOG
AUDIO OUT
AUDIO OUT
VIDEO OUT
COMPONENT VIDEO OUT
DIGITAL AUDIO OUT
(COAXIAL)
DIGITAL AUDIO OUT
(OPTICAL)
LAN
HDMI OUT
S-VIDEO OUT
Raccordez à la prise d’entrée analogique 5,1 canaux d’un amplifi cateur A / V.
Raccordez à la prise d’entrée audio des appareils périphériques à l’aide de câbles audio.
Raccordez à la prise d’entrée vidéo des appareils périphériques à l’aide d’un câble vidéo.
Pour raccorder les appareils avec entrée vidéo Composantes.
Pour raccorder à un amplifi cateur possédant une prise d’entrée audio coaxiale.
Raccordez à un amplifi cateur possédant une prise d’entrée audio optique.
Raccordez ce terminal RLE au terminal de RLE de votre modem pour les mises à niveau
des logiciels.
Raccordez la prise de sortie HDMI à la prise d’entrée HDMI de votre téléviseur à l’aide
du câble HDMI pour obtenir une qualité d'image supérieure.
Raccordez la prise d’entrée des appareils périphériques à l’aide d’un câble S-Vidéo.
Français _15
Page 82
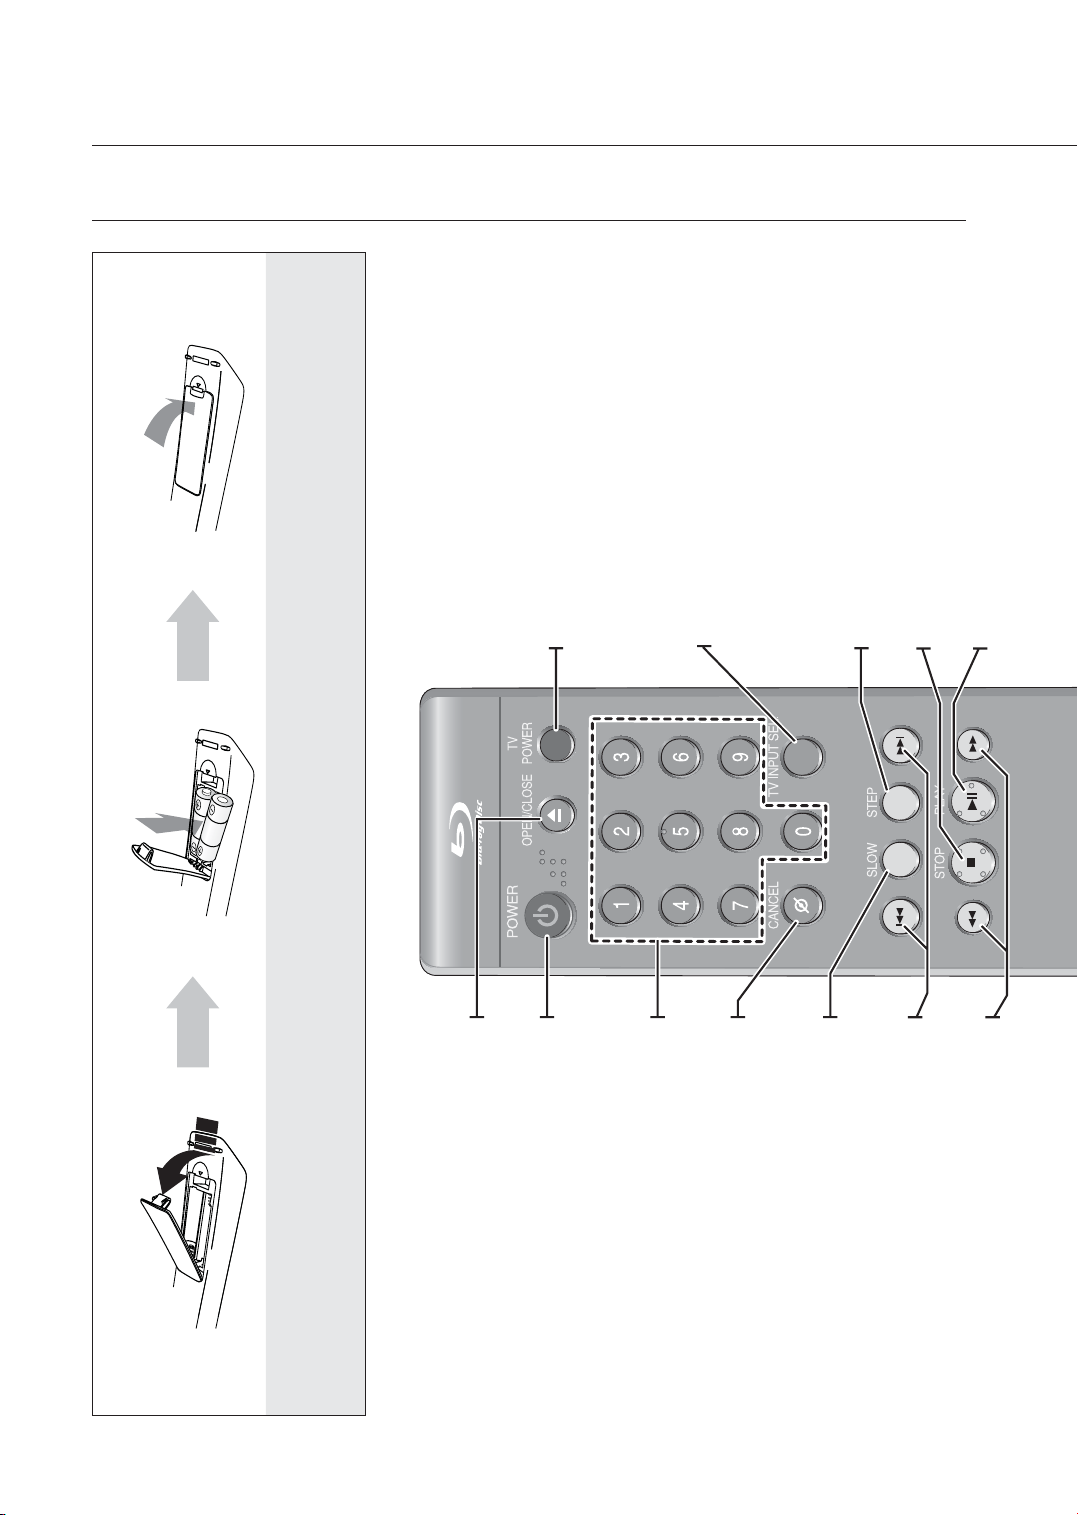
télécommande
TOURNÉE DE LA TÉLÉCOMMANDE
Les piles devraient durer environ douze
mois en utilisation normale.
3. Replacez le couvercle.
Touche TV POWER
Touche TV INPUT SEL.
non avec le lecteur. Appuyez sur la touche RETURN pour activer
Il vous permet de défi nir la source d’entrée de votre téléviseur
suite au réglage.
Lorsque la touche TV INPUT SEL. de la télécommande est
le fonctionnement des touches avec le lecteur.
sélectionnée, les fl èches de DIRECTION (haut/bas/gauche/droite)
et la touche ENTER fonctionnent uniquement avec le téléviseur et
Touche STEP
À chaque appui sur la touche, une nouvelle image apparaît.
Touche ARRÊT
Appuyez pour arrêter le disque.
Touche LECTURE / PAUSE
Appuyez pour lire ou arrêter momentanément un
disque.
Veillez à ce que les pôles « + » et « – »
des piles s'alignent avec l'illustration à
l'intérieur du compartiment.
2. Insérez deux piles AAA.
Touche OPEN/CLOSE
Appuyez pour ouvrir et fermer le tiroir disque.
télécommande tel qu'indiqué.
Insertion des piles dans la télécommande
1. Retirez le couvercle à l'arrière de la
16_ télécommande
Touche POWER
Touches numériques
Touche SLOW
Touche CANCEL
disque joue plus lentement.
À chaque fois que vous appuyez sur cette touche, le
l’arrière.
Touches SAUT ARRIÈRE / AVANT
Appuyez pour sauter vers l’avant ou vers
l’arrière.
Appuyez pour effectuer une recherche vers l’avant ou
Touches RECHERCHE ARRIÈRE / AVANT
Page 83
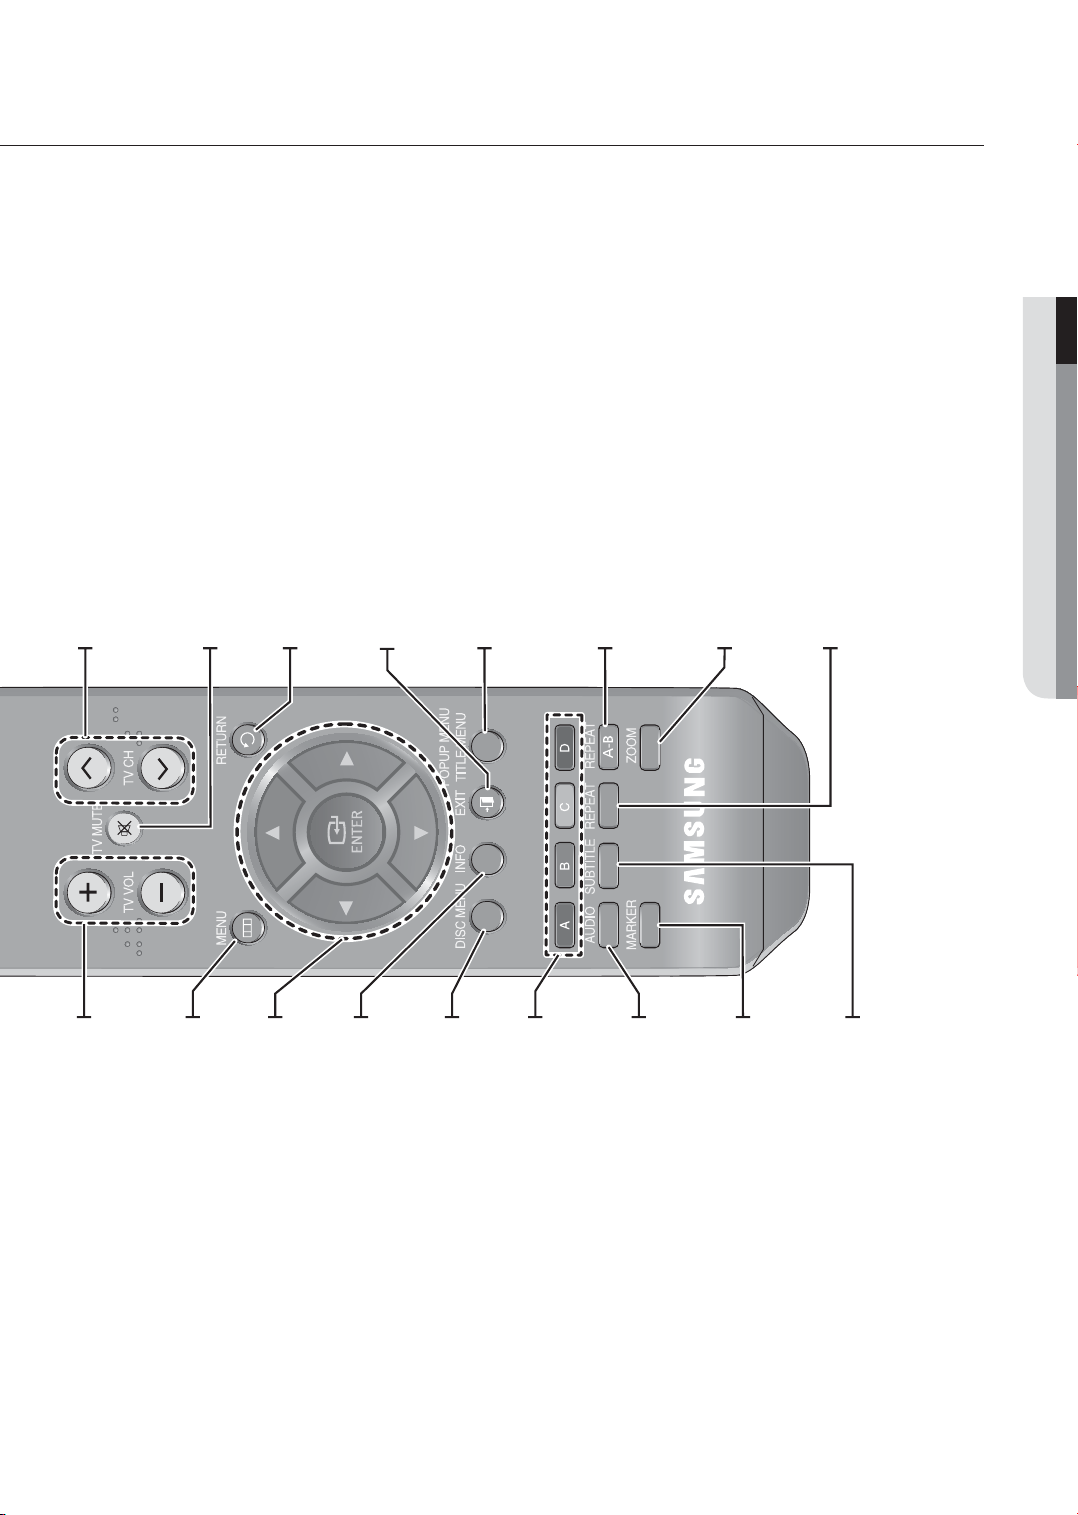
● TÉLÉCOMMANDE
Touche TV CH
Sélectionnez une émission de télévision.
Touche TV VOL
Touche TV MUTE
Désactive les haut-parleurs du téléviseur.
Touche MENU
Touche RETURN
((touches ▲▼◄►)
Touche EXIT
Touche INFO
Touche DISC MENU
Touche POPUP MENU/TITLE MENU
Permet l’accès au menu contextuel ou au menu des
titres.
Touche REPEAT A-B
Permet la lecture en boucle d’unecertaine section.
.
Touche AUDIO
Touche ZOOM
(BD/DVD).
Permet d’agrandir les photos sur un disque JPEG.
en cours de lecture.
Touche MARKER
JAUNE (C), BLEU (D)
Touche REPEAT
Permet la lecture en boucle d’un titre, d’un chapitre ou
d’un disque.
BD/DVD.
Touche SUBTITLE
Réglage du volume du téléviseur.
Touches ENTER/DIRECTION
Affi che le menu de confi guration du lecteur Blu-ray.
Utilisez pour accéder au menu du disque.
comme la Liste de musique ou la Liste de photos
Permet d’affi cher le réglage actuel ou l’état du disque.
Permet l’accès aux fonctions communes du lecteur Blu-ray
Touche COULEURS : ROUGE (A), VERT (B),
Permet l’accès à diverses fonctions audio d’un disque
Permet d’ajouter un signet pour marquer une position
Appuyez pour modifi er la langue de sous-titrage d'un
Français _17
Page 84
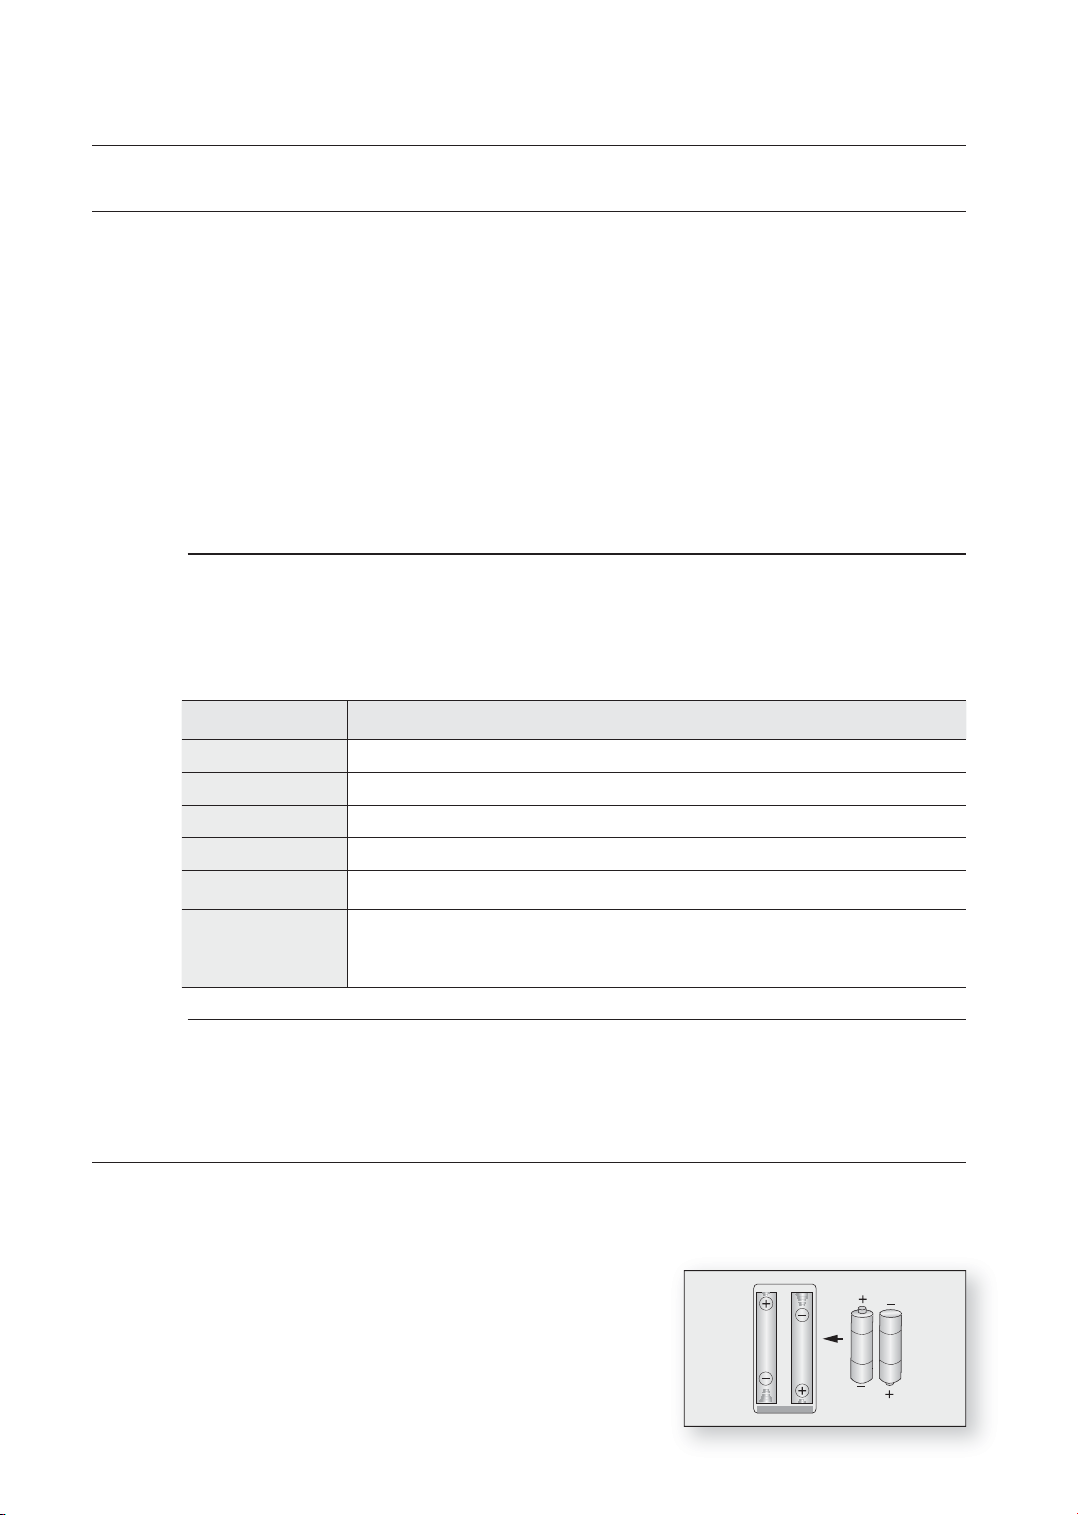
télécommande
RÉGLAGE DE LA TÉLÉCOMMANDE
Cette télécommande vous permet de contrôler certaines fonctions de votre téléviseur.
Les touches de commande des fonctions comprennent : TV POWER, TV CH ,., TV VOL (VOLUME) + –, TV
MUTE, TV INPUT SEL., DIRECTION/ENTER. Cependant, la touche DIRECTION/ENTER (DIRECTION/ENTRÉE)
ne fonctionne que lorsque la touche TV INPUT SEL. (SÉL. SOURCE TV) a été sélectionnée.
Suivez les directives ci-dessous pour déterminer la compatibilité de votre téléviseur.
1.
Allumez votre téléviseur.
2.
Pointez la télécommande vers le téléviseur.
3.
Appuyez sur la touche TV POWER et maintenez-la enfoncée, puis saisissez le code à deux chiffres
correspondant à votre marque de téléviseur en appuyant sur les touches numériques appropriées
(voir la liste de codes à la page suivante).
Si votre téléviseur est compatible avec la télécommande, il s’éteint. Il est maintenant programmé
pour fonctionner à l’aide de la télécommande.
Si existe plusieurs codes pour votre marque de téléviseur, essayez-les un après l’autre jusqu’à ce que vous
M
trouviez le bon.
Si vous remplacez les piles de la télécommande, le code doit être reprogrammé.
Après avoir appuyé sur la touche TV, vous pourrez alors contrôler votre téléviseur à l’aide des
touches suivantes.
Touche Fonction
TV POWER Pour allumer et éteindre le téléviseur.
TV INPUT SEL. Pour sélectionner une source externe
TV VOL (+ –) Pour régler le volume du téléviseur.
,.
TV CH (
TV MUTE Pour activer ou désactiver le son.
DIRECTION/ENTER
(DIRECTION/ENTRÉE)
M
) Pour sélectionner la chaîne souhaitée.
Vous permet de vous déplacer vers le haut/bas, sur la gauche/droite ((Ɓ, Ƅ, Ƃ, ƃ) pour
sélectionner l'élément souhaité.
*(ne fonctionne que lorsque la touche TV INPUT SEL. est sélectionnée)
Les fonctions énumérées plus haut peuvent ne pas fonctionner avec tous les téléviseurs. Si vous éprouvez des
diffi cultés, manipulez directement le téléviseur.
CONCERNANT LE BLOC-PILES
Si la télécommande ne fonctionne pas adéquatement :
Vérifi ez la polarité + – des piles (à anode sèche)
•
Vérifi ez la charge des piles.
•
Assurez-vous qu’aucun obstacle ne bloque le capteur infrarouge.
•
Vérifi ez la présence d’éclairage fl uorescent à proximité.
•
Disposez des piles selon la règlementation
environnementale de votre localité. Ne les jetez pas avec
les déchets domestiques.
18_ télécommande
Page 85

CODES TÉLÉVISEUR CONTRÔLABLES
Marque
SAMSUNG
AIWA
ANAM
BANG & OLUFSEN
BLAUPUNKT
BRANDT
BRIONVEGA
CGE
CONTINENTAL EDISON
DAEWOO
EMERSON
FERGUSON
FINLUX
FORMENTI
FUJITSU
GRADIENTE
GRUNDIG
HITACHI
IMPERIAL
JVC
LG
LOEWE
LOEWE OPTA
MAGNAVOX
METZ
MITSUBISHI
MIVAR
NEC
NEWSAN
NOBLEX
NOKIA
NORDMENDE
PANASONIC
PHILIPS
PHONOLA
PIONEER
RADIOLA
RADIOMARELLI
RCA
REX
SABA
SALORA
SANYO
SCHNEIDER
SELECO
SHARP
SIEMENS
SINGER
SINUDYNE
SONY
TELEAVA
TELEFUNKEN
THOMSON
THOMSON ASIA
TOSHIBA
WEGA
YOKO
ZENITH
Code
TV POWER+01, +02, +03, +04, +05, +06, +07, +08, +09
TV POWER+82
TV POWER+10, +11, +12, +13, +14, +15, +16, +17, +18
TV POWER+57
TV POWER+71
TV POWER+73
TV POWER+57
TV POWER+52
TV POWER+75
TV POWER+19, +20, +23, +24, +25, +26, +27, +28, +29, +30, +31, +32, +33, +34
TV POWER+64
TV POWER+73
TV POWER+06, +49, +57
TV POWER+57
TV POWER+84
TV POWER+70
TV POWER+49, +52, +71
TV POWER+60, +72, +73, +75
TV POWER+52
TV POWER+61, +79
TV POWER+06, +19, +20, +21, +22, +78
TV POWER+06, +69
TV POWER+06, +57
TV POWER+40
TV POWER+57
TV POWER+06, +48, +62, +65
TV POWER+52, +77
TV POWER+83
TV POWER+68
TV POWER+66
TV POWER+74
TV POWER+72, +73, +75
TV POWER+53, +54, +74, +75
TV POWER+06, +55, +56, +57
TV POWER+06, +56, +57
TV POWER+58, +59, +73, +74
TV POWER+06, +56
TV POWER+57
TV POWER+45, +46
TV POWER+74
TV POWER+57, +72, +73, +74, +75
TV POWER+74
TV POWER+41, +42, +43, +44, +48
TV POWER+06
TV POWER+74
TV POWER+36, +37, +38, +39, +48
TV POWER+71
TV POWER+57
TV POWER+57
TV POWER+35, +48
TV POWER+73
TV POWER+67, +73, +75, +76
TV POWER+72, +73, +75
TV POWER+80, +81
TV POWER+47, +48, +49, +50, +51, +52
TV POWER+57
TV POWER+06
TV POWER+63
● TÉLÉCOMMANDE
Français _19
Page 86
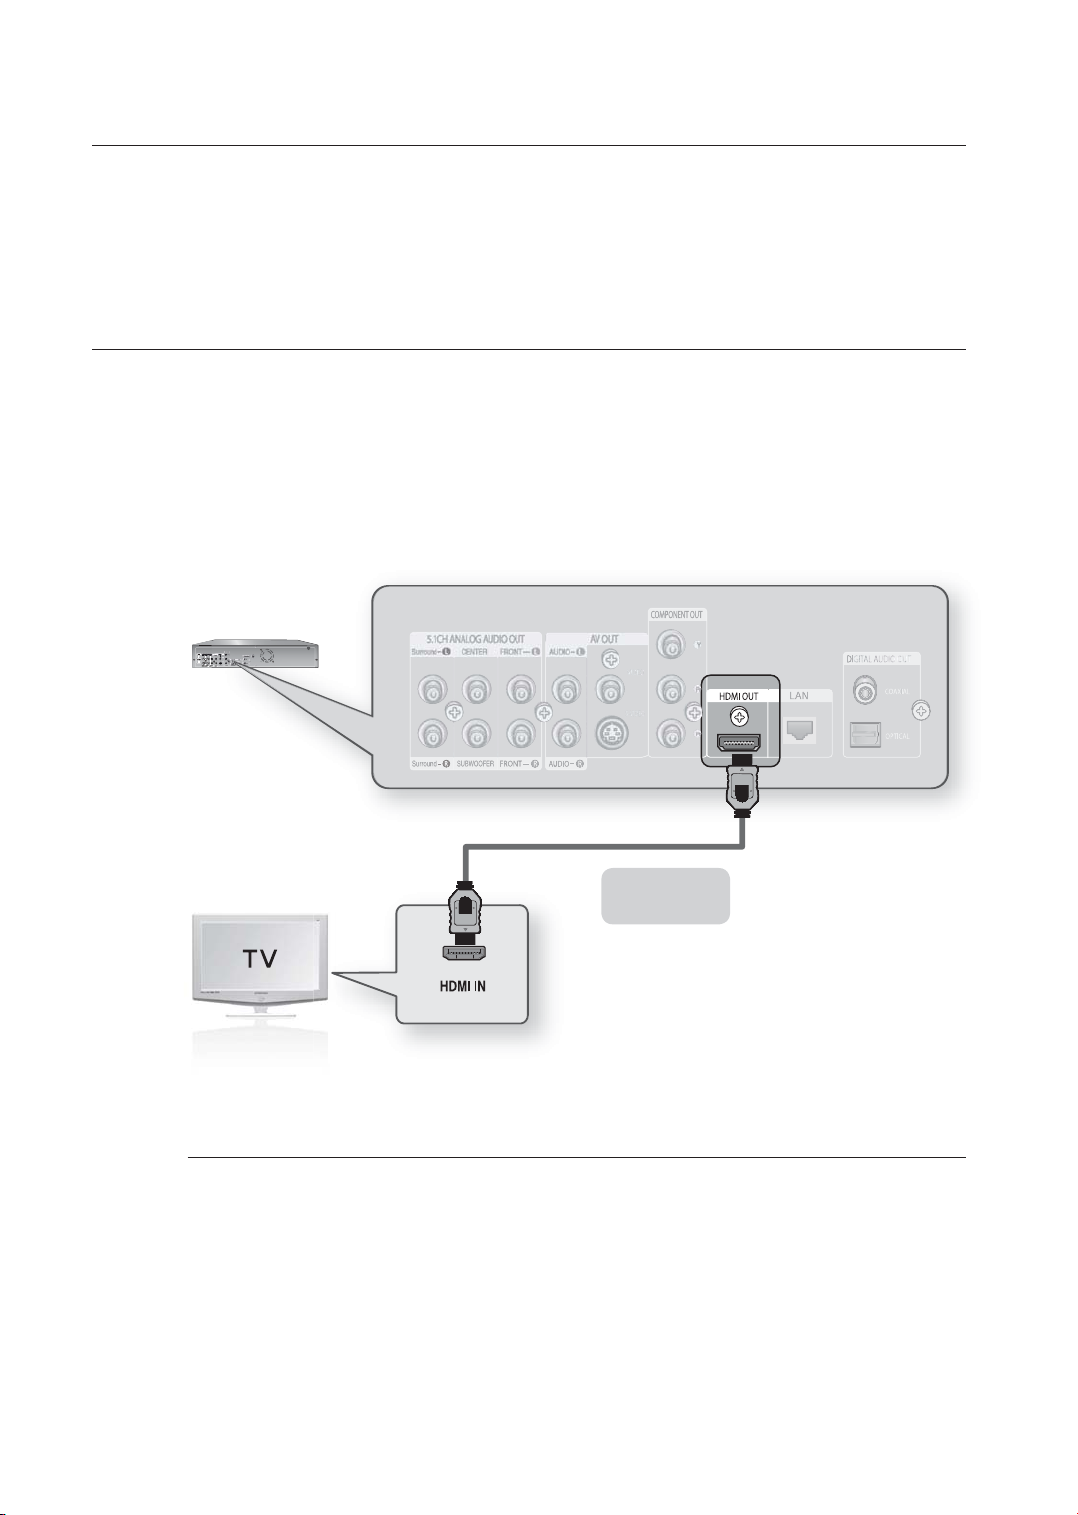
raccordements
Cette section implique des méthodes variées de raccordement du lecteur Blu-ray à
des périphériques.
RACCORDEMENT À UN TÉLÉVISEUR AVEC LE CÂBLE HDMI
1.
À l’aide du câble HDMI-HDMI (non compris), raccordez la prise HDMI OUT à l’arrière du lecteur Blu-ray à la
prise HDMI IN de votre téléviseur.
2.
Appuyez sur la touche TV INPUT SEL. de la télécommande de votre téléviseur jusqu’à ce que le signal HDMI du
lecteur Blu-ray apparaisse à l’écran du téléviseur.
Si vous avez adéquatement réglé la télécommande pour fonctionner avec votre téléviseur (Voir les pages
•
18~19), appuyez sur la touche TV INPUT SEL. de la télécommande et sélectionnez HDMI comme source
externe pour le téléviseur.
M
Câble HDMI
(non compris)
Si le câble HDMI est branché ou débranché en cours de lecture d'un fi chier CDDA, MP3 ou JPEG, le lecteur
interrompt la lecture.
20_ raccordements
Page 87

FONCTION DE DÉTECTION AUTOMATIQUE HDMI
La sortie vidéo du lecteur passe automatiquement en mode HDMI lorsque que vous branchez un câble HDMI alors
qu'il est allumé (voir à la page 40).
Certains modes de résolution de sortie peuvent ne pas fonctionner en fonction de votre téléviseur.
M
Veuillez vous reporter au manuel d’utilisation du téléviseur pour plus de détails.
Si vous branchez un câble HDMI ou HDMI-DVI sur le téléviseur, la sortie du lecteur Blu-ray passe
automatiquement en mode HDMI/DVI en moins de 10 secondes.
Si les câbles Component et HDMI sont tous deux branchés, le mode HDMI est automatiquement sélectionné.
(Voir la page 40)
Lorsque vous raccordez le lecteur à un téléviseur pour la première fois ou à un nouveau téléviseur à l'aide d'un
câble HDMI, la meilleure résolution HDMI disponible sur le téléviseur est automatiquement défi nie.
Si vous raccordez un téléviseur Samsung au lecteur Blu-ray à l’aide d’un câble HDMI, il est possible de
manipuler facilement le lecteur à l’aide de la télécommande du téléviseur. (Cette fonction n’est disponible
qu’avec les téléviseurs Samsung pouvant accueillir Anynet+.) (Voir les pages 41
HDMI (High Defi nition Multimedia Interface) (Interface multimédia haute défi nition)
•
HDMI est une interface qui permet la transmission de données audio et vidéo par une prise unique.
À l’aide du mode HDMI, le lecteur Blu-ray transmet un signal audio / vidéo numérique et affi che une
image aux couleurs vives sur un téléviseur à prise d’entrée HDMI.
Description du raccordement HDMI
•
Prise HDMI – accueille les données vidéo / audio numériques (LPCM (modulation par impulsion et
codage linéaire)) ou Bit Stream (train de bits)).
- Le mode HDMI transmet uniquement un signal numérique pur au téléviseur.
- Si votre téléviseur ne peut accueillir la HDCP (Highbandwidth Digital Content Protection) (protection
de contenu numérique à large bande passante), des parasites apparaissent à l’écran.
Pourquoi Samsung utilise-t-il le format HDMI ?
•
Les téléviseurs analogiques requièrent un signal vidéo / audio analogique. Cependant, en cours de
lecture d’un disque BD/DVD, les données transmises au téléviseur sont numériques. Donc, un
convertisseur numérique / analogique (compris dans le lecteur Blu-ray) ou un convertisseur analogique
/ numérique (dans le téléviseur) est nécessaire. La qualité d’image se dégrade en cours de conversion
à cause des parasites et des pertes de signal. La technologie HDMI est supérieure parce qu’elle ne
nécessite pas de conversion numérique / analogique et qu’elle transmet un signal numérique pur du
lecteur au téléviseur.
Qu'est-ce que la technologie HDCP ?
•
HDCP (High-band width Digital Content Protection) (Protection du contenu numérique à large bande
passante) est un système de protection contre la copie du contenu des disques BD/DVD transmis par
HDMI. Le système fournit un lien numérique sécuritaire entre une source vidéo (PC, DVD, etc) et un
dispositif à écran (téléviseur, projecteur, etc) Le contenu est encodé à la source pour en prévenir la
copie non autorisée.
Qu’est-ce que Anynet+ ?
•
Anynet+ est une fonction commode offrant un lien de fonctionn ement pour cet appareil par le biais
d’un téléviseur doté de la fonction Anynet+.
- Si votre téléviseur TV possède le logo
- Si vous allumez le lecteur et y insérez un disque, la lecture du disque est lancée, le téléviseur
s’allume automatiquement et passe en mode HDMI.
- Si vous allumez le lecteur avec un disque déjà inséré, puis appuyez ensuite sur la touche Play
(Lecture), le téléviseur s’allume immédiatement et passe en mode HDMI.
, il peut alors accueillir la fonction Anynet+.
~
42)
● RACCORDEMENTS
Français _21
Page 88
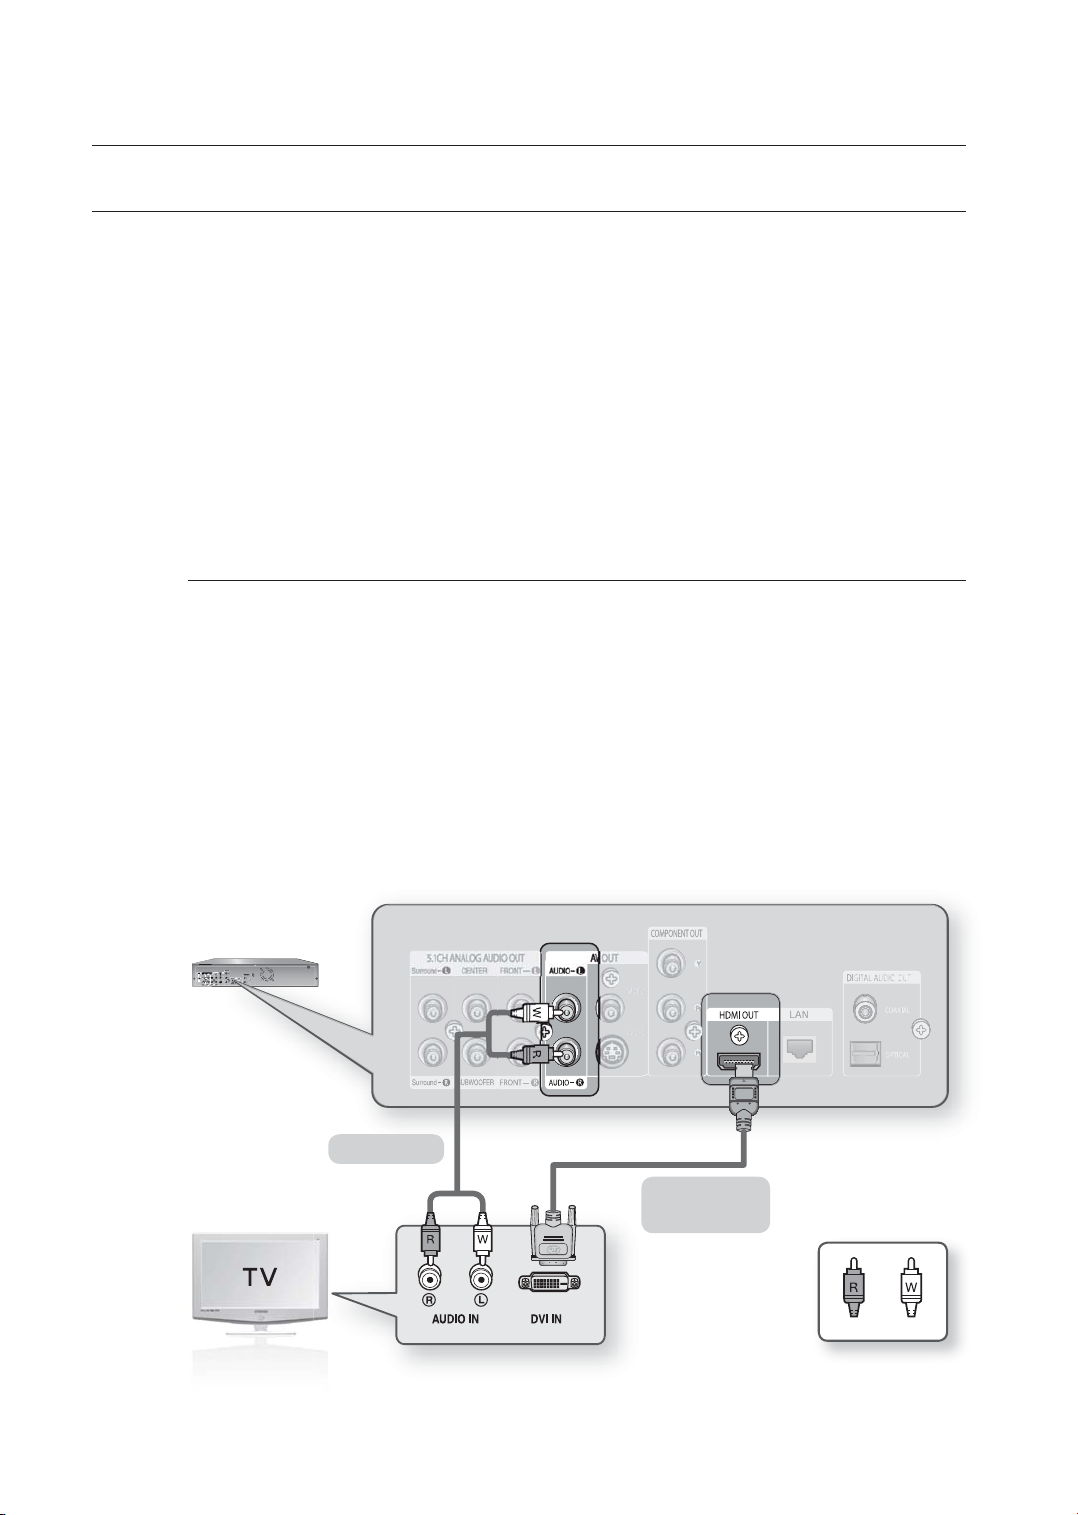
raccordements
RACCORDEMENT À UN TÉLÉVISEUR AVEC LA PRISE DVI
1.
À l’aide des câbles vidéo composante (non compris), raccordez la prise HDMI OUT à l’arrière du lecteur Blu-ray
à la prise DVI IN de votre téléviseur.
2.
À l’aide des câbles audio, raccordez les prises AUDIO OUT (rouge et blanche) à l’arrière du lecteur Blu-ray aux
prises AUDIO IN (rouge et blanche) de votre téléviseur.
Allumez le lecteur Blu-ray et le téléviseur.
3.
Appuyez sur la touche TV INPUT SEL. de la télécommande de votre téléviseur jusqu’à ce que le signal DVI du
lecteur Blu-ray apparaisse à l’écran du téléviseur.
•
Si vous avez correctement réglé la télécommande pour fonctionner avec votre téléviseur (pages 18~19),
appuyez sur la touche TV INPUT SEL. de la télécommande et sélectionnez HDMI comme source externe
pour le téléviseur.
Si vous branchez le câble HDMI pendant que le lecteur Blu-Ray est allumé, sa sortie vidéo passe automatiquement
en mode HDMI (voir la page 40).
Certains modes de résolution de sortie peuvent ne pas fonctionner en fonction de votre téléviseur.
M
Veuillez vous reporter au manuel d’utilisation du téléviseur pour plus de détails.
Si vous branchez un câble HDMI ou HDMI-DVI sur le téléviseur, la sortie du lecteur Blu-ray passe
automatiquement en mode HDMI/DVI en moins de 10 secondes.
Si les câbles Component et HDMI sont tous deux branchés, le mode HDMI est automatiquement sélectionné.
(Voir la page 40)
Lorsque vous raccordez le lecteur à un téléviseur pour la première fois ou à un nouveau téléviseur à l'aide d'un
câble HDMI, la meilleure résolution HDMI disponible sur le téléviseur est automatiquement défi nie.
Si le câble HDMI est branché ou débranché en cours de lecture d'un fi chier CDDA, MP3 ou JPEG, le lecteur
interrompt la lecture.
22_ raccordements
Câble Audio
Câble HDMI-DVI
(non compris)
WlancRouge
Page 89
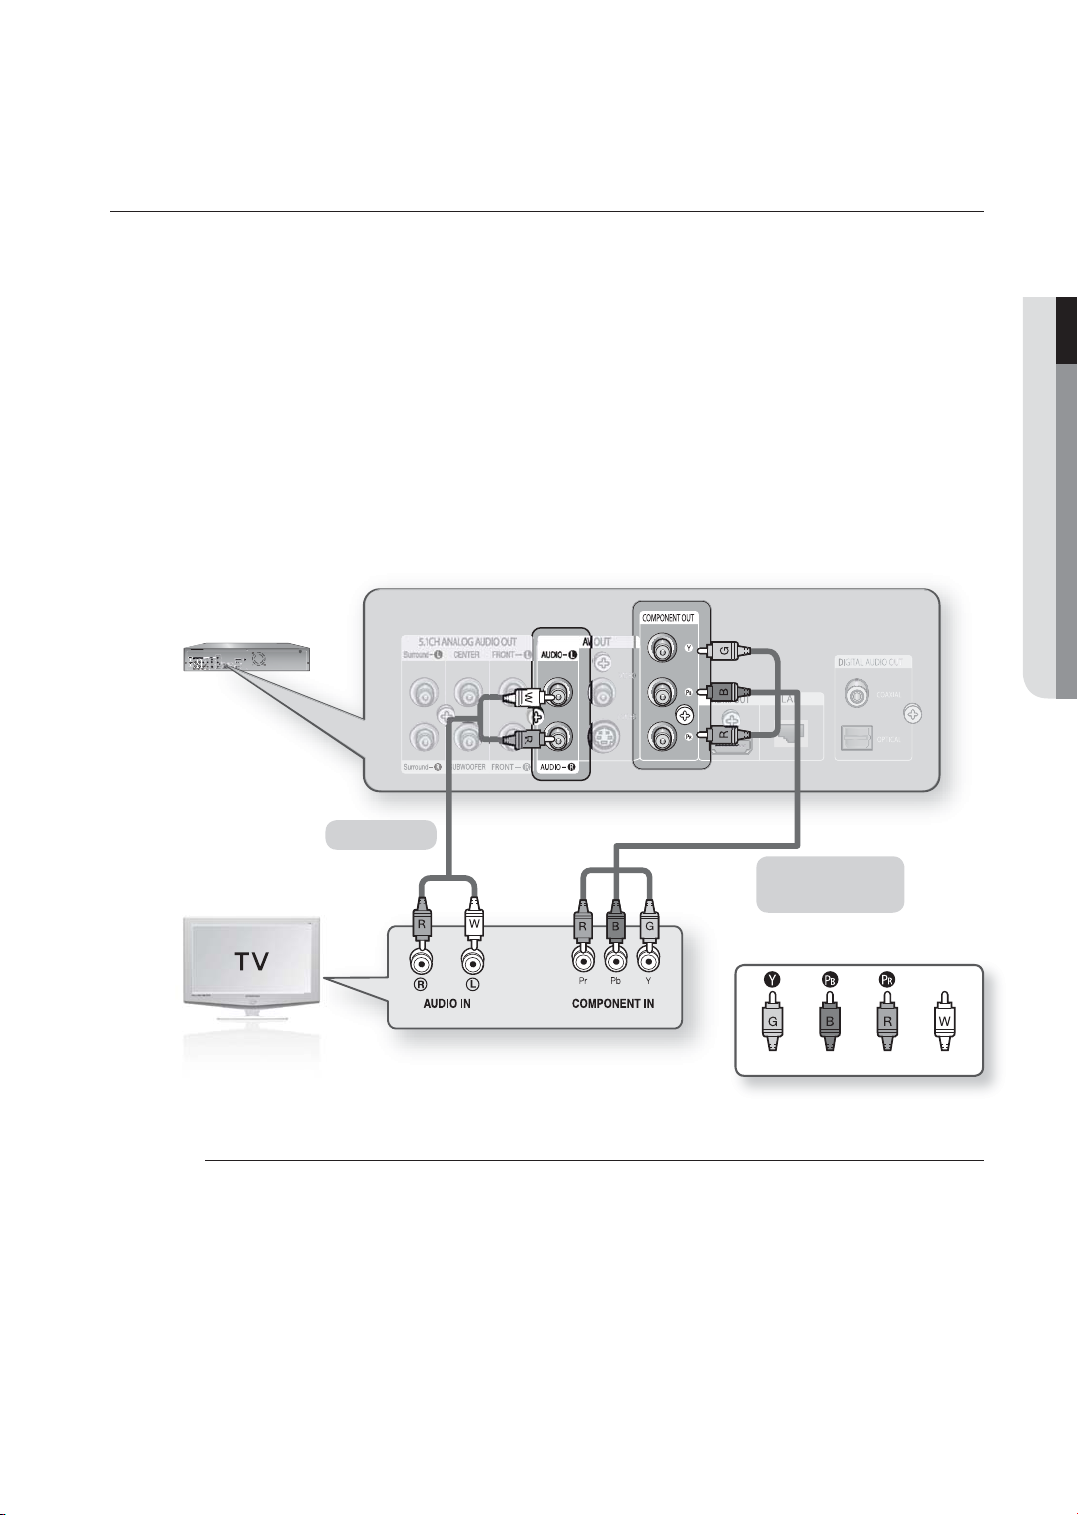
RACCORDEMENT À UN TÉLÉVISEUR (COMPONENT)
Raccordement de votre téléviseur à l’aide du câble Composantes.
Vous profi terez d’images de haute qualité à reproduction de couleur précise. Le format vidéo Composantes sépare
B
les éléments de l’image en signaux noir et blanc (Y), bleu (P
et plus claires. (Les signaux audio sont transmis par la sortie audio.)
1.
À l’aide des câbles vidéo composante (non compris), raccordez les prises COMPONENT VIDEO OUT à l’arrière
du lecteur Blu-ray aux prises COMPONENT IN de votre téléviseur.
2.
À l’aide des câbles audio, raccordez les prises AUDIO OUT (rouge et blanche) à l’arrière du lecteur Blu-ray aux
prises AUDIO IN (rouge et blanche) de votre téléviseur.
3.
Appuyez sur le sélecteur d’entrée de la télécommande de votre téléviseur jusqu’à ce que le signal Composantes
du lecteur Blu-ray apparaisse à l’écran du téléviseur.
•
Si vous avez correctement réglé la télécommande pour fonctionner avec votre téléviseur (Voir les pages
18~19), appuyez sur la touche TV INPUT SEL. de la télécommande et sélectionnez COMPONENT comme
source externe pour le téléviseur.
), et rouge (PR) pour reproduire des images lumineuses
● RACCORDEMENTS
M
Câble Audio
Câble Composantes
(non compris)
Vert Bleu Rouge Wlanc
Selon le manufacturier, les prises composantes de votre téléviseur sont codées “R-Y, B-Y, Y” ou “Cr, Cb, Y”
plutôt que “Pr, Pb, Y”. Le nombre de prises et leur position peuvent varier selon le type de téléviseur. Veuillez
vous reporter au manuel d’utilisation du téléviseur pour plus de détails.
Vous pouvez choisir parmi une variété de résolutions comprenant 1080i, 720p, 480p and 480i, selon le type
de disque. (Voir la page 40)
La résolution réelle peut varier de celle confi gurée dans le menu Param. (CONFIGURATION) si les câbles
Component (Composantes) et HDMI sont tous deux branchés. La résolution peut aussi varier en fonction du
disque utilisé. (Voir à la page 40)
Français _23
Page 90
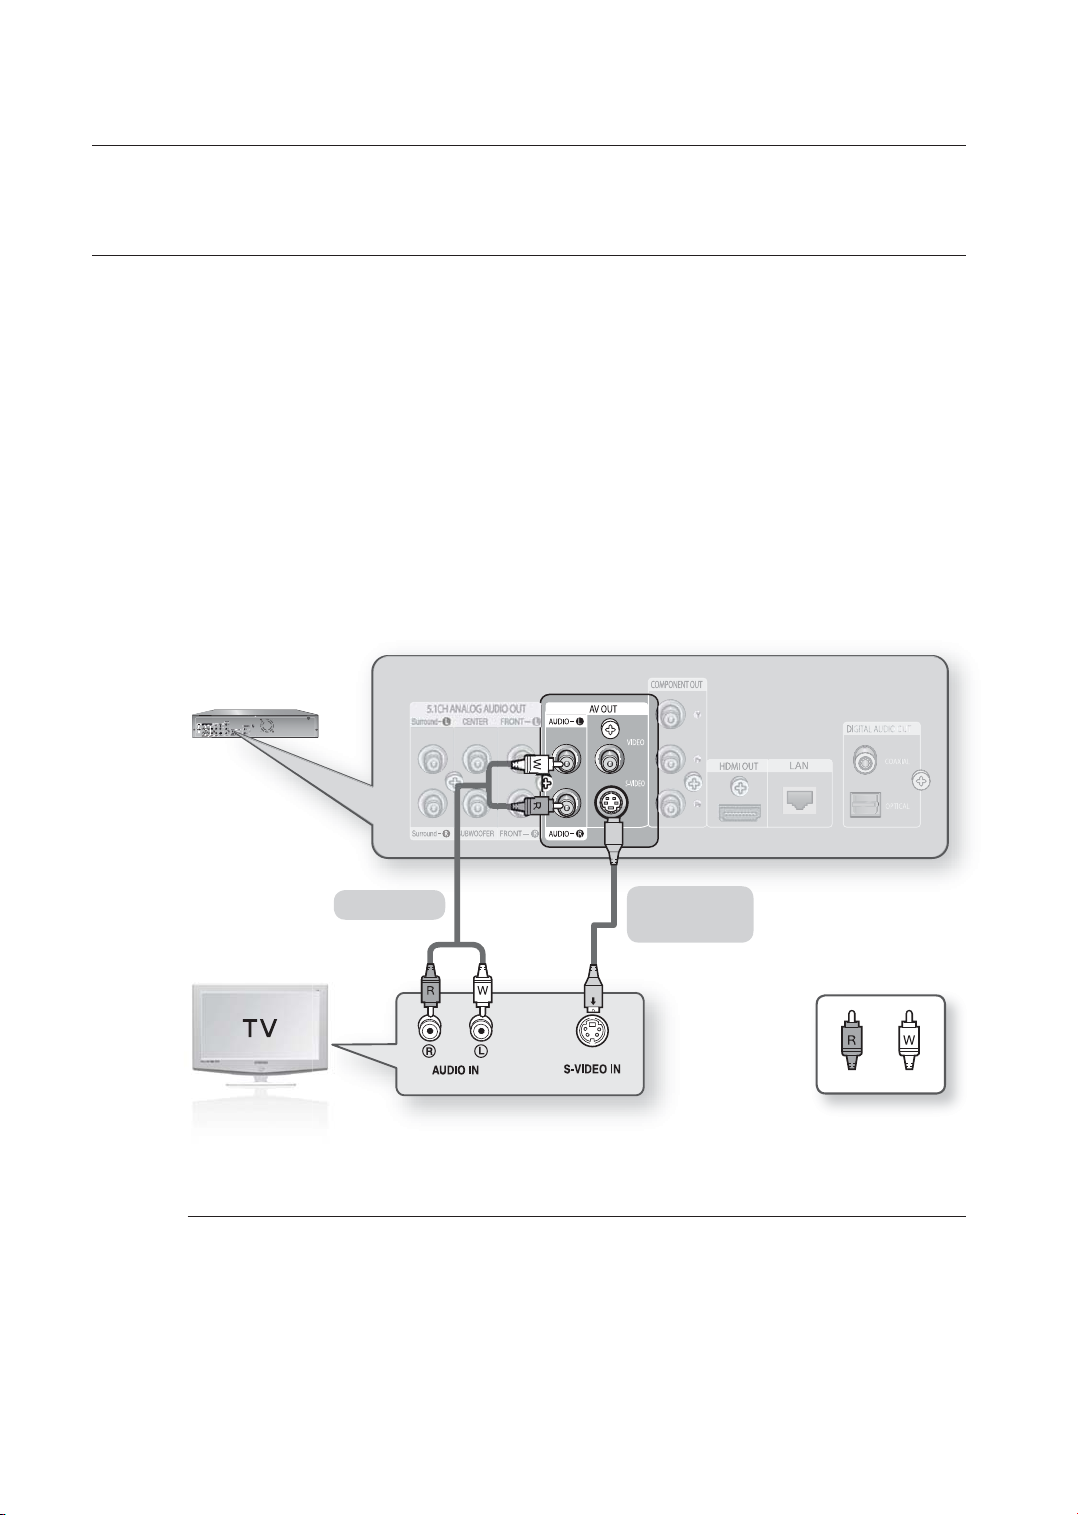
raccordements
RACCORDEMENT À UN TÉLÉVISEUR (S-VIDEO)
Raccordement de votre téléviseur à l’aide du câble S-Vidéo.
Vous profi terez d’images de haute qualité. Le format SVidéo sépare les éléments de l’image en signaux noir et
blanc (Y) et couleur (C) pour reproduire une image plus nette que le mode d'entrée vidéo ordinaire. (Les signaux
audio sont transmis par la sortie audio.)
1.
À l’aide d’un câble S-Vidéo (non compris), raccordez la prise S-VIDEO OUT à l’arrière du lecteur Blu-ray à la
prise S-VIDEO IN de votre téléviseur.
2.
À l’aide des câbles audio, raccordez les prises AUDIO OUT (rouge et blanche) à l’arrière du lecteur Blu-ray aux
prises AUDIO IN (rouge et blanche) de votre téléviseur. Allumez le lecteur Blu-ray et le téléviseur.
3.
Appuyez sur la touche TV INPUT SEL. de la télécommande de votre téléviseur jusqu’à ce que le signal S-Vidéo
du lecteur Blu-ray apparaisse à l’écran du téléviseur.
Si vous avez correctement réglé la télécommande pour fonctionner avec votre téléviseur (Voir les pages 18~19),
•
appuyez sur la touche TV INPUT SEL. de la télécommande et sélectionnez S-VIDEO comme source externe
pour le téléviseur.
La résolution de la source S-VIDÉO est toujours à 480i quel que soit le réglage du menu Param..
M
(Voir la page 40)
24_ raccordements
Câble Audio
Câble S-Vidéo
(non compris)
WlancRouge
Page 91
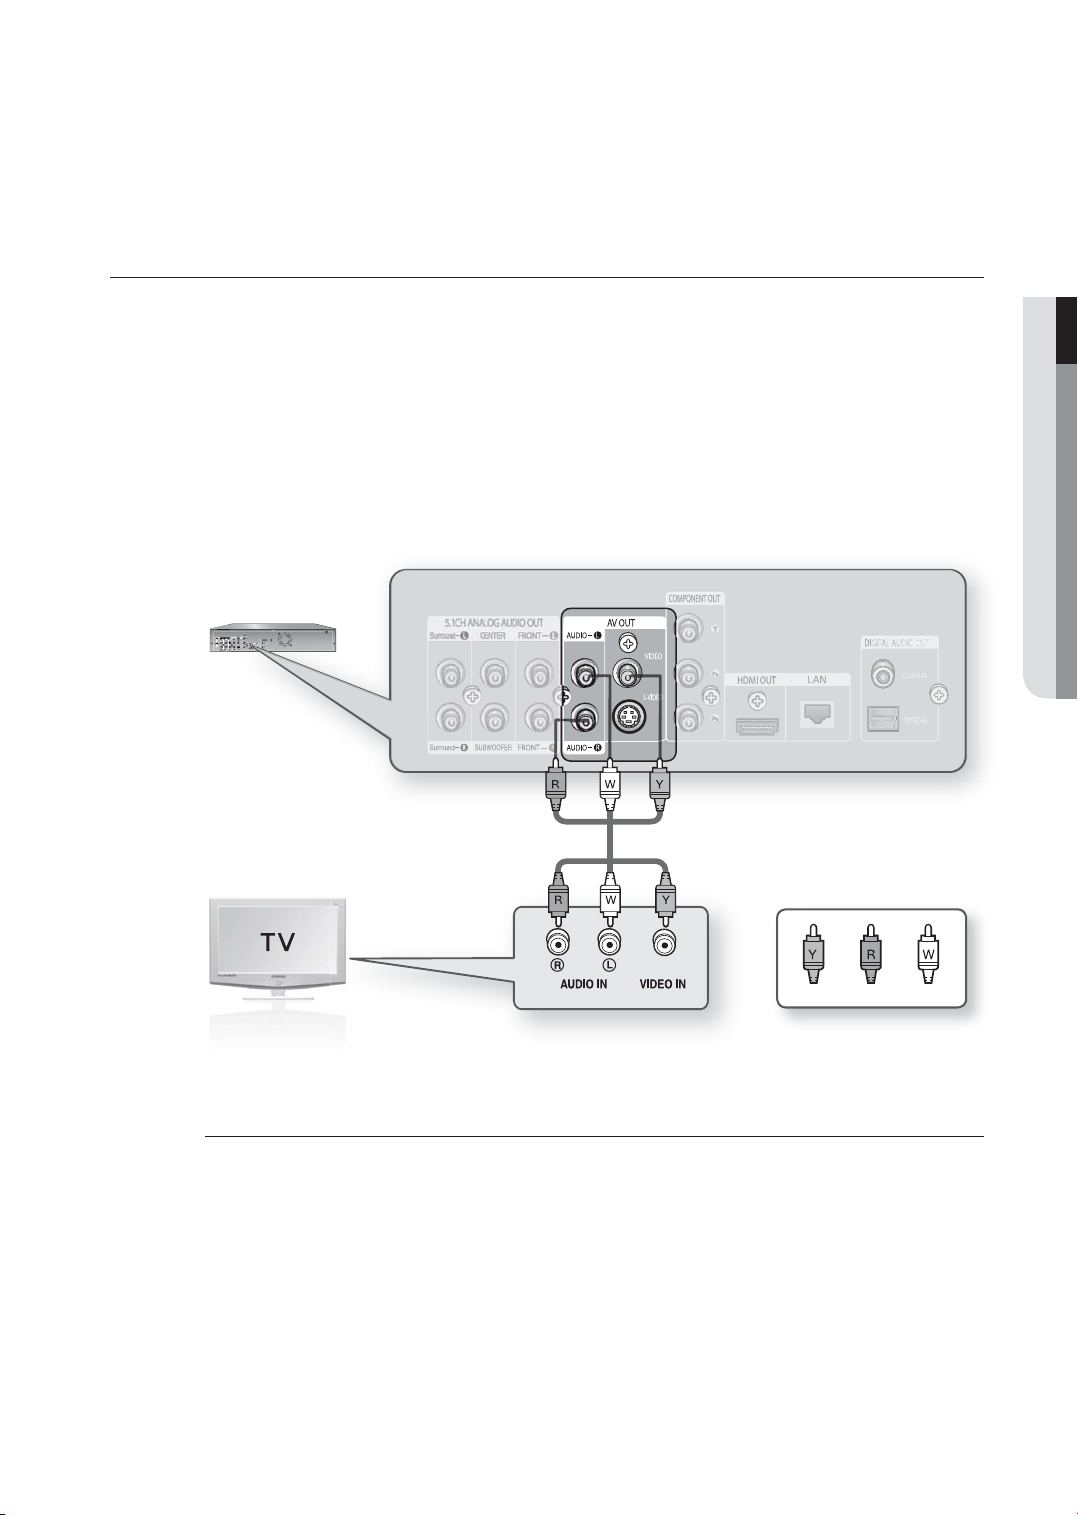
RACCORDEMENT À UN TÉLÉVISEUR (VIDEO)
1.
À l’aide des câbles vidéo / audio, raccordez les prises de sortie VIDEO (jaune) / AUDIO OUT (rouge et
blanche) à l’arrière du lecteur Blu-ray aux prises d’entrée VIDEO (jaune) / AUDIO IN(rouge et blanche) de
votre téléviseur.
2.
Allumez le lecteur Blu-ray et le téléviseur.
3.
Appuyez sur le sélecteur d’entrée de la télécommande de votre téléviseur jusqu’à ce que le signal vidéo du
lecteur Blu-ray apparaisse à l’écran du téléviseur.
•
Si vous avez adéquatement réglé la télécommande pour fonctionner avec votre téléviseur (pages 18~19),
appuyez sur la touche TV INPUT SEL. de la télécommande et sélectionnez VIDEO comme source externe
pour le téléviseur.
● RACCORDEMENTS
M
RougeJaune Wlanc
Les câbles audio peuvent générer des parasites lorsqu’ils sont placés trop près des cordons d’alimentation.
Si vous souhaitez raccorder un amplifi cateur, reportez-vous à la page reliée au raccordement d’un
amplifi cateur. (Voir les pages 26~29)
Le nombre et la position des prises peuvent varier selon le type de téléviseur. Veuillez vous reporter au manuel
d’utilisation du téléviseur pour plus de détails.
Si le téléviseur ne possède qu’une seule prise d’entrée audio, raccordez-la à la prise [AUDIO OUT] [gauche]
(blanche) du lecteur Blu-ray.
La résolution de la source VIDÉO est toujours à 480i quel que soit le réglage du menu Param..
(Voir la page 40)
Français _25
Page 92
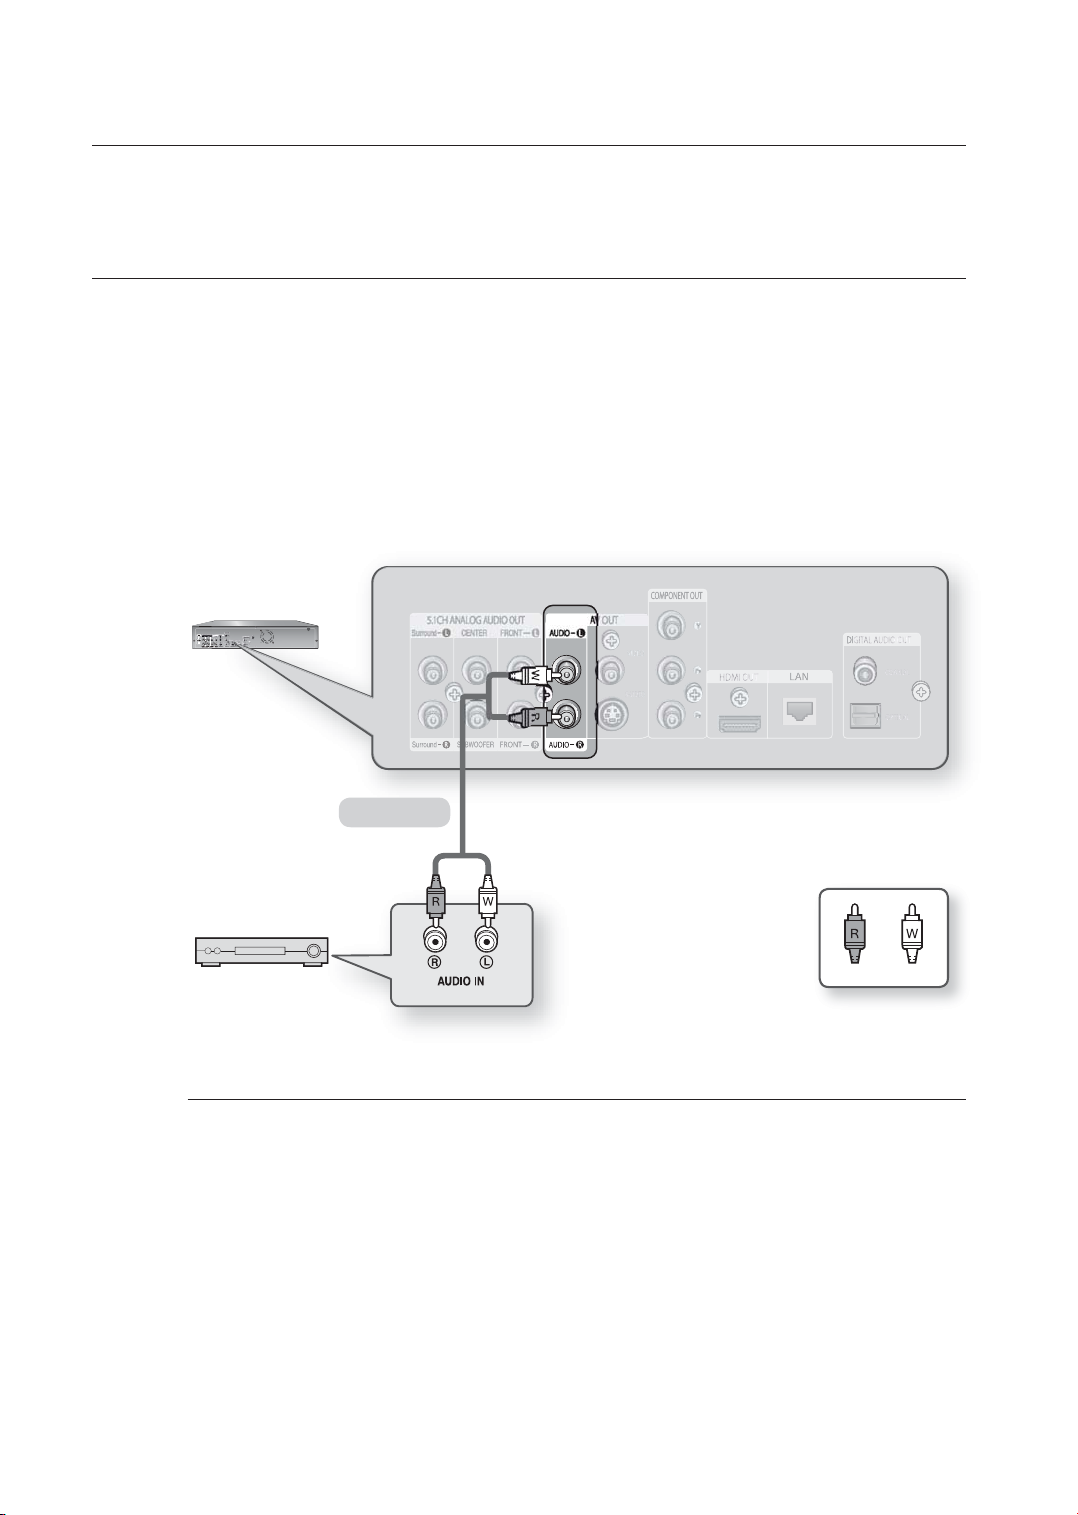
raccordements
RACCORDEMENT À UN SYSTÈME AUDIO (AMPLIFICATEUR À 2 CANAUX)
1.
À l’aide des câbles audio, raccordez les prises AUDIO OUT (rouge et blanche) à l’arrière du lecteur Blu-ray aux
prises AUDIO IN (rouge et blanche) de votre amplifi cateur.
2.
À l'aide des câbles vidéo, raccordez les prises HDMI, COMPONENT, S-VIDEO ou VIDEO OUT sur le panneau
arrière du lecteur Blu-ray aux prises HDMI, COMPONENT, S-VIDEO ou VIDEO IN de votre téléviseur tel que
décrit aux pages 20 à 25.
3.
Allumez le lecteur Blu-ray, le téléviseur et l’amplifi cateur.
4.
Appuyez sur la touche de sélection d’entrée de l’amplifi cateur pour sélectionner entrée externe pour entendre
le son depuis le lecteur Blu-ray. Reportezvous au manuel de l’utilisateur de votre amplifi cateur pour en régler les
entrées audio.
Amplifi cateur
stéréo à 2 canaux
Fabriqué sous licence de Dolby Laboratories. “Dolby” et le symbole du double D sont des marques déposées
M
des laboratoires Dolby.
“DTS” et “DTS DIGITAL SURROUND” sont des marques déposées de DTS, Inc.
Câble Audio
WlancRouge
26_ raccordements
Page 93
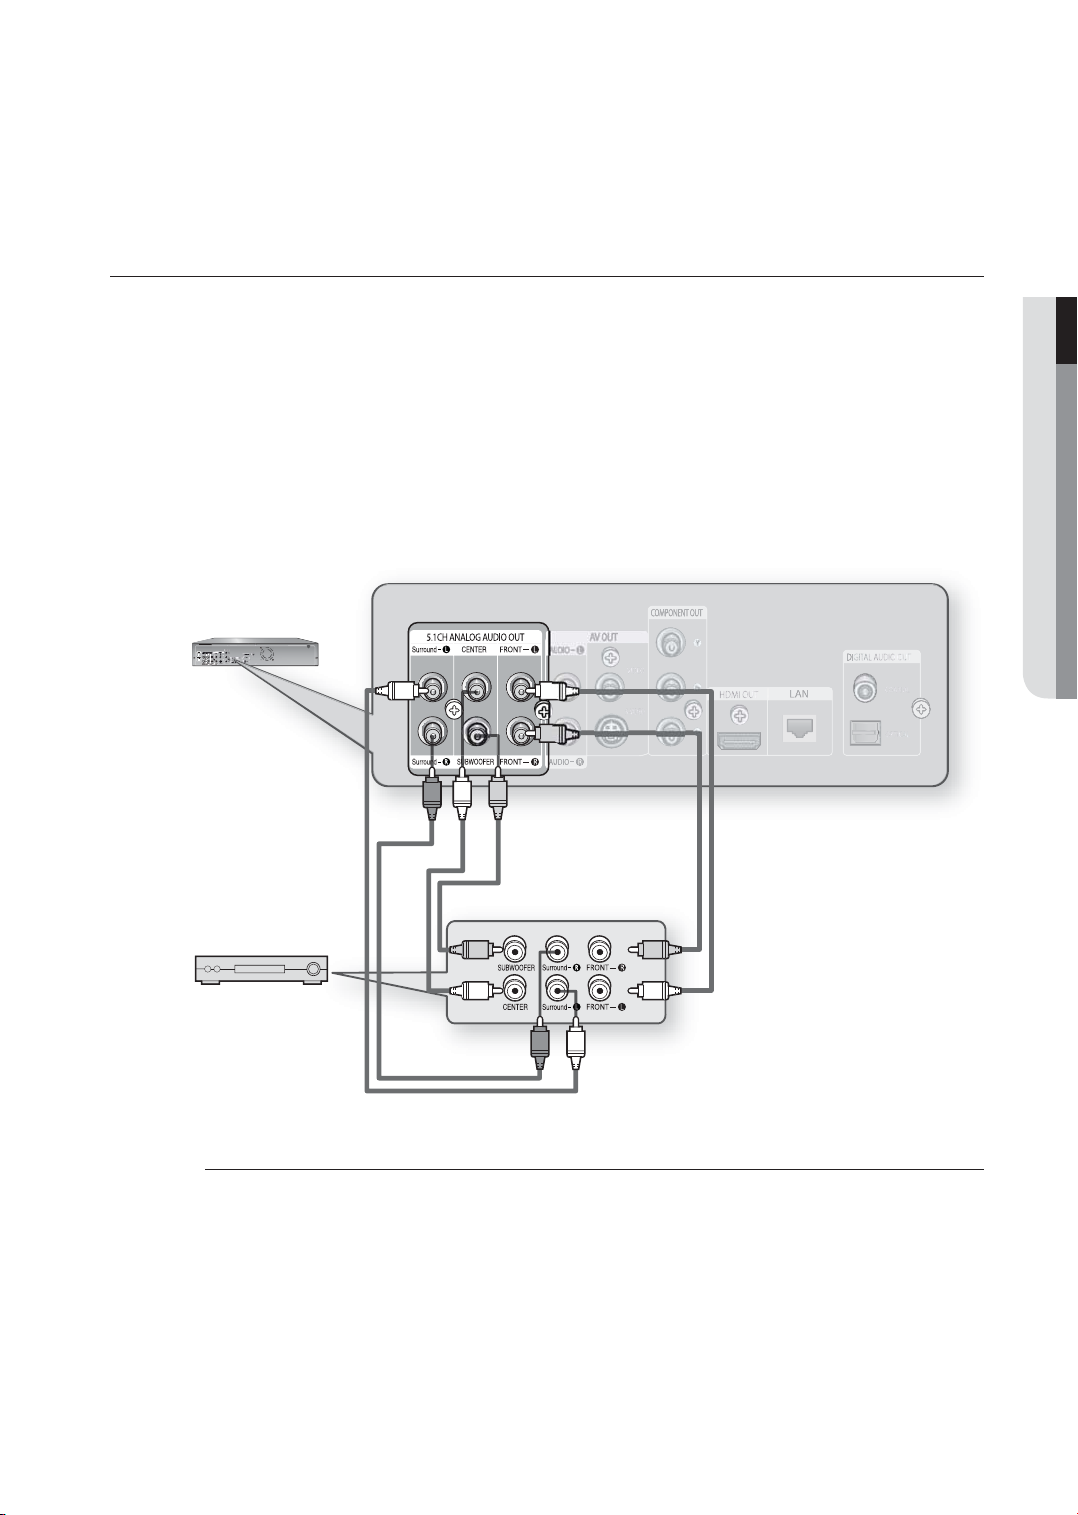
RACCORDEMENT À UN SYSTÈME AUDIO (AMPLIFICATEUR À 5,1 CANAUX)
1.
À l’aide des câbles audio, raccordez les prises 5.1 ANALOG AUDIO OUT (Front R, Front L, CENTER,
SUBWOOFER, Surround L, Surround R) à l'arrière du lecteur Blu-ray aux prises 5.1 ANALOG AUDIO IN
(Front R, Front L, CENTER, SUBWOOFER, Surround L, Surround R) de votre amplifi cateur.
2.
À l'aide des câbles vidéo, raccordez les prises HDMI, COMPONENT, S-VIDEO ou VIDEO OUT sur le panneau
arrière du lecteur Blu-ray aux prises HDMI, COMPONENT, S-VIDEO ou VIDEO IN de votre téléviseur tel que
décrit aux pages 20 à 25.
3.
Allumez le lecteur Blu-ray, le téléviseur et l’amplifi cateur.
4.
Appuyez sur la touche de sélection d’entrée de l’amplifi cateur pour sélectionner entrée externe pour entendre
le son depuis le lecteur Blu-ray. Reportezvous au manuel de l’utilisateur de votre amplifi cateur pour en régler les
entrées audio.
● RACCORDEMENTS
Amplifi cateur 5,1
canaux
Veuillez baisser le volume avant d’allumer l’amplifi cateur. Un son fort soudain peut endommager les enceintes
M
acoustiques et vos oreilles.
Veuillez réglez le signal audio depuis l’écran menu selon l’amplifi cateur. (Voir les pages 35~36)
La position des prises peut varier selon le type d’amplifi cateur. Veuillez vous reporter au manuel d’utilisation de
l’amplifi cateur pour plus de détails.
Les sorties avant gauche et droite du lecteur et de l'amplifi cateur 5.1 Channel doivent être branchées afi n que
vous puissiez entendre la trame sonore du menu de certains disques Blu-ray.
Français _27
Page 94
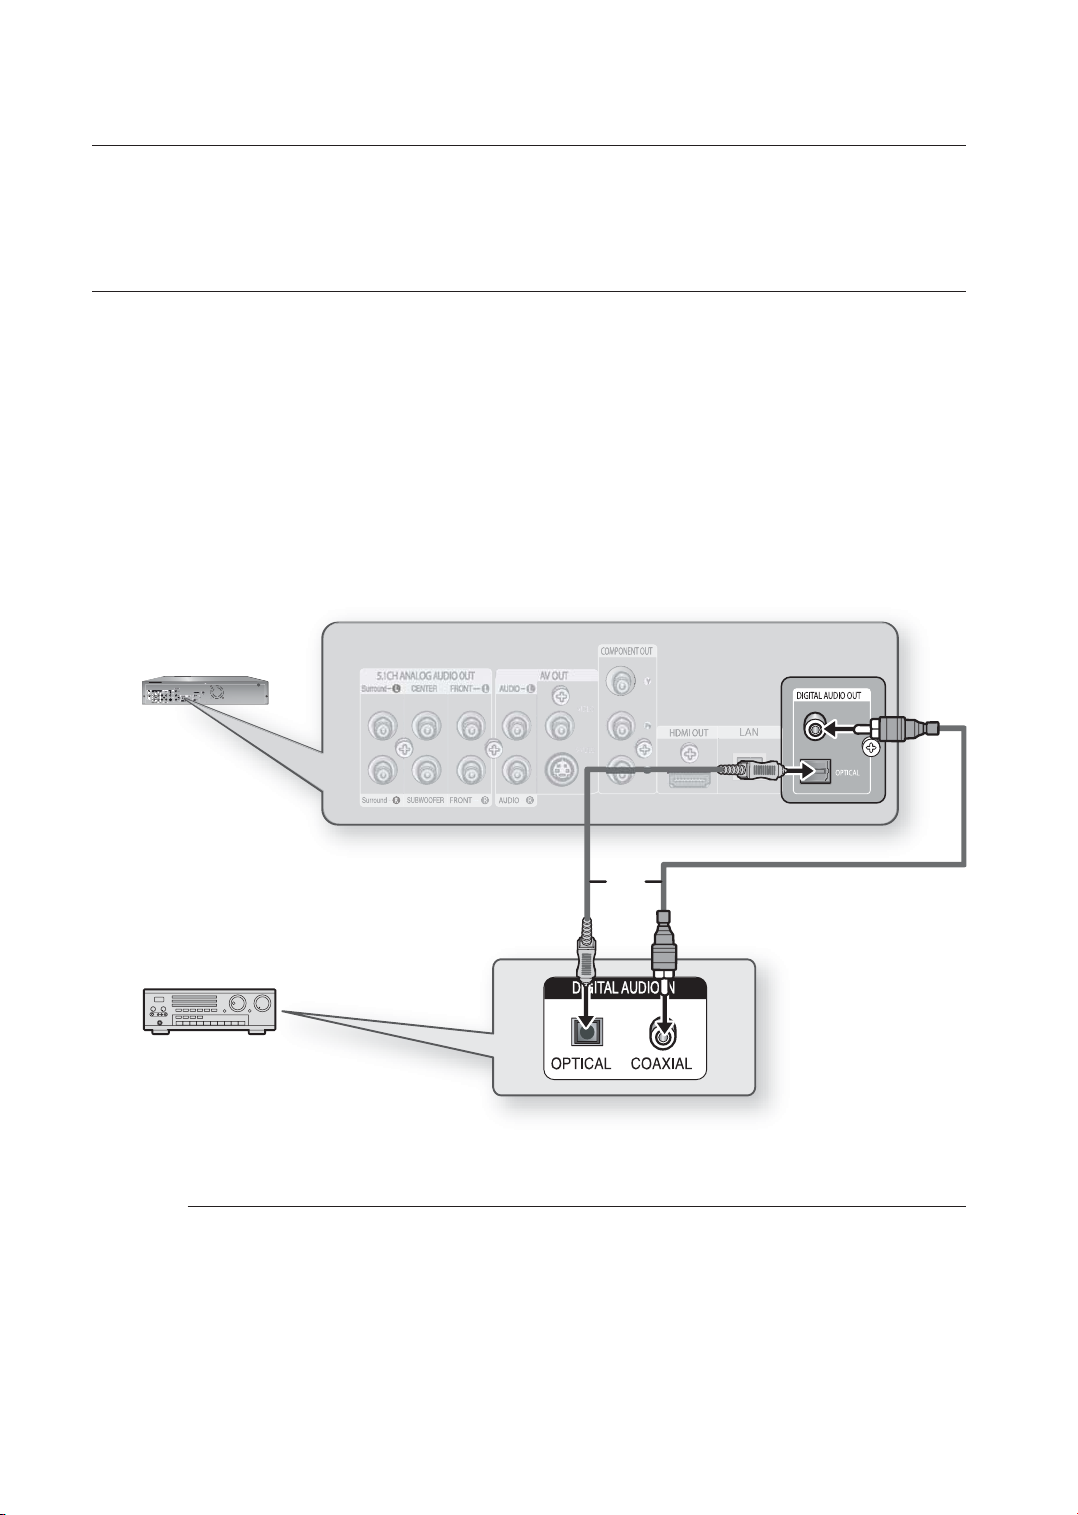
raccordements
RACCORDEMENT À UN SYSTÈME AUDIO (DOLBY NUMÉRIQUE),
AMPLIFICATEUR DTS (SYSTÈME CINÉMA NUMÉRIQUE)
1.
Si vous utilisez un câble optique (non compris), raccordez la prise DIGITAL AUDIO OUT (OPTICAL) à l’arrière
du lecteur Blu-ray à la prise DIGITAL AUDIO IN (OPTICAL) de votre amplifi cateur. Si utiliza un cable coaxial (no
incluido), conecte el terminal DIGITAL AUDIO OUT (COAXIAL) situado en la parte posterior del Reproductor de
discos Blu-ray con el terminal DIGITAL AUDIO IN (COAXIAL) del amplifi cador.
2.
À l'aide des câbles vidéo, raccordez les prises HDMI, COMPONENT, S-VIDEO ou VIDEO OUT sur le panneau
arrière du lecteur Blu-ray aux prises HDMI, COMPONENT, S-VIDEO ou VIDEO IN de votre téléviseur tel que
décrit aux pages 20 à 25.
3.
Allumez le lecteur Blu-ray, le téléviseur et l’amplifi cateur.
4.
Appuyez sur la touche de sélection d’entrée de l’amplifi cateur pour sélectionner entrée externe pour entendre
le son depuis le lecteur Blu-ray. Reportez-vous au manuel de l’utilisateur de votre amplifi cateur pour en régler les
entrées audio.
M
ou
Veuillez baisser le volume avant d’allumer l’amplifi cateur. Un son fort soudain peut endommager les enceintes
acoustiques et vos oreilles.
Veuillez réglez le signal audio depuis l’écran menu selon l’amplifi cateur. (Voir les pages 35~36)
La position des prises peut varier selon le type d’amplifi cateur. Veuillez vous reporter au manuel d’utilisation de
l’amplifi cateur pour plus de détails.
Si vous utilisez ce raccordement, les disques Blu-Ray à trame sonore LPCM ne sont reproduits que sur les
deux canaux avant.
28_ raccordements
Page 95
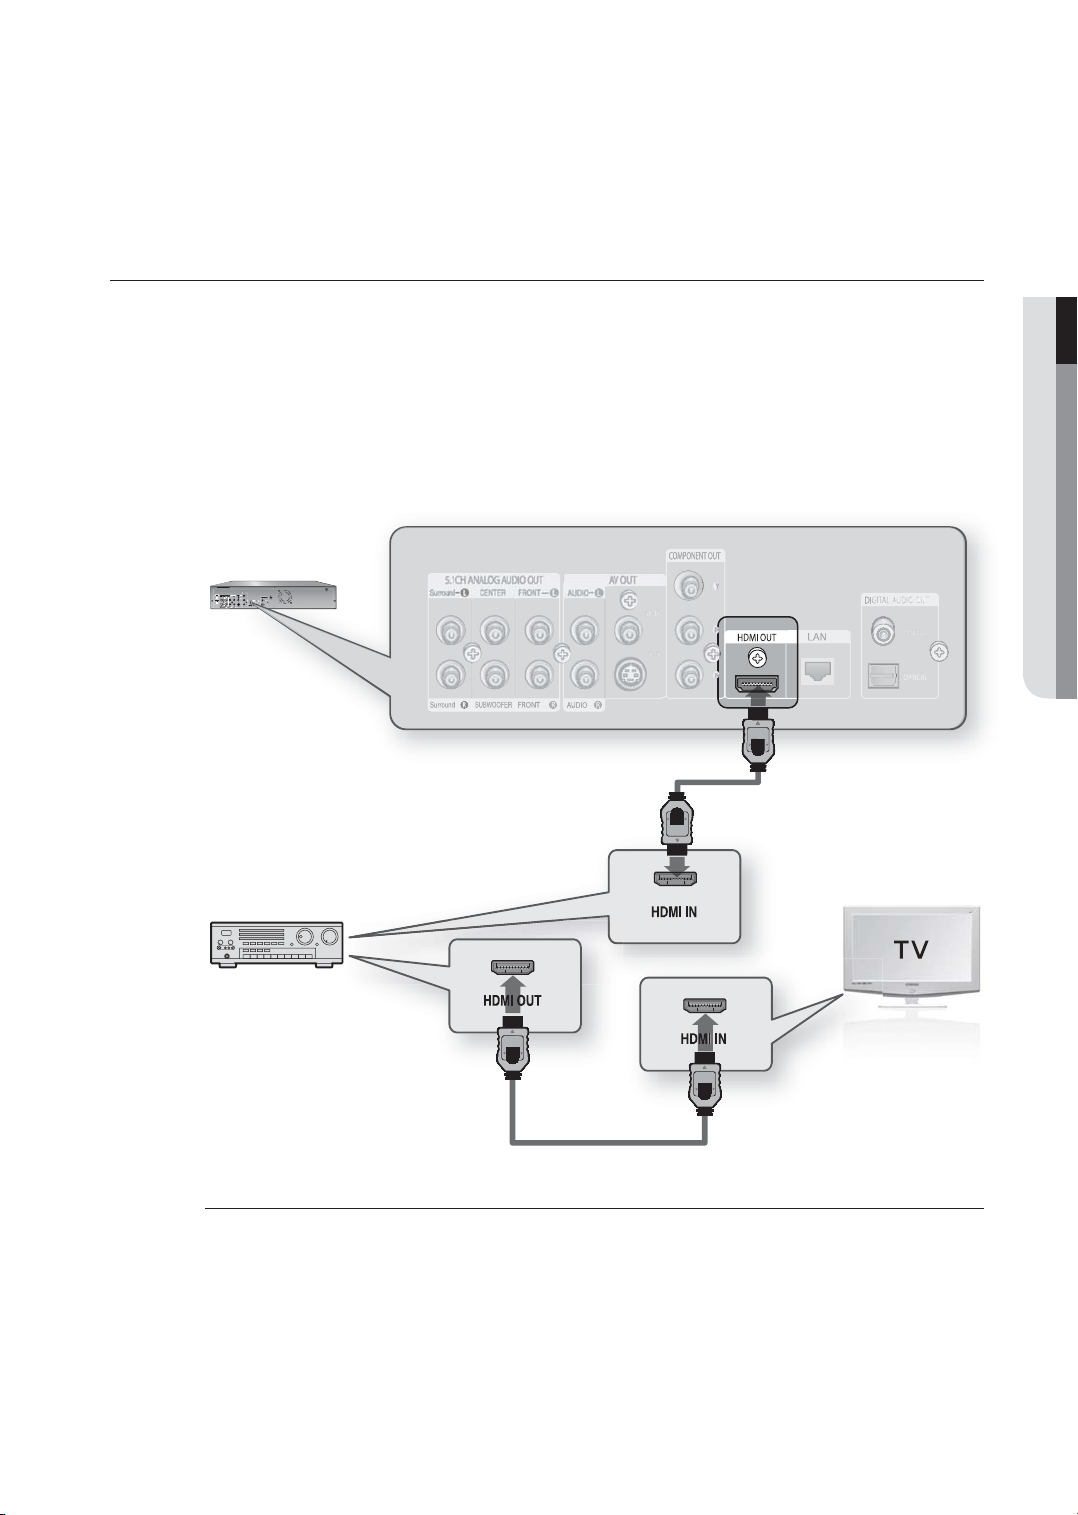
RACCORDEMENT À UN SYSTÈME AUDIO
(AMPLIFICATEUR COMPATIBLE HDMI)
1.
À l’aide du câble HDMI-HDMI(non compris), raccordez la prise HDMI OUT à l’arrière du lecteur Blu-ray à la prise
HDMI IN de votre amplifi cateur.
2.
À l’aide du câble HDMI-HDMI, raccordez la prise HDMI OUT de l’amplifi cateur à la prise HDMI IN de votre
téléviseur.
3.
Allumez le lecteur Blu-ray, le téléviseur et l’amplifi cateur.
4.
Appuyez sur la touche de sélection d’entrée de l’amplifi cateur pour sélectionner entrée externe pour entendre
le son depuis le lecteur Blu-ray. Reportezvous au manuel de l’utilisateur de votre amplifi cateur pour en régler les
entrées audio.
● RACCORDEMENTS
M
Veuillez baisser le volume avant d’allumer l’amplifi cateur. Un son fort soudain peut endommager les enceintes
acoustiques et vos oreilles.
Veuillez réglez le signal audio depuis l’écran menu selon l’amplifi cateur. (Voir les pages 35~36)
La position des prises peut varier selon le type d’amplifi cateur. Veuillez vous reporter au manuel d’utilisation de
l’amplifi cateur pour plus de détails.
Français _29
Page 96
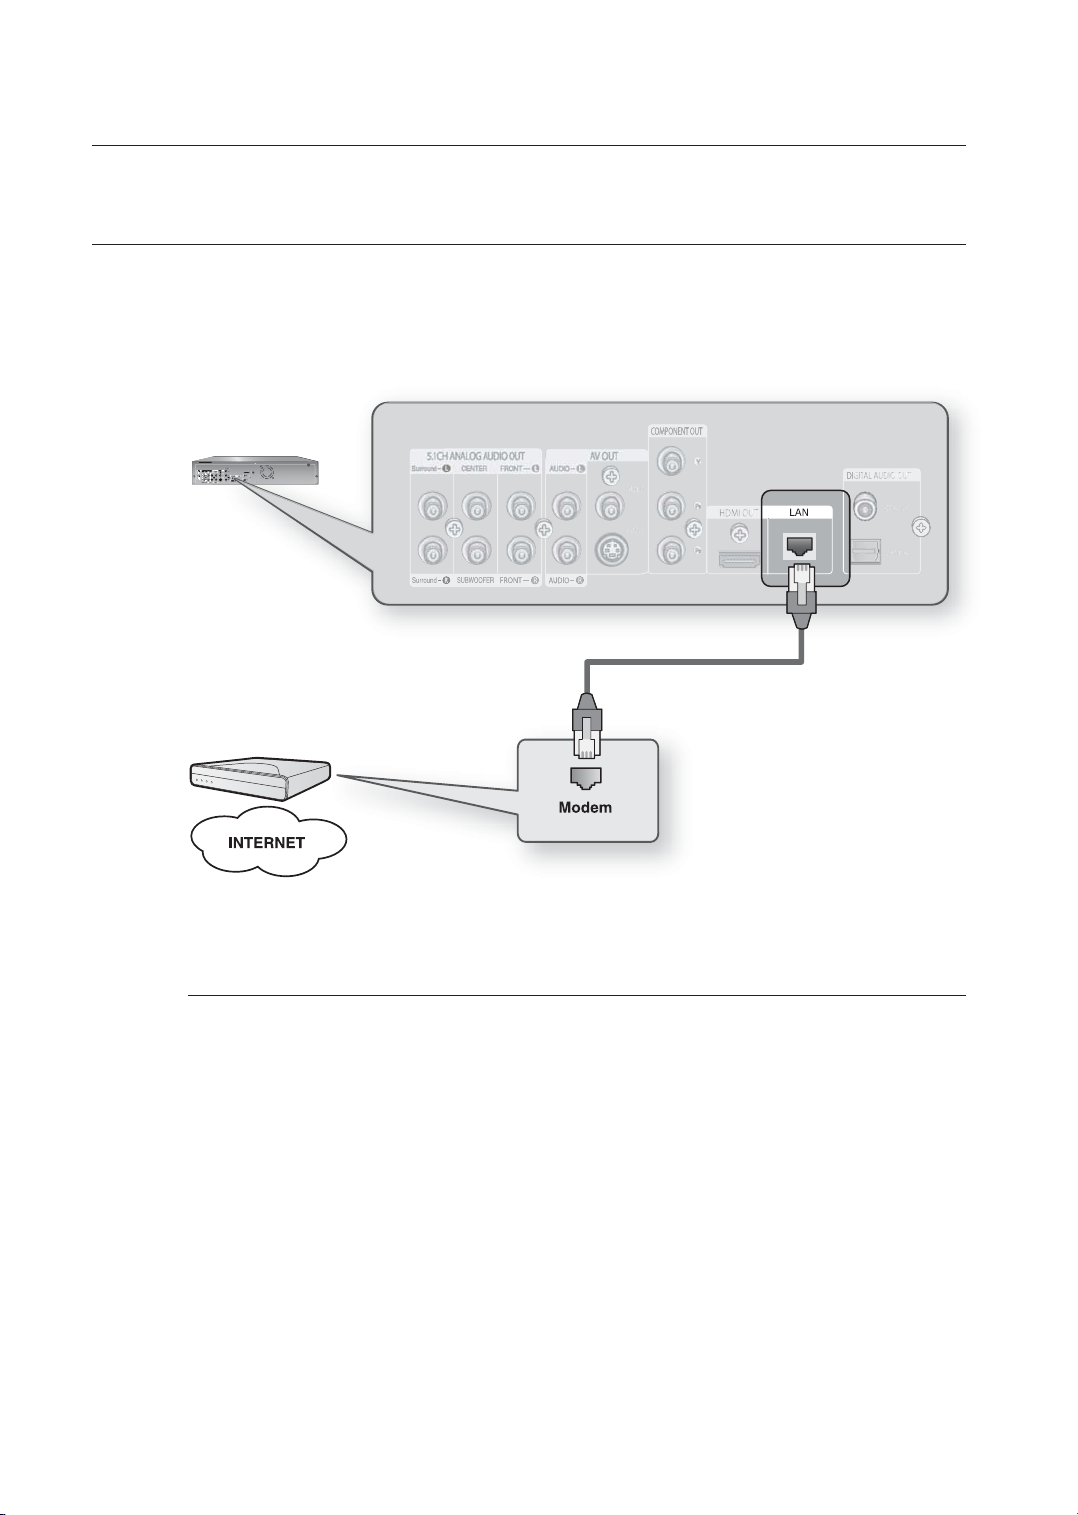
raccordements
BRANCHEMENT SUR LESITE FTP/INTERNET DE SAMSUNG POUR
LA MISE À NIVEAU DU LOGICIEL
1.
À l’aide d’un câble RLE (câble UTP), raccordez le terminal RLE à l’arrière du lecteur Blu-ray au terminal RLE de
votre modem.
- Branchez-vous sur l’Internet pour les mises à niveau de logiciel ultérieures.
Voir les pages 45 à 48 pour la procédure de mise à REMARQUE niveau du logiciel.
M
30_ raccordements
Page 97
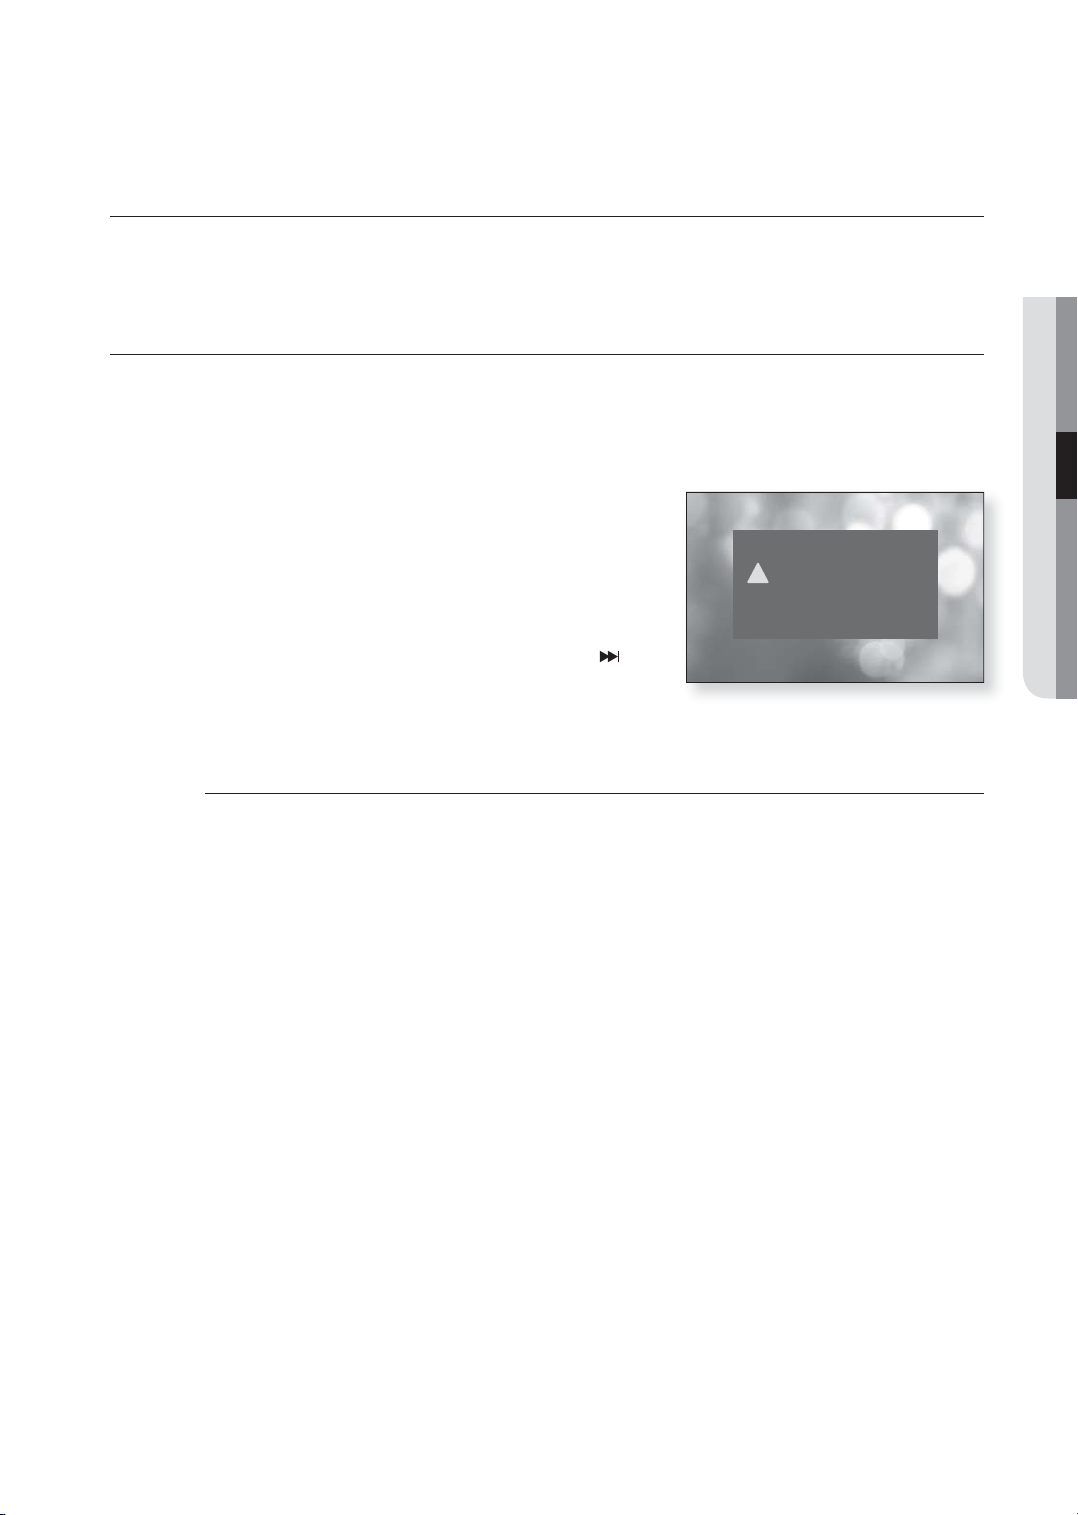
fonctions de base de votre
lecteur de disque Blu-ray
Cette section vous présente les fonctions de lecture de base et de la lecture selon
le type de disque.
AVANT D’EFFECTUER UNE LECTURE
•
Allumez votre téléviseur et défi nissez la source vidéo appropriée (l’entrée sur laquelle le lecteur Blu-Ray est
branché).
•
Si vous avez raccordé un système audio externe, allumez-le et réglez l'entrée audio.
Cet écran s’affi che au premier branchement du lecteur, dès que vous appuyez sur la touche POWER :
Si vous souhaitez modifi er la langue, appuyez sur une touche
numérique. (Cet écran s’affi che uniquement au premier
branchement du lecteur.) Si la langue de l’écran de
confi guration n’est pas réglée, les réglages peuvent changer à
chaque fois que vous l’allumez ou l’éteignez. Par conséquent,
veillez à sélectionner la langue souhaitée. Vous pouvez
modifi er la langue du menu après l’avoir sélectionnée en
appuyant pendant plus de 5 secondes sur la touche
panneau avant de l’appareil sans disque dans l’unité. La
fenêtre MENU LANGUAGE SELECTION (SÉLECTION DE LA
LANGUE DU MENU) apparaît de nouveau pour vous
permettre de régler la langue de votre choix.
sur le
MENU LANGUAGE SELECTION
Press 1 for English
!
Pulsar 2 para Español
Touche 3 pour Français
Macrovision : BSS01
● FONCTIONS DE BASE
M
Disques que vous ne pouvez pas lire avec ce lecteur.
• BD-R • BD-RE • HD DVD • DVD+RW
• DVD+R • DVD-ROM • DVD-RAM • CDV
• CD-ROM • CVD • CD-I
• Super Audio CD (sauf CD à couche) • disques CDG - audio uniquement et non les graphiques.
La compatibilité de lecture peut dépendre des conditions d’enregistrement.
• DVD-R • CD-RW/R • DVD-RW (mode V)
• Le type de disque ou les conditions d’enregistrement peuvent empêcher le lecteur de lire certains disques
CD-R, CD-RW et DVD-R.
Le disque Blu-ray Disc est un nouveau format toujours en évolution. En conséquence, les problèmes de
compatibilité avec de nouveaux formats ou formats existants de disque sont possibles. Tous les disques ne
sont pas compatibles et tous ne peuvent être lus. Pour plus de renseignements, reportez-vous aussi aux
chapitres Types de disque, Caractéristiques et Avis de conformité et de compatibilité dans ce manuel. Si vous
éprouvez des problèmes de compatibilité, veuillez contacter un centre d’aide à la clientèle SAMSUNG.
L'appareil ne peut pas lire les CD-R/-RW et DVD-RW/-R enregistrés au format divx, avi, mpg, mov et wma.
Français _31
Page 98
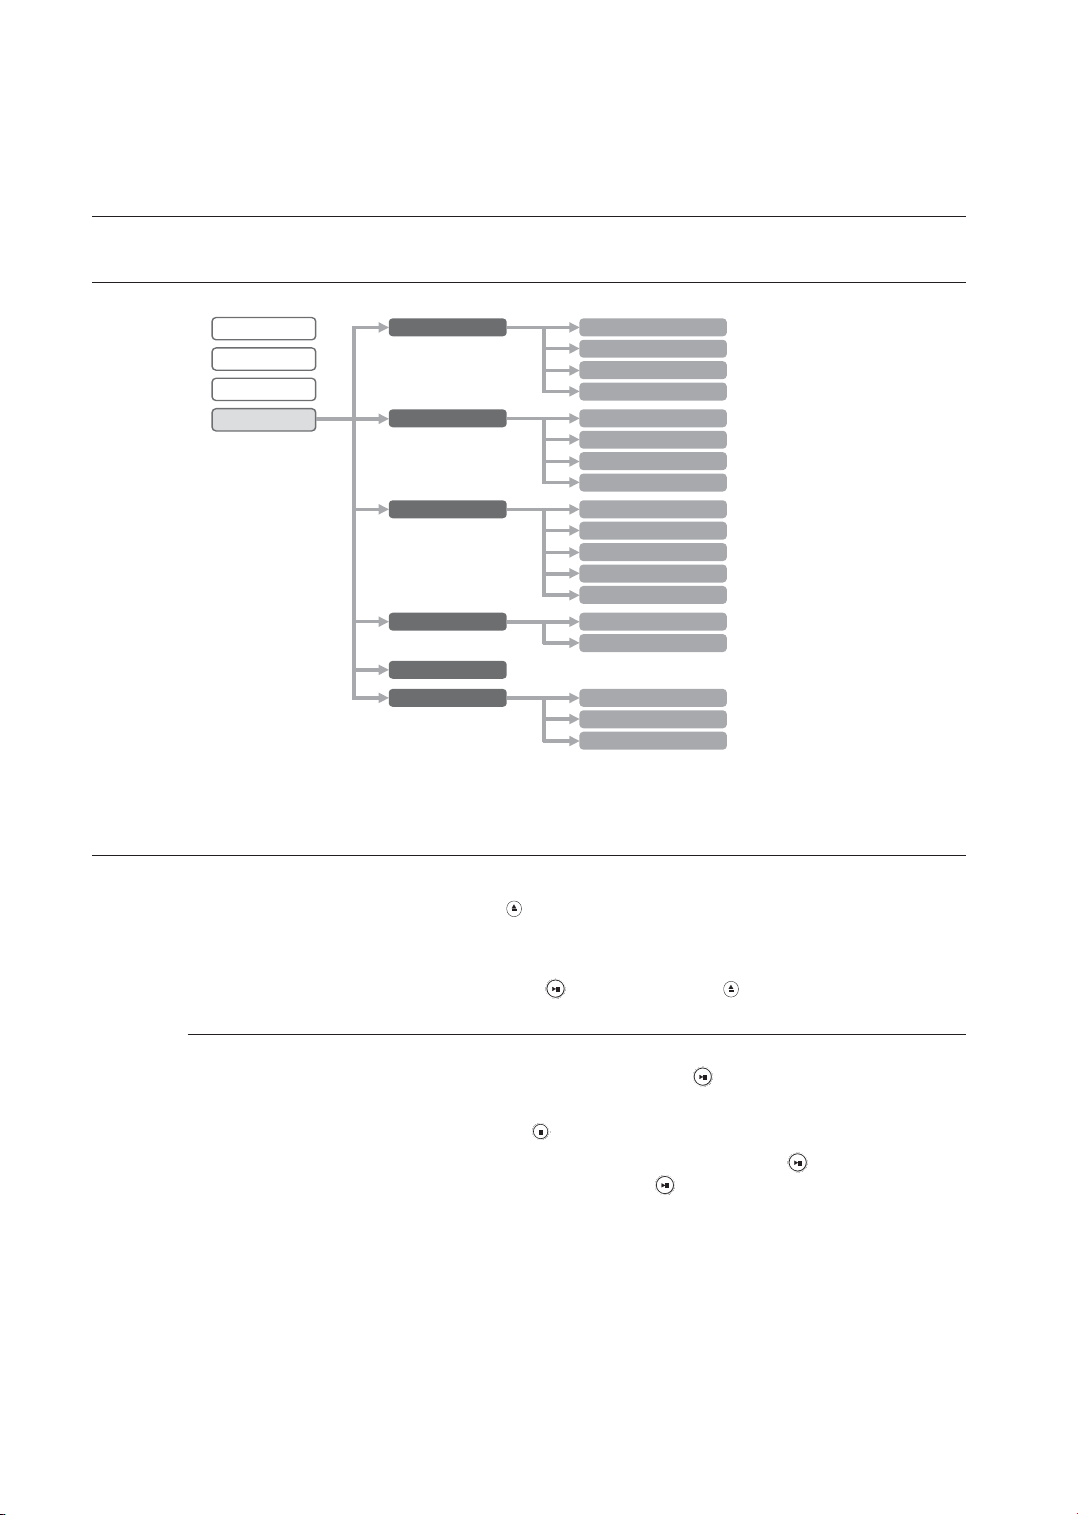
fonctions de base de votre
lecteur de disque Blu-ray
NAVIGATION DANS LES MENUS À L’ÉCRAN
Vidéo
Musique
Photo
Param.
LECTURE D’UN DISQUE
Réglage de langue Audio
Sous-titre
Menus du Disque
Menu
Options Audio Sortie numérique
Echantillonnage PCM
Compression dyna.
Param. HP
Options D'affichage
Configuration HDMI
Contrôle Parental
Mise à niv. système
Format écran
Cadre Vidéo (24 Fs)
Résolution
Message écran
Affichage du Panneau
Anynet+ (HDMI-CEC)
Formater
Information système
Configuration du Réseau
Dém. m. à niv.
1.
Appuyez sur la touche OPEN/CLOSE ( ).
Le témoin EN VEILLE s’éteint et le tiroir disque s’ouvre.
2.
Placez délicatement un disque dans le tiroir, côté étiquette vers le haut.
3.
Appuyez sur la touche LECTURE / PAUSE (
Lorsque vous arrêtez la lecture, le lecteur enregistre l’endroit où vous vous êtes arrêté ; conséquemment,
M
lorsque vous appuyez de nouveau sur la touche LECTURE / PAUSE (
elle s’est arrêtée.
Appuyez deux fois sur la touche ARRÊTER (
Pour arrêter momentanément la lecture, appuyez sur la touche LECTURE / PAUSE(
lecture, appuyez de nouveau sur la touche LECTURE / PAUSE(
Si le lecteur est laissé en mode d’arrêt pour plus de 10 minutes sans interface utilisateur, un économiseur
d’écran apparaît sur votre téléviseur. Si le lecteur est laissé en mode économiseur d’écran pour plus de 30
minutes, l’alimentation est interrompue automatiquement sauf durant la lecture d’un MP3/CDDA et / ou d’un
JPEG. (Fonction d’interruption automatique d’alimentation)
MP3/CDDA : l'économiseur d'écran apparaît si aucune touche n'est activée pendant 10 minutes.
JPEG : l’économiseur d’écran et la fonction de coupure automatique sontdésactivés pendant que vous
visionnez un fi chier photo.
32_ fonctions de base
) ou OPEN/CLOSE ( ) pour fermer le tiroir disque.
) la lecture recommence à l’endroit où
) en cours de lecture pour désactiver la fonction Continuer.
) Pour reprendre la
) .
Page 99
UTILISATION DES FONCTIONS RECHERCHE ET SAUT
Vous pouvez effectuer une recherche rapide dans un chapitre ou sur une piste en cours de lecture et utiliser la
fonction de saut pour vous déplacer sur la sélection suivante.
Recherche dans un chapitre ou sur une piste
En cours de lecture, appuyez sur la touche RECHERCHER ( ) .
Appuyez sur cette touche si vous souhaitez effectuer une recherche sur un BD/DVD plus rapidement.
•
•
Si vous appuyez sur la touche RECHERCHER (
X128
•
Si vous appuyez sur la touche RECHERCHER (
Aucun son n’est perceptible en mode de recherche.
M
), X2 X4 X8 X16 X32
), X2 X4 X8 X16 X32 X128
Saut de pistes
En cours de lecture, appuyez sur la touche SAUTER ( ) .
Lors de la lecture d’un BD/DVD, pour passer au chapitre suivant, appuyez sur la touche SAUT (
Pour retourner au début du chapitre, appuyez sur la touche SAUT (
chapitre précédent, appuyez de nouveau.
) Pour retourner au début du
hZCV
hZCV
POUR RETOURNER AU DÉBUT DU CHAPITRE PRÉCÉDENT,
APPUYEZ DE NOUVEAU.
● FONCTIONS DE BASE
)
Lecture au ralenti
En mode PAUSE ou ARRÊT, appuyez sur la touche SLOW de la télécommande pour effectuer la
lecture au ralenti.
Si vous appuyez sur la touche SLOW,
•
Pour repasser en lecture à vitesse normale, appuyez sur la touche LECTURE / PAUSE (
•
L’icône ( ) indique qu’une touche non valide a été actionnée.
M
Aucun son n’est perceptible en mode LENT.
Le ralenti ne fonctionne qu’en direction avant.
8/1 4/1 2/1
Lecture Step Motion (Image par image)
Appuyez sur la touche STEP de la télécommande en cours de lecture.
A chaque appui sur la touche, une nouvelle image apparaît.
•
L’image suivante est activée lorsque vous appuyez sur la touche STEP.
•
Appuyez sur la touche LECTURE / PAUSE (
•
Aucun son n’est perceptible en mode image par image.
M
Le pas-à-pas ne fonctionne qu’endirection avant.
) pour reprendre la lecture normale.
hZCV
).
hZCV
Français _33
Page 100
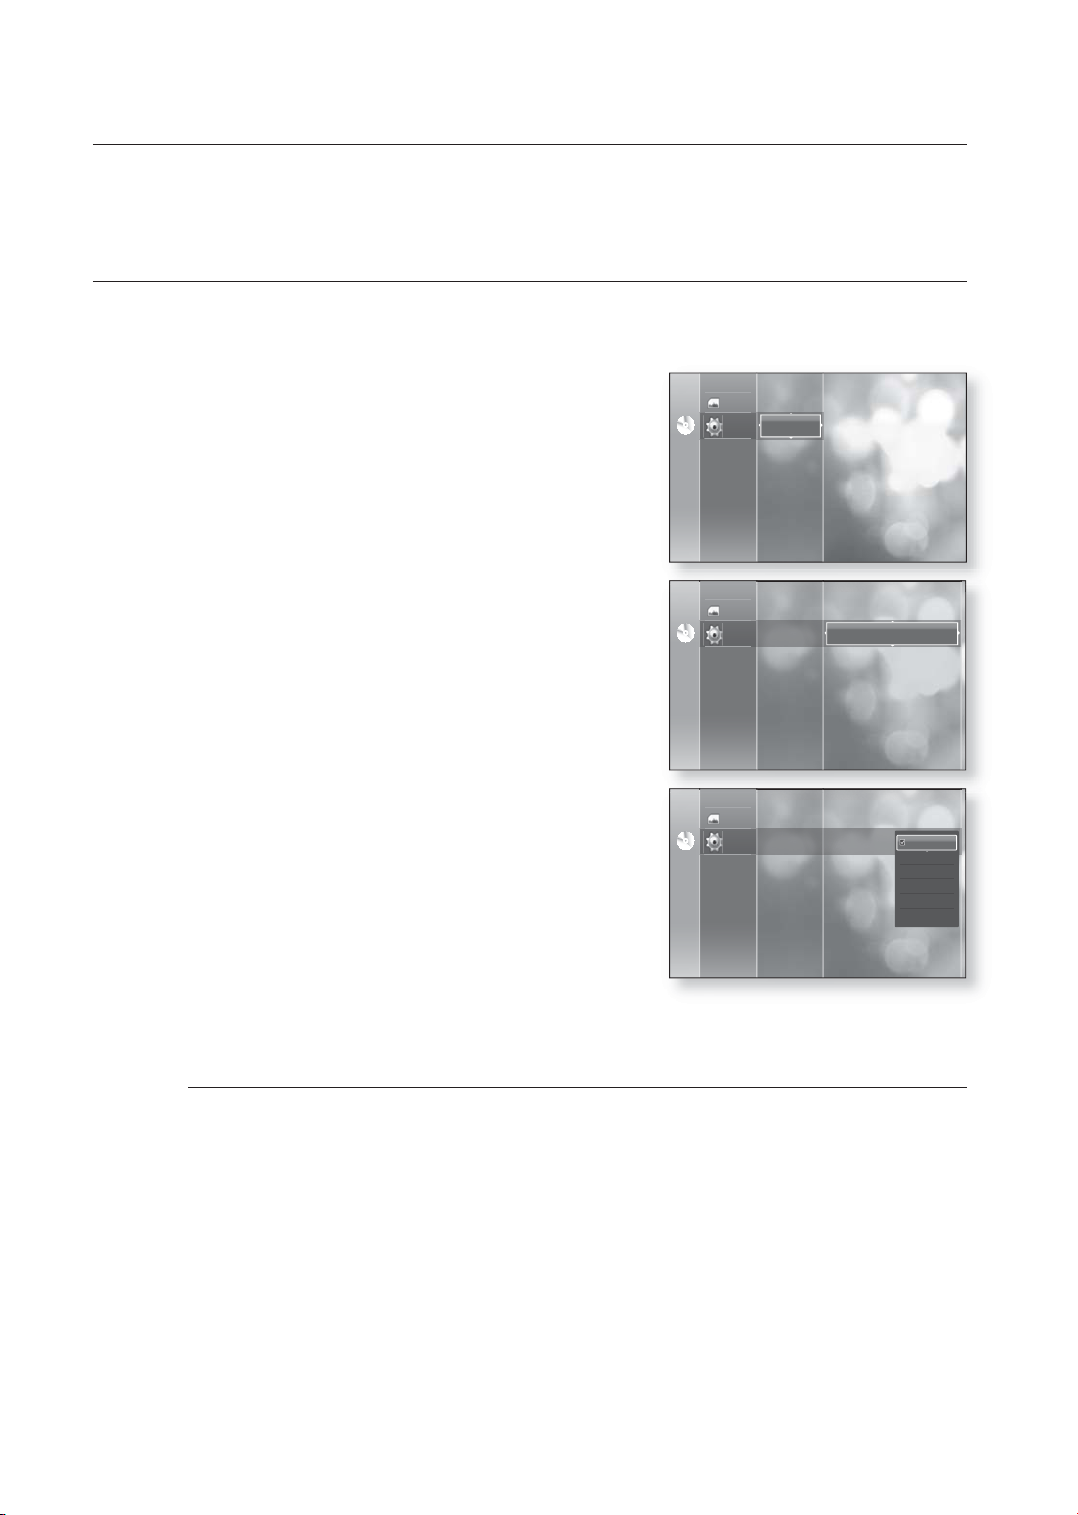
confi guration du système
Pour raisons de commodité, confi gurez les réglages adéquats pour le périphérique
ou pour tout autre appareil raccordé au lecteur avant d'utiliser ce dernier.
CONFIGURATION DES PARAMÈTRES DE LANGUE
Si vous avez préalablement réglé les options audio, soustitrage, menu disque et menu lecteur, elles apparaissent
automatiquement à chaque fois que vous visionnez un fi lm.
1.
Arrêtez l’appareil, puis appuyez sur la touche MENU.
2.
Appuyez sur les touches
puis appuyez sur la touche ENTER ou
▲▼
pour sélectionner Param.,
►
.
Photo
Réglage de langue
Param.
NoDiscNo Disc
Options Audio
Options D'affi chage
Confi guration HDMI
Contrôle Parental
Mise à niv. système
3.
Appuyez sur les touches
▲▼
pour sélectionner
Réglage de langue, puis appuyez sur la touche ENTER
►
Le menu de param de la langue s’affi che.
ou
4.
Appuyez sur les touches ▲▼ pour sélectionner l’option de langue
appropriée, puis appuyez sur la touche ENTER ou ►
•
Audio : langue du disque.
•
Sous-titre : sous-titrage du disque.
•
Menus du Disque : pour le menu du disque.
Please delete disque.
•
Menu : pour le menu à l’écran de votre
lecteur Blu-ray.
5.
Appuyez sur les touches
▲▼
pour sélectionner la langue appropriée, puis appuyez sur la touche
ENTER.
Appuyez sur la touche RETURN ou ◄ pour revenir au menu précédent. Appuyez sur la touche MENU pour
M
quitter le menu.
La langue sélectionnée n’apparaîtra que si elle est accueillie par le disque.
Photo
Param.
Photo
Param.
Réglage de langue
Options Audio
Options D'affi chage
Confi guration HDMI
Contrôle Parental
Mise à niv. système
Réglage de langue
Options Audio
Options D'affi chage
Confi guration HDMI
Contrôle Parental
Mise à niv. système
NoDiscNo Disc
NoDiscNo Disc
:
Audio
Sous-titre
Menus du Disque
Menu
:
Audio
Sous-titre
Menus du Disque
Menu
:
Original
:
Automatique
: English
Français
:
Original
Original
English
:
Automatique
Français
: English
Deutsch
Français
Español
Italiano
34_ confi guration du système
 Loading...