

Page 1

LCD TV
LC3D
LCD TV
LC3D
TRAINING MANUALTRAINING MANUAL
LN26C350D1DXZA(LC350)
LN26C350D1DXZA(LC350)
LN32C350D1DXZA(LC350)LN32C350D1DXZA(LC350)
LN32C350D1DXZA(LC350)LN32C350D1DXZA(LC350)
Page 2
AgendaAgenda
I.
Inside of
LC3D
II.
Specification Comparison to old Model
II.
Specification Comparison to old Model
III.
Board description
IV.
Disassembly
V.
Trouble Shooting
Page 3

Inside of
LC3D
Inside of
Inside of
LC3D
LC3D
Page 4

Inside of
LC3D
Items
Specification
Model Name
LN**B360C5DXZA/LN32B350F1DXZA
LC350 26
”
: 26.5 x 8.75 x 20.21 inchs
Size (W*D*H) with Stand
LC350 26
”
: 26.5 x 8.75 x 20.21 inchs
LC350 32” : 31.4 x 8.6 x 22.6 inchs
Weight with Stand
LC 350 26
”
: 16.75 lbs
Panel Resolution
1366*768
A/V
1AV
Component
PC
1 Dsub
HDMI
2 HDMI
General
Tuner
1 ATSC/Half NIM/QAM tuner
Sound Output
LC350 16 ohm 5 W
Sound option
SRS TruSurround HD
DNIe
O(Saturn4)
DNIe
O(Saturn4)
Luminance [cd/m2, typical]
26” : 350 / 32” : 400
Dynamic C/R
3000:1
X
Anynet+(hdmi cec)
X
Power Supply
Power Consumption
26”: 55W / 32
”
: 71W
Color System
NTSC
Sound System
MTS
LC 350 32”: 21.16 lbs
1 Component
480i/p,720p,1080i/p
Response time
View Angle(H/V)
26” / 32” : 8.5ms
26” / 32” : 176/176
AC 110~220V, 60Hz
Page 5

Inside of
LC3D
Spec ComparisonSpec Comparison
Spec ComparisonSpec Comparison
SAMSUNG SAMSUNG
LN32C350D1DXZA
LN32B360C5DXZA
Design
Size
Diagonal 32
”
Diagonal 32
”
Panel
Resolution
1366 x 768
1366 x 768
Viewing angle
H : 176 V : 176
H : 176 V : 176
Color System
ATSC / NTSC
ATSC / NTSC
Tuner
1
1
Function
CR ( Dynamic )
3000 : 1
3000 : 1
CR ( Dynamic )
3000 : 1
3000 : 1
Enhancer
DNIe(Saturn4)
DNIe(Saturn4)
Enhancer
DNIe(Saturn4)
DNIe(Saturn4)
Dynamic contrast
Dynamic contrast
Additional Function
Game Mode
Game Mode
Power Consumption
71W
100W
Power Consumption
71W
100W
Model
Set Size 26.5x8.75x20.21 inches 31.4 x 22.7 x 9.9 inches
Contrast (cd/m2) 400 450
(LC3D 32”)
(LB3F 32”)
Energy Saving
Energy Saving
Page 6
Inside of
LC3D
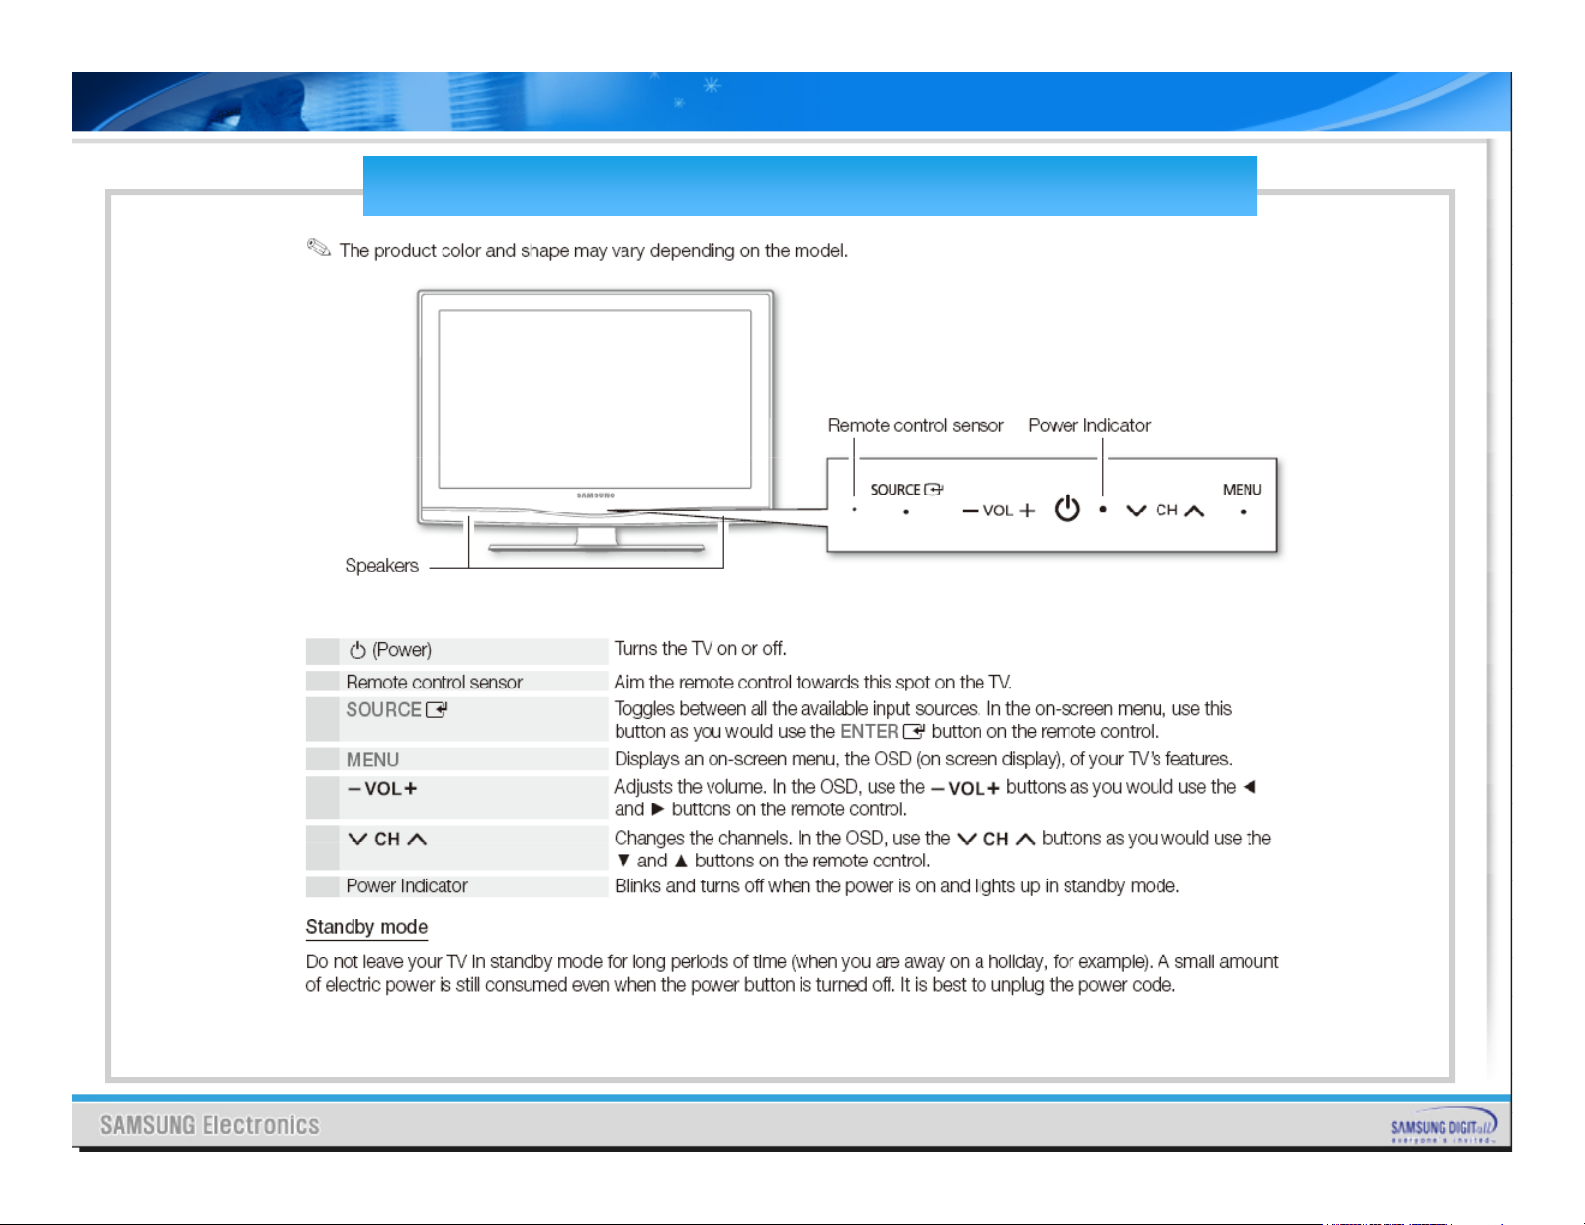
Control & Connection Panel(LC350)Control & Connection Panel(LC350)
Page 7

Inside of
LC3D
Control & Connection Panel(LC350)Control & Connection Panel(LC350)
Page 8

Inside of
LC3D
Control & Connection PanelControl & Connection Panel
Page 9
Inside of
LC3D
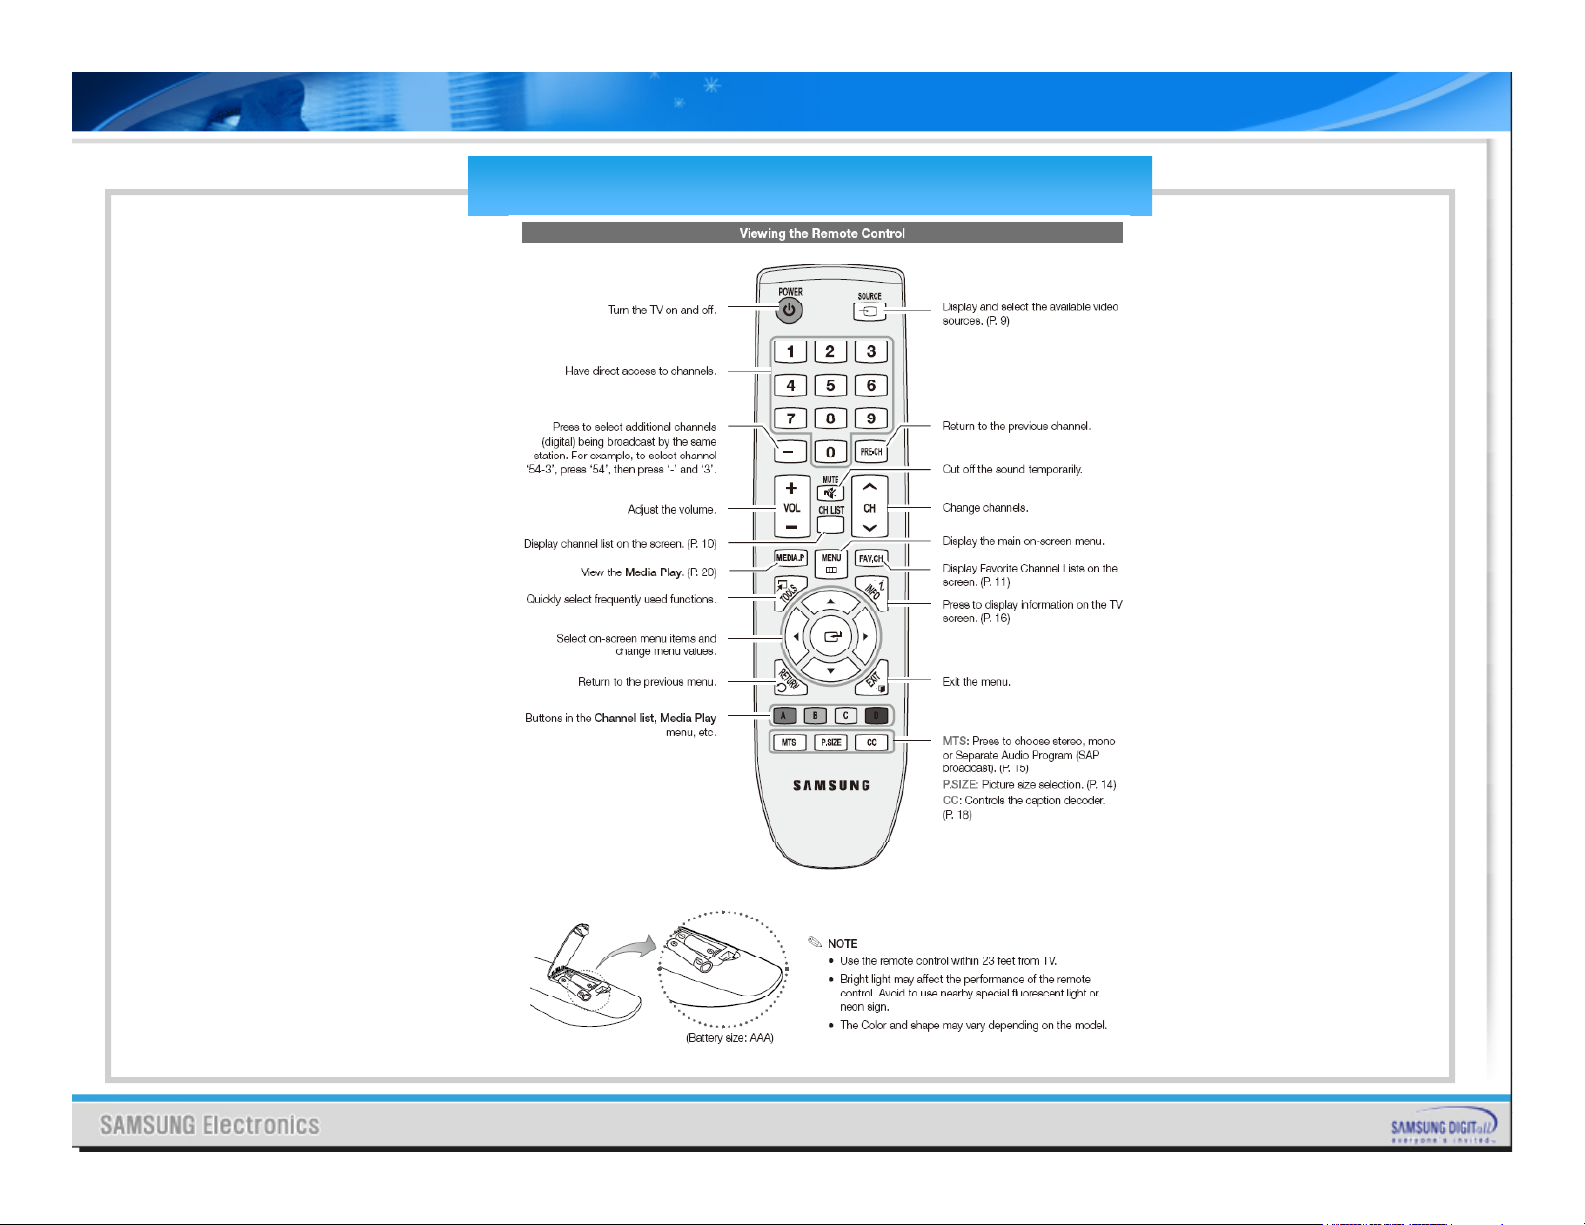
Remote controlRemote control
Page 10

Inside of
LC3D
Wiring DiagramWiring Diagram
26” / 32”26” / 32”
26” / 32”26” / 32”
CN1
CN1
Page 11

Inside of
LC3D
Inner Feature of LC3D 26Inner Feature of LC3D 26
””
/32/32
””
IP Board, Main Board, Panel
Power cable
Main Board
IP Board
LVDS
Speaker
Speaker
Page 12

Inside of
LC3D
Key parts of Key parts of
LB3FLB3F
1. DTV Chip/Scaler/Sound processor : Saturn4
2. Saturn4 Video Block
3. SOUND AMP : TAS5715
3. SOUND AMP : TAS5715
4. TUNER : DTM
-
6B/13FCS
Page 13

Inside of
LC3D
Saturn4
Saturn4
Page 14

Inside of
LC3D
Saturn4 Video Block
Saturn4 Video Block
Page 15
Inside of
LC3D
Audio Block
Audio Block
SATURN4 ATSC
MSD
3003
SPDIF JACK
SPDIFO
SPDIFO
REAR
REAR
I2S_S4I2S_OUT
TAS
5715
DACOUT
0
MON_LR_OUT
LINE_OUT1Monitor
TL
062
HDMI 1/2/3 IN
HALF NIM TUNER TU_SIF SIF_IN
PC_ DVI _LR_IN
AULR0COMP(V1)_LR_IN
AULR1
AULR2
AULR4
SOUND AMP
AMP
SPK OUT
MON OUT
Page 16

Inside of
LC3D
I2C Tree
I2C Tree
SCL_TU/SDA_TU
DDCR_CK
DDCR_CK
S5H1411
TUNER
SCL_EEP/SDA_EEP
( R: 0xA1, W: 0xA0 )
GPIO62
NTP3200
SCL_D/SDA_D
GPIO61
GPIO59
PANEL
AT24C02
I2C_HDMI (for DDC)
AT24C02
AT24C02
AT24C02
I2C_HDMI (for DDC)
AT24C02
AT24C02
DDCR_DK
GPIO60
GPIO85
GPIO84
SCL_PANEL/SDA_PANEL
AT24C512BN
(R0x55,W:0x54)
(0x)
( R: 0xA1, W: 0xA0)
(0xA0)
(0xA0)
(R:0xC1, W:0xC0)
I2C_PC (for DDC & ISP)
( R: 0xA1, W: 0xA0)
Page 17

Inside of
LC3D
Control Signal Flow
–
Reset Tree
AMP_RESET
KS1411
NRESET_TU
GPIOPM2
KEY INPUT1,2
GPIOPM2
B5V or B13V
PANEL
LVDS_OUT
HWRESET
CPU_nRESET
LVDS_OUT
RT9818C
GPIOPM6
INVERTER
SMPS
GPIO86GPIO94
STA335WBS
Reset Switch
SW_POWER
Stand-by
B+ Power
POWER_DET
RT9818C
IR/KEY
GPIOPM1
MSD3003
GPIO44
SW_PVCC
SW_INVERTER
POWER_DET
SW
Page 18

Inside of
LC3D
Some Features of LC3DSome Features of LC3D
Dynamic Contrast
Enhancing Contrast Ratio
Energy Saving
Energy Saving
Realize Low Power Consumption by Selecting
Realize Low Power Consumption by Selecting
Energy Saving Level ( Off, Low, Medium, High )
Tru Surround HD
Tru Surround HD
Page 19

Inside of
LC3D
Some Features of LC3DSome Features of LC3D
-
Dynamic contrast
※ Reproducing optimized contrast by detecting the
characteristics and contrast level of input signal.
→ Enhancing dynamic contrast
Mid range dynamic
range Enhancement
Contrast
Enhancement
Enhancement
Luma
Luma
Luma
Dimming
Y
Y
Y
Page 20

Inside of
LC3D
Some Features of LC3DSome Features of LC3D
-
Contrast Enhancement Factor
OUT
255
Gamma Curve
200
120
110
190
255
IN
Page 21

Inside of
LC3D
Some Features of LC3DSome Features of LC3D
-
Contrast Enhancement & Dimming
Output
255
0
4
MEAN
0
< Dark Image >
MEAN
< Analog
MEAN
UCOutput
Duty(%)
255
0
MEAN
50
50
Input
MEAN
MEAN
< Bright
Image >
MEAN
UC< PWM
Dimming >
Image >
Dimming >
V
Input
Dimming >
98
Page 22

Inside of
LC3D
Some Features of LC3DSome Features of LC3D
Energy Saving
Off
Off•100 %
Wattage
Low
•
70 %
Energy Saving
Medium
High
•
35 %
Energy Saving Level
•
Basic Operation of Energy Saving function
Off
Low
Medium
High
• 50 %
Page 23

Inside of
LC3D
Some Features of LC3DSome Features of LC3D
User control functions
User control functions
1. Source key
: Select Video source
1.1 : Cabinet side Function key
TV→AV1→AV2→Component1→Component2→PC→HDMI1
→
HDMI2
1.2 : Remote control Function key
1.2 : Remote control Function key
TV→AV1→AV2→Component1→Component2→PC→HDMI1→HDMI2
2. Menu key
: Open the OSD and Exit the highlighted function.
3. ◀▶: -
Moves the selector left or right on the OSD.
3. ◀▶: -
Moves the selector left or right on the OSD.
-
Increase or decrease the values of the selected function
-
VOL +
: Increase or decrease the level of audio volume.
(in the Anynet mode, You can control only TV volume)
4. ▼ ▲ : Moves the selector up or down on the OSD.
-
CH +
: Increase or decrease the channel number .
5. Power
: 1) Turn ON/OFF the TV.
2) Indicates the status of the Monitor.
2) Indicates the status of the Monitor.
-
Black : Normal Operation.
-
on : Power Off or Disconnected Signal Cable.
-
Blinking : PC DPMS Mode.
Page 24

Inside of
LC3D
Some Features of LC3DSome Features of LC3D
OSD functions and adjustments
–
continue
-
1.
Picture
-
Mode : Change the image to Standard/Dynamic/Movie
-
Backlight
-
Contrast
-
Brightness
-
Sharpness
-
Color
-
Color
-
Tint
-
Tint
-
Advanced Settings
–
Black Tone : Off/Dark/Darker/Darkest
-
Dynamic Contrast : Off/Low/Medium/High
-
Gamma :
-
3 ~ +3
-
Color Space : Native/Auto
-
White Balance
-
Flesh Tone :
-
15 ~ +15
-
Edge Enhancement : Off/On
-
Edge Enhancement : Off/On
-
Picture Options
-
Color Tone : Cool/Normal/Warm1/Warm2
-
Picture Options
-
Color Tone : Cool/Normal/Warm1/Warm2
-
Size : 16:9/Zoom1/Zoom2/Wide Fit/4:3/Screen Fit
-
Digital NR : Off/Low/Medium/High/Auto
-
HDMI Black Level
-
Film Mode : Off/Auto
-
Picture Reset
Page 25

Inside of
LC3D
Some Features of LC3DSome Features of LC3D
OSD functions and adjustments
–
continue
-
2. Sound
: -Mode : Change the sound mode to
Standard/Music/Movie/Speech or adjust Custom setting.
-
Equalizer
-
SRS TruSurround HD : Off/On
-
Preferred Language
-
Preferred Language
-
Multi
-
Track Sound : Mono/Stereo/SAP
-
Auto Volume : Off/On
-
Speaker Select : External Speaker/TV Speaker
-
Sound Reset
3. Channel
-
Antenna/Auto Program/Clear Scrambled Channel/Channel List/Fine Tune
-
Antenna/Auto Program/Clear Scrambled Channel/Channel List/Fine Tune
Page 26

Inside of
LC3D
Some Features of LC3DSome Features of LC3D
OSD functions and adjustments
–
continue
-
OSD functions and adjustments
–
continue
-
4. Setup
-
Plug & Play
-
Language : Select country language
-
Time : Clock / Sleep Timer / Timer 1,2,3
-V-
Chip
-
Caption
-
Melody : Off/Low/Medium/High
-
Melody : Off/Low/Medium/High
-
Game Mode : Off/On
-
Game Mode : Off/On
-
Energy Saving : Off/Low/Medium/High/Auto
5.
Input
-
TV/Video Change the image Source List :TV→AV1→ AV2→
5.
Input
-
TV/Video Change the image Source List :TV→AV1→ AV2→
Component1→ Component2→PC→HDMI1→HDMI2
-
Edit Name : Edit Mode Name
Page 27

Inside of
LC3D
Some Features of LC3DSome Features of LC3D
OSD functions and adjustments
6.
Support
–
Self Diagnosis
- Software Upgrade
-
HD Connection Guide
-
Contact Samsung
Page 28

Inside of
LC3D
Some Features of LC3DSome Features of LC3D
Tru Surround HD
•
Everything TruSurround HD does plus:
–
Delivers
discrete, immersive
surround
from front speakers
–
Input: 6.1 to 1.0 audio channels
–
Input: 6.1 to 1.0 audio channels
–
Output: 4.0 to 5.1 discrete channels
from the front of the listener
–
Much broader sweet spot
–
Virtual bass enhancement to optimize
low frequency performance of small
drivers
– Dialog enhancement to ensure clear
and intelligible vocals
–
Bass management for subwoofer and
–
Bass management for subwoofer and
center speaker designs
center speaker designs
–
Definition control for maximum high
-
frequency realism and clarity
Page 29

Specification Comparison to Old Model
Page 30

Specification Comparison to Old Model
Page 31

Specification Comparison to Old Model
* Wall Mount
Page 32

BOARD
DESCRIPTION
Page 33

MAIN BOARD LAYOUTMAIN BOARD LAYOUT
Model : 26Model : 26
””
/32/32
””
Page 34

Main board connector pin mapMain board connector pin map
FUNCTI
ON
DEFINE:
FUNCTING DEFINE:
--
A3.3
V Front control board power supply
--SW_INVERTER
panel inverter control, about 5V
--
KEY_1,2
K
ey control, fr
o
m the Menu , channel up/down Etc.
--I_
PWM(ANA)
panel dimming control
--
IR
R
emote control signal
--
E_PWM(EXT)
panel PWM control, duty 40%~90%
--
LED_
Control
C
ontrol the timing and standby LED
Page 35

IP BOARD(26IP BOARD(26
””
))
Page 36

IP BOARD(32IP BOARD(32
””
))
Page 37

Disassembly
DISASSEMBLY
Page 38

Disassembly
Disassembly LB3F
Page 39

Disassembly
Page 40

Disassembly
Page 41

Trouble Shooting
TROUBLE
TROUBLE
SHOOTING
Page 42

Trouble Shooting
Check List for Initial operation
-
. Power switch on
-
. You can hear the Power On sound
-
. You can hear the Power On sound
* If you can’t sound, check the A_5V appear at BD102
in main board
-
. Back
-
light on
* If back
-
light not on, check the main board power line
* If back
-
light on but display is nothing, check the 12p cable
* If back
-
light on but display is nothing, check the 12p cable
-
. Picture on or display the banner
* If display is nothing, check the LVDS cable
And LVDS clk/data line
Page 43

Trouble Shooting
Inform to change the Assembly
-
. Check the Side
-
Label Ver. in set (important)
-
. Order using the Side
-
Label Ver
-
. Order using the Side
-
Label Ver
-
. If you change the item, see the service
-
bulletin
for setting the factory option.
Page 44

Trouble Shooting
No
power
Page 45

Trouble Shooting
No Video
(analog PC)
Page 46

Trouble Shooting
No Video
(analog PC)
Page 47

Trouble Shooting
No Video
(HDMI)
Page 48

Trouble Shooting
No Video
(HDMI)
Page 49

Trouble Shooting
No Video
(tuner_CVBS)
Page 50

Trouble Shooting
No Video
(tuner_CVBS)
Page 51

Trouble Shooting
No Video
(tuner_DTV)
Page 52

Trouble Shooting
No Video
(tuner_DTV)
Page 53

Trouble Shooting
No Video
(Video CVBS)
Page 54

Trouble Shooting
No Video
(Video CVBS)
Page 55

Trouble Shooting
No Video
(Video Component)
Page 56

Trouble Shooting
No Video
(Video Component)
Page 57

Trouble Shooting
No Sound
Page 58

Trouble Shooting
No Sound
Page 59

Trouble Shooting
DOs after changing assemblyDOs after changing assembly
-
Adjust Panel option, and install EDID data in Factory mode
<Factory menu>
-
Type : 26”
–26P
6AH0C
32”
–32P
6AH0C
32”
–32P
6AH0C
(I: CPT Panel,
L
: AUO Panel,
D
: CMO Panel,
A
: HDLCD Panel
P
: Chilin Panel)
(I: CPT Panel,
L
: AUO Panel,
D
: CMO Panel,
A
: HDLCD Panel
P
: Chilin Panel)
-
Model : LC350
** If establish panel type and model in Factory Option,
picture quality commands are inputted automatically.
Page 60

Trouble Shooting
DOs after changing assemblyDOs after changing assembly
-
Adjust Panel option, and install EDID data in Factory mode
<Factory menu>
①
EDID on
-
> ②EDID WRITE ALL
ALL EDID/PC EDID/DVI EDID/HDMI1 EDID/
ALL EDID/PC EDID/DVI EDID/HDMI1 EDID/
HDMI2 EDID : success
Ver : HDMI 1.3
Ver : HDMI 1.3
Page 61

Trouble Shooting
Factory mode
Page 62

Trouble Shooting
Factory mode
Page 63

Trouble Shooting
Factory mode
Page 64

Trouble Shooting
Factory mode
Page 65

USB UPDATE
USB Download Method
USB Download Method
Page 66

Adjustment of Screen
Page 67

Adjustment of Screen
Calibration (Adjustment)
Calibration (Adjustment)
Pattern : MIK K
-
7256 #24 ‘Chessboard Pattern’
Set Aging time : 60min
↑
-
HDMI Calibration (Time #6, 720p)
-
HDMI Calibration (Time #6, 720p)
-
COMP Calibration (Time #6, 720p)
-
CVBS Calibration (Time #22, NTSC
-J)-
PC Calibration (Time #21, 1024*768)
Page 68

Adjustment of Screen
White Balance (Adjustment)
White Balance (Adjustment)
Test : CA
-
210
Pattern : MIK K
-
7256 #92 ‘Flat W/B
Pattern’
Set Aging time : 60min
↑
Page 69

Adjustment of Screen
White Balance
-
26/32
”
(Adjustment)
White Balance
-
26/32
(Adjustment)
 Loading...