

Page 1
USER'S MANUAL
AW07PH Series
AW08PH Serie
AW09PH Serie
AW10PH Serie
AW12PH Serie
AW14PH Serie
AW18PH Serie
AW24PH Serie
AW122P
B
s AW08PK Series
s
s
s
s
s
s
AW07PK Serie
AW09PK Serie
AW10PK Serie
AW12PK Serie
AW14PK Serie
AW18PK Serie
AW24PK Serie
s
s
s
s
s
s
s
E S
DB98-26004A(6)
Window-type Room Air Conditioner (Cooling)
DB98-26004A.indd 23 2006-12-5 16:37:47
Page 2
E-2
Safety Precautions
The following safety precautions must be taken when using your air conditioner.
WARNING
Risk of electric shock. • Can cause injury or death. • Disconnect all
remote electric power supplies before servicing, installing or cleaning.
• This must be done by the manufacturer or its service agent or a similar
qualified person in order to avoid a hazard.
Register your product at www.samsung.com/global/register
DURING OPERATION
u
Users of this product are cautioned not to attempt repair of this product at their
own discretion. Instead, they are requested to directly contact a designated
service center or the outlet at which the product was purchased.
u
Never spill any kind of liquid into the unit. Should this happen, unplug or main
switch off the unit and contact an authorized service center.
u
Do not insert anything between the air outlet blades because the inner fan may
be damaged and could cause injury. Keep children away from the unit.
u
Do not place any obstacles in front of the unit.
u
Do not spray liquid of any kind into the indoor unit. Should this happen, switch off
the breaker used for your air conditioner and contact your installation specialist.
u
Make sure that the unit is correctly ventilated at all times:
Do not place clothing or other materials over it.
u
If the wireless remote control will not be used for a long time, remove the
batteries. (If applicable)
u
When using a wireless remote control, the distance should not be more than 7
meters from the air conditioner. (If applicable)
u
The air conditioner must be plugged into its own specific power source, which
must be installed in compliance with national wiring,earthing and safety
regulations.
u
If the power cord is damaged in any way, it must be replaced by the manufacturer
or its service agent or a similarly qualified person in order to avoid a hazard.
u
This device must be installed according to the national electrical rules.
u
The appliance must be installation that the plug should be easily accessible
after installation.
u
If the fuse on PC board is broken please change it with the type of T 3.15A 250V.
u
The breaker of the air conditioner should be all-pole switch; and the distance
between its two contacts should be no less than 3.5mm. Such means for
disconnection must be incorporation in the fixed wiring.
DISPOSING OF THE UNIT
u
Before throwing out the device, it is necessary to pull back the battery cells and
get rid of them safely for recycling reasons.
u
When you need to dispose of the unit, consult your dealer. If pipes are removed
incorrectly, refrigerant may blow out and come into contact with your skin,causing
injury. Releasing refrigerant into the atmosphere also damages the environments.
u
Please recycle or dispose of the packaging material for this product in an
environmentally responsible manner.
O
THERS
u
Never store or ship the air conditioner upside down or sideways to avoid damage
to the compressor.
u
The appliance is not intended for use by young children or infirm persons without
supervision: Young children should be supervised to ensure that they do not play
with the appliance.
u
Max current is measured according to IEC standard for safety and current is
measured according to ISO standard for energy efficiency.
DB98-26004A.indd 2 2006-12-5 16:37:18
Page 3
E-3
Contents
CAUTION
“The high inrush current of the starting compressor motor can have adverse effects to
the operation of other equipment under unfavorable mains conditions. This equipment
does not comply with the relevant technical standards for the limitation of voltage
fluctuations and flicker.”
Before connection this equipment to the power supply system, please report to your
suply authority and obtain the consent.
Do not connect other electric appliances to the same supply lines.
The maximum permissible system impedance at the power junction box is 0.24 ohms.
Usually, the maximum permissible mains impedance will not be exceeded when the
branch to the power outlet is fed from a junction box with a rated current of 32A.
AW18
PREPARING YOUR AIR CONDITIONER
n Safety Precautions ........................................................................................ 2
n Air Conditioning Unit-Main Parts, Buttons and Display ................................. 4
n Remote Control-Buttons ................................................................................ 5
n Getting Started .............................................................................................. 6
n Inserting the Remote Control Batteries ........................................................ 7
OPERATING YOUR AIR CONDITIONER
n Cooling Your Room ....................................................................................... 8
n Airing Your Room .......................................................................................... 9
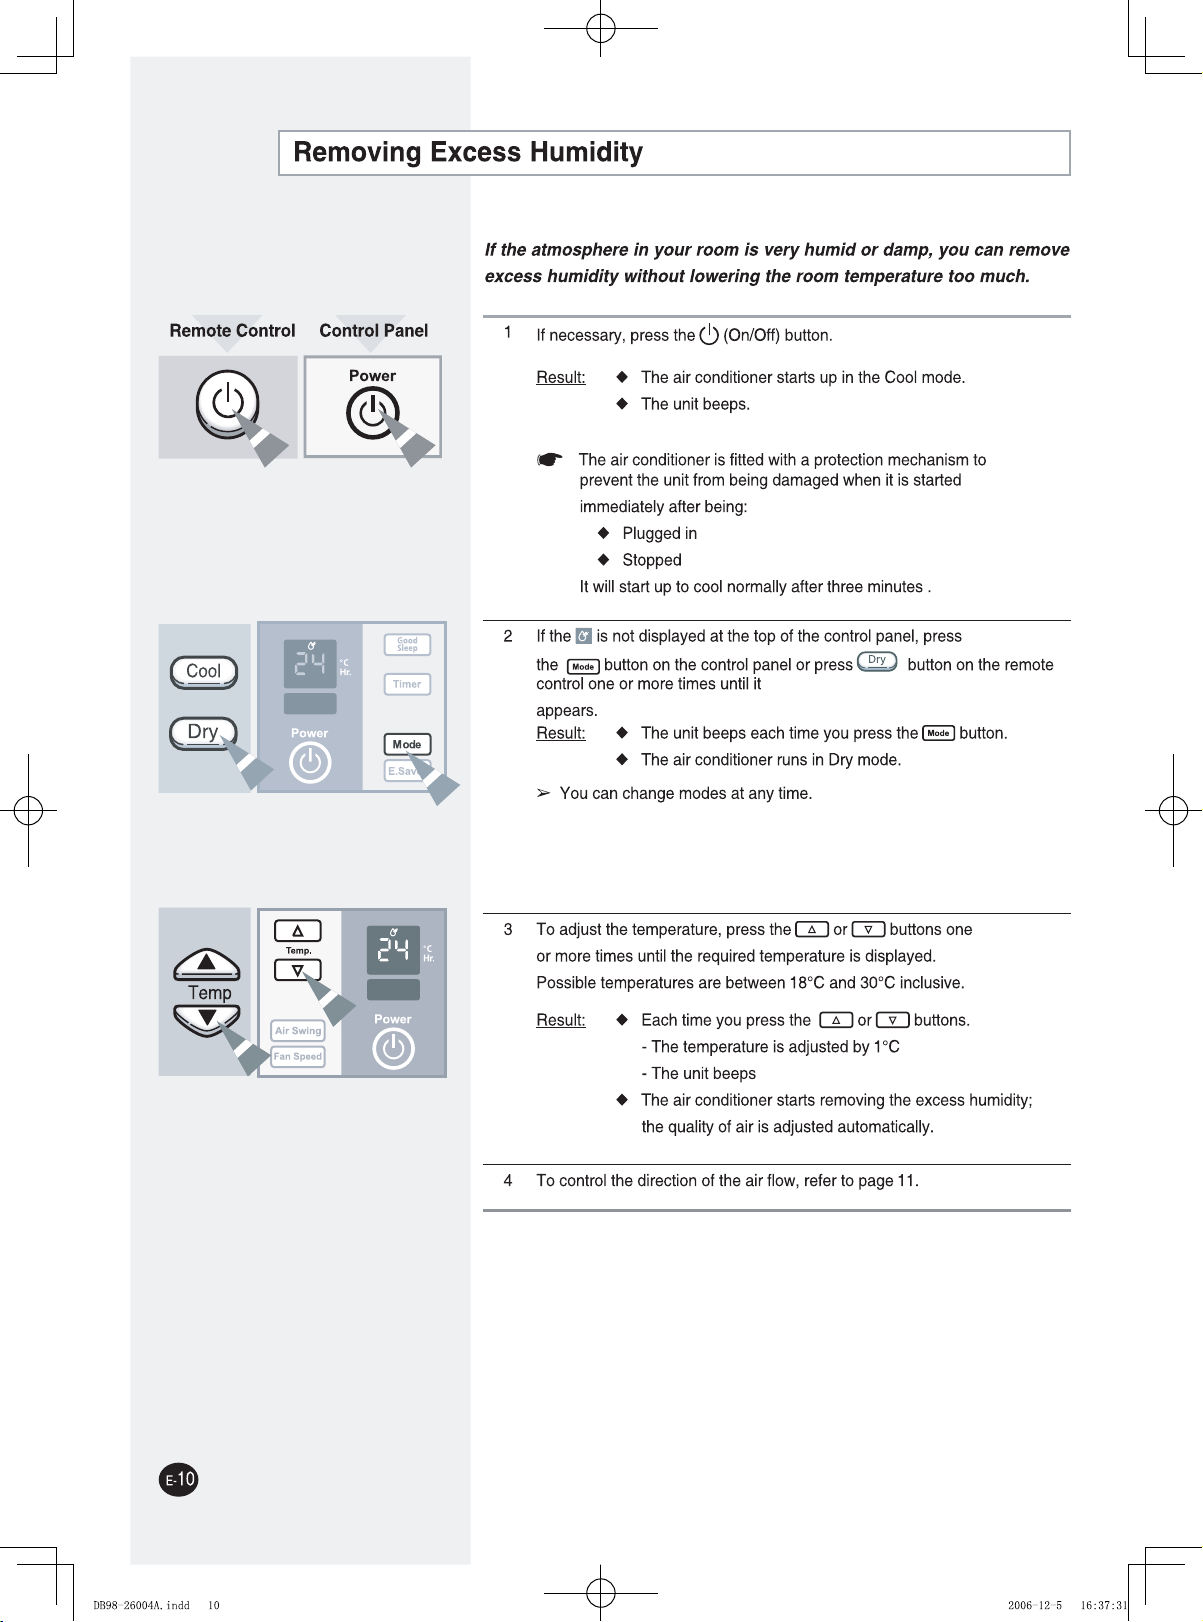
n Removing Excess Humidity........................................................................... 10
n Adjusting the Air Flow Direction Horizontally ................................................ 11
n Adjusting the Air Flow Direction Vertically .................................................... 11
PROGRAMMING YOUR AIR CONDITIONER
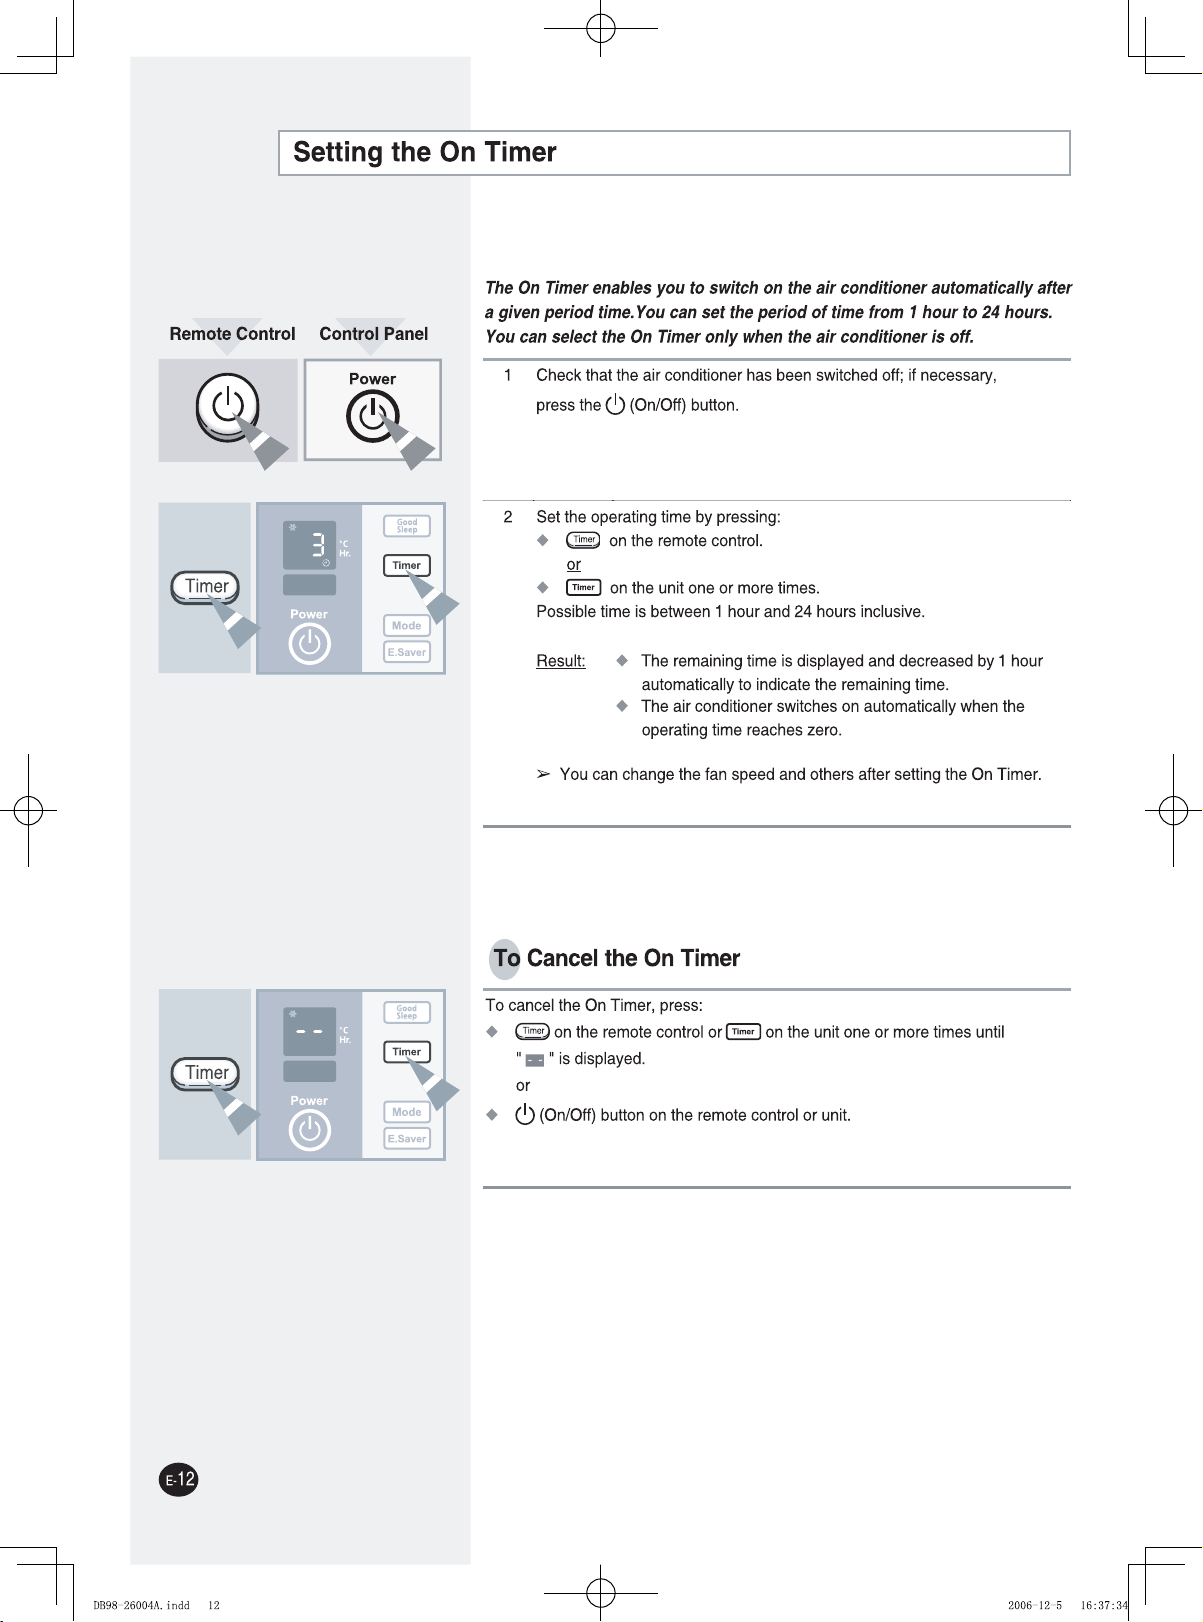
n Setting the On Timer ..................................................................................... 12
n Setting the Off Timer ..................................................................................... 13
n
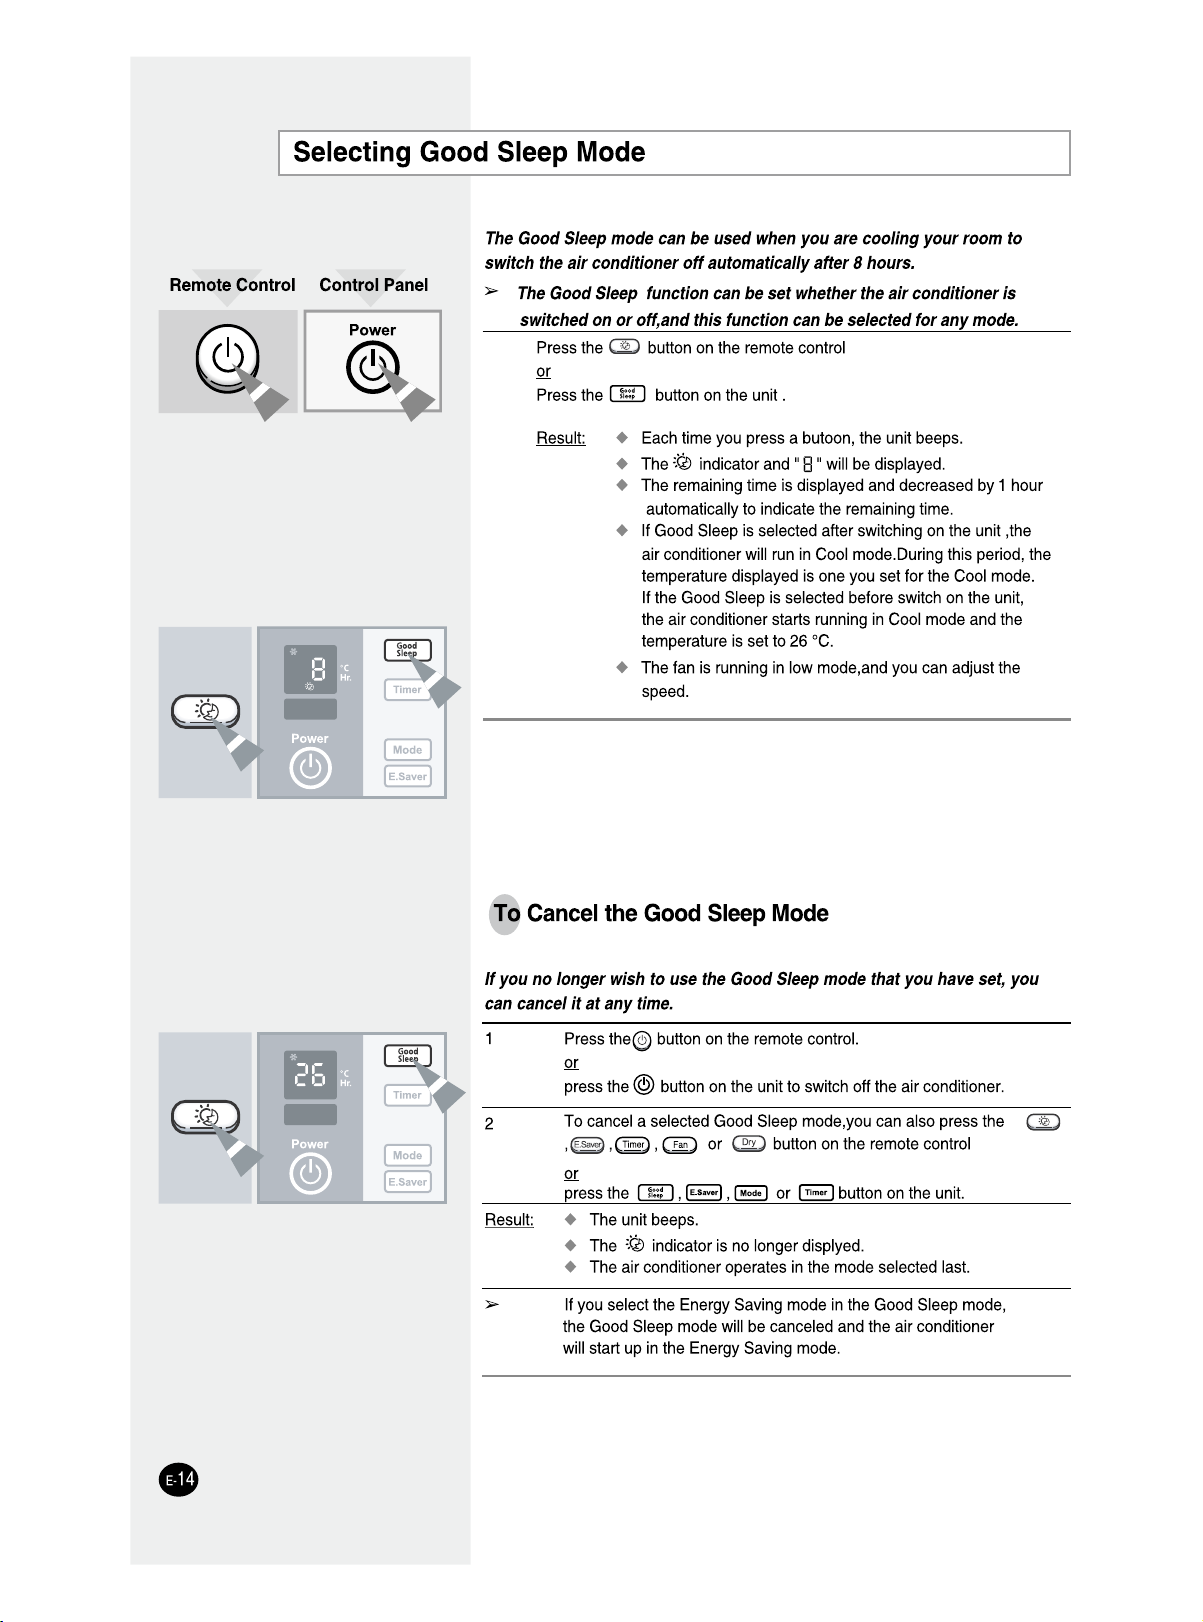
Selecting Good Sleep mode
n Selecting Energy saving mode ...................................................................... 15
RECOMMENDATIONS FOR USE
n Temperature and Humidity Ranges .............................................................. 15
n Cleaning Your Air Conditioner ....................................................................... 16
n Solving Common Problems ........................................................................... 17
n
Technical Specifications
........................................................................ 14
.................................................................................. 18
INSTALLATION............................................................................................. 19
DB98-26004A.indd 3 2006-12-5 16:37:18
Page 4
E-4
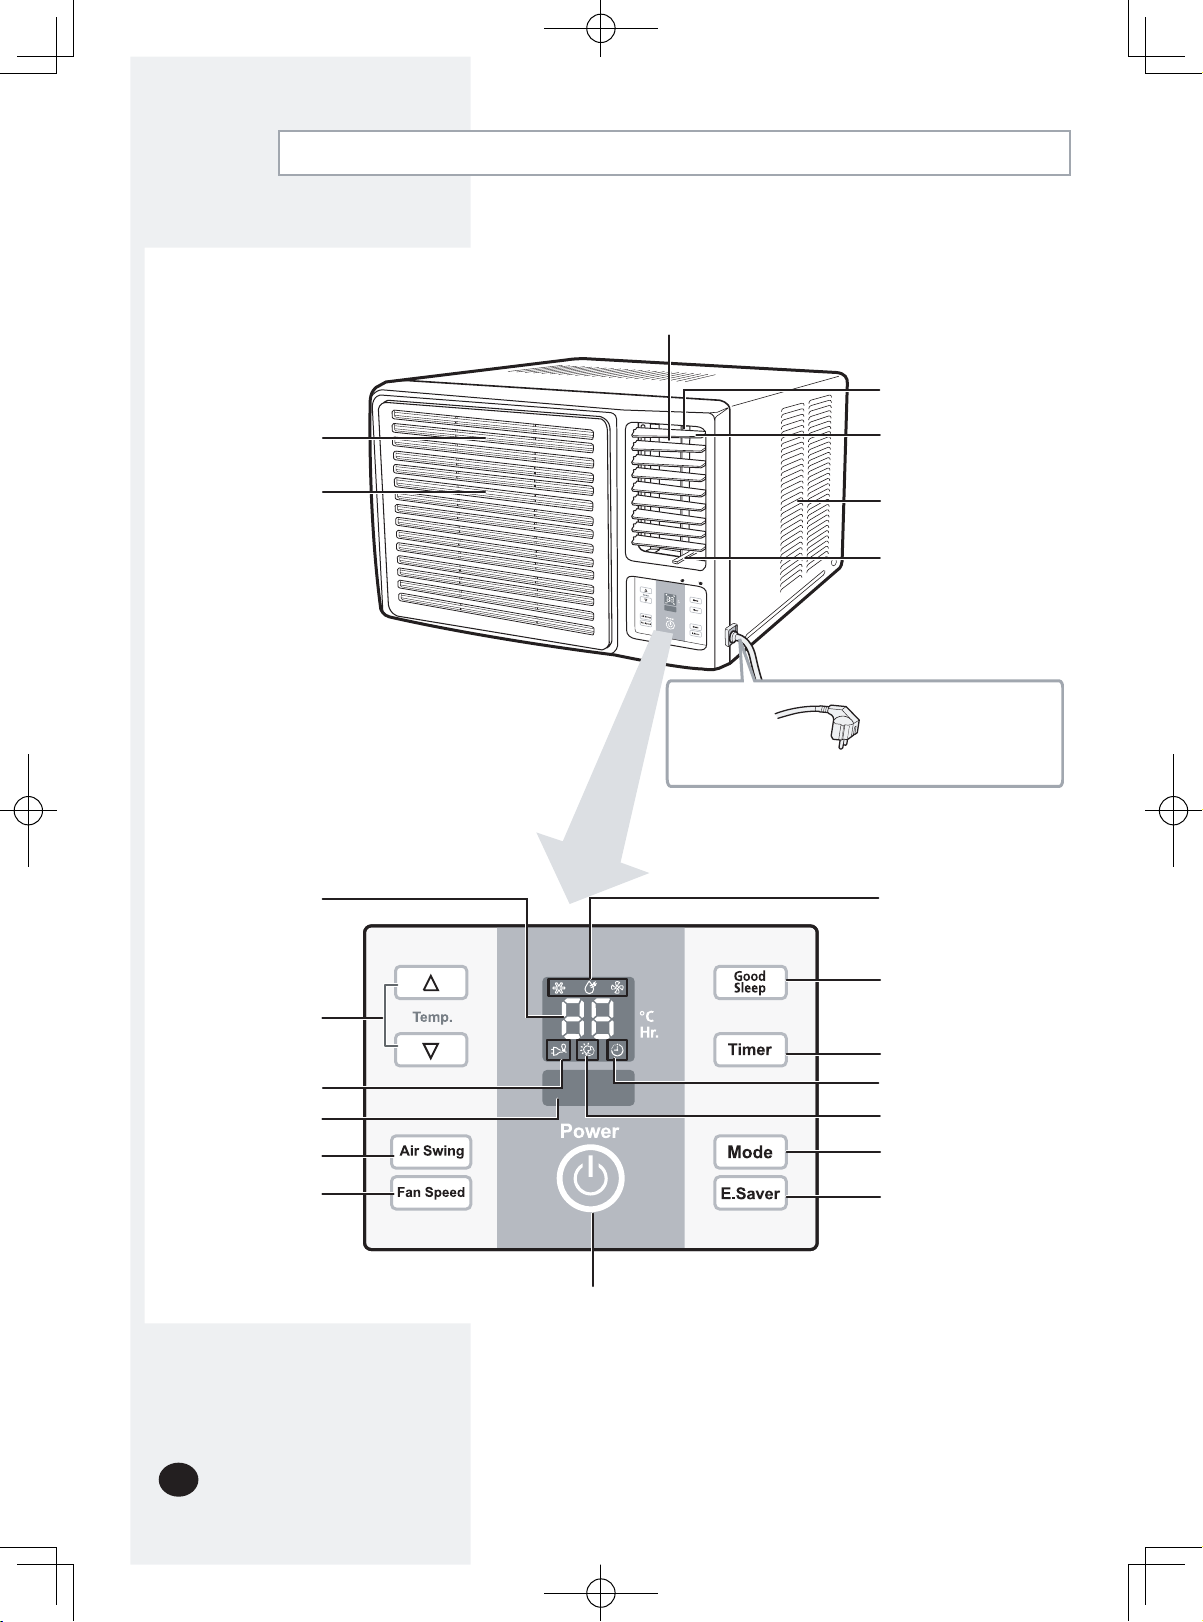
Air Conditioning Unit - Main Parts, Buttons and Display
Air inlet (Inside)
The air filter is
located in sid
e
Air Outle
t
Inner air flow blades
(right/left orientation)
Outer air flow blades
(up/down orientation
)
Air inlet (Outside)
Ven
tilation lever
�✟
The power plug may be not supplied
depending on the model
.
Power plu
g
The
type of the power plug
may differ according to the
type of local power supply
.
Temperature adjustment
button
s
Air flow blade
swing butto
n
Fan speed adjustment
butto
n
Good Sleep setting button
Timer setting button
Operating mode selection
button (COOL,DRY, FAN
)
Energy Saver button
Timer indicator
Good Sleep indicato
r
Operating mode indicators
(COOL, DRY,FAN
)
Energy Saver indicato
r
Remote Control senso
r
Temperature/
Timer settin
g
On/Off button
The
design and shape are subject to
change
according to the model.
DB98-26004A.indd 4 2006-12-5 16:37:19
Page 5
E-5
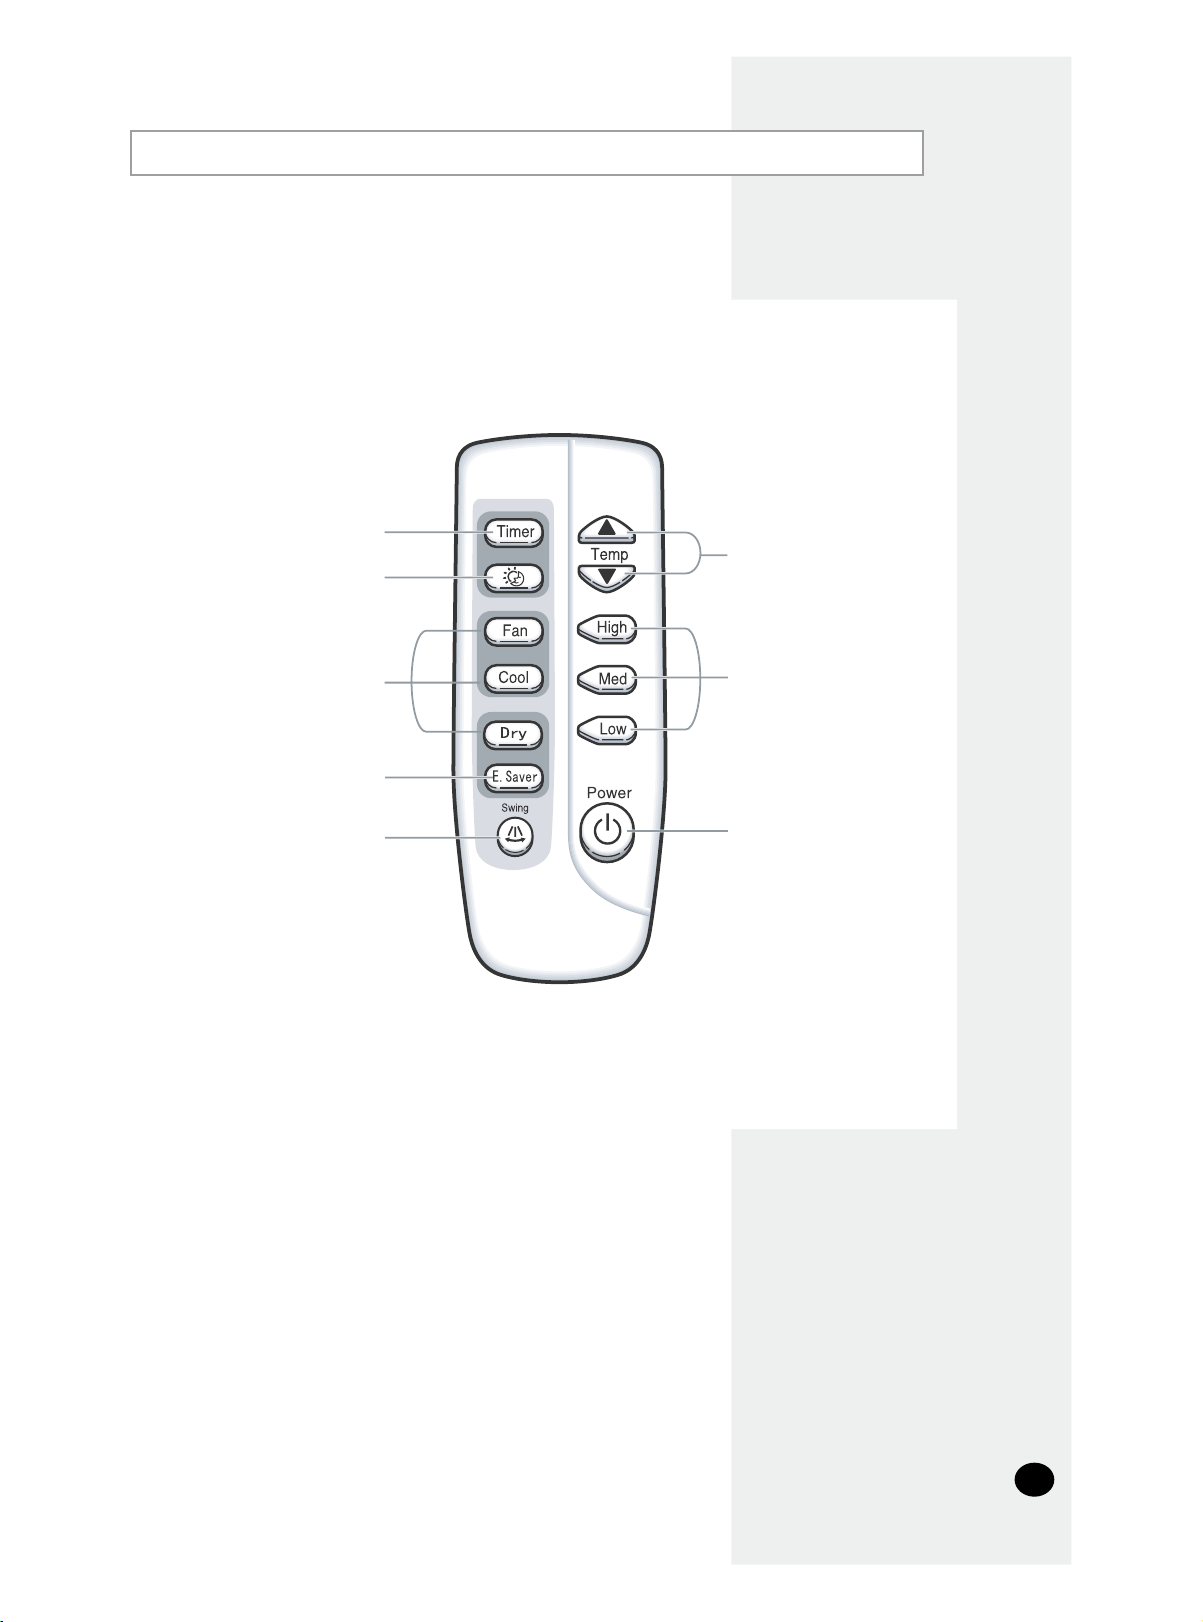
Remote Control - Buttons
Timer setting button
Selecting Good Sleep
butto
n
Operating mode
selection butto
n
Energy Saver butto
n
Air flow blade swing butto
n
Temperature adjustment
butto
n
On/Off butto
n
Fan speed adjustment
butto
n
DB98-26004A.indd 5 2006-12-5 16:37:20
Page 6
E-6
You have just purchased a window-type room air conditioner and it has been installed by your
installation specialist.
Your Owenr’s Instructions contain valuable information on using your air conditioner.
Please take the time to read them as they will help you take full advantage of the unit’s functions.
This Owner’s Instructions is just for using your air conditioner correctly.
Thus, the illustrations shown in this manual may not exactly match your air conditioners.
The booklet is organized as follows.
The following figures are shown on pages 4 and 5:
- Air conditioning unit (main parts, buttons and display)
- Remote control (buttons)
They will help you find the buttons and understand the symbols displayed.
In the manual, you will find a series of step-by-step procedures for each function available.
The illustrations in the step-by-step procedures use four different symbols:
PRESS PUSH IMPORTANT NOTE
Moreover,applicable, wherever the illustrations show the positions of the buttons on both the
remote control and the unit itself.
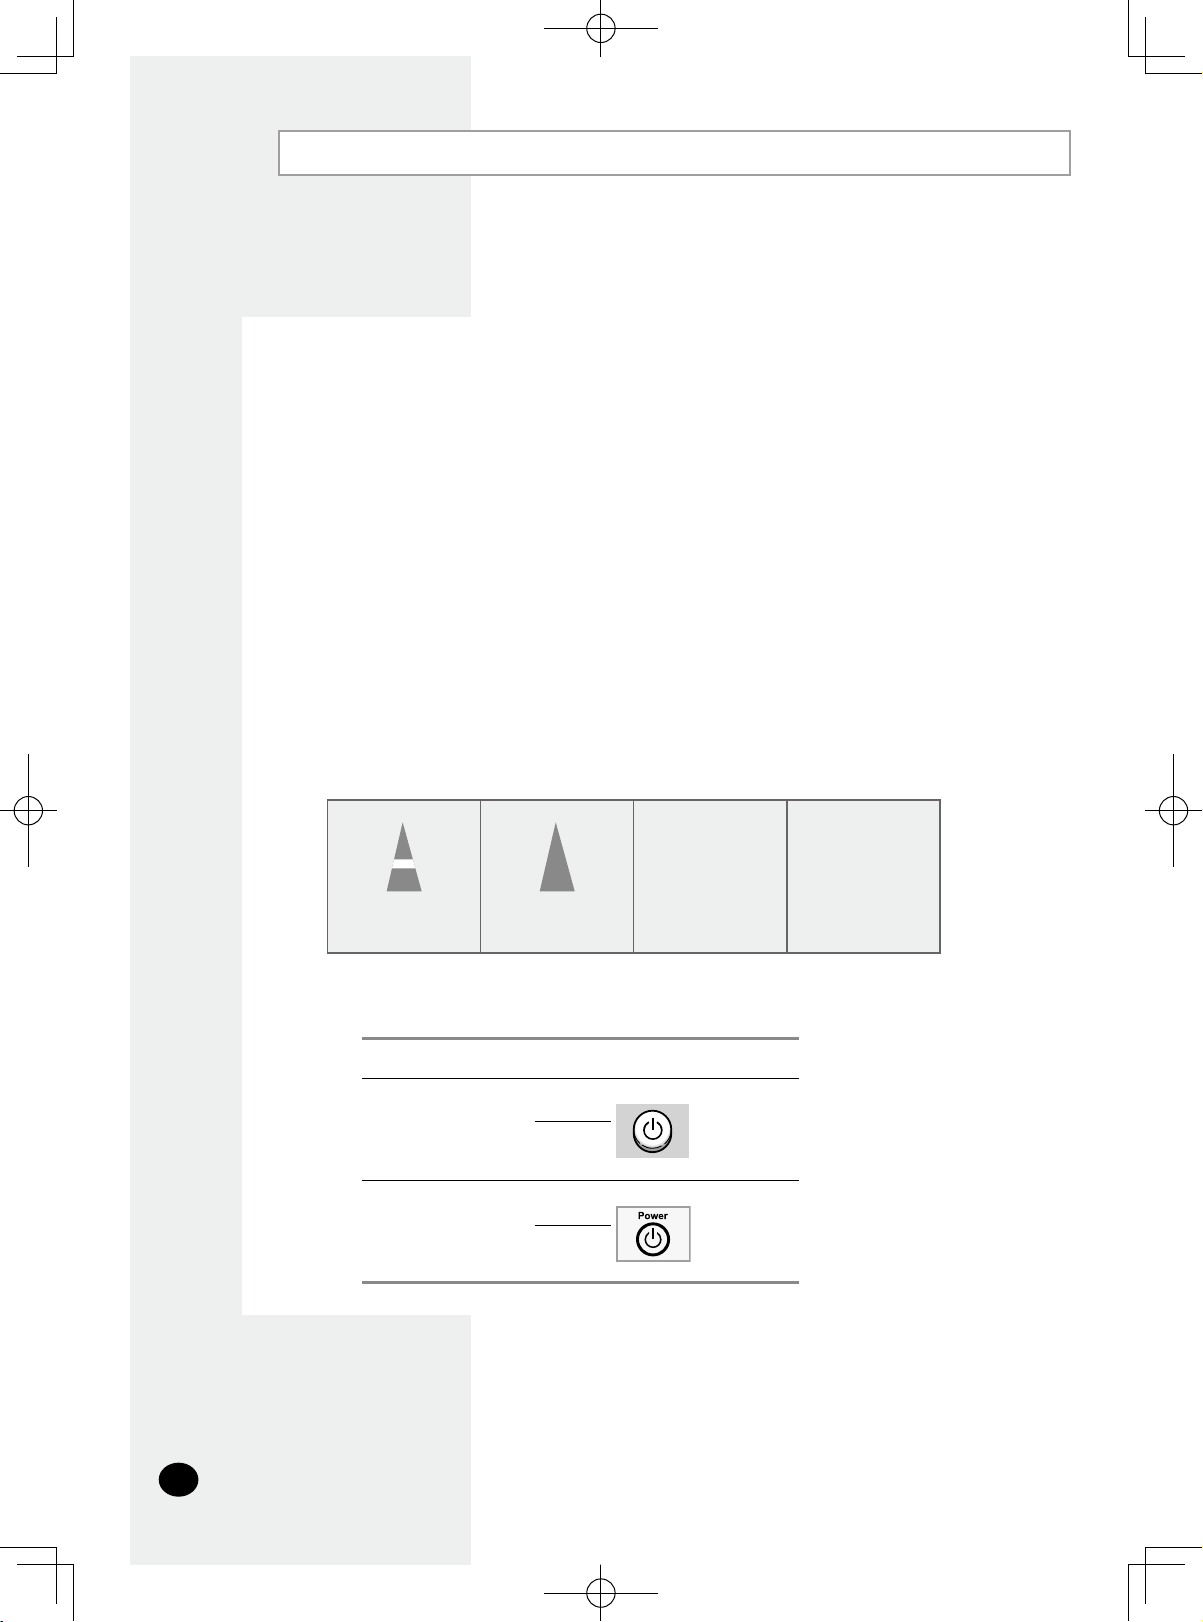
For the... The illustrations have a...
Remote control Gray background.
Example:
Unit itself White background.
Example:
Getting Started
DB98-26004A.indd 6 2006-12-5 16:37:21
Page 7
E-7
Inserting the Remote Control Batteries
You must insert or replace the remote control batteries when:
You purchase the air conditioner
The remote control does not work correctly
Use two AAA, LR03 1.5V batteries. Do not use old
batteries or different kinds of batteries together.
Batteries may be completely discharged after 12 months,
even if they have not actually been used.
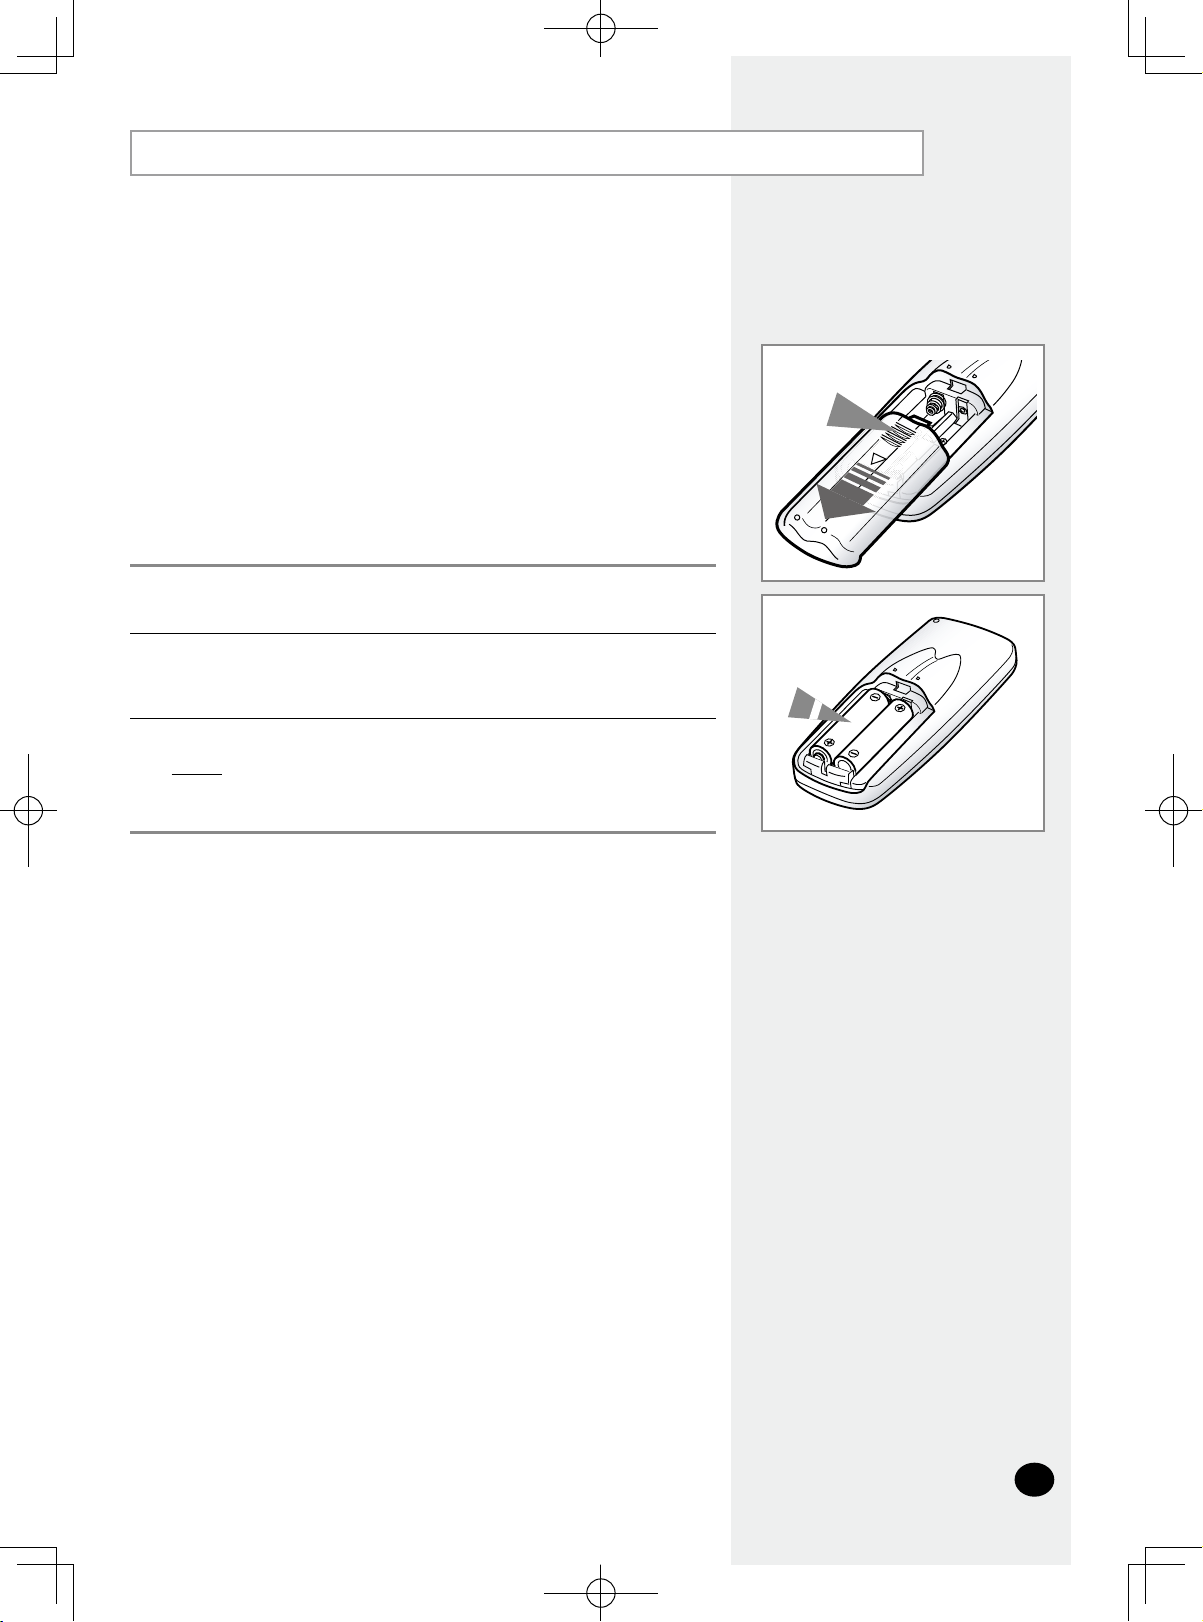
1 Push the battery cover on the rear of the remote control with your thumb in
the direction of the arrow and remove it.
2 Insert the two batteries,taking care to respect the polarities:
+ on the battery with + on the remote control
- on the battery with - on the remote control
3 Close the cover by sliding it back unitl it clicks into place.
Result: You can control all the functions your air conditioning unit
directly from your seat, using the remote control.
DB98-26004A.indd 7 2006-12-5 16:37:22
Page 8
Page 9
E-9
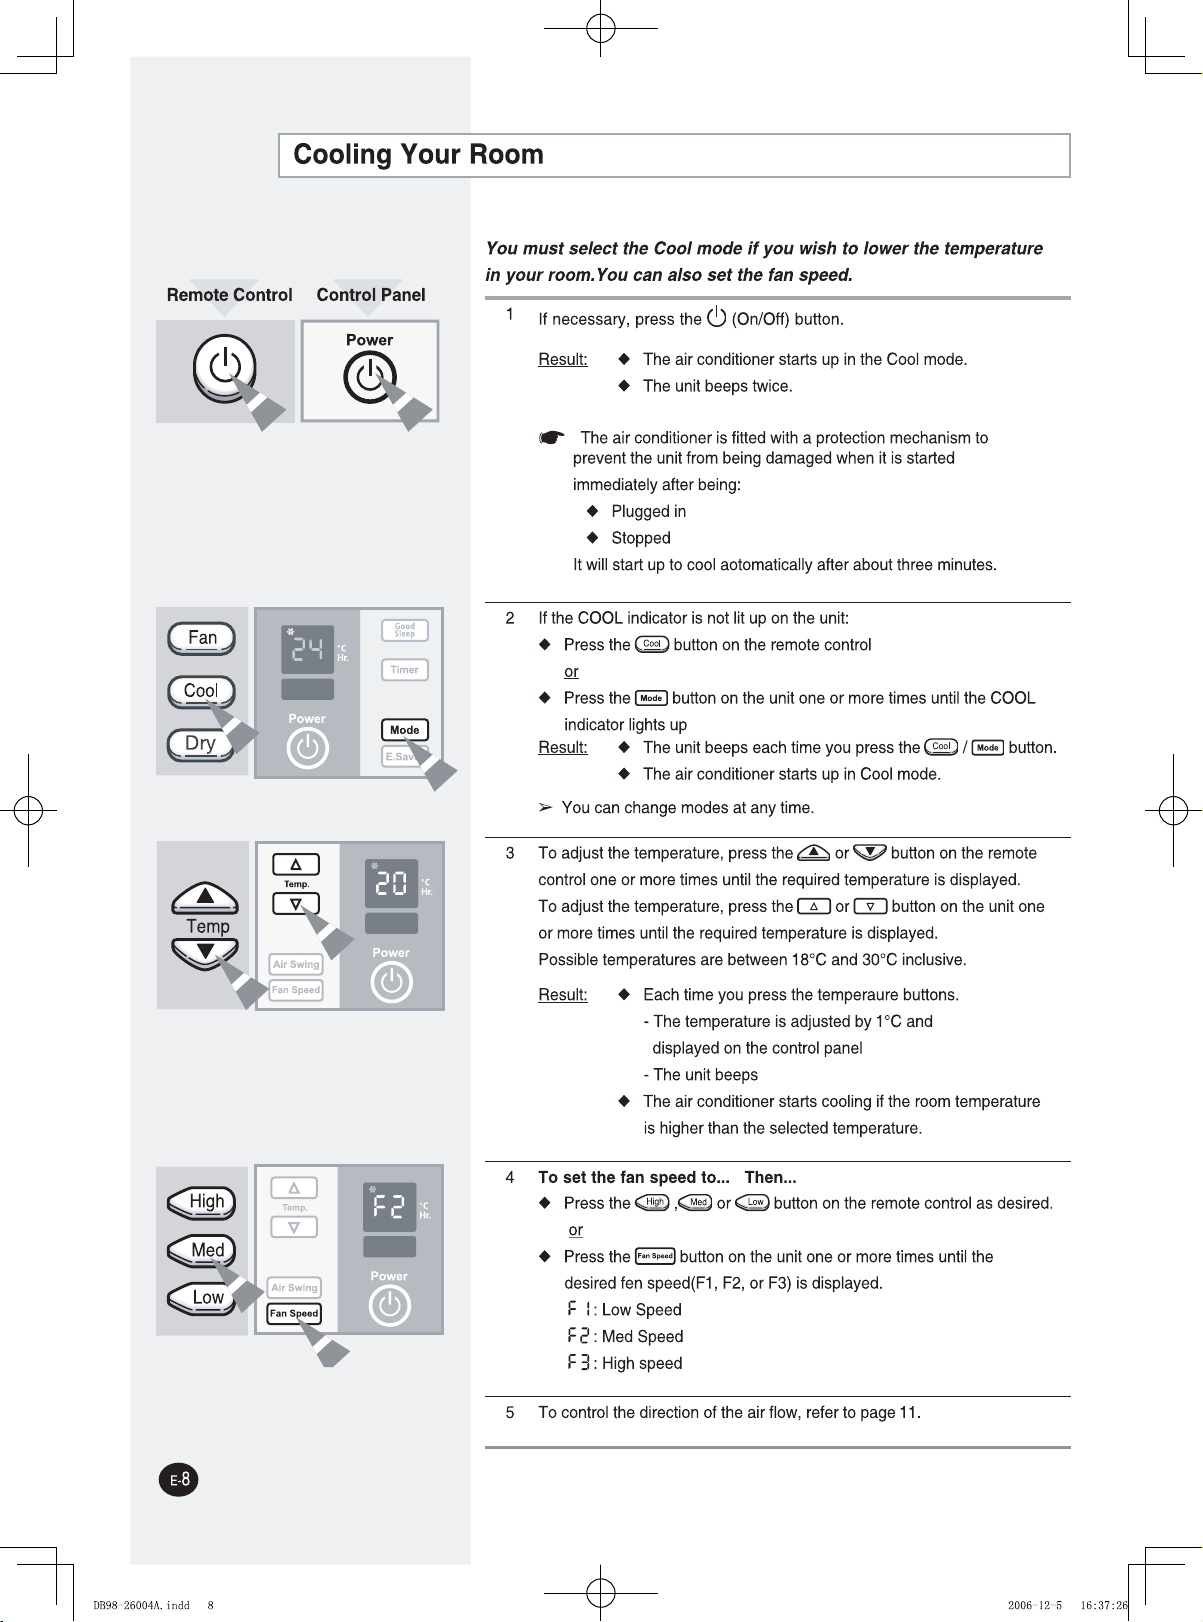
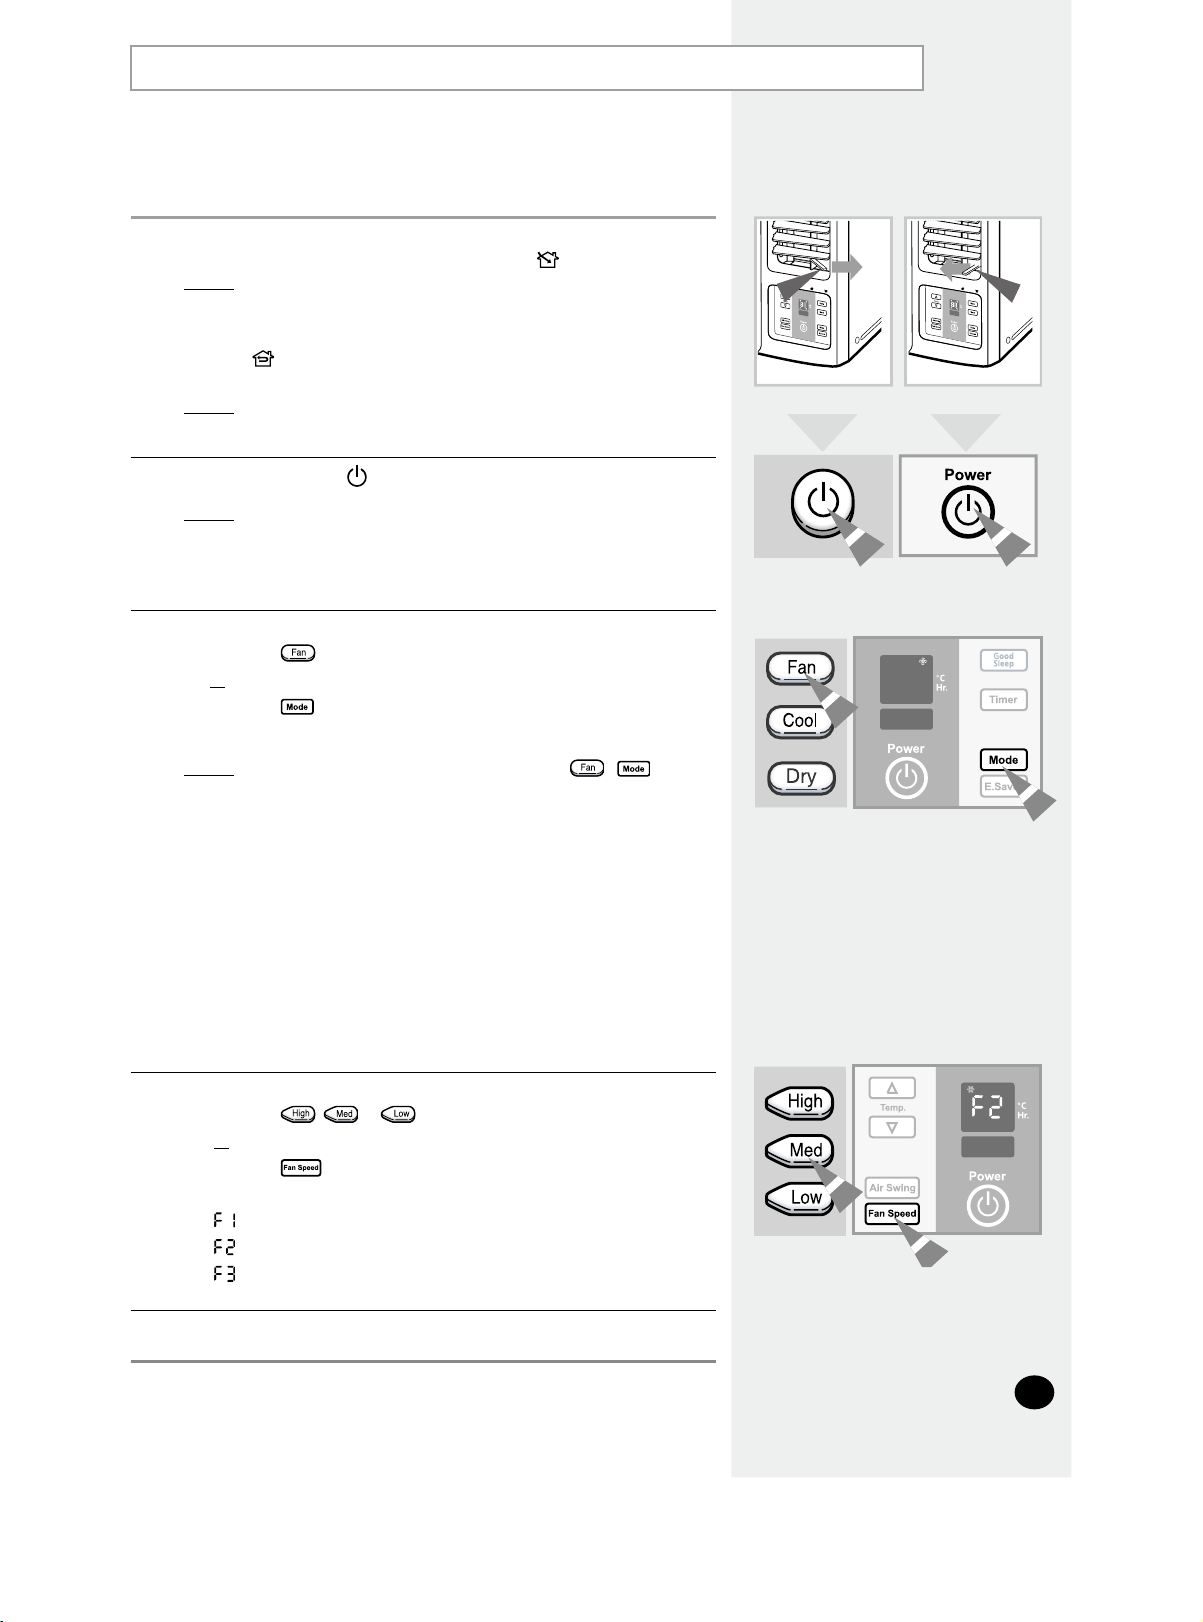
Airing Your Room
If the atmosphere in your room is stale, you can air it using the Fan
feature
and if necessary, evacuate the stale air outside.
1 If you wish to evacuate stale air outside, push the ventilation lever on the
front of the unit to the right and the open position (
).
Result: The air inside the room circulates and stale air is evacuated
outside
.
Otherwise, push the ventilation lever to the left and the closed
position (
).
Result: The air simply circulates inside the room.
2
If necessary, press the
(On/Off) button.
Result:
The air conditioner starts up in the Cool mode.
The unit beeps twice.
3 If the FAN indicator is not lit up on the unit:
Press the button on the remote control
or
Press the
button on the unit one or more times until the FAN
indicator lights u
p
Result:
The unit beeps each time you press the
/ button.
The air conditioner starts up in Fan mode.
You can change modes at any time
.
When the air conditioner is in the Fan mode, the temperature is not dis
played; in this case, you do not need to set the temperature
.
4 To set the fan speed to... Then...
Press the , or button on the remote control as desired.
or
Press the button on the unit one or more times until the
desired fen speed(
F1, F2, or F3) is displayed.
: Low Speed
: Med Speed
: High speed
5 To control the direction of the air flow, refer to page 11.
Remote Control Control Panel
DB98-26004A.indd 9 2006-12-5 16:37:28
Page 10
Page 11
E-11
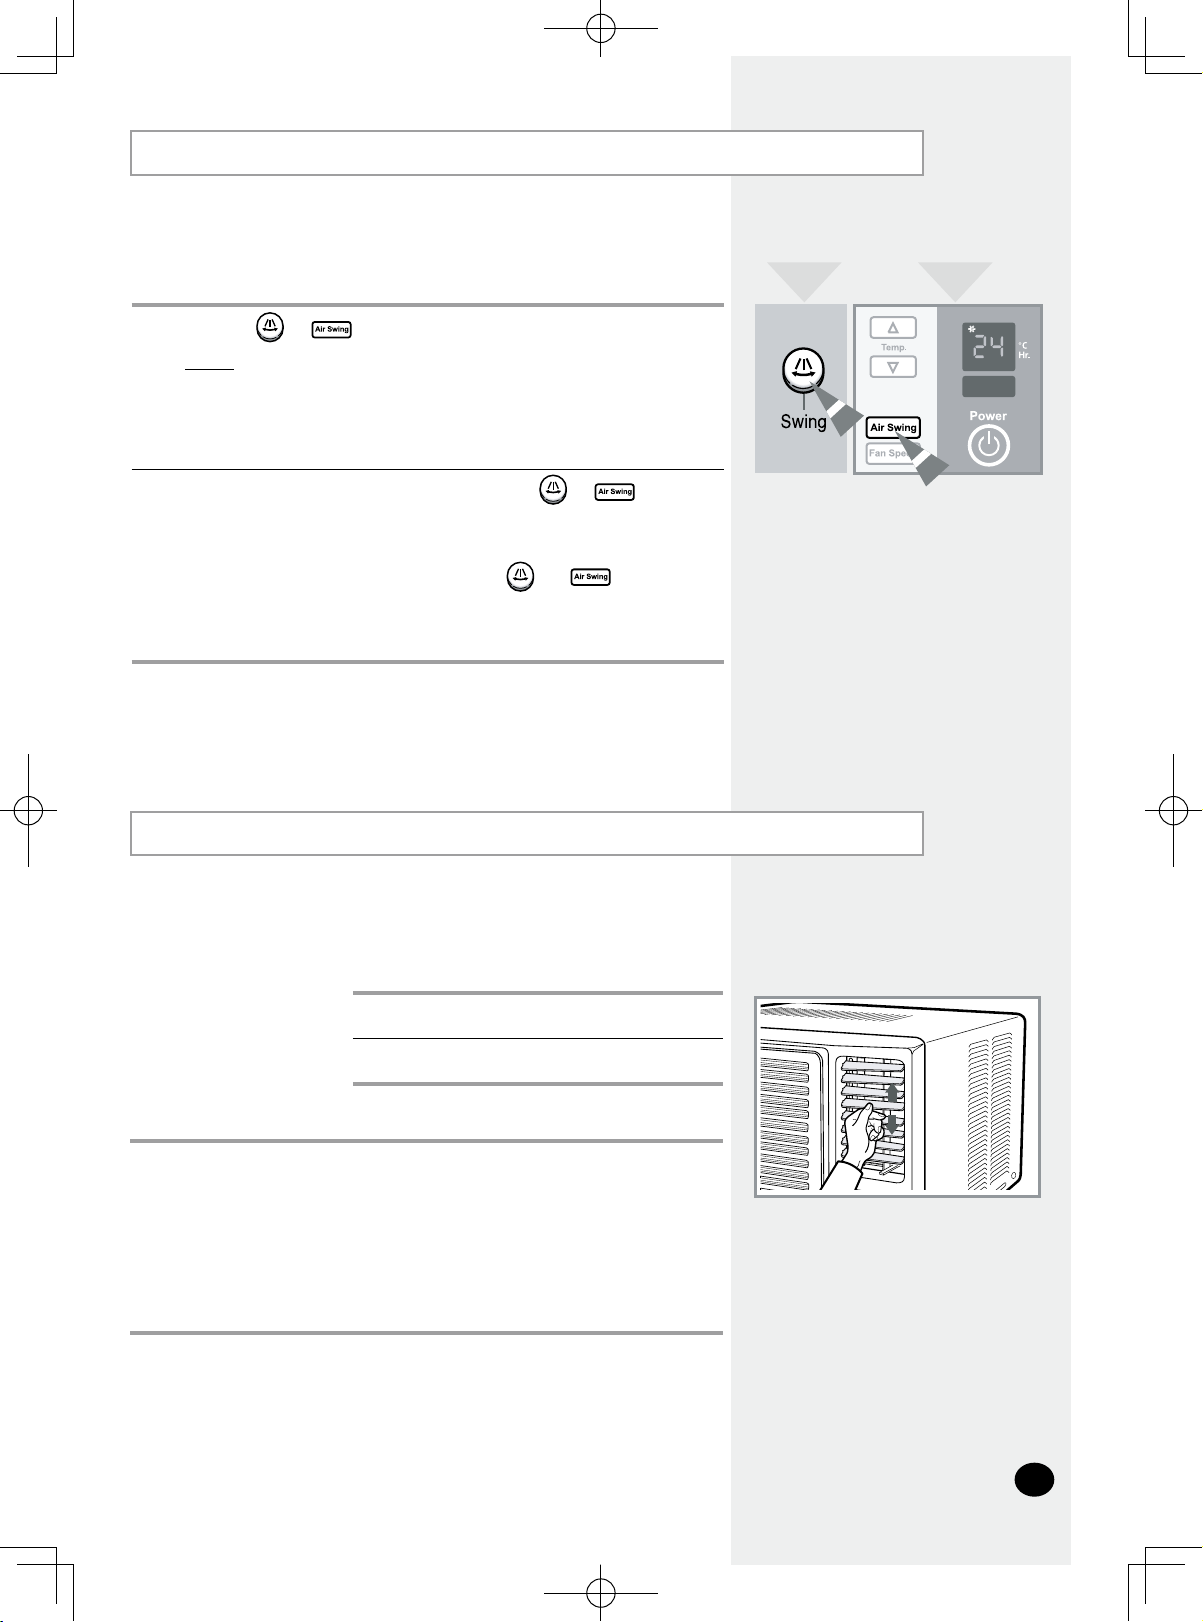
Adjusting the Air Flow Direction Horizontally
Adjusting the Air Flow Direction Vertically
Depending on the position of the unit in your room, you can adjust the
orientation of the inner air flow blades on the right-hand side of the unit,
thus increasing the efficiency of the air conditioner.
1
Press the (or on the unit) button on the remote control.
Result: The inner blades swing automatically left and right.
2
To stop the blades moving left and right, press the (or on the unit)
button in the remote control.
To stop the blades in a specific position and orient the air flow in the
corresponding direction, simply press the (or on the unit)
button on the remote control when the blades are in the desired position.
Remote Control Control Panel
Again depending on the position of the unit in your room, you can
adjust the orientation of the outer air flow blades on the right-hand
side of the unit.
RECOMMENDATION
When... Adjust the blades to face...
Cooling Upwards.
Adjust the air flow blades to the desired position, by pushing them upwards or
downwards.
If you orient the air flow blades downwards and the unit operates in Cool mode
for a long period of time, dew may:
From on the surface of the blades
Drip from the blades
DB98-26004A.indd 11 2006-12-5 16:37:32
Page 12
Page 13
E-13
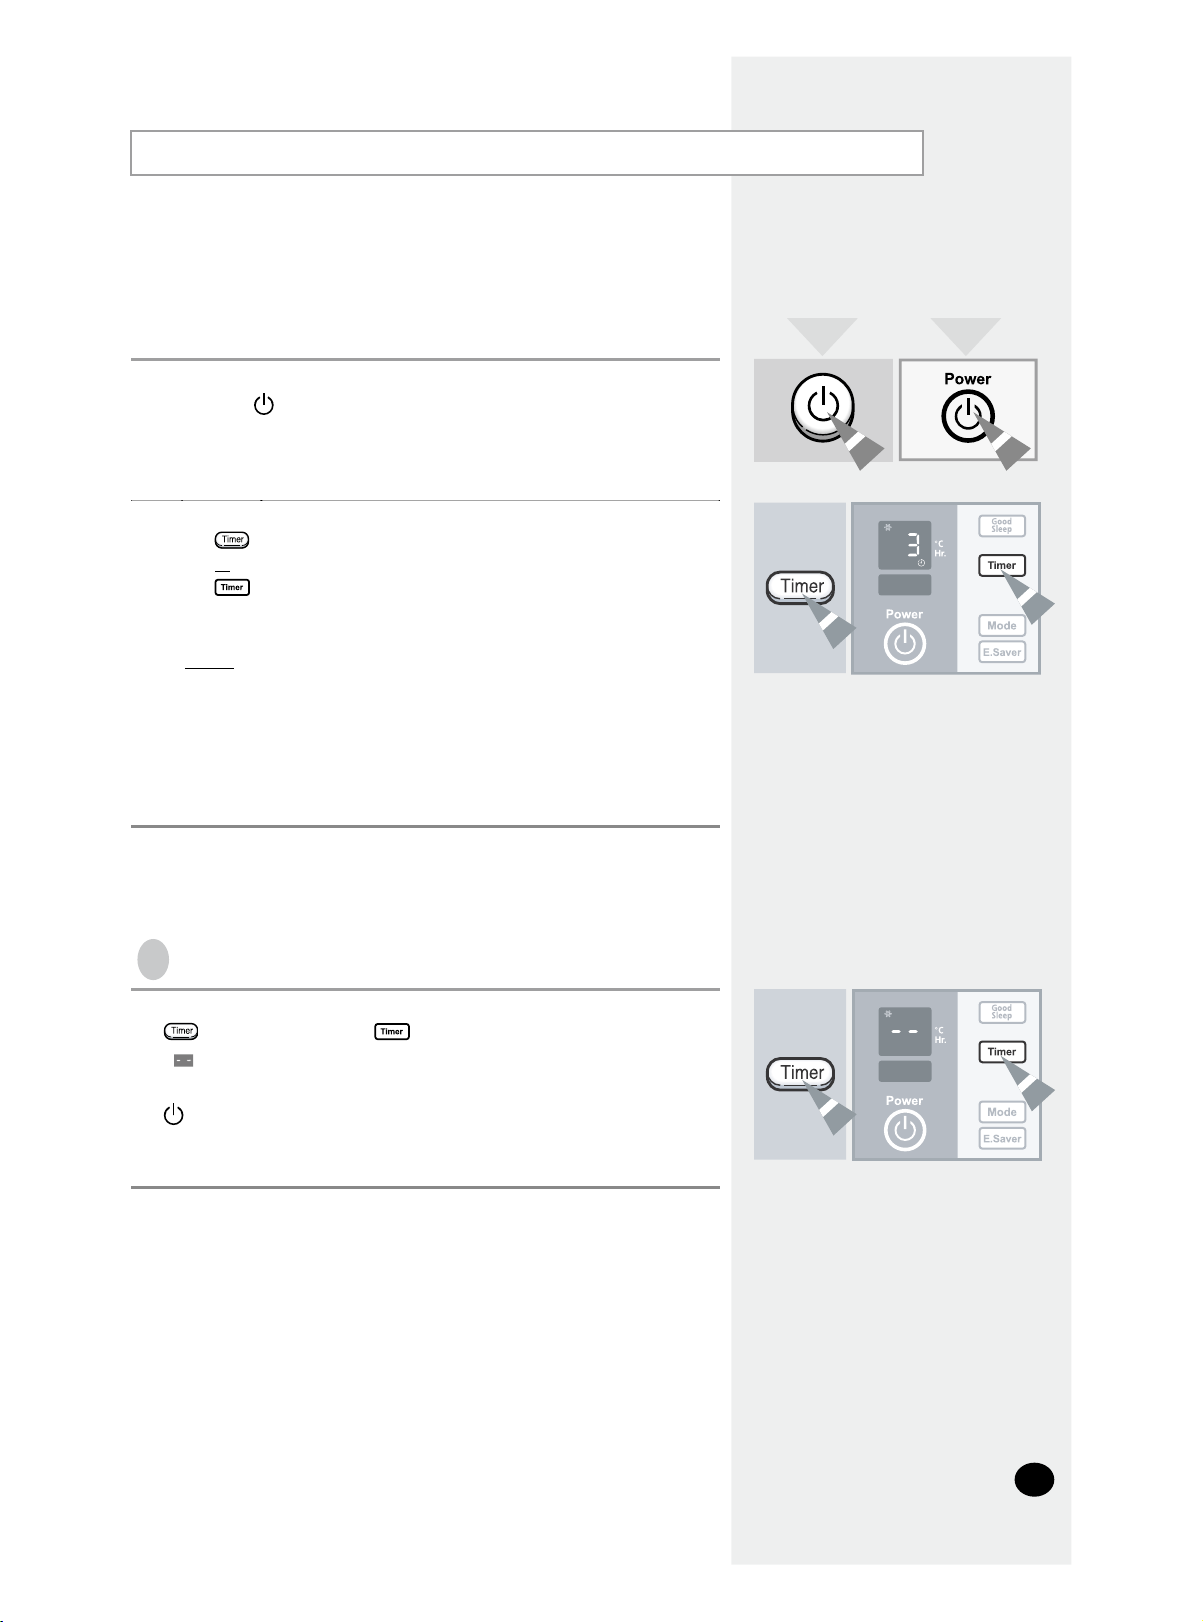
Setting the Off Timer
1 Check that the air conditioner has been switched on; if necessary,
press the
(On/Off) button.
2 Set the operating time by pressing:
on the remote control
.
or
on the unit one or more times
.
Possible time is between 1 hour and 24 hours inclusive.
Result:
The remaining time is displayed and decreased by
1 hour
automatically to indicate the remaining time
.
The air conditioner switches off automatically when the
operating time reaches zero
.
You can change the fan speed and air flow direction and other
s
after setting the Off Timer
.
The Off Timer enables you to switch off the air conditioner automatically after
a given period of time.You can set the period of time from 1 hour to 24 hours.
You
can select the Off Timer only when the air conditioner is on.
Remote Control Control Panel
To cancel the Off Timer, press:
on the remote control or on the unit one or more times until
"
" is displayed.
o
r
(On/Off) button on the remote control or unit.
To Cancel the Off Timer
DB98-26004A.indd 13 2006-12-5 16:37:34
Page 14
Page 15
E-15
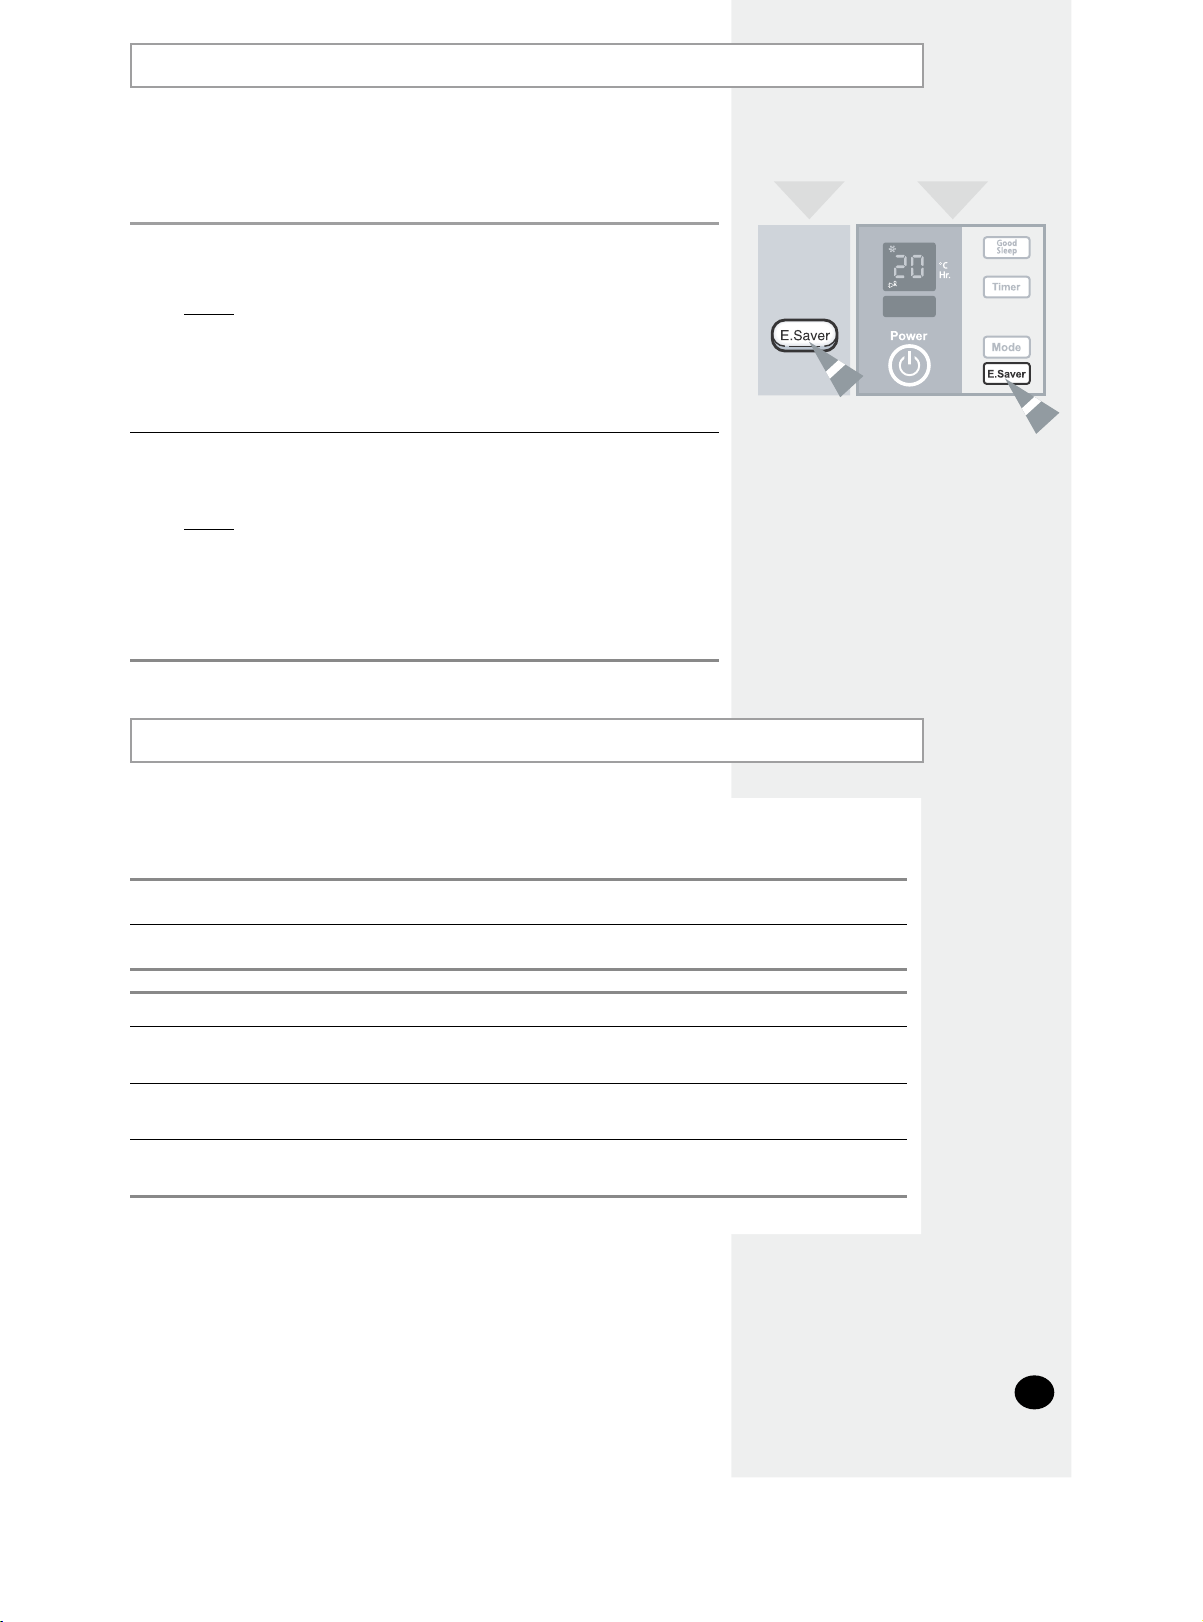
Selecting Energy Saving Mode
Temperature and Humidity Ranges
1
To select the Energy Saving mode, press the Energy Saver button on the remote
control or unit one or more times until the Energy Saver indicator lights up
.
Result:
The fan and compressor cycle on and off together.
The fan will continue to run for a short time after th
e
compressor cycles off
.
2 To stop the Energy Saving mode, press the Energy Saver button on the
remote control or unit again
.
Result: The fan runs at all times, while the compressor cycles on and off.
If you select the Good Sleep mode in the Energy Savin
g
mode, the Energy Saving will be cancelled and the air
conditioner will start up in the Good Sleep mode
.
If you wish to save Energy when using your air conditioner,
select
the Energy Saving mode with the Energy Saver button.
Mode IndoorTemperature OutdoorTemperature Indoor Humidity
Coolin
g 21°C to 32°C approx. 21°C to 43°C approx. 80% or less
The following table indicates the temperature and humidity ranges within which the
air
conditioner can be used in the best condition .
If the air conditioner is used at... Then...
Higher
temperatures
The
automatic protection feature may be triggered and the air
conditioner
stopped.
Lower
temperatures
A water leakage or some other malfunction may happen if the
heat
exchanger freezes.
Higher
humidity levels
Water
way condense on and drip from the surface of the unit if
it
is used for long periods.
Remote Control Control Panel
DB98-26004A.indd 15 2006-12-5 16:37:38
Page 16

E-16
Cleaning Your Air Conditioner
1
Hold the front grille handle, slightly pull it to the left side and open the front grille.
The removal of the front grille makes it easier to clean the air
conditioner. Open the grille as much as possible.
Be sure to clean the air filter periodically to maintain the air conditioner in
the best condition for a long period of time.
When cleaning the air conditioner, turn it off and pull out
the power plug.
IMPORTANT
CAUTION
Removal and Reassembly of the Front Grille
For user’s safety, a safety clip has been installed in the front grille.
1 Grasp the lower part of the front
grille and the front grille handle,
then open the grille. (The open
angle of front grille has not to be
exceeded 25 degree)
2 Lift the front grille slightly and
remove it from the front panel.
3 Reassembling of front grille
should be done in reverse
order of disassembly.
2
Pull the air filter to the right side.
3
Remove all dust on the air filter with a vacuum cleaner or brush.
4
When you have finished, insert the air filter back into its original position.
5
Wipe the surface of the unit with a neutral detergent and then wipe it again
with dry cloth.
(Be sure not to use benzene, solvent or other chemical products.)
If you... Then...
Will not be using the
air conditioner for a
long period of time
Set the fan going for a few hours to
dry the inside of the air conditioner
thoroughly.
Switch the air conditioner off and
unplug it from the wall socket.
Clean the filter and outer surfaces.
Have not used the air
conditioner for a long
period of time
Set the fan going for a few hours to
dry the inside of the air conditioner
thoroughly.
The air conditioner has two or three grille
grooves depending on the model.
DB98-26004A.indd 16 2006-12-5 16:37:40
Page 17
E-17
Solving Common Problems
Problem Explanation/Solution
The air conditioner does not
operate at all
Check that the circuit breaker used for the air conditioner has not
been triggered.
Check that the power cable is plugged into a wall socket and the
socket is switched on, if necessary.
Check that the operating mode indicator (COOL or FAN) on the unit is
lit up; if necessary press (On/Off) button on the remote control or
unit.
The air conditioner does not
operate with the remote control
Check that there are no obstacles between you and the unit.
Replace the remote control batteries if necessary.
Check that you are close enough to the unit (seven metres/yards
or less).
No beep is heard when you press
(On/Off) on the remote control
Check that you are pointing the remote control at the remote
control sensor on the unit.
Replace the remote control batteries if necessary.
The air conditioner does not cool
Check that the correct operating mode has been selected COOL..
The room temperature may be too low.
Dust may be blocking the air filter; refer to page 16 for
cleaning instructions.
Check that there is no obstacle blocking the air flow into or out of
the unit.
The air flow direction does not
change when you press the
or on the unit button
Check that the air conditioner has been switched on; if necessary,
press (On/Off) button on the remote control or unit.
The timer is not correctly triggered
Check that the timer has been programmed correctly;
see page 12~13.
Odour is permeated in the
room during air conditioning
Air the room.
Before contacting the after-sales service,perform the following simple checks.
They may save you the time and expense of an unnecessary service call.
DB98-26004A.indd 17 2006-12-5 16:37:41
Page 18
E-18
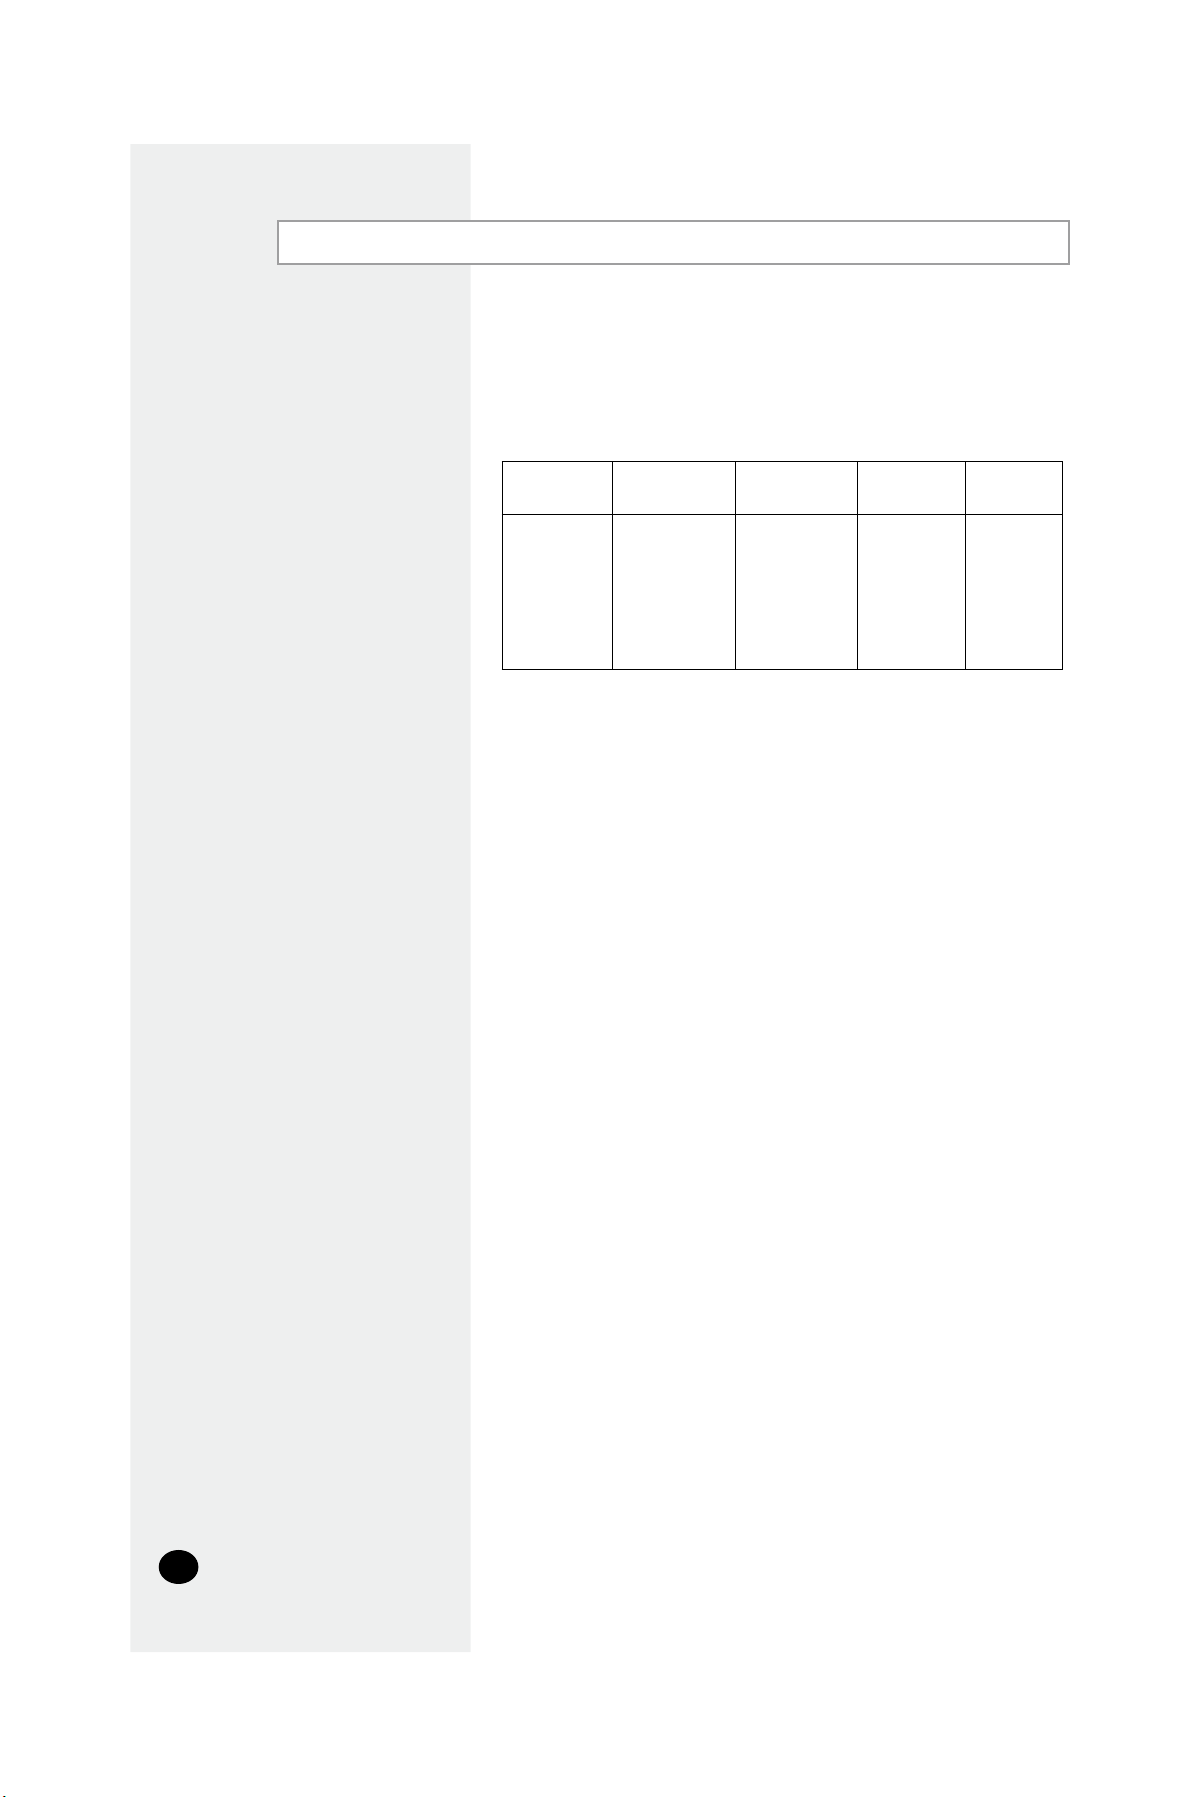
Technical Specifications
Design and specifications are to change without notice
Model
Voltage
&
Frequec
y
Capacit
y
Power
Consumptio
n
Operating
Curren
t
AW12PKAA
AW12PKBA
AW
18PKBA
AW24PKBA
115V~, 60Hz
220V~, 60Hz
220V~, 60Hz
220V~, 60Hz
12000BTU/h
12000BTU/h
18000BTU/h
24000BTU/h
1230W
1230W
1850W
2820W
11,2A
5,5
A
8,3
A
12,5A
DB98-26004A.indd 18 2006-12-5 16:37:41
AW12PKAB 115V~, 60Hz 12000BTU/h 1110W
AW12PKBB
220V~, 60Hz 12000BTU/h
1110W
10,0A
5,2
A
Page 19
E-19
Installation (for 60Hz)
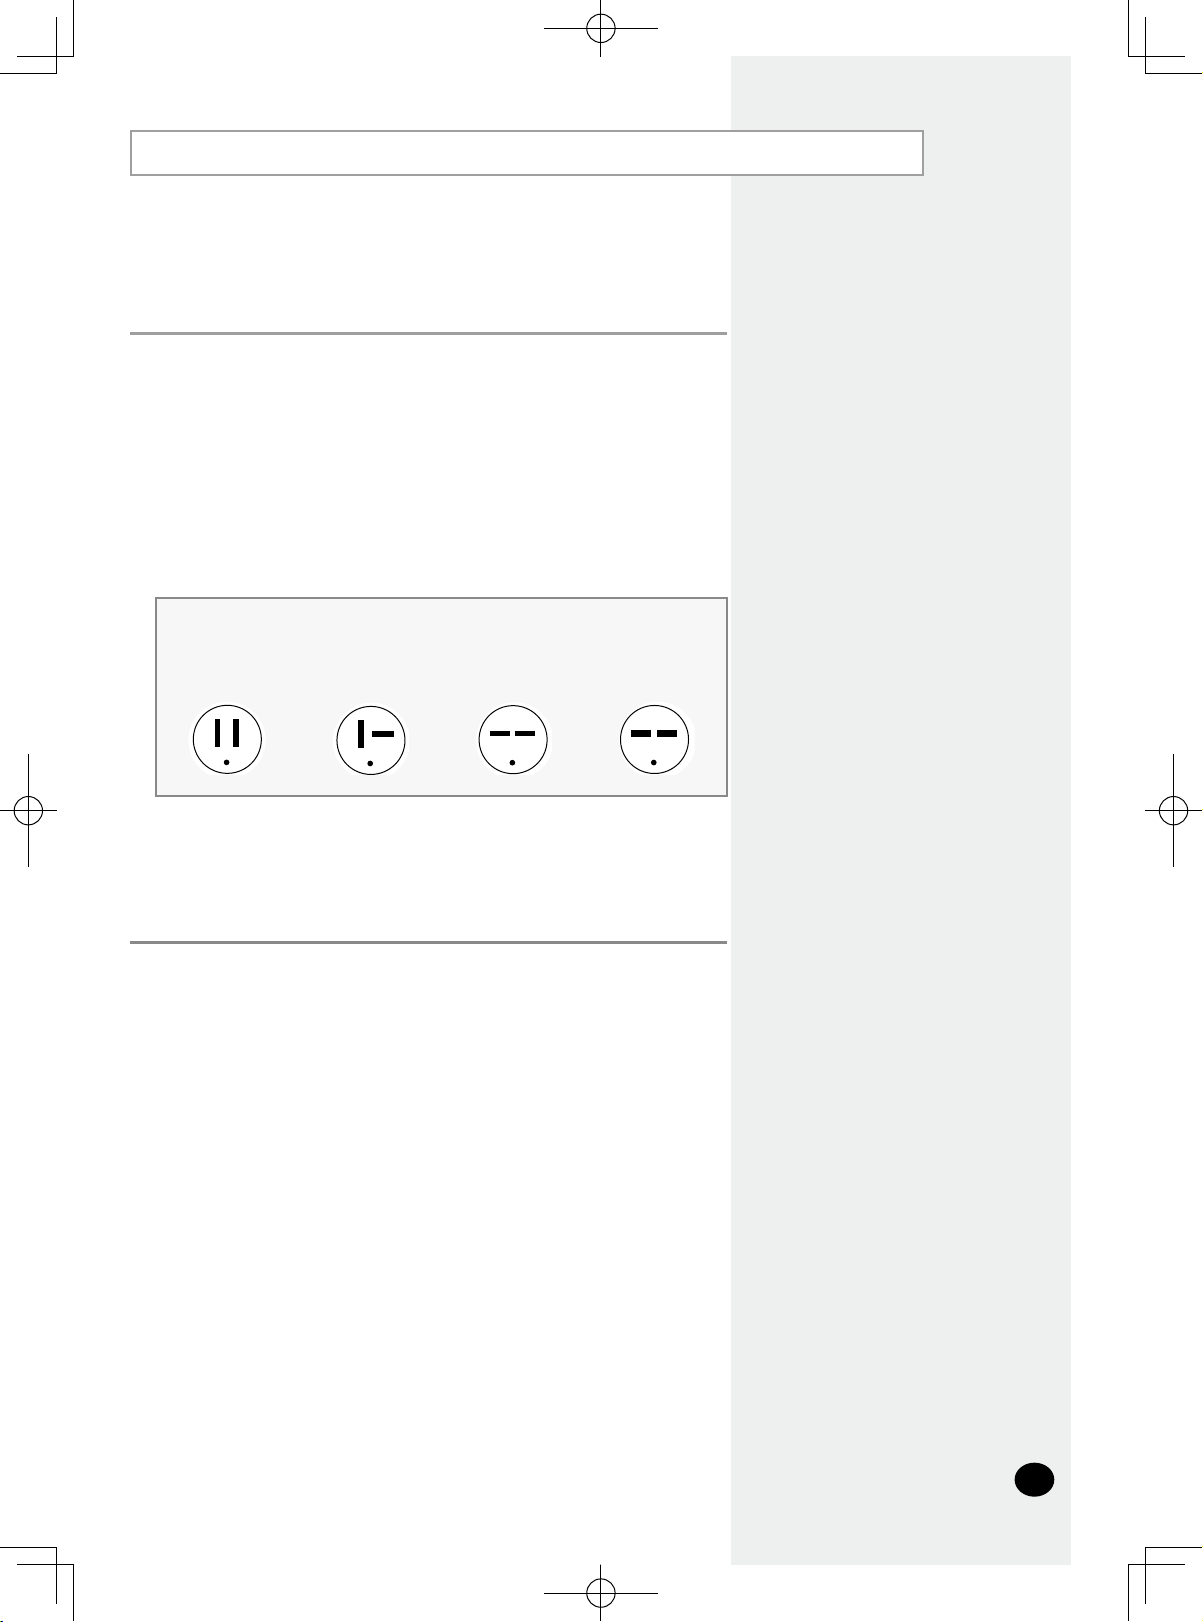
1 Electrical Requirements
For personal safety:
This appliance must be properly grounded.
Do not, under any circumstances, cut or remove the third grounding prong
from the power cord.
We recommend that you do not use an extension cord or an adapter plug
with this appliance.
Do not change the plug on the power cord of this appliance.
Follow national electrical codes or local codes and ordinances.
If the electric supply provided does not meet the above specifications,
call a licensed electrician.
Aluminum house wiring may pose special problemsconsult a qualified
electrician.
This unit requires a separate circult, serving only this appliance.
115V
15 AMP Circuit
“parallel” type
230V/208V
20 AMP circuit
“perpendicular” type
230V/208V
15AMP circuit
“tandem” type
230V/208V
30 AMP circuit
“tandem” type
DB98-26004A.indd 19 2006-12-5 16:37:42
Page 20
E-20
Installation (cont.)
Checkpoints prior to installation
1
Check the cabinet and front grille of the unit for any harmful defects
such as scratches
.
2
Be sure to check the power supply.
- Refer to the specifications on the label attached to the unit
.
Before installation, be sure to check the installation area or the air
conditioner,
and drain hose.
Installation Conditions
1
As the unit is heavy, the wall or window of the installation area should
have sufficient strength and durability for operation of the air conditioner
,
and for prevention of any vibration or noise
.
If it is weak, reinforcement work should be performed separately
.
2
It is advisable to install the air conditioner in the north or west side to
prevent the effect of direct sunlight
.
When installing it in the south or east side due to unavoidabl
e
circumstances, it is advisable to install the sunshade to prevent th
e
direct sunlight
.
In this case, take care not to cause any hindrance to the flow of outside air
.
3
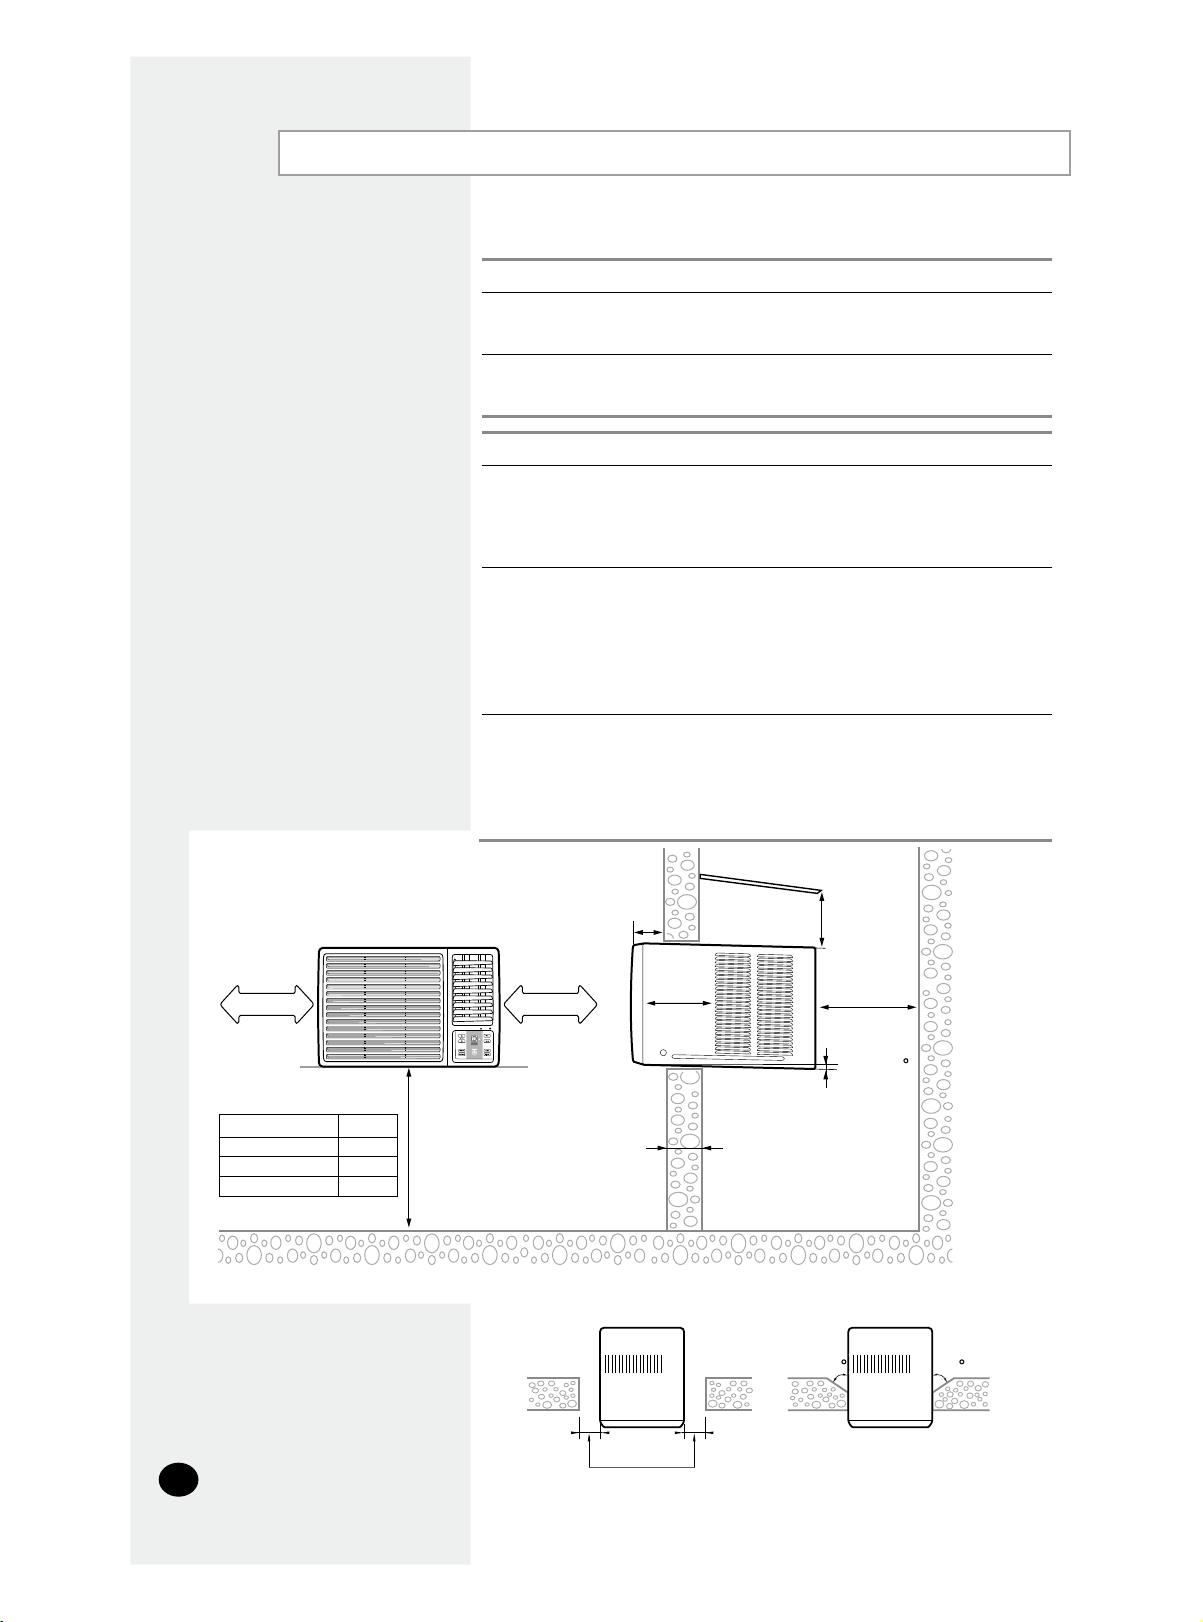
When installing the air conditioner, be sure to obtain sufficient space on
the rear side of the unit for smooth flow of air
.
When operating the air conditioner in closed areas such as inner buildin
g
with cooling operation, and result in trouble with the unit
.
See the illustration below
.
500mm 500mm
75mm
min.
300mm
500m
m
150mm
min.
"A"
Approx.3
750mm
45
45
The appliance must be fixed well by screw or similar
method.
Awning
Fence,
wall
or
other
obstacle
If the wall is greater than 150mm thick,
cut
the wall back on a 45 angle if possible.
Outdoor
side
Indoor
side
100mm or more
MODEL “A”
AW07/AW08/AW09
145
AW10/AW12
170
260
AW14/AW18/AW24
DB98-26004A.indd 20 2006-12-5 16:37:43
Page 21
Installation (cont.)
21
Page 22
Country
Customer Care Center
☎
Web Site
MEXICO 01-800-SAMSUNG (7267864) www.samsung.com/mx
ARGENTINE 0800-333-3733 www.samsung.com/ar
BRAZIL
0800-124-421
4004-0000
www.samsung.com/br
CHILE 800-726-7864(SAMSUNG) www.samsung.com/cl
COSTA RICA 0-800-507-7267 www.samsung.com/latin
ECUADOR 1-800-10-7267 www.samsung.com/latin
EL SALVADOR 800-6225 www.samsung.com/latin
GUATEMALA 1-800-299-0013 www.samsung.com/latin
JAMAICA 1-800-234-7267 www.samsung.com/latin
PANAMA 800-7267 www.samsung.com/latin
PUERTO RICO 1-800-682-3180 www.samsung.com/latin
REP. DOMINICA 1-800-751-2676 www.samsung.com/latin
TRINIDAD &
TOBAGO
1-800-7267-864 www.samsung.com/latin
VENEZUELA 0-800-100-5303 www.samsung.com/latin
COLOMBIA 01-8000112112 www.samsung.com.co
AUSTRALIA 1300 362 603 www.samsung.com/au
INDIA
3030 8282
1800 110011
http://www.samsung.com/in/
INDONESIA 0800-112-8888 www.samsung.com/id
MALAYSIA 1800-88-9999 www.samsung.com/my
PHILIPPINES 1800-10-SAMSUNG (7267864) www.samsung.com/ph
SINGAPORE 1800-SAMSUNG (7267864) www.samsung.com/sg
VIETNAM 1 800 588 889 www.samsung.com/vn
SOUTH AFRICA 0860 726 7864 (SAMSUNG) www.samsung.com/za
800SAMSUNG (7267864)
8000-4726
www.samsung.com/mea
U.A.E
THAILAND
1800-29-3232
02-689-3232
www.samsung.com/th
DB98-26004A.indd 22 2006-12-5 16:37:44
 Loading...