

Page 1

Air Conditioner
user manual
AS 09E Series
AS 12E Series
AS 18E Series
AS 24E Series
imagine the possibilities
Thank you for purchasing this Samsung product.
To receive more complete service, please
register your product at
www.samsung.com/global/register
DB98-30369A
Page 2
d
f
eatures of your new
g
gy
g
y
y
y.
function
g
) to attack undesirable air contaminants
f
.
air conditioner
ool Summer Oer
On those hot sweltering summer days and long restless nights, there is no better escape
rom the heat than the cool comforts of home. Your new air conditioner brings an end to
exhaustin
air conditioner.
Your new air conditioner not only provides maximum cooling power in the summer, but can
also be an e
This technolo
reduce its runnin
A Look for Everywhere
The elegant and harmonious design gives priority to the esthetics of your space and
complements an
the new air conditioner adds class to an
unctionally and estheticall
and havin
hot summer days and lets you rest. This summer, beat the heat with your own
ost Ecient System
cient heating method in the winter with the advanced “Heat pump” system.
is up to 300% more ecient than electrical heating, so you can further
cost. Now, meet year-round needs with one air conditioner.
of your existing interior décor. With its soft color and rounded-edge shape,
room. Enjoy what your air conditioner oers both
unction allows you to set a comfortable sleep temperature while saving energy
sound sleep.
02_ features
function
function generates hydrogen(H) and oxygen(O
such as bacteria, pollen, and odor. It makes you breathe better as if you were staying around
water
alls, ocean surf, rivers and mountains.
For easy future reference write the model and serial number
own. You will nd your model number on the bottom side of
the air conditioner.
<optional>
2
odel #
Serial #
Page 3

To prevent electric shock, disconnect the power before servicing, cleaning, and installing the unit.
fely
f
y
g y
f
f
SAFETY INFORMATION
Before using your new air conditioner, please read this manual thoroughly to ensure that you know how to
sa
and eciently operate the extensive features and functions of your new appliance.
Because the
conditioner ma
contact center or
ollowing operating instructions cover various models, the characteristics of your air
dier slightly from those described in this manual. If you have questions, call your nearest
nd help and information online at www.samsung.com.
What the icons and signs in this user manual mean:
WARNING
AUTION
AUTION
hese warning signs are here to prevent injury to you and others.
ollow them carefully.
Please
ter reading this section, keep it in a safe place for future reference.
A
Risk of death or serious personal injury.
Potential risk of personal injury or material damage.
To reduce the risk of re, explosion, electric shock, or personal injury when
usin
our air conditioner, follow these basic safety instructions:
Do NOT attempt.
Do NOT disassemble.
Do NOT touch.
Follow directions carefully.
Unplug the power plug from the wall socket.
ake sure the machine is grounded to prevent electric shock.
all the contact center for help.
Recommended instructions or useful information for use.
safety information _03
Page 4

SEVERE WARNING SIGNS
f
f f
pp
f
p
y
g
y.
f
y
y
o not place the air conditioner near hazardous substances or equipment
that releases
Potential risk of re hazard or explosion.
ree ames to avoid re, explosions or injuries.
o not install the outdoor unit at an unstable place or elevated surface
where there is potential risk o
the outdoor unit falls, it may cause personal injury or loss or property.
alling.
nstall the air conditioner away from direct exposure to sunlight, heating
aratus, and humid places.
a
Hang curtains on windows to boost cooling eciency and to avoid the risk of electric
shock.
Any changes or modications performed not following by the installation
manual,
be res
ailure or damage may occur on the condition. In this case, user will
onsible for all the repair expenses.
nstall an exclusive circuit breaker and short-circuit breaker for the air
conditioner.
Potential risk of electric shock or re.
Never use a damaged or dusted power plug, power cable, or loosened
ower receptacle.
Potential risk of re or electric shock.
o not yank the power cable and touch the power plug with hands.
Potential risk of re or electric shock.
o not cut the power plug and connect to a dierent power cable.
urn o the air conditioner using the provided remote control or control
accessor
(if provided). Do not unplug to turn o the unit (unless there is an
mmediate danger).
o not insert anything such as ngers or branches into the air conditioner
vents when the air conditioner is runnin
Keep children away from the air conditioner not to put their gures. Potential risk of
ersonal injur
.
nsure no water gets into the air conditioner.
Potential risk or electric shock.
the water gets into the air conditioner, stop and turn o the power source immediately.
o not insert anything such as ngers or branches into the air inlet or outlet
o
the unit.
Keep children away from the air conditioner. Potential risk of personal injury.
he air conditioner is composed of moving parts. Keep children away from
the unit to avoid ph
sical injury.
ake sure that children take precautions against access to the air
conditioner and the
do not play with the unit.
04_ safety information
Page 5

o not clean the interior of air conditioner on your own.
g
y
g
y
.
p
f
f
y
fety
f
.
fy
p
f
onsult the place of purchase or contact center before cleaning the interior of air
conditioner. The wron
cause electric shock or
way of cleaning may damage or defective electric parts and
re.
o not run the air conditioner for an extended period of time in a room with
the door closed or with babies, elderl
Open the door or windows to ventilateyour room at least once an hour to prevent oxygen
shorta
e
or disabled people.
o not connect the air conditioner with heating apparatus or attempt to
disassemble, remodel or repair it
Potential risk of malfunction, electric shock or re. If repairs are needed, consult the
contact center.
ourself.
onsult the place of purchase or contact center to reinstall or disassemble
the air conditioner.
mproper installation carries a risk of unit malfunction, water leakage, electric shock or
re
installing in specialty areas, such as a factory complex or saline coastal area, consult
the
lace of purchase or contact center for specic installation details.
onsult a dealer regarding the appropriate measures to prevent the
allowable concentration
the refrigerant leaks, and cause the concentration limit to be exceeded, hazards due to
oxygen in the room may result.
lack o
rom being exceeded.
Always make sure that the power supply is compliant with current safety
standards. Alwa
standards.
sa
s install the air conditioner in compliance with current local
o not put undue stress or place heavy object on the power cable.
o not bend the power cable excessively.
Potential risk of re or electric shock.
Use a rated circuit breaker only.
Never use steel wires or copper wires as a circuit breaker. It may cause re or unit
mal
unctions
the indoor unit gets wet, turn the power o immediately and call your
nearest contact center.
Potential risk of re or electric shock.
o protect the product from water and possible shock, you should keep the
ower cable and the connection cord of the indoor and outdoor units in the
rotection tube.
that the voltage and frequency of the power supply comply with
Veri
ecications and that the installed power is sucient to ensure the
the s
operation o
any other domestic appliance connected to the same electric
lines.
isconnect the air conditioner from power supply before it is repaired or
disassembled.
lean the air conditioner after the inner fan stops operating.
Potential risk of injury or electric shock.
safety information _05
Page 6

SEVERE WARNING SIGNS
g
y f
pp
f f
y
y
y
g
y f
y
f
Be sure to ground the unit. Do not connect the ground wire to gas or water
hting rods, or telephone grounding lines.
pipes, li
the unit is not properly grounded, electric shock may result.
Use a receptacle that has a ground terminal. The receptacle must be used
exclusivel
mproper electrical grounding may cause electric shock or re.
or the air conditioner.
If you smell burning plastic, hear strange sounds, or see smoke coming from
the unit, unplug the air conditioner immediately and call a contact center.
Potential risk of re or electric shock.
AUTION SIGNS
ount with the lowest moving parts at least 2.5m above the oor or grade
level. (If a
I
ailure or damage occurs on the conditions of improper use not followed
b
the installation manual, there will be an extra labor charge for installing
licable.)
and construction.
Potential risk of malfunction, electric shock or re if repairs or installations are attempted
b
a non-qualied service technician.
Do not block or place items in front of the air conditioner. Do not step, hang
onto, or place heav
Potential risk of personal injury.
items on the air conditioner.
Do not allow children to climb on the air conditioner.
Do not pull or
Potential risk of re, or unit malfunction and there are risk of personal injury because unit
ma
ive excessive shock to the air conditioner.
all down.
Do not drink drain water coming out of the air conditioner.
Potential risk of health hazard.
Do not spray ammable gases such as insecticide near the air conditioner.
Potential risk of electric shock, re or unit malfunction.
Do not use the air conditioner as a cooling precision instrument for food,
pets, plants, cosmetics or machiner
.
ool air should not ow directly towards people, pets, and plants.
t is harmful to your health, pets, and plants.
Do not spray water directly on the air conditioner or use benzene, thinner or
alcohol to clean the sur
Potential risk of electric shock or re.
Potential risk of damage to the air conditioner.
ace of the unit.
Do not open the front grille during operation.
Potential risk of electric shock or unit malfunction.
Do not place any objects, especially containers with liquid.
06_ safety information
Page 7

o not touch the pipe connected to the air conditioner.
g
.
p
y
g
q
p
f
y
p
frig
g
f
g
g
y
g
nstall the indoor unit away from lighting apparatus using the ballast.
you use the wireless remote control, reception error may occur due to the ballast of the
hting apparatus
li
nstall the outdoor unit where operating noise and vibration will not disturb
our neighbor and in a well-ventilated area with no obstacle.
Potential risk of malfunction.
Operating noise may disturb your neighbor.
ake sure that there are no obstacles or covers that block the air
conditioner.
Allow su
cient space for air circulation.
nsucient ventilation may result in poor performance.
the power cable is damaged, the manufacturer or a qualied service
technician must re
lace it.
a power outage occurs while the air conditioner is working, turn o the
power source immediatel
.
ax current is measured according to IEC standard for safety and current is
measured accordin
Have a
ualied service technician install the air conditioner and perform a
trial o
eration.
to ISO standard for energy eciency.
ake sure there are no obstacles under the indoor unit.
Potential risk of re or loss of property.
When cleaning the outdoor unit, touch the heat exchanger radiator ns with
extreme care.
Wearing thick gloves can protect your hands.
Check for damages on the H Beam of the outdoor unit at least once a year
The unit may fall down and there are potential risk of personal injury.
heck for damage on delivery. If damaged, do not install the air conditioner
and call the place o
purchase immediately.
eep indoor temperatures stable and not extremely cold, especially where
there are children, elderl
or disabled people.
he packaging material and used batteries of the remote controller (optional)
must be dis
osed of in accordance with the national standards.
he refrigerant used in the air conditioner must be treated as chemical
waste. Dispose the re
When usin
7 meters
a wireless remote control, the distance should not be more than
rom the air conditioner.
erant following national standards.
the remote control is not used for a long period of time, remove the
batteries to prevent leaka
e of electrolyte.
he appliance is not intended for use by young children or inrm persons
without supervision: Youn
the
do not play with the appliance.
children should be supervised to ensure that
nspect the condition, electric connections, pipes and external case of the
air conditioner re
ularly by a qualied service technician.
safety information _07
Page 8
AUTION SIGNS
y
f
y
g
g f
g
q
o not open doors and windows in the room being cooled during operation
unless necessar
o not block the air conditioner vents. If objects block the air ow, it may
cause unit mal
ake sure that the condensed water dripping from the drain hose runs out
properl
irmly connect the drain hose to the air conditioner for proper water
draina
nsure the o-on and protection switches are properly installed.
o not use the air conditioner if damaged. If problems occur, immediately
stop operation and disconnect the plu
f the air conditioner will not be used for an extended period of time (for
example, over several months), unplu
all the place of purchase or a contact center if repairs are needed.
Potential risk of re or electric shock if disassembly or repairs are attempted by a
non-
.
unction or poor performance.
and safely.
e.
rom the power supply.
the power from the wall.
ualied service technician.
08_ safety information
Page 9

g
mode
g
function
g
g
g y
y
g
T
VIEWING YOUR AIR CONDITIONER
y
p
yalp
g
p
y
g
f
wolfrialacitreV91
p
y
y
pp
p
10
OPERATING BASIC FUNCTION
15
USING ADVANCED FUNCTIONS
20
10
21
31
41
41
14
51
51
51
61
71
81
20 Using the Turbofunction
21 On timer
22 O timer
23 Combinin
24
26 Using the Smart Saver function
26 Usin
niaM01
siD01
ninepO11
Humidit
nikcehC11
otuA
looC
yrD
naF
Setting timer
the
stra
lenaptnorfeht
sensor
On timer and O timer
metmooR,nottubrewoP11
yalpsidlortnocetomeR
lortnocetomerehtgnisU
seirettabehtgnitresnI
edomnoitarepognitceleS
riaehtgnitsujdA91
wolfrialatnoziroH91
<optional>
alpsiddnatinuroodniehtgnikcehC
dnarosneserutare
tinuroodtuoeht
lortnocetomerehtgnikcehC
lortnocetomerehtgnikcehC
ffodnanorenoitidnocriaehtgninruT
noitceridwol
LEANING AND MAINTAINING
HE AIR CONDITIONER
28
APPENDIX
28 Cleaning the lter
28 Air
lter
29 Bio
30 Replacin
30 Deodorizin
31 Maintainin
31 Periodical checks
33
lter
thelter
lter
our air conditioner
nitoohselbuor
mets
slortnoctinuehtaivsnoitcetorplanretnI23
33
This product has been determined to be in compliance with the Low Voltage Directive (2006/95/EC), and the Electromagnetic
Compatibility Directive (2004/108/EEC) of the European Union.
(Waste Electrical & Electronic Equipment)
(Applicable in the European Union and other European countries with separate collection systems)
This markingshown on the product or its literature, indicates that it should not be disposed with other household wastes at the end ofits workinglife. To
reventpossible harm to the environment or human healthfrom uncontrolled waste disposal,please separate thisfrom other types ofwastes and recycle
onsiblytopromote the sustainable reuse ofmaterial resources.
it res
Household users should contact either the retailer where the
can take this itemfor environmentallysaferecycling.
Business users should contact their su
This
roduct should not be mixed with other commercial wastesfor disposal.
lier and check the terms and conditions ofthepurchase contract.
purchased this product, or their localgovernment oce,for details ofwhere and how the
contents _09
Page 10
viewing your air conditioner
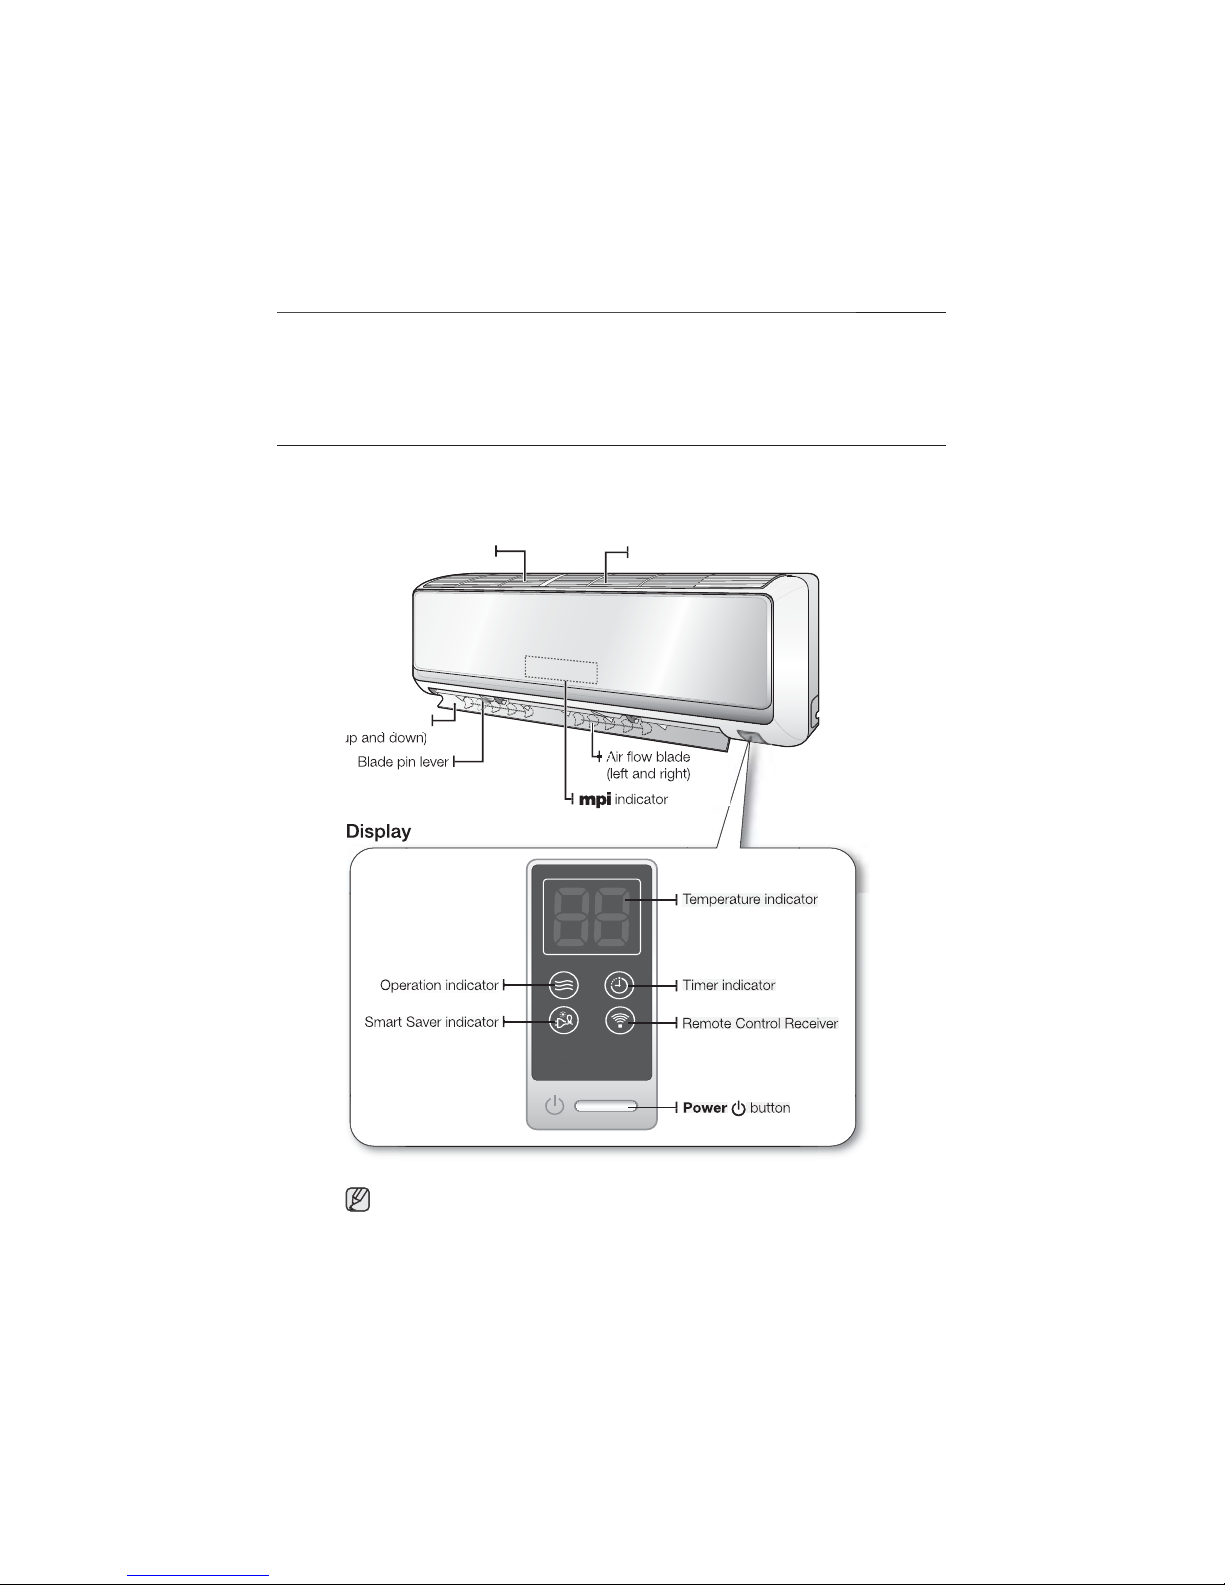
ongratulations on the purchase of the air conditioner. We hope you enjoy the features of your air
y
g
Air intake
)
conditioner and sta
Please read the user manual to
cool or warm with optimal eciency.
et started and to make the best use of the air conditioner.
HECKING THE INDOOR UNIT AND DISPLAY
arefully unpack your air conditioner, and check the unit to make sure it is not damaged.
ain parts
Air lter(under the panel
Air ow blade
<optional>
Your air conditioner may slightly look dierent from illustration shown above depending on
our model.
10_ viewing
Page 11

PENING THE FRONT PANEL
g
y
.
n
t
Air Inlet (Rear)
t
Tightly grab front side of the front panel and lift up the panel to open. Then slightly push the panel up until
the panel is han
ed over the hooks of the unit.
Power button and Room temperature sensor
You may locate the Power button on the right bottom side of the air conditioner. If the front
anel is open, you can check the room temperature sensor.
You can turn on the air conditioner without the remote control b
The room temperature sensor measures indoor room temperature.
pressing the
button
Room temperature
sensor
HECKING THE OUTDOOR UNIT
AS09ELX/AS12ELX AS18ELX/AS24ELX
Air Inlet (Rear)
onnection Valve
Air Outle
Power butto
onnection Valve
Air Outle
viewing _11
Page 12
viewing your air conditioner
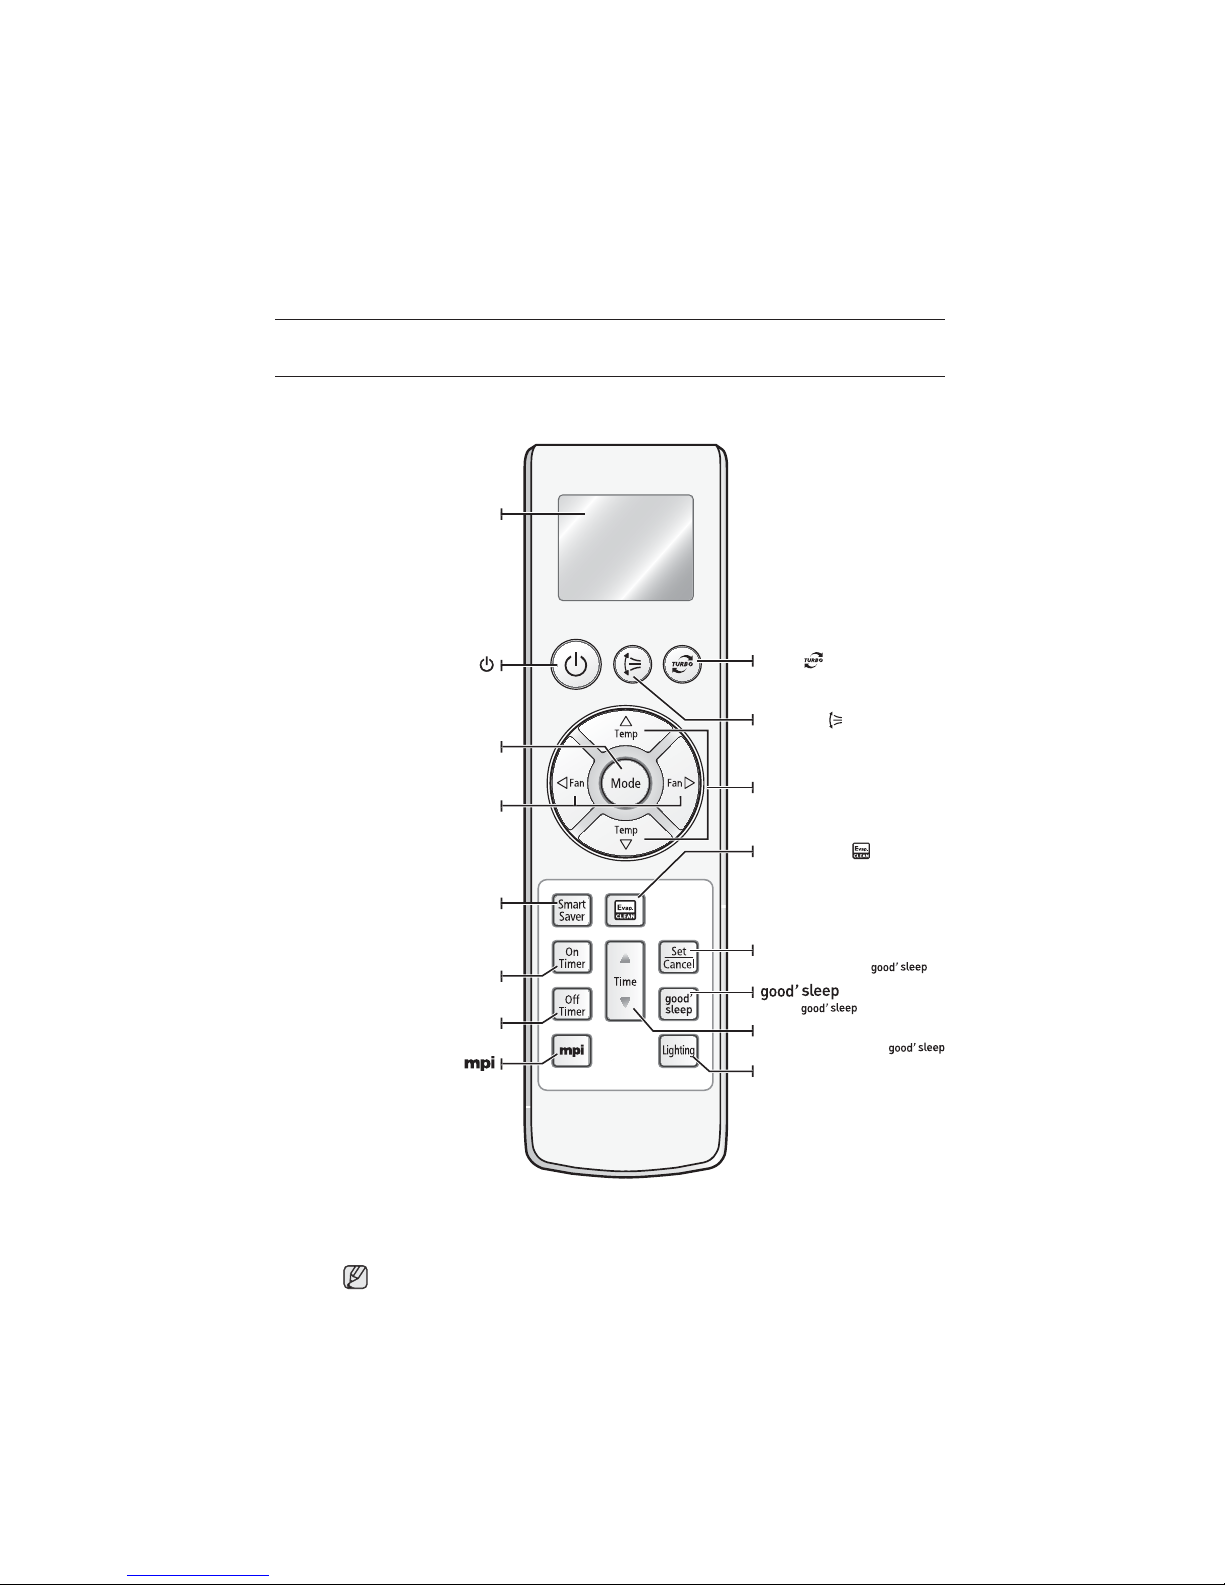
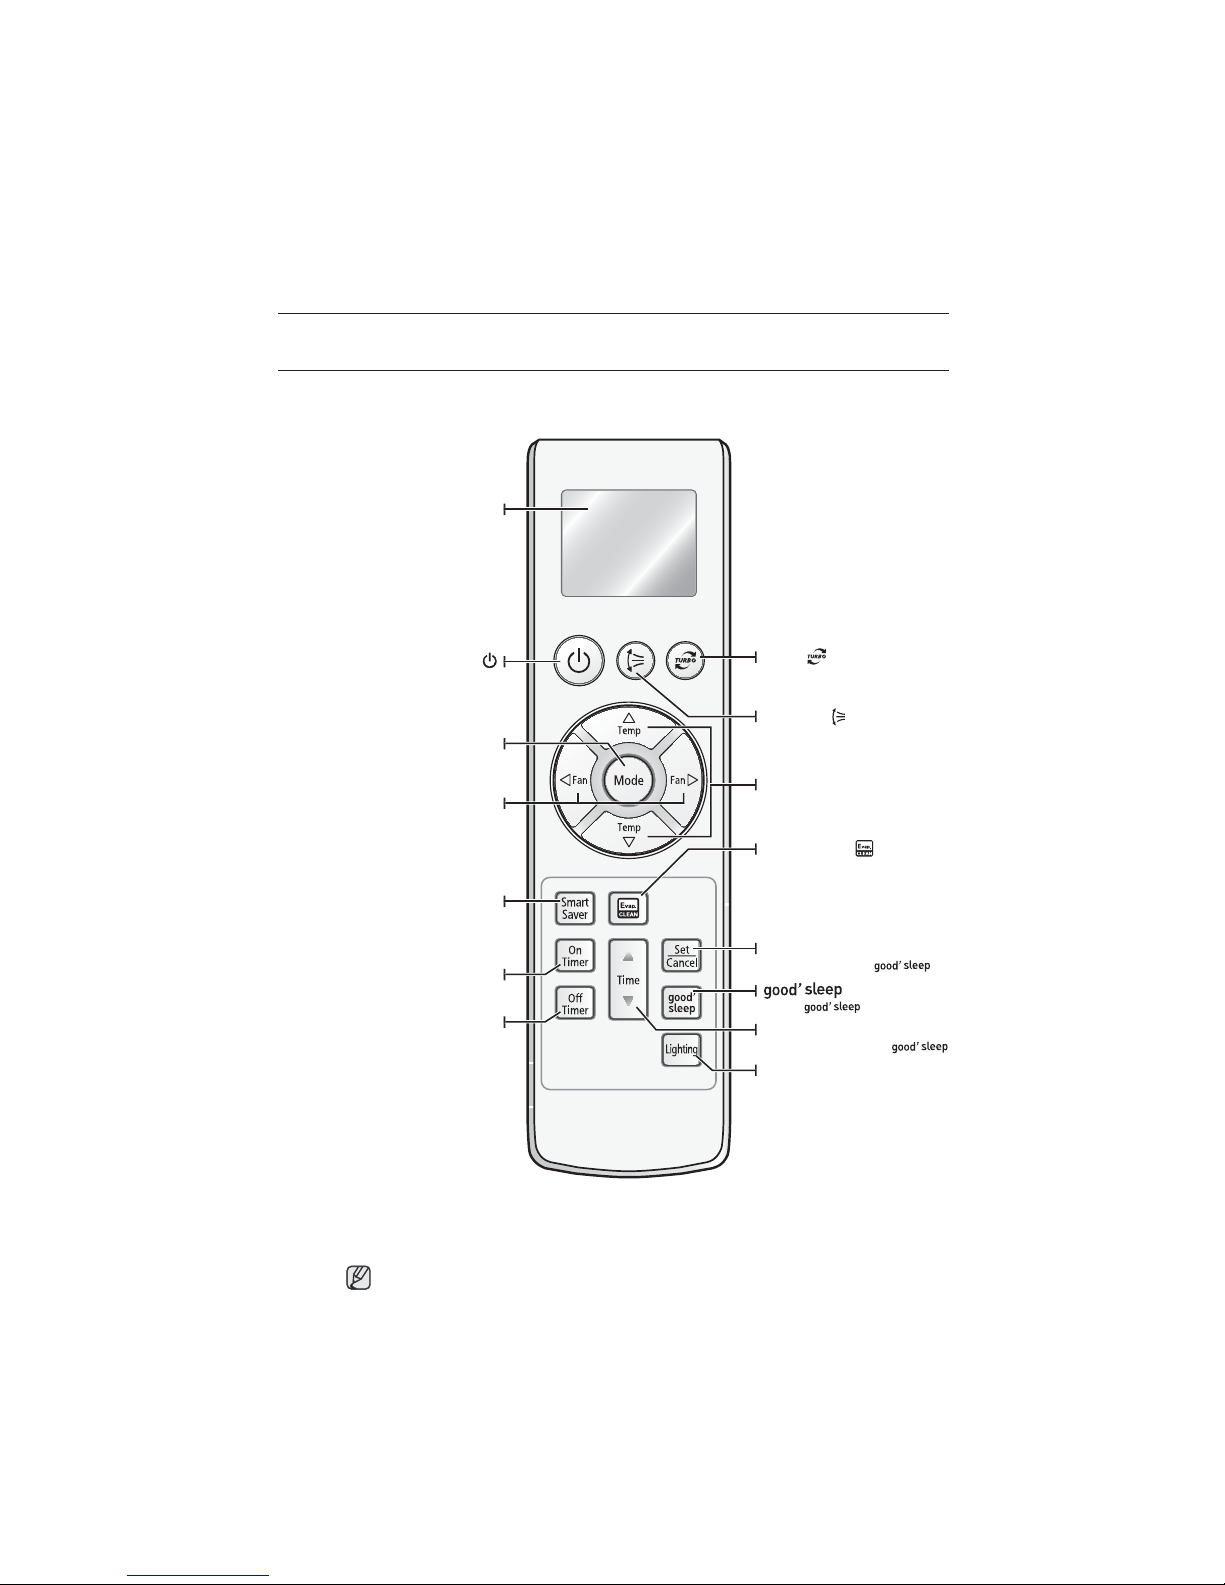
CHECKING THE REMOTE CONTROL (FOR MPI MODEL)
ys p
y
play
y
g
g
g
g
p
/
.
mode on.
f
.
g
You can activate the air conditioner by pointing the remote control away from it. When using the remote
control, alwa
oint it directly at the air conditioner.
Remote Control displa
Turn on/o the air conditioner
Set one of the 5 operating modes.
(See pa
es 14~18 for instructions.)
Adjust how much air ows
h the air conditioner with
throu
erent fan speeds such as
the 4 di
Auto/Low/Medium/Hi
Less energy usage makes your space
cool between the temperature ran
Set the mpi mode on/o.
Power
Fan speed
Smart Saver
26ºC~30ºC.
n Timer
Set the On Timer on.
Timer
Set the O Timer on.
ode
e of
urbo
cool/warm quicly.
Air swing
Activate/Deactivate air ow blade movement
em
ncrease/Decrease the temperature by 1˚C.
h.
Evap.CLEAN
Evaporator clean function – Dry inside of the
Set/Cancel
Set/Cancel the timer
Set the
ime Ê
Adjust the time for timer/
function
unction
Lightin
Each time
on the remote control dis
ou press the button, a short beep will sound and a transmit indicator appears
.
12_ viewing
Page 13
viewing your air conditioner
CHECKING THE REMOTE CONTROL (FOR NO MPI MODEL)
ys p
y
play
y
g
g
g
g
Activate/Deactivate air ow blade movement
q
p
.
g
f
.
g
You can activate the air conditioner by pointing the remote control away from it. When using the remote
control, alwa
oint it directly at the air conditioner.
Remote Control displa
Turn on/o the air conditioner
Set one of the 5 operating modes.
(See pa
es 14~18 for instructions.)
Adjust how much air ows
h the air conditioner with
throu
the 4 di
erent fan speeds such as
Auto/Low/Medium/Hi
Less energy usage makes your space
cool between the temperature ran
Power
Fan speed
Smart Saver
26ºC~30ºC.
n Timer
Set the On Timer on.
Timer
Set the O Timer on.
ode
e of
urbo
Operate in maximum fan speed to
cool/warm
uicly.
Air swing
automatically up and down.
em
h.
Evap.CLEAN
Evaporator clean function – Dry inside of the
indoor unit to
Set/Cancel
Set the mode on.
ime Ê
Adjust the time for timer/
et rid of odor.
function
unction
Lightin
Each time
on the remote control dis
ou press the button, a short beep will sound and a transmit indicator appears
.
viewing _13
Page 14
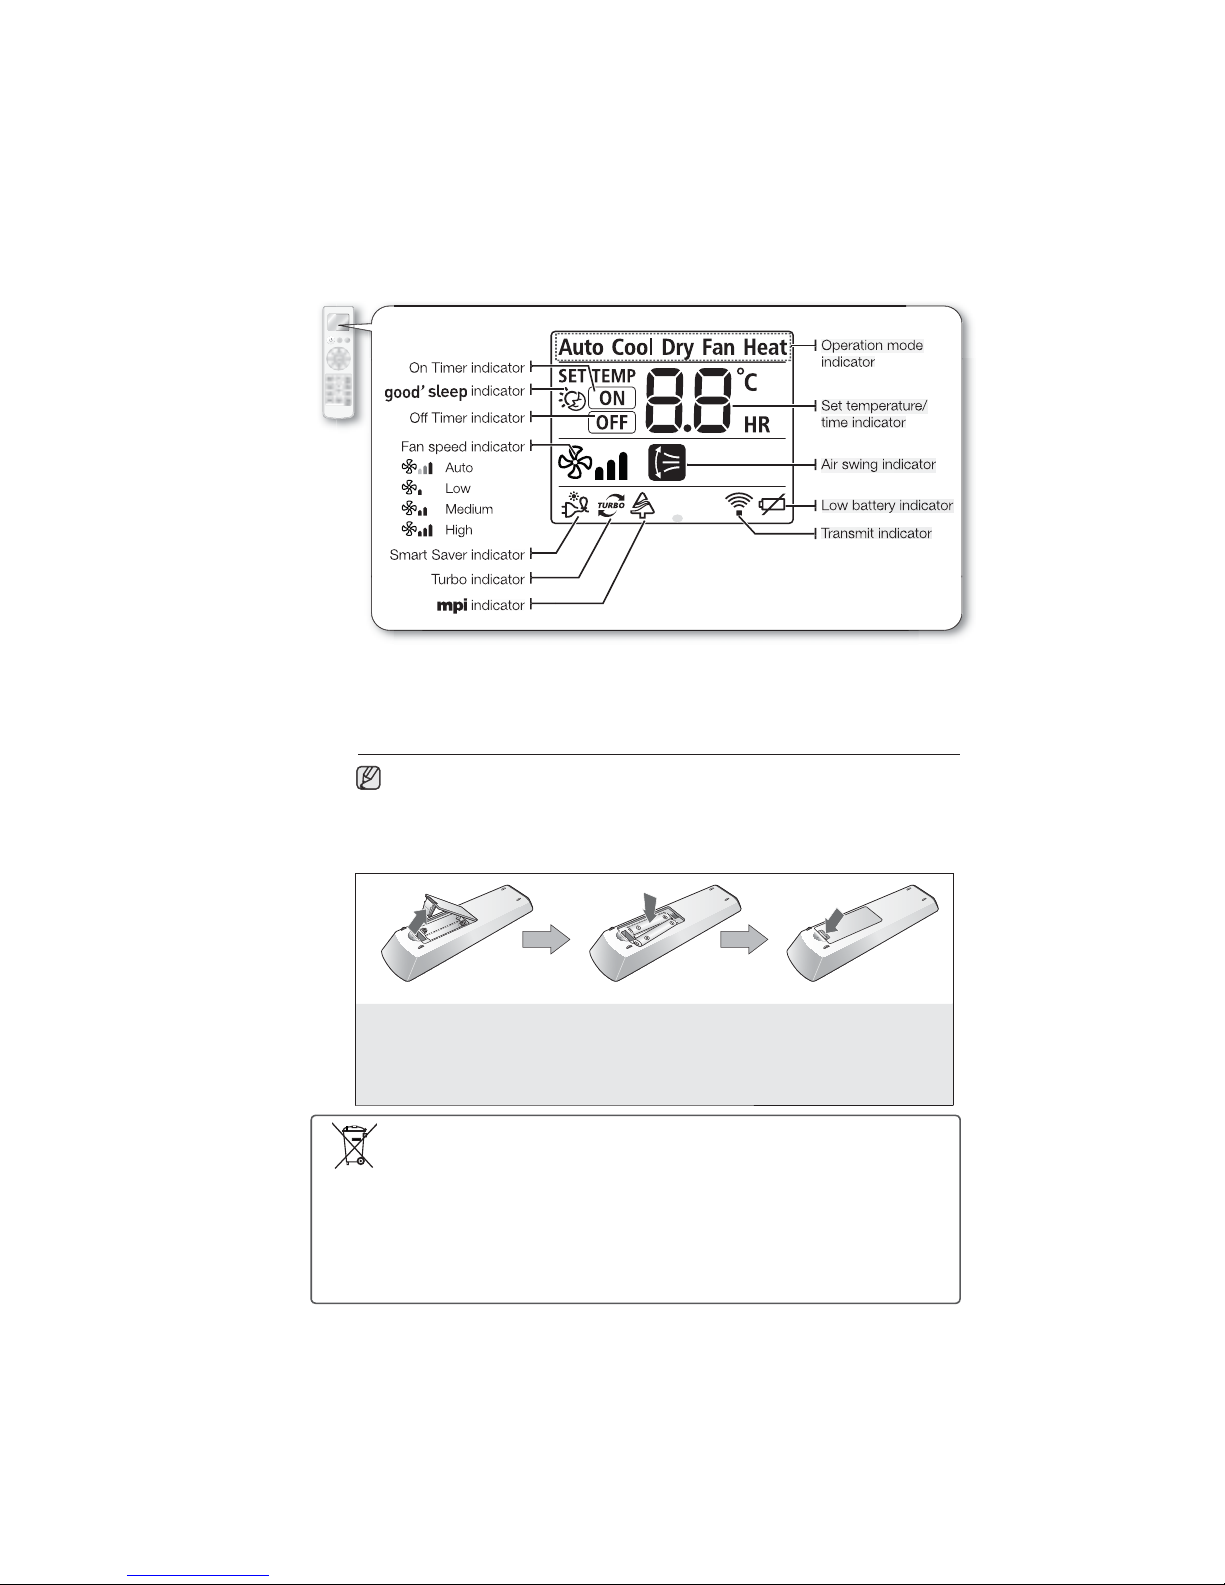
y.
emote control displa
y
.
g
f
y
prop
p
y
<optional>
Using the remote control
Point the remote control towards the remote control sensor of the unit.
When properly pressing the button on the remote control, you will hear beep sound
rom the unit
The signal may not be received well of electronic lighting style uorescent lamps,
such as inverter
other electrical products operate by the remote control, call your nearest contact center.
uorescent lamps are in the same space.
Inserting the batteries
1. Push the lever as arrow
indicates on the rear side
ofthe remote control and
ull up.
(Applicable in the European Union and other European countries with separate batteryreturn systems.)
This markin
with other household waste at the end of their workinglife. Where marked, the chemical symbols Hg, Cd or Pb indicate
that the batter
not
To
rec
on the battery, manual or packagingindicates that the batteries in this product should not be disposed o
contains mercury, cadmium or lead above the reference levels in EC Directive 2006/66. If batteries are
erlydisposed of, these substances can cause harm to human health or the environment.
rotect natural resources and topromote material reuse,please separate batteriesfrom other types ofwaste and
cle them throughyour local,free batteryreturn system.
14 _viewing
2. Insert two AAA batteries.
heck and match the “+” and
-” signs accordingly. Make
sure you have inserted the
batteries in correctposition.
orrect disposal of batteries in thisproduct
3.
back to its original position.
You should hear click sound
when the cover is locked
roperl
Page 15
operating basic function
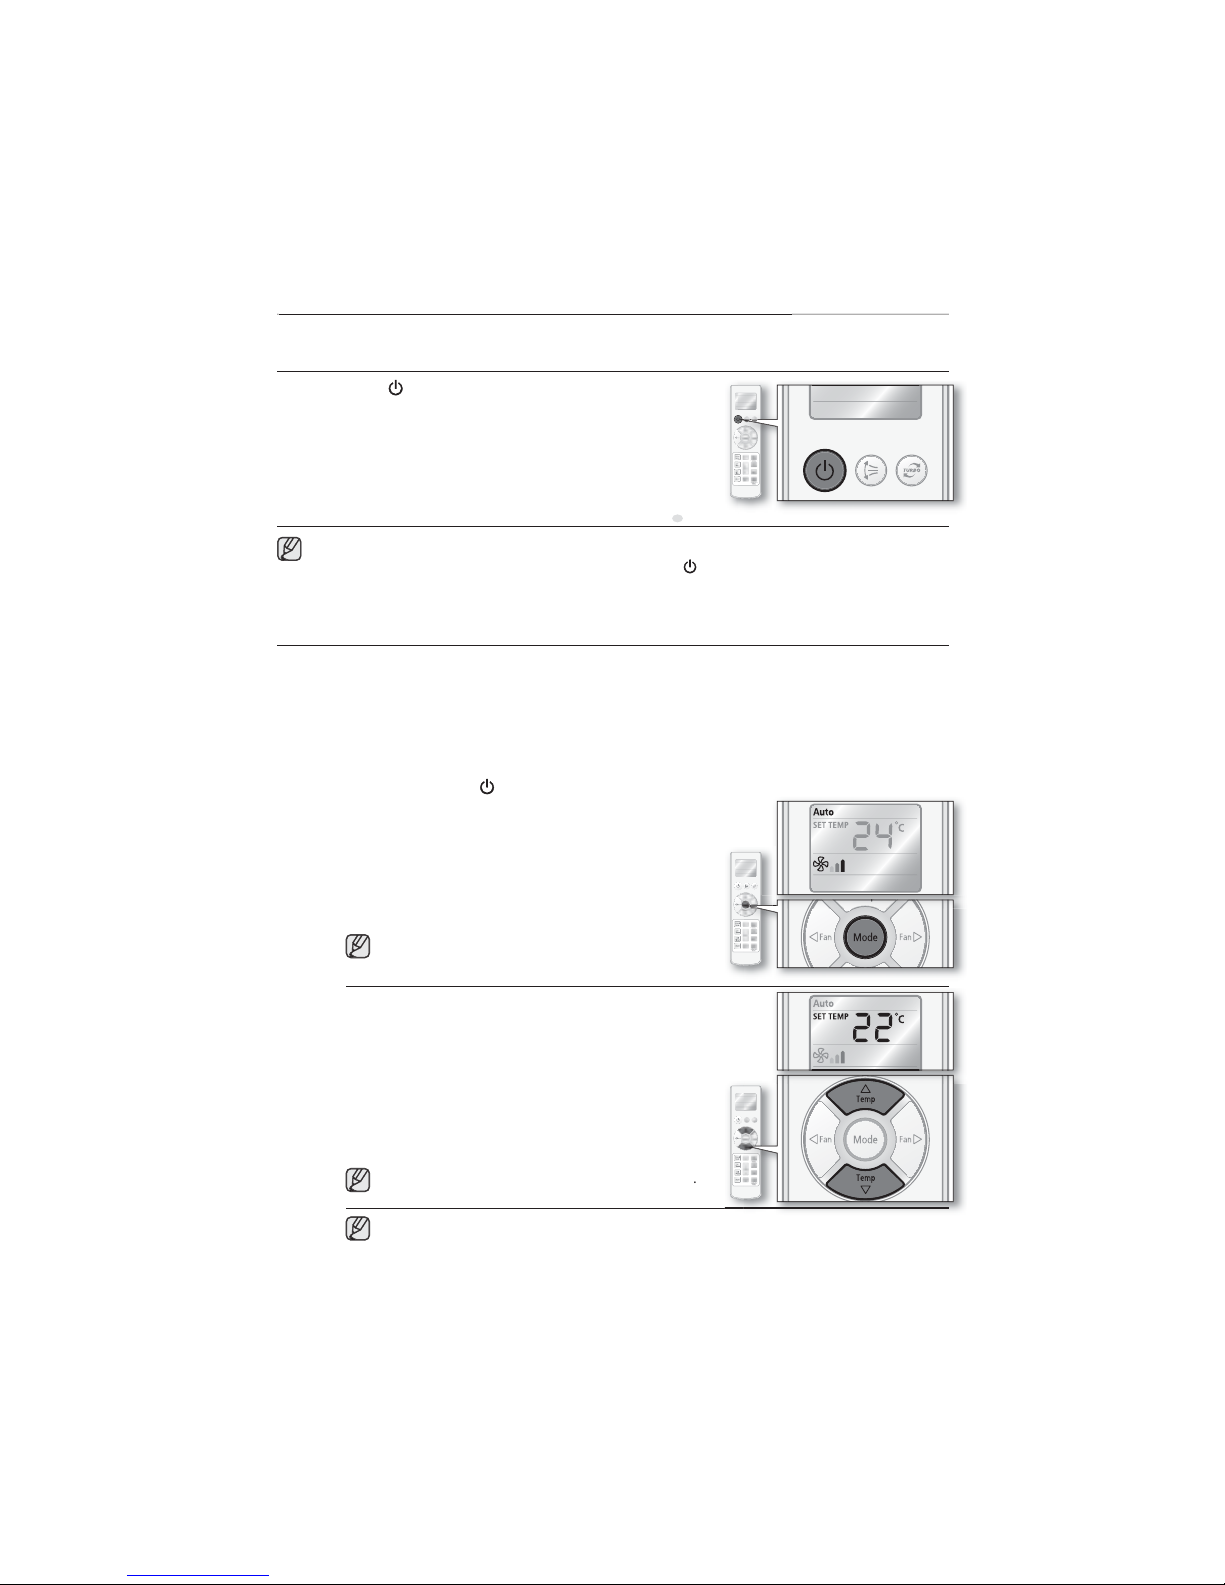
URNING THE AIR CONDITIONER ON AND OFF
ging
p
y
y
.
.
f
play
y
p
y
p
p
p
g
p
pp
Press the Power button on the remote control.
You will hear a rin
down automatically when the air conditioner is properly on.
The air conditioner will o
used or Auto mode.
When
ou turn o the air conditioner, air ow blade will stop moving
and remain closed.
urning on/o your air conditioner without the remote control.
You can operate
air conditioner
sound and the air ow blade will move up and
erate in the most recent operation mode
our air conditioner by pressing the Power
SELECTING OPERATION MODE
Auto
n Auto mode, the air conditioner will automatically set the temperatur e and fan speed depending
on the room temperature detected by the room temperature sensor.
1
Turn on the air conditioner.
Press the Power
Set the operating mode.
Press the
Auto mode and Auto
remote control dis
The air conditioner will automaticall
mode to Cool or Heat de
ou press the
When
in order of Auto, Cool, Dry, and Fan.
button on the remote control.
ode button on the remote control until
an speed indicator appear on the
.
set the operation
ends on the room temperature.
ode button, mode will change
3. Set the Tem
Press the
to increase or decrease the desired tem
You can set the desired tem
ran
You can increase/decrease the tem
When you are using the remote control, make sure correct indicator which matches your
Air ow can be adjusted manually. (See page 19 for instructions.)
Press the Temp
erature.
empor
e of 16˚C~30˚C.
selection a
button on the remote control
ears on the remote control display.
button on the remote control to check the temperature in a room
erature.
erature between the
erature by 1˚C
operating_15
Page 16
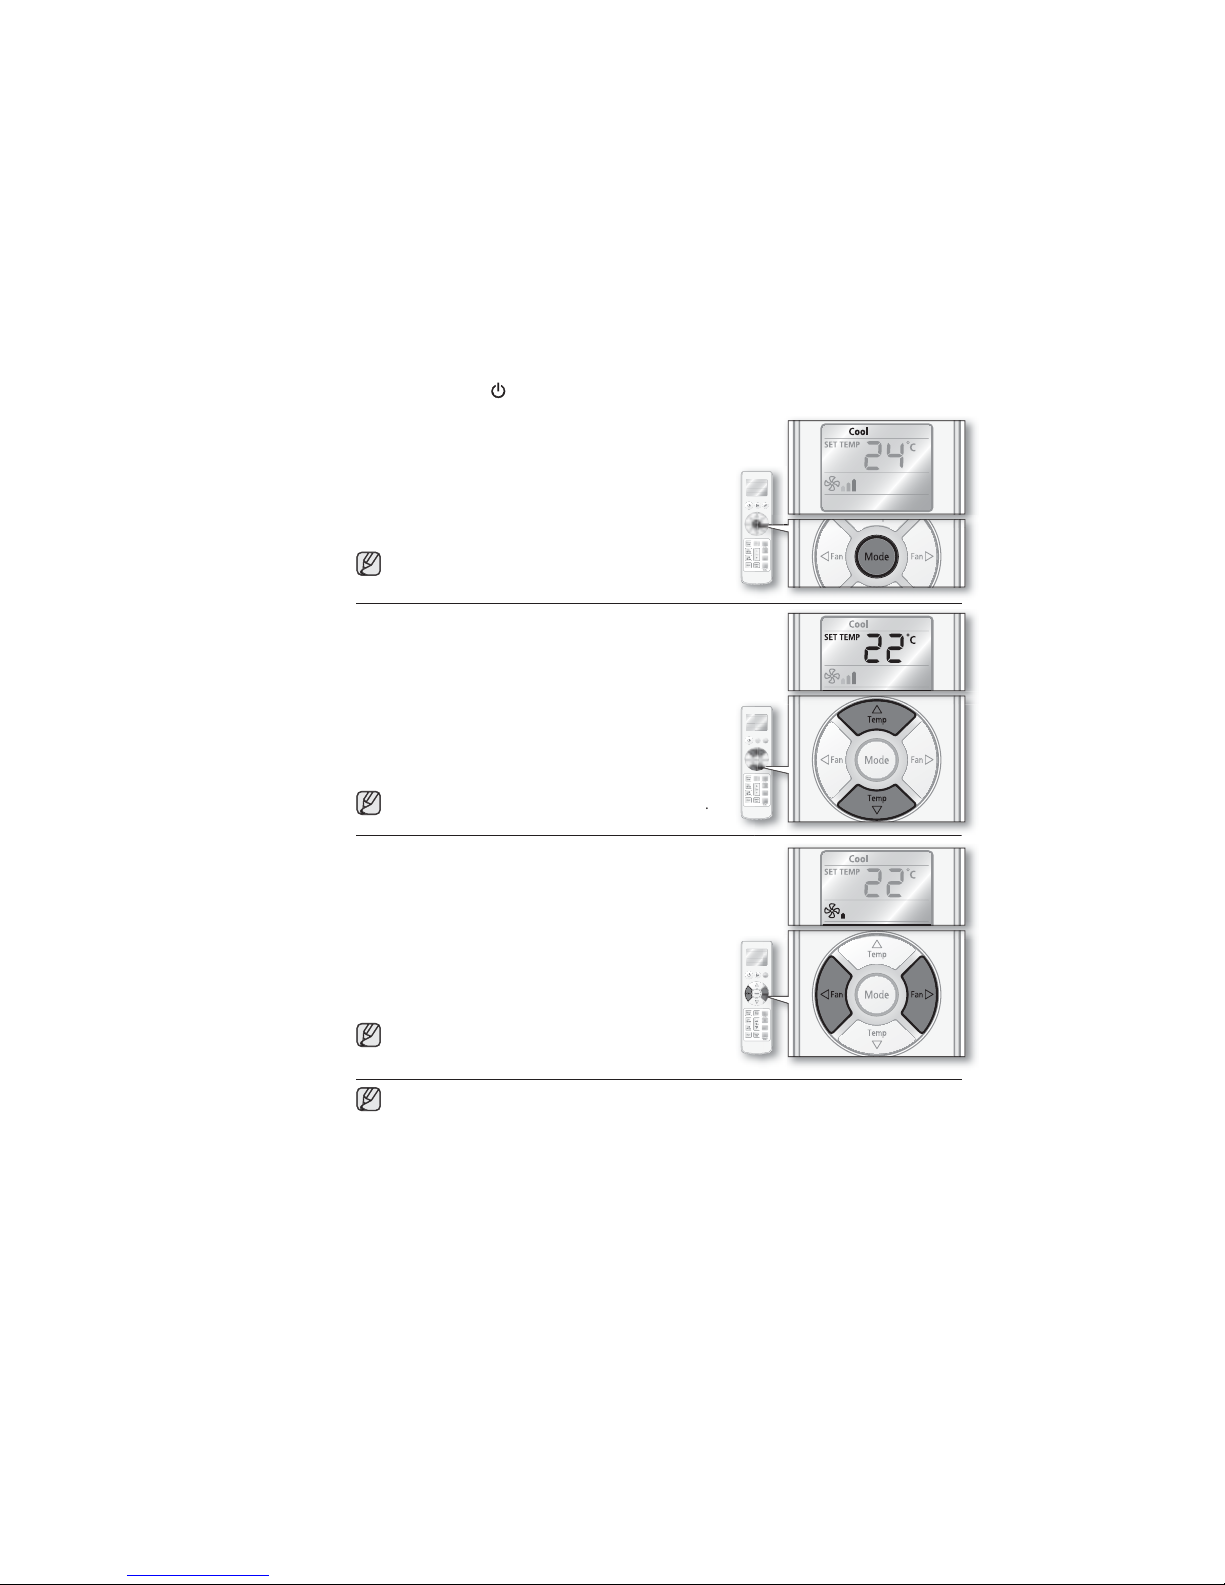
ool
p
.
.
play
p
p
y
y
p
p
p
g
p
f
y
g
pp
y
n Cool mode, the air conditioner will cool your room. You can adjust the temperature and the fan
eed to feel cooler in hot season.
s
1
Turn on the air conditioner.
Press the Power
Set the operating mode.
2
Press the
ool mode indicator appears on the remote control
.
dis
The air conditioner o
lower the tem
When
ou press the
in order of Auto, Cool, Dr
button on the remote control.
ode button on the remote control until
erates in Cool mode and it will
erature in your room.
ode button, mode will change
, and Fan.
3. Set the tem
Press the
to increase or decrease the desired tem
You can set the desired tem
the ran
You can increase/decrease the tem
Set the fan speed.
Press the Fan
set the desired
room temperature reaches desired value, the air
conditioner will shut o
an runs.
When
will chan
Air ow can be adjusted manually. (See page 19 for instructions.)
erature.
empor
e of 16˚C~30˚C.
ou press the Fan
e in order of Auto, Low, Medium and High.
When you are using the remote control, make sure correct indicator which matches your
selection a
current outside temperatures are much higher than the selected indoor temperature,
it ma
take time to bring the inner temperature to the desired coolness.
Press the Temp
button on the remote control
erature between
or
button on the remote control to
an speed.
cooling for a while and just the
or
ears on the remote control display.
button on the remote control to check the temperature and in a room.
erature.
erature by 1˚C
button, fan speed
16_ operating
Page 17
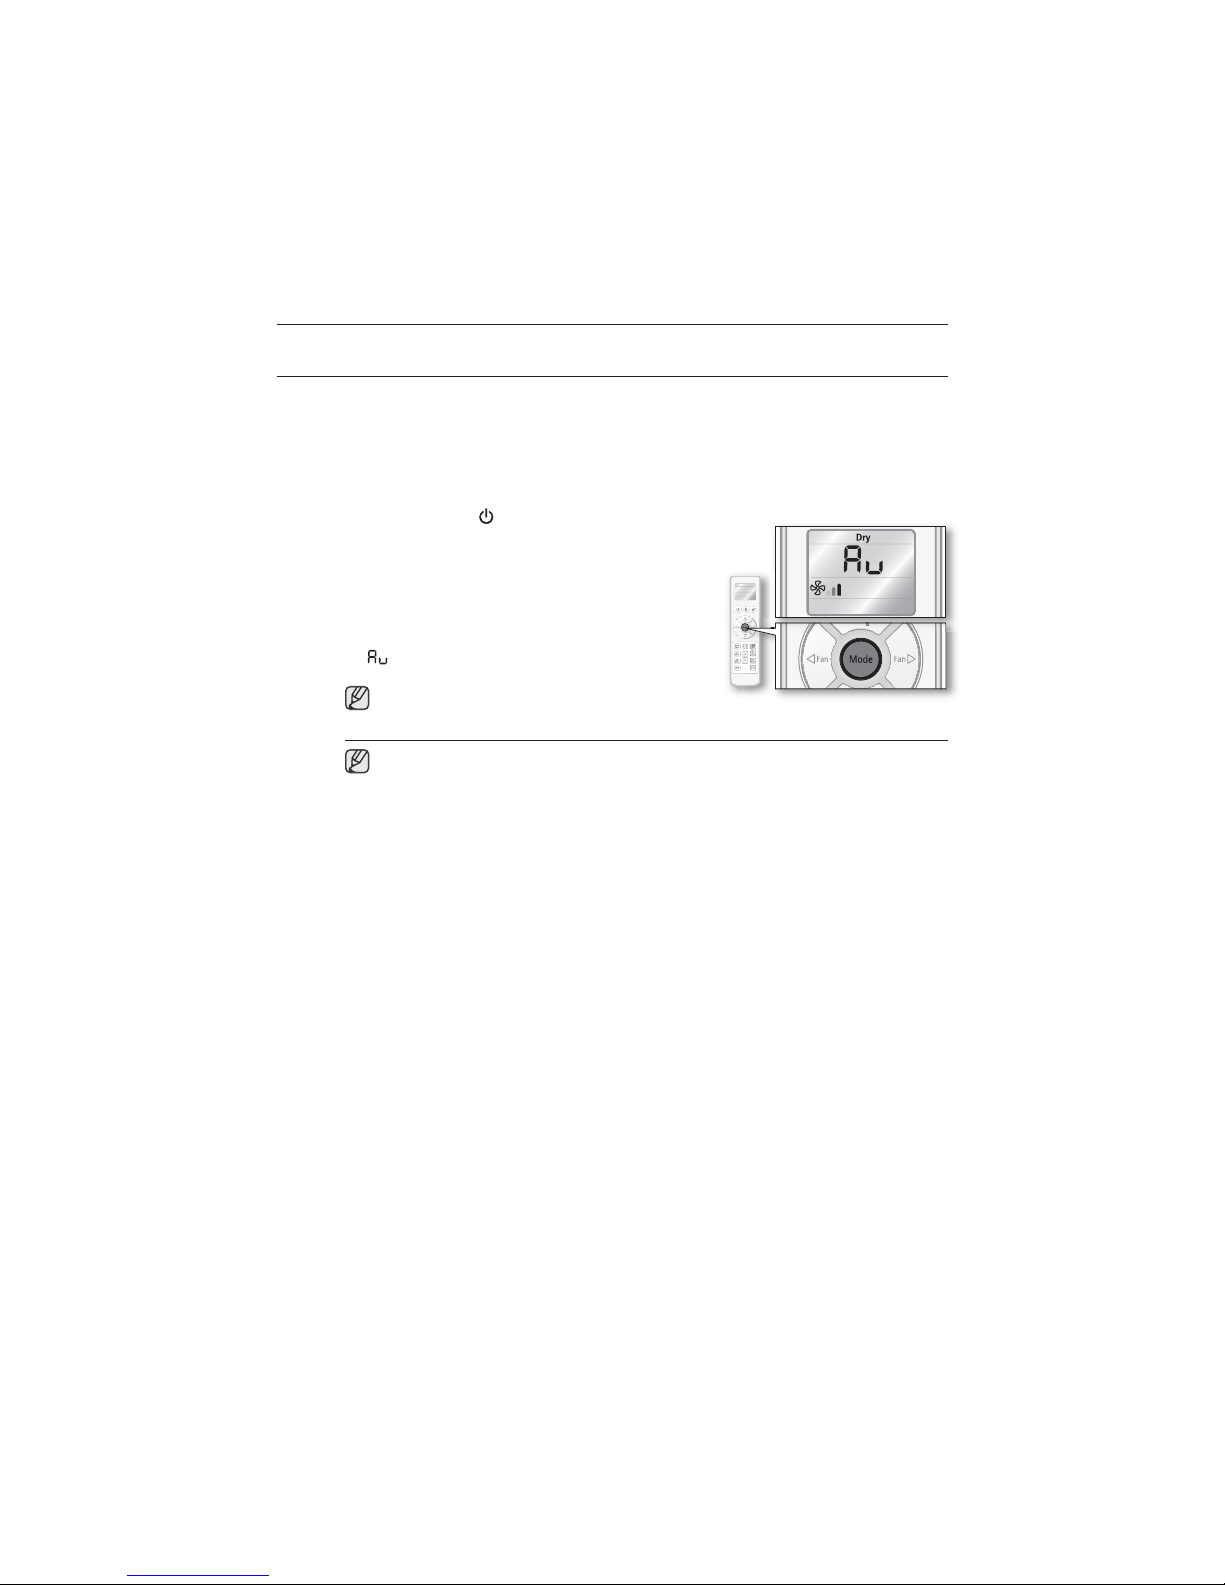
SELECTING OPERATION MODE
y
y
.
y
play
puoy
y
pp
Dr
The air conditioner in Dry mode acts like a dehumidier by removing moisture from the indoor air.
mode makes the air feel refreshing in a humid climate.
Dr
Turn on the air conditioner.
1
Press the Power button on the remote control.
2
Set the operating mode.
Press the
Dr
remote control dis
n Dry mode temperature will be set automatically and
ode button on the remote control until
mode and Auto fan speed indicator appear on the
.
will appear on the remote control display.
nehW
in order of Auto, Cool, Dr
When you are using the remote control, make sure correct indicator which matches your
selection a
Temperature/Fan speed cannot be adjusted while using this mode.
Air ow can be adjusted manually. (See page 19 for instructions.)
Press the Temp
ode button, mode will change
ehtsser
, and Fan.
ears on the remote control display.
button on the remote control to check the temperature and in a room.
operating_17
Page 18
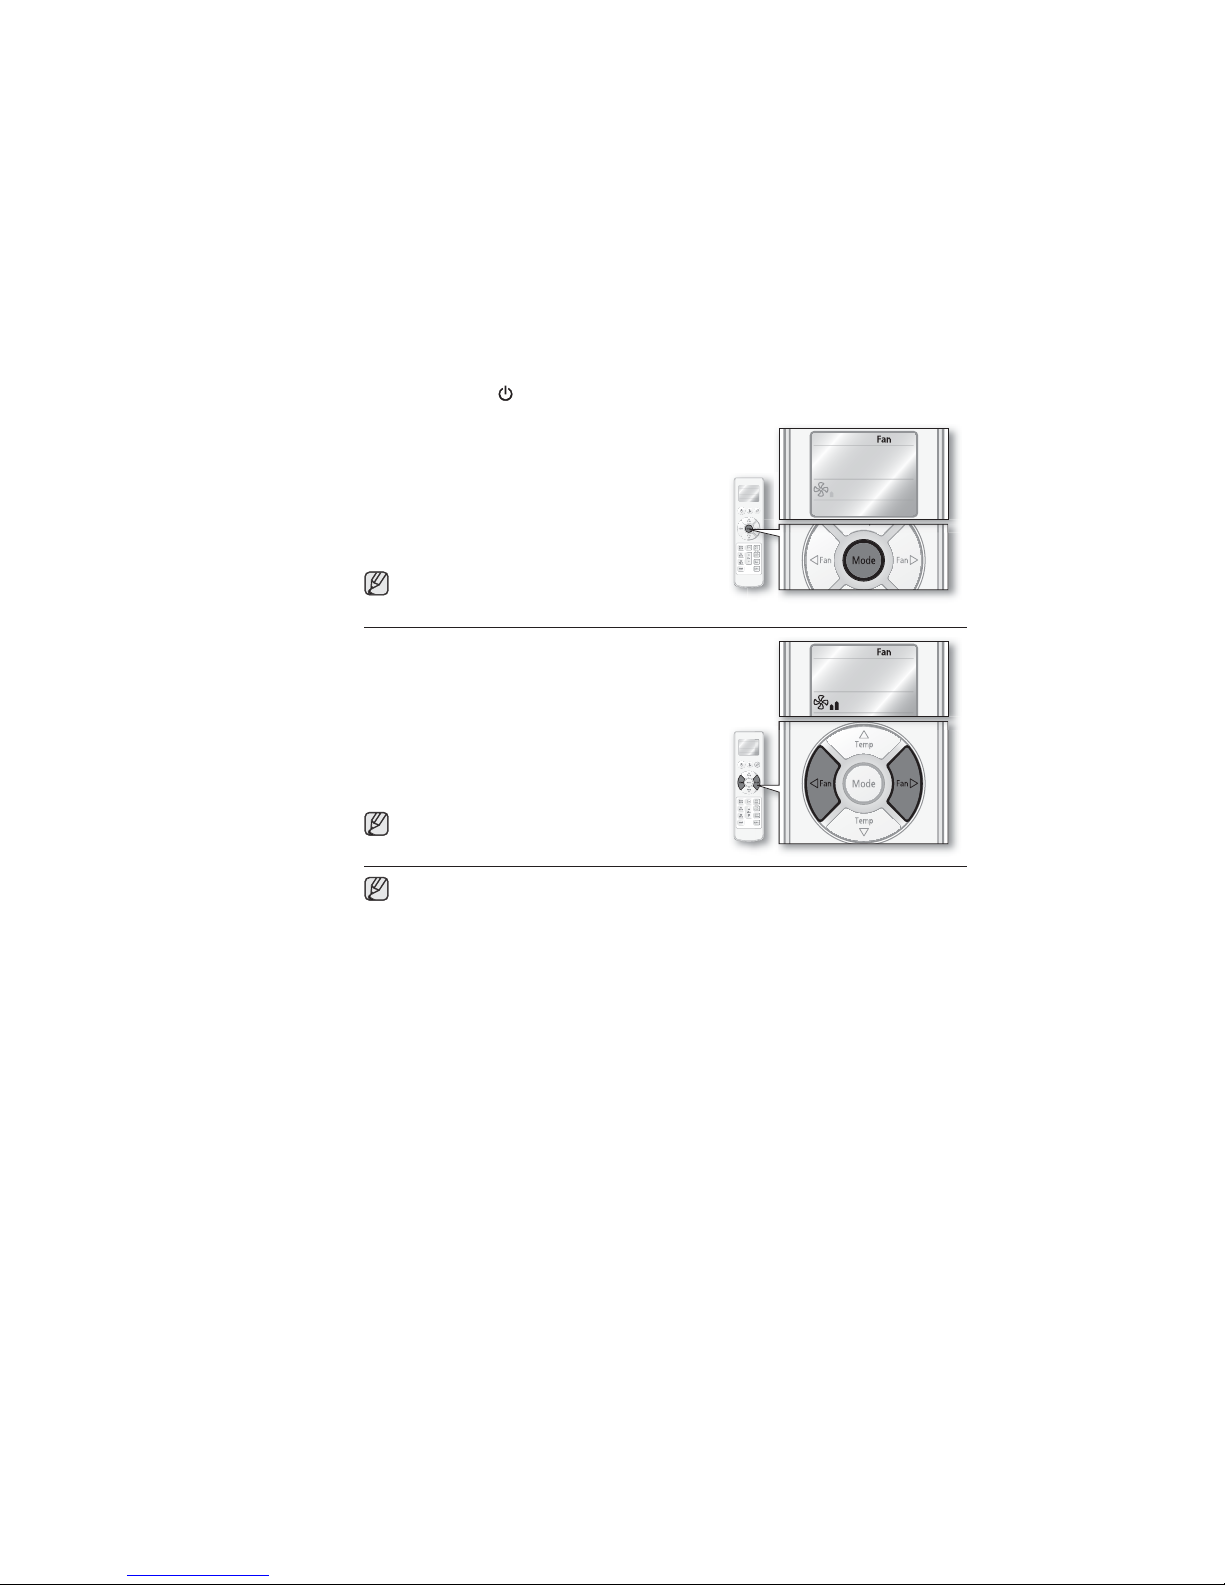
Fan
y
.
.
pp
play
p
y
p
y
y
p
f
y
g
pp
Fan mode can be selected to ventilate your room. Fan mode will be helpful to refresh the stale air
our room.
in
Turn on the air conditioner.
1
Press the Power
2
Set the operating mode.
Press the
Fan mode indicator a
dis
.
The air conditioner o
automaticall
current room tem
When
ou press the
in order of Auto, Cool, Dr
button on the remote control.
ode button on the remote control until
ears on the remote control
erates in Fan mode and
adjusts the temperature according to the
erature.
ode button, mode will change
, and Fan.
3. Set the fan s
Press the Fan
set the desired
When
will chan
When you are using the remote control, make sure correct indicator which matches your
Air ow can be adjusted manually. (See page 19 for instructions.)
Press the
eed.
or
button on the remote control to
an speed.
ou press the Fan
e in order of Low, Medium and High.
selection a
ears on the remote control display.
emp button on the remote control to check the temperature and in a room.
or
button, fan speed
18 _operating
Page 19
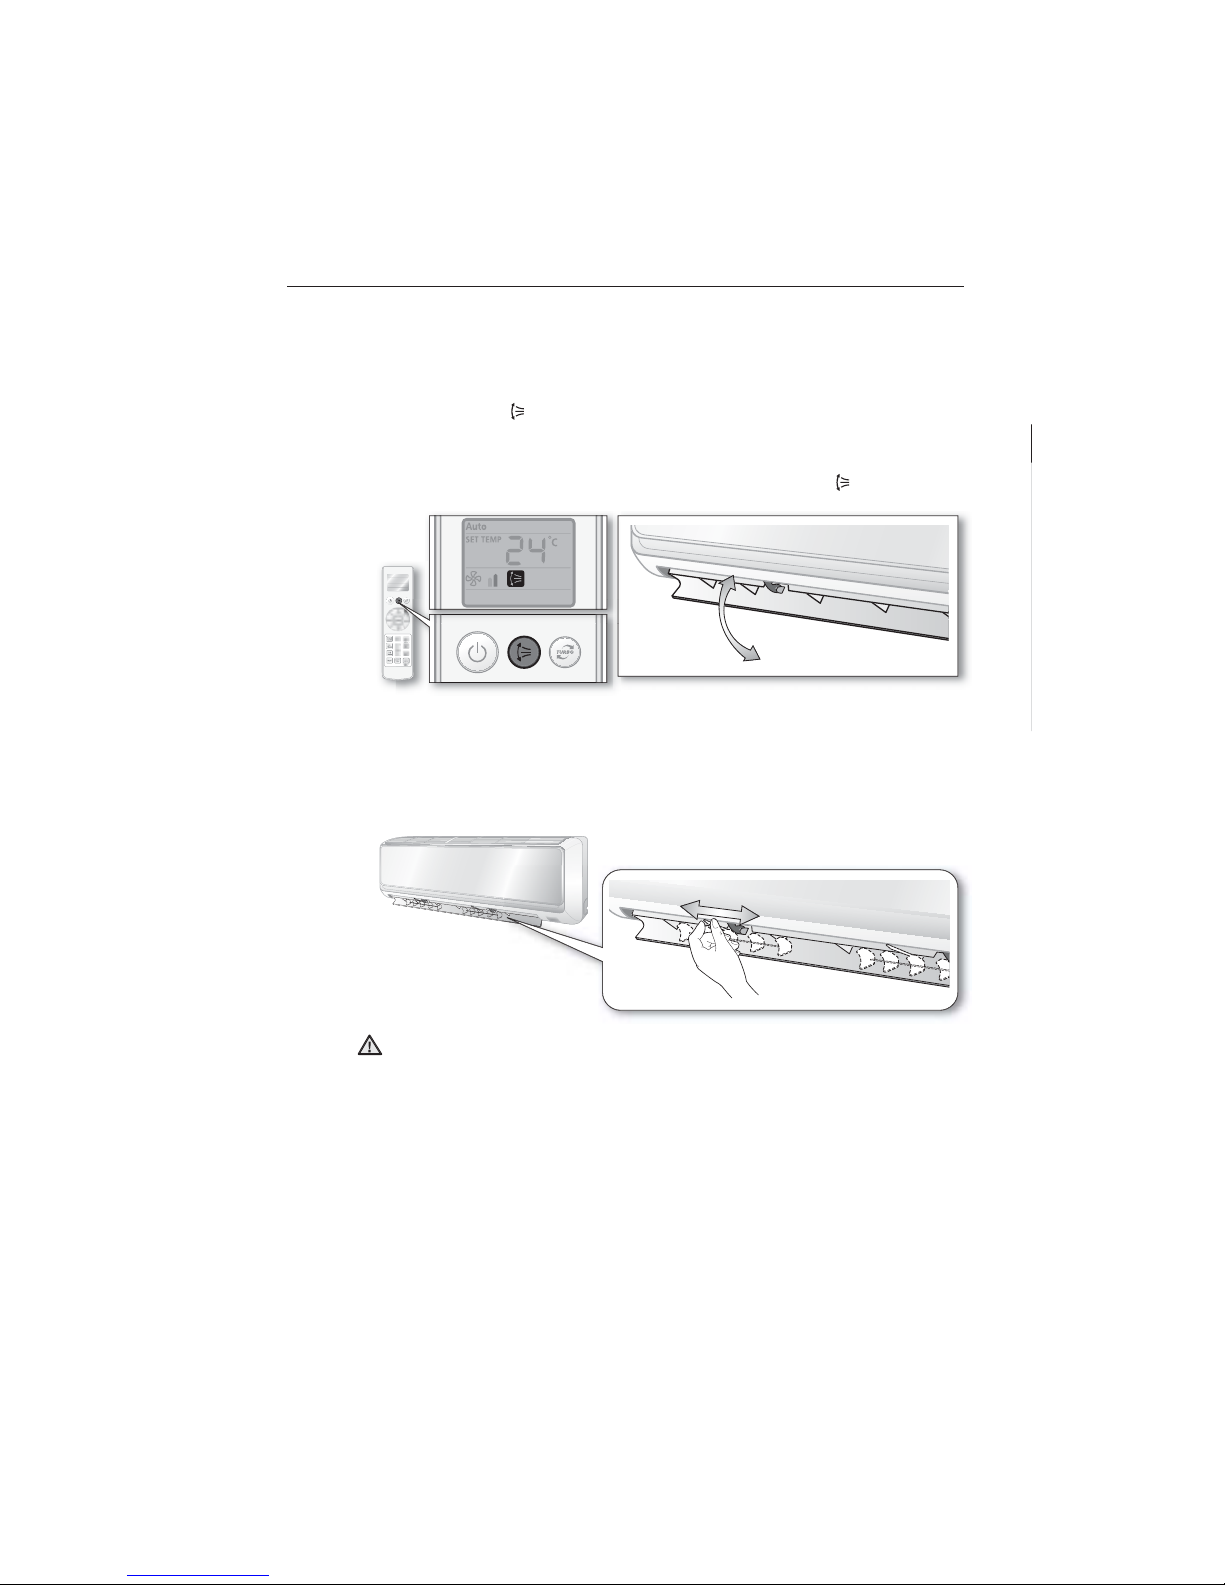
ADJUSTING THE AIR FLOW DIRECTION
.
g
p
g
.
.
p
Air ow can be directed to your desired position.
Vertical air ow
Air ow blades move up and down.
1
Press the Air swing button on the remote control.
indicator will be on and air ow blades move up and down continuously to circulate
Air swin
the air.
the air ow direction in a constant position, press the Air swing button on the
To kee
remote control a
Horizontal air ow
ake sure one of the blade pins that stick out of the air ow blades are not broken.
1
ove the blade pin lever left or right to keep the air ow direction in a constant position you
refer
ain.
Be extremely careful with your ngers while adjusting the Horizontal air ow direction.
There is a
AUTION
otential risk of personal injury when the unit is mishandled.
operating _19
Page 20
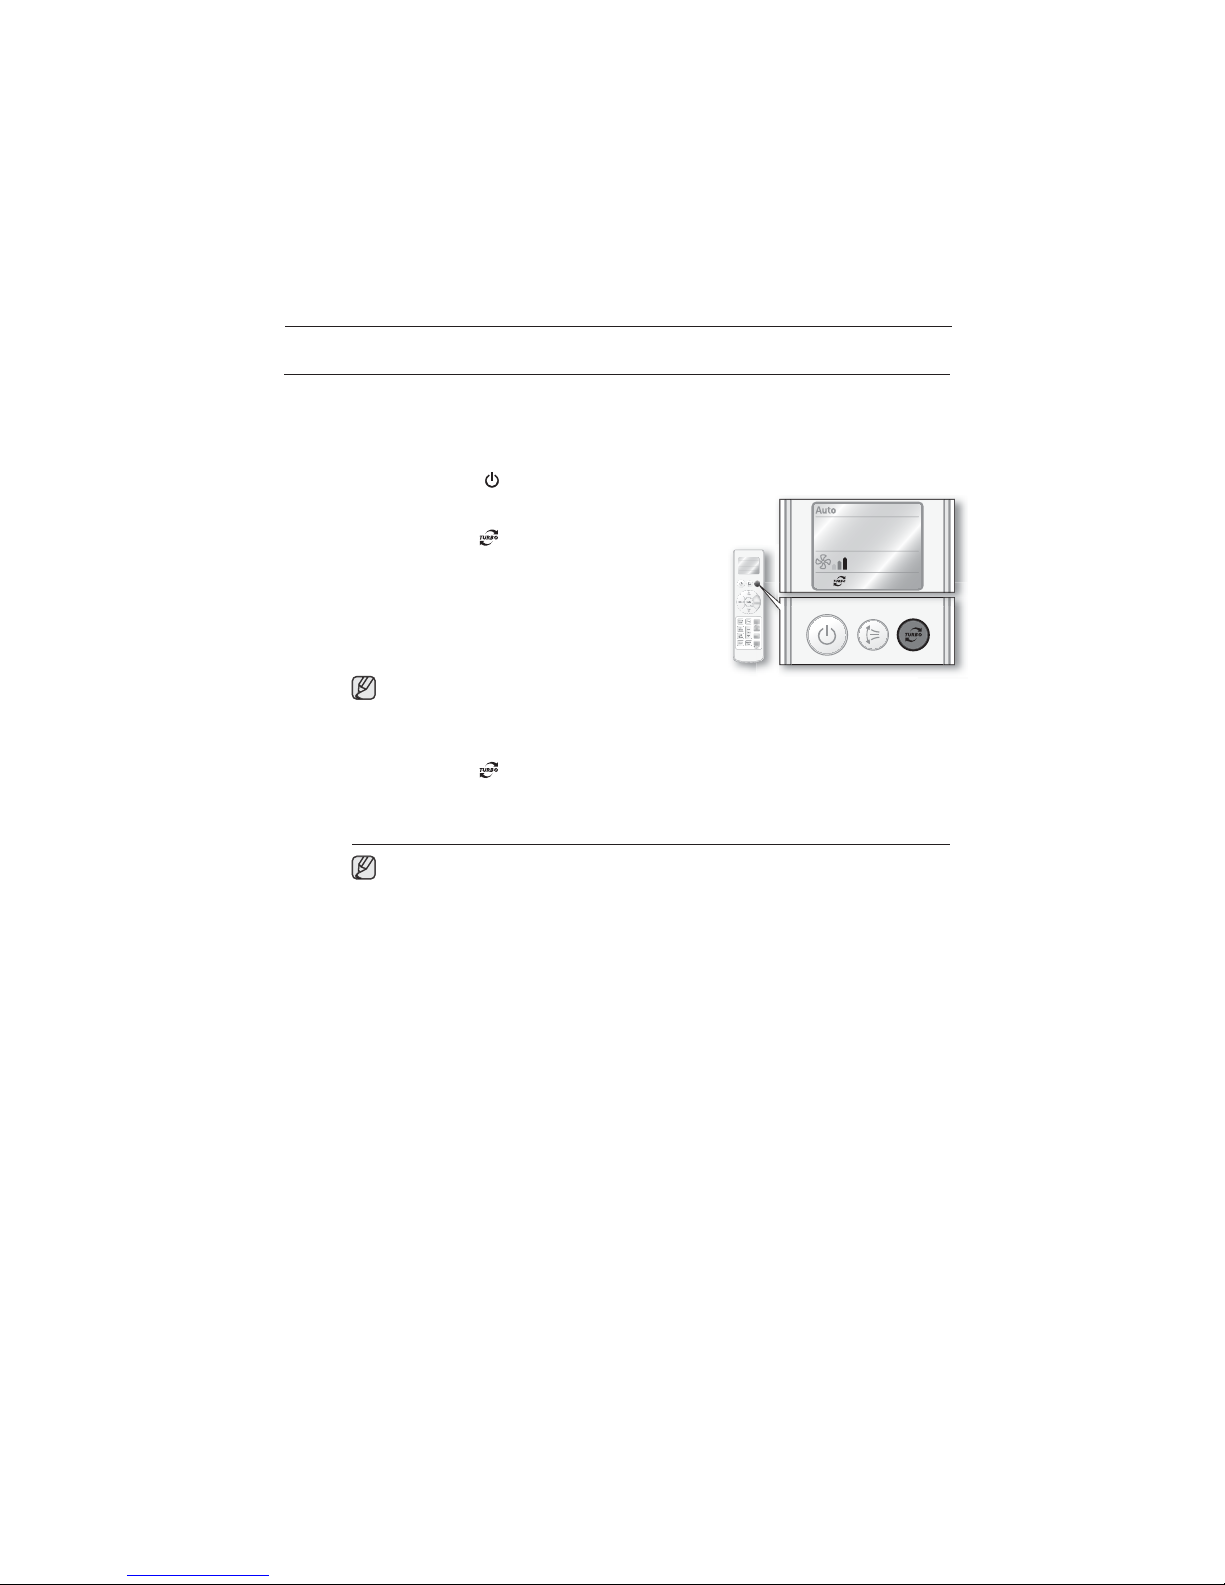
USING THE TURBO FUNCTION
.
pp
p
y
p
p
y
Turbo function is only available in Auto/Cool mode. If Turbo function is selected in
p
play
.
Turbo function will be helpful to cool or heat your room quickly and eectively by operating at the maximum
an speed for 30 minutes.
Turn on the air conditioner.
Press the Power
Set the operating mode.
2
Press the
Turbo indicator a
The air conditioner o
automaticall
current room tem
30 minutes and then o
Auto mode if Dr
urbo button on the remote control until
Dry/Fan mode, operating mode changes to Auto.
o deactivate Turbo function
1.Press the
The air conditioner o
recent mode used.
urbo button on the remote control again.
button on the remote control.
ears on the remote control display.
erates in Auto fan speed and
adjusts the temperature according to the
erature. The unit operates for
erates in last used mode, or in
/Fan mode is most recent mode used.
erates in last used mode, or in Auto mode if Dry/Fan mode is most
When you are using the remote control, make sure corresponding indicator appears on
the remote control dis
Temperature/Fan speed cannot be adjusted while using this function.
Air ow can be adjusted manually. (See page 19 for instructions.)
When the Turbo function is activated, pressingode button will automatically cancel the
unction
20_ using advanced functions
.
Page 21
SETTING TIMER
y
y
y
play
y.
g
g.
p
f
/
play
p
p
g
g.
pp
p
y
g
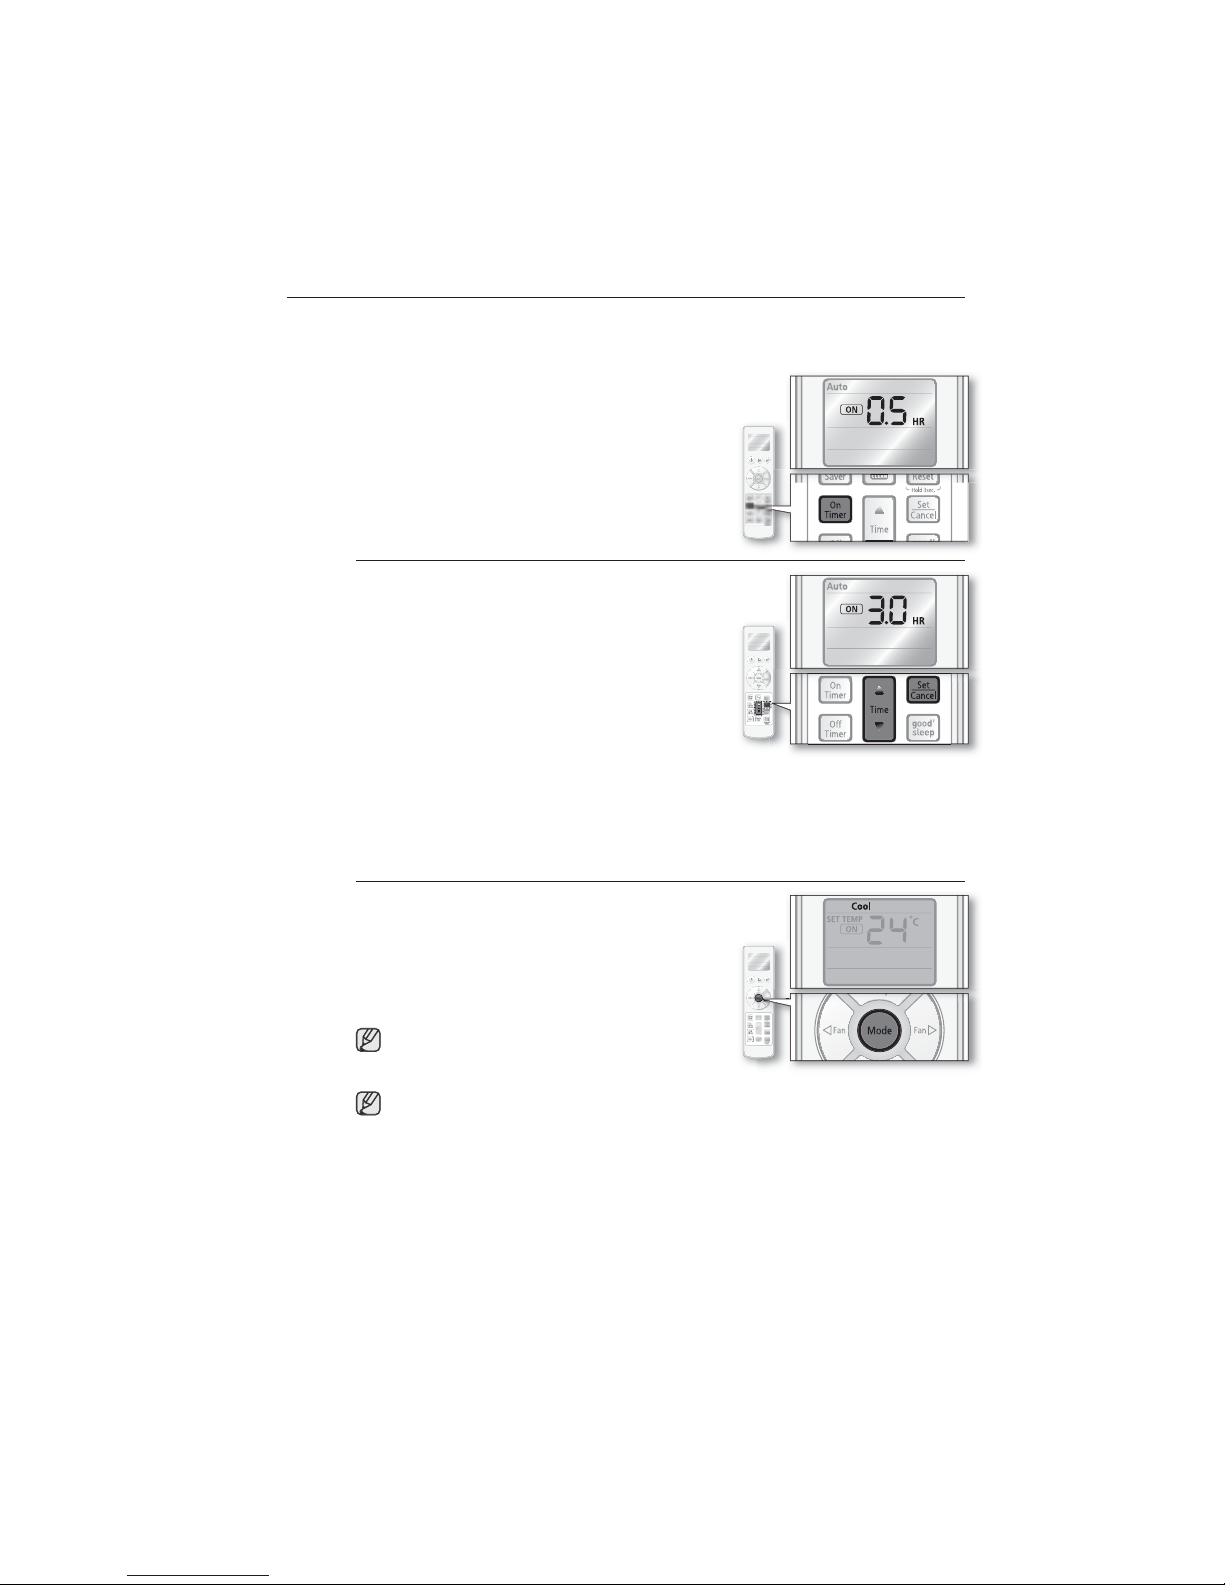
On Timer
/
y
This advanced Timer function allows you to turn on/o your air conditioner automatically even when you are
awa
. Simply set the time and your air conditioner will turn on/o automatically.
n timer
This function allows you to turn on the air conditioner
automaticall
On timer is available while
within the time range of 24 hours.
our air conditioner is on/o.
Press the
On timer indicator blinks on the remote control dis
Set the time you want the air conditioner to turn on
automaticall
Press the
to chan
blinkin
You can set the time up to 24 hours, increasing in
30 minute unit u
a
ter rst 3 hours.
3. Press the Set
active it on.
The remote control dis
set desired tem
The air conditioner will o
stops blinkin
will end settin
Set the operating mode.
Press the
desired mode a
The air conditioner will o
On timer function is available in Auto/Cool/Dr
mode.
n Timer button on the remote control.
ime or button on the remote control
e the time setting while On timer indicator is
to rst 3 hours and in hourly unit
Cancel button on the remote control to
will show the hour(s) you have set for 3 seconds and
erature will display.
erate automatically at set time and then On timer indicator
and stays on. If On timer is not set within 10 seconds, the air conditioner
ode button on the remote control until the
ears on the remote control display.
erate in the mode you set.
.
/Fan/
After the set up while the unit is o, approximately after 10 seconds, all the other
o deactivate the On timer
1.Press the Set/Cancel button on the remote control.
On timer
Temperature can also be adjusted. (See step 3 on page 14 for instructions.)
indicators will be
Time setting can be changed by pressing the
Press the
button to active it on.
ou set will be canceled and On timer indicator will disappear.
one except the On timer indicator.
button.
ime or button to change time setting and then press the
using advanced functions _21
Set
Cancel
Page 22
SETTING TIMER
y
.
play
.
y.
g
g.
p
f
/
play
p
p
r
g
/
g
y
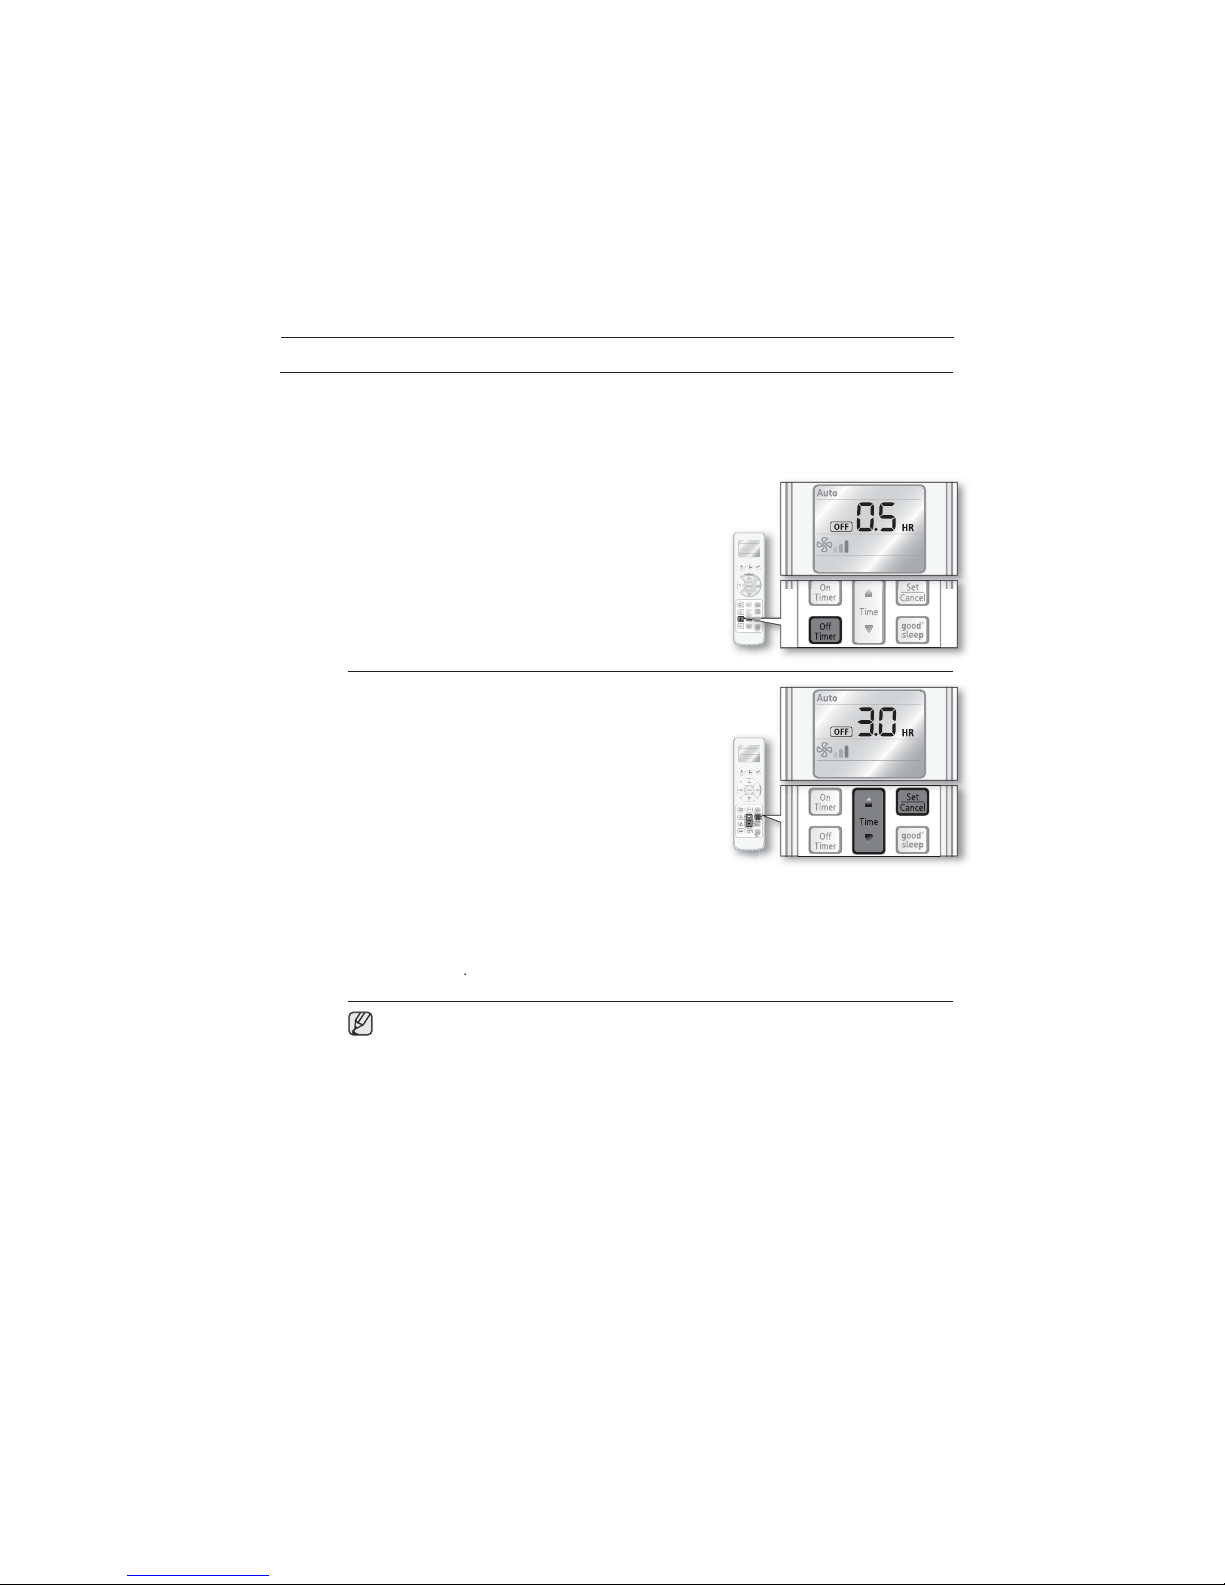
timer
This function allows you to turn o the air conditioner automatically within the time range of
24 hours. O timer is available while
1
Press the
O timer indicator blinks on the remote control dis
Set the time you want the air conditioner to turn o
2
automaticall
Press the
to chan
blinkin
You can set the time up to 24 hours, increasing in
30 minute unit u
a
ter rst 3 hours.
3. Press the Set
active it on.
The remote control dis
set desired tem
The air conditioner will o
stops blinking and stays on. If O timer is not set within 10 seconds, the air conditioner
will end settin
our air conditioner is on/o.
Timer button on the remote control.
.
ime or button on the remote control
e the time setting while O timer indicator is
to rst 3 hours and in hourly unit
Cancel button on the remote control to
will show the hour(s) you have set for 3 seconds and
erature will display.
erate automatically at set time and then Of f timer indicato
Time setting can be changed by pressing the
Press the
Set
You can combine O timer function with On timer function to turn on and then o the air
conditioner at the desired time.(See pa
o deactivate the O timer
Press the Set/Cancel button on the remote control.
O timer
22_ using advanced functions
ime or button to change the time setting and then press the
Timer
Cancel button to active it on.
e 23 for instructions.)
ou set will be canceled and O timer indicator will disappear.
Page 23
ombining On timer and O timer
.
.
g
.
.
y
p
f
y.
y
g
p
y
g
.
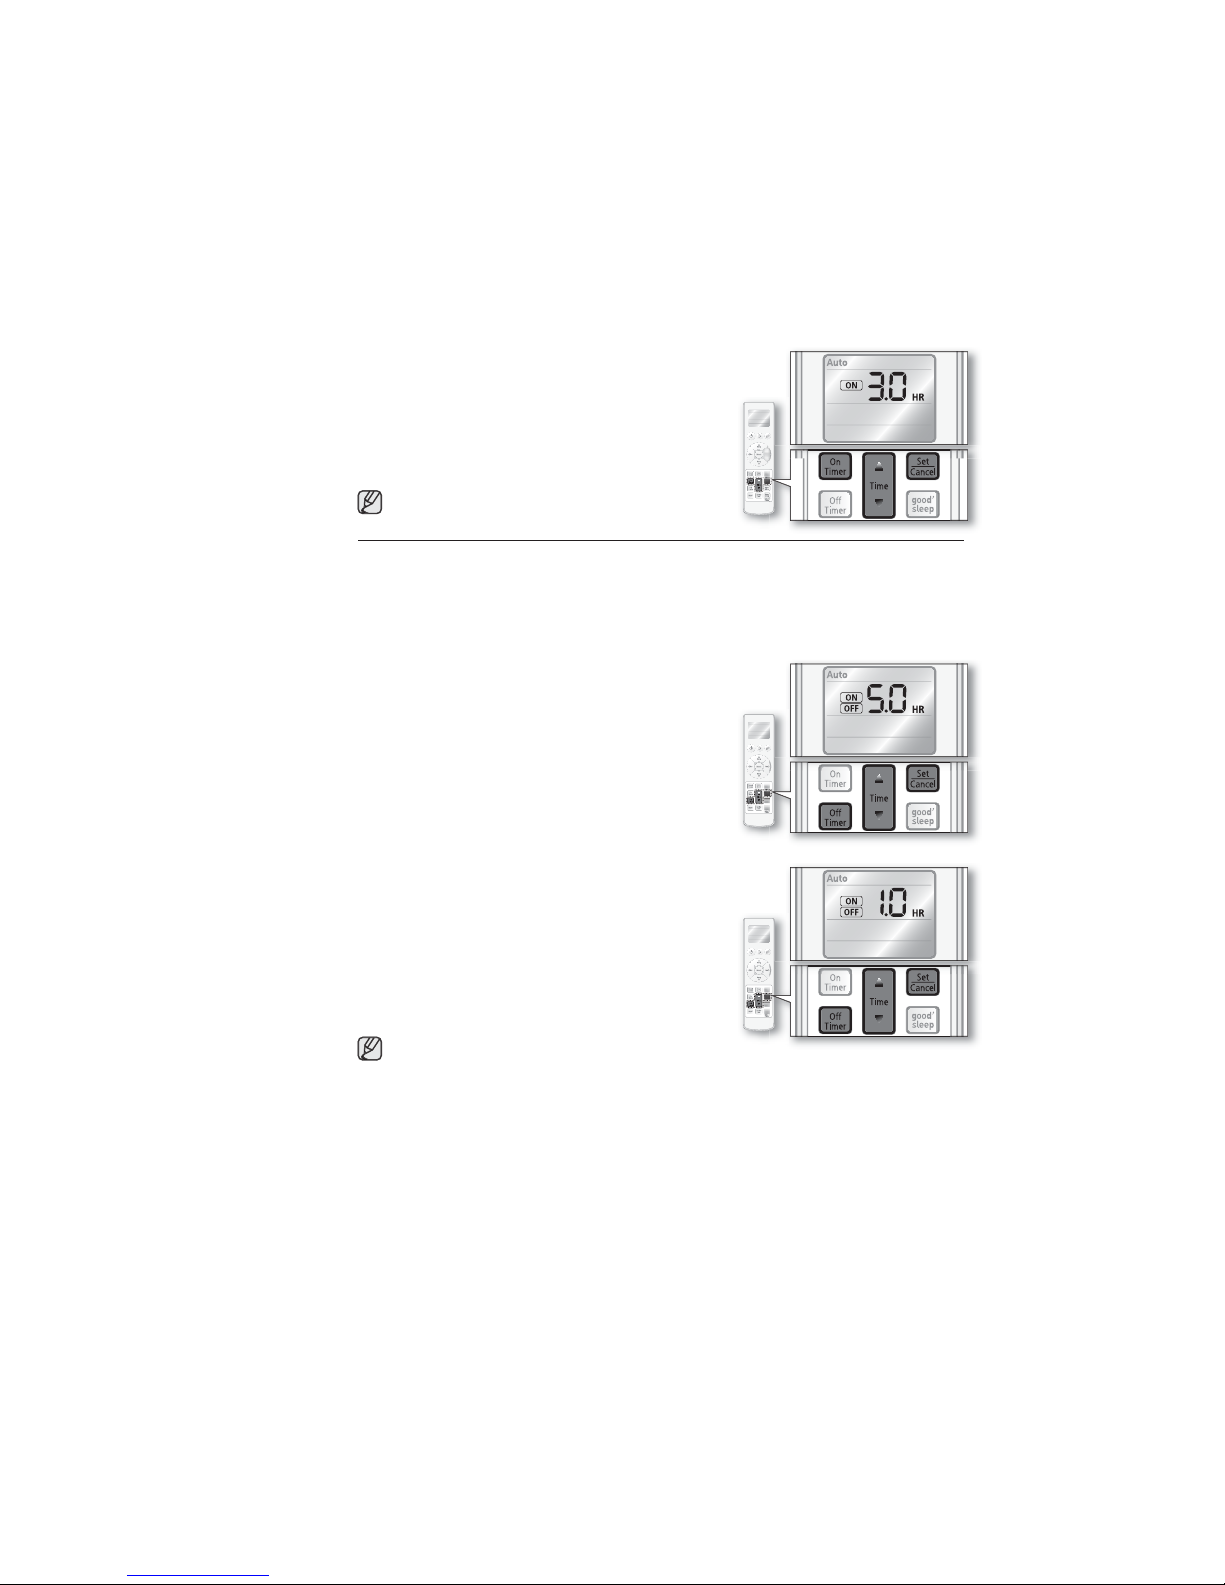
You can combine the On timer and O timer together for more convenient use of the timer
unction.
Set the On timer.
1
Press the
Set the time with
Press Set/Cancel button to activate the On timer.
See pa
On timer.
Set the O timer.
2
Press the
Set the time with
Press Set/Cancel button to activate the O timer.
When
The air conditioner will turn on and then o
automatically. Set up should be done while the air
conditioner is o
For exam
the O timer at 5 hours, the air conditioner will turn
o
then operate
automaticall
n Timer button.
ime or button
e 21 for more detail instructions on setting
Timer button.
ime or button
ou set the time, there can be two possible options:
n timer is shorter than O timer
.
le, If the On timer is set at 3 hours and
automatically 3 hours after the set time and
or next 2 hours before turning o
n timer is longer than O timer
The air conditioner will turn o
automaticall
conditioner is operatin
For exam
the O timer at 1 hour, the air conditioner will turn o
automaticall
or 2 hours before turning on automatically.
See pa
O timer
. Set up should be done while the air
le, If the On timer is set at 3 hours and
an hour after the set time and remain o
e 22 for more detail instructions on setting
and then on
.
o deactivate the timer combination
Press the Set/Cancel button on the remote control.
.raeppasidlliwsrotacidniehtdnadelecnaceblliwremitffOdnanOehtfohtoB
using advanced functions _23
Page 24
SETTING TIMER
g
.
g
g
y
f
t
g
g.
p
play
p
p
g
f
y
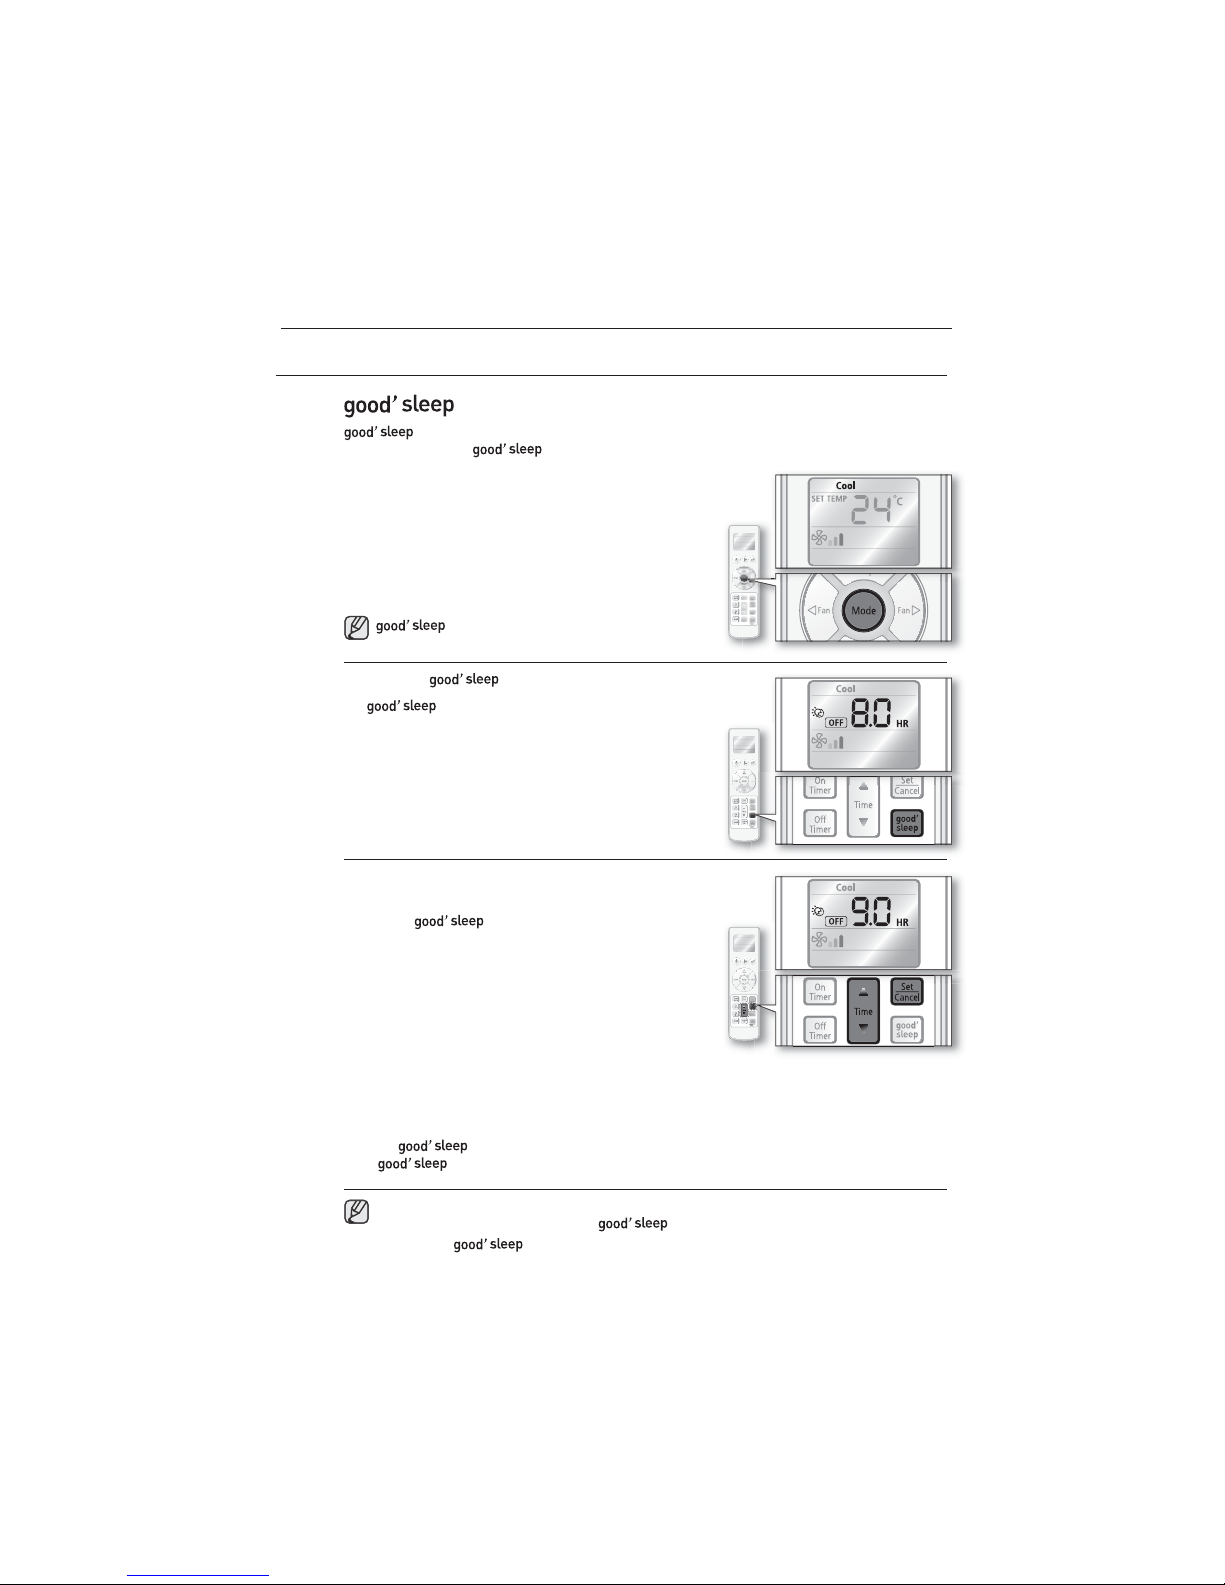
sound sleep. mode can be set up when the air conditioner is on.
havin
Set the operating mode.
Press the
ool/Heat appears on the remote control display.
2
Press the button on the remote control.
starts blinkin
mode
mode allows you to set a comfortable sleep temperature while saving energy and
ode button on the remote control until
is only available in Cool mode.
indicator appears and O timer indicator
on the remote control display.
3. Set the len
sta
De
Press
chan
blinkin
You can set the time up to 12 hours, increasing in
30 minute unit u
rst 3 hours.
Press the Set/Cancel button on the remote control to active it on.
The remote control dis
set desired tem
When the set time has ela
then
When the
th of time you want the air conditioner to
on.
aul
ime or button on the remote control to
e the time setting while O timer indicator is
mode is not set within 10 seconds, the air conditioner will end setting.
Te mperature can be adjusted and the air conditioner automatically adjusts the
Fan speed/Air swin
cancel the function.
24_ using advanced functions
time is set to 8 hours.
to rst 3 hours and in hourly unit after
will show the hour(s) you have set for 3 seconds and
erature will display.
sed, the air conditioner will automatically turn o and
indicator disappears.
after setting in Cool mode.
unction is activated, pressingode button will automaticall
Page 25
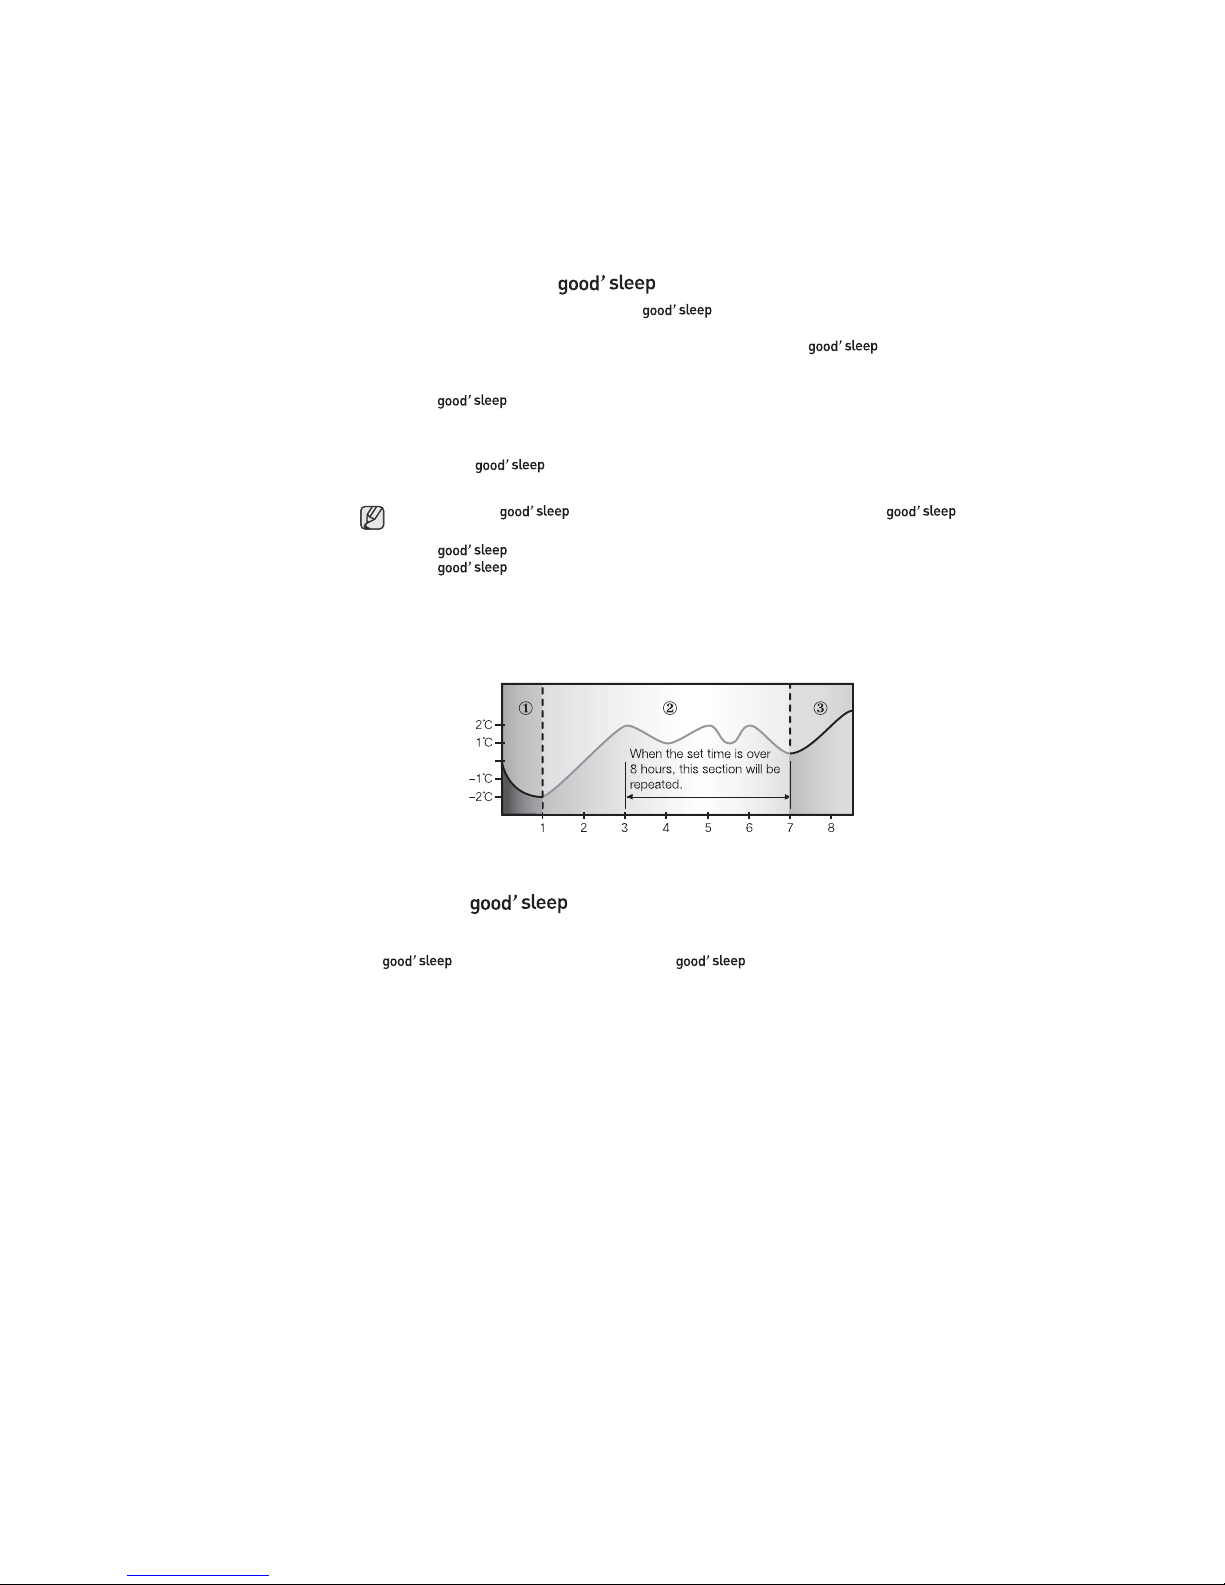
emperature changes in mode
mode automatically modies
g
y
g
p
p
p f
y
f
indicator will disappear.
Time(hr.)
p
To prevent excessive cooling during sleep, the
the temperature setting in accordance with the time setting. Temperature and air current change
to the three stages; Fall asleep, Sound sleep, and Wake up from mode,
accordin
and then the air conditioner will automaticall
turn o when the set time has elapsed.
Three sta
e prevents you from having diculty sleeping in summer night.
Fall aslee
Sound slee
Wake u
rom mode:
Allows
ou to wake up from comfortable intermittent air and it makes you feel refresh.
is set too short or long because the default is set to 8-hour-operation.
the mode is set less than 4 hours, the operation will stop at the set time.
the mode is set over 5 hours, it will run as Wake up stage for the last one
hour be
Recommended set temperature is between 25˚C~27˚C for cooling
ool mode
Set temperature
niremitffOteS
ore stop.
Te m
.
mode over 5 hours. You feel disturbed sleep if the
.erutarepmetehtgnippordybpeelsotniuoysesaE:
.ylthgilserutarepmetruoysesiardnaydobruoysexaleR:
o deactivate mode
1.Press the Set/Cancel button on the remote control.
mode you set will be canceled and
using advanced functions _25
Page 26
USING THE SMART SAVER FUNCTION
g
g
y
y
g
.
f
g
play
) to remove a polluted substance and
f
y
/
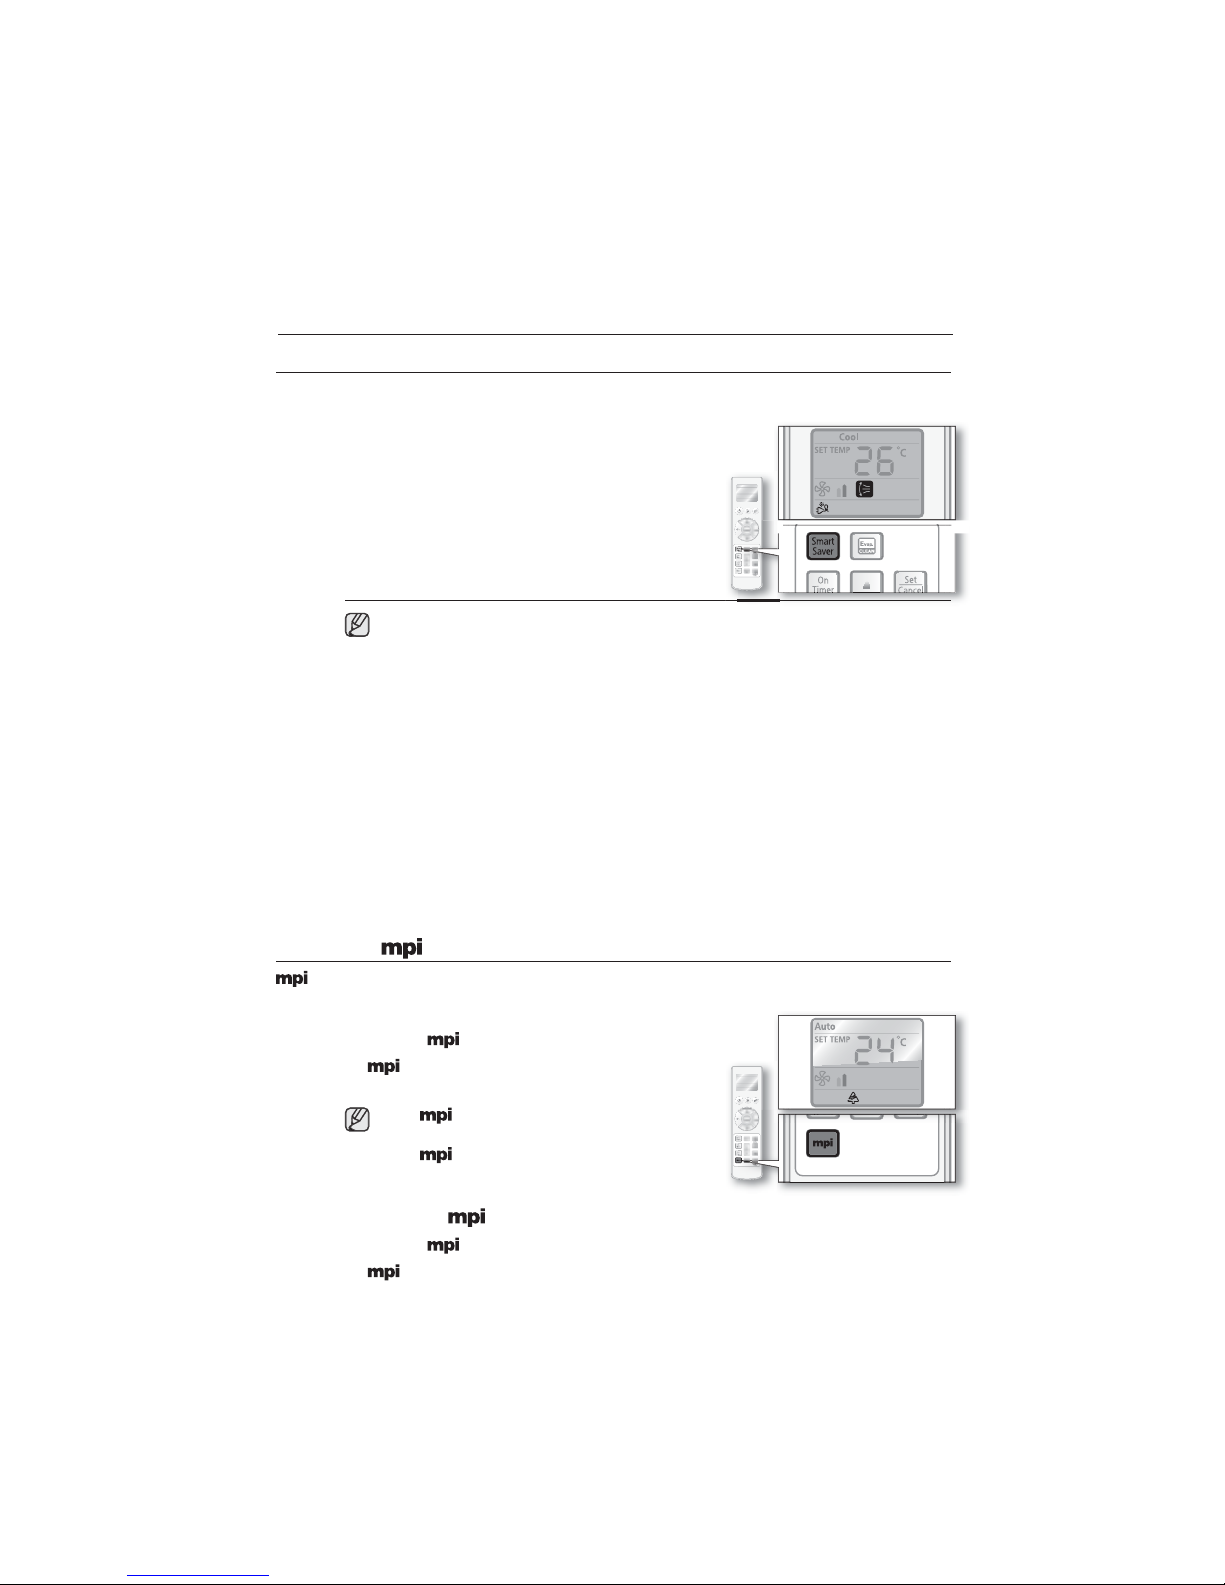
This function will set the temperature range limit to help you save energy while the air conditioner is operating
in Cool mode.
1.Press the Smart Saver button on the remote control
while the air conditioner is operatin
Smart Saver indicator and air swin
automaticall
The air
f the current set temperature is lower than 26ºC, it will
automaticall
When Smart Savingfunction is activated, temperature range will be limited to 26ºC~30ºC.
Temperature/Fan speed can also be adjusted. (See step 3~4 on page 15 for instructions.)
Air ow can be adjusted manually. (See page 19 for instructions.)
on the remote control display.
ow blades move up and down.
raise to 26ºC.
Smart Saving function is only available in Cool mode.
f the desired temperature is lower than 26ºC, turn o the Smart Saving function by
pressin
the Smart Saver button again
When the Smart Saver function is activated, pressing Mode button will automatically
cancel the
unction.
o deactivate the Smart Saver function
Press the Smart Saver button on the remote control.
Smart Savin
the remote control dis
function you set will be canceled and Smart Saving indicator will disappear on
.
in Cool mode.
indicator appears
USING THE FUNCTION
Micro Plasma Ion, generates hydrogen(H) and oxygen(O
ecomposition of such harmful particles. It makes you breathe better as if you were staying around
alls, ocean surf, rivers and mountains.
water
1.Press the button on the remote control.
indicator will appears on the remote control displa
and the air conditioner generates MPI.
ehT
mode can be selected whether the air
conditioner is on
mode will be on automatically when you
ehT
turn on the air conditioner.
< FOR MPI MODEL>
2
o.
o deactivate mode
1
Press the button on the remote control.
mode you set will be canceled and blue light will turn o.
26_ using advanced functions
Page 27
USING THE EVAPORATOR CLEAN FUNCTION
p
.
p
g f
p
g f
g
y
pp
p
f
p
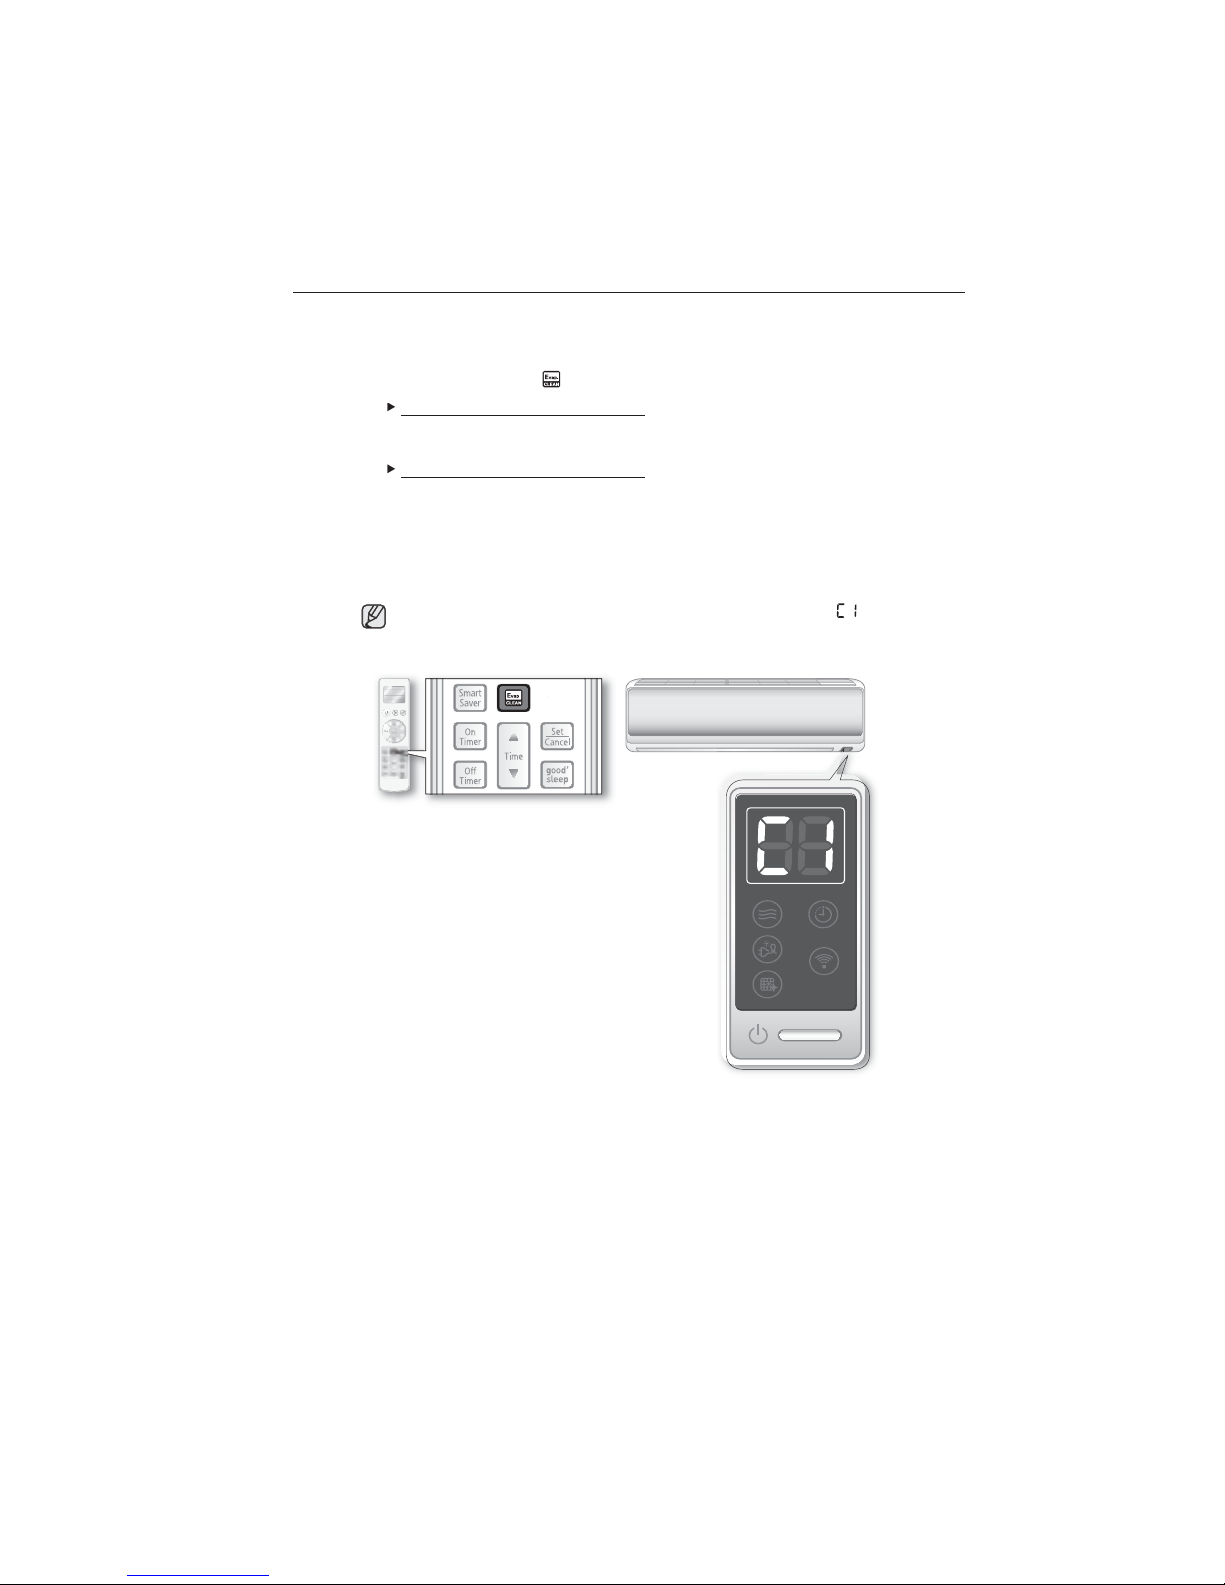
Evaporator clean function will prevent from growing mold by eliminating the moisture inside of the indoor unit.
Your indoor unit eva
clean and healthier air.
1.Press the Evap. CLEAN button
orates the moisture inside of the unit. Activate this function to provide you with more
When the air conditioner is turned o,
orator clean indicator on the indoor unit display appears and the Evaporator
The Eva
cleanin
unction runs.
When the air conditioner is turned on,
orator clean indicator on the indoor unit display appears and the Evaporator
The Eva
unction runs after stopping the air conditioner operation.
cleanin
Evaporator Cleanin
Auto, Cool, Dr
Fan mode : a
The Eva
When the air conditioner is turned on, the Evaporator clean
air conditioner o
time can vary, depending on the previously used mode.
mode : approximately 30 minutes.
roximately 15 minutes.
orator clean indicator appears only on the indoor unit display as (Clean).
eration.
unction runs after stopping the
using advanced functions _27
Page 28
cleaning and maintaining th
e
y
.
g
g
.
g
y
air conditioner
LEANING THE FILTER
When cleaning the lter, make sure to unplug the power from the unit. No special tools are needed to clean it.
Air lter
Washable foam based air lter captures large particles from the air. The lter is cleaned with a
vacuum or b
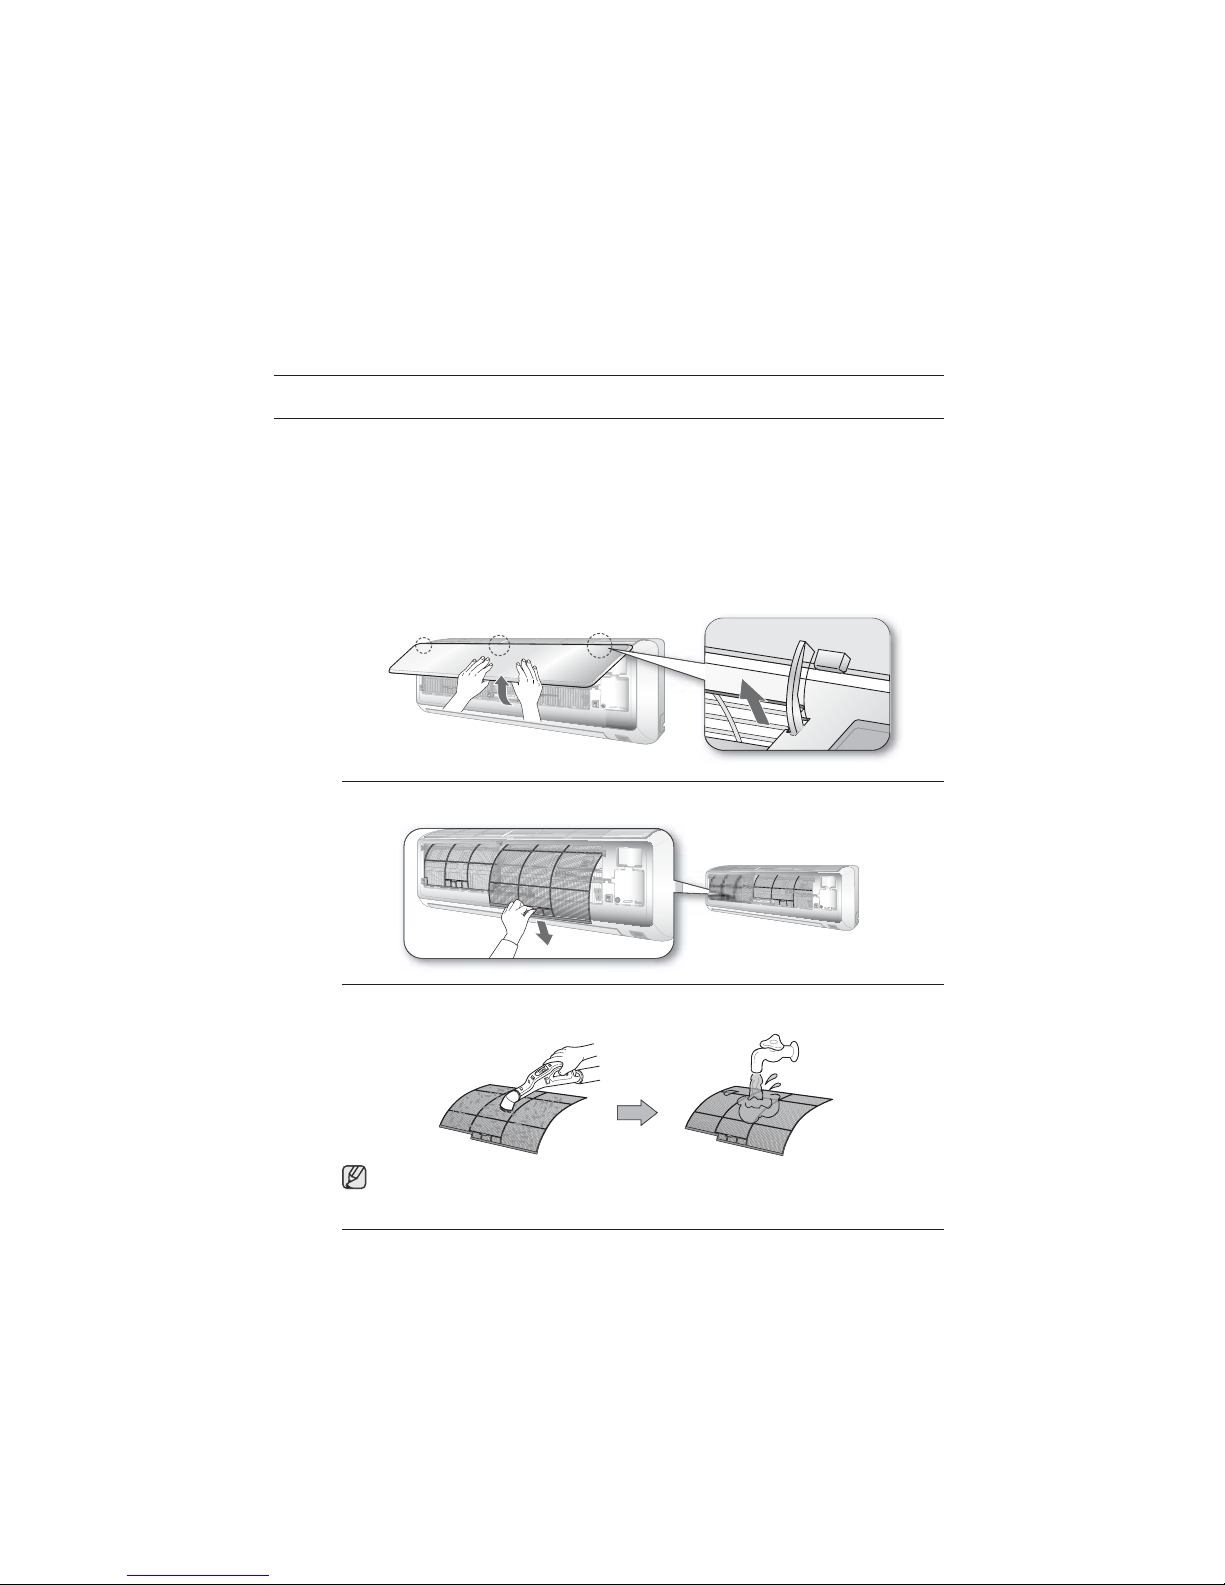
Open the front panel.
1
Ti
Then sli
2.rab the handle and lift it up. Then, pull the Air lter towards you and slide it down.
hand washing.
htly grab front side of the front panel and lift up the panel to open.
htly push the panel up until the panel is hanged over the hooks of the unit
3.
lean the Air lter with a vacuum cleaner or soft brush. If dust is too heavy, then rinse it with
runnin
For the best conditions, repeat every two weeks.
f the Air lter dries in a conned(or humid) area, odors may generate. If it occurs,
re-clean and dr
nsert the Air lter back in its original position.
5.
lose the front panel.
cleaning and maintaining
28_
water and dry it in a ventilated area.
it in a well-ventilated area.
Page 29
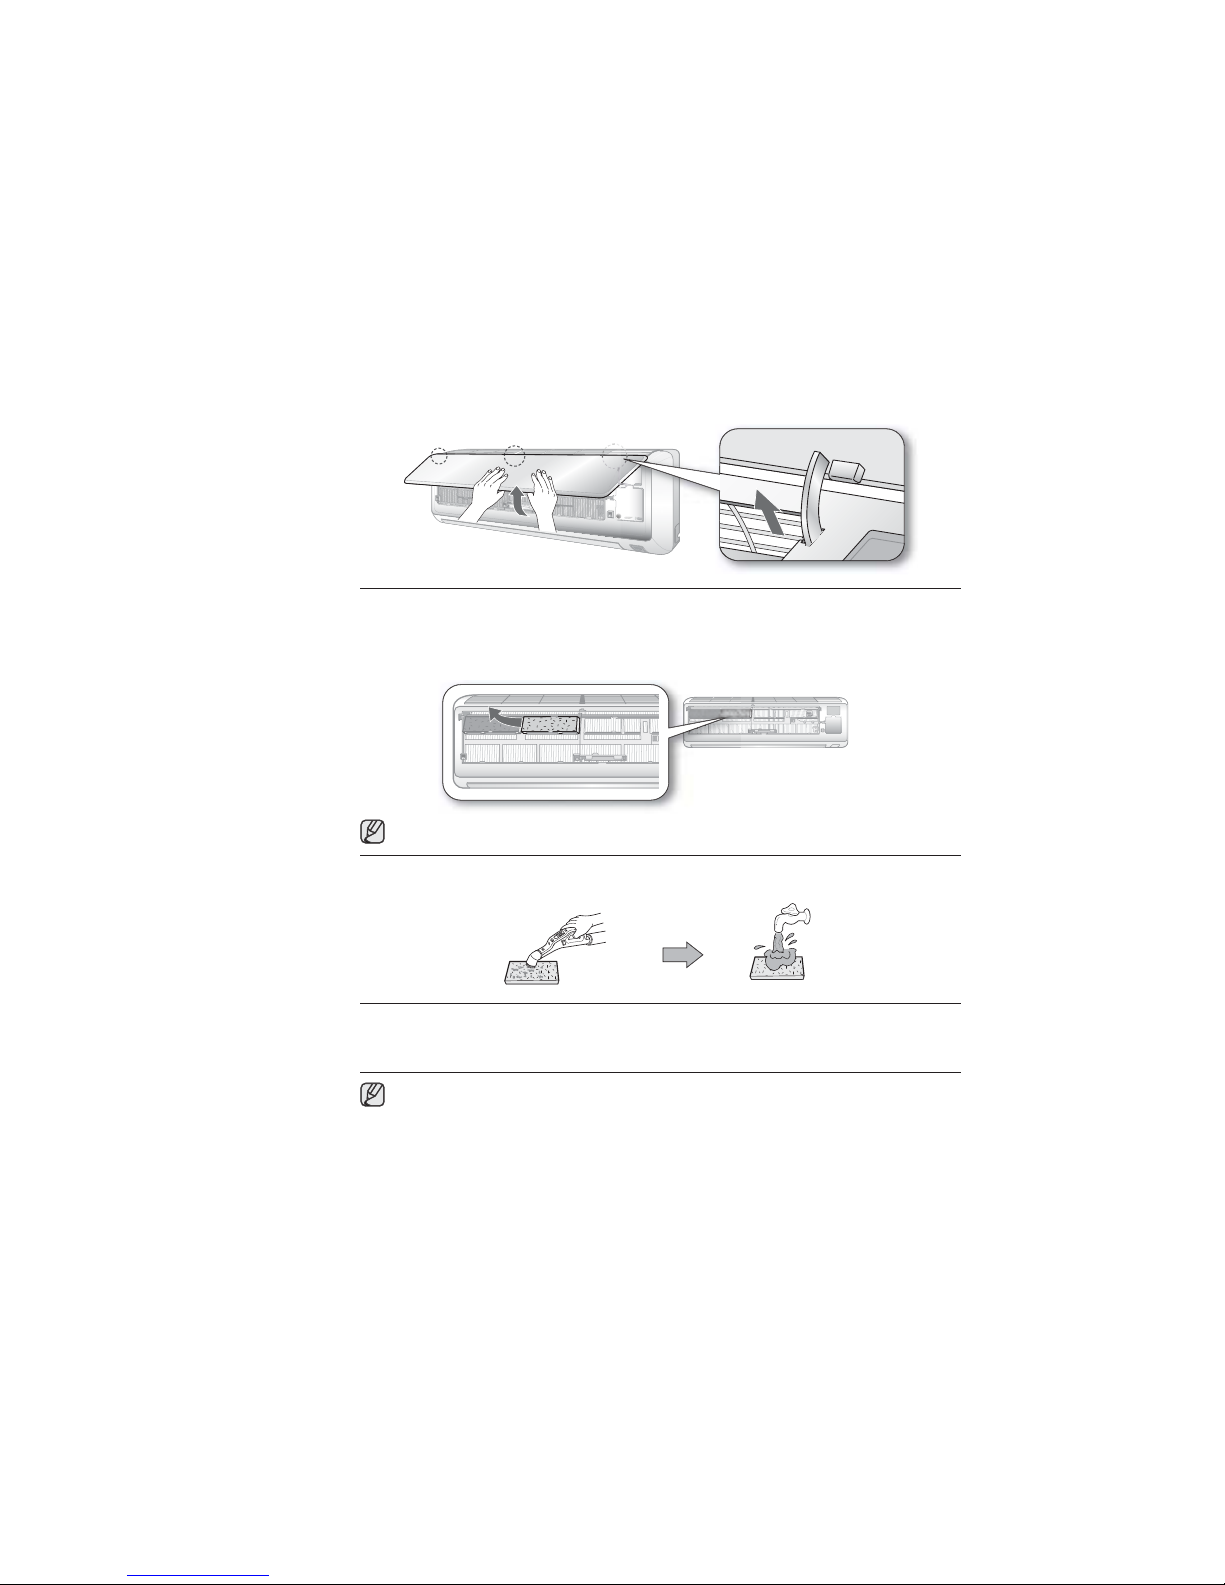
io lter
g
g
.
y
f
Washable foam based Bio lter leads to reduction in allergens that thrive in polluted air.
lter is cleaned with a vacuum or by hand washing.
The
Open the front panel.
Ti
htly grab front side of the front panel and lift up the panel to open.
htly push the panel up until the panel is hanged over the hooks of the unit
Then sli
Remove the Air lter.
rab the handle and lift it up. Then, pull the Air lter towards you and slide it down.
3. Slide the Bio lter(color in sk
-blue) out to remove it from the slot.
riaehthtaenebstols4ynanidecalpebnacretlifoiB
.retli
lean the Bio lter with a vacuum cleaner or soft brush. Then rinse it with running water and
ry it in a ventilated area.
nstall the Bio lter back in position.
5.
6.
lose the front panel.
lean the Bio lter every 3 months. The cleaning term may dier on usage and
environmental conditions.
cleaning and maintaining _29
Page 30
cleaning and maintaining the
f y
g
g
g
.
g
f
.
.
air conditioner
REPLACING THE FILTER
Replacement lter may be purchased from the retail store or ordered from the dealer where you purchased
the unit. I
ou cannot nd one, please call a contact center.
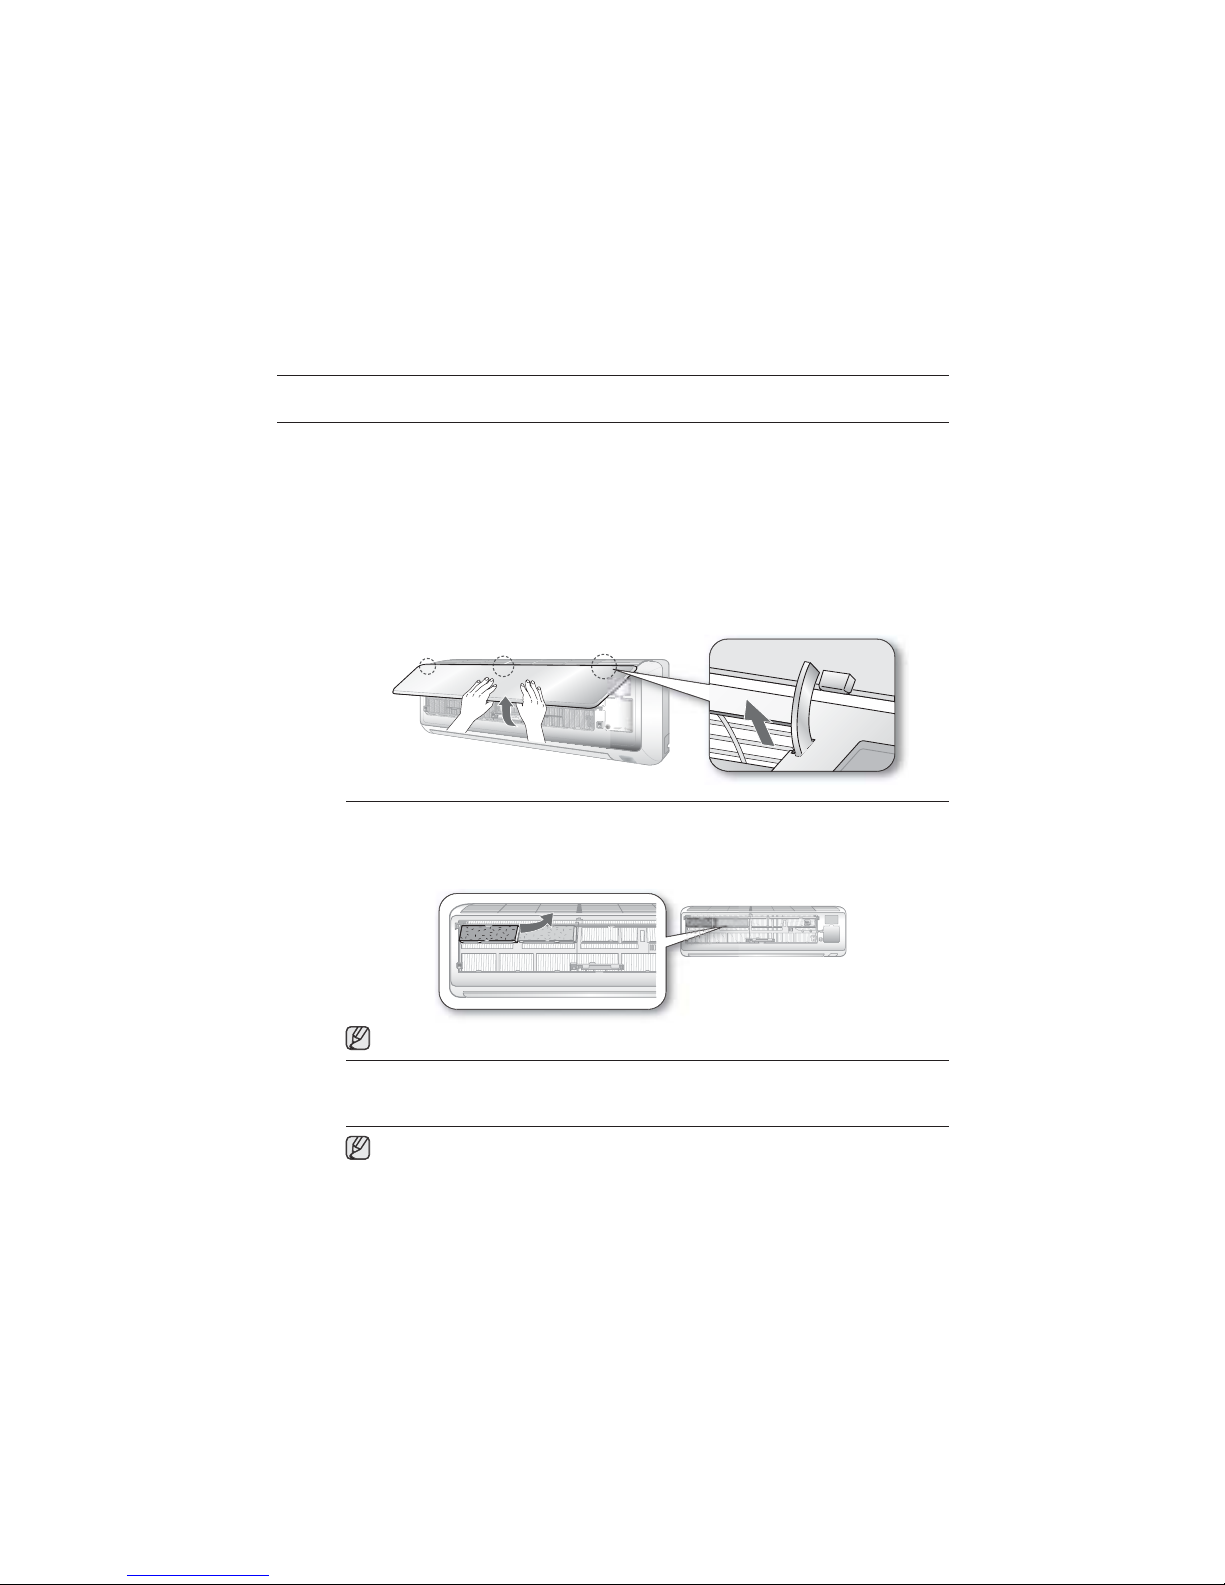
Deodorizing lter
Deodorizing lter absorbs eciently cigarette smoke, pet odors and other unpleasant smells.
Deodorizin
Open the front panel.
Ti
Then sli
Remove the Air lter.
3. Slide the Deodorizin
lter cleaning is simple, just remove old lter and install a new one.
htly grab front side of the front panel and lift up the panel to open.
htly push the panel up until the panel is hanged over the hooks of the unit
rab the handle and lift it up. Then, pull the Air lter towards you and slide it down.
lter(color in black) out to remove it from the slot.
nstall the new Deodorizing lter back in position.
lose the front panel.
5.
The replacement timing of the Deodorizing lter diers depending on usage and
environmental conditions
Even if Deodorizing and Bio lters are installed in an inverted position, it will not aect its
ltration system
cleaning and maintaining
30_
riaehthtaenebstols4ynanidecalpebnacretlifgnizirodoeD
.retli
Page 31
AINTAINING YOUR AIR CONDITIONER
.
g
.
y
y
y
)
)
y
)
y
)
g
f
y
y
p
f
the air conditioner will not be used for an extended period of time, dry the air conditioner to maintain it in
best condition.
1
Dry the air conditioner thoroughly by operating in Fan mode for 3 to 4 hours and disconnect
the power plu
Before using the air conditioner again, dry the inner components of the air conditioner again
2
runningin Fan modefor 3 to 4 hours. This helps remove odors which mayhavegenerated
b
rom dampness.
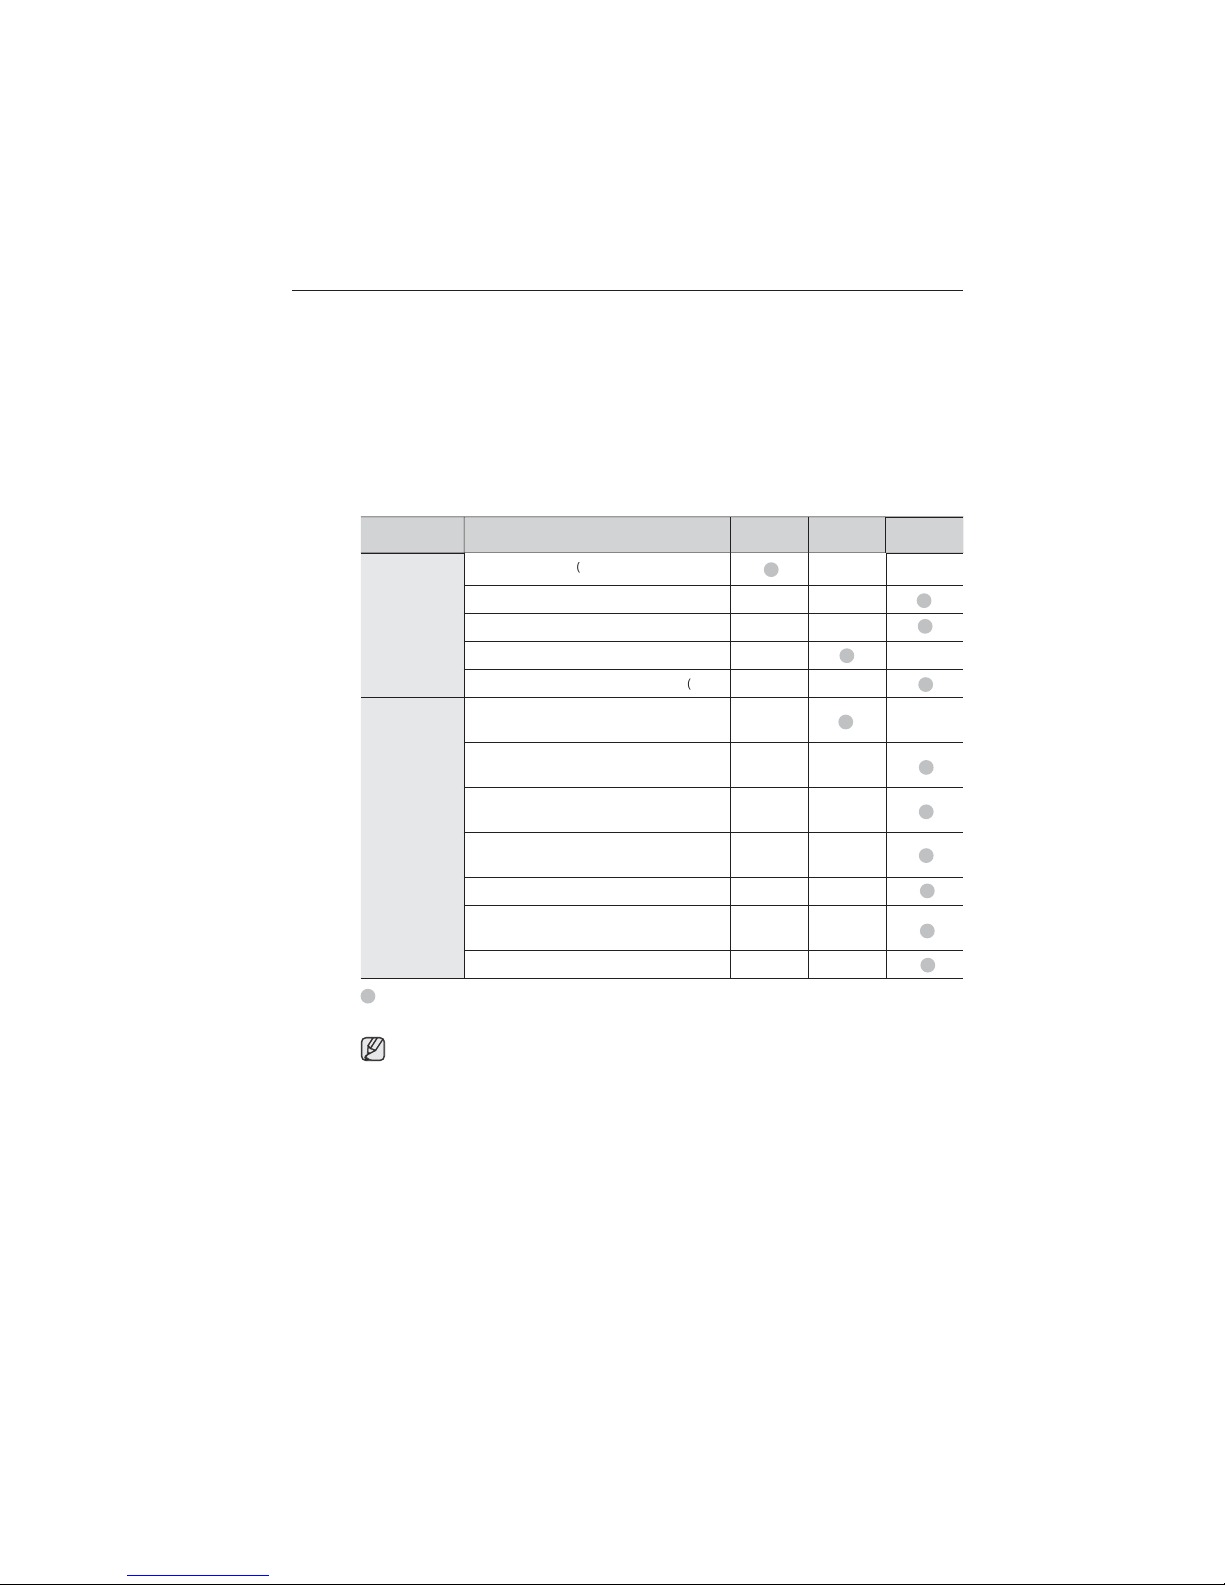
Periodical checks
Refer to the following chart to maintain the air conditioner properly.
Indoor unit
utdoor unit
Ê
escription to maintain the air conditioner properly.
The checks and maintenance operations described are essential to
ciency of the air conditioner. The frequency of these operations varies according to the
e
characteristics o
is ver
in
. There may be internal damage if moisture is left in components.
e Description
lean the air lter
lean the condensate drain pan (2)
Thoroughly clean the heat exchanger (2)
lean the condensate drain pipe (2)
Replace the remote control batteries
lean the heat exchanger on the outside of
the unit (2
lean the heat exchanger on the inside of
the unit (2
lean the electric components with jets of
air (2)
Verify that all the electric components are
tightened (2
rml
lean the fan (2)
Verify that all the fan assembly is rml
tightened (2
lean the condensate drain pan (2)
the area, the amount of dust, etc.
dusty.
ormation, see the Installation Manual.
1)
1)
onthl
Ê
deifilauqybdemrofrepebsyawlatsumsnoitarepoesehT)2(
months
Ê
Ê
uarantee the
ltneuqerferomdemrofrepebdluohssnoitarepodebircsedehT)1(
nce a
ear
Ê
Ê
Ê
Ê
Ê
Ê
Ê
Ê
Ê
ehtotgniwollof,yllacidoireptinuroodtuo/roodniehtgnikcehcseriuqerkramkcehcsihT
noitallatsnifoaeraehtfi
deliatederomroF.lennosre
cleaning and maintaining
_31
Page 32
cleaning and maintaining the
y
p
p
air conditioner
AINTAINING YOUR AIR CONDITIONER
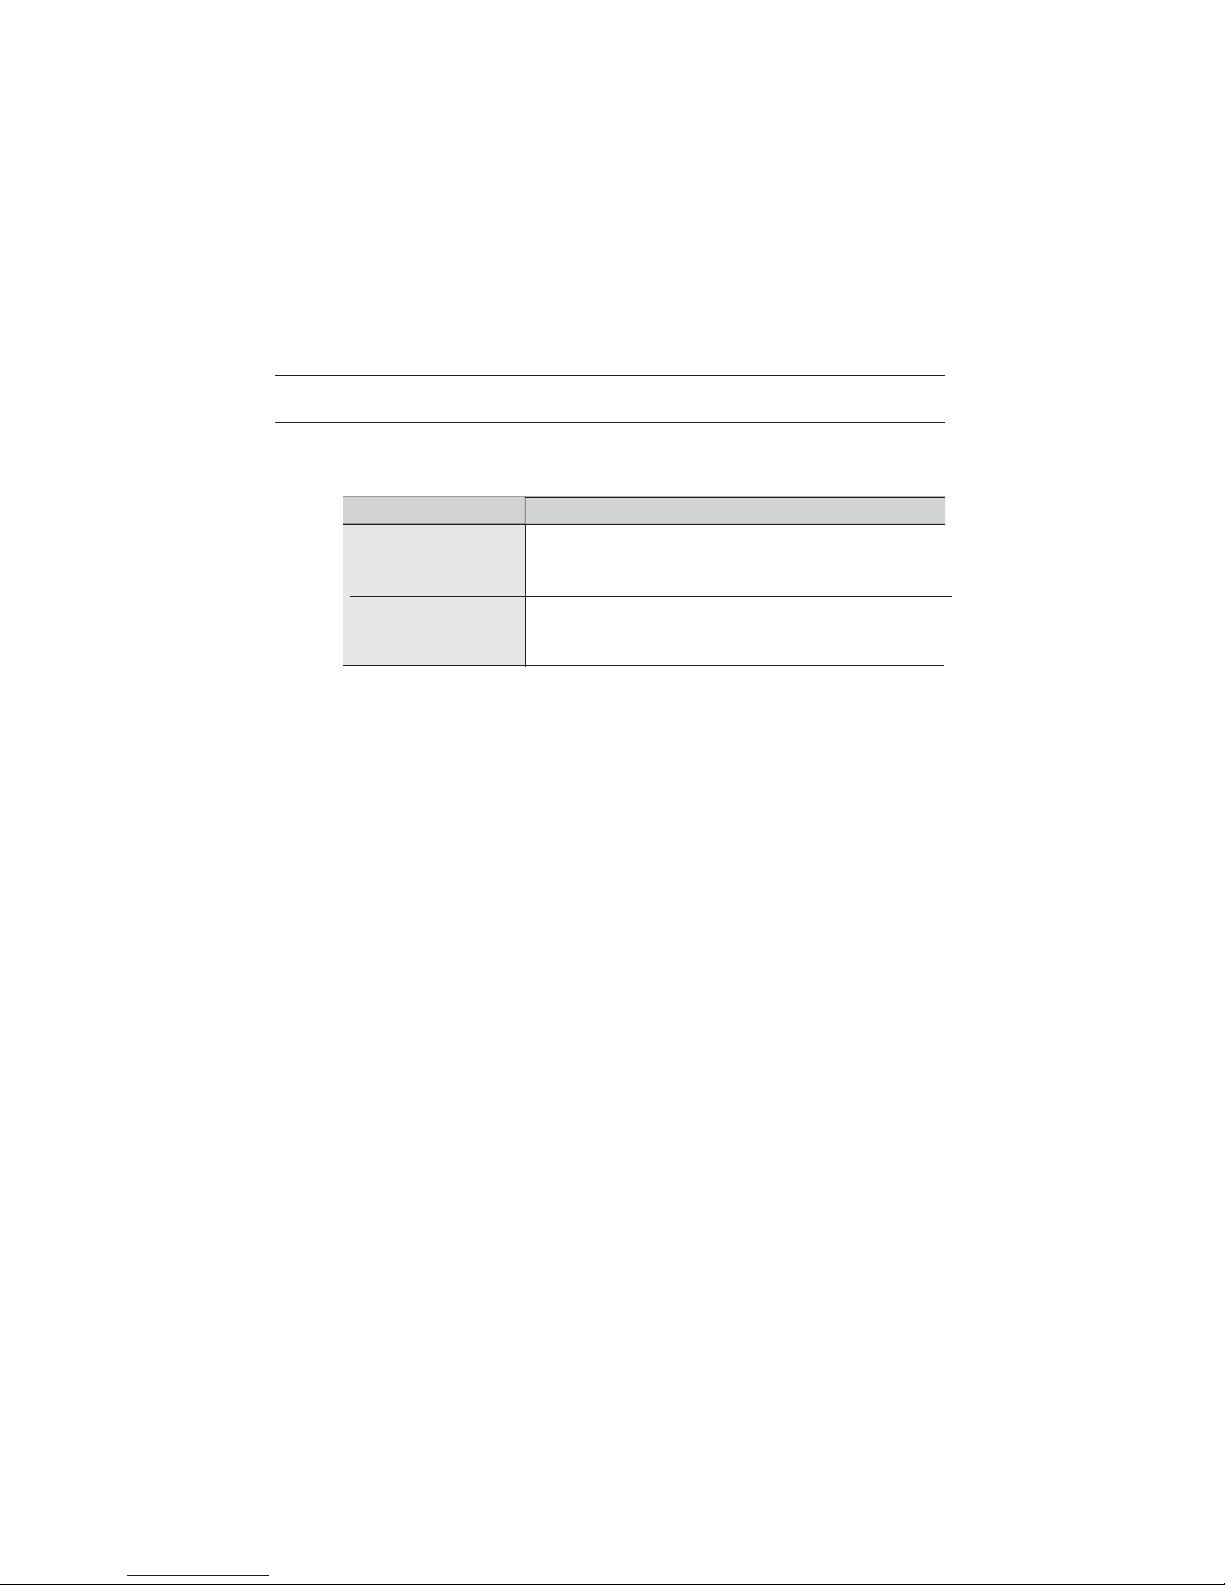
Internal protections via the unit control system
This internal protection operates if an internal fault occurs in the air conditioner.
e Description
Anti-protection of
nternal batter
Protect compressor
The compressor will be o to protect internal battery when the air
conditioner o
The air conditioner does not start operating immediately to protect the
com
erates in Cool mode.
ressor of the outdoor unit after it has been started.
32_ cleaning and maintaining
Page 33
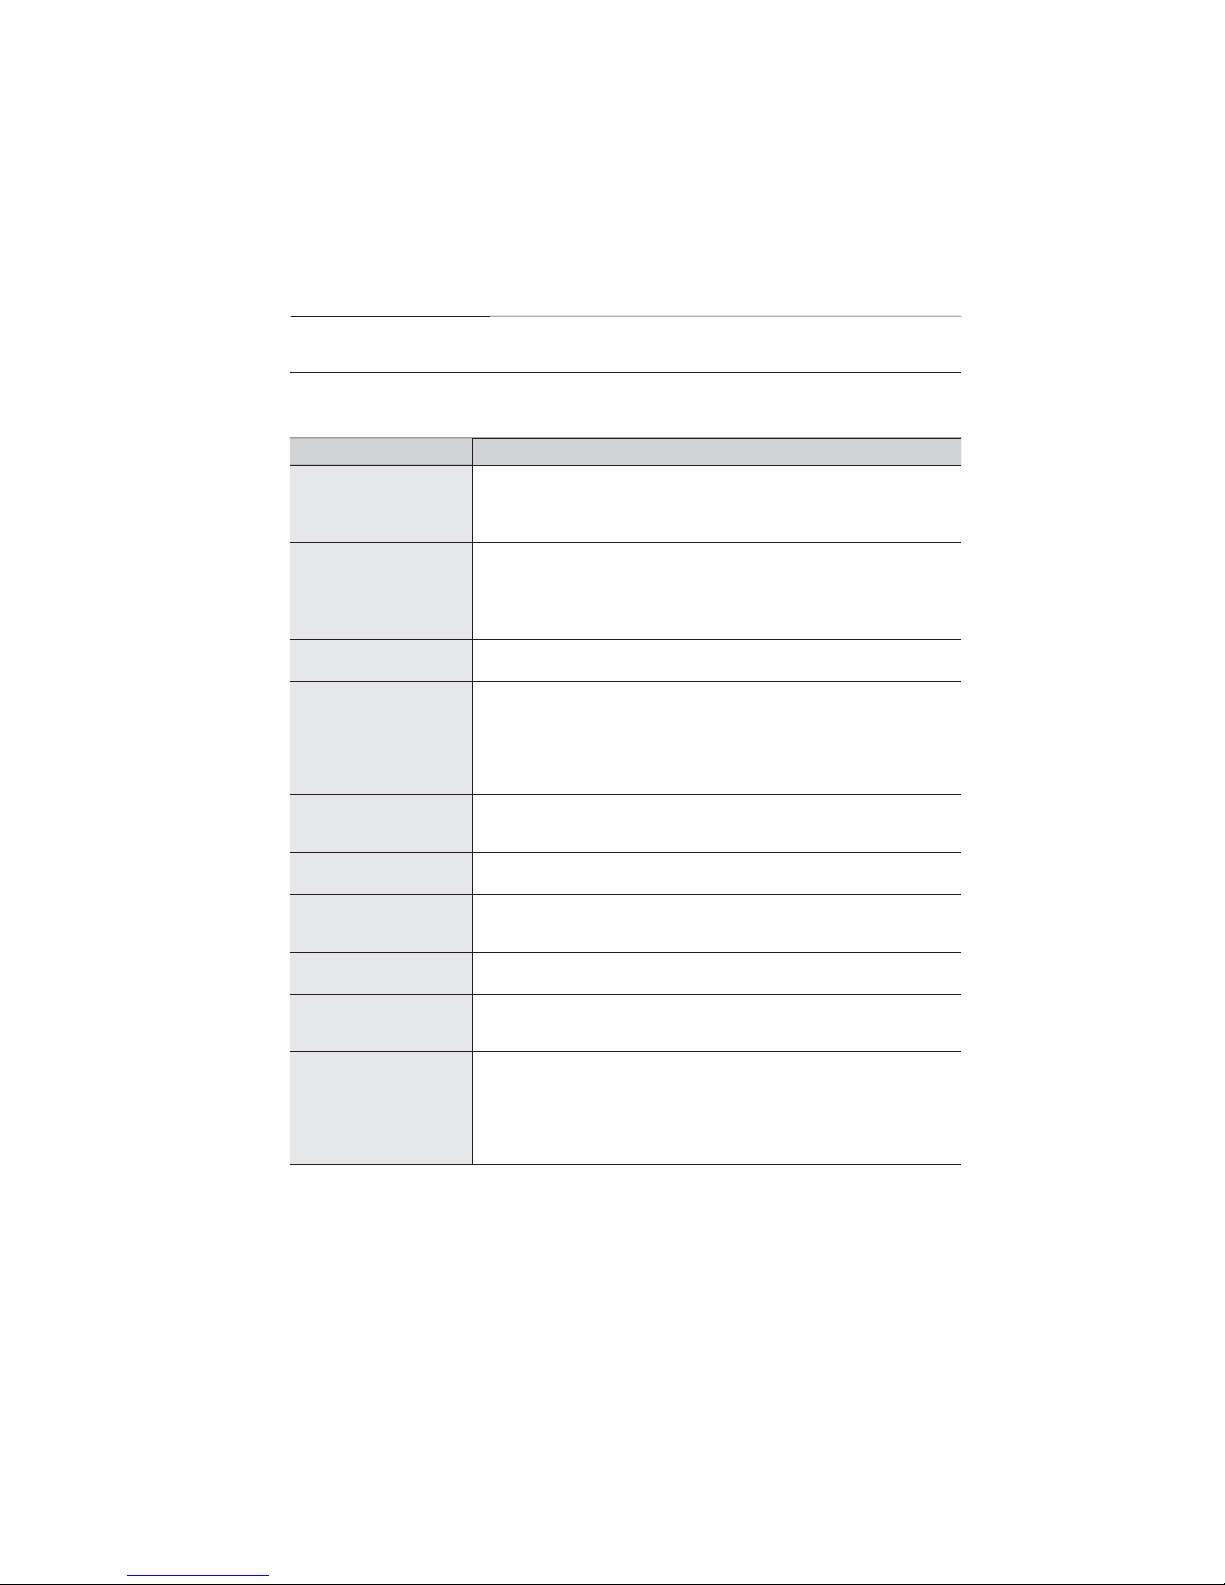
ROUBLESHOOTING
p
g
y
p
p
.
y
y
button on the remote control after you
g
p
p
g
p
Refer to the following chart if the air conditioner operates abnormal ly. This may save time and unnecessary
ex
enses.
PROBLEM SOLUTION
he air conditioner does
not operate immediately
after it has been
restarted.
he air conditioner does
not work at all.
he temperature does
not change.
he cool air does
not come out of the air
conditioner.
he fan speed does not
change.
imer function does not
set.
Odors permeate in the
room during operation.
he air conditioner
makes a bubbling sound.
Water is dripping from
the air ow blades.
Remote control is not
working.
Because of the protective mechanism, the appliance does not start
immediately to keep the unit from overloading.
operatin
The air conditioner will start in 3 minutes.
heck that the power plug is properly connected. Insert the power plug
into the wall socket correctl
heck if the circuit breaker is switched o.
heck if there is a power failure.
heck your fuse. Make sure it is not blown out.
heck if you selected Fan mode.
Press the
heck if the set temperature is higher(lower) than the current temperature.
Press the
temperature. Press the
tem
heck if the air lter is blocked by dirt. Clean the Air lter every two weeks.
heck if the air conditioner has just been turned on. If so, wait 3 minutes.
heck if you selected Auto or Dry mode.
The air conditioner automaticall
mode.
heck if you press the Set/Cancel
have set the time.
heck if the appliance is running in a smoky area or if there is a smell
enterin
the windows to air out the room.
A bubbling sound may be heard when the refrigerant is circulating through
the com
heck if the air conditioner has been cooling for an extended period of
time with the air ow blades
enerate due to the dierence in temperature.
heck if your batteries are depleted.
ake sure batteries are correctly installed.
ake sure nothing is blocking your remote control sensor.
heck that there are strong lighting apparatus near the air conditioner.
Stron
interru
ode button on the remote control to select another mode.
em
erature
from outside. Operate the air conditioner in Fan mode or open
ressor. Let the air conditioner operate in a selected mode.
light which comes from uorescent bulbs or neon signs may
t the electric waves.
.
button on the remote control to change the set
empor
button to increase or decrease the
adjusts the fan speed to Auto in Auto/Dr
ointed downwards. Condensation may
appendix
_33
Page 34
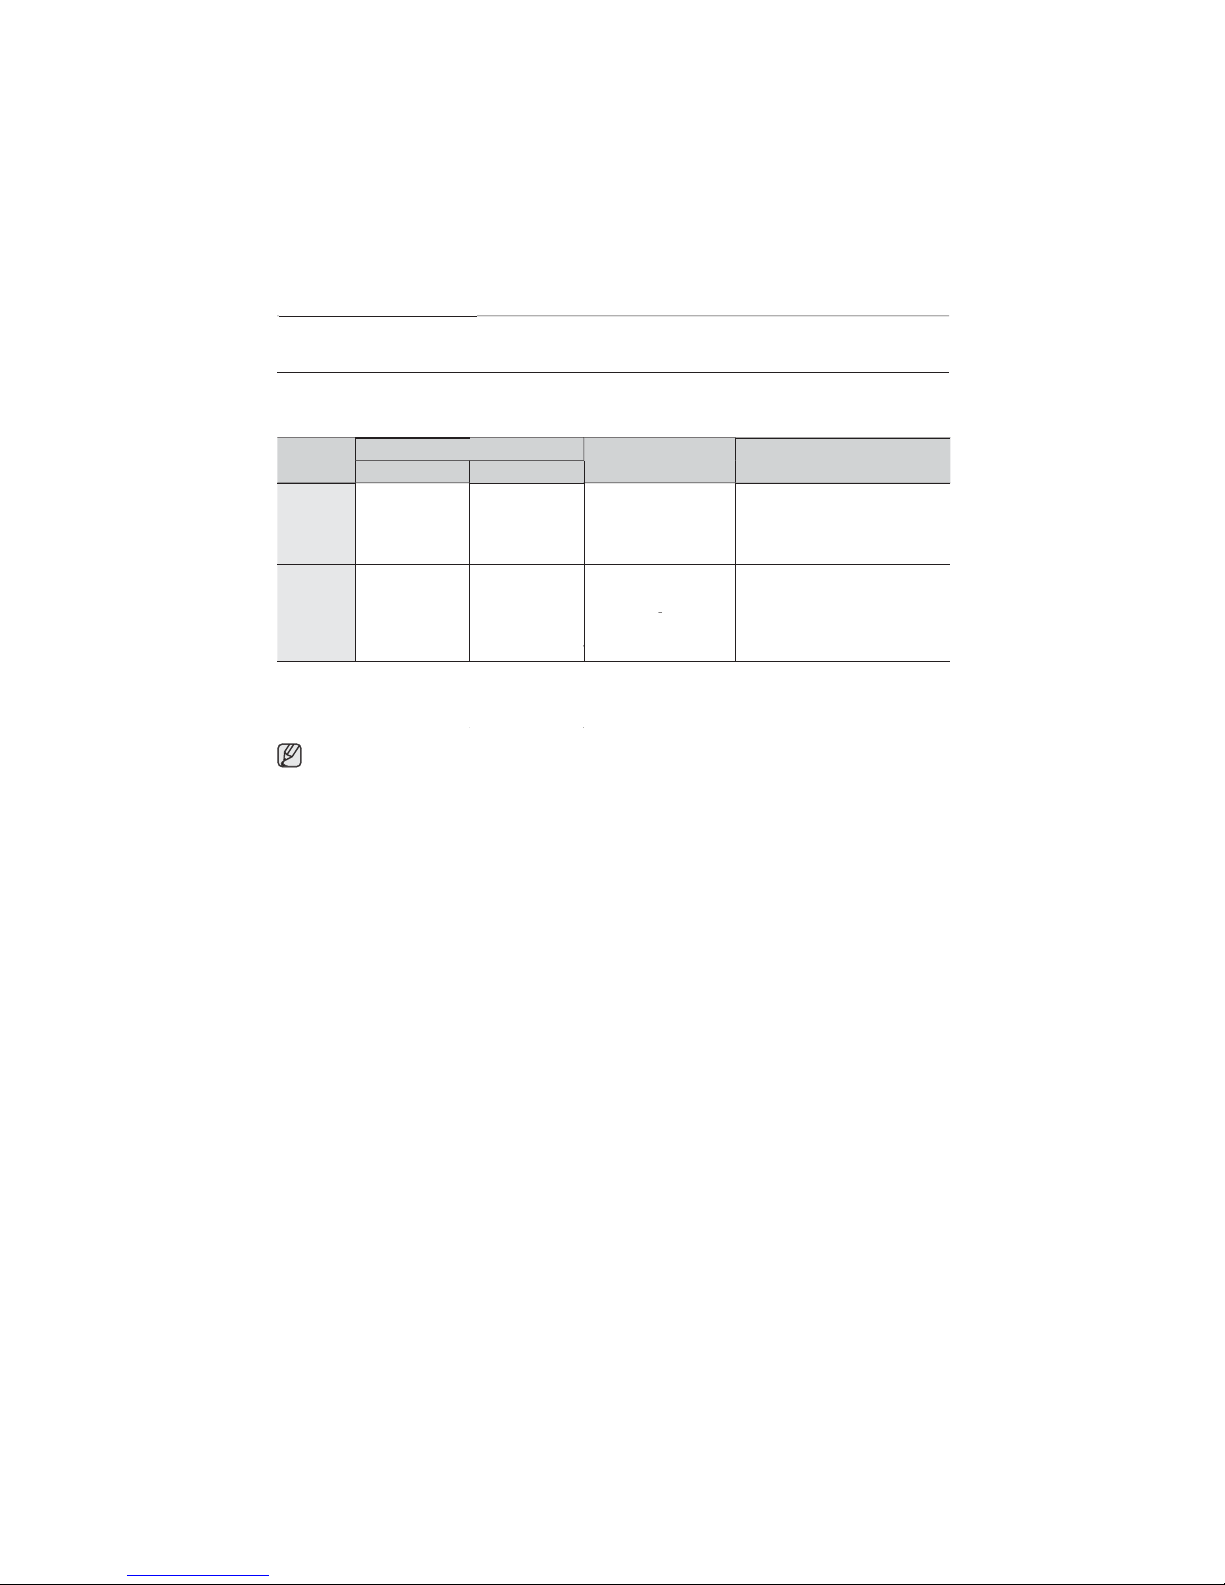
PERATION RANGES
f
.
.
The table below indicates the temperature and humidity ranges the air conditioner can be operated within.
er to the table for ecient use.
Re
ODE
OOLING 16˚C to 32˚C 15˚C to 43˚C 80% or less
DRYING
PERATIONAL TEMPERATURE
INDOOR
18˚C to 32˚C
f the cooling operation is used at over 32˚C(indoor temperature), it does not cool at its full capacity.
UTDOOR
15˚C to 43˚C
INDOOR HUMIDITY IF OUT OF CONDITIONS
ondensation may occur on
the oor
ondensation may occur on
the oor
34_
appendix
Page 35
memo_35
Page 36
Contact SAMSUNG WORLD WIDE
If you have any comments or questions regarding a Samsung products, contact the SAMSUNG
customer care center.
Country
INDIA 3030 8282, 1600 1100 11 www.samsung.com/in
INDONESIA 0800-112-8888 www.samsung.com/id
PHILIPPINES 1800-10-SAMSUNG(7267864) www.samsung.com/ph
SINGAPORE 1800-SAMSUNG (7267864) www.samsung.com/sg
THAILAND 1800-29-3232, 02-689-3232 www.samsung.com/th
AGENTINA 0800-333-3733
Samsung Electronics Co.,Ltd. All Rights Reserved.
C
Customer Care Center
Web Site
ym/moc.gnusmas.www9999-88-0081AISYALAM
wt/moc.gnusmas.www999-923-0080NAWIAT
nv/moc.gnusmas.www9888850081MANTEIV
www.samsung.com/ar
 Loading...