

Samsung AR**MXWS Series, AR**NXPX Series, AR**MXPD Series, AR**NXWX Series, AR**NXCX Series Installation Manual
Air conditioner
Installation manual
AR**MXWS*** / AR**MXPD***/ AR**NXPX*** /
AR**NXWX*** / AR**NXCX***
• Thank you for purchasing this Samsung air conditioner.
• Before operating this unit, please read this user manual carefully and retain it for future
reference.

2
English
Contents
Installation 3
Safety Information on Installation 3
Preparation 8
Step 1.1 Choosing the installation location
Step 1.2 Checking and preparing accessories and tools
Step 1.3 Drilling a hole through the wall
Step 1.4 Taping the pipes, cables, and drain hose
Indoor Unit Installation 12
Step 2.1 Disassembling the cover panel
Step 2.2 Disassembling the installation plate
Step 2.3 Connecting the power and communication cables (assembly cable)
Step 2.4 Optional: Extending the power cable
Step 2.5 Installing and connecting the drain hose
Step 2.6 Optional: Extending the drain hose
Step 2.7 Optional: Changing the direction of the drain hose
Step 2.8 Installing and connecting the assembly pipes to the refrigerant pipes (assembly pipe)
Step 2.9 Shortening or extending the refrigerant pipes (assembly pipe)
Step 2.10 Fixing the installation plate
Step 2.11 Fixing the indoor unit to the installation plate
Step 2.12 Assembling the cover panel
Outdoor Unit Installation 21
Step 3.1 Fixing the outdoor unit in place
Step 3.2 Connecting the power and communication cables and the refrigerant pipes
Step 3.3 Evacuating the air
Step 3.4 Adding refrigerant
Step 3.5 Important information: regulation regarding the refrigerant used
Installation Inspection 25
Step 4.1 Performing the gas leak tests
Step 4.2 Running the Smart Install mode
Step 4.3 Performing final check and trial operation
Maintenane Procedures 28
Sub PCB installation(optional) 29
For information on Samsung’s environmental commitments and product-specific regulatory obligations, e.g.
REACH, WEEE, Batteries, visit : samsung.com/uk/aboutsamsung/samsungelectronics/corporatecitizenship/
data_corner.html

3
English
Installation
Carefully follow the precautions listed below because
they are essential to guarantee the safety of both the air
conditioner and the workers.
• Always disconnect the air conditioner from the
power supply before servicing it or accessing its
internal components.
• Verify that installation and testing operations are
performed by qualified personnel.
• Verify that the air conditioner is not installed in an
easily accessible area.
General information
• Carefully read the content of this manual before
installing the air conditioner and store the manual in
a safe place in order to be able to use it as reference
after installation.
• For maximum safety, installers should always
carefully read the following warnings.
• Store the operation and installation manual in a safe
location and remember to hand it over to the new
owner if the air conditioner is sold or transferred.
• This manual explains how to install an indoor unit
with a split system with two SAMSUNG units. The
use of other types of units with different control
systems may damage the units and invalidate the
warranty. The manufacturer shall not be responsible
for damages arising from the use of non compliant
units.
• The manufacturer shall not be responsible for
damage originating from unauthorised changes
or the improper connection of electric and
requirements set forth in the “Operating limits”
table, included in the manual, shall immediately
invalidate the warranty.
• The air conditioner should be used only for the
applications for which it has been designed: the
indoor unit is not suitable to be installed in areas
used for laundry.
• Do not use the units if damaged. If problems occur,
switch the unit off and disconnect it from the power
supply.
• In order to help prevent electric shocks, fires or
injuries, always stop the unit, disable the protection
switch and contact SAMSUNG’s technical support if
the unit produces smoke, if the power cable is hot or
damaged or if the unit is very noisy.
• Always remember to inspect the unit, electric
connections, refrigerant tubes and protections
regularly. These operations should be performed by
qualified personnel only.
• The unit contains moving parts, which should always
be kept out of the reach of children.
• Do not attempt to repair, move, alter or reinstall the
unit. If performed by unauthorised personnel, these
operations may cause electric shocks or fires.
• Do not place containers with liquids or other objects
on the unit.
• All the materials used for the manufacture and
packaging of the air conditioner are recyclable.
• The packing material and exhaust batteries of the
remote control (optional) must be disposed of in
accordance with current laws.
• The air conditioner contains a refrigerant that has
to be disposed of as special waste. At the end of its
life cycle, the air conditioner must be disposed of in
authorised centres or returned to the retailer so that
it can be disposed of correctly and safely.
• Do not use means to accelerate the defrost
operation or to clean, other than those
recommended by Samsung.
• Do not pierce or burn.
• Be aware that refrigerants may not contain an
odour.
Installation of the product
• IMPORTANT: When installing the unit, always
remember to connect first the refrigerant tubes,
then the electrical lines. Always disassemble the
electric lines before the refrigerant tubes.
• Upon receipt, inspect the product to verify that
it has not been damaged during transport. If the
product appears damaged, DO NOT INSTALL it and
immediately report the damage to the carrier or
retailer (if the installer or the authorised technician
has collected the material from the retailer.)
• After completing the installation, always carry out a
functional test and provide the instructions on how
to operate the air conditioner to the user.
Safety Information on Installation

4
English
Installation
• Do not use the air conditioner in environments with
hazardous substances or close to equipment that
release free flames to avoid the occurrence of fires,
explosions or injuries.
• Our units must be installed in compliance with the
spaces indicated in the installation manual to ensure
either accessibility from both sides or ability to
perform routine maintenance and repairs. The units’
components must be accessible and that can be
disassembled in conditions of complete safety either
for people or things. For this reason, where it is not
observed as indicated into the Installation Manual,
the cost necessary to reach and repair the unit (in
safety, as required by current regulations in force)
with slings, trucks, scaffolding or any other means of
elevation won’t be considered in-warranty and will
be charged to end user.
• The outdoor unit shall be installed in an open space
that is always ventilated.
• The local gas regulations shall be observed.
• To handle, purge, and dispose the refrigerant, or
break into the refrigerant circuit, the worker should
have a certificate from an industry-accredited
authority.
• Do not install the indoor unit in the following areas:
– Area filled with minerals, splashed oil, or
steam. It will deteriorate plastic parts, causing
failure or leakage.
– Area that is close to heat sources.
– Area that produces substances such as sulfuric
gas, chlorine gas, acid, and alkali. It may cause
corrosion of the pipings and brazed joints.
– Area that can cause leakage of combustible
gas and suspension of carbon fibers,
flammable dust, or volatile flammables.
– Area where refrigerant leaks and settles.
– Area where animals may urinate on the
product. Ammonia may be generated.
• Do not use the indoor unit for preservation of food
items, plants, equipment, and art works. This may
cause deterioration of their quality.
• Do not install the indoor unit if it has any drainage
problem.
• When installing the outdoor unit at the seaside,
make sure that it is not directly exposed to sea
breeze. If you cannot find an adequate place free
from direct sea breeze, construct a protection wall or
a protective fence.
– Install the outdoor unit in a place (such as
near buildings etc.) where it can be protected
from sea breeze. Failure to do so may cause a
damage to the outdoor unit.
Sea
Sea breeze
Outdoor unit Outdoor unit
Sea breeze
Sea
• If you cannot avoid installing the outdoor unit at the
seaside, construct a protection wall around to block
the sea breeze.
• Construct a protection wall with a solid material
such as concrete to block the sea breeze. Make sure
that the height and the width of the wall are 1.5
times larger than the size of the outdoor unit. Also,
secure a space larger than 600 mm between the
protection wall and the outdoor unit for exhausted
air to ventilate.
Sea
Sea breeze
Outdoor unit
Protection wall
Outdoor unit
Protection wall
• Install the unit in a place where water can drain
smoothly.
• If you have any difficulty finding installation location
as prescribed above, contact your manufacturer for
details.
• Be sure to clean the sea water and the dust on the
heat exchanger of the outdoor unit and apply a
corrosion inhibitor on it. (At least once in a year.)
• For the multi system, this indoor unit can be
conncected to an R-32 or R-410A outdoor unit. Check
the type of refrigerant in the outdoor unit.
• In addition to table 1, make sure that the indoor and
outdoor unit are installed in a space at least of 4m²
to guarantee the regular maintenance or service
repair.

5
English
Installation
• Table 1 (defined according to EN378-1:2017)
[Unit : m2]
Installation
height (m)
1.224
1.225
1.250
1.500
1.750
2.000
2.250
2.500
0.6
No limitations
12.77 13.30 19.15 26.0 6 34.04 43.09 53.19
1 4.60 4.79 6.89 9.38 12.26 15.51 19.15
1.8 1.42 1.48 2.1 3 2.9 0 3.78 4.79 5.91
2 1.15 1. 20 1.72 2.35 3.06 3.88 4.79
2.2 0.95 0 .99 1.42 1.94 2.53 3.20 3.9 6
•IMPORTANT: it’s mandatory to consider either
the table 1 or taking into consideration the local
law regarding the minimum living space of the
premises.
•Minimum installation height of indoor unit is 0.6 m
for floor mounted, 1.8 m for wall, 2.2 m for ceiling.
Installation of the outdoor unit
• While in installation or relocation of the product, do
not mix the refrigerant with other gases including
air or unspecified refrigerant. Failure to do so may
cause pressure increase to result in rupture or injury.
• Do not cut or burn the refrigerant container or
pipings.
• Use clean parts such as manifold gauge, vacuum
pump, and charging hose for the refrigerant.
• Installation must be carried out by qualified
personnel for handling the refrigerant. Additionally,
reference the regulations and laws.
• Be careful not to let foreign substances (lubricating
oil, refrigerant, water, etc.) enter the pipings. The
application of oil or refrigerant deteriorates the
pipings to result in drain leakage. For storage,
securely seal their openings.
• When mechanical ventilation is required, ventilation
openings shall be kept clear of obstruction.
• For disposal of the product, follow the local laws and
regulations.
• Do not work in a confined place.
• The work area shall be blocked.
• The refrigerant pipings shall be installed in the
position where there are no substances that may
result in corrosion.
• The following checks shall be performed for
installation:
– The charging amount depends on the room
size.
– The ventilation devices and outlets are
operating normally and are not obstructed.
– Markings and signs on the equipment shall be
visible and legible.
• Upon leakage of the refrigerant, ventilate the room.
When the leaked refrigerant is exposed to flame, it
may cause generation of toxic gases.
• Make sure that the work area is safe from
flammable substances.
• To purge air in the refrigerant, be sure to use a
vacuum pump.
• Note that the refrigerant has no odour.
• The units are not explosion proof so they must be
installed with no risk of explosion.
• This product contains fluorinated gases that
contribute to global greenhouse effect. Accordingly,
do not vent gases into the atmosphere.
• Because the working pressure for R-32 is 1.6 times
higher than that for R-22, use exclusive pipings
and tools specified. In case of replacing an R-22
model with an R-32 model, be sure to replace the
conventional pipings and flare nuts with exclusive
ones.
• The models that use the refrigerant R-32 have a
different thread diameter for the charging port
to prevent charging failure. Therefore, check its
diameter (1/2 inch) in advance.
• Servicing shall be performed as recommended by
the manufacturer. In case other skilled persons are
joined for servicing, it shall be carried out under
supervision of the person who is competent in
handling flammable refrigerants.
• For servicing the units containing flammable
refrigerants, safety checks are required to minimise
the risk of ignition.
• Servicing shall be performed following the
controlled procedure to minimize the risk of
flammable refrigerant or gases.
• Do not install where there is a risk of combustible
gas leakage.
• Do not place heat sources.
• Be cautious not to generate a spark as follows:
– Do not remove the fuses with power on.
Charge
amount (kg)

6
English
Installation
– Do not disconnect the power plug from the
wall outlet with power on.
– It is recommended to locate the outlet in a
high position. Place the cords so that they are
not tangled.
• If the indoor unit is not R-32 compatible, an error
signal appears and the unit will not operate.
• After installation, check for leakage. Toxic gas may
be generated and if it comes into contact with an
ignition source such as fan heater, stove, and cooker.
cylinders, make sure that only the refrigerant
recovery cylinders are used.
Preparation of fire extinguisher
• If a hot work is to be done, an appropriate fire
extinguishing equipment should have been
available.
• A dry powder or CO2 fire extinguisher shall be
equipped near the charging area.
Ignition sources free
• Make sure to store the units in a place without
continuously operating ignition sources (for
example, open flames, an operating gas appliance
or an operating electric heater).
• The service engineers shall not use any ignition
sources with the risk of fire or explosion.
• Potential ignition sources shall be kept away from
the work area where the flammable refrigerant can
possibly be released to the surrounding.
• The work area should be checked to ensure that
there are no flammable hazards or ignition risks.
The “No Smoking” sign shall be attached.
• Under no circumstances shall potential sources of
ignition be used while in detection of leakage.
• Make sure that the seals or sealing materials have
not degraded.
• Safe parts are the ones with which the worker can
work in a flammable atmosphere. Other parts may
result in ignition due to leakage.
• Replace components only with parts specified by
Samsung. Other parts may result in the ignition of
refrigerant in the atmosphere from a leak.
Area ventilation
• Make sure that the work area is well ventilated
before performing a hot work.
• Ventilation shall be made even during the work.
• The ventilation should safely disperse any
released gases and preferably expel them into the
atmosphere.
• Ventilation shall be made even during the work.
Leakage detection methods
• The leakage detector shall be calibrated in a
refrigerant-free area.
• Make sure that the detector is not a potential
source of ignition.
• The leakage detector shall be set to the LFL (lower
flammability limit).
• The use of detergents containing chlorine shall be
avoided for cleaning because the chlorine may react
with the refrigerant and corrode the pipings.
• If leakage is suspected, naked flames shall be
removed.
• If a leakage is found while in brazing, the entire
refrigerant shall be recovered from the product or
isolated (e.g. using shut-off valves). It shall not be
directly released to the environment. Oxygen free
nitrogen (OFN) shall be used for purging the system
before and during the brazing process.
• The work area shall be checked with an appropriate
refrigerant detector before and during work.
• Ensure that the leakage detector is appropriate for
use with flammable refrigerants.
Labelling
• The parts shall be labelled to ensure that they have
been decommissioned and emptied of refrigerant.
• The labels shall be dated.
• Make sure that the labels are affixed on the system
to notify it contains flammable refrigerant.

7
English
Installation
Recovery
• When removing refrigerant from the system for
servicing or decommissioning, it is recommended to
remove the entire refrigerant.
• When transferring refrigerant into cylinders, make
sure that only the refrigerant recovery cylinders
are used.
• All cylinders used for the recovered refrigerant shall
be labelled.
• Cylinders shall be equipped with pressure relief
valves and shut-off valves in a proper order.
• Empty recovery cylinders shall be evacuated and
cooled before recovery.
• The recovery system shall operate normally
according to the specified instructions and shall be
suitable for refrigerant recovery.
• In addition, the calibration scales shall operate
normally.
• Hoses shall be equipped with leak-free disconnect
couplings.
• Before starting the recovery, check for the status of
the recovery system and sealing state. Consult with
the manufacturer if suspected.
• The recovered refrigerant shall be returned to the
supplier in the correct recovery cylinders with the
Waste Transfer Note attached.
• Do not mix refrigerants in the recovery units or
cylinders.
• If compressors or compressor oils are to be
removed, make sure that they have been evacuated
to the acceptable level to ensure that flammable
refrigerant does not remain in the lubricant.
• The evacuation process shall be performed before
sending the compressor to the suppliers.
• Only the electrical heating to the compressor body
is allowed to accelerate the process.
• Oil shall be drained safely from the system.
• For installation with handling the refrigerant
(R-32), use dedicated tools and piping materials.
Because the pressure of the refrigerant, R-32 is
approximately 1.6 times higher than that of R-22,
failure to use the dedicated tools and piping
materials may cause rupture or injury. Furthermore,
it may cause serious accidents such as water
leakage, electric shock, or fire.
• Never install a motor-driven equipment to prevent
ignition.
Power supply line, fuse, or circuit
breaker
• Always make sure that the power supply is
compliant with current safety standards. Always
install the air conditioner in compliance with
current local safety standards.
• Always verify that a suitable grounding
connection is available.
• Verify that the voltage and frequency of the
power supply comply with the specifications and
that the installed power is sufficient to ensure
the operation of any other domestic appliance
connected to the same electric lines.
• Always verify that the cut-off and protection
switches are suitably dimensioned.
• Verify that the air conditioner is connected to the
power supply in accordance with the instructions
provided in the wiring diagram included in the
manual.
• Always verify that electric connections (cable
entry, section of leads, protections…) are
compliant with the electric specifications and
with the instructions provided in the wiring
scheme. Always verify that all connections comply
with the standards applicable to the installation
of air conditioners.
•Be sure not to perform power cable modification,
extension wiring, and multiple wire connection.
– It may cause electric shock or fire due to poor
connection, poor insulation, or current limit
override.
– When extension wiring is required due
to power line damage, refer to "Step 2.4
Optional: Extending the power cable" in the
installation manual.

8
English
Installation
Step 1.1 Choosing the installation
location
If using a multi system, install as described in the
installation manual supplied with the outdoor
unit.
Overview of installation location requirements
CAUTION
CAUTION
• Comply with the length and height limits
described in the figure above.
• For the product that uses the R-32 refrigerant,
Install the indoor unit on the wall 1.8 m or higher
from the floor.
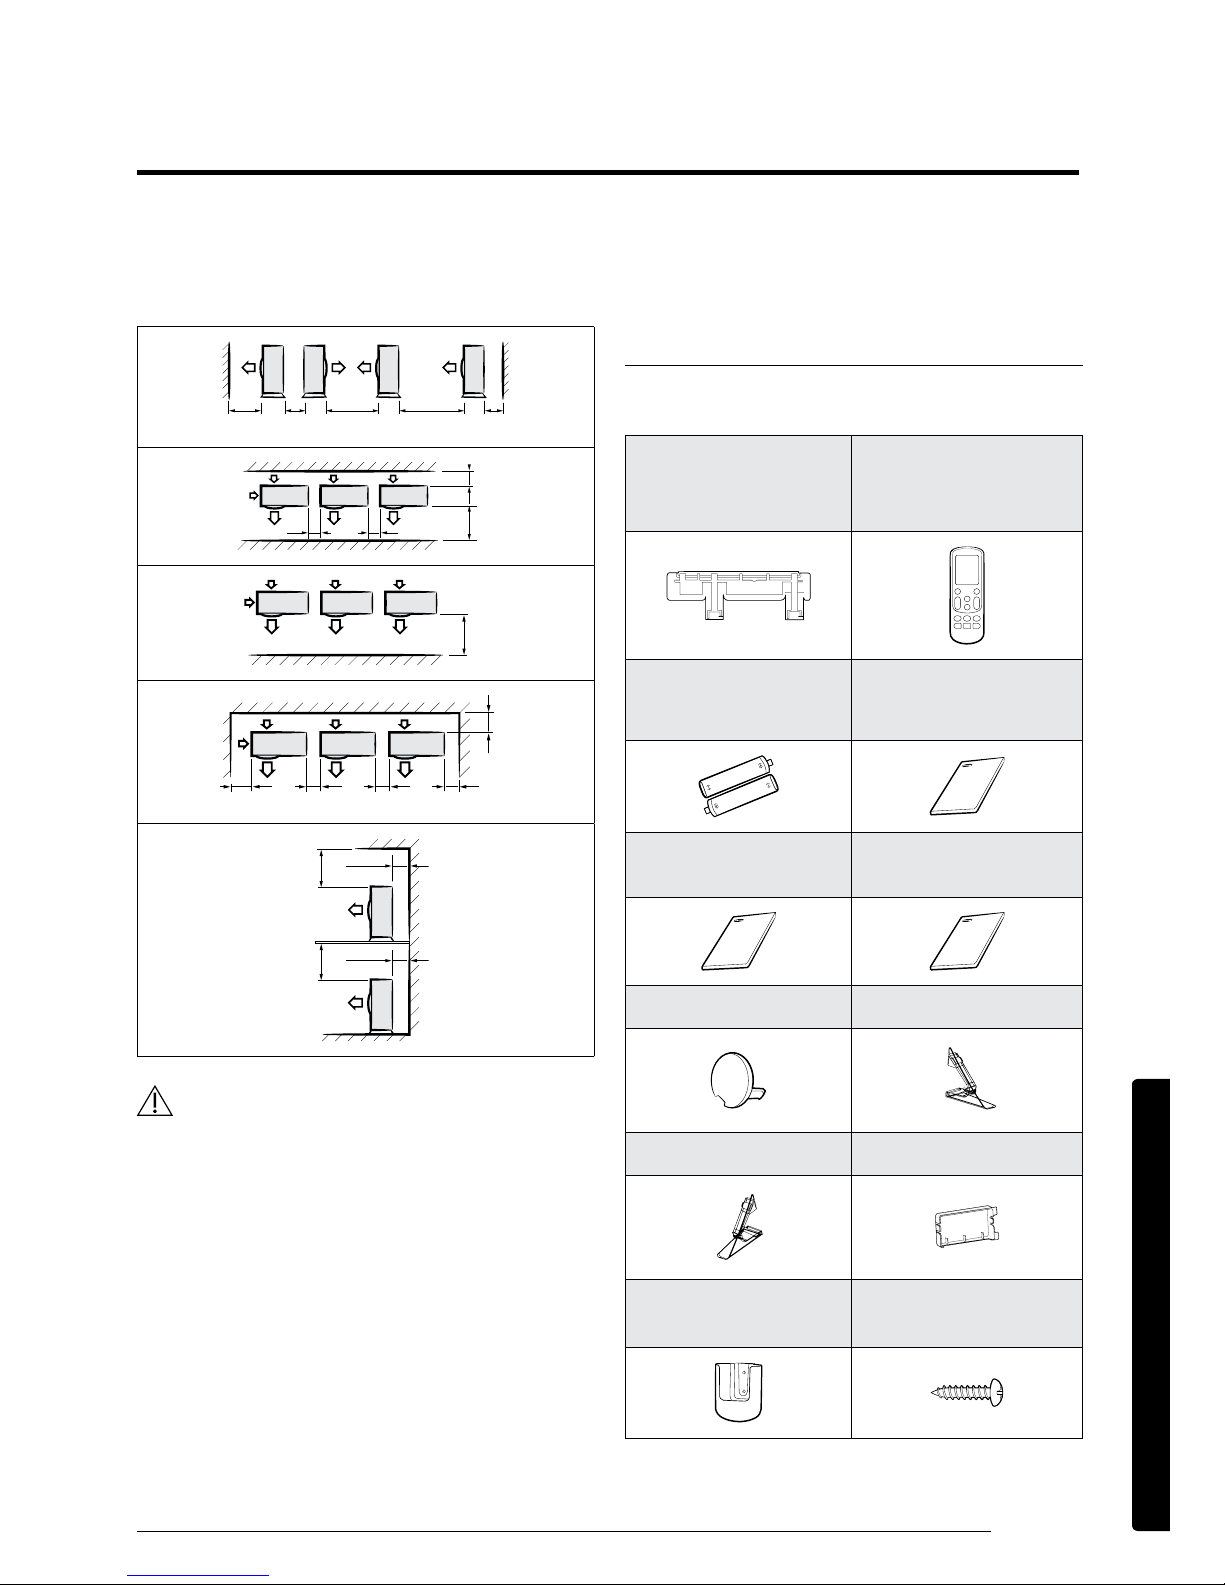
Minimum clearances for the outdoor unit
Wall
Minimum clearance in mm
300
600
Air flow direction
Side viewTop view
When installing 1 outdoor unit (6 cases)
(Unit: mm)
300
1500
300
150 600
1500
2000
500
300
300 1500
(Unit : m)
Model
Pipe length Pipe height
Minimum Maximum Maximum
**07*******
**09*******
**12*******
3 15 8
Preparation
100 mm or more
125 mm
or more
125 mm
or more
Drain hose hole
You can select the direction of
draining (left or right).
Maximum pipe height
Make at least one round to
reduce noise and vibration.
The actual units may look different from
the images depicted here.
Make a U-trap (A) on the pipe
(which is connected to the indoor
unit) at outer wall and cut the
bottom part of the insulation
(about 10 mm) to prevent
rainwater from getting inside
through the insulation.
Outdoor
Unit
Outer wall
Indoor
Unit
Cut insulation to have
rainwater drained
Maximum pipe
length
9
English
Installation
When installing more than 1 outdoor unit (5 cases)
(Unit: mm)
1500 600 3000 2003000
3001500
600 600
1500
300
300 600 600 600
500
300
500
300
CAUTION
• If the outdoor unit is installed with any insufficient
clearance, it may generate sound and affect the
whole product.
• Be sure to install the outdoor unit in a level place
where its vibration does not affect the whole
product.
Step 1.2 Checking and preparing
accessories and tools
Accessories
Accessories in the indoor unit package
Installation plate (1)
**07*******
**09*******
**12*******
Remote control (1)
Remote control battery (2)
User Manual (1)
AR**MX*****
AR**NX*****
User Manual (3)
AR**NXCX***
Installation Manual (1)
Cap screw (2) Guide Left (1)
Guide Right (1) Case Sub PCB (1)
Remote control holder (1)
AR**NX*****
M4 x 12 tapping screw (2)
AR**NX*****
 Loading...