

Page 1
COLOR M ONITOR
AP17K*
AP17J*
SERV ICE
M anual
COLOR M ONITOR CONTENTS
1. Precautions
2. Product Specifications
3. Disassembly & Reassembly
4. Alignment & Adjustments
5. Troubleshooting
6. Exploded View & Parts List
7. Electrical Parts List
8. Block Diagram
9. Wiring Diagram
10. Schematic Diagrams
Page 2
1 Precautions
!
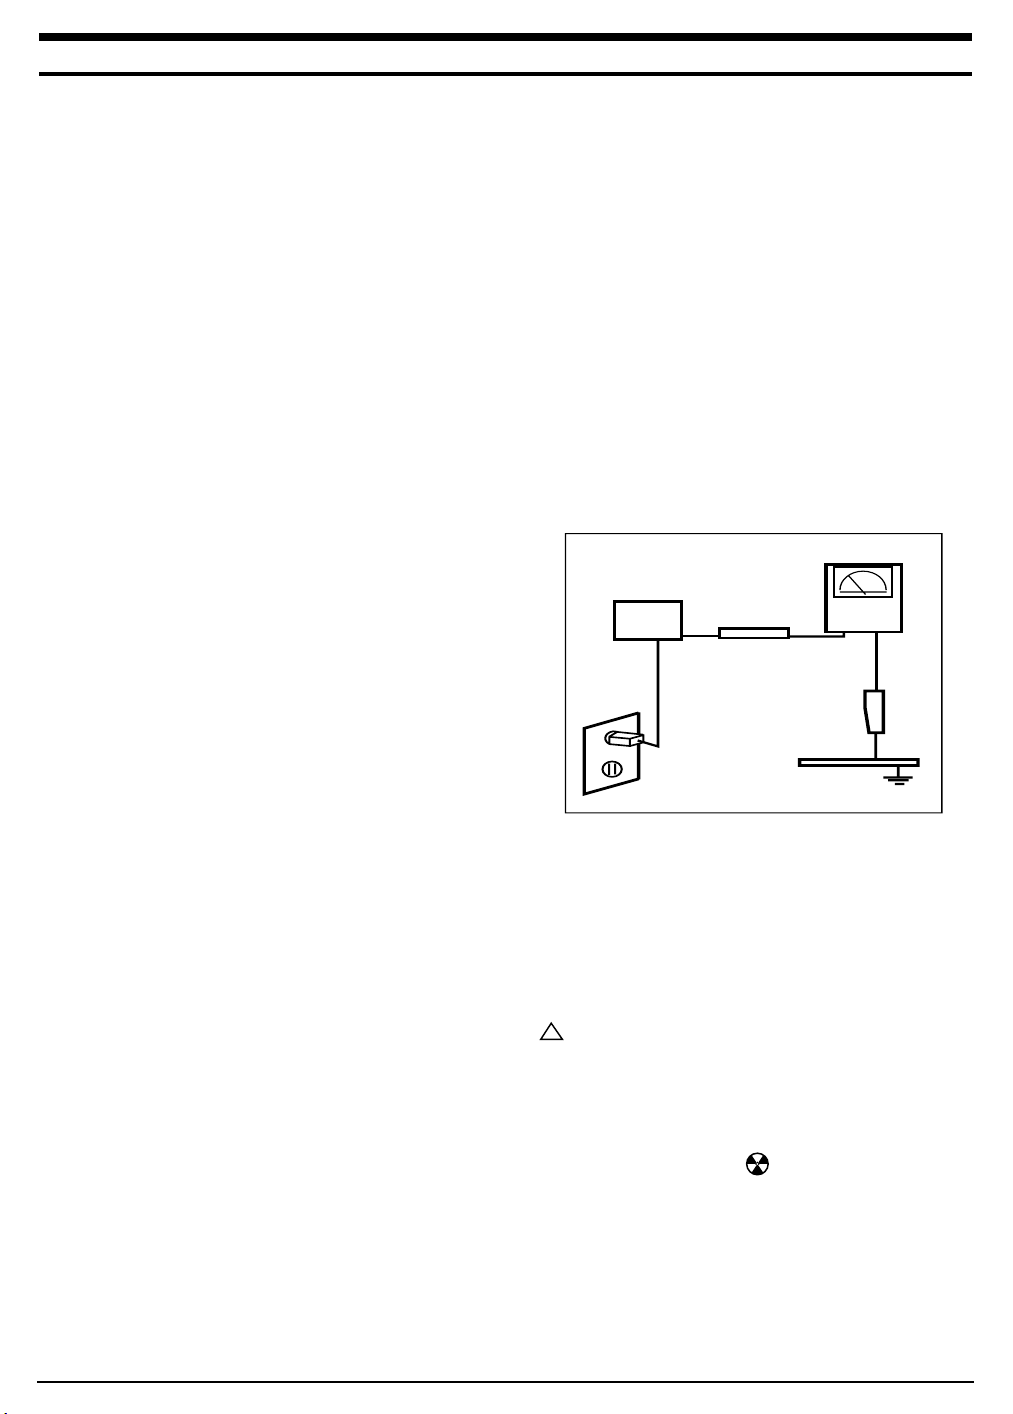
DEVICE
UNDER
TEST
TEST ALL
EXPOSED METAL
SURFACES
(READING SHOULD
NOT BE ABOVE 0.5mA)
LEAKAGE
CURRENT
TESTER
2-WIRE CORD
ALSO TEST WITH
PLUG REVERSED
(USING AC ADAPTER
PLUG AS REQUIRED)
EARTH
GROUND
1-1 Safety Precautions
WARNIN GS
1. For continued safety, do not attempt to modify the
circuit board.
2. Disconnect the AC power before servicing.
3. When the chassis is operating, semiconductor
heatsinks are potential shock hazards.
1-1-1 Servicing the High Voltage and CRT :
WARNING:A high voltage adjusted to t he w rong
value may cause excessive X-ray
emissions.
1. When servicing the high voltage system, remove
the static charge by connecting a 10 kohm resistor
in series with an insulated wire (such as a test
probe) between the chassis and the anode lead.
2. When troubleshooting a monitor with excessively
HV, avoid being unnecessarily close to the monitor.
Do not operate the monitor for longer than is
necessary to locate the cause of excessive voltage.
3. High voltage should always be kept at the rated
value, no higher. Only when high voltage is
excessive are X-rays capable of penetrating the shell
of the CRT, including the lead in glass material.
Operation at high voltages may also cause failure of
the CRT or high voltage circuitry.
4. When the HV regulator is operating properly, there
is no possibility of an X-ray problem. Make sure the
HV does not exceed its specified value and that it is
regulating correctly.
5. The CRT is especially designed to prohibit
X-ray emissions. To ensure continued X-ray
protection, replace the CRT only with one that is
the same or equivalent type as the original.
6. Handle the CRT only when wearing shatterproof
goggles and after completely discharging the high
voltage anode.
7. Do not lift the CRT by the neck.
1-1-2 Fire and Shock Hazard :
Before returning the monitor to the user, perform the
following safety checks:
1. Inspect each lead dress to make certain that the
leads are not pinched or that hardware is not
lodged between the chassis and other metal parts in
the monitor.
2. Inspect all protective devices such as nonmetallic
control knobs, insulating materials, cabinet backs,
adjustment and compartment covers or shields,
isolation resistor-capacitor networks, mechanical
insulators, etc.
3. Leakage Current Hot Check (Figure 1-1):
WARNIN G: Do not use an isolation transformer during
this test.
Use a leakage current tester or a metering system
that complies with American National Standards
Institute (ANSI C101.1, Leakage Current for
Appliances), and Underwriters Laboratories (UL
Publication UL1410, 59.7).
4. With the unit completely reassembled, plug the AC
line cord directly into a 120V AC outlet. With the
unit’s AC switch first in the ON position and then
OFF, measure the current between a known earth
ground (metal water pipe, conduit, etc.) and all
exposed metal parts, including: metal cabinets,
screwheads and control shafts. The current
measured should not exceed 0.5 milliamp. Reverse
the power-plug prongs in the AC outlet and repeat
the test.
Figure 1-1. Leakage Current Test Circuit
1-1-3 Product Safety Notices
Some electrical and mechanical parts have special
safety-related characteristics which are often not
evident from visual inspection. The protection they give
may not be obtained by replacing them with
components rated for higher voltage, wattage, etc. Parts
that have special safety characteristics are identified by
on schematics and parts lists. A substitute
replacement that does not have the same safety
characteristics as the recommended replacement part
might create shock, fire and / or other hazards. Product
safety is under review continuously and new
instructions are issued whenever appropriate.
Components identified by on schematics and parts
lists must be sealed by a soldering iron after
replacement and adjustment.
AP17K*/ AP17J* 1-1
Page 3

1 Precautions
1-2 Servicing Precautions
WARNING1: First read t he “Safety Precautions” section of this manual. If unforeseen circumstances
create conflict between the servicing precautions and safety precautions, always
follow the safety precautions.
WARNING2: A high voltage adjusted to the w rong value may cause excessive X-ray em issions.
WARNING3: An elect rolytic capacitor installed w ith the w rong polarity might explode.
1. Servicing precautions are printed on the cabinet,
and should be followed closely.
2. Always unplug the unit’s AC power cord from the
AC power source before attempting to: (a) remove
or reinstall any component or assembly, (b)
disconnect PCB plugs or connectors, (c) connect all
test components in parallel with an electrolytic
capacitor.
3. Some components are raised above the printed
circuit board for safety. An insulation tube or tape
is sometimes used. The internal wiring is
sometimes clamped to prevent contact with
thermally hot components. Reinstall all such
elements to their original position.
4. After servicing, always check that the screws,
components and wiring have been correctly
reinstalled. Make sure that the area around the
serviced part has not been damaged.
5. Check the insulation between the blades of the AC
plug and accessible conductive parts (examples:
metal panels, input terminals and earphone jacks).
6. Insulation Checking Procedure: Disconnect the
power cord from the AC source and turn the power
switch ON. Connect an insulation resistance meter
(500 V) to the blades of the AC plug.
The insulation resistance between each blade of the
AC plug and accessible conductive parts (see
above) should be greater than 1 megohm.
7. Never defeat any of the +B voltage interlocks. Do
not apply AC power to the unit (or any of its
assemblies) unless all solid-state heat sinks are
correctly installed.
8. Always connect a test instrument’s ground lead to
the instrument chassis ground before connecting
the positive lead; always remove the instrument’s
ground lead last.
1-3 Electrostatically Sensitive Devices (ESD) Precautions
Some semiconductor (solid state) devices can be easily damaged by static electricity. Such components are commonly
called Electrostatically Sensitive Devices (ESD). Examples of typical ESD devices are integrated circuits and some fieldeffect transistors. The following techniques will reduce the incidence of component damage caused by static electricity.
1. Immediately before handling any semiconductor
components or assemblies, drain the electrostatic
charge from your body by touching a known earth
ground. Alternatively, wear a discharging wriststrap device. To avoid a shock hazard, be sure to
remove the wrist strap before applying power to
the monitor.
2. After removing an ESD-equipped assembly, place it
on a conductive surface such as aluminum foil to
prevent accumulation of an electrostatic charge.
3. Do not use freon-propelled chemicals. These can
generate electrical charges sufficient to damage
ESDs.
4. Use only a grounded-tip soldering iron to solder or
desolder ESDs.
5. Use only an anti-static solder removal device. Some
solder removal devices not classified as “anti-static”
can generate electrical charges sufficient to damage
ESDs.
6. Do not remove a replacement ESD from its
protective package until you are ready to install it.
Most replacement ESDs are packaged with leads
that are electrically shorted together by conductive
foam, aluminum foil or other conductive materials.
7. Immediately before removing the protective
material from the leads of a replacement ESD,
touch the protective material to the chassis or
circuit assembly into which the device will be
installed.
Caution:
8. Minimize body motions when handling
unpackaged replacement ESDs. Motions such as
brushing clothes together, or lifting your foot from
a carpeted floor can generate enough static
electricity to damage an ESD.
9. Indicates ESDs on the Schematic Diagram in
this manual.
Be sure no pow er i s applied to t he
chassis or circu it and observe all
other safety precautions.
1-2 AP17K*/ AP17J*
Page 4
2 Product Specifications
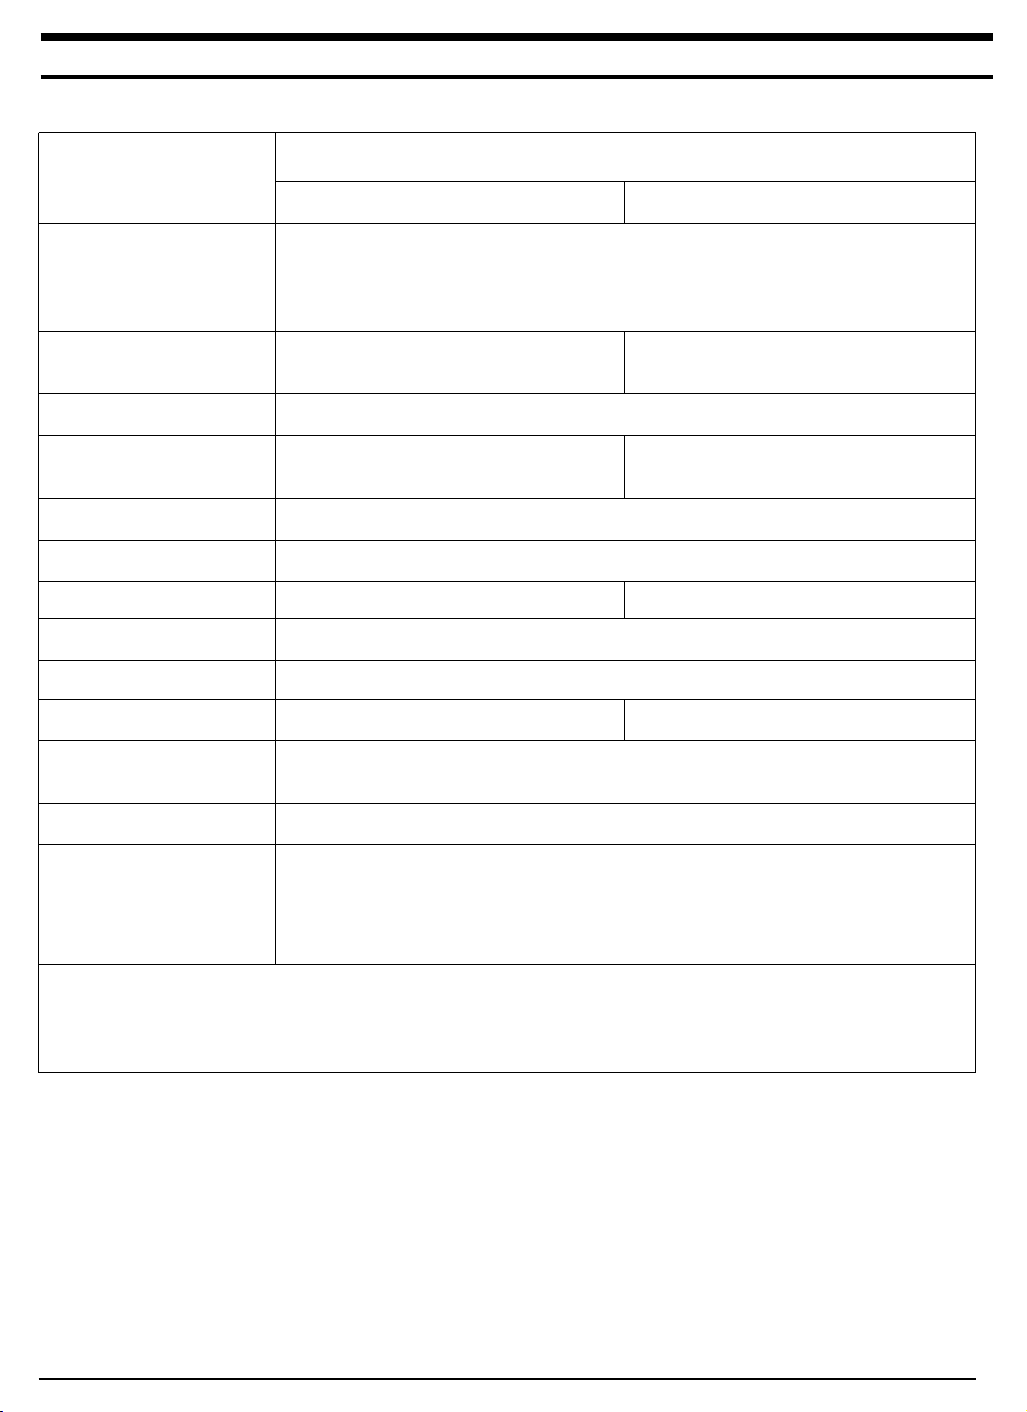
2-1 Specifications
Description
Item
AP17K* AP17J*
Picture Tube 17-Inch (43 cm): 16-inch (40.6 cm) view able,
Flat-face, 90˚ Deflection, 0.20 mm (Horizontal) Dot pit ch,
Silica coated with anti-electrostatic properties (TCO: M ultilayer coating),
M edium-short persistence phosphor
Scanning Frequency Horizontal : 30 kHz ~ 70 kHz 30 kHz ~ 85 kHz
Vertical : 50 Hz ~ 160 Hz 50 Hz ~ 160 Hz
Display Colors Unlimited colors
M aximum Resolution Horizontal : 1280 Dots Horizontal : 1600 Dots
Vertical : 1024 Lines Vertical : 1200 Lines
Input Video Signal Analog, 0.7 Vp-p positi ve at 75 Ω, int ernally terminated
Input Sync Signal Separate Sync: TTL level, posit ive/ negative
M aximum Pixel Clock rate 110 M Hz 185 M Hz
Active Display Horizontal : 312 mm ± 4 mm, Vertical : 234 mm ± 4 mm
Input Volt age AC 90 ~ 264 Volts, 60 Hz or 50 Hz ± 3 Hz
Power Consumption 90 Watt (max) 100 W at t (max)
Dimensions (W x D x H) Unit ; 15.7 x 16.2 x 15.7 Inches (398 x 412 x 400 mm)
Carton ; 20.4 x 22.8 x 18.42 Inches (517 x 580 x 468 mm)
Weight (Net/ Gross) 35.1 lbs (15.9kg) / 41.2 lbs (18.68kg)
Environmental Considerations Operating Temperat ure : 32° F ~ 104°F (0°C ~ 40°C)
Humidity : 10 % ~ 80 %
Storage Temperat ure : -4° F ~ 113°F (-20°C ~ 45°C)
Humidity : 5 % ~ 95 %
• Above models comply w ith SWEDAC (MPR II) recommendations for reduced electromagnetic f ields.
• Designs and specificat ions are subject t o change w ithout prior not ice.
AP17K*/ AP17J* 2-1
Page 5
2 Product Specifications
5
15
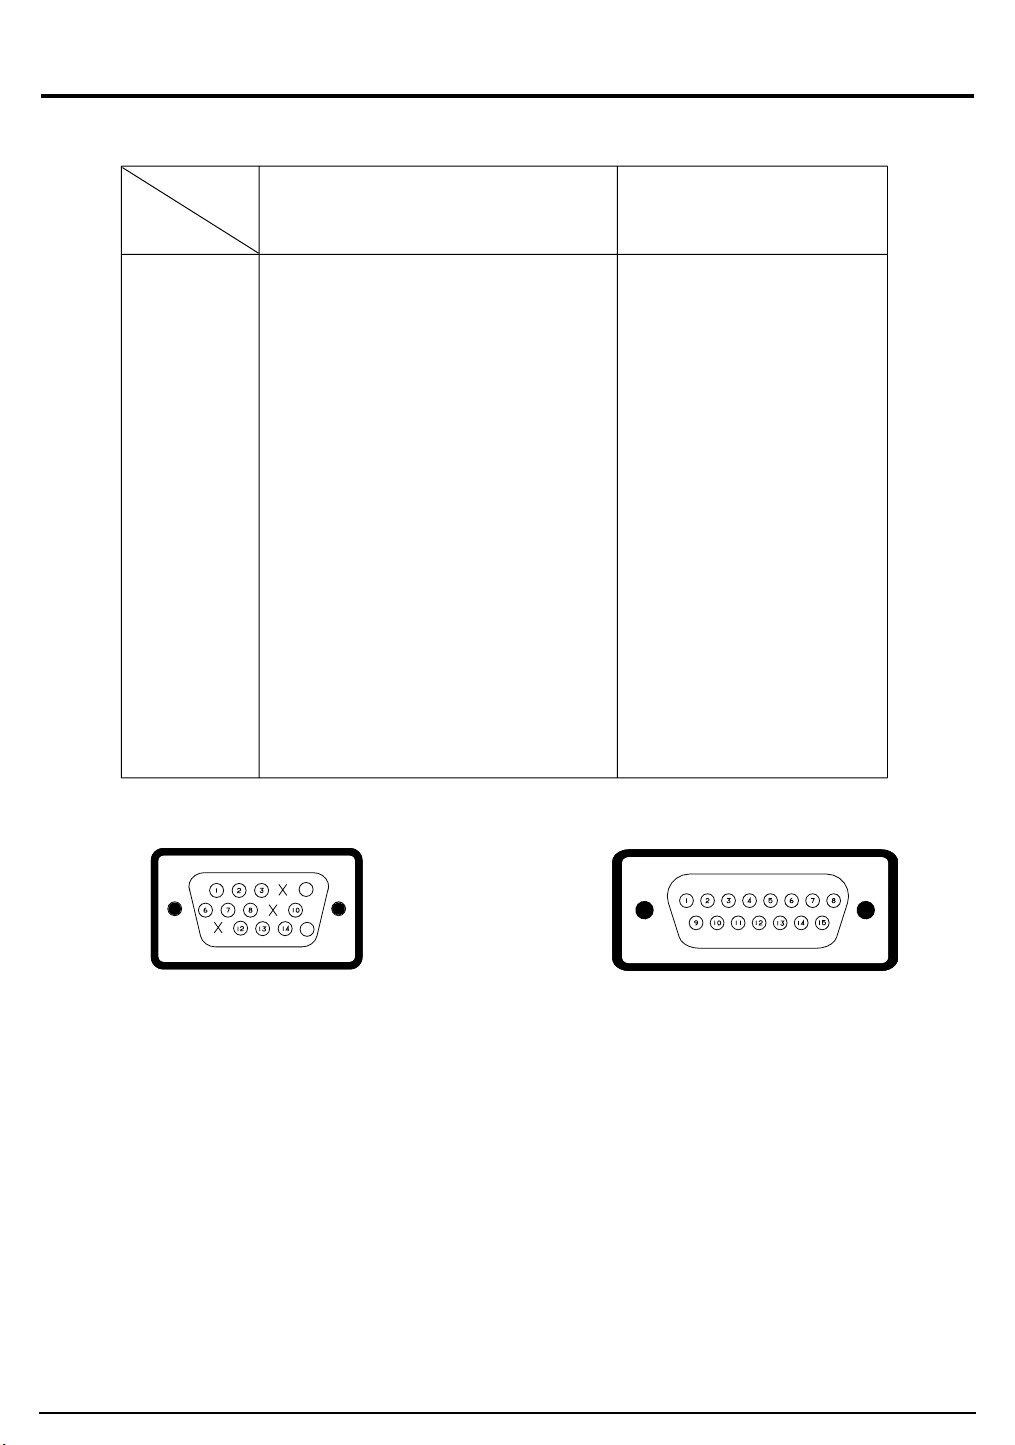
2-2 Pin Assignments
Sync
Type
Pin N o.
Separate
M acintosh
10
11
12
13
14
15
1
2
3
4
5
6
7
8
9
Red
Green
Blue
N-C
DDC Return
GND-R
GND-G
GND-B
N-C
GND-Sync/Self -raster
N-C
DDC Data
H-Sync
V-Sync
DDC Clock
GND-R
Red
H/V Sync
Sense 0
Green
GND-G
Sense 1
Reserved
Blue
Sense 2
GND
V-Sync
GND-B
GND
H-Sync
Figure 2-1. M ale Type Figure 2-2. M ale Type
2-2 AP17K*/ AP17J*
Page 6
2 Product Specifications
QRS
P
O
Video
Sync
Sync
Horizontal
Vertic al
CDE
P
O
B
A
Video
Sync
Sync
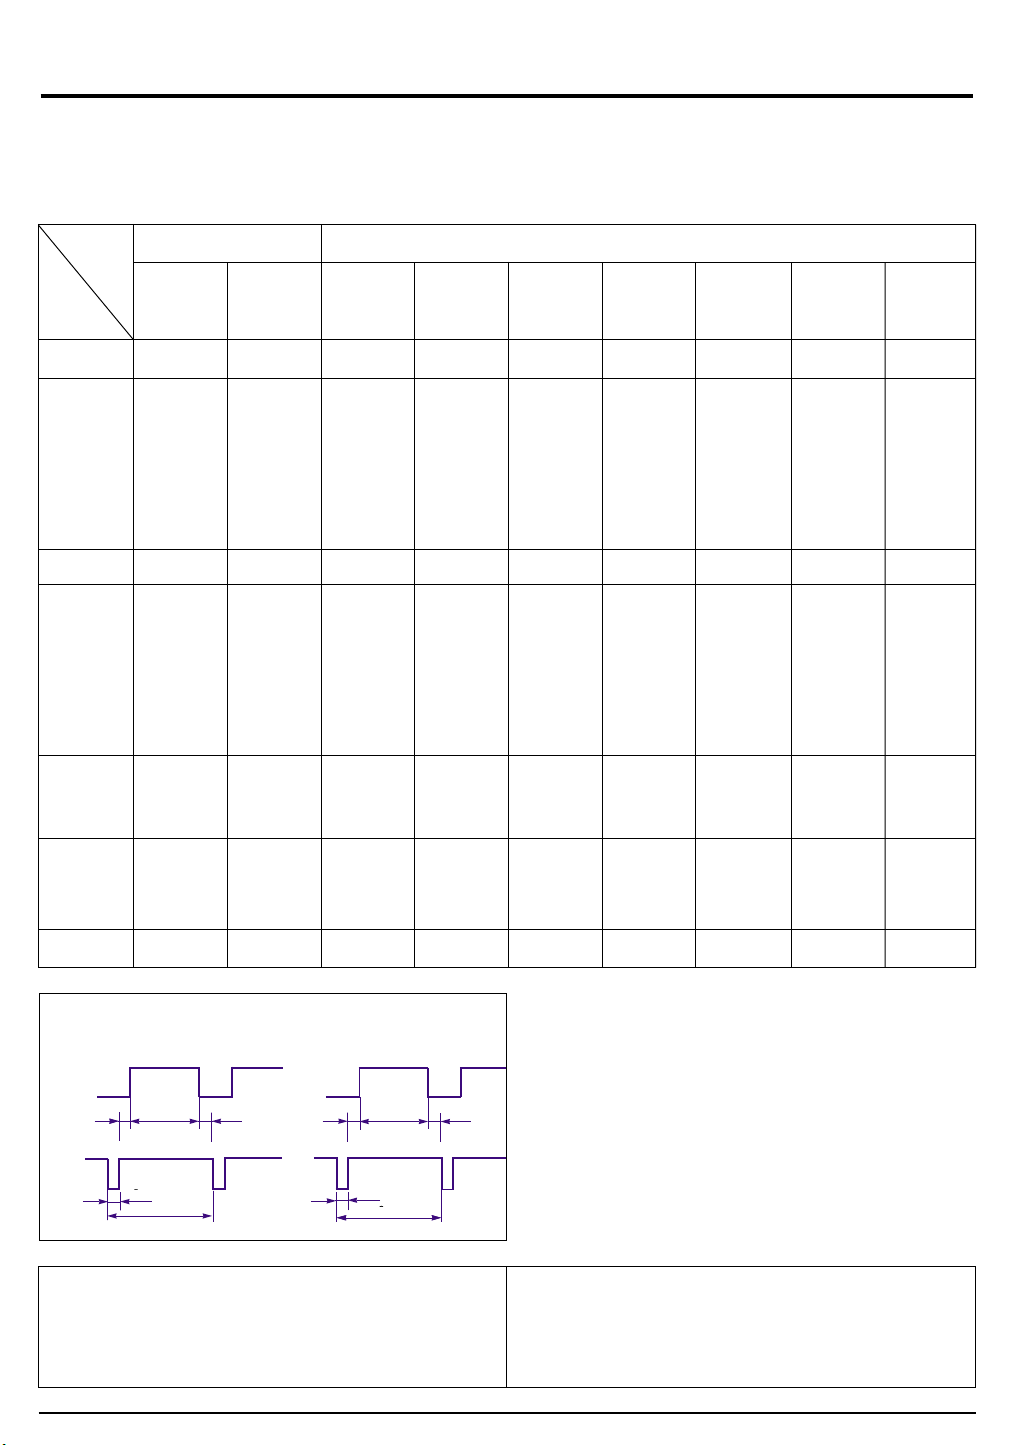
2-3 Timing Chart
This section of the service manual describes the timing that the computer industry recognizes as standard
for computer-generated video signals.
Table 2-1. Timing Chart
M ode
IBM
VESA
Timing
fH (kHz)
A µsec
B µsec
C µsec
D µsec
E µsec
fV (Hz)
O msec
P msec
Q msec
R msec
S msec
Clock
Frequency
(MHz)
Polarity
H.Sync
V.Sync
Remark
VGA2/70 Hz
720 x 400
31.469
31.778
3.813
1.907
25.422
0.636
59.940
16.683
0.064
1.048
15.253
0.318
25.175
Negative
Negative
Separate
VGA3/60 Hz
640 x 480
31.469
31.777
3.813
1.907
25.422
0.636
70.087
14.268
0.064
1.080
12.711
0.413
28.322
Negative
Positive
Separate
640/75 Hz
640 x 480
(AP17K* Only)
37.500
26.667
2.032
3.810
20.317
0.508
75.000
13.333
0.080
0.427
12.800
0.027
31.500
Negative
Negative
Separate
640/85 Hz
640 x 480
43.269
23.111
1.556
2.222
17.778
1.556
85.008
11.764
0.671
0.578
11.093
0.023
36.000
Negative
Negative
Separate
800/75 Hz
800 x 600
46.875
21.333
1.616
3.232
16.162
0.323
75.000
13.333
0.064
0.448
12.800
0.021
49.500
Positive
Positive
Separate
800/85 Hz
800 x 600
53.674
18.631
1.138
2.702
14.222
0.569
85.061
11.756
0.056
0.503
11.179
0.019
56.250
Positive
Positive
Separate
1024/75 Hz
1024 x 768
60.023
16.660
1.219
2.235
13.003
0.203
75.029
13.328
0.050
0.466
12.795
0.017
78.750
Positive
Positive
Separate
1024/85 Hz
1024 x 768
68.677
14.561
1.016
2.201
10.836
0.508
84.997
11.765
0.044
0.524
11.183
0.015
94.500
Positive
Positive
Separate
1280/75 Hz
1280 x 1024
(AP17J* )
79.976
12.504
1.067
1.837
9.481
0.119
75.025
13.329
0.038
0.475
12.804
0.013
135.000
Positive
Positive
Separate
Separate Sync
Video
C D
Sync
B
A : Line time t otal B : Horizontal sync w idth O : Frame time total P : Vertical sync w idth
C : Back porch D : Active time Q : Back porch R : Active time
E : Front porch S : Front porch
E
A
Video
Q R S
Sync
P
O
AP17K*/ AP17J* 2-3
Page 7

2 Product Specifications
M emo
2-4 AP17K*/ AP17J*
Page 8
3 Disassembly and Reassembly
This section of the service manual describes the disassembly and reassembly procedures for the
AP17K*/AP17J* monitor.
WARNING: This monitor contains electrostatically sensitive devices. U se w ith caution w hen
handling these components.
3-1 Disassembly
Cautions: 1. Disconnect the monitor from the power source before disassem bly.
2. To rem ove the Rear Cover, you m ust use the special opening jig tool.
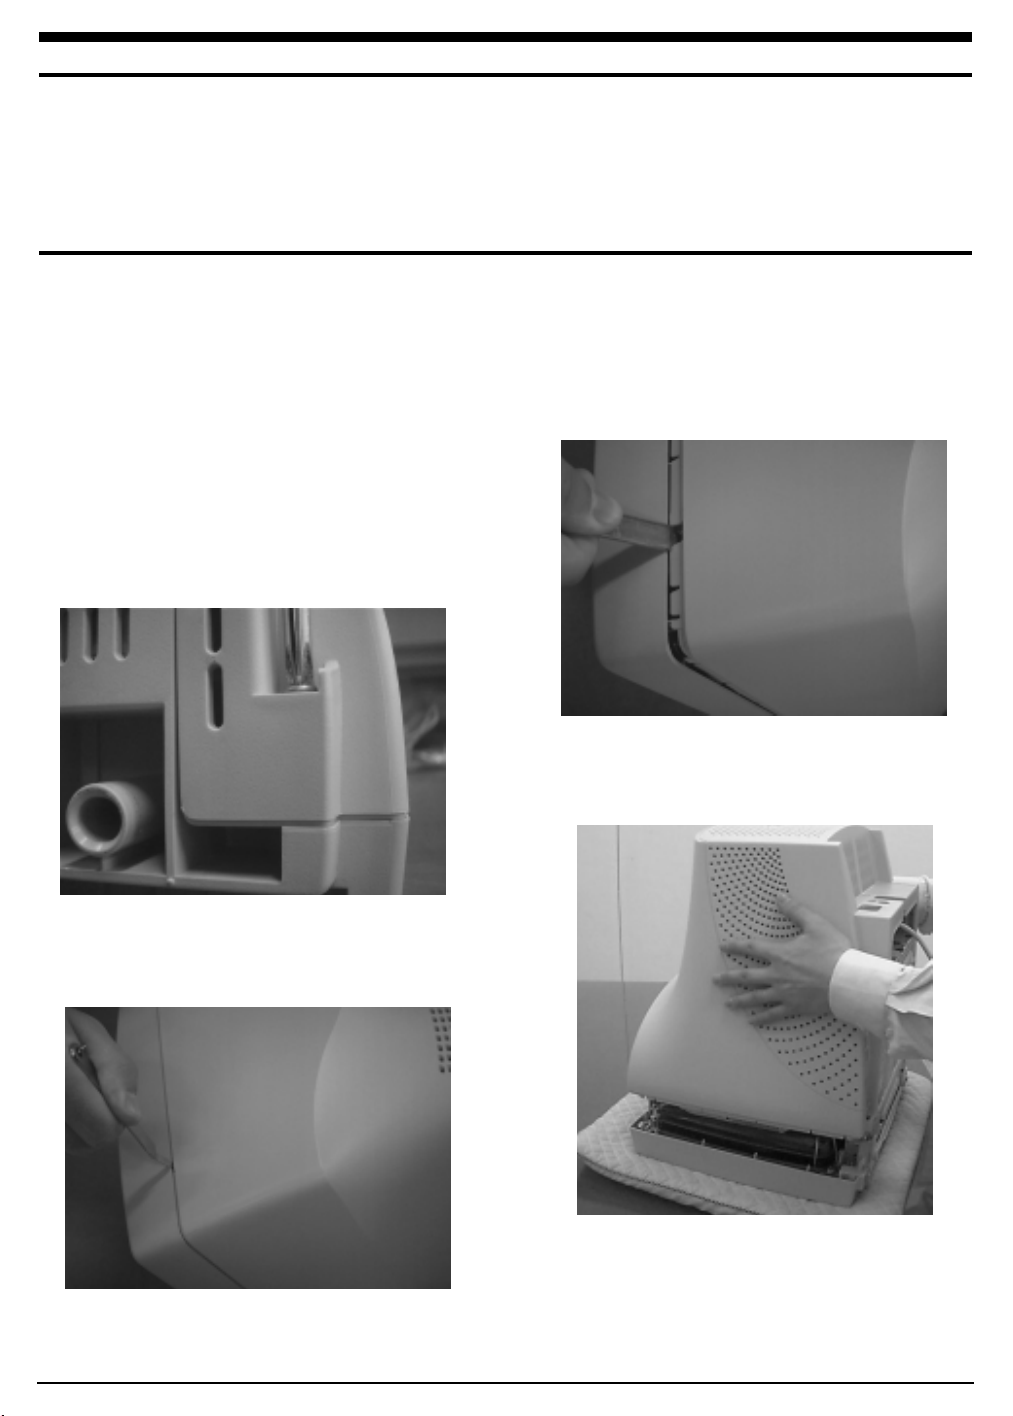
3-1-1 Before making Disassembly
1. Disconnect or power cord from the monitor.
2. With a pad beneath it, stand the monitor on its
front with the screen facing downward and
the base close to you.
3-1-2 Cabinet Disassembly
1. Remove the Stand from the monitor.
(Refer to Stand manual)
2. Remove 2 screws on the Rear cover.
4. Push the Opening jig each groove along the
Side of the monitor till it makes a “ttak”
sound. (2 grooves : Left and Right, Make sure
each snap is disengaged.)
Figure 1
3. Incline the monitor by lifting the rear of the
monitor.
Figure 2
Figure 3
5. Pull the Rear Cover up off the monitor.
Figure 4
AP17K*/ AP17J* 3-1
Page 9
3 Disassembly and Reassembly
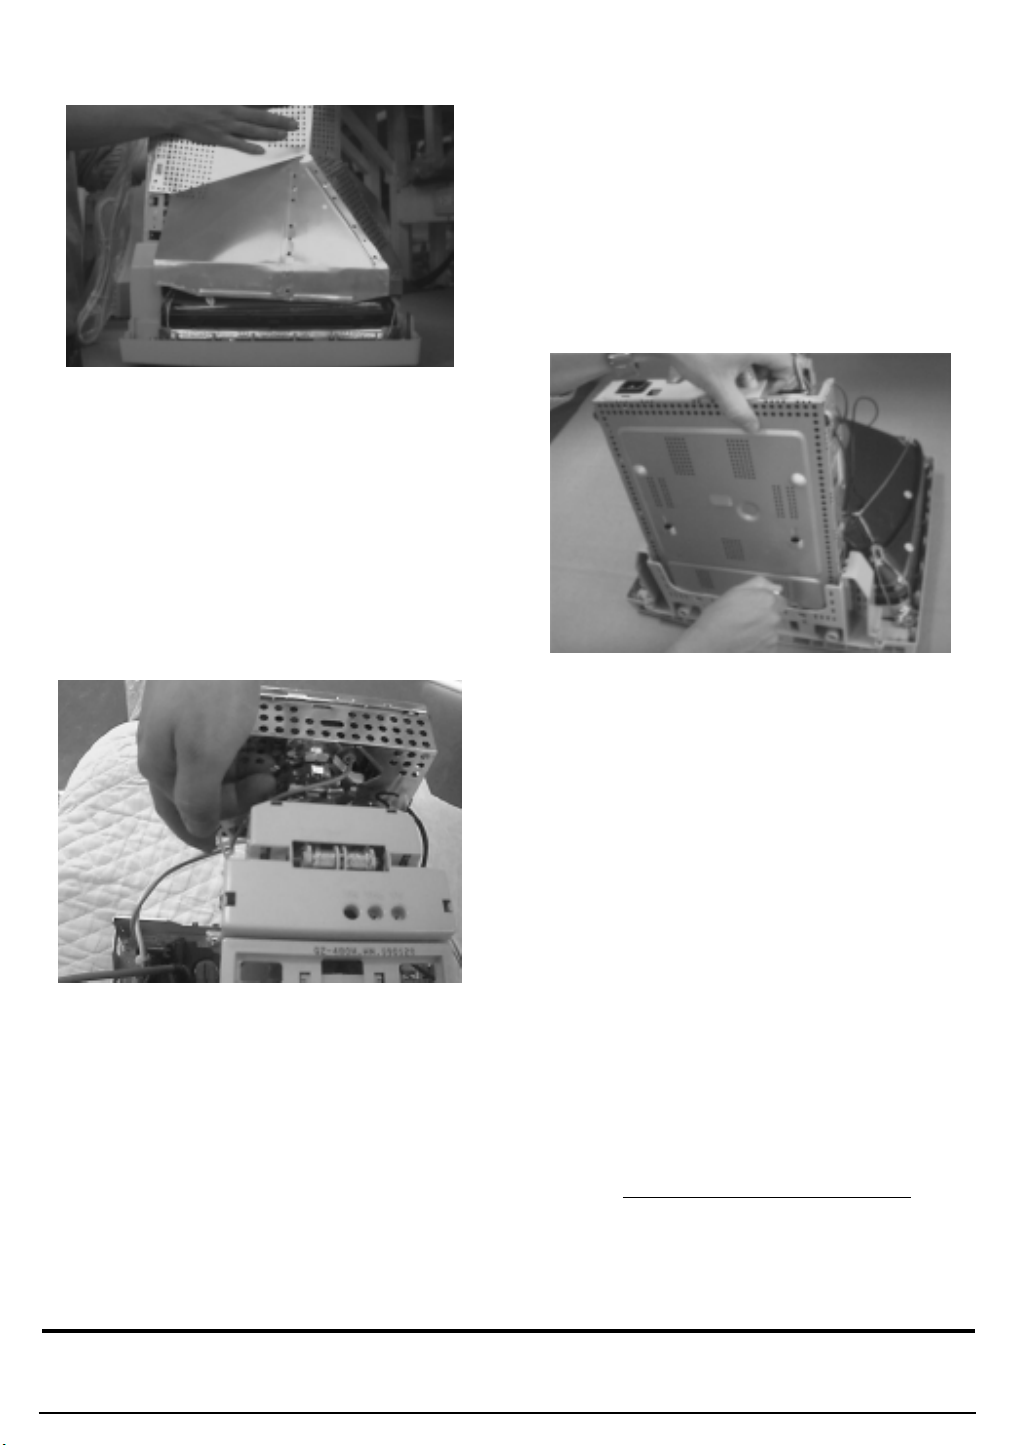
6. Remove the Shield.(TCO 99)
Figure 5
7. Using pinch-nose pliers or ling-nose pliers,
acrefully disconnect the Anode Cap from the
CRT.
Warning: Do not touch the Anode contact
on the CRT (High Voltage m ay
rem ain).
3-1-3 Removing the CRT Socket PCB
1. Complete all previous steps.
2. Lift up the Video Spring and remove the CRT
Socket PCB from the CRT.
3-1-4 Removing the M ain PCB
1. Complete all previous steps.
2. Disconnect the Degaussing Coil at CN603 on
the Main PCB.
3. Disconnect all easily accessible ground wires
on the PCB and Bottom Chassis.
4. Disconnect the DY connector at the CN401
connector on the Main .
5. Using the jig, release the snaps (2) connecting
the Front Cover and the PCB then lift up the
Bottom to separate the two Shield.
Figure 7
Figure 6
3. Disconnect all connectors on the CRT Socket
PCB.
4. Using a solder iron, disconnect Ground (GND)
on the back of the Video Shield and remove
the Shield Cap.
5. Remove the screw on the front of the Shield
Socket.
6. Desolder the 4 tabs on the CRT Socket PCB
and remove Shield.
7. Place the Video PCB on a flat, level surface
that is protected from static electricity.
6. Disconnect the Tilt connector at the
CN2(CN22) connector on the Main PCB.
7. Disconnect the Sub PCB connector at the
CN201 connector on the Main PCB.
8. Remove the screws on the back and along
each side of the Bottom Chassis.
9. Carefully lift the Main PCB Ass’y and remove
the remaining ground wires.
10. Place the Main PCB Ass’y on a flat, level
surface that is protected from static electricity.
3-1-5 CRT Ass’y Disassembly
1. Complete all previous steps.
2. Straighten the Degaussing Coil Assembly
coated metal ties and lift the Coil Ass’y from
the CRT.
3. Remove the four corner screws and lift the
CRT up and away from the Front Cover
Assembly and place it on a padded surface.
Caution: Do not lift the CRT by the neck.
If you w ill be returning this CRT to
the m onitor, be sure to place the CRT
face downw ard on a protective pad.
3-2 Reassembly
Reassembly procedures are in the reverse order of Disassembly procedures.
3-2 AP17K*/ AP17J*
Page 10

4 Alignment and Adjustments
This section of the service manual explains how to make permanent adjustments to the monitor. Directions
are given for adjustments using the monitor Interface Board Ver. 2.0 and software (Softjig).
4-1 Adjustment Conditions
Caution: Changes made without the Softjig are saved only to the user m ode settings. As such, the
settings are not perm anently stored and may be inadvertently deleted by the user.
4-1-1 Before M aking Adjustments
4-1-1 (a) ORIENTATION
When servicing, always face the monitor to the
east.
4-1-1 (b) WARM -UP TIME
The monitor must be on for 30 minutes before
starting alignment. Warm-up time is especially
critical in color temperature and white balance
adjustments.
4-1-1 (c) SIGNAL
Analog, 0.7 Vp-p positive at 75 ohm, internal
termination
Sync: Separate
(TTL level negative/positive)
4-1-1 (d) SCANNING FREQUENCY
Horizontal : 30 kHz to 70 kHz (Automatic)
: 30 kHz to 85 kHz (Automatic) AP17JS
Vertical : 50 Hz to 160 Hz (Automatic)
Unless otherwise specified, adjust at the
1024 x 768 mode (68 kHz/85 Hz),
Refer to Table 2-1 on page 2-3.
AP17KS
4-1-2 Required Equipment
The following equipment may be necessary for
adjustment procedures:
4-1-2 (a) DISPLAY CONTROL ADJUSTMENT
1. Non-metallic (–) screwdriver:
1.5, 2.5, 3 mm
2. Non-metallic (+) screwdriver:
1.5, 2.5, 3 mm
3. Digital Multimeter (DMM), or
Digital Voltmeter
4. Signal generator, or
DM200 software
5. Personal computer
4-1-2 (b) COLOR ADJUSTM ENTS
1. All equipment listed in 4-1-2 (a), above
2. Color analyzer, or any luminance
measurement equipment
AP17K*/ AP17J* 4-1
Page 11
4 Alignment and Adjustments
4-2 Display Control Adjustments
4-2-1 HIGH VOLTAGE ADJUSTM ENT
Signal: 1024 x 768 (68 kHz/85 Hz)
Display image: Don’t care
Contrast: Minimum
Brightness: Minimum
Limit: 26.0 kV ± 0.3 kV
Measure the hight voltage level at the anode cap.
High voltage should be within the limit as above.
4-2-2 CENTER RASTER
Adjust SW401 so that the back raster comes to the
center when you apply basic mode for 17”.
Run the All Mode save in the Right Menu.
Caution : Do not Run the All mode Save at the
other scannig times except for 1024x768
(68kHz/85Hz).
4-2-4 (b) VERTICAL SIZE ADJUSTM ENT
CONDITIONS
Scanning frequency: 68 kHz/85 Hz
Display image: Crosshatch pattern
Brightness: Maximum
Contrast: Maximum
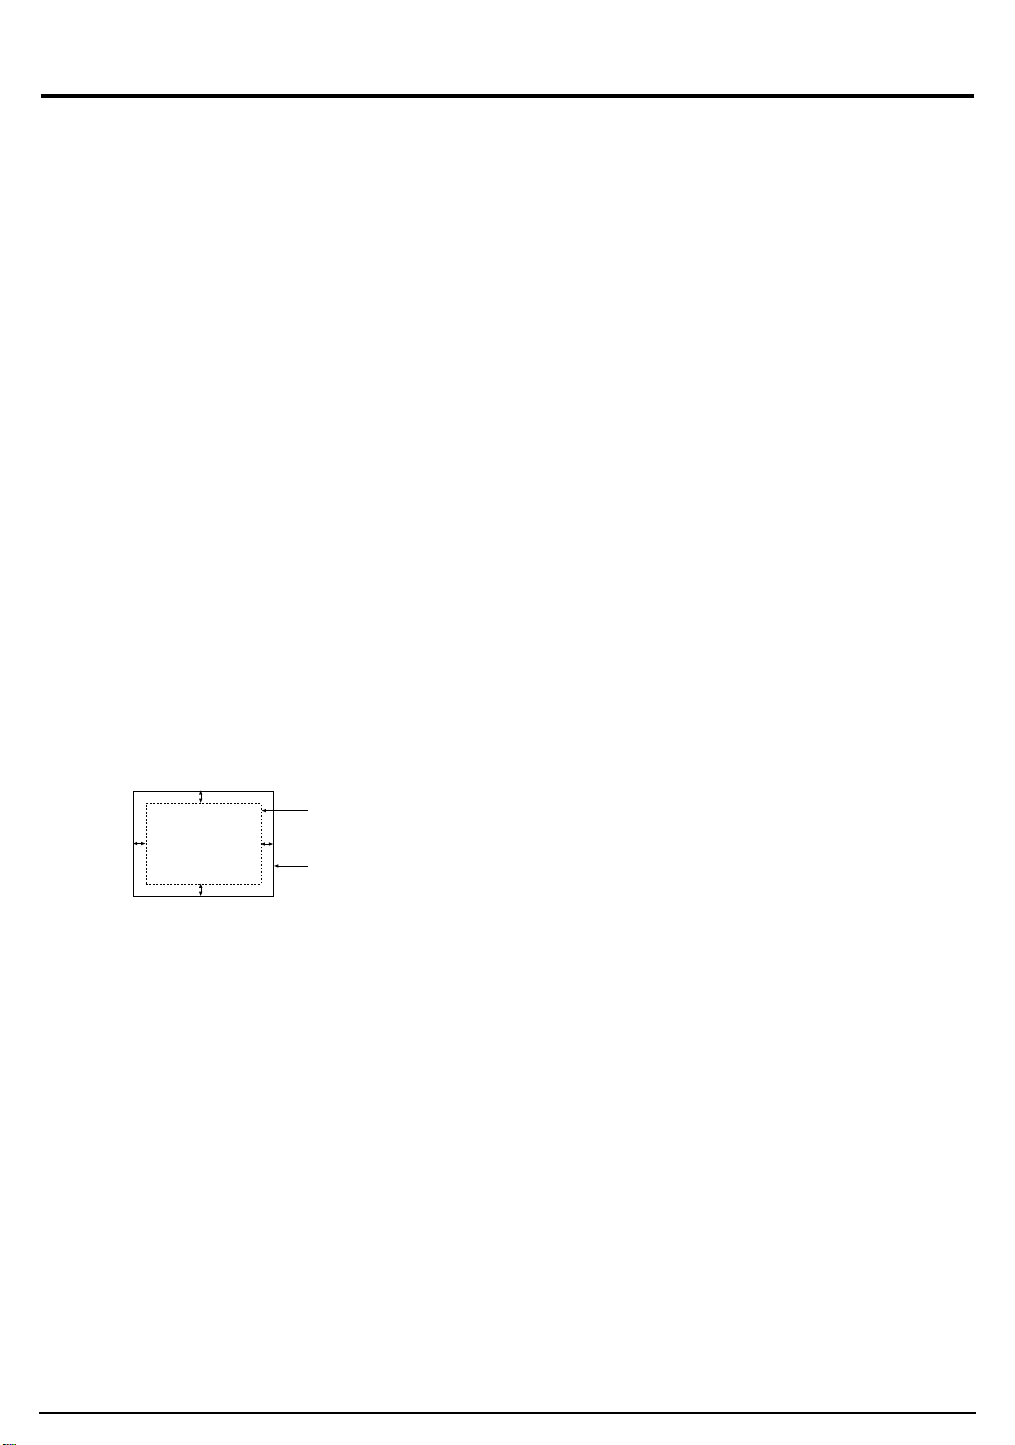
4-2-3 Centering
Centering means to position the center point of
the display in the middle of the display area.
Horizontal size and position and vertical size and
position control the centering of the display.
Adjust the horizontal size and vertical size to their
optimal settings: 312 mm (H) x 234 mm (V).
Adjust the horizontal position and vertical
position to ≤ 4.0 mm of the center point of the
screen.
|A-B| ≤ 4.0 mm. |C-D| ≤ 4.0 mm.
C
DISPLAY AREA
A
D
Figure 4-3. Centering
* In Softjig window, “Geometry” has to be
selected for GD adjustment.
B
EDGE OF BEZEL
Use control bar after selecting “V-SIZE” in left
menu to adjust the vertical size of the display
pattern to 234 mm.(Tolerance: ± 3 mm.)
4-2-4 (c) HORIZONTAL POSITION ADJUSTMENT
CONDITIONS
Scanning frequency: 68 kHz/85 Hz
Display image: Crosshatch pattern
Use control bar after selecting “H-POSITION” in
left menu to center the horizontal image on the
raster.
4-2-4 (d) VERTICAL POSITION ADJUSTMENT
CONDITIONS
Scanning frequency: 68 kHz/85 Hz
Display image: Crosshatch pattern
Use control bar after selecting “V-POSITION” in
left menu to center the vertical image on the
raster.
4-2-4 (a) HORIZONTAL SIZE ADJUSTMENT
CONDITIONS
Scanning frequency: 68 kHz/85 Hz
Display image: Crosshatch pattern
Brightness: Maximum
Contrast: Maximum
Click Standard Dump on the right Menu in the
general field.
Use control bar after selecting size B+ in the left
Menu to adjust the horizontal size of the display,
Pattern to 312mm(Tolerance : ±3mm.)
4-2 AP17K*/ AP17J*
Page 12
4 Alignment and Adjustments
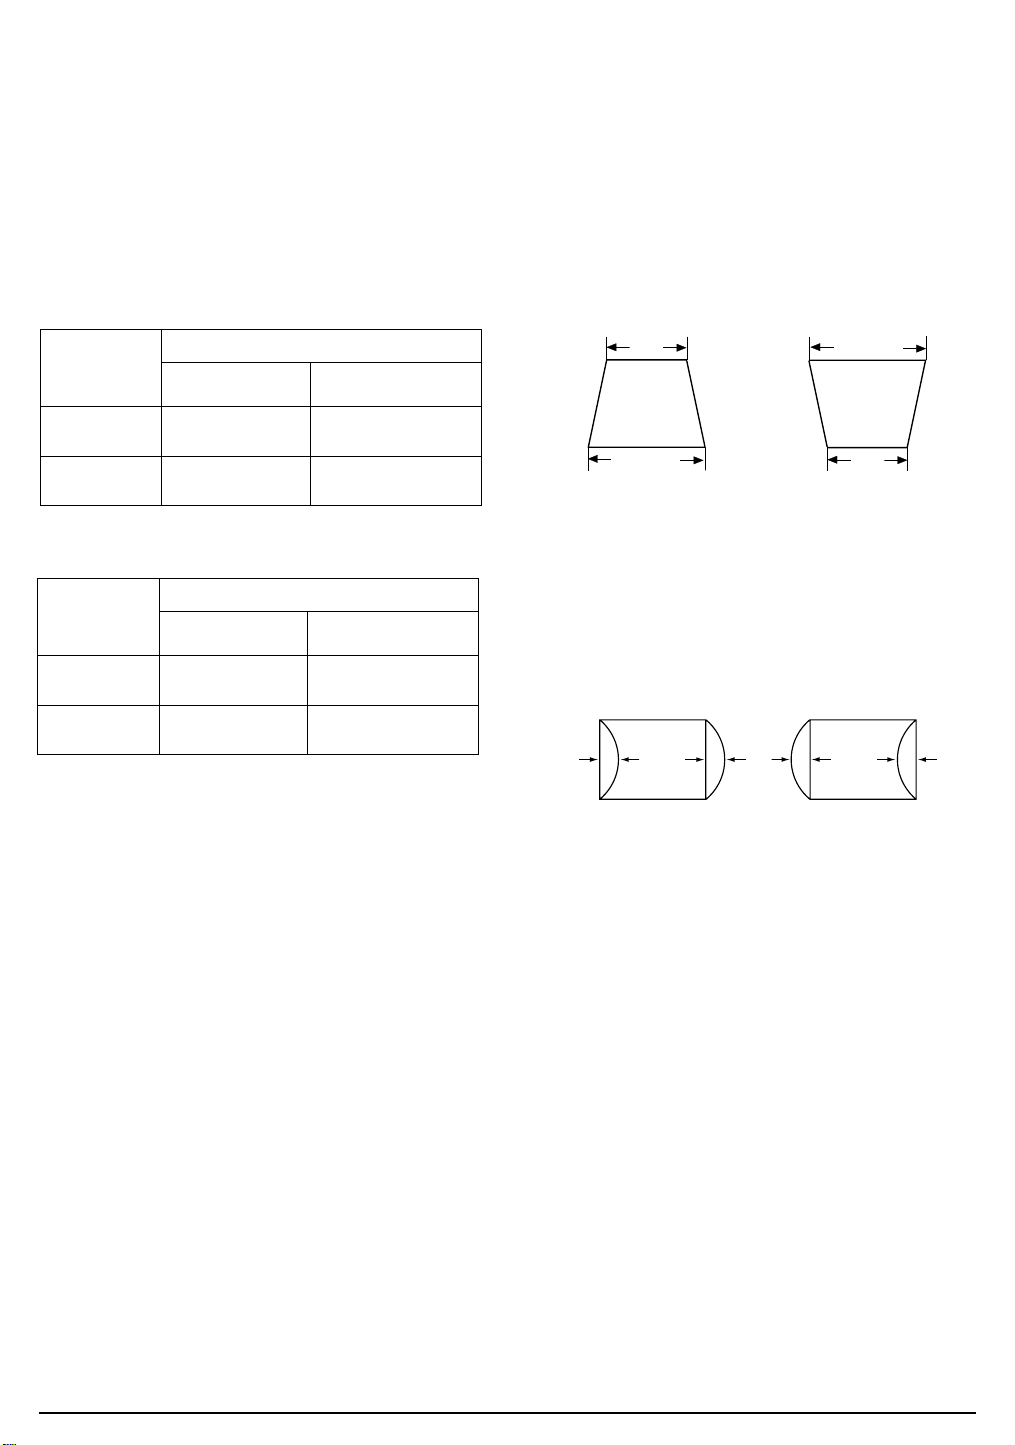
4-2-4 Linearity
Linearity affects the symmetry of images as they
appear on the screen. Unless each row or column
of blocks in a crosshatch pattern is of equal size,
or within the tolerances shown in Tables 4-2 and
4-3, an image appears distorted, elongated or
squashed.
Table 4-1. Standard M odes Linearity: 640x480/ 85Hz,
800x600/ 85Hz and 1024x768/85Hz
Standard M odes Linearity
Each block (10 %)
4 : 3
5 : 4
Horizontal: 20.9~23.1
Vertical : 20.9~23.1
Horizontal: 19.60~21.65
Vertical : 20.9~23.1
Table 4-2. Other M odes Linearity: VGA, SVGA, XGA,
M AC, etc.
Supported Timing M ode
Each block (14 %)
4 : 3
5 : 4
Horizontal: 20.5~23.5
Vertical : 20.5~23.5
Horizontal: 19.18~22.07
Vertical : 20.5~23.5
4-2-4 (a) HORIZONTAL LINEARITY ADJUSTM ENT
CONDITIONS
Scanning frequency: 68 kHz/85 Hz
Display image: Crosshatch pattern
Brightness: Maximum
Contrast: Maximum
To adjust the Horizontal Linearity, refer to Tables
4-2 and 4-3 for the tolerance range.
Increase or decrease H_LIN to optimize the
image.
Difference bet w een
adjacent blocks (4 %)
Horizontal: Less than 0.88 mm
Verti cal : Less than 0.88 mm
Horizontal: Less than 0.82 mm
Verti cal : Less than 0.88 mm
Difference bet w een
adjacent blocks (5 %)
Horizontal: Less than 1.10 mm
Verti cal : Less than 1.10 mm
Horizontal: Less than 1.03 mm
Verti cal : Less than 1.10 mm
4-2-5 Trapezoid Adjustment
CONDITIONS
Scanning frequency: 68 kHz/85 Hz
Display image: Crosshatch pattern
Brightness: Maximum
Contrast: Maximum
Use control bar after selecting “TRAPEZOID” in
left menu to make the image area rectangular.
| A - B | < 4 mm
A
B
A
B
Figure 4-4. Trapezoid
4-2-6 Pinbalance Adjustment
CONDITIONS
Scanning frequency: 68 kHz/85 Hz
Display image: Crosshatch pattern
Brightness: Maximum
Contrast: Maximum
D1 D2 D1
Figure 4-5. Pinbalance
Use control bar after selecting “PINBALANCE” in
left menu to optimize the image.
4-2-4 (b) VERTICAL LINEARITY ADJUSTMENT
CONDITIONS
Scanning frequency: 68 kHz/85 Hz
Display image: Crosshatch pattern
Brightness: Maximum
Contrast: Maximum
To adjust the Vertical Linearity, refer to Tables 4-2
and 4-3 for the tolerance range.
Use control bar after selecting “V-LINEARITY
BAL” in left menu to optimize the image.
AP17K*/ AP17J* 4-3
Page 13
4 Alignment and Adjustments
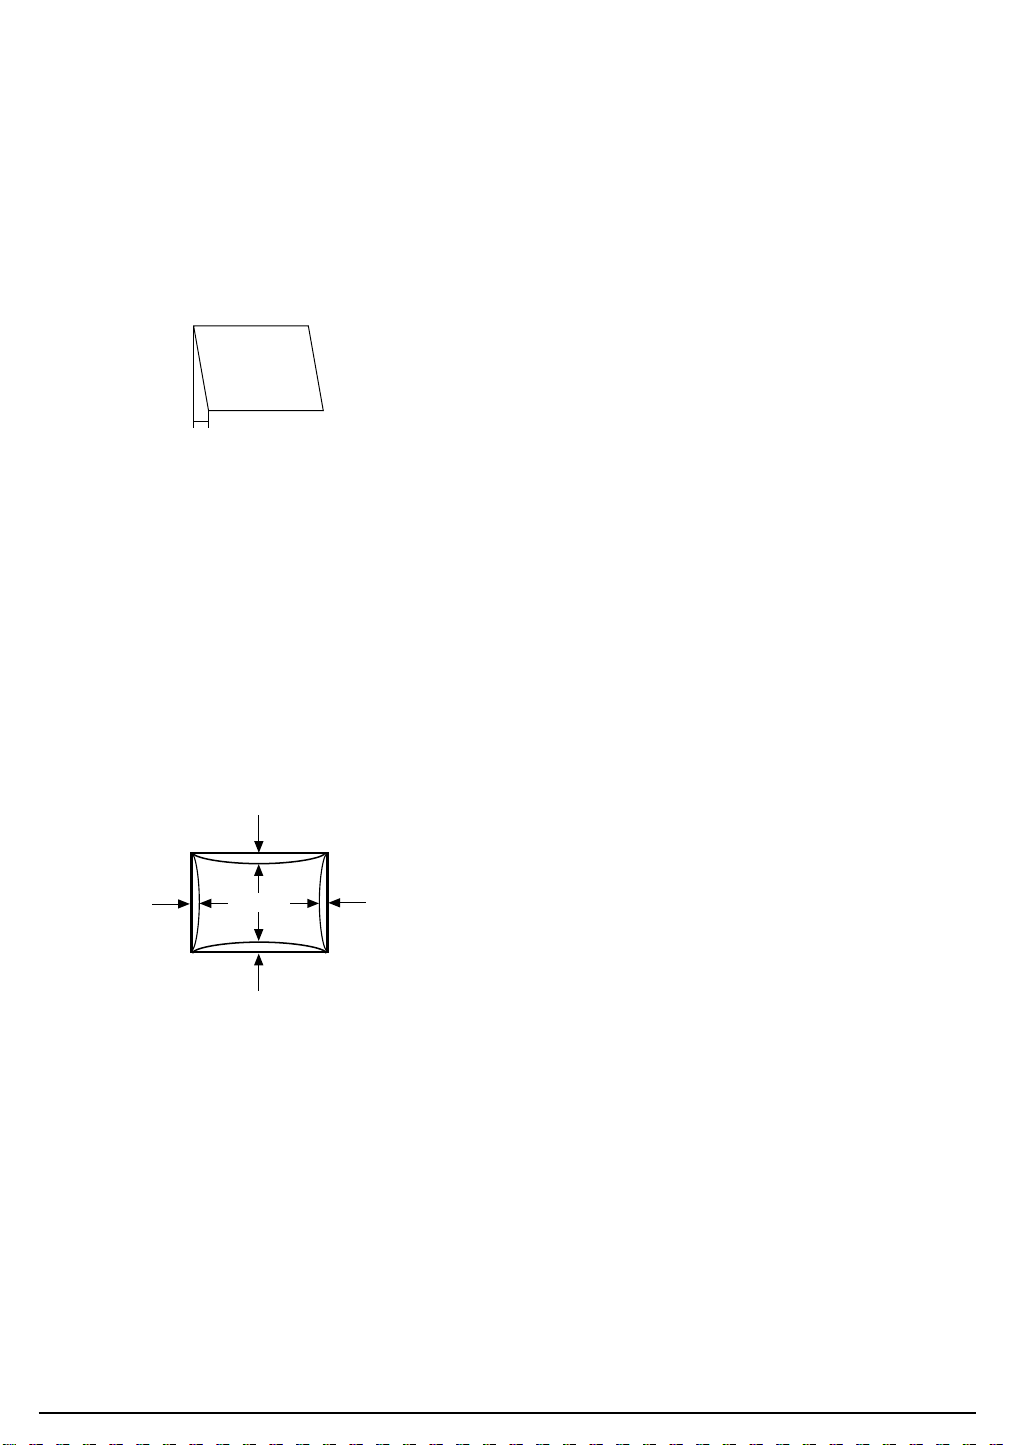
4-2-7 Parallelogram Adjustment
CONDITIONS
Scanning Frequency: 68 kHz/85 Hz
Display image: Crosshatch pattern
Brightness: Maximum
Contrast: Maximum
Use control bar after selecting “PARALLEL” in
left menu to make the image area rectangular.
4 mm
Figure 4-6. Parallelogram
4-2-8 Side Pincushion Adjustment
CONDITIONS
Scanning frequency: 68 kHz/85 Hz
Display image: Crosshatch pattern
4-2-9 Degauss
No adjustments are available for the degaussing
circuit. The degaussing circuit can effectively
function only once per 30 minutes.
4-2-10 To Delete the User M ode Data
To delete the adjustment data from the user
modes, click “@4: USER DELETE” in right ment.
4-2-11 Save the Data
To save the adjustment data for a mode, press
“@3: ALL MODE SAVE” in right ment.
Use control bar after selecting “PINCUSHION” in
left menu to straighten the sides of the image area.
| C1 |, | C2 | ≤ 2.0 mm, | D1 |, | D2 | ≤ 2.0 mm.
C2
D1 D2
C1
Figure 4-7. Pincushion
4-4 AP17K*/ AP17J*
Page 14
4-3 Color Adjustments
4 Alignment and Adjustments
CA U TION :Check below condition before color
adjustm ent
Video signal : Analog 0.7 Vp-p (at 75 Ω)
Sync : TTL level (H, V seperate signal)
* Select “Color” in Softjig menu for color adjustment.
4-3-1 Color Coordinates (Temperature)
Color temperature is a measurement of the
radiant energy transmitted by a color. For
computer monitors, the color temperature refers
to the radiant energy transmitted by white. Color
coordinates are the X and Y coordinates on the
chromaticity diagram of wavelengths for the
visible spectrum.
CONDITIONS
Measurement instrument: Color analyzer
Scanning frequency: 68 kHz/85 Hz
Display image: White flat field at
center of display area
Luminance: Maximum
PROCEDURE
Use the directions in sections 4-3-2 through 4-3-3
to adjust the color coordinates for:
9300K to x = 0.283 ± 0.02, y = 0.298 ± 0.02
6500K to x = 0.313 ± 0.02, y = 0.329 ± 0.02
4-3-2 Color Adjustments for 9300K
4-3-2 (b) WHITE BALANCE ADJUSTMENT
CONDITIONS
Scanning frequency: 68 kHz/85 Hz
Display image: White box pattern
Brightness: 0.06ft-L at Back Raster
Pattern Display
Contrast: Maximum
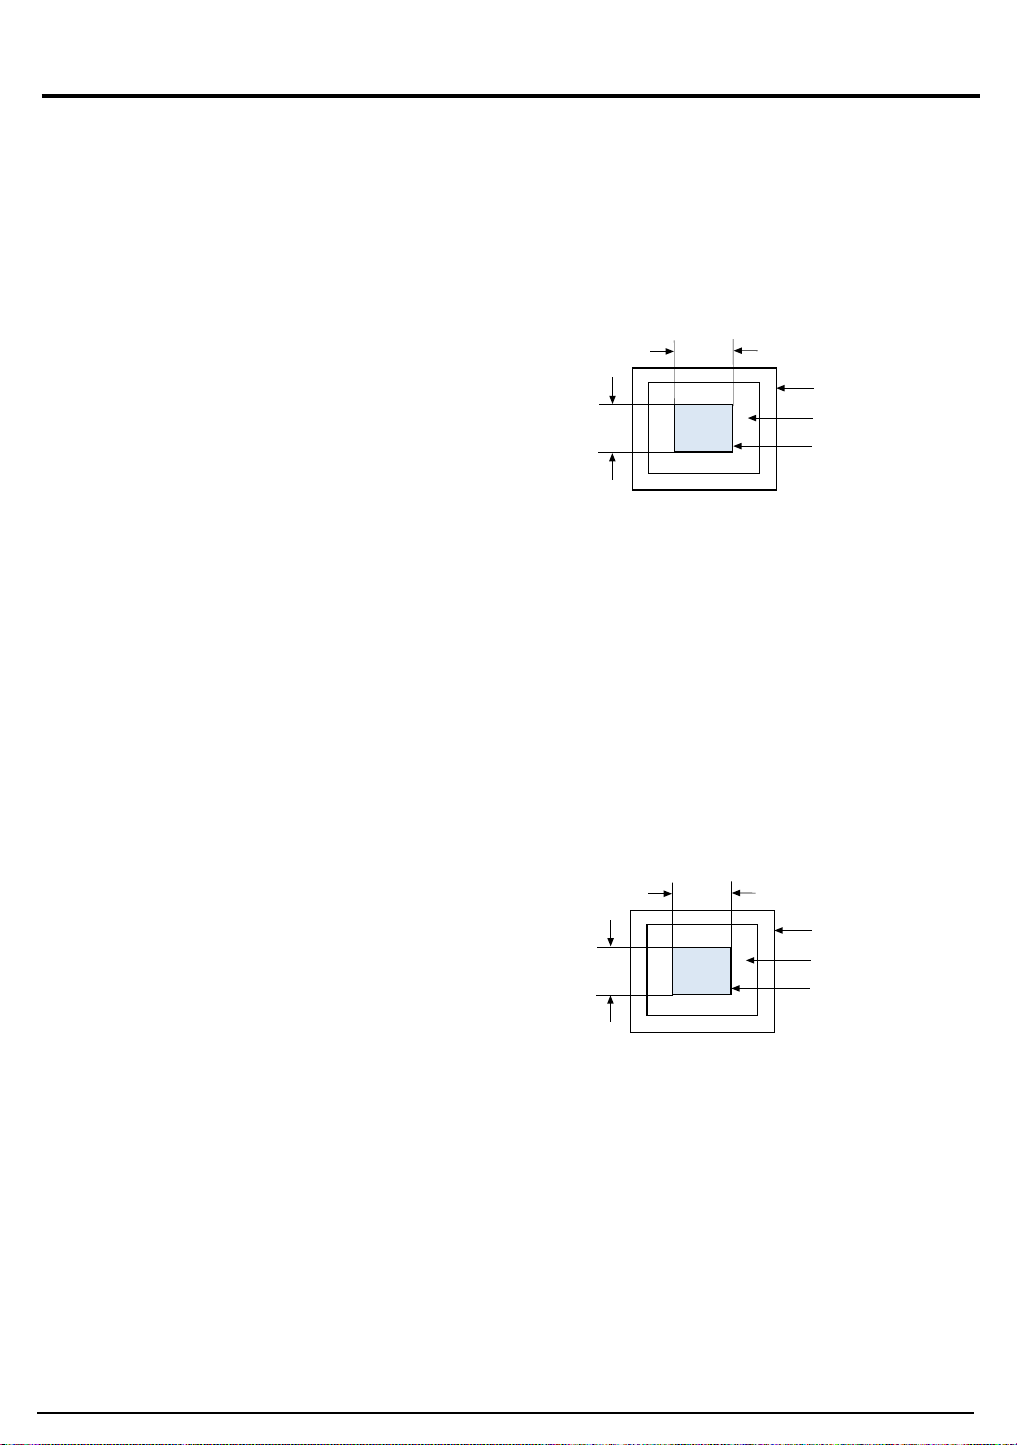
1/ 3H-1/2H
FRONT BEZEL OPENIN G
1/ 3V-1/ 2V
Figure 4-8. W hite Box Pattern
BACK RASTER
WHITE WIN DOW
1. Use control bar after selecting “RED GAIN”,
“GREEN GAIN” and “BLUE GAIN” to adjust
the luminance to 40 ft-L with the color
coordinates ranged for
9300K to x = 0.283 ± 0.02, y = 0.298 ± 0.02.
4-3-2(c) HIGH LIGHT ZONE ADJUSTMENT
CONDITIONS
Scanning frequency: 68 kHz/85 Hz
Display image: White box pattern
Brightness: 0.06ft-L at Back Raster
Pattern Display
Contrast: Maximum
4-3-2 (a) BACK RASTER COLOR ADJUSTM ENT
CONDITIONS
Scanning frequency: 68 kHz/85 Hz
Display image: Back raster pattern
Brightness: Maximum
1/ 3V-1/ 2V
1/ 3H-1/2H
FRONT BEZEL OPENIN G
BACK RASTER
WHITE WIN DOW
Contrast: Maximum
1. Select “@1: CHANNEL 1” in right menu to
control the color for 9300K.
2. Adjust the luminance of the back raster to
between 0.5 to 0.7 ft-L using contron bar after
selecting “GREEN CUTOFF” in the menu.
3. Use control bar after selecting “BLUE
CUTOFF” in left menu to set the “y”
coordinate to 0.298 ± 0.02.
1. Select “@9: BMFULL” in right menu.
2. Use control bar after selecting “ BM CONT”
to adjust the luminance to
65ft - L (±5ft-L) : AP17KS/AP17JS
3. Select “@0: BM OFF” in right menu.
Figure 4-9. High Light Box Pattern
4. Use control bar after selecting “RED
CUTOFF” in left menu to 0.283 ± 0.02.
* If color values would not be matched desirable
values, repeat sequence 3 and 4 after readjusting
“GREEN CUTOFF” control a little different.
AP17K*/ AP17J* 4-5
Page 15
4 Alignment and Adjustments
4-3-2 (d) ABL ADJUSTM ENT
CONDITIONS
Scanning frequency: 68 kHz/85 Hz
Display image: Full white pattern
Brightness: Maximum
Contrast: Maximum
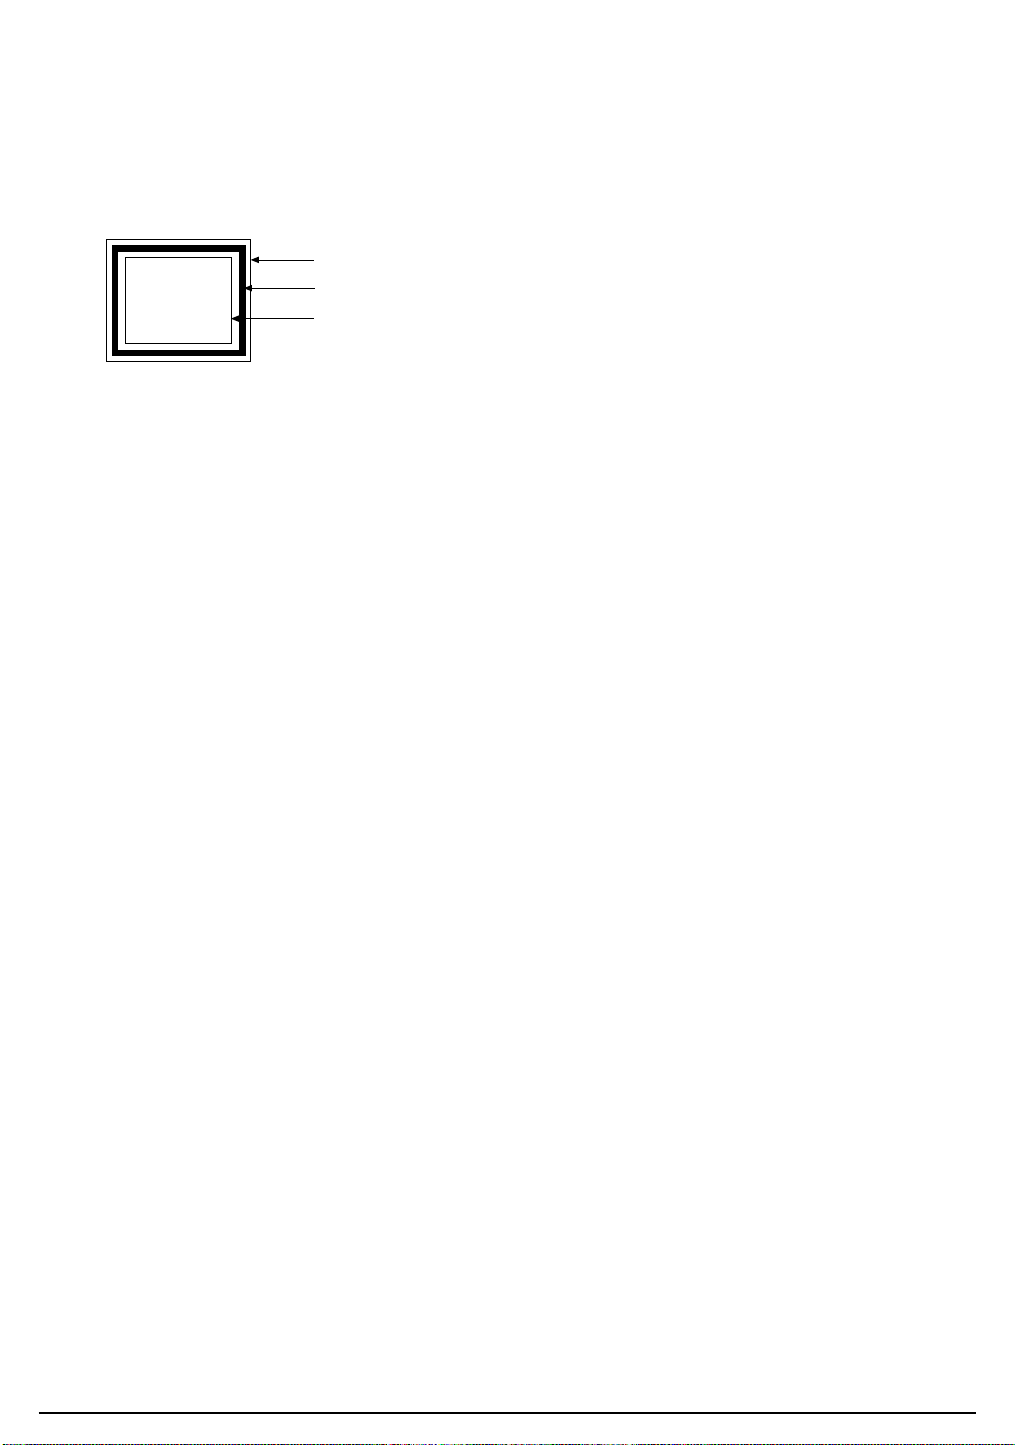
FRONT BEZEL OPENIN G
BACK RASTER
WHITE WIN DOW
Figure 4-10. Full White Patt ern
1. Check the ABL. If it is not within the
specifications, use the ABL controls to adjust
it. (29 ± 1 ft-L )
2. Select “@4: COLOR SAVE” to save the data.
3. Select “@6: ALL COLOR SAVE” to save the
CH2.
4-3-2 (e) WHITE BALANCE ADJUSTMENT VERIFICATION
CONDITIONS
Scanning frequency: 68 kHz/85 Hz
Display image: Back raster pattern
Full White Pattern
X-Y Coordinates: x = 0.283 ± 0.02,
y = 0.298 ± 0.02
ABL Luminance Refer to 4-3-2(c)
Brightness: Maximum
Contrast: 5 ft-L, 24 ft-L
5. Check whether the white coordinates of the
video meet the above coordinates spec.
6. Select “@8: 24-ft “ in right menu.
7. Check whether the white coordinates of the
video satisfies the above spec.
If they do not, return to 4-3-2 (a) and readjust
all settings.
Select “Color” and click “@2: CHANNEL 2”
for color ajdustment for 6500K
Repeat the sequence of 9300K adjustment.
The luminance values the same as 9300K, but
the color coordinated of back raster and white
box are : x = 0.313 ± 0.02 y = 0.329 ± 0.02
4-3-3 Luminance Uniformity Check
Luminance is considered uniform only if the ratio
of lowest to highest brightness areas on the screen
is not less than 7.5:10.
CONDITIONS
Scanning frequency: 68 kHz/85 Hz
(1024 x 768)
Display image: White flat field
Brightness: Cut off point at 24 ft-L
Contrast: Maximum
1. Check whether the color coordinates of the
back raster satisfy the above spec.
If they do not, return to 4-3-2 (a) and readjust
all settings.
2. Display a full white pattern.
3. Select “Geometry” in softjig menu.
4. Select “@7: 5-ft “ in right menu.
4-6 AP17K*/ AP17J*
Page 16
4 Alignment and Adjustments
PROCEDURE
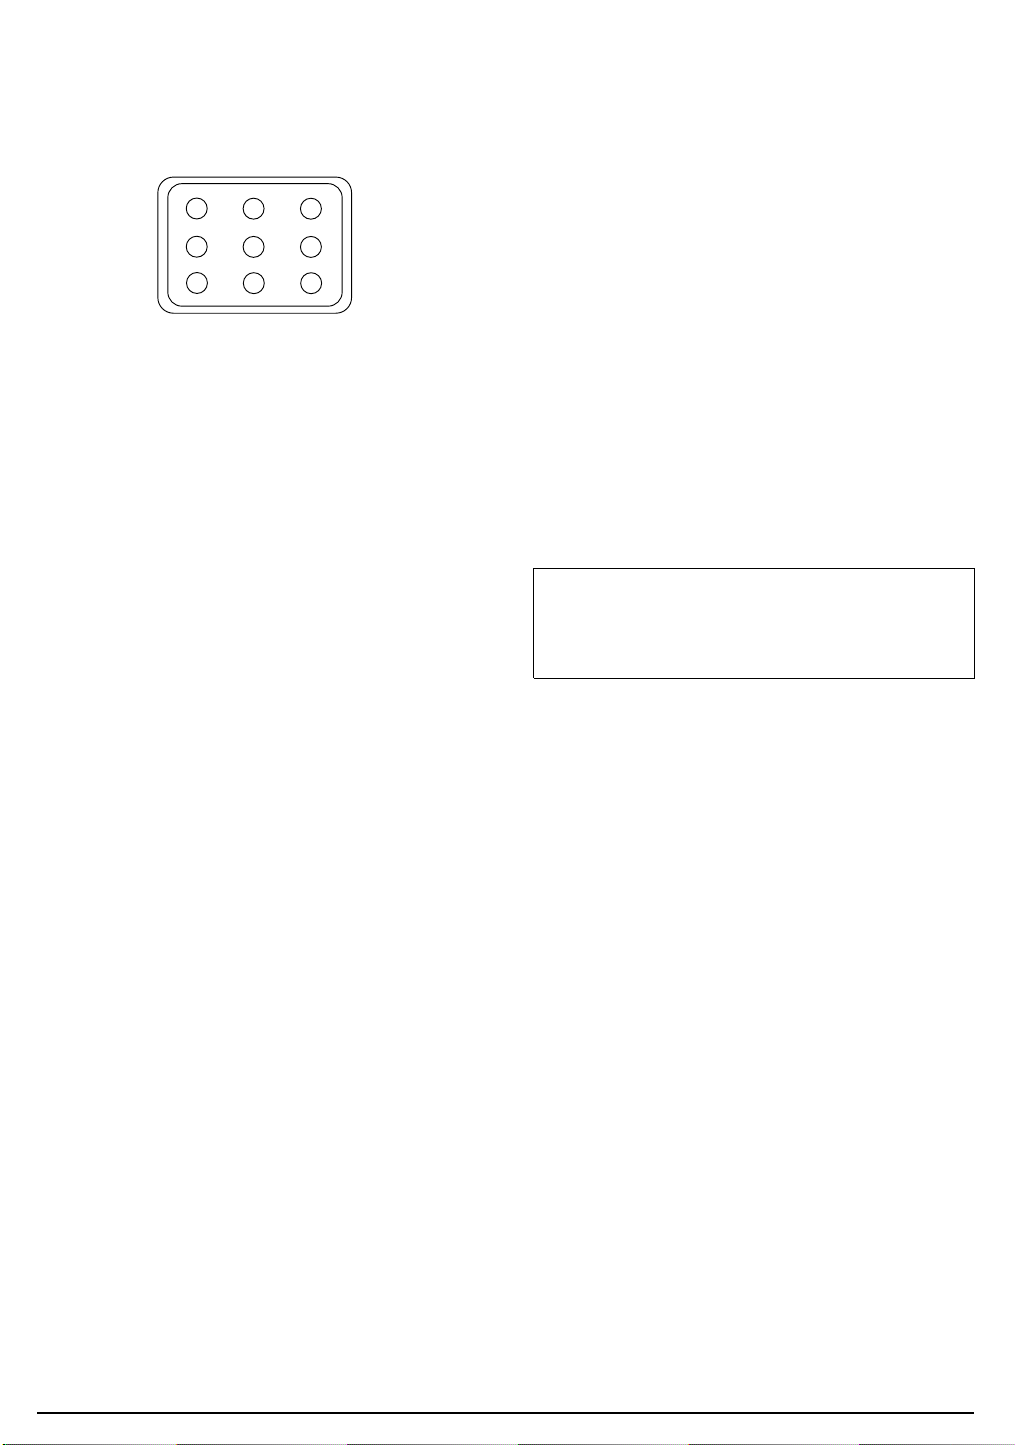
Measure luminance at nine points on the display
screen (see figure below).
Figure 4-10. Luminance Uniformity Check Locations
4-3-4 Focus Adjustment
CONDITIONS
Scanning frequency: 68 kHz/85 Hz
(1024 x 768)
Display image: “H” character pattern
Brightness: Cut off point
Contrast: Maximum
PROCEDURE
1. Adjust the Focus VR on the FBT to display the
sharpest image possible.
2. Use Locktite to seal the Focus VR in position.
PROCEDURE
For trained and experienced service technicians
only.
Use the following procedure to correct minor
color purity problems:
1. Make sure the display is not affected by
external magnetic fields.
2. Make sure the spacing between the PCM
assembly and the CRT stem is 29 mm ± 1 mm.
3. Display a green pattern over the entire display
area.
4. Adjust the purity magnet rings on the PCM
assembly to display a pure green pattern.
(Optimum setting: x = 0.295 ± 0.015,
y = 0.594 ± 0.015)
5. Repeat steps 4 and 5 using a red pattern and
then again, using a blue pattern.
Table 4-4. Color Purity Tolerances
Red: x = 0.640 ± 0.015 y = 0.323 ± 0.015
Green: x = 0.295 ± 0.015 y = 0.594 ± 0.015
Blue: x = 0.142 ± 0.015 y = 0.066 ± 0.015
4-3-5 Color Purity Adjustment
Color purity is the absence of undesired color.
Conspicuous mislanding (unexpected color in a
uniform field) within the display area shall not be
visible at a distance of 50 cm from the CRT
surface.
CONDITIONS
Orientation: Monitor facing east
Scanning frequency: 68 kHz/85 Hz
Display image: White flat field
Luminance: Cut off point at the center
of the display area
Note: Color purity adjustments should only be
attempted by qualified personnel.
(For 9300K color adjustment: x = 0.283 ± 0.02, y = 0.298 ± 0.02)
6. When you have the PCMs properly adjusted,
carefully glue them together to prevent their
movement during shipping.
AP17K*/ AP17J* 4-7
Page 17

4 Alignment and Adjustments
M emo
4-8 AP17K*/ AP17J*
Page 18
5 Troubleshooting
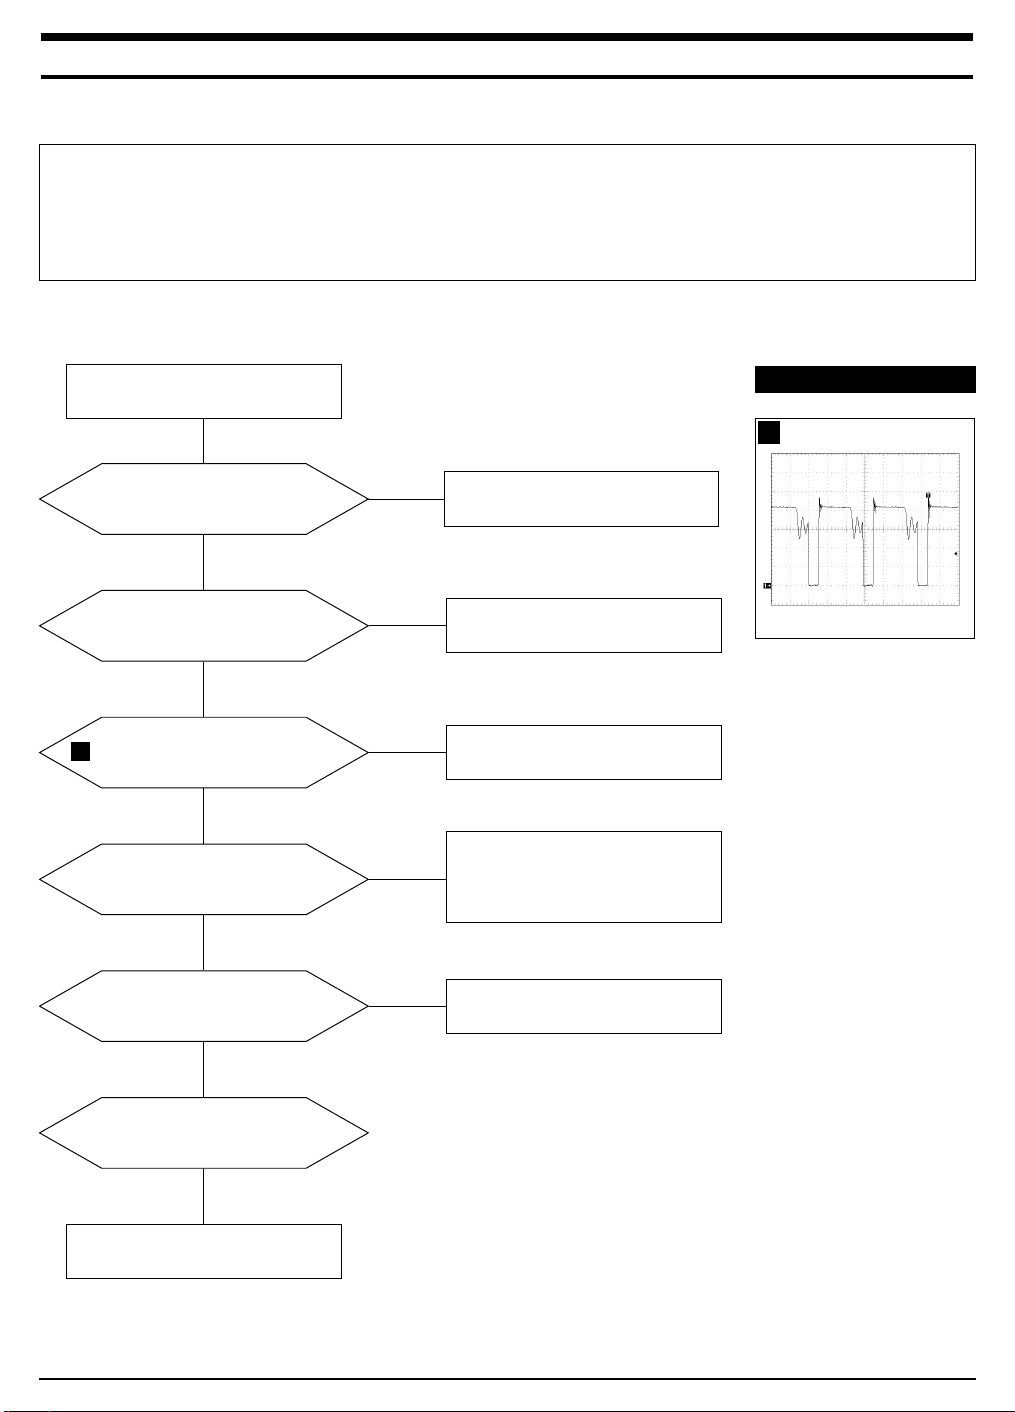
5-1 Parts Level Troubleshooting
Notes: Check the following circuits.
• No raster appears: Power circuit, Horizontal output circuit.
• High voltage develops but no raster appears: Video output circuits.
• High voltage does not develop: Horizontal output circuits.
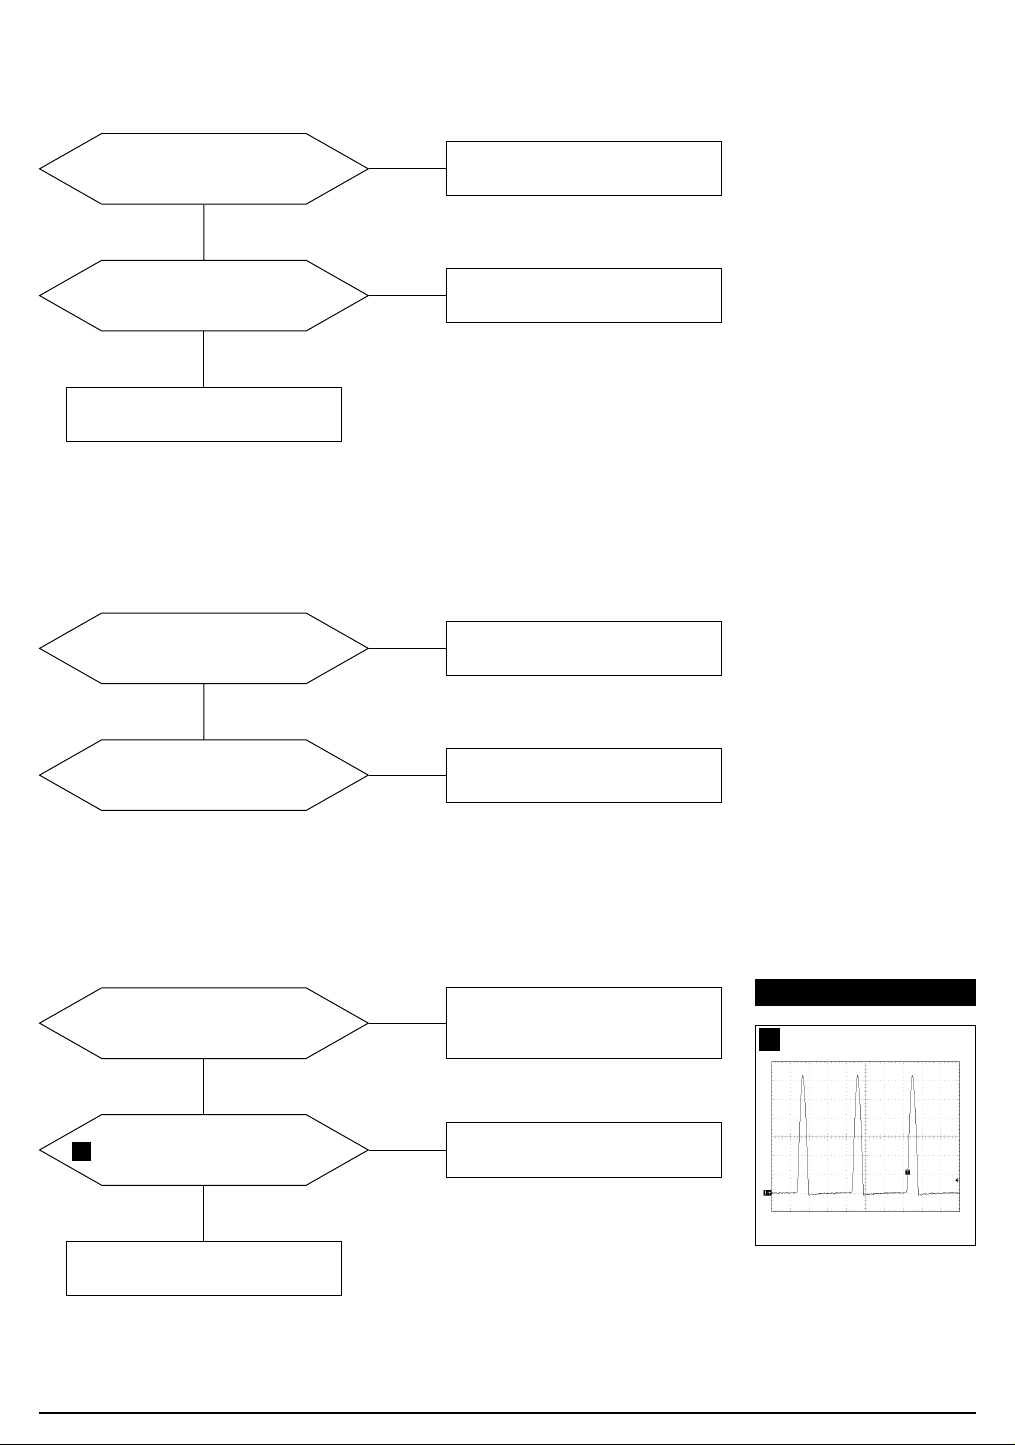
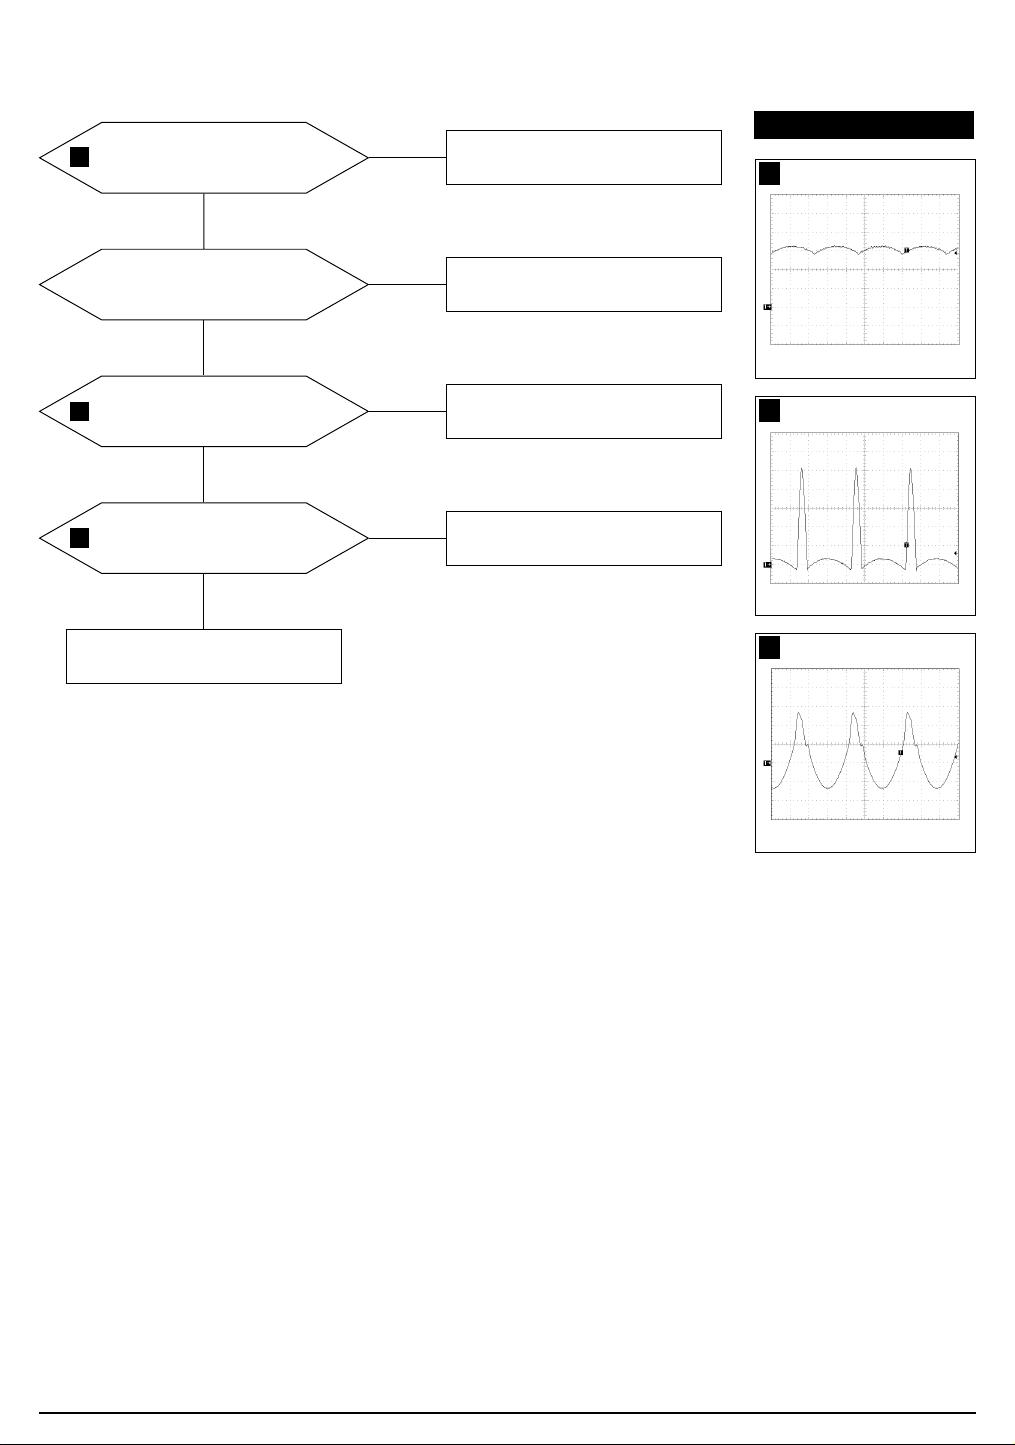
5-1-1 No Pow er Supply
Check and replace D601 and FH1
Chirping noise exists?
No
Repeating start?
No
1
IC601 Pin 1 w aveform is right?
Yes
C622 Voltage is 13 V ± 0.5V?
Yes
Yes
Yes
No
No
Check and replace IC601.
Check and replace D606.
Check and replace D614, IC601,
Q602, and ZD601.
Check and replace IC201, IC301,
IC401, Q402, and Q404.
WAVEFORM S
100 V (IC601, #1)
1
CH1 P-P = 100 V CH1 RMS = 350.2 V
Operate normally?
Yes
Verify voltages.
Done.
AP17K*/ AP17J* 5-1
No
Replace M ain board.
Page 19
5 Troubleshooting
5-1-2 DPM S Failure
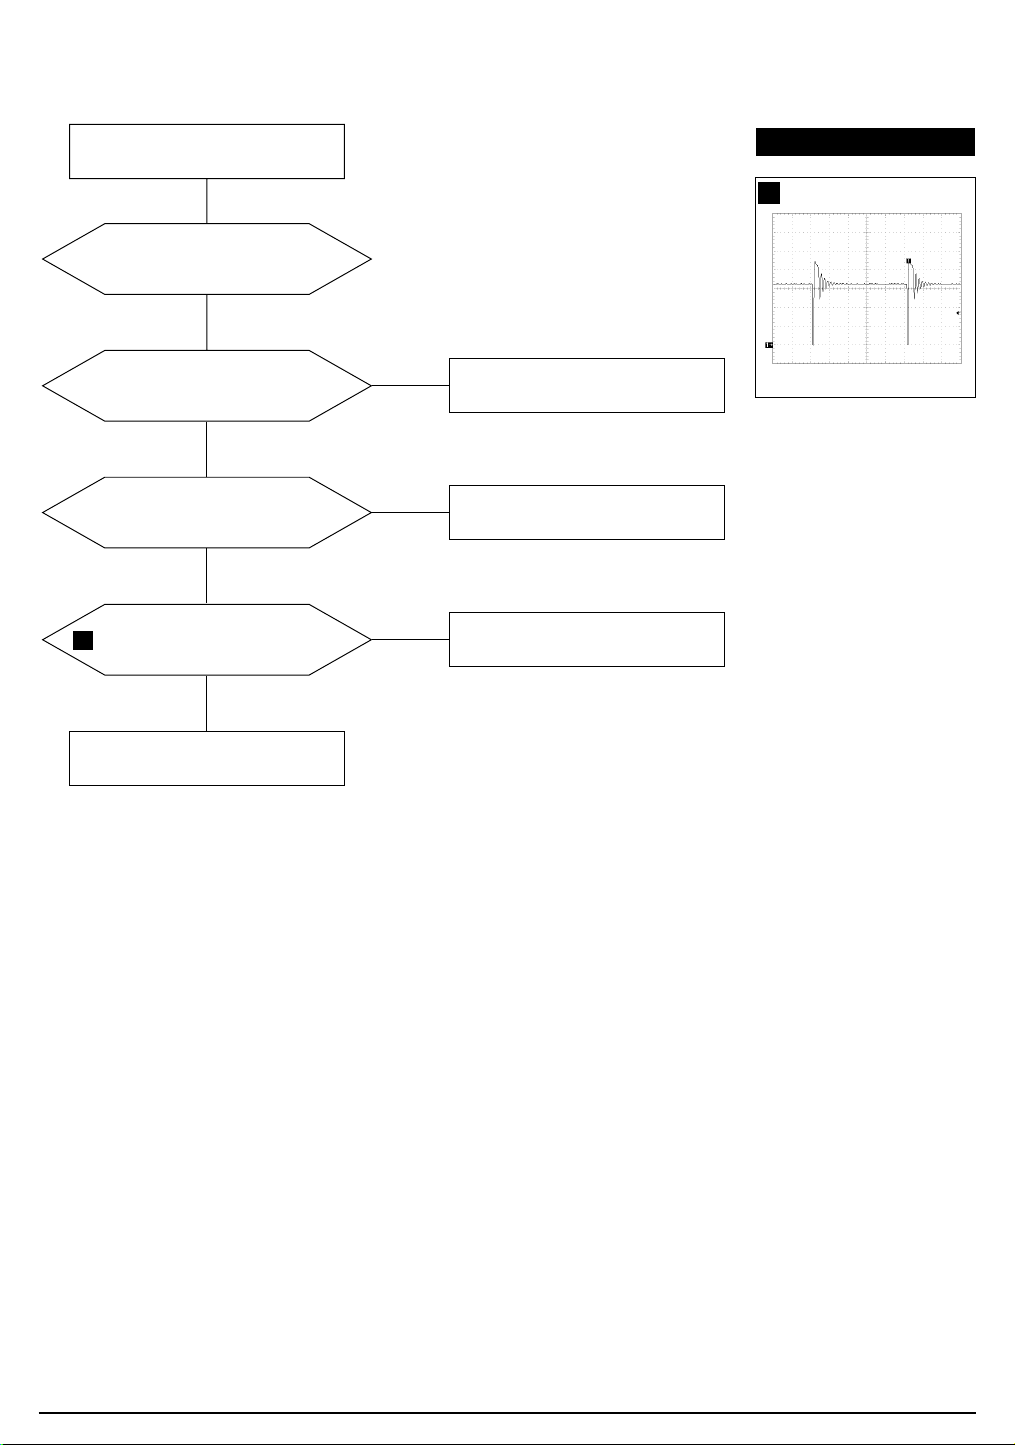
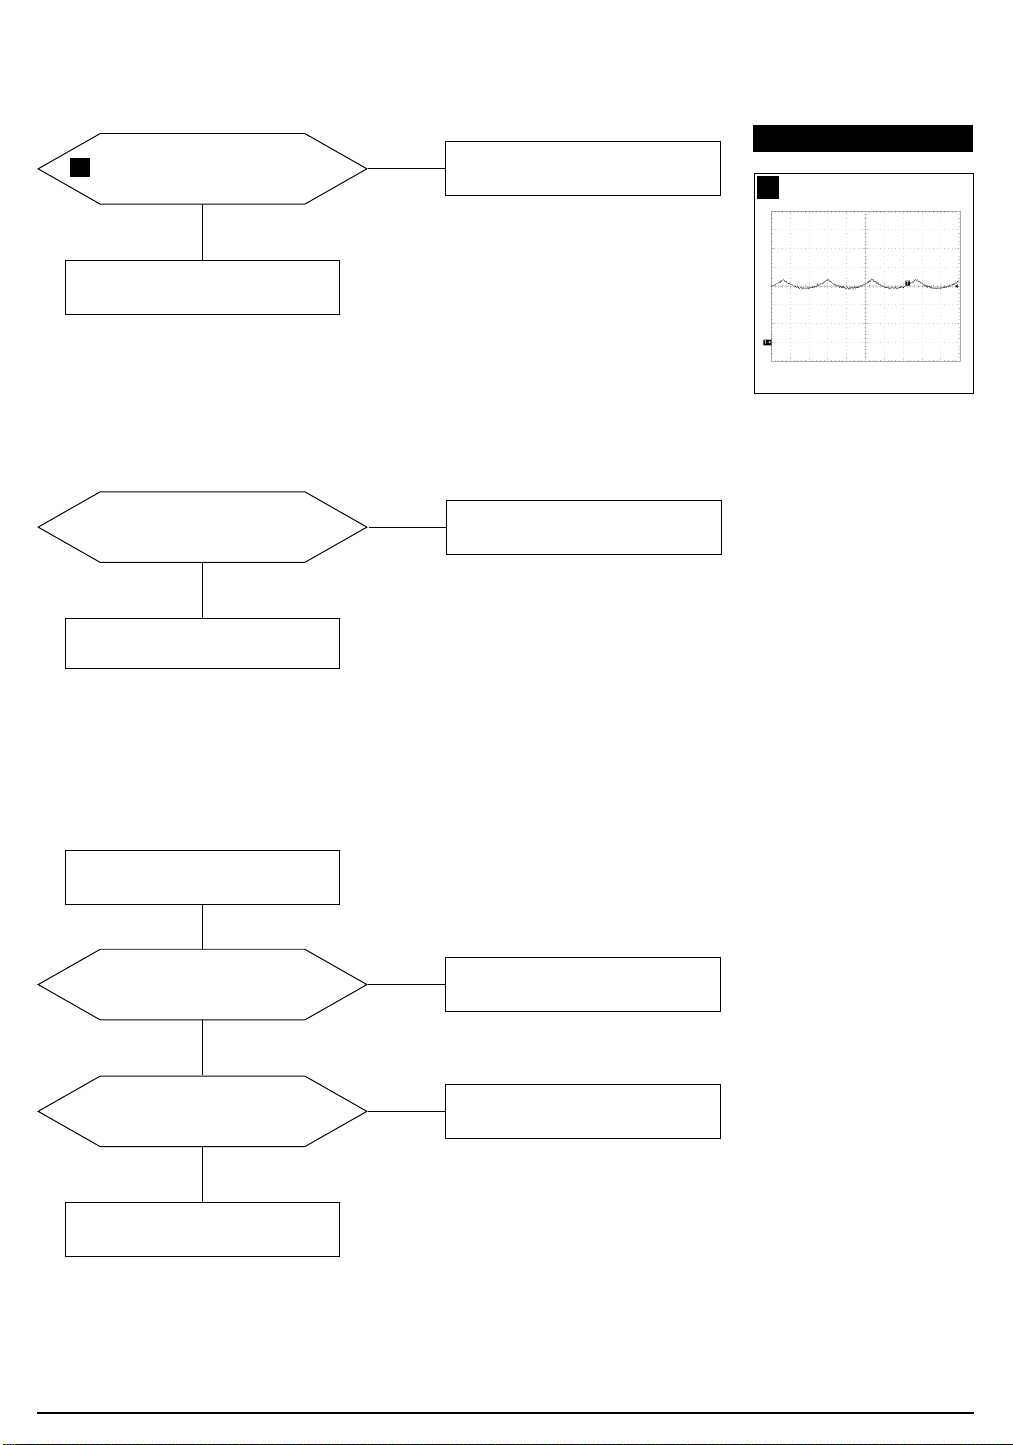
Check signal source
H/V Sync. video level.
M ake No H/ V Sync. (power off
mode)
LED blinks?
Yes
+12 V line off?
Yes
2
IC601 Pin 1 out put
volt age exists?
Yes
No
No
No
Check IC201 Pin 40.
Check IC201 Pin 6.
Refer to 5-1-1 No Power Supply.
WAVEFORM S
100 V (IC601, #1)
2
CH1 P-P = 100 V CH1 RM S = 325.8 V
Done
5-2 AP17K*/ AP17J*
Page 20
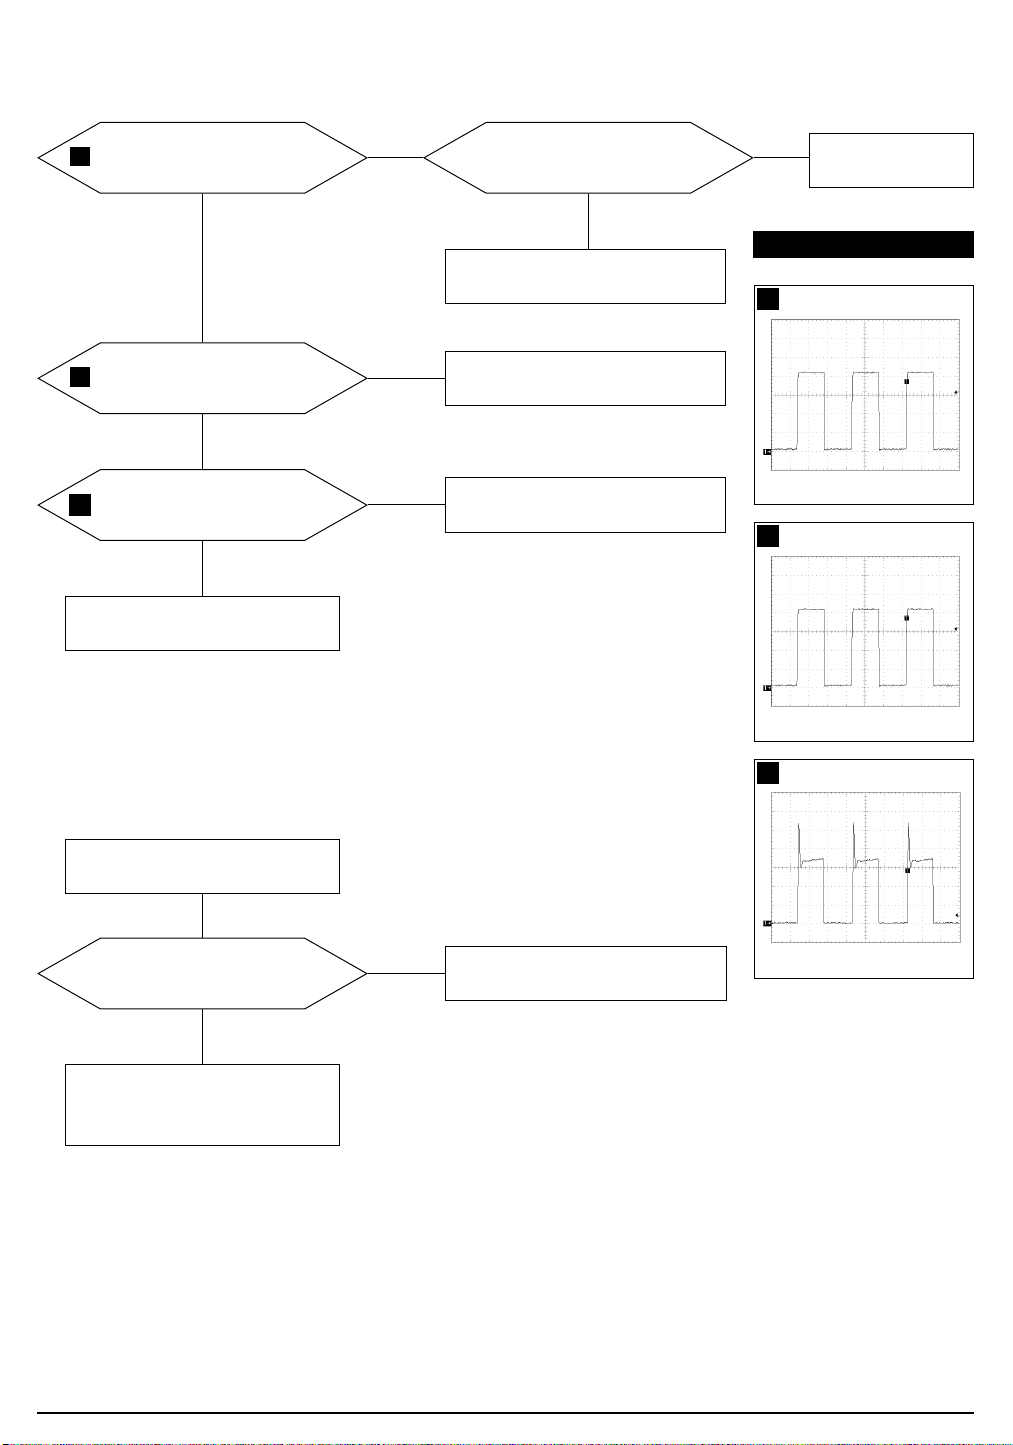
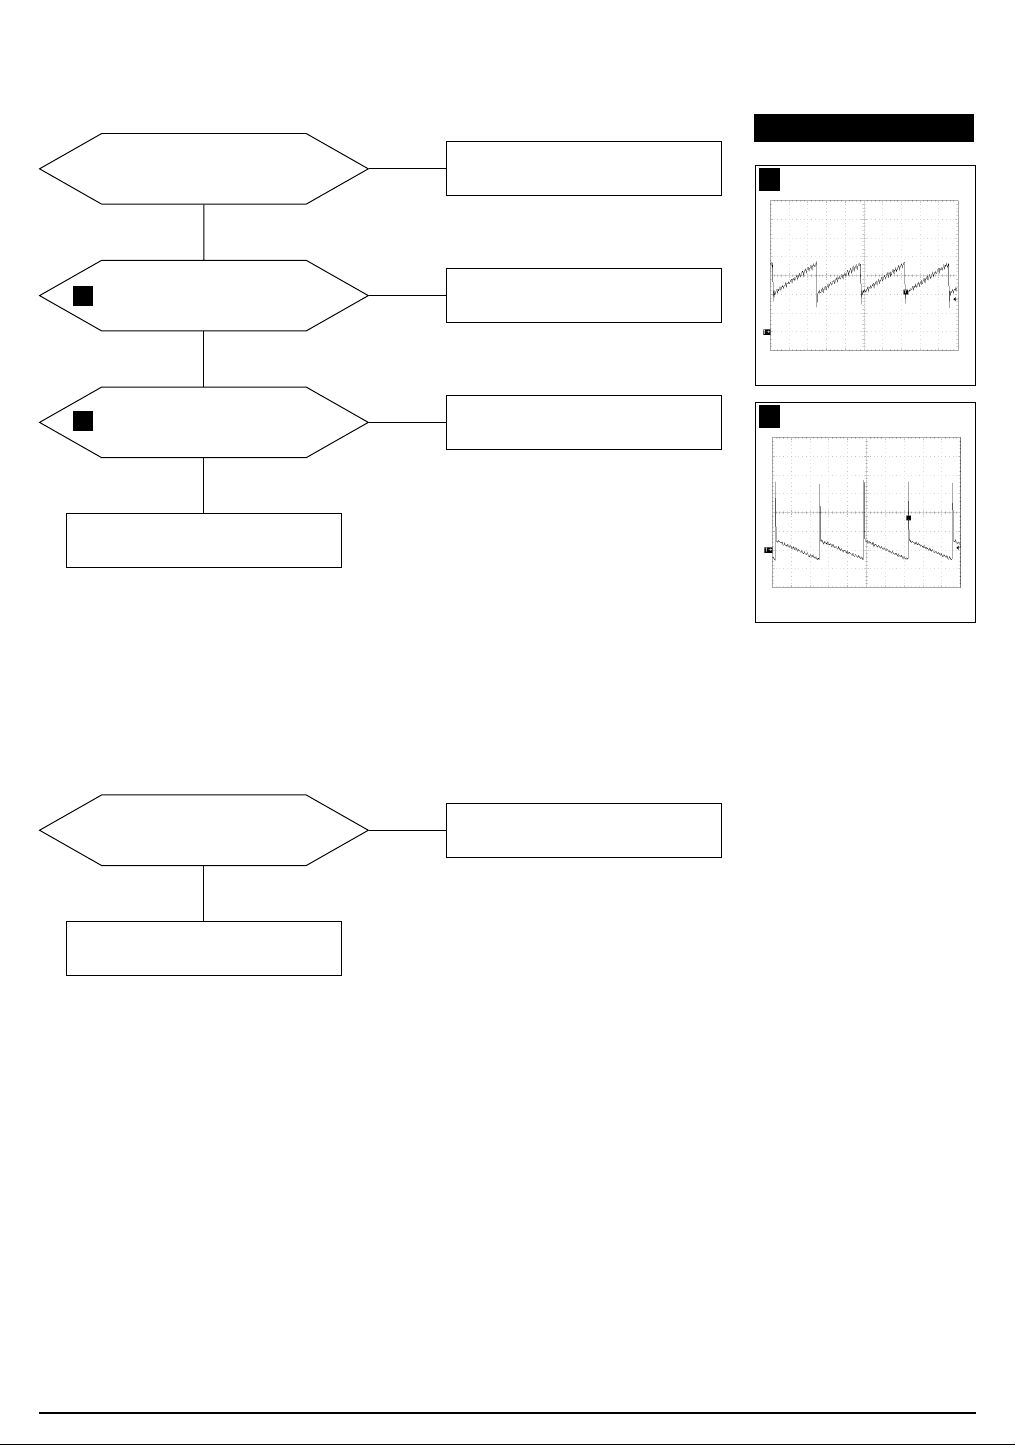
5-1-3 H_Deflection Failure
5 Troubleshooting
Does PWM output signal appear
3
at Pin 6 (B_out) of IC401?
Yes
Does Horizontal pluse signal
4
appear at Pin 8 of IC401?
Yes
Does 110 Vp-p signal appear
5
at Collector of Q403?
Yes
Check Q402, Q404 and T401.
No
No
No
Does DC 12V appear at
Pin 10 of IC401?
Yes
Check IC401.
Check IC401.
Check Q403.
No
Check 12 V line.
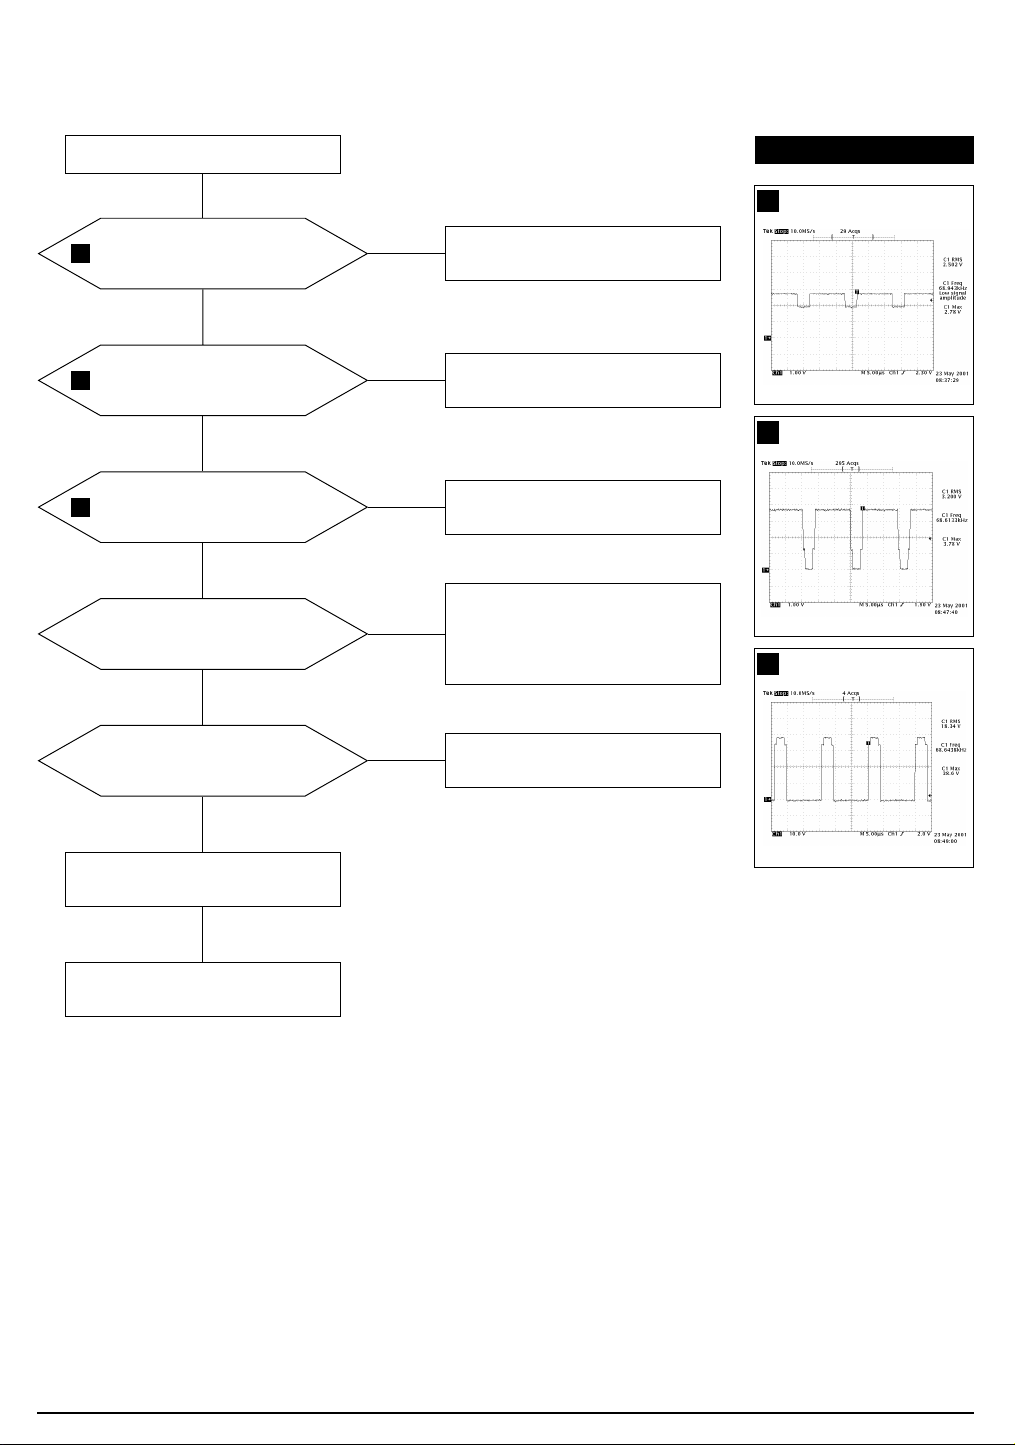
WAVEFORM S
2.00 V (IC401, #6)
3
CH1 P-P = 2.00V CH1 RMS = 5.868V
2.00V (IC401, #8)
4
5-1-4 S Correction Failure
Check S1 ~ S4 signal.
S1~S4 signals are right at each
frequency block?
Yes
Check and replace Q404, Q409,
Q410, Q411, Q414, Q415, Q416,
Q420, and Q421.
No
Check and replace IC201.
CH1 P-P = 2.00V CH1 RMS = 5.868V
20.0 V (Q403, Collector)
5
CH1 P-P = 20.0 V CH1 RMS = 46.80V
AP17K*/ AP17J* 5-3
Page 21
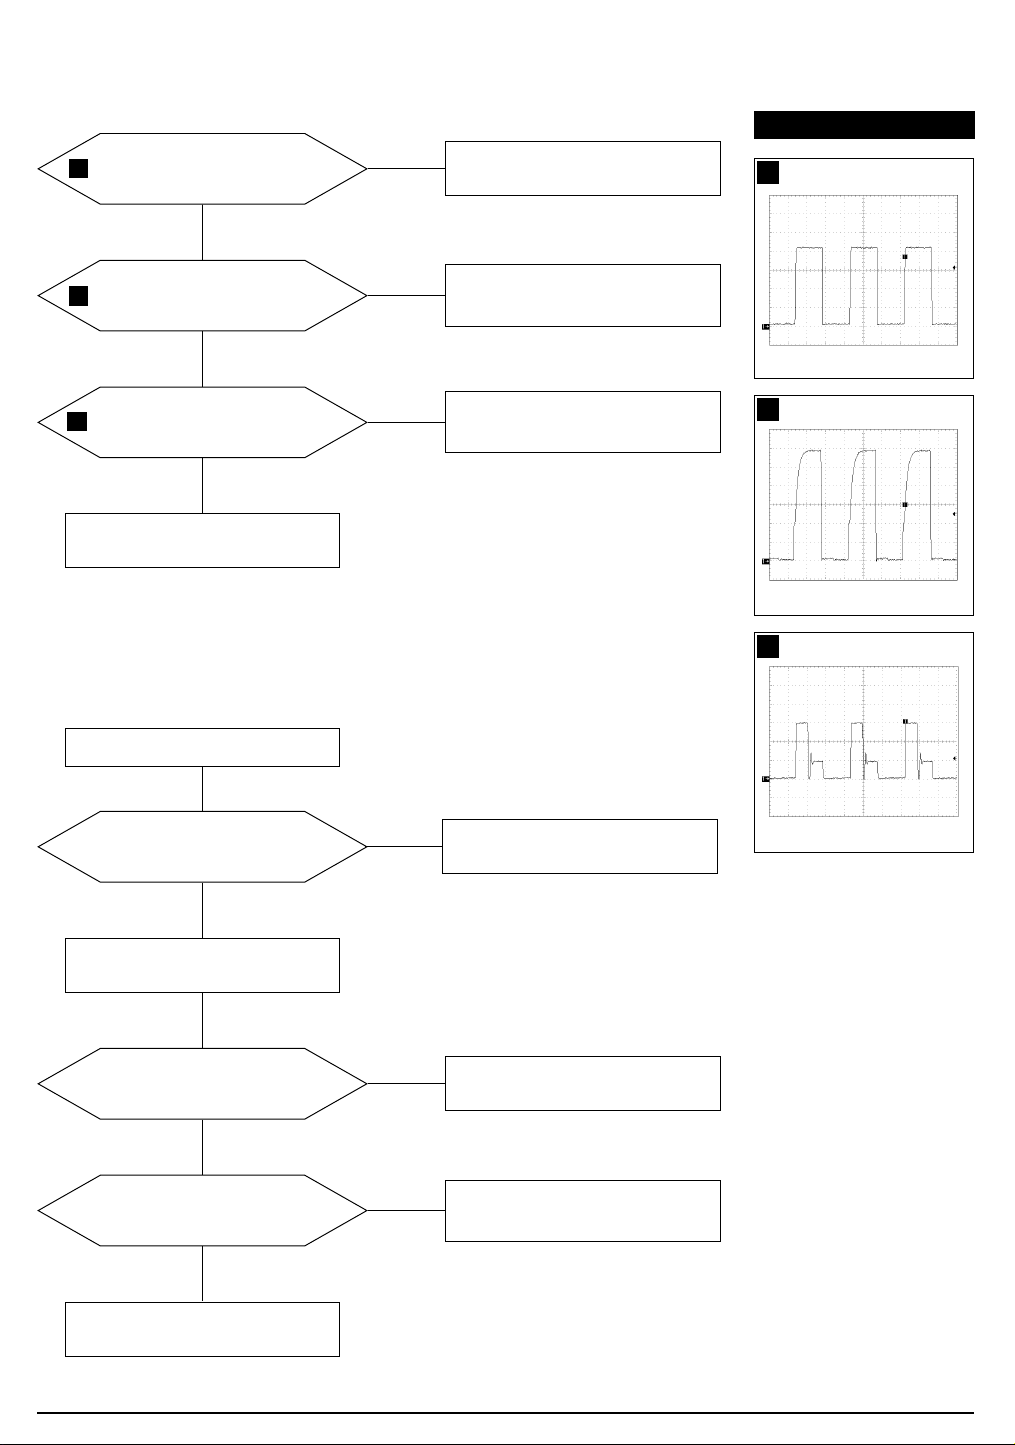
5 Troubleshooting
5-1-5 H_Lin. Failure
IC201 Pin 21 voltage varies w ith
dif ferent H_Lin. DAC values?
Yes
IC603 Pin 9 voltage varies w ith
dif ferent H_Lin. DAC values?
Yes
Check Q412, Q413 and T402.
5-1-6 Invariable H_Size
IC401 Pin 6 voltage varies w ith
dif ferent B_Out DAC values?
Yes
No
No
No
Replace IC201.
Check +13V, Coil_5V line.
Check some parts around IC603.
Check and replace IC401.
Q402 Gate output duty varies w ith
dif ferent B_Out DAC values?
5-1-7 Abnormal H_Size
IC401 Pin 11 output duty
varies with dif ferent B+ offset
DAC values?
Yes
Q404 Collector w aveform is
6
around D409 and L401.
right?
Yes
Check some parts
No
No
No
Check some parts around Q402,
IC401 Pin 3 ~ 6.
Check and replace IC201.
Check and replace Q405,
Q406, Q407, and Q408.
WAVEFORM S
200 V (Q404, Collector)
6
CH1 P-P = 200V CH1 RMS = 387.2V
5-4 AP17K*/ AP17J*
Page 22
5-1-8 Side Pin or Trap Failure
5 Troubleshooting
7
IC401 Pin 11 output exists?
Yes
Refer to 5-1-7
Abnormal H_Size
.
5-1-9 Para. or Pin Balance Failure
IC401 Pin 11 output varies w it h
dif ferent DAC values?
No
Replace IC401.
No
Yes
Check and replace IC401.
Refer to 5-1-7
Abnormal H_Size
WAVEFORM S
1.00 V (IC401, #11)
7
CH1 P-P = 1.00V CH1 RMS = 3.008 V
.
5-1-10 Tilt Failure
Check tilt connector connection
IC201 Pin 20 output duty varies
with different DAC values?
Yes
IC603 Pin 13 output varies w it h
dif ferent DAC values?
Yes
Check and replace Q301 and Q302.
No
Check and replace IC201.
No
Check and replace IC603.
AP17K*/ AP17J* 5-5
Page 23
5 Troubleshooting
5-1-11 V Deflection Failure
13V and –10V lines are on?
Yes
No
Refer to 5-1-1 No Power Supply
WAVEFORM S
500 V (IC401, #12)
8
IC401 Pin 12 output exists?
8
No
Yes
9
IC301 Pin 6 out put exists?
No
Yes
Check DY connector connection.
5-1-12 V Size or Position Variation Failure
IC401 Pin 12 output varies w it h
dif ferent DAC values?
No
Check and replace IC401.
Check and replace some parts
around IC301.
Check and replace IC201 and IC401.
CH1 P-P = 500 V CH1 RMS = 1.425 V
10.0 V (IC301, #6)
9
CH1 P-P = 10.0 V CH1 RMS = 5.06 V
Yes
Check and replace IC301.
5-6 AP17K*/ AP17J*
Page 24
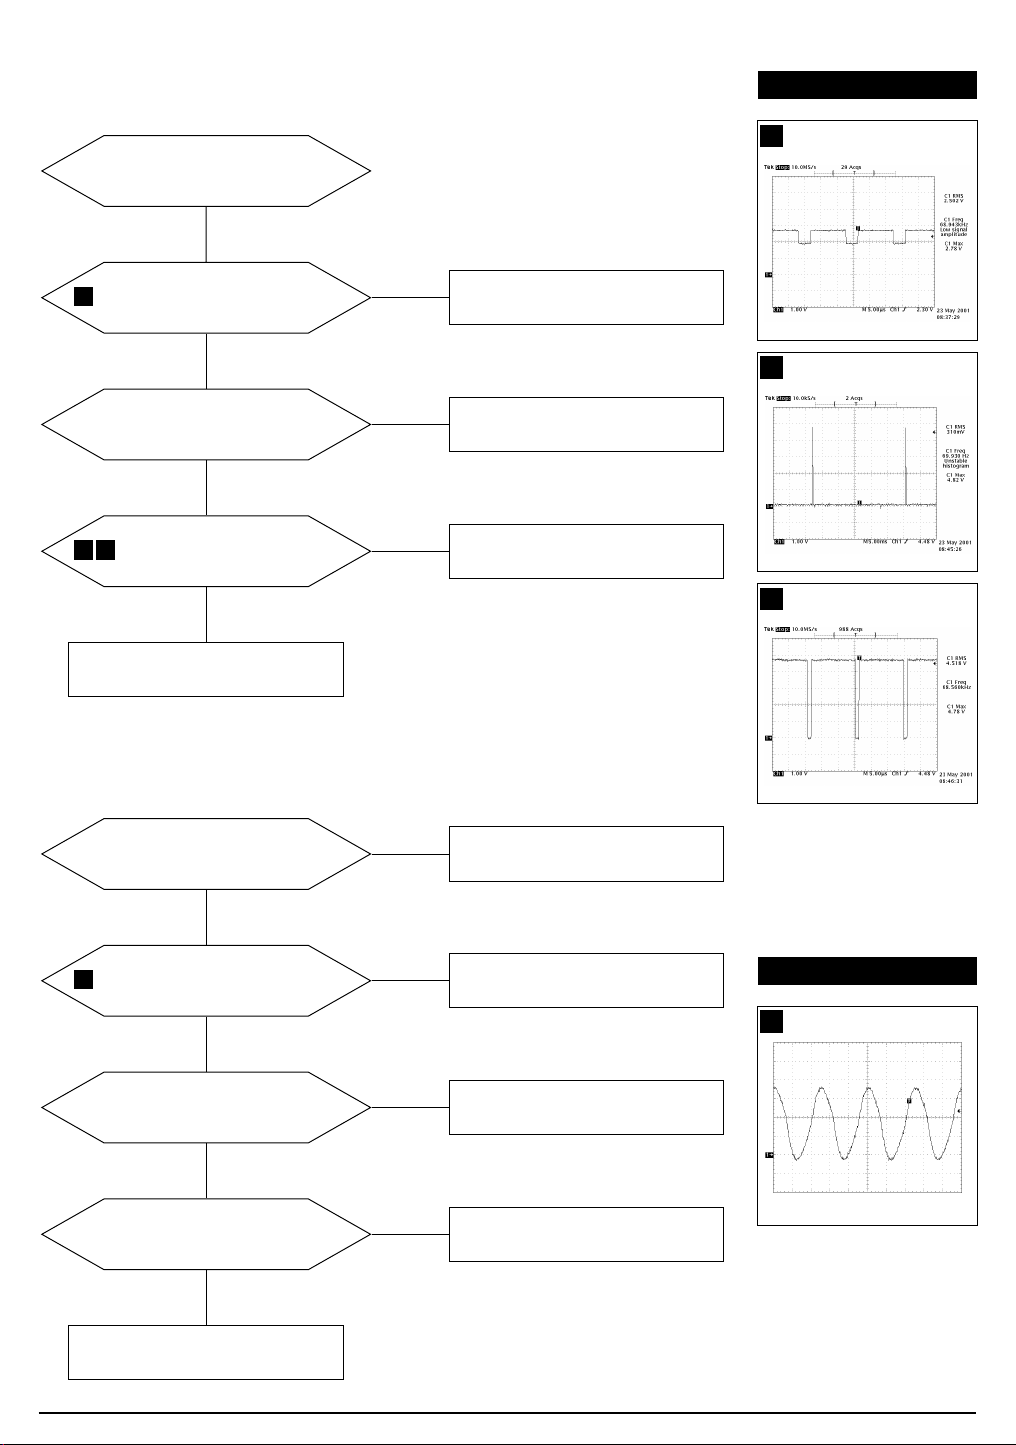
5-1-13 High Voltage Failure
IC401 Pin 6 OSC pulse exists?
3
Yes
No
Check and replace IC401
and +12 V line.
5 Troubleshooting
WAVEFORM S
2.00 V (IC401, #6)
3
Q402 Gate driving pulse exists?
10
Yes
Q402 Drain pulse exists?
11
Yes
Done
5-1-14 ABL Failure
Input full w hite pattern t o monit or.
IC101 Pin 8 input exists and
varies with dif ferent patterns?
No
No
No
Check and replace Q401 and Q423.
Check and replace
D401, Q403 and L402.
Check and replace IC101.
CH1 P-P = 2.00 V CH1 RMS = 5.868 V
2.00 V (Q402, Gate)
10
CH1 P-P = 2.00 V CH1 RMS = 7.692V
50.0 V (Q402, Drain)
11
CH1 P-P = 50.0 V CH1 RMS = 73.7V
Yes
Check CN102.
T501 Pin 8 output exists?
No
Check and replace T501.
Yes
IC201 Pin 26 output exists and
varies with dif ferent patterns?
No
Check and replace IC201.
Yes
Done
AP17K*/ AP17J* 5-7
Page 25
5 Troubleshooting
5-1-15 Dynamic Focus Failure
12
IC401 Pin 32 output is right?
Yes
Some parts around Q551 are right ?
Yes
T502 Pin 6 input is right?
13
Yes
T502 Pin 1 output is right?
14
Yes
Check the connection bet w een FBT
Focus pin and CRT Socket PCB.
No
No
No
No
Replace the IC401.
Replace failed part.
Check and replace C432.
Replace the T502.
WAVEFORM S
2.00 V (IC401, #32)
12
CH1 P-P = 2.00V CH1 RMS = 6.124V
50.0 V (T502, #6)
13
CH1 P-P = 50.0V CH1 RMS = 75.6V
100 V (T502, #1)
14
CH1 P-P = 100V CH1 RMS = 124.0V
5-8 AP17K*/ AP17J*
Page 26
5-1-16 No Video
5 Troubleshooting
Check signal cable and connection.
IC102 Pin 5, 8 and 10
15
16
17
inputs are right?
Yes
IC102 Pin 25, 28 and 30
outputs are right?
Yes
IC105 Pin 1, 3 and 5
outputs are right?
Yes
Cathode DC levels are right ?
Yes
No
No
No
No
Check the signal cable connection.
Check I2C bus and +12 V line.
Check +12 V, +80 V line.
Check and replace IC105.
Check +80 V line.
Check and replace IC104
Check IC102 Pin 19, 20, 21
WAVEFORM S
1.00 V (IC102,#5, 8, 10)
15
1.00 V (IC102, #25,28,30)
16
20.0 V (IC105, #1, 3, 5)
17
G2 voltage is right?
Yes
Change CRT.
Yes
Done.
No
Check G2 wire,
CRT Socket board and FBT.
AP17K*/ AP17J* 5-9
Page 27
5 Troubleshooting
5-1-17 No Highlight Zone
IC101 Pin 2, 4 and 6
inputs are right?
Yes
IC101 Pin 20, 22 and 24
18
19 20
outputs are right?
Yes
IC101 Pin 12, 13 are right?
(I2C Data / Clock Line)
IC101 Pin 14, 15 and
V_FLB, CLAM P
waveforms are right?
No
No
No
Check +5V IC101 pin 1, 23.
Check Micom (IC201)
I2C Data / Clock Line.
Check CLAM P, V_FLB waveforms.
WAVEFORM S
1.00 V (IC101, #20, 22, 24)
18
1.00 V (IC101, #14)
19
1.00 V (IC101, #15)
20
Done
5-1-18 M icom Failure
IC201 Pin 11 input voltage is 5V?
Yes
21
IC201 Pin 13 and 14
inputs are right?
Yes
IC201 Pin 18 input is right?
Yes
All in/ output values are right?
No
No
No
No
Check IC604.
Check C202, C203 and X201.
Check IC605 and 5V.
Replace IC201.
WAVEFORM S
1.00 V (IC201, #13, 14)
21
CH1 P-P = 1.00 V CH1 RMS = 2.108V
Yes
Done
5-10 AP17K*/ AP17J*
Page 28
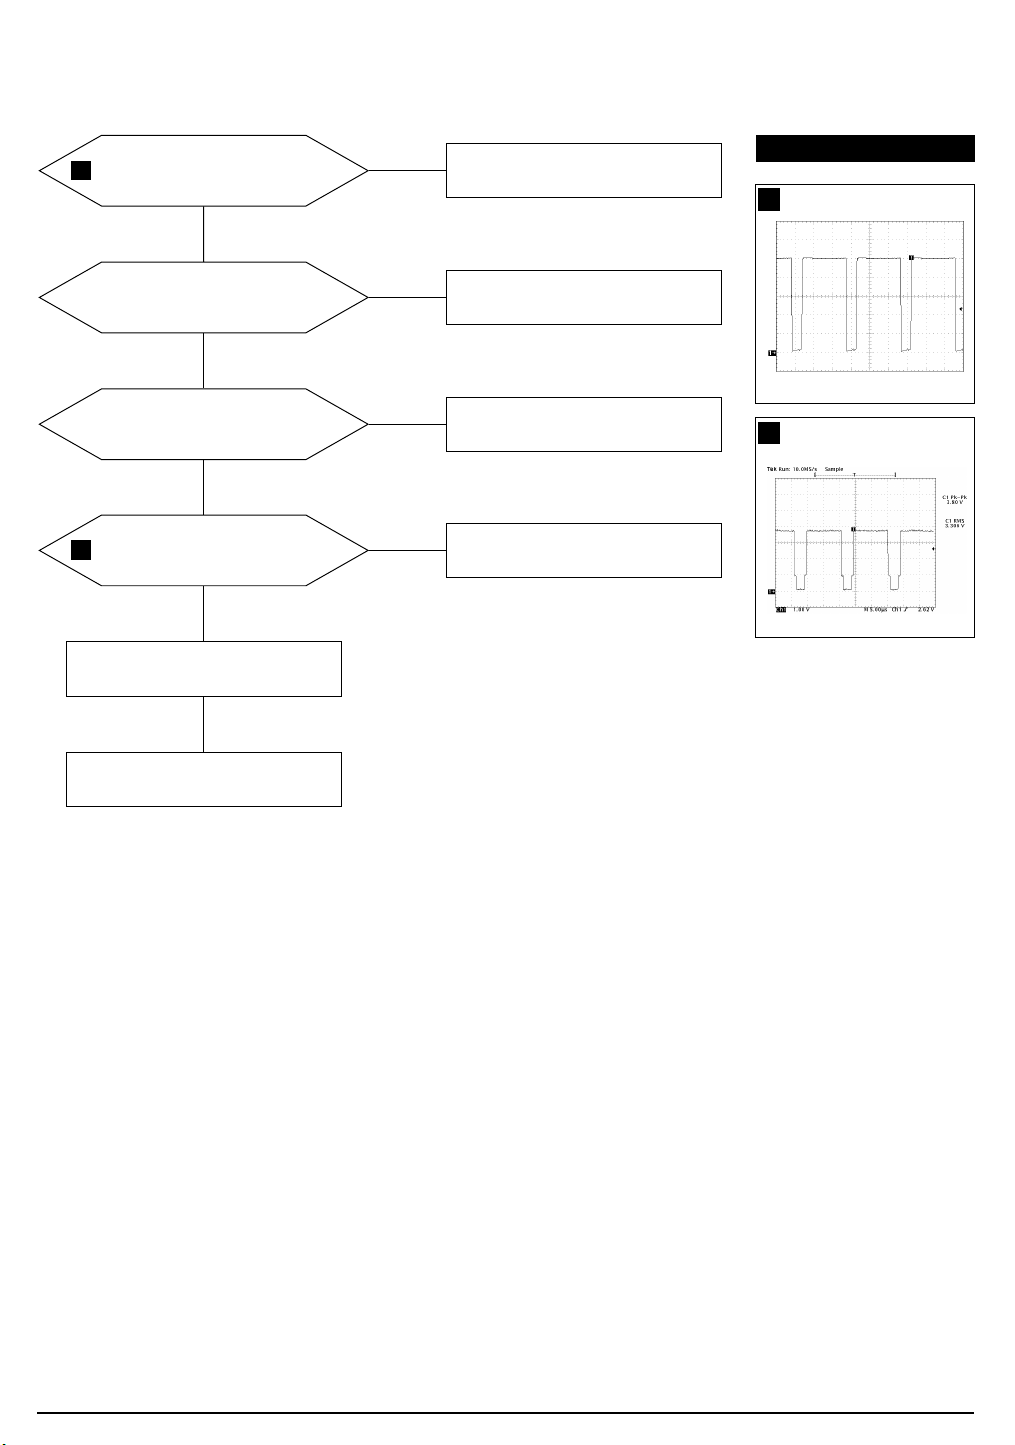
5-1-19 OSD Failure
5 Troubleshooting
IC103 Pin 5, 24 input is 5V?
22
Yes
Check IC103 Pin 7, 8 I2C
Data / Clock Line?
Yes
IC103 Pin 6 and 17
inputs are right?
Yes
IC103 Pin 20, 21 and 22
23
outputs are right?
Yes
Check and replace IC103.
No
No
No
No
Check +5V Line.
I2C wavef roms.
Check
Check H-FLB 2, V_BLK.
Check and replace IC101.
WAVEFORM S
1.00 V (IC103, #5, 24)
22
CH1 P-P = 1.00V CH1 RMS = 4.516V
1.00 V (IC103, #20, 21, 22)
23
Done
AP17K*/ AP17J* 5-11
Page 29
5 Troubleshooting
5-1-20 User Control Failure
Does the DC level change at
Pin 36 of IC201 when you
push the button S/ W ?
Yes
Check IC201, CN2 and CN206.
5-1-21 Degaussing Failure
Check degaussing connector.
RL601 operation is right?
No
Q601 base input is right?
No
Yes
Yes
Check the but ton.
(SW201 ~ SW 204)
Check D-coil and TH601.
Check 13V Line.
Check and replace Q601.
No
IC201 Pin 4 out put is right?
Yes
Done
No
Check and replace IC201.
5-12 AP17K*/ AP17J*
Page 30
5-2 General Troubleshooting
5-2-1 No Picture
5 Troubleshooting
LED blinks?
LED is green color?
Check G2 voltage, high voltage
and R, G, B cathode voltage.
5-2-2 Shut Dow n
Blinking LED’s?
Yes
Refer to 5-2-2 Shut dow n.
No
Yes
Check Micom.
No
No
Check power supply.
Yes
Scan failure?
No
Video f ailure?
No
Check and replace IC201.
Done
Yes
Yes
Check horizontal, vertical deflection
system and check power
supply secondary voltages.
Check Video board.
AP17K*/ AP17J* 5-13
Page 31
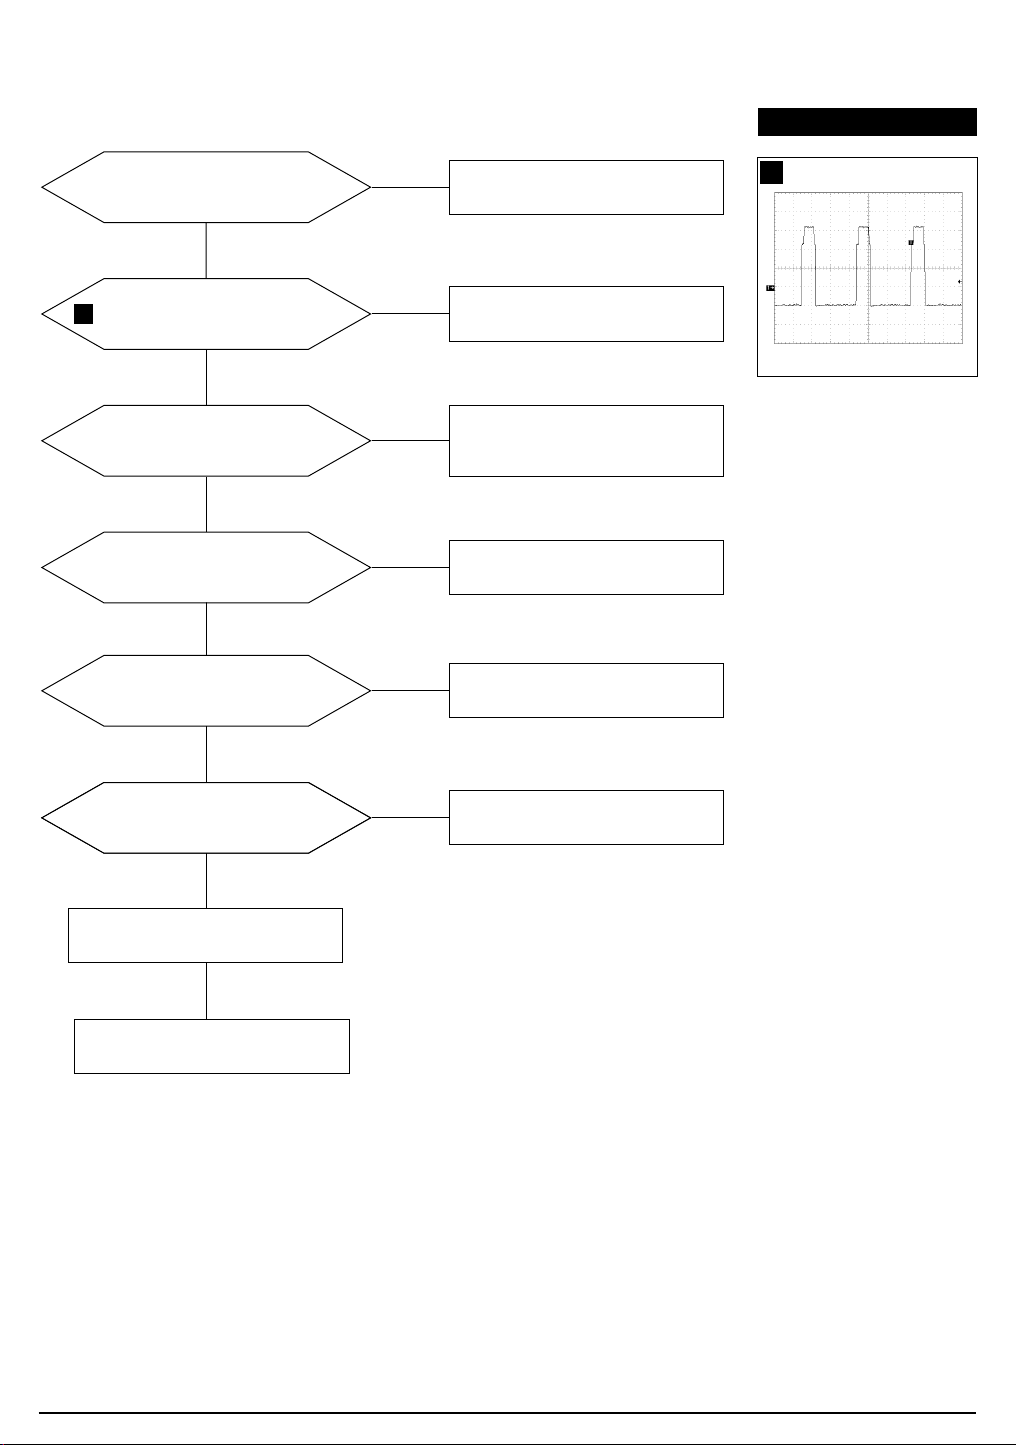
5 Troubleshooting
5-2-3 M issing Color
WAVEFORM S
Proper Video levels are
on CN101 (D-Sub) Pin 1, 3 and 5?
Yes
Proper Video signal is
24
on all cat hodes?
Yes
Proper DC voltage is
on all cat hodes?
Yes
G2 voltage is right?
Yes
Heater voltage is right?
No
No
No
No
No
Check signal generator.
Refer to 5-1-16 No Video.
Check IC101 Pin 18, 21 and 24.
Check QR01, QR02, QG01,
QG02, QB01, and QB02.
Check D502, D518, Q501,
D520, D521, and CN501.
Check D608, Q604 and T601.
10.0 V (R,G,B, Video)
24
CH1 P-P = 10.0V CH1 RM S = 17.02V
Yes
Yes
Is G2 voltage right?
Yes
Replace CRT.
Yes
Done
No
No
Check D504, Q502 and T501.
5-14 AP17K*/ AP17J*
Page 32
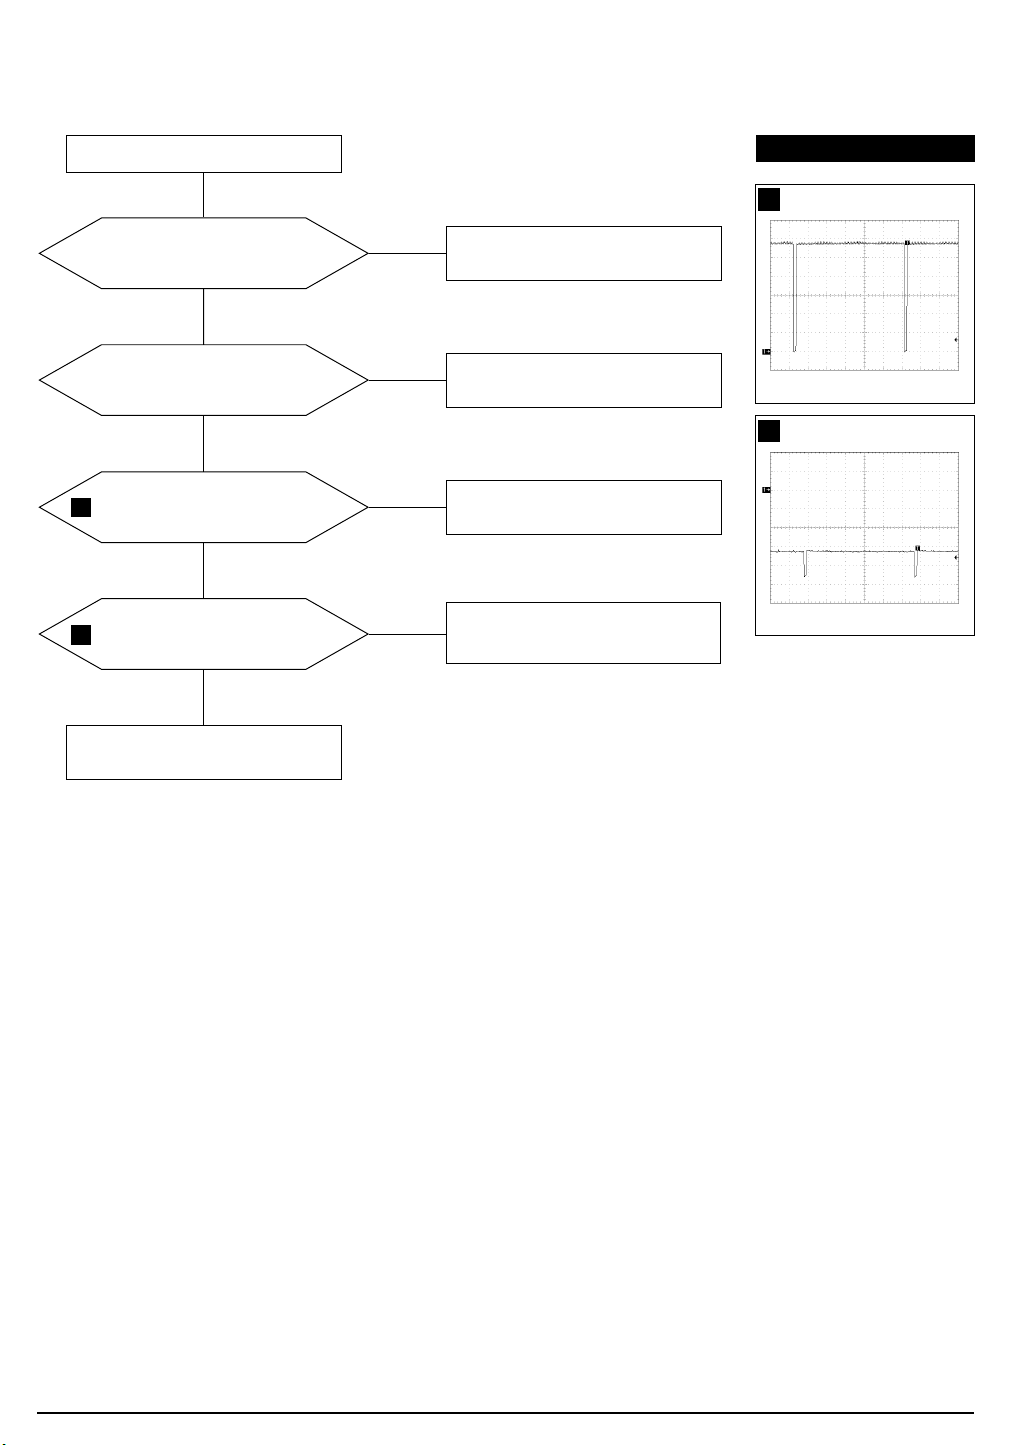
5-2-4 Visible Retrace
5 Troubleshooting
Check white balance adjustment .
G2 voltage is right?
Yes
Blank pulse is on Pin 17 of IC401?
Yes
25
V_FLB pulse is on
Collector of Q501?
Yes
Does approve the Vertical pulse
26
on the CRT Socket G1?
Yes
No
Check D502, D518, Q501, Adjust G2.
No
Check IC401.
No
Check Blank pulse is on
Pin 17 of IC401 and Q303.
No
Check CN102 and CN201.
WAVEFORM S
5.00V (Q501, Emitter)
25
CH1 P-P = 5.00V CH1 RMS = 28.33V
20.00V (CRT Socket, G1)
26
CH1 P-P = 20.0V CH1 RMS = 66.68V
Done
AP17K*/ AP17J* 5-15
Page 33
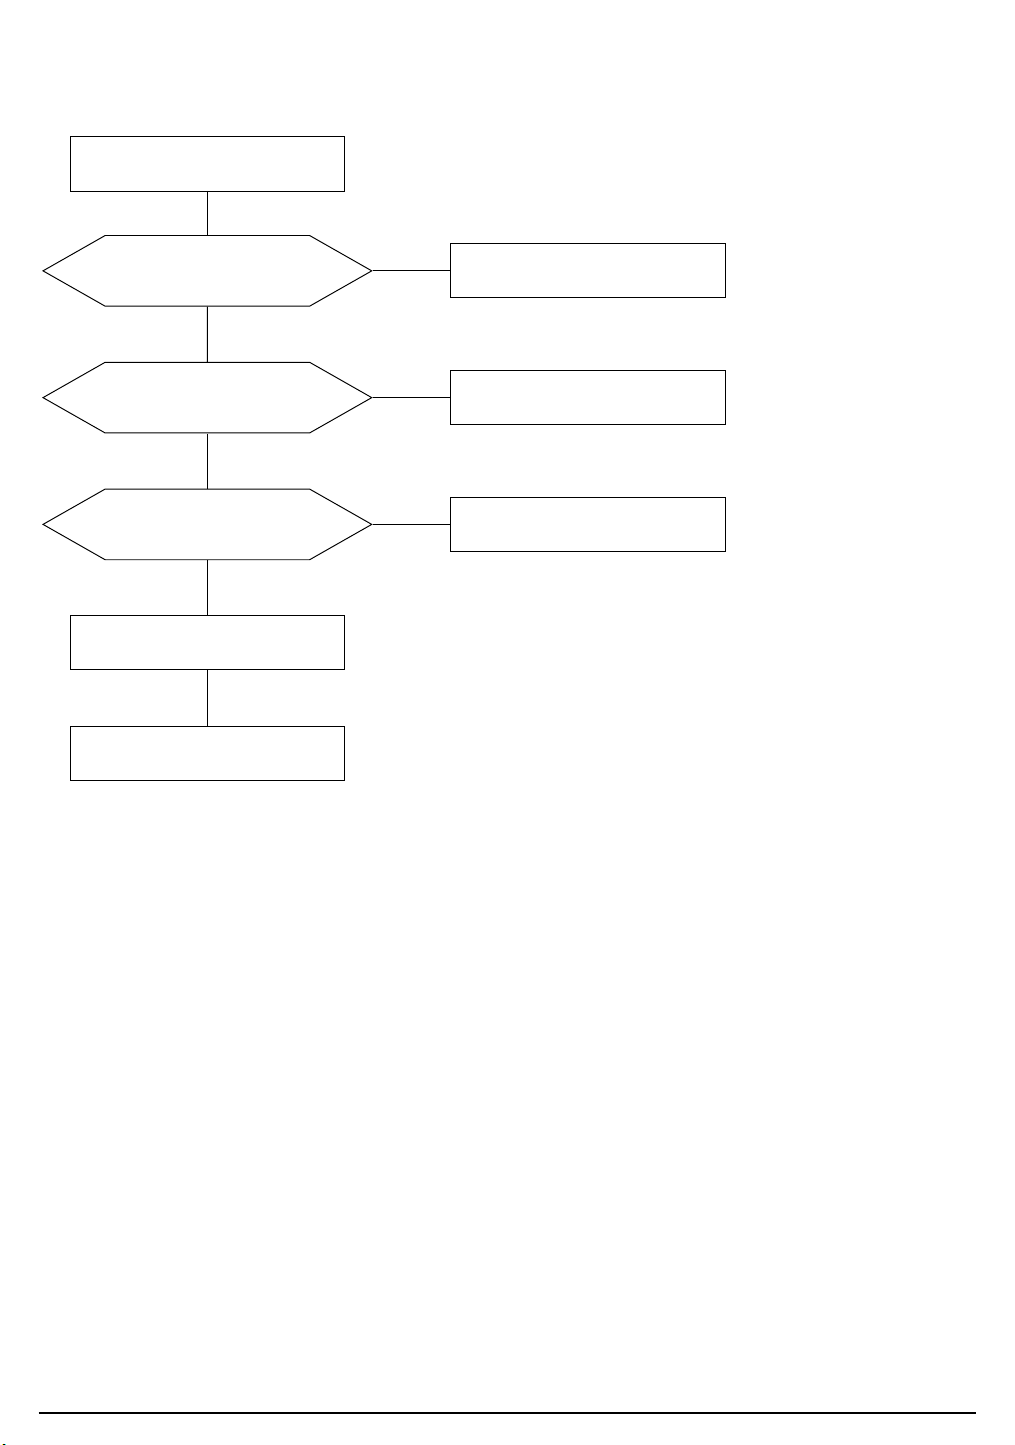
5 Troubleshooting
5-2-5 Unsynchronized Image
Check input signals
Pin 2 and 3 of CN202.
Signals are right?
Yes
Signals at Pin 28 and 29 of
IC201 are right?
Yes
Signals at Pin 14 and 15 of
IC401 are right?
Yes
Check circuits on M ain board.
Done
No
Check Video Cable.
No
Check IC201.
No
Check IC401.
5-16 AP17K*/ AP17J*
Page 34
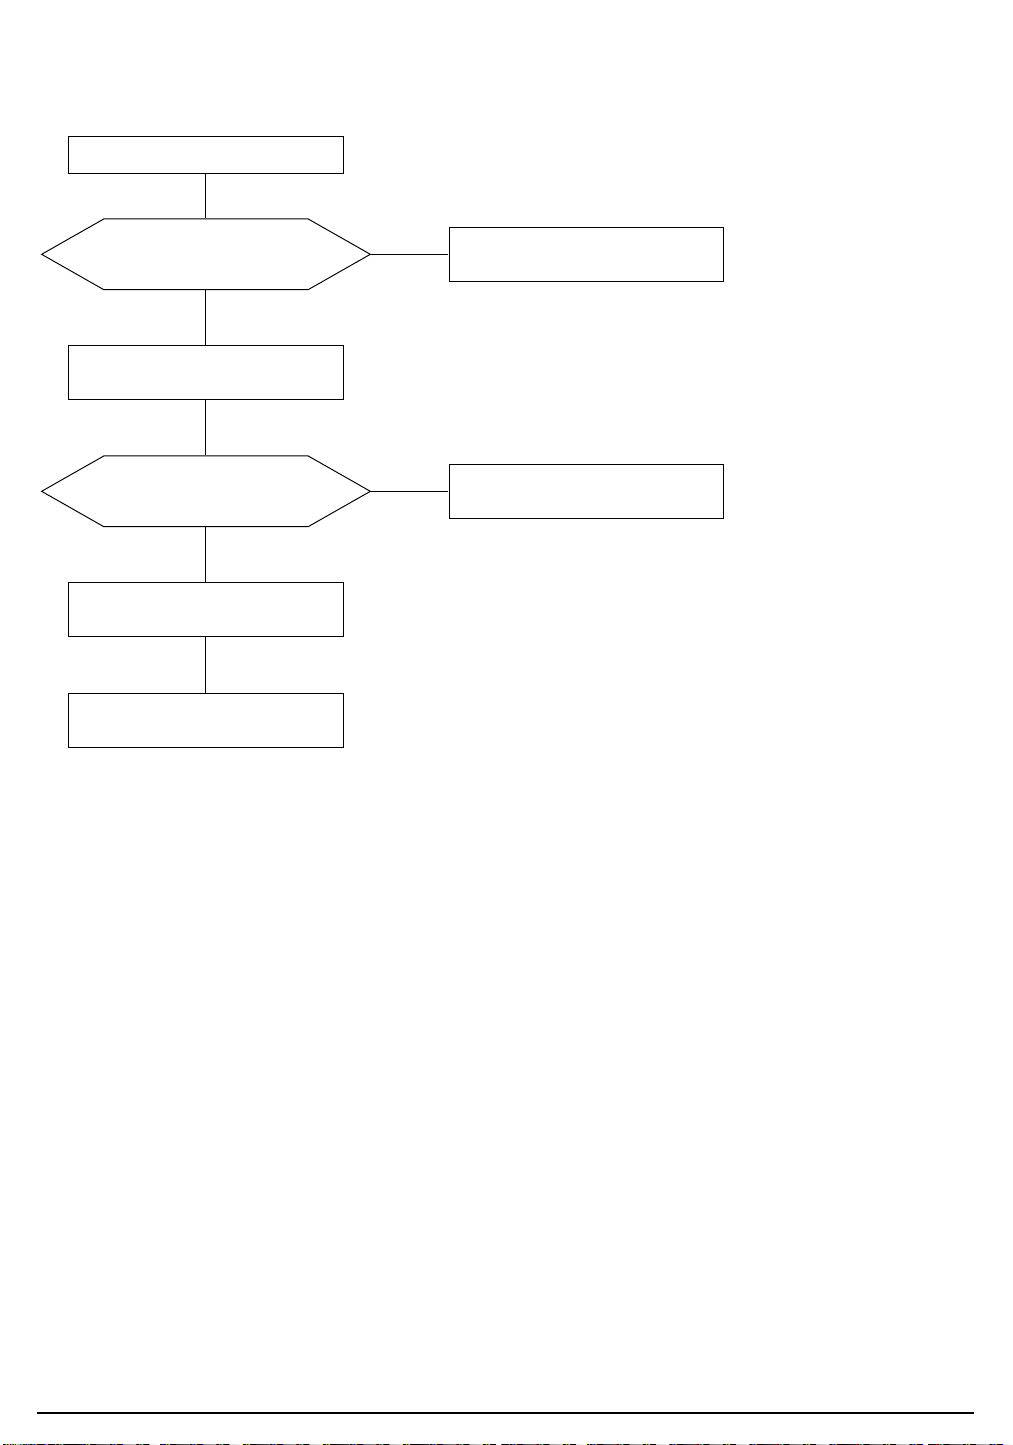
5-2-6 M isconvergence
Try readjusting convergence.
5 Troubleshooting
The convergence is
now w ithin spec.?
No
Readjust convergence.
The convergence is
now w ithin spec.?
No
Change CRT and readjust
convergence.
Done
Yes
Done
Yes
Done
AP17K*/ AP17J* 5-17
Page 35
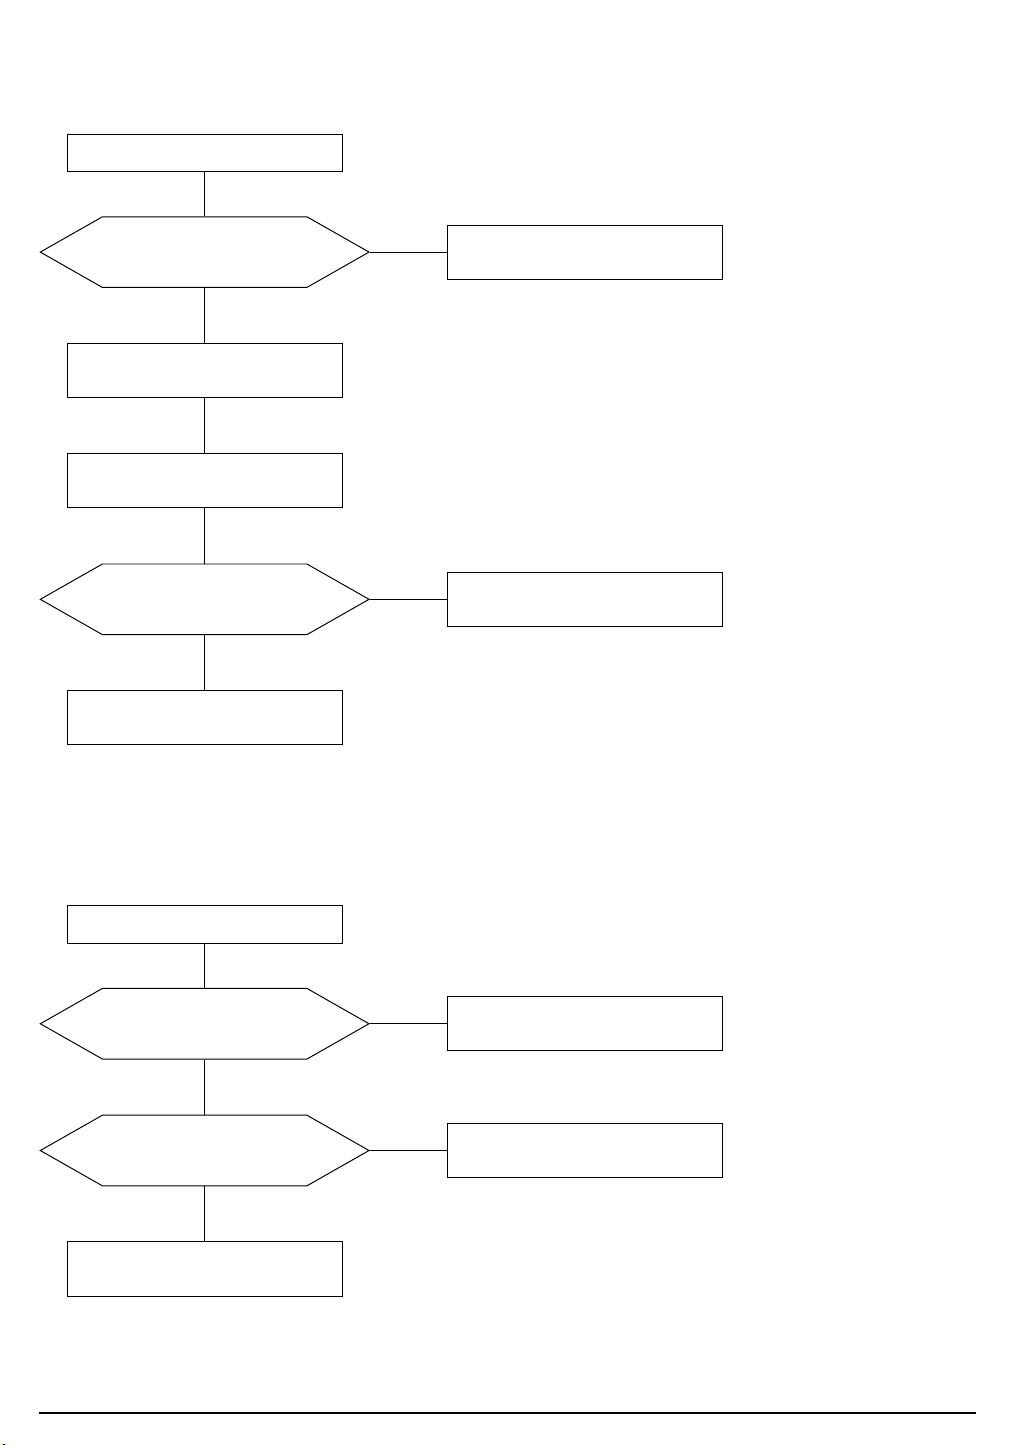
5 Troubleshooting
5-2-7 Poor Focus
Adjust focus VR of FBT.
Improved focus?
No
Check focus leads from FBT
to CRT Socket.
Check the CRT Socket.
Dynamic focus circuit is right?
Yes
Replace the CRT and verify focus.
Yes
No
Aging monitor and check for focus
change.
Refer to 5-1-15 Dynamic
Focus Failure.
5-2-8 Purity Failure
Degaussing
Purity is right?
No
Degaussing circuit is right?
Yes
Replace CRT and verify purity.
5-18 AP17K*/ AP17J*
Yes
Done
No
Refer to 5-1-20 Degaussing Failure.
Page 36
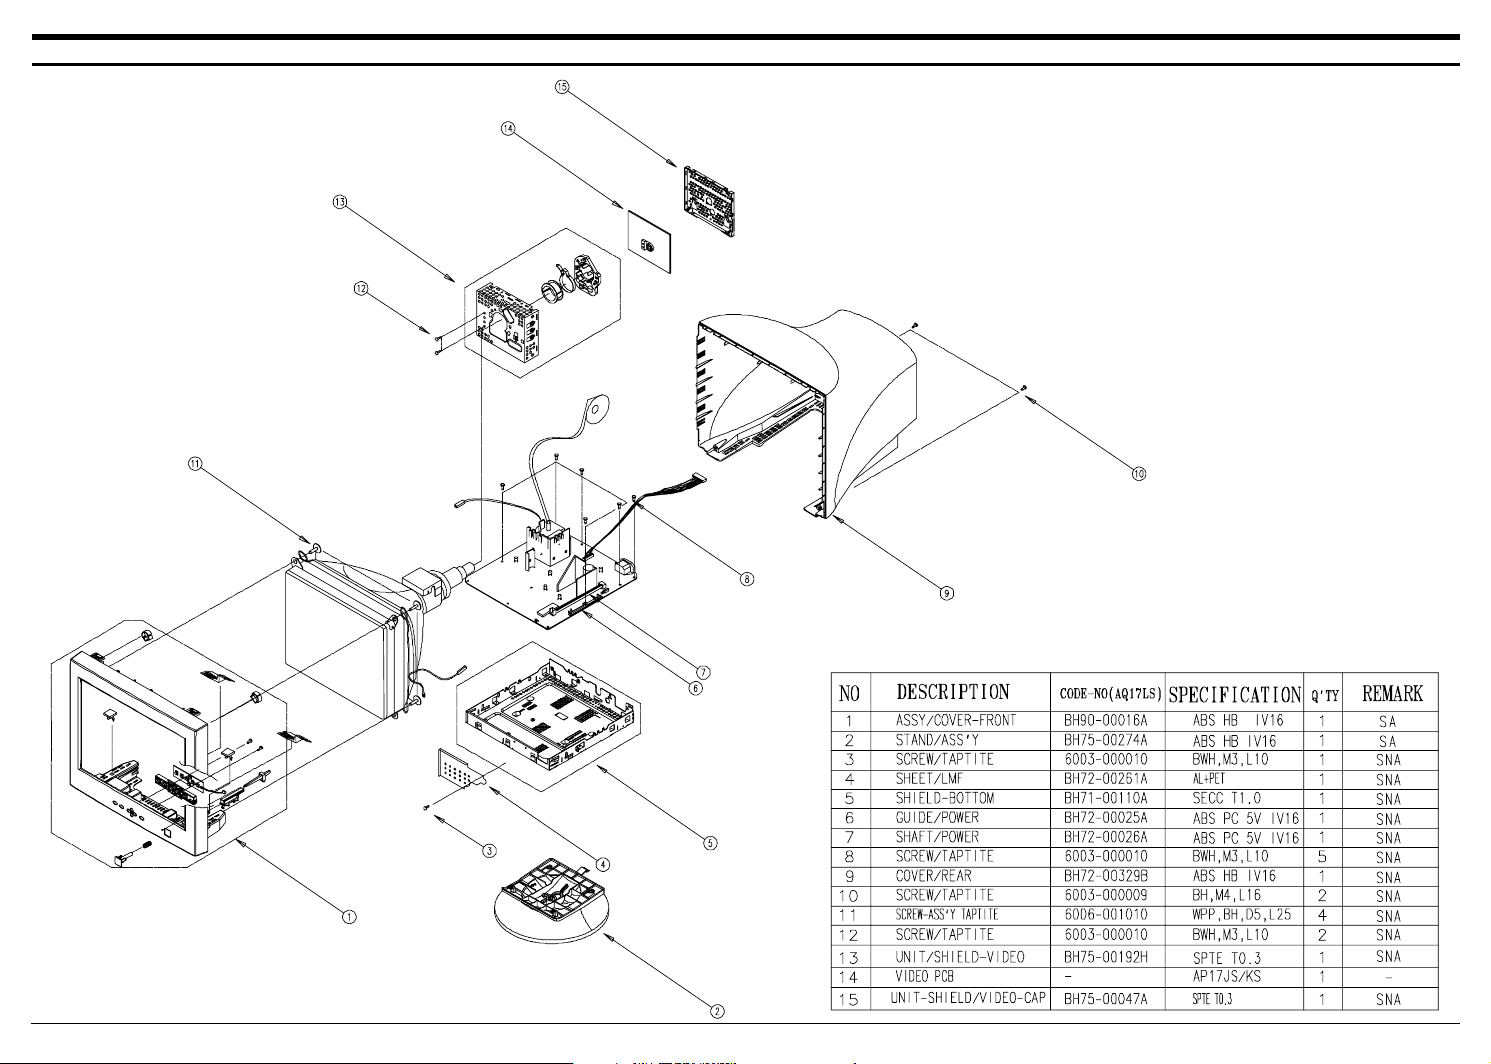
6 Exploded View and Parts List
AP17K*/AP17J* 6-1
Page 37

6 Exploded View & Parts List
M emo
6-2
AP17K*/AP17J*
Page 38
!!!
7 Electrical Parts List
7-1 M ain PCB Parts
Loc. No. Code No. Description Specification Remarks
C409 2306-000147 C-FILM ,MPPF 1uF,5%,250V,BK,26x24x15,22.5mm
C430 2306-000249 C-FILM ,MPPF 680nF,5%,250V,TP,26x20.5x12,20
C506 2201-000154 C-CERAM IC,DISC 10nF,+80-20%,2kV,Y5P,TP,20x5,10
C601 2301-001195 C-FILM ,MPPF 150nF,10%,275VAC,BK,26x16.5x7,
C602 2301-001195 C-FILM ,MPPF 150nF,10%,275VAC,BK,26x16.5x7,
C608 2401-003391 C-AL 220uF,20%,450V,GP,BK,25x50,10
CIS 3301-000233 CORE-FERRITE ZZ,18x9.5x28mm,-,- SNA
CIS BH68-00001A LABEL/M ARK-CDT ART-PAPER 100G,-,WHT,BLK,-,ALL,CDT SNA
CIS BH71-00110A SHIELD-BOTTOM PN15VT,SECC ,T1.0,-,-,- SNA
CIS BH72-00025A GUIDE-POWER CDA4507,ABS+PC,5V,IV16,-,- SNA
CIS BH72-00026A SHAFT-POWER CDA4507,ABS+PC,5V,IV16,-,- SNA
CIS BH72-00261A SHEET-LM F IB10LO,AL+PET,-,-,-,-,-,- SNA
CIS BH73-60304C RUBBER-SUPPORT DP15LT,CR V0,GRAY,-,14* 7*10,-,- SNA
CIS BH46-00005D M ICOM-S/ W AP17JS,-,-,-,-,-,- SNA
CN201 3711-003895 CONNECTOR-HEADER BOX,13P,1R,2mm,STRAIGHT,SN SNA
CN202 3711-003873 CONNECTOR-HEADER BOX,7P,1R,2mm,STRAIGHT,SN SNA
CN205 3711-004379 CONNECTOR-HEADER BOX,4P,1R,2MM ,STRAIGHT,SN SNA
CN403 3711-003989 CONNECTOR-HEADER NOWALL,4P,1R,8mm,STRAIGHT,SN SNA
CN501 BH39-00232A CBF-HARNESS
CN502 3711-000024 CONNECTOR-HEADER BOX,3P,1R,2.5mm,STRAIGHT,SN SNA
CN601 3721-001028 PLUG-AC POWER 3P,-,-,NI
D406 0402-001313 DIODE-RECTIFIER ERD07-15AL,1.7VK,1.5A,-,BK
D601 0402-001407 DIODE-BRIDGE G2SB60,600V,1.5A,SIP-4,BK
D609 0402-000005 DIODE-RECTIFIER 31DF4,400V,3A,DO-201AD,BK
FUSE 3601-000004 FUSE-CARTRIDGE 250V,3.15A,SLOW-BLOW,CERAM IC,5x20mm
HS501_CLAMP 6502-000001 CABLE CLAM P DAWH-5NB,D15,L35,NYLON66,NTR SNA
IC201 0903-001194 IC-M ICROCONTROLLER
IC201_SOCK 3704-001071 SOCKET-IC 42P,DIP,SN,1.778mm
IC401 1204-001611 IC-DEF. PROCESSOR
IC602 1203-000165 IC-POSI.ADJUST REG.
IC604 1203-000001 IC-POSI.FIXED REG. 7805,TO-220,3P,-,PLASTIC,4.8/ 5
JW 1 BH39-40306C CBF-HARNESS ,60MM ,BLK,1015,AW G22,-,-,-,-,JW 2 BH39-40306D CBF-HARNESS ,80MM ,BLK,1015,AW G22,-,-,-,-,L401 BH27-00005A COIL-CHOKE
L402 BH27-00022A COIL-CHOKE
L403 BH27-20342U COIL-CHOKE -,8.2M H(250KHz),10%,DR8* 11,-,-,-,-,10.5OHM,-,-,-,BULK
L601 BH27-00061A COIL FILTER -,33.0mH,0.1ohm,72Ts,28.* 28,-,BK,SQE-2828,3A,-,OP201 0601-001147 LED ROUND,GRN,4.75mm,565nm SNA
R428 2003-000653 R-METAL OXIDE(S) 330ohm,5% ,3W,AA,TP,6x16mm
RL601 3501-001111 RELAY-POWER 12Vdc,250mW ,5A,1FormA,15mS,5mS
SH/BTM+M /PCB
SH/BTM+SH/ LM F
SIGNAL BH39-00145A CBF SIGNAL ATT,1500M M ,15P/6P,7P,IVORY(IV01),-,D-SUB/M ALE
SW401 3406-000002 SWITCH-ROTARY 36Vdc,200mA,SP3T,SW601 3403-001116 SWITCH-PUSH 30VDC,0.1A,2C2P,SELF LOCK,T401 BH26-00090A TRANS HORIZ.DRIVE
T402 BH27-00103A COIL LINEARITY
T501 BH26-00109A TRANS FBT
T502 BH26-00137A TRANS-FOCUS
T601 BH26-00135A TRANS SWITCHING
T602 BH26-30302S TRANS-SYNC.
TH601 1404-000002 THERMISTOR-PTC 9ohm,20% ,-,-,TR,RECT,TH602 1404-001020 THERMISTOR-NTC 8ohm,15%,-,17mW /C,BK
6003-000010 SCREW-TAPTITE BWH,+,B,M3,L10,ZPC(YEL),SWRCH1 SNA
6003-000010 SCREW-TAPTITE BWH,+,B,M3,L10,ZPC(YEL),SWRCH1 SNA
DP17M O,UL1032,UL/CSA,1P,290MM ,RED,AW G22,YHF800-1,-,-,-,-,-,-,-,CBF-CONN ASS’Y
3P863,8Bit,SDIP,42P,600M IL,12M Hz,ST,CM OS,PLASTIC,5V,-,-40to+85C,1040BYTE,48KBYTE
TDA4856,SDIP,32P,400M IL,PLASTIC,16V,-,-20to+70C,ST,H/V DEF. PROCESSOR
78R12,TO-220,4P,-,PLASTIC,11.7/12.3V,1.5W ,-20TO+80C,1A,-,ST
CH-0630,120uH,10% ,AR-06* 30,-,PHENAL,-,-,0.20,37.0* 16.2,-,-,BULK
CH-1523S,100uH,+/-10% ,DR1523(C:9.8),-,PHELOLIC,-,-,0.16ohm M AX,32* 17.3,-,-,BK
EI-1916,AQ17HS,6P,35.0mH,-,-,73.0uH,-,-,7.5ohm/ 0.04ohm,-,PL-3,DMR30,J2A-1,EI1916
HL-1527C,4.5uH/50mH,DR15*27.5,3.7* 11.0,17* 15.5* 47,15* 8T,5P,BK,10%,19.5ohm/ 0.04,0
LC-13,CF1781,PN17L,1.12mH,HV45,FUR3556,375.0mohm,71.0Vdc,14P,-10 ~60,BK,27.0KV
EE-1916,AP17JS,8P,1.0MH M IN,-,-,450M H MIN,-,-,0.70OHM/ 450OHM,-,PL3,DMR30,PM2A,EE
EER3541(16P),DF(85KHZ),-,90~264V,PL3,DMR30,-,EER3541,-,-,390UH,-,110UH,-,80V,-
-,-,-,-,-,3-1(250UH),4-6(250UH,-,-,-,0.13OHM,-,SB-5S,UU1116,-,-,-,B,-
SNA
AP17K*/ AP17J* 7-1
Page 39
!
!
7 Electrical Parts List
Loc. No. Code No. Description Specification Remarks
AP17JS_85K BH39-40305U CBF HARNESS 52MM ,AWG22(0.6PI),-,-,AWG22(0.
BD301 3301-000011 CORE-FERRITE BEAD AA,3.5x1.0x5.7mm,1500,2375G SNA
BD401 3301-000011 CORE-FERRITE BEAD AA,3.5x1.0x5.7mm,1500,2375G SNA
BD402 3301-000011 CORE-FERRITE BEAD AA,3.5x1.0x5.7mm,1500,2375G SNA
BD403 3301-000011 CORE-FERRITE BEAD AA,3.5x1.0x5.7mm,1500,2375G SNA
BD405 3301-000011 CORE-FERRITE BEAD AA,3.5x1.0x5.7mm,1500,2375G SNA
BD601 3301-000011 CORE-FERRITE BEAD AA,3.5x1.0x5.7mm,1500,2375G SNA
BD602 3301-000011 CORE-FERRITE BEAD AA,3.5x1.0x5.7mm,1500,2375G SNA
BD603 3301-000011 CORE-FERRITE BEAD AA,3.5x1.0x5.7mm,1500,2375G SNA
C201 2401-000025 C-AL 100uF,20%,16V,GP,TP,6.3x11,5
C202 2201-000389 C-CERAM IC,DISC 0.022nF,5%,50V,NP0,TP,5x3,5
C203 2201-000389 C-CERAM IC,DISC 0.022nF,5%,50V,NP0,TP,5x3,5
C204 2401-002075 C-AL 4.7uF,20%,50V,GP,TP,5x11,5
C205 2401-000603 C-AL 1uF,20%,50V,GP,TP,5x11,5
C207 2401-002075 C-AL 4.7uF,20%,50V,GP,TP,5x11,5
C210 2401-002075 C-AL 4.7uF,20%,50V,GP,TP,5x11,5
C211 2201-000146 C-CERAM IC,DISC 0.1nF,5%,50V,SL,TP,5x3.5,5
C212 2201-000017 C-CERAM IC,DISC 1nF,10%,50V,Y5P,TP,5x3.5,5
C213 2401-000029 C-AL 10uF,20%,100V,GP,TP,6.3x11,5
C214 2401-000025 C-AL 100uF,20%,16V,GP,TP,6.3x11,5
C215 2201-000146 C-CERAM IC,DISC 0.1nF,5%,50V,SL,TP,5x3.5,5
C217 2202-002009 C-CERAM IC,M LC-AXIAL 100nF,+80-20%,50V,Y5V,TP,2.3X3
C220 2401-000025 C-AL 100uF,20%,16V,GP,TP,6.3x11,5
C225 2401-002075 C-AL 4.7uF,20%,50V,GP,TP,5x11,5
C301 2305-000665 C-FILM,M PEF 100nF,5%,63V,TP,7.5x4.0x5.0mm,
C302 2305-001041 C-FILM,M PEF 220nF,5%,63V,TP,7.5x4.5x13.5,5
C305 2401-000037 C-AL 470uF,20%,16V,GP,TP,8x11.5,5
C306 2401-002274 C-AL 220uF,20%,35V,W T,TP,10x12.5,5
C307 2305-000237 C-FILM,M PEF 1uF,5%,63V,TP,7.5x15.5mm,5mm
C308 2301-000013 C-FILM,PEF 4.7nF,5%,100V,TP,10.5x12.5x6.5
C309 2202-000252 C-CERAM IC,M LC-AXIAL 4.7nF,10%,50V,X7R,TP,2.5x4.3,C310 2301-000519 C-FILM,PEF 3.3nF,5%,100V,TP,5.8x3x12.5,5m
C312 2401-000050 C-AL 10uF,20%,16V,GP,TP,5x11,2.5
C313 2301-000010 C-FILM,PEF 100nF,5%,100V,TP,11.5x12.5mm,5
C401 2301-000312 C-FILM,PEF 8.2nF,5%,100V,TP,6x12.5mm,5mm
C402 2305-000665 C-FILM,M PEF 100nF,5%,63V,TP,7.5x4.0x5.0mm,
C403 2303-000119 C-FILM,PPF 10nF,5%,100V,TP,7x10x4.5,5
C404 2301-000004 C-FILM,PEF 2.2nF,5%,100V,TP,5.5X10X2.9,5m
C406 2301-000013 C-FILM,PEF 4.7nF,5%,100V,TP,10.5x12.5x6.5
C407 2401-000540 C-AL 150uF,20%,63V,LZ,TP,10x25,5
C408 2305-000428 C-FILM,M PEF 47nF,5%,250V,TP,11x9x4.5,5mm
C410 2401-000037 C-AL 470uF,20%,16V,GP,TP,8x11.5,5
C411 2301-000294 C-FILM,PEF 56nF,5%,100V,TP,9.5x12.5mm,5mm
C412 2301-000519 C-FILM,PEF 3.3nF,5%,100V,TP,5.8x3x12.5,5m
C413 2401-001012 C-AL 3.3UF,20%,50V,BP,TP,16X25,7.5
C414 2401-001334 C-AL 470nF,20%,50V,GP,TP,5x11,2.5
C415 2401-001218 C-AL 4.7uF,20%,100V,W T,TP,5x11,5
C416 2301-000010 C-FILM,PEF 100nF,5%,100V,TP,11.5x12.5mm,5
C419 2303-000165 C-FILM,PPF 2.2nF,5%,1.6kV,TP,21x6.8x12.6mm,7.5
C420 2309-000106 C-FILM,M PE-PPF 2.2nF,5%,1.6KV,TP,23x16x9,7.5m
C421 2301-001341 C-FILM,PPF 3.3nF,5%,630V,TP,17.4x10x5.4mm,7.5
C423 2401-000603 C-AL 1uF,20%,50V,GP,TP,5x11,5
C425 2306-000131 C-FILM,M PPF 150nF,5%,250V,TP,19x16x7.5,7.5
C426 2401-000603 C-AL 1uF,20%,50V,GP,TP,5x11,5
C427 2306-000171 C-FILM,M PPF 270nF,5%,250V,TP,21.5x12.5mm,7
7-2 AP17K*/ AP17J*
Page 40
!
7 Electrical Parts List
Loc. No. Code No. Descripti on Speci fication Remarks
C429 2401-000603 C-AL 1uF,20%,50V,GP,TP,5x11,5
C431 2306-000164 C-FILM,M PPF 220nF,5%,250V,TP,19x22x10,7.5m
C432 2305-000207 C-FILM,M PEF 18nF,5%,250V,TP,13* 9*4.5,5mm
C433 2305-001003 C-FILM,M PEF 10nF,5%,250V,TP,13x4.5x9mm,7.5
C434 2401-000050 C-AL 10uF,20%,16V,GP,TP,5x11,2.5
C435 2201-000132 C-CERAM IC,DISC 0.1nF,10%,500V,Y5P,TP,6.5x3,5
C436 2201-000469 C-CERAM IC,DISC 0.33nF,10%,500V,Y5P,TP,5.5x3,5
C438 2401-000025 C-AL 100uF,20%,16V,GP,TP,6.3x11,5
C441 2401-000603 C-AL 1uF,20%,50V,GP,TP,5x11,5
C442 2301-001249 C-FILM,M PPF 68nF,5%,400V,TP,19x7x15mm,7.5
C443 2303-000122 PEF CAPACITOR 10nF,5%,630V,TP,19x12.5mm,7.5m
C444 2303-000122 PEF CAPACITOR 10nF,5%,630V,TP,19x12.5mm,7.5m
C445 2201-000019 C-CERAM IC,DISC 10nF,+80-20%,500V,Y5V,TP,13.5x4mm,5
C446 2201-000647 C-CERAM IC,DISC 0.068nF,5%,500V,NP0,TP,8x3.5mm,5
C447 2201-000469 C-CERAM IC,DISC 0.33nF,10%,500V,Y5P,TP,5.5x3,5
C450 2305-000237 C-FILM,M PEF 1uF,5%,63V,TP,7.5x15.5mm,5mm
C455 2305-000012 C-FILM,M PEF 5.6NF,10%,250V,TP,14.5X9.0X6.0M M ,7.5
C456 2305-000012 C-FILM,M PEF 5.6NF,10%,250V,TP,14.5X9.0X6.0M M ,7.5
C458 2301-000312 C-FILM,PEF 8.2nF,5%,100V,TP,6x12.5mm,5mm
C459 2201-000411 C-CERAM IC,DISC 0.27nF,10%,50V,Y5P,TP,4x3.5,5
C501 2301-000016 C-FILM,PEF 22nF,5%,100V,TP,7.2x4.5x9.0mm,
C502 2301-000287 C-FILM,PEF 5.6nF,5%,100V,TP,10.5x12.5x6.5
C503 2401-000603 C-AL 1uF,20%,50V,GP,TP,5x11,5
C504 2301-000519 C-FILM,PEF 3.3nF,5%,100V,TP,5.8x3x12.5,5m
C505 2305-001041 C-FILM,M PEF 220nF,5%,63V,TP,7.5x4.5x13.5,5
C507 2201-000291 C-CERAM IC,DISC 1nF,10%,500V,Y5P,TP,7.5x3.5,5
C508 2201-000291 C-CERAM IC,DISC 1nF,10%,500V,Y5P,TP,7.5x3.5,5
C509 2401-002267 C-AL 2.2uF,20%,250V,GP,TP,8x11.5,5
C510 2301-000020 C-FILM,PEF 27nF,5%,100V,TP,7.3x4x12.5mm,5
C511 2301-000519 C-FILM,PEF 3.3nF,5%,100V,TP,5.8x3x12.5,5m
C512 2201-000291 C-CERAM IC,DISC 1nF,10%,500V,Y5P,TP,7.5x3.5,5
C513 2201-000291 C-CERAM IC,DISC 1nF,10%,500V,Y5P,TP,7.5x3.5,5
C514 2401-001334 C-AL 470nF,20%,50V,GP,TP,5x11,2.5
C515 2201-000119 C-CERAM IC,DISC 100nF,+80-20% ,50V,Y5V,TP,8x3,5
C521 2401-002267 C-AL 2.2uF,20%,250V,GP,TP,8x11.5,5
C530 2201-000291 C-CERAM IC,DISC 1nF,10%,500V,Y5P,TP,7.5x3.5,5
C531 2201-000019 C-CERAM IC,DISC 10nF,+80-20%,500V,Y5V,TP,13.5x4mm,5
C551 2401-000050 C-AL 10uF,20%,16V,GP,TP,5x11,2.5
C557 2401-001643 C-AL 0.68uF,20%,50V,GP,TP,5x11mm,5
C558 2201-000129 C-CERAM IC,DISC 0.1nF,10%,1kV,Y5P,TP,7x4,5
C603 2201-000024 C-CERAM IC,DISC 4.7nF,20%,250VAC,Y5U,TP,16x7,7
C604 2201-000024 C-CERAM IC,DISC 4.7nF,20%,250VAC,Y5U,TP,16x7,7
C607 2202-002009 C-CERAM IC,M LC-AXIAL 100nF,+80-20% ,50V,Y5V,TP,2.3X3
C609 2401-000970 C-AL 22uF,20%,50V,W T,TP,5x11,5
C610 2301-000284 C-FILM,PEF 47nF,5%,100V,TP,8.5x12.5mm,5mm
C611 2401-000613 C-AL 1uF,20%,50V,WT,TP,5x11,5
C612 2401-000613 C-AL 1uF,20%,50V,WT,TP,5x11,5
C613 2201-000129 C-CERAM IC,DISC 0.1nF,10%,1kV,Y5P,TP,7x4,5
C614 2201-000019 C-CERAM IC,DISC 10nF,+80-20%,500V,Y5V,TP,13.5x4mm,5
C615 2201-000291 C-CERAM IC,DISC 1nF,10%,500V,Y5P,TP,7.5x3.5,5
C616 2201-000023 C-CERAM IC,DISC 2.2nF,20%,125V,Y5U,TP,11x7,5
C617 2201-000023 C-CERAM IC,DISC 2.2nF,20%,125V,Y5U,TP,11x7,5
C618 2401-000039 C-AL 1000uF,20%,16V,GP,TP,10x16,5
C619 2201-000469 C-CERAM IC,DISC 0.33nF,10%,500V,Y5P,TP,5.5x3,5
C620 2401-000540 C-AL 150uF,20%,63V,LZ,TP,10x25,5
AP17K*/ AP17J* 7-3
Page 41
7 Electrical Parts List
Loc. No. Code No. Description Specification Remarks
C621 2401-001585 C-AL 47uF,20%,50V,W T,TP,8x11.5,5
C622 2401-000039 C-AL 1000uF,20%,16V,GP,TP,10x16,5
C623 2401-000039 C-AL 1000uF,20%,16V,GP,TP,10x16,5
C624 2201-000210 C-CERAM IC,DISC 0.12NF,10%,1KV,Y5P,TP,6.3X4M M,5
C625 2305-001041 C-FILM,M PEF 220nF,5%,63V,TP,7.5x4.5x13.5,5
C626 2401-000037 C-AL 470uF,20%,16V,GP,TP,8x11.5,5
C627 2401-000037 C-AL 470uF,20%,16V,GP,TP,8x11.5,5
C630 2401-001561 C-AL 47uF,20%,35V,W T,TP,8x11.5,5
C631 2202-002009 C-CERAM IC,M LC-AXIAL 100nF,+80-20%,50V,Y5V,TP,2.3X3
C635 2201-000019 C-CERAM IC,DISC 10nF,+80-20%,500V,Y5V,TP,13.5x4mm,5
CN304 3711-000197 CONNECTOR-HEADER 1WALL,3P,1R,2.5mm,STRAIGHT,SN SNA
CN408 BH71-40300A PIN-HINGE -,BRASS,D2.36,SN,HEAT/SINK SNA
CN409 BH71-40300A PIN-HINGE -,BRASS,D2.36,SN,HEAT/SINK SNA
CN603 3711-000217 CONNECTOR-HEADER 1WALL,3P,1R,3.96mm,STRAIGHT,SN SNA
D210 0403-000361 DIODE-ZENER UZ6.2BSB,6.2V,5.99-6.24V,500mW
D301 0402-000274 DIODE-RECTIFIER UF4004,400V,1A,DO-41,TP
D401 0402-000274 DIODE-RECTIFIER UF4004,400V,1A,DO-41,TP
D402 0402-000006 DIODE-RECTIFIER 1N4007GP,1000V,1A,DO-41,TP
D403 0402-000006 DIODE-RECTIFIER 1N4007GP,1000V,1A,DO-41,TP
D404 0402-000006 DIODE-RECTIFIER 1N4007GP,1000V,1A,DO-41,TP
D405 0402-000208 DIODE-RECTIFIER EK-04,40V,1.5A,DO-41
D407 0402-001118 DIODE-RECTIFIER UF1G,400V,1.2A,DO-204AL,TP
D410 0402-000546 DIODE-RECTIFIER TVR10G,400V,1.0A,DO-41,TP
D411 0402-000546 DIODE-RECTIFIER TVR10G,400V,1.0A,DO-41,TP
D412 0402-000546 DIODE-RECTIFIER TVR10G,400V,1.0A,DO-41,TP
D413 0402-000546 DIODE-RECTIFIER TVR10G,400V,1.0A,DO-41,TP
D414 0401-000005 DIODE-SWITCHING 1N4148,100V,200mA,DO-35,TP
D415 0401-000005 DIODE-SWITCHING 1N4148,100V,200mA,DO-35,TP
D416 0401-000005 DIODE-SWITCHING 1N4148,100V,200mA,DO-35,TP
D420 0401-000005 DIODE-SWITCHING 1N4148,100V,200mA,DO-35,TP
D421 0401-000005 DIODE-SWITCHING 1N4148,100V,200mA,DO-35,TP
D422 0401-000004 DIODE-SWITCHING 1SS244,250V,625mA,DO-34,TP
D430 0402-000006 DIODE-RECTIFIER 1N4007GP,1000V,1A,DO-41,TP
D431 0402-000546 DIODE-RECTIFIER TVR10G,400V,1.0A,DO-41,TP
D501 0401-000005 DIODE-SWITCHING 1N4148,100V,200mA,DO-35,TP
D502 0402-000017 DIODE-RECTIFIER RGP02-12,1200V,0.5A,DO-204AL,T
D503 0402-000252 DIODE-RECTIFIER RGP02-16E,1.6KV,0.5A,DO-41,TP
D505 0401-000005 DIODE-SWITCHING 1N4148,100V,200mA,DO-35,TP
D506 0402-000017 DIODE-RECTIFIER RGP02-12,1200V,0.5A,DO-204AL,T
D507 0401-000005 DIODE-SWITCHING 1N4148,100V,200mA,DO-35,TP
D508 0401-000005 DIODE-SWITCHING 1N4148,100V,200mA,DO-35,TP
D511 0401-000005 DIODE-SWITCHING 1N4148,100V,200mA,DO-35,TP
D512 0401-000005 DIODE-SWITCHING 1N4148,100V,200mA,DO-35,TP
D513 0401-000005 DIODE-SWITCHING 1N4148,100V,200mA,DO-35,TP
D514 0401-000005 DIODE-SWITCHING 1N4148,100V,200mA,DO-35,TP
D515 0401-000005 DIODE-SWITCHING 1N4148,100V,200mA,DO-35,TP
D516 0401-000005 DIODE-SWITCHING 1N4148,100V,200mA,DO-35,TP
D517 0402-000017 DIODE-RECTIFIER RGP02-12,1200V,0.5A,DO-204AL,T
D518 0401-000005 DIODE-SWITCHING 1N4148,100V,200mA,DO-35,TP
D519 0401-000005 DIODE-SWITCHING 1N4148,100V,200mA,DO-35,TP
D520 0402-000252 DIODE-RECTIFIER RGP02-16E,1.6KV,0.5A,DO-41,TP
D602 0401-000005 DIODE-SWITCHING 1N4148,100V,200mA,DO-35,TP
D604 0402-000012 DIODE-RECTIFIER UF4007,1KV,1A,DO-41,TP
D605 0402-000012 DIODE-RECTIFIER UF4007,1KV,1A,DO-41,TP
D606 0402-000546 DIODE-RECTIFIER TVR10G,400V,1.0A,DO-41,TP
7-4 AP17K*/ AP17J*
Page 42
7 Electrical Parts List
Loc. No. Code No. Descripti on Speci fication Remarks
D608 0402-001194 DIODE-RECTIFIER UG2D,200V,2A,DO-204AC,TP
D610 0402-000012 DIODE-RECTIFIER UF4007,1KV,1A,DO-41,TP
D611 0402-001194 DIODE-RECTIFIER UG2D,200V,2A,DO-204AC,TP
D612 0402-000274 DIODE-RECTIFIER UF4004,400V,1A,DO-41,TP
D614 0402-000546 DIODE-RECTIFIER TVR10G,400V,1.0A,DO-41,TP
EY301 6042-000001 EYELET ID2.2,OD2.7,L3.1,SN,BSS3-E/EH SNA
EY302 6042-000001 EYELET ID2.2,OD2.7,L3.1,SN,BSS3-E/EH SNA
EY401 6042-000002 EYELET ID1.5,OD2,L3.1,SN,BSS3-E/EH SNA
EY402 6042-000002 EYELET ID1.5,OD2,L3.1,SN,BSS3-E/EH SNA
EY403 6042-000002 EYELET ID1.5,OD2,L3.1,SN,BSS3-E/EH SNA
EY501 6042-000001 EYELET ID2.2,OD2.7,L3.1,SN,BSS3-E/EH SNA
EY502 6042-000001 EYELET ID2.2,OD2.7,L3.1,SN,BSS3-E/EH SNA
EY503 6042-000001 EYELET ID2.2,OD2.7,L3.1,SN,BSS3-E/EH SNA
EY504 6042-000002 EYELET ID1.5,OD2,L3.1,SN,BSS3-E/EH SNA
EY505 6042-000002 EYELET ID1.5,OD2,L3.1,SN,BSS3-E/EH SNA
EY506 6042-000002 EYELET ID1.5,OD2,L3.1,SN,BSS3-E/EH SNA
EY507 6042-000002 EYELET ID1.5,OD2,L3.1,SN,BSS3-E/EH SNA
EY508 6042-000002 EYELET ID1.5,OD2,L3.1,SN,BSS3-E/EH SNA
EY510 6042-000001 EYELET ID2.2,OD2.7,L3.1,SN,BSS3-E/EH SNA
EY511 6042-000002 EYELET ID1.5,OD2,L3.1,SN,BSS3-E/EH SNA
EY512 6042-000002 EYELET ID1.5,OD2,L3.1,SN,BSS3-E/EH SNA
EY601 6042-000001 EYELET ID2.2,OD2.7,L3.1,SN,BSS3-E/EH SNA
EY602 6042-000001 EYELET ID2.2,OD2.7,L3.1,SN,BSS3-E/EH SNA
EY603 6042-000001 EYELET ID2.2,OD2.7,L3.1,SN,BSS3-E/EH SNA
EY604 6042-000001 EYELET ID2.2,OD2.7,L3.1,SN,BSS3-E/EH SNA
EY605 6042-000001 EYELET ID2.2,OD2.7,L3.1,SN,BSS3-E/EH SNA
EY606 6042-000001 EYELET ID2.2,OD2.7,L3.1,SN,BSS3-E/EH SNA
EY607 6042-000002 EYELET ID1.5,OD2,L3.1,SN,BSS3-E/EH SNA
EY608 6042-000002 EYELET ID1.5,OD2,L3.1,SN,BSS3-E/EH SNA
EY609 6042-000002 EYELET ID1.5,OD2,L3.1,SN,BSS3-E/EH SNA
EY610 6042-000002 EYELET ID1.5,OD2,L3.1,SN,BSS3-E/EH SNA
FH1 3602-000001 FUSE-CLIP -,-,30mohm SNA
GT603 BH71-40300A PIN-HINGE -,BRASS,D2.36,SN,HEAT/SINK SNA
GT604 BH71-40300A PIN-HINGE -,BRASS,D2.36,SN,HEAT/SINK SNA
IC202 1103-001150 IC-EEPROM
IC603 1201-000229 IC-OP AM P 324,DIP,14P,300MIL,QUAD,100V/ m
JP1 BH39-40305U CBF HARNESS 52MM ,AWG22(0.6PI),-,-,AWG22(0.
JP10 BH39-40305U CBF HARNESS 52MM ,AWG22(0.6PI),-,-,AW G22(0.
JP100 BH39-40305U CBF HARNESS 52MM ,AWG22(0.6PI),-,-,AW G22(0.
JP102 BH39-40305U CBF HARNESS 52MM ,AWG22(0.6PI),-,-,AW G22(0.
JP103 BH39-40305U CBF HARNESS 52MM ,AWG22(0.6PI),-,-,AW G22(0.
JP104 BH39-40305U CBF HARNESS 52MM ,AWG22(0.6PI),-,-,AW G22(0.
JP106 BH39-40305U CBF HARNESS 52MM ,AWG22(0.6PI),-,-,AW G22(0.
JP107 BH39-40305U CBF HARNESS 52MM ,AWG22(0.6PI),-,-,AW G22(0.
JP11 BH39-40305U CBF HARNESS 52MM ,AWG22(0.6PI),-,-,AW G22(0.
JP110 BH39-40305U CBF HARNESS 52MM ,AWG22(0.6PI),-,-,AW G22(0.
JP111 BH39-40305U CBF HARNESS 52MM ,AWG22(0.6PI),-,-,AW G22(0.
JP112 BH39-40305U CBF HARNESS 52MM ,AWG22(0.6PI),-,-,AW G22(0.
JP113 BH39-40305U CBF HARNESS 52MM ,AWG22(0.6PI),-,-,AW G22(0.
JP114 BH39-40305U CBF HARNESS 52MM ,AWG22(0.6PI),-,-,AW G22(0.
JP120 BH39-40305U CBF HARNESS 52MM ,AWG22(0.6PI),-,-,AW G22(0.
JP122 BH39-40305U CBF HARNESS 52MM ,AWG22(0.6PI),-,-,AW G22(0.
JP126 BH39-40305U CBF HARNESS 52MM ,AWG22(0.6PI),-,-,AW G22(0.
JP127 BH39-40305U CBF HARNESS 52MM ,AWG22(0.6PI),-,-,AW G22(0.
JP128 BH39-40305U CBF HARNESS 52MM ,AWG22(0.6PI),-,-,AW G22(0.
524C80D81,8KBit,DIP,8P,300M IL,10mS,5V,10%,PLASTIC,-25to+70C,10uA,CMOS,ST
AP17K*/ AP17J* 7-5
Page 43
7 Electrical Parts List
Loc. No. Code No. Description Specification Remarks
JP13 BH39-40305U CBF HARNESS 52MM ,AWG22(0.6PI),-,-,AW G22(0.
JP130 BH39-40305U CBF HARNESS 52MM ,AWG22(0.6PI),-,-,AW G22(0.
JP133 BH39-40305U CBF HARNESS 52MM ,AWG22(0.6PI),-,-,AW G22(0.
JP134 BH39-40305U CBF HARNESS 52MM ,AWG22(0.6PI),-,-,AW G22(0.
JP136 BH39-40305U CBF HARNESS 52MM ,AWG22(0.6PI),-,-,AW G22(0.
JP137 BH39-40305U CBF HARNESS 52MM ,AWG22(0.6PI),-,-,AW G22(0.
JP139 BH39-40305U CBF HARNESS 52MM ,AWG22(0.6PI),-,-,AW G22(0.
JP14 BH39-40305U CBF HARNESS 52MM ,AWG22(0.6PI),-,-,AW G22(0.
JP140 BH39-40305U CBF HARNESS 52MM ,AWG22(0.6PI),-,-,AW G22(0.
JP141 BH39-40305U CBF HARNESS 52MM ,AWG22(0.6PI),-,-,AW G22(0.
JP16 BH39-40305U CBF HARNESS 52MM ,AWG22(0.6PI),-,-,AW G22(0.
JP17 BH39-40305U CBF HARNESS 52MM ,AWG22(0.6PI),-,-,AW G22(0.
JP18 BH39-40305U CBF HARNESS 52MM ,AWG22(0.6PI),-,-,AW G22(0.
JP19 BH39-40305U CBF HARNESS 52MM ,AWG22(0.6PI),-,-,AW G22(0.
JP2 BH39-40305U CBF HARNESS 52MM ,AWG22(0.6PI),-,-,AWG22(0.
JP20 BH39-40305U CBF HARNESS 52MM ,AWG22(0.6PI),-,-,AW G22(0.
JP22 BH39-40305U CBF HARNESS 52MM ,AWG22(0.6PI),-,-,AW G22(0.
JP23 BH39-40305U CBF HARNESS 52MM ,AWG22(0.6PI),-,-,AW G22(0.
JP24 BH39-40305U CBF HARNESS 52MM ,AWG22(0.6PI),-,-,AW G22(0.
JP26 BH39-40305U CBF HARNESS 52MM ,AWG22(0.6PI),-,-,AW G22(0.
JP29 BH39-40305U CBF HARNESS 52MM ,AWG22(0.6PI),-,-,AW G22(0.
JP3 BH39-40305U CBF HARNESS 52MM ,AWG22(0.6PI),-,-,AWG22(0.
JP31 BH39-40305U CBF HARNESS 52MM ,AWG22(0.6PI),-,-,AW G22(0.
JP32 BH39-40305U CBF HARNESS 52MM ,AWG22(0.6PI),-,-,AW G22(0.
JP34 BH39-40305U CBF HARNESS 52MM ,AWG22(0.6PI),-,-,AW G22(0.
JP35 BH39-40305U CBF HARNESS 52MM ,AWG22(0.6PI),-,-,AW G22(0.
JP36 BH39-40305U CBF HARNESS 52MM ,AWG22(0.6PI),-,-,AW G22(0.
JP4 BH39-40305U CBF HARNESS 52MM ,AWG22(0.6PI),-,-,AWG22(0.
JP40 BH39-40305U CBF HARNESS 52MM ,AWG22(0.6PI),-,-,AW G22(0.
JP42 BH39-40305U CBF HARNESS 52MM ,AWG22(0.6PI),-,-,AW G22(0.
JP44 BH39-40305U CBF HARNESS 52MM ,AWG22(0.6PI),-,-,AW G22(0.
JP46 BH39-40305U CBF HARNESS 52MM ,AWG22(0.6PI),-,-,AW G22(0.
JP47 BH39-40305U CBF HARNESS 52MM ,AWG22(0.6PI),-,-,AW G22(0.
JP5 BH39-40305U CBF HARNESS 52MM ,AWG22(0.6PI),-,-,AWG22(0.
JP50 BH39-40305U CBF HARNESS 52MM ,AWG22(0.6PI),-,-,AW G22(0.
JP51 BH39-40305U CBF HARNESS 52MM ,AWG22(0.6PI),-,-,AW G22(0.
JP52 BH39-40305U CBF HARNESS 52MM ,AWG22(0.6PI),-,-,AW G22(0.
JP55 BH39-40305U CBF HARNESS 52MM ,AWG22(0.6PI),-,-,AW G22(0.
JP58 BH39-40305U CBF HARNESS 52MM ,AWG22(0.6PI),-,-,AW G22(0.
JP59 BH39-40305U CBF HARNESS 52MM ,AWG22(0.6PI),-,-,AW G22(0.
JP6 BH39-40305U CBF HARNESS 52MM ,AWG22(0.6PI),-,-,AWG22(0.
JP60 BH39-40305U CBF HARNESS 52MM ,AWG22(0.6PI),-,-,AW G22(0.
JP63 BH39-40305U CBF HARNESS 52MM ,AWG22(0.6PI),-,-,AW G22(0.
JP64 BH39-40305U CBF HARNESS 52MM ,AWG22(0.6PI),-,-,AW G22(0.
JP66 BH39-40305U CBF HARNESS 52MM ,AWG22(0.6PI),-,-,AW G22(0.
JP67 BH39-40305U CBF HARNESS 52MM ,AWG22(0.6PI),-,-,AW G22(0.
JP68 BH39-40305U CBF HARNESS 52MM ,AWG22(0.6PI),-,-,AW G22(0.
JP7 BH39-40305U CBF HARNESS 52MM ,AWG22(0.6PI),-,-,AWG22(0.
JP70 BH39-40305U CBF HARNESS 52MM ,AWG22(0.6PI),-,-,AW G22(0.
JP8 BH39-40305U CBF HARNESS 52MM ,AWG22(0.6PI),-,-,AWG22(0.
JP82 BH39-40305U CBF HARNESS 52MM ,AWG22(0.6PI),-,-,AW G22(0.
JP85 BH39-40305U CBF HARNESS 52MM ,AWG22(0.6PI),-,-,AW G22(0.
JP87 BH39-40305U CBF HARNESS 52MM ,AWG22(0.6PI),-,-,AW G22(0.
JP9 BH39-40305U CBF HARNESS 52MM ,AWG22(0.6PI),-,-,AWG22(0.
JP93 BH39-40305U CBF HARNESS 52MM ,AWG22(0.6PI),-,-,AW G22(0.
7-6 AP17K*/ AP17J*
Page 44
!
!
7 Electrical Parts List
Loc. No. Code No. Descripti on Speci fication Remarks
JP94 BH39-40305U CBF HARNESS 52MM ,AWG22(0.6PI),-,-,AW G22(0.
JP95 BH39-40305U CBF HARNESS 52MM ,AWG22(0.6PI),-,-,AW G22(0.
JP96 BH39-40305U CBF HARNESS 52MM ,AWG22(0.6PI),-,-,AW G22(0.
M P1.0 BH41-00188A PCB MAIN
AP17JS,FR-1,247* 247*T1.6,0.0,1.6T,247* 247* 1.6T,09B1,1ARRAY,M AIN-PCB,-
SNA
Q301 0501-000122 TR-SMALL SIGNAL 2N3904,NPN,625mW ,TO-92,TP,100-300
Q302 0501-000581 TR-SMALL SIGNAL 2N3906,PNP,625mW,TO-92,TP,100-300
Q401 0501-000122 TR-SMALL SIGNAL 2N3904,NPN,625mW ,TO-92,TP,100-300
Q405 0501-000303 TR-SMALL SIGNAL KSA733,PNP,250mW,TO-92,TP,120-240
Q406 0501-000303 TR-SMALL SIGNAL KSA733,PNP,250mW,TO-92,TP,120-240
Q407 0501-000140 TR-SMALL SIGNAL 2N5551,NPN,625mW ,TO-92,TP,80-250
Q412 0501-000122 TR-SMALL SIGNAL 2N3904,NPN,625mW ,TO-92,TP,100-300
Q413 0501-000581 TR-SMALL SIGNAL 2N3906,PNP,625mW,TO-92,TP,100-300
Q414 0501-000412 TR-SMALL SIGNAL KSP42,NPN,625mW ,TO-92,-,40
Q415 0501-000412 TR-SMALL SIGNAL KSP42,NPN,625mW ,TO-92,-,40
Q416 0501-000412 TR-SMALL SIGNAL KSP42,NPN,625mW ,TO-92,-,40
Q417 0501-000586 TR-SMALL SIGNAL KSC945,NPN,250mW ,TO-92,TP,120-240
Q420 0501-000412 TR-SMALL SIGNAL KSP42,NPN,625mW ,TO-92,-,40
Q423 0501-000303 TR-SMALL SIGNAL KSA733,PNP,250mW,TO-92,TP,120-240
Q501 0501-000143 TR-SMALL SIGNAL 2N6520,PNP,625mW,TO-92,TP,30-200
Q502 0501-000586 TR-SMALL SIGNAL KSC945,NPN,250mW ,TO-92,TP,120-240
Q503 0501-000303 TR-SMALL SIGNAL KSA733,PNP,250mW,TO-92,TP,120-240
Q551 0501-000413 TR-SMALL SIGNAL KSP44,NPN,625mW ,TO-92,TP,50-200
Q601 0501-000586 TR-SMALL SIGNAL KSC945,NPN,250mW ,TO-92,TP,120-240
Q602 0501-000122 TR-SMALL SIGNAL 2N3904,NPN,625mW ,TO-92,TP,100-300
Q604 0501-000404 TR-SMALL SIGNAL KSD1616-Y,NPN,750mW ,TO-92,TP,135-270
Q607 0501-000581 TR-SMALL SIGNAL 2N3906,PNP,625mW,TO-92,TP,100-300
Q608 0501-000404 TR-SMALL SIGNAL KSD1616-Y,NPN,750mW ,TO-92,TP,135-270
Q609 0501-002228 TR-SMALL SIGNAL KTA1281,PNP,1000mW,TO-92L,TP,120-240
Q610 0501-000586 TR-SMALL SIGNAL KSC945,NPN,250mW ,TO-92,TP,120-240
R200 2001-000869 R-CARBON 56OHM,5% ,1/8W ,AA,TP,1.8X3.2M M
R201 2001-000435 R-CARBON 1M OHM,5%,1/ 8W,AA,TP,1.8X3.2M M
R202 2001-000290 R-CARBON 10KOHM,5% ,1/ 8W,AA,TP,1.8X3.2M M
R203 2001-000734 R-CARBON 4.7KOHM ,5% ,1/ 8W,AA,TP,1.8X3.2M M
R204 2001-000734 R-CARBON 4.7KOHM ,5% ,1/ 8W,AA,TP,1.8X3.2M M
R206 2001-000290 R-CARBON 10KOHM,5% ,1/ 8W,AA,TP,1.8X3.2M M
R207 2001-000869 R-CARBON 56OHM,5% ,1/8W ,AA,TP,1.8X3.2M M
R208 2001-000869 R-CARBON 56OHM,5% ,1/8W ,AA,TP,1.8X3.2M M
R209 2001-000734 R-CARBON 4.7KOHM ,5% ,1/ 8W,AA,TP,1.8X3.2M M
R210 2001-000472 R-CARBON 2.7KOHM ,5% ,1/ 8W,AA,TP,1.8X3.2M M
R211 2001-000812 R-CARBON 5.6KOHM ,5% ,1/ 8W,AA,TP,1.8X3.2M M
R212 2001-000660 R-CARBON 33KOHM,5% ,1/ 8W,AA,TP,1.8X3.2M M
R213 2001-000429 R-CARBON 1KOHM,5% ,1/ 8W,AA,TP,1.8X3.2M M
R214 2001-000786 R-CARBON 47KOHM,5% ,1/ 8W,AA,TP,1.8X3.2M M
R215 2001-000281 R-CARBON 100OHM,5%,1/ 8W ,AA,TP,1.8X3.2MM
R216 2001-000281 R-CARBON 100OHM,5%,1/ 8W ,AA,TP,1.8X3.2MM
R217 2001-000281 R-CARBON 100OHM,5%,1/ 8W ,AA,TP,1.8X3.2MM
R218 2001-000281 R-CARBON 100OHM,5%,1/ 8W ,AA,TP,1.8X3.2MM
R219JS 2001-000290 R-CARBON 10KOHM,5%,1/ 8W,AA,TP,1.8X3.2M M
R220 2001-000281 R-CARBON 100OHM,5%,1/ 8W ,AA,TP,1.8X3.2MM
R221 2001-000734 R-CARBON 4.7KOHM ,5% ,1/ 8W,AA,TP,1.8X3.2M M
R222 2001-000734 R-CARBON 4.7KOHM ,5% ,1/ 8W,AA,TP,1.8X3.2M M
R223 2001-000552 R-CARBON 270OHM,5%,1/ 4W ,AA,TP,2.4X6.4MM
R224 2001-000869 R-CARBON 56OHM,5% ,1/8W ,AA,TP,1.8X3.2M M
R225 2001-000869 R-CARBON 56OHM,5% ,1/8W ,AA,TP,1.8X3.2M M
R229 2001-000281 R-CARBON 100OHM,5%,1/ 8W ,AA,TP,1.8X3.2MM
AP17K*/ AP17J* 7-7
Page 45
!
!
7 Electrical Parts List
Loc. No. Code No. Description Specification Remarks
R230 2001-000429 R-CARBON 1KOHM,5% ,1/ 8W,AA,TP,1.8X3.2MM
R231 2001-000281 R-CARBON 100OHM,5%,1/ 8W ,AA,TP,1.8X3.2MM
R232 2001-000281 R-CARBON 100OHM,5%,1/ 8W ,AA,TP,1.8X3.2MM
R233 2001-000429 R-CARBON 1KOHM,5% ,1/ 8W,AA,TP,1.8X3.2MM
R236 2001-000290 R-CARBON 10KOHM,5% ,1/ 8W,AA,TP,1.8X3.2MM
R239 2001-000290 R-CARBON 10KOHM,5% ,1/ 8W,AA,TP,1.8X3.2MM
R301 2001-000869 R-CARBON 56OHM,5% ,1/8W ,AA,TP,1.8X3.2M M
R302 2004-000580 R-M ETAL 22Kohm,1% ,1/ 4W,AA,TP,2.4x6.4mm
R303 2001-000890 R-CARBON 6.8KOHM ,5% ,1/ 8W,AA,TP,1.8X3.2MM
R304 2001-000890 R-CARBON 6.8KOHM ,5% ,1/ 8W,AA,TP,1.8X3.2MM
R306 2004-001022 R-M ETAL 5.6Kohm,1% ,1/ 4W,AA,TP,2.4x6.4m
R307 2001-001048 R-CARBON(S) 1.2OHM ,5% ,1/ 2W,AA,TP,2.4X6.4MM
R308 2001-000109 R-CARBON(S) 470OHM ,5% ,1/2W ,AA,TP,2.4X6.4M M
R309 2004-001409 R-M ETAL 2.7ohm,1% ,1/4W ,AA,TP,2.4x6.4mm
R310 2004-001136 R-M ETAL 6.8Kohm,1% ,1/ 4W,AA,TP,2.4x6.4m
R311 2001-000890 R-CARBON 6.8KOHM ,5% ,1/ 8W,AA,TP,1.8X3.2MM
R312 2001-000812 R-CARBON 5.6KOHM ,5% ,1/ 8W,AA,TP,1.8X3.2MM
R315 2004-001409 R-M ETAL 2.7ohm,1% ,1/4W ,AA,TP,2.4x6.4mm
R316 2001-000281 R-CARBON 100OHM,5%,1/ 8W ,AA,TP,1.8X3.2MM
R320 2001-000290 R-CARBON 10KOHM,5% ,1/ 8W,AA,TP,1.8X3.2MM
R324 2001-000878 R-CARBON 6.2KOHM ,5% ,1/ 8W,AA,TP,1.8X3.2MM
R401 2001-001096 R-CARBON(S) 2.2OHM ,5% ,1/ 2W,AA,TP,2.4X6.4MM
R402 2001-000869 R-CARBON 56OHM,5% ,1/8W ,AA,TP,1.8X3.2M M
R403 2004-001226 R-M ETAL 750ohm,1% ,1/4W,AA,TP,2.4x6.4mm
R404 2004-000498 R-M ETAL 2.7Kohm,1% ,1/ 4W,AA,TP,2.4x6.4m
R405 2001-000591 R-CARBON 3.3KOHM ,5% ,1/ 8W,AA,TP,1.8X3.2MM
R406 2001-000522 R-CARBON 22KOHM,5% ,1/ 8W,AA,TP,1.8X3.2MM
R407 2001-000109 R-CARBON(S) 470OHM ,5% ,1/2W ,AA,TP,2.4X6.4M M
R408 2001-000429 R-CARBON 1KOHM,5% ,1/ 8W,AA,TP,1.8X3.2MM
R409 2001-000812 R-CARBON 5.6KOHM ,5% ,1/ 8W,AA,TP,1.8X3.2MM
R410 2001-000105 R-CARBON 1.5KOHM ,5% ,1/ 4W,AA,TP,2.4X6.4MM
R412 2001-000290 R-CARBON 10KOHM,5% ,1/ 8W,AA,TP,1.8X3.2MM
R413 2001-001038 R-CARBON(S) 0.56OHM ,5% ,1/2W ,AA,TP,2.4X6.4M M
R414 2001-001038 R-CARBON(S) 0.56OHM ,5% ,1/2W ,AA,TP,2.4X6.4M M
R416 2001-000107 R-CARBON(S) 150KOHM,5% ,1/ 2W,AA,TP,2.4X6.4MM
R417 2001-000331 R-CARBON 12KOHM,5% ,1/ 8W,AA,TP,1.8X3.2MM
R418 2001-000044 R-CARBON 1.2KOHM ,5% ,1/ 4W,AA,TP,2.4X6.4MM
R419 2001-000004 R-CARBON 200KOHM ,5% ,1/ 8W,AA,TP,1.8X3.2MM
R420 2004-000398 R-M ETAL 180Kohm,1% ,1/ 4W,AA,TP,2.4x6.4m
R421 2003-000429 R-M ETAL OXIDE(S) 1.5Kohm,5%,2W,AA,TP,4x12mm
R422 2001-001006 R-CARBON 82OHM,5% ,1/8W ,AA,TP,1.8X3.2M M
R423 2004-000176 R-M ETAL 1.8Kohm,1%,1/ 4W,AA,TP,2.4x6.4m
R424 2004-000284 R-M ETAL 12Kohm,1%,1/ 4W,AA,TP,2.4x6.4mm
R425 2001-000119 R-CARBON 680OHM,5%,1/ 4W ,AA,TP,2.4X6.4MM
R426 2001-000110 R-CARBON 10OHM,5% ,1/4W ,AA,TP,2.4X6.4M M
R427 2001-000591 R-CARBON 3.3KOHM ,5% ,1/ 8W,AA,TP,1.8X3.2M M
R429 2001-000052 R-CARBON(S) 3.3KOHM,5% ,1/ 2W,AA,TP,2.4X6.4M M
R430 2001-001078 R-CARBON(S) 15KOHM,5%,1/ 2W,AA,TP,2.4X6.4M M
R431 2005-001163 R-W IRE WOUND,NON 0.68ohm,1%,3W ,AA,TP,5.5x15mm
R432 2001-000020 R-CARBON(S) 22OHM ,5% ,1/ 2W,AA,TP,2.4X6.4M M
R433 2003-000769 R-M ETAL OXIDE(S) 680ohm,5%,3W ,AA,TP,6x16mm
R434 2001-000449 R-CARBON 2.2KOHM ,5% ,1/ 8W,AA,TP,1.8X3.2M M
R435 2001-000786 R-CARBON 47KOHM,5% ,1/ 8W,AA,TP,1.8X3.2M M
R436 2001-000449 R-CARBON 2.2KOHM ,5% ,1/ 8W,AA,TP,1.8X3.2M M
R437 2001-000786 R-CARBON 47KOHM,5% ,1/ 8W,AA,TP,1.8X3.2M M
7-8 AP17K*/ AP17J*
Page 46
!
!!!
!
!
7 Electrical Parts List
Loc. No. Code No. Descripti on Speci fication Remarks
R438 2001-000449 R-CARBON 2.2KOHM ,5% ,1/ 8W,AA,TP,1.8X3.2MM
R439 2001-000786 R-CARBON 47KOHM,5% ,1/ 8W,AA,TP,1.8X3.2MM
R440 2001-000290 R-CARBON 10KOHM,5% ,1/ 8W,AA,TP,1.8X3.2MM
R441 2001-000290 R-CARBON 10KOHM,5% ,1/ 8W,AA,TP,1.8X3.2MM
R442 2001-000290 R-CARBON 10KOHM,5% ,1/ 8W,AA,TP,1.8X3.2MM
R443 2003-000505 R-M ETAL OXIDE(S) 150ohm,5%,3W ,AA,TP,6x16mm
R444 2001-000739 R-CARBON 4.7M OHM,5%,1/ 8W,AA,TP,1.8X3.2MM
R445 2001-000019 R-CARBON(S) 10OHM ,5% ,1/ 2W,AA,TP,2.4X6.4M M
R446 2001-001079 R-CARBON(S) 15OHM ,5% ,1/ 2W,AA,TP,2.4X6.4M M
R450 2001-000522 R-CARBON 22KOHM,5% ,1/ 8W,AA,TP,1.8X3.2M M
R451 2001-000290 R-CARBON 10KOHM,5% ,1/ 8W,AA,TP,1.8X3.2M M
R452 2001-000290 R-CARBON 10KOHM,5% ,1/ 8W,AA,TP,1.8X3.2M M
R453 2001-000290 R-CARBON 10KOHM,5% ,1/ 8W,AA,TP,1.8X3.2M M
R454 2003-000650 R-M ETAL OXIDE(S) 330ohm,5%,2W ,AA,TP,4x12mm
R455 2001-000449 R-CARBON 2.2KOHM ,5% ,1/ 8W,AA,TP,1.8X3.2M M
R456 2001-000290 R-CARBON 10KOHM,5% ,1/ 8W,AA,TP,1.8X3.2M M
R457 2001-000786 R-CARBON 47KOHM,5% ,1/ 8W,AA,TP,1.8X3.2M M
R458 2001-000020 R-CARBON(S) 22OHM ,5% ,1/ 2W,AA,TP,2.4X6.4M M
R460 2003-000724 R-M ETAL OXIDE(S) 5.6ohm,5%,3W ,AA,TP,6x16mm
R500 2001-000435 R-CARBON 1M OHM,5%,1/ 8W,AA,TP,1.8X3.2M M
R501 2001-000472 R-CARBON 2.7KOHM ,5% ,1/ 8W,AA,TP,1.8X3.2M M
R502 2004-000979 R-M ETAL 47Kohm,1%,1/ 4W,AA,TP,2.4x6.4mm
R504 2001-000008 R-CARBON 15KOHM,5% ,1/ 8W,AA,TP,1.8X3.2M M
R505 2004-000344 R-M ETAL 15Kohm,1%,1/ 4W,AA,TP,2.4x6.4mm
R506 2004-000643 R-M ETAL 270Kohm,1%,1/4W ,AA,TP,2.4x6.4m
R507 2004-000216 R-M ETAL 10Kohm,1%,1/ 4W,AA,TP,2.4x6.4mm
R508 2001-001129 R-CARBON(S) 330KOHM,5% ,1/ 2W,AA,TP,2.4X6.4M M
R509 2001-001129 R-CARBON(S) 330KOHM,5% ,1/ 2W,AA,TP,2.4X6.4M M
R510 2001-000273 R-CARBON 100KOHM ,5% ,1/ 8W,AA,TP,1.8X3.2M M
R511 2001-000478 R-CARBON 2.7OHM,5%,1/4W ,AA,TP,2.4X6.4MM
R512 2001-001112 R-CARBON(S) 24KOHM,5%,1/ 2W,AA,TP,2.4X6.4M M
R513 2001-001110 R-CARBON(S) 240KOHM,5% ,1/ 2W,AA,TP,2.4X6.4M M
R514 2001-000786 R-CARBON 47KOHM,5% ,1/ 8W,AA,TP,1.8X3.2M M
R515 2001-000786 R-CARBON 47KOHM,5% ,1/ 8W,AA,TP,1.8X3.2M M
R518 2001-001071 R-CARBON(S) 12KOHM,5%,1/ 2W,AA,TP,2.4X6.4M M
R519 2001-000356 R-CARBON 150KOHM ,5% ,1/ 8W,AA,TP,1.8X3.2M M
R524 2001-000290 R-CARBON 10KOHM,5% ,1/ 8W,AA,TP,1.8X3.2M M
R525 2001-000331 R-CARBON 12KOHM,5% ,1/ 8W,AA,TP,1.8X3.2M M
R526 2001-000411 R-CARBON 18KOHM,5% ,1/ 8W,AA,TP,1.8X3.2M M
R527 2001-000837 R-CARBON 51KOHM,5% ,1/ 8W,AA,TP,1.8X3.2M M
R529 2001-000539 R-CARBON 24KOHM,5% ,1/ 8W,AA,TP,1.8X3.2M M
R530 2001-000290 R-CARBON 10KOHM,5% ,1/ 8W,AA,TP,1.8X3.2M M
R531 2001-000010 R-CARBON 68KOHM,5% ,1/ 8W,AA,TP,1.8X3.2M M
R532 2002-000133 R-COMPOSITION 3.3Mohm,5% ,1/ 2W,AA,TP,3.5x9.5m SNA
R533 2002-001073 R-COMPOSITION 15Mohm,5% ,1/ 2W,AA,TP,4.0x10mm
R534 2002-001083 R-COMPOSITION 56MOHM,10%,1/ 2W ,AA,TP,9X4MM
R551 2001-000530 R-CARBON 240KOHM ,5% ,1/ 4W,AA,TP,2.4X6.4M M
R552 2004-000532 R-M ETAL 20Kohm,1%,1/ 4W,AA,TP,2.4x6.4mm
R553 2001-000642 R-CARBON 330KOHM ,5% ,1/ 2W,AA,TP,3.3X9M M
R554 2002-001049 R-COMPOSITION 240Kohm,5%,1/2W ,AA,TP,3.9x9mm
R555 2001-001088 R-CARBON(S) 1KOHM,5%,1/ 2W ,AA,TP,2.4X6.4M M
R556 2001-000613 R-CARBON 3.9KOHM ,5% ,1/ 8W,AA,TP,1.8X3.2M M
R560 2001-001129 R-CARBON(S) 330KOHM,5% ,1/ 2W,AA,TP,2.4X6.4M M
R570 2001-001108 R-CARBON(S) 22KOHM,5%,1/ 2W,AA,TP,2.4X6.4M M
R600 2001-001129 R-CARBON(S) 330KOHM,5% ,1/ 2W,AA,TP,2.4X6.4M M
AP17K*/ AP17J* 7-9
Page 47
!
7 Electrical Parts List
Loc. No. Code No. Description Specification Remarks
R601 2001-001129 R-CARBON(S) 330KOHM,5% ,1/ 2W,AA,TP,2.4X6.4MM
R602 2001-000023 R-CARBON 47OHM,5% ,1/4W ,AA,TP,2.4X6.4M M
R603 2001-000290 R-CARBON 10KOHM,5% ,1/ 8W,AA,TP,1.8X3.2MM
R604 2001-000857 R-CARBON 560OHM,5%,1/ 8W ,AA,TP,1.8X3.2MM
R605 2001-000734 R-CARBON 4.7KOHM ,5% ,1/ 8W,AA,TP,1.8X3.2MM
R607 2003-000014 R-M ETAL OXIDE(S) 10Kohm,5%,3W,AA,TP,6x16mm
R608 2001-000281 R-CARBON 100OHM,5%,1/ 8W ,AA,TP,1.8X3.2MM
R609 2002-001068 R-COMPOSITION 180Kohm,5%,1/2W ,AA,TP,3.9x9mm
R610 2002-001068 R-COMPOSITION 180Kohm,5%,1/2W ,AA,TP,3.9x9mm
R611 2001-000376 R-CARBON 15OHM,5% ,1/8W ,AA,TP,1.8X3.2M M
R612 2003-000738 R-M ETAL OXIDE(S) 56Kohm,5%,2W,AA,TP,4x12mm
R613 2001-000290 R-CARBON 10KOHM,5% ,1/ 8W,AA,TP,1.8X3.2M M
R614 2001-001107 R-CARBON(S) 220ohm,5%,1/ 2W ,AA,TP,2.4x6.4mm
R615 2001-001088 R-CARBON(S) 1KOHM,5%,1/ 2W ,AA,TP,2.4X6.4MM
R617 2001-001037 R-CARBON(S) 0.39OHM ,5% ,1/ 2W,AA,TP,2.4X6.4MM
R618 2001-000429 R-CARBON 1KOHM,5% ,1/ 8W,AA,TP,1.8X3.2M M
R619 2003-000471 R-M ETAL OXIDE(S) 10ohm,5%,2W ,AA,TP,4x12mm
R621 2001-000989 R-CARBON 820KOHM ,5% ,1/ 8W,AA,TP,1.8X3.2M M
R622 2001-000588 R-CARBON 3.3KOHM ,5% ,1/ 4W,AA,TP,2.4X6.4M M
R627 2001-000812 R-CARBON 5.6KOHM ,5% ,1/ 8W,AA,TP,1.8X3.2M M
R628 2001-000221 R-CARBON 1.2KOHM ,5% ,1/ 8W,AA,TP,1.8X3.2M M
R630 2001-000786 R-CARBON 47KOHM,5% ,1/ 8W,AA,TP,1.8X3.2M M
R631 2001-001088 R-CARBON(S) 1KOHM,5%,1/ 2W ,AA,TP,2.4X6.4MM
R632 2001-000290 R-CARBON 10KOHM,5% ,1/ 8W,AA,TP,1.8X3.2M M
R641 2003-000744 R-M ETAL OXIDE(S) 56ohm,5%,2W ,AA,TP,4x12mm
R642 2001-000016 R-CARBON(S) 1OHM,5% ,1/ 2W,AA,TP,2.4X6.4M M
SDI CDT BH39-40305U CBF HARNESS 52MM ,AWG22(0.6PI),-,-,AWG22(0.
SK501 4715-000001 SURGE ABSORBER 1KV,+50-10%,-,-,
TP501 6042-000002 EYELET ID1.5,OD2,L3.1,SN,BSS3-E/EH SNA
X201 2801-000005 CRYSTAL-UNIT 8M Hz,50ppm,28-AAM ,S,35ohm,TP
ZD201 0403-000361 DIODE-ZENER UZ6.2BSB,6.2V,5.99-6.24V,500mW
ZD202 0403-000361 DIODE-ZENER UZ6.2BSB,6.2V,5.99-6.24V,500mW
ZD203 0403-000361 DIODE-ZENER UZ6.2BSB,6.2V,5.99-6.24V,500mW
ZD204 0403-000361 DIODE-ZENER UZ6.2BSB,6.2V,5.99-6.24V,500mW
ZD205 0403-000361 DIODE-ZENER UZ6.2BSB,6.2V,5.99-6.24V,500mW
ZD206 0403-000361 DIODE-ZENER UZ6.2BSB,6.2V,5.99-6.24V,500mW
ZD207 0403-000361 DIODE-ZENER UZ6.2BSB,6.2V,5.99-6.24V,500mW
ZD208 0403-000361 DIODE-ZENER UZ6.2BSB,6.2V,5.99-6.24V,500mW
ZD209 0403-000361 DIODE-ZENER UZ6.2BSB,6.2V,5.99-6.24V,500mW
ZD401 0403-000355 DIODE-ZENER UZ5.1BSB,4.97-5.18V,500M W,DO-35,TP
ZD501 0403-001068 DIODE-ZENER UZ4.7BSA,4.7V,4.47-4.65V,500mW
ZD600 0403-000753 DIODE-ZENER MTZJ27D,27V,26.29-27.64V,500mW
ZD601 0403-000361 DIODE-ZENER UZ6.2BSB,6.2V,5.99-6.24V,500mW
ZD602 0403-001068 DIODE-ZENER UZ4.7BSA,4.7V,4.47-4.65V,500mW
ZD603 0406-001062 DIODE-TVS P6KE200A,190/ 200/210V,600W ,CAS
ZD604 0403-001274 DIODE-ZENER UZ24BSC,23.29-24.27V,500M W ,DO-34,TP
ZD606 0403-000367 DIODE-ZENER UZ7.5BSC,7.5V,7.33-7.64V,500mW
HS301 BH99-00002G ASSY HEAT/SINK H/ S V.IC,SCREW+NUT,KA2142,-,-,OIL SILICON SNA
CIS 1204-001508 IC-VERTICAL DEF.
KA2142,SIP,10P,-,PLASTIC,35V,15W,-20TO+70C,ST,VERTICAL DEFLECTION
CIS 6006-001097 SCREW-ASS’Y M ACH WSP,BH,+,M3,L8,ZPC(YEL),SWRCH18A SNA
CIS 6021-000118 NUT-HEXAGON 1C,M 3,ZPC(YEL),SM20C SNA
CIS BH62-00047A HEAT SINK-V.IC PS17NO(DELL),A1050S,T1.0,70,77,-,-,- SNA
HS601 BH99-00003A ASSY,HEAT/SINK H/S POWER,SPRING,DP104,-,-,RUBBER,-,- SNA
7-10 AP17K*/ AP17J*
Page 48
7 Electrical Parts List
Loc. No. Code No. Descripti on Speci fication Remarks
CIS BH13-00004A IC-HYBRID -,DP104C,TO-220-5L,5P,POWER SWITCH,-,CIS BH61-00004A SPRIN G-TR CDA,CDB,SUS304,-,-,-,-,-,T0.5,-,-,- SNA
CIS BH62-00004A HEAT/SINK-POWER -,T1,-,A1050S,DA/ DB SNA
CIS BH62-20001B RUBBER CSQ4357,W25* L20* T0.45,-,-,-,- SNA
HS403 BH99-00005G ASSY,HEAT/SINK HS TR,SPRING,IRF740A,-,-,OIL SILICON,-,- SNA
CIS BH61-00004A SPRIN G-TR CDA,CDB,SUS304,-,-,-,-,-,T0.5,-,-,- SNA
CIS BH62-00008A HEAT SINK-TR -,SPC-1 L20* H45* T1,-,CDB SNA
HS401 BH99-00006G ASSY HEAT/SINK HS TR,SCREW+NUT,IRF640A,-,-,OIL SILICON SNA
CIS 6006-001008 SCREW-ASS’Y M ACH WSP,BH,+,M3,L10,ZPC(YEL),SWRCH SNA
CIS 6021-000118 NUT-HEXAGON 1C,M 3,ZPC(YEL),SM20C SNA
CIS BH62-30024A HEAT/SINK-TR SPC,T1,SN,CFX1577L SNA
HS402 BH99-00010A ASSY,HEAT/SINK HS TR,SPRING,IRF634A,-,-,OIL SILICON,-,- SNA
CIS BH61-00004A SPRIN G-TR CDA,CDB,SUS304,-,-,-,-,-,T0.5,-,-,- SNA
CIS BH62-00016A HEAT SINK-TR A1050S,T1.0,-,DP17MO SNA
HS501 BH99-00033C ASSY HEAT/SINK HS FBT,SPRING,2SC5583,DTV56F,KTD2058,OIL,MICA SNA
CIS 0402-001255 DIODE-RECTIFIER DTV56F,1.5KV,10A,TO-220AC,BK
CIS 0502-000465 TR-POWER KTD2058,NPN,25000mW,TO-220IS,ST,100-200
CIS 0502-001143 TR-POWER 2SC5583,NPN,150W ,TOP-3L,ST,6-1
CIS BH61-70003A SPRIN G
CIS BH62-00001A INSULATION-M ICA CSM920B,M ICA,-,-,-,-,-,-,POWER-TR SNA
CIS BH62-00038A HEAT SINK-FBT TS17JS,A1050S,T2.0,-,-,-,-,- SNA
CVT4857,STS304-W1/2H,W 3.8,-,L30,L30,-,T0.5,DEGRE,W3.8,STS304-W1/ 2H
SNA
HS409 BH99-10019N ASSY,HEAT/SINK HS,-,31DF6,-,-,SOLDER,-,- SNA
CIS 0402-001289 DIODE-RECTIFIER 31DF6,600V,3A,DO-201AD,BK
CIS BH62-30024B HEAT/SINK-IC SPC-1,T1,SN COATING,- SNA
AP17K*/ AP17J* 7-11
Page 49
!
!
7 Electrical Parts List
7-2 Video PCB Parts
Loc. No. Code No. Description Specification Remarks
CIS BH75-00047A UNIT/ SHIELD-VIDEO/CAP CL17LO,SPTE T0.3,-,-,- SNA
CIS BH71-00006B SHIELD-VIDEO/ CAP CL17LO,SPTE,0.2,-,- SNA
CIS BH71-10311A EARTH-PLATE PBS 3/ 4H,T0.2 SNA
CIS BH75-00192H UNIT/SHIELD-VIDEO DEL,-,SPTE,-,-,14,15,17,- SNA
CIS BH61-00002A SPRIN G-VIDEO CDB7907,STS H14 ,-,-,-,-,-,T1.0,-,-,- SNA
CIS BH71-00007A SHIELD-VIDEO CDA4507,SPTE,T0.2,-,- SNA
CIS BH72-00024A HOLDER-VIDEO CDA4507,ABS+PC,5V,IV16,-,NORMAL CRT SNA
CIS BH73-00014A HOLDER-RUBBER(NORMAL) DEL,SILICON V2,GRAY,-,-,-,NORMAL SNA
CN101 3711-004228 CONNECTOR-HEADER BOX,6P,1R,2M M ,ANGLE,SN SNA
CN102 BH39-00015A CBF-HARNESS
IC102 1201-001832 IC-VIDEO AM P
JW 1 BH39-40306C CBF-HARNESS ,60MM ,BLK,1015,AW G22,-,-,-,-,JW 2 BH39-40306D CBF-HARNESS ,80MM ,BLK,1015,AW G22,-,-,-,-,JW 3 BH39-40306D CBF-HARNESS ,80MM ,BLK,1015,AW G22,-,-,-,-,SH/VID 6502-000001 CABLE CLAMP DAWH-5NB,D15,L35,NYLON66,NTR SNA
SH/VID+H/S 6003-000010 SCREW-TAPTITE BWH,+,B,M 3,L10,ZPC(YEL),SWRCH1 SNA
SK101 3704-001142 SOCKET-CRT 10P,22.5PI,25.6PI,NI,BD103 3301-000011 CORE-FERRITE BEAD AA,3.5x1.0x5.7mm,1500,2375G SNA
BD104 3301-000011 CORE-FERRITE BEAD AA,3.5x1.0x5.7mm,1500,2375G SNA
BD105 3301-000011 CORE-FERRITE BEAD AA,3.5x1.0x5.7mm,1500,2375G SNA
BD106 3301-000011 CORE-FERRITE BEAD AA,3.5x1.0x5.7mm,1500,2375G SNA
BD112 3301-000011 CORE-FERRITE BEAD AA,3.5x1.0x5.7mm,1500,2375G SNA
BD115 3301-000011 CORE-FERRITE BEAD AA,3.5x1.0x5.7mm,1500,2375G SNA
C102 2201-000119 C-CERAM IC,DISC 100nF,+80-20% ,50V,Y5V,TP,8x3,5
C104 2401-003224 C-AL 470uF,20%,16V,W T,TP,8X11.5,5mm
C105 2401-002075 C-AL 4.7uF,20%,50V,GP,TP,5x11,5
C112 2401-003034 C-AL 220uF,20%,16V,W T,TP,8x11.5,5
C113 2301-000312 C-FILM,PEF 8.2nF,5%,100V,TP,6x12.5mm,5mm
C116 2401-003484 C-AL 10uF,20%,100V,LZ,TP,6.3X11,5
C117 2201-000019 C-CERAM IC,DISC 10nF,+80-20%,500V,Y5V,TP,13.5x4mm,5
C118 2401-000393 C-AL 10uF,20%,100V,W T,TP,8x11.5,5
C119 2201-000019 C-CERAM IC,DISC 10nF,+80-20%,500V,Y5V,TP,13.5x4mm,5
C120 2401-002075 C-AL 4.7uF,20%,50V,GP,TP,5x11,5
C121 2401-000025 C-AL 100uF,20%,16V,GP,TP,6.3x11,5
C122 2401-000025 C-AL 100uF,20%,16V,GP,TP,6.3x11,5
C125 2201-000341 C-CERAM IC,DISC 2.7nF,10%,2kV,Y5P,TP,14x6,7.5
C126 2201-000119 C-CERAM IC,DISC 100nF,+80-20% ,50V,Y5V,TP,8x3,5
C127 2201-002110 C-CERAM IC,DISC 1.8nF,10%,1kV,Y5P,TP,10x5mm,5
C131 2401-000010 C-AL 220uF,20%,16V,GP,-,6.3x11mm,2.
C135 2401-000042 C-AL 100uF,20%,16V,GP,TP,6.3x7,5
C137 2401-002075 C-AL 4.7uF,20%,50V,GP,TP,5x11,5
C146 2401-000042 C-AL 100uF,20%,16V,GP,TP,6.3x7,5
C148 2401-000042 C-AL 100uF,20%,16V,GP,TP,6.3x7,5
C149 2401-000025 C-AL 100uF,20%,16V,GP,TP,6.3x11,5
CB05 2301-000010 C-FILM,PEF 100nF,5%,100V,TP,11.5x12.5mm,5
CB06 2305-000407 C-FILM,M PEF 470nF,5%,100V,TP,-,5mm
CG05 2301-000010 C-FILM,PEF 100nF,5%,100V,TP,11.5x12.5mm,5
CG06 2305-000407 C-FILM,M PEF 470nF,5%,100V,TP,-,5mm
CN_G2 BH71-40300A PIN-HINGE -,BRASS,D2.36,SN,HEAT/SINK SNA
CN_GND BH71-40300A PIN-HINGE -,BRASS,D2.36,SN,HEAT/SINK SNA
CN_GTP1 BH71-40300A PIN-HINGE -,BRASS,D2.36,SN,HEAT/SINK SNA
CR05 2301-000010 C-FILM,PEF 100nF,5%,100V,TP,11.5x12.5mm,5
CR06 2305-000407 C-FILM,M PEF 470nF,5%,100V,TP,-,5mm
D101 0401-000005 DIODE-SWITCHING 1N4148,100V,200mA,DO-35,TP
D102 0401-000005 DIODE-SWITCHING 1N4148,100V,200mA,DO-35,TP
13P/14P,200M M ,WHT/ BLK/RED/BLU,UL1007,AW G26,SM H200-13/ YBNH200-14
S1D2518X01,SDIP,30P,-,-,18DB,PLASTIC,12V,1.2W,-25TO+75C,-,-,-,-,-,ST
7-12 AP17K*/ AP17J*
Page 50
7 Electrical Parts List
Loc. No. Code No. Descripti on Speci fication Remarks
DB03 0401-000004 DIODE-SWITCHING 1SS244,250V,625mA,DO-34,TP
DB04 0401-000004 DIODE-SWITCHING 1SS244,250V,625mA,DO-34,TP
DB05 0401-000005 DIODE-SWITCHING 1N4148,100V,200mA,DO-35,TP
DG03 0401-000004 DIODE-SWITCHING 1SS244,250V,625mA,DO-34,TP
DG04 0401-000004 DIODE-SWITCHING 1SS244,250V,625mA,DO-34,TP
DG05 0401-000005 DIODE-SWITCHING 1N4148,100V,200mA,DO-35,TP
DR03 0401-000004 DIODE-SWITCHING 1SS244,250V,625mA,DO-34,TP
DR04 0401-000004 DIODE-SWITCHING 1SS244,250V,625mA,DO-34,TP
DR05 0401-000005 DIODE-SWITCHING 1N4148,100V,200mA,DO-35,TP
EY1 6042-000001 EYELET ID2.2,OD2.7,L3.1,SN,BSS3-E/EH SNA
EY2 6042-000001 EYELET ID2.2,OD2.7,L3.1,SN,BSS3-E/EH SNA
EY5 6042-000002 EYELET ID1.5,OD2,L3.1,SN,BSS3-E/EH SNA
EY6 6042-000002 EYELET ID1.5,OD2,L3.1,SN,BSS3-E/EH SNA
EY7 6042-000002 EYELET ID1.5,OD2,L3.1,SN,BSS3-E/EH SNA
EY8 6042-000002 EYELET ID1.5,OD2,L3.1,SN,BSS3-E/EH SNA
IC104 BH13-00022A IC-BIAS CLAMP LM2480NA,PN15H/ 17L,8P,0to+70C,DIP,3mA,85V,ST
JP16 BH39-40305U CBF HARNESS 52MM ,AWG22(0.6PI),-,-,AW G22(0.
JP20 BH39-40305U CBF HARNESS 52MM ,AWG22(0.6PI),-,-,AW G22(0.
JP21 BH39-40305U CBF HARNESS 52MM ,AWG22(0.6PI),-,-,AW G22(0.
JP23 BH39-40305U CBF HARNESS 52MM ,AWG22(0.6PI),-,-,AW G22(0.
JP24 BH39-40305U CBF HARNESS 52MM ,AWG22(0.6PI),-,-,AW G22(0.
JP25 BH39-40305U CBF HARNESS 52MM ,AWG22(0.6PI),-,-,AW G22(0.
JP26 BH39-40305U CBF HARNESS 52MM ,AWG22(0.6PI),-,-,AW G22(0.
JP29 BH39-40305U CBF HARNESS 52MM ,AWG22(0.6PI),-,-,AW G22(0.
JP30 BH39-40305U CBF HARNESS 52MM ,AWG22(0.6PI),-,-,AW G22(0.
JP31 BH39-40305U CBF HARNESS 52MM ,AWG22(0.6PI),-,-,AW G22(0.
JP32 BH39-40305U CBF HARNESS 52MM ,AWG22(0.6PI),-,-,AW G22(0.
JP33 BH39-40305U CBF HARNESS 52MM ,AWG22(0.6PI),-,-,AW G22(0.
JP34 BH39-40305U CBF HARNESS 52MM ,AWG22(0.6PI),-,-,AW G22(0.
JP36 BH39-40305U CBF HARNESS 52MM ,AWG22(0.6PI),-,-,AW G22(0.
JP37 BH39-40305U CBF HARNESS 52MM ,AWG22(0.6PI),-,-,AW G22(0.
JP39 BH39-40305U CBF HARNESS 52MM ,AWG22(0.6PI),-,-,AW G22(0.
JP40 BH39-40305U CBF HARNESS 52MM ,AWG22(0.6PI),-,-,AW G22(0.
JP41 BH39-40305U CBF HARNESS 52MM ,AWG22(0.6PI),-,-,AW G22(0.
JP43 BH39-40305U CBF HARNESS 52MM ,AWG22(0.6PI),-,-,AW G22(0.
JP47 BH39-40305U CBF HARNESS 52MM ,AWG22(0.6PI),-,-,AW G22(0.
JP48 BH39-40305U CBF HARNESS 52MM ,AWG22(0.6PI),-,-,AW G22(0.
JP49 BH39-40305U CBF HARNESS 52MM ,AWG22(0.6PI),-,-,AW G22(0.
JP51 BH39-40305U CBF HARNESS 52MM ,AWG22(0.6PI),-,-,AW G22(0.
JP52 BH39-40305U CBF HARNESS 52MM ,AWG22(0.6PI),-,-,AW G22(0.
JP53 BH39-40305U CBF HARNESS 52MM ,AWG22(0.6PI),-,-,AW G22(0.
JP54 BH39-40305U CBF HARNESS 52MM ,AWG22(0.6PI),-,-,AW G22(0.
JP55 BH39-40305U CBF HARNESS 52MM ,AWG22(0.6PI),-,-,AW G22(0.
JP57 BH39-40305U CBF HARNESS 52MM ,AWG22(0.6PI),-,-,AW G22(0.
JP61 BH39-40305U CBF HARNESS 52MM ,AWG22(0.6PI),-,-,AW G22(0.
JP62 BH39-40305U CBF HARNESS 52MM ,AWG22(0.6PI),-,-,AW G22(0.
JP66 BH39-40305U CBF HARNESS 52MM ,AWG22(0.6PI),-,-,AW G22(0.
JP70 BH39-40305U CBF HARNESS 52MM ,AWG22(0.6PI),-,-,AW G22(0.
JP71 BH39-40305U CBF HARNESS 52MM ,AWG22(0.6PI),-,-,AW G22(0.
JP73 BH39-40305U CBF HARNESS 52MM ,AWG22(0.6PI),-,-,AW G22(0.
JP74 BH39-40305U CBF HARNESS 52MM ,AWG22(0.6PI),-,-,AW G22(0.
JP75 BH39-40305U CBF HARNESS 52MM ,AWG22(0.6PI),-,-,AW G22(0.
JP76 BH39-40305U CBF HARNESS 52MM ,AWG22(0.6PI),-,-,AW G22(0.
JP77 BH39-40305U CBF HARNESS 52MM ,AWG22(0.6PI),-,-,AW G22(0.
JP85 BH39-40305U CBF HARNESS 52MM ,AWG22(0.6PI),-,-,AW G22(0.
AP17K*/ AP17J* 7-13
Page 51
7 Electrical Parts List
Loc. No. Code No. Description Specification Remarks
JP86 BH39-40305U CBF HARNESS 52MM ,AWG22(0.6PI),-,-,AW G22(0.
JP87 BH39-40305U CBF HARNESS 52MM ,AWG22(0.6PI),-,-,AW G22(0.
L101 2701-000319 INDUCTOR-AXIAL 470NH,10%,3X7M M
L102 2701-001014 INDUCTOR-AXIAL 4.7uH,10% ,3x7mm
L104 2701-000112 INDUCTOR-AXIAL 100uH,10% ,3x7mm
LB10 2701-000190 INDUCTOR-AXIAL 470nH,10%,4x9.8mm
LB11 2701-001065 INDUCTOR-AXIAL 0.22UH,10% ,3X7MM
LG10 2701-000190 INDUCTOR-AXIAL 470nH,10% ,4x9.8mm
LG11 2701-001065 INDUCTOR-AXIAL 0.22UH,10% ,3X7M M
LR10 2701-000190 IN DUCTOR-AXIAL 470nH,10% ,4x9.8mm
LR11 2701-001069 IN DUCTOR-AXIAL 180NH,10% ,3X7MM
M P1.0 BH41-00189A PCB DISPLAY-VIDEO
Q101 0501-000122 TR-SM ALL SIGNAL 2N3904,NPN,625mW,TO-92,TP,100-300
Q102 0501-000122 TR-SM ALL SIGNAL 2N3904,NPN,625mW,TO-92,TP,100-300
Q103 0501-000404 TR-SM ALL SIGNAL KSD1616-Y,NPN,750mW,TO-92,TP,135-270
R114 2001-000331 R-CARBON 12KOHM,5% ,1/ 8W,AA,TP,1.8X3.2M M
R115 2001-000890 R-CARBON 6.8KOHM ,5% ,1/ 8W,AA,TP,1.8X3.2M M
RB03 2001-000766 R-CARBON 43KOHM,5% ,1/ 8W,AA,TP,1.8X3.2M M
RB09 2001-000643 R-CARBON 330KOHM,5% ,1/ 4W,AA,TP,2.4X6.4M M
RB11 2001-001088 R-CARBON(S) 1KOHM,5%,1/ 2W ,AA,TP,2.4X6.4MM
RB12 2001-000705 R-CARBON 39OHM ,5% ,1/ 2W,AA,TP,3.3X9MM
RG03 2001-000766 R-CARBON 43KOHM,5% ,1/ 8W,AA,TP,1.8X3.2M M
RG09 2001-000643 R-CARBON 330KOHM ,5% ,1/ 4W,AA,TP,2.4X6.4M M
RG11 2001-001088 R-CARBON(S) 1KOHM,5%,1/ 2W ,AA,TP,2.4X6.4MM
RG12 2001-000705 R-CARBON 39OHM ,5% ,1/ 2W,AA,TP,3.3X9MM
RR03 2001-000766 R-CARBON 43KOHM,5% ,1/8W ,AA,TP,1.8X3.2MM
RR09 2001-000643 R-CARBON 330KOHM,5%,1/ 4W ,AA,TP,2.4X6.4MM
RR11 2001-000109 R-CARBON(S) 470OHM ,5% ,1/ 2W,AA,TP,2.4X6.4M M
RR12 2001-000705 R-CARBON 39OHM,5%,1/ 2W ,AA,TP,3.3X9MM
SK104 1405-001064 SURGE ABSORBER 400V,20%,-,-,AXIAL
SK108 4715-001055 SURGE ABSORBER 1kV,+50-10%,-,-,RADIAL SNA
SKB01 4715-000102 SURGE ABSORBER 200V,20%,1000A,-,RADIAL SNA
SKG01 4715-000102 SURGE ABSORBER 200V,20%,1000A,-,RADIAL SNA
SKR01 4715-000102 SURGE ABSORBER 200V,20%,1000A,-,RADIAL SNA
ZD101 0403-000509 DIODE-ZENER MTZJ5.6B,5.6V,5.45-5.73V,500mW
ZD102 0403-000361 DIODE-ZENER UZ6.2BSB,6.2V,5.99-6.24V,500mW
ZD103 0403-000361 DIODE-ZENER UZ6.2BSB,6.2V,5.99-6.24V,500mW
ZD104 0403-000361 DIODE-ZENER UZ6.2BSB,6.2V,5.99-6.24V,500mW
C106 2203-000204 C-CERAM IC,CHIP 100nF,10%,25V,X7R,TP,2012
C107 2203-000260 C-CERAM IC,CHIP 10nF,10%,50V,X7R,TP,2012
C108 2203-000634 C-CERAM IC,CHIP 0.022nF,5%,50V,NP0,TP,2012
C128 2203-000260 C-CERAM IC,CHIP 10nF,10%,50V,X7R,TP,2012
C129 2203-000239 C-CERAM IC,CHIP 0.1nF,5%,50V,NP0,TP,2012
C130 2203-000239 C-CERAM IC,CHIP 0.1nF,5%,50V,NP0,TP,2012
C134 2203-000204 C-CERAM IC,CHIP 100nF,10%,25V,X7R,TP,2012
C139 2203-000204 C-CERAM IC,CHIP 100nF,10%,25V,X7R,TP,2012
C145 2203-001105 C-CERAM IC,CHIP 6.8nF,10%,50V,X7R,TP,2012
C147 2203-000204 C-CERAM IC,CHIP 100nF,10%,25V,X7R,TP,2012
CB01 2203-000204 C-CERAM IC,CHIP 100nF,10%,25V,X7R,TP,2012
CB02 2203-000204 C-CERAM IC,CHIP 100nF,10%,25V,X7R,TP,2012
CB04 2203-000204 C-CERAM IC,CHIP 100nF,10%,25V,X7R,TP,2012
CB10 2203-000389 C-CERAM IC,CHIP 0.015nF,5%,50V,NP0,TP,2012
CG01 2203-000204 C-CERAM IC,CHIP 100nF,10%,25V,X7R,TP,2012
CG02 2203-000204 C-CERAM IC,CHIP 100nF,10%,25V,X7R,TP,2012
CG04 2203-000204 C-CERAM IC,CHIP 100nF,10%,25V,X7R,TP,2012
AP17JS,FR-1,123.5* 100* 1.6T,0.0,1.6T,123.5* 100* 1.6T,09B1,1ARRAY,VIDEO,-
SNA
7-14 AP17K*/ AP17J*
Page 52
7 Electrical Parts List
Loc. No. Code No. Descripti on Speci fication Remarks
CG10 2203-000389 C-CERAM IC,CHIP 0.015nF,5%,50V,NP0,TP,2012
CR01 2203-000204 C-CERAM IC,CHIP 100nF,10%,25V,X7R,TP,2012
CR02 2203-000204 C-CERAM IC,CHIP 100nF,10%,25V,X7R,TP,2012
CR04 2203-000204 C-CERAM IC,CHIP 100nF,10%,25V,X7R,TP,2012
CR10 2203-000389 C-CERAM IC,CHIP 0.015nF,5%,50V,NP0,TP,2012
DB01 0401-001056 DIODE-SWITCHING M MBD4148SE,75V,200M A,SOT-23,TP
DG01 0401-001056 DIODE-SWITCHING M MBD4148SE,75V,200M A,SOT-23,TP
DR01 0401-001056 DIODE-SWITCHING M M BD4148SE,75V,200M A,SOT-23,TP
IC101 1201-001791 IC-VIDEO AM P
IC103 1204-001864 IC-OSD PROCESSOR
L103 2703-001334 INDUCTOR-SM D 1.5uH,10%,2x1.25x0.85mm
L105 2703-001334 INDUCTOR-SM D 1.5uH,10%,2x1.25x0.85mm
L106 2703-001334 INDUCTOR-SM D 1.5uH,10%,2x1.25x0.85mm
L107 2703-001334 INDUCTOR-SM D 1.5uH,10%,2x1.25x0.85mm
L108 2703-001334 INDUCTOR-SM D 1.5uH,10%,2x1.25x0.85mm
L109 2703-001334 INDUCTOR-SM D 1.5uH,10%,2x1.25x0.85mm
L111 2703-001334 INDUCTOR-SM D 1.5uH,10%,2x1.25x0.85mm
R101 2007-001071 R-CHIP 6.8KOHM,5%,1/ 10W ,DA,TP,2012
R102 2007-000355 R-CHIP 12KOHM,5%,1/ 10W ,DA,TP,2012
R103 2007-001071 R-CHIP 6.8KOHM,5%,1/ 10W ,DA,TP,2012
R104 2007-000290 R-CHIP 100OHM,5%,1/ 10W,DA,TP,2012
R105 2007-000766 R-CHIP 330OHM,5%,1/ 10W,DA,TP,2012
R106 2007-000781 R-CHIP 33OHM,5%,1/ 10W ,DA,TP,2012
R107 2007-000290 R-CHIP 100OHM,5%,1/ 10W,DA,TP,2012
R108 2007-000290 R-CHIP 100OHM,5%,1/ 10W,DA,TP,2012
R109 2007-000290 R-CHIP 100OHM,5%,1/ 10W,DA,TP,2012
R110 2007-000290 R-CHIP 100OHM,5%,1/ 10W,DA,TP,2012
R111 2007-008393 R-CHIP 11M OHM ,5% ,0.100W,DA,TP,2012
R112 2007-000290 R-CHIP 100OHM,5%,1/ 10W,DA,TP,2012
R113 2007-000300 R-CHIP 10KOHM,5%,1/ 10W ,DA,TP,2012
R116 2007-000290 R-CHIP 100OHM,5%,1/ 10W,DA,TP,2012
R117 2007-000290 R-CHIP 100OHM,5%,1/ 10W,DA,TP,2012
R118 2007-000290 R-CHIP 100OHM,5%,1/ 10W,DA,TP,2012
R119 2007-000290 R-CHIP 100OHM,5%,1/ 10W,DA,TP,2012
R121 2007-000493 R-CHIP 2.2KOHM,5%,1/ 10W ,DA,TP,2012
R122 2007-000300 R-CHIP 10KOHM,5%,1/ 10W ,DA,TP,2012
R123 2007-000241 R-CHIP 1.5KOHM,5%,1/ 10W ,DA,TP,2012
R124 2007-000468 R-CHIP 1KOHM,5% ,1/10W ,DA,TP,2012
R128 2007-000981 R-CHIP 5.6KOHM,5%,1/ 10W ,DA,TP,2012
R129 2007-000355 R-CHIP 12KOHM,5%,1/ 10W ,DA,TP,2012
R130 2007-001071 R-CHIP 6.8KOHM,5%,1/ 10W ,DA,TP,2012
R132 2007-000468 R-CHIP 1KOHM,5% ,1/10W ,DA,TP,2012
R133 2007-000468 R-CHIP 1KOHM,5% ,1/10W ,DA,TP,2012
R139 2007-000766 R-CHIP 330OHM,5%,1/ 10W,DA,TP,2012
R140 2007-000766 R-CHIP 330OHM,5%,1/ 10W,DA,TP,2012
R141 2007-000766 R-CHIP 330OHM,5%,1/ 10W,DA,TP,2012
R142 2007-000766 R-CHIP 330OHM,5%,1/ 10W,DA,TP,2012
R143 2007-000572 R-CHIP 220OHM,5%,1/ 10W,DA,TP,2012
R144 2007-000710 R-CHIP 3.9KOHM,5%,1/ 10W ,DA,TP,2012
R145 2007-008393 R-CHIP 11M OHM ,5% ,0.100W,DA,TP,2012
RB01 2007-001166 R-CHIP 75OHM,5%,1/ 10W ,DA,TP,2012
RB02 2007-000593 R-CHIP 22OHM,5%,1/ 10W ,DA,TP,2012
RB04 2007-000931 R-CHIP 470OHM,5%,1/ 10W ,DA,TP,2012
RB05 2007-000822 R-CHIP 390OHM,5%,1/ 10W ,DA,TP,2012
RB06 2007-000593 R-CHIP 22OHM,5%,1/ 10W ,DA,TP,2012
-,SOP,24P,375MIL,-,-,PLASTIC,7V,0.8W,-20TO+80C,-,-,-,-,-,TR
S5D2509X09-S0,SOP,24P,295MIL,PLASTIC,6.5V,1200M W,-20+70C,TR,10LANGUAGES
AP17K*/ AP17J* 7-15
Page 53
7 Electrical Parts List
Loc. No. Code No. Description Specification Remarks
RB07 2007-000457 R-CHIP 18KOHM,5% ,1/10W ,DA,TP,2012
RB08 2007-000593 R-CHIP 22OHM,5%,1/ 10W ,DA,TP,2012
RB10 2007-000572 R-CHIP 220OHM,5%,1/ 10W ,DA,TP,2012
RG01 2007-001166 R-CHIP 75OHM,5%,1/ 10W ,DA,TP,2012
RG02 2007-000593 R-CHIP 22OHM,5%,1/ 10W ,DA,TP,2012
RG04 2007-000931 R-CHIP 470OHM,5%,1/ 10W ,DA,TP,2012
RG05 2007-000822 R-CHIP 390OHM,5%,1/ 10W ,DA,TP,2012
RG06 2007-000593 R-CHIP 22OHM,5%,1/ 10W ,DA,TP,2012
RG07 2007-000457 R-CHIP 18KOHM,5% ,1/10W ,DA,TP,2012
RG08 2007-000593 R-CHIP 22OHM,5%,1/ 10W ,DA,TP,2012
RG10 2007-000572 R-CHIP 220OHM,5%,1/ 10W ,DA,TP,2012
RR01 2007-001166 R-CHIP 75OHM,5%,1/ 10W ,DA,TP,2012
RR02 2007-000593 R-CHIP 22OHM,5%,1/ 10W ,DA,TP,2012
RR04 2007-000931 R-CHIP 470OHM,5%,1/ 10W ,DA,TP,2012
RR05 2007-000822 R-CHIP 390OHM,5%,1/ 10W ,DA,TP,2012
RR06 2007-000593 R-CHIP 22OHM,5%,1/ 10W ,DA,TP,2012
RR07 2007-000457 R-CHIP 18KOHM ,5% ,1/ 10W,DA,TP,2012
RR08 2007-000593 R-CHIP 22OHM,5%,1/ 10W ,DA,TP,2012
RR10 2007-000572 R-CHIP 220OHM,5%,1/ 10W ,DA,TP,2012
HS103 BH99-00004K ASSY HEAT/SINK HS VIDEO,SCREW+NUT,LM2415T,-,-,OIL SILICON
CIS 6006-001008 SCREW-ASS’Y M ACH WSP,BH,+,M3,L10,ZPC(YEL),SWRCH SNA
CIS 6021-000118 NUT-HEXAGON 1C,M 3,ZPC(YEL),SM20C SNA
CIS BH13-00025A IC HYBRID LM2415T,LM2415T,11,-20 TO +100,TO-220,13M A,90V,ST
CIS BH61-70003A SPRIN G
CIS BH62-00002A HEAT/SINK-FBT -,T1.0,-,A1050S,DA/ DB SNA
CIS BH62-00006A HEAT SINK-VIDEO -,A1050S T2.0,-,DB SNA
CVT4857,STS304-W1/2H,W 3.8,-,L30,L30,-,T0.5,DEGRE,W3.8,STS304-W1/ 2H
SNA
7-3 Others
Part N ame Code No. Description & Specification Remarks
CRT BH03-00024U CRT-SX;M 41QCJ761X174(T4),84,17,0.25,-,29 AP17JS
CRT BH03-00024T CRT-SX;M41QCJ761X173(T4),70,17,0.25,-,29 AP17KS
M agnet 3302-000006 MAGNET-RUBBER;AF,14G,1620-1980G,0.58-0.9
ASS’Y PBA UNIT BH94-00364B ASSY PCB;AP17KS,-,-,-” AP17KS
ASS’Y PBA UNIT BH94-00364A ASSY PCB;AP17JS AP17JS
ASS’Y M AIN UNIT BH98-00324B ASSY PCB/M AIN;AP17KSAP17KS
ASS’Y M AIN UNIT BH98-00324A ASSY PCB/M AIN;AP17JS AP17JS
ASS’Y VIDEO UNIT BH98-00325A ASSY PCB/VIDEO;AP17JS
S/CABLE BH39-00145A CBF SIGNAL;ATT,1500M M ,15P/6P,7P,IVORY(IV
DEGAUSSING BH27-00054A COIL DEGAUSSING-ASS’Y;320* 250* 1100mm,9.6
7-16 AP17K*/ AP17J*
Page 54
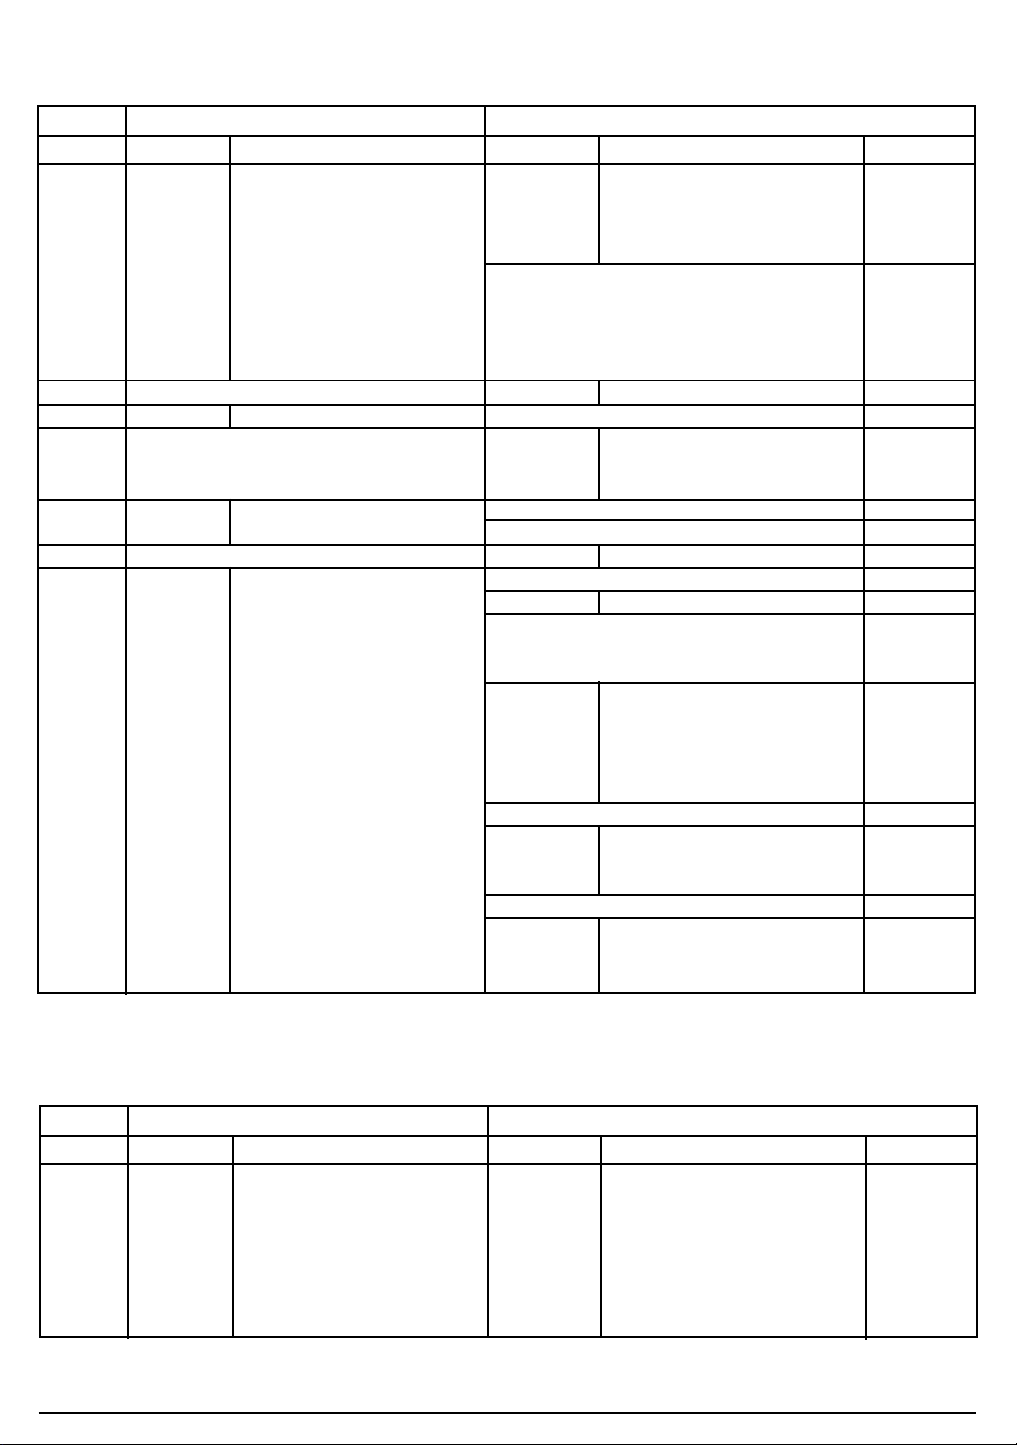
7 Electrical Parts List
7-4 AP17K* & AP17J* Different Part List (2SC5802A)
BEFORE(AP17JS) AFTER(AP17KS)
LOC
LOC
CRT BH03-00024U CRT-SX;M41QCJ761X174(T4) BH03-00024T CRT-SX;M41QCJ761X173(T4) M A
C427 2306-000171 C-FILM,M PPF;270nF,5%,250V,TP 2306-000137 C-FILM,M PPF,180nF,5%,250V,TP, RA
C431 2306-000164 C-FILM,M PPF;220nF,5%,250V,TP 2301-001324 C-FILM,M PPF;200nF,5%,250V,TP RA
C432 2305-000207 C-FILM,M PPF;18nF,5%,250V,TP 2305-001033 C-FILM,M PEF;15nF,10%,250V,TP RA
C441 2401-000603 C-AL;1uF,20%,50V,GP,TP DEL RA
C442 2301-001249 C-FILM,M PPF;68nF,5%,400V,TP DEL RA
C443 2303-000122 C-FILM,PPF;10nF,5%,630V,TP DEL BP
C444 2303-000122 C-FILM,PPF;10nF,5%,630V,TP DEL BP
C450 2305-000237 C-FILM,M PEF;1uF,5%,63V,TP DEL RA
C457 DEL 2305-000012 C-FILM,M PEF;5.6NF,10%,250V,T RA
D430 0402-000006 DIODE-RECTIFIER;1N4007GP,1000V,1A DEL AX
JP125KS DEL BH39-40305U jumper AX
JP72 DEL BH39-40306U jumper AX
AP17KS_70K DEL BH39-40305U jumper AX
AP17JS_85K BH39-40305U jumper DEL AX
Q420 0501-000412 TR-SMALL SIGNAL;KSP42,NPN,625mW DEL BP
R205 DEL 2001-000258 R-CARBON;1.8KOHM,5%,1/ 8W , AX
R219JS 2001-000290 R-CARBON;10KOHM,5%,1/8W DEL AX
R431 2005-001163 R-WIRE W OUND,NON;0.68ohm,1%,3W ,AA 2003-000407 R-METAL OXIDE(S);0.6ohm,5%,2W BP
R455 2001-000449 R-CARBON;2.2KOHM,5%,1/ 8W DEL AX
R457 2001-000786 R-CARBON, 47Kohm,5%,1/ 6W , DEL AX
R460 2003-000724 R-M ETAL OXIDE(S);5.6ohm,5% ,3W DEL BP
R510 2001-000273 R-CARBON;100KOHM,5% ,1/ 8W 2001-000356 R-CARBON;150KOHM,5%,1/ 8W AX
R527 2001-000837 R-CARBON;51KOHM,5%,1/ 8W , 2001-000633 R-CARBON, 30Kohm,5% ,1/ 6W AX
R531 2001-000010 R-CARBON;68KOHM,5%,1/ 8W , 2001-000337 R-CARBON;130KOHM,5%,1/ 8W AX
R428 2003-000653 R-M ETAL OXIDE(S);330ohm,5% ,3W 2003-002017 R-METAL OXIDE(S);360ohm,5%,3W ,AA M A
Q410 0505-001135 FET-SILICON; IRF640A,N,200V,18A,0.18ohm 0505-001309 FET-SILICON ;IRF630,N,200V,10A,0.4OHM M A
Q421 0505-001309 FET-SILICON;IRF630,N,200V,10A,0.4OHM DEL M A
C430 2306-000249 C-FILM,M PPF;680nF,5%,250V,TP 2301-001194 C-FILM,M PPF;470nF,5%,250V,TP M A=>RA
L402 BH27-00022A COIL-CHOKE;CH-1523S,100uH,+/ -10%,DR1523( BH27-00023A COIL-CHOKE;CH-1523S,120uH,+/ -10% M A
HS401 BH99-00006G ASSYHEAT/SINK;HSTR,SCREW+NUT,IRF640A BH99-00006A ASSY,HEAT/SINK;H/ S,SCREW+NUT,IRF630 M A
HS403 BH99-00005G HEAT SINK ASSY; IRF740A DEL MA
HS501 BH99-00033C 2SC5583, DTV56F, KTD2058-Y BH99-00024B ASSY HEAT/SINK;HS FBT,SPRING,2SC5802A M A
T401 BH26-00090A TRANS HORIZ.DRIVE;AQ17HS,6P,35.1 BH26-00027A TRANS-HOR.DRIVE MA
T402 BH27-00103A COIL LINEARITY;HL-1527C,4.5uH/50mH BH26-00028A TRANS-H.LINEARITY;HL-1425E,-,6P,-,-,5.21 M A
CODE
Descript ion
CODE
Descript ion Remark
7-5 AP17K* Different Part List (2SC5802A, FJAF6910)
BEFORE(2SC5802A) AFTER( FJAF6910)
LOC
LOC
HS501 BH99-00024B 2SC5802A, DTV56F, KTD2058-Y ( 2 T ) BH99-00024P FJAF6910, DTV56F, KTD2058-Y M A
C421 2301-001341 C-FILM,PPF;3.3nF,5%,630V,TP, 2301-001463 C-FILM,PPF;4NF,5%,630V RA
R417 2001-000331 R-CARBON;12KOHM,5%,1/ 8W 2001-000890 R-CARBON;6.8KOHM,5% ,1/ 8W AX
C450 DEL 2305-000237 C-FILM ,M PEF;1uF,5%,63V,TP RA
R428 2003-002017 R-METAL OXIDE(S);360ohm,5%,3W ,AA 2003-000608 R-M ETAL OXIDE(S);270ohm,5% ,3W MA
L402 BH27-00023A COIL-CHOKE;CH-1523S,120uH,+/ -10% BH27-00022A COIL-CHOKE;100uH,+/-10% M A
R460 DEL 2003-000724 R-METAL OXIDE(S);5.6ohm,5%,3W BP
CODE
AP17K*/ AP17J* 7-17
Descript ion
CODE
Descript ion Remark
Page 55

7 Electrical Parts List
M emo
7-18 AP17K*/ AP17J*
Page 56
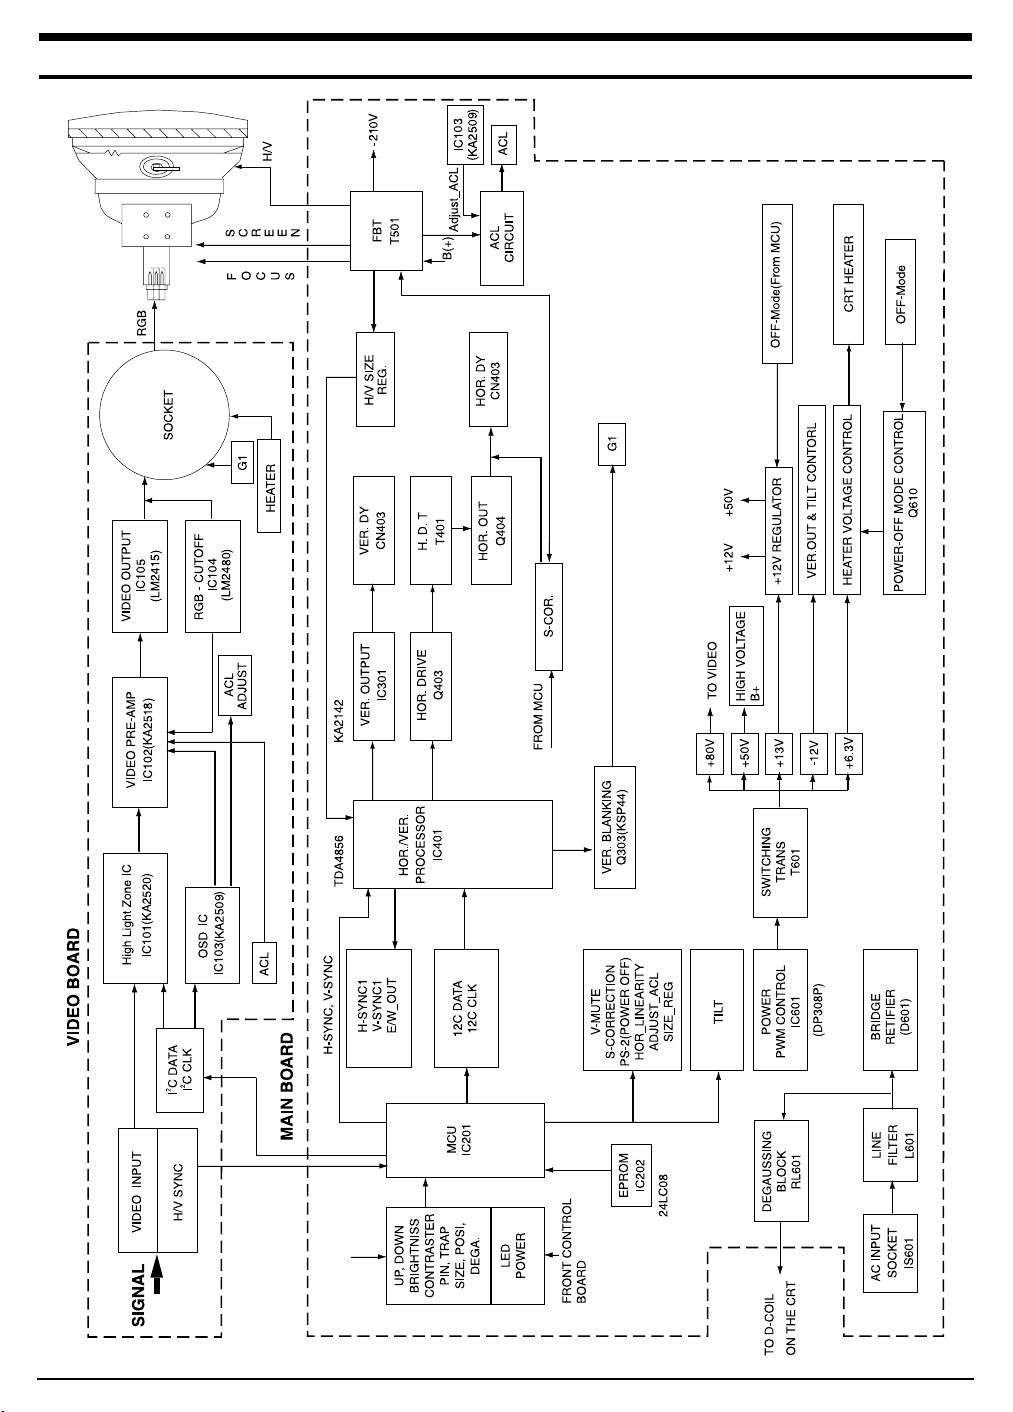
8 Block Diagrams
AP17K*/ AP17J* 8-1
Page 57

8 Block Diagrams
M emo
8-2 AP17K*/ AP17J*
Page 58
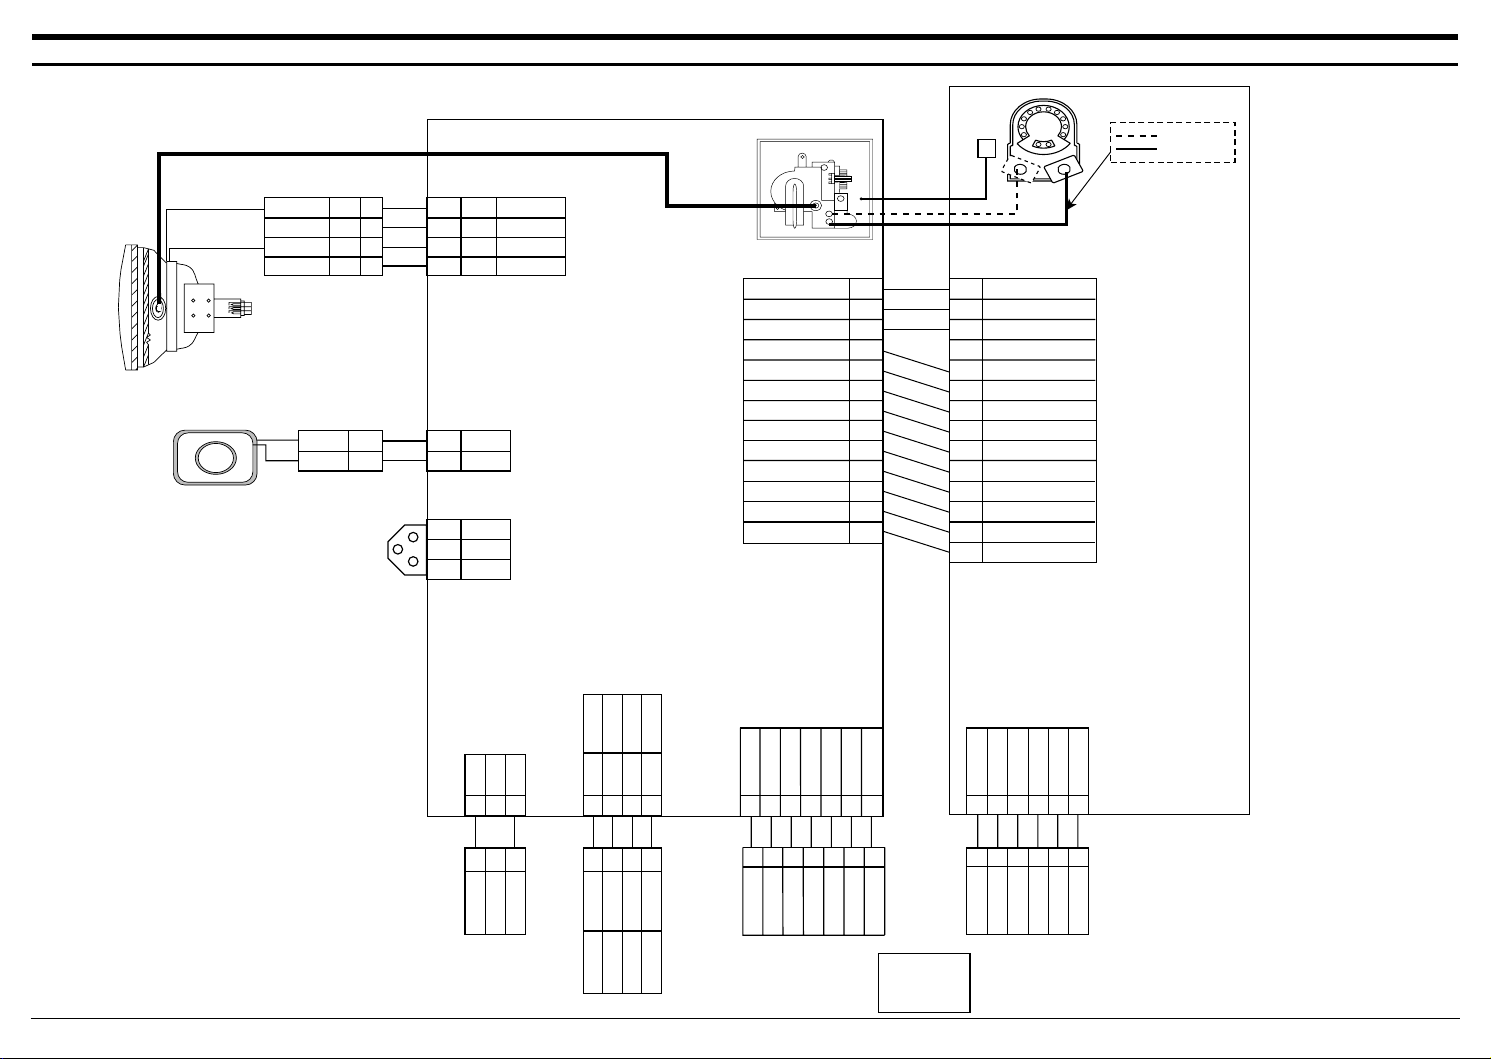
1
2
3
4
CN403
12AC
AC
1
2
AC
AC
1
2
3
GND
AC INPUT
AC INPUT
TILT
CN1
9
10
11
12
13
1
2
3
4
5
6
7
8
FBT
DEGAUSSIN G COIL
AC INPUT
CRT SOCKET
G2
CN603
IS601
M AIN PCB
CRT SOCKET PCB
FOCUS
(WHT)
1
2
3
1
2
3
NC
GND_RED
TILT +
NC
GND
1
2
3
4
TILT+(BLK)
80 V
IICCLK
HS_OUT(CLAM P)
OSD 5 V
HS_OUT (CLAM P)
OSD 5 V
GND
GND
6.3 V
G1
12 V
V-SYNC
ACL
IICDATA
AFC
9
10
11
12
13
14
1
2
3
4
5
6
7
8
H+
H–
V+
V–
H+
H–
V+
V–
YELLOW
BROWN
RED
BLUE
YELLOW
BROWN
RED
BLUE
FOCUS1 (WHT)
FOCUS2 (RED)
CN304
1
2
1
2
GND
KEY
GND
KEY
BLUE BLUE
WHITE WHITE
CN204
CN501
CN201
GND
HS-IN
DDC CLK
DDC 5V
S-RASTER
DDC DATA
VS-IN
1
2
3
4
5
6
7
CN202
CONTROL PCB
SIGNAL CABLE
GND
HS-IN
DDC CLK
DDC 5V
S-RASTER
DDC DATA
VS-IN
1
2
3
4
5
6
7
80 V
GND
6.3 V
IICCLK
GND
G1
12 V
V-SYNC (V_BLK)
ACL
IICDATA
AFC
BLANK
1
2
3
4
5
6
CN101
R
GND
GND
G
GND
B
1
2
3
4
5
6
SIGNAL CABLE
R_IN
GND_R
GND_G
G_IN
GND_B
B_IN
2 x 3p DY2 x 3p DY
CN102
3
4
GND
KEY
WHITE
WHITE
3
4
GND
KEY
WHITE
WHITE
15 PIN
D-SUB
refer to pi n
assignment
of
product spec.
9 Wiring Diagram
AP17K*/AP17J* 9-1
Page 59

9 PCB Diagrams
M emo
9-2 AP17K*/ AP17J*
Page 60
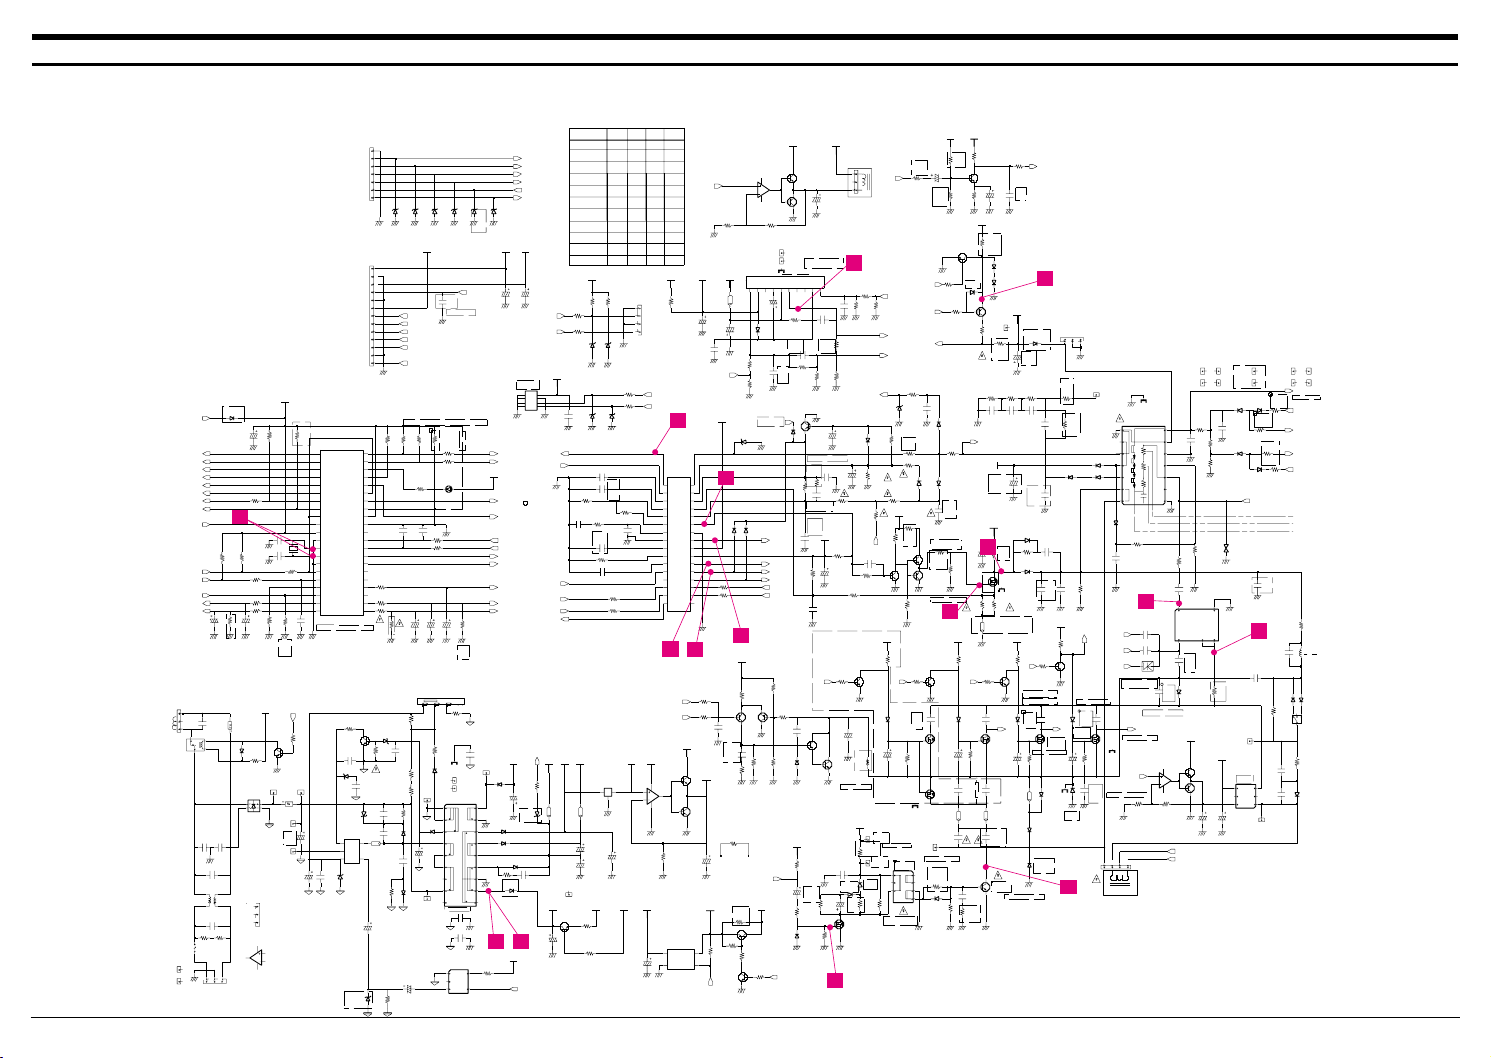
HIGH HIGHHIGH
HIGH
V_MUTE
1.2UH
DEGAUSS
BDRV
FOCUS
c432(ks):15nf
BSENSE
NC
LOW
HIGH
HIGH
S-Correction Table
0.68 3W
VREF
CN602 : JP64(JUMPER)
FUSE : T3.15A OR T4.0A
RESET
NORMAL = OPEN
TILT
VSMOD
LED
BIN
HSMOD
68 ~ 69.99
HIGH
LOW
HIGH
HIGH
74 ~ 85.99
LOWHIGH
S4
X-IN
VSYNC_IN
1.2UH
NC
JS(85K):R219JS/KS(70K):JP125KS=JUMPER
JP125KS
HCAP
S3
1.2UH
LOW LOW LOW
POWER_KEY
VSYNC_OUT
1.2UH
JS:4.5uH
C431(KS): 200NF
IICCLK
HUNLOCK
NC
TEST
LOW
39 ~ 51.99
70 ^ 73.99
D-COIL
MODEL-SEL
LATCH
HSYNC_OUT
AP17JS(85Khz)ONLY
c432(js):18nf 250v
IIC_CLK
HIGH
63 ~ 67.99 HIGH
HIGH
T401(jS):00090A
Q404(KS):FJAF6910
S1
PGND
IICDATA
BOP
58 ^ 62.99
Freq [Hz] S1
G2
EWDRV
HFLB
G2-ADJ
1.6KV
52 ~ 54.99
55 ~ 57.99
C427(KS): 180NF
C430(KS): 470NF
HIGH
HIGH
100UH
XSEL
LOW
HSYNC
SELFRASTER
HPLL2
VAGC
GND
AC INPUT
H_LIN
AC90V~AC264V
S2
1.2UH
VSYNC
DDCCLK
REG
AP17KS:DELETE
C516 delete
C421(KS) 4nF 630V
S3S2
HIGH
HIGH
HIGH HIGH
VCAP
LOW
HDRV
5V
S4
HIGH
FOCUS
LOW
33 ~ 38.99
CLBL
MODE SELETE
2.2nF
X-OUT
HBUF
LOW
LOW
OFF_MODE
C457(JS):DELETE
GND
R531(KS)130K
1.2UH
H/V
SGND
30 ~ 32.99
LOW
KEY1
BH62-00047A
120uH
HIGH
PP
T401(KS):00027A
R510(ks):150k
KEY3
(8.2mH)
VCC
Q410(KS):IRF630
Q402(KS):IRF634A
LOW
jp138 delete(ic201#19~26)
---------
HV-ADJ
HREF
ACL
SCREEN
L401:120uH
R428(KS):270
KS:5.2uH
LOW
HIGH
LOW
DDCDATA
SIZE-ADJ
8MHz
C408 DELETE
V-H/S WING TYPE
IIC_DATA
XRAY
LOW
BD404 TO R401
jp72ks
Q410(ks)IRF630
R431(KS):0.6 2W
AVREF
VOUT1
Q411(KS):IRF630
LOW
HPLL1
VOUT2
KEY2
ASCOR
CLAMP
C457(KS):5.6NF
H-DY
R557 DELETE
HSYNC_IN
500V
330pF
C436
2W
MO
50V
1uF
C503
TH601
R641
56
C201
16V
1K
1/8W
R213
100uF
CC
1/2W
3.3M
R532
13V_2
50V
1uF
C612
7V
13V_2
1/6W
10K
R456
R602
1/4W
47
1/8W
1K
R408
1K
1/8W
R618
COIL_5V
1/8W
2.2K
R434
EYE2.2
EY602
1
R436
2.2K
1/8W
7
8
13V_1
slcon1p
CN409
1
IC202
1
2
3456
TVR10G
D614
KS24C081C
D
G
S
S-23(1KV),5MM
SK501
R225
Q410
IRF640A
R230
1/8W
1K
56
1/8W
D516
1N4148
UZ6.2BSB
ZD203
B
C
E
240K
1/4W
R551
R607
KSA733-Y
Q406
MO
3W
10K
1.2K
1/4W
R418
R429
1/2W
3.3K
G5PA-1
RL601
1
2
3
4
16V
10uF
C434
R455
2.2K
1/8W
150
3W
4.7K
1/8W
R222
R444
MO
R443
1/6W
13V_1
1/6W
4.7M
0.56
1/2W
R413
R202
10K
270K
1/4W MF
1/4W
3.3K
R622
R506
15
14
13
12
11
10
4
5
6
7
8
9
18
17
16
BH26-00135A
ER-3541
T601
1
2
3
100V
56NF
C411
P
5V
1/6W
12K
R525
B
C
E
250V
MPS
C430
680nF
KSP42
B
C
E
KSC945-Y
Q610
EY606
1
Q415
210V
ZD600
MTZJ27D-T-72
Q551
KSP44
B
C
E
1
R457
1/6W
47K
SNAME
EY403
2.2
1/2W
R401
1.2UH,3.5_5.7MM
1N4148
D415
TVR10G
D412
240K
1/2W
CC
R554
R512
1/2W
EY510
EYE2.2
1
24K
1
slcon3p
CN603
1
2
3
EY402
SNAME
1
GT604
L601
12
34
34
C214
100uF
16V
SW401
JRS-1301
1
2
R534
R232
1/6W
100
X201
Q0 Q1
CC
1/2W
56M
50V
270pF
C459
C401
P
100V
8.2nF
2
3
1/6W
12K
R417
slcon3p
CN304
1
16V
100uF
C220
D502
RGP02-12(T)
R316
100
1/6W
R600
330K
1/2W
1
slcon4p
CN403
1234
1/6W
5.6K
EY501
EYE2.2
R312
CN408
slcon1p
1
C558
100PF
1KV
C513
1nF
500V
EY508 1
1/8W56R200
R630
1/6W
47K
EYE1.5
BD301
B
47K
1/6W
4.70NF
250V
C604
R524
R439
1
Q0
3
Q1
2
Q2
4
VCC
VSS
11
1/8W
10K
R501
1/6W
2.7K
IC603-1
LM324N
C413
3.3UF
50V
561/8WR301
D413
TVR10G
1N4007GP
D403
R309
MF
2.7
R504
15K1/6W
C450
1uF
63V
MP
S
heat_sink
HS409
12V
1
IRF630
Q409
D
G
C308
4.7nF
100V P
EYE1.5
EY504
Q407
B
C
E
100V
C412
3.3nF
P
2N5551C-Y
TP501
1
TVR10G
C443
10nF
630V
PP
EK-04
D405
D606
10
13
122321
14
2
9
26
30
28
15
17
7
18
19
25
22
24
3
4
16
11
32
31
27
29
8
1
IC401
TDA4856
20
6
5
UG2D
D608
R627
5.6K
1/6W
100pF
1KV
1/4W
MF
R423
C613
TVR10G
D410
1.8K
CC
1/2W
15M
R533
C622
1000uF
16V
13V_1
80V
D520
RGP02-16E
220
1/2W
R224
1/8W
56
1
R614
R218
1/6W
100
EYE1.5
EY607
1/8W33KR212
Q601
KSC945-Y
B
C
E
160V
2.20UF
C521
12V
R619
2W
10
MO
2.7
0.39
1/2W
R617
EYE1.5
1
MF
R315
R233
1/8W
EY609
50V
470nF
C414
1K
C225
4.7uF
50V
220uF
35V
C306
13V_1
500V
10nF
C531
500V
1nF
C615
13V_1
C625
220nF
63V
MP
12V
MF
1/4W
15K
R505
17
18
19
20
21 22
23
24
25
26
38
13
39
14
40
15
41
16
42
8
34
9
35
10
36
11
37
12
3
29
4
30
5
31
6
32
7
33
IC201
1
27
2
28
C616
2.2nF
125V
1/2W
1K
RGP02-12(T)
D517
1uF
R631
R421
MPS
250V
C409
R553
330K
1/2W
MO
2W
1.5K
1/4W
680
R425
12V
Q607
2N3906
B
C
E
D610
100V
10uF
C213
UF4007(T)
E
D430
1N4007GP
KTA1281-Y
Q609
B
C
P
100V
4.7nF
C406
UZ6.2BSB
ZD601
1N4148
D602
R23910K 1/8W
Vin1Vout
2
50V
1uF
C429
C501
PQ12RD11
IC602
GND3Vc
4
100V
P
100V
22nF
R628
100nF
C416
P
750
1/4W
MF
R403
1.2K
1/8W
EY503
EYE2.2
1
1
C432
22nF
250V
MP
CN602
slcon3p
1
2
3
EYE1.5
EY506
R220
100
C509
250V
2.2uF
1/6W
500V
1nF
C530
E
1/2W
330K
R560
KSA733-Y
Q503
B
C
R440
1/8W
10K
R420
180K
1/4W
MF
C442
1/6W
100
R229
68nF
400V
P
1/6W
6.8K
C511
3.3nF
100V
P
1/4W
240K
R513
MF
R311
2.7K
1/4W
MF
R404
50V
100nF
C515
1
500V
1nF
C508
5.6K
1/6W
12V
EYE1.5
EY505
500V
10nF
C635
R409
1/6W
5.6K
R211
MO
3W
5.6
R460
1/6W
100
R608
L402
KSA733-Y
Q423
B
C
E
2N3904
Q602
B
C
E
-10V
C420
13V
82
1/6W
R422
C623
16V
1000uF
MP
63V
100nF
C402
ZD208
UZ6.2BSB
UZ4.7BSA
ZD602
D201DDC
SB020
C456
5.6nF
250V
MP
C457
5.6nF
250V
MP
EY610
EYE1.5
1
10K
R451
1KV
120pF
C624
R610
CC
1/2W
180K
1
275VAC
150nF
C601
EY302
10
1/2W
TVR10G
D411
R445
D407
UF1G
ZD606
MTZ7.5C
B
12K
1/2W
R518
20K
1/4W
MF
BD401
-140V
R552
C
E
BD403
B
D414
1N4148
FUSE
Q302
2N3906
B
R219JS
1/8W
10K
R510
100K1/8W
7V
R435
47K
1/6W
R206
10K
1/6W
10K
R453
HS401
1M
1/6W
12V
BH62-00004A
HS601
12V
R500
R556
3.9K
1/6W
1/2W
330K
R601
B
1N4148
D512
BD402
12K
1/4W
MF
125V
2.2nF
C617
4.7uF
50V
R424
HS501
BH62-00015A
C210
PP
630V
10nF
C444
MPS
250V
150nF
C202
22pF
50V
ZD401
UZ5.1BSB
C425
R531
1/6W
C516G1
1nF
1KV
1/6W
47K
R214
68K
C307
1uF
63V
MP
1/2W
R446
15
C204
4.7uF
50V
100pF
C211
50V
MP
250V
10nF
C433
1N4148
D501
1/2W
1
R642
12V
MO
50V
100nF
C607
7
D508
1N4148
5V
CN202
slcon7p
1
2
3
4
5
6
G
S
10K
1/8W
R603
IRF740
Q422
D
1
100V
P
C313
100nF
R223
EYE2.2
EY603
1N4007GP
D404
12V
1/4W
270
T602
1
2
354
Q421
IRF630
D
G
S
BH26-30302S
1.5K
1/4W
MP
63V
100NF
C301
250V
4.70NF
R410
R221
1/8W
4.7K
C603
1/2W
22
R458
EYE1.5
EY608
1
470uF
16V
1N4148
D519
C627
2N3906
Q413
B
C
E
D406
ERD07-15AL
50V
1uF
C426
C
E
EY605
1
C407
KSC945-Y
Q502
B
R324
150uF
63V
P
C510
27nF
1/6W
6.2K
P
630V
3.3nF
C421
100V
1/8W
10K
R441
D514
1N4148
6.3V
S
R454
MO
2W
330
IRFU210A
Q403
D
G
B
C
E
10K
1/8W
R236
100V
2.2nF
C404
2SC5583
Q404
MO
3W
P
47K
1/6W
R515
COIL_5V
R428
330
UZ6.2BSB
6.3V
50V
ZD202
C309
4.7nF
50V
MO
1N4148
D513
C514
470nF
50V
12V
6
7
8
9
10
11
12
13
14
T501
1
2
3
4
5
C458
8.2nF
100V
P
UF4004
D612
MPS
250V
220nF
C431
B
C
E
R427
3.3K
1/8W
6
Q2
VCC
4
VSS
11
KSD1616-Y
Q604
IC603-2
LM324N
7
Q0
Q1
5
10K
UZ4.7BSA
ZD501
FH1
1/4W
MF
R507
R215 1/6W100
500V
100pF
C435
-10V
31DF6
D409
15
1/6W
P6KE200ATA
ZD603
R611
D301
UF4004
1N4007GP
D402
C410
470uF
16V
PP
1.6KV
2.2nF
C419
R210
1/6W
2.7K
6
5
R613
10K
1/8W
EI-1916
T401
1
2
3
4
7
1/8W
560
R604
50V
50V
13V_2
100
R217
1/6W
C212
1nF
IRF740A
Q402
D
G
S
16V
1000uF
C618
C630
47uF
35V
C441
1uF
50V
C438
100uF
16V
321DF4D609
MP
63V
220nF
C302
UZ6.2BSB
ZD207
123
50V
C215
100pF
1N4148
slcon3p
CN502
R407
470
1/2W
D420
1
EY512
EYE1.5
1
4.7K
1/8W
R605
EYE1.5
EY511
Q301
2N3904
B
C
E
1.2
1/2W
R307
R519
1/6W
150K
UZ6.2BSB
ZD201
R207 561/8W
UZ6.2BSB
D210
TH602
50V
1N4148
D515
SCK-083
C608
220uF
450V
5V
R431
0.68
3W
WW
13V
680
3W
MO
R433
R632
1/8W
10K
BH62-00003A
HS301
5.6K
R306
1/4W
MF
D421
1N4148
16V
470uF
C626
12V
BD602
1.2UH
B
100V
4.7uF
C415
R442
C512
1nF
500V
HS402
heat_sink
1/8W
10K
1/8W
10K
R320
50V
1uF
C423
1/8W
18K
R526
3
R430
15K
1/2W
IC601
DP104C
DRAIN1F_B
4
GND
2
SYNC5Vcc
G
S
1/6W
1.8K
R205
IRF640A
Q411
D
22K
1/6W
R450
D503
6.8K
1/4W
MF
R310
C620
63V
150uF
RGP02-16E
2.7
BD603
B
B
C
E
1/4W
R511
R231
Q412
2N3904
1/6W
R621
1/6W
100
R308
1/2W
470
820K
KSA733-Y
Q405
B
C
E
5V
R452
10K
C312
10uF
16V
8
Q0
10
Q1
9
Q2
4
VCC
VSS
11
D604
UF4007
R570
IC603-3
LM324N
GND
VCC_H9VOUTPUT
62
Vcc_L
10
Vin+
1
Vin-
1/2W
22K
KA2142
IC301
3784
F.G
5
561/8WR402
RGP02-12(T)
D506
12
3
4
L401
C621
SHL
D601
G2SB60L-5700
47uF
50V
R208
100V
680nF
C557
Q416
B
C
E
1/8W
56
220nF
C505
MP
KSP42
C427
12V
63V
9
10
11
12
13
270nF
250V
MPS
1
2
3
4
5
6
7
8
DTV56F
80V
slcon13p
CN201
D611
UG2D
D408
ZD204
UZ6.2BSB
D511
1N4148
C631
100nF
50V
MO
GT603
1
C506
10NF
2KV
Q501
2N6520
B
C
E
1uF
50V
C611
UZ6.2BSB
ZD209
EY502
EYE2.2
1
C602
150nF
275VAC
C447
330pF
500V
MO2W
56K
R612
1/6W
51K
R527
1
2
3
6
5
4
C446
68pF
500V
T402
HL-1425
MF
R302
1/6W
22K
1/4W
E
R529
24K
2
3
4
KSC945-Y
Q417
B
C
B
CN205
slcon4p
1
MP
250V
47NF
C408
BD405
1.2UH,3.5*5.7MM
UZ6.2BSB
210V
EY401
1
ZD205
P100V3.3nF
C504
1/2W
R555
5V
D431
TVR10G
R406
1K
22K
1/6W
47K
1/6W
D505
1N4148
EY604
EYE2.2
1
R514
16V
470uF
C305
MO
50V
100nF
C217
200K
1/6W
50V
4.7uF
C207
CN601
123
R419
Q608
KSD1616-Y
B
C
E
slcon3p
2
3
45678
EYE1.5
1
KPJ-2S1BB
SW601
1
Q401
B
C
E
50V
EY507
1SS244
D422
2N3904
P100V
47nF
C610
OP201
LTL-10233W
R509
1N4148
D518
1/2W
330K
BH27-20342U
L403
C445
10NF
500V
1/6W
6.8K
R303
7.1MH
R203
4.7K
1/8W
1/8W
2.2K
R438
R416
150K
1/2W
C507
P
100V
3.3nF
C310
330pF
C619
1nF
500V
10K
1/8W
500V
UZ24BSC
ZD604
R412
1/2W
330K
R508
1/6W
6.8K
R304
C403
10NF
100V
PP
1/8W
4.7K
R204
22pF
50V
C203
10
1/4W
500V
10nF
C614
B
C
E
R426
180K
1/2W
CC
Q408
KTD2058-Y
1/8W
R530
R609
R432
1/2W
22
10K
B
1001/6WR216
BD601
C455
5.6nF
250V
MP
1
4
865
C609
22uF
50V
1M
1/6W
T502
EE-1916
BH26-00137A
R405
3.3K
1/8W
R201
10uF
C551
16V
R502
47K
1/4W
MF
COIL_5V
R437
47K
1/6W
KIA7805P
IC604
GND
INOUT
VCC
4
VSS
11
ZD206
UZ6.2BSB
IC603-4
LM324N
14
Q0
12
Q1
13
Q2
UF4004
D401
D416
1N4148
13V_2
EY601
EYE2.2
1
D507
1N4148
HS403
R414
1/2W
0.56
R209 1/8W4.7K
1
C502
5.60NF
100V
P
1K
R615
EY301
D605
UF4007
1/2W
KSP42
Q414
B
C
E
Q420
KSP42
B
C
E
OFF_MODE
1uF
50V
C205
V_OUT
FBT
A
C
B
A
B
SIZE_ADJ
V_REF
L_SENSE
V_MUTE
G1
V_MUTE
AFC
KEY1
KEY3
DDC5V
L_SENSE
TILT
H_LIN
AFC_SENSE
AFC_SENSE
VERT2
VERT1
C
V_BLK
H_OUT
SIZE_REG
D_F
EW_OUT
V_REG
DDC5V
ACL
S1
HS_OUT
VS_OUT
KEY1
OFF_MODE
OFF_MODE
HS_IN
S4
KEY3
REG
REG
V_REG_1
FBT
D_F
HV_ADJ
G1
OFF_MODE
S4
DEGAUSS
S3
S2
V_REG_1
VERT2
VS_OUT
SIZE_ADJ
AFC
VS_IN
S_RASTER
DDCDATA
DDCCLK
VERT1
IICDATA
IICCLK
HV_ADJ
AFC
IICDATA
IICCLK
SIZE_REG
S1
S3 S2
VS_OUT
HS_OUT
V_BLK
V_REG
V_OUT
V_REF
VS_IN
HS_IN
S_RASTER
ACL
IICDATA
IICCLK
HS_OUT
EW_OUT
TILT
H_LIN
H_OUT
IICDATA
IICCLK
DEGAUSS
DDCDATA
DDCCLK
10
25
9
1
2
12
3
4
8
7
21
5
6
14
13
11
1/4W
R645
3.3K
10 Schematic Diagrams
10-1 M ain Part Schematic Diagram
AP17K*/AP17J* 10-1
Page 61
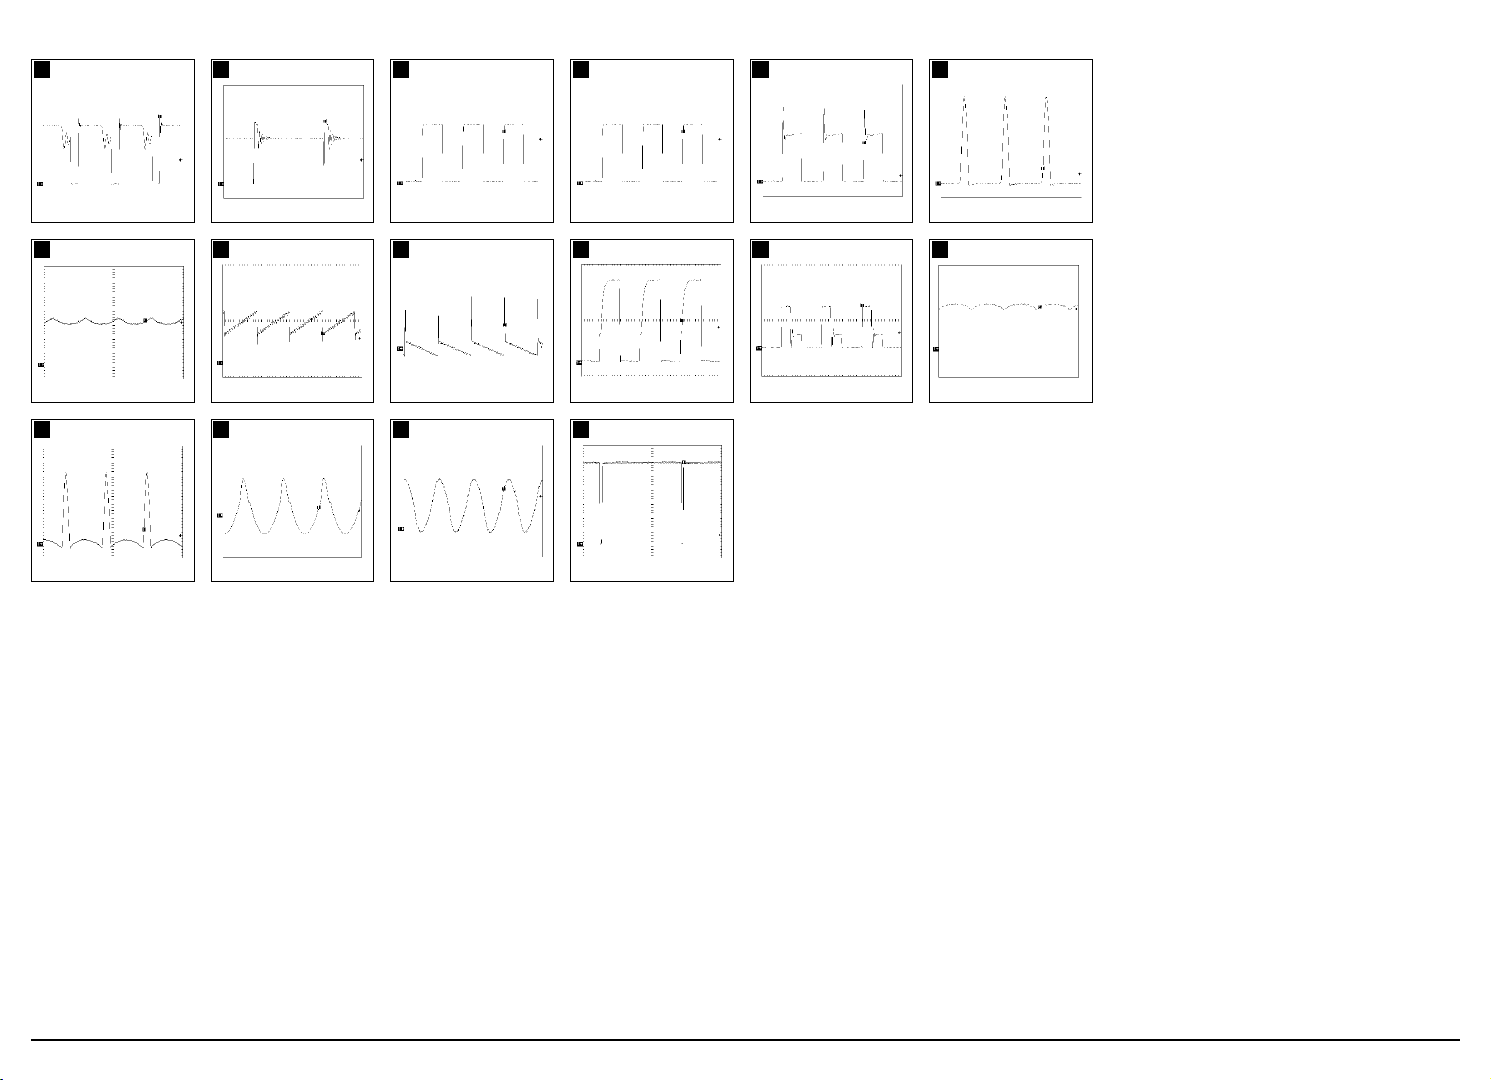
10 Schematic Diagrams
100 V (IC601, #1)
1
CH1 P-P = 100 V CH1 RMS = 350.2 V
1.00 V (IC401, #11)
7
CH1 P-P = 1.00V CH1 RMS = 3.008 V
50.0 V (T502, #6)
13
CH1 P-P = 50.0V CH1 RMS = 75.6V
100 V (IC601, #1)
2
CH1 P-P = 100 V CH1 RMS = 325.8 V
500 V (IC401, #12)
8
CH1 P-P = 500 V CH1 RMS = 1.425 V
100 V (T502, #1)
14
CH1 P-P = 100V CH1 RMS = 124.0V
2.00 V (IC401, #6)
3
CH1 P-P = 2.00V CH1 RMS = 5.868V
10.0 V (IC301, #6)
9
CH1 P-P = 10.0 V CH1 RMS = 5.06 V
1.00 V (IC201, #13, 14)
21
CH1 P-P = 1.00 V CH1 RMS = 2.108V
2.00V (IC401, #8)
4
CH1 P-P = 2.00V CH1 RMS = 5.868V
2.00 V (Q402, Gate)
10
CH1 P-P = 2.00 V CH1 RMS = 7.692V
5.00V (Q501, Emitter)
25
CH1 P-P = 5.00V CH1 RMS = 28.33V
20.0 V (Q403, Collector)
5
CH1 P-P = 20.0 V CH1 RMS = 46.80V
50.0 V (Q402, Drain)
11
CH1 P-P = 50.0 V CH1 RMS = 73.7V
200 V (Q404, Collector)
6
CH1 P-P = 200V CH1 RMS = 387.2V
2.00 V (IC401, #32)
12
CH1 P-P = 2.00V CH1 RMS = 6.124V
10-2 AP17K*/AP17J*
Page 62
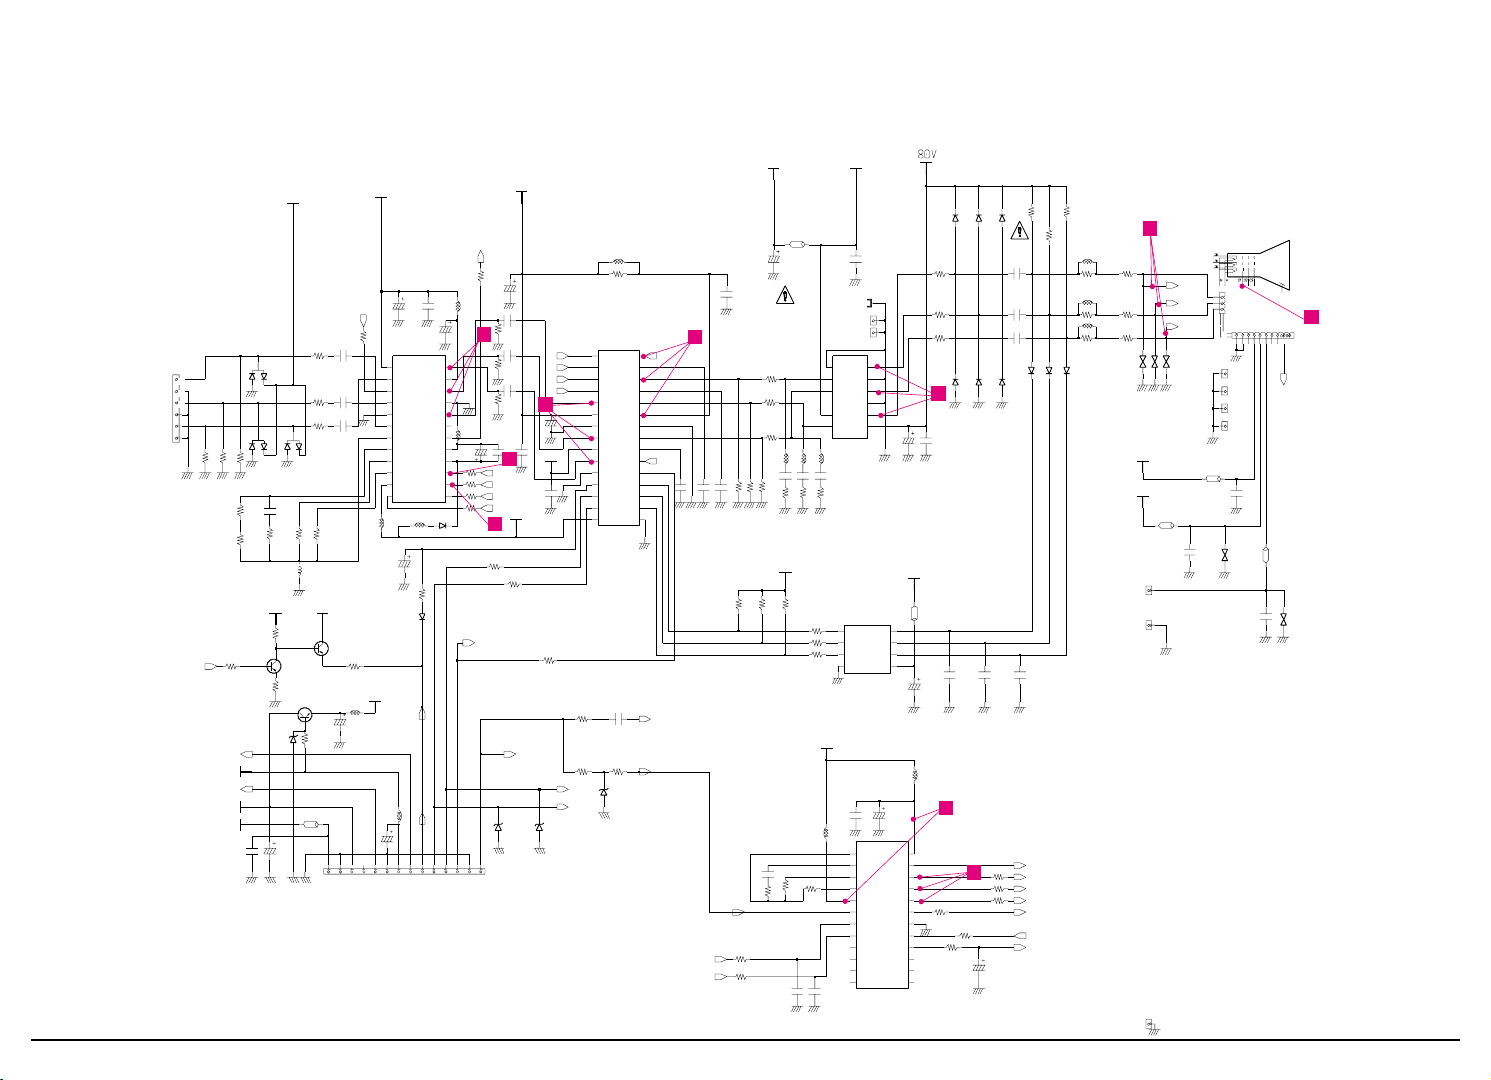
10 Schematic Diagrams
SCL
VSSA
GND
KA2518
TEST
GOUT
VCC
GND
ABL
VCC2
12V
ACL
RCT
INT
BIN
VCC1
NC
GND2
B_OUT
VDDA
AP17KS(70K)
R_OUT
R_CLP
ROSD
G_OUT
VREF
SDA
G1
AFC
5V
OSD-SW
FBLK
SCL
VCOIN
GND
BOUT
GIN
6.3V
CLAMP
GND
GIN
H_BLK
RIN
VCC2
BOSD
HFLB
VDD
G_CLP
SCL
RIN
4.7uH
M41QCJ761X174(T4)
BIN
BH03-00024U
VCC
CLP
GIN
BH03-00024T
GOSD
RIN
ROUT
gnd1
GCT
VSS
BCLP
SDA
V_BLK
VFLB
CLAMP
SDA
S1D2520
GND
130uH SDI DF CDT180uH SDI DF CDT
VICTL
BCT
BIN
*Note : Pedestal Level :06H
AP17JS(85K)
OSD SMD IC
Cutoff IC
80V
VDDOUT
MO
25V
100nF
CB02
12V
L105
1.5uH
1
1/10W330R142
1N4148
D102
12V
EY8
SNAME
DMS-200D
SKG01
12V
C130
MO
50V
100PF
BD106
1.2UH,3.5*5.7MM
B
470
1/10W
330K
1/4W
RR09
BD105
1.2UH,3.5*5.7MM
B
RR04
100
1/10W
R116
100
1/10W
220
RB10
1/10W
1/10WR110
220
1/10W
100
R112
12V
RG10
1N4148
DB05
MO
50V
6.8nF
C145
20
12 19
13 18
14 17
15 16
625
724
823
922
10 21
11
130
229
328
427
526
IC102
S1D2518X01
11M
0.100W
R111
L108
1.5uH
MO
25V
100nF
C147
R143
G1
R123
1/10W
1.5K
220
1/10W
MO
25V
100nF
C139
R109 1/10W100
RB11
1/2W
39
RB12
1/2W
1K
1/10W
10K
R113
1
1/10W
22
RB02
RG01
CN_GND
4.7uH
L102
75
1/10W
KSD1616-Y
Q103
B
C
E
L111
1.5uH
0.47UH
LG10
80V
L101
0.47uH
6.8K
R103
1/10W
80V
R106
33
1/10W
16V
100uF
C122
+5V
CG02
100nF
25V
MO
M41QCJ761X173(T4)
CRT1
C126
100nF
50V
UZ6.2BSB
ZD104
R107 1/10W100
50V
4.7uF
C120
C108
22PF
50V
MO
DMS-200D
SKB01
C129
MO
50V
100PF
100V
470nF
CB06
MP
1SS244
DG03
1/10W
RB01
75
1/10W
R144
22
RR0625V
1/10W
3.9K
R141
330
1/10W
MO
CG04
100nF
B
2
C
3
D4E
5
F
6
G
7
H
8
1/10W
10K
IC104
LM2480NA
A
1
R122
R101
1/10W
6.8K
470
1/10W
RR07
1/10W
18K
1
RB04
EY1
R105
1/10W
330
LB10
0.47UH
Q102
2N3904
B
C
E
MO
50V
10nF
C107
6
ZD101
BZX79C5V6
CN101
slcon6p
1
2
3
4
5
1/2W
470
RR11
50V
100nF
C102
CR02
100nF
25V
MO
LR11
180NH
C146
100
1/10W
R104
100UF
16V
100uH
L106
1.5uH
DR01
MMBD4148SE
12
3
L104
2J
19
2K
18
2L
17
2M
16
2N
15
11
1L121M
13
1N
14
2E
24
2F
23
2G
22
21
2H
2I
20
1D
4
1E
5
1F
6
1G
7
1H
8
1I
9
10
1J
1K
1201-001791
IC101
1A
1
1B
2
1C
3
25V
100nF
C134
MO
+5V
1/10W
22
RB08
16V
100UF
C135
RB03 43K 1/6W
RR03
1.5uH
L103
43K 1/6WRG03
43K 1/6W
0.47UH
+5V
CN_G2
1
LR10
heat_sink
HS103
MO
CR01
100nF
25V
+5V
C118
10uF
100V
1/10W
18K
RB07
P
CB05
100nF
100V
$P
CR10
15PF
50V
MO
RG11
1K
1/2W
C148
16V
100UF
2KV
C125
2.7nF
$P
$P
CG05
P
100V
100nF
$P
CB04
100nF
25V
CR05
100nF
100V
P
MO
B
CB10
15PF
50V
MO
1K
R132
1/10W
1.2UH,3.5*5.7MM
BD104
CN_GTP1
1
MO
50V
15PF
CG10
L107
1.5uH
C112
220uF
16V
1.2UH,3.5*5.7MM
BD115
B
RG06
1/10W
22
22
1/10W
RG08
LB11
0.22uH
1/10W
220
RR10
1SS244
1/10W100R117
BD103
B
DB03
DR05
DG04
1SS244
0.22uH
LG11
1N4148
1/10W
6.8K
SNAME
EY6
1
R130
SNAME
1
330K
1/4W
RB09
50V
10nF
C128
EY5
C119
10nF
500V
MO
1N4148
D101
12V
330K
RG09
1/4W
C127
1.8nF
1KV
DR04
1SS244
6.8K
RG05
390
1/10W
22
1/10W
RB06
1/6W
R115
BD112
1.2UH,3.5*5.7MM
B
1/10W
18K
12V
EY7
SNAME
1
RG07
RG04
C113
8.2nF
100V
P
R121
1/10W
470
220UF
16V
2.2K
1/10W
G4
11
2GK
4
HH2
56
IC1IC2
7
RK
1
C131
SK101
j_c11p
BK
3
8
G1G2
910
G3
100V
10uF
C116
1/10W
75
RR01
C137
50V
4.7uF
1/10W
1K
R124
MO
C149
100uF
16V
1/2W
39
RR12
CR04
100nF
25V
1K
1/10W
R133
RR08
1/10W
22
ZD102
R119
1/10W
100
UZ6.2BSB
ZD103
UZ6.2BSB
1N4148
DG05
EY2
1
WSP-401M
SK104
56789
1011121314
CN102
slcon14p
123
4
470nF
100V
MP
CG06
R128
1/10W
5.6K
1/10W
390
RB05
6.3V
MO
25V
100nF
CG01
2K
18
2L
17
2M
16
2N
15
C117
10nF
500V
1M
13
1N
14
2E
24
2F
23
2G
22
2H
21
2I
20
2J
19
1E
5
1F
6
1G
7
1H
8
1I
9
1J
10
1K
11
1L
12
IC103
S5D2509X09-S0
1A
1
1B
2
1C
3
1D
4
100
1/10WR118
RR05
1/10W
12V
SK108
SSG-102B2
$P
390
330 1/10WR139
C105
4.7uF
50V
470uF
16V
L109
1.5uH
MO
25V
100nF
C104
1/10W
330R140
CB01
1/10W
12K
R102
RG12
39
1/2W
1SS244
6.3V
2N3904
Q101
B
C
E
DB04
DMS-200D
SKR01
DR03
1SS244
R129
C121
100uF
16V
C106
1/10W
12K
DG01
12
3
MO
25V
100nF
DB01
MMBD4148SE
12
3
MMBD4148SE
R108100 1/10W
R114
1/6W
12K
22
RR02
1/10W
VIN3
1
VOUT1
3
VOUT2
5
VOUT3
12V_A
1/10W
RG02
22
LM2413T
IC105
7
GND
2
GND1
4
GND2
VBB
10
VCC
6
11
VIN1
9
VIN2
8
100V
470nF
CR06
MP
+5V
0.100W
11M
R145
CLAMP
SDA
INT
H_FLB1
H_FLB1
H_FLB2
H_FLB2
SCL
SDA
V_BLK
CLAMP
INT
OSDSW
ACL
ACL_ADJ
V_BLK
V_BLK
GOSD
ROSD
BOSD
OSDSW
BOSD
GOSD
ROSD
OSDSW
CLAMP
G_OUT
R_OUT
B_OUT
FOCUS
AFC
SCL
ACL_ADJ
SCL
SDA
G1
ACL
17
24
26
23
22
18
20
16
15
19
10-2 Video Part Schematic Diagram
AP17K*/AP17J* 10-3
Page 63
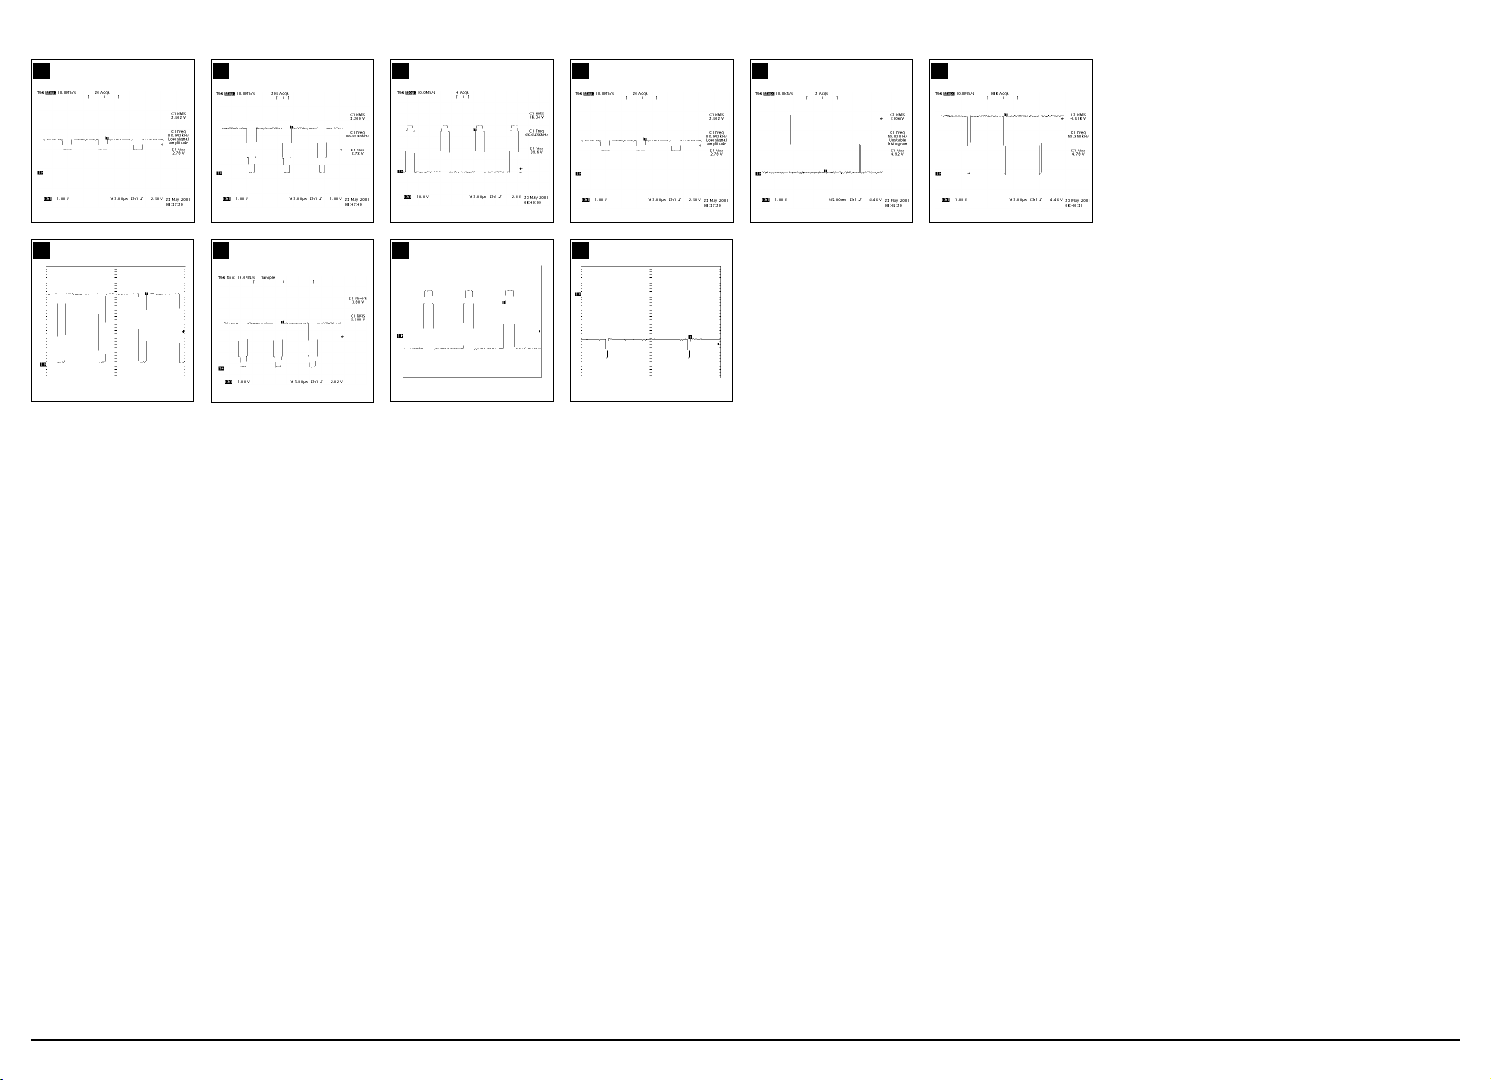
10 Schematic Diagrams
1.00 V (IC102,#5, 8, 10)
15
1.00 V (IC103, #5, 24)
22
CH1 P-P = 1.00V CH1 RMS = 4.516 V
1.00 V (IC102, #25,28,30)
16
1.00 V (IC103, #20, 21, 22)
23
20.0 V (IC105, #1, 3, 5)
17
10.0 V (R,G,B, Video)
24
CH1 P-P = 10.0V CH1 RMS = 17.02V
1.00 V (IC101, #20, 22, 24)
18
20.00V (CRT Socket, G1)
26
CH1 P-P = 20.0V CH1 RMS = 66.68V
1.00 V (IC101, #14)
19
1.00 V (IC101, #15)
20
10-4 AP17K*/AP17J*
Page 64

Samsung Electronics Co.,Ltd.
416, M aetan-3Dong, Paldal-Gu, Suwon City, Kyungki-Do, Korea.
Printed in Korea
P/N : BH68-00484A-00
http:/ /w ww .samsungmonitor.com (SyncMaster Worldw ide)
http:/ /w ww .samsung-monit or.com (SyncMaster USA)
http:/ /w ww .sec.co.kr/ monit or (Korea)
 Loading...