

Page 1
User Manual
Page 2
PORTABLE All Digital
MOBILE PHONE
User Manual
Please read this manual before operating your
phone, and keep it for future reference.
u750.book Page 1 Sunday, April 5, 2009 8:40 PM
Page 3

U750_Alias 2_ English_CB19_PM_032409_F6
Intellectual Property
All Intellectual Property, as defined below, owned by or which is otherwise the property of Samsung or its respective suppliers relating to
the SAMSUNG Phone, including but not limited to, accessories, parts, or software relating there to (the “Phone System”), is proprietary to
Samsung and protected under federal laws, state laws, and international treaty provisions. Intellectual Property includes, but is not limited
to, inventions (patentable or unpatentable), patents, trade secrets, copyrights, software, computer programs, and related documentation
and other works of authorship. You may not infringe or otherwise violate the rights secured by the Intellectual Property. Moreover, you
agree that you will not (and will not attempt to) modify, prepare derivative works of, reverse engineer, decompile, disassemble, or
otherwise attempt to create source code from the software. No title to or ownership in the Intellectual Property is transferred to you. All
applicable rights of the Intellectual Property shall remain with SAMSUNG and its suppliers.
Samsung Telecommunications America (STA), LLC
Headquarters: Customer Care Center:
1301 E. Lookout Drive 1000 Klein Rd.
Richardson, TX 75082 Plano, TX 75074
Toll Free Tel: 1.888.987.HELP (4357)
Internet Address:
http://www.samsungusa.com
©
2009 Samsung Telecommunications America, LLC is a registered trademark of Samsung Electronics America, Inc. and its related
entities.
Do you have questions about your Samsung Mobile Phone?
For 24 hour information and assistance, we offer a new FAQ/ARS System (Automated Response System) at:
www.samsungtelecom.com/support
u750.book Page 2 Sunday, April 5, 2009 8:40 PM
Page 4

GH68-22369A
Printed in Korea
T9 Text Input is licensed by Tegic Communications and is covered by U.S. Pat. 5,818,437; U.S. Pat. 5,953,541; U.S. Pat. 6,011,554 and
other patents pending.
ACCESS® and NetFront™ are trademarks or registered trademarks of ACCESS Co., Ltd. in Japan and other countries.
The Bluetooth® word mark, figure mark (stylized “B Design”), and combination mark (Bluetooth word mark and “B Design”) are registered
trademarks and are wholly owned by the Bluetooth SIG.
microSD™ and the microSD logo are Trademarks of the SD Card Association.
Alias™ 2 is a trademark of Verizon Wireless.
Open Source Software
Some software components of this product incorporate source code covered under GNU General Public License (GPL), GNU Lesser General
Public License (LGPL), OpenSSL License, BSD License and other open source licenses. To obtain the source code covered under the open
source licenses, please visit:
http://www.samsungnetwork.com/Home/opensource
.
u750.book Page 3 Sunday, April 5, 2009 8:40 PM
Page 5

Disclaimer of Warranties; Exclusion of Liability
EXCEPT AS SET FORTH IN THE EXPRESS WARRANTY CONTAINED ON THE WARRANTY PAGE ENCLOSED WITH THE PRODUCT, THE
PURCHASER TAKES THE PRODUCT "AS IS", AND SAMSUNG MAKES NO EXPRESS OR IMPLIED WARRANTY OF ANY KIND WHATSOEVER
WITH RESPECT TO THE PRODUCT, INCLUDING BUT NOT LIMITED TO THE MERCHANTABILITY OF THE PRODUCT OR ITS FITNESS FOR ANY
PARTICULAR PURPOSE OR USE; THE DESIGN, CONDITION OR QUALITY OF THE PRODUCT; THE PERFORMANCE OF THE PRODUCT; THE
WORKMANSHIP OF THE PRODUCT OR THE COMPONENTS CONTAINED THEREIN; OR COMPLIANCE OF THE PRODUCT WITH THE
REQUIREMENTS OF ANY LAW, RULE, SPECIFICATION OR CONTRACT PERTAINING THERETO. NOTHING CONTAINED IN THE INSTRUCTION
MANUAL SHALL BE CONSTRUED TO CREATE AN EXPRESS OR IMPLIED WARRANTY OF ANY KIND WHATSOEVER WITH RESPECT TO THE
PRODUCT. IN ADDITION, SAMSUNG SHALL NOT BE LIABLE FOR ANY DAMAGES OF ANY KIND RESULTING FROM THE PURCHASE OR USE OF
THE PRODUCT OR ARISING FROM THE BREACH OF THE EXPRESS WARRANTY, INCLUDING INCIDENTAL, SPECIAL OR CONSEQUENTIAL
DAMAGES, OR LOSS OF ANTICIPATED PROFITS OR BENEFITS.
u750.book Page 4 Sunday, April 5, 2009 8:40 PM
Page 6

1
Table of Contents
Section 1: Getting Started .............................................. 4
Understanding this User Manual . . . . . . . . . . . . . . . . . . . . . . . . 4
Notes and Tips . . . . . . . . . . . . . . . . . . . . . . . . . . . . . . . . . . . . . 4
Dialogue boxes . . . . . . . . . . . . . . . . . . . . . . . . . . . . . . . . . . . . 4
Using the Battery . . . . . . . . . . . . . . . . . . . . . . . . . . . . . . . . . . . 5
Turning Your Phone On and Off . . . . . . . . . . . . . . . . . . . . . . . . 9
Setting Up Voicemail . . . . . . . . . . . . . . . . . . . . . . . . . . . . . . . . 9
Inserting and Removing Your Memory Card . . . . . . . . . . . . . . 10
Memory Card Formatting . . . . . . . . . . . . . . . . . . . . . . . . . . . . 11
Section 2: Understanding Your Phone ......................... 12
Features of Your Phone . . . . . . . . . . . . . . . . . . . . . . . . . . . . . 12
Closed View of Your Phone . . . . . . . . . . . . . . . . . . . . . . . . . . . 12
Open View of Your Phone (Portrait Mode) . . . . . . . . . . . . . . . . 14
Keypads . . . . . . . . . . . . . . . . . . . . . . . . . . . . . . . . . . . . . . . . . 15
Command Keys . . . . . . . . . . . . . . . . . . . . . . . . . . . . . . . . . . . 16
Understanding the Home Screen . . . . . . . . . . . . . . . . . . . . . . 18
Section 3: Call Functions ............................................21
Making a Call . . . . . . . . . . . . . . . . . . . . . . . . . . . . . . . . . . . . . 21
Answering a Call . . . . . . . . . . . . . . . . . . . . . . . . . . . . . . . . . . 21
Call In-Progress Options . . . . . . . . . . . . . . . . . . . . . . . . . . . . . 21
Recent Calls . . . . . . . . . . . . . . . . . . . . . . . . . . . . . . . . . . . . . . 22
Contacts . . . . . . . . . . . . . . . . . . . . . . . . . . . . . . . . . . . . . . . . 25
Roaming . . . . . . . . . . . . . . . . . . . . . . . . . . . . . . . . . . . . . . . . 26
Voice Commands . . . . . . . . . . . . . . . . . . . . . . . . . . . . . . . . . . 26
Section 4: Menu Navigation ........................................ 34
Menu Navigation . . . . . . . . . . . . . . . . . . . . . . . . . . . . . . . . . . 34
Menu Outline . . . . . . . . . . . . . . . . . . . . . . . . . . . . . . . . . . . . . 36
Section 5: Understanding Your Contacts .................... 42
Opening Contacts Menu . . . . . . . . . . . . . . . . . . . . . . . . . . . . 42
Contacts Icons . . . . . . . . . . . . . . . . . . . . . . . . . . . . . . . . . . . . 42
Adding a Contact . . . . . . . . . . . . . . . . . . . . . . . . . . . . . . . . . . 43
Adding Pauses . . . . . . . . . . . . . . . . . . . . . . . . . . . . . . . . . . . . 46
Contact Groups . . . . . . . . . . . . . . . . . . . . . . . . . . . . . . . . . . . 46
Finding a Contacts Entry . . . . . . . . . . . . . . . . . . . . . . . . . . . . 51
Editing an Existing Contact Entry . . . . . . . . . . . . . . . . . . . . . . 51
Deleting a Contact Entry . . . . . . . . . . . . . . . . . . . . . . . . . . . . 52
Speed Dialing . . . . . . . . . . . . . . . . . . . . . . . . . . . . . . . . . . . . 52
My Name Card . . . . . . . . . . . . . . . . . . . . . . . . . . . . . . . . . . . 53
Finding My Phone Number . . . . . . . . . . . . . . . . . . . . . . . . . . . 53
Emergency Contacts . . . . . . . . . . . . . . . . . . . . . . . . . . . . . . . 54
Section 6: Entering Text ............................................... 55
Entering Text in Landscape Mode . . . . . . . . . . . . . . . . . . . . . 55
Entering Text in Portrait Mode . . . . . . . . . . . . . . . . . . . . . . . . 55
Section 7: Messaging .................................................. 57
Types of Messages . . . . . . . . . . . . . . . . . . . . . . . . . . . . . . . . 57
Changing Message Settings . . . . . . . . . . . . . . . . . . . . . . . . . 57
Creating and Sending Text Messages . . . . . . . . . . . . . . . . . . 58
Creating and Sending Picture Messages . . . . . . . . . . . . . . . . 59
u750.book Page 1 Sunday, April 5, 2009 8:40 PM
Page 7

2
Creating and Sending Video Messages . . . . . . . . . . . . . . . . . .61
Creating and Sending Voice Messages . . . . . . . . . . . . . . . . . . 62
Receiving New Messages . . . . . . . . . . . . . . . . . . . . . . . . . . . . 64
Message Folders . . . . . . . . . . . . . . . . . . . . . . . . . . . . . . . . . . 67
Voicemail . . . . . . . . . . . . . . . . . . . . . . . . . . . . . . . . . . . . . . . . 77
Visual Voice Mail . . . . . . . . . . . . . . . . . . . . . . . . . . . . . . . . . . . 78
Mobile IM . . . . . . . . . . . . . . . . . . . . . . . . . . . . . . . . . . . . . . . . 78
Email . . . . . . . . . . . . . . . . . . . . . . . . . . . . . . . . . . . . . . . . . . . 79
Chat . . . . . . . . . . . . . . . . . . . . . . . . . . . . . . . . . . . . . . . . . . . . 80
Section 8: Changing Your Settings ............................. 81
My Verizon . . . . . . . . . . . . . . . . . . . . . . . . . . . . . . . . . . . . . . . 81
Tools . . . . . . . . . . . . . . . . . . . . . . . . . . . . . . . . . . . . . . . . . . . 81
Bluetooth Menu . . . . . . . . . . . . . . . . . . . . . . . . . . . . . . . . . . . 81
Sounds Settings . . . . . . . . . . . . . . . . . . . . . . . . . . . . . . . . . . . 85
Display Settings . . . . . . . . . . . . . . . . . . . . . . . . . . . . . . . . . . . 88
Phone Settings . . . . . . . . . . . . . . . . . . . . . . . . . . . . . . . . . . . . 94
Call Settings . . . . . . . . . . . . . . . . . . . . . . . . . . . . . . . . . . . . . 102
TTY . . . . . . . . . . . . . . . . . . . . . . . . . . . . . . . . . . . . . . . . . . . . 103
Memory . . . . . . . . . . . . . . . . . . . . . . . . . . . . . . . . . . . . . . . . 105
USB Mode . . . . . . . . . . . . . . . . . . . . . . . . . . . . . . . . . . . . . . 106
Phone Info . . . . . . . . . . . . . . . . . . . . . . . . . . . . . . . . . . . . . . 107
Section 9: Media Center ............................................ 108
Media Center . . . . . . . . . . . . . . . . . . . . . . . . . . . . . . . . . . . . 108
Music & Tones . . . . . . . . . . . . . . . . . . . . . . . . . . . . . . . . . . . 108
Picture & Video . . . . . . . . . . . . . . . . . . . . . . . . . . . . . . . . . . . 110
Games . . . . . . . . . . . . . . . . . . . . . . . . . . . . . . . . . . . . . . . . . 115
Mobile Web . . . . . . . . . . . . . . . . . . . . . . . . . . . . . . . . . . . . . 116
Browse & Download . . . . . . . . . . . . . . . . . . . . . . . . . . . . . . . 116
Extras . . . . . . . . . . . . . . . . . . . . . . . . . . . . . . . . . . . . . . . . . 117
Section 10: Music ...................................................... 118
Inserting and Removing the microSD card . . . . . . . . . . . . . . 118
Memory Card Formatting . . . . . . . . . . . . . . . . . . . . . . . . . . . 118
Music & Tones . . . . . . . . . . . . . . . . . . . . . . . . . . . . . . . . . . . 118
Section 11: Tools ........................................................ 124
Voice Commands . . . . . . . . . . . . . . . . . . . . . . . . . . . . . . . . . 124
Calculator . . . . . . . . . . . . . . . . . . . . . . . . . . . . . . . . . . . . . . 124
Calendar . . . . . . . . . . . . . . . . . . . . . . . . . . . . . . . . . . . . . . . 126
Alarm Clock . . . . . . . . . . . . . . . . . . . . . . . . . . . . . . . . . . . . . 128
Stop Watch . . . . . . . . . . . . . . . . . . . . . . . . . . . . . . . . . . . . . 129
World Clock . . . . . . . . . . . . . . . . . . . . . . . . . . . . . . . . . . . . . 130
Notepad . . . . . . . . . . . . . . . . . . . . . . . . . . . . . . . . . . . . . . . . 130
Section 12: Landscape Mode ..................................... 133
Opening Your Phone to a Landscape View . . . . . . . . . . . . . . 133
Making a Call . . . . . . . . . . . . . . . . . . . . . . . . . . . . . . . . . . . . 133
Answering a Call . . . . . . . . . . . . . . . . . . . . . . . . . . . . . . . . . 135
Creating and Sending Messages . . . . . . . . . . . . . . . . . . . . . 135
Email . . . . . . . . . . . . . . . . . . . . . . . . . . . . . . . . . . . . . . . . . . 136
Mobile IM . . . . . . . . . . . . . . . . . . . . . . . . . . . . . . . . . . . . . . . 137
Chat . . . . . . . . . . . . . . . . . . . . . . . . . . . . . . . . . . . . . . . . . . . 138
My Account . . . . . . . . . . . . . . . . . . . . . . . . . . . . . . . . . . . . . 138
Section 13: Mobile Web ............................................. 139
Mobile Web . . . . . . . . . . . . . . . . . . . . . . . . . . . . . . . . . . . . . 139
Launching Mobile Web . . . . . . . . . . . . . . . . . . . . . . . . . . . . . 139
u750.book Page 2 Sunday, April 5, 2009 8:40 PM
Page 8
3
Exit Mobile Web . . . . . . . . . . . . . . . . . . . . . . . . . . . . . . . . . . 139
Navigate the Web . . . . . . . . . . . . . . . . . . . . . . . . . . . . . . . . . 139
Mobile Web Soft Keys . . . . . . . . . . . . . . . . . . . . . . . . . . . . . 140
Links . . . . . . . . . . . . . . . . . . . . . . . . . . . . . . . . . . . . . . . . . . 141
Place a Call While Using Mobile Web . . . . . . . . . . . . . . . . . . 141
Section 14: Health and Safety Information ...............142
Health and Safety Information . . . . . . . . . . . . . . . . . . . . . . . 142
Samsung Mobile Products and Recycling . . . . . . . . . . . . . . . 143
UL Certified Travel Adapter . . . . . . . . . . . . . . . . . . . . . . . . . . 143
Consumer Information on Wireless Phones . . . . . . . . . . . . . . 144
Road Safety . . . . . . . . . . . . . . . . . . . . . . . . . . . . . . . . . . . . . 149
Responsible Listening . . . . . . . . . . . . . . . . . . . . . . . . . . . . . 151
Operating Environment . . . . . . . . . . . . . . . . . . . . . . . . . . . . . 153
Using Your Phone Near Other Electronic Devices . . . . . . . . . 153
FCC Hearing-Aid Compatibility (HAC) Regulations
for Wireless Devices . . . . . . . . . . . . . . . . . . . . . . . . . . . . . . . 154
Potentially Explosive Environments . . . . . . . . . . . . . . . . . . . . 155
Emergency Calls . . . . . . . . . . . . . . . . . . . . . . . . . . . . . . . . . 156
FCC Notice and Cautions . . . . . . . . . . . . . . . . . . . . . . . . . . . 157
Other Important Safety Information . . . . . . . . . . . . . . . . . . . 157
Product Performance . . . . . . . . . . . . . . . . . . . . . . . . . . . . . . 158
Availability of Various Features/Ring Tones . . . . . . . . . . . . . 158
Battery Standby and Talk Time . . . . . . . . . . . . . . . . . . . . . . 159
Battery Precautions . . . . . . . . . . . . . . . . . . . . . . . . . . . . . . . 159
Care and Maintenance . . . . . . . . . . . . . . . . . . . . . . . . . . . . . 160
Section 15: Warranty Information ............................. 162
Standard Limited Warranty . . . . . . . . . . . . . . . . . . . . . . . . . 162
End User License Agreement for Software . . . . . . . . . . . . . . 165
Index ............................................................................ 170
Note: The Home screen is where the phone is waiting for input from you. No menu
is displayed and the phone isn’t performing any action. It’s the starting point
for all instructional steps.
u750.book Page 3 Sunday, April 5, 2009 8:40 PM
Page 9

4
Section 1: Getting Started
Understanding this User Manual
The chapters of this manual generally follow the same order as
the menus and sub-menus in your phone. A robust index for
quick reference to most features begins on page page 170.
Also included is important safety information that you should
know before using your phone. Most of this information is near
the back of the guide, beginning on page 142.
Notes and Tips
Throughout this guide are icons and text that are set apart from
the rest. These are intended to point out important information,
quick methods for activating features, to define terms, and more.
The definitions for these methods are as follows:
•
Notes
: Explain alternative options within the current feature, menu, or
sub-menu.
•
Tips
: Provide quick or innovative methods for performing functions
related to the subject at hand.
•
Important
: Points out important information about the current feature
that could affect performance, or even damage your phone.
This section allows you to start using your phone after activating
your service, setting up your voicemail, contacting customer
support, or getting an understanding of how this manual is put
together.
Dialogue boxes
Dialogue boxes prompt for action, inform you of status, or warn
of situations such as low memory. Dialogue boxes and their
definitions are outlined below.
•
Choice
-Example: “SAVE MESSAGE?”
•
Reconfirm
-Example: “ERASE ALL MESSAGES?”
•
Performing
-Example: “SENDING...” “CONNECTING...”
•
Completed
-Example: “MESSAGE SENT”
•
Information
-Example: “NEW MESSAGE”
•
Error
-Example: “SYSTEM ERROR!”
•
Warning
-Example: “BATTERY LOW,” “MEMORY FULL!”
u750.book Page 4 Sunday, April 5, 2009 8:40 PM
Page 10
Getting Started 5
Using the Battery
Note:
This phone comes packaged with a partially charged rechargeable
standard Li-Ion battery and wall charger.
You must fully charge the battery before using your phone for the first
time. A fully discharged battery requires up to 4 hours of charge time.
Important!:
Although the phone can be used while the battery is charging,
the battery must be fully charged before first use, otherwise you
could damage the battery.
Battery Indicator
The battery indicator in the upper-right corner of the
display indicates battery power level. Four bars indicate a full
charge, while an empty icon indicates an almost empty
battery. Two to three minutes before the battery becomes too low
to operate, a blinking empty battery icon appears and a
tone sounds. If you continue to operate the phone without
charging, it shuts down.
Using A Non-Supported Battery
Samsung handsets do not support the use of a non-supported
battery.
When using a non-supported battery you will hear a series of
beeps and you will see a warning message that indicates “
NON
SUPPORTED BATTERY. SEE USER MANUAL
” If you receive this
warning, battery charging has been disabled.
Samsung charging accessories (i.e. wall charger, and cigarette
lighter adapter) will only charge a Samsung approved battery.
To continue use of your handset press .
Note:
When using a non-supported battery the handset can only be used for
the duration of the life of the battery and cannot be recharged.
Important!:
Using a non-supported battery may cause damage to your
phone. Use a Samsung supported battery only.
OK
OK
u750.book Page 5 Sunday, April 5, 2009 8:40 PM
Page 11
6
Installing the Battery
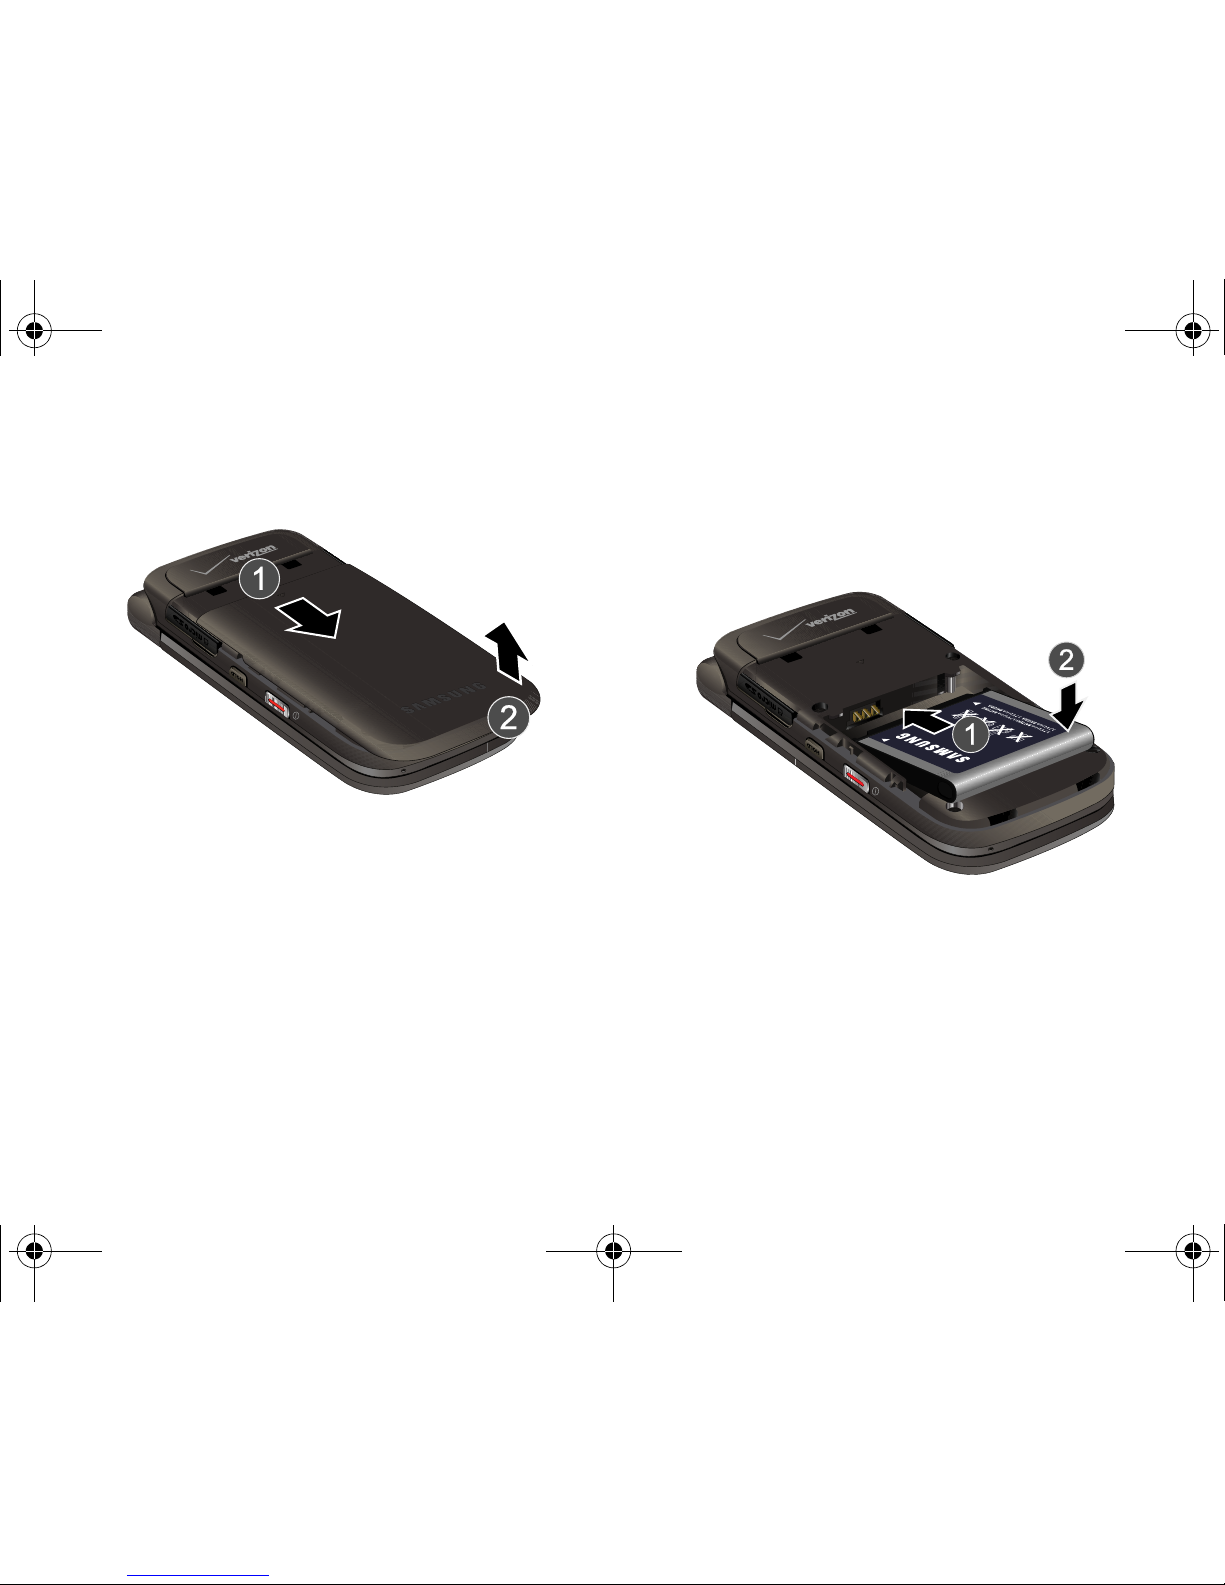
1. Press down at the top of the battery cover, and slide the
battery cover back and lift up to remove.
2. Insert the top end of the battery into the phone housing
using the directional arrow printed on the battery. The gold
contacts at the battery end must align with contacts on the
phone. Push bottom end of the battery down until it snaps
into place.
u750.book Page 6 Sunday, April 5, 2009 8:40 PM
Page 12
Getting Started 7
3.
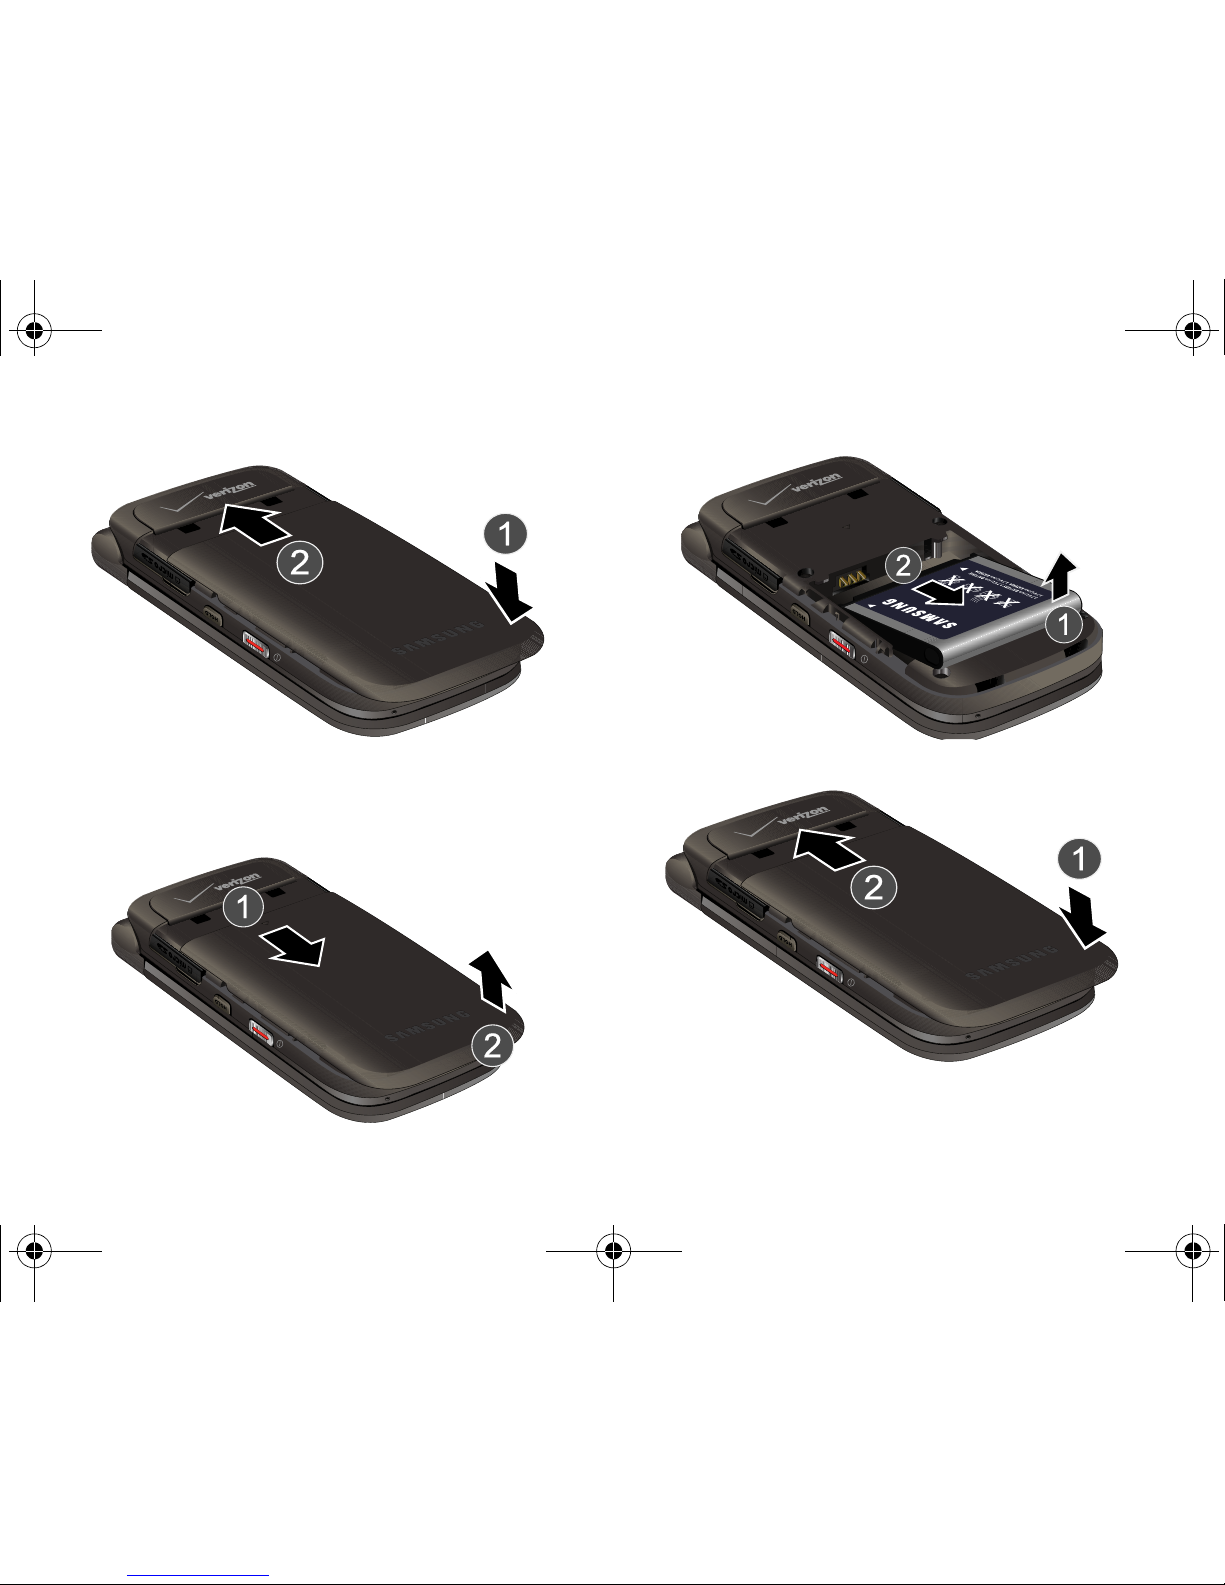
Slide the battery cover up until it snaps into place.
Removing the Batter y
1. Press down at the top of the battery cover, and slide the
battery cover back and lift up to remove.
2. Lift the battery from the bottom end and remove.
3. Slide the battery cover up until it snaps into place.
u750.book Page 7 Sunday, April 5, 2009 8:40 PM
Page 13
8
Charging the Battery
Your phone is powered by a rechargeable standard Li-ion battery.
Only use Samsung-approved charging devices and batteries.
Samsung accessories are designed to maximize battery life.
Using other accessories may invalidate your warranty and may
cause damage.
Note:
The phone can be used while charging but will charge faster when
powered off.
Wall Charger
The wall charger is a convenient, light-weight charger that
rapidly charges your phone from any 120/220 VAC outlet.
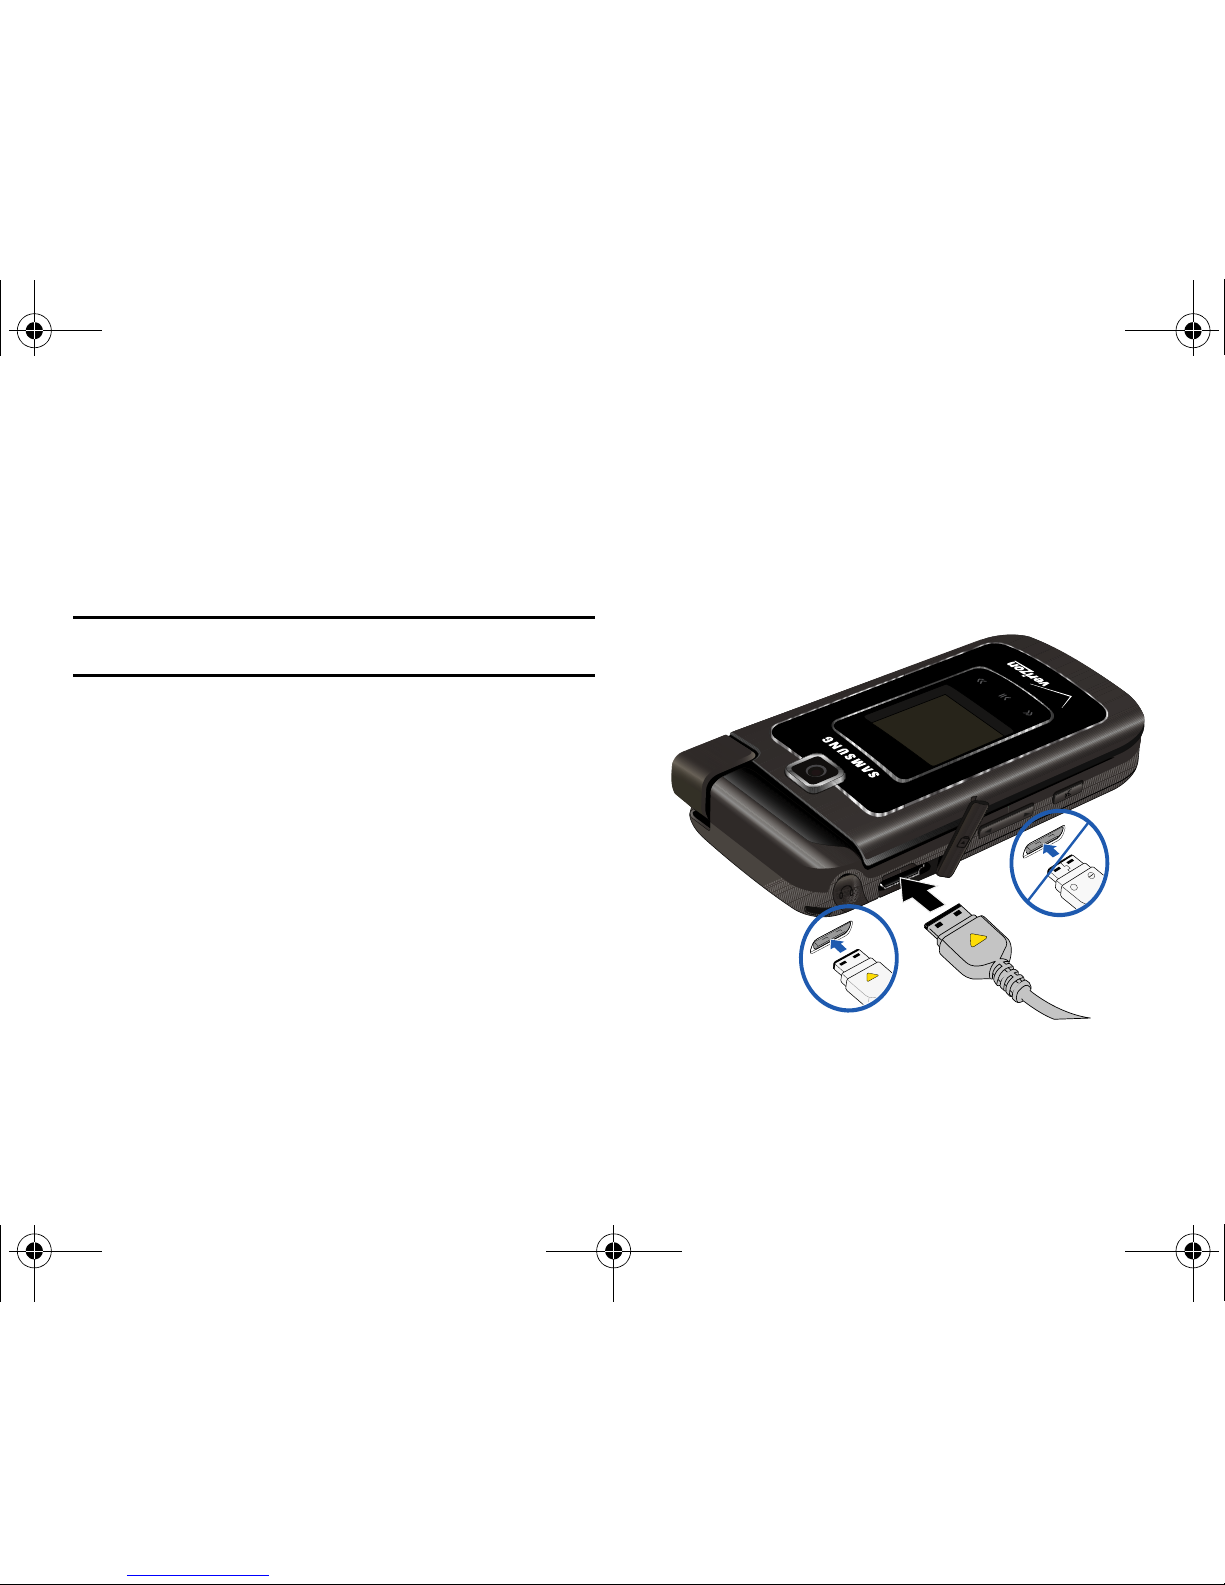
1. Pull the connector cover out and turn to expose the
connector. Insert the wall charger adapter end, with the
arrow up, into the connector.
+
Incorrect
Correct
u750.book Page 8 Sunday, April 5, 2009 8:40 PM
Page 14
Getting Started 9
2.
Plug the wall charger into a standard AC wall outlet.
When the phone is completely charged (the battery icon becomes
still), unplug the charger from the power outlet. Remove the
adapter end from the connector and replace the connector cover.
Turning Your Phone On and Off
Turning Your Phone On
1. Open the flip, then press and hold the
On/Off
button
on the right side of the phone.
Note:
As with any other radio-transmitting device, do not touch the internal
antenna as it affects call quality and may cause the phone to operate
at a higher power level than is necessary. The internal antenna is
located along the top on the back side of your phone.
2. Once the phone finds a signal, the time, date, and day
appear in the display.
3. You’re now ready to place and receive calls.
Note:
If the phone is outside the Verizon Wireless coverage area the roaming
icon appears in the top of the display.
Turning Your Phone Off
䊳
Open the flip, then press and hold the
On/Off
button
on the right side of the phone.
Setting Up Voicemail
Voicemail allows callers to leave voice messages.
Note:
Airtime and long distance charges apply. Mobile to Mobile minutes do
not apply to Voicemail setup or retrievals.
Voicemail Setup
1. Press the
Voicemail
key .
2. When the recorded announcement begins, press to
interrupt (if applicable). An easy-to-follow setup tutorial
will begin. Follow the instructions to set up your new
password and record a greeting.
Note:
Once your voicemail account has been set up, you can use the
voicemail selection 5 (under the Messaging menu) to view details of
voice messages in your voicemail box.
u750.book Page 9 Sunday, April 5, 2009 8:40 PM
Page 15
10
Listening to Voicemail
1. Press the
Voicemail
key .
2. You are then prompted to enter your password followed by
key. Follow recorded prompts to listen to messages,
change administrative options, etc.
Inserting and Removing Your Memory Card
Inserting Your microSD™ Card
Note:
Your phone does not come with the microSD™ memory card, it must
be purchased as an accessory. See your service provider for more
information.
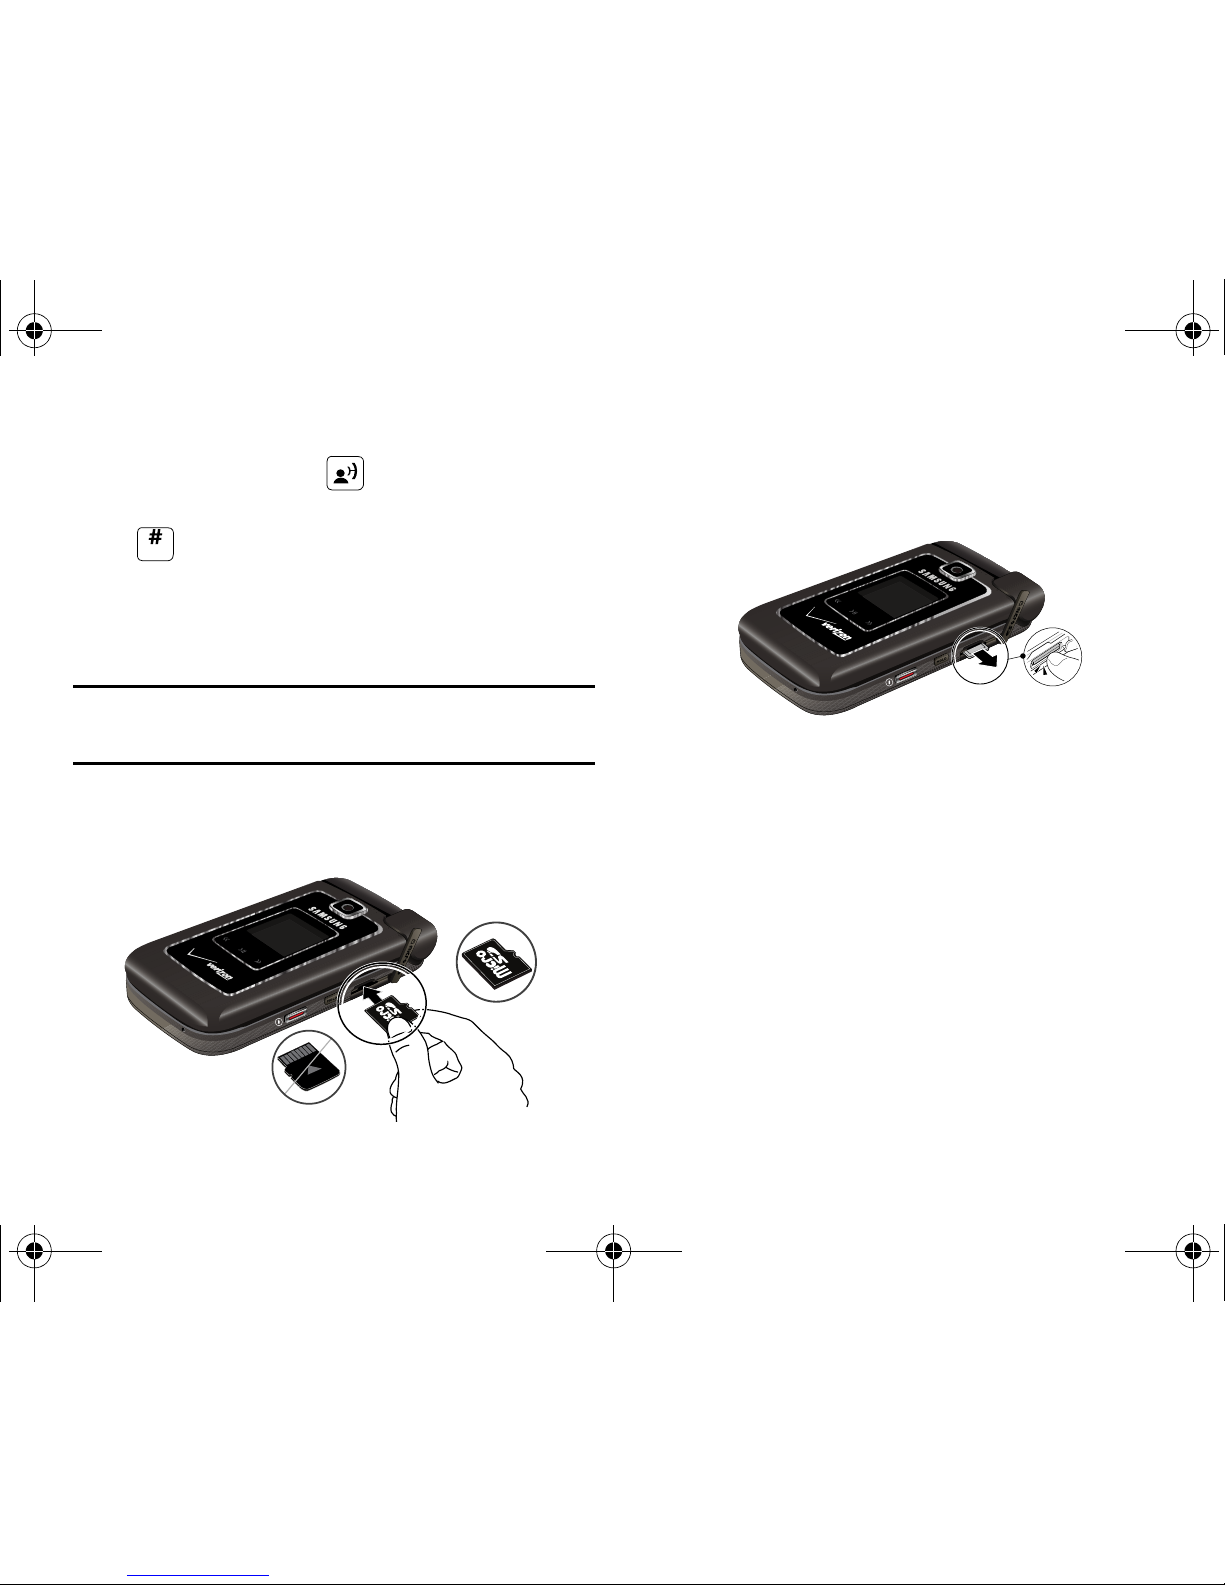
1. Lift memory card cover and insert the memory card, with
the contacts side down, into the memory card slot until it is
fully seated. Refer to the following illustration.
Removing Your Memory Card
1. Pull the microSD card cover out and turn to expose the
card slot.
2. Press in the microSD card to unlock and remove.
Incorrect
Correct
u750.book Page 10 Sunday, April 5, 2009 8:40 PM
Page 16
Getting Started 11
Memory Card Formatting
Formatting a microSD™ Card using your Alias™ 2
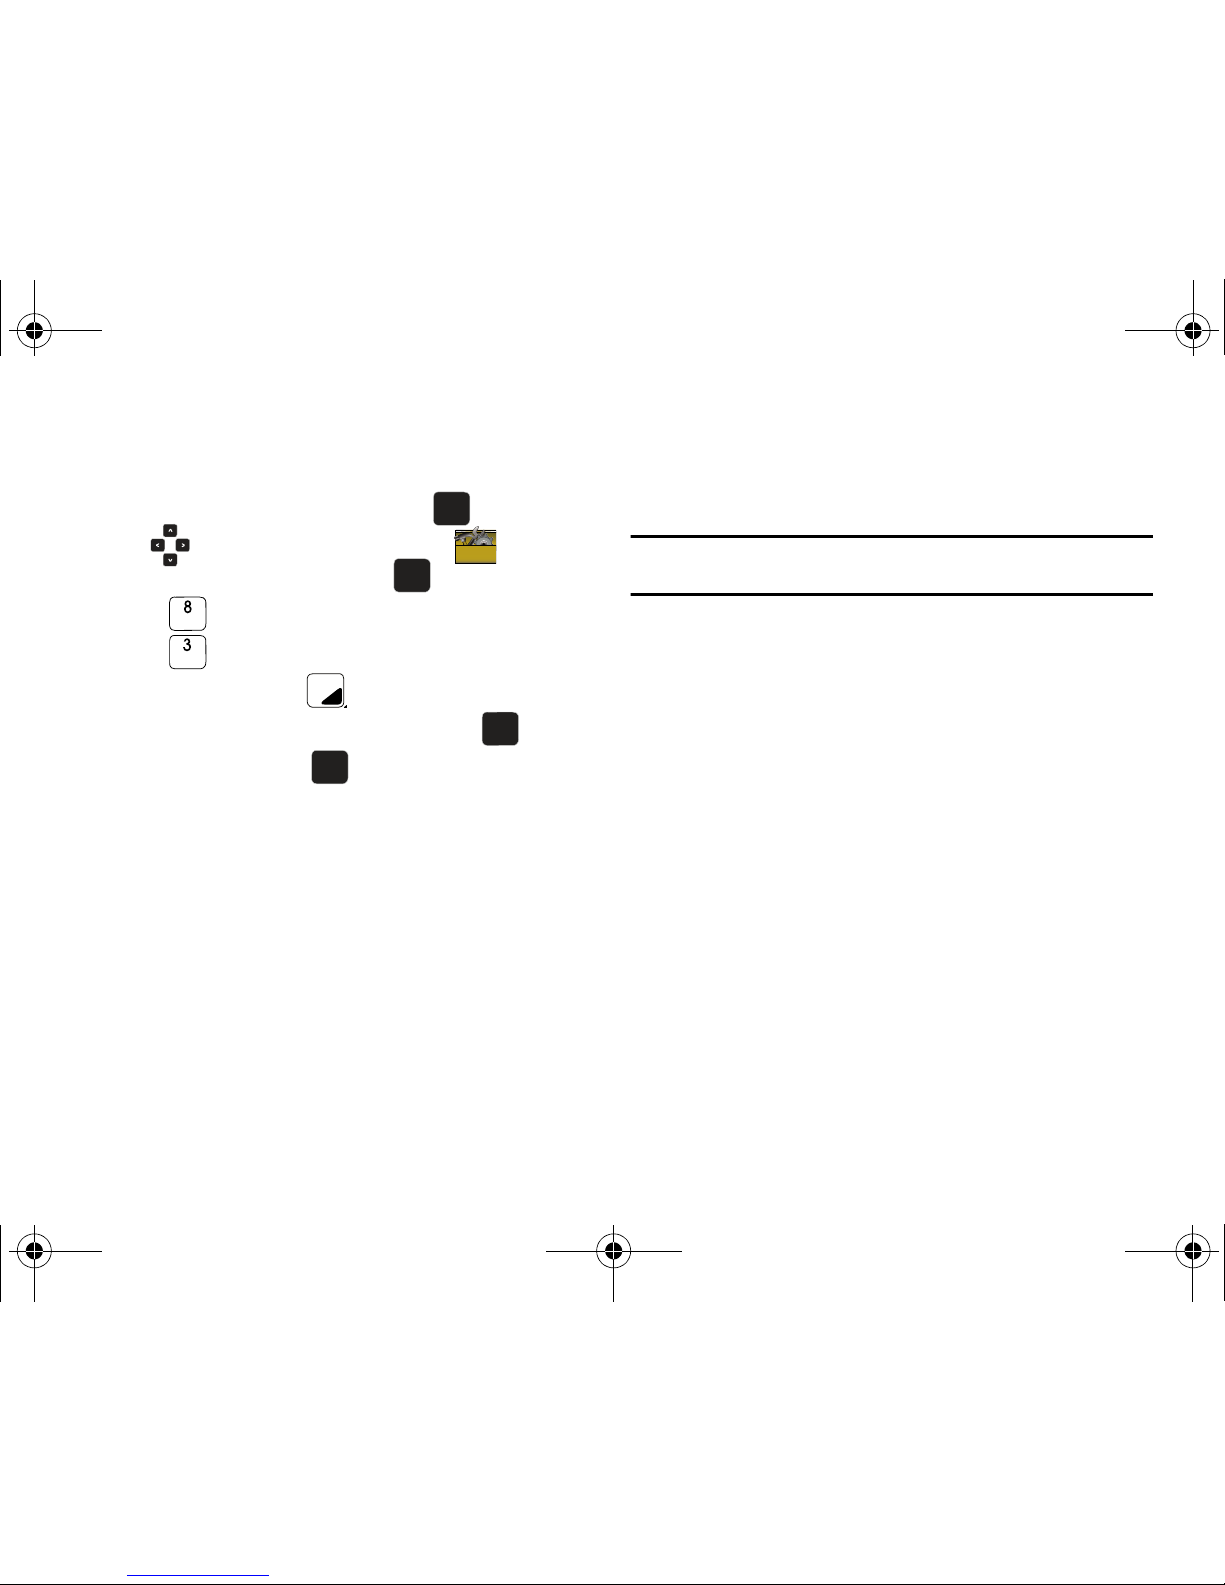
1. Open the flip in portrait mode and press
MENU
. Press
the
Directional keys to highlight the
Settings & Tools menu and press .
2. Press Memory.
3. Press Card Memory.
4. Press the right soft key Options.
5. The Format Card option is highlighted. Press .
6. Highlight Yes and press to format microSD™ card.
Formatting a microSD™ Card using your PC
For best playback of songs stored to the microSD™ memory
card, reformat your memory card with PC format FAT32.
Note:
Any content currently stored on the microSD™ memory card will be
lost after this procedure is performed.
1. Insert the microSD™ memory card into an SD card
adapter (purchased separately).
2. Insert the SD card adapter into the SD card reader slot.
3. Plug the SD card reader into a USB port on your PC.
4. On your PC, go to your My Computer directory and
highlight the drive that represents the SD card reader.
5. Right click and select the Format option.
6. Under the File System option, select FAT32 and click the
Start button. Your microSD™ memory card will be
reformatted.
7. Remove the microSD™ card from the SD card reader and
insert it back into your phone. The My Music directory will
automatically be created on the microSD™ memory card.
OK
OK
OKOK
OKOK
OK
OK
u750.book Page 11 Sunday, April 5, 2009 8:40 PM
Page 17
12
Section 2: Understanding Your Phone
This section outlines key features of your phone as well as
screens and icons that display when the phone is in use.
Features of Your Phone
–
High Speed Data (EvDo 1x Technology)
–
Global Positioning (GPS) Technology for VZ Navigator
SM
–
V CAST Music with Rhapsody
®
–
Personal Organizer (Calculator, Calendar, Alarm Clock, Stop Watch,
World Clock, Notepad, File Viewer)
–
Messaging Services (Standard and Enhanced TXT Messaging, Picture
Messaging, Video Messaging, Email Messaging, Voice Messaging,
Mobile Instant Messenger and Chat)
–
QWERTY keyboard for quick messaging
–
2.0 Megapixel Camera with Night Shot Mode
–
Advanced Speech Recognition
–
Speakerphone
–
Bluetooth® Wireless Technology **
**The Alias™ 2 supports the following Bluetooth profiles: Headset, Handsfree,
Stereo Bluetooth for music playback, Phonebook Access, Basic Printing, Basic
Imaging, Object Push for vCard and vCalendar and Serial Port.
The Alias™ 2 does not support all Bluetooth OBEX profiles. Go to
www.verizonwireless.com/bluetoothchart to check vehicle/accessory compatibility.
Closed View of Your Phone
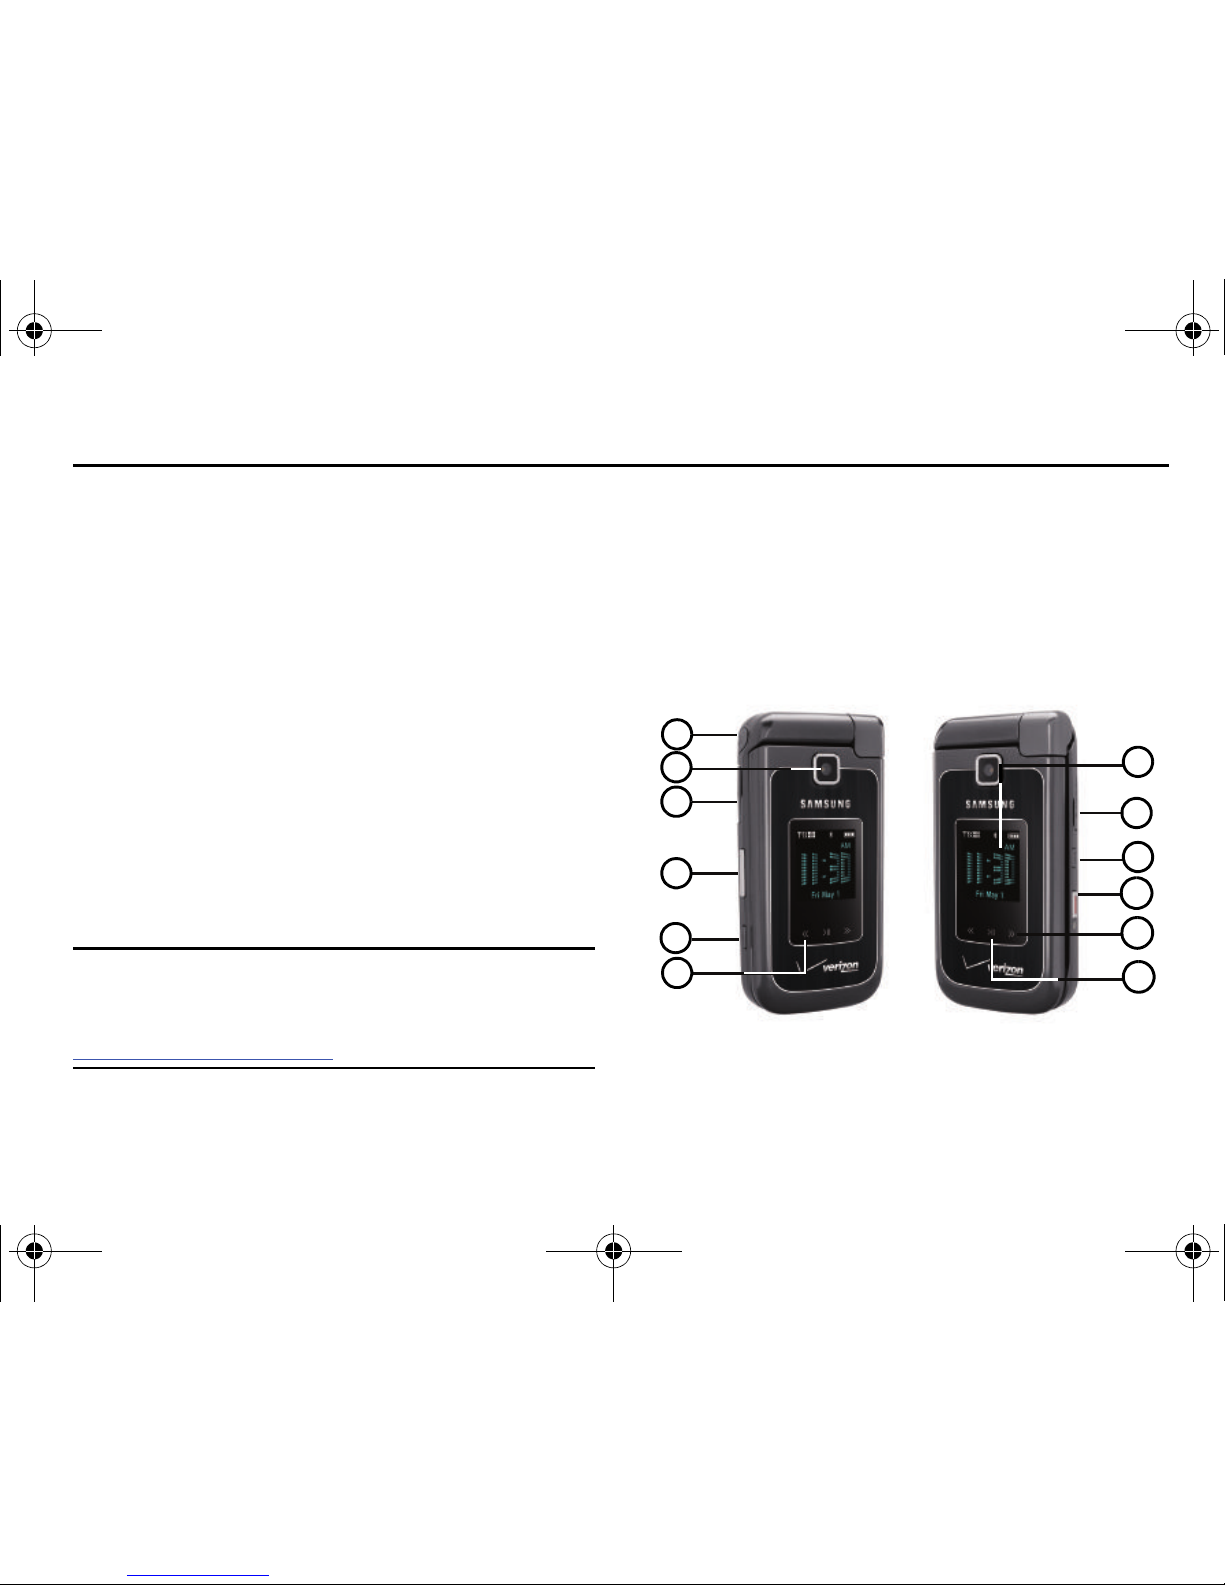
The following illustration shows the main external features of
your phone. For explanation of features; see “Features (Closed
view)” on page 13.
1
2
3
6
8
5
4
9
11
12
7
10
u750.book Page 12 Sunday, April 5, 2009 8:40 PM
Page 18

Understanding Your Phone 13
Features (Closed view)
1.
Headset Jack
: Allows you to plug in an optional headset for
safe, convenient conversations.
2.
Camera Lens
: Allows you to take photos.
3.
Power/Accessory Connector
: The power/accessory
interface connector is used to plug in the charging
accessories and also connect any available accessory
cables to your phone.
4.
Volume Key
: Allows you to adjust the master volume or
adjust the voice volume during a call. To mute the ringer
during an incoming call, press the volume key up or down.
Also press and hold the key, to activate Sound Off mode/
Normal mode.
5.
Voice Commands Key
: Allows you to access Voice
Commands.
6.
Rewind Key: Touch and hold to rewind music. Touch to go
to a previous song.
7.
External LCD
: External LCD shows signal and battery
strength, time, day, and date. It also displays incoming
calls or messages.
8.
microSD™ Memory Card Slot
: Allows you to insert a
microSD™ memory card (purchased separately) to add
additional memory and storage capacity.
9.
Hold Key
: Allows you to lock/unlock the music keys (i.e.,
Rewind, Play/Pause, and Fast Forward) on the front of the
phone.
10.
On/Off button
: Allows you to turn handset on and off.
11.
Fast Forward Key
: Touch and hold to fast forward music.
Touch to go to a next song.
12.
Play/Pause Key
: Touch play or touch to pause music
playing.
u750.book Page 13 Sunday, April 5, 2009 8:40 PM
Page 19
14
Open View of Your Phone
(Portrait Mode)
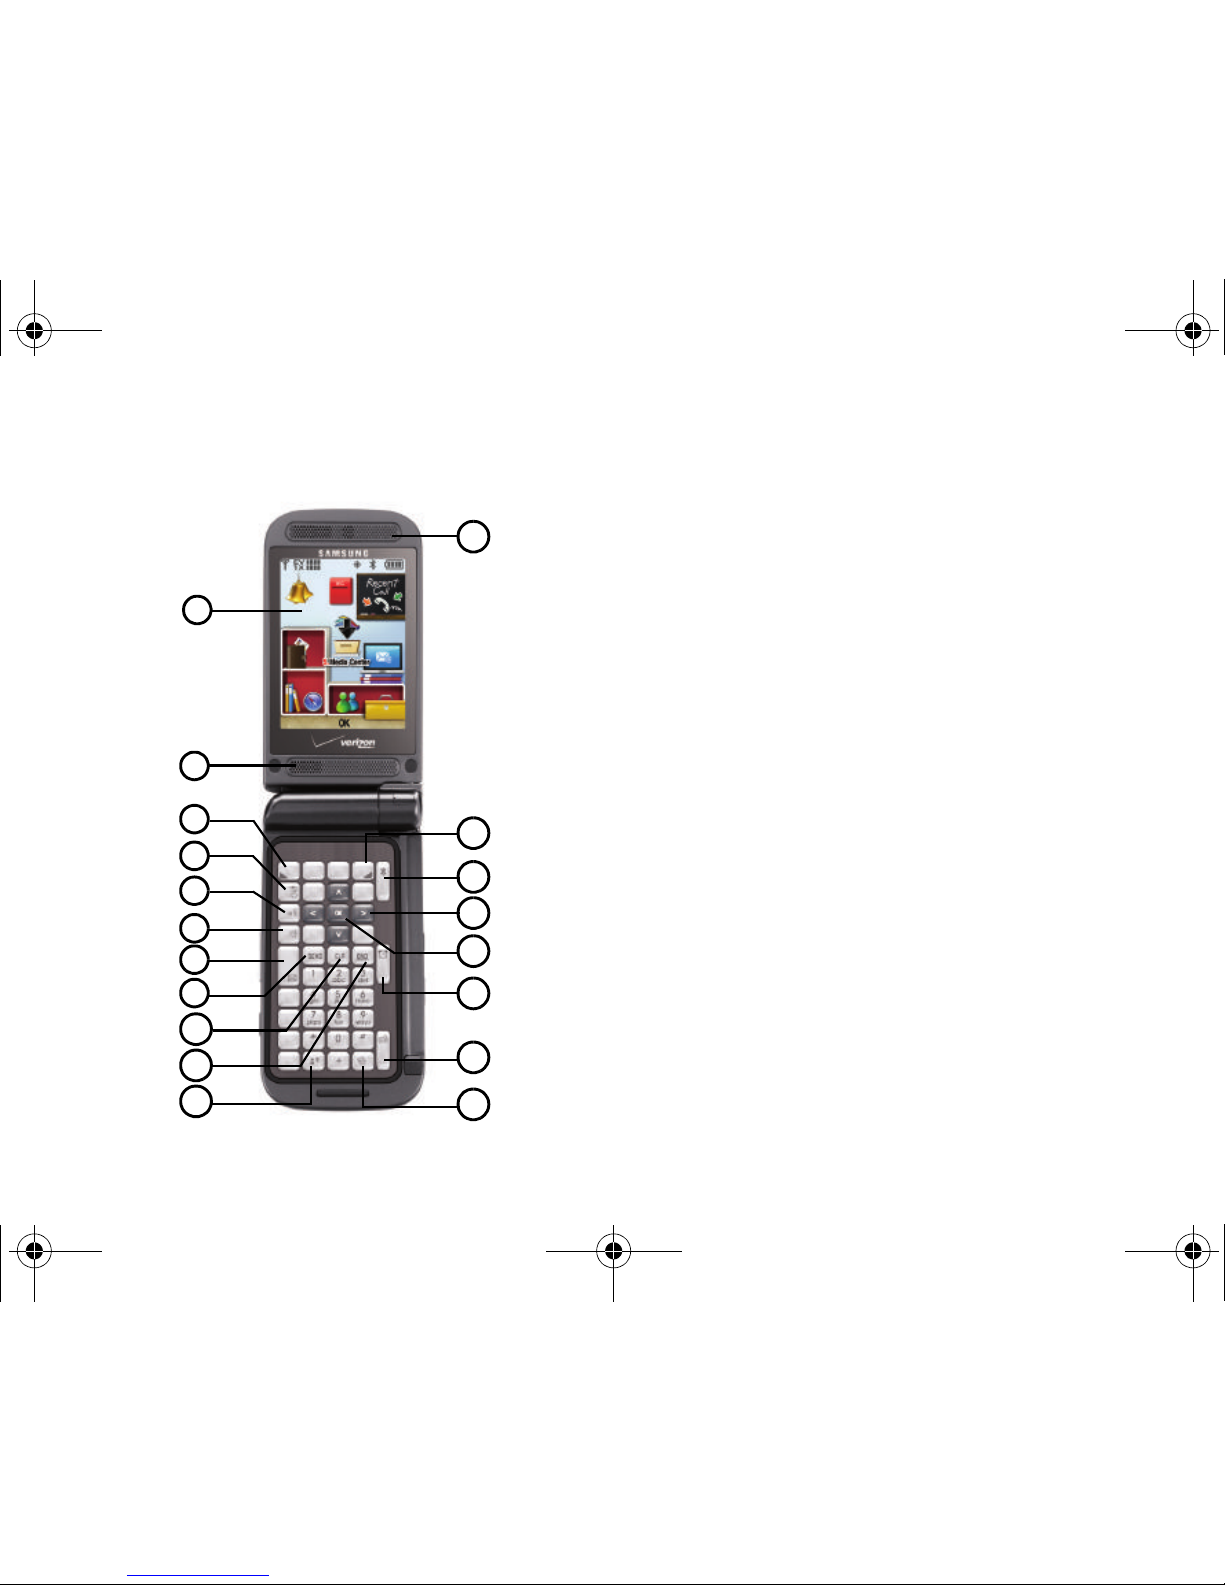
The following illustration shows the main features of the phone.
Features
1.
Internal LCD
: Displays all the information needed to operate
your phone.
2.
Speaker
: Music, Ringtones and Sounds are played through
the speaker.
3.
Left Soft Key
: This key is used to navigate through menus
and applications by selecting the choice indicated on the
lower left area of the display screen.
4.
Camera/Camcorder Key
: Press to activate the camera and
take photos. Press and hold to activate the camcorder and
take video.
5.
Voice Commands Key
: Press to access Voice Commands.
6.
Speakerphone Key
: Press and hold this key to enable/
disable the speakerphone option.
7.
Text Message Key
: Launches the New Txt Msg screen.
8.
Send Key
: Allows you to place or receive a call. From the
Home screen, press the key once to view All Calls log.
9.
Back/Clear Key
: Deletes characters from the display when
you are in text entry mode. Press to return to the previous
menu or screen when navigating features.
2
5
4
3
1
6
8
7
14
15
16
9
10
12
18
19
17
11
13
u750.book Page 14 Sunday, April 5, 2009 8:40 PM
Page 20
Understanding Your Phone 15
10.
End Key
: Ends a call. When you receive an incoming call,
press to send the call directly to voicemail.
11.
Voicemail/Visual Voice Mail Key
: Press to dial Voicemail or
open Visual Voice Mail (subscription required).
12.
Earpiece
: The earpiece allows you to hear the other caller.
13.
Right Soft Key
: This key is used to navigate through menus
and applications by selecting the choice indicated on the
lower right area of the display screen.
14.
Bluetooth
: Turn Bluetooth on or off.
15.
Directional Key
: This key allow you to scroll through the
phone menu options.
16.
OK Key
: Pressing when navigating through a menu accepts
the highlighted choice in a menu, or performs an action in
an application.
17.
Alarms
: Launches the Alarm Clock screen.
18.
Games
: Launches the Games screen.
19.
Vibration Key:
Press to activate vibration mode.
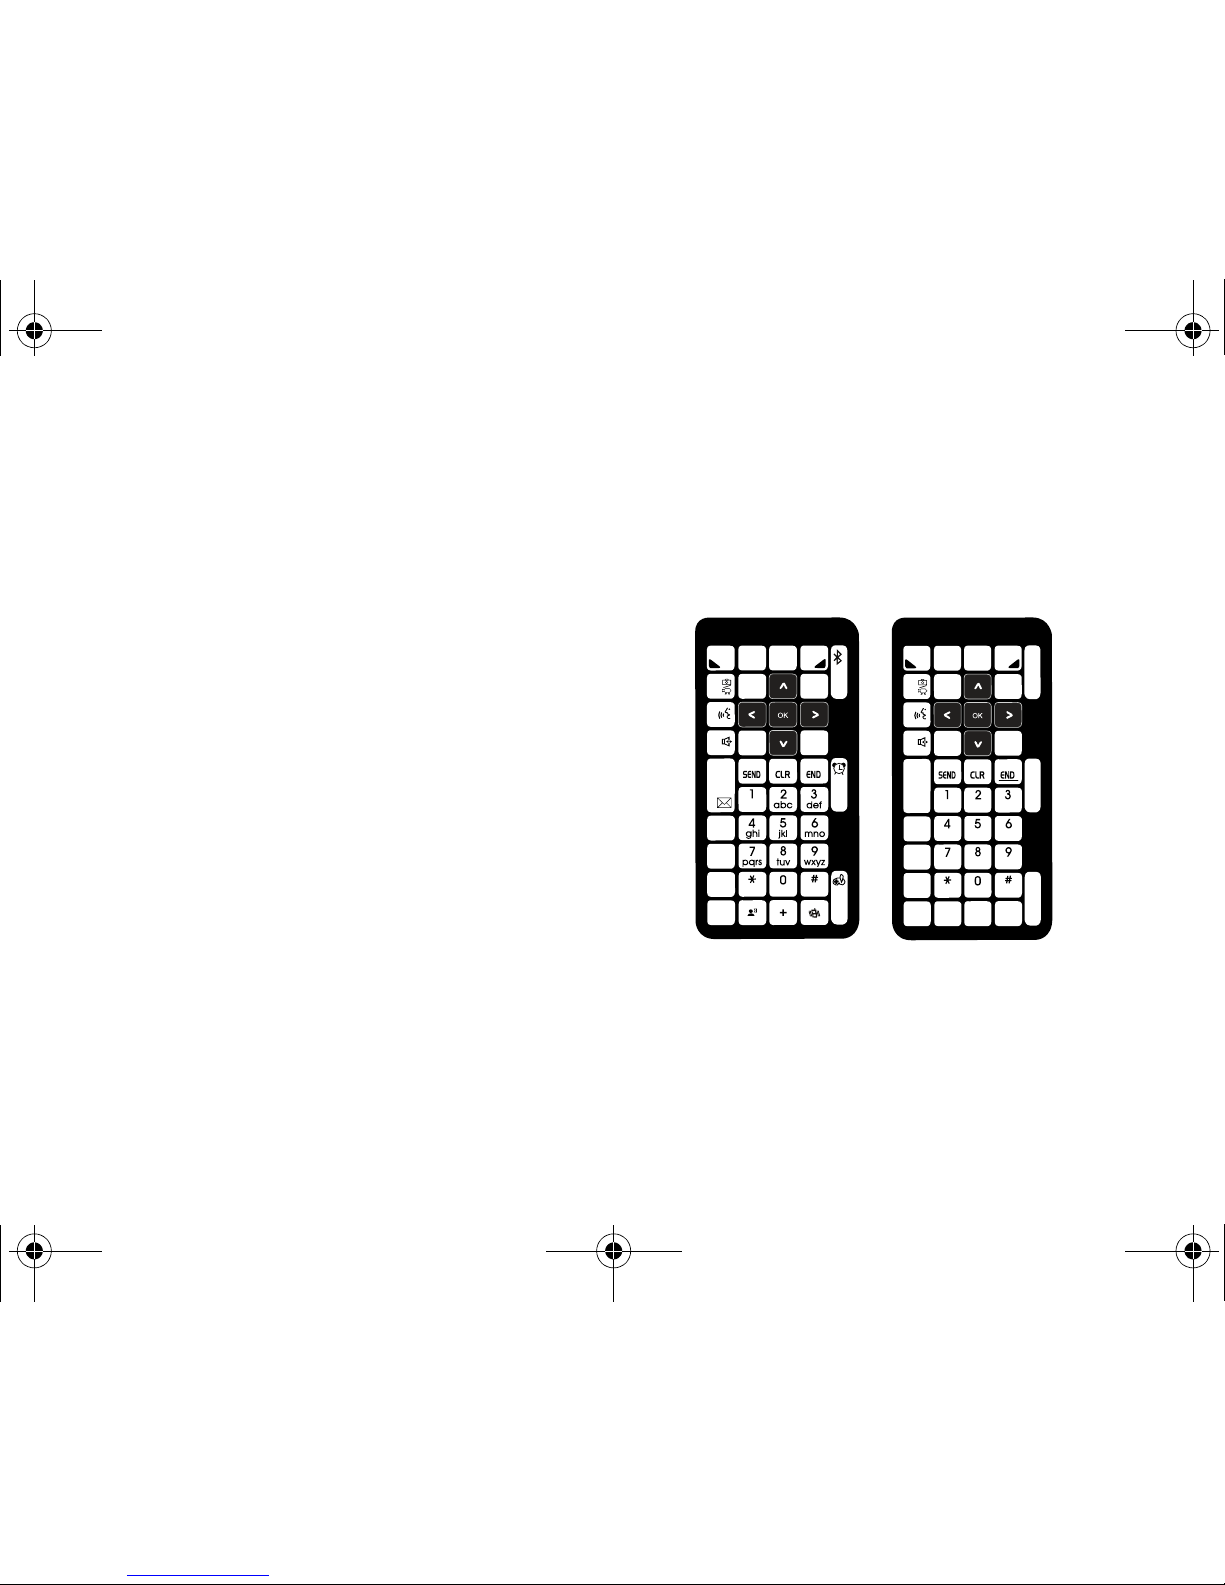
Keypads
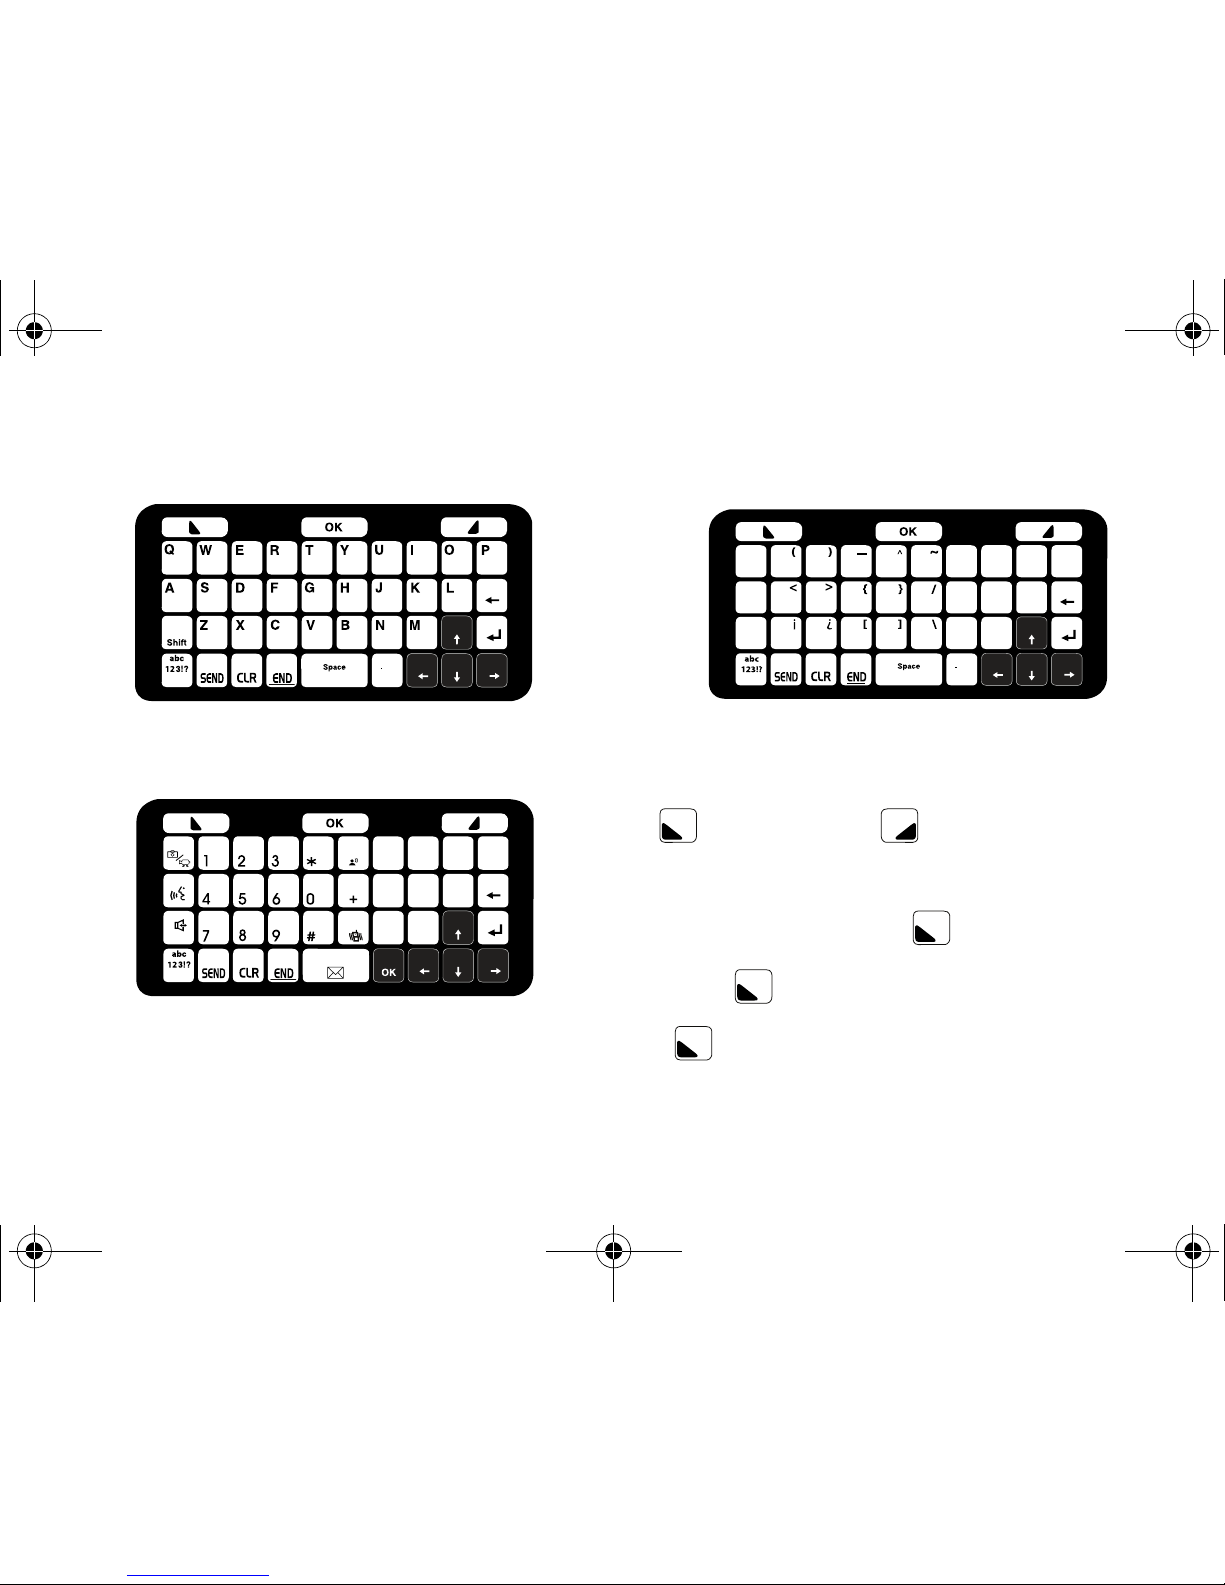
Your phone can be opened either vertically or horizontally. The
keyboard changes depending upon whether the phone is in
portrait or landscape orientation.
Portrait Keypad - Numeric
u750.book Page 15 Sunday, April 5, 2009 8:40 PM
Page 21
16
Landscape Keypad - QWERTY
Landscape Keypad - Numeric
Landscape Keypad - Symbols
Command Keys
Functions for the soft keys are defined by what appears above
each in the display. There are two soft keys, the left soft key
and the right soft key .
Left Soft Key
Some functions of the left soft key are as follows.
•
Press the
Message
(left) soft key to open the Messaging menu.
•
When the left soft key function is
Settings
, press the
Settings (
left)
soft key to view settings for the feature.
•
When the left soft key function is
Edit
, press the
Edit
(left) soft key
to edit a Contact or Profile setting.
u750.book Page 16 Sunday, April 5, 2009 8:40 PM
Page 22
Understanding Your Phone 17
Right Soft Key
Some functions of the right soft key are as follows.
•
Press the
Contacts
(right) soft key to open your Contacts list.
•
When the right soft key function is
Options
, press the
Options
(right)
soft key to view more options for the current menu.
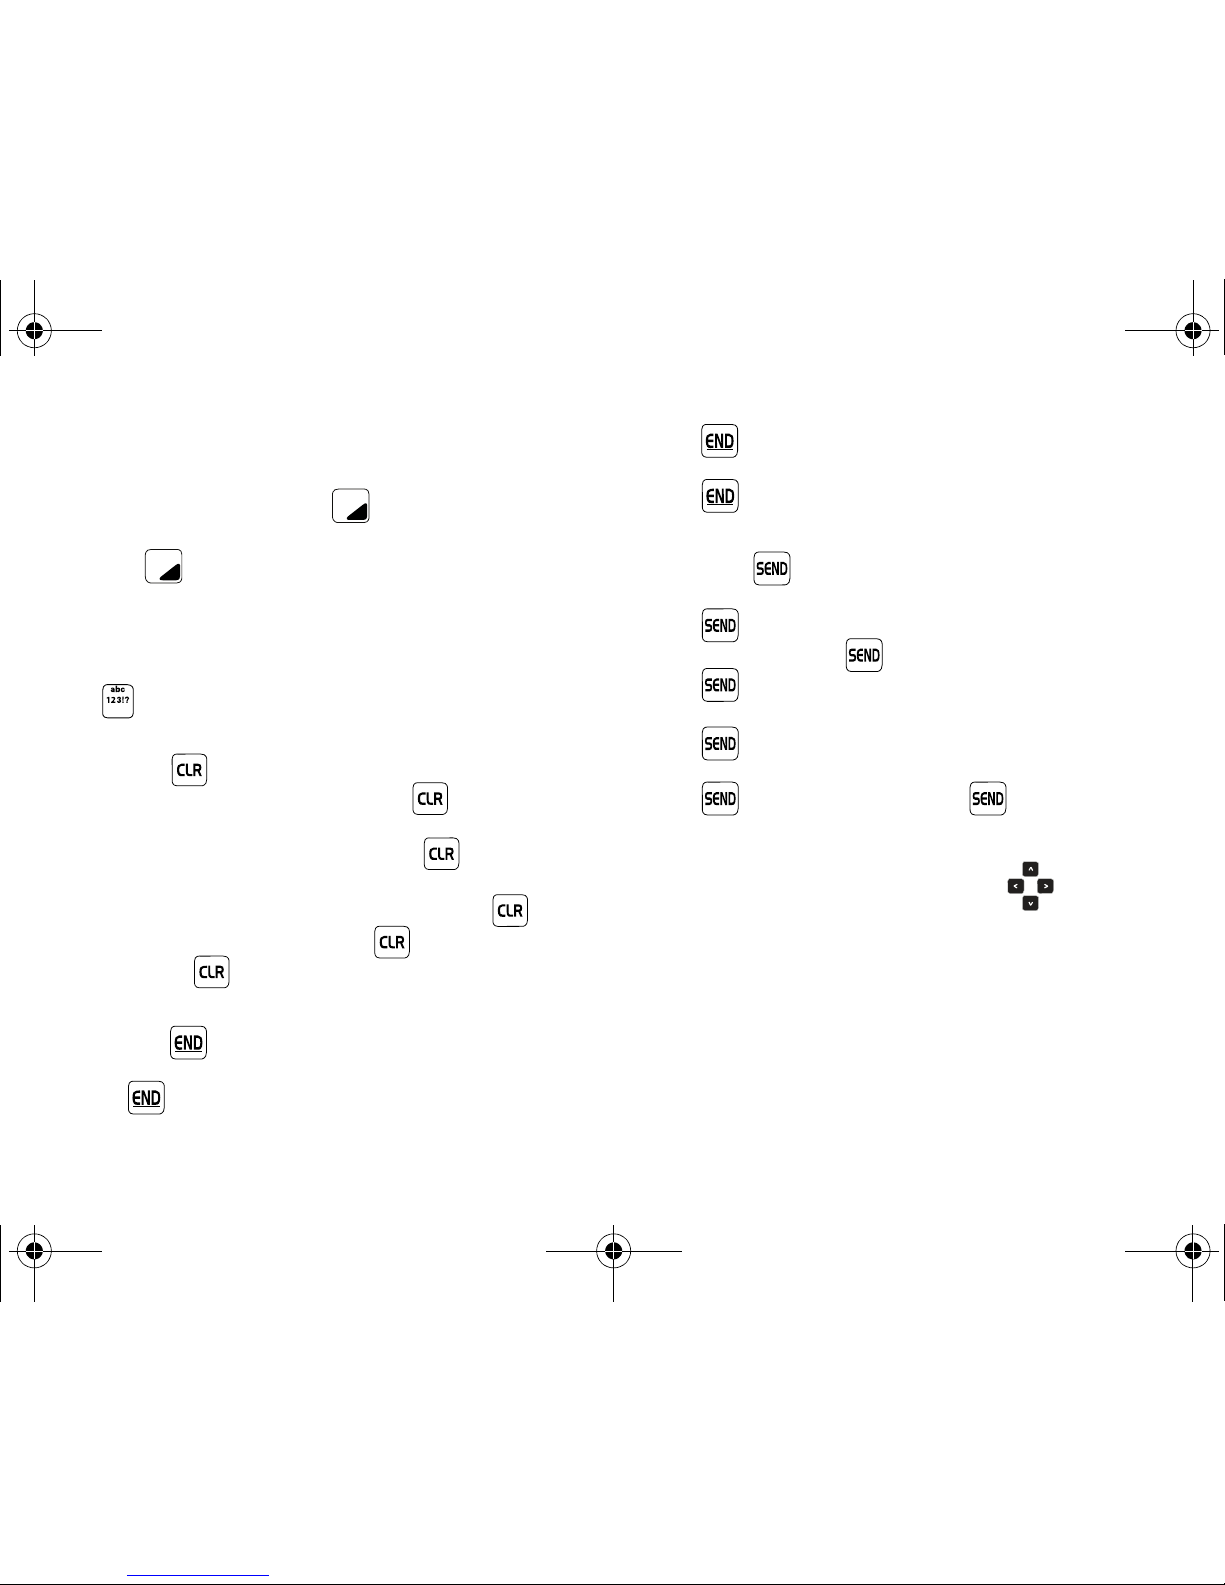
Text E ntr y M o de Key
This key is limited to Landscape mode:
In text fields, while in landscape mode press the
Text E n try M od e
key to toggle between Abc,123!? and Symbols keypad.
Clear Key
The
CLR
key is used to erase or clear numbers, text, or
symbols from the display. You can also use to return to a
previous menu or to return to the Home screen from any menu.
•
If you enter an incorrect character, briefly press to backspace
(and delete) the character.
•
To erase the previous word in a sentence, press and hold .
•
To back up one menu level, briefly press .
•
Press and hold to return to the Home screen.
End Key
The
End
key is used to end a call or to return to the Home
screen from any menu or cancel the last input.
•
Press to disconnect a call.
•
Press to return to the Home screen from any menu, or to cancel
the last input.
•
Press to send an incoming call directly to Voicemail.
Send Key
The
Send
key is used to answer calls, dial calls, and to
recall the last number(s) dialed, received, or missed.
•
Press to answer calls.
•
Enter a number and press to make a call.
•
Press from the Home screen to display a list of all calls to and
from your phone.
•
Press twice from the Home screen to call the most recently
dialed, received, or missed number.
•
Press to pick up a waiting call. Press again to switch
back to the other call.
Directional Keys
Use the Directional keys (up, down, left, right) to browse
menus, sub-menus, and lists. Each key also acts as a shortcut to
launch applications. The Directional keys can be customized to
launch your favorite application. For more information, refer to
“Set Shortcut Keys” on page 95.
u750.book Page 17 Sunday, April 5, 2009 8:40 PM
Page 23
18
Camera Key
From the Home screen, press
Camera
key to activate the
camera. While in camera mode, press the Camera key to take a
photo.
Voice Commands Key
From the Home screen, press the
Voice Commands
key to
activate Voice Commands.
Speakerphone Key
With the flip open, press the
Speakerphone
key to switch
from using the earpiece to the speakerphone before or during a
call. Use the volume keys (located on the left side of your phone)
to adjust the volume. Press the
Speakerphone
key to enable
and disable the speakerphone option.
When answering a call, press and hold the Speakerphone key
. To end the call, press the End key . After the call has
ended the speakerphone function turns off automatically.
New Text Message Key
From the Home screen, press the
Text Message
key to
create a Text Message.
Bluetooth Key
Open the flip in portrait mode and press the
Bluetooth
key to
to turn Bluetooth On/Off on your device.
Alarm Clock Key
Open the flip in portrait mode and press the
Alarm Clock
key
to open the Alarm Clock menu.
Games Key
Open the flip in portrait mode and press the
Games
key to
open Games menu.
Vibration Mode Key
Open the flip in portrait mode and press the
Vibration Mode
key
to set your incoming call alert to vibrate.
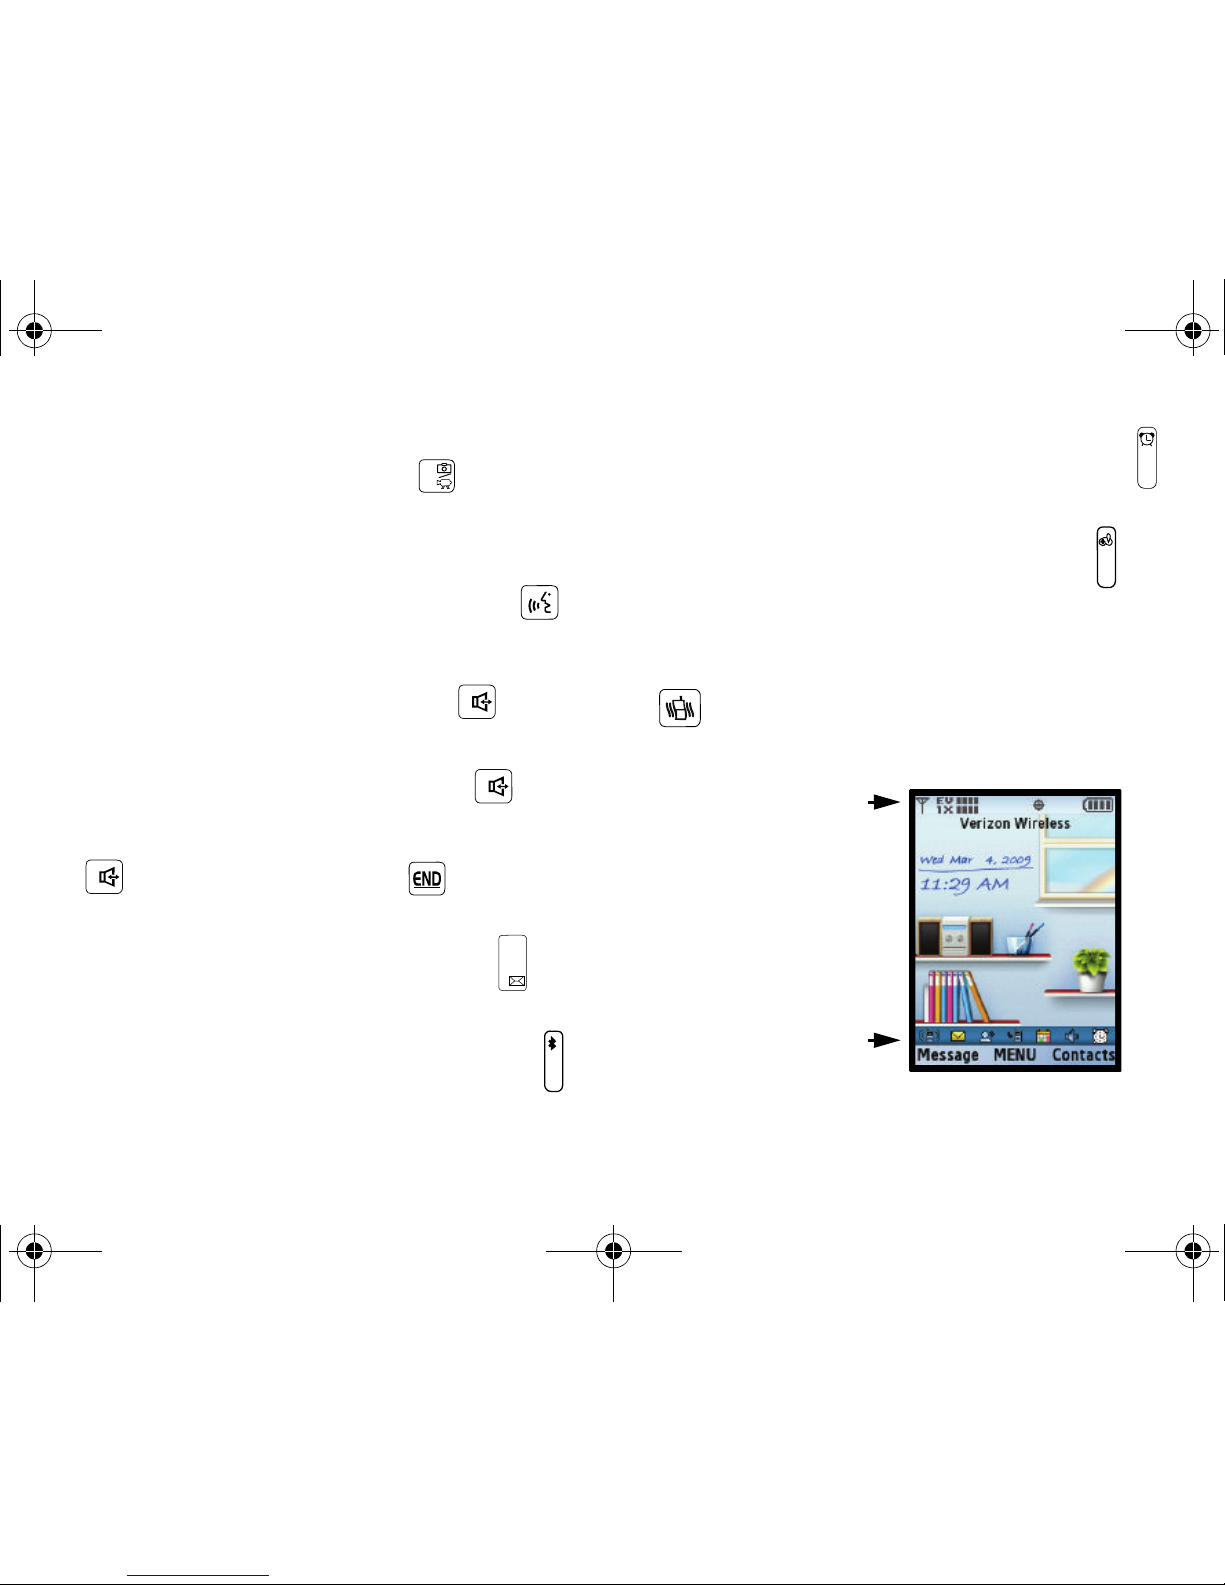
Understanding the Home Screen
The top annunciator line
of your phone’s display
contain icons that indicate
network status, battery
power, signal strength,
connection type and
more.
The lower area of the
Home screen shows icons
that indicate feature and
function status.
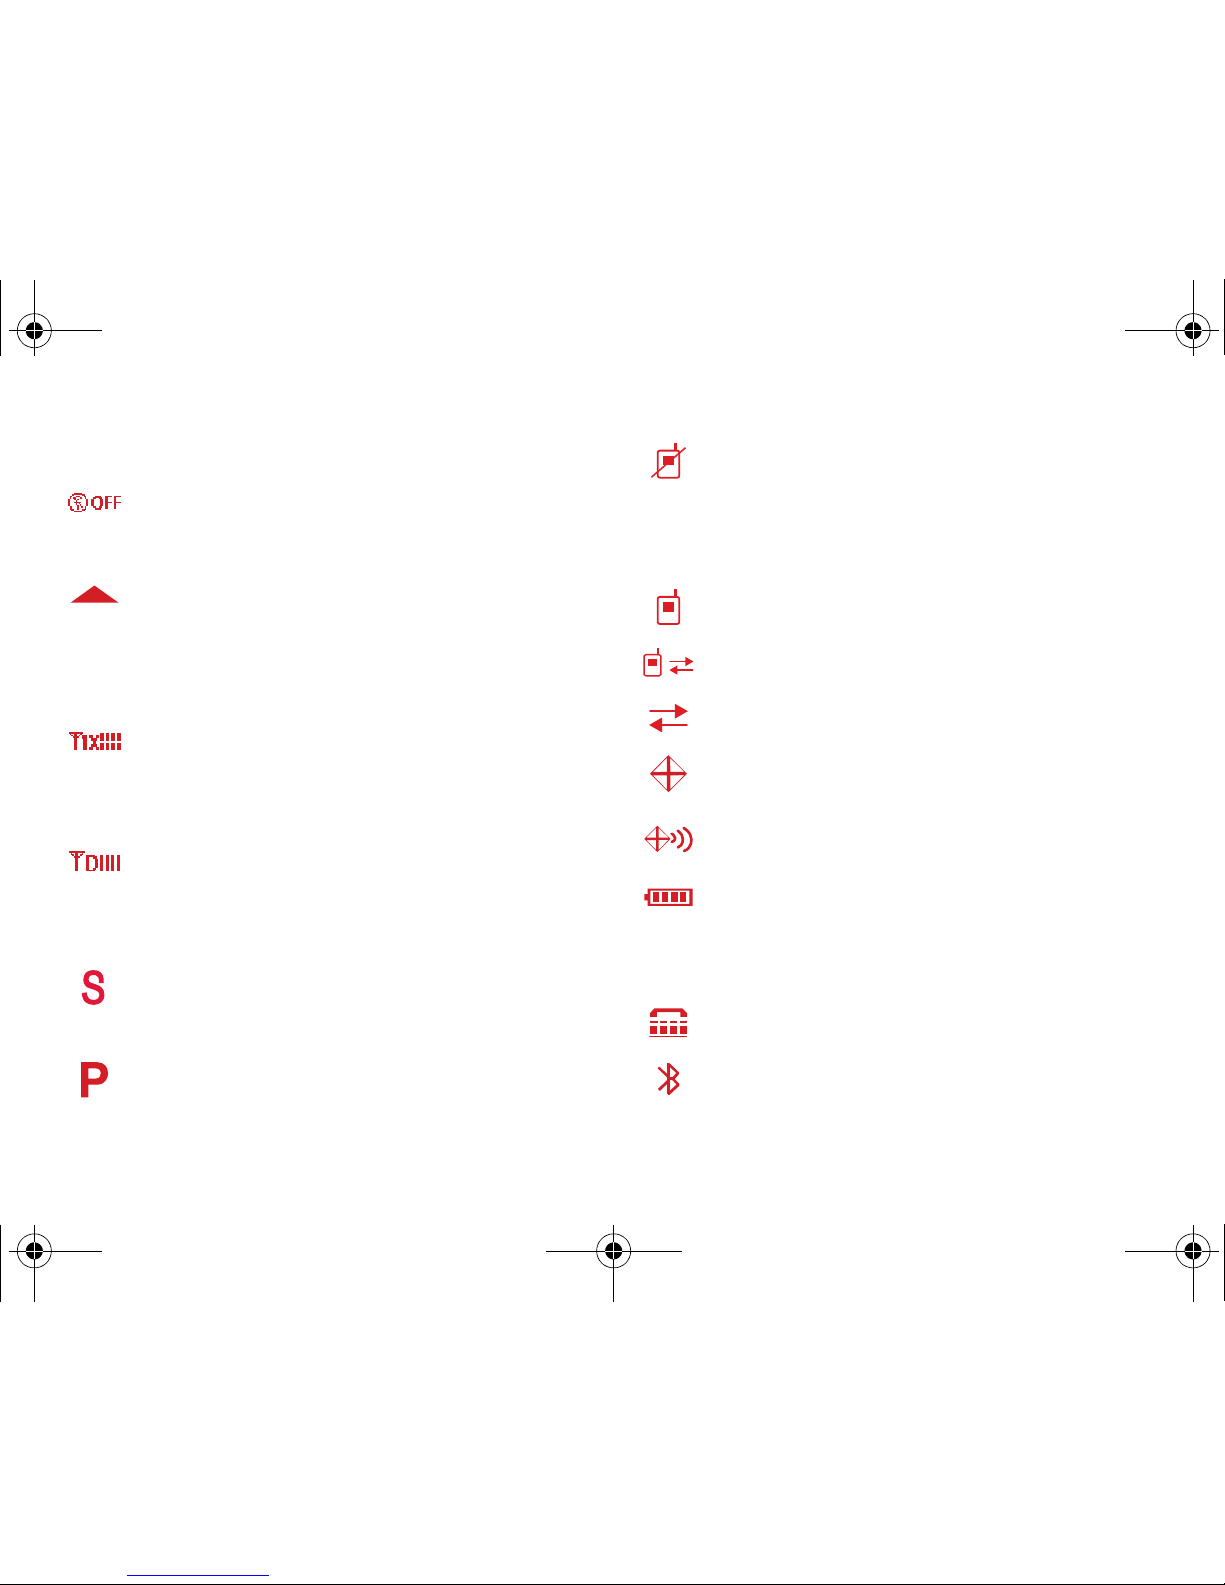
The following list contains icons that may appear in your display.
u750.book Page 18 Sunday, April 5, 2009 8:40 PM
Page 24
Understanding Your Phone 19
Display icons
Airplane Mode
: Appears when Airplane Mode is on. When
on, all RF functions for your phone are disabled, and you
cannot use your phone to place or receive calls.
Roaming
: Your phone is outside your home area. While
roaming, another wireless provider may be handling your
call. The service rate for the call may be higher than those
made from within your home area. Please refer to Verizon
Wireless for roaming rates.
1X signal streng
th: Indicates your phone is using the CDMA
1X protocol. Appears when your phone is on and indicates
the current signal strength. More bars indicate a stronger
signal.
D signal strength
: Appears when your phone is receiving
digital data. Appears when your phone is on and indicates
the current signal strength. More bars indicate a stronger
signal.
SSL
: Indicates the secure socket layer is actively
transmitting your communications over the internet in an
encrypted format.
Voice Privacy
: Prevents eavesdropping over a CDMA traffic
channel.
No service
: Your phone cannot find a signal because you’re
outside a service area. You cannot make or receive calls.
Wait for a signal or move to an open area to find a signal. This
indicator always appears when you first turn on your phone
and disappears once service is located.
Voice Call
: Indicates a call in progress.
Data Call
: Indicates a data call in progress.
Dormant
: Indicates no incoming or outgoing data.
E911
: Indicates Global Positioning Service (GPS) for 911 is
set to On for emergency calls only.
Location On
: Global Positioning Service is set to On for
location and 911 calls.
Battery Level
: More bars indicate a greater charge. When
the battery is low, an empty battery icon flashes and the
phone sounds an alert, which indicates your phone is about
to shut down.
TTY
: Indicates that TTY is enabled.
Bluetooth On
: Indicates that Bluetooth wireless technology
is turned on.
u750.book Page 19 Sunday, April 5, 2009 8:40 PM
Page 25
20
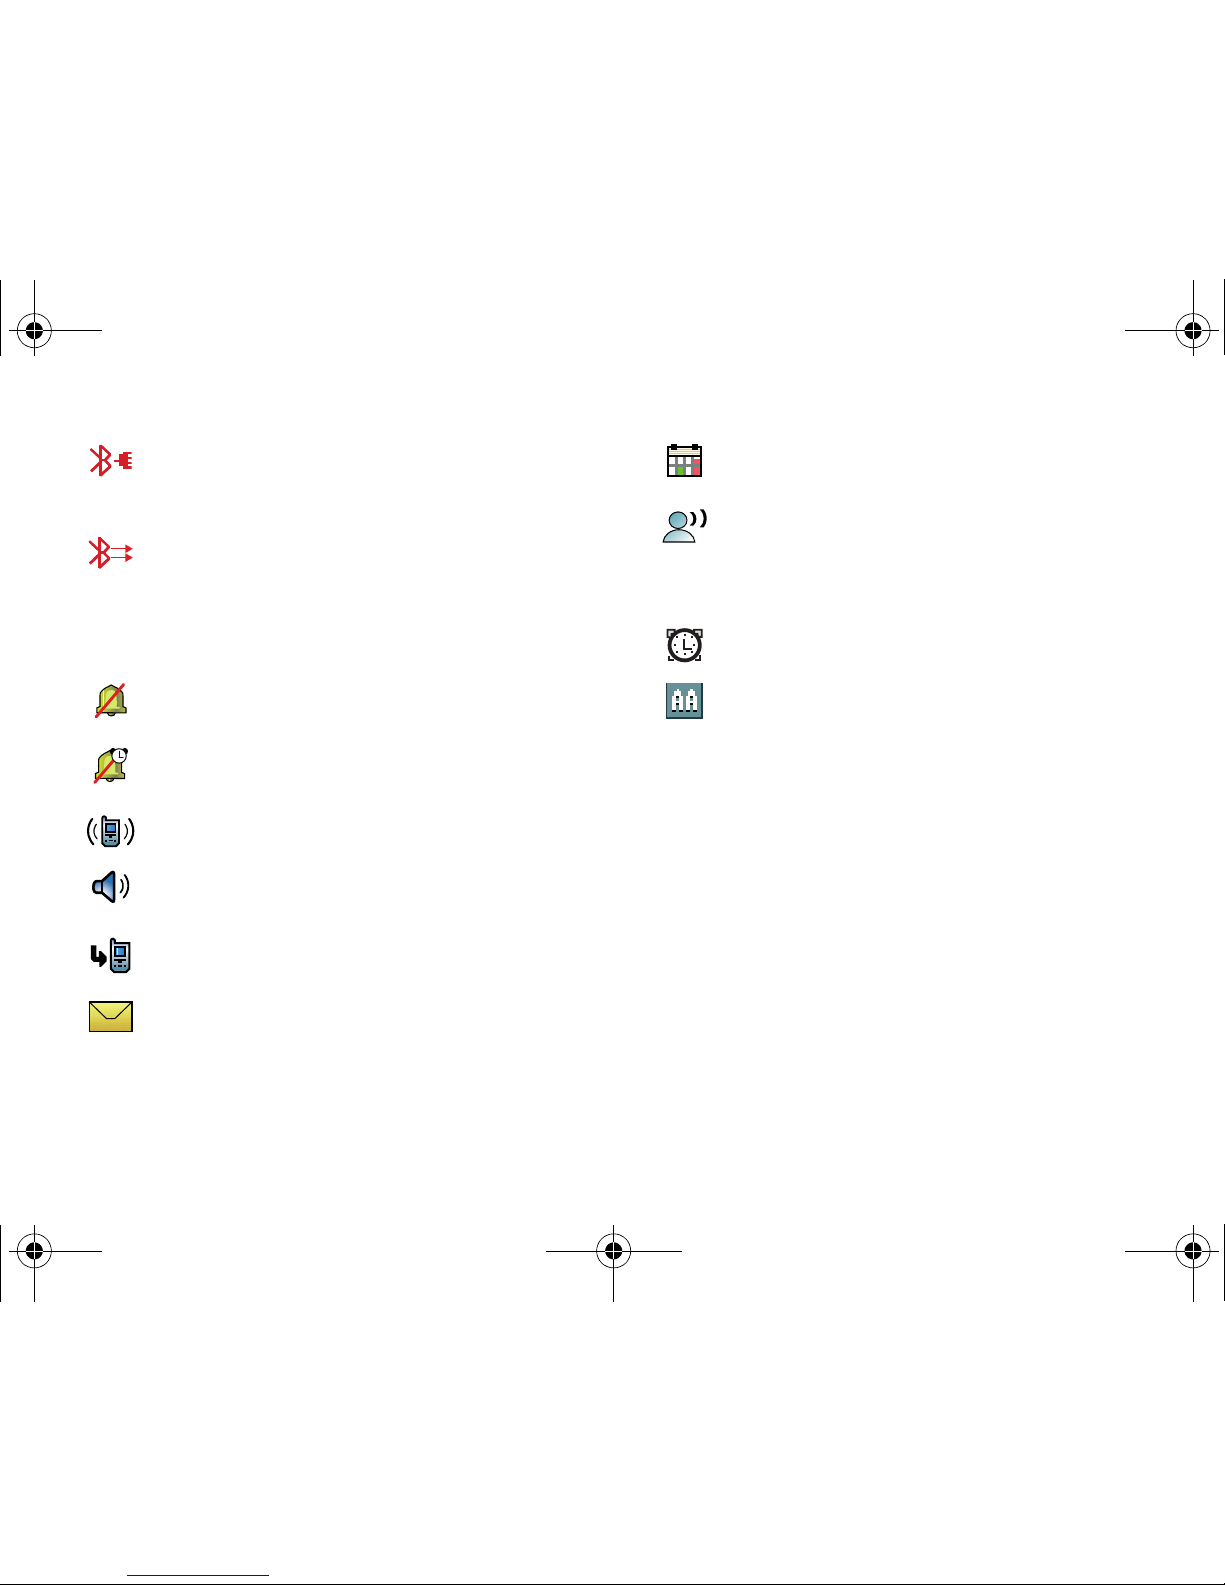
Bottom Display Icons
Bluetooth Connected
: Indicates Bluetooth wireless
technology is turned on and is paired with another
Bluetooth-enabled device.
Bluetooth Active
: Indicates that Bluetooth wireless
technology is connected to another device and receiving or
pushing data.
All Sounds Off
: The ringer is silenced for all alerts, incoming
calls, and incoming messages.
Alarm Only
: Your phone will only ring when the set alarm
sounds.
Vibrate On
: Your phone vibrates upon receiving a call.
Speakerphone
: Your phone switches to speakerphone
instead of earpiece.
Missed Calls
: Your phone displays this icon when calls are
missed.
New Msgs
: You’ve received a new text, page or web alert
message. You’re also notified of a new message by
animations and sound.
Calendar Appt:
Your phone displays this icon when you have
a calendar event scheduled.
Voicemail:
You’ve received a voicemail message, page or
web alert message. You have one or more unread voicemail
messages in your voicemail box. (Only applicable on the
Verizon Wireless Network.)
Alarm On
: Indicates that your phone has a set alarm.
Auto Answer
: Automatic answer is enabled. Your phone
automatically picks up calls after the designated time with
the stereo headset or when your Bluetooth headset or
Bluetooth hands-free car kit is connected.
u750.book Page 20 Sunday, April 5, 2009 8:40 PM
Page 26
Call Functions 21
Section 3: Call Functions
This section describes how to make or answer a call. It also
includes the features and functionality associated with making or
answering a call.
Making a Call
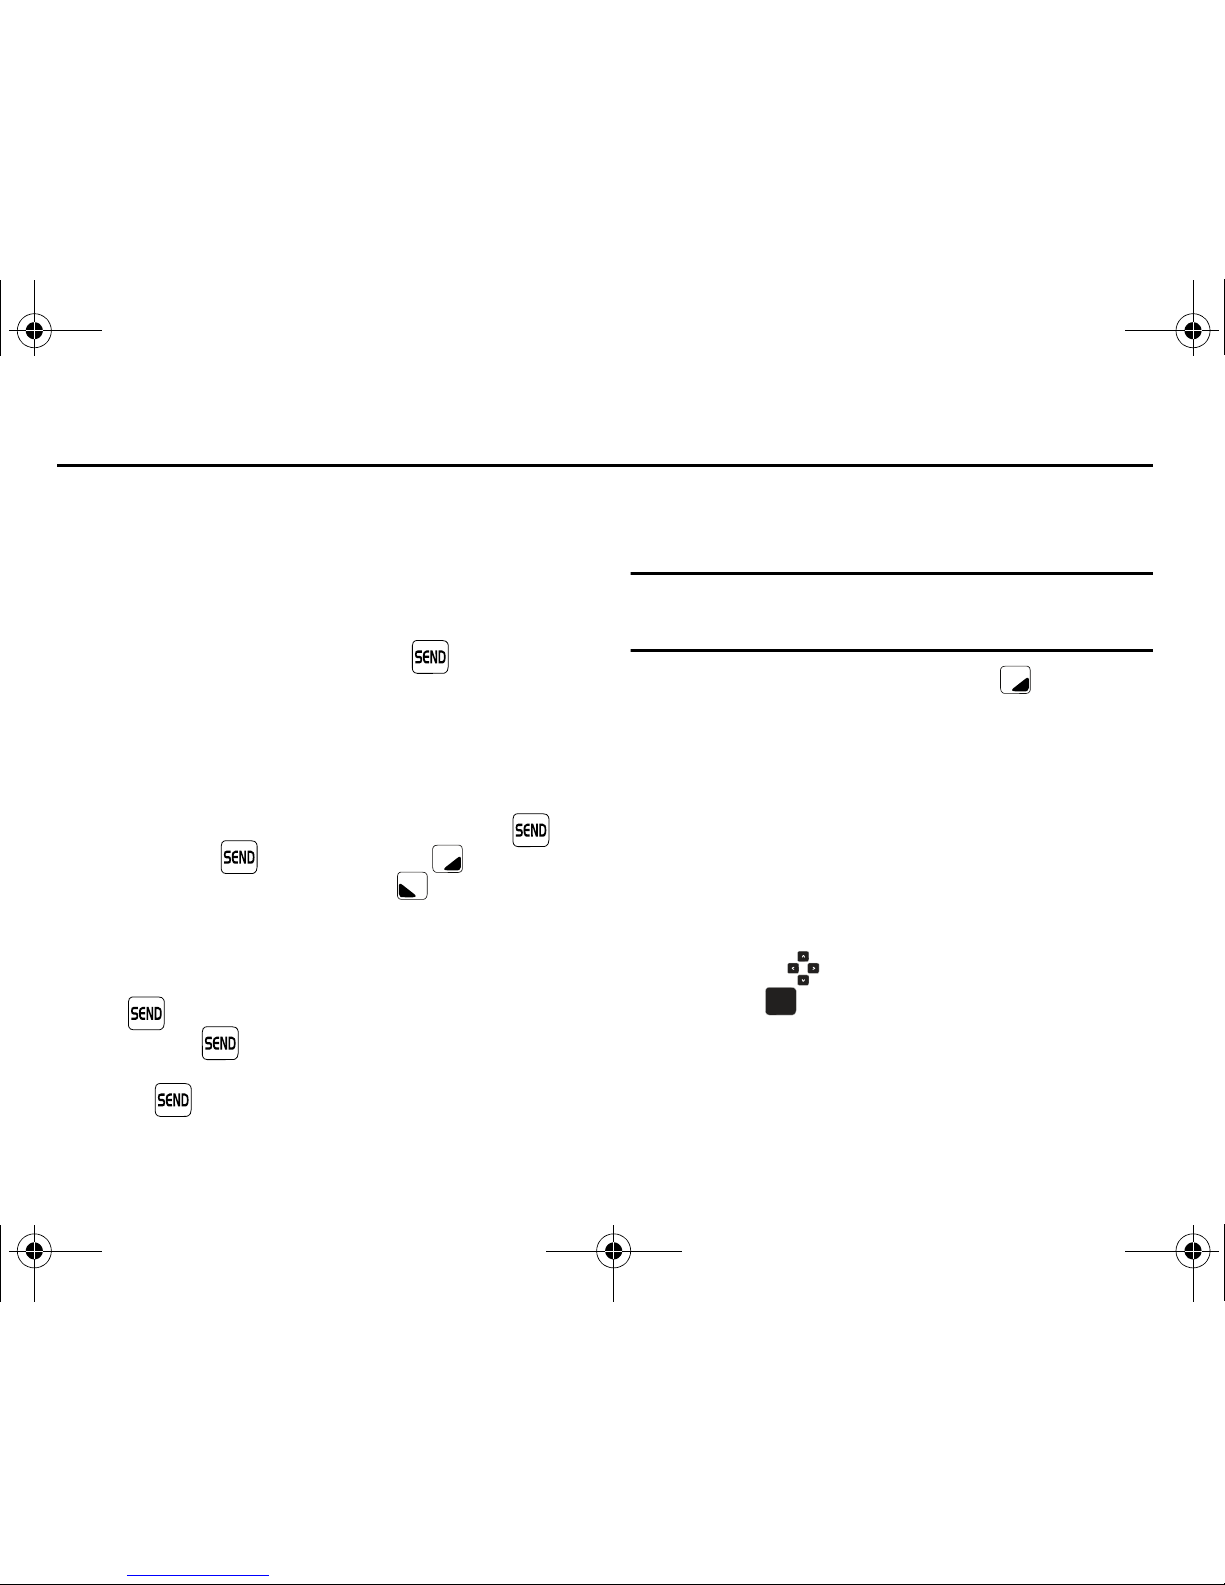
1. Open the flip in portrait mode and enter the number to call
using the numeric keypad and press .
Answering a Call
You can answer calls with either the flip open or closed.
To answer a call with the flip in the closed position; open the flip.
The call will be automatically answered.
To answer a call with the flip in the open position; press to
answer the call, or , or the right soft key Ignore to
send the call to voicemail, or left soft key Quiet to silence
the ringer.
Answering Call-Waiting Calls
When you receive a call while on a call:
•
Press to answer the new call.
•
When you press and answer the incoming call, the original
caller is placed on hold.
•
Press the key again to return to your original call.
Call In-Progress Options
Access numerous menus and features even while in a call.
Note:
If the call is disconnected while accessing the Call-In Progress Options,
the options disappear from the display and the phone eventually
returns to the Home screen.
1. While in a call, press the right soft key Options. The
following menu items appear in the display.
•New Message
: Allows you to create a new text message.
• Contact List
: Opens Contact list to view your contacts.
• Recent Calls
: Displays recent received, missed and dialed calls.
• Bluetooth Menu
: Displays the Bluetooth menu.
• Main Menu
: Displays the Main menu.
•Notepad
: Opens the Notepad.
• Whisper Mode
: Increases microphone to maximum volume level.
–
Press the Directional key to highlight a menu.
–
Press to open the highlighted menu or to activate the feature.
• Voice Privacy:
Prevents eavesdropping over a CDMA traffic
channel.
OKOK
u750.book Page 21 Sunday, April 5, 2009 8:40 PM
Page 27
22
Note:
During a call turn on Whisper Mode when speaking softly or when the
caller cannot hear your voice clearly. This mode is useful in meetings
or public places.
2. Press the left soft key Mute/Unmute to mute the call.
Press again to unmute the call.
Recent Calls
When you place, miss, or receive a call, a record of the call is
saved in Recent Calls, which is a listing of the different types of
calls you can either receive or make. These types of calls are:
•
Missed
: Displays any missed calls.
•
Received
: Displays any received calls that were answered.
•
Dialed
: Displays all outgoing calls made from your phone.
•
All
: Displays all missed, received, and outgoing calls made from your
phone.
•
View Timers
: Displays amount of time for: Last Call, All Calls, Received
Calls, Dialed Calls, Roaming Calls, Transmit Data, Received Data, Total
Data, Last Reset, Lifetime Calls, and Lifetime Data Counter.
Note:
The menu navigation instructions for this section uses the default
My Place
display theme,
Grid menu
layout.
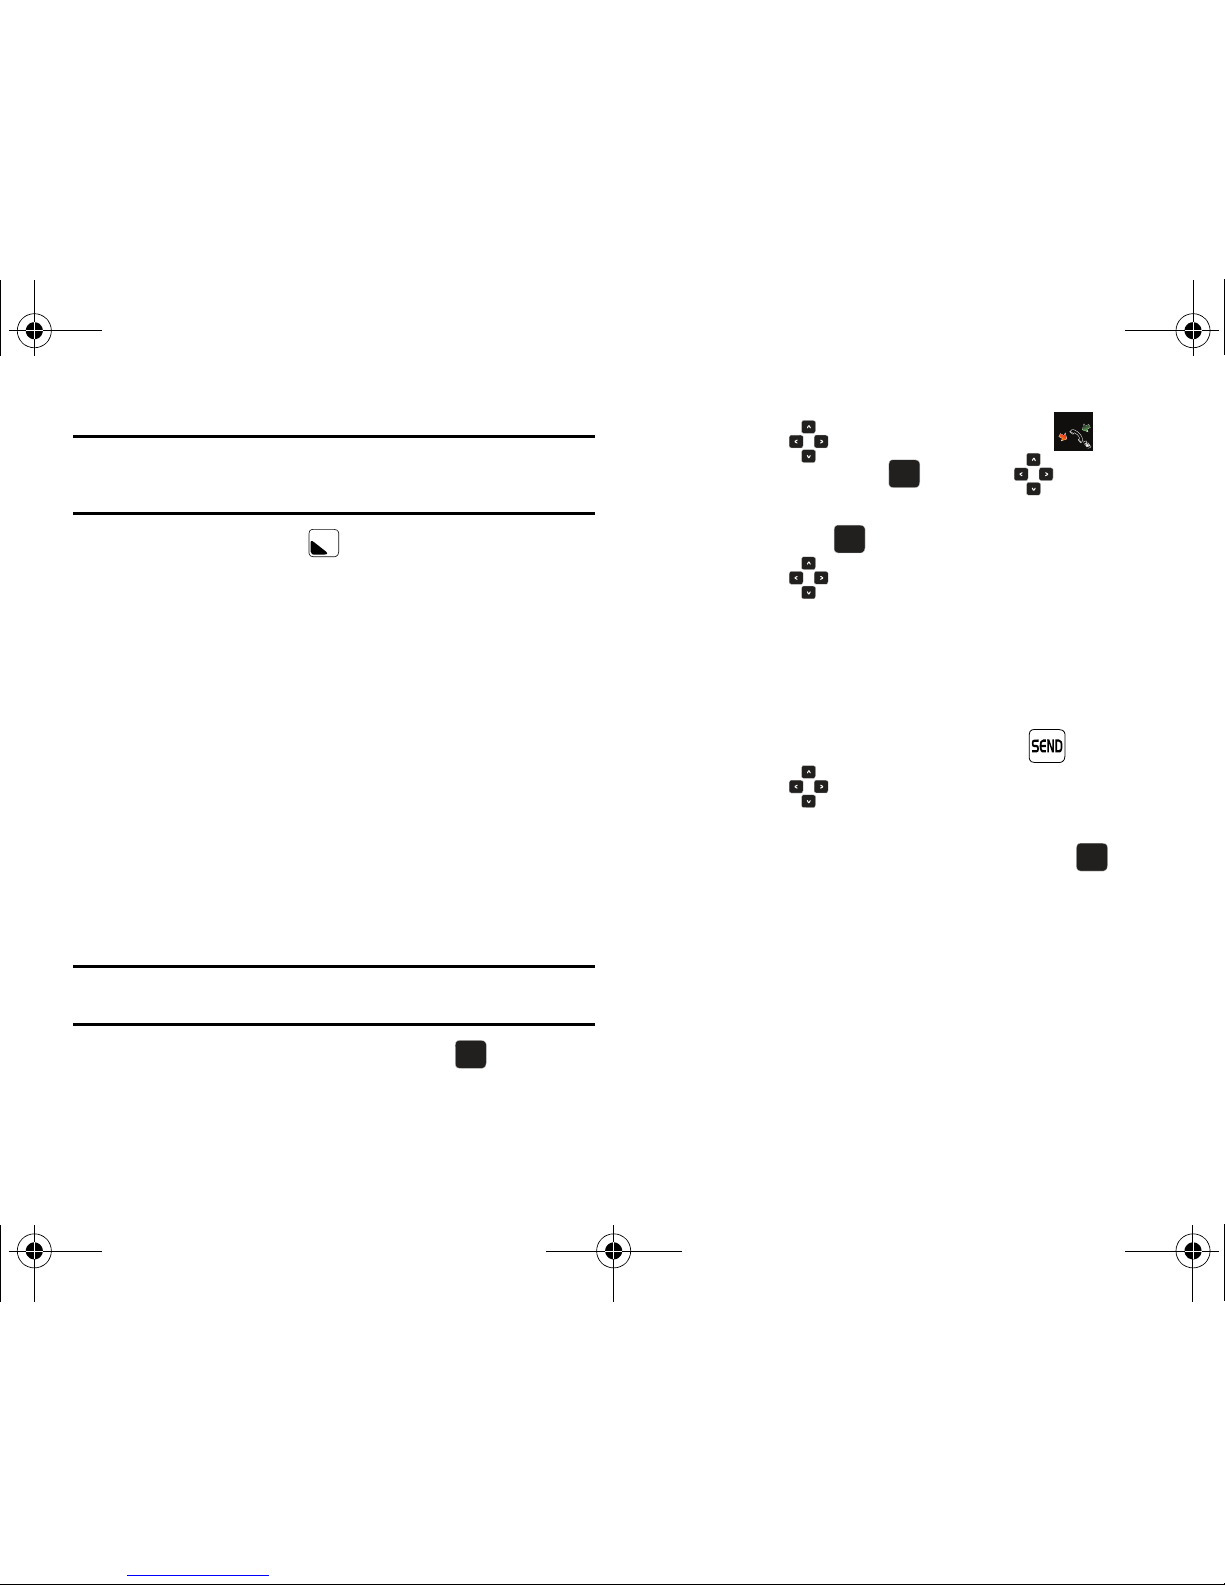
1. Open the flip in portrait mode and press
MENU
.
2. Press the
Directional key to highlight Recent
Calls menu and press . Press the
Directional
key up or down to highlight the call type that you want to
view and press .
3. Press the
Directional key up or down to view the
call.
Viewing Call Histor y
Recent Calls retains information such as the duration, date and
time, and whether the call was received, dialed, or missed.
1. Open the flip in portrait mode and press .
2. Press the
Directional key down to highlight the
desired number.
3. Once the desired number is highlighted, press OPEN.
4. The following call information appear in the display:
• Call Type
: The title bar displays if the call is a missed, dialed, or
received.
•Name
: If the caller is in your Contacts list, their name is listed here
as well as the appropriate icon to indicate Mobile 1, Mobile 2,
Home, Work, or Fax. This option only appears if the caller is in your
Contacts list. If the caller is not in your Contacts list, “No Name”
appears.
OKOK
Recent
Call
OK
OKOKOK
OKOK
u750.book Page 22 Sunday, April 5, 2009 8:40 PM
Page 28
Call Functions 23
• Number
: Displays the telephone number.
• Time and Date
: The time and date of the call.
•Duration
: The duration of the calls made or received.
5. Press the right soft key Options to display the
following options:
• Details: Displays when the contact is in your contact list. Details show
the contact information provided in the contact list.
• Save to Contacts
: Save the number to your Contacts list.
Note:
If
Save to Contacts
doesn't appear, that entry is already in your
Contacts list.
•Erase
: Deletes the call from Call History.
•Lock/Unlock
: Locks or unlocks the entry to prevent accidental
deletion.
•View Timers
: Select to view the call timers for your phone.
6. Press the
Directional key down to highlight an
option. Press to enter the highlighted option’s sub-
menu.
Call History Icons
When you view Recent Calls, an icon to the left of the number
indicates the type of call.
Indicates a Missed call
Indicates a Dialed call
Indicates a Received call
Making Calls Using Call History
1. Open the flip in portrait mode and press . Press the
Directional key up or down until the desired number
is highlighted.
2. Press to call the highlighted number. Or, you can
press OPEN, then press to call the highlighted
number.
Creating or Updating Contacts Using Call History
1. Open the flip in portrait mode and press then press
the
Directional key up or down until the desired
number is highlighted. Press the right soft key
Options. Save to Contacts is highlighted. Press .
2. Press the
Directional key up or down to highlight
Add New Contact or Update Existing. Press .
OK
OK
OKOK
OK
OK
OKOK
u750.book Page 23 Sunday, April 5, 2009 8:40 PM
Page 29
24
3.
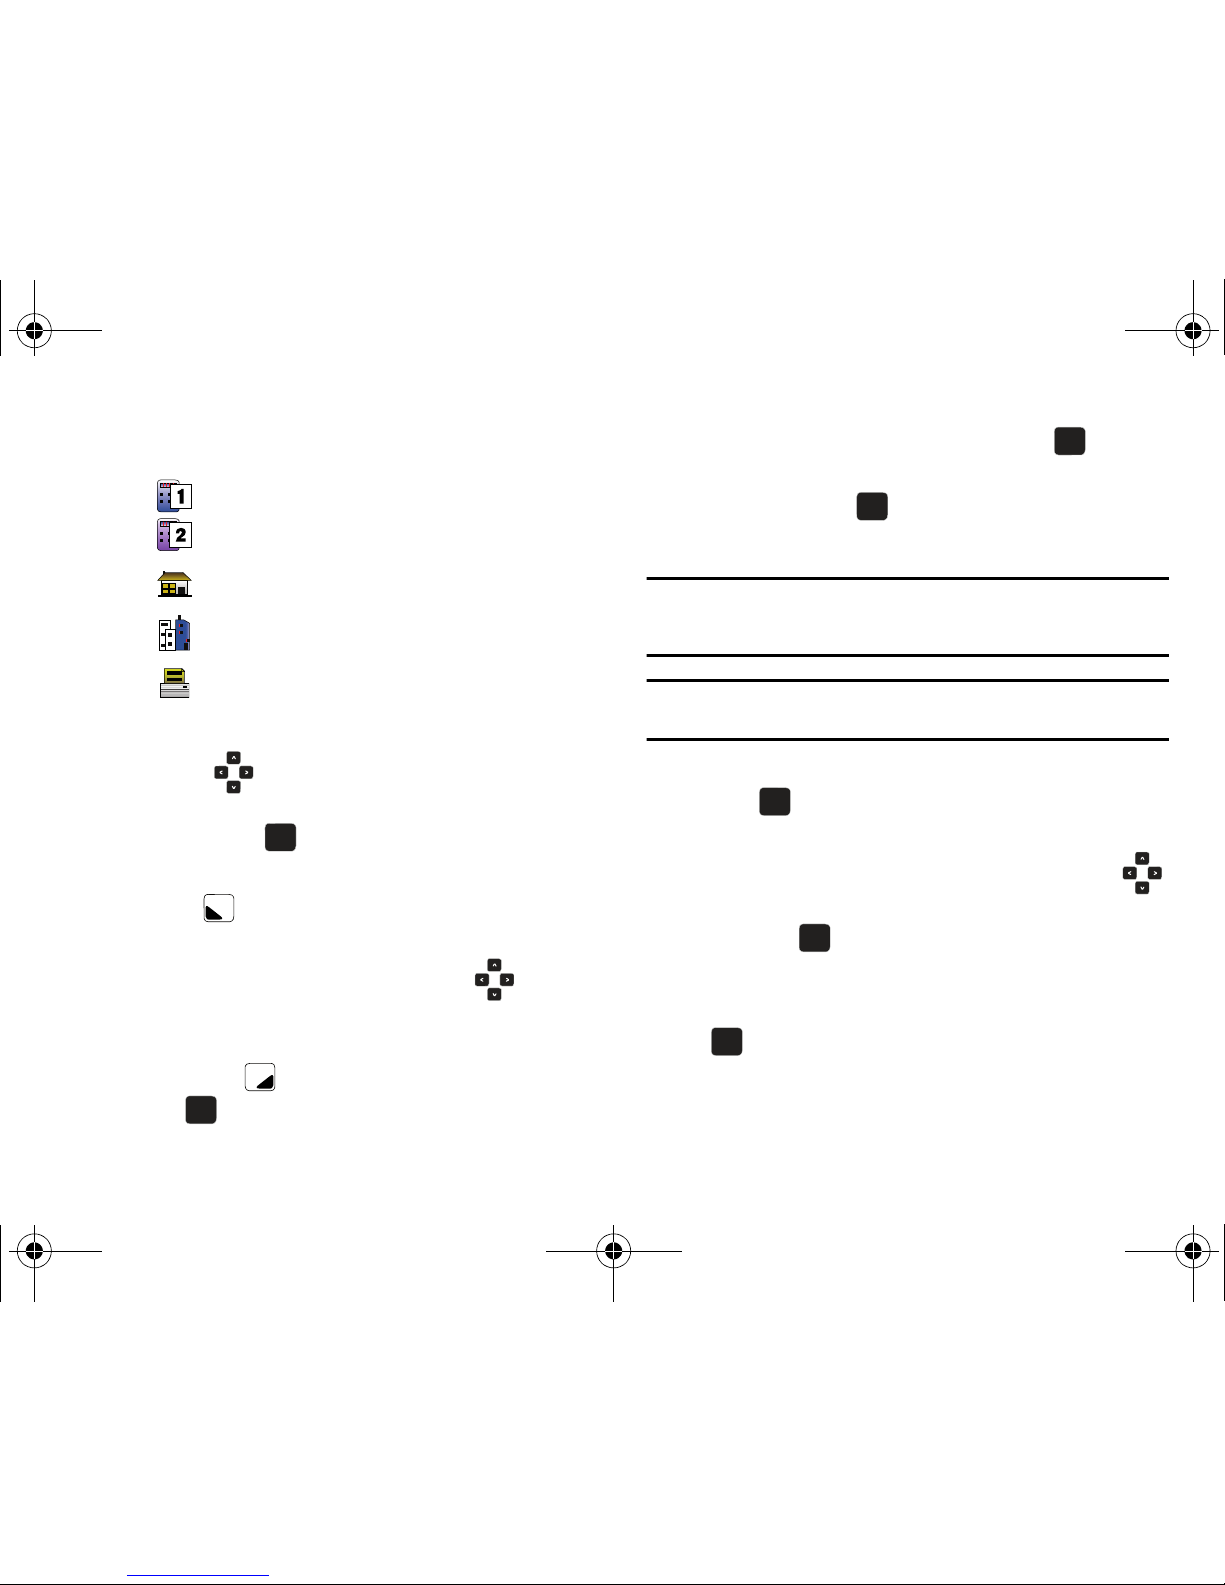
If you selected Add New Contact, the following types are
available.
•
Mobile 1
•
Mobile 2
•
Home
•
Work
•
Fax
4. If you selected
Update Existing
, proceed to step 10.
5. Press the
Directional key up or down to highlight the
desired entry type (Mobile 1, Mobile 2, Home, Work, or
Fax) then press .
6. Enter a name for the entry using the keypad. Press the left
soft key Abc if you wish to select a different method
of text entry, such as T9 Word, Abc, 123, and Symbols.
7. To assign a Speed Dial location, press the
Directional key up or down to highlight the number you
would like to assign to a Speed Dial location and press the
right soft key Options. Highlight Set Speed Dial and
press .
Highlight an unassigned location and press SET. A
confirmation message appears in the display, Yes is
highlighted, press to add Contact to the speed dial
location.
Note:
Voicemail is assigned to Speed Dial location 1. Location 411: directory
assistance, 611: customer service access, 911: emergency phone
number.
Note:
You can assign a speed dial location to each number associated with
the contact (Home, Work, Mobile 1, Mobile 2, and Fax.).
8. When you’re finished entering information for the entry,
press SAVE. The entry is saved to your Contacts.
9. An CONTACT UPDATED or
CONTACT SAVED
pop-up screen
with a selection list of entry types displays. Press the
Directional key up or down to highlight the desired type
then press . The number is added to the selected
entry and saved to your Contacts.
10. For
Update Existing
, highlight the desired contact and press
.
OKOK
OKOK
OK
OK
OK
OK
OK
OK
OK
OK
OK
OK
u750.book Page 24 Sunday, April 5, 2009 8:40 PM
Page 30

Call Functions 25
11.
Press the
Directional key to highlight the desired
entry type and press .
12. Press
SAVE
to save the new entry.
Deleting Call History Entries
1. Open the flip in portrait mode and press then press
the
Directional key up or down until the desired
number is highlighted. Press the right soft key
Options. A pop-up menu appears in the display.
2. Press the Directional key down to highlight Erase
and press . Select Ye s or No at the ERASE ENTRY?
pop-up screen.
3. Press .
Deleting All Call History Entries
1. Open the flip in portrait mode and press .
2. Press the right soft key Options. A pop-up menu
appears in the display.
3. Press the
Directional key down to highlight Erase All
and then press . Select Ye s or No at the ERASE ALL?
pop-up screen and press .
Contacts
Making Calls Using Contacts
Contacts are entries that you create to store names, numbers,
and other information for people or groups of interest. If you’ve
already entered information into your Contacts list, you can recall
and dial the contact easily. For more information, refer to “Adding
a Contact” on page 43.
1. Open the flip in portrait mode and press the right soft key
Contacts. Press the
Directional key up or down
until the contact that you want to call is highlighted then
press VIEW. Details for the contact appear in the
display.
Note:
To quickly locate a name, press (or multi-press) any key on the keypad
that corresponds to the first, second, and/or third letters of the
contact’s name.
2. If the entry contains more than one number, press the
Directional key up or down to highlight the desired
number.
3. Press to call the number.
OK
OK
OKOK
OKOK
OKOK
OKOK
OKOK
OKOK
u750.book Page 25 Sunday, April 5, 2009 8:40 PM
Page 31
26
Roaming
What is Roaming?
Your phone can roam on other compatible digital networks.
Roaming occurs when you travel outside a pre-designated
coverage area. The roaming icon displays when roaming is active
and extra charges may apply when making or receiving calls.
Note:
Some features may be unavailable while roaming.
Roaming Options
The following roaming options are available:
–
Home Only
- Your phone is available for normal operation only in the
designated coverage area.
–
Automatic-A
: The preferred “A” side carrier roaming list is used to
acquire service.
–
Automatic-B
: The preferred “B” side carrier roaming list is used to
acquire service.
Note:
Contact Verizon Wireless for information regarding preferred systems.
To change your Roaming option, follow these steps:
Note:
The menu navigation instructions for this section uses the default
My Place
display theme,
Grid menu
layout.
1. Open the flip in portrait mode and press
MENU
.
2. Press the
Directional key to highlight Settings
& Tools menu and press .
3. Press Phone Settings.
4. Press System Select.
5. Press the
Directional key up or down to choose the
setting you want, and press .
Voice Commands
Voice Commands is advanced speech recognition software that
can be used to access a variety of functions on your phone.
Voice Commands software automatically voice activates all
contacts for voice dialing and searching, no pre-recording or
training needed. Speak phone numbers naturally to dial, and use
voice commands to navigate phone menus.
Voice Commands Settings
You can adjust the settings and preferences by opening Voice
Commands menu. Using this menu, you can change the
following Voice Command features:
OK
OK
OK
OKOKOK
u750.book Page 26 Sunday, April 5, 2009 8:40 PM
Page 32
Call Functions 27
Note:
When using the Voice Command system, there are four commands
that are available at all times:
Repeat
will repeat the Voice Command prompt.
Readout
will read out the phone status or contact details.
Info
will offer more information about the Voice Command or read out
the available options.
Quit
will exit the Voice Command system.
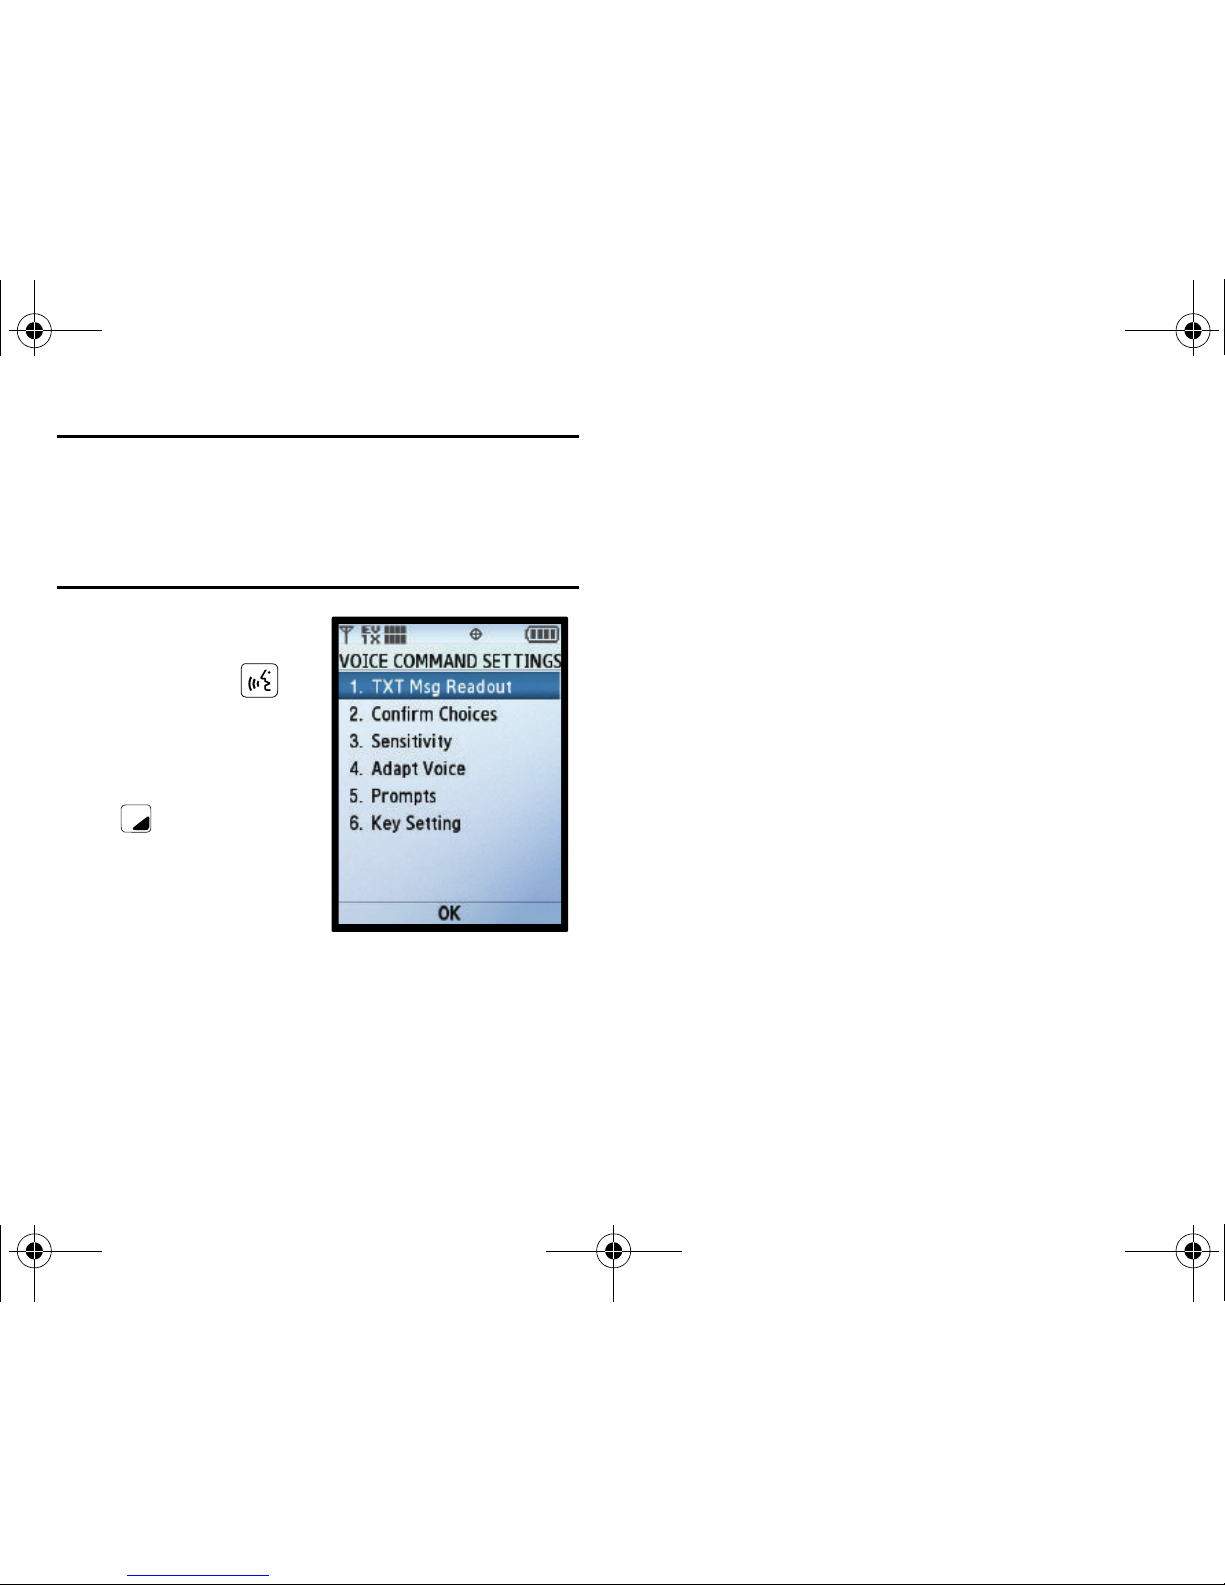
1. From the Home screen,
press the
Voice
Commands
key . The
Voice Commands screen
appears in the display.
2. Press the right soft key
Settings
.The
following options appear
in the display:
•TXT Msg Readout
: Reads
out the text in a TXT
message.
•Confirm Choices
:Choose from Automatic, Always Confirm, or
Never Confirm.
•Sensitivity
: Sensitivity controls the balance between rejecting too
much, which means the phone frequently does not recognize
names, numbers, or commands, and rejecting too little, which
means it frequently recognizes something even if nothing was said.
When Voice Commands rejects an utterance, it displays a message
such as “Please repeat…” or “No match found.” If you frequently
experience these messages, you might be able to get better
recognition by selecting the Sensitivity setting Reject Less. If you
frequently experience false activations (Voice Commands detects a
wrong match), you might be able to get better performance by
selecting the Sensitivity setting Reject More.
• Adapt Voice
: Use the Adapt Voice menu to adapt digit dialing and
name dialing to your voice.
–
Adapt VoiceMode
: Lets you adapt your voice, which can improve
speech recognition. Adaptation takes about 60 seconds.
–
Reset VoiceMode
: Erases any VoiceMode adaptation you have done
and resets VoiceMode recognition to the factory default. If you have not
adapted your voice, this option is grayed out.
•Prompts
: Allows you to select the following settings for Voice
Command prompts:
–
Mode
: Allows you to select the readout mode. Select one of the
following:
Prompts
(which reads out prompts for the Voice Command
system),
Readout
(which reads out all screen info, alerts, and prompts for
the Voice Command system), or
u750.book Page 27 Sunday, April 5, 2009 8:40 PM
Page 33
28
Tones O nly
(which plays a tone to prompt you to say a Voice
Command)
–
Audio Playback
: Allows audio playback to play through the
speakerphone or through the earpiece.
–
Timeout
: Allows you to set the timeout interval. If not used within 5 sec
or 10 sec Voice Command will timeout and return to the Home screen.
• Key Settings
: Allows you to select the method the Voice Command
menu can be accessed. Select Voice Key Only, Voice Key / Headset,
Voice Key / Flip.
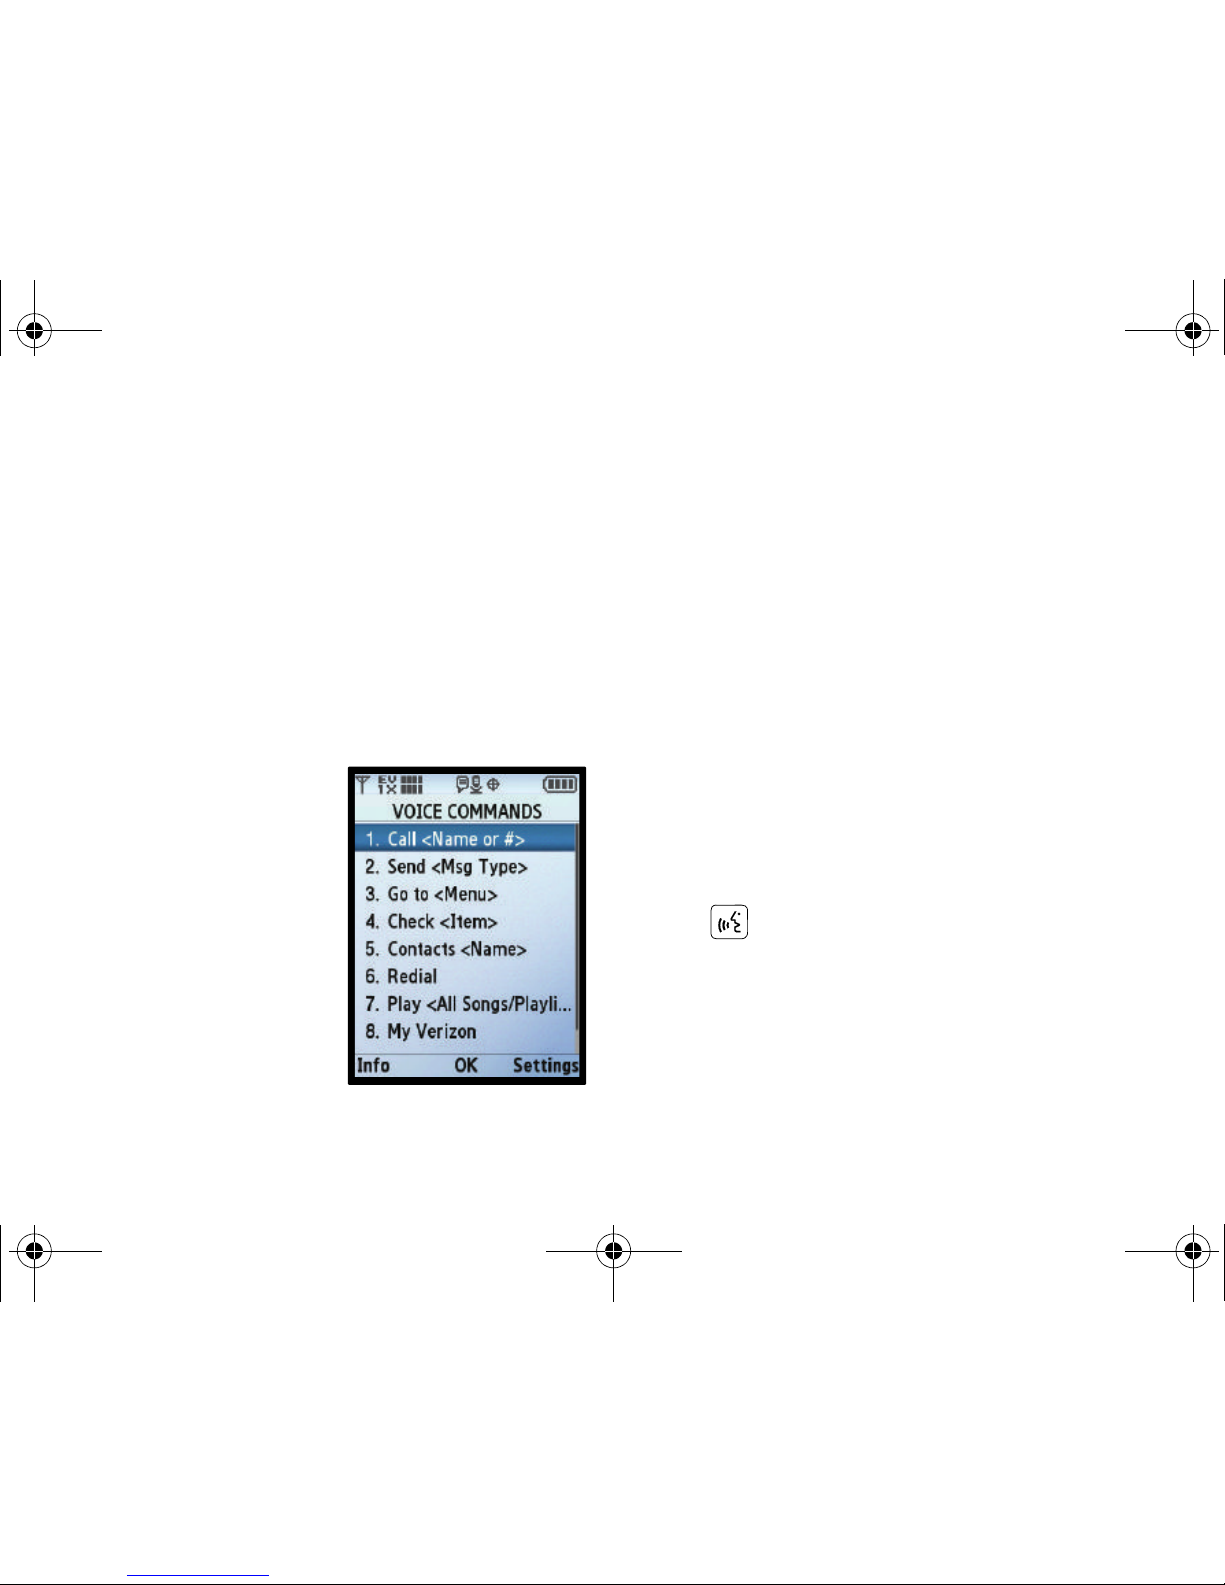
Voice Commands
The following is a list of functions that you can perform using
Voice Commands speech recognition on your phone.
•
Call <Name or #>:
Dial by saying
a Name in your Contacts List, a
Name and a Location (home,
work, mobile) or the phone
number.
•
Send <Msg Type>
: Start a text,
picture, voice or video message to
a number or to someone in your
Contacts List.
•
Go To <Menu>:
Go to any menu
on the phone.
•
Check <Item>
: Provides details of your phone status, Voicemail,
Messages, Missed Calls, Time, Signal Strength, Battery Level, Volume
Level, Balance, Minutes, Payment, and My Number.
•
Contacts <Name>
: Open the contact record for any name in your
Contacts List.
•
Redial
: Allows you to call the last number dialed.
•
Play <All Songs/Playlist Name>
: Opens a music playlist.
•
My Verizon
: Provides information about your Verizon Wireless
account.
•
Help
: Provides a helpful tutorial on how to use Voice Commands.
Call <Name or #>
Call Digit Dialing
Digit Dial allows you to dial any phone number by simply
speaking the digits into the phone. No training is necessary, and
Digit Dial is programmed to understand natural speech.
1. From the Home screen, press the Voice Commands key
.
2. After a brief pause, a list of optional commands appears in
the display and the audio prompt "Please say a command"
plays through the earpiece or speakerphone.
3. After the beep, say “Call” at a distance of 3-12 inches from
the phone in a natural voice.
u750.book Page 28 Sunday, April 5, 2009 8:40 PM
Page 34
Call Functions 29
4.
“Please say the name, number, voice mail or last number”
plays through the earpiece or speakerphone.
5. After the beep, say the area code and number that you
want to dial into the microphone, clearly and naturally.
6. The number that you said is repeated through the speaker
and your phone dials the number.
7. If Voice Commands is not sure of the number that you said,
a list of possible matches appears in the display.
8. You’re asked to confirm the correct number as Voice
Commands displays the results.
•
Say “
Yes
” to confirm the number.
•
Say “No” to reject the number.
•
Say “
Repeat
” to have the selected number read one more time.
Call Name Dialing
To use Name Dial, you’ll need to have entries stored in your
Contacts list. See page 43 for information on creating a Contacts
list.
1. From the Home screen, press the Voice Commands key
.
2. After a brief pause, a list of optional commands appears in
the display and the audio prompt “Please say a command”
plays through the earpiece or speakerphone.
3. After the beep, say “Call” at a distance of 3-12 inches from
the phone in a natural voice.
4. “Please say the name, number, voice mail or last number”
plays through the earpiece or speakerphone.
5. To use Name Dialing, after the beep, say the name of the
contact that you want to dial.
6. The name that you said is repeated through the speaker
and your phone dials the number.
7. If Voice Commands is not sure of the number that you said,
a list of possible matches appears in the display.
8. You’re asked to confirm the correct number as Voice
Commands displays the results.
•
Say “
Yes
” to confirm the number.
•
Say “No” to reject the number.
•
Say “
Repeat
” to have the selected number read one more time.
u750.book Page 29 Sunday, April 5, 2009 8:40 PM
Page 35
30
Note:
In case various number are displayed , “Which Number?” will display
in the Listening menu option.
9. The location is repeated through the speaker and your
phone dials the number.
Send <Msg Type>
Send Text
1. From the Home screen, press the Voice Commands key
.
2. A list of commands appears in the display and the audio
prompt "Please say a command" plays through the
earpiece or speakerphone.
3. After the beep, say “Send Text” at a distance of 3-12
inches from the microphone. “Please say the name or
number” plays through the earpiece or speakerphone.
4. After the beep, say the name exactly as it is displayed in
your Contacts list, first name followed by last name or the
phone number of the recipient.
Note:
In case various number are displayed , “Which Number?” will display
in the Listening menu option.
5. The contact name appears in the To: field. For more
information, refer to “Creating and Sending Text
Messages” on page 58.
Send Picture
Send Picture allows you to access the Picture Messaging menu.
You can use entries stored in My Pictures or you can take a
picture of an image using the camera.
1. From the Home screen, press the Voice Commands key
.
2. A list of commands appears in the display and the audio
prompt "Please say a command" plays through the
earpiece or speakerphone.
3. After the beep, say “Send Picture” at a distance of 3-12
inches from the microphone. “Please say the name or
number” plays through the earpiece or speakerphone.
4. Say the name exactly as it is displayed in your Contacts
list, first name followed by last name.
Note:
In case various number are displayed , “Which Number?” will display
in the Listening menu option.
u750.book Page 30 Sunday, April 5, 2009 8:40 PM
Page 36
Call Functions 31
5.
The contact name appears in the To: field. For more
information, refer to “Creating and Sending Picture
Messages” on page 59.
Go To <Menu>
The “Go To” command allows you to access any menu or setting
screen within the phone (for example, “Go To Contacts”).
Opening Menus
To use the "Go To" voice command to access a menu or screen,
perform the following:
1. From the Home screen, press the Voice Commands key
.
2. A list of commands appears in the display and the audio
prompt “Please say a command” plays through the
earpiece or speakerphone.
3. After the beep, say “Go To” at a distance of 3-12 inches
from the microphone.
4. User can “Go To” any menu directly, but the screen name
spoken must match what displays on the menu item list,
e.g., “Go to Airplane Mode.”
Check <Item>
Checking Phone Status
Note:
Checking Phone Status
can be accessed with the phone flip in either the
closed or open position.
1. From the Home screen, press the Voice Commands key
.
2. A list of commands appears in the display and the audio
prompt "Please say a command" plays through the
earpiece or speakerphone.
3. After the beep, say “Check” at a distance of 3-12 inches
from the microphone. “Please choose” plays through the
earpiece or speakerphone. Valid “Check” commands are:
•"Status
": Displays and announces all of the available status
indicators in sequence through the earpiece or speakerphone—if it
is enabled.
•"Voicemail
" : Displays the number of new voicemail messages.
•"Messages":
Displays and announces the number of new
voicemail, TXT, and Picture messages through the earpiece or
speakerphone—if it is enabled.
•"Missed Calls
": Displays the missed call log.
u750.book Page 31 Sunday, April 5, 2009 8:40 PM
Page 37
32
•"Time
": Displays and announces the current time through the
earpiece or speakerphone—if it is enabled.
• "Signal Strength"
: Displays and announces the current 1x signal
strength level through the earpiece or speakerphone—if it is
enabled.
•“Battery Leve
l": Displays and announces the current battery level
through the earpiece or speakerphone—if it is enabled.
•“Volume”
: Displays and announces the current volume level
through the earpiece or speakerphone—if it is enabled.
• “Balance”
: Calls the service number for your handset so that
balance information can be obtained through the earpiece or
speakerphone—if it is enabled.
• “Minutes”
: Calls the service number for your handset so that
minutes information can be obtained through the earpiece or
speakerphone—if it is enabled.
•“Payment”
: Calls the service number for your handset so that
payment information can be obtained through the earpiece or
speakerphone—if it is enabled.
• “Number”
: Displays and announces the handset phone number
through the earpiece or speakerphone—if it is enabled.
Contacts <Name>
To perform a name lookup, you’ll need to have some entries in
your Contacts list.
1. From the Home screen, press the Voice Commands key
.
2. A list of commands appears in the display and the audio
prompt “Please say a command” plays through the
speakerphone.
3. In a single command, after the beep, say “Lookup”
followed by the name of a contact entry at a distance of 3-
12 inches from the microphone. For example, you could
say “Lookup John Smith."
4. If you only say “Lookup”, “Please say the name” plays
through the speakerphone.
To use Lookup, say the name of the contact that you want
to look up.
5. After the beep, say the name exactly as it is displayed in
your Contacts list, first name followed by last name.
6. The contact name appears in the display with other
information that you’ve entered for that contact.
u750.book Page 32 Sunday, April 5, 2009 8:40 PM
Page 38
Call Functions 33
Redial
1. From the Home screen, press the Voice Commands key
.
2. A list of commands appears in the display and the audio
prompt “Please say a command” plays through the
earpiece or speakerphone.
3. In a single command, after the beep, say “Redial”.
4. The last number dialed is redialed.
Play <Playlist Name>
Play
1. From the Home screen, press Voice Commands key
.
2. A list of commands appears in the display and the audio
prompt "Please say a command" plays through the
earpiece or speakerphone.
•
Say “Play” or “My Music” at a distance of 3-12 inches from the
microphone. The Music Library displays.
•
Say “Play All” or “Play All Songs” at a distance of 3-12 inches from
the microphone to play all songs on your device.
•"Volume":
Displays and announces the current master volume
setting through the earpiece or speakerphone—if it is enabled.
3. The option spoken opens.
My Verizon
Check your Verizon Wireless account status by voice command.
Note:
This features launches the browser to your account page and requires
a data plan and is subject to Verizon Wireless data coverage.
Help
Provides helpful information on how to use Voice Commands.
1. From the Home screen, press the Voice Commands key
.
2. A list of commands appears in the display and the audio
prompt “Please say a command” plays through the
earpiece or speakerphone.
3. Say, "Help" at a distance of 3-12 inches from the phone in
a natural voice. The tutorial appears in the display.
u750.book Page 33 Sunday, April 5, 2009 8:40 PM
Page 39
34
Section 4: Menu Navigation
This section explains the menu navigation for your phone. An
outline of the available menus of your phone is included.
Menu Navigation
Access menus using these Directional keys in portrait
mode, soft keys , or use a shortcut.
Your Alias™ 2 comes with the
My Place
display theme as the
default display theme. You may change the display theme to the
Slick Black, White
, or
Gliss
. For more information about choosing
display themes, see “Display Themes” on page 91.
The display themes may be customized to show the Main Menu
layout as the
Tab
main menu layout, the
List
main menu layout,
or the
Grid
main menu layout on the inside main display. For
more information about choosing main menu layouts, see “Main
Menu Settings” on page 91.
To access menus using the
Tab
main menu layout, use the
following steps:
1. Open the flip in portrait mode and press MENU.
2. Press the Directional key left or right to highlight a
menu.
3. When the desired menu is highlighted, press the
Directional key up or down to highlight a sub-menu and
press .
To access menus using the
List or Grid
main menu layouts, use
the following steps:
1. From the Home screen, press MENU.
2. Press the Directional key up or down to highlight the
desired menu and press .
3. Press the Directional key up or down to highlight the
desired sub-menu and press .
Return to the Previous Menu
Press to return to the previous menu.
Menu Number Accelerators
You can also access menus and sub-menus faster and with
fewer key presses using menu number accelerators. To access a
menu or sub-menu quickly, press
MENU
, then enter the
menu and/or sub-menu number(s) for the feature desired.
OKOK
OKOK
OKOK
OKOK
OK
OK
OK
OK
u750.book Page 34 Sunday, April 5, 2009 8:40 PM
Page 40
Menu Navigation 35
See the following examples for standard menu navigation and
number accelerators using the default
My Place
display theme,
List
main menu layout.
Example using
standard menu navigation
:
1. Open the flip in portrait mode and press MENU.
2. The
Media Center
menu is highlighted on the display
screen. Press .
3. Press the Directional key down to highlight
2. Pictures and Video
and press .
4. Press the Directional key down to highlight
7. Online Album
and press .
Example using
number accelerators
:
1. From the Home screen, press MENU. The
Media Center menu is highlighted press .
2. Press:
Picture & Video
, then:
My Videos
to
access Mobile Web.
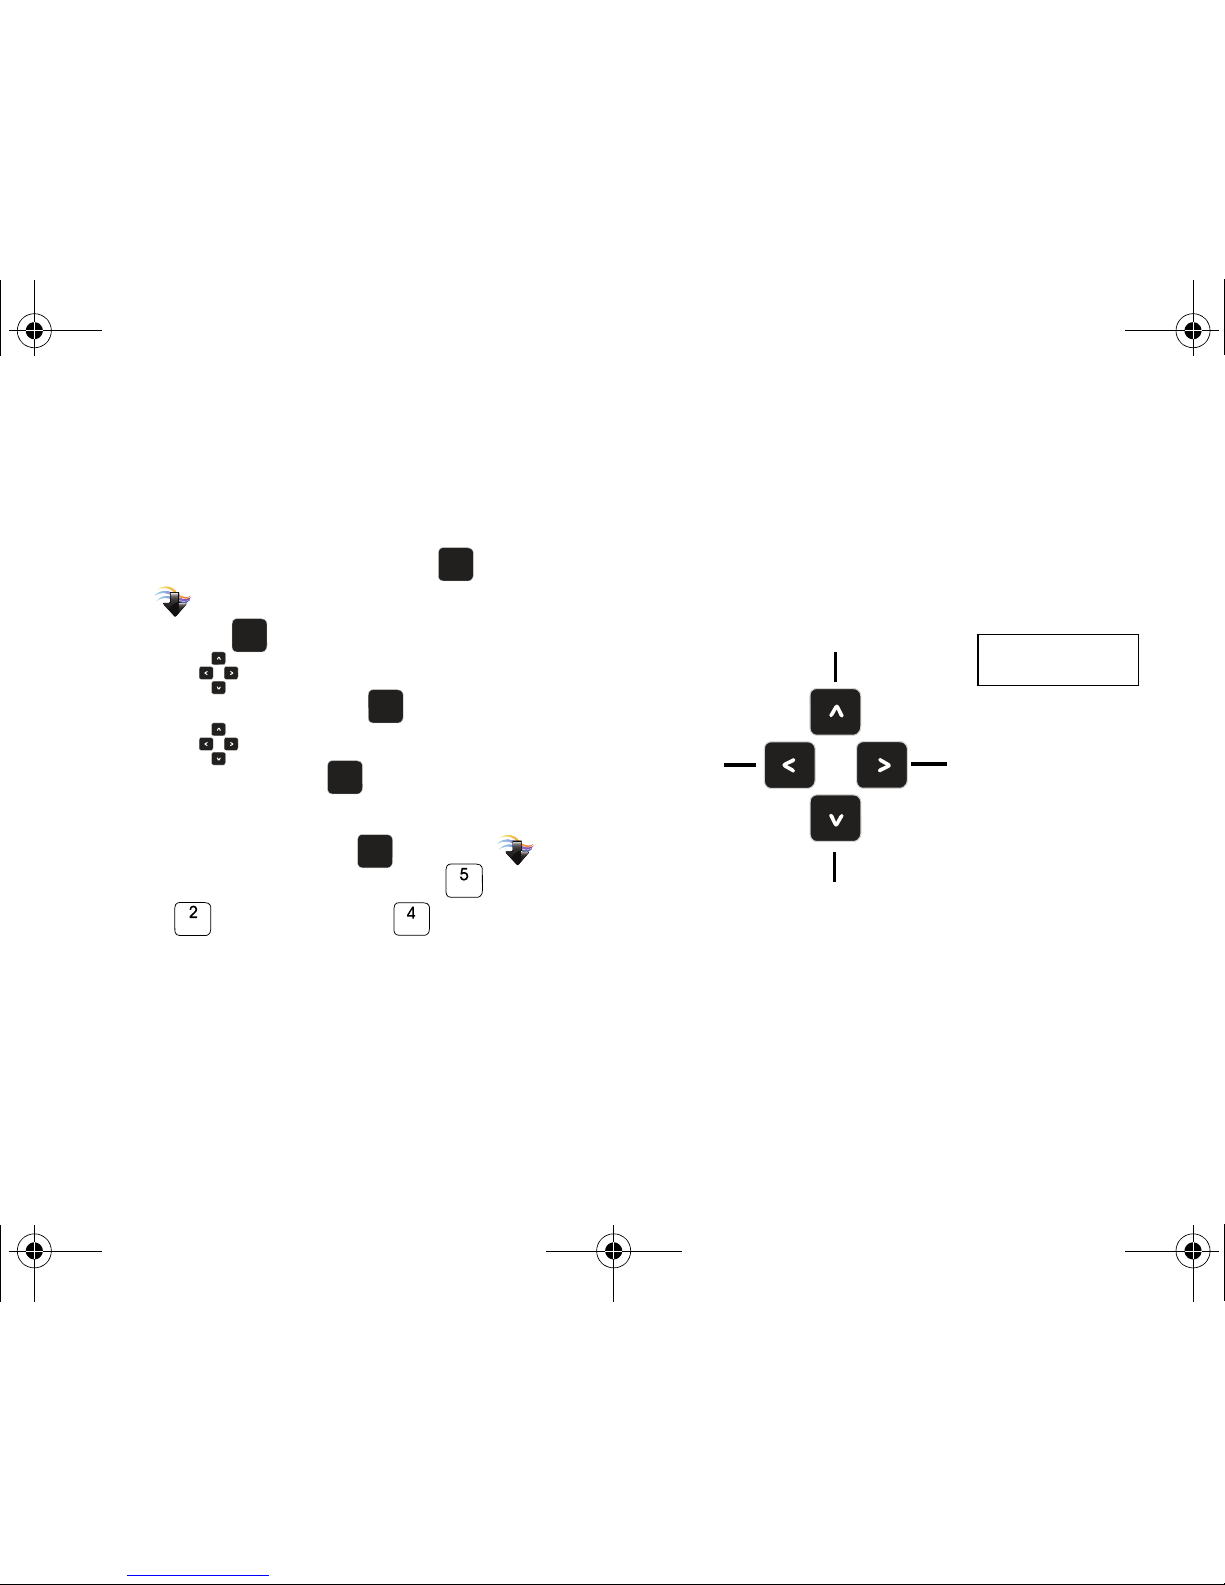
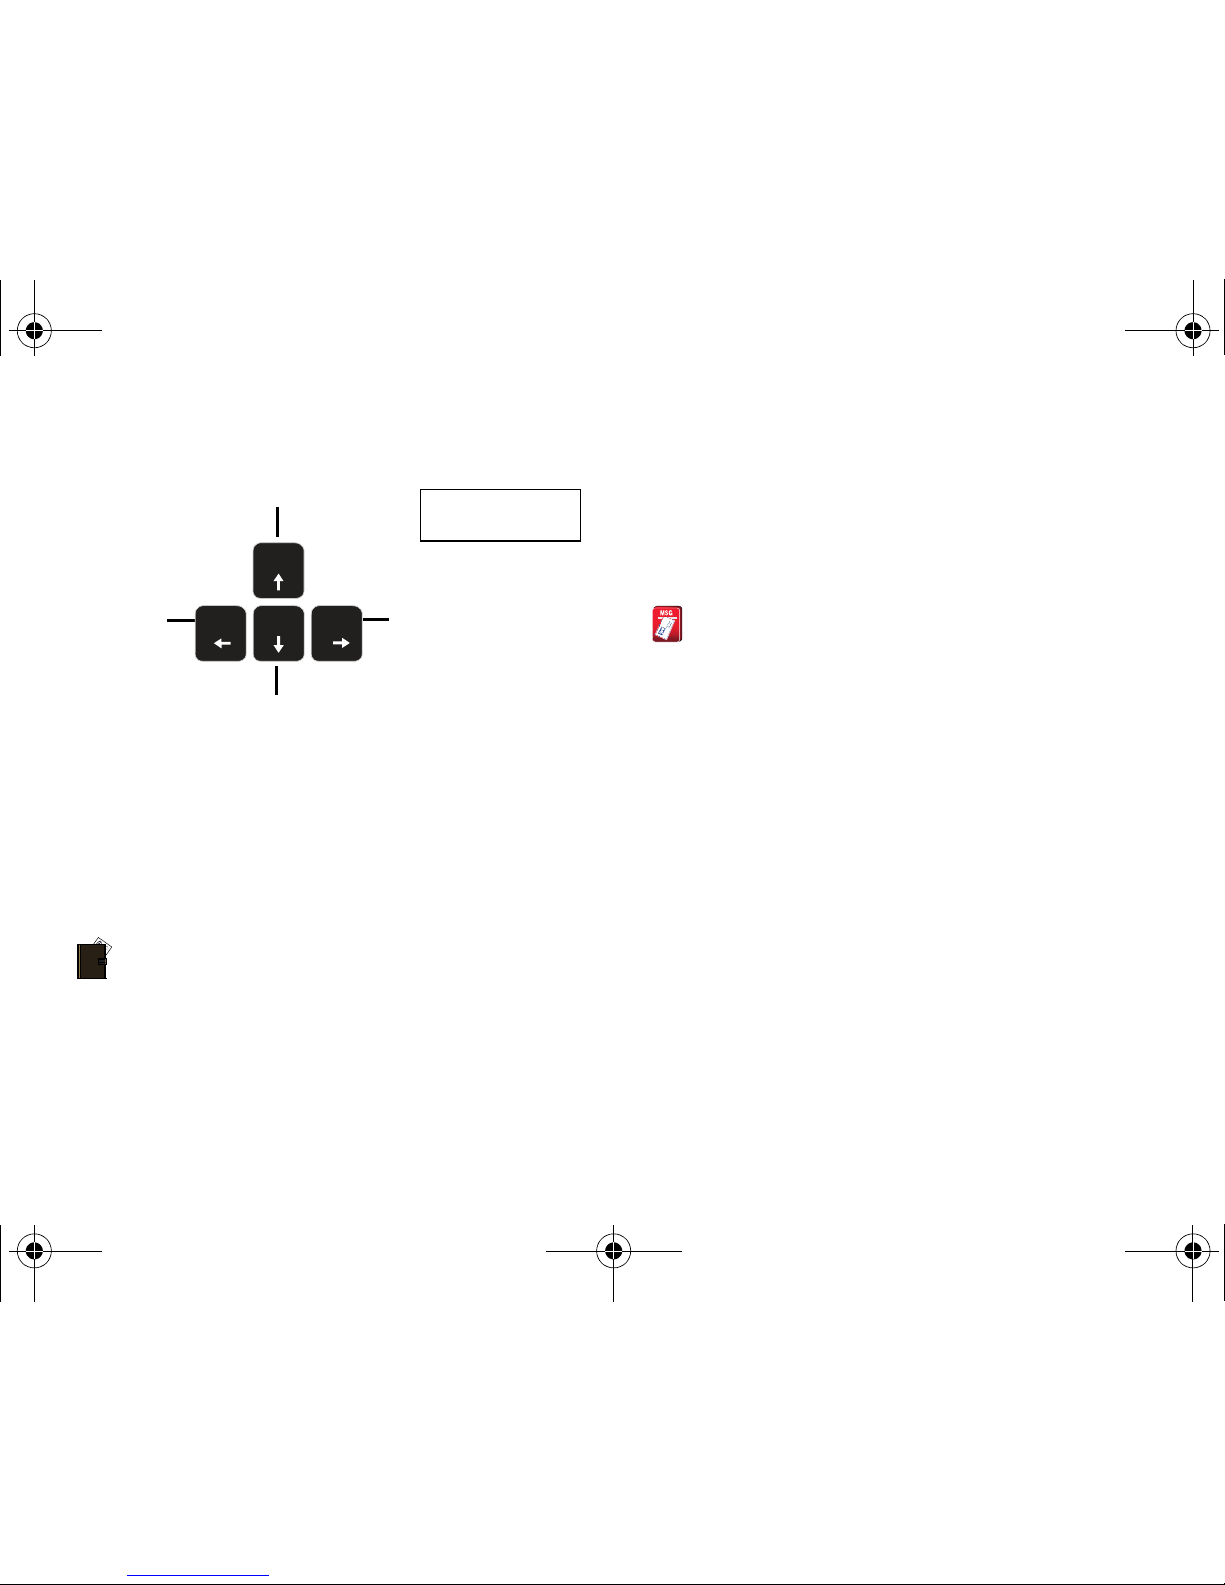
Directional Key Shortcuts
From the Home screen, press a Directional key to launch its
corresponding application. For more information on personalizing
directional shortcut keys, see “Set Shortcut Keys” on page 95.
Portrait Mode
OK
OK
OKOK
OKOK
OKOKOKOK
Calendar
Mobile Web
My Verizon
My Shortcuts*
2. New Picture Msg
3. Calculator
4. Alarm Clock
1. New TXT Message
Default Directional
Shortcut Keys
*Press the Directional key to select a menu item.
u750.book Page 35 Sunday, April 5, 2009 8:40 PM
Page 41
36
Landscape Mode
Menu Outline
The following list shows the menu structure and indicates the
accelerator number assigned to each option.
Contacts
1: New Contact
2: Contact List
3: Groups
1: Business
2: Colleague
3: Family
4: Friends
4: Speed Dials
5: In Case of Emergency
6: My Name Card
Messaging
1: New Message
1: TXT Message
2: Picture Message
3: Video Message
4: Voice Message
2: Inbox
3: Sent
4: Drafts
5: Voicemail
6: Visual Voice Mail
7: Mobile IM
8: Email
1: Mobile Email
2: RemoSync
3: Mobile Web Mail
9: Chat
Calendar
Mobile Web
My Verizon
My Shortcuts*
2. New Picture Msg
3. Calculator
4. Alarm Clock
1. New TXT Message
Default Directional
Shortcut Keys
*Press the Directional key to select a menu item.
u750.book Page 36 Sunday, April 5, 2009 8:40 PM
Page 42
Menu Navigation 37
Recent Calls
1: Missed
2: Received
3: Dialed
4: All
5: View Timers
My Ringtone
1: Get New Ringtones
1: Get New Applications
Media Center
1: Music & Tones
1: V CAST Music | Rhapsody
2: Get New Ringtones
1: Get New Applications
3: My Ringtones
1: Get New Ringtones
1: Get New Applications
4: My Music
5: My Sounds
1: Record New
6: Sync Music
2: Picture & Video
1: V CAST Videos
2: Get New Pictures
1: Get New Applications
3: My Pictures
4: My Videos
5: Take Picture
6: Record Video
7: OnlineAlbum
3: Games
1: Get New Applications
4: Mobile Web
5: Browse & Download
1: Get New Applications
6: Extras
1: Get New Applications
Settings & Tools
1: My Verizon
2: Tools
1: Voice Commands
2: Calculator
1: Normal
2: Tip
3: Converter
1: Temperature
2: Length
Recent
Call
u750.book Page 37 Sunday, April 5, 2009 8:40 PM
Page 43

38
3: Weight
4: Area
5: Volume
6: Currency
3: Calendar
4: Alarm Clock
5: Stop Watch
6: World Clock
7: Notepad
8: USB Mass Storage
9: File Viewer
3: Bluetooth Menu
1: Add New Device
4: Sounds Settings
1: Easy Set-Up
2: Call Sounds
1: Call Ringtone
1: Get New Ringtones
1: Get New Applications
2: Call Vibrate
3: Call Alert
3: Alert Sounds
1: TXT Message
1: Tone
1: Get New Ringtones
1: Get New Applications
2: Vibrate
3: Reminder
2: Multimedia Message
1: Tone
1: Get New Ringtones
1: Get New Applications
2: Vibrate
3: Reminder
3: Voicemail
1: Tone
1: Get New Ringtones
1: Get New Applications
2: Vibrate
3: Reminder
4: Emergency Tone
5: Missed Call
6: Device Connect
4: Keypad Sounds
5: Keypad Volume
6: Digit Dial Readout
7: Service Alerts
1: ERI
2: Minute Beep
3: Call Connect
u750.book Page 38 Sunday, April 5, 2009 8:40 PM
Page 44

Menu Navigation 39
8: Power On/Off
1: Power On
2: Power Off
5: Display Settings
1: Easy Set-Up
2: Banner
1: Personal Banner
2: ERI Banner
3: Backlight
1: Display
1: Duration
2: Brightness
2: Keypad
4: Front Contrast
5: Wallpaper
1: Main Screen
2: Front Screen
6: Display Themes
7: Main Menu Settings
8: Dial Fonts
9: Menu Fonts
0: Clock Format
1: Main Clock
2: Front Clock
6: Phone Settings
1: Airplane Mode
2: Set Shortcuts
1: Set My Shortcuts
1: Shortcut 1
2: Shortcut 2
3: Shortcut 3
4: Shortcut 4
2: Set Directional Keys
1: Up Directional Key
2: Left Directional Key
3: Down Directional Key
3: Voice Command Settings
1: TXT Msg Readout
2: Confirm Choices
3: Sensitivity
4: Adapt Voice
1: Adapt VoiceMode
2: Reset VoiceMode
5: Prompts
1: Mode
2: Audio Playback
3: Timeout
6: Key Setting
4: Language
5: Location
u750.book Page 39 Sunday, April 5, 2009 8:40 PM
Page 45

40
6: Current Country
7: Security
1: Edit Codes
1: Phone Only
2: Calls & Services
2: Restrictions
1: Location Setting
2: Calls
1: Incoming Calls
2: Outgoing Calls
3: Messages
1: Incoming Messages
2: Outgoing Messages
3: Dial-Up Modem
3: Phone Lock Setting
4: Lock Phone Now
5: Restore Phone
8: System Select
9: NAM Select
1: NAM Select
2: Auto NAM Select
0: Quick Search
7: Call Settings
1: Answer Options
2: Auto Retry
3: TTY Mode
4: One Touch Dial
5: Voice Privacy
6: DTMF Tones
7: Assisted Dialing
8: Memory
1: Save Options
1: Pictures
2: Videos
3: Sounds
2: Phone Memory
1: Phone Memory Usage
2: My Pictures
3: My Videos
4: My Ringtones
5: My Music
6: My Sounds
7: My Contacts
8: Move All To Card
3: Card Memory
1: Card Memory Usage
2: My Pictures
3: My Videos
4: My Ringtones
5: My Music
u750.book Page 40 Sunday, April 5, 2009 8:40 PM
Page 46

Menu Navigation 41
6: My Sounds
7: My Contacts
8: Move All To Phone
9: USB Mode
0: Phone Info
1: My Number
2: SW/HW Version
3: Icon Glossary
4: Software Update
1: Status
2: Check New
*: Set-Up Wizard
u750.book Page 41 Sunday, April 5, 2009 8:40 PM
Page 47
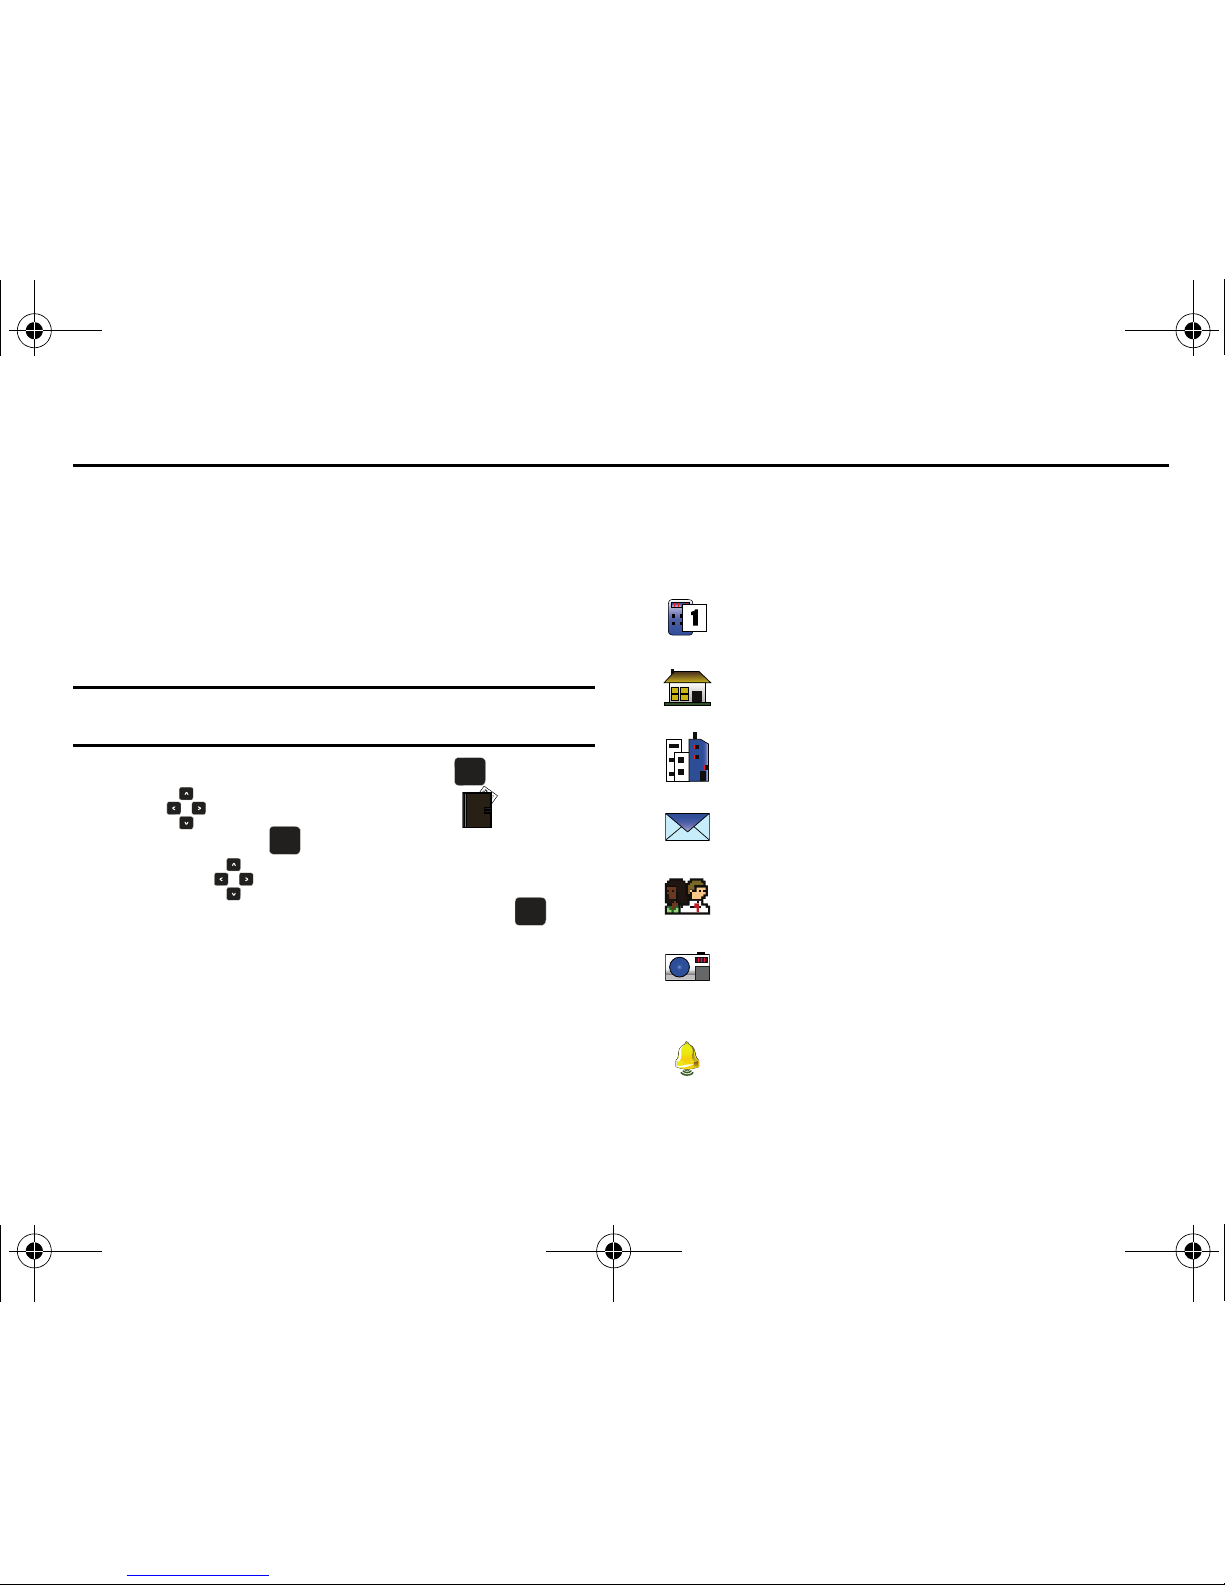
42
Section 5: Understanding Your Contacts
This section allows you to manage your daily contacts by storing
their name and number in your Address Book.
Opening Contacts Menu
The Contacts menu provides access to powerful features such as
adding Groups, creating and sending vCards, and viewing the
phone number assigned to your phone by Verizon Wireless.
Note:
The menu navigation instructions for this section uses the default
My Place
display theme,
Grid menu
layout.
1. Open the flip in portrait mode and press
MENU
. Press
the
Directional key to highlight the Contacts
menu and press .
2. Press the
Directional key up or down to highlight the
Contacts menu item of your choice, then press to
select it.
Contacts Icons
You can assign multiple entries to a contact. The icons in the
following table represent all available entry types.
OKOK
OK
OK
OKOK
Mobile 1 icon
. Enter a mobile number for the entry in this
field.
Home icon
. Enter a home number for the entry in this field.
Work icon
. Enter the work number for the entry in this field.
Email 1 icon
. Enter an Email address for the entry in this field.
Group icon
. Select an available group to associate with the
entry in this field.
Picture icon
. Select an available pre-loaded image or
downloaded image from Picture ID to associate with the
contact.
Ringtone icon
. Select a ringtone to associate with the entry
in this field.
u750.book Page 42 Sunday, April 5, 2009 8:40 PM
Page 48
Understanding Your Contacts 43
Adding a Contact
When you add information to your Contacts, you can add it as a
new entry or as an existing entry.
Method 1
Creating a new Contact from the Home screen
1. Open the flip in portrait mode and press
MENU
. Press
the
Directional key to highlight the Contacts
menu and press .
2. Press New Contact.
3. Enter a name for the entry using the keypad.
4. Press the
Directional key up or down to highlight the
appropriate type (
Mobile 1, Home, Work, Email 1
, etc.).
Once highlighted, use the keypad to enter required
information.
Mobile 2 icon
. Enter a secondary mobile number for the
entry in this field.
IM Screen Name icon
. Enter an IM name.
Note:
The name entered in this field will populate in the
associated Instant Messaging application when Send IM is
selected from View Contact->Options with the IM Screen
Name highlighted.
Fax icon
. Enter a fax number for the entry in this field.
Email 2 icon
. Enter an Email address for the entry in this field.
Street:
Enter the street address for the contact.
City:
Enter the city for the contact.
State:
Enter the state for the contact
Zip Code:
Enter the zip code for the contact.
Country:
Enter the country for the contact.
Notes icon
. Enter a note for the entry in this field.
OK
OK
OKOK
u750.book Page 43 Sunday, April 5, 2009 8:40 PM
Page 49
44
5.
Press the
Directional key up or down to highlight
other type fields, if desired. Enter information using the
keypad.
6. To assign a Speed Dial location after entering the number,
press the right soft key Options. Highlight Set Speed
Dial and press .
7. Highlight an unassigned location and press SET. A
confirmation message appears in the display, Yes is
highlighted, press to add the Contact to the speed dial
location.
Note:
Voicemail is assigned to Speed Dial location 1.
Note:
You can assign a speed dial location to each number associated with
the contact (Home, Work, Mobile 1, Mobile 2, and Fax.).
8. When you’re finished entering information for the entry,
press SAVE to save the entry to your Contacts.
Method 2
Adding a number to a new or existing Contact from the Home
screen
You can add new numbers to the Contacts by simply entering the
number from the Home screen, then following the necessary
prompts to complete the process.
1. From the Home screen, enter the number to save using the
keypad, then press the left soft key Save.
You’re prompted to select from Add New Contact, Update
Existing or Notepad.
2. Press to enter the number as a Add New Contact,
press to add the number to Update Existing or press
to save the entry to Notepad.
3. If you selected Add New Contact, the following types are
available.
•
Mobile 1
•
Mobile 2
•
Home
•
Work
OKOK
OK
OKOKOK
OKOK
u750.book Page 44 Sunday, April 5, 2009 8:40 PM
Page 50
Understanding Your Contacts 45
•
Fax
4. If you selected
Update Existing
, proceed to Step 9.
5. Press the
Directional key up or down to highlight the
desired entry type (mobile, home, work, etc.) then press
.
6. Enter a name for the entry using the keypad. Press the left
soft key Abc if you wish to select a different method
of text entry, such as Abc, ABC, 123, Symbols or Domain
Extensions.
7. To assign a
Speed Dial
location, highlight the number you
would like to assign to a Speed Dial location and press the
right soft key Options. Highlight Set Speed Dial and
press .
Highlight an unassigned location and press SET. A
confirmation message appears in the display, Yes is
highlighted, press to add Contact to the speed dial
location.
Note:
Voicemail is assigned to Speed Dial location 1.
Note:
You can assign a speed dial location to each number associated with
the contact (Mobile1, Home, Work, Mobile2, Fax).
8. When you’re finished entering information for the entry,
press SAVE. The entry is saved to your Contacts.
9. If you selected Update Existing, the Contact List opens in
Search mode. Press the
Directional key up or down
to browse through entries, or enter the name of the entry
using the keypad. Once you’ve highlighted the entry you
wish to update, press .
10. An UPDATE EXISTING pop-up screen with a selection list
of entry types displays. Press the
Directional key up
or down to highlight the desired type then press . The
number is added to the selected entry and saved to your
Contacts.
Method 3
Storing Numbers After a Call
Once you’ve finished a call, you can store the number of the
caller to your Contact List.
OKOK
OKOK
OKOK
OKOK
OKOK
OK
OK
OKOK
u750.book Page 45 Sunday, April 5, 2009 8:40 PM
Page 51
46
Note:
If the call was incoming and Caller ID information was unavailable,
then the store option is also unavailable.
1. After you press to end your call, the call time, length
of call and phone number appears in the display.
2. Press the right soft key Save. You’re prompted to
select Add New Contact, or Update Existing. Follow the
on-screen prompts to designate other information.
Adding Pauses
Calls to automated systems often require a password or account
number. Instead of manually entering numbers each time, store
the numbers to your Contacts along with special characters
called pauses.
1. From the Home screen, enter the number.
2. Press the right soft key Options to highlight
Add
2-Sec Pause (a “P” appears in the display) or
Add Wait
(a “W” appears in the display) and press .
• 2-Sec Pause
: A two-second pause stops the calling sequence for
two seconds and then automatically sends the remaining digits.
•Wait
: A hard pause stops the calling sequence until further input
from you.
3. When you’re finished entering information for the entry,
press the left soft key SAVE.
4. Continue with Step 2, Method 2 for Adding a number to a
new or existing Contact from the Home screen. See
“Adding a number to a new or existing Contact from the
Home screen” on page 44.
Note:
Entering multiple Add 2-sec Pause extends the length of a pause. For
example, two consecutive Add Pauses cause a total pause time of four
seconds. Keep in mind pauses count as digits towards the 48-digit
maximum.
Contact Groups
You can place Contact entries into categories, called “
Groups
.”
Groups allow you to search your Contacts faster, quickly send
messages to one or more group members, and more.
Note:
Contacts can be a member of more than one group. So you must
unmark any group previously selected to remove the Contact from that
group.
View Groups
1. Open the flip in portrait mode and press
MENU
. Press
the
Directional key to highlight the Contacts
menu and press .
OK
OK
OKOK
OK
OK
u750.book Page 46 Sunday, April 5, 2009 8:40 PM
Page 52
Understanding Your Contacts 47
2.
Press
Groups
. The following groups appear in the
display.
•
Business
•
Colleague
•
Family
•
Friends
3. Press the
Directional key up or down to highlight the
desired group, then press to access the group and
view its contents.
Add a Contact to a Group
1. Open the flip in portrait mode and press
MENU
. Press
the
Directional key to highlight the Contacts
menu and press .
2. Press
Groups
.
3. Press the
Directional key up or down to highlight a
group.
4. Press the right soft key
Options
and press
Add
.
5. Press the
Directional key up or down to highlight a
contact and press
MARK
. A checkmark displays in the
box.
6. Press the left soft key
Done
.
Move an Entry to Another Group
1. Open the flip in portrait mode and press the right soft key
Contacts. Press the
Directional key up or down
to highlight the contact you wish to move.
2. Press the left soft key Edit. Press the
Directional key up or down to scroll to the Group option.
3. Press the left soft key Edit.
•
Press the
Directional key up or down to highlight the group
where you wish to move the entry into, then press
MARK
or
press the right soft key
New
to create a new group for the
entry.
4. Press the left soft key
Done
.
5. Press SAVE to complete the entry move.
OK
OK
OK
OK
OKOK
OK
OK
OKOK
OKOK
u750.book Page 47 Sunday, April 5, 2009 8:40 PM
Page 53
48
Create a New Group
In addition to the four groups already in your phone, you can
create additional groups (a maximum of 25). New group names
must be within a 32-character limit.
1. Open the flip in portrait mode and press
MENU
. Press
the
Directional key to highlight the Contacts
menu and press .
2. Press
Groups
. Your existing groups appear in the
display.
3. Press the left soft key
New
. A
NEW GROUP
pop-up
menu displays with the “Enter Name” field highlighted.
4. Press to select text entry mode.
5. Enter the Group name.
6. Press SAVE to save. The Groups list now displays
the new group added.
Send a Text Message to Members of a Group
Use Send Message in the Group feature to send a message to as
many as 10 members of a group at once.
Note:
Text messaging availability varies when roaming off the Verizon
Wireless Network.
1. Open the flip in portrait mode and press
MENU
. Press
the
Directional key to highlight the Contacts
menu and press .
2. Press
Groups
. Your existing groups appear in the
display.
3. Highlight the desired group name and press the right soft
key Options. Highlight New TXT Msg and press
.
4. Press the
Directional key up or down to highlight the
contacts in the group you want to send a message. Press
MARK
to place a checkmark next to each selection to
send messages to.
5. Press the left soft key Done after selecting up to 10
contacts.
OKOK
OK
OK
OK
OK
OKOKOKOK
OKOK
OKOK
u750.book Page 48 Sunday, April 5, 2009 8:40 PM
Page 54
Understanding Your Contacts 49
Note:
You can mark up to 10 members of a group for message distribution. If
you try to mark an 11th member, you’ll be notified that “MAXIMUM
NUMBER OF RECIPIENTS IS 10”.
6. Press the
Directional key down to place the cursor in
the Text field.
7. Enter the content of your message using the keypad.
8. To send the text message, press SEND.
Send a Picture Message to Members of a Group
Note:
Only available within Verizon Wireless Enhanced Services Area.
1. Open the flip in portrait mode and press
MENU
. Press
the
Directional key to highlight the Contacts
menu and press .
2. Press
Groups
. Your existing groups appear in the
display.
3. Highlight the desired group name and press the right soft
key Options. Highlight New Picture Msg and press
.
4. Use the
Directional key down to highlight the
contacts in the group to which you want to send a
message. Press
MARK
to place a checkmark next to
each selection to send messages to.
5. Press the left soft key Done after selecting up to 10
contacts.
6. Press the
Directional key up or down to move the
cursor into the following entry fields:
•Text
: Add text to the Picture Message.
•Picture
: Add an picture from My Pictures gallery to the message.
–
To add a picture in the picture entry field, press the left soft key
My Pics
. Use the
Directional key to highlight the
desired picture and then press
.
• Sound:
Add sound to the Picture Message.
• Subject
: Add a subject to the Picture Message.
•Name Card
: Attach a Name Card or an entry in your Contacts to
the message.
7. Once you’ve finished adding the desired content to your
Picture Message, press SEND to send the Picture
Message to the intended recipients.
OKOK
OK
OK
OKOK
OKOK
OKOK
OKOK
OKOK
u750.book Page 49 Sunday, April 5, 2009 8:40 PM
Page 55
50
Send a Video Message to Members of a Group
Note:
Only available within Verizon Wireless Enhanced Services Area.
1. Open the flip in portrait mode and press
MENU
. Press
the
Directional key to highlight the Contacts
menu and press .
2. Press
Groups
. Your existing groups appear in the
display.
3. Highlight the desired group name and press the right soft
key Options. Highlight New Video Msg and press
.
4. Use the
Directional key down to highlight the
contacts in the group to which you want to send a
message. Press
MARK
to place a checkmark next to
each selection to send messages to.
5. Press the left soft key Done after selecting up to 10
contacts.
6. Press the
Directional key up or down to move the
cursor into the following entry fields:
•Text
: Add text to the Picture Message.
•Video
: Add an video from Video gallery to the message.
–
To add a picture in the picture entry field, press the left soft key
Videos
. Use the
Directional key to highlight the
desired picture and then press
.
• Subject
: Add a subject to the Picture Message.
•Name Card
: Attach a Name Card or an entry in your Contacts to
the message.
7. Once you’ve finished adding the desired content to your
Picture Message, press SEND to send the Picture
Message to the intended recipients.
Send a Voice Message to Members of a Group
Note:
Only available within Verizon Wireless Enhanced Services Area.
1. Open the flip in portrait mode and press
MENU
. Press
the
Directional key to highlight the Contacts
menu and press .
2. Press
Groups
. Your existing groups appear in the
display.
3. Highlight the desired group name and press the right soft
key Options. Highlight New Voice Msg and press
.
OKOK
OK
OK
OKOK
OK
OK
OK
OK
OK
OK
OKOK
OK
OK
OK
OK
u750.book Page 50 Sunday, April 5, 2009 8:40 PM
Page 56
Understanding Your Contacts 51
4.
Use the
Directional key down to highlight the
contacts in the group to which you want to send a
message. Press to place a checkmark next to each
selection to send messages to.
5. Press the left soft key Done after selecting up to 10
contacts.
6. Press to record your voice message. Press the left
soft key
Pause
if needed. After completing your
recording, press
STOP
to end the recording.
7. After the recording your voice message,
NEW VOICE MSG
screen will display and the cursor will be placed in the
Tex t
field. Enter your message in the
Tex t
field.
8. Press the
Directional key to highlight the following
fields and enter the necessary information:
• Subject
: Add a subject to the Picture Message.
•Name Card
: Attach a Name Card or an entry in your Contacts to
the message.
Once you’ve finished adding the desired content to your Voice
Message, press SEND to send the Voice Message to the
intended recipients.
Finding a Contacts Entry
From the Home screen, you can quickly open the Contacts list.
Contacts is a quick way of viewing entries you’ve stored in the
Contacts list.
1. From the Home screen, press the right soft key
Contacts. The Contact List displays.
2. In the
Go To
field, enter the first and second letters of the
name you wish to search until it is highlighted.
Editing an Existing Contact Entry
1. Open the flip in portrait mode and press the right soft key
Contacts.
2. Press the
Directional key up or down to highlight the
contact list entry and press the left soft key Edit.
3. Press the
Directional key up or down to highlight the
name, number, Email address, or other field that you wish
to edit.
4. Press to backspace and delete numbers, text, or
symbols.
OKOK
OKOK
OK
OK
OKOK
u750.book Page 51 Sunday, April 5, 2009 8:40 PM
Page 57
52
5.
Press and hold to erase all numbers in the
highlighted field. Use the keypad to re-enter numbers, text,
or symbols.
6. When you’re finished editing the entry, press SAVE.
Your changes are saved.
Deleting a Contact Entry
1. Open the flip in portrait mode and press the right soft key
Contacts.
2. Press the
Directional key up or down to highlight the
contact list entry and press VIEW.
3. Press the left soft key Erase. A pop-up “
ERASE
CONTACT?
” screen displays.
4. Highlight
Yes
or No, then press .
Speed Dialing
Note:
1-Press, 2-Press, and 3-Press dialing allows you to call numbers
stored in your Contact List quicker.
Speed dialing allows you to press and hold a key (or keys) to dial
the number associated with those key(s). There are three types
of speed dialing;
1-press, 2-press
, and
3-press dialing
.
Note:
Memory location 001 is reserved for voicemail. Location 411 is
reserved for directory assistance; 611 for customer service access;
and 911 for emergencies. These locations cannot be reassigned.
1-press dialing
Call phone numbers assigned to memory locations 002 - 009 by
pressing and holding the any of the 2 - 9 keys. For example, to
speed dial the number assigned to location 2, press and hold
until the name and number appear in the display and the
number is dialed.
2-press dialing
Call phone numbers assigned to keys 010 through 099 by briefly
pressing the first key, then pressing and holding the second key.
For example, to speed dial the number assigned to 013, briefly
press , then press and hold until the number dials.
3-press dialing
Call phone numbers assigned to memory locations 100 through
999 by briefly pressing the first and second keys, then pressing
and holding the third key.
For example, to dial location number 113, briefly press
, then press and hold until the number dials.
OKOKOKOK
OKOK
u750.book Page 52 Sunday, April 5, 2009 8:40 PM
Page 58
Understanding Your Contacts 53
Assign a speed dial location
1. Open the flip in portrait mode and press
MENU
. Press
for the Contacts menu. Press
Speed
Dials
. The Speed Dials screen displays with the first
available number highlighted.
2. Press the
Directional key up or down to highlight the
number you wish to assign or enter the speed dial location
using the keypad. Press SET. The SET SPEED DIAL
screen displays.
3. Press the
Directional key up or down to highlight the
entry you want added to the speed dial location, then press
.
4. At the pop-up screen, highlight Yes or No and press .
5. Continue to assign speed dial entries or press to
return to the Home screen.
My Name Card
My Name Card allows you to create a virtual business card. You
can send the card to recipients as a vCard attachment.
1. Open the flip in portrait mode and press
MENU
. Press
the
Directional key to highlight the Contacts
menu and press .
2. Press My Name Card.
3. My Name Card opens with the Name field highlighted.
4. Enter information in each of the fields as desired. Press the
Directional key up or down to move between fields,
then use the keypad to enter information.
Note:
A check mark appears to the left of selected contacts.
5. When finished, press to save the Name Card.
Finding My Phone Number
1. Open the flip in portrait mode and press
MENU
. Press
the
Directional key to highlight the Settings &
Tools menu and press .
2. Press Phone Info.
OK
OK
OKOK
OKOK
OK
OKOKOK
OKOK
OKOK
OK
OK
OKOK
u750.book Page 53 Sunday, April 5, 2009 8:40 PM
Page 59
54
3.
Press My Number. The mobile device, phone
number, and mobile identification number are displayed.
Emergency Contacts
Adding Emergency Contacts
1. From the Home screen, press the right soft key
Contacts
.
2.
In Case of Emergency
is highlighted, press
VIEW
.
3.
Contact 1, Contact 2, Contact 3
and
Personal Info
options
are shown. Highlight a contact location and press
ADD
.
Note:
Use the
Personal Information
option to enter information such as
illnesses, allergies, and other detail information.
4. Press
From Contacts
to add an emergency number
from your contacts list. Select a Contact and press .
5. Press
New Contact
to enter a new contact as an
emergency number. Enter Contact information and press
SAVE
. The Emergency Contact is added and is
displayed in the Contact List in red font.
Unassign an Emergency Contact
1. Open the flip in portrait mode and press the right soft key
Contacts
. Press the
Directional key to highlight
the Emergency Contact you want to unassign.
Note:
Emergency contacts are displayed in red font.
2. Press the right soft key
Options
.
3. Press
Unassign ICE Contact
. The “
UNASSIGN ICE
CONTACT?
” confirmation screen appears in the display.
4.
Yes
is highlighted, press to confirm or highlight No
and press to return to your contact list.
OKOK
OKOK
OKOK
OK
OK
OK
OK
OK
OK
u750.book Page 54 Sunday, April 5, 2009 8:40 PM
Page 60
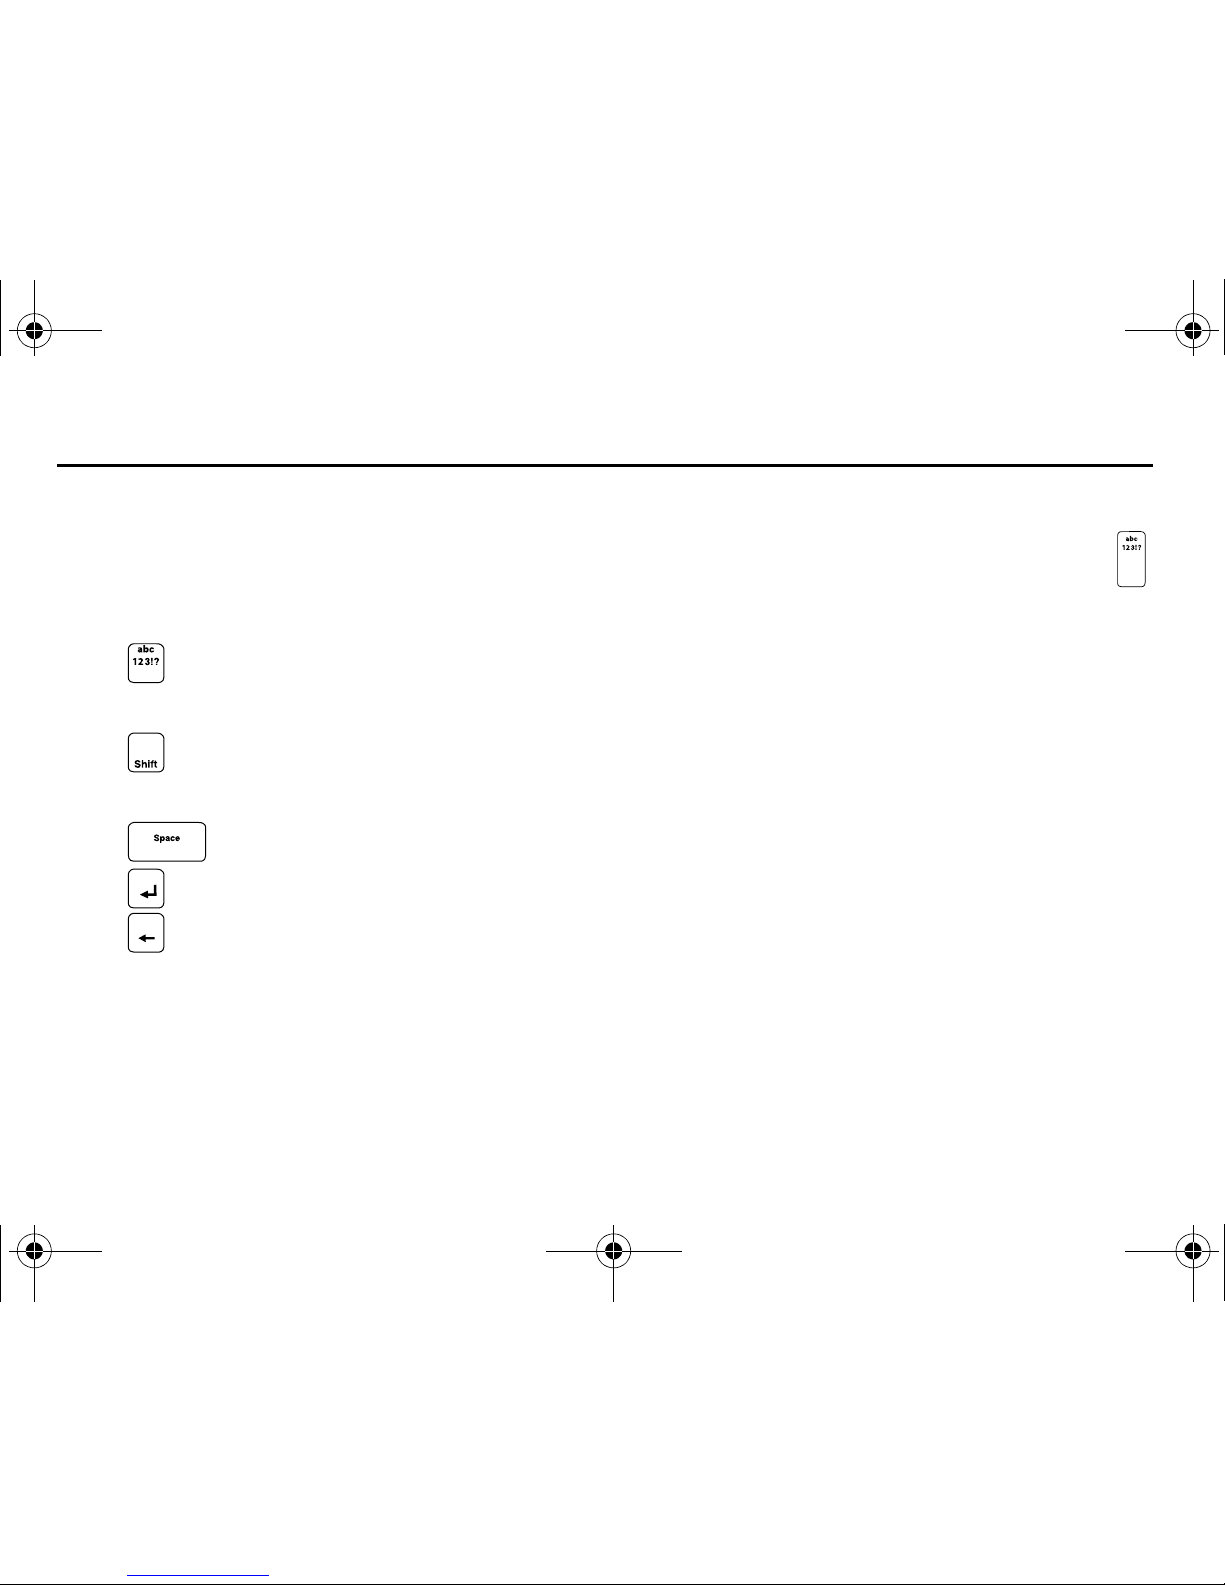
Entering Text 55
Section 6: Entering Text
This section outlines how to select the desired text input mode
when entering characters into your phone. This section also
describes how to use Word text entry system to reduce the
amount of key strokes associated with entering text.
Entering Text in Landscape Mode
•
Press to change the dynamic keypad from Abc,123?!, and
Symbols.
•
Press
to cycle between upper case (ABC), lower case (abc), or
initial caps (Abc) for characters in
ABC
mode.
•
Press to enter a space between words or characters.
•
Press
to move the insertion point to the next line in a message.
•
Press
to delete characters behind the blinking cursor.
Entering Text in Portrait Mode
Changing the Text Mode
While composing a message, press the Text Entry Mode key
to quickly cycle to the desired entry mode (except for Domain
Extensions):
•
T9 Word
•
Abc
•
123
•
Symbols
•
Domain Extensions
Entering Text using T9 Word
T9 Word mode recognizes the most commonly used word for any
sequence of key presses and inserts that word into your
message. It’s much faster than the traditional method of text
entry (Abc) and requires only one key press per letter of the word
that you’re spelling.
u750.book Page 55 Sunday, April 5, 2009 8:40 PM
Page 61
56
Entering Upper and Lower Case
Use ABC or abc mode to enter upper and lower case letters into a
text message.
1. While composing your message in the
Text
field, press
to select text entry mode.
2.
Abc
is the default text entry mode.
3. To enter a word with all capital case letters, press to
enter upper-case letters.
Note:
Use the
Space
key to add spaces between words.
Entering Numbers
Use 123 mode to enter numbers into a text message.
1. In the
Text
field, press to select text entry mode 123.
2. Enter the key that corresponds with the number that you
wish to enter. For example, press for the number 4.
3. When you are finished adding numbers, press to select
a different method of text entry.
Entering Symbols
Use symbol mode to enter symbols @ or % into a text message.
1. In the
Text
field, press to select text entry mode
Symbols. The first of three screens containing symbols
appears in the display.
2. Press left soft key Prev or right soft key Next to
page through the other symbols, if necessary.
3. Enter the key that corresponds with the symbol that you
wish to enter. For example, press for an exclamation
point (!) on the second page of symbols.
Shift
Space
u750.book Page 56 Sunday, April 5, 2009 8:40 PM
Page 62
Messaging 57
Section 7: Messaging
This section allows you to send or receive different types of
messages. It also includes the features and functionality
associated with messaging.
Types of Messages
Your phone is capable of sending Email, text, picture, video, and
voice messages. Send messages by simply entering the Email
address or the phone number of the recipient in the To: <.........>
or Send To field when creating a new message.
Changing Message Settings
This menu allows you to define settings for messages sent or
received on your phone. To access your message settings, use
the following steps:
1. From the Home screen, press the left soft key
Message, then press the left soft key Settings.
2. Select the message type you would like to change and
press . Choose from the following options:
• Messages View
: Select either View by Time (allows you to view
message by time of receipt.) or View by Contact (allows you to view
message by receipients.)
• Entry Mode
: Sets the default entry mode for messaging. Choose from
T9 Word, Abc, or 123.
• Auto Save Sent:
Saves all messages sent. Choose from: On, Off, or
Prompt.
• Auto Erase Inbox
: Erases the oldest message of the same type
(Text or Picture) when the maximum number of received messages of
that type is exceeded in the Inbox. For example,
When the Inbox
exceeds 100 text messages, the first message in the list is replaced
with the next incoming message. Picture messages are replaced
when the phone’s memory is full.
Choose from On or Off.
• Messaging Font Size
: Allows you to set the messaging font size for
messages received.
•TXT Auto View:
Automatically displays the text message when
received. Choose from On or Off.
• Multimedia Auto Receive
: Automatically receives picture, video, and
voice messages into your inbox. Choose from On or Off.
• Domain Extensions
: Allows you to
Edit
or
Erase
any of
four
different pre-loaded domain extensions or create a
New
domain
extension.
•Quick Text
: Displays the Quick Text pre-defined entries for Text
Message and Picture Message. Press the right soft key
Options
to create a
New
quick text or to
Move
the order of quick texts. Press
the left soft key
Erase
to erase a quick text.
• Voicemail Settings
: Press the down directional key to move between
the following fields:
OKOK
u750.book Page 57 Sunday, April 5, 2009 8:40 PM
Page 63
58
–
Press and Hold "1"
: Press the right or left directional key to choose to
see Visual Voicemail or call the Voicemail # when you press and hold
.
–
Voicemail Key
: Press the right or left directional key to choose to see
Visual Voicemail or call the Voicemail # when you press .
–
Voicemail #
: Enter the Voicemail phone number to be dialed (if other
than the default value of *86).
• Callback #
: Allows you to use or edit the number assigned to your
handset. Choose from On or Off.
• Signature
: Adds the signature text to each message sent. Choose
from None or Custom.
Creating and Sending Text Messages
You can send text messages to another mobile phone or to an
Email address. For more information about entering text in
messages, see “Entering Text” on page 55.
Note:
The menu navigation instructions for this section uses the default
My Place
display theme,
Grid menu
layout.
1. Open your device in landscape mode, from the Home
screen, press the
New TXT Message
hot key .
2. In the
To:
field:
•
By default the entry mode is Abc so that you can enter a contact
name or Email address of the recipient. If you have contacts stored
in the Contact List, you will see a list of partially matched names in
the drop down box. Use the directional arrows to select a contact
and press
.
•
Press the Text Entry Mode key , to change Entry Mode to
123!?. In portrait orientation, choose from T9 Word, Abc, 123,
Symbols and Domain Extensions. In landscape orientation, chose
from Abc, 123!?(Symbols), More Symbols, and Domain Extensions.
•
Press the right soft key
Add
to add a recipient From
Contacts, Recent Calls or Groups.
Note:
If you do not select an option from the menu press to return to
your message.
3. Press to move to the
Text
field. In the Text field,
compose your message using the keypad.
4. At any point while composing a message, press the Text
Entry Mode key to quickly cycle to the desired entry
mode (except for Domain Extensions).
5. Press the right soft key Options to display
additional options. Press the
Directional key to
highlight desired option, then press :
u750.book Page 58 Sunday, April 5, 2009 8:40 PM
Page 64
Messaging 59
•Insert Quick Text
: Choose from up to 15 pre-loaded messages.
You can add 15 additional messages by pressing the right soft key
Options, and then press 1.
New
. You can also 2.
Edit
and 3.
Move
quick texts. You can erase Quick Text messages by
pressing the left soft key
Erase
.
• Save As Draft
: Save the message to your Draft folder.
•Add
: Select this option to display the following sub-
menus:
–
Graphic
: Lists preloaded and downloaded graphics.
–
Animation
: Lists preloaded and downloaded animations.
–
Sound
: Lists preloaded and downloaded sounds.
–
Name Card
: Attach My Name Card information or information from
one of your Contacts.
•Edit Text Format
: Allows you to change the size, alignment, style
or color of the text.
• Priority Level
: Save the message with a High or Normal priority.
• Callback #
: Provides the ability to send a callback number with the
message.
• Cancel Message
: Cancels the message and allows you to save it
in the Drafts folder.
Note:
If you do not select an option from the menu press to return to
your message.
6. Press the
Directional key to highlight an option.
Press to perform the function for the option, or to
enter its sub-menu.
7. To send the message, press SEND.
Creating and Sending Picture Messages
Note: Only available within Verizon Wireless Enhanced Services Area.
Picture Message combines text, picture, and sound creating an
intuitive message. This is also known as Multimedia Messaging
(MMS).
1. Open your device in landscape mode, from the Home
screen, press the left soft key Message. Press
New
Message.
2. Press Picture Message.
3. In the
To:
field:
•
By default the entry mode is Abc so that you can enter a contact
name or Email address of the recipient. If you have contacts stored
in the Contact List, you will see a list of partially matched names in
the drop down box. Use the directional arrows to select a contact
and press
.
•
Press the Text Entry Mode key , to change Entry Mode to
123!?. In portrait orientation, choose from T9 Word, Abc, 123,
u750.book Page 59 Sunday, April 5, 2009 8:40 PM
Page 65
60
Symbols and Domain Extensions. In landscape orientation, chose
from Abc, 123!?(Symbols), More Symbols, and Domain Extensions.
•
Press the right soft key
Add
to add a recipient From
Contacts, Recent Calls or Groups.
Note:
If you do not select an option from the menu press to return to
your message.
4. Press to move to the Text field. In the Text field,
compose your message using the keypad.
5. At any point while composing a message, press the Text
Entry Mode key to quickly cycle to the desired entry
mode (except for Domain Extensions)
6. Press the right soft key Options to display
additional options. Press the
Directional key to
highlight desired option, then press :
•Preview
: Shows the message before it is sent.
• Save As Draft
: Save the message to your Draft folder.
• Add Quick Text
:
Choose from up to 15 pre-loaded messages. You
can add 15 additional messages by pressing the right soft key
Options
then press
1. New
. Enter your new quick text and
press
SAVE
.You can erase Quick Text messages by pressing
the left soft key Erase.
• Add Slide
: Add a slide to you message.
• Priority Level
: Save the message with a High or Normal priority.
• Remove Slide
: Remove a slide from your message.
• Cancel Message
: Cancels the message and allows you to save it
in the Drafts folder.
Note:
The
Add Slide
and
Remove Slide
options are available only when at
least one picture has been attached from My Pics.
Note:
If you do not select an option from the menu press to return to
your message.
7. Press the
Directional key down to highlight the
Picture field. Press the left soft key My Pics to add
a picture, and follow the prompts. Press to attach
the highlighted image.
8. Press the
Directional key down to highlight the
Sound field. Press the left soft key
Sounds
to select
a sound.
Highlight the desired sound or highlight
1. R
ecord New to
record a sound and press .
u750.book Page 60 Sunday, April 5, 2009 8:40 PM
Page 66
Messaging 61
9.
Press the
Directional key down to highlight the
Subject field. In the Subject field, compose your message
using the keypad.
10. At any point while composing a message, press the Text
Entry Mode key to quickly cycle to the desired entry
mode (except for Domain Extensions) or press the right
soft key Options to
Add Quick Text
. Highlight the
desired Quick Text phrase, and press .
11. Press the
Directional key down to highlight the
Name Card field. Press the left soft key Add to
select My Name Card or an entry from your Contacts list.
Follow the prompts and press to insert.
12. Once all fields are complete, press
SEND
.
Creating and Sending Video Messages
You can send video messages to another mobile phone or to an
Email address.
1. Open your device in landscape mode, from the Home
screen, press the left soft key Message. Press
New
Message.
2. Press Video Message.
3. In the
To:
field:
•
By default the entry mode is Abc so that you can enter a contact
name or Email address of the recipient. If you have contacts stored
in the Contact List, you will see a list of partially matched names in
the drop down box. Use the directional arrows to select a contact
and press
.
•
Press the Text Entry Mode key , to change Entry Mode to
123!?. In portrait orientation, choose from T9 Word, Abc, 123,
Symbols and Domain Extensions. In landscape orientation, chose
from Abc, 123!?(Symbols), More Symbols, and Domain Extensions.
•
Press the right soft key
Add
to add a recipient From
Contacts, Recent Calls or Groups.
4. Press the
Directional key down to highlight the
Tex t
field. In the Text field, compose your message using the
keypad.
5. At any point while composing a message, press the Text
Entry Mode key to quickly cycle to the desired entry
mode (except for Domain Extensions).
6. Press the
Directional key down to highlight the
Video field.
7. Press the left soft key
Videos
. If you have saved
videos on your handset, you can play them by pressing the
left soft key .
u750.book Page 61 Sunday, April 5, 2009 8:40 PM
Page 67
62
8.
Press the right soft key
Options
, and then press
Record Video.
9. Press
to start recording. Press the left soft key
Pause
if needed. After completing your recording,
press
STOP
to end the recording.
10. Press the
Directional key down to highlight the
Subject field. In the Subject field, compose your message
using the keypad.
11. At any point while composing a message, press the Text
Entry Mode key to quickly cycle to the desired entry
mode (except for Domain Extensions) or the right soft key
Options to
Add Quick Text
. Highlight the desired
Quick Text phrase, and press .
12. Press the
Directional key down to highlight the
Name Card field. Press the left soft key Add to
select My Name Card or an entry from your Contacts list.
Follow the prompts and press to insert.
13. Press
to
SEND
the video.
Creating and Sending Voice Messages
You can send voice messages to another mobile phone or to an
Email address.
1. Open your device in landscape mode, from the Home
screen, press the left soft key Message. Press
New
Message.
2. Press Voice Message.
3. Press
to start recording. Press the left soft key
Pause
if needed. After completing your recording,
press
STOP
to end the recording.
4. In the
To:
field:
•
By default the entry mode is Abc so that you can enter a contact
name or Email address of the recipient. If you have contacts stored
in the Contact List, you will see a list of partially matched names in
the drop down box. Use the directional arrows to select a contact
and press
.
•
Press the Text Entry Mode key , to change Entry Mode to
123!?. In portrait orientation, choose from T9 Word, Abc, 123,
Symbols and Domain Extensions. In landscape orientation, chose
from Abc, 123!?(Symbols), More Symbols, and Domain Extensions.
•
Press the right soft key
Add
to add a recipient From
Contacts, Recent Calls or Groups.
u750.book Page 62 Sunday, April 5, 2009 8:40 PM
Page 68
Messaging 63
5.
Press the key to move to the Voice field. Your voice
recording is shown. Press the right soft key
Options
to display a pop-up menu with the options listed:
•Review
: Plays the voice recording.
• Save As Draft
: Save the message to your Draft folder.
• Priority Level
: Save the message with a High or Normal priority.
• Remove Recording
: Removes the voice recording.
• Cancel Message
: Cancels the message and allows you to save it in
the Drafts folder.
6. Press the left soft key
Record
to re-record a new
voice recording, if needed.
7. Press the
Directional key down to highlight the
Text field. In the text field, compose your message using
the keypad.
8. At any point while composing a message, press the Text
Entry Mode key to quickly cycle to the desired entry
mode (except for Domain Extensions).
9. Press the right soft key Options to display
additional options. Press the
Directional key to
highlight desired option, then press :
•Review
: Shows the message before it is sent.
• Save As Draft
: Save the message to your Draft folder.
• Add Quick Text
:
Choose from up to 15 pre-loaded messages. You
can add 15 additional messages by pressing the right soft key
Options
then press
1. New
. Enter your new quick text and
press
SAVE
. You can erase Quick Text messages by pressing
the left soft key Erase.
• Priority Level
: Save the message with a High or Normal priority.
• Cancel Message
: Cancels the message and allows you to save it in
the Drafts folder.
10. Press the
Directional key down to highlight the
Subject field. In the Subject field, compose your message
using the keypad.
11. Press the Text Entry Mode key to quickly cycle to the
desired entry mode (except for Domain Extensions) or
press the right soft key Options to
Add Quick Text
.
Highlight the desired Quick Text phrase, and press .
12. Press the
Directional key down to highlight the
Name Card field. Press the left soft key Add to
select My Name Card or an entry from your Contacts list.
Follow the prompts and press to insert.
13. Once all fields are complete, press
SEND
.
u750.book Page 63 Sunday, April 5, 2009 8:40 PM
Page 69
64
Receiving New Messages
While text messages from other phones are delivered directly to
your phone, Picture messages, Video Messages, Voice Messages
and Email will be stored in the Inbox of the message server and
the server will alert you to new messages. Therefore you need to
retrieve new messages to your phone and read them on the
phone.
Receiving a Text Message
When you receive a message the message ringer sounds, (unless
turned off), and New Text Message appears in the display along
with the closed envelope icon . The date and time of the
message also appear in the display.
1. Press to View Now or highlight View Later and press
. The message is saved to your Inbox where you can
view it later.
2. With the message open, press the right soft key
Options to Forward, Reply w. Copy, Save Quick Text, Lock,
Add To Contacts, Messaging Font Size, Extract Addresses
and Message Info. Press the left soft key
Erase
to
erase the message.
3. With the message open, press REPLY to return a
message to the sender.
Receiving Picture Messages
When you receive a new Picture Message, NEW MULTIMEDIA
MSG. appears in the display along with the options View Now or
View Later.
Note:
For the option Reject to appear in the display when you receive a
Picture Message, Pic-Voice Auto Receive mode must be set to Off in
the Message Settings menu. The default Pic-Voice Auto Receive value
is set to On.
1. When you receive a new Picture Message, press
View Now.
2. After loading, the image (and text if any) contained in the
Picture Message appears in the display.
3. Press the
Directional key up or down to scroll
through the message or view the entire picture if
necessary.
4. Press the left soft key Mute/Unmute (while an
attached sound byte is playing), or the right soft key
Options. The following options may appear in the display:
•Play Again
: Replays the sound byte attached to a Picture Message.
•Forward
: Forward the message to another recipient.
OKOK
OK
OK
OKOK
OKOK
u750.book Page 64 Sunday, April 5, 2009 8:40 PM
Page 70
Messaging 65
•Erase
: Deletes the message. Only displays in menu when a sound
byte isn’t attached to the message that was sent.
• Save Picture
: Saves the picture in a Picture message to My
Pictures.
• Save As Ringtone:
Saves the sound byte received with the
message as a ringtone.
• Save Sound
: Saves the sound received with the message.
•Save Quick Text
: Saves the text received in the message to the
Quick Text list.
•Save Name Card
: Saves the attached name card to your Contact
List.
•Lock/Unlock
: Locks or unlocks the entry to prevent accidental
deletion.
• Add To Contacts
: Save the number of the sender to your Contacts
as a new entry or add to an existing entry.
• Message Info
: Provides the following information: From and
Callback #, Priority, Message Type, Size and Attachment(s) name
and size.
Note:
When viewing a Picture message, you can view the previous message
by pressing the
Directional key left and view the next message
by pressing the
Directional key right.
5. With the message open, press REPLY to return a
message to the sender.
Receiving Video Messages
When you receive a new Video Message, NEW MULTIMEDIA
MSG appears in the display along with the options View Now or
View Later.
Note:
For the option
Reject
to appear in the display when you receive a Video
Message, Multimedia Auto Receive mode must be set to Off in the
Message Settings menu. The default Multimedia Auto Receive value is
set to On.
1. Press the left soft key Message and press
Inbox.
2. Highlight the video message and press OPEN .
3. Press PLAY to play the video.
4. Press the Directional key
up or down to scroll
through the message.
5. Press the left soft key Erase to erase the message or
the right soft key Options. The following options may
appear in the display:
• Reply:
Replies to the received message.
•Forward
: Forward the message to another recipient.
•Save Video
: Saves the video in a Video message to My Videos.
OK
OK
OKOK
OK
OK
u750.book Page 65 Sunday, April 5, 2009 8:40 PM
Page 71
66
•Save Quick Text
: Saves the text received in the message to the
Quick Text list.
•Save Name Card
: Saves the attached name card to your Contact
List.
•Lock/Unlock
: Locks or unlocks the entry to prevent accidental
deletion.
• Add To Contacts
: Save the number of the sender to your Contacts
as a new entry or add to an existing entry.
• Message Info
: Provides the following information: From and
Callback #, Priority, Message Type, Size and Attachment(s) name
and size.
Note:
When viewing a Video message, you can view the previous message
by pressing the
Directional key left and view the next message
by pressing the
Directional key right.
Receiving Voice Messages
When you receive a new Voice Message, NEW MULTIMEDIA
MSG. appears in the display along with the options View Now or
View Later.
Note:
For the option Reject to appear in the display when you receive a Voice
Message, Pic-Voice Auto Receive mode must be set to Off in the
Message Settings menu. The default Pic-Voice Auto Receive value is
set to On.
1. When you receive a new Voice Message, press .
2. After loading, the recording (and text if any) contained in
the Voice Message appears in the display.
3. Press the
Directional key up or down to scroll
through the message or view the entire picture if
necessary.
4. Press the left soft key Mute/Unmute (while an
attached sound byte is playing), or the right soft key
Options. The following options may appear in the display:
•Play Again
: Replays the sound byte attached to a Picture Message.
•Forward
: Forward the message to another recipient.
•Erase
: Deletes the message. Only displays in menu when a sound
byte isn’t attached to the message that was sent.
• Save As Ringtone:
Saves the sound byte received with the
message as a ringtone.
• Save Sound
: Saves the sound received with the message.
•Save Quick Text
: Saves the text received in the message to the
Quick Text list.
•Save Name Card
: Saves the attached name card to your Contact
List.
•Lock/Unlock
: Locks or unlocks the entry to prevent accidental
deletion.
OK
OK
u750.book Page 66 Sunday, April 5, 2009 8:40 PM
Page 72
Messaging 67
• Add To Contacts
: Save the number of the sender to your Contacts
as a new entry or add to an existing entry.
• Message Info
: Provides the following information: From and
Callback #, Priority, Message Type, Size and Attachment(s) name
and size.
Note:
When viewing a Voice message, you can view the previous message
by pressing the
Directional key left and view the next message
by pressing the
Directional key right.
5. With the message open, press REPLY to return a
message to the sender.
Receive Messages While in a Call
1. When you receive a message while in a call, the NEW TXT
MESSAGE or NEW MULTIMEDIA MESSAGE pop-up box
appears in the display. Press to View Now or
highlight View Later and press .
Note:
Only text messages can be viewed during a call. Multimedia messages
can not be downloaded during a call.
View a Text, Picture, Video or Voice Message Later
1. When you receive a new Text, Picture, Video or Voice
message that you would like to view later, highlight View
Later and press . The message will be stored in the
Inbox.
2. To view the stored message, press the left soft key
Message.
3. Press
Inbox
.
4. Highlight the unopened message, then press OPEN.
The INBOX screen appears first with information about the
message.
Message Folders
Your phone provides default message folders for your Text,
Picture, Video and Voice messages.
Note:
To quickly view all messages in the Inbox, Sent, or Drafts folders, open
one message and then press the
directional key right to view the
next message or press the
Directional key left to view the
previous message.
OK
OK
OK
OK
OK
OK
OKOK
OK
OK
u750.book Page 67 Sunday, April 5, 2009 8:40 PM
Page 73
68
Inbox
Note:
Messaging menu depends upon the Messages View setting. For more
information, refer to “Changing Message Settings” on page 57.
Messages view by time
Note:
If
Messages View is By Time
, then you will see all received messages in
your Inbox folder and all sent messages in your Sent folder in reverse
chronological order.
Received messages of all types are stored in the Inbox folder
when Messages View is by Time.
1. From the Messaging menu.
2. Press
Inbox
.
3. Press the
Directional key up or down to highlight the
message that you wish to view.
4. Press OPEN to view contents of the highlighted
message.
5. While viewing a message press the right soft key
Options to display the available options. Options are
dependent on the message type:
–
For Text Messages the following options may appear in the display:
•Forward
: Forwards the message to another recipient.
• Reply w. Copy
: Replies to the received message with a text
message and allows you to send a copy of the message to another
contact.
•Save Quick Text
: Saves the text received in the message to the
Quick Text list.
•Lock/Unlock
: Locks or unlocks the entry to prevent accidental
deletion.
• Add To Contacts
: Saves the number of the sender to your
Contacts as a new entry or add to an existing entry.
• Messaging Font Size
: Allows you to select the font size of the
message being viewed. Select Normal or Large.
• Extract Addresses
: Displays all Contact Numbers, Email
Addresses and URLs extracted from the opened message. Press
left soft key Save
to save the number to your contacts or
press to call the sender.
• Message Info
: Provides the following information: From (also
provides the date and time the message was received), Callback #,
Priority, Message Type, Size and Attachments (if any).
–
For Picture Messages the following options may appear in the display:
•Play Again
: Replays the sound byte attached to a Picture
Message.
•Forward
: Forwards the message to another recipient.
•Erase
: Deletes the message. Only displays in menu when a sound
byte is attached to the message that was sent.
OK
OK
OKOK
u750.book Page 68 Sunday, April 5, 2009 8:40 PM
Page 74

Messaging 69
• Save Picture
: Saves the picture sent in a Picture message to My
Pictures.
• Save As Ringtone
: Saves the sound byte received with the
message as a ringtone.
• Save Sound
: Saves the sound byte received with the message in
My Sounds.
•Save Quick Text
: Saves the text received in the message to the
Quick Text list.
•Save Name Card
: Saves the attached name card to your Contact
List.
•Lock/Unlock
: Locks or unlocks the entry to prevent accidental
deletion.
• Add To Contacts
: Save the number of the sender to your Contacts
as a new entry or add to an existing entry.
• Message Info
: Provides the following information: From (also
provides the date and time the message was received), Callback #,
Priority, Message Type, Size and if a Picture, Sound or Name Card
were included in the message.
–
For Video Messages the following options may appear in the display:
•Reply:
Replies to the received message.
•Forward
: Forwards the message to another recipient.
•Save Video:
Saves the video received with the message in My
Videos.
•Save Quick Text
: Saves the text received in the message to the
Quick Text list.
•Save Name Card
: Saves the attached name card to your Contact
List.
•Lock/Unlock
: Locks or unlocks the entry to prevent accidental
deletion.
• Add To Contacts
: Save the number of the sender to your Contacts
as a new entry or add to an existing entry.
• Message Info
: Provides the following information: From (also
provides the date and time the message was received), Callback #,
Priority, Message Type, Size and if a video or Name Card were
included in the message.
–
For Voice Messages the following options may appear in the display:
•Play Again
: Replays the sound byte attached to a Picture
Message.
•Forward
: Forwards the message to another recipient.
•Erase
: Deletes the message. Only displays in menu when a sound
byte is attached to the message that was sent.
• Save As Ringtone
: Saves the sound byte received with the
message as a ringtone.
•Save Sound
: Saves the sound byte received with the message in
My Sounds.
•Save Quick Text
: Saves the text received in the message to the
Quick Text list.
•Save Name Card
: Saves the attached name card to your Contact
List.
u750.book Page 69 Sunday, April 5, 2009 8:40 PM
Page 75
70
•Lock/Unlock
: Locks or unlocks the entry to prevent accidental
deletion.
• Add To Contacts
: Save the number of the sender to your Contacts
as a new entry or add to an existing entry.
• Message Info
: Provides the following information: From (also
provides the date and time the message was received), Callback #,
Priority, Message Type, Size and if a Picture, Sound or Name Card
were included in the message.
6. For Picture, Video and Voice messages, press REPLY
to reply to the message.
Note:
When the Inbox exceeds 500 text messages, the first message in the
list is replaced with the next incoming message. Picture messages are
replaced when the phone’s maximum memory is reached. For
information on how to set Auto Erase and Auto Receive see “Changing
Message Settings” on page 57.
Messages view by contacts
The following options display when the Messages View is set to
Contact. For more information, refer to “Changing Message
Settings” on page 57.
Note:
From the INBOX folder, you can quickly switch the Messages View by
pressing Options and selecting
Msgs View by Contact
.
If
Messages View is By Contact
, then you will see one Messages folder
with both received and sent messages grouped by contact. The default
order in the Messages folder is to show each Contact name/number
sorted in reverse chronological order (according to the last
communication with that contact). To see Contact names sorted
alphabetically, press Options and select Sort Alphabetically.
1. From the Messaging menu.
2. Press
Messages
.
3. Press the right soft key
Options
from the
Messages
folder to display options listed:
•Erase
: Allows you to erase all messages.
• Erase Multiple
: Allows you to erase a selected message.
Use the Directional key to highlight a message(s) and press
MARK
(repeat this step as needed) or press the right
soft key
MarkAll
to select all messages.
Press the left soft key
Done
once you have selected all the
messages you want to erase.
OK
OK
OK
OK
u750.book Page 70 Sunday, April 5, 2009 8:40 PM
Page 76
Messaging 71
Use the Directional key to highlight the message type to be deleted
All Messages
or
Only Read Messages
and press
.
• Sort by Time/Sort Alphabetically
: Allows you to sort contacts in
Messages folder by time (i.e. by last communication first) or in
alphabetical order.
• Msgs View by Time
: Allows you to view messages by time of
receipt in separate Inbox and Sent folders (instead of by Contact).
4. Press the
Directional key up or down to highlight the
Contact name or number whose messages you want to
view, and press to open the list of received and set
messages from/to that contact.
Sent
Your phone stores messages in the Sent folder, when Messages
View is By Time, regardless of whether the message was
successfully transmitted.
Review Messages in the Sent Folder
1. Open the flip in portrait mode and press the left soft key
Message. Press Sent.
2. Highlight the message you wish to review, then press
OPEN.
3. While viewing the message, press the right soft key
Options
to display options listed. Options are dependent on
the type of message:
–
For Text Messages the following options may appear in the display:
•Forward
: Forwards the message to another recipient.
•Lock/Unlock
: Locks or unlocks the entry to prevent accidental
deletion.
•Save Quick Text
: Saves the text sent in the message to the Quick
Text l ist .
• Add To Contacts
: Adds the sender’s information to your contact
list.
• Messaging Font Size
: Allows you to select the font size of the
message being viewed. Select Normal or Large.
• Message Info
: Provides the following information: Send To
Number (also provides the date and time the message was sent),
Priority, Message Type, Size, Status, and Cause Code.
–
For Picture Messages the following options may appear in the display:
•Play Again:
Replays the sound in the message.
•Forward
: Forwards the message to another recipient.
•Erase
: Deletes the message. Only displays in menu when a sound
byte is attached to the message that was sent.
•Lock/Unlock
: Locks or unlocks the entry to prevent accidental
deletion.
OKOK
OK
OK
OKOK
u750.book Page 71 Sunday, April 5, 2009 8:40 PM
Page 77
72
•Save Quick Text
: Saves the text sent in the message to the Quick
Text lis t .
• Add To Contacts
: Adds the sender’s information to your contact
list.
• Message Info
: Provides the following information: Send To
Number (also provides the date and time the message was sent),
Priority, Message Type, Size, Attachment(s) (if a Graphic, Sound or
Name Card was attached), Status and Cause Code.
–
For Video Message the following options may appear in the display:
•Forward
: Forwards the message to another recipient.
• Resend
: Allows you to resend the message.
•Lock/Unlock
: Locks or unlocks the entry to prevent accidental
deletion.
•Save Quick Text
: Saves the text sent in the message to the Quick
Text lis t .
• Add To Contacts
: Adds the sender’s information to your contact
list.
•Message Info
: Provides the following information: Send To Number
(also provides the date and time the message was sent), Priority,
Message Type, Size, Attachment(s) (if a Video or Name Card were
included in the message), Status, and Cause Code.
–
For Voice Messages the following options may appear in the display:
•Play Again:
Replays the sound in the message.
•Forward
: Forwards the message to another recipient.
•Erase
: Deletes the message. Only displays in menu when a sound
byte is attached to the message that was sent.
•Lock/Unlock
: Locks or unlocks the entry to prevent accidental
deletion.
•Save Quick Text
: Saves the text sent in the message to the Quick
Text lis t .
• Add To Contacts
: Adds the sender’s information to your contact
list.
• Message Info
: Provides the following information: Send To
Number (also provides the date and time the message was sent),
Priority, Message Type, Size, Attachment(s) (if a Sound or Name
Card was attached), Status and Cause Code.
Note:
If no sound byte is attached to the message, press the left soft key
Erase to delete the message. Press the left soft key
Mute/
Unmute
to mute/unmute a sound byte attached to the picture
message.
4. Press the
Directional key up or down to highlight the
desired option.
5. Press to perform the function for the highlighted
option.
6. From the Sent menu, press the left soft key Erase to
delete the message from the Sent folder. Highlight Yes to
delete, or No to return to the Sent menu.
OK
OK
u750.book Page 72 Sunday, April 5, 2009 8:40 PM
Page 78
Messaging 73
Drafts
Draft messages are those that have been composed but never
sent. You can return to the Drafts folder at any time to view, edit,
or send a draft message.
Create a Draft Text Message
1. Open your device in Landscape mode and from the Home
screen, press the left soft key left soft key
Message. Press New Message.
2. Select the type of message you want to create.
3. Enter the phone number of the recipient, then press the
.
4. Compose your message using the keypad, then press the
right soft key Options. A pop-up menu appears in
the display.
5. Press the
Directional key until Save As Draft is
highlighted, then press . A confirmation message
appears in the display and your message is saved to the
Drafts folder.
View and Edit Draft Messages
1. Open your device in Landscape mode and from the Home
screen, press the left soft key Message. Press
Drafts.
2. Press the
Directional key to highlight the message
you wish to view, then press EDIT.
Note:
For
Tex t
messages, the message opens in the To field.
3. Press the
Directional key to highlight the phone
number or Email address to edit, if necessary.
4. Press the Text Entry Mode key to quickly cycle to the
desired entry mode (except for Domain Extensions) or the
right soft key Add for additional options. Choose
any of the options and press to enter the
Tex t
field.
Note:
For
Picture
and
Voice
messages, the message opens in the Text field.
5. In the
Tex t
field, press or to backspace and
delete any characters in the display, if desired. Press and
hold to erase all characters in the field.
OKOK
u750.book Page 73 Sunday, April 5, 2009 8:40 PM
Page 79
74
6.
Press the right soft key Options. A pop-up menu
appears in the display with the options listed.
–
For Text Messages the following options may appear in the display:
• Insert Quick Text
:
Choose from up to 15 pre-loaded messages. You can
add 15 additional messages by pressing the right soft key
Options
and press
1. New
, and press
SAVE. You can erase
Quick Text messages by pressing the left soft key
Erase
.
•
Save As Draft
: Save the message to your Draft folder.
•Add
: Select this option to display the following sub-menus:
–
Graphic
: Lists preloaded and downloaded graphics.
–
Animation
: Lists preloaded and downloaded animations.
–
Sound
: Lists preloaded and downloaded sounds.
–
Name Card
: Attach My Name Card information or information from
one of your Contacts.
•
Edit Text Format
: Allows you to edit the text size, alignment, style,
color, and background color.
•
Priority Level
: Save the message with a High or Normal priority.
• Callback #
: Provides the ability to send a callback # with the
message.
•
Cancel Message
: Cancels the message and allows you to save it
in the Drafts folder.
–
For Picture-Video Messages the following options may appear in the
display:
•Preview
: Allows you to preview the message.
• Save As Draft
: Save the message to your Draft folder.
• Add Quick Text
:
Choose from up to 15 pre-loaded messages. You can
add 15 additional messages by pressing the right soft key
Options
and press
1. New
, and press
SAVE. You can erase
Quick Text messages by pressing the left soft key
Erase
.
• Add Slide
:
Attach a an additional slide to your Picture message.
• Priority Level
: Save the message with a High or Normal priority.
• Cancel Message
: Cancels the message and allows you to save it
in the Drafts folder.
–
For Voice Messages the following options may appear in the display:
•Review
: Allows you to preview the message.
• Save As Draft
: Save the message to your Draft folder.
• Add Quick Text
: Choose from up to 15 pre-loaded messages. You
can add 15 additional messages by pressing the right soft key
Options
then press
1. New
. Enter your new quick text and
press
SAVE
. You can erase Quick Text messages by
pressing the left soft key Erase.
• Priority Level
: Save the message with a High or Normal priority.
• Cancel Message
: Cancels the message and allows you to save it
in the Drafts folder.
7. Press the
Directional key up or down to highlight
the desired option. Press to perform the function
for the highlighted option.
u750.book Page 74 Sunday, April 5, 2009 8:40 PM
Page 80
Messaging 75
8.
Highlight the following fields for
Picture Messages
and
press the right soft key Options to display the
assoiciated options:
•Picture
: Insert a picture clip.
Note:
Press the left soft key
My Pics
to add a new picture.
Note:
The
Add Slide
and
Remove Slide
options are available only when at
least one picture has been attached from My Pics.
–
Preview
: Allows you to preview the message.
–
Save As Draft
: Save the message to your Draft folder.
–
Add Slide
: Attach an additional slide to your message.
–
Priority Level
: Save the message with a High or Normal priority.
–
Remove Slide
: Remove the slide in focus from your message.
–
Remove Picture
: Remove the picture in focus from the current slide in
your message.
Note:
If you remove a picture from a slide (and there are 2 or more slides),
you will be asked if you want to remove the slide if you don't attach a
new picture for that slide. You can move between slides by
highlighting the "Slide" field and pressing Directional keys left or right
to select the desired slide.
–
Cancel Message
: Cancels the message and allows you to save it in
the Drafts folder.
• Sound
: Insert a sound byte.
Note:
Press the left soft key
Sounds
to add a new sound byte.
–
Preview
: Allows you to preview the message.
–
Save As Draft
: Save the message to your Draft folder.
–
Add Slide
: Attach a slide to your message.
–
Priority Level
: Save the message with a High or Normal priority.
–
Remove Sound
: Deletes the attached recording
–
Remove Slide
: Remove the attached slide from your message.
–
Cancel Message
: Cancels the message and allows you to save it in
the Drafts folder.
• Subject
: Insert the subject of your message.
Note:
Press the left soft key
Abc
to change Entry Mode.
–
Preview
: Allows you to preview the message.
–
Save As Draft
: Save the message to your Draft folder.
–
Add Quick Text
:
Choose from up to 15 pre-loaded messages. You
can add 15 additional messages by pressing the right soft key
Options
and press
1. New
, and press
SAVE. You can erase
Quick Text messages by pressing the left soft key
Erase
.
–
Add Slide
: Attach a slide to your message.
–
Priority Level
: Save the message with a High or Normal priority.
–
Remove Slide
: Remove the attached slide from your message.
u750.book Page 75 Sunday, April 5, 2009 8:40 PM
Page 81
76
–
Cancel Message
: Cancels the message and allows you to save it in
the Drafts folder.
•Name Card
: Insert and name card.
Note:
Press the left soft key
Add
to add a name card.
–
Preview
: Allows you to preview the message.
–
Save As Draft
: Save the message to your Draft folder.
–
Priority Level
: Save the message with a High or Normal priority.
–
Remove Name Card
: Deletes the name card.
–
Cancel Message
: Cancels the message and allows you to save it in
the Drafts folder.
9. Highlight the following fields for
Voice Messages
and press
the right soft key Options to display the following
options:
•Voice
: Shows the voice recording number/name if attached. Press
the left soft key to Record a new voice message.
•Text
: Insert text to send with your voice message.
Note:
Press the left soft key
Abc
to change the Entry Mode.
–
Review
: Allows you to preview the message.
–
Save As Draft
: Save the message to your Draft folder.
–
Add Quick Text
:
Choose from up to 15 pre-loaded messages. You
can add 15 additional messages by pressing the right soft key
Options
and press
1. New
, and press
SAVE. You can erase
Quick Text messages by pressing the left soft key
Erase
.
–
Priority Level
: Save the message with a High or Normal priority.
–
Cancel Message
: Cancels the message and allows you to save it in
the Drafts folder.
• Subject
: Insert the subject of your message.
Note:
Press the left soft key
Abc
to change Entry Mode.
–
Review
: Allows you to preview the message.
–
Save As Draft
: Save the message to your Draft folder.
–
Add Quick Text
:
Choose from up to 15 pre-loaded messages. You
can add 15 additional messages by pressing the right soft key
Options
and press
1. New
, and press SAVE. You can erase
Quick Text messages by pressing the left soft key
Erase
.
–
Priority Level
: Save the message with a High or Normal priority.
–
Cancel Message
: Cancels the message and allows you to save it in
the Drafts folder.
•Name Card
: Insert and name card.
Note:
Press the left soft key
Add
to add a name card.
–
Review
: Allows you to preview the message.
–
Save As Draft
: Save the message to your Draft folder.
–
Priority Level
: Save the message with a High or Normal priority.
–
Remove Name Card
: Deletes the name card.
OKOK
u750.book Page 76 Sunday, April 5, 2009 8:40 PM
Page 82
Messaging 77
–
Cancel Message
: Cancels the message and allows you to save it in
the Drafts folder.
10. Press the
Directional key up or down to highlight
the desired option. Press to perform the function
for the highlighted option.
11. Once you’ve returned to the message composer, press
SEND
to send the message, if desired.
Erase Options
You can erase unlocked messages in your Inbox, Drafts folder, or
Sent folder. Locked messages are not erased.
To erase messages:
1. From the Messaging menu, press Options.
2. The following options are available:
• Erase Inbox
: Erases unlocked messages in your Inbox.
•Erase Sent
: Erases unlocked messages in your Sent folder.
• Erase Drafts
: Erases unlocked messages in your Drafts folder.
•Erase All
: Erases unlocked messages in all message folders
(Inbox, Drafts and Sent).
Voicemail
New voicemail alerts are sent via a free Text message. These
messages indicate how many new and urgent voicemails are in
your voice mailbox. Open the free text message to view the
number of new and urgent voice messages in your voice
mailbox. If a caller leaves a callback number, this number will
also be sent via Text message.
Note:
Standard Text Messaging charges do not apply.
Receive Voicemail Messages
When you receive a new voicemail message you’ll hear a sound
and a Text message appears in the display.
1. Press the
Directional key up or down to select
Listen Now or Listen Later. Press .
Listen to Voicemail messages
Note:
User can press and hold to access your voicemail instead of
doing the following steps
1. Open the flip in portrait mode and press to dial
voicemail and retrieve your message(s).
OK
OK
u750.book Page 77 Sunday, April 5, 2009 8:40 PM
Page 83
78
Visual Voice Mail
Visual Voice Mail gives you a quick and easy way to access your
voicemail. Find exactly the message you are looking for without
having to listen to every voicemail message first. Visual Voice
Mail makes it quick and easy to choose the voicemails you want
to listen first. You can also send out your own Visual Voice Mail
messages to select recipients.
1. From the Home screen, press the left soft key
Message. Press Visual Voice Mail.
2. The Visual Voice Mail information message plays. Press
to proceed to the next screen.
3. After the application is downloaded, press
Yes
to run
the application.
4. The first time that the Visual Voice Mail application is
accessed, you will be asked "Do you want to use Visual
Voicemail as the preferred way of checking voicemail?". If
you press with "
Yes
" highlighted, then the Voicemail
Setting screen will display for you to set your preference
for which key(s) should access Visual Voice Mail with one
touch. Press the Directional key down to move
between the following fields:
• Press and Hold "1"
: Press the right or left directional key to choose
to see Visual Voicemail or call Voicemail # when you press and hold
.
• Voicemail Key
: Press the right or left directional key to choose to
see Visual Voicemail or call Voicemail # when you press .
• Voicemail #
: Enter the Voicemail phone number to be dialed (if
other than the default value of *86).
Note:
The
Voicemail Setting
can be changed anytime by doing the following
from the Home screen: Press
Message
>
Settings
>
Voicemail Settings
.
Mobile IM
The Instant Messaging function allows you to send and receive
instant messages using one of the following communities:
•
AOL® Instant Messenger™
•
Windows Live Messenger
•
Yahoo!® Messenger
Note:
You must first create the Instant Message account before accessing it
on your phone.
Using Mobile IM
1. Open the flip in portrait mode and press the left soft key
Message. Press
Mobile IM
.
OK
OK
OK
OK
OKOK
u750.book Page 78 Sunday, April 5, 2009 8:40 PM
Page 84
Messaging 79
2.
Select your instant message community by pressing the
Directional key left or right and press . Use the
on-screen application specific functions and options to use
the instant message applications.
Email
Send and receive Email using
Mobile Email
or
Mobile Web Mail
.
Mobile Email
Follow the steps below to access Mobile Email.
1. Open the flip in portrait mode and press the left soft key
Message. Press Email.
2. Press Mobile Email.
3. Follow the on-screen prompt for subscribing to Mobile
Email.
Note:
Subscription rates apply for Mobile Email.
4. Press the
Directional key up or down, select one of
the following Email providers and press .
•
Yahoo!® Mail
•
Windows Live Mail
•
AOL®
•
AIM
®
•
Verizon.net
•
Other
5. Use the on-screen application specific functions and
options to use the Email applications.
Corporate Email (RemoSync)
For more information, refer to “Corporate Email (RemoSync)” on
page 136.
Mobile Web Mail
Follow the steps below to access Mobile Web Mail.
1. Open the flip in portrait mode and press the left soft key
Message. Press Email.
2. Press Mobile Web Mail.
3. Press the
Directional key up or down, select one of
the following Email providers and press .
•
MSN® Hotmail
•
AOL® Mail
•
Yah oo!® Mail
•
Verizon.net
•
Search
OK
OK
OK
OK
OK
OK
u750.book Page 79 Sunday, April 5, 2009 8:40 PM
Page 85
80
4.
Use the on-screen application specific functions and
options to use the Email applications.
Chat
Join wireless chat rooms from your phone. Send text messages
and icons to many chat room participants or launch one-on-one
(private) chat rooms. To access a chat room from the browser:
1. From the Home screen, press the left soft key
Message. Press
Chat.
Highlight one of the following
chat rooms and press .
•
MySpace
•
Facebook
•
Photobucket
•
Zannel
•
Powerchat
•
Friendz
•
Lavalife Chat
•
Best Mobile Pix
•
More
•
Search
2. Use the on-screen application specific functions and
options to use the Chat applications.
OKOK
u750.book Page 80 Sunday, April 5, 2009 8:40 PM
Page 86
Changing Your Settings 81
Section 8: Changing Your Settings
This section explains the sound and phone settings for your
phone. It includes display settings, security settings, and extra
settings associated with your phone.
My Verizon
The My Verizon menu connects to the Verizon Wireless Mobile
Web. You can setup Favorites or choose from the available
applications.
1. Open the flip in portrait mode and press
MENU
. Press
the
Directional key to highlight the Settings &
Tools menu and press .
2. Press My Verizon.
Tools
The Tools menu provides the ability to access the following
menus:
•
Voice Commands: For more information, refer to
“Voice Commands”
on page 26.
•
Calculator: For more information, refer to
“Calculator”
on page 124.
•
Calendar: For more information, refer to
“Calendar”
on page 126.
•
Alarm Clock: For more information, refer to
“Alarm Clock”
on
page 128.
•
Stop Watch: For more information, refer to
“Stop Watch”
on
page 129.
•
World Clock: For more information, refer to
“World Clock”
on
page 130.
•
Notepad: For more information, refer to
“Notepad”
on page 130.
•
USB Mass Storage: For more information, refer to
“USB Mass
Storage”
on page 131.
•
File Viewer: For more information, refer to
“File Viewer”
on
page 132.
Bluetooth Menu
About Bluetooth
Bluetooth is a short-range wireless communications technology
capable of exchanging information over a distance of about 30
feet without requiring a physical connection.
Unlike infrared, you don't need to line up the devices to beam
information with Bluetooth. If the devices are within a range of
one another, you can exchange information between them, even
if they are located in different rooms.
Note:
When connected to your Bluetooth headset, press the multi-function
key on the headset to use Voice Commands’s Voice Dial feature.
OK
OK
OKOK
u750.book Page 81 Sunday, April 5, 2009 8:40 PM
Page 87
82
Bluetooth Service Profiles
Actually, the Bluetooth specification is a protocol that describes
how the short-range wireless technology works, whereas
individual profiles describe the services supported by individual
devices. Profiles reduce the chance that different devices will not
work together.
Your phone supports the following Bluetooth profile services:
–
Voice Calls are supported using any of the following depending on the
accessory:
•HSP
- Headset
•HFP
- Hands-free profiles*
– Transfer Object allows sending an
OPP
- Object Push Profile
which allows transfer of vCard (i.e. Contact information)
between devices and vCalendar (i.e. Calendar events).
–
Bluetooth Stereo uses
A2DP
- Advanced Audio Distribution Profile and
AVRCP
- Audio/Video Remote Control Profile.
–
Automobile Kits can use any of the following:
HFP
- Hands-free or
PBAP
- Phone Book Access Profiles*.
– Connectivity Connections (i.e. computer) are supported using
SPP
- Serial Port (connecting two BT devices)
–
BPP
- Printing is supported using basic printing profiles.
–
BIP
- Basic Imaging Profile
–
SSP
- Serial Port Profile
*
For vehicle/accessory compatibility, go to
www.verizonwireless.com/bluetoothchart
. Phone does not support all
Bluetooth OBEX profiles.
Turning Bluetooth On or Off
When the Bluetooth radio is turned on, you can use the Bluetooth
features available. When the Bluetooth radio is turned off, you
cannot send or receive information via Bluetooth. To save battery
life or in situations where radio use is prohibited, such as airline
traveling, you can turn off the Bluetooth wireless technology.
Note:
The menu navigation instructions for this section uses the default
My Place
display theme,
Grid menu
layout.
䊳
Open the flip in portrait mode and press the Bluetooth
key
to turn Bluetooth On or
Off
.
Note:
The Bluetooth key is only available from the Home screen in portrait
mode.
– or –
1. From the Home screen, press
MENU
. Press the
Directional key to highlight the Settings & Tools
menu and press .
2. Press Bluetooth Menu.
OKOK
OK
OK
u750.book Page 82 Sunday, April 5, 2009 8:40 PM
Page 88
Changing Your Settings 83
3.
Press the left soft key
to turn
On or Off
.
Note:
If Bluetooth is turned on, the Bluetooth icon displays in the top line
of the display.
Search
This option searches for a recognized Bluetooth wireless device.
1. Open the flip in portrait mode and press
MENU
. Press
the
Directional key to highlight the Settings &
Tools menu and press .
2. Press Bluetooth Menu.
3. Add New Device is highlighted, press .
Note:
If you have NOT already activated Bluetooth on the phone, the
message: “TURN BLUETOOTH POWER ON?” displays. Highlight Yes to
activate or No to exit and press .
4. The prompt: “PLACE DEVICE YOU ARE CONNECTING TO IN
DISCOVERABLE MODE.” is shown. Activate your Bluetooth
device and press .
5. The phone will begin searching for the device and list of
found Bluetooth devices will be displayed. Highlight a
Bluetooth device to be paired and press .
6. The phone automatically attempts to send a passkey of
"0000" to a hands-free device and shows the message
"ATTEMPTING TO AUTO PAIR". If the default passkey is not
successful, the phone will display the message "AUTO
PAIR FAILED. ENTER PASSKEY". (If you are attempting to
pair with a car kit, be sure to clear any error message on
the car kit display first.) Enter the correct passkey for the
device you want to pair, and press .
7. Select Ye s to pair the devices. Once connected the
Bluetooth Connected icon appears in the upper half of
the display. When pairing is complete, highlight Always
Ask or Always Connect and press .
Bluetooth Settings
The Bluetooth wireless technology settings menu provides the
ability to view and change the device name, show the visibility,
and set the security for the device.
1. Open the flip in portrait mode and press
MENU
. Press
the
Directional key to highlight the Settings &
Tools menu and press .
2. Press Bluetooth Menu.
OK
OK
OKOK
OKOK
OKOK
OKOKOKOKOKOK
OKOK
OK
OK
OKOK
u750.book Page 83 Sunday, April 5, 2009 8:40 PM
Page 89
84
3.
Press the right soft key
Options
. The Bluetooth menu
displays with the following options:
•My Phone Name
: Allows you enter a customized name.
• Discovery Mode
: Allows other users to see your accessibility.
Select On for other devices to see your device, or Off for no visibility.
Note:
After selecting On, users have one minute to see your accessibility.
After which Discovery Mode will automatically default back to off.
• Supported Profiles
: Displays a list of supported Bluetooth
profiles. Highlight a profile and press to view a description.
•My Phone Info
: Shows the handset information.
• Auto Pairing
: Allows you to turn automatic pairing of Bluetooth
devices on or off.
Sending Contact Information (vCard) to another Bluetooth
enabled phone
You can send individual contacts or your entire contact list to or
from another device that is Bluetooth enabled*.
Note:
*If Bluetooth is not powered on, or your Alias™ 2 is not paired with
another device see “Turning Bluetooth On or Off” on page 82.
Important!:
Not all Bluetooth devices will accept a name card.
1. From the Home screen, press right soft key Contacts.
2. Highlight a contact and press right soft key Options.
3. Press Send Name Card. The following options
display:
•TXT Message
: Allows you to send a name card via TXT Message.
A name card with a picture cannot be sent in a TXT Message
because it exceeds the maximum number of characters allowed.
• Picture Message
: Allows you to send a name card via Picture
Message.
• Video Message
: Allows you to send a name card via Video
Message
• Voice Message
: Allows you to send a name card via a Voice
Message.
•Bluetooth
: Allows you to send a name card to a Bluetooth enabled
device.
4. Press Bluetooth.
5. Highlight the desired contact and press MARK. To
choose all contacts, press right soft key Mark All.**
When finished, press left soft key Done.
6. Highlight the destination device an press .
Note:
If your Alias™ 2 is not paired already with the destination device,
follow the instructions on p.90 for Bluetooth Search.
OK
OK
OK
OK
OK
OK
u750.book Page 84 Sunday, April 5, 2009 8:40 PM
Page 90
Changing Your Settings 85
7.
Highlight Yes to connect to the other device. press .
8. The other device will ask to connect. Press .
“
CONNECTING
” appears in the display.
9. When the information is exchanged, a message will appear
that the transfer is complete.
Note:
** All information will be transferred except for group name, ringtone,
and Emergency (ICE) contact reference.
Transferring vCalendar events via Bluetooth
You can transfer vCalendar events via Bluetooth. Use the
following steps:
1. Open the flip in portrait mode and press
MENU
. Press
the
Directional key to highlight the Settings &
Tools menu and press .
2. Press Bluetooth Menu.
3. If not paired with a Bluetooth device, see “Search” on
page 83.
4. Highlight the desired Bluetooth device.
5. Press right soft key Options and then press
Send Calendar Event.
6. Navigate to highlight a Calendar event in your phone
(which is indicated by light blue color).
7. Press
VIEW
to see a list of all events on that day
8. Highlight the one(s) you want to send and press
MARK
to select the appropriate one(s). Press
Done
when
finished marking events.
9. When you see a prompt
“CONNECT TO <Bluetooth device>”
,
press
Yes
to connect to that device.
10. The other Bluetooth device may prompt you to accept the
transfer. If so, accept the transfer on the other device.
11. The selected Calendar event(s) will be sent to the target
Bluetooth device.
Sounds Settings
Sounds Settings
menu provides the ability to access the following
menus:
1. From the Home screen, press
MENU
. Press the
Directional key to highlight the Settings & Tools
menu and press .
2. Press Sounds Settings.
3. Select an option and press .
OK
OK
OKOK
OK
OK
OKOK
OKOK
OKOK
OKOK
OK
OK
OKOK
OK
OK
u750.book Page 85 Sunday, April 5, 2009 8:40 PM
Page 91
86
Easy Set-up
Easy Set-up allows you to quickly set five Sound Settings
parameters:
Calls Sounds
, Keypad Volume, Text Message Alert,
Multimedia Message Alert, and Voicemail Message Alert.
1. From the Home screen, press
MENU
. Press the
Directional key to highlight the Settings & Tools
menu and press .
2. Press Sounds Settings.
3. Press
Easy Setup
.
4. Follow instructions on the screen to select your preference
for Call Sounds, Keypad Volume, TXT Message Alert,
Multimedia Message Alert, and Voicemail Message Alert.
5. Press the
Directional key to highlight the option you
want and press
SET
.
6. If you want to skip a setting, touch the right soft key
Skip to move to the next setting.
Call Sounds
1. Open the flip in portrait mode and press
MENU
. Press
the
Directional key to highlight the Settings &
Tools menu and press .
2. Press Sounds Settings.
3. Press Call Sounds. The
Call Sounds
menu screen
displays
1. Call Ringtone, 2. Call Vibrate
and
3. Call Alert
.
4. For
Call Ringtone
, at the
Call Sounds
menu screen, press
Call Ringtone.
5. Press
Get New Ringtones
to get new ringtones from
Media Center or choose from the pre-loaded ringtones.
6. For
Call Vibrate
, at the
Call Sounds
menu screen, press
Call Vibrate
to turn Call Vibrate On or
Off
.
7. For
Call Alert
, at the
Call Sounds
menu screen, press
Call Alert
to set Call Alert to
Ring Only, Caller ID + Ring
, or
Name Repeat
.
8. Press to save the setting.
Alert Sounds
1. Open the flip in portrait mode and press
MENU
. Press
the
Directional key to highlight the Settings &
Tools menu and press .
2. Press Sounds Settings.
OKOK
OK
OK
OKOK
OKOK
OK
OK
OK
OK
OKOK
OK
OK
u750.book Page 86 Sunday, April 5, 2009 8:40 PM
Page 92
Changing Your Settings 87
3.
Press Alert Sounds. For the following options, you
can set the tone for the message alerts.
• TXT Message
: Allows you to set a notification for text message.
• Multimedia Message
: Allows you to set a notification for
multimedia messages.
• Voicemail
: Allows you to set a notification for voicemail message.
•Emergency Tone
: Allows you to set the alert for emergency dialing.
The options for the emergency tone are:
–
Alert: Phone plays the Emergency Dialing tone except when the master
volume setting is Vibrate or All Sounds Off.
Note:
If Emergency Tone is set to
Alert
and Master Volume is set to
Vibrate
,
the handset will vibrate after emergency dialing.
If Emergency Tone is set to
Alert
and the master Volume is set to
All
Sounds Off
, the handset will not sound after emergency dialing.
–
Vibrate: Phone will vibrate only and will not play the Emergency Dialing
tone.
Note:
If Emergency Tone is set to
Vibrate
and Master Volume is set to
All
Sounds Off
, the handset will not sound after emergency dialing.
–
Off: Phone will not play the Emergency Dialing tone or vibrate.
• Missed Call
: Allows you to set a notification for missed calls.
• Device Connect
: Allows you to set a notification when you
connect to a device.
4. Select an option and press .
Keypad Sounds
Select the sound of the keypad when pressed.
1. Open the flip in portrait mode and press
MENU
. Press
the
Directional key to highlight the Settings &
Tools menu and press .
2. Press Sounds Settings.
3. Press
Keypad Sounds.
4. Select Default or Xylophone.
5. Press
to set the new dial sound.
Keypad Volume
1. Open the flip in portrait mode and press
MENU
. Press
the
Directional key to highlight the Settings &
Tools menu and press .
2. Press Sounds Settings.
3. Press Keypad Volume.
4. Press the
Directional key up or down or volume key
to adjust the keypad volume.
5. Press
SET
to save.
OK
OK
OK
OK
OKOK
OKOK
OK
OK
OKOK
OKOK
u750.book Page 87 Sunday, April 5, 2009 8:40 PM
Page 93
88
Digit Dial Readout
1. Open the flip in portrait mode and press
MENU
. Press
the
Directional key to highlight the Settings &
Tools menu and press .
2. Press Sounds Settings.
3. Press
Digit Dial Readout
.
4. Select
On
or
Off
, and press . When the Digit Dial
Readout is set to On, you will hear the numbers called out
as you dial each digit.
Service Alerts
1. Open the flip in portrait mode and press
MENU
. Press
the
Directional key to highlight the Settings &
Tools menu and press .
2. Press Sounds Settings.
3. Press Service Alerts. For the following options, you
can turn the Service Alert On or
Off
.
•ERI
: Sounds an alert when you go into and out of your coverage
areas.
• Minute Beep: While on a call your phone beeps after every minute
of usage.
• Call Connect: Sounds an alert when a call is connected and when
a call has ended.
4. Select an option and press .
Power On/Off
1. Open the flip in portrait mode and press
MENU
. Press
the
Directional key to highlight the Settings &
Tools menu and press .
2. Press Sounds Settings.
3. Press
Power On/Off. You can set the sounds for
Power On and Power Off to either On or Off.
Display Settings
The
Display
menu affects the menu style, Home screen
animation, backlight settings, and more.
1. Open the flip in portrait mode and press
MENU
. Press
the
Directional key to highlight the Settings &
Tools menu and press .
2. Press
Display Settings
.
3. Select an option and press .
OKOKOKOK
OKOK
OKOK
OK
OK
OKOK
OK
OKOKOK
OKOK
OK
OK
OKOK
u750.book Page 88 Sunday, April 5, 2009 8:40 PM
Page 94
Changing Your Settings 89
Easy Set-Up
1. Open the flip in portrait mode and press
MENU
. Press
the
Directional key to highlight the Settings &
Tools menu and press .
2. Press
Display Settings
.
3. Press
Easy Set-Up
.
4. You can scroll through the menu options to set up your
Display Settings: Personal Banner, Display Backlight,
Keypad Backlight, Main Wallpaper, Front Wallpaper,
Display Themes, Menu Type, Dial Fonts, Main Clock
Format, and Front Clock Format.
5. Select an option and press .
Banner
Banner
allows you to create your own personalized greeting that
appears in Home screen or you can display the network to which
you are subscribed.
To create a personal banner:
1. Open the flip in portrait mode and press
MENU
. Press
the
Directional key to highlight the Settings &
Tools menu and press .
2. Press
Display Settings
.
3. Press Banner.
4. Press Personal Banner to create a customized
banner for your handset.
Note:
Press and hold to erase an existing banner, if necessary.
5. Enter a word or short phrase (18 characters or less) to
appear in the Home screen. Press to save banner.
To turn on an ERI banner:
1. Open the flip in portrait mode and press
MENU
. Press
the
Directional key to highlight the Settings &
Tools menu and press .
2. Press
Display Settings
.
3. Press Banner.
4. Press to set the ERI Banner for your handset.
5. Select On or Off and press .
OK
OK
OKOK
OK
OK
OK
OK
OKOK
OK
OKOKOK
OKOK
OK
OK
u750.book Page 89 Sunday, April 5, 2009 8:40 PM
Page 95
90
Backlight
Set the
backlight
for the display or keypad to remain on for a
specified period of time or to remain on as long as the flip is
open.
Note:
Prolonged backlight use drains your battery faster.
1. Open the flip in portrait mode and press
MENU
. Press
the
Directional key to highlight the Settings &
Tools menu and press .
2. Press
Display Settings
.
3. Press Backlight. The menus listed appear in the
display.
•Display
: The following options are for the Main LCD.
–
Duration
: Can be set to 7 seconds, 15 seconds, 30 seconds, or
Always On.
–
Brightness
: Press the
Directional key left or right to adjust the
brightness.
•Keypad
: The following options are for the keypad.
–
7 Seconds
: The keypad is on for 7 seconds.
–
15 Seconds
: The keypad is on for 15 seconds.
–
30 Seconds
: The keypad is on for 30 seconds.
–
Always On
: The keypad is always on.
4. Highlight a menu and press to enter the highlighted
option’s menu and change settings as desired.
Front Contrast
Set the
contrast
for the display on the external LCD.
1. Open the flip in portrait mode and press
MENU
. Press
the
Directional key to highlight the Settings &
Tools menu and press .
2. Press
Display Settings
.
3. Press
Front
Contrast. Press the left or right to adjust
the contrast of the front external LCD then press .
Wallpaper
1. Open the flip in portrait mode and press
MENU
. Press
the
Directional key to highlight the Settings &
Tools menu and press .
2. Press
Display Settings
.
3. Press Wallpaper.
4. Press Main Screen or Front Screen.
• Main Screen
: Choose My Pictures (allows you to select an image
from the My Pictures.) Choose My Videos (allows you to select a
video from My Video.)
OKOK
OK
OK
OKOK
OKOK
OK
OK
OKOK
OK
OK
OK
OK
u750.book Page 90 Sunday, April 5, 2009 8:40 PM
Page 96
Changing Your Settings 91
• Front Screen
: Choose My Pictures (allows you to select an image
from the My Pictures folder.) to select the wallpaper that will appear
in the main or front LCD display.
Note:
You can also press the right soft key
Get New
and press
1. Get New
Applications
to download images from the Internet.
Warning!:
Wallpaper will not display if the front clock is On.
5. Select your desired picture and press .
Display Themes
1. Open the flip in portrait mode and press
MENU
. Press
the
Directional key to highlight the Settings &
Tools menu and press .
2. Press
Display Settings
.
3. Press Display Themes. Press the left soft key
Preview.
Press the
Directional key left or right to
cycle through thumbnails of the themes.
4. Press the left soft key
List
to return to the list.
5. Make your selection and press
to save.
Main Menu Settings
Note:
This menu is not available with the default Display Theme
My Place
.
This menu is only available when using the Display Theme Slick Black,
White or Gliss.
Menu Layout
Choose 3 preset main menu layout themes for the menu display.
1. Open the flip in portrait mode and press
MENU
. Press
the
Directional key to highlight the Settings &
Tools menu and press .
2. Press
Display Settings
.
3. Press Main Menu Settings, then
Menu Layout
.
•Tab
: Displays Media Center, Messaging, Contacts, Recent Calls
and Settings & Tools menu icons on the menu screen.
•List
: Displays 9 menu listings on the menu screen.
•Grid
: Displays 9 menu icons in a matrix on the menu screen.
4. Highlight a main menu setting and press .
5. The
Main Menu Type
screen appears on the display. Select
from the following options if
List
or
Grid
were selected for
Main Menu layout:
OKOK
OK
OK
OKOK
OK
OKOKOK
OKOK
OK
OK
u750.book Page 91 Sunday, April 5, 2009 8:40 PM
Page 97
92
• Messaging
: Choose Messaging to display: Media Center,
Messaging, Contacts, Email, Mobile IM, My Ringtones, Recent
Calls, VZ Navigator and Settings & Tools.
• Personalizing
: Choose Personalizing to display: Media Center,
Messaging, My Ringtones, My Pictures, V Cast Music, Contacts,
Recent Calls, Games and Settings & Tools.
6. Highlight a setting and press .
Replace Menu Items
Note:
This menu is not available with the default Display Theme
My Place
.
Choose the menu items for the menu display.
1. Open the flip in portrait mode and press
MENU
. Press
the
Directional key to highlight the Settings &
Tools menu and press .
2. Press
Display Settings
.
3. Press Main Menu Settings, then
Replace
Menu Items
. A list or grid of icons displays.
4. Select an icon and press . A list of menu items
displays.
5. Select a menu to associate with the selected icon and
press .
Position Menu Items
Note:
This menu is not available with the default Display Theme
My Place
.
Change the location of the menu items for the menu display.
1. Open the flip in portrait mode and press
MENU
. Press
the
Directional key to highlight the Settings &
Tools menu and press .
2. Press
Display Settings
.
3. Press Main Menu Settings, then
Position
Menu Items
. A list or grid of icons displays.
4. Select an icon that you want to move to another location,
and press .
5. Press the
Directional key to select another icon to
swap with the previously selected icon.
6. Press . The two selected items with swap positions.
OKOK
OKOKOKOKOKOK
OKOK
OKOKOKOK
OK
OK
OK
OK
u750.book Page 92 Sunday, April 5, 2009 8:40 PM
Page 98
Changing Your Settings 93
Reset Menu Settings
Note:
This menu is not available with the default Display Theme
My Place
.
Revert to the default positions for the menu items to display.
1. Open the flip in portrait mode and press
MENU
. Press
the
Directional key to highlight the Settings &
Tools menu and press .
2. Press
Display Settings
.
3. Press Main Menu Settings, then
Reset Menu
Settings
. Choose from
Menu Layout, Menu Items, Item
Positions
, or
All
.
4. Press .
Dial Fonts
1. Open the flip in portrait mode and press
MENU
. Press
the
Directional key to highlight the Settings &
Tools menu and press .
2. Press
Display Settings
.
3. Press Dial Fonts.
4. Press the
Directional key up or down to highlight
Normal
or
Large
and press .
Menu Fonts
1. Open the flip in portrait mode and press
MENU
. Press
the
Directional key to highlight the Settings &
Tools menu and press .
2. Press
Display Settings
.
3. Press Menu Fonts.
4. Press
Font Style
, then press the
Directional
key left or right to highlight a font.
5. Press .
6. Press
Size
, then press the
Directional key up
or down to highlight
Normal
or
Large
.
7. Press .
Clock Format
This menu allows you to have time displayed in digital or analog
format.
1. Open the flip in portrait mode and press
MENU
. Press
the
Directional key to highlight the Settings &
Tools menu and press .
2. Press
Display Settings
.
OK
OK
OKOK
OKOK
OK
OK
OKOK
OK
OK
OK
OK
OKOK
OK
OK
OKOK
OK
OK
OKOK
u750.book Page 93 Sunday, April 5, 2009 8:40 PM
Page 99
94
3.
Press Clock Format.
4. Press Main Clock. The following options appear in
the display:
•Analog
: Time appears in clock format.
• Large Analog
: Time appears in clock format in larger size.
• Digital 12
: Time appears in 12-hour digital format. Example:
8:00pm.
•Large Digital 12
: Time appears in 12-hour digital format in larger
size.
• Digital 24
: Time appears in 24-hour digital format. Example:
20:00.
•Large Digital 24
: Time appears in 24-hour digital format in larger
size.
•Off
: No time is displayed.
5. Press the
Directional key left or right to view and
press to save the option.
To set the
Front Clock
display, use the following options:
1. Open the flip in portrait mode and press
MENU
. Press
the
Directional key to highlight the Settings &
Tools menu and press .
2. Press
Display Settings
.
3. Press Clock Format.
4. Press Front Clock. The following options appear in
the display.
•Laser Dots
: Time appears in 12-hour digital format using a laser-
dot font.
• Digital
: Time appears in 12-hour digital format. Example: 8:00pm.
•Analog
: Time appears in clock format with Roman numerals.
•Off
: No time is displayed.
5. Press the
Directional key left or right to view and
press to save the option.
Phone Settings
1. Open the flip in portrait mode and press
MENU
. Press
the
Directional key to highlight the Settings &
Tools menu and press .
2. Press
Phone Settings
.
3. Select an option and press .
Airplane Mode
With
Airplane Mode
on, all RF functions for your phone are
disabled, and you cannot use your phone to place or receive
calls.
1. Open the flip in portrait mode and press
MENU
. Press
OKOK
OKOK
OK
OK
OK
OK
OKOK
OK
OK
OKOK
OKOK
u750.book Page 94 Sunday, April 5, 2009 8:40 PM
Page 100
Changing Your Settings 95
the
Directional key to highlight the Settings &
Tools menu and press .
2. Press Phone Settings.
3. Press
Airplane Mode
. elect On or Off and press
.
Set Shortcut Keys
Set Shortcut Keys
allows you to personalize menu settings for
Set
My Shortcuts
and
Set Directional Keys
. Choose menu settings for
each of the shortcut options under
Set My Shortcuts
. In addition,
you can personalize 3 Directional keys (up, down and left) with
Set Directional Keys
.
1. Open the flip in portrait mode and press
MENU
. Press
the
Directional key to highlight the Settings &
Tools menu and press .
2. Press Phone Settings.
3. Press Set Shortcuts.
– or –
1. Open the flip in portrait mode and press the
Directional key right to launch
My Shortcuts
and press the
left soft key
Settings
.
•Set My Shortcuts: Choose from 44 menu settings for each of the
4 shortcut options.
• Set Directional Keys: Choose from 44 menu settings for the up,
left and down Directional keys.
To personalize
Set My Shortcuts
:
1. Highlight
Set My Shortcuts
and press . Highlight any of
the shortcut options (Shortcut 1, 2, 3 or 4) to change and
press .
2. Highlight any of the menu settings and press .
Note:
Press the right soft key Options to:
1. Reset Shortcut 1,2,3 or 4
or:
2. Reset My Shortcuts,
for resetting the shortcuts to default settings.
For default settings see “Directional Key Shortcuts” on page 35.
To personalize
Set Directional Keys
:
1. Highlight
Set Directional Keys
and press . Highlight any
of the
Directional keys (Up, Left or Down) to change
and press .
2. Highlight any of the menu settings and press .
Note:
Press the right soft key Options for:
1. Reset Up, Left or Down Key
or:
2. Reset Directional Keys,
for resetting the keys to default settings.
For default settings see “Directional Key Shortcuts” on page 35.
OKOK
OKOK
OK
OK
OKOK
OK
OK
OKOK
OK
OK
OKOK
OKOK
OK
OK
u750.book Page 95 Sunday, April 5, 2009 8:40 PM
 Loading...