

Page 1

1_AK57V77E.Cover.fm Page 1 Wednesday, April 2, 2003 10:19 AM
AK57V/AK77E
Page 2

3_TOC.fm Page 1 Wednesday, April 2, 2003 10:20 AM
Table of Contents
Safety Instructions . . . . . . . . . . . . . . . . . . . . . . . . . . . . . . . . . . . . . . . . . . . . . . . . . . . . . . . . . . 2
Your New Monitor . . . . . . . . . . . . . . . . . . . . . . . . . . . . . . . . . . . . . . . . . . . . . . . . . . . . . . . . . . . 3
Connecting Your Monitor . . . . . . . . . . . . . . . . . . . . . . . . . . . . . . . . . . . . . . . . . . . . . . . . . . 3
Front Panel . . . . . . . . . . . . . . . . . . . . . . . . . . . . . . . . . . . . . . . . . . . . . . . . . . . . . . . . . . . . . 4
Direct Access Buttons . . . . . . . . . . . . . . . . . . . . . . . . . . . . . . . . . . . . . . . . . . . . . . . . . . . . 4
Operation . . . . . . . . . . . . . . . . . . . . . . . . . . . . . . . . . . . . . . . . . . . . . . . . . . . . . . . . . . . . . . . . . . 5
On Screen Display(OSD) . . . . . . . . . . . . . . . . . . . . . . . . . . . . . . . . . . . . . . . . . . . . . . . . . . . 5
Monitor function control . . . . . . . . . . . . . . . . . . . . . . . . . . . . . . . . . . . . . . . . . . . . . . . . . . . 6
Brightness . . . . . . . . . . . . . . . . . . . . . . . . . . . . . . . . . . . . . . . . . . . . . . . . . . . . . . . . . . .6
Contrast . . . . . . . . . . . . . . . . . . . . . . . . . . . . . . . . . . . . . . . . . . . . . . . . . . . . . . . . . . . .6
Horizontal Position . . . . . . . . . . . . . . . . . . . . . . . . . . . . . . . . . . . . . . . . . . . . . . . . . . . .6
Vertical Position . . . . . . . . . . . . . . . . . . . . . . . . . . . . . . . . . . . . . . . . . . . . . . . . . . . . . . 6
Horizontal Size . . . . . . . . . . . . . . . . . . . . . . . . . . . . . . . . . . . . . . . . . . . . . . . . . . . . . . . 6
Vertical Size . . . . . . . . . . . . . . . . . . . . . . . . . . . . . . . . . . . . . . . . . . . . . . . . . . . . . . . . . .6
Pincushion . . . . . . . . . . . . . . . . . . . . . . . . . . . . . . . . . . . . . . . . . . . . . . . . . . . . . . . . . . .7
Geometry . . . . . . . . . . . . . . . . . . . . . . . . . . . . . . . . . . . . . . . . . . . . . . . . . . . . . . . . . . . 7
Trapezoid . . . . . . . . . . . . . . . . . . . . . . . . . . . . . . . . . . . . . . . . . . . . . . . . . . . . . . . . 7
Parallelogram . . . . . . . . . . . . . . . . . . . . . . . . . . . . . . . . . . . . . . . . . . . . . . . . . . . . . 7
Rotation . . . . . . . . . . . . . . . . . . . . . . . . . . . . . . . . . . . . . . . . . . . . . . . . . . . . . . . . . 7
Pinbalance . . . . . . . . . . . . . . . . . . . . . . . . . . . . . . . . . . . . . . . . . . . . . . . . . . . . . . . 7
V-Linearity . . . . . . . . . . . . . . . . . . . . . . . . . . . . . . . . . . . . . . . . . . . . . . . . . . . . . . . 7
Language . . . . . . . . . . . . . . . . . . . . . . . . . . . . . . . . . . . . . . . . . . . . . . . . . . . . . . . . . . . 8
Advanced . . . . . . . . . . . . . . . . . . . . . . . . . . . . . . . . . . . . . . . . . . . . . . . . . . . . . . . . . . . . 8
H- Moiré . . . . . . . . . . . . . . . . . . . . . . . . . . . . . . . . . . . . . . . . . . . . . . . . . . . . . . . . .8
V- Moiré . . . . . . . . . . . . . . . . . . . . . . . . . . . . . . . . . . . . . . . . . . . . . . . . . . . . . . . . . 8
Video Input Level . . . . . . . . . . . . . . . . . . . . . . . . . . . . . . . . . . . . . . . . . . . . . . . . . . 8
Color Temperature . . . . . . . . . . . . . . . . . . . . . . . . . . . . . . . . . . . . . . . . . . . . . . . . .8
Zoom . . . . . . . . . . . . . . . . . . . . . . . . . . . . . . . . . . . . . . . . . . . . . . . . . . . . . . . . . . . . . . .9
Degauss . . . . . . . . . . . . . . . . . . . . . . . . . . . . . . . . . . . . . . . . . . . . . . . . . . . . . . . . . . . .9
Recall . . . . . . . . . . . . . . . . . . . . . . . . . . . . . . . . . . . . . . . . . . . . . . . . . . . . . . . . . . . . . . 9
Display Timing . . . . . . . . . . . . . . . . . . . . . . . . . . . . . . . . . . . . . . . . . . . . . . . . . . . . . . . . 9
OSD Lock/Unlock. . . . . . . . . . . . . . . . . . . . . . . . . . . . . . . . . . . . . . . . . . . . . . . . . . . . . . 9
Troubleshooting . . . . . . . . . . . . . . . . . . . . . . . . . . . . . . . . . . . . . . . . . . . . . . . . . . . . . . . . . . . . 10
Power Saver . . . . . . . . . . . . . . . . . . . . . . . . . . . . . . . . . . . . . . . . . . . . . . . . . . . . . . . . . . . . . . 11
Display Modes . . . . . . . . . . . . . . . . . . . . . . . . . . . . . . . . . . . . . . . . . . . . . . . . . . . . . . . . . . . . . 11
Specifications . . . . . . . . . . . . . . . . . . . . . . . . . . . . . . . . . . . . . . . . . . . . . . . . . . . . . . . . . . . . . 12
Index . . . . . . . . . . . . . . . . . . . . . . . . . . . . . . . . . . . . . . . . . . . . . . . . . . . . . . . . . . . . . . . . . . . . 13
Regulatory lnformation . . . . . . . . . . . . . . . . . . . . . . . . . . . . . . . . . . . . . . . . . . inside back cover
FrançaisEspañolDeutschItaliano EnglishPortuguese
English - 1
Page 3

2_Saf.fm Page 2 Wednesday, April 2, 2003 10:20 AM
Safety Instructions
Before connecting the AC power cord
1
to an outlet, make sure the voltage
designation on your monitor
corresponds to the local electrical
supply.
Never insert anything metallic into
2
the monitor openings. Doing so may
create the danger of electric shock.
To avoid electric shock, never touch
3
the inside of the monitor. Only a
qualified technician should open the
monitor’s case.
Never use your monitor if the power
4
cord has been damaged. Do not
allow anything to rest on the power
cord, and keep the cord away from
areas where people can trip over it.
Be sure to hold the plug, not the cord,
5
when disconnecting the monitor from
an electric socket.
Openings in the monitor cabinet are
6
provided for ventilation. To prevent
overheating, these openings should
not be blocked or covered. Also,
avoid using the monitor on a bed,
sofa, rug, or other soft surface. Doing
so may block the ventilation
openings in the bottom of the
cabinet. If you put the monitor in a
bookcase or some other enclosed
space, be sure to provide adequate
ventilation.
Put your monitor in a location with
7
low humidity and a minimum of dust.
Do not expose the monitor to rain or
8
use it near water (in kitchens, near
swimming pools, etc.). If the monitor
accidentally gets wet, unplug it and
contact an authorized dealer
immediately. You can clean the
monitor with a damp cloth when
necessary, but be sure to unplug the
monitor first.
Place the monitor on a solid surface
9
and treat it carefully. The screen is
made of glass and can be damaged if
dropped, hit or scratched.
Locate your monitor near an easily
10
accessible AC outlet.
If your monitor does not operate
11
normally – in particular, if there are
any unusual sounds or smells coming
from it – unplug it immediately and
contact an authorized dealer or
service center.
High temperatures can cause
12
problems. Don’t use your monitor in
direct sunlight, and keep it away
from heaters, stoves, fireplaces, and
other sources of heat.
Unplug the monitor when it is going
13
to be left unused for an extended
period of time.
Unplug your monitor from the AC
14
outlet before any service.
CAUTION
RISK OF ELECTRIC SHOCK
DO NOT OPEN
CAUTION:
REFER SERVICING TO QUALIFIED SERVICE PERSONNEL.
TO REDUCE THE RISK OF ELECTRIC SHOCK,
DO NOT REMOVE COVER (OR BACK).
NO USER-SERVICEABLE PARTS INSIDE.
English - 2
Page 4

MENU
MENU
4_3p-4p.fm Page 3 Wednesday, April 2, 2003 10:17 AM
Your New Monitor
Please make sure the following items are included with your monitor. If any items are
missing, contact your dealer.
Manual
MENU
EXIT
EXIT
MENU
Power Cord
Connecting Your Monitor
3
(Adapter not included)
Turn off your computer and unplug
1
the power cord.
Signal cable
2
Connect the end of the signal cable to
your computer’s video port (Video
board, video card, or graphics card).
If you are using a Macintosh
computer, connect the cable to a
Macintosh adapter, and set the pins
on your adapter (Adapter not
included). A PC-compatible computer
does not need an adapter.
Power port
3
Connect the power cord for your
monitor to the power port on the back
of the monitor.
Monitor
4
5
6
MENU
EXIT
EXIT
MENU
AK77EAK57V
2
Power cords
Plug the power cord for the monitor
and the power cord for your computer
into a nearby outlet.
Turn on your computer and monitor.
If your monitor displays an image,
installation is complete.
Install monitor driver
•
Insert the provided diskette into the
A drive.
•
Double click the “install.exe” file.
Stand
4
English - 3
Page 5
MENU
MENU
MENU
MENU
MENU
4_3p-4p.fm Page 4 Wednesday, April 2, 2003 10:17 AM
Your New Monitor
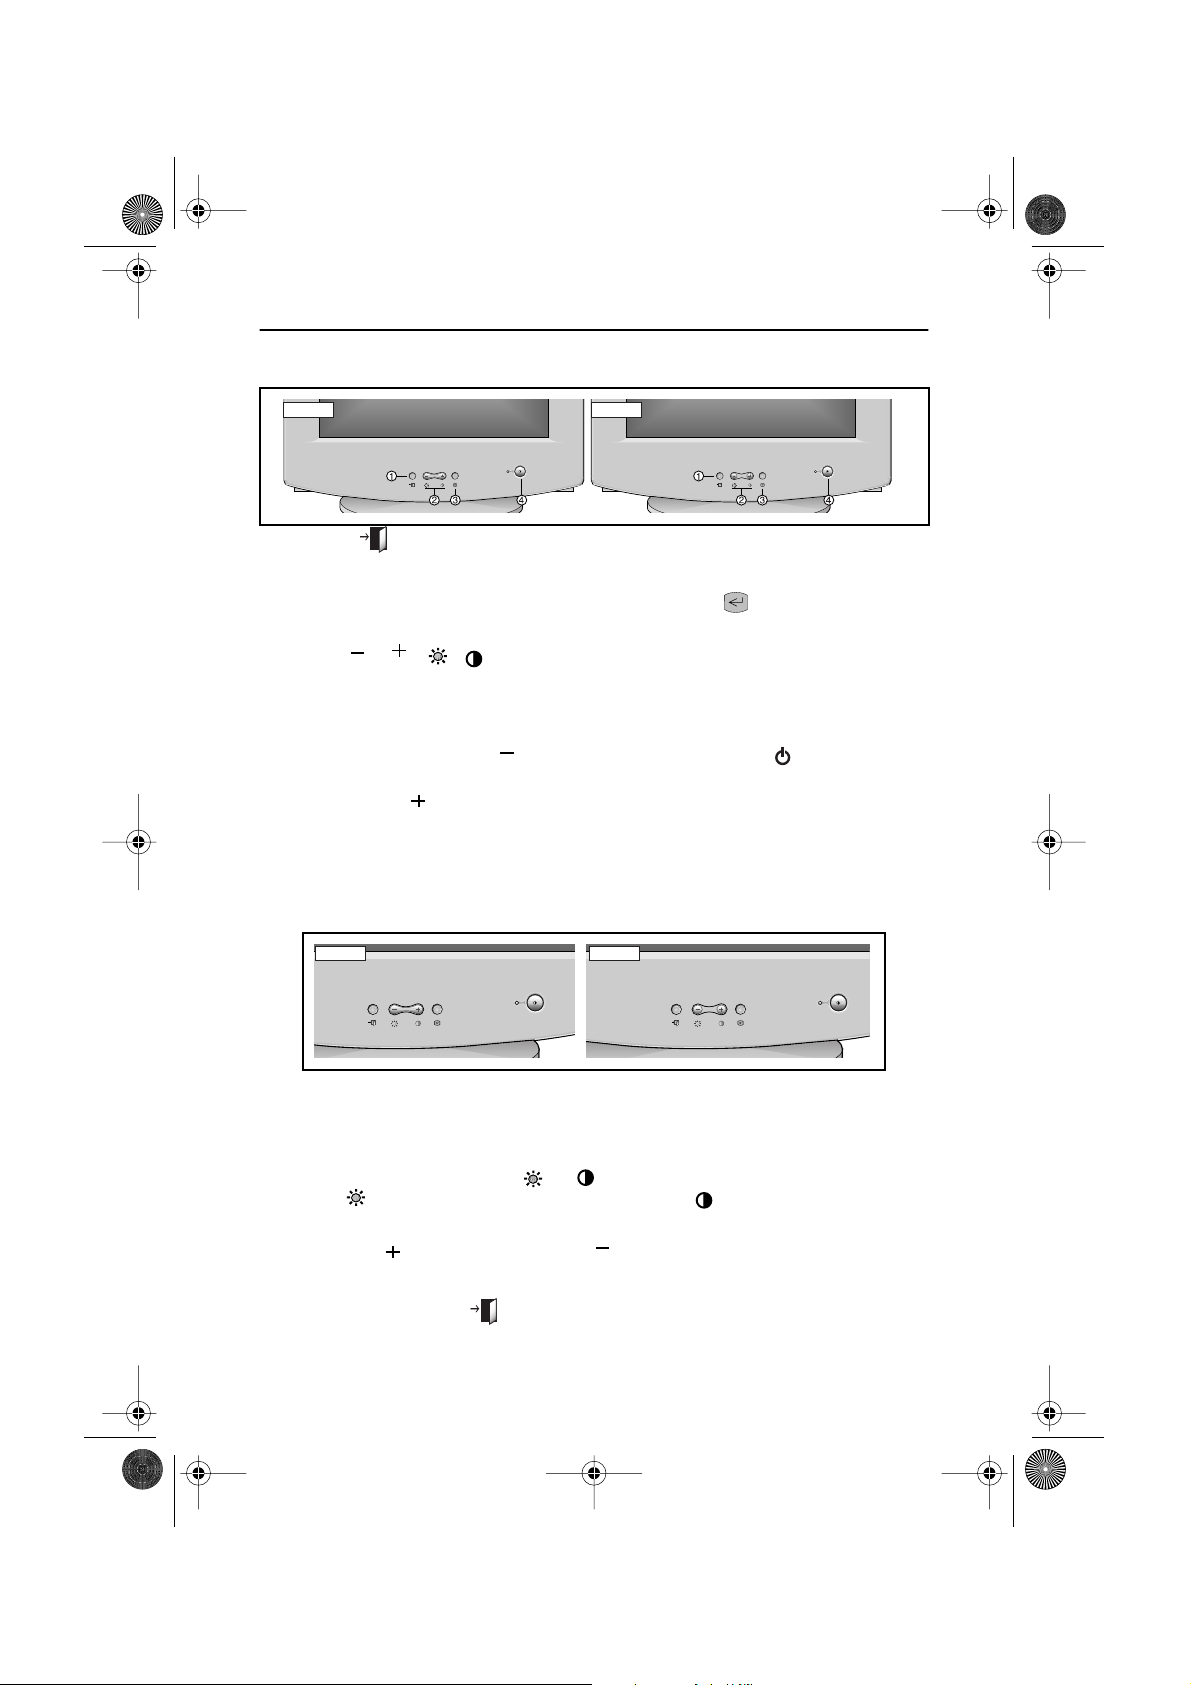
Front Panel
AK57V AK77E
MENU
EXIT
EXIT
MENU
EXIT ( ) button
1
Closes the On Screen Display. It is
also used to return to the previous
menu when using the on-screen
menu system.
The / ( / ) buttons
2
These buttons allow you to select and
adjust items using the on-screen
menu. When adjusting an item using
the on-screen menu, the button
lowers the value of the selected
function. The button raises the
value of the selected function. These
buttons are also direct access buttons
for the Contrast and Brightness
Direct Access Buttons
AK57V
EXIT
EXIT
MENU
MENU
3
4
AK77E
MENU
EXIT
EXIT
MENU
feature controls. (See the section
below on Direct Access Buttons.)
MENU ( ) button
Opens the on-screen menu. It is also
used to select a highlighted function,
open a sub-menu, or move between
menus when using the on-screen
menu system.
Power button
The power button turns the monitor
on and off. The power indicator light
glows green during normal operation,
see page 11.
EXIT
EXIT
MENU
MENU
FrançaisEspañolDeutschItaliano EnglishPortuguese
Most of the adjustments you make to your monitor will be accessed through the on-screen
menu described in the next section. The Contrast and Brightness features can also be
accessed directly from the front of your monitor.
With the menu off, press the or button on the front of your monitor.
1
The button accesses the Brightness feature. The button accesses the
Contrast feature.
Push the button to increase or the button to decrease the value of the
2
selection.
Press the EXIT button twice to exit the on-screen menu.
3
English - 4
Page 6
5_5p.fm Page 5 Wednesday, April 2, 2003 10:18 AM
Operation
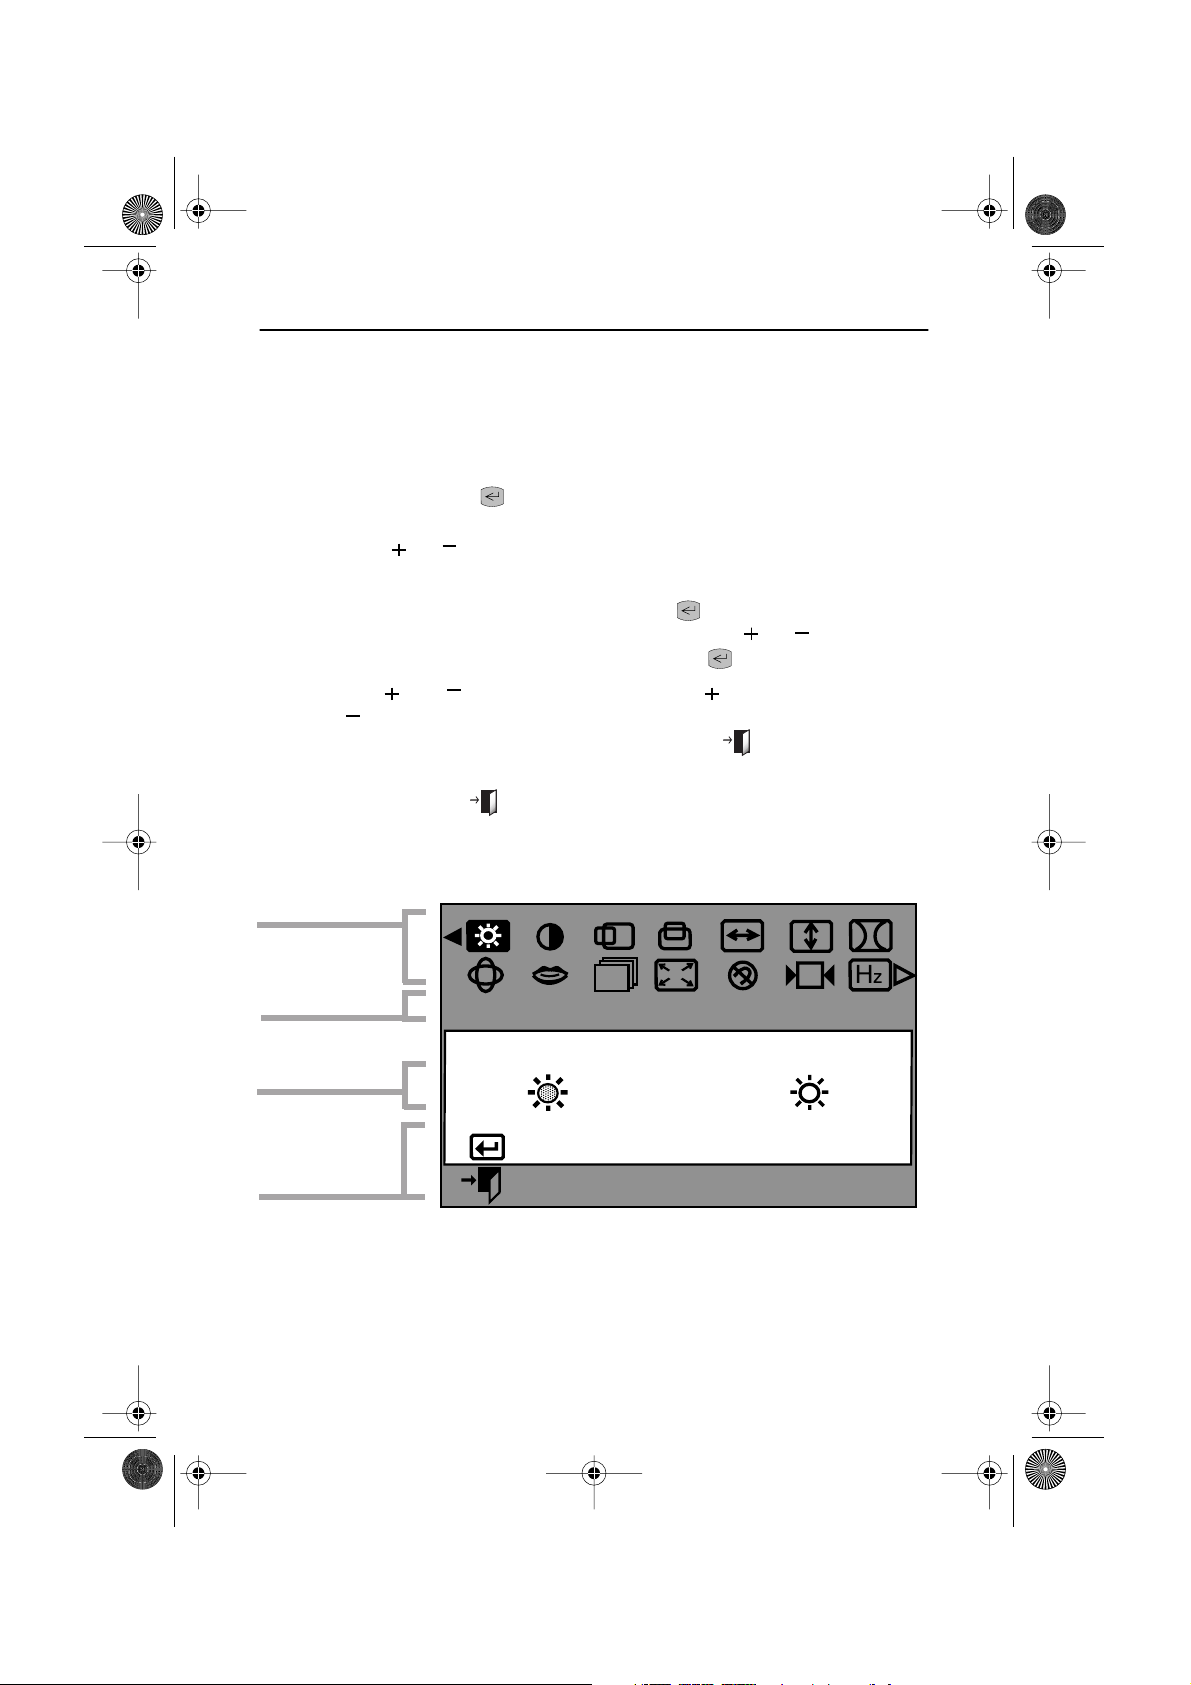
On Screen Display(OSD)
Your monitor has an OSD, accessed by the buttons on the front of your monitor, that allows
you to adjust characteristics of the screen image. Display changes are indicated by on-screen
adjustment icons. Some functions have sub-menus.
Push the menu button to display the main menu.
1
Function icons are arranged across the top of the OSD.
Push the or button to move through the icons.
2
The name of the function will appear below the rows of function icons.
To select a function or open a sub-menu, push the button. The screen will display
3
the options for adjustment. If there is a sub-menu, use the or button to
highlight the feature you want to adjust, then push the button to select it.
Use the and buttons to make adjustments. increases values
4
and decreases values. On-screen calibration numbers show the effect of your
adjustment. If you are in a sub-menu, use the EXIT button to return to the previous
menu.
Push the EXIT button to exit and save your changes.
5
Function icons
Active function
Adjustment icons
Function
selection and
Menu navigation
Brightness
:
Access Function
:
Exit Menu
English - 5
Page 7
5_5p.fm Page 6 Wednesday, April 2, 2003 10:18 AM
Operation
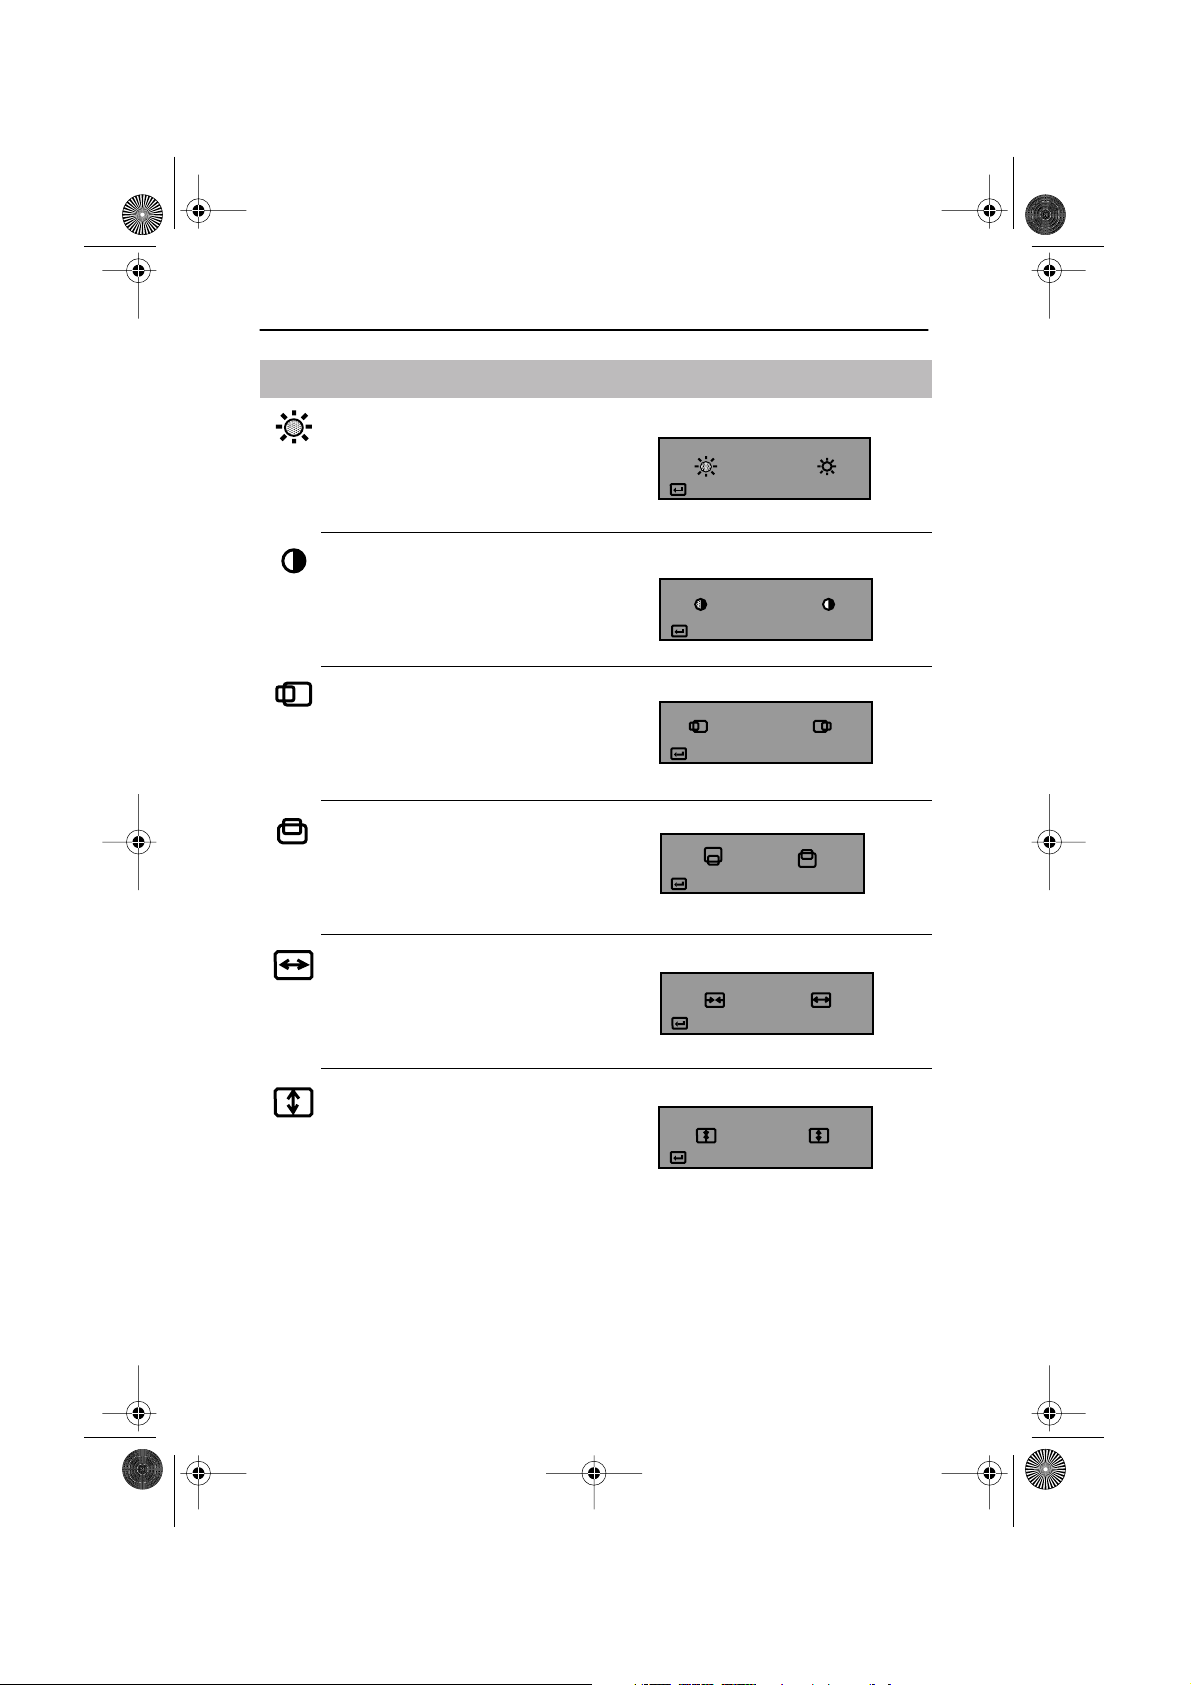
Icon Monitor Function Control
Brightness
Background brightness of screen.
-– Decreases brightness
+ Increases brightness
Contrast
Contrast of screen image.
-– Decreases contrast
+ Increases contrast
Horizontal Position
Horizontal screen position.
-– Moves screen left
+ Moves screen right
Vertical Position
Vertical screen position.
-– Moves screen down
+ Moves screen up
Horizontal Size
Horizontal screen size.
-– Decreases size
+ Increases size
Brightness
:
Access Function
Contrast
:
Access Function
H-Position
:
Access Function
V-Position
:
Access Function
H-Size
:
Access Function
FrançaisEspañolDeutschItaliano EnglishPortuguese
Vertical Size
Vertical screen size.
-– Decreases size
+ Increases size
English - 6
V-Size
:
Access Function
Page 8
5_5p.fm Page 7 Wednesday, April 2, 2003 10:18 AM
Operation
Icon Monitor Function Control
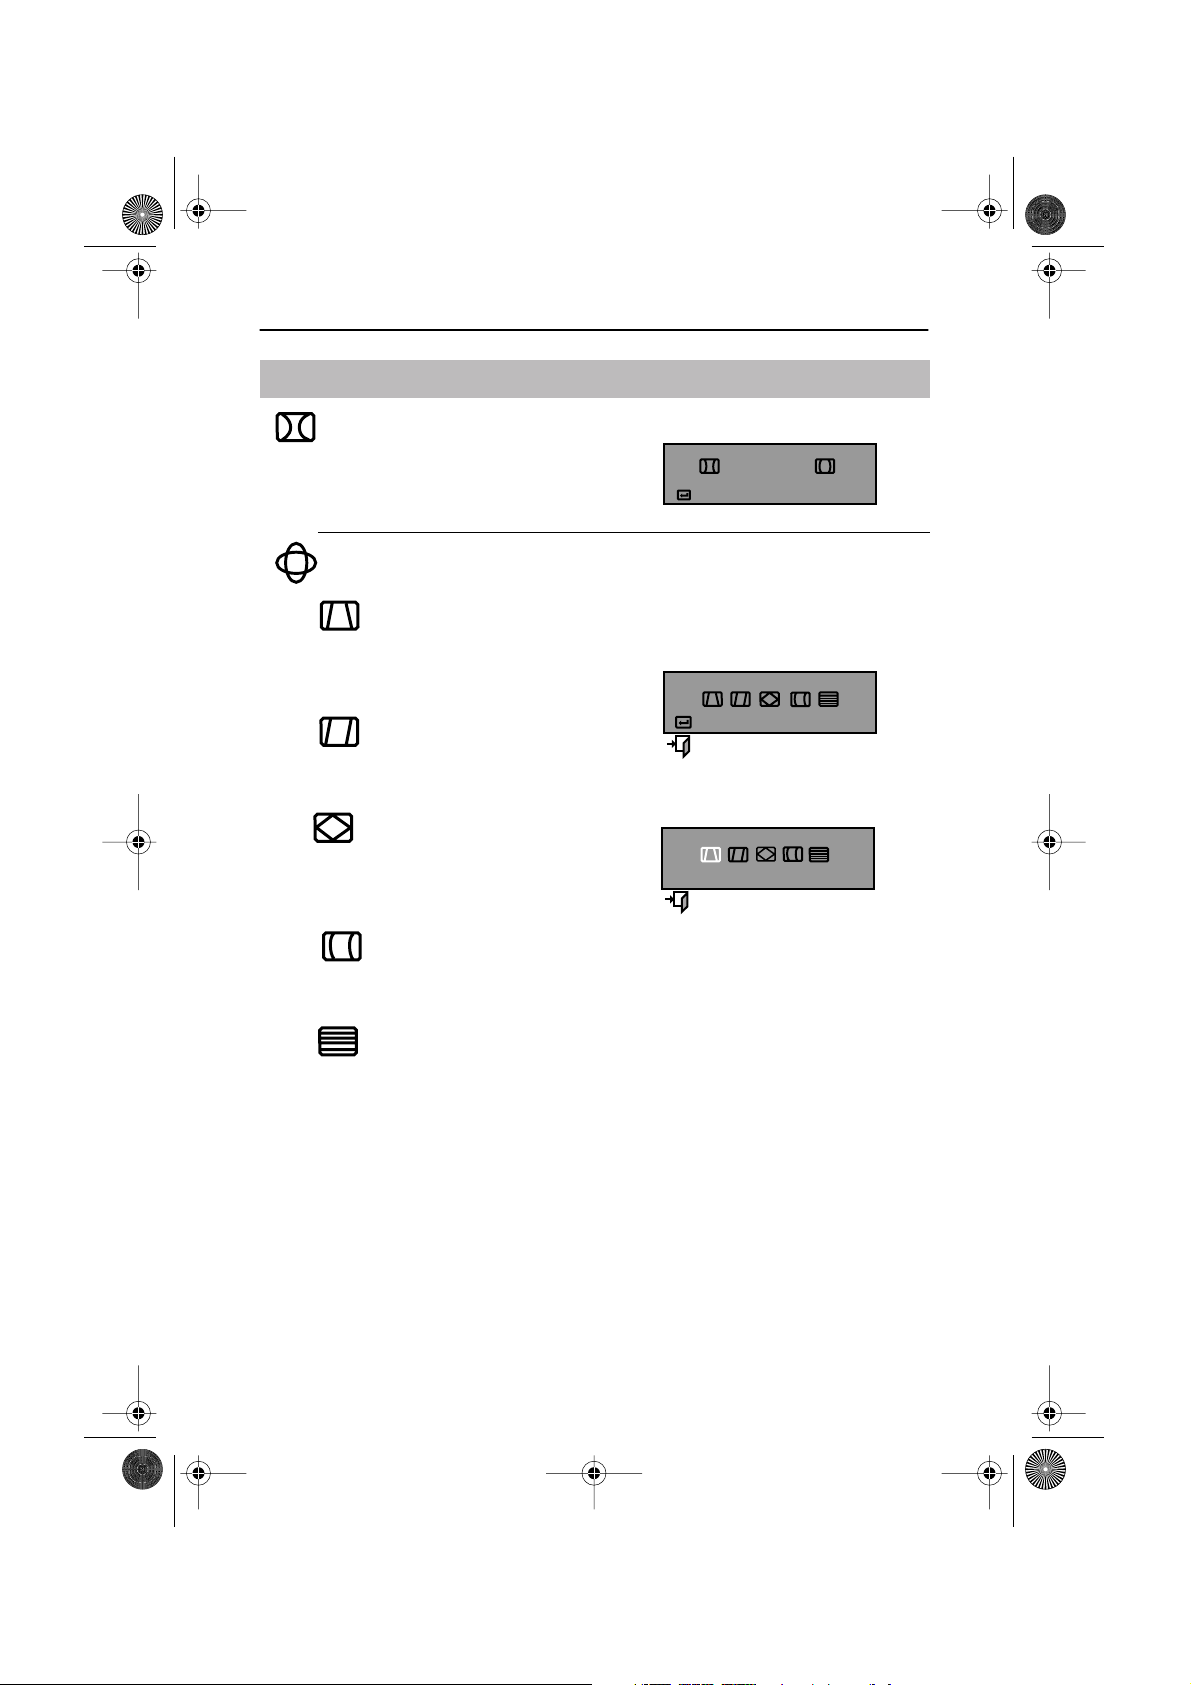
Pincushion
Straightens screen vertical edges.
-– Curves image inward
+ Curves image outward
Geometry
Trapezoid
Width of top and bottom of screen.
-– Widens bottom of screen
+ Widens top of screen
Parallelogram
-– Skews screen image left
+ Skews screen image right
Rotation
-– Rotates entire screen left
+ Rotates entire screen right
(AK77E model only)
Pinbalance
-– Curves vertical lines to left
+ Curves vertical lines to right
1.
2.
Pincushion
:
Access Function
Geometry
:
Access Function
Exit Menu
:
Trapezoid
Select Function
+ - :
Previous Menu
:
V-Linearity
-– Compresses image at top of screen
+ Compresses image at bottom of screen
English - 7
Page 9
5_5p.fm Page 8 Wednesday, April 2, 2003 10:18 AM
Operation
Icon Monitor Function Control
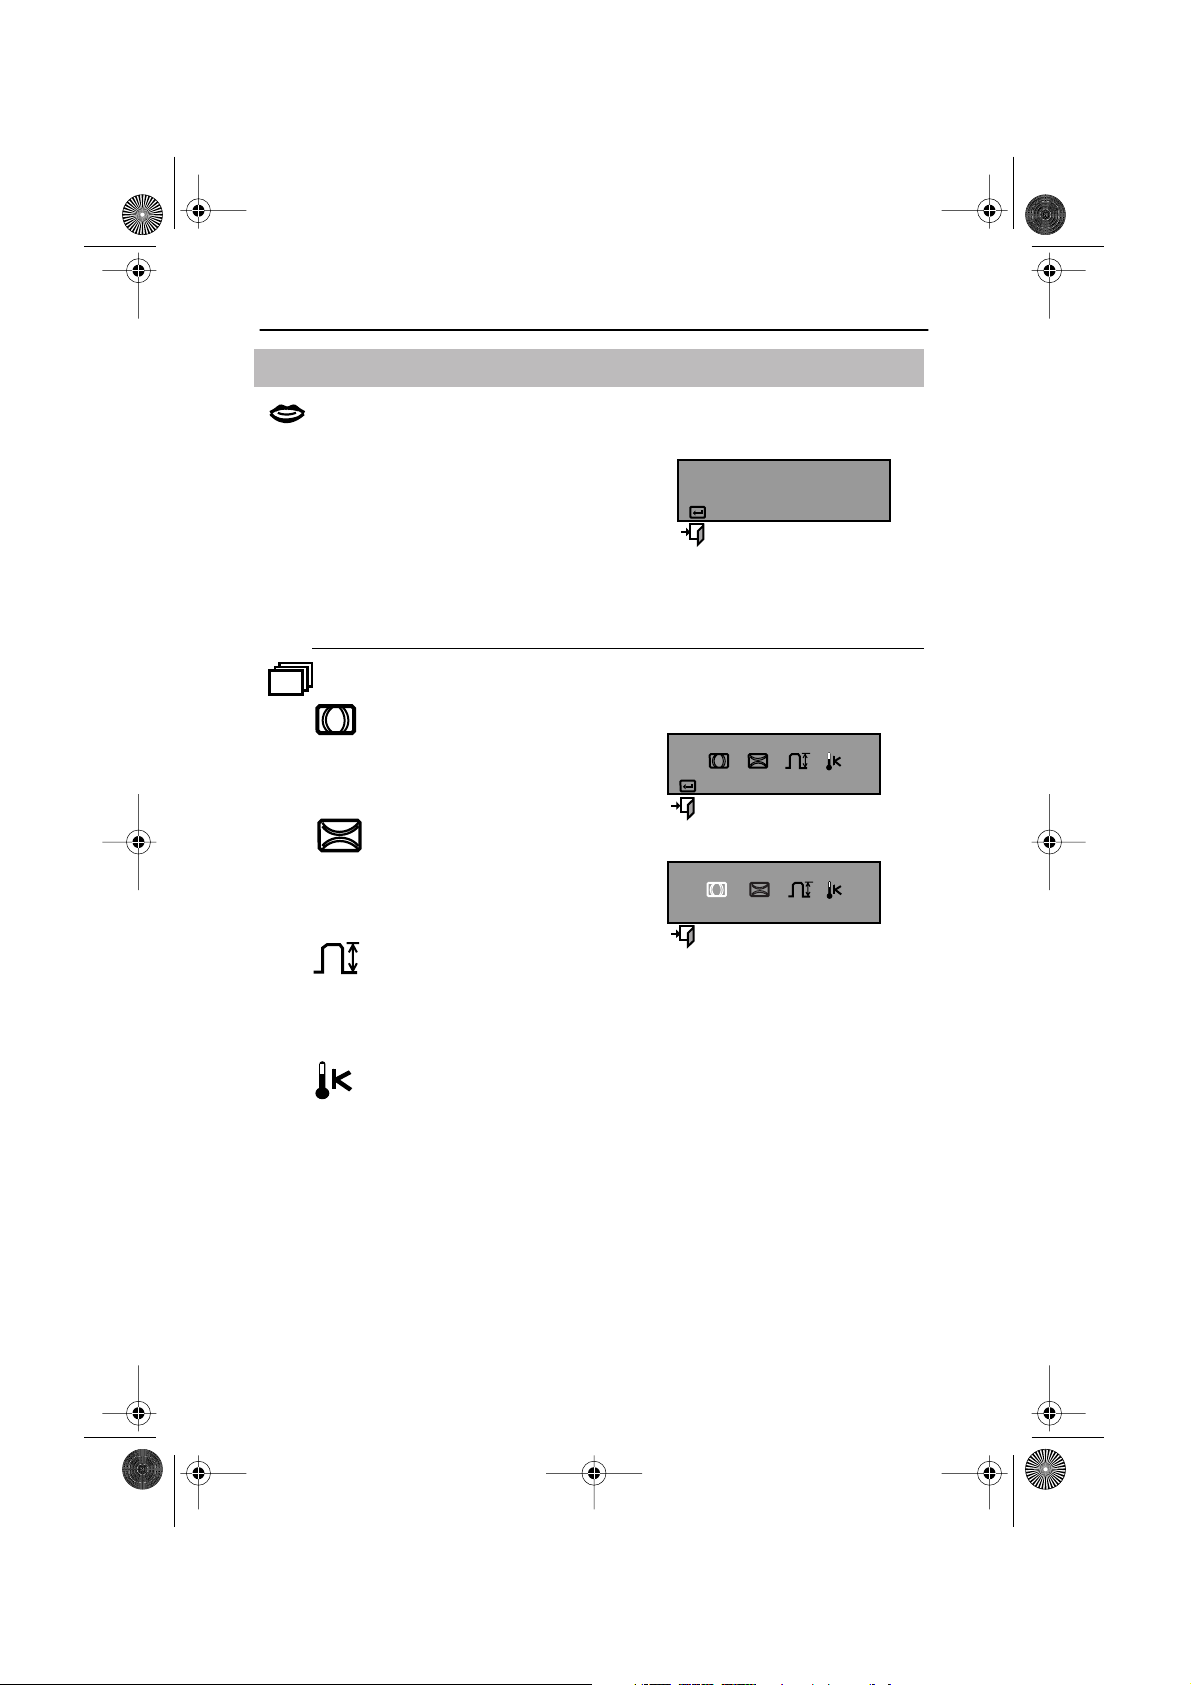
Language
Follow there steps to change the language used
in the menu. You can choose one of ten languages. Engligh, German, French, Italian,
Portuguese, Spanish, Swedish, Russian,
Polish or Magyar. (Some OSD languages may
not appear in some areas.) The languages
chosen affects only the language of the OSD.
It has no effect on any software running on the
computer.
Language
Deutsch
English
Magyar
Access Function
:
:
Exit Menu
FrançaisEspañolDeutschItaliano EnglishPortuguese
Advanced
H- Moiré
Corrects for on-screen moiré
pattern.
-– and + clear Vertical Moiré
V- Moiré
Corrects for on-screen moiré
pattern.
-– and + clear Vertical Moiré
Video Input Level
Selects the video signal level
-– Select 0.7 V
+ Select 1.0 V
Color Temperature
-– 9300k more blue
+ 6500k more red
1.
2.
Advanced
Access Function
:
Exit Menu
:
Select Function
+ - :
Previous Menu
:
H-Moiré
English - 8
Page 10
5_5p.fm Page 9 Wednesday, April 2, 2003 10:18 AM
Operation
Icon Monitor Function Control
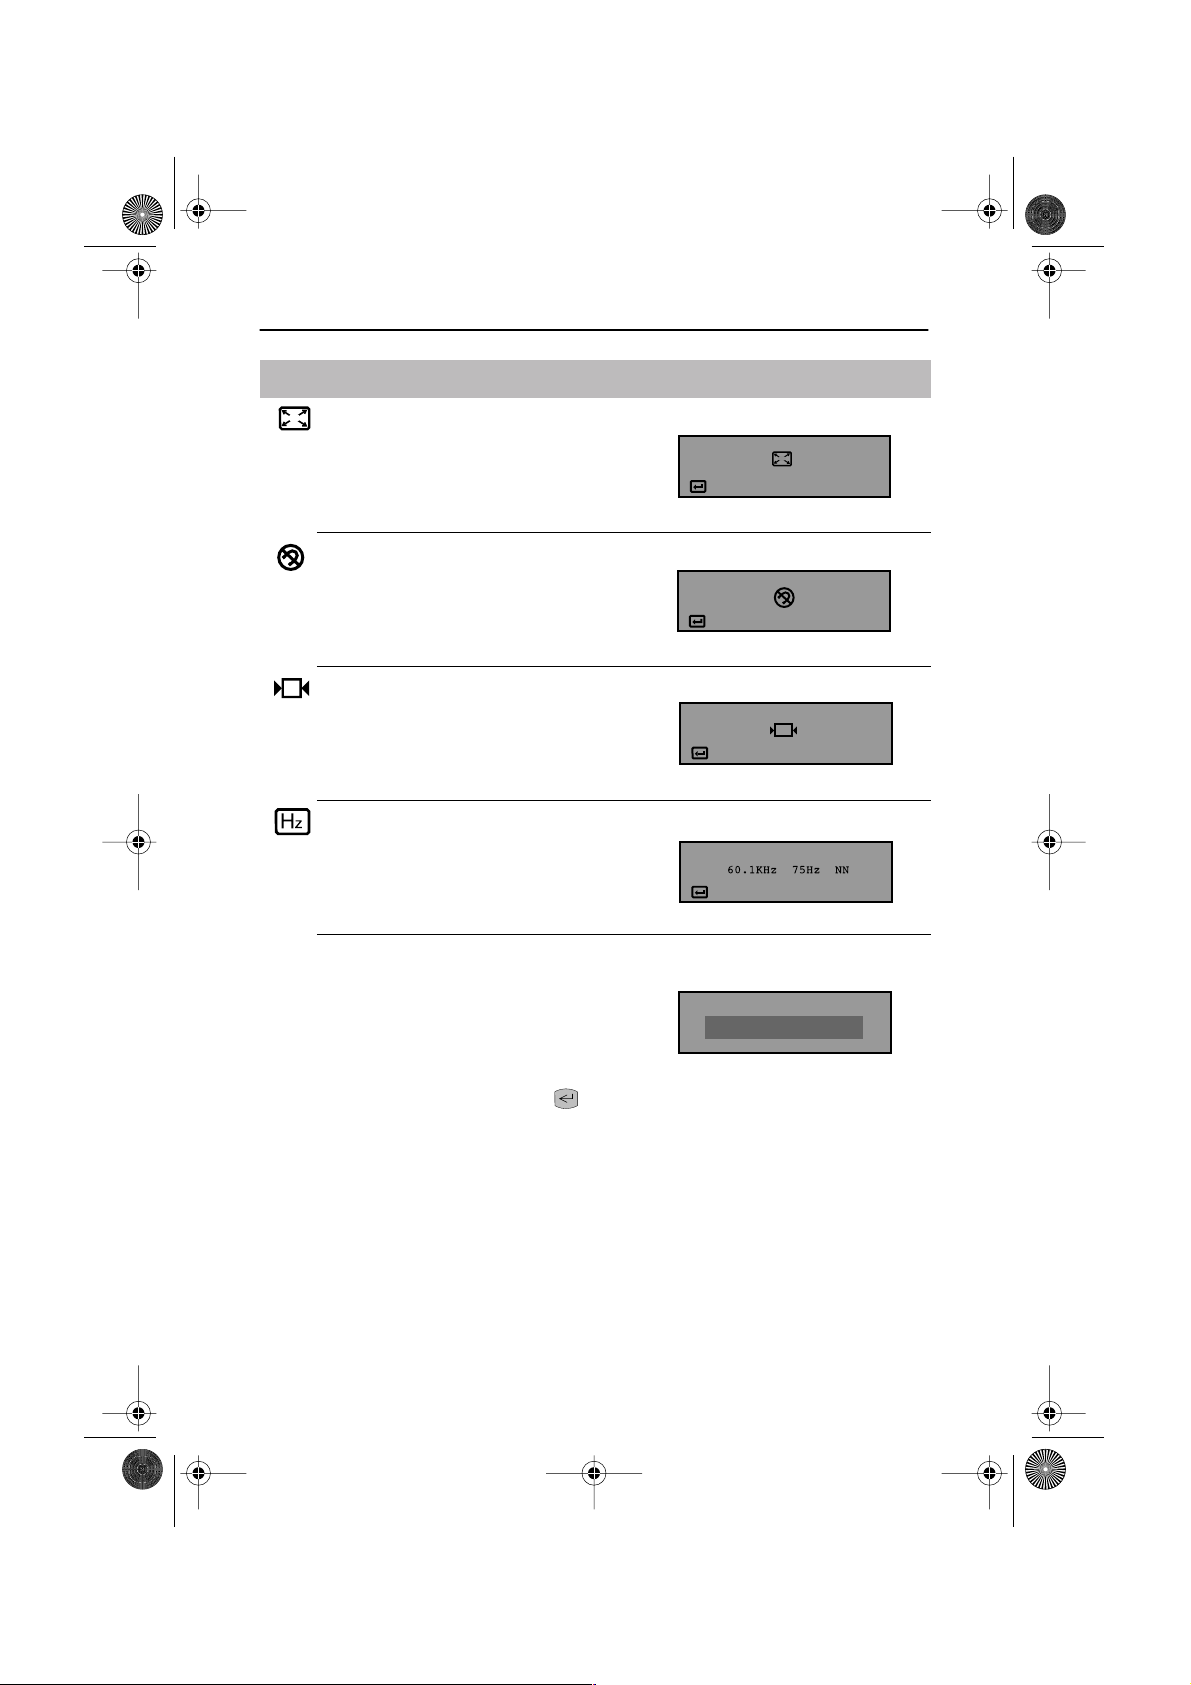
Zoom
-– Reduces view of display area
+ Enlarges view of display area
Degauss
Removes color distortion caused by
magnetic fields. Do not use more than
once in 30 minutes.
Recall
Returns monitor to original settings.
-– No
+ Yes
Display Timing
Monitor display settings.
-– Factory timing
+ User timing
OSD Lock/Unlock
Allows you to secure the current control
settings so that they cannot be
inadvertently changed. You can unlock
the OSD controls at any time by using
the same procedure.
Push and hold the Menu ( )
■
button for 10 seconds or more to Lock
or to Unlock.
Zoom
:
Access Function
Degauss
:
Access Function
Recall
:
Access Function
Display Timing
:
User Mode
OSD Lock/Unlock
Control Lock
Locked
English - 9
Page 11
5_5p.fm Page 10 Wednesday, April 2, 2003 10:18 AM
Troubleshooting
Before calling for service, check the information in this section to see if you can solve the
problem yourself. If you do need assistance, please call the phone number on the warranty
card, the phone number on the back cover of this manual, or contact your dealer.
There is no screen image
■
Check to see that both the monitor and the computer are plugged in and turned on.
“No Connection, Check Signal Cable” appears
Check the signal cable connection between the computer and the monitor.
■
FrançaisEspañolDeutschItaliano EnglishPortuguese
“Sync. Out of Range” appears
The input signal frequency is over or under the synchronization range of the monitor, see
■
“Specifications” on page 12.
The screen image is too light or too dark
Adjust the brightness or contrast settings, see page 6.
■
The screen image is too large or too small
Adjust the size settings, see H-size and V-Size on page 6.
■
■
Adjust the Zoom setting, see page 9.
The colors are distorted with dark or shadowed areas
■
Activate the degauss feature, see page 9.
Adjust the color temperature, see page 8.
■
The power indicator light is blinking green
■
The monitor is using its power management system, see “PowerSaver” on page 11.
English - 10
Page 12
5_5p.fm Page 11 Wednesday, April 2, 2003 10:18 AM
PowerSaver
This monitor has a built-in power management system called PowerSaver. This system saves
energy by switching your monitor into a low-power mode when it has not been used for a
certain amount of time. The monitor automatically returns to normal operation when you
move the computer's mouse or press a key on the keyboard. For energy conservation, turn
your monitor OFF when it is not needed, or when leaving it unattended for long periods.
The PowerSaver system operates with a VESA DPMS compliant video card installed in your
computer. Use a software utility installed on your computer to set up this feature.
State Normal Operation Power-off Mode (EPA/ENERGY 2000)
Power Indicator Green Green, Blinking (1 sec. interval)
Power
Consumption
NOTE: This monitor is EPA Energy Star® compliant and ENERGY 2000 compliant when used with a
computer equipped with VESA DPMS functionality.
57V
70 W (Maximum)
65 W (Nominal)
77E
90 W (Maximum)
80 W (Nominal)
Less than 2 W
Display Modes
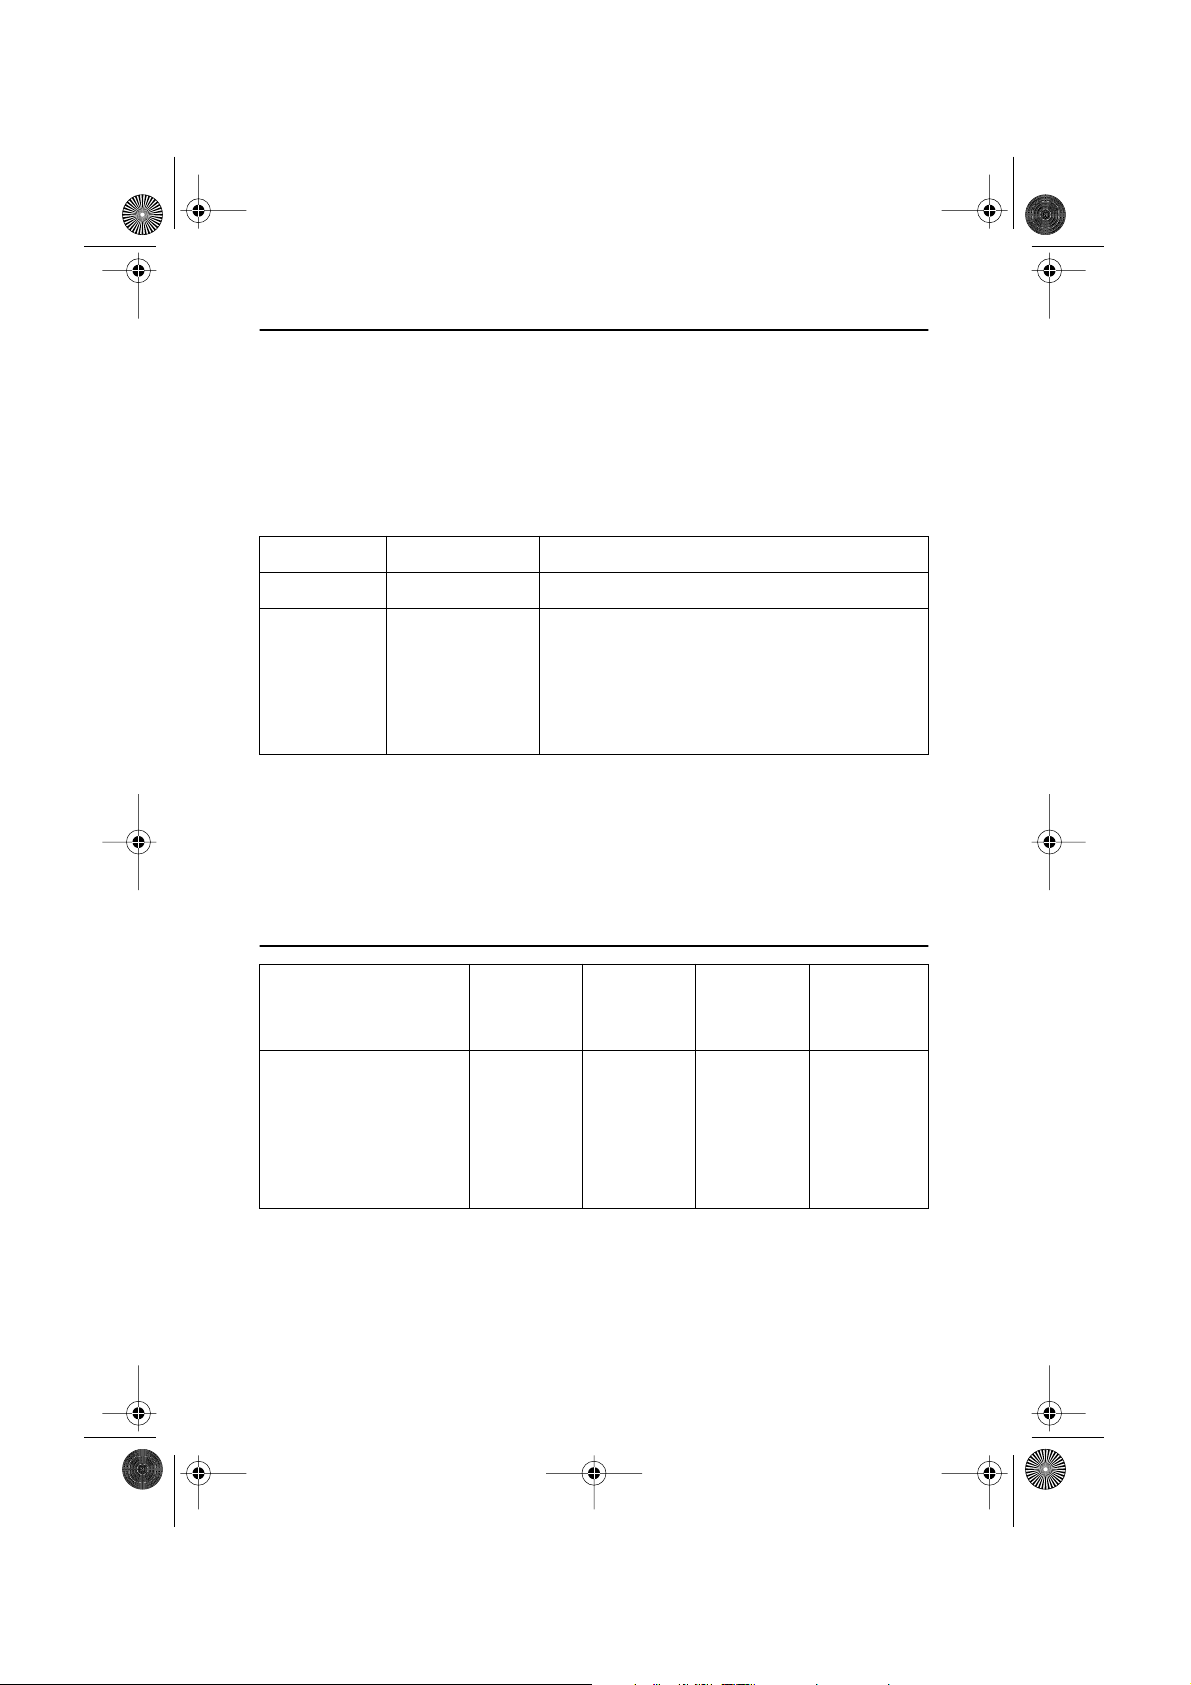
Display Mode
IBM, 640 x 480
IBM, 720 x 400
VESA, 640 x 480
VESA, 640 x 480
VESA, 800 x 600
VESA, 1024 x 768
(AK77E)
Horizontal
Frequency
(kHz)
31.469
31.469
37.500
43.269
53.674
68.677
Vertical
Frequency
(Hz)
59.940
70.087
75.000
85.008
85.061
84.997
Pixel
Clock
(MHz)
25.175
28.322
31.500
36.000
56.250
94.500
Sync.
Polarity
(H/V)
–/–
–/+
–/–
–/–
+/+
+/+
English - 11
Page 13
5_5p.fm Page 12 Wednesday, April 2, 2003 10:18 AM
Specifications
Specifications Models: AK57V/AK77E
°
°
°
Picture Tube •
57V:
15” (38 cm) Full square type (35 cm Viewable)
77E:
17” (43 cm) Full square type (40.6 cm Viewable)
•
• 90
Deflection
57V:
• Dot pitch
77E:
0.24mm (Horizontal)
0.23mm (Horizontal)
• Medium-short persistence phosphor
57V:
Synchronization
• Horizontal:
• Vertical:
30 kHz to 55 kHz
77E:
30 kHz to 70 kHz
57V:
50 kHz to 120 kHz
77E:
50 Hz to 160 Hz
Display Color • Unlimited
•
57V:
77E:
Maximum Resolution •
Active Display • Horizontal:
• Vertical:
Input Signal,
Terminated
Maximum Pixel Clock •
Analog:
•
Separate Sync.:
•
57V:
65 MHz /
1024 Dots / 768 Lines
1280 Dots / 1024 Lines
57V:
10.5 ± 0.16 inch (267.0 ± 4 mm)
77E:
12.5 ± 0.16 inch (312.0 ± 4 mm)
57V:
8.0 ± 0.16 inch (200.0 ± 4 mm)
77E:
9.4 ± 0.16 inch (234 ± 4 mm)
0.7 Vpp positive at 75 ohms
TTL level, positive or negative
77E:
110 MHz
Power Supply • AC 90-264 V ± 10%, 60 Hz / 50Hz ± 3Hz
FrançaisEspañolDeutschItaliano EnglishPortuguese
Power Consumption •
Dimensions/Weight
(WxDxH)
70 W (maximum) /
57V:
14.0 x 14.9 x 14.5inch /25.4 lbs
•
(356 x 380 x 369.5 /11.5 kg)
•
77E:
15.7 x 16.2 x 15.7inch /33.1 lbs
77E:
90 W (maximum)
57V:
(398 x 412 x 400 /15 kg)
32
Environmental
Considerations
• Operating temperature:
Humidity:
• Storage temperature:
Humidity:
F to 104 ° F (0 ° C to 40 ° C)
10% to 80%
-4
F to 113 ° F (-20 ° C to 45 ° C)
5% to 95%
Design and specifications are subject to change without notice.
English - 12
 Loading...