

Samsung AHT-E300 User Manual

AHT-E300 ADSL Router
User Manual

This Guide is a copyright of:
Samsung Electro-Mechanics Co., Ltd.
314 Maetan-3 Dong, Paldal-Gu
Suwon, Kyunggi-Do, 442-743
Korea.
AHT-E300 ADSL Router User Manual
Europe Edition (March 2002)
This device complies with part 15 of the FCC Rules.
Operation is subject to the following two conditions:
(1) This device may not cause harmful interference, and
(2) This device must accept any interference received
(3) Including interference that may cause undesired operation.
* Microsoft Windows is a registered trademark of Microsoft Corporation in the United
States and other countries.
Chapter 1. Introduction ------------------------------------------------ 1
Features -------------------------------------------------------- 2
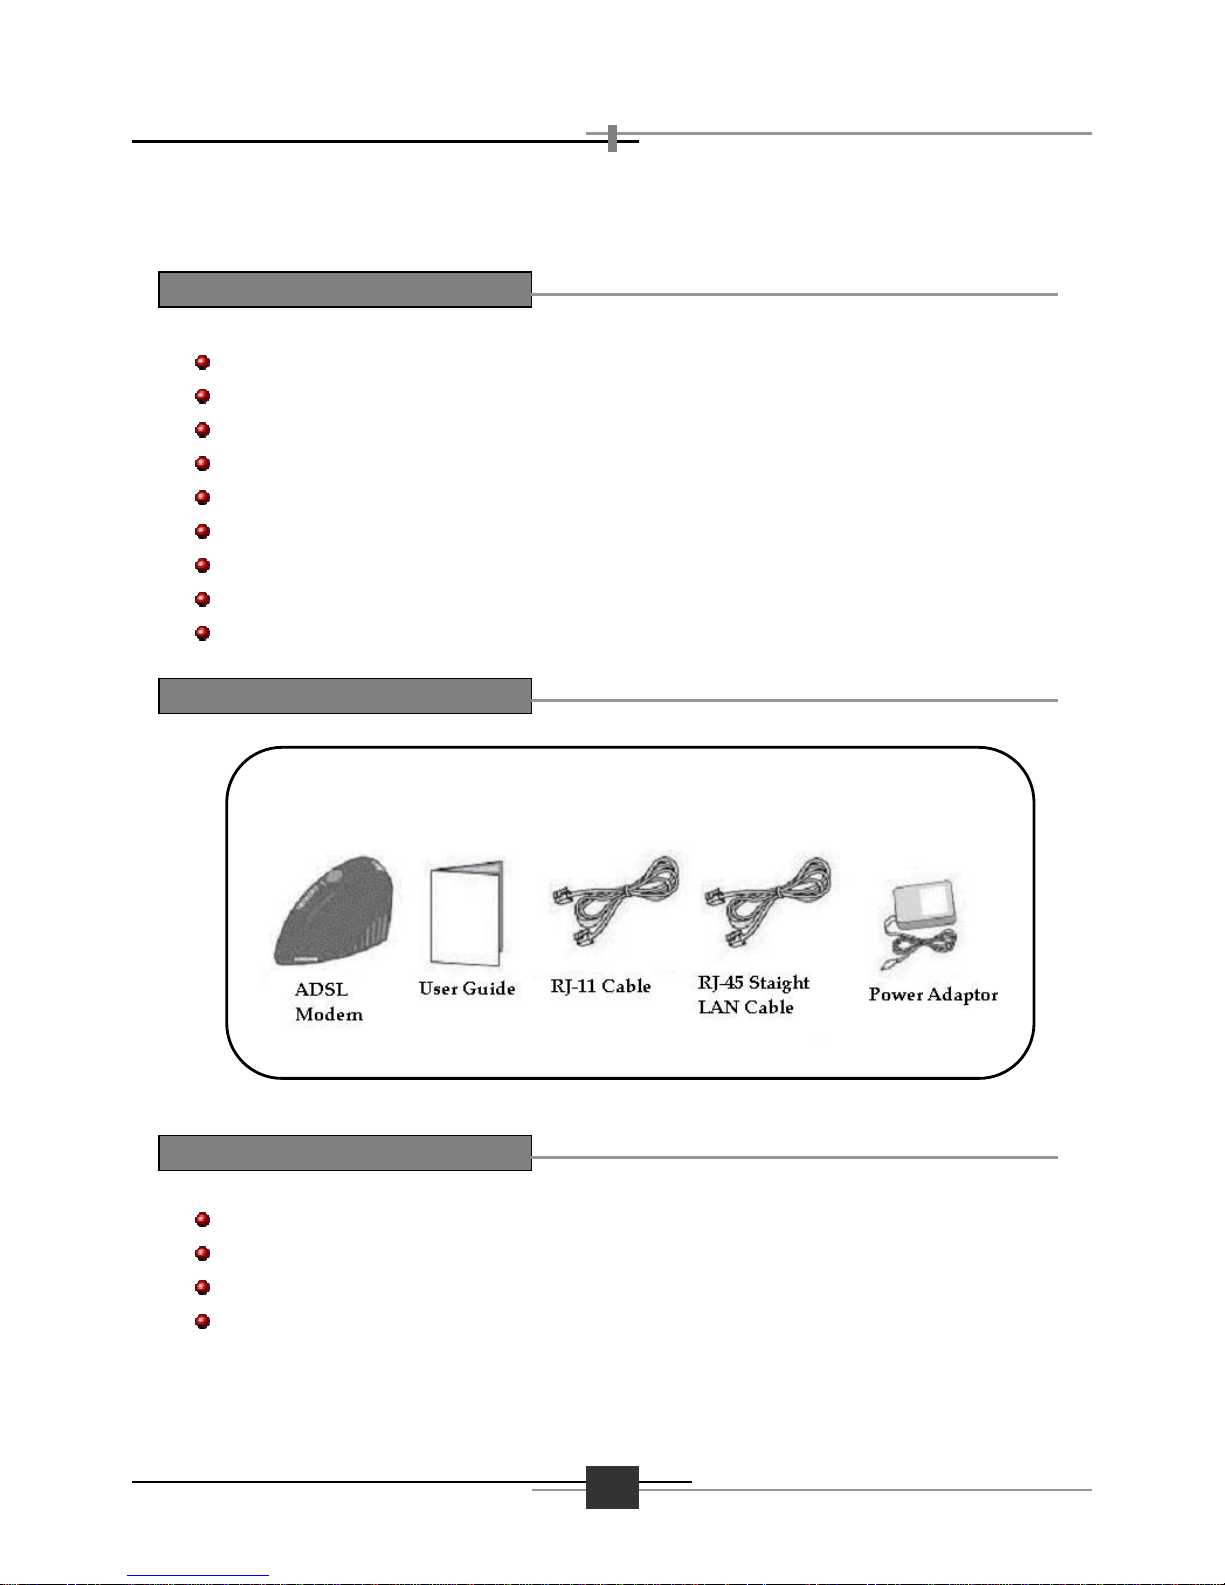
Package Contents --------------------------------------------- 2
System Requirements ---------------------------------------- 2
Front Panel LEDs --------------------------------------------- 3
Rear Panel ----------------------------------------------------- 3
Chapter 2. Preparing ADSL Router Settings ---------------------- 4
2.1 Hardware Installation ------------------------------------ 5
Hardware Installation ---------------------------------------- 5
General ADSL Connection Setup -------------------------- 5
2.2 Network Setup -------------------------------------------- 6
Network Setting ---------------------------------------------- 6
Chapter 3. Web-based Management --------------------------------- 8
Appendix I. Specifications -------------------------------------------- 30
Appendix II. Troubleshooting ----------------------------------------- 31
Troubleshooting Flow Chart -------------------------------- 31
Solution 1 ------------------------------------------------------ 32
Solution 2 ------------------------------------------------------ 32
Solution 3 ------------------------------------------------------ 33
Solution 4 ------------------------------------------------------ 33
Solution 5 ------------------------------------------------------ 34
Other Troubles ------------------------------------------------ 35
Appendix III. Glossary --------------------------------------------------
36
Table of Contents


AHT-E300 ADSL ROUTE
R
1
This chapter introduces features, component and
panel layout of the AHT-E300 ADSL Router and
explains the structure of this guide.
1
Introduction
Chapter
AHT-E300 ADSL ROUTER
2
Thank you for purchasing Samsung AHT-E300 ADSL Router. This guide describes the
installation and basic configuration of the AHT-E300 ADSL Router.
Automatic IP Configuration with DHCP Server/Client functions
Internet phone, Internet Game, Netmeeting and Internet Messenger support
Interoperable with ANSI T1.413 Issue 2, G.DMT and G.LITE specification
Compatible with major DSLAM in the world including DSLAM of BEZEQ
8 PVCs (simultaneous and encapsulation independent)
VPI/VCI range 0-255, 0-65536
Encapsulation hunting of up to 8 pre-defined VPI/VCI & encapsulation sets
AAL5 UBR & CBR
OAM F4/F5
One Active ADSL Internet connection
One PC with 10Mbps, 100Mbps or 10/100 Mbps Ethernet card
TCP/IP protocol stack installed in the PC or Mac
Microsoft Internet Explorer 4.0 or later, or Netscape 4.0 or later
(Internet Explorer 5.0 and Netscape 4.7 or later is highly recommended)
Features
Package Contents
AHT-E300 ADSL Router
System Requirements
AHT-E300 ADSL ROUTE
R
3
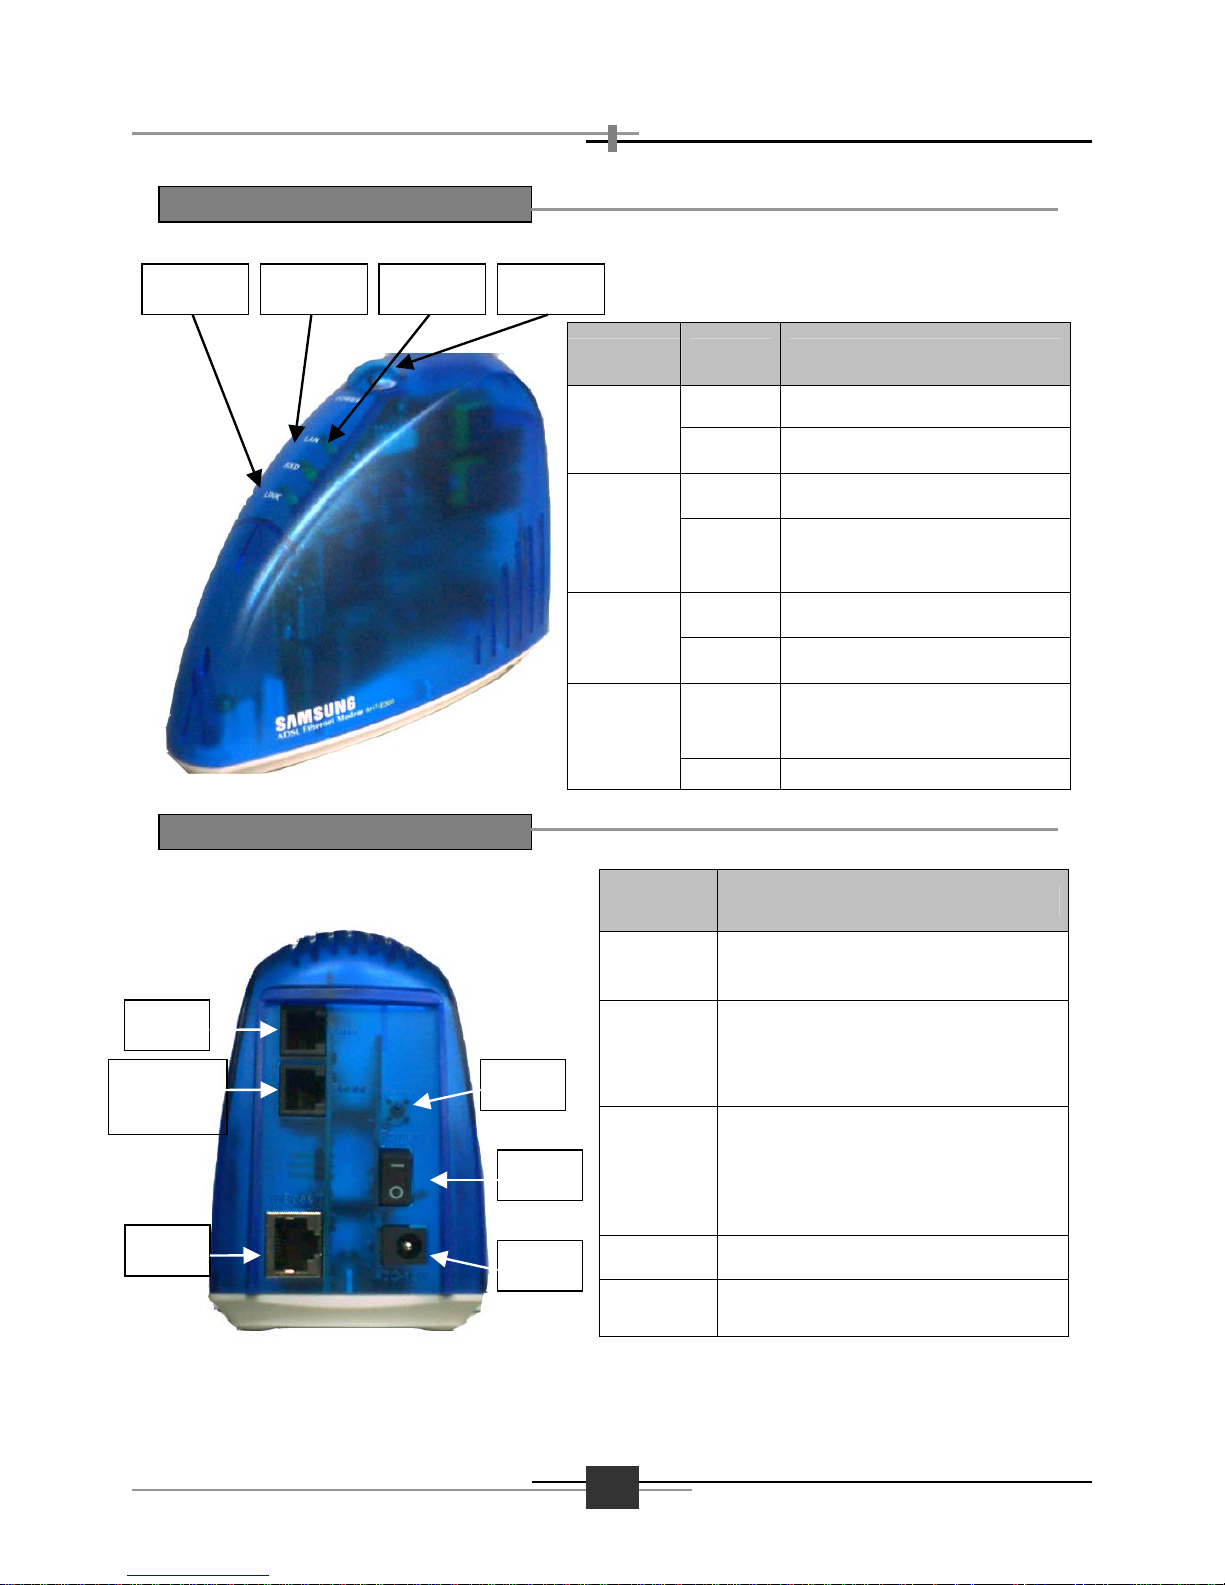
LED Status Description
On Power on
Power
Off No power
On LAN connection is active.
LAN
Off
LAN connection is not
active.
Blinking Data is being transferred.
RXD
Off Data is not transferred.
Blinking
Modem is trying to sync
with DSLAM.
LNK
(ADSL)
On ADSL sync is finished.
Port Description
Line
Connect RJ-11 cable to ASDL
port of micro-filter
LAN
Connection to PC.
Use the supplied RJ-45 Straight
Through Cable.
Reset
Pressing the Reset Switch and
holding it for 5-seconds will
restore the factory default
settings.
Power
Turn on or off the power.
DC in
Connect the supplied Power
Adapter.
The Front Panel LEDs
LNK
RXD
LAN
Power
The Rear Panel
Phone
(Optional)
Line
LAN
DC in
Power
Reset

AHT-E300 ADSL ROUTER
4
This chapter describes preparing ADSL Router
settings, such as Hardware Installation and Network
Settings for PC.
2
Preparing ADSL Router Settings
Chapter
5
AHT-E300 ADSL ROUTE
R
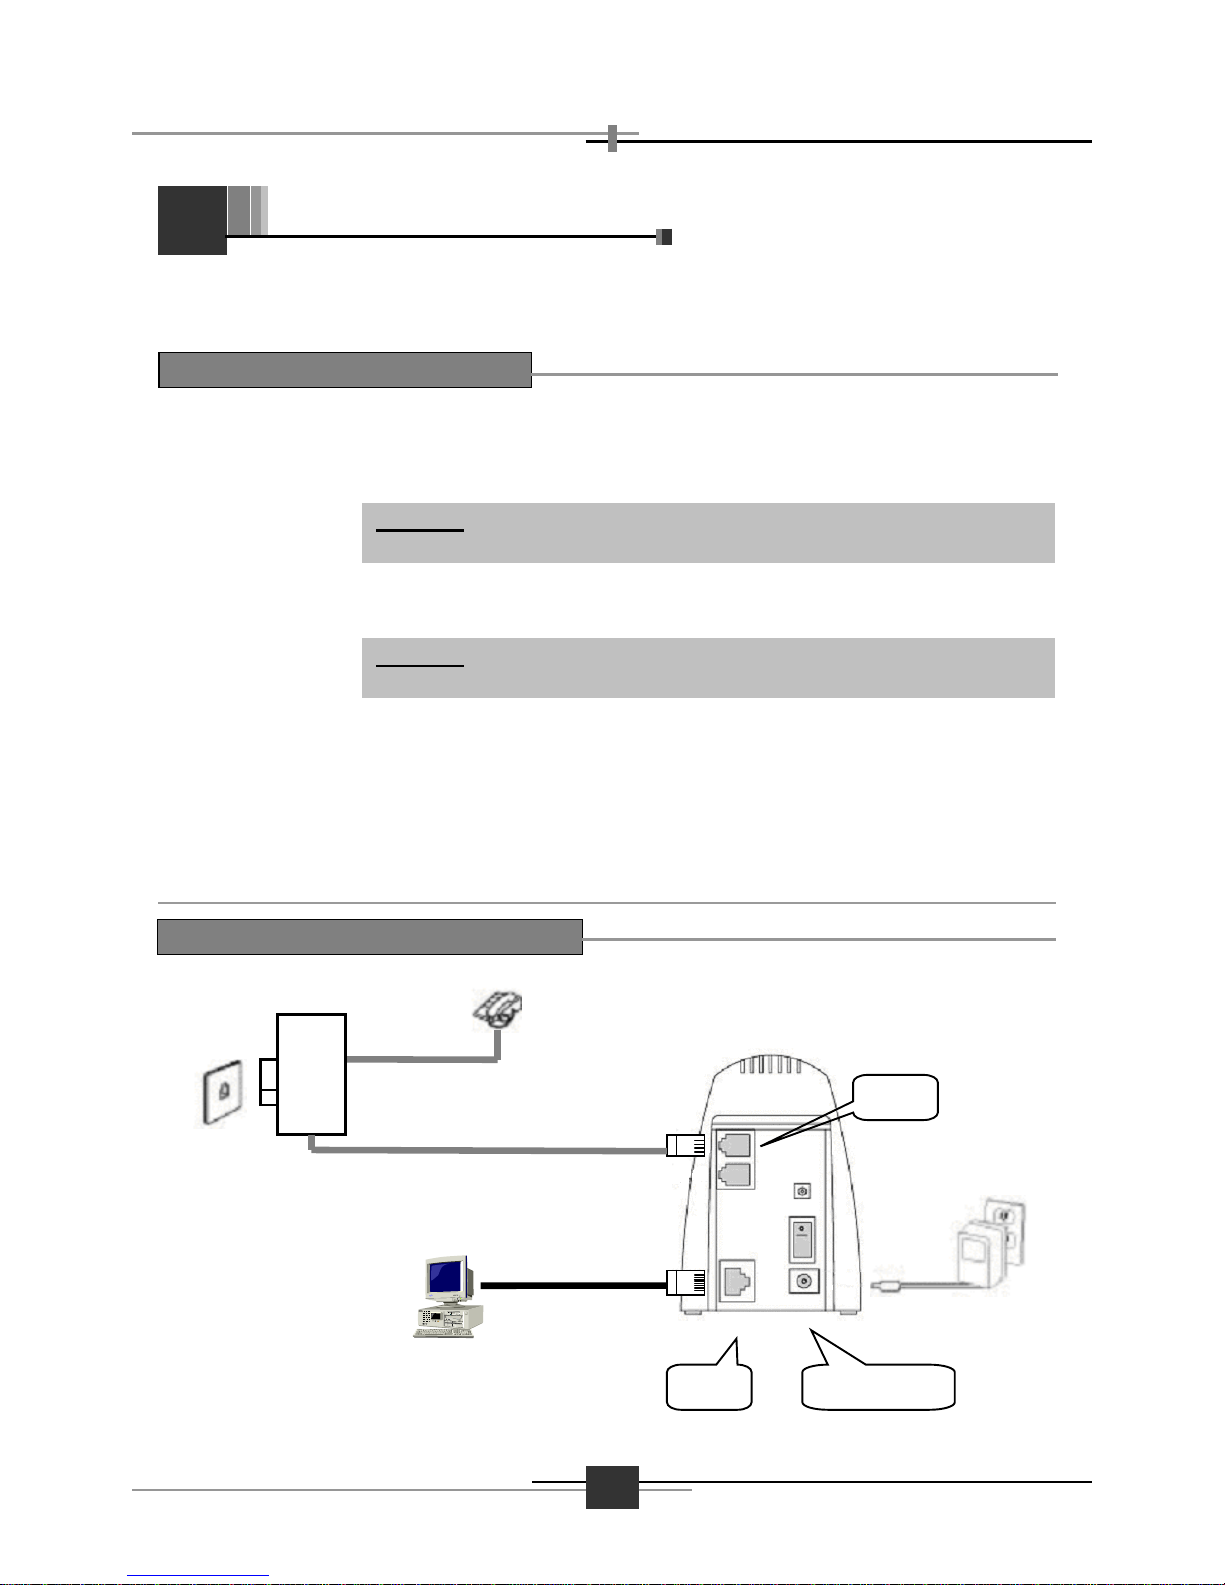
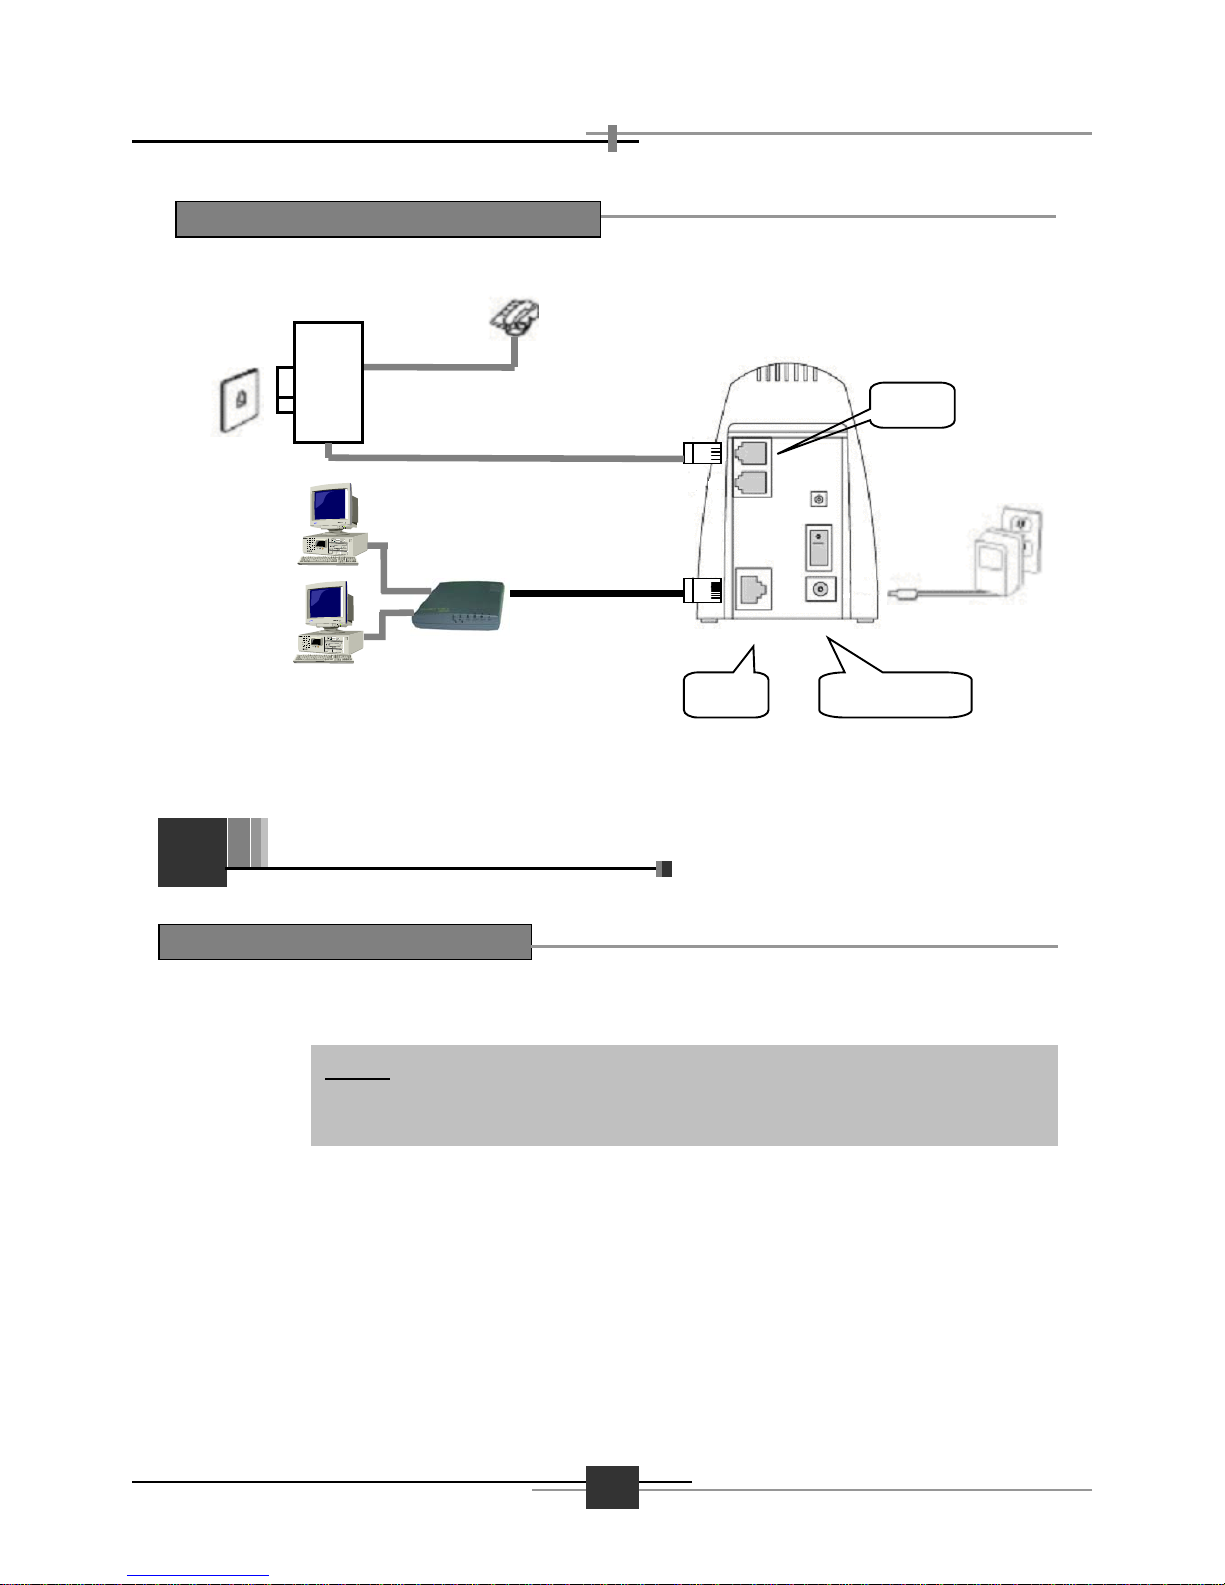
The connection diagram below is the example that you can configure network using AHTE300 ADSL Router. Install and connect your AHT-E300 ADSL Router in order as follows:
1. Connect the
Power
Connect the AC Power Adapter cord into the power jack on the rear
panel of the AHT-E300 ADSL Router and plug the adapter into the
power source. Check the Power LED is flashing.
2. Connect the
Micro-Filter
To use the phone service and ADSL service simultaneously, install
the micro-filter to the wall-jack.
3. Connect the
ADSL Line
Interconnect the supplied RJ-11 cable between LINE port of the
modem and ADSL port of the micro-filter.
4. Connect the
RJ-45 Straight
through cable
Interconnect the supplied RJ-45 Straight-though Ethernet Cable
between LAN port of the modem and LAN port of the PC or Mac.
2.1
Hardware Installation
Hardware Installation
Warning: If you don’t use the micro-filter to your phone service, the
s
ervice quality of phone service may be degraded.
General ADSL Connection Setup #1
Warning: Use the supplied power adapter (DC 14V) only to
p
revent the permanent failure of AHT-E300 ADSL Router.
RJ-45 Straight
Trough Cable
AHT-E300
RJ-11
Cable
Micro
Filter
ADSL
Phone
LINE
LAN Power Jack
AHT-E300 ADSL ROUTER
6
Step 1
After clicking [Start] button in Taskbar, select Settings and then Control
Panel.
2.2
Network Settings for PC
Network Setting
N
otice: These instructions apply to PCs installed with MS-Windows M
E
only. Linux or Macintosh machine may have different steps from
mentioned in this Guide. Please re
f
er to the operating system
’
s
manual.
General ADSL Connection Setup #2
RJ-45 Straight
Trough Cable
AHT-E300
RJ-11
Cable
Micro
Filter
ADSL
Phone
LINE
LAN Power Jack
7
AHT-E300 ADSL ROUTE
R
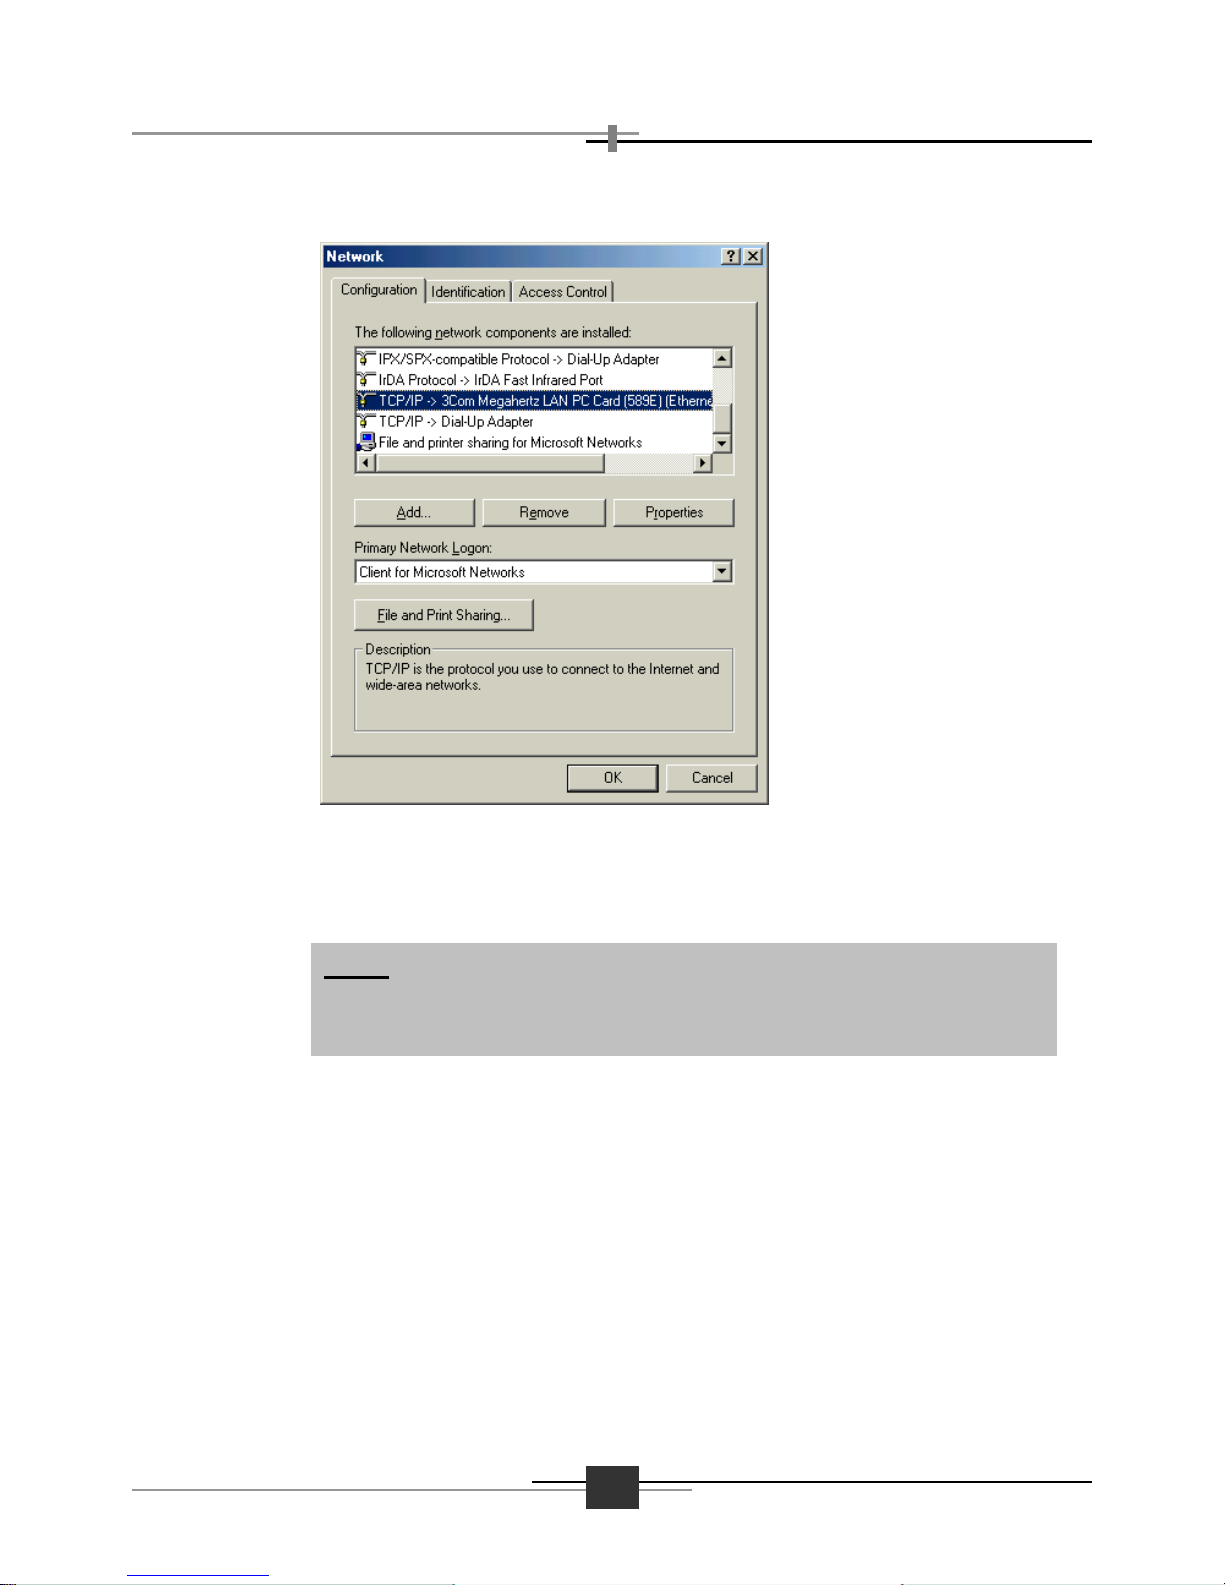
Step 2
Double-clicking the Network icon in Control Panel, the following
window will appear.
Step 3
In the Configuration tab, you can see several network components under
The following network components are installed:. Make it sure that a
network adapter connected with AHT-E300 ADSL Router appears in the
list of the network components.
Step 4
Double click TCP/IP.
N
otice: The network adapter must be installed in order to progress the
s
etting. If the network adapter is not installed, contact customer support
of the network adapter.
AHT-E300 ADSL ROUTER
8
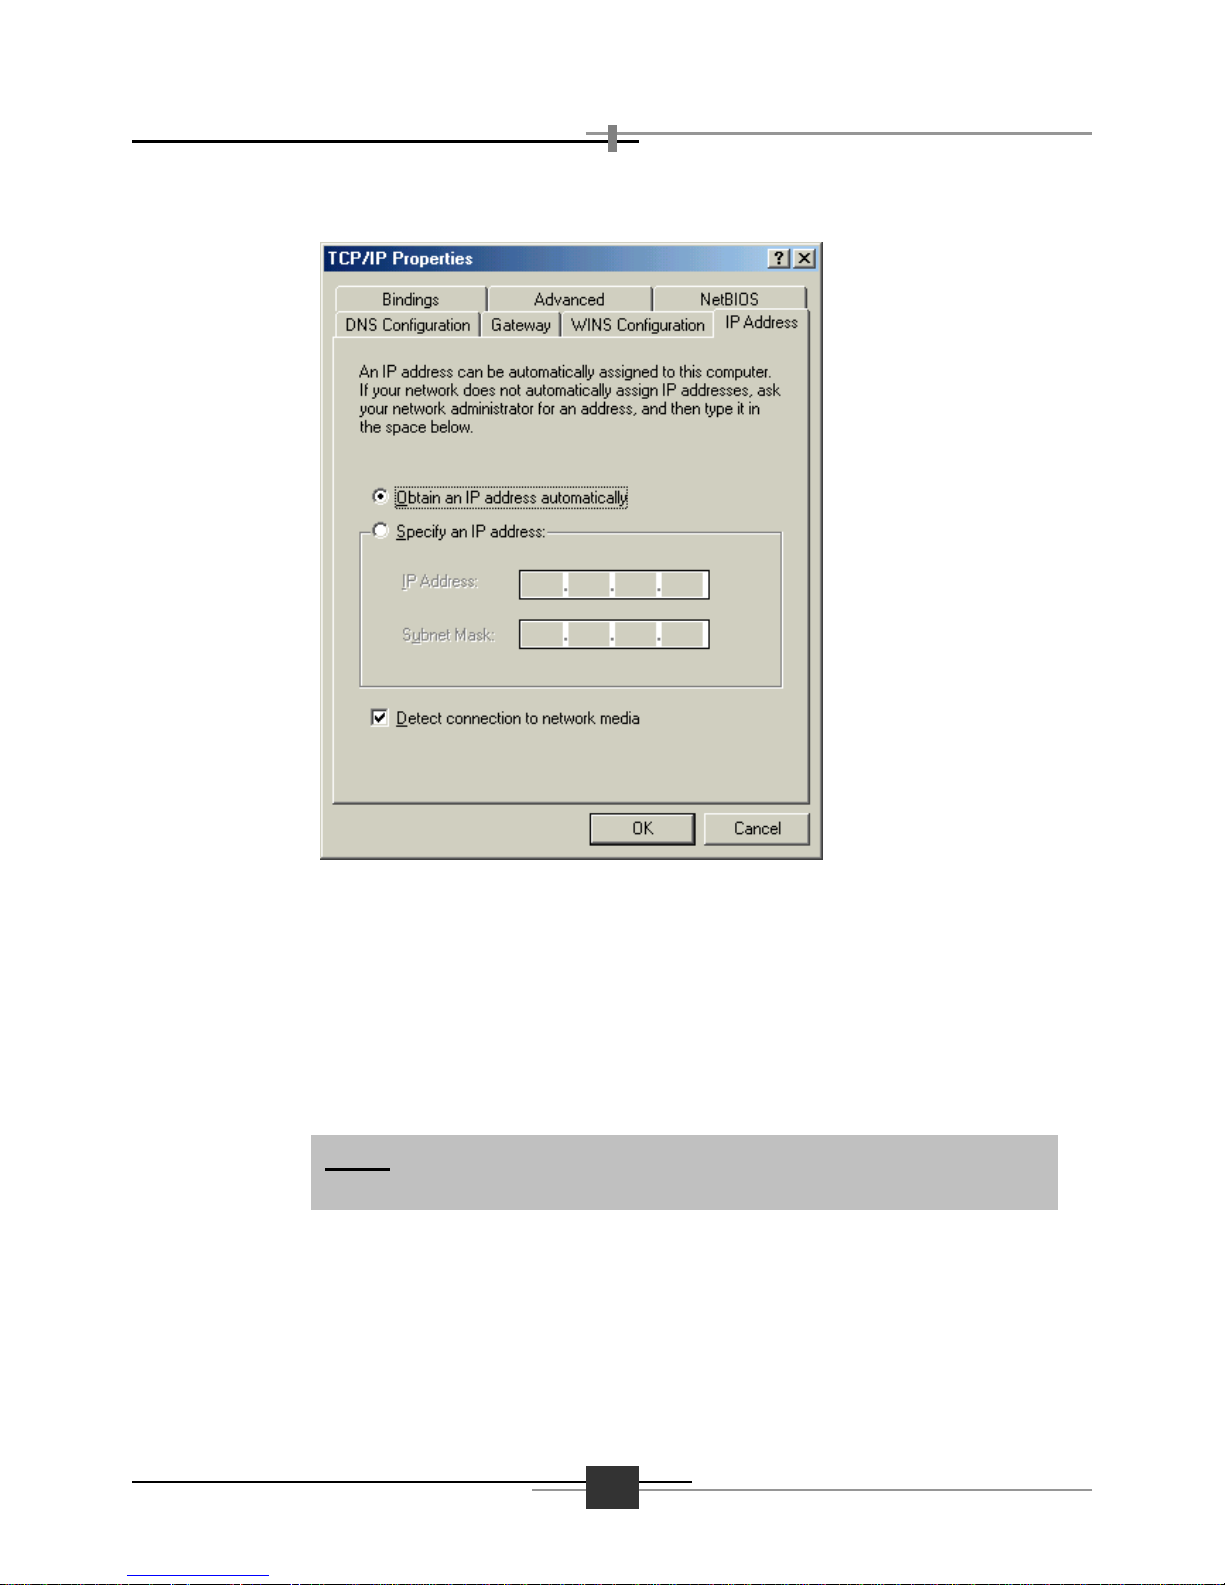
Click [TCP/IP Properties] button, and IP address tab.
You can choose one of the following options to set TCP/IP values.
Obtain an IP address
automatically
(Recommended)
If you want to obtain an IP address of PC
automatically from DHCP server of AHTE300, check on this radio button.
Specify an IP address
If you want to use an assigned (static) IP
address,
and set the IP Address as 10.0.0.1,
Subnet Mask as 255.255.255.0 and Gateway
10.0.0.2.
Step 5
Step 6
Click [OK] button. Windows may ask for original Windows installation
disk. Insert the installation disk if needed.
Step 7
Windows will ask you to restart the PC. Click [Yes ] button.
The TCP/IP settings of PC have been completed.
N
otice: When you want to use static IP address, you should set the I
P
address as the same subnet with AHT-E300 ADSL Router.
9
AHT-E300 ADSL ROUTE
R
This chapter explains how to manage the AHT-E300
ADSL Router.
Web-based Management
3
Chapter
10
AHT-E300 ADSL ROUTER
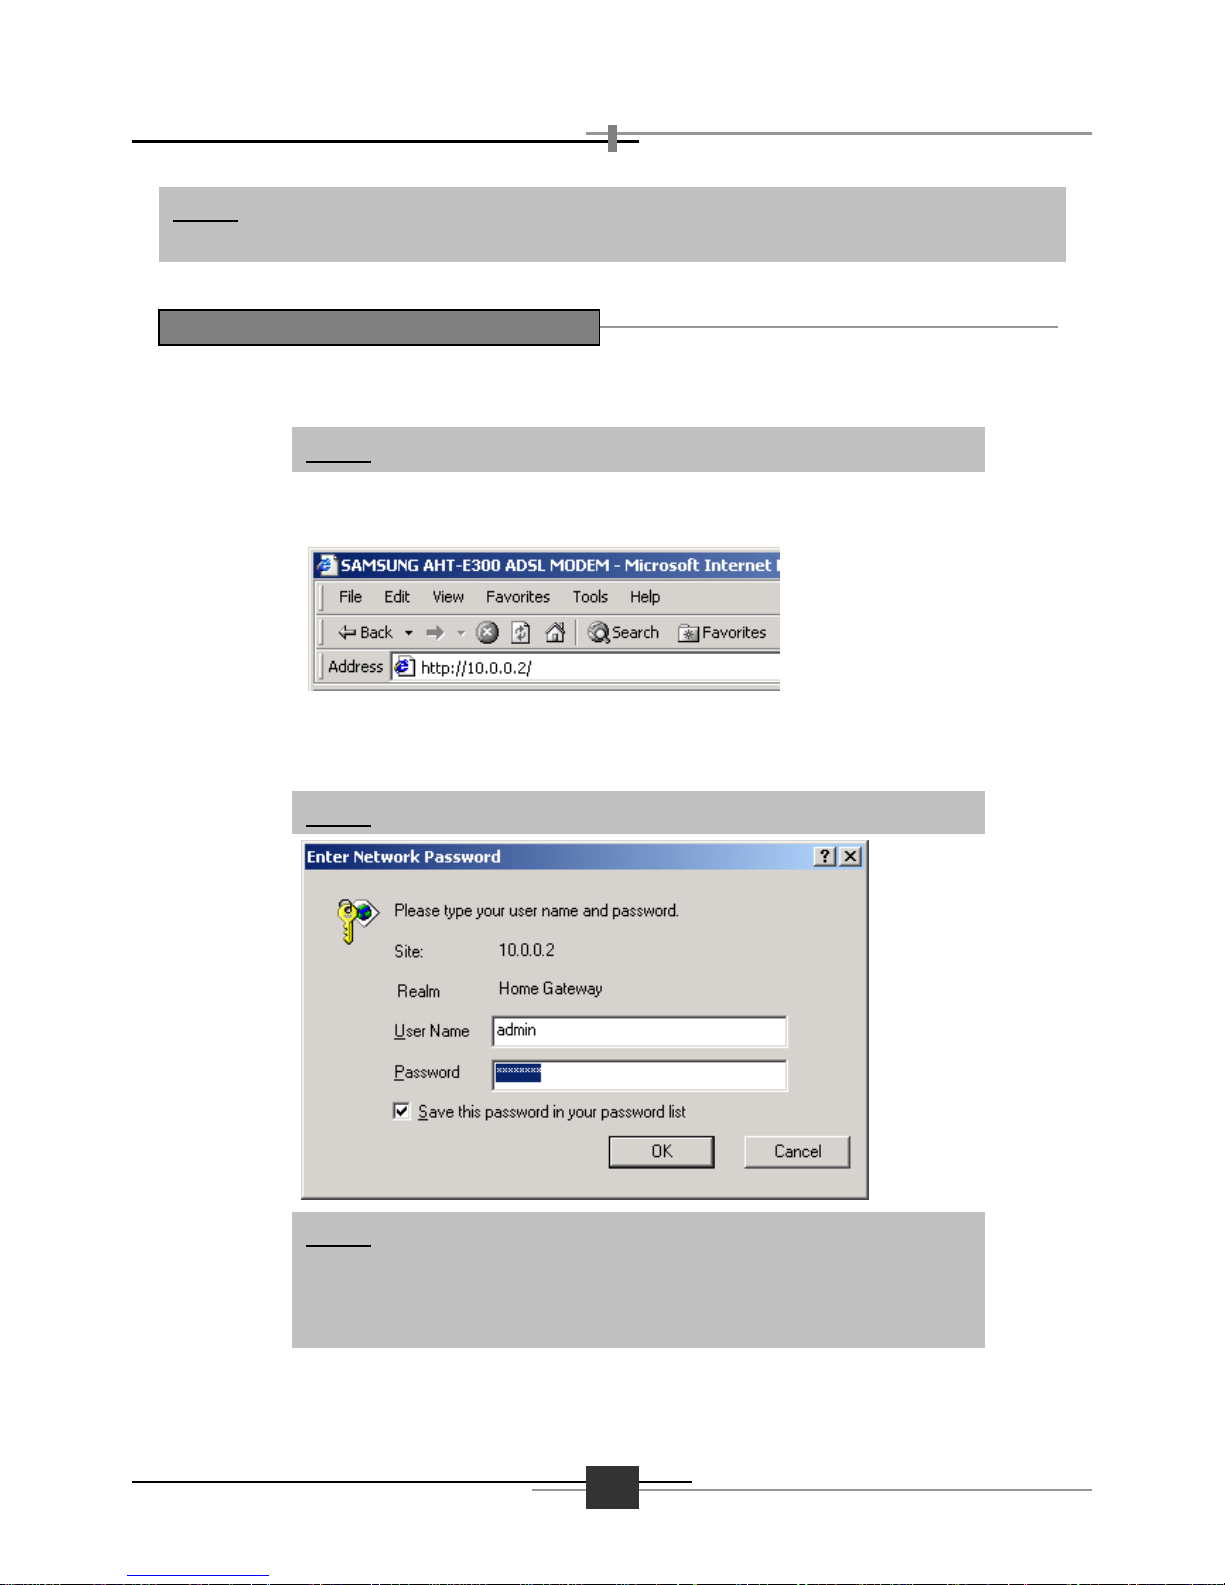
Open your Web Browser on your PC that is connected to AHT-E300 ADSL
Router..
Type “http://10.0.0.2” in the browser’s Address box and Press Enter. This
address is the default LAN IP address of AHT-E300 ADSL Router.
1.
A user name and password prompt will appear. Type User Name as admin
and password as conexant.
N
otice: You must set up AHT-E300 ADSL Router via LAN. Make sure that the PC is
connected to AHT-E300 ADSL Router.
Start-up with Web-based Management
N
otice: If the user name and password prompt appears again, i
t
means unauthorized user. Please check Caps Lock key. AHT-E30
0
A
DSL Router distinguishes the uppercase and lowercase letters (in
the password).
N
otice: You can change the password later.
N
otice: Internet Explorer 4.0 or higher version is recommended
 Loading...