

Page 1

QUESTIONS OR COMMENTS?
COUNTRY CALL OR VISIT US ONLINE AT WRITE
IN THE US
1-800-SAMSUNG
(7267864)
www.samsung.com/us
Samsung Electronics America, Inc.
105 Challenger Road Ridgefield Park,
NJ 07660-0511
Code No. AH68-02019S(0.0)
Page 2

HT-BD2
7.1CH Blu-ray
Home Theater System
user manual
imagine the possibilities
Thank you for purchasing this Samsung product.
To receive more complete service,
please register your product at
www.samsung.com/global/register
Page 3

key features of your new Blu-ray Home Theater
PLAYER FEATURES
Multi-Disc Playback & FM Tuner
The HT-BD2 combines the convenience of multi-disc playback capability, including BD-ROM, DVD-VIDEO,
DVD-RW/-R(V mode), CD, MP3-CD and CD-R/RW, with a sophisticated FM tuner, all in a single player.
Dolby Pro Logic IIx
Dolby Pro Logic IIx is a form of multi-channel audio signal decoding technology that improves upon existing Dolby Pro Logic.
Dolby Digital Plus
Dolby Digital Plus is the next-generation audio technology for all high-definition programming and media.
Dolby TrueHD
Dolby TrueHD is Dolby’s next-generation lossless technology developed for high-definition disc-based media.
DTS (Digital Theater Systems)
DTS is an audio compression format developed by Digital Theater Systems Inc.
DTS-HD ( Digital Theater Systems - High Definition )
DTS-HD Audio provides the highest quality multi-channel sound possible.
It delivers sound quality that matches the clear and vivid images of high-definition video.
TV Screen Saver Function
If the main unit remains in stop mode for 10 minutes, the Samsung logo appears on TV screen.
The HT-BD2 automatically switches itself into the power saving mode after 20 minutes in the Screen Saver mode.
Power Saving Function
The HT-BD2 automatically shuts itself off after 30 minutes in Stop mode.
HDMI
HDMI transmits DVD video and audio signals simultaneously, and provides a clearer picture.
The 1080p(Full HD) resolution provides even clearer pictures.
Anynet+(HDMI-CEC) Function
Anynet+ is a function that can be used to operate the main unit of this system using a Samsung TV remote control,
by connecting the Blu-ray Home Theater to a SAMSUNG TV using an HDMI Cable. (This is only available with
SAMSUNG TVs that support Anynet+.)
BLU-RAY DISC FEATURES
Blu-ray Discs can store 25 GB (single layer) or 50 GB (dual layer) on a single sided disc - about 5 to 10 times the
capacity of a DVD. Blu-ray Discs also support the highest quality HD video available in the industry (up to 1920 x
1080 at 40 Mbit/sec) - Large capacity means no compromise on video quality. Furthermore, a Blu-ray Disc has the
same familiar size and look as DVD.
* The following Blu-ray Disc features are disc dependant and will vary. Appearance and navigation of features will
also vary from disc to disc. Not all discs will have the features described below.
Video highlights
The BD-ROM format for movie distribution supports three highly advanced video codecs, including AVC, VC-1, and MPEG-2.
HD video resolutions are also available:
1920 x 1080 HD
•
1280 x 720 HD
•
For High-Definition Playback
To view high-definition contents in BD discs, an HDTV (High Definition Television) is required. Some discs may require
using the player's HDMI OUT to view high-definition content. The ability to view high-definition content on BD discs may be
limited depending on the resolution of your TV.
2
Page 4
3
ENG
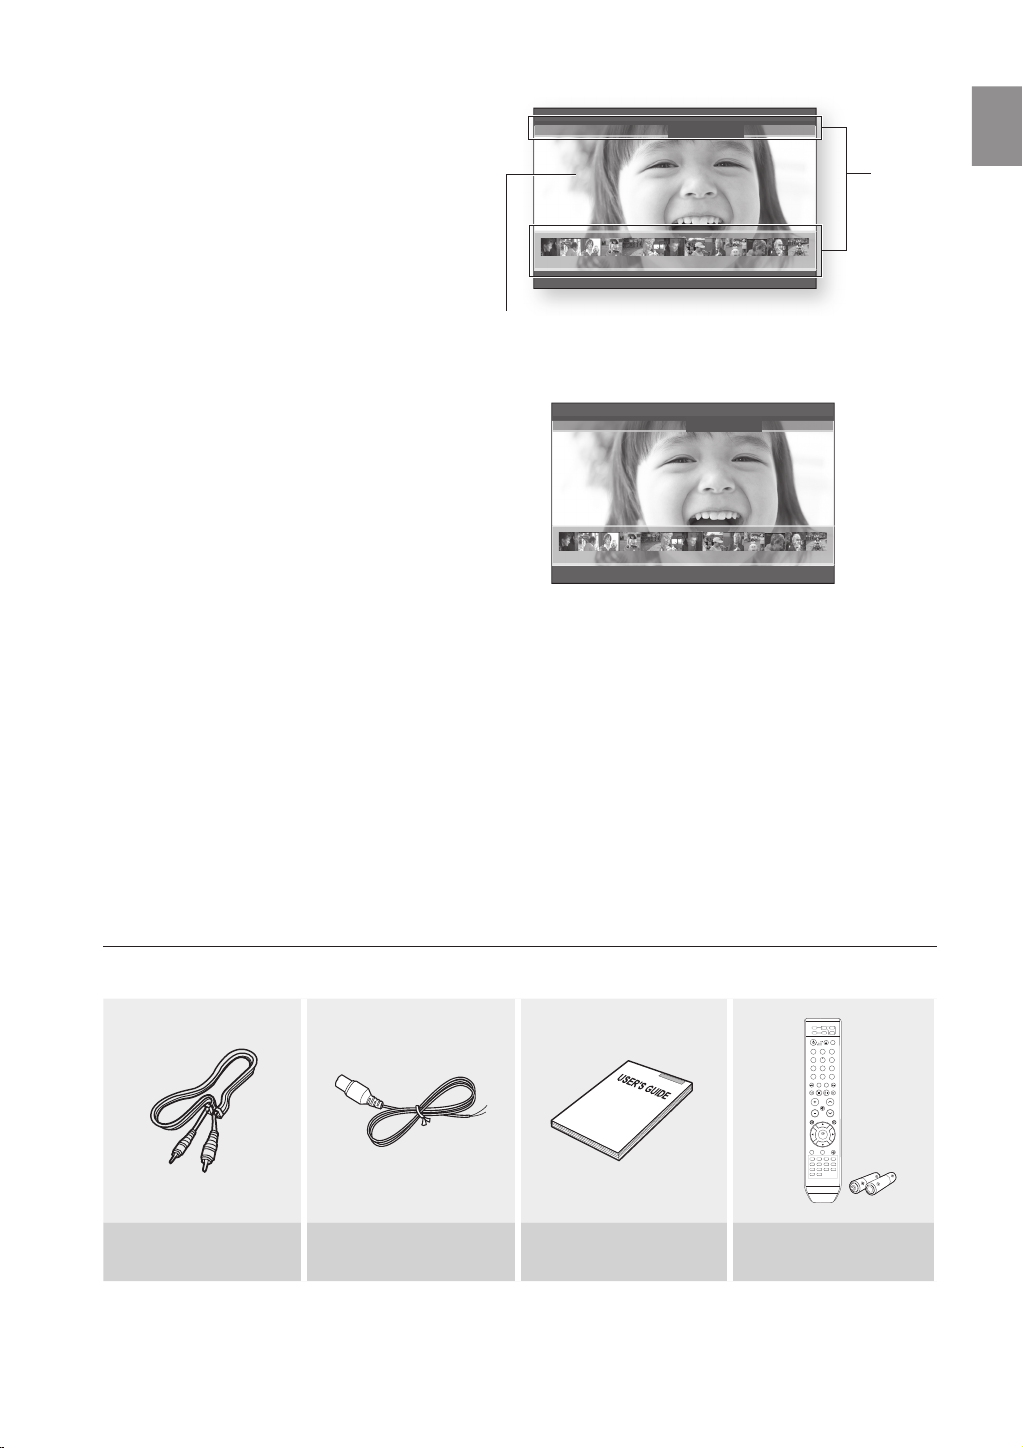
Graphic planes
Two individual, full HD resolution (1920x1080) graphic
layers are available, on top of the HD video layer.
PLAY MOVIE LANGUAGES SCENE SELECTIONS PREVIEWS
One layer is assigned to video-related graphics (like
subtitles), and the other layer is assigned to interactive
elements, such as buttons or menus. Various wipes,
fades and scroll effects may be available on both
layers.
3 4 5 6 7 8 9 10 11 12 1 3 14 15
Menu graphics
Support 256 full color resolution graphics and
animation, thereby greatly surpassing the capabilities
HD Video
of DVD-Video. Unlike DVD, Menus can be accessed during video playback.
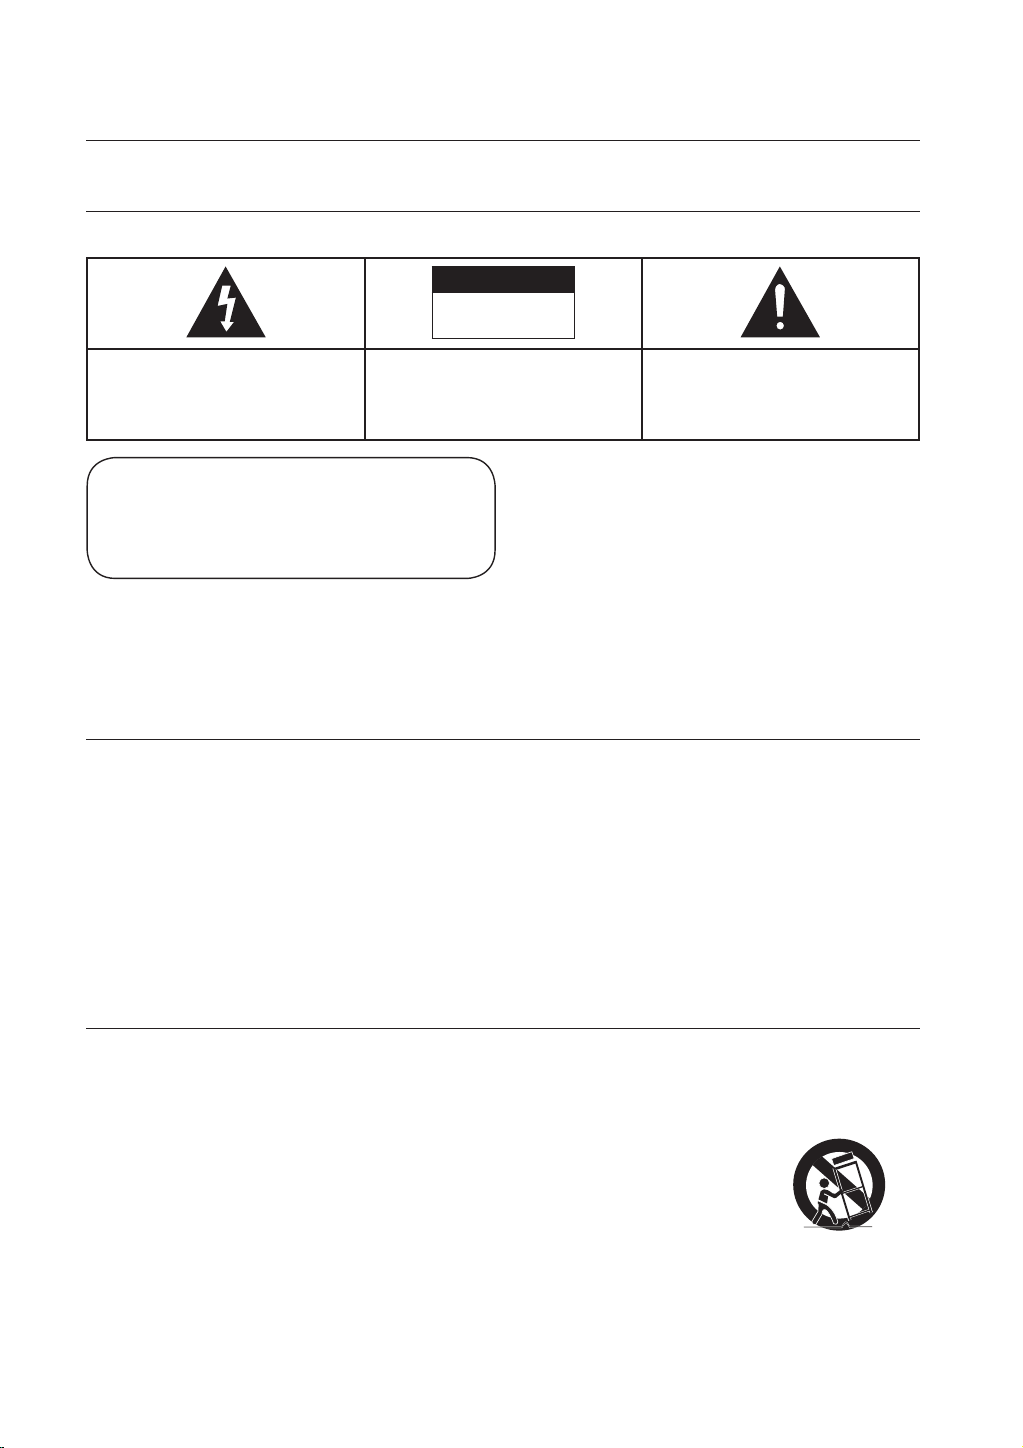
Menu sounds
When you highlight or select a menu option on a Blu-ray Disc,
sounds can be heard such as button clicks or a voice-over
PLAY MOVIE LANGUAGES SCENE SELECTIONS PREVIEWS
explaining the highlighted menu choice.
Multi-page/PopUp Menus
With DVD-Video, playback is interrupted each time a new
menu screen is accessed. Due to Blu-ray Disc's ability to
preload data from the disc without interrupting playback, a
3 4 5 6 7 8 9 10 11 12 13 14 15
menu may consist of several pages.
You can browse through the menu pages or select different
menu paths, while the audio and video remain playing in the
background.
Interactivity
Certain Blu-ray Discs may contain Animated menus and Trivia games.
Graphic
Planes
%
%
User Browsable Slideshows
With Blu-ray Discs, you can browse through various still pictures while the audio remains playing.
Subtitles
Depending on what is contained on the Blu-ray Disc, you may be able to select different font styles, sizes and colors for the subtitles,
Subtitles may also be animated, scrolled or faded in and out.
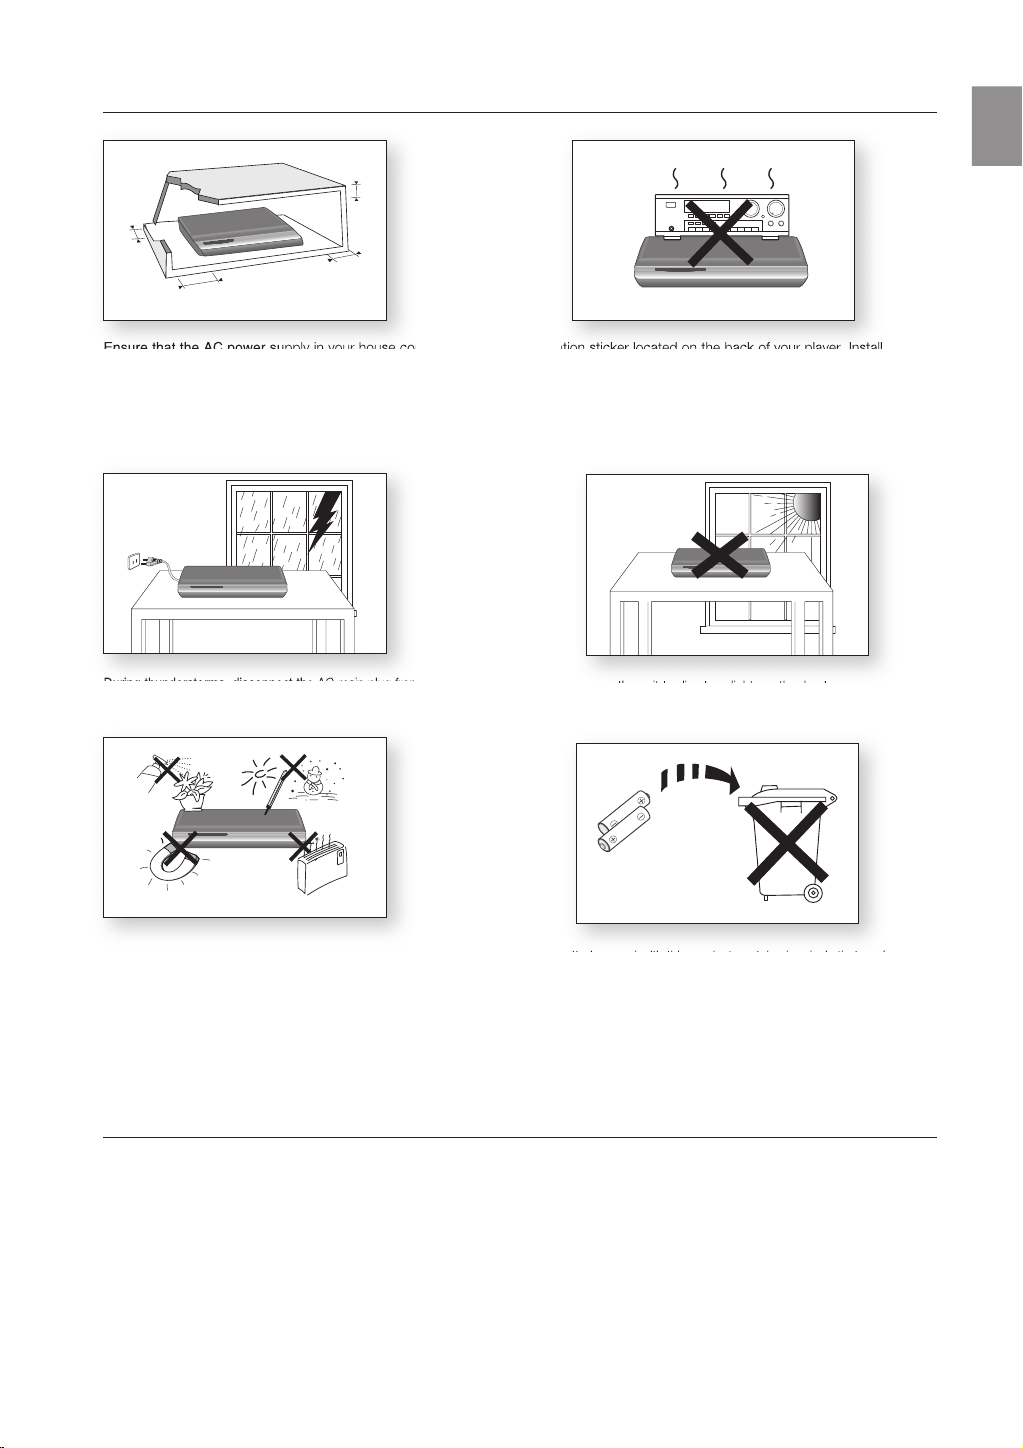
WHAT’S INCLUDED
Check for the supplied accessories below.
Video Cable FM Antenna
User's Manual
Remote Control
Batteries(AAA size)
/
Page 5
safety information
SAFETY WARNINGS
TO REDUCE THE RISK OF ELECTRIC SHOCK, DO NOT REMOVE THE COVER(OR BACK). NO USER-SERVICEABLE PARTS ARE INSIDE. REFER SERVICING TO QUALIFIED SERVICE PERSONNEL.
CAUTION
RISK OF ELECTRIC SHOCK
DO NOT OPEN
The lighting flash and Arrowhead within
Triangle Is a warning sign alerting you of
dangerous voltage Inside the product
CLASS 1 LASER PRODUCT
KLASSE 1 LASER PRODUKT
LUOKAN 1 LASER LAITE
KLASS 1 LASER APPARAT
PRODUCTO LASER CLASE 1
WARNING
To reduce the risk of fire or electric shock, do not expose this appliance to rain or moisture.
•
To prevent injury, this apparatus must be securely attached to the floor/wall in accordance with the installation instructions.
•
If this power supply is used at 240V ac, a suitable plug adapter should be used.
•
CAUTION
Apparatus shall not be exposed to dripping or splashing and no objects filled with liquids, such as vases, shall be placed on the apparatus.
•
The Mains plug is used as a disconnect device and shall stay readily operable at any time.
•
This product satisfies FCC regulations when shielded cables and connectors are used to connect the unit to other equipment. To prevent
electromagnetic interference with electric appliances, such as radios and televisions, use shielded cables and connectors for connections.
FCC NOTE (for U.S.A):
This equipment has been tested and found to comply with the limits for a Class B digital device, pursuant to Part 15 of the FCC Rules. These limits
are designed to provide reasonable protection against harmful interference in a residential installation.
This equipment generates, uses and can radiate radio frequency energy and, if not installed and used in accordance with the instructions, may cause
harmful interference to radio communications. However, there is no guarantee that interference will not occur in a particular installation.
If this equipment does cause harmful interference to radio or television reception, which can be determined by turning the equipment off and on, the
user is encouraged to try to correct the interference by one or more of the following measures:
Reorient or relocate the receiving antenna.
•
Increase the separation between the equipment and receiver.
•
Connect the equipment into an outlet on a circuit different from that to which the receiver is connected.
•
Consult the dealer or an experienced radio/TV technician for help.
•
Caution : FCC regulations state that any unauthorized changes or modifications to this equipment may void the user's authority to operate it.
CAUTION: TO REDUCE THE RISK OF
ELECTRIC SHOCK, DO NOT REMOVE
COVER (OR BACK) NO USER SERVICEABLE
PARTS INSIDE. REFER SERVICING TO
QULAIFIED SERVICE PERSONNEL.
CLASS 1 LASER PRODUCT
This Compact Disc player is classified as a CLASS 1 LASER product.
Use of controls, adjustments or performance of procedures other than
those specified herein may result in hazardous radiation exposure.
CAUTION :
INVISIBLE LASER RADIATION WHEN OPEN AND INTERLOCKS DEFEATED,
AVOID EXPOSURE TO BEAM.
The explanation point within the triangle is a
warning sign alerting you of important
instructions accompanying the product.
Important Safety Instructions
Read these operating instructions carefully before using the unit. Follow all the safety instructions listed below. Keep these operating instructions
handy for future reference.
1) Read these instructions.
2) Keep these Instructions.
3) Heed all warnings.
4) Follow all instructions.
5) Do not use this apparatus near water.
6) Clean only with dry cloth.
7) Do not block any ventilation openings. Install in
zaccordance with the manufacturer? instructions.
8) Do not install near any heat sources such as
radiators, heat registers, stoves, or other apparatus (including
amplifiers) that produce heat.
9) Do not defeat the safety purpose of the polarized or grounding-type
plug. A polarized plug has two blades with one wider than the other.
A grounding type plug has two blades and a third grounding prong.
The wide blade or the third prong are provided for your safety. If the
provided plug does not fit into your outlet, consult an electrician for
replacement of the obsolete outlet.
10) Protect the power cord from being walked on or pinched
particularly at plugs, convenience receptacles, and the point where
they exit from the apparatus.
11) Only use attachment/accessories
specified by the manufacturer.
12) Use only with the cart, stand, tripod,
bracket, or table specified by the
manufacturer, or sold with the apparatus.
When a cart is used, use caution when
moving the cart/apparatus combination
to avoid injury from tip-over.
13) Unplug this apparatus during lightning storms or when unused for
long periods of time.
14) Refer all servicing to qualified service personnel. Servicing is
required when the apparatus has been damaged in any way, such
as power-supply cord or plug is damaged, liquid has been spilled
or objects have fallen into the apparatus, the apparatus has been
exposed to rain or moisture, does not operate normally, or has
been dropped.
4
Page 6
5
ENG
PRECAUTIONS
2.7 inch
3.9 inch
3.9 inch
3.9 inch
Phones
Ensure that the AC power supply in your house complies with the identification sticker located on the back of your player. Install your
player horizontally, on a suitable base (furniture), with enough space around it for ventilation (3~4 inches). Make sure the ventilation slots
are not covered. Do not stack anything on top of the player. Do not place the player on amplifiers or other equipment which may
become hot. Before moving the player, ensure the Disc Insert Hole is empty. This player is designed for continuous use. Switching off
the Blu-ray Home Theaterr to the stand-by mode does not disconnect the electrical supply. In order to disconnect the player
completely from the power supply, remove the main plug from the wall outlet, especially when left unused for a long period of time.
During thunderstorms, disconnect the AC main plug from the
wall outlet. Voltage peaks due to lightning could damage the unit.
Protect the player from moisture (i.e. vases) , and excess heat
(e.g.fireplace) or equipment creating strong magnetic or electric fields
(i.e.speakers...). Disconnect the power cable from the AC supply if the
Do not expose the unit to direct sunlight or other heat sources.
This could lead to overheating and malfunction of the unit.
The batteries used with this product contain chemicals that are harmful
to the environment.
Do not dispose of batteries in the general household trash.
player malfunctions. Your player is not intended for industrial use. Use of
this product is for personal use only.
Condensation may occur if your player or disc has been stored in
cold temperatures. If transporting the player during the winter,
wait approxi
mately 2 hours until the unit has reached room temperature
before using.
This product is covered by one or more of the following U.S. patents:
5,060,220 5,457,669 5,561,649 5,705,762 5,987,417 6,043,912 6,222,983 6,272,096 6,377,524 6,377,531 6,385,587
6,389,570 6,408,408 6,466,532 6,473,736 6,477,501 6,480,829 6,556,520 6,556,521 6,556,522 6,578,163 6,594,208
6,631,110 6,658,588 6,674,697 6,674,957 6,687,455 6,697,307 6,707,985 6,721,243 6,721,493 6,728,474 6,741,535
6,744,713 6,744,972 6,765,853 6,765,853 6,771,890 6,771,891 6,775,465 6,778,755 6,788,629 6,788,630 6,795,637
6,810,201 6,862,256 6,868,054 6,894,963 6,937,552
This product is covered by the following U.S. patents:
US4,930,158 US4,930,160
Page 7

contents
KEY FEATURES OF YOUR NEW
BLU-RAY HOME THEATER
2
SAFETY INFORMATION
4
GETTING STARTED
8
DESCRIPTION
12
REMOTE CONTROL
14
CONNECTIONS
18
2 Player Features
2 Blu-ray Disc Features
3 What’s included
4 Safety Warnings
5 Precautions
8 Before Reading the User’s Manual
9 Disc Type and Characteristics
12 Front Panel
13 Rear Panel
14 Tour of the Remote Control
16 Setting the Remote Control
18 Speaker Installation
20 Connecting the Speakers
22 Connecting the Video Out to your TV
24 Connecting Audio from External
Components
26 Connecting to Samsung's FTP/Internet site
for Software Upgrades
27 Connecting the FM Antenna
BASIC FUNCTIONS OF YOUR
BLU-RAY HOME THEATER
28
SYSTEM SETUP
32
28 Before Playing
29 Using the remote control to operate the
blu-ray home Theater or your samsung tv
30 Playing a Disc
31 Using the Search and Skip Functions
31 Slow Motion Play/Step Motion Play
32 On-Screen Menu Navigation
33 Setting up the Language Options
34 Setting up the Audio Options
35 Setting up the Speaker Options
39 Setting up the Video Display/Output Options
42 Setting up the HDMI Setup Options
44 Setting up the Parental Lock
Page 8

7
ENG
SYSTEM UPGRADE
46
46 Firmware Upgrade
48 System Information
48 Network Setup
WATCHING A MOVIE
50
LISTENING TO MUSIC
56
VIEWING A PICTURE
59
SOUND MODE
61
50 Using the Display Function
51 Using the Disc Menu & Popup/Title Menu
52 Repeat Play
53 Selecting the Audio Language
53 Selecting the Subtitle Language
54 Changing the Camera Angle
54 Using the Bookmark Function
56 Playing an Audio CD(CD-DA)
56 Playing an MP3
56 Audio CD(CD-DA)/MP3 Screen Elements
57 Buttons on the Remote Control used for
Audio CD(CD-DA)/ MP3 disc playback
57 Repeat Audio CD(CD-DA) & MP3
59 Viewing a Picture
59 Slide Show/Speed
59 Rotate
60 Zoom
60 Go To Photo List
61 SFE(Sound Field Effect) Mode
61 NEO:6 mode
62 Dolby Pro Logic IIx Mode
62
Dolby Pro Logic IIx Effect
RADIO
63
CONVENIENT FUNCTION
64
TROUBLESHOOTING
65
APPENDIX
67
63 Listening to Radio
63 Presetting Stations
64 Sleep Timer Function
64 Adjusting Display Brightness
64 Mute Function
65 troubleshooting
67 Cautions on Handling and Storing Discs
68 Specifications
Page 9
getting started
BEFORE READING THE USER’S MANUAL
Make sure to check the following terms before reading the user manual.
Icons that will be used in manual
Icon Term Definition
h
Z
C
V
B
G
A
M
About the use of this user’s manual
1)
2)
BD-ROM This involves a function available on a BD-ROM.
DVD-VIDEO
DVD-RW This involves a function available on DVD-RW. (V mode and finalized only)
DVD-R This involves a function available on DVD-R. (V mode and finalized only)
Audio CD This involves a function available on a data CD (CD-R or CD-RW).
JPEG This involves a function available on CD-R/-RW, DVD-R/-RW discs.
MP3 This involves a function available on CD-R/-RW, DVD-R/-RW discs.
Caution
Note
Be sure to be familiar with Safety Instructions before using this product. (See pages 4~5)
If a problem occurs, check the Troubleshooting. (See pages 65~66)
This involves a function available on DVD-Video or DVD-R/DVD-RW discs
that have been recorded and finalized in Video Mode.
This involves a case where a function does not operate or settings may be
cancelled.
This involves tips or instructions on the page that help each function
operate.
Copyright
©2007 Samsung Electronics Co.,Ltd.
All rights reserved; No part or whole of this user’s manual may be reproduced or copied without the
prior written permission of Samsung Electronics Co.,Ltd.
8
Page 10
9
ENG
● GETTING STARTED
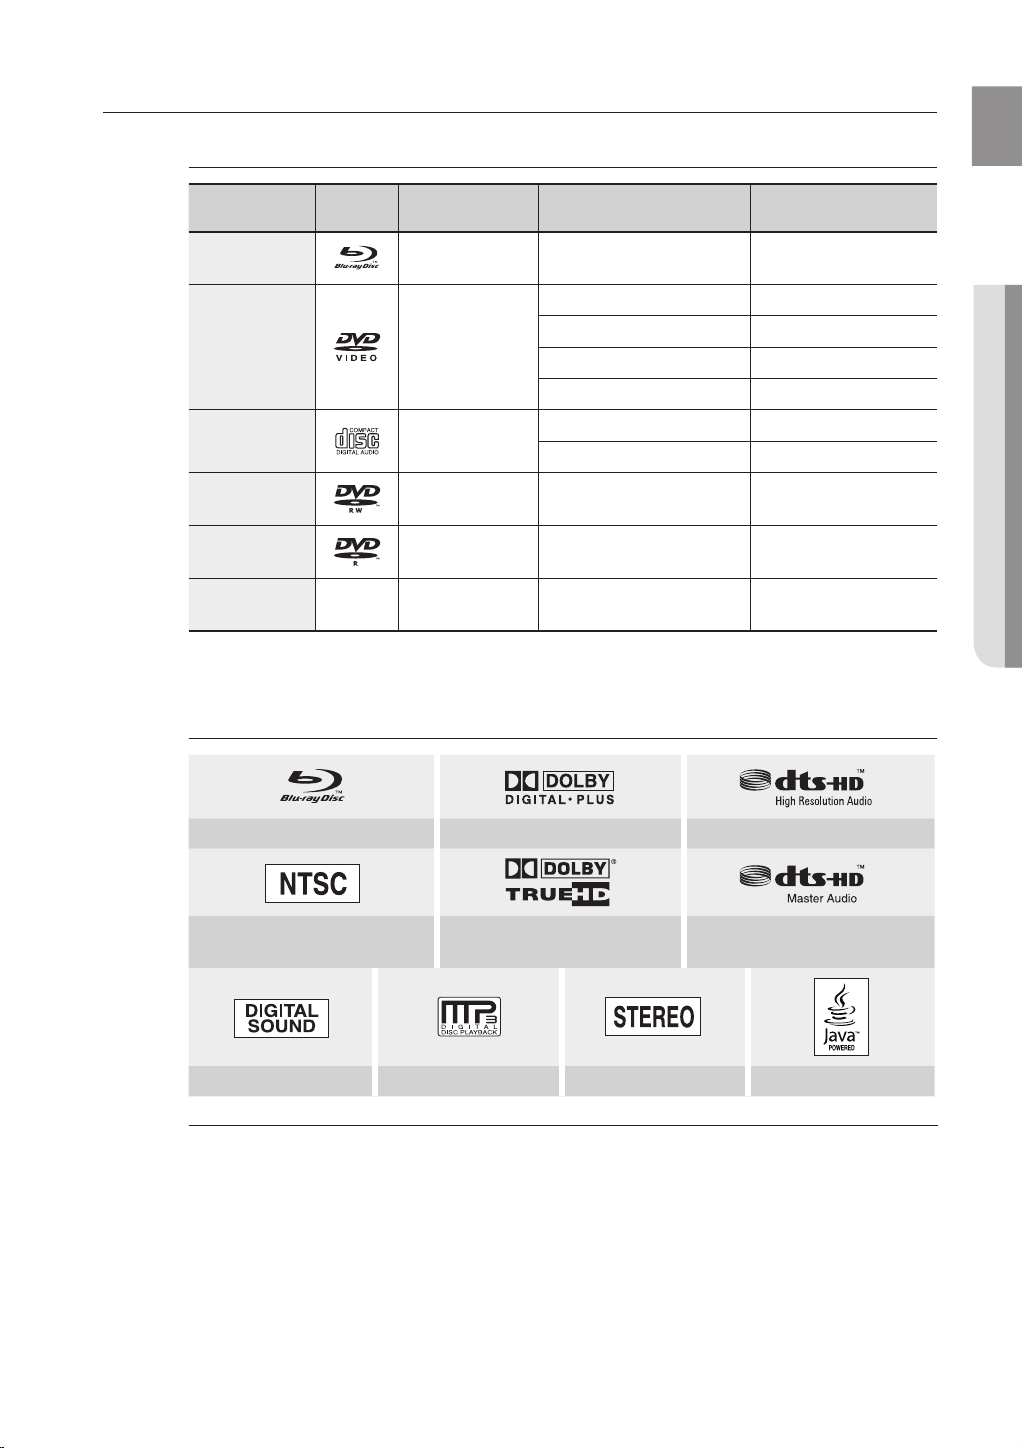
DISC TYPE AND CHARACTERISTICS
Disc types that can be played
Disc Types Disc Logo Recorded content Disc Shape Max. Playing minute
BD-ROM AUDIO + VIDEO Single sided (25GB/50GB)
Single sided(5 inches) 240
DVD-VIDEO AUDIO + VIDEO
AUDIO-CD AUDIO
DVD-RW
(V mode and finalized only)
DVD-R
(V mode and finalized only)
CD-R/-RW
DVD-RW/-R
•
This player is compatible with the NTSC color system only.
PAL discs will not play.
•
AUDIO + VIDEO 5 inches (4.7GB)
AUDIO + VIDEO 5 inches (4.7GB)
JPEG
MP3
Double sided(5 inches) 480
Single sided(3 1/2 inches) 80
Double sided(3 1/2 inches) 160
Single sided(5 inches) 74
Single sided(3 1/2 inches) 20
– –
Logos of Discs that can be played
Playing time depends
on the Title
480
(EX : Extended Play)
480
(EX : Extended Play)
Blu-ray Disc Dolby Digital Plus DTS-HD High Resolution Audio
NTSC broadcast system in U.S.A,
Canada, Korea, Japan
Digital Audio MP3 Stereo Java
Manufactured under license from Dolby Laboratories. “Dolby” and the double-D symbol are trademarks of Dolby
M
Laboratories.
Manufactured under license under U.S. Patent #’s: 5,451,942; 5,956,674; 5,974,380;
5,978,762; 6,226,616; 6,487,535 & other U.S. and worldwide patents issued & pending.
DTS is a registered trademark and the DTS logos, Symbol, DTS-HD, DTS-HD High
Resolution Audio and DTS-HD High Res Audio are trademarks of DTS, Inc. © 1996-2007
DTS, Inc. All Rights Reserved.
Manufactured under license under U.S. Patent #'s:5,451,942; 5,956,674; 5,974,380;
5,978,762; 6,226,616; 6,487,535 & other U.S. and worldwide patents issued & pending.
DTS is a registered trademark and the DTS logos, Symbol, DTS-HD and DTS-HD Master
Audio are trademarks of DTS, Inc. © 1996-2007 DTS, Inc. All Rights Reserved.
Dolby TrueHD DTS-HD Master Audio
Page 11
getting started
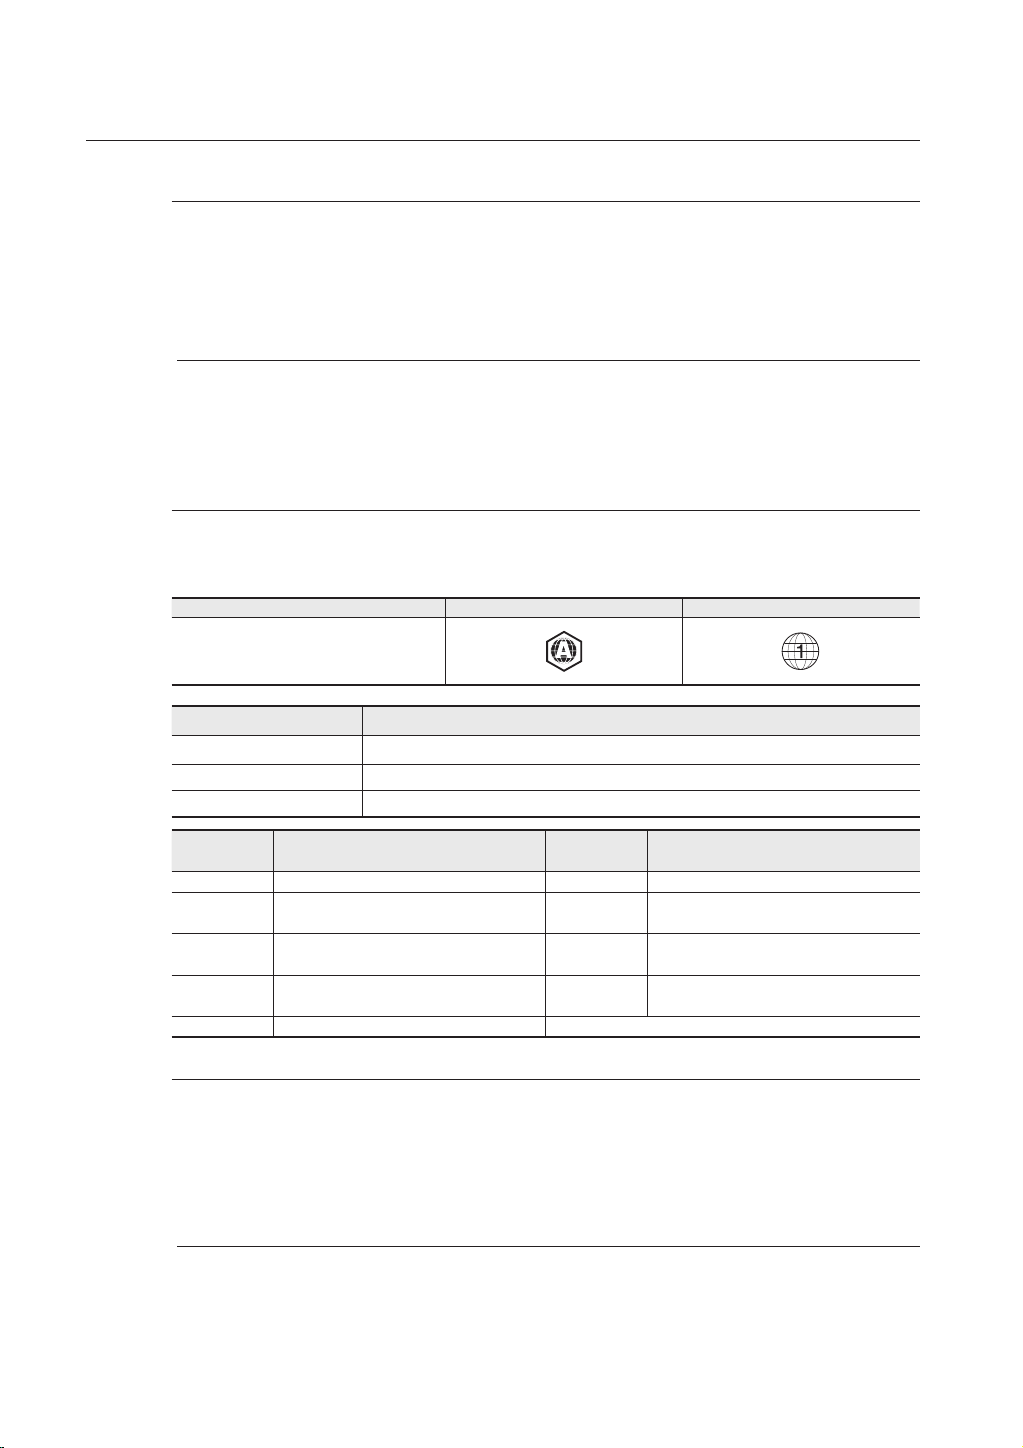
Discs that cannot be played
Blu-ray Discs with a region code other
•
than "Region A".
BD-R, BD-RE
•
HD DVD Disc
•
DVD-Video with a region number other
•
than “1” or “ALL”
Some commercial discs and DVD discs purchased outside your region may not be playable with this
M
Region code
Both the Blu-ray Home Theater and the discs are coded by region. These regional codes must match in
order to play the disc. If the codes do not match, the disc will not play. The Region Number for this Bluray Home Theater is described on the rear panel of the Blu-ray Home Theater.
product. When these discs are played, either “No disc.” or “Please check the regional code of the disc.”
will be displayed.
If a DVD-R/-RW disc has not been recorded properly in DVD video format, it will not be playable.
Disc Type Blu-ray DVD-Video
Region code
DVD-RAM
•
3.9 GB DVD-R Disc for Authoring.
•
DVD-RW(VR mode)
•
DVD-ROM/PD/MV-Disc, etc
•
CVD/CD-ROM/CDV/CD-G/CD-I/LD
•
3 1/2 inch MD (mini disc)
•
10
BD Region Code Area
A
B Europe, Greenland, French territories, Middle East, Africa, Australia and New Zealand.
C India, China, Russia, Central and South Asia.
DVD-Video
Region Code
1
USA, Canada
Japan, Europe, South Africa, Middle East,
2
Greenland
Korea, Taiwan, Hong Kong, Parts of South
3
East Asia
Australia, New Zealand, Latin America
4
(including Mexico)
5 Eastern Europe, Russia, India, Africa
North America, Central America, South America, Korea, Japan, Taiwan, Hong Kong and South East Asia.
Area
DVD-Video
Region Code
6
China
7 Unspecified Special Use
8 Airlines/Cruise Ships (including Mexico)
9 region free
Area
Blu-ray Disc Compatibility
Blu-ray Disc is a new and evolving format. Accordingly, disc compatibility issues are possible. Not all discs are
compatible and not every disc will play back. For additional information, refer to the Compliance and Compatibility
Notice section of this Manual. If you encounter compatibility problems, please contact the SAMSUNG customer care
center. This Samsung Blu-ray Home Theater (HT-BD2) supports only the BD-ROM Profile 1 version 1.0
specification. If you want to play later version discs, you may need to update player's firmware. Please refer to http://
www.samsung.com/us or contact the SAMSUNG customer care center at 1-800 SAMSUNG.
Playback may not work for some types of discs, or when specific operations, such as angle change and aspect
M
ratio adjustment, are being performed. Information about the discs is written in detail on the box. Please refer to
this if necessary.
Do not allow the disc to become dirty or scratched. Fingerprints, dirt, dust, scratches or deposits of cigarette
smoke on the recording surface may make it impossible to use the disc for playback.
Discs with PAL programs recorded on them cannot be played using this product.
When a BD-Java title is played, loading may take longer than a normal title, or some functions may perform slowly.
Page 12

11
ENG
● GETTING STARTED
Disc Types
BD-ROM
❖
Blu-ray Disc Read Only Memory. A BD-ROM disc contains pre-recorded data. Although a BD-ROM
may contain any form of data, most BD-ROM discs will contain movies in High Definition format, for
playback on Blu-ray Home Theaters. This unit can play back pre-recorded commercial BD-ROM discs.
DVD-Video
❖
A digital versatile disc (DVD) can contain up to 135-minutes of images, 8 audio languages and 32
•
subtitle languages. It is equipped with MPEG-2 picture compression and Dolby Digital surround,
allowing you to enjoy vivid and clear theatre quality images.
When switching from the first layer to the second layer of a dual-layered DVD Video disc, there may be
•
momentary distortion in the image and sound. This is not a malfunction of the unit.
Once a DVD-RW/-R recorded in Video Mode is finalized, it becomes DVD-Video. Pre-recorded (pre-
•
stamped) commercial DVDs with movies are also referred to as DVD-Videos. This unit can play back
pre-recorded commercial DVD discs (DVD-Video discs) with movies.
Audio CD
❖
An audio disc on which 44.1kHz PCM Audio is recorded.
•
This unit can play back CD-DA format audio CD-R and CD-RW discs.
•
The unit may not be able to play some CD-R or CD-RW discs due to the condition of the recording.
•
CD-R/-RW
❖
Use a 700MB(80 minutes) CD-R/-RW disc. If possible, do not use a 800MB(90 minutes) or above
•
disc, as the disc may not play back.
If the CD-R/-RW disc was not recorded as a closed session, you may experience delays when playing
•
back the beginning of the disc or all recorded files may not play.
Some CD-R/-RW discs may not be playable with this unit, depending on the device which was used
•
to burn them. For contents recorded on CD-R/-RW media from CDs for your personal use, playability
may vary depending on contents and discs.
DVD-R Disc Playback
❖
Once a DVD-R recorded in Video Mode is finalized, it becomes DVD-Video.
•
This unit can play back DVD-R discs recorded and finalized with a Samsung DVD video recorder. It
•
may not be able to play some DVD-R discs depending on the disc and the condition of the recording.
DVD-RW Disc Playback
❖
Playback can be performed with DVD-RW discs in the Video Mode and finalized only.
•
Once a DVD-RW recorded in Video Mode is finalized, it becomes DVD-Video. Ability to play back may
•
depend on recording conditions.
Disc Format
Using MP3 disc
❖
CD-R/-RW, DVD-RW/-R recorded with UDF, ISO9660 or JOLIET format can be played back.
•
Only MP3 files with the “.mp3” or “.MP3” extension can be played.
•
Playable bit-rate range is from 56 Kbps to 320 Kbps.
•
Playable sample-rate is 32KHz to 48KHz.
•
The unit can handle a maximum of 1500 files and folders under a parent folder. For MP3 files recorded
•
with a VBR(Variable Bit Rates), the sound may cut in and out.
Using JPEG disc
❖
CD-R/-RW, DVD-RW/-R recorded with UDF, ISO9660 or JOLIET format can be played back.
•
Only JPEG files with the ".jpg", ".JPG", ".jpeg" or "JPEG" extension can be displayed.
•
Progressive JPEG is supported.
•
DVD-RW/-R (V)
❖
This is a format that is used for recording data on a DVD-RW or DVD-R disc. The disc can be played
•
by this Blu-ray Home Theater once it has been finalized.
If a disc that has been recorded in Video Mode by a different maker’s recorder but has not been
•
finalized, it cannot be played by this Blu-ray Home Theater.
Page 13
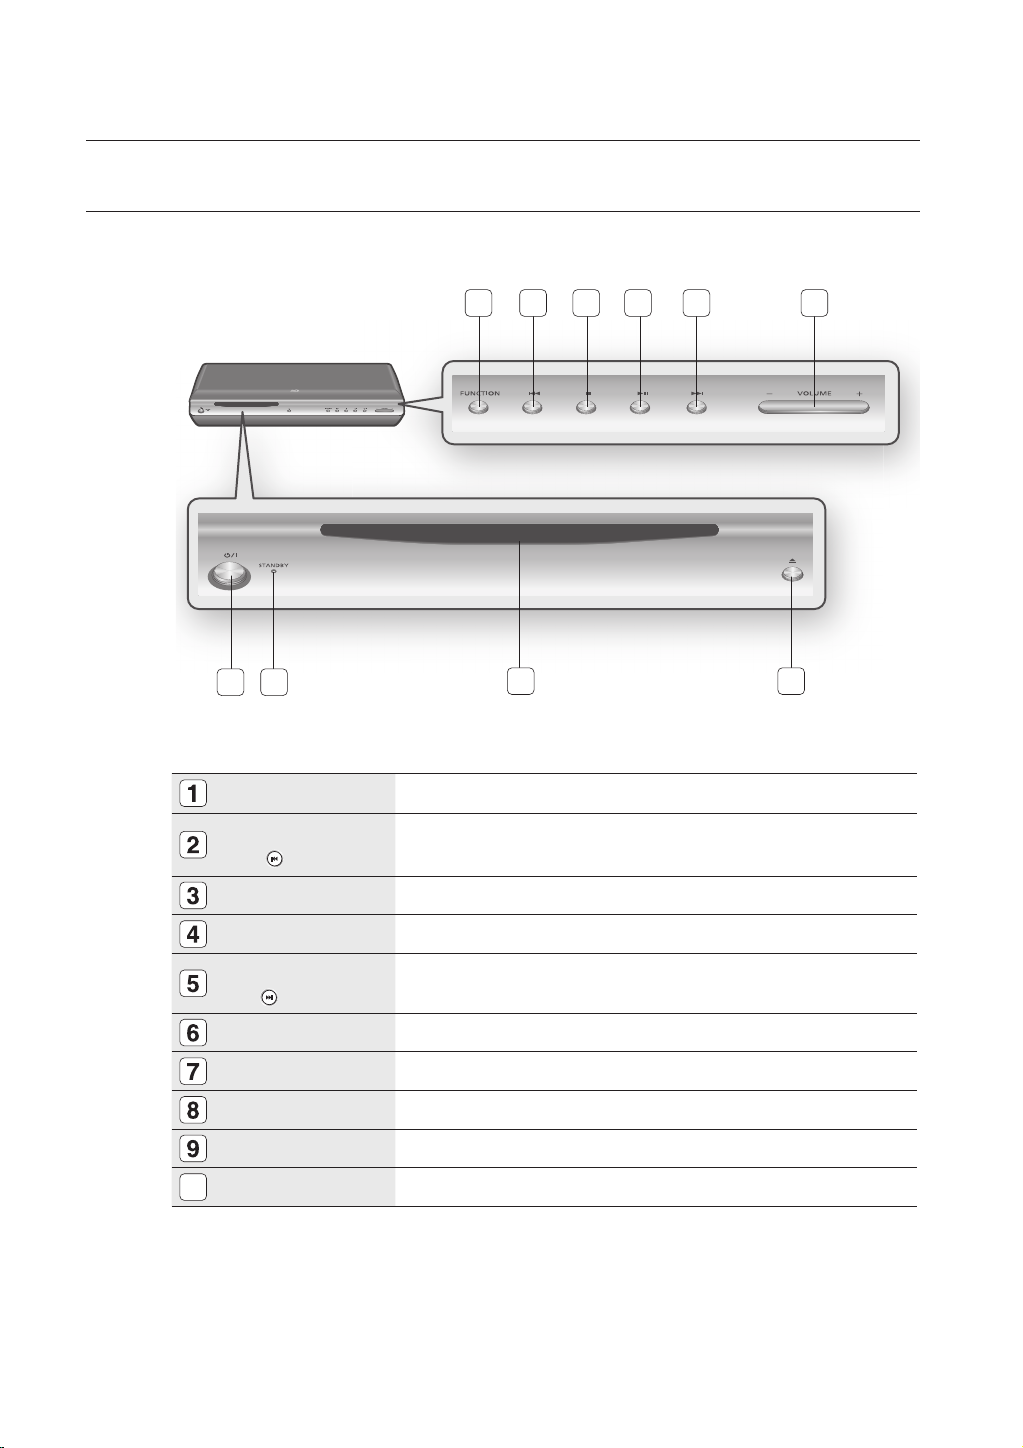
description
FRONT PANEL
1 2 3 4 5 6
10
FUNCTION BUTTON
TUNING DOWN &
SKIP
( )
STOP BUTTON
PLAY/PAUSE BUTTON
TUNING UP &
SKIP() BUTTON
Volume Control
EJECT BUTTON
DISC INSERT HOLE
STANDBY INDICATOR
POWER BUTTON
10
9
BUTTON
BUTTONS
8 7
The mode switches as follows : BD/DVD ➞ D.IN 1 ➞ D.IN 2 ➞ AUX ➞ FM.
Goes back to the previous title/chapter/track.
Tunes down the FM frequency band.
Stops disc playback.
Plays a disc or pauses playback.
Goes to the next title/chapter/track.
Tunes up the FM frequency band.
Volume adjustment.
Eject the disc.
Insert a disc.
When the unit is first plugged in, this indicator lights.
Turns the Blu-ray Home Theater on and off.
12
Page 14
13
ENG
● DESCRIPTION
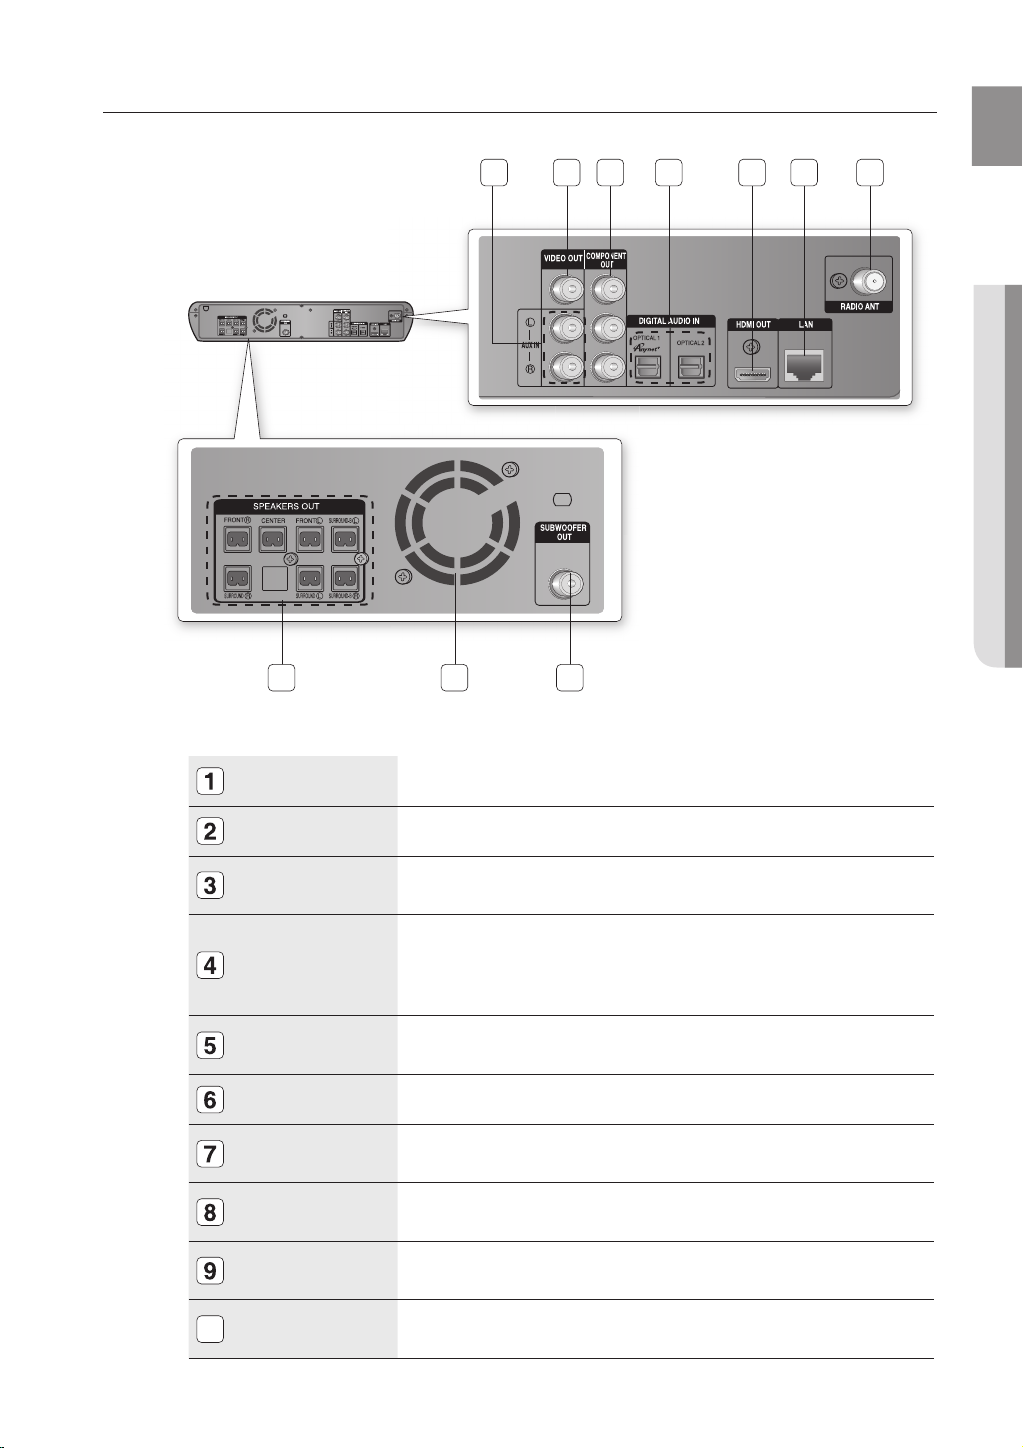
REAR PANEL
FM
FM
2 31 4 5 6 7
AUX IN JACKS
VIDEO OUTPUT JACK
COMPONENT VIDEO
OUTPUT JACKS
EXTERNAL DIGITAL
OPTICAL INPUT
JACKS(OPTICAL1,
OPTICAL2)
HDMI OUT JACK
LAN TERMINAL
FM 75Ω COAXIAL
JACK
SUBWOOFER OUT
JACK
8910
Connect to the 2CH analog output of an external device (such as a VCR)
Connect your TV's Video Input jack (VIDEO IN) to the VIDEO OUT Jack on this unit.
Connect a TV with Component video inputs to these jacks.
Use this to connect external equipment capable of digital output.
Use the HDMI cable, connect this HDMI output terminal to the HDMI input terminal on
your TV for the best quality picture.
Connect this LAN terminal to the LAN terminal on your modem for software upgrades.
Connect the FM antenna.
Connect the subwoofer speaker.
COOLING FAN
7 CHANNEL SPEAKER
10
OUTPUT CONNECTORS
The fan always revolves when the power is on. Ensure a minimum of 4 inches of clear
space on all sides of the fan when installing the product.
Connect the front, center, surround, surround back speakers.
Page 15
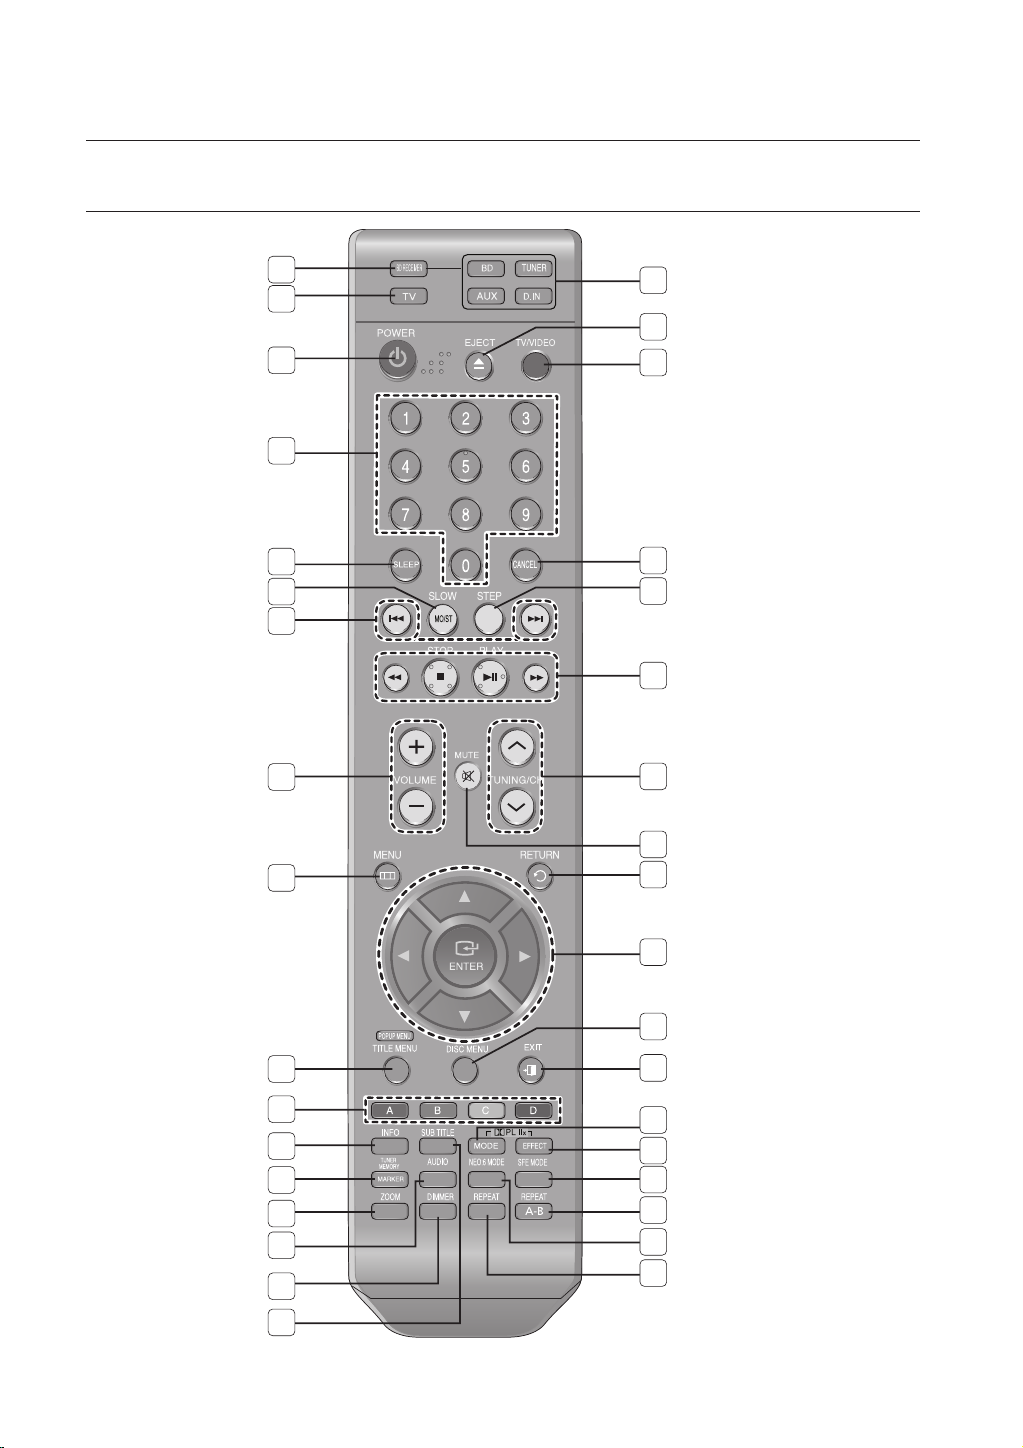
remote control
TOUR OF THE REMOTE CONTROL
1
2
3
4
5
6
7
8
9
18
19
20
21
22
23
24
25
26
14
10
11
12
13
14
15
16
17
27
28
29
30
31
32
33
34
35
Page 16
15
ENG
● REMOTE CONTROL
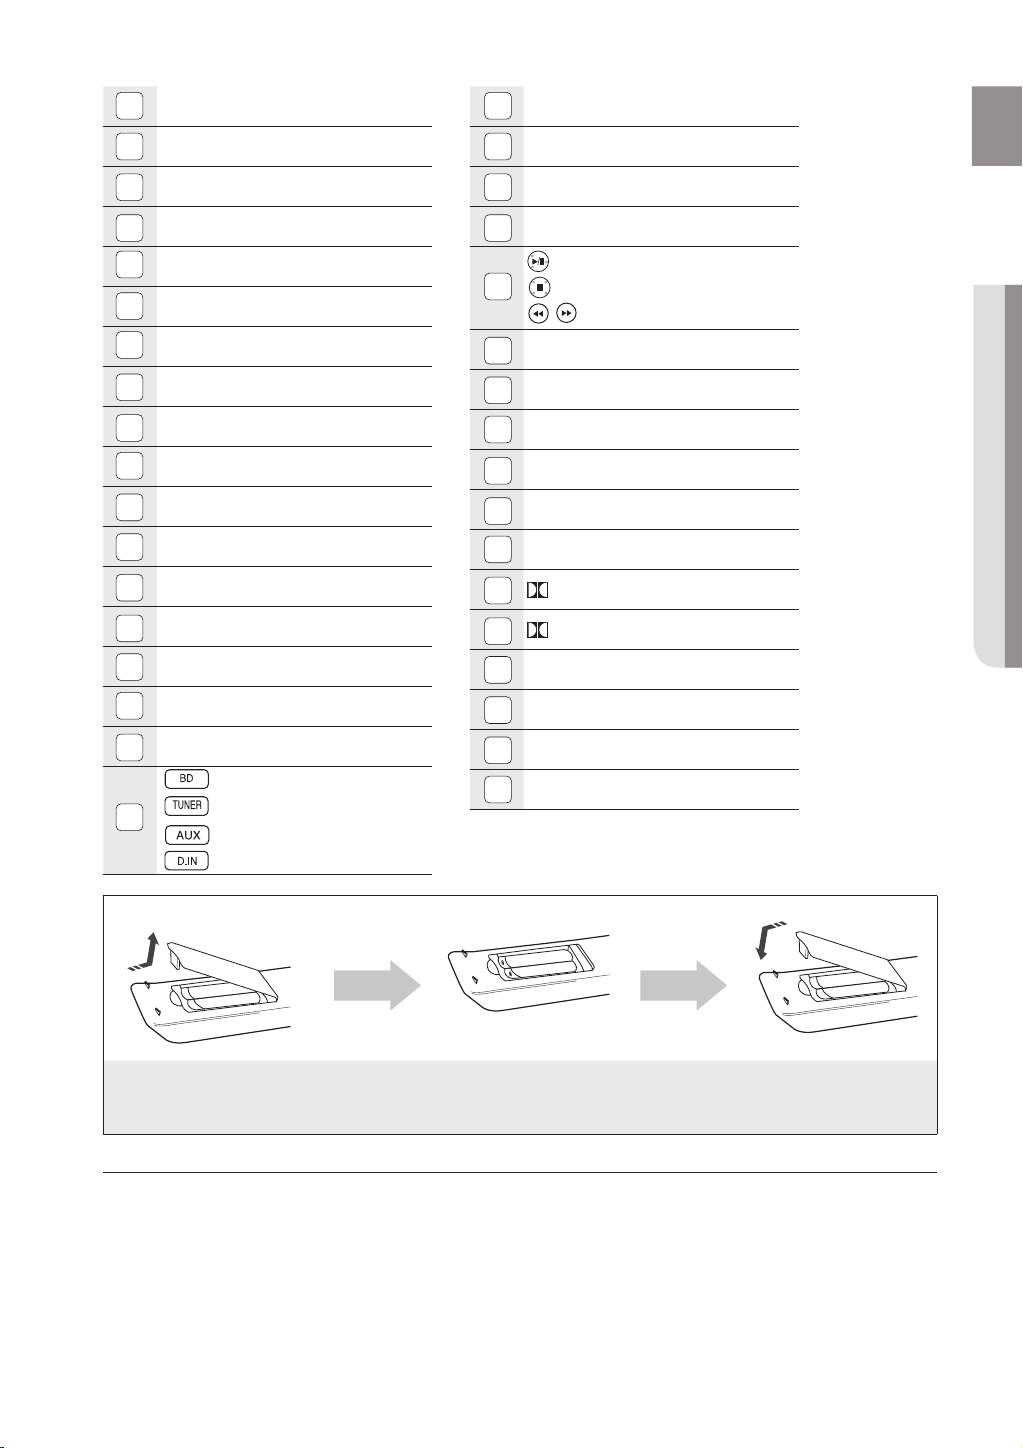
BD RECEIVER button
1
EJECT button
19
TV button
2
POWER button
3
Number (0~9) buttons
4
SLEEP button
5
SLOW, MO/ST button
6
Tuning Preset/CD Skip buttons
7
VOLUME button
8
MENU button
9
POPUP MENU, TITLE MENU button
10
Color buttons
11
INFO button
12
TUNER MEMORY, MARKER button
13
ZOOM button
14
AUDIO button
15
DIMMER button
16
TV/VIDEO button
20
CANCEL button
21
STEP button
22
PLAY/PAUSE button
23
24
25
26
27
28
29
30
31
32
33
STOP button
SEARCH buttons
TUNING/CH button
MUTE button
RETURN button
Cursor/ENTER button
DISC MENU button
EXIT button
PL IIx MODE button
PL IIx EFFECT button
SFE MODE button
REPEAT A-B button
SUB TITLE button
17
18
BD button
TUNER button
AUX button
D.IN button
NEO:6 MODE button
34
REPEAT button
35
Insert Remote Batteries
1. Remove the battery
cover in the direction
of the arrow.
M
Follow these precautions to avoid leaking or cracking cells:
Place batteries in the remote control so they match the polarity : (+) to (+) and (–) to (–).
Use the correct type of batteries. Batteries that look similar may differ in voltage.
Always replace both batteries at the same time.
Do not expose the batteries to heat or a flame.
2. Insert two 1.5V AAA batteries, paying
attention to the correct polarities
(+ and –).
3. Replace the battery
cover.
Page 17
remote control
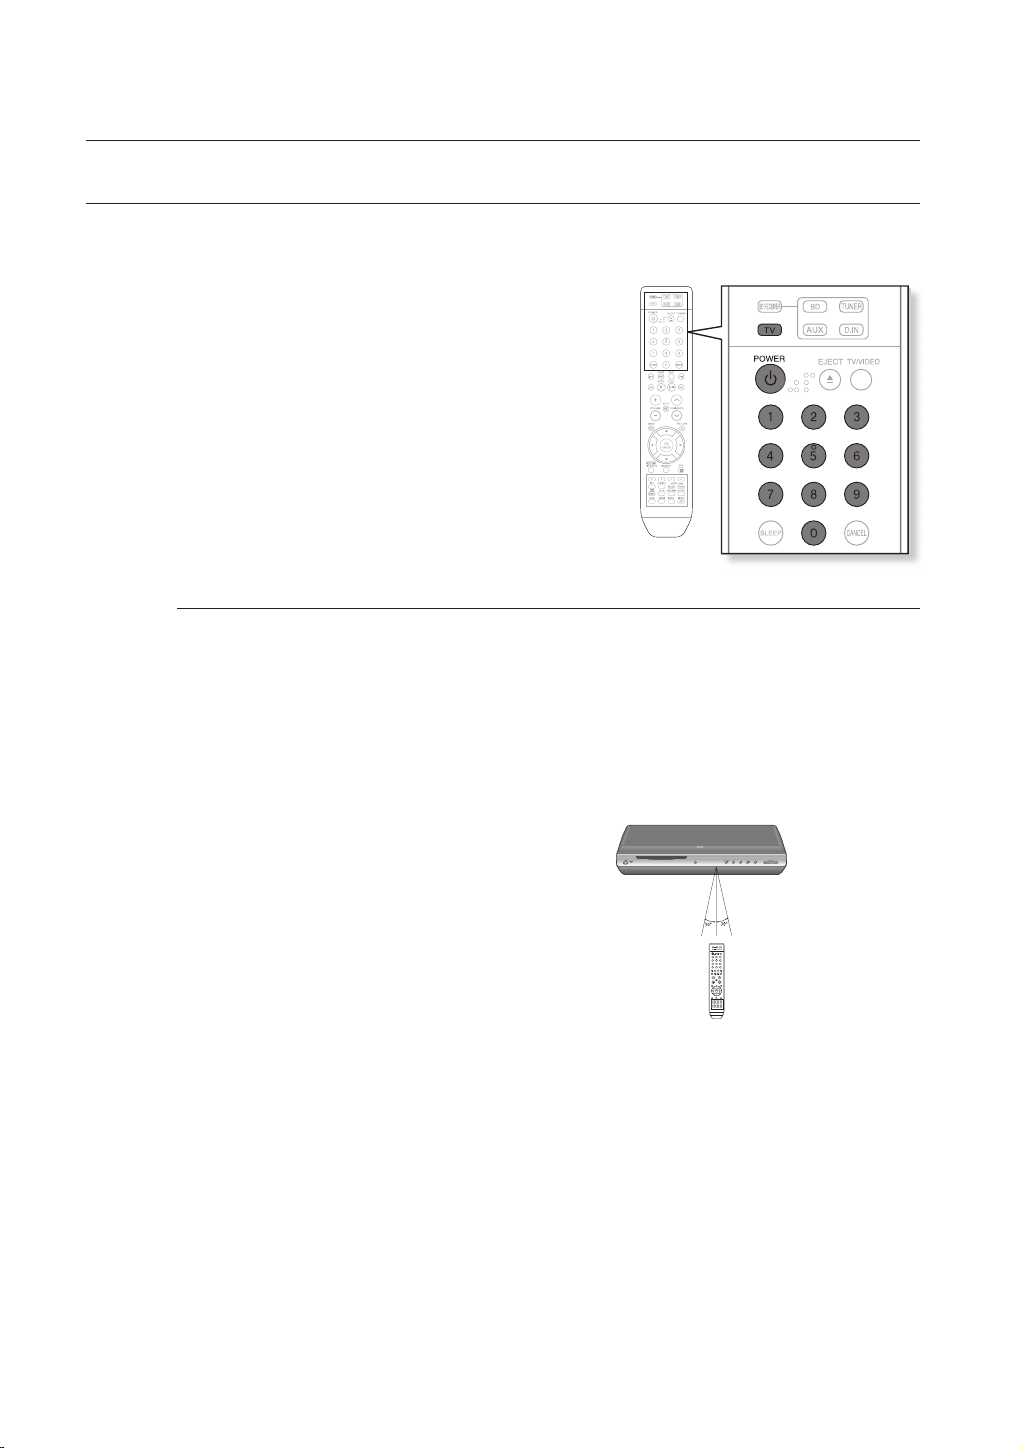
SETTING THE REMOTE CONTROL
You can control certain functions of your TV with this remote control.
When operating a TV with the remote control
1. Press the TV button to set the remote to TV mode.
2. Press the POWER button to turn on the TV.
3. While holding down the POWER button, enter the code
corresponding to your brand of TV.
If there is more than one code listed for your TV in the
•
able, enter one at a time to determine which code works.
Example : For a Samsung TV
While holding down the POWER button, use the number
buttons to enter 00, 15, 16, 17 and 40.
4. If the TV turns off, the setting is complete.
You can use the TV POWER, VOLUME, CHANNEL, and
•
Numeric buttons (0~9).
M
The remote control may not work on some brands of TVs. Also, some operations may not
be possible depending on your brand of TV.
If you do not set the remote control with the code for your brand of TV, the remote control
will work on a Samsung TV by default.
Operation Range of the Remote Control
The remote control can be used up to approximately 23 feet (7 meters)
in a straight line. It can also be operated at a
horizontal angle of up to 30° from the remote control sensor.
16
Page 18

17
ENG
● REMOTE CONTROL
TV Brand Code List
No.
1
2
3
4
5
6
7
8
9
10
11
12
13
14
15
16
17
18
19
20
21
22
23
24
25
26
27
28
29
30
31
32
33
34
35
36
37
38
39
40
41
42
43
Brand
Admiral (M.Wards)
A Mark
Anam
AOC
Bell & Howell (M.Wards)
Brocsonic
Candle
Cetronic
Citizen
Cinema
Classic
Concerto
Contec
Coronado
Craig
Croslex
Crown
Curtis Mates
CXC
Daewoo
Daytron
Dynasty
Emerson
Fisher
Funai
Futuretech
General Electric (GE)
Hall Mark
Hitachi
Inkel
JC Penny
JVC
KTV
KEC
KMC
LG (Goldstar)
Luxman
LXI (Sears)
Magnavox
Marantz
Matsui
MGA
Mitsubishi/MGA
Code
56, 57, 58
01, 15
01, 02, 03, 04, 05, 06, 07, 08, 09, 10, 11,
12, 13, 14
01, 18, 40, 48
57, 58, 81
59, 60
18
03
03, 18, 25
97
03
18
46
15
03, 05, 61, 82, 83, 84
62
03
59, 61, 63
03
02, 03, 04, 15, 16, 17, 18, 19, 20, 21, 22, 23, 24,
25, 26, 27, 28, 29, 30, 32, 34, 35, 36, 48, 59, 90
40
03
03, 15, 40, 46, 59, 61, 64, 82, 83, 84, 85
19, 65
03
03
06, 40, 56, 59, 66, 67, 68
40
15, 18, 50, 59, 69
45
56, 59, 67, 86
70
59, 61, 87, 88
03, 15, 40
15
01, 15, 16, 17, 37, 38, 39, 40, 41, 42, 43, 44
18
19, 54, 56, 59, 60, 62, 63, 65, 71
15, 17, 18, 48, 54, 59, 60, 62, 72, 89
40, 54
54
18, 40
18, 40, 59, 60, 75
.
No
44
45
46
47
48
49
50
51
52
53
54
55
56
57
58
59
60
61
62
63
64
65
66
67
68
69
70
71
72
73
74
75
76
77
78
79
80
81
82
83
84
85
86
Brand
MTC
NEC
Nikei
Onking
Onwa
Panasonic
Penney
Philco
Philips
Pioneer
Portland
Proton
Quasar
Radio Shack
RCA/Proscan
Realistic
Sampo
Samsung
Sanyo
Scott
Sears
Sharp
Signature 2000 (M.Wards)
Sony
Soundesign
Spectricon
SSS
Sylvania
Symphonic
Tatung
Techwood
Teknika
TMK
Toshiba
Vidtech
Videch
Wards
Yamaha
York
Yupiteru
Zenith
Zonda
Dongyang
Code
18
18, 19, 20, 40, 59, 60
03
03
03
06, 07, 08, 09, 54, 66, 67, 73, 74
18
03, 15, 17, 18, 48, 54, 59, 62, 69, 90
15, 17, 18, 40, 48, 54, 62, 72
63, 66, 80, 91
15, 18, 59
40
06, 66, 67
17, 48, 56, 60, 61, 75
18, 59, 67, 76, 77, 78, 92, 93, 94
03, 19
40
00, 15, 16, 17, 40, 43, 46, 47, 48, 49,
59, 60, 98
19, 61, 65
03, 40, 60, 61
15, 18, 19
15, 57, 64
57, 58
50, 51, 52, 53, 55
03, 40
01
18
18, 40, 48, 54, 59, 60, 62
61, 95, 96
06
18
03, 15, 18, 25
18, 40
19, 57, 63, 71
18
59, 60, 69
15, 17, 18, 40, 48, 54, 60, 64
18
40
03
58, 79
01
03, 54
Page 19
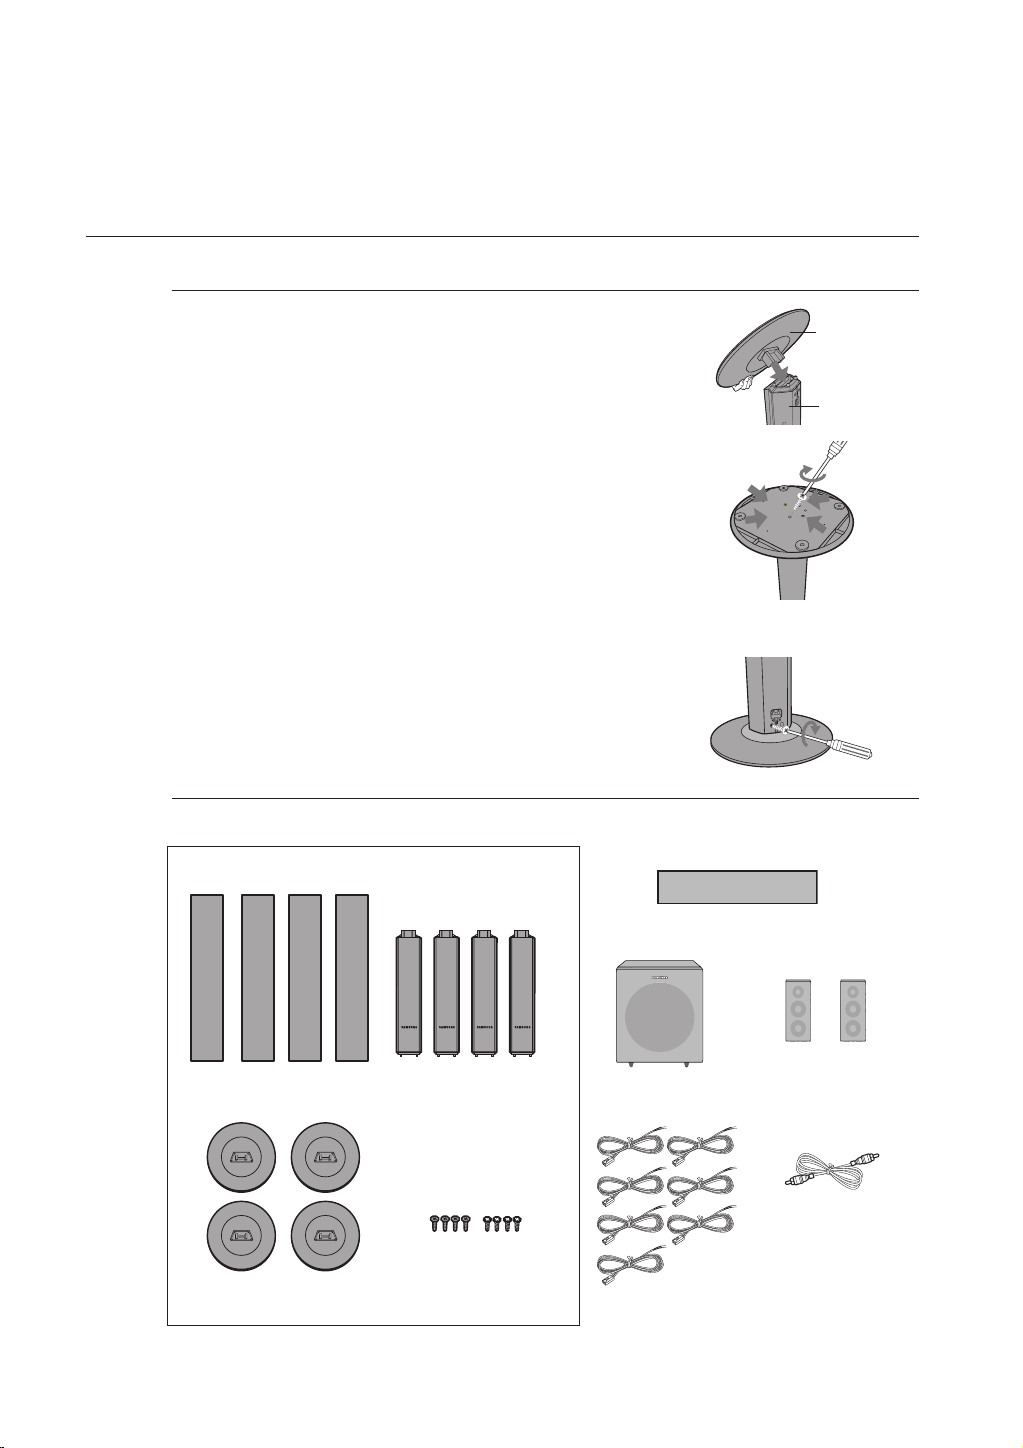
connections
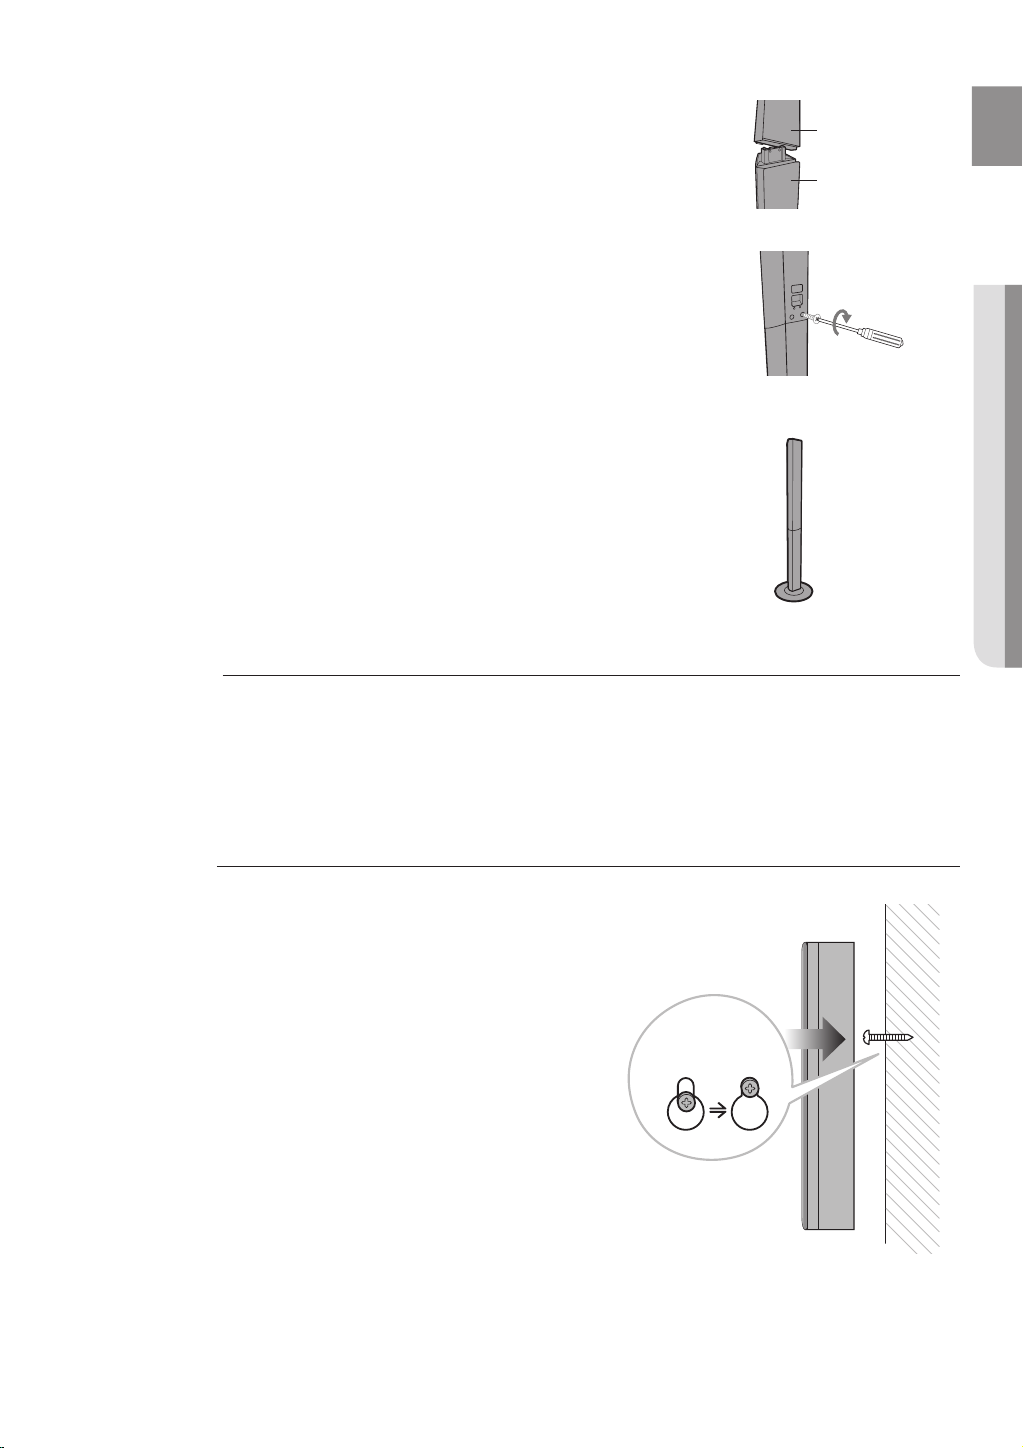
Please follow the steps below to install the speakers on the stands.
SPEAKER INSTALLATION
How to Install the Speaker and the Stand
1.
Turn the stand upside down and mount it on the stand base.
2.
Insert and tighten (Black) screws on the bottom side of the stand base.
3.
Place the stand on the floor. Insert and tighten 2 (Silver) screws
on the back of the stand.
STAND
BASE
STAND
18
Speaker Packages
Please confirm that all the following contents are included in the package.
Front/Surround Speaker
SPEAKER (4EA)
STAND BASE(4EA)
Front speakers and Surround speakers are
packaged separately as shown in the diagram.
STAND (4EA)
Screw
(16EA): Black
Screw
(16EA): Silver
Subwoofer Speaker
Speaker Wire (7EA)
Center Speaker
Surround Back
Speaker (2EA)
Audio Cable for Subwoofer
connection (1EA)
Page 20
19
ENG
● CONNECTIONS
Mount the speaker on the stand.
4.
Tighten 2 (Silver) screws on the back of the speaker.
5.
This is the successfully assembled speaker.
6.
SPEAKER
STAND
Make sure that the speaker is installed on a flat and stable area. Otherwise it may easily
M
be knocked over.
To mount the speakers on the wall
Drive a screw into the wall for each speaker and then hook the front speaker over them.
Hook the speakers so that
the screws are in the
position of the figure.
Page 21
connections
This section involves various methods of connecting the Blu-ray Home Theater to other external components.
Before moving or installing the product, be sure to turn off the power and disconnect the power cord.
CONNECTING THE SPEAKERS
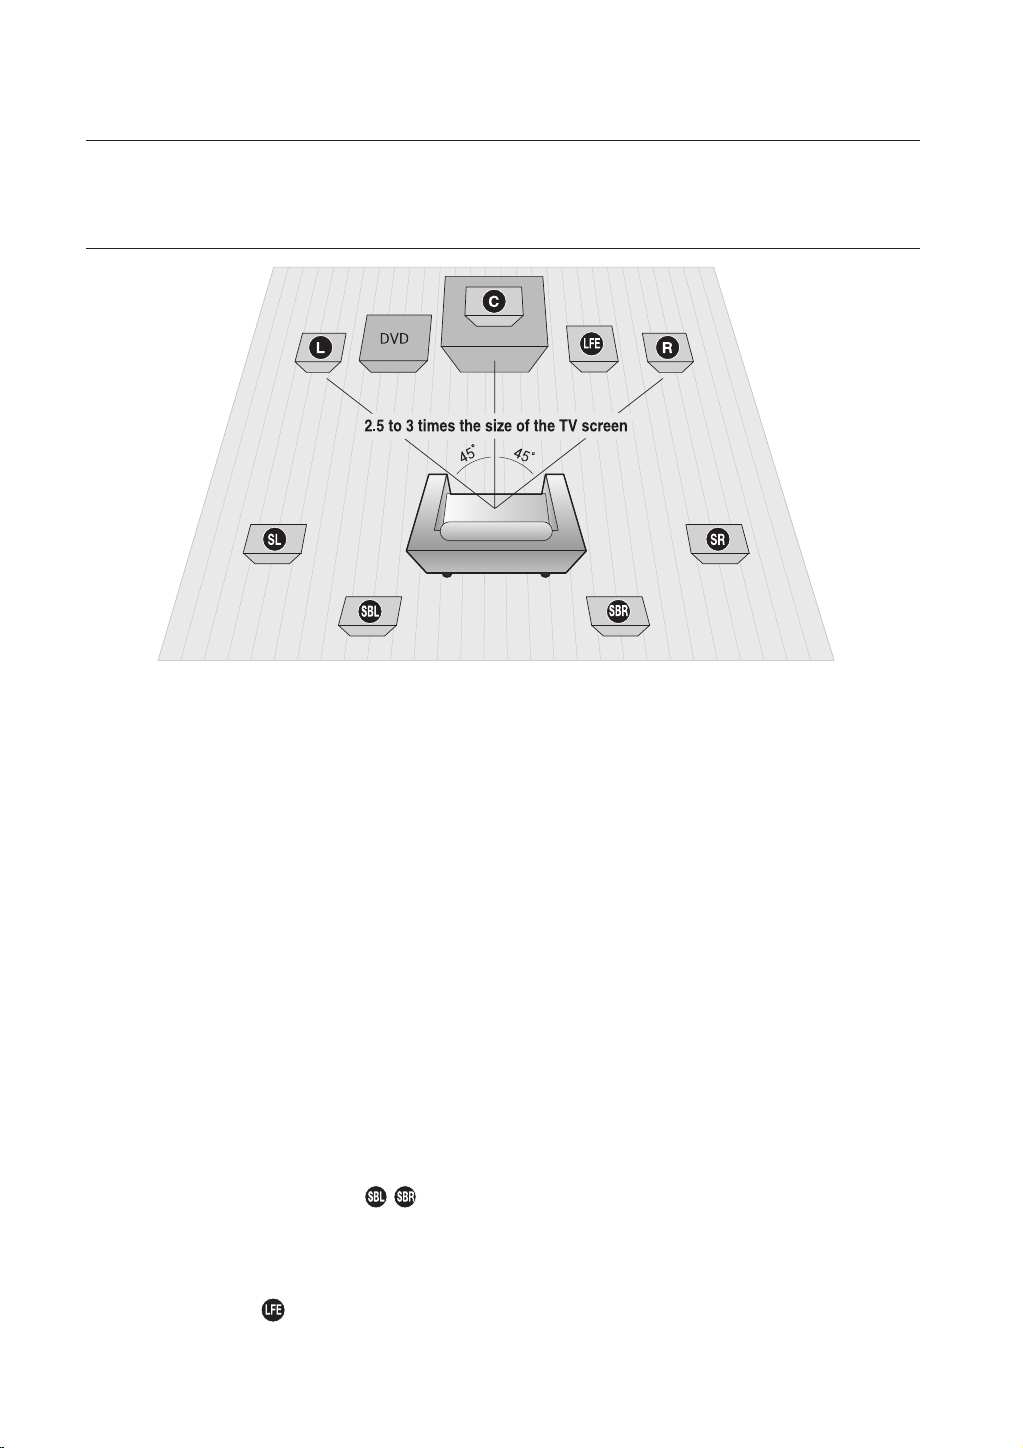
Position of the Blu-ray Home Theater
Place it on a stand or cabinet shelf, or under the TV stand.
Selecting the Listening Position
The listening position should be located about 2.5 to 3 times the distance of the TV's screen size away from the TV.
Example : For 32" TVs 2~2.4m (6~8feet)
Front Speakers
Place these speakers in front of your listening position, facing inwards (about 45°) toward you.
Place the speakers so that their tweeters will be at the same height as your ear.
Align the front face of the front speakers with the front face of the center speaker or place them slightly in front
of the center speakers.
Center Speaker
It is best to install it at the same height as the front speakers. You can also install it directly over or under the TV.
Surround Speakers
Place these speakers to the side of your listening position. If there isn't enough room, place these speakers so they face
each other. Place them about 60 to 90cm (2 to 3feet) above your ear, facing slightly downward.
*
Surround Back Speakers
•
•
Subwoofer
The position of the subwoofer is not so critical. Place it anywhere you like.
For 55" TVs 3.5~4m (11~13feet)
ei
f
hj
Unlike the front and center speakers, the rear speakers are used to handle mainly sound effects and sound will not
come from them all the time.
Place them so they face forward towards the back of the listener.
Place the surround back speakers about 70 cm to 1 m (2.3~3.3feet) above surround speakers, facing slightly
downwards.
20
Page 22
21
ENG
● CONNECTIONS
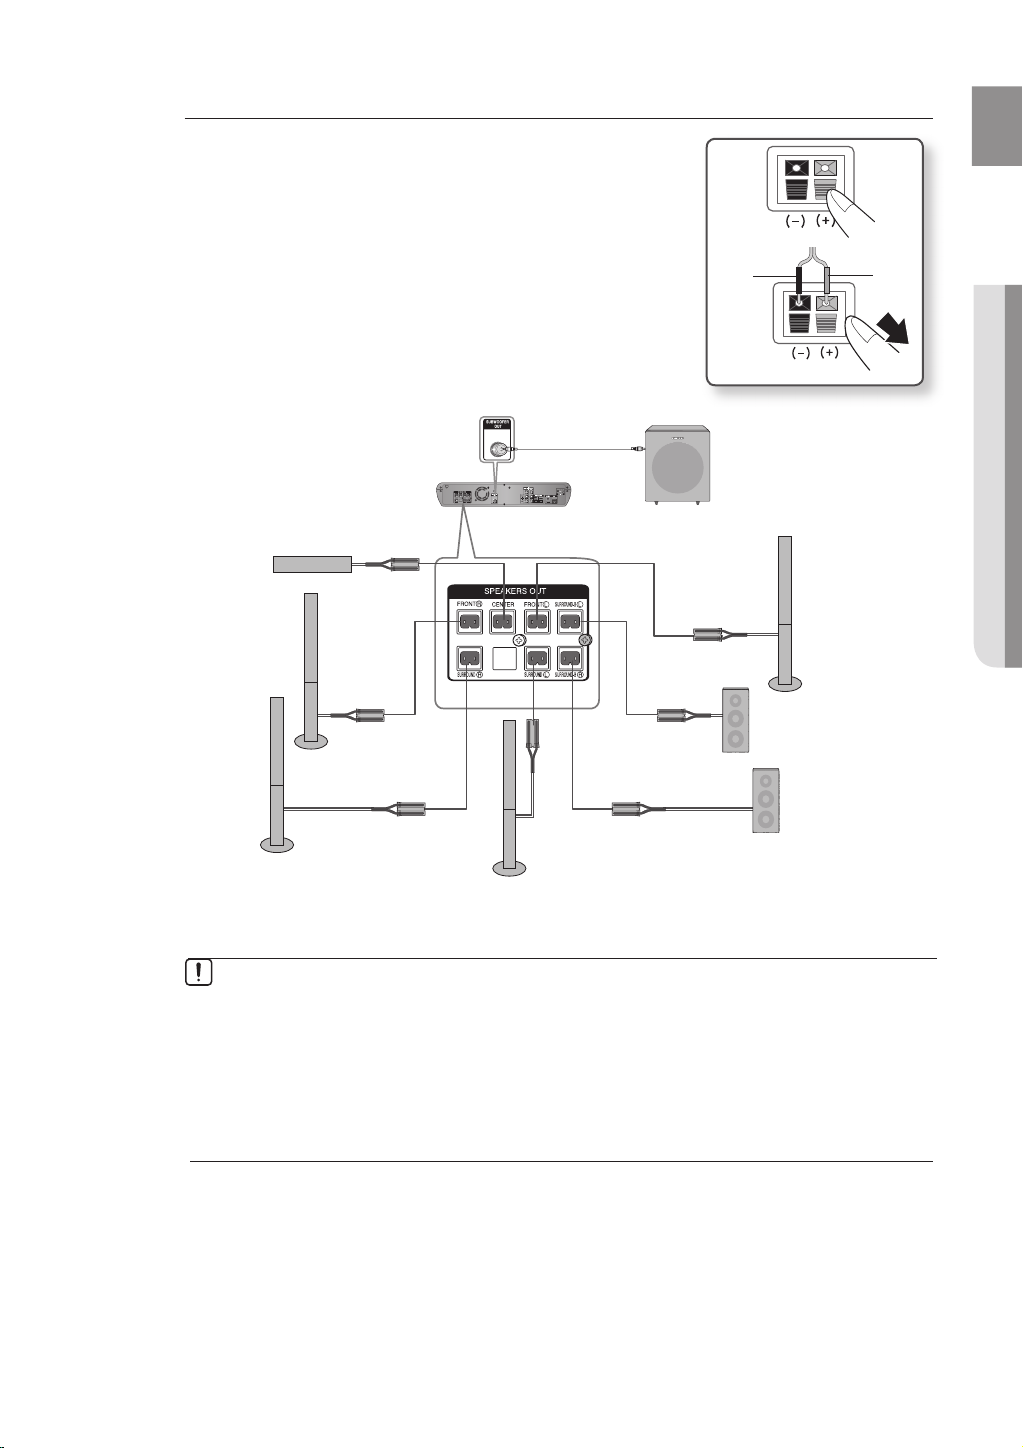
Connecting The Speakers
FM
Press down the terminal tab on the back of the speaker.
1.
Insert the black wire into the black terminal (–) and the red wire into
2.
the red (+) terminal, and then release the tab.
Connect the connecting plugs to the back of the Blu-ray Home
3.
Theater by matching the colors of the speaker plugs to the speaker
jacks.
Use the Audio cable to connect the SUBWOOFER OUT jack of
4.
the main unit to the AUDIO IN jack of the subwoofer.
Audio cable
Center Speaker
Front Speaker (R)
Black
Subwoofer Speaker
Front Speaker (L)
Red
Surround Speaker (R)
Do not let children play with or near the speakers. They could get hurt if a speaker falls.
When connecting the speaker wires to the speakers, make sure that the polarity (+/ –) is
correct.
Keep the subwoofer speaker out of reach of children so as to prevent children from
inserting their hands or alien substances into the duct (hole) of the subwoofer speaker.
Do not hang the subwoofer on the wall through the duct (hole).
M
If you place a speaker near your TV set, screen color may be distorted because of the
magnetic fi eld generated by the speaker. If this occurs, place the speaker away from your
TV set.
Surround-Back Speaker (L)
Surround-Back
Speaker (R)
Surround Speaker (L)
Page 23

connections
CONNECTING THE VIDEO OUT TO YOUR TV
Choose one of the three methods for connecting to a TV.
METHOD3
(supplied)
METHOD 1 : HDMI ....... (Best Quality)
Connect the HDMI cable from the HDMI OUT jack on the back of the Blu-ray Home Theater to the HDMI
IN jack on your TV.
Depending on your TV, certain HDMI output resolutions may not work.
M
If an HDMI cable is connected from the player to a TV, the Blu-ray Home Theater’s output is set to
HDMI automatically within 10 seconds.
If you are using the Anynet + feature (see page 42) and Component and HDMI are both
connected, HDMI mode is automatically selected.
When you connect the player to the TV using the HDMI cable for the first time or to a new TV, the
HDMI output resolution will be automatically set to the highest provided by the TV.
If you connect a Samsung TV to the Blu-ray Home Theater using an HDMI cable, the player can
be easily operated using the TV remote control. (This is only available with Samsung TVs that
support the Anynet+ feature.)
(See page 42)
If the HDMI cable is connected or removed during playback of a CDDA, MP3 or JPEG file, the
player will stop playing.
After making the video connection, set the Video input source on your TV to match the
corresponding
Video output (HDMI, Component or Composite) on your Home theater.
See your TV owner's manual for more information on how to select the TV's Video Input source.
METHOD2 METHOD1
22
Page 24

23
ENG
● CONNECTIONS
HDMI Auto Detection Function
The player's video output will automatically change to HDMI mode when connecting an HDMI cable
while power is on. For possible HDMI resolutions, see page 41.
HDMI (High Definition Multimedia Interface)
•
HDMI is an interface that enables the digital transmission of video and audio data with just a single connector.
Using HDMI, the Blu-ray Home Theater transmits a digital video and audio signal and displays a vivid picture on a
TV having an HDMI input jack.
HDMI connection description
•
HDMI connector - Supports video and digital audio data.
- HDMI outputs only a pure digital signal to the TV.
- If your TV does not support HDCP (High-bandwidth Digital Content Protection), random noise appears on the
screen.
Why does Samsung use HDMI?
•
Analog TVs require an analog video/audio signal. However, when playing a BD/DVD, the data
transmitted to a TV is digital. Therefore either a digital-to-analog converter (in the Blu-ray Home Theater) or an
analog-to-digital converter (in the TV) is required. During this conversion, the picture quality is degraded due to
noise and signal loss. HDMI technology is superior because it requires no D/A conversion and is a pure digital
signal from the player to your TV.
What is the HDCP?
•
HDCP (High-band width Digital Content Protection) is a system for protecting BD/DVD content outputted via HDMI
from being copied. It provides a secure digital link between a video source (PC, DVD. etc) and a display device (TV,
projector. etc). Content is encrypted at the source device to prevent unauthorized copies from being made.
What is Anynet+?
•
Anynet+ is a convenient function that offers linked operation of this unit through Samsung TVs with the Anynet+
feature.
- If your Samsung TV has an
- If you turn on the player and insert a disc, the player will start playing the disc, and the TV will turn on
automatically and switch to HDMI mode.
- If you turn on the player and press the Play button with a disc already inserted, the TV will immediately turn on
and switch to HDMI mode.
logo, then it supports the Anynet+ function.
METHOD 2 : Component Video .... (Better Quality)
If your television is equipped with Component Video inputs, connect a Component video cable(not
supplied) from the Component Video Output (Pr, Pb and Y) Jacks on the back of the Blu-ray Home
Theater to the Component Video Input Jacks on your TV.
You can select from a variety of resolution settings such as 1080i, 720p, 480p and 480i, depending
M
on the disc type. (See page 41)
The actual resolution may differ from the setting in the SETUP menu if both Component and HDMI
cables are connected. The resolution may also be different depending on the disc. (See page 41)
After making the video connection, set the Video input source on your TV to match the
corresponding Video output (HDMI, Component or Composite) on your Home theater.
See your TV owner's manual for more information on how to select the TV's Video Input source.
METHOD 3 : Composite Video ....... (Good Quality)
Connect the supplied Video cable from the VIDEO OUT jack on the back of the Blu-ray Home Theater
to the VIDEO IN jack on your TV.
The VIDEO source is always output in 480i resolution regardless of the resolution set in the SETUP
M
menu. (See page 41)
After making the video connection, set the Video input source on your TV to match the
corresponding Video output (HDMI, Component or Composite) on your Home theater.
See your TV owner's manual for more information on how to select the TV's Video Input source.
Page 25

connections
FM
CONNECTING AUDIO FROM EXTERNAL COMPONENTS
AUX : Connecting an External Analog Component
Analog signal components such as a VCR.
Connect AUX IN (Audio) on the main unit to the Audio Out of the external analog component.
1.
Be sure to match connector colors.
•
2.
Press the AUX
You can also use the FUNCTION button on the main unit.
•
The mode switches as follows : BD/DVD ➞ D.IN 1 ➞ D.IN 2 ➞ AUX ➞ FM.
button on the remote control to select AUX input.
Audio Cable
If the external analog component has
only one Audio Out, connect either left
or right.
(not supplied)
24
M
You can connect the Video Output jack of your VCR to the TV, and connect the Audio
Output jacks of the VCR to this product.
Page 26

25
ENG
● CONNECTIONS
OPTICAL : Connecting an External Digital Component
Digital signal components such as a Cable Box/Satellite receiver (Set-Top Box).
Connect the Digital Input (OPTICAL 1 or OPTICAL 2) on the main unit to the Digital Output of the
1.
external digital component.
2.
Press the D.IN
You can also use the FUNCTION button on the main unit.
•
The mode switches as follows : BD/DVD ➞ D.IN 1 ➞ D.IN 2 ➞ AUX ➞ FM.
button on the remote control to select D.IN 1 or D.IN 2 input.
Optical Cable
(not supplied)
M
To see video from your Cable Box/Satellite receiver, you must connect it's video output
to a TV.
This system supports Digital sampling frequencies of 32 kHz of higher from external digital
components.
Page 27

connections
CONNECTING TO SAMSUNG'S FTP/INTERNET SITE FOR SOFTWARE UPGRADES
Using the Direct LAN Cable (UTP cable), connect the LAN terminal on the rear of the Blu-ray Home Theater to
the LAN terminal of your modem.
Connect to the Internet for future software upgrades.
•
26
M
Only connect this product to isolated networks that remain completely within the building.
See pages 46~49 for the Software Upgrade procedure.
Page 28

27
ENG
● CONNECTIONS
CONNECTING THE FM ANTENNA
Connect the FM antenna supplied to the FM 75Ω COAXIAL Jack.
1.
2.
Slowly move the antenna wire around until you find a location where reception is good, then fasten it
to a wall or other rigid surface.
FM Antenna
(supplied)
This unit does not receive AM broadcasts.
M
Cooling Fan
The cooling fan supplies cool air to the unit to prevent overheating.
Please observe the following cautions for your safety.
Make sure the unit is well-ventilated. If the unit has poor ventilation, the temperature inside the unit may rise
•
and may damage it.
Do not obstruct the cooling fan or ventilation holes. (If the cooling fan or ventilation holes are covered with a
•
newspaper or cloth, heat may build up inside the unit and fire may result.)
Page 29

basic functions of your Blu-ray Home Theater
This section introduces basic playback functions and playback by disc type.
BEFORE PLAYING
Turn on your TV and set it to the correct Video Input (the input the
•
Blu-ray Home Theater is connected to: HDMI, Component or Video).
After plugging in the player, the fi rst time you press the
POWER button, this screen comes up:
If you want to select a language, press a NUMBER button.
(This screen will only appear when you plug in the player for
the fi rst time.) If the language for the startup screen is not set,
the settings may change whenever you turn the power on or
off. Therefore, make sure that you select the language you
want to use. Once you select a menu language, you can
change it by pressing the STOP ( ) button on the front panel of the unit for more than 5 seconds with
no disc in the unit. Then the MENU LANGUAGE SELECTION window appears again where you can
reset your preferred language.
Discs which cannot be played on this player.
M
• BD-R • BD-RE • HD DVD • DVD+RW
• DVD+R • DVD-ROM • DVD-RAM • CDV
• CD-ROM • CVD • CD-I •
• Super Audio CD(except CD layer) • CDGs play audio only, not graphics.
Ability to play back may depend on recording conditions.
• DVD-R • CD-RW/R • DVD-RW (V mode)
• The unit may not play certain CD-R, CD-RW and DVD-R due to the disc type or
recording conditions.
Blu-ray Disc is a new and evolving format. Accordingly, disc compatibility issues with new
and existing format discs are possible. Not all discs are compatible and not every disc will
playback.
For additional information, refer to the Disc Type and Characteristics and Compliance and
Compatibility Notice sections of this Manual. If you encounter compatibility problems,
please contact the SAMSUNG customer care center.
The unit cannot play CD-R/-RW and DVD-RW/-R recorded content such as divx, avi,
mpg, mov, wma.
MENU LANGUAGE SELECTION
Press 1 for English
!
Pulsar 2 para Español
Touche 3 pour Français
Macrovision : BSS01
3 1/2 inch MD (mini disc)
28
Page 30

29
ENG
● BASIC FUNCTIONS
USING THE REMOTE CONTROL TO OPERATE THE BLU-RAY HOME THEATER OR YOUR SAMSUNG TV
The Blu-ray Home Theater's remote can be used to control Samsung TVs.
Plug the main unit's power cord into the AC power supply.
1.
Press the BD RECEIVER button to switch to BD RECEIVER
2.
mode to operate the Blu-ray Home Theater.
Press the FUNCTION button on the main unit or BD button
3.
on the remote to enable BD/DVD playback.
Press the TV button to set the remote to TV mode.
4.
Press the POWER button to turn on your Samsung TV with this remote.
5.
Press the TV/VIDEO button to select VIDEO mode on your TV.
6.
Page 31

basic functions of your
Blu-ray Home Theater
PLAYING A DISC
Insert a disc into the disc insert hole.
1.
Insert a disc so that the label side faces upward.
•
Playback starts automatically.
•
To eject the disc, press the EJECT button.
2.
When you stop disc play, the player remembers where
•
you stopped, so when you press PLAY/PAUSE ( )
button again, it will pick up where you left off.
Press the STOP ( ) button twice during playback to
•
disable the Resume function.
To pause playback, press the PLAY/PAUSE ( )
•
button during playback.
button once again.
To resume, press the PLAY/PAUSE( )
30
M
If the player is left in the stop mode for more than 10 minutes without any pressing any buttons, a screen
saver will appear on your TV. If the player is left in the screen saver mode for more than 30 minutes, the
power will automatically turn off except during playback of an MP3/CDDA and/or JPEG. (Automatic
Power-Off Function)
MP3/CDDA : if no button is pressed for more than 10 minutes, the screen saver appears.
JPEG : the screen saver program or the auto power off function will be deactivated when playing a photo file.
Page 32

31
ENG
● BASIC FUNCTIONS
USING THE SEARCH AND SKIP FUNCTIONS
During play, you can search quickly through a chapter or track, and use the skip function to jump to the next selection.
Searching through a Chapter or Track
During playback, press the SEARCH ( ) button.
If you want to search at a faster speed on the BD/DVD, press
•
this button.
If you press the SEARCH ( ) button,
•
)
X2 ) X4 ) X8 ) X16 ) X32 ) X128
If you press the SEARCH ( ) button,
•
(
X2 ( X4 ( X8 ( X16 ( X32 ( X128
No sound is heard during search mode.
M
MP3 discs cannot be searched.
Skipping Tracks
During playback, press the SKIP ( ) button.
When playing a BD/DVD, if you press the SKIP ( ) button, it
moves to the next chapter. If you press the SKIP ( ) button, it
moves to the beginning of the chapter. One more press makes it
move to the beginning of the previous chapter.
SLOW MOTION PLAY/STEP MOTION PLAY
hZCV
hZCV
Slow Motion Play
In pause or step mode, press the SLOW button on the
remote control for Slow Motion play.
If you press the SLOW button, * 1/8 * 1/4 * 1/2
•
To return to normal speed playback, press the
•
PLAY/PAUSE ( ) button.
This ( ) icon indicates an invalid button press.
M
No sound is heard during slow mode.
Slow motion operates only in the forward direction.
Step Motion Play
Press the STEP button on the remote control during play for Step
Motion play.
Each time the button is pressed a new frame will appear.
•
When the STEP button is pressed, the next frame will be
•
activated.
Press the PLAY/PAUSE ( ) button to resume normal play.
•
No sound is heard during step mode.
M
Step motion operates only in the forward direction.
hZCV
hZCV
Page 33

system setup
For your convenience, you can set this Blu-ray Home Theater's features for the best
use in your home environment.
ON-SCREEN MENU NAVIGATION
32
Page 34

33
ENG
● SYSTEM SETUP
SETTING UP THE LANGUAGE OPTIONS
If you set the audio, subtitle, disc menu and player menu, in advance, they will come up automatically every time
you watch a movie.
With the unit in Stop mode, press the MENU button.
1.
Press the $% buttons to select Setup, then press the
2.
ENTER or + button.
Press the $% buttons to select Language Setup,
3.
then press the ENTER or + button.
Language setup menu will be displayed.
•
Press the $% buttons to select the desired language
4.
option, press the ENTER or + button.
Audio : For the disc audio language.
•
Subtitle : For the disc subtitles.
•
Disc Menu : For the disc menu contained on the disc.
•
Menu : For the on-screen menu of your Blu-ray Home
•
Theater.
Press the $% buttons to select the desired language,
5.
then press the ENTER button.
Photo
No Disc
No Disc
Photo
Setup
Audio Setup
Display Setup
HDMI Setup
Parental Setup
System Upgrade
Language Setup
Audio Setup
Display Setup
HDMI Setup
Parental Setup
System Upgrade
Language Setup
Setup
Audio : Original
Subtitle : Automatic
Disc Menu : English
Menu : English
Audio : Original
Subtitle : Automatic
Disc Menu : English
Menu : English
Original
English
Français
Deutsch
Español
Italiano
M
Press the RETURN or _ button to return to the previous menu. Press the MENU button to
exit the menu.
The selected language will only appear if it is supported on the disc.
Page 35

system setup
SETTING UP THE AUDIO OPTIONS
Allows you to set up the system's audio features.
With the unit in Stop mode, press the MENU button.
1.
Press the $% buttons to select Setup, then press the
2.
ENTER or + button.
Press the $% buttons to select Audio Setup, then press
3.
the ENTER or + button.
Audio setup menu will be displayed.
•
Press the $% buttons to select Dynamic Compression or
4.
AV Sync, then press the ENTER or + button.
Press the $% buttons to select the desired item, then
5.
press the ENTER button.
Language Setup
Photo
No Disc
No Disc
Photo
Setup
Display Setup
HDMI Setup
Parental Setup
System Upgrade
Language Setup
Audio Setup
Display Setup
HDMI Setup
Parental Setup
System Upgrade
Audio Setup
Setup
Dynamic Compression : On
AV Sync : 50msec
Speaker Setup
Speaker Distance
Sound Edit
Dynamic Compression : On
AV Sync
Speaker Setup
Speaker Distance
Sound Edit
On
Off
Press the RETURN or _ button to return to the previous menu.
M
Press the MENU button to exit the menu.
Dynamic Compression
This is only active when a Dolby Digital signal is detected.
On : When Movie soundtracks are played at low volume or
•
from smaller speakers, the system can apply appropriate
compression to make low-level content more intelligible
and prevent dramatic passages from getting too loud.
Off : You can enjoy the movie with the standard Dynamic
•
Range.
AV Sync
Video may look slower than the audio when the player is
connected to a digital TV. If this occurs, adjust the audio
delay time to match the video.
You can set the audio delay time between 0 ms and 300
•
ms. Set it to the optimal status.
Language Setup
Photo
No Disc
No Disc
Photo
Setup
Display Setup
HDMI Setup
Parental Setup
System Upgrade
Language Setup
Audio Setup
Display Setup
HDMI Setup
Parental Setup
System Upgrade
Audio Setup
Setup
Dynamic Compression : On
AV Sync
Speaker Setup
Speaker Distance
Sound Edit
Dynamic Compression : On
AV Sync
Speaker Setup
Speaker Distance
Sound Edit
On
Off
0msec
25msec
50msec
50msec
75msec
100msec
125msec
34
Page 36

35
ENG
● SYSTEM SETUP
SETTING UP THE SPEAKER OPTIONS
Setting the Speaker Mode
Signal outputs and frequency responses from the speakers will automatically be adjusted according to
the system's speaker confi guration and whether certain speakers are used or not.
With the unit in Stop mode, press the MENU button.
1.
Press the $% buttons to select Setup, then press the
2.
ENTER or + button.
Press the $% buttons to select Audio Setup, then press
3.
the ENTER or + button.
Audio setup menu will be displayed.
•
Language Setup
Photo
No Disc
Display Setup
HDMI Setup
Parental Setup
System Upgrade
Audio Setup
Setup
Dynamic Compression : On
AV Sync : 50msec
Speaker Setup
Speaker Distance
Sound Edit
Press the $% buttons to select Speaker Setup, then
4.
press the ENTER or + button.
Press the $%buttons to select the Surround Back, then
5.
press the ENTER button.
For Surround Back, each time ENTER button is
•
pressed, the mode switches alternately as follows :
Small ➞ None.
For Front, Subwoofer, Center and Surround, the mode is
•
set to Present.
When done, use the
6.
$%_+
buttons to select Save, then
press the ENTER button.
If you don’t want to save your settings, use the
$%_+
buttons to select Cancel, then press the ENTER button.
Press the RETURN button to return to the previous menu.
M
Language Setup
Photo
Audio Setup
Setup
No Disc
No Disc
Photo
Setup
Display Setup
HDMI Setup
Parental Setup
System Upgrade
Language Setup
Audio Setup
Display Setup
HDMI Setup
Parental Setup
System Upgrade
Dynamic Compression : On
AV Sync : 50msec
Speaker Setup
Speaker Distance
Sound Edit
Dynamic Compression : On
AV Sync : 50msec
Speaker Setup
Speaker Distance
Sound Edit
Page 37

system setup
SETTING UP THE SPEAKER OPTIONS
Speaker Setup
Front (L, R) Present
Subwoofer (LFE) Present
Center (C) Present
Surround (SL, SR) Present
Surround Back (SBR, SBL) Small, None
Speaker
Small/Present : Bass below 100Hz will be outputted through the Subwoofer instead of the speakers.
•
None : Select to disable the speakers.
•
Setting the Test Tone
Use the Test Tone feature to check the speaker
Language Setup
connections.
Press the RED(A) button
A test tone will be sent to L ; C ; R ; SR ; SBR
•
;
SBL ; SL ; LFE in order so you can make sure the
speakers are set up correctly.
To end the test tone, press the RED (A) button again.
•
When playing a BD/DVD or CD, this will work only in Stop mode.
•
M
Use this function to check that each speaker is correctly connected and that there is no
•
Photo
Audio Setup
Setup
No Disc
Display Setup
HDMI Setup
Parental Setup
System Upgrade
problem.
When HDMI AUDIO is on (audio is produced through TV speakers), the TEST TONE function is
•
not available.
Dynamic Compression : On
AV Sync : 50msec
Speaker Setup
Speaker Distance
Sound Edit
36
Page 38

37
ENG
● SYSTEM SETUP
Setting the Speaker Distance
If the speakers cannot be placed at equal distances from the listening position, you can adjust the delay
time of the audio signals from the front, subwoofer, center, surround and surround back speakers.
With the unit in Stop mode, press the MENU button.
1.
Press the $% buttons to select Setup, then press the
2.
ENTER or + button.
Press the $% buttons to select Audio Setup,
3.
then press the ENTER or + button.
Audio setup menu will be displayed.
•
Press the $% buttons to select Speaker Distance,
4.
then press the ENTER or + button.
Press the $% buttons to select the desired Speaker,
5.
then press the _+ buttons to set the Speaker Distance.
You can set the Speaker Distance between 1ft(0.3m) and
•
30ft(9m).
When done, use the
6.
$%_+
buttons to select Save,
then press the ENTER button.
If you don’t want to save your settings, use the
$%_+
buttons to select Cancel, then press the ENTER button.
No Disc
No Disc
Photo
Setup
Photo
Setup
Language Setup
Audio Setup
Display Setup
HDMI Setup
Parental Setup
System Upgrade
Language Setup
Audio Setup
Display Setup
HDMI Setup
Parental Setup
System Upgrade
Dynamic Compression : On
AV Sync : 50msec
Speaker Setup
Speaker Distance
Sound Edit
AV Sync : 50msec
Speaker Setup
Speaker Distance
Sound Edit
M
Press the RETURN button to return to the previous menu.
Language Setup
Photo
No Disc
Display Setup
HDMI Setup
Parental Setup
System Upgrade
Audio Setup
Setup
Dynamic Compression : On
AV Sync : 50msec
Speaker Setup
Speaker Distance
Sound Edit
Page 39

system setup
SETTING UP THE SPEAKER OPTIONS
Setting the Sound Edit
You can adjust the balance and level for each speaker.
With the unit in Stop mode, press the MENU button.
1.
Press the $% buttons to select Setup, then press the
2.
ENTER or + button.
Press the $% buttons to select Audio Setup, then press
3.
the ENTER or + button.
Audio setup menu will be displayed.
•
Press the $% buttons to select Sound Edit,
4.
then press the ENTER or + button.
Press the $% buttons to select the desired Speaker,
5.
then press the _+ button to adjust the settings.
When done, use the
6.
then press the ENTER button.
If you don’t want to save your settings, use the
buttons to select Cancel, then press the ENTER button.
$%_+
buttons to select Save,
$%_+
Language Setup
Photo
No Disc
No Disc
Photo
Setup
Display Setup
HDMI Setup
Parental Setup
System Upgrade
Language Setup
Audio Setup
Display Setup
HDMI Setup
Parental Setup
System Upgrade
Audio Setup
Setup
Dynamic Compression : On
AV Sync : 50msec
Speaker Setup
Speaker Distance
Sound Edit
Speaker Setup
Speaker Distance
Sound Edit
38
Language Setup
Photo
M
Press the RETURN button to return to the previous menu.
No Disc
Display Setup
HDMI Setup
Parental Setup
System Upgrade
Audio Setup
Setup
Dynamic Compression : On
AV Sync : 50msec
Speaker Setup
Speaker Distance
Sound Edit
Adjusting Front/Surround/Surround Back Speaker Balance
• You can select between 0, -6, and OFF.
• The volume decreases as you move closer to –6.
Adjusting Center/Surround/Surround Back/Subwoofer Speaker Level
• The volume level can be adjusted in steps from +6dB to –6dB.
• The sound gets louder as you move closer to +6dB and quieter as you get closer to -6dB.
Page 40

39
ENG
● SYSTEM SETUP
SETTING UP THE VIDEO DISPLAY/OUTPUT OPTIONS
This function allows you to set up the TV screen settings. This function depends on the disc or TV type. It may not
work with some discs or TVs.
With the unit in Stop mode, press the MENU button.
1.
Press the $% buttons to select Setup, then press the
2.
ENTER or + button.
Press the $% buttons to select Display Setup, then
3.
press the ENTER or + button.
Display setup menu will be displayed.
•
Press the $% buttons to select the desired display option
4.
then press the ENTER or + button.
Press the $% buttons to select the desired sub-menu
5.
item from a display option, then press the ENTER button.
Press the RETURN or _ button to return to the previous menu. Press the MENU button to
M
exit the menu.
No Disc
No Disc
Photo
Setup
Photo
Setup
Language Setup
Audio Setup
Display Setup
HDMI Setup
Parental Setup
System Upgrade
Language Setup
Audio Setup
Display Setup
HDMI Setup
Parental Setup
System Upgrade
TV Aspect : 16:9 Wide
Movie Frame (24 Fs) : Off
Resolution : 480p
Screen Message : On
TV Aspect : 16:9 Wide
Movie Frame (24 Fs) : Off
Resolution : 480p
Screen Message : On
4:3 Letter Box
4:3 Pan-Scan
16:9 Wide
TV Aspect
Depending on the type of television you have, you may want to adjust the screen setting. (aspect ratio)
M
• 4:3 Letter Box :
Select when you want to see the total
16:9 ratio screen BD/DVD supplies, even
though you have a TV with a 4:3 ratio
No Disc
screen. Black bars will appear at the top
and bottom of the screen.
• 4:3 Pan-Scan :
Select this for conventional size TV when
you want to see the central portion of the
16:9 screen. (Extreme left and right side
of movie picture will be cut off.)
• 16:9 Wide :
You can view the full 16:9 picture on your widescreen TV.
Depending on the disc type, some aspect ratios may not be available.
Certain movies will be displayed in 4:3 Pillarbox (black bars on sides of picture) even if 16:9
wide is selected.
Photo
Setup
Language Setup
Audio Setup
Display Setup
HDMI Setup
Parental Setup
System Upgrade
TV Aspect : 16:9 Wide
Movie Frame (24 Fs) : Off
Resolution : 480p
Screen Message : On
4:3 Letter Box
4:3 Pan-Scan
16:9 Wide
Page 41

system setup
Movie Frame (24 Fs)
Movies are usually fi lmed at 24 frames per second.
Some Blu-ray Discs have the capability of playing back at this
frame rate. Setting the Movie Frame (24Fs) feature to ON
allows you to adjust the Blu-ray player's HDMI output to 24
frames per second for improved picture quality.
No Disc
Photo
Setup
Language Setup
Audio Setup
Display Setup
HDMI Setup
Parental Setup
System Upgrade
TV Aspect : 16:9 Wide
Movie Frame (24 Fs) : Off
Resolution : 480p
Screen Message : On
On
Off
You can enjoy the Movie Fame (24Fs) feature solely on a TV
supporting this frame rate.
This menu can only be selected in 1080i or 1080p HDMI
output resolution modes.
Depending on the disc, two types of source may be included: Movie material (24 frame) and Video
material (30 frame). When switching the source between Movie and Video, the screen may blink for a
few seconds.
Resolution
Sets the output resolution of the Component and HDMI video signal.
The number in 480i, 480p, 720p, 1080p and 1080i indicates
•
the number of lines of video. The i and p indicate interlace
and progressive scan, respectively.
- 1080p : Outputs 1080 lines of progressive video.
- 1080i : Outputs 1080 lines of interlaced video.
- 720p : Outputs 720 lines of progressive video.
- 480p : Outputs 480 lines progressive video.
- 480i : Outputs 480 lines of interlaced video.
Language Setup
Audio Setup
Photo
Display Setup
Setup
No Disc
HDMI Setup
Parental Setup
System Upgrade
TV Aspect : 16:9 Wide
Movie Frame (24 Fs) : Off
Resolution : 480p
Screen Message : On
1080p
1080i
720p
480p
480i
40
Component does not output 1080p.
M
If the connected TV does not support the movie frame
or the selected resolution, you will see the following message:
If you select Yes and the resolution is not supported,
the TV's screen will be blank.
M
If the screen is blank, press and hold the
STOP ( )
more than 5 seconds (no disc inserted). All settings are restored to the factory default.
Follow the steps on the previous page to access each mode and select the Display Setup
that your TV will support.
Language Setup
Audio Setup
Photo
Display Setup
Setup
No Disc
If no pictures are shown after the selection,
please wait for 15 seconds. And then,
HDMI Setup
the resolution will be reverted
!
Parental Setup
to the previous value automatically.
System Upgrade
Would you like to make a selection?
TV Aspect : 16:9 Wide
Movie Frame (24 Fs) : Off
Resolution : 480p
Screen Message : On
Front Display : Automatic
Yes No
1080p
1080i
720p
480p
480i
button on the front of the player for
Page 42

41
ENG
● SYSTEM SETUP
Resolution according to the output mode
•
BD playback
Output
Setup
HDMI Component VIDEO
1080p, Movie Frame(24Fs) off 1080p@60F 1080i 480i
1080p/1080i, Movie Frame (24Fs) on
1080p@24F 1080i 480i
1080i, Movie Frame (24Fs) off 1080i 1080i 480i
720p 720p 720p 480i
480p 480p 480p 480i
480i 480P 480i 480i
•
DVD playback
Output
Setup
HDMI Component VIDEO
1080p 1080p@60F 480p 480i
1080i 1080i 480p 480i
720p 720p 480p 480i
480p
480p 480p
480i 480P 480i 480i
This player has the HDMI Auto Detect Feature. When the player is fi rst connected to a TV
M
via HDMI, the player's output will be set automatically to HDMI.
If the HDMI Auto Detection feature does not work, you can't select the 1080p resolution or
Movie Frame (24 Fs).
The BD disc must have the 24 frame feature in order to use the Movie Frame (24 Fs)
mode.
If you have both HDMI and Component cables connected to your TV, the Component
resolution may differ from the chart above.
In DVD playback, if both HDMI and Component jacks are connected and you select the
Component mode, the Display Setup menu will show the output resolution as 1080p. The
resolution is actually 480p.
If the resolution is set to ‘I’ (ex: 480i or 1080i), the output is displayed in 30 frames per second
and if set to ‘p’ (ex: 480p, 720p, 1080p), it will be displayed in 60 frames per second.
i : interlaced mode (30 frames) p : progressive mode (60 frames)
480i
Screen Message
On : Displays messages related to operation mode.
•
Off : Does not display messages related to operation mode.
•
Language Setup
Photo
Audio Setup
Display Setup Screen Message : On
Setup
No Disc
HDMI Setup
Parental Setup
System Upgrade
Movie Frame (24 Fs) : Off
Resolution : 1080i
On
Off
Page 43

system setup
RETURN
ENTER
EXIT
View TV
THEATER
THEATER Menu
Move
Enter
Exit
Setup
Connected to Player
Off
On
View TV
THEATER
THEATER Menu
SETTING UP THE HDMI SETUP OPTIONS
With the unit in Stop mode, press the MENU button.
1.
Press the $% buttons to select Setup, then press the ENTER or + button.
2.
Press the $% buttons to select HDMI Setup, then press
3.
the ENTER or + button.
HDMI setup menu will be displayed.
•
Press the $% buttons to select the desired HDMI option
4.
(Format or HDMI Audio), then press the ENTER or +
button.
Press the $% buttons to select the desired sub-menu
5.
item
from a HDMI option, then press the ENTER button.
Press the RETURN or _ button to return to the previous menu. Press the MENU button to exit the menu.
M
Anynet+ (HDMI-CEC)
Anynet+ is a function that enables you to control other Samsung Devices with your Samsung TV's
remote control, Anynet + can be used by connecting this Home Theater to a SAMSUNG TV using an
HDMI Cable. (This is only available with SAMSUNG TVs that support Anynet+.)
What is Anynet+?
You can operate this unit, power on your TV, or watch a movie by pressing the Play button on your
Samsung TV's remote control.
Audio Setup
Display Setup
Photo
HDMI Setup
Setup
No Disc
Parental Setup
System Upgrade
42
Connect the main unit of the Home Theater to a Samsung TV with
1.
an HDMI cable. (See page 22)
Set the Anynet+ function on your TV. (See the TV instruction manual
2.
for more information.)
You can operate the Home Theater by using the TV remote
•
control. (Available TV buttons : , , , $,%
buttons,
button)
If you select TV
Set the Anynet+(HDMI-CEC) function to On on your TV.
Receiver : On : You can listen to audio through the Home Theater.
•
Receiver : Off : You can listen to audio through the TV.
•
If you select the THEATER
Select THEATER to connector and set the option of each items below.
View TV : If Anynet+ (HDMI-CEC) is on and you select View TV, the Home Theater will automatically
•
switch to DIGITAL IN.
THEATER Menu : You can access the Home Theater menu.
•
THEATER Operation : The Home Theater disc playback information will be displayed.
•
Receiver : On : You can listen to audio through the Home Theater.
•
Receiver : Off : You can listen to audio through the TV.
•
If you want to listen to TV sound through the home theater system, connect the optical cable
M
from the TV to the OPTICAL 1 port of the system.
If Anynet+ (HDMI-CEC) is on and you turn off the main unit, your TV will also turn off.
Anynet+ (HDMI-CEC) will only work while in the DVD mode.
and ,_,+
MOVE
MOVE
ENTER
ENTER
EXIT
EXIT
Page 44

43
ENG
● SYSTEM SETUP
Format
You can optimize the HDMI output for connection to a TV or
Monitor.
• TV : Select if connected to a TV via HDMI.
• Monitor : Select if connected to a Monitor via HDMI.
If the player is connected to a TV, the Monitor option is
unavailable.
HDMI Audio
The audio signals transmitted over the HDMI Cable can be
toggled ON/OFF.
• On : Both video and audio signals are transmitted over the
HDMI connection cable, and audio is output through
your TV speakers only.
• Off : Video is transmitted over the HDMI connection cable
only, and audio is output through the home theater
speakers only.
Audio Setup
Display Setup
Photo
No Disc
Parental Setup
System Upgrade
HDMI Setup
Setup
Format : TV
HDMI Audio : On
TV
Monitor
Audio Setup
Display Setup
Photo
HDMI Setup HDMI Audio : On
Setup
No Disc
Parental Setup
System Upgrade
Format : TV
On
Off
M
The default setting of this function is HDMI Audio Off.
HDMI AUDIO is automatically down-mixed to 2ch for TV speakers.
Page 45

system setup
SETTING UP THE PARENTAL LOCK
The Parental Lock function works in conjunction with BD/DVDs that have been assigned a rating which helps you
control the types of BD/DVDs that your family watches. There are up to 8 rating levels on a disc.
With the unit in Stop mode, press the MENU button.
1.
Press the $% buttons to select Setup, then press the
2.
ENTER or + button.
Press the $% buttons to select Parental Setup, then
3.
press the ENTER or + button.
When you operate your Blu-ray Home Theater for the
•
fi rst time, the “Enter New password” message will be
displayed.
Enter the 4-digit password using the number buttons on
4.
the remote control.
The “Confi rm the password” message will be displayed.
Enter your password again.
Press the ENTER or + button to select Parental Lock.
5.
Press the $% buttons to select On or Off, then press the
6.
ENTER button.
hZ
Display Setup
HDMI Setup
Photo
Parental Setup
Setup
No Disc
Parental Setup
System Upgrade
Enter New password.
-
NUMBER
Display Setup
HDMI Setup
Photo
Parental Setup
Setup
No Disc
Parental Setup
System Upgrade
Confi rm the password.
-
NUMBER
Display Setup
HDMI Setup
Photo
Parental Setup
Setup
No Disc
System Upgrade
r
RETURN
r
RETURN
Parental Lock : Off
Rating Level : 1 (Kids)
New Password
44
Press the RETURN or _ button to return to the previous menu.
M
Press the MENU button to exit the menu.
If you forgot your password
Remove the disc.
1.
Press and hold the STOP ( ) button on the front panel for 5 seconds or more.
2.
All settings will revert to the factory settings.
•
Page 46

45
ENG
● SYSTEM SETUP
Setting the Rating Level
Display Setup
Parental Lock : Off
Press the $% buttons to select Rating Level, then press
1.
the ENTER or + button.
Display Setup
HDMI Setup Parental Lock : Off
Photo
No Disc
System Upgrade
Parental Setup
Setup
Rating Level : 8 (Adults)
New Password
8 (Adults)
7
6
5
4
3
2
1 (Kids)
Press the $% buttons to select the rating level you want,
2.
then press the ENTER button.
For example, if you select up to Level 6, discs that
•
contain Level 7, 8 will not play.
A larger number indicates that the program is intended
for adult use only.
Level 1 is the most restrictive and Level 8 is the least.
Changing the Password
Press the $% buttons to select New Password, then
1.
press the ENTER or + button.
Enter the 4-digit password using the number buttons on
2.
the remote control. The “Confi rm the password.” message
will be displayed.
Display Setup
HDMI Setup Parental Lock : Off
Photo
No Disc
No Disc
No Disc
System Upgrade
Display Setup
HDMI Setup
Photo
Parental Setup New Password
Setup
System Upgrade
Display Setup
HDMI Setup
Photo
Parental Setup New Password
Setup
Parental Setup
System Upgrade
Parental Setup
Setup
Rating Level : 1 (Kids)
New Password
Parental Lock : Off
Rating Level : 1 (Kids)
Parental Lock : Off
Rating Level : 1 (Kids)
Enter New password.
Enter your password again using the number buttons on
3.
the remote control.
-
NUMBER
Display Setup
HDMI Setup
Photo
Parental Setup New Password
Setup
No Disc
Parental Setup
System Upgrade
Confi rm the password.
-
NUMBER
r
RETURN
Parental Lock : Off
Rating Level : 1 (Kids)
r
RETURN
Page 47

system upgrade
system upgrade
Samsung may offer upgrades to your Blu-ray player's fi rmware in the future. To upgrade this fi rmware you must :
Go to samsung.com and refer to 'SUPPORT' page to download the fi rmware and burn an update CD.
1.
or
Connect this player's LAN terminal to the LAN terminal on your modem (see page 23) and follow the steps
2.
below.
FIRMWARE UPGRADE
With the unit in No Disc mode, press the MENU button.
1.
Press the $% buttons to select Setup, then press the ENTER
2.
or + button.
Press the $% buttons to select System Upgrade, then press
3.
the ENTER or + button.
Press the $% buttons to select Upgrade Start, then press the
4.
ENTER or + button.
You will see a window that allows you to check the cable or
5.
network connection status.
No Disc
No Disc
HDMI Setup
Parental Setup
Photo
System Upgrade Upgrade Start
Setup
HDMI Setup
Parental Setup
Photo
System Upgrade Upgrade Start
Setup
System Upgrade
Now, Checking.
Please wait...
System Information
Network Setup
System Information
Network Setup
2 3 4
1
If the upgrade is possible : You will see information on the
@
current and new versions of fi rmware in a message box.
If the upgrade is not possible : You will see the following
@
description in the message box.
If the cable is not connected :
•
Photo
Setup
No Disc
System Upgrade
Photo
Setup
No Disc
System Upgrade
"This system can not connect to internet for update.
Please, check the network setup."
If the network connection has failed :
•
"This system can not connect to internet for update.
Please, check the network setup"
If no later version has been released (the latest version has been already installed) :
•
"The latest version of the fi rmware is already installed. There is no need to update."
If there is a disc in the player :
•
"Please maintain "No Disc" state for network update."
This indicates that you must remove all discs from the unit to perform the update.
HDMI Setup
System Information
Parental Setup
Network Setup
System Upgrade Upgrade Start
The new update data was found.
Current Version : XXXXX
New Version : XXXXX
CancelStart
HDMI Setup
System Information
Parental Setup
Network Setup
System Upgrade Upgrade Start
This system can not connect
to internet for update.
Please, check the network setup.
OK
46
Page 48

47
ENG
● SYSTEM UPGRADE
To perform the system upgrade, press the _+ buttons to
6.
select Start and then press the ENTER button.
The system update gets started.
7.
When the verifi cation is done, you will see a window that
8.
allows you to update fi rmware. To perform the fi rmware
update,press the _+ buttons to select Yes and then press
the ENTER button.
You will see a message about the upgrade process for
•
3 seconds.
- When update is fi nished, the power will turn off.
If you do not want to update fi rmware, select No and then
•
press the ENTER button.
HDMI Setup
System Information
Parental Setup
Photo
Setup
No Disc
System Upgrade
Photo
Setup
No Disc
System Upgrade
Photo
Setup
No Disc
System Upgrade
Photo
Setup
No Disc
System Upgrade
Network Setup
System Upgrade Upgrade Start
The new update data was found.
Current Version : XXXXX
New Version : XXXXX
CancelStart
HDMI Setup
System Information
Parental Setup
Network Setup
System Upgrade Upgrade Start
Downloading update data...
Please, do not turn off the power.
Cancel
HDMI Setup
System Information
Parental Setup
Network Setup
System Upgrade Upgrade Start
Verifying update data
Please wait...
HDMI Setup
Parental Setup
System Upgrade Upgrade Start
Do you want to update Firmware?
2 3 4
1
System Information
Network Setup
NoYes
When the installation is done, you will see a
9.
“Update Completed” message.
The player will automatically turn off in 3 seconds.
•
Please turn the player on, then press the STOP button
•
5 seconds to intialize the player.
If you intialize the player, all settings will revert to the factory
•
settings. You will see the menu language selection window.
If you want to cancel the upgrade while it is in process, press the ENTER button.
M
You will see a confi rmation message.
Selecting Yes will end the upgrade process, and selecting No will proceed with the verifi cation
step.
When the system upgrade is done, check the fi rmware details in the System Upgrade menu.
Do not turn off the player during the System Upgrade Otherwise, the player may not work
properly.
When software is upgraded, settings you have made will return to their default (factory) settings. We
recommend you write down your settings so that you can easily reset them after the upgrade.
HDMI Setup
System Information
Parental Setup
Photo
Setup
No Disc
System Upgrade
Network Setup
System Upgrade Upgrade Start
Update completed.
Page 49

system upgrade
SYSTEM INFORMATION
When the fi rmware upgrade is done, check the fi rmware details by following the steps below.
With the unit in Stop mode, press the MENU button.
1.
Press the $% buttons to select Setup, then press the
2.
ENTER or + button.
Press the $% buttons to select System Upgrade, then
3.
press the ENTER or + button.
No Disc
Photo
Setup
HDMI Setup
Parental Setup
System Upgrade
System Information
Network Setup
Upgrade Start
Press the $% buttons to select System Information,
4.
then press the ENTER or + button.
You can see detailed information about the current
•
fi rmware.
Press the ENTER button to select OK.
5.
System Upgrade menu will be displayed.
•
NETWORK SETUP
In some rare cases, the fi rmware upgrade may not succeed.
If this occurs, you may need to set up your IP address, Subnet, Mask,
Gateway and DNS by following the steps below.
To setup, follow steps 1 and 3 above
Press the $% buttons to select Network setup, then
4.
press the ENTER or + button.
You will see a menu that allows you to make network
•
settings.
Press the $% buttons to select DHCP, then press the
5.
ENTER button.
HDMI Setup
Parental Setup
Photo
No Disc
No Disc
No Disc
System Information
HDMI Setup
Parental Setup System Information
Photo
System Upgrade
Setup
HDMI Setup
Parental Setup System Information
Photo
Network Setup
System Upgrade
Setup
DHCP : On
IP Address : 000 . 000 . 000 . 000
Subnet Mask : 255 . 255 . 255 . 000
Gateway : 000 . 000 . 000 . 000
DNS : Automatic
Primary DNS : 000 . 000 . 000 . 000
Secondary DNS : 000 . 000 . 000 . 000
System Upgrade
Setup
System Information
Network Setup
F/E:MAIN[09/08/01] DSP[07/07/05] cec[02/15/32]
Upgrade Start
B/E:070914.01_XAA LDR:0913(105 .A01-.BISD)
Region:A/01 (BD/DVD_176_br31x
OK
Network Setup
Upgrade Start
Network Setup
Upgrade Start
Save Cancel
s
SELECT r RETURN
48
M
If DHCP is set to On, you can't select IP Address, Subnet Mask or Gateway.
If DNS is set to Automatic, you can’t select Primary/ Secondary DNS.
Page 50

49
ENG
● SYSTEM UPGRADE
Press the $% buttons to select a desired item, then press the ENTER button.
6.
If DHCP is set to Off and DNS is set to Manual
•
HDMI Setup
Parental Setup System Information
Photo
Network Setup
System Upgrade
Setup
No Disc
If DHCP is set to On and DNS is set to Manual
•
No Disc
DHCP : Off
IP Address : 000 . 000 . 000 . 000
Subnet Mask : 255 . 255 . 255 . 000
Gateway : 000 . 000 . 000 . 000
DNS : Manual
Primary DNS : 000 . 000 . 000 . 000
Secondary DNS : 000 . 000 . 000 . 000
HDMI Setup
Parental Setup System Information
Photo
Network Setup
System Upgrade
Setup
DHCP : On
IP Address : 000 . 000 . 000 . 000
Subnet Mask : 255 . 255 . 255 . 000
Gateway : 000 . 000 . 000 . 000
DNS : Manual
Primary DNS : 000 . 000 . 000 . 000
Secondary DNS : 000 . 000 . 000 . 000
Network Setup
Upgrade Start
Save Cancel
s
SELECT r RETURN
Network Setup
Upgrade Start
Save Cancel
s
SELECT r RETURN
Setup available
Setup not available
Setup available
If DHCP is set to On and DNS is set to Automatic
•
HDMI Setup
Parental Setup System Information
Photo
Network Setup
System Upgrade
Setup
No Disc
M
When done, use the $% buttons to select Save, then press the ENTER button.
7.
If you don’t want to save your work, use the
8.
DHCP : On
IP Address : 000 . 000 . 000 . 000
Subnet Mask : 255 . 255 . 255 . 000
Gateway : 000 . 000 . 000 . 000
DNS : Automatic
Primary DNS : 000 . 000 . 000 . 000
Secondary DNS : 000 . 000 . 000 . 000
When you select an item, use the number and $%_+ buttons.
Network Setup
Upgrade Start
Save Cancel
s
SELECT r RETURN
Setup not available
$%_+
buttons to select Cancel, then press the
ENTER button.
The IP address used in this manual is for illustrative purposes only. You must refer to the
M
your network settings for the actual IP address.
Page 51

watching a movie
watching a movie
USING THE DISPLAY FUNCTION
During playback, press the INFO button on the remote
1.
control.
Press the
2.
Press the _+ buttons to make the desired setup and then
3.
press the ENTER button.
You may use the number buttons of the remote control
•
to directly access a title, chapter or to start the playback
from a desired time.
To make the screen disappear, press the INFO button again.
4.
If you are playing contents from the Info menu, in some cases, playback may malfunction
M
depending on the title.
Title : To access the desired title when there is more than one in the disc. For example, if
there is more than one movie on a BD/DVD, each movie will be identifi ed as a Title.
Chapter: Most BD/DVD discs are recorded in chapters so that you can quickly fi nd a
specifi c passage.
Playing Time : Allows playback of the fi lm from a desired time. You must enter the starting
time as a reference. The time search function does not operate on some discs.
Audio : Refers to the fi lm's soundtrack language. A BD disc can contain up to 32 audio
languages and a DVD up to 8.
Subtitle : Refers to the subtitle languages available in the disc. You will be able to choose
the subtitle languages or, if you prefer, turn them off from the screen. A BD disc can
contain up to 255 subtitle languages, and a DVD up to 32.
Angle : When a BD/DVD contains multiple angles of a particular scene, you can use the
ANGLE function.
buttons to select the desired item.
$%
BD Info
Title
: 001/006
Chapter
: 001/016
Playing Time
: 00:04:17
Audio
: ENG Multi CH
Subtitle
: Off
Angle
: 01/01
{
CHANGE s SELECT
hZCV
50
Page 52

51
ENG
● WATCHING A MOVIE
USING THE DISC MENU & POPUP/TITLE MENU
Using the Disc Menu
During playback, press the DISC MENU button on the
1.
remote control.
Press the
2.
then press the + or ENTER button.
•
M
$%_+
The Disc menu setup items may vary from disc to disc.
Depending on the disc, the Disc Menu may not be
available.
buttons to make the desired setup,
Using the Title Menu
During playback, press the TITLE MENU button on the
1.
remote control.
Press the
2.
press the ENTER button.
•
$%_+
The Title menu setup options may vary from disc to disc.
buttons to make the desired setup, then
hZ
PLAY MOVIE LANGUAGES SCENE SELECTIONS PREVIEWS
%
3 4 5 6 7 8 9 10 11 12 1 3 14 15
Z
Depending on the disc, the Title Menu may not be
M
available.
Title Menu will only be displayed if there are at least two titles in the disc.
Using the Popup Menu
During playback, press the POPUP MENU button on the
1.
remote control.
Press the
2.
desired menu.
•
M
$%_+
The Popup menu setup options may vary from disc to
disc.
Depending on the disc, the Popup Menu may not
be available.
buttons or ENTER button to select the
h
MAIN MENU AUDIO SET UP SUBTITLES SCENE SELECTIONS
%
3 4 5 6 7 8 9 10 11 12 1 3 14 15
Page 53

watching a movie
REPEAT PLAY
Repeat the current chapter or title.
Repeat playback
During playback, press the REPEAT button on the remote
1.
control.
Repeat screen appears.
•
Press the $% buttons to select Chapter or Title.
2.
BD/DVD repeats play by chapter or title.
•
To return to normal play, press the REPEAT button again,
3.
then press the $% buttons to select Off.
Depending on the disc, the Repeat function may not be available.
M
Using the A-B Repeat function
hZCV
Repeat Off
hZCV
52
Press the REPEAT A-B button on the remote control.
1.
Press the REPEAT A-B button at the point where you want
2.
repeat play to start (A).
Press the REPEAT A-B button at the point where you want
3.
repeat play to stop (B).
To return to normal play, press the CANCEL button.
4.
Point B cannot be set until 5 seconds of playback has elapsed from point A.
M
Page 54

53
ENG
● WATCHING A MOVIE
SELECTING THE AUDIO LANGUAGE
You can select a desired audio language and audio format quickly and easily with the AUDIO button.
Using the AUDIO button
Press the AUDIO button during playback.
1.
The Audio changes when the button is pressed repeatedly.
•
The audio languages are represented by abbreviations.
•
To remove the AUDIO icon, press the CANCEL or
2.
RETURN button.
Using the INFO button
During playback, press the INFO button on the remote
1.
control.
Press the $% buttons to select Audio.
2.
Press the _+ buttons on the remote control to select the
3.
desired audio.
This function depends on what audio languages are encoded on the disc and may not be available.
M
A BD disc can contain up to 32 audio languages and a DVD up to 8.
Depending on the disc type, you can use the Audio button to change the audio sound
track as well as the audio language.
Some Blu-ray Discs may allow you to select multi-channel LPCM, Dolby digital audio English
sound tracks and HD audio formats like Dolby digital+, Dolby TrueHD or DTS-HD.
Audio ENG Dolby Digital Multi CH
hZ
SELECTING THE SUBTITLE LANGUAGE
You can select a desired subtitle quickly and easily with the SUBTITLE button.
Using the SUBTITLE button
Press the SUBTITLE button.
1.
The subtitle changes when the button is pressed
•
repeatedly. The subtitle languages are represented by
abbreviations.
To remove the SUBTITLE icon, press the CANCEL or
2.
RETURN button.
Using the INFO button
During playback, press the INFO button on the remote control.
1.
Press the $% buttons to select Subtitle.
2.
Press the _+ buttons on the remote control to select the
3.
desired subtitle language.
Depending on BD/DVDs, you may have to change the desired subtitle in the Disc Menu. Press the
M
DISC MENU button.
This function depends on what subtitles are encoded on the disc and may not be available on all BD/DVDs.
A BD disc can contain up to 255 subtitle languages and a DVD up to 32.
Subtitle ENG
hZ
Page 55

watching a movie
CHANGING THE CAMERA ANGLE
When a BD/DVD contains multiple angles of a particular scene, you can use the ANGLE function.
Using the ANGLE function
During playback, press the INFO button on the remote control.
1.
Press the $% buttons to select Angle.
2.
Press the
3.
_+ buttons or you can use the number buttons
on the remote control to select the desired angle.
If the disc has only one angle, this feature won’t work.
M
BD Info
Title
: 001/006
Chapter
: 003/016
Playing Time
: 00:11:14
Audio
: ENG Multi CH
Subtitle
: ENG
Angle
: 01/01
{
CHANGE } MOVE
Currently, very few discs have this feature.
Depending on the disc, these functions may not work.
USING THE BOOKMARK FUNCTION
The features lets you bookmarks sections of a DVD so you can quickly fi nd them at a later time.
Using the MARKER button
During playback, press the MARKER button on the remote
1.
control.
The Bookmark screen appears.
•
Marker
BD
+
hZCV
hZ
00:12:21 / 01:53:26
54
Press the ENTER button when the desired scene appears.
2.
The selected scene will be stored.
•
Press the _+ buttons to move to the next position.
3.
Press the ENTER button again when the desired scene
4.
appears.
The scene will be stored at the selected position and the
•
bookmark time information will be shown.
Repeat above to bookmark other positions.
•
You can bookmark up to 8 scenes.
•
When the EJECT button is pressed, bookmarks will
M
disappear.
T:1
Add Add Add Add Add Add Add
00:12:17
a
DELETE
BD
T:1
00:12:17
a
DELETE
Marker
+
00:12:27
{
MOVE s Play e EXIT
T:1
Add Add Add Add Add Add
{
MOVE s Play e EXIT
00:12:33 / 01:53:26
Page 56

55
ENG
● WATCHING A MOVIE
Playing back a bookmark
During playback, press the MARKER button on the
1.
remote control.
Press the _+ buttons to select a bookmarked scene.
2.
Press the ENTER or PLAY/PAUSE( ) button to start playing from the selected scene.
3.
BD
T:1
00:12:17
a
DELETE
Marker
+
T:1
Add Add Add Add Add Add
00:12:27
{
MOVE s Play e EXIT
Clearing a bookmark
During playback, press the MARKER button on the
1.
remote control.
Press the _+ buttons to select a bookmarked scene.
2.
BD
T:1
00:12:17
a
DELETE
BD
Marker
+
00:12:27
Marker
+
T:1
T:1
T:1
00:12:53
00:12:55
{
MOVE s Play e EXIT
T:1
00:12:57
T:1
00:12:59
00:12:21 / 01:53:26
00:13:11 / 01:53:26
Add Add
00:13:27 / 01:53:26
Press the RED(A) or CANCEL button to delete the
3.
selected bookmark.
T:1
00:12:17
a
DELETE
BD
T:1
00:12:17
a
DELETE
00:12:27
Marker
+
00:12:27
T:1
T:1
T:1
T:1
T:1
00:12:53
00:12:55
00:12:57
{
MOVE s Play e EXIT
T:1
T:1
T:1
00:12:53
T:1
00:12:55
00:12:57
{
MOVE s Play e EXIT
Add Add
00:12:59
00:13:38 / 01:53:26
Add Add Add
Page 57

listening to music
listening to music
PLAYING AN AUDIO CD(CD-DA)
Insert an Audio CD(CD-DA) into the Disc Insert Hole.
1.
For an audio CD, the fi rst track will be played
•
automatically.
To move to the Music List, press the STOP or RETURN
2.
button.
The Music List screen is displayed
•
Press the $% buttons to select the track you want to play,
3.
and then press the ENTER button.
PLAYING AN MP3
Insert an MP3 disc into the Disc Insert Hole.
1.
The Menu screen is displayed.
•
Press the $% buttons to select Music, then press the
2.
ENTER button.
The Music List is displayed.
•
Press the $% buttons to select the MP3 fi le you want to
3.
play, and then press the ENTER button.
TRACK 001 01/12
CD
+
a
Play Mode
Video
TRACK 005 00:03:20
Music
CD
Photo
Setup
Video
Music
CD
Photo
Setup
TRACK 006 00:03:20
TRACK 007
TRACK 008
TRACK 009
TRACK 010
TRACK 011
TRACK 012
TRACK 013
b
Playlist
Root
Song01.mp3 00:03:06
Song02.mp3
Song03.mp3
Song04.mp3
Song05.mp3
Song06.mp3
Song07.mp3
Song08.mp3
b
Playlist
21 Jun 2007
21 Jun 2007
21 Jun 2007
21 Jun 2007
21 Jun 2007
21 Jun 2007
21 Jun 2007
21 Jun 2007
B
00:01:29 / 00:04:06
00:03:32
00:04:36
00:04:17
00:04:11
00:04:07
00:04:46
00:04:21
A
00:03:32
00:03:38
00:03:41
00:03:43
00:04:05
00:03:27
00:03:51
Audio CD(CD-DA)
MP3
TRACK 001 01/12
CD
+
a
Play Mode
00:01:29 / 00:04:06
CD
a
AUDIO CD(CD-DA)/MP3 SCREEN ELEMENTS
Displays the media type. Play Status Bar.
Current track (song)
56
•
Audio CD(CD-DA) : Displays the
•
number of the track currently being
played.
MP3 : Displays the name of the track
•
currently being played.
Displays the current play index, total track number.
Current /Total Play Time.
Displays available COLOR buttons.
(see next page for Color button usage).
Song01.mp3 01/04
+
Play Mode
00:00:05 / 00:05:02
Page 58

57
ENG
● LISTENING TO MUSIC
BUTTONS ON THE REMOTE CONTROL USED FOR AUDIO CD
(CD-DA)/ MP3 DISC PLAYBACK
SKIP( ) button: During playback, plays the next track.
1.
1
Moves to the next page in the Music List or the Playlist.
PLAY/PAUSE ( ) button: Plays the currently selected track.
2.
5
6
1
2
3
7
4
8
9
2
If pressed during playback, the current track is paused.
Press the SEARCH ( ) buttons :
5.
3
Fast Play (Audio CD(CD-DA) only).
$%
buttons : Selects a track(song) or a folder in Music List
6.
4
or Playlist.
SKIP ( ) button : Returns to the beginning of the current
7.
5
track when pressed during playback. If pressed again, your
Blu-ray Home Theater moves to and plays the previous
track.
If you press this button within three seconds after playback
starts, the previous track will be played.
If you press this button after three seconds, the current track
will be replayed from the beginning.
Moves by the page in the Music List or the Playlist.
STOP ( ) button: Stops a track(song).
8.
6
ENTER
9.
7
10.
8
1.
9
•
•
•
button : Plays the selected track (song).
_+
buttons
+
: Moves to the applicable folder or plays the applicable
track, according to the current position.
_
: Moves to the parent folder.
COLOR buttons: RED(A), GREEN(B), YELLOW(C)
RED(A) button :
playback.
GREEN(B) button : Go to Playlist from Music List/Go to
Music list from Playlist.
YELLOW(C) button : Playlist play.
Selects the Play Mode(Repeat) during
REPEAT AUDIO CD(CD-DA) & MP3
During playback, press the REPEAT or RED(A) button repeatedly to select the repeat mode you want.
When playing an Audio CD(CD-DA) : Normal ; ; ;
When playing an MP3 disc : Normal ; ; ;
Normal (Audio CD(CD-DA)/MP3): Tracks on a disc are played in the order in which they were
•
recorded on the disc.
Repeat Track (Audio CD(CD-DA)/MP3)
•
Repeat Folder (MP3)
•
Random (Audio CD(CD-DA)/MP3)
•
- When playing an Audio CD(CD-DA):
- When playing an MP3 disc :
Repeat All (Audio CD(CD-DA)): All tracks are repeated.
•
- To return to normal playback Press the REPEAT or
RED(A)
button repeatedly to return to normal playback.
The random option plays a disc’s tracks in random order.
The random option plays a folder’s file in random order.
Page 59

listening to music
Playlist
You can create a playlist with up to 99 tracks.
To setup, follow steps 1 to 2 in page 56.
Press the GREEN(B) button.
1.
Press the $% buttons to select a track, then press the
2.
ENTER button to add it to the Playlist.
Repeat this procedure to add additional tracks.
•
If there is an undesired track in the playlist, press the
3.
+$%
button to select that track, and then press the
ENTER button.
The selected track will be deleted.
•
Video
TRACK 006 00:03:20
Music
CD
Photo
Setup
Video
Music
CD
Photo
Setup
Video
Music
CD
Photo
Setup
TRACK 007 00:03:32
TRACK 008
TRACK 009
TRACK 010
TRACK 011
TRACK 012
TRACK 013
TRACK 014
b
Playlist
Original Playlist
TRACK 001
TRACK 002
TRACK 003
TRACK 004
TRACK 005
TRACK 006
TRACK 007
TRACK 008
b
Music List c Playlist Play
Original Playlist
TRACK 005
TRACK 006
TRACK 007
TRACK 008
TRACK 009
TRACK 010
TRACK 011
TRACK 012
TRACK 013
b
Music List c Playlist Play
s
Add t Play
01.TRACK 002
02.TRACK 003
03.TRACK 004
04.TRACK 006
s
Add t Play
00:04:36
00:04:17
00:04:11
00:04:07
00:04:46
00:04:21
00:03:43
58
Press the YELLOW(C) button to play the selected tracks.
4.
When the track is fi nished, the next track will automatically
play.
To go back to the Music List, press the STOP or RETURN
5.
button.
Video
Music
CD
Photo
Setup
b
Original Playlist
TRACK 005
TRACK 006
TRACK 007
TRACK 008
TRACK 009
TRACK 010
TRACK 011
TRACK 012
TRACK 013
Music List c Playlist Play
01.TRACK 002
02.TRACK 003
03.TRACK 004
04.TRACK 006
s
Delete t Play
Page 60

59
ENG
Viewing a Picture
VIEWING A PICTURE
Insert a JPEG disc into the Disc Insert Hole.
1.
The Menu screen is displayed.
•
Press the $% buttons to select Photo, then press the
2.
ENTER button.
The Photo List is displayed.
•
Press the $% buttons to select a picture.
3.
To see the next page, press the SKIP ( ) button.
•
To see the previous page, press the SKIP( ) button.
•
Photo fi les larger than 6Mb or with more than 7 million pixels may not be played.
M
SLIDE SHOW/SPEED
To setup, follow steps 1 and 2 above.
Press the BLUE(D) button.
3.
The slide show starts.
•
When the SlideShow starts, press the BLUE(D) button to
4.
adjust the play speed.
Each time you press the button, the play speed will
•
increase accordingly.
Music
Photo
CD
Setup
+
_____1_.JPG
CD
Root
176.JPG 127 KB
BEACH.JPG
KE.JPG
KE2.JPG
MBHONG.JPG
NEW_BEE.JPT
_____1_.JPG
d
Slide Show
08 Feb 2003
17 Feb 2004
10 Apr 2003
10 Apr 2003
20 Apr 2002
08 Jul 2004
18 Feb 2004
27 KB
194 KB
191 KB
30 KB
76 KB
17 KB
07/07
● VIEWING A PICTURE
- To stop the Slide Show -
Press the STOP or RETURN button.
M
ROTATE
To setup, follow steps 1 and 3 above.
4.
5.
M
➞ ➞
JPEG's smaller than 1920 x 1080 will be displayed
at normal resolution. They will not fully fi ll the
screen.
Press the ENTER button.
Use the RED(A) and GREEN(B) buttons to rotate the image in a
desired direction.
Photo fi les larger than 6Mb or with more than 7
million pixels cannot be rotated.
#
KE.JPG
CD
ay
90
b u
90 c Zoom d Speed t Slide Show
d
Speed T Stop
04/07
Page 61

ZOOM
To setup, follow steps 1 to 3 in "Viewing a Picture" on page 59.
Press the ENTER button.
4.
Press the YELLOW(C) button.
5.
Use the RED(A) and GREEN(B) buttons to zoom in/out the
6.
image.
- To move the area -
Press the
$%_ +
buttons to the area you want to enlarge.
- To stop the Zoom -
Press the YELLOW(C) button.
#
KE.JPG
CD
ay
90
b u
90 c Zoom d Speed t Slide Show
a
Zoom In b Zoom Out c Zoom Off
04/07
x2
m
MOVE
GO TO PHOTO LIST
To setup, follow steps 1 to 3 in "Viewing a Picture" on page 59.
Press the ENTER button.
4.
To go Photo List, press the RETURN or STOP button.
5.
#
BEACH.JPG
CD
ay
90
b u
90 c Zoom d Speed t Slide Show
Music
Photo
CD
Setup
..
176.JPG
BEACH.JPG 27 KB
KE.JPG
KE2.JPG
MBHONG.JPG
NEW_BEE.JPT
_____1_.JPG
d
Slide Show
17 Feb 2004
10 Apr 2003
10 Apr 2003
20 Apr 2002
08 Jul 2004
18 Feb 2004
03/07
127 KB08 Feb 2003
194 KB
191 KB
30 KB
76 KB
17 KB
60
Page 62

ENG
sound mode
SFE(SOUND FIELD EFFECT) MODE
You can set the SFE best suited for the type of music you are listening to.
Press the SFE MODE button.
SFE MODE appears on the display panel.
•
Each time the button is pressed, the selection changes as
•
follows
HALL1 ➞ HALL2 ➞ JAZZ ➞ CHURCH ➞ ROCK ➞ SFE OFF.
HALL : Provides a clear vocal as if listening in a concert hall.
•
JAZZ : Recommended setting for Jazz.
•
ROCK : Recommended setting for Rock.
•
CHURCH : Gives the feel of being in a grand church.
•
SFE OFF : Select this for normal listening.
•
SFE mode is not available with 7.1CH encoded signals or HD audio sound.
M
● SOUND MODE
NEO:6 MODE
Enables you to play back 2 channel or DTS 5.1 channel audio signals over 7.1speakers.
Press NEO:6 MODE button.
NEO:6 MODE appears on the display panel.
•
Each time the button is pressed, the selection changes as follows.
•
CINEMA ➞ MUSIC ➞ NEO:6 OFF.
This mode decodes 2 channel signals to a high precision digital
matrix decoder.
CINEMA : CINEMA mode is optimized for movie playback.
•
MUSIC : MUSIC mode is optimized for music playback.
•
NEO:6 OFF : Select this for normal listening.
•
NEO:6 mode is not available with 7.1CH encoded discs or HD (High Defi nition) audio.
M
PCM signal is available when it is at 32KHZ, 44.1KHZ, 48KHZ, 88.2KHZ or 96KHZ.
This mode is available only with 2 channel or DTS 5.1 channel audio sources.
61
Page 63

sound mode
DOLBY PRO LOGIC IIx MODE
You can select the desired Dolby Pro Logic IIx audio mode.
Press the PL IIx MODE button.
Each time the button is pressed, the mode changes as
•
follows.
MUSIC ➞ MOVIE ➞ PRO LOGIC ➞ MATRIX ➞ VIRTUAL ➞
GAME ➞ DPL IIx OFF .
MUSIC : When listening to music, you can experience sound effects as if you are listening to the
•
actual performance.
MOVIE : Adds realism to the movie soundtrack.
•
PRO LOGIC : You will experience a realistic multi-channel effect, as if using six speakers, while using
•
just the front left and right speakers.
MATRIX : You will hear 7.1 channel surround sound.
•
VIRTUAL : Select to enjoy a 5.1-channel surround sound that gives the feeling of being in a baseball
•
park or concert hall.
GAME : Enhances the excitement of the game's sound.
•
DPL IIx OFF
•
M
:
Select this to listen to sound from the front left and right speakers and the subwoofer only.
When selecting Pro Logic IIx mode, connect your external device to the AUDIO INPUT
jacks (L and R) on the player. If you connect to only one of the inputs (L or R), you cannot
listen to surround sound.
It is available only for 2 channel or Dolby Digital 5.1 channel signals.
DOLBY PRO LOGIC IIx EFFECT
This function works only in Dolby Pro Logic MUSIC mode.
Press the
1.
Press the
2.
•
Press the _ + buttons to select the desired effect setting.
3.
•
•
•
PL IIx MODE button to select MUSIC mode.
PL IIx EFFECT button.
Each time the button is pressed, the mode changes as
follows.
PANORAMA : You can select either 0 or 1.
C- WIDTH : You can select between 0 and 7.
DIMENS : You can select between 0 and 6.
62
Page 64

ENG
radio
LISTENING TO RADIO
Remote Control
Press the TUNER button to select the FM band.
1.
Tune in to the desired station.
2.
Automatic Tuning 1 : When the SKIP
•
pressed, a preset broadcast station is selected.
Automatic Tuning 2 : Press and hold the
•
TUNING/CH ( ) button to
active broadcasting stations.
Manual Tuning : Briefl y press the TUNING/CH ( )
•
frequency incrementally.
Main Unit
Press the FUNCTION button to select the FM band.
1.
Select a broadcast station.
2.
Automatic Tuning 1 : Press the STOP ( ) button to select PRESET and then
•
press the SKIP
Automatic Tuning 2 : Press the STOP ( ) button to select MANUAL and then
•
press and hold the SKIP ( ) button to automatically search the band.
Manual Tuning : Press the
•
briefl y press the SKIP ( ) button to tune in to a lower or higher frequency.
( )
( )
automatically search for
button to select the preset station.
STOP ( )
button is
button to increase or decrease the
button to select MANUAL
● RADIO
and then
Mono/Stereo
Press the MO/ST button to listen in Mono/Stereo.
Each time the button is pressed, the sound switches
•
between STEREO and MONO.
In a poor reception area, select MONO for a clear,
•
interference-free broadcast.
PRESETTING STATIONS
Example : Presetting FM 89.10 in the memory
Press the TUNER button to select the FM band.
1.
Press the
2.
Press the TUNER MEMORY button.
3.
•
Press the
4.
•
Press the TUNER MEMORY button again.
5.
•
•
To preset another station, repeat steps 2 to 5.
6.
•
TUNING/CH ( )
PRGM fl ashes in the display.
SKIP ( )
You can select between 1 and 15 presets.
Press the TUNER MEMORY button before PRGM disappears from the display.
PRGM disappears from the display and the station is stored in memory.
To tune in to a preset station, press the SKIP
button to select preset number.
button to select <89.10>.
( )
button on the remote control to select a channel.
63
Page 65

convenient function
SLEEP TIMER FUNCTION
You can set the time that the Blu-ray Home Theater will shut itself off.
Press the SLEEP button.
Each time the button is pressed, the preset time changes as follows :
•
10 ➞ 20 ➞ 30 ➞ 60 ➞ 90 ➞ 120 ➞ 150 ➞ OFF.
To confi rm the sleep timer setting, press the SLEEP button.
The remaining time before the Blu-ray Home Theater will shut itself off
•
is displayed.
Pressing the button again changes the sleep time from what you have set earlier.
•
To cancel the sleep timer, press the SLEEP button until OFF appears on the display.
ADJUSTING DISPLAY BRIGHTNESS
You can adjust the brightness of the display on the main unit so it won't interfere with your movie viewing.
Press the DIMMER button.
Each time the button is pressed, the brightness of front display will be
•
adjusted.
MUTE FUNCTION
This is useful when answering a doorbell or telephone call.
Press the MUTE button.
MUTE appears in the display.
•
To restore the sound, press the MUTE button again.
•
64
Page 66

65
ENG
troubleshooting
Refer to the chart below when this unit does not function properly. If the problem you are experiencing is not listed
below or if the instruction below does not help, turn off the unit, disconnect the power cord, and contact the nearest
authorized dealer or Samsung Electronics Service Center.
SYMPTOM Check/Remedy
I cannot eject the disc.
Playback does not start.
Playback does not start
immediately when the
Play/Pause button is pressed.
Sound is not produced.
Sound can be heard only from a few
speakers and not all 8.
• Is the power cord plugged securely into the outlet?
• Turn off the power and then turn it back on.
• Check the region number of the BD/DVD.
BD/DVD discs purchased from abroad may not be playable.
• CD-ROMs and DVD-ROMs cannot be played on this Blu-ray Home Theater.
• Make sure that the rating level is correct.
• Are you using a deformed disc or a disc with scratches on the surface?
• Wipe the disc clean.
•
No sound is heard during fast playback, slow playback, and step motion playback.
•
Are the speakers connected properly? Is the speaker setup correctly customized?
• Is the disc severely damaged?
• When listening to a CD or radio, sound is output from the front speakers
(L/R) only. To enjoy sound over 7 or 8 speakers select the D.PL IIX, Neo:6
or SFE MODE modes.
• If you set SBL and SBR to NONE in the speaker mode in the audio setup of
the setup screen, no sound is heard from the SBL and SBR speakers.
Set SBL and SBR to Small.
● TROUBLESHOOTING
Dolby Digital 5.1 CH Surround Sound is
not produced.
The remote control does not work.
• Disc is rotating but no
picture is produced.
• Picture quality is poor and
picture is shaking.
Audio language and subtitles do not work.
Menu screen does not appear even
when the menu function is selected.
Aspect ratio cannot be changed.
•
Is there "Dolby Digital 5.1 CH" mark on the disc? Dolby Digital 5.1 CH Surround
Sound is produced only if the disc is recorded with 5.1 channel sound.
• Is the audio language correctly set to DOLBY DIGITAL 5.1-CH in the
information display?
•
Is the remote control being operated within its operation range of angle and distance?
• Are the batteries drained?
•
Have you selected the mode(TV/BD) functions of the remote control (TV or BD) correctly?
• Is the TV power on?
• Are the video cables connected properly?
• Is the disc dirty or damaged?
• A poorly manufactured disc may not be playable.
•
Audio language and subtitles will not work if the disc does not contain them.
• Are you using a disc that does not contain menus?
• You can play 16:9 BD/DVDs in 16:9 Wide mode, 4:3 Letter Box mode, or
4:3 Pan - Scan mode, but 4:3 BD/DVDs can be seen in 4:3 ratio only.
Refer to the BD disc jacket and then select the appropriate function.
Page 67

troubleshooting
SYMPTOM Check/Remedy
• The main unit is not working.
(Example: The power goes out or
strange noise is heard.)
•
The Blu-ray Home Theater is not working
normally.
The password for rating level has been
forgotten.
Can't receive radio broadcasts.
While listening to TV audio through the
Blu-ray Home theater system, no sound
is heard.
The icon appears on screen.
• Turn off the power and hold the STOP ( ) button on the main unit for
longer than 5 seconds.
Using the RESET function will erase all stored settings.
Do not use this unless necessary.
• While (NO DISC) message appears on the display of main unit, hold the
main unit's STOP ( ) button for longer than 5 seconds. INITIAL
appears on the display and all settings will return to the default values.
• Press the POWER button.
Using the RESET function will erase all stored settings.
Do not use this unless necessary.
• Is the antenna connected properly?
• If the antenna's input signal is weak, install an external FM antenna in an
area with good reception.
•
If the EJECT button is pressed while listening to TV audio using the
D.IN or AUX functions, the BD/DVD functions are turned on and this mutes
the TV audio.
• The features or action cannot be completed at this time because:
1. The BD/DVD’s software restricts it.
2. The BD/DVD’s software doesn’t support the feature (e.g., angles)
3. The feature is not available at the moment.
4.
You’ve requested a title or chapter number or search time that is out of range.
If the HDMI output is set to a resolution your
TV cannot support (for example, 1080p), you
may not see a picture on your TV.
No HDMI output.
Abnormal HDMI output screen.
66
• Press the STOP ( ) utton (in front panel) for more than 5 seconds with
no disc inside. All settings will revert to the factory settings.
• Check the connection between the TV and the HDMI jack of the Blu-ray
Home Theater.
• Check if your TV supports 480p/720p/1080i/1080p HDMI input
resolution.
• If random noise appears on the screen, it means that TV does not support
HDCP (High-bandwidth Digital Content Protection).
Page 68

67
ENG
appendix
CAUTIONS ON HANDLING AND STORING DISCS
Small scratches on the disc may reduce sound and picture quality or cause skipping.
Be especially careful not to scratch discs when handling them.
Handling discs
Do not touch the playback side of the disc.
Hold the disc by the edges so that fingerprints will not get on the surface.
Do not stick paper or tape on the disc.
Disc Storage
Do not keep in direct sunlight
Do not allow the discs to become contaminated with dirt.
M
Do not load cracked or scratched discs.
Keep in a cool
ventilated area
Keep in a clean Protection jacket.
Store vertically.
Handling and Storing Discs
When you get fingerprints or dirt on the disc, clean it with a mild detergent diluted in water and wipe with
a soft cloth.
When cleaning, wipe gently from the inside to the outside of the disc
•
● APPENDIX
M
Condensation may form if warm air comes into contact with cold parts inside the player.
When condensation forms inside the player, the player may not operate correctly. If this
occurs, remove the disc and let the player stand for 1 or 2 hours with the power on.
Page 69

appendix
SPECIFICATIONS
Power Requirements AC 120V, 60Hz
Power Consumption 110 W
General
Disc
Video Output
Video/Audio HDMI
Amplifier
Speaker
- Samsung Electronics Co., Ltd reserves the right to change the specifications without notice.
- Weight and dimensions are approximate.
Weight 13.5 Ibs
Dimensions 17.3 (W) x 15.6 (D) x 3.4 (H) inches
Operating Temperature Range +41°F to +95°F
Operating Humidity Range 10 % to 75 %
BD (Blu-ray Disc) Reading Speed : 4.917m/sec
DVD (Digital Versatile Disc)
CD : 5 inches (COMPACT DISC)
CD : 3 1/2 inches (COMPACT DISC)
Composite Video
Component Video
Front speaker output
Center speaker output
Surround speaker output
Subwoofer speaker output
Surround Back speaker output
Frequency range
Reading Speed : 3.49 ~ 4.06 m/sec.
Approx. Play Time (Single Sided, Single Layer Disc) : 135 min.
Reading Speed : 4.8 ~ 5.6 m/sec.
Maximum Play Time : 74 min.
Reading Speed : 4.8 ~ 5.6 m/sec.
Maximum Play Time : 20 min.
1 channel : 1.0 Vp-p (75 Ω load)
Blu-ray Disc : 480i DVD : 480i
Y : 1.0 Vp-p (75 load)
Pr : 0.70 Vp-p (75 Ω load)
Pb : 0.70 Vp-p (75 Ω load)
Blu-ray Disc : 1080i, 720p, 480p, 480i DVD : 480p, 480i
1080p, 1080i, 720p, 480p
PCM multichannel audio, Bitstream audio, PCM audio
135W x 2(3Ω)
135W(3Ω)
135W x 2(3Ω)
155W(8Ω)
135W x 2(3Ω)
20Hz~20KHz
S/N Ratio 70dB
Channel separation 60dB
Input sensitivity
Speaker system
Impedance
Frequency range
Output sound pressure level
Rated input
Maximum input
Dimensions (W x H x D)
Weights
(AUX)400mV
7.1ch speaker system
Front/Surround, Center, Surround Back
3 Ω
140Hz~50KHz
88dB/W/M
135W
270W
Front/Surround : 4.92x51.6x3.2 inches (Stand Base : Ø13.4inch)
Center : 21.6x5.4x3.4 inches
Surround Back : 4x10.6x3.8 inches
Subwoofer : 12.2x14.9x17.4 inches
Surround
Front/
Surround Back : 2.9 Ibs, Subwoofer : 31.8 Ibs
*: Nominal specification
: 13.89 Ibs, Center :4.85 Ibs
Subwoofer
Ω
8
35Hz~160Hz
90dB/W/M
155W
310W
68
Page 70

69
ENG
● APPENDIX
COPY PROTECTION
•
Because AACS (Advanced Access Content
System) is approved as content protection
system for BD format, similar to use of CSS
(Content Scramble System) for DVD format,
certain restrictions are imposed on playback,
analog signal output, etc., of AACS protected
contents. The operation of this product and
restrictions on this product may vary depending
on your time of purchase as those restrictions
may be adopted and/or changed by AACS after
the production of this product. Furthermore, BDROM Mark and BD+ are additionally used as
content protection system for BD format, which
imposes certain restrictions including playback
restrictions for BD-ROM Mark and/or BD+
protected contents. To obtain additional
information on AACS, BD-ROM Mark, BD+, or
this product, please contact SAMSUNG
customer care center.
Many BD/DVD discs are encoded with copy
•
protection. Because of this, you should only
connect your Blu-ray Home Theater directly to
your TV, not to a VCR. Connecting to a VCR
results in a distorted picture from copy-protected
BD/DVD discs.
This product incorporates copyright protection
•
technology that is protected by methods claims
of certain U.S. patents and other intellectual
property rights owned by Macrovision
Corporation and other rights owners. Use of this
copyright protection technology must be
authorized by Macrovision Corporation and is
intended for home and other limited viewing uses
only, unless otherwise authorized by Macrovision
Corporation. Reverse engineering or disassembly
is prohibited.
Under the U.S. Copyright laws and Copyright
•
laws of other countries, unauthorized recording,
use, display, distribution, or revision of television
programs, videotapes, BDs, DVDs, CDs and
other materials may subject you to civil and/or
criminal liability.
For Blu-ray Home Theaters with 525p, but not
•
625p, progressive scan output :
CONSUMERS SHOULD NOTE THAT NOT ALL
HIGH DEFINITION TELEVISION SETS ARE
FULLY COMPATIBLE WITH THIS PRODUCT
AND MAY CAUSE ARTIFACTS TO BE
DISPLAYED IN THE PICTURE. IN CASE OF 525
PROGRESSIVE SCAN PICTURE PROBLEMS, IT
IS RECOMMENDED THAT THE USER SWITCH
THE CONNECTION TO THE `STANDARD
DEFINITION' OUTPUT. IF THERE ARE
QUESTIONS REGARDING OUR TV SET
COMPATIBILITY WITH THIS MODEL 525p DVD
PLAYER, PLEASE CONTACT OUR CUSTOMER
SERVICE CENTER.
Compliance and Compatibility Notice
NOT ALL discs are compatible
Subject to the restrictions described below and those
•
noted throughout this Manual, including the Disc Type
and Characteristics section of this Manual, disc types
that can be played are: pre-recorded commercial BDROM, DVD-Video, and Audio CD discs; DVD-RW / DVDR discs; and CD-RW/CD-R discs.
Discs other than the above cannot and/or is not intended
•
to be played by this player. And some of the above discs
may not play due to one or more reasons provided
below.
HD DVD discs cannot be played in this player.
•
Samsung cannot assure that this player will play every
•
disc bearing the BD-ROM, DVD-Video, DVD-RW / DVDR and CD-RW / CD-R logos, and this player may not
respond to all operating commands or operate all
features of every disc. These and other disc compatibility
and player operation issues with new and existing format
discs are possible because:
- BD format is a new and evolving format and this player may
not operate all features of BD discs because some features
may be optional, additional features may have been added to
the BD format after the production of this player, and certain
available features may be subject to delayed availability;
- not all new and existing disc format versions are supported by
this player;
- new and existing disc formats may be revised, changed,
updated, improved and/or supplemented;
- some discs are produced in a manner that allows specific or
limited operation and feature during playback;
- some features may be optional, additional features may have
been added after the production of this player or certain
available features may be subject to delayed availability;
- some discs bearing the BD-ROM, DVD-Video, DVD-RW/
DVD-R and CD-RW/ CD-R logos may still be nonstandardized discs;
- some discs may not be played depending on their physical
state or recording conditions;
- problems and error can occur during the creation of BD, DVD
and CD software and/or the manufacture of discs;
- this player operates differently than a standard DVD player or
other AV equipment; and/or
- for reasons noted throughout this Manual and for other
reason(s) discovered and posted by SAMSUNG customer
care center.
If you encounter disc compatibility or player operation
•
problems, please contact SAMSUNG customer care
center. You may also contact SAMSUNG customer care
center for possible updates on this player.
For additional information on playback restrictions and
•
disc compatibility, refer to the Precautions, Before
Reading the User’s Manual, Disc Types and
Characteristics, and Before Playing sections of this
Manual.
Page 71

LIMITED WARRANTY TO ORIGINAL PURCHASER
Samsung Electronics Canada Inc.(SECA), warrants that this product is free from defective
material and workmanship.
SECA further warrants that if this product falls to operate properly within the specified warranty
period and the failure is due to improper workmanship or defective materials, SECA will repair
or replace the product at its option.
All warranty repairs must be performed by a SECA Authorized Service Center. (The name and
address of the location nearest you can be obtained by calling toll free: 1- 800- SAMSUNG)
LABOR
One year (Carry- in)
PARTS
One year
On carry-in models, transportation to and from the service center is the customer’s responsibility.
The original dated sales receipt must be retained by the customer and is the only acceptable
proof of purchase. It must be presented to the authorized service center at the time service is
requested.
EXCLUSIONS (WHAT IS NOT COVERED)
This warranty does not cover damage due to accident, fire, flood and/ or other acts of God; misuse,
incorrect line voltage, improper installation, improper or unauthorized repairs, commercial use or
damage that occurs in shipping. Exterior and interior finish, lamps, glass are not covered under this
warranty. Customer adjustments which are explained in the instruction manual are not covered
under the terms of this warranty. This warranty will automatically be voided for any unit found with a
missing or altered serial number. This warranty is valid only on products purchased and used in
Canada.
HEADQUARTERS
SAMSUNG ELECTRONICS CANADA INC.,
CUSTOMER SERVICE
55 STANDISH COURT MISSISSAUGA, ONTARIO L5R 4B2 CANADA
FABRIQUE EN CORÉE
1-800-SAMSUNG (1-800-7267864)
WWW.SAMSUNG.COM/CA
Page 72

Contact SAMSUNG WORLD WIDE
If you have any questions or comments relating to Samsung products, please contact the SAMSUNG customer
care center.
Region Country Customer Care Center Web Site
CANADA 1-800-SAMSUNG(726-7864) www.samsung.com/ca
North America
Latin America
Europe
CIS
Asia Pacic
Middle East &
Africa
MEXICO 01-800-SAMSUNG(726-7864) www.samsung.com
U.S.A 1-800-SAMSUNG(726-7864) www.samsung.com
ARGENTINE 0800-333-3733 www.samsung.com/ar
BRAZIL 0800-124-421 , 4004-0000 www.samsung.com
CHILE 800-SAMSUNG(726-7864) www.samsung.com/cl
NICARAGUA 00-1800-5077267
HONDURAS 800-7919267
COSTA RICA 0-800-507-7267 www.samsung.com/latin
ECUADOR 1-800-10-7267 www.samsung.com/latin
EL SALVADOR 800-6225 www.samsung.com/latin
GUATEMALA 1-800-299-0013 www.samsung.com/latin
JAMAICA 1-800-234-7267 www.samsung.com/latin
PANAMA 800-7267 www.samsung.com/latin
PUERTO RICO 1-800-682-3180 www.samsung.com/latin
REP. DOMINICA 1-800-751-2676 www.samsung.com/latin
TRINIDAD & TOBAGO 1-800-SAMSUNG(726-7864) www.samsung.com/latin
VENEZUELA 0-800-100-5303 www.samsung.com/latin
COLOMBIA 01-8000112112 www.samsung.com.co
BELGIUM 0032 (0)2 201 24 18 www.samsung.com/be
CZECH REPUBLIC
DENMARK 70 70 19 70 www.samsung.com/dk
FINLAND 030-6227 515 www.samsung.com/fi
FRANCE
GERMANY
HUNGARY 06-80-SAMSUNG(726-7864) www.samsung.com
ITALIA 800-SAMSUNG(726-7864) www.samsung.com
LUXEMBURG 0035 (0)2 261 03 710 www.samsung.com/be
NETHERLANDS
NORWAY 815-56 480 www.samsung.com/no
POLAND 0 801 801 881 , 022-607-93-33 www.samsung.com/pl
PORTUGAL 80820-SAMSUNG(726-7864) www.samsung.com/pt
SLOVAKIA 0800-SAMSUNG(726-7864) www.samsung.com/sk
SPAIN 902 10 11 30 www.samsung.com
SWEDEN 0771-400 200 www.samsung.com/se
U.K 0845 SAMSUNG (7267864) www.samsung.com
EIRE 0818 717 100 www.samsung.com/ie
AUSTRIA 0800-SAMSUNG(726-7864) www.samsung.com/at
SWITZERLAND 0800-SAMSUNG(726-7864) www.samsung.com/ch
RUSSIA 8-800-555-55-55 www.samsung.com
KAZAHSTAN 8-10-800-500-55-500 www.samsung.kz
UZBEKISTAN 8-10-800-500-55-500 www.samsung.uz
KYRGYZSTAN 00-800-500-55-500
TADJIKISTAN 8-10-800-500-55-500
UKRAINE 8-800-502-0000 www.samsung.com
LITHUANIA 8-800-77777 www.samsung.lt
LATVIA 800-7267 www.samsung.com/lv
ESTONIA 800-7267 www.samsung.ee
AUSTRALIA 1300 362 603 www.samsung.com
NEW ZEALAND 0800SAMSUNG(726-7864) www.samsung.com/nz
CHINA 800-810-5858 , 010-6475 1880 www.samsung.com
HONG KONG 3698-4698 www.samsung.com/hk
INDIA 3030 8282 , 1800 110011 www.samsung.com
INDONESIA 0800-112-8888 www.samsung.com
JAPAN 0120-327-527 www.samsung.com/jp
MALAYSIA 1800-88-9999 www.samsung.com/my
PHILIPPINES 1800-10-SAMSUNG(726-7864) www.samsung.com/ph
SINGAPORE 1800-SAMSUNG(726-7864) www.samsung.com
THAILAND 1800-29-3232 , 02-689-3232 www.samsung.com
TAIWAN 0800-329-999 www.samsung.com/tw
VIETNAM 1 800 588 889 www.samsung.com
TURKEY 444 77 11 www.samsung.com
SOUTH AFRICA 0860-SAMSUNG(726-7864 ) www.samsung.com
U.A.E 800-SAMSUNG (726-7864), 8000-4726
844 000 844
Distributor pro Českou republiku:
Samsung Zrt., česka organizační složka
Vyskočilova 4, 14000 Praha 4
3260 SAMSUNG ( 0,15/Min),
08 25 08 65 65 ( 0,15/Min)
01805 - SAMSUNG(726-7864) ( 0,14/Min)
0900-SAMSUNG(726-7864) ( 0,10/Min)
www.samsung.com/cz
www.samsung.com
www.samsung.com
www.samsung.com/nl
www.samsung.com
 Loading...