

Page 1

- MP3 and WMA playback
- Removable Storage Device
- Encoding function
- FM reception
- 3D sound
- Upgradable
- 12 hours of continuous play
YP-T5
AH68-01523A (Rev 0.0)
Page 2

English
3
Contents
2
Basic Usage
Playing Music and Turning Off the Device 26
Adjusting the Volume/Hold Function 27
Recording Voice 28
MP3 Encoding 29
Searching for Music/Voice Files 30
Listening to FM Radio 31
FM Encoding 33
Preparations
Safety Instructions 4
Features 6
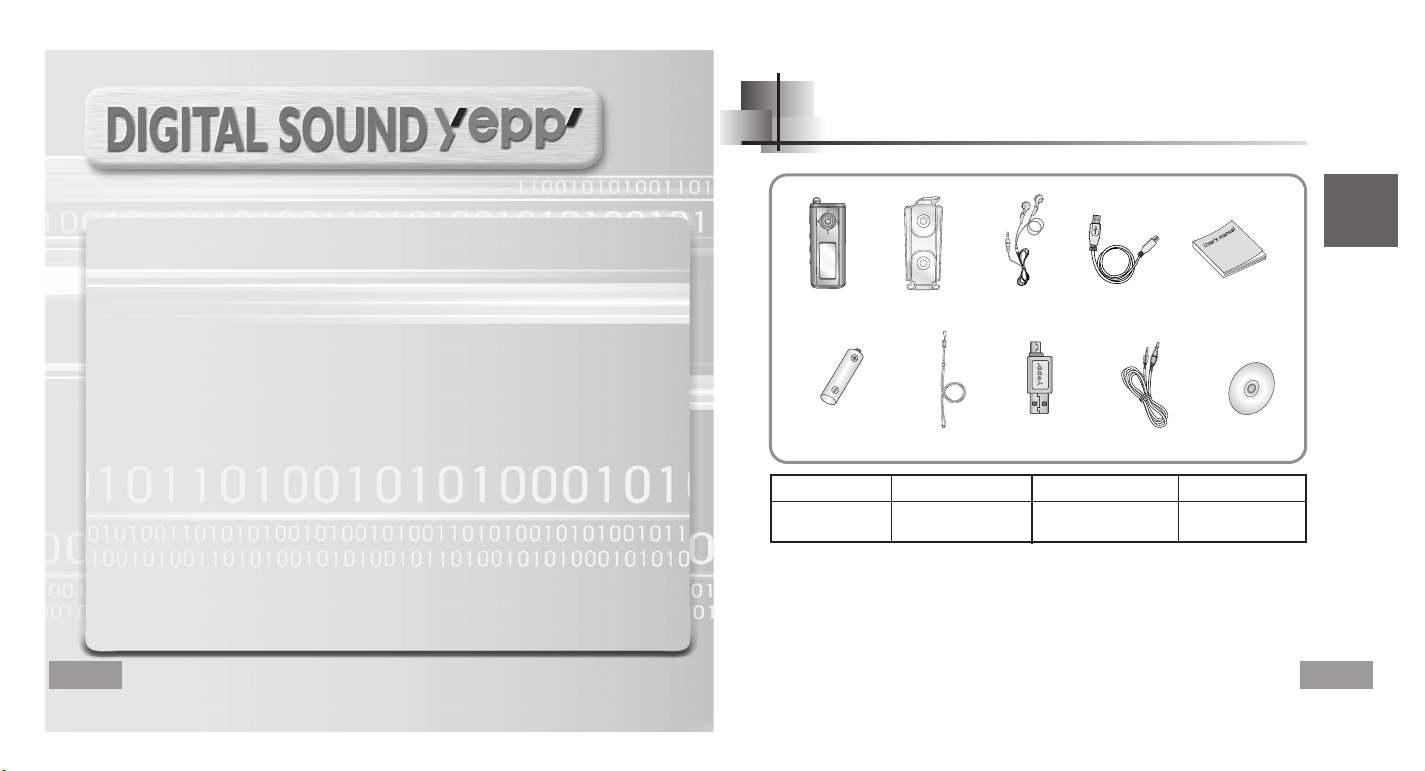
Accessories 9
Location of Controls (yepp) 10
Connection to Computer
Connecting the yepp to a PC 12
Manual Installation of the USB Driver 16
Using the removable storage 20
● Downloading/Uploading files 20
● Disconnecting the USB cable 21
● Formatting 22
Installing yepp Studio 23
● To View Help on yepp Studio 25
Loop Repeating 34
Using Navigation 35
Setting Playlist 36
Setting up MENU 37
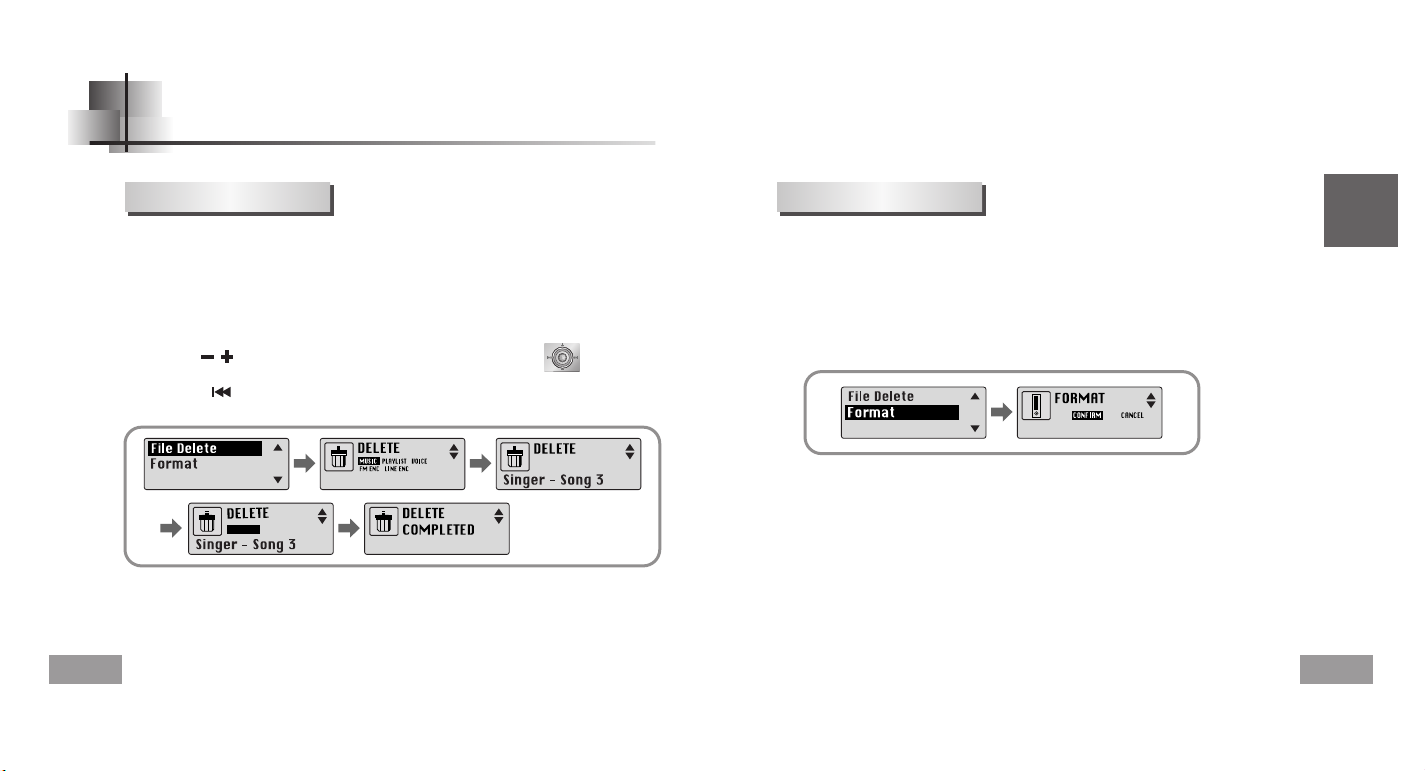
Managing Files 38
● Deleting 38
● Formatting 39
Setting the Advanced Functions 40
Selecting the Playmode 41
Setting the EQ mode 42
Display 43
● Scroll Speed/Lyric On/Off/Time 43
● Backlight 44
● Contrast 45
Power Off Time 46
● Time / Sleep 46
Encoding 47
● Bitrate / AutoSync Time 47
WOW Level 48
● Adjusting SRS and TruBass LEVEL 48
● WOW Optimum 48
Default Volume 49
Appendix
MENU Table 50
Customer Support
Troubleshooting 52
Specifications 54
Additional Usage
Page 3
English
5
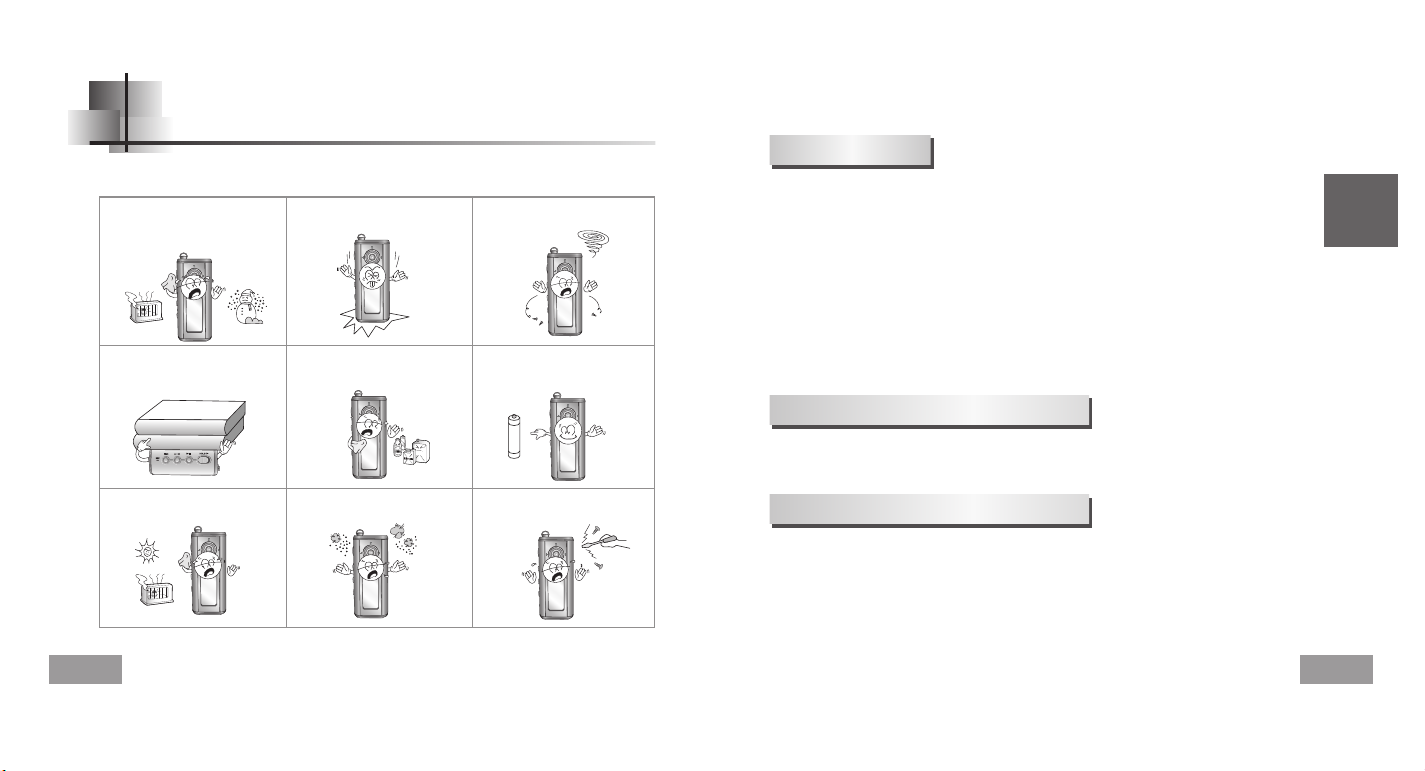
Safety Instructions
Earphones
Follow Traffic Safety Instructions
●
Do not use the earphones while driving an automobile or riding a bicycle.
It’s not only dangerous, but also against the law.
●
An accident may result if you turn up the volume of the earphones too high while walking
down the street, especially when crossing at intersections.
Protect your ears
●
Do not turn the volume up too high.
Doctors warn against prolonged exposure to high volumes.
●
Stop using the device or turn the volume down if you get ringing in your ears.
●
Follow local guidelines for waste disposal when discarding packaging, batteries,and old
electronic appliances.
●
yepp packaging uses cardboard, polyethylene etc., and does not use
any unnecessary materials.
●
Ambient temperature : 5°C ~ 35°C (41°F ~ 95°F)
●
Humidity : 10% ~ 75%
Read and understand all the instructions to avoid injury to yourself and damage to the equipment.
✽
Please be aware that we disclaim all responsibility for damages from loss of saved
or recorded data due to breakdown, repair or other causes.
Do not expose to extreme temperatures (above 95°F or below 23°F).
Do not expose to moisture.
Do not apply excessive pressure
to the device.
Do not expose to chemicals such
as benzene and thinners.
Remove batteries when the device
is left unused for a long period of
time.
Do not expose to direct sunlight
or heat sources.
Do not store in dusty areas.
Do not place heavy objects on top
of the device.
Do not let any foreign matter spill
into the device.
Do not try to disassemble and
repair the device yourself.
Ambient operating conditions
Environmental Information
4
Page 4
MP3 & WMA Playback
● MP3 is an MPEG1 Layer3 audio format.
● WMA is a Microsoft Windows Media audio format.
Removable Storage Device
● You can easily copy and paste files to the yepp player using Windows Explorer.
Encoding Function
● You can make an MP3 file from an external source using the ENC jack
on the main unit.
● You can also convert an FM radio program into an MP3 file in real time.
FM Reception
● Listening to an FM program is made easy with Auto Search and Frequency
Memory functions.
3D Surround Sound
● You will hear deep bass and 3D surround sound.
Upgradable
● You can upgrade the built-in programs when available.
Add functions, CODEC, etc. Please check the yepp home page for upgrades.
6
7
English
Page 5
English
9
12-Hour Continuous Play
● This unit uses one AAA/LR03 alkaline battery. Operation can last up to 12hours.
Actual playing time may vary according to the type and capacity of the battery.
Voice Recording Function
● You can do a Voice Recording with high quality and use it for a conference.
Sound
● You can adjust the equalizer manually.
●
The capacity of the useable built-in memory is less than indicated as the internal firmware
uses a part of the memory as well.
●
Design of accessories is subject to change, for the purposes of improvement, without notice.
Accessories
Player
Earphones USB cable User manual
Installation CD
One Battery
(1.5V AAA/LR03 type)
Neck Strap
Carrying case
Direct Connect
USB Adaptor
Line In Cable
Model
Built-in memory
YP-T5 H
128MB
YP-T5 V
256MB
YP-T5 X
512MB
8
Page 6
English
Location of Controls (yepp)
11
10
Playtime indicator
Mode indicator
Bit rate indicator
Play mode indicator
Equalizer, SRS indicator
Play/Stop/Pause indicator
Remaining Battery Power indicator
Track Number indicator
Title (track & artist) indicator
Display
Inserting a Battery
Recording Button
Play/Pause Button
Hold Switch
Loop Repeating Button
USB Cable
Connection Port
ENC Jack
Microphone
Neck strap Hook
MENU, Navigation button/
Move to Track/Speed Search/
Volume Button
Display
Earphone Jack
Battery Cover
Slide the cover in the
direction of the arrow to open.
Insert a battery to the right poles
+ , – and push-close the cover in the
direction the arrow as indicated.
1
2
NNNNoooottttee
ee
●
Do not place heavy objects on the cover.
➡
Page 7
English
13
Connecting the yepp to a PC
12
Before connecting yepp to PC, make sure to install
USB driver. If “Add New Hardware Wizard”appears,
press the [Cancel] button and install the USB driver.
System
Requirements.
The PC system must meet the
following specifications:
●
Pentium 133MHz or greater.
●
Windows 98SE/ME/2000/XP.
●
40MB of available hard disk space
●
CD-ROM drive.
(double speed or greater)
●
USB port (1.1) supported.
●
DirectX 8.0 or above.
Continued...
NNNNoooottttee
ee
●
Install the operating system in
Administrator Account mode for Windows
2000 or XP. Otherwise, installation will not
be completed.
●
Windows ME, 2000 and XP can recognize
the driver without installing the provided
program. However, you must install the
program in order to format yepp and
upgrade firmware.
●
If the YP-T5 program has not been
installed in Windows 98, then it will not
communicate with your removable disk.
You must install the USB driver file first.
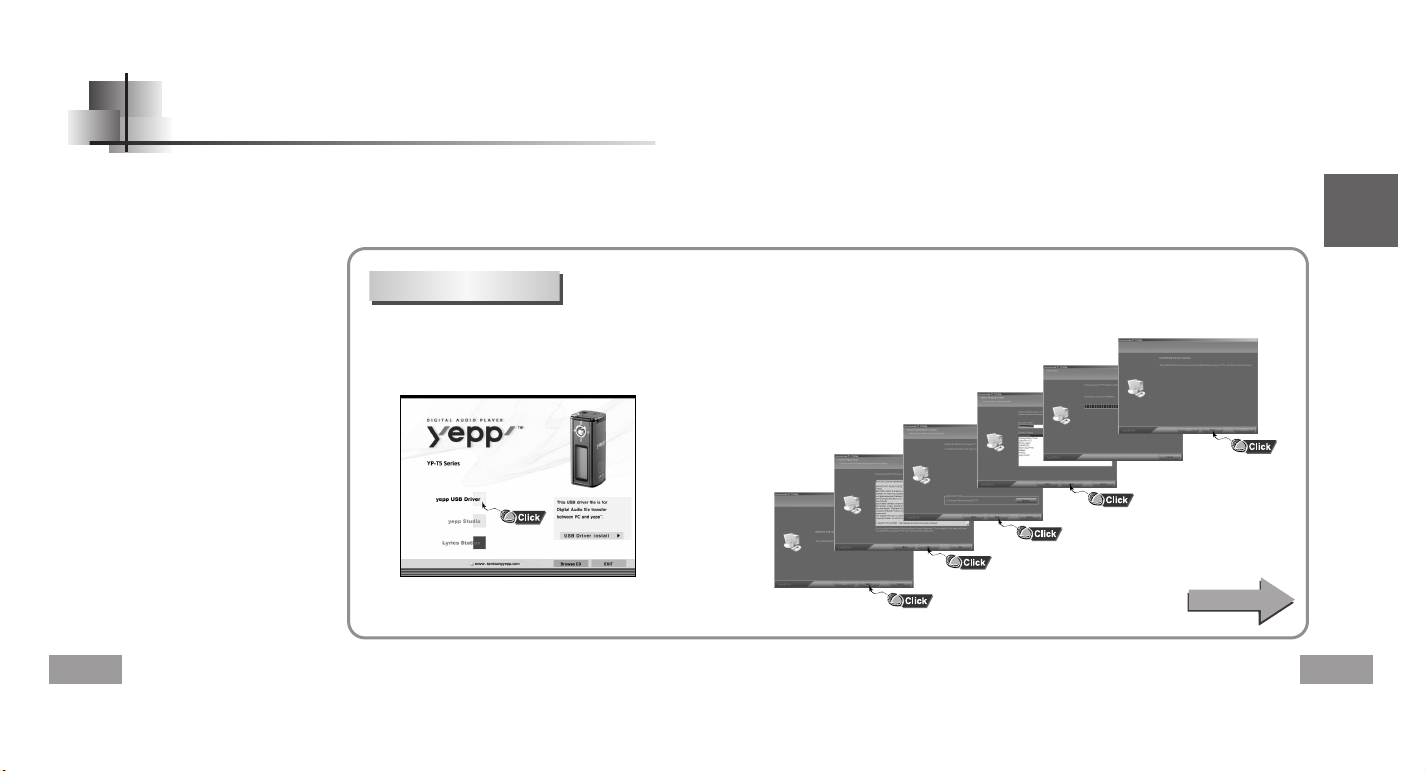
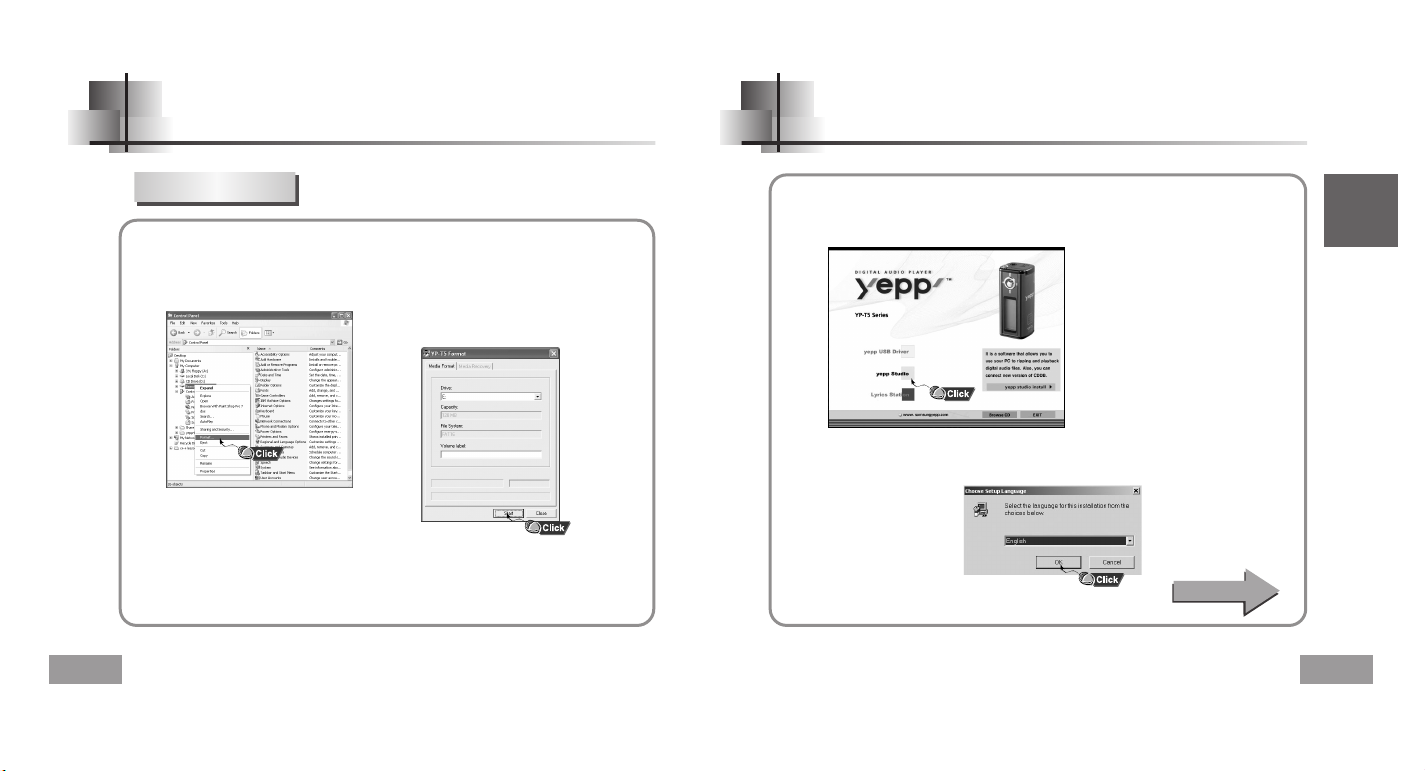
Installing software
1
Insert the Installation CD into the CD-ROM drive.
The picture shown below appears.
Select [yepp USB Driver]
2
Click [Next] in the series of windows that appear.
NNNNoooottttee
ee
●
Lyrics Station is currently available only in Korean songs.
Page 8
English
15
14
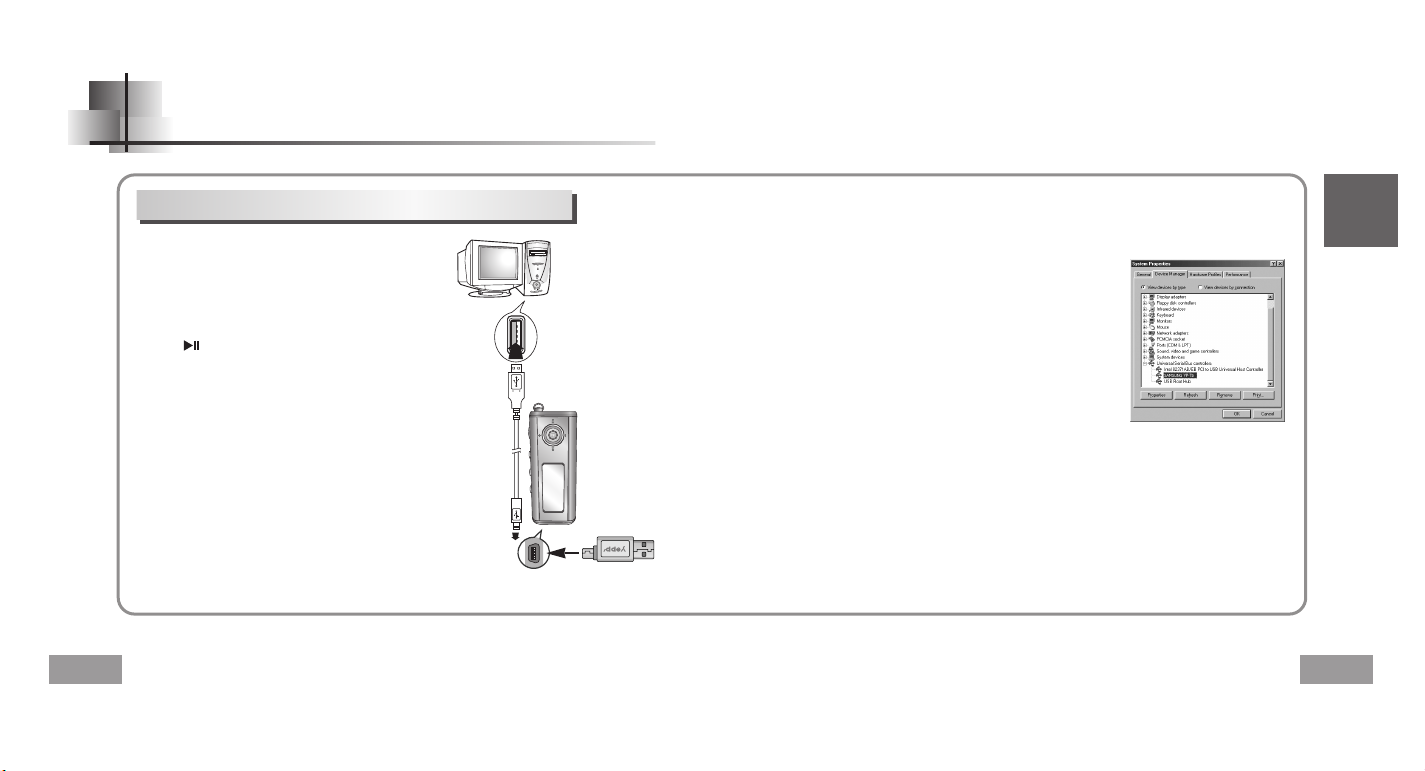
Connect a USB cable to the USB port on the
computer.
Connect the other end of a USB cable to the USB cable
connection port on the bottom of the yepp, and press
the button on the main unit.
●
If you disconnect the USB cable from your PC while
implementing a command or initializing during USB
driver installation, your PC may not function correctly.
4
Upon installation of the USB driver
"SAMSUNG YP-T5" will appear in the
[System Properties]→[Device Manager].
6
3
The USB driver is installed with a message saying that
it is searching for a new device. You may not see the
display screen during installation.
Go to the device manager to check that
installation has been successfully completed.
5
How to check the USB driver
●
Windows 98:
Control Panel→System→Device Manager
→
Universal Serial Bus controllers/Samsung YP-T5 Class
●
Windows 2000/ME:
Control Panel→System→Hardware
→
Device Manager→Universal Serial Bus controllers
→
USB Mass Storage Device
●
Windows XP:
Control Pane→System→Hardware→Device Manage
→
Universal Serial Bus controllers→USB Mass Storage Device
When the USB driver is not installed automatically,
refer to the next page.
7
Connecting the yepp to a PC with a USB cable
Connecting the yepp to a PC
USB connect cable
Page 9
English
17
Manual Installation of the USB Driver
16
Go to “Downloading/Uploading files” on page 20 if the USB driver is in place.
Follow these steps if the USB driver is not in place :
Check the device manager.
●
Windows 98/ME:
Control Panel→System→Device Manager
●
Windows 2000 (Professional):
Control Panel→System→Hardware
→
Device Manager
●
Windows XP (Professional):
Control Panel→System→Hardware
→
Device Manager
1
Check if there is a device listed with an
exclamation point or a question mark
(displayed as unknown device or USB device).
2
Double click on the device listed with an exclamation
point or a question mark.
3
After selecting the driver,
click on [Update Driver].
4
Select a compatible driver,
click on [Next] to finish.
5
NNNNoooottttee
ee
●
If you are using Windows 2000 and your version of Windows does not recognize the USB driver
please download and install the latest service pack from windowsupdate.microsoft.com
●
The installation method may vary depending on the type of PC or operating system.
Contact your PC dealer or service center for installation information.
●
If errors occur continuously when you install the USB driver,
reconnect the USB cable after rebooting your system.
When an error occurs during installation of the USB driver
Page 10

English
19
18
In Windows 98
Manual Installation of the USB Driver
●
You must reboot your computer to
complete the installation.
USB driver location
[CD ROM]\setup\Drivers
NNNNooootttteeee
●
You cannot use it as a removable disk in Windows 98 if the YP-T5 program is not installed.
Make sure to install the USB driver file first.
Click [Next] button in the series of windows that appear.
Page 11
English
21
20
Using the removable storage
1
2
NNNNoooottttiiiicccceeee
●
The “WRITING/READING” message will appear during file
download or upload. Disconnecting the USB cable while
“WRITING/READING” is displayed may cause
malfunction of the unit.
●
The order of music files is not relative to the replay order
when you select a Removable Disk in Windows Explorer.
Turn on the yepp and connect yepp to PC.
Open Windows Explorer on PC.
3
Select the file to save and drag-and-drop it into the removable disk icon.
(In numerical, alphabetical order)
Downloading/Uploading files
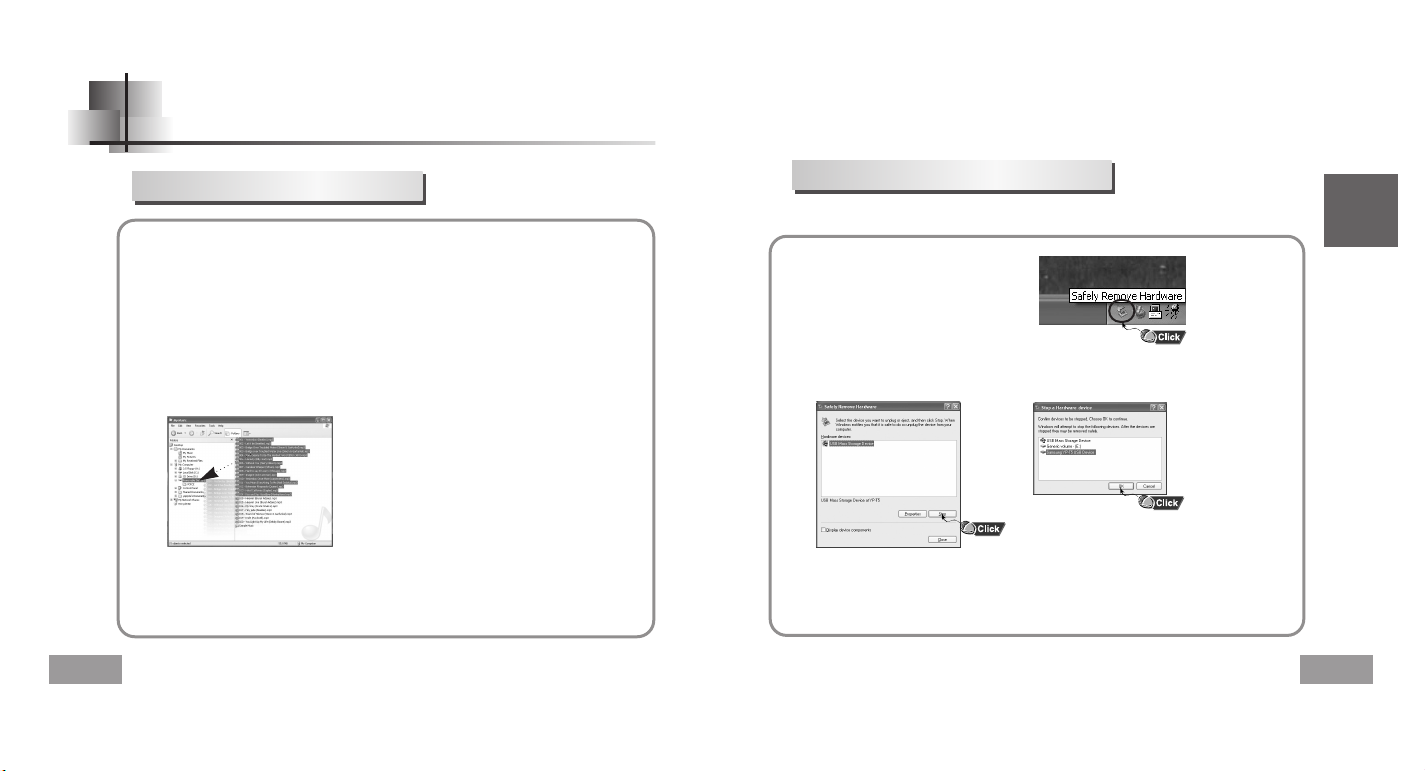
Disconnecting the USB cable
After completing the file transmission, you must disconnect the cable in the following way:
NNNNooootttteeee
●
The green arrow is not displayed on the Task Bar in Windows 98 system.
If “READY” message is shown in Display window, please disconnect the USB cable.
1
Double-click on the green arrow in
the taskbar on the bottom right of
the window.
2
When the [ Stop a Hardware device ] message appears,
press the [OK] button and disconnect the USB cable.
➡
Page 12
Installing yepp Studio
23
English
Using the removable storage
22
1
Select the removable disk
icon and click the right mouse
button to select [Format].
2
Press the [Start] button.
●
All saved files will be formatted.
●
You can change the name of
removable disk by selecting
[Volume label].
NNNNooootttteeee
●
By formatting, all previously preset menus will be initialized.
●
Care must be taken as formatted files can not be recovered.
Formatting
1
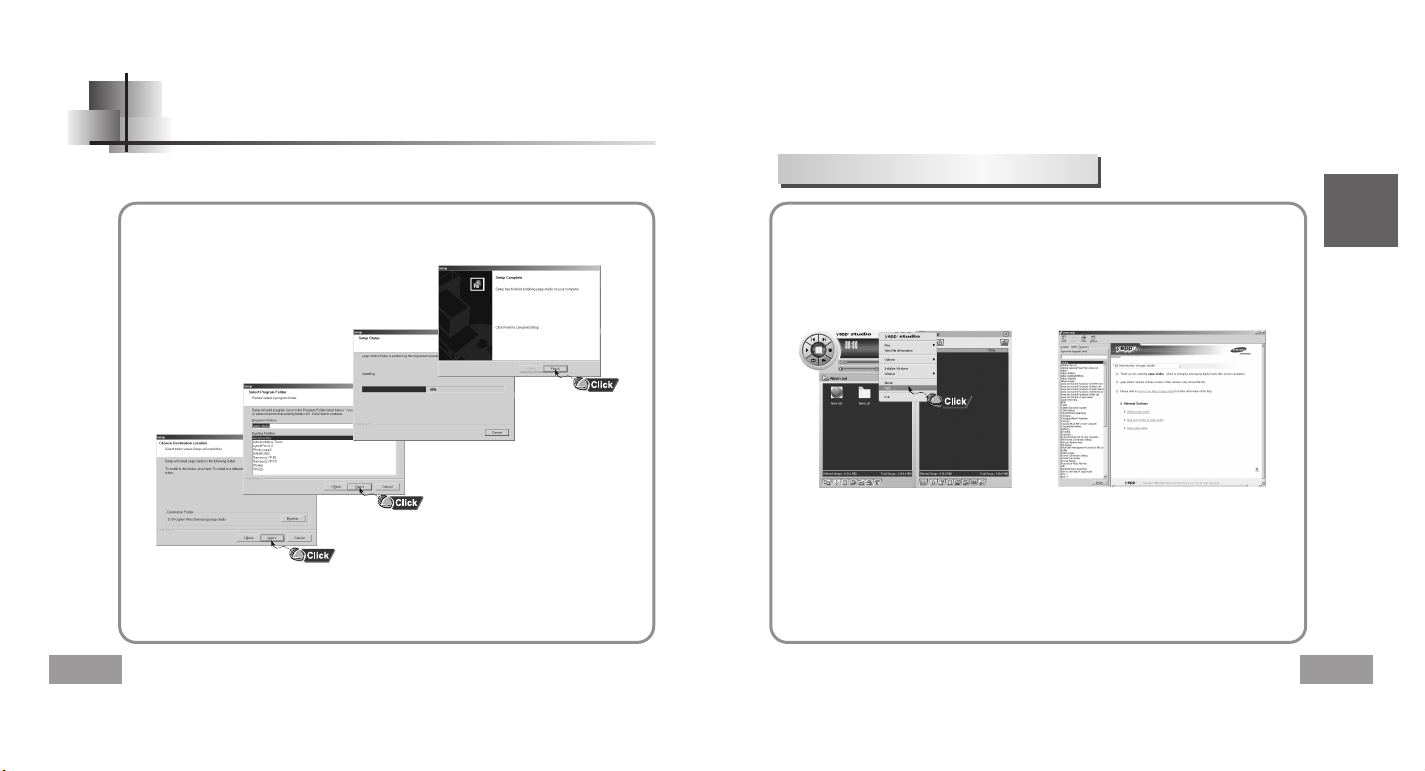
Insert the Installation CD into CD-ROM drive.
Select [yepp Studio].
2
Select language
Continued...
Page 13
English
25
Installing yepp Studio
24
3
Click [Next] in the series of windows that appear.
●
Please refer to Help for more information on how to use yepp Studio.
Run yepp Studio and press F1.
●
Help will appear.
Move the arrow to the top of yepp Studio and right click on the mouse.
The following selection window will appear.
●
Click on Help and the Help window will appear.
➡
NNNNoooottttee
ee
●
Music recognition technology and related data are provided by Gracenote and Gracenote
CDDB® Music Recognition ServiceSM.
●
CDDB is a registered trademark of Gracenote. The Gracenote logo and logotype,
the Gracenote CDDB logo and logotype, and the "Powered by Gracenote CDDB" logo are
trademarks of Gracenote. Music Recognition Service and MRS are service marks of Gracenote.
NNNNoooottttee
ee
●
When the [Register Serial Number] message appears, at your first execution of yepp Studio,
enter the yepp’s serial number.
To View Help on yepp Studio
Page 14
English
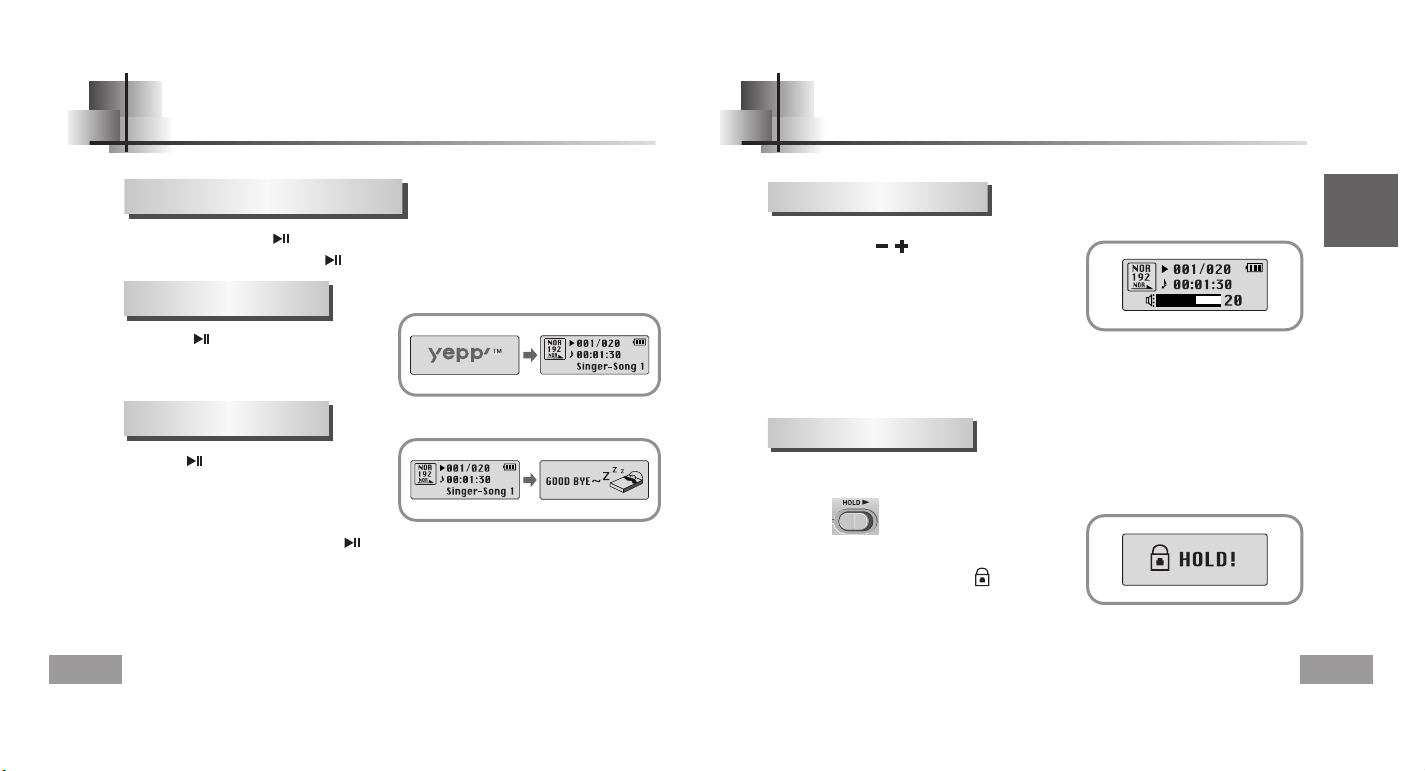
Adjusting the Volume/Hold Function
27
Playing Music and Turning Off the Device
26
Press the player’s , key during playback to
adjust the volume.
NNNNoooottttee
ee
●
Volume ranges from 00 to 30.
●
Press once to adjust the volume by one step.
Press and hold to increase or decrease the volume in greater increments.
In Hold mode, all buttons are disabled.
Slide the switch on the player in the
direction of the arrow.
●
When the button is pressed, the “ HOLD!”
message will appear on the display.
Adjusting the Volume
HOLD Function
Press the button.
● Playback starts.
● Power On : Press the button to turn on the power.
● Power Off : Press and hold the button to turn off the power.
Press the button to pause playback.
● If no buttons are pressed within 10 seconds
(changes depending on settings),
the yepp automatically powers off.
● While in Pause mode, briefly press
again to resume playback.
NNNNooootttteeee
●
WMA files can be played only as music files with a compression rate of 48Kbps-192Kbps,
that can be created in Windows Media Player (Version 8.0).
●
The power off time can be set in the menu.
Playing Music
Turning Power On and Off
Pausing Music
Page 15
MP3 Encoding
29
English
Recording Voice
28
1
Press the REC button to start voice recoding.
If the REC button is pressed again, the recording stops and a voice file
is created.
2
NNNNooootttteeee
●
Recording is performed in order (V001, V002, etc.)
and files are saved in the WAV format after recording.
●
If the Memory is full, the Voice Recording is stopped automatically.
●
Voice Recording does not work in FM Mode or when the Line In cable is connected.
To Record Voice
1
Connect the Audio Output port on the external audio source
(or the Line Out port) to the ENC port on the device with the Line cable.
2
Press the REC button to start MP3 encoding.
●
If the button is pressed, encoding is paused and if the button is pressed again,
the encoding resumes.
3
If the REC button is pressed during encoding, the encoding stops and an
encoding file is created.
●
Encoding is performed in order (L001, L002, etc.)
and files are saved in the MP3 format after encoding.
NNNNoooottttee
ee
●
Bit Rates can be set within the range of 32Kbps~128Kbps.
●
Volume can be adjusted from level 0 to 10 while monitoring the Encoding.
NNNNoooottttiiiicccceeee
●
Do not disconnect the Line cable during Encoding.
●
If the battery is not charged enough, encoding will not be done.
●
Adjust the volume of the external audio source to a suitable level and encode it.
If the volume level is extremely high, the sound quality may not be good.
Page 16
English
31
Searching for Music/Voice Files
30
NNNNooootttteeee
●
VBR(Variable Bit Rate) file: A file that constantly changes the compression rate according
to the type of sounds, such as their pitch, in the file.
●
In the case of a VBR file, you cannot move to and play the previous track even if you push the key within
5 seconds after playback starts.
●
Files that were downloaded in MP2 or MP1 and had their file extension changed to MP3 may not play.
●
Pull and hold the , keys to the left or right during playback to search for
the part you want to listen to.
●
Release the key to resume play normally.
To search for specific parts during play
●
Pull the key briefly during playback to play the next track.
●
Pull the key briefly within 5 seconds after playback starts
to move to and play the previous track. Pull the key briefly after five seconds
to play the current track from the beginning.
To change tracks during play
●
Pull the , keys to the left or right in stop mode to move to the previous/next track.
To change tracks when stopped
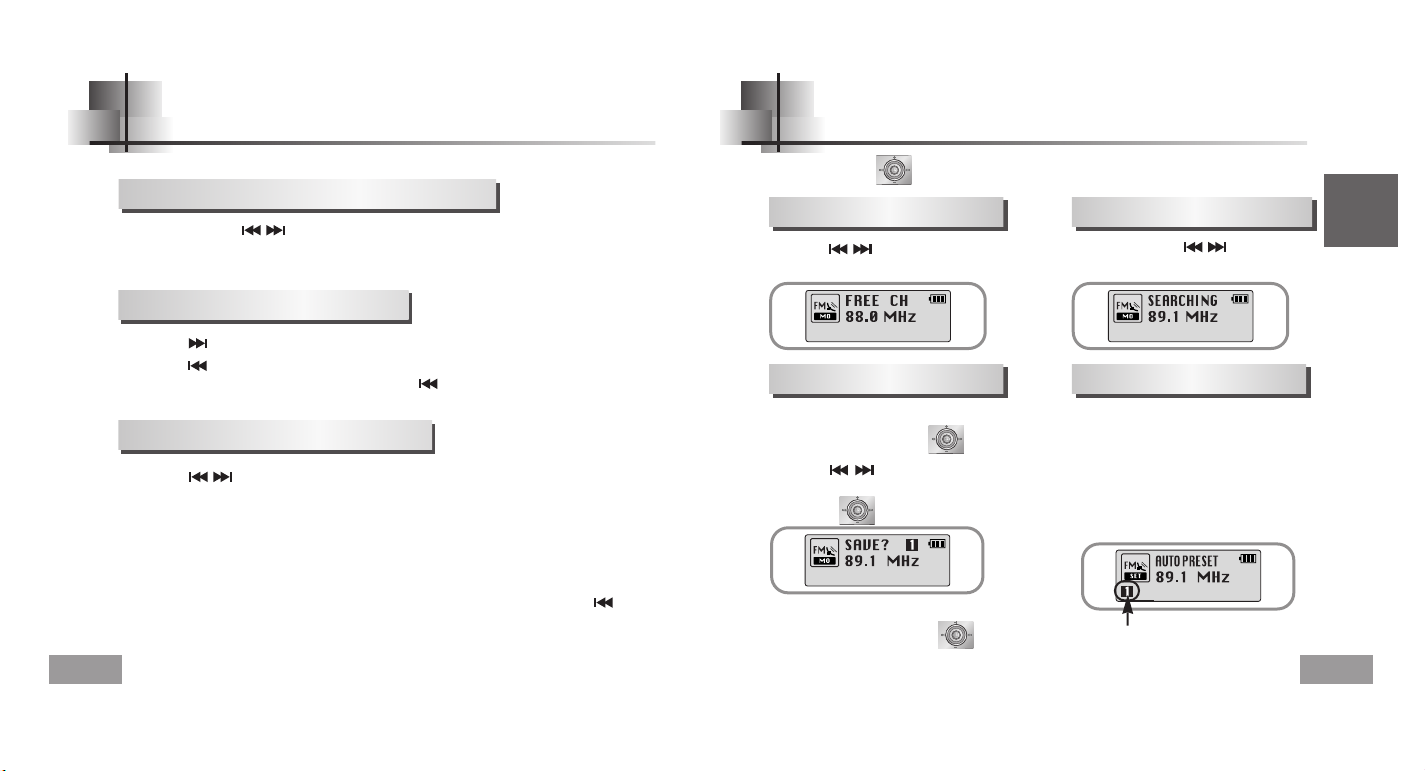
Listening to FM Radio
First, press the key to display the menu screen and select FM Radio.
●
Pull the , keys briefly to search
manually for the frequency you want.
●
Pull and hold the , keys to search
for and stop at frequencies with reception.
●
After searching manually for the frequency you
want, press and hold the key to display
the Save screen.
●
Use the , keys to select the number you
want to assign to save the frequency and then
press the key.
●
Press and hold the A↔B button
while in FM Mode.
●
Frequencies within the range of
88.0MHz to 108.0MHz are automatically
selected and stored.
●
Frequencies are automatically stored,
starting from 1.
NNNNoooottttee
ee
●
To exit from FM Mode press the key.
●
Mono (MO) or Stereo (ST) is automatically selected.
Number of channels saved.
Manual Search for a Frequency
Automatic Search for a Frequency
Manual Storage of a Frequency
Automatic Storage of a Frequency
Page 17
English
33
Listening to FM Radio
32
FM Encoding
Searching Stored Frequencies
NNNNoooottttee
ee
●
You can store up to 20 frequencies.
●
Press the button in the PRESET screen to exit the PRESET mode.
1
Press the button in FM Mode.
●
PRESET screen will appear.
Use the , keys to move to the frequency you want.
2
Deleting Stored Frequencies
- After moving to the PRESET number you want to delete, press and hold the key.
●
The saved PRESET number will be deleted.
1
Press the REC button during FM reception.
●
Encoding of the currently transmitted FM broadcast begins.
2
Press the REC button again.
●
A file is created and the encoding stops.
●
Files are saved in order of F001, F002, F003...and stop automatically when the memory is full.
Page 18
Using Navigation
35
English
Loop Repeating
34
Starting Point
While playing music files, press the
A↔B button briefly at the beginning
of the loop you want to set.
A↔ appears in the display.
Ending Point
Press the A↔B button briefly
again to set the end of the loop.
A↔B appears in the display.
The loop is played repeatedly.
NNNNoooottttee
ee
●
Press the A↔B button briefly to cancel the loop.
●
Loop Repeat is automatically released if you Speed Search with the , buttons.
NNNNoooottttee
ee
●
Press and hold the key in Navigation mode to exit Navigation mode.
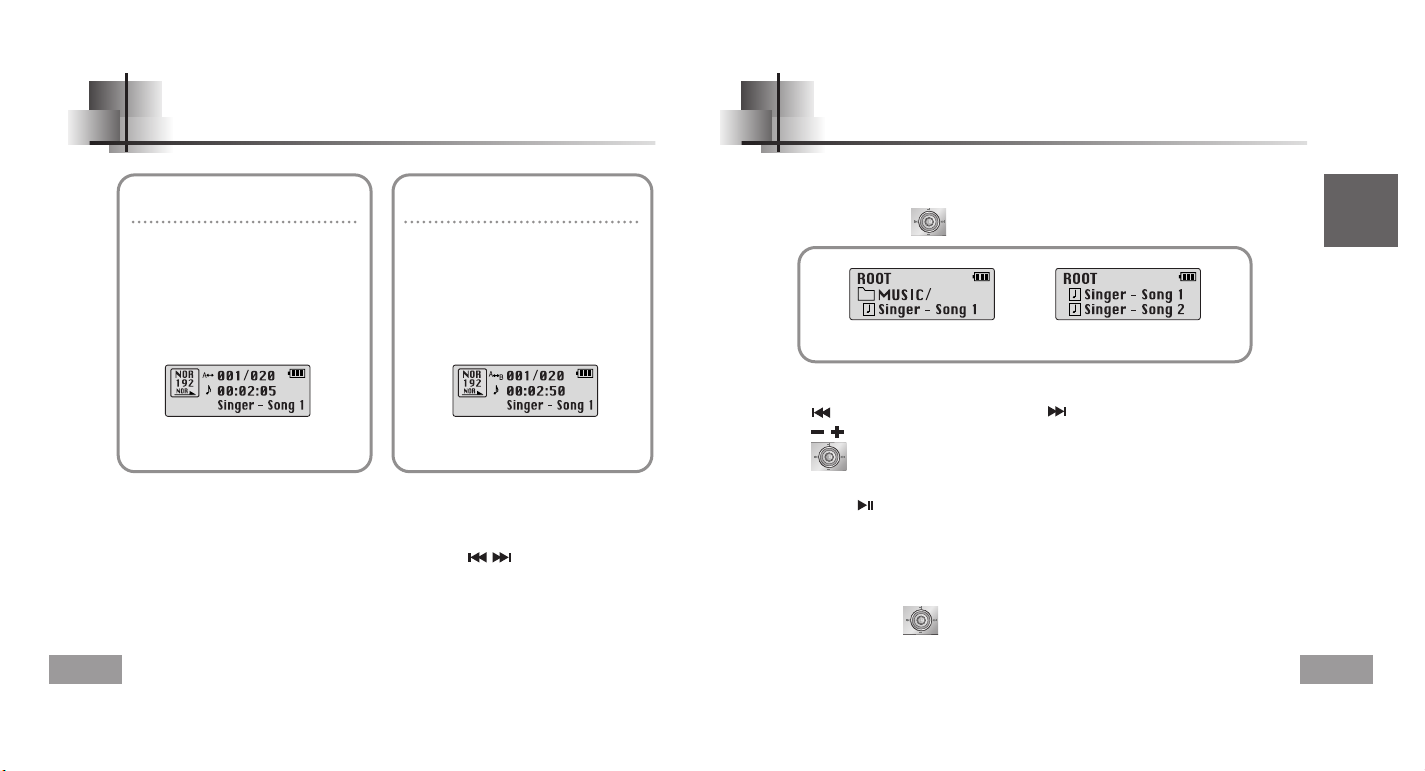
1
Press and hold the button to move to Navigation mode.
2
Select the file or folder that you want to play.
●
: When moving to a higher-level folder. ●: When moving to a lower-level folder.
●
, : When moving to a file or folder in the same directory.
●
: Move to the next folder down. When there is not a lower folder,
the selected file will be designated as part of the playlist.
When the folder is in play or stop status. When the file is in play or stop status.
3
Press the button.
●
The selected file will be played.
●
If you select a folder, all the files in the selected folder will be played.
You can easily search for files or switch modes using the Navigation function.
Page 19
English
Setting up MENU
37
Setting Playlist
36
NNNNoooottttee
ee
●
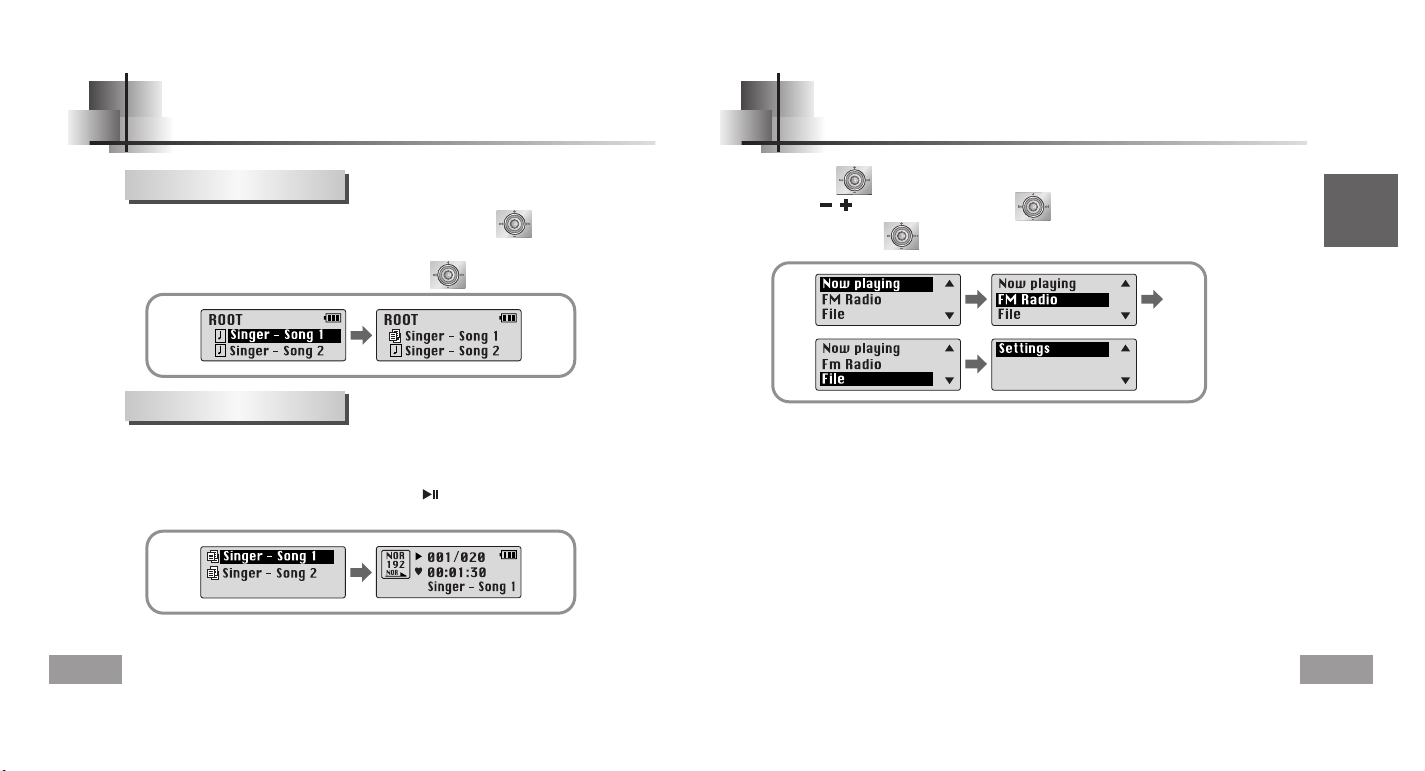
Select PLAYLIST in File Delete (see “Deleting”) to release all the playlists you set.
- Move to the file you want in Navigation mode and press the key.
●
The selected file will be marked.
●
To release the playlist setting,
move to the marked file in Navigation mode and press the key again.
●
Now playing : To check the track currently played.
●
FM Radio : To listen to FM radio.
●
File : To delete or format files.
●
Settings : To set the detailed function of yepp.
NNNNoooottttee
ee
●
In MENU mode, no input for 15 seconds will cancel the MENU mode.
Press the key to switch to MENU mode.
Use the , key to move and press the key briefly to select the menu you want.
Press and hold the key to exit the MENU mode.
Setting Playlist
1
Press and hold the A↔B button in Music mode.
●
The Playlist you set will be displayed.
2
Move to the file you want to play and press the button.
●
The selected file will be played.
Playing Playlist
Page 20
English
39
Managing Files
38
1
Select File in the MENU. (refer to “Setting up MENU”)
2
In File, select File Delete and the mode the target file is in.
3
Use the , key to move to the file you want to delete, press the key and
select CONFIRM.
Press the key briefly to exit the setting.
CONFIRM
CANCEL
Deleting
1
Select File in the MENU. (refer to “Setting up MENU”)
2
Select Format in File.
●
Formatting is performed if CONFIRM is selected.
NNNNoooottttee
ee
●
All files will be deleted when formatting the built-in memory.
●
It is recommended that formatting be carried out on a PC that has the provided program installed as
formatting in the Menu may take a long time.
Formatting
Page 21
Selecting the Playmode
41
Setting the Advanced Functions
English
Settings
1
Select Settings in the MENU. (Refer to “MENU Mode”)
2
In Settings, use the , key to move to the function you want and
press the key to select.
●
Use key to move to upper menu.
40
1
Select Playmode in Settings.
2
In Play mode, use the , key to move to the mode you want and
press the key to select.
●
Normal: To play all the tracks in order one time.
●
Repeat one: To repeat one track.
●
Repeat all: To repeat all tracks.
●
Shuffle: To play tracks at random.
●
Intro: To listen to the first part of all saved tracks for 10 seconds.
Page 22

Display
43
English
Setting the EQ mode
42
1
Select Sound in Settings.
2
In Sound, use the , key to move to the sound mode you want and press the key.
NNNNoooottttee
ee
●
is a trademark of SRS Labs, Inc.
WOW technology is incorporated under license from SRS labs, Inc..
●
Please adjust the volume to a suitable level, as the volume may increase in the SRS setting.
●
This unit supports sampling frequencies of 32KHz, 44.1KHz or 48KHz.
●
The SRS function is not set for voice recording files.
3
Select User and set the Bass/Treble if you want to set the tone yourself,
apart from the specified tone.
●
Bass/Treble can be adjusted from 0 to 10 with the , key.
●
SRS ( ): You will hear 3D Stereo sound.
●
TruBass ( ): This is a bass boost feature that adds fullness to the sound.
●
WOW: This feature allows you to enjoy the SRS and Trubass features simultaneously.
●
If you want bass boost, select DBB.
●
Use the , key to set the scroll speed.
●
The setting range for the scroll speed,
which adjusts the speed of the track title flow, is 0 to 10.
Select Display in Settings.
Scroll Speed
●
Use the , key to select LYRIC ON or OFF.
●
ON: The saved lyrics are shown on the display screen
when playing music.
● OFF: The lyrics are not shown even if they are saved.
● This function is currently available only in Korean songs.
LYRIC
ON OFF
Lyric On/Off
●
Play time: Displays the current play time
●
Remain time: Displays the remaining play time
●
Used size: Displays the size of memory used.
●
Free size: Displays the remaining memory
Time
Page 23
English
45
Display
44
●
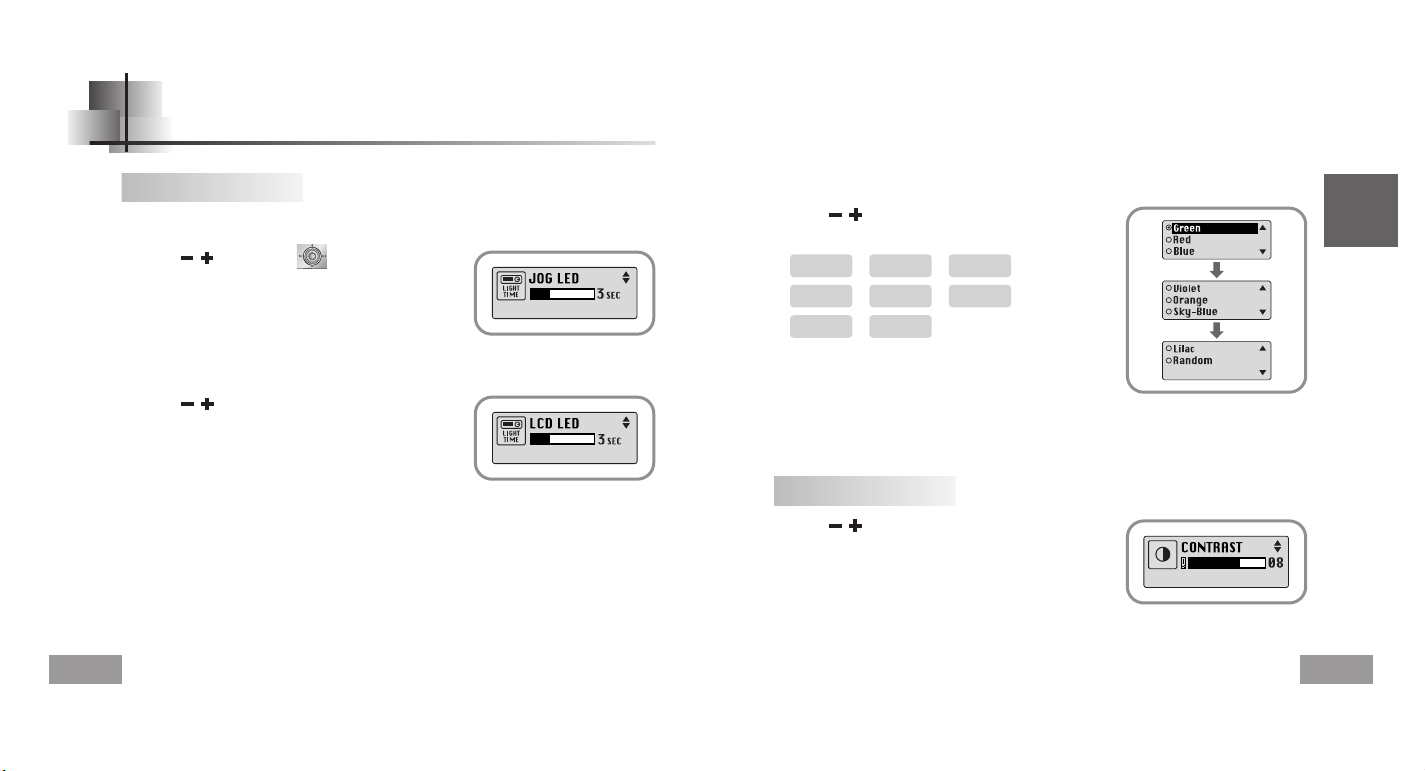
Use the , key to set the Light-On time.
●
The setting range for Light-On Time is 0 to 10 seconds.
●
When set to On, the Light stays on continuously.
●
Use the , key to set the LCD Light-Off time.
●
The setting range for Light-On Time is 0 to 10 seconds.
●
When set to On, the Light stays on continuously.
Backlight
[ Light Time - Jog ]
[ Light Time - LCD ]
●
Use the , key to select the LCD color you want,
out of 7 colors.
[ LCD color ]
NNNNooootttteeee
●
The light does not illuminate when the residual battery level is insufficient.
Green Red Blue
➞➞➞
Violet Orange Sky-Blue
➞➞➞
Lilac Random
➞
Contrast
●
Use the , key to set the contrast.
●
The setting range for the contrast, which adjusts the
brightness of the screen, is from 0 to 10.
Page 24
English
47
46
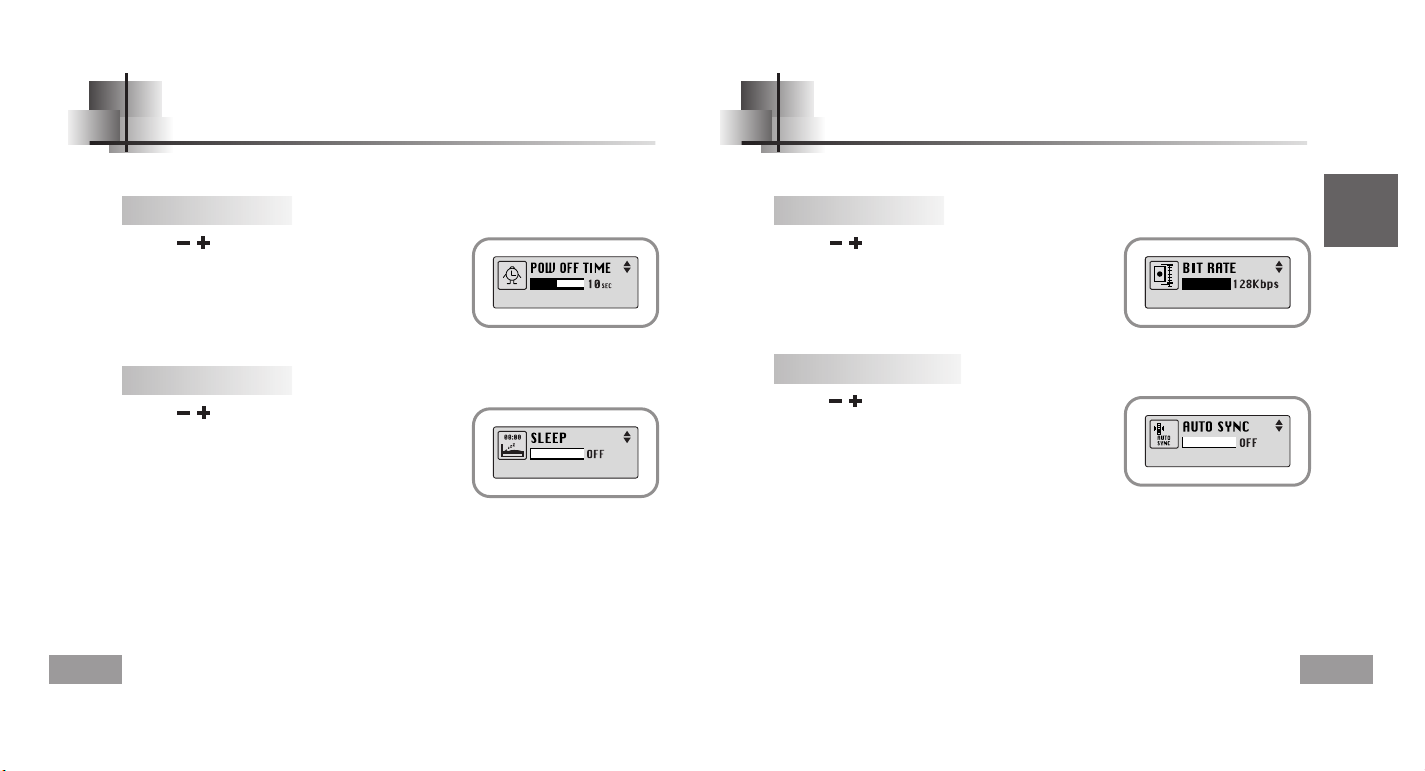
Power Off Time Encoding
Time
●
Use the , key to set the Power-Off time.
●
You can set the time from 0 to 1 minute. If no key is pressed
after play stops, the unit will automatically turn off after the
time you set.
●
If you set it to 0 seconds, it will not turn off automatically.
Sleep
●
Use the , key to set the Sleep time.
●
30, 60, 90 and 120 minutes are available for sleep time,
and it will automatically turn off after the time you set.
●
When set to OFF, the power does not turn off
automatically.
Bitrate
●
Use the , key to set the encoding bit rate you want.
●
When encoding music into an MP3 file, you can select
one of the following bit rates: 32Kbps, 48Kbps, 64Kbps,
96Kbps and 128Kbps.
AutoSync Time
●
Use the , key to set the AutoSync Time.
●
AutoSync Time is a function for separating and saving
MP3 files when there is no sound for a set time during
MP3 encoding.
●
The setting range for the AutoSync Time is from
2 to 5 seconds.
●
If AutoSync Time is set to OFF, encoding keeps going even if there is no sound,
and then it is saved as one file.
Select Encoding in Settings.Select Power off in Settings.
NNNNoooottttee
ee
●
Auto Sync function can support from 64Kbps to 128Kbps.
Page 25
English
49
48
WOW Level Default Volume
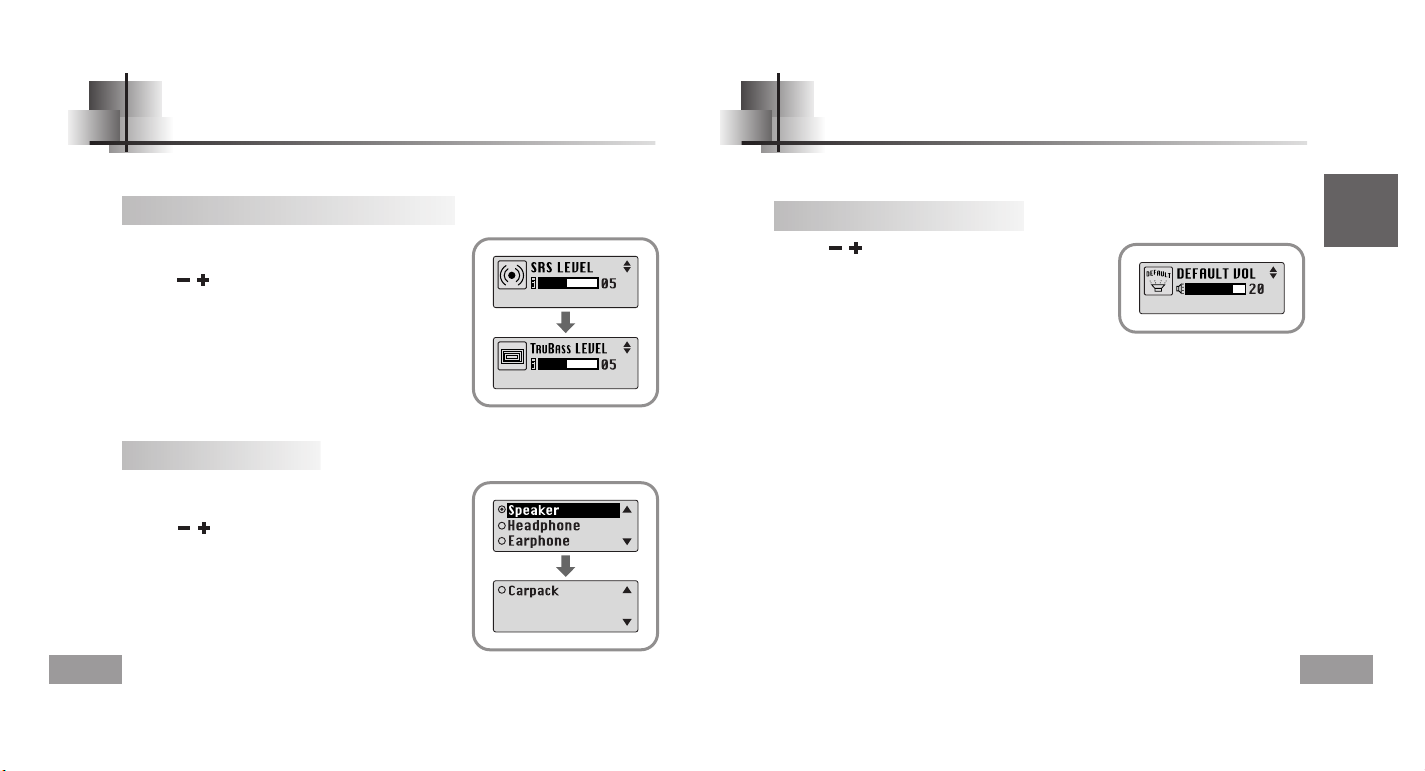
Adjusting SRS and TruBass LEVEL
●
If you select SRS or TruBass in WOW level, you can
adjust the level of SRS and TruBass.
●
Use the , key to select the level you want.
●
The level for SRS and TruBass can each be set
within the range of 0 to 10.
●
If you select WOW Optimum, it optimizes the SRS function
according to the device connected.
●
Use the , key to select Speaker, Headphone,
Earphone or Carpack(car cassette adapter).
WOW Optimum
Select WOW level in Settings.
Default vol
●
Use the , key to set the default volume value.
●
It is possible to set the default volume to a value
between 0 and 25(MAX).
If the power is turned on again after having adjusted the
volume above the default value, music is played at the
default volume.
●
If the power is turned on again after the volume was set to
within the default value, the music is replayed at the previously played volume.
Select Default vol in Settings.
Page 26
English
51
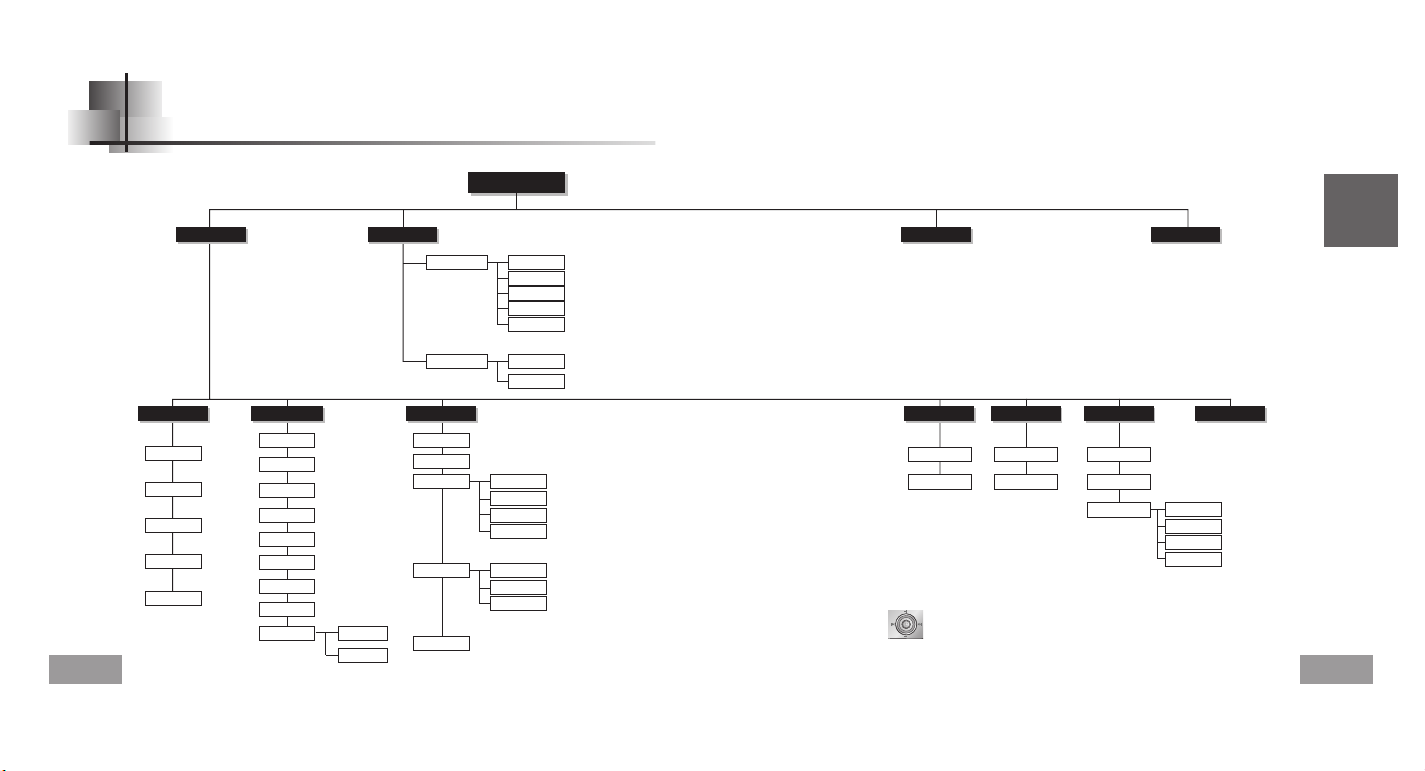
MENU Table
50
Play mode
Settings File FM Radio Now playing
Power offSound Display
SRS
Normal
Repeat one
Repeat all
Shuffle
Intro
TruBass
WOW
Normal
Classic
Jazz
Rock
DBB
User Bass
Treble
File Delete
Format
Time
Sleep
Encoding
Bitrate
AutoSync Time
Default volWOW level
SRS
TruBass
WOW Optimum
Scroll
Lyric
Time
Backlight
Contrast
Play Time
Remain time
Used size
Free size
Speaker
Earphone
Headphone
Carpack
Light Time-Jog
Light Time-LCD
LCD Color
MUSIC
PLAYLIST
VOICE
FM ENC
LINE ENC
CONFIRM
CANCEL
MENU
●
Use the key to move and select.
Page 27

English
53
Troubleshooting
52
The software doesn’t work
●
Refer to the recommended PC specifications.
yepp does not work and the LCD displays nothing.
●
Check the battery capacity
●
Check to see if the battery is inserted to the right poles ( + , – )
In PLAY mode, music is not played after pressing the button
●
Check to see if MP3 or WMA files are saved in the built-in memory.
●
Check to see if the HOLD button is locked.
Files cannot be downloaded.
●
Check to see if the driver is installed correctly in the computer.
●
Check the connection between yepp and computer.
●
Check and/or replace the battery, turn on the yepp's power.
●
Operating system limits the number of files you can save.
Please save your music files by creating a subfolder.
●
Check if the memory is full.
Backlight does not work.
●
Check the backlight setup.
●
When the battery power is low, the backlight will go out.
The buttons do not work.
●
Check setting of Hold switch.
●
Remove the battery once and then insert it again.
The yepp keeps being turned off.
●
In Stop mode, the power is automatically turned off after ten seconds
(changes depending on settings).
●
Check to see if there are files saved in it.
Something’s wrong with play time displayed during Play mode.
●
“VBR SONG” message is displayed while VBR (Variable Bit Rate) file is playing.
LCD window is dark
●
Check Contrast
Page 28

English
Specifications
54
Model YP-T5
Built-in Memory capacity
128MB(YP-T5 H), 256MB(YP-T5 V), 512MB(YP-T5 X)
Voltage 1.5V X 1 (AAA/LR03 size alkaline battery)
Playing time
lasts up to 12hours (Alkaline battery, MP3 128Kbps, Vol level 20)
Dimensions/Weight 23X54X23mm/24g (without battery)
Case Plastic/Aluminuma
Noise Ratio 80dB with 20KHz LPF
Earphones Jack Output Power 5mW(Max 10mW)/CH (16Ω)
Output Frequency Range 20Hz~20KHz
Operating Temperature Range -5 ~ +35°C(23~95°F)
FM Frequency 88.0 ~ 108.0 MHz
FM Signal to Noise Ratio 45dB
FM T.H.D 1%
FM Useable Sensitiivity 10dB
File Support
MPEG1/2/2.5 Layer3(8Kbps ~ 320Kbps, 8KHz ~ 48KHz)
WMA (48Kbps ~ 192Kbps, 8KHz ~ 48KHz)
55
MEMO
Page 29
- MP3 & WMA 지원
- 이동식디스크 기능
- 인코딩기능지원
- FM 수신
- 3D 입체음향 지원
- 자동가사 지원
- 업그레이드 기능
- 최대 12시간 연속재생
안전을 위한 주의사항 (4,5쪽 참조) 사용자의 안전과 재산상의 손해등을 막기위한 내용입니다.
반드시 읽고 올바르게 사용해 주세요.
YP-T5
제품, 모델명, 고장상태, 연락처를 정확히 알려
주시면 고객 여러분의 궁금한 점을 언제나 친절하게
상담, 빠른 서비스를 제공합니다.
서비스센터 대표전화번호 :
(전국 어디서나)
1588-3366
고객상담실
02-541-3000 080-022-3000
인터넷 홈페이지
http://www.sec.co.kr
http://www.yepp.co.kr
[한국A/S 우수기업]
국가기관인 산업자원부 기술표준원에서
소비자에 대한 품질정보나 고객서비스가
우수한 기업임을 인증하는 마크입니다.
인터넷 쇼핑몰
http://www.gosamsung.co.kr
AH68-01482A (Rev 1.0)
홈 페이지를 방문하시면 삼성 오디오 제품에 대한 다양한
정보를 볼 수 있으며 DVD Home Theater(홈시어터),
MP3-CD Player, yepp(MP3), Internet Audio등
첨단 디지털 오디오를 만나실 수 있습니다.
삼성 오디오 홈페이지
http://www.bluetek.co.kr
서비스 센터 홈페이지
www.samsungsvc.co.kr
고객이 직접 원하는 날짜와 시간에 서비스 접수 및 실시간 사이버
상담이 가능한 사이버 서비스 센터를 운영하고 있습니다.
Page 30

한국어
3
차례
2
기본 사용편
yepp으로 음악듣기 30
음량
//
잠금기능 설정하기 31
음성 녹음하기 32
MP3 인코딩하기 33
듣고싶은 음악//음성파일 찾기 34
FM 듣기 35
FM 인코딩하기 37
준비편
안전을 위한 주의사항 4
특징 6
구성물 확인 9
각부의 명칭 10
컴퓨터와 연결편
PC와 연결하여 사용하기 12
USB 드라이버 수동 설치하기 16
이동식 디스크 사용하기 20
● 파일 다운로드//업로드하기 20
● USB 케이블 분리하기 21
● 포맷하기 22
yepp Studio 설치하기 23
yepp Studio의 도움말을 보려면 25
Lyrics Station 설치하기 26
Lyrics Station 사용하기 28
구간반복 설정하기 38
네비게이션 사용하기 39
플레이리스트 설정하기 40
메뉴 설정하기 41
파일 관리하기 42
● 삭제하기 42
● 포맷하기 43
세부 기능 설정하기 44
재생모드 설정하기 45
EQ 설정하기 46
디스플레이 설정하기 47
● Scroll Speed
//
Lyric On/Off //Time 47
● Backlight 48
● Contrast 49
전원꺼짐 설정하기 50
● Time
//
Sleep 50
인코딩 설정하기 51
● Bitrate
//
AutoSync Time 51
WOW 레벨 설정하기 52
● SRS,TruBass 레벨 조절 52
● WOW Optimum 52
디폴트 볼륨 설정하기 53
부록편
MENU 일람표 54
고객지원편
yepp이 이상하다구요? 56
제품 규격 58
제품 보증서 59
부가기능 사용하기
Page 31

한국어
5
안전을 위한 주의사항
이어폰 관련
교통안전에 대하여
● 자전거, 자동차, 오토바이 등의 운전 중에는 이어폰을 사용하지 마세요.
위험할 뿐만 아니라 지역에 따라서는 위법이 됩니다.
보행 중에 특히 횡단보도에서 이어폰을 큰 음량으로 사용하면 위험합니다.
청력을 보호하기 위하여
● 이어폰을 큰 음량으로 사용하지 마세요.
의사들은 장시간 계속해서 큰 음량으로 듣는 것의 위험성을 지적하고 있습니다.
● 귀울림이 있을 때에는 음량을 줄이거나 사용을 중지하여 주세요.
● 포장, 건전지, 오래된 전자제품을 폐기할 때는 분리 수거해 주세요.
● 포장재는 판지, 폴리에틸렌, PS의 3종류로 구분되어 있으며,
불필요한 포장재는 사용하지 않았습니다.
● 주변온도: 5℃ ~ 35℃
● 습 도: 10% ~ 75%
사용자의 안전과 재산상의 손해 등을 막기 위한 내용입니다.
반드시 읽고 올바르게 사용해 주세요.
※고장, 수리, 그외 기타 이유로 인한 녹음 데이타 및 저장 데이타의 소실에 따른
손해에 대해서는 당사에서 일체 책임을 지지 않으므로 양해해 주시기 바랍니다.
온도가 너무 높은 곳(35℃ 이상)
이나 낮은 곳(-5℃ 이하), 습기가
많은 곳은 피해 주세요.
본체에 심한 충격을 주지 마세요.
벤젠이나 신나 등의 화학 약품에
접촉되지 않게 하세요.
오랫동안 사용하지 않을 경우에는
건전지를 빼서 분리해 주세요.
직사광선이나 열기구를 피해
주세요.
먼지나 그을음이 많은 곳은
피해 주세요.
플레이어 위에 무거운 물건을
올려 놓지 마세요.
제품내부로 이물질이 들어가지
않도록 하세요.
절대로 분해, 수리 개조하지
마세요.
제품 최적 사용조건
환경정보
4
Page 32

MP3 & WMA 재생
● MP3란? MPEG1 Layer3 오디오 포맷으로 일반적으로 쉽게 접할 수 있는
음악파일 형식입니다.
● WMA란? 마이크로 소프트 Widows Media 오디오파일로 사용자가
증가하고 있는 음악파일 형식입니다.
이동식디스크 기능
● 원도우 탐색기에서 쉽게 파일을 복사, 저장할 수 있습니다.
인코딩(Encoding)기능 지원
● 본체의 ENC단자를 통해 MP3파일로 직접 만들 수 있습니다.
● FM라디오 방송도 실시간으로 MP3파일로 만들 수 있습니다.
FM수신
● 자동선국 기능, 주파수 저장기능으로 편리하게 FM방송을 청취할 수 있습니다.
3D음향 지원
● 풍부한 베이스와 3D입체음향을 느낄 수 있습니다.
자동가사 지원
● 음악파일을 yepp에 전송 후 Lyrics Station을 사용하면 별도의 가사입력이나
싱크작업을 하지 않아도 화면 표시창을 통해 가사를 확인할 수 있습니다.
6
7
한국어
Page 33

한국어
9
업그레이드 기능지원
● yepp 내장프로그램(펌웨어)의 기능추가를 위해 업그레이드 할 수 있습니다.기능 추가,
CODEC 추가 등 업그레이드 관련사항은 www.yepp.co.kr에 공지되오니 지속적인
관심을 부탁 드립니다.
최대 12시간 연속재생
● 알카라인 건전지1개 (AAA/LR03 타입)로 최대 12시간까지 연속재생이 가능합니다.
참고: 재생시간은 사용 건전지의 종류에 따라 달라질 수 있습니다.
음성녹음 기능
● 고음질 음성녹음이 가능하며, 회의용 등으로 활용할 수 있습니다.
다양한 이퀄라이져 지원
● 자신만의 EQ를 설정하여 음악을 들을 수 있습니다.
● 내부 펌웨어에서 메모리 용량을 일부 사용하므로 사용가능한 내장 메모리 용량은
표기된 용량보다 적습니다.
● 악세서리 파손시에는 삼성 서비스센터에서 개별적으로 구입 가능합니다.
● 구성물의 외관은 제품의 성능향상을 위해 예고없이 변경될 수 있습니다.
구성물 확인
본체
이어폰
USB 케이블
설치 CD
사용설명서
알카라인 건전지
(AAA/LR03형 1개)
목걸이 끈
휴대용 케이스
간편 USB 어댑터 Line In 케이블
모델
내장메모리용량
YP-T5 H
128MB
YP-T5 V
256MB
YP-T5 X
512MB
8
Page 34

한국어
각부의 명칭
11
10
재생시간 표시
모드 표시
비트 레이트 표시
재생방법 표시
EQ/SRS 표시
재생/정지/일시정지 표시
건전지 잔량 표시
곡번호 표시
타이틀(곡이름 및 가수) 표시
화면 표시창
건전지 넣기
녹음 버튼
재생/일시정지 버튼
잠금 스위치
구간반복 설정버튼
USB 케이블
연결 단자
ENC 단자
마이크
목걸이 고리
메뉴, 네비게이션 설정 버튼/
트랙이동/고속탐색/
음량 조절키
화면 표시창
이어폰 단자
건전지 덮개
화살표방향으로 덮개를
밀어서 여세요.
건전지의 ,극을 바르게 하여
건전지를 넣고 화살표 방향으로
밀어 닫으세요.
1
2
주주주주의의
의의
● 덮개에 과도한 힘을 가하면 파손의 원인이 됩니다.
Page 35

한국어
13
PC와 연결하여 사용하기
12
PC와 yepp을 연결 전에 반드시 USB 드라이버를
설치하시기 바랍니다. 만약, '새 하드웨어 추가 마법사'가
보이면 [취소]버튼을 누르고, USB 드라이버를 설치하시기
바랍니다.
권장 PC 환경
PC시스템은 아래와 같은 조건을
갖추어야 합니다.
● 펜티엄 133MHz이상
● 윈도우 98SE/ME/2000/XP
● 40MB 하드디스크 여유 공간
● CD-ROM 드라이브
(2배속 이상)
● USB 포트(1.1)지원
● DirectX 8.0 이상
계속
참참참참고고
고고
● Windows 2000, XP일 경우,
설치하실 때에는 반드시
Administrator(관리자)계정에서
설치하시기 바랍니다.
Administrator(관리자)계정이
아닐 경우 설치가 되지 않습니다.
● Windows ME, 2000, XP에서는
별도의 프로그램 설치없이 드라이버
인식이 가능하지만 펌웨어 업그레이드가
필요할때는 반드시 설치하세요.
● Windows98에서는 YP-T5 프로그램이
설치되지 않으면 이동식디스크로
사용할 수 없습니다.
반드시 USB드라이버파일을
먼저 설치하세요.
소프트웨어 설치하기
1
설치 CD를 CD-ROM 드라이브에 넣으세요.
그러면 아래와 같은 그림이 나타납니다.
[[yyeepppp UU SSBB DDrriivvee rr ]]
를 선택하세요.
2
연속되는 창마다
[[다다음음]]
버튼을 클릭하세요.
소프트웨어 설치가
완료되면 다음 페이지처럼
PC와 연결하여 사용하세요.
Page 36

한국어
15
14
컴퓨터 본체의 USB 포트에 USB 케이블을
연결하세요.
yepp의 하단에 있는 USB 케이블 연결단자에
USB 케이블의 반대쪽을 연결한 후,
본체의
▶
버튼을 누르세요.
● USB 드라이버 설치에서 초기화 중, 혹은 명령 실행 중
USB 케이블을 빼면 PC가 오동작을 할 가능성이 있습니다.
4
USB 드라이버가 설치되면 오른쪽
그림과 같이
[[장장치치 관관리리자자]]
에
"
SSaammssuu nn gg YYPP--TT 55 UU SSBB DDeevv ii ccee
"가 나타납니다.
6
3
새로운 디바이스를 찾는다는 메세지와 함께 USB
드라이버가 설치됩니다. 설치되는 화면은 보이지
않을 수도 있습니다. 장치관리자를 확인하여
제대로 설치되었는지 확인하시기 바랍니다.
5
USB 드라이버 확인하는 방법
● Windows 98:
제어판 시스템 장치관리자
디스크드라이브 Samsung yepp YP-T5 USB Device
● Windows 2000/ME (Professional 기준):
제어판 시스템 하드웨어 장치관리자
디스크드라이브 Samsung yepp YP-T5 USB Device
● Windows XP (Professional 기준):
제어판 성능 및 유지관리 시스템 하드웨어 장치관리자
디스크드라이브 Samsung yepp YP-T5 USB Device
만약 위 그림과 같이 USB드라이버가 설치되지 않을 때는
"USB드라이버 수동 설치하기" 를 참조하시기 바랍니다.
7
USB케이블을 이용하여 PC에 연결하기
PC와 연결하여 사용하기
USB 케이블
Page 37

한국어
17
USB드라이버 수동 설치하기
16
정상적으로 USB드라이버가 설치된 경우는 20페이지의 "파일 다운로드/업로드 하기"로
가시고 USB드라이버가 자동으로 설치되지 않은 경우에만 아래의 방법을 참조하세요.
장치관리자를 확인하세요.
● Windows 98/ME:
제제어어판판 시시 스스템템 장장치치 관관리리자자
● Windows 2000 (Professional 기준):
제제어어판판 시시 스스템템 하하드드 웨웨 어어 장장치치 관관 리리자자
● Windows XP (Professional 기준):
제제어어판판 성성 능능 및및 유유지지관관 리리 시시스스템템
하하드드 웨웨 어어 장장치치관관 리리자자
1
느낌표나 물음표가 있는 장치(알수 없는
장치 또는 USB Device로 표기됨) 가
있는지 확인하시기 바랍니다.
2
느낌표나 물음표가 있는 장치를 더블클릭합니다.
3
드라이버를 선택 후
[[드드라라이이버버 업업데데이이트트]]
를 클릭합니다.
4
호환드라이버 선택 후
[[다다음음]]
을
클릭하고 마치면 됩니다.
5
참참참참고고
고고
● Windows 2000 사용자중 USB드라이버 인식이 되지 않을 경우
Windowsupdate.microsoft.com에서 최신 서비스팩을 다운받아 설치하시기 바랍니다.
● PC의 기종이나 환경에 따라서 설치방법이 다를 수 있습니다.
이때는 PC의 구입처나 서비스 센터를 이용하여 설치 문의하시기 바랍니다.
● 계속해서 USB드라이버 설치에 오류가 발생할 경우 시스템 재부팅 후
USB케이블을 다시 연결하시기 바랍니다.
USB드라이버 설치시 오류가 발생한 경우
Page 38

한국어
19
18
Win 98일 경우
USB드라이버 수동 설치하기
● 설치를 완료하려면 시스템을
반드시 재시동하세요.
USB 드라이버 위치
[CDROM]₩setup₩Drivers
참참참참고고
고고
● windows98에서는 YP-T5 프로그램이 설치되지 않으면
이동식디스크로 사용할 수 없습니다. 반드시 USB드라이버
파일을 먼저 설치하세요.
연속되는 창마다
[[다다음음]]
버튼을 클릭하세요.
Page 39

한국어
21
20
이동식 디스크 사용하기
1
2
주주주주의의
의의
● 파일 다운로드 혹은 업로드 중에는
"READING/WRITING"메세지가 표시됩니다.
"READING/WRITING"표시 중
USB케이블을 분리하면 오동작을 일으킬 수 있습니다.
● 윈도우 탐색기 내의 이동식 디스크 선택시 나타나는
음악파일의 순서는 실제 재생순서와는 관계가 없습니다.
yepp의 전원을 켠 후, PC에 연결하세요.
PC의 windows 탐색기를 실행하세요.
3
저장하고자 하는 파일을 선택한 후 이동식 디스크로 드래그 앤 드롭 하세요.
저장된 파일은 파일명 순서대로 재생됩니다. 순서를 바꾸기 위해서는
파일이름을 변경하세요. (숫자, 알파벳 순서)
파일 다운로드/업로드하기
USB 케이블 분리하기
파일 전송을 모두 마친 후에는 반드시 아래와 같은 방법으로 케이블을
분리하시기 바랍니다.
주주주주의의
의의
● windows98에서는 작업표시줄에 녹색화살표가 표시되지 않으니,
화면표시창에 "READY"메세지가 표시되면 USB케이블을 분리하시기 바랍니다.
1
윈도우 화면 오른쪽 아래
작업표시줄에 있는 녹색화살표를
더블클릭하세요.
2
USB장치를 선택한 후
[[중중지지]]
버튼을 누르세요.
[하드웨어 장치 중지]화면이 나타나면 [확인]버튼을 누른 후,
USB 케이블을 분리하세요.
Page 40

yepp Studio 설치하기
23
한국어
이동식 디스크 사용하기
22
1
이동식 디스크를 선택한 후
마우스 오른쪽을 클릭하여
포맷을 선택하세요.
2
[[시시작작]]
버튼을 누르세요.
● 저장된 모든 파일이 포맷됩니다.
● 볼륨 레이블에서 이동식 디스크의
이름을 변경할 수 있습니다.
주주주주의의
의의
● 포맷을 하면 기존에 설정된 메뉴들이 초기화 됩니다.
● 포맷한 후 파일은 다시 복구되지 않으니 주의하세요.
포맷하기
1
설치 CD를 CD-ROM 드라이브에 넣으세요.
[[yyeepppp SStt uu dd ii oo]]
를 선택하세요.
2
사용하실 언어를 선택하세요.
계속
Page 41

한국어
25
yepp Studio 설치하기
24
3
연속되는 창마다
[[다다음음]]
버튼을 클릭하세요.
● yepp Studio의 자세한 사용방법은 도움말을 참조하세요.
yepp Studio를 실행한 후 F1을 누르세요.
● 도움말이 나타납니다.
또는 yepp Studio의 상단부분으로 화살표를 이동한 후 마우스 오른쪽을
클릭하면 아래와 같은 선택창이 나타납니다.
● 도움말을 클릭하면 도움말창이 나타납니다.
참참참참고고
고고
● Gracenote와 Gracenote CDDB Music Recognition ServiceSM는 음악인식 기술과
음악 관련 데이터를 제공합니다,
● Gracenote 및 CDDB는 Gracenote의 등록 상표입니다.
Gracenote로고 및 심벌, Gracenote CDDB로고 그리고 "Power by Gracenote" 로고는
Gracenote의 등록 상표입니다. 음악 인식 서비스
(Music Recognition Service)와 MRS는 Gracenote의 서비스 상표입니다.
참참참참고고
고고
● yepp Studio 최초 실행시 [제품번호 등록]창이 나타나면 yepp의 제조번호(S/N)를 입력하세요.
yepp Studio의 도움말을 보려면
Page 42

한국어
27
Lyrics Station 설치하기
26
1
설치 CD를 CD-ROM 드라이브에 넣으세요.
[[LLyy rr ii ccss SSttaattiioonn]]
을 선택하세요.
2
사용하실 언어를 선택하세요.
3
연속되는 창마다
[[다다음음]]
버튼을 클릭하세요.
Page 43

한국어
29
Lyrics Station 사용하기
28
yepp의 전원을 켠 후, PC에 연결하세요.
가사 다운로드하기
1
가사 검색기능을 원하는 음악파일을 더블클릭하세요.
2
가사 검색창에 검색할 가수명이나 노래이름을 입력한 후
[[찾찾기기]]
를 클릭하세요.
3
원하는 가사를 클릭하세요.
● 자동으로 가사가 마킹됩니다.
● 가사마킹을 취소하려면 원하는 곡에서 오른쪽
버튼을 눌러 [가사삭제]를 클릭하세요.
가사 다운로드에 실패한 경우나 다운로드한 가사와 음악파일의 싱크가 맞지 않을
경우일 때는 가사 검색기능을 이용하세요.
주주주주의의
의의
● MENU의 LYRIC에서 ON을 선택해야 가사를 볼 수 있습니다.
● VBR파일은 가사를 지원하지 않습니다.
가사 검색하기
1
[[LLyy rr ii ccss SSttaattiioonn]]
을 클릭하세요.
3
원하는 음악 파일이 있는 디렉토리로 이동하여 가사마킹 하고자 하는 파일을
선택한 후, 왼쪽 상단의
[[LLDD BB]]
버튼을 클릭하세요.
● 데이타 베이스 내에 찾고자 하는 가사가 있으면 [가사마킹]항목에 YP-T5으로 표시가 되며,
가사가 없는 경우에는 NO로 표시됩니다.
2
아래와 같은 제품 선택창이 나타나면 사용하시는 제품명을 선택하세요.
참참참참고고
고고
● 가사지원이 가능한 다른 yepp제품을 사용할 경우에는 [Marking Option]버튼을 클릭하여
해당제품을 선택하세요.
Page 44

한국어
음량/잠금기능 설정하기
31
yepp으로 음악듣기
30
재생 중 본체에 있는 , 키를 이용하여
음량을 조절하세요.
참참참참고고
고고
● 음량은 00~30까지 조절됩니다.
● 짧게 밀면 1단계씩 조절되며, 길게 밀고 있으면 연속적으로 조절됩니다.
잠금기능을 설정해 놓으면 재생중에 다른 버튼을 눌러도 동작되지 않습니다.
본체의 스위치를 작동시키세요.
본체의 다른 버튼을 눌러도 작동되지 않으며,
표시창에 " HOLD!" 표시가 나타납니다.
재생을 하려면
(전원켜기)
본체의 ▶버튼을 누르면
로로고고
화면이
나온 후 음악/음성 파일이 재생됩니다.
재생 중 본체의 ▶버튼을 누르면 일시정지
하고 별도의 키입력이 없으면 10초 후
(설정에 따라 변경)자동으로 전원이 꺼집니다.
● 본체의 ▶
버튼을 길게 누르고 있어도
전원이 꺼집니다.
참참참참고고
고고
● WMA 파일은 Windows Media player(Ver 8.0)에서 만들 수 있는 압축율 48Kbps~192Kbps로
된 음악파일만 재생 가능합니다. 48Kbps미만 WMA파일은 재생되지 않을 수도 있습니다.
● 전원꺼짐시간은 MENU에서 설정 가능 합니다.
음악을 정지하려면
(전원끄기)
음량을 조절하려면
잠금기능
Page 45

MP3 인코딩하기
33
한국어
음성녹음하기
32
1
REC 버튼을 누르면 음성녹음이 시작됩니다.
REC 버튼을 다시 누르면 녹음이 정지되며,
새로운 Voice파일이 생성됩니다.
2
참참참참고고
고고
● V001,V002......순으로 녹음되며, 녹음 후에는 .WAV파일로 저장됩니다.
● 메모리가 Full상태가 되면 음성녹음이 자동으로 멈추게 됩니다.
● FM모드이거나 Line In케이블이 연결되어 있는 경우에는 음성녹음이 되지 않습니다.
음성녹음을 하려면
1
외부 음향기기의 출력단자(또는 Line out 단자)와 본체의
ENC 단자를 Line in케이블로 연결하세요.
2
REC 버튼을 누르면 MP3 인코딩을 시작합니다.
● ▶버튼을 누르면 인코딩이 일시 정지되며, 다시 ▶버튼을 누르면
인코딩이 계속됩니다.
3
인코딩 중 REC 버튼을 누르면 인코딩이 정지되고 인코딩 파일이 생성됩니다.
● L001, L002....순으로 인코딩되며, 인코딩된 후에는
MP3파일로 저장됩니다.
참참참참고고
고고
● Bit Rate는 32Kbps~128Kbps로 설정 가능 합니다.
● 인코딩 모니터링시 볼륨은 0~10단계까지 조절 가능합니다.
주주주주의의
의의
● 인코딩 중에는 Line In 케이블을 빼면 인코딩이 중지됩니다.
● 건전지 잔량이 부족할 경우에는 인코딩이 되지 않습니다.
● 외부음향기기의 볼륨을 적절한 크기로 설정하여 인코딩하시기 바랍니다.
볼륨이 너무 크거나 작은 경우에는 인코딩된 음질이 좋지 않을 수도 있습니다.
Page 46

한국어
35
듣고 싶은 음악/음성파일 찾기
34
참참참참고고
고고
●
VV BBRR (( VVaarriiaabbllee BBiitt RR aattee))
파일: 파일 내에서 음의 높낮이등 음의 종류에 따라 압축률을
수시로 변환시키는 파일.
●
VV BBRR
파일일 경우 재생시작 후 5초 이내에◀◀ 키를 당겨도 이전곡으로 이동재생이 안될 수 있습니다.
● MP2 또는 MP1 포맷의 파일은 확장자만 MP3로 바꾸어 다운로드 했을 때는 재생되지
않을 수도 있습니다.
●재생중에◀◀,▶▶
키를 좌,우로 길게 당기고 있으면 원하는 부분을 찾아 들을 수 있습니다.
● 당기고 있던 키에서 손을 떼면 정상으로 재생됩니다.
재생 중 원하는 부분 찾기
●재생중에▶▶키를 짧게 당기면 다음 트랙이 재생됩니다.
● 재생시작 후 5초 이내에◀◀ 키를 짧게 당기면 이전 트랙으로 이동하여 재생되고,
5초 이후에
◀◀ 키를 짧게 당기면 현재 트랙이 처음부터 재생됩니다.
재생 중 원하는 파일 찾기
● 정지상태에서◀◀,▶▶키를 좌,우로 당기면 이전/다음 트랙으로 이동됩니다.
정지 중 원하는 파일 찾기
FM 듣기
먼저 키를 눌러 메뉴화면이 나타나면, FM Radio를 선택하세요.
●◀◀,▶▶키를 짧게 당겨 수동으로
원하는 주파수를 찾으세요.
●◀◀,▶▶키를 길게 당기면 수신되는
주파수를 찾아 멈추게 됩니다.
● 수동으로 원하는 주파수를 탐색한 후,
키를 길게 누르면 저장화면이 나타납니다.
●
◀◀
,▶▶
키를 이용해 원하는 주파수 저장번호를
선택한 후 키를 누르세요.
● FM모드에서 AB 버튼을 길게 누르세요.
● 88MHz부터 108MHz까지 자동으로
선곡하여 저장합니다.
● 자동으로 주파수를 저장할 경우에는
1번부터 다시 저장됩니다.
참참참참고고
고고
● FM모드를 나오기 위해서는 키를 누르세요.
● 모노(MO), 스테레오(ST)는 자동으로 선택됩니다.
저장되는 채널 개수
수동으로 주파수 찾기
자동으로 주파수 찾기
수동으로 주파수 저장하기
자동으로 주파수 저장하기
Page 47

한국어
37
FM 듣기
36
FM 인코딩하기
저장된 주파수 탐색하기
참참참참고고
고고
● 최대 20개 주파수를 저장할 수 있습니다.
● PRESET 화면에서 ▶버튼을 누르면 PRESET 모드가 해제됩니다.
1
FM모드에서 ▶버튼을 누르세요.
●
PRESET 화면이 나타납니다.
◀◀,
▶▶키를 이용하여 원하는 주파수로 이동하세요.
2
저장된 주파수 삭제하기
- 삭제하고자 하는 PRESET 번호로 이동한 후, 키를 길게 누르세요.
●
저장된 PRESET 번호가 삭제됩니다.
1
FM 수신중에 REC 버튼을 누르세요.
● 현재 수신중인 FM방송을 MP3파일로 인코딩하기 시작합니다.
2
REC 버튼을 다시 누르세요.
● 파일이 생성되며 인코딩이 정지됩니다.
● F001, F002, F003...순으로 저장되며 메모리가 Full상태가 되면 자동으로
멈추게 됩니다.
Page 48

네비게이션 사용하기
39
한국어
구간반복 설정하기
38
구간반복 시작 시점
음악/음성파일 재생 중 반복해서
듣고자 하는 첫 부분에서 본체의
AB 버튼을 누르세요.
표시창에 A 가 표시됩니다.
구간반복 끝낼 시점
구간반복을 끝낼 부분에서 본체의
AB 버튼을 다시 한번 누르세요.
표시창에 AB 가 표시됩니다.
설정된 구간이 계속해서 반복 재생됩니다.
참참참참고고
고고
● 구간반복을 해제하려면 본체의 AB 버튼을 다시 한번 짧게 누르세요.
●
◀◀,▶▶키를 이용하여 고속탐색을 하게 되면 구간반복이 자동 해제됩니다.
참참참참고고
고고
● 네비게이션 모드에서 키를 길게 누르면 네비게이션 모드가 해제됩니다.
1
키를 길게 눌러 네비게이션 모드로 이동하세요.
2
재생하고 싶은 폴더나 파일을 선택하세요.
●◀◀: 상위폴더로 이동●▶▶: 하위폴더로 이동
●
, : 동일한 디렉토리 내의 파일이나 폴더 이동
●
: 하위폴더로 이동. 하위폴더가 없을 때에는 선택한 파일이 플레이리스트로 지정
폴더 재생이나 정지중일때 파일재생이나 정지중일때
3
▶버튼을 누르세요.
● 선택한 파일이 재생됩니다.
● 폴더를 선택한 경우에는 선택한 폴더내의 전체 파일이 재생됩니다.
네비게이션 기능을 이용하여 원하는 파일을 쉽게 검색하거나 모드를 전환할 수 있습니다.
Page 49

한국어
메뉴 설정하기
41
플레이리스트 설정하기
40
참참참참고고
고고
● MENU의 File Delete에서 (“삭제하기”참조) PLAYLIST를 선택하면
설정된 플레이리스트 전체가 해제됩니다.
- 네비게이션 모드에서 원하는 파일로 이동한 후, 키를 누르세요.
● 선택한 파일이 마크됩니다.
● 플레이리스트 설정을 해제하려면 네비게이션 모드에서 마크된 파일로 이동한 후, 키를
다시 누르세요.
●
NNooww ppllaayyiinngg::
현재 재생하고 있는 곡을 확인하고자 할 때
●
FFMM RRaaddiioo::
FM 라디오를 듣고자 할 때
●
FFiillee ::
파일을 삭제하거나 포맷할 때
●
SS ee ttttiinnggss::
yepp의 세부기능을 설정하고자 할 때
참참참참고고
고고
● MENU모드에서 별도의 입력이 15초간 없으면 MENU모드가 해제됩니다.
키를 누르면 MENU 모드로 전환됩니다.
, 키로 이동한 후, 키를 짧게 눌러 원하는 메뉴를 선택하세요.
키를 다시 길게 누르면 MENU모드가 해제됩니다.
플레이리스트 설정하기
1
음악모드에서 AB 버튼을 길게 누르세요.
● 설정된 플레이리스트가 나타납니다.
2
재생하고자 하는 파일로 이동한 후,▶버튼을 누르세요.
● 선택한 파일이 재생됩니다.
플레이리스트 재생하기
Page 50

한국어
43
파일 관리하기
42
1
MM EENN UU에서FF iill ee
을 선택하세요. ("메뉴 설정하기" 참조)
2
FF iill ee
에서 File
DD ee ll ee tt ee
를 선택하고 지울 파일이 있는 모드를 선택하세요.
3
, 키로 삭제하고 싶은 파일로 이동하여 키 를 누 른 후,
CC OONN FFIIRR MM
을 선택하세요.
설정에서 나올때는
◀◀ 키를 짧게 당기세요.
삭제하기
1
MM EENN UU에서FF iill ee
을 선택하세요. ("메뉴 설정하기" 참조)
2
FF iill ee에서FF oo rrmmaatt
을 선택하세요.
● CONFIRM을 선택하면 포맷이 실행됩니다.
참참참참고고
고고
● 내장 메모리를 포맷하면 파일이 모두 삭제되므로 주의하시기 바랍니다.
● 메뉴에서 포맷할 경우 시간이 오래 걸릴 수 있으니, 제공된 프로그램이 설치되어 있는
PC에서 포맷하시기를 권장합니다.
포맷하기
Page 51

재생모드 설정하기
45
한국어
세부 기능 설정하기
SETTING기능
1
MENU에서
SSeetttt ii nnggss
를 선택하세요. ("메뉴 설정하기" 참조)
2
SSeetttt ii nnggss
에서 , 키로 변경하고 싶은 기능으로 이동 후,
키를 눌러 선택하세요.
●
상위 메뉴로 이동하고자 할 때는◀◀ 키를 이용하세요.
44
1
SSeetttt ii nnggss에서PPllaayymmooddee
를 선택하세요.
2
PPllaayymmooddee
에서 , 키로 원하는 모드로 이동 후, 키를
눌러 선택하세요.
●
NNoorrmmaa ll::
수록된 트랙 순서대로 1회씩 재생
●
RR ee ppee aatt oonnee::
한 트랙만 반복해서 듣고자 할 때
●
RR ee ppee aatt aall ll::
저장된 모든 트랙을 반복해서 듣고자 할 때
●
SS hh uu ffffll ee::
저장된 트랙을 임의의 순서로 반복해서 듣고자 할 때
●
II nnttrroo::
저장된 모든 트랙의 앞부분을 10초동안 듣고자 할 때
Page 52

디스플레이 설정하기
47
한국어
EQ 설정하기
46
1
SSeetttt ii nnggss에서SSoouunndd
를 선택하세요.
2
SSoouunndd
에서 , 키로 원하는 사운드 모드로 이동한 후, 키를 누르세요.
참참참참고고
고고
● 는 SRS Labs, Inc. 의 등록 상표입니다.
WOW기술은 SRS Labs, Inc. 라이센스하에 있습니다.
● SRS설정시 소리가 상당히 커지게 되므로 적절한 볼륨을 선택하시기 바랍니다.
● 샘플링주파수가 32KHz, 44.1KHz, 48KHz로 되어 있어야 지원 가능합니다.
● 음성 녹음된 파일은 SRS기능이 설정되지 않습니다.
3
지정된 음색외에 개인적으로 음색을 설정하고자 할 때에는
UU ssee rr
를 선택하고
BBaassss// TTrreebbllee
을 설정하세요.
●
BBaass ss//TT rreebb llee
은 , 키로 각각 0~10까지 조절이 가능합니다.
●
SSRR SS (( )) ::
3D 입체 음향을 느낄 수 있습니다.
●
TTrruuBB aassss (( )) ::
저음의 보강으로 더 웅장한 음을 즐길 수 있습니다.
●
WW OOWW::
SRS, TruBass기능으로 이루어져 있으며,
풍부한 베이스와 3D입체음향을 동시에 즐길수 있습니다.
● 음색의 중저음 보강을 원하시면, DBB를 선택하세요.
● , 키를 이용하여 스크롤 스피드를 설정하세요.
● 트랙 타이틀의 흐르기의 속도를 조절해 주는
스크롤 스피드는 0~10까지 설정이 가능합니다.
Settings에서 Display를 선택하세요.
Scroll Speed
Lyric On/Off
● , 키를 이용하여 LYRIC ON이나 OFF를 선택하세요.
●
OONN ::
음악재생시 저장된 가사가 화면표시창에 나타납니다.
●
OOFF FF::
가사가 저장되어 있더라도 나타나지 않습니다.
●
PPllaayy ttiimmee::
현재 재생시간 표시
●
RR eemm aaiinn ttii mm ee ::
재생 잔여시간 표시
●
UUss ee dd ssii zz ee::
사용된 메모리 표시
●
FF rreeee ssiizzee::
잔여 메모리 표시
Time
Page 53

한국어
49
디스플레이 설정하기
48
● , 키를 이용하여 의 라이트 켜짐시간을
설정하세요.
● 라이트 켜짐시간은 0~10초로 설정이 가능합니다.
● ON 설정시에는 라이트가 계속 켜져 있습니다.
● , 키를 이용하여 LCD의 라이트 켜짐시간을
설정하세요.
● 라이트 켜짐시간은 0~10초로 설정이 가능합니다.
● ON 설정시에는 라이트가 계속 켜져 있습니다.
Backlight
[ Light Time - Jog ]
[ Light Time - LCD ]
● , 키를 이용하여 7가지 색중에서
LCD색을 선택하세요.
[ LCD color ]
참참참참고고
고고
● 건전지 잔량이 부족할 경우에는 라이트가 켜지지 않습니다.
Green Red Blue
Violet Orange Sky-Blue
Lilac Random
Contrast
● , 키를 이용하여 콘트라스트를 설정하세요.
● 화면 밝기를 선택할 수 있는 콘트라스트는
0~10까지 설정이 가능합니다.
Page 54

한국어
51
50
전원 꺼짐 설정하기 인코딩 설정하기
Time
● , 키를 이용하여 전원 꺼짐시간을 설정하세요.
● 0~1분까지 설정이 가능하며, 재생을
정지 시킨 후 별도의 버튼 압력이 없으면 설정된 시간 후
자동으로 전원이 꺼집니다.
● 0초로 설정시에는 전원이 자동으로 꺼지지 않습니다.
Sleep
● , 키를 이용하여 취침 예약시간을 설정하세요.
● 취침 예약시간은 30, 60, 90, 120분으로 설정이
가능하며,설정된 시간이 지나면 전원이
자동으로 꺼집니다.
● OFF설정시에는 전원이 자동으로 꺼지지 않습니다.
Bitrate
● , 키를 이용하여 원하는 인코딩
비트 레이트를 설정하세요.
● 음악을 MP3파일로 인코드 할 때 32Kbps, 48Kbps,
64Kbps, 96Kbps, 128Kbps 중 한가지
비트 레이트를 선택할 수 있습니다.
AutoSync Time
● , 키를 이용하여 AutoSync Time을 설정하세요.
● AutoSync Time은 MP3 인코딩 중 설정된 시간동안
소리가 없을 때 MP3파일을 구분하여 저장하는
기능입니다.
● AutoSync Time은 2~5초로 설정이 가능합니다.
● OFF 설정시에는 MP3 인코딩으로 녹음되는 곡 사이에
소리가 없더라도 인코딩이 멈추지 않고 하나의 파일로 저장됩니다.
Settings에서 Encoding을 선택하세요.Settings에서 Power off를 선택하세요.
참참참참고고
고고
● AutoSync 기능은 64Kbps`~128Kbps까지만 지원합니다.
Page 55

한국어
53
52
WOW 레벨 설정하기 디폴트 볼륨 설정하기
SRS, TruBass 레벨 조절
● WOW level에서 SRS나 TruBass를 선택하면,
SRS와 TruBass의 레벨을 조절할 수 있습니다.
● , 키를 이용하여 원하는 레벨을 선택하세요.
● SRS와 TruBass의 레벨은 각각 0~10까지
설정할 수 있습니다.
● WOW Optimum을 선택하면 연결된 기기에 따라
SRS기능을 최적화 시켜줍니다.
● , 키를 이용하여 Speaker, Headphone,
Earphone, Carpack 중 원하는 기기를 선택하세요.
WOW Optimum
Settings에서 WOW level을 선택하세요.
Default vol
● , 키를 이용하여 디폴트 볼륨값을 설정하세요.
● 디폴트 볼륨은 0~25(Max)까지 설정이 가능하며,
설정값 이상으로 볼륨을 조절했다가 전원을
다시 켜면 설정된 볼륨크기로 음악이 재생됩니다.
● 설정값 이내의 볼륨상태에서 전원을 다시 켜면
전에 듣던 볼륨크기로 음악이 재생됩니다.
Settings에서 Default vol을 선택하세요.
Page 56

한국어
55
MENU 일람표
54
● 키로 이동, 선택합니다.
Page 57

한국어
57
yepp이 이상하다구요?
56
소소 프프트트 웨웨어어가가 작작 동동 하하지지 않않아아 요요..
● 권장 PC환경을 참조하세요.
동동 작작 을을 하하 지지 않않 고고 화화 면면 표표시시 창창에에 아아무무런런 표표시시 가가 없없 어어 요요
● 건전지 용량을 확인하세요.
● 건전지의 , 극을 확인하세요.
음음 악악모모 드드에에서서 재재생생 버버튼튼 을을 눌눌 러러 도도 음음 악악이이 들들리리지지 않않아아 요요..
● 메모리에 MP3, WMA파일이 저장되어 있는지 확인하세요.
● HOLD 버튼이 잠금으로 되어 있는지 확인해 보세요.
파파 일일 을을 다다운운로로 드드할할 수수 없없어어 요요..
● 건전지 용량을 확인하세요.
건전지를 넣고 전원을 켠 후 컴퓨터에 연결하세요.
● 컴퓨터상에 드라이버가 제대로 설치되어 있는지 확인해 주세요.
● 컴퓨터와 yepp간의 USB연결을 확인해 보세요.
● 저장가능한 파일개수가 제한되어 있으므로 하위폴더를 만들어 음악파일을 저장하세요.
● 메모리가 Full상태인지 확인해 보세요.
백백 라라이이트트 가가 안안 켜켜 져져요요
.
● 백라이트 설정 상태를 확인해 보세요.
● 건전지의 잔류 전압이 낮은 경우, 더 오래 재생하기 위해
자동으로 백라이트가 켜지지 않게 되어 있습니다.
yyeepppp의의 버버튼튼을을 눌눌러러 도도 작작 동동하하지지 않않아아 요요..
● HOLD스위치가 잠금으로 되어 있는지 확인해 보세요.
● 건전지를 뺀 후 다시 넣어보세요.
yyeepppp이이 꺼꺼져져요요..
● 정지상태에서는 설정에 따라 전원이 자동으로 차단됩니다.
● 저장된 곡이 있는지 확인해 보세요.
재재 생생 중중 재재 생생시시간간 표표 시시 가가 이이 상상해해 요요..
● VBR(Variable Bit Rate)파일 재생시에 "VBR SONG"이라는 메세지가 표시됩니다.
LL CCDD창창 이이 어어 두두워워 요요..
● Contrast를 확인해 보세요.
Page 58

제품규격
58
본 사용설명서상의 내용은 성능향상을 위해 사전 예고없이 변경될 수 있습니다.
B급기기 (가정용 정보통신기기)
이 기기는 가정용으로 전자파 적합등록을 한 기기로서 주거지역에서는 물론 모든 지역에서
사용할 수 있습니다.
인증자의 상호: 블루텍 주식회사
제조자: 에스캠/에스엠
제조국가: 대한민국
모델 YP-T5
내장메모리 용량
128MB(YP-T5 H), 256MB(YP-T5 V), 512MB(YP-T5 X)
전압 1.5V×1 (AAA/LR03 알카라인 건전지)
연속 재생 시간
동작시간 최대 12시간 (알카라인 건전지, MP3 128Kbps, VOL.20기준)
크기(W×H×D)/무게 23×54×23mm/24g (건전지 제외)
케이스 알루미늄/플라스틱
잡음비 80dB with 20KHz LPF
이어폰 출력 5mW(최대 10mW)/CH (16Ω)
출력 주파수 범위 20Hz~20KHz
온도 특성 -5 ~ +35℃(23~95°F)
FM 주파수 88.0 ~ 108.0 MHz
FM 신호대 잡음비 45dB
FM 의율 1%
FM 실용감도 10dB
파일 지원
MPEG1/2/2.5 Layer3(8Kbps ~ 320Kbps, 8KHz ~ 48KHz)
WMA (48Kbps ~ 192Kbps, 8KHz ~ 48KHz)
yepp의
제품보증기간은
1년, 부품
보유년한은
5년입니다.
서비스에 대하여
●저희 삼성전자에서는 품목별 소비자피해 보상규정(재정경제부 고시 제2000-21호)에 따라 아래와 같이 제품에 대한 보증을 실시합니다.
●서비스 요청시 삼성전자서비스(주) 또는 지정된 협력사에서 서비스를 합니다.
●보상여부 및 내용통보는 요구일로부터 7일 이내에, 피해보상은 통보일로부터 14일 이내에 해결해 드립니다.
무상서비스
※일반 제품을 영업용도로 전환하여 사용할 경우의 보증기간은 반으로 단축 적용됩니다.
YP-T5
Digital Audio Player
■ 소비자 피해 유형 품질보증기간이내 품질보증기간이후
※ 고장이 아닌 경우 서비스를 요청하면 요금을 받게 되므로 반드시 사용설명서를 읽어주세요.
(수리가 불가능한 경우, 별도 기준에 준함)
● 이 품질보증서는 대한민국에서만 적용이 되며, 해외에서는 적용을 받으실 수 없습니다.
구입 후 10일 이내에 중요한 수리를 요할 때 제품교환 또는 구입가환급 해당없음
구입 후 1개월 이내에 중요한 수리를 요할 때 제품교환 해당없음
제품구입시 운송과정 및 제품설치중 발생된 피해 제품교환 해당없음
교환된 제품이 1개월 이내에 중요한 구입가 환급 해당없음
수리를 요하는 고장발생
교환 불가능시 구입가 환급 해당없음
동일하자로 3회까지 고장 발생시 무상수리 유상수리
동일하자로 4회까지 고장 발생시 제품교환 또는 구입가환급 유상수리
서로 다른 하자로 5회째 고장 발생시 제품교환 또는 구입가환급 유상수리
소비자가 수리의뢰한 제품을 제품교환 또는 정액 감가상각한 금액
사업자가 분실한 경우 구입가환급 10%를 가산하여 환급
부품보유기간이내 수리용 부품을
보유하고 있지 않아 수리가 불가능한 경우
수리용 부품은 있으나 수리 불가능시 제품교환 또는 구입가환급 정액 감가상각후 환급
소비자의 고의, 과실로 인한 고장인 경우
수리 불가능시
유상수리에 해당하는 유상수리 금액징수 후
금액징수 후 제품교환 감가상각적용 제품교환
수리 가능시 유상수리 유상수리
정상적인 사용 상태에서 발생한 성능, 기능상의 하자로 고장 발생시
유상서비스
고장이 아닌 경우
2회부터 유상 1회 무상
■ 제품기능 사용설명 및 분해하지 않고 간단한 조정시
■ 외부안테나 및 유선신호 관련 서비스 요청시
■ 판매점에서 부실하게 설치해주어 재설치시
■ 제품 내부에 먼지 세척 및 이물 제거시
1회부터 유상
■ 제품의 이동, 이사 등으로 인한 설치 부실건
■ 구입시 고객요구로 설치한 후 재설치시
■ 소비자 설치 미숙으로 재설치시
■ 헤드세척 및 이물투입 서비스 요청시
■ 네트워크 및 타사 프로그램 사용설명시
소비자 과실로 고장난 경우
■ 소비자의 취급 부주의 때는 함부로 수리,
개조하여 고장 발생시
■ 전기용량을 틀리게 사용하여 고장 발생시
■ 설치 후 이동시 떨어뜨림 등에 의한 고장,
손상 발생시
■ 당사에서 미지정한 소모품이나
옵션품 사용으로 고장 발생시
■ 삼성전자(주) 서비스 위탁업체인 삼성전자 서비스(주)
기사 협력 및 기가 아닌 사람이 수리하여 고장 발생시
그밖의경우
■ 천재지변(화재, 염·수해 등)에 의한 고장 발생시
■ 소모성 부품의 수명이 다한 경우(배터리,형광등,
헤드, 진동자, 램프류, 필터류, 토너, 드럼, 리본 등)
Page 59

한국어
MEMOMEMO
Page 60

AH68-01482A (Rev 0.0)
-- 支支持持
MP3&WMA
-- 移移動動硬硬盤盤功功能能
-- 支支持持編編碼碼功功能能
-- FM接接收收
-- 支支持持3D立立郞郞瀨瀨
-- 升升級級功功能能
-- 最最大大連連樓樓播播放放12小小時時
YP-T5
Page 61

中
國
語
3
目目湳湳
2
基基本本使使用用
利用
yepp
聽湳音........................................................................................................26
設置音量/鎖定功能 ...................................................................................................27
語音湳音 ...................................................................................................................28
進行
MP3
編碼............................................................................................................29
査胥想聽的音樂/語音文件 ........................................................................................30
收聽FM.....................................................................................................................31
進行FM編碼 ..............................................................................................................33
准准備備篇篇
安全注意事項 ..............................................................................................................4
特点 ............................................................................................................................6
開箱檢査 .....................................................................................................................9
各部的名稱................................................................................................................10
侮侮計計算算机机的的連連接接
侮PC連接使用...........................................................................................................12
手動安裝
USB
驅動程序 .............................................................................................16
使用可移動存儲設備(計算机) ...................................................................................20
●
下載/上傳文件.............................................................................................................20
●
阿取
USB
電纜..............................................................................................................21
●
格式化.........................................................................................................................22
安裝
yepp Studio
.......................................................................................................23
在
yepp Studio
上査看搗助 ........................................................................................25
設置片段反復 ............................................................................................................34
使用導航 ...................................................................................................................35
設置播放列憐 ............................................................................................................36
設置菜單 ...................................................................................................................37
管理文件 ...................................................................................................................38
●
刪除 ............................................................................................................................38
●
格式化.........................................................................................................................39
設置詳細功能 ............................................................................................................40
設置播放模式 ............................................................................................................41
設置EQ.....................................................................................................................42
設置顯示 ...................................................................................................................43
●
Scroll Speed/Lyric On/Off/Time
.......................................................................................43
●
Backlight
.......................................................................................................................44
●
Contrast
.......................................................................................................................45
設置關閉電源 ............................................................................................................46
●
Time/ Sleep
..................................................................................................................46
設置編碼 ...................................................................................................................47
●
Bitrate/AutoSync Time
...................................................................................................47
設置
WOW
等級..........................................................................................................48
●
調節
SRS
/
TruBass
等級 .............................................................................................48
●
WOW Optimum
.............................................................................................................48
設置預定音量 ............................................................................................................49
附附湳湳
MENU
一覽憐.......................................................................................................................50
客客戶戶支支持持
yepp
排憂潁難......................................................................................................................52
産品規格..............................................................................................................................54
附附加加使使用用
Page 62

中
國
語
5
安安全全注注意意事事項項
關關于于耳耳机机
關關于于交交通通安安全全
●
騎騎自自行行車車
//
駕駕路路汽汽車車及及摩摩托托車車時時,,請請勿勿使使用用耳耳机机
00
這這樣樣不不僅僅危危險險,,而而且且在在有有些些地地袴袴還還是是違違法法的的
00
步步行行時時,,尤尤其其是是在在人人行行橫橫道道上上,,如如果果使使用用耳耳机机的的音音量量過過大大是是危危險險的的
00
爲爲了了保保護護聽聽力力
●
不不要要以以過過大大音音量量使使用用耳耳机机
00
秉秉生生指指出出,,長長時時間間連連樓樓以以較較大大音音量量收收聽聽繇繇有有損損聽聽力力
00
●
出出現現耳耳鳴鳴時時,,請請癎癎低低音音量量或或停停止止使使用用
00
●
廢廢棄棄包包裝裝
//
電電池池
//
鼓鼓電電子子産産品品時時,,請請分分類類處處理理
00
●
包包裝裝材材料料分分爲爲紙紙殼殼// 聚聚乙乙臭臭// PS等等三三類類,,不不需需要要的的包包裝裝材材料料未未使使用用00
●
外外界界溫溫度度::
5°C~35°C(41°F~95°F)
●
陵陵度度 ::
10% ~ 75%
以下是爲了使用者安全和防止財産損害等的內容
0
務請認眞閱規,正確使用
0
※
捲于因故障/ 修理及此外其央理由而出現湳音瑠据及保存瑠据線失所導
致的損失,本公司槪不負責,請給予諒潁0
請避開溫度過高(35℃以上)或
過低(-5℃以下)/ 潮陵的地方
0
切勿嚴重撞擊主机
0
切勿接觸蓬/ 稀撈芟等化縯葯品0
如果長期不使用,請取出電池
0
請避開直射光陸或屠熱器具
0
請避開灰塵或烟灰較多的場所
0
切勿在播放器上放置重物
0
勿使異物進入産品內部
0
切不可阿隷/ 修理/ 改造
0
産産品品的的最最佳佳使使用用穡穡件件
環環境境信信息息
4
Page 63

MP3 & WMA
播播放放
●
什鹿是
MP3?葉MPEG1 Layer3
音頻格式,是一種易于使用的音樂文
件格式
0
●
什鹿是
WMA?
葉微軟
Widows Media
音頻文件,是一種使用者不鉤增加
的音樂文件格式
0
移移動動硬硬盤盤功功能能
●
可以在
windows
資源管理器中輕松地復制/ 保存文件
0
MP3
編編碼碼
(Encoding)
功功能能
●
可以通過主机的
ENC
端子,把外部音樂直接制成
MP3
文件
0
●
也可以把FM收音机廣播麟時制成
MP3
文件
0
FM
接接收收
●
具有自動選臺功能/ 保存頻率功能,可以方便地收聽FM廣播
0
支支持持
3D
音音響響
●
可以感受到酪富的低音和3D立郞瀨
0
支支持持升升級級功功能能
●
可以進行升級,以便添加
yepp
內置程序(固件)的功能0 添加功能/ 添加
CODEC
等
升級相關事項已在
www.yepp.com.cn
上公布,請格常光顧査閱0
6
7
中
國
語
Page 64

中
國
語
9
最最大大連連樓樓播播放放12小小時時
●
一節杆性電池(
AAA/LR03
型)最大可連樓播放12小時
0
參考: 播放時間繇因使用電池的種類而異
0
語語音音湳湳音音功功能能
●
可以用作授課湳音/ 繇議湳音等
0
支支持持多多樣樣的的
EQ
均均衡衡器器
●
可以設置自己的EQ,收聽音樂0
●
由于內部固件繇占用部分內存,所以麟際可用內存小于標出的容量
0
●
爲提高産品性能,構成物品的外觀如有變更,恕不奉告
0
開開箱箱檢檢査査
主主机机
耳耳机机
USB
連連接接陸陸
安安裝裝光光盤盤
使使用用說說明明書書
杆杆性性電電池池
((
AAA/LR03型型1
節節))
棨棨繩繩
便便旭旭套套
簡簡易易
USB
轉轉接接器器 連連接接陸陸
型型獄獄
內內存存容容量量
YP-T5 H
128MB
YP-T5 V
256MB
YP-T5 X
512MB
8
使使用用說說明明書書
Page 65

中
國
語
各各部部的的名名稱稱
11
10
00:01:30
001/020
Singer-Song 1
NOR
192
NOR
演演奏奏時時間間顯顯示示
模模式式標標識識
比比特特率率標標識識
播播放放方方法法顯顯示示
EQ/SRS
顯顯示示
播播放放//停停止止//暫暫停停鍵鍵
電電池池電電量量顯顯示示
曲曲獄獄顯顯示示
標標題題((曲曲名名及及歌歌手手))顯顯示示
顯顯示示屛屛
放放入入電電池池
湳湳音音鍵鍵
播播放放//暫暫停停鍵鍵
鎖鎖定定開開關關
片片段段反反復復設設置置按按瞿瞿
USB
連連接接陸陸
連連接接端端子子
ENC
端端子子
麥麥克克風風
棨棨環環
菜菜單單// 導導航航設設置置按按瞿瞿//
曲曲目目移移動動//高高速速搜搜索索//
音音量量調調節節鍵鍵
顯顯示示屛屛
耳耳机机端端子子
電電池池盖盖
按箭頭方向推動電池盖
幷打開0
然后放入電池,放入時電池的
/ 極要正確,向箭頭方向
推動幷盖好0
1
2
注注注注意意
意意
如捲電池盖過度用力,可能導致損壞
0
Page 66

中
國
語
13
侮侮
PC
連連接接使使用用
12
連連接接PC侮侮
yepp
之之前前,,務務請請安安裝裝
USB
驅驅動動程程序序00
如果彈出“胥到新的硬件向導”請按[[Cancel]]按
瞿,然后安裝
USB
驅動程序0
推推茱茱PC配配置置
PC
係統應具備如下穡件
0
●
奔騰
133MHz
以上
●
Windows 98SE/ME/2000/XP
●
20MB
硬盤可用空間
●
CD-ROM
驅動器(2倍速以上)
●
支持
USB端口(1.1)
●
DirectX 8.0
以上
樓樓
參參參參考考
考考
●
如是
Windows 2000/XP
,安裝時
務請安裝于
Administrator
(管理
員)帳戶中0 如不是
Administrator
(管理員)帳戶,則不能安裝0
●
在
Windows ME/2000/XP
中,
无須癩行安裝程序,也可識別驅
動器,但爲了進行格式化及固件
升級,請務必安裝0
●
Windows 98
如果不安裝
YP-T5
程序,則无法使用移動硬盤0
必須先安裝
USB
驅動文件0
安安裝裝軟軟件件
1
將安裝光盤揷入CD-ROM驅動器0
然后將彈出如下所示的怜面0
選楊[yepp USB Driver]0
2
在接下來的每憾鎖口中均点擊[[Next]]按瞿0
軟軟件件安安裝裝完完成成后后,,按按下下頁頁所所
示示侮侮PC連連接接使使用用
00
參參參參考考
考考
●
Lyrics Station
(歌曲站) 目前只適用于韓語歌曲
0
Page 67

中
國
語
15
14
將
USB
連接陸連接到計算机主机后面的
USB
端口
0
把
USB
瑠据陸的癩一端連接到
yepp
下端的
USB
瑠据陸連接端子后,按主机的
▶按瞿0
●
如果在
USB
驅動程序安裝的初始化過程或在命
令執行中拔下
USB
連接陸,可能導致PC出錯
0
4
USB
驅動程序安裝后,如下詭所示,
在
[[設設備備管管理理器器]]
中出現
““
Samsung YP-T5 USB Device
””
0
6
3
彈出屠現新硬件提示信息的同時,安裝
USB
驅
動程序
0
也可能不顯示安裝的怜面0 請査看設
備管理器,確認是否已正常安裝0
5
USB
驅驅動動程程序序確確認認方方法法
● Windows 98:
控制面板
係統
設備管理器
通用串行總陸控制器
Samsung YP-T5 USB Device
● Windows 2000/ME (Professional):
控制面板係統硬件設備管理器
通用串行總陸控制器
Samsung YP-T5 USB Device
● Windows XP (Professional):
控制面板性能及維護係統硬件
設備管理器通用串行總陸控制器
Samsung YP-T5 USB Device
万一
USB
驅動程序未按如上所示安裝好,請參考
“手動安裝
USB
驅動程序”
0
7
利利用用
USB
連連接接陸陸連連接接到到
PC
侮侮
PC
連連接接使使用用
USB
連連接接陸陸
Page 68

中
國
語
17
手手動動安安裝裝
USB
驅驅動動程程序序
16
芎
USB
驅動程序已正常安裝時,請移動至20頁的“下載/上傳文件”,只有芎
USB
驅動程序未自
動安裝時,思請參考如下方法
0
確認設備管理器
0
● Windows 98/ME:
控制面板係統設備管理器
● Windows 2000 (Professional):
控制面板係統硬件設備管理器
● Windows XP (Professional):
控制面板性能侮維護係統硬件
設備管理器
1
確認是否存在標有感嘆獄或問獄的設備(標記爲未知設備或
USB Device
)
0
2
雙擊帶有感嘆獄或問獄的設備
0
3
選楊驅動程序,然后点擊[
Update Driver]0
4
選楊兼容驅動程序,然后点擊[
Next
]結束葉可
0
5
參參參參考考
考考
●
捲于
Windows 2000
用戶,如果不能識別
USB
驅動程序,請到
Windowsupdate.microsoft.com
下載最新服務包幷安裝
0
●
根据PC机型及配置的不同,安裝方法可能繇各異
0
此時,請就安裝問題向PC的購買單位或服務中心進行咨詢
0
●
如果
USB
驅動程序安裝訣樓出錯,請重新啓動係統,然后再重新連接
USB
連接陸0
芎芎安安裝裝UUSSBB驅驅動動程程序序過過程程中中屠屠生生錯錯誤誤時時
Page 69

中
國
語
19
18
芎芎是是
Win 98
時時
手手動動安安裝裝
USB
驅驅動動程程序序
●
如如要要完完成成安安裝裝,,請請重重新新啓啓動動係係統統
00
USB
驅驅動動程程序序位位置置
[CDROM]\setup\Drivers
參參參參考考
考考
●
在
windows98
中,如不安裝
YP-T5
程序,則不能芎作移動硬盤使用
0
必須要先安裝
USB
驅動程序
0
在接下來的每憾鎖口中均点擊[
Next
]按瞿
0
Page 70

中
國
語
21
20
使使用用可可移移動動存存儲儲設設備備
((計計算算机机))
1
2
注注注注意意
意意
●
在文件上傳或下載過程中,顯示出
“READING/WRITING”
提示信息0 如果在顯示有
“READING/WRITING”
時拔下
USB
連接陸,可能
引起出錯0
●
在
Windows
資源管理器中選楊移動硬盤時出
現的音樂文件順序侮麟際播放順序无關
0
打開
yepp
的電源,然后連接到PC上
0
運行PC的
Windows
資源管理器
0
3
選楊要保存的文件,然后拖放到移動硬盤
0
下下載載//上上傳傳文文件件
拔拔下下
USB
連連接接陸陸
在在文文件件傳傳輸輸全全部部結結束束后后,,一一定定要要按按如如下下方方法法拔拔下下連連接接陸陸00
注注注注意意
意意
●
在
Windows98
中,綠色的任務欄中不顯示綠色的箭頭,請在怜面顯示
鎖口中出現
“READY”
字樣的信息后再拔下
USB
連接陸
0
1
雙擊鎖口右下方任務欄中的綠色
箭頭,然后拔下連接着的
USB
連
接陸0
2
選楊了
USB
裝置后,按[
Stop
]按瞿0
彈出[硬郞設備終止]怜面后,按[確定]按瞿,把
USB
瑠
据陸取下0
Page 71

安安裝裝
yepp Studio
23
中
國
語
使使用用可可移移動動存存儲儲設設備備
((計計算算机机))
22
1
選楊移動硬盤,然后單擊
鼠標右鍵,選楊格式化0
注注注注意意
意意
●
如果進行格式化,原來設置的菜單被初始化
0
●
請注意,格式化后,文件將无法恢復
0
2
按[
Start
]按瞿
0
●
保存的全部文件被格式化0
●
在
Volume label
中可以變更移
動硬盤的名稱0
格格式式化化
1
將安裝光盤揷入光盤驅動器中
0
選楊
[[
yepp Studio
]]
0
2
選楊語言
0
樓樓
Page 72

中
國
語
25
安安裝裝
yepp Studio
24
3
在出現的一係列鎖口中單擊
[[
Next
]]
0
●
關于如何使用
yepp Studio
的更多信息,請參閱搗助
0
運行
yepp Studio
,幷按F1鍵
0
●
出現搗助
0
將箭頭移至
yepp Studio
的頂部,幷單擊鼠標右鍵,將出現以下的選
楊鎖口
0
●
單擊搗助,將出現搗助鎖口
0
參參參參考考
考考
●
音樂識別技術及相關瑠据由
Gracenote&Gracenote CDDB
®
Music
Recognition ServiceSM(
音樂識別服務SM)提供
0
●
CDDB是Gracenote
公司的注冊商標
0
Gracenote
標識及徽標
/
Gracenote
CDDB
標識及徽標以及
“Powered by Gracenote CDDB”
標識及徽標是
Gracenote
公司的注冊商標
0
Music Recognition Service侮MRS是Gracenote
公
司的服務標志
0
參參參參考考
考考
●
最初運行
yepp Studio
時,如果彈出[登湳産品獄碼]鎖口,請輸入
yepp
的制造編獄
(S/N)
0
在在
yepp Studio
上上査査看看搗搗助助
Page 73

中
國
語
設設置置音音量量//鎖鎖定定功功能能
27
利利用用
yepp
聽聽湳湳音音
26
請在播放中利用主机上的
/
鍵調節
音量
0
參參參參考考
考考
●
音量可在
00~30
之間調節0
●
如短促按下,則一段一段地調節,如長按,則連樓調節0
20
00:01:30
001/020
NOR
192
NOR
HOLD!
如設置了鎖定功能,那鹿在播放中葉使按下其央鍵,也不繇工作
0
操操作作主主机机的的 開開關關
00
●
葉使按下主机的其央鍵,也不繇工作,顯示
屛上出現
“ HOLD!”
顯示0
如如要要播播放放
((打打開開電電源源))
按下主机的
▶
鍵,出完標志怜面
后,音樂/語音文件開始播放
0
在播放中按下主机的
▶
鍵,停止播
放,如无其央鍵輸入,電源10秒后
(根据設置而定)自動關閉
0
●
長按主机的▶
鍵,電源也繇關閉
0
參參參參考考
考考
●
捲于
WMA
文件,只能播放可由
Windows Media player(Ver 8.0)
生成的忘縮率爲
48Kbps~192Kbps
的音樂文件0
48Kbps以下WMA
文件可能繇无法播放0
●
電源關閉時間可在
MENU
中進行設置0
如如要要停停止止音音樂樂
((關關閉閉電電源源))
如如要要調調節節音音量量
鎖鎖定定功功能能
FREE MEMORY
114.37 MB
NOR
001/020
192
OR
N
00:01:30
Singer-Song 1
NOR
001/020
192
OR
N
00:01:30
Singer-Song 1
GOOD BYE
Page 74

進進行行
MP3
編編碼碼
29
中
國
語
語語音音湳湳音音
28
1
按下
REC
按瞿后,開始語音湳音
0
再次按
REC
按瞿后,湳音停止,生成新
Voice
文件
0
2
00:00:15
001/001
V001. WAV
00:00:00
001/001
V001. WAV
NOR
NOR
參參參參考考
考考
●
按
V001
/
V002......
的順序湳音,湳音后,保存爲
.WAV
文件
0
●
如果存儲器達到
Full
狀態,則自動停止
0
●
在FM模式下,或是
Line
連接陸已格連接時,不能進行語音湳音
0
1
利用連接陸把外部音頻設備的
Line out
端子(或音頻輸出端子)
侮主机的
ENC
端子連接起來0
2
按下
REC
按瞿后,開始
MP3
編碼
0
●
如果按下▶
按瞿,暫停編碼,如再按▶
按瞿,則訣樓編碼
0
3
在編碼過程中如果按
REC
按瞿,停止編碼,生成編碼文件
0
●
按
L001
/
L002....
順序編碼,編碼后,保存爲MP3文件
0
參參參參考考
考考
●
Bit Rate
可以在
32Kbps~128Kbps
之間設置
0
●
在監聽編碼時,音量可在
0~10
段之間調節
0
注注注注意意
意意
●
在編碼過程中,如果拔下
Line In
陸纜,那鹿終止編碼
0
●
電池電量不足時,不進行編碼
0
●
請將外部音響設備的音量設置爲適芎大小后再編碼
0
芎音量過大時,編碼的音質可能繇不好
0
Page 75

中
國
語
31
査査胥胥想想聽聽的的音音樂樂//語語音音文文件件
30
參參參參考考
考考
●
VBR(Variable Bit Rate)
文件:在文件中根据音的高低等種類隨時轉換忘縮率的文件
0
●
芎是
VBR
文件時,葉使在播放開始后5秒內推動◀◀
鍵,也可能不移動到上一
首幷播放
0
●
MP2或MP1
格式的文件只把頑展名變成
MP3
幷下載時,可能繇无法播放
0.
●
在播放中如果向左右長時間推◀◀/ ▶▶鍵,可以胥到需要的部分幷收聽
0
●
如果松開推動的鍵,則正常播放
0
在在播播放放中中査査胥胥需需要要的的部部分分
●
在播放中如果短促推動▶▶
鍵,則播放下一首
0
●
如果在開始播放后5秒以內短促推動◀◀
鍵,則移動到上一首幷播放,如果在5秒以后
短促推動
◀◀鍵,那鹿芎前曲目從頭播放
0
如如要要在在播播放放中中査査胥胥需需要要的的文文件件
●
在停止狀態下,如果左右推動◀◀/ ▶▶鍵,則移動到上一首/下一首
0
如如要要在在停停止止中中査査胥胥需需要要的的文文件件
收收聽聽
FM
89.1 MHz
SEARCHING
FM
MO
88.0 MHz
FREE CH
FM
MO
請選按 鍵,彈出菜單怜面后,選楊
FM Radio
0
●
請短促推動◀◀/ ▶▶鍵,手動搜尋需
要的頻率
0
●
請短促推動◀◀/ ▶▶鍵,手動搜尋
需要的頻率
0
●
手動搜索需要的頻率后,如果長時間按
鍵,則彈出保存怜面
0
●
請利用◀◀/ ▶▶鍵選楊需要的頻率保存獄
碼,然后按 鍵
0
●
請在FM模式下長時間按A
B
按瞿
0
●
在
87.50MHz至108.00MHz
之間自動選
曲幷保存
0
●
自動保存頻率時,自1獄起重新保存
0
參參參參考考
考考
●
如要退出FM模式,按 鍵葉可
0
●
單瀨道(MO)/ 立郞瀨(ST)繇自動選楊
0
89.1 MHz
AUTO PRESET
FM
SET
1
89.1 MHz
SAVE?
FM
MO
1
保保存存的的頻頻道道憾憾瑠瑠
手手動動査査胥胥頻頻率率
自自動動査査胥胥頻頻率率
手手動動保保存存頻頻率率
自自動動保保存存頻頻率率
Page 76

中
國
語
33
收收聽聽
FM
32
進進行行
FM
編編碼碼
89.1 MHz
PRESET
FM
MO
1
107.7 MHz
PRESET
FM
MO
3
91.9 MHz
PRESET
FM
MO
2
參參參參考考
考考
●
最多可保存20憾頻率
0
●
如果在
PRESET
怜面中按▶
按瞿,
PRESET
模式被潁除
0
1
請在FM模式下按
▶
按瞿
0
● 彈出
PRESET
怜面
0
請利用
◀◀/ ▶▶
鍵移動到需要的頻率
0
2
89.1 MHz
PRESET
FM
MO
1
89.1 MHz
Deleted!!
PRESET
FM
MO
1
刪刪除除保保存存的的頻頻率率
-
請在移動到要刪除的
PRESET
獄碼后,長時間按 鍵
0
● 保存的
PRESET
獄碼被刪除
0
1
請在FM接收過程中按
REC
按瞿
0
●
開始把芎前接收的FM廣播編碼成
MP3
文件0
2
請再按一次
REC
按瞿
0
●
生成文件,編碼停止0
●
按
F001/ F002/ F003...
的順序保存,如果存儲器達到
Full
狀態,則自動停止0
00:01:30
001/001
F001.MP3
Page 77

使使用用導導航航
35
中
國
語
設設置置片片段段反反復復
34
段段落落重重復復開開始始点点
在音樂/語音文件播放過程中,
請在想反復收聽的開始部分按
主机的
AB
按瞿
0
顯示屛上出現
A
0
段段落落重重復復結結束束点点
請在結束片段反復的部分再按一
次主机的
AB
按瞿
0
顯示屛上出現
AB
0
設置的段落重復播放0
參參參參考考
考考
●
如要潁除片段反復,請再短促按一次主机的A
B
按瞿
0
●
如利用
◀◀,▶▶
選楊了高速搜索,則段落重復自動潁除
0
參參參參考考
考考
●
如在導航模式下長時間按 鍵,導航模式被潁除
0
00:02:05
001/020
Singer - Song 1
NOR
192
NOR
00:02:50
001/020
Singer - Song 1
NOR
192
NOR
MUSIC/
ROOT
Singer - Song 1
ROOT
Singer - Song 2
Singer - Song 1
1
請長時間按 鍵,移動到導航模式
0
2
請選楊要播放的文件夾或文件
0
●◀◀:
移動到上級文件夾 ●
▶▶:
移動到下級文件夾
●
/ :
同一目湳內的文件或文件夾間的移動
●
:
移動到下級文件夾0 芎沒有下級文件夾時,選楊的文件被指定爲播
放列憐
芎文件夾處于播放或停止中時 文件處于播放或停止中時
3
請按
▶
按瞿
0
●
播放選楊的文件
0
●
芎選楊了文件夾時,播放選楊的文件夾內的全郞文件
0
可以利用導航功能輕松地檢索需要的文件或轉換模式
0
Page 78

中
國
語
設設置置菜菜單單
37
設設置置播播放放列列憐憐
36
參參參參考考
考考
●
如果在MENU的
File Delete
中選楊(參照“刪除”)
PLAYLIST
,那鹿設置的播
放列憐全部被潁除
0
ROOT
Singer - Song 2
Singer - Song 1
ROOT
Singer - Song 2
Singer - Song 1
-在導航模式下移動到需要的文件,然后請按 鍵
0
●
選楊的文件被標記
0
●
如要潁除播放列憐設置,請在導航模式下移動到已標記的文件,然后按 鍵
0
●
Now playing:
芎要確認現在播放的曲目時
●
FM Radio:
芎要收聽FM收音机時
●
File :
要刪除或格式化音樂文件時
●
Settings:
芎要設置
yepp
的詳細功能時
參參參參考考
考考
●
在
MENU
模式下,如15秒鍾內无其央輸入,則
MENU
模式潁除
0
如果按 鍵,則轉換爲
MENU
模式
0
利用
/
鍵移動后,請短促按 鍵,選楊需要的菜單
0
如果再次長時間按 鍵,
MENU
模式潁除
0
FM Radio
File
Now playing
File
Now playing
Fm Radio
Now playing Settings
FM Radio
File
設設置置播播放放列列憐憐
Singer - Song 2
Singer - Song 1
00:01:30
001/020
Singer - Song 1
NOR
192
NOR
♥
1
請在音樂模式下長時間按
AB
按瞿
0
●
出現選楊的播放列憐
0
2
移動到要播放的文件后,請按
▶
按瞿
0
●
播放選楊的文件
0
播播放放播播放放列列憐憐
Page 79

中
國
語
39
管管理理文文件件
38
1
在
MENU
中選楊
File
0
(參照“設置菜單”)
2
在
File
中選楊
File Delete
,然后選楊要刪除文件所在的模式
0
3
利用
/
鍵移動到要刪除的文件,然后按 鍵選楊
CONFIRM
0
退出設置時,請短促推動
◀◀
鍵
0
Format
File Delete
DELETE
MUSIC PLAYLIST VOICE
FM ENC LINE ENC
DELETE
Singer - Song 3
DELETE
COMPLETED
Singer - Song 3
DELETE
CONFIRM
CANCEL
刪刪除除
1
在
MENU
中選楊
File
0
(參照“設置菜單”)
2
在
File
中選楊
Format
0
●
選楊
CONFIRM
后,運行格式化
0
參參參參考考
考考
●
請注意,如果捲內存進行格式化,文件將繇被全部刪除
0 .
●
芎在菜單中格式化時,時間可能繇較長,推茱在安裝了提供的程序的PC中進
行格式化
0
File Delete
FORMAT
Format
CONFIRM CANCEL
格格式式化化
Page 80

設設置置播播放放模模式式
41
中
國
語
設設置置詳詳細細功功能能
SETTING
功功能能
1
在
MENU
中選楊
Settings
0
(參照“設置菜單”)
2
請在
Settings
中利用
/
鍵移動到要變更的功能,然后按
鍵選楊
0
●
芎到移動到上級菜單時,請利用◀◀鍵0
Display
Sound
Playmode
Display
Sound
Playmode
Sound
Power off
WOW level
Encoding
Power off
WOW level
Encoding
Power off
Encoding
Default vol
Playmode
Display
WOW level
40
1
在
Settings
中選楊
Playmode
0
2
請在
Playmode
中利用
/
鍵移動到需要的模式,然后按
鍵選楊
0
Repeat all
Repeat one
Intro
Shuffle
Normal
●
Normal:
按收湳的曲目的順序逐憾播放
●
Repeat one:
要重復收聽一首曲目時
●
Repeat all:
要重復收聽保存的所有曲目時
●
Shuffle:
要按任意順序重復收聽保存的曲目時
●
Intro:
芎要收聽已保存的所有曲目前面
10
秒鍾時
Page 81

設設置置顯顯示示
43
中
國
語
設設置置
EQ
42
1
在
Settings
中選楊
Sound
0
2
請在
Sound
中利用
/
鍵移動到需要的瀨音模式,然后按 鍵
0
WOW
TruBass
SRS
Jazz
Classic
Normal
User
Rock
DBB
參參參參考考
考考
●
是
SRS Labs, Inc.
的注冊商標
0
WOW
技術格
SRS Labs, Inc.
授權
0
●
設置
SRS
時,瀨音繇在一定程序上加大,請選楊適芎的音量
0
●
支持的取樣頻率是
32KHz
/
44.1KHz/ 48KHz
0
●
語音湳音的文件未設置
SRS
功能
0
3
如要在指定的音色之外設置憾性化音色,請選楊
User
,然后設置
Bass/Treble
0
●
Bass/Treble
可利用
/
鍵分別在
0~10
的範圍內調節
0
●
S R S ( ) :
可以欣賞3D立郞瀨
0
●
TRUBASS ( ) :
通過增强低音,可以獲得更雄壯的音響
0
●
WOW :
由
SRS
/
TRUBASS/ FOCUS
功能構成,可以同時欣賞酪富的低音和
3D
立郞瀨
0
●
如果需要增强音色的重低音,請選楊
DBB
0
●
請利用
/
鍵設置滾動速度
0
●
滾動速度可以調節曲目標題滾動的速度,其設置範
圍是
0~10
0
SCROLL SPEED
SCROLL
SPEED
06
在
Settings
中選楊
Display
0
Scroll Speed
Lyric On/Off
●
請利用
/
鍵,選楊
LYRIC ON或OFF
0
●
ON:
播放音樂時,顯示屛上出現保存的歌詞
0
●
OFF:
葉使保存有歌詞,但歌詞也不出現
0
●
此功能目前只適用于韓語歌曲
0
LYRIC
ON OFF
Used size
Remain time
Free size
Play time
●
PLAY TIME:
芎前播放時間顯示
●
REMAIN TIME:
播放剩余時間顯示
●
USED SIZE:
已用內存顯示
●
FREE SIZE:
可用內存顯示
Time
Page 82

中
國
語
45
設設置置顯顯示示
44
JOG LED
LIGHT
TIME
3
SEC
LCD LED
LIGHT
TIME
3
SEC
Blue
Red
Sky-Blue
Orange
Violet
Random
Lilac
Green
●
請利用
/
鍵,設置 的燈点亮時間
0
●
燈点亮時間的設置範圍是
0~10
秒
0
●
芎設置爲ON時,燈連樓点亮
0
●
請利用
/
鍵,設置
LCD
的燈点亮時間
0
●
燈点亮時間的設置範圍是
0~10
秒
0
●
芎設置爲ON時,燈連樓点亮
0
Backlight
[ Light Time - Jog ]
[ Light Time - LCD ]
●
請利用
/
鍵,在7種顔色中選楊
LCD
顔色
0
[ LCD color ]
參參參參考考
考考
●
電池電量不足時,背景光不打開
0
Green Red Blue
Violet Orange Sky-Blue
Lilac Random
Contrast
●
請利用
/
鍵設置捲比度
0
●
捲比度可以選楊怜面亮度,其設置範圍是
0~10
0
CONTRAST
08
Page 83

中
國
語
47
46
設設置置關關閉閉電電源源 設設置置編編碼碼
Time
●
請利用
/
鍵設置電源關閉
0
●
設置範圍是
0~1
分,在停止播放后,如果沒有其央按
瞿忘力,那鹿在設置的時間以后,電源自動關閉
0
●
芎設置爲0秒時,電源不自動關閉
0
POW OFF TIME
10 SEC
Sleep
●
請利用
/
鍵設置就寢預約時間
0
●
就寢預約時間可設置爲
30/ 60/ 90/ 120
分,
如果到了設置的時間,電源自動關閉
0
●
設置爲
OFF
時,電源不自動關閉
0
SLEEP
OFF
00:00
Bitrate
●
請利用
/
鍵設置需要的編碼比特率
0
●
把音樂編碼成
MP3
文件時,可以在
32Kbps
/
48Kbps
/
64Kbps/ 96Kbps/ 128Kbps
中選楊一種比特率
0
POW OFF TIME
10sec
BIT RATE
128Kbps
AutoSync Time
●
請利用
/
鍵設置
AutoSync Time
0
●
AutoSync Time
的功能是在
MP3
編碼過程中,芎在已
設置的時間內无瀨音時,袴分
MP3
文件進行保存
0
●
AutoSync Time
的設置範圍是
2~5
0
●
芎設置爲
OFF
時,在以
MP3
編碼湳音的曲目之間葉使
沒有瀨音,編碼不停止,而是只在爲一憾文件
0
AUTO SYNC
OFF
AUTO
SYNC
在
Settings
中選楊
Encoding
0
在
Settings
中選楊
Power off
0
參參參參考考
考考
●
AutoSync
功能只支持
64Kbps~128kbps
0
Page 84

中
國
語
49
48
設設置置
WOW
等等級級 設設置置預預定定音音量量
調調節節
SRS
/
TruBass
等等級級
●
如在
WOW level
中選楊
SRS或TruBass
,可以調節
SRS和TruBass
的等級
0
●
請利用
/
鍵選楊需要的等級
0
●
SRS和TruBass
水平的設置範圍分別是
0~10
0
SRS LEVEL
05
TRUB
ASS
LEVEL
05
Earphone
Headphone
Carpack
Speaker
●
如果選楊
WOW Optimum
,則根据連接的設備捲
SRS
功能進行最優化
0
●
請利用
/
鍵,在
Speaker
/
Headphone
/
Earphone/ Carpack
中選楊需要的設備
0
WOW Optimum
在
Settings
中選楊
WOW level
0
Default vol
●
請利用
/
鍵設置默認音量値
●
默認音量的設置範圍是
0~25(MAX)
,如把音量調至
設置値之上,關閉電源后再次打開,則以設定的音
量播放音樂0
●
如音量在設置値以內,在該狀態下關閉電源后再
次打開,則以以前收聽音量播放音樂
0
DEFAULT VOL
D
EFA
U
L
T
20
在
Settings
中選楊
Default vol
0
Page 85

中
國
語
51
MENU
一一覽覽憐憐
50
●
利用 鍵選楊/ 移動
0
Page 86

中
國
語
53
yepp
排排憂憂潁潁難難
52
軟軟郞郞不不工工作作
00
●
請參照推茱PC配置
0
不不工工作作,,顯顯示示屛屛沒沒有有任任何何顯顯示示
00
●
請確認電池電量
0
●
請確認電池的
/
極
0
在在音音樂樂模模式式按按了了播播放放鍵鍵,,但但却却聽聽不不到到音音樂樂
00
●
確認存儲器中是否保存有
MP3
/
WMA
文件
0
●
確認
HOLD
鍵是否已鎖上
0
无无法法下下載載文文件件
00
●
請確認電池電量0 放入電池,打開電源,然后連接到計算机
0
●
確認計算机中的驅動程序是否已正常安裝
0
●
確認計算机侮
yepp間的USB
連接
0
●
由于可保存的文件憾瑠受限,請創建下級文件夾保存音樂文件
0
●
請確認記憶郞是否處于
Full
狀態
0
背背景景光光打打不不開開
00
●
請確認背景光設置狀態
0
●
芎電池的電流電忘較低時,爲了播放時間更長,背景光自動變爲不亮
0
yepp
的的按按鍵鍵不不動動作作
00
●
請確認
HOLD
開關是否被鎖定
0
●
取出電池,然后再重新揷入
0
yepp
關關机机了了
00
●
在停止狀態下,電源繇根据設置自動關閉
0
●
請確認是否存在已保存的曲目
0
在在播播放放中中,,播播放放時時間間顯顯示示異異常常
00
●
請確認是否在播放
VBR(Variable BIT RATE)
文件
0
VBR
文件時間顯示不准
0
LCD
顯顯示示屠屠暗暗
00
●
請確認
Contrast
0
Page 87

備備注注産産品品規規格格
54
YP-T5
128MB(YP-T5 H)/256MB(YP-T5 V)/512MB(YP-T5 X)
1.5V×1 (AAA/LR03
杆性電池
)
工作時間最多12小時(以杆性電池 /
MP3 128Kbps / VOL.20
爲准)
23×54×23mm/24g
(電池除外)
MPEG 1 / 2 / 2.5 Layer 3
8 Kbps ~ 320 Kbps, 8KHz ~ 48KHz
WMA
48 Kbps ~ 192 Kbps, 8KHz ~ 48KHz
期質/塑料
80dB with 20KHz LPF
5mW/CH (16 Ω) (
最大10mW)
20Hz~20KHz
-5 ~ +35℃(23~95°F)
88.0 ~ 108.0 MHz
45dB
1%
10dB
爲提高性能,本使用說明書內容如有變更,恕不奉告
0
型獄
內存容量
電忘
連樓播放時間
尺寸
(W×H×D)
/重量
外殼
筮瀨比
耳机輸出
輸出頻率範圍
溫度特性
FM
頻率
FM
信筮比
FM
失眞
FM
麟用靈敏度
支持文件
中
國
語
Page 88

AH68-00000A (Rev 0.0)
-
-
-
-
-
-
-
YP-T5
Page 89

..........................................................................................................4
........................................................................................................................9
..........................................................................................................................10
PC
USB
● .......................................................................20
● USB .....................................................................................................21
● ................................................................................................................22
yepp Studio
yepp Studio
yepp
MP3
................................................................................................................................31
FM
FM
..........................................................................................................12
..........................................................................16
(PC) ......................................................................................20
................................................................................................23
.................................................................................25
...............................................................................................................26
..........................................................................................................................28
............................................................................................27
....................................................................................................29
...................................................................................................30
......................................................................................................33
............................................................................................................34
.................................................................................................35
............................................................................................................36
...................................................................................................................37
● ..............................................................................................................................38
● ................................................................................................................39
EQ
● Scroll Speed / Lyric On/Off / Time ....................................................................................43
● Backlight ........................................................................................................................44
● Contrast .........................................................................................................................45
● Time / Sleep ...................................................................................................................46
● Bitrate / AutoSync Time ...................................................................................................47
● ...........................................................................................48
● WOW Optimum ..............................................................................................................48
MENU
...................................................................................................................38
...................................................................................................................40
...............................................................................................................41
............................................................................................................................42
.....................................................................................................................43
...................................................................................................................46
....................................................................................................47
.............................................................................................................48
............................................................................................49
.......................................................................................................................50
yepp
..............................................................................................................................54
2
.....................................................................................................52
3
Page 90

:
:
PS
4
5
Page 91

MP3 & WMA
MP3 MPEG1 Layer3
WMA Widows Media
Encoding
ENC MP3
FM MP3
FM
FM
3D
3D
6
7
Page 92

AAA/LR03
USB
USB
YP-T5 V
256MB
EQ
AAA/LR03
YP-T5 H
128MB
8
Line
CD
YP-T5 X
512MB
9
Page 93

00:01:30
001/020
Singer-Song 1
NOR
192
NOR
EQ/SRS
1
10
ENC
USB
❖
2
11
Page 94

PC
PC
●
●
●
40MB
●
CD-ROM 2
●
USB 1.1
●
DirectX 8.0
●
Windows 2000 XP
Administrator
●
Windows ME 2000 XP
●
Windows 98 YP-T5
USB
12
PC
133MHz
98SE/ME/2000/XP
Administrator
PC yepp USB
Cancel USB
1
CD-ROM
yepp USB Driver
●
2
Next
13
Page 95

PC
USB PC
3
USB
4
●
USB
5
USB
USB
USB
PC
USB
USB
●
Windows 98:
●
Windows 2000/ME Professional
Samsung yeep YP-T5 USB Device
●
Windows XP Professional
➔ ➔ ➔
➔ ➔
Samsung yeep YP-T5 USB Device
➔ ➔ ➔
Samsung yeep YP-T5 USB Device
➔ ➔ ➔
➔ ➔
➔
14
6
"Samsung YP-T5 USB Device"
7
USB
USB
15
Page 96

USB
16
USB
USB
1
●
Windows 98/ME:
●
Windows 2000 Professional
➔
●
Windows XP Professional
2
USB Device
➔ ➔
➔ ➔
➔ ➔
➔ ➔
3
●
Windows 2000 USB
Windowsupdate.microsoft.com
●
PC
●
USB USB
PC
4
5
Update Driver
Next
17
Page 97

USB
Win 98
Next
USB
[CDROM]\setup\Drivers
●
Windows98 YP-T5
●
USB
18
19
Page 98

yepp PC
1
PC windows
2
USB
1
20
3
2
USB
●
●
●
READING/WRITING
READING/WRITING
USB
●
Windows 98
READY USB
❖
21
Page 99

1
yepp Studio
CD-ROM CD
1
[yepp Studio]
2
Start
●
●
Volume label
2
●
●
22
23
Page 100

yepp Studio
3
● yepp Studio
[
Next
yepp Studio
]
yepp Studio F1
●
yepp Studio
●
❖
24
●
yepp Studio
yepp S/N
● Gracenote Gracenote CDDB
Music Recognition ServiceSM
● CDDB Gracenote Gracenote
Gracenote CDDB "Powered by Gracenote CDDB"
Gracenote Recognition Service MRS
Gracenote
®
25
 Loading...