

Samsung 6050 User Manual

Laser Printer
User’s Guide
QQwwiikkLLaasseerr 66005500

I
Trademark Notices
•QwikLaser 6050 and Samsung logo are trademarks of Samsung Electronics Co. Ltd.
•Centronics is a registered trademark of Centronics Data Computer Corporation.
•HP, PCL5e, and PCLXL are registered trademarks of Hewlett-Packard Company.
•IBM, IBM PC, XT, AT, PS/2 are registered trademarks of International Business Machines
Corporation.
•Apple, AppleTalk, TrueType, Laser Writer, Macintosh, and LocalTalk are registered
trademarks of Apple Computer, inc.
•Microsoft, MS-Windows, and MS-DOS are registered trademarks of Microsoft Corporation.
•PostScript, is a registered trademark of Adobe Systems, Inc.
•CompuServe is a registered trademark of CompuServe Inc.
•TrueDoc®is a registered trademark of Bitstream, Inc.
•Font NavigatorTMis a registered trademark of Bitstream, Inc.
•All other brand or product names are trademarks or registered trademarks of their
respective companies or organizations.
Copyright
This manual is provided for information purposes only. All information included herein is
subject to change without notice. Samsung Electronics is not responsible for any damages,
direct or indirect, arising from or related to use of this manual.
© 1998 Samsung Electronics Co. Ltd. All rights reserved.

II
Notice
FCC Regulations
This equipment has been tested and found to comply with the limits for a Class B digital
device, pursuant to Part 15 of the FCC Rules. These limits are designed to provide
reasonable protection against harmful interference in a residential installation. This
equipment generates, uses and can radiate radio frequency energy and, if not installed and
used in accordance with the instructions, may cause harmful interference to radio
communications. However, there is no guarantee that interference will not occur in a
particular installation. If this equipment does cause harmful interference to radio or
television reception, which can be determined by turning the equipment off and on, the user
is encouraged to try to correct the interference by one or more of the following measures:
•Reorient or relocate the receiving antenna.
•Increase the separation between the equipment and receiver.
•Connect the equipment into an outlet on a circuit different from that to which the receiver
is connected.
•Consult the dealer or an experienced radio/TV technician for help.
Do not make any changes or modifications to the equipment unless otherwise specified in
the manual. If such changes or modifications should be made, you could be required to stop
operation of the equipment.
Use of shielded cable is required to comply with Class B limits in Subpart B of Part 15 of
FCC Rules.
Canadian Radio Interference Regulations
This digital apparatus does not exceed the Class B limits for radio noise emissions from
digital apparatus as set out in the interference-causing equipment standard entitled “Digital
Apparatus”, ICES-003 of the Industry and Science Canada.
Cet appareil numérique respecte les limites de bruits radioélectriques applicables aux
appareils numériques de Classe B prescrites dans la norme sur le matériel brouilleur:
“Appareils Numériques”, ICES-003 édictée par l’Industrie et Sciences Canada.

III
EC Declaration of Conformity
We,
SAMSUNG ELECTRONICS CO.,LTD
#259, Gong Dan-Dong, Gumi-City, Kyung Buk, Korea
declare sole responsibility that the
QwikLaser 6050 Laser printer
meets the intent of Directive 89/336/EEC for Electromagnetic Compatibility and Low
Voltage Directive 73/23/EEC.
Compliance was demonstrated to the following specifications as listed in the official
journal of the European Communities:
EN 50081-Emissions:
EN 55022 Radiated, Class B
EN 55022 Conducted, Class B
EN 61000-3-2 Power Harmonics
EN 61000-3-3 Voltage Fluctuations and Flicker
EN 50082-Immunity:
IEC 801-2 Electrostatic Discharge
IEC 801-3 RF Radiated
IEC 801-4 Fast Transient/Burst
EN 60950-Safety

IV
Laser Safety Statement
The printer is certified in the U.S. to conform to the requirements of DHHS 21 CFR,
chapter 1 Subchapter J for Class I(1) laser products, and elsewhere is certified as a Class I
laser product conforming to the requirements of IEC 825.
Class I laser products are not considered to be hazardous. The laser system and printer
are designed so there is never any human access to laser radiation above a Class I level
during normal operation, user maintenance, or prescribed service condition.
WARNING Never operate or service the printer with the protective cover removed from
Laser/Scanner assembly. The reflected beam, althougs invisible, can damage
your eyes.
CAUTION -INVISIBLE LASER RADIATION WHEN THIS COVER IS OPEN. DO
NOT OPEN THIS COVER
VORSICHT -UNSICHTBARE LASERSTRAHLUNG, WENN ABDECKUNG
GEÖFFENT. NICHT DEM STRAHL AUSETZEN.
ATTENTION -RAYONNEMENT LASER INVISIBLE EN CAS D’OVERTURE.
DANGEREUSE AU FAISCEAU.
ATTENZIONE -RADIAZIONE LASER INVISIBILE IN CASO DIAPERTURA.
EVITARE L’ESPOSIZIONE AL FASCIO.
PRECAUCION -RADIACION LASER IVISIBLE CUANDO SE ABRE. EVITAR EXPONERSE AL
RAYO.
ADVARSEL -USYNLIG LASERSTRÅLNING VED ÅBNING NÅR SIKKERHEDSBRYDERE ER
UDE AF FUNKTION UNDGÅ UDSAETTELSE FOR STRÅLNING.
ADVARSER -USYNLIG LASERSTRÅLNING NÅR DEKSEL ÅPNES. STIRR IKKE INN I
STRÅLEN. UNNGÅ EKSPONERING FOR STRÅLEN.
VARNING -OSYNLIG LASERSTRÅLNING NÄR DENNA DEL ÄR ÖPPAND OCH SPÄRREN ÅR
URKOPPLAD. BETRAKTAEJSTRÅLEN STRÅLEN AR FARLIG.
VARO -AVATTAESSA JA SUOJALUKITUS OHITETTAESSA OLET ALTTIINA
NÄKYMÄTTÖMÄLLE LASERSÄTEILYLLE ÄLÄ KATSO SÄTEESEEN.

V
Safety Information
PRODUCT SAFETY
USA & CANADA UL 1950 Third Edition (C-UL LISTING)
EEC(Europe) EN 60950 (T
ÜV GS Certification)
CB IEC 60950
LASER SAFETY
EEC(Europe) EN 60825
USA 21 CFR, Chapter 1, Subchapter J (CDRH Certified)
Power Saver
This printer contains advanced energy conservation technology that reduces power
consumption when it is not in active use.
When the printer does not receive data for an extended period of time, power consumption
is automatically lowered. For potentially faster printing of the first page, you may turn the
power save off from the Remote Control Panel setting.
The energy star emblem does not represent EPA endorsement of any product or service.

VI
Contents
Unpacking the Printer ______________________________ 1-2
Control Locations and Functions ____________________ 1-2
Front View _______________________________________ 1-2
Inside ___________________________________________ 1-3
Rear View ________________________________________ 1-3
Using the Operator Panel ___________________________ 1-4
Indicator Light Status ______________________________ 1-4
Operator Panel Button Usage _______________________ 1-6
Chapter 1
Introduction
Setting Up Your Printer
Paper Handling
Selecting a Location ________________________________ 2-2
Installing the Toner Cartridge _______________________ 2-3
Connecting Your Printer to the Computer ____________ 2-5
Attaching the Power Cord __________________________ 2-6
Installing Printer Driver ____________________________ 2-8
Overview ________________________________________ 2-8
System Requirement ______________________________ 2-8
Installation Procedure ______________________________ 2-9
In Windows 95/98/NT 4.0 _________________________ 2-9
With Windows 3.1x _______________________________ 2-11
Uninstalling the Printer Driver ______________________ 2-11
Tips on Network Printing __________________________ 2-11
Using Your Printer on NT TCPIP Network ___________ 2-11
To Install Shared Win 95/98 Printer Driver from
NT Server to Client PC ____________________________ 2-11
Loading a Stack of Paper ___________________________ 3-2
How To Adjust Paper Guides _______________________ 3-5
Manually Feeding Paper ___________________________ 3-7
Using Rear Output Tray ____________________________ 3-10
Selecting Paper Types and Feed Source ______________ 3-11
Paper Guidelines __________________________________ 3-12
Chapter 2
Chapter 3

Clearing Paper Jams _______________________________ 5-2
Paper Jam in Output Area __________________________ 5-2
Paper Jam in Input Area ___________________________ 5-4
Paper Jam Inside Printer ___________________________ 5-5
Paper Jam in Optional Paper Cassette _______________ 5-6
Tips for Avoiding Paper Jams _______________________ 5-8
Fixing Problems ___________________________________ 5-9
Printing Problems _________________________________ 5-9
Print Quality Problems ____________________________ 5-12
Before You Call For Service _________________________ 5-14
Managing Toner Cartridge __________________________ 5-15
Expected Cartridge Life ____________________________ 5-15
Replacing Toner Cartridge _________________________ 5-15
Specifications _____________________________________ A-2
Memory and Option Cards _________________________ 6-2
Accessing the Printer Control Board _________________ 6-2
Printer Memory Option ____________________________ 6-5
Removing a Memory Option _______________________ 6-7
Second Cassette ___________________________________ 6-8
Installing Second Cassette __________________________ 6-8
Troubleshooting and Maintenance
Printer Options
Appendix
Operating Your Printer
Selecting Your Printer ______________________________ 4-2
Printing a Document _______________________________ 4-3
Printer Settings ____________________________________ 4-4
Using HELP ______________________________________ 4-7
Changing Printer Settings for All Documents _________ 4-8
Font Navigator ____________________________________ 4-9
How to use “Disk Image Utility” ____________________ 4-9
Remote Control Panel for Windows/Dos _____________ 4-10
Chapter 4
Chapter 5
Chapter 6
VII

Introduction
Chapter 1

1-2 Introduction
Unpacking the Printer
Make sure that you have the items listed below:
• Toner cartridge
• Power cord
• Centronics-compatible parallel cable (IEEE 1284-compliant)
• Setup CD-ROM
• This manual
• Diskette (Only in U.S.A.)
Notes:
• If you need help during setup, or if any items are missing or damaged,
notify your dealer immediately.
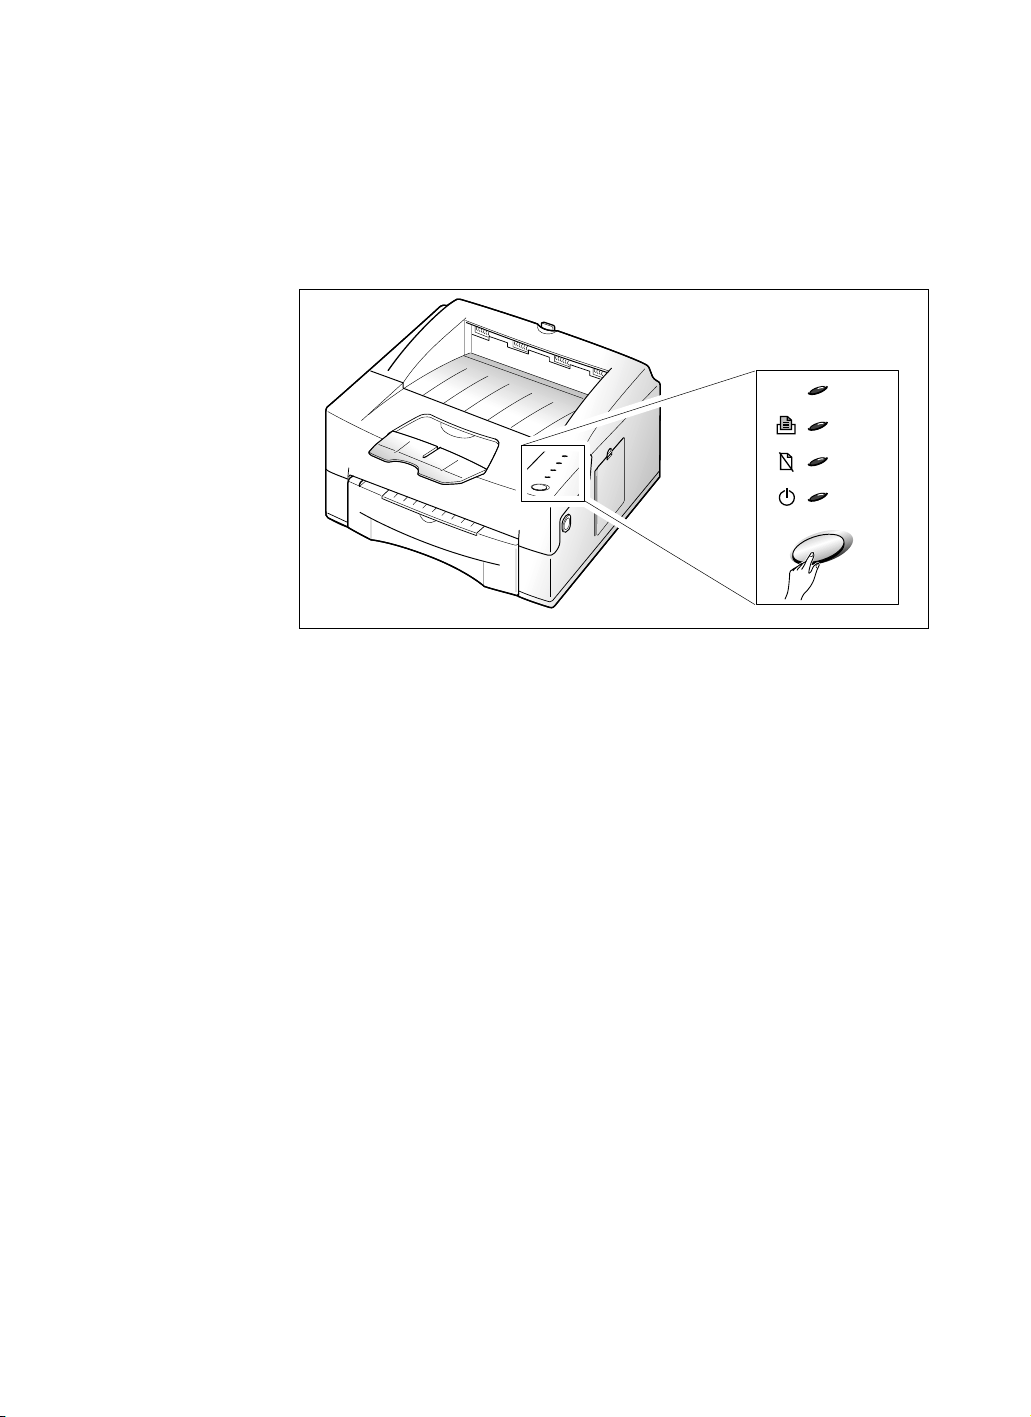
Control Locations and Functions
Front View
Memory Cover
Allows access to
the printer control
board when you install
an optional memory card.
Second Cassette (option)
You can purchase a second cassette as
an option. It also holds 250 sheets of
paper. See page 6-8.
Indicator Lights
and Button
Output Bin
Automatically stacks up to 250 sheets
of printed paper, face down.
Paper Cassette
Holds 250 sheets
of plain paper.
Paper Support
Supports paper
feeding manually.
Paper Support
Supports paper
stacked in the
output bin.

Introduction 1-3
Inside
Rear View
Printer Cover
Release Button
To open the printer
cover, press this button.
Toner Cartridge
Printer Cover
Printer Cable Connector
Rear Cover Tab
Pull it out to open
the rear output tray.
Rear Output Tray
Holds printed paper,
face up.
Power Cord Connector
Power Switch
1-4 Introduction
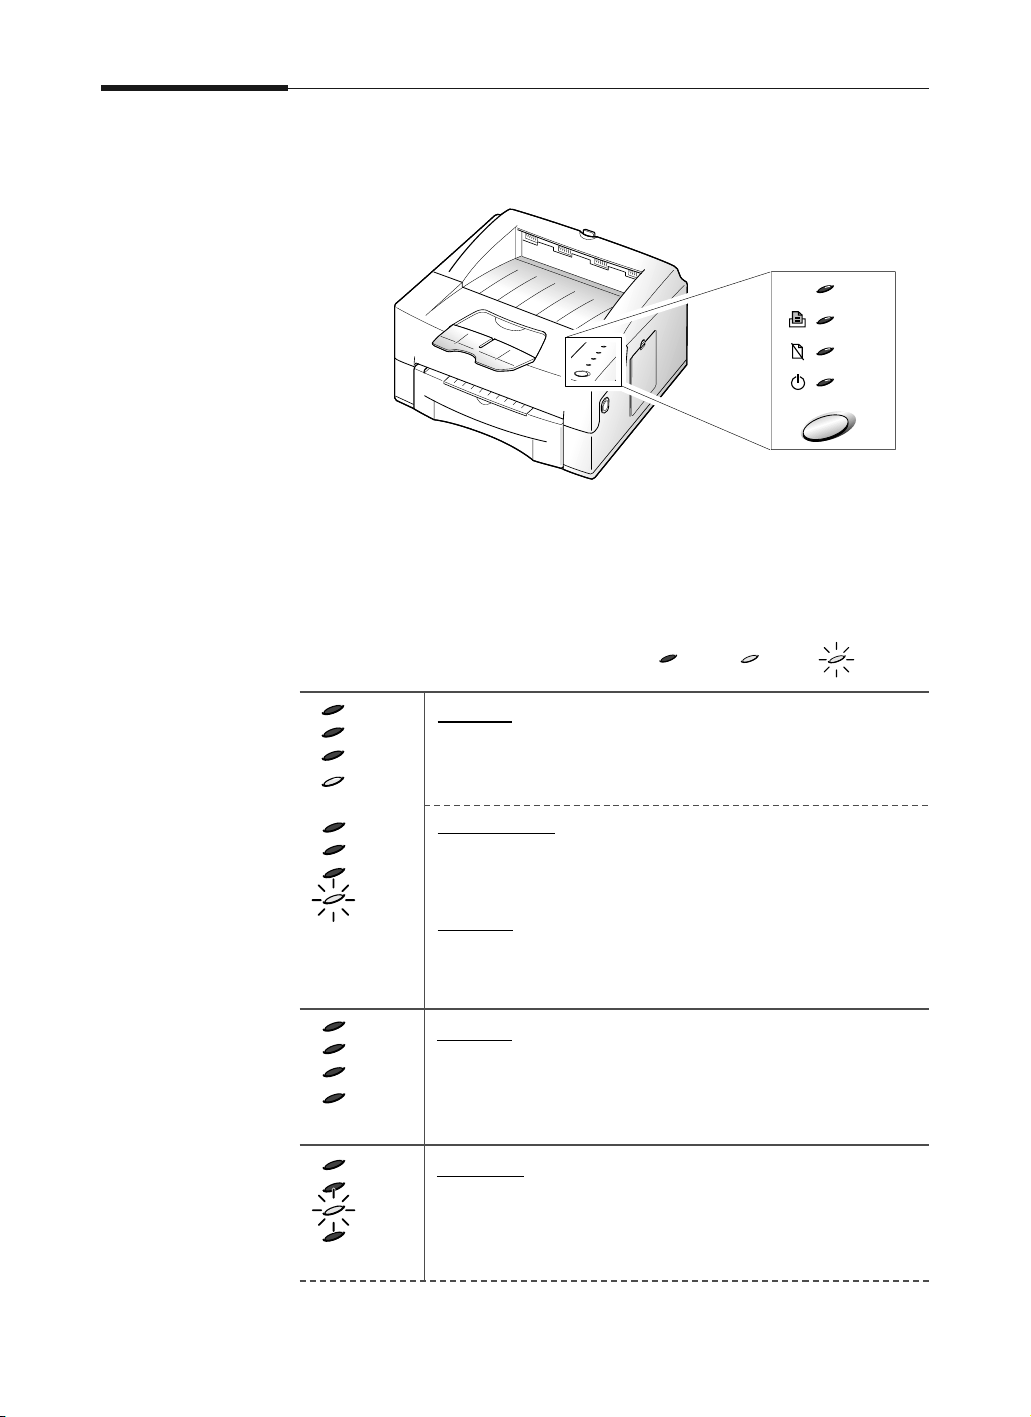
Using the Operator Panel
The operator panel has 4 indicator lights and 1 button.
Indicator Light Status
The indicator lights shows the current status including error condition.
BlinkingOnOff
ERROR
MANUAL
PAPER
READY
On line
If the READY light is on steadily, the printer is ready to
print.
Printer busy
If the READY light is blinking slowly, the printer is
receiving data from PC.
Printing
If the READY light is blinking fast, the printer is printing
a page.
Off line
The printer is off-line. The printer cannot receive data
from the computer. Press the operator panel button to
switch to on-line.
No paper
If the PAPER indicator is blinking, the printer is out of
paper. See ‘Loading a Stack of Paper’ on page 3-2.
ERROR
MANUAL
PAPER
READY
ERREUR
MANUEL
PAPIER
PRET
ERROR
MANUAL
PAPER
READY
ERROR
MANUAL
PAPER
READY

Introduction 1-5
Paper jam
If the ERROR and the PAPER light both are steadily on, there is paper jammed in
the printer. See ‘Clearing Paper Jams’ on page 5-2.
ERROR
MANUAL
PAPER
READY
Manual feed mode
If the MANUAL and the READY light both are steadily on,
the printer is in manual feed mode. It happens when
you insert paper into manual feed slot, or when you
select ‘Manual Feed’ source from your software application.
Waiting for the next sheet from manual feed
If the MANUAL and the READY light both are blinking, the printer is waiting
for the next sheet to be fed in the manual slot.
ERROR
MANUAL
PAPER
READY
ERROR
MANUAL
PAPER
READY
Manual feed printing
If the MANUAL light is steadily on and the READY light is blinking, the printer
prints a job with paper fed manually.
ERROR
MANUAL
PAPER
READY
Cover open or no cartridge
If the red ERROR light is steadily on, the printer has experienced an error.
Check for:
•The printer cover is open or not closed securely.
•The print cartridge is either missing or not installed.
ERROR
MANUAL
PAPER
READY
Overrun or memory overflow
If the red ERROR indicator blinks for a while, then only the READY indicator
comes on, data which was too complex was sent to the printer or there is no
available memory in the printer.
The printer will print a page, telling you the error status. Simplify the page
layout and remove any unnecessary graphics. Or, you might want to add more
memory.
ERROR
MANUAL
PAPER
READY
ERROR
MANUAL
PAPER
READY
System error or operating error
If all indicator lights blink at the same time, it is a system error. If the indicator
lights are scrolling, it is an operating error. Turn the printer off and back on. If
your printer is still not operating properly and all indicators blink, you have to
call for service. Contact the point of purchase.

1-6 Introduction
Operator Panel Button Usage
The operator button is located in the operator panel. It can be used to accomplish the
following functions:
Briefly press the button. Each time you press the button, the printer goes
to on-line or off-line status. The READY light goes on and off according to
the line status.
To print data, the printer should have on-line status.
Function Description
On line and
Off line
To perform a printer self-test:
While the printer is on-line (READY light on), press and hold down the
button until all three lights are blinking (approximately four seconds),
then release the button. Aone-page printer status sheet will be printed.
Self test
If the READY light is blinking slowly and the printer does not print any
image, or if you want to cancel the print job and remove the unprinted
data from the printer, reset the printer.
Press the button to turn the printer off-line. With the READY light off,
press and hold down the button until all lights are blinking
(approximately four seconds), then release the button.
Printer reset
If you are getting streaks or spots on your prints, the OPC drum on your
printer may need to be cleaned.
While the printer is on-line (READY light on), press and hold down the
button until all three lights remain lit (not blinking; approximately seven
seconds) and the printer begins to cycle up (the printer begins to feed
paper), then release the button. One sheet will be printed.
OPC Cleaning

Setting Up
Your Printer
Chapter 2

2-2 Setting Up Your Printer
Selecting a Location
Place your printer on a flat, stable surface near your workstation.
Leave enough space around the printer, so that you can easily:
• open the printer cover
• open the rear cover to remove jammed paper, or retrieve the paper
when you use the rear output path
• remove and install the paper cassette to load paper
• allow air circulation around the vents to prevent the printer from
overheating
Do not place the printer:
• in direct sunlight
• near heat sources or air conditioners. Place the printer where the
temperature is stable and set for human comfort.
• in dusty or dirty environments. Dust accumulation may prevent the
printer from functioning properly.
• near devices that contain magnets or generate magnetic field (such
as loudspeakers or base units of cordless telephones).
Make sure your printer is placed in a well ventilated area.
Setting Up Your Printer 2-3
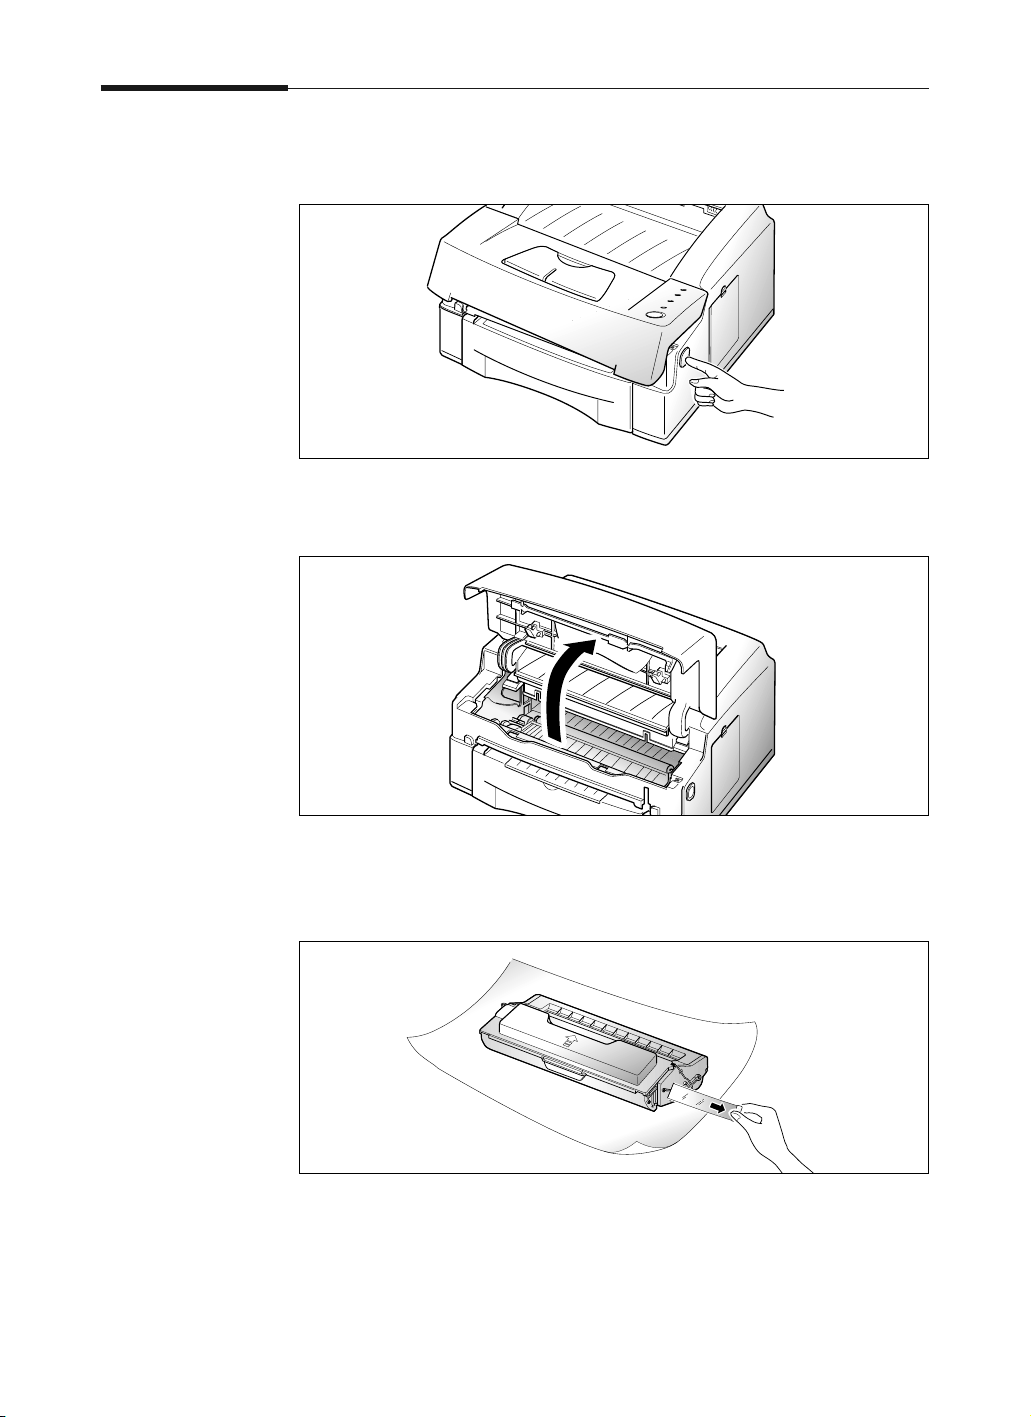
Installing the Toner Cartridge
1. Open the printer cover by pressing the cover release button.
2. Raise the printer cover.
3. Unpack the toner cartridge, and carefully remove the sealing
tape.
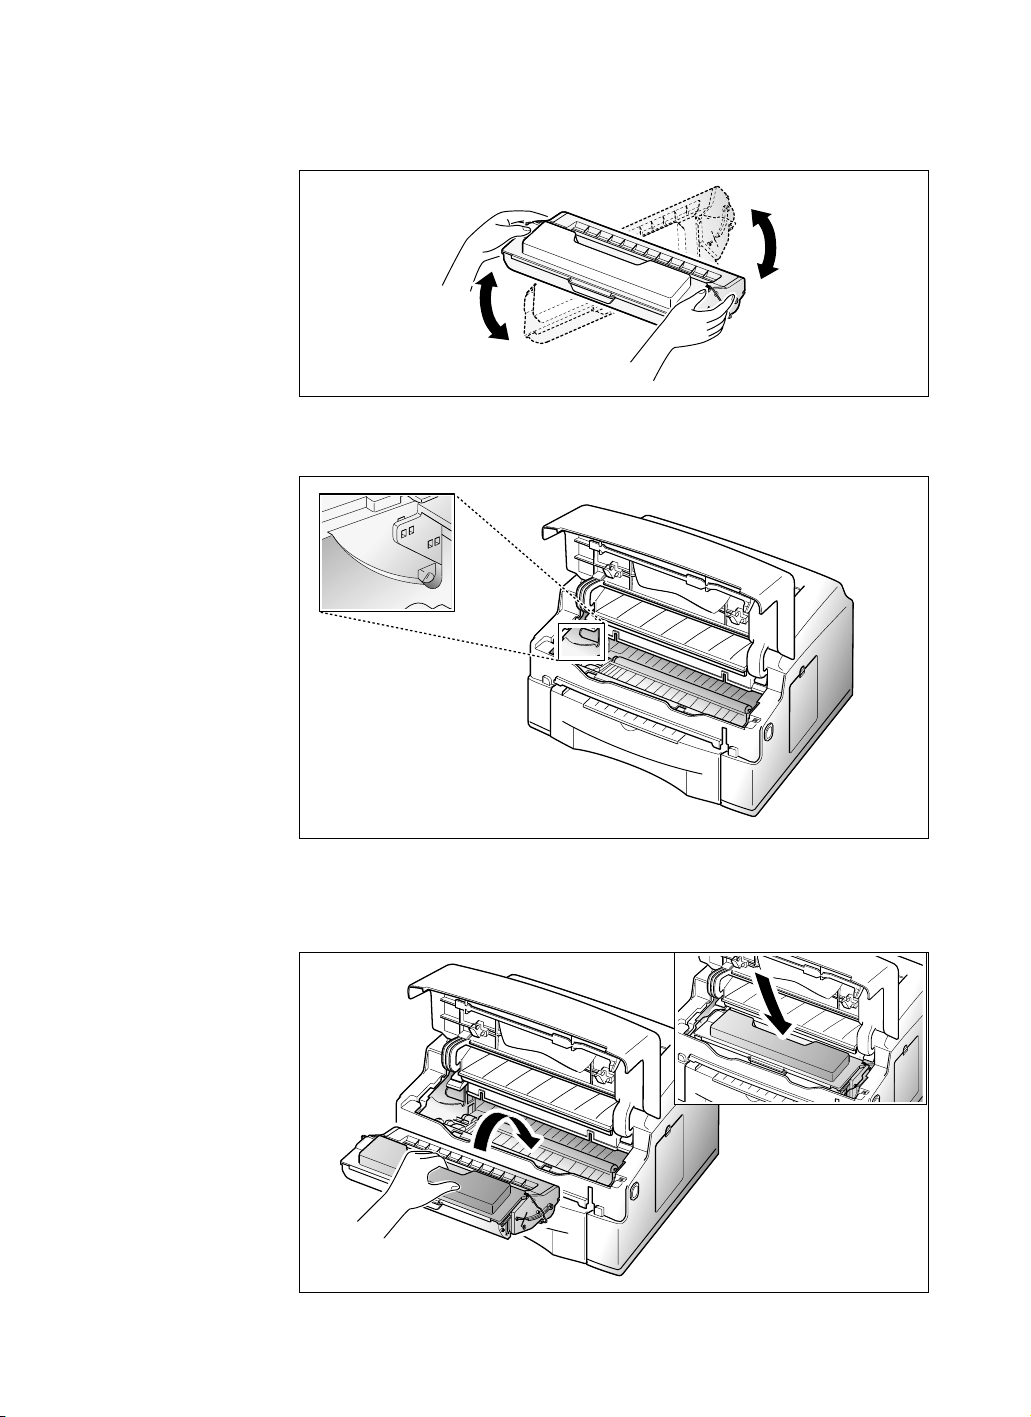
2-4 Setting Up Your Printer
6. Grasp the handle and slide the cartridge down between the
cartridge slots, until it drops into place.
5. Find the cartridge slots inside the printer, one on each side.
4. Gently shake the cartridge from side to side 5 or 6 times to
distribute the toner evenly inside the cartridge.

Setting Up Your Printer 2-5
7. Close the printer cover. Make sure that the cover is securely
closed.
Connecting Your Printer to the Computer
Your printer has parallel interface port, which allows you to use it
with IBM PC and compatible computers.
To connect the printer to the computer, follow the steps below:
1. Make sure that both the printer and computer are turned off.
2. Plug the cable into the connector on the back of the printer. Push
the metal clips down to fit inside the notches on the cable plug.
3. Connect the other end of the cable to the parallel interface port on
your computer. See your computer documentation if you need help.
2-6 Setting Up Your Printer
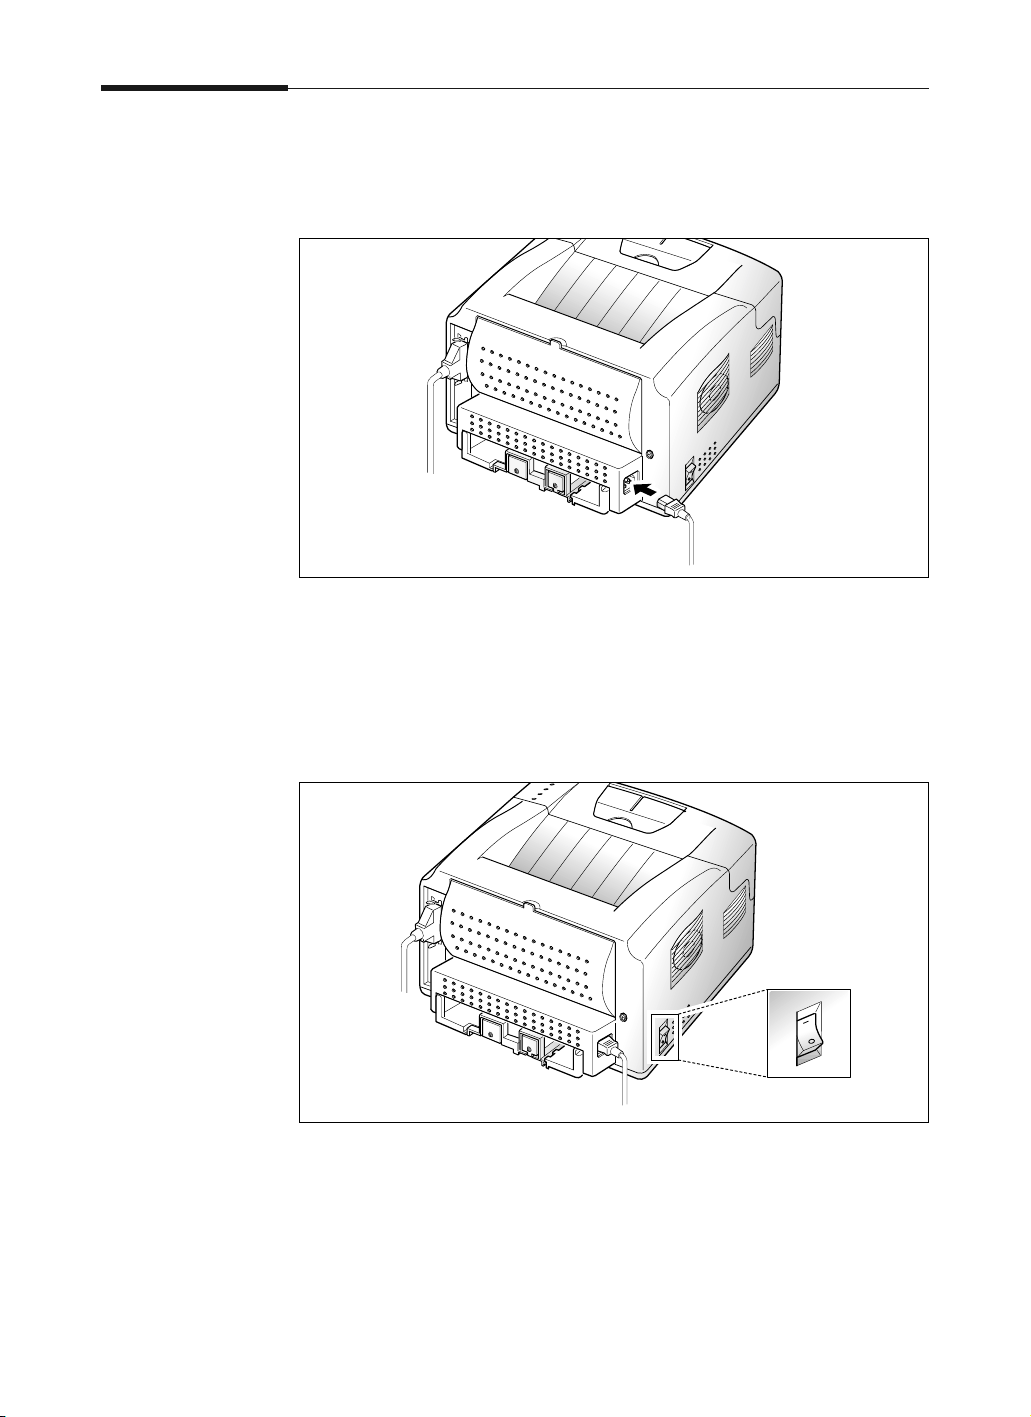
Attaching the Power Cord
1. Plug one end of the power cord into the connector on the printer.
2. Plug the other end into a properly grounded AC outlet.
3. Turn the printer on.
Setting Up Your Printer 2-7
4. As the printer powers up, all operator panel lights turn on briefly.
When only the READY light is steadily on, press and hold the
operator panel button until all lights are blinking (approximately
four seconds), then release the button. Atest page should print out.
If this does not happen, re-check the installation.
The test page lists your printer model and default settings along
with the data streams available for your printer model.
ERROR
MANUAL
PAPER
READY

2-8 Setting Up Your Printer
Installing Printer Driver
Overview
Included with your printer is a CD-ROM containing printer drivers
for some of the most popular Windows software applications. You
must install a printer driver, which translates data from your
application into data the printer understands.
The CD-ROM shipped with your printer contains the following
printer drivers and utilities. PCL6 is the combination of PCL5e and
the new PCLXL printer language.
• PCL5e: Printer driver for Windows 95/98, Windows 3.1x, and
Windows NT 4.0
• PCLXL: Printer driver for Windows 95/98, and Windows 3.1x.
Note: You cannot use the PCLXL driver in Windows NT 4.0.
• Smart Monitor: The Smart Monitor is installed automatically with
the printer driver. If you click on the “Smart
Monitor” in Samsung ML&QwikLaser 6050 folder,
you can monitor the printer ’s status via the Smart
Monitor. You cannot monitor the status of the
printer which is connected to a network.
• Font Navigator: It’s a font manager. It gives a quick and easy way
to find fonts, install the fonts, and print the font
samples. The Font Navigator is installed
automatically with the printer driver.
System Requirement
Before you start, make sure that you have the following computer
setup. (These are the minimum requirements.)
• IBM or compatible with a 486 or higher processor
• Microsoft Windows 95/98, Windows 3.1x, or Windows NT 4.0
• 7 MB of available hard disk space
• 8 MB of RAM for Windows 3.1x
16 MB of RAM for Windows 95/98, Windows NT 4.0
• CD-ROM drive
• Centronics-compatible parallel cable (IEEE 1284-compliant)
Note: If you do not have access to a CD-ROM drive, contact your local
dealer.

Setting Up Your Printer 2-9
Installation Procedure
Before you start, make sure that your computer meets or exceeds the
system requirements for the driver and application program you
want to install.
In Windows 95/98/NT 4.0
1. Insert the CD-ROM into your CD-ROM drive.
2. Type in the user name and company. Then click on the Next
button.
3. Select the model to install. Then click on the Next button.
4. Follow the instructions on the screen.
IF WINDOWS DOES NOT RUN THE CD-ROM
1. Insert the CD-ROM into your CD-ROM drive.
2. Select Run from the Start menu.
3. Type d: (or e:) \setup.exe on the command line, then click on the
OK button.
4. Follow the instructions on the screen.

2-10 Setting Up Your Printer
IN CASE OF PLUG
AND PLAY
For Windows 95
1. Make sure the printer is plugged and connected to your computer.
2. Turn on the printer and start Windows on your computer.
3. Windows recognizes the printer, and ‘New Hardware Found’
dialog box is displayed.
4. Click on the OK button.
5. Insert the CD-ROM into your CD-ROM drive, and click on the
Browse button.
6. Select the CD-ROM drive, then click on the OK button.
7. Follow steps 2 through 4 on page 2-9 to complete the installation.
For Windows 98
1. Make sure the printer is plugged and connected to your computer.
2. Turn on the printer and start Windows on your computer.
3. Windows recognizes the printer, and the Add New Hardware
Wizard dialog box is displayed.
4. Select Search for the best driver for your device
(Recommended), then click on the NEXT button.
5. Insert the CD-ROM into your CD-ROM drive, then click on the
Browse button.
6. Select the CD-ROM drive, then click on the OK button.
7. Follow steps 2 through 4 on page 2-9 to complete the installation.

Setting Up Your Printer 2-11
Uninstalling the Printer Driver
An uninstall utility is supplied with the printer driver to enable you
to remove the driver and all associated files from your hard disk, if so
required.
To uninstall the driver, proceed as follows:
From the Start menu, select Programs, Samsung ML&QwikLaser
6050, then Samsung 6050 Uninstaller.
With Windows 3.1x
1. Make sure the printer is plugged in and connected to your
computer. Turn on your printer and computer.
2. Insert the CD-ROM disk into your CD-ROM drive.
3. From Program Manager window, select Run from the File menu.
The Run dialog box appears.
4. Type d: (or e:) \setup.exe on the command line, then click on the
OK button.
5. Type the user name and company. Click on the Next button.
6. Select the model to install. Click on the Next button.
7. Follow the instructions on the screen.
Tips on Network Printing
Using Your Printer on NT TCPIP Network
You can use your printer on NT TCPIP network. Connect your
printer on the network using a HP Jetdirect Explus external printer
server with 8 MB RAM on your printer. For information on installing
optional memory, see page 6-5.
To Install Shared Win 95/98 Printer Driver from
NT Server to Client PC
1. Select Sharing in Properties of the printer driver.
2. Select Windows 95 in Alternate Drivers.
3. Type in D: (or E:) \PCLDRV\ PCLXL\ENGLISH\ WIN95_98\QL.
4. Install the network printer on the client PC.
 Loading...