

Samsung 6000, 6050 User Manual

E-MANUAL
Contact SAMSUNG WORLDWIDE
If you have any questions or comments relating to Samsung products, please contact the SAMSUNG customer care center.
Country
CANADA 1-800-SAMSUNG (726-7864) www.samsung.com Samsung Electronics Canada Inc., Customer Service
U.S.A 1-800-SAMSUNG (726-7864) www.samsung.com Samsung Electronics America, Inc. 85 Challenger
Customer Care Center
Web Site Address
55 Standish Court Mississauga, Ontario L5R 4B2
Canada
Road Ridgefi eld Park, NJ 07660-2112
LED TV
user manual
© 2011 Samsung Electronics Co., Ltd. All rights reserved.
imagine the possibilities
Thank you for purchasing this Samsung product.
To receive more complete service, please register
your product at
www.samsung.com/register
Model _____________ Serial No. _____________
BN68-03330A-02

Figures and illustrations in this User Manual are provided for reference only and may differ from actual product appearance.
Product design and specifications may be changed without notice.
Important Warranty Information Regarding Television Format Viewing
✎
See the warranty card for more information on warranty terms.
Wide screen format LED Displays (with 16:9 aspect ratios, the ratio of the screen width to height) are primarily designed
to view wide screen format full-motion video. The images displayed on them should primarily be in the wide screen 16:9
ratio format, or expanded to fill the screen if your model offers this feature with the images constantly in motion. Displaying
stationary graphics and images on the screen, such as the dark side bars on non-expanded standard format television video
and programming, should be limited to no more than 5% of the total television viewing per week.
Additionally, viewing other stationary images and text such as stock market crawls, video game displays, station logos, web
sites or computer graphics and patterns, should be limited as described above for all televisions. Displaying stationary images
for more than 5% of total viewing time can cause uneven aging of your LED display and leave subtle, but permanent burnedin ghost images in the LED picture. To avoid this, vary the programming and images, and primarily display full screen moving
images, not stationary patterns or dark bars. On LED models that offer picture sizing features, use these controls to view
different formats as a full screen picture.
Be careful about the television formats you select and the length of time you view them. Uneven LED aging as a result of
format selection and use, as well as burned in images, are not covered by your Samsung limited warranty.
y SAMSUNG ELECTRONICS NORTH AMERICAN LIMITED WARRANTY STATEMENT
Subject to the requirements, conditions, exclusions and limitations of the original Limited Warranty supplied with Samsung
Electronics (SAMSUNG) products, and the requirements, conditions, exclusions and limitations contained herein,
SAMSUNG will additionally provide Warranty Repair Service in the United States on SAMSUNG products purchased
in Canada, and in Canada on SAMSUNG products purchased in the United States, for the warranty period originally
specified, and to the Original Purchaser only.
The above described warranty repairs must be performed by a SAMSUNG Authorized Service Center. Along with this
Statement, the Original Limited Warranty Statement and a dated Bill of Sale as Proof of Purchase must be presented to
the Service Center. Transportation to and from the Service Center is the responsibility of the purchaser. Conditions covered
are limited only to manufacturing defects in material or workmanship, and only those encountered in normal use of the
product.
Excluded, but not limited to, are any originally specified provisions for, in-home or on-site services, minimum or maximum
repair times, exchanges or replacements, accessories, options, upgrades, or consumables.
For the location of a SAMSUNG Authorized Service Center, please call toll-free:
– In the United States : 1-800-SAMSUNG (1-800-726-7864)
– In Canada : 1-800-SAMSUNG
Still image warning
Avoid displaying still images (such as jpeg picture files), still image elements (such as TV channel logos, stock or news bars
at the screen bottom etc.), or programs in panorama or 4:3 image format on the screen. Constantly displaying still pictures
can cause image burn-in on the LED screen, which will affect image quality. To reduce risk of this effect, please follow the
recommendations below:
y Avoid displaying the same TV channel for long periods.
y Always try to display any image in full screen. Use the TV set’s picture format menu for the best possible match.
y Reduce brightness and contrast to avoid the appearance of after-images.
y Use all TV features designed to reduce image retention and screen burn. Refer to the e-Manual for details.
English - 2
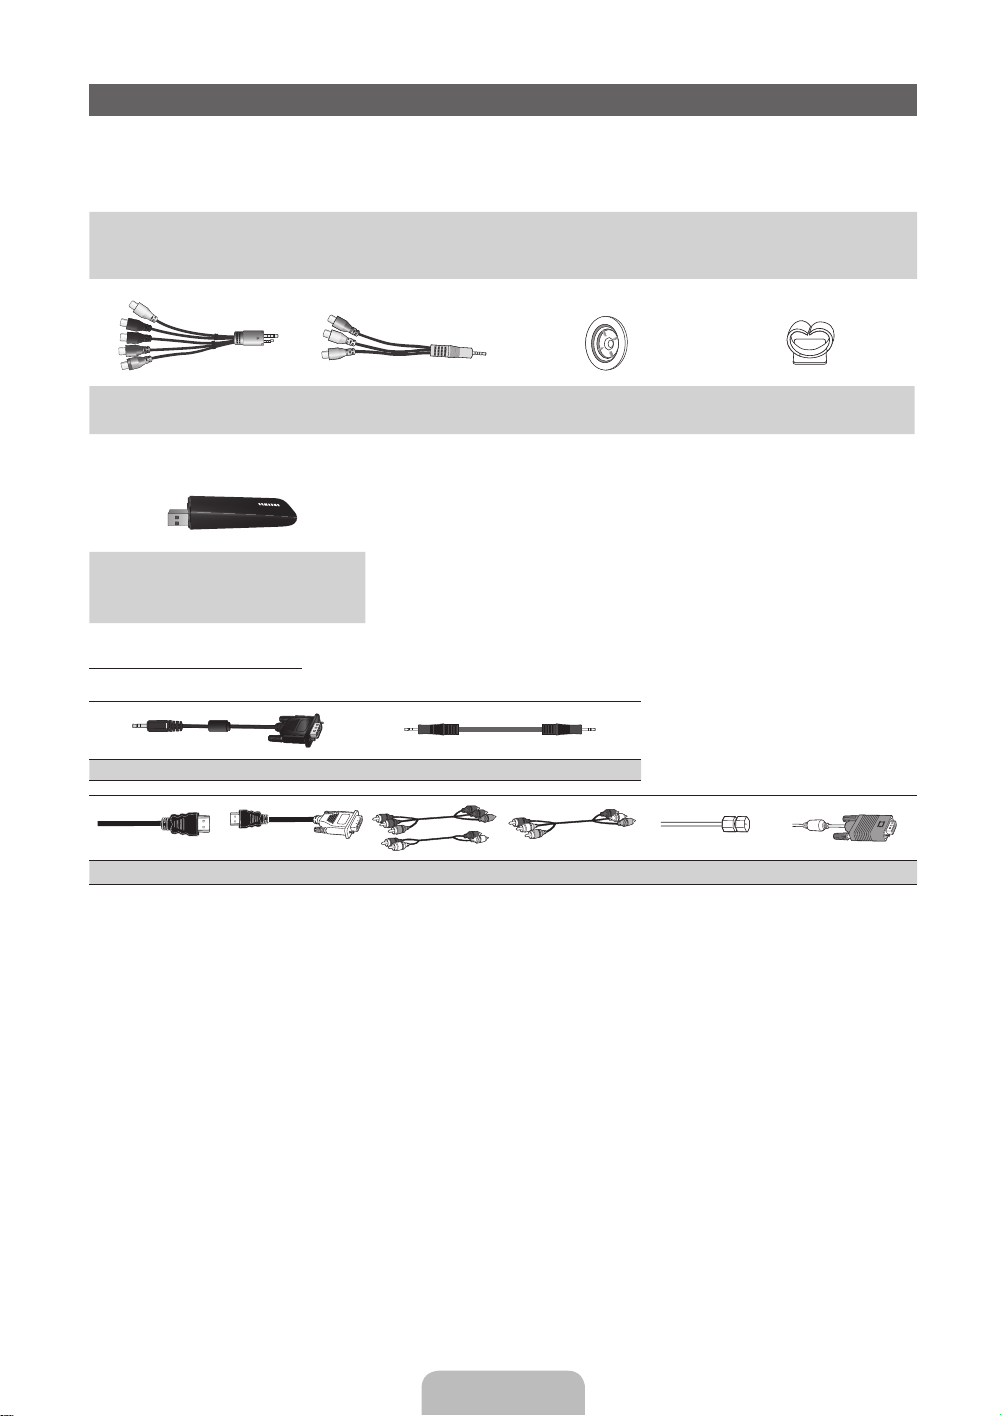
Accessories
✎
Please make sure the following items are included with your T V. If any items are missing, contact your dealer.
✎
The items’ colors and shapes may vary depending on the model.
✎
Check that there are no accessories hidden behind or under packing materials when you open the box.
y Remote Control (AA59-00442A) & Batteries (AAA x 2)
y Owner’s Instructions
AV/Component Adapter AV Adapter Holder-Ring (4EA) Holder-Wire stand
(BN39-01154W) (BN39-01154H) (BN61-07295A) (BN61-05491A)
Samsung Wireless LAN
Adapter (LED 6050 Series only)
(AK98-01080A)
Input Cables (Sold Separately)
To purchase the RS232 cable, contact www.SamsungParts.com.
y Power Cord
y Cleaning Cloth
y Warranty Card / Safety Guide
RS232 (AA39-00311A) Audio
HDMI HDMI-DVI Component Composite (AV) Coaxial (RF) VGA
English - 3
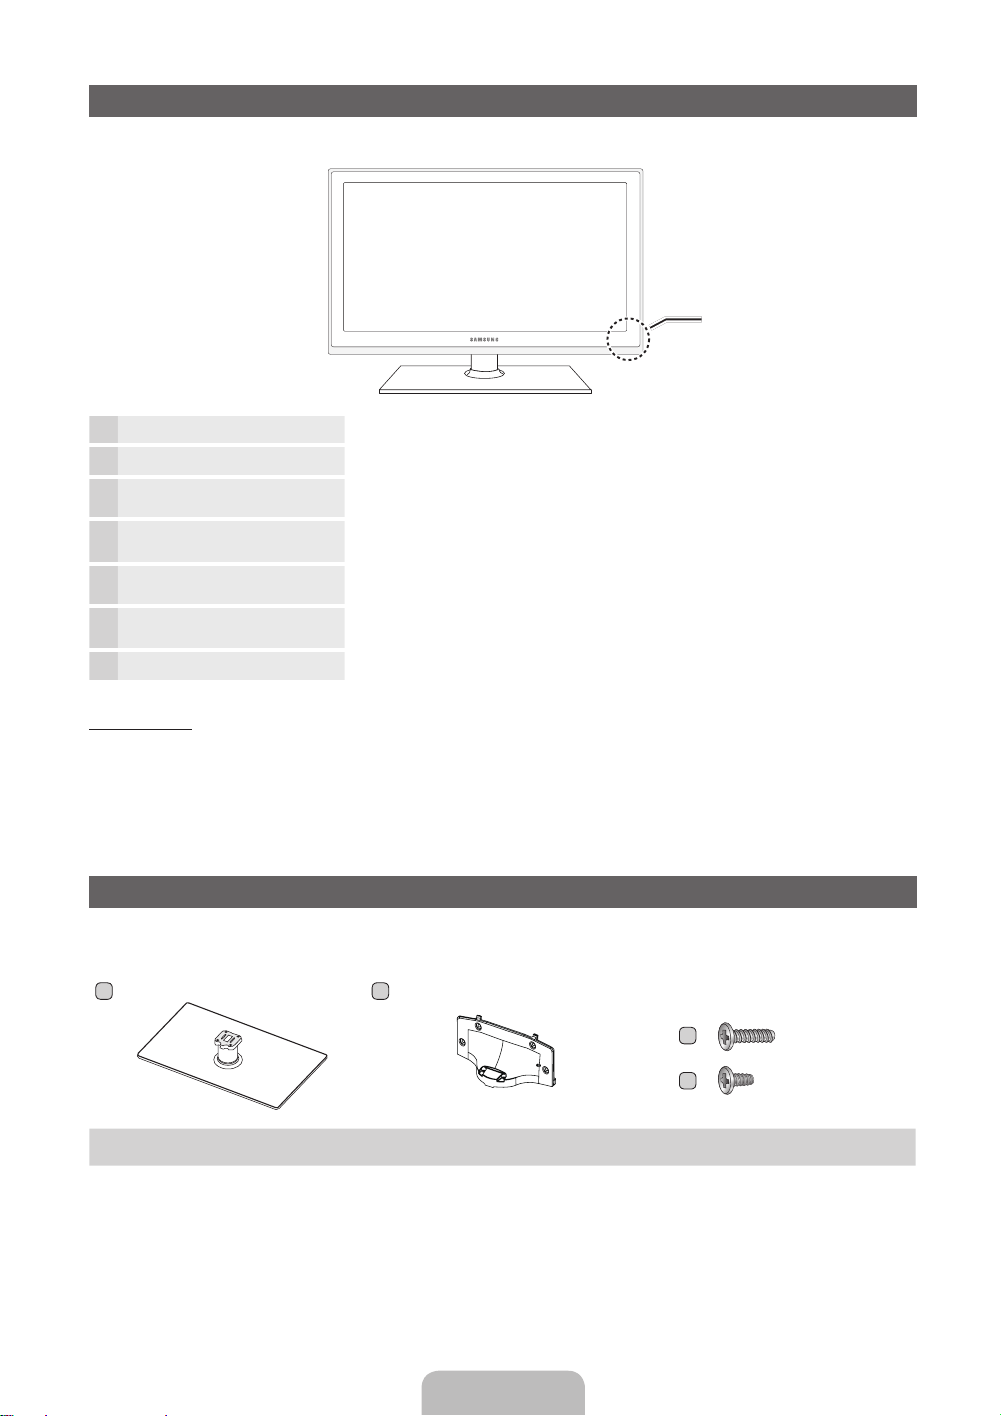
Viewing the Control Panel
✎
The product color and shape may vary depending on the model.
Control Panel
Remote control sensor Aim the remote control towards this spot on the TV.
Power Indicator Blinks and turns off when the power is on and lights up in standby mode.
SOURCE
MENU Displays an on-screen menu, the OSD (on screen display), which contains controls for
y Adjusts the volume. In the OSD, use the y buttons as you would use the
z
P
E
(Power)
Toggles between all the available input sources. In the on-screen menu, use this
button as you would use the ENTERE button on the remote control.
your TV’s features.
◄ and ► buttons on the remote control.
Changes the channels. In the OSD, use the z buttons as you would use the
▼ and ▲ buttons on the remote control.
Turns the TV on or off.
Standby mode
Your TV enters Standby mode when you turn it off and continues to consume a small amount of electric power. To be safe
and to decrease power consumption, do not leave your TV in standby mode for long periods of time (when you are away on
vacation, for example). It is best to unplug the power cord.
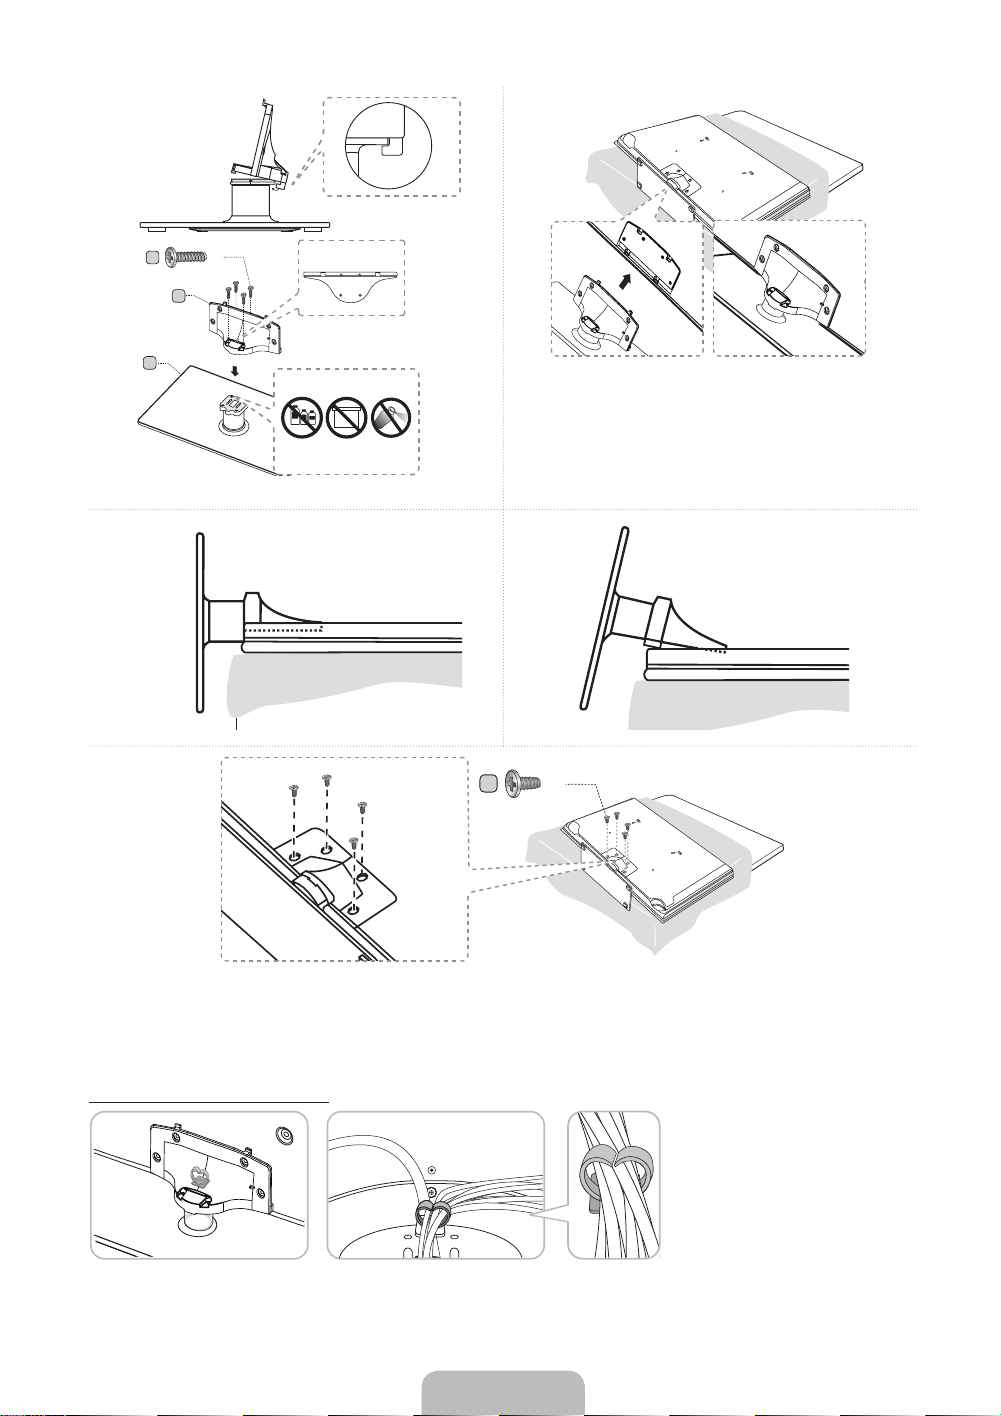
Install the Stand
See the separate stand installation guide for more detailed instructions.
A
1 EA
Stand (depending on the model) Guide Stand Screws
B
1 EA
C
D
x4 (M4 X L12)
x4 (M4 X L8)
English - 4
1
3
2
4
5
C
(M4 X L12)
A
Rear
Side View
x4
B
Front
Top View
ATTENTION
✎
Place a soft cloth over the table to protect the TV, and
then place the TV on the cloth screen side down.
✎
DO NOT USE
DO NOT USE
GREASE
DO NOT USE
OIL
CHEMICALS
(Correct assembly) (Incorrect assembly)
Insert the Stand Guide into the slot of TV bottom side.
D
x4
(M4 X L8)
✎
NOTE
Make sure to distinguish between the front and back of each component when assembling them.
x
Make sure that at least two people lift and move the TV.
x
Assembling the Holder-Wire stand
English - 5

Installing the Wall Mount
Preparing before installing Wall-Mount
To install a wall-mount from another manufacturer, use the Holder-Ring.
s
s
s
s
s
Installing the Wall Mount Kit
The wall mount kit (sold separately) allows you to mount the TV on the wall.
For detailed information on installing the wall mount, see the instructions provided with the wall mount. We recommend you
assistance when installing the wall mount bracket. Samsung Electronics is not responsible for any damage to the product or
injury to yourself or others if you elect to install the wall mount on your own.
Wall Mount Kit Specifications (VESA)
Install your wall mount on a solid wall perpendicular to the floor. Before attaching the wall mount to surfaces other than plaster
board, please contact your nearest dealer for additional information. If you install the TV on a ceiling or slanted wall, it may fall
and result in severe personal injury.
✎
NOTE
Standard dimensions for wall mount kits are shown in the table below.
x
Samsung wall mount kits contain a detailed installation manual and all parts necessary for assembly are provided.
x
Do not use screws that do not comply with the VESA standard screw specifications.
x
Do not use screws that are longer than the standard length or do not comply with the VESA standard screw
x
specifications. Screws that are too long may cause damage to the inside of the TV set.
For wall mounts that do not comply with the VESA standard screw specifications, the length of the screws may differ
x
depending on the wall mount specifications.
Do not fasten the screws too firmly. This may damage the product or cause the product to fall, leading to personal
x
injury. Samsung is not liable for these kinds of accidents.
Samsung is not liable for product damage or personal injury when a non-VESA or non-specified wall mount is used or
x
the consumer fails to follow the product installation instructions.
Our 55” model do not comply with VESA Specifications. Therefore, you should use our dedicated wall mount kit for
x
this model.
Do not mount the TV at more than a 15 degree tilt.
x
Always have two people mount the TV on a wall.
x
Product Family
LED-TV
TV size in
inches
19~22 75 X 75
23~27 200 X 100
32~40 200 X 200
60~65 600 X 400
Do not install your Wall Mount Kit while your TV is turned on. It may result in personal injury due to
electric shock.
VESA screw hole
specs (A * B) in
millimeters
Standard Screw Quantity
M4
4
M846~55 400 X 400
English - 6
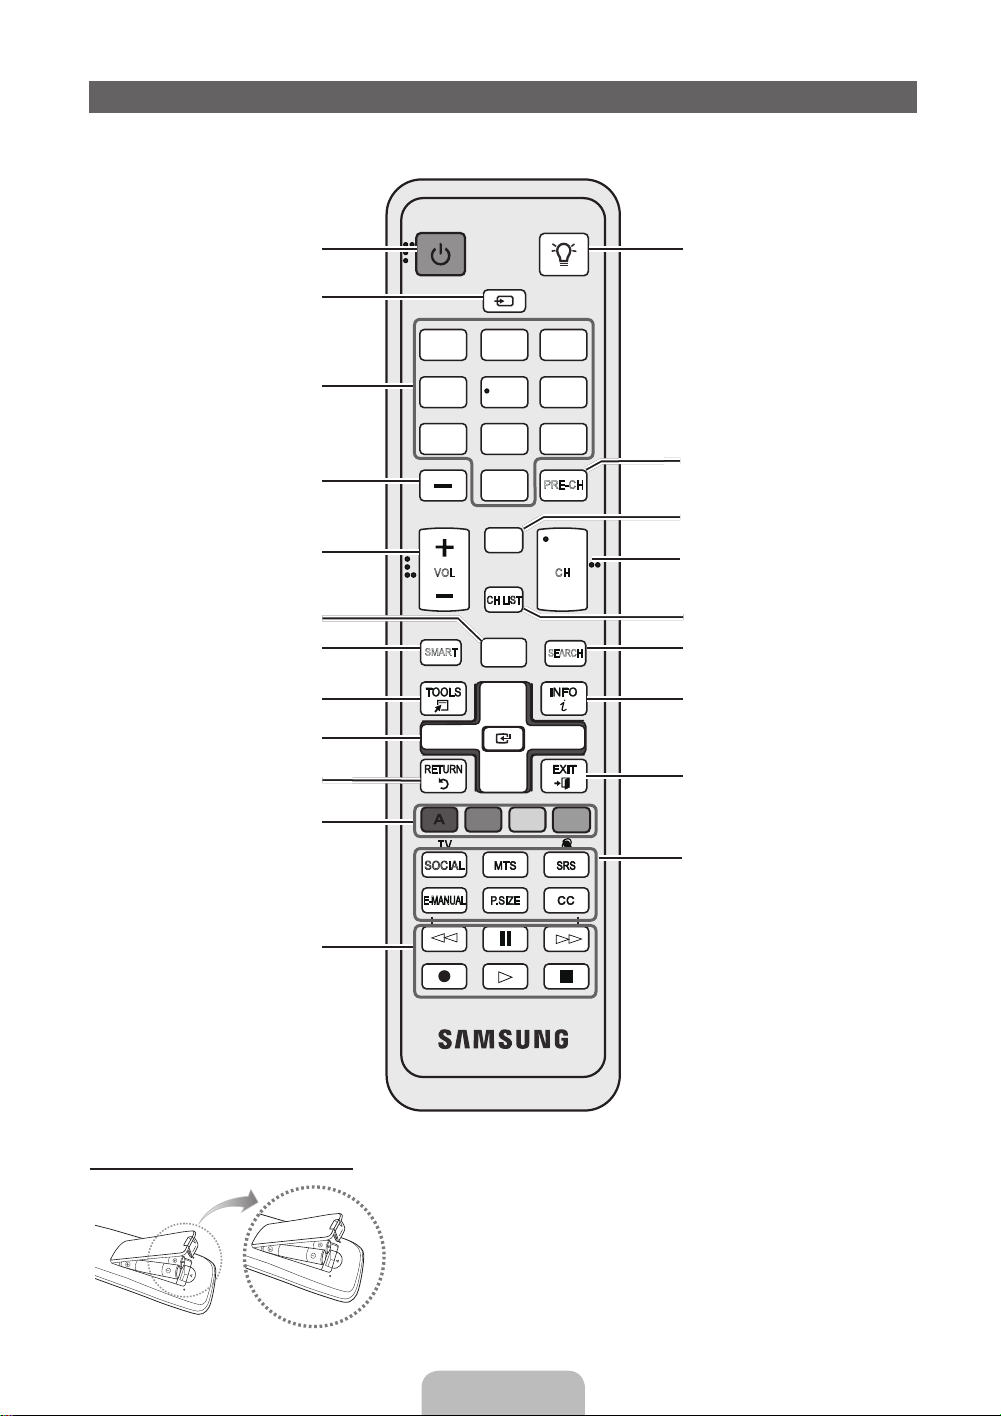
Remote Control Buttons
✎
This remote control has Braille points on the Power, Channel, and Volume buttons and can be used by visually impaired
persons.
Turns the TV on and off.
Displays and selects the available video
sources.
Gives direct access to channels.
Press to select additional digital channels
being broadcast by the same station. For
example, to select channel ‘54-3’, press
‘54’, then press ‘-’ and ‘3’.
Adjusts the volume.
Opens the OSD.
Link to various application services.
Quickly select frequently used functions.
Selects the on-screen menu items and
changes the values seen on the menu.
Returns to the previous menu.
POWER
SOURCE
1
4
2 3
5 6
7 8 9
0
MUTE
M
VOL CH
CH LIST
MENU
HUB
SMART
m
l
l
l
ON/OFF
PRE-CH
<
SEARCH
l
Turns the remote control light on or
off. When on, the buttons become
illuminated for a moment when pressed.
(Using the remote control with this button
set to On will reduce the battery usage
time.)
Returns to the previous channel.
Cuts off the sound temporarily.
Changes channels.
<
Displays channel lists on the screen.
Support to recommendation search
word and search function.
Displays information on the TV screen.
Exits the menu.
Buttons used in the Channel List and
SMART HUB menu, etc.
Use these buttons in SMART HUB and
Anynet+ (HDMI-CEC) modes.
Installing batteries (Battery size: AAA)
T V
SOCIAL
E-MANUAL
l
l
l
l
✎
English - 7
B C D
SOCIAL TV: Connect to Social TV
application.
MTS: Press to choose stereo, mono,
l
l
l
l
l
or Separate Audio Program (SAP
broadcast).
SRS: Turns the SRS TruSurround HD
on or off.
CC: Displays digital subtitles.
P.SIZE: Lets you choose the Picture
Size.
E-MANUAL: Displays the e-Manual.
NOTE
Use the remote control within 23 feet of the TV.
x
Bright light may affect the per formance of the remote control
x
Avoid using when near special fluorescent lights or neon signs.
The color and shape may vary depending on the model.
x
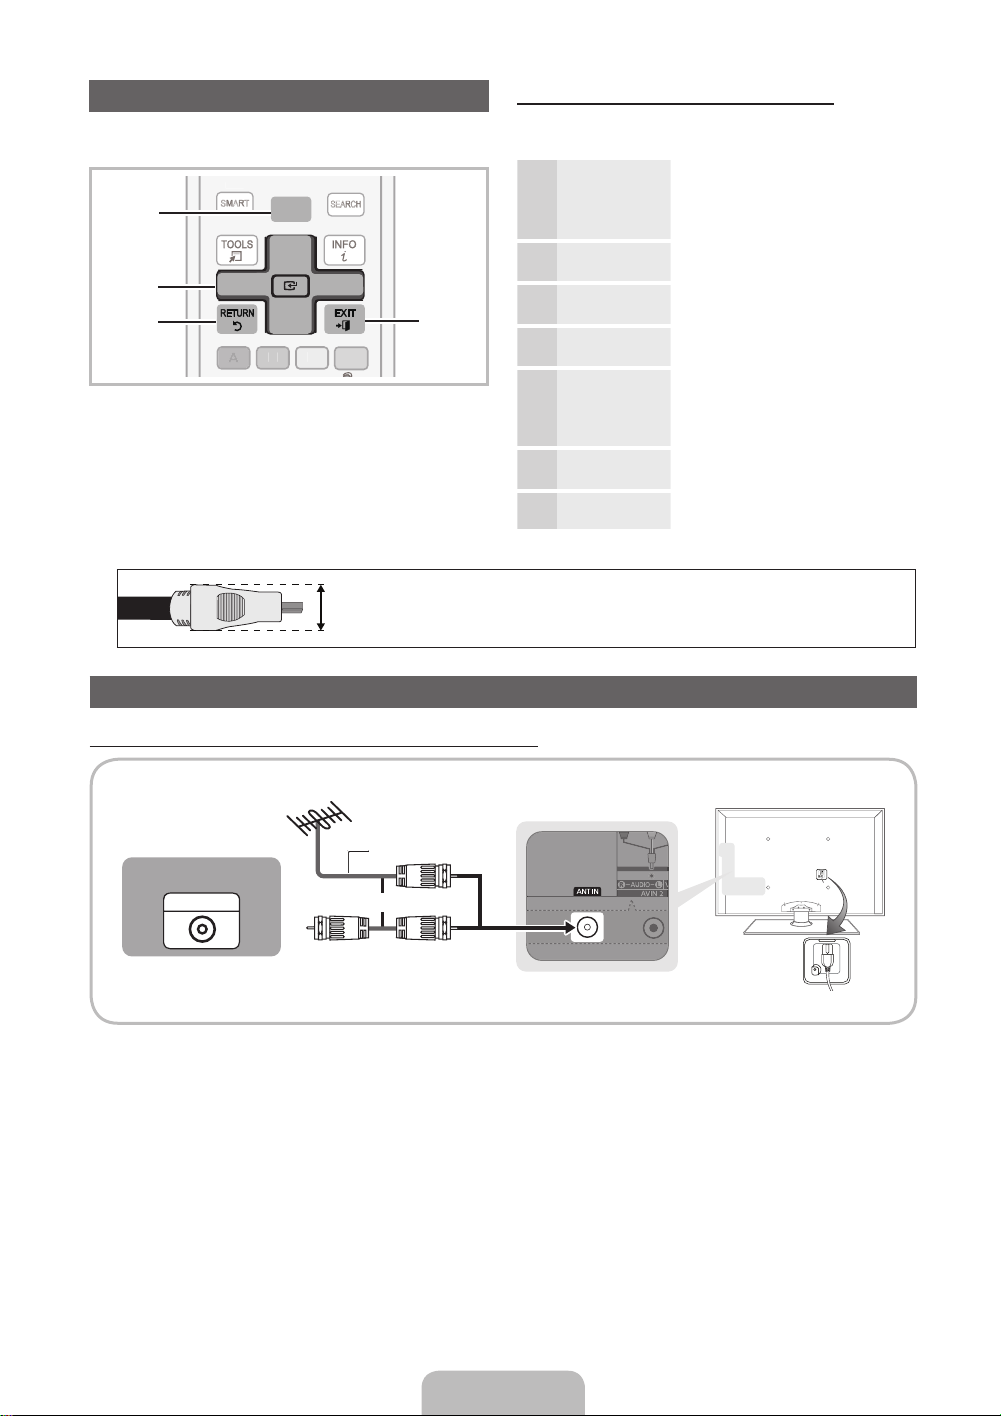
How to Navigate Menus
PRE-CH
CH LIST
POWE
R
4
2
<
M
UTE
C
VOL
CH
SMART
ON/OFF
SOURCE
HUB
SEARCH
Before using the TV, follow the steps below to learn how to
navigate the menu and select and adjust different functions.
MENU
1
2
3
1 MENU button: Displays the main on-screen menu.
2 ENTER
3 RETURN button: Returns to the previous menu.
4 EXIT button: Exits the on-screen menu.
E
select an item. Confirm the setting.
/ Direction button: Move the cursor and
m
l
l
l
l
4
How to Operate the OSD (On Screen Display)
The access steps may differ depending on the selected
menu.
MENU The main menu options appear on
1
▲ / ▼ Select an icon or option with the ▲
2
ENTER
E
3
▲ / ▼
4
◄ / ►
5
ENTER
E
6
EXIT
e
the screen:
Picture, Sound, Channel,
Network, System, Support.
or ▼ button.
Press ENTERE to access the
sub-menus.
Select the desired submenu with
the ▲ or ▼ button.
Adjust the value of an item with the
◄ or ► button. The adjustment in
the OSD may differ depending on
the selected menu.
Press ENTERE to confirm the
selection.
Press EXIT.
7
✎
For the best cable connections to this product, be sure to use cables no thicker than 0.55 inches (14mm).
Maximum thickness - 0.55 inches (14mm)
x
Connecting the power cord and an antenna or cable connection
Connecting the power cord and an antenna or cable connection
VHF/UHF Antenna
Cable
ANT OUT
Antenna Cable (Not Supplied)
or
Power Input
English - 8
 Loading...