

Samsung 580S TFT, 570S TFT User Manual

SyncMaster 570S TFT
580S TFT
Flat Panel Monitor
Owner’s
Instructions

Information in this document is subject to change without notice.
© 2000 Samsung Electronics Co., Ltd. All rights reserved.
Reproduction in any manner whatsoever without the written permission of Samsung Electronics Co.,
Ltd. is strictly forbidden.
Samsung Electronics Co., Ltd. shall not be liable for errors contained herein or for incidental or
consequential damages in connection with the furnishing, performance, or use of this material.
The
Samsung logo
Microsoft, Windows
DPMS
and
and
SyncMaster
and
Windows NT
DDC
are registered trademarks of Video Electronics Standard Association; the
are registered trademarks of Samsung Electronics Co., Ltd.;
are registered trademarks of Microsoft Corporation;
VESA,
NERGY STAR
E
name and logo are registered trademarks of the U.S. Environmental Protection Agency (EPA). As an
E
NERGY STAR
S
TAR
Partner, Samsung Electronics Co., Ltd. has determined that this product meets the E
NERGY
guidelines for energy efficiency. All other product names mentioned herein may be the trademarks
or registered trademarks of their respective owners.

Table of Contents
Safety Instructions . . . . . . . . . . . . . . . . . . . . . . . . . . . . . . . . . . . . . . . . . . . . . . . . . . . . . . . . . . . . . . . . . . 2
Unpacking Your Monitor . . . . . . . . . . . . . . . . . . . . . . . . . . . . . . . . . . . . . . . . . . . . . . . . . . . . . . . . . . . . . . 3
Setting up Your Monitor . . . . . . . . . . . . . . . . . . . . . . . . . . . . . . . . . . . . . . . . . . . . . . . . . . . . . . . . . . . . . . 4
Setting up an Ergonomic Workstation . . . . . . . . . . . . . . . . . . . . . . . . . . . . . . . . . . . . . . . . . . . . . . . . 4
Monitor location . . . . . . . . . . . . . . . . . . . . . . . . . . . . . . . . . . . . . . . . . . . . . . . . . . . . . . . . . . . . . 4
Workstation height . . . . . . . . . . . . . . . . . . . . . . . . . . . . . . . . . . . . . . . . . . . . . . . . . . . . . . . . . . . 4
Viewing angle . . . . . . . . . . . . . . . . . . . . . . . . . . . . . . . . . . . . . . . . . . . . . . . . . . . . . . . . . . . . . . . 4
Kensington Security Slot . . . . . . . . . . . . . . . . . . . . . . . . . . . . . . . . . . . . . . . . . . . . . . . . . . . . . . . . . . 4
Connecting Your FPD Monitor . . . . . . . . . . . . . . . . . . . . . . . . . . . . . . . . . . . . . . . . . . . . . . . . . . . . . . 5
Connecting Your Multimedia FPD Monitor . . . . . . . . . . . . . . . . . . . . . . . . . . . . . . . . . . . . . . . . . . . . 6
Plug and Play . . . . . . . . . . . . . . . . . . . . . . . . . . . . . . . . . . . . . . . . . . . . . . . . . . . . . . . . . . . . . . . . . . . 7
Installing the Video Driver . . . . . . . . . . . . . . . . . . . . . . . . . . . . . . . . . . . . . . . . . . . . . . . . . . . . . . . . . 7
Windows
Windows® 95 . . . . . . . . . . . . . . . . . . . . . . . . . . . . . . . . . . . . . . . . . . . . . . . . . . . . . . . . . . . . . . 8
Self-Test Feature Check (STFC) . . . . . . . . . . . . . . . . . . . . . . . . . . . . . . . . . . . . . . . . . . . . . . . . . . . . 8
Getting Help . . . . . . . . . . . . . . . . . . . . . . . . . . . . . . . . . . . . . . . . . . . . . . . . . . . . . . . . . . . . . . . . . . . . 9
Warm-up Time . . . . . . . . . . . . . . . . . . . . . . . . . . . . . . . . . . . . . . . . . . . . . . . . . . . . . . . . . . . . . . . . . 9
Adjusting Your FPD . . . . . . . . . . . . . . . . . . . . . . . . . . . . . . . . . . . . . . . . . . . . . . . . . . . . . . . . . . . . . . . . . 10
User Controls . . . . . . . . . . . . . . . . . . . . . . . . . . . . . . . . . . . . . . . . . . . . . . . . . . . . . . . . . . . . . . . . . . 10
Automatic Save . . . . . . . . . . . . . . . . . . . . . . . . . . . . . . . . . . . . . . . . . . . . . . . . . . . . . . . . . . . . . . . . 11
Direct-Access Features . . . . . . . . . . . . . . . . . . . . . . . . . . . . . . . . . . . . . . . . . . . . . . . . . . . . . . . . . . 11
Auto Adjustment . . . . . . . . . . . . . . . . . . . . . . . . . . . . . . . . . . . . . . . . . . . . . . . . . . . . . . . . . . . 11
Brightness . . . . . . . . . . . . . . . . . . . . . . . . . . . . . . . . . . . . . . . . . . . . . . . . . . . . . . . . . . . . . . . . . 12
OSM Lock/Unlock . . . . . . . . . . . . . . . . . . . . . . . . . . . . . . . . . . . . . . . . . . . . . . . . . . . . . . . . . . 12
On-Screen Menu System (OSM) . . . . . . . . . . . . . . . . . . . . . . . . . . . . . . . . . . . . . . . . . . . . . . . . . . . 12
Accessing the menu system . . . . . . . . . . . . . . . . . . . . . . . . . . . . . . . . . . . . . . . . . . . . . . . . . . . 13
OSM functions and adjustments . . . . . . . . . . . . . . . . . . . . . . . . . . . . . . . . . . . . . . . . . . . . . . . 13
Audio Controls . . . . . . . . . . . . . . . . . . . . . . . . . . . . . . . . . . . . . . . . . . . . . . . . . . . . . . . . . . . . . . . . 18
Appendix . . . . . . . . . . . . . . . . . . . . . . . . . . . . . . . . . . . . . . . . . . . . . . . . . . . . . . . . . . . . . . . . . . . . . . . . . 19
PowerSaver . . . . . . . . . . . . . . . . . . . . . . . . . . . . . . . . . . . . . . . . . . . . . . . . . . . . . . . . . . . . . . . . . . . 19
Troubleshooting . . . . . . . . . . . . . . . . . . . . . . . . . . . . . . . . . . . . . . . . . . . . . . . . . . . . . . . . . . . . . . . . 20
Specifications . . . . . . . . . . . . . . . . . . . . . . . . . . . . . . . . . . . . . . . . . . . . . . . . . . . . . . . . . . . . . . . . . 24
Pin Assignments . . . . . . . . . . . . . . . . . . . . . . . . . . . . . . . . . . . . . . . . . . . . . . . . . . . . . . . . . . . . . . 25
Display Modes . . . . . . . . . . . . . . . . . . . . . . . . . . . . . . . . . . . . . . . . . . . . . . . . . . . . . . . . . . . . . . . . . 26
Changing the Base . . . . . . . . . . . . . . . . . . . . . . . . . . . . . . . . . . . . . . . . . . . . . . . . . . . . . . . . . . . . . . 27
Removing the base . . . . . . . . . . . . . . . . . . . . . . . . . . . . . . . . . . . . . . . . . . . . . . . . . . . . . . . . . . 27
Attaching a base . . . . . . . . . . . . . . . . . . . . . . . . . . . . . . . . . . . . . . . . . . . . . . . . . . . . . . . . . . . . 28
Maintenance of Your Flat Panel Display . . . . . . . . . . . . . . . . . . . . . . . . . . . . . . . . . . . . . . . . . . . . . 28
Index . . . . . . . . . . . . . . . . . . . . . . . . . . . . . . . . . . . . . . . . . . . . . . . . . . . . . . . . . . . . . . . . . . . . . . . . . . . . 29
Regulatory Information . . . . . . . . . . . . . . . . . . . . . . . . . . . . . . . . . . . . . . . . . . . . . . . . . . inside back cover
®
98 . . . . . . . . . . . . . . . . . . . . . . . . . . . . . . . . . . . . . . . . . . . . . . . . . . . . . . . . . . . . . . 7
FrançaisDeutschEspañolPortuguese EnglishItaliano
1

Safety Instructions
Before connecting the AC power cord to the DC adapter outlet, make sure the voltage
1
designation of the DC adapter corresponds to the local electrical supply.
Never insert anything metallic into the openings in the cabinet of the flat panel display
2
(FPD) monitor; doing so may create the danger of electric shock.
To avoid electric shock, never touch the inside of the FPD. Only a qualified technician
3
should open the case of the FPD.
Never use your FPD if the power cord has been damaged. Do not allow anything to rest on
4
the power cord, and keep the cord away from areas where people can trip over it.
Be sure to hold the plug, not the cord, when disconnecting the FPD from an electric socket.
5
Openings in the FPD cabinet are provided for ventilation. To prevent overheating, these
6
openings should not be blocked or covered. Also, avoid using the FPD on a bed, sofa, rug,
or other soft surface. Doing so may block the ventilation openings in the bottom of the
cabinet. If you put the FPD in a bookcase or some other enclosed space, be sure to provide
adequate ventilation.
Put your FPD in a location with low humidity and a minimum of dust.
7
Do not expose the FPD to rain or use it near water (in kitchens, near swimming pools, etc.).
8
If the FPD accidentally gets wet, unplug it and contact an authorized dealer immediately.
You can clean the FPD with a damp cloth when necessary, but be sure to unplug the FPD
first.
Place the FPD on a solid surface and treat it carefully. The screen is made of thin glass
9
with a plastic front surface and can be damaged if dropped, hit or scratched. Do not clean
the front panel with keton-type materials (e.g., acetone), ethyl alcohol, toluene, ethyl acid,
methyl, or chloride – these may damage the panel.
Locate your FPD near an easily accessible AC outlet.
10
If your FPD does not operate normally – in particular, if there are any unusual sounds or
11
smells coming from it – unplug it immediately and contact an authorized dealer or service
center.
High temperature can cause problems. Don’t use your FPD in direct sunlight, and keep it
12
away from heaters, stoves, fireplaces, and other sources of heat.
Unplug the FPD when it is going to be left unused for an extended period of time.
13
Unplug your FPD from the AC outlet before any service.
14
CAUTION
RISK OF ELECTRIC SHOCK
DO NOT OPEN
CAUTION: TO REDUCE THE RISK OF ELECTRIC SHOCK, DO NOT REMOVE COVER
(OR BACK).
NO USER-SERVICEABLE PARTS INSIDE.
REFER SERVICING TO QUALIFIED SERVICE PERSONNEL.
2

Unpacking Your Monitor
Please make sure the following items are included with your monitor. If any items are
missing, contact your dealer.
English
Colorific
& Driver
Warranty Card
(not available everywhere)
Manual
DC Adapter
(Optional)
†
Your monitor may come equipped with one of five different stands, or none at all, according
Pivot software
(optional)
EXIT MENUAUTO EXIT MENUAUTO
Monitor and Base†
EXIT MENUAUTO EXIT MENUAUTO
Monitor and Base†
Power Cord
15-pin D-Sub Signal Cable
Speaker Cable
(Optional)
Microphone Output Cable
(Optional)
to the option you selected at the time of purchase. Contact your dealer if you want a different
base.
Wire-frame base
Multimedia base
Angle-Pivot base
Simple base
Pivot Multimedia base
3
Setting up Your Monitor
Setting up an Ergonomic Workstation
Consider the advice given below before you install your monitor.
Monitor location
Choose a position that exposes you monitor to the least reflection from lights or windows,
usually at a right angle to any window.
Workstation height
Place your flat panel display (FPD) monitor so that the top of the screen is slightly below your
eye level when you are comfortably seated.
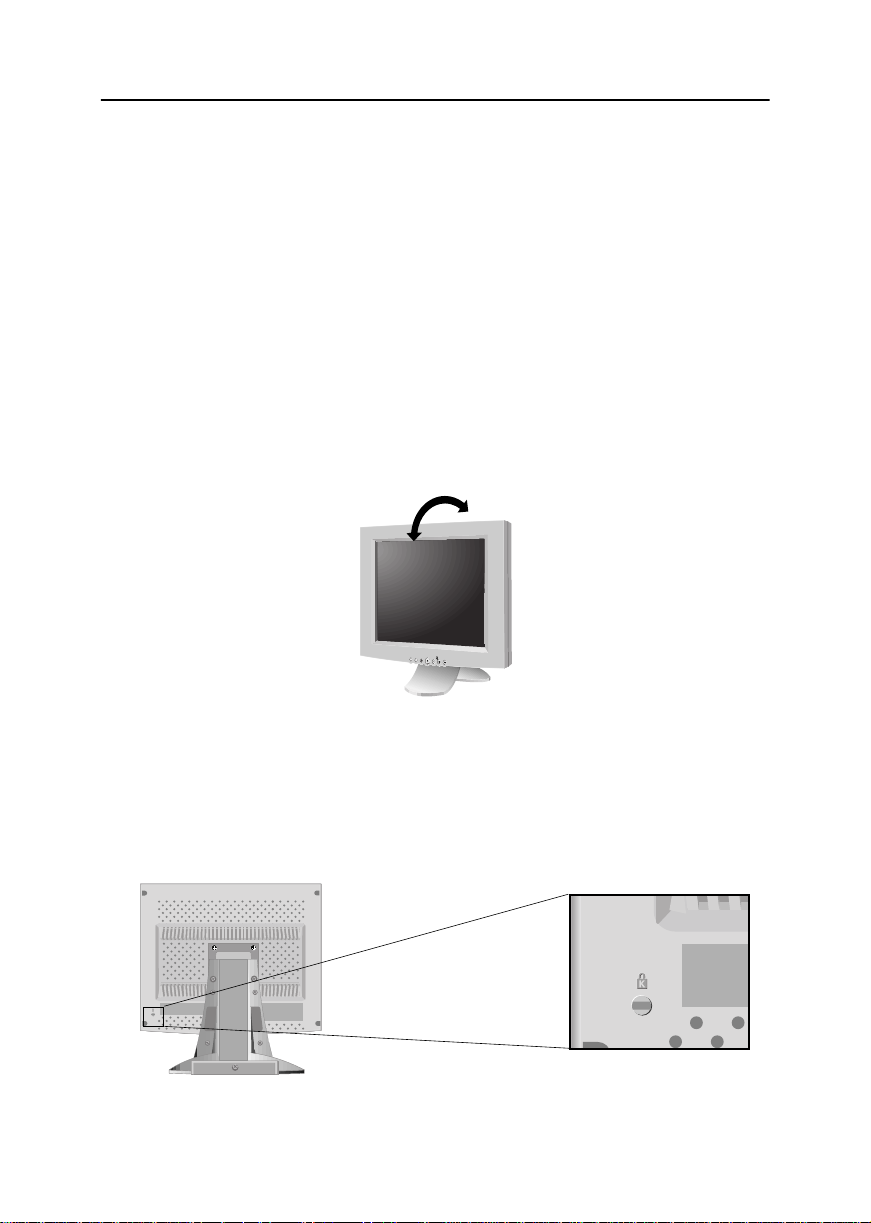
Viewing angle
Tilt the screen backward or forward to a comfortable viewing position.
AUTO
MENU
Figure 1. Tilt the screen
Kensington Security Slot
This monitor offers you the opportunity to secure your monitor using a Kensington-type
security device. Kensington lock not included. Refer to your locking device documentation for
installation instructions.
Figure 2. Kensington-type security slot location
4
Setting up Your Monitor
Connecting Your FPD Monitor
English
Â
-
Ã
Ã
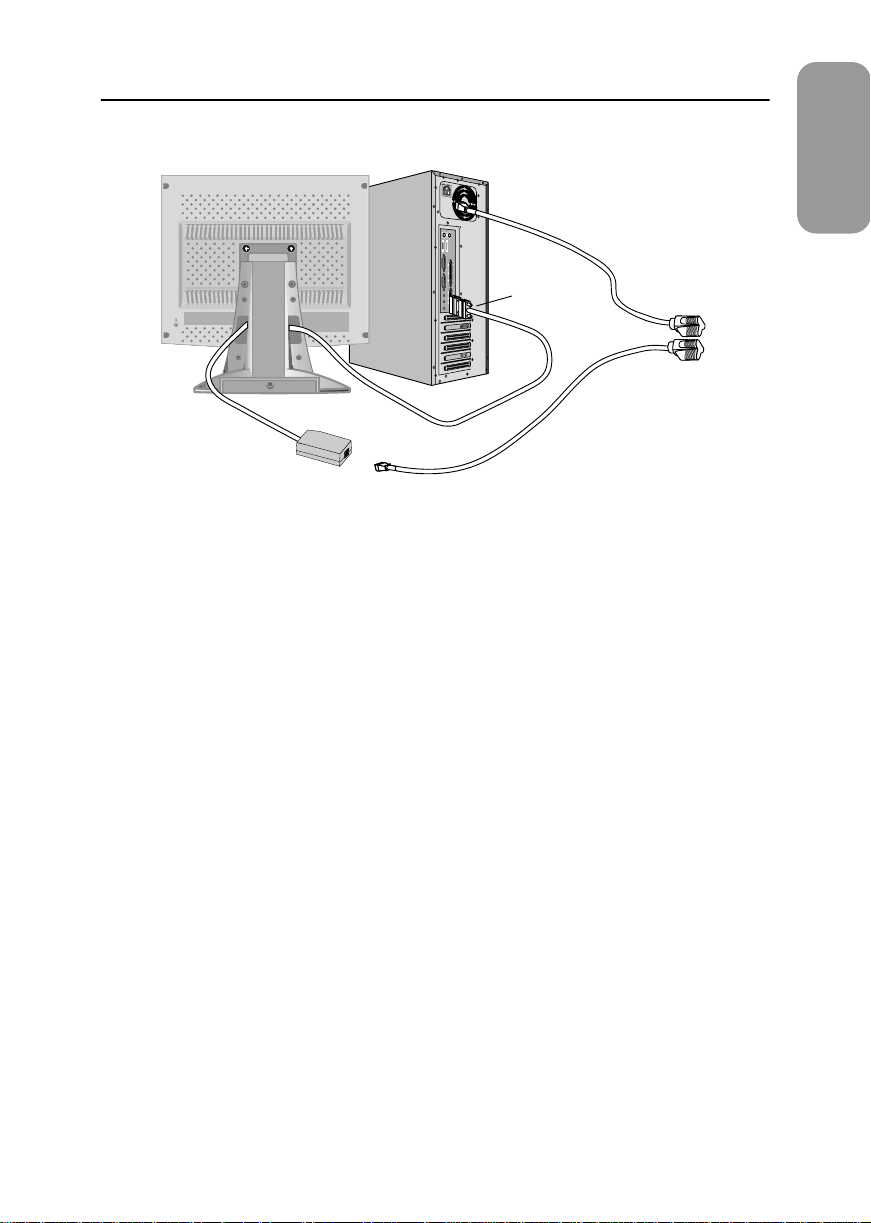
Figure 3. Cable connections
Turn off your computer and unplug its power cord.
1
Connect the signal cable to the 15-pin, D-sub connector on the back of your monitor.
2
Connect the signal cable to the video port on your computer, video board, video card,
3
or graphics card.
Connect the power cord for your monitor to the DC adapter and connect the adapter
4
jack to the DC power port on the back of your monitor.
Plug the computer and monitor power cords into a nearby power mains outlet.
5
Turn your computer and monitor on. If your monitor displays an image, it has been
6
successfully installed.
If necessary, install the video driver for this monitor (see “Installing the Video Driver”
7
on page 7).
After your monitor has been fully installed, run Auto Adjustment (see page 11).
8
Ä
5
Setting up Your Monitor
Connecting Your Multimedia FPD Monitor
A
C
MIC AUDIO
B
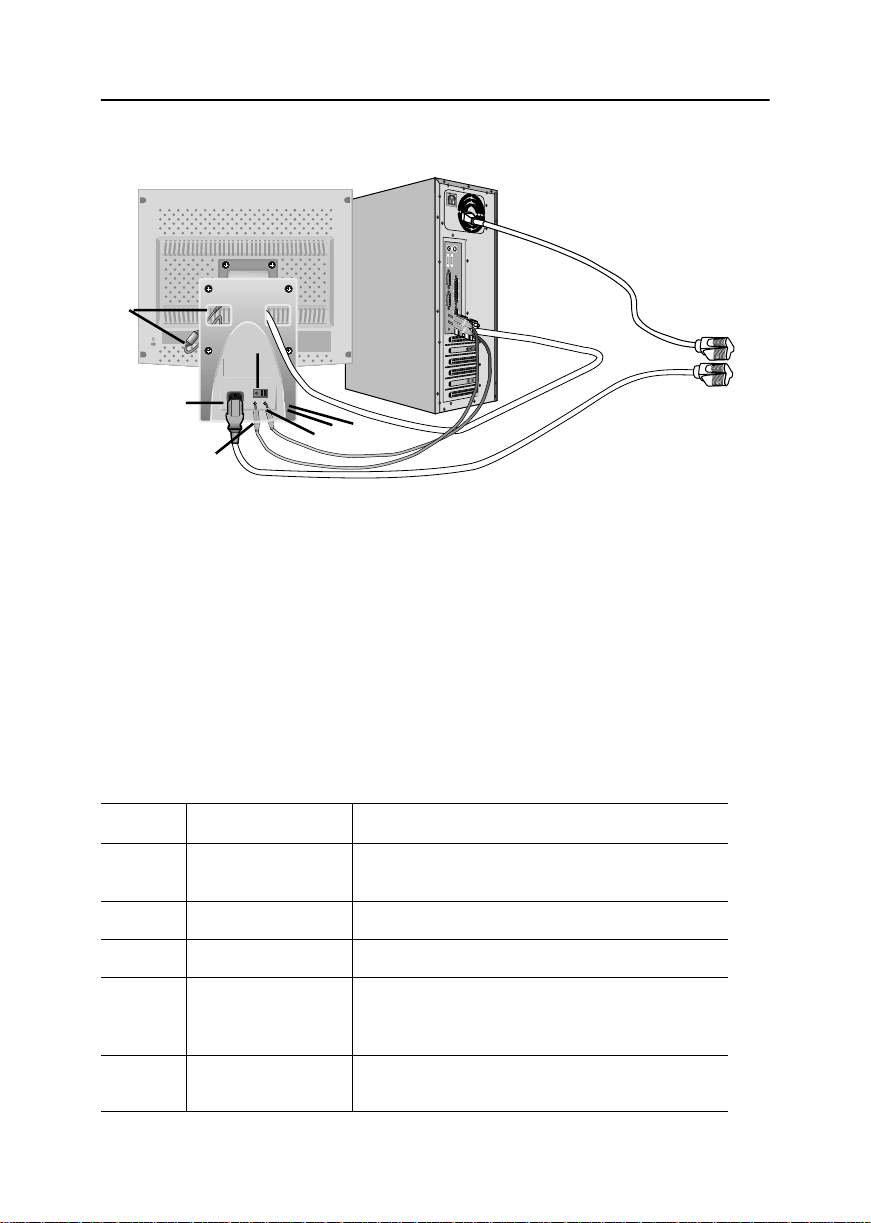
Figure 4. Multimedia connections
Follow steps 1 through 3 on the previous page.
1
If you have a Multimedia or Multimedia Pivot stand, connect the attached power
2
adapter jack (A) to the DC power port on the back of your monitor. Connect the power
cord to the power port on the back of the stand.
Follow the directions that came with your sound card or your computer to connect the
3
speakers and microphone on the stand. See Figure 4, above and Table 1, below.
Continue with step 5 on the previous page.
4
OUT IN
E F G
D
Table 1. Connector locations for multimedia bases
Item Name Description
A
B
C
D
E
6
Attached power
adapter jack
Power port
Power switch
MIC OUT jack
AUDIO IN jack
Connect this cable to the DC power port on the
back of the monitor cabinet.
Connect the power cable here.
Use this switch to turn the monitor On and Off.
Connect a cable here to send sound from the
internal microphone to the computer’s sound
card.
Connect a cable here to bring sound from your
computer’s sound card.

Setting up Your Monitor
Table 1. Connector locations for multimedia bases (
Item Name Description
F
G
External
microphone jack
Headphone jack
Connect an external microphone here. Using an
external microphone automatically disconnects
the monitor’s internal microphone.
Connect headphones here. Connecting
headphones automatically turns the speakers
off.
Continued
)
Plug and Play
Our adoption of the new VESA® Plug and Play solution eliminates complicated and time
consuming setup. It allows you to install your monitor in a Plug and Play compatible system
without the usual hassles and confusion. Your PC system can easily identify and configure
itself for use with your display. This monitor automatically tells the PC system its Extended
Display Identification (EDID) data using Display Data Channel (DDC) protocols so the PC
system can automatically configure itself to use the flat panel display. If your PC system
needs a video driver, following the instructions given below according to the operating
system your computer uses.
Installing the Video Driver
When prompted by the operating system for the monitor driver, insert the Driver diskette
included with this monitor. Driver installation is slightly different from one operating system
to another. Follow the directions as appropriate for the operating system you have.
English
Windows® 98
Windows® 98 will auto-detect your new monitor and start the “Add New Hardware
1
Wizard” if the drivers are not already installed. Click the
drivers.
Check the diskette drive box to install the drivers off the diskette provided with your
2
FPD monitor and click
Confirm that Windows found the driver on the diskette and click
3
the driver.
To manually install or update the driver, follow the directions below:
Click on
1
ADVANCED, MONITOR
Wizard”.
Follow the same directions as given in the steps in the section above.
2
START, SETTINGS, CONTROL PANEL, DISPLAY SETTINGS
NEXT
tab,
.
CHANGE
. This will start the “Add New Hardware
NEXT
button to search for
NEXT
again to install
tab,
7

Setting up Your Monitor
Windows® 95
To determine the version of Windows® 95 that your computer uses, right click on the “My
Computer” icon on the Windows desktop and select “Properties”. The version number can be
seen on the “General” section under “System:”. Follow the directions given below according
to the version of your Windows® 95 operating system:
Version 4.00.950A
Click on
1
CHANGE DISPLAY TYPE, CHANGE, HAVE DISK
Type the diskette drive letter in the box and click OK.
2
Version 4.00.950B
Click on
1
PROPERTIES, MONITOR
Type the diskette letter in the box and click OK.
2
Self-Test Feature Check (STFC)
Your monitor provides a self test feature that allows you to check whether your monitor is
functioning properly. If your monitor and computer are properly connected but the monitor
screen remains dark and the power indicator is blinking, run the monitor self-test by
performing the following steps:
START, SETTINGS, CONTROL PANEL, DISPLAY SETTINGS
.
START, SETTINGS, CONTROL PANEL, DISPLAY, ADVANCED
tab,
HAVE DISK
.
tab,
Turn off both your computer and the monitor.
1
Unplug the video cable from the back of the computer.
2
Turn on the monitor.
3
8

Setting up Your Monitor
If the monitor is functioning properly, you will see a white box with a red border and black
text inside as shown in the following illustration:
No Connection
Check Signal Cable
Figure 5. Monitor self test screen
The three boxes inside the border are red, green and blue. Failure of any of the boxes to
appear indicates a problem with your monitor. This box also appears during normal operation
if the video cable becomes disconnected or damaged.
Turn off your monitor and reconnect the video cable; then turn on both your computer
4
and the monitor.
If your monitor screen remains blank after using the previous procedure, check your video
controller and computer system; your monitor is functioning properly.
Getting Help
English
If your monitor does not display an image, check your cable connections and refer to
“Troubleshooting” on page 20. If you experience difficulties with the quality of the displayed
image, run Auto Adjustment (see page 11) and refer to “Adjusting Your FPD” on page 10 or
“Troubleshooting” on page 20.
Warm-up Time
All FPD monitors need time to become thermally stable the first time you turn them on each
day. Therefore, to achieve more accurate adjustments for parameters, allow the FPD monitor
to warm (be on) for at least 20 minutes before making any screen adjustments.
9
 Loading...