

Page 1

LASER PRINTER
ML-5100A
User ’s Manual
00-Cover&Contents 5/10/99 4:35 PM Page 1
Page 2

This manual is provided for information purposes only. All information included herein is
subject to change without notice. Samsung Electronics is not responsible for any damages,
direct or indirect, arising from or related to use of this manual.
© 1998 Samsung Electronics Co. Ltd. All rights reserved.
¥ ML-5100A and Samsung logo are trademarks of Samsung Electronics Co. Ltd.
¥ Centronics is a registered trademark of Centronics Data Computer Corporation.
¥ PCL is a registered trademark of Hewlett-Packard Company.
¥ IBM, IBM PC are registered trademarks of International Business Machines Corporation.
¥ True Type is a registered trademark of Apple Computer, inc.
¥ Microsoft, MS-windows, MS-DOS are registered trademarks of Microsoft Corporation.
¥ All other brand or product names are trademarks or registered trademarks of their
respective companies or organisations.
00-Cover&Contents 5/10/99 4:35 PM Page 2
Page 3

Unpacking РРРРРРРРРРРРРРРРРРРРРРРРРРРРРРРРРРР 2
Selecting a Location РРРРРРРРРРРРРРРРРРРРРРРРРРР 2
Control Locations and Functions РРРРРРРРРРРРРРРР 3
Front View РРРРРРРРРРРРРРРРРРРРРРРРРРРРРРРРРР 3
Rear View РРРРРРРРРРРРРРРРРРРРРРРРРРРРРРРРРРР 4
InsideРРРРРРРРРРРРРРРРРРРРРРРРРРРРРРРРРРРРРРР 4
Installing the Toner Cartridge РРРРРРРРРРРРРРРРРР 5
Loading Paper РРРРРРРРРРРРРРРРРРРРРРРРРРРРРРРР 6
Connecting to Your Computer РРРРРРРРРРРРРРРРРР 8
Using Parallel Port РРРРРРРРРРРРРРРРРРРРРРРРРРР 8
Using The USB Port РРРРРРРРРРРРРРРРРРРРРРРРРР 9
Powering On the Printer РРРРРРРРРРРРРРРРРРРРРР 10
Installing Software РРРРРРРРРРРРРРРРРРРРРРРРРРР 11
Installing Printer Driver РРРРРРРРРРРРРРРРРРРРРР 12
System RequirementРРРРРРРРРРРРРРРРРРРРРРРРР 12
Windows 95/98/NT4.0 InstallationРРРРРРРРРРРР 12
Windows 95/98 Plug and PlayРРРРРРРРРРРРРРРР 13
If Windows Does Not Run the CD-ROM РРРРРРР 13
Windows 3.1x Installation РРРРРРРРРРРРРРРРРРРР 14
Uninstalling the Printer DriverРРРРРРРРРРРРРРРР 15
Installing Printer Utilities РРРРРРРРРРРРРРРРРРРРР 15
Windows 95/98/NT 4.0 Installation РРРРРРРРРРР 15
Windows 3.x Installation РРРРРРРРРРРРРРРРРРРРР 15
Printing on Network PrinterРРРРРРРРРРРРРРРРРРР 16
Setting Up Host PC Printer РРРРРРРРРРРРРРРРРРР 16
Client PC Sharing SetupРРРРРРРРРРРРРРРРРРРРРР 16
Chapter 1
Setting Up Your Printer
Selecting Paper Types and Feed Source РРРРРРРР 18
Loading Print Material РРРРРРРРРРРРРРРРРРРРРРР 19
Feeding Manually РРРРРРРРРРРРРРРРРРРРРРРРРРР 23
Using Face-up Stacker РРРРРРРРРРРРРРРРРРРРРРР 24
Paper Guidelines РРРРРРРРРРРРРРРРРРРРРРРРРРРР 25
Chapter 2
Paper Handling
Contents
00-Cover&Contents 5/10/99 4:35 PM Page 3
Page 4

Chapter 3
Operating Your Printer
Chapter 4
Troubleshooting and Maintenance
FCC Regulations РРРРРРРРРРРРРРРРРРРРРРРРРРРРР 56
Canadian Radio Interference Regulations РРРРРР 56
EC Declaration of Conformity РРРРРРРРРРРРРРРРР 57
Laser Safety Statement РРРРРРРРРРРРРРРРРРРРРРР 58
Safety Information РРРРРРРРРРРРРРРРРРРРРРРРРРР 59
Specifications РРРРРРРРРРРРРРРРРРРРРРРРРРРРРР 60
Appendix
Operator Panel РРРРРРРРРРРРРРРРРРРРРРРРРРРРРР 28
Indicator Lights РРРРРРРРРРРРРРРРРРРРРРРРРРРР 28
Button Function РРРРРРРРРРРРРРРРРРРРРРРРРРРР 29
Selecting Your Printer РРРРРРРРРРРРРРРРРРРРРРРР 30
Windows 95 / 98 / NT РРРРРРРРРРРРРРРРРРРРРР 30
Windows 3.x РРРРРРРРРРРРРРРРРРРРРРРРРРРРРРР 30
Printing a Document РРРРРРРРРРРРРРРРРРРРРРРРР 31
Print Settings РРРРРРРРРРРРРРРРРРРРРРРРРРРРРРРР 32
Remote Control Panel(RCP)for Windows User ÐÐ 35
Status Monitor(SM) for Win 3.x/95/98 Users РРРРР 38
Status Monitor РРРРРРРРРРРРРРРРРРРРРРРРРРРРРРР 38
Poor Print Quality РРРРРРРРРРРРРРРРРРРРРРРРРРР 40
Paper Problems РРРРРРРРРРРРРРРРРРРРРРРРРРРРРР 41
Printing Problems РРРРРРРРРРРРРРРРРРРРРРРРРРР 42
Software Problems РРРРРРРРРРРРРРРРРРРРРРРРРР 43
Before You Call For Service РРРРРРРРРРРРРРРРРР 44
Clearing Paper Jams РРРРРРРРРРРРРРРРРРРРРРРРРР 45
Tips for Avoiding Paper Jams РРРРРРРРРРРРРРРР 47
Cartridge Maintenance РРРРРРРРРРРРРРРРРРРРРРР 48
Replacing Toner Cartridge РРРРРРРРРРРРРРРРРРРР 48
Cleaning OPC Drum РРРРРРРРРРРРРРРРРРРРРРРРР 49
Chapter 5
Printer Options
Optional Memory Card РРРРРРРРРРРРРРРРРРРРРРР 52
00-Cover&Contents 5/10/99 4:35 PM Page 4
Page 5

P/N. JC68-00048A Rev.3.00
ELECTRONICS
Visit us at http://samsungelectronics.com
If you have access to this online service,you can download
the UserÕs Guide and drivers from Samsung Electronics.
00-Cover&Contents 5/10/99 4:35 PM Page 5
Page 6
Setting Up Your Printer
Chapter 1
01-Setup 5/10/99 4:28 PM Page 1
Page 7

2
Setting Up Your Printer
Unpacking
Remove the printer and all accessories from the packing carton. Save
the carton and packing materials in case you need to repack the
printer.
Make sure you have the following items:
¥ Toner cartridge (Please, refer to page 4 and page 5)
¥ Power cord
¥ Setup CD-ROM
¥ This manual
Notes:
¥ If you need help during setup, or if any items are missing or damaged,
notify your dealer immediately.
¥ You need a Centronics-compatible parallel printer cable. The cable is not
shipped with your printer. You can purchase this cable from your dealer or
retailer. Make sure the cable is IEEE 1284-compliant. Ask your dealer for
assistance if you need help selecting the right cable.
Selecting a Location
Place your printer on a flat, stable surface near your workstation.
Leave enough space around the printer, so that you can easily:
¥ open the printer cover
¥ load the paper
¥ retrieve the paper
¥ open the front output tray and retrieve the paper from the front
output tray
¥ allow air circulation around the vents to prevent the printer from
overheating
Do not place the printer:
¥ In direct sunlight
¥ Near heat sources or air conditioners
¥ In dusty or dirty environments
01-Setup 5/10/99 4:28 PM Page 2
Page 8

3
Setting Up Your Printer
Automatic Paper Feeder
Holds 150 sheets of paper.
Paper Guides
Adjust to the
width of paper.
Face-down Stacker
Holds printed documents.
If printed on plain paper,
a maximum of 100 sheets
can be held.
Stacker Extender
Supports paper stacked in the
paper output bin.
Face-up Stacker
Holds a single sheet of special media (transparency,
label, envelope, and heavy weight paper) with print
side facing up.
Operator Panel
Tray Extender
Supports paper stacked in the
automatic paper feeder.
Manual Paper Feeder
Used to feed a single sheet of paper.
Control Locations and Functions
Front View
01-Setup 5/10/99 4:28 PM Page 3
Page 9

4
Setting Up Your Printer
Rear View
Inside
Power
Switch
Power Cord
Connector
USB Port
Printer Cable
Connector
Front Cover
Toner Cartridge
01-Setup 5/10/99 4:28 PM Page 4
Page 10
5
Setting Up Your Printer
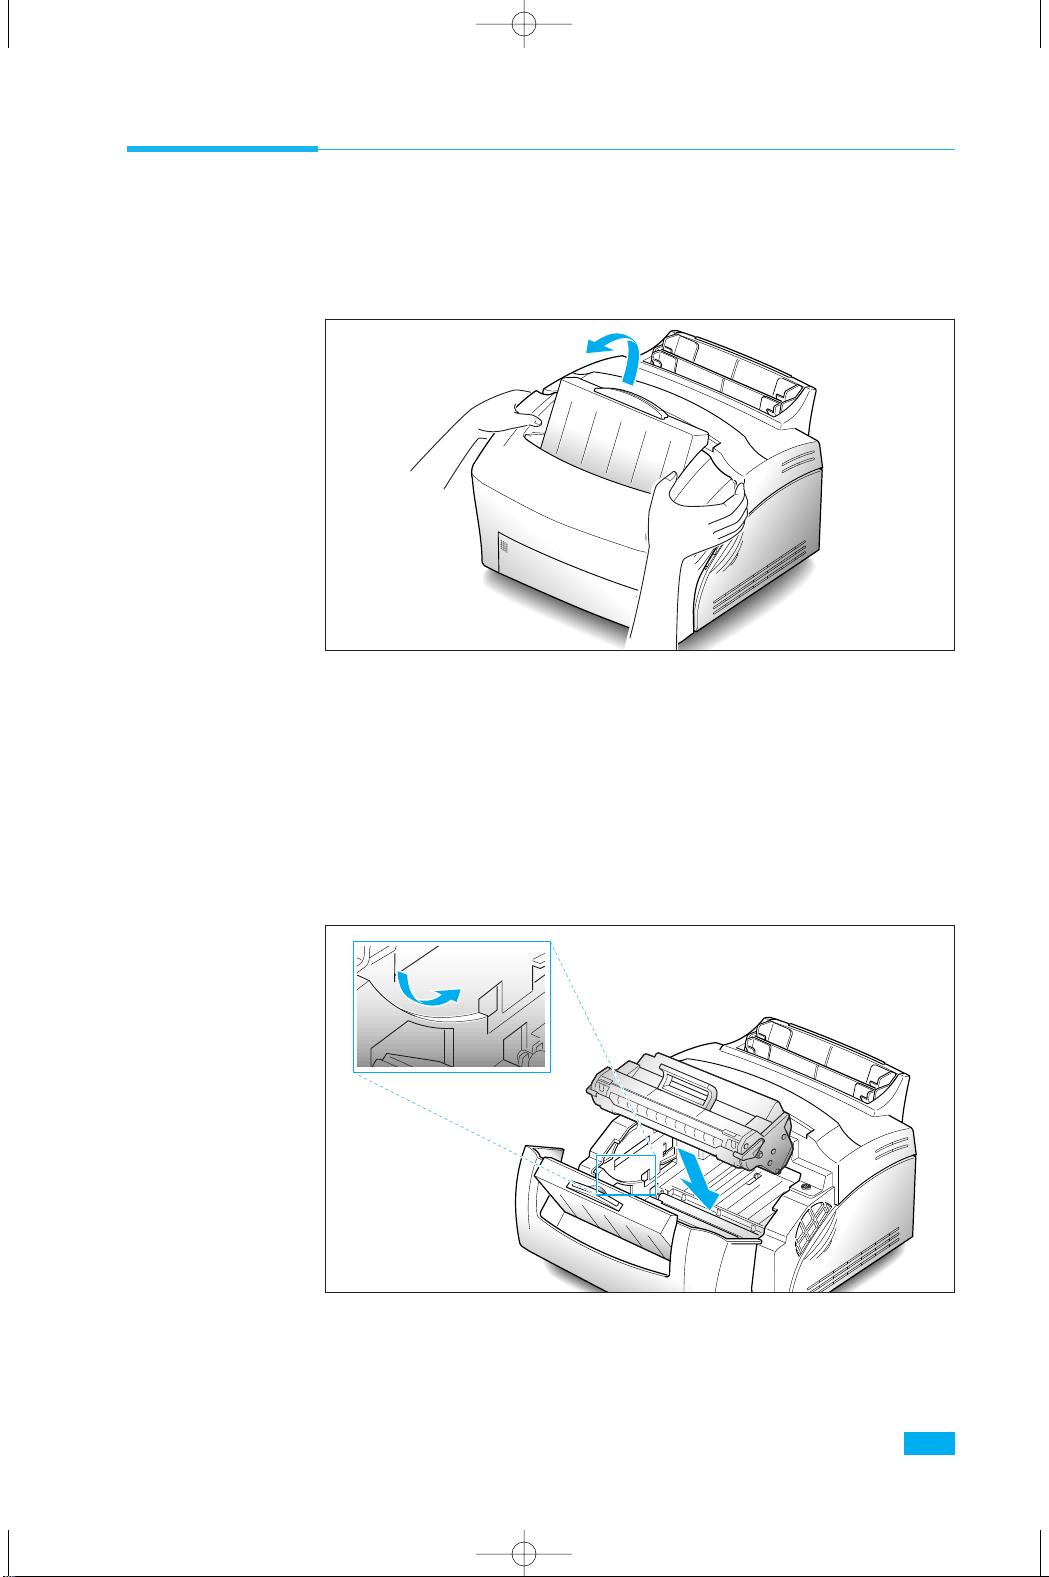
Installing the Toner Cartridge
1. To open the printer cover, hold the cover using both hands and
pull it toward you.
2. Unpack the Toner Cartridge. Carefully remove the sealing tape.
3. Rock the Cartridge 5 or 6 times to distribute the toner.
4. Find the cartridge slots inside the printer, one on each side.
5. Grasp the handle and slide the Cartridge down between the toner
cartridge slots, until it drops into place.
6. Close the cover.
01-Setup 5/10/99 4:28 PM Page 5
Page 11

6
Setting Up Your Printer
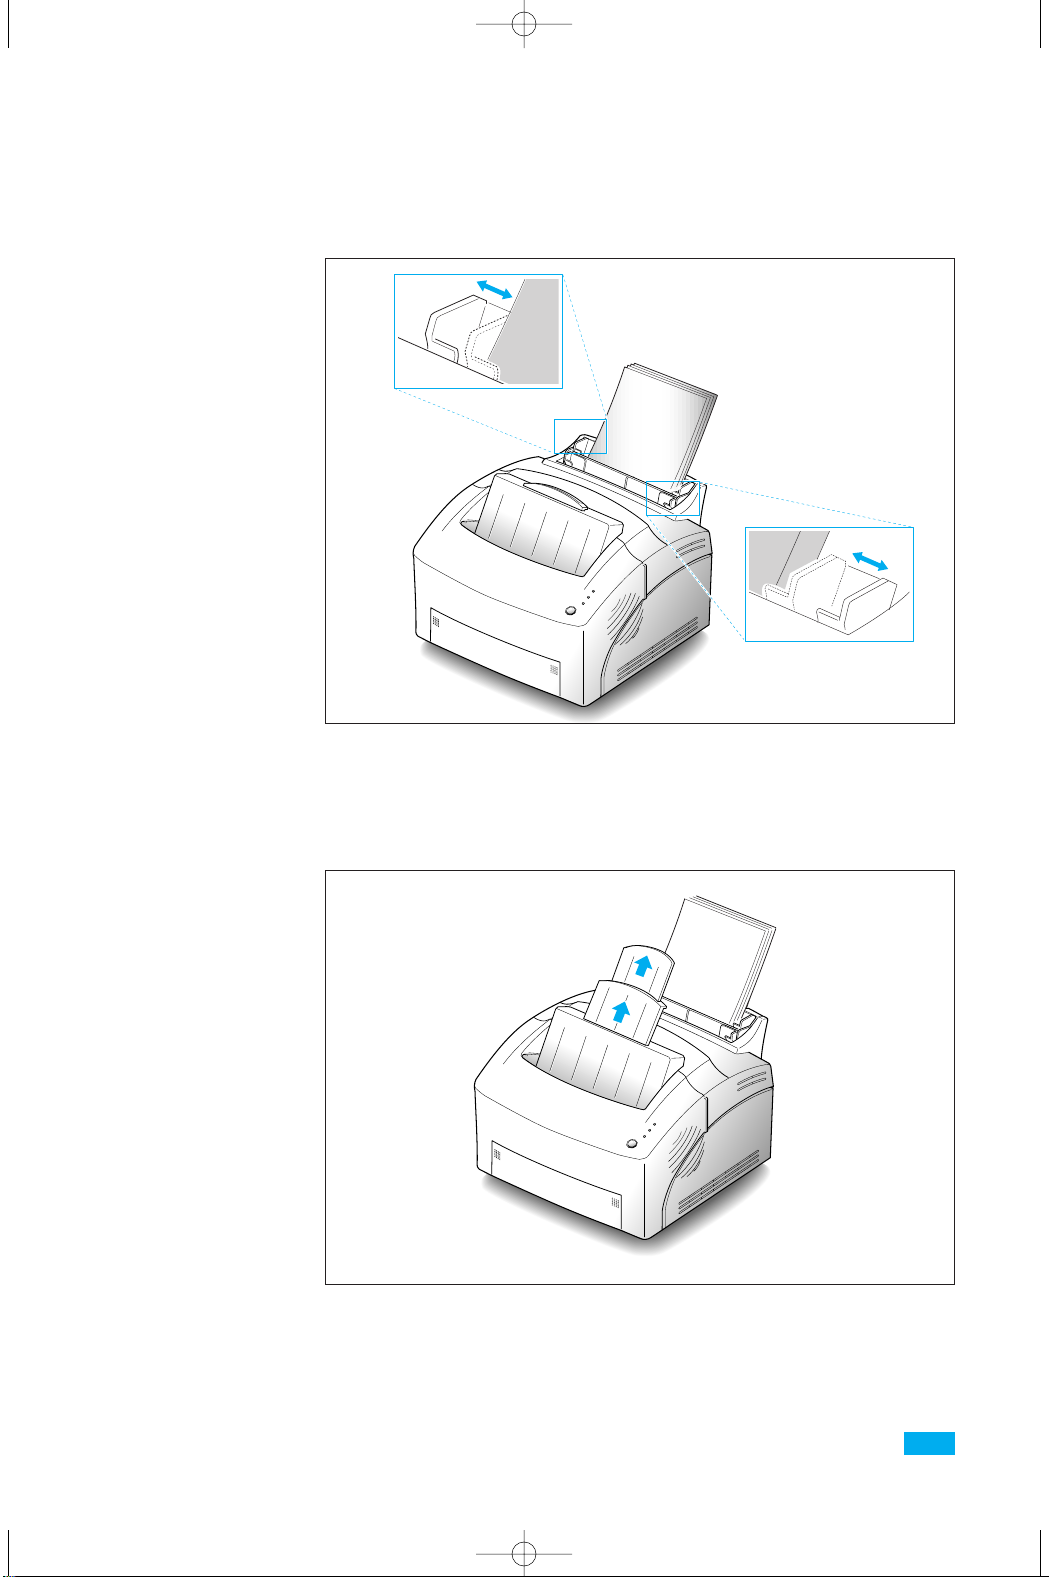
2. Before loading the paper, flex the sheets back and forth to loosen
them, then fan them. Tap the edges on a table top to straighten
them. Doing this before you load paper helps prevent paper jams.
DonÕt load too much. This feeder holds up to 150 sheets.
3. Insert the paper in the paper feeder.
If the paper has a preferred print side, place the print side facing
you. If you use letterhead paper, load the paper with the letter-head
edge down and facing you.
Loading Paper
For best results, use high quality 75g/m2 (20 lb) xerographic paper.
Note: For more information on loading paper and other print material, refer
to ÔLoading Print MaterialÕ on page 19.
1. Pull the extender on the automatic paper feeder up, until it stops.
01-Setup 5/10/99 4:28 PM Page 6
Page 12
7
Setting Up Your Printer
5. Pull up the extender on the face-down stacker. The face-down
stacker can hold up to 100 printed pages.
4. Adjust the paper guides to the width of the paper.
01-Setup 5/10/99 4:28 PM Page 7
Page 13

8
Setting Up Your Printer
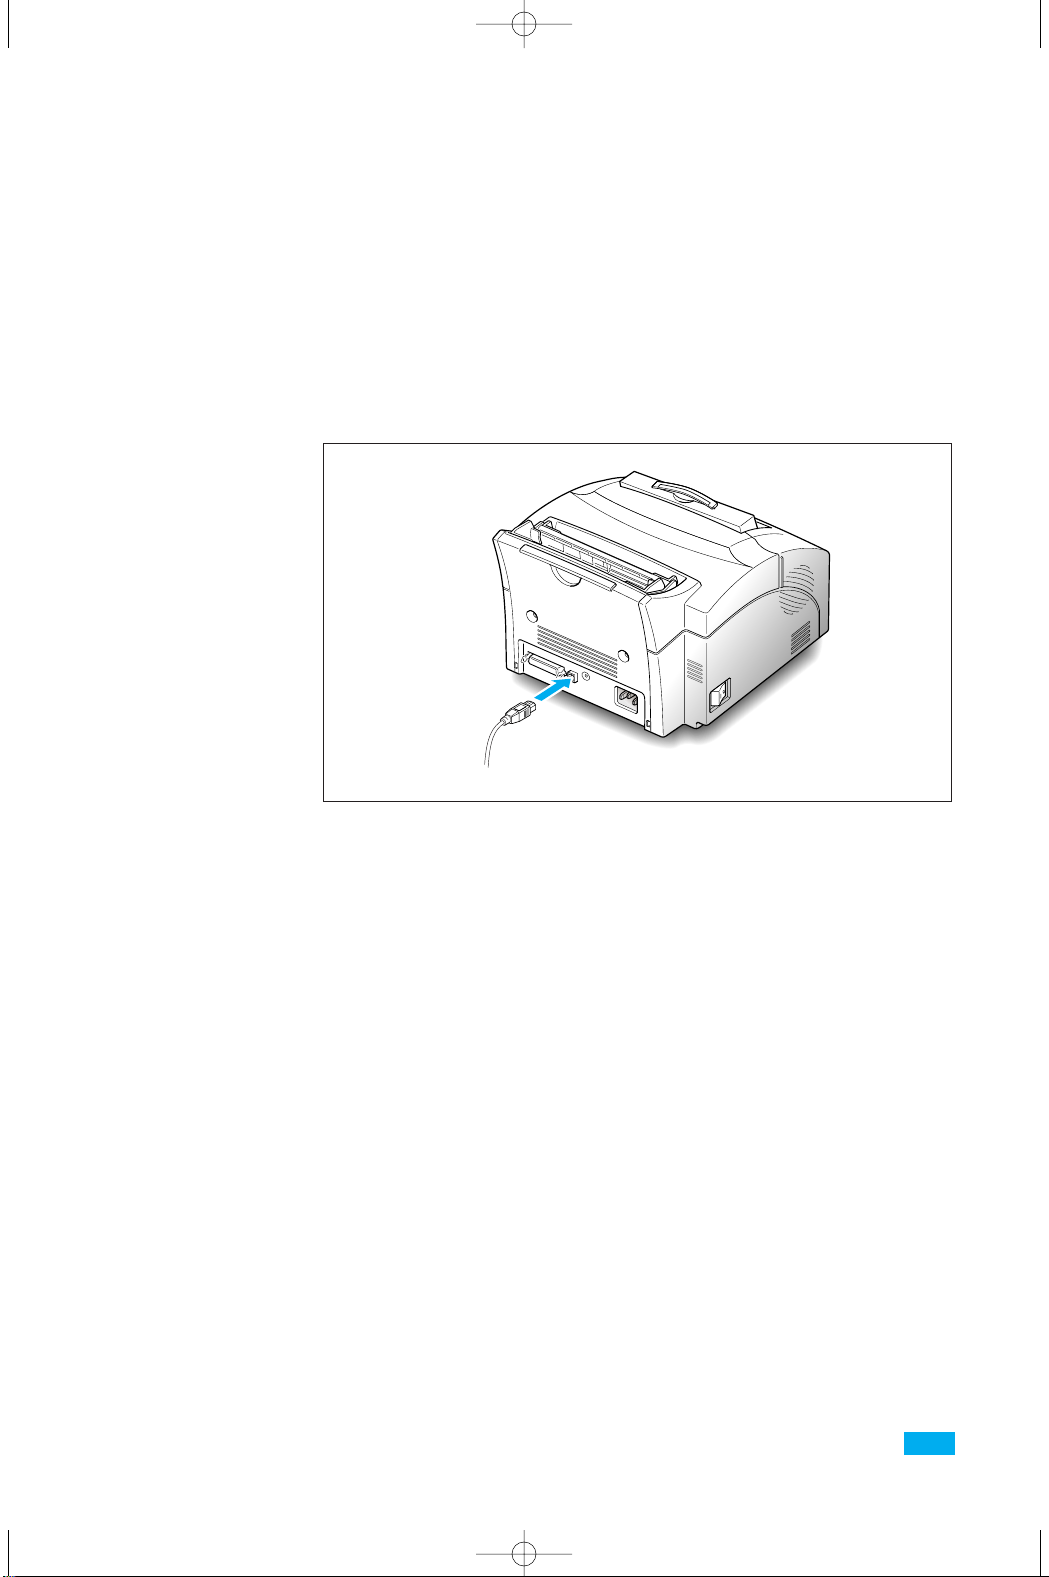
2. Attach the other end of the parallel cable to your computer.
Note: Make sure the printer power is off when you connect it to the
computer.
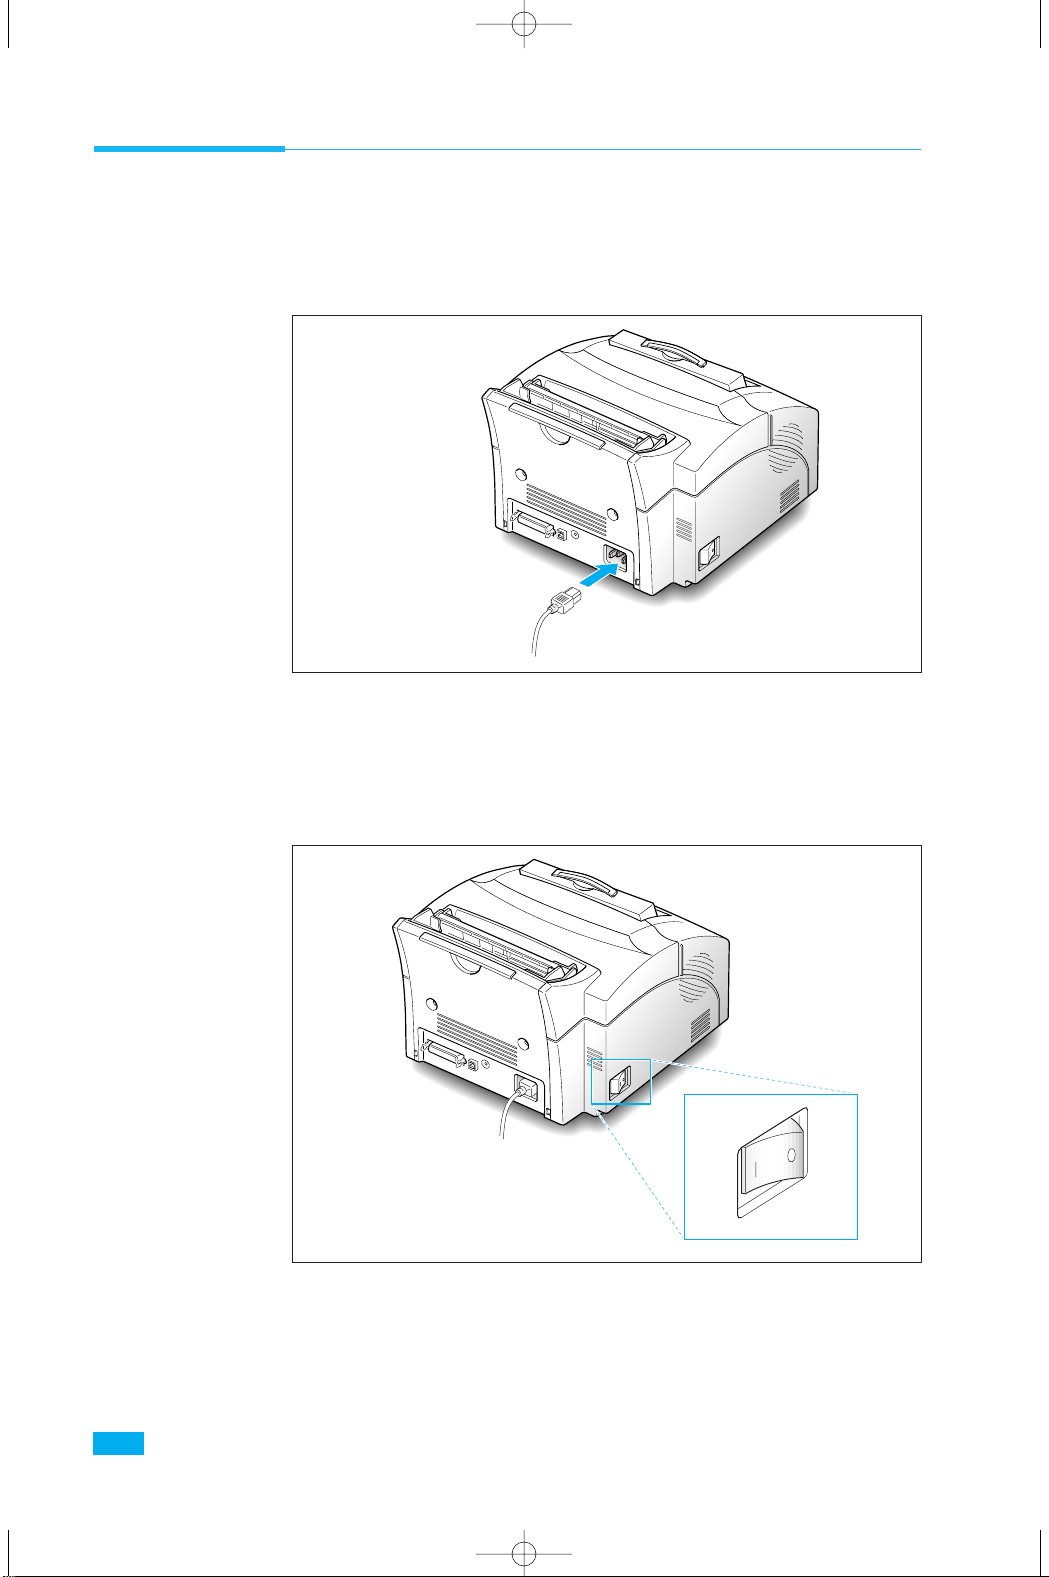
Connecting to Your Computer
Your printer has parallel interface port, which allows you to use it
with IBM PCs and compatible computers. You have to purchase a
Centronics compatible parallel interface cable that supports bidirectional communications (IEEE standard 1284). Ask your dealer for
assistance if you need help selecting the right cable.
Your printer also has Universal Serial Bus (USB) port. The Universal
Serial Bus is an interface which allows the printer to be connected to
multiple peripheral devices. If your PC has USB port, you can connect
your printer to your PC by using USB interface.
Using Parallel Port
1. Plug the parallel interface cable into the connector on the back of
the printer. Push the clips at each end of the connector into the
notches on the printer cable. The clips snap when pushed into the
notches.
01-Setup 5/10/99 4:28 PM Page 8
Page 14
9
Setting Up Your Printer
Using The USB Port
The USB port requires USB v1.0-compliant cable. Ask your dealer for
assistance if you need help selecting the right cable.
1. Make sure that both the printer and computer are turned off.
2. Plug the USB cable into the connector on the back of the printer.
3. Connect the other end of the cable to the USB port on your
computer. See your computer documentation if you need help.
Note: To print using USB interface, you must install the USB driver. See
page xx.
01-Setup 5/10/99 4:28 PM Page 9
Page 15
10
Setting Up Your Printer
Powering On the Printer
1. Plug one end of the power cord into the connector at the back of
the printer, and the other end into a wall outlet.
2. Turn the printer on. As the printer powers up, all control panel
lights turn on briefly.
01-Setup 5/10/99 4:28 PM Page 10
Page 16

11
Setting Up Your Printer
Installing Software
Included with your printer is a CD-ROM containing printer drivers
for some of the most popular Windows software applications. To
operate your printer, you must install a printer driver, which
translates data from your application into data the printer
understands. (Installation procedures follow this section.)
The CD-ROM shipped with your printer contains the following
printer drivers and utilities.
¥ PCL 5e printer driver for Windows 95/98, Windows 3.1x and
Windows NT 4.0
¥ PCL 6 printer driver for Windows 95/98.
¥ Status Monitor enables you to monitor the status of print jobs.
¥ Remote Control Panel, which allows you to set up your printer to
work properly with Window applications run inside a Windows
3.1/95/98 or NT Windows.
¥ USB driver, which allows your printer to connect USB peripheral.
3. When only the READY light is steadily on, press and hold the
button for about 3 seconds. All the indicators blink. Then let it go
when each indicator starts to blink in turn. A test page should print
out.
PAPER
ERROR
READY
01-Setup 5/10/99 4:28 PM Page 11
Page 17

12
Setting Up Your Printer
Installing Printer Driver
System Requirement
Before you start, make sure you have the following computer setup.
(These are the minimum requirements.)
¥ IBM or compatible with a 386 or higher processor
¥ Windows 95, Windows 98, Windows 3.1x, or Windows NT
¥ 4 MB of available hard disk space
¥ 4 MB of RAM
¥ Centronics-compatible parallel cable (IEEE 1284-compliant)
Windows 95/98/NT4.0 Installation
1. Turn on the computer and start Windows.
If Windows 95/98 recognizes the new printer, go to the section
ÒWindows 95/98 Plug and PlayÓ on page 13.
2. Insert the setup CD-ROM into your CD-ROM drive.
If Windows does not automatically run the CD-ROM, go to the
section ÒIf Windows Does Not Run the CD-ROMÓ on page 13.
3. Click the language you want.
01-Setup 5/10/99 4:28 PM Page 12
Page 18
13
Setting Up Your Printer
4. Click the Item you want to install.
5. Follow the instructions on the screen.
Windows 95/98 Plug and Play
1. At the ÔNew Hardware FoundÕ dialog box, click on the OK button.
2. Insert the setup CD-ROM into your CD-ROM drive.
3. Follow the instructions on the screen.
If Windows Does Not Run the CD-ROM
1. Select Run from the Start menu.
2. Type d:\setup.exe on the command line (where ÒdÓ is your CDROM drive letter), then click OK.
3. Follow the instructions on the screen.
01-Setup 5/10/99 4:28 PM Page 13
Page 19
14
Setting Up Your Printer
Windows 3.1x Installation
1. Make sure the printer is plugged and connected to your
computer. Turn on your printer and computer.
2. Insert the CD-ROM disk into your CD-ROM drive.
3. From the Program Manager window, double-click Main, and File
Manager.
4. From the File Manager window, select your CD-ROM drive,
execute setup16.exe and click the language you want.
5. Click the Item you want to install.
6. Follow the instructions on the screen.
01-Setup 5/10/99 4:28 PM Page 14
Page 20

15
Setting Up Your Printer
Uninstalling the Printer Driver
An uninstall utility is supplied with the printer driver to enable you
to remove the driver and all associated files from your hard disk, if so
required.
To uninstall the driver, proceed as follows:
Windows 95/98/NT 4.0: From the Start menu, select Programs,
Samsung ML-5100A, Uninstall Samsung ML-5100A Driver.
Installing Printer Utilities (USB & Remote
Control Panel)
Windows 3.x Installation
1. From the Program Manager window, double-click Main, and File
Manager.
2. From the File Manager window, select your CD-ROM drive,
execute setup16.exe and click the language you want.
3. Select the language you want.
4. Select the Item you want to install.
5. Follow the instructions on the screen.
Windows 95/98/NT 4.0 Installation
1. Select Run from the Start menu.
2. Type d:\setup.exe on the command line (where ÔdÕ is your CDROM drive letter), and click OK.
3. Select the language you want.
4. Select the the Item you want to install.
5. Follow the instructions on the screen.
*
You can install the USB Driver in the Windows 98.
01-Setup 5/10/99 4:28 PM Page 15
Page 21

Printing on Network Printer
Setting Up Host PC Printer
1. Start Windows.
2. Click Start, select Control Panel, and double-click on the
Network icon.
3. Click File and Print Sharing, check box(es), then click OK.
Close the window.
4. Click Start and select Printers from Settings, then double-click
your printer name (ML-5100A).
5. Select Properties in Printer menu.
6. Click the Sharing tab, then check Shared As, fill in the Shared
Name field, and click OK.
Client PC Sharing Setup
1. Right-click the Start button, and select Explore.
2. Open your network folder in the left column.
3. Right-click the shared name, and select Capture Printer Port.
4. Select the port you want, click Reconnect at log on check box,
the click OK button.
5. From the Start menu, select Settings, then Printers.
6. Double-click your printer icon (ML-5100A).
7. From the Printer menu, select Properties.
8. Press the Details tab, select the printer port, then press OK
button.
16
Setting Up Your Printer
01-Setup 5/10/99 4:28 PM Page 16
Page 22

Paper Handling
Chapter 2
02-Printing 5/13/99 10:34 AM Page 1
Page 23

18
Paper Handling
Notes:
¥When you print, select the correct paper size and source in your application.
¥Depending on paper thickness, the maximum capacity may be reduced.
Type
Plain paper
(20 to 30 Ib)
Envelopes
Transparency
Film Paper Labels
Size
Letter: 8
1/2
x 11Ó
Legal: 8
1/2
x 14Ó
Executive: 7
1/4
x 10
1/2
Ó
A4: 210 x 297 mm
A5: 148 x 210 mm
B5: 182 x 257 mm
Folio: 8
1/2
x 13Ó
Custom size
COM-10: 4
1/8
x 9
1/2
Ó
Monarch: 3
7/8
x 7
1/2
Ó
C5: 162 x 229 mm
C6: 114 x 162 mm
DL: 110 x 220 mm
Feed Source
Automatic feeder
Manual feeder
Automatic feeder
Manual feeder
Automatic feeder
Manual feeder
Capacity
150 sheets
(Approx.)
1 sheet
10 envelopes
(Approx.)
1 envelope
10 items
(Approx.)
1 item
Selecting Paper Types and Feed Source
One of the most important things you can do to assure the best
possible print quality from your printer is to select the correct paper.
Your printer produces letter quality output on most plain bond
papers, including cotton bond and photocopying papers; it does not
require special papers. However, the print quality varies with
different paper types. Be sure to test a small quantity of paper before
you purchase a large quantity.
You can print on any of the following paper types:
02-Printing 5/13/99 10:34 AM Page 2
Page 24

19
Paper Handling
2. Prepare the print material for loading.
¥ For paper and envelopes:
- Flex paper or fan envelopes back and forth. Do not fold or
crease the paper. Straighten the edges on a level surface.
Note: If envelopes jam while printing, try reducing the number of envelopes
in the automatic feeder.
Loading Print Material
You can stack paper, envelopes, card stocks, labels, or transparencies
in the automatic paper feeder to feed automatically. The automatic
feeder can hold a maximum of 150 sheets of plain paper, and 10
envelopes or other print media. The maximum capacity may reduce,
depending on the thickness.
Note: If you experience feeding problems, try printing one at a time from the
manual feeder. See page 23.
1. Pull the extender on the automatic feeder up until it stops.
Extender
Automatic feeder
Manual feeder
02-Printing 5/13/99 10:34 AM Page 3
Page 25

20
Paper Handling
3. Load the print material in the automatic feeder. Do not load too
much print material. Do not mix types. See the following directions
to load each type of print material.
¥ Load paper or transparencies with the print side facing you.
¥ For transparencies:
- Hold the transparencies by the edges and avoid touching the
print side.
- Fan the stack of transparencies to prevent feeding failures. Be
careful not to scratch or leave fingerprints on the print sides.
Place the print side facing you.
02-Printing 5/13/99 10:34 AM Page 4
Page 26

21
Paper Handling
¥ Load envelopes with the flap side facing away from you. The stamp
area is on the right side. The end of the envelope with the stamp
area enters the feeder first.
¥ Load letterhead paper with the design facing you. The top edge of
the sheet with the logo should enter the printer first.
Notes:
¥ Do not feed stamped envelopes. The stamp is shown for placement only.
¥ Never use envelopes with clasps, snaps, windows, coated lining, or self-
stick adhesives.
¥ These envelopes may severely damage the printer.
02-Printing 5/13/99 10:34 AM Page 5
LETTERHEAD
Page 27

22
Paper Handling
5. Pull up the extender on the face-down stacker. The face-down
stacker can hold a maximum of 100 printed pages.
6. Before starting your print job, make sure you select the correct
paper size and feed source in your application.
4. Adjust the guides to the width of the print material. Slide the
guides until they lightly touch the stack of print material. Do not
bend the print material.
Paper guide
Paper guide
Face-down
stacker
02-Printing 5/13/99 10:34 AM Page 6
Page 28

23
Paper Handling
Feeding Manually
Use the manual feeder to feed one sheet at a time into your printer.
The manual feeder is in front of the automatic feeder.
1. If necessary, open the face-up stacker. See page 24.
2. Load the print material in the manual feeder and adjust the paper
guides to the width of the print material.
See the instructions to load each type of material on page 18.
3. Push it all the way in.
4. Before starting your print job, make sure you select the correct
paper size and feed source in your application.
5. Press the button on the operator panel. Printing starts.
6. If you have more than one page to print, the PAPER indicator
blinks to alert you to feed the next sheet each time the printer is
ready to print the next page. Press and hold the button for about 2
seconds until the printer pulls in the paper, and starts printing.
Note: If you press the button without paper in the manual feeder, the
printer will automatically use paper into the automatic paper feeder.
Automatic paper feeder
Paper guide
Paper guide
Manual paper feeder
02-Printing 5/13/99 10:34 AM Page 7
Page 29

24
Paper Handling
2. If you use the face-up stacker, printed pages exit through the front
output path, with the printed side up.
Using Face-up Stacker
1. Push both sides of the stacker marked , and the stacker will
open.
Notes:
¥ The face-up stacker may not hold the printed materials properly.
¥ The printed pages will not stack in the standard face-down stacker unless
you close the face-up stacker. The face-down stacker can hold up to 100
printed pages. When you finish using the face-up stacker, you must close
the face-up stacker.
02-Printing 5/13/99 10:34 AM Page 8
Page 30

25
Paper Handling
Paper Guidelines
When selecting or loading paper, envelopes, or other special media,
keep these guidelines in mind:
¥ Attempting to print on damp, curled, wrinkled, or torn paper can
cause paper jams and poor print quality.
¥ Use cut-sheet paper only. You cannot use multipart paper.
¥ Use only high quality, copier grade paper. Avoid paper with
embossed lettering, perforations, or texture that is too smooth or
too rough.
¥ Colored paper should be of the same high quality as white
photocopy paper. The pigments must withstand the printerÕs fusing
temperature of 392 oF (200 oC) for 0.1 second without deterioration.
Do not use paper with a colored coating that was added after the
paper was produced.
¥ Pre-printed forms must be printed with non-flammable, heat-
resistant inks that do not melt, vaporize, or release hazardous
emissions when subject to the printerÕs approximately 392 oF (200
o
C) fusing temperature for 0.1 second.
¥ Store paper in its ream wrapper until ready to use. Place cartons on
pallets or shelves, not on the floor. Do not place heavy objects on
top of the paper, whether it is packaged or unpackaged. Keep it
away from moisture, or other conditions that can cause it to wrinkle
or curl.
¥ During storage, moisture-proof wrap (any plastic container or bag)
should be used to prevent dust and moisture from contaminating
your paper.
¥ Always use paper and other media that conform with those listed
under ÔSpecificationsÕ on page 60.
¥ When you choose envelopes, use only well-constructed envelopes
with sharp, and well creased folds.
- DO NOT use envelopes with clasps and snaps.
- DO NOT use envelopes with windows, coated lining, self-stick
adhesives, or other synthetic materials.
- DO NOT use damaged or poorly made envelopes.
02-Printing 5/13/99 10:34 AM Page 9
Page 31

26
Paper Handling
MEMO
02-Printing 5/13/99 10:34 AM Page 10
Page 32

Operating Your Printer
Chapter 3
03-Troubleshooting 5/10/99 4:04 PM Page 1
Page 33

28
Operating Your Printer
Operator Panel
The operator panel has the indicator lights and one button.
Depending on the light sequence, pressing the button activates
different printer functions, such as resetting the printer, or running
self-test. See page 29.
ERROR
PAPER
READY
Indicator Lights
INDICATOR DESCRIPTION
READY (on) The printer is ready to receive and process
data.
READY (blink) The printer is receiving or processing data, or
the print engine is running.
READY (off) The printer is off-line.
ERROR (on) ¥ There is no image cartridge installed, or the
cover is open
¥ Print error occurs.
¥ If PAPER light is also on, there is a paper
jammed.
ERROR (blink) The printer memory is insufficient for printing.
PAPER (on) The paper bin is empty.
PAPER (blink) The printer is in manual feed mode and
waiting you to feed paper into the manual
feeder.
All lights Blinking System error occurs.
03-Troubleshooting 5/10/99 4:04 PM Page 2
Page 34

29
Operating Your Printer
Button Function
FUNCTION USAGE
On-line/Off-line Pressing the button toggles the printer
between on-line (READY light on) and off-line
(READY light off) status.
Manual Feed Start When you print a file if you have selected
`Manual FeedÕ source, the printer waits you to
feed paper into the manual feeder. When you
are ready, press and hold down the button for
about 2 seconds.
The printer pulls in the page, and starts
printing.
Press the button each time you feed paper
manually.
Reset To clear all data from the printerÕs memory
except permanent fonts and macros, and then
restore the user default settings:
Press the button to turn the printer off-line.
With the READY light off, press and hold
down the button until all lights are blinking
(approximately four seconds), then release the
button.
Self-test To perform a printer self-test:
While the printer is on-line (READY light on),
press and hold down the button until all three
lights are blinking (approximately four
seconds), then release the button. A one-page
printer status sheet will be printed.
To remove excess toner from the image
cartridge: While the printer is on-line (READY
light on), press and hold down the button until
all three lights remain lit (not blinking;
approximately seven seconds) and the printer
begins to cycle up (starts feeding paper), then
release the button. One sheet will be printed.
Image Cartridge
Cleaning
03-Troubleshooting 5/10/99 4:04 PM Page 3
Page 35

30
Operating Your Printer
Selecting Your Printer
To use all of the features of your Samsung ML-5100A printer, make sure
it is selected as the default printer. When you install the printer driver,
Samsung ML-5100A is automatically set as the default printer. If you use
more than one printer, select ML-5100A as the default printer as follows:
Windows 95 / 98
1. Select Start, Settings, then Printers.
2. Double-click Samsung ML-5100A PCL5e or Samsung ML-5100A
PCL 6.
3. Select Set As Default from the Printer menu.
Windows 3.x
1. Double-click the Control Panel icon from the Main program group.
2. Double-click the Printers icon.
3. Select Samsung ML-5100A PCL5e or Samsung ML-5100A PCL 6.
4. Click Set As Default Printer.
Windows NT 4.0
1. Select Start, Settings, then Printers.
2. Double-click Samsung ML-5100A PCL
3. Select Set As Default from the Printer menu.
03-Troubleshooting 5/10/99 4:04 PM Page 4
Page 36

31
Operating Your Printer
Printing a Document
This procedure describes the general steps required for printing from
various Windows applications. The exact steps for printing a
document may vary depending on the application you are using.
Refer to your applicationÕs documentation for the exact printing
procedure.
1. Start the program you are using to create the document, and/or
open the document you want to print.
2. Choose Print or Print Setup from the File menu. The Print or
Print Setup dialog appears to make changes to the printer setting.
3. If you click on Properties, Setup, or Options in the dialog box,
youÕll access the printer driver and you can make any additional
setting as appropriate for printing your document. See ÔPrint
SettingsÕ on page 32. The settings you can change depend on the
printer you selected.
4. Select OK to close the dialog box.
5. After making any necessary changes to the print parameters,
select OK to start the print job.
Note: The way you access the printer driver varies depending on the
programs you use.
03-Troubleshooting 5/10/99 4:04 PM Page 5
Page 37

Print Settings
Most Windows applications allow you to make changes to the printer
settings. This changes the number of copies, sequence of the pages,
paper orientation, and margins.
If you click Properties, Setup, or Options in the Print dialog box,
youÕll access the printer driverÕs dialog box. It allows you to change
additional printer settings.
Note: Most Windows applications will override settings you specify in the
printer driver. Change all printer settings available in the software
application first, and any remaining settings with the printer driver.
Samsung ML-5100A PCL5e printer driver shows the dialog box as
shown below. It includes 4 tabs.
32
Operating Your Printer
03-Troubleshooting 5/10/99 4:04 PM Page 6
Page 38

Setup
Using this tab, you can change the number of copies, print resolution,
page orientation, paper size, and feed source.
For detailed information about each setting, click Help at the bottom
of the dialog box.
Advanced Setup
Using this tab, you can change graphic settings; graphic mode, grey
scale, graphic quality. It also includes settings that determines how
the printer handles True Type font. When you upgrade your printer
memory, you have to set the correct memory size using this tab.
For detailed information about each setting, click Help at the bottom
of the dialog box.
RCP
Using this tab, You can change Econo mode and SRT mode.
For detailed information about each setting, click Help at the bottom
of the dialog box.
About
This tab shows the software version and useful information about
your printer.
Default
button at the bottom of the dialog box restores the factory
default setting.
33
Operating Your Printer
03-Troubleshooting 5/10/99 4:04 PM Page 7
Page 39
34
Operating Your Printer
Samsung ML-5100A PCL 6 driver includes 5 tabs.
Paper Options
Using this tab, you can change the number of copies, page
orientation, paper size, paper source, and so on. For detailed
information about each setting, click Help at the bottom of the dialog
box.
Graphics
Using this tab, you can change graphics mode, resolution, text mode,
toner saver, and so on. For detailed information about each setting,
click Help at the bottom of the dialog box.
Overlays
Using this tab, you can create, delete and load over lay. For detailed
information about each setting, click Help at the bottom of the dialog
box.
Watermarks
Using this tab, you can edit, save, delete and control watermartk. For
detailed information about each setting, click Help at the bottom of
the dialog box.
About
This tab shows the software version and useful information about
your printer.
03-Troubleshooting 5/10/99 4:04 PM Page 8
Page 40

Remote Control Panel (RCP) for Windows User
Windows users can change print setting with the Remote Control
Panel, program.
Windows 3.x
1. From Program Manager, double-click File Manager.
2. In the Ò5100utilÓ, double-click Òwinrcp.exeÓ.
3. The Remote Control Panel screen appears.
After you change settings, you must send it to the printer by pressing
the Send button.
Windows 95/98/NT 4.0
1. Select ÒProgramÓ from the ÒstartÓ ment.
2. Select ÒSamsung ML-5100A utilityÓ.
3. Click ÒRemote Control PanelÓ.
4. The Remote Control Panel screen appears.
After you change settings, you must send it to the printer by pressing
the Send button.
35
Operating Your Printer
03-Troubleshooting 5/10/99 4:04 PM Page 9
Page 41

The Remote Control Panel dialog box includes six tabs.
PRINTER
Power Save
Determines the length of time the printer waits after a job is printed
before it goes to a reduced power state. If the printer is used
constantly, select OFF which keeps the printer ready to print with
the minimum warm-up time. This uses more energy to keep the
printer warm and ready to print.
Timeout
Determines the amount of time in seconds the printer waits before
printing the last page of a print job that does not end with a
command to print the page.
Econo Mode
To get the most from your toner supply, set Econo Mode to ON. If
you set Econo Mode to ON, print quality may be reduced.
Jam Recovery
If paper jams as it exits to the output bin, the data on the jammed
page will be lost. If you set Jam Recovery feature to ON, the printer
keeps the image for a printed page until the printer signals that the
page has successfully exited the printer. The printer reprints all
jammed pages.
With the feature set to OFF, the printer does not reprint a page that
has jammed.
PAGE SETUP
Paper Size
Sets the paper size.
Lines Per Page
Use this menu item to change the number of lines that print on each
page. The setting can range from 5 to 228 lines per page.
Copies
Sets the number of copies printed for each page.
Orientation
Determines how the printing is oriented on the page.
36
Operating Your Printer
03-Troubleshooting 5/10/99 4:04 PM Page 10
Page 42

FONT SETUP
Typeface
Allows you to select the desired typeface. This setting is ignored when
the software application specifies a font.
Symbol Set
Determines the symbol set. A symbol set is a set of alphabetic and
numeric characters, punctuation, and special symbols used when
printing with a selected font.
Pitch
If you chose a scalable monospaced font, you can select the font pitch.
Pitch refers to the number of fixed-space characters in a horizontal
inch of type.
Point Size
If you chose a scalable typographic font, you can select the point size
for the font. Point size refers to the height of the characters in the font.
One point equals approximately 1/72 of an inch. You can select point
sizes from 4 to 999.75 in increments of 0.25 points.
Font List
Prints the font list showing all the fonts available for PCL emulation.
QUALITY
Density
Determines the overall density of the printed image.
SMET
SMET(Samsung Memory Enhancemant Technology) mode makes
the printer process more data by optimizing the memory. With this
mode set to ON,the complex data can be processed.
SRT
Use the printerÕs SRT(Samsung Resolution enhancement Technology)
setting to produce print with smooth angles, curves and edges.
ENHANCE : Better Text Image
GRAY : Better Photo Image
GRAY+ : Better Photo Image & Text Image
You can get 1200 dpi grade printouts by using SRT mode.
ABOUT
This tab shows the software version and copyright information.
37
Operating Your Printer
03-Troubleshooting 5/10/99 4:04 PM Page 11
Page 43

38
Operating Your Printer
Status Monitor(SM) for Win 3.x/95/98 Users
Accessing status monitor.
In Windows 3.x
1. From Program Manager, double-click File Manager.
2. In the Ò5100utilÓ, double-click Òwinsm.exeÓ.
3. The Remote Control Panel screen appears.
In Windows 95/98
1. Select ÒProgramÓ from the ÒstartÓ ment.
2. Select ÒSamsung ML-5100A utilityÓ.
3. Click ÒStatus MonitorÓ.
4. The Status Monitor screen appears.
Status Monitor
The status MonitorÕs dialog message. Show the following meanings.
1. Printer Ready
It show the printer is ready.
2. Printer Off-Line
It show the status of printer is off-line.
3. Cover open or Missing catridge
It show the printerÕs cover is open or developer catridge is not
installed comedly.
4. Paper Empty
It show the printer has run out of paper.
5. Paper Jam
There is paper jammed in the printer.
6. Check print cable or Power
It show the printer is off or not connected properly.
03-Troubleshooting 5/10/99 4:04 PM Page 12
Page 44
Troubleshooting and Maintenance
Chapter 4
04-Supplies 5/10/99 4:00 PM Page 1
Page 45
40
Troubleshooting and Maintenance
Poor Print Quality
Problem Action
¥ Hot/humid or cold/dry weather conditions may affect
how well toner adheres to paper. Select the next darker
print setting.
¥ Turn Econo Mode off using Remote Control Program.
¥ Make sure the Toner Cartridge is installed correctly.
¥ Toner Cartridge may be out of toner. Install a new
Cartridge.
¥ Make sure you are using the correct type of paper. See
ÒSelecting Paper Types and Feed SourceÓ on page 18.
¥ The Toner Cartridge may be defective. Remove it and
check for damage. Install a new Cartridge if needed.
¥ Make sure the paper is straight and unwrinkled.
¥ If printing on transparencies, try changing the fill pattern
in your application.
¥ The paper may be too damp. Try printing with a different
batch of paper.
¥ Try using a different fill pattern in your application.
¥ The Toner Cartridge may be defective. Remove and check
the Cartridge for damage. Install a new Cartridge if
needed.
¥ Try a different type of paper. Paper designed for use with
xerographic copiers give the best quality.
¥ Try a different type of paper. Paper designed for use with
xerographic copiers give the best quality.
¥ You may be printing on the wrong side of the paper. Some
paper has a right side for printing. If the print quality is
not as clear as you would like it to be, try turning the
paper over and printing on the other side.
A page is printed with the ÒPCL5e:Insufficient MemoryÓ
message. There is not enough memory installed to print
the page. Print the page with a lower resolution or expand
the printer memory. See page 52 for further details on
how to expand the printer memory.
Light or blurred
characters
Smudged or dark
characters
Irregular or missing dots
Solid black areas on
transparencies or paper
contain white streaks
Poor printer quality
Insufficient memory
04-Supplies 5/10/99 4:00 PM Page 2
Page 46

41
Troubleshooting and Maintenance
Paper Problems
Problem Action
¥ Remove paper from the paper feeder and flex or fan the
paper.
¥ Make sure there is not too much paper in the paper
tray. Depending on the thickness of your paper, the
automatic feeder holds up to 150 sheets.
¥ Make sure you are using the correct type of paper. See
ÒSelecting Paper Types and Feed SourceÓ on page 18.
¥ Different types of paper may be stacked in the
automatic feeder. Load just one type of paper.
¥ Remove paper from the paper feeder and flex or fan the
paper.
¥ Make sure the paper source you selected in your
application is correct.
¥ Remove any obstructions inside the printer.
¥ Make sure there is not too much paper in the automatic
feeder. Depending on paper thickness, the automatic
feeder can hold up to 150 sheets of paper.
¥ Make sure the paper guides do not cause the paper to
bow in the paper feeder.
¥ Make sure you are using the correct type of paper. See
ÒSelecting Paper Types and Feed SourceÓ on page 18.
¥ Make sure the paper guides do not cause envelopes to
bow in the paper feeder.
¥ Make sure the envelopes are loaded properly, and that
there are no more than 10 envelopes in the automatic
feeder.
¥ Try a different kind. Envelopes designed for laser
printers will produce the best results.
¥ Envelopes may not match specification for this
machine.
Paper sticks
together/multiple sheets of
paper feed
Paper fails to feed
Paper skews or buckles
Envelopes skew
Envelopes fail to feed
correctly
04-Supplies 5/10/99 4:00 PM Page 3
Page 47

Problem Action
¥ The film or envelopes may not be loaded correctly.
Make sure you load no more than 10 transparencies or
envelopes in the automatic feeder. Depending on the
thickness, the maximum capacity may need to be
reduced.
¥ When you feed into the manual feeder, you must load
one sheet at a time.
¥ The paper you are using may be causing the jams. Fan
the paper before stacking it in the paper feeder. This
keeps the sheets from sticking together.
¥ Check that the paper you are using and your printing
environment are within the specifications of the unit.
Transparencies or
envelopes do not feed
correctly
Repeated paper jams
occur
Problem Action
¥ Be sure to turn on the printer power switch.
¥ Make sure the printer power cord is firmly attached at
the back of the printer and at the electrical outlet.
¥ Be sure to turn on the printer power switch.
¥ Make sure the Toner Cartridge is installed.
¥ The Toner Cartridge may be empty. Install a new Toner
Cartridge.
¥ The Toner Cartridge may be defective. Remove and
check the Cartridge for damage. Install a new
Cartridge if needed.
¥ Make sure that the printer interface cable is firmly
inserted into the interface connector of the printer.
¥ Print a test page to determine if the problem is with the
printer or the PC. If you can print a test page, the
problem is in the PC or application. If you canÕt print a
test page, you have a mechanical problem and should
call for service. The printer may not be setup properly.
Power is turned on but the
READY light is not on
The operator panel
indicator lights do not come
on when printer is turned on
Printer seems to be
printing, but pages are
blank
Printer power is on, but
nothing prints
Printing Problems
42
Troubleshooting and Maintenance
04-Supplies 5/10/99 4:00 PM Page 4
Page 48

Problem Action
¥ Open and close the cover to restart the printer.
¥ Change the parallel interface cable.
¥ Make sure you are using the correct printer driver.
¥ Make sure the Toner Cartridge is properly installed.
¥ Paper may not be loaded and aligned correctly in the
paper feeder.
¥ The applicationÕs paper size and margin settings may be
incorrect.
¥ The selected printer driver may be incorrect. Make sure
you select the ML-5100A as the default printer in your
application.
¥ Turn the printer off for a minutes, then turn the printer
back on.
¥ If the error persists, contact your dealer or technical
support.
Printer does not print even
though a paper jam has
been cleared
Unexpected characters
are printed or characters
are missing
Cannot close the printer
cover
Printout does not match
paper size
All indicator lights are
blinking
Problem Action
¥TrueType fonts may be disabled. Use the Fonts dialog
box in the Control Panel to enable TrueType fonts.
¥The page layout is too complex. Simplify the page
layout and remove any unnecessary graphics from the
document if possible. You can also lower the print
resolution to 300dpi.
¥The page orientation setting may be incorrect. Change
the page orientation in the Printer Setup dialog box.
¥The paper size and the software paper size settings do
not match. Insert the correct paper into the printer or
change the software paper size settings.
Incorrect fonts
Half of the page is blank.
Software Problems
43
Troubleshooting and Maintenance
04-Supplies 5/10/99 4:00 PM Page 5
Page 49

Problem Action
¥ The printer cable might not be connected properly.
Check the printer cable connection.
¥ There may be a problem with the printer driver
software. Exit Windows and reboot the computer. Turn
the printer off and then back on again.
¥ The printer cable specifications may be incorrect. Use
the printer cable supplied with the printer or replace
the cable with an IEEE-1284 rated cable.
¥ If using Windows 3.x, Print Manager may be disabled.
From the Control Panel Printers menu, check the Use
Print Manager box.
¥ If using Windows 95, the Spooling Setting may be set
incorrectly. From the Start menu, select Settings and
Printers. Click the Samsung ML-5100A PCL5e icon
with the right mouse button, select Properties, click
the Details tab, and then click the Spool Settings
button. Select the desired spool setting from the
available choices.
¥ The computer may have insufficient random-access
memory (RAM). Install more random-access memory
(RAM) in your computer.
The printer prints the
wrong data, or it prints
incorrect characters.
Printing is too slow.
Before You Call For Service
If youÕre unable to solve printer problems, you may want to call for service. Before calling,
however, check these things:
¥ Is the power cord plugged into the printer?
¥ Is the power cord plugged directly into a wall outlet?
¥ Is your printer connected properly to your computer?
¥ Are all other devices attached to your printer plugged in and turned on?
¥ Is the wall outlet live?
¥ Has a power outage occurred in your area?
¥ Is a Toner Cartridge installed in the printer?
¥ Is the cover closed completely?
Once youÕve checked all these things, turn your printer off and back on again. If your
printer is still not operating properly, call your point of purchase for service.
If the READY light is on, print out a test page by pressing the operator panel button until
each of the indicators start to blink in turn, and release the button. The Test Page lists your
printer model, any options installed, and the user default settings. The service
representative will probably ask for this information.
44
Troubleshooting and Maintenance
04-Supplies 5/10/99 4:00 PM Page 6
Page 50

Clearing Paper Jams
If the paper has just started to feed from the feeder when the
jam occurs:
1. Pull the jammed paper back out of the feeder toward you.
2. Open and close the cover to resume printing.
45
Troubleshooting and Maintenance
04-Supplies 5/10/99 4:00 PM Page 7
Page 51

If the jam occurs near the fusing unit, do not pull the paper
through the fuser or you may damage the fusing unit.
4. Check that there is no other paper in the printer.
5. Close the cover. The printer continues printing.
If the jam occurs inside the printer:
1. Open the cover, and remove the Toner Cartridge.
3. Grasp the paper on both sides and gently pull out toward you.
46
Troubleshooting and Maintenance
04-Supplies 5/10/99 4:00 PM Page 8
Page 52

Tips for Avoiding Paper Jams
By carefully selecting print materials and loading them properly, you
should be able to avoid most paper jams. If jams occur frequently, make
sure you are following these tips to avoid jams.
¥ Follow the procedures in ÒLoading a Stack of PaperÓ on page 6 to load
paper properly.
¥ Do not overload the paper feeder. The automatic feeder can hold up to
150 sheets and the manual feeder can hold only one sheet at a time.
¥ Flex, fan, and straighten the paper before loading it.
¥ Fan stacks of labels or transparencies before loading them into the
automatic feeder. If jams do occur using the automatic feeder, try
feeding one sheet at a time in the manual feeder.
¥ Do not load wrinkled, creased, damp, or highly curled paper.
¥ Do not mix paper types in the automatic feeder.
¥ Use only recommended print materials.
¥ Make sure the recommended print side is face up when loading the
feeders.
¥ Keep print materials stored in an acceptable environment.
47
Troubleshooting and Maintenance
04-Supplies 5/10/99 4:00 PM Page 9
Page 53

Cartridge Maintenance
To get the maximum benefit from your Toner Cartridges:
¥Do not remove a Toner Cartridge from its packaging until you are
ready to install it.
¥Do not refill Toner Cartridge. The printer warranty does not cover
damage caused by using a refilled Cartridge.
¥Store Toner Cartridge in the same environment as the printer.
¥Do not remove a Toner Cartridge from the printer except to replace
it, clean it or clear a paper jam. Replace the Cartridge immediately.
Replacing Toner Cartridge
1. Hold the printer cover using hands, and pull it toward you.
2. Lift up and pull out the old Toner Cartridge. Follow the
instructions printed on the cartridge box to recycle the used
Cartridge.
48
Troubleshooting and Maintenance
04-Supplies 5/10/99 4:00 PM Page 10
Page 54

Cleaning OPC Drum
If you are getting streaks or spots on your prints, the OPC drum on
your printer may need to be cleaned.
To clean the OPC drum, press and hold the operator panel button
until all indicator lights come on steadily.
The printer starts feeding paper and prints one cleaning sheet stained
with toner.
3. Unpack the new Toner Cartridge, and rock it 5 or 6 times to
distribute the toner.
4. Find the cartridge slots inside the printer, one each side.
5. Grasp the handle and slide the Cartridge down between the
Toner cartridge slots. Gently push down on the Cartridge until it
stops in place.
6. Close the printer cover.
49
Troubleshooting and Maintenance
04-Supplies 5/10/99 4:00 PM Page 11
Page 55

50
Troubleshooting and Maintenance
MEMO
04-Supplies 5/10/99 4:00 PM Page 12
Page 56

Printer Options
Chapter 5
05-Options 5/10/99 2:01 PM Page 1
Page 57

52
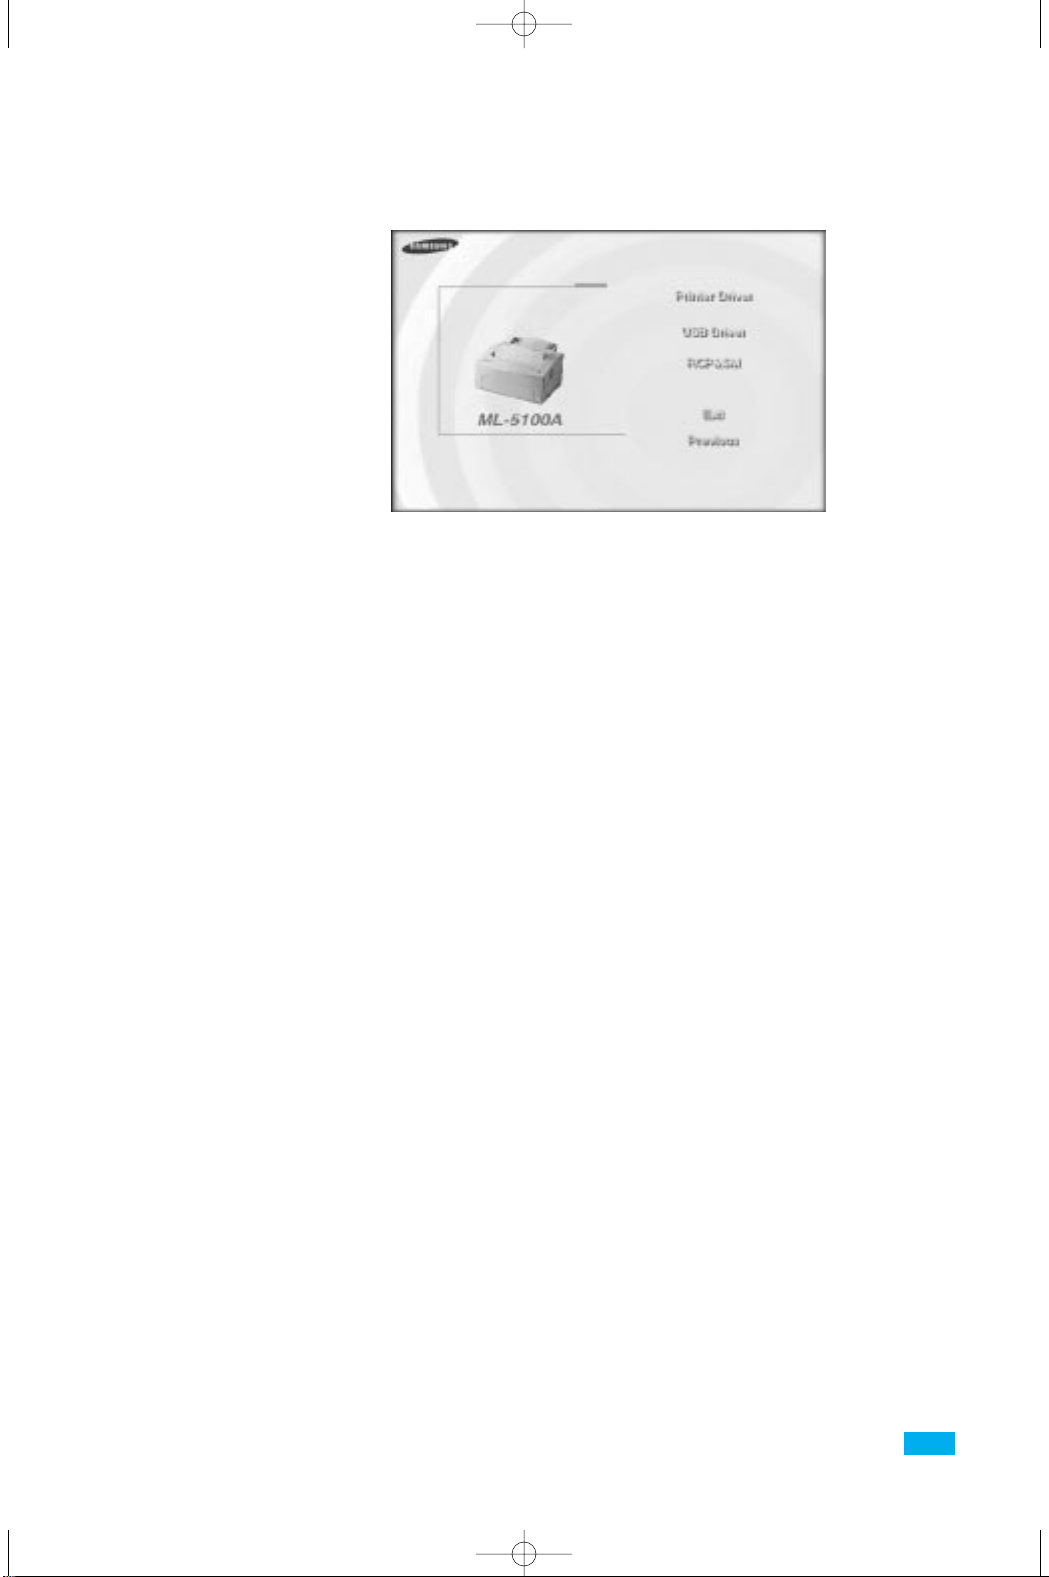
Printer Options
Shield cover
Optional Memory Card
Your printer comes with 4 Mb of memory. You can install an optional
memory card for a maximum of 32 Mb of printer memory.
1. Turn the printer power Off (O) and unplug the printer power
cord and all cables from the back of the printer.
2. Open the front cover and remove the Toner Cartridge. Refer to
ÔReplacing Toner CartridgeÕ on page 48.
3. Push down on the feeder and stacker extenders until both are
recessed into the printer body.
4. Turn the printer upside down, and remove all screws securing the
shield cover, then remove it.
05-Options 5/10/99 2:01 PM Page 2
Page 58

53
Printer Options
Control board
5. Locate the connector on the control board.
6. Hold the memory card with the connection pointing toward the
control board, and insert all the way into the connector at a 30
o
angle .
Memory Card
Connector
05-Options 5/10/99 2:01 PM Page 3
Page 59

54
Printer Options
8. Reassemble the shield cover.
9. Turn the printer back over and replace the Toner Cartridge. Pull
out the feeder and stacker extenders. Then, reconnect the printer
cable and power cord and power ON the printer.
Note: When you disassemble the memory card, push out on the metal
clips at each end of the connector, and pull it toward you.
7. Push it away from you, until it snaps into place.
Make sure both metal clips on the connector are fastened and the
two pins on the connector are visible through the holes on each
end of the memory card. The pins should be flush with the surface
of the card.
Pin
Metal clip
Metal clip
05-Options 5/10/99 2:01 PM Page 4
Page 60

Appendix
06-Appendix 5/10/99 1:58 PM Page 1
Page 61

56
Appendix
FCC Regulations
This equipment has been tested and found to comply with the limits for a Class B digital
device, pursuant to Part 15 of the FCC Rules. These limits are designed to provide
reasonable protection against harmful interference in a residential installation. This
equipment generates, uses and can radiate radio frequency energy and, if not installed and
used in accordance with the instructions, may cause harmful interference to radio
communications. However, there is no guarantee that interference will not occur in a
particular installation. If this equipment does cause harmful interference to radio or
television reception, which can be determined by turning the equipment off and on, the user
is encouraged to try to correct the interference by one or more of the following measures:
¥Reorient or relocate the receiving antenna.
¥Increase the separation between the equipment and receiver.
¥Connect the equipment to an outlet on a circuit different from that to which the receiver
is connected.
¥Consult the dealer or an experienced radio/TV technician for help.
Do not make any changes or modifications to the equipment unless specified in the manual.
If such changes or modifications should be made, you could be required to stop operation of
the equipment.
Use of shielded cable is required to comply with Class B limits in Subpart B of Part 15 of
FCC Rules.
Canadian Radio Interference Regulations
This digital apparatus does not exceed the Class B limits for radio noise emissions from
digital apparatus as set out in the interference-causing equipment standard entitled ÒDigital
ApparatusÓ, ICES-003 of the Industry and Science Canada.
Cet appareil numŽrique respecte les limites de bruits radioŽlectriques applicables aux
appareils numŽriques de Classe B prescrites dans la norme sur le matŽriel brouilleur:
ÒAppareils NumŽriquesÓ, NMB-003 ŽdictŽe par lÕIndustrie et Sciences Canada.
06-Appendix 5/10/99 1:58 PM Page 2
Page 62

57
Appendix
EC Declaration of Conformity
We,
SAMSUNG ELECTRONICS CO.,LTD
#259, Gong Dan-Dong, Gumi-City, Kyung Buk, Korea
declare sole responsibility that the
ML-5100A Laser printer
meets the intent of Directive 89/336/EEC for Electromagnetic Compatibility and Low
Voltage Directive 73/23/EEC.
Compliance was demonstrated to the following specifications as listed in the official
journal of the European Communities:
EN 50081-Emissions:
EN 55022 Radiated, Class B
EN 55022 Conducted, Class B
EN 60555-2 Power Harmonics
EN 50082-Immunity:
IEC 801-2 Electrostatic Discharge
IEC 801-3 RF Radiated
IEC 801-4 Fast Transient/Burst
EN 60950-Safety
06-Appendix 5/10/99 1:58 PM Page 3
Page 63

58
Appendix
Laser Safety Statement
The printer is certified in the U.S. to conform to the requirements of DHHS 21 CFR
Subchapter J for Class I(1) laser products, and elsewhere is certified as a Class I laser
product conforming to the requirements of IEC 825.
Class I laser products are not considered to be hazardous. The laser system and printer are
designed so there is never any human access to laser radiation above a Class I level during
normal operation, user maintenance, or prescribed service condition.
WARNING Never operate or service the printer with the protective cover removed from
the Laser/Scanner assembly. The reflected beam, although invisible, can
damage your eyes.
CAUTION -INVISIBLE LASER RADIATION WHEN THIS COVER IS OPEN.
DO NOT OPEN THIS COVER
VORSICHT -UNSICHTBARE LASERSTRAHLUNG, WENN ABDECKUNG
GEÖFFENT. NICHT DEM STRAHL AUSETZEN.
ATTENTION -RAYONNEMENT LASER INVISIBLE EN CAS D’OVERTURE.
DANGEREUSE AU FAISCEAU.
ATTENZIONE -RADIAZIONE LASER INVISIBLE IN CASO DIAPERTURA.
EVITARE L’ESPOSIZIONE AL FASCIO.
PRECAUCION -RADIACION LASER IVISIBLE CUANDO SE ABRE. EVITAR EXPONERSE AL
RAYO.
ADVARSEL -USYNLIG LASERSTRÅLNING VED ÅBNING NÅR SIKKERHEDSBRYDERE ER
UDE AF FUNKTION UNDGÅ UDSAETTELSE FOR STRÅLNING.
ADVARSER -USYNLIG LASERSTRÅLNING NÅR DEKSEL ÅPNES. STIRR IKKE INN I
STRÅLEN. UNNGÅ EKSPONERING FOR STRÅLEN.
VARNING -OSYNLIG LASERSTRÅLNING NÄR DENNA DEL ÄR ÖPPAND OCH SPÄRREN
ÅR URKOPPLAD. BETRAKTA EJ STRÅLEN STRÅLEN AR FARLIG.
VARO -AVATTAESSA JA SUOJALUKITUS OHITETTAESSA OLET ALTTIINA
NÄKYMÄTTÖMÄLLE LASERSÄTEILYLLE ÄLÄ KATSO SÄTEESEEN.
06-Appendix 5/10/99 1:58 PM Page 4
Page 64

59
Appendix
Laser product labels are located above the print cartidge.
CLASS 1 LASER PRODUCT
LASER KLASSE 1
LUOKAN 1 LASERLAITE
APPARELÀ LASER DE CLASSE 1
TO IEC 825
Safety Information
PRODUCT SAFETY
USA UL 1950 (UL LISTING)
CANADA CSA C22.2 No. 950 & UL 1950 (CSA Certification)
EEC (Europe) IEC 60950/EN 60950 (TÜV GS Certification)
CB IEC 60950
LASER SAFETY
EEC (Europe) HD 194. & EN 60825
USA 21 CFR, Chapter 1, Subchapter J (CDRH Certified)
06-Appendix 5/10/99 1:58 PM Page 5
Page 65

Item Description Remarks
Speed
Resolution
Developing
method/Toner
Warm up time
First print time
Duty cycle
Size (w x d x h)
Weight
Power consumption
Noise level
Input capacity
Output capacity
Paper size
Type
Life time
Charging/Transfer
Econo mode
CPU
Emulation
Memory
Interface
8 PPM
600 DPI
Eletrophotography
Non-mag monocomponent
Less than 30 sec.
Less than 19 sec.
Maximum 6,000 pages per month
13.6 x 14.4 x 8.8 in (345 x 365 x 224 mm)
Less than 16.5 Ib (7.5 Kg)
Printing: 200W avg./450 W max.
Sleep mode: Less than 25 W
Printing: <48 dBA
Sleep mode: Background noise
150 sheets (automatic feeder)
1 sheet (manual feeder)
100 sheets in face-down stacker
1 sheet in face-up stacker
A4, Letter, Legal, Executive, B5
COM-10, Monarch, DL, C5, C6, A5,
Custom paper size
Cartridge
5,000 pages at 5 % density
Contact roller Charging & Transfer
Yes
32 bit RISC CPU 33 MHz
PCL5e,PCL6
4 Mb Standard
Max up to 32 Mb
IEEE1284 B type 1,USB
at normal condition
from idle mode
USA: 100~127 VAC, 47~63 Hz
EUROPE: 220~240 VAC, 47~63 Hz
ISO 7779
Multi-Page Feeding
By Controller
Specifications
Engine
Paper
Handling
Toner
Cartridge
Controller
60
Appendix
06-Appendix 5/10/99 1:58 PM Page 6
 Loading...