

Samsung 50 User Manual

1. Charge battery for at least 8 hours (page 12).
2. Set up your player (page 18).
3. Activate your XM subscription (page 17).
4. Listen to and record live XM* (pages 24 and 28).
5. Listen to recorded content on the go (page 32).
6. Manage your songs and playlists from
your computer (page 51).
7. Buy songs from XM+Napster (page 50).
*Hardware and required monthly subscription sold separately. Recorded music not for use in commercial establishments.
Installation cost and other fees and taxes, including a one-time activation fee may apply. Subscription fee is consumer
only. XM products, programming, services, and fees are subject to change, at any time, without notice. Channels with
frequent explicit language are indicated with an XL. Channel blocking is available for XM radio receivers by calling
1-800-XM-RADIO. Subscriptions subject to Customer Agreement available at xmradio.com. XM service only available in
the 48 contiguous United States. ©2006 XM Satellite Radio Inc. All rights reserved.
Quick Start
2
Quick Start

Contents
Contents
3
ENG
Introduction...................................... 4
Features.................................................... 4
Safety Instructions.................................... 7
What’s in the Box.................................... 10
Charging the Battery .............................. 12
Player Controls ...................................... 13
Using the Controls .................................. 14
Player Display.......................................... 15
Remote .................................................... 16
Subscribing to XM........................ 17
Using Your Player Alone .......... 18
Setup ...................................................... 18
Live XM .................................................. 24
Recording XM.......................................... 28
Listening to Recorded XM Content.......... 32
Organizing Your Music ............................ 33
Using Your Player with a PC .. 42
System Requirements .............................. 42
Setup ...................................................... 43
Registering with XM+Napster ................ 46
What Can You Do with XM+Napster? .... 49
Exploring ................................................ 49
Purchasing Music .................................... 50
Organizing Your Music ............................ 51
Disconnecting the Player from the PC .... 55
Listening to XM Radio Online (XMRO).... 56
Using Your CDs or MP3/WMA Files ........ 57
Updating NeXus Firmware...... 60
Settings .............................................. 62
FM Frequency.......................................... 62
Audio ...................................................... 64
Display .................................................... 65
Channel Access........................................ 66
Time ........................................................ 67
Memory Partition .................................... 68
Restoring Factory Defaults ...................... 69
Customer Support........................ 70
Troubleshooting ...................................... 70
Specifications .......................................... 73
Patent Information .................................. 75
FCC Statement ........................................ 76
Warranty.................................................. 77

Features
Congratulations on your purchase of the Samsung NeXus™– our newest digital audio player
plus XM
®
Satellite Radio.
Like any digital audio player, you can enjoy listening to your music anywhere you go. But
NeXus offers more: dock the player into a home or vehicle cradle, plug in the XM Passport
and an antenna, and access XM’s 160 channels from coast to coast, with over 80,000 hours
of entertainment each month. XM offers musical choice, variety, and discovery – worlds beyond
your own collection – plus a wide range of news, sports, talk, comedy, kids, and entertainment
channels. Hear XM live, or save XM programming on your NeXus to listen at your leisure.
We’ve also teamed up with Napster, a leading provider of online music. Imagine discovering a
new artist on XM and then, with just a few clicks of a mouse, buying high-fidelity tracks and
albums by that artist and similar artists. It’s that simple.
We also provide you with the XM+Napster program that lets you manage all your music –
XM tracks, songs you purchase from Napster, and MP3/WMA files you rip from your CDs –
on one integrated package on your Microsoft
®
Windows®PC.
One device, all the music you could ever hope for, and the easiest way to find the music you
want – now that’s a music experience!
Introduction
Introduction
4
Introduction
Introduction
5
ENG
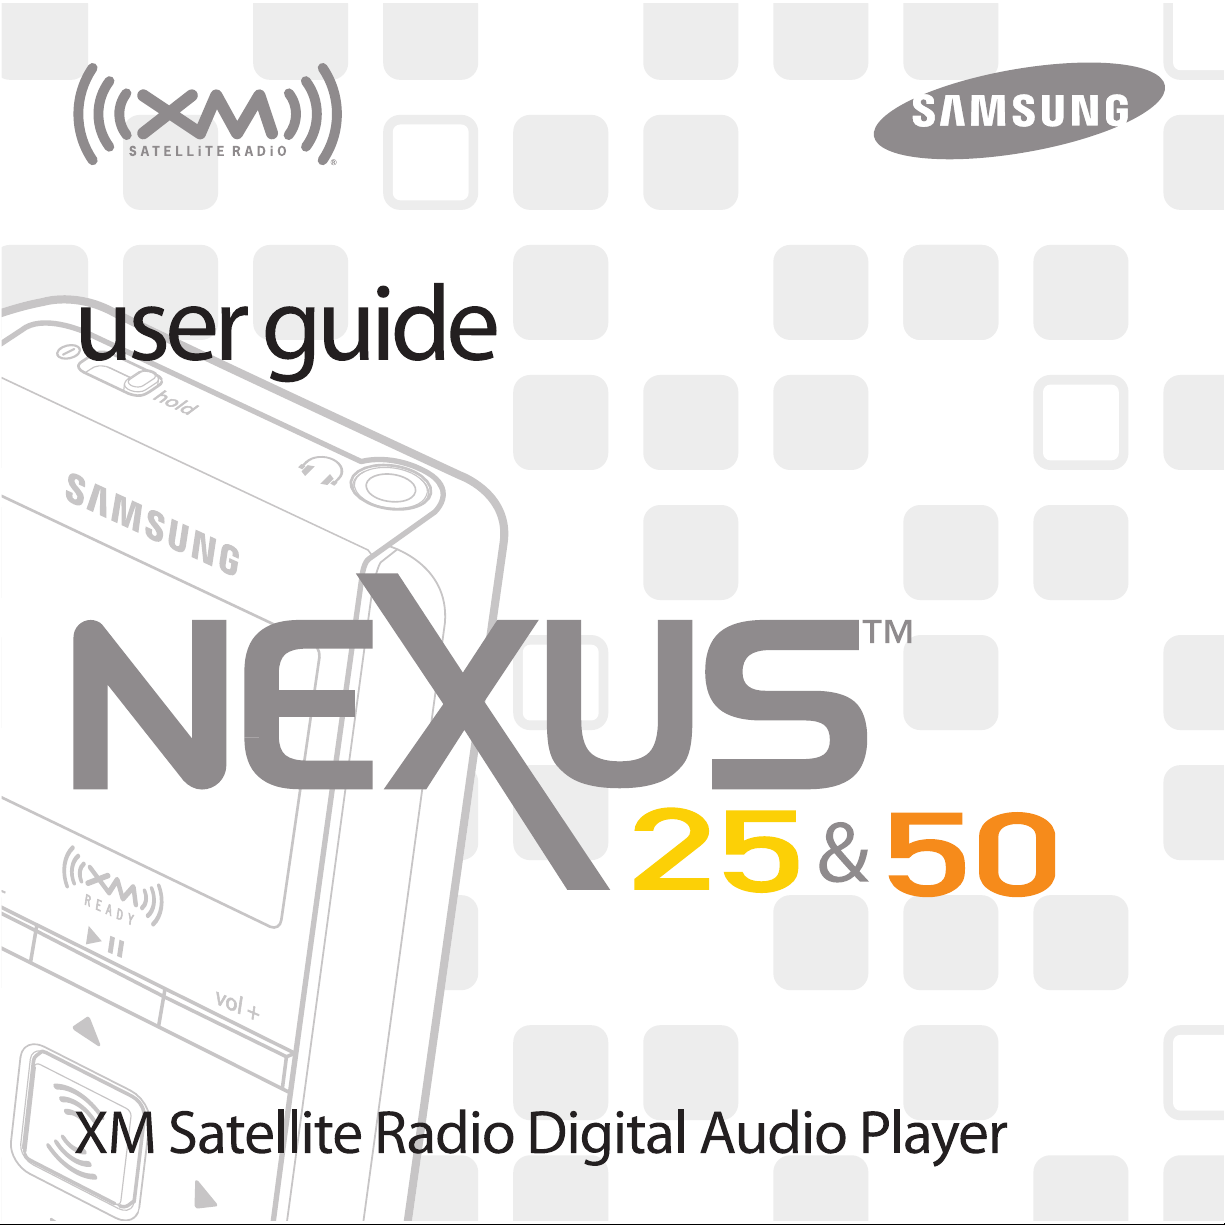
NeXus, Undocked
Listen to recorded XM content and MP3/WMA files
Manage your music
*Hardware and required monthly subscription sold separately. Recorded music not for use in commercial establishments.
Installation cost and other fees and taxes, including a one-time activation fee may apply. Subscription fee is consumer
only. XM products, programming, services, and fees are subject to change, at any time, without notice. Channels with
frequent explicit language are indicated with an XL. Channel blocking is available for XM radio receivers by calling
1-800-XM-RADIO. Subscriptions subject to Customer Agreement available at xmradio.com. XM service only available in
the 48 contiguous United States. ©2006 XM Satellite Radio Inc. All rights reserved.
NeXus + Cradle + Antenna
Listen to live XM*, recorded XM*, and MP3/WMA files
Listen at home or in your car (Car Accessory Kit YA-CP200
sold separately); you only have to
carry your NeXus player and the
XM Passport between locations
Manage your music
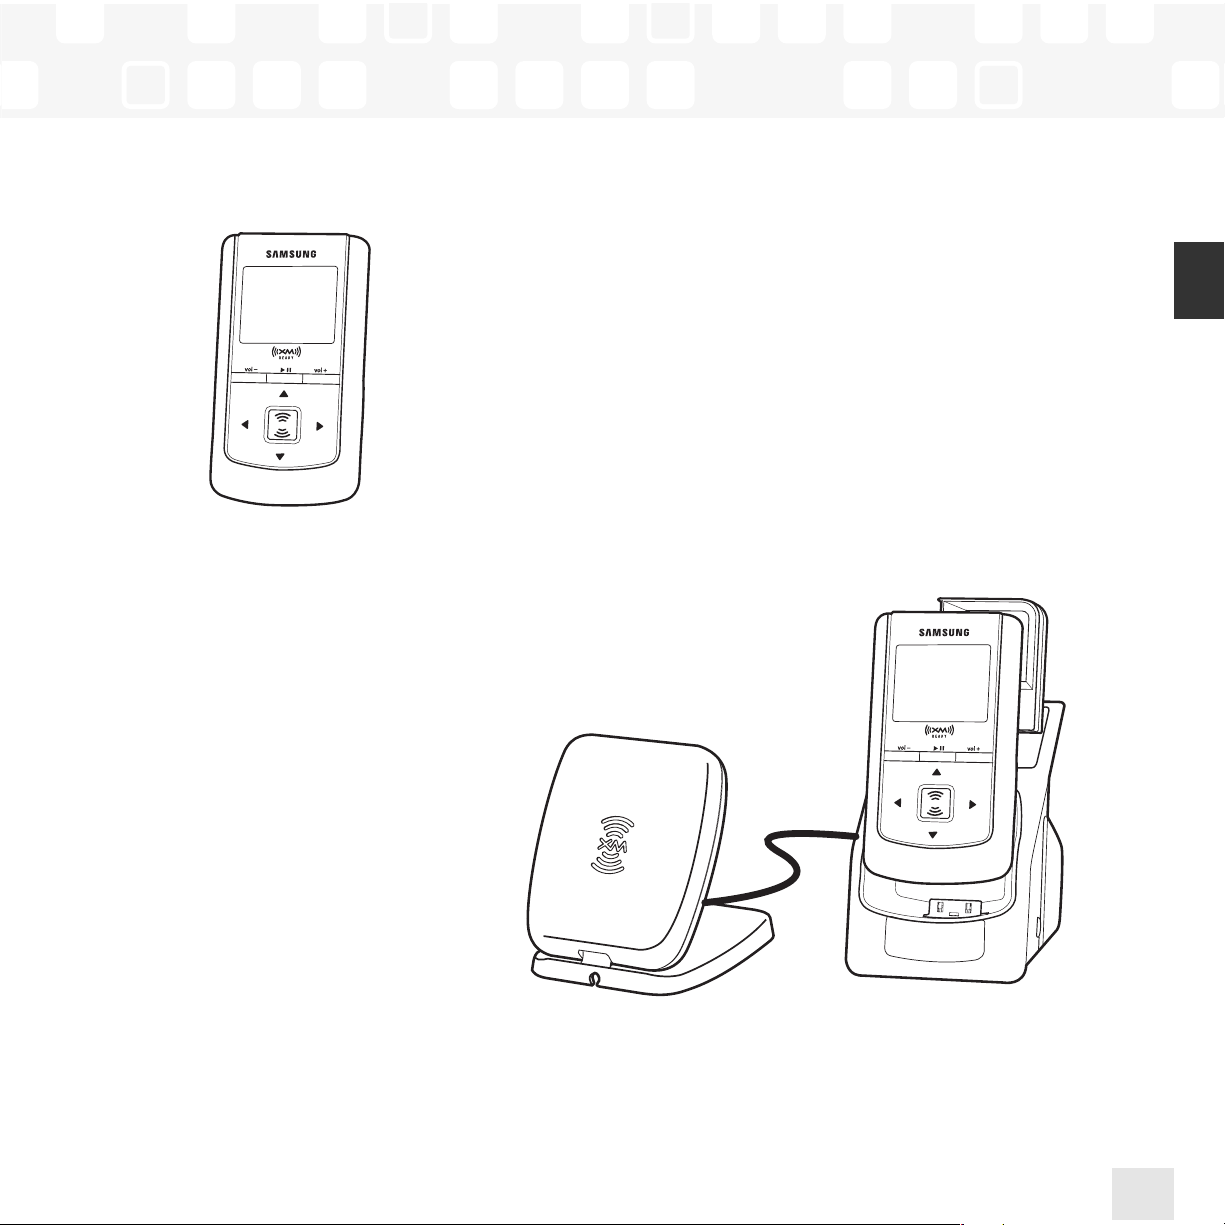
NeXus + Cradle + Antenna + PC
Manage your music using NeXus or the PC
Listen to XM Radio Online
Purchase music from XM+Napster and transfer purchased music to your NeXus player
Introduction
Introduction
6

Safety Instructions
NeXus Digital Audio Player
Please read and understand all the instructions to avoid injury to yourself
and/or damage to the player.
Do not expose to extreme temperatures (above 140°F or below -4°F, or above
60°C or below -20°C).
Do not expose to moisture. Do not use this product near water.
Do not let any foreign matter spill into the player.
Do not expose to chemicals such as benzene and thinners. Do not use liquid or aerosol
cleaners. Clean with a soft damp cloth only.
Do not expose to direct sunlight or heat sources for a prolonged period.
Do not try to disassemble and/or repair the player yourself.
Do not subject the unit to severe impact.
Do not place heavy objects on the player.
Do not subject the player to excessive pressure.
Do not touch the charger with wet hands.
Do not store in dusty areas.
Please be aware that Samsung claims no responsibility for damage from
data loss due to breakdown, repair, or other causes.
Introduction
Introduction
7
ENG

Earbuds and Headphones
Follow traffic safety instructions
Do not use the earbuds while driving an automobile or riding a bicycle. It’s not only
dangerous, but against the law.
Protect your ears
Do not turn up the volume too high. Doctors warn against prolonged exposure to
high volume.
Stop using the player or turn the volume down if you have ringing in your ears.
Take care so that the earbud cable is not caught by your arm or other objects while
walking or exercising.
Environmental Information
Follow local guidelines for waste disposal when discarding packaging, batteries, and
electronics appliances.
Your player is packaged with cardboard, polyethylene, etc., and does not contain any
unnecessary materials.
Introduction
Introduction
8

Battery Charger Safety
Caution: Opening the case may result in electric shock.
Caution: The uninsulated parts inside the power adapter and cradle may cause electric
shock or fire. For your safety, please do not open these components. Do not let metallic
objects such as necklaces or coins come into contact with the power adapter plugs or
battery terminal.
Caution: To avoid electric shock, use the power adapter only with an outlet that matches
the shape of the adapter’s plug.
Caution: Make sure that you insert the adapter’s plug all the way into the outlet.
Caution: To avoid the risk of fire, do not charge longer than 12 hours.
Caution: Do not plug several devices into the same electrical outlet.
Important: Always read and understand the user guide to help prevent problems.
Warning: Use the power adapter and cradle away from water sources to avoid fire or
electric shock.
Introduction
Introduction
9
ENG
Introduction
10
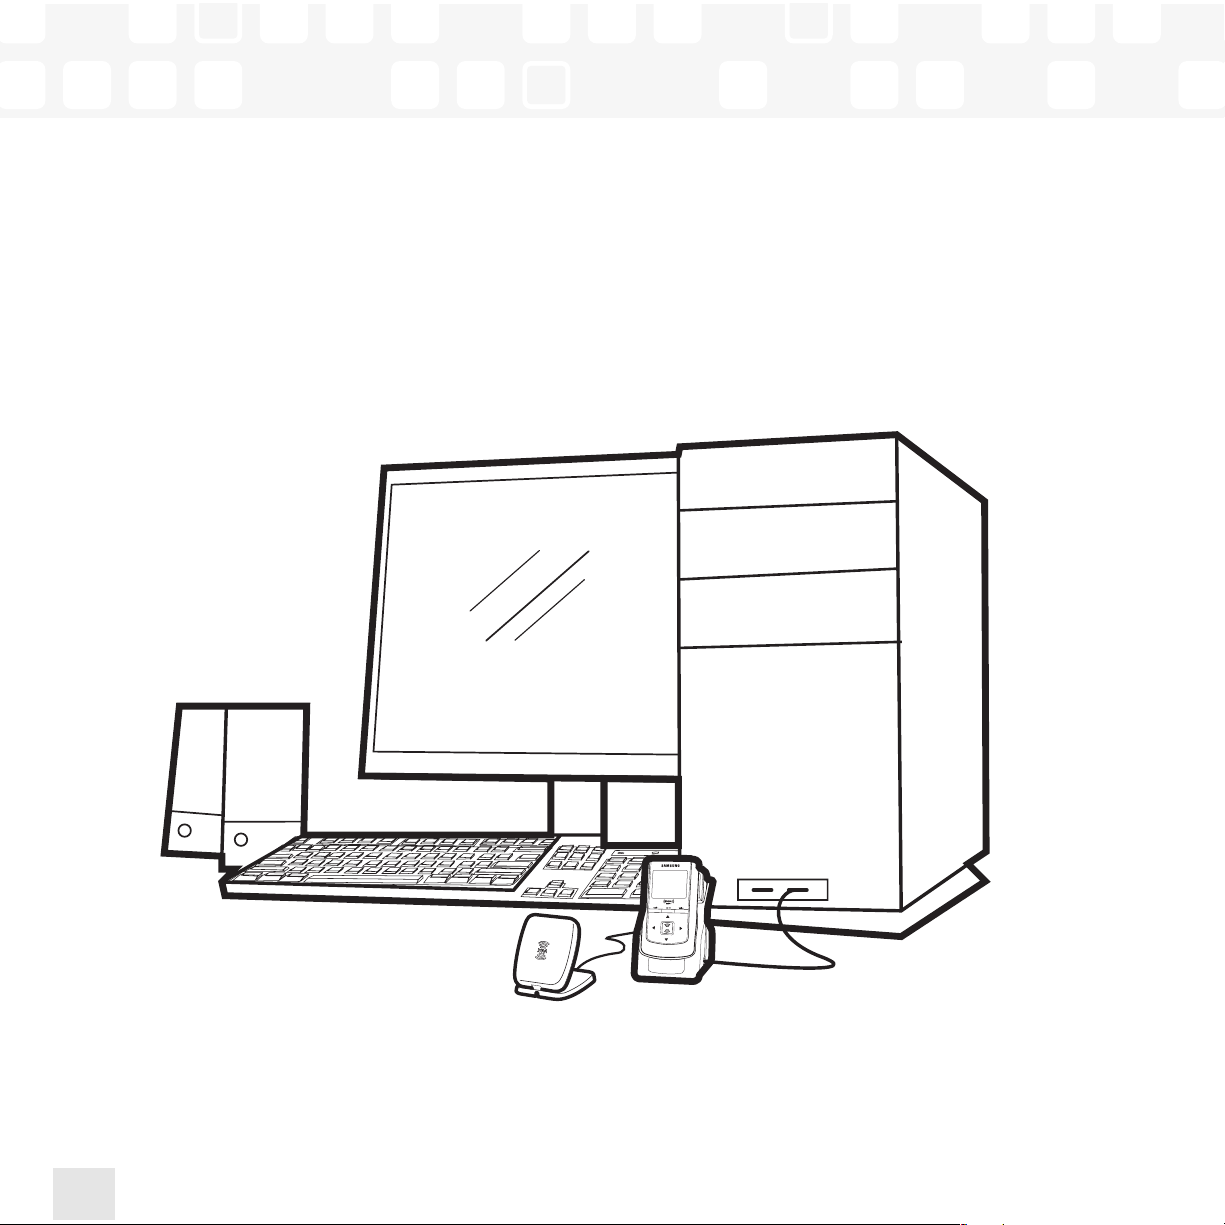
What’s in the Box
NeXus player
(NeXus 25: YP-X5X, NeXus 50: YP-X5Z)
XM Passport
Battery
Home dock/cradle
(YA-CD200)
Earbuds
(EP-360)
Remote
Introduction

Introduction
Introduction
11
ENG
What’s in the Box
Home XM antenna
AC power
adapter
RCA audio cable
Also included:
User guide
XM+Napster install CD
Carrying
case/holster
USB cable
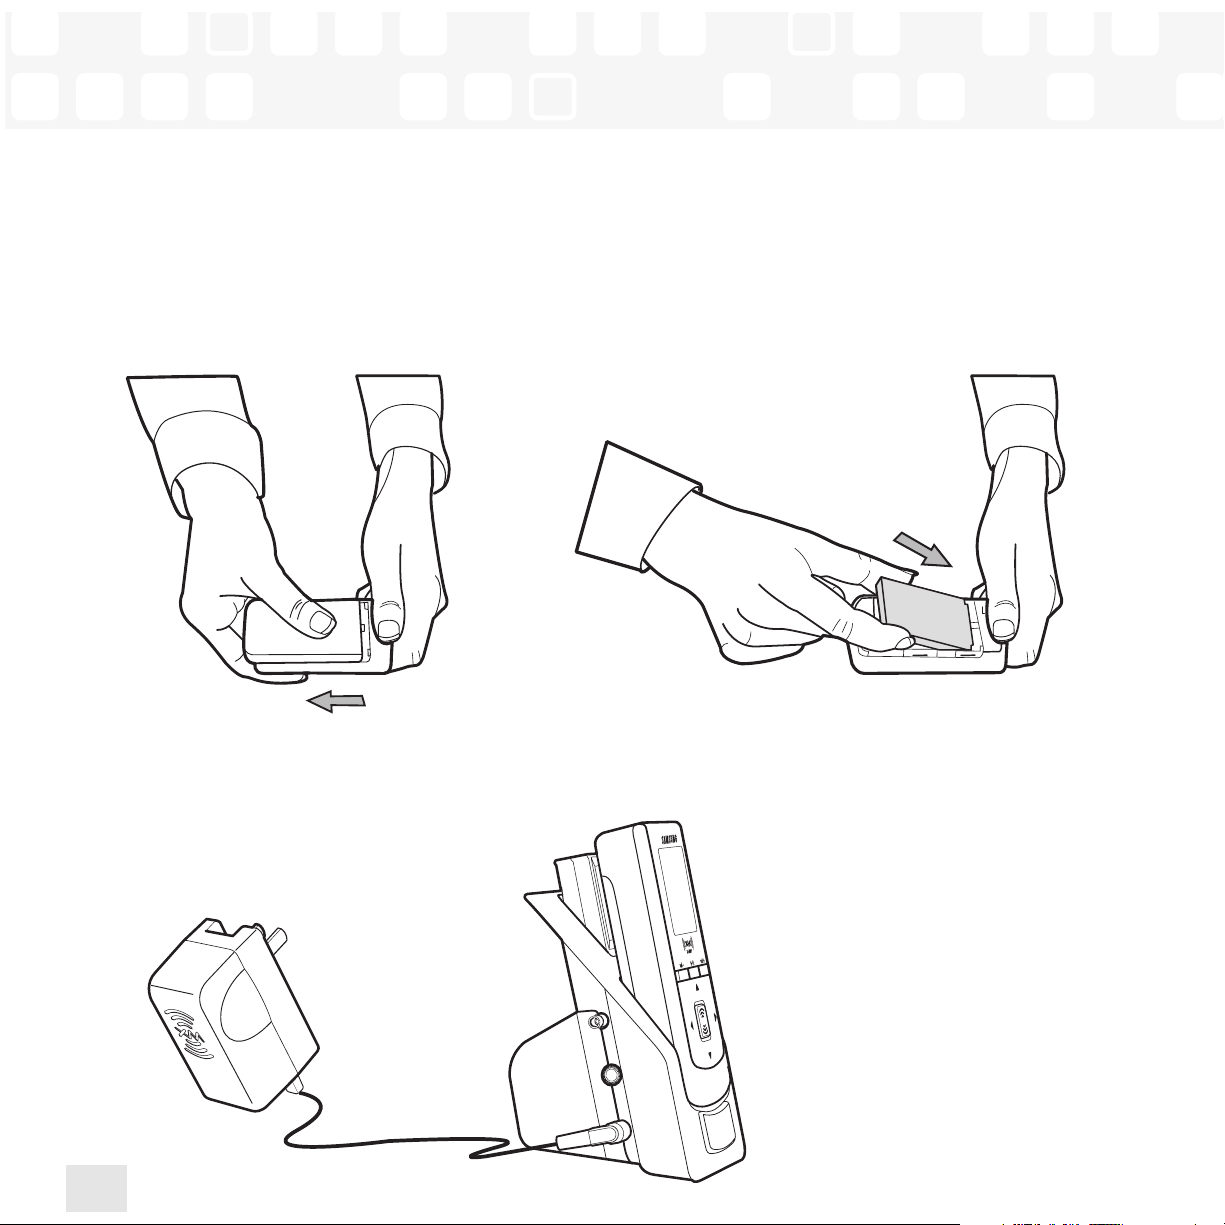
Charging the Battery
Charge the battery for at least 8 hours before using your player for the first time,
or if you have not used it for several months. When charging, make sure the
ambient temperature is between 32°F and 113°F (0°C to 45°C).
Introduction
12
1. Open battery compartment.
2. Insert battery into player.
3. Plug adapter into cradle
and wall socket.
Introduction
Player Controls
Introduction
Introduction
13
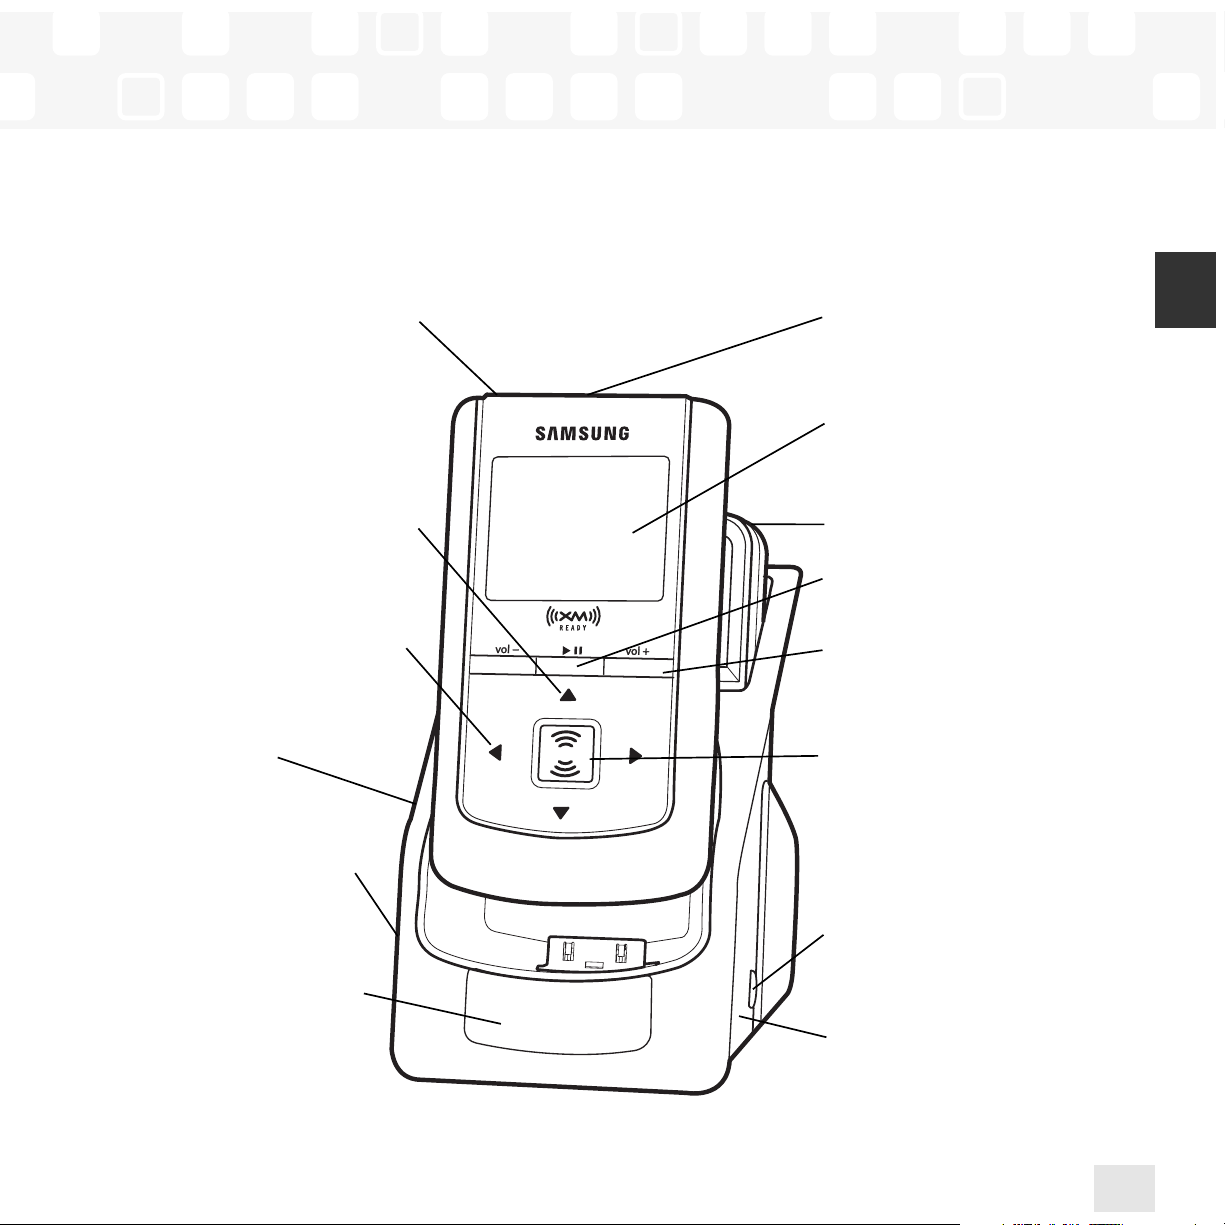
ENG
Power button – Slide left to
turn power on or off. Slide right
to “hold” controls, preventing
you from accidentally pressing
a button.
Arrow buttons – Select
menu entries, change channels,
cycle through categories, skip to
next or previous songs, and more
Left arrow button –
Pressing the left arrow button
also allows you to “back out”
of any menu you have selected
Home cradle
Audio, power, and
antenna connections
IR window – Point the
remote here
Earbud jack
Display
XM Passport
Pause/Mute – Pause
playback or mute live XM
Volume
XM button – Start here;
press to access channels,
playlists, menus, and
confirm selections
Digital antenna jack
USB jack

Using the Controls
Throughout this guide, you will see instructions such as “Select XM Settings Setup
Antenna Aiming.” This tells you to perform the following actions:
1. Press the XM button.
2. The displayed menu’s last option is “Settings.” Press the down arrow button to
highlight “Settings,” then press the XM button to select it.
3. The next displayed menu’s third option is “Setup.” Again, press the down arrow
button to highlight “Setup,” and press the XM button to select it.
4. The last menu’s second option is “Antenna Aiming.” Press the down arrow
button to highlight “Antenna Aiming,” then the XM button to select it.
Not all of the menu items described in this guide may appear on your NeXus display. For
example, if you have not recorded any XM content and have not stored any MP3 or WMA
files, you will not see “My Music” if you press the XM button while listening to live XM.
NOTE: Remember that pressing the left arrow button generally allows you to “back out”
of any menu.
Introduction
Introduction
14
Player Display
Introduction
Introduction
15
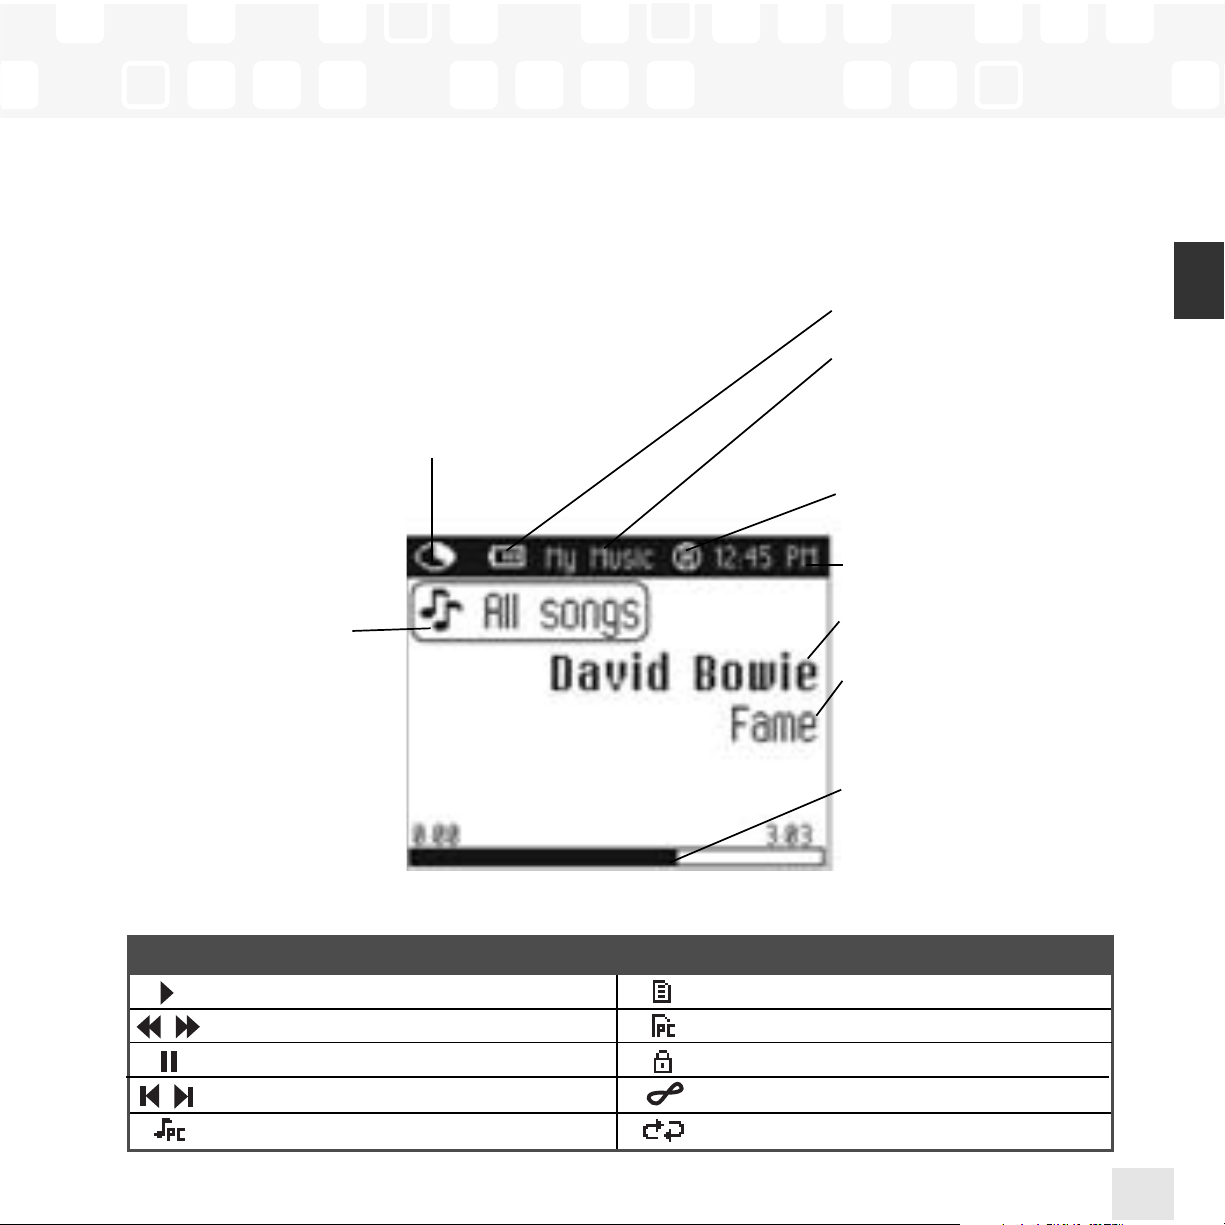
ENG
Battery charge
Mode – “Live XM” or
“My Music” (recorded
content)
H – “H” indicates that the
power switch is set in the
“hold” position.
Clock
Artist name
Song title
Progress bar – Shows
total song length and
current location within
song during playback.
Available memory – Black portion indicates
amount of storage available.White portion indicates
amount of storage taken up by locked XM songs
(page 35). “!” indicates that there is less than 3
minutes of storage available. In “Live XM” mode,
you will see a signal strength indicator instead.
While listening to “Live XM,”
this box shows the channel
name. During “My Music,”
this box indicates whether
you’re viewing all songs,
or songs by a particular
artist, channel, category,
or recording session.
play
reverse or fast-forward through track
pause
skip to previous or next track
PC track (MP3 or WMA file)
track assigned to a playlist
PC track is assigned to a playlist
XM track is locked
repeat track
play tracks randomly
Additional symbols:
Introduction
Introduction
16
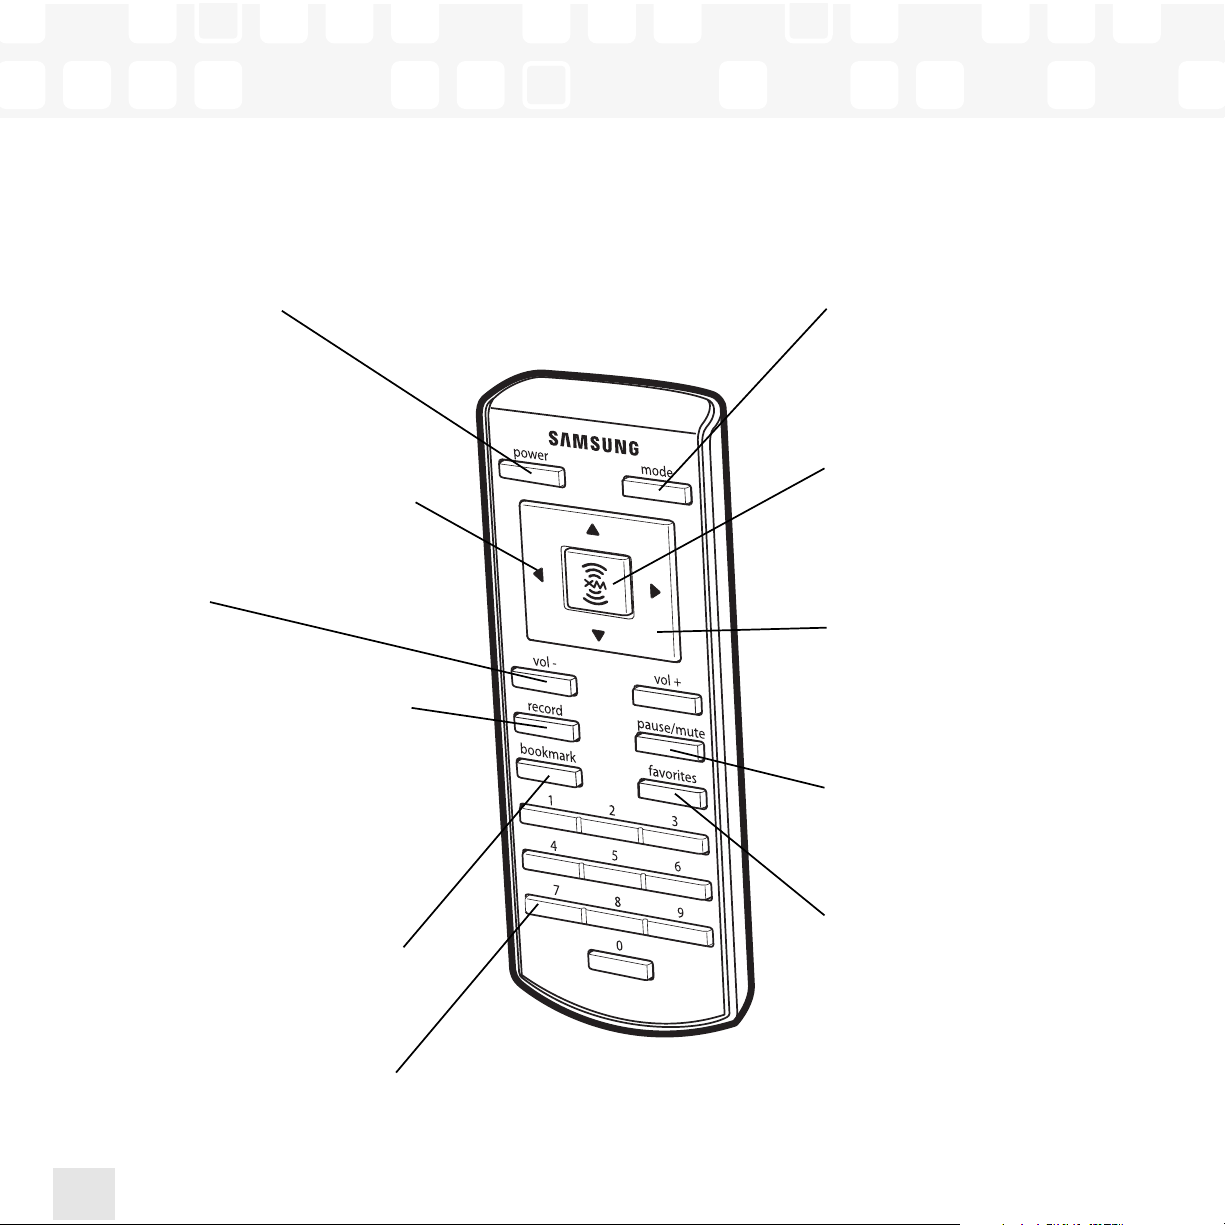
Remote
Power button
Left arrow button –
Pressing the left arrow button
also allows you to “back out”
of any menu you have selected
Volume
Record – Press and release to
start recording a song, or to
stop recording. Press and hold
to start recording a channel. If
you’re already recording a
channel, pressing and holding
this button ends recording after
the current song.
Bookmark – Tag interesting
songs or tracks
Numeric keypad – Select
XM channels by channel number
Mode – “Live XM” or
“My Music” (recorded
content)
XM button – Access
menus and confirm
selections
Arrow buttons –
Select menu entries, change
channels, cycle through
categories, skip to next or
previous songs, and more
Pause/Mute – Pause
playback or mute live XM
Favorites – Go to
favorite channels

Before you can listen to or record XM content, you must activate your player.
1. Set up your player, cradle, power adapter, and antenna (page 18 or page 20). Make sure the
XM Passport is inserted in the cradle and that the player can receive the XM signal.
2. Place NeXus in the “Live XM” mode (page 24).
3. Find the 8-character XM Radio ID, which is printed on the XM Passport and on the package.
Or select XM channel 0 to view the Radio ID. Record the Radio ID here for reference:
The XM Radio ID does not use the letters I, O, S, or F.
4. Activate your XM Satellite Radio service online at http://activate.xmradio.com or by calling
1-800-XM-RADIO (1-800-967-2346). You will need a major credit card.
XM will send a signal from the satellites to activate the full channel lineup. Activation normally
takes 10 to 15 minutes, but during peak busy periods, you may need to keep your player on
for up to an hour. When you can access the full channel lineup on your player, you’re done!
Subscribing to XM
Subscribing to XM
17
ENG

Setup: At Home
Using Your Player Alone
Using Your Player Alone
18
1. Insert XM Passport into
home cradle.
2. Insert player into
home cradle.

3. Connect NeXus to your
audio system. Connect
power adapter and home
antenna. Point antenna
toward the southern sky
through a window.
Using Your Player Alone
Using Your Player Alone
19
ENG
4. To optimize signal reception, you may mount the
home antenna outdoors,
facing south. Make sure
the antenna is not blocked
by buildings or trees.

Setup: In a Vehicle
(requires Car Accessory Kit, sold separately)
Every vehicle is different; for your safety, follow all instructions carefully.
Consult a professional installer if you have questions.
You can listen to your Samsung NeXus through your car stereo by using the FM transmitter
built into the optional car cradle. Simply find an unused FM frequency on your car stereo and
set NeXus to transmit on that same frequency.
1. Mount antenna to the roof or trunk of the vehicle. During installation, make sure you are
outdoors and the antenna is not obstructed by tall buildings.
Using Your Player Alone
Using Your Player Alone
20
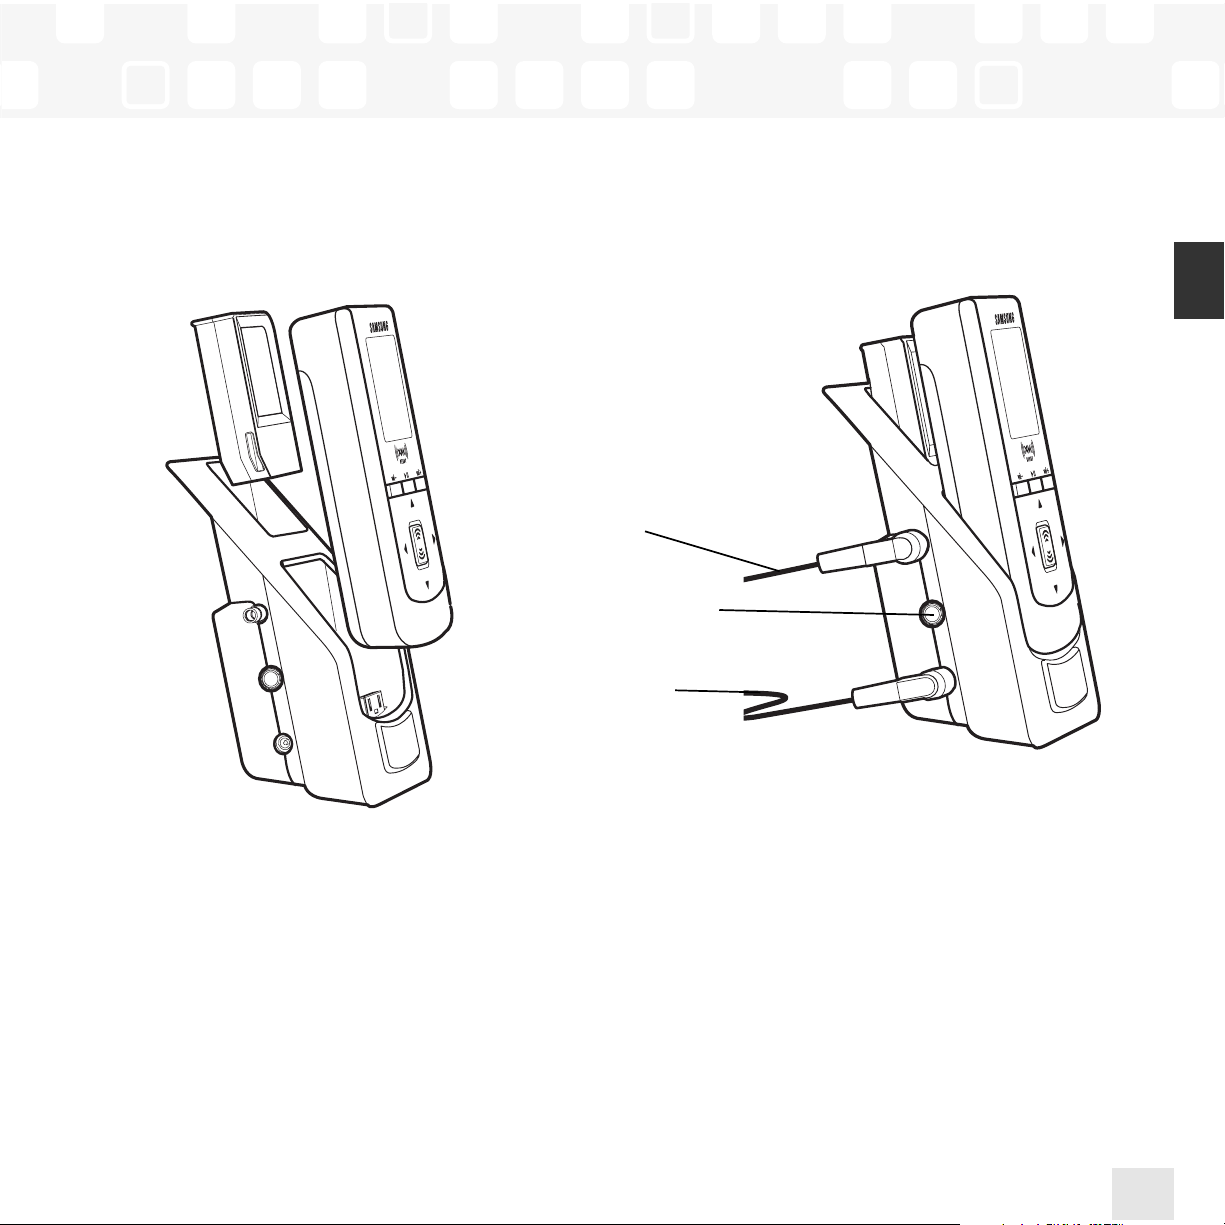
2. Insert XM Passport and
player into car cradle.
Using Your Player Alone
Using Your Player Alone
21
ENG
3. Connect car cradle to antenna cable and
power adapter.
to antenna
(optional) audio
output for cassette
adapter or RCA cable
to DC adapter
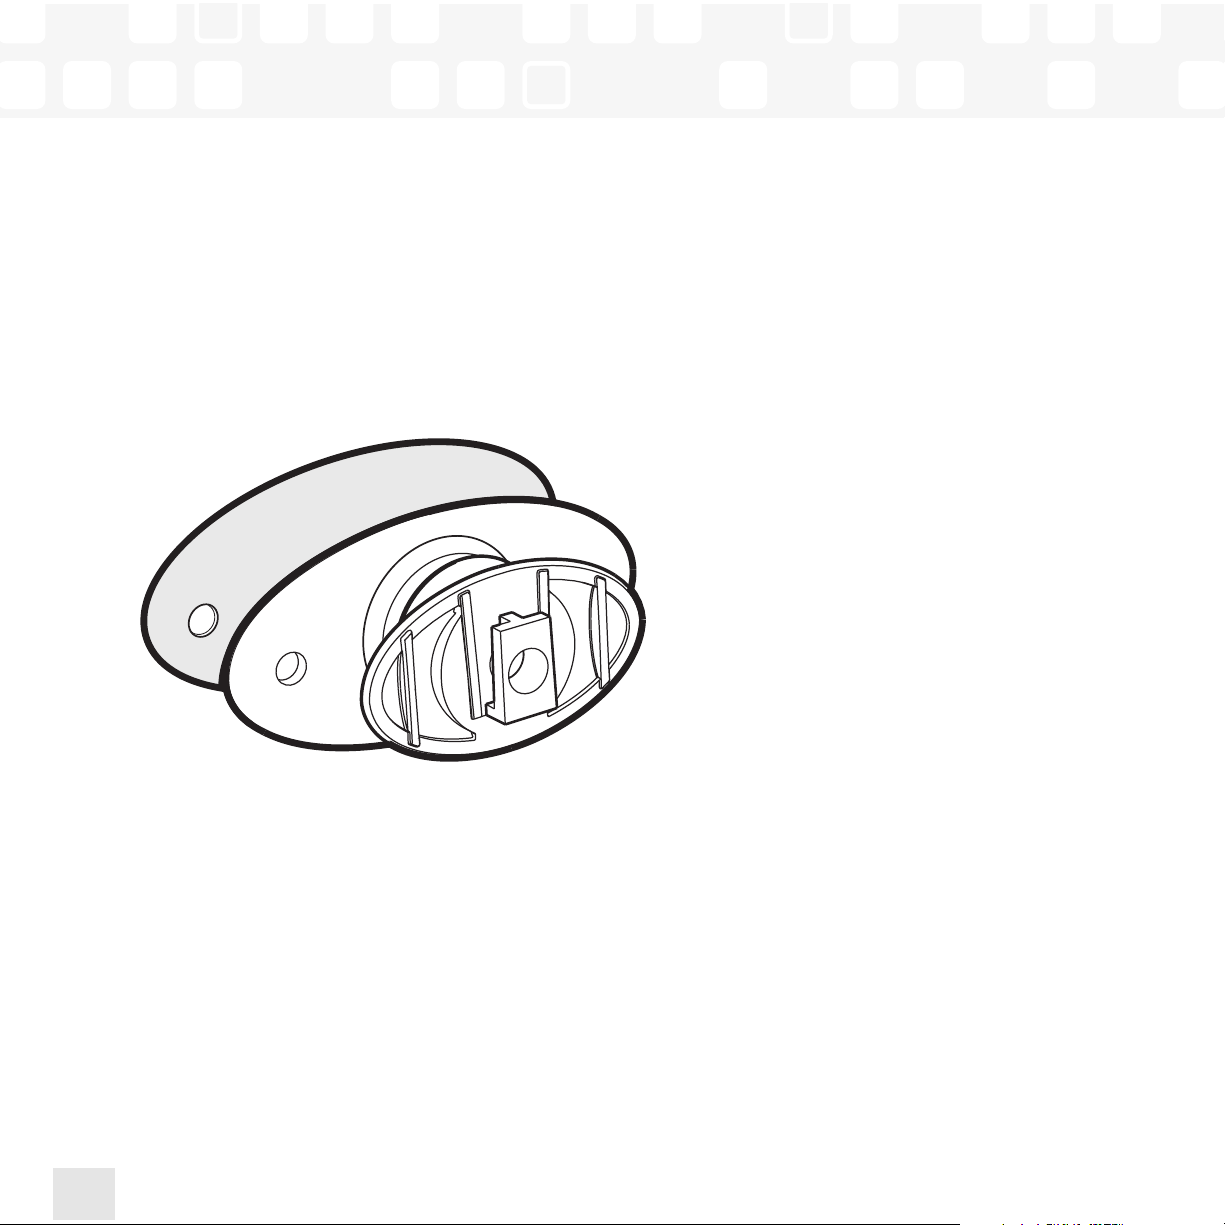
4. To install the swivel mount, first find a suitable location. The swivel mount’s adhesive is
very strong and may be difficult to remove. Do not install this mount on leather surfaces
and make sure the air temperature is at least 60°F (15˚C).
Clean the mounting surface with the surface preparation kit. Peel away the adhesive liner
and firmly press the swivel mount to the surface for 30 seconds. Allow 24 hours before
using the mount.
You can adjust the tension of the mount with a screwdriver.
If you need to remove the mount, carefully lift the adhesive pad with your fingers or a
spoon. Warming with a hair dryer for several minutes will help soften the adhesive.
Using Your Player Alone
Using Your Player Alone
22

5. To install the vent mount, find a horizontal vent that is strong enough to hold your NeXus
and its cradle. To remove the vent mount, push it into the vent and lift upwards slightly to
release the mount’s hooks from the vent vane.
6. Find an unused FM frequency on your car stereo.
7. Set your NeXus to the same FM frequency. (Refer to the section marked “Settings,”
“FM Frequency.”)
8. Tune NeXus to XM channel 1. You should be able to hear XM through your car stereo.
Using Your Player Alone
Using Your Player Alone
23
ENG
Live XM
NOTE: You must dock your NeXus in its cradle, with the XM Passport, power adapter, and
antenna connected, and power it on at least 8 hours a month. This authenticates your XM
subscription and ensures that you can continue to enjoy your recorded XM content and live
XM programming. If you do not dock your NeXus as described, you will lose access to your
recorded content and live XM programming.
Dock the player in its cradle. Make sure you attach the power adapter, insert XM Passport,
and connect the antenna.
Turn on the player. Subscribe to XM (page 17) if you haven’t done so already.
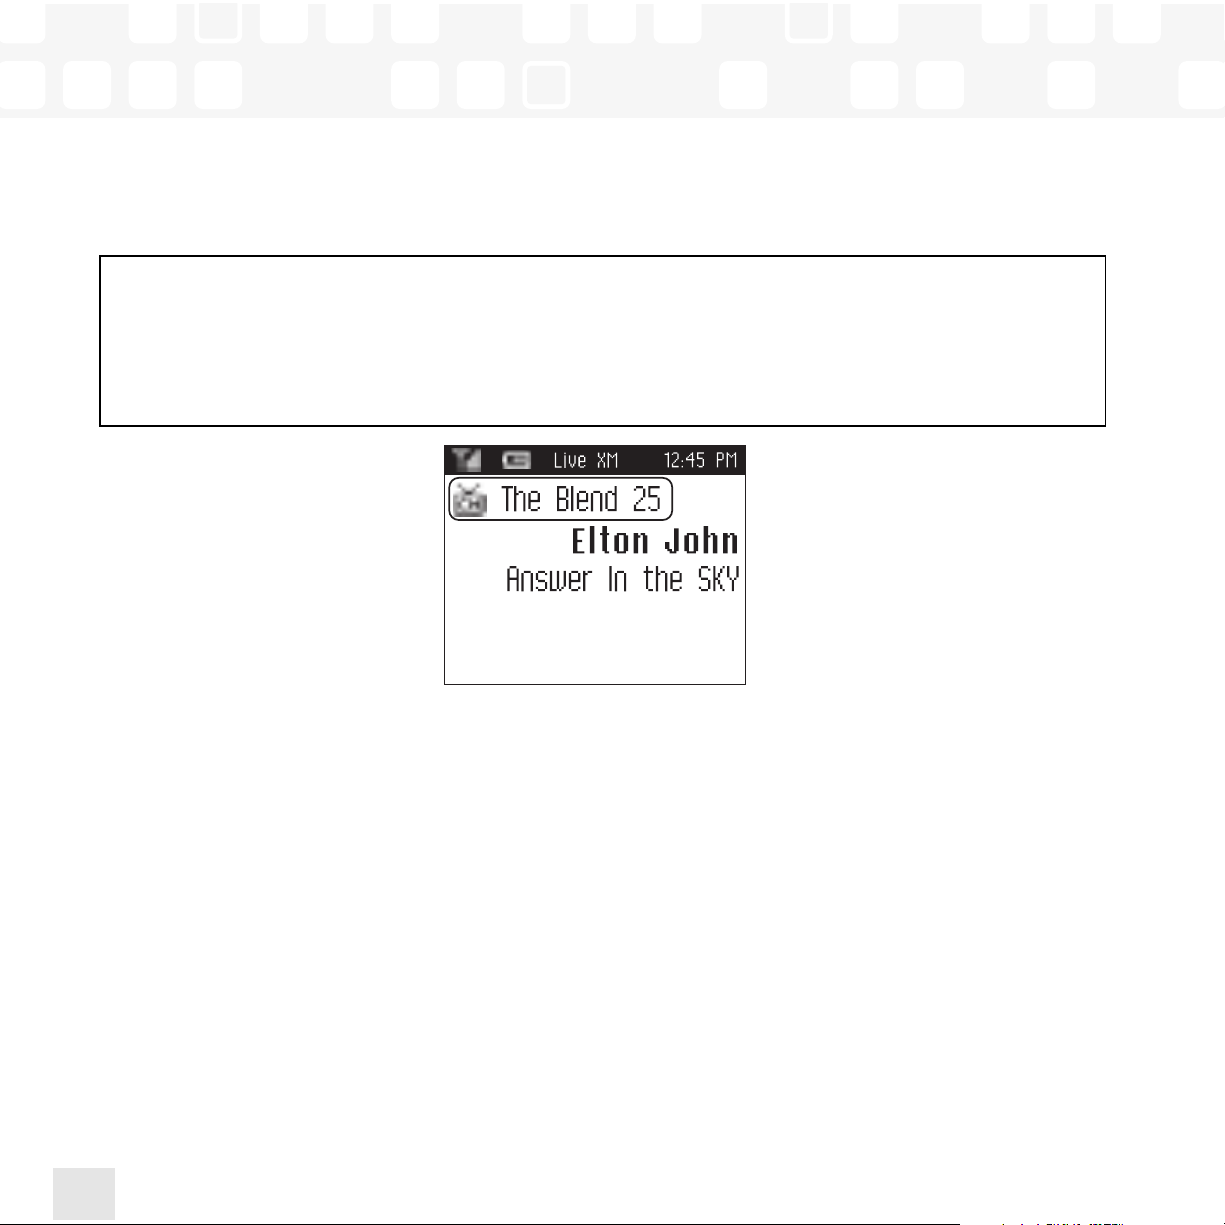
If you see “Live XM” at the top of the display, you’re listening to XM content that is currently
being broadcasted from the satellites.
If you see “My Music” on the display, perform these steps to hear live XM:
1. Press the XM button to display the menu.
2. Use the arrow buttons to highlight “Live XM” and press the XM button to select it.
Using Your Player Alone
Using Your Player Alone
24

Selecting Channels
Press the up or down arrow buttons to scroll through the list of channels.
– OR –
Press the number keys on the remote that correspond to the channel number.
– OR –
1. Press the left arrow button on the player. You will see a virtual keypad on the display.
2. Use the arrow buttons to select the digits corresponding to the channel number.
Press the XM button after highlighting each digit.
3. When you’ve entered a valid channel number, the player will tune to that channel
after 2 seconds.
Using Your Player Alone
Using Your Player Alone
25
ENG

Favorite Channels
You can save your favorite channels in an easily accessible list.
1. While you’re tuned to a channel, press the XM button.
2. Select Favorite Channels Add Channel.
3. To remove a channel from the “Favorites” list, select XM Favorite Channels
Edit Channels (channel name) Remove Channel.
4. Once you’ve saved your favorites, you can quickly access the list. From the “Live XM”
screen, simply press the right arrow button to see your “Favorites” list. Press the up and
down arrow buttons, then the XM button to select the desired channel.
Using Your Player Alone
Using Your Player Alone
26

Categories
XM channels are organized into categories, or genres, such as “Rock,” “Jazz,” or “News.”
To find a channel by category:
1. Press the right arrow button one or more times. The category name appears in the display.
“Favorites” is your first category if you have designated any channel as a “favorite channel.”
2. When you’ve found the category you want, press the up or down arrow buttons to select
a channel.
3. Select XM Select to tune to that channel.
Using Your Player Alone
Using Your Player Alone
27
ENG
Using Your Player Alone
Using Your Player Alone
28
Recording XM
Your NeXus enables you to record XM content for personal, non-commercial use. You may
record XM content while listening to live XM or by scheduling a recording session. You can
then listen to recorded XM content on the go. You can also personalize your XM content by
creating playlists for every mood and occasion.*
To record XM content, you must dock NeXus in its cradle, insert XM Passport, and attach the
antenna and power adapter.
Recording a Single Song
1. While you’re listening to live XM, select XM Record Record Song. Don’t worry if
you miss the beginning of the song; your NeXus captures the entire song even if you start
up to 45 seconds after the beginning of the song, as long as you’re already tuned to that
channel.
2. By selecting “Record Song,” you instruct your NeXus to stop recording at the end of
the song.
3. To stop recording immediately, press the XM button and select XM Record Stop
Recording. If you change channels, NeXus automatically stops recording.
4. Alternatively, you can continue recording the channel you’re listening to by selecting
XM Record Record Channel. Recording will not stop until you select
XM Record Stop Recording.
SHORTCUT: To immediately start recording at any time, press and hold the XM button until
you see the “Recording …” message on the display.
*XM content cannot be downloaded from the NeXus digital audio player. If you wish to own a complete, high-fidelity
version of any song on demand, you should purchase those songs from XM+Napster. This allows you to store the songs on
multiple devices.

Using Your Player Alone
Using Your Player Alone
29
ENG
Recording a Channel
1. While you’re listening to live XM, select XM Record Record Channel. You will
record the channel you’re currently listening to.
2. To stop recording immediately, select XM Record Stop Recording. If you change
channels, NeXus automatically stops recording.
3. Alternatively, you can choose to stop recording at the end of the song you’re currently
listening to by selecting XM Record Record Song.
Scheduling a Recording Session
You can set NeXus to record XM at a later time. To record live XM, you must dock NeXus in its
cradle, and attach the antenna, XM Passport, and power adapter.
1. To schedule a recording session, select XM Record Schedule Recording
New Session.
2. The “Scheduled Rec” display allows you to set various options. Use the up and down arrow
buttons to adjust each entry. Press the XM button to accept the entry and move to the
next option.
Using Your Player Alone
Using Your Player Alone
30
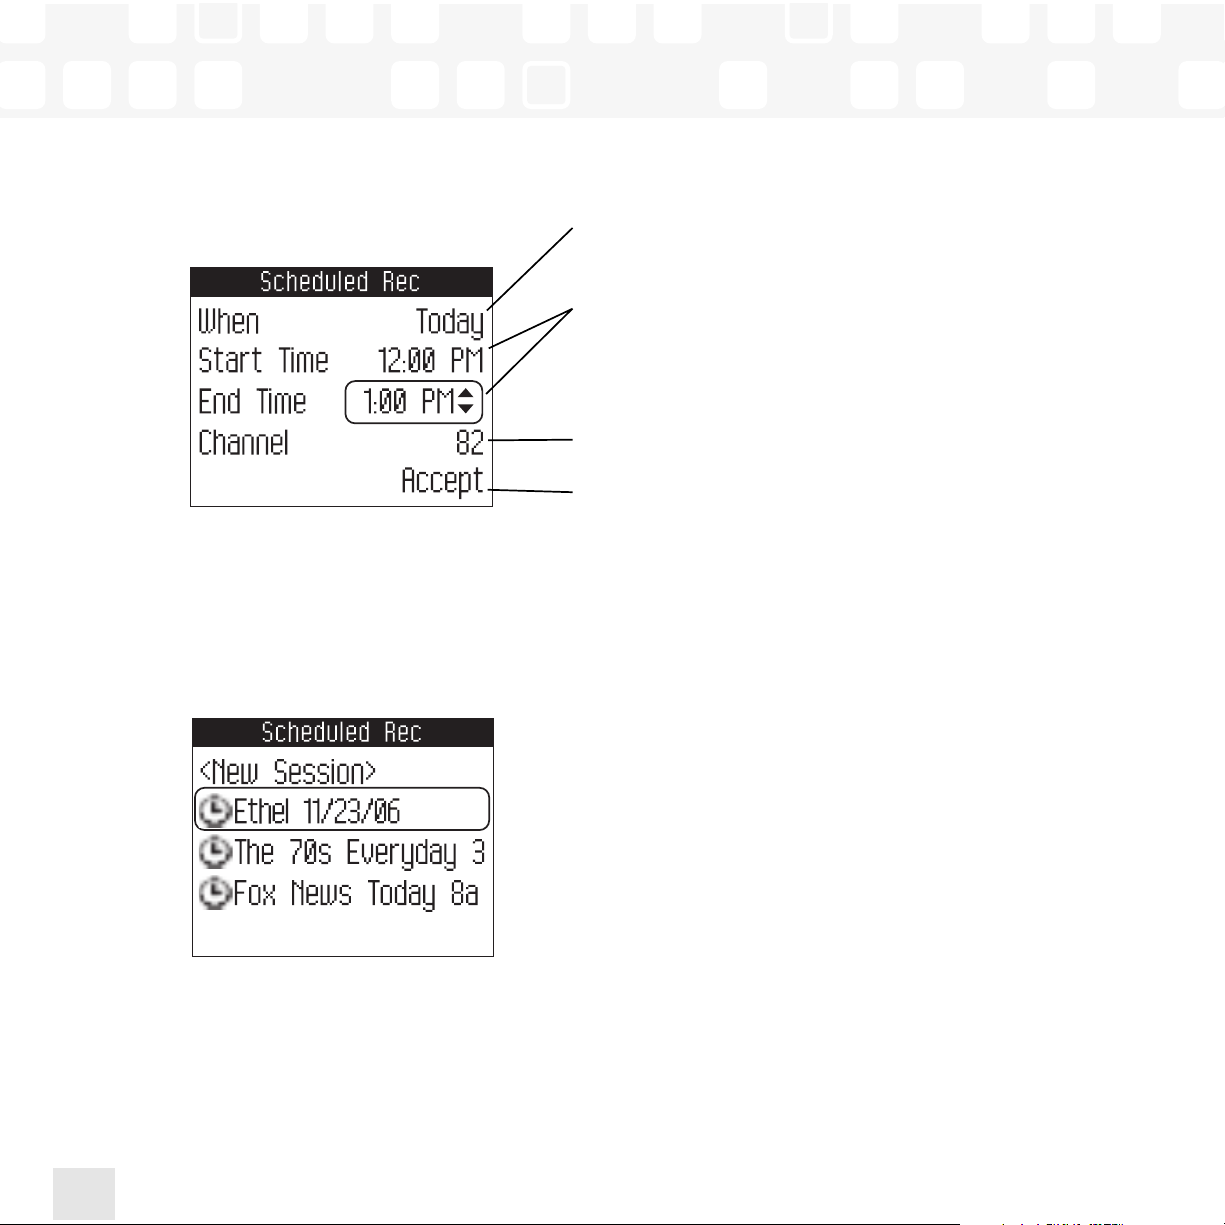
3. To edit an existing session, select XM Record Schedule Recording.
You will see a list of sessions. Highlight the session you wish to edit.
You may not see all the sessions that you scheduled in the past. Sessions that have expired
are automatically removed from the list.
You can choose to schedule a session for “Today,”
“Everyday,” or a specific “Date.”
Set start and stop times using the up and down arrow
buttons. If the session length exceeds the available
memory, you will record over the oldest XM tracks in
the memory, so you’ll always have the latest content.
Choose the channel you want recorded.
Choose “Accept” to save the session. You can also
edit the session. To cancel, press the left arrow button.
 Loading...