

Page 1
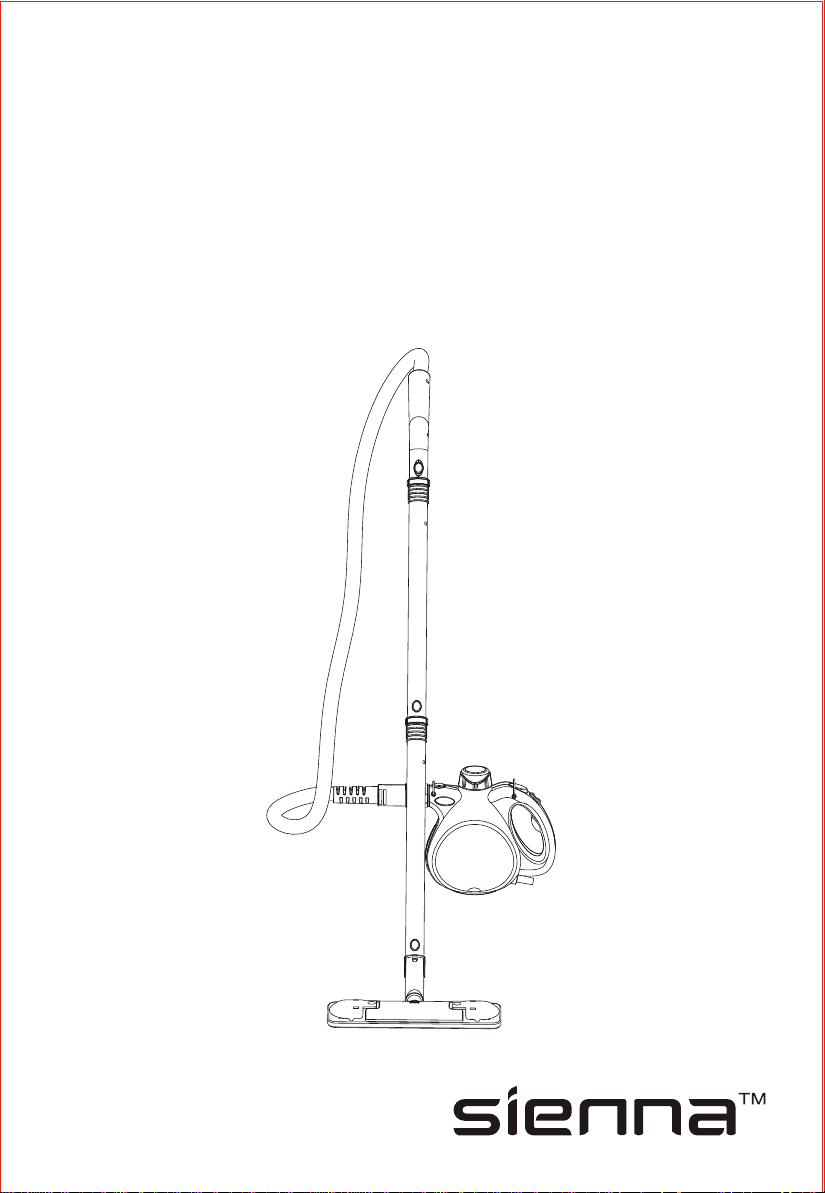
INSTRUCTION MANUAL
Samson Steam Cleaner
SSC-0313
Page 2

CONTENTS
Important Safeguards.............................................1
Key Features..........................................................2
Description............................................................2
Filling the Samson Steam Cleaner with water..............3
Switching on and off................................................4
Using the Samson Steam Cleaner...........................4-8
Refilling the Samson Steam Cleaner while cleaning.....9
Maintenance.........................................................10
Troubleshooting Guide...........................................11
Warranty.........................................................12-13
Page 3

IMPORTANT SAFEGUARDS
When using an electric appliance, basic precautions should always be followed:
READ ALL INSTRUCTIONS BEFORE USING THIS STEAMER
WARNING
DANGER OF SCALDING
To reduce the risk of fire, electric shock, or injury:
!
Do not use outdoors.
!
Do not leave the Samson Steam Cleaner unattended while pluged on.
Unplug the electrical cord when not in use and before servicing.
!
Do not allow to be used as a toy. Close attention is necessary when used
near children, pets or plants.
!
The Samson Steam Cleaner is not intended for use by young children or
infirm persons without supervision. Young children should be supervised to
ensure that they do not play with the appliance.
!
Do not immerse the Samson Steam Cleaner into water or other liquids.
!
Never direct steam towards people, animals or plants, or equipment
containing components.
!
Always unplug the power cord from the electrical socket when filling the
Steamer.
!
Do not use with damaged cord or plug.
not working as it should or if it has been damaged, or has been immersed
in water; for repairs please take it to the Authorized distributor or
Authorized reseller before continuing use.
it must be replaced by the manufacturer or its service agent.
!
Do not pull or carry by cord, use cord as handle, close a door on cord, or
pull cord around sharp edges or corners. Keep cord away from heated
surfaces.
!
Do not handle plug or the Samson Steam Cleaner with wet hands or
operate without shoes.
!
Do not touch the hot surfaces during use. Allow the accessories to cool
down before changing them.
!
Keep your work area well lighted.
!
Never put desiccating, aromatic, alcoholic or detergent products into the
Steamer as this may damage it or make it unsafe for use.
!
Follow these steps before unscrewing the Filler Cap:
1) Unplug the power supply.
2) Slowly start to unscrew the Filler Cap, wait a few seconds, then
screw it off completely.
!
3) Do not open water tank while in use.
Use only as described in this manual. Use only manufacturer's
recommended accessories and service agent.
If the Samson Steam Cleaner is
If the supply cord is damaged,
SAVE THESE INSTRUCTIONS
1
Page 4
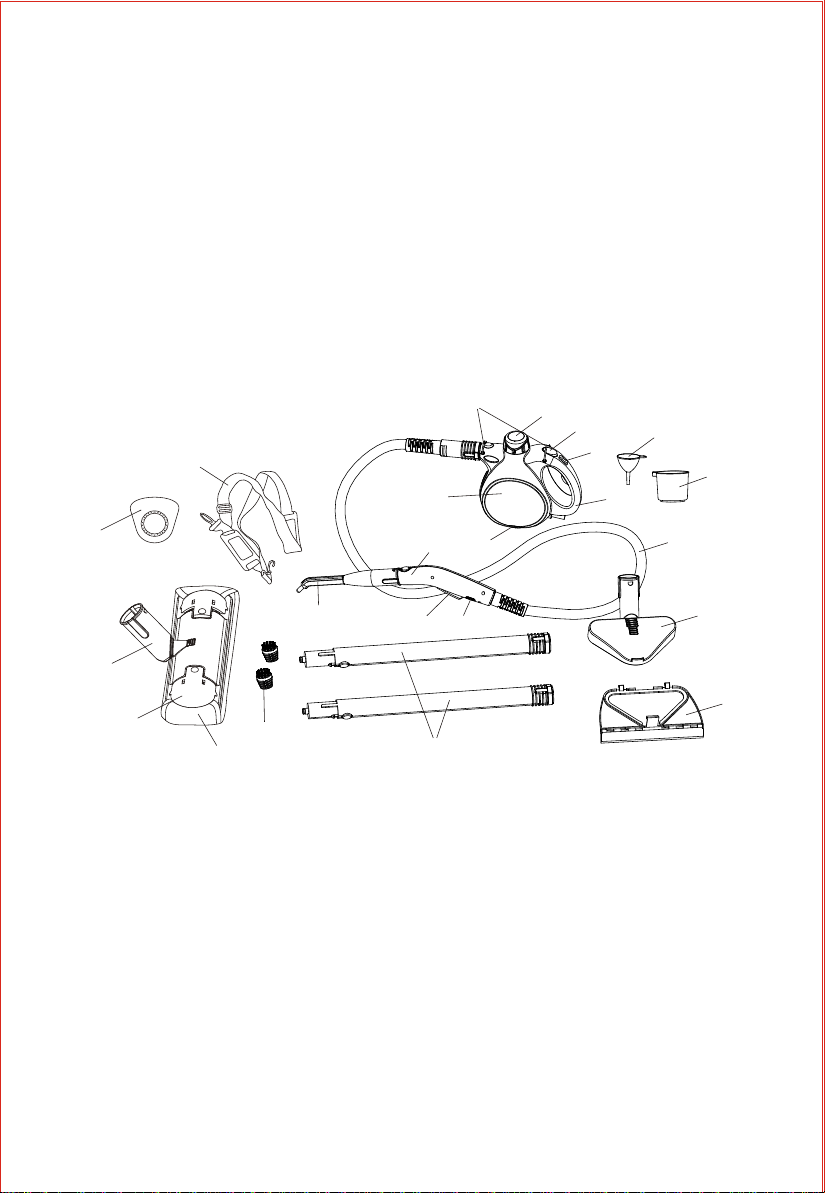
KEY FEATURES
1. Handle
2. Safety Filler Cap
3. Locking Trigger Button
4. Trigger R elease
5. Deluxe Hose
6. Gun
7. Steam Trigger
8. Safety Slider
9. Extension Tubes (2pcs)
10. Connector
11. Deluxe Floor Brush
12. Floor Cloth Pad (2pcs)
20
13. Extension Spout
14. Fabric Brush
15. Glass Squeegee
16. Round Brush (2pcs)
17. Funnel
18. Refill Cup(500ml)
19.Fabric Brush Pad
20. Shoulder Strap
21. Should Strap Hook
22. Main unit
23. Indicator Light
21
2
22
3
4
17
18
1
19
10
11
12
16
13
6
23
8
7
9
5
14
15
DESCRIPTION
Thank you and congratulations for choosing the Samson Steam cleaner. Your
Samson Steam Cleaner utilizes pressurized steam to remove tough grease,
dirt and grime. Steam is nature's purest and most powerful cleaner for safely
cleaning all hard surfaces in your home without harsh chemicals, thus being
perfectly ecological.
The appliance has various attachments so that it can be used for many
purposes such as:
1. Clean upholstery, sealed grout, bathroom/kitchen tile, stovetops.
2. Easy to clean difficult to reach areas with the extension tubes and
extension spout.
3. Ideal for windows, mirrors, glass doors, etc.
4. Clean fabrics, window coverings, pillows, bedding etc.
5. Clean hard surface areas such as counters, sinks, shower door tracks, etc.
2
Page 5
FILLING THE SAMSON STEAM CLEANER WITH WATER
WARNING!
THERE IS A DANGER OF SCALDING. YOU MUST NEVER ATTEMPT
TO REMOVE THE SAFETY CAP WHILE THE SAMSON STEAM
CLEANER IS SWITCHED ON OR UNDER PRESSURE. THE TOOLS
AND HOSE WILL GET HOT DURING USE. ALLOW THE TOOLS TO
COOL DOWN BEFORE CHANGING THEM WHILE THE SAMSON
STEAM CLEANER IS BEING USED.
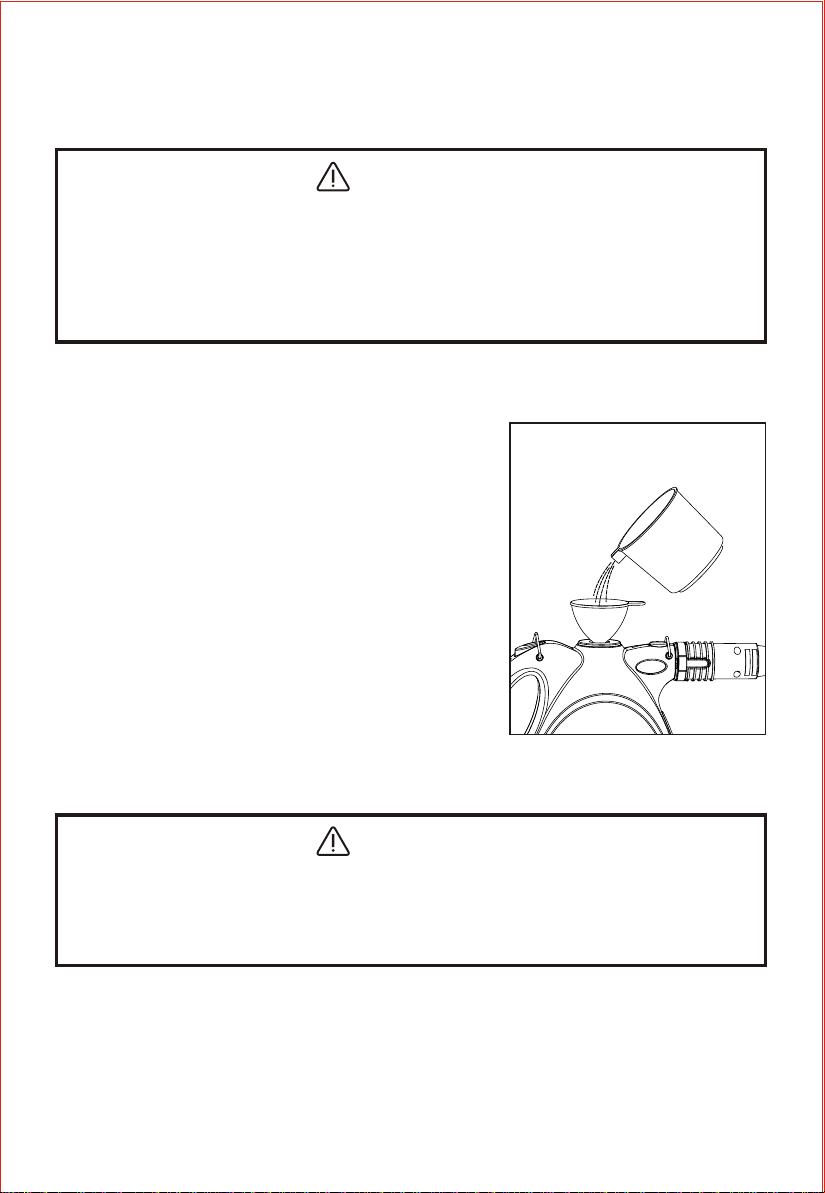
The Samson steam cleaner tank has a
capacity of 650ml.
Check that the Samson steam cleaner is
disconnected from the mains supply.
Press the Locking Trigger Button until any
pressure has been released.
Unscrew the safety cap.
Check that there is no residual water in the
Samson steam cleaner. Always empty the unit
first to ensure that only the correct measured
volume of water can then be added.
Make sure the steam Samson cleaner is on a
stable flat surface.
Fill the measuring cup with water of 650ml. It
is not necessary to use distilled water.
Using the funnel, pour the water into the
steam cleaner.
WARNING!
DO NOT OVERFILL THE TANK. USE ONLY 650ml WATER. NEVER
PUT DESCALING, AROMATIC, ALCOHOLIC OR DETERGENT
PRODUCTS INTO THE SAMSON STEAM CLEANER, AS THIS MAY
DAMAGE IT OR MAKE IT UNSAFE FOR USE.
Screw the safety cap back onto the Samson steam cleaner and tighten by
hand.
3
Page 6
SWITCHING ON AND OFF
Mains Power
Plug the 3-pin mains plug into the mains supply.
The Indicator light will come on to show that the steamer is heating the
water.
Steam will be available after approximately 3 to 4 minutes.
The steamer will provide continuous hot steam for approximately 20
minutes for each fill of the tank. (650ml).
To switch Off, unplug the power cable, the Indicator Light will go out.
NOTE: DO NOT LEAVE THE SAMSON STEAM CLEANER
UNATTENDED DURING THE HEATING-UP PERIOD.
USING THE SAMSON STEAM CLEANER
Fitting the Accessory Tools
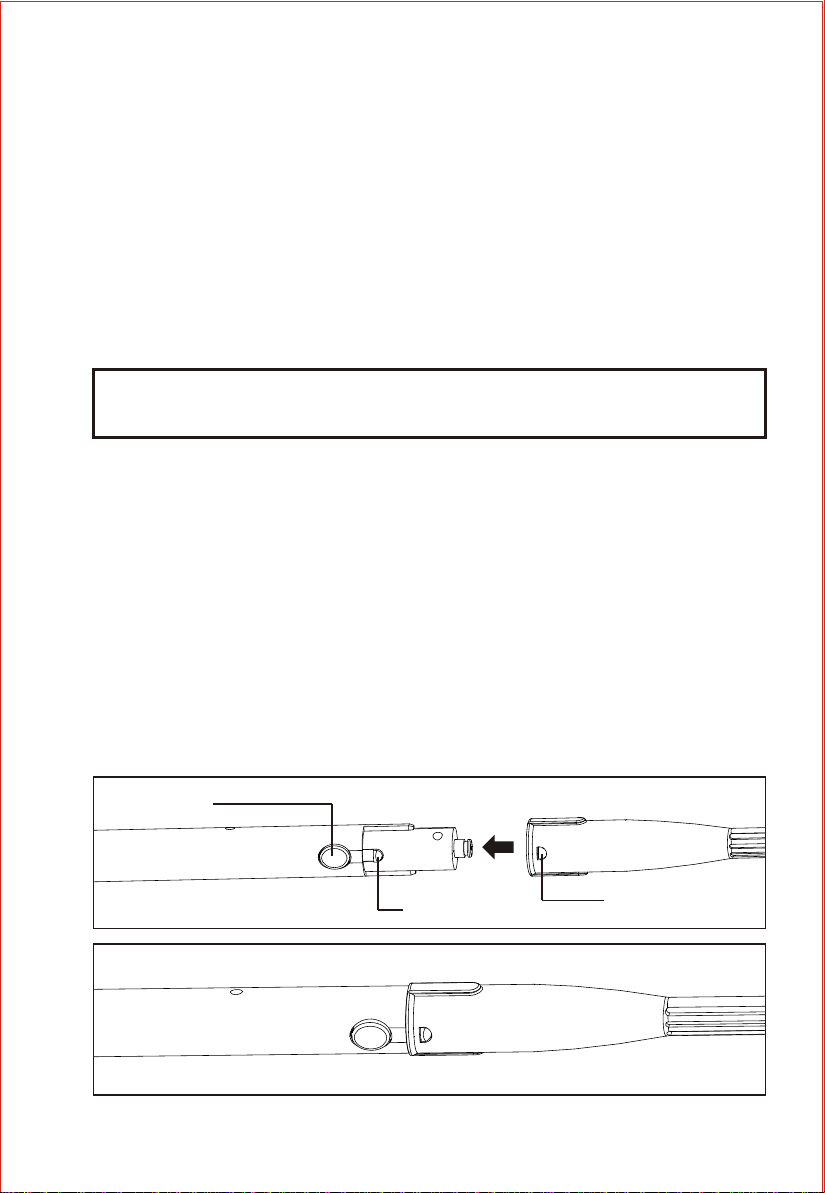
The tools can be fitted directly to the Gun, or to the end of the extension
tubes. The two extension tubes can be fitted together to give extra reach
if required.
To fit the tools or extension tubes first make sure that the aperture in the
tool is aligned with the retaining lug on the Gun (or extension tube if
fitted).
Push the tool or extension tube onto the end of the Gun (or extension
tube if fitted) until it clicks into place and is held by the retaining lug.
To remove a tool or extension tube from the Gun, press and hold the tool
release button and pull the tool off.
Tool release
button
Retaining lug
4
Aperture
Page 7
WARNING!
THE TOOLS, EXTENSION TUBES AND THE HOSE WILL GET HOT
DURING USE. ALLOW THE TOOLS TO COOL DOWN BEFORE
REMOVING THEM WHILE THE SAMSON STEAM CLEANER IS
BEING USED.
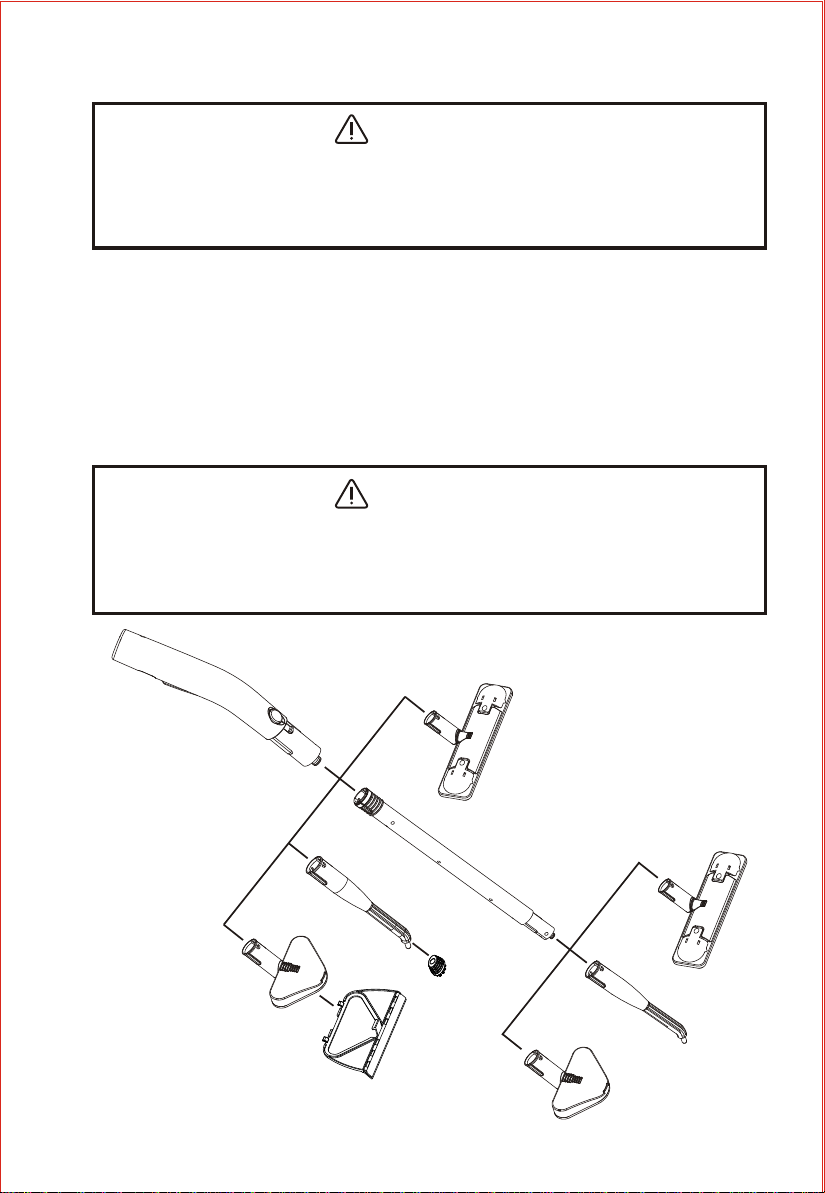
FITTING THE ACCESSORY TOOLS - CONTINUED
The tools can be fitted in a variety of different sequences. See below.
Always make sure that the tool is locked securely in place before using
the steamer.
The glass squeegee must be used in conjunction with the fabric brush.
The round brushes can only be used in conjunction with the extension
spout.
WARNING!
THE TOOLS, EXTENSION TUBES AND THE HOSE WILL GET HOT
DURING USE. ALLOW THE TOOLS TO COOL DOWN BEFORE
CHANGING THEM WHILE THE SAMSON STEAM CLEANER IS
BEING USED.
5
Page 8
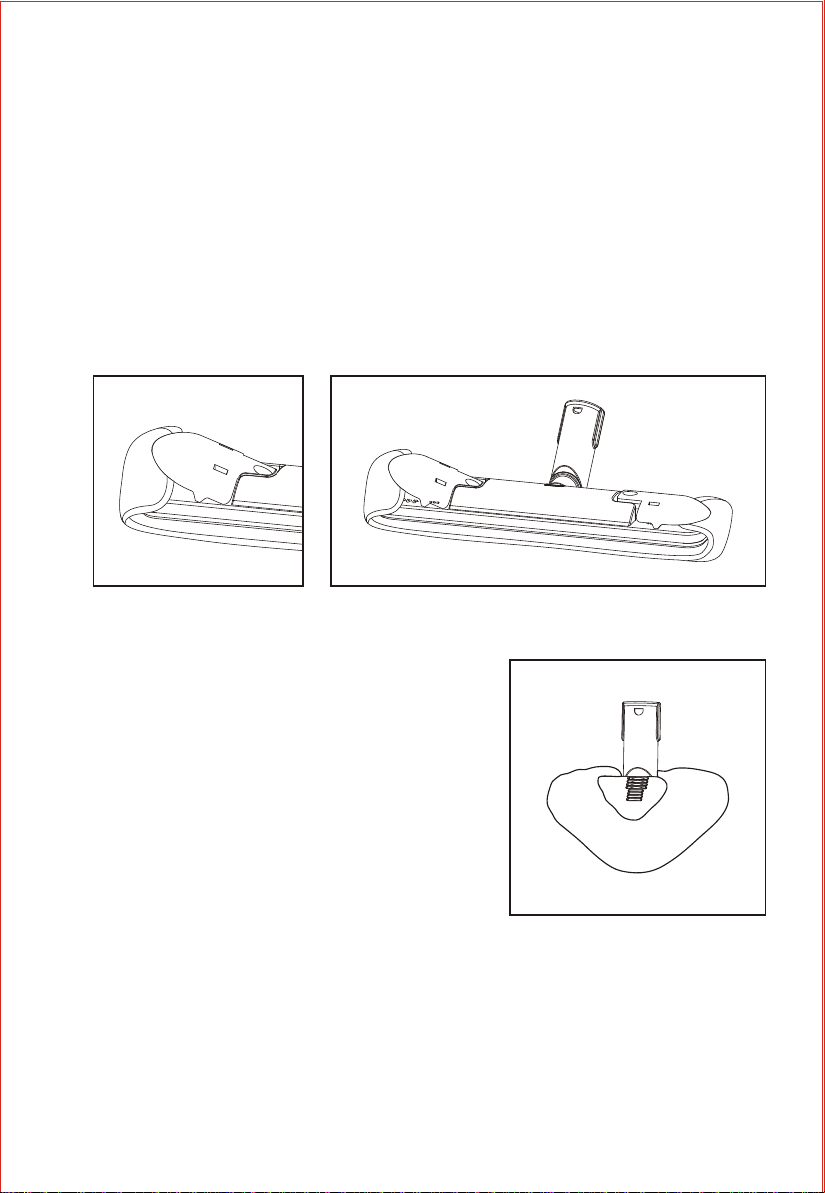
FITTING THE ACCESSORY TOOLS - CONTINUED
The floor brush pads can be fitted to the floor brush if a softer surface is
required for cleaning.
To fit a floor brush pad, first press and hold down the pad retaining clip
on one side of the floor brush.
Position one side of the floor brush pad under the retaining clip.
Release the retaining clip.
Wrap the floor brush pad over the bristles and then secure the end of the
pad under the retaining clip on the other side of the floor brush.
The fabric brush pad can be fitted to
the fabric brush if a softer surface is
required for cleaning.
To fit the fabric brush pad, pull it over
the fabric brush.
6
Page 9
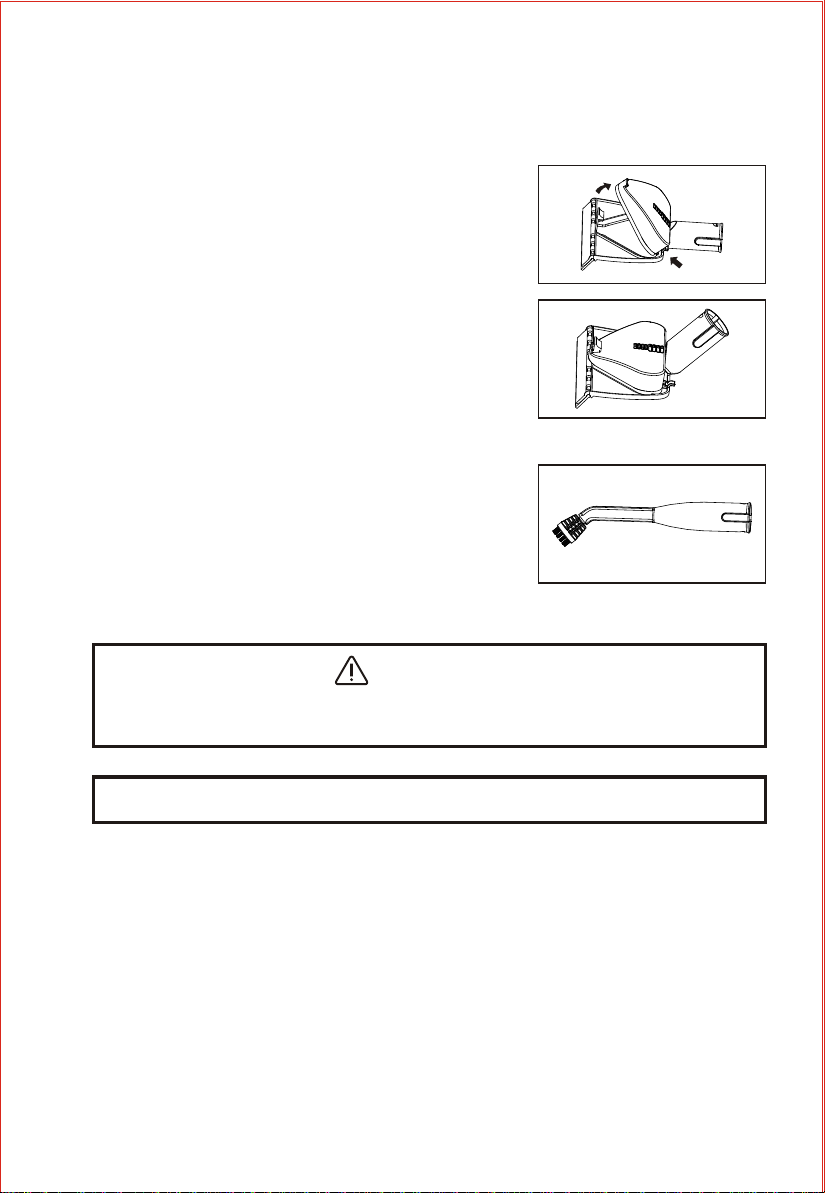
FITTING THE ACCESSORY TOOLS CONTINUED
The window cleaning squeegee can be
attached to the fabric brush.
Remove the fabric brush pad, if fitted.
Locate the two lugs on the squeegee in the
slots on the rear of the fabric brush.
Push the squeegee upwards until it clicks
into place over the clip on the front of the
fabric brush.
The round brush can be fitted to the
extension spout for cleaning in corners and
other areas with limited access.
To fit the round brush, push it firmly on to
the end of the extension spout.
WARNING!
DO NOT HOLD THE EXTENSION HOSE WHEN IN USE AS IT
WILL BE HOT.
NOTE: ALWAYS STORE THE TOOLS IN A SAFE PLACE.
ATTACHING THE SHOULDER STRAP
Using the detachable shoulder strap allows for greater freedom of movement
when both hands are needed for various cleaning tasks. To attach the
shoulder strap to the Samson steam cleaner, simply snap to the shoulder
strap hooks onto the connecting rings on the unit body. When using the
Samson steam cleaner with the shoulder strap, avoid rocking or tilting the
unit excessively as this may cause water to enter the hose and be discharged
along with the steam.
7
Page 10
USING THE SAMSON STEAM CLEANER
WARNING!
DO NOT USE THIS SAMSON STEAM CLEANER ON ANY
APPLIANCE THAT CONTAINS ELECTRICAL COMPONENTS,
(SUCH AS THE INTERIOR OF OVENS), AND IS NORMALLY
CONNECTED TO A MAINS OR BATTERY POWER SUPPLY. NEVER
TURN THE HAND STEAMER ON ITS SIDE WHEN STEAM
CLEANING, OR DIRECT STEAM AT ANY PERSON, PET OR PLANT.
WARNING!
DO NOT USE ON DRAYLON, SOFT PLASTICS, UNSEALED WOOD
AND COLD GLASS. ON SURFACES THAT HAVE BEEN TREATED
WITH WAX OR SOME NON-WAX FLOORS, THE SHEEN MAY BE
REMOVED BY THE HEAT AND STEAM ACTION.
NOTE: IT IS RECOMMENDED THAT A SAMPLE CLEANSING BE
CARRIED OUT ON AN ISOLATED AREA OF THE SURFACE TO BE
CLEANED. ALSO, CHECK WITH THE RESPECTIVE
MANUFACTURER'S LITERATURE FOR THE OBJECT TO BE
CLEANED.
Press the Locking Trigger Button
Move the Safety Slider on Gun to the unlock position.
Squeeze the trigger switch.
Steam will be released from the tool.
Pass the tool you are using slowly over the surface to be cleaned. To sanitize
specific areas, pass the tool slowly over the area at a distance of no more
than one inch away.
The tools can be used to clean and sanitize work surfaces, remove the lime
scale from taps and tiles, and for non-electrical oven utensils.
Non-electrical cooker parts, such as oven racks, baking trays, griddles, pan
supports and removable oven linings must be steam cleaned well away from
any electrical components. Ensure that these parts are completely dry prior
to reassembly.
8
Page 11
Refilling the Samson steam cleaner while cleaning
Should the need arise to refill the Samson steam cleaner with water while
cleaning, unplug the power cable from the mains supply socket.
Press the steam release trigger until all pressure has been released.
WARNING!
ALTHOUGH THE STEAM PRESSURE IN THE SAMSON STEAM
CLEANER HAS BEEN RELEASED, THE STEAM CLEANER STILL
CONTAINS VERY HOT WATER. DO NOT ATTEMPT TO REMOVE
THE SAFETY CAP UNTIL THE STEAM CLEANER HAS COOLED
DOWN.
Push Trigger Release to unlock Trigger button
Move the safety slider on the Gun to the locked position.
Wait at least 5 minutes for the Samson steam cleaner to cool, then
carefully start to unscrew the safety cap. If you hear steam escaping,
stop and wait until the hissing sound stops.
Carefully, continue to unscrew the safety cap. If you hear steam escaping
again, stop and wait for the hissing to stop. Continue in this manner until
the safety cap can be removed.
Take great care, as any residual water will be very hot.
Check that there is no residual water in the Samson steam cleaner.
Always empty the unit first to ensure that only the correct measured
volume of water can then be added.
Slowly fill the Samson steam cleaner with water using the measuring jug
and funnel.
Screw the safety cap back onto the steam cleaner and tighten by hand.
Plug the 3-pin mains plug into the mains socket.
The Indicator Light will come on.
Continue with the instructions for steam cleaning.
When you have finished steam cleaning, unplug the power cable from the
mains supply socket.
Allow the Samson steam cleaner and accessories to cool completely then
empty any residual water. Clean and dry the accessories and store in a
dry place.
9
Page 12

MAINTENANCE
There are no user servicable parts inside the Samson steam cleaner.
Cleaning
WARNING!
THE SAMSON STEAM CLEANER MUST BE UNPLUGGED FROM
THE MAINS POWER SUPPLY AND ALLOWED TO COOL DOWN
BEFORE ALL CLEANING AND MAINTENANCE TASKS. ALWAYS
UNSCREW THE SAFETY CAP VERY CAREFULLY TO ENSURE
THERE IS NO PRESSURE INSIDE UNIT. WAIT AT LEAST 5
MINUTES FOR THE SAMSON STEAM CLEANER TO COOL, THEN
CAREFULLY START TO UNSCREW THE SAFETY CAP. IF YOU
HEAR STEAM ESCAPING, STOP AND WAIT UNTIL THE HISSING
SOUND STOPS. CAREFULLY, CONTINUE TO UNSCREW THE
SAFETY CAP. IF YOU HEAR STEAM ESCAPING AGAIN, STOP
AND WAIT FOR THE HISSING TO STOP. CONTINUE IN THIS
MANNER UNTIL THE SAFETY CAP CAN BE REMOVED. DO NOT
IMMERSE THE SAMSON STEAM CLEANER IN WATER.
After each use, empty any remaining water from the Samson steam
cleaner.
Rinse out the Samson steam cleaner every month to eliminate any
accumulated calcium deposits. Make sure the Samson steam cleaner is
cold and disconnected from the mains supply. Fill the Samson steam
cleaner with approximately half a measuring jug of clean water. Screw
the safety cap onto the Samson steam cleaner and tighten by hand.
Shake the Samson steam cleaner for a few seconds, remove the safety
cap and empty out the water into a container.
Wipe the body of the Samson steam cleaner with a soft, dry cloth. Do not
use any abrasive cleaners.
Store the Samson steam cleaner in a dry, cool place.
10
Page 13

TROUBLESHOOTING GUIDE
Below is a chart detailing the most common problems, their causes
and solutions. Prior to troubleshooting, isolate the unit by removing
the cord from the power socket.
PROBLEM
No steam.
No steam, but
water.
Puffs of steam
during refill.
CAUSE
The steamer is not on.
Water tank is empty.
Condensation is formed
inside the hose.
Water tank is too hot.
SOLUTION
Plug the power cable and
make sure the Indicator
light is on.
Refill the water tank as
instructed.
Press the Steam Trigger and
release the water until
steam comes.
Leave the steamer to cool
down for a while before refill,
use the provided Funnel for
refill every time.
11
Page 14

ONE YEAR LIMITED WARRANTY
Warranty: This product warranty extends only to the original customer
purchaser of the product. This product is warranted by the manufacturer
to be free from all defects in materials or workmanship for a period of
one year from the date of original purchase. This warranty is subject to
the following conditions, exclusions and exceptions.
Warranty Exclusions: This warranty does not cover normal wear and
tear of parts and does not apply to any product that has been tampered
with or used for commercial purposes. This warranty does not cover
damage caused by misuse, abuse, negligent handling or damage due to
mishandling in transit or shipping. This warranty does not cover damage
or defects caused by or resulting from repairs, service or alterations to
the product or any of its parts, which have been performed by a repair
person not authorized by the manufacturer. This warranty is effective
only if the product is purchased and operated in the USA or Canada, and
does not extend to any units which have been used in violation of written
instructions furnished by the manufacturer, or to units which have had
the serial number removed, altered, defaced or rendered illegible.
Warranty Performance: During the limited warranty period, the
manufacturer will, at its option, repair or replace free of charge a
defective product or part that is covered by this warranty. As a matter of
warranty policy, the manufacturer will not refund the purchase price. A
repaired or replacement product will be covered by this warranty for the
balance of the initial one year warranty period and an additional one
month period. To contact write to:
Customer Service
Anvid Products, Inc.
Attn: Customer Service
1401-1499 Greenville Road,
Livermore, CA 94550
Or call :1-888-5SIENNA (1-888-574-3662).
Please refer to your product name and model number when contacting
Customer Service.
12
Page 15

Customer
Service will give you further instructions for returning a defective
product for repair or replacement. When returning a defective product,
carefully pack the item to avoid damage in shipping, the manufacturer cannot
assume responsibility for loss or damage during incoming shipment. We
recommend that you insure the package, as damage in shipping including the
shipping cost is not covered by this warranty. Be sure to include the following
items with your product: any accessories related to the problem; your name,
complete address and phone number; a note describing the problem you
experienced; and a copy of your sales slip or other proof of purchase to
determine warranty status. C.O.D. shipments cannot be accepted.
Out-of-Warranty Service: A flat rate charge by model is made for Out-ofWarranty service. Please contact our Service for a flat rate. In
Customer
addition, please include a check of $20.00 made payable to Anvid
Products, Inc. for return shipping and handling. The check will need to be
cleared by the Bank to enable us to return the product.
Limitation of Remedies: No representative or person is authorized to assume
for the manufacturer any other liability in connection with the sale of our
products. This limited warranty is not transferable and any sale, transfer or
other disposition of the product voids this limited warranty. There shall be no
claims for defects or failure of performance or product failure under any
theory of tort, contract or commercial law including, but not limited to,
negligence, gross negligence, strict liability, breach of warranty and breach of
contract.
ANY IMPLIED WARRANTIES, OBLIGATIONS, OR LIABILITIES,
INCLUDING, BUT NOT LIMITED TO, THE IMPLIED WARRANTY OF
MERCHANTABILITY AND FITNESS FOR A PARTICULAR PURPOSE,
SHALL BE LIMITED TO THE DURATION OF THIS WARRANTY. Some
states do not allow limitations on how long an implied warranty lasts, so the
above limitations may not apply to you.
REPAIR OR REPLACEMENT SHALL BE THE SOLE REMEDY OF THE
PURCHASER UNDER THIS LIMITED WARRANTY, AND IN NO EVENT
SHALL THE MANUFACTURER BE LIABLE FOR ANY SPECIAL,
INCIDENTAL, OR CONSEQUENTIAL DAMAGES, LOSSES OR EXPENSES
YOU MAY INCUR IN CONNECTION WITH YOUR PURCHASE OR USE OF
THE PRODUCT OR FOR ANY BREACH OF THIS OR ANY OTHER
WARRANTY, EXPRESS OR IMPLIED, WHATSOEVER. Some states do not
allow the exclusion or limitation of special, incidental, or consequential
damages, so the above limitation may not apply to you. This limited warranty
gives you specific legal rights, and you may also have other rights which vary
from state to state.
Copyright 2010 Anvid Products, Inc. Made in China Printed in China
13
 Loading...