

Page 1
Self-operated Pressure Regulators
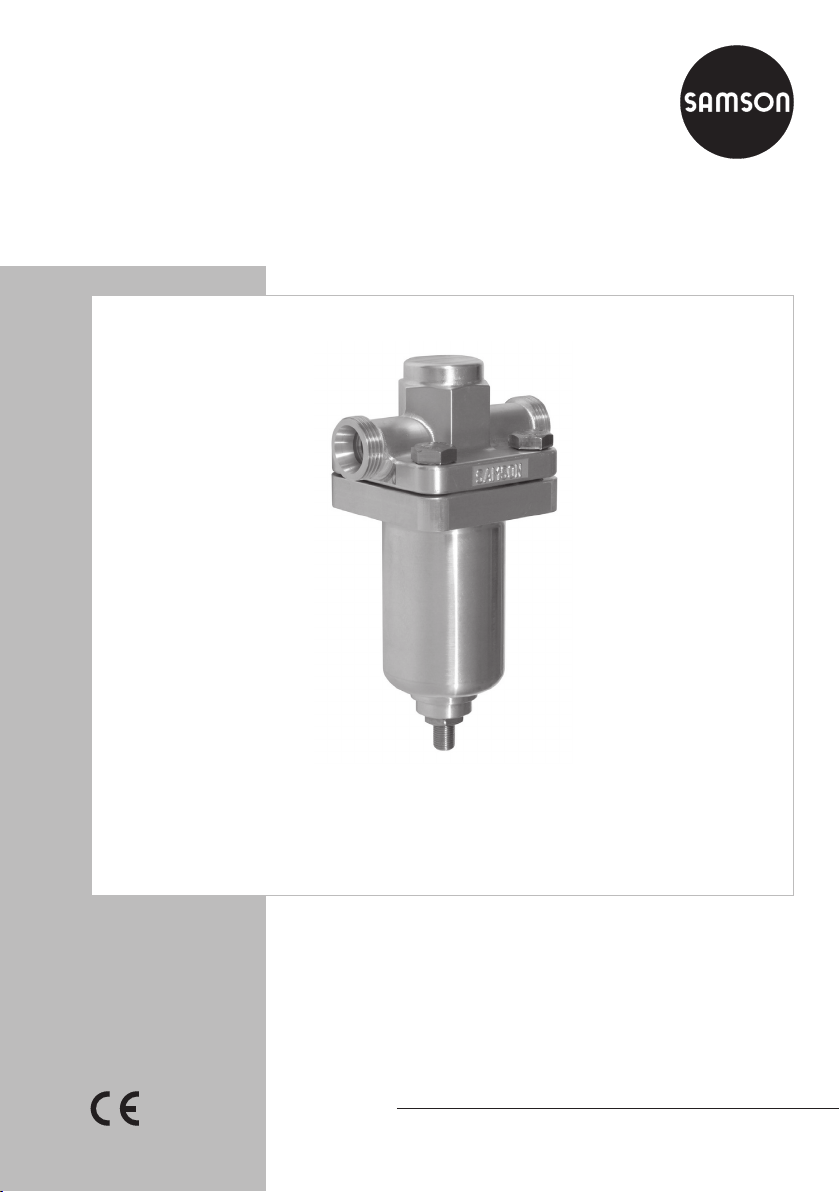
Type 2357-11 Pressure Build-up Regulator
Type 2357-21 Excess Pressure Valve
Type2357-11 Pressure Build-up Regulator/Type 2357-21 Excess Pressure Valve
Mounting and
Operating Instructions
EB 2560 EN
Edition August 2014
Page 2
Denition of signal words
DANGER!
Hazardous situations which, if not
avoided, will result in death or seri
ous injury
WARNING!
Hazardous situations which, if not
avoided, could result in death or se
rious injury
2 EB 2560 EN
-
-
NOTICE
Property damage message or malfunction
Note:
Additional information
Tip:
Recommended action
Page 3

Contents
1 General safety instructions .............................................................................4
2 Process medium and scope of application .......................................................5
2.1 Transportation and storage .............................................................................5
3 Design and principle of operation ..................................................................6
4 Installation ....................................................................................................8
4.1 Mounting position ..........................................................................................8
4.2 Shut-off valve .................................................................................................8
5 Operation .....................................................................................................8
5.1 Start-up .........................................................................................................8
5.2 Set point adjustment .......................................................................................8
5.2.1 Changing the set point range ..........................................................................9
5.3 Decommissioning .........................................................................................10
6 Maintenance ...............................................................................................10
6.1 Exchanging the seat and plug .......................................................................10
6.2 Exchanging the non-return unit .....................................................................11
7 Customer service .........................................................................................12
8 Nameplate ..................................................................................................12
9 Dimensions and weights ..............................................................................13
10 Technical data .............................................................................................14
EB 2560 EN 3
Page 4
General safety instructions
1 General safety instructions
− The regulators are to be mounted, started up or serviced by fully trained and
qualied personnel only; the accepted industry codes and practices are to
be observed. Make sure employees or third persons are not exposed to any
danger.
− All safety instructions and warnings given in these mounting and operating
instructions, particularly those concerning installation, start-up and maintenance, must be strictly observed.
− According to these mounting and operating instructions, trained person-
nel refers to individuals who are able to judge the work they are assigned
to and recognize possible dangers due to their specialized training, their
knowledge and experience as well as their knowledge of the applicable
standards.
− The regulators comply with the requirements of the European Pressure Equip-
ment Directive 97/23/EC. The declaration of conformity issued for a regulator bearing the CE marking includes information on the applied conformity
assessment procedure. The declaration of conformity is available on request.
− To ensure appropriate use, only use the regulator in applications where the
operating pressure and temperatures do not exceed the specications used
for sizing the regulator at the ordering stage.
− The manufacturer does not assume any responsibility for damage caused by
external forces or any other external factors.
− Any hazards that could be caused in the pressure regulator by the process
medium, operating pressure or by moving parts are to be prevented by taking appropriate precautions.
− Proper transport, storage, installation, operation and maintenance are as-
sumed.
4 EB 2560 EN
Page 5
Process medium and scope of application
2 Process medium and scope of application
Pressure regulators for cryogenic gases and liquids as well as other liquids, gases and va-
pors. Operating pressures up to 63bar, with set points from 1 to 40bar. Temperature range
from –200 to +200°C. Oxygen clean according to international standards and guidelines.
The regulators are designed to keep the pressure constant to the adjusted set point, especially in cryogenic plants.
WARNING!
Risk of injury and property damage due to high pressure in the plant!
A suitable overpressure protection must be installed on site in the plant section.
2.1 Transportation and storage
The regulators must be carefully handled, transported and stored. Protect the regulators
against adverse inuences, such as dust, dirt or moisture before they are installed.
In the delivered state, the pressure regulators are packed to be free of oil and grease for oxygen service. To avoid contamination, do not open the packaging until immediately before installation.
EB 2560 EN 5
Page 6

Design and principle of operation
3 Design and principle of op-
eration
See Fig. 1 on page7.
Ports A and B are marked on the valve body.
Type 2357-11 Pressure Build-up Regulator
Functioning as a Type 2357-11 Pressure
Build-up Regulator (Fig. 1) with direction of
ow from port B to port A, the pressure upstream of the valve (port B) is transmitted to
the operating diaphragm. The valve closes
when the upstream pressure increases and
opens when the upstream pressure decreases.
The pressure build-up regulator operates
as a safety valve and relieves the pressure
chamber of pressure when the pressure exceeds the set point by 5bar. After overcoming the force of the top plug spring (16), the
valve opens to equalize the pressures.
The valve is open when no pressure is applied. The pressure upstream of the valve
(port B) is transmitted to the operating diaphragm (3). The positioning force produced
moves the valve plug (2) depending on the
spring force adjustable at the set point adjuster (10). The valve closes when the pressure upstream of the valve (port B) increases.
moves the valve plug (2.1) depending on the
spring force adjustable at the set point adjuster (10). The valve closes when the pressure downstream of the valve (port B) rises.
Type 2357-21 Excess Pressure Valve
The medium ows through the Type 2357-21
Excess Pressure Valve (Fig. 3) from port B to
port A. The valve is closed when no pressure
is applied. The pressure at port B is transmitted internally to the operating diaphragm
(3). The positioning force produced opposes
the adjustable spring force. The valve opens
when the pressure increases until the set
point is reached. The integrated non-return
unit prevents the medium from owing back.
EC type examination
An EC type examination according to the
Pressure Equipment Directive 97/23/EC,
Module B has been performed on the regulators.
Type 2357-11 Pressure Reducing Valve
The process medium ows from port A to
port B when the Type2357-11 Pressure Reg-
ulator is used as a pressure reducing valve.
The valve is open when no pressure is ap-
plied. The pressure downstream of the valve
(port B) is transmitted to the operating diaphragm (3). The positioning force produced
6 EB 2560 EN
Page 7

16
2.1
15
11
10
4.1
BA
Design and principle of operation
Pressure build-up regulator
Pressure reducing valve
1
B
A
3
5
6
7
8
7
9
Direction of ow
1 Valve body
2.1 Plug
3 Operating diaphragm
4.1 Gasket (bottom section of the body)
5 Diaphragm plate
6 Ball
7 Spring plate
8 Set point springs
9 Spring housing (bottom section of the
body)
10 Set point adjuster (hexagon socket,
5mm)
11 Lock nut (17mm)
12 Integrated non-return unit
14 Body screws
15 Seat
16 Plug spring
12
3
4.1
Fig. 1: Functional diagram
Type2357-11
Type2357-21
1
14
5
6
7
8
EB 2560 EN 7
Page 8

Installation
4 Installation
In the delivered state, the regulators are
packed to be free of oil and grease for oxygen service.
WARNING!
Use of oil and grease in oxygen atmospheres!
Risk of explosion!
Make sure that the regulator is absolutely clean and free of oil and grease
on installing it.
Flush and clean the pipeline thoroughly before installing the regulator.
− Make sure the regulator is installed free
of stress.
− Install a strainer upstream of the regu-
lator.
Otherwise, impurities in the pipeline
may impair the proper functioning of the
valve, above all the tight shut-off.
4.1 Mounting position
Install the pressure regulator with
the actuator housing suspended
downward in horizontal pipelines.
Observe the ow direction.
Type 2357-11 Pressure Build-up Regulator
with safety function
− Direction of ow from port B to port A
Type 2357-11 Pressure Reducing Valve
− Direction of ow from port A to port B
Type 2357-21 Excess Pressure Valve with
with non-return unit
B
− Direction of ow from port B to port A
The ports are marked.
Required spare parts and accessories are
listed in Data Sheet uT2570EN.
4.2 Shut-off valve
We recommend installing a hand-operated shut-off valve both upstream and downstream of the regulator. This allows the plant
to be shut down for cleaning and maintenance, and when the plant is not used for
longer periods of time.
Install a pressure gauge at a suitable point to
monitor the pressures prevailing in the plant.
5 Operation
See Fig. 1 on page7.
5.1 Start-up
First start up the regulator after mounting all
parts.
A
5.2 Set point adjustment
Every pressure regulator is delivered with the
set point listed in Table 1 already adjusted.
Turn the set point adjuster (10) using Al-
len key (size 5mm) to change the default set
point.
Provided a pressure gauge has been in-
stalled at a suitable point in the plant, the
required set point can be directly adjusted
8 EB 2560 EN
Page 9

Operation
while monitoring the pressure reading at the
gauge.
When a pressure gauge is not installed, adjust the set point using the adjustment diagram Fig. 2.
To increase the set point, turn the set point
adjuster into the body () and out of the
body () to reduce it.
NOTICE!
Set point adjuster screwed too tight!
The regulator is blocked and the medium ow through it is restricted. Pressure regulation is no longer possible!
Only screw the set point adjuster up
to the point where the spring tension
can still be felt!
How to proceed:
1. Loosen the lock nut (11, size 17mm) to
allow the set point adjuster to move freely.
2. Determine the difference between the
xed set point (Table 1) and the required
set point. Turn the set point adjuster (10)
the required amount of turns as specied
in Fig. 2 on page10.
Based on the default setting, any subsequent
change to the set point can be also be made
by determining the required number of turns
using the specications listed in Table 1.
3. Lock the setting with the lock nut (11).
5.2.1 Changing the set point
range
The default set point ranges can be adapt-
ed to your specic requirements. Contact
SAMSON (see section7) for further details.
Table 1: Set point adjustment (default)
Set point range 1 to 8bar 5 to 25bar 8 to 40bar
Set point adjusted at the factory
(approx.)
Set point change per turn 1bar 2.5bar 3.5bar
EB 2560 EN 9
2357-11 3bar 12bar 25bar
2357-21 4bar 13bar 26bar
Page 10

Maintenance
Set point
[bar]
40
35
30
5...2
1...8 bar
8...40 bar
5 bar
25
20
15
Set point ranges
10
5
0
012345678910 11 12 13 14
Turns of the set point adjuster
: to increase the set point
: to reduce the set point
Fig. 2: Adjustment diagram
5.3 Decommissioning
Close rst the shut-off valve on the upstream
side of the valve and then on the downstream side of the valve.
6 Maintenance
The regulators do not require any maintenance. Nevertheless, they are subject to natural wear, particularly at the seat, plug and
operating diaphragm.
Depending on the operating conditions,
check the regulator at regular intervals to
avoid possible malfunctions.
WARNING!
Process medium can escape uncontrolled on dismantling the regulator.
Risk of cold burns!
Allow the regulator to defrost before
depressurizing and draining it and remove it from the pipeline.
If faults or malfunctions cannot be remedied,
contact SAMSON (see section7).
6.1 Exchanging the seat and
plug
See Fig. 1 on page7.
1. Loosen the lock nut (11) and turn the set
point adjuster (10) counterclockwise to
fully relieve the internal set point springs
(8).
2. Unscrew the body screws (14) using an
open-end wrench (size 19mm). Lift off
the valve body (1).
3. Unscrew the seat (15) using a seat
wrench (size 30mm socket). Remove the
plug (2.1).
10 EB 2560 EN
Page 11

Maintenance
4. Insert the plug spring (16) into the new
plug (Type2357-11 only). Tighten the
seat using a seat wrench and a tight-
ening torque of 20Nm. Use a suitable
high-performance lubricant (e.g. Gleitmo
595, SAMSON order no. 8150-0116).
5. Check the PTFE gasket (4.1) and replace
it, if necessary.
6. Carefully mount the valve body (1) and
fasten it onto the bottom section of the
body (9) (tightening torque 25Nm).
6.2 Exchanging the non-return
unit
See Fig. 1 on page7.
1. Loosen the lock nut (11) and turn the set
point adjuster (10) counterclockwise to
fully relieve the internal set point springs
(8).
2. Unscrew the body screws (14) using an
open-end wrench (size 19mm). Lift off
the valve body (1).
3. Unscrew the integrated non-return unit
(12) using a seat wrench (30mm size
socket) and lift off the valve body (1).
4. Check the ball and seating surface. If
necessary, replace the entire non-return
unit. Mount the non-return unit using a
seat wrench (tightening torque 20Nm).
Use a suitable high-performance lubri-
cant (e.g. Gleitmo 595, SAMSON order
no. 8150-0116).
5. Check the PTFE gasket (4.1) and replace
it, if necessary.
6. Carefully mount the valve body (1) and
fasten it onto the spring housing (9) using the body screws (14) (tightening
torque 25Nm).
EB 2560 EN 11
Page 12

Customer service
7 Customer service
If malfunctions or defects occur, contact the SAMSON After-sales Service Department for
support.
The addresses of SAMSON AG, its subsidiaries, representatives and service facilities worldwide can be found on the SAMSON website (uwww.samson.de), in all SAMSON product
catalogs or on the back of these Mounting and Operating Instructions.
Please send your inquiries to: service@samson.de
To assist diagnosis and in case of an unclear mounting situation, specify the following details
(see section8):
− Type designation and KVS coefcient
− Model number with index
− Upstream and downstream pressure
− Temperature and process medium
− Min. and max. ow rate
− Is a strainer installed?
− Installation drawing showing the exact location of the regulator and all the additionally
installed components (shut-off valves, pressure gauge, etc.)
8 Nameplate
1
2
3
Fig. 3: Nameplate details
12 EB 2560 EN
Details on lower section of body
1 Set point range/date of manufacture
2 Type designation with index
3 Customer-specic details
CE compliance
Page 13

9 Dimensions and weights
51
140
Dimensions and weights
140
100
G ¾ A
Type 2357-11 Pressure Regulator/Type 2357-21 Excess Pressure Valve with welding ends
(accessories)
Weight: approx. 4kg
All dimensions in mm
Fig. 4: Dimensions and weights
EB 2560 EN 13
Page 14

Technical data
10 Technical data
Type 2357-11 2357-21
coefcient 0.8 1.25
K
VS
Set point ranges
Max. perm.operating pressure p
Safety function for Type 2357-11 5 bar above the set point
Max. perm. differential pressure
∆p
max
Temperature range –200 to +200 °C
1)
Further set point ranges on request
2)
For oxygen p
1)
in bar 1 to 8 · 5 to 25 · 8 to 40
max
63bar
2)
Types 2357-11 Pressure Reducing Valves: Gases 30 bar
Liquids 6 bar
Type 2357-21 Excess Pressure Valve: 3bar (> 3bar only with
special accessories)
= 40bar
max
14 EB 2560 EN
Page 15

EB 2560 EN 15
Page 16

SAMSON AG · MESS- UND REGELTECHNIK
Weismüllerstraße 3 · 60314 Frankfurt am Main, Germany
Phone: +49 69 4009-0 · Fax: +49 69 4009-1507
samson@samson.de · www.samson.de
EB 2560 EN
2014-09-16 · English
 Loading...