

Page 1
2100 SERIES ELECTRONIC DIGITAL METER
n
n
CONTADOR ELECTRÓNICO SERIE 2100
Technical service guide and spare parts listing
Guía de servicio técnico y recambios
Description/ Descripció
E
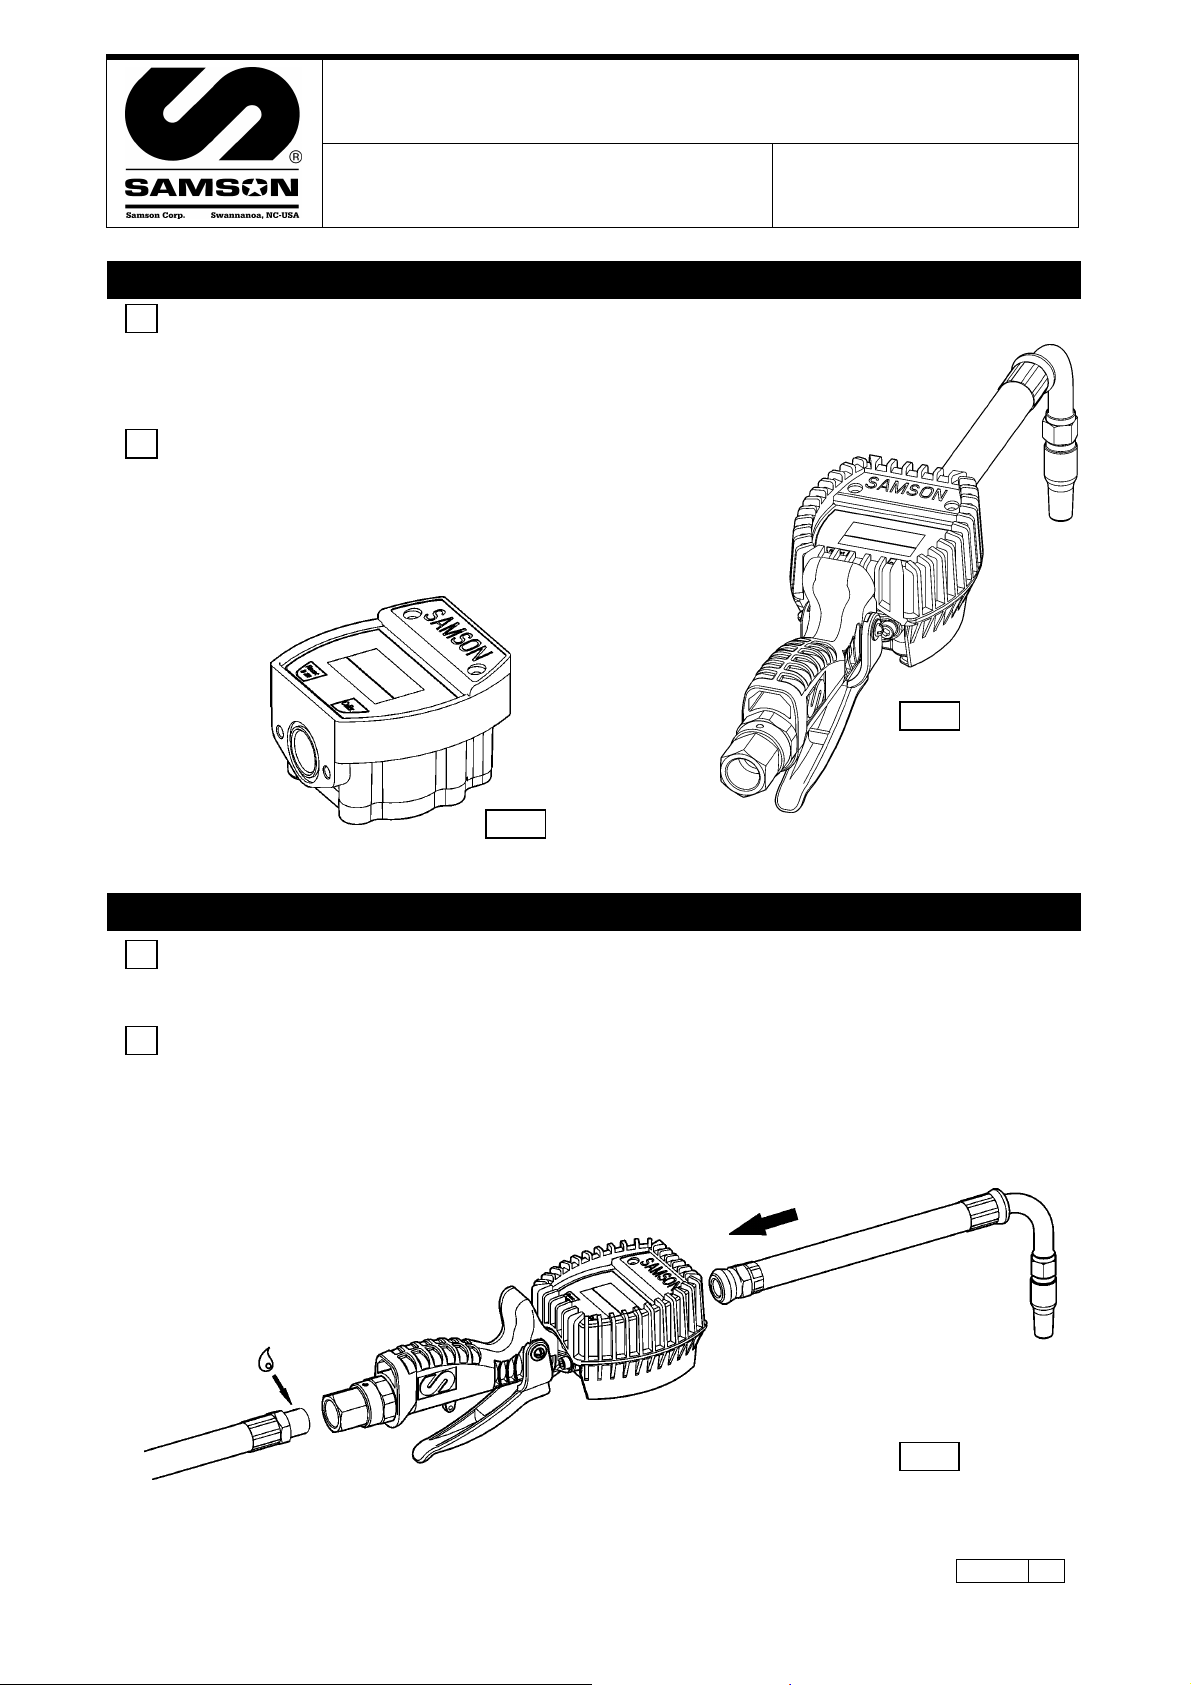
Oval gear type Hose end meter/ In-line meter with electronic LCD display for
Lubricants, Anti-Freeze and WW Fluid. The Hose end meter includes a
progressive opening control valve for precise control of oil delivery, a ball-bearing
inlet swivel with an extra large filter, and an outlet hose with non-drip tip.
SP
Pistol
a contadora/ Contador en línea de engranajes ovales y registrador
electrónico para lubricantes y anti-congelante. La pistola contadora incluye una
válvula con apertura progresiva para un mejor control del caudal de suministro,
rótula de entrada con filtro y extensión con boquilla anti-goteo.
E
Install the outlet extension to the outlet thread of the meter and tighten it well (fig 2).
1.
2. Thread the dispensing hose to the inlet swivel of the hose end meter using Loctite 242
SP
. Coloque la extensión a la salida de la pistola y apriete firmemente (Fig. 2).
1
2. Rosque la manguera de suministro a la rótula de entrada de la pistola conta
2100
Installation/ Instalació
dora usando sellador.
Part Nº/ Cód.:
2100 SERIES
2162
(provided).
Samson Corporation-Swannanoa, NC 28778- 800.311.1047 www.samsoncorporation.com
Fig. 2
2100
1
Page 2
s
o
n
Operation/ Modo de emple
E
meter is delivered ready for use, and needs no additional attention even after a
The
long storage period.
If the display is not tur
display, see Replacing batteries.
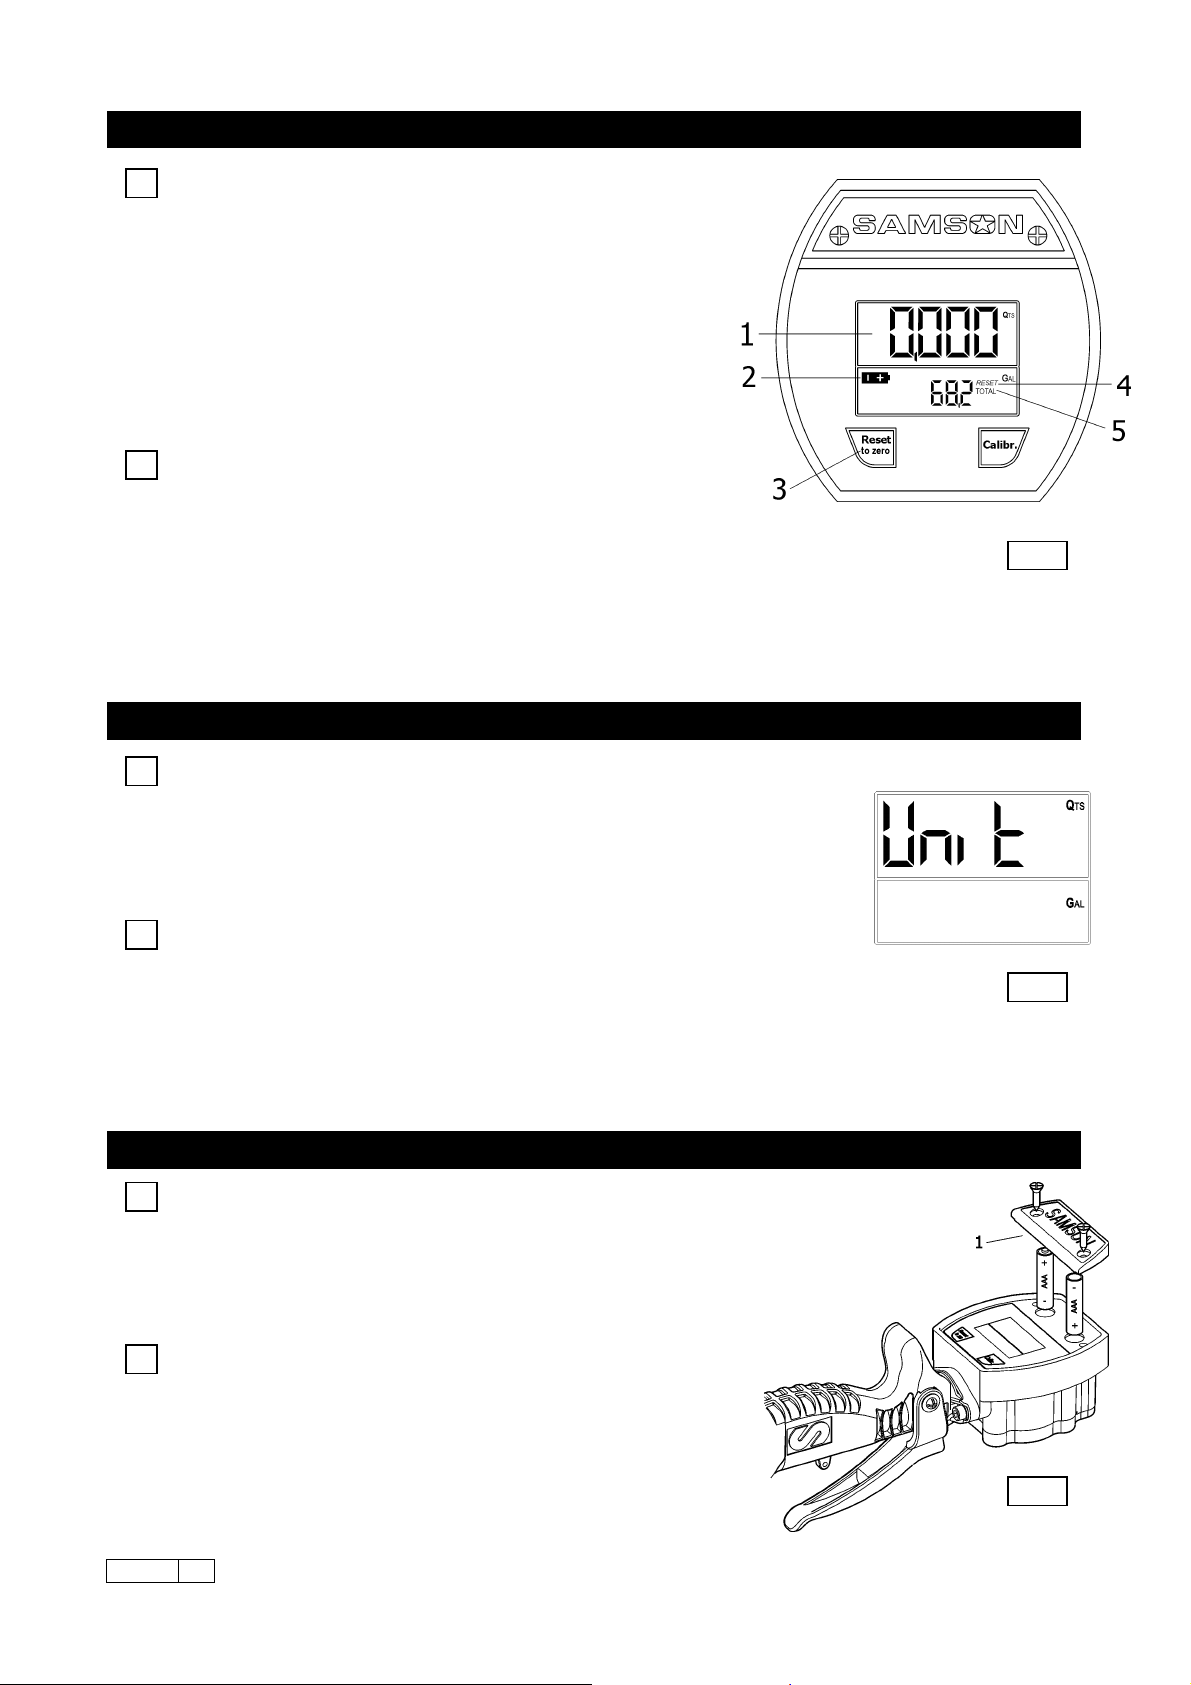
he meter has two totalizer registers incorporated; one resettable (4) and another
T
non-resettable (5). To bring up the resettable total register, press the reset button
(3). If the reset button is pressed again (immediately), the resettable total register
is set to zero. If not, after a few seconds the non-resettable total register will
appear.
NOTE: T
reading (1).
El co
aún después de un largo tiempo de almacenaje.
Si la pantalla no está encendida, o el indicador de
pantalla, ver Sustitución de pilas.
El
visualizar la cantidad acumulada en el totalizador con posibilidad de puesta a cero, presionar el botón “Reset” (3). Si se vuelve
a presionar este botón inmediatamente, este totalizador se pone a cero. Sino, después de algunos segundos aparecerá la
cantidad acumulada en el totalizador sin posibilidad de puesta a cero.
ATENCIÓN: Antes de cada servicio, presionar el botón de puesta a ce
E
It is
combinations (Partial reading – Total register): Gal – Gal, Qts – Gal, Pts – Gal, L – L.
To change the measuring units, press and hold the Reset and the Calibr buttons unti
appears showing ‘Unit’ as in fig. 4. Use the Reset button to change units and press the Calibr
button to confirm.
E
(Registrador parcial – Totalisador): Gal – Gal, Qts – Gal, Pts – Gal, L – L.
Para cambiar las unidades de medición, mantener los botones “Reset” y “C
que la pantalla aparece como en Fig. 4. Utilizar el botón “Reset” para elegir unidades y mantener
el botón “Calibr” para confirmar.
he reset button (3) must be pressed prior each delivery to clear the partial
SP
ntador está suministrado listo para usar, y no necesita manipulación alguna
contador tiene incorporado dos totalizadores; uno con posibilidad de puesta
convenient to change the measuring units in the meter according to the following
SP
s posible cambiar las unidades de medición del contador según las siguientes combinaciones
E
Remove the two screws and the battery cover (1) (Fig.5).
1.
2. Replace the old batteries with new ones (2xAAA Alkaline).
both batteries at the same time. Confirm that the batteries are placed in their
correct position.
3. ery cover (1).
Reattach the batt
4. Press the reset button to turn on
SP
1. estornillar y retirar los tornillos y la tapa de las baterías (1) (Fig. 5).
D
2. Sustituir las baterías por nuevas (2xtamaño AAA alcalinas). NOT
siempre las dos pilas a la vez. Asegurar que la posición de las pilas es la correcta.
3.
Volver a montar la tapa de las baterías (1).
4. Presionar el botón puesta a cero para encen
2100
2
ned on, or the “low battery” indication (2) appears in the
baja tensión (2) se muestra en la
a cero y otro sin esta posibilidad. Para
ro (3) para inicializar el contador parcial (1).
Measuring units/ Unidades de medició
l the display
alibr” presionados hasta
Replacing batteries/ Sustitución de pila
NOTE: Always replace
the meter display.
A: Sustituir
der la pantalla.
Fig. 3
Fig. 4
Fig. 5
Samson Corporation-Swannanoa, NC 28778- 800.311.1047 www.samsoncorporation.com
Page 3

p
t
g
g
g
T
s
E
is not necessary to separate the meter from the oil control gun to clean the chamber.
It
WARNING: Do not open the control valve by pressing the trigger while cleaning the
chamber.
1. Remo
2. Remove the oval gears.
3. Clean the chamber and t
4. Replace the gears, then reattach the cover as shown in figure 6
ve the cover at the back of the meter.
Cleaning the measuring chamber/ Limpiar la cámara de medición
measuring
he gears carefully using a soft brush.
.
SP
No es necesario separar el contador de la pistola de control aceite para limpiarlo. ATENCIÓN: T
cuidado de no abrir la pistola de control de aceite presionando el gatillo de forma accidental durante la
limpieza del contador.
1. Retirar la cubierta infer
2. Retirar los engranajes ovales.
3. Limpiar la cámara de medición y
4. Volver a colocar los engranajes, la junta y la tapa inferior como muestra la figura 6.
en
ior del contador.
los engranajes cuidadosamente utilizando un cepillo suave.
83681x
rouble shooting/ Anomalías y sus solucione
Symptom Possible Causes Solution
METER
Faded display Weak batteries Replace the batteries
Display Blank
The display is on but the meter does he
not work
GUN
Oil leaking in closed position Contaminated valve seat or damaged valve Clean the valve seat and if necessary,
Oil leaking through trigger cam Damaged O rings
Dead batteries Replace the batteries No reading in the display
Meter has no
re
lacemen
Wrong calibra
Flow rate is outside the wo
Gears placed incorrectly after cleaning t
measuring chamber
Clogged inlet screen Clean the inlet screen Reduced flow
Obstructed
t been reset after battery
tion factor Calibrate the meter The meter is not accurate
flow range the flow rate
rkin
ears Clean the measuring ch
Press the reset key
Increase or decrease
Place the gears in the right position
amber
replace damaged parts
Replace O rings
Síntoma Posibles causas Solución
CONTADOR
Lectura borrosa o poco clara Baterías gastadas Cambiar las baterías
Baterías gastadas Cambiar las baterías El display no muestra ninguna señal
cambiar las baterías
Factor de calibración
El caudal suministrado está fuera del rango de
caudales
El contador no cuenta aunque el najes están mal colocados tán en la
display esté encendido
GUN
Salida de aceite en posición cerrado Válvula gastada o impurezas en el asiento de Limpiar el asiento de la válvula y sustituir
Fuga de aceite por el eje del gatillo deteriorada
Los engra Verifique que los engranajes es
El filtro de entrada (opcional) está obstruido filtro de entrada
ranajes están obstruidos Limpiar la cámara de medici
Los en
la válvula las piezas en caso de deterioro
Junta tórica Sustituir la junta tórica
uesta a cero después de esta a cero No se realizó la p
errónea Calibrar el contador correctamente Fallos en la precisión del contador
Presionar el botón pu
Ajustar el caudal de fluido dentro
rango de caudales del contador
posición
Limpiar el Caudal reducido
ón
2
Fig. 6
del
2100
Samson Corporation-Swannanoa, NC 28778- 800.311.1047 www.samsoncorporation.com
3
Page 4

s
a
E
Please do not calibrate the meter, as it is not necessary.
SP
or, no calibrar el contador, ya que no es necesario.
Por fav
Max. Working Pressure Presión máxima de trabajo 1000PSI / 70 bar
Min. Rupture Pressure Presión mínima de rotura 2000 PSI / 140 bar
Delivery range Caudal ¼ - 5 GPM / 1-20 l/min
Max. Pressure drop de carga Pérdida 18 PSI / 1.25 bar
Temperature range Temperatura 32ºF – 40ºC / 0ºC – 40ºC
Max./min. fluid viscosity osidad de fluido Max./min. visc 5000/5 mPa/s
Accuracy (unadjusted) Precisión (sin ajuste)
Weight Peso 3.5 LBS
Technical information/ Información técnic
± 1 %
/ 1.6 kg
Spare parts/ Recambio
Pos Part Nº Description Descripción Pos Part Nº Description Descripción
1 1127 Swivel Rótula 11 942104 Washer Arandela
2 836302 a Spring Muelle 12 946068 O ring Junta tóric
3 736608 Valve holder lvula Porta-vá 13 736606 Cam Eje
4 836500 Valve Válvula 14 946083 O ring a tórica Junt
5 736607 Sleeve Empujador 15 2100 Meter Contador
6 736106 Body Cuerpo 16 8 ection 36504 Meter prot Protección
7 736102 Trigger Gatillo 17 1128 Outlet hose
8 Screw Tornillo 946014 18 O ring Junta tórica
9 Washer Arandela 19 836404 Filter Filtro
10 940 02 ,
18, 19
736625 Replac
ement
Handle Assem
contador
Extensión
Monta
bly
pistola del
reemplazo
je de la 1 Screw Tornillo 1-13
2100
4
Samson Corporation-Swannanoa, NC 28778- 800.311.1047 www.samsoncorporation.com
 Loading...