

Page 1
SAMSON SPLICING INSTRUCTIONS
12-Strand Class II Tuck-Bury Eye Splice Modified For HMPE
®
The Tuck-Bury splice is designed as a short splice for HMPE (Dyneema
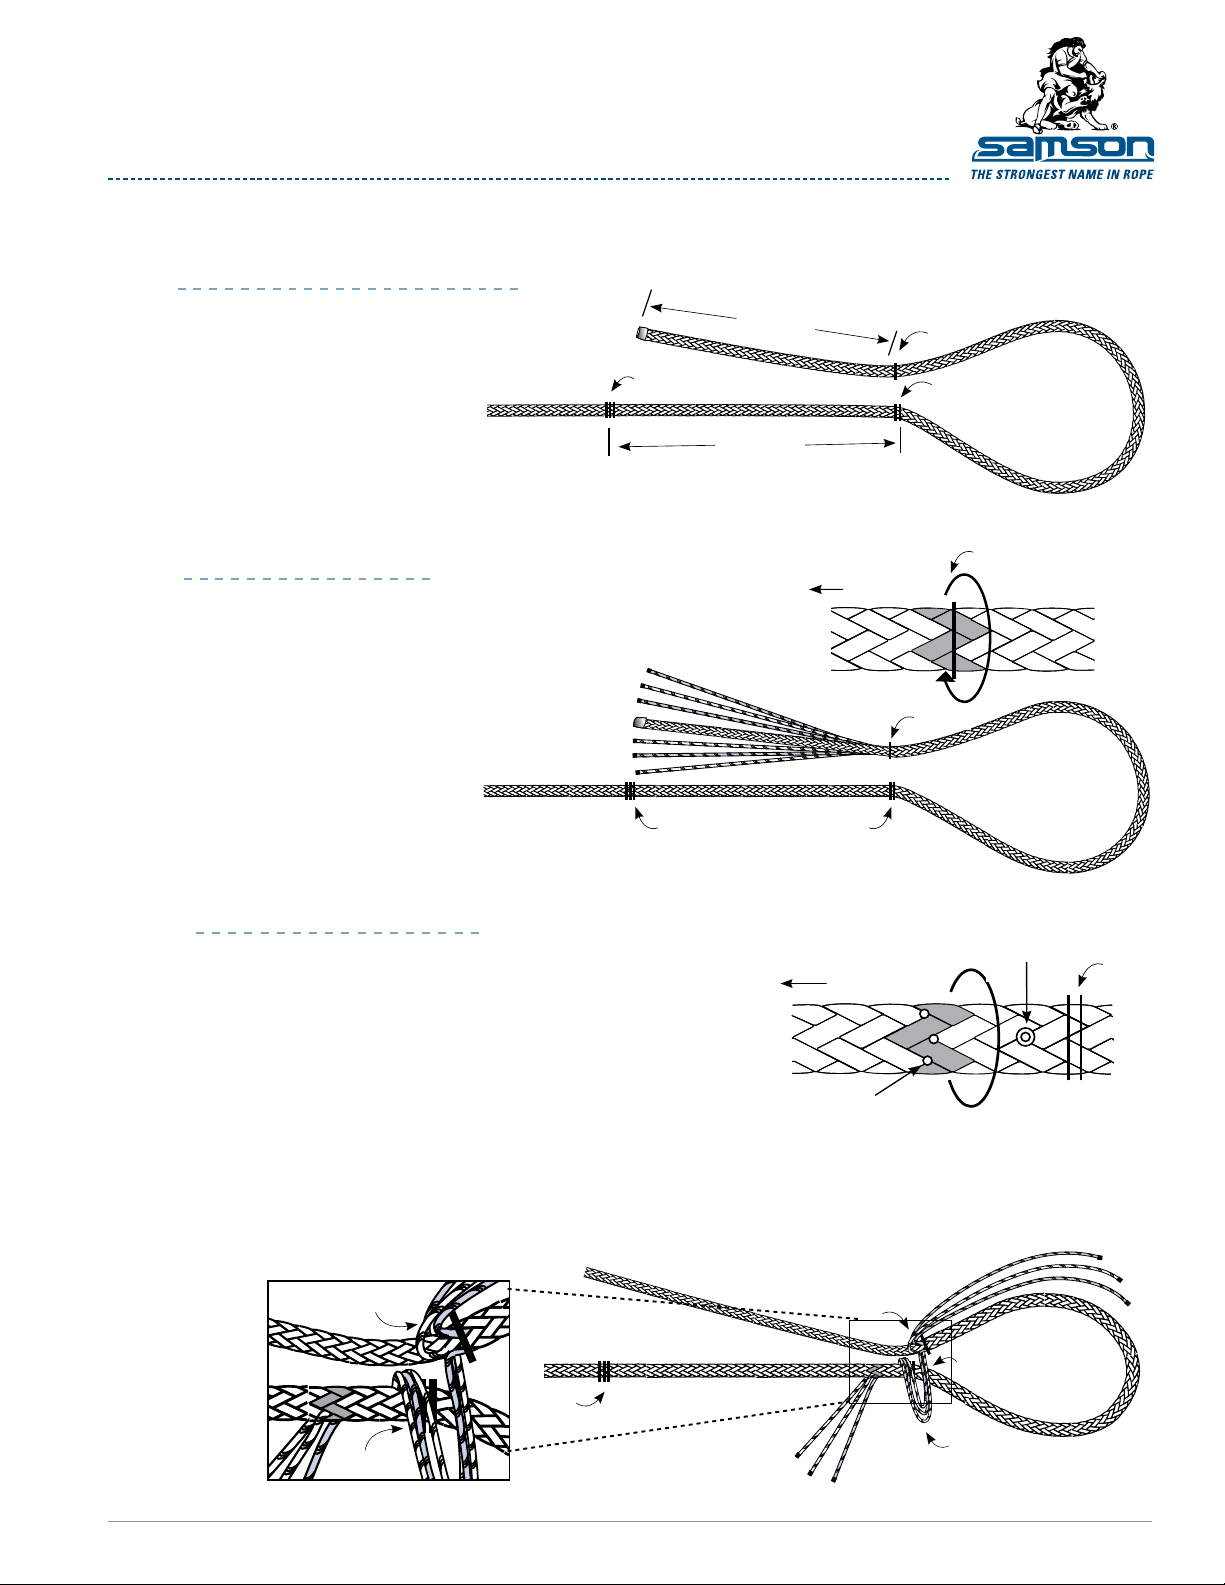
MEASURING AND MARKING
Tape end to be spliced. Measure 1-1/2
d lengths from the bitter end and
step
1
mark. This is Mark 1. Put tight tape
wrap at Mark 1.
From Mark 1, form a loop the
1A
size of the eye desired and
mark. This is Mark 2.
From Mark 2, measure down
1B
the rope 1-3/4 ds and mark.
This is Mark 3.
TAPERING THE TAIL
step
2
At Mark 1, pull out half the strands (3
"S" and 3 "Z") by
rotating around the rope and pulling
out strands in the pattern shown:
Z Strand = counter-clockwise twist
S Strand = clockwise twist
This should leave 6 strands still
braided down the middle. Tightly tape
the ends of the 6 individual strands,
as well as the end of the remaining
braided portion.
On one side you should have 2 S strands
and 1 Z strand. On the other side, you
should have 2 Z strands and 1 S strand.
ber) 12-strand ropes only.
1-1/2 fids
Mark 3
1-3/4 fids
s
z
s
z
s
z
Mark 2Mark 3
Bitter end
Mark 1
Mark 1
Mark 1
Mark 2
Mark 1
Mark 1
Form size of
eye desired
ROUTING THE STRANDS
step
3
3A
3B
SamsonRope.com | Email CustServ@SamsonRope.com | Tel +1.360.384.4669
MARKING ENTRY AND EXIT POINTS
Make a mark at the intersection of an S and a Z strand at Mark 2. This
will be the entry point for all 6 strands and the tail when it is buried.
The entry point should be on the side of the rope facing the opposite
leg of the eye.
From the entry point, count 2 picks down the rope and mark 6 strands
around the circumference of the rope. There will be 3 S strands and 3
Z strands marked. At each intersection of an S and a Z strand, mark
an exit point. There will be 6 exit points marked.
ROUTING 3 STRANDS
The rst 3 strands are now routed from the entry point at Mark 2 to the exit point.
Each strand is routed separately, entering at the entry point and exiting at its own
exit point. Do not pull the strands up tight yet. Leave slack at the entry point.
Mark 1
Mark 3
Mark 2
Exit points
z
z
Standing rope
Mark 1
s
Mark 2
Leave
slack
Entry point
Mark 2
s
z
s
PAGE 1 OF 3
Page 2
SAMSON SPLICING INSTRUCTIONS
12-Strand Class II Tuck-Bury Eye Splice Modified For HMPE
3C
3D
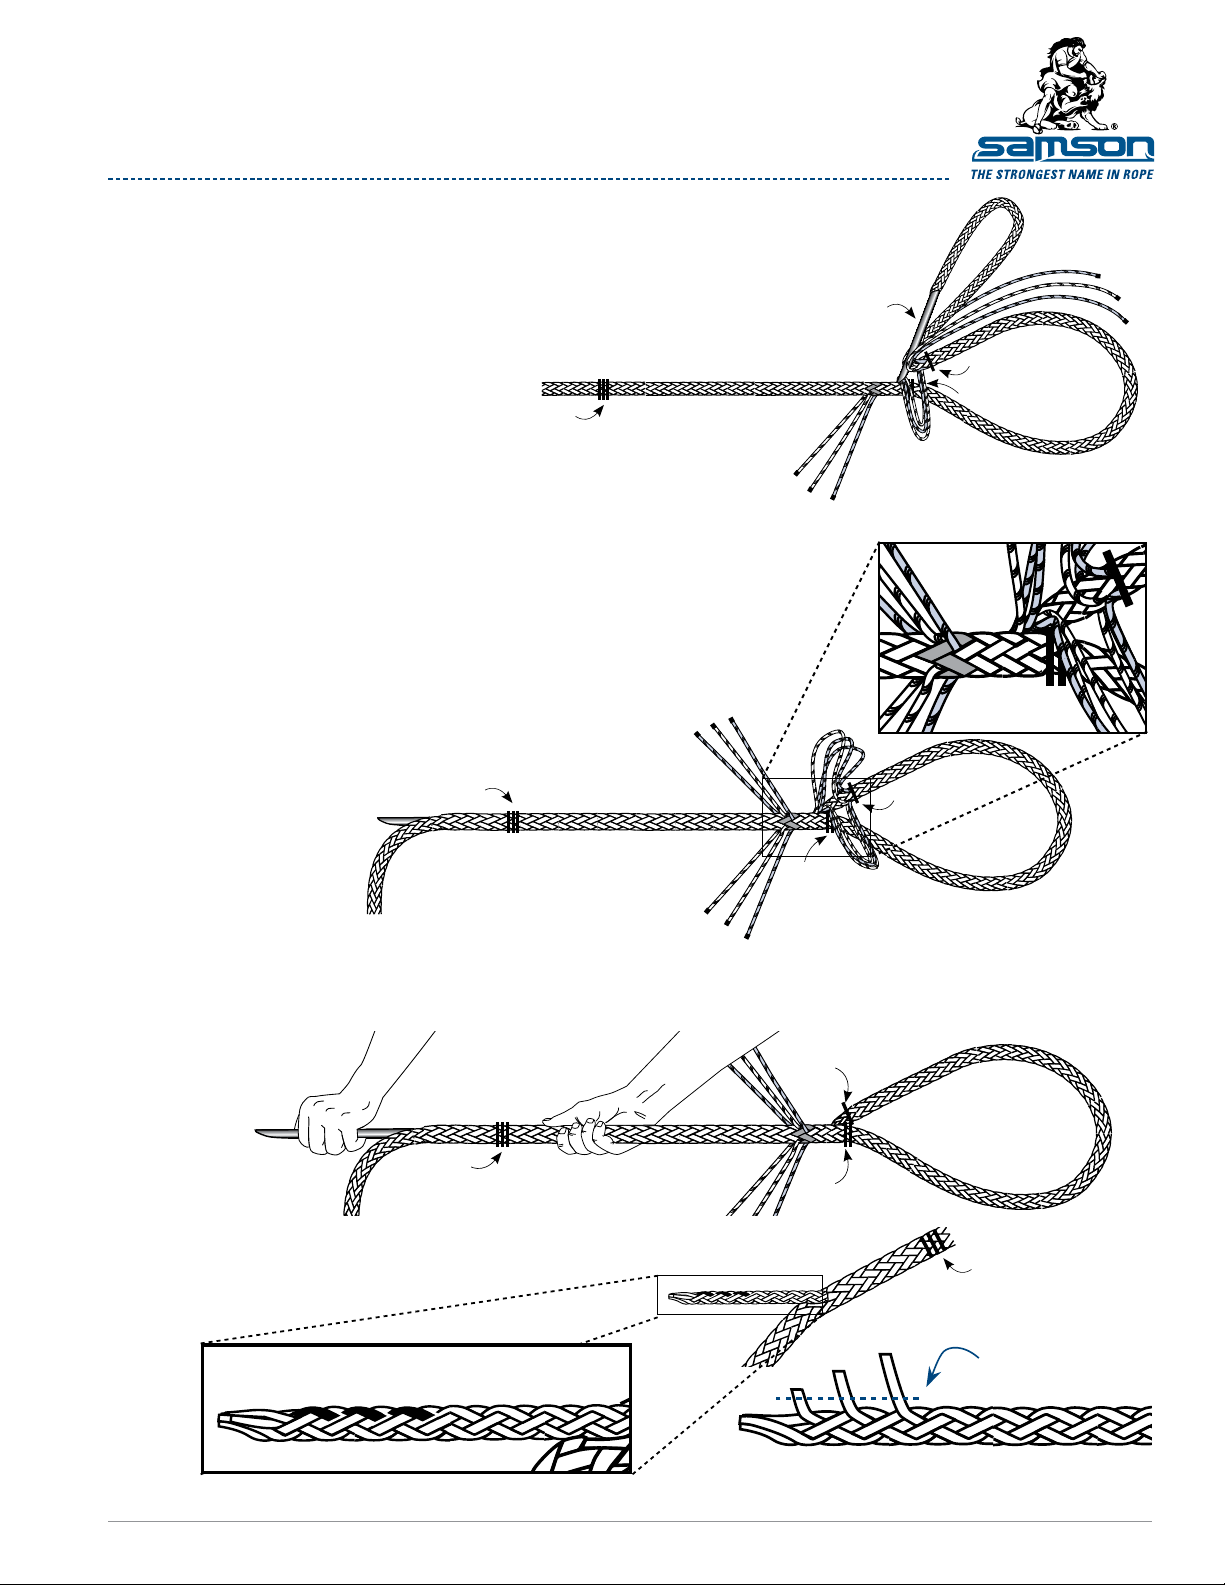
BURYING THE TAIL
Attach a d to the end of the
tapered tail and bury it from
the entry point through the
rope to exit beyond Mark 3.
Leave the tail exposed.
Mark 3
ROUTING LAST 3 STRANDS
The 3 remaining strands are now routed from the entry point at Mark 2
to the exit point. Each strand is routed separately, entering at the entry
point and exiting at its own exit point. Do not pull the strands tight yet.
Leave slack at the entry point.
Now that all 6 strands are routed and the tail is buried, pull each of the
strands to remove any slack. Make sure the rope is smooth and tight
at the entry point.
s
z
s
Mark 3
s
fid
Mark 1
Mark 2
z
z
s
Mark 1
z
s
TAPERING TAIL
3E
At Mark 3, pull the tail out until Marks 1 and 2 meet. Pull any
slack out of the 6 strands that are routed. Pull out the tail and
mark 3 consecutive strands as shown. Pull out all 3 and cut.
Mark 3
Mark 3 consecutive strands
Mark 2
z
z
s
Mark 1
Mark 2
Mark 3
Pull out marked
strands and cut off
SamsonRope.com | Email CustServ@SamsonRope.com | Tel +1.360.384.4669
PAGE 2 OF 3
Page 3

SAMSON SPLICING INSTRUCTIONS
12-Strand Class II Tuck-Bury Eye Splice Modified For HMPE
SMOOTHING SLACK OVER TAPER
3F
Remove the tape from the end
of the tail. Now smooth the rope
from the eye towards Mark 3, the
tail will disappear into the rope.
Smooth the rope to remove any
remaining slack. Check that the
6 routed strands are snug.
Mark 3
Mark 1
Mark 2
step
4
TUCKING THE STRANDS
The strands are now
tucked into the braid of
the rope. 1 complete
tuck consists of passing
a strand over 1 strand
and under 2 strands.
The tucks proceed down
the same row of picks
straight down the body
of the rope.
Do 3 complete tucks for all 6 strands. Each strand is always tucked under the same
4A
line of the braid so that the tucks progress straight down the body of the rope.
After completing the rst 3 tucks, remove 1/2 of the volume of the twisted yarns. Cut yarns from each
4B
of the 6 strands near the taped ends and complete 3 more tucks with the reduced volume strands.
s
z
s
s
z
s
z
z
s
s
z
s
z
z
s
s
z
s
Mark 1
Mark 2
3 tucks
s
z
Mark 1
Mark 2
Mark 1
z
s
Tucked strands
Mark 1
Mark 2
z
s
z
z
s
z
z
s
FINISHING THE SPLICE
step
5
DOCUMENT 12Strand_C2_Tuck-Bury_Eye_Splice_HMPE.pdf
SamsonRope.com | Email CustServ@SamsonRope.com | Tel +1.360.384.4669
© 2012 Samson Rope Technologies, Inc. All rights reserved. S/WD #108294 7/2012
After completing the second set of 3 tucks, cut off the excess
material and tape the ends. Leave enough of an end protruding so
that it does not slip back into the rope when the rope is loaded.
Finished splice
Mark 2
PAGE 3 OF 3
 Loading...